Channel Banking User
Channel Banking User allows you to provide Internet banking and Mobile banking access to your clients. You can maintain different authentication and authorization methods for these services. According to the methods chosen for the channel banking user, he / she will be able to login and avail the required services. The login details are maintained under the tabs.
The following are the tabs in Channel Banking User:
To add channel banking user
- From Admin menu, click Channel Banking and then User maintain. Channel Banking User Search page appears.

- Click Add. New Channel Banking User -- Profile (1/6) page appears.
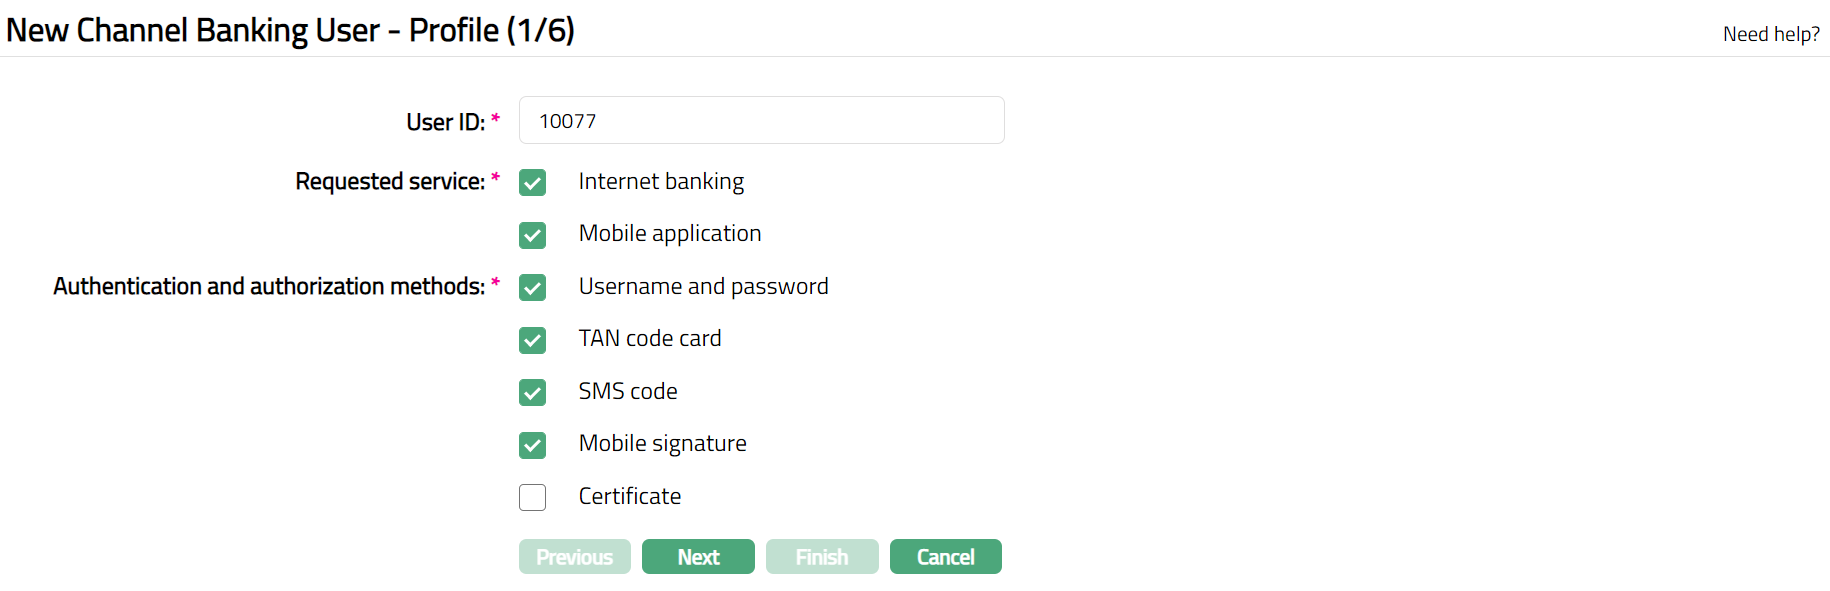
Enter unique User ID for channel banking.
Select option for Requested service. This will determine the type of service offered by bank. You can choose from:
Internet banking
Mobile application
- Select option for Authentication and authorization methods for the service for the channel banking user. You can choose from
Username and Password: Using this method, user can login into the application using a username and password. Username and password is used only for authentication (logging -- in). The Password is automatically generated, printed and sent to the client.
TAN Code card: If this method is used, the users are issued plastic cards containing printed codes and a serial number. For each login or transaction confirmation and payment authorization, users may be asked to enter the next available code or the code against a specific serial number. If this option is chosen for the channel banking user, then ensure that TAN code card is issued to the client using the tab Issue Code Card.
SMS code: If this method is used, the user can authorize a payment by using a one-time SMS code sent to the user by the bank. If the SMS code option is chosen by the client, Aura generates an encrypted code, and the bank sends a decrypted code to the client. This SMS code can be used by the client only once.
Mobile Signature: If this method is chosen, the channel user has to download the mobile application in his mobile. Bank will send the channel user a randomly generated Id to login into the mobile application. Once the channel user logs into the mobile application, bank will send a secret pin code (password) to the channel user. Using this pin code, the channel user can login into Internet Banking.
Certificate: In this method, the user can log in and authorize payments using the Certificate. If this option is chosen for the channel banking user, ensure that a Secure device is issued to the client, using the Issue Secure Device tab. The Secure Device has an identifier code which is a randomly generated password). Using this code, the client can log into Internet Banking.
- Click Next. New Channel Banking User -- General (2/6) page appears.
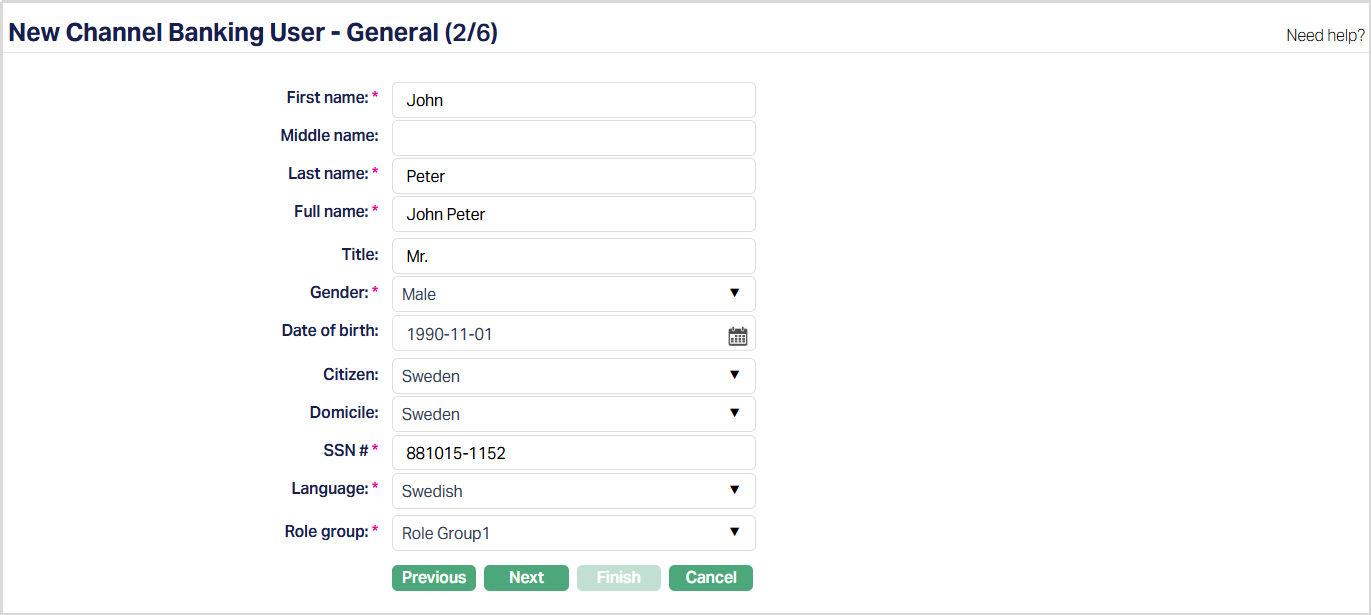
Enter First Name of the user.
Enter Last Name of the user.
On entering the First Name and Last Name system derives Full Name of the user.
Enter Title of the user i.e. prefix to the user First name.
Select Gender from the drop-down list of the user.
Input Date of birth of the user. You can either enter the date manually or select using the calendar. Aura will validate the date format against the format maintained under Admin > Entities > Maintain > Regional > Date format.
Select country in which the user is a Citizen from the drop-down list of countries maintained under Admin > System Codes > Generic definition > Countries.
Select Domicile of the user i.e. place of residence from the drop-down list of countries maintained under Admin > System codes > Generic definitions > Countries.
Enter SSN # of the user. It is the user's social security number i.e. a unique number provided by the person's residence country.
Note: The validation for SSN, if required, may be customized during implementation.
Select Language i.e. preferred Language of the user from the drop-down list of languages maintained under Admin > System codes > Generic definitions > Languages.
Select Role groups from the drop-down list maintained under Admin > Users > Role groups. Role groups are predefined sets of permissions and responsibilties that define the access and actions available to the Channel Banking User.
Click Next. New Channel Banking User -- Address (3/6) page appears.
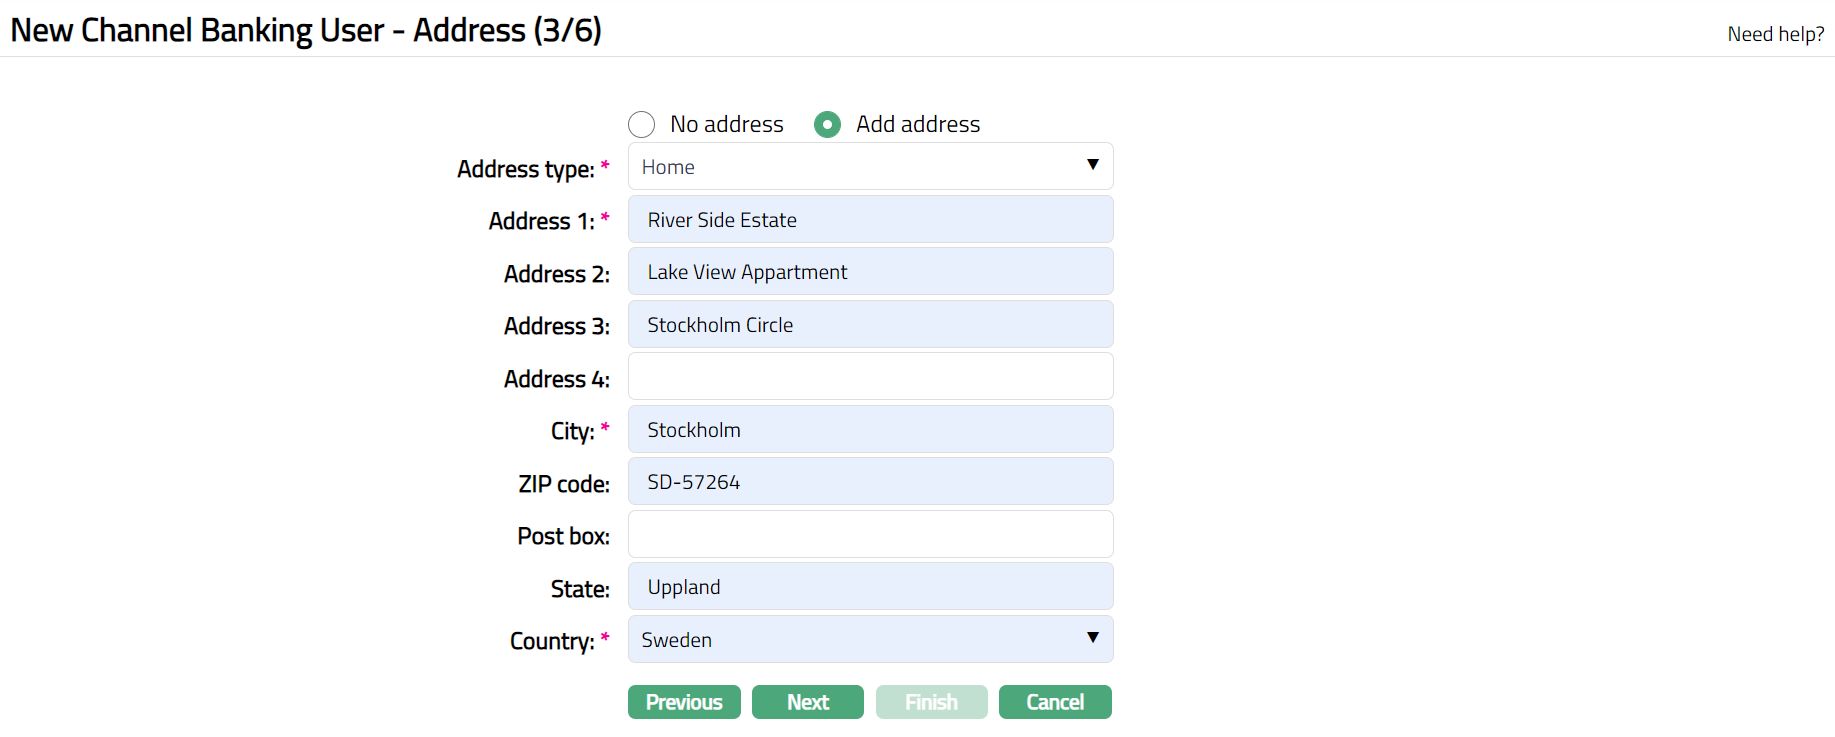
By default, No address is selected. If you do not want to record the address of the user at this stage, then you can select this option.
If you want to enter the address, then click Add address and provide the required details.
Select Address type from the list of Address types maintained under Admin > Address Details > Address types.
Enter address details in Address 1, Address 2, Address 3 and Address 4 i.e., any additional locator such as name of Apartment / Building, a prominent landmark, etc, which will help to locate the address more easily.
Enter City of the user.
Enter Zip code of the user.
Enter Post box of the user.
Enter State of the user.
Select Country from the drop-down list maintained under Admin > System codes > Generic definitions > Countries.
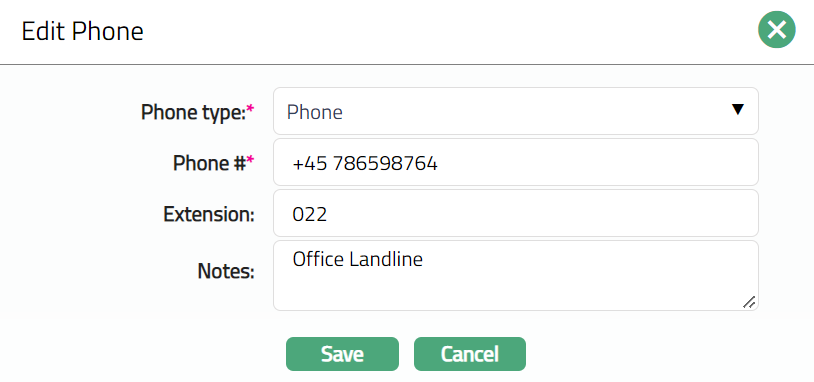
Click Next. New Channel Banking User -- Phone (4/6) page appears.
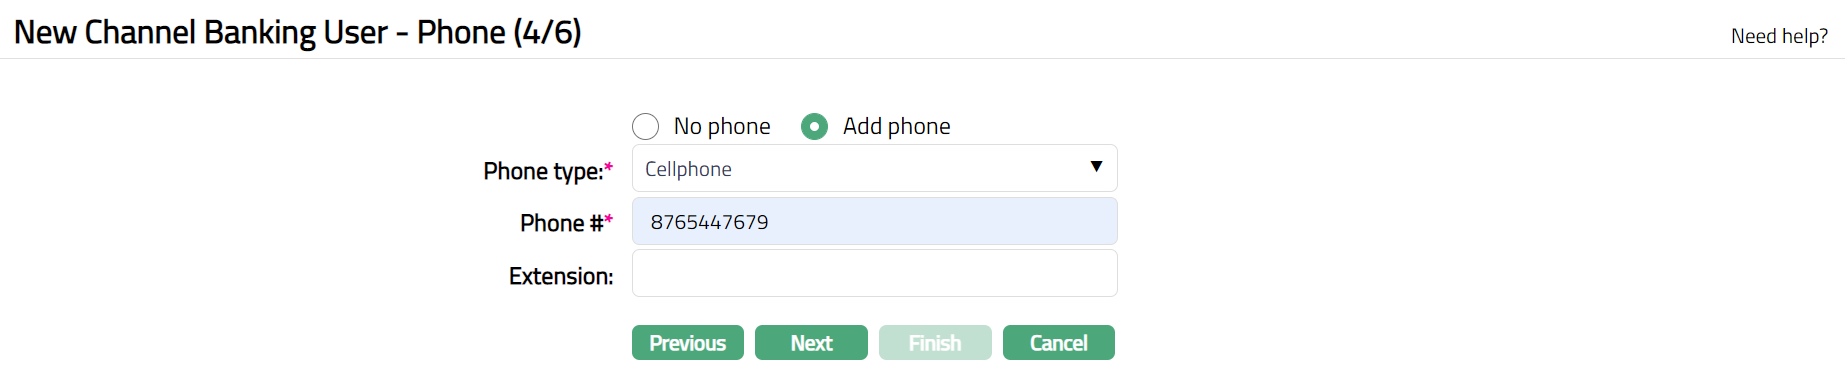
By default, No phone is selected. If you do not want to input the phone details at this stage, then you can select this option.
If you want to enter the phone details, then click Add phone and provide the required details.
Select Phone type from the drop-down list maintained under Admin > System Codes > Address details > Phone types.
Enter Phone # of the person.
Enter Extension of the phone of the person.
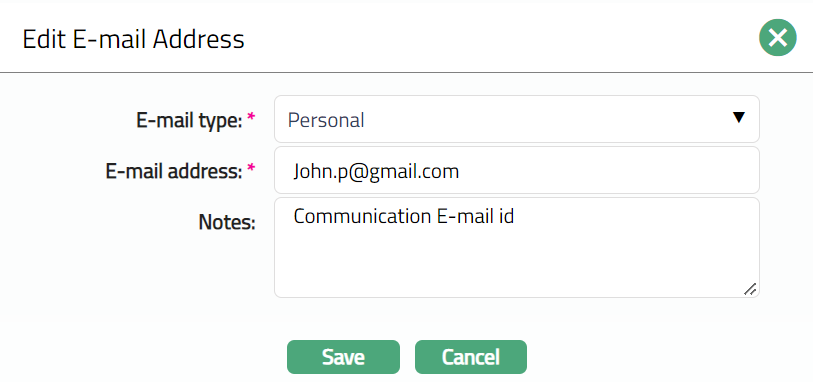
Click Next. New Channel Banking User -- E-mail (5/6) page appears

By default, No E-mail is selected. If you do not want to enter the E-mail details of the user at this stage, then you can select this option.
If you want to enter the Email, then click Add E-mail and provide the required details.
Select E-mail type from the drop-down list maintained under Admin > System Codes > Address details > E-mail types.
Enter E-mail address of the User.
Click Next. New Channel Banking -- Confirmation (6/6) page appears.
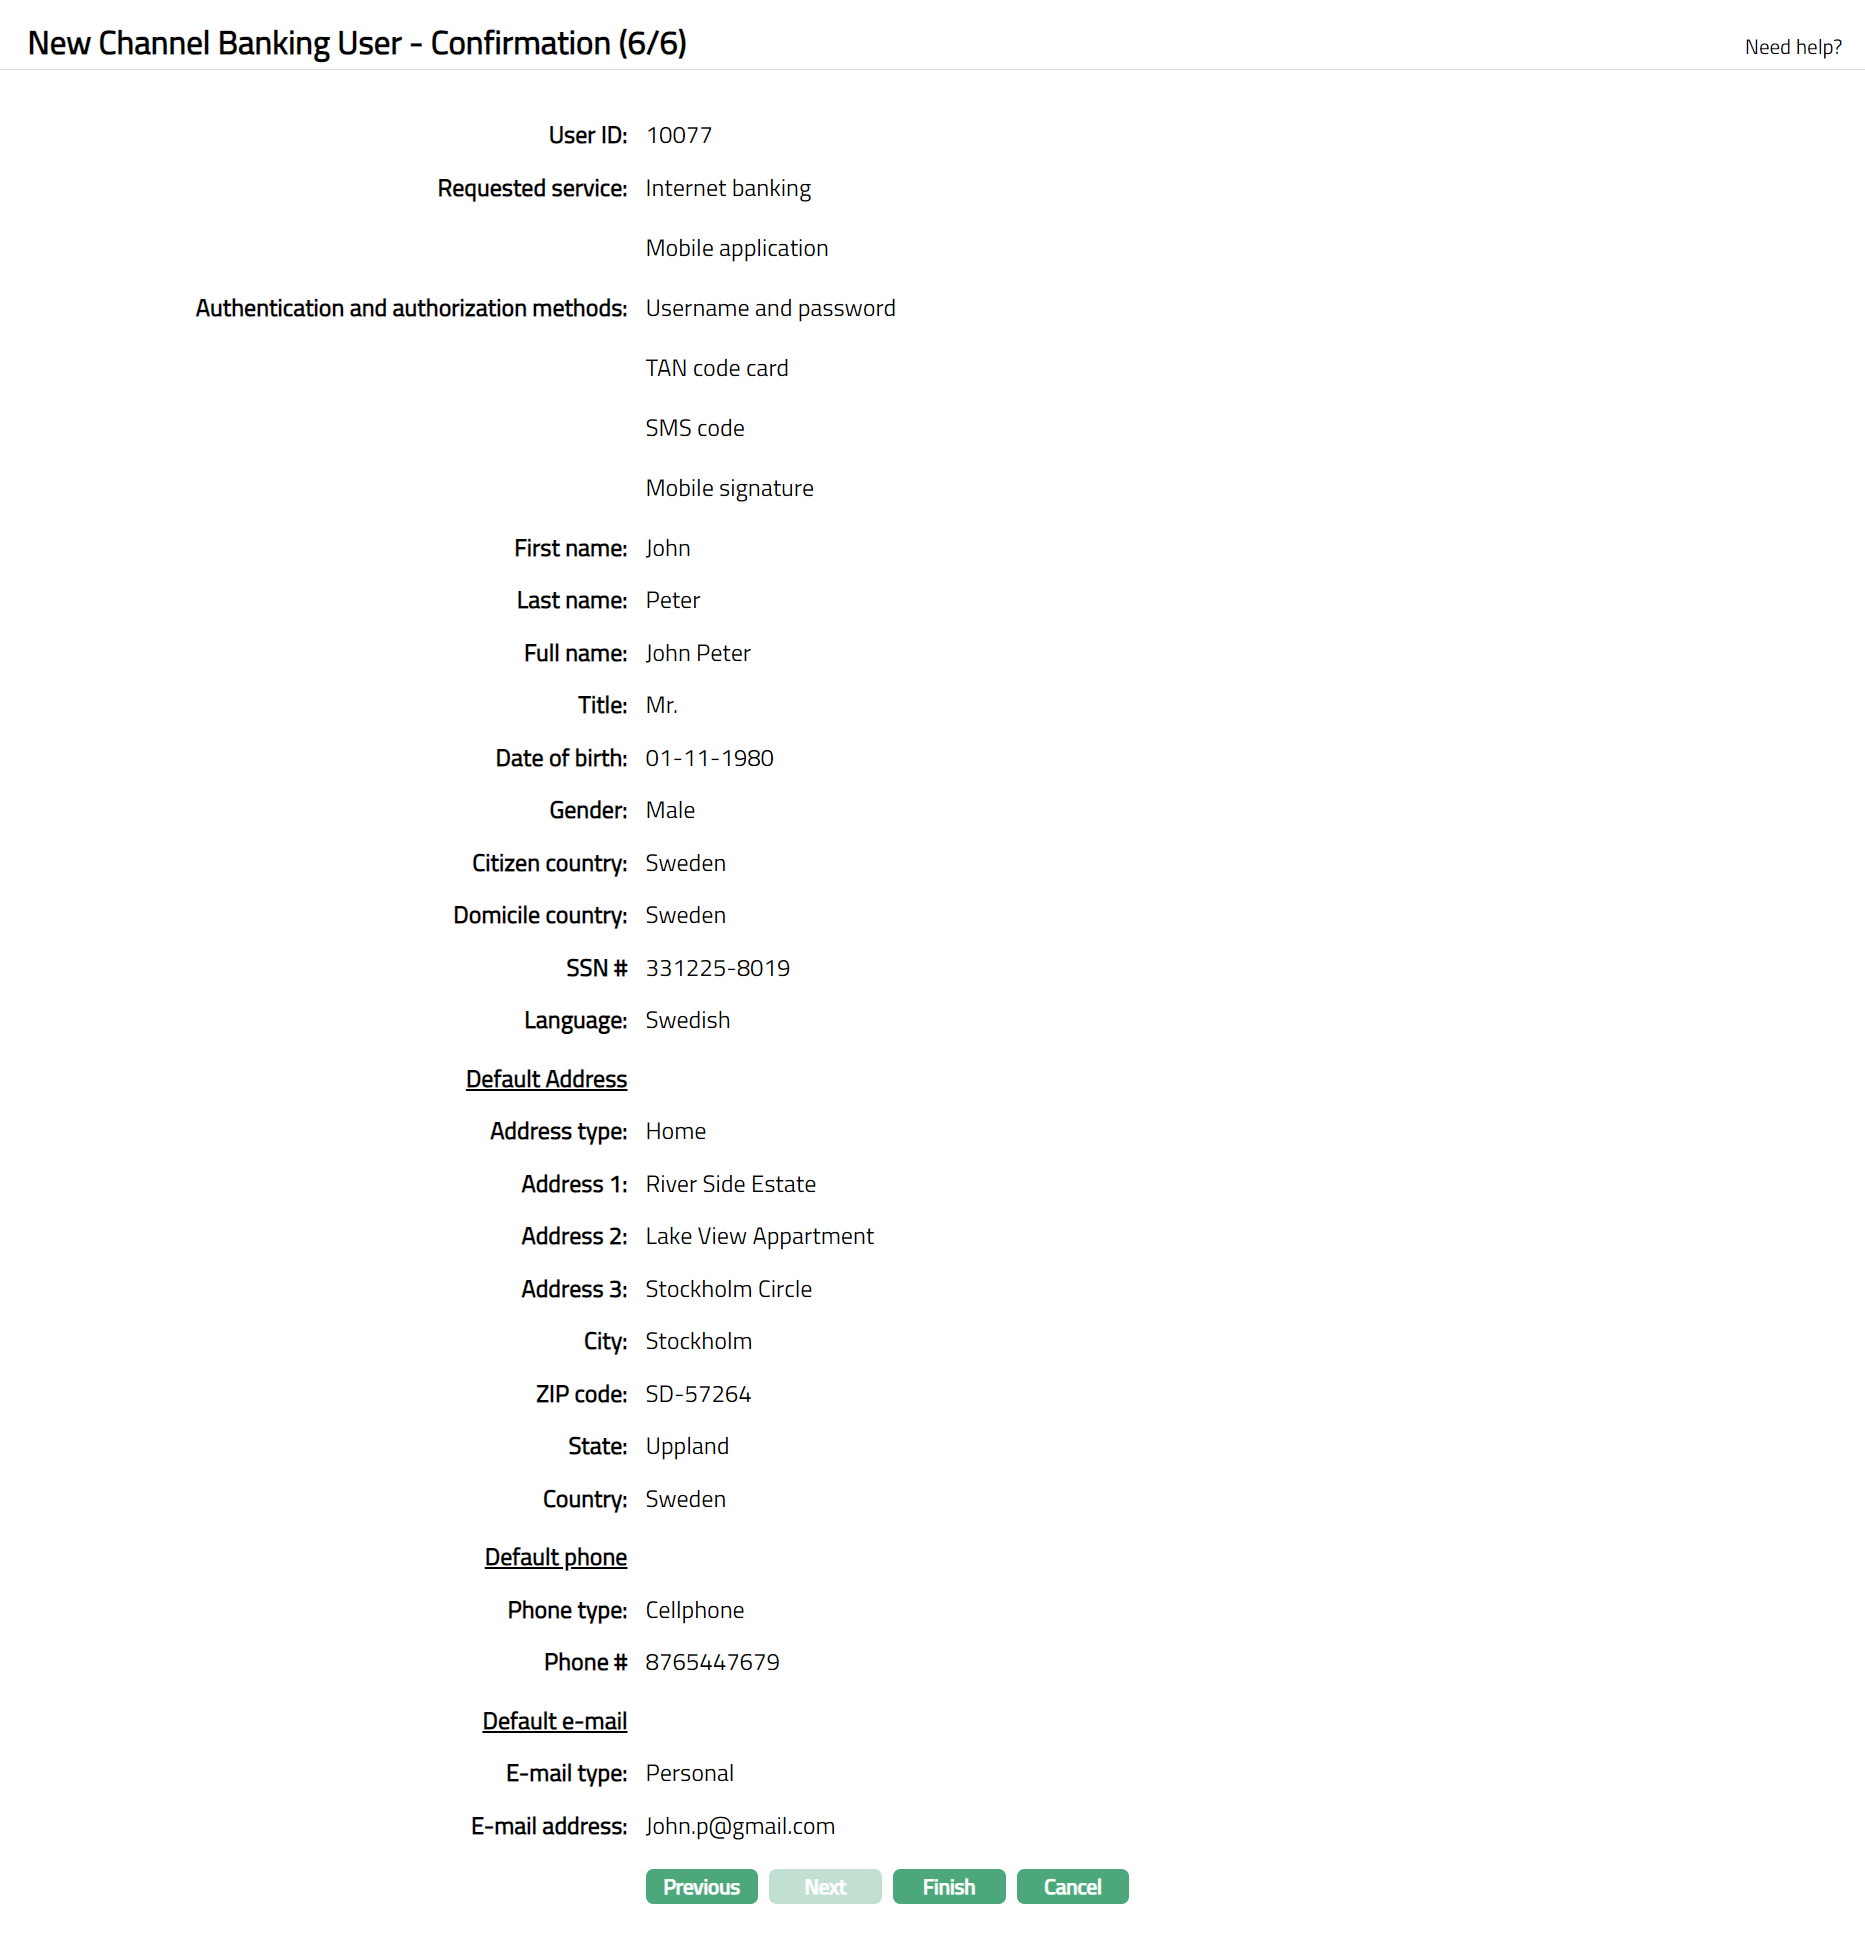
- Click Finish. Channel Banking User page appears with the new Channel Banking User details, and you can see the Profile tab by default.
Functions: Add, Search, Suspend, Activate, Edit, Reset Password
Search: You can search a Channel Banking User saved in Aura by a click on Search button. The system will then display the Channel Banking User Search screen where you can search for a User by entering the related variables about it.
Suspend: You can suspend a Channel Banking User by clicking on Suspend button. When you click on Suspend button, Aura will ask for confirmation. On confirmation Aura will suspend the User and Activate button will appear in place of the Suspend button.
Activate: If you want to activate a suspended Channel Banking user then click on Activate button. Aura will ask for confirmation. On confirmation Aura will Activate the User and Suspend button will appear in place of Activate button.
Reset Password: If you want to reset the password for the Channel Banking User, then click on Reset Password button. Aura will ask for confirmation. On confirmation Aura will automatically generate a password and send to the Channel Banking User
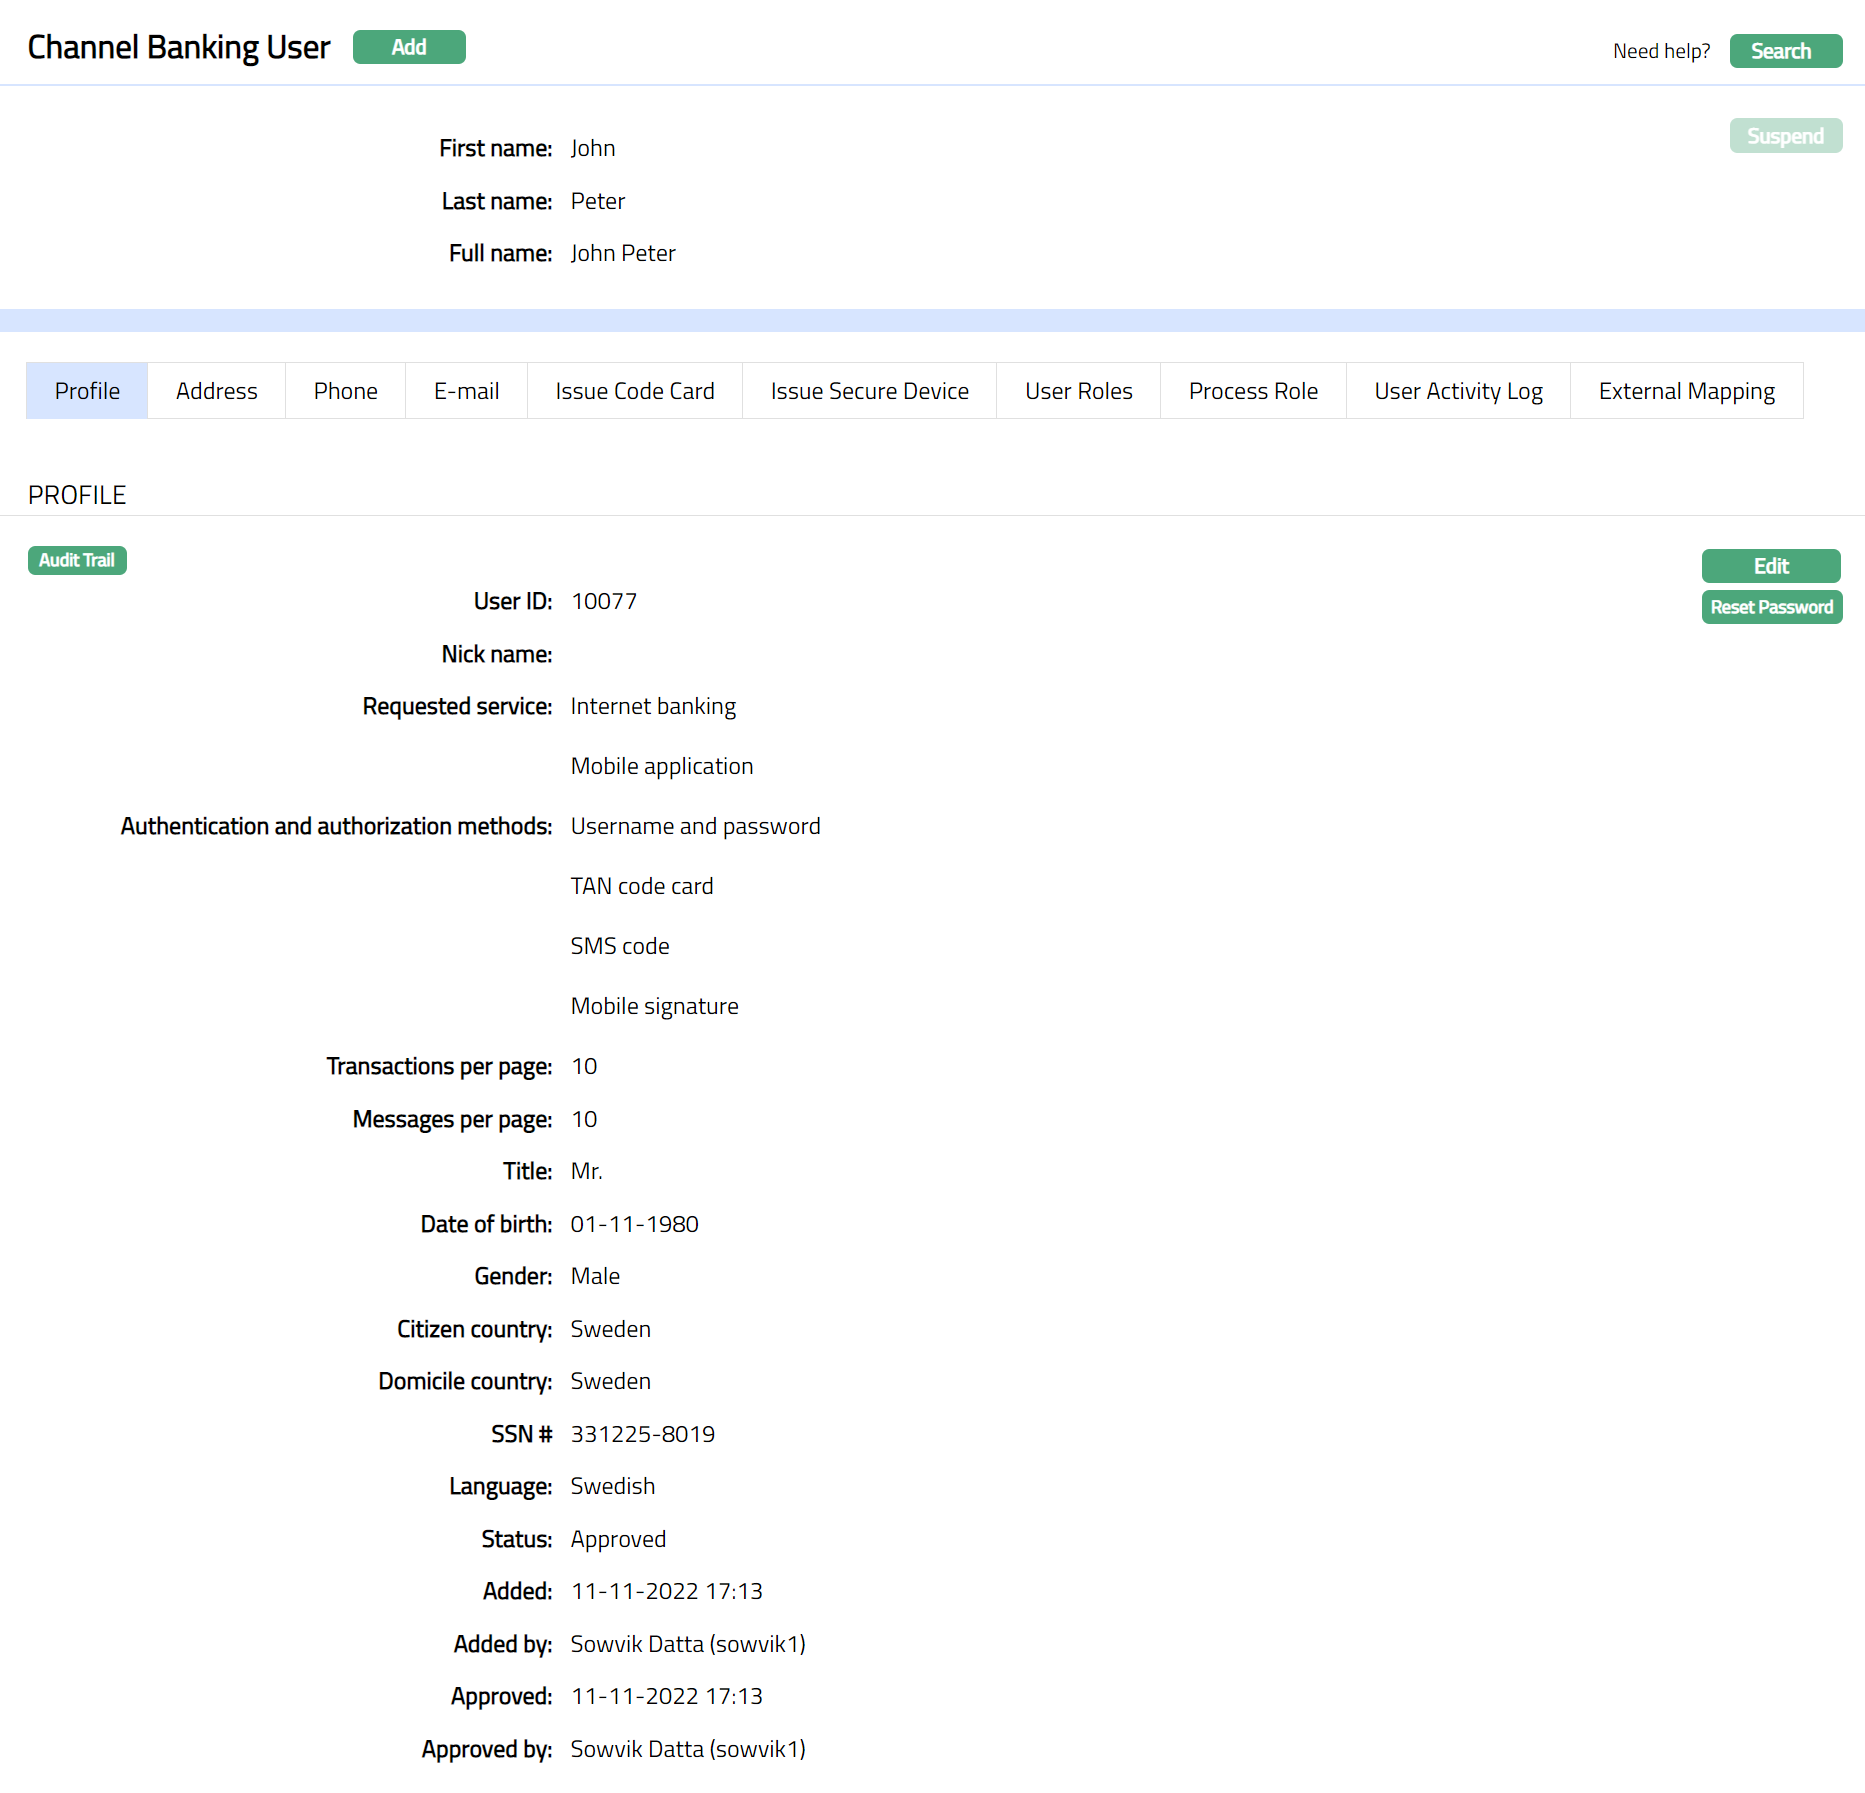
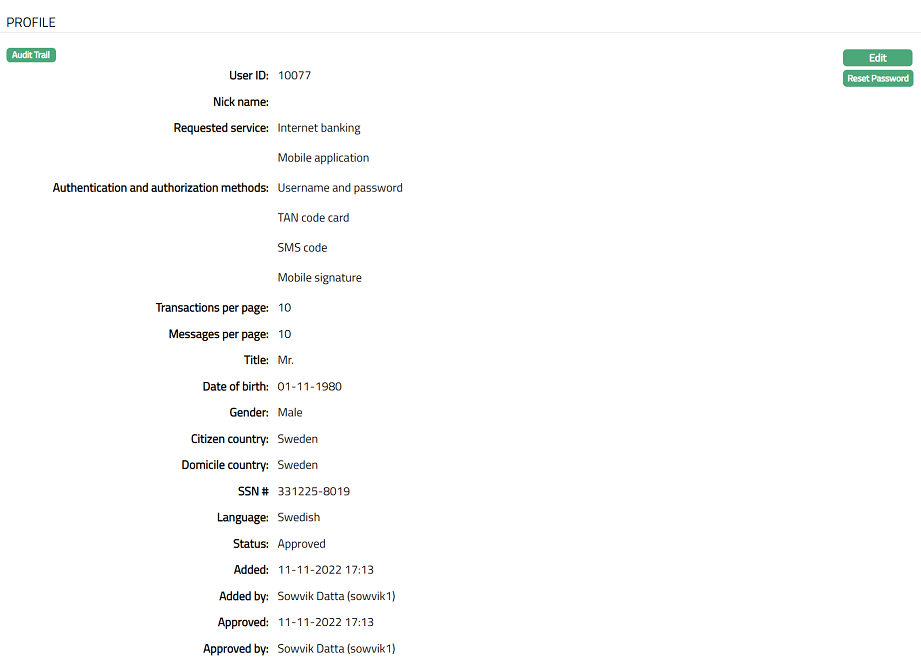
Profile
Profile tab, which is the default tab in the Channel Banking screen, shows the basic details of the Channel Banking User. It is also used to reset the password of a user.
To view / edit the details in the Profile Tab,
- Access Channel Banking page and click Profile tab to view the details as per sample below. The details are defaulted from the entries that you made during creation of a New Channel Banking User. For details refer to New Channel Banking User -- Profile (1/6) and New Channel Banking User -- General (2/6).
The additional fields are as follows:
Nick name: When the channel user logs into Internet Banking, he is asked to input the Nick name. Nick name input there is displayed here and is non-editable.
Transaction per page: When the channel user logs into Internet Banking, he is asked to enter the number of transactions to be displayed per page. Transaction per page input there is displayed here and is non-editable.
Message per page: When the channel user logs into Internet Banking, he is asked to enter the number of messages to be displayed per page. Message per page input there is displayed here and is non-editable.
- Click Edit. Edit Channel Banking User page appears.
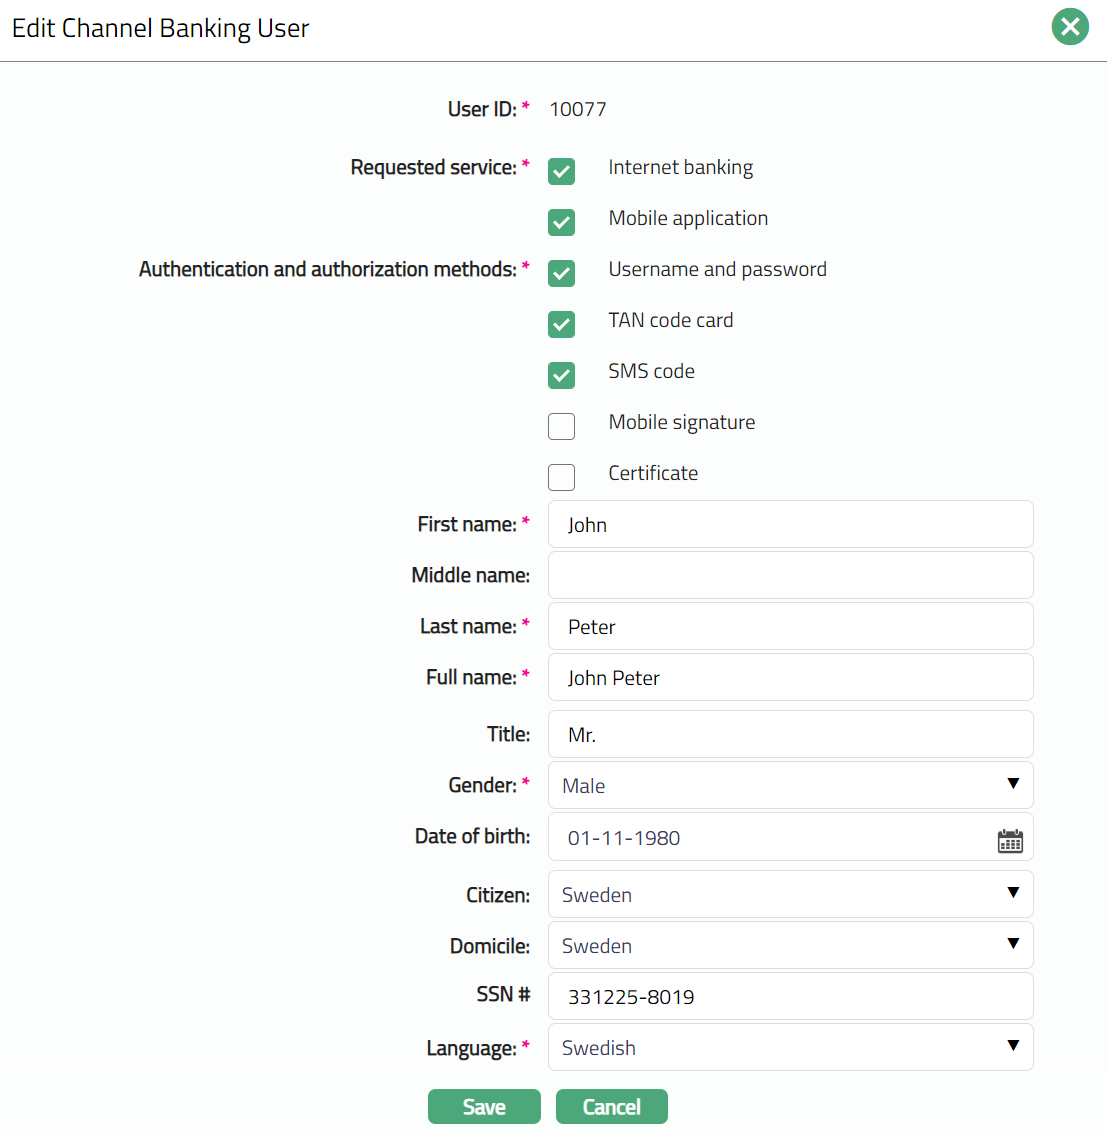
Note: All the fields except User ID can be updated in Edit screen.
- Click Save. Profile page appears with the edited details.
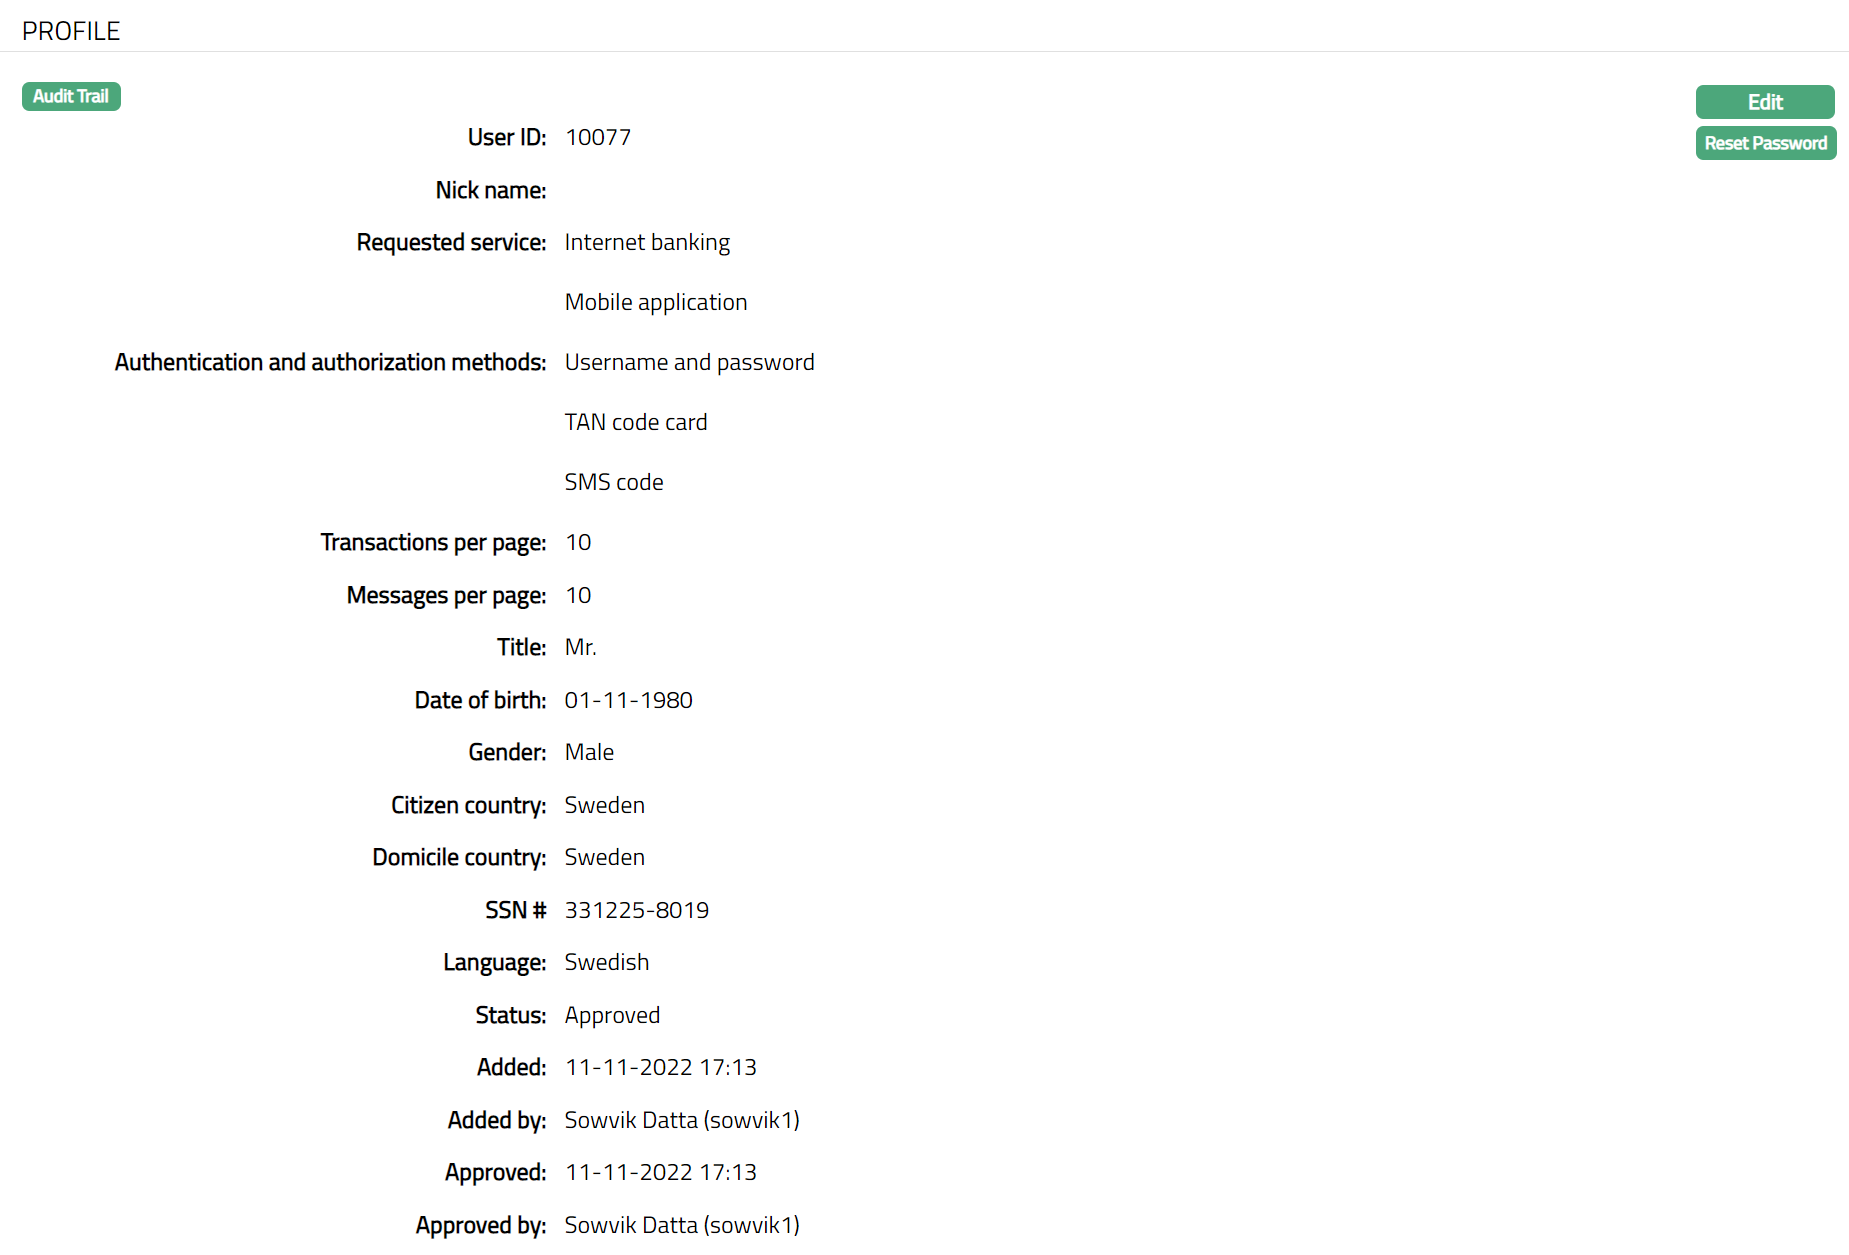
Functions: Edit, Reset Password
Reset Password: If you want to reset the password for the Channel Banking User, then click on Reset Password button. Aura displays an alert message. On confirmation Aura will automatically generate a password and send to the Channel Banking User.
Address
The Address tab allows you to maintain the address of the User.
To view the details,
- Access Channel Banking User page and click Address tab to view the details as per sample below. The details are defaulted from the entries that you made during creation of a New Channel Banking User. For details refer New Channel Banking User -- Address (3/6).
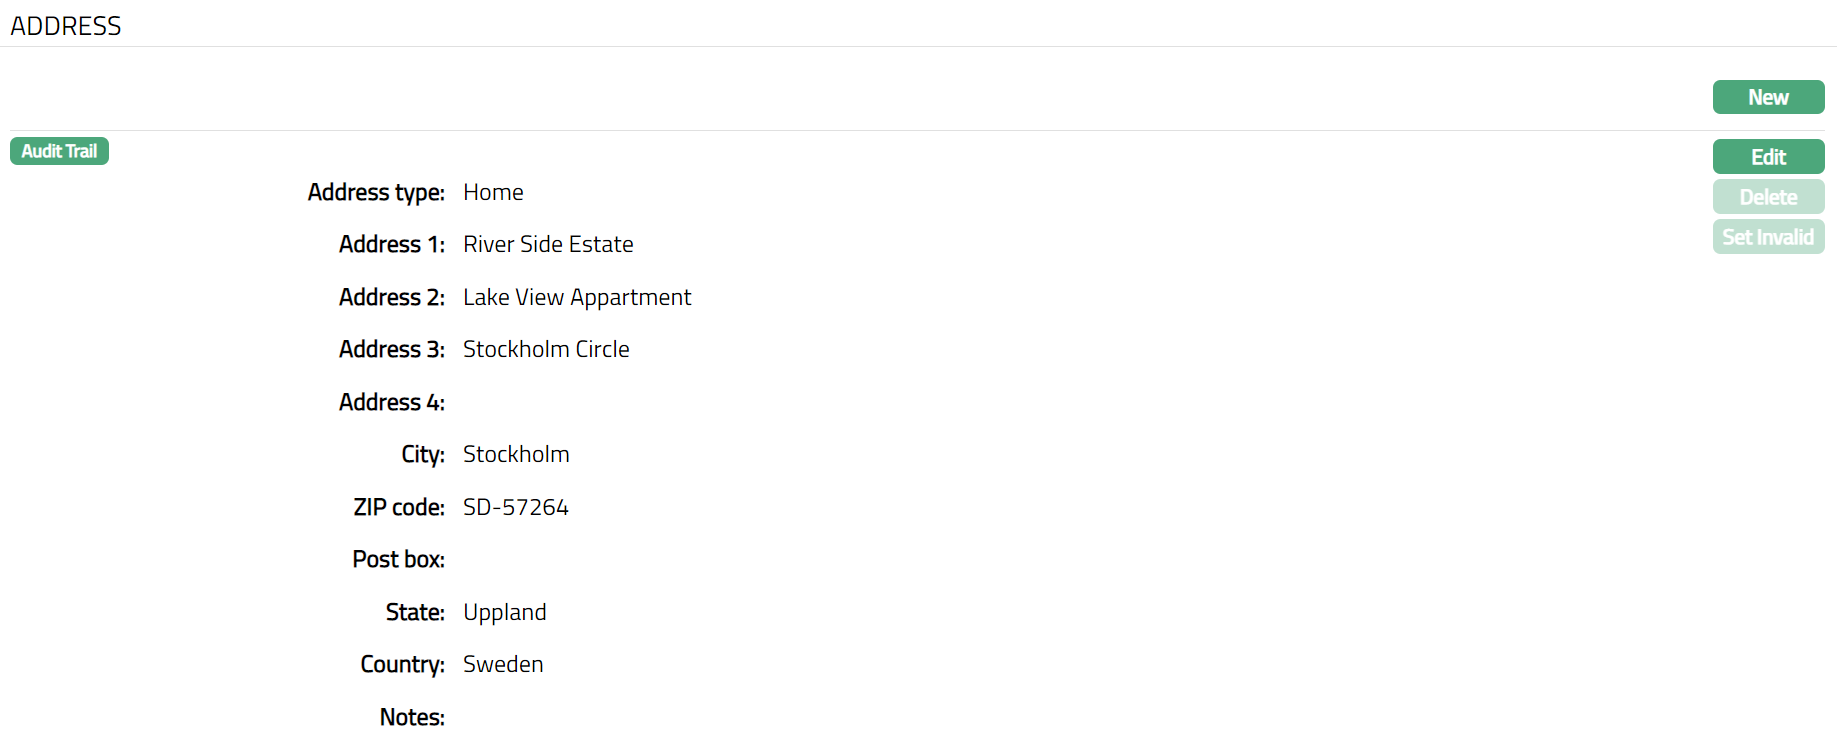
The additional field is Notes. This field will allow you to add a note for the address.
- Click New to add a new address New Address page appears.
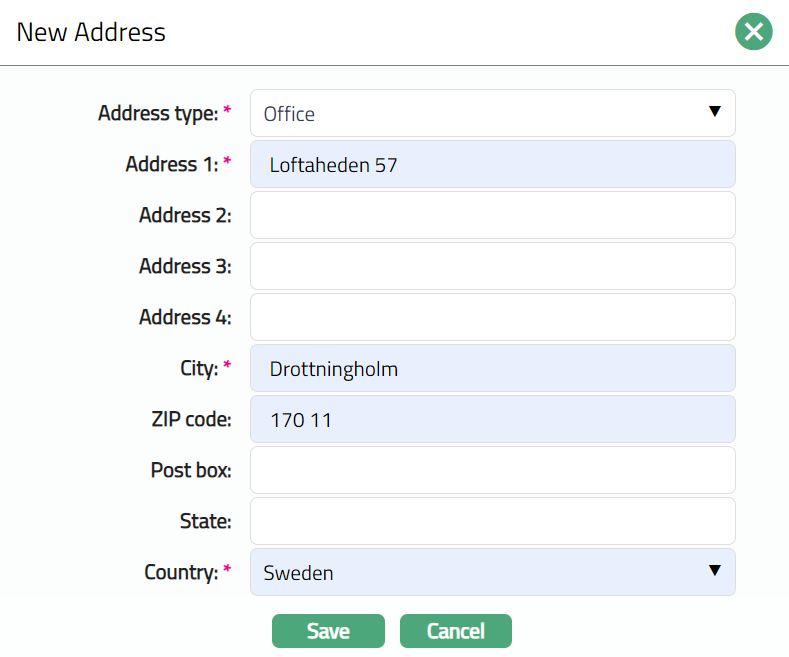
Select Address type from the list of Address types maintained at Admin > Address Details > Address types.
Enter address details in Address 1, Address 2, Address 3 and Address 4 i.e., any additional locator such as name of Apartment / Building, a prominent landmark, etc, which will help locate the User's address more easily.
Enter City or the town of the User's address as designated by the post office.
Enter Zip code or postal code in full, if used in the User's address.
Enter Post box details of the address.
Enter State in which the address exists, if applicable.
Select Country from the list of countries maintained at Admin > Generic Definitions > Countries.
Click Save. The Address page appears with the added details.
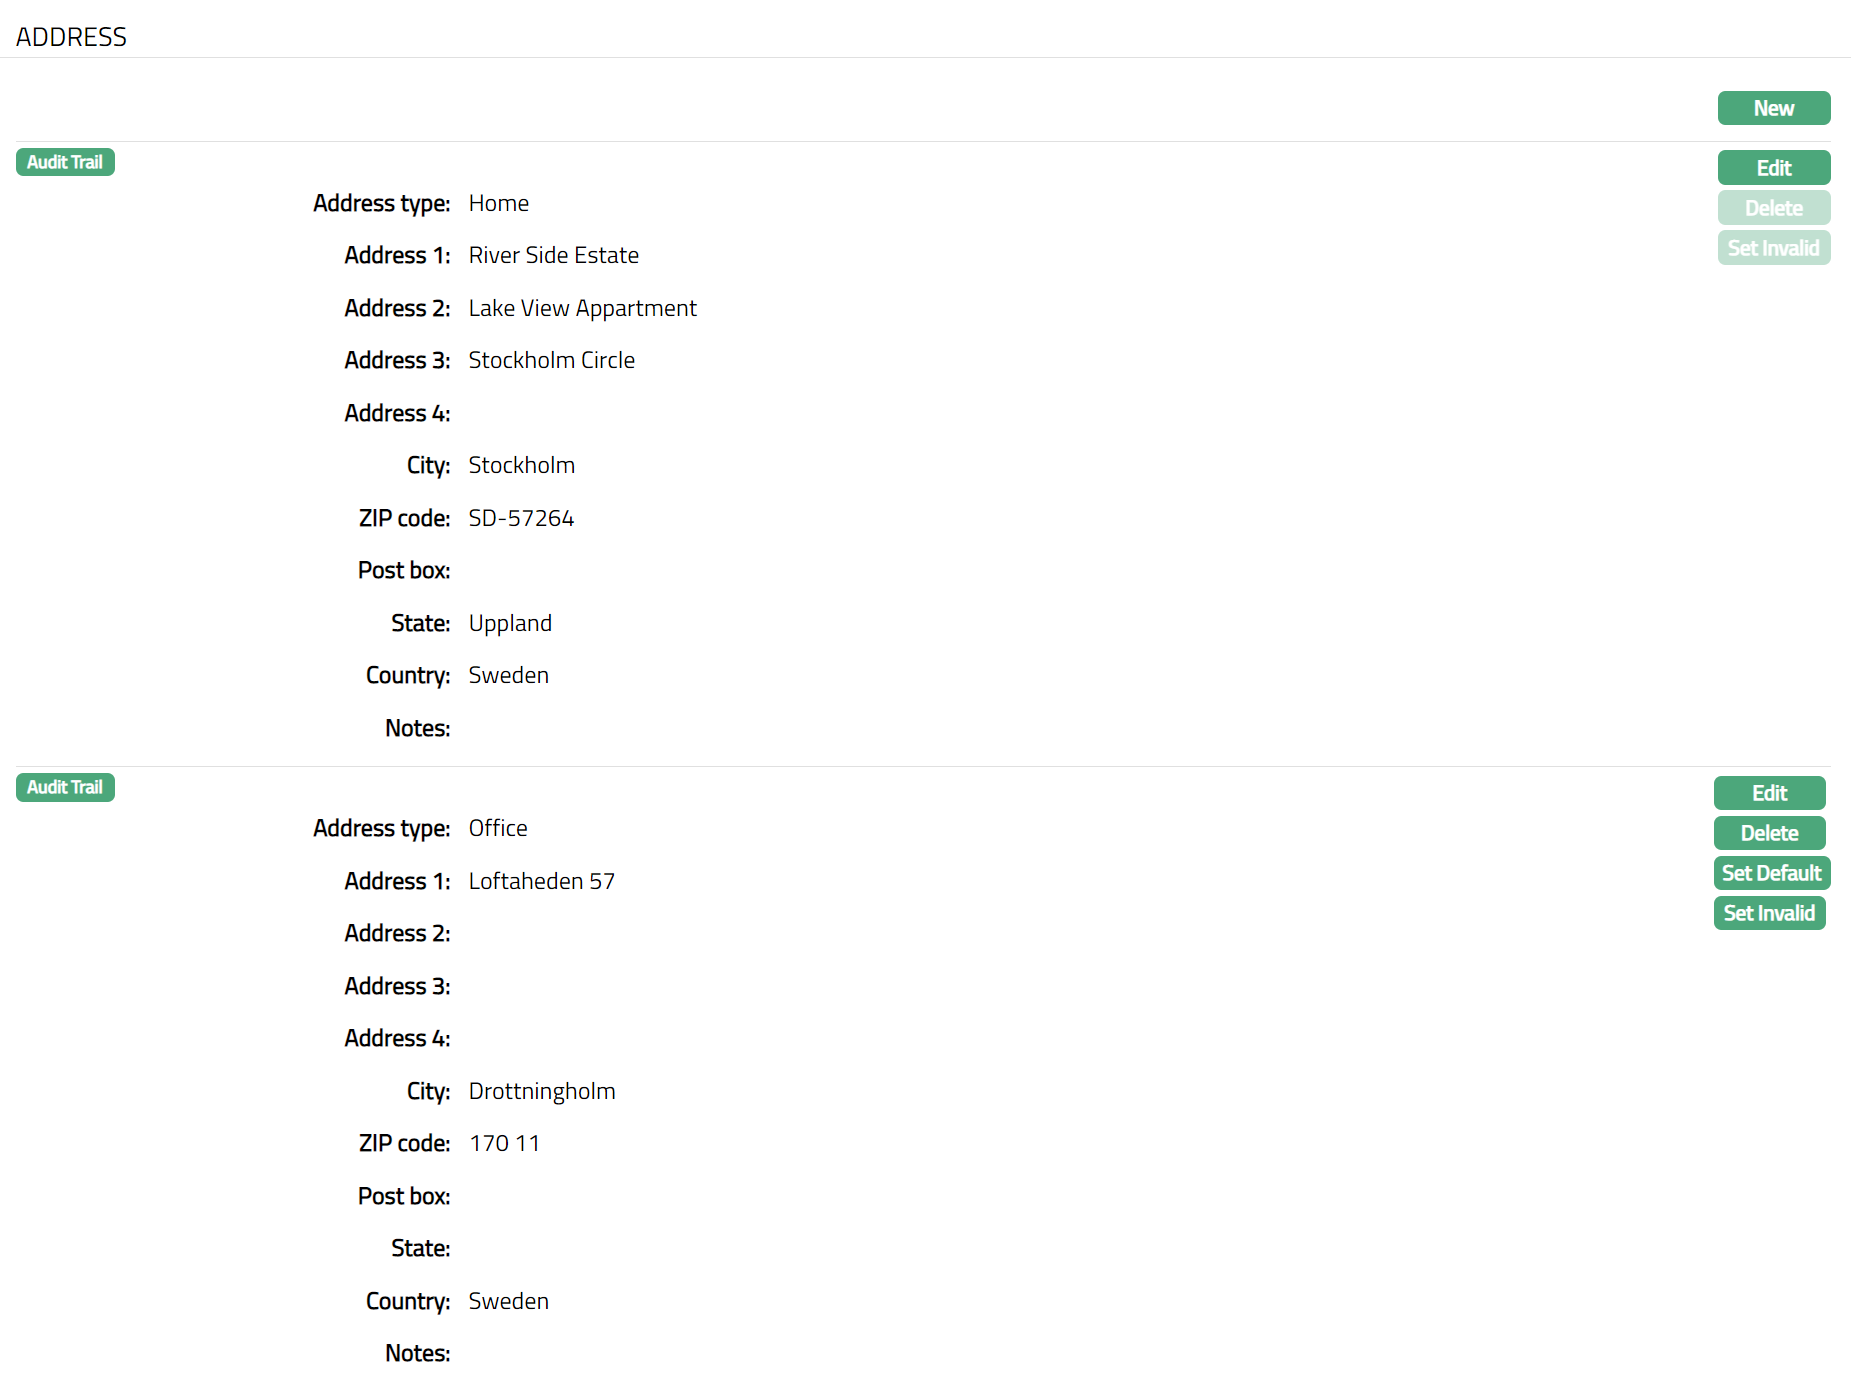
Functions: New, Edit, Delete, Set Default, Set Invalid, Set Valid
Delete: You can delete the Address saved in Aura by a clicking on Delete button. Aura will ask for confirmation, on approving which the selected record will be deleted.
Set Invalid: You can set the selected address as invalid by clicking on Set Invalid button. When you click on Set Invalid button, Aura will ask for confirmation. On confirmation Aura will set the address as invalid and Set Valid button will appear in place of Set Invalid button.
Set valid: If you want to set the address as valid, then click on Set valid button. Aura will ask for confirmation. On confirmation Aura will set the address as valid and Set Invalid button will appear in place of Set valid button
Set Default: When you create multiple address records, you can set one of them as the default address using this button. When there is only one address, the same is taken as the default address.
Notes: Once saved, there will be an additional field -- Notes, with which you can add any additional information that you wish regarding the Address record (using Edit and Save function).
To Edit Address
- Click Edit button available next to the list of address displayed in the Address page. Edit Address page appears.
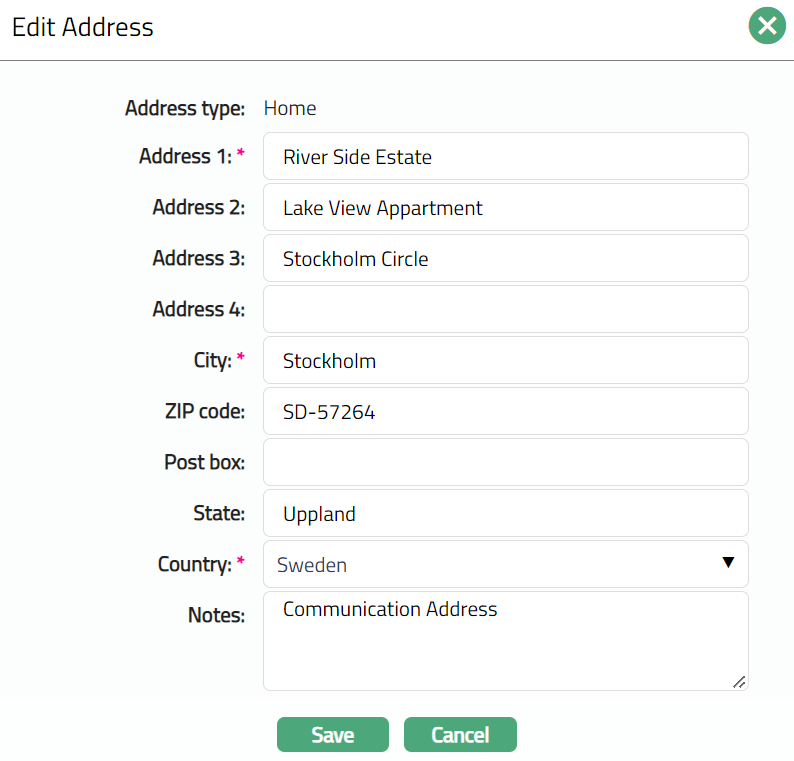
Note: Except Address Type, all other fields are editable.
- Click Save. Address page appears with the edited details.

Functions: New, Edit, Delete, Set Default, Set Invalid, Set Valid
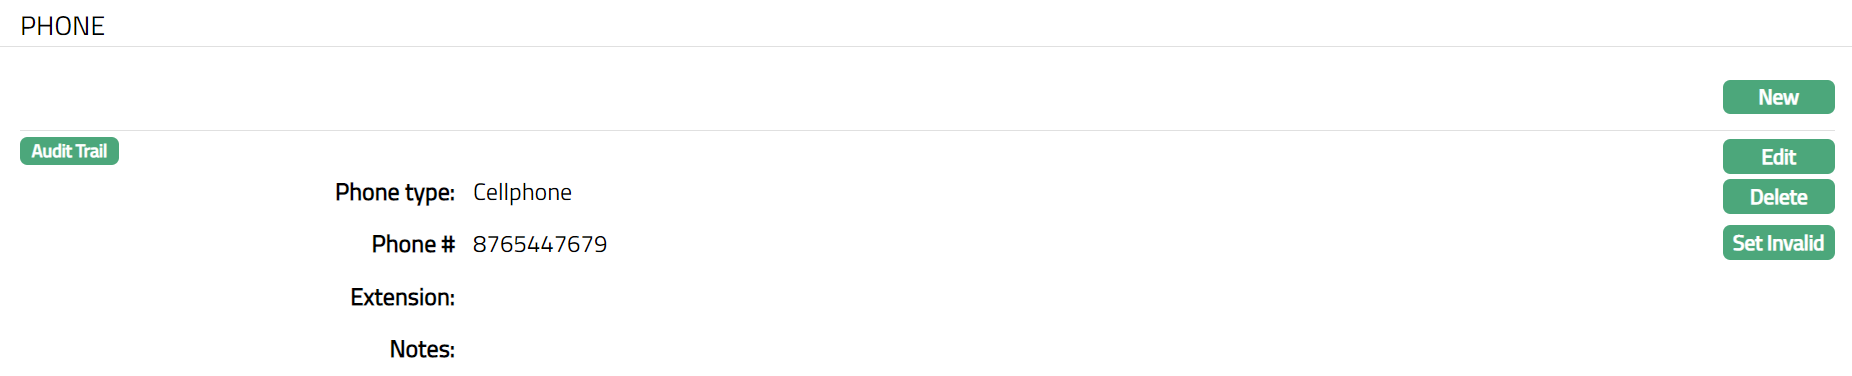
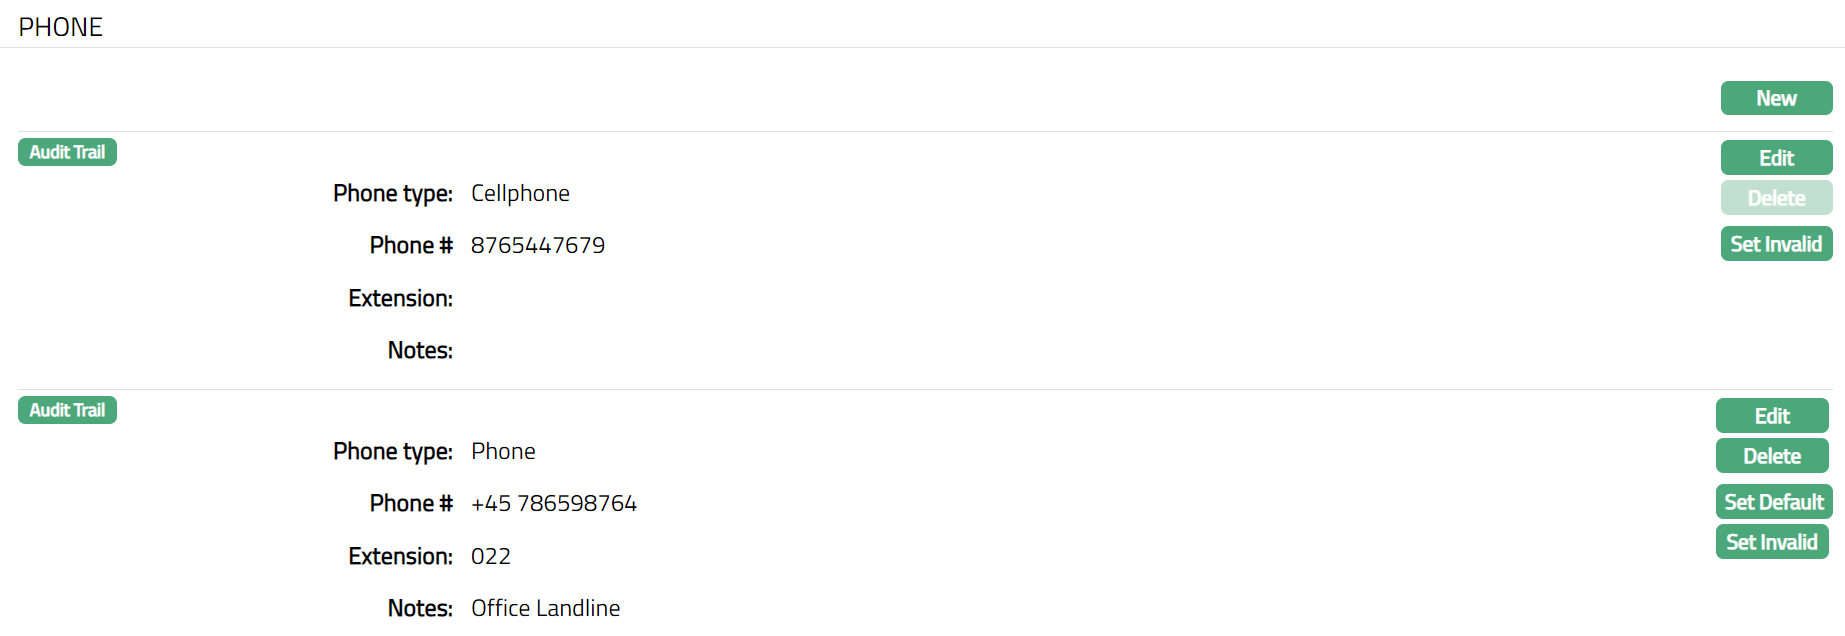
Phone
Phone tab allows you to maintain the phone details of the User.
- Access Channel Banking User page and click Phone tab. The details are defaulted from the entries that you made during creation of a New Channel Banking User. For details refer to New Channel Banking User -- Phone (4/6).
- Click New to add the new phone details. New Phone page appears.
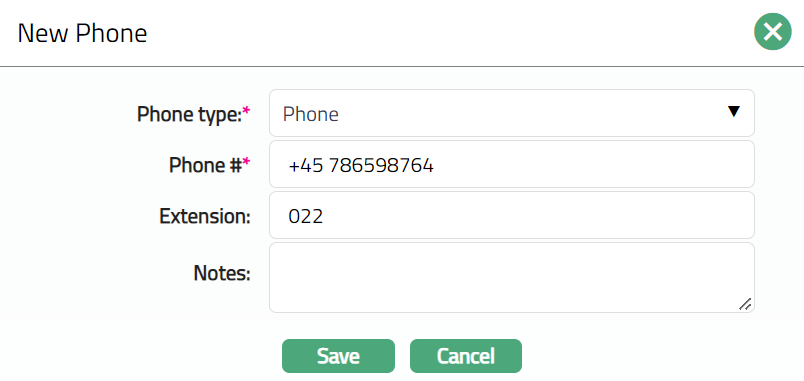
Select Phone type from the dropdown list. The Phone type should be maintained at Admin > Address Details > Phone types.
Enter Phone # i.e., the phone number of the user.
Enter Extension for the Phone #.
Enter Notes, if there is any additional information that you wish to capture regarding the phone record.
Click Save. Phone page appears with the added details.
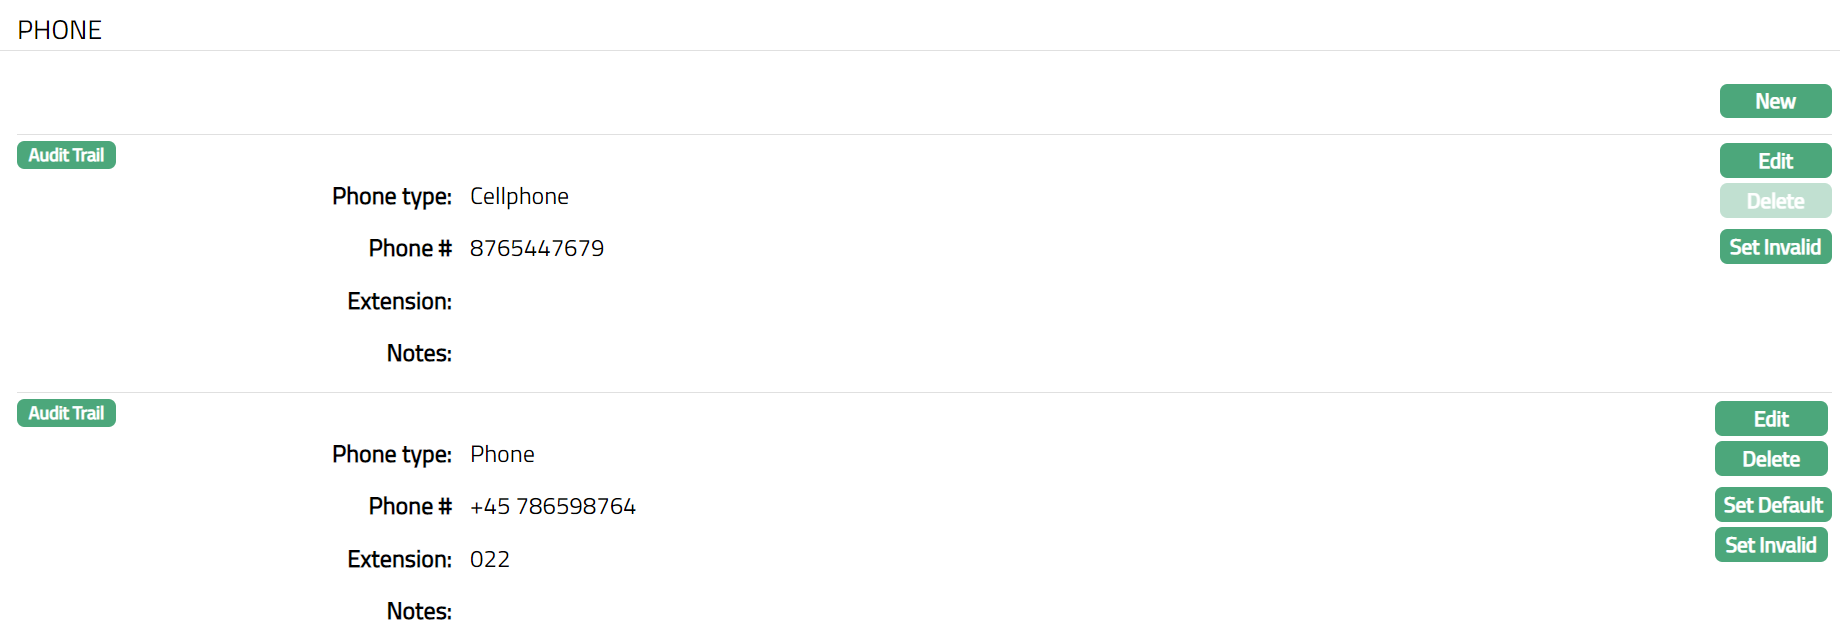
Functions: New, Edit, Delete, Set Default, Set Invalid, Set Valid
Delete: You can delete the Phone details saved in Aura by a clicking on Delete button. Aura will ask for confirmation, on approving which the selected record will be deleted.
Set Invalid: You can set the selected Phone details as invalid by clicking on Set Invalid button. When you click on Set Invalid button, Aura will ask for confirmation. On confirmation Aura will set the address as invalid and Set Valid button will appear in place of Set Invalid button.
Set valid: If you want to set the Phone details as valid, then click on Set valid button. Aura will ask for confirmation. On confirmation Aura will set the address as valid and Set Invalid button will appear in place of Set valid button
Set Default: When you create multiple Phone records, you can set one of them as the default Phone details using this button. When there is only one Phone detail, the same is taken as the default Phone.
Notes: Once saved, there will be an additional field -- Notes, with which you can add any additional information that you wish regarding the Phone record (using Edit and Save function).
To Edit Phone
- Click Edit button available next to the list of phone details displayed in the Phone page. Edit Phone page appears.
Note: All fields are editable.
- Click Save. Phone page appears with the edited details.
Functions: New, Edit, Delete, Set Default, Set Invalid, Set Valid
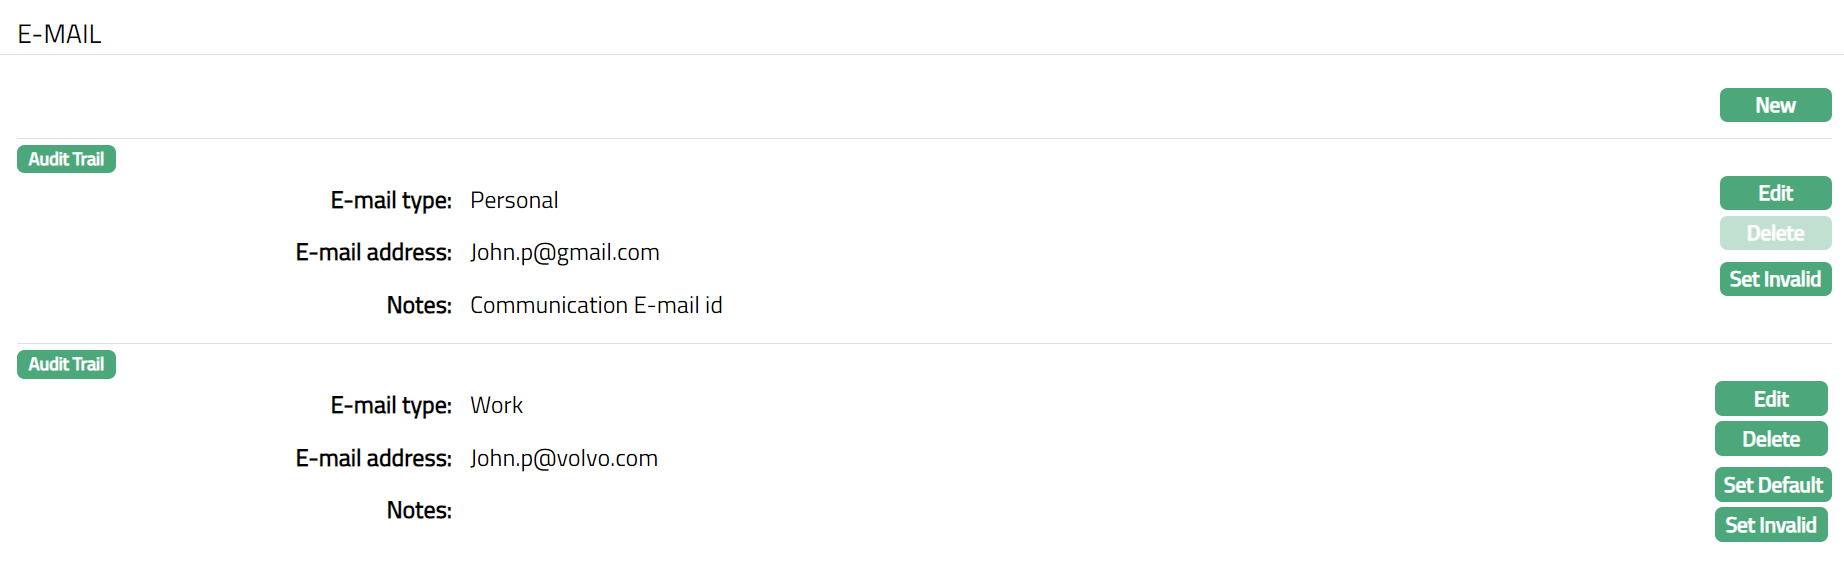
The E-mail tab allows you to maintain the E-mail details of the User.
- Access Channel Banking User page and click E-mail tab. The details are defaulted from the entries that you made during creation of a New Channel Banking User. For details refer to New Channel Banking User -- E-mail (5/6)

- Click New to add the new e-mail details. New E-mail Address page appears.
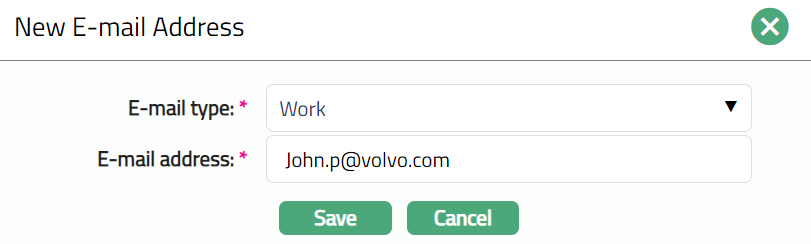
Select Email type from the drop-down list of E-mail types maintained under Admin > Address Details > E-mail types.
Enter E-mail address.
Click Save. E-mail page appears with the added details.
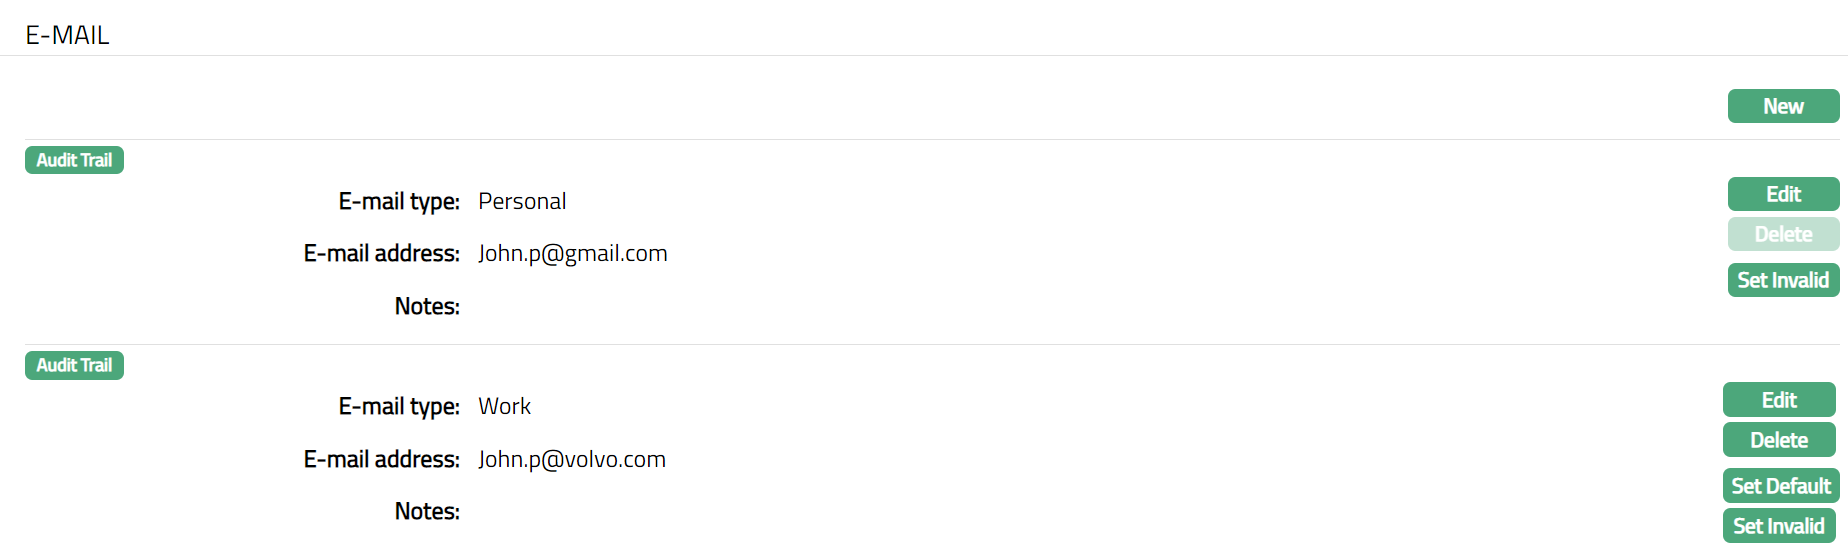
Functions: New, Edit, Delete, Set Invalid, Set Default, Set Valid
Valid: You can delete the E-mail saved in Aura by a clicking on Delete button. Aura will ask for confirmation, on approving which the selected record will be deleted.
Set Invalid: You can set the E-mail as invalid by clicking on Set Invalid button. When you click on Set Invalid button, Aura will ask for confirmation. On confirmation Aura will set the E-mail as invalid and Set Valid button will appear in place of Set Invalid button.
Set valid: If you want to set the E-mail valid, then click on Set valid button. Aura will ask for confirmation. On confirmation Aura will set the E-mail as valid and Set Invalid button will appear in place of Set valid button.
Set Default: When you create multiple E-mail records, you can set one of them as the default E-mail details using this button. When there is only one E-mail detail, the same is taken as the default E-mail.
Notes: Once saved, there will be an additional field -- Notes, with which you can add any additional information that you wish regarding the E-Mail record (using Edit and Save function).
To Edit E-Mail
- Click Edit button available next to the list of E-Mail displayed in the E-Mail page. Edit E-Mail page appears.
Note: All fields are editable.
- Click Save. Address page appears with the edited details.
Functions: New, Edit, Delete, Set Default, Set Invalid, Set Valid
Issue Code Card
One of the commonly used login methods for a secure login to internet banking is via Code card. In this method the users are issued plastic cards containing printed codes and a serial number. For each login or transaction confirmation, users may be asked to enter the next available code or the code against a specific serial number. Using this tab, you can issue these cards to the client.
To issue a new code card
- Access Channel Banking User Maintenance page. Click Issue Code Card tab and click New. The Issue Code Card page appears. The New button will be enabled only when TAN code card method is chosen.
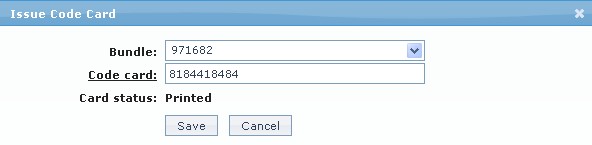
Select the Bundle from the dropdown list maintained under Admin > Secure stationery > Card bundle with status as Printed.
Aura randomly allocates one of the cards from the card bundle to the Code card. However, you can click Code card hyperlink to select any other card within the selected card bundle. The number of codes allocated to the card needs to be used by the user before he is issued another code card by the bank.
Card status of the code card is displayed by Aura.
Note:
Only if the Code Card status is Printed, it can be issued for use to a Channel Banking user.
The Card status is updated to Reserve as soon as the record is saved. The Code Card selected is Reserved for the Channel Banking User.
Once the record is approved, the Card status gets updated to Issued.
If you want to Block the Code Card; you need to mark it as Blocked using the Edit option in Card Maintenance (Admin > Secure stationery > Card Maintenance > Edit). The Card status also gets updated to Blocked.
- Click Save. The Channel Banking User Maintenance page appears displaying the details of the code card issued. After saving, Aura will update the Card Status as Reserved, and the record status will get updated as Pending. This means that the issued card with that card number cannot be issued for any other user. It is reserved for the allotted user.

Functions: New, Delete, Approve
Delete: You can delete Code card saved in Aura by a click on Delete button. Aura will ask for confirmation. On confirmation Aura will delete the selected Code card. Once the Code card is approved, it cannot be deleted.
Approve: If you want to Approve a Code card, then retrieve the record and Click on Approve. Aura will ask for confirmation. Once the tab is approved, status gets changed from pending to Approved.
Note: Any person other than the one who assigned the card can approve the issued Code Card. Once the Code Card is approved, the Card Status will change to Issued.
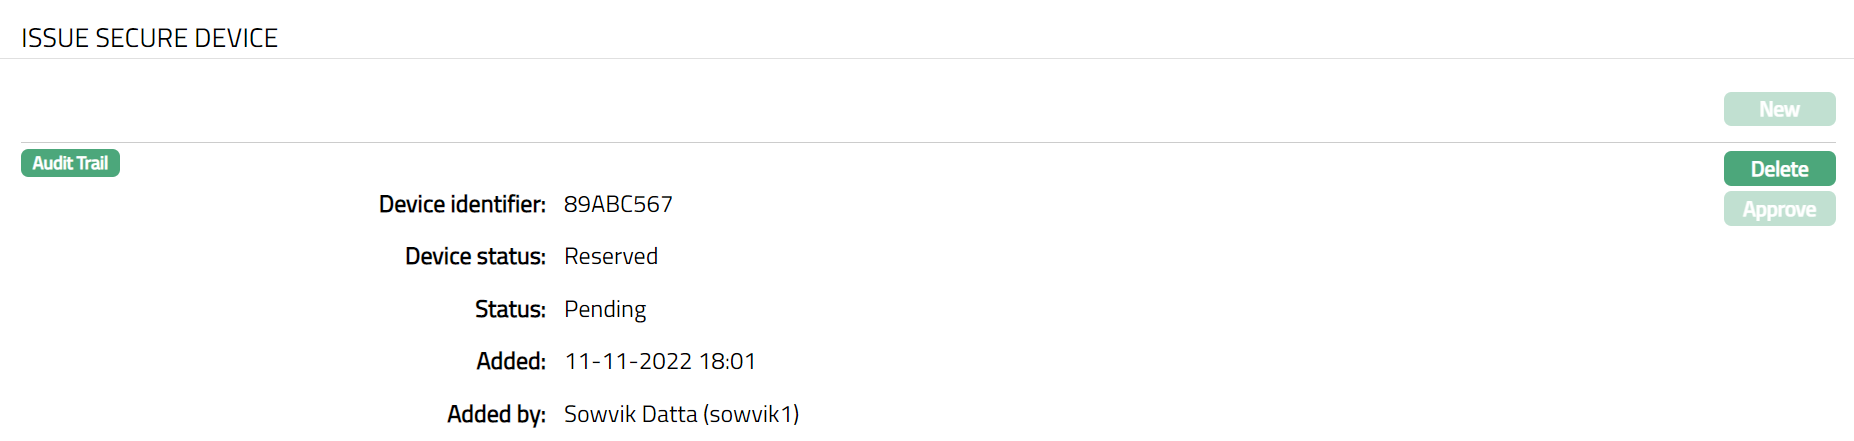
Issue Secure Device
Issue secure device is another medium for logging in to internet banking. A device is issued by the bank to the user which has an identifier code. It is reusable unlike Code Card.
To issue a new secure device
- Access Channel Banking User page. Click Issue Secure Device tab.

- Click New. Issue Secure Device page appears. Note: The New button will be enabled only when Certificate method is chosen.
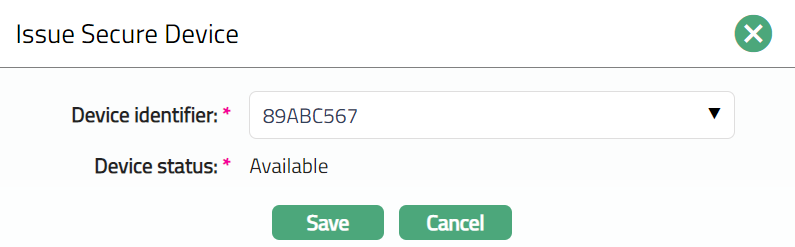
Select Device identifier from the dropdown list maintained under Admin > Secure stationery > Secure device. You can add only one device for a user.
Aura displays the Device status for the secure device.
Click Save. Issue Secure Device page appears with the added details. After saving, Aura will update the Device status as Reserved, and the record status will get updated as Pending. This means that the issued Secure Device with that Device Identifier cannot be issued to any other user. It is reserved for the allotted user.
Delete: You can delete the Issued Secure Device record by a click on Delete button. Aura will ask for confirmation. On confirmation Aura will delete the selected Issued Secured Device. Once the Issued Secure Device tab is approved, it cannot be deleted
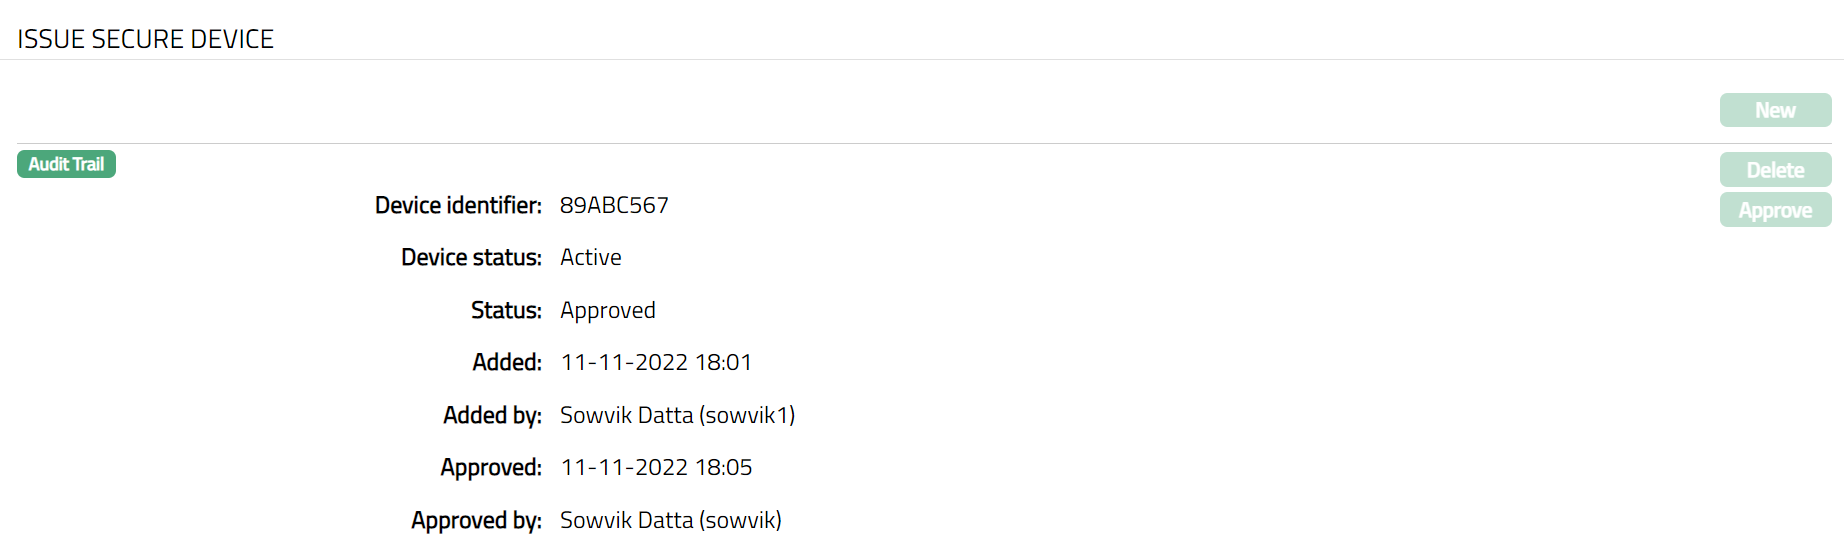
Approve: If you want to Approve an Issued Secure Device, then retrieve the record and Click on Approve. Aura will ask for confirmation. Once the tab is approved, status gets changed from Pending to Approved.
Note: If you want to remove the device which is attached for a particular person, then you have to disable the status from the Admin > Secure stationery > Secure device maintenance > Edit. Once the attached device is disabled for the channel banking user, Aura will display the status as Disabled for the old secure device which you attached before, and it will no longer be valid.
Note: Any changes in the tab the status will reflect as pending unless ny person other than the one who assigned the device can approve the issued Secure Device. Once the Secure Device is approved, the Device Status will change to Active. Once the Device status is Reserved, the New button will be disabled and Delete button will be enabled.
Once the Device status is Active, the New and Delete button will be disabled.
Once the Device status is Disabled, the New button will be enabled and Delete button will be disabled.
Functions: New, Delete, Approve
The additional fields that you can view in the Settings tab are as follows. :
Status field denotes the status of the record.
Added field denotes the date on which the record was added.
Added by field denotes the name of the user who created the record.
Approved field denotes the date on which the record was approved and is displayed only on approval.
Approved by field denotes the name of the user who approved the record and is displayed only on approval.
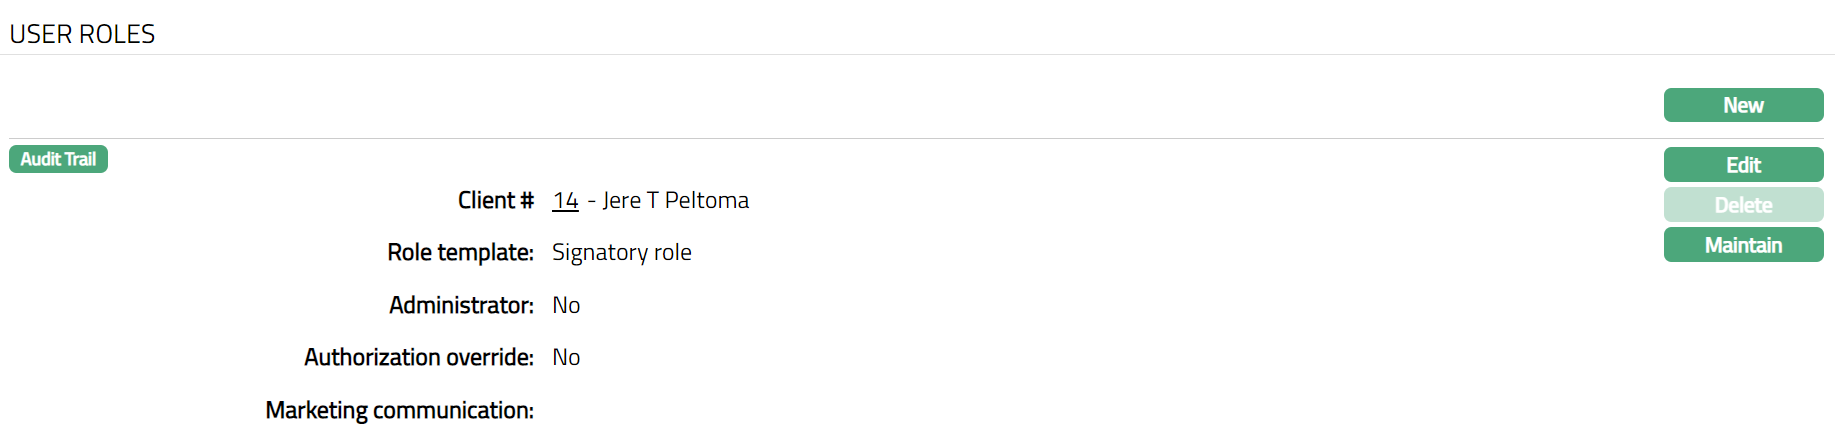
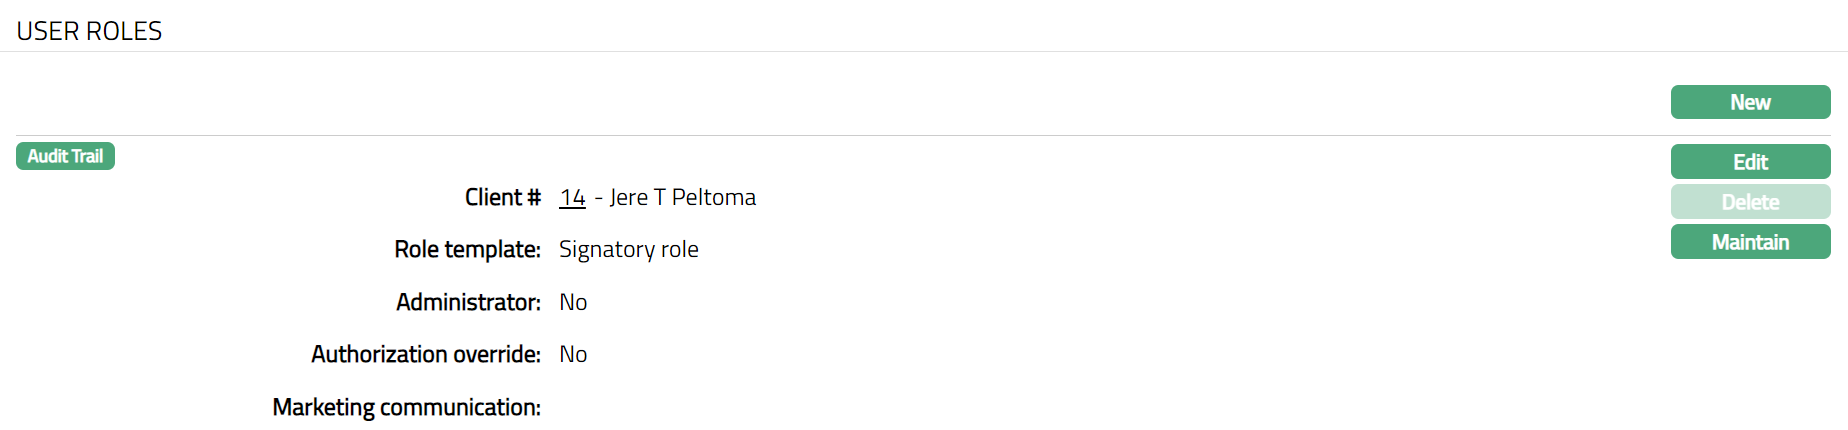
User Roles
The User Roles tab allows you to add multiple clients and define the role of the user for the client to control certain banking operations. The control activities can primarily be of three types -- enquiry, input and authorize. The user can set limits for input and authorize activities.
To define the User Roles for a client,
- Access Channel Banking User page. Click User Roles tab.

- Click New. New Client page appears.
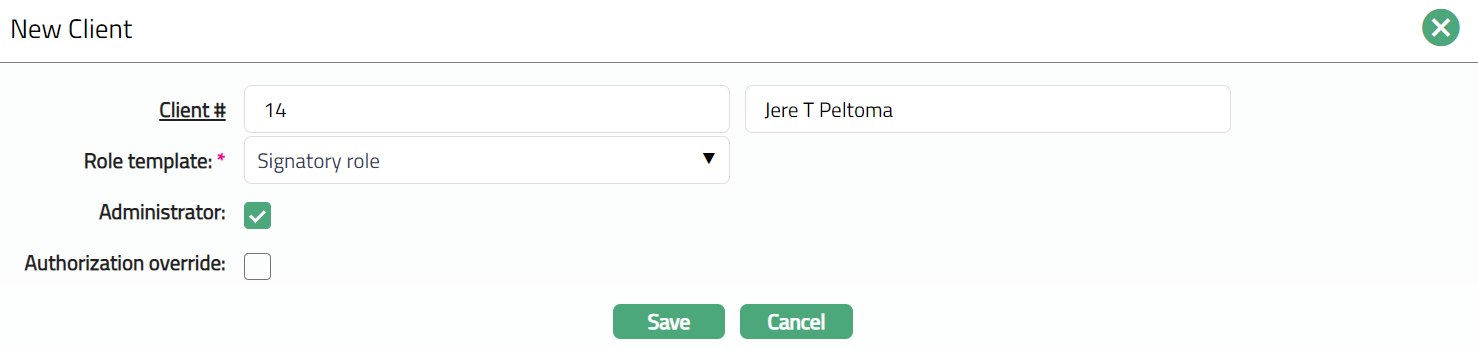
Select Client by clicking on client hyperlink. The Client search page appears where you can search for a client with relevant criteria and select the required client. You can also input the client's name and select the required client from the list displayed by Aura.
Select Role of the user from the list of Roles maintained under Admin > System codes > Generic definitions > Person role.
Select Limit currency from the list of all the active currencies as maintained under Admin > System codes > Currencies > Currencies.
Check Administrator checkbox to grant the above Client the rights to manage other channel users.
Click Save. User Roles page appears with the added details.
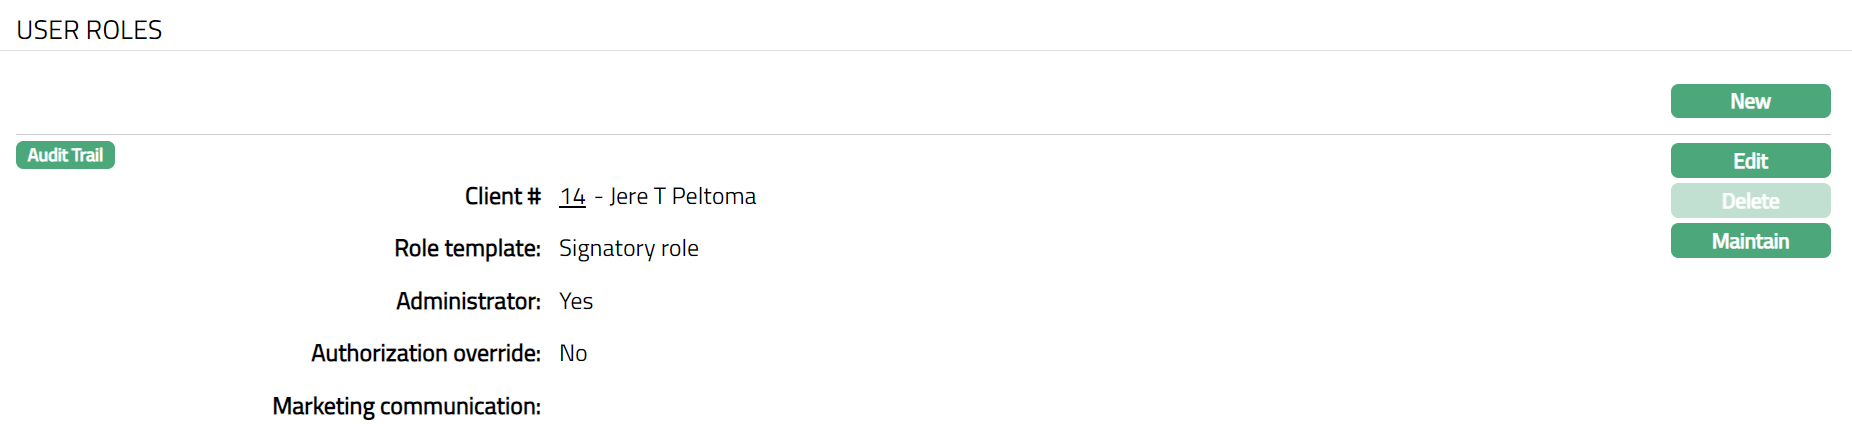
Functions: New, Edit, Delete, Maintain
Delete: You can delete a Client selected for the User saved in Aura by a click on Delete button. Aura will ask for confirmation, on approving which the selected Client for the User will be deleted. Delete button is disabled for the Default client.
To edit User Roles
- Click Edit. Edit Client page appears.
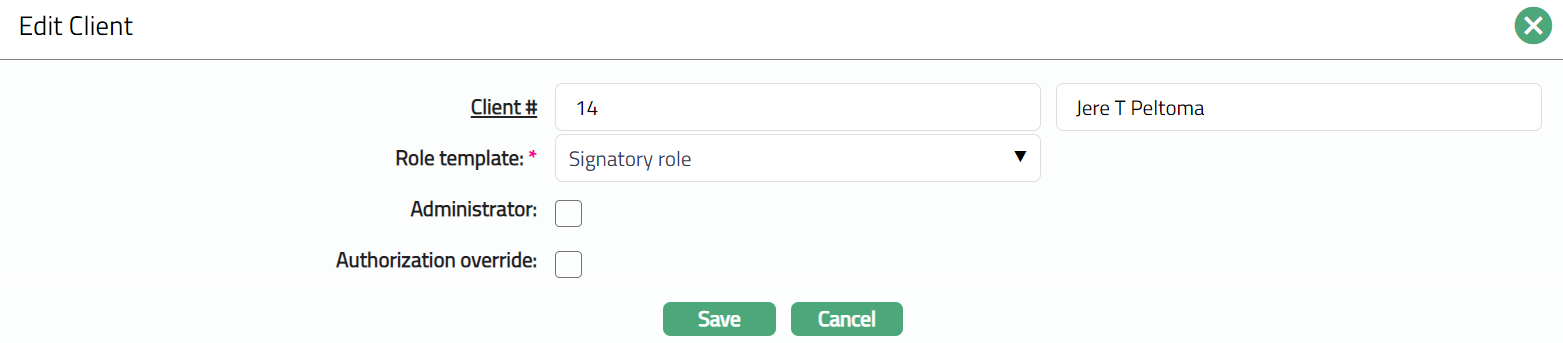
Note: All fields are editable.
- Click Save. The User Roles page appears with the edited details.
Functions: New, Edit, Delete, Maintain
To Maintain
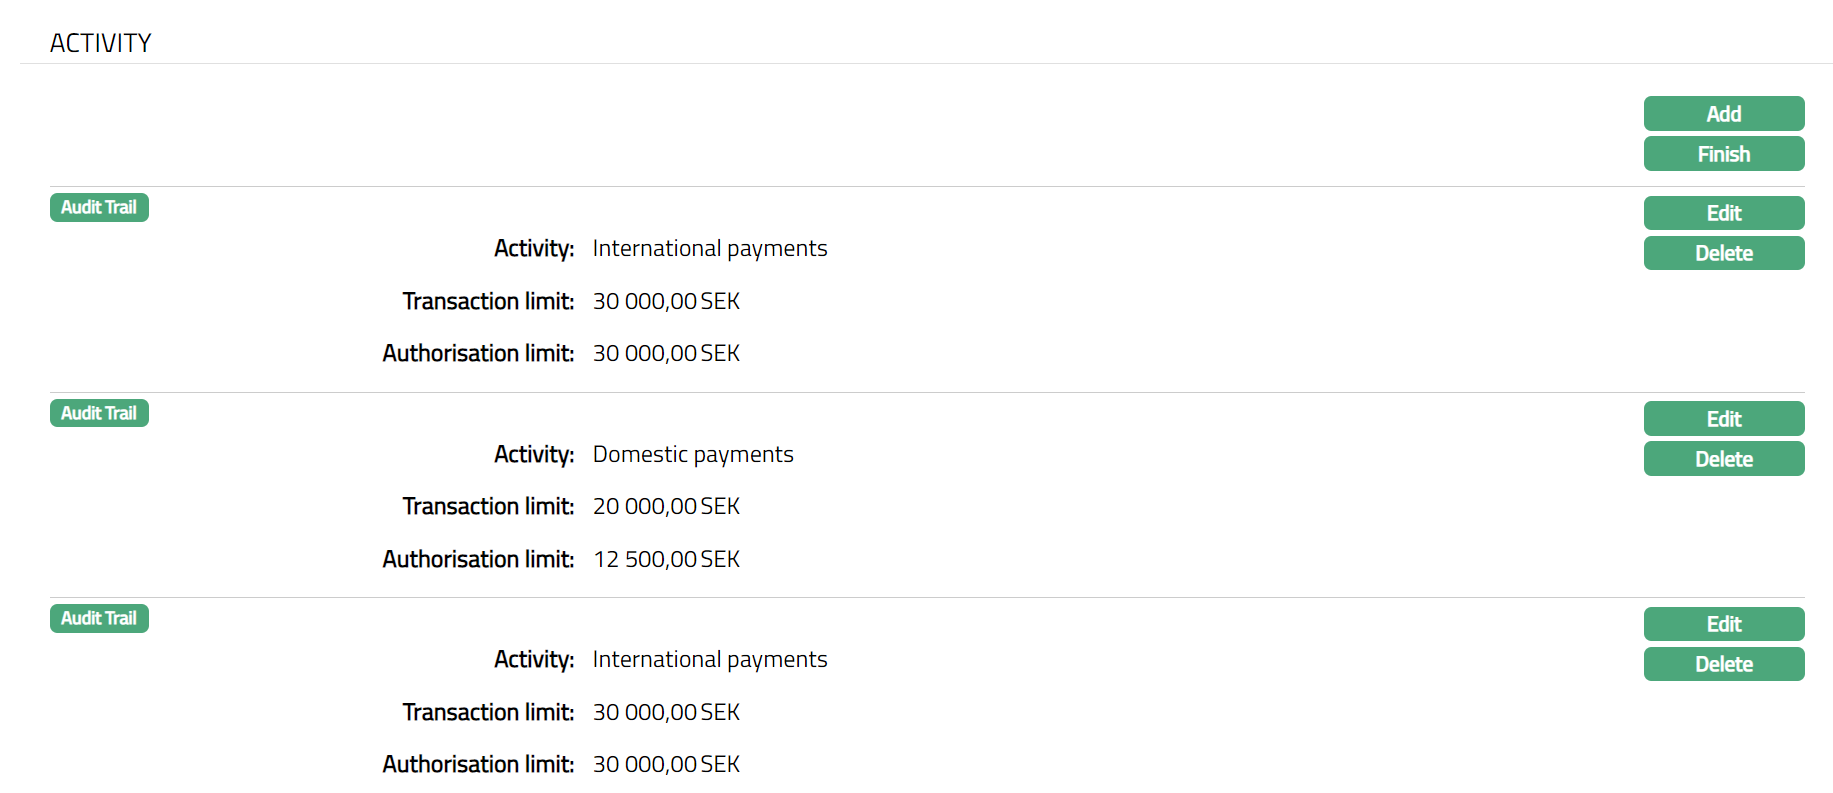
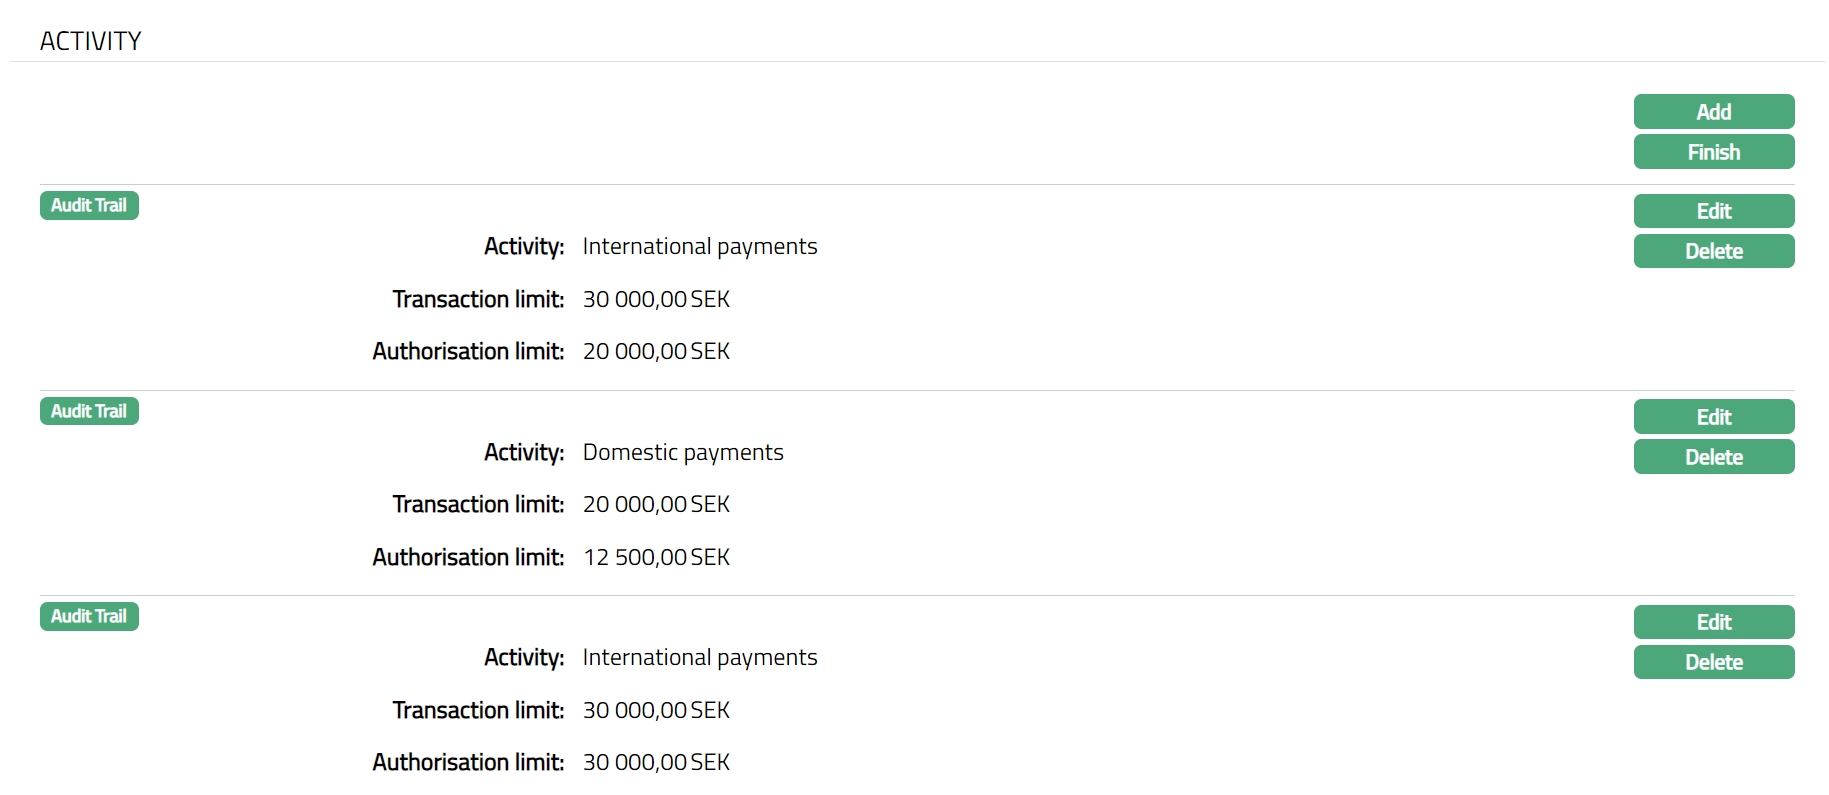
- Click Maintain. Activity tab appears.
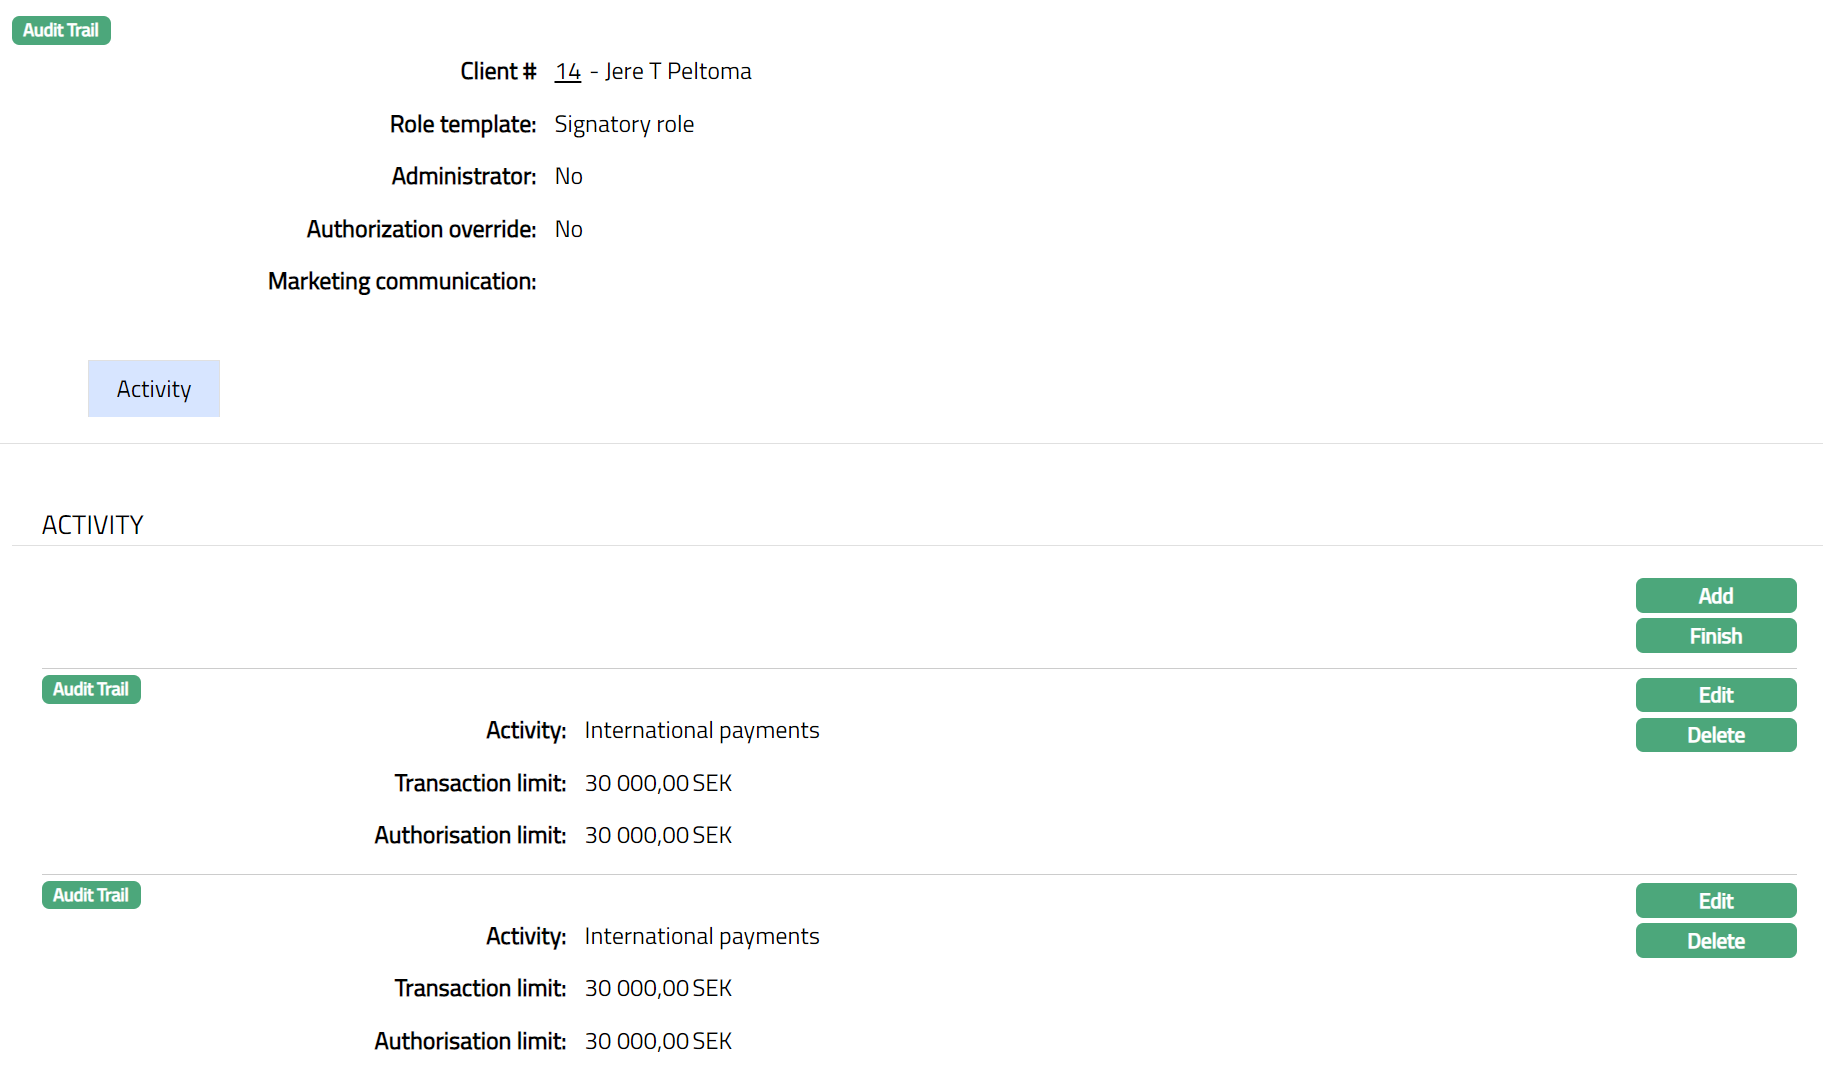
- Click Add. Add Activity page appears.
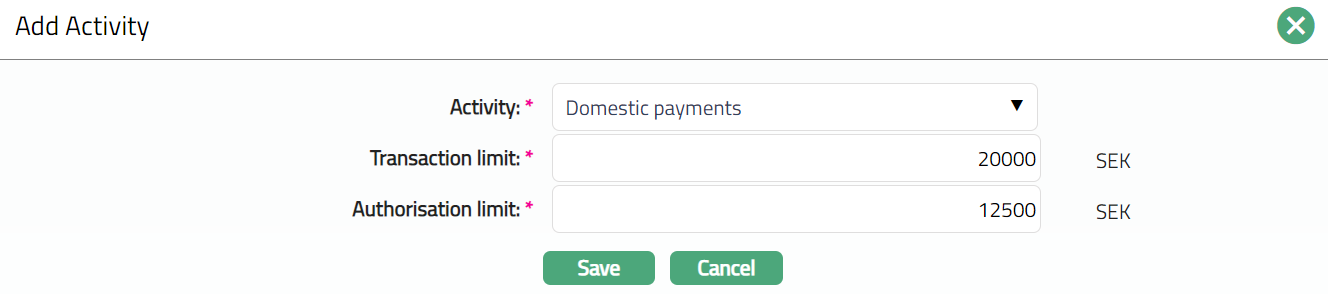
Select Activity from the drop-down list. The available pre-shipped options can be for example International payments, Own account transfers, Domestic Payments, Direct Links. The available activity can be added only once for a Client. Once added, the option will not be available in the drop-down list.
Enter Transaction limit. It is the limit up to which the channel banking user can do transactions.
Enter Authorisation Limit. It is the limit up to which the channel banking user can do transaction without any authorisation.
For example:
Channel Banking User= User A User A has a Transaction Limit= 2,00,00 and Authorized limit = 12500. Any transaction which is more than 12500 but below 20000 will require approval from a superior.
Note: Authorisation limit is always less than the transaction limit.
- Click Save. Activity page under User Roles tab appears with the added details.
- Click Edit. Edit Activity page appears.
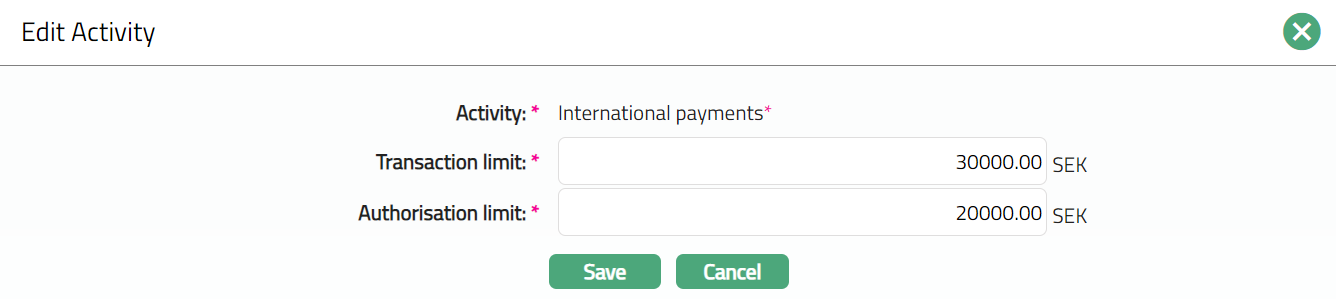
- Click Save. Activity page appears with the edited details.
- Click Finish. User Roles page appears.
Functions: New, Edit, Delete, Maintain
Process Role
The Process Role tab allows you to view and maintain the process-level roles assigned to the Channel Banking User, providing granular control over the actions the user can perform.
To view/edit Process Role,
- Access Channel Banking User Maintenance page. Click Process Role tab.

- Click Edit. Edit Role page appears.
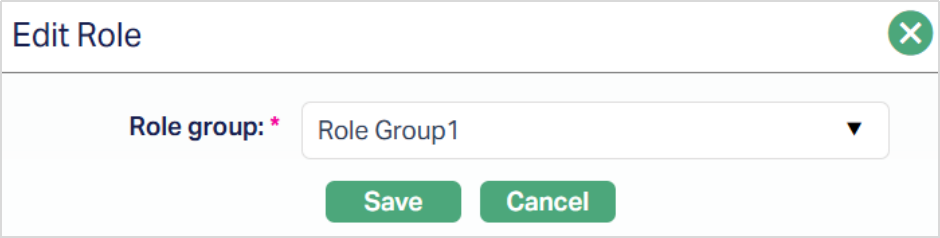
You can change and select another Role Group from the drop-down.
- Click Save. The Process Role tab appears with the edited details.
Functions: Edit
User Activity log
User Activity log allows you to view the log of the activities done by the user.
To view user activity log
- Access Channel Banking User Maintenance page. Click User Activity log tab.
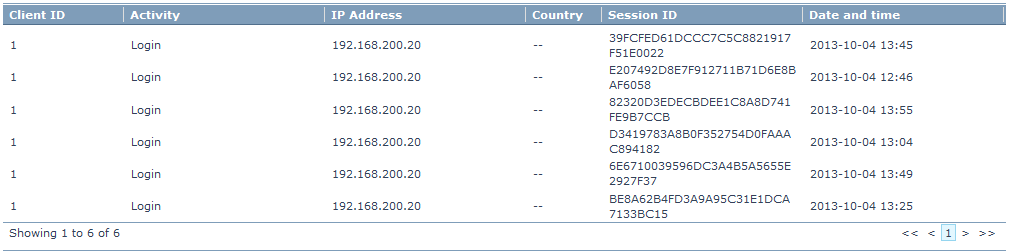
Client ID denotes the ID number of the client
Activity denotes the activities done by the user.
IP Address denotes the ip address of the computer system used by the user.
Country denotes the country from which the banking service was accessed.
Session ID denotes id of the user's session.
Date and time denotes the date and the time for that activity.
External Mapping
External mapping tab allows you to add user for external mapping to any external link or interface.
To add external mapping
- Access Channel Banking User Maintenance page. Click External Mapping tab. Initially the tab will be blank.

- Click New. New External Mapping page appears.

Select Client by clicking on client hyperlink. The Client search page appears where you can search for a client with relevant criteria and select the required client. You can also input the client's name and select the required client from the list displayed by Aura.
Select External system from the list of interfaces, which is maintained under Admin > System codes > Interface definition > Maintain.
Enter External id for the user.
Click Save. External Mapping page appears displaying the added details.

Functions: New, Edit, Delete
To Edit External Mapping.
- Click Edit. Edit External Mapping page appears.

- Click Save. External Mapping page appears with the edited details.

Functions: New, Edit, Delete.