Change of terms based on Settings
The following are the tabs in the Change of Terms page:
To change the Settings for the loan account,
1. From Retail menu, click Loans and then click Change of terms. The New Loan Change Of Terms Search page appears.

2. Click Add. New Loan Change Of Terms → Profile (1/3) page appears.
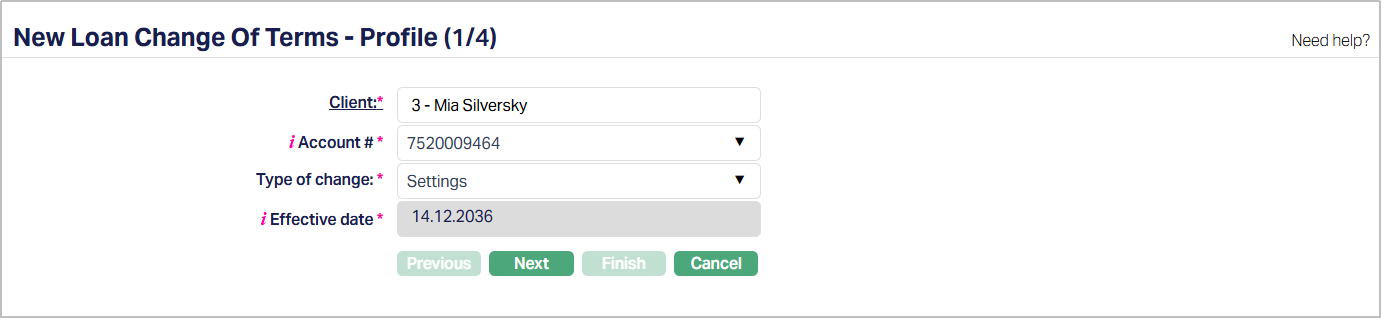
3. Select the Client by clicking on client hyperlink. The Client search page appears with the list of Clients maintained under CRM → Clients → Maintain. You can search for a client with relevant criteria and select the required client. You can also input the client's name and select the required client from the list displayed by Aura.
4. Select the Account # from the drop-down list of active consumer loan accounts of the selected client.
5. Select Settings as the Type of change from the drop-down list of type of changes.
6. Aura displays Effective date as the current system date by default. You can change the Effective Date but it should be greater than or equal to the current system date and less than the Maturity Date of the consumer loan account.
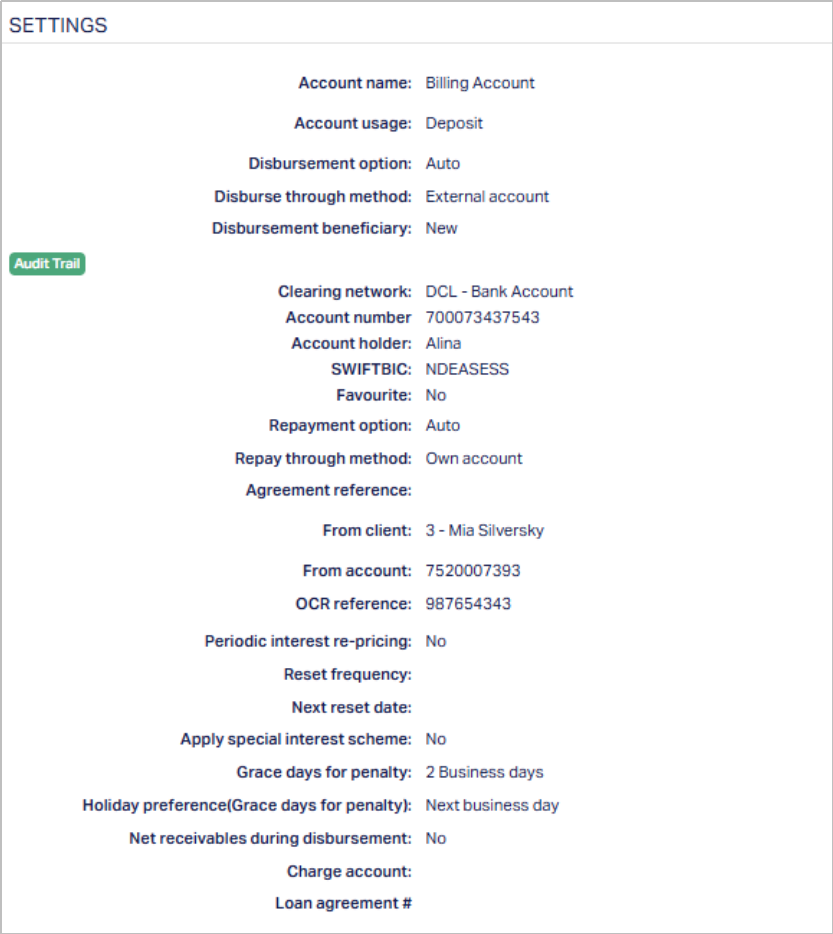
7. Click Next. The New Loan Change Of Terms → Settings (2/3) page appears. The existing values for the loan account are shown as per sample below:
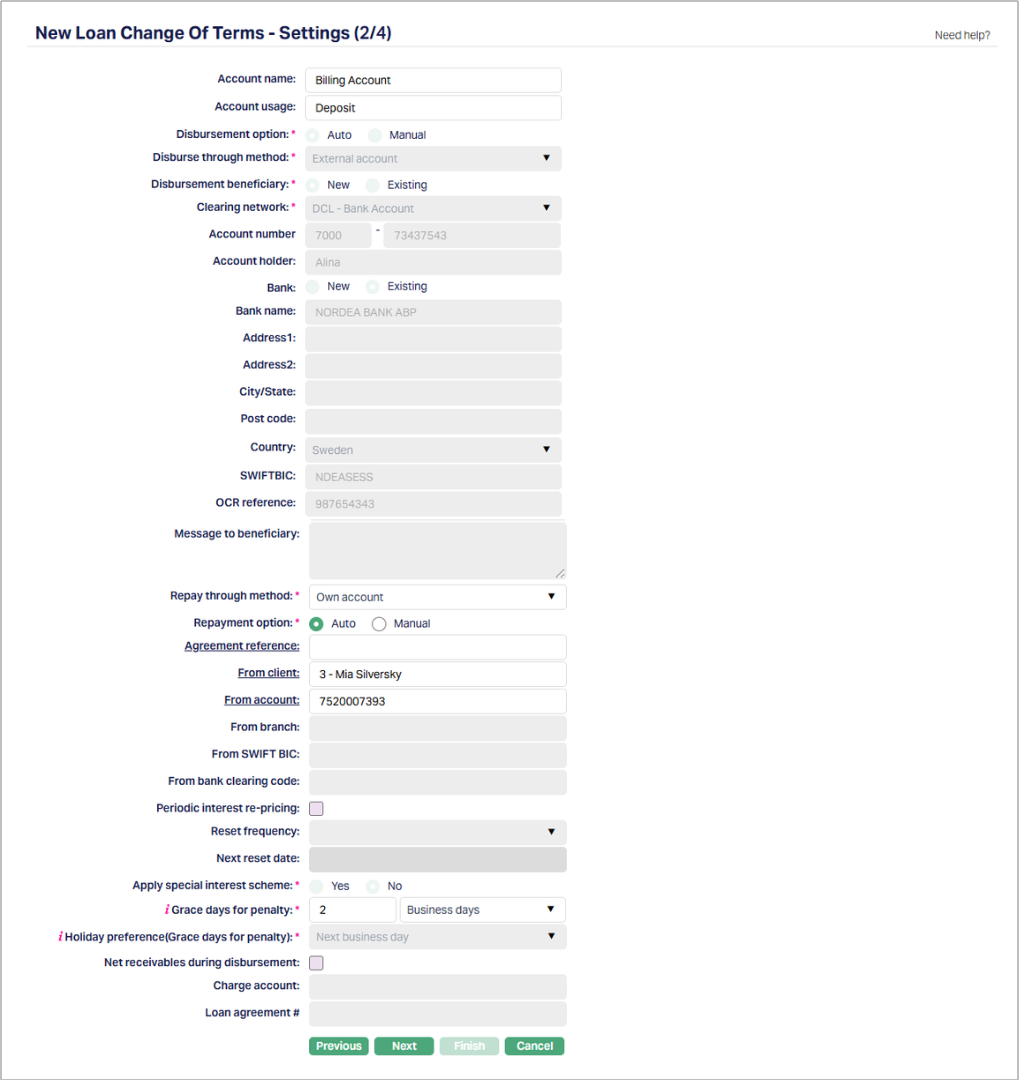
8. Enter Account name. This name will be used for the account.
9. Enter Account usage, i.e. the purpose of the account.
10. Choose Disbursement option -- Either Auto or Manual by choosing the appropriate radio button.
If you select the option as Auto, then the disbursement happens automatically on Value date
If you select the option as Manual, then the disbursement has to be done manually by a user on the Value date.
11. Select Disburse through method from the drop down. This denotes the method in which the loan amount is to be disbursed and depends on what you selected as the Disbursement Option above. Disburse though method will be disabled, once disbursement is done. The following are the options available in Aura:
Settlement GL -- This option appears only if you had selected the Disbursement option as Manual
Own Account -- This option appears for both Auto and Manual Disbursement options
External Account -- This option appears for both Auto and Manual Disbursement options.
a. If you select Settlement GL as the Disburse Through Method, then To ledger field will be displayed. The Settlement GL specified at the product will be defaulted and it cannot be edited.
b. If you select External account as your Disburse Through Method, then Disbursement Beneficiary option is displayed.
i. By default, New radio button will be selected. When New is selected you need to enter the account details to which the loan amount has to be disbursed.
Select Clearing network from the dropdown, using which the loan amount has to be disbursed.
Enter the account holder's name in the Account holder field.
Provide Address details of the beneficiary using the next set of fields Address1, Address2, City/State, Post code and Country
In the Account number field provide the Beneficiary account number
ii. If you select Existing as your Disbursement Beneficiary option, then select the account from the list of Beneficiary details maintained under CRM > Clients > Maintain > Beneficiary. The data for the following fields will be auto populated and the fields are disabled.
- Clearing network, Account holder, Address1, Address2, City/State, Post code, Country, Bank name, Country and SWIFTBIC
i. By default, New radio button will be selected for Bank. When New is selected you need to enter the bank details to which the loan amount has to be disbursed.
In the Bank name provide the beneficiary bank name to which loan needs to be disbursed.
Provide Address details of the beneficiary bank using the next set of fields Address1, Address2, City/State, Post code and Country
In the SWIFTBIC provide the BIC corresponding to the beneficiary bank
ii. If you select Existing as your Bank option, then select the Bank from the list of Banks maintained under Admin → Correspondent bank management → Maintain. The data for the following fields will be auto populated and the fields are disabled.
Bank name, Country and SWIFTBIC
a. If you select Own account as your Disburse Through Method, then
To client field is enabled. The To Client will be defaulted to the client selected in the Profile stage. However, you can change the client to another one. To change the client, click on To client hyperlink to see the Client Search page. Search for the required client using appropriate inputs and select the required client.
Click on To account hyperlink to select one of the client's active Accounts maintained under Retail → Accounts → Client account → Maintain
12. Select the Repay through method, from the drop down. This denotes the method in which the amount is to be repaid. The available options are:
Direct Debit: If this option is selected, then repayment happens through an external account
Own account: If this option is selected, then repayment happens through client's account in the current bank
Payment by invoice: If this option is selected, then the payment will be made against the invoice generated.
Settlement GL: If this option is selected, then repayment happens in the form of cash through the client.
a. If you select Direct debit as Repay Through Method.
By default, Auto will be selected for Repayment option and this option will be disabled.
Click on the Agreement reference hyperlink to select the agreement. Aura will display the list of agreements maintained under CRM → Client → Agreement.
By default, New radio button will be selected for the Repayment Account Detail option.
In the From Account field enter the account number from which the repayment is supposed to happen.
Enter the account holder's name in the Repayment account holder field.
Click on the From Bank hyperlink to select the bank name listed in settlement directory. On selection of the bank, the data in the following fields will be auto populated.
From SWIFT BIC
From bank clearing code.
In the From branch field enter the name of the branch of the bank which holds the account through which repayment is supposed to be done.
If you select Existing, then select the account from the list of beneficiary details maintained under CRM → Clients → Maintain → Beneficiary. The data for the following fields will be auto populated and the fields are disabled.
From account
Repayment account holder
From bank
From SWIFT BIC
From bank clearing code.
a. If you have selected Own account as Repay Through Method, then
By default, Auto will be selected for Repayment Option and this option can be changed to Manual.
Click on the Agreement reference hyperlink to select the agreement. Aura will display the list of agreements maintained under CRM → Client → Agreement.
From client field is enabled. The client selected in the Profile stage will be defaulted here. However, you can change the client to another one. To change the client, click on From Client hyperlink to see the Client Search. Search for the required client using appropriate inputs and select the required client.
Click on From account hyperlink to select the client's current account maintained in the same bank.
a. If you have selected Payment by invoice as Repay Through Method, then
By default, Auto will be selected for Repayment Option and this option will be disabled.
Click on the Agreement reference hyperlink to select the agreement. Aura will display the list of agreements maintained under CRM → Client → Agreement. Optional if repay through method is Payment by invoice
By default, for New radio button will be selected for the Repayment account detail option.
In the From Account field enter the account number from which the repayment is supposed to happen.
Enter the account holder's name in the Repayment account holder field.
Click on the From Bank hyperlink to select the bank name listed in settlement directory. On selection of the bank, the data in the following fields will be auto populated.
From SWIFT BIC
From bank clearing code.
In the From Branch field enter the name of the branch of the bank which holds the account through which repayment is supposed to be done.
If you select Existing, then select the account from the list of beneficiary details under CRM → Clients → Maintain → Beneficiary. The data for the following fields will be auto populated and the fields are disabled.
From account
Repayment account holder
From bank
From SWIFT BIC
From bank clearing code.
a. If you select Settlement GL as the Repay Through Method, then
From ledger field will be displayed. The settlement GL specified at the product will be defaulted and it cannot be edited.
13. If you want to be able to reset the interest rate at a specified frequency, check Periodic interest rate reset checkbox. This enables the next two fields Reset Frequency and Next Reset Date.
14. Select the Reset frequency from the drop-down list. The following are the available options: Monthly, Quarterly, Semi Annual and Annual.
15. Select the Next reset date. This date should be greater than the Value date specified in the Profile.
16. Select the Charge account by clicking on the Charge account hyperlink. On click Aura displays the Active Client accounts held by the selected client.
17. Click Next. The New Loan Change Of Terms → Confirmation (3/3) page appears.
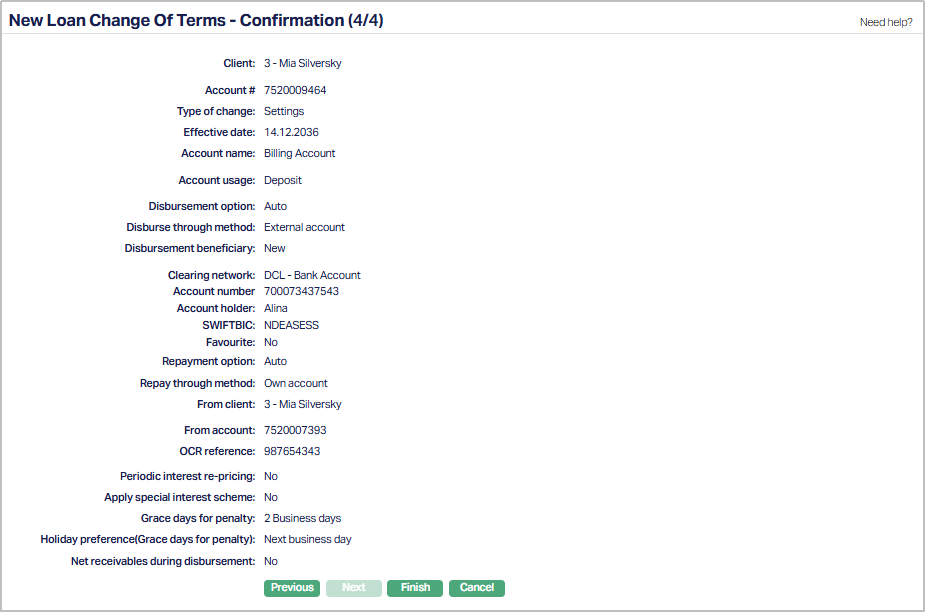
18. Click Finish. The record is created with a Change ref number, a unique number identifying the record. The Loan Change Of Terms page appears displaying the details of the record.
Functions: Add, Search
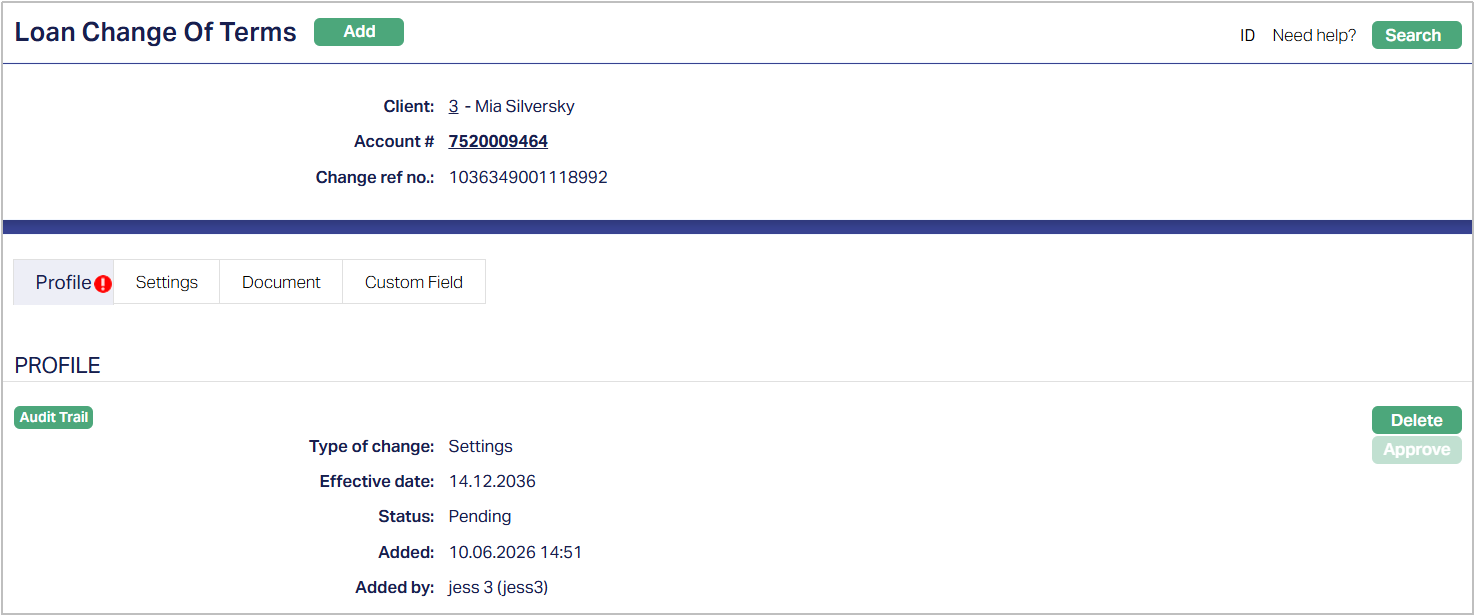
Profile
The Profile tab, which is the default tab in the Loan Change Of Terms screen, shows the basic details of the Change of term record.
To view / edit the Profile
1. Access Loan Change Of Terms page. Profile tab is displayed by default as per the sample below. The details are defaulted from the entries that you made during the creation of change of terms record. For details refer to New Loan Change Of Terms → Profile (1/3).

The additional fields are as follows:
Status field denotes the status of the record.
Added field denotes the date on which the record was added.
Added by field denotes the name of the user who created the record.
Approved field denotes date on which the record was approved and is displayed only on approval.
Approved by field denotes name of the user who approved the record and is displayed only on approval.
Settings
The Settings tab allows you to view and maintain certain account settings like Disbursement option, Disburse through method and Repay through method.
1. Access Loan Change Of Terms page. Click Settings tab. The details are defaulted from the entries that you made during creation of change of terms record. For details refer to New Loan Change Of Terms → Settings (2/3).
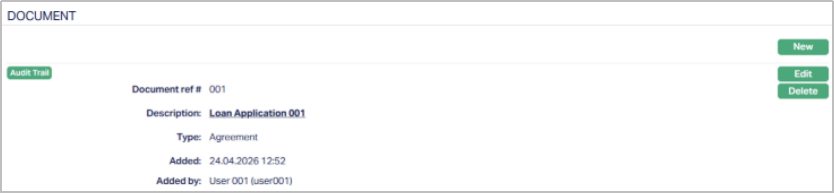
Document
The Document tab allows you to view / add any relevant documents. Also, you can generate advice using the available templates.
1. Access Loan Change Of Terms page. Click Document tab and then click New. The New Document page appears.

2. Click New. The New Document page appears.
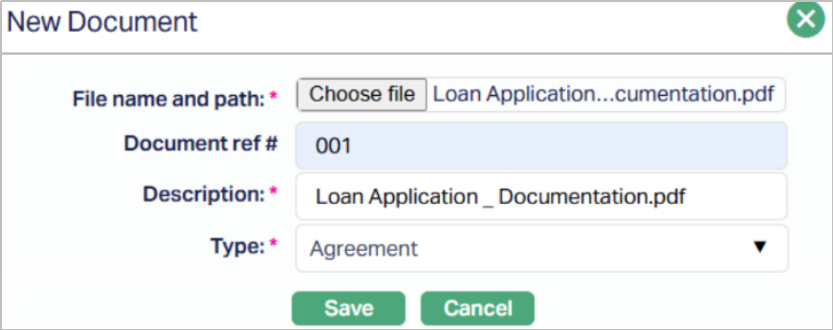
3. Click Choose File and Select the desired file on your local media .
4. Enter the Document ref no.
5. Description will be defaulted to the name of the selected file with the ability for you to make changes.
6. Select the Type of the document from the list of available drop-down as maintained under Admin → System codes → Documents → Document types.
7. Click Save. The Document page appears with the added details.
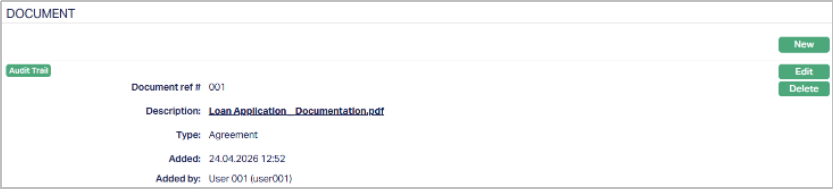
Functions: New, Generate, Edit, Delete
To edit the details of the document attached,
1. Click Edit. The Edit Document page will be displayed.
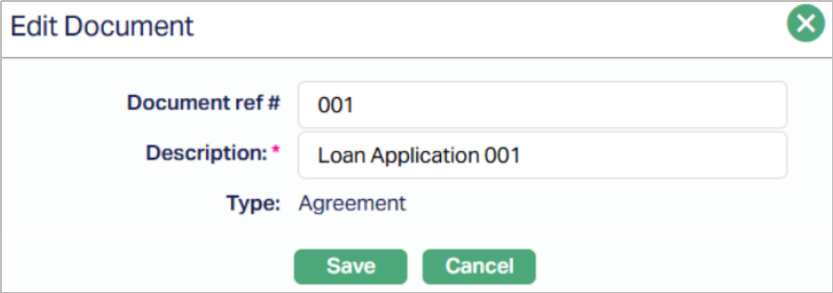
Note: Except Type field all other fields are editable.
2. Click Save. The Document page appears with the edited details.
3. Click Generate to generate a pdf version of the document by selecting from a list of templates available for manual loan disbursement.
Note: The Template need to be defined by the user.
4. Click Delete to delete the document. Aura will ask for confirmation, on approving which the document will be deleted.
Custom Field
This option provides you the flexibility to define fields apart from those that are already available in the standard version of Aura. Thus, it enables you to customize additional data storage and use as required to suit your specific business needs.
To Edit Custom Field,
1. Access Change of Terms page. Click the Custom Field tab.

2. The field appears only when it is created in Admin > System codes > Custom fields > Custom fields and linked to specific Accounts option in Admin > System codes > Custom fields > Field mappings.
3. Click Edit. Edit Custom Field page appears. In the following illustration, a custom field, Last Review Date has been mapped to the record as shown below.

4. Enter Last Review Date, New Value and OTP.
5. Click Save. Custom Field page appears with the edited details.

Functions: Edit