Nostro Account Product
Nostro Account Product menu allows you to maintain the details of various Nostro Products that are offered by the Bank to other Banks. Once the Nostro Account Product is created, the values are defaulted to the Nostro Accounts that are created under the Product, with an option to change the details at account level.
Following are the tabs in a Nostro Account Product:
To add new Nostro Account Product
- From Retail menu, click Settings, and then Product. Product Search page appears. All Products available in Aura appear on the page.

- Click Add. New Product -- Profile (1/7) page appears.
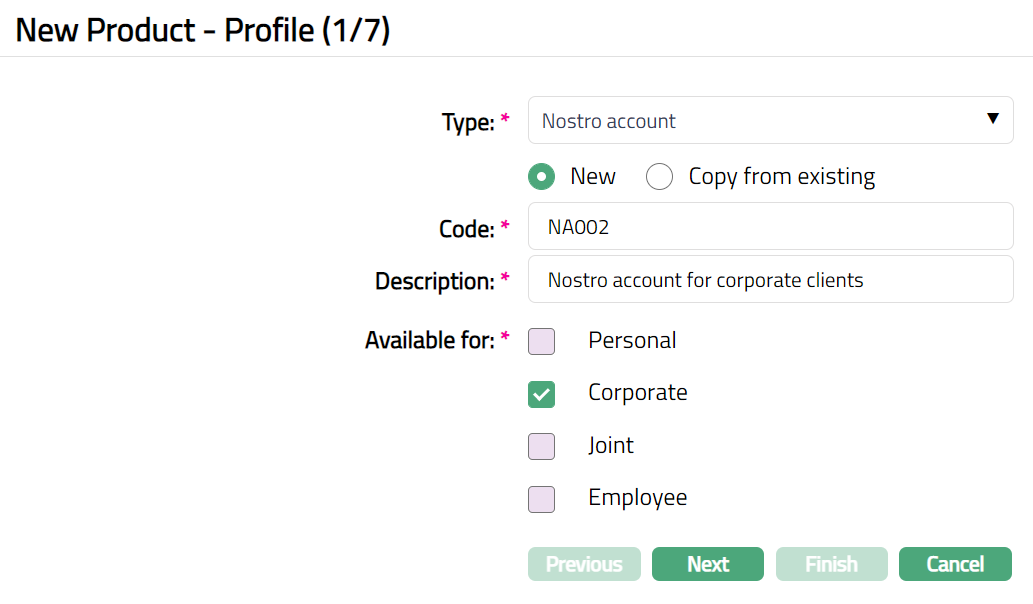
Select Nostro Account as Type from the drop-down list for the Product.
Enter Code for the product. This has to be unique for the Entity.
Enter Description for the Product.
Available for will be defaulted to Corporate and the other options Personal, Joint ownership, Employee will be disabled for Nostro account product.
Click Next. New Product -- Currency (2/7) page appears.
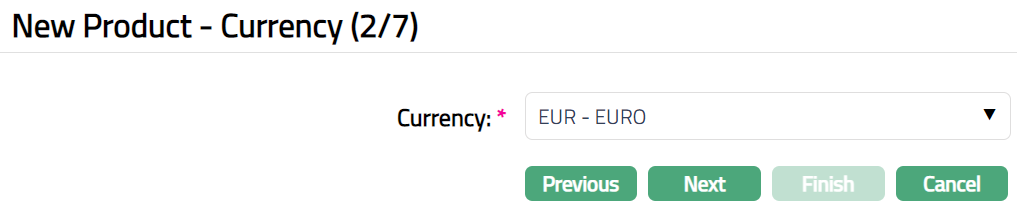
- Select Currency for the Product from the drop-down list of GL Currencies. More currencies can be added during Edit using the Currency tab, once the Product record is created. Accounts for the product can be opened only in the selected currencies.
Note: The currency for which Commodity is marked as Yes will not be displayed in the Currency drop-down list.
- Click Next. New Product -- Settings (3/7) page appears.
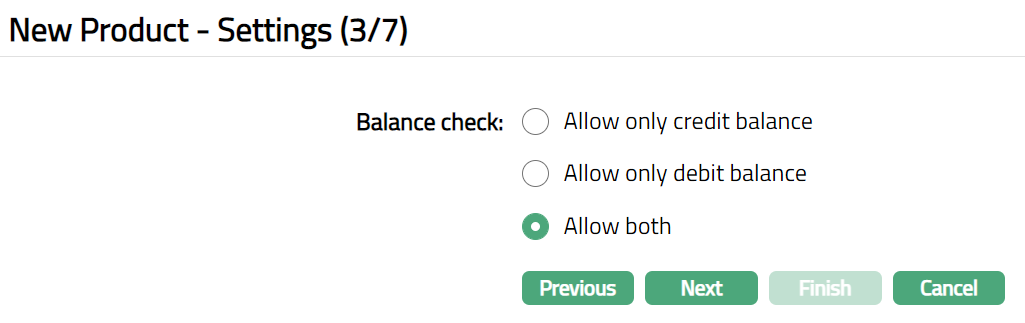
Select option for Balance check field. In the Balance Check field, if you select Allow credit balance, then Aura will allow only credit balance for that account. Thus, if a transaction would result in a debit balance, and if this account allows only credit balance, the transaction will result in failure. Similarly, if you select Allow debit balance, then Aura will allow only debit balance for that account. If a transaction would result in a credit balance, and if this account allows only debit balance, the transaction will result in failure. If you select Allow both, then Aura will allow both credit and debit balance for that account.
Click Next. New Product -- General Ledger (4/7) page appears.

- You will see the list of various GLs required to account for the events in the life cycle of the Product. The table below gives the fields, the use and the conditions for each of these GLs. You can either directly input the Ledger # or click on the hyperlink to see the list of GLs satisfying these conditions and select the required Ledger #.
| SL. No | Fields | Used | List based on |
|---|---|---|---|
| 1 | Master GL | as the Master GL to record all transactions for ledger type Asset, Liability or Neutral where the cash account is No, Manual posting is No, and the FX consolidation is blank |
- Click Next. New Product -- Transaction Settings (5/7) page appears.
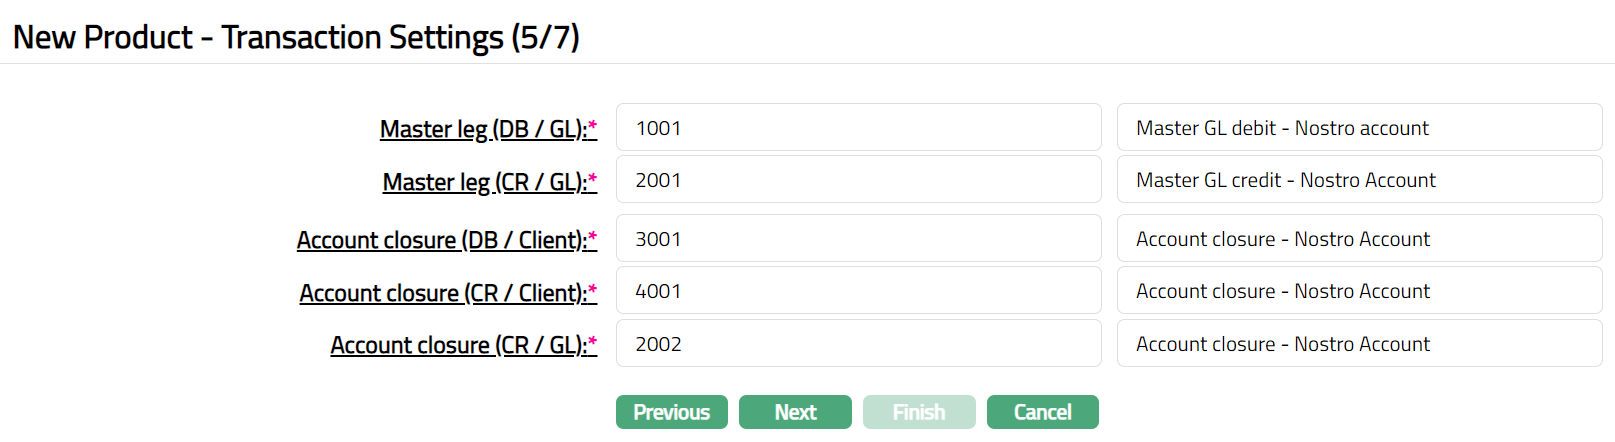
- Input required Transaction codes to be used for accounting the various events in the life cycle of the Product. You can directly input the Transaction Code or use the hyperlink to search for and select the required Transaction Code. The list of Transaction codes shown on click of hyperlink is based on certain conditions as listed against each field.
| SL. No | Field name of Transaction Settings | Used for | List of Transaction codes based on | Event when it will be used |
|---|---|---|---|---|
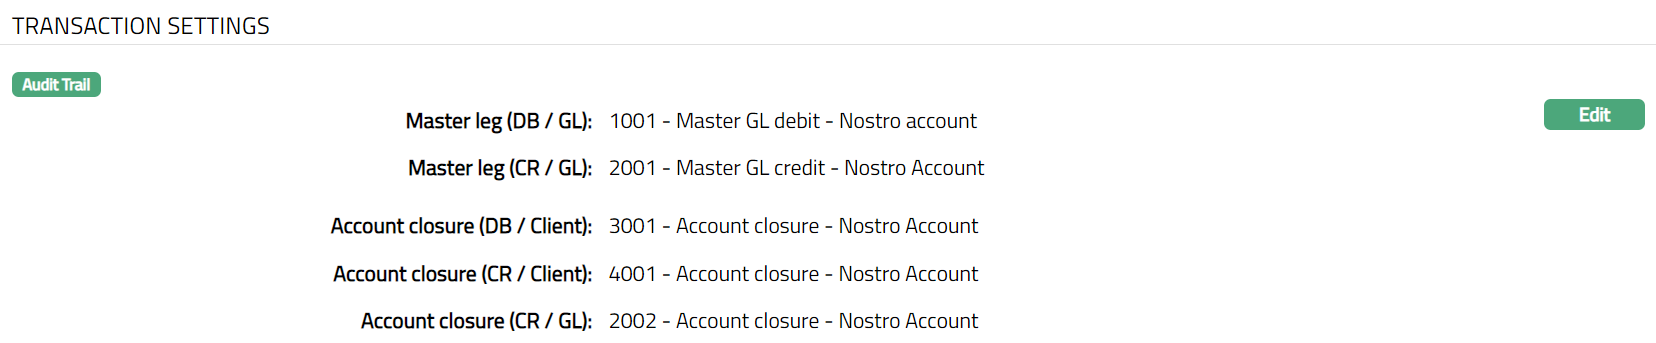
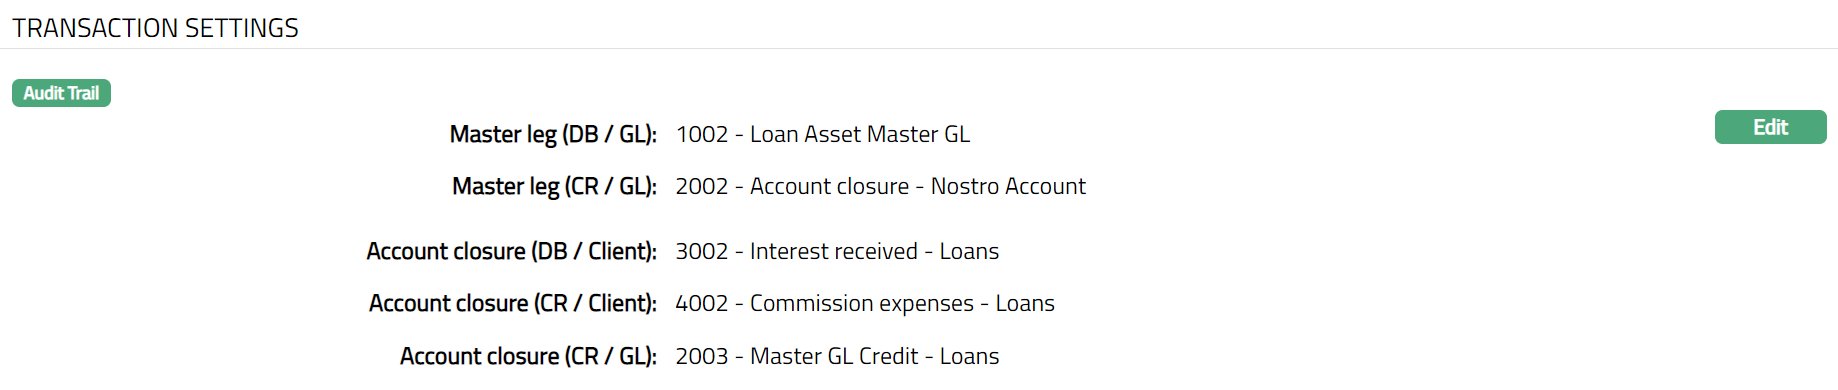
| 1 | Master leg (DB/GL) | All the debit transactions affecting the accounts under this product. | General Ledger Debit | All |
| 2 | Master leg (CR/GL) | All the credit transactions affecting the accounts under this product. | General Ledger Credit | All |
| 3 | Account Closure (DB/Client) | All Account Closure transactions in the Client account. | Client account Debit | Closure of Accounts |
| 4 | Account Closure (CR/Client) | All Account Closure transactions in the Client account. | Client account Credit | Closure of Accounts |
| 5 | Account Closure (CR/GL) | All Account Closure transactions in the General Ledger. | General Ledger Credit | Closure of Accounts |
- Click Next. New Product -- Statement Parameter (6/7) page appears.

Select Format from the drop-down list of formats that have been maintained under Admin > System codes > Generic definition > Statement formats. It is the Format of the statement that is to be generated.
Select Communication mode from the drop-down list -- i.e., the manner in which you want to send the statement. Available options are Data handoff, e-Invoice, Email, Paper, SMS and Web Hotel.
Select Frequency of the statement to be generated from the drop-down. Available options are: Daily, Monthly, Quarterly, Semi-annual and Annual.
Select Statement fee from drop-down list of Event based, Flat or Banded Charges maintained at Admin > Charges > Charges. If banded, the Nostro account balance will be taken as the basis for the charge.
Select Generate only on movement option.
Note: Any additional statements that may be required for the accounts under this product may be defined using Statement tab in edit mode for those accounts.
- Click Next. New Product -- Confirmation (7/7) page appears.

- Click Finish. Product page appears with the added details, displaying the Profile tab by default.
Functions: Add, Search, Suspend, Activate, Edit, Delete
Note: The status of the Product is Active as soon as the product is created.
Suspend: You can suspend a Nostro Product by clicking on Suspend button. When you click on Suspend button, Aura will ask for confirmation. On confirmation, Aura will suspend the Nostro Product. Suspending a Nostro Product only makes it unavailable in future in the product dropdown list. Suspended products can be activated by using Activate button.
Activate: You can activate a suspended Nostro product by clicking on Activate button. When you click on Activate button, Aura will ask for confirmation. On confirmation, Aura will activate the Nostro Product. Activation of a product makes it available in future in the product dropdown list.
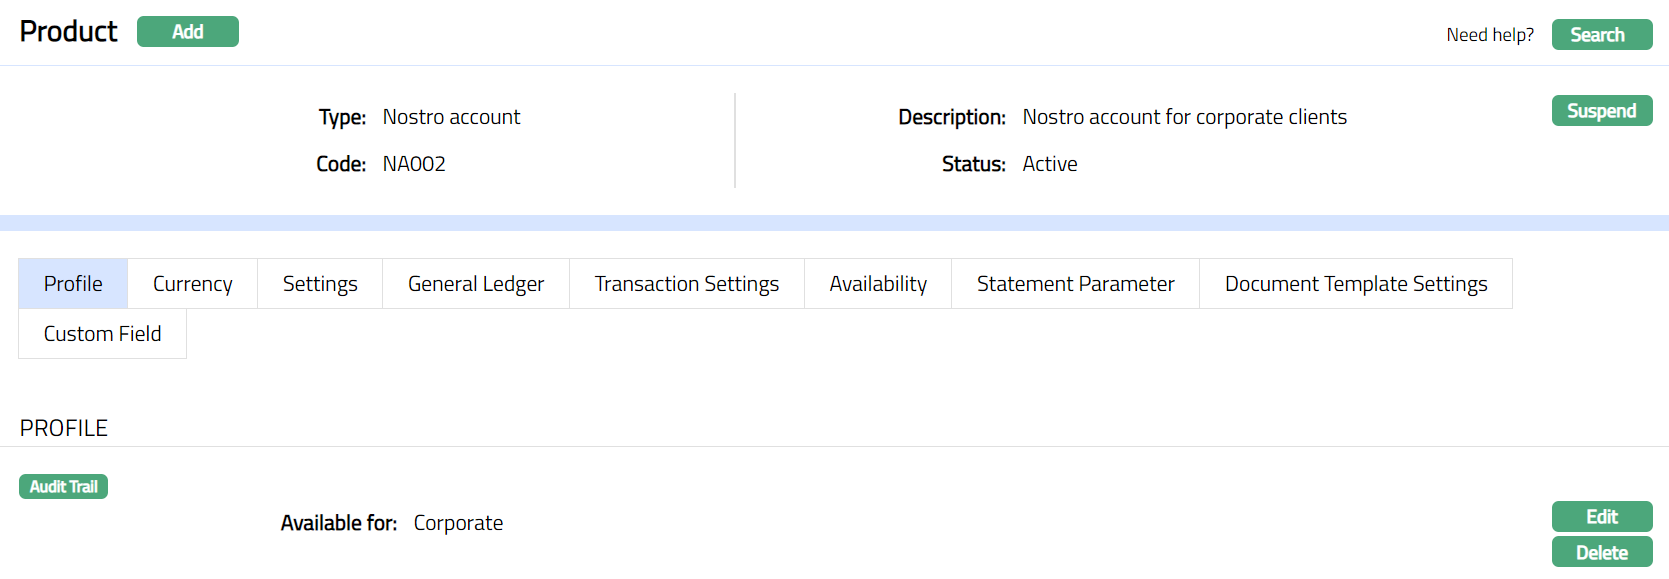
Profile
Profile tab, which is the default tab in the Product record screen, shows the basic details of the Product.
To view / edit Profile.
- Access Product record page and click Profile tab to view the details as per sample below. The details are defaulted from the entries that you made during product creation. For details refer to New Product -- Profile (1/7).

- Click Edit. Edit Product page appears.
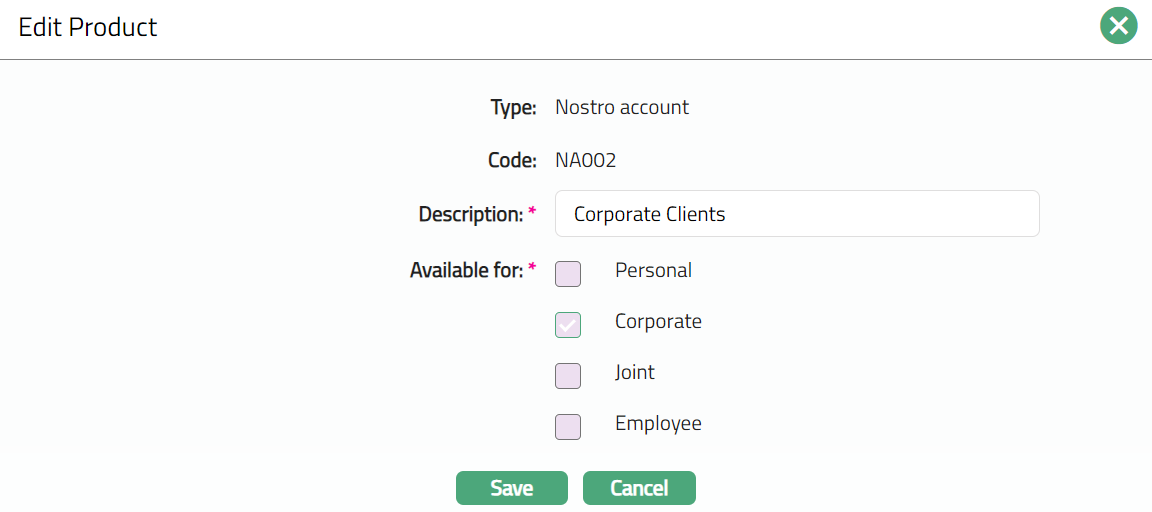
Note: Only Description field can be Edited.
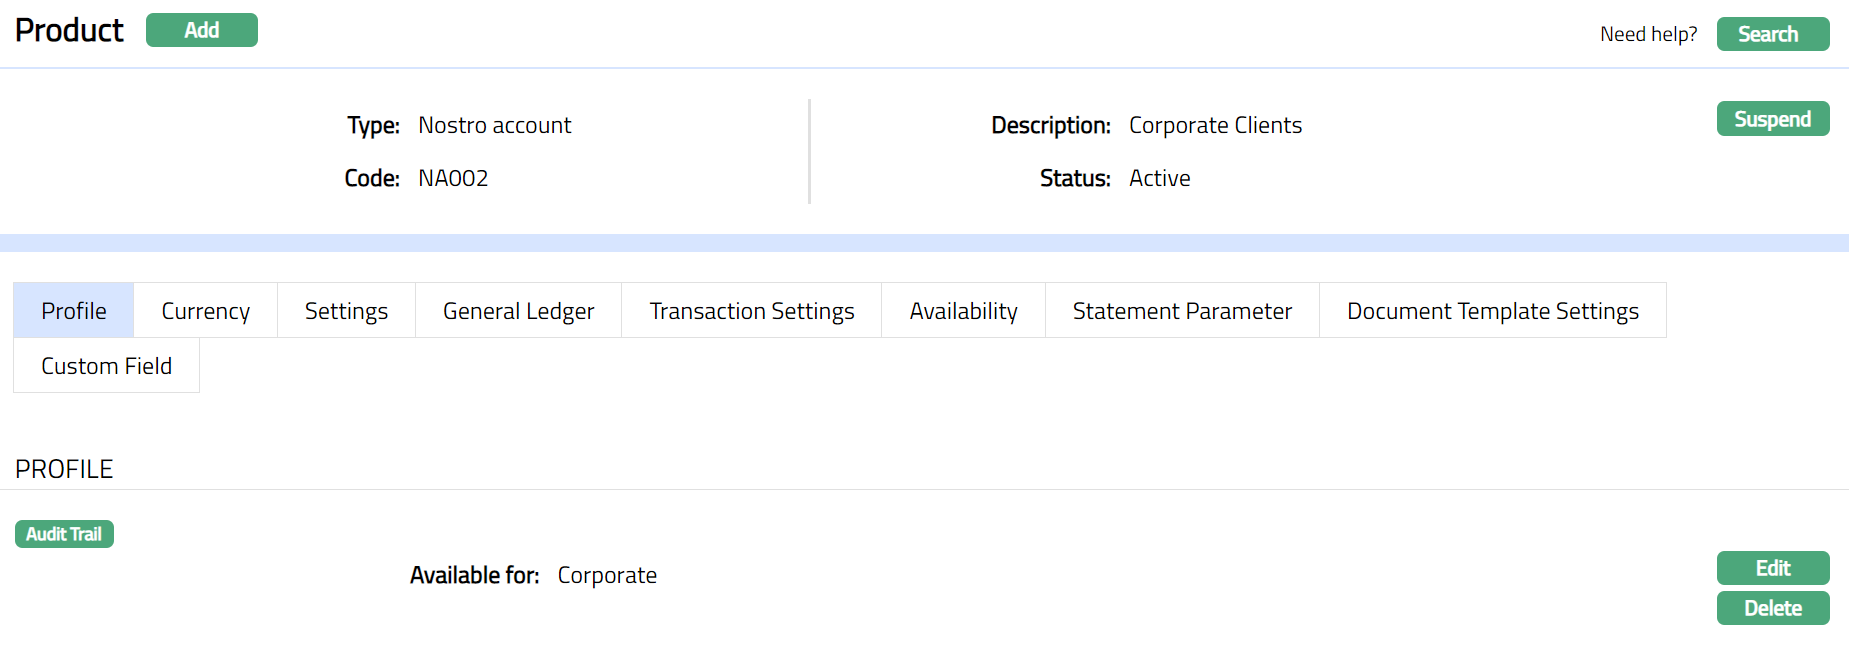
- Click Save. Profile tab appears with the edited details
Functions: Edit, Delete
Currency
Currency tab allows you to maintain currency for the product. One or more currencies can be added using the Currency tab, once the Product record is created. Accounts for the product can be opened only in the selected currencies.
To Add currency
- Access Product record page and click Currency tab to view the details as per sample below. The details are defaulted from the entries that you made during Product creation. For details refer to New Product -- Currency (2/7).

- Click New. New Currency page will appear.

Select Currency for the product from the drop-down list of GL currencies. The list will show only those GL currencies which have not already been added for the Product.
Click Save. Currency tab appears with the added details.

Functions: New, Delete
Settings
This Tab allows you to view and maintain settings related to Balance check.
To edit settings
- Access Product record page and click Settings tab to view the details as per sample below. The details are defaulted from the entries that you made during Product creation. For details refer to New Product -- Setting (3/7).

- Click Edit. Edit Product Settings page appears.
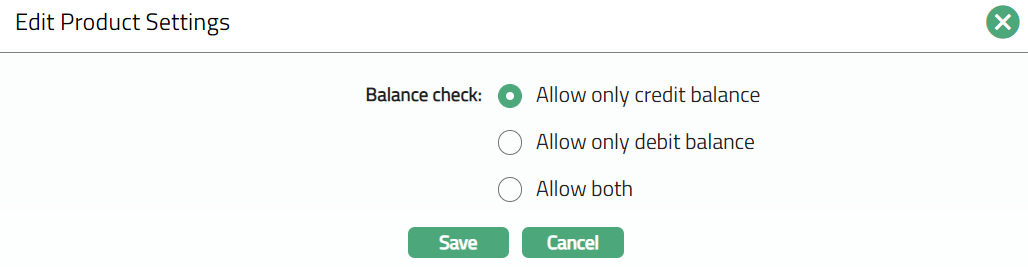
Note: All fields are Editable.
- Click Save, Settings page appears with the edited details.

Functions: Edit
General Ledger
General Ledger tab allows you to view the GL account for the Product.
To view General Ledger tab
- Access Product record page. Click General Ledger tab to view the details as per sample below. The details are defaulted from the entries that you made during Product creation. For details refer to New Product -- General Ledger (4/7).

Note: Add/Edit option are not available, you can only view Master GL.
Transaction settings
Transaction settings tab allows you to specify the transaction codes that are to be used for the various events in the life cycle of the product. These transaction codes define what description / narration is used for the account postings / statements and may also be used to trigger other charges.
To edit Transaction Settings
- Access Product record page and click Transaction settings tab to view the details as per sample below. The details are defaulted from the entries that you made during Product creation. For details refer to New Product -- Transaction settings (5/7).
- Click Edit. Edit Transaction settings page appears.
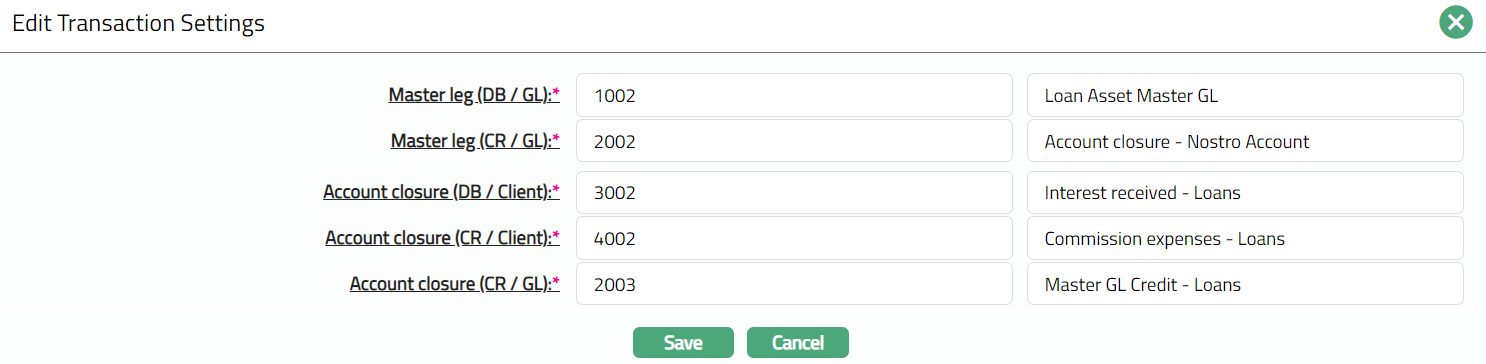
Note: All fields are Editable.
- Click Save. Transaction Settings page appears with the edited details.
Functions: Edit
Availability
This tab can be used to control the availability of the product to specific Branch, Transaction Code, Offering or Client. It has four sub-tabs, one for each of these.
Availability-Branch
Using this tab, you can allow the Product to be available for all the Branches or only specific Branch(es).
To select branch
- Access Product record page, click Availability tab, then click Branch tab.

By default, All radio button is selected so that this Product is available for all Branches.
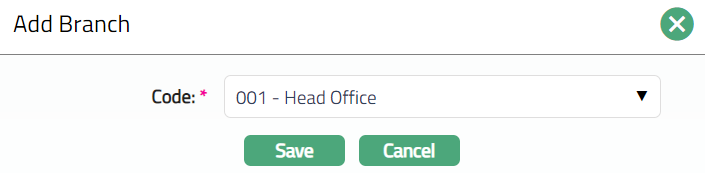
To restrict the branches for which this Product is available, click Selected radio button. Add button is now enabled.

- Click Add. Add Branch screen appears where you can select the required branch from the drop-down of all active Branches of the Entity.
- Click Save. Branch sub tab under Availability tab appears with the added details. Selected branch(es) will appear in product maintenance screen.

Function: Add, Delete
Note: You may choose to allow All branches for the product at any time. However, Aura will prompt you to confirm if the selected branches may be deleted. If confirmed, then all the selected branches will be deleted, and the product will be available for ALL Branches.
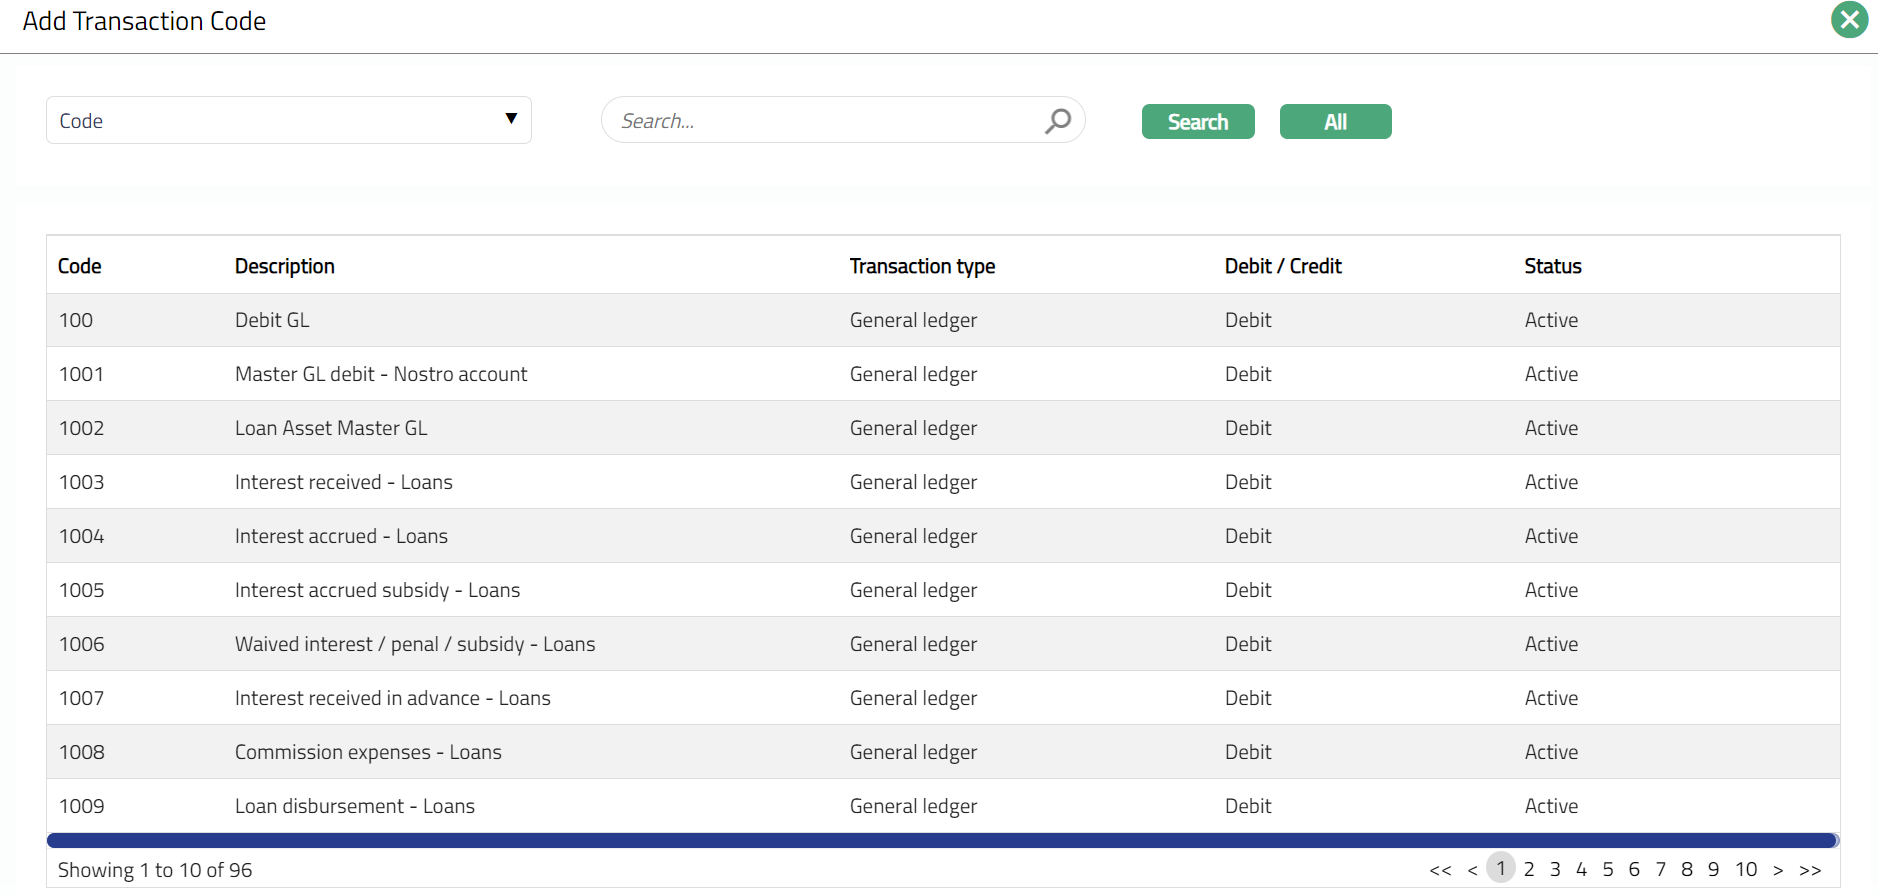
Availability-Transaction Code
Using this tab, you can allow the Product to be available for all the Transaction Codes or only specific Transaction Code(s).
- Access Product record page, click Availability tab, and then click Transaction Code tab.

By default, All radio button is selected so that this Product is available for all Transaction Codes.
To restrict Transaction codes that are available under this product, click Selected radio button. Add button is now enabled.

- Click Add, Add Transaction Code search page appears. Search for the required Transaction code with relevant criteria and select the required Transaction code. The selected Transaction code will appear in maintenance screen as shown below.

Function: Add, Delete
Note: You may choose to allow All Transaction codes for the product at any time. However, Aura will prompt you to confirm if the selected Transaction code may be deleted. If confirmed, then all the selected Transaction codes will be deleted, and the product will be available for ALL Transaction Codes.
Availability-Offering
Using this tab, you can allow the Product to be available for all the Offerings or only specific Offering(s).
- Access Product record page, click Availability tab, and then click Offering tab.

By default, All radio button is selected so that this Product is available for all Offerings.
To restrict the Offerings that are available under this product, click Selected radio button. Add button is now enabled.

- Click Add. Add Offering screen appears where you can select the required Offering from the drop-down list of active Offerings.

- Click Save. Offering sub tab under Availability tab. will appear as shown below.

Function: Add, Delete
Note: You may choose to allow All Offerings for the product at any time. However, Aura will prompt you to confirm if the selected Offering may be deleted. If confirmed, then all the selected Offering will be deleted, and the product will be available for ALL Offerings.
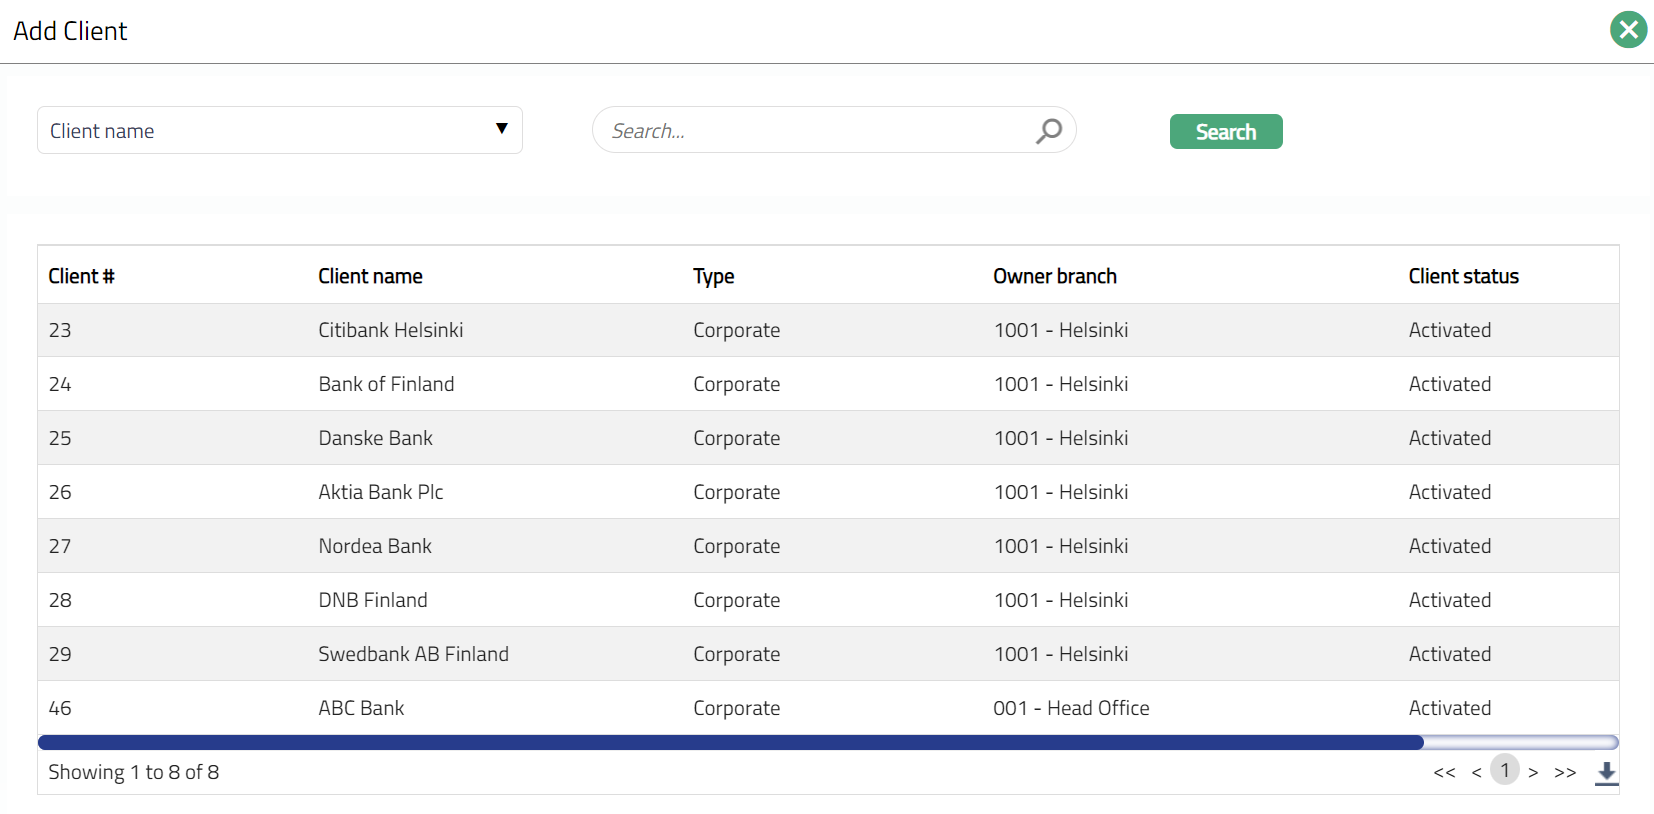
Availability-Client
Using this tab, you can allow the Product to be available for all the Clients or only specific Client(s).
- Access Product record page, click Availability tab, then click Client tab.

By default, All radio button is selected so that this Product is available for all Clients.
To restrict the Clients that are available under this product, click Selected radio button. Add button is now enabled.

- Click Add. Add client page appears where you can search for the required client with relevant criteria and select the required client. The selected Client will appear as shown below.

Function: Add, Delete
Note: You may choose to allow All Clients for the product at any time. However, Aura will prompt you to confirm if the selected Clients may be deleted. If confirmed, then all the selected Clients will be deleted, and the product will be available for ALL Clients.
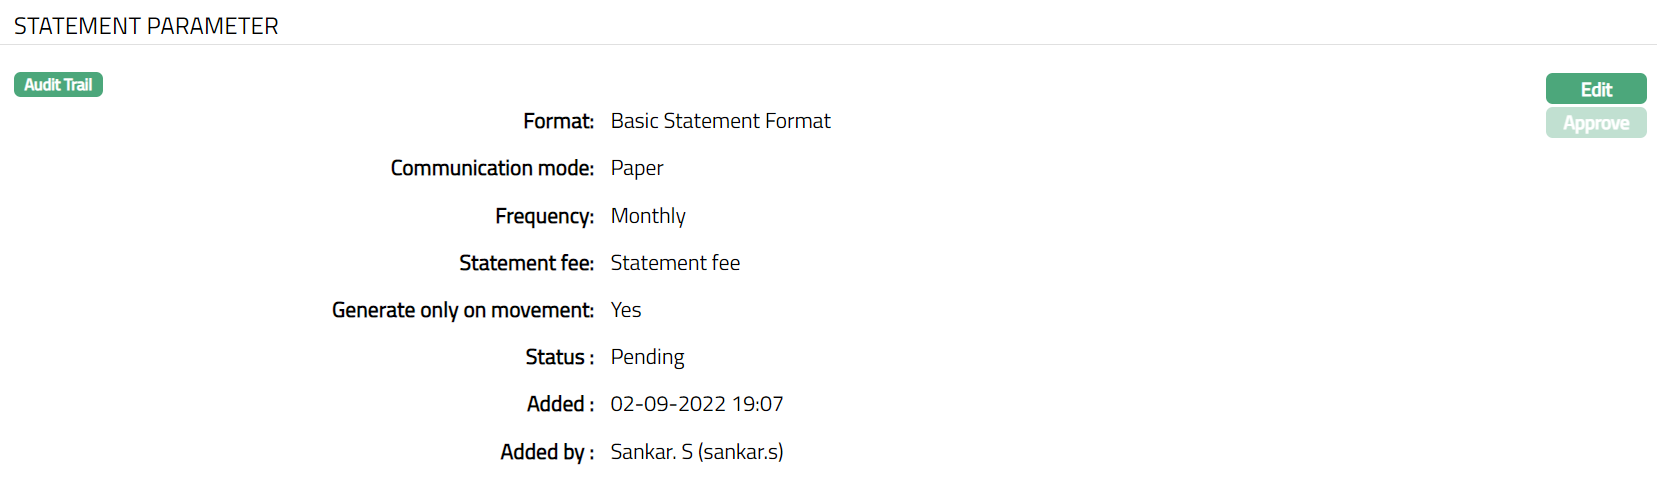
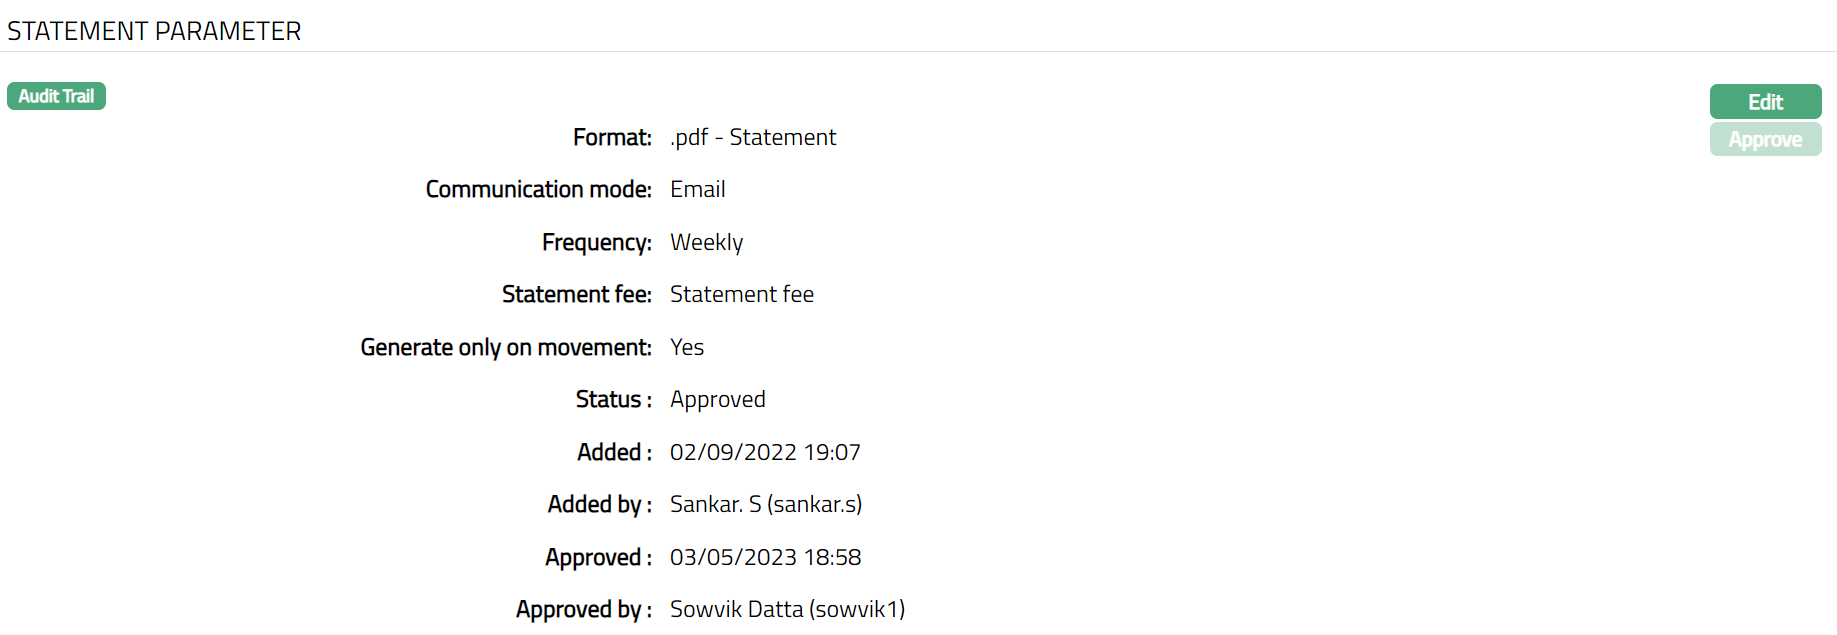
Statement Parameter
Using this tab, you can view and maintain the preferences for generating the statements.
- Access Product record page and click on the Statement parameter tab to view the details as per sample below. The details are defaulted from the entries that you made during Product creation. For details refer to Nostro Account New Product -- Statement parameter (6/7).
- Click Edit. Edit Statement Parameter page appears.

Note: All fields Editable.
Click Save. Statement Parameter page appears with the edited details.
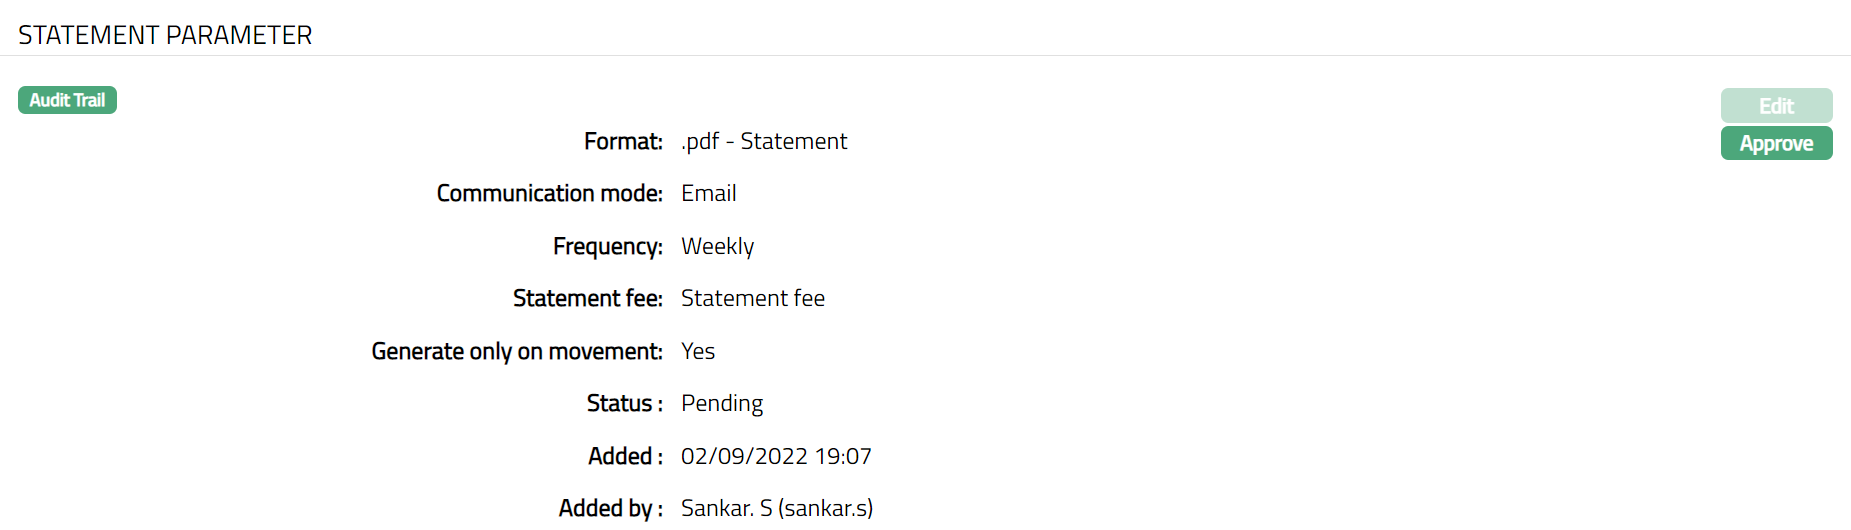
Note: The status will display as pending unless the same is approved by another user who has not created the record. Once approved the status will change to Approve.
Function: Edit, Approve
The additional fields available are:
Status field denotes the status of the tab.
Added field denotes the date on which the record was added.
Added by field denotes the name of the user who created the record.
Approved field denotes date on which the record was approved and is displayed only for approved records.
Approved by field denotes name of the user who approved the record and is displayed only for approved records.
Document Template Settings
Using this tab, you can maintain the document template which can be used for uploading documents for all the accounts maintained under this current account product.
- Access Product record page. Click Document Template Settings tab.

- Click New. Page New Document Template appears.
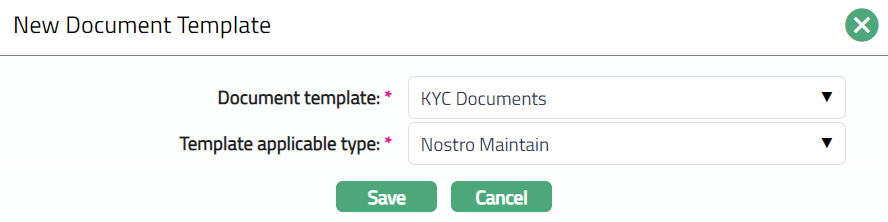
Select Document template from the available drop-down as maintained under Admin > System codes > Process > Document templates.
Select Template applicable type from the available drop-down. The available options are Closure and Maintain.
Click Save. Document Template Settings page appears with the added details.
 Functions: New, Delete
Custom Field
This menu option allows you to define fields apart from those that are already available in the standard version of Aura. Thus, it enables you to customize additional data storage and use as required to suit your specific business needs.
To maintain Custom Field
- Access Product record page and click Custom Field tab.

The custom field(s) appears only when it is created in Admin > System codes > Custom fields > Custom fields and linked to specific Product option in Admin > System codes > Custom fields > Field mappings.
Click Edit. Edit Custom Field page appears. In the following illustration, two custom fields, Code and Name have been mapped to the Product as shown below:

Enter Code.
Enter Name.
Click Save. Custom Field page appears with the edited details.

Function: Edit