Cross Currency Journal
The cross-currency journal is used to post transactions between GL Accounts or Client Accounts of different currencies.
The following are the tabs in Cross Currency Journal
To post cross currency transactions
- From General ledger menu, click Transaction entry and then Cross Currency Journal. Cross Currency Journal search page appears.

- Click Add. Transaction Profile (1/4) page will appear
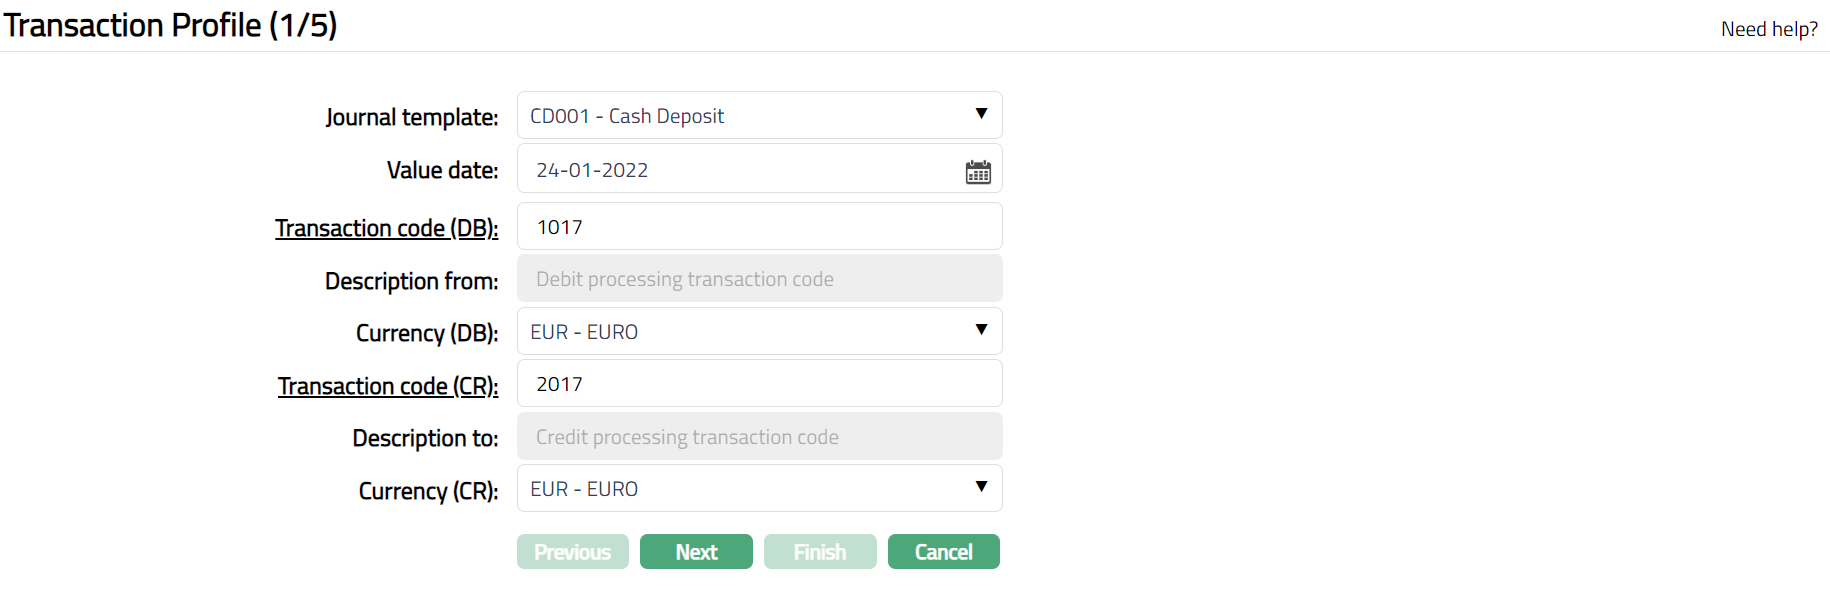
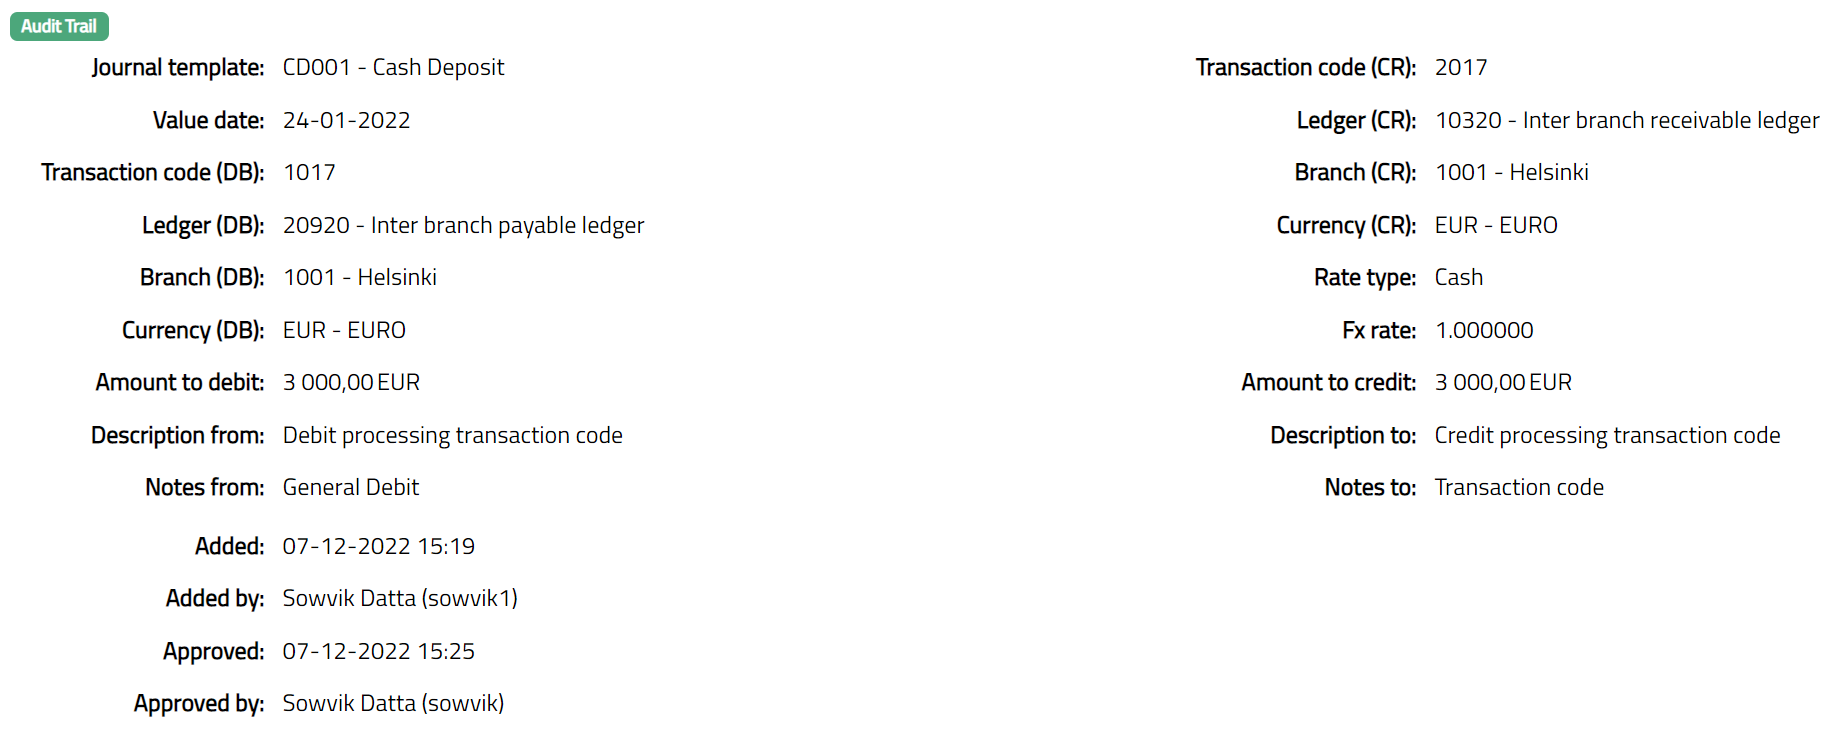
Select Journal template from the available drop-down list.
By default, value date shows the current date. You can change this by entering the required date or by clicking on the calendar button next to value date field and selecting the required date. Depending on whether the chosen Journal template allows back valued transactions or future valued transactions you can input the required value date. The date input should also satisfy the condition in respect of the number of days for back / future value date as specified for the Journal template chosen.
Click Transaction code (DB) hyperlink, to see the Transaction code search (as shown below). Depending on the Transaction code availability for the journal template chosen, all / selected transaction codes maintained for General Ledger and Client Account are shown here and you can select one of the existing transaction codes. Alternatively, you can type in the required Transaction code
Description from will be derived from Transaction Code (DB). Depending on the Transaction code settings, you may be allowed to / forced to change the Description.
Select Currency (DB) -- currency to be debited -- from the available drop down. If the transaction type for the Transaction Code (DB) is client account then the account currency is defaulted, and you cannot change the currency.
Click Transaction code (CR) hyperlink, to see the Transaction code search. All the transaction codes maintained for General ledger and Client Account are shown here and you can select one of the existing transaction codes. Alternatively, you can type in the required Transaction code
Description to will be derived from Transaction Code (CR). Depending on the Transaction code settings, you may be allowed to / forced to change the Description.
Select Currency (CR) -- the currency to be credited -- from the available drop down. If the transaction type for the Transaction Code (CR) is a client account then the account currency is defaulted, and you cannot change the currency.
Click Next. Transaction Accounting Details (2/4) page appears.
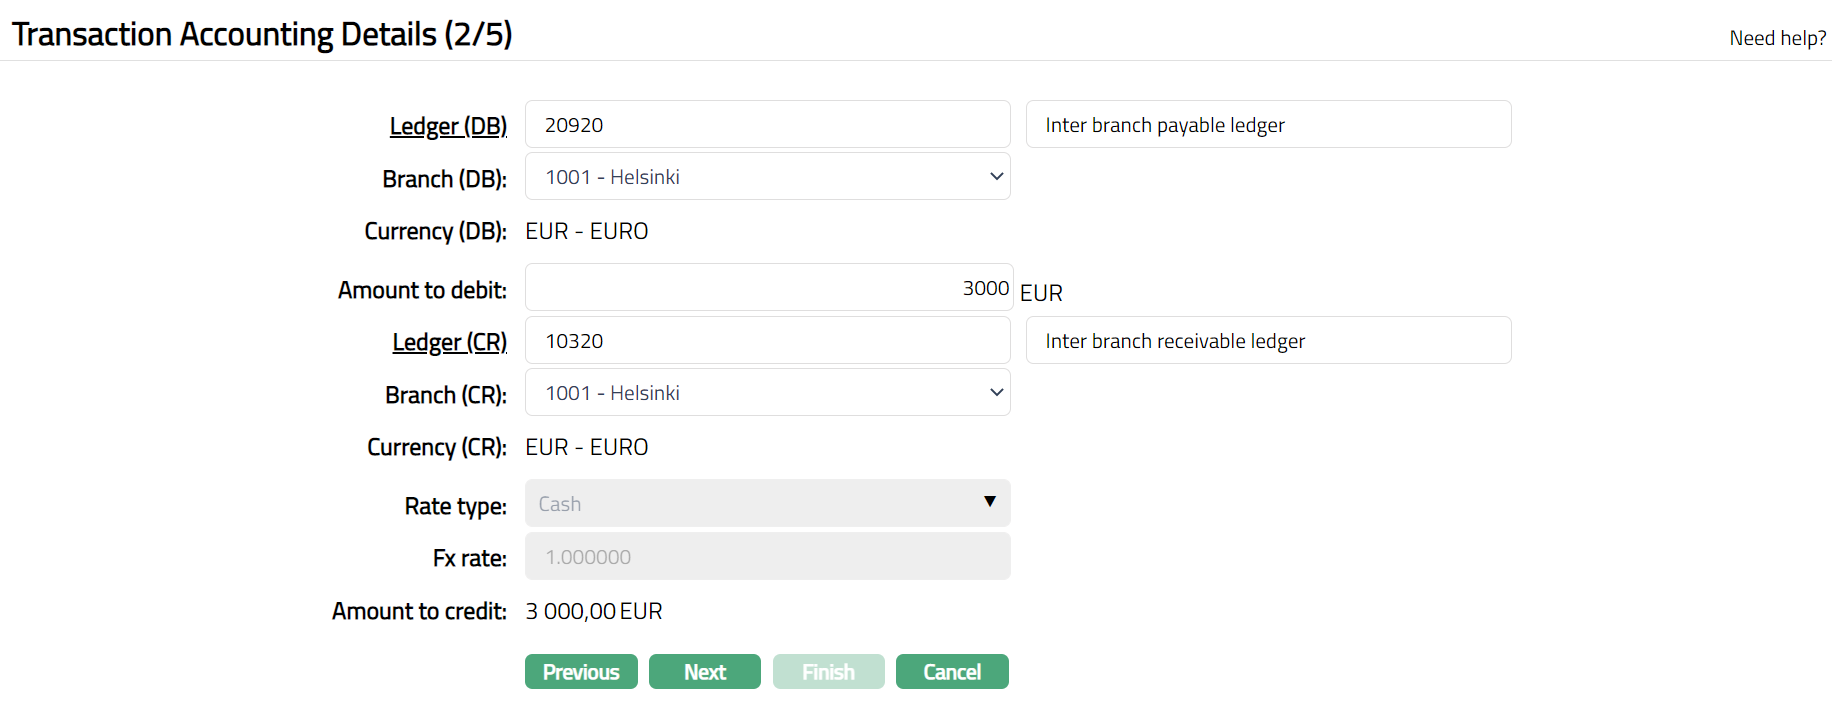
- You need to enter Ledger (DB) / Account # -- the ledger number / account number to be debited for the transaction. This depends on the Transaction Code (DB) type that you have entered.
- If you have selected a Transaction Code (DB) whose type is General Ledger in the previous screen, then the field appears as Ledger (DB). For the Transaction Code (DB) if a Default Transaction has been maintained under General Ledger > Settings > Transaction code for the Currency (DB), Aura will display the ledger # and description by default. If the Default transaction override is allowed, you can change the Ledger #.
To input / change the Ledger #, click on Ledger (DB) hyperlink, which opens up a new screen, called GL Account Search. This allows you to select one of the existing ledgers for debiting in the transaction. Alternatively, you can also type in the required Ledger #.
- If you have selected a Transaction Code whose type is Client Account, then the field appears as Account #. Click on Account # hyperlink**,** which opens up a new screen, called Search Client Account. This allows you to select one of the existing Accounts for debiting in the transaction. Alternatively, you can type in the required Account #.
Select Branch (DB) from the available drop-down list. If the Transaction Code (DB) is of type Client account, the debit branch will be defaulted to account branch of the account # chosen above. Aura allows you to select the required branch in case of transaction codes where the type is general ledger. The list of branches will display only those branches that are mapped to Journal Template > Rate type.
If selected Account # is a Nostro Account, then External ref # field will be displayed. Enter the External ref #.
Currency (DB) displays the currency which was selected in the previous screen as the currency to be debited
If the transaction type is General ledger, then Aura may default the amount to be debited and allow an override as defined in the Transaction code > Default transaction. If the transaction type is client account, or if no Default transaction is defined, enter Amount to debit.
You need to enter Ledger (CR) / Account # -- the ledger number / account number to be credited for the transaction. This depends on the transaction code (CR) type that you have entered.
- If you have selected a transaction code (CR) whose type is General Ledger in the previous screen, then the field appears as Ledger (CR). For the Transaction code (CR) if a Default Transaction has been maintained under General Ledger > Settings > Transaction code for the Currency (CR), Aura will display the ledger # and description by default. If the Default transaction override is allowed, you can change the Ledger #.
To input / change the Ledger #, click on Ledger (CR) hyperlink, which opens up a new screen, called GL Account Search. This allows you to select one of the existing ledgers for crediting in the transaction. Alternatively, you can also type in the required Ledger #.
- If you have selected a transaction code whose type is Client Account, then the field appears as Account #. Click on Account # hyperlink**,** which opens up a new screen, called Search Client Account. Aura will display only those accounts where the account branches match the selected branches as maintained under Journal template > Availability > Branch (Credit). This allows you to select one of the existing Accounts for crediting in the transaction. Alternatively, you can type in the required Account #.
Select Branch (CR) from the available drop-down list. If the transaction code (CR) is of type Client account, the credit branch will be defaulted to account branch of the account # chosen above. Aura allows you to select the required branch in case of transaction codes where the type is general ledger. The list of branches will display only those branches that are mapped to Journal Template > Availability > Branch (Credit).
If the selected Account # is a Nostro Account, then External ref # field will be displayed. Enter the External ref #.
Currency (CR) field displays the currency which was selected in the previous screen as the currency to be credited.
Select Rate type from the drop-down list. Rate types should have been associated to the Journal Template for the Branch (DB)
Fx Rate is derived based on the Branch (DB), Currency (DB), Currency (CR) and the Rate type. This will be derived from the currency exchange rate maintained in Aura between these currencies for the rate type specified in the transaction for the Branch (DB). You may modify the rate. Aura validates that the exchange rate input is within the negative variance and positive variance specified in the Journal Template.
If the currency (DB) and currency (CR) are same, Fx rate is defaulted as 1.00.
If the currency (DB) and currency (CR) are different, Fx rate is derived as follows.
When currency rate is maintained as Multiplier for Currency (DB): Currency (CR), Fx rate = midrate / number of units.
When currency rate is maintained as Multiplier for Currency (CR): Currency (DB), Fx rate = number of units / midrates.
When currency rate is maintained as Divisor for Currency (CR): Currency (DB), Fx rate = midrate / number of units
When currency rate is maintained as Divisor for Currency (DB): Currency (CR, Fx rate = number of units / midrates.
You can change the Fx rate as long as the difference is within the negative and positive variance that is maintained in Journal template > Branch > Maintain rate type.
Amount to credit is the amount that would be credited. This is derived based on the Amount to Debit and Fx Rate specified for the transaction.
Click Next. Accounting Settings (3/4) page appears.

Enter remarks for the Debit side of the transaction in Notes from.
Enter remarks for the Credit side of the transaction in Notes to.
Click Next. Confirmation (4/4) page appears.
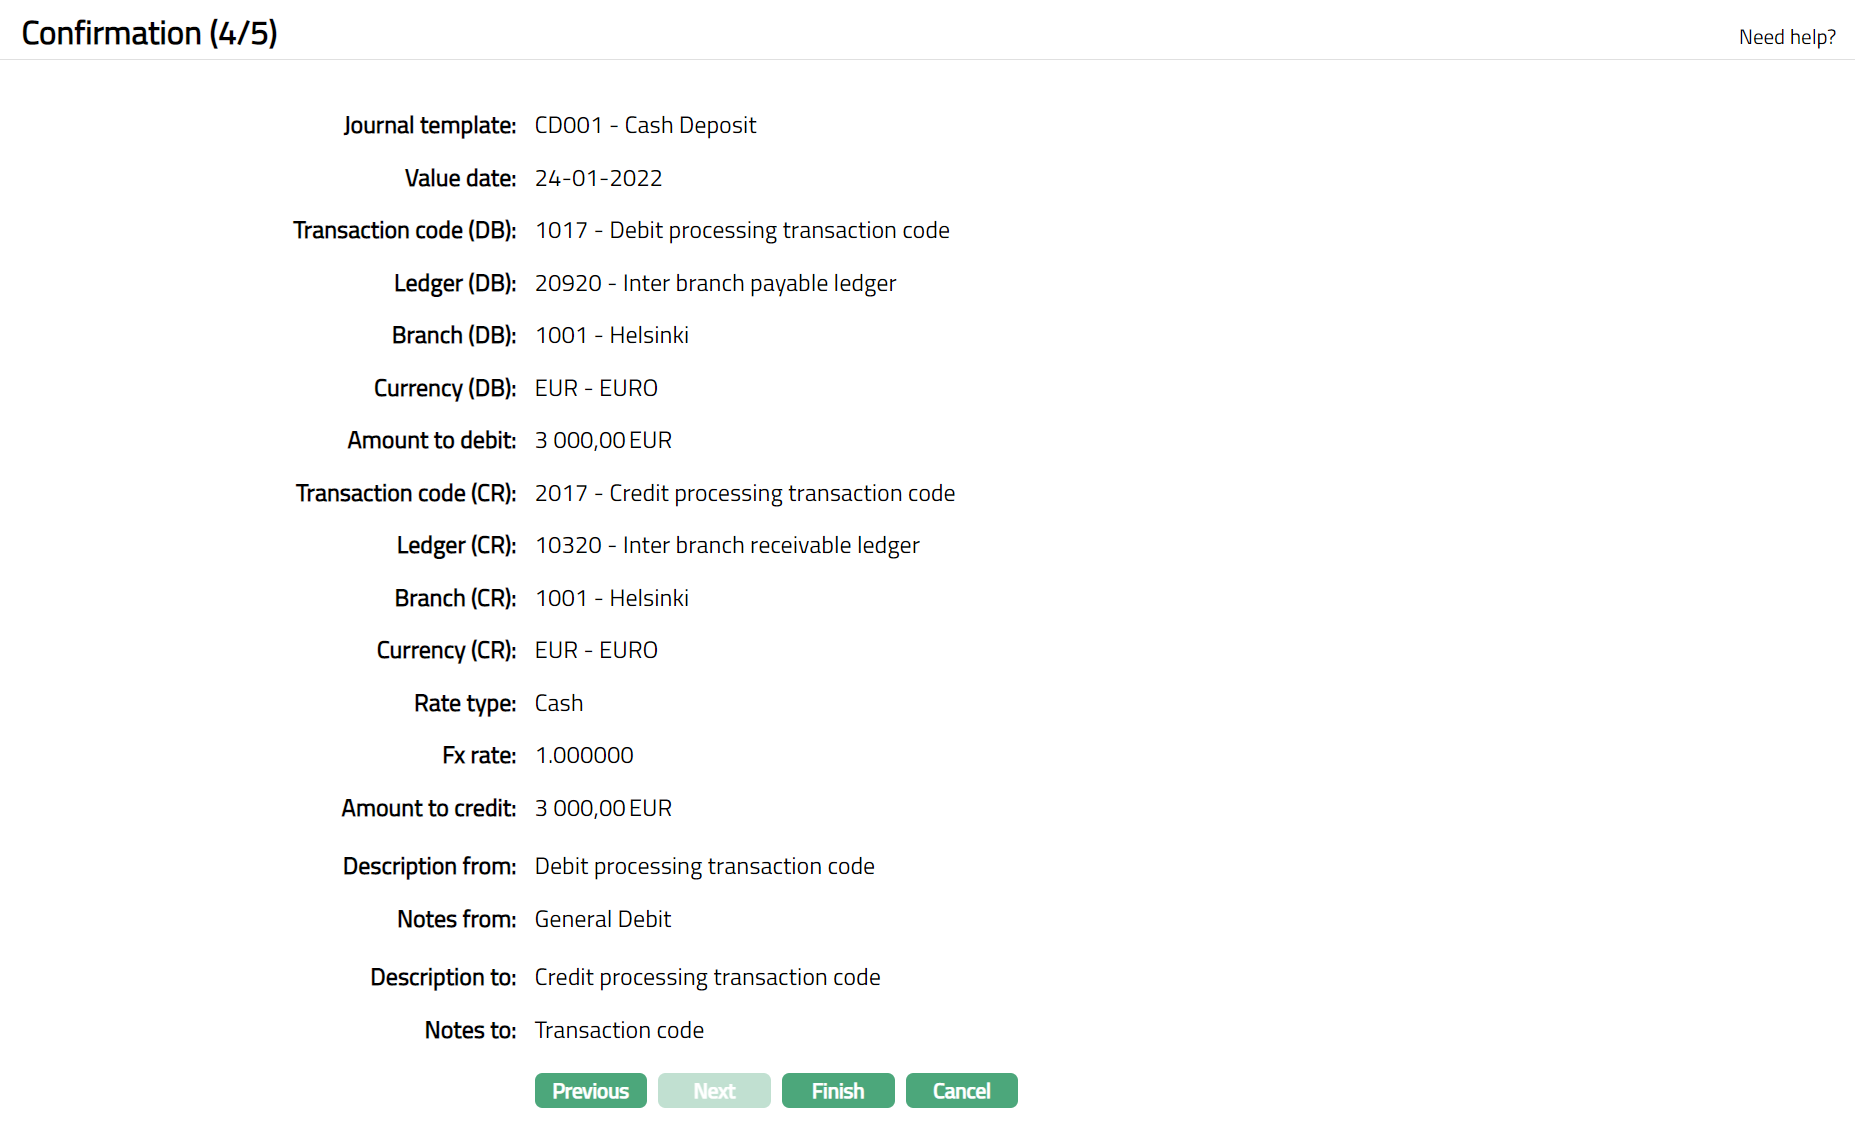
- Click Finish. Cross Currency Journal page appears displaying the details of the Cross Currency Journal you added.
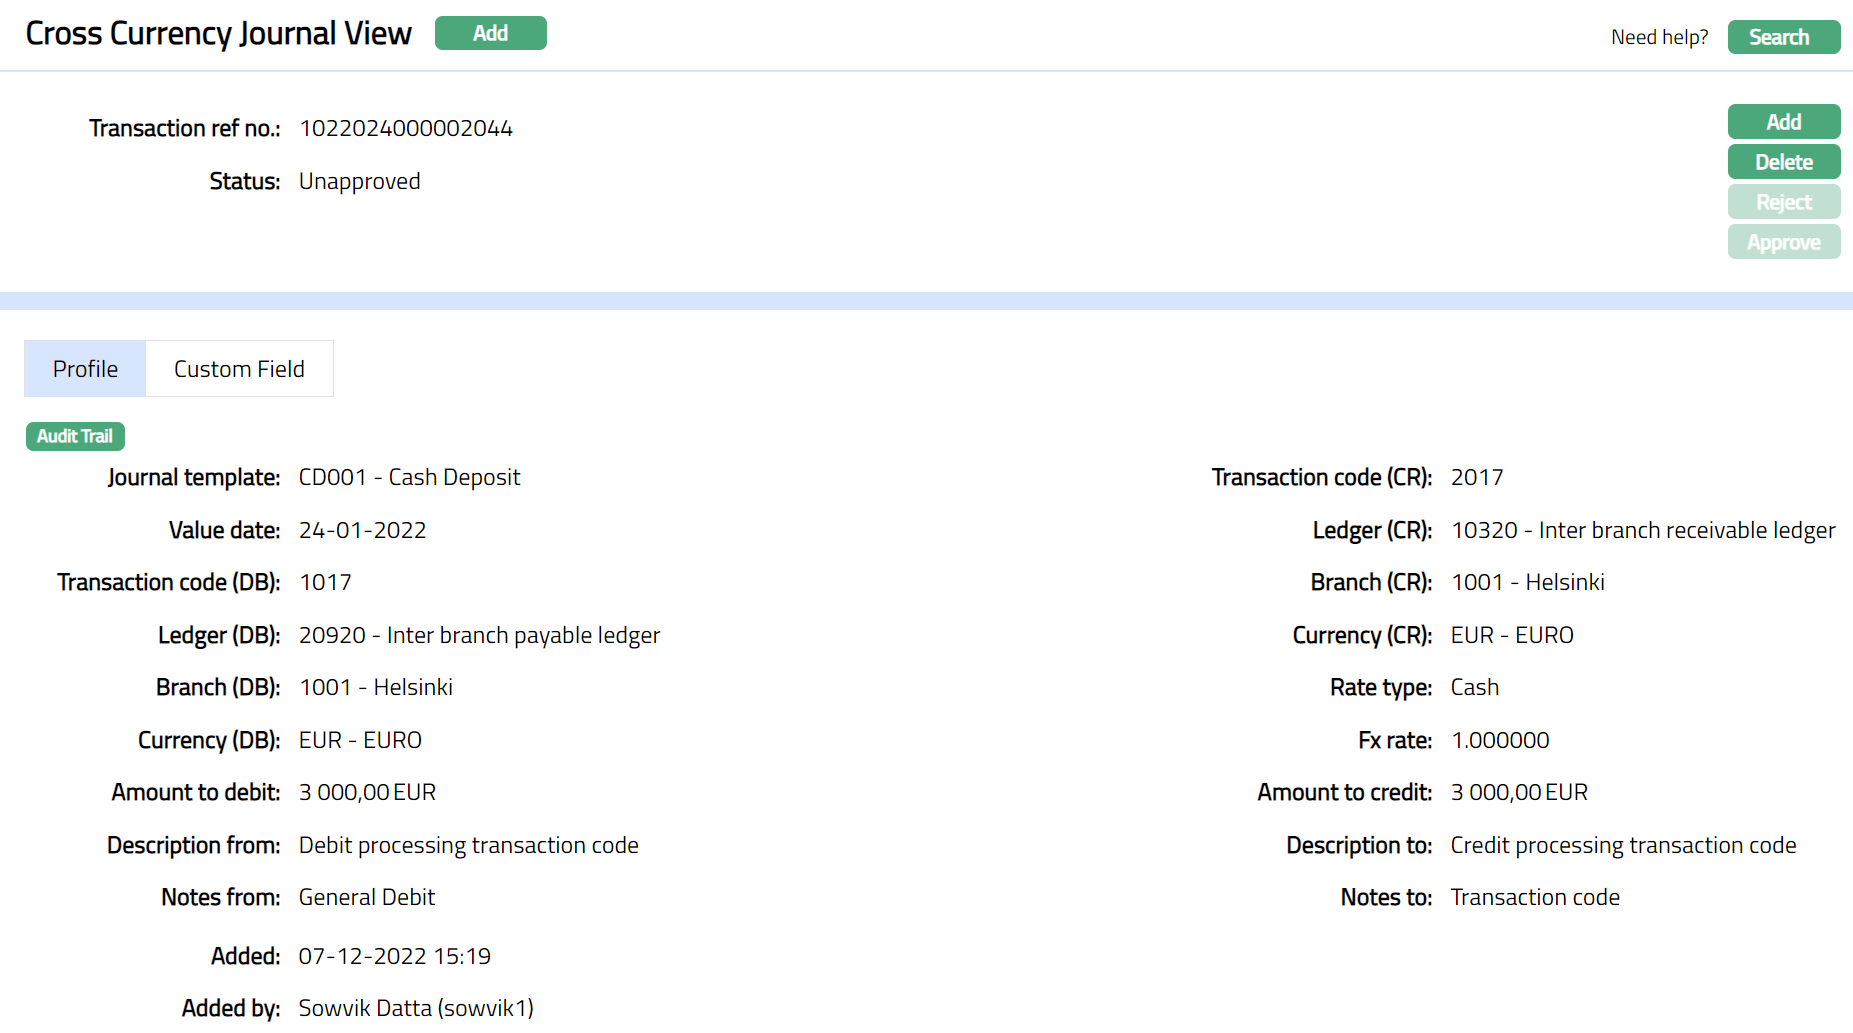
Functions: Add, Search, Reject, Delete, Approve
The cross-currency journal can be approved / Rejected only by a user different from the one who created it. To approve, access the Cross Currency Journal View from the Search page and click Approve.
Search: You can search a cross currency journal saved in Aura by a click on Search button. Aura will then display Cross Currency Journal Search screen where you can search a cross currency journal by entering the related search inputs.
Delete: You can delete a Cross Currency Journal by clicking on Delete button. When you click on Delete button, Aura will ask for confirmation on deletion. Aura will delete the Cross Currency Journal. However, you cannot delete a Cross Currency Journal once it is approved. The cross-currency journal can be deleted only by a user one who created it till it is Approved / Rejected.
Reject: You can reject a Cross Currency Journal until it is approved. Aura will ask for confirmation on rejection. Aura will reject the Cross Currency Journal.
Approve: If you want to approve a Cross Currency Journal, then retrieve the record and click on Approve. Aura will ask for confirmation. On approval, the recorded will be posted to the corresponding the Status will be Approved.

Note:
If the custom field is mapped to Cross currency journal under Admin > System Codes > Custom fields > Field mapping, then an additional screen will appear before the confirmation screen. The custom fields will be mandatory or non mandatory based on the rules set at the Field mappings. For more detail on custom field functionality please refer Admin> System codes > Custom fields > Field mappings manual.
Based on the chosen availability for - User / Role, Journal template is to be filtered in the Station Journal.
Profile
Profile tab, which is the default screen, shows the basic Transaction details entered using Add Cross Currency Journal.
Custom Fields
This option provides you the flexibility to define fields apart from those that are already available in the standard version of Aura. Thus, it enables you to customize additional data storage and use as required to suit your specific business needs.
Using the Custom Field tab, you can maintain the custom fields mapped to the Cross Currency Journal. Depending on the custom fields created and mapped to Cross Currency Journal module (using Admin > System Codes > Custom Fields), the fields will be displayed on this tab.
To edit custom field
- Access Cross Currency Journal, click Custom field tab, Custom field page appears.

The field appears only when it is created in Admin > System Codes > Custom fields > Custom fields and linked to specific currency exchange option in Admin > System Codes > Custom fields > Field mappings. Two fields Exchange Code and Exchange Type have been shown as sample here.
Click Edit. Edit Custom Field page appears.

Enter details for the custom field -- Additional Field.
Click Save. Custom Field page appears with the edited details.
 Functions: Edit