Manual Reconciliation
Manual Reconciliation in Aura allows you to reconcile transactions that are not matched through the auto-reconciliation process. You can select transactions from Internal and External Accounts or within the same account type to perform reconciliation.
Based on the selected transactions, Aura calculates the balance and either completes the reconciliation or allows you to pass an adjustment entry, subject to defined limits. You can also filter transactions using date criteria to view relevant unreconciled records.
After completing the process, Aura returns you to the initial screen to start a new reconciliation.
To manually reconcile a record,
1. From the Payment Grid menu, click Nostro reconciliation and then click Manual reconciliation. The New Manual Reconciliation (1/3) page appears.
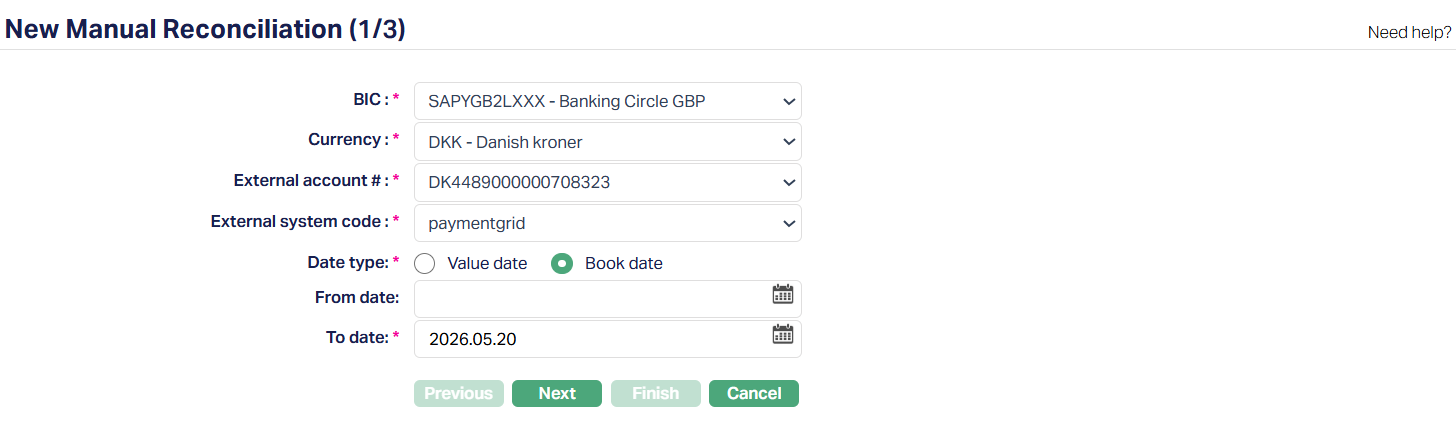
2. Select the BIC (Business Identifier Code) from the list of active BICs maintained under Account Mapping and Preferences. The BIC is displayed along with the financial institution name.
3. The Currency field will be enabled only on selection of BIC. Select the Currency from the drop-down list of active currencies which gets auto-populated from the Account Mapping and Preferences.
4. External Account # gets auto-populated from Account Mapping and Preferences based on selection of BIC and Currency combination.
5. External system code field is auto-populated based on the selected BIC and Currency combination. If multiple system codes are available, you can select the required value from the list.
6. Select the Date Type to be used for filtering - Book Date (Default) and Value Date.
7. From Date and To Date - Enter the date range to filter transactions. You can enter the date manually or use the calendar icon.
If you provide a date filter, you must enter both From date and To date. The system validates that the To date is greater than or equal to the From date.
If no date is specified, Aura displays all unreconciled transactions
8. Click Next. The New Manual Reconciliation → Transaction (2/3) page appears.
Based on the selected criteria of the previous page (1/3), Aura displays unreconciled transactions under two sections:
External Account Transactions
Internal Account Transactions
All records are displayed with a vertical scroll, allowing you to view and select the required transactions. See sample screenshot below.
The details of the External/Internal account transactions are displayed under the following fields:
Book Date: It specifies the date the external bank initiates the transaction in its ledger (often shown as entry date on SWIFT statements). This is a bookkeeping timestamp; it is not always the same as the date when funds are settled.
Value Date: It specifies the date on which the transaction affects the available/settled balance (that is, when funds are considered effective). Value date is not always equal to booking date in many cases; both are recorded for reconciliation.
Debit/Credit: This field, sometimes abbreviated as Dr / Cr, specifies a directional indicator showing whether the statement line is a debit (amount leaving the Nostro account) or credit (amount entering the Nostro account).
Amount: It specifies the monetary value of the statement line in the statement currency (the exact numeric amount recorded on the external statement).
Internal Reference #: It specifies the unique identifier created by your internal system (the mirror or internal transaction ID). It is used to link or correlate an external statement line to an internal posting for audit and matching.
External Reference #: It specifies the identifier supplied by the correspondent/external system (the external bank's transaction or message reference). This is the field you typically match against your internal reference during automated or manual reconciliation.
Transaction Type Code: It specifies the classification or code describing the nature of the entry. Many reconciliation UIs show a transaction type code which helps filtering and applying match rules.
Transaction Description: This field provides a short description of the unreconciled Internal/External Account transactions.
You can select the required transactions using the checkboxes provided. As you select transactions, Aura updates the Debit Total and Credit Total for the selected records.
Debit Total: It is the sum of all debits (amount leaving the Nostro account) of the Internal/External Account transactions.
Credit Total: It is the sum of all credits (amount entering the Nostro account) of the Internal/External Account transactions
Conditions for matching transactions:
Aura allows you to select transactions for reconciliation from External Account Transactions, Internal Account Transactions, or both.
You can:
Select one or more records only from External Account Transactions.
Select one or more records only from Internal Account Transactions
Select one or more records from both External and Internal Account Transactions.
When transactions are selected only from one section (External or Internal), Aura calculates the balance within the selected transactions in that section. The system then validates whether the resulting difference is within the manual reconciliation adjustment limit.
If the limit is exceeded, the system displays an error message.
If the amount is within the limit, you can proceed to pass an adjustment entry.
When transactions are selected from both External and Internal sections, the system processes the reconciliation as per the existing behavior.
If the net balance is zero, the system completes the reconciliation.
If there is a difference, the system allows you to proceed with an adjustment entry, subject to validation rules.
At least one transaction must be selected to proceed. If no transactions are selected, the system displays a validation message.
9. Click Next after selecting at least one transaction. The New Manual Reconciliation → Adjustment Entry (3/4) page appears.
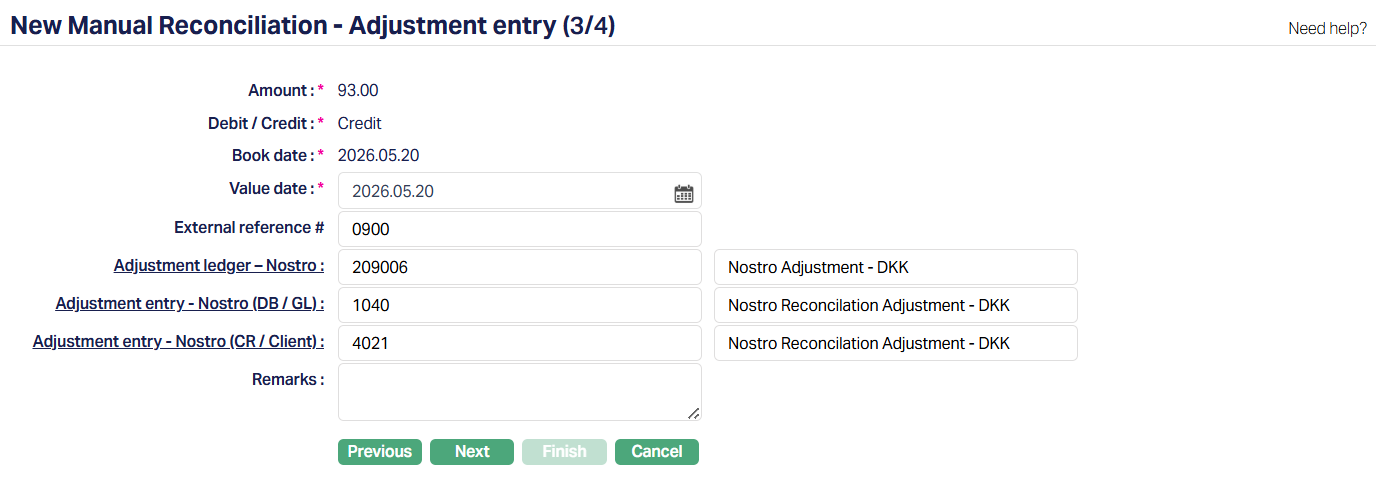
10. Amount - Displays the difference amount calculated by Aura based on the selected transactions. This field is not editable.
11. Debit / Credit - Displays whether the adjustment amount is a Debit or Credit. This value is derived automatically and is not editable.
12. Book date - Displays the current booking date. This field is not editable.
13. Value date -Select the value date for the adjustment entry. The value date cannot be earlier than the book date.
14. External reference # - Enter the external reference number for the adjustment entry. This field is optional.
15. The table below gives the fields, the use for, the conditions and the remarks for each of these Transaction Codes/General Ledger. You can either directly input the Transaction Code #/GL or click on the hyperlink to see the list of Transaction codes/GL satisfying these conditions and select the required Transaction code #/GL.
| Fields | Used for | List of accounts/transaction codes based on | Remarks |
|---|---|---|---|
| Adjustment Ledger – Nostro | Specifying which Ledger number is to be used as the Adjustment Ledger for the Nostro reconciliation. | Ledger type Asset, Liability , Income and Expense maintained under Payment Grid > Settings > General Ledger | Adjustment ledger maintained for auto reconciliation gets auto populated from Account mapping and preferences |
| Adjustment entry - Nostro (DB/Client). | Specifying which transaction code is to be used for debiting the Client account during the Nostro Reconciliation. | Active transaction codes with the transaction type Client and Debit/Credit as Debit maintained under Settings > Transaction code. | By default, the Adjustment entry - Nostro (DB/Client) maintained for auto reconciliation gets auto populated from Account mapping and preferences. The field will be enabled only if the amount difference for the adjustment entry is a Debit. |
| Adjustment entry- Nostro (DB/GL) | Specifying which transaction code is to be used for debiting the General Ledger account during the Nostro Reconciliation. | Transaction codes with the transaction type GL and Debit/Credit as Debit maintained under Settings > Transaction code | By default, the Adjustment entry - Nostro (DB/GL) maintained for auto reconciliation gets auto populated from Account mapping and preferences. The field will be enabled only if the amount difference for the adjustment entry is a Credit. |
| Adjustment entry - Nostro (CR/Client) | Specifying which transaction code is to be used for crediting the client account during the Nostro Reconciliation. | Active transaction codes with the transaction type Client and Debit/Credit as Credit maintained under Settings > Transaction code | By default, the Adjustment entry - Nostro (CR/Client) maintained for auto reconciliation gets auto populated from Account mapping and preferences. The field will be enabled only if the amount difference for the adjustment entry is a Credit. |
| Adjustment entry-Nostro (CR/GL) | Specifying which transaction code is to be used for crediting the General Ledger account during the Nostro Reconciliation | Active transaction codes with the transaction type GL and Debit/Credit as Credit maintained under Settings > Transaction code. | By default, the Adjustment entry - Nostro (CR/Client) maintained for auto reconciliation gets auto populated from Account mapping and preferences. The field will be enabled only if the amount difference for the adjustment entry is a Debit. |
16. Enter the Remarks for the adjustment entry. A maximum of 500 characters are allowed.
17. Click Next. The New Manual Reconciliation → Confirmation (4/4) page appears.
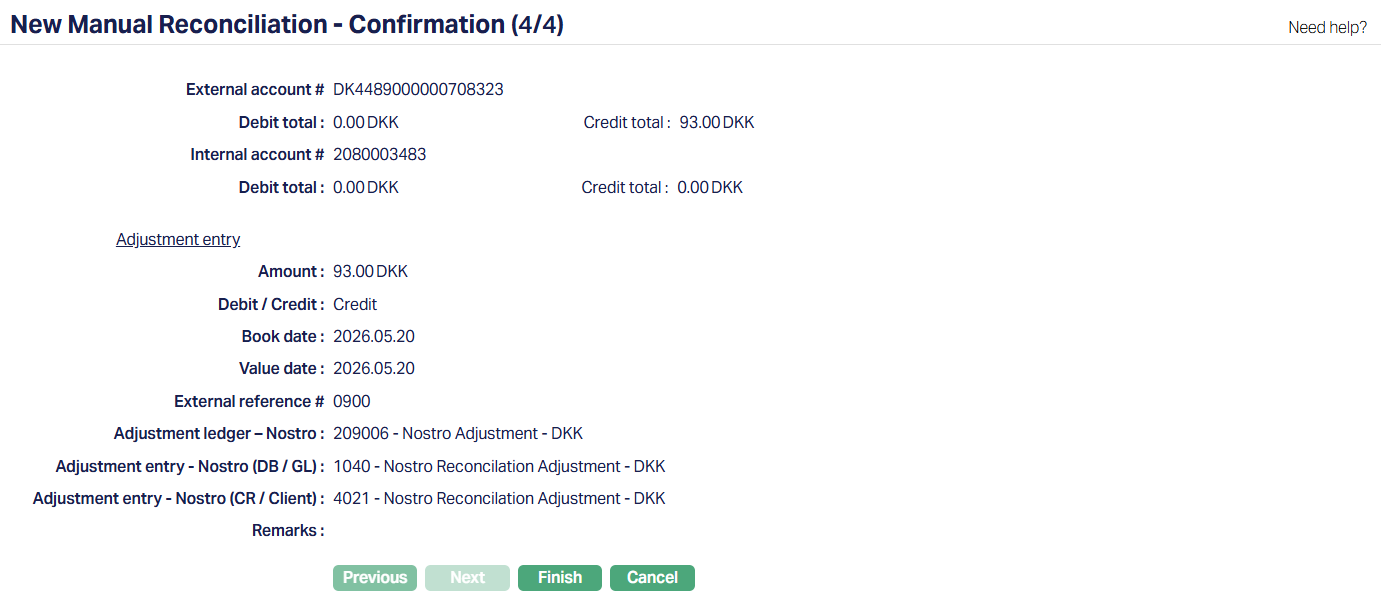
18. Click Finish. The record gets reconciled and is displayed under Reconciliation Details. Reconciliation reference # gets generated and Reconciliation status is displayed as Reconciled.
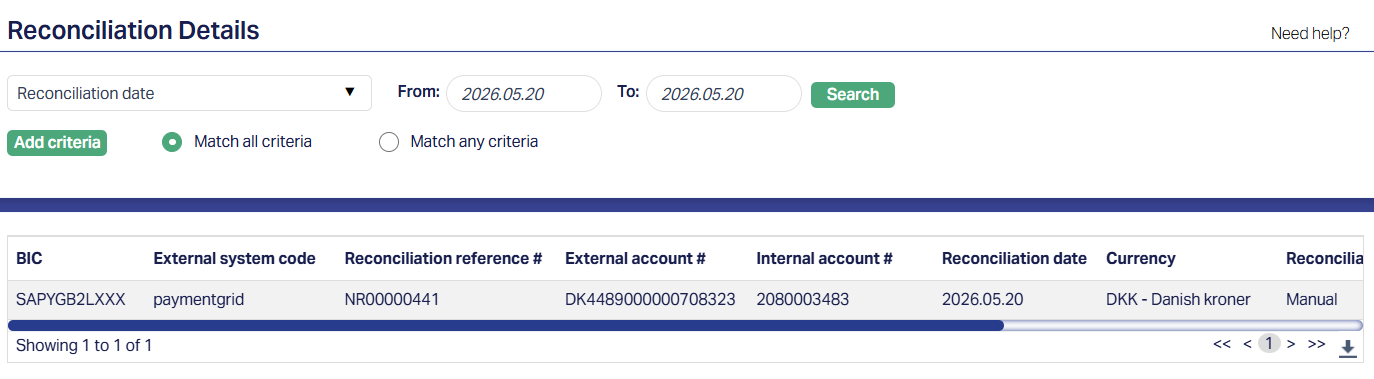
You can access the reconciled records in Payment Grid → Nostro Reconciliation → Reconciliation details. For example, you can search for a particular reconciled record using the generated Reconciliation date or reference number in the Reconciliation Details search page. A sample screenshot is shown below.