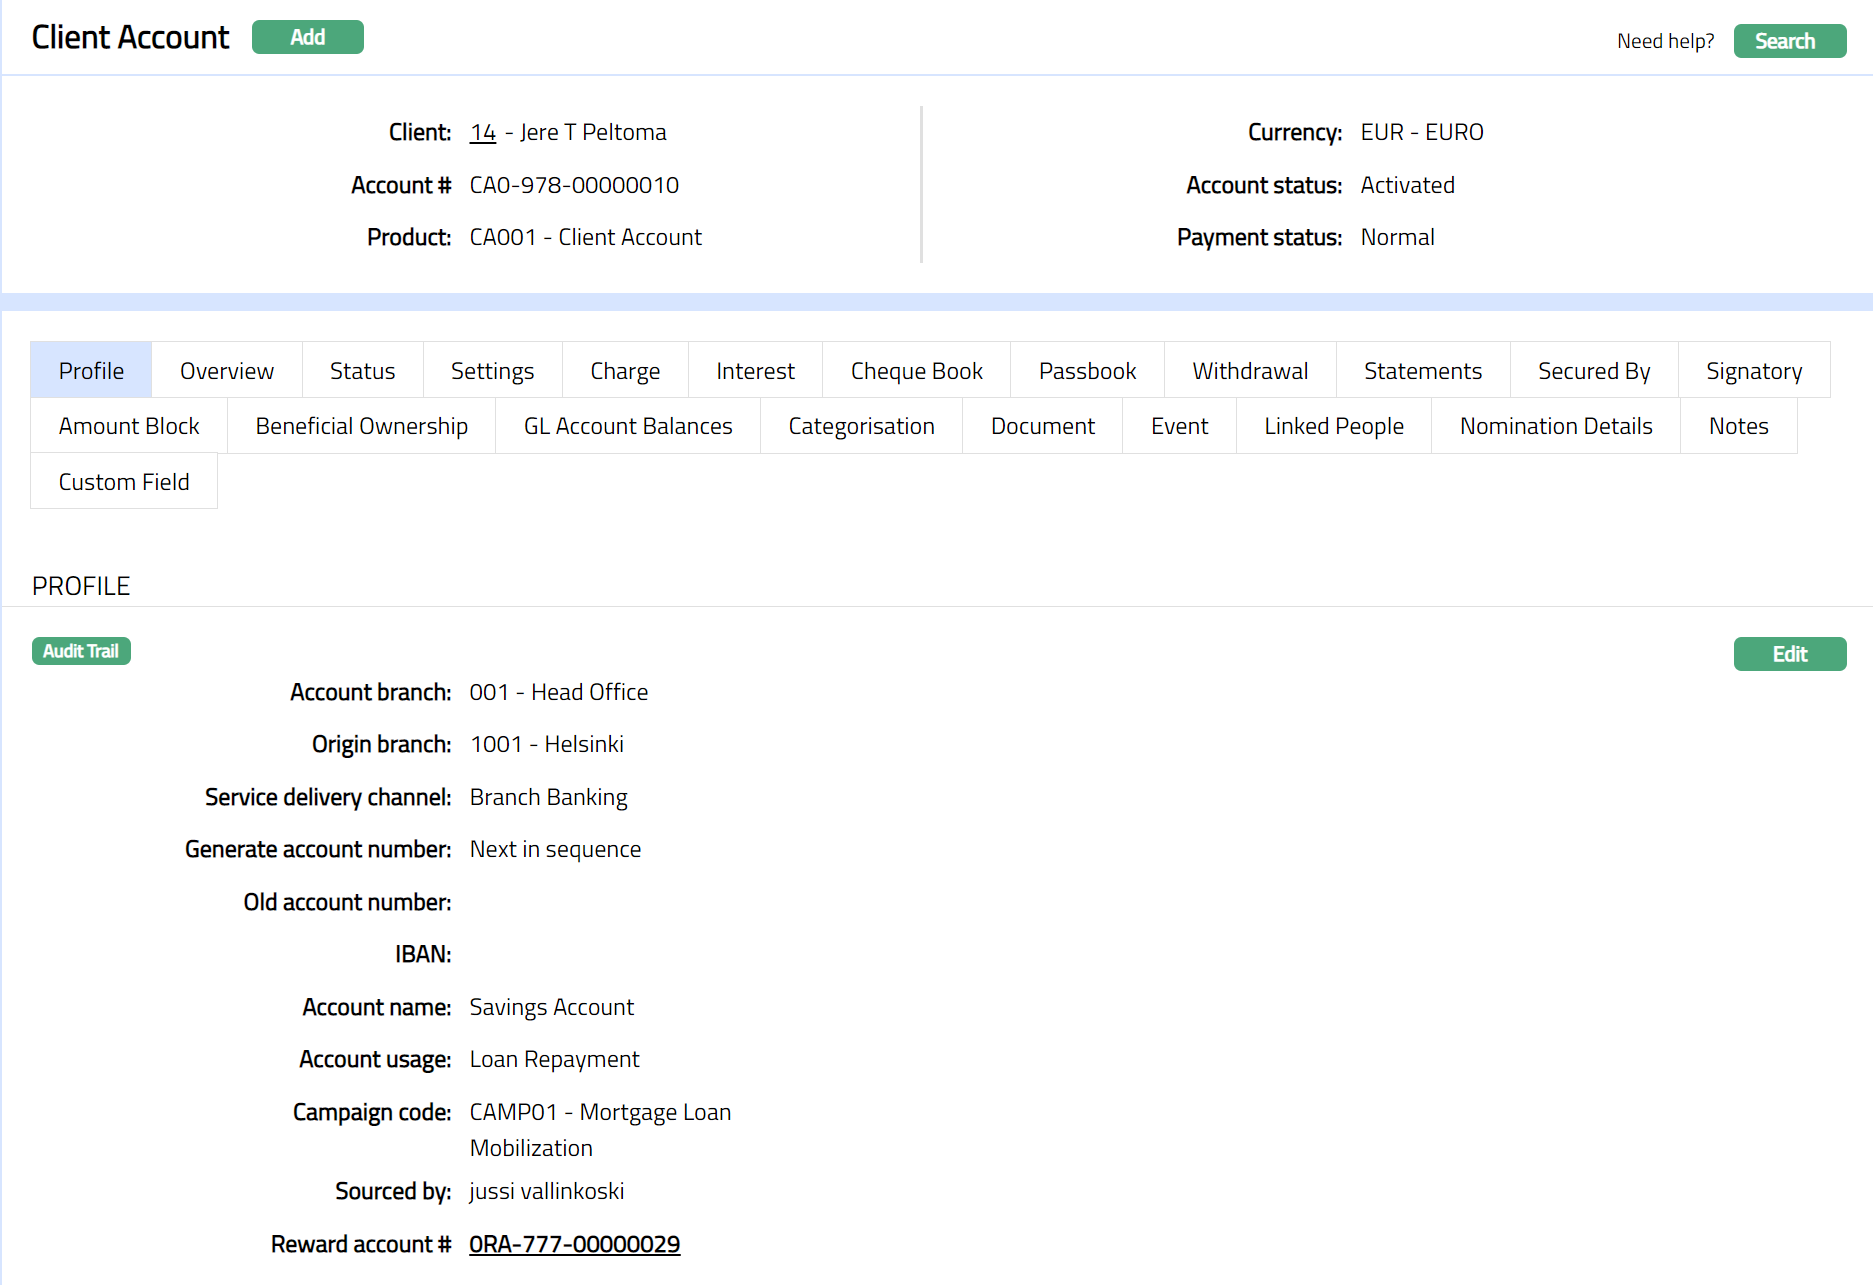
Client Account Maintain
Client Account maintain option allows you to create and maintain client accounts. These accounts can be created under Current account products that you have maintained. Based on the product defined, the account level details are defaulted, with options to modify these for specific accounts. Thus, it combines ease of maintenance with flexibility to suit the specific needs of each account.
The following are the various tabs that appear on the Client Account page:
To add a new Client Account,
1. From Retail menu, click Accounts, Client account and then Maintain. The Client Account Search page appears

2. Click Add. New Client Account → Account Details (1/3) page appears.
3. Select the Client by clicking on client hyperlink. The Client search page appears where you can search for a client with relevant criteria and select the required client. You can also input the client name and select the required client from the list displayed by Aura.
4. Select the Product from the drop-down list of active products belonging to Type Current account, where the client type defined for the Product matches the selected client. For example, if selected client belongs to Client type Personal, then all the products which are marked for Personal will be displayed. Based on the availability criteria set at the Product level, the product will be displayed in the dropdown list.
5. Select the Currency from the drop-down list. The drop-down list displays all the currencies maintained for the selected product.
6. Select the Account branch from the drop-down list of all the branches which are allowed for the product. By default, the user's logged in branch is selected. You can change as required. This is the branch in which the account is maintained.
7. Select the Service delivery channel from the drop-down list of Service Delivery Channels that are maintained under Admin → System codes → Categories → Service delivery channel.
8. Select Generate account number as Next in sequence or pre-assigned number. On selecting Next in sequence Aura will generate account number internally using the account number mask maintained at the Entity level. The account number is unique across the Entity.
9. Account # will be enabled only on selecting pre-assigned number for Generate Account Number. Enter the required Account #. Aura will validate the Pre - assigned number against the account number mask maintained at the Entity level and also checks if it is unique.
10. Enter the Application number to capture the reference number of the application under which the Client account is opened.
11. Enter the Account name. This name will be used for the account.
12. Enter the Account usage, i.e. the purpose of the account.
13. Select the Campaign code from the drop-down list of options maintained under Admin → Sales → Campaigns. Campaigns code is a unique code which can be used as campaign identifier in Aura.
14. Select the Sourced by. It is the Aura user whose status is activated. All activated Aura users will be available in the drop-down list.
15. Click Next. The New Client Account → Secured By (2/3) page appears. Please refer to the sample Screenshots as shown below related to both Collateral & Limit.
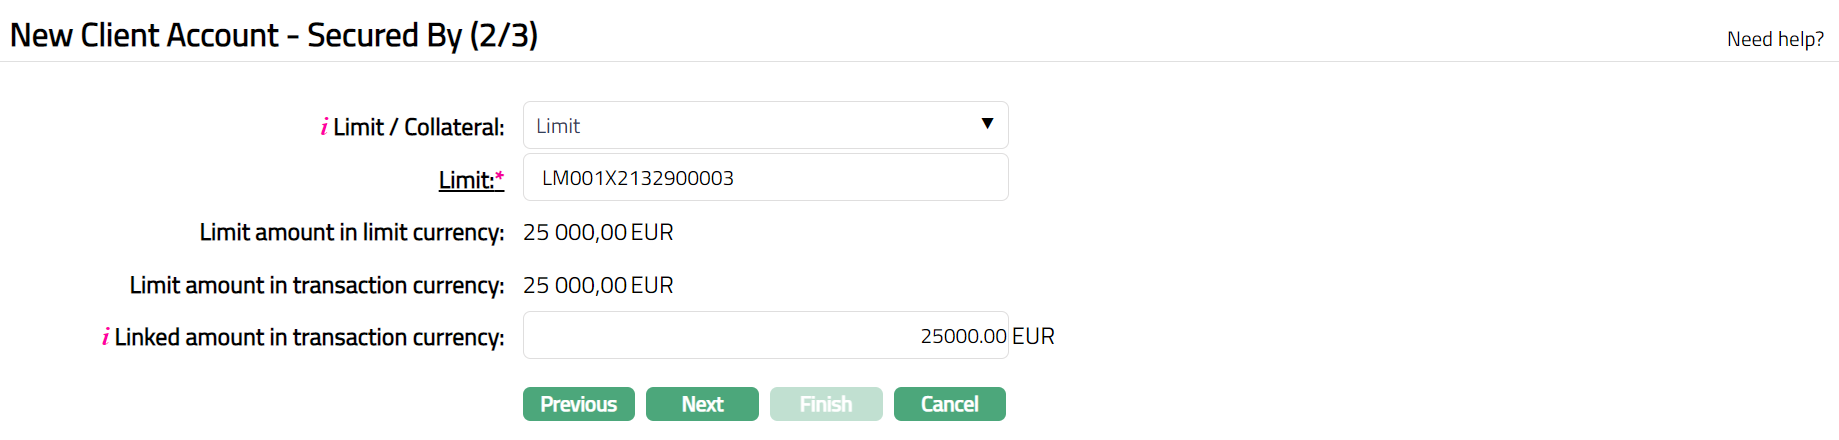
Specify whether the client account is to be secured by a Limit or Collateral using the Limit / Collateral dropdown.
Based on the selection above, enter the details of the specific Limit or Collateral as described below:
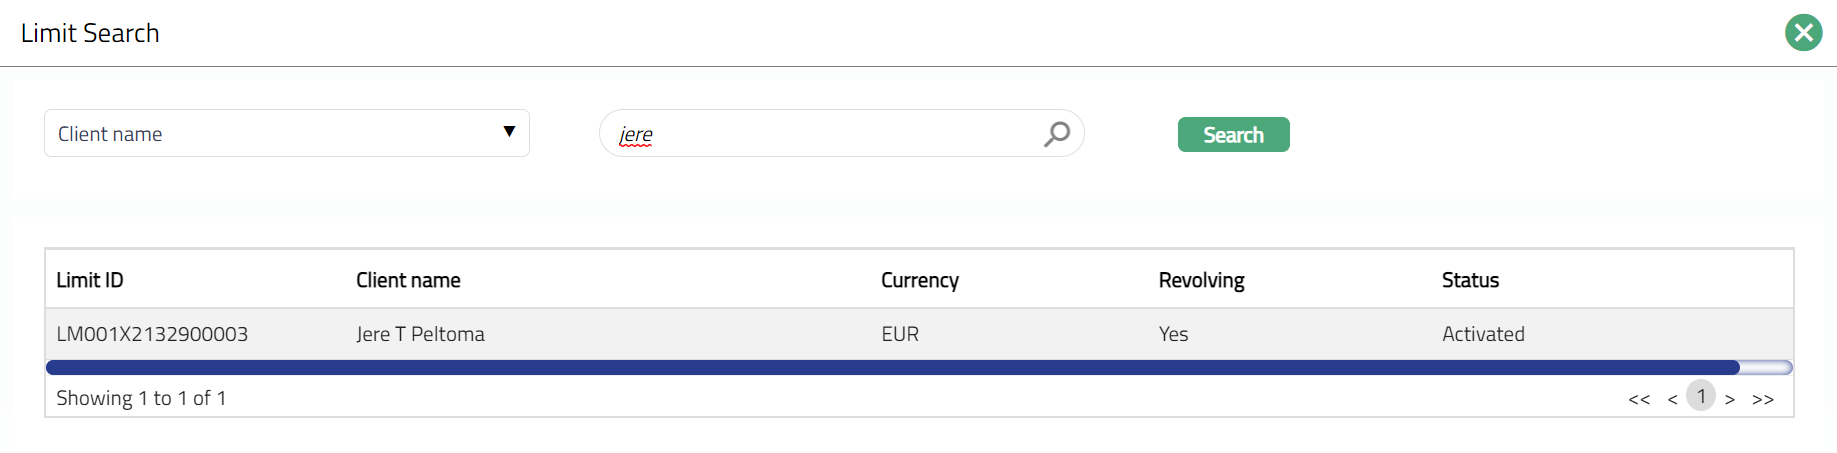
If you select Limit, Limit hyperlink will be displayed. On click of the hyperlink, Aura displays the Limit Search screen and the list of limits (status as Active) and Revolving = Yes maintained under CRM → Collaterals & Limits → Limits having Available Limit Amount > 0.
If you select Collateral, Collateral hyperlink will be displayed. On click of the hyperlink, Aura displays the Collateral Search screen and the list of collaterals (status as Active) maintained under CRM → Collaterals & Limits → Collaterals, having Available Collateral Amount > 0 and Availability of collateral is for selected client.
Based on the selection of Limit/Collateral, Limit amount in limit currency field or Collateral amount in collateral currency field is displayed. The value for the displayed fields is derived from the limit id or collateral id maintained under CRM > Collaterals & Limits.
Based on the selection of Limit/Collateral, Limit Amount in Transaction Currency or Collateral Amount in Transaction Currency is displayed.
For Limit amount in transaction currency, the value is derived from selected limit id. If the limit currency is different from the transaction (account) currency, then Aura will apply the mid rate for these two currencies from the default rate type maintained in the entity level and display the values after respective conversion. If the same currency is involved for the contract and limit, then system will display the same amount as in Limit Amount in Limit Currency.
For Collateral amount in transaction currency, the value is derived from selected Collateral ID. If the collateral currency is different from the transaction (account) currency then Aura will apply the mid rate for these two currencies from the default rate type maintained in the entity level and display the values after respective conversion. If the same currency is involved for the contract and collateral, then system will display the same amount as in Collateral Amount in Limit Currency.
Based on the selection of Limit/Collateral, Linked amount in transaction currency is defaulted from Limit (or Collateral) Amount in Transaction Currency. You can modify this, but this amount cannot be greater than Limit (Collateral) Amount in Transaction Currency.
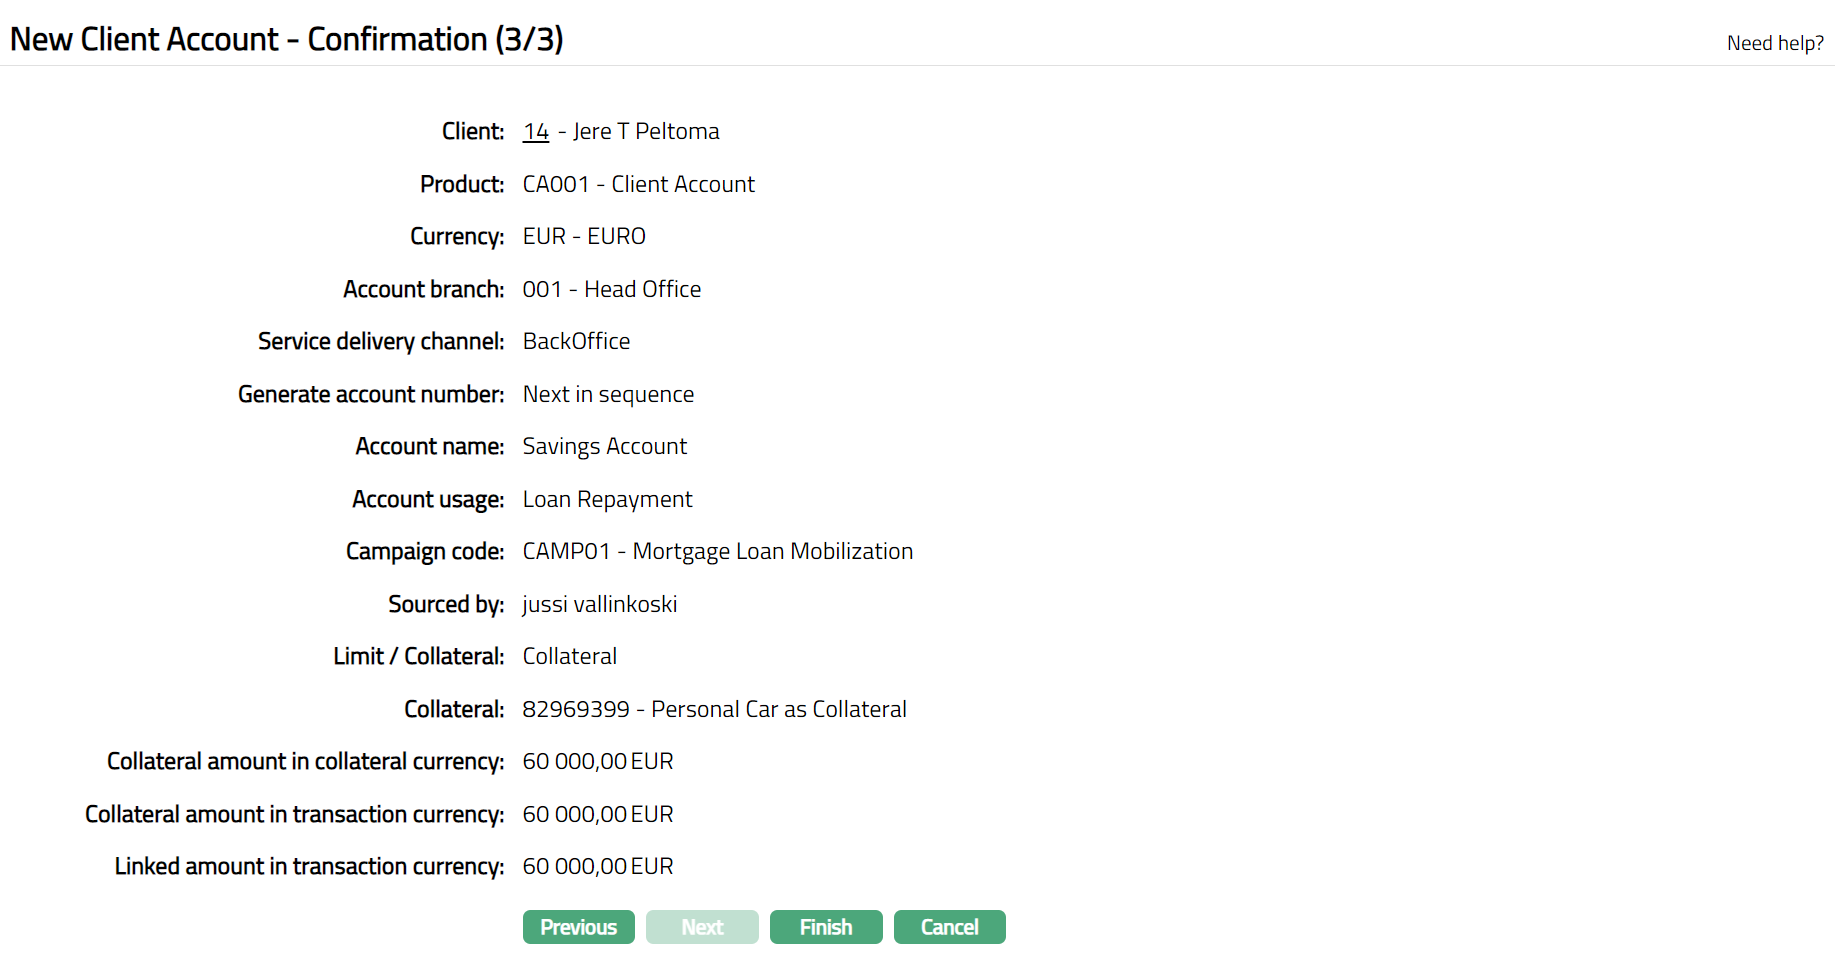
16. Click Next. The New Client Account → Confirmation (3/3) page appears.
Note: If the custom field is mapped to Client account at Admin → System Codes → Custom fields → Field mapping, then an additional screen will appear before the confirmation screen. The custom fields will be mandatory or non mandatory based on the rules set at the Field mappings. For more detail on custom field functionality please refer Admin → System codes → Field mapping manual.
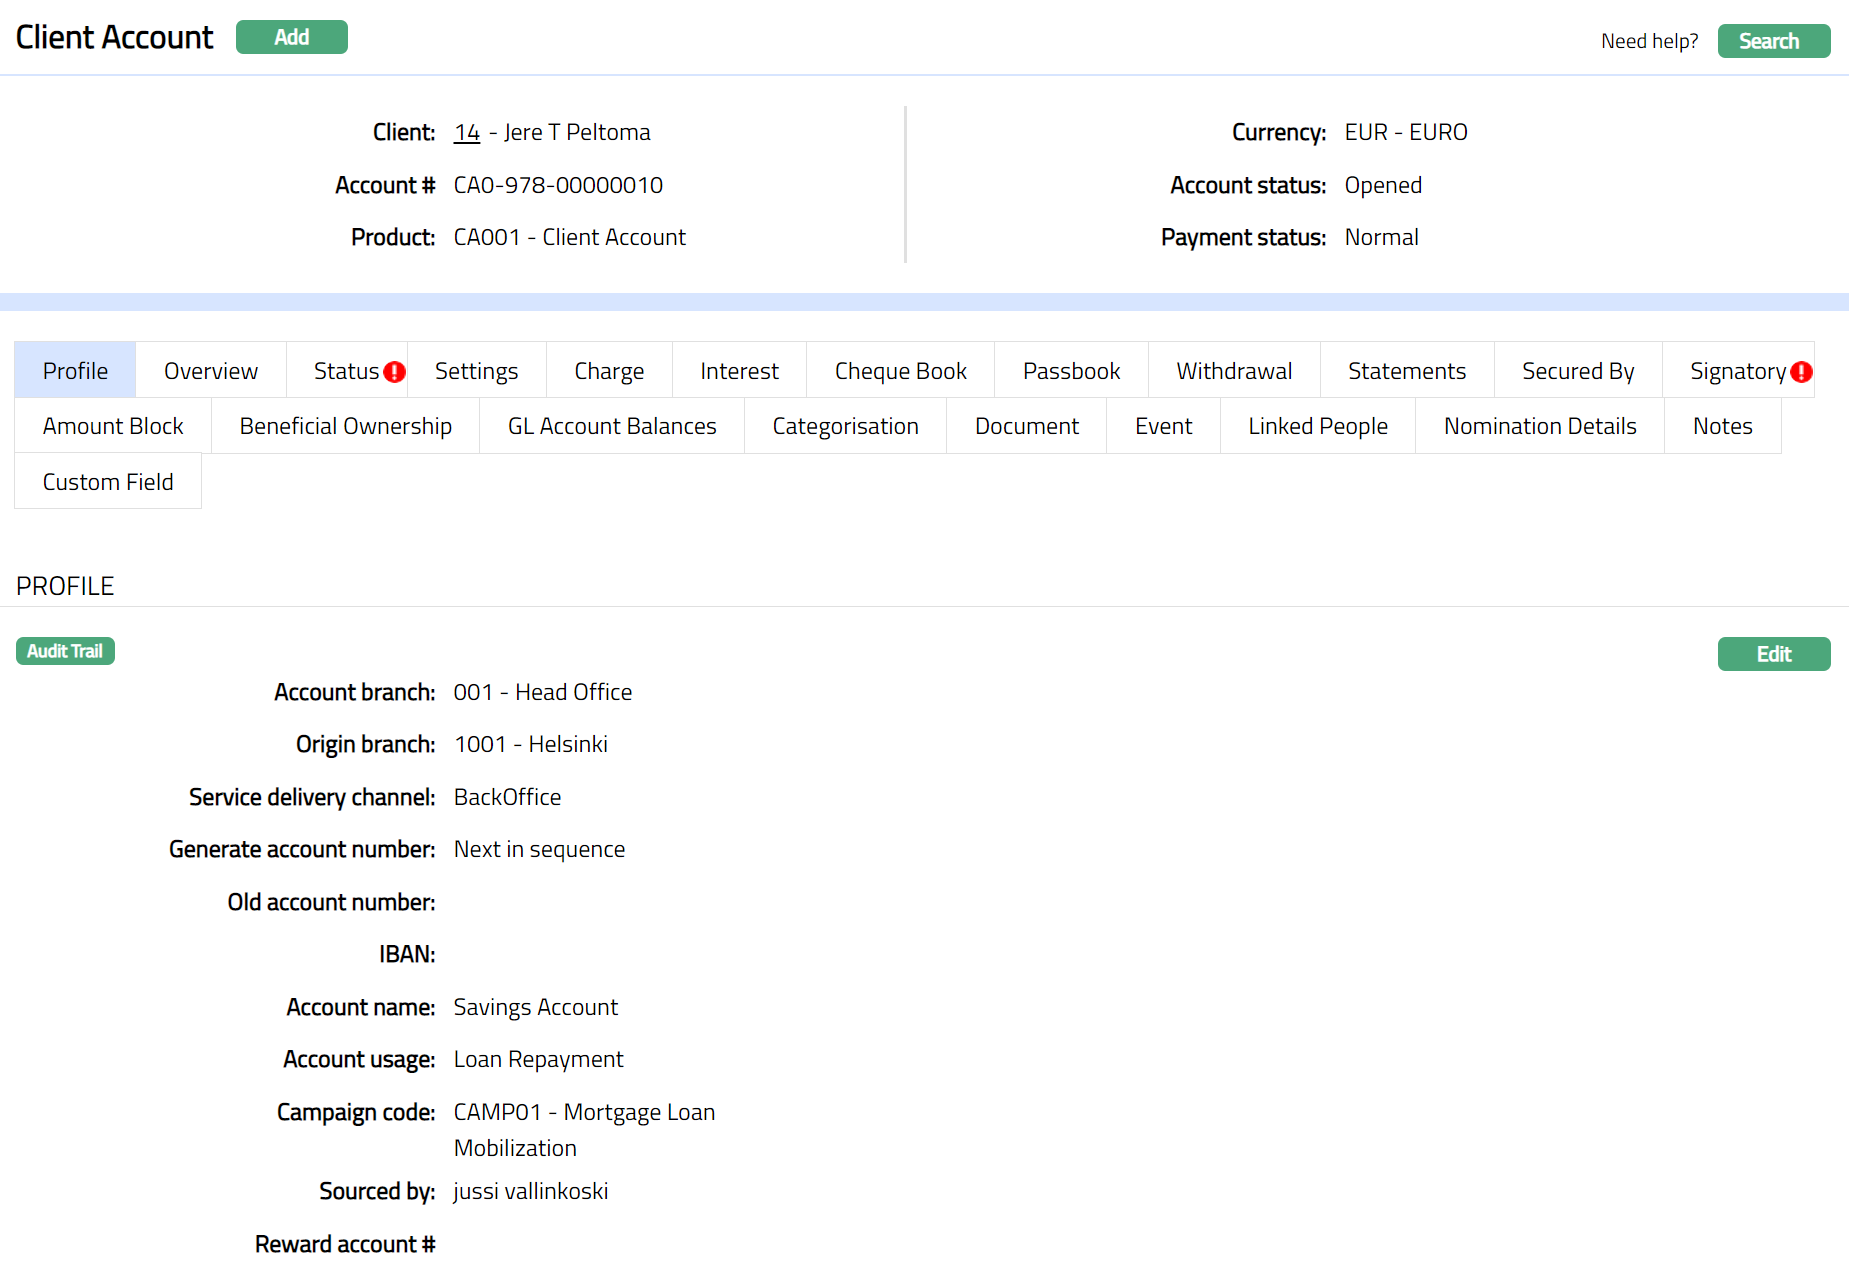
16. Click Finish. Client Account page appears displaying the Profile tab of the Client Account you added.
Functions: Add, Search.
The Account status is Opened, and the Record status is Approved. Click on More information to view other tabs.
Only when the Account status is Activated and Record status is Approved, the account becomes effective and further actions (debit and credit) can happen in the account.
Note:
If KYC of the customer is not approved
The Account status is Opened, and the record status is Approved.
Add the Activated Account status using Account Status tab. This will make the Account Status Activated, but the record status is Pending.
Another user should approve the status, so that the record status becomes Approved and Account status becomes Activated
Inside preference for account status Disallow debit flag set as Yes
If KYC is approved
The status of the Account is Opened, and the record status is Approved
Another user should approve the status, so that the record status becomes Approved.
Inside Preferences for account status Disallow debit is set as No.
Note: If the KYC for the client is not approved, Aura allows you to approve the account, but at the preferences, disallow debit flag is automatically marked as Yes. If the KYC is approved after approval of client account, disallow debit flag is automatically marked as No.
Refer to the Account Status section for a detailed explanation
Any changes to the Interest Receivable, Charge and Status tabs will render the status of these tabs to Pending. Only when it is Approved by another user, the changes will be effective.
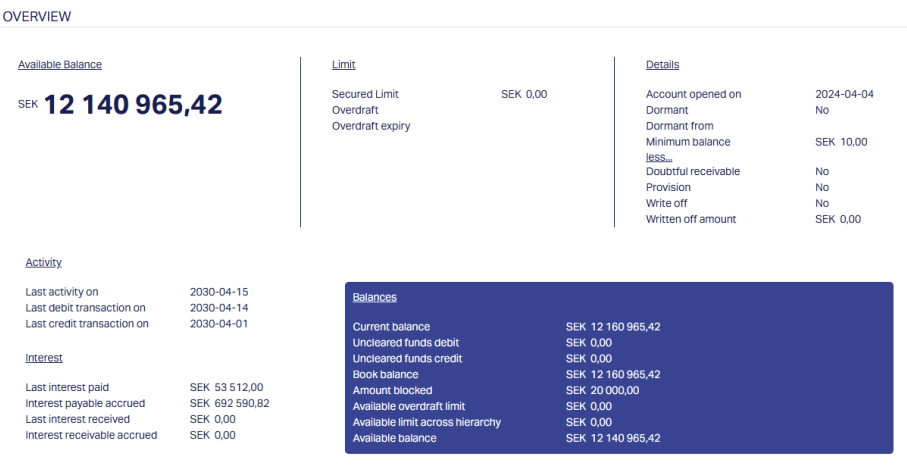
Overview
The Overview tab allows you to see various details of an account to get an immediate overview of the account in terms of the various balances in the account and details of the current cycle, past cycle. It also shows information on the interest and general activities in the account.
To view the account details
1. Access Client Account page and click Overview tab to view the details.
The fields available are:
Secured limit is the total limit amount attached to the client account while creating an account. The value is derived from the Secured By tab. This is a static amount.
Overdraft limit denotes the maximum amount up to which the account can be overdrawn. If Overdraft allowed = No or No overdraft amount has been maintained at Account level, then by default value for the field will be 0.00. This will be derived from the Settings tab at the Account level.
Overdraft expiry Limit denotes the date up to which the account can be overdrawn. By default, Aura shows you the current business date, but you may change it to any later date. You cannot enter a past date. On the expiry date, during EOD process, Aura will default the overdraft limit to zero. This field will be enabled only on selecting Yes for overdraft limit in Product → Settings for Current accounts. This will be derived from the Settings tab at the Account level.
Current balance denotes the current value dated balance in the account.
Uncleared funds - Debit denotes the total amount of future value dated debits for the account. In case of negative debits (say, for a reversal) with future value date, it will be shown under Uncleared funds - Credit.
Uncleared funds - Credit denotes the total amount of future value dated credits for the account. In case of negative credits, (say, for a reversal) with future value date, it will be shown under Uncleared funds - Debit.
Book balance will display the current book dated balance. The Book balance will be calculated as Value dated balance minus Uncleared Funds Debit plus Uncleared Funds Credit. This will be shown as a negative amount in case of Debit balance and as a positive amount in case of Credit balance.
Amount blocked is the sum of authorizations that are pending on the account. The value is derived from the sum of all active amount blocks in the Amount block tab. This is considered as a negative balance for the account.
Available overdraft limit is an additional amount that is granted by bank. This will be derived from the Settings tab.
Available limit across hierarchy is the minimum available limit across the limit hierarchy above. If the limit has been over-utilized, this field will be 0.
Available balance denotes the available balance in the account and is calculated as follows: Book balance minus Amount Block plus Available Overdraft plus Available limit across hierarchy.
Last interest paid denotes the amount of interest last paid out (credited) to the customer's account during the last interest liquidation cycle.
Interest payable accrued denotes the interest payable accrued (but not yet credited to the customer's account) as of the previous day, since interest payable accrual happens at the end of day.
Last interest received denotes the amount of interest last received on the account due to overdraft balances during the last interest liquidation cycle.
Interest receivable accrued denotes the interest receivable accrued (but not yet debited from the customer's account) as of the previous day, since interest receivable accrual happens at the end of day.
Last activity on displays the date on which the last activity (debit / credit) was recorded on the account.
Last debit transaction on displays the date on which the last debit transaction was recorded.
Last credit transaction on displays the date on which the last credit transaction was recorded.
Doubtful receivable will be Yes if doubtful receivable impairment treatment is currently booked for the account.
Provision will be Yes if Provision impairment treatment is currently booked for the account.
Write off will be Yes if Write off impairment treatment is currently booked for the account.
Write off amount denotes the amount to be written off.
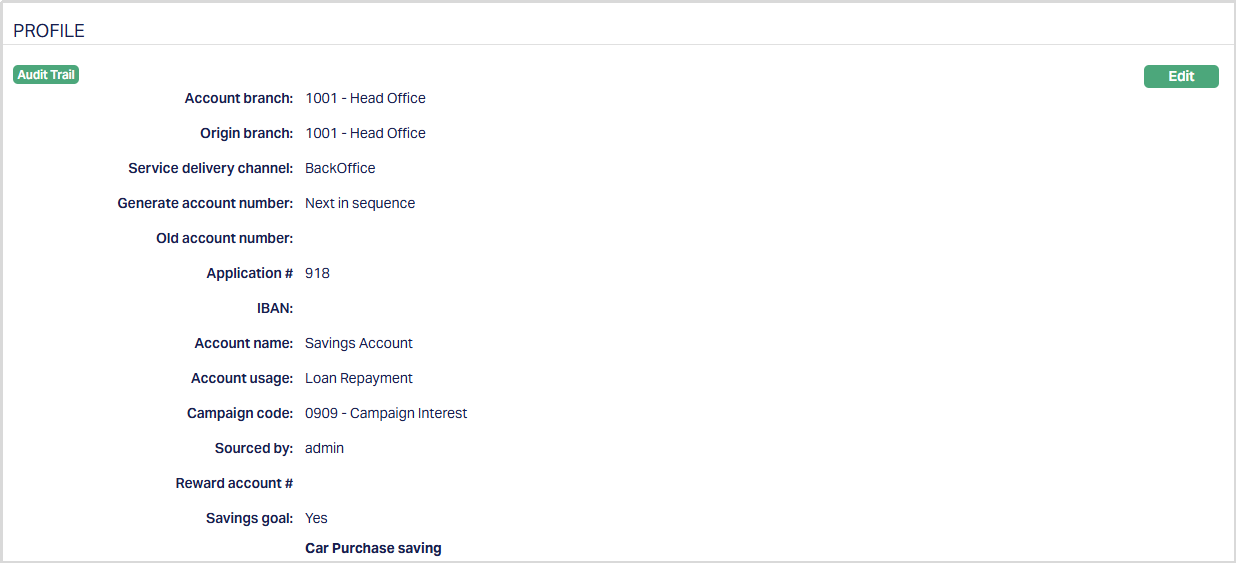
Profile
The Profile tab, which is the default tab in the Client Account Maintain screen, shows the basic details of the Client Account. For details refer to Client Account → New Client Account → Account Details (1/2).
1. Access Client Account page and click Profile tab to view the details as per sample below. The details are defaulted from the entries that you made during creation of a Client Account. For details refer New Client Account → Account Details (1/2).
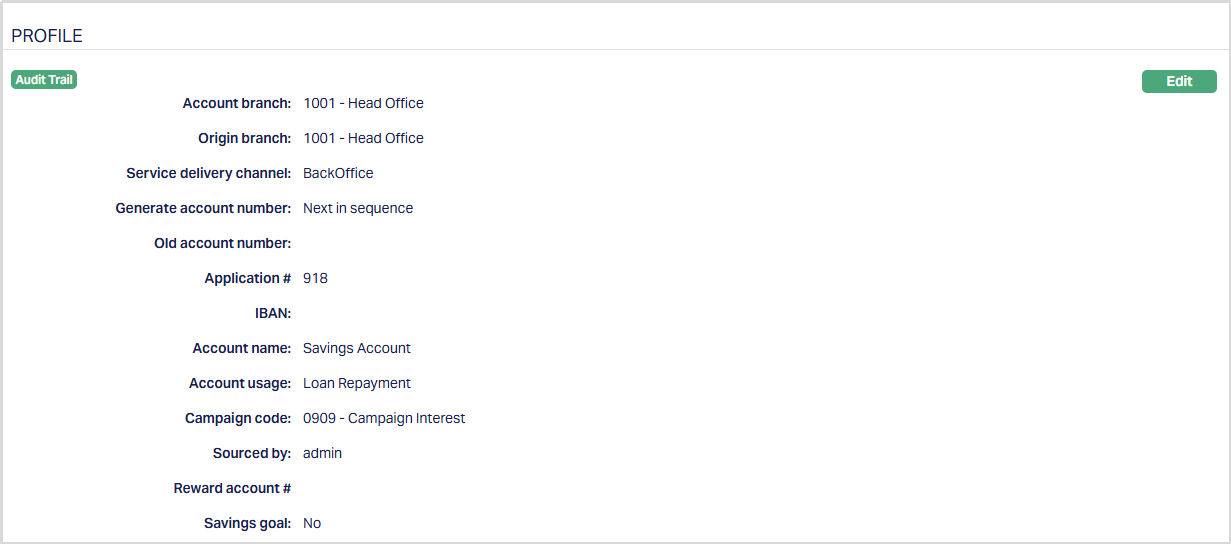
The additional fields that you can view in the Profile tab are explained below:
2. Origin branch denotes the branch name where the Account was created. This field is non-editable.
3. Old Account number can be used to record the earlier account number, say, from a legacy system, for purposes of reference. You can enter the same during Edit.
4. ConnectCore displays the IBAN for the Account. IBAN is generated only if you have selected IBAN generation required at Product level. This field is non editable.
5. Reward account # denotes the account number of the reward account associated with the client account. If Reward account product has been attached at Client account product level, then on creation of client account Reward # will be auto generated and will display here.
6. The Savings goal field in the Profile tab displays whether a savings purpose has been defined for the client account.
To edit Profile,
1. Access Client Account page. Profile tab is displayed by default.
2. Click Edit. Edit Client Account page appears.
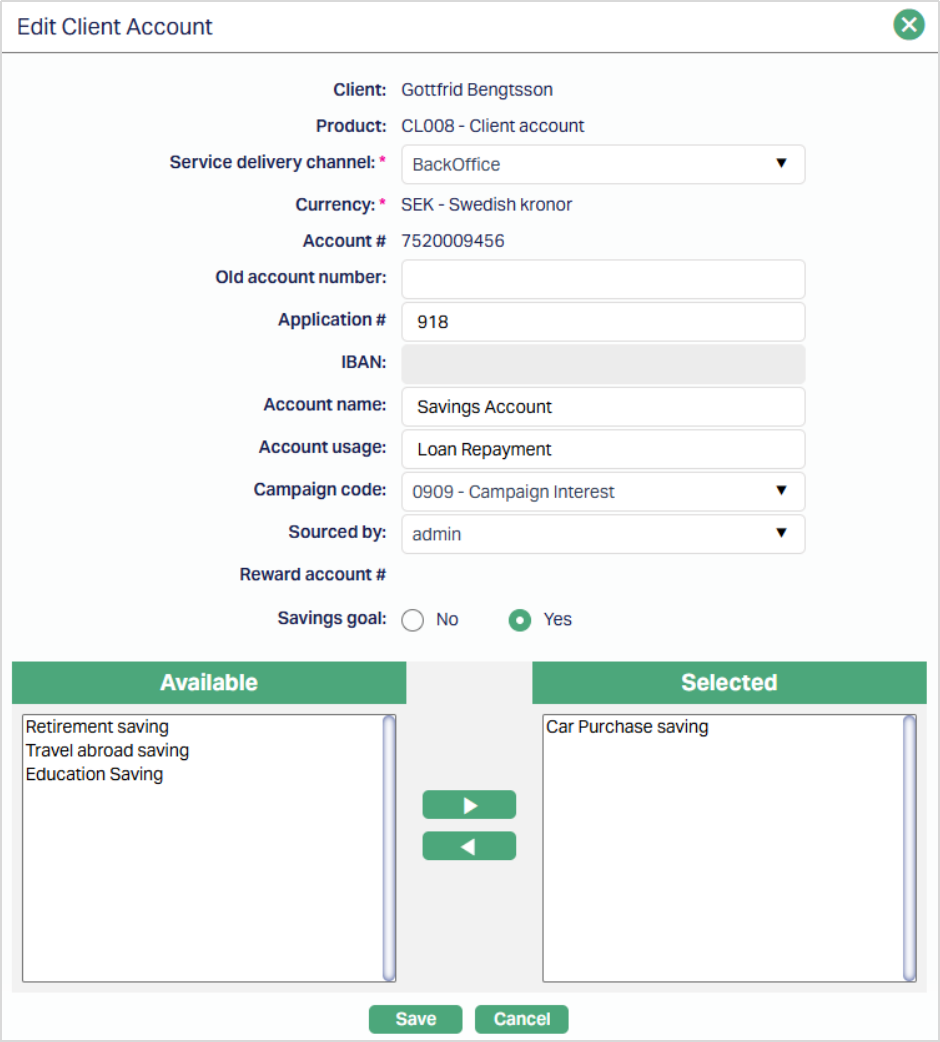
You can edit only the following fields:
Service delivery channel
Old account number
Application number
Account name
Account usage
Campaign code
Sourced by
3. Savings Goal - This field allows you to indicate whether the client account is associated with one or more predefined savings purposes.
- When you create a client account, Aura sets the Savings goal field to No by default. When you select No, the selection control is not displayed, and no savings purpose is associated with the account.
- When you select Yes, Aura displays a selection control that allows you to choose one or more savings purposes for the account. The available values in this selection are maintained under Admin → System Codes → Generic Definitions → Purpose of savings. You can select multiple values, and the selected items are displayed in the Profile tab after saving.
4. Click Save. Profile page appears with the edited details.
Function: Edit
Status
Status tab allows you to view / set the loan account status as well as define the preferences for the current status of the account. The preferences will allow you to enable / disable certain functions on the loan account like interest accrual, waiver, liquidation, disallow debit, disallow credit, etc.
The sub tabs available are:
Account Status
To Add/Edit the Account status
Access Client Account page.
Click Status tab. The Account Status tab is opened by default
The following fields are shown only in the View screen and are not editable:
Account Status field denotes the current status of the account.
Description field denotes the description maintained for an account status maintained at Admin > Status > Current account status.
Reason displays the reason for the status selected for the account. In case of automatic status movements, the reasons are predefined; while in case of manual status updates, this will display the reason input during the manual status change.
Allow auto-movement is defaulted from Account status maintenance in case of user defined Account Statuses; and in case of pre-shipped Account Statuses, this is predefined. When status is Opened, the Allow auto movement flag is defaulted to No, and is not editable.
Modify Preferences is defaulted from Account status maintenance in case of user defined Account Statuses; and in case of pre-shipped Account Statuses, this is predefined. When status is Opened, the Modify Preferences flag is defaulted to No, and is not editable.
Status denotes the status of the record. In case of automatic status movements, the Status is automatically set to Approved; while in case of manual status updates, this will be Pending. Once another user manually approves the record, this will be set to Approved.
Added field denotes the date on which the record was added.
Added by field denotes the name of the user who created the record.
Approved field denotes date on which the record was approved and is displayed only for approved records.
Approved by field denotes name of the user who approved the record and is displayed only for approved records
Click Add. Add Account status screen appears.
Select Account Status from the drop-down list. Depending on the current status of the client account, the possible values are:
a. Opened: This is the initial account status as soon as it is created.
b. Activated: This is the status in which transactions are allowed on the account. It has to be manually set by a user different from the one who created the account.
c. Blocked: You can manually update the account status from Activated to Blocked as required. In this account status, no debits or credits will be allowed from / into the account. When you want to remove the block, you can update the account status manually back to Activate.
d. Closed: This account status will be automatically updated when an account closure is processed.
e. Re-opened: You can open an account that has a Closed account status, if needed. This account status is equivalent to Open account status in all other respects but gives you an indication that the account was once Closed.
Aura will validate and allow you to change the status as mentioned below.
Opened to Activate
Activated to Block or any user defined status.
Blocked to Activate.
Closed to Re opened.
Reopened to Activated
Enter the Reason for the status selected.
If Allow auto movement is Yes, rule-based status changes will automatically be applied to the account; however, if No is selected, then the rule-based status changes will not apply. By default, this will be as explained in the following table:
| Current Status | Allow auto movement flag |
|---|---|
| Opened | Defaulted to No and disabled; the Preferences will not be displayed |
| Activated | Defaulted to Yes and enabled; all the Preferences will be displayed. |
| Closed | Defaulted to No and disabled |
When the Modify Preferences is marked as Yes, then the Preferences will be enabled and you can modify them as required. When the flag is marked as No, then all Preferences from the Status Maintenance will be defaulted and disabled. By default, this will be as explained in the following table:
| Current Status | Modify preferences flag |
|---|---|
| Opened | Defaulted to No and disabled; the Preferences |
| will not be displayed | |
| Activated | Defaulted to Yes and enabled; all the |
| Preferences will be displayed. |
Disallow Debit: When the flag is marked as Yes, Aura will not allow you to debit from that account. However, based on Allow Forced Debit flag in the Transaction code, debits may still be done. It will be defaulted from the account status maintenance after selection of account status.
Disallow Credit: When the flag is marked as Yes, Aura will not allow you to credit to this account. However, based on Allow Forced Credit flag in the Transaction code, credits may still be done. It will be defaulted from the account status maintenance after selection of account status.
Stop fee generation: When the flag is marked as Yes, Aura will not process any periodical fee for the account. However, the transaction charges that are generated by the Transaction file upload will continue to apply. It will be defaulted from the account status maintenance after selection of account status.
Stop debit interest accrual: When the flag is marked as Yes, Aura will stop any interest accrual on the debit balances for this account. When the flag is unchecked, Aura will continue to accrue interest from that date. There will not be any accrual for the interim period when this flag is Yes. It will be defaulted from the account status maintenance after selection of account status.
Stop Credit interest accrual: When the flag is marked as Yes, Aura will stop any interest accrual on the credit balances for this account. When the flag is unchecked, Aura will continue to accrue interest from that date. There will not be any accrual for the interim period when this flag is Yes. It will be defaulted from the account status maintenance after selection of account status.
Waive accrued debit interest: This field is enabled only if Stop debit interest accrual is marked as Yes. You can choose to waive the interest that has accrued till that point by marking this Yes. If this is marked as No, then the interest that had accrued till then will not be waived and will remain as an accrual. It will be defaulted from the account status maintenance after selection of account status.
Waive accrued Credit interest: This field is enabled only if Stop credit interest accrual is marked Yes. You can choose to waive the interest that has accrued till that point by marking this Yes. If this is marked as No, then the interest that had accrued till then will not be waived and will remain as an accrual. It will be defaulted from the account status maintenance after selection of account status.
Stop debit interest liquidation: When the flag is marked as Yes, Aura will not liquidate any debit interest even though the liquidation day according to the frequency is reached. The accrual of debit interest continues and thus this flag will only stop the liquidation of interest as long as this option is checked. When the flag is unchecked all the accrued debit interest will be liquidated in the next cycle. It will be defaulted from the account status maintenance after selection of account status.
Stop credit interest liquidation: When the flag is marked as Yes, Aura will not liquidate any credit interest even though the liquidation day according to the frequency is reached. The accrual of credit interest continues and thus this flag will only stop the liquidation of interest as long as this option is checked. When the flag is unchecked all the accrued credit interest will be liquidated in the next cycle. It will be defaulted from the account status maintenance after selection of account status.
Force capitalization of debit interest: When the flag is marked as Yes, Aura will liquidate the accrued debit interest in the account, when the account moves to this payment status. If this is Yes, Stop Debit Interest Accrual will be Yes and disabled. It will be defaulted from the account status maintenance after selection of account status.
Force capitalization of credit interest: When the flag is marked as Yes, Aura will liquidate the accrued credit interest in the account, when the account moves to this payment status. Withholding Tax will be debited. If this is Yes, Stop Credit Interest Accrual will be Yes and disabled. It will be defaulted from the account status maintenance after selection of account status.
Stop statement generation: When the flag is marked as Yes, Aura will not generate any statement for this account and the charge for the statement generation will not be charged on the account.
Set overdraft limit to zero: In the product level, Overdraft Allowed field is set as No, then this field will be disabled. If this is marked as Yes, then on approval of the account status - under Client account maintenance settings tab the Expiry date field will be replaced by Current booking date and the Overdraft limit becomes 0.
Restrict account closure: If this flag is marked as Yes, then Aura will not allow you to close the account-on-Account closure.
- Close on complete write off: When the flag is marked as Yes, and 100% write off is set as impairment treatment for the account, then the loan account will be completely written off and the account will be closed. If the preference is marked as Yes and the impairment treatment is not set for the account, then the account will not be closed. If this field is marked as No then on complete write off the account will not be closed.
Click Save. The Account Status screen appears with the added details. .
Functions: Add, Edit, Approve.
Any change in the tab will set the tab status to Pending till it is approved by another user. On approval, the tab status is set to Approved and the red bubble disappears. If the status is pending, the Edit button also gets enabled. If you have mapped the loyalty product to the client account product and marked Yes for auto generate, then on approval of client account activation, the loyalty account will be auto generated and displayed.
You can edit a record for Account Status. To edit,
1. Click Edit. Edit Account Status page appears.
You can edit Reason, Allow auto movement and Modify preferences, subject to certain conditions as described earlier.
The Preferences can be edited, only if the Modify preference is Yes. By default, it will display all the last maintained values for the Account status.
2. Click Save. Account Status page appears with the edited details.
Note: The Status will reflect as Pending. Once Approved by another user the Status will change to Approved and the red bubble disappears as per the sample shown below.
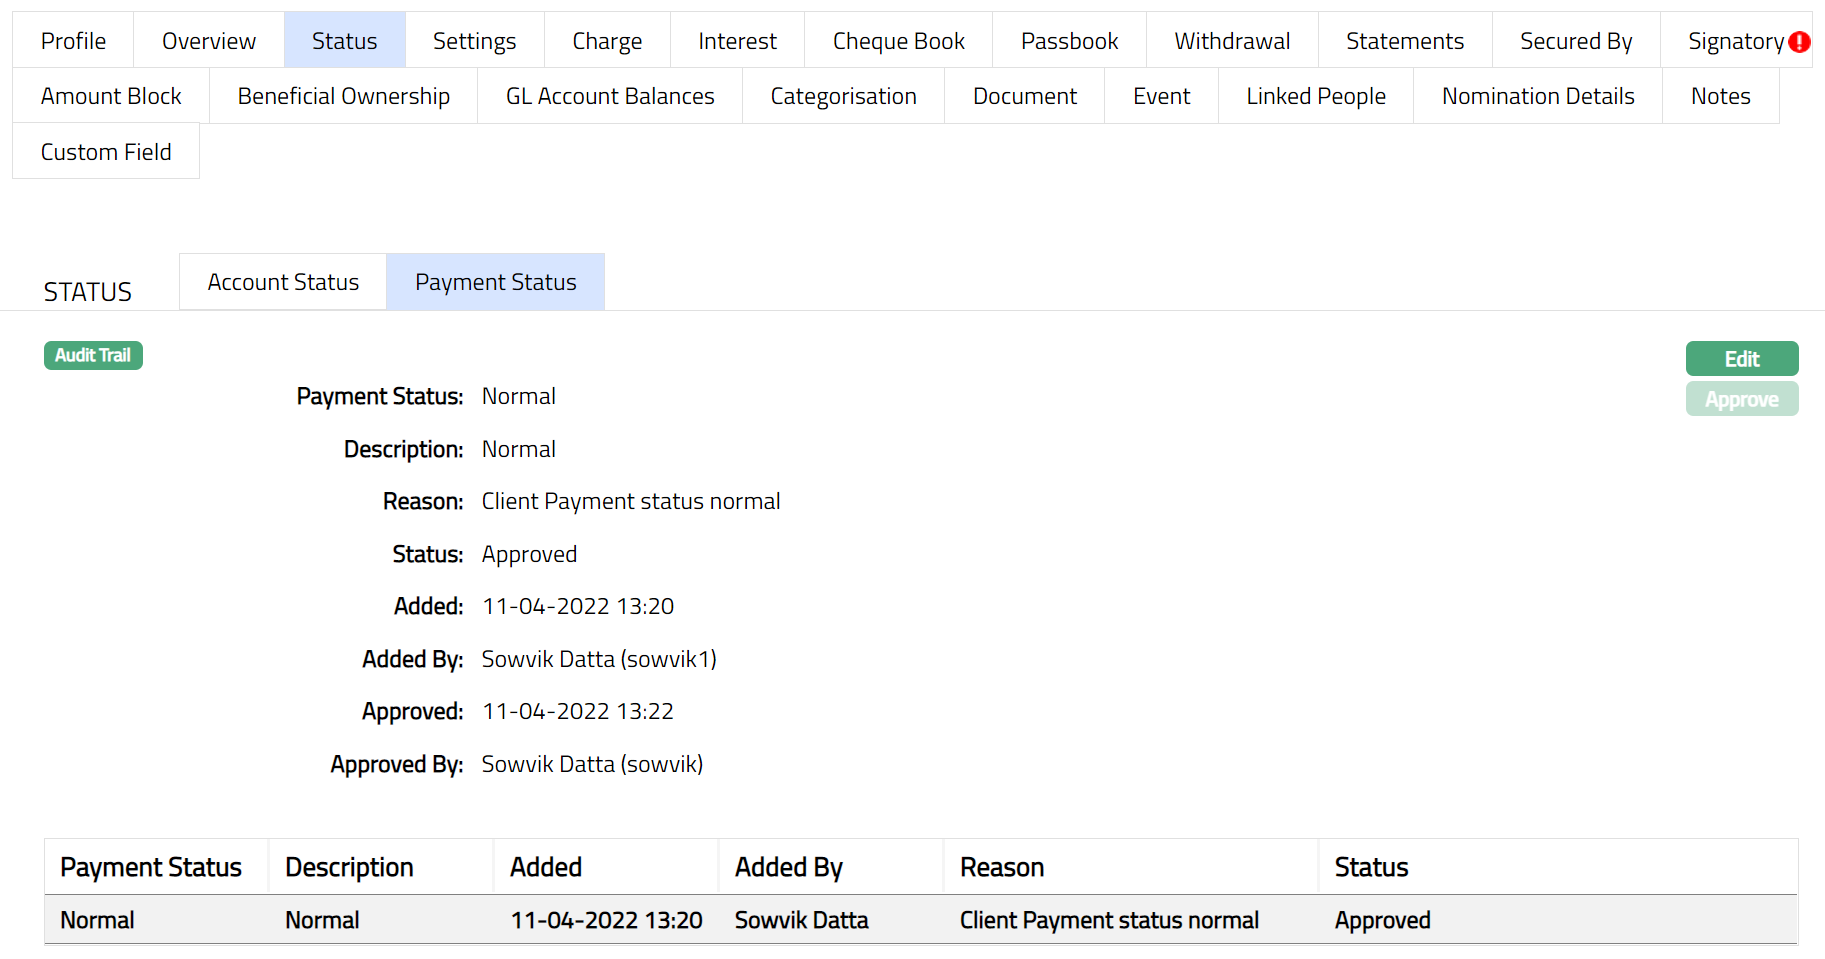
Payment Status
This tab will allow you to set and view the history of the Payment Status of the Loan Account. Status maintained under Admin > Status > Current Account Status. It will also display the pre-shipped Payment Statuses, custom status and the generic value Any. You can edit the defaulted preferences before approval.
To View/Edit the Payment status
- Access Client Account page. Click Payment Status tab. A sample of the tab is shown below.
Additional fields are
Payment Status field denotes the current payment status of the account.
Description field denotes the description maintained for an account status maintained at Admin > Status > Current account status.
Reason displays the reason for the status selected for the account. In case of automatic status movements, the reasons are predefined; while in case of manual status updates, this will display the reason input during the manual status change.
Status field denotes the status of the record.
Added field denotes the date on which the record was added.
Added by field denotes the name of the user who created the record.
Approved field denotes date on which the record was approved and is displayed only on approval.
Approved by field denotes name of the user who approved the record and is displayed only on approval.
- Click Edit. Edit Payment Status page appears.
Note: Only Reason field is editable.
By default, on creation of an account; Normal will be the Payment status and Description of the loan account
Enter the Reason for editing the preferences of the Payment status.
Click Save. The Payment Status page appears with the edited details. .
Approve: Any person other than the one who has edited the payment status can approve the payment status record. Please refer to the sample screen shot shown below.
Functions: Edit,Approve
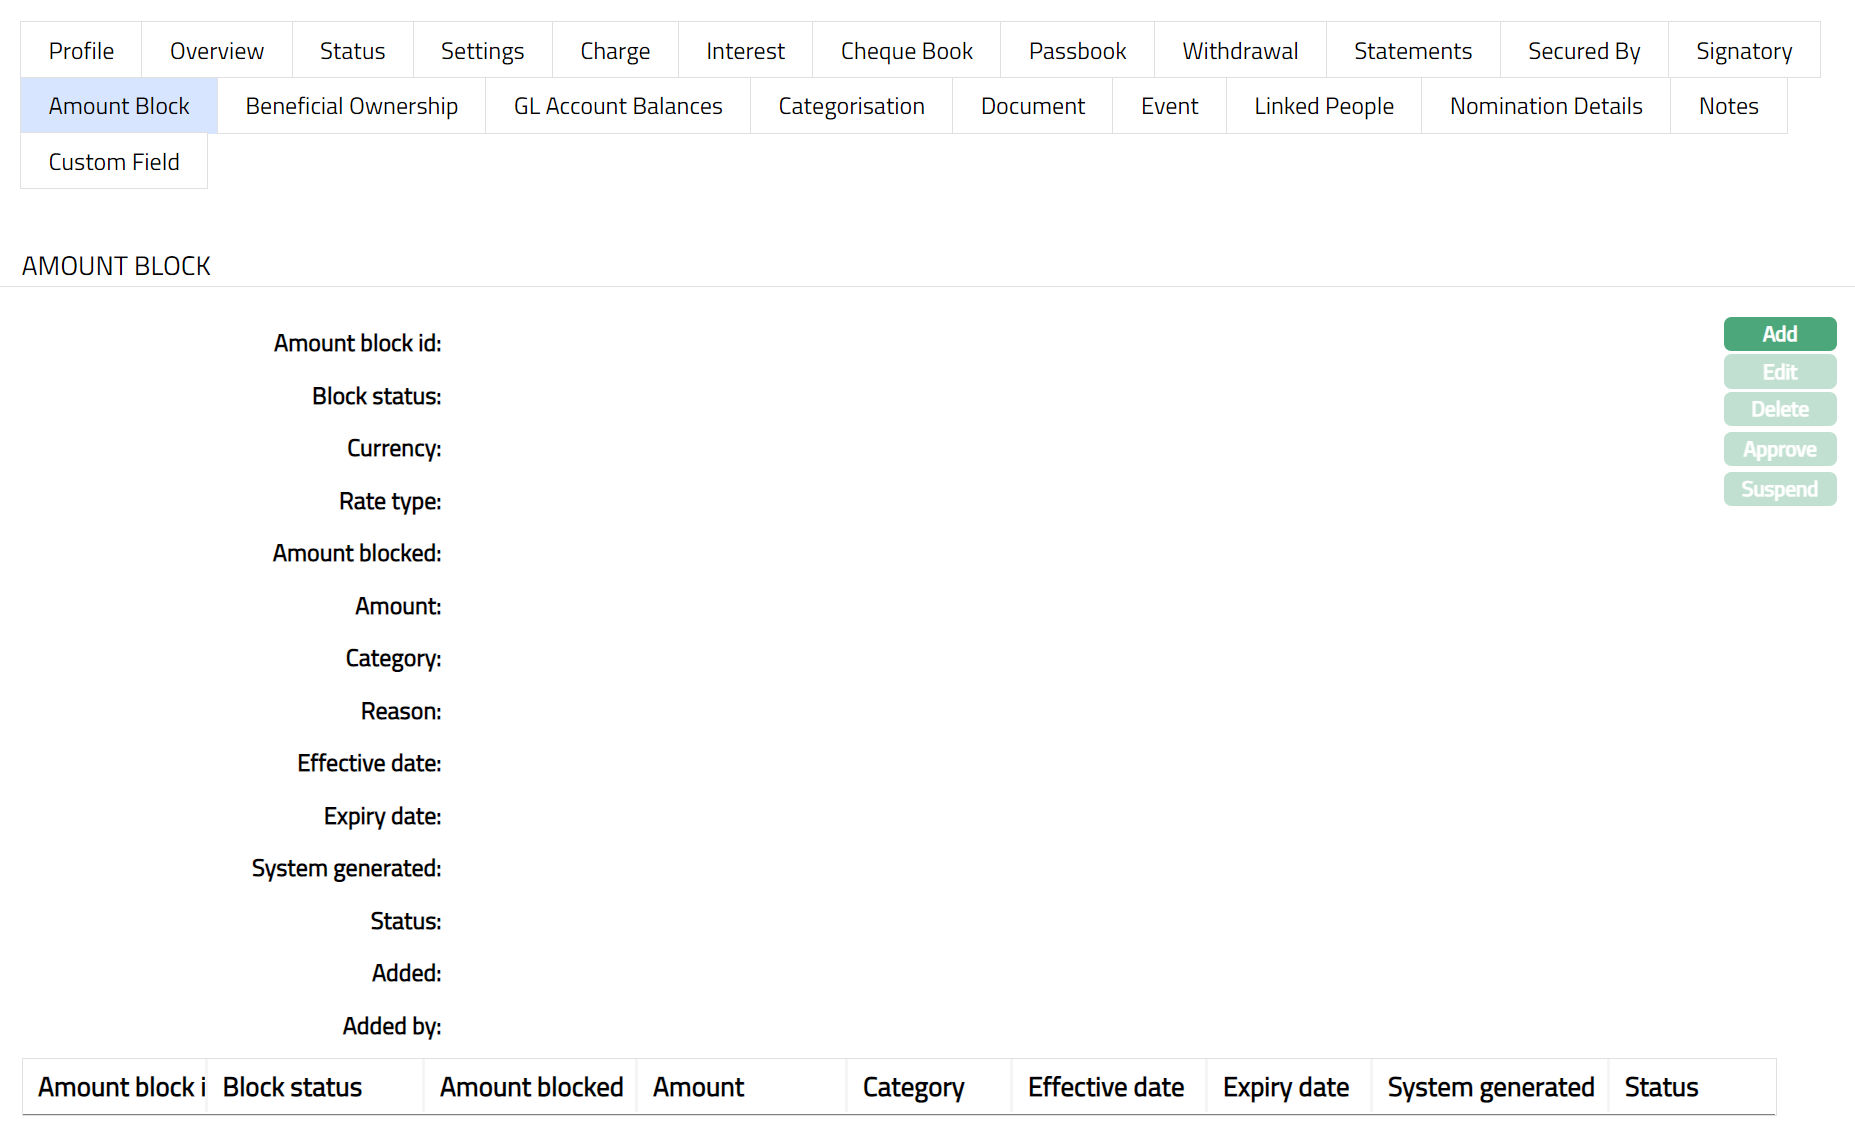
Amount Block
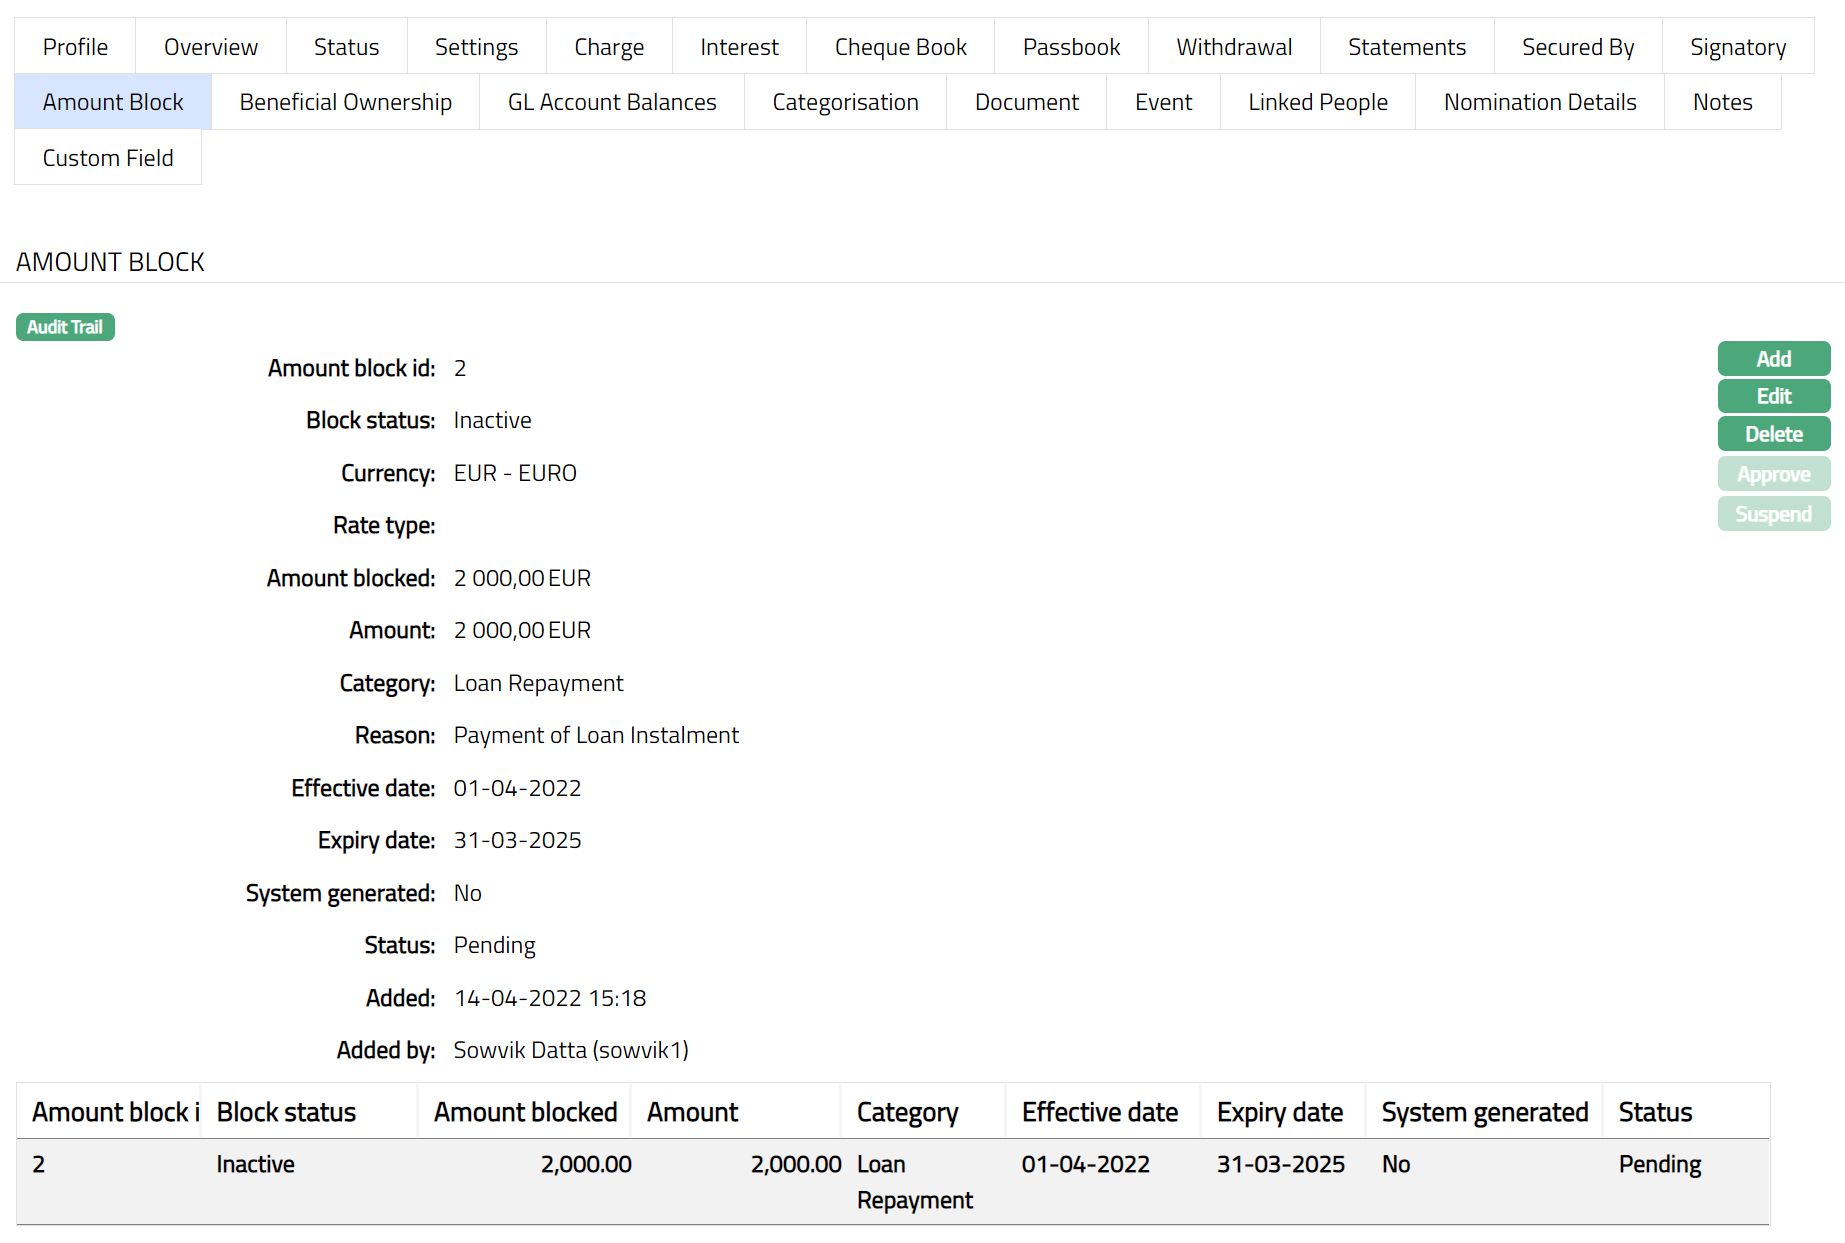
Using this tab, you can set certain settings to block the amount. Once the amount block is approved, the same will be blocked in the account and cannot be withdrawn / used. Any entry / change in this tab will set the tab status to Pending till it is approved by another user. On approval, the tab status is set to Approved. The amount block will be displayed in the Overview tab only when the amount block is approved. The Amount blocks can be manually created or Aura itself can create Amount blocks for example, when cash collateral is attached to the account.
To add new Amount Block
1. Access Client Account screen and click Amount Block tab.
2. Click Add. Add Amount Block screen appears.
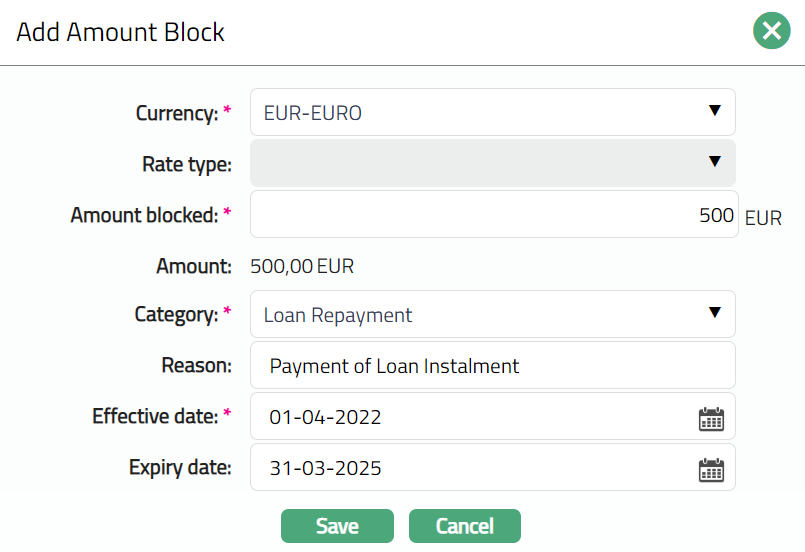
3. Select the currency from the drop-down list of GL currencies. This is the currency in which you want the amount to be blocked (block currency).
4. Select the currency Rate type from the drop-down list. Aura will display the list of rate types maintained for the entity. This field will be enabled only when you select a Currency other than the account currency.
5. Enter the Amount to be blocked. It is the block amount in block currency. This field can be edited.
6. Aura will retrieve the mid-rate for the currency pair (block currency and account currency) and convert Amount blocked to Amount. If block currency and account currency are same, then Aura will default amount blocked in Amount field.
Select the block Category from the drop-down list. It is the category to which the amount block belongs and should have been maintained under System codes > Categories > Block categories. Amount blocks are categorized based on
a. Check for available balance -- If this option is chosen, the system ensures block is successful only if there is enough available balance to cover the amount requested to be blocked.
b. Check for current balance -- If this option is chosen, the system will ensure block is successful only if there is enough book balance to cover the amount requested to be blocked.
c. Check for cash limit balance -- If this option is chosen, the system will ensure block is successful only if there is enough available balance to cover the Cash limit balance. This is to check if the customer has exceeded his cash limit though he may have enough available (POS) balance.
d. No check. -- If this option is chosen, the system will not check for any balance and successfully blocks the amount requested.
8. Enter the Reason for amount block.
9. Enter the Effective date. It is the date from which the amount block is effective. You cannot enter a past date. The effective date will be defaulted to current business day and may be changed to a future date. This field can be edited.
10. Expiry date is the date when the amount block expires Based on the Expiry days maintained for the Category chosen above, Expiry date will be calculated and displayed. You can however change it. This date should be greater than or equal to the effective date. If you don't enter the expiry date, then the amount block is effective till you release the amount block.
11. Click Save. Amount Block page appears with the added details.

Functions: Add, Edit, Delete, Approve, Suspend.
Once the amount block is added, The Block status of the Amount block will be Active/Inactive, and the record status will be Pending. Any user other than the one who has added the record can approve the Amount block record. On approval, the record status will be Approved.
The additional fields that you can view in the tab are explained below:
Block Status field denotes the status of the Amount block. The statuses available are:
Inactive: If the Effective date for the Amount block is greater than the current date, the Block status will be Inactive.
Active: If the Effective date is equal to the current date the Block status of the Amount block will be active.
Suspended: You can Suspend (release) an Amount block where block status is Active or Inactive any time before expiry date. On such suspension / release, the Block status will be Suspended.
Expired: When the Expiry date is equal to the current date, then on end of the day Block status of the Amount block is changed to Expired.
The fields available on this screen are:
Amount block id denotes the id number of the amount block record that is auto generated by Aura.
Block status denotes the status of the amount blocked.
If System generated is No then it denotes that the amount block record is manually generated. If it is Yes, when the system is automatically generated by Aura.
Note: Any change in the tab will set the tab status to Pending till it is approved by another user. On approval, the tab status is set to Approved and the red bubble disappears.
The Additional Fields are:
Status field denotes the status of the record
Added field denotes the date on which the record was added.
Added by field denotes the name of the person who created the record.
Approved field denotes date on which the record was approved.
Approved by field denotes name of the person who approved the record.
To edit an Amount Block
- Click Edit. The Edit Amount Block page appears.
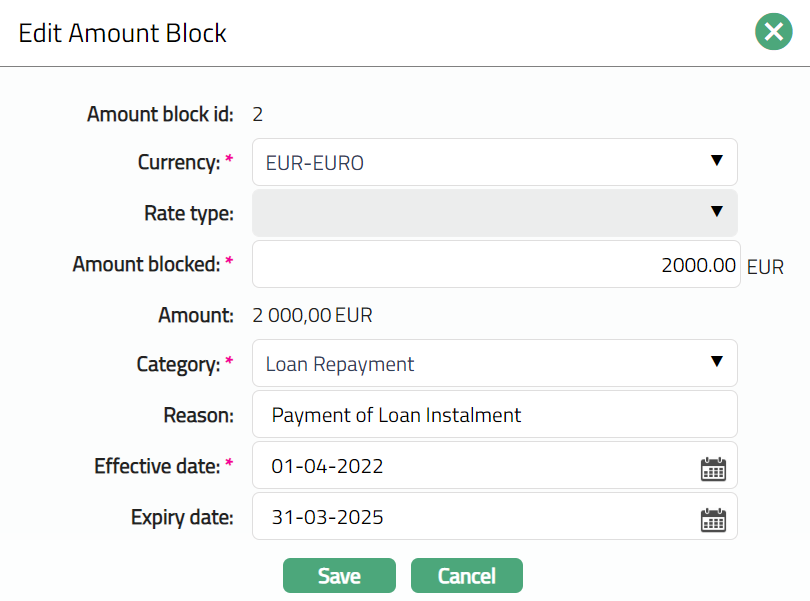
If the record status of the Amount block is Pending and the Block status is Inactive or Active, then, you can edit the amount block. Record. Except Rate type and Amount block id, you can edit all the fields available in the Edit Amount Block screen. For an amount block, if the currency is other than the Account currency, then the Rate type field will be enabled.
If the record status of the Amount block is Approved and the Block status is Inactive, then you can edit only Amount Blocked, Effective date and Expiry date in the Edit Amount Block screen.
Click Save. Amount blocked page appears with the edited details.
Note: Any change in the tab will set the tab status to Pending till it is approved by another user. On approval, the tab status is set to Approved.
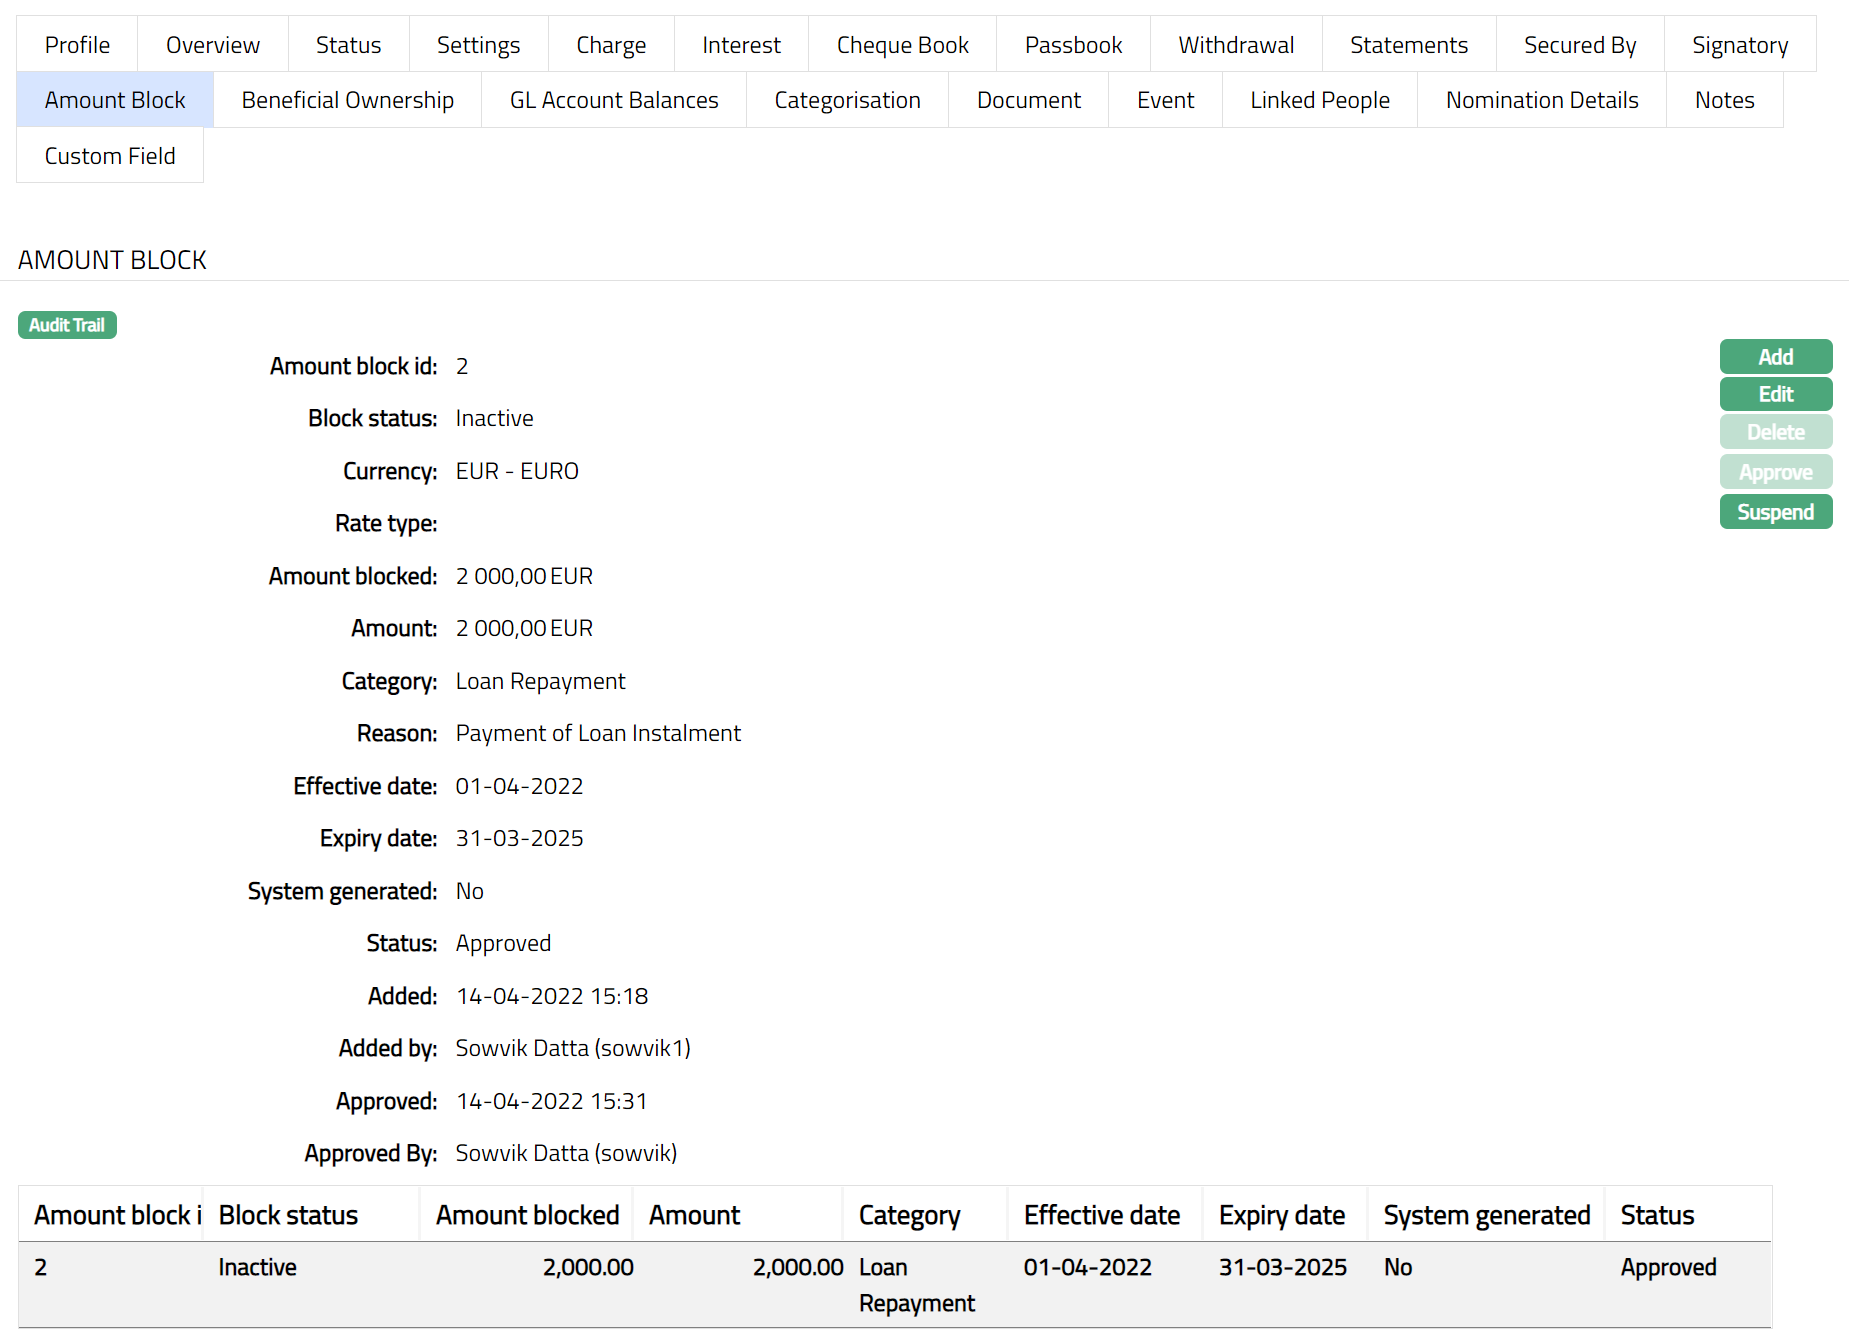
Approve: An amount block can be approved only by a user different from the one who created it. To approve, access the Amount block view from the search page and click Approve. On Approval Amount mentioned in the approved amount block will be set aside upto the amount block expiry date and will not be available to the client.
Suspend: Suspend button will be enabled only for amount blocks where there is no expiry date or where the expiry date is on or after current business date and where the amount block has been approved.
The fields available are:
Status denotes the status of the record.
Added denotes the date on which the limit is added to the Client account while creation of the account.
Added by denotes the name of the person who has added the limit to the card account while creation of the account.
Approved denotes date on which the record was approved and is displayed only if the record is approved.
Approved by denotes name of the person who approved the record and is displayed only if the record is approved.
To Suspend an Amount block,
- Click Suspend button. Suspend Amount block page appears.
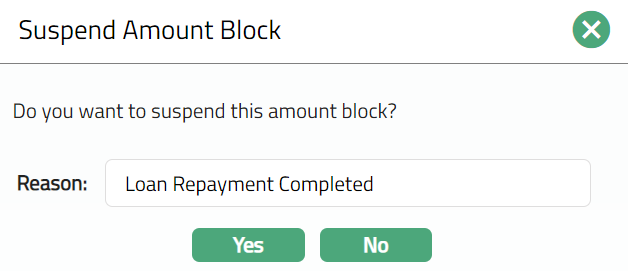
Enter the Reason for the suspension of the Amount block.
If you want to suspend the amount block, click Yes; else click No.
Delete: When the Status is set to Pending, the Delete button is enabled and amount block can be deleted, but once the status is set to Approved, Delete button will be disabled.
Beneficial Ownership
The Beneficial Ownership tab allows you to view and edit the beneficial ownership details for the Client Account. In case the account is for Personal or Corporate client, you can only view the details of the beneficial owner. In case of Joint client, you can view and edit the details of the beneficial owners.
To view the Beneficial ownership details
Access Client Account page and click Beneficial ownership tab to view the details as per sample below. In case of Personal / Corporate
Click Beneficial Ownership tab to see details as shown below.
In case of Personal / Corporate
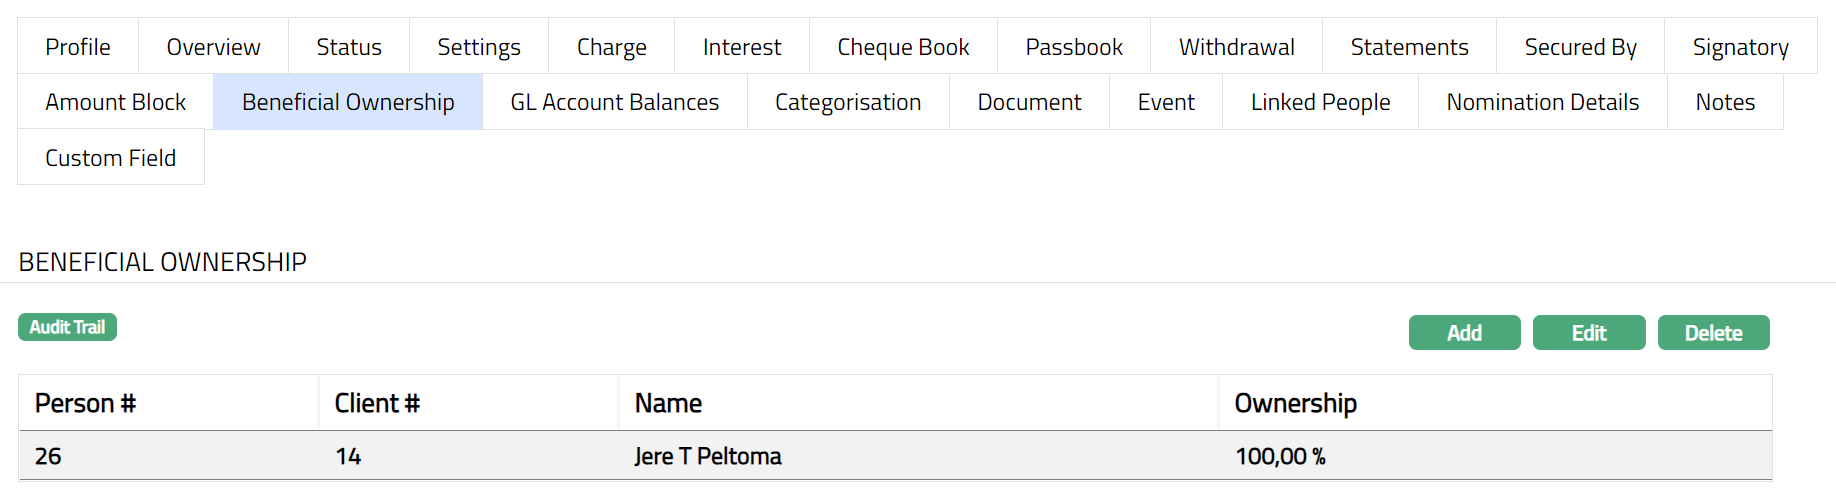
In case of Joint you need to add another Beneficial Owner details.
- Click Add. Add Beneficial Ownership page appears.
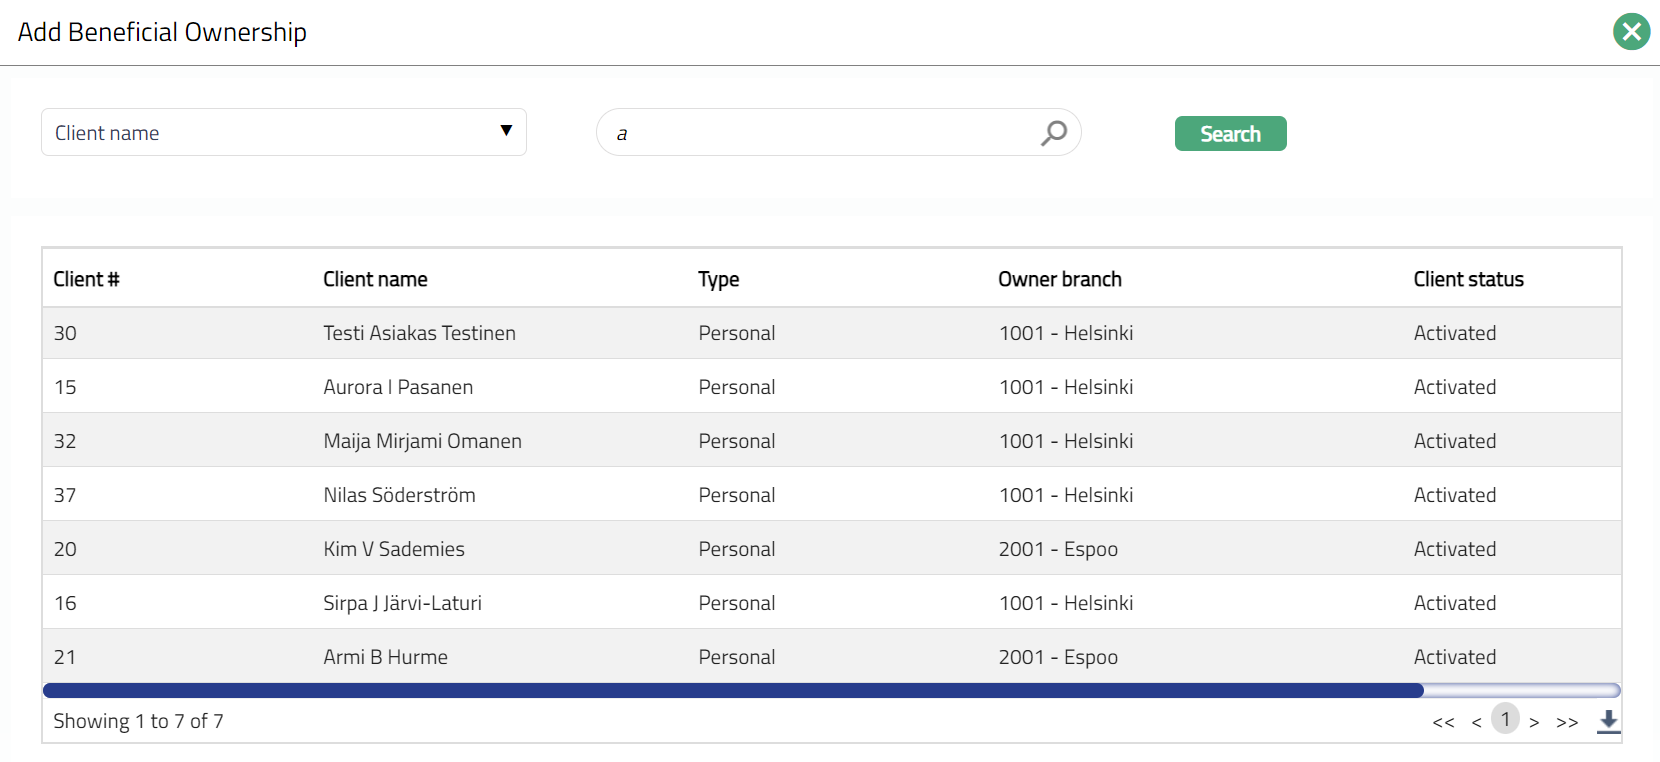
To add select the name of the Beneficial Ownership person from the list.
Once selected the Beneficial Ownership page appears with the Added details.
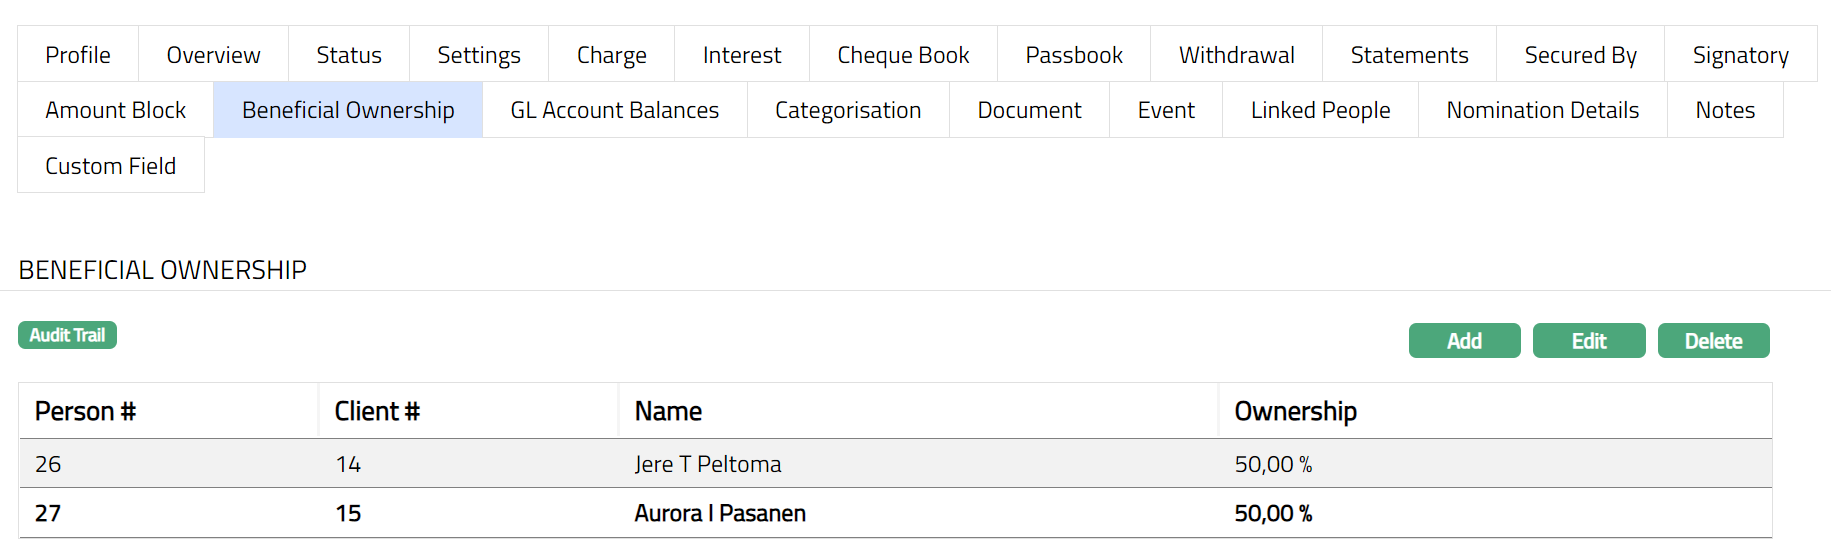
Functions: Add, Edit, Delete
Note: Edit button will be enabled only when Client type is Joint.
To edit,
- Click Edit. The Edit Beneficial Ownership page appears.
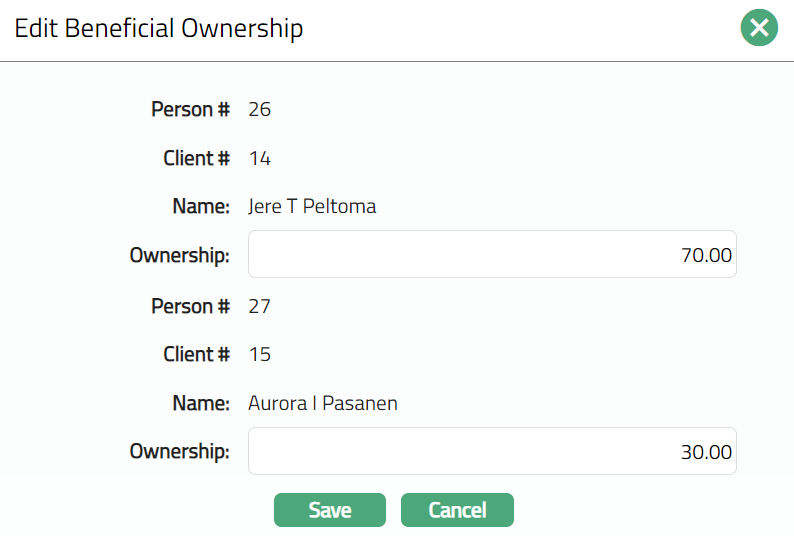
Ownership percentage can be edited is required. The total ownership should be equal to 100%.
- Click Save. Beneficial Ownership page appears with the edited details.
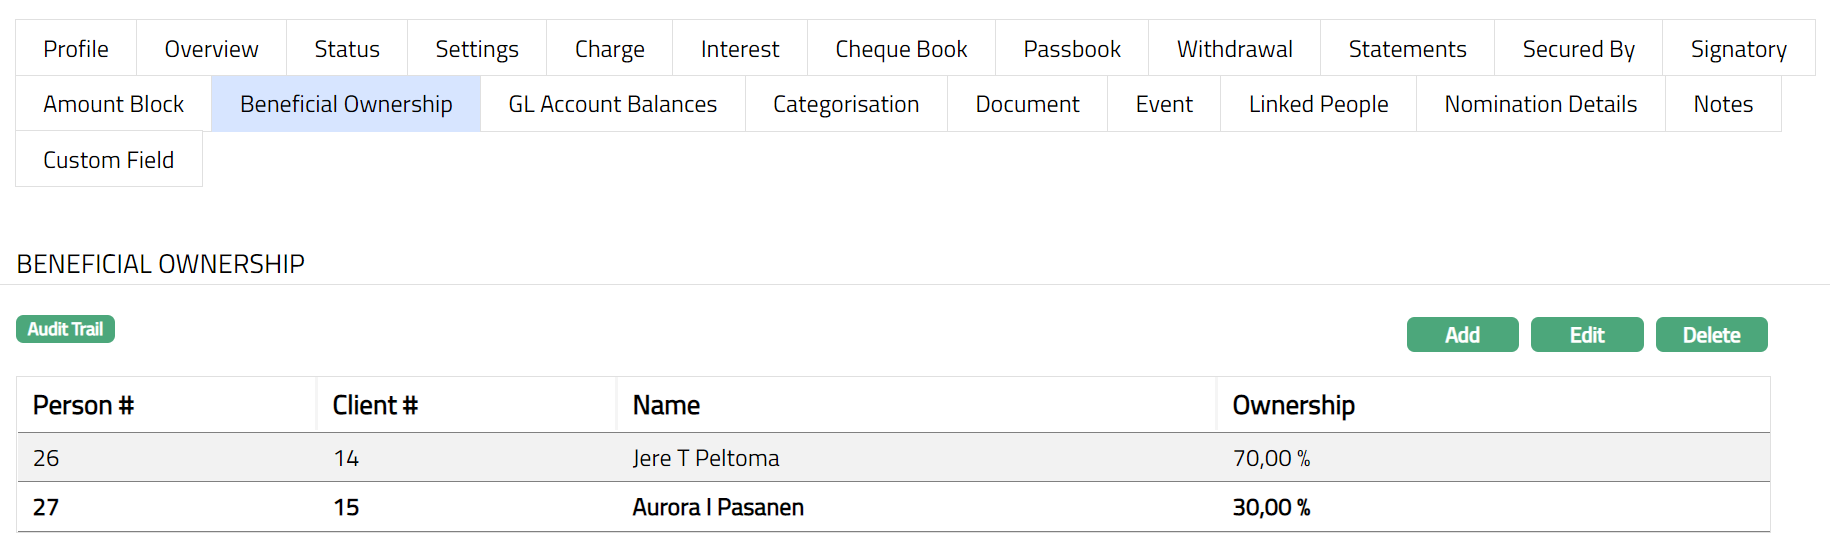
Functions: Add, Edit, Delete
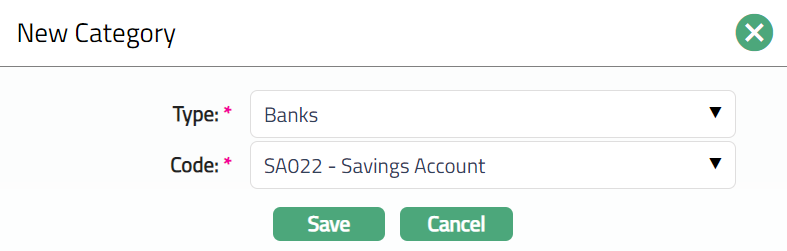
Categorisation
The Categorisation tab allows you to categorise the accounts and add the parameters in the status rules. Based on the categorization done, the account can be moved to various status as required.
To add the Category
- Access Client Account page and click Categorisation tab. The following screen appears.
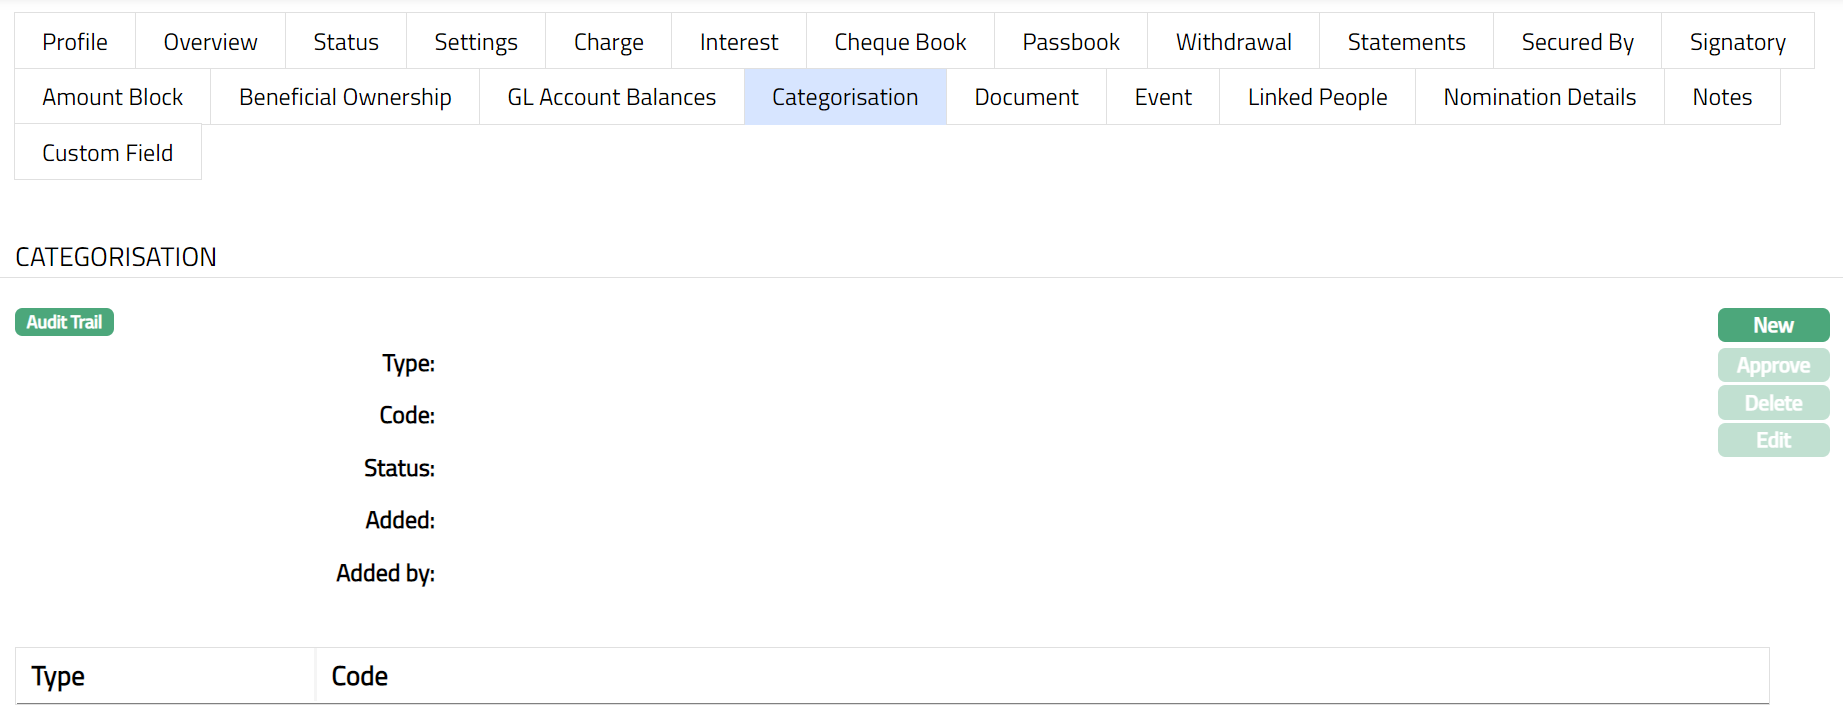
To Add a new category
- Click New. New Category page appears.
Select the Category Type from the drop-down list maintained under Admin > Categories > Category type for which Applicable for is selected as Account.
Select the Code from the drop-down list, maintained under the selected category type at Admin > Categories > Category type.
Click Save. Categorisation page appears with the newly added category.
Note: The categorisation added has to be unique.
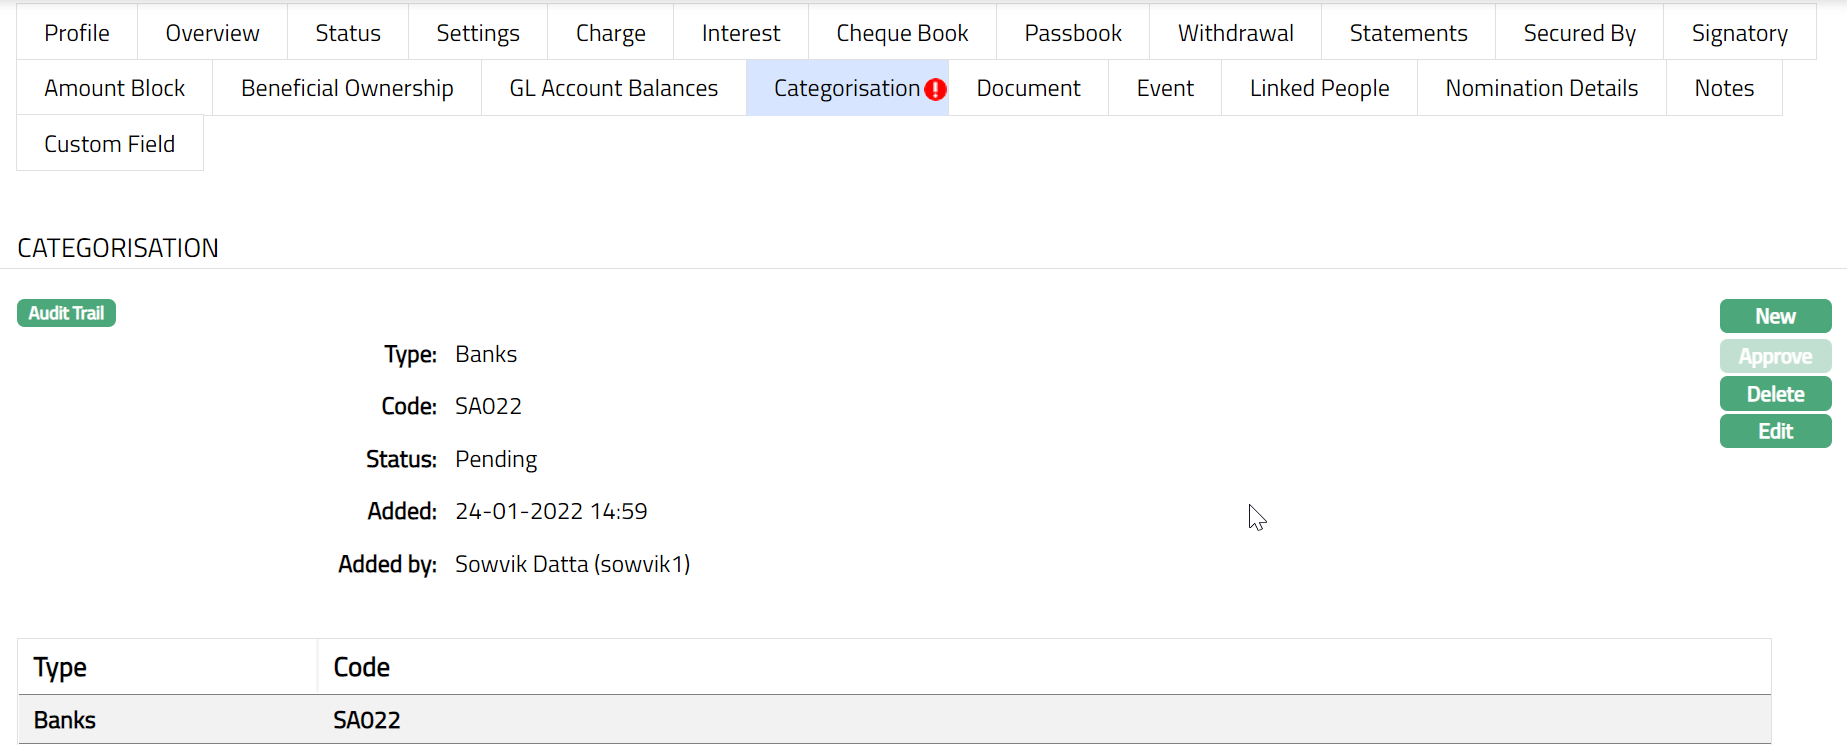
Note: Any change in the tab will set the tab status to Pending till it is approved by another user. On approval, the tab status is set to Approved and the red bubble disappears.
 Functions: New, Approve, Edit, Delete.
The additional fields available here are:
Status field denotes the status of the tab.
Added field denotes the date on which the record was added.
Added by field denotes the name of the user who created the record.
Approved field denotes date on which the record was approved and is displayed only on approval.
Approved by field denotes name of the user who approved the record and is displayed only on approval.
Delete: Click on the Delete button to delete the Categorisation record. A flexible schedule can be deleted until it is approved.
Edit: You can Edit the Categorisation details as per your requirement. Note: Only Code field is editable.
Charge
This tab can be used to view and edit the default charges and additional charges of the current account. It has two sub-tabs, one for each of these.
Note: The charges are defaulted from the Product during Account creation; and the Charge Combination that is applicable to the Client at that point of time will be applied. Any changes in the parameters of the Client or the Account will NOT result in automatic update of the Combination and the applicable charges
The Sub tabs available in the Charge tab are
Default Charges
The Default Charges tab allows you to view and maintain the details of different charges applicable for the client account.
To edit the Default Charges
Access Client Account page. Click Charge tab to view the details as per sample below. Default Charges page is displayed by default. The details are defaulted from Product > Charges based on the Product that you chose for the account during creation.
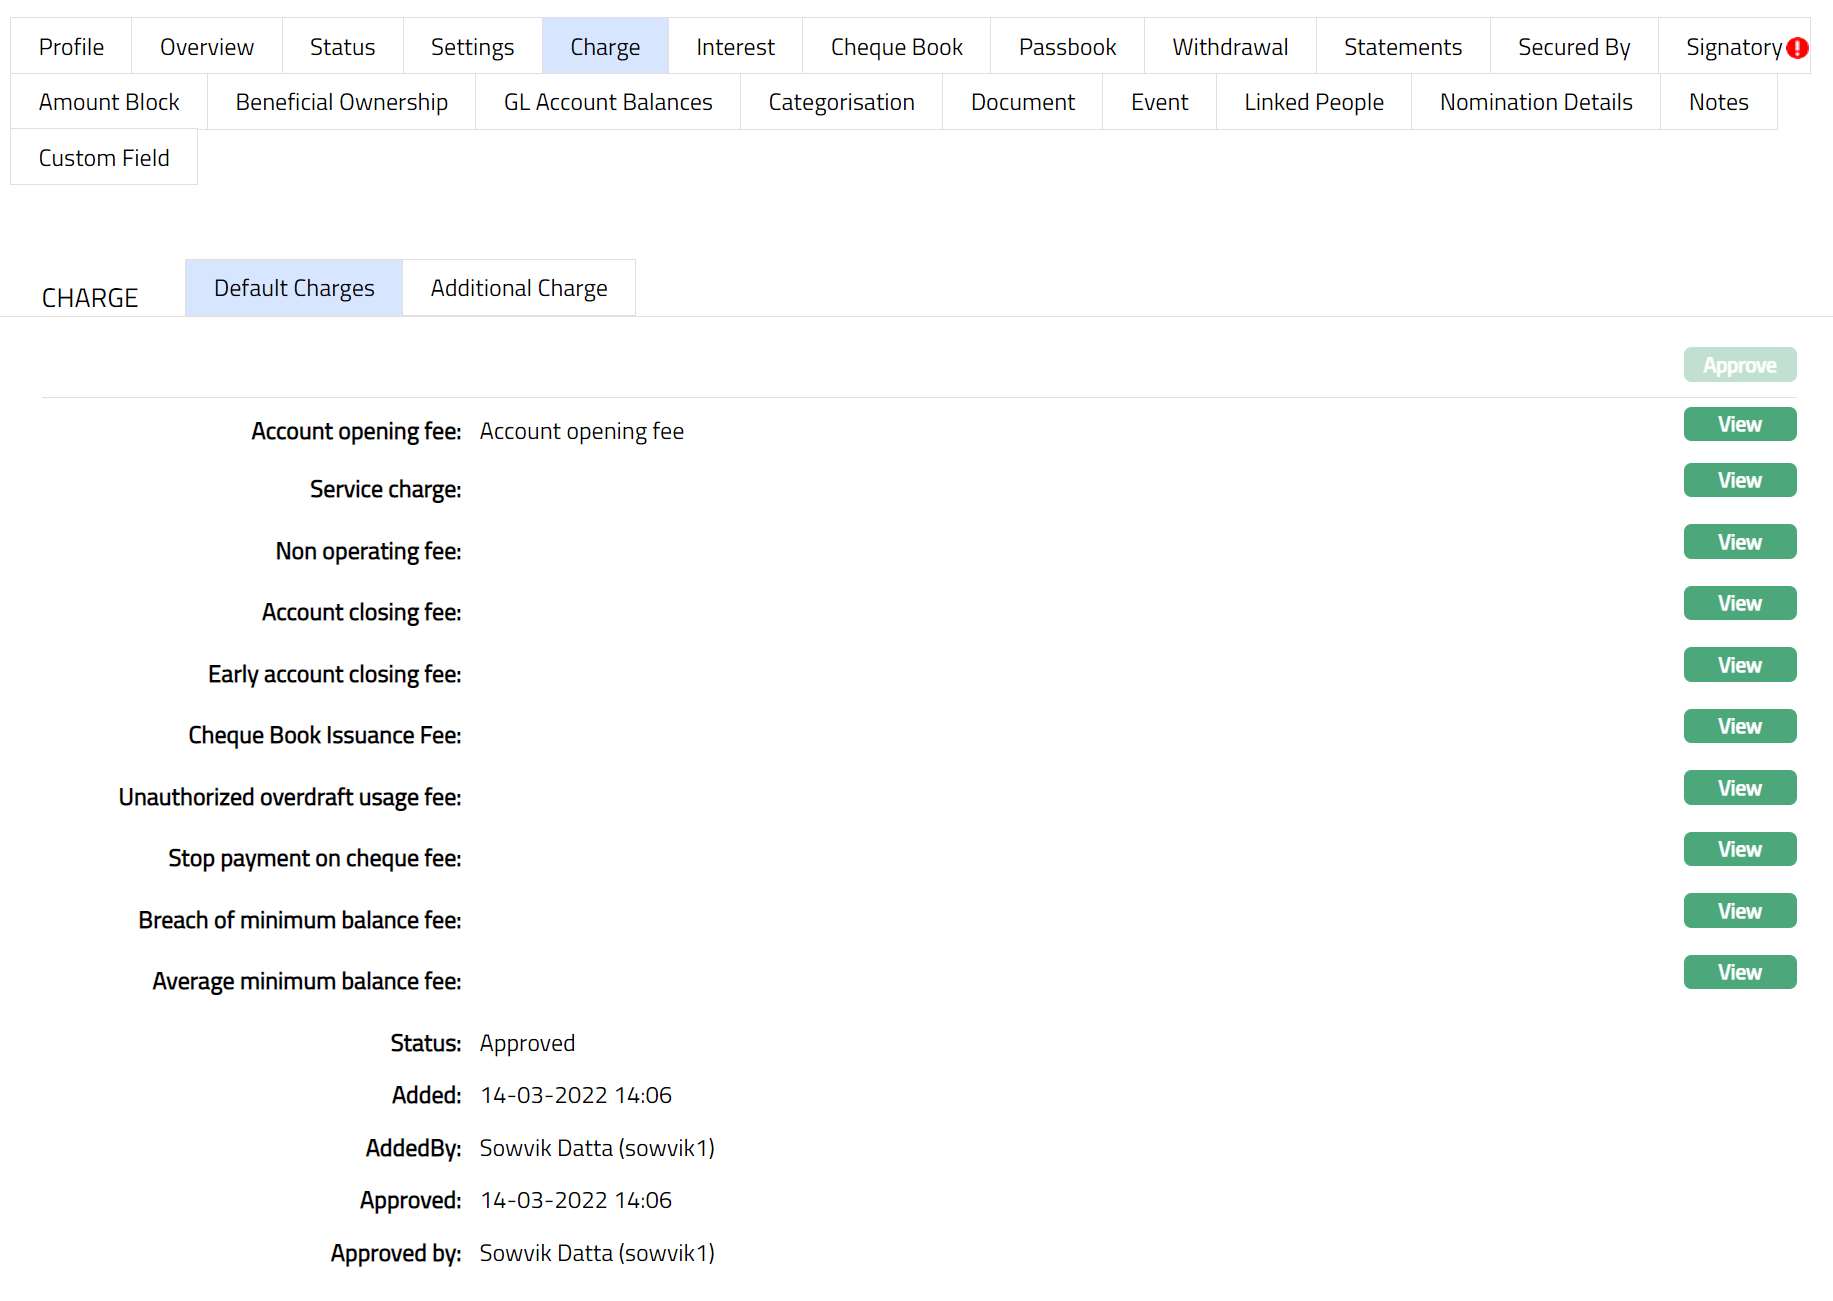
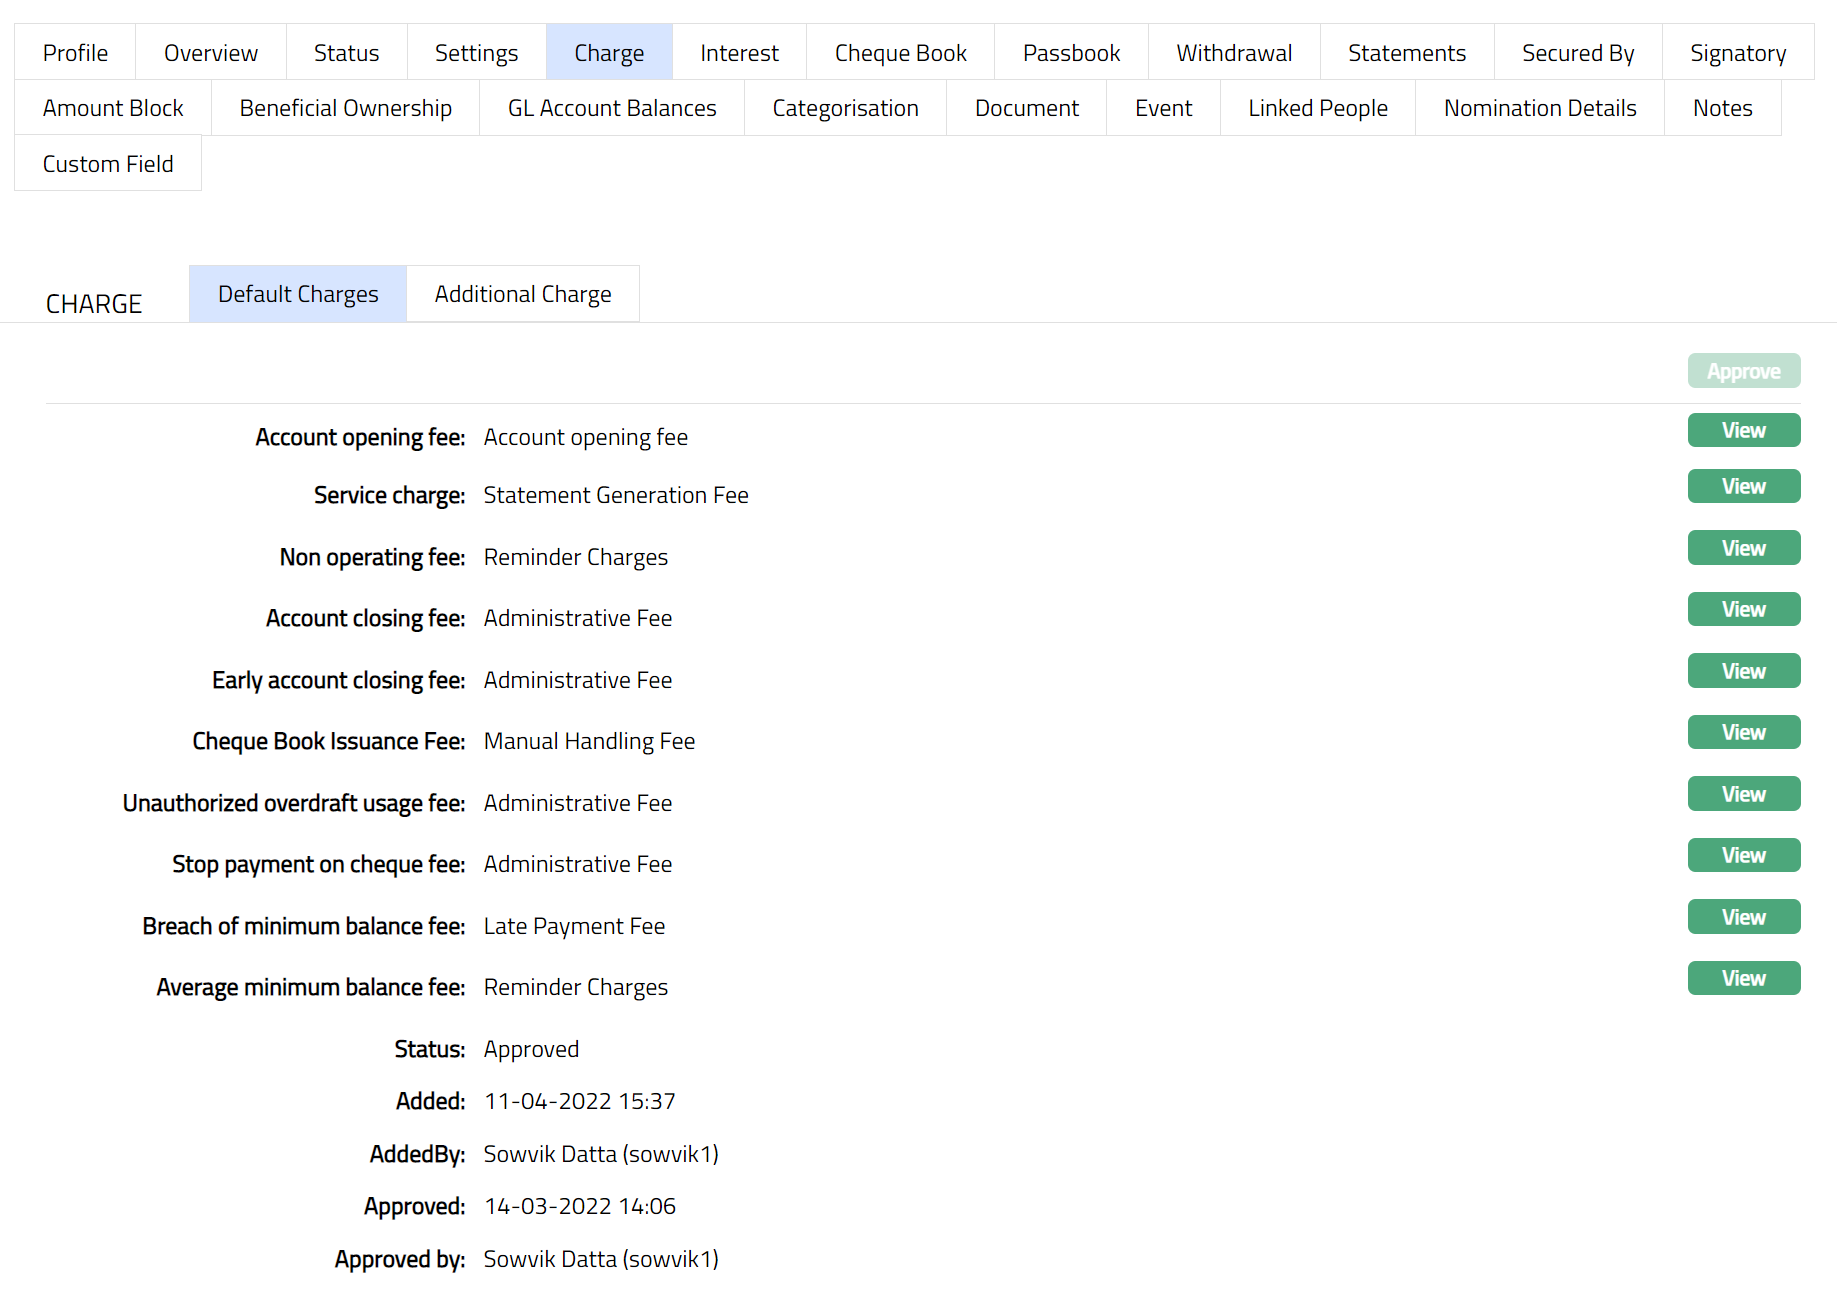
Functions: Approve, View.
The additional fields are:
Status field denotes the status of the tab.
Added field denotes the date on which the record was added.
Added by field denotes the name of the user who created the record.
Approved field denotes date on which the record was approved and is displayed only for approved records.
Approved by field denotes name of the user who approved the record and is displayed only for approved records.
- Click View button against each default charges to see the charge details and other parameters for the Charge. The detail of an attached charge Scheme is also displayed. The sample of the page is shown below.
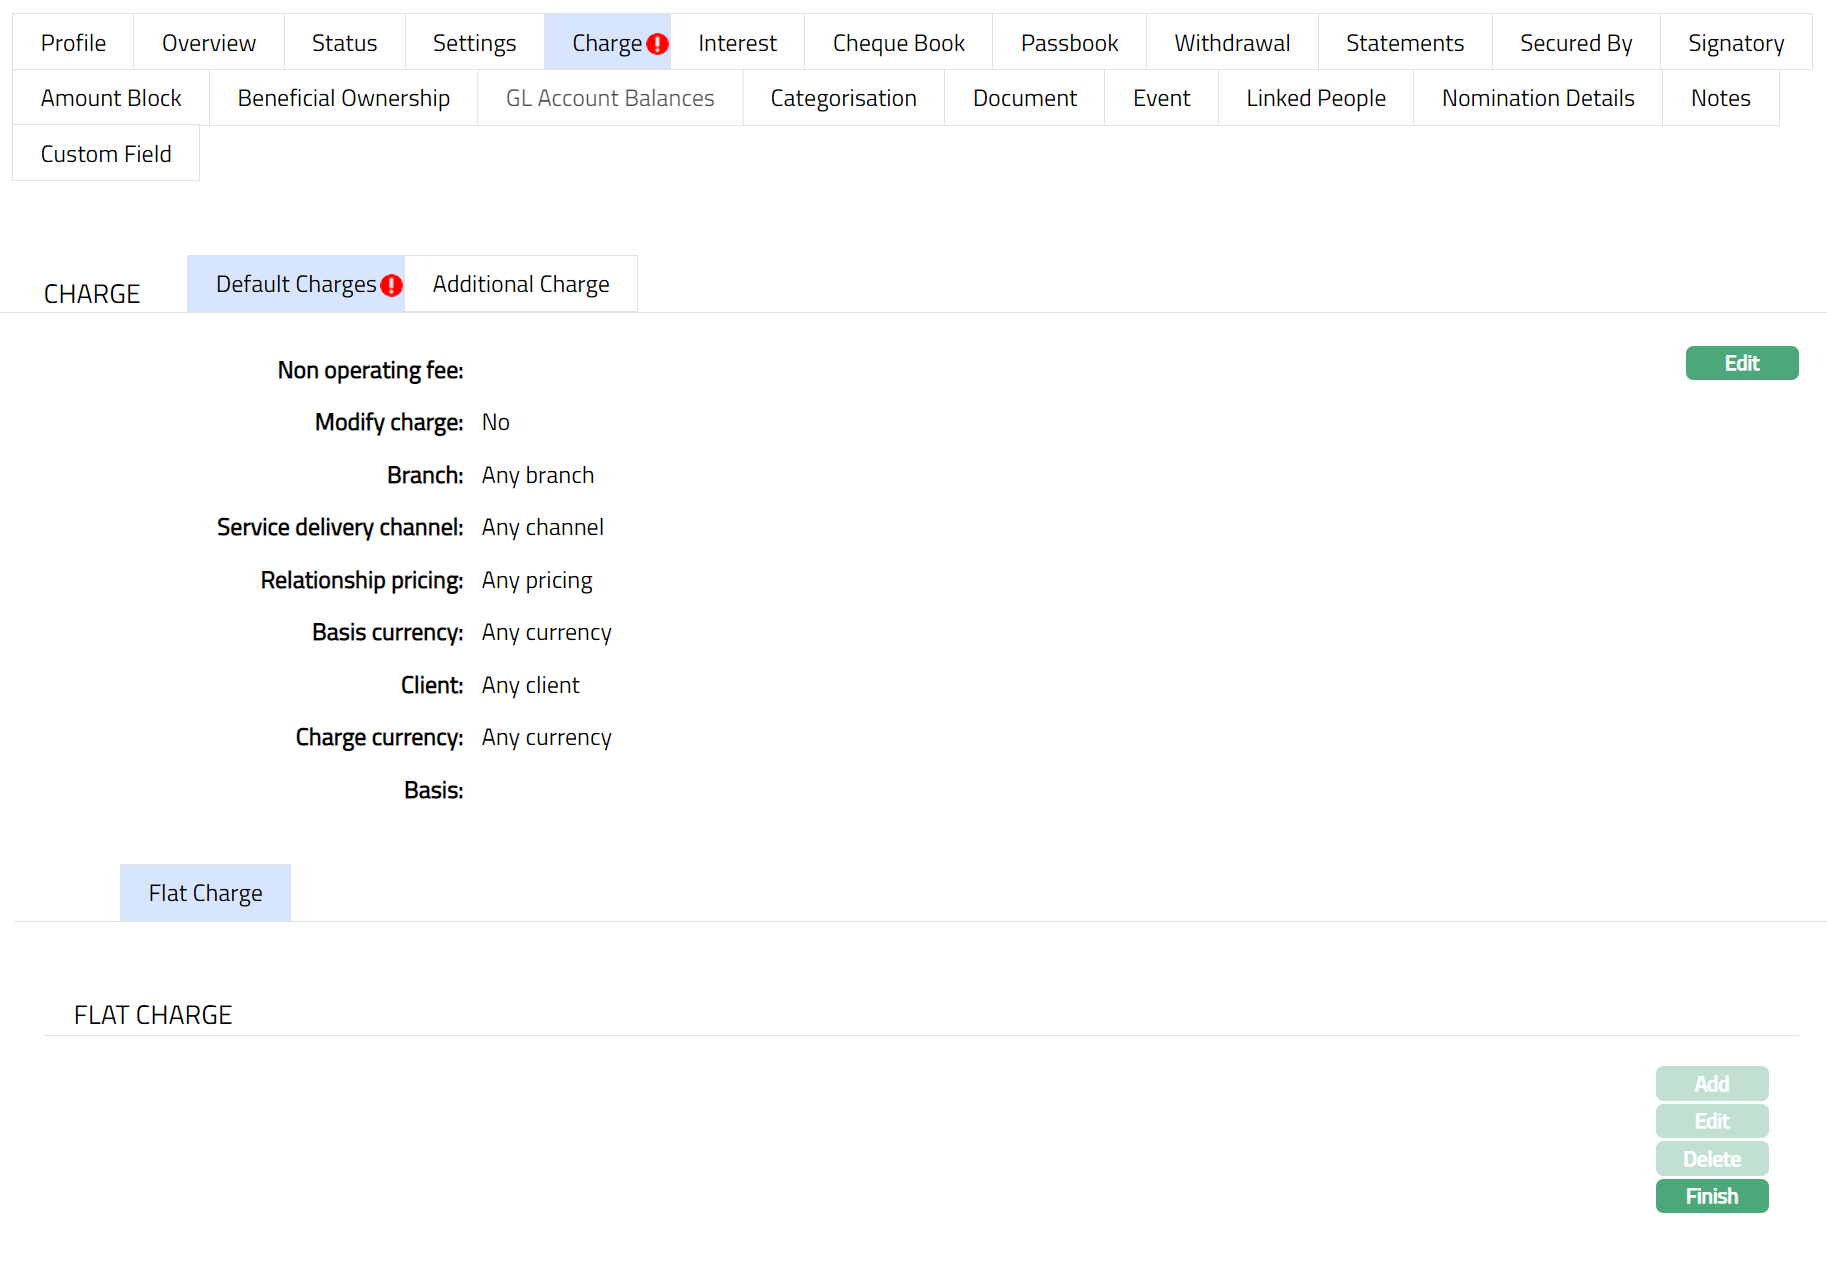
- Click Edit to change the Charge Scheme and modify the parameters attached to the charge scheme. The Edit Scheme page appears.
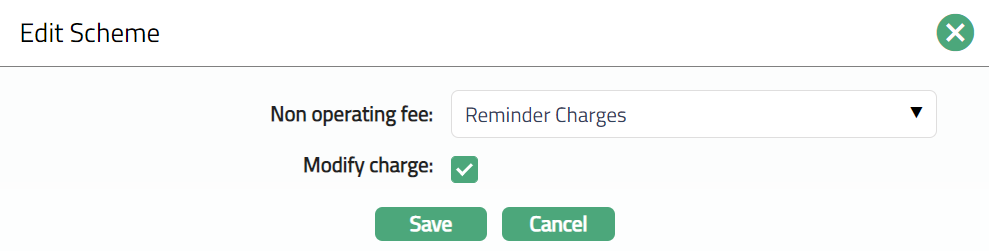
If you want to change the Charge scheme, select the required Charge Scheme from the drop-down list of all active schemes that are shown in the dropdown list. You can modify this field irrespective of the Modify charge parameters flag. If the scheme is modified when Modify parameters flag is checked, then all the details of the modified scheme will be displayed in the view screen and the flag will be unchecked.
Using the Modify Charge parameters check box you can specify if you want to delink the Charge parameters applicable to this account from the Charge scheme details that are maintained under Admin > Pricing > Charges > Charge Scheme for this charge scheme. Thus, it enables you to customize the charge applicable to a specific account and keep it tailor-made for that account even if there are changes at the charge scheme level. If this is checked (Yes) the Add, Edit and Delete buttons will be enabled (only for last band) and you can make changes in the charge scheme parameters. If this is unchecked (No) then all the band and band details will get populated from the charge scheme and the Add, Edit & Delete buttons will be disabled. Finish button is always enabled and can be used to close Band view or Flat view.
To edit the Band Details
Click Edit. Based on the type of charge Flat/Banded the following screen appears as per the sample shown below.
If the charge is flat

- Click Save. Flat Charge screen appears with the edited details.
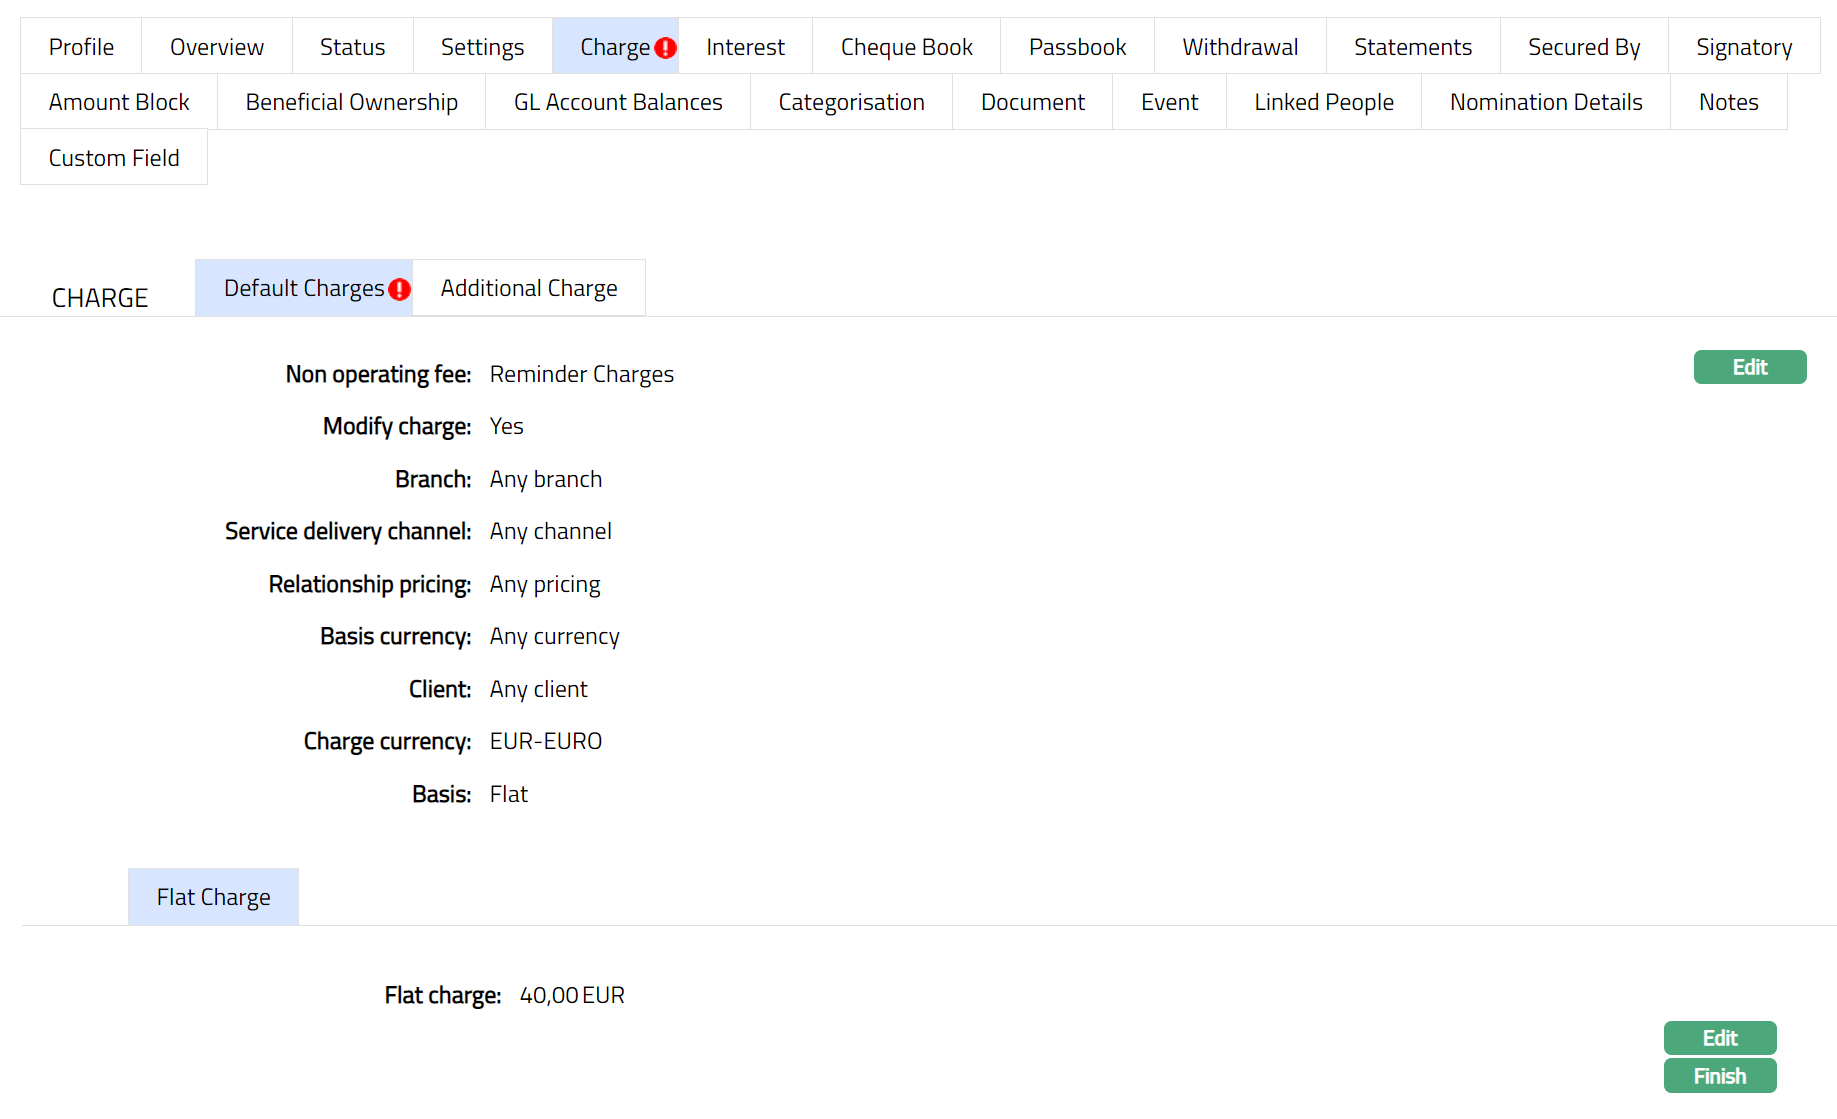
Functions: Edit, Finish
- Click Finish.
Note: Similarly, you can Edit all the Default Charges by clicking on View button. Once Edited the Default Charges page appears with the edited details.
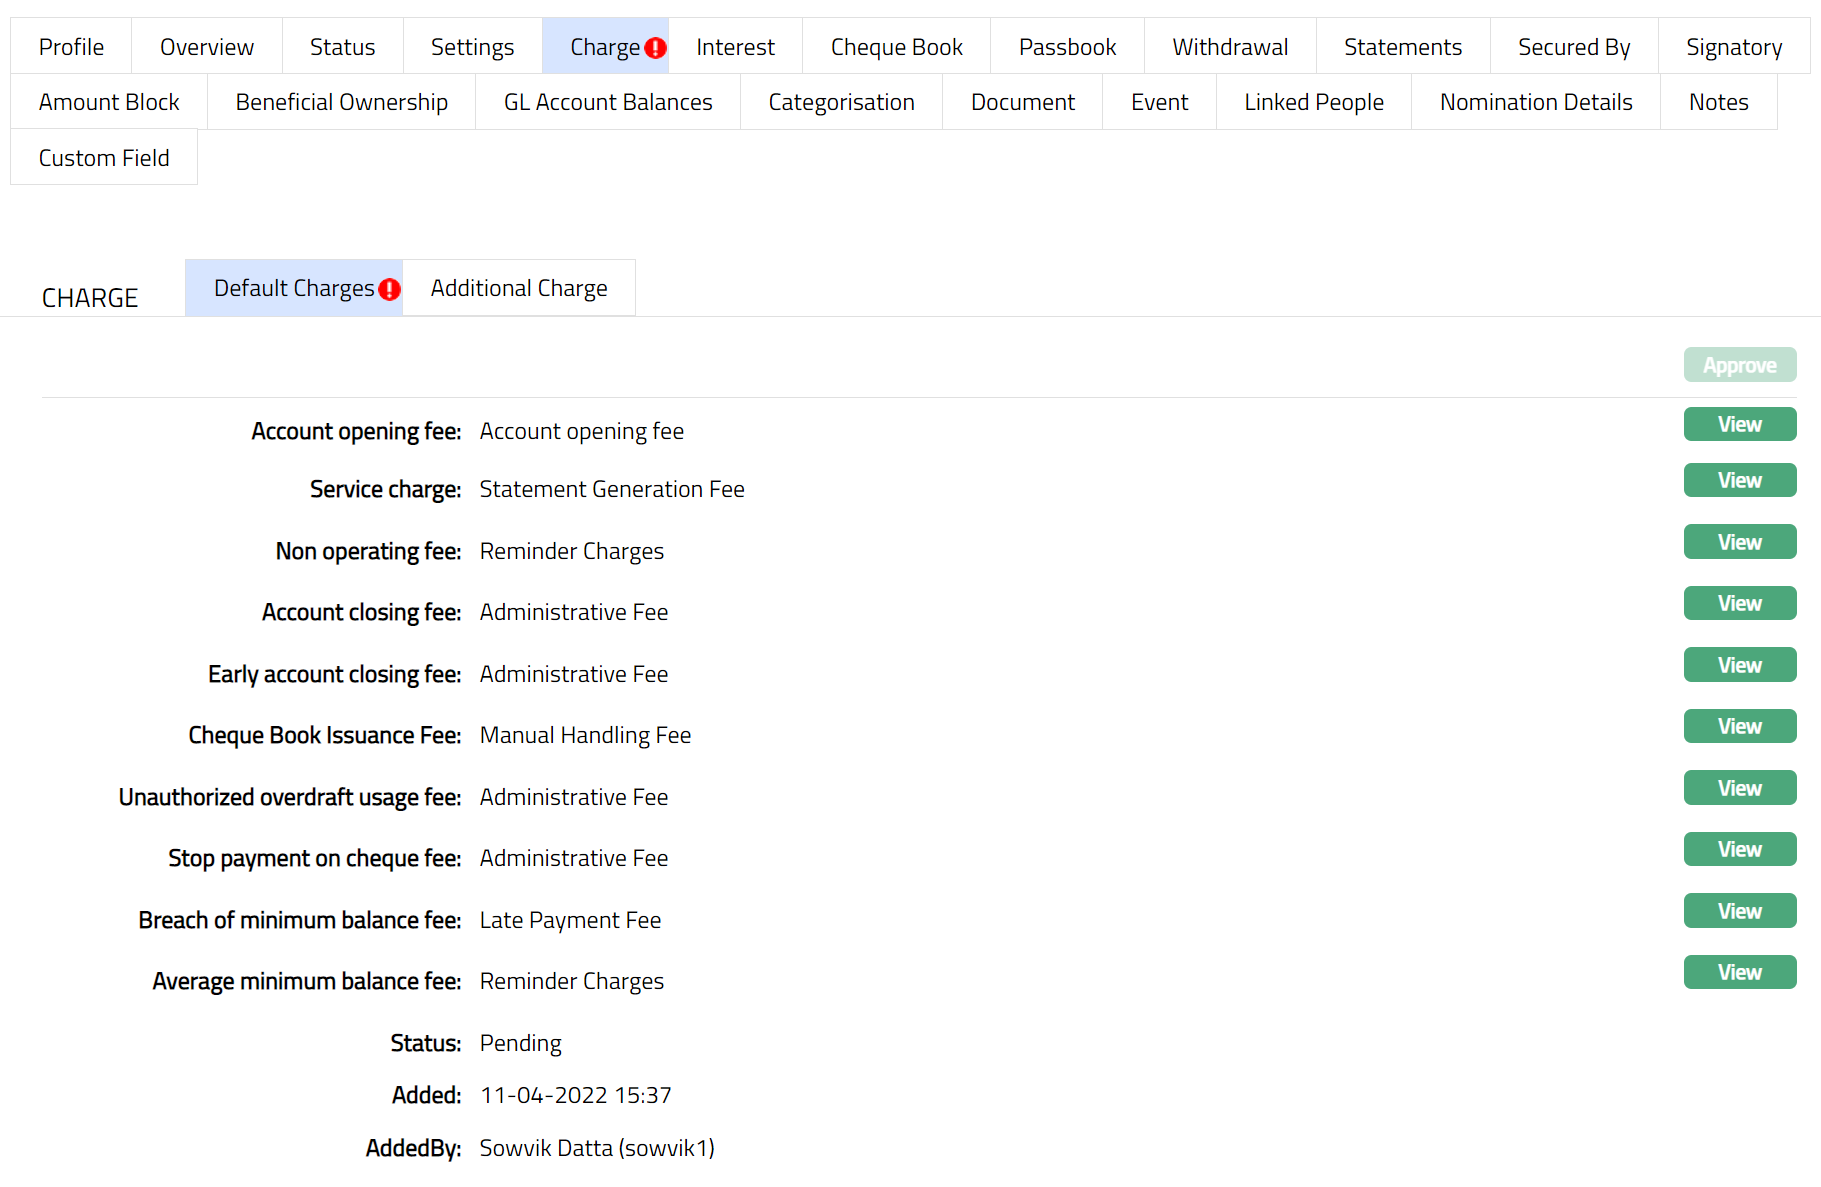
If you want to collect charges for opening the account, select the Account opening fee from the list of the Event based, Flat charges maintained under Admin > Pricing > Charges > Charge Scheme. This charge may be deferred.
If you want to collect service charges, select the Service charge from the list of Periodic, Flat or Banded charges for which Treat as receivable is No maintained under Admin > Pricing > Charges > Charges Scheme. If banded, the Current balance will be the basis for the charge. Please refer to Point number 1 -- 8 under the Charge tab for the procedures to modify the default charges of an attached charge Scheme. If the charge is banded, then the basis for the charge is current balance.
If you want to levy a charge for an account that remains un operated, select the Nonoperation fee from the list of Periodic, Flat charges for which Treat as receivable is No maintained under Admin > Pricing > Charges > Charge Scheme. If there were no transactions during the charge period, the charge will be applied at the end of the period. It will be only arrear charges. Please refer to Point number 1 -- 8 under the Charge tab for the procedures to modify the default charges of an attached charge Scheme.
If you want to collect charges for closure of the account, select the Account closing fee from the list of Event based Flat charges for which Treat as receivable is No maintained under Admin > System code > Pricing > Charge Scheme. Please refer to Point number 1 -- 8 under the Charge tab for the procedures to modify the default charges of an attached charge Scheme. If the charge is banded, then the basis for the charge is current balance.
If you want to levy a charge every time the account goes beyond its authorized limit, select the Unauthorized overdraft usage fee from the list of Event based Flat or Banded charges for which Treat as receivable is No maintained under Admin > Pricing > Charges > Charge Scheme. This can be a deferred charge. If banded, the Current balance will be the basis for the charge. Please refer to Point number 1 -- 8 under the Charge tab for the procedures to modify the default charges of an attached charge Scheme. If the charge is banded, then the basis for the charge is current balance.
If you want to levy a charge every time the payment of cheque is stopped, then, select the Stop payment on cheque fee from the list of Event based Flat charges for which Treat as receivable is No maintained under Admin > Pricing > Charges > Charge Scheme. This charge may be deferred. Please refer to Point number 1 -- 8 under the Charge tab for the procedures to modify the default charges of an attached charge Scheme.
If you want to levy a charge every time the account's book balance goes beyond the minimum balance maintained for the account, then select Breach of minimum balance fee from the list of Event based Flat or Banded charges for which Treat as receivable is No maintained under Admin > Pricing > Charges > Charge Scheme. This can be a deferred charge. If banded, the Current balance will be the basis for the charge. Please refer to Point number 1 -- 8 under the Charge tab for the procedures to modify the default charges of an attached charge Scheme. If the charge is banded, then the basis for the charge is current balance.
If you want to levy a charge for an account when its average booking balance goes less than the minimum balance maintained at the account level, then select the Average minimum balance fee from the list of Periodic, Flat or banded charges for which Treat as receivable is No maintained under Admin > Pricing > Charges > Charge Scheme. If there were no transactions during the charge period, the charge will be applied at the end of the period. It will be only arrear charges. If banded, the Book balance will be the basis for the charge. Please refer to Point number 1 -- 8 under the Charge tab for the procedures to modify the default charges of an attached charge Scheme. If the charge is banded, then the basis for the charge is current balance.
The Average balance is calculated as
Example: If 'Average balance non-maintenance fee' frequency set as 'Monthly-Arrear' then system should populate charge events at the end of the month and system should calculate the average of account's Current balance maintained during the month, and if this average balance is lesser than maintained minimum balance for the account then system should charge 'Average balance non- maintenance fee'. For this new periodic charge other functionality will remain similar to other existing periodic charges.
If charge frequency is weekly and daily maintained Current balance from Monday to Sunday is like 5000,5000,5000,5000,8000,8000,8000 then average balance for a week is 6285.714 and if minimum balance is set as 10000. then average balance is lesser then minimum balance for the account, in this case system should charge 'Average minimum balance fee'.
Average should be calculated based on the weighted average over the period:
In other words, this formula for calculating the average should be
Balance 1 x number of days | Balance 2 x number of days ....n / number of days
((5000 * 4) | (8000 * 3)) / 7 = 6285.71
Example 2: If balances are as follows -- 5000, 5000, 11000, 15000, 8000, 2000, 10000 then the average balance should be calculated as follows:
((5000 * 2) | (11000 * 1) | (15000 * 1) | (8000 * 1) | (2000 * 1) | (10000 * 1)) / 7 = 8000
Balance should be each end of the day balance for defined period /frequency.
Note: Any change in the tab will set the tab status to Pending till it is approved by another user. On approval, the tab status is set to Approved and the red bubble disappears.
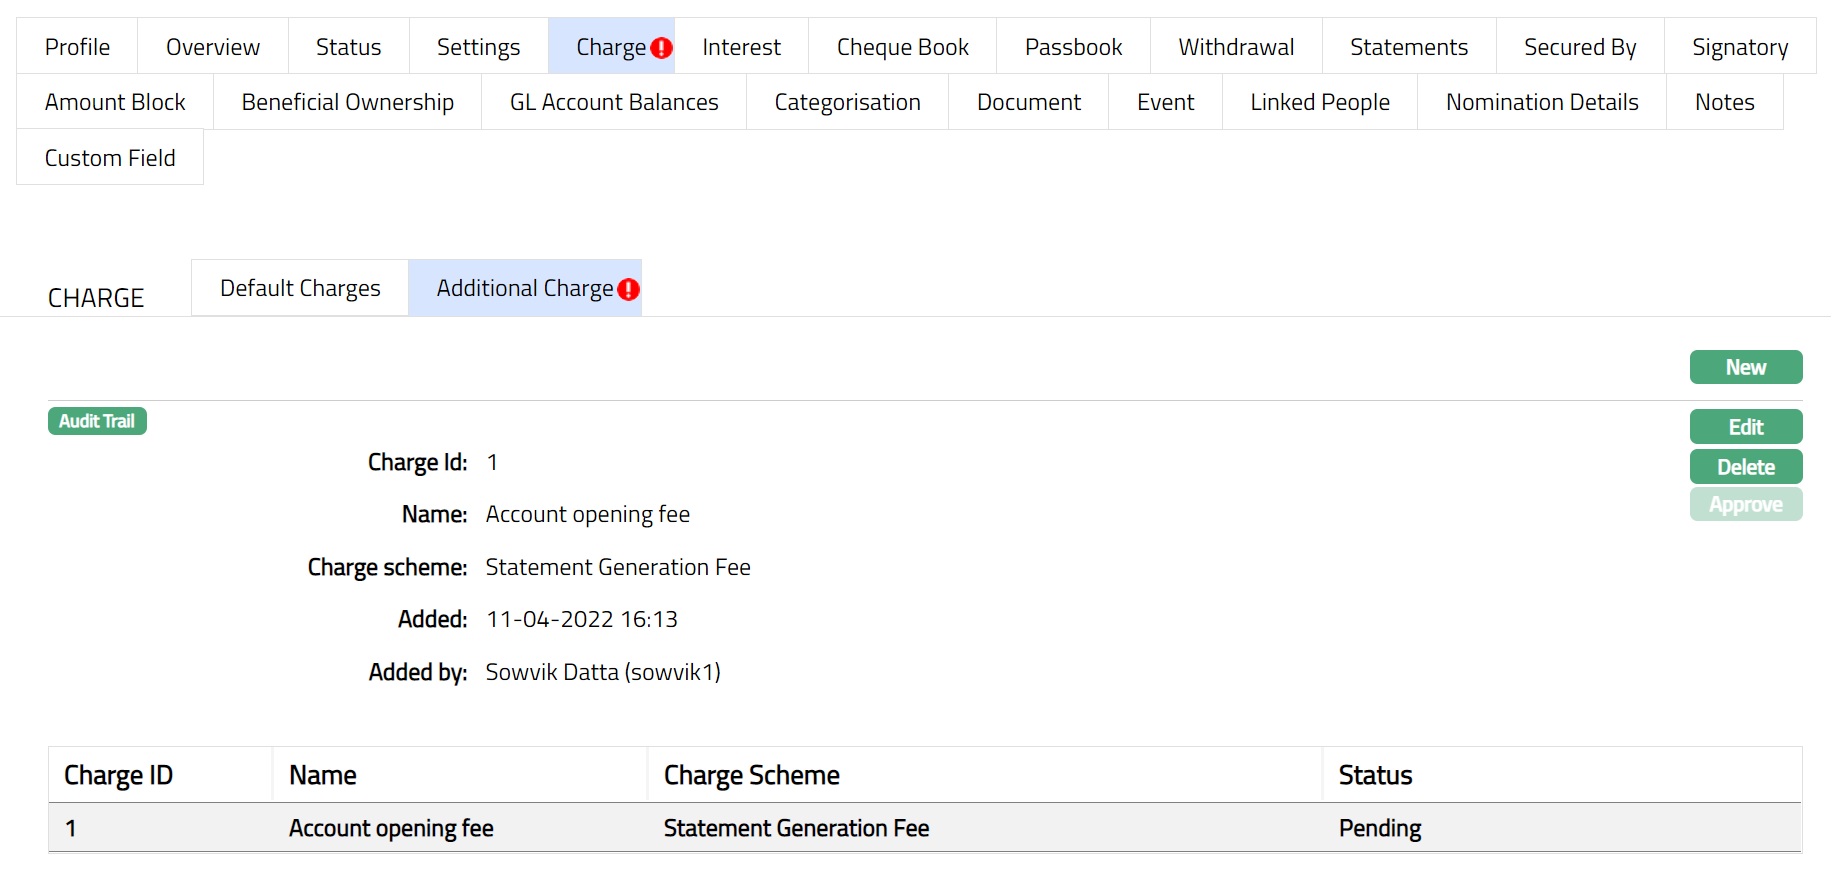
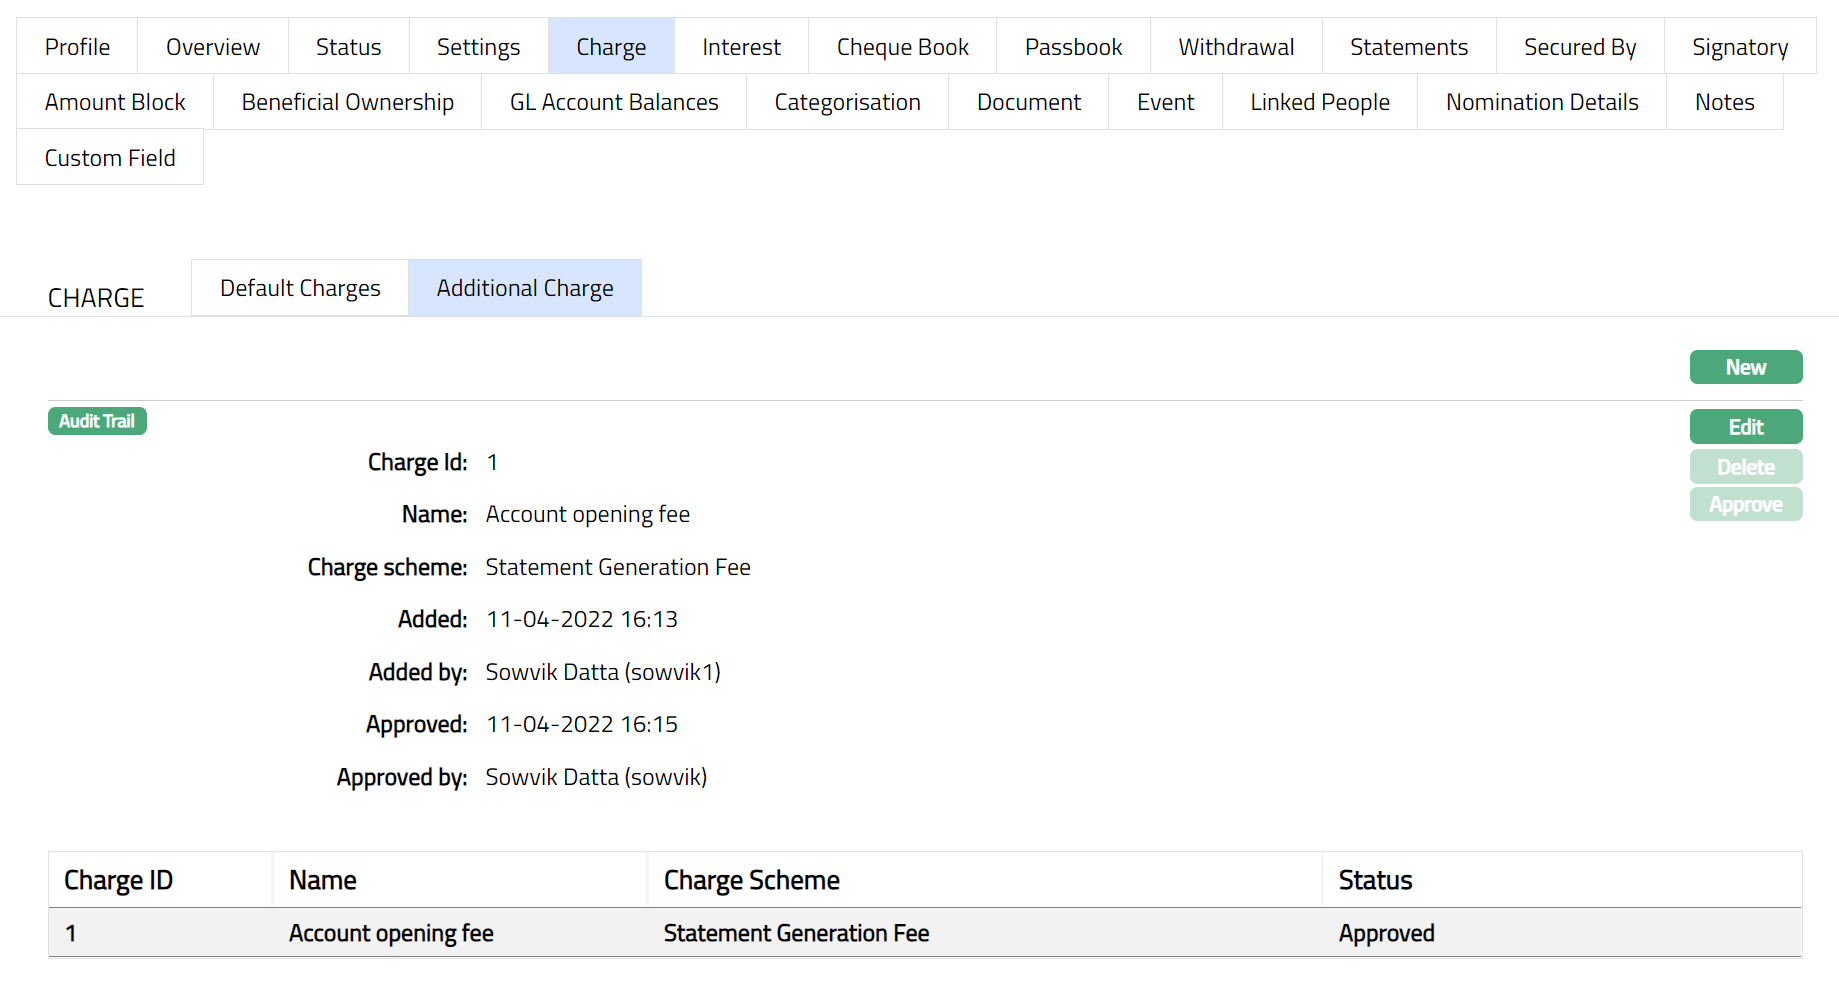
Additional Charge
The Additional Charge tab allows you to add, view and maintain additional charges for the client account. If there are any additional charges attached to the product is defaulted at the Account. The charge ID will be generated in sequence for individual charge attached. If any charge is deleted, then the ID of the deleted charge will not be regenerated.
To add an Additional charge:
Aura will allow you to add additional charges attached at the product (on creation of product) to the Account. If any new additional charges are added at the product, those additional charges will be available for new accounts and not for existing account.
To Add a charge
- Access Client Account page. Click Charge tab and then Additional charge tab to view the details as per sample below. Note: If Account creation is not done then the Additional page will display blank as per the sample shown below. On creation of Account, the details are defaulted from Product > Additional Charge based on the Product that you chose for the account during creation.
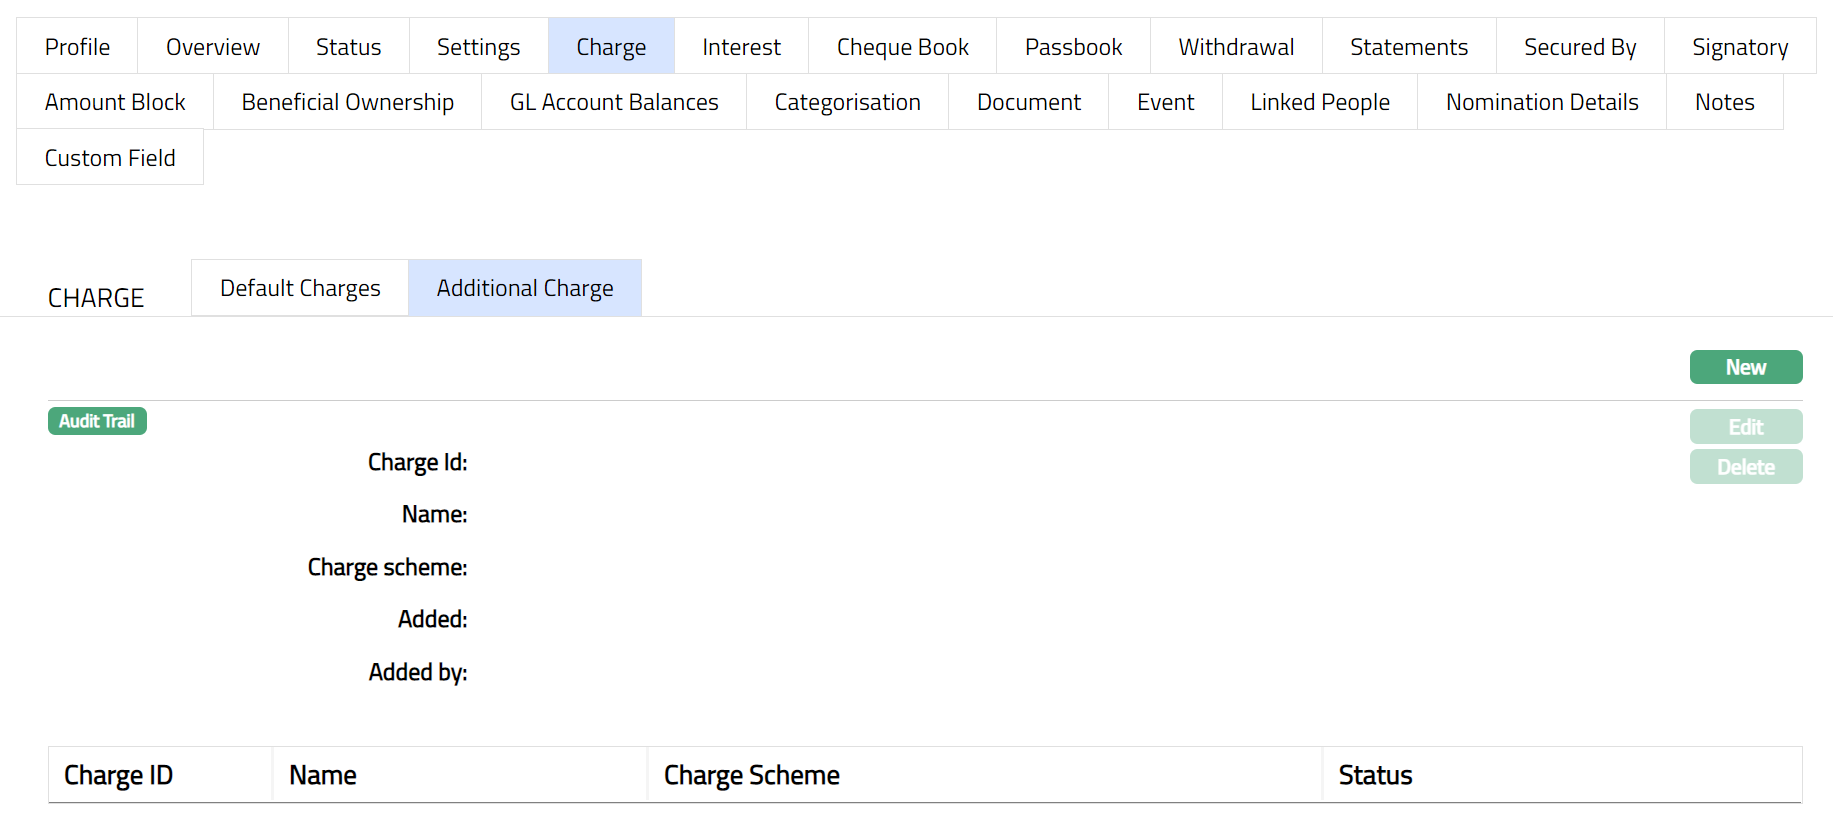
The following fields are shown only in the View screen and are not editable:
Charge Id field denotes the unique sequential charge id generated at the Account level for the additional charges attached at the Product level.
Name field denotes the name of the additional charge.
Charge Scheme field denotes the name of the charge scheme attached to the additional charge.
Status field denotes the status of the tab.
Added field denotes the date on which the record was added.
Added by field denotes the name of the user who created the record.
- Click New. New Additional Charge page appears.
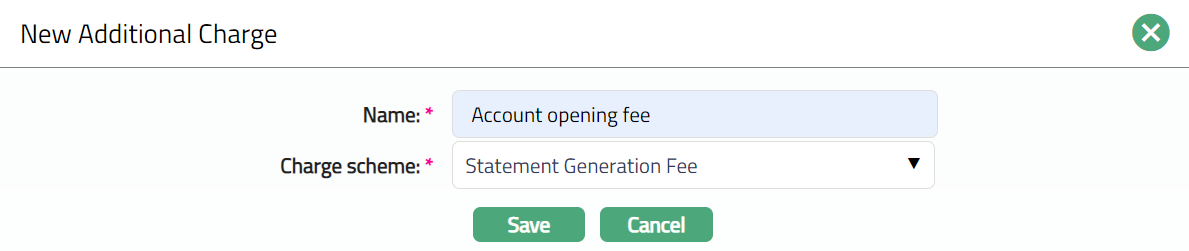
Enter the charge Name.
Select Charge scheme from the drop-down list of Periodic charges maintained at Admin > Pricing > Charge > Charge Scheme.
Click Save. Additional Charge page appears with the added details.
Functions: New, Edit, Delete, Approve
To edit Additional Charge
- Access Client Account page. Click Additional charge tab.
- Click Edit. Edit Additional Charge page appears.
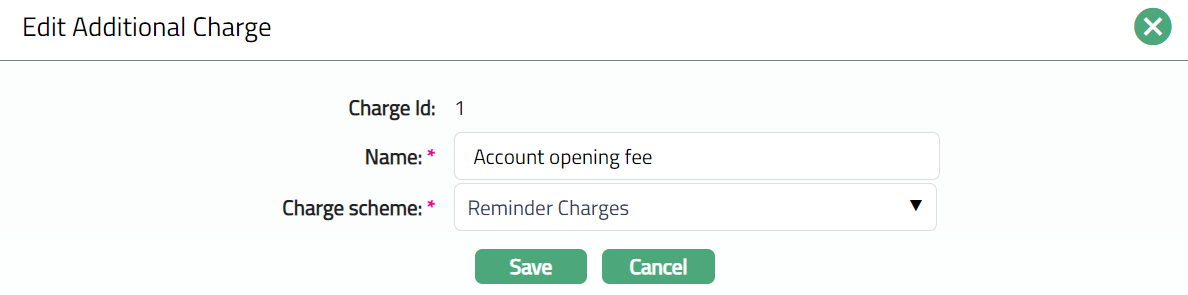
Except Charge Id field all other fields are editable.
- Click Save. Additional Charge page appears with the edited details.

Functions: New, Edit, Delete, Approve
Note: Any change in the tab will set the tab status to Pending till it is approved by another user. On approval, the tab status is set to Approved and the red bubble disappears.
The additional fields available are:
Status field denotes the status of the tab.
Added field denotes the date on which the record was added.
Added by field denotes the name of the user who created the record.
Approved field denotes date on which the record was approved and is displayed only for approved records.
Approved by field denotes name of the user who approved the record and is displayed only for approved records.
Cheque Book
The Cheque Book tab allows you to issue cheque books, stop payment for issued cheque instruments, and revoke stop payments for the selected Client Account. All cheque book operations are performed at the account level and follow the maker-checker approval process.
The Cheque Book tab contains the following sub-tabs:
- Issue
- Stop Payment
These sub-tabs allow you to manage cheque book issuance and control the usage of issued cheque instruments for the selected Client Account.
Issue
The Issue sub-tab allows you to issue cheque books to the selected Client Account and submit them for approval.
To issue a Cheque Book,
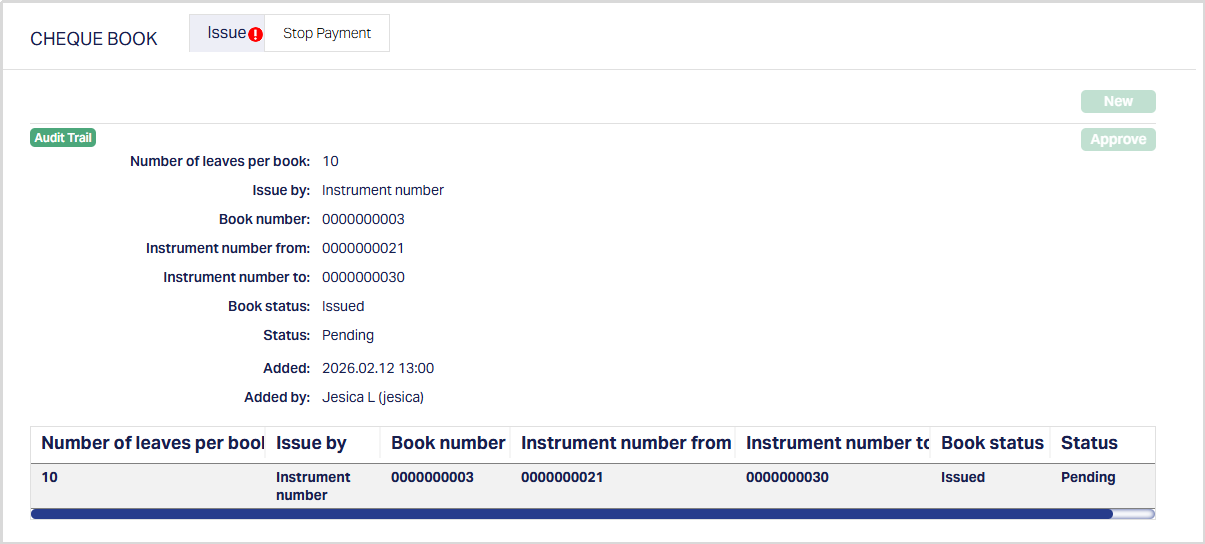
1. Access the Client Account maintenance screen and click the Cheque Book tab. The Issue sub-tab opens by default and displays the previously issued Cheque Book records, if any.
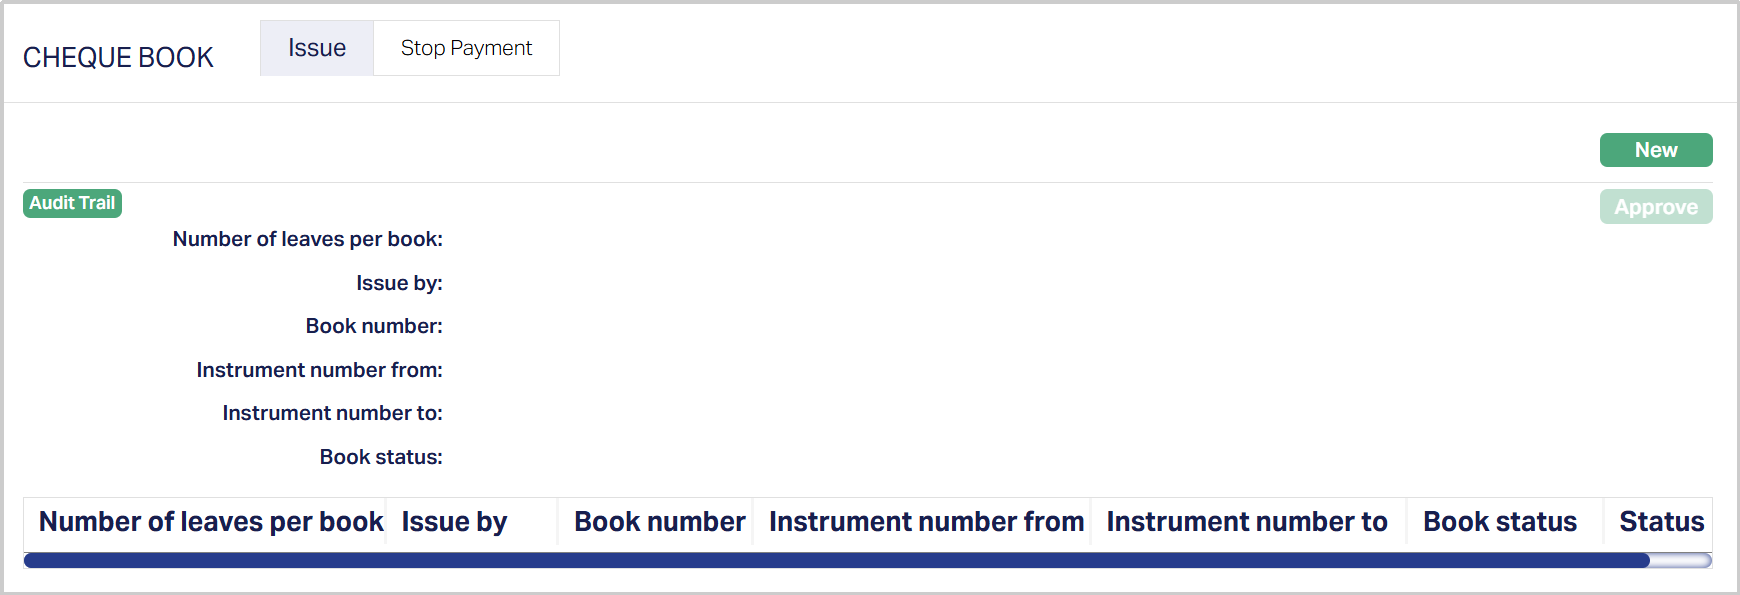
2. Click New. The New Cheque Book Issue page appears.

Note: The New button is enabled only when the account status is Activated.
3. Select the Number of leave per book from the available options - 10,25,50 or 100.
4. From the Issued by field, select whether the Cheque Book is issued using Book number or Instrument number. The default selection is instrument number.
If Issued by = Instrument number:
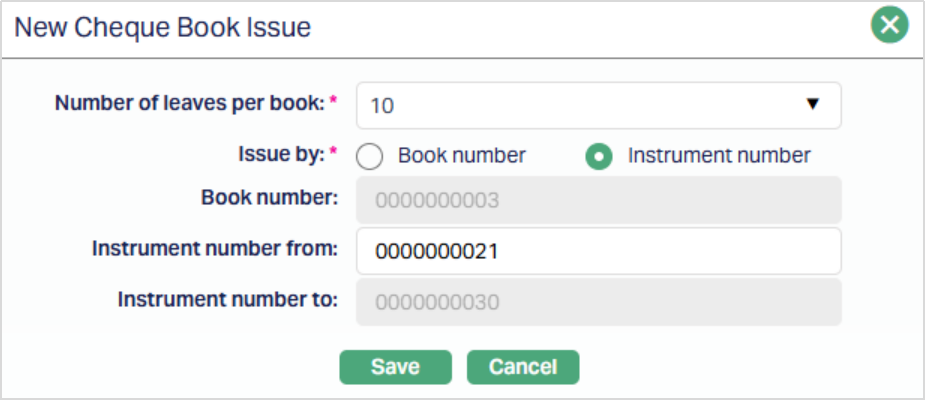
Enter the starting instrument number in the Instrument number from field. Aura derives the Book number and instrument number to automatically based on the entered instrument number and the number of leaves per book.
If Issued by = Book number:
Enter the Cheque Book number in the Book number field, Aura derives the Instrument number from and Instrument number to automatically based on the entered Book number and the number of leaves per book.
5. Click Save. The Cheque Book Issue page appears with the added details
Functions: New, Approve.
During Save, Aura validates that the entered Instrument numbers against records maintained under Admin → Secure Stationery → Series, where the type is Cheque book, status is Printed-Approved, and the stationery is associated with the selected account branch. If the entered value does not belong to the branch, is not in stock, or is not in Printed status, Aura displays the relevant validation message and prevents saving.
After saving, the Cheque Book status is set to Issued and the record status is set to Pending. The Issued Cheque Book remains in Pending status until it is approved by another user.
EVENT: When a Cheque Book Issue is saved, Aura creates an event CHQISU (Cheque Issue) with status Pending. This event is available in the Event tab of the Client Account.
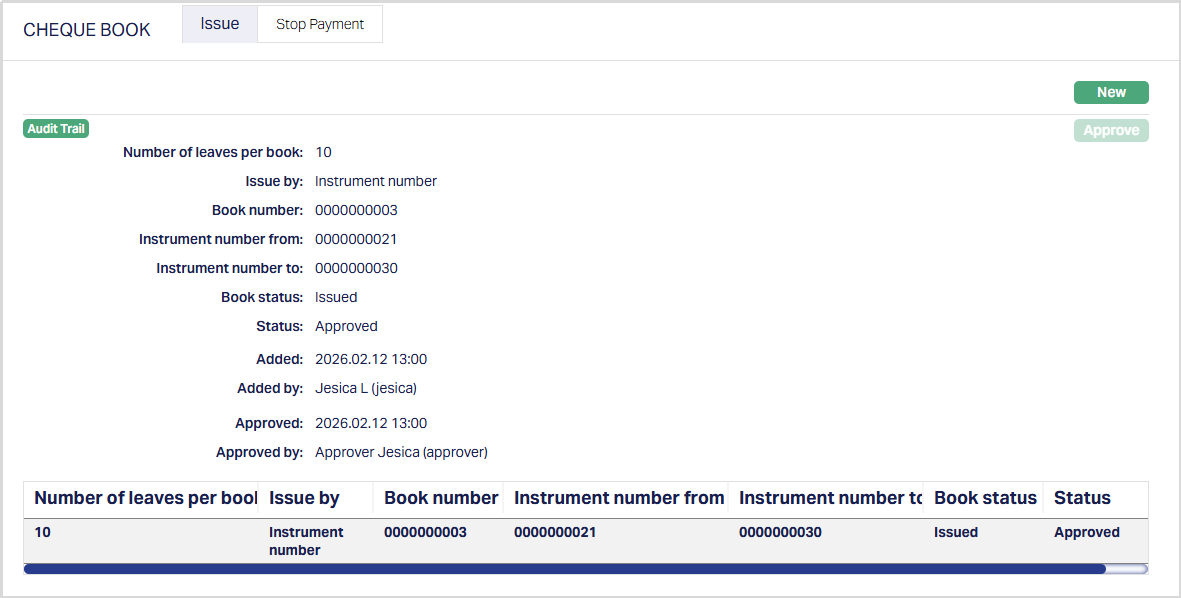
To approve a Cheque Book issue - Select the Pending record and click Approve. Aura displays a confirmation message asking whether you want to approve the cheque book issue. On confirmation, the record status changes from Pending to Approved and the related CHQISU event status changes from Pending to Success.
Functions: Add, Approve.
Note: If an issuance charge is configured, Aura collects the charge during approval by debiting the client account and crediting the charge income GL.
The Approve button is enabled only when the cheque book status is Issued and the record status is Pending. Once approved, the Approve button becomes disabled.
The additional fields that are shown are:
- Status indicates the current state of the record. It will be either: Pending - If the record is waiting for approval or Approved - If the record has been reviewed and finalized.
- Added shows the date and timestamp when the record was created and Added by displays the user ID and full name of the person who created the record.
- Approved shows the date and time when the record was approved and Approved by displays the user ID and full name of the person who approved the record.
Stop Payment
The Stop Payment sub-tab allows you to stop payment for Issued Cheque Instruments associated with the selected Client Account.
To add a Stop Payment request,
1. Access the Client Account maintenance screen, click the Cheque Book tab, and then select the Stop Payment sub-tab.
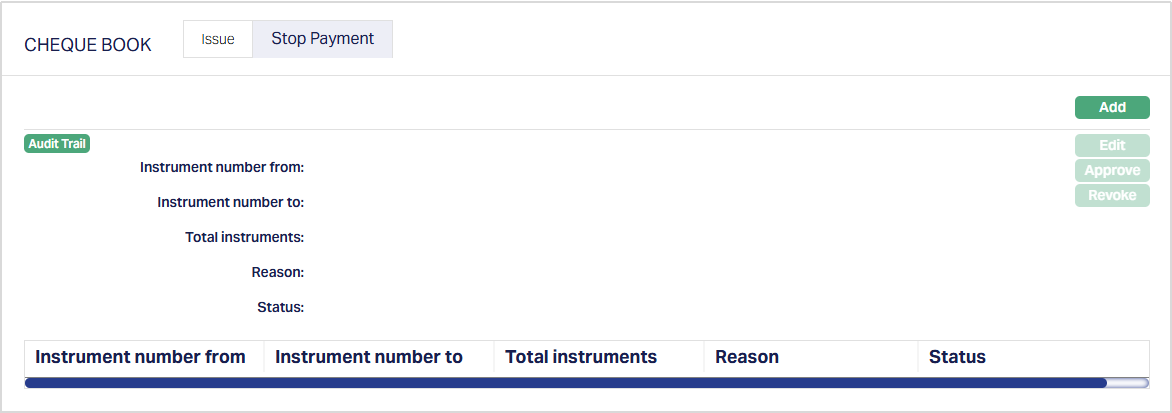
2. Click Add. The New Stop Payment screen appears.
Note: The Add button is enabled only when the Cheque Instruments have been issued to the account.
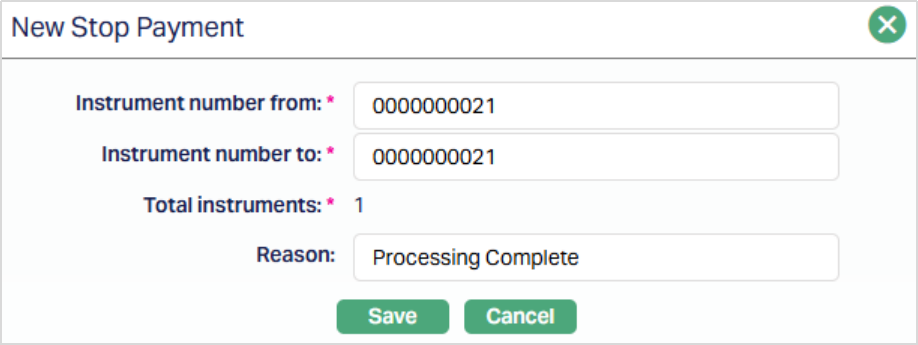
3. Enter the starting instrument number in the Instrument number from field.
4. Enter the ending instrument number in the Instrument number to field. By default, Aura populates the instrument number to with the same value as Instrument number from, but you can modify it if the stop payment request applies to multiple instruments.
5. Aura calculates the Total Instruments automatically based on the entered range.
6. Enter the Reason to stop payment, if required.
7. Click Save. The Stop Payment page appears with the added details.
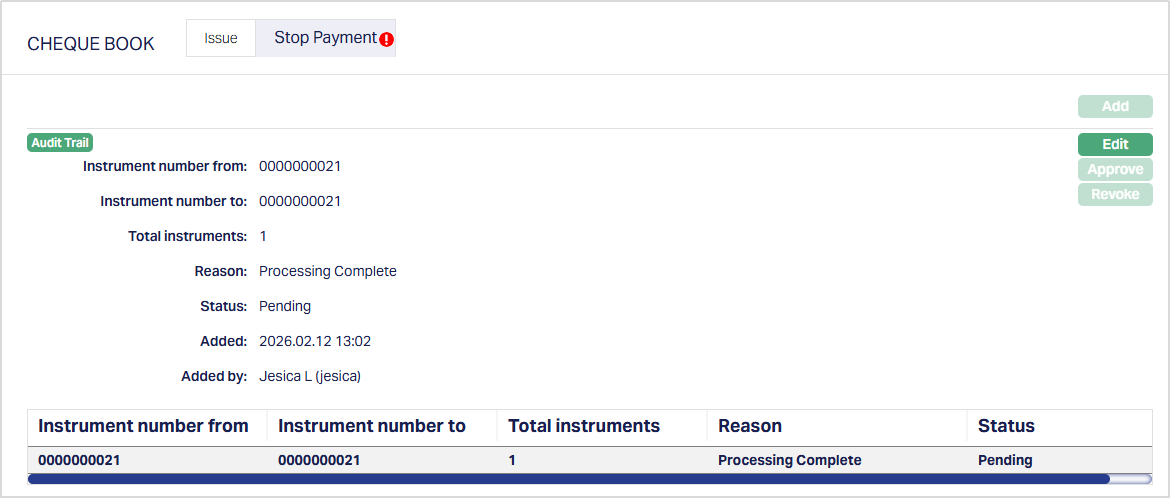
Functions: Add, Edit, Approve, Revoke.
To edit,
1. Click on Edit. Edit Stop Payment page appears.
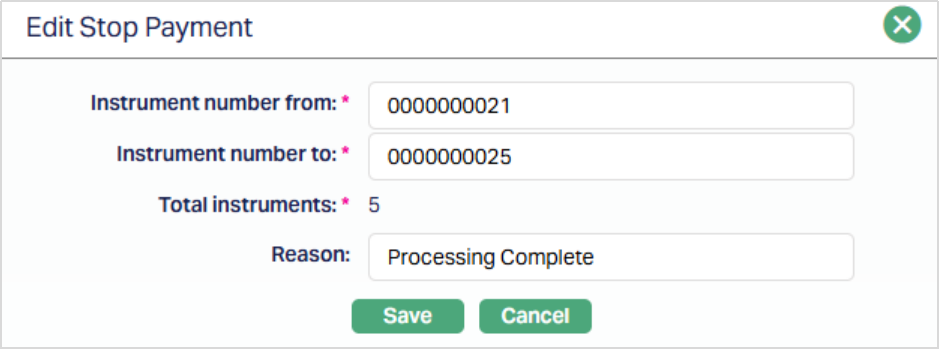
All fields are editable, and the Total instruments field updates automatically according to the changes/updates made.
2. Click Save. The Stop Payment page appears with the edited details.
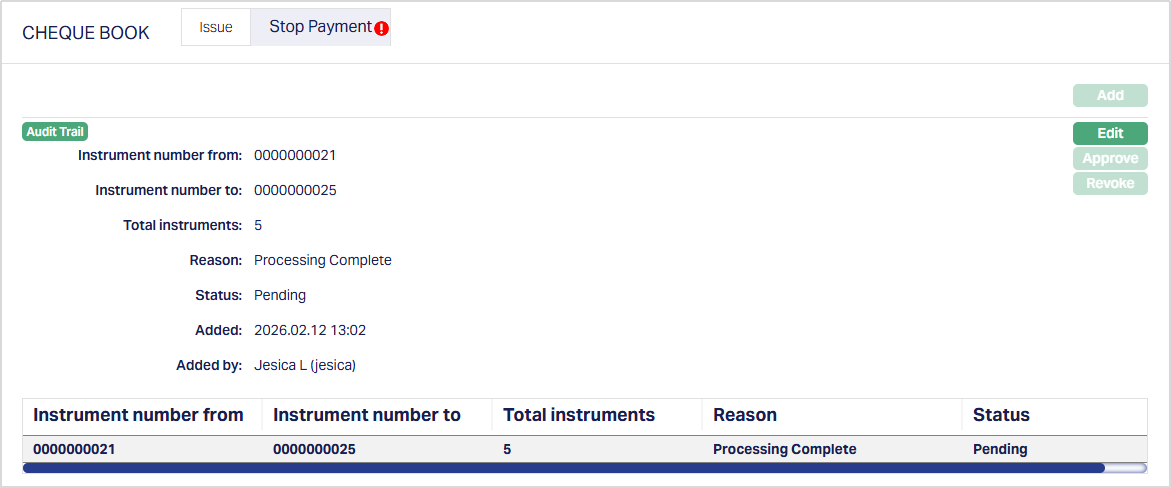
Functions: Add, Edit, Approve, Revoke.
During save, Aura validates that the entered instrument numbers belong to Cheque Instruments issued to the selected account and are currently in Issued status. If the instrument numbers do not belong to the account or are not in Issued status, Aura displays the appropriate validation message and prevents saving.
After saving, the instrument status is updated to Stop Payment and the record status is set to Pending.
EVENT:
Aura creates an event CHQSTP (Stop Payment) with status Pending. This event can be viewed in the Event tab of the Client Account.
To approve a Stop Payment request - Select the pending record and click Approve. Aura displays a confirmation message. On confirmation, the record status changes from Pending to Approved and the related CHQSTP event status changes from Pending to Success.
Functions: Add, Edit, Approve, Revoke.
Note: If a Stop Payment charge is configured, Aura collects the charge during approval by debiting the client account and crediting the charge income GL.
The Approve button is enabled only when the cheque book status is Issued and the record status is Pending. Once approved, the Approve button becomes disabled.
The additional fields that are shown are:
- Status indicates the current state of the record. It will be either: Pending - If the record is waiting for approval or Approved - If the record has been reviewed and finalized.
- Added shows the date and timestamp when the record was created and Added by displays the user ID and full name of the person who created the record.
- Approved shows the date and time when the record was approved and Approved by displays the user ID and full name of the person who approved the record.
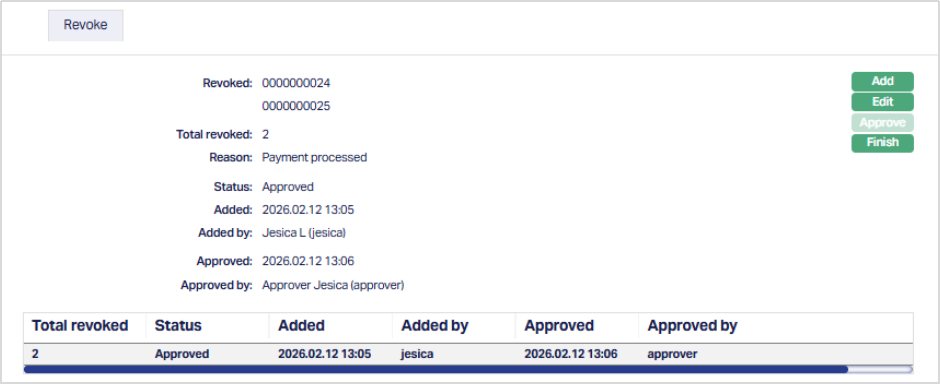
Revoke Stop Payment The Revoke function allows you to revoke stop payment instructions for selected cheque instruments that are current;y under Stop Payment Status.
Revoke is enabled only when the selected record has instrument status Stop Payment and record status is Approved.
To revoke stop payment,
1. Select the approved Stop Payment record and click Revoke, The Revoke Stop Payment screen appears.
2. Click Add. Add Revoke page appears.
You can select the numbers for which stop payment must be revoked. Aura displays all instrument numbers currently under Stop Payment status for the selected record.
3. Move the required instrument numbers from the Available (Stop Payment) list to the Selected (Revoked) list. Aura displays the total number of instruments selected for revocation.
4. Enter the reason for revocation, if required.
5. Click Save. The Revoke page appears displaying the revoked instruments with the status Pending.
Functions: Add, Edit, Approve, Finish.
EVENT: On saving, Aura updates the selected instrument statuses from Stop Payment-Approved to Issued-Pending and creates an event CHQRVK (Revoke Stop Payment) with status Pending.
To approve the revoke request - Select the pending revoke record and click Approve. Aura displays a confirmation message. On confirmation, the instrument status changes from Issued–Pending to Issued–Approved and the CHQRVK event status updates from Pending to Success.
The Approve button is enabled only when the revoke record status is Pending and becomes disabled after approval.
Functions: Add, Edit, Approve, Finish.
Add: Creates a new revoke stop payment request by allowing you to select cheque instruments currently under Stop Payment status and submit them for revocation.
Edit: Allows you to modify an existing revoke request. Before approval, you can change the selected instruments and reason; after approval, only the reason can be updated.
Communication
The Communication tab allows you to configure, track and manage all communication preferences related to a Client Account. This ensures that notifications are sent in line with client requirements and account activity.
The Communication tab has three sub-tabs:
Preferences
The Preferences sub-tab is used to suspend specific types of notifications and to set the preferred notification mode. It defines how notifications are handled and the communication channels to be used.
To View/Edit Preferences,
Access the Client Account maintenance page. Click the Communication tab and the Preferences sub-tab. The Preferences page appears.
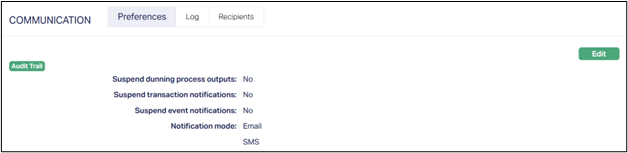
Click Edit. The Edit Communication Preferences page appears.
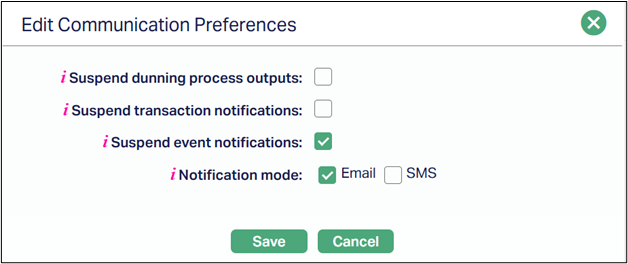
All the fields are editable.
- Suspend dunning process outputs - Choose whether dunning outputs (such as reminders or overdue notices) should be suspended for the account.
- Checked = Dunning outputs are suspended.
- Unchecked = Dunning outputs are generated as usual.
- Suspend transaction notifications - Controls whether transaction-related notifications should be sent.
- Checked = Transaction notifications are not sent.
- Unchecked = Transaction notifications continue.
- Suspend event notifications - Allows you to suspend notifications generated for system or account-related events.
- Checked = Event notifications are not sent.
- Unchecked = Event notifications continue.
- Notification mode - Defines the medium through which notifications will be sent. You may select one or more of the following modes:
- SMS
- Click Save. The Preferences page appears with the edited details.
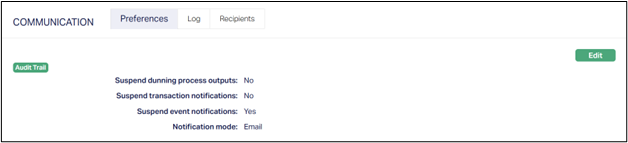 Function: Edit.
Log
The Log sub-tab provides a record of all communication messages triggered for the Client account.
To View/Edit Log,
Access the Client Account maintenance page. Click the Communication tab, then the Log sub-tab. This sub-tab will show no records until you enter/select a particular log or notification sent date.
Notified on - A search field where you can select the date for which communication logs should be retrieved.
- Clicking inside the field opens a calendar, allowing you to select the date, month and year.
- After selecting a date, click Search to view the communication records for that day.
The additional fields that are shown on the grid are -
- Notified - Date and time when the notification was triggered.
- Recipient - The selected client who was designated to receive the communication.
- Sent to - The actual phone number or email address used for delivery.
- Setting name - The communication setting that triggered the notification.
- Trigger - The event or process in Aura that generated the notification (e.g., maturity alert, deposit renewal).
- Mode - The communication channel (Email/SMS)
- Status - The delivery status (e.g., Sent, Pending, Failed)
Search - The Search button retrieves the log entries for the chosen date.
Resend - Allows you to resend a selected notification if it has failed or needs to be re-issued.
Recipients
The Recipients sub-tab lets you define who will receive the notification for the Client account.
To View/Add a recipient,
Access the Client Account maintenance page. Click the Communication tab, then the Recipients sub-tab. This tab will show no records until you enter/add a recipient.

Click Add. The Add Notification Recipients page appears.
Select the client to Send the notification to from the drop-down list. The listing contains the primary client of the account and any linked clients associated with the account in the Linked People tab.
The Use default checkbox determines whether the client's default contact details (phone and email) are used.
- If checked, the Phone # and Email Address are auto-filled and read-only.
- If unchecked, you can manually enter alternate contact details.
Phone # - The phone number where SMS notifications will be delivered. This is mandatory if SMS is chosen in Notification Preferences.
E-mail address - The email address where notifications will be sent. This is mandatory if Email is chosen in Notification Preferences.
Click Save. The Recipients page appears with the details entered.
To Edit recipients,
- Click Edit to the right of the notification recipient. The Edit Notification Recipients page appears.
All fields are editable except the Send notification to drop-down.
- Click Save. The Recipients page appears with the edited details.
Functions: Add, Edit, Delete.
Note: If the Client account has linked clients (in the Linked People tab), you can add multiple recipients. In such cases, you may select the Primary Client or any Linked Client from the Send Notification To dropdown and add them as separate recipients. This allows more than one individual to receive notifications related to the account.
Delete: To delete a particular recipient, click Delete to the right of the notification. Aura will ask for confirmation, and on approval, the recipient will be deleted and removed from the page.
Document
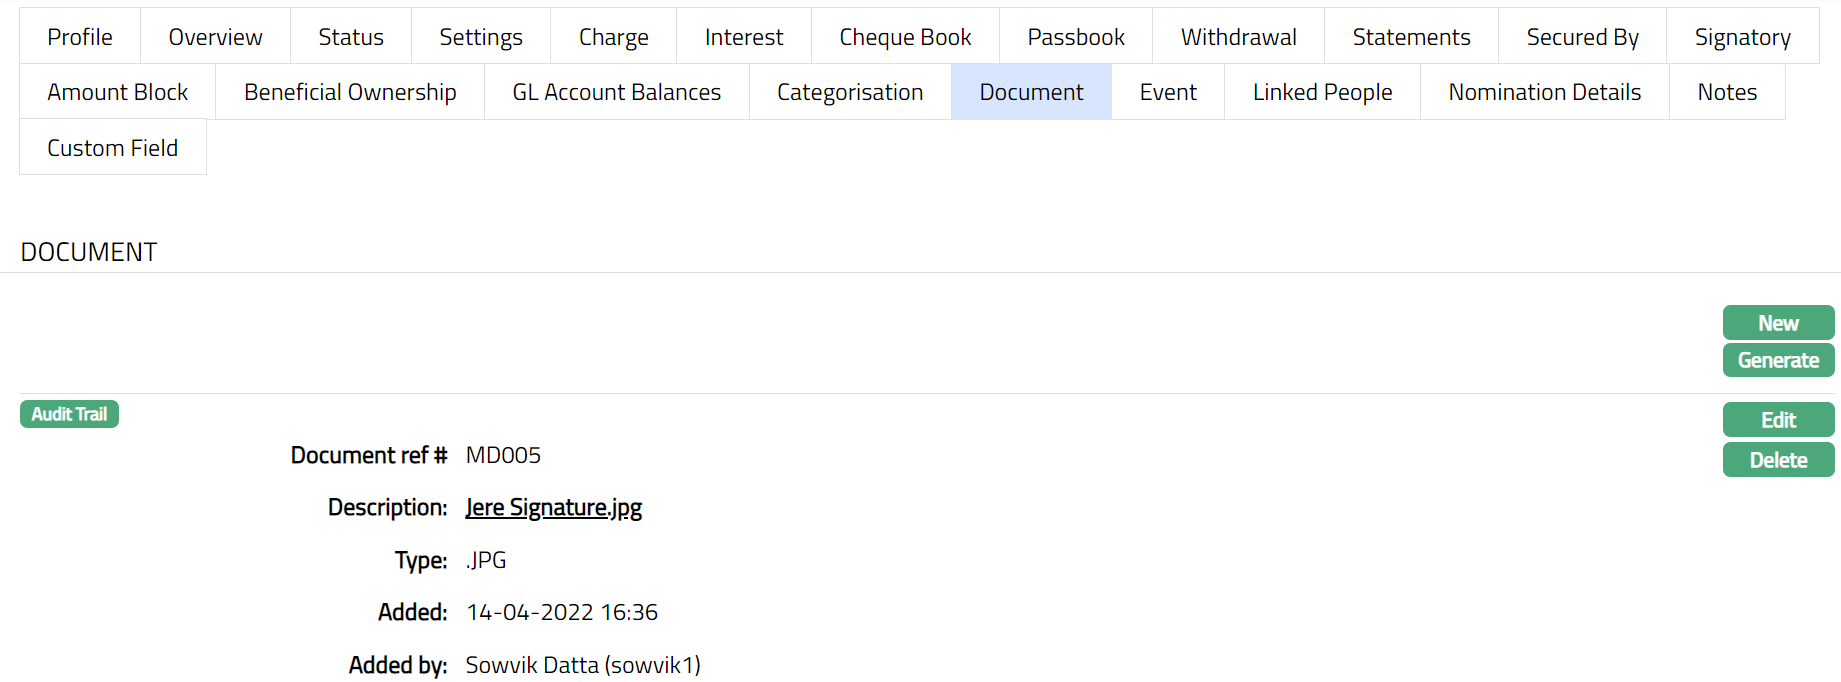
The Document tab allows you to upload documents related to the Client Account. These can be in the form of scanned images or files on your computer. You can categorise the documents as per Document Type and store with a document reference number.
- Access Client Account screen. Click Document tab.
- Click New. New Document page appears.
Click Choose File button to select the File name and path of the document.
Enter the Document ref no. for the document. This document reference number is used in Branch view > Documents.
Based on the file selected the Description field will be derived. If required, you can change the description.
Select the Type of the Document uploaded. The document types should have been maintained using Admin > System codes > Documents > Document types. Once entered, this cannot be edited.
Click Save. Document page appears with the added details. .
Functions: New, Generate, Edit, Delete
Delete: To delete the document added, click on the Delete button. Aura will ask for confirmation. On confirming the document will be deleted.
To Edit the document
Access Client Account screen. Click Document tab.
Click Edit. Edit New Document page appears.
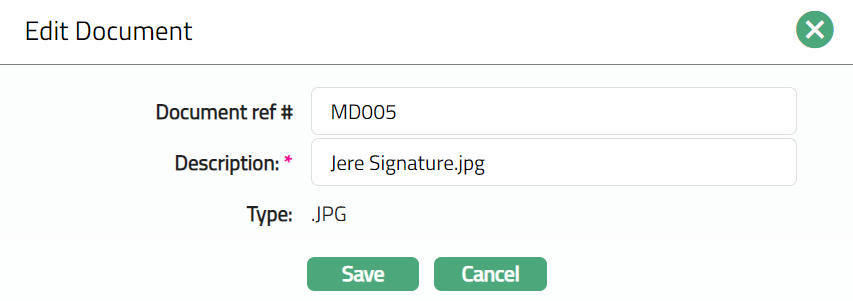
Note: Only Document ref no and Description fields are editable.
Click Save. Document page appears with the edited details.
Event
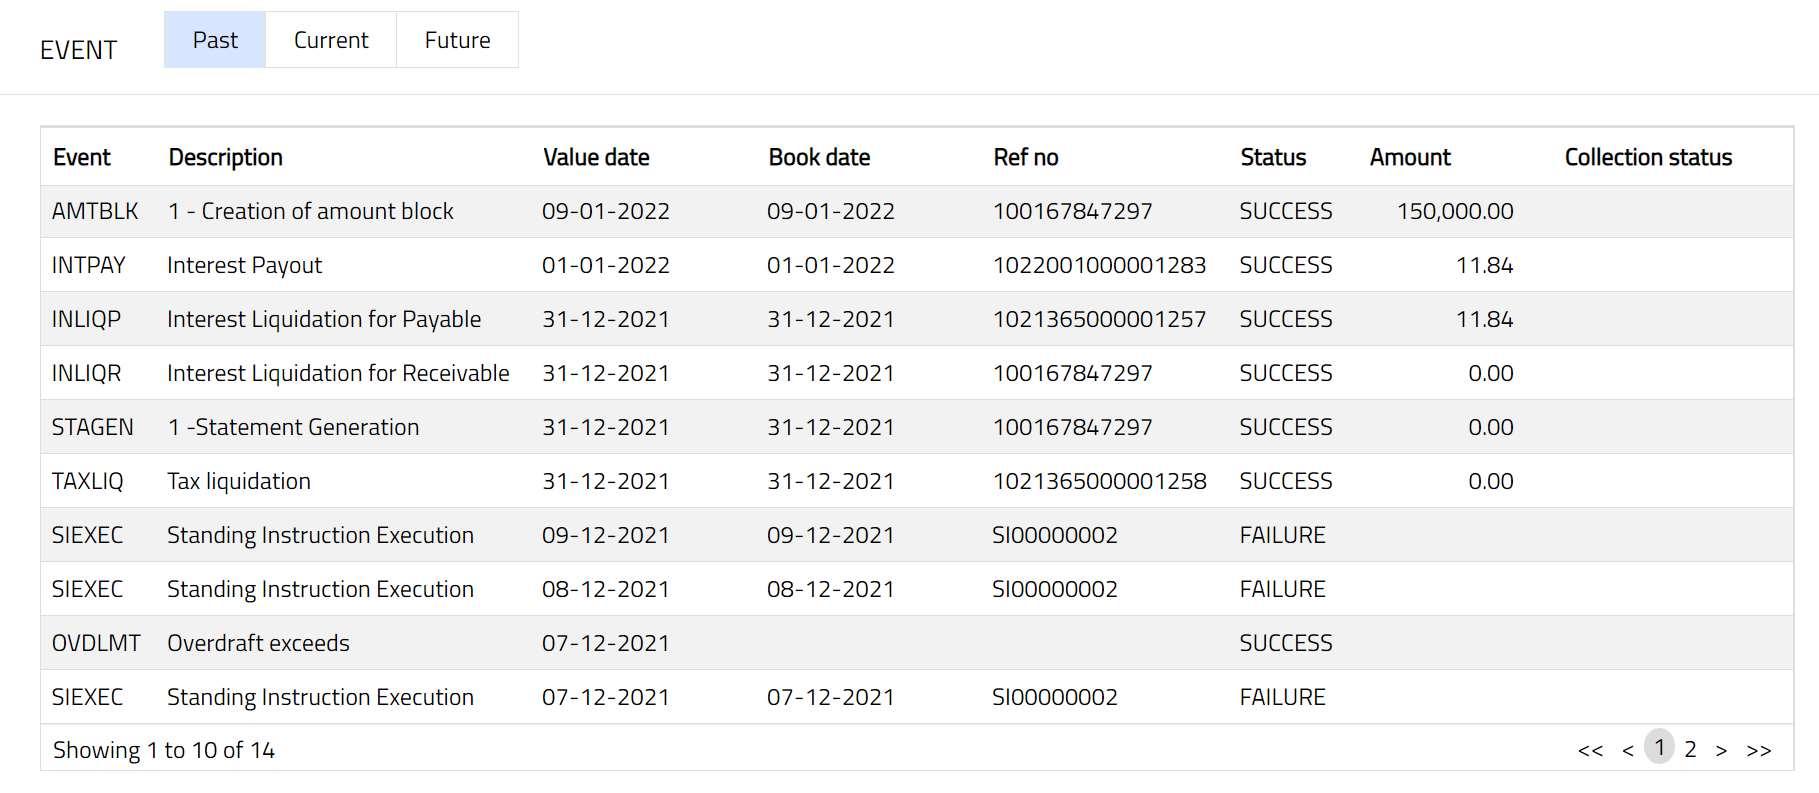
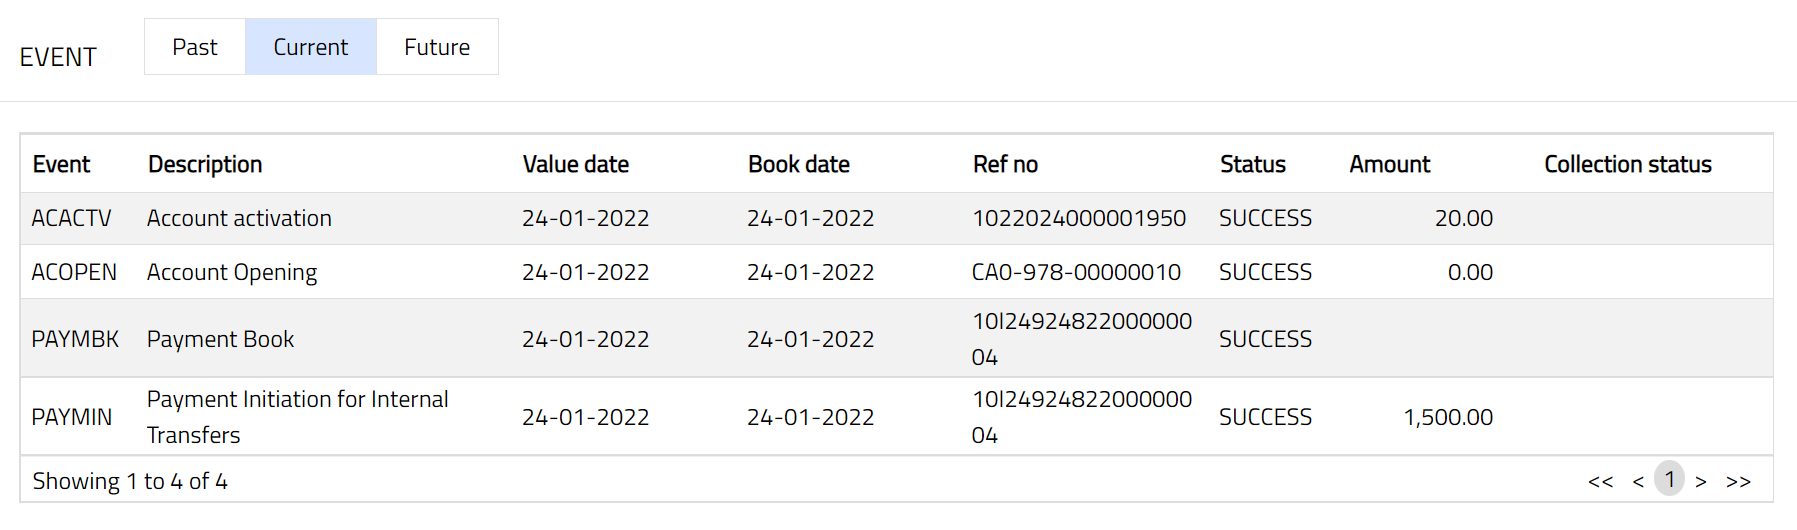
Events tab allows you to view the past, current and future events. This tab is non-editable.
To view the Events
Access Client Account Maintain page.
Click Event tab. There are three sub-tabs within it -- Past, Current and Future. By default, the Current tab is displayed. It shows the details of the Events that have value date = current business date. The Past tab and Future tab show details of events that have value date earlier than / later than the current business date respectively.
Past
A sample of the Past tab is shown below:
Current
A sample of the Current tab is shown below:
Future
A sample of the Future tab is shown below:
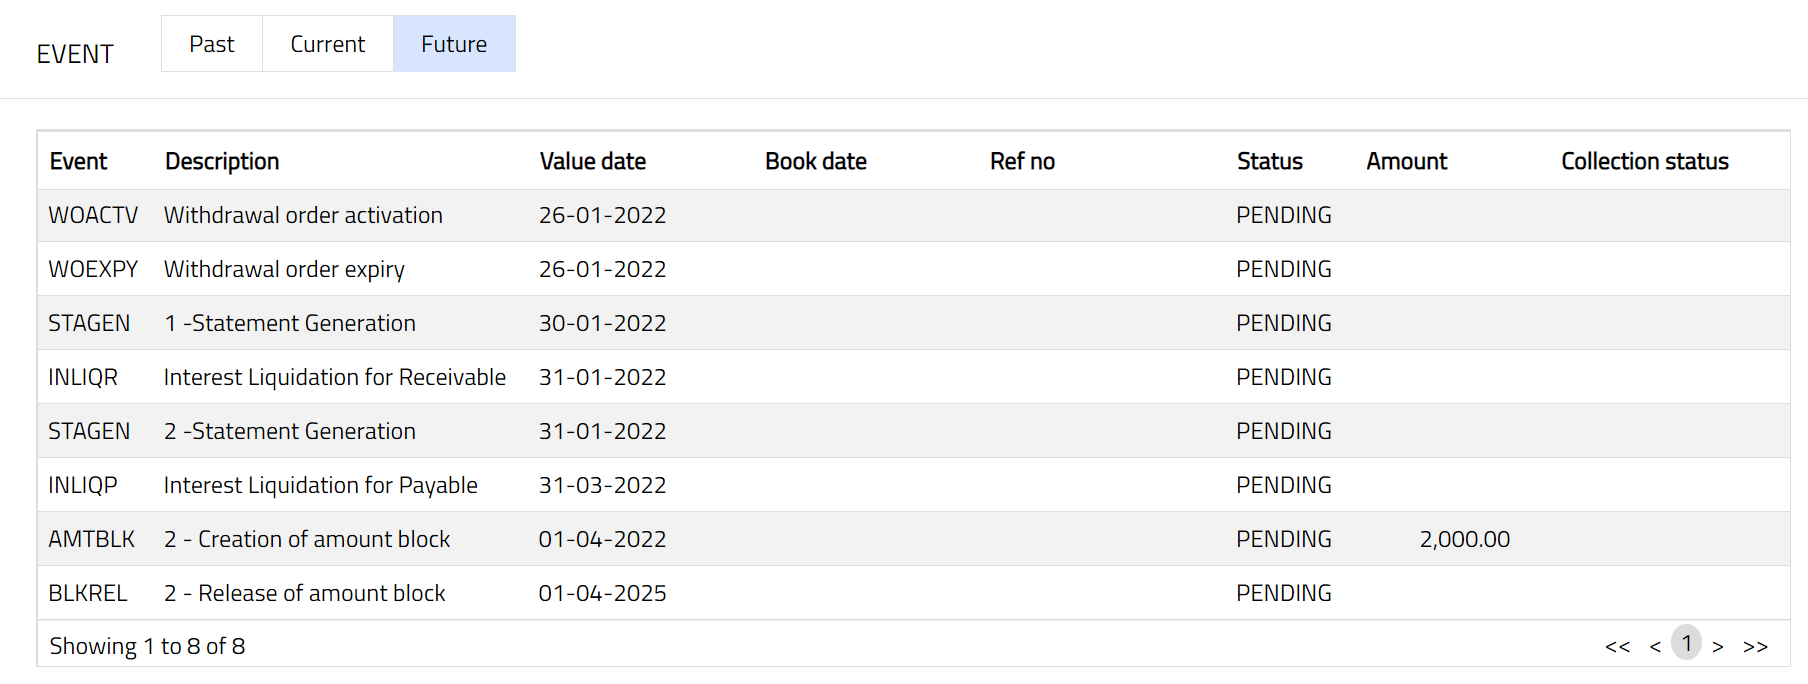
All the tabs show the following data:
Event: Code for the event.
Description: Description of the event.
Value Date: The value date for the event.
Book Date: The date of entry / input of the event.
Ref No: The transaction reference number under which the event is processed.
Status: Status of the event:
Pending: Where the event is not yet processed.
Success: Where the event has been processed successfully.
Failure: Where the event has failed during process.
Retry: Indicates a failed event where the system retries to process the event on subsequent business days.
Amount: Indicates the amount processed by the event. Example: Interest liquidation event will have the amount of interest liquidated.
Collection Status: If the Collection status is Pending, it indicates that the deferred charges has not been collected and if the Collection Status is Success, it indicates that the deferred charges has been collected.
The Events in a Client account are listed below.
| Event Code | Description | Condition |
|---|---|---|
| ACOPEN | Account Opening | This event occurs when an account is opened and occurs only once at the time of opening. The account status defaults to Opened when the Status Change event is triggered. |
| ACACTV | Account Activation | This event occurs when the account is in opened status and the user manually changes the status to Activated. Once changed, the account opening fee is triggered, and transaction entries are posted, even if funds are insufficient. |
| ACDORM | Account Dormancy | This event occurs when no client transactions occur for a specific period, marking the account as Dormant. |
| INLIQP | Interest Liquidation for Payable | This event occurs based on the Interest frequency maintained under the interest payable tab. |
| INLIQR | Interest Liquidation for Receivable | This event occurs based on the Interest frequency maintained under the interest receivable tab. |
| INTPAY | Interest Payout | This event occurs based on the Payment day maintained under the interest payable tab. |
| ACCLOS | Account Closure | This event occurs when the current account is closed and happens only once. |
| SERFEE | Service Charge | This event occurs based on the periodicity of the charges linked to the account as a Service charge. |
| NOPFEE | Non Operation Fee | This event occurs based on the periodicity of charges linked to the account as Non-operation fee. |
| STAGEN | Statement Generation | This event occurs whenever an account statement is identified to be generated for an account. |
| ACREOP | Account Reopen | This event occurs when an account is reopened. |
| NODORM | Reversing of Dormancy | This event is triggered when a dormant account moves to a normal status. |
| AMTBLK | Creation of Amount Blocks | This event is triggered when an amount block is created manually by a user. |
| BLKREL | Release of Amount Block | This event occurs when the amount block is released, either manually by the user or automatically on the block's end date. |
| INADJP | Interest Adjustment for Payable | This event deals with interest adjustments required in case of back-valued transactions, resulting in payable interest re-computation. |
| INADJR | Interest Adjustment for Receivable | This event deals with interest adjustments required in case of back-valued transactions, resulting in receivable interest re-computation. |
| ADDFEE | Additional Charge | This event occurs based on the periodicity of the charges linked to the account as additional charges. |
| ACBLOC | Account Block | This event occurs when a user manually marks an account as blocked. |
| RNTFEE / PROCHG | Locker Rental Fee | This event occurs based on the periodicity of the charges linked to the agreement as locker rent or locker allocation fees. |
| OPEFEE | Operations Fee | This event occurs when the locker operation maintenance record is saved, and charge collection happens. |
| ACACST | Current Account Status Movement | This event occurs whenever there is a change of status in the account. |
| ADHFEE | Adhoc Charge Fee | This event occurs when an account is charged for an adhoc charge fee. |
| AUTBON | Automatic Reward Redemption | This event occurs when reward points are automatically redeemed to the client account. |
| AVGFEE | Average Balance Non-Maintenance Fee | This event is triggered based on the periodicity when the average book balance is calculated and charged to the account. |
| BALFEE | Breach of Minimum Balance Fee | This event is triggered when the client is charged for breaching the minimum balance in the current account. |
| BNCFEE | Breach of Withdrawal Conditions Fee (Non-Cash) | This event is triggered when the client is charged for breaching withdrawal conditions on non-cash transactions. |
| BRCFEE | Breach of Withdrawal Conditions Fee (Cash) | This event is triggered when the client is charged for breaching withdrawal conditions on cash transactions. |
| CHGWAV | Waive Charge | This event is triggered when any charge is waived for the account. |
| EVNPOP | Event Population | On account activation, this event is inserted to trigger other events for charges, accruals, and interests. |
| INACRP | Interest Accrual for Payable | This event occurs when interest payable to the client is accrued and is triggered daily. |
| INACRR | Interest Accrual for Receivable | This event occurs when interest receivable from the client is accrued and is triggered daily. |
| INCAPP | Accrued Interest Capitalized for Payable | This event is triggered if force capitalization is checked and accrued interest is capitalized for Payable. |
| INCAPR | Accrued Interest Capitalized for Receivable | This event is triggered if force capitalization is checked and accrued interest is capitalized for Receivable. |
| INWAVR | Accrued Interest Waived for Receivable | This event occurs when the Waiver Flag is checked and accrued interest receivable is waived. |
| LOYCOM | Account Opening Commission | This event is triggered when account opening commission is collected from the client. |
| PROCHG | Pro Rata Charge | This event is triggered if any amount has to be refunded for prorated charges. |
| STPFEE | Stop Payment Cheque Fee | This event is triggered when a fee is charged for any payment through cheque. |
| TODEXP | Overdraft Limit Expiry | This event is triggered when the overdraft limit for an account expires. |
| UODFEE | Unauthorized Overdraft Fee | This event occurs when a client account is over the limit and unauthorized overdraft fees are charged. |
| WOACTV | Withdrawal Order Activation | This event is triggered when a withdrawal order is activated based on the activation date. |
| WOEXPY | Withdrawal Order Expiry | This event occurs when the withdrawal order expires. |
| WRITOF | Write Off | This event is triggered when the client account balance is written off. |
| CHQSTPQ | Stop payment for cheque | This event occurs when a stop payment instruction is placed against an issued cheque for the Client Account. |
| INWAVP | Accrued interest waived for payable | This event occurs when accrued interest payable on the Client Account is waived based on the configured account preferences or status settings. |
| MINBAL | Minimum balance | This event occurs when the Client Account balance breaches the minimum balance maintained at the account level, as evaluated during the applicable charge cycle. |
| ACPAST | Payment status fee | This event occurs when a fee linked to the Payment Status of the Client Account is applied based on the configured charge rules. |
| TAXPAY | Tax payout | This event occurs when tax payable is paid out from the Client Account during the applicable tax processing cycle. |
| TAXLIQ | Tax liquidation | This event occurs when accrued tax amounts are liquidated from the Client Account as per configured tax liquidation rules. |
| PBKCLS | Client account Passbook closed | This event occurs when the passbook linked to the Client Account is closed through the passbook maintenance process. |
| DOUREC | Doubtful receivable processing for CASA | This event occurs when the Client Account moves into a status configured for doubtful receivable processing as per impairment settings. |
| CHQISU | Cheque issue | This event occurs when a cheque book or cheque leaf is issued for the Client Account. |
| CHQRVK | Revoke for stop payment | This event occurs when a previously placed stop payment instruction for a cheque is revoked. |
| DBTPRO | Debit processing | This event occurs when a debit transaction is processed on the Client Account. |
| DSTCHG | Documentation stamp tax charge issue | This event occurs when a documentation stamp tax charge is applied to the Client Account based on the configured charge setup . |
| PBKISU | Passbook issue | This event occurs when a passbook is issued for the Client Account. |
| OVDLMT | Overdraft exceeds | This event occurs when the Client Account balance exceeds the authorized overdraft limit. |
| TAXACR | Tax accrual | This event occurs when tax amounts are accrued on the Client Account as per the configured accrual frequency. |
| AWRTOF | Write off processing for CASA | This event occurs when the Client Account moves into a status configured for write-off processing as per impairment settings. |
| ALLFEE | Allocation fee | This event occurs when an allocation fee configured for the Client Account is applied. |
| SERFEP | Service Charge Percentage | This event occurs when a percentage-based service charge is calculated and applied to the Client Account as per the configured charge scheme. |
| ADRCHG | Change of address | This event occurs when the address details linked to the Client Account are updated. |
| ADSTFE | Adhoc Statement Generation | This event occurs when an adhoc statement is generated for the Client Account and a statement fee is applicable. |
| PROVIS | Provision processing for CASA | This event occurs when the Client Account moves into a status configured for provision processing as per impairment settings. |
| CHQCAN | Client account cheque book cancelled | This event occurs when a cheque book linked to the Client Account is cancelled. |
Note:
If you click on any of the successful events listed in the Current and Past Sub tabs, based on the transaction reference number, a scarred will be displayed.
If the transaction reference number is not an account number, then the following screen will appear.
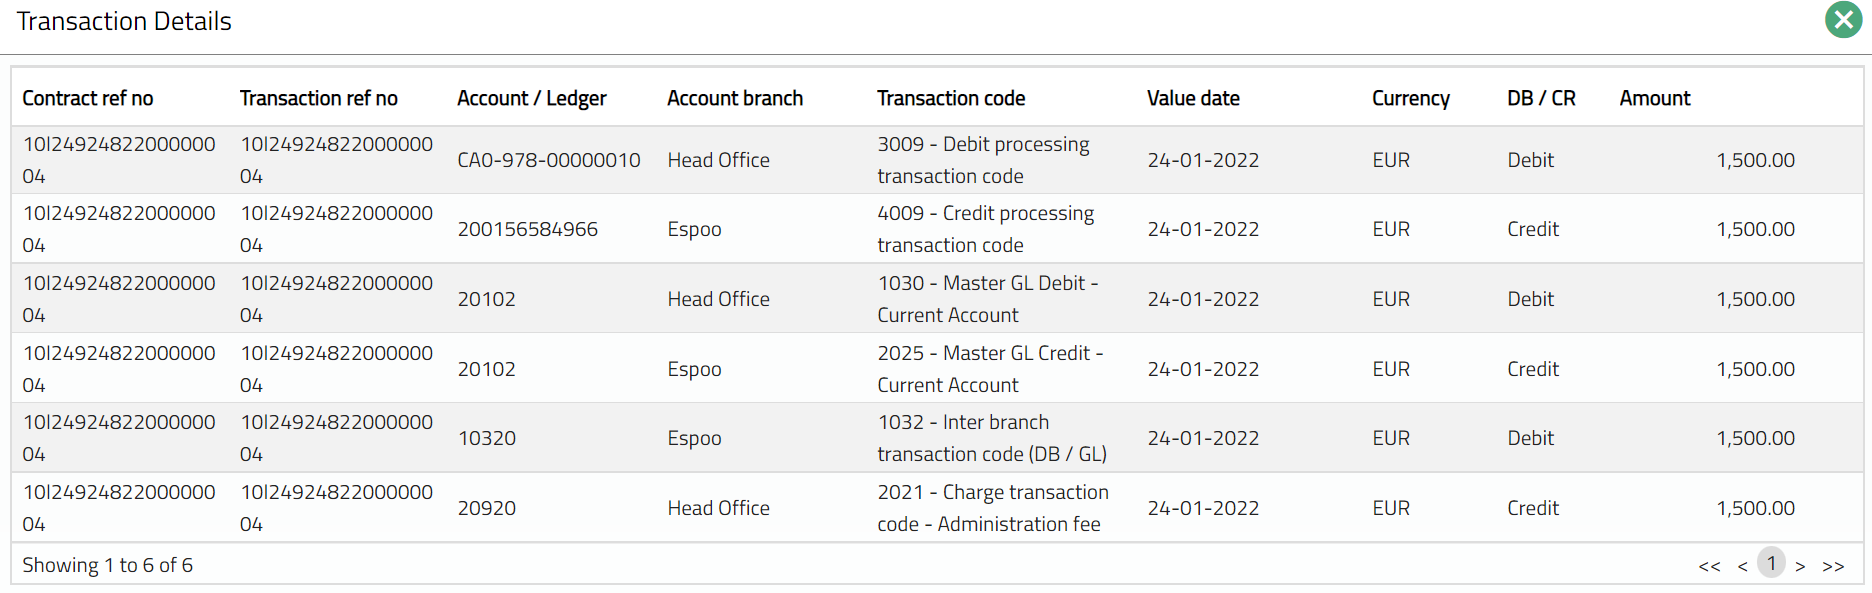
If the transaction reference number is an account number, then the following screen will appear. You will be routed to the Profile tab of that account.
GL Account Balances
This tab allows you to view the summary of the component level balances on impairment treatment as per GL. Please refer to the Impairment tab in Product Maintenance.
To view the GL Account Balances, 1. Access Client Account Maintenance page. Click on GL Account Balances tab to see details as shown below; as an
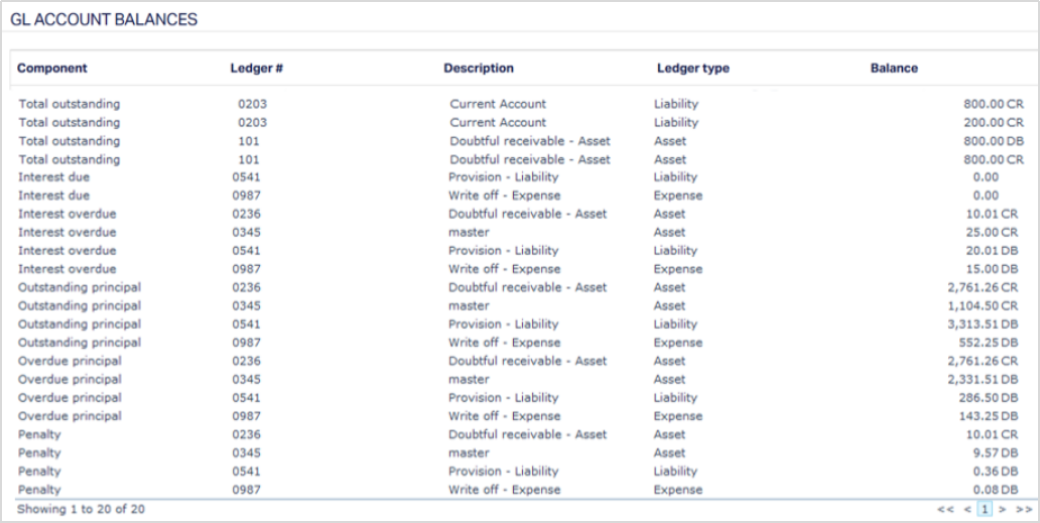
The columns available on the page are:
- Component denotes the components. The possible component displayed in this page is Total Outstanding.( Total outstanding = Total outstanding in the account = Book balance )
- Ledger# denotes the ledger number to which the impairment treatment entry is posted.
- Description denotes the description of the ledger.
- Ledger type denotes the type of ledger.
- Balance denotes the Ledger balance with respect to the component. This balance may not be equal to the current balance displayed under General Ledger > Transaction review > Statement > Balance.
For example:
If total outstanding is 1, 00,000.00 EUR Doubtful receivable treatment is booked for the account for 25 %. Provision is booked for 30
| Component balance | Master GL / Accrual GL balance (Primary GLs) | Secondary GL (mapped GL for treatment) |
|---|---|---|
| 1,00,000.00 EUR | 75,000.00 EUR | 25,000.00 EUR – Balance in Doubtful receivable GL |
| 1,00,000.00 EUR | 75,000.00 EUR | 30,000.00 EUR – Balance in Provision GL (Exp and Liability) |
If total outstanding is 8000 EUR Doubtful receivable treatment is booked for the account for 20 %. Provision is booked for 25%
| Component balance | Master GL / Accrual GL balance (Primary GLs) | Secondary GL (mapped GL for treatment) |
|---|---|---|
| 8000 EUR | 6400EUR | 1600EUR – Balance in Doubtful receivable GL |
| 8000 EUR | 6400EUR | 2400 EUR – Balance in Provision GL (Exp and Liability) |
Interest
This tab can be used to view and edit the interest receivable and interest payable of the client account. It has two sub-tabs, one for each of these. While creating the product, if you select the overdraft allowed as Yes, then both Interest Payable and Interest Receivable tabs will get displayed for Client Account. If you select the overdraft as No, then only the Interest Payable tab gets displayed.
Interest Payable
Interest Payable tab allows you to view and maintain the interest rate offered on a client account.
To edit the Interest payable
- Access Client Account page. Click Interests tab and then Interest Payable tab to view the details as per sample below. The details are defaulted from Product > Interest Payable based on the Product that you chose for the account during creation.
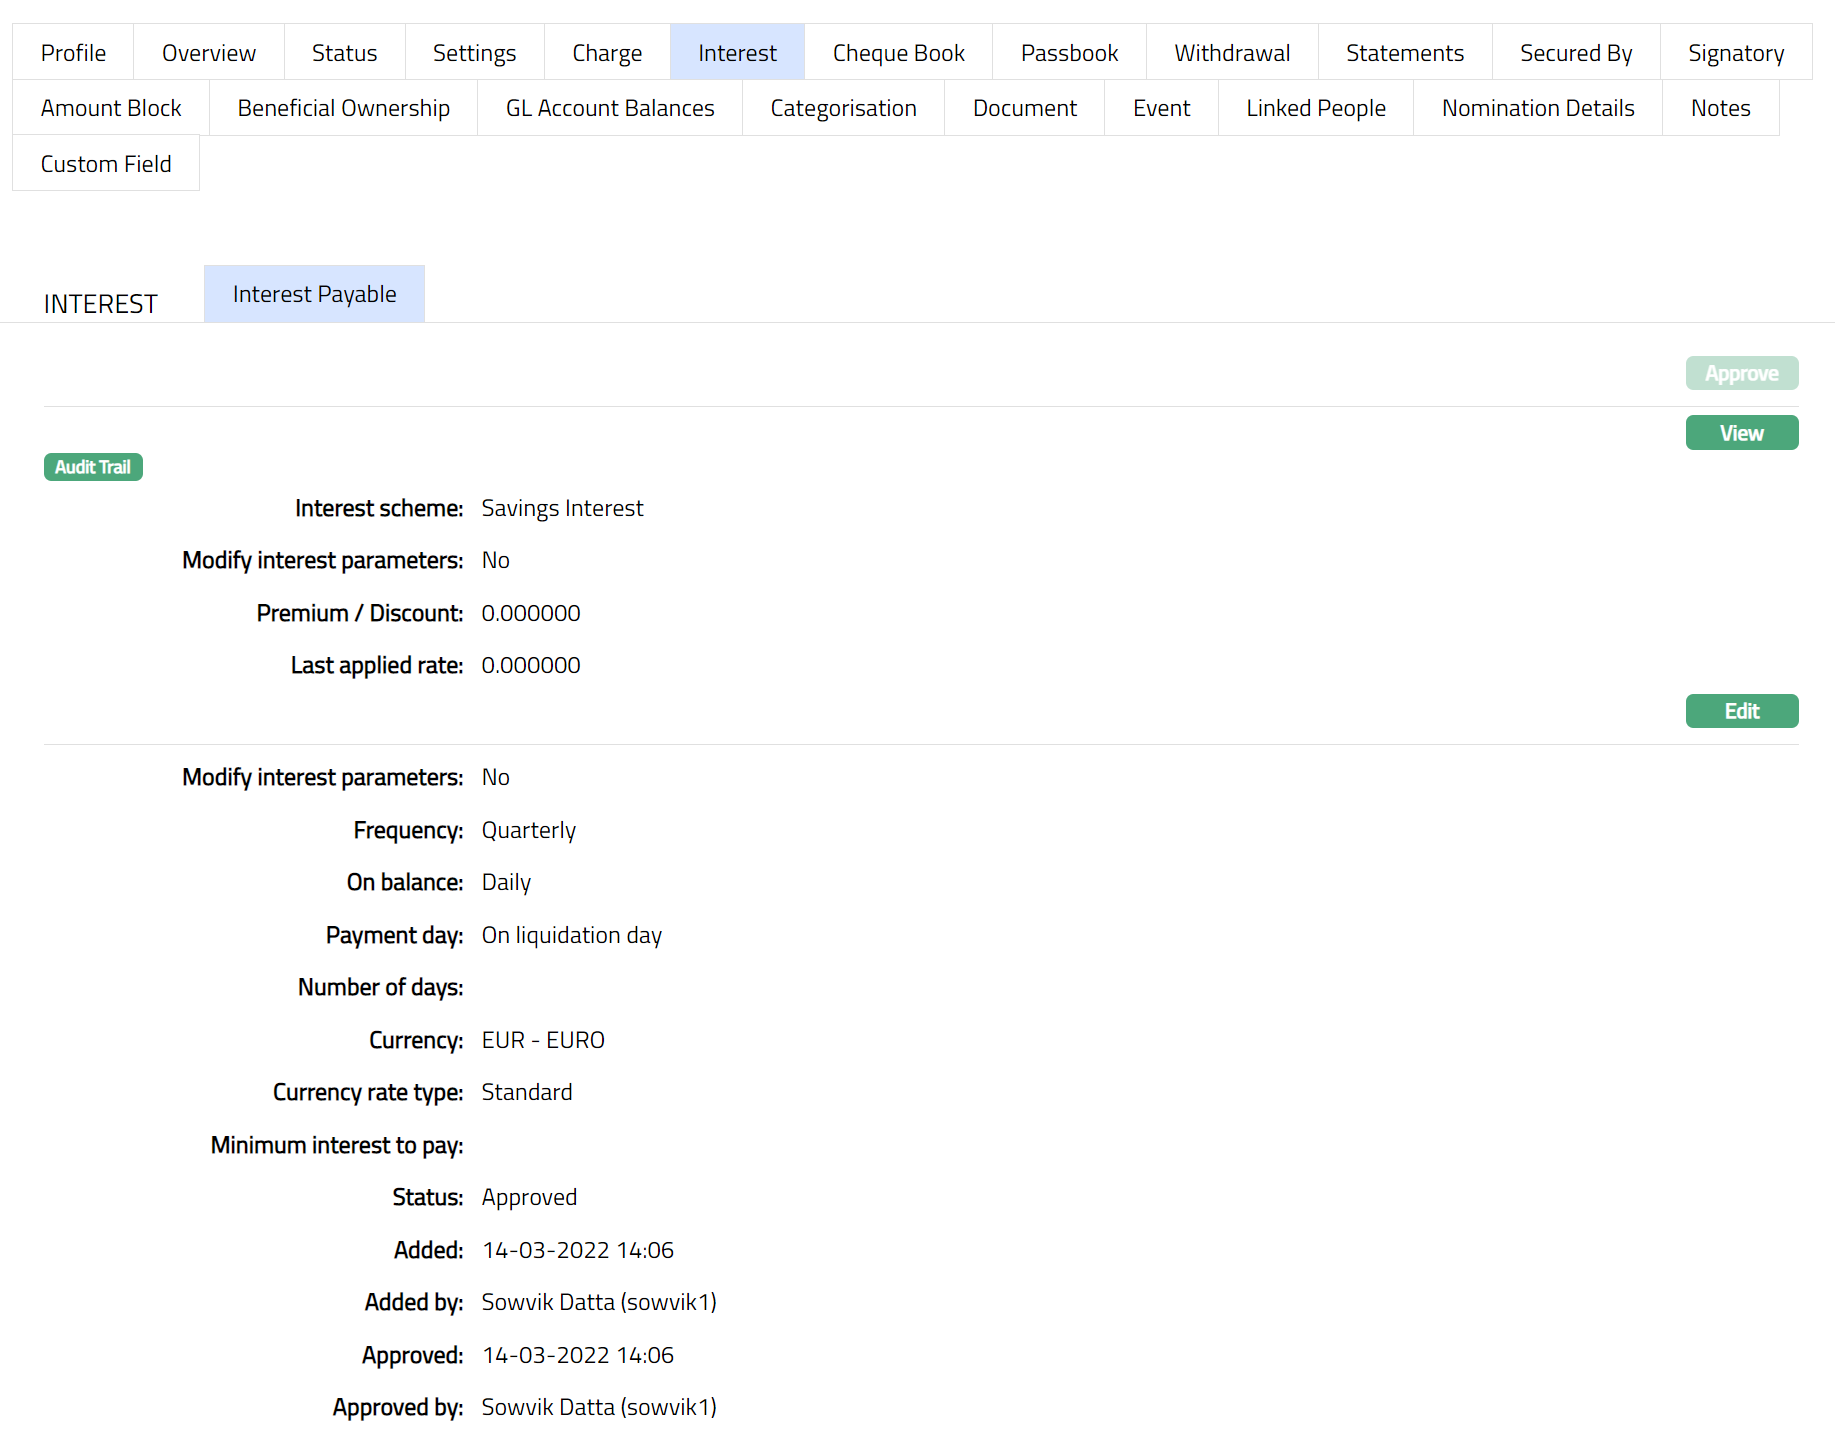
The additional fields that you can view in the tab are explained below:
Status field denotes the status of the tab.
Added field denotes the date on which the record was added.
Added by field denotes the name of the person who created the record.
Approved field denotes date on which the record was approved and is displayed only for approved records.
Approved by field denotes name of the person who approved the record and is displayed only for approved records
To view / edit the parameters of the Interest scheme for Interest Payable
Click View. The interest's combination and other parameters for the Interest details appears. A sample of the page is shown below.
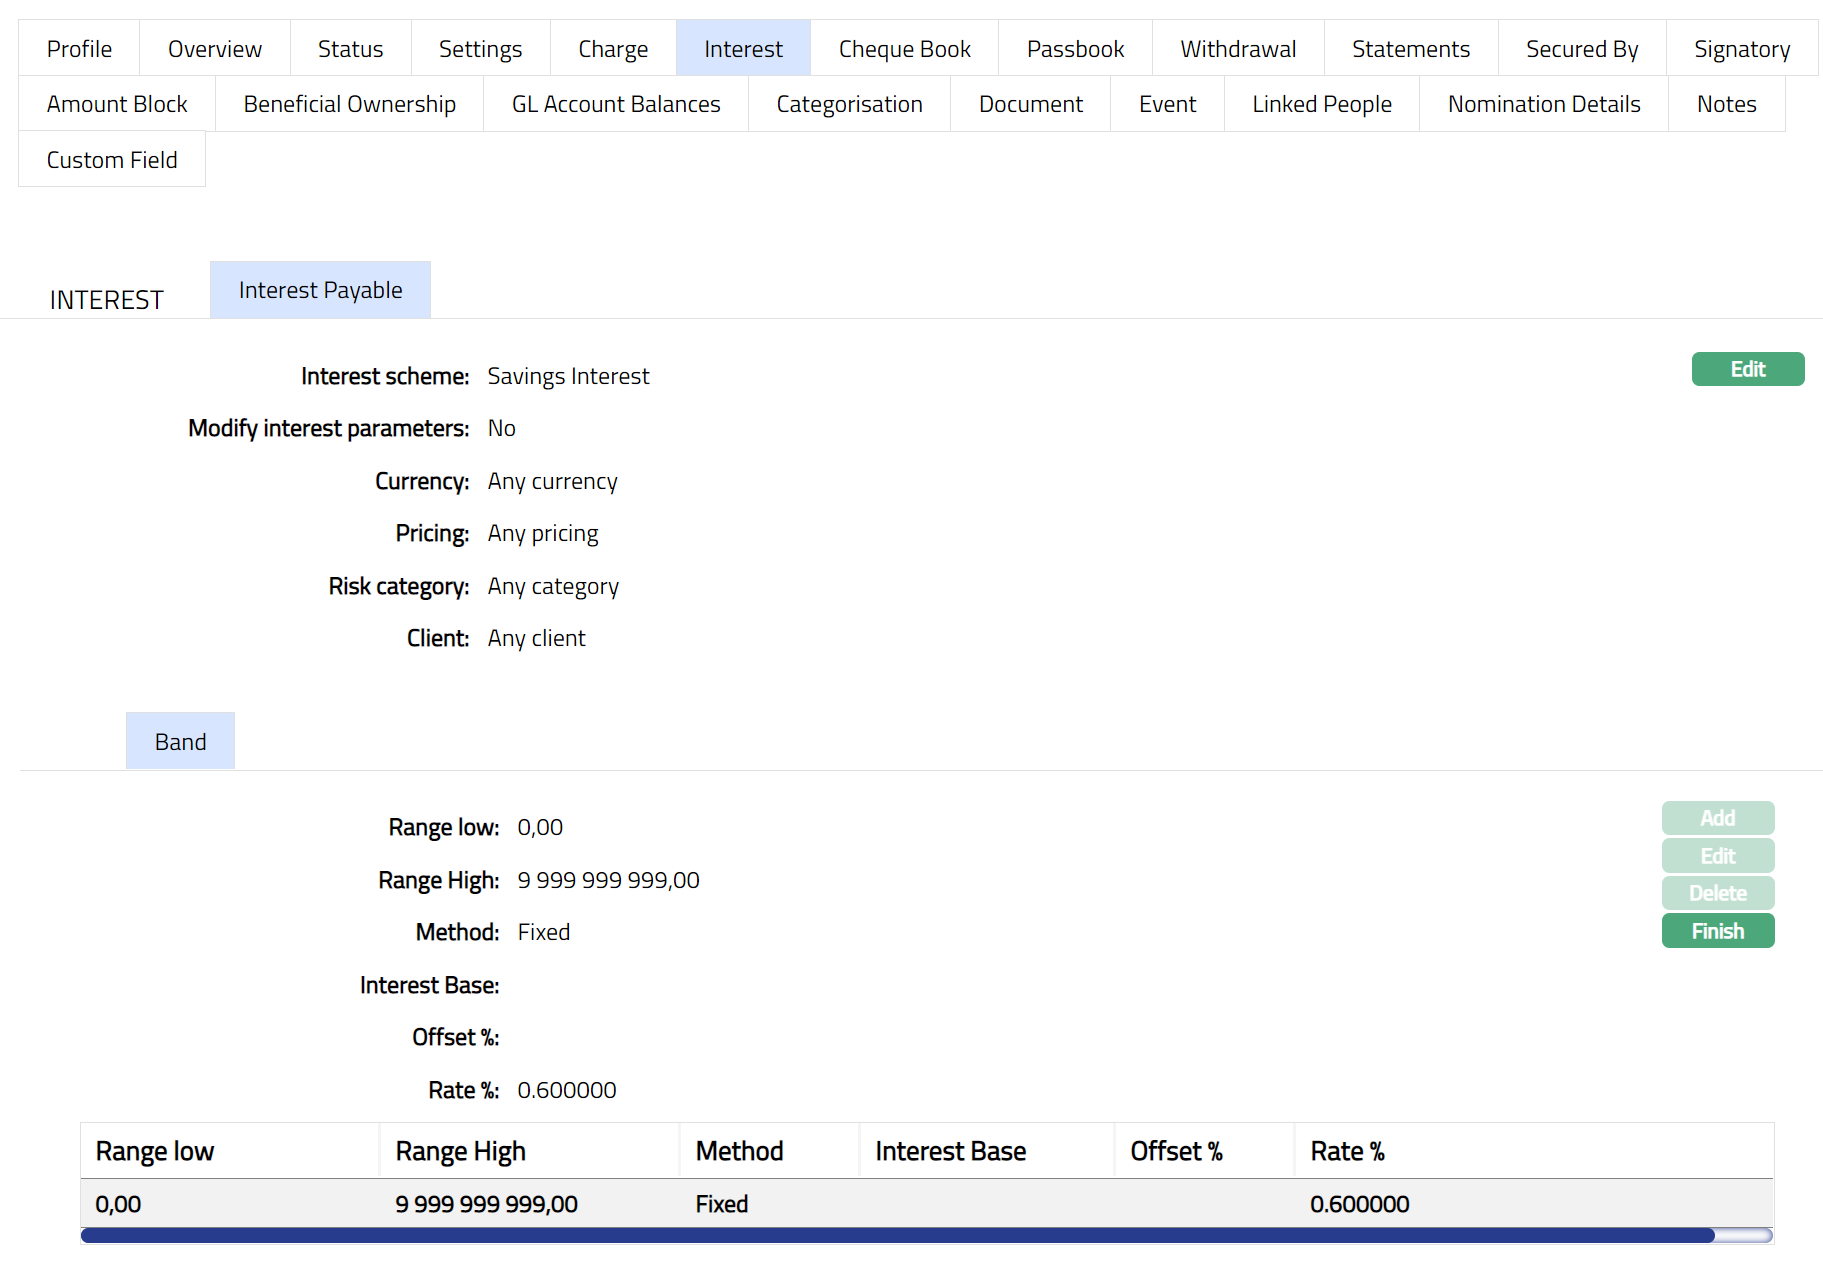
Interest scheme displays the interest scheme selected for the interest payable in interest group, chosen during creation of the account. If edited, it shows the interest scheme that was chosen last for this account.
Modify interest parameter allows you to modify the Interest parameters applicable to this account that are defaulted from the Interest scheme. By default it will be No, but is an editable field. Only if this is set to Yes you will be allowed to change the interest parameters.
The values for Currency, Pricing and Client fields are defaulted from the most suitable Interest combination applicable for the account as explained earlier. These fields are non-editable.
The Range low, Range high, Method, Interest base, Offset % and Rate % are displayed based on the bands maintained for the chosen interest scheme. New bands can be added, or the existing bands can be modified as needed, if you have checked Modify Interest Parameters check box.
The Range Low i.e., the lower limit, is defaulted to Zero for the first band. For the succeeding bands, it is automatically set as Range high of the previous band | least decimal of Basis currency. In case of Any Currency, the number of decimals is taken as 2. The value is derived from the Band details maintained for the Interest scheme. See Note below
The Range high i.e., the upper limit for the Band is derived from the Band details maintained for the Interest. This is an editable field.
Note: If the Interest basis amount lies outside the Range, the Interest will be calculated as 0. Hence, you should maintain the Range values such that it would cover any amount.
Method displays the interest method option. The available options are None, Fixed or Variable.
Offset%: It is the % by which the base interest rate will be offset to get the actual interest to be applied for interest calculation. This field will be enabled only if Variable Method is chosen. If edited, it shows the value that was chosen last for this account.
Rate % indicates the interest rate applied based on the card account's balance as of last EOD and the interest bands maintained for the Combination and is calculated as the Interest Rate % | Offset. For Fixed Interest, Offset will be taken as 0. If the card account balance does not have a credit balance or if there is no corresponding band, then this will be 0. On creation of the account, it is defaulted from the Admin > Pricing > Interest Scheme > Maintain Band. If the interest parameters for the account have been edited, it shows the rate % based on the bands maintained for this account.
- Click Edit to change the Interest Scheme and modify the parameters attached to the Interest scheme. The Edit Scheme page appears.
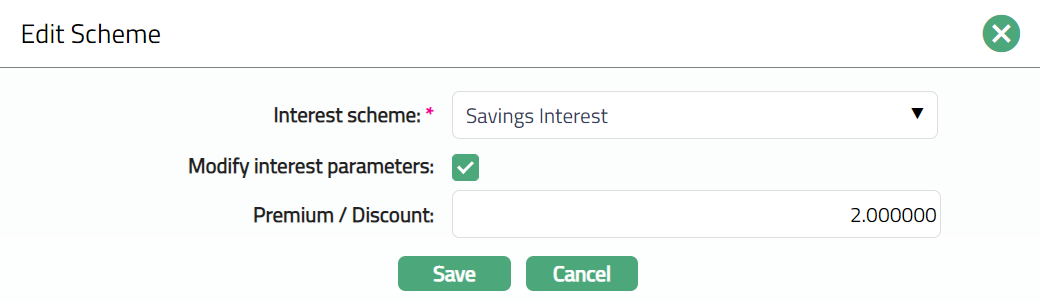
If you want to change the Interest scheme, select the required Interest Scheme from the drop-down list of all active Interest schemes that are shown in the dropdown list. You can modify this field irrespective of the Modify interest parameters flag. If the scheme is modified when Modify interest parameters flag is checked, then all the details of the modified scheme will be displayed in the view screen and the flag will be unchecked.
Using the Modify interest parameters check box you can specify if you want to delink the interest parameters applicable to this account from the interest scheme details that are maintained under Admin > Pricing > Interest > Interest scheme for this Interest scheme. Thus, it enables you to customize the interest applicable to a specific account and keep it tailor-made for that account even if there are changes at the Interest scheme level. If this is checked (Yes) the Add, Edit and Delete buttons will be enabled (only for last band) and you can make changes in the interest scheme parameters. If this is unchecked (No) then all the band and band details will get populated from the interest scheme and the Add, Edit & Delete buttons will be disabled. Finish button is always enabled and can be used to close Band view or Flat view. By default, Modify Interest parameters will be unchecked (No), which will display the default values that are retained.
Enter the Premium/ Discount rate. By default, it shows the value that was input last for this account. If you enter the positive value here, it will be considered as Premium and will be added to the interest rate. If you enter the negative value, then it will be considered as Discount. This will be deducted from the interest rate applicable for this account. Based on the Addition or deduction modified interest rate will be applicable for client account interest calculation.
Click Save. The Interest scheme details appears with the edited details..
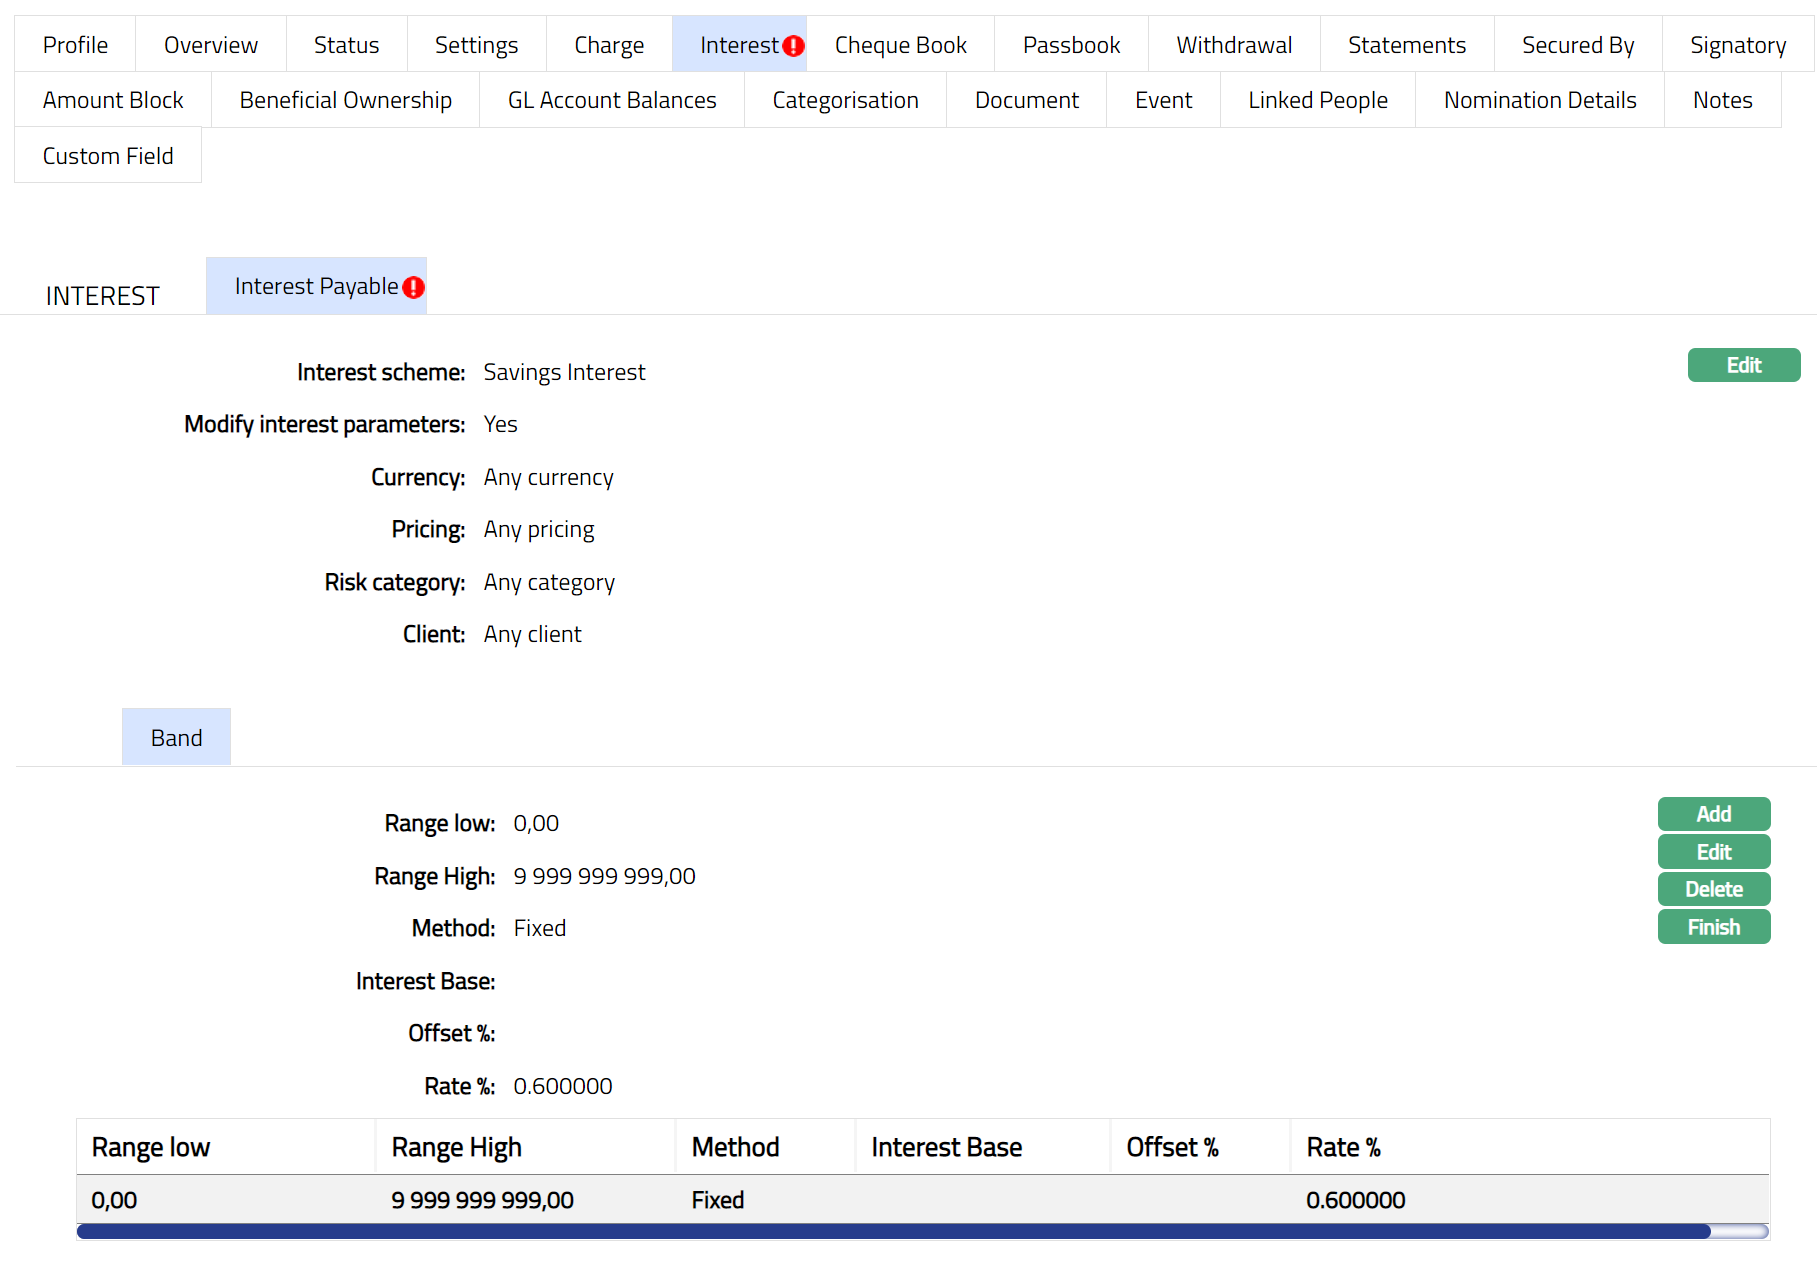
Functions: Add, Edit, Delete, Finish
To add New Band
Click Add. Add Band page appears.
The Range low value is derived from the Range high of the previous Band.
Enter the Range high.
Enter the Method from the drop-down list. The options are None, Variable and fixed.
If Variable option is chosen in the Method field, the Interest base field will be enabled. Select the Interest base from the drop-down list maintained under Admin > Pricing > Interest > Interest bases.
Enter the Offset%. It is the % by which the base interest rate will be offset to get the actual interest to be applied for interest calculation. This field will be enabled only if Variable Method is chosen. If edited, it shows the value that was chosen last for this account.
Enter the Rate %. This field will be enabled only when Fixed option is chosen in Method field.
Click Save. The added band details will get displayed in the Band view page.
Functions: Add, Edit, Delete, Finish
Any change in the tab will set the tab status to Pending till it is approved by another user. On approval, the tab status is set to Approved and the red bubble disappears.
To edit the Band Details
Click Edit. Edit Band appears.
Except for Range Low, all other fields are editable
Make the required changes and click Save.
To Edit Interest payable,
- Click Edit. Edit Interest Payable page appears.
- Using the Modify interest parameter check box you can specify if you want to delink the interest parameters applicable to this account from the interest scheme details that are maintained under Product / System codes for this interest scheme. Thus, it enables you to customize the interest applicable to a specific account and keep it tailor-made for that account even if there are changes at the product level or interest scheme level. Only if you have checked this checkbox, you can make changes in the other interest parameters. If this is unchecked, the other interest parameters are defaulted from the interest scheme selected and you cannot make any changes. By default, this is unchecked.
Note: Interest base, Offset % and Rate % are defaulted from the System codes, based on the Interest scheme chosen above. The other parameters are defaulted from the Product and may be de-linked using this checkbox.
Select the Frequency for interest liquidation from the drop-down list. Available options are: Daily, Monthly, Quarterly, Semi-annual and Annual.
You can specify the balance amount on which the Interest payable is to be accrued using the On balance drop down list. The available options are as follows:
Daily -- Interest accrual happens for daily end of day balance
Period end -- Interest accrual happens for balance at the end of the period
Minimum -- Interest accrual happens for minimum balance during the period
Average -- Interest accrual happens for the average balance during the period.
Based on the selected On balance and Interest frequency, Aura accrues the interest. If you select the frequency as Daily, then the On balance will be defaulted to Daily and Aura will not allow you to select other options. Accrual and Liquidation will be either daily or period end.
Select the Payment Day for the Interest payable from the drop down list. Based on this, and the Number of days (next field), the date on which the interest will be paid to the account is determined. Available options are On Liquidation Day and Liquidation plus n day. The latter will be allowed only on selecting the frequency as Monthly or Quarterly or Semiannual or Annual.
Enter the Number of days after which the liquidated interest is to be paid. This field will be enabled only on selecting Payment Day as Liquidation plus n day.
If Frequency is Monthly, Payment Day can be either of the options and hence this field is enabled. You need to enter the number of days between 1 and 30.
If Frequency is Quarterly, Payment Day can be either of the options and hence this field is enabled. You need to enter the number of days between 1 and 4.
If Frequency is Semi Annual, Payment Day can be either of the options and hence this field is enabled. You need to enter the number of days between 1 and 2.
If Frequency is Annual, Payment Day can be either of the options and hence this field is enabled. You need to enter the number of days 1.
Select the Currency for the Interest payable from the drop-down list of GL currencies for the Entity.
Select the Currency rate type for the Interest payable. The interest will be accrued in terms of the Account Currency and will be converted into the equivalent amount in terms of the above Currency using this Currency Rate Type, as on the date of Liquidation. If the Currency rate is not maintained at the Account level, then Aura will consider Central bank rate type maintained at the Entity level.
Minimum interest to pay is the minimum threshold amount for interest payable. Aura will liquidate the interest to the account only if the accrued interest on the Account is greater than or equal to this amount. On creation of the account, it is defaulted from the product but is editable. If edited, it shows the value that was input last for this account.
Note: The amount entered in Minimum interest to be collected belongs to the currency chosen in Currency field, and the number of decimals will also depend on same. Click Save to save the changes that you made.
- Click Save.
Note: Any change in the tab will set the tab status to Pending till it is approved by another user. On approval, the tab status is set to Approved and the red bubble disappears.
The additional fields are:
Status field denotes the status of the tab.
Added field denotes the date on which the record was added.
Added by field denotes the name of the user who created the record.
Approved field denotes date on which the record was approved and is displayed only for approved records.
Approved by field denotes name of the user who approved the record and is displayed only for approved records
Interest Receivable
This Interest Receivable tab allows you to create and maintain the interest which can be charged for authorized and unauthorized overdrafts from the account
1. Access the Client Account Maintenance page. Click on the Interests tab to view the details as per sample below. The Interest Receivable tab is shown by default. The details are defaulted from Product > Interest Receivable based on the Product that you chose for the account during creation.
Functions: Approve, Edit, View
2. Click on Edit. The Edit Interest Receivable page appears.
3. Using the Modify interest parameters check box you can specify if you want to link the interest parameters applicable to this account from the interest scheme details that are maintained under Product / System codes for this interest scheme. Thus, it enables you to customize the interest applicable to a specific account and keep it tailor-made for that account even if there are changes at the product level or interest scheme level. Only if you have checked this checkbox, you can make changes in the other interest parameters. If this is unchecked, the other interest parameters are defaulted from the interest scheme selected and you cannot make any changes. By default, this is unchecked.
4. System displays selected liquidation frequency as label and same is not editable.
5. Select the On balance for the Interest Receivable. Available options are: Daily, Period end, Minimum, Maximum and Average.
Based on the selected On balance and Frequency Aura accrues the interest. If you select the Frequency as Daily then the On balance will be defaulted to Daily and Aura will not allow you to select other options. Accrual and Liquidation will be either daily or period end.
6. Select the Currency name for the Interest Receivable from the drop down list of GL currencies for the Entity.
7. Select the Currency rate type for the Interest Receivable. The interest will be accrued in terms of the Account Currency and will be converted into the equivalent amount in terms of the above Currency using this Currency Rate Type, as on the date of Liquidation. If the currency rate type is not maintained at the account level, then the currency rate maintained at the Entity level will be considered.
8. Minimum interest to receive is the minimum threshold amount for interest receivable. Aura will liquidate the interest to the account only if the accrued interest on the Account is greater than or equal to this amount. On creation of the account, it is defaulted from the Product but is editable. If edited, it shows the value that was input last for this account.
Note: The amount entered in Minimum interest to be collected belongs to the currency chosen in the Currency field, and the number of decimals will also depend on the same.
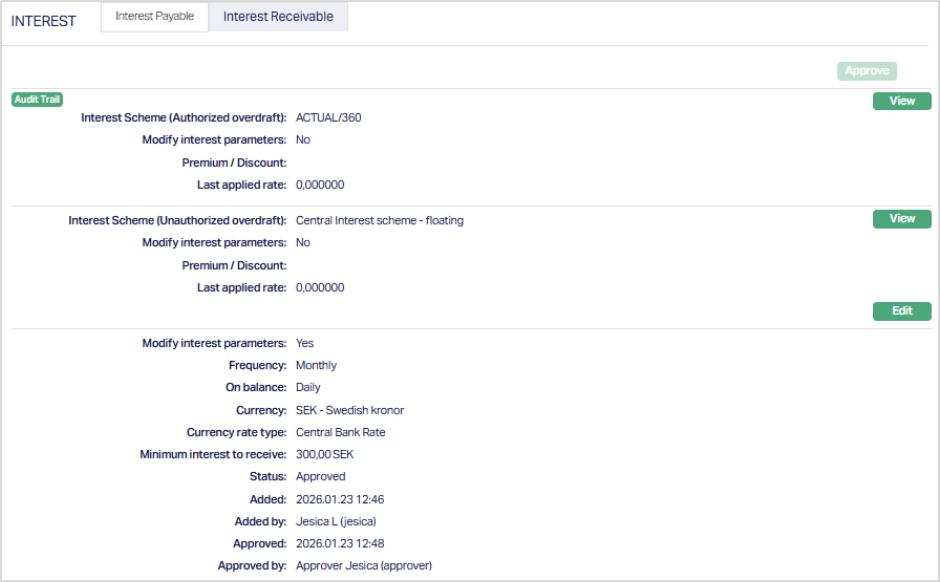
Functions: Approve, Edit, View
Note: Any change in the tab will set the tab status to Pending till it is approved by another user. On approval, the tab status is set to Approved.
The additional fields that you can view in the tab are explained below:
- Status field denotes the status of the tab.
- Added field denotes the date on which the record was added.
- Added by field denotes the name of the user who created the record.
- Approved field denotes the date on which the record was approved and is displayed only for approved records.
- Approved by field denotes name of the user who approved the record and is displayed only for approved records
To view / edit the parameters of the Interest scheme for Interest Receivable
1. Click on View against the Interest scheme to see the interest combination details and other parameters for the Interest. A sample of the page is shown below
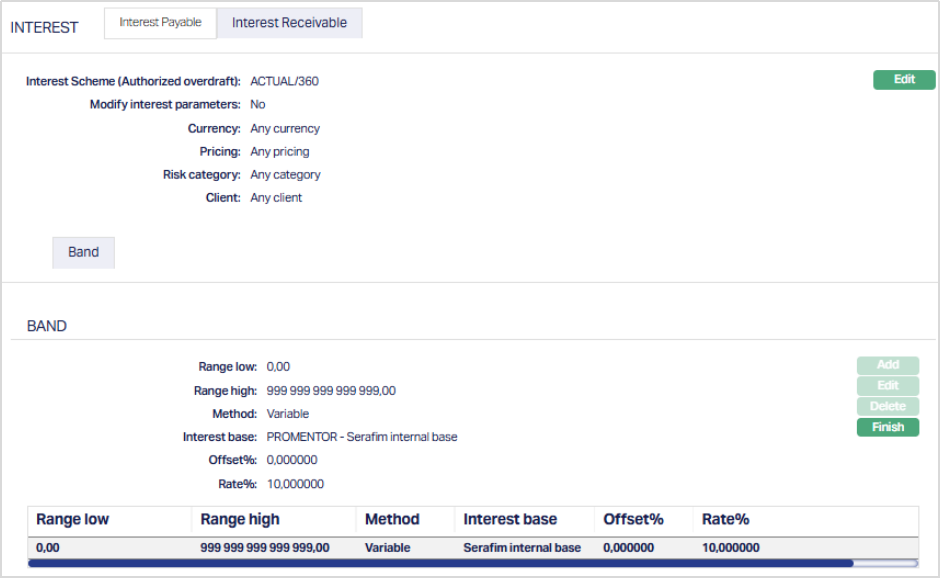
- Select the Interest scheme (Unauthorized overdraft) from the drop down list. In case the account goes into an overdraft which is beyond the limit specified for the account, the interest receivable on such unauthorized overdraft will be calculated using this Interest scheme. Interest schemes should have been created under Admin > System codes > Interest > Interest Scheme.
- Modify interest parameter allows you to modify the Interest parameters applicable to this account that are defaulted from the Interest scheme. By default it will be No, but is an editable field. Only if this is set to Yes you will be allowed to change the interest parameters.
- The values for Currency, Pricing, Risk Category and Client fields are defaulted from the most suitable Interest combination applicable for the account as explained earlier. These fields are non-editable.
- The Range low, Range high, Method, Interest base, offset % and Rate % are displayed based on the bands maintained for the chosen interest scheme. New bands can be added or the existing bands can be modified as needed, if you have checked Modify Interest Parameters check box.
- The Range Low i.e., the lower limit, is defaulted to Zero for the first band. For the succeeding bands, it is automatically set as Range high of the previous band + least decimal of Basis currency. In case of Any Currency, the number of decimals is taken as 2. The value is derived from the Band details maintained for the Interest scheme. See Note below
- The Range high i.e., the upper limit for the Band is derived from the Band details maintained for the Interest This is an editable field.
Note: If the Interest basis amount lies outside the Range, the Interest will be calculated as 0. Hence, you should maintain the Range values such that it would cover any amount. -Method displays the interest method option. The available options are None, Fixed or Variable.
- Offset%: It is the % by which the base interest rate will be offset to get the actual interest to be applied for interest calculation. This field will be enabled only if Variable Method is chosen. If edited, it shows the value that was chosen last for this account.
- Rate % indicates the interest rate applied based on the card account’s balance as of last EOD and the interest bands maintained for the Combination and is calculated as the Interest Rate % + Offset. For Fixed Interest, Offset will be taken as 0. If the card account balance does not have a credit balance or if there is no corresponding band, then this will be 0. On creation of the account, it is defaulted from the System Codes > Interest Scheme > Maintain Band. If the interest parameters for the account have been edited, it shows the rate % based on the bands maintained for this account.
2. Click on Edit to change the Interest Scheme and modify the parameters attached to the Interest scheme. The Edit Scheme page appears.
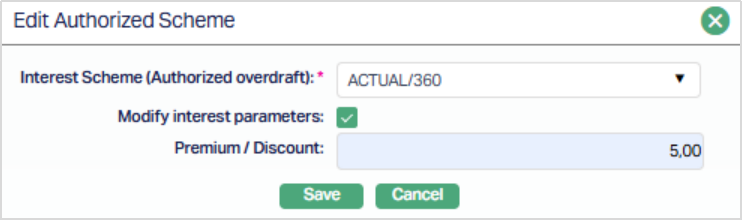
3. If you want to change the Interest scheme, select the required Interest Scheme from the drop down list of all active Interest schemes that are shown in the dropdown list. You can modify this field irrespective of the Modify interest parameters flag. If the scheme is modified when Modify interest parameters flag is checked, then all the details of the modified scheme will be displayed in the view screen and the flag will be unchecked.
4. Using the Modify interest parameters check box you can specify if you want to delink the interest parameters applicable to this account from the interest scheme details that are maintained under Admin > System codes > Generic definitions > Interest > Interest scheme for this Interest scheme. Thus, it enables you to customize the interest applicable to a specific account and keep it tailor-made for that account even if there are changes at the Interest scheme level. If this is checked (Yes) the Add, Edit and Delete buttons will be enabled (only for last band) and you can make changes in the interest scheme parameters. If this is unchecked (No) then all the band and band details will get populated from the interest scheme and the Add, Edit & Delete buttons will be disabled. Finish button is always enabled and can be used to close Band view or Flat view. By default, Modify Interest parameters will be unchecked (No), which will display the default values that are retained.
5. Enter the Premium / Discount rate. By default it shows the value that was input last for this account. If you enter the positive value here, it will be considered as Premium and will be added to the interest rate. If you enter the negative value, then it will be considered as Discount. This will be deducted from the interest rate applicable for this account.
6. Click on Save to save the changes.
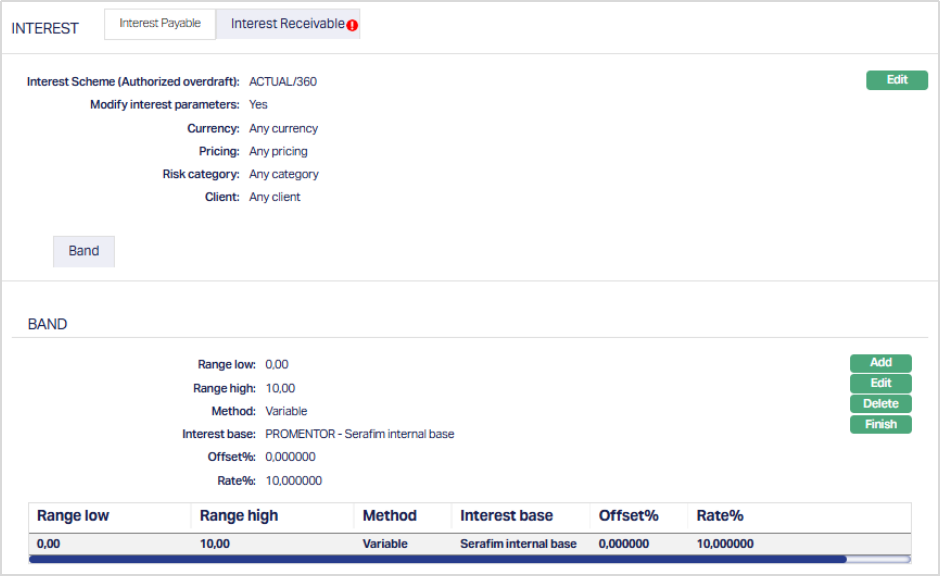
Functions: Add, Edit, Delete, Finish
To add a New Band 1. Click on Add. The Add Band page appears.
2. The Range low value is derived from the Range high of the previous Band.
3. Enter the Range high.
4. Enter the Method from the drop down list. The options are None, Variable and fixed.
5. If the Variable option is chosen in the Method field, the Interest base field will be enabled. Select the Interest base from the drop down list maintained under Admin > System Codes > Interest > Interest bases.
6. Enter the Offset%. It is the % by which the base interest rate will be offset to get the actual interest to be applied for interest calculation. This field will be enabled only if Variable Method is chosen. If edited, it shows the value that was chosen last for this account.
7. Enter the Rate %. This field will be enabled only when fixed option is chosen in Method field.
8. Click on Save. The added band details will get displayed in the Band view page

Any change in the tab will set the tab status to Pending till it is approved by another user. On approval, the tab status is set to Approved.
To edit the Band Details 1. Click on Edit. The Edit Band appears.

Except for Range Low and Range High, all other fields are editable.
Linked People
This tab allows you to link people -- say, an Accountant or Attorney -- to the Client Account.
To add linked people
Access Client Account page and click Linked People tab.
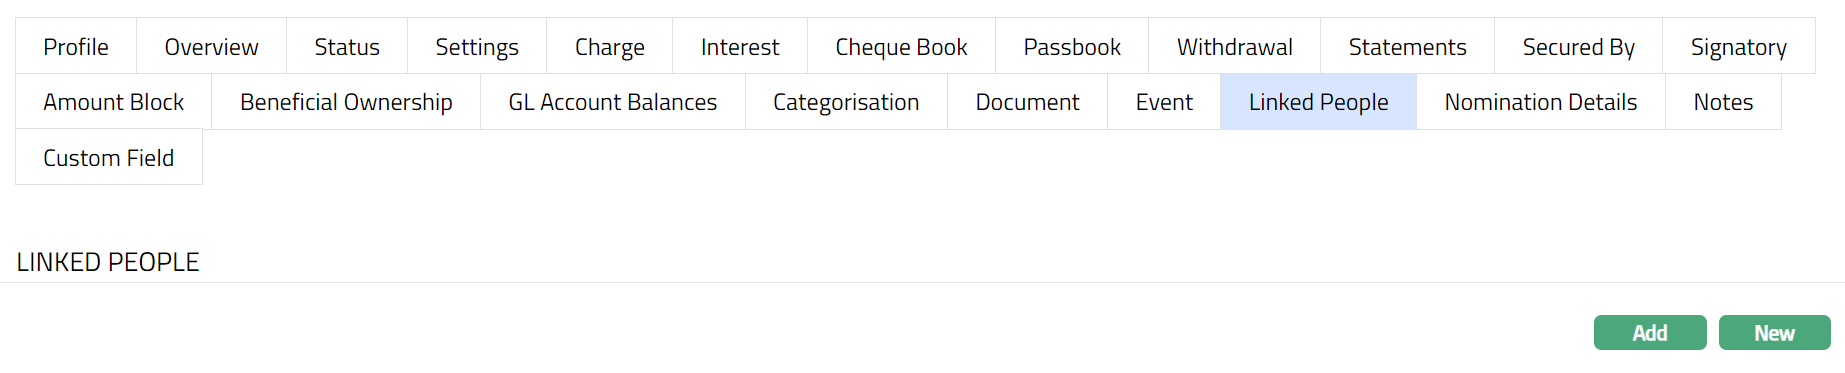
If you want to link a person who has already been created as a Person under CRM > Person Maintenance, then click Add. Aura will display the Add Linked People window with the list of Persons maintained in Aura..

Select the required Person. Linked People page appears with the selected person details.
If you want to enter the details of a Person / Client who has not yet been created as a Person under CRM > Person Maintenance, then click New. The New Linked People page appears.
Enter First name of the person.
Enter Last name of the person.
On entering the First Name and Last Name Aura derives Full name of the person.
Enter Title of the person that is to be prefixed to the person's First name.
Select the role of the Person in relation to this account using the Person role dropdown, which shows the list of Person Roles maintained under Admin > System codes > Generic definitions > Person role.
Select Gender of the person from the drop-down list.
Select Language of the person from the drop-down list maintained under Admin > Generic definitions > Languages.
Click Save. Linked People page appears with the added New People details.
Note: Any change in the tab will set the tab status to Pending till it is approved by another user. On approval, the tab status is set to Approved and the red bubble disappears.
Functions: Add, New, Edit, Delete.
To edit the linked people record
- Click Edit. Edit Linked People page appears.
All the fields are editable.
- Click Save. Linked People page appears with the edited details.
Functions: Add, New, Edit and Delete
The additional fields available are:
Status field denotes the status of the tab.
Added field denotes the date on which the record was added.
Added by field denotes the name of the user who created the record.
Approved field denotes date on which the record was approved and is displayed only for approved records.
Approved by field denotes name of the user who approved the record and is displayed only for approved records.
Nomination Details
The Nomination Details tab allows you to Add and edit the nominee details for the Client Account. In case the account is corporate client, you can only view the details of the nominee owner. In case of Personal and Joint client, you can view and edit the details of the nominee.
To add new Nomination details
Access Client Account screen and click Nomination tab.
Click Add. Add Nomination Details screen appears.
Enter the Effective date from the calendar. Note: The effective date should always be >= to the current booking date.
Select the Nominee by clicking on Nominee hyperlink. The search person page appears, where you can select the name of the nominee.
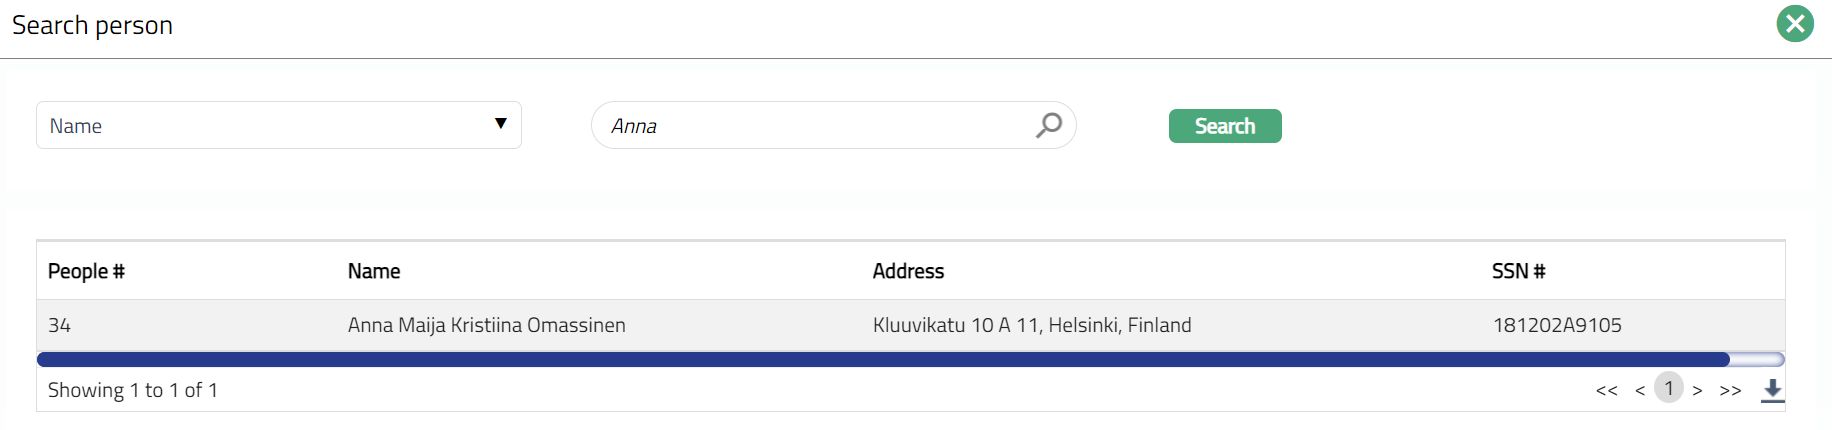
Once you select the nominee their Date of Birth will be displayed by default.
Select the Relationship from the drop-down list. The Available list are Father, Mother, Spouse, Son, Daughter and others.
Enter the name of the Nominee Guardian.
Click Save. Nomination Details page appears with the added details.
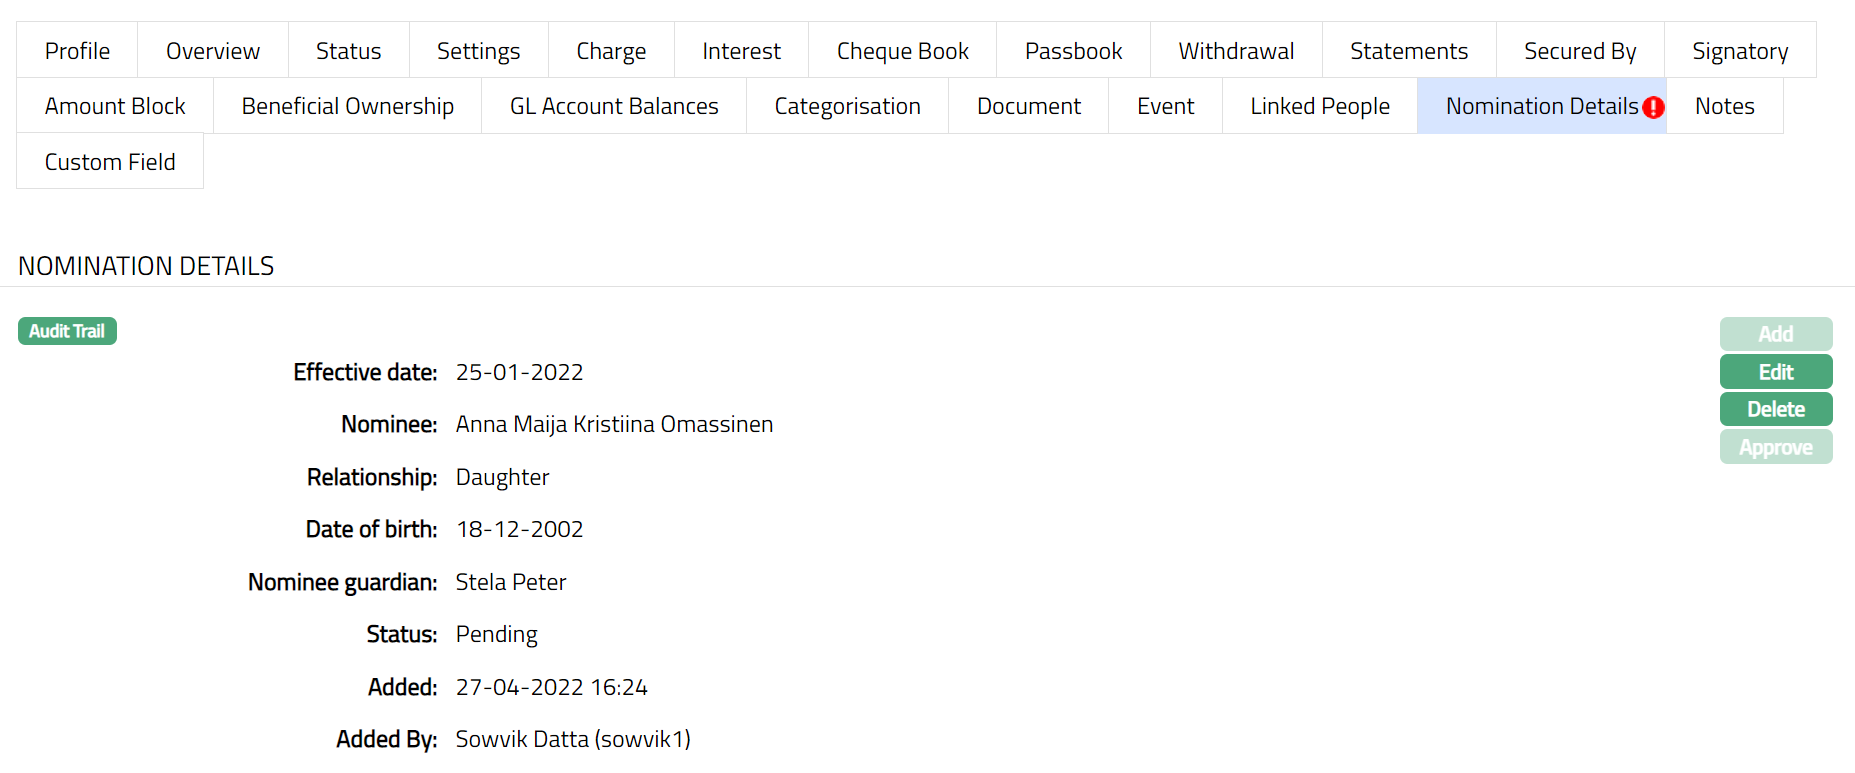
Note: Any change in the tab will set the tab status to Pending till it is approved by another user. On approval, the tab status is set to Approved and the red bubble disappears.
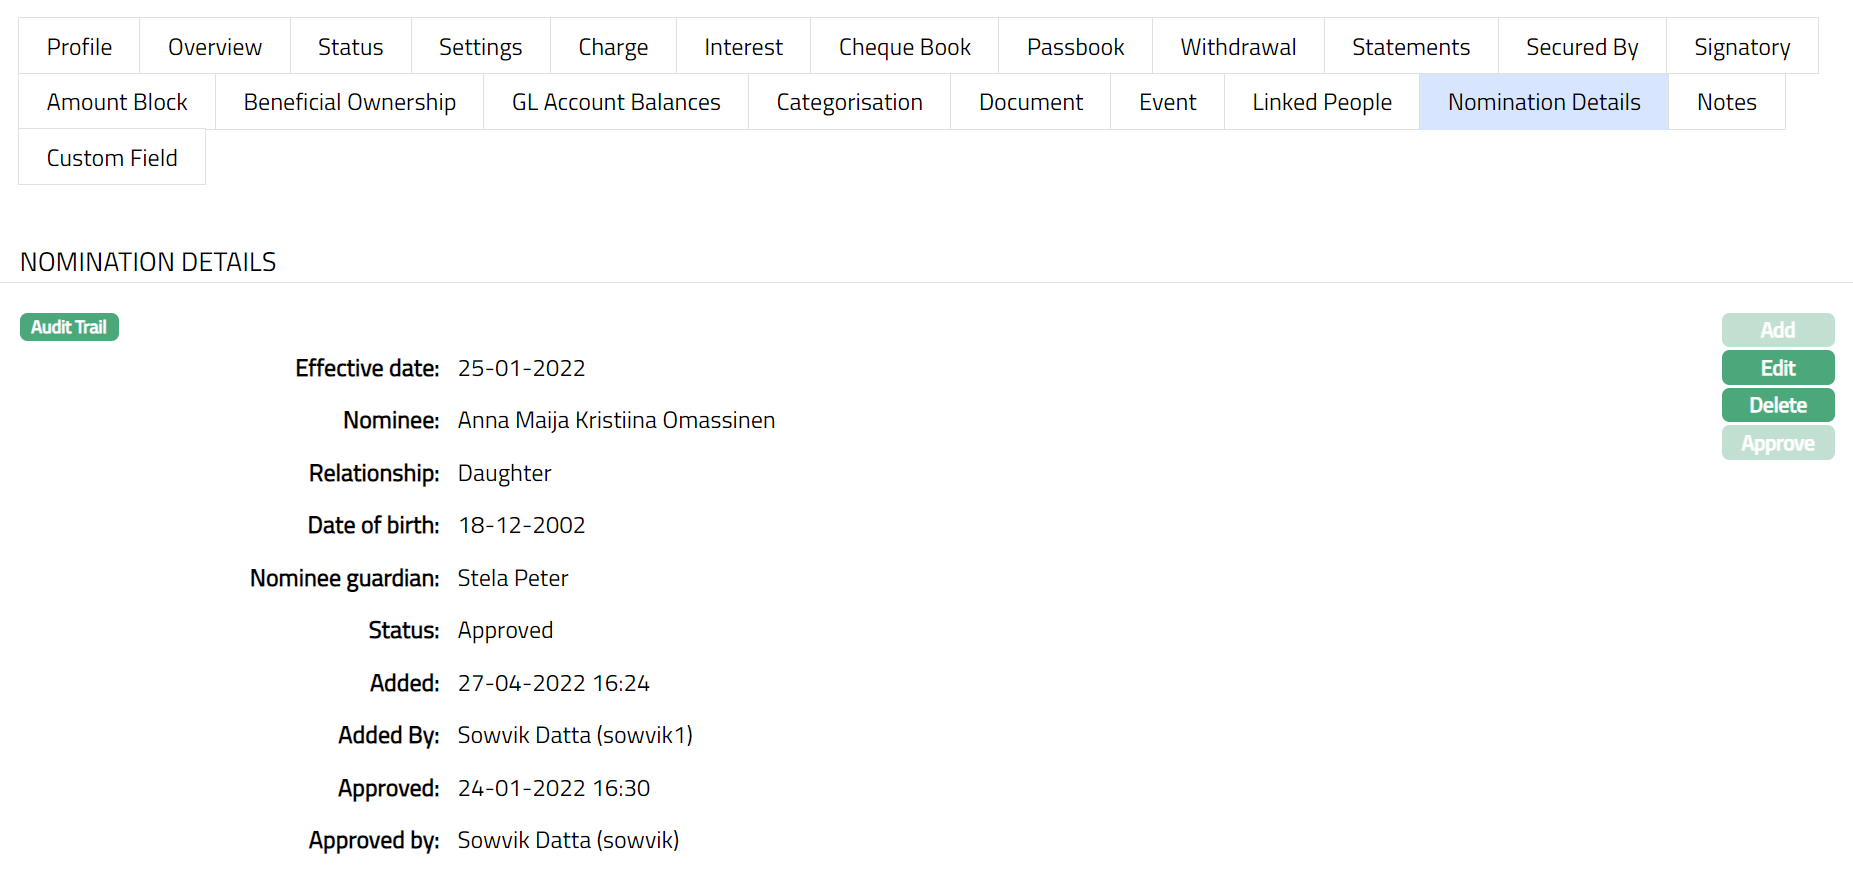
Functions: Add, Edit, Delete and Approve.
The additional fields available are:
Status field denotes the status of the tab.
Added field denotes the date on which the record was added.
Added by field denotes the name of the user who created the record.
Approved field denotes date on which the record was approved and is displayed only for approved records.
Approved by field denotes name of the user who approved the record and is displayed only for approved records.
To Edit Nomination Details
- Click Edit. The Edit Nomination Details page appear.
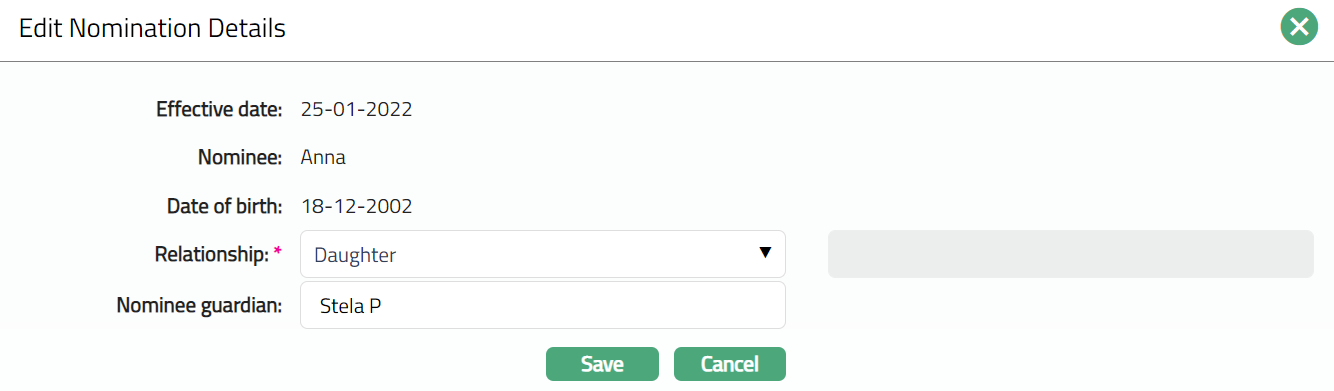
Note: Only Relationship and Nominee guardian fields are editable.
- Click Save. The Nomination Details page appears with the edited details.
Note: Any change in the tab will set the tab status to Pending till it is approved by another user. On approval, the tab status is set to Approved and the red bubble disappears.
 Function: Edit and Delete.
Notes
The Notes tab allows you to record additional remarks or observations related to the client account. This feature is useful for maintaining context, tracking discussions, or capturing account-specific instructions that may not fit into other structured fields.
This section allows you to record single or multiple notes for the client account.
To add / view Notes,
1. Access Client Account page. Click the Notes tab.

2. Click Add. Add Notes page appears.
3. Type any important remarks, such as instructions, customer-specific updates, account handling guidelines etc. Click Save.
4. The Notes screen appears with the added and updated details.
Status of the Note is marked as Open to indicate that the instruction, request, or reminder written still requires action or verification.
5. Once the action mentioned in the note has been completed or verified, you can update the status to Closed using the Edit button.
Note: Closed notes remain visible for reference but are treated as resolved. This helps you distinguish between pending and completed account-related items. You can change the status back to Open at any time using the Edit button.
Functions: Add, Edit.
Passbook
The Passbook tab allows you to issue,close, and approve Client passbooks for the selected Client Account. This tab appears only if the Client Account product is configured with Allow Passbook = Yes in the product setup
When you create a Client Account for the first time, Aura checks the product setup to determine whether the Passbook tab should be displayed. After the account is created, the tab’s availability is controlled at the account level. Any later change to the product setting will not affect the existing accounts.
To add/issue a new Passbook,
1. Access the Client Account maintenance screen, click the Passbook tab. This tab will show no records until you add a new passbook.
Note: The new button is enabled only when the Client Account status is activated.
2. Click New. New Passbook Issue page appears.
3. Enter the Passbook number - this is a mandatory field and is maintained under Admin → Secured Stationery → Series with Type = Passbook and Status = Approved and Printed, and should be associated with the selected account branch.
4. Select the Reason for Issue from the drop-down list. The available values are -
- Continuation - When a new passbook is issued after the old one is complete.
- New Account - When a passbook is issued for a newly opened account.
- Request for Duplicate - When a passbook is reissued due to loss or misplacement.
Note: The default value is Continuation. Once a new passbook is issued for an Account, the previously issued passbook for that account is automatically marked as Closed, ensuring that only passbooks with status Issued can be used for transactions.
5. You can use the Notes field to capture the purpose of issuance or any other notes related to the passbook.
6. Click Save. The Passbook page appears with the added details.
Functions: New, Edit, Approve.
Note: If the entered passbook number is invalid, not in stock, not printed, or from another branch, Aura displays the relevant validation message.
To edit Passbook,
1. Click Edit. Edit Passbook Issue page appears.
Note: Only the Notes field is editable.
2. Click Save. The Passbook page appears with the edited details.
Functions: New, Edit, Approve.
Note: When you save, Aura creates an event - PBKISU (Passbook Issue) with the status set to Pending. This event can be viewed under the Event tab of the Client Account.
Status of the passbook is pending till it is approved by another user. On approval, the status is set to approved. When you approve, Aura updates the record status from Pending to Approved and marks the related event (PBKISU) as Success in the Event Master table.
The Edit button remains enabled even after a record is approved. However, if any changes are made, the updated details will require re-approval from another user as per the maker-checker process.
The additional fields that are shown are:
- Status indicates the current state of the record. It will be either: Pending - If the record is waiting for approval or Approved - If the record has been reviewed and finalized.
- Added shows the date and timestamp when the record was created and Added by displays the user ID and full name of the person who created the record.
- Approved shows the date and time when the record was approved and Approved by displays the user ID and full name of the person who approved the record.
Passbook Status
When you Issue or update a Passbook, Aura tracks its lifecycle through the following statuses:
- Issued - Indicates the active passbook currently issued for the account.
- Closed - When a new passbook is issued for the same account (Continuation or Request for Duplicate), the previously issued passbook is automatically marked as Closed. Only passbooks with Issued status are valid for transaction updates.
Passbook Close (PBKCLS) Event
This event is triggered when a passbook is closed. Aura automatically generates the PBKCLS (Passbook Close) event in the following cases:
- When a new passbook is issued with the reason Continuation or Request for Duplicate, the previously issued passbook is automatically marked as Closed.
- When the Term Deposit account itself is closed, the active passbook linked to that account is also marked as closed.
The event is created with the status Pending and can be viewed under the Event tab of the Term Deposit account. Once the record is approved, Aura updates the event status from Pending to Success.
Secured By
During account creation a limit is attached to an account, specifying the amount of the limit for the account. You can view and maintain these details using the Secured By tab. You can also change the attached limit. However, at any point of time, only one limit can be attached to an account.
To view the limit attached to the account,
- Access Client Account page and click Secured By tab The details of the limit attached to the account while creating the account are displayed as shown below.

Functions: Edit, Delete, Approve
The fields available are:
Total linked amount denotes the total amount that is linked to the account.
Secured ID denotes the id of the limit attached to the account as security.
Linked amount in transaction currency denotes the amount of the Limit linked to the account in the account currency.
Status denotes the status of the record.
Added denotes the date on which the limit is added to the Client account while creation of the account.
Added by denotes the name of the person who has added the limit to the card account while creation of the account.
Approved denotes date on which the record was approved and is displayed only if the record is approved.
Approved by denotes name of the person who approved the record and is displayed only if the record is approved.
The following details of the limit attached to the account while creating the account are displayed under respective columns.
Serial #: This column lists the auto generated serial number of the security
Type: The type of the security attached to the account is listed in this column. In case of card accounts, it is generally Limit
Secured ID: This column lists the auto generated ID of the security -- i.e., the Limit
Secured Amount: Shows the total limit amount attached to the account that is not yet utilised. If the limit amount is fully utilised, then the value displayed here is 0
Secured amount in transaction currency: Shows the Secured amount in the account currency.
Linked amount in transaction currency: Shows the Linked amount in the account currency.
Note:
On Expiry of limit under Secured by tab, the following fields gets updated as 0
i. Linked amount in transaction currency
ii. Secured amount (In the grid)
iii. Secured amount in transaction currency (In the grid)
iv. Total linked amount
When the status of the limit attached to the account is Expired, then you are not allowed to Edit the details in the secured by tab. Only Delete button will be enabled. You can delete the existing expired limit and then add a new limit.
On expiry of limit, utilization of limit amount by that account is update as 0; and hence, the account is considered as over limit.
To Edit the Limit,
- Click Edit button. Edit Secured By page appears.
Note: Only Collateral and Linked amount in transaction currency field are editable.
Click on the Collateral hyperlink. The Collateral Search page appears with the list of all active Revolving, Manual limits made available for the Client under CRM > Collaterals & Limits > Collateral. Select the required Limit for the account.
Collateral amount in Collateral currency will display the total limit amount of the selected limit id in limit currency.
Collateral amount in transaction currency is the total limit amount of the selected limit in terms of the account currency.
The Linked amount in transaction currency is the limit amount that has to be linked to the Card account. By default, this will display the Limit amount in account currency 0.
Click Save. Secured by page appears with the Edited details.
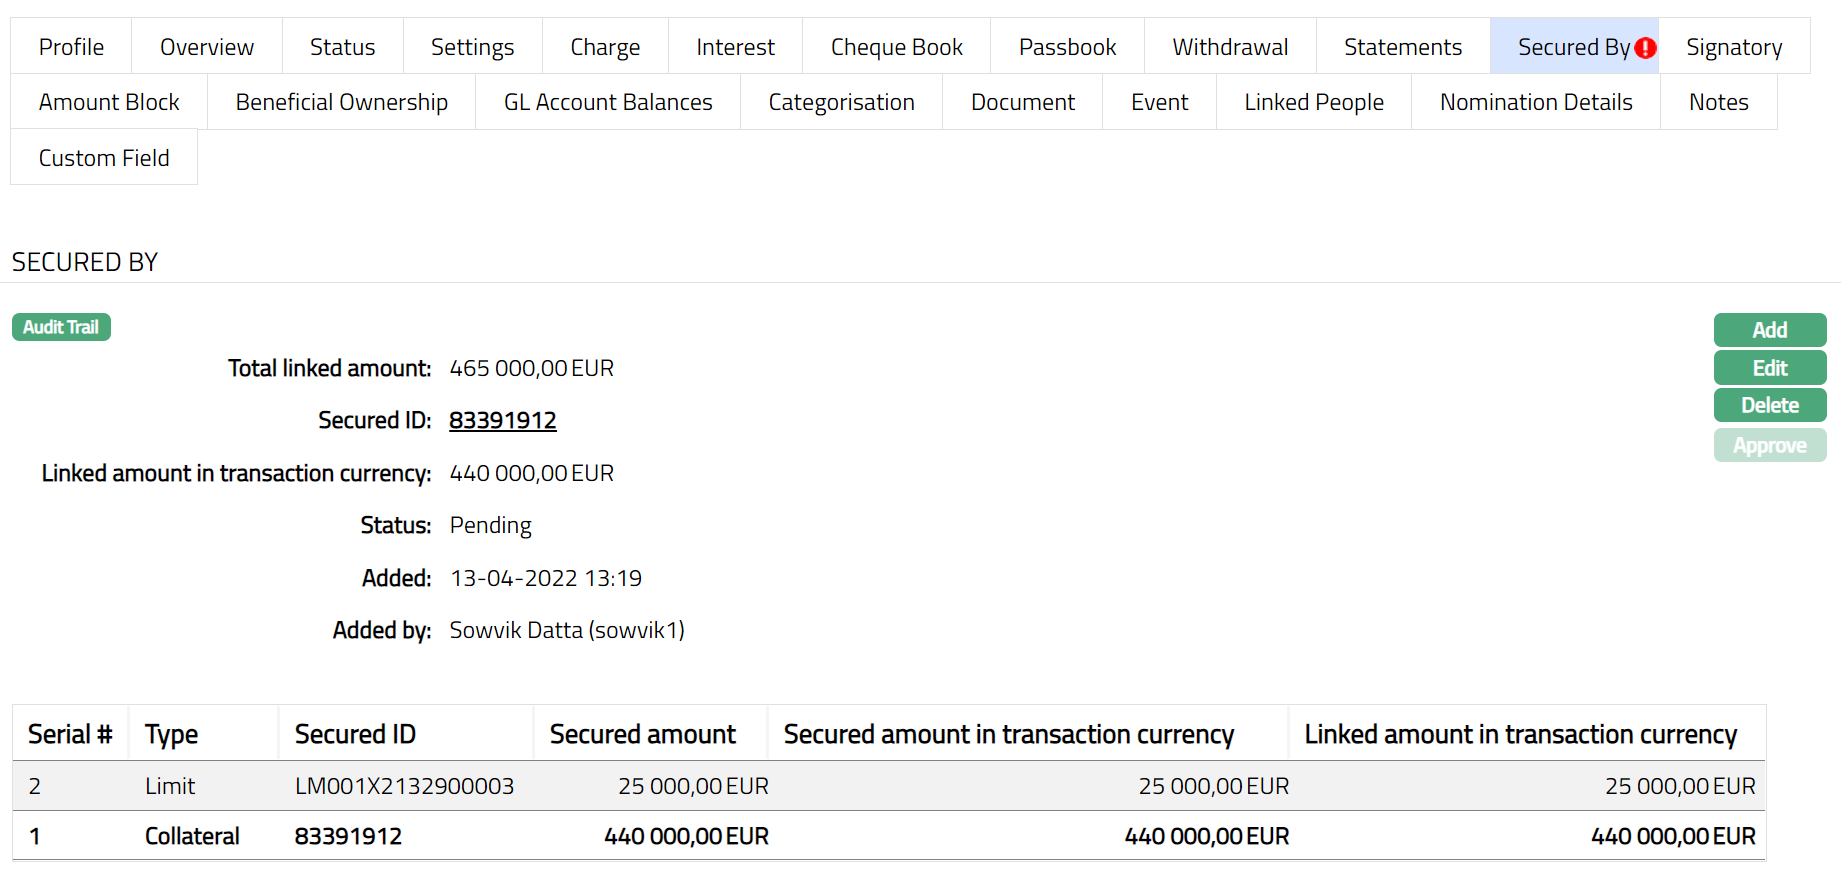
Functions: Edit, Delete, Approve
To Add a new Collateral to an account,
Click Add. Add Secured By page appears.
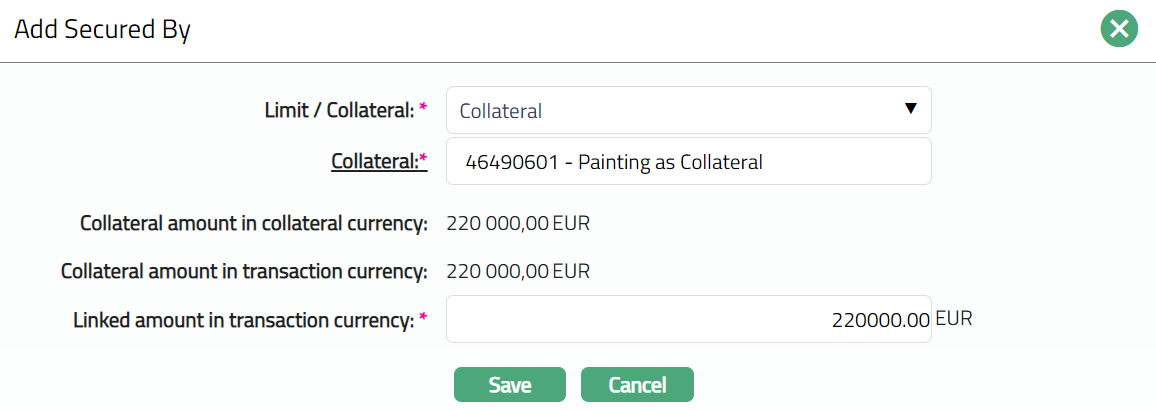
Select the Limit or Collateral from the drop-down list. (Here we are taking an example where limit is considered.)
Select Collateral, the Collateral hyperlink will get displayed. If you click on the limit hyperlink, the limit search screen appears displaying the list of limits with 'Active' status maintained under CRM > Collaterals & Limits > Collaterals.
Collateral amount in Collateral currency will display the unutilized amount of the selected limit id in limit currency by default. Aura will calculate the Limit amount as (Limit amount -- Utilized limit).
Collateral amount in transaction currency is the limit amount in terms of the account currency. The value will get displayed by default. This value is defaulted to the Linked amount in transaction currency is defaulted from limit amount in transaction currency. The value cannot be greater than limit amount in transaction currency. Currency code of the transaction currency will be displayed beside the Linked amount in transaction currency.
The Linked amount in transaction currency will display the linked amount in account currency.
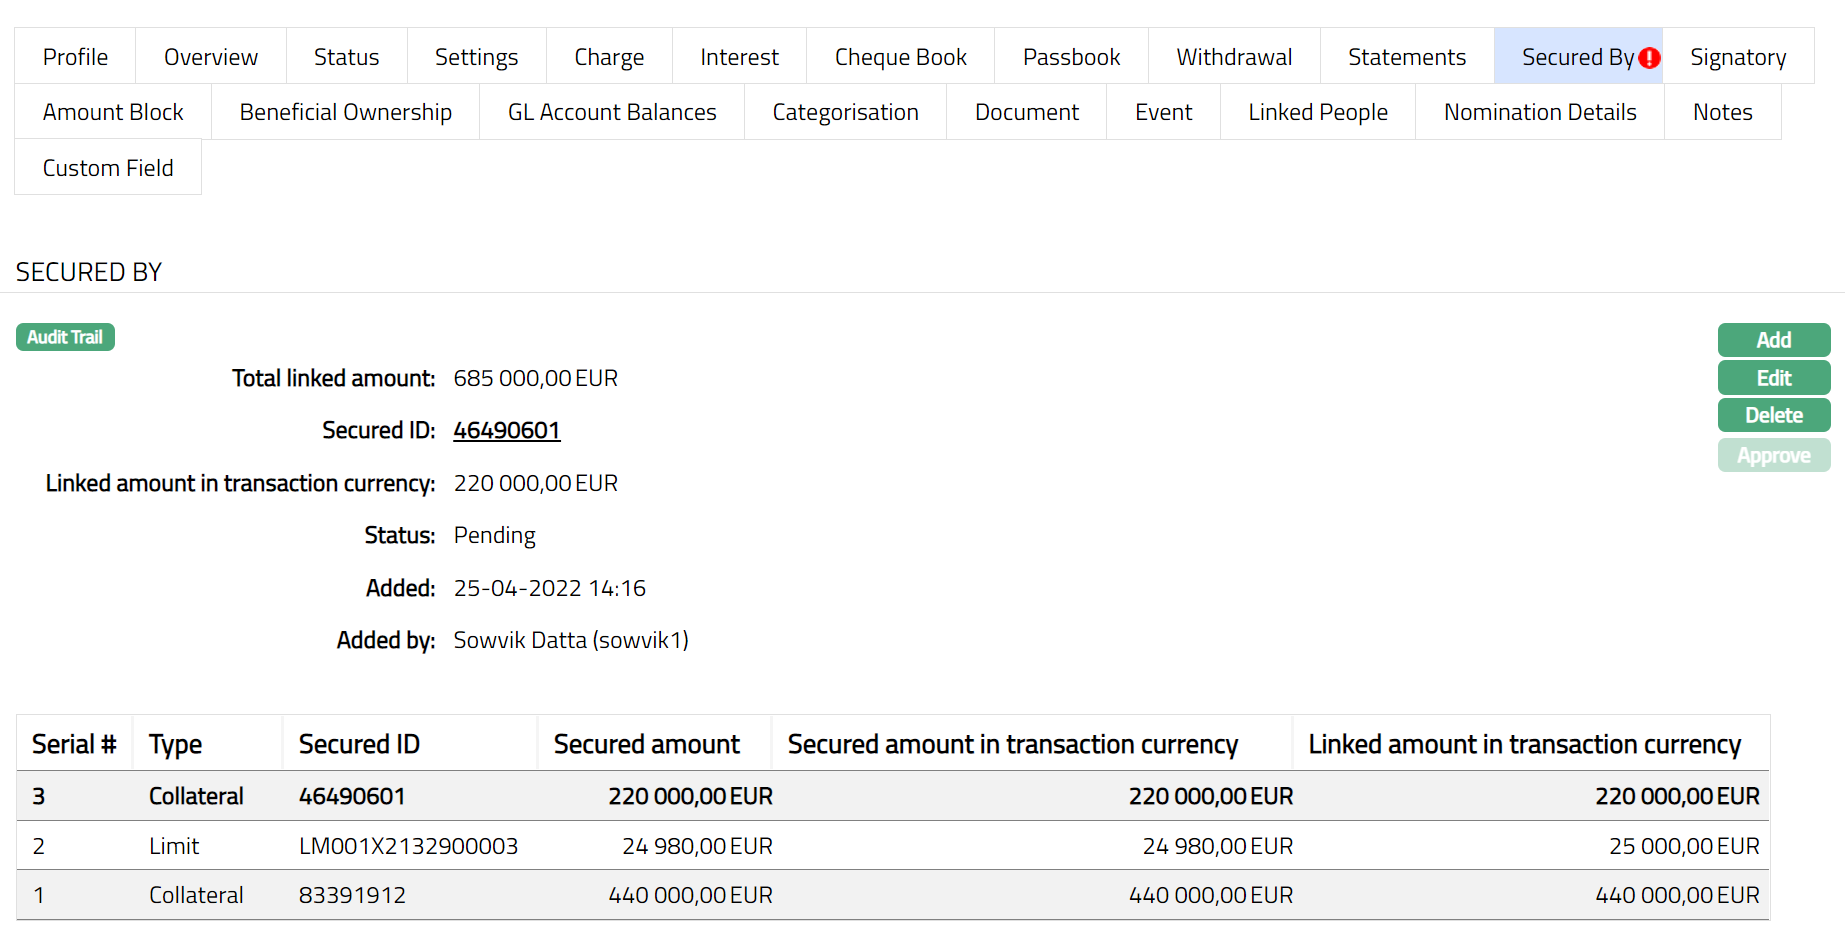
Functions: Add, Edit, Delete, Approve
Note: Any change in the tab will set the tab status to Pending till it is approved by another user. On approval, the tab status is set to Approved and the red bubble disappears.
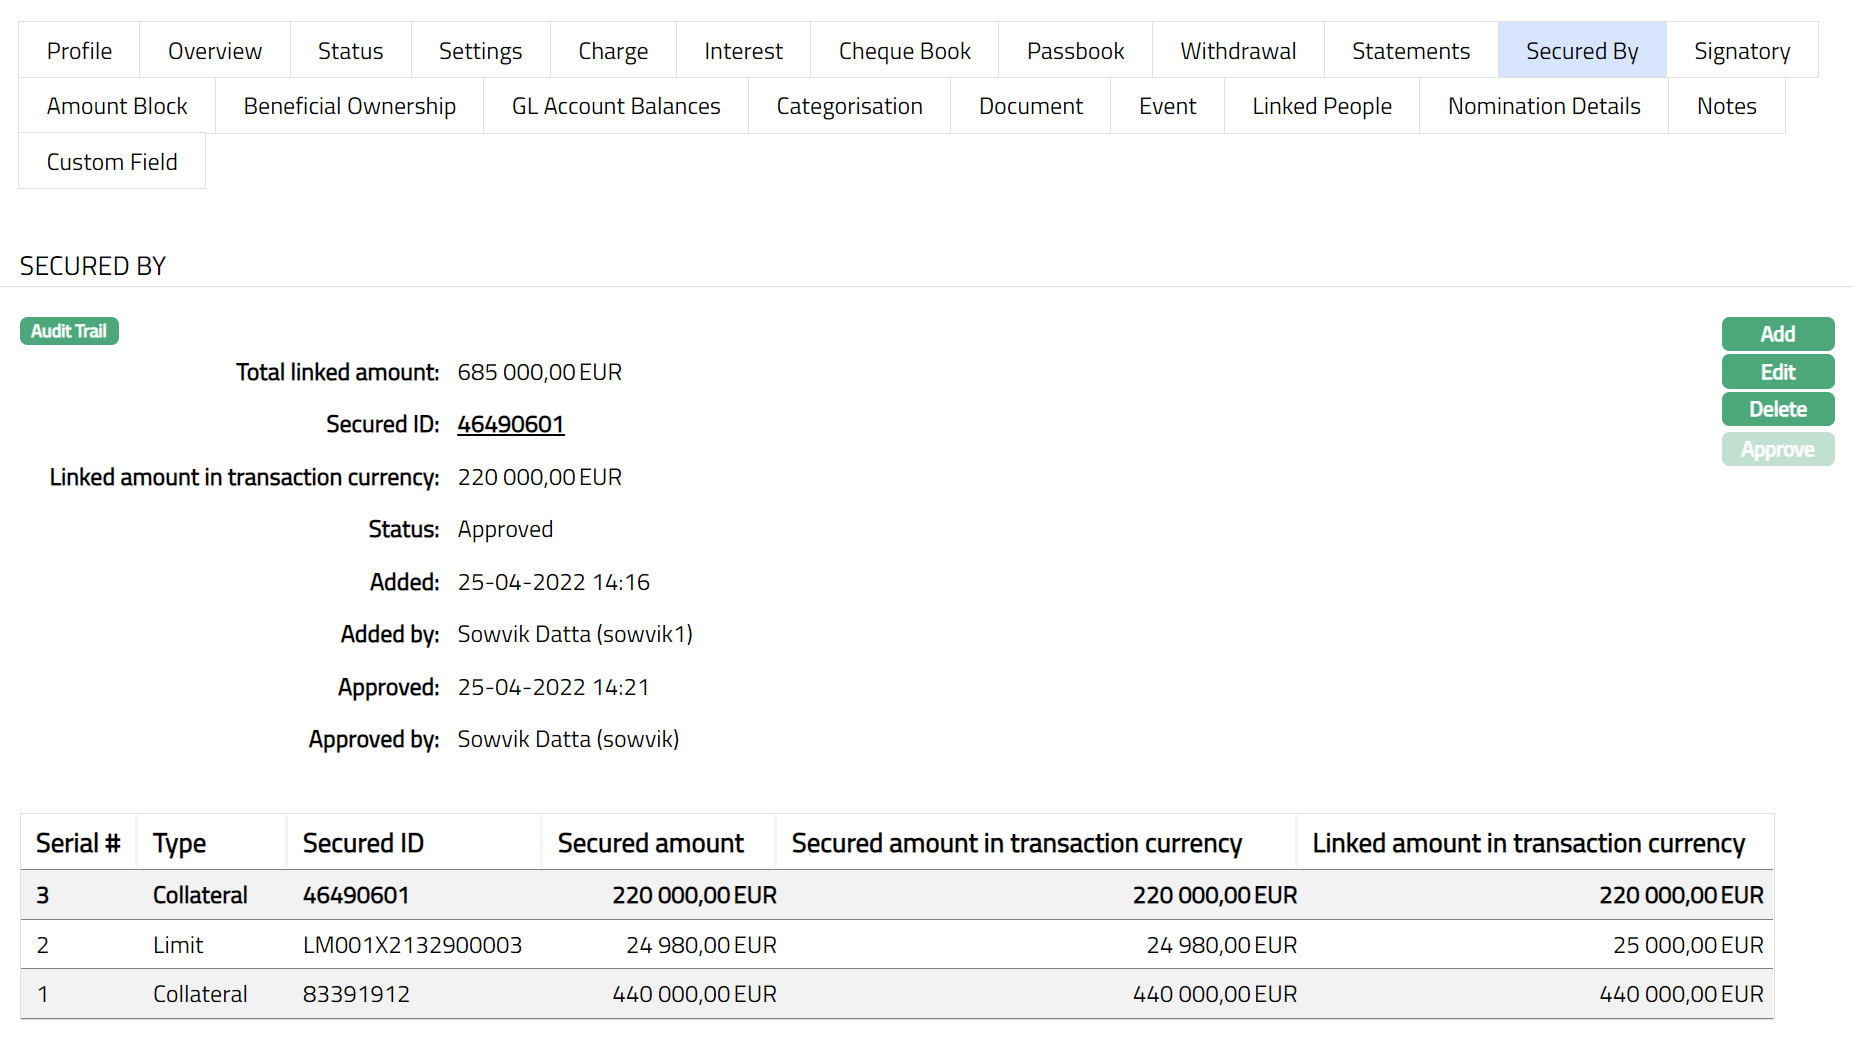
The fields available are:
Status denotes the status of the record.
Added denotes the date on which the limit is added to the Client account while creation of the account.
Added by denotes the name of the person who has added the limit to the card account while creation of the account.
Approved denotes date on which the record was approved and is displayed only if the record is approved.
Approved by denotes name of the person who approved the record and is displayed only if the record is approved.
Settings
This tab allows you to view and maintain certain account settings like overdraft limit, dormancy details and whether to allow / disallow debit and credit.
To edit the settings
- Access Client Account page. Click Settings tab to view the details as per sample below. The details are defaulted from Product > Settings based on the product that you chose for the account during creation.
The additional fields that you can view in the Settings tab are explained below.
Overdraft limit denotes the maximum amount up to which the account can be overdrawn. This field will not be displayed if Overdraft allowed is selected as 'No' in Product > Settings.
Expiry date denotes the date up to which the account can be overdrawn. By default, Aura shows you the current business date, but you may change it to any later date. You cannot enter a past date. On the expiry date, during EOD process, Aura will default the overdraft limit to zero. This field will be enabled only on selecting Yes for overdraft limit in Product > Settings for Current accounts.
Dormant denotes the dormancy status of the account
Dormant From denotes the date from which the account is dormant.
Minimum balance denotes the minimum balance to be maintained in the account
Balance check specifies the type of balance -- whether credit, debit or both -- to be allowed in the account. The value will be defaulted from the Product selected for this account and is editable.
Tax exempt specifies if the tax calculation for the account has to be exempted or not.
Status field denotes the status of the record.
Added field denotes the date on which the record was added.
Added by field denotes the name of the user who created the record.
Approved field denotes the date on which the record was approved and is displayed only on approval.
Approved by field denotes the name of the user who approved the record and is displayed only on approval.
To edit Settings
- Click Edit. Edit Settings page appears.
Note: If user A edited a record, then only user A can edit the record further until it is approved by another user.
The fields that you can view / edit in this tab are explained below:
When an account shows no activity for some specified period, then the account is considered as Dormant. The Dormancy calculation depends on the Dormancy days set in the Product and the Transaction Code settings for the entries posted to the account. By default, the Dormant checkbox is unchecked, and the value displayed is No. If Account Dormancy days is defined in the Product, and if the Dormancy days for the account becomes 0, then Aura will automatically check the Dormancy checkbox. The Dormant value will be displayed as Yes and Aura will display the Dormant From date by default. If you want the account to be no longer treated as Dormant, click Edit and then uncheck the Dormant checkbox. When the account is in dormant status and any transaction entry is made using transaction code of type Client-DB/CR where Affect dormancy calculation is marked as Yes, then the number of days for which the account was dormant will be reset to 0. If Affect dormancy calculation is marked as No, then Aura will continue to count the number of days for which the account was dormant.
Balance Check specifies the type of balance -- whether credit, debit or both -- to be allowed in the account. The value will be defaulted from the Product selected for this account and is editable. The options for Balance check are as follows:
- Allow only positive balance -- If you select Allow only positive balance, then Aura will allow only credit balance for that account. If a transaction would result in a debit balance, and if this account allows only credit balance, the transaction will fail.
Allow only negative balance -- If you select Allow only negative balance, then Aura will allow only debit balance for that account. If a transaction would result in a credit balance, and if this account allows only debit balance, the transaction will fail.
Allow both -- If you select Allow both, then Aura will allow both credit and debit balances for that account.
By selecting Yes or No in the Tax-exempt field you can define if the tax calculation for the account has to be done or not. If NO is selected, then the tax will be calculated on interest accrual as per the tax scheme defined for the Entity under Admin > Tax Schemes > Maintain where Applies To = Demand Liabilities. If it is No then Tax is not calculated for the account.
Click Save. Settings page appears with the edited details. .
Functions: Edit, Approve
Note: Any change in the tab will set the tab status to Pending till it is approved by another user. On approval, the tab status is set to Approved and the red bubble disappears. Please refer to the sample screen shot shown below.
Functions: Edit, Approve
Additional fields are
Approved field denotes date on which the record was approved and is displayed only on approval.
Approved by field denotes name of the user who approved the record and is displayed only on approval.
Signatory
This tab allows you to add, view and maintain the signatories for the account. You have to first add the details of the Signatory group and then add persons to each group.
To add a new Signatory group
Access Client Account screen and click Signatory tab.
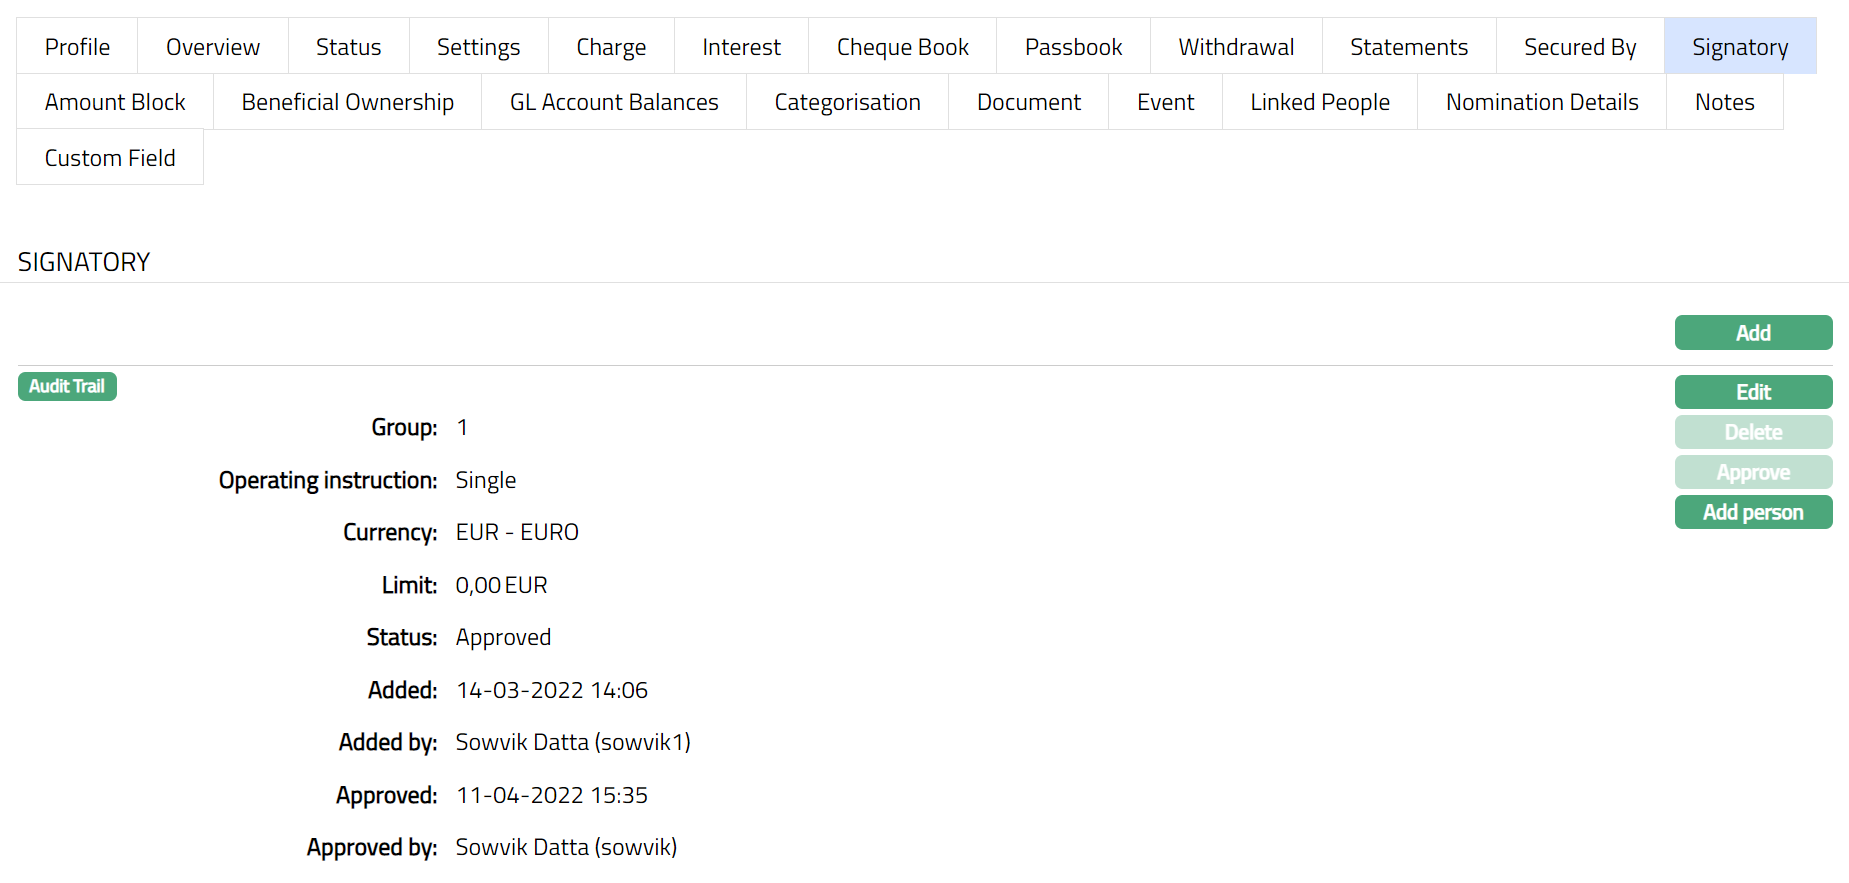
Click Add. Add Signatory screen appears.
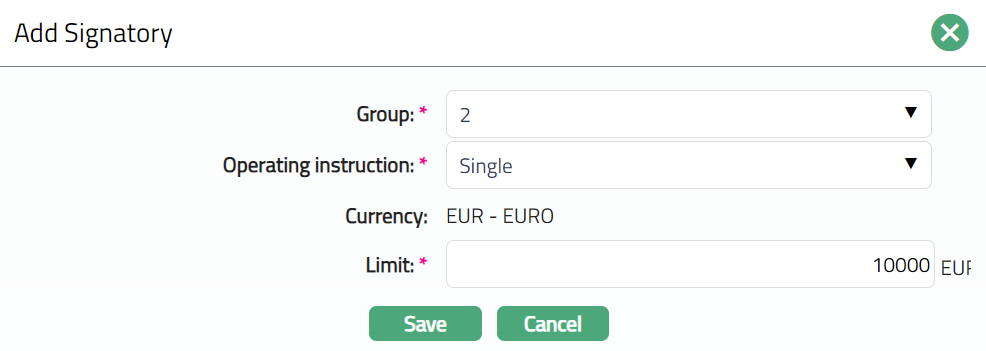
Select the Group from the drop-down list. You can add a maximum of 9 groups with varying signing powers.
Select the Operating instruction whether Single, Jointly as appropriate for this Group.
Aura will display the account Currency and will not allow you to change the currency.
Enter the Limit amount for the group in terms of account currency.
Click Save. Signatory tab appears with the added details.
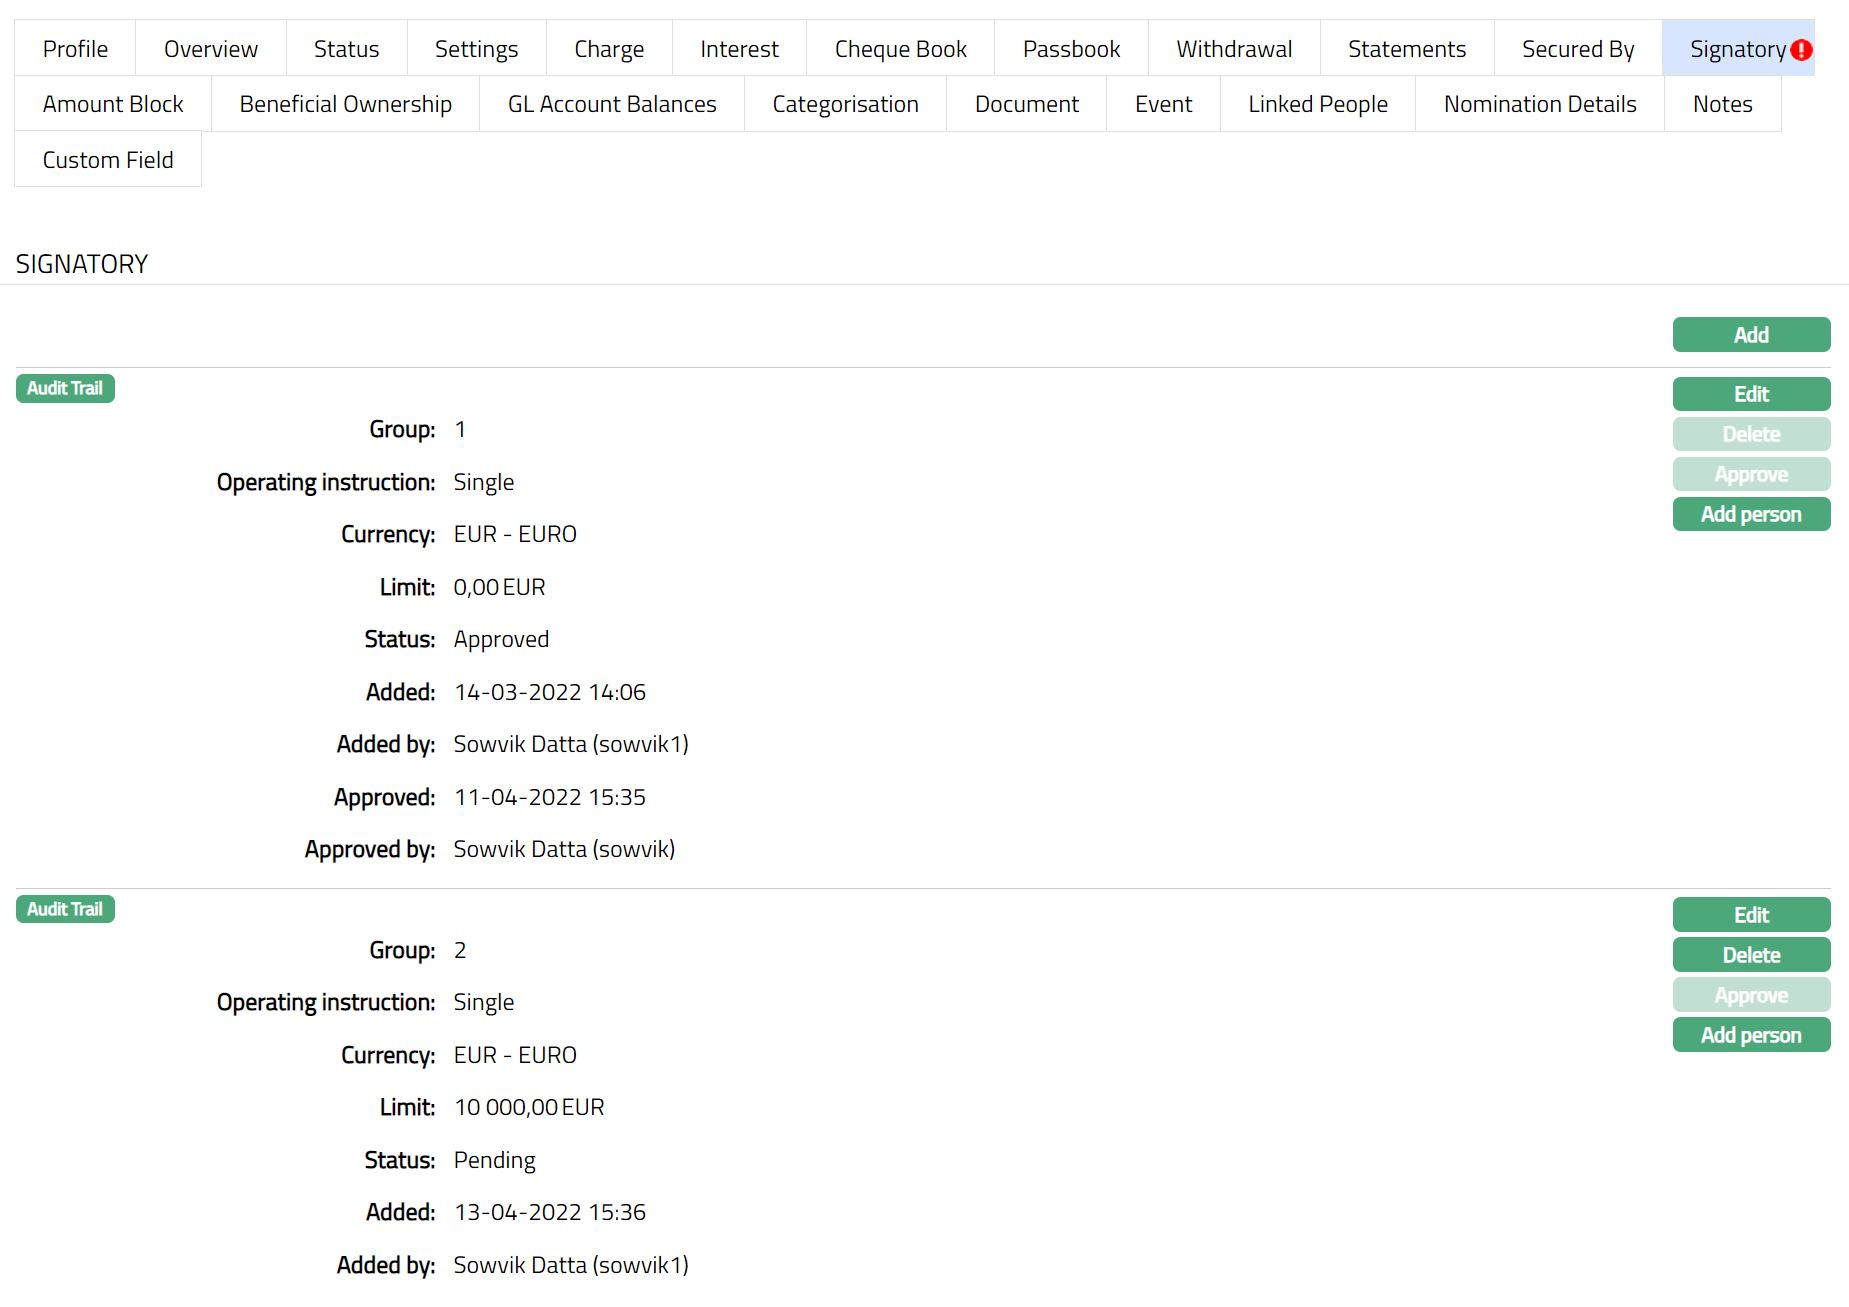
Functions: Add, Edit, Delete, Approve, Add Person
Note: On save, the status of the record is Pending. It can be approved only by a user different from the one who created it. A Signatory record can be deleted until Approval. Any changes made to the signatory tab have to be approved.
To add a person as a signatory
Access Client Account screen and click Signatory tab.
- Click Add Person. Person Sub tab appears.
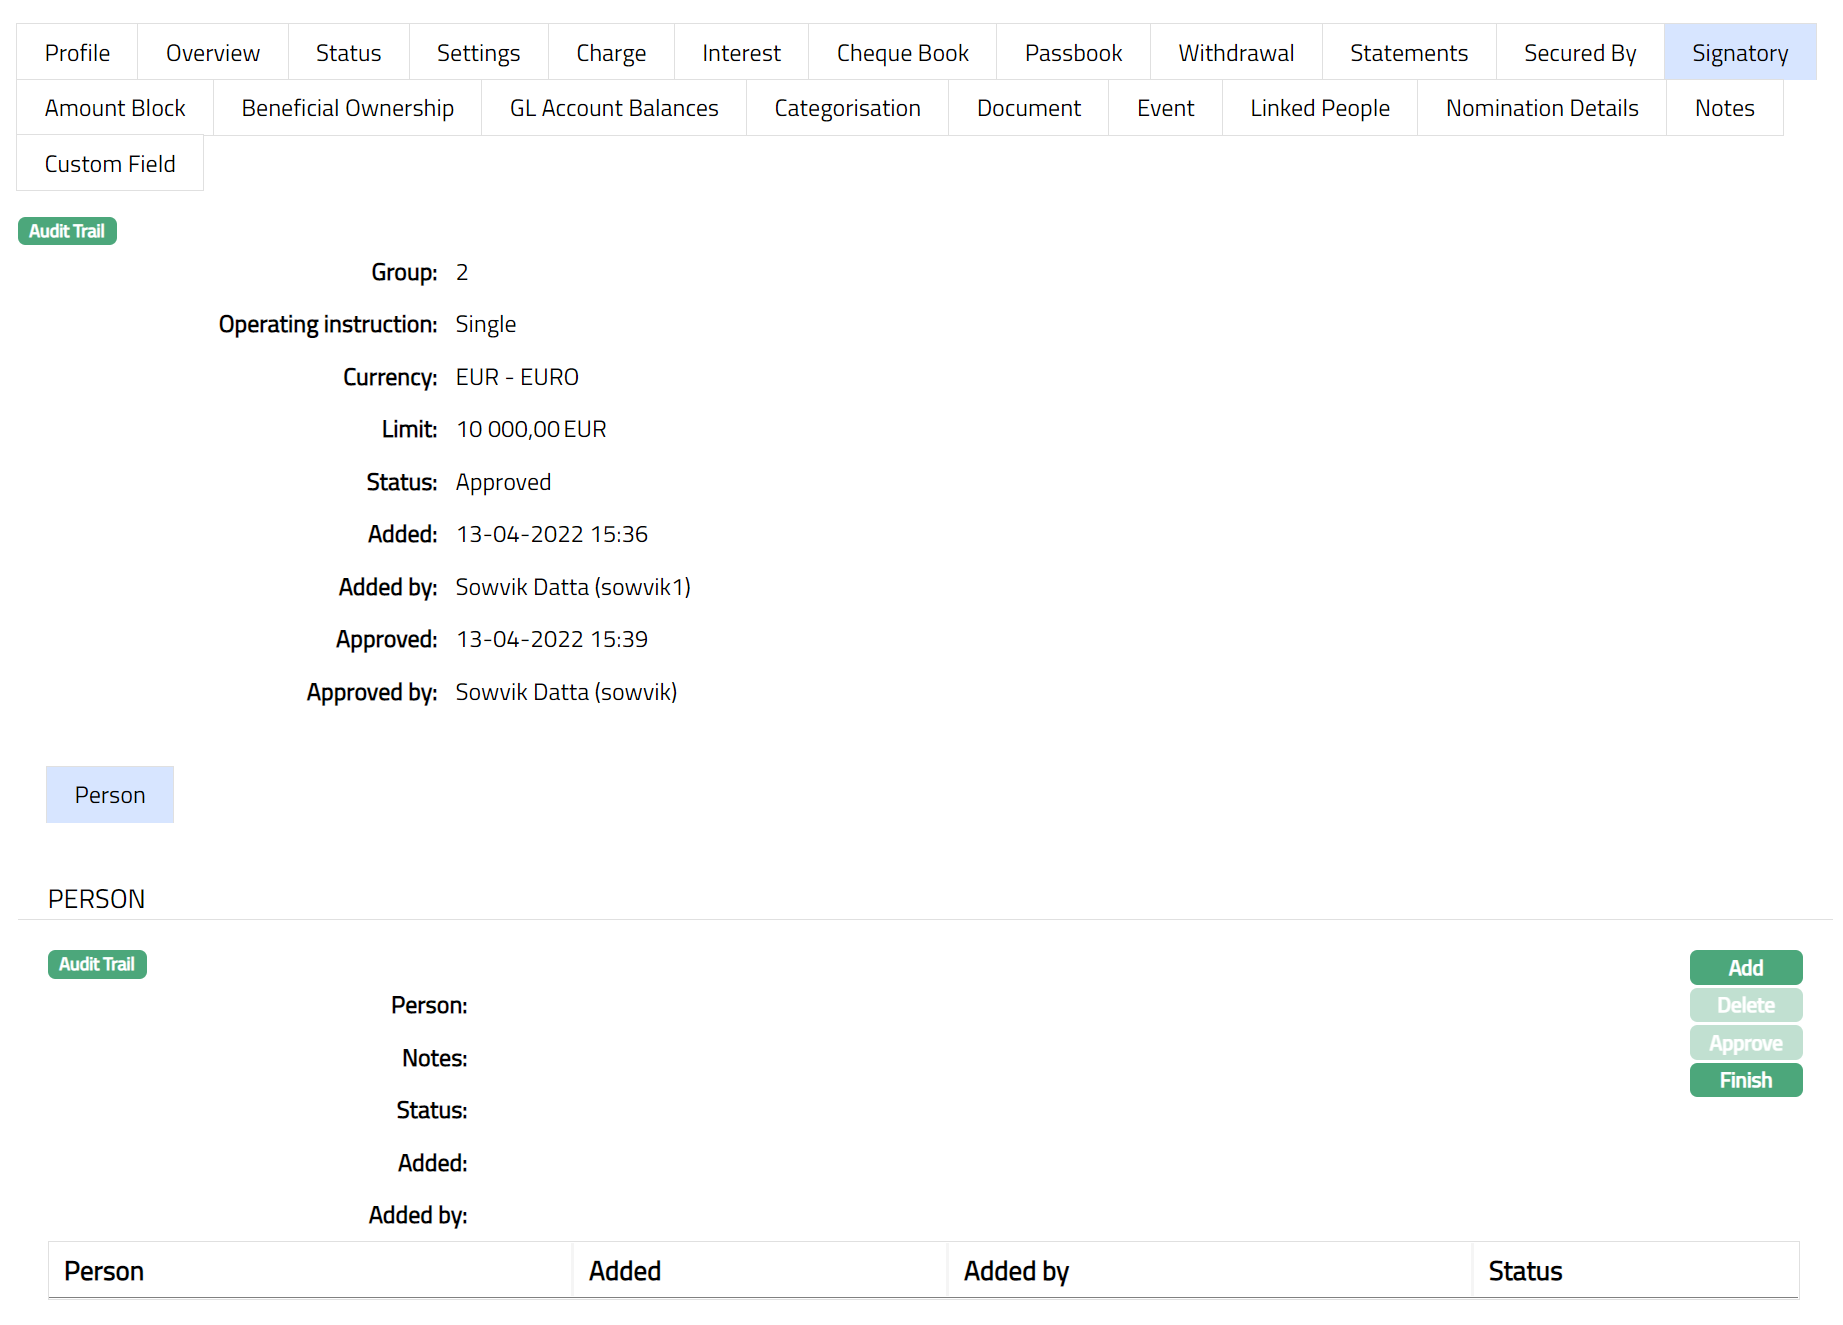
- Click Add. Add Person page appears.

- Select the Person by clicking on Person hyperlink. The person search page displays the list of people linked to the client with the role signatory.
Enter the Notes, if any, for the person.
Click Save. The Person Sub tab appears with the added details.
Click Finish.
Note: On save, the status of the record is Pending. It can be approved only by a user different from the one who created it.
Functions: Add, Delete, Approve, Finish
The additional fields available in view are:
Status denotes status of the record.
Added denotes the date and time on which the Person has been added.
Added by denotes the name of the user who has added the person.
Approved denotes the date and time on which record is approved. This field is displayed for the approved record.
Approved by denotes the name of the user who has approved the record. This field is displayed for the approved record.
Note: More than one person can be maintained as signatory. A Person record can be deleted until Approval.
To Edit the Signatory
1. Access Client Account screen and click Signatory tab.
2. Click Edit. The Edit Signatory page appears.
Note: Except Currency all the fields are editable.
3. Click Save. The Signatory tab appears with the edited details
Note: On save, the status of the record is Pending. It can be approved only by a user different from the one who created it.
Functions: Add, Delete, Approve, Add person
The additional fields available in view are:
Status denotes status of the record.
Added denotes the date and time on which the Person has been added.
Added by denotes the name of the user who has added the person.
Approved denotes the date and time on which record is approved. This field is displayed for the approved record.
Approved by denotes the name of the user who has approved the record. This field is displayed for the approved record.
Statements
Using this tab, you can add, view and maintain the preferences for generating the statements.
To add a new Statement parameter
1. Access Client Account screen.
2. Click Statements tab to view the details as per sample below. The details are defaulted from Product > Statement Parameter based on the Product that you chose for the account during creation.
3. Click Add. Add Statements page appears.
The Statement id is automatically displayed by Aura.
4. Enter the Name for the statement.
5. Select Format from the drop-down list of formats that have been maintained under Admin > System codes > Generic definition > Statement formats. It is the Format of the statement that is to be generated.
6. Select Communication mode from the drop-down list -- i.e., the manner in which you want to send the statement. The options available are
- Data handoff: When this mode is selected, the data like invoices and statements are handoff to any external system.
- e- Invoice: When this mode is used, the invoice is to be sent through any electronic medium.
- Email: When this mode is selected, the statements are sent to the client through emails.
- Paper: When this mode is selected, the statements are sent in printed format on paper.
- SMS: When this mode is selected, the statement is sent to the client through SMS
- Web hotel: When this mode is selected, then the statements are distributed and stored at the web hotels through agencies.
7. Select the Frequency of the statement to be generated from the drop down. The available values are, Daily, Weekly, Fortnightly, Monthly, Quarterly, Semi-annual, Annual, On debit/credit liquidation.
8. Select the Statement fee from drop down list of all Event based flat or banded charges maintained at Admin > Charges. This is the fee that is to be collected from the client for the statement defined above. If the charge is Banded, then the basis for the charge is Current balance.
By default, Generate on account activity checkbox is checked. This indicates that the account statement will be generated only if there are any transactions on the account. If you would like to generate an account statement irrespective of whether there were transactions in the account or not, you may clear this checkbox.
9. Click Save. The Statement page appears with the added details. .
 Functions: Add, Edit, Delete.
The following details are displayed when you view the Statement parameter and are not editable:
- Last statement date - It denotes the date of the statement last generated.
- Last statement number - It denotes the number of statements last generated.
To Edit Statement
- Click Edit. The Edit Statement page will appear.
Note: All fields are editable except Statement id.
- Click Save. Statement page appears with the edited details.
Note: Any change in the tab will set the tab status to Pending till it is approved by another user. On approval, the tab status is set to Approved and the red bubble disappears.
Functions: Add, Edit, Delete.
The additional fields available are:
Status field denotes the status of the tab.
Added field denotes the date on which the record was added.
Added by field denotes the name of the user who created the record.
Approved field denotes date on which the record was approved and is displayed only for approved records.
Approved by field denotes name of the user who approved the record and is displayed only for approved records.
Withdrawal
The Withdrawal tab allows you to view and maintain withdrawal conditions applicable for client-initiated debit transactions on the account. Withdrawal conditions apply only to client-initiated transactions and not to bank-initiated transactions.
This tab consists of two sub-tabs:
- Conditions
- Orders
Conditions
The Conditions section under the Withdrawal tab allows you to define withdrawal restrictions and applicable breach charges for client-initiated transactions. These conditions control how frequently and how much a client can withdraw, and define the charges or penalties applied when those conditions are breached.
Withdrawal conditions are applicable only to client-initiated debit transactions and not to bank-initiated transactions.
Client-initiated debit transactions - Cash: Transactions posted using a transaction code of type Client DB/CR where Affect dormancy calculation is marked as Yes, and Cash In/Out is marked as Yes.
Client-initiated debit transactions - Non-cash: Transactions posted using a transaction code of type Client DB/CR where Affect dormancy calculation is marked as Yes and Cash In/Out flag is marked as No.
Client-initiated debit transactions - Close-out withdrawal: Close-out withdrawal conditions define the notice period and applicable penalty or charge when an account is withdrawn and closed before completion of the intended holding period. These conditions apply only when a close-out withdrawal is initiated for the account.
Withdrawal conditions define:
- Number of withdrawals allowed
- Maximum withdrawal amount
- Percentage-based withdrawal limit
- Gap between withdrawals
- Notice period for withdrawal
- Charges for breach of withdrawal conditions
If any parameter defined in the withdrawal condition is not met, the transaction is treated as a breach and applicable charges are applied.
Withdrawal conditions maintained at the product level are defaulted to the account level and can be modified at the account level.
Maintaining Withdrawal Conditions:
You can maintain withdrawal conditions separately for:
- Cash transactions
- Non-cash transactions
- Close-out withdrawal (premature account closure)
To add/maintain withdrawal conditions,
1. Access Client Account Maintenance page. Click the Withdrawal tab to view the details on the Conditions sub-tab as per sample below. If withdrawal conditions are not maintained at the account level, then there will be no data maintained in the tab.
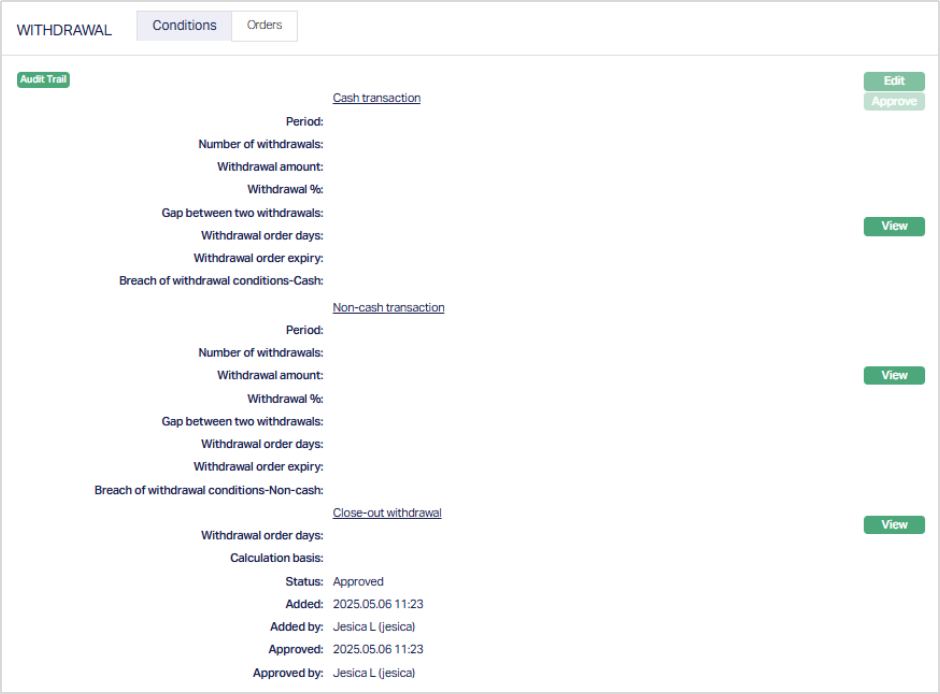
2. Click Edit. Edit Withdrawal Conditions page appears.

For Cash and Non-Cash transactions.
3. Select a Period for which withdrawal conditions will be defined. Aura will display a dropdown list of pre-shipped values. The options available are - Daily, Weekly, Monthly, Quarterly, Semiannual and Annual.
If any account gets activated in the middle of the month, then the period will continue till the last day of the month and all withdrawal conditions will be applicable for that period. If Period is maintained for withdrawal conditions, then only other fields will be in enable mode to maintain data.
Note: If any of the withdrawal parameter is not met, the withdrawal transaction will be considered as breached, and you will be charged for it.
4. Enter the Number of withdrawals.
- If the number of withdrawals is zero, then no withdrawals are possible/allowed from the account.
- If the number of withdrawals is null/blank, then unlimited withdrawals are allowed without any charge.
- If your number of transactions exceeds the number of withdrawals mentioned here, then you will be charged for Breach of withdrawal condition fee cash or non-cash.
Example: If your Period is Monthly, and the number of transactions are 8, then for the 9th transaction done in a month you will be charged for breach of withdrawal condition. Only client-initiated transactions will come under this count.
5. Enter the Withdrawal Amount. The amount entered here is the maximum limit of withdrawal each time. If the withdrawal amount is mentioned as 0 then the user is not allowed to withdraw any amount. If the withdrawal amount is defined and you are withdrawing more than that amount, then that will be considered as a breach of withdrawal conditions. If this field value is null, then the user can withdraw any amount available in the account.
Example: If the Withdrawal amount is 5000, you withdraw 8000, then you will be charged for breach of withdrawal. Every time the amount withdrawn exceeds the withdrawal amount mentioned here, you will be charged.
6. Enter the percentage of Available balance eligible for each withdrawal in the Withdrawal % field. If both withdrawal amount and withdrawal percentage are given, whichever is lower Aura will consider that amount as the maximum amount possible for each withdrawal. If the withdrawal amount is 0, then the user will not be allowed to withdraw any amount. If the user withdraws any amount greater than the maximum amount, then that will be considered as breach of withdrawal conditions and if this field value is null then the user can withdraw any amount available in the account.
Example: Consider that your Available balance is 100000 and withdrawal % is 10%, then you can withdraw only 10000 that particular transaction if the amount withdrawn exceeds, then you will be charged for that transaction.
7. Enter the Gap between two withdrawals in terms of Calendar days. The days will be according to the selected period.
- Daily - Gap between two withdrawals is disabled
- Weekly - Gap between two withdrawals has to be between 1 and 6 days
- Monthly - Gap between two withdrawals has to be between 1 and 30 days
- Quarterly - Gap between two withdrawals has to be between 1 and 90 days
- Semiannual - Gap between two withdrawals has to be between 1 and 90 days
- Annual - Gap between two withdrawals has to be between 1 and 90 days
Example: The Period selected is Weekly and the gap between two withdrawals is set a 2, then if you make 2 withdrawal transactions within 2 consecutive days then you will be charged for breach of withdrawal conditions.
8. Enter the Withdrawal order days in terms of business days. This is the number of days before which you will be informing the bank about the withdrawal that you will make. These days will be mentioned working days. Withdrawal order days will always be between 1 to 30 working days for all selected periods. If withdrawal order days are maintained then under Withdrawal Order tab, Add button will be in enable mode. On click of Add button users can record cash and non-cash type withdrawal orders.
Example: If the Withdrawal order days is 3, then you will have to inform/place the order for withdrawal in the bank before 3 days. Once the order is placed, the Add button in the Order tab is enabled. Once the order is placed the status will be Inactive – Pending. On approval the status becomes Inactive Approved. On the 3^rd^ day BOD, the order status will be Active – Approved, If the amount (within the withdrawal amount) is withdrawn on this day or before the expiry of withdrawal order you will not be charged for breach of withdrawal. If you withdraw the amount when the order status is inactive – approved or Expired or if the amount booked is more than the withdrawal amount, then you will be charged for breach of withdrawal. Once the withdrawal is done the status is changed to Fulfilled.
9. Enter the Withdrawal order expiry in terms of business days. This is the number of days for which the withdrawal order will be kept live, after the activation of the withdrawal condition. These days will always be between 1 to 30.
10. Select the charge to be levied on Breach of withdrawal conditions - Cash/Non-cash. Aura will display the list of all the Event based Flat or Banded charges maintained under Admin > System Codes > Charges > Charges.
Note: If the withdrawal condition is maintained without the charge scheme attached to it, then No charge will be charged for breach of withdrawal.
For Close-out withdrawal:
Close-out withdrawal applies when the account is prematurely closed based on withdrawal conditions.
11. Withdrawal order days - This field specifies the number of business days’ notice you must give before performing a close-out withdrawal (premature account closure). When you enter a value here:
- The customer must place a Close-out withdrawal order at least the specified number of business days in advance.
- Aura calculates the Order activation date based on this notice period.
- The close-out withdrawal can be executed only after the activation date.
For example: If Withdrawal order days = 3 and the order is placed on 10th May, the activation date will be calculated as 3 business days later. The account can be closed only after that date. This field must be maintained if Close-out withdrawal control is required for the account.
12. Click Save. Withdrawal page appears with the edited details.
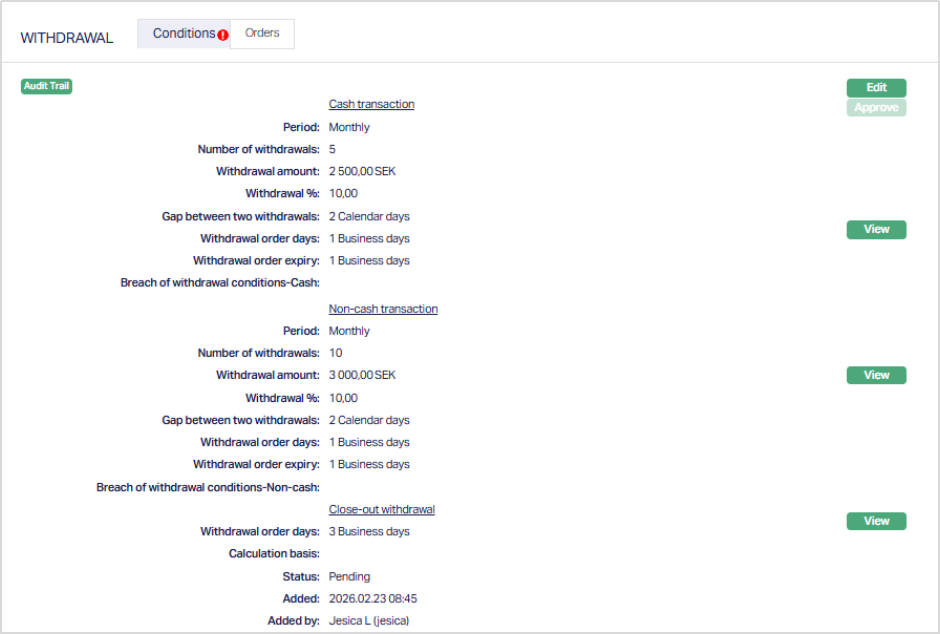
Any change in the tab will set the tab status to Pending till it is approved by another user. On approval, the tab status is set to Approved and the red bubble disappears.
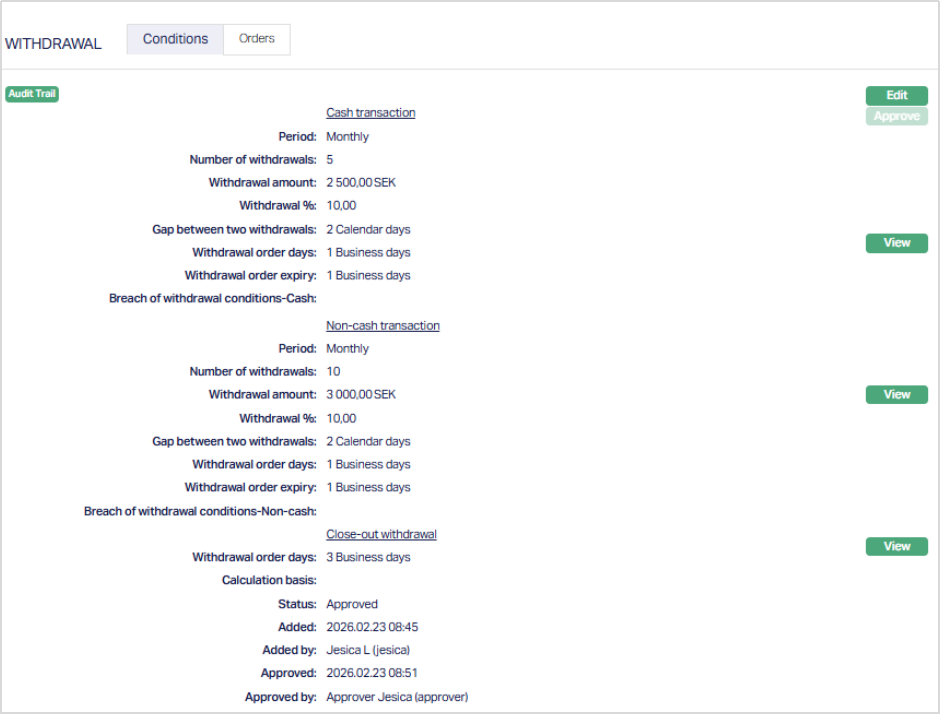
Functions: Edit, Approve, View.
Viewing Breach Charges and Close-out details:
After maintaining conditions, click View next to each section to access the detailed configuration screen for that section. From this screen, you can view existing settings and maintain the applicable charge or penalty configuration.
Maintaining Charge scheme for Cash and Non-Cash Transactions:
1. Click View corresponding to Cash or Non- Cash transactions. The detailed maintenance screen appears.
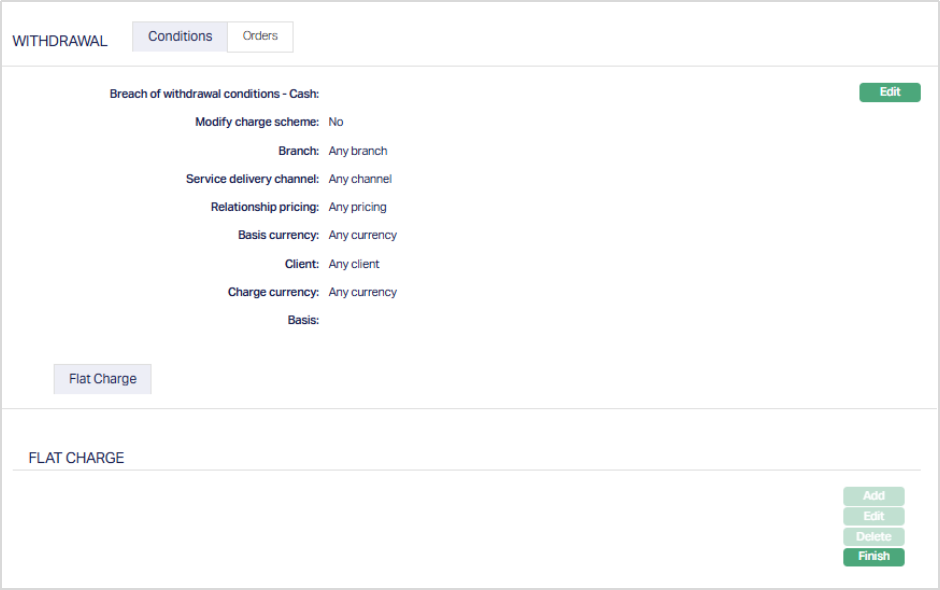
The values for Branch, Service Delivery Channel, Relationship pricing, Basis currency, Client specific, Client, Charge Effective from, Flat Charge and Waive first charge are derived from the charge combination maintained in Aura.
2. Click Edit. The Edit Scheme page appears.
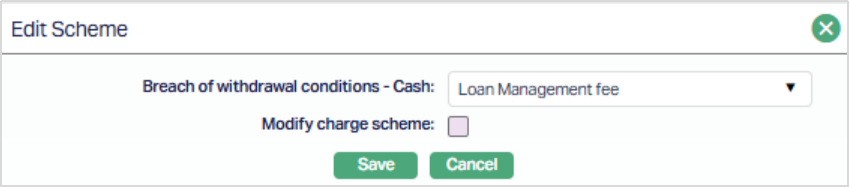
3. Select the charge scheme from the Breach of withdrawal conditions - Cash / Non - Cash dropdown list. Aura displays all active event-based flat or banded charge schemes maintained under Admin → Pricing → Charge Schemes
4. Modify charge scheme - You can modify the selected charge scheme only when the Modify charge scheme checkbox is selected.
- If the checkbox is not selected, Aura applies the charge values exactly as maintained in the selected charge scheme.
- If selected, charge parameters become editable and can be modified for the account. Modified values override the defaulted scheme values.
5. Click Save. The Conditions screen appears with the updated details.
For Cash Transaction
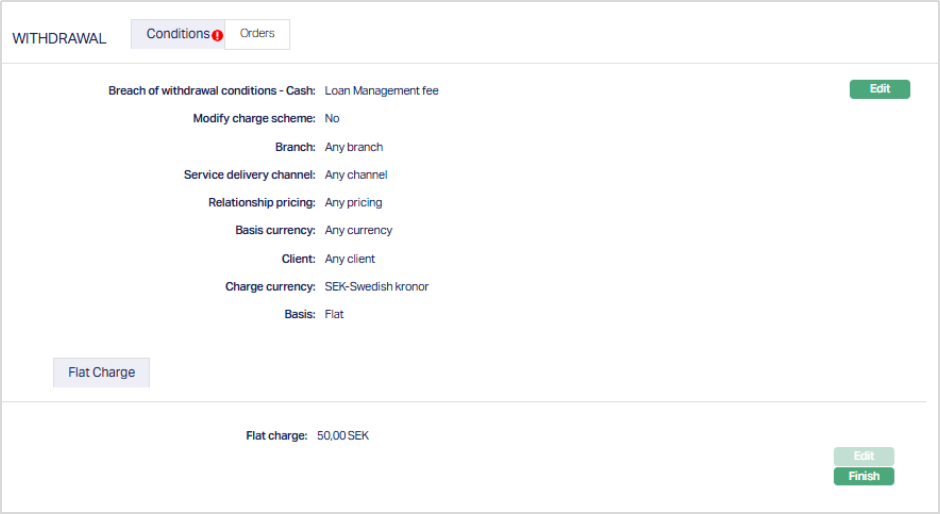
For Non-Cash Transaction
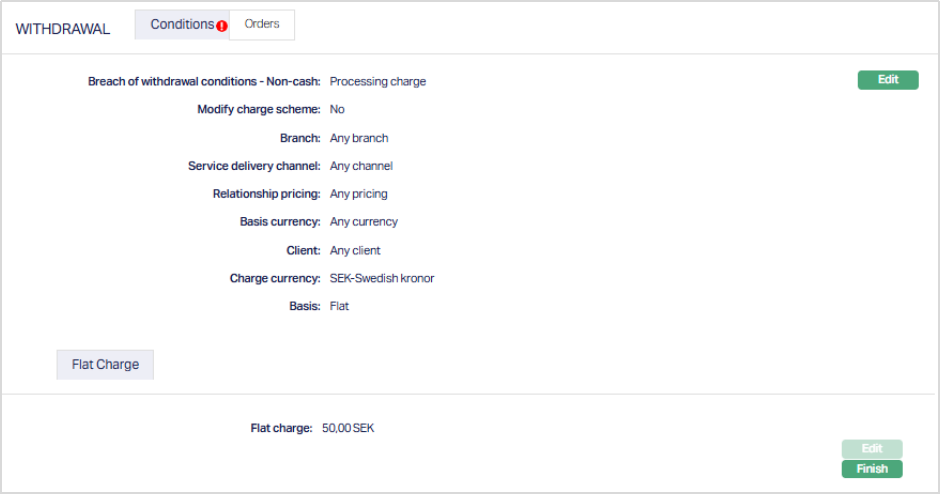
Note: Based on Branch, service delivery channel, Relationship pricing, currency, Client and effective date, Aura derives and displays the applicable charge combination.
Maintaining Close-out withdrawal penalty configuration
1. Click View corresponding to Close-out withdrawal. The Close-out withdrawal maintenance screen appears.
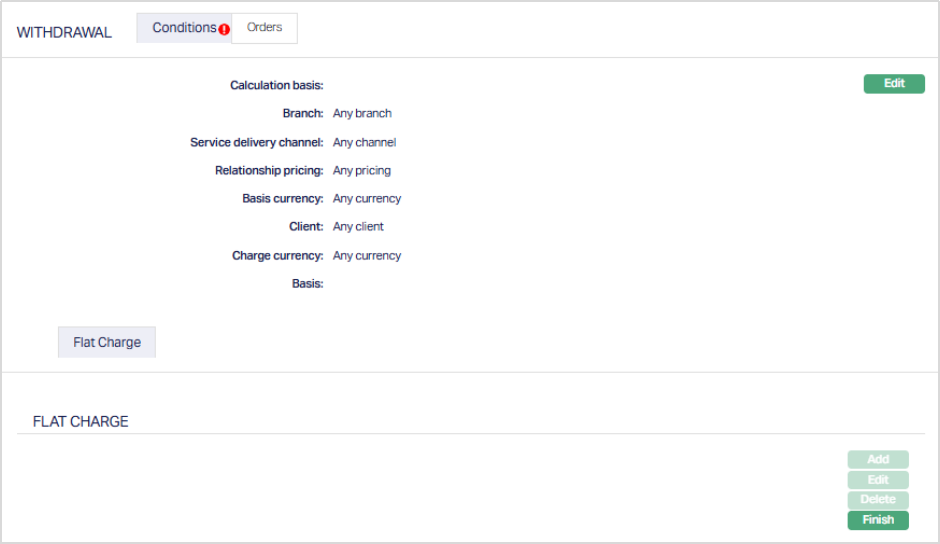
2. Click Edit. The Edit Scheme page appears.
3. Select the Calculation Basis. This field is mandatory when close-out withdrawal conditions are maintained. The available options are - Fee based rate and Contract rate based.
If Calculation Basis = Fee rate based
4. Select the applicable charge scheme from the Breach of withdrawal conditions - Close-out withdrawal dropdown.
5. Modify charge scheme - You can modify the selected charge scheme only when the Modify charge scheme checkbox is selected.
- If the checkbox is not selected, Aura applies the charge values exactly as maintained in the selected charge scheme.
- If selected, charge parameters become editable and can be modified for the account. Modified values override the defaulted scheme values.
If Calculation Basis = Contract rate based
6. Enter the Penalty % - This field is mandatory when Contract Rate based is selected. The entered penalty percentage will be applied for close-out withdrawal processing based on the contract rate applicable to the account.
7. Click Save. The Conditions screen appears with the updated details.

Functions: Edit, Finish.
Click Finish to return to the main Conditions screen.
Any change in the tab will set the tab status to Pending till it is approved by another user. On approval, the tab status is set to Approved and the red bubble disappears.
Functions: Edit, Approve, View.
Orders
The Orders sub-tab allows you to record withdrawal orders when Withdrawal order days are maintained in the Conditions section.
The Add button is enabled only if Withdrawal order days are maintained.
To add a withdrawal order,
1. Access Client Account Maintenance page. Click the Withdrawal tab and then the Orders sub-tab. If withdrawal conditions are not maintained at the account level, then there will be no data maintained in the tab.
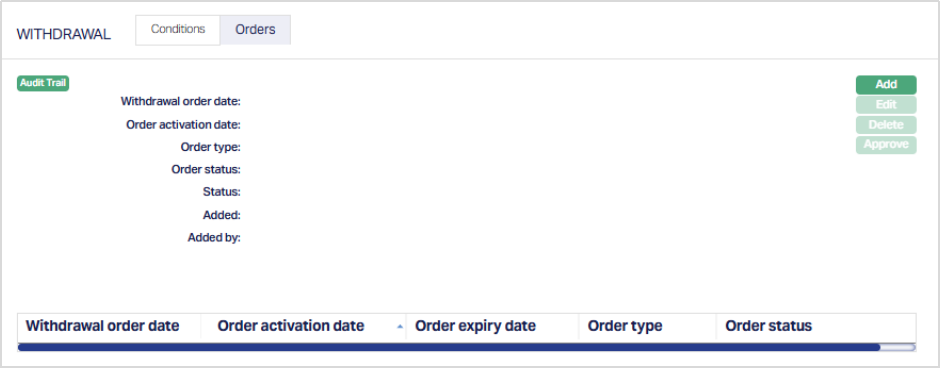
2. Click Add. The Add Withdrawal Order page appears.
If Cash:
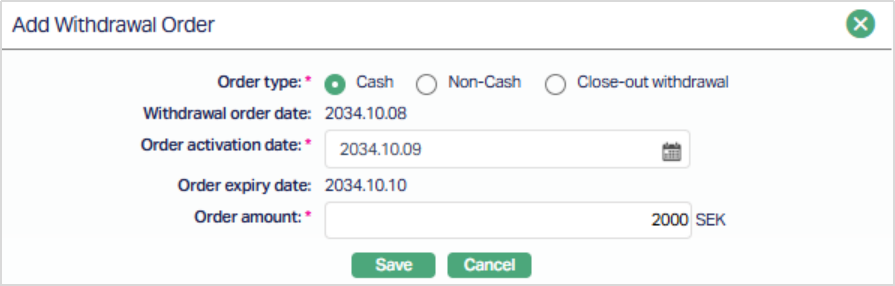
If Non-Cash:
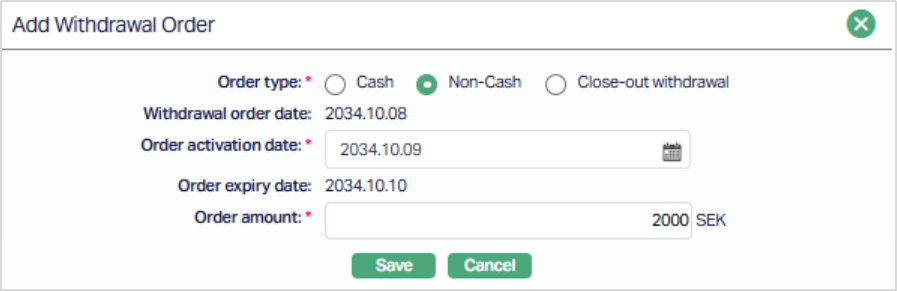
If Close-out withdrawal:
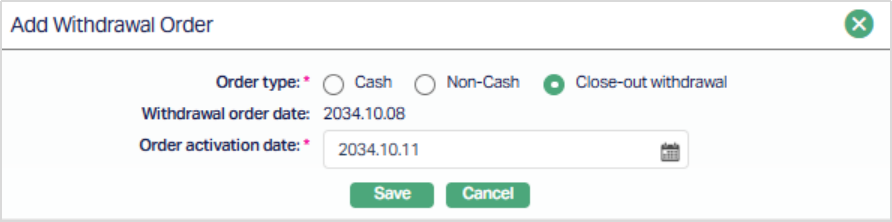
3. Order type - Select the type of transaction from the available options - Cash, Non-Cash or Close-out withdrawal.
Order type behaviour:
- If multiple withdrawal conditions are maintained, no option is selected by default.
- You must manually select the required Order type.
- If no option is selected, Aura displays the validation message: “Order type is required.”
- If only one withdrawal condition is maintained, Aura may default the Order type accordingly.
4. The Withdrawal order date is defaulted to the Current booking date. This field is not editable.
5. Select the Order activation date. This date has to be greater than or equal to Withdrawal Order Date | Withdrawal Order days.
For example: If withdrawal order date = 10-Feb-2014; Withdrawal order days = 2 business days; then, order activation date >= 12-Feb-2014.
6. Order expiry date is automatically populated based on the Withdrawal order expiry maintained in the Conditions section.
7. For Cash and Non-Cash orders, you must enter the Order amount. For Close-out withdrawal, Order amount is not applicable.
8. Click Save. The orders page appears with the added details.
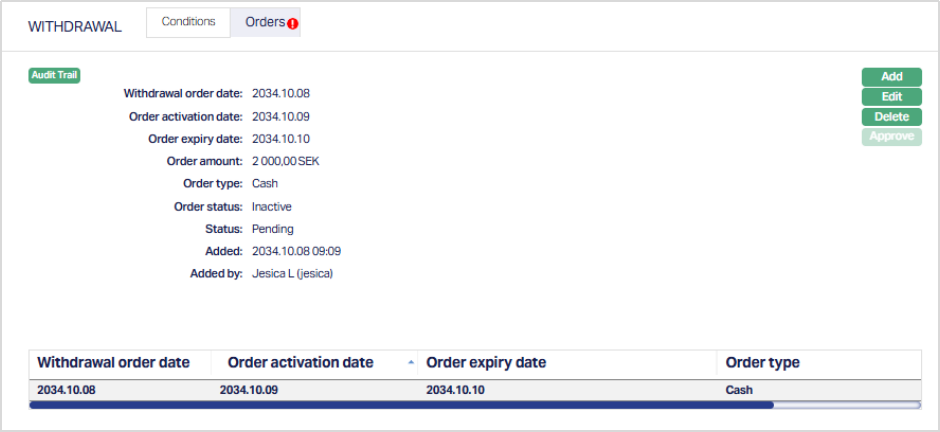
Note: If more than one withdrawal order records are Active at one point in time and any withdrawal transaction comes into the account then Aura will first consider the oldest withdrawal order record and will change order status as Fulfilled
| Action | Order Status | Record Status | Remarks |
|---|---|---|---|
| On save | Inactive | Pending | |
| On Approval (when Approval date < Order activation date) | Inactive | Approved | - Change Order status from Inactive to Active on 'Order activation date' BOD. - If any transaction comes into the account, change Order status from Active to Fulfilled. - If no transaction happens in the account until order expiry date, at EOD, change Order status from Active to Expired. |
| On Approval (when Approval date = Order activation date) | Active | Approved | - Change Order status from Inactive to Active on Approval of the Record status. - If any transaction comes into the account, change Order status from Active to Fulfilled. - If no transaction happens in the account until order expiry date, at EOD, change Order status from Active to Expired. |
| On Approval (when Approval date > Order activation date but < Order expiry date) | Active | Approved | - Since the Order will be Inactive Pending at BOD on Order activation date, do not change Order status from Inactive to Active. - If any transaction comes into the account before approval of Record status, treat that transaction as 'Breach of withdrawal conditions'. - On Approval of Record status before expiry date, change Order status from Inactive to Active and Record status from Pending to Approved. - After Approval, if any transaction comes into the account, change Order status from Active to Fulfilled. - If no transaction happens in the account until order expiry date, change Order status from Active to Expired. |
| If user has not Approved Record status till Expiry date EOD | Inactive | Pending | - Since the Order will be Inactive Pending at BOD on Order activation date, do not change Order status from Inactive to Active. - If any transaction comes into the account before approval of Record status, treat that transaction as 'Breach of withdrawal conditions'. - On Order expiry date EOD, change Order status to Expired and Record status from Pending to Approved. |
To Edit the Order,
Note: The Edit button will be enabled only if the withdrawal order record is not in Inactive status. If there are multiple withdrawal conditions, then the older withdrawal conditions will be considered first.
1. Click Edit. Edit Withdrawal Order page appears.
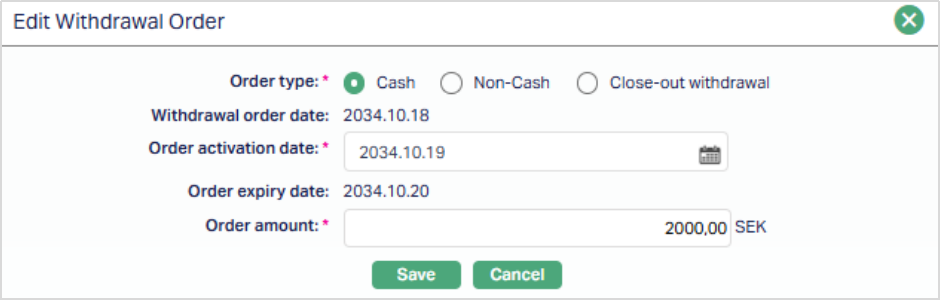
All the Fields except Withdrawal order date and Order expiry date are editable.
2. Make the required changes and click Save.
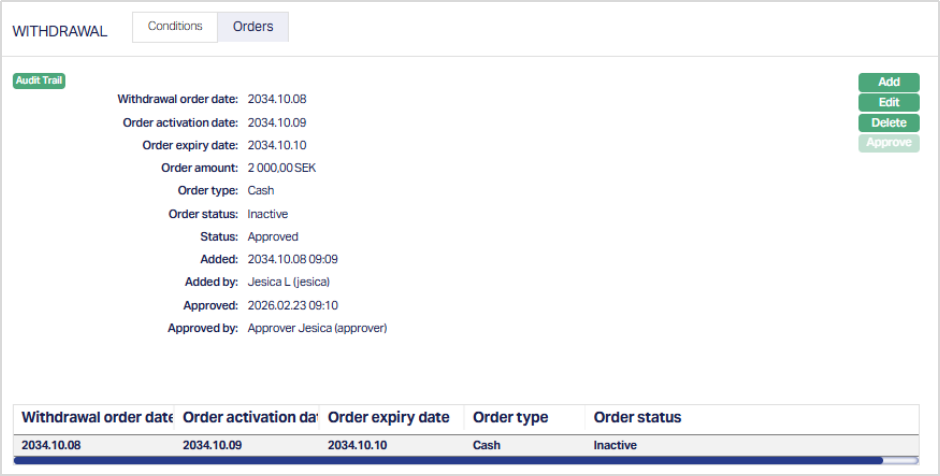
Note: Any change in the tab will set the tab status to Pending till it is approved by another user. On approval, the tab status is set to Approved and the red bubble disappears.
Functions: Edit, Delete, Approve
The Additional fields are:
Status field denotes the status of the tab.
Added field denotes the date on which the record was added.
Added by field denotes the name of the user who created the record.
Approved field denotes date on which the record was approved and is displayed only for approved records.
Approved by field denotes name of the user who approved the record and is displayed only for approved records.
Custom Field
This option provides you the flexibility to define fields apart from those that are already available in the standard version of Aura. Thus, it enables you to customize additional data storage and use as required to suit your specific business needs.
To Maintain Custom Field
- Access Client Account page. Click Custom Field tab.
The field appears only when it is created in Admin > System codes > Custom fields > Custom fields and linked to specific Accounts option in Admin > System codes > Custom fields > Field mappings. Based on the rule set in the rule builder at Admin > System codes > Custom fields > Field mappings, certain custom maintenance will be mandatory.
Click Edit. The Edit Custom Field page appears. In the following illustration, a custom field, Initial account opening date has been mapped to the Account as shown below:

Enter Additional Field. This is the custom field mapped to client account at Admin > System codes > Custom fields > Field mappings
Enter Initial account opening date. This is the custom field mapped to client account at Admin > System codes > Custom fields > Field mappings,
Click Save. Client Account screen appears with the Added details..
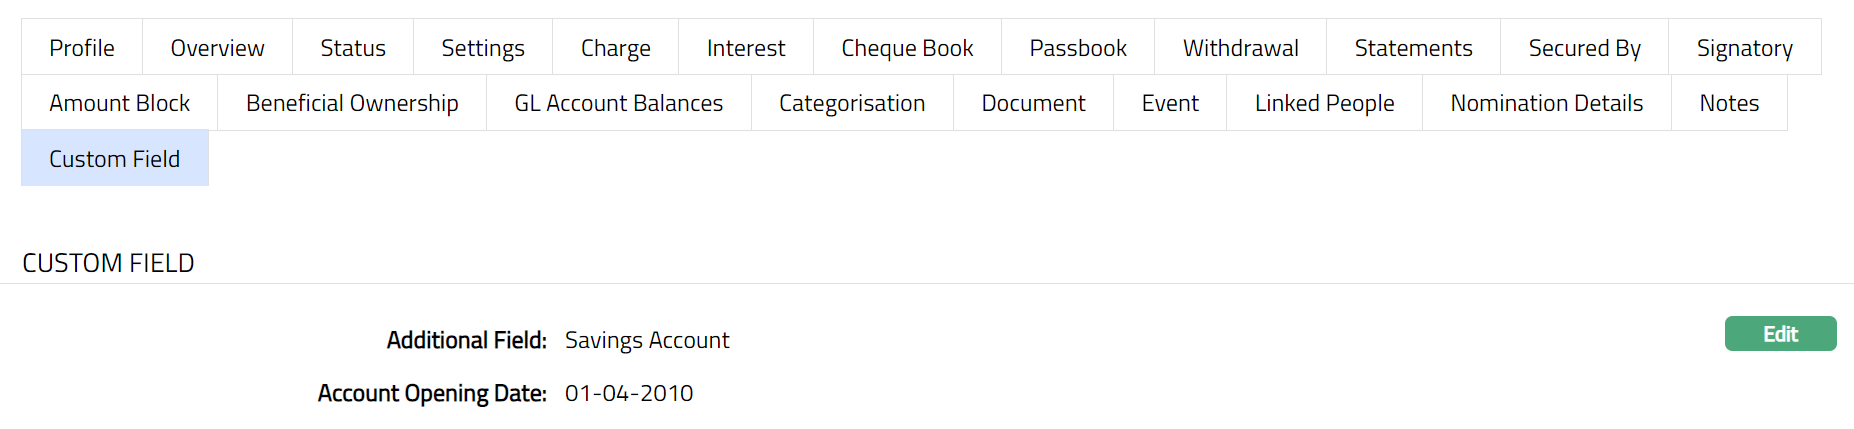 Functions: Maintain
Note: Custom field functionality has been explained in detail in Admin > Custom field manual.