Factoring Repayment
The Repayment function in Aura allows you to record payments received against factoring invoices.
You can use this function to apply a payment towards an invoice that has outstanding dues. Based on the invoice selected, Aura identifies the relevant contract and processes the repayment against it.
Repayments are created and maintained within the Factoring module and are used to update the outstanding balance of invoices as payments are received.
The following are the tabs that appear on the Factoring Repayment page:
To add a Factoring Repayment,
1. From the Commercial menu, click Factoring, and then click on Repayment under Contract. The Factoring Repayment page appears.

2. Click Add. The New Factoring Repayment → Profile (1/5) page appears.
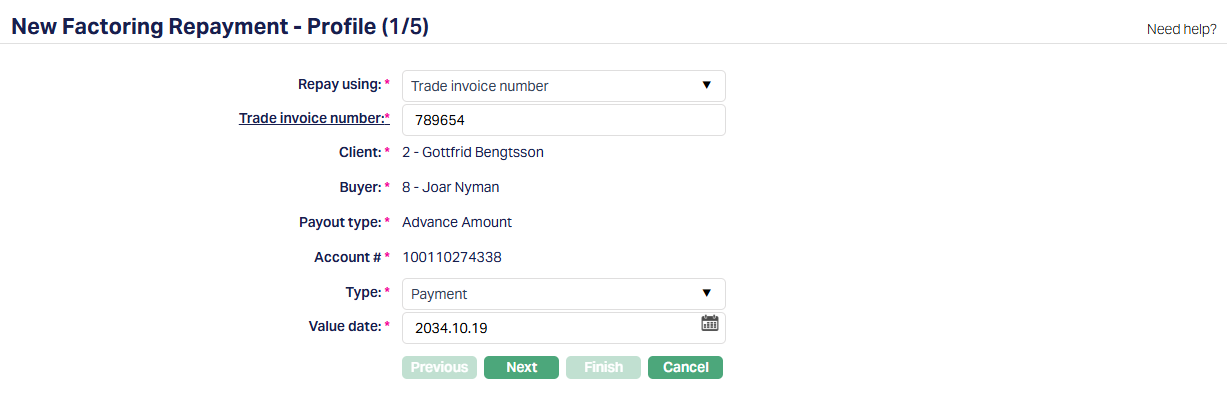
3. Select the basis on which you want to identify the invoice from the Repay Using drop-down.
You can choose to search using:
Trade Invoice number
Invoice #
Based on the option you select, the next field changes accordingly. Aura will then allow you to search and select those invoices that are not yet fully paid.
4. Enter or select Trade invoice number / Invoice # by clicking on the hyperlink. The Contract Search page appears where you can search for a client with the relevant criteria and select the required client. (As shown in the screenshot below.)

Alternatively, you can type and choose from the auto-suggested list and select the required record. Aura displays only those invoices that are not yet fully paid.
Once the invoice is selected, Aura automatically retrieves and displays the associated contract details.
5. The Client field is automatically populated based on the selected invoice. This represents the seller associated with the selected factoring contract and cannot be edited.
6. The Buyer field is automatically populated based on the selected invoice. This represents the buyer associated with the selected invoice and cannot be modified.
7. The Payout Type is displayed based on the selected contract. This indicates how the contract is structured (for example - Advance, On Maturity, or On Realisation) and is shown for reference only.
8. The Account # displays the account number of the factoring contract linked to the selected invoice. This helps you confirm that the repayment is being processed against the correct contract.
9. Type - This field specifies the type of record you are creating. The available options are:
Payment
Credit Invoice
By default, this is set to Payment. Based on the option selected, the behaviour of subsequent steps will change.
10. Value Date - This field specifies the effective date of the repayment.
For Payment:
The value date is mandatory.
It defaults to the Current Booking Date.
You can change it to a Past Date.
For Credit Invoice:
- The value date is defaulted and cannot be edited.
The value date determines when the repayment is considered effective in the system.
11. Click Next. The New Factoring Repayment → Settings (2/5) page appears.

12. Repay through method - Select the method through which the repayment is processed. The available options include:
Own Account
Settlement GL
Payment by Invoice
If Own Account is selected:
When you select Own Account as the repayment method, you are specifying that the payment is being made from a client's account maintained in Aura.
13. From Client - This field is defaulted based on the client selected in Step 1. You can change this and select another active client if required.
This field represents the client from whose account the repayment amount will be made.
14. From Account - Select the account from which the repayment amount will be debited. Aura displays the list of eligible accounts for the selected client. You can choose the required account from this list.
This field determines the exact account from which the repayment amount is processed.
If Settlement GL is selected:

When you select Settlement GL as the repayment method, the payment is processed through a ledger instead of a client account.
The From Ledger # field is automatically populated based on the settlement GL configured for the product associated with the contract. This field cannot be modified.
The repayment amount will be processed through this ledger during accounting.
If Payment By Invoice is selected:

When you select Payment by Invoice as the repayment method, no additional input fields are displayed in this step.
15. Click Next. The New Factoring Repayment → Dues (3/5) page appears.
This step displays the total outstanding dues for the selected invoice. Aura calculates and shows the breakup of all unpaid components associated with the contract.
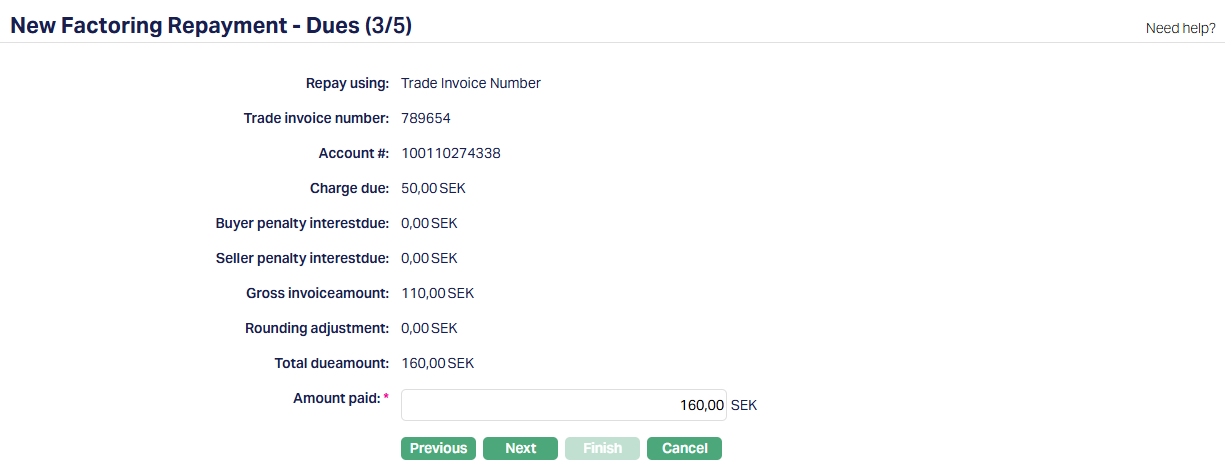
Repay Using / Trade Invoice Number / Account # - These fields are displayed based on your selection in Step 1 and are shown for reference. They help you confirm that the repayment is being processed for the correct invoice and contract.
Charge Due displays the total unpaid charges applicable to the contract. If there are no outstanding charges, the value is shown as 0.
Buyer Penalty interest due displays the total unpaid penalty interest applicable to the buyer, if any. If no penalty is applicable, this value is shown as 0.
Seller Penalty interest due displays the total unpaid interest applicable to the seller, if any. If no penalty is applicable, this value is shown as 0.
Gross Invoice Amount displays the unpaid invoice amount for the selected contract.
Rounding Adjustment displays any rounding difference applicable to the invoice. If not applicable, the value is shown as 0.
Total Due Amount displays the total outstanding amount for the contract. This is calculated as the sum of all unpaid components displayed above.
16. Amount Paid - Enter the amount being paid towards the invoice. By default, Aura populates this field with the Total due amount, indicating full payment. You can change this value if partial payment is being made.
The amount entered must be less than or equal to =< the Total due amount.
17. Click Next. The New Factoring Repayment → Allocation (4/5) page appears.
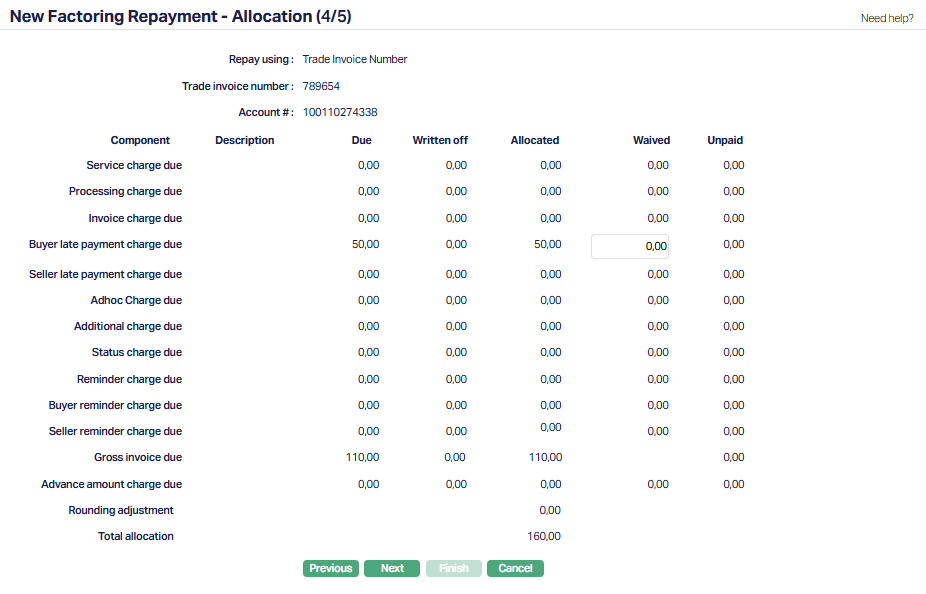
This step displays how the repayment amount is allocated across the different components of the invoice.
Aura automatically distributes the Amount Paid across all outstanding components based on system-defined rules.
Component - Displays the list of all components for which amounts are due under the contract. Each component is shown as a separate row. This may include charges, penalty interest, invoice amount, and other applicable components.
Description - Displays the description of the corresponding component, such as the Charge scheme or Interest scheme. Etc
Due - Displays the unpaid amount for each component before the repayment is applied. If there are none, then 0 is displayed.
Written Off - Displays the amount that has already been written off for the component. If no amount is written off, the value is shown as 0.
Allocated - Displays the portion of the repayment amount that has been allocated to each component. Aura automatically allocates the payment across components based on system-defined repayment order.
18. Waived - Enter the amount to be waived for a component, if applicable. By default, this value is 0. You can modify it where applicable. Waiver is not allowed for certain components such as the Gross Invoice Amount.
Unpaid - Displays the remaining unpaid amount for each component after allocation and waiver. This is calculated based on the due amount, written-off amount, allocated amount, and waived amount.
Total Allocation - Displays the total amount allocated across all components. This must match the Amount Paid entered in the previous step.
19. Click Next. The New Factoring Repayment → Confirmation (5/5) page appears showing all the details you have entered in the previous steps.
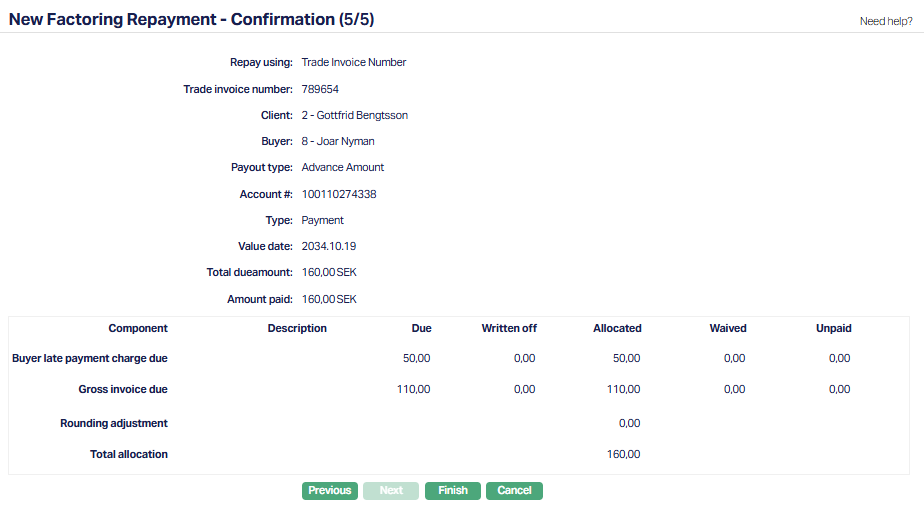
20. Click Finish. The Factoring Repayment is created with a unique Transaction Reference Number and the Repayment page appears displaying the Profile tab of the record that you added. The record is created with a Pending status.
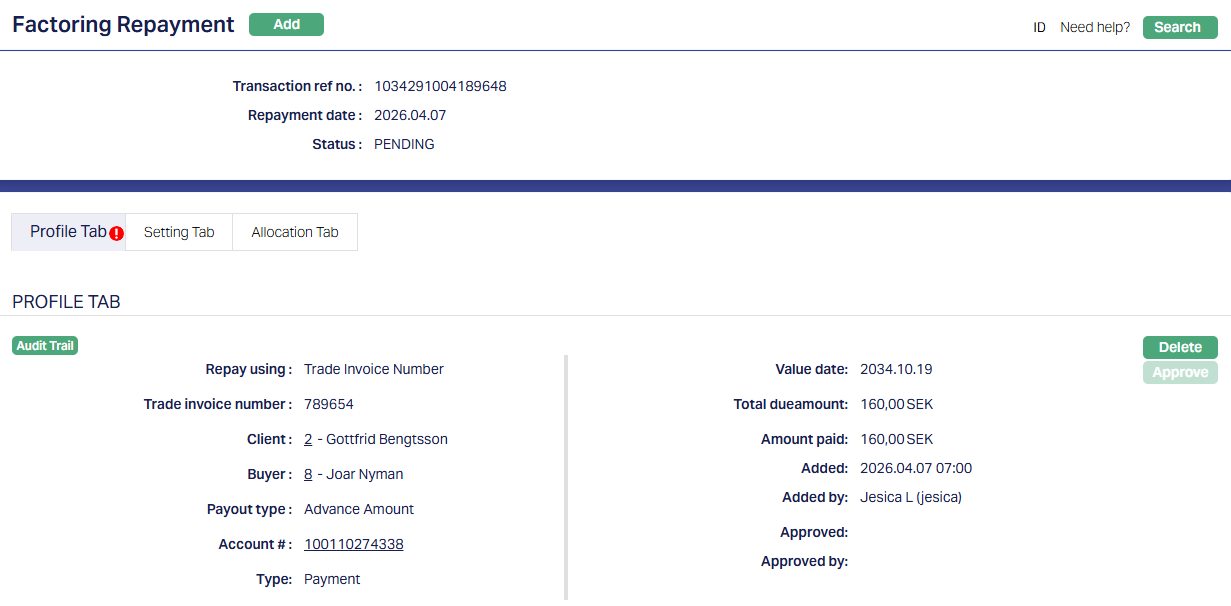
Status of the record is Pending till it is approved by another user. On approval, the tab status is set to Approved and the red bubble disappears.
Profile
The Profile tab, which is also the default tab of the Factoring Repayment screen, shows the basic details of the record.
To view Profile,
1. Access Factoring Repayment page. Click Profile tab to view the details as per sample below. The details are defaulted from the entries that you made during record creation. For details, refer to New Factoring Repayment → Profile (1/5) page.
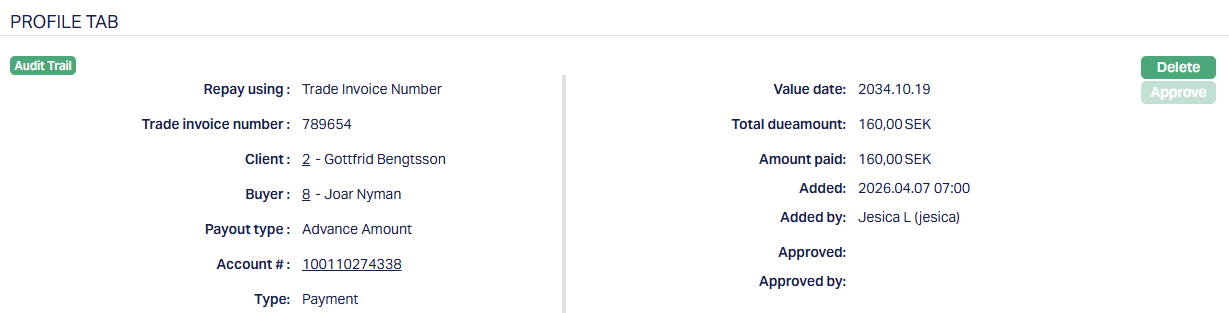
Functions: Delete, Approve
Delete: You can delete the repayment record only when the status is Pending. On clicking Delete, Aura prompts for confirmation before removing the record.
Approve: You can approve the repayment only when the status is Pending. On clicking Approve, Aura displays a confirmation message.
Once approved, Aura performs the following:
1. Validates the repayment again based on all rules applied during creation. If any validation fails, the repayment remains in Pending status and must be corrected before approval.
2. If all validations are successful, the status is updated to Approved.
3. Aura processes the repayment by:
Allocating the payment across the applicable components
Updating the outstanding balances of the contract
Passing the required accounting entries
Triggering related system processes such as settlement of charges, penalty components, and other applicable adjustments.
The additional fields that are shown are -
Status indicates the current state of the record. It will be either: Pending - If the record is waiting for approval or Approved - If the record has been reviewed and finalized.
Added shows the date and timestamp when the record was created and Added by displays the user ID and full name of the person who created the record.
Approved shows the date and time when the record was approved and Approved by displays the user ID and full name of the person who approved the record.
Setting Tab
The Setting tab displays the repayment source details that were selected during creation.
To view/ edit setting tab,
1. Access Factoring Repayment page. Click the Setting tab to view the details as per sample below. The details are defaulted from the entries that you made during record creation. For details, refer to New Factoring Repayment → Settings (2/5) page.

2. Click Edit. Edit Settings page appears.
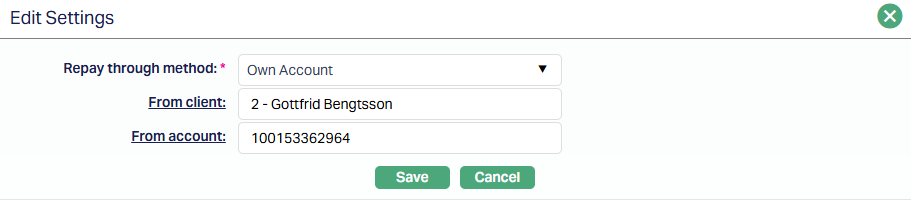
All fields are editable.
3. Click Save. The Setting tab appears with the edited details.
Function: Edit
Allocation Tab
The Allocation tab displays the final distribution of the repayment amount across the different components of the invoice.
This tab shows how the payment has been applied and the resulting balances after the repayment is processed.
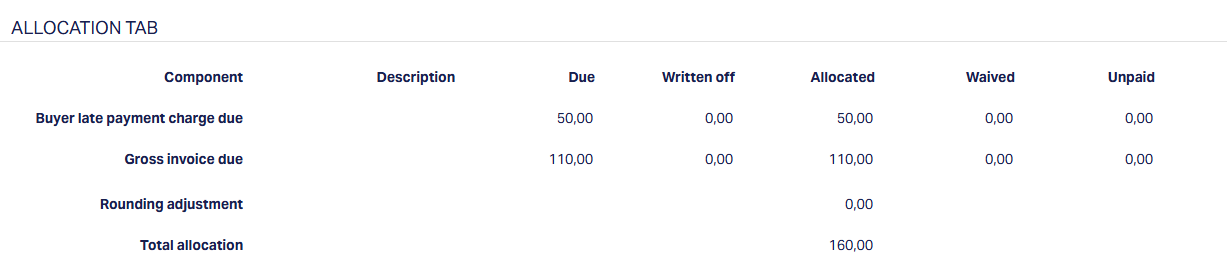
Each row represents a component of the invoice, such as charges, penalty interest, or invoice amount.
For each component, Aura displays:
Due - the outstanding amount for the component
Written Off - any amount written off prior to repayment
Allocated - the portion of the repayment applied.
Waived - any amount waived during repayment
Unpaid - the remaining balance after repayment
The Total allocation at the bottom shows the total amount distributed across all components, which matches the repayment amount entered.
Notes:
Allocation is performed automatically by Aura based on system-defined rules.
The allocation cannot be modified after the repayment is created
Any adjustment to allocation is done only during repayment creation through the Waived field.