RTGS/SWIFT/TARGET2
RTGS/SWIFT/TARGET2 menu allows you to initiate a credit transaction to any bank using the SWIFT, TARGET2, and RTGS network.
SWIFT (Society for Worldwide Interbank Financial Telecommunication) provides a network for financial institutions to send and receive information about financial transactions all over the world in a secure environment.
TARGET2 (Trans-European Automated Real-time Gross Settlement Express Transfer System) network is used for transactions in the Euro zone.
RTGS ((Real Time Gross Settlement) the Reserve Bank of India (India's Central Bank) maintains this payment network.)) is used to transfer funds from one bank to other on a real time and on gross basis. Settlement in Real Time means payment transactions are not subjected to any waiting period. The transactions are settled as soon as they are processed. Gross settlement means the transaction is settled on one to one basis without bunching or netting with any other transaction. Once processed, payments are final and irrevocable.
RTGS systems are typically used for high-value transactions that require immediate clearing.
The following are the tabs in a RTGS/SWIFT/TARGET2 payment record.
For existing customers:
For walk-in customers (pay by cash):
For Bank:
To initiate a new RTGS/SWIFT/TARGET2 payment,
1. From the Retail menu, click Gross Settlement, and then RTGS/SWIFT/TARGET2. RTGS/SWIFT/TARGET2 Search page appears.

2. Click Add. The New Outgoing RTGS/SWIFT/TARGET2 → Profile (1/5) page appears.
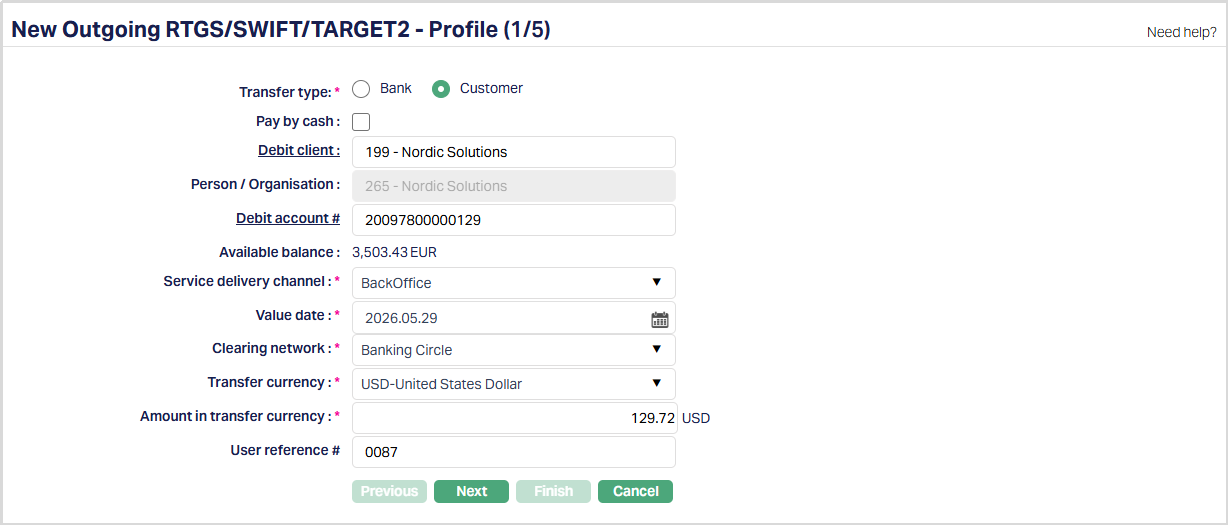
For existing customers:
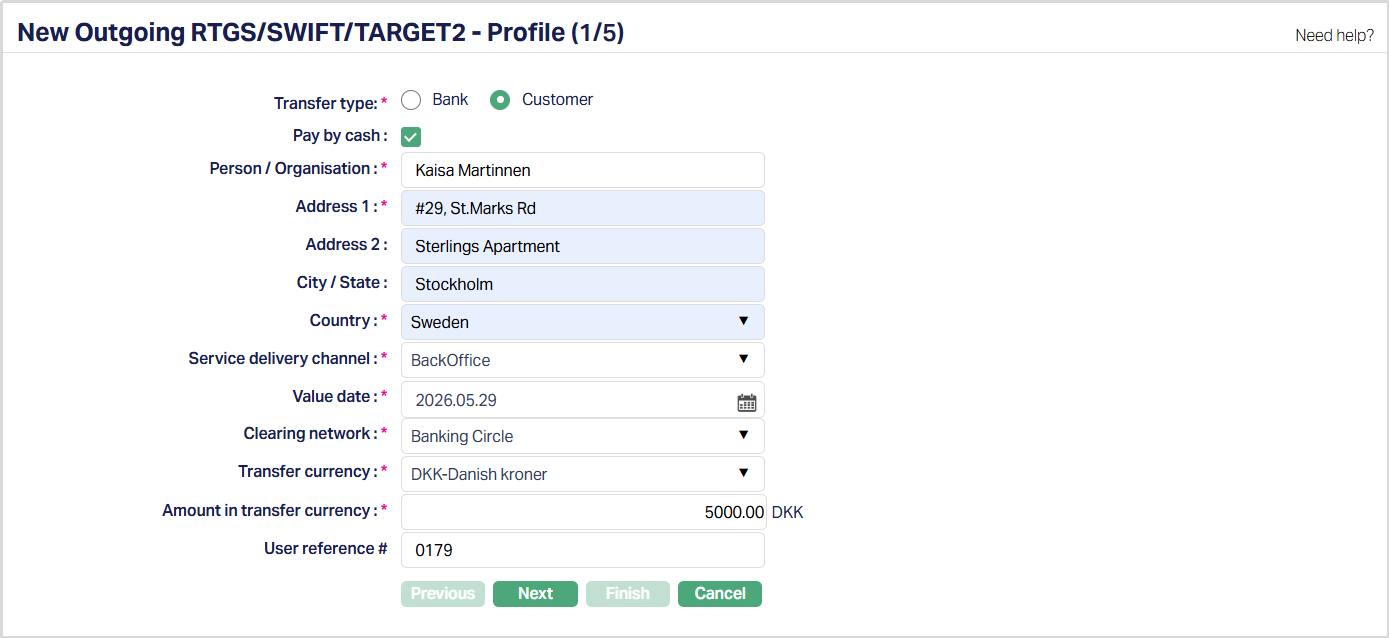
For walk-in customers (Pay by cash):
For Bank:
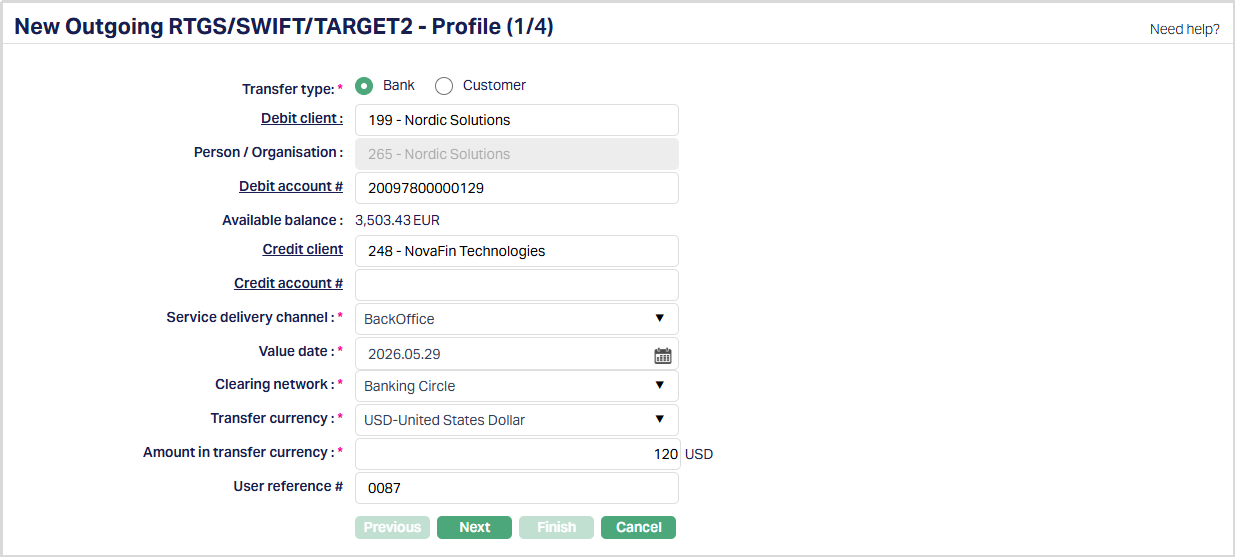
3. Select the Transfer type. The options are Bank and Customer.
4. If the customer is a walk-in customer and pays by cash, then check the Pay by cash checkbox. If the customer is an existing customer, then uncheck the Pay by Cash checkbox.
5. To select a client whose account will be debited; click Debit Client hyperlink. The Client Search page appears where you can search for a client with relevant criteria and select the required client. Alternatively, you can type in the name of the client and choose the relevant client from the list suggested by Aura.
6. The Person/Organisation for the selected client will get displayed by default and the field will be disabled.
7. Enter the Address details in Address 1 and 2 for the walk-in customer.
8. Enter the City/State of the walk-in customer.
9. Select the Country of the walk-in customer, from the drop down list of countries maintained under Admin → Admin → System codes → Generic definitions → Countries.
10. Click Debit Account# hyperlink. The Search Client Account page appears. Aura will display all active CASA account numbers of the selected Client as maintained under Retail → Accounts → Client account → Maintain and all active Nostro account numbers of the selected client as maintained under Retail → Accounts → Nostro account → Maintain Alternatively, you can type in the account number of the selected client and choose the relevant Account# from the list suggested by Aura.
11. Available balance of the selected account will be derived and displayed by Aura.
12. To select a client whose account will be credited; click on Credit Client hyperlink. The Client Search page appears where you can search for a client with relevant criteria and select the required client. Alternatively, you can type in the name of the client and choose the relevant client from the list suggested by Aura.
13. Click Credit Account# hyperlink. The Search Client Account page appears. Aura will display all active CASA account numbers of the selected Client as maintained under Retail → Accounts → Client account → Maintain and all active Nostro account numbers of the selected client as maintained under Retail → Accounts → Nostro account → Maintain. Alternatively, you can type in the account number of the selected client and choose the relevant Account# from the list suggested by Aura.
14. Select the Service delivery channel from the list of available dropdown which is maintained under Admin → System codes → Categories → Service delivery channel.
15. Value date denotes the date on which the selected client account will be debited. By default, Aura will display the current business date, but you can change the value date to a future date.
16. Select the Clearing network from the drop down list of pre-shipped values based on the country, clearing network and currency.
17. Payment date denotes the date on which the beneficiary account needs to be credited. Payment date cannot be less than value date.
18. Transfer currency denotes the currency in which the payment / transfer needs to be executed.
19. Enter the Amount in transfer currency to be credited to the beneficiary account. Selected Transfer currency code will be suffixed to this field. i.e if EUR is the Transfer currency selected then EUR will be displayed after the field.
20. Enter the User ref #.
21. Click Next. The New Outgoing RTGS/ SWIFT / TARGET2 → Beneficiary Details (2/5) page appears.
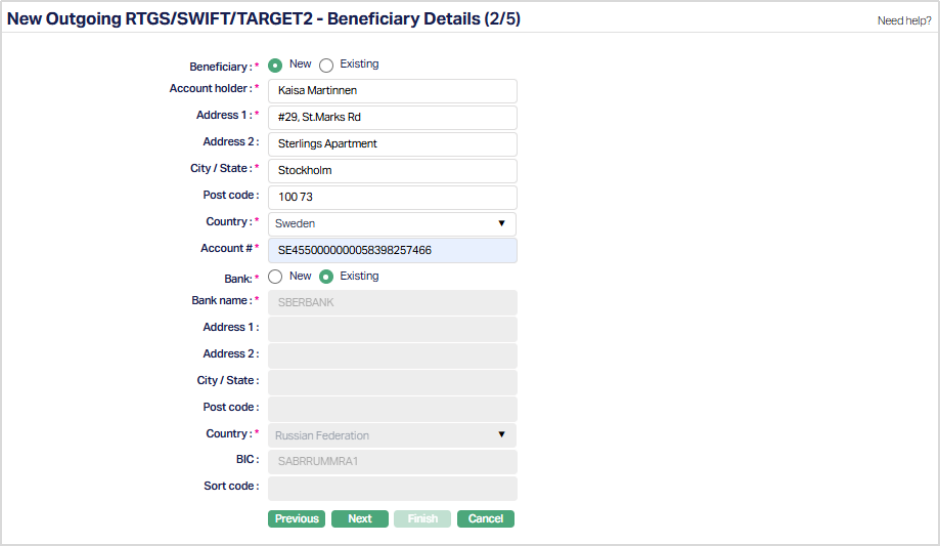
22. Click New or Existing radio button for Beneficiary to indicate if the Beneficiary is new or already exists in Aura. If you select Beneficiary as Existing, Aura will derive the beneficiary and the related fields cannot be edited then.
23. Enter the name of the Account holder.
24. Enter the address of the Bank in the Address 1 and Address 2 fields.
25. Enter the City/State of the beneficiary.
26. Enter the Post code of the selected country.
28. Select the Country in which the beneficiary is located from the list of available dropdown which is maintained under Admin → System codes → Generic definitions → Countries.
29. Enter the Account # of the beneficiary to which the specified amount will be credited.
30. Click New or Existing radio button for Bank to indicate if the Bank is new or already exists in Aura. If you select Bank as Existing, Aura will derive the beneficiary and the related fields cannot be edited then.
31. Enter the Bank name.
32. Enter the address of the Bank in the Address 1 and Address 2 fields.
33. Enter the City/State of the Bank.
34. Enter the Post code of the selected country.
35. Select the Country in which the bank is located from the list of available dropdown which is maintained under Admin → System codes → Generic definitions → Countries.
36. Enter the BIC of the beneficiary bank.
37. Enter the Sort code of the beneficiary bank if applicable.
38. Enter the IFSC code of the Beneficiary bank if applicable. This field will appear only if Country is selected as India.
Note:
| Beneficiary | Actions by Aura |
|---|---|
| Existing Beneficiary and Existing Beneficiary Bank are chosen | Aura will retrieve the Beneficiary details maintained for the Beneficiary chosen. Edit is not allowed. |
| New Beneficiary and Existing Beneficiary Bank are chosen | Details of the beneficiary bank will be defaulted from the Settlement Directory details for the Bank chosen by Aura |
| New Beneficiary and New Bank are chosen | Aura will provide a text box to input the Beneficiary and Beneficiary Bank name that does not exist in the Settlement Directory. Edit is allowed. |
39. Click Next. The New Outgoing RTGS/SWIFT/TARGET2 → Others (3/5) page appears.
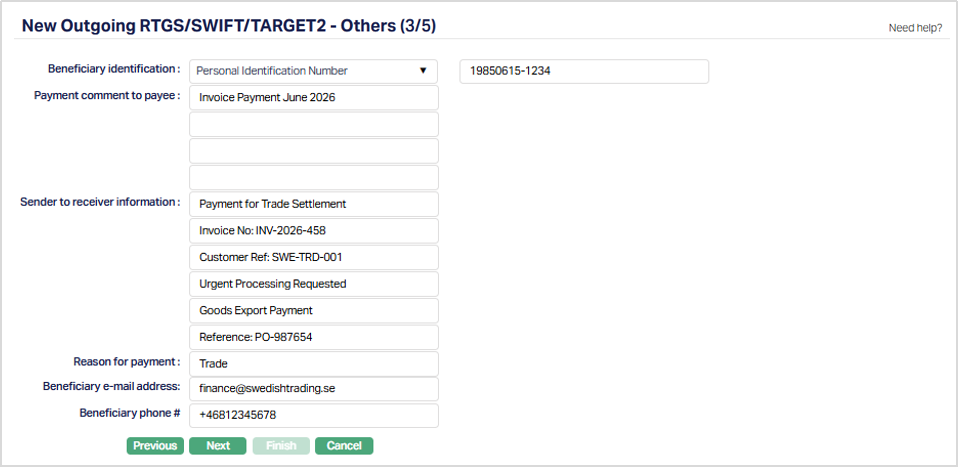
40. Select the Beneficiary identification from the drop down list maintained under Admin → System Codes → Generic Definitions → Identification Type.
41. Enter the Identification type/number in the text-box next to the Beneficiary identification field.
42. Enter the Payment Comment to Payee. It specifies the comment to the payee regarding the payment.
43. Enter the Sender to receiver information. It specifies the information sent by the sender to the receiver.
44. Enter the Reason for Payment. It specifies the reason for payment.
45. Enter the e-mail address and phone # of the Beneficiary.
47. Click Next. The New Outgoing RTGS/SWIFT/TARGET2 → Charges (4/5) page appears.
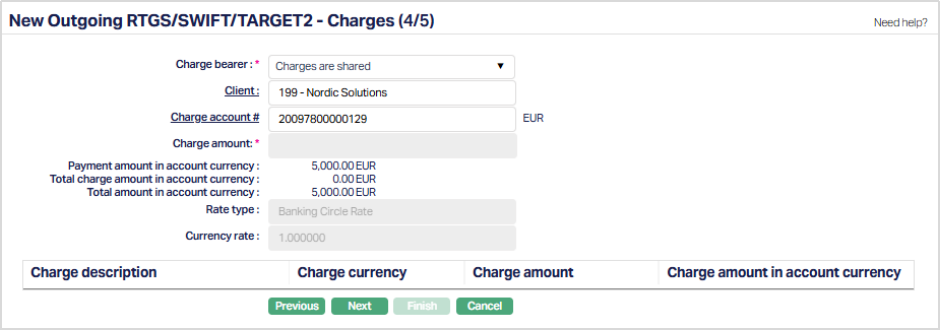
48. Charge bearer denotes the person who will bear all the charges related to the RTGS/SWIFT/TARGET2 payment. Based on the network, select the Charge Bearer from the available drop down list of pre-shipped values.
If the network is SWIFT/TARGET, the available pre-shipped options are
- Payee pays charges
- Payer pays charges
- Charges are shared.
If the network is RTGS, the available pre-shipped option is
- Payer pays charges.
49. Client is defaulted from the Debit Client selected in New Outgoing RTGS/SWIFT/TARGET2 → Profile (1/5) page. However, you can also select a client by clicking on the Client hyperlink.
50. Charge Account # is defaulted from the Debit Account# selected in New Outgoing RTGS/SWIFT/TARGET2 → Profile (1/5) page. However, you can select another account number by clicking on the Charge Account# hyperlink
51. Charge Amount in charge currency will display the resolved charges. In case of multiple charges, you can select a charge from the grid and can update the charge amount.
52. Payment amount in account currency will display the amount in account currency.
53. Total charge amount in account currency will display in case of multiple charges, cumulative of total charges in account currency.
54. Rate Type displays the exchange rate type resolved for the transaction based on the configured Payment Setting. This field is non-editable.
55. Currency Rate displays the exchange rate retrieved for the transaction. This field is non-editable.
56. Aura calculates the **Net amount in account currency **as Amount in account currency - Net charge amount in account currency.
57. Charge scheme displays the charge scheme as resolved by Payment Grid.
58. Charge currency displays the charge currency as resolved by Payment Grid.
59. Charge amount in charge currency displays the charge amount in charge currency as resolved by Payment Grid.
60. Charge amount in account currency displays the charge amount in account currency as resolved by Payment Grid.
61. If the account currency and transfer currency is same, then the payment amount will be displayed in transfer currency If the account currency is different from the transfer currency, then the Payment amount is calculated based on the latest available exchange rate and is displayed in transfer currency.
62. In case of multiple charges in same currency, the total charge amount will display cumulative of total charges in transfer currency. In case of multiple charges in different currencies, the Total charge amount is calculated as per the latest available exchange rate and will be displayed in transfer currency.
63. Aura calculates the Total amount in transfer currency as Payment amount in transfer currency + Charge amount in transfer currency (Cumulative, if multiple charges) and displays the amount in transfer currency.
64. Click Next. The New Outgoing RTGS/SWIFT/TARGET2 → Confirmation (5/5) page appears.
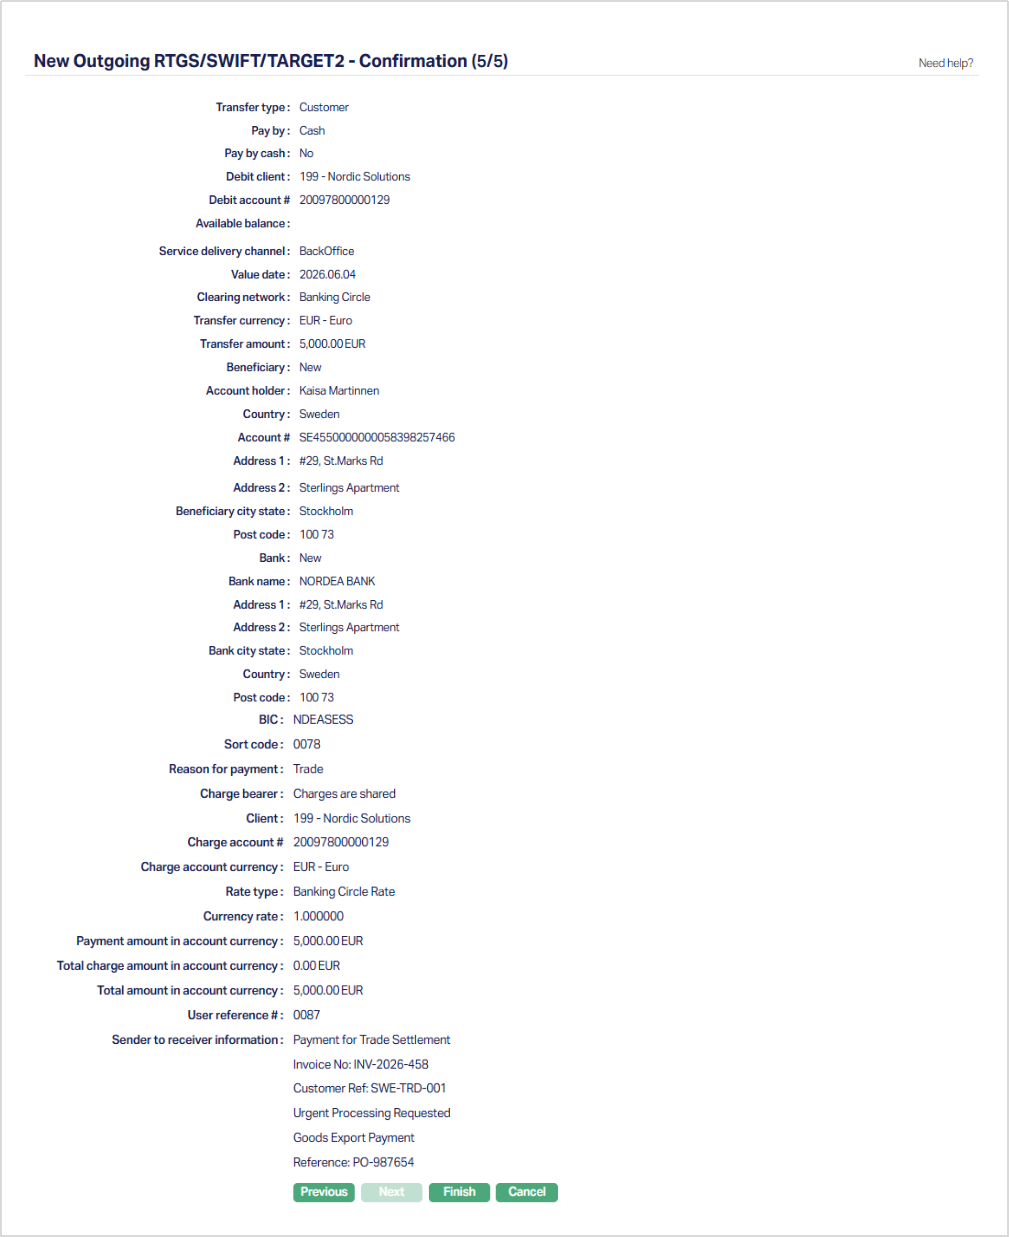
65. Click Finish. The RTGS/SWIFT/TARGET2 Maintenance → Outgoing page appears with a unique Payment reference #, Status as Registered, Record status as Pending and a Profile tab by default.
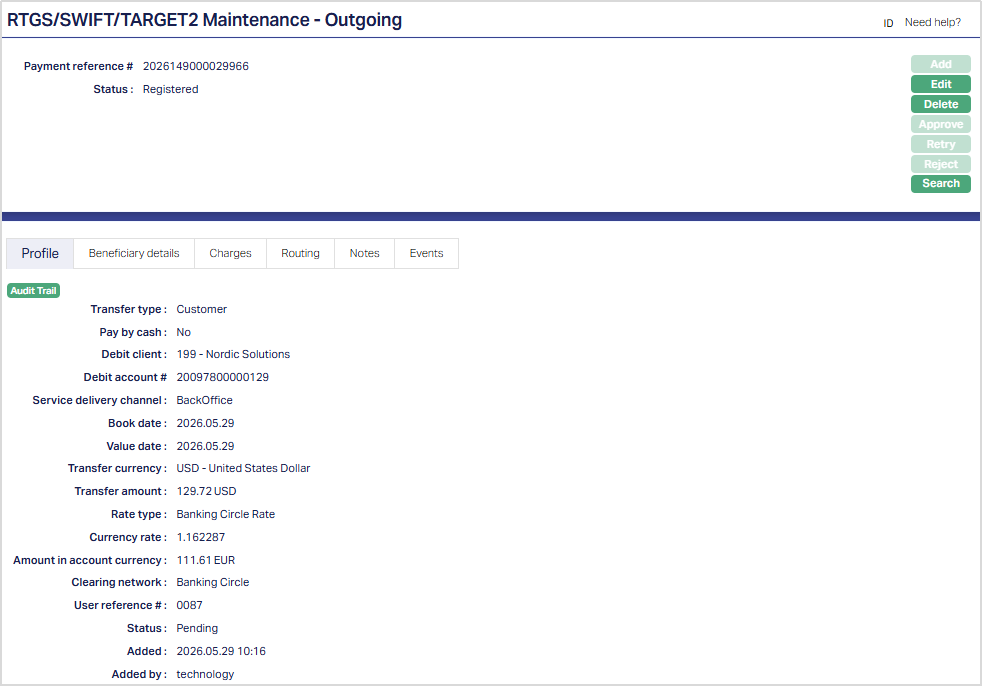
Functions: Add, Edit, Delete, Approve, Retry, Reject, Search.
Note: Once the Payment record is created, Aura will generate a unique payment reference number with Status as Registered and Record status as Pending.
The Payment record will be available under Net Settlement → Authorization, where the user can do bulk Approval.
Delete: You can delete a RTGS/SWIFT/TARGET2 Payment record by a click on Delete button. Aura will ask for confirmation. On confirmation, RTGS/SWIFT/TARGET2 Payment record will be deleted.
Approve: You can approve a RTGS/SWIFT/TARGET2 Payment record by a click on Approve button. Aura will ask for confirmation. On confirmation, the selected record will be approved.
Retry: Retry allows you to reprocess a failed payment transaction. When you click Retry, Aura updates the Value Date of the payment to the current business date and pushes a new message to the appropriate processing queue based on the current payment status. Retry is available when the payment status is:
- ACCOUNTINGFAILED
- AMLFAILED
- OUTPAYFAILED
Reject: Reject allows you to reject a payment transaction. When you click Reject. Aura displays a confirmation message. On confirmation, the selected payment transaction is rejected. Reject is available when the payment status is:
- ACCOUNTINGFAILED
- AMLFAILED
- AMLUNDERREVIEW
Interaction of Aura with the Payment Grid
When you click Finish, the following takes place:
All entered transaction details will be saved with audit trail versioning.
A unique Payment reference # will be generated.
The record status of the transaction of this Payment is Pending
The Payment type will be automatically populated as Outgoing, the booking date as the system date.
Aura will call Payment Grid to resolve Product and Charges.
If any of the above fields cannot be resolved, Payment Grid will call Aura and provide the exact reason for failure New Outgoing RTGS/SWIFT/TARGET2 → Others (3/5) screen.
If the resolution of the above fields is successful Aura will update the status of the transaction as Registered and display the New Outgoing RTGS/SWIFT/TARGET2 → Charges (4/5) screen.
Any user other than the user who created this payment should approve this record.
The events in Credit Transfer are as follows:
| Events | Description | Payment status |
|---|---|---|
| PAYMBK | This event will trigger, if the payment is booked in Core bank. | Registered |
| PAYMPD | This event will trigger if debit processing occurs in Core bank | Registered |
| PAYMCP | This event will trigger if credit processing occurs in Core bank | Processed |
| PAYMRV | This event will trigger if Payment is reversed in Core bank | Reversed |
| PAYMCN | This event will trigger if Payment is cancelled in Core bank | Cancelled |
Actions allowed:
| If Payment Status is | If Record Status is | Then the Actions Allowed in ConnectCore are |
|---|---|---|
| Failed | Pending | Delete, Edit |
| Registered | Pending | Edit, Delete, Approved |
| Processed | Approved | None |
Note: Retry and Reject actions may be available for specific payment statuses depending on the transaction processing stage.
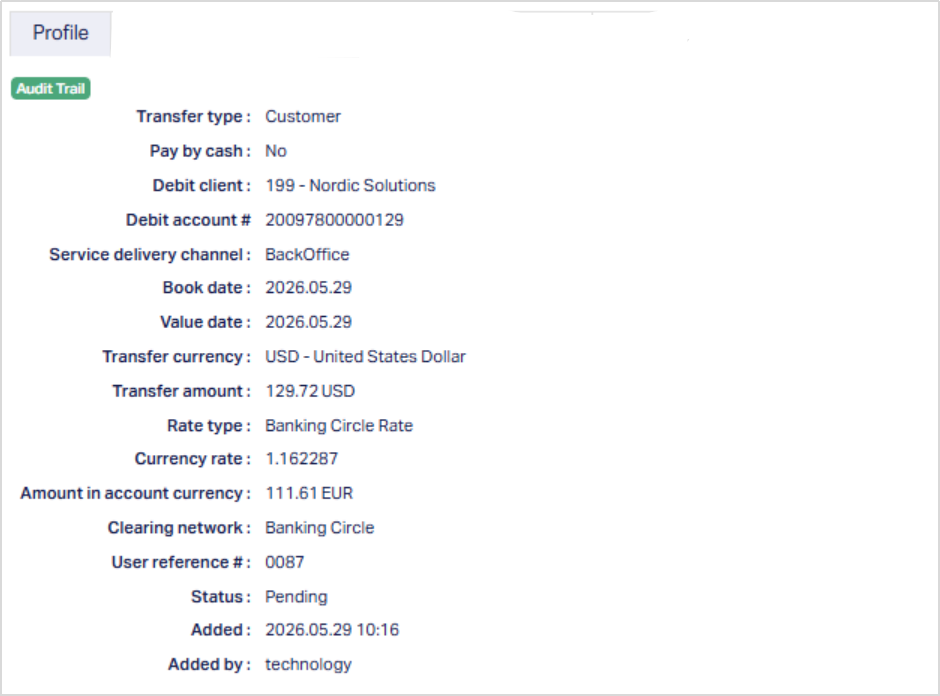
Profile
The Profile tab, which is the default tab in the RTGS/SWIFT/TARGET2 -- Maintenance Outgoing screen, shows the basic details of the RTGS/SWIFT/TARGET2 payment transfer.
1. From the Retail menu, click Gross Settlement, and then RTGS/SWIFT/TARGET2 search.

2. Search for the desired transaction record by entering the related variables about it. Select the searched record. The RTGS/SWIFT/TARGET2 Maintenance -- Outgoing page appears. The values are defaulted from New SEPA Outgoing Credit Transfer → Profile (1/5) page for details.
On approval and on value date, prior to Debit processing Payment Grid calls Aura for payment settings (Exchange rate). Aura then selects the latest updated rates as per the payment setting and the same is displayed in Rate type and Currency rate.
Status field denotes the status of the RTGS/SWIFT/TARGET2- Outgoing Payment record.
Added field denotes the date on which the record was added.
Added by field denotes the name of the person who created the record.
Approved field denotes date on which the record was approved and is displayed only for approved records.
Approved by field denotes name of the user who approved the record and is displayed only for approved records.
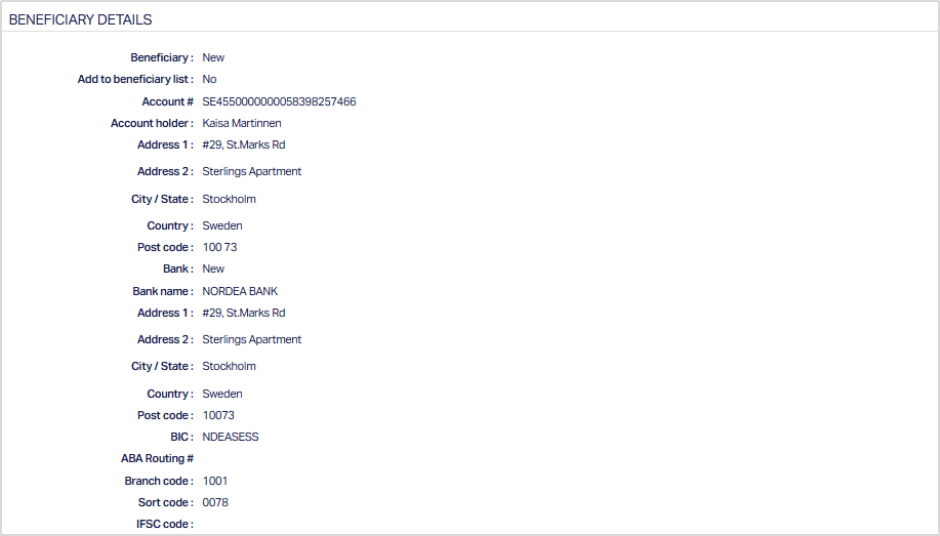
Beneficiary details
Beneficiary details tab allows you to view the details of the beneficiary and the beneficiary bank.
Access the RTGS/SWIFT/TARGET2 Maintenance -- Outgoing page and Click Beneficiary details tab. The values are defaulted from New Outgoing RTGS/ SWIFT / TARGET2 → Beneficiary Details (2/5).
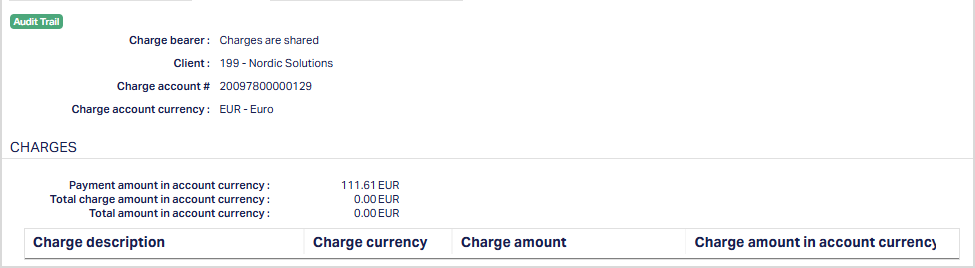
Charges
Charges tab allows you to view the charges and the related details.
Access the RTGS/SWIFT/TARGET2 Maintenance -- Outgoing page and Click Charges tab. The values are defaulted from New Outgoing RTGS/SWIFT/TARGET2 → Charges (4/5)
Routing
The Routing tab allows you to view the route through which the Payment transfer is done. By default the values are defaulted from Payment Grid. You can also edit the details, if required.
Access the RTGS/SWIFT/TARGET2 Maintenance → Outgoing page and Click Routing tab.
Note: The values are defaulted from Payment Grid.

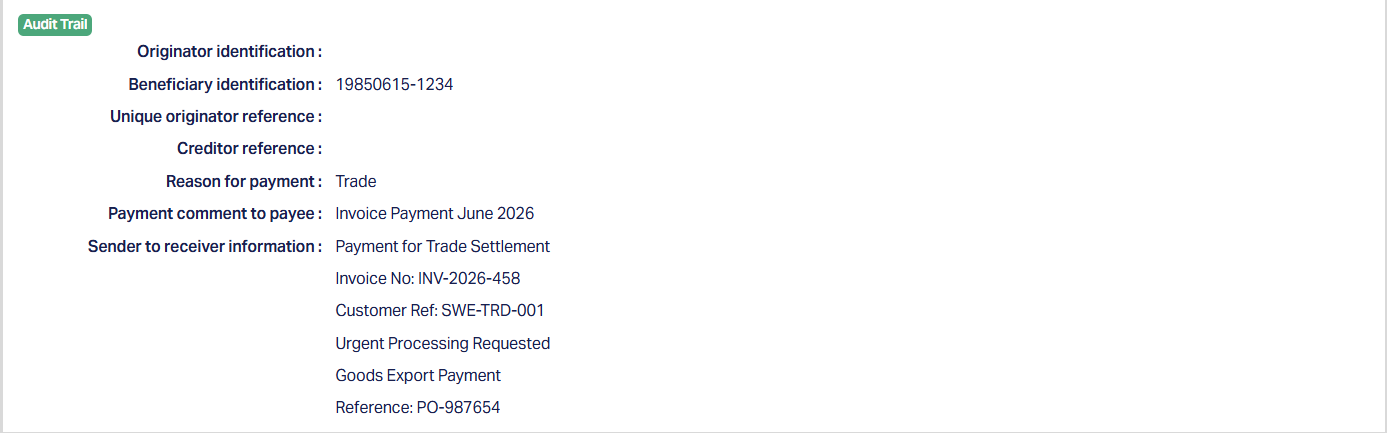
Notes
Notes tab allows you to view additional details about the RTGS/SWIFT/TARGET2 payment record.
Access the RTGS/SWIFT/TARGET2 Maintenance -- Outgoing page and click on the Notes tab. The values are defaulted from New Outgoing RTGS/SWIFT/TARGET2 → Others (3/5),
Events
Events tab allows you to view the past, current and future events. This tab is non-editable.
Access the RTGS/SWIFT/TARGET2 Maintenance -- Outgoing page and Click Events tab.
By default, the Current tab is displayed. It shows the details of the Events that have value date = current business date. The Past tab and Future tab show details of events that have a value date earlier than / later than the current business date respectively.
All the tabs show the following data:
Event: It displays the code for the event.
Description: It displays the description of the event.
Value Date: It is the date when the Payment transaction is processed. For example: Booking date is 29th June, Value date is 5th July- transaction will be processed on 5th July.
Book Date: The date of entry / input of the event.
Ref No: The transaction reference number under which the event is processed.
Status: It displays the status of the event. It status can be of the following types.
Pending: Where the event is not yet processed
Success: Where the event has been processed successfully
Failure: Where the event has failed during process
Retry: Indicates a failed event where the system retries to process the event on subsequent business days.
Amount: Indicates the amount processed by the event.
A sample of the Past tab is shown below:

A sample of the Current tab is shown below:

A sample of the Future tab is shown below:

EDITING RTGS/SWIFT/TARGET2 RECORD
The Edit button allows you to edit all the tabs in RTGS/SWIFT/TARGET2 record in one iteration. The Edit button will be enabled only when the payment Status is Failed or Registered and the record Status is Pending.
To edit,
Access the RTGS/SWIFT/TARGET2 Maintenance -- Outgoing page and Click Edit.
1. The Edit Outgoing RTGS/SWIFT/TARGET2 → Profile (1/6) page appears.
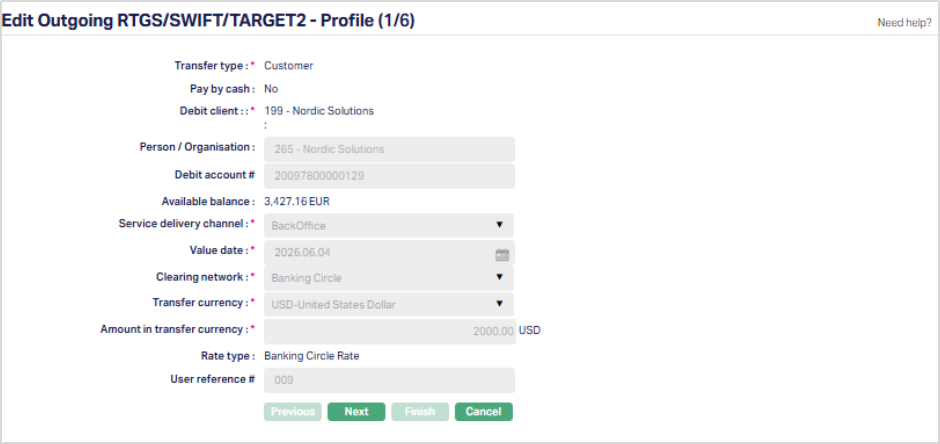
The Profile page is displayed in read-only mode during Edit. The transaction profile details cannot be modified.
2. Click Next. The Edit Outgoing RTGS/SWIFT/TARGET2 → Beneficiary Details (2/6) page appears.
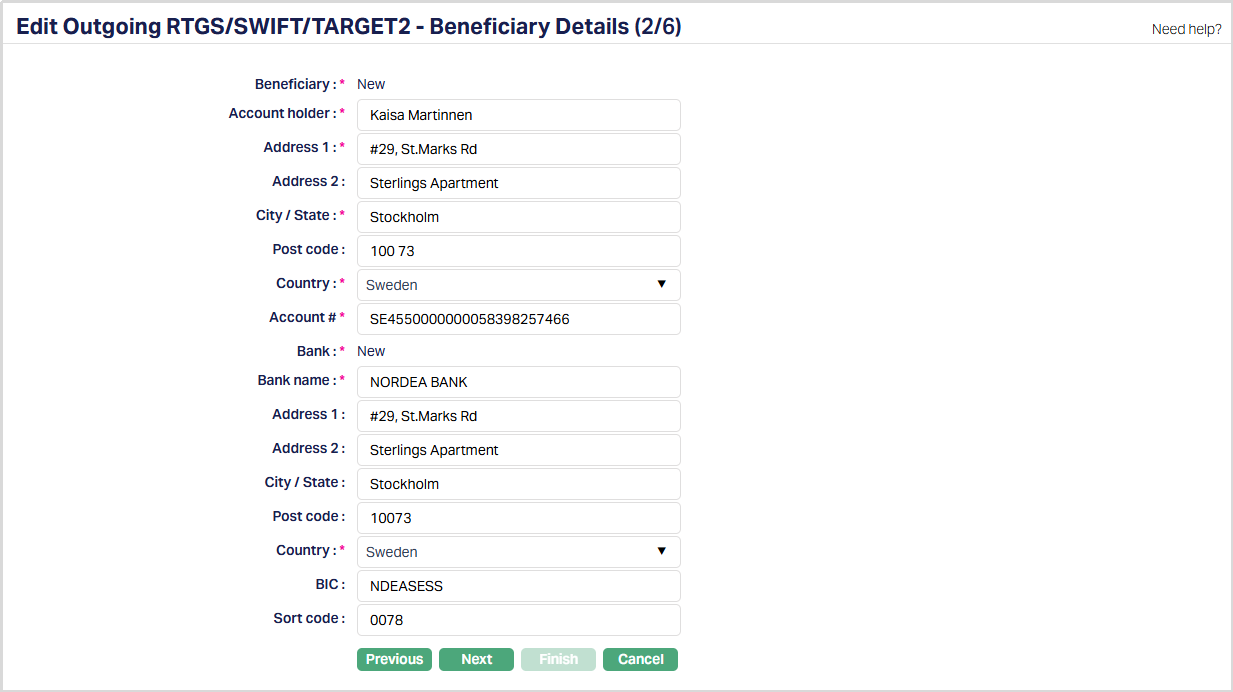
All fields are editable except the Beneficiary and Bank selections, these are displayed as fixed values during Edit and cannot be changed.
3. Click Next. The Edit Outgoing RTGS/SWIFT/TARGET2 → Routing (3/6) page appears.
Routing details are not available during payment creation. After the payment record is created and the routing information is resolved by Payment Grid, the Routing page becomes available during Edit.
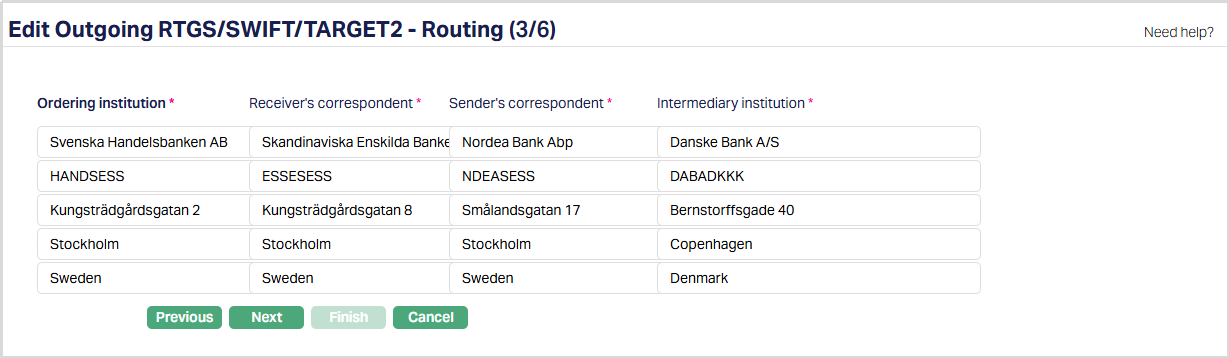
- Ordering Institution displays the financial institution of the ordering customer when it differs from the sender.
- Receiver's Correspondent displays the branch or financial institution at which funds are made available to the receiver.
- Sender's Correspondent displays the account, branch, or financial institution through which the sender reimburses the receiver.
- Intermediary Institution displays the financial institution through which the transaction passes before reaching the account with the institution.
4. Click Next. The Edit Outgoing RTGS/SWIFT/TARGET2 → Others (4/6) page appears.
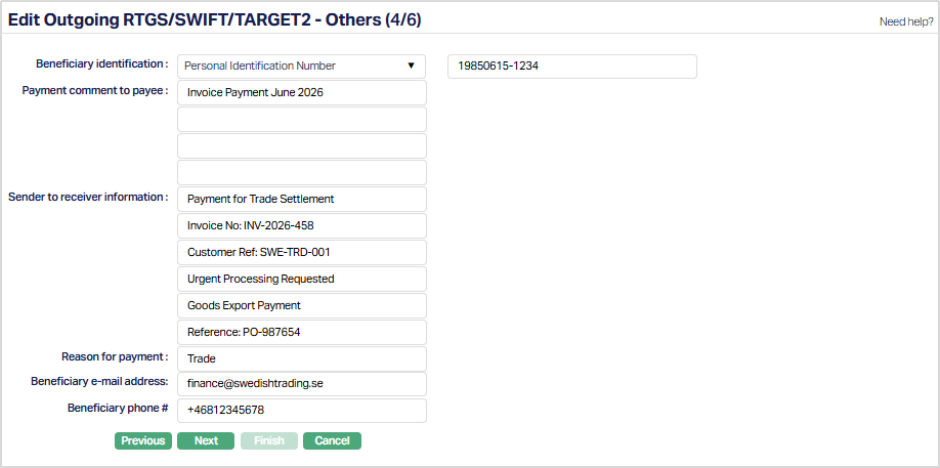
All the fields are editable.
5. Click Next. The Edit Outgoing RTGS/SWIFT/TARGET2 → Charges (5/6) page appears.
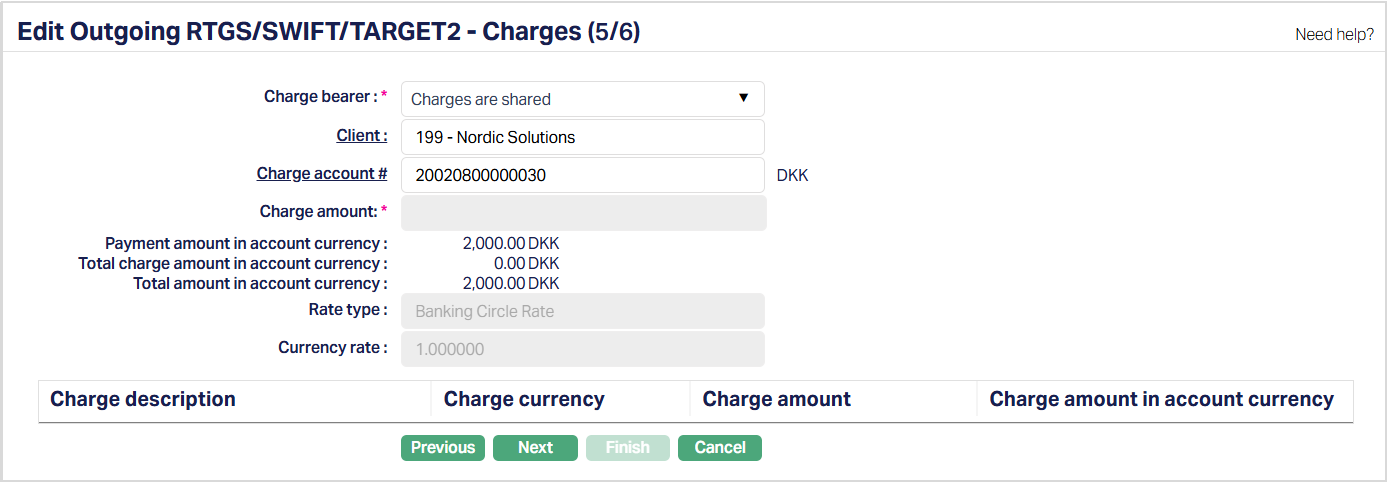
You can edit Charge bearer, Client and Charge Account #.
6. Click Next. The Edit Outgoing RTGS/SWIFT/TARGET2 → Confirmation (6/6) page appears.
7. Click Finish. The RTGS/SWIFT/TARGET2 Maintenance - Outgoing page appears.
Functions: Add, Edit, Delete, Approve, Retry, Reject, Search.