Mortgage and Loan Product Maintenance
Product maintenance menu allows you to maintain the details of Mortgage and Loan Products that are offered by your bank to its customers. Once the Product is created, the values in these Products are defaulted to the loan accounts that are created under the Product, with an option to change the details at the account level.
The following are the tabs in a Mortgage and Loan Product and are aggregated under these tab heads:
PROFILE
PRICING
REPAYMENT
ACCOUNTING
CUSTOM FIELD
Creating a Mortgage and Loan Product
To create a new Mortgage and Loan Product,
1. Access Retail menu, click Settings, and then Product. The Product Search page appears. All Products available in Aura appear on the page.

2. Click Add. The New Product → Profile (1/10) appears.
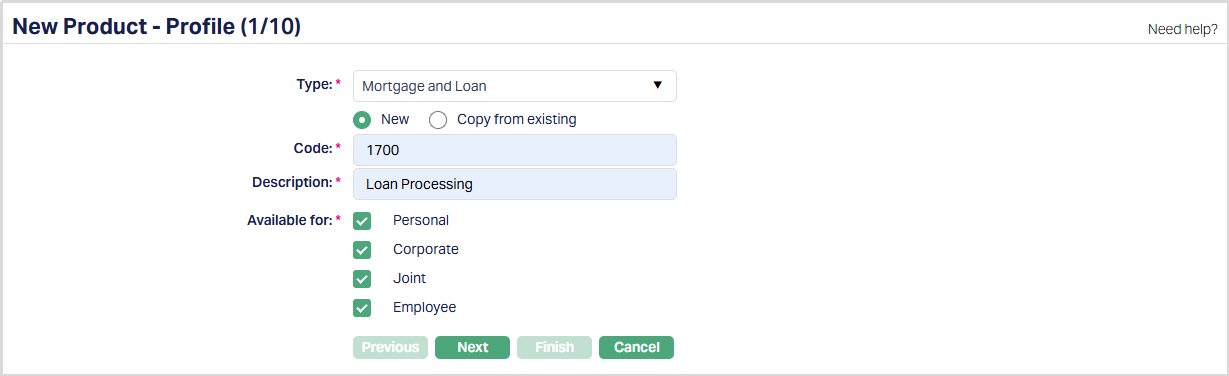
3. Select Mortgage and Loan as the Type from the drop-down list for the Product.
4. Aura allows you to create a new loan Product from scratch or create a loan Product based on already existing loan Products.
To create a new Product, select New.
If you want to create a loan Product based on the properties of an existing loan Product, then select Copy from existing.
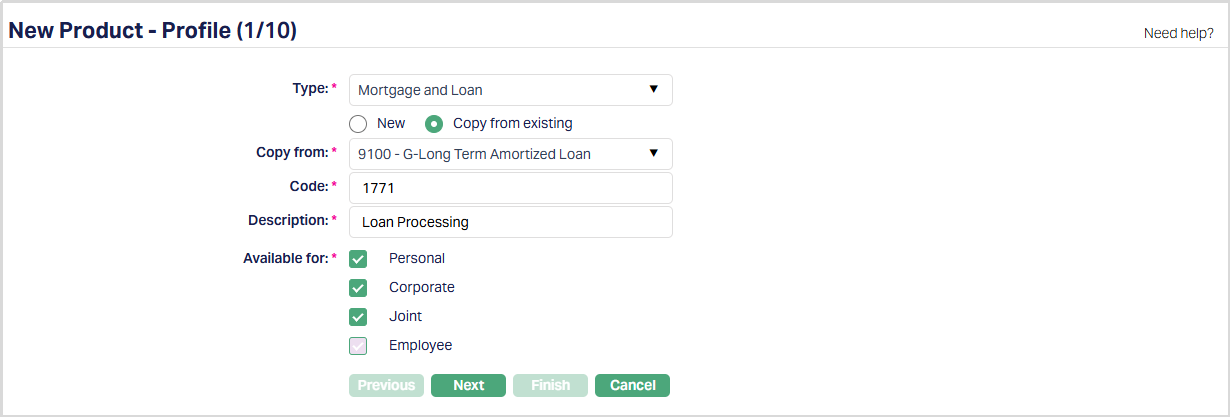
5. On selection of Copy From Existing, Copy from drop-down list is displayed with the list of all Mortgage and Loan Products already existing. Select the required Product to copy from. All the values in the next steps are defaulted from that Product; and you can make the required changes.
Note: Certain fields where the value should be unique are left blank so that you can input the required values. Example: Code
6. Enter the Code for the Product. The Product Code has to be unique across all Products for the Entity.
7. Enter the Description for the Product.
8. Select the option for Available for field. This will determine the type of clients to which the Product will be available. The options are:
- Personal → Single person
- Corporate → Organisations or companies
- Joint → Group of two or more persons
- Employee → Employee of the bank.
Note: For Mortgage loans, the Personal option is checked by default. You can uncheck the same and / or check the required checkboxes for Corporate or Employee and / or Joint ownership.
9. Click Next. The New Product → Currency (2/10) page appears.
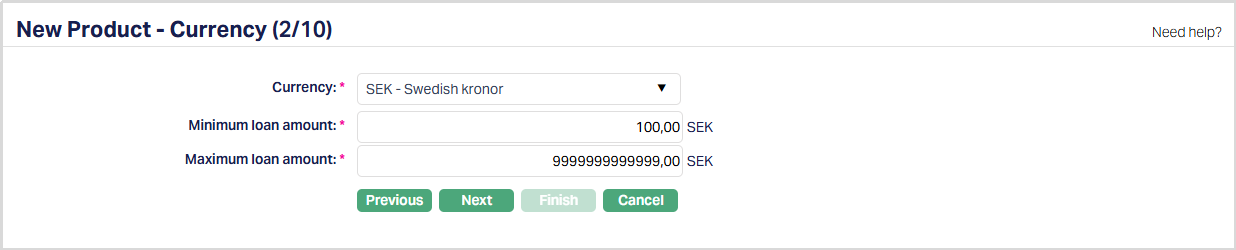
10. Select the Currency for the Product from the drop-down list of GL currencies that have been defined as Not a Commodity under Admin →> Currency definition. More currencies can be added during Edit using the Currency tab, once the Product record is created. Loan accounts for the Product can be opened only in such currencies that are mapped to that Product.
11. Enter the Minimum loan amount for the loan accounts under the Product for the above currency.
12. Enter the Maximum loan amount for the loan accounts under the Product for the above currency. The Maximum Loan Amount should be greater than the Minimum Loan Amount.
13. Click Next. The New Product → Settings (3/10) page appears.
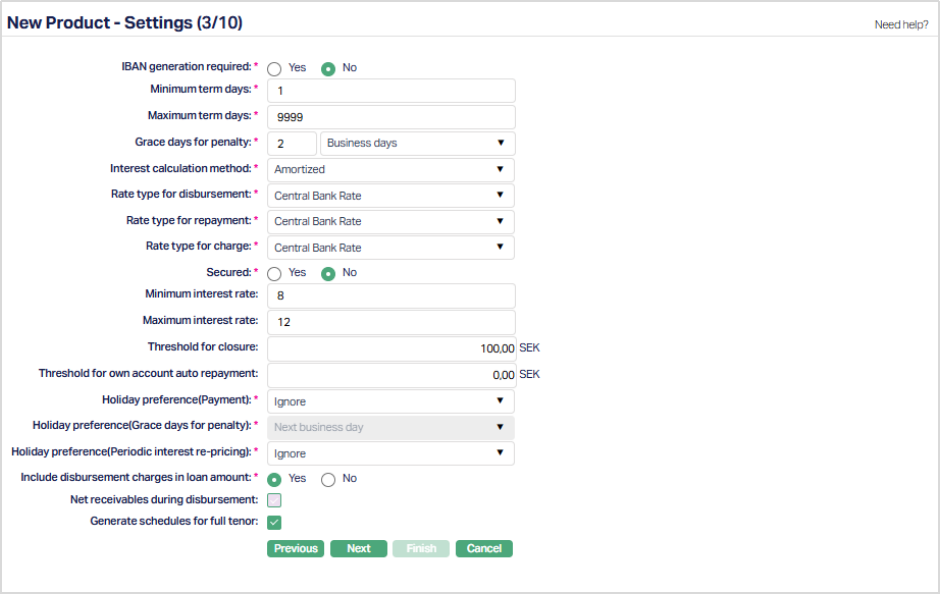
14.Click Yes or No radio button for IBAN generation required for this Product. During account creation under the Product, if this has been selected as Yes, Aura will automatically create IBAN according to the IBAN format maintained at the Entity level.
15. Enter the minimum number of days for loans under this Product in Minimum term days. This should be a positive integer between 1 and 99999
16. Enter the maximum number of days for loans under this Product in Maximum term days. This should be a positive integer between 1 and 99999 and also should be greater than or equal to Minimum Term Days
17. Enter the number of days after which the penalty interest or late payment fees for any payment defaults will start applying in Grace days for penalty. By default, this is set to 0; and in such a case, the penalty interest or late payment fee will be applied on the Payment Due Date in case of any payment default.
18. Select the type of days for the Grace days for penalty. The preshipped options available in the dropdown list are:
Calendar days → If this is selected, then all the calendar days will be counted for Grace Days For Penalty, including the holidays.
Business days → If this is selected, then only working days, i.e., days excluding the holidays as defined in the Account Branch of the Loan will be counted for Grace Days For Penalty.
Note: If Grace Days for Penalty is defined as Business Days, then the field Holiday Preference(Grace Days for Penalty) will not be applicable as the Grace Days will never end on a Holiday; and hence, will be disabled.
19. Select Interest calculation method from the pre-shipped drop-down. Available options are:
Amortized Under this, the Loan Principal is spread out into a series of fixed payment amounts that you can specify. You have the ability to set different frequencies for Interest and Principal payment. The interest calculation will be based on the outstanding principal at the beginning of the period and is calculated based on the amount and length of time period.
Annuity Annuity is a payment option where the repayment interval and the amount of repayment are fixed. Aura will automatically split the required repayment amount between Principal and Interest and you cannot change the same.
20. If Annuity is selected as your Interest Calculation Method, then On prepayment field will be available. You can choose to Revise Annuity or Revise Tenor. If you select Revise Annuity, and if there are any changes to the terms of the loan contract, the Tenor of the loan remains the same and the Annuity is appropriately recalculated. On the other hand, if Revise Tenor is selected, then, during change of terms, the Annuity of the loan contract remains the same and the tenor of the loan is suitably adjusted.
21. Select Rate type for disbursement from the drop-down list of rate types maintained under Admin → System codes → Currencies → Currency rate type. This is the rate type to be used when the Loan Account Currency and Disbursement Currency are different
22. Select Rate type for repayment from the drop-down list of rate types maintained under Admin → System codes → Currencies → Currency rate type. This is the rate type to be used when the Loan Account Currency and Repayment Account Currency are different.
23. Select Rate type for charge from the drop-down list of rate types maintained under Admin → System codes → Currencies → Currency rate type. This is the rate type to be used when the Loan Account Currency and Charge Account Currency are different and also if the Charge Currency created at charge level is different.
24. Indicate if the loans under this Product should be Secured or not using the radio buttons. If this has been selected as Yes, the next field Minimum Secured Percentage will be enabled.
25. Enter the Minimum secured percentage for the Product. Minimum Secured Percentage denotes the percentage applied on the exposure amount (i.e., the Loan amount) up to which the loan has to be secured by collateral / limit for the Loan Account Activation to be successful.
Example:
Loan Amount = EUR 100 000.00
Minimum Secured Percentage = 75%
Loan Account can be activated only when the mapped collateral / limit amount >= EUR 75 000.00
27. Enter the Minimum interest rate for the loan accounts under the Product.
28. Enter the Maximum interest rate for the loan accounts under the Product. Maximum Interest Rate should be greater than the Minimum Interest Rate.
Note: If the Final Interest Rate in the Loan Account falls beyond the Minimum / Maximum interest rate specified here, Aura will automatically use these Minimum / Maximum interest rates appropriately to calculate the Loan's interest
29.Enter the Minimum annuity schedule amount. This field is displayed only if the Interest Calculation Method is selected as Annuity. When the threshold is mentioned, during Payment Schedule generation, if the total outstanding amount in the last schedule is less than the threshold for Minimum annuity schedule amount, then Aura adds the minimum annuity schedule amount in previous schedule.
30. Enter the threshold amount for closure of a loan account in Threshold for closure field. At EOD, if the total receivable amount is less than threshold amount for closure, then Aura will pass threshold entries for the account and will close loan account.
31. Threshold for Own Account Auto Repayment is used to define the minimum amount that should be available in the borrower's Client Account that has been linked to the Loan Account to trigger the automatic repayments. If the available balance in the linked Client Account is less than the amount specified here, automatic repayment will not be initiated.
32. Select the holiday preference for payments from the Holiday preference (Payment) dropdown list. This will determine the Payment Due On date (the actual date on which the payment will be initiated from the linked Client Account). The options available are:
Ignore
When this preference is selected, No holiday preference will be applicable for loan accounts under this Product. All Payment Due Dates will remain the same, irrespective of whether it is a working day or a holiday.
During Schedule generation, if the payment day is a holiday then the Payment Due On date will remain the same and payment is to be initiated / accepted on the same day.
Next business day
- When this preference is applied to the loan account, On payment schedule generation, Aura will check if the payment day is a holiday. If yes then the Payment Due On date for the repayment is updated with next business date.
Previous business day
- Similar to Next business day; but, here, the Payment Due On date will be the previous business day when holiday is encountered.
Example:
Holidays: 25-Dec-2025, 26-Dec-2025, 27-Dec-2025, 28-Dec-2025
Schedule's Payment Due Date: 26-Dec-2025
Payment Due On Date will be as follows for the different Holiday Preferences:
| Preference | Payment Due On Date |
|---|---|
| Ignore | 26-Dec-2025 |
| Next business day | 29-Dec-2025 |
| Previous business day | 24-Dec-2025 |
32. Enter the holiday preference for grace days for penalty from the Holiday preference (Grace days for penalty) dropdown list. This field specifies the holiday treatment to be applied when the End of Grace Days happens to be a holiday. This field is disabled if Grace Days For Penalty is defined as Business Days. The late payment fee / penalty calculation will start based on this treatment, but with effect from the Due Date. The options available are:
Ignore
- If the day on which the grace days end is a holiday, then the same day is treated as end of grace day to calculate penalty.
Next business day
- If the end of grace days happens to be a holiday, then Aura will postpone till next business day and start calculating the penalty from that day, but, with effect from the Payment Due Date.
Previous business day
- Similar to Next business day except that the previous business day is considered when holiday is encountered.
Example:
Holidays: 25-Dec-2025, 26-Dec-2025, 27-Dec-2025, 28-Dec-2025
Schedule's Payment Due Date: 26-Dec-2025
Grace Days: 2 calendar days End of Grace Days will be as follows for the different Holiday Preferences:
| Preference | End of Grace Days |
|---|---|
| Ignore | 28-Dec-2025 |
| Next business day | 29-Dec-2025 |
| Previous business day | 24-Dec-2025 |
33. Select the holiday preference for periodic interest re-pricing from the Holiday preference (Periodic interest re-pricing) dropdown list. This determines the actual date for the interest re-pricing if the upcoming reset date falls on a holiday. The options available are:
Ignore
- When this preference is selected, then no holiday preference will be applicable for loan accounts under this Product for any Interest Re-pricing (LNRATE) to be done; and Interest will be reset on that day.
Next business day
- When this preference is applied Aura will check if the next Interest Re-pricing (LNRATE) reset date is a holiday. If yes, then the book date and value date for the event will be updated with next business date.
Previous day
- Similar to Next business day, except that the previous business day is considered when a holiday is encountered.
Example:
Holidays: 25-Dec-2025, 26-Dec-2025, 27-Dec-2025, 28-Dec-2025
Next Interest Reset Date: 26-Dec-2025
The Interest Reset Date will be as follows for the different Holiday Preferences:
| Preference | Interest Reset Date |
|---|---|
| Ignore | 26-Dec-2025 |
| Next business day | 29-Dec-2025 |
| Previous business day | 24-Dec-2025 |
34. Include Disbursement Charges in Loan Amount can be used to indicate if the Loan Amount should be enhanced by the initial disbursement related charges. When this is set to Yes, the Approved Amount of any loan account that is created under this Product would automatically be increased by the amount of charges that is applied at the time of the first disbursement. When this is set to No, there is no such increase in the loan's Sanctioned Amount.
Disbursement Charges: The following charges defined in the Loan Account → Default Charges Tab along with any Adhoc Charges applied on the account before the first disbursement will be considered as Disbursement Charges:
- Processing Fee
- Service Charge
- Documentation Charge
- Legal Charge
- Appraisal Charge
- Lender Inspection Charge
- Credit Report Charge
- Notary Charge
- Stamp Charge
36. Net receivables during disbursement enables you to define if the disbursement charges should be netted off during the first disbursement, or if they should be part of the first Payment Schedule / Invoice. If this is checked, then any disbursement charges applicable for an account will be collected during the disbursement and only the net disbursement amount will be credited to the borrower. The checkbox can be unchecked to indicate that the disbursement charges will not be deducted during disbursement; but will be included in the upcoming schedule / invoice.
If the above field (Include Disbursement Charges in Loan Amount) is set to No, by default the Net receivables during disbursement checkbox is unchecked; and you can check it if required.
If the above field (Include Disbursement Charges in Loan Amount) is set to Yes, by default the Net receivables during disbursement checkbox is checked and disabled. This is to ensure that the disbursement charges are netted off during disbursement when the loan's Approved Amount is increased to include such charges.
38. Include Disbursement Charges in Annuity is enabled only if Interest Calculation Method = Annuity; and only if Include Disbursement Charges in Loan Amount = No. By default, this field is set to No and can be changed to Yes. If this field is set to Yes, the Annuity Amount will be calculated based on the Approved Amount plus the Disbursement Charges; and the schedules will be generated to ensure that the Principal repayment starts only after the Disbursement Charges are paid. Interest for such period till the Principal repayment starts will however continue to be included in the schedule as usual.
If this field is set to No, the Annuity amount will be calculated based on the Approved Amount only; and the schedules will be generated using the Annuity Amount split between Interest and Principal; the Disbursement charges will be either netted off during disbursement or included in the upcoming schedule, based on the Net Receivables During Disbursement.
If Interest Calculation Method = Annuity and Include Disbursement Charges in Loan Amount = Yes: This field is set to No and disabled.
40. By default, the Generate Schedules for Full Tenor checkbox is unchecked, and the schedules will be generated for only 12 schedules. When this checkbox is checked, the schedules will be generated for the entire loan tenor.
41. Click Next. The New Product → Interest Receivable (4/10) page appears.

39. Select the Loan Interest scheme that would be applicable to the accounts under this Product from the drop-down list of Interest schemes maintained under Admin → Pricing → Interest → Interest Scheme. The interest receivable on the principal amount would be derived using this scheme.
40. Select the Principal overdue scheme from the drop-down list of Interest schemes maintained under Admin → Pricing → Interest → Interest Scheme. The penalty receivable on the principal overdue (i.e., the principal amount which was due but has not been received from the client even after the grace days) would be calculated using this scheme.
41. Select the Interest overdue scheme from the drop down. Interest schemes should have been maintained under Admin → Pricing → Interest → Interest Scheme. The penalty receivable on the Interest overdue (i.e., the Interest amount which was due but has not been received from the client even after the grace days) would be calculated using this scheme.
42. Click Next. The New Product → Charges (5/10) page appears.
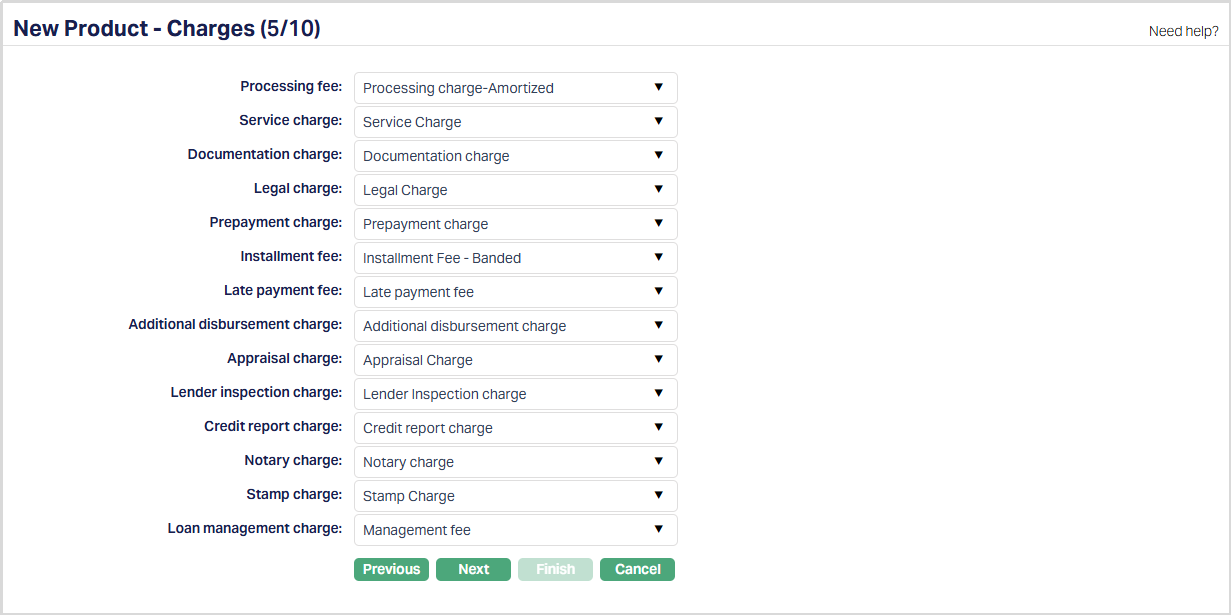
43. If you want to levy a charge for processing the loans under this Product, select the Processing fee from the drop-down list of all the Active Charges where the Charge Type is Event, it is not a Deferred Charge, Treat as Commission = No and Treat as Receivable = No. If the Charge is Banded, the charge amount will be calculated on the basis of the amount sanctioned. The charge amount is collected upon disbursement, if Net Receivables during disbursement = Yes; else, it is created as a charge schedule with due date same as upcoming Principal / Interest / Annuity schedule due date.
44. When you want to levy Service charges for the loans under this Product, select the Service charge from the drop-down list of all the Active Charges where the Charge Type is Event, it is not a Deferred Charge, Treat as Commission = No and Treat as Receivable = No. If the Charge is Banded, the charge amount will be calculated on the basis of the amount sanctioned. The charge amount is collected upon disbursement, if Net Receivables during disbursement = Yes; else, it is created as a charge schedule with due date same as upcoming Principal / Interest / Annuity schedule due date.
45. When you want to levy a Documentation charge, select the Documentation charge from the drop-down list of all the Active Charges where the Charge Type is Event, it is not a Deferred Charge, Treat as Commission = No and Treat as Receivable = No. If the Charge is Banded, the charge amount will be calculated on the basis of the amount sanctioned. The charge amount is collected upon disbursement, if Net Receivables during disbursement = Yes; else, it is created as a charge schedule with due date same as upcoming Principal / Interest / Annuity schedule due date.
46. When you want to levy a Legal charge, select the Legal charge from the drop-down list of all the Active Charges where the Charge Type is Event, it is not a Deferred Charge, Treat as Commission = No and Treat as Receivable = No. If the Charge is Banded, the charge amount will be calculated on the basis of the amount sanctioned. The charge amount is collected upon disbursement, if Net Receivables during disbursement = Yes; else, it is created as a charge schedule with due date same as upcoming Principal / Interest / Annuity schedule due date.
47. When you want to levy a Prepayment charge on Principal repayments made before their due dates, select the Prepayment charge from the drop-down list of all the Active Charges where the Charge Type is Event, it is not a Deferred Charge, Treat as Commission = No, Treat as Receivable = No and Amortization is set as No. If the Charge is Banded, the charge amount will be calculated on the basis of the Principal amount prepaid. This charge will be collected when user does a prepayment using the Loan Repayment Screen.
48. When you want to levy an Installment fee, select the Installment fee from the drop-down list of all the Active Charges where the Charge Type is Event, it is not a Deferred Charge, Treat as Commission = No, Treat as Receivable = No and Amortization is set as No. If the Charge is Banded, the charge amount will be calculated on the basis of the amounts due for Principal and Interest. The charge amount is collected for every installment and will be shown as a separate charge schedule for every Due Date when Principal and / or Interest is due.
49. When you want to levy a Late payment fee, select the Late payment fee from the drop-down list of all the Active Charges where the Charge Type is Event, it is not a Deferred Charge, Treat as Commission = No, Treat as Receivable = No and Amortization is set as No. If the Charge is Banded, the charge amount will be calculated on the basis of the overdue amount of Principal and Interest. The charge is applied on the End of Grace Days and is created as a charge schedule with due date same as upcoming Principal / Interest / Annuity schedule due date.
50. When you want to levy an Additional disbursement charge, select the Additional disbursement charge from the drop-down list of all the Active Charges where the Charge Type is Event, it is not a Deferred Charge, Treat as Commission = No and Treat as Receivable = No. If the Charge is Banded, the charge amount will be calculated on the basis of the Principal amount that is being disbursed. The charge amount is collected when ever an additional disbursement is done, if Net Receivables during disbursement = Yes; else, it is created as a charge schedule with due date same as upcoming Principal / Interest / Annuity schedule due date.
51. When you want to levy Appraisal charges for the loans under this Product, select the Appraisal charge from the drop-down list of all the Active Charges where the Charge Type is Event, it is not a Deferred Charge, Treat as Commission = No and Treat as Receivable = No. If the Charge is Banded, the charge amount will be calculated on the basis of the amount sanctioned. The charge amount is collected upon disbursement, if Net Receivables during disbursement = Yes; else, it is created as a charge schedule with due date same as upcoming Principal / Interest / Annuity schedule due date.
52. When you want to levy Lender inspection fee for the loans under this Product, select the Lender inspection charge from the drop-down list of all the Active Charges where the Charge Type is Event, it is not a Deferred Charge, Treat as Commission = No and Treat as Receivable = No. If the Charge is Banded, the charge amount will be calculated on the basis of the amount sanctioned. The charge amount is collected upon disbursement, if Net Receivables during disbursement = Yes; else, it is created as a charge schedule with due date same as upcoming Principal / Interest / Annuity schedule due date.
53. When you want to levy fee for sending reports for the loans under this Product, select the Credit report charge from the drop-down list of all the Active Charges where the Charge Type is Event, it is not a Deferred Charge, Treat as Commission = No and Treat as Receivable = No. If the Charge is Banded, the charge amount will be calculated on the basis of the amount sanctioned. The charge amount is collected upon disbursement, if Net Receivables during disbursement = Yes; else, it is created as a charge schedule with due date same as upcoming Principal / Interest / Annuity schedule due date.
54. When you want to levy charges on identity verification by Notary for the loans under this Product, select the Notary charge from the drop-down list of all the Active Charges where the Charge Type is Event, it is not a Deferred Charge, Treat as Commission = No and Treat as Receivable = No. If the Charge is Banded, the charge amount will be calculated on the basis of the amount sanctioned. The charge amount is collected upon disbursement, if Net Receivables during disbursement = Yes; else, it is created as a charge schedule with due date same as upcoming Principal / Interest / Annuity schedule due date.
55. When you want to levy charges on registration for the loans under this Product, select the Stamp charge from the drop-down list of all the Active Charges where the Charge Type is Event, it is not a Deferred Charge, Treat as Commission = No and Treat as Receivable = No. If the Charge is Banded, the charge amount will be calculated on the basis of the amount sanctioned. The charge amount is collected upon disbursement, if Net Receivables during disbursement = Yes; else, it is created as a charge schedule with due date same as upcoming Principal / Interest / Annuity schedule due date.
56. When you want to levy fee for managing the loans under this Product, select the Loan Management charge from the drop-down list of all the Active Charges where the Charge Type is Event, it is not a Deferred Charge, Treat as Commission = No and Treat as Receivable = No. If the Charge is Banded, the charge amount will be calculated on the basis of the amount sanctioned. The charge amount is collected for every installment and will be shown as a separate charge schedule for every Due Date when Principal and / or Interest are due.
57. Click Next. The New Product → General Ledger (6/10) page appears.
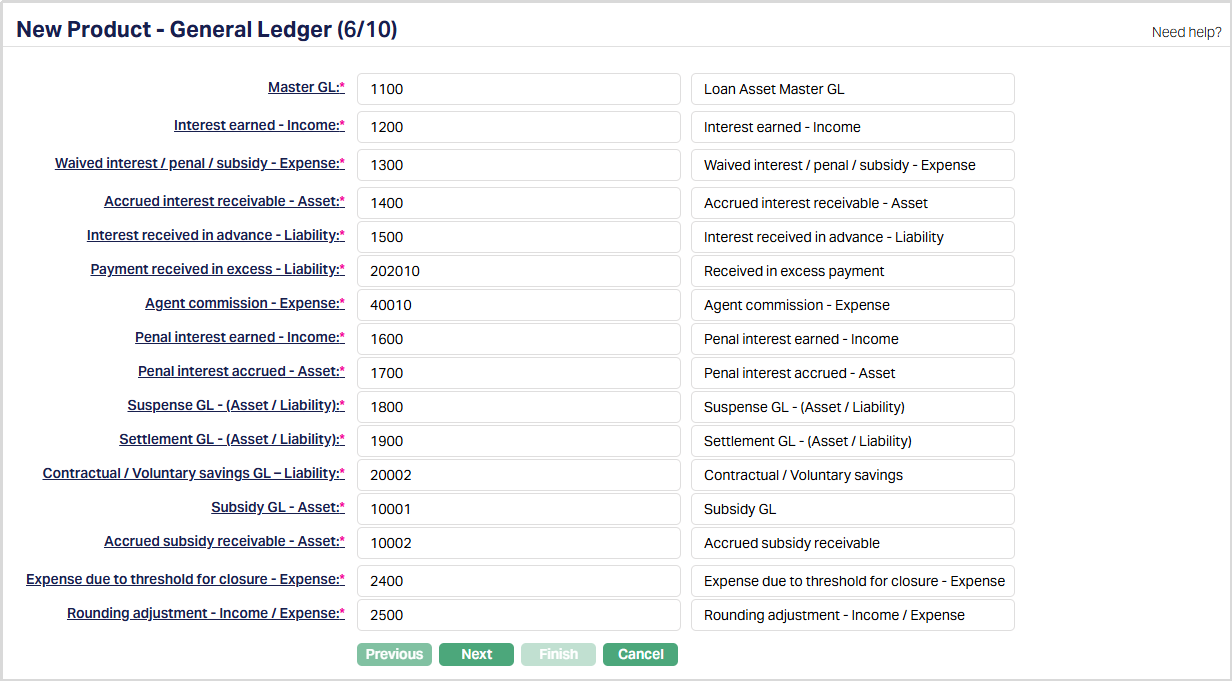
58. You will see the list of various GLs required to account for the events in the life cycle of the loans under this Product. The table below gives the fields, the use and the conditions for each of these GLs. You can either directly input the Ledger # or click on the hyperlink to see the list of GLs satisfying these conditions and select the required Ledger #.
Field Details
| Sl. No. | Field name | Used | List based on |
|---|---|---|---|
| 1 | Master GL | as the Master GL to record all transactions of all accounts under this Product | ledger type Asset where Status is Active, Cash Account is No, Manual Posting is No and the FX Consolidation is blank |
| 2 | Interest earned – Income | for accounting the Interest earned on accounts under this Product | Ledger type Income where Status is Active |
| 3 | Waived interest / Penal / Subsidy Expense | for accounting the expenses on Waiver of interest / penalty / subsidy on accounts under this Product | Ledger type Expense where Status is Active |
| 4 | Accrued Interest Receivable – Asset | for accounting the Accrued interest receivable on accounts under this Product | Ledger type Asset where Status is Active |
| 5 | Interest Received in Advance - Liability | for accounting the interest received in advance on accounts under this Product | Ledger type Liability where Status is Active |
| 6 | Payment received in excess - Liability | for accounting any payments that are received in excess for accounts under this Product | Ledger type Liability where Status is Active |
| 7 | Agent commission – Expense | for accounting the Agent commission expenses on accounts under this Product. | Ledger type Expense where Status is Active |
| 8 | Penal interest earned – Income | for accounting the Penal interest earned on accounts under this Product. | Ledger type Income where Status is Active |
| 9 | Penal interest accrued – Asset | for accounting the Penal interest accrued on accounts under this Product. | Ledger type Asset where Status is Active |
| 10 | Suspense GL – (Asset / Liability) | for accounting the disbursement to external bank account for accounts under this Product | Ledger type Asset or Liability where Status is Active |
| 11 | Settlement GL – (Asset / Liability) | for accounting the disbursement / repayment through the Settlement GL, say, for cash transactions (cash disbursement or cash payments) on accounts under this Product. | Ledger type Asset or Liability where Status is Active |
| 12 | Contractual / Voluntary Savings GL - Liability | For accounting the Contractual / Voluntary savings, if Repayment is through Settlement GL for accounts under this Product. | Ledger type Liability where Status is Active |
| 13 | Subsidy GL - Asset | for accounting the interest on subsidy for accounts under this Product when the subsidy type is Claim by bank. | Ledger type Asset where Status is Active |
| 14 | Accrued subsidy receivable - Asset | for accounting the subsidy Accrued on accounts under this Product when the subsidy type is Claim by customer. | Ledger type Asset where Status is Active |
| 15 | Expense due to threshold for closure - Expense | for accounting the expenses due to threshold for closure of accounts under this Product. | Ledger type Expense where Status is Active |
| 16 | Rounding adjustment - Income/Expense | for accounting the rounding amounts during payments against invoices for accounts under this Product. | Ledger type Income or Expense where Status is Active |
59. Click Next. The New Product → Transaction Settings (7/10) page appears.
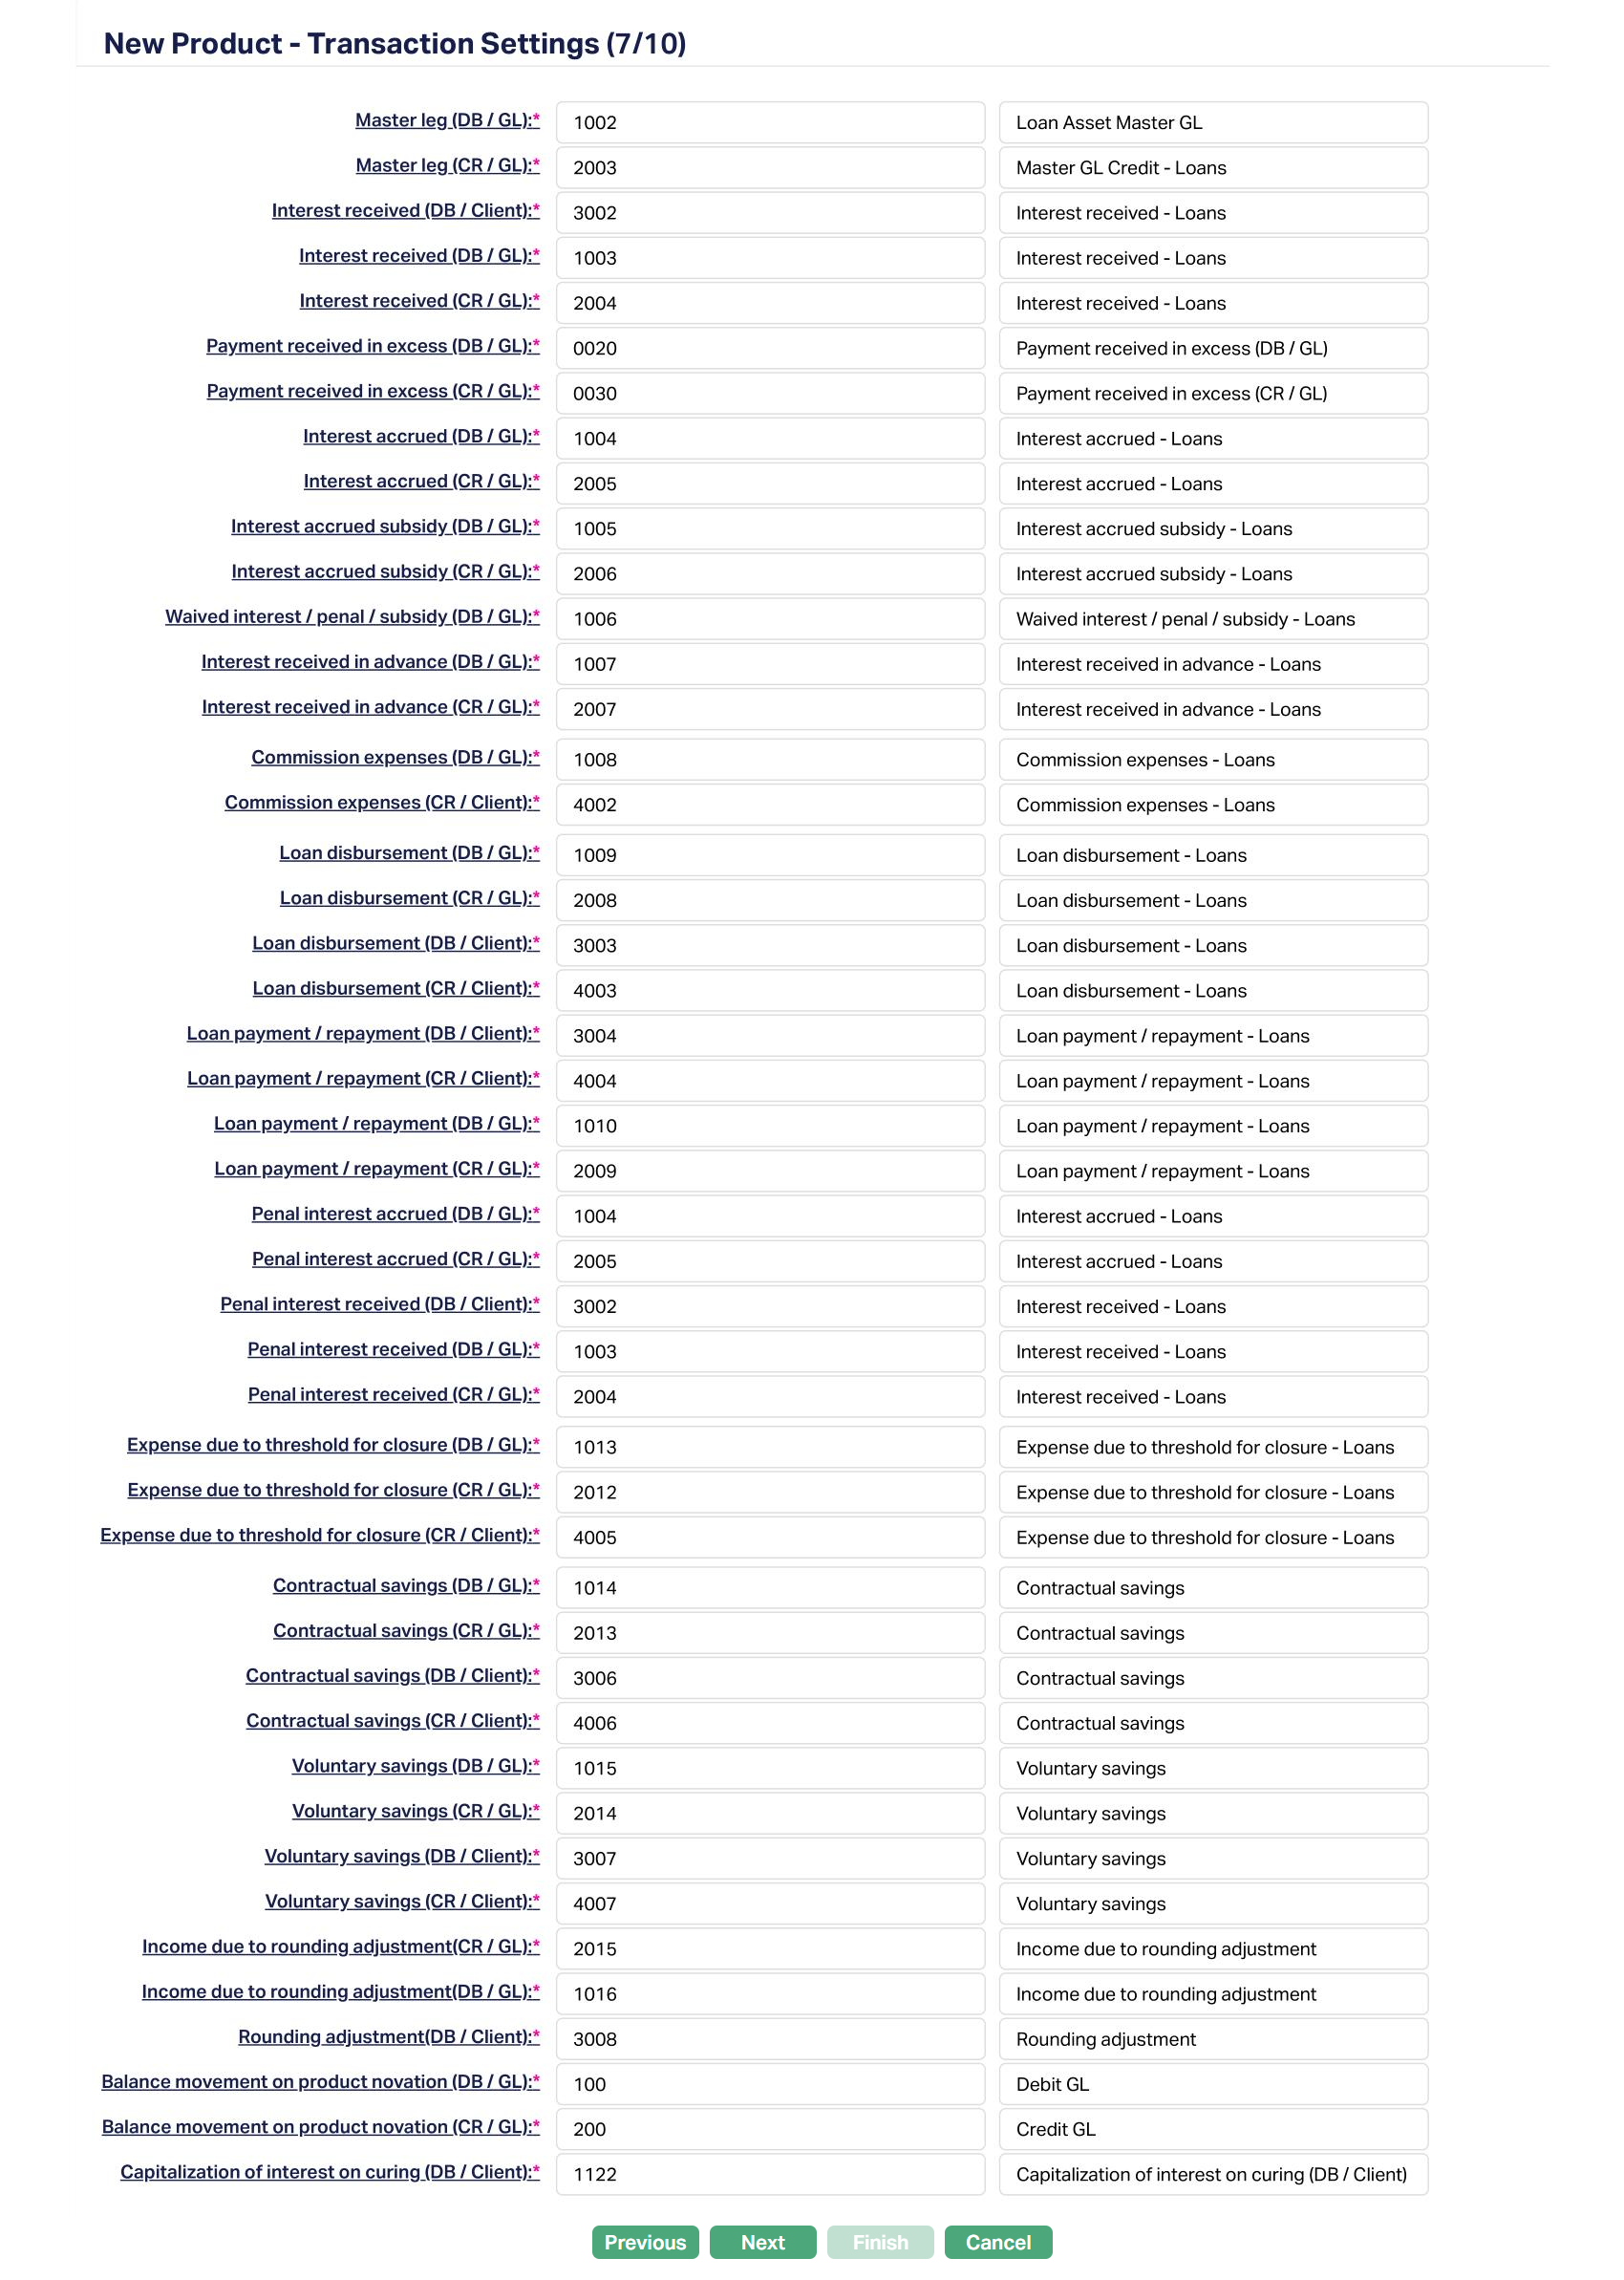
60. Input the required Transaction codes to be used for accounting the various events in the life cycle of the loans under this Product. You can directly input the Transaction Code or use the hyperlink to search for and select the required Transaction Code. The list of Transaction codes shown on click of hyperlink is based on certain conditions as listed against each field.
| Sl. No. | Field name of Transaction Settings | Used for | List of Transaction codes based on | Event when it will be used |
|---|---|---|---|---|
| 1 | Master leg (DB/GL) | recording all the debit transactions related to Principal affecting the accounts under this Product | General Ledger Debit where Status is Active | Disbursement and Payments |
| 2 | Master leg (CR/GL) | recording all the credit transactions related to Principal affecting the accounts under this Product. | General Ledger Credit where Status is Active | Disbursement and Payments |
| 3 | Interest received (DB/Client) | recording all Interest received in the Client Account. | Client account Debit where Status is Active | Payments |
| 4 | Interest received (DB/GL) | recording all Interest received debit transactions in the General Ledger Account. | General Ledger Debit where Status is Active | Payments |
| 5 | Interest received (CR/GL) | recording all Interest received credit transactions in the General Ledger Account. | General Ledger Credit where Status is Active | Payments |
| 6 | Payment received in excess (DB/GL) | recording all excess payment debit transactions in the General Ledger Account. | General ledger Debit where Status is Active | Payments |
| 7 | Payment received in excess (CR/GL) | recording all excess payment credit transactions in the General Ledger Account. | General ledger Credit where Status is Active | Payments |
| 8 | Interest accrued (DB/GL) | recording all Interest accrued debit transactions in the General Ledger account. | General ledger Debit where Status is Active | Accrual |
| 9 | Interest accrued (CR/GL) | recording all Interest accrued credit transactions in the General Ledger account. | General ledger Credit where Status is Active | Accrual |
| 10 | Interest accrued subsidy (DB/GL) | recording all the Debit transactions for the subsidy on interest accrual in the General Ledger account. | General ledger Debit where Status is Active | Accrual |
| 11 | Interest accrued subsidy (CR/GL) | recording all the Credit transactions for the subsidy on interest accrual in the General Ledger account. | General ledger Credit where Status is Active | Accrual |
| 12 | Waived interest / Penal / Subsidy (DB/GL) | recording all Penal / Subsidy / Interest waived transactions in the General Ledger account. | General ledger Debit where Status is Active | Accrual, Payments |
| 13 | Interest received in advanced (DB/GL) | recording all debit transactions on interest received in advance in the General Ledger account. | General ledger Debit where Status is Active | Payments |
| 14 | Interest received in advanced (CR/GL) | recording all credit transactions of the interest received in advance in the General Ledger account. | General ledger Credit where Status is Active | Payments |
| 15 | Commission expenses (DB/GL) | recording all commission expense transactions in the General Ledger account. | General ledger Debit where Status is Active | - |
| 16 | Commission expenses (CR/Client) | recording all commission expense transactions in the Client account. | Client account Credit where Status is Active | - |
| 17 | Loan disbursement (DB/GL) | recording all loan disbursement debit transactions in the General Ledger accounts. | General ledger Debit where Status is Active | Disbursement |
| 18 | Loan disbursement (CR/GL) | recording all loan disbursement credit transactions in the General Ledger accounts. | General ledger Credit where Status is Active | Disbursement |
| 19 | Loan disbursement (DB/Client) | for recording all loan disbursement debit transactions in the Client accounts. | Client account Debit where Status is Active | Disbursement |
| 20 | Loan disbursement (CR/Client) | for recording all loan disbursement credit transactions in the Client accounts. | Client account Credit where Status is Active | Disbursement |
| 21 | Loan payment/repayment (DB/Client) | for recording all payment / repayment debit transactions in the Client account. | Client account Debit where Status is Active | Payment/Repayment |
| 22 | Loan payment/repayment (CR/Client) | for recording all payment / repayment credit transactions in the Client account. | Client Account Credit where Status is Active | Payment/Repayment |
| 23 | Loan payment/repayment (DB/GL) | recording all payment / repayment debit transactions in the General Ledger account. | General Ledger Debit where Status is Active | Payment/Repayment |
| 24 | Loan payment/repayment (CR/GL) | recording all payment / repayment credit transactions in the General Ledger account. | General Ledger Credit where Status is Active | Payment/Repayment |
| 25 | Penal interest accrued (DB/GL) | for recording the debit transactions in the General Ledger account in respect of the Penal Interest Accrued. | General Ledger Debit where Status is Active | Accrual |
| 26 | Penal interest accrued (CR/GL) | for recording the credit transactions in the General Ledger account in respect of the Penal Interest Accrued. | General Ledger Credit where Status is Active | Accrual |
| 27 | Penal interest received (DB/Client) | for recording the debit transactions in the Client account in respect of the Penal Interest Received. | Client account Debit where Status is Active | Payment |
| 28 | Penal interest received (DB/GL) | for recording the debit transactions in the General Ledger account in respect of the Penal Interest Received. | General Ledger Debit where Status is Active | Payment |
| 29 | Penal interest received (CR/GL) | for recording the credit transactions in the General Ledger account in respect of the Penal Interest Received. | General Ledger Credit where Status is Active | Payment |
| 30 | Expense due to threshold for closure (DB / GL) | for recording the debit transactions in the General Ledger account in respect of the Expense due to threshold for closure. | General Ledger Debit where Status is Active | Payment, Closure |
| 31 | Expense due to threshold for closure (CR / GL) | for recording the credit transactions in the General Ledger account in respect of the Expense due to threshold for closure. | General Ledger Credit where Status is Active | Payment, Closure |
| 32 | Expense due to threshold for closure (CR / Client) | for recording the credit transactions in the Client account in respect of the Expense due to threshold for closure. | Client account Credit where Status is Active | Payment, Closure |
| 33 | Contractual savings (DB/GL) | For recording the contractual savings debit transactions in the GL. | General Ledger Debit where Status is Active | Payment |
| 34 | Contractual savings (CR/GL) | For recording the contractual savings GL transactions if the repayment is done through Settlement GL. | General Ledger Credit where Status is Active | Payment |
| 35 | Contractual savings (DB/Client) | For recording the contractual savings debit transactions to the Client account. | Client account Debit where Status is Active | Payment |
| 36 | Contractual Savings (CR/Client) | For recording the contractual savings credit transactions to the Client account. | Client account Credit where Status is Active | Payment |
| 37 | Voluntary savings (DB/GL) | For recording the voluntary savings debit transactions in the GL. | General Ledger Debit where Status is Active | Payment |
| 38 | Voluntary savings (CR/GL) | For recording the voluntary savings GL transactions if the repayment is done through Settlement GL. | General Ledger Credit where Status is Active | Payment |
| 39 | Voluntary savings (DB/Client) | For recording the voluntary savings debit transactions to the Client account. | Client account Debit where Status is Active | Payment |
| 40 | Voluntary savings (CR/Client) | For recording the voluntary savings credit transactions to the Client account. | Client account Credit where Status is Active | Payment |
| 41 | Income due to rounding adjustment (CR/GL) | for accounting the credit transactions to the GL due to rounding amounts. | General Ledger Credit where Status is Active | Payment |
| 41 | Income due to rounding adjustment (DB/GL) | for accounting the debit transactions to the GL due to rounding amounts. | General Ledger Debit where Status is Active | Payment |
| 42 | Rounding adjustment (DB/Client) | for accounting the debit transactions to the Client account due to rounding amounts. | Client account Debit where Status is Active | Payment |
| 43 | Balance movement on Product novation (DB/GL) | for accounting the debit transactions to the General Ledger account due to balances to be moved on Product Novation | General Ledger Debit where Status is Active | Product Novation |
| 44 | Balance movement on Product novation (CR/GL) | for accounting the credit transactions to the General Ledger account due to balances to be moved on Product Novation | General Ledger Credit where Status is Active | Product Novation |
| 45 | Capitalization of interest on curing (DB/Client) | for accounting the capitalization of the interest amount earmarked for curing under a Payment Plan | Client account Debit where Status is Active | Payment Plan |
61. Click Next. The New Product → Statement Parameter (8/10) page appears.
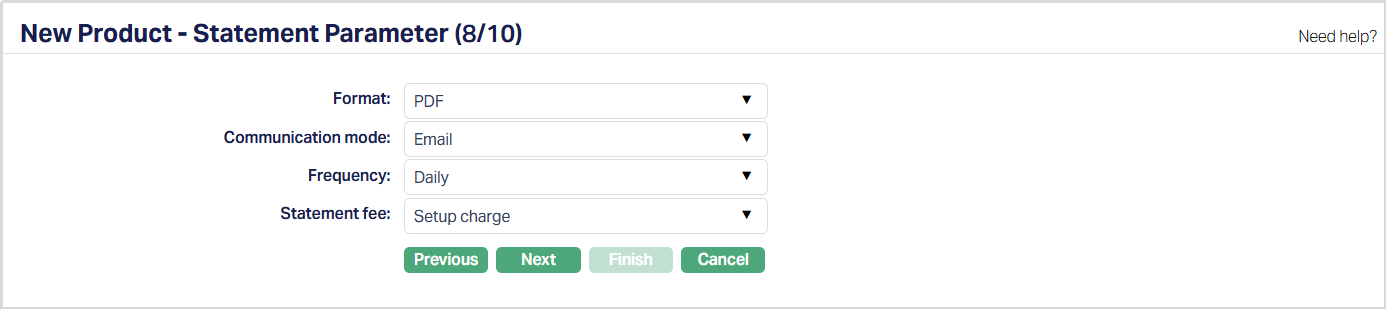
62. Select Format from the drop-down list of statement formats that have been maintained under Admin → System codes → Generic definition → Statement formats. It is the format of the statement that is to be generated.
63. Select Communication mode i.e., the manner in which you want to send the statement from the drop down. Available options are Data handoff, e-Invoice, Email, Paper, SMS and Web hotel.
64. Select Frequency of the statement to be generated from the drop down. Available options are: Daily, Weekly, Fortnightly, Monthly, Quarterly, Semi-annual and Annual.
65. Select the Statement fee from drop down list of all Active charges maintained under Admin → Pricing → Charges where the Charge Type is Event, it is not a Deferred Charge, Treat as Commission = No, Treat as Receivable = No and Amortization = No. If the Charge is Banded, the charge amount will be calculated on the basis of the amount sanctioned. If a Charge account is attached to the loan account, then the charge amount is debited from the charge account on statement generation; else, it is created as a charge schedule with due date same as upcoming Principal / Interest / Annuity schedule due date.
66. Click Next. The New Product → Custom Field (9/10) page appears.

Note: Only if any custom field is mapped to Mortgage and Loan Product under Admin → System Codes → Custom fields → Field mapping, the additional screen will appear before the confirmation screen as shown above; else, the same will not be displayed. The custom fields will be mandatory or non-mandatory based on the rules set at the Field mappings. For more details on custom field functionality please refer Admin → System codes → Custom fields → Field mappings manual.
67. Enter the details as required and Click Next. The New Product → Confirmation (10/10) page appears showing all the details that you entered above.
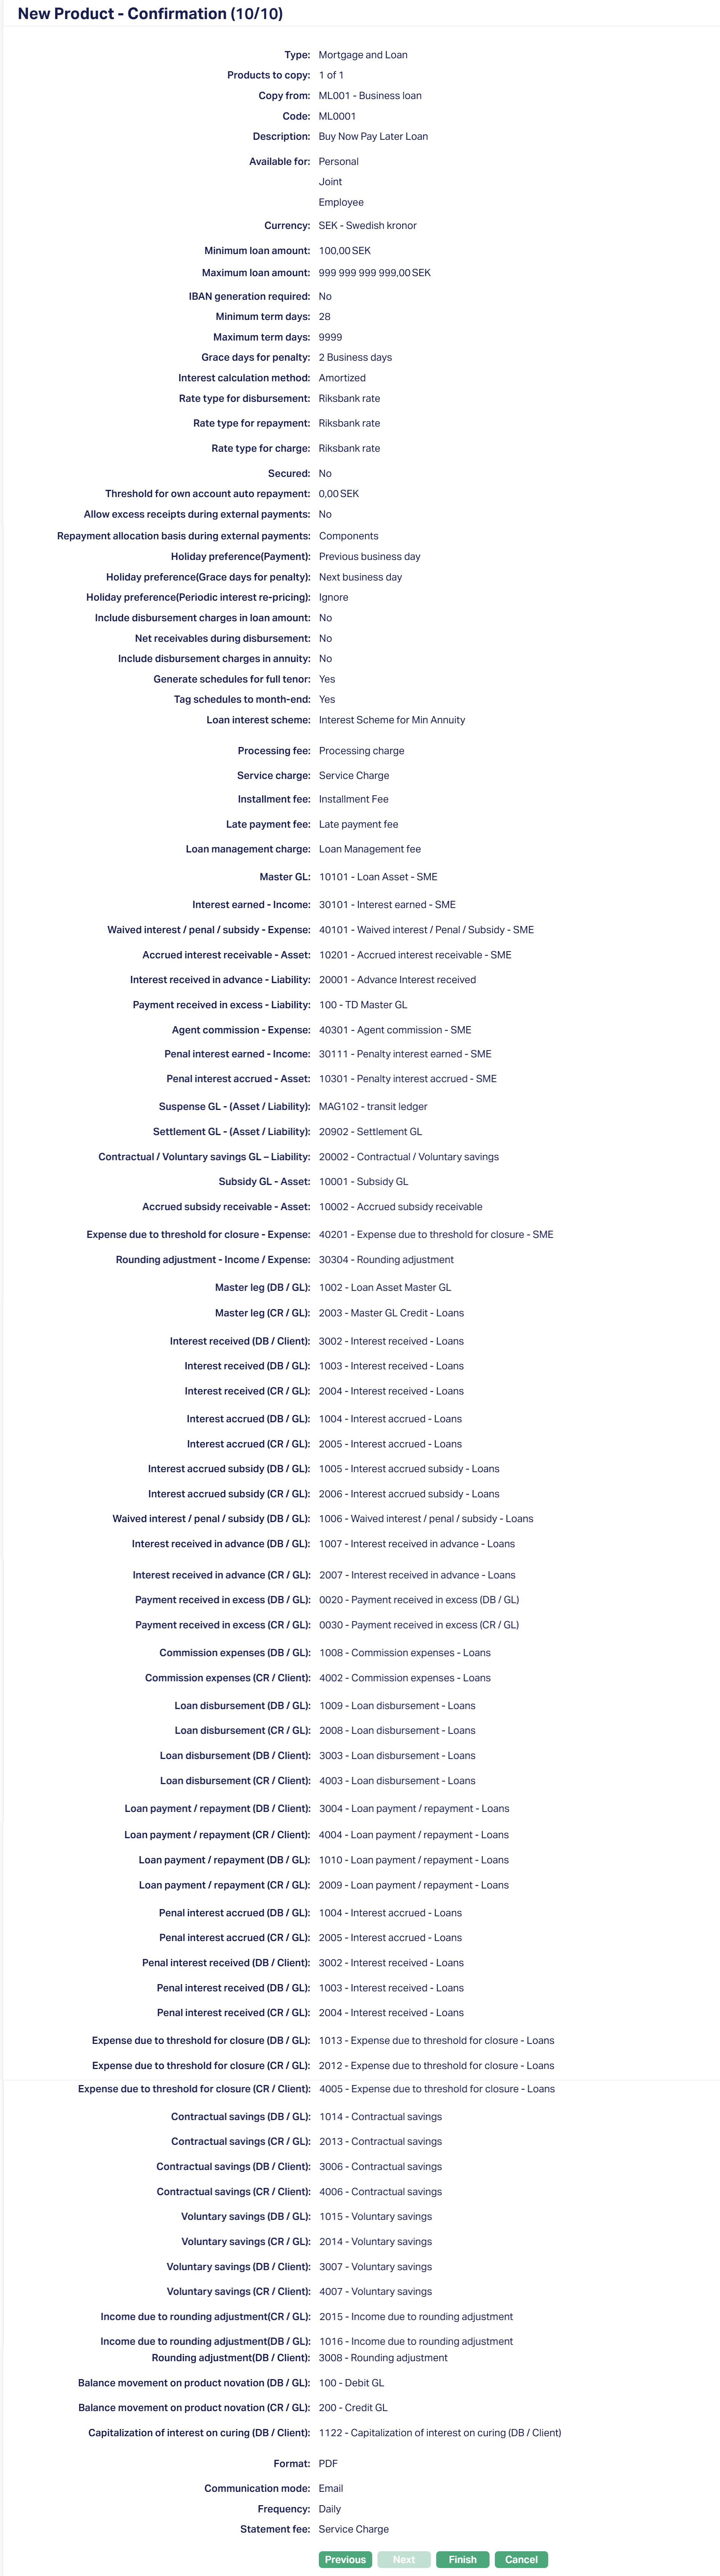
68. Click Finish. The new Product record is created, and you will see the Profile tab by default.
Note: The Status of the Product is Active as soon as the Product is created. The status of the Interest Receivable tab, Special Interest Scheme, Charge tab and Statement Parameter will be Pending till it is approved by another user as indicated by the red bubble on the tab. On approval, the tab status is set to Approved. If the tab status is Pending, loan accounts under the Product cannot be created.
Edit: Using Edit, you can update certain details of the Product. However, the updated conditions will be applicable only for any accounts that are created AFTER the changes have been done and will NOT affect the accounts already created.
Suspend: You can suspend the Product by a click on Suspend button. When you click on Suspend button, Aura displays an alert message. On confirmation Aura will suspend the Product. Suspending a Product only makes it unavailable in future for any new account creation / any other dropdown list. Existing accounts under the Product continue without any impact. Suspended Products can be activated by using Activate button.
Activate: You can activate a suspended Product by a click on Activate button. When you click on Activate button, Aura displays an alert message. On confirmation Aura will activate the Product. Activation of a Product makes it available in future for any new account creation / any other dropdown list.
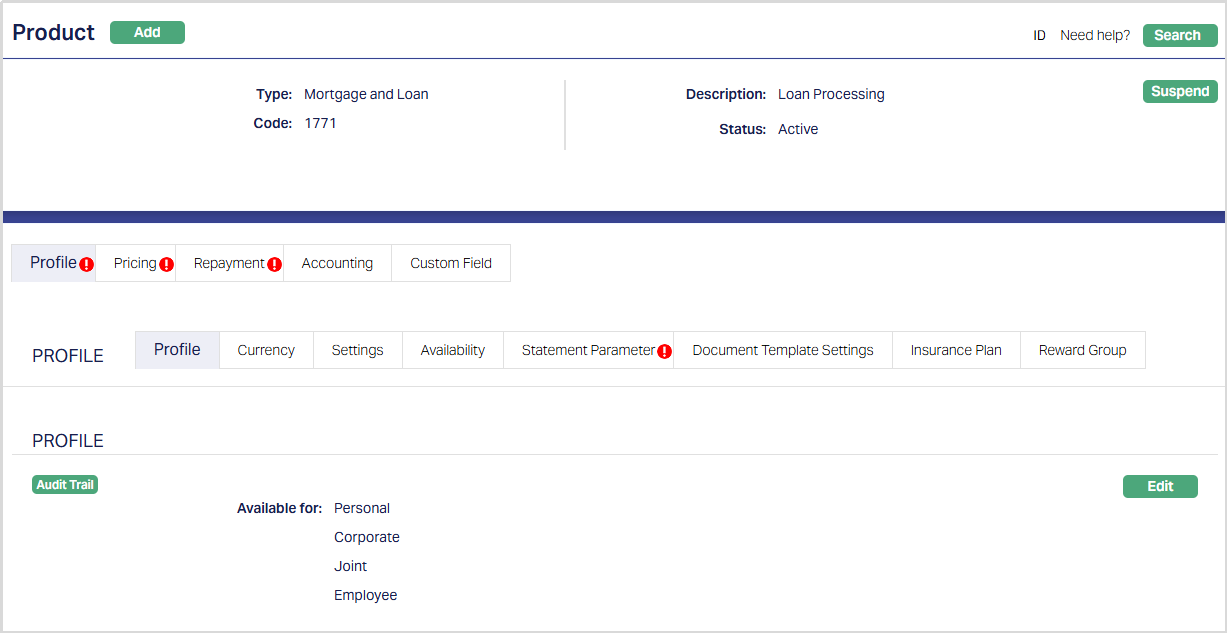
Profile
The Profile tab, which is the default tab in the Product screen, shows the basic details of the Product.
To view / edit Profile.
1. Access Product page and retrieve the required Product record using Search. Click Profile tab to view the details as per sample below. The details are defaulted from the entries that you made during Product creation. For details refer to Mortgage and Loan > New Product → Profile (1/10).

2. Click Edit. Edit Product page appears.
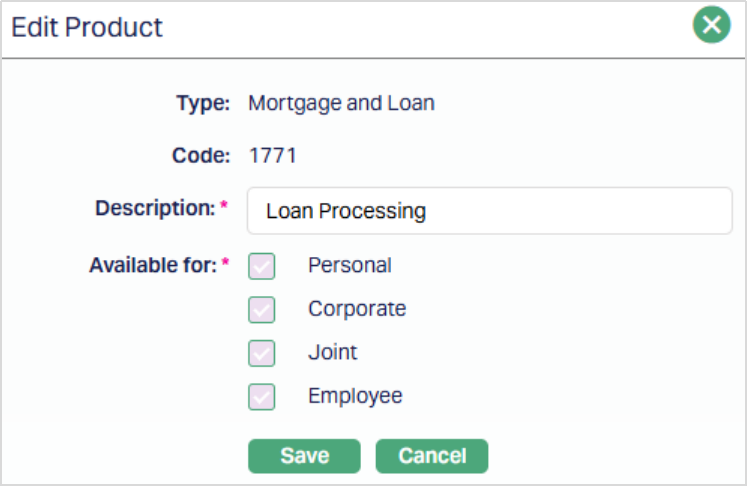
The following fields are editable:
Description
Available for: You can only add the client types. But you cannot remove a client type for which the Product was marked as available earlier.
3. Click Save. Profile page appears with the edited details.
Functions: Edit
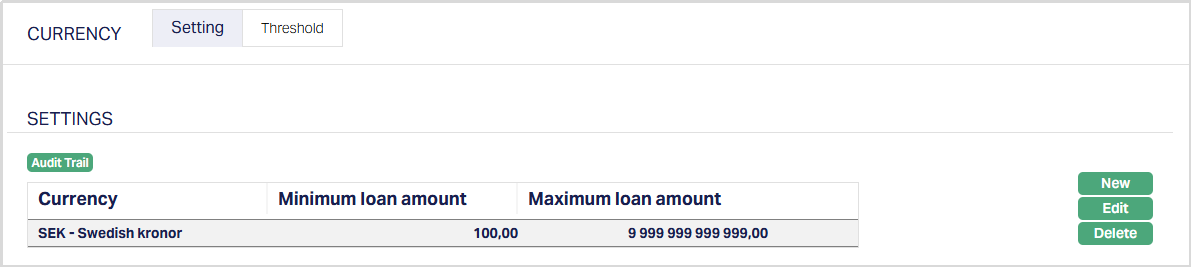
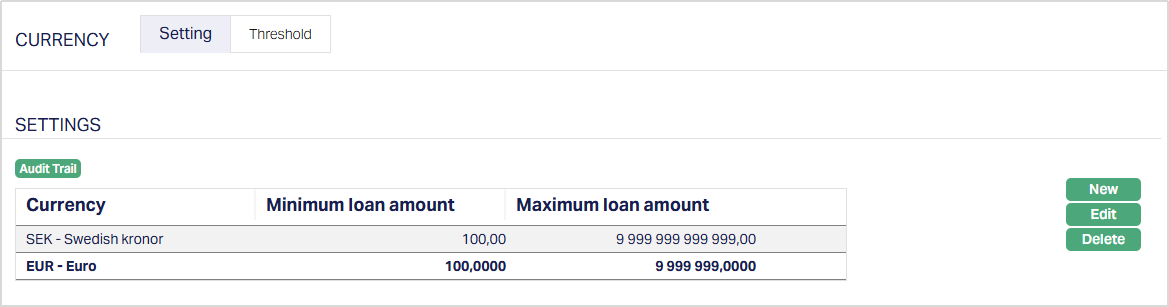
Currency
The Currency tab allows you to maintain the currencies for the Product. One or more currencies can be added using the Currency tab, once the Product record is created. Accounts for the Product can be opened only in the selected currencies. You can also maintain the threshold parameters for each currency
The sub-tabs available under this tab are
Setting
Using the Settings sub-tab, you can add / remove currencies and update the amount range for each currency for loans under a Product.
To add a currency,
1. Access the Product Maintenance page and retrieve the required Product record using Search.
2. Click on the Currency tab to view the details as per sample shown below under sub tab Settings. The details are defaulted from the entries that you made during Product creation / last edit. For details refer to Mortgage and Loan → New Product → Currency (2/10).
3. Click New. The New Currency page will appear.
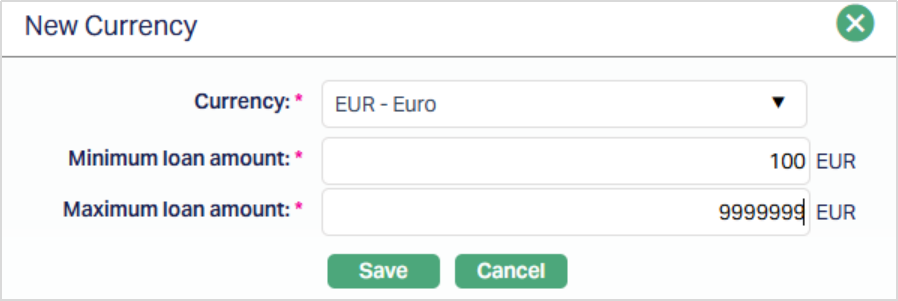
4. Select the Currency that you would like to add under the Product from the drop-down list of GL currencies maintained under General Ledger → Settings → Currency.
5. Enter the Minimum loan amount for the loan accounts under the Product for this currency.
6. Enter the Maximum loan amount for the loan accounts under the Product for this currency. Maximum amount should be greater than the minimum amount.
7. Click Save. The Currency tab appears with the added new currency added under the sub-tab Settings.
To edit the minimum / maximum loan amounts allowed for the Product under each currency
1. Click Edit. The Edit Currency page appears.
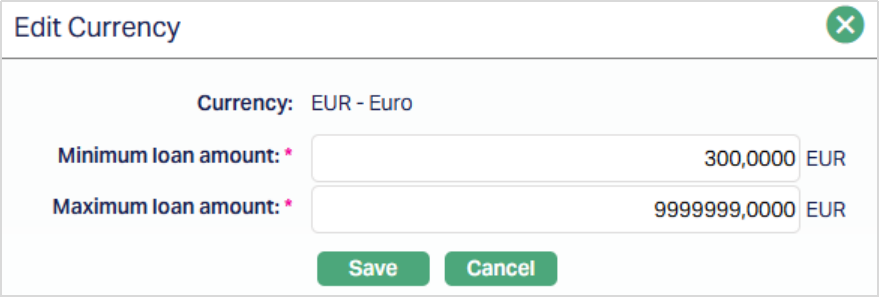
Note: The editable fields are Minimum Loan Amount and Maximum Loan Amount.
2. Input the required details and click Save. The Currency tab appears with the edited details under the sub-tab Settings.
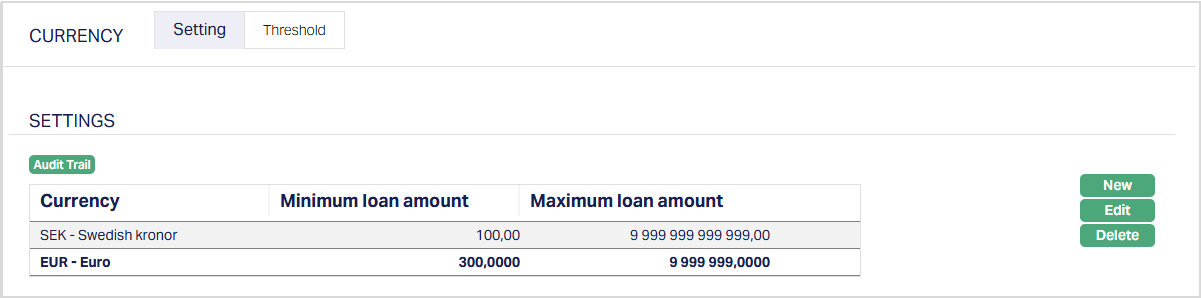
Functions: New, Edit and Delete.
Delete: You can delete a currency by clicking on the Delete button. When you click on the Delete button, Aura displays an alert message. On confirmation, Aura will delete the currency, only if there are no Loan Accounts already created under the Product. Also, a Product must support at least one currency; and hence, if there is only one currency defined for the Product, it cannot be deleted.
Threshold
The Threshold sub-tab allows you to maintain the values for thresholds applicable to the Product for each currency. These thresholds control how Aura processes receipts, prepayments, overdues and excess amounts under different conditions.
When a Currency is added to the Product in the Add Wizard or in the Currency → Settings sub-tab, a Threshold record is automatically created with the Amount = 0.00. You can then edit the record to maintain the required threshold values.
To view the details of Threshold sub-tab,
1. Access Product Maintenance page. Click on the Currency tab and then click on Threshold sub-tab to view the details as per sample below
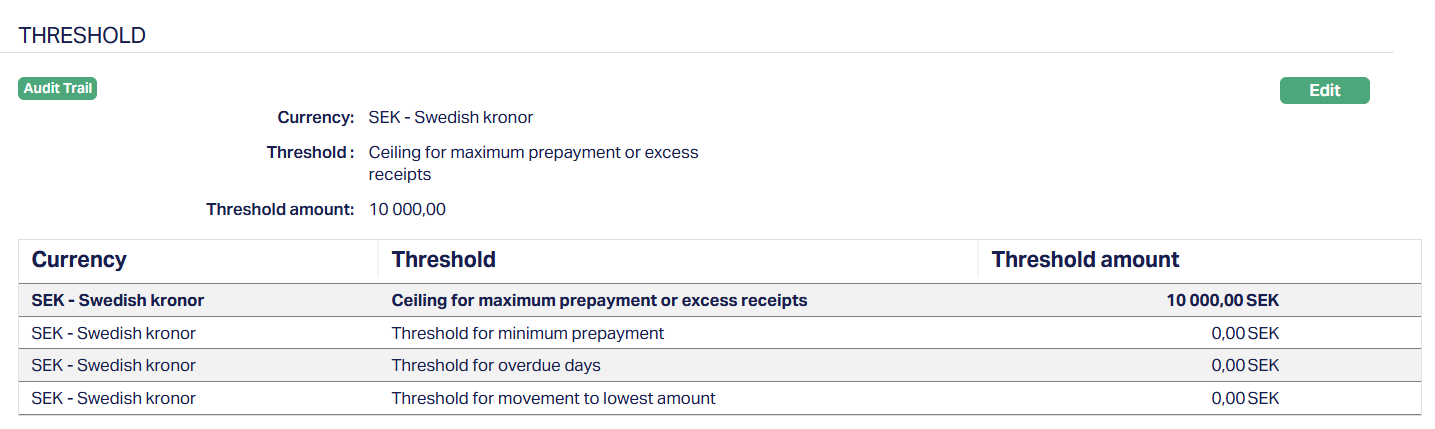
Function: Edit
The following Thresholds are available in this sub-tab:
1. Ceiling for Maximum Prepayment or Excess Receipts - This threshold defines the maximum amount that can be accepted as Prepayment or Excess Receipts.
- If the excess amount after allocation to dues exceeds this ceiling, Aura rejects the payment with an error message.
- By default, this field is set to maximum allowable system value, but you can revise as required.
- The Ceiling is applied in both cases:
- If Treat Excess Receipts = Prepayment → payment fails if it exceeds the ceiling.
- If Treat Excess Receipts = Received In Excess → payment fails if it exceeds the ceiling. Any transaction breaching this ceiling requires manual intervention
2. Threshold for Minimum Prepayment - This threshold defines the minimum amount required for treating excess receipts as Prepayment.
- If the excess amount after allocation to dues is greater than or equal to this threshold, Aura classifies it as Prepayment, if Treat Excess Receipts = Prepayment.
- If the excess amount is less than this threshold, it is treated as Received in Excess (RIE) even if Treat Excess Receipts = Prepayment.
3. Threshold for Overdue Days - This threshold defines the amount after which the loan is considered as overdue such that for small amounts (say < 10 EUR), the loan is not treated as an Overdue Loan.
Example:
Threshold for Overdue Days = 70.00 EUR
Penalty on Principal Overdue = 24%
Loan Account Schedule
| Schedule Due Date | Component | Due Amount | Paid Amount | Unpaid Amount |
|---|---|---|---|---|
| 26-Sep-2024 | Principal | 50.00 | 0.00 | 50.00 |
| 26-Sep-2024 | Interest | 10.00 | 0.00 | 10.00 |
| 26-Sep-2024 | Instalment fee | 12.00 | 2.00 | 10.00 |
Assuming Grace Days = 1, on 27-Sep-2024, Penalties will be applied on the Principal and Interest overdue amounts and the Schedule will be as follows:
| Schedule Due Date | Component | Due Amount | Paid Amount | Unpaid Amount |
|---|---|---|---|---|
| 26-Sep-2024 | Principal | 50.00 | 0.00 | 50.00 |
| 26-Sep-2024 | Interest | 10.00 | 0.00 | 10.00 |
| 26-Sep-2024 | Instalment fee | 12.00 | 2.00 | 10.00 |
| 26-Sep-2024 | Penalty on Principal Overdue | 0.06 | 0.00 | 0.06 |
For purposes of calculating the overdue days, the Overdue Amount as on 27-Sep-24 on the above account will be arrived at by summing up all the unpaid amounts except the Penalty components and compared with the Threshold defined. When the sum of such unpaid amounts exceeds the Threshold, it will be considered to be Overdue. In the above case, the total Overdue Amount = Sum of unpaid amounts of Principal, Interest and Instalment Fee = 70.00 which is equal to the Threshold for Overdue Days. Hence, the loan will NOT be considered to be overdue for purposes of Status Movement as per the Status Rules defined for the Product. The number of overdue days will be considered as 0
However, if there was no payment received towards the Instalment Fee, the toal of Unpaid Amount would be 72.00 which is > Threshold for Overdue Amount; and hence, the Loan will be considered as Overdue from the Due Date i.e., 26-Sep-2024; and Overdue Days would be calculated as Current Booking Date minus Overdue Since Date.
4. Threshold for Movement to Lowest Amount - This threshold applies only to a Product where Apply Special Interest Scheme = Yes. It defines the maximum overdue amount allowed before the movement into the Lowest Amount to Pay category. When this threshold is breached, the concessional interest rate no longer applies, and the .normal interest rate becomes effective
To edit Threshold,
1. Access Product Maintenance page. Click on the Currency tab and then click on Threshold sub-tab
2. Select the required Threshold record and click Edit. The Edit Threshold page for that currency will appear.
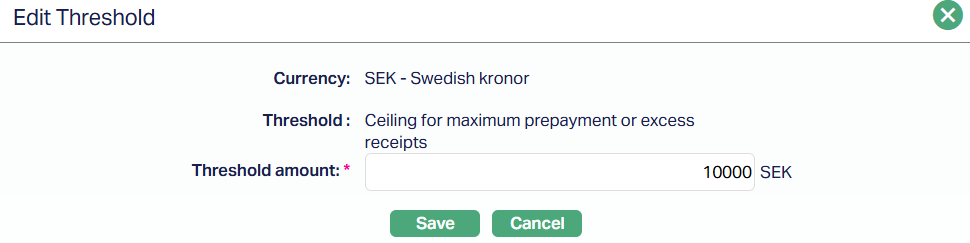
Only the Threshold amount field is editable.
3. Update the amount as required.
4. Click Save. The Threshold sub-tab appears with the edited details.
Function: Edit
Settings
This Tab allows you to view and maintain certain Product settings like IBAN generation required, Minimum and maximum term days, Rate types for currency conversions, holiday preferences, payment free months, parameters related to repayment, etc.
To edit the settings,
1. Access Product Maintenance page. Click Settings tab to view the details as per sample below. The details are defaulted from the entries that you made during Product creation. For details refer to Mortgage and Loan → New Product → Settings (3/10).

2. Click Edit. The Edit Product Settings page appears.

Note: All fields in the Edit Product Settings page are editable except the Interest Calculation method.
Additional fields available here are:
1. Allow Excess Receipts during External Payments: By default, this field is set to No to ensure that the amount received from the borrower through an external bank does not exceed the total amount due on the Loan Account or Invoice. If you wish to allow borrowers to pay more than the due amount and have Aura automatically process the excess either as a Principal Prepayment or as Amount Received in Excess, select Yes.
When enabled, the received amount is first adjusted against all amounts due, and any surplus is treated as a prepayment towards the Principal Outstanding or as Amount Received in Excess. See note below the next point for more details.
2. Treat External Excess Receipt as: This field becomes editable only when Allow Excess Receipts during External Payments is set to Yes. You can select one of the following options -
- Prepayment - Excess receipts will be applied toward the Principal Prepayment.
- Received in Excess - Excess receipts will be recorded separately without affecting the principal balance.
Note: External Payment Processing with reference to Excess Receipts
When an external payment is received in Aura:
a. Allocation to dues →
- Aura first applies the payment against outstanding dues for the invoice / loan account based on payment reference received as invoice # or loan account # respectively.
b. Check Minimum Prepayment Threshold →
- If the excess amount remaining after allocation to dues is greater than or equal to Minimum Prepayment Threshold, it is treated as Prepayment, provided Allow Excess Receipts during External Payments = Yes and Treat External Excess Receipts As = Prepayment.
- If the excess amount is lesser than the Minimum Prepayment Threshold, it is treated as Received in Excess (RIE), provided Allow Excess Receipts during External Payments = Yes, irrespective of where Treat External Excess Receipts As = Prepayment or Received in Excess; else, Aura rejects the payment with an error message.
c. Check Maximum Ceiling →
- If the excess amount (whether Prepayment or RIE) exceeds the Maximum Ceiling, Aura rejects the payment with an error message. Such transactions require manual intervention to proceed.
These layered validations ensure that the receipts are classified consistently and do not breach the limits defined for the Product.
3. Repayment Allocation Basis during External Payments - This field gives you an ability to define how repaid amounts should be allocated when the Payment Reference in an External Payment is the Loan Account. The options available are:
- Components - This is the default option when the Product record is created. Allocation is done component-wise (as per Repayment Order) across all unpaid schedules, starting from the oldest schedule. Once a component is fully allocated across all schedules, the next component in the repayment order is processed.
- Schedule due dates - Allocation is performed schedule-wise. The payment is applied first to the oldest schedule across all components (following the Repayment Order). Once all components within that schedule are settled, allocation moves to the next oldest schedule.
Notes:
- When Schedule Due Dates is selected, penalty allocation is determined based on the Unpaid Amount in the schedule, not the Invoiced Amount. Therefore, if multiple schedules are overdue, Aura allocates payments starting with the oldest schedule, applying payments to each component in order. The penalty allocation may therefore exceed the invoiced penalty amount, as it is based on unpaid amounts Aat the time of allocation, rather than invoiced amounts.
- If the Payment Reference in the external payment is Invoice Number, amounts are allocated on the basis of Components as per the Repayment Order defined in the Product.
4. Tag Schedules to Month-end: This field determines how Aura generates future repayment schedules when the first or next installment date falls on the last day of a month (for example, 28-Feb in a non-leap year). By default, this flag is checked when the Product is created and can be edited during Edit → Settings. Any change made here will apply only to Loan Accounts created after the change.
When a Loan Account is created, the value of this flag is automatically defaulted from the Product internally. It is not displayed in the Loan Account UI and therefore cannot be modified at the account level.
During schedule generation or regeneration, when the first or next payment date falls on a month-end, and if the Principal/ Interest / Annuity Frequency is set as Monthly, Quarterly, Semi-Annual, or Annual, Aura checks the value of this flag:
- If this flag is checked, the subsequent schedules are generated using month-end dates
- If this flag is unchecked, schedules are generated using the same date (DD part of the DD-MM-YYYY) as the first or next payment date instead of month-end.
Examples:
| First / Next Payment Date | Is it a month-end date? | Flag considered? | Flag Value | Subsequent Schedule Dates |
|---|---|---|---|---|
| 28th Feb of a non-leap year | Yes | Yes | Checked | 31st Mar, 30th Apr, 31st May and so on |
| 28th Feb of a leap year | No | No | Checked | 28th Mar, 28th Apr, 28th May, 28th Jun and so on |
| 29th Feb of a leap year | Yes | Yes | Checked | 31st Mar, 30th Apr, 31st May and so on |
| 30th Nov | Yes | Yes | Checked | 31st Dec, 31st Jan, 28th Feb (or 29th Feb in case of a leap year, as Feb does not have 30 days), 31st Mar, 30th Apr and so on |
| 30th Dec | No | No | Checked | 30th Jan, 28th Feb (or 29th Feb in case of a leap year, as Feb does not have 30 days), 30th Mar, 30th Apr and so on |
| 15th Dec | No | No | Checked | 15th Jan, 15th Feb, 15th Mar, 15th Apr and so on |
| 28th Feb of a non-leap year | Yes | Yes | Unchecked | 28th Mar, 28th Apr, 28th May and so on |
| 28th Feb of a leap year | No | No | Unchecked | 28th Mar, 28th Apr, 28th May, 28th Jun and so on |
| 29th Feb of a leap year | Yes | Yes | Unchecked | 29th Mar, 29th Apr, 29th May and so on |
| 30th Nov | Yes | Yes | Unchecked | 30th Dec, 30th Jan, 28th Feb (or 29th Feb in case of a leap year, as Feb does not have 30 days), 30th Mar, 30th Apr and so on |
| 30th Dec | No | No | Unchecked | 30th Jan, 28th Feb (or 29th Feb in case of a leap year, as Feb does not have 30 days), 30th Mar, 30th Apr and so on |
| 15th Dec | No | No | Unchecked | 15th Jan, 15th Feb, 15th Mar, 15th Apr and so on |
5. Payment-Free Months: Aura enables you to grant Payment Free Month(s) by selecting specific months in the Fixed Holiday Months field. If installments are due during a Payment-Free Month, they are treated as zero, and the subsequent instalment includes the cumulative Principal, Interest, and Charges.
This option is not applicable in the month of Maturity Date.
6. Overdue Schedule Check determines eligibility for Payment-Free Month applicability. The following options are available:
- No check - If you want to specify that the payment free month is applicable irrespective of whether the account is overdue or not, choose this option. No overdue status check for the account will be performed.
- Check overdue for X cycles - If you want to specify that the payment free month is applicable only if the account has not been overdue for the past X cycles, choose this option. Aura will check if the account has gone overdue for the past X cycles and if so, disallow the Payment Free Months.
7. Contractual Savings applicable is a long-term savings involving a definite, continuous commitment on the part of the savers; and is usually combined with a micro-finance loan to encourage the borrowers to save along with repayment of the loans. If you are creating a Product where there should be compulsory savings along with repayment, Select the radio button Yes or No as required.
Note: If you select Yes then the Percentage of Savings field is enabled for you to input.
8. Percentage of Savings is enabled when you have chosen Contractual Savings = Yes in the above field. Enter the percentage of saving as required. The total contractual savings for the loan will be calculated as a % of the Loan Approved amountand will be amortized over the period of the loan, based on the number of principal payments.
9. Click Save. The Settings page appears with the edited details.
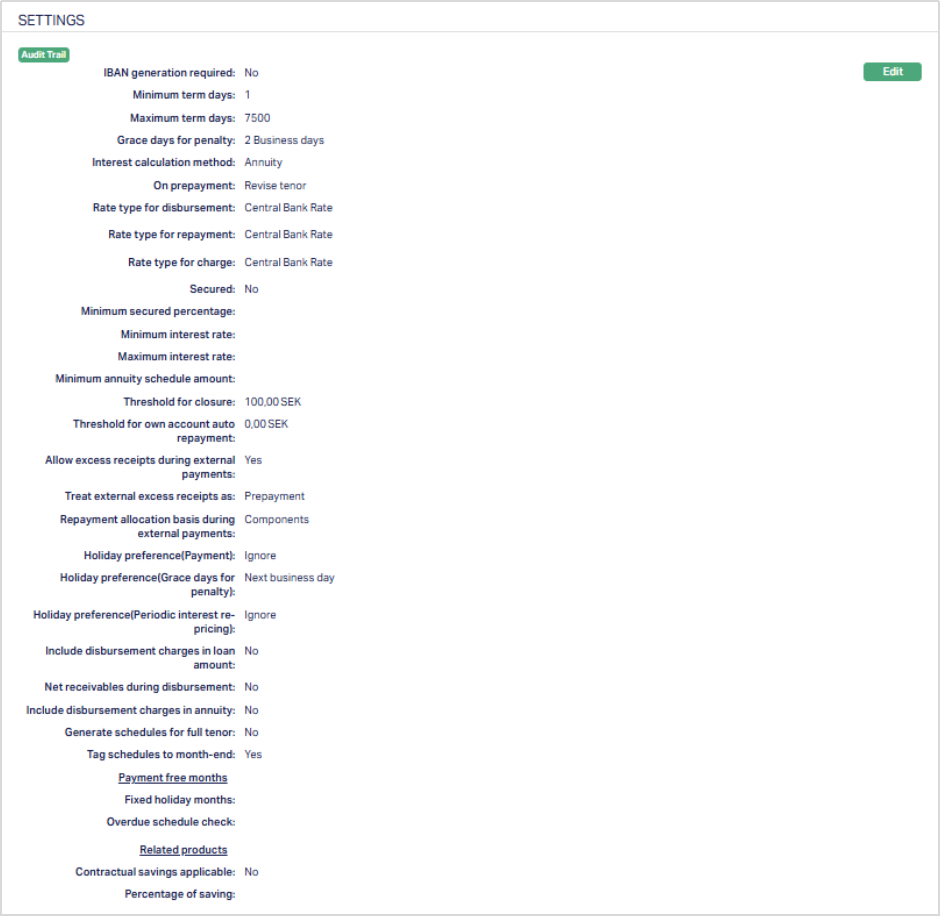
Function: Edit
Availability
This tab can be used to control the availability of the Product to specific Branch, Offering Category or Client. It has three sub-tabs, one for each of these.
Availability-Branch
Using this tab, you can allow the Product to be available for all the branches or only specific branch(es).
To select the required branch,
1. Go to Product page, click on Availability tab, then click on Branch tab.

2. By default, All radio button is selected so that this Product is available for all Branches.
3. To restrict the branches for which this Product is available, click Selected radio button. Add button is now enabled.

4. Click Add. The Add Branch screen appears where you can select the required branch from the drop down of all active branches of the Entity maintained under Admin → Branches → Maintain
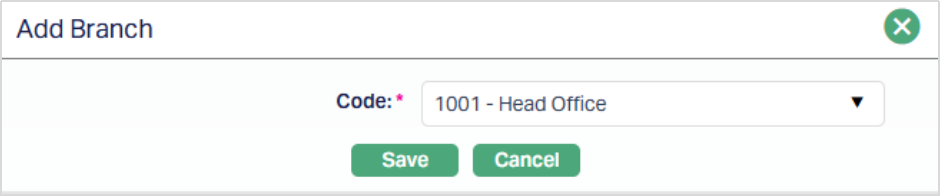
5. Click Save. The Availability tab appears with the added branch details under Branch Sub tab.

Function: Add, Delete
To delete a branch, select the branch and click Delete.
Note: You may choose to allow All branches for the Product at any time. However, Aura will prompt you to confirm if the selected Branches may be deleted. If confirmed, then all the selected Branches will be deleted, and the Product will be available for ALL branches.
Availability-Offering
Using this tab, you can allow the Product to be available for all the Offering Categories or only specific Offering Categories.
1. Go to Product page, click on Availability tab, then click on Offering tab.

2. By default, All radio button is selected so that this Product is available for all Offerings.
3. To restrict the Offerings that are available under this Product, click on Selected radio button. Add button is now enabled.

4. Click on Add. Add Offering screen appears where you can select the required Offering from the drop-down list of active Offerings maintained under Admin → System Codes → Categories → Offering

5. Click Save. The Availability tab appears with the added offering details under Offering Sub tab.

Function: Add, Delete
NOTE: You may choose to allow All Offerings for the Product at any time. However, Aura will prompt you to confirm if the selected Offering Categories may be deleted. If confirmed, then all the selected Offering Categories will be deleted, and the Product will be available for ALL Offering Categories.
Availability-Client
Using this tab, you can allow the Product to be available for all the Clients or only specific Client(s).
1. Go to Product page, click on Availability tab, then click on Client tab.

2. By default, All radio button is selected so that this Product is available for all Clients.
3. To restrict the Clients for which this Product is available, click Selected radio button. Add button is now enabled.

4. Click Add. The Add Client page appears, where you can search for the required client with relevant criteria and select the required client
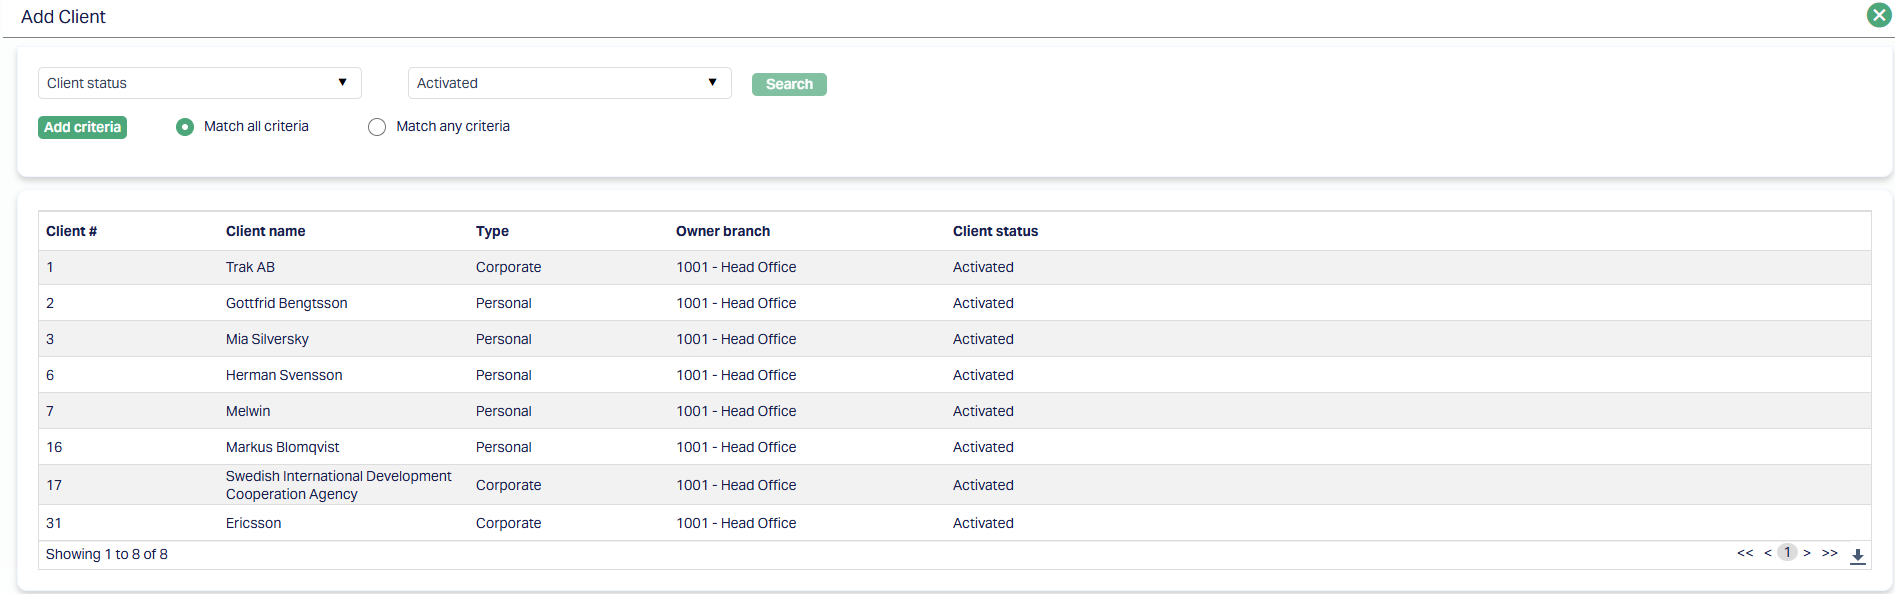
5. The Availability tab appears with the added Client details under Client Sub tab.

Function: Add, Delete
To delete a client, select the client and click Delete.
Note: You may choose to allow All clients for the Product at any time. However, Aura will prompt you to confirm if the selected clients may be deleted. If confirmed, then all the selected clients will be deleted, and the Product will be available for ALL Clients.
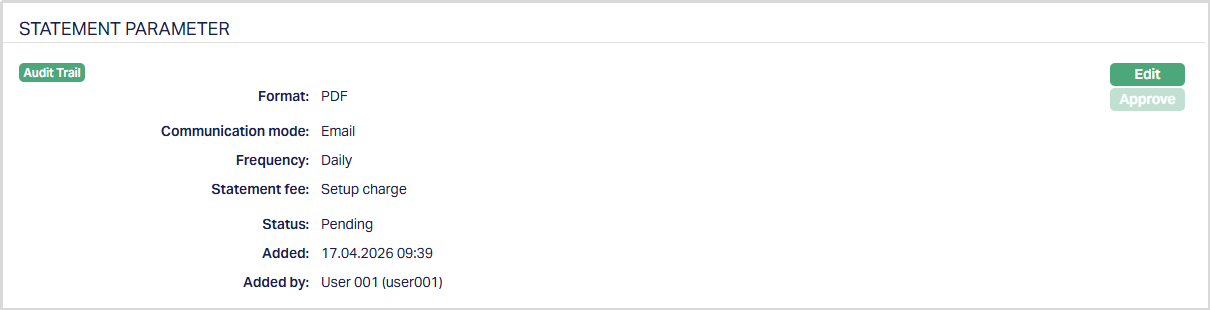
Statement Parameter
Using this tab, you can view and maintain the preferences for generating the statements.
To view/edit the Statement Parameter,
1. Access the Product page. Click on the Statement Parameter tab to view the details as per sample below. The details are defaulted from the entries that you made during Product creation / last edit. For details refer to Mortgage and Loan → New Product → Statement Parameter (8/10).
2. Click Edit. The Edit Statement Parameter page appears.
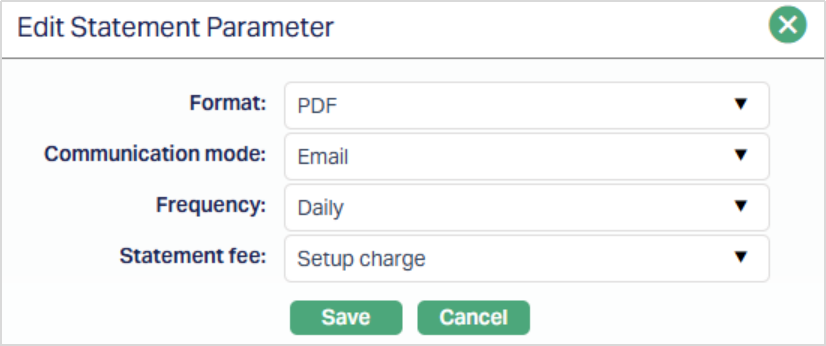
All the fields in Statement Parameter are editable.
3. Click Save. The Statement Parameter page appears with the edited details.
Note: After edit, the Status of Statement Parameter tab will reflect as Pending with a red bubble on the Tab. To approve, a user different from the one who created / edited has to retrieve the record and click Approve. Once the tab is approved the red bubble disappears and the Status changes to Approved as shown below.
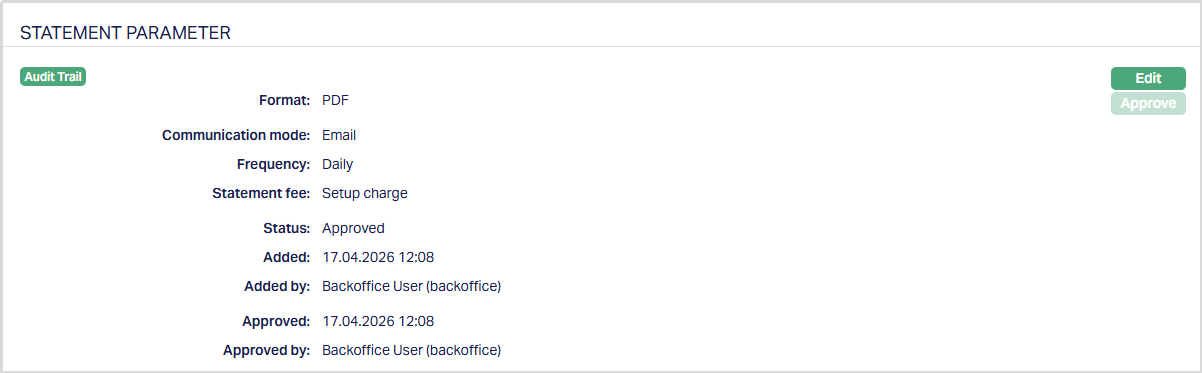
Function: Edit and Approve
The additional fields that you can view in the Statement Parameter tab are explained below.
Status field denotes the status of the record.
Added field denotes the date on which the record was added.
Added by field denotes the name of the user who created the record.
Approved field denotes the date on which the record was approved and is displayed only on approval.
Approved by field denotes the name of the user who approved the record and is displayed only on approval.
Document Template Settings
Using this tab, you can maintain the document template which can be used for creating documents for all the accounts maintained under this Mortgage and Loan Product.
Note: This feature has to be customized for each bank during implementation as per their specific requirements.
To add a new Document template settings,
1. Access the Product page. Click on the Document Template Settings tab.

2. Click New. New Document Template page appears.
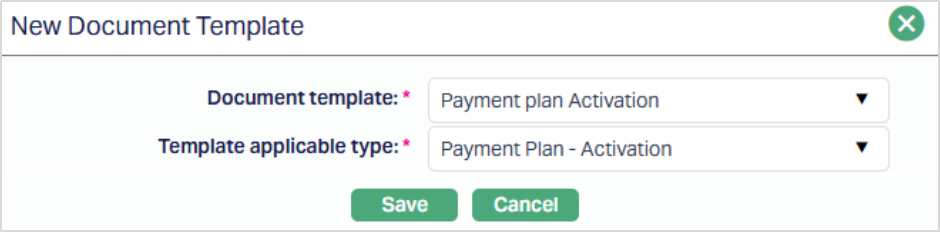
3. Select the Document template from the available dropdown as maintained under Admin → System codes → Document → Document templates.
4. Select the Template applicable type from the available drop-down. The available options are:
- Disbursement
- Insurance-Cancellation
- Insurance-Initiation
- Insurance-Reactivation
- Insurance-Suspension
- Product novation
- Payment Plan-Activation
- Payment Plan-Completion
- Maintain
- Repayment
- Restructuring
- Partial Prepayment
- Full Prepayment
- Simulation of Payment
- Change of Terms-Settings
- Change of Terms-Interest Parameters
- Change of Terms-Payment Terms
- Change of Terms-Invoice Cancellation
5. Click Save. The Document Template Settings tab appears with the added details.

Functions: New and Delete.
Delete: You can delete a Document Template by clicking on the Delete button. Aura will ask for confirmation, on approving which the selected record will be deleted.
Insurance Plan
This tab allows you to map insurance plans that can be linked to the loan accounts created under the Product. You can maintain the details of the plan, such as fees, coverage limits, and suspension conditions.
To add a new Insurance Plan,
1. Access the Product page and click on the Insurance Plan tab. On creation of Product, this tab will be blank. If any plans have already been added, these will be displayed.
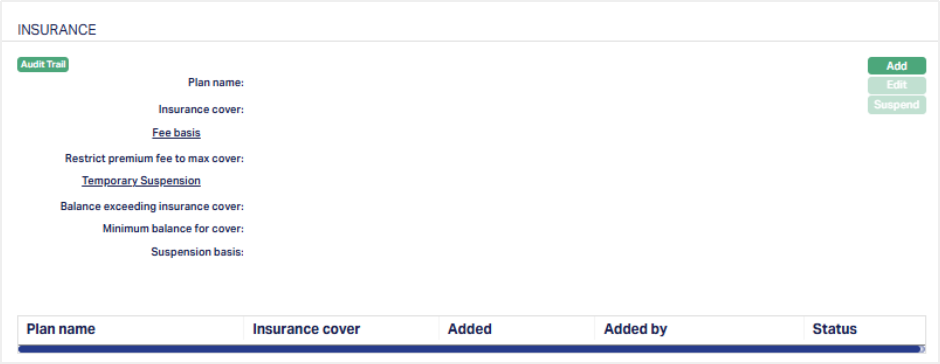
2. Click Add. The Add Insurance Plan page appears.
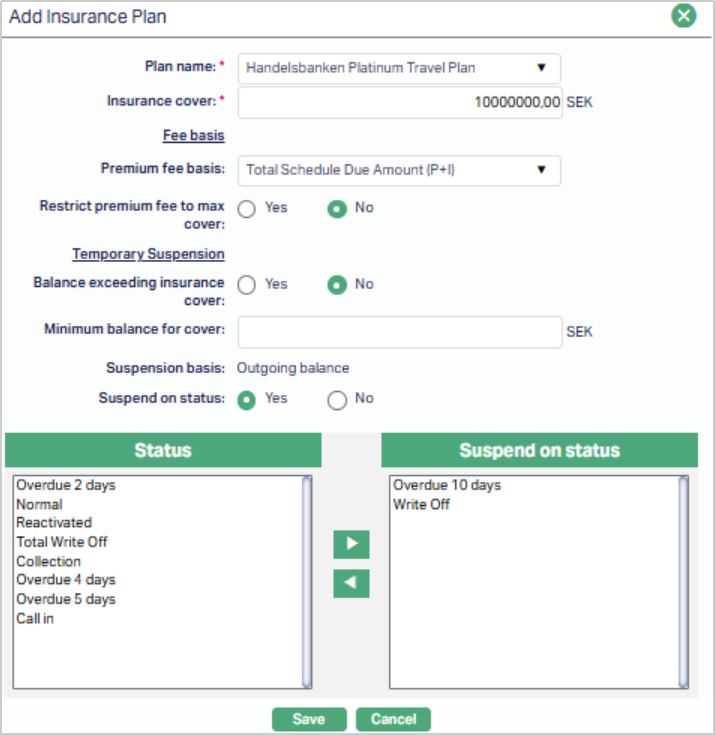
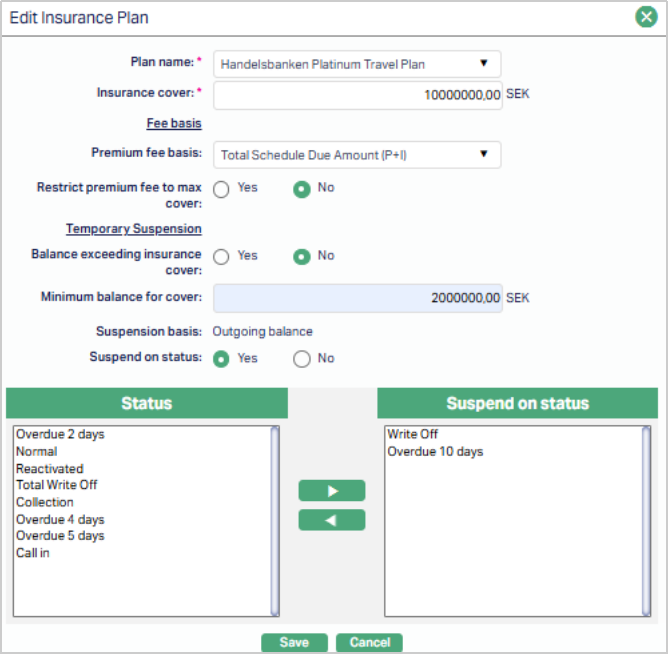
3. Select the required Plan name from the drop-down list of insurance plans maintained as available for this specific Product or for all Products under Admin → System Codes → Generic Definitions → Insurance Plan → Availability Tab.
Note: Once an insurance plan is mapped to a Product, it cannot be added again to the same Product
4. Specify the maximum amount of Insurance cover under this plan for loan accounts created under this Product. By default, Aura displays the maximum cover defined for the plan under Admin → System Codes → Generic Definitions → Insurance Plan. The Insurance Cover value can be reduced at the Product level but cannot exceed the Maximum Cover defined under Admin → System Codes → Generic Definitions → Insurance Plan.
Under Fee Basis, you can define the following:
5. Premium fee basis defines the base used for calculating the insurance premium fee. You can choose from three available options, allowing flexibility in how the premium amount is derived:
- Outgoing Balance - Calculates the premium fee based on the current outstanding loan balance. This represents the principal amount yet to be repaid on the loan.
- Total Schedule Due Amount (P + I) - Calculates the premium fee on the total amount of the Principal and Interest due as per the upcoming repayment schedule.
- Total Schedule Due Amount (P + I + C) - Calculates the premium fee on the total amount that includes Principal, Interest, Instalment Fee and Loan Management Fee due as per the upcoming repayment schedule.
6. By default, the Restrict premium fee to max cover option is selected as No. If you select this option as Yes, then the insurance fee percentage basis calculation will be derived from the maximum cover of the insurance plan only when the current balance of the loan account exceeds the maximum cover of the insurance plan.
Example:
Insurance Cover = 100,000
| Current Balance in Loan | Restrict Premium Fee to Max Cover | Basis Amount to calculate Premium |
|---|---|---|
| 105,000 | Yes | 100,000 |
| 105,000 | No | 105,000 |
| 99,000 | Yes | 99,000 |
| 99,000 | No | 99,000 |
You can define Temporary suspension rules using the following:
7. Balance exceeding insurance cover option is selected as No by default. You can change it to Yes if you want the insurance plan to be suspended when the current balance in the account exceeds the Insurance Cover amount. If Temporary suspension is Yes and if Insurance fee basis is selected as outgoing balance, then the temporary suspension will get triggered when the outgoing balance is greater than insurance plan cover. The insurance will get reactivated when the current balance of the loan account goes below the amount of Insurance cover maintained.
8. Enter the minimum balance that is required for the insurance coverage in the Minimum balance for cover field. If the balance in the account is less than the Minimum balance to cover specified here, the insurance for the account will be temporarily suspended; and will be automatically reactivated when the balance in the account reaches the Minimum Balance to Cover.
9. If Balance Exceeding Insurance Cover is Yes or Minimum Balance for Cover is > 0, then the Suspension Basis will be Outgoing balance. Based on this Aura will check the outgoing balance (i.e., the Principal amount remaining unpaid on the loan) to suspend the insurance. The Suspension Basis is defaulted to Outgoing Balance and is not editable.
10. By default, Suspend on status will be selected as No and insurance plan will not be suspended when the loan moves to different Account Status or Payment Status. If Yes is selected, then Status pane with all the user defined statuses maintained at Admin > System codes > Generic definitions > Loan status definitions will be displayed. By selecting the loan statuses, you can define when the insurance plan needs to be suspended. When the loan account moves into any of the selected statuses, the insurance plan for the account will be suspended automatically; and will be automatically reactivated when the loan account status is moved to any Status that is not added to Suspend on Status pane.
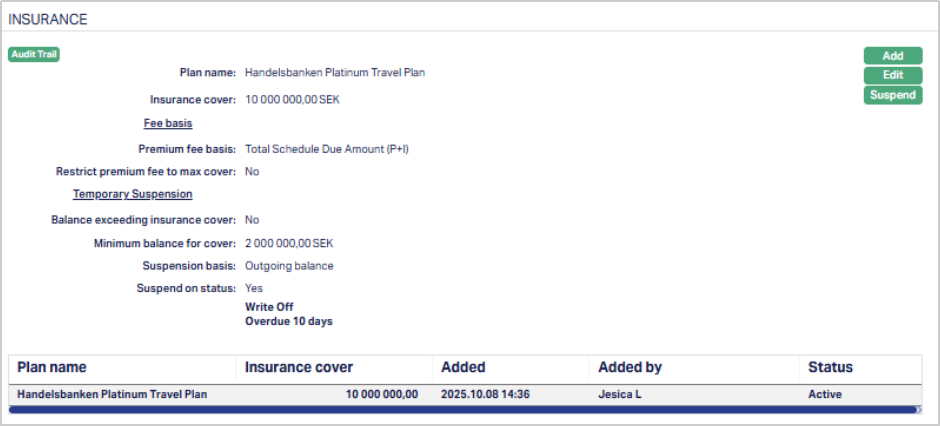
11. Click Save. The Insurance Plan tab appears with the added details.
Once saved, the Insurance Plan is linked to the Product and has an Active Status. Such Active Insurance Plans are available to all new loan accounts created under this Product, based on the parameters defined here.
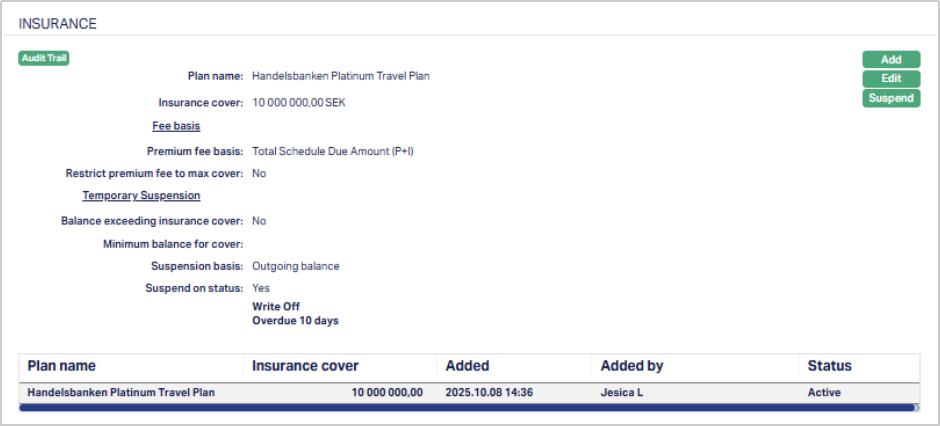
Functions: Add, Edit, Suspend.
Note: When an insurance plan is mapped to a loan account under this Product, Aura automatically copies the following fields from the Product to the account level: Premium fee basis, Restrict premium fee to max cover, Balance exceeding insurance cover, Minimum balance for cover, Suspension basis, and Suspend on status. These fields are read-only at the account level. Aura uses the account-level values for all premium fee processing and automatic suspension logic.
If any of these fields are updated at the Product level after loan accounts have already been created, the changes do not apply to existing accounts. The account-level values remain as they were at the time the insurance plan was mapped. Only new accounts created after the update will reflect the revised Product configuration.
To edit the Insurance Plan,
1. Click Edit. The Edit Insurance Plan page appears.
Note: All fields under Edit Insurance Plan are editable.
2. Click Save. The Insurance Page appears with the edited details.
Functions: Add, Edit, Suspend.
Suspend: You can suspend an Insurance Plan record by clicking on the Suspend button. When you click on the Suspend button, Aura will ask for confirmation. On confirmation Aura will suspend the Insurance Plan and the Activate button will appear in place of the Suspend button. The status of the Insurance Plan is set to Suspended. Such suspended Insurance Plans will no longer be available for loan accounts created under the Product after such suspension.
Activate: If you want to activate a suspended Insurance Plan record then click on the Activate button. Aura will ask for confirmation. On confirmation Aura will activate the Insurance Plan and the Suspend button will appear in place of the Activate button. The status of the Insurance Plan is set to Active. Only such Active Insurance Plans will be available for loans created under the Product.
Reward Group
The Reward Group tab allows you to associate a Reward Group with the selected Loan Product. The Reward Group defines the generic rewards applicable to all loan accounts created under this Product. Any loan account created under this Product will automatically inherit the rewards mapped to the associated Reward Group.
To view / edit a Reward Group,
1. Access the Product Maintenance page. Click on Profile tab and select the Reward Group tab. If any Reward Group has already been added, these would be displayed; else, it will be blank.

2. Click Edit. The Edit Reward Group page appears.
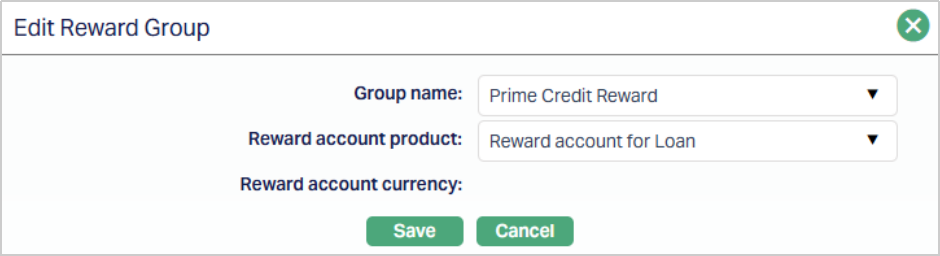
3. Select the required Group from the drop-down list under Group name. The list displays all active Reward Groups defined under CRM → Loyalty Program → Settings → Reward Group that are available for Mortgage & Loan Products. Once you save the mapping, the selected Group Name becomes a hyperlink that redirects you to the corresponding Reward Group record for detailed viewing or maintenance.
4. Select the Reward account product from the drop-down list of active Reward Account Products maintained under CRM → Loyalty Program → Settings → Product. This Product will be used to create Reward Accounts for maintaining reward accrual and redemption transactions.
5. Reward account currency displays the reward currency associated with the selected Reward Account Product as defined under CRM → Loyalty Program → Settings → Product. This field becomes mandatory when you select the Reward Account Product.
6. Click Save. The Reward Group tab is displayed with the added details.

Function: Edit
Once you save the details, the selected Reward Group and Reward Account Product are mapped to the Loan Product. This mapping defines which reward configuration and reward account setup will apply to loans created under this product.
You can edit the Reward Group setup at any time. After the edit is approved, the updated configuration will apply only to loans disbursed after the change.
You can modify the Reward Group or the Reward Account Product as required. When a new Reward Account Product is selected, the Reward Account Currency field becomes conditionally mandatory and displays only the currencies linked to the selected Reward Account Product.
Note: The list of Reward Groups displays only Active Reward Groups where the Product Type = Mortgage and Loans. For details on how the selected Reward Group behaves at the Loan Account level - such as how rewards are generated, validated, or replaced, refer to the Loan Account → Reward Tab user manual.
Changes made in the Reward Group tab are subject to approval as per standard Product Maintenance workflow.
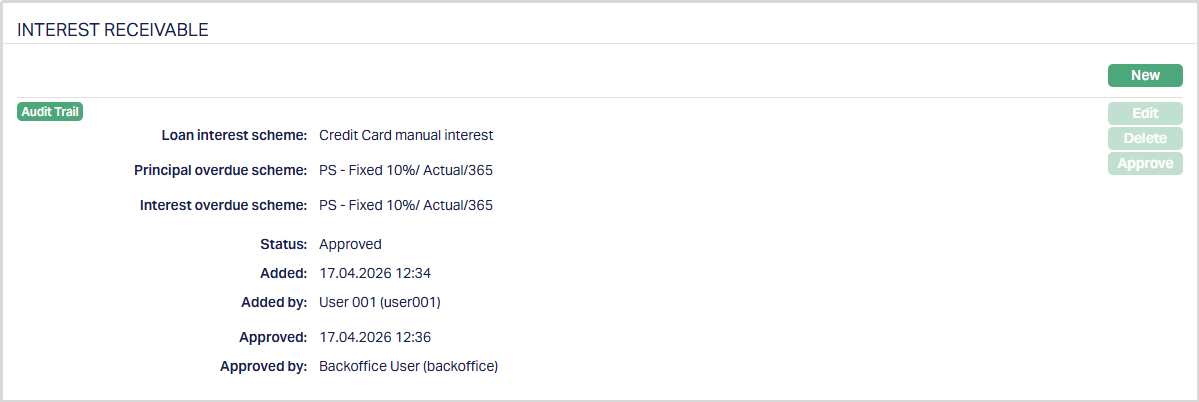
Interest Receivable
This tab allows you to create and maintain the various interest schemes for the interest chargeable on the loan accounts under this Product. You can define the interest schemes applicable for the interest on the Loan Principal as well as the Penalty interest on any overdue Principal / Interest.
To view / add Interest Receivable,
1. Access the Product Maintenance page. Click on the Interest Receivable tab to view the details as per sample below. The details are defaulted from the entries that you made during Product creation / last edit. For details refer to Mortgage and Loan → New Product → Interest Receivable (4/10).
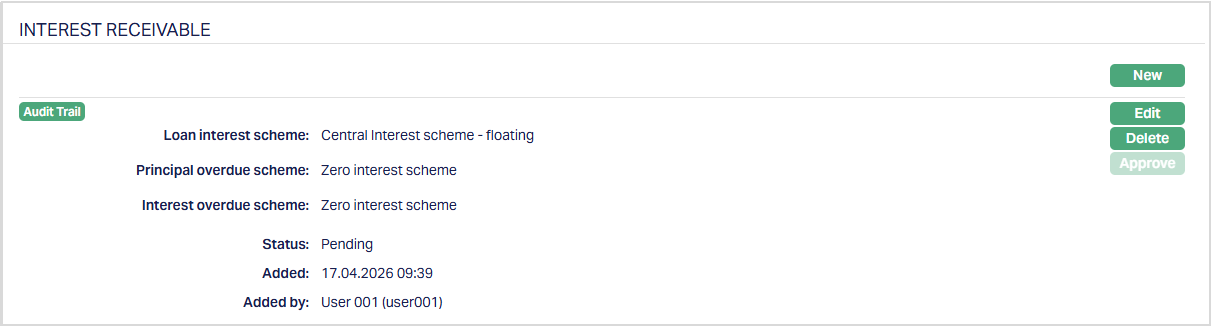
Notes:
After creation / edit, the tab is in Pending status.
When the status is Pending, the interest receivable record can be edited only by the user who created the record; however, it can be deleted by any user by a click on Delete.
To approve, a user different from the one who created / edited has to retrieve the record and click Approve. Once the tab is approved and the red bubble disappears, no further changes can be done on the Interest Receivable tab.
If you want to change any settings for the Interest receivable tab for the Product after it is approved, you have to use the New button and create a new Interest Receivable record.

The additional fields that you can view in the Interest Receivable tab are explained below.
Status field denotes the status of the record.
Added field denotes the date on which the record was added.
Added by field denotes the name of the user who created the record.
Approved field denotes the date on which the record was approved and is displayed only on approval.
Approved by field denotes the name of the user who approved the record and is displayed only on approval.
2. Click New. The New Interest Receivable page appears.
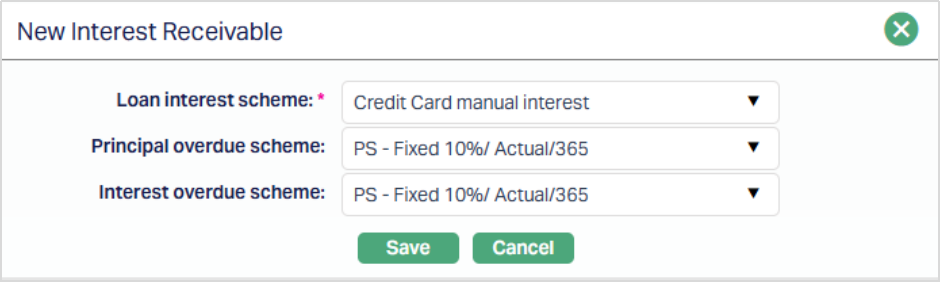 Enter the details as explained in the section New Product → Interest Receivable (4/10).
3. Click Save. The Interest Receivable page appears with the added details.
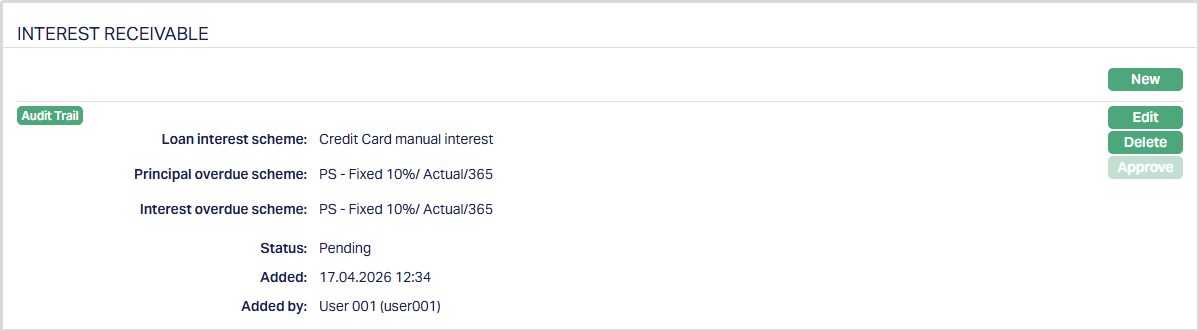
Functions: New, Edit, Delete and Approve.
To edit the Interest Receivable details,
1. Access the Product Maintenance page. Click on the Interest Receivable tab to view the details as per sample below. The details are defaulted from the entries that you made during Product creation. For details refer to Mortgage and Loan → New Product → Interest Receivable (4/10).
2. Click Edit. The Edit Interest Receivable page appears.
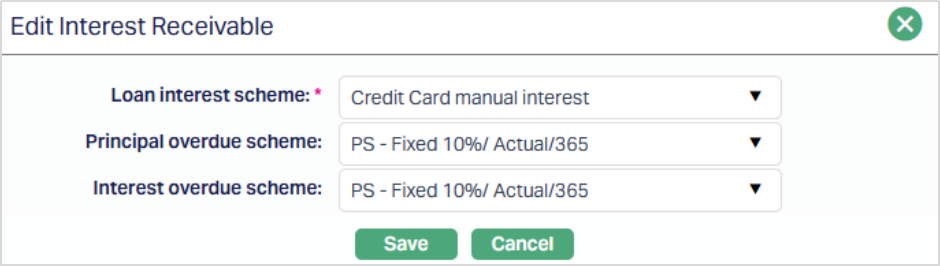
All the fields are editable during Edit Interest Receivable. However, only the person who created the interest receivable record can edit it, till it is approved.
3. Make the required changes and click Save. Once Saved the Interest Receivable page appears with the edited details as shown below.
Functions: Edit and Delete
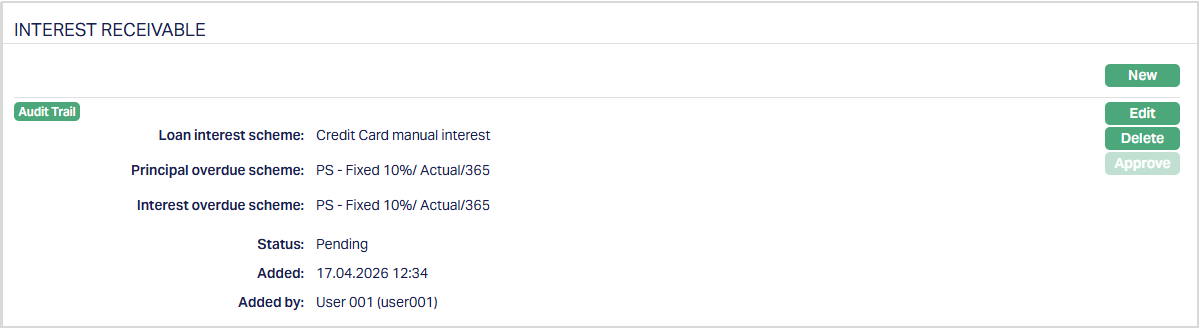
Note: To approve, a user different from the one who created / edited has to retrieve the record and click Approve. Once the tab is approved and the red bubble disappears, no further changes can be done on the Interest Receivable tab.
Special Interest Scheme
The Special Interest Scheme (SIS) tab allows you to define whether a Mortgage and Loan Product will have a Special Interest Scheme applied. Under this arrangement, loans will start at concessional rates of interest as defined under the Interest Receivable Tab but, based on the payment behaviour, the interest rate and tenor of the loan can be revised depending on when the payment default occurs. This tab allows you to set up the required details for such a scheme. Thus, you can define concessional repayment structures that respond dynamically to borrower performance. Once configured and approved, Aura automatically applies these parameters to loans created under the Product, ensuring repayment consistency, audit transparency, and accurate schedule regeneration whenever defaults occur.
When a new loan Product is created, the Apply Special Interest Scheme option is automatically set to No. This means the scheme is not active by default, and no scheme maintenance can be performed until it is explicitly enabled. If you want to retain it the same, just click on the Approve button. However, if you would like to activate the Special Interest Scheme for this Product, you need to edit and input the required details.
To view / edit Special Interest Scheme,
1. Access the Product Maintenance page. Click on the Pricing tab and select the Special Interest Scheme tab.

2. Click Edit. Edit Special Interest Scheme page appears.

Here, you will find a single checkbox labeled Apply special interest scheme. By default, this checkbox is unchecked.
- When you check this box, Aura marks the Product as eligible for a special interest scheme. Once selected, the Maintain Scheme button on the main tab becomes enabled.
- When you uncheck the box, Aura disables the Maintain Scheme button and clears any existing scheme setup for that Product.
3. Click Save. The Special Interest Scheme tab appears with the edited/updated details.

Status of the Scheme is Pending till it is approved by another user. On approval, the tab status is set to Approved.
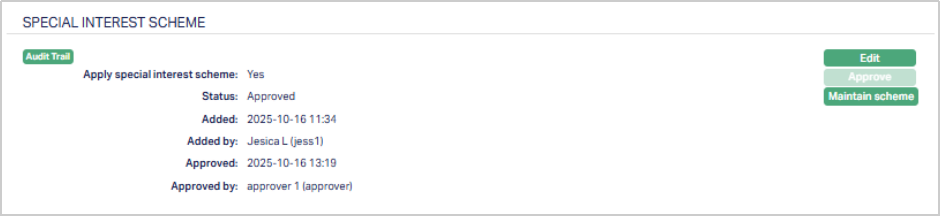
Functions: Edit, Approve, Maintain Scheme.
The Edit button remains enabled even after the special interest scheme has been approved. However, any modifications made to an approved record will change the status back to Pending, and must be re-approved before the updates take effect.
Maintain Scheme
Once you enable the Apply Special Interest Scheme checkbox and return to the main tab, the Maintain Scheme button becomes active. Click to open the Scheme sub-tab.
This sub-tab allows you to define the specific parameters of the scheme for each applicable currency and unpaid loan amount balance.
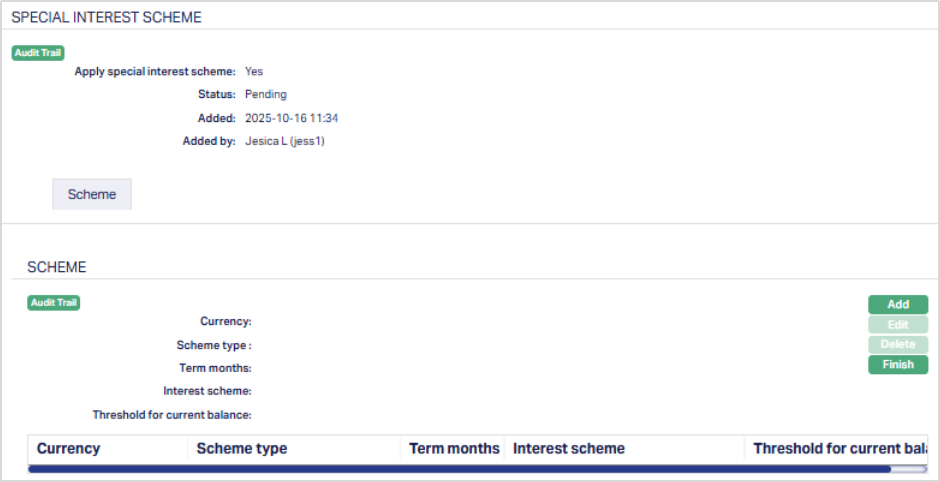
Functions: Add, Edit, Delete, Finish.
To add a scheme,
1. Click Add. The Add Special Interest Scheme page appears.
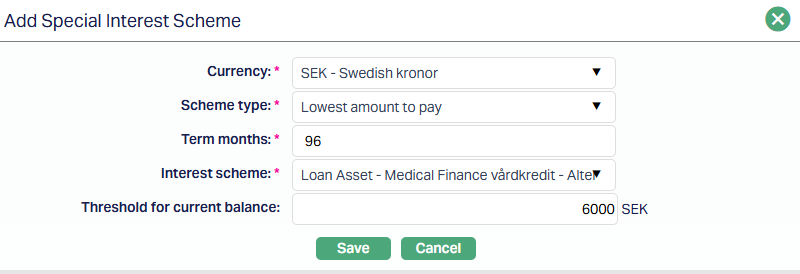
2. Select the Currency for which the scheme applies. Only currencies allowed for the Product appear in the list.
3. Scheme Type - Choose the type of scheme. Currently, the only available type is Lowest Amount to Pay, which determines the scheme applicable when repayments fall below defined thresholds.
4. Term Months - Enter the tenure (in months) for which the loan will get extended from the date of default.
5. Select the Interest Scheme applicable for the chosen currency, type, and term. This list displays active schemes maintained under Admin > Pricing > Interest Scheme. From the date of default, the interest scheme defined here will determine the rate of interest on the Loan Principal for the extended duration defined under Term Months above.
6. Threshold for Current Balance: Specify the current balance (loan principal unpaid) amount that triggers this scheme. Depending on the current balance at the time of default, the loan will be extended at the revised interest terms specified above.
7. Click Save. The Scheme sub-tab appears with the added details.
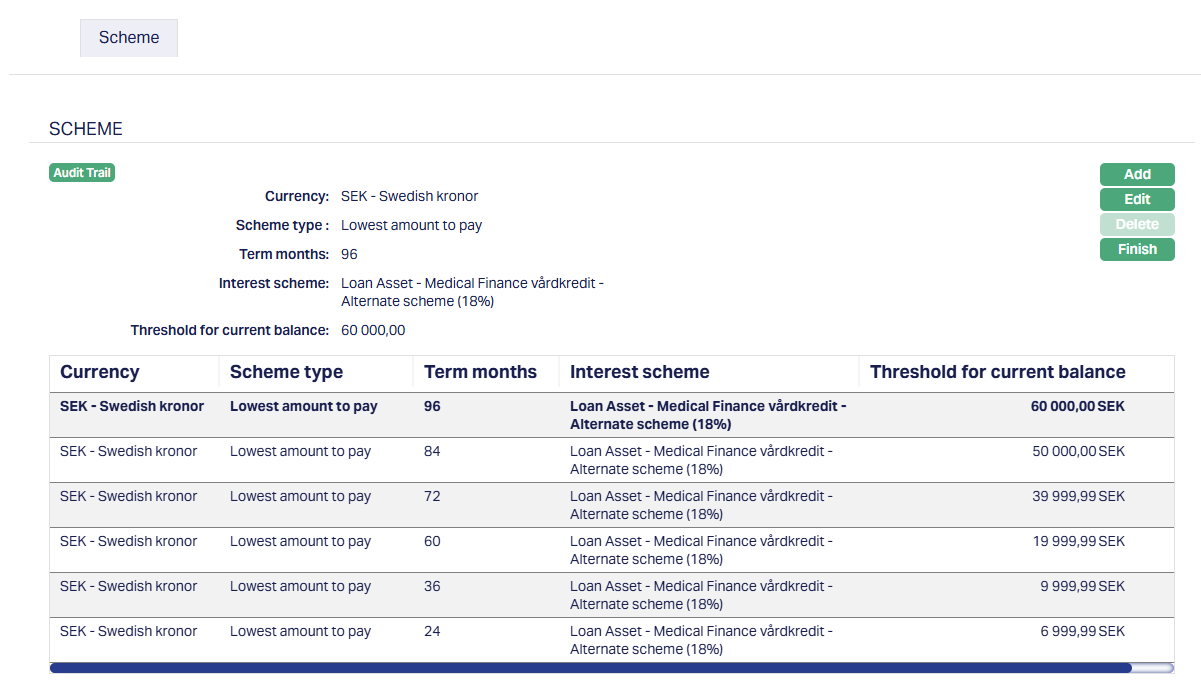
Functions: Add, Edit, Delete, Finish.
To Edit,
1. Click Edit. Edit Special Interest Scheme page appears.

All fields are editable.
2. Click Save. The Scheme sub-tab appears with the edited details.
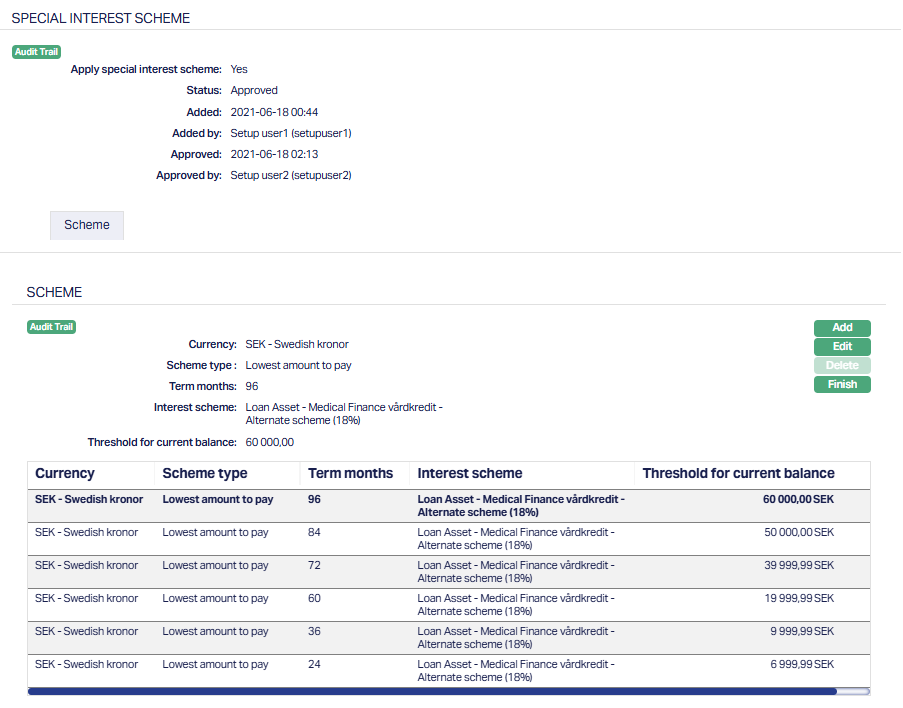
Functions: Add, Edit, Delete, Finish.
Add: The add button opens a new entry form where you can define a new scheme record using the above fields. You can create more than one record by adding multiple combinations of currency, scheme type, and threshold.
Delete: Removes a selected record. This action is allowed only when the record status is Pending.
Finish: Saves your updates and closes the sub-tab, returning you to the main Special Interest Scheme tab.
Functional Behaviour and Backend Logic
Once the Special Interest Scheme is approved at the Product level, its configuration directly influences how loans created under that Product behave in Aura when there are payment defaults.
When you create a new loan account, in the Loan Account Add Wizard, the Apply Special Interest Scheme flag from the Product is automatically copied to the loan.
- If the Product-level flag is No, it is defaulted to No and remains disabled on the account.
- If Yes, it is defaulted as Yes and is enabled so that you can retain the flag as Yes or change it to No.
- All details from the SIS tab in the Product are defaulted to the Loan Account.
Aura generates the initial repayment schedule based on the selected interest scheme, loan amount, and tenor. This typically starts at a lower (or many times zero) interest rate.
Payment Monitoring and Threshold Evaluation
During each End of Grace Day (EOGD) cycle, Aura checks if the borrower has made all repayments as scheduled.
- If all payments are received correctly, the account continues with the current interest rate and tenor.
- If a payment default or shortfall is detected, and the loan has not yet moved to the Lowest Amount to Pay slab, Aura compares the Total Overdue Amount against the Threshold for Movement to Lowest Amount as defined for the Loan Account Currency in the Currency > Threshold tab.
- If the Overdue Amount does not exceed the threshold, the loan continues with the current interest rate.
- If the overdue amount exceeds the threshold:
- Any payments that were received for that instalment are reversed
- Based on the current balance (unpaid principal amount) of the loan at the beginning of the schedule in which the payment default occurred, Aura moves the loan into the Lowest Amount to Pay (LAP) slab corresponding to the Currency and Threshold for Current Balance as defined in the Special Interest Scheme Tab.
- The loan’s Annuity is recalculated using the Interest Scheme and Term Months defined for that slab and the Payment Schedule for the Loan is regenerated using the revised annuity amount from the beginning of the Schedule period in which the payment default occurred.
- The Loan Tenor gets extended by the Term Months defined for that slab.
- The interest accrual is revised from the beginning of the schedule in which the payment default occurred.
- The invoice pertaining to the overdue schedule is marked as cancelled; and a revised invoice is generated based on the revised schedule.
- All payments that were reversed are re-applied on the due amounts as per the revised Schedule.
- If there is any excess, it will always be treated as a Prepayment.
- If there is any shortfall vis-a-vis the revised schedule, it will be treated as Overdue and late payment fees / penalty interest on Principal / Interest Overdue will be applied.
- The date on which the loan was moved to the LAP slab is recorded under Moved to Lowest Amount On in the loan’s Overview tab.
- A corresponding event, with Event Code LNSPML, is logged in the Account Event Log for full audit tracking.
- The LNSPML Event and any events that happened before it, cannot be subsequently reversed.
Subsidy
This tab allows you to add / maintain the subsidy for a Loan Product. You can create subsidy of two types such as Claim by bank and Claim by customer. If it is of type Claim by bank, then bank has to claim the subsidized amount from the third party. If it is of type Claim by customer, then client has to pay the total interest and then claim the subsidized amount from the third party. While creating a subsidy you can choose the loan component to be subjected to the subsidy. You can also define parameters such as maximum qualifying threshold and the subsidy period for the subsidy.
The options available under this tab are
Subsidy
To add a Subsidy,
1. Go to Product page, click on subsidy tab.

2. Click Add. The Add Subsidy page appears.
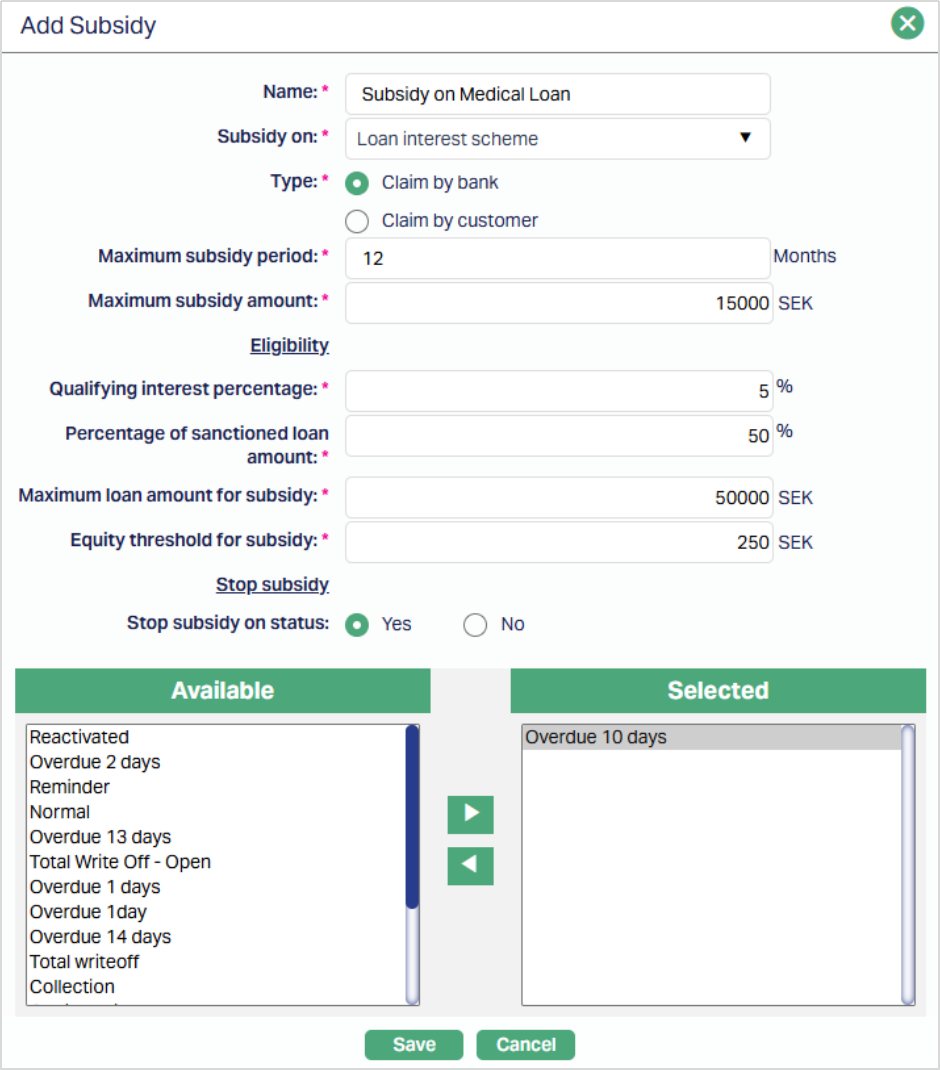
3. Enter the Name of the subsidy.
4. From the Subsidy on drop-down list select the interest component of the loan which is eligible for the subsidy. By default, main loan interest scheme is selected.
5. Select the subsidy Type. The options are
Claim by bank: If this option is selected, then the subsidy is not paid by the client instead, bank claims it from third party → so the subsidy is liquidated into a GL. For example, if the loan interest rate is 12% and subsidy is 2%, then client pays 10%; Bank claims 2% from third party.
Claim by customer: If this option is selected, then the subsidy is paid by client to the bank and is paid back by a third party when claimed by the client. For example, if the loan interest rate is 12% and subsidy is 2%, then client pays 12% and client himself will claim 2% subsidy from third party (based on report from Bank).
6. Enter the Maximum subsidy period in months. The Maximum Subsidy Period has to be less than the Maximum term days of the loan. The loan account will be eligible for this subsidy only within this period.
7. Enter the Maximum subsidy amount in base currency. This is the maximum subsidy for the loan component. This amount has to be less than Maximum Loan Amount for Subsidy. If the loan account currency is different from the base currency, Aura will consider the equivalent amount based on rates for Central Bank Rate Type as specified in Entity Maintenance.
8. Enter the Qualifying interest percentage. This is the interest percentage that qualifies the loan for the subsidy i.e., when the Interest % of the loan component is higher than the Qualifying Interest Percentage the loan account is eligible for subsidy. For example, if the qualifying interest % = 5%, then
| Case | Loan Interest % | Qualified |
|---|---|---|
| 1 | 5 | No |
| 2 | 5.01 | Yes |
| 3 | 4.99 | No |
9. Enter the Percentage of sanctioned loan amount which is eligible for subsidy. However, this is subject to the Maximum Loan Amount for Subsidy given in the next field. Only the lesser of these two will be eligible for subsidy. Example: Eligible % = 80%; Maximum Loan Amount for Subsidy = 50000
| Case | Loan Amt | 80% | Maximum Loan amount for subsidy | Actual Eligible amount for subsidy |
|---|---|---|---|---|
| 1 | 60000 | 48000 | 50000 | 48000 |
| 2 | 70000 | 56000 | 50000 | 50000 |
| 3 | 40000 | 32000 | 50000 | 32000 |
10. Enter the Maximum loan amount for subsidy. Subsidy is allowed only up to this Loan amount. If the loan account currency is different from the base currency, Aura will consider the equivalent amount based on rates for Central Bank Rate Type as specified in Entity Maintenance.
11. Enter the Equity threshold for subsidy. This is the repayment threshold of the loan which decides the eligibility of the subsidy for the Product. As long as the loan amount repaid is <= Equity Threshold for Subsidy, loan is not eligible for subsidy. This ensures that the borrower brings in his part of the equity before he can claim subsidy. The amount entered here has to be less than Maximum Loan Amount for Subsidy. If Repayment Threshold = 0, then, subsidy will start immediately. So, if borrower is paying only interest (and not Principal), still, loan will be eligible for subsidy. Example: Repayment Threshold = 10000. Loan Repayment <= 10000: Loan is not eligible for subsidy. If Loan Repayment > 10000, Loan is eligible for subsidy, till it reaches the Max Loan Amount for subsidy.
12. If you want to stop the subsidy based on the status of the loan account, you can use the Stop subsidy on status. By default, this is No and hence the subsidy is not suspended for any of the statuses. However, if you choose Yes, you can specify the statuses (one or many) using the combo box of list of statuses. When the account reaches any of the chosen statuses, the subsidy will be stopped.
13. Click Save. The subsidy record is created, and the record status will be Pending.
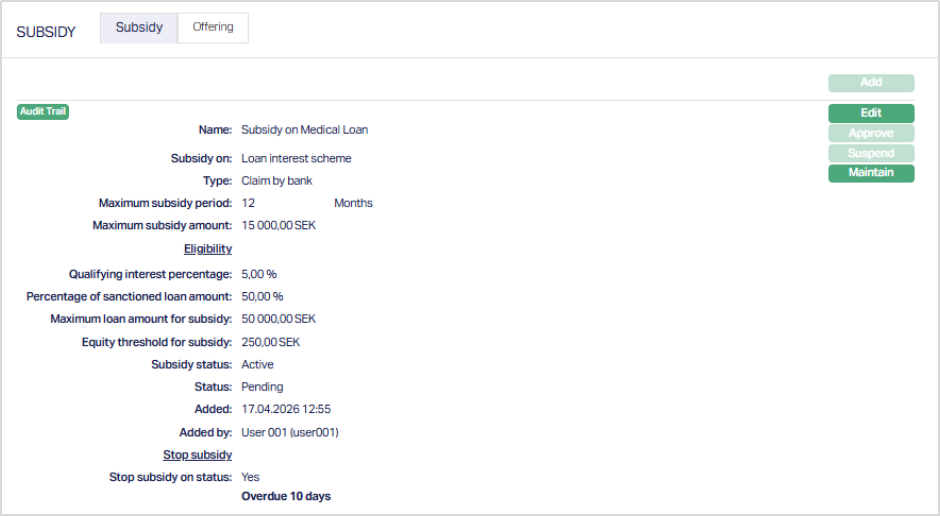
Functions: Add, Edit, Approve, Suspend, Maintain Tenor.
The additional fields are explained below.
Status field denotes the status of the record.
Added field denotes the date on which the record was added.
Added by field denotes the name of the user who created the record.
Edit: Using Edit, you can update details of the Subsidy. The Subsidy details can be edited until the subsidy record status is Pending.
Approve: If you want to approve a Subsidy, then retrieve the record and click on Approve Aura will ask for confirmation. Once the tab is approved, status gets changed from Pending to Approved.
Suspend: You can suspend the Subsidy by a click on Suspend button. When you click on Suspend button, Aura displays an alert message. On confirmation Aura will suspend the subsidy. Suspending a Subsidy only makes it unavailable in future for any new account created. Suspended subsidies can be activated by using Activate button.
To Edit the Subsidy,
1. Access the Product page, click on Subsidy tab and then click Edit. The Edit Subsidy page appears.
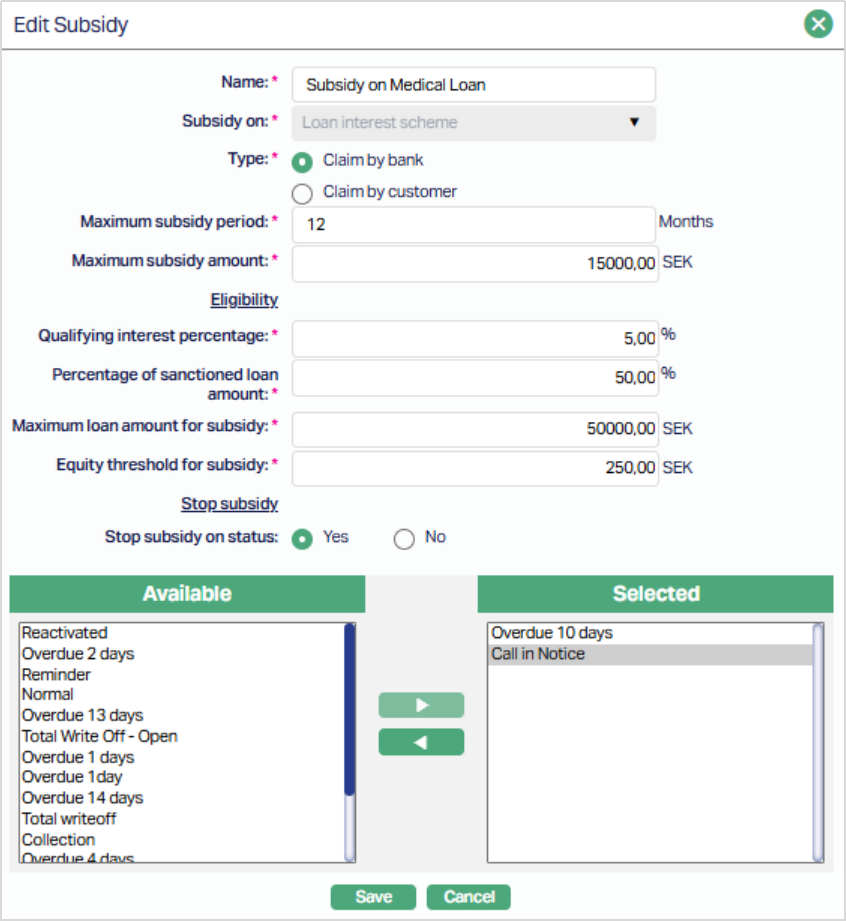
All fields are editable, Except Subsidy On field.
2. Click Save. The Subsidy page appears with the edited details.
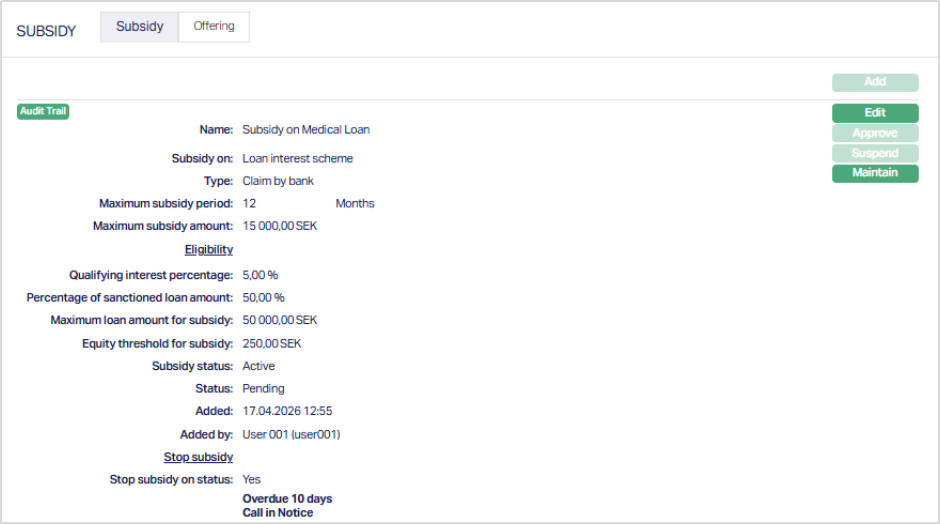
Functions: Edit, Approve, Suspend, Maintain Tenor
Maintaining a Tenor.
Using this, you can maintain varying subsidies for different terms.
1. Access the Product page, click on Subsidy tab and then click Maintain Tenor.
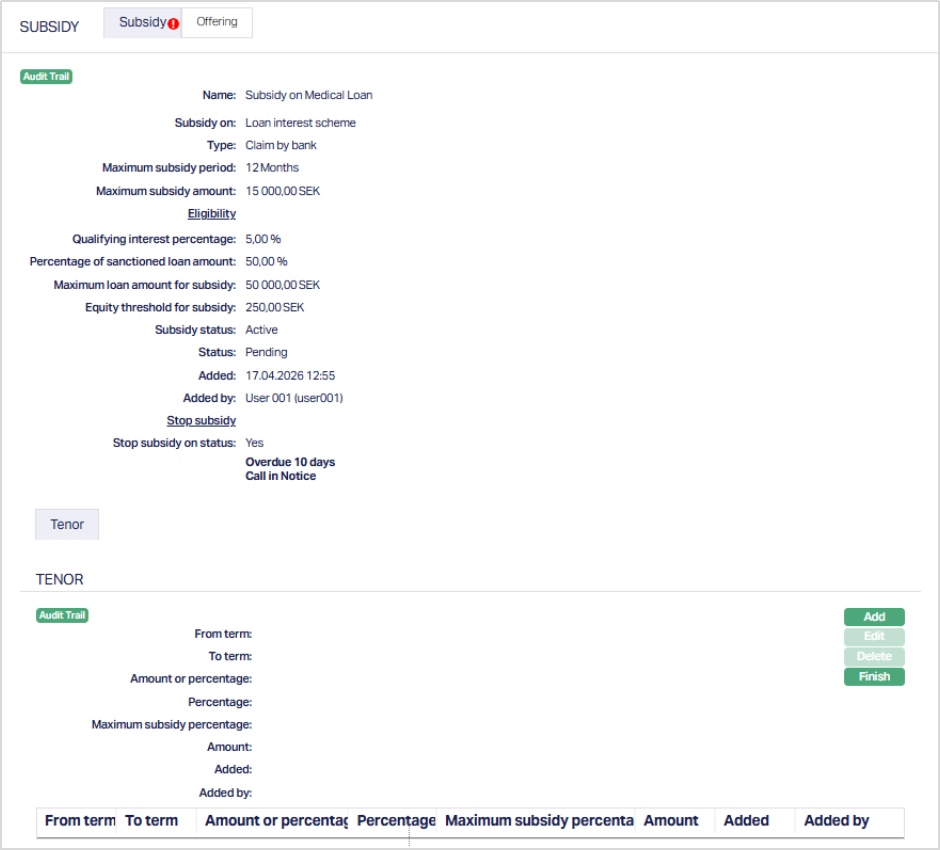
2. Click Add. The Add Tenor page appears .
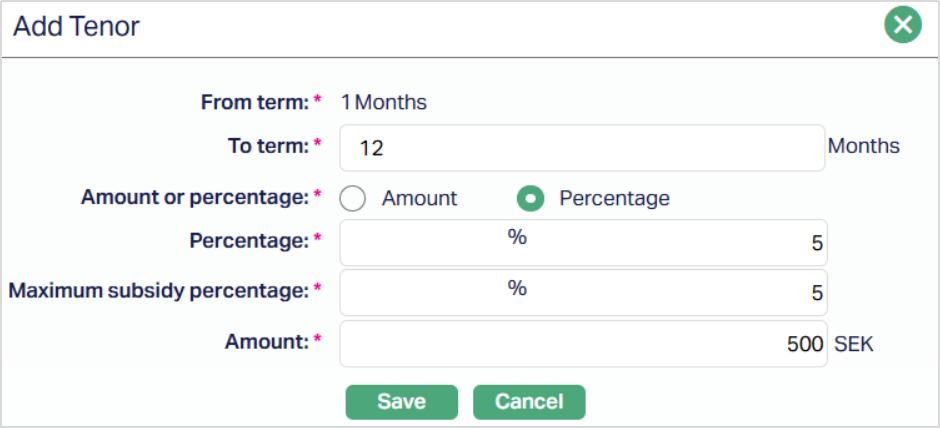
3. The From term will be the 1 for the first tenor record. For subsequent records, this will be calculated as the previous To Term + 1.
4. Enter the To term. This has to be less than or equal to the Maximum Subsidy Period.
5. Select Amount or percentage to indicate if the subsidy is a fixed amount or is to be calculated as a percentage. By default, Amount is selected.
6. Enter the Percentage of the subsidy. This field will be displayed only when Percentage is selected as an option for Amount or Percentage. The % mentioned here is a % on the interest rate. So, if the component chosen has a % of 8 and if this Percentage is 50%, then it means that 50% of 8 which is 4% will be subsidized.
7. Enter the Maximum subsidy percentage. This is the maximum subsidy percentage on the loan interest component and is enabled only if you have chosen Percentage in Amount or Percentage above. For example, If Percentage above is given as 50 %, Loan Component interest is 8 %, then 4 % is Qualified for the Subsidy. However, if Maximum subsidy Percentage is given as 2 % then, only 2 % is to be subsidized. This field will be displayed only when Percentage is selected as an option for Amount or Percentage.
8. Enter the Amount. The Amount entered here is the amount of subsidy by tenor on this component. If this amount is 100 EUR, then until 100 EUR for this tenor, interest on this component is subsidised. The amount will be in terms of the base currency of the entity. If the Account currency is different from the base currency which is at the entity level, the equivalent amount should be arrived at based on the rates for Central Bank Rate Type as specified in Entity Maintenance. Subsidy amount for a Tenor should not exceed the Maximum subsidy amount.
9. Click Save. The Tenor page appears with the added details.
Functions: Add, Edit, Delete and Finish.
10. Click Finish to navigate to the subsidy maintenance screen.
The additional fields are explained below.
Status field denotes the status of the record.
Added field denotes the date on which the record was added.
Added by field denotes the name of the user who created the record.
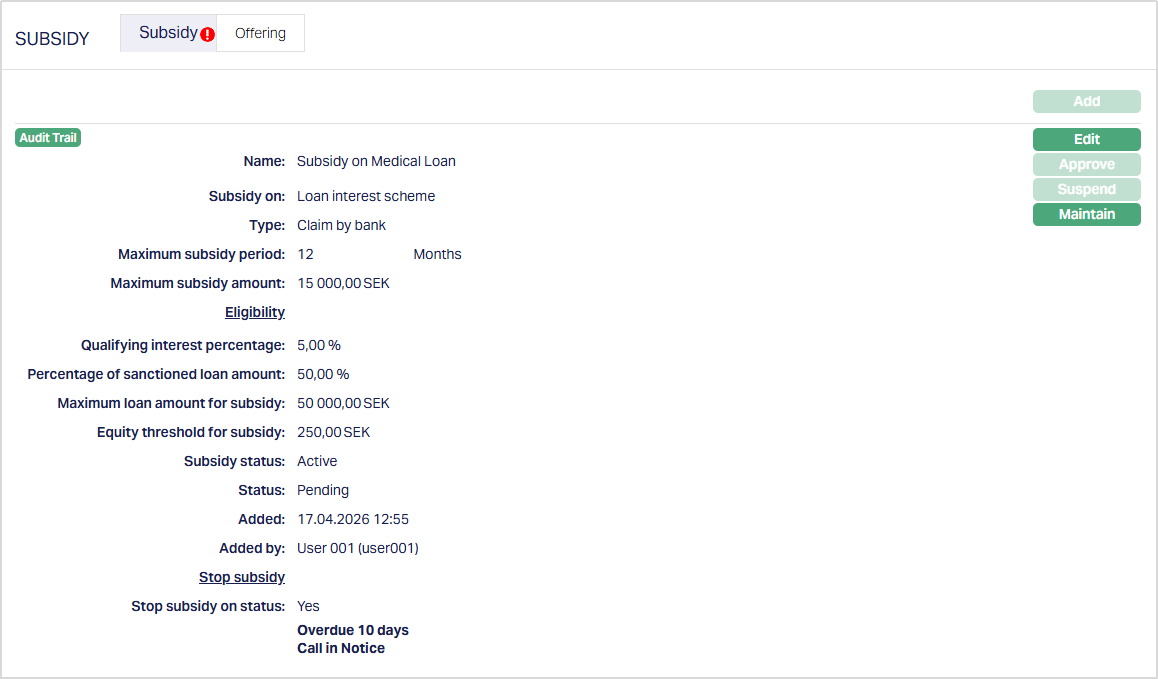
To Edit the Tenor,
1. Click Edit. The Edit Tenor page appears.
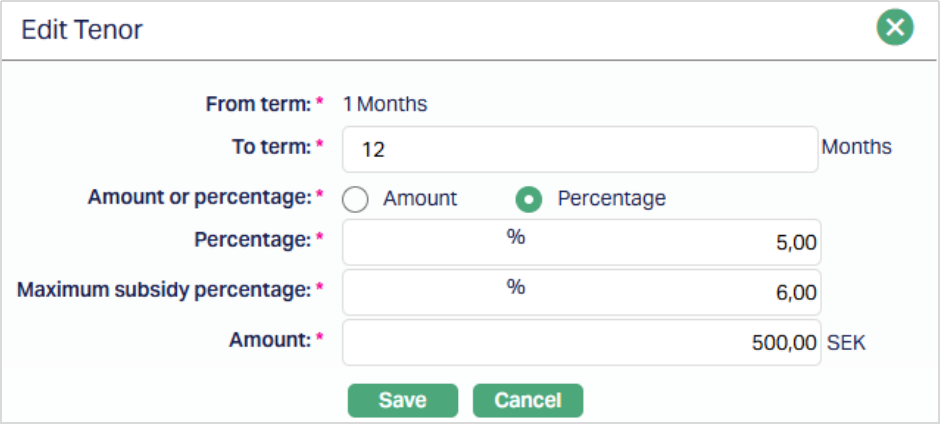
Except From term field, all the fields in the Edit Tenor page are editable. To Term can be edited only for the last record. For other records, this is not editable.
2. Click Save. The Tenor page appears with the edited details.
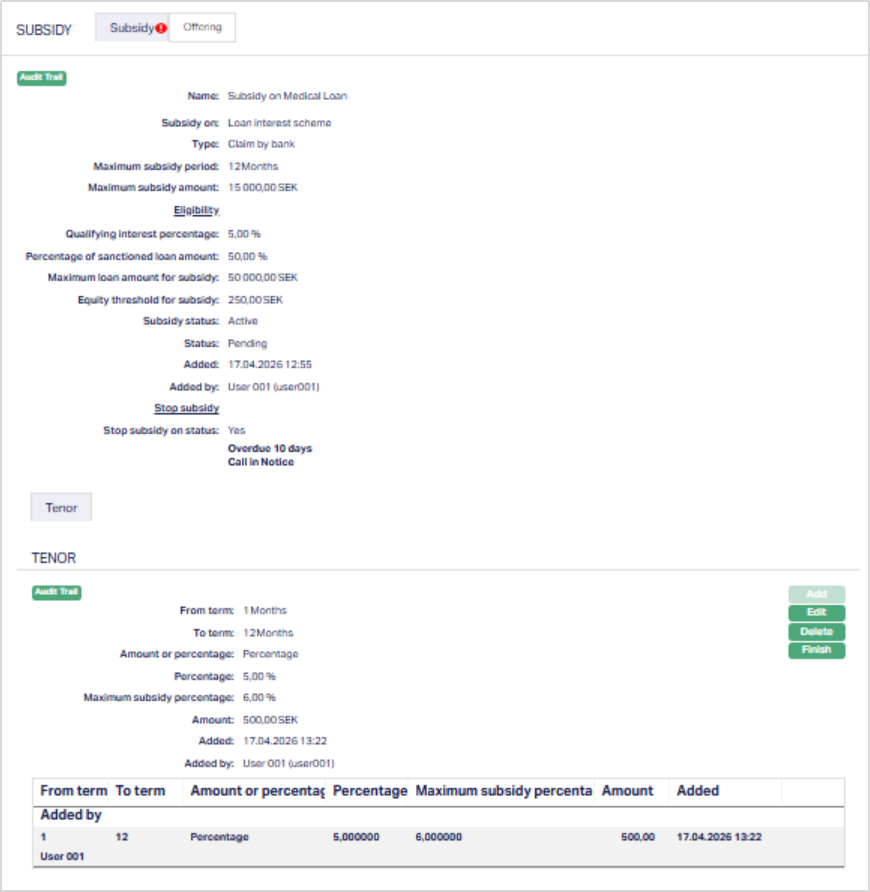
Functions: Add, Edit, Delete, Finish
3. Click Finish to navigate to the subsidy maintenance screen.
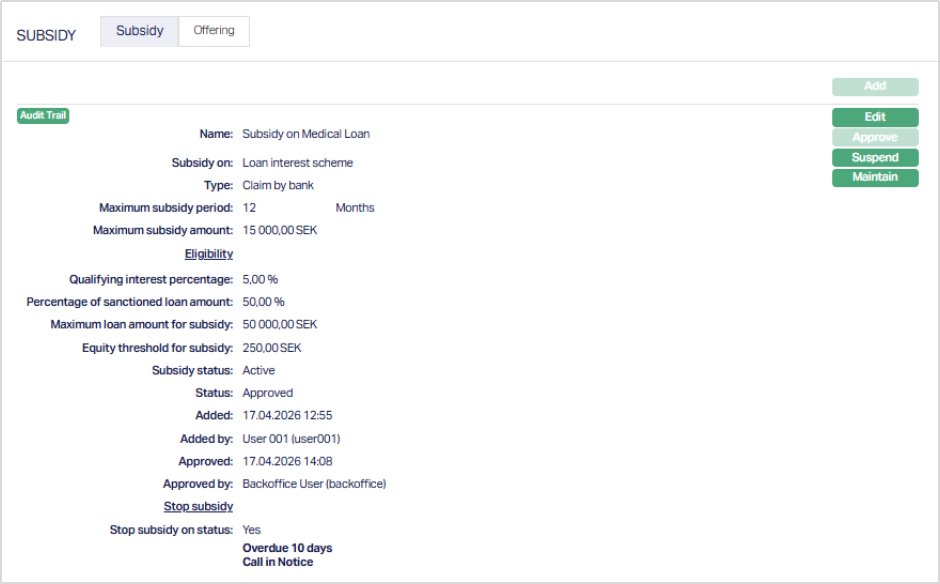
Functions: Add, Edit, Approve, Suspend and Maintain Tenor.
The additional fields are explained below.
Status field denotes the status of the record.
Added field denotes the date on which the record was added.
Added by field denotes the name of the user who created the record.
Approved field denotes date on which the record was approved and is displayed only on approval.
Approved by field denotes name of the user who approved the record and is displayed only on approval.
Note:
After creation / edit, the tab is in Pending status.
When the status is Pending, the Subsidy record can be deleted by the user who created the record by a click on Delete.
To approve, a user different from the one who created / edited has to retrieve the record and click Approve. Once the tab is approved and the red bubble disappears.
Offering
This tab allows you to specify the categories of the clients to whom the subsidy will be offered.
To add the offerings,
1. Access the Subsidy tab in the Product page and click on Offerings tab.

2. By default, All radio button is selected so that this Subsidy is available for all clients.
3. To restrict the clients for which this Subsidy is available, click Selected radio button. Add button is now enabled.
4. Click Add. The Add Offerings page appears where you can select the required offerings from the drop-down list of offerings maintained at Admin → System codes → Categories → Offering. You can thus specify that a subsidy would be available to a client only if he belongs to the specified Offering category.

5. Click Save. The Offering page appears with the added details.

Function: Add, Delete
Delete: You can delete an Offering by clicking on the Delete button. When you click on the Delete button, Aura displays an alert message. On confirmation, Aura will delete the tenor.
Charge
The Charge tab allows you to view and edit the details of different charges for accounts under the Product.
To view/edit the Charge,
1. Access the Product page. Click on the Charge tab to view the details as per sample below. The details are defaulted from the entries that you made during Product creation. For details refer to Mortgage and Loan → New Product → Charge (5/10).
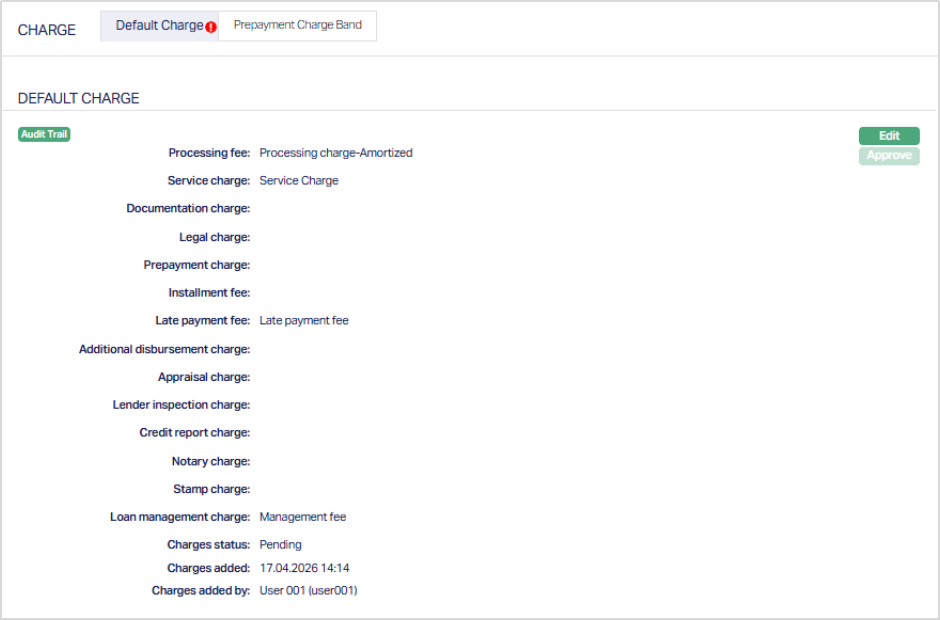
The following fields are shown only in the View screen and are not editable:
Status field denotes the status of the tab.
Added field denotes the date on which the record was added.
Added by field denotes the name of the user who created the record.
Approved field denotes the date on which the record was approved and is displayed only for approved records.
Approved by field denotes name of the user who approved the record and is displayed only for approved records.
2. Click Edit. The Edit Charge page appears.
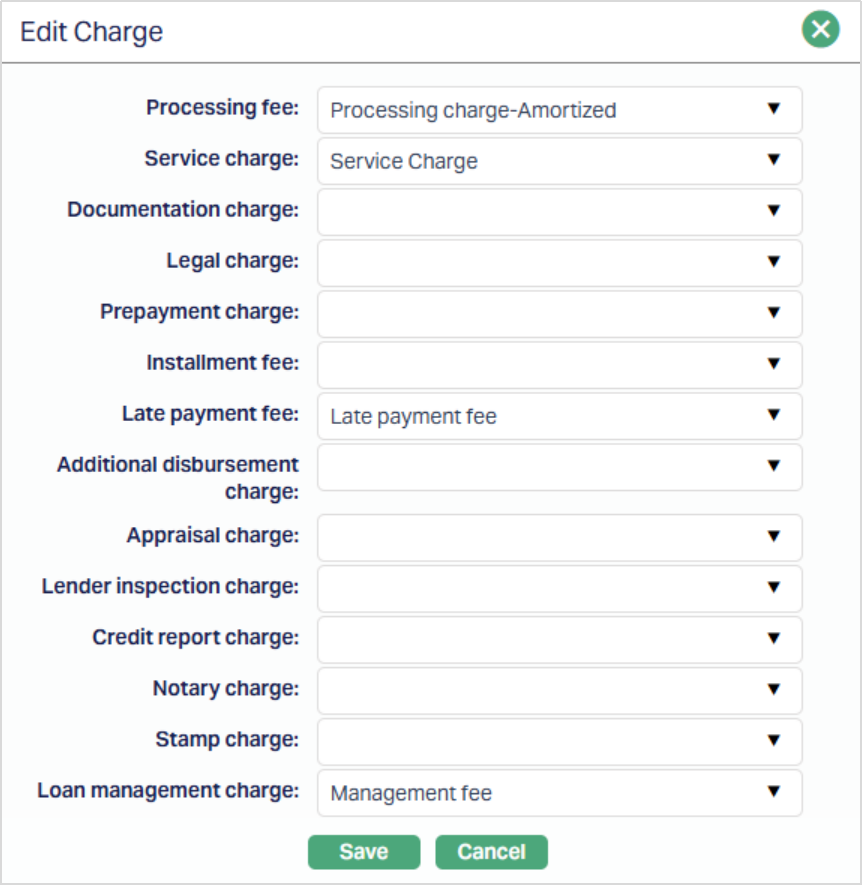
All the fields in Edit Charge are editable.
3. Click Save. The Charge page appears with the edited details.
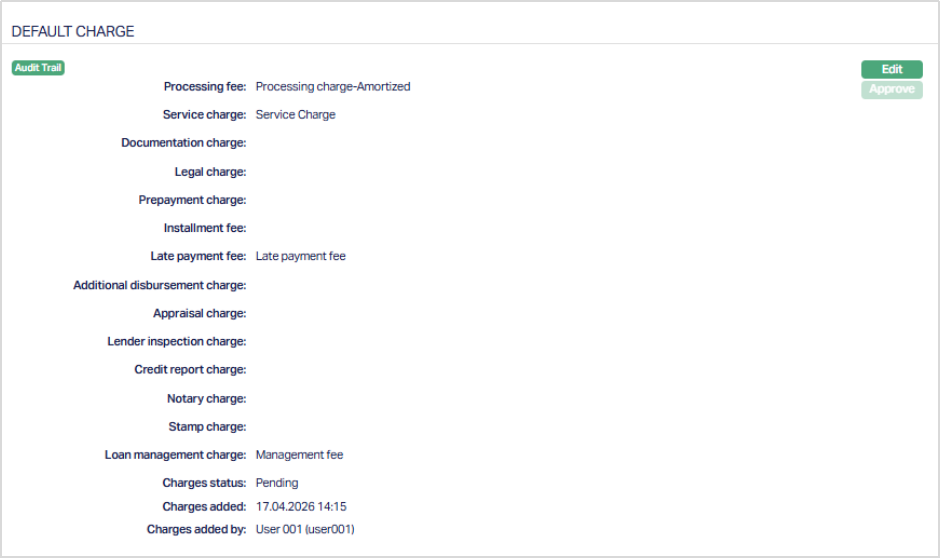
Note: If the charge schemes are edited, then a red bubble appears on the tab and the status of the Charge tab will be Pending till it is approved by another user. On approval, the tab status is set to Approved and the red bubble disappears. If the tab status is Pending, loan accounts under the Product cannot be created. On Approval of the Charges tab, the modified charges will not be applicable on the existing loan accounts.
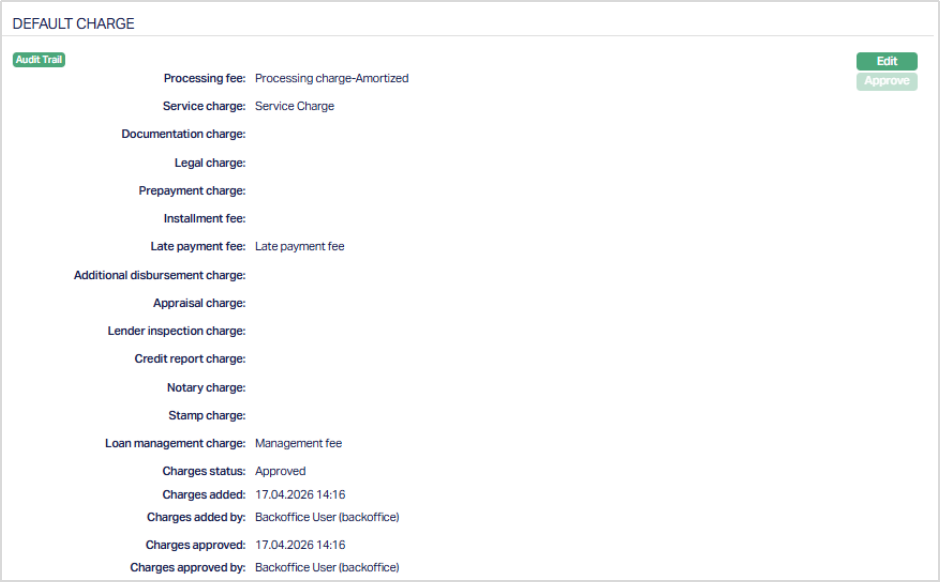
Functions: Edit, Approve
Prepayment Charge Band
Coming Soon
Additional Charge
The Additional Charge tab allows you to view and maintain additional charges for the Product, apart from the ones that are specified under Charges tab. Only Periodic Charges as defined under Admin → Pricing → Charges → Charge Schemes can be mapped under Additional Charges.
To view / Add Additional Charge,
1. Access the Product page. Click on the Additional charge tab. If any additional charges had already been added, these would be displayed; else, it would be blank.
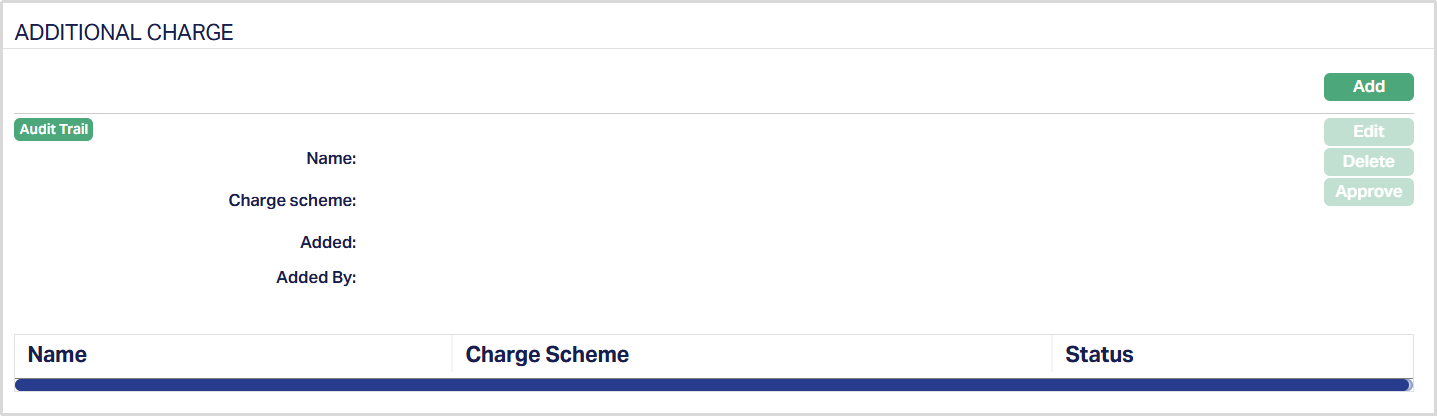
2. Click Add. Add Additional Charge page appears.
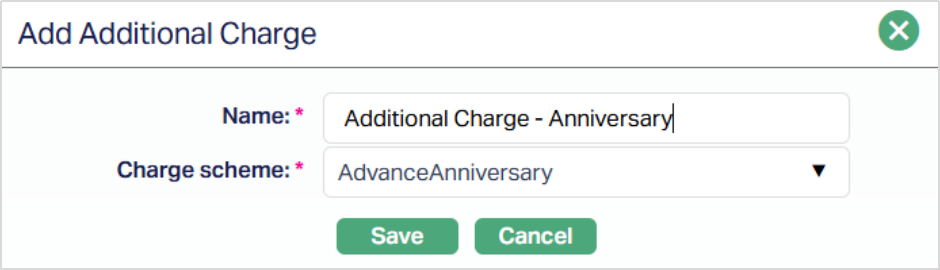
3. Enter the Name of the additional charge to be added.
4. Select the Charge scheme for the Additional Charge from the drop-down list which must be maintained under Admin → Pricing → Charges → Charge Schemes. You can add any active Periodic charge - whether Flat or Banded. If Banded, the Approved amountwill be taken as the basis for the charge.
5. Click Save. Additional Charge page appears with the added details.
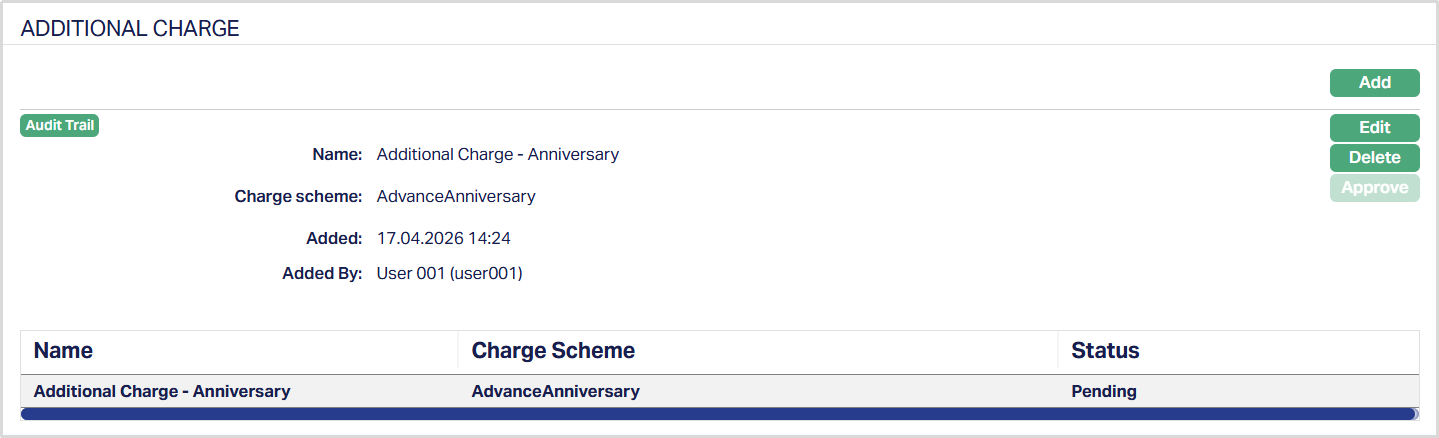
Note: Once the Additional Charge is added or edited, the status of the Additional Charge tab will be Pending till it is approved by another user. On Approval, the Additional Charge tab status is set to Approved and such charges will be applicable on the new Accounts created under this Product.
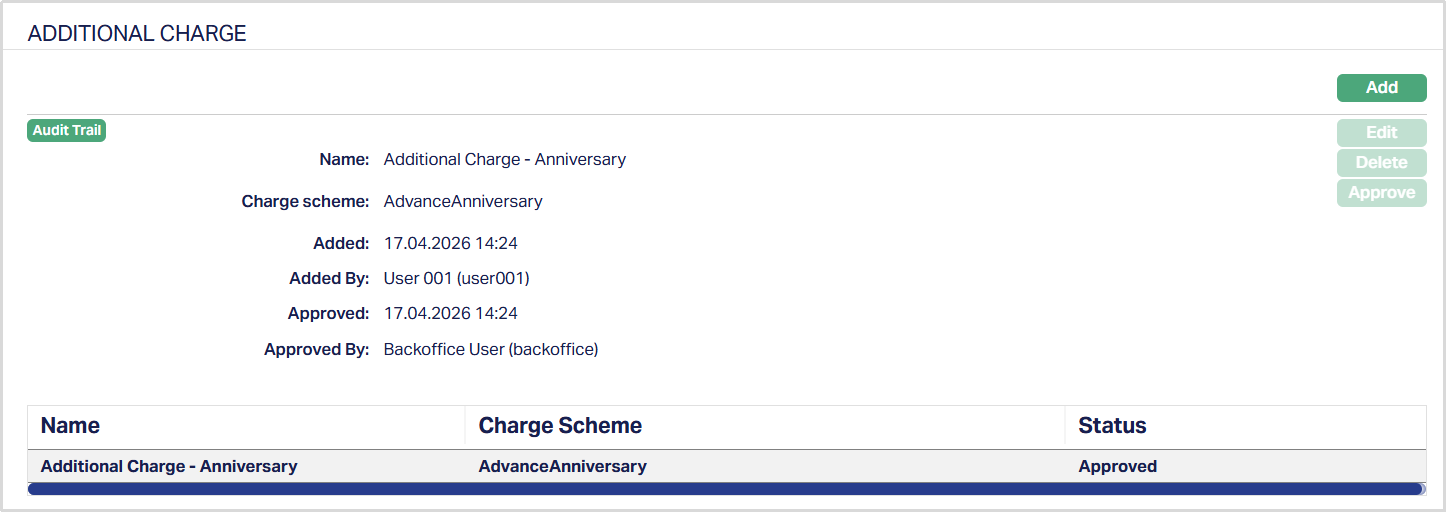
Functions: Add, Edit, Delete, Approve.
The additional fields available are:
Status field denotes the status of the tab.
Added field denotes the date on which the record was added.
Added by field denotes the name of the user who created the record.
Approved field denotes date on which the record was approved and is displayed only for approved records.
Approved by field denotes name of the user who approved the record and is displayed only for approved records.
Similarly, if required you can add as many periodic charges as required under Additional Charge as shown below.
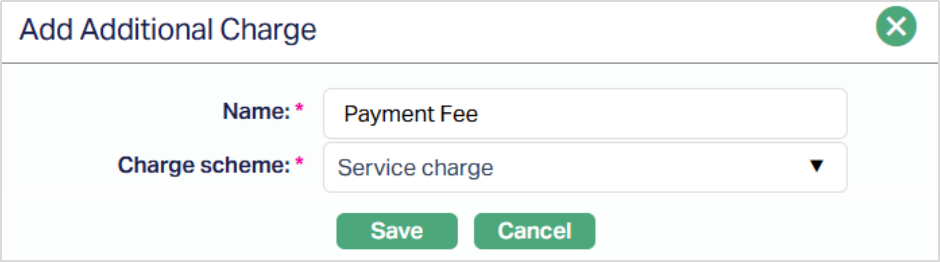
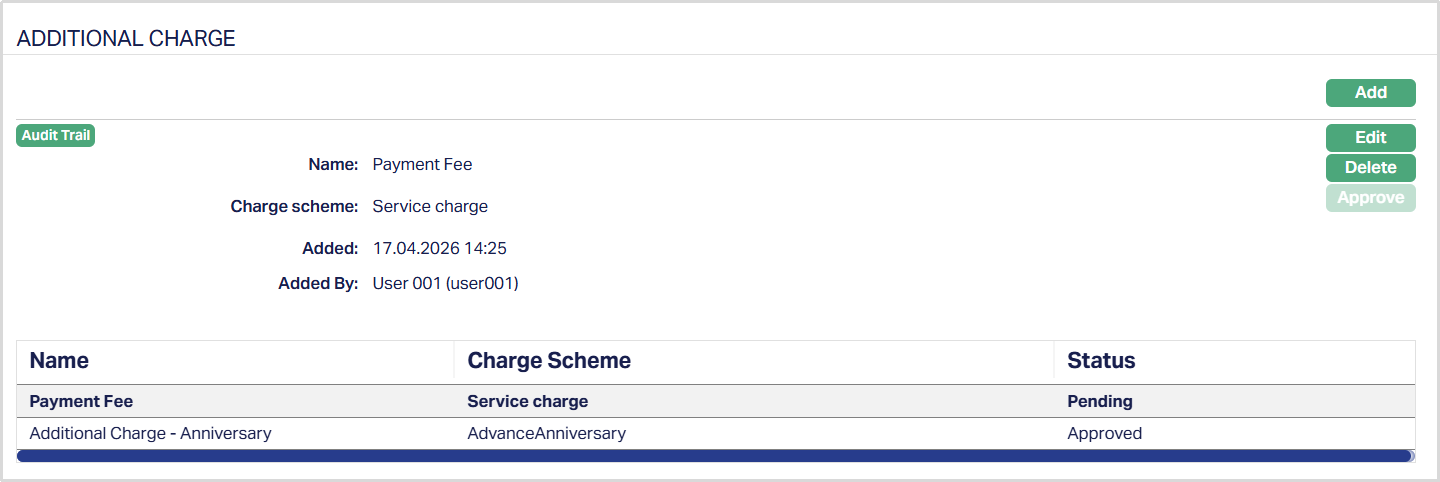
To Edit Additional Charge,
1. Select the required Product from Retail > Settings > Product > Search.
2. Click Additional Charge Tab, select the required record and then Edit. The Edit Additional Charge page appears.
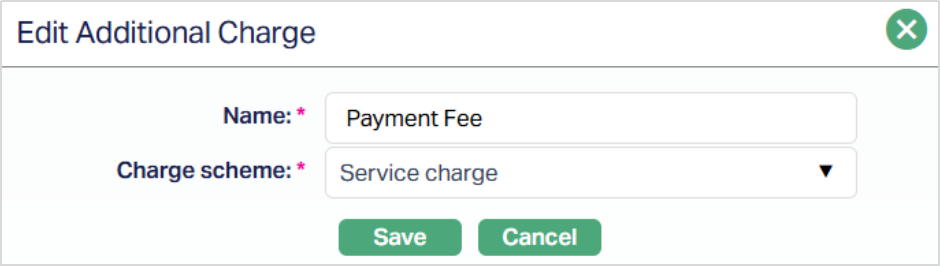
All the fields in Edit Additional Charge are editable.
3. Click Save. The Additional Charge page appears with the edited details.
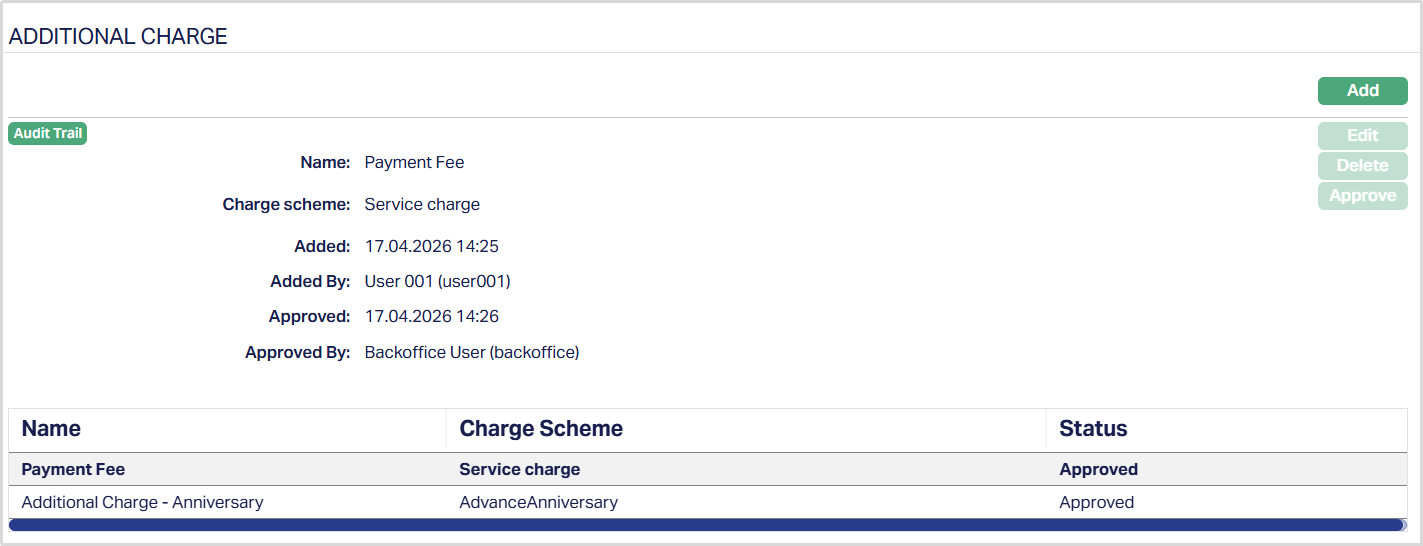
Functions: Add, Edit, Delete, Approve.
Sales
Using this tab, you can view and maintain the sales commission for the Product. On creation of the Product, this tab will be blank and you can edit to input the details of the commission applicable on loan accounts created under this Product.
1. Access Product page and click on the Sales tab.

2. Click Edit. The Edit Sales page appears.
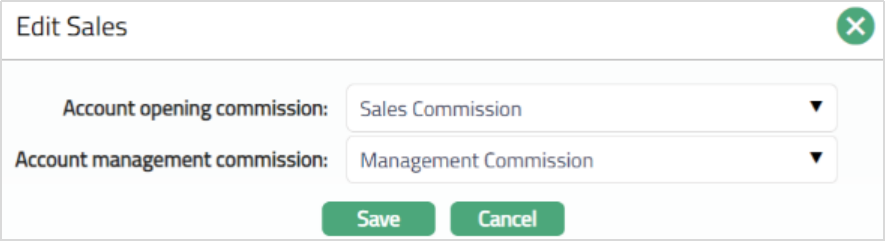
3. If you want to allow a specific commission for account opening, select the Account opening commission from the drop-down list of active Charges maintained under Admin → System code → Charges → Charges, where the Charge type is Event, Flat or Banded and Treat as Commission is Yes.
4. If you want to allow a commission for account management, select the Account management commission from the drop-down list of active Charges maintained under Admin → Pricing → Charges → Charge Scheme, where the Charge type is Periodic, Flat or Banded and Treat as Commission is Yes.
5. Click Save. The Sales tab appears with the edited details.

Function: Edit
Invoice Settings
The Invoice Settings tab allows you to view and edit the invoice settings for the loan accounts created under the Product. You can set parameters like when the invoice has to be generated and the mode through which it has to be communicated to the client, as well as rounding rules and invoices post-maturity date of the loan.
To view / edit the invoice settings,
1. Access the Product page. Click on the Invoice Settings tab to view the details as per sample below. Aura automatically defaults the values as shown in the screen below
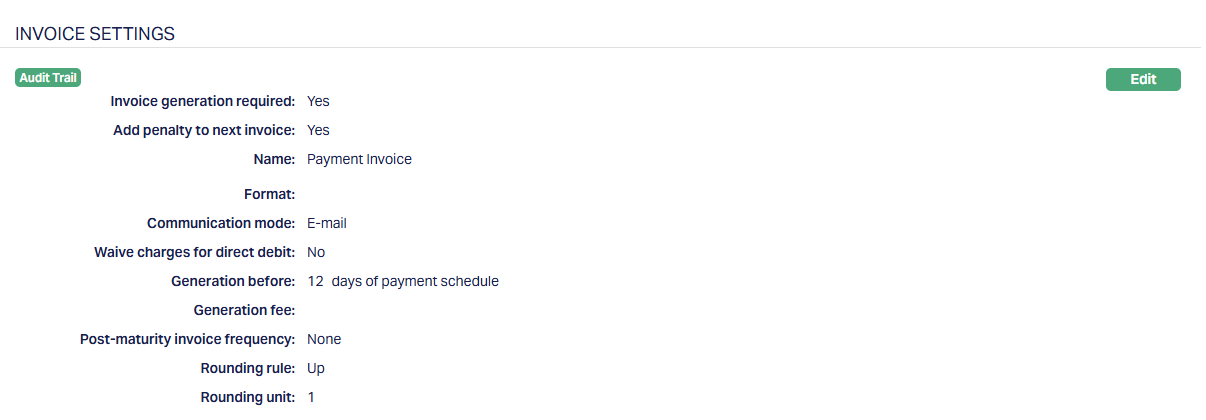
2. Click Edit. Edit Invoice Settings page appears.

3. By default, Yes radio button is selected for Invoice generation required field. Only when this is Yes, all the subsequent fields in Edit Invoice Settings can be updated during edit. If you select No radio button for Invoice Generation Required field, all the subsequent fields will be disabled.
4. Select an option Yes or No for the Add penalty to next invoice to add the penalty charged for a loan account in the next invoice.
If Add Penalty to Next Invoice is marked as Yes, then the Penalty Interest on Principal / Interest Overdue from the previous invoice generation date to the current invoice generation date will be included in the invoice. During manual repayment of an invoice, such amounts will be shown under the invoice in which these were included.
If Add Penalty to Next Invoice is marked as No, then the Penalty Interest on Principal / Interest Overdue from the previous invoice generation date to the current invoice generation date will not be included in the invoice and will only be shown in the Manual Repayment screen.
5. Enter a name for the invoice in the Name field.
6. Select Format from the drop-down list of statement formats that have been maintained under Admin → System codes → Generic definition → Invoice formats. It is the Format of the invoice that is to be generated.
7. Select Communication mode from the drop-down list - i.e., the manner in which you want to send the invoice. Available options are Data handoff, Email and Internet banking.
8. If you would like to Waive Charges for Direct Debit, ensure to check the box for the same. For any loan account created under this Product, if the repayment is through a Direct Debit arrangement, invoice generation fee will be waived.
9. In the Generation Before field, enter the number of days before payment due date on which the invoice has to be generated.
10. Select the required Generation fee from the drop-down list maintained under the list of Charges from Admin → Pricing → Charges → Charge Schemes where the charge is Active, Event-based, Treat as Commission = No and Amortization is set as No. In case of Banded charges, the charge amount will be calculated on the basis of the Amount Sanctioned. The charge amount is applied when the invoice is generated.
11. Select the required Post-maturity invoice frequency from the drop-down list. Available options are Monthly and None. - If None is chosen, Aura will not generate any invoice on loan accounts whose maturity date is past. - If Monthly is chosen, Aura will generate a monthly invoice, even after teh maturity date is past.
12. Select the required Rounding rule from the drop-down list. The available list are Up and None
13. If Rounding Rule above is Up, Rounding unit is enabled. Select the required unit from the available options: 0.1, 1, 10. Based on the option chosen, the invoice amount will be rounded up as shown below: Sum of the various unpaid amounts in an Invoice = 123.45
| Rounding Unit | Rounded Amount |
|---|---|
| 0.1 | 123.50 |
| 1 | 124.00 |
| 10 | 130.00 |
- Click Save. The Invoice Settings page appears with the edited details.
Functions: Edit.
Secondary Collection
You can configure the Secondary Collection tab at the product level to define whether Aura should allow collection from Beneficial Owners and under what conditions such collection should be initiated.
This configuration acts as the master control for Secondary Collection. All loan accounts created under the product will derive their Secondary Collection behaviour from this setup. If Secondary Collection is not enabled at the product level, Aura will not perform any Secondary Collection processing for accounts under that product, regardless of account-level configuration.
To configure Secondary Collection,
1. Access the Mortgage and Loan Product page. Go to Repayment tab and then Invoice Settings tab, select Secondary Collection sub-tab.

2. Click Edit. The Edit Secondary Collection page appears.
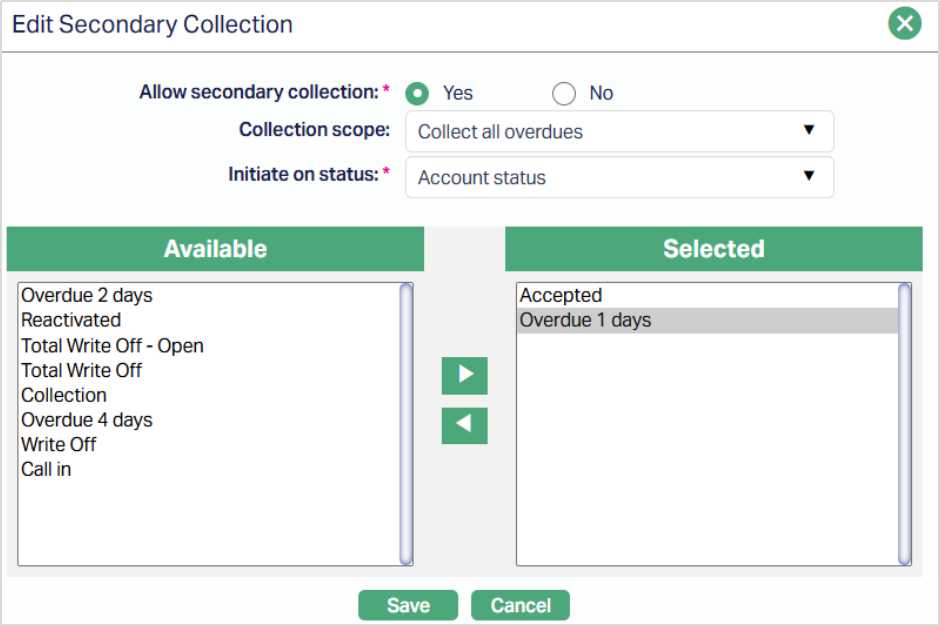
3. Allow Secondary Collection is used to enable or disable Secondary Collection for the product.
When you set this field to Yes, Aura is allowed to evaluate loan accounts for Secondary Collection processing based on the configured conditions. When set to No, Secondary Collection is completely disabled, and no collection attempts will be made from Beneficial Owners.
By default, this field is set to No during product creation.
4. Collection Scope is used to define what dues should be considered when Secondary Collection is triggered. This field becomes available only when Allow Secondary Collection is set to Yes.
Aura supports three collection scopes -
- Collect all overdues - Aura considers the total outstanding amount from all overdue invoices at the time of processing.
- Collect current dues - Aura considers only the unpaid amount from the current invoice or upcoming schedule.
- Collect specific overdues - Aura selects a defined number of overdue invoices based on the Number of Overdue Cycles and processes them in chronological order, starting from the oldest overdue invoice.
Note: For collection scopes Collect all overdues and Collect specific overdues, Aura applies threshold validation during processing. Secondary Collection will be initiated only if the total eligible overdue amount exceeds the configured threshold.
5. Number of Overdue Cycles - you use this field to specify how many overdue invoices should be considered when the Collection Scope is set to Collect Specific Overdues. This field is displayed only when Collection Scope is set to Collect Specific Overdues and is mandatory in that case.
During processing, Aura selects overdue invoices in sequence from the oldest to the latest, up to the number specified in this field. If the number of available overdue invoices is less than the configured value, Aura considers all available overdue invoices.
This field accepts only positive integers between 1 and 99. If the field is left blank when required, Aura displays an error message indicating that the number of overdue cycles is required.
6. Initiate on Status defines the condition that triggers Secondary Collection This field is displayed and becomes conditionally mandatory only when Allow Secondary Collection is set to Yes.
You can configure the trigger based on either:
- Account Status
- Payment Status
Based on your selection, Aura evaluates the corresponding status of the loan account during processing. Secondary Collection is initiated only when the account status or payment status matches the configured condition.
7. Available Status and Selected Status - You use these fields to define the specific statuses that should trigger Secondary Collection.
The Available Status field displays the list of applicable statuses based on the value selected in Initiate on Status. This includes both predefined loan statuses and user-defined statuses configured in Aura, provided they are active.
You can select one or more statuses and move them to the Selected Status field. Secondary Collection is triggered only when the current status of the loan account matches one of the selected statuses.
If no matching status is found during processing, Aura will not initiate Secondary Collection for the account.
8. Click Save. The Secondary Collection tab appears with the added details.
Note: When you update and save the Secondary Collection configuration at the product level, the changes apply only to future processing.
Aura does not automatically update or modify existing account-level configurations or previously created Secondary Collection records. Existing records will continue to be processed based on their original configuration.
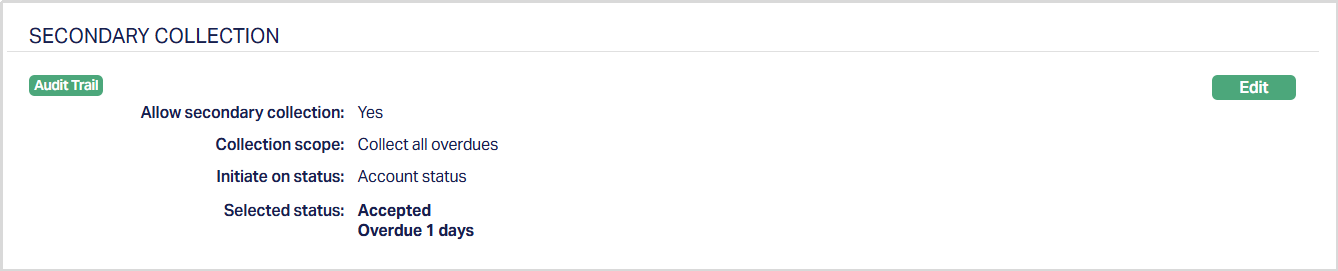
Function: Edit
Important Behaviour:
No Auto Propagation - When you update and save the Secondary Collection configuration at the product level, the changes apply only to future processing.
Aura does not automatically update or modify existing account-level configurations or previously created Secondary Collection records. Existing records will continue to be processed based on their original configuration.
Threshold Validation - During Secondary Collection processing, Aura performs a threshold validation before initiating collection.
If the total eligible overdue amount is less than or equal to the configured threshold amount (maintained separately at the product level under threshold settings), Aura will not initiate Secondary Collection and no records will be created.
Secondary Collection is triggered only when the eligible amount exceeds the defined threshold.
System Behaviour:
Based on the configuration defined in this tab, Aura performs Secondary Collection processing through batch execution.
Aura evaluates eligible loan accounts, validates product-level configuration, checks status conditions, applies the configured collection scope and threshold validation, and creates Secondary Collection records for further processing through Direct Debit or Payment by Invoice.
Secondary Collection does not create or modify invoice records. All collection activity is managed separately while maintaining a reference to the original invoice.
Reminder Preferences
The Reminder preferences tab allows you to add, view and edit the preferences based on which the reminders are sent to the client for recovering their dues. You can also specify if such reminders should not be sent using the Threshold sub-tab. On creation of a loan account under the Product, all the reminder preferences are defaulted to the Account, with an option to add / remove / modify these at the account. Only if the Reminder Preference is available at the Product, the Threshold can be defined to specify the Overdue Amount that should be reached for the Reminder to be sent.
The sub-tabs available under this tab are
Preferences sub-tab:
The Preferences sub-tab enables you to add, edit or delete reminder preferences. These preferences control how reminders are generated and communicated for loans accounts created under that Product.
To add / edit / view the Preferences,
1. Access the Mortgage and Loan Product page, select Repayment tab and click the Reminder Preferences tab. The Preferences sub-tab is opened by default.
If any preferences have already been added, they would be displayed; else, the page will be blank.
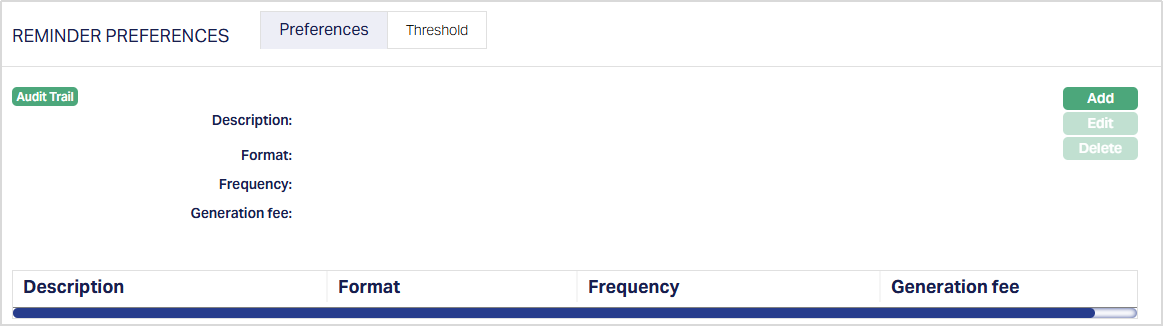
2. Click Add. The Add Reminder Preferences page appears.
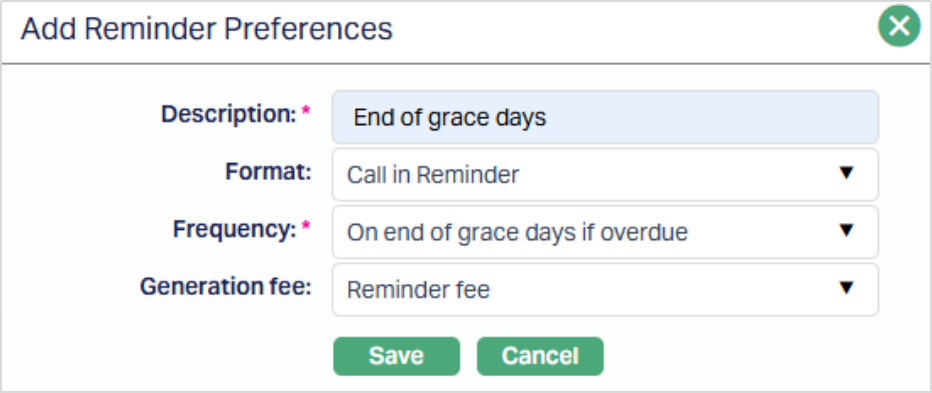
3. Enter a name or description for the reminder in the Description.
4. Select the Format of the reminder from the drop-down list of available Reminder Formats maintained under Admin → System Codes → Generic Definition → Reminder Formats.
5. Select the Frequency at which the reminder should be generated. The available options are predefined in Aura and cannot be modified. Options include:
- On Payment Due date: The reminder will be generated on the due date of the payment.
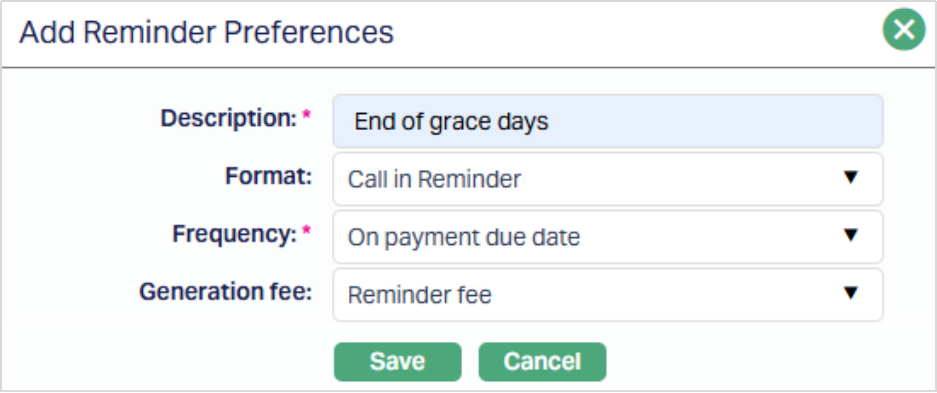
- X days before payment due date: The Reminder will be generated X number of days before the due date of the payment. If you select this option, enter the number of days in the Days field that appears, as shown in the sample screenshot below.
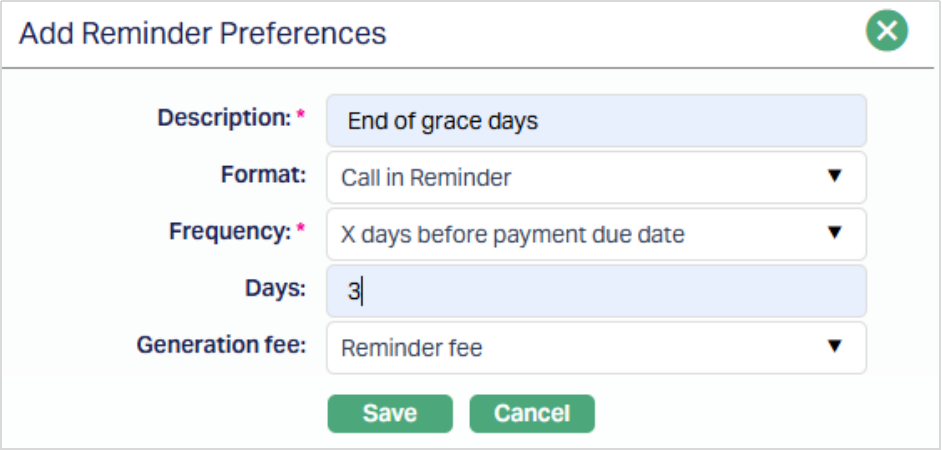
- X days after payment due date: The Reminder will be generated X number of days after the due date of the payment. If you select this option, enter the number of days in the Days field that appears, as shown in the sample screenshot given below
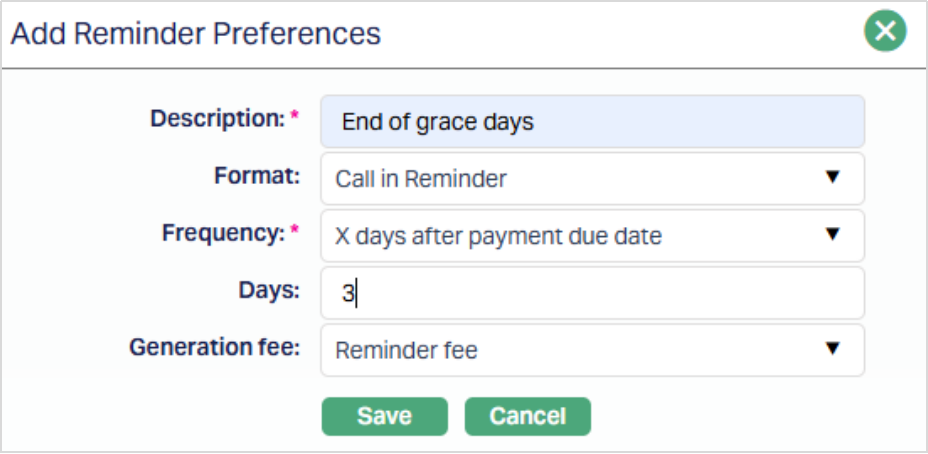
- On end of grace days if overdue: The reminder will be generated on the last day of grace days, if the payment is still pending.
- X days after grace days if overdue: The reminder will be generated X number of days after grace days are over, if the payment is still pending. If you select this option, enter the number of days in the Days field that appears, as shown in the sample screenshot below.
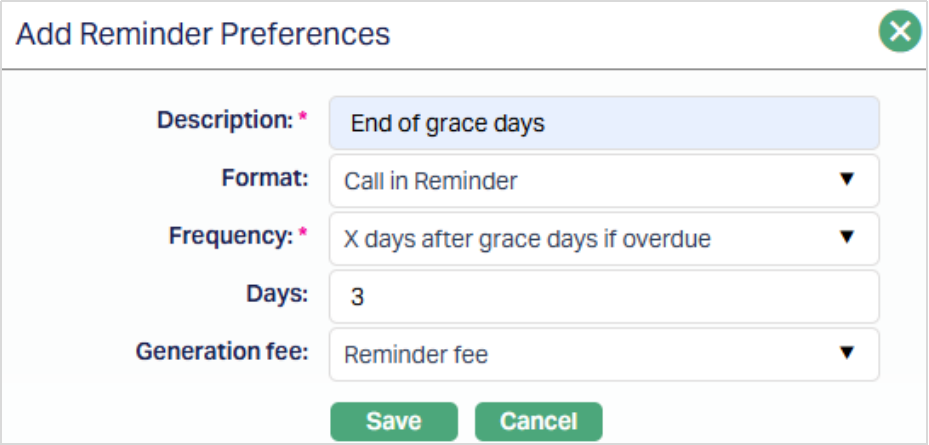
- X days after reminder Y: The reminder will be generated X days after the generation of the existing reminder Y. If you select this option, enter the number of days in the Days field that appears, and select the reminder Y from the drop-down list of available reminders, as shown in the sample screenshot below.

- X days after payment status Y: The reminder will be generated X number of days after the payment status Y. If you select this option, enter the number of days in the Days field that appears, and select the Payment status Y from the drop-down list of Payment Status records as maintained under Admin → Status → Loan Status, as shown in the sample screenshot below.
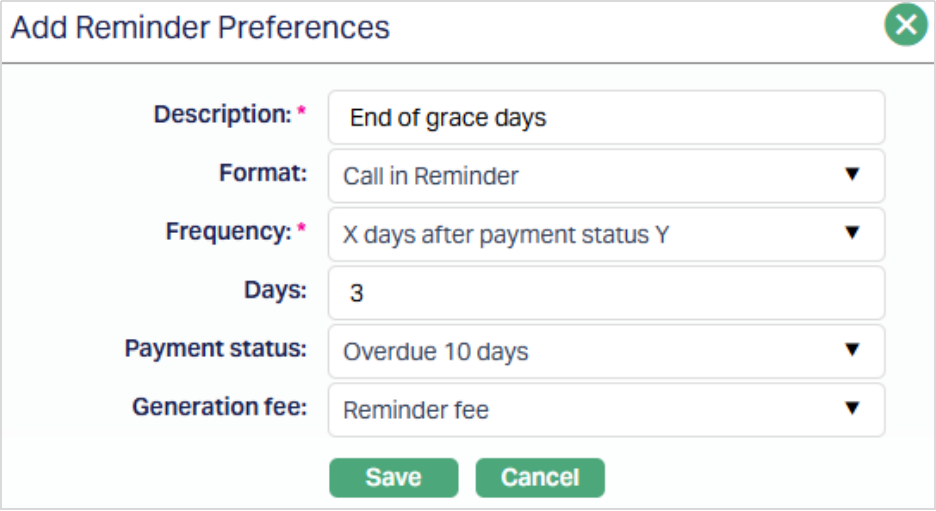
6. Select the required Generation fee from the drop-down list of Charges maintained under Admin → Pricing → Charges → Charge scheme.
7. Click Save. The Preferences tab appears with the added details.
Note: As soon as the Reminder Preference record is saved, the Threshold tab will be populated with for each currency allowed under the Product. See section on Threshold for details.
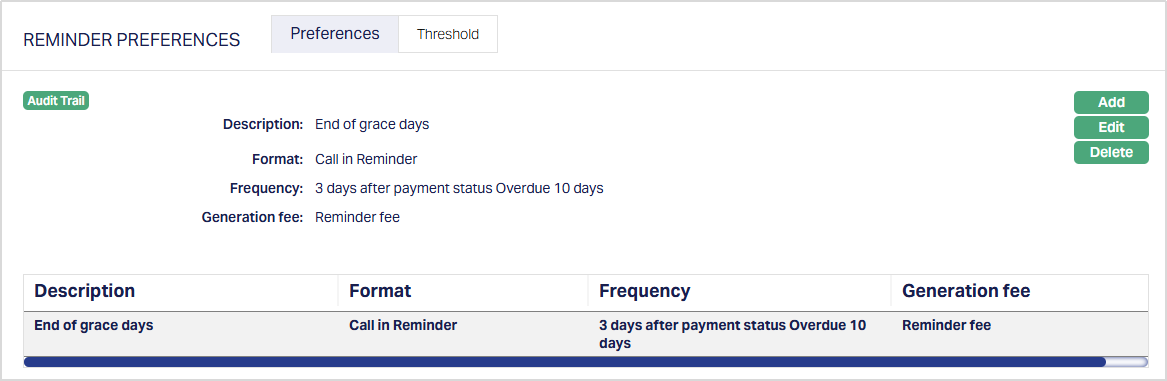
Functions: Add, Edit, Delete.
To edit the Preferences,
1. Click Edit. Edit Reminder Preferences page appears.
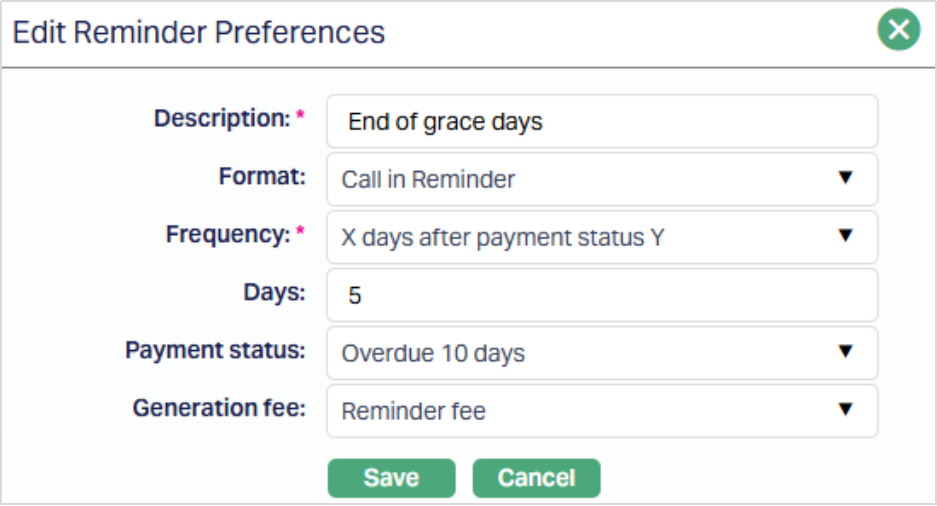
All fields are editable.
2. Click Save. The Reminder Preferences page appears with the edited details.
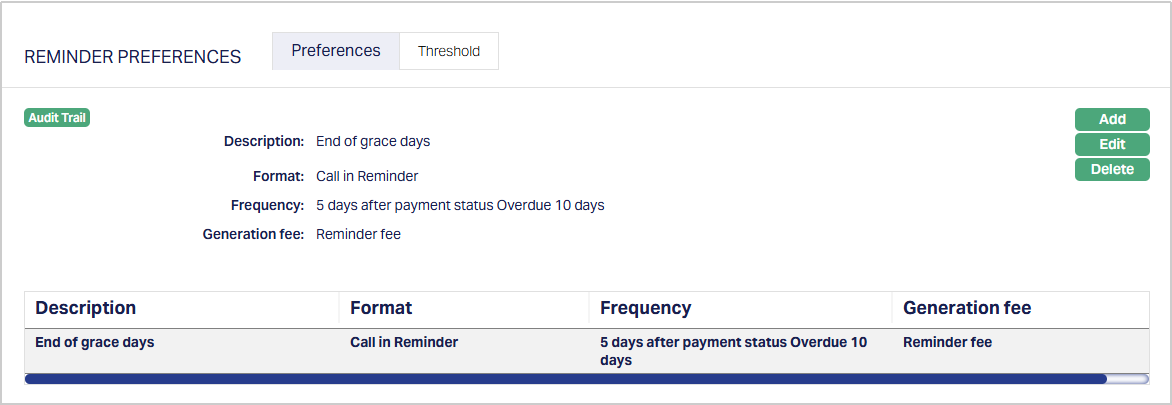
Functions: Add, Edit, Delete.
Delete: You can delete a Reminder Preference by clicking on the Delete button. Aura will ask for confirmation, on approving which the selected Reminder Preference will be deleted. Such reminders will not be defaulted to loan accounts created after such deletion.
Threshold sub-tab:
The Threshold sub-tab allows you to define and maintain the minimum overdue amount required for a reminder to be triggered. When a reminder is added under the Preferences sub-tab, a threshold record is automatically created with the Threshold Amount = 0.00 for each currency that is mapped to the Product.
The grid displays the following columns:
- Currency - Currency in which the Product operates.
- Description - Description of the reminder preference (taken from the Preferences sub-tab)
- Frequency - Frequency of the reminder as defined in Preferences.
- Threshold amount - Defaulted as 0.00 when a new reminder is added; editable to define the minimum overdue amount required to trigger the reminder.
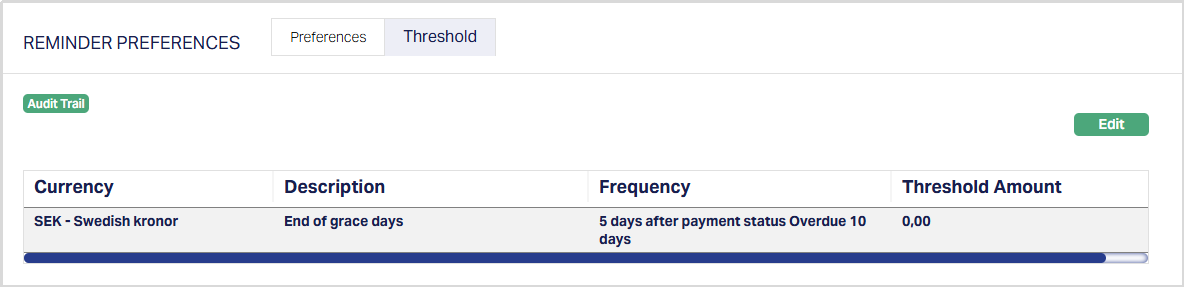
Function: Edit.
To edit Threshold,
1. Click Edit. The Edit Threshold page appears.

Only the Threshold Amount field is editable.
2. Enter the required Threshold amount for that reminder record. This amount represents the minimum overdue value that must be reached for the reminder to be triggered. If the overdue amount of the loan <= Threshold Amount specified here, the reminder will not be generated.
3. Click Save. The updated threshold values appear in the grid.
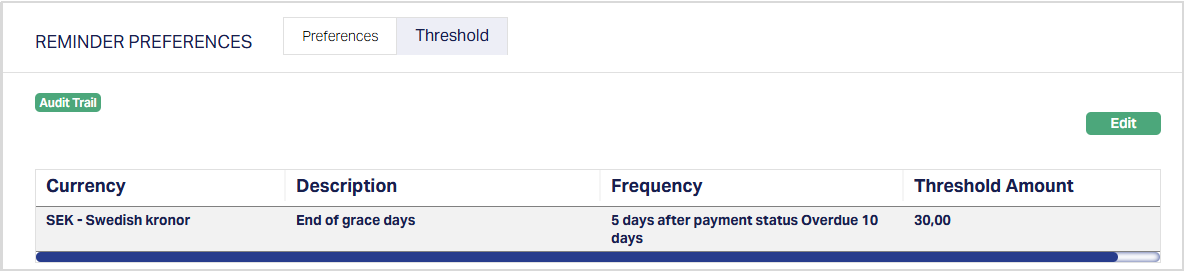
Function: Edit.
Status Rule
Status Rule option allows you to add any rules / triggers between origin Account Status or Payment Status and destination Account Status or Payment Status to suit various business rules. For example, if you want to make the Payment Status of an account as Overdue 30 since a payment is overdue for 30 days for the account, you can build a rule as follows: If the current Payment Status of an account is Normal, and Overdue days > 30 days, move the Payment Status of the account to Overdue 30. You can use multiple such conditions to build rules to move statuses as per your business requirements.
The Account Statuses or Payment Statuses could be pre-shipped, or user defined. The Status Rule is available at the Product level. Based on the rules set up, the account status and / or Payment Status of the accounts is moved automatically at the end of the day. The rules will apply in the order of preference that you set up under the Rule Sequence.
The two sub-tabs are:
Rules
To add Rules in Status Rules,
1. Access the Product page and click on Status Rules and then Rule tab. If any Rules had already been defined, the same will be displayed; else, it will be blank.
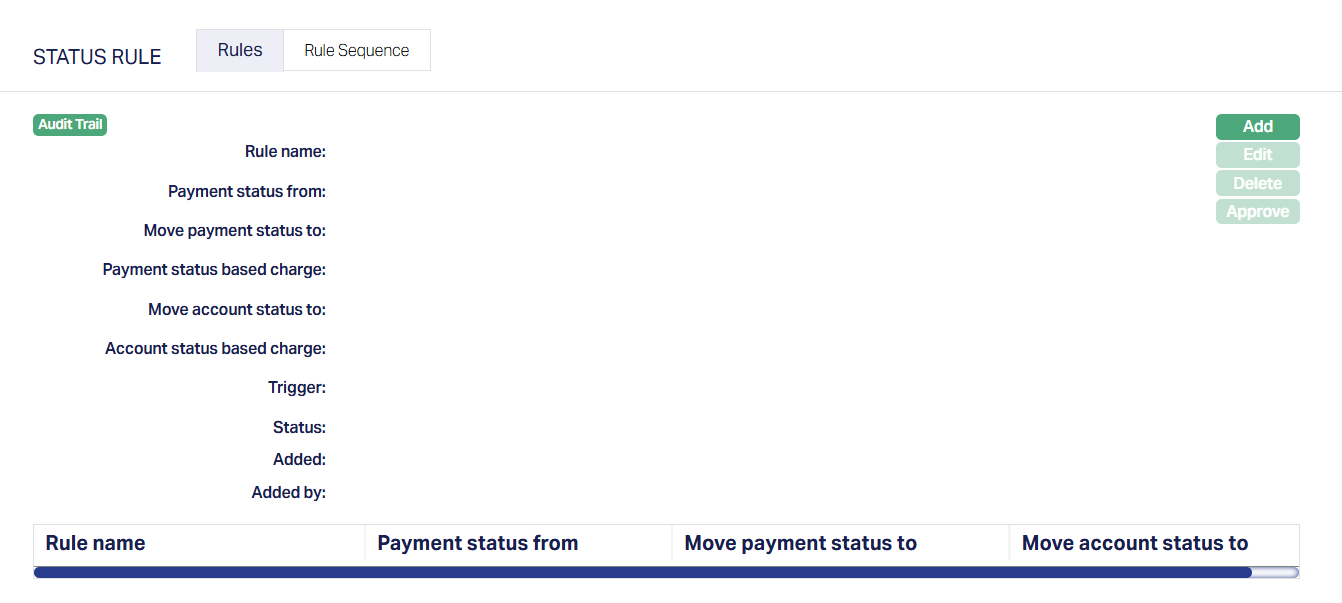
2. Click Add. Add Rule page appears.
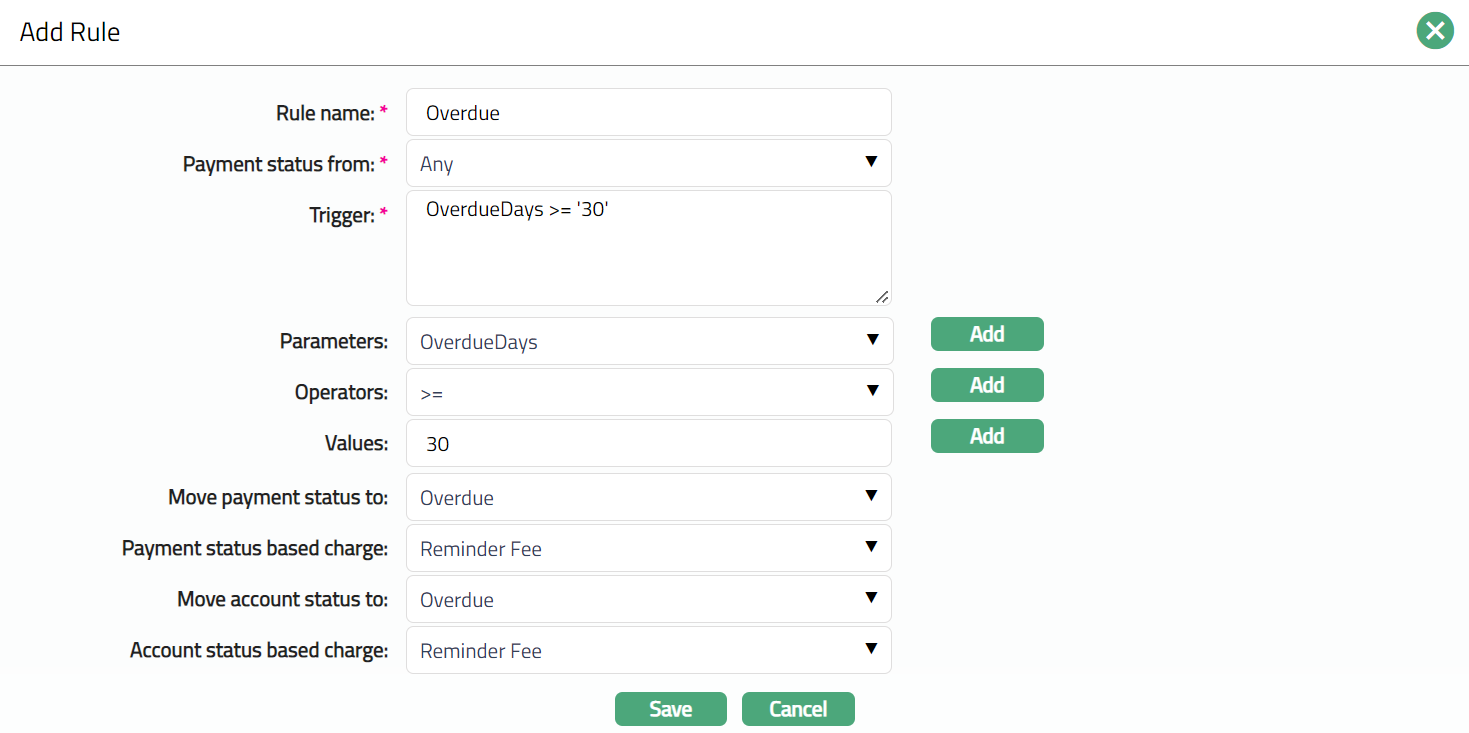
3. Enter the Rule name as required for this Rule.
4. Select the Payment status from using the drop-down list of the following:
- Pre-shipped Payment Status values: Any and Normal
- Active user-defined Payment statuses maintained under Admin → System Codes → Generic definitions → Loan status.
5. Enter the Trigger details. Each trigger will constitute a collection of individual conditions joined by AND and / OR operator. The Trigger details can be built using the Parameter, Operator and Values.
6. Select the Parameter from the pre-shipped list and click Add. Aura will push the selected value of Parameter into the Trigger text area above. Based on the Parameter selected, the Operator and Values will change.
7. Select the Operator from the pre-shipped list and click Add. Aura will push the selected value of Operator into the Trigger text area above.
8. Enter the required Values for the Parameter and click Add. Aura will push the selected value into Trigger text area above.
Details of the Parameter, Operator and Values:
- Account Currency: If this is the selected parameter, the value field will display a list of all the active GL currencies. If this parameter is used then based on the selected account currency, the loan status will be moved. You can use this parameter (in conjunction with others) to build rules specific to different account currencies.
- Account Category Code: If this is the selected parameter, the value field will display all the Account Category codes maintained under Admin > System codes > Categories > Category type, where Applicable For = Account. Also note that if this parameter is used, you should have necessarily used the Account Category Type parameter also in the Trigger. You can use this parameter (in conjunction with others) to build rules specific to Account Categories. Based on the approved Category Code to which the Loan Account belongs as maintained in Account > Categorisation tab, the loan status will be moved.
- Account Category Type: If this is the selected parameter, the value field will display all the Account Category Types maintained under Admin > System codes > Categories > Category type, where Applicable For = Account. Based on the approved Category Type to which the Loan Account belongs as maintained in Account > Categorisation tab, the loan status will be moved.
- Amount Disbursed: If the Parameter is Amount disbursed, then the value field becomes a text box for you to enter an amount. Based on the amount disbursed for the loan account, the loan status will be moved.
- Amount Sanctioned: If the Parameter is Amount sanctioned, then the value field becomes a text box for you to enter an amount. Based on the loan Approved amountfor the loan account, the loan status will be moved.
- Account Status: If this is the selected parameter then the Values field will display all the active Account statuses maintained under Admin > System Codes > Generic definitions > Status, where Consider Status As = Account Status or Payment Status and Account Status. It will also display the pre-shipped Account Statuses and the generic value Any. Based on the Loan Account's latest approved Account Status, the rule will be applied to move the loan status.
- Annuity Payment Frequency: If this is the selected parameter, then the Values field will display a pre-shipped list of values: Weekly, Semimonthly, Monthly, Quarterly, Semiannual and Annual. Based on the Payment Frequency of the annuity loan, the rule will be applied to move the loan status.
- Client AML Category: If this is the selected parameter, then the Values field will display all the AML Categories maintained under Admin > System Codes > Categories > AML Categories. Based on the Loan Client's AML Category as maintained under the latest approved Client > Profile tab, the rule will be applied to move the loan status.
- Client Category Codes: If this is the selected parameter, the Values field will display all the Client Category Codes maintained under Admin > System codes > Categories > Category type, where Applicable For = Client. Also note that if this parameter is used, you should have necessarily used the Client Category Type parameter also in the Trigger. You can use this parameter (in conjunction with others) to build rules specific to Client Categories. Based on the approved Category Code to which the Loan's Client belongs as maintained in Client > Categorisation tab, the loan status will be moved.
- Client Category Type: If this is the selected parameter, the value field will display all the Client Category types maintained under Admin > System codes > Categories > Category type, where Applicable For = Client. Based on the approved Category Type to which the Loan's Client belongs as maintained in Client > Categorisation tab, the loan status will be moved.
- Client Offering Category: If this is the selected parameter, the Values field will display all the Client Offering categories maintained under Admin > System codes > Categories > Offering. Based on the Offering Category to which the Loan's Client belongs as maintained under the latest approved record in Client > Profile Tab, the loan status will be moved. You can use this parameter (in conjunction with others) to build rules specific to Offering Categories.
- Client Relationship Pricing: If this is the selected parameter, the Values field will display a list of all the Relationship Pricing Categories maintained under Admin > Pricing > Settings > Relationship Pricing. Based on the Pricing Category to which the Loan's Client belongs as maintained under the latest approved record in Client > Profile Tab, the loan status will be moved. You can use this parameter (in conjunction with others) to build rules specific to Relationship Pricing categories.
- Client Risk Category: If this is the selected parameter, the Values field will display all the Client Risk categories maintained under Admin > System codes > Categories > Risk Category. Based on the Risk Category to which the Loan's Client belongs as maintained under the latest approved record in Client > Profile Tab, the loan status will be moved. You can use this parameter (in conjunction with others) to build rules specific to Risk Categories.
- Credit Rating: If this is the selected parameter, you can input the required Credit Rating in the Values field textbox. You can use this parameter (in conjunction with others) to build rules specific to different credit ratings of clients.
- Date: If this is the selected parameter, Values field will display the following preshipped option:
- Maturity Date: When the Status Rules are executed by Aura during end of day, if the Maturity Date of the Loan Account matches the EOD Date, the loan status will be moved.
- Disbursement Currency: If this is the selected parameter, the value field will display a list of all the active GL currencies. If this parameter is used then based on the selected disbursement currency in the loan account, the loan status will be moved. You can use this parameter (in conjunction with others) to build rules specific to different Disbursement currencies.
- Disbursement Option: If this is the selected parameter, the value field will show the following list of options:
- Manual
- Automatic If this parameter is used then based on the selected disbursement option in the loan account, the loan status will be moved. You can use this parameter (in conjunction with others) to build rules specific to different Disbursement options.
- Interest Amount Overdue: If this is the selected Parameter, then the Values field becomes a text box for you to enter an amount. Based on the overdue interest amount in the Loan account, the loan status will move. You can use this parameter to move the loan statuses of accounts where the interest amount is unpaid after the scheduled date.
- Interest Calculation Method: This parameter can be used to select if the interest calculation method for an account is Amortized or Annuity. If this is the selected parameter, the Values field will show the following list of options:
- Amortized
- Annuity Based on the Interest Calculation Method chosen in the Loan Account, the loan status will move. You can use this parameter (in conjunction with others) to build rules specific to Amortized or Annuity loans.
- Interest Payment Frequency: If this is the selected parameter, then the Values field will display a pre-shipped list of values: Weekly, Semimonthly, Monthly, Quarterly, Semiannual, Annual, On Maturity and Flexible. Based on the Interest Payment Frequency of the Amortized loan, the rule will be applied to move the loan status.
- Overdue Days: If the Parameter is Overdue days, then the Values field becomes a text box for you to enter the number of days. You can use this parameter to move the statuses of accounts where there are unpaid amounts for a specific number of days after the scheduled date, subject to the Threshold for Overdue Days specified under the Product > Currency > Threshold.
- Overdue Schedules: If this Parameter is selected, then the Values field becomes a text box for you to enter the number of schedules. This parameter refers to number of schedules for which the Interest and / or Principal component is unpaid after the due date. Based on the number of such overdue schedules in the loan account, the loan status will be moved.
- Payment Plan: If this is the selected parameter, then the Values field will display a pre-shipped list of values: Yes, No. Based on whether the Loan has Payment Plan whose Payment Plan Status at the time the Rules are run = Activated, Approved, the condition for Payment Plan Active = Yes is satisfied; and the loan qualifies for the status movement / charges as defined in that rule. Similarly, If the Payment Plan Status != Activated, Approved, the condition for Payment Plan Active = No is satisfied; and the loan qualifies for the status movement / charges as defined in that rule.
- Payment Status: If this is the selected parameter, the Values field will display all the active Payment statuses maintained under Admin > System Codes > Generic definitions > Status, where Consider Status As = Payment Status or Payment Status and Account Status. It will also display the pre-shipped Payment Statuses and the generic value Any. Based on the Loan Account's latest approved Payment Status, the rule will be applied to move the loan status.
- Payment Status Days: If this is the selected Parameter, then the Values field becomes a text box for you to enter Days. Also note that if this parameter is used, you should have necessarily used the Payment Status parameter also in the Trigger. This parameter can be used to move the loan status based on the number of days an account has been in a specific Payment Status.
- Percentage Disbursed: If this is the selected Parameter, then the Values field becomes a text box for you to enter the percentage of amount disbursed. The value entered has to be between 0 and 100. This parameter is used to move the loan status (as specified in the rule) based on the percentage of the Disbursed Amount to Approved Amount for an account. You can use this parameter (in conjunction with others) to build rules based on the percentage of amount disbursed.
- Person Status: If this is the selected Parameter then the Values field will show the following options.
- Living
- Dead Based on the Loan Client's first Beneficial Owner Person's living status, the loan status will be moved. You can use this parameter (in conjunction with others) to build rules specific to dead or alive clients.
- Principal Amount Overdue: If this is the selected Parameter, then the Values field becomes a text box for you to enter an amount. Based on the overdue principal amount in the Loan account, the loan status will move. You can use this parameter to move the loan statuses of accounts where the principal amount is unpaid after the scheduled date.
- Principal Outstanding: If this is the selected Parameter, then the Values field becomes a text box for you to enter an amount. This parameter is used to move the account status (as specified in the rule) based on the Principal outstanding for an account.
- Principal Payment Frequency: If this is the selected parameter, then the Values field will display a pre-shipped list of values: Weekly, Semimonthly, Monthly, Quarterly, Semiannual, Annual, On Maturity and Flexible. Based on the Principal Payment Frequency of the Amortized loan, the rule will be applied to move the loan status.
- Repayment Option: If this is the selected parameter, the value field will show the following list of options:
- Manual
- Automatic If this parameter is used then based on the selected repayment option in the loan account, the loan status will be moved. You can use this parameter (in conjunction with others) to build rules specific to different repayment options.
- Restructured: If this is the selected parameter, then the Values field will display a pre-shipped list of values: Yes, No. Based on whether the Loan has already been Restructured, the condition for Restructured = Yes is satisfied; and the loan qualifies for the status movement / charges as defined in that rule. Similarly, if the loan has never been Restructured, the condition for Restructured = No is satisfied; and the loan qualifies for the status movement / charges as defined in that rule
- Secured: If this is the selected Parameter, then the Values field will show the following list of options:
- Yes
- No Based on whether the Loan is secured or not, the condition will be evaluated and the loan status will be moved. You can use this parameter (in conjunction with others) to build rules specific to Secured or Unsecured loans
- Secured Percentage: If this is the selected Parameter, then the Values field becomes a text box for you to enter the value. The value entered has to be between 0 and 100. The secured percentage of the account is calculated on the basis of the value of the linked security to the value of the loan amount outstanding. The loan status is moved if it satisfies the rule defined.
- Total Amount Overdue: If this is the selected Parameter, then the Values field becomes a text box for you to enter an amount. Based on the overdue principal + overdue interest amount in the Loan account, the loan status will move. You can use this parameter to move the loan statuses of accounts where the principal and/or interest amount is unpaid after the scheduled date.
- Total Outstanding: If the Parameter is Total Outstanding, then the value field becomes a text box for you to enter an amount. This parameter is used to move the loan status (as specified in the rule) based on the Total outstanding for an account.
9. You can specify in the Move payment status to field, the specific Payment Status into which the accounts have to be moved in case the rule is satisfied. This will show all the active Payment statuses maintained under Admin → System Codes → Generic definitions → Loan status definition, along with the pre-shipped Normal Payment Status.
10. If the Payment Status is moved to any other status and you want to levy a charge for that, you can select the charge from the drop-down list of active charge schemes maintained under Admin → Pricing → Charges → Charge Schemes in Payment status based charge field. Aura will display only those charges that are Event-based, Flat or Banded. This field will be enabled only if any status is selected in the Move Payment Status To field above. The charge will be applied once when the account moves into the new Payment Status; and if it is Banded, the basis will be the loan amount sanctioned.
11. You can specify in the Move account status to field, the specific Account Status into which the accounts have to be moved in case the rule is satisfied. This will show all the active Account statuses maintained under Admin → System Codes → Generic definitions → Loan status definition, along with the pre-shipped Active and Closed Account Statuses.
12. If the Account Status is moved to any other status and you want to levy a charge for that, you can select the charge from the drop-down list of active charges maintained under Admin → Pricing → Charges → Charge Schemes in Account status based charge field. Aura will display only those charges that are Event-based, Flat or Banded. This field will be enabled only if any status is selected in Move Account Status To field above. The charge will be applied once when the account moves into the new Account Status; and if it is Banded, the basis will be loan amount sanctioned.
13. Click Save. The Rule sub-tab page under Status Rule appears with the added details.

Note: After creation / edit, the record is in Pending status. To approve, a user different from the one who created / edited has to retrieve the record and click Approve. Once the record is approved the Status changes to Approved as shown below.
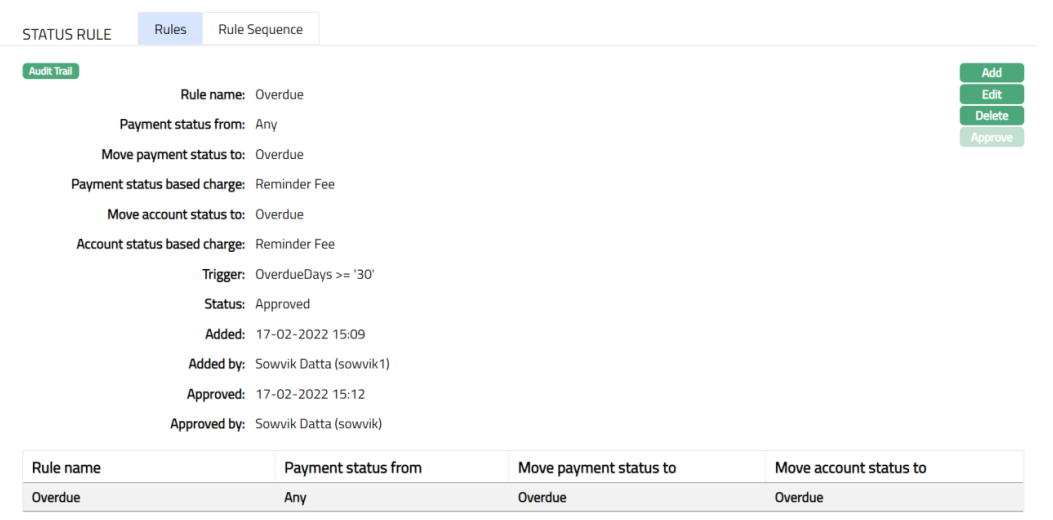
Functions: Add, Edit, Delete and Approve.
The additional fields are explained below:
- Status field denotes the status of the record.
- Added field denotes the date on which the record was added.
- Added by fields denotes the name of the user who created the record.
- Approved field denotes the date on which the record was approved and is displayed only on approval.
- Approved by field denotes name of the user who approved the record and is displayed only on approval.
Note: Similarly, you can add as many Rules you want as required as per the sample screenshot shown below.
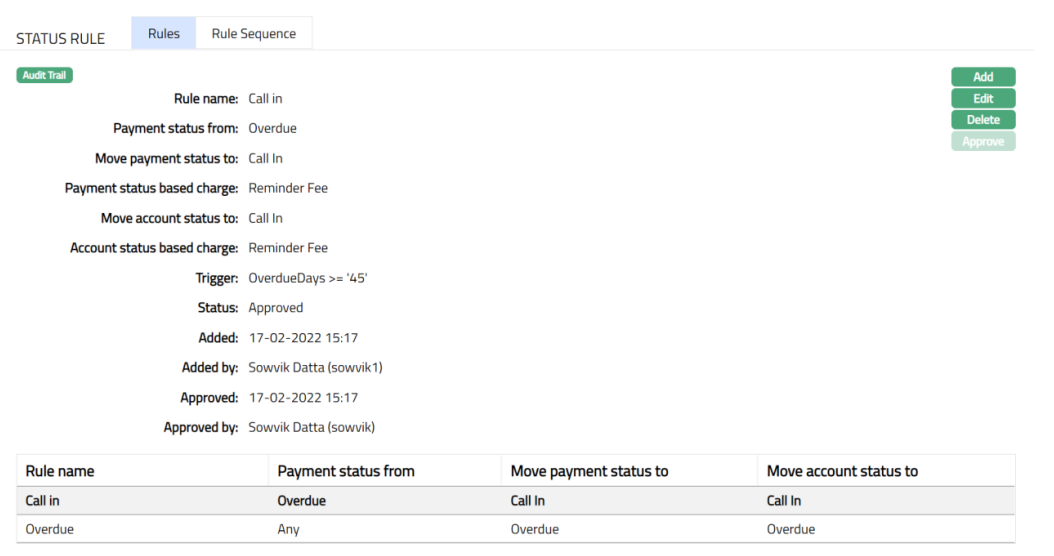
Rule Sequence
You can define the order in which the rules have to be executed using the Rule Sequence tab. By default, it will contain all the maintained Rule Names. It will be displayed in ascending order and will have the provision to re-arrange the sequence, as you require.
To define the Rule Sequence,
1. Access the Product page and click on Status Rule, and then click on Rule Sequence tab.

2. All available Rules are displayed in the ascending order of Rule sequence. Select any Rule Name and click on Up or Down button, as required as per the sample screenshots shown below.
Up: If you click on up button, then Aura will move the selected Rule Name to the next higher order of sequence and interchange the position between the source and destination. For the topmost Rule Name, the Up button will be disabled.
Down: If you click on down button, then Aura will move the selected Rule Name to the next lower order of sequence and interchange the position between the source and destination. For the bottom most Rule Name, the Down button will be disabled.

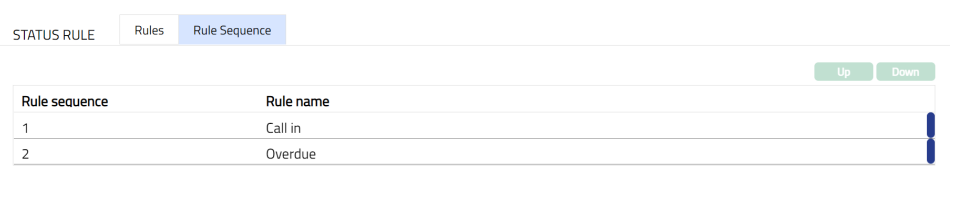
Repayment Order
Repayment order tab allows you to define different repayment orders for accounts created under the Product. These repayment orders are based on a combination of the Loan Account's Account Status and Payment Status. Thus, this gives you a flexibility to define the order such that the payment allocation can be towards different components of due amounts for different statuses. On creation of a Product, there is a standard repayment order that Aura displays for Any Account Status and Any Payment Status combination; you can choose to retain the same or change it as required. You can also add more records for defining a different order for any other Account Status - Payment Status combination.
The standard repayment order is,
- Charge due
- Penalty on interest overdue
- Penalty on principal overdue
- Interest overdue
- Principal overdue
- Interest due
- Principal due
- Interest accrued
- Principal prepayment
You can change the order between the components as required, as these components are pre-defined in Aura.
When a payment is received and processed (Auto / Manual mode) for an account, Aura will check if the repayment order is maintained at Product with respect to the loan account's current Account Status - Payment Status combination for which Effective from date is less than equal to Value date of payment. If it is maintained, then Aura will allocate the received amount against the unpaid amounts of the Components as per the repayment order defined for that specific Account Status - Payment Status combination; else, it will use the default Any Account Status - Any Payment Status combination to arrive at the Repayment Order for components.
To add a new Combination of Account Status - Payment Status for which a different repayment order is to be defined:
1. Access the Product page. Click on the Repayment order tab to view the details as per sample below.
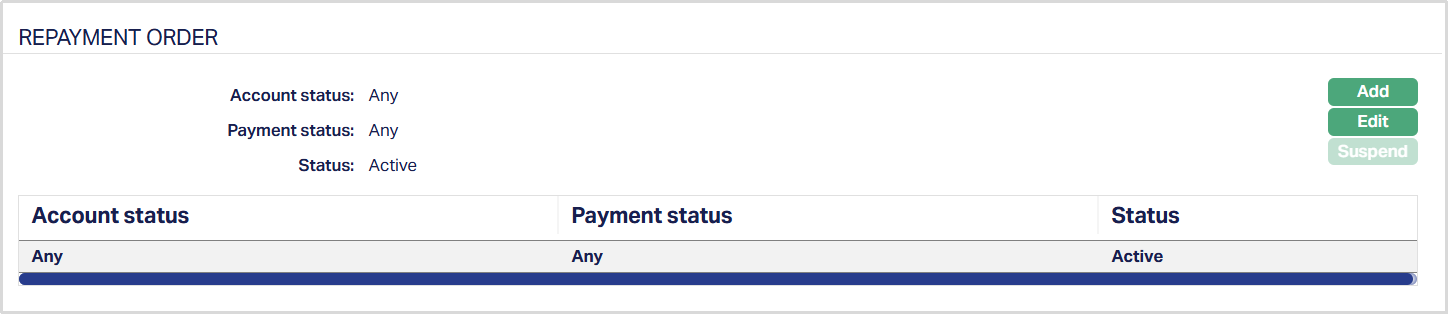
2. Click Add. The Add Repayment Order page appears.
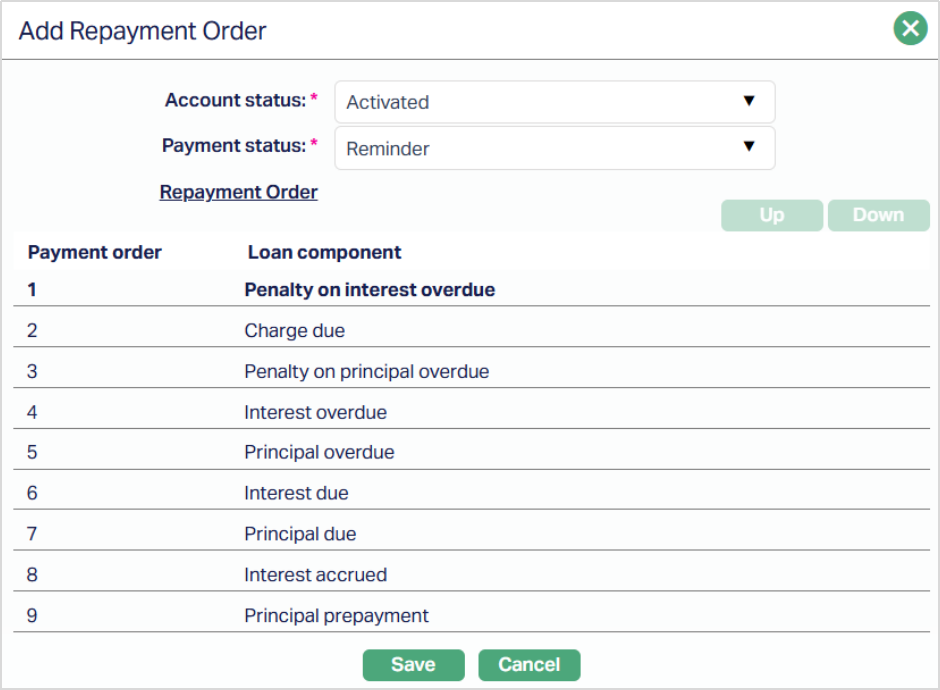
3. Select the Account Status from the drop-down list of pre-shipped and user defined active Account Statuses maintained at Admin → Status → Loan Status.
4. Select the Payment Status from the drop-down list of pre-shipped and user defined active Payment Statuses maintained at Admin → Status → Loan Status.
5. The standard loan components are displayed in the standard sequence. Select any component and click on Up or Down button, as required.
Up: If you click on up button, then Aura will move the selected Loan Component to the next higher order of sequence and interchange the position between the source and destination. For the topmost Loan Component, the Up button will be disabled.
Down: If you click on down button, then Aura will move the selected Loan Component to the next lower order of sequence and interchange the position between the source and destination. For the bottom most Loan Component the Down button will be disabled.
6. Click Save. The Repayment Order page appears with the added details.
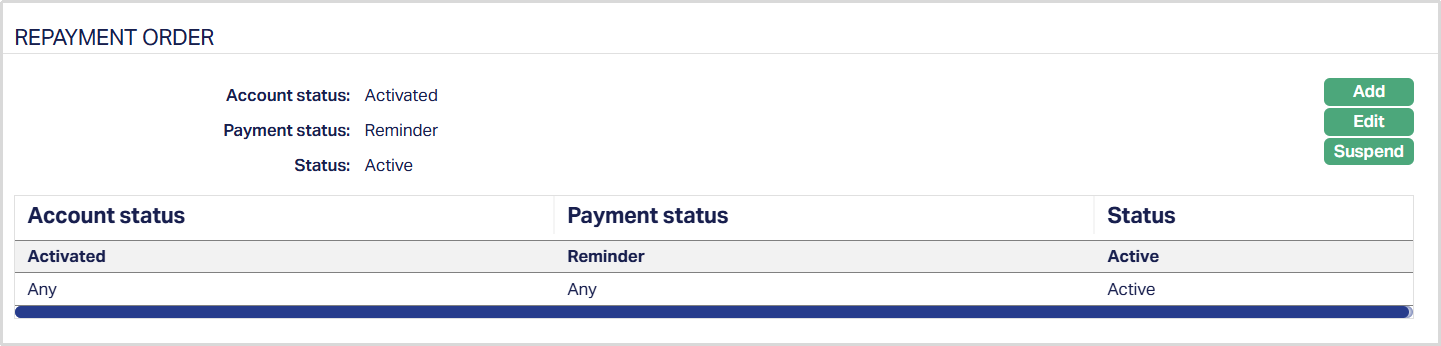
Functions: Add, Edit, Suspend.
To Edit the Repayment Order,
1. Select the required combination for which you want to change the repayment order and click Edit. The Edit Repayment Order page appears.
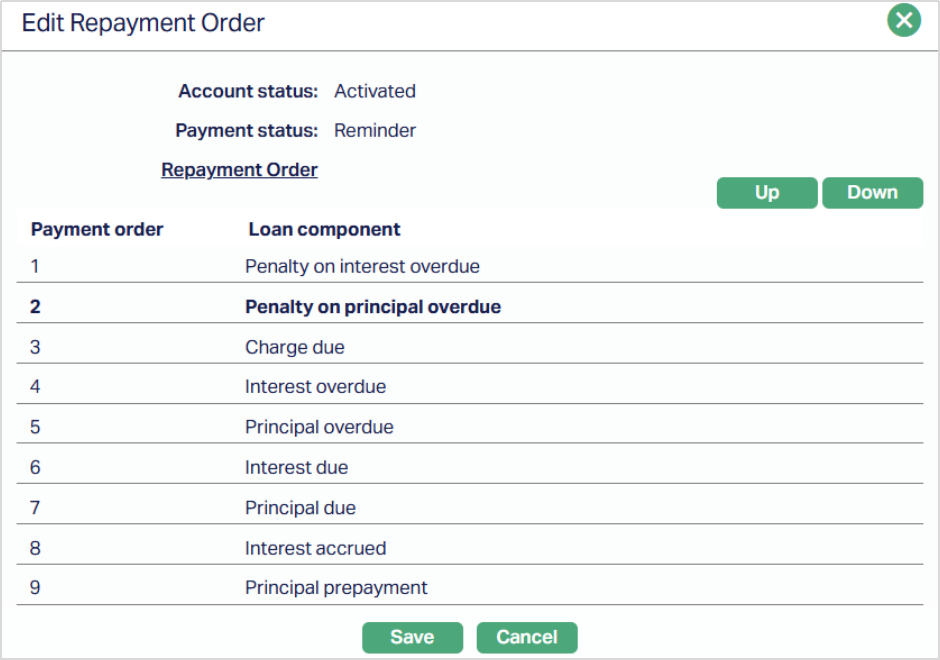
2. You can change the sequence of the Loan Component as described above using the Up and Down buttons.
3. Make the required changes and click Save. The Repayment Order page appears with the updated details.
Note: You cannot define two records for the same combination of Account Status and Payment Status. The combination has to be unique.
Suspend: You can suspend the Repayment Order for any new combination that you added by a click on the Suspend button. When you click on the Suspend button, Aura displays an alert message. On confirmation Aura will suspend the record and not use it during repayment allocation.
Impairment
This tab allows you to define the impairment treatment for the loan account under the Product. Based on Payment Status and Account Status of a loan account, you can parameterize the percentage which is to be impaired and GLs and Transaction Codes against which it is to be accounted. The three types of impairment treatments provided by Aura are Doubtful Receivable, Provision and Write off. Aura also allows you to parameterize sequence for the impairment treatment if multiple treatments are booked for same status.
The principles of the impairment treatment are as follows:
Any of the treatment will not change the account balance except Write off.
Treatment percentage is always calculated on component balance.
On the status change - if there were treatment entries made for the previous status, then as per the treatment settings defined for the new status the treatment entries will be reversed, recalculated or rebooked if needed. If there is no treatment booked for the current status, then already booked treatment entries will be reversed and no rebooking will be done.
For an account, if Provision / Doubtful Receivable treatment is already made, then on Write Off, the balance from Provision / Doubtful Receivable GL will be first considered; and then, the remaining from Primary GL attached to component will be considered.
If payment is received after Write Off, the write off GL is balanced out and then the balance would be considered against the primary GL attached to the component.
Reversal and re-booking will happen in case if 'Recalculate on actual cash flow movement' flag is set Yes and any one of the following business events occurs:
Payment (Prepayment / Partial-full Payment / Instalment
Disbursement
Reversal of Payment
Reversal of Disbursement
Write off
Components are
Principal outstanding including due excluding overdue
Principal overdue
Interest
Interest due
Penalty → both on Principal and on Interest
Charge → (Will not be applicable in case doubtful receivable)
Treatment categorization
| Treatment Name | Primary GL balances impact (Y / N) | Component level balance impact (Y / N) | Charge → as component applicable (Y/ N) |
|---|---|---|---|
| Doubtful receivable | Yes | No | No |
| Provision | No | No | Yes |
| Write off | Yes | No | Yes |
The sub tabs available under Impairment are:
Settings
Sequence
Settings
This tab allows you to set the impairment treatment based on a combination of the Payment Status and Account Status.
To Add the Settings,
1. Go to Product page, click Impairment tab. By default, Settings tab will be opened.
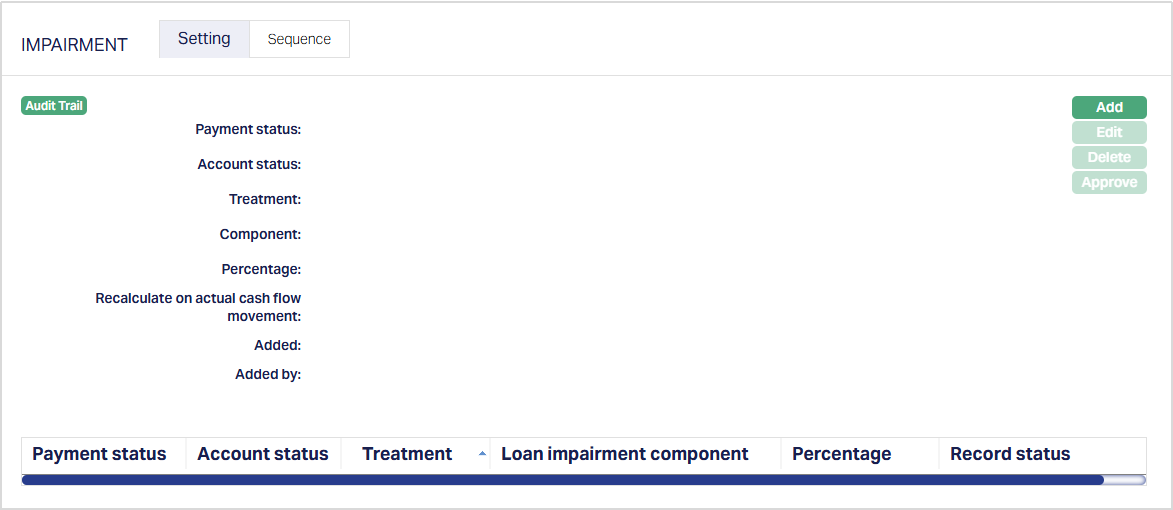
2. Click Add. The New Impairment Settings → General (1/3) page appears.

3. Select Payment status from the drop-down list of the following: Any, all preshipped Payment Statuses and active user-defined Payment Statuses maintained under Admin → Status → Loan status.
4. Select the Account status from the dropdown list of the following: Any, all preshipped Account Statuses and active user-defined Account Statuses maintained under Admin → Status → Loan status.
5. Select the type of Impairment Treatment from the dropdown list. The pre-shipped values are: Doubtful receivable, Provision and Write off. Doubtful receivable is selected by default.
6. Select the required Component from the drop-down list. The available Components are: - Outstanding principal: This is calculated as Outstanding Principal = Principal Due + Principal Outstanding. Based on the entered percentage, the impairment amount will be derived. For the derived amounts Master GL (of type asset) entries will be passed based on selected treatment. - Principal Overdue: This is calculated as the Unpaid Principal amounts that were due in the past (i.e., Overdue Principal amounts). Based on entered percentage the impairment amount will be derived and for derived amounts Master GL (of type asset) entries will be passed based on selected treatment. - Interest due: This is calculated as the Unpaid Interest amounts that were due on the day (i.e., Due Interest amounts for components Interest, Interest Intermediate and Interest Difference). Based on entered percentage the impairment amount will be derived and for derived amounts GL (Accrued interest receivable of type Asset) entries will be passed based on selected treatment. - Interest overdue: This is calculated as the Unpaid Interest amounts that were due in the past (i.e., Overdue Interest amounts for components Interest, Interest Intermediate and Interest Difference). Based on entered percentage the impairment amount will be derived and for derived amounts GL (Accrued interest receivable of type Asset) entries will be passed based on selected treatment. - Penalty: This is calculated as the Unpaid amounts of Penalty Interest on Principal Overdue + Penalty Interest on Interest Overdue. Based on entered percentage the impairment amount will be derived and for derived amounts GL (Penal interest accrued of type Asset) entries will be passed based on selected treatment. - Charge due: This is calculated as the Unpaid amounts of all Charges that are due on that day + Charges that were due in the past (Charges due + Charges Overdue). Based on entered percentage the impairment amount will be derived and for derived amounts GL (Accrued interest receivable of type Asset) entries will be passed based on selected treatment. This option is not available if the selected Treatment is Doubtful receivable.
7. Enter the Percentage for the Impairment as required.
8. Select the option for Recalculate on actual cash flow movement. This field is enabled only if the Treatment is Doubtful receivable or Provision.
By default, it is Yes. When this is Yes with the account being in the selected status; if disbursement, payment (including repayment), reversal → payment and repayment or write off happens on the accounts then all treatment entries will be reversed and fresh entries will be posted based on % chosen. If the selected Treatment is Write off, then this flag is set as No and is disabled.
9. Click Next. The New Impairment Settings → Accounting (2/3) appears.
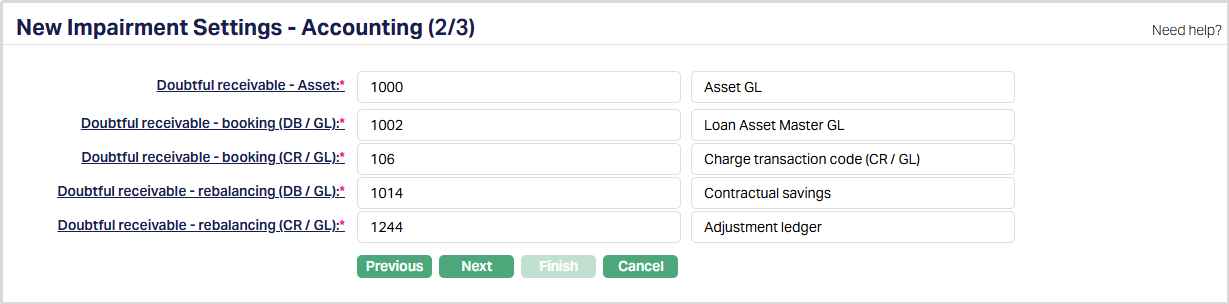
10. You will see the list of various GLs required to account for the events in the impairment treatment defined under this Product. The table below gives the fields its use and the conditions for each of these GLs. You can either directly input the Ledger # or click on the hyperlink to see the list of GLs satisfying these conditions and select the required Ledger #.
- The following will be available if the Treatment is Doubtful Receivable
| Sl. No. | Field name | Used | List based on |
|---|---|---|---|
| 1 | Doubtful receivable - Asset | For passing the accounting entries for the doubtful receivables on accounts under this Product | Ledger type Asset. |
- The following will be available if the Treatment is Provision
| Sl. No. | Field name | Used | List based on |
|---|---|---|---|
| 1 | Provision - Expense | For passing the accounting entries of Provision expenses on accounts under this Product. | Ledger type Expense |
| 2 | Provision - Liability | For passing the accounting entries of the Provision liability on accounts under this Product. | Ledger type Liability |
- The following will be available if the Treatment is Write Off
| Sl. No. | Field name | Used | List based on |
|---|---|---|---|
| 1 | Write off - Expense | For passing the accounting entries of the Write off expenses on accounts under this Product. | Ledger type Expense |
11. Input the required Transaction codes to be used for accounting the various events in the impairment treatment for Accounts under this Product. You can directly input the Transaction Code or use the hyperlink to search for and select the required Transaction Code. The list of Transaction codes shown on click of hyperlink is based on certain conditions as listed against each field.
- These fields will be available if the Treatment is Doubtful Receivable
| Sl. No. | Field name of Transaction Settings | Used for | List of Transaction codes based on |
|---|---|---|---|
| 1 | Doubtful receivable - booking (DB/GL) | Recording all doubtful receivable GL debit transactions booked for accounts under this Product | General Ledger Debit |
| 2 | Doubtful receivable - booking (CR/GL) | Recording all doubtful receivable GL credit transactions booked for accounts under this Product | General Ledger Credit |
| 3 | Doubtful receivable - rebalancing (DB/GL) | Recording all doubtful receivable GL debit transactions for rebalancing for accounts under this Product | General Ledger Debit |
- These fields will be available if the Treatment is Provision
| Sl. No. | Field name of Transaction Settings | Used for | List of Transaction codes based on |
|---|---|---|---|
| 1 | Provision - booking (CR/GL) | Recording all Provision Booking GL credit transactions for accounts under this Product | General Ledger Credit |
| 2 | Provision - rebalancing (DB/GL) | Recording all Provision Rebalancing GL debit transactions for accounts under this Product | General Ledger Debit |
| 3 | Provision - rebalancing (CR/GL) | Recording all Provision Rebalancing GL credit transactions for accounts under this Product | General Ledger Credit |
- These fields will be available if the Treatment is Write off
| No. | Description | Details | GL Type |
|---|---|---|---|
| 1 | Write off - booking (DB/GL) | Recording all write-off booking GL debit transactions for accounts under this Product | General Ledger Debit |
| 2 | Write off - booking (CR/GL) | Recording all write-off booking GL credit transactions for accounts under this Product | General Ledger Credit |
| 3 | Write off - booking (CR/Client) | Recording all write-off booking client credit transactions for accounts under this Product | Client account Credit |
| 4 | Write off - rebalancing (DB/Client) | Recording all write-off rebalancing client debit transactions for accounts under this Product | Client account Debit |
| 5 | Write off - rebalancing (DB/GL) | Recording all write-off rebalancing GL debit transactions for accounts under this Product | General Ledger Debit |
| 6 | Write off - rebalancing (CR/GL) | Recording all write-off rebalancing GL credit transactions for accounts under this Product | General Ledger Credit |
12. Click Next. The New Impairment Settings → Conformation (3/3) page appears.
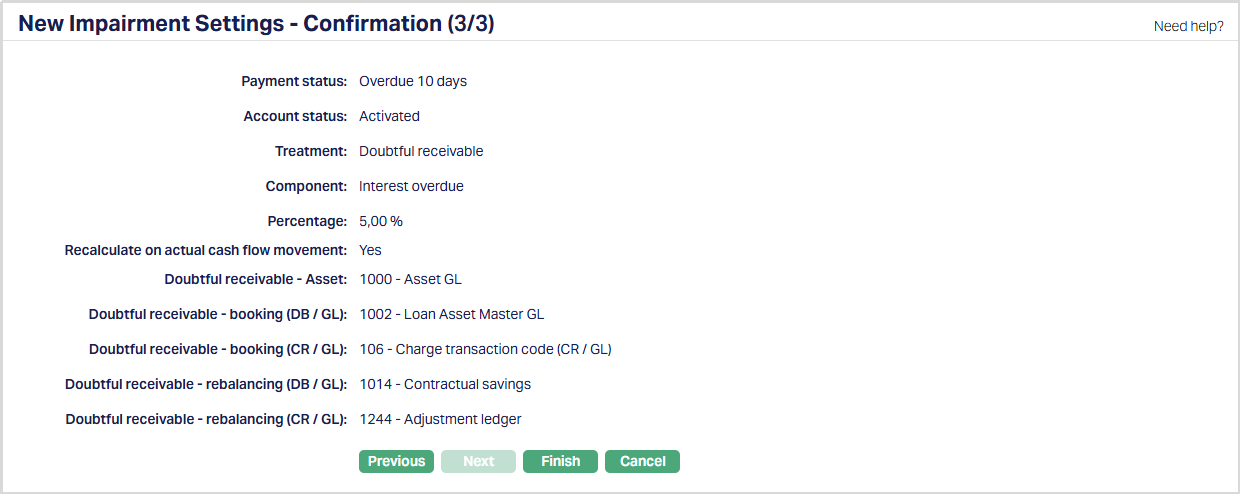
13. Click Finish. The Impairment settings record is created with Status Active and the Record Status Pending.
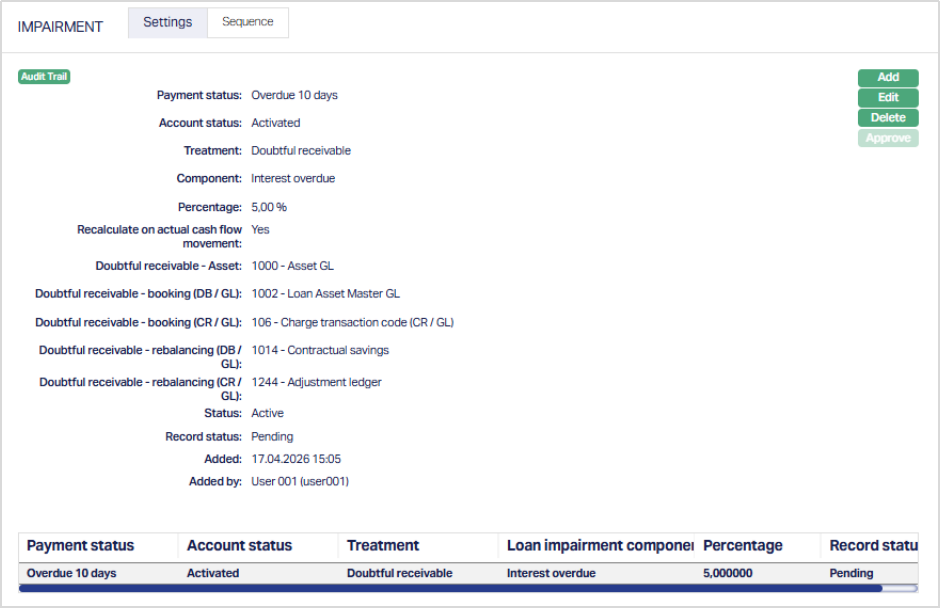
Functions: Add, Edit, Delete, Approve
Note: After creation / edit, the tab is in Pending status and a red bubble is displayed on the Tab. To approve, a user different from the one who created / edited has to retrieve the record and click Approve. Once the record is approved the record status changes to Approved and the red bubble disappears as shown in the Edit screen below.
Delete: You can delete an Impairment record by a click on Delete button. If there are no accounts available which are under combination of selected Account Status - Payment Status and impairment treatment mentioned in the impairment record, then impairment record can be deleted. Aura will ask for confirmation, on approving which the selected record will be deleted.
Approve: If you want to approve an Impairment record, then retrieve the record and click on Approve. Aura will ask for confirmation. Once the tab is approved, record status will be updated from Pending to Approved.
The additional fields available in view are:
Status denotes impairment status of the record.
Record Status denotes the record status of the impairment record
Added denotes the date and time on which the record has been added.
Added by denotes the name of the user who has added the record.
Approved denotes the date and time on which record is approved. This field is displayed for the approved record.
Approved by denotes the name of the user who has approved the record. This field is displayed for the approved record.
Example on how the single impairment treatment is handled for the account is mentioned below:
Unpaid Amounts per Component
| Component | Unpaid Amount |
|---|---|
| Outstanding Principal | 150000 |
| Principal Due | 15000 |
| Principal Overdue | 30000 |
| Penalty on Interest Overdue | 3000 |
| Penalty on Principal Overdue | 300 |
| Interest Overdue | 450 |
| Interest Due | 150 |
| Charge | 100 |
| Total | 199000 |
Impairment Settings: Treatment = Doubtful Receivable
| Component | Treatment % |
|---|---|
| Outstanding Principal | 20% |
| Principal Overdue | 20% |
| Interest Due | 70% |
| Interest Overdue | 60% |
| Penalty | 15% |
| Charges | Not applicable |
The impairment amounts will be computed as follows:
| Component | Treatment % | Corresponding GL | Components to be considered for Treatment | Amount before Impairment | Impairment amount moved to Doubtful Receivable GL | Amount after Impairment |
|---|---|---|---|---|---|---|
| Outstanding Principal | 20% | Master GL | Principal Outstanding + Principal Due | 165000 | 33000 | 132000 |
| Principal Overdue | 20% | Master GL | Principal Overdue | 30000 | 6000 | 24000 |
| Interest Due | 70% | Accrued Interest Receivable - Asset | Interest Due | 150 | 105 | 45 |
| Interest Overdue | 60% | Accrued Interest Receivable - Asset | Interest Overdue | 450 | 270 | 180 |
| Penalty | 15% | Penal Interest Accrued - Asset | Penalty on Principal Overdue + Penalty on Interest Overdue | 3300 | 495 | 2805 |
| Charges | Not applicable | Not applicable | Not applicable | 100 | Not applicable | 100 |
| TOTAL | 199000 | 39870 | 159130 |
On treatment, the GL balances will be modified as:
| GL | Comprising of Unpaid amounts of | Balance before Impairment | Impairment amount moved to Doubtful Receivable GL | Balance after impairment |
|---|---|---|---|---|
| Master GL | Outstanding Principal + Principal Due + Principal Overdue | 195000 | 39000 | 156000 |
| Penal Interest Accrued - Asset | Penalty on Principal Overdue + Penalty on Interest Overdue | 3300 | 495 | 2805 |
| Accrued Interest Receivable - Asset | Interest Due + Interest Overdue | 600 | 375 | 225 |
| Charge | Not applicable | Not applicable | Not applicable | Not applicable |
| Total | 198900 | 39870 | 159030 |
Note: Component total should match up with the total of both the GLs
Treatment handling for Write off
Unpaid Amounts per Component
| Component | Unpaid Amount |
|---|---|
| Outstanding Principal | 150000 |
| Principal Due | 15000 |
| Principal Overdue | 30000 |
| Penalty on Interest Overdue | 3000 |
| Penalty on Principal Overdue | 300 |
| Interest Overdue | 450 |
| Interest Due | 150 |
| Charge | 100 |
| Total | 199000 |
Impairment Settings: Treatment = Write-off
| Component | Treatment % |
|---|---|
| Outstanding Principal | 30% |
| Principal Overdue | 45% |
| Interest Due | 70% |
| Interest Overdue | 60% |
| Penalty | 15% |
| Charges | 50% |
The impairment amounts will be computed as follows:
| Component | Treatment % | Corresponding GL | Components to be considered for Treatment | Amount before Impairment | Impairment amount moved to Write-off Expense GL | Amount after Impairment |
|---|---|---|---|---|---|---|
| Outstanding Principal | 30% | Master GL | Principal Outstanding + Principal Due | 165000 | 49500 | 115500 |
| Principal Overdue | 45% | Master GL | Principal Overdue | 30000 | 13500 | 16500 |
| Interest Due | 70% | Accrued Interest Receivable - Asset | Interest Due | 150 | 105 | 45 |
| Interest Overdue | 60% | Accrued Interest Receivable - Asset | Interest Overdue | 450 | 270 | 180 |
| Penalty | 15% | Penal Interest Accrued - Asset | Penalty on Principal Overdue + Penalty on Interest Overdue | 3300 | 495 | 2805 |
| Charges | 50% | Not applicable | Charge due | 100 | Not applicable | 50 |
| TOTAL | 199000 | 63920 | 135080 |
On treatment, the GL balances will be modified as:
| GL | Comprising of Unpaid amounts of | Balance before Impairment | Impairment amount moved to Write-off Expense GL | Balance after impairment |
|---|---|---|---|---|
| Master GL | Outstanding Principal + Principal Due + Principal Overdue | 195000 | 63000 | 132000 |
| Penal Interest Accrued - Asset | Penalty on Principal Overdue + Penalty on Interest Overdue | 3300 | 495 | 2805 |
| Accrued Interest Receivable - Asset | Interest Due + Interest Overdue | 600 | 375 | 225 |
| Charge | Not applicable | Not applicable | Not applicable | Not applicable |
| Total | 198900 | 63870 | 135030 |
Note: Charges due will be shown only in the Payment Schedule; and is not posted to any GL; and hence, any write-off will result in only a reduction of the amount in the Payment Schedule and will not result in any accounting entry. Note: Write off reduces the component unpaid amount as well.
Treatment handling for Provision
Unpaid Amounts per Component
| Component | Unpaid Amount |
|---|---|
| Outstanding Principal | 150000 |
| Principal Due | 15000 |
| Principal Overdue | 30000 |
| Penalty on Interest Overdue | 3000 |
| Penalty on Principal Overdue | 300 |
| Interest Overdue | 450 |
| Interest Due | 150 |
| Charge | 100 |
| Total | 199000 |
Impairment Settings: Treatment = Provision
| Component | Treatment % |
|---|---|
| Outstanding Principal | 30% |
| Principal Overdue | 45% |
| Interest Due | 70% |
| Interest Overdue | 60% |
| Penalty | 90% |
| Charges | 50% |
The impairment amounts will be computed as follows:
| Component | Treatment % | Corresponding GL | Components to be considered for Treatment | Amount before Impairment | Impairment amount for Provision - Expense & Liability GL | Amount after Impairment |
|---|---|---|---|---|---|---|
| Outstanding Principal | 30% | Master GL | Principal Outstanding + Principal Due | 165000 | 49500 | 115500 |
| Principal Overdue | 45% | Master GL | Principal Overdue | 30000 | 13500 | 16500 |
| Interest Due | 70% | Accrued Interest Receivable - Asset | Interest Due | 150 | 105 | 45 |
| Interest Overdue | 60% | Accrued Interest Receivable - Asset | Interest Overdue | 450 | 270 | 180 |
| Penalty | 90% | Penal Interest Accrued - Asset | Penalty on Principal Overdue + Penalty on Interest Overdue | 3300 | 2970 | 330 |
| Charges | 50% | Not applicable | Charge Due | 100 | 50 | 50 |
| TOTAL | 199000 | 66395 | 132605 |
On treatment, the GL balances will be modified as:
| GL | Comprising of Unpaid amounts of | Balance before Impairment | Impairment amount for Provision - Expense & Liability GL | Balance after impairment |
|---|---|---|---|---|
| Master GL | Outstanding Principal + Principal Due + Principal Overdue | 195000 | 63000 | 195000 |
| Penal Interest Accrued - Asset | Penalty on Principal Overdue + Penalty on Interest Overdue | 3300 | 2970 | 3300 |
| Accrued Interest Receivable - Asset | Interest Due + Interest Overdue | 600 | 375 | 600 |
| Charge | Charges due | Not applicable | 50 | Not applicable |
| Total | 198900 | 66395 | 198900 |
Note: Provision does not reduce the component unpaid amount; also, it doesn't impact the corresponding GL balances
To Edit the Impairment record,
1. Go to Product page, click on Impairment tab. By default, Settings tab will be opened.
2. Click Edit. The Edit Settings page appears.
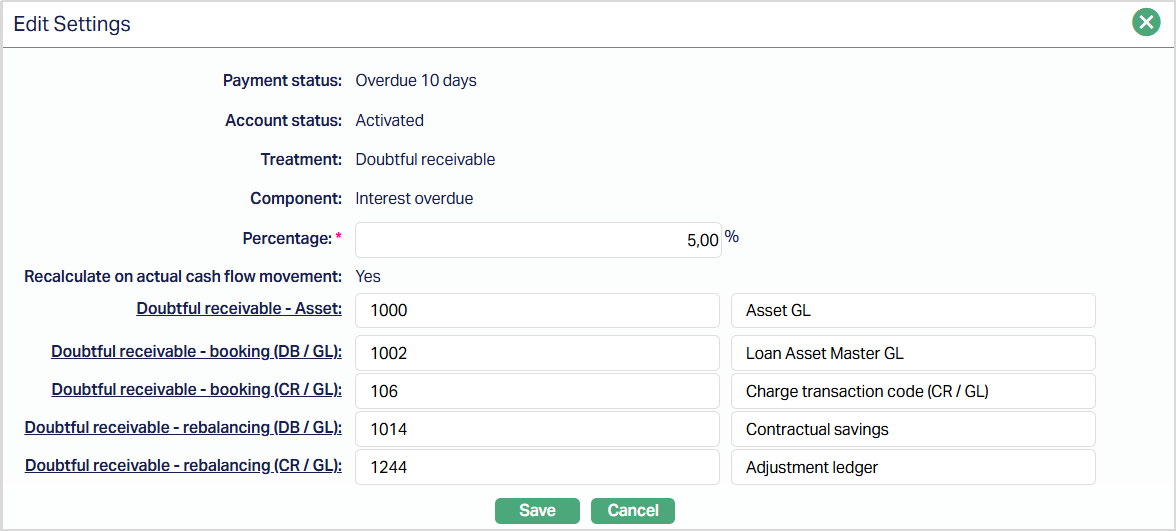
Payment Status, Account status, Treatment, Component and Recalculate on actual cash flow movement fields are not editable. The percentage and Accounting-related fields (i.e., General Ledger and Transaction Settings) are editable.
3. Click Save. The Settings page under Impairment tab page appears with the edited details.
Note: The changes made here will be applicable on any impairment that occurs after such change is approved.
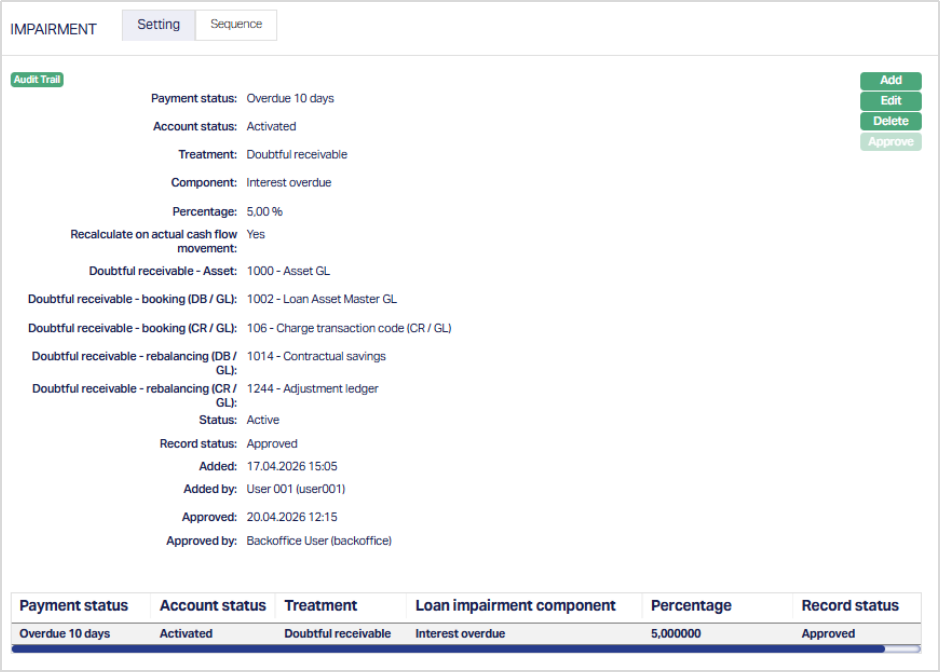
Functions: Add, Edit, Delete and Approve.
Sequence
The data in this tab is populated as and when the user approves a new impairment treatment record in the Settings Tab, or when a record is deleted from the Settings Tab. You can change the sequence by moving the treatment's priority up and down
To set the priority,
1. Access the Product page and click Impairment tab, and then click Sequence.
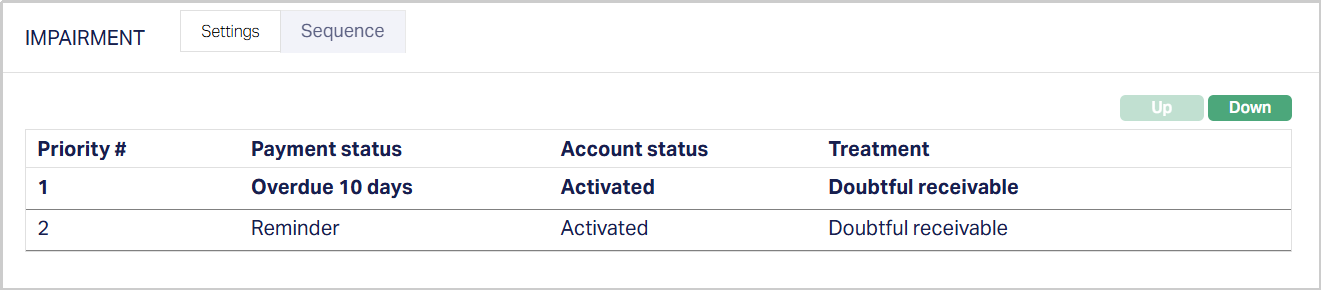
2. By default, the first impairment treatment record will have the first priority and all the other impairment records listed are as per the sequence of creation. The Up and Down button will be disabled.
3. If you want to change the order, select the required impairment treatment record which enables the Up and Down buttons.
4. If you click on Up button, the selected impairment treatment will move to the next higher order of priority and interchange the position between the source and destination. For the topmost treatment the Up button will be disabled.
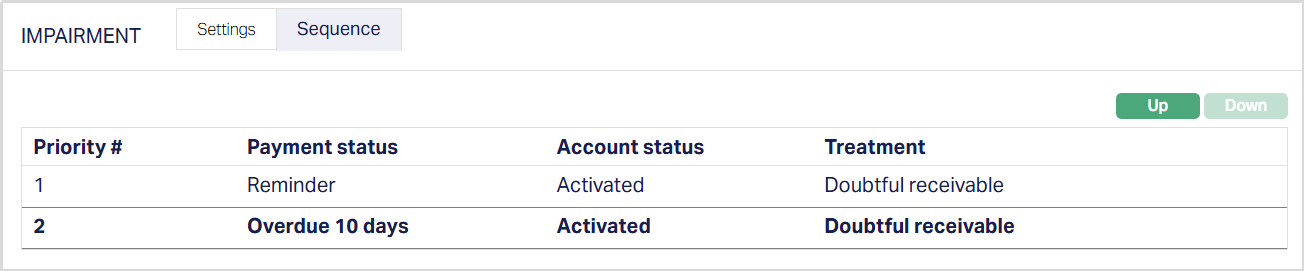
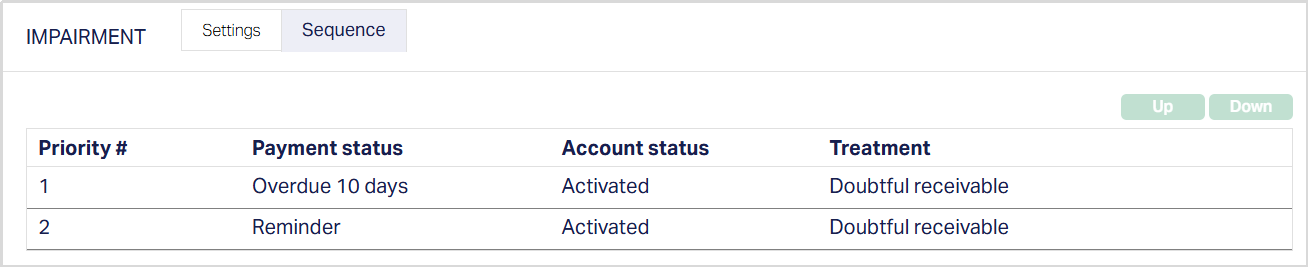
5. If you click on Down button, the selected impairment treatment will move to the next lower order of preference and interchange the position between the source and destination. For the bottom most treatment the Down button will be disabled.
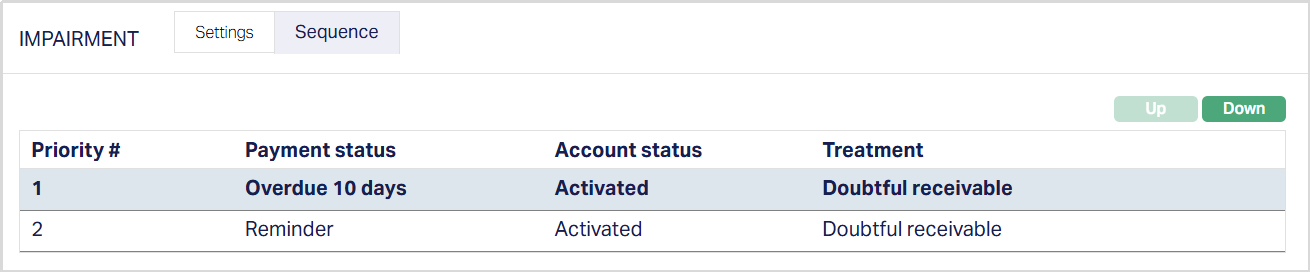
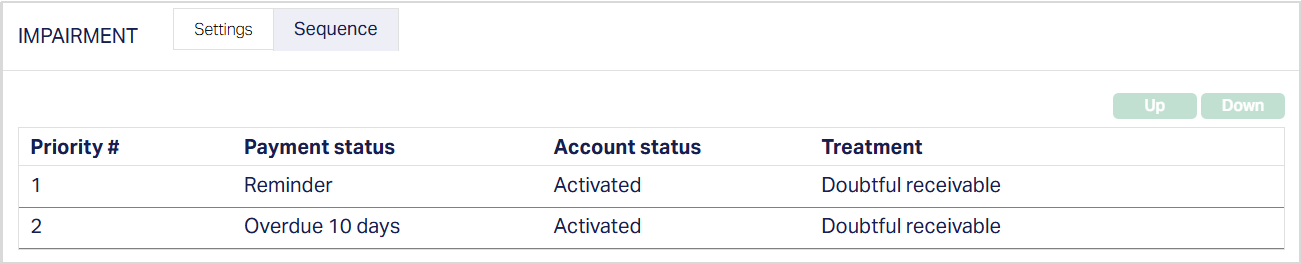
Functions: Up, Down.
General Ledger
The General Ledger tab allows you to view and maintain the various General Ledger accounts to be used in accounting for the life cycle events in the loan accounts created under the Product.
1. Access the Product page. Click on the General Ledger tab to view the details as per sample below. The details are defaulted from the entries that you made during Product creation / last edit. For details refer to Mortgage and Loan → New Product → General Ledger (6/10).
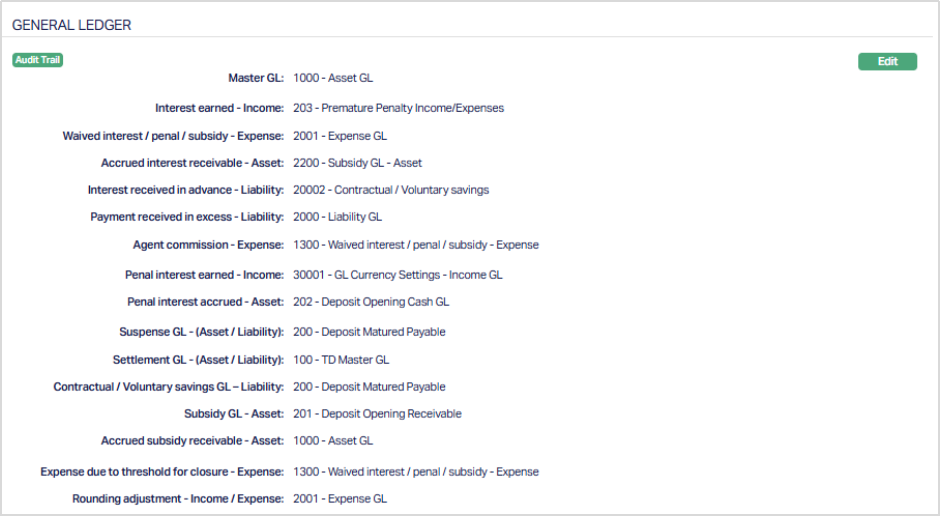
2. Click Edit. Edit General Ledger page appears.
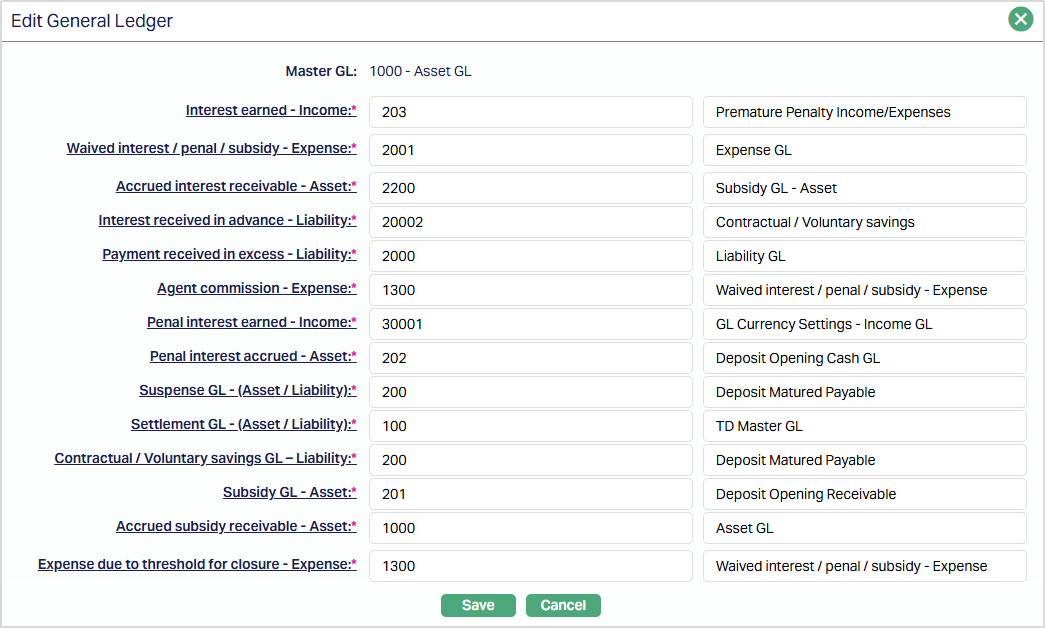
Note: Except Master GL, all the fields in General ledger can be edited during Edit General Ledger. However, Aura does not update the balances of the old GL into the new GL automatically for any change in GL settings. If any GL setting is changed midway, you should take care to also move the balances from the old GL to the new GL appropriately to avoid any mismatch of the General Ledger accounts.
3. Make the required changes and click Save. The General Ledger page appears with the edited details.
Functions: Edit
Transaction Settings
Transaction settings tab allows you to specify the Transaction Code that are to be used for accounting the various events in the life cycle of loan accounts created under the Product. These transaction codes define what description / narration is used for the account postings / statements and may also be used to trigger other charges.
1. Access the Product page. Click on the Transaction settings tab to view the details as per sample below. The details are defaulted from the entries that you made during Product creation / last edit. For details refer to Mortgage and Loan → New Product → Transaction settings (7/10).
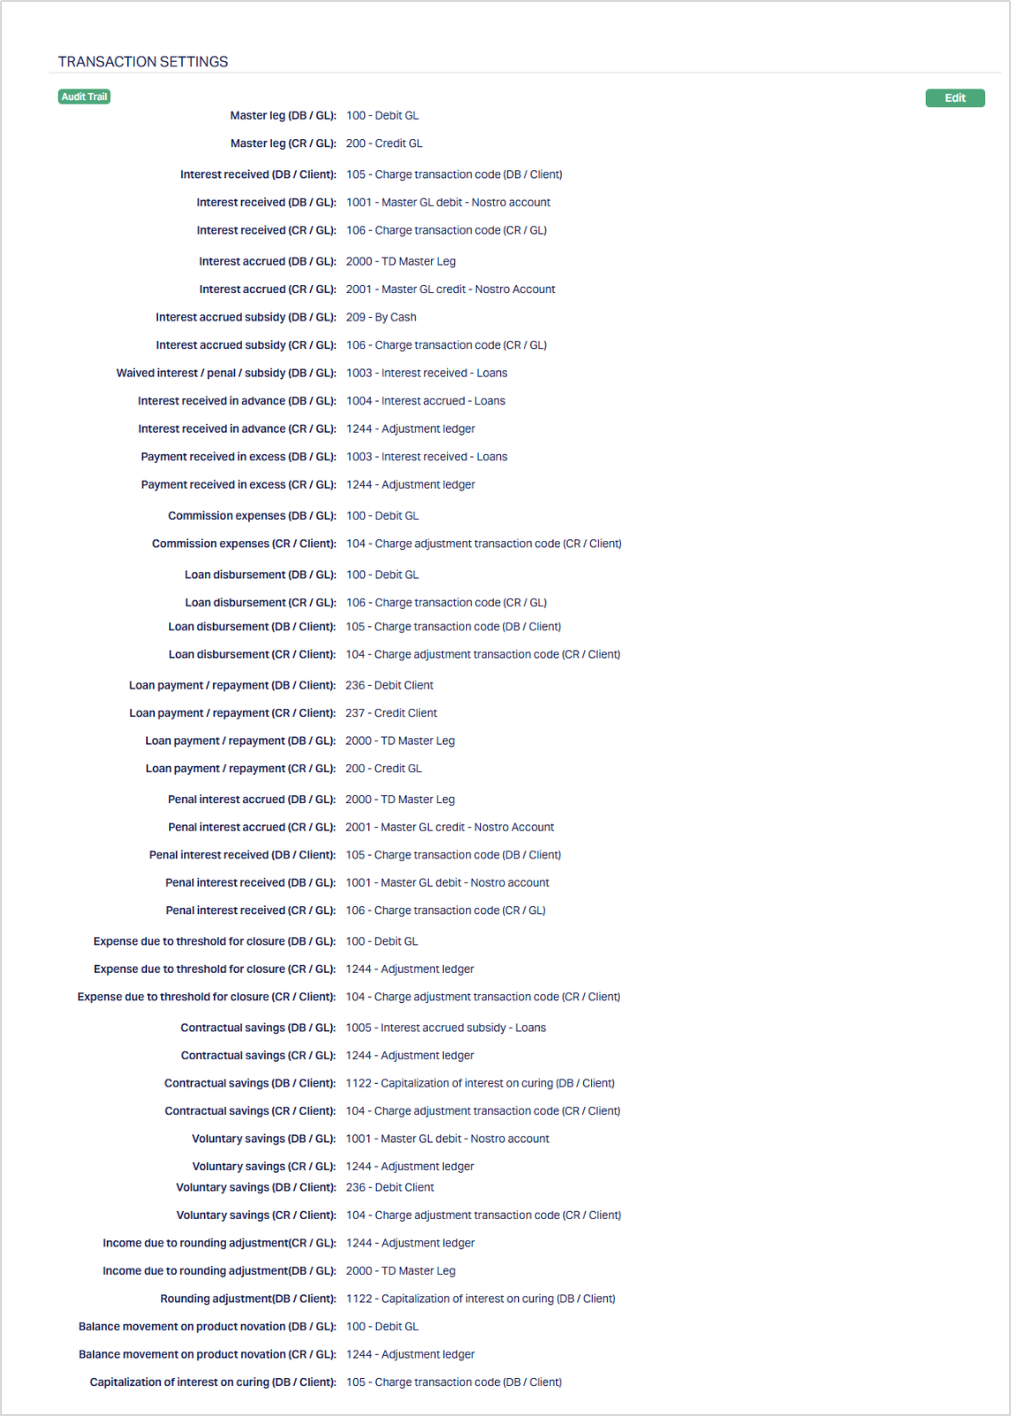
2. Click Edit. Edit Transaction Settings page appears.
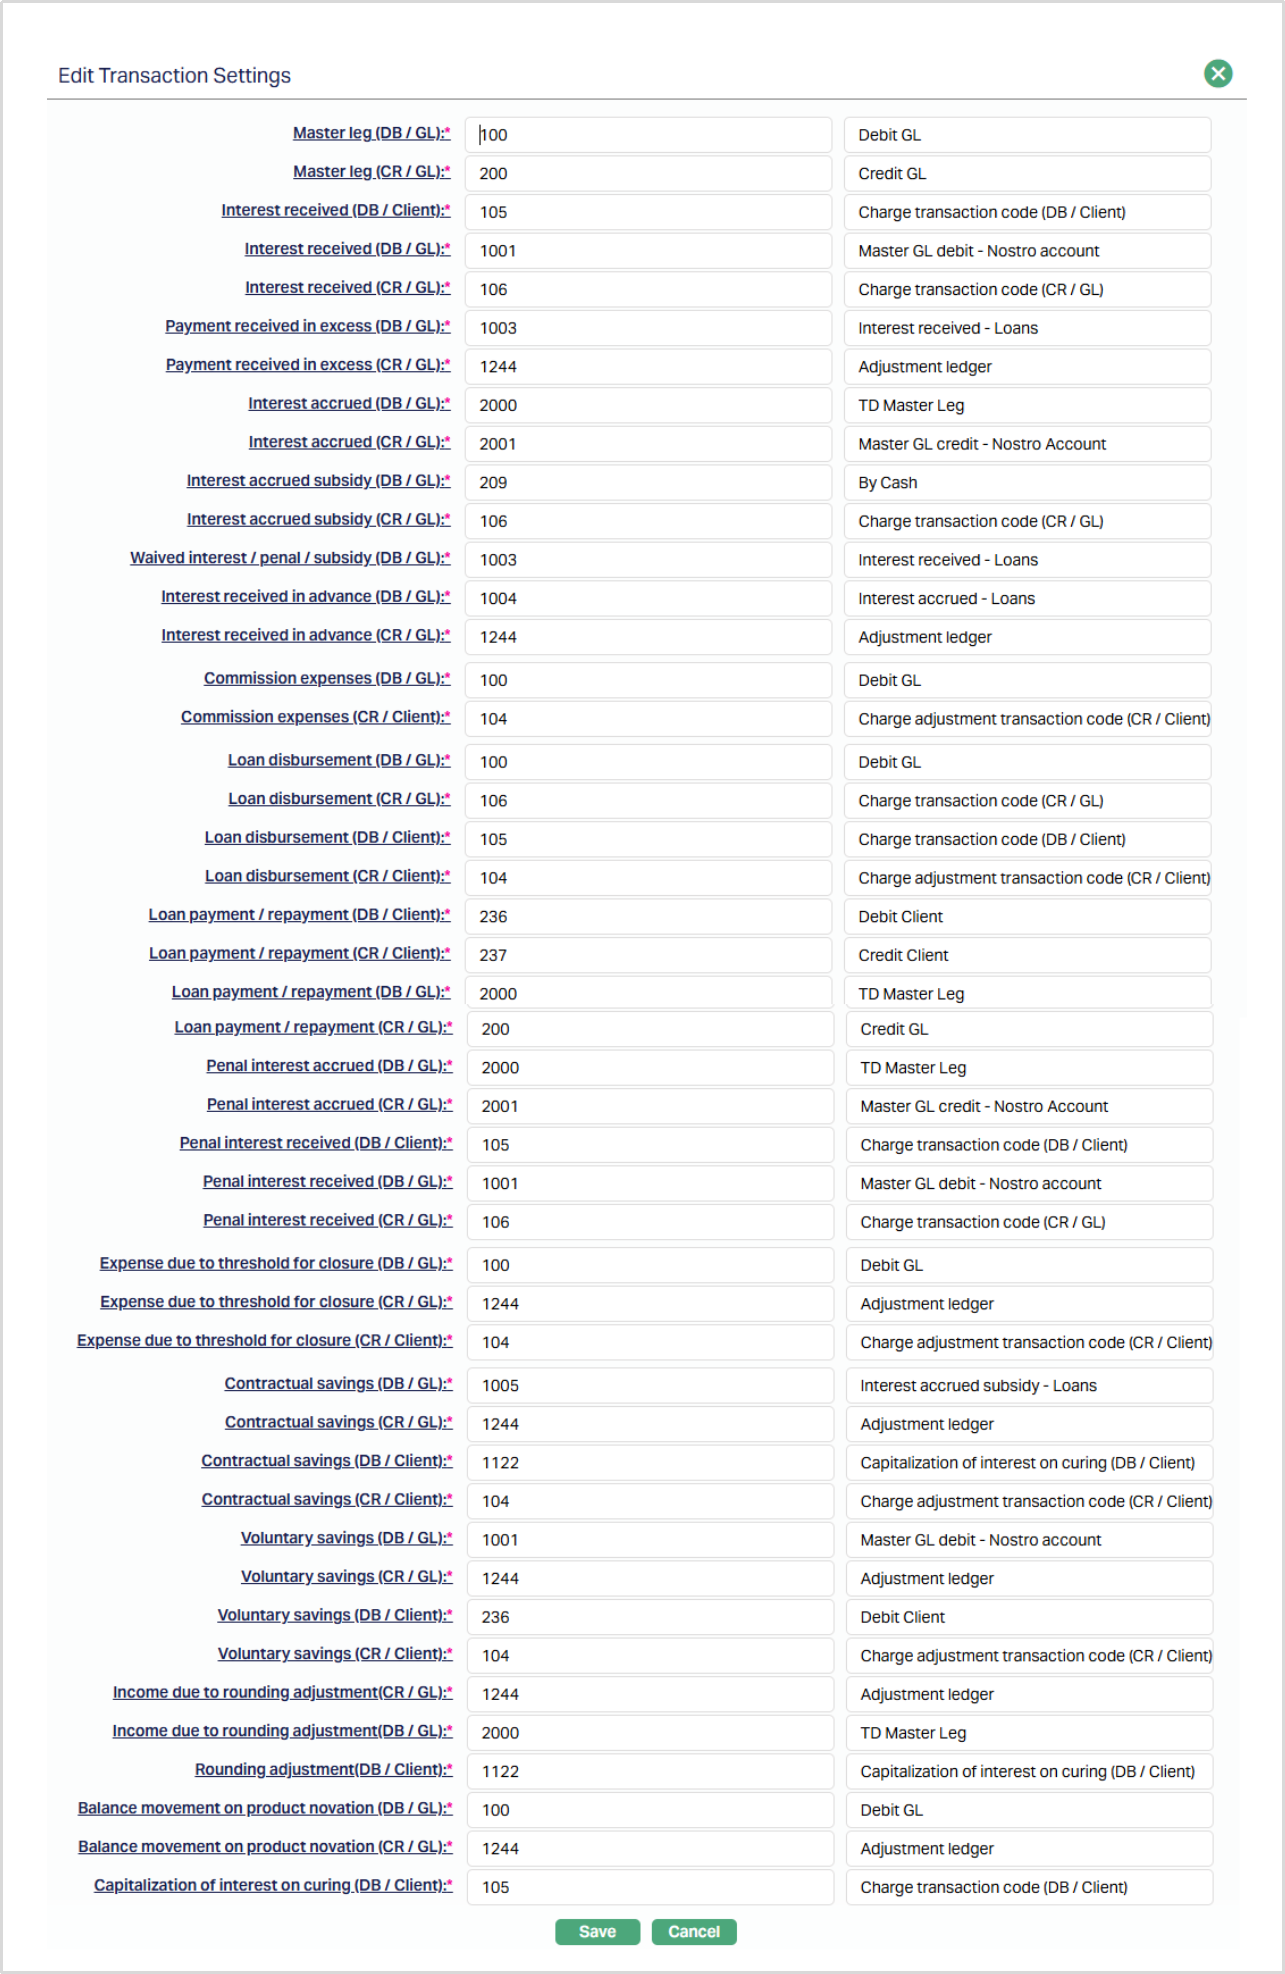
Note: All the fields in Edit Transaction Settings are editable.
3. Make the required changes and click Save. The Transaction Settings page appears with the edited details.
Functions: Edit
Custom Field
This menu option allows you to define fields apart from those that are already available in the standard version of Aura. Thus, it enables you to customize additional data storage and use as required to suit your specific business needs.
To maintain the Custom Field,
1. Access the Product page. Click on the Custom Field tab.

2. The field appears only when it is created in Admin → System codes → Custom fields → Custom fields and linked to Mortgage and Loan Product option in Admin → System codes → Custom fields → Field mappings.
3. Click Edit. The Edit Custom Field page appears. In the following illustration, one custom field Pan number Category has been mapped to the Product as shown below:

4. Enter the Loan Category to be associated with the Mortgage loan. For example, enter: Auto Loan.
5. Click Save. The Custom Field tab appears with the edited details.

Function: Edit