Account Mapping and Preferences
This functionality allows you to set up preferences for automatic reconciliation of Nostro Account entries with the mirror account maintained internally by the bank. Once the Preferences are set, CC-PG will automatically reconcile the entries and only the un-reconciled records will be displayed under Reconciliation Details. Through Manual Reconciliation you can match those un-reconciled transactions and can pass the required adjustment entries.
There are two sub- tabs to maintain Account Mapping and Preferences. The two sub-tabs are:
To add new Account Mapping & Preference setting
- From PaymentGrid menu, click Nostro reconciliation, and then Account mapping and preferences. Account Mapping and Preferences Search page appears.

- Click Add. New Account Mapping and Preferences -- Profile (1/3) page appears.
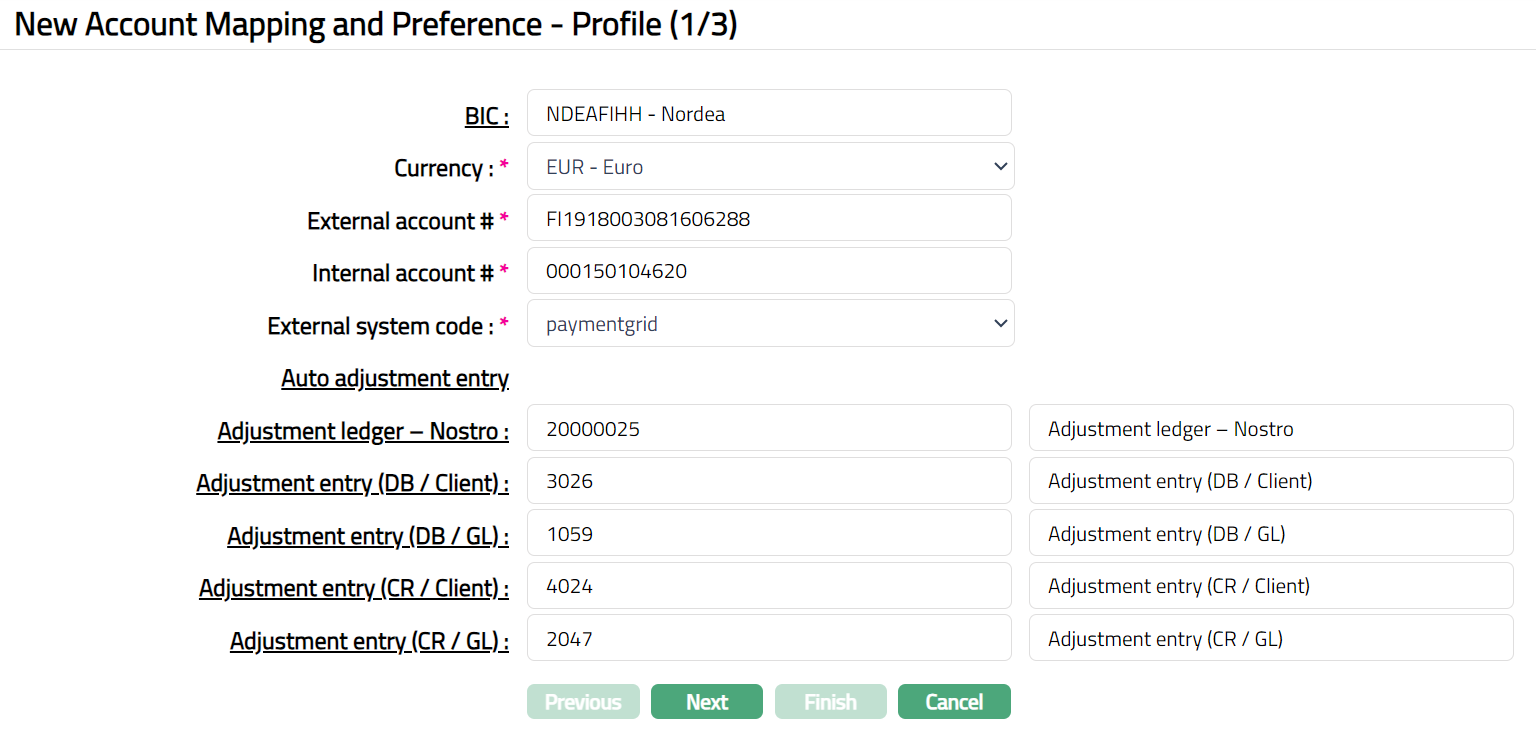
Select **BIC **(Business Identifier Code) code by clicking BIC hyperlink. BIC Code Search page appears with the list of active BIC's maintained under Admin > Management > Settlement Directory. You can search for a BIC code with relevant criteria and select the required BIC code. You can also input the name of the bank and select the required BIC code from the list displayed by CC-PG.
Select Currency for the BIC selected above from the drop-down list of active currencies maintained under Admin > System codes > Currencies > Currencies. For example: Bank of America BIC is maintained for USD by HDFC for payment transfer in Dollars in United States.
Enter External account #. It is the Nostro account number maintained by a bank with another bank. For example: The Nostro account maintained by HDFC in BANK OF AMERICA is the external account #.
Enter Internal account #. It is the replica of the Nostro account which is maintained by the bank. For example: The mirror account maintained by HDFC bank is the Internal account #.
Select External system code from the drop-down list of all active codes maintained under Admin > System codes > Interface definition.
Specify which Ledger number is to be used as the Adjustment Ledger for the Nostro reconciliation by clicking on the Adjustment Ledger -- Nostro hyperlink. The Nostro General Ledger Search page appears with the list of active Adjustment Ledgers with the ledger type Asset, Liability, Income and Expense maintained under Payment Grid > Settings > General Ledger. You can search for the Adjustment Ledger with relevant criteria and select the required Adjustment Ledger or you can enter the first few characters of the General Ledger and choose from the list suggested by CC-PG.
Specify which transaction code is to be used for debiting the client account during the Nostro Reconciliation using Adjustment entry (DB/Client). Click on the **Adjustment Entry (DB/Client) **hyperlink. The **Nostro Transaction Code Search **page appears with the list of active transaction codes with the transaction type Client and Debit/Credit as Debit maintained under Settings > Transaction code. You can search for the Adjustment entry with relevant criteria and select the required Adjustment entry or you can enter first few characters of the Transaction Code and choose from the list suggested by CC-PG.
Specify which transaction code is to be used for debiting the General Ledger account during the Nostro Reconciliation using Adjustment entry (DB/GL). Click on the Adjustment Entry (DB/GL) hyperlink. The Nostro Transaction Code Search page appears with the list of active transaction codes with the transaction type GL and Debit/Credit as Debit maintained under Settings > Transaction code. You can search for the Adjustment entry with relevant criteria and select the required Adjustment entry. or you can also enter first few characters of Transaction Code and choose from the list suggested by CC-PG.
Specify which transaction code is to be used for crediting the client account during the Nostro Reconciliation using Adjustment entry (CR/Client). Clicking on the Adjustment Entry (CR/Client) hyperlink. The Nostro Transaction Code Search page appears with the list of active transaction codes with the transaction type Client and Debit/Credit as Credit maintained under Settings > Transaction code. You can search for the Adjustment entry with relevant criteria and select the required Adjustment entry or you can also enter first few characters of Transaction code and choose from the list suggested by CC-PG.
Specify which transaction code is to be used for crediting the General Ledger account during the Nostro Reconciliation using Adjustment entry (CR/GL). Click Adjustment Entry (CR/GL) hyperlink. The Nostro Transaction Code Search page appears with the list of active transaction codes with the transaction type GL and Debit/Credit as Credit maintained under Settings > Transaction code. You can search for the Adjustment entry with relevant criteria and select the required Adjustment entry or you can also enter first few characters of Transaction code and choose from the list suggested by CC-PG.
Click Next. New Account Mapping and Preference -- Preferences (2/3) page appears.
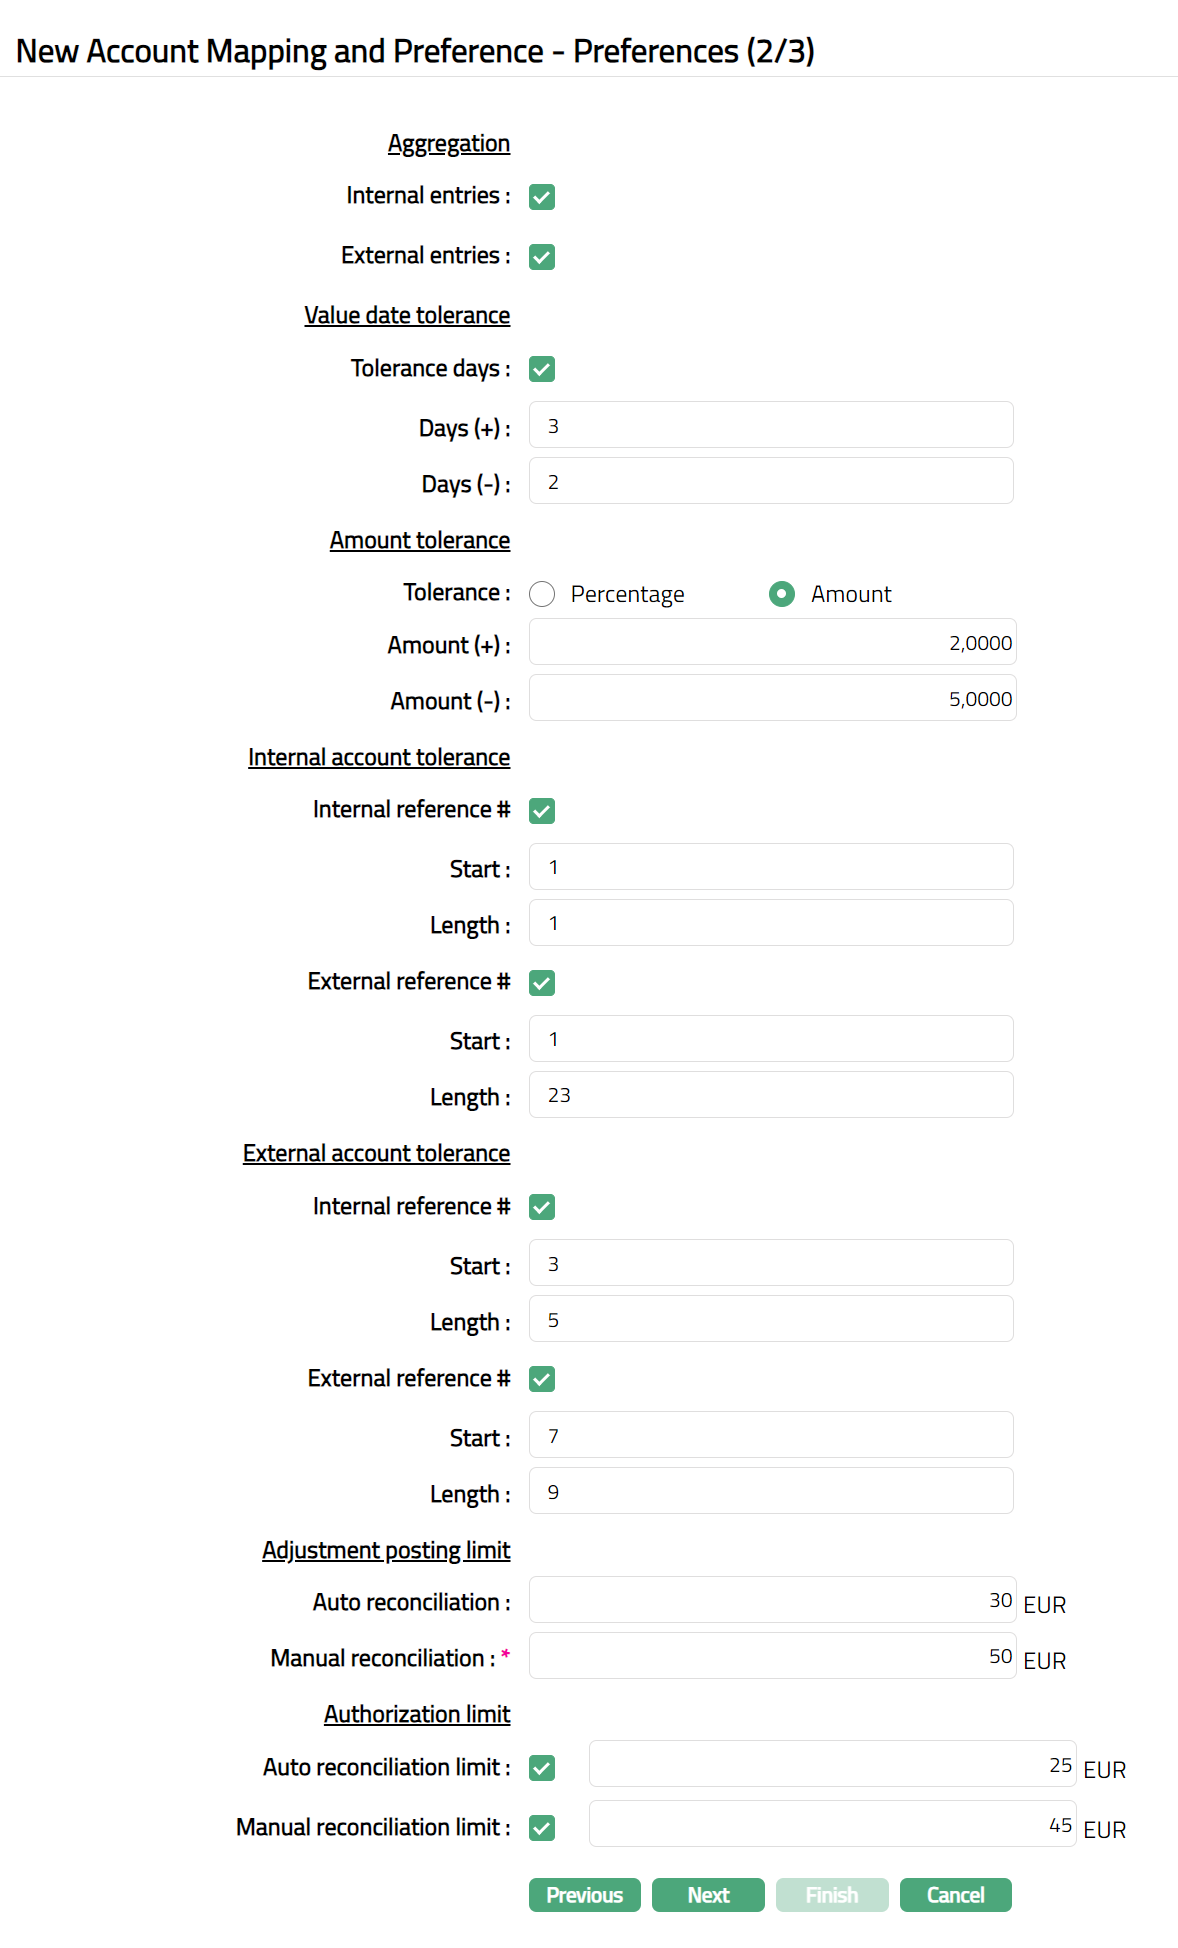
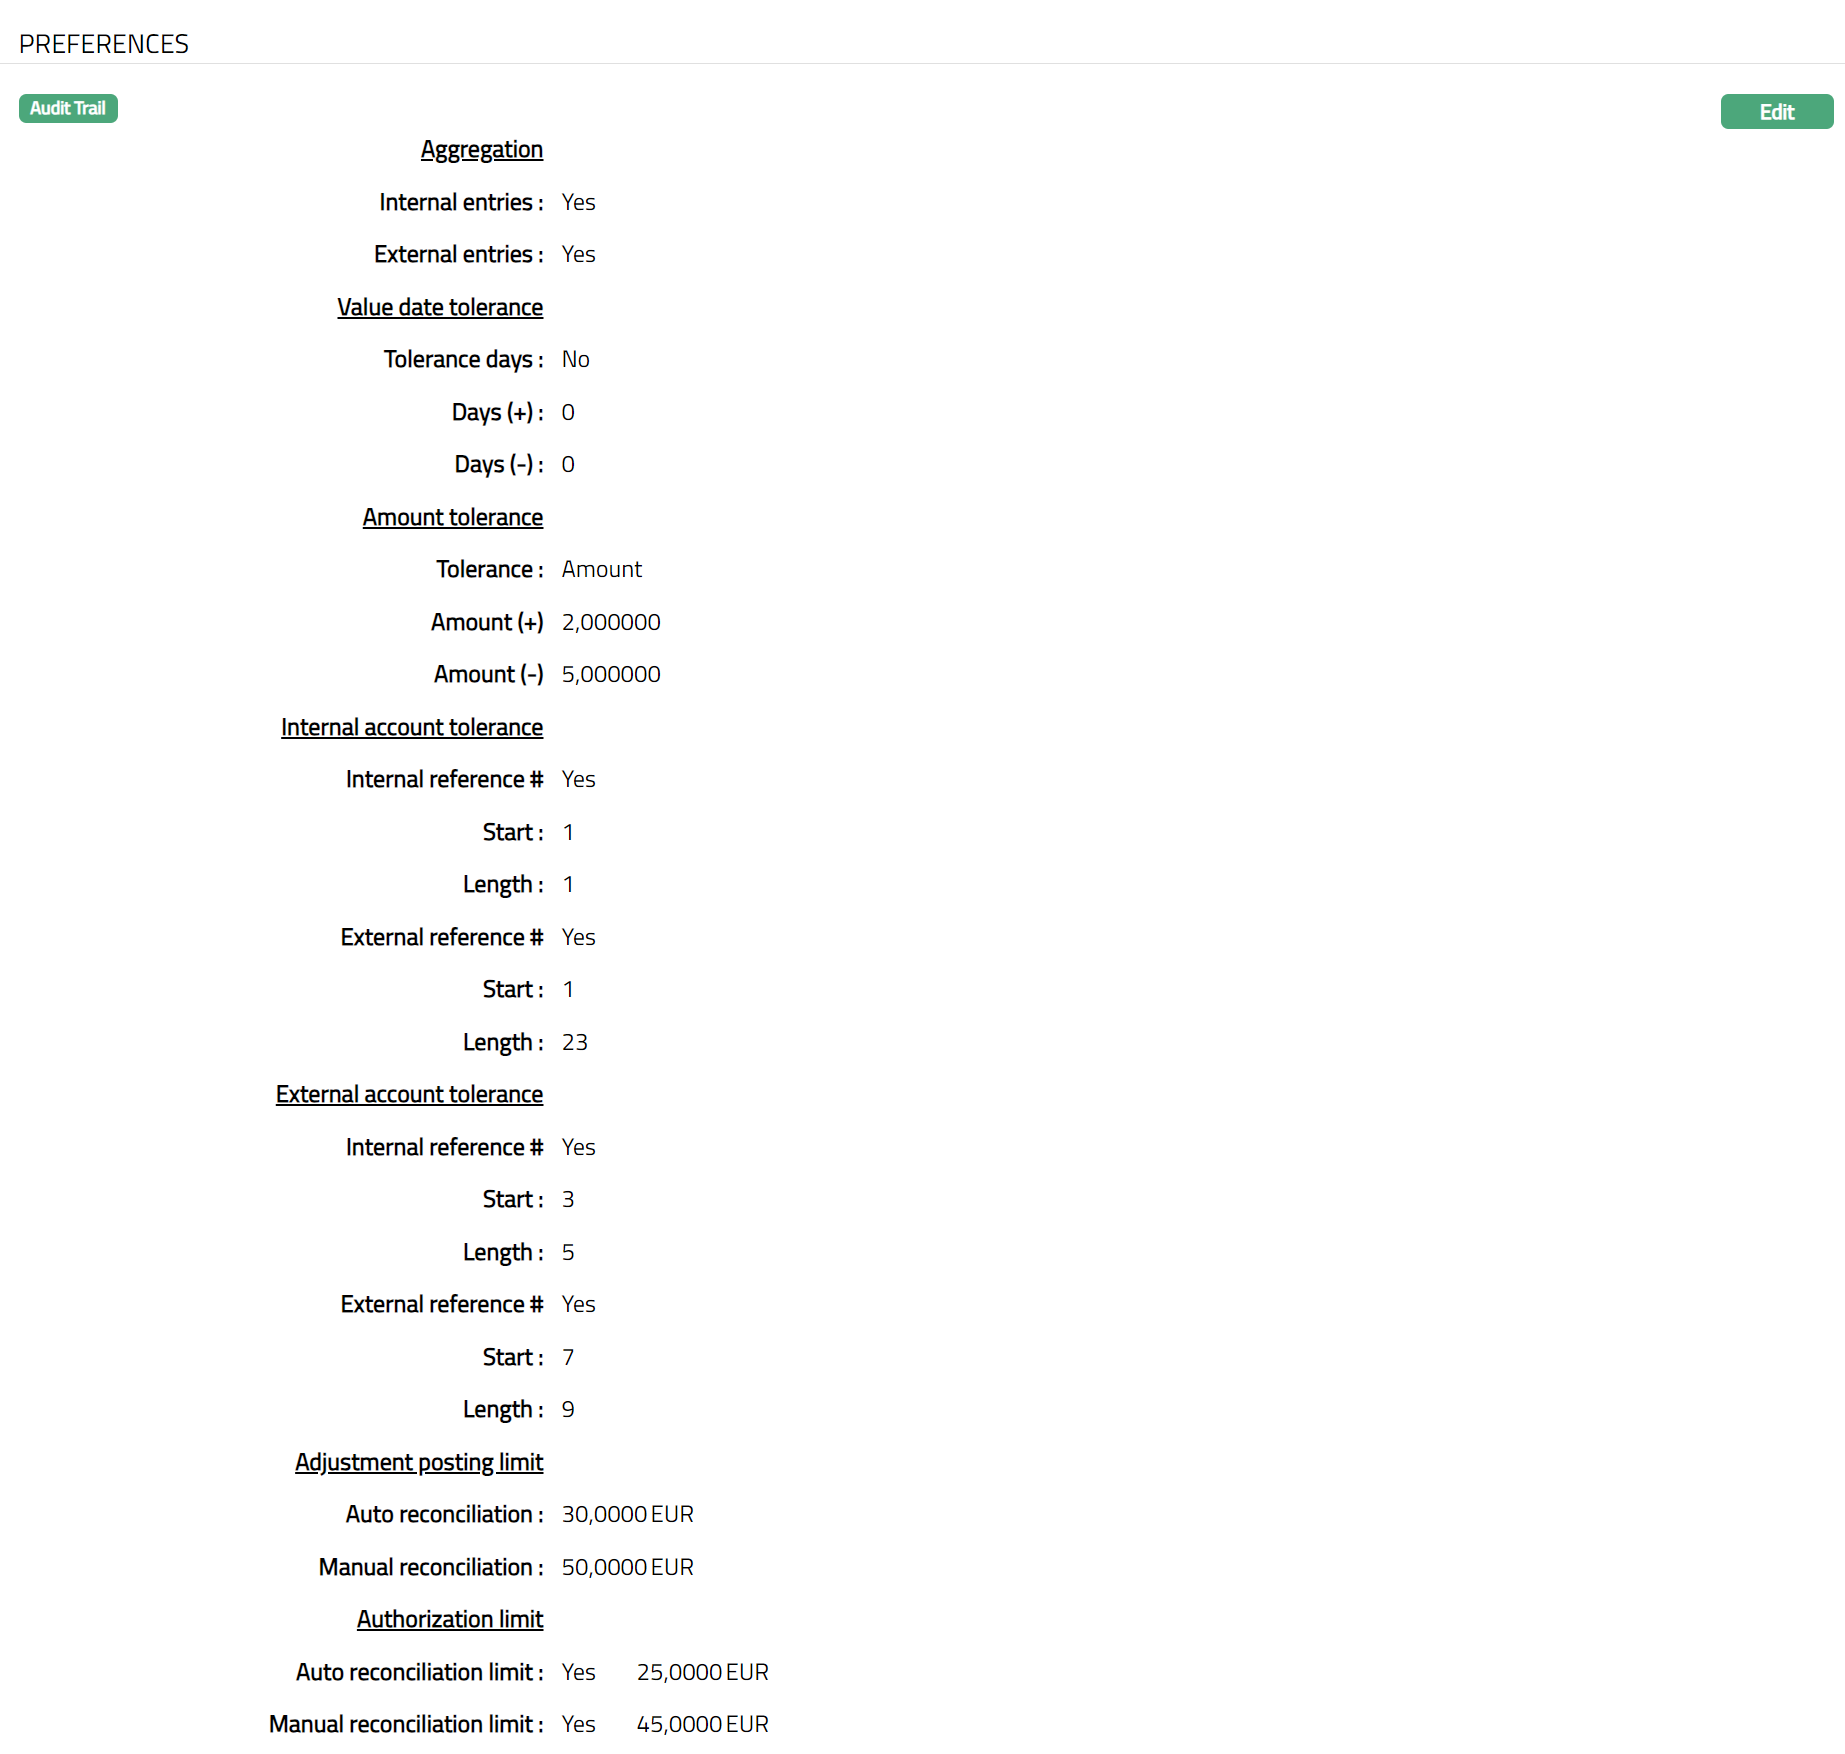
Aggregation: Using these parameters, you can specify whether or not the entries with the same reference number can be summed up for the purpose of reconciliation.
**Internal entries: **If the checkbox is checked, the amount of the entries with same
Internal reference number is summed up and the entry is considered as a single entry for reconciliation. If the checkbox is unchecked, entries with same internal reference number are considered as individual entry for reconciliation. By default, will be taken as individual entries.
External entries: If the checkbox is checked, then the amount of the entries with same external reference number is summed up and the entry is considered as a single entry for reconciliation. If the checkbox is unchecked, then entries with same external reference number are considered as individual entry for reconciliation. By default, will be taken as individual entries.
Value date tolerance: Using these parameters you can set up the tolerance limits for the value date of the entries.
Tolerance days: If this is checked, both Days (+) and Days (-) will be enabled. If this is unchecked, both Days (+) and Days (-) will be disabled.
Days (+): Enter the number of days to be added to the value date of the transaction. PG will check all entries between the value date and this date for automatic reconciliation.
For example: Value date = 14-Sep-2013 and Days (+) = 2, CC-PG will check entries with dates from 14-Sep-2013 to 16-Sep-2013.
- Days (-): Enter the number of days to be subtracted from the value date of the transaction. PG will check all entries between this date and the value date for automatic reconciliation.
For example: Value date = 14-Sep-2013 and Days (-) = 2, CC-PG will check entries with dates from 12-Sep-2013 to 14-Sep-2013.
Amount Tolerance: Using these parameters, you can set up the tolerance limits for the amount of the transactions.
You can set the Tolerance in terms of Percentage or Amount. If Percentage option is chosen, CC-PG will display Percentage (+) and Percentage (-) fields. If option Amount is chosen, CC-PG will display Amount (+) and Amount (-) fields. By default, Percentage will be displayed.
Percentage (+): Enter the percentage to be added to the amount as tolerance.
For Example: If Percentage (+) = 1 and the amount = 2000, then CC-PG will check for the amounts from 2000 to 2020.
- **Percentage (-): **Enter the percentage to be deducted from the amount as tolerance.
For Example: Percentage (-) = 1 and the amount = 2000, then CC-PG will check for the tolerance amount from 1980 to 2000.
- Amount (+): Enter the amount to be added to the transaction amount as tolerance.
For Example: Amount = 2000 and Amount (+) = 1, then CC-PG will check for amount from 2000 to 2001.
- Amount (-): Enter the amount to be deducted from the transaction amount as tolerance.
For example: Amount = 2000 and Amount (-) = 1, then application will check for amount from 1999 to 2000.
Internal Account tolerance: Using these parameters, you can specify the tolerance value for the Internal/external reference number for the internal account.
If **Internal reference # **checkbox is checked, **Start **and **Length **fields will be enabled, and you can specify the tolerance value for the Internal Reference # for the internal account.
Enter Start position to be considered for the Internal reference #.
Enter Length to specify the number of characters to be considered.
Example: Suppose, Internal reference # = 000123456000. Start = 4 and Length = 6. CC-PG will take the Internal Reference # to be 123456, i.e., starting from the 4th digit to the 9th digit and not as 000123456000.
If External reference # checkbox is checked, the Start and Length fields will be enabled, and you can specify the tolerance value for the External Reference # for the internal account.
Enter Start position to be considered for the External reference #.
Enter Length to specify the number of characters to be considered.
Example: Suppose, External reference # = 000123456000. Start = 4 and Length = 6, then CC-PG will take the External Reference number to be 123456, i.e., starting from the 4th digit to the 9th digit; and not as 000123456000.
External Account Tolerance: Using these parameters, you can specify the tolerance value for the Internal/external reference number for the external account.
If **Internal reference # **checkbox is checked, the Start and Length fields will be enabled, and you can specify the tolerance value for the Internal Reference # for the external account.
Enter **Start **position to be considered for the Internal reference #.
Enter **Length **to specify the number of characters to be considered.
Example: Suppose, Internal reference # = 000678901000. Start = 4 and Length = 6. CC-PG will take the Internal Reference # to be 678901, i.e., starting from the 4th digit to the 9th digit and not as 000678901000.
If External reference # checkbox is checked, the** Start and Length** fields will be enabled, and you can specify the tolerance value for the External Reference # for the external account.
Enter **Start **position to be considered for the External reference #.
Enter **Length **to specify the number of characters to be considered.
Example: Suppose, External reference # = 000456000. Start = 4 and Length = 6, then CC-PG will take the External Reference number to be 456000, i.e., starting from the 4th digit to the 9th digit; and not as 000456000.
Adjustment posting limit: Using these parameters, you can set up the limit for posting the adjustment entries for auto reconciliation and manual reconciliation.
Enter the Auto reconciliation amount. It specifies the limit amount for Auto Reconciliation. CC-PG will allow posting adjustment entries only up to the amount specified here for auto reconciliation.
Example: Suppose, Auto reconciliation = 25 EUR. CC-PG will allow to post Adjustment entries up to (less than or equal to) 25 EUR. When the adjustment entry amount goes beyond 25 EUR, CC-PG will not perform Auto reconciliation.
- Enter Manual reconciliation amount. It specifies the limit amount for Manual Reconciliation. CC-PG will allow posting adjustment entries only up to the amount specified here for manual reconciliation.
Example: Suppose, Manual reconciliation = 25 EUR. CC-PG will allow to post Adjustment entries up to (less than or equal to) 25 EUR. When the adjustment entry amount goes beyond 25 EUR, CC-PG will not allow further manual adjustment entries.
Authorization Limit: Using these parameters, you can set up the limit for authorization for both Manual and Auto reconciliation.
If Auto reconciliation limit checkbox is checked, then the field will be enabled, and you can enter the limit for authorization applicable for Auto Reconciliation. If the checkbox is unchecked, the field will be disabled.
Example: Suppose, Auto reconciliation limit = 10 EUR and Authorization limit for Auto reconciliation = 3 EUR. CC-PG will allow to post Adjustment entries up to (less than or equal to) 3 EUR without further approval. If any adjustment entry is posted beyond 3 EUR, then authorization is required. Without the authorization, the amount will not be reconciled.
- If Manual reconciliation limit checkbox is checked, then the field will be enabled, and you can enter the limit for authorization applicable for Manual Reconciliation. If the checkbox is unchecked, the field will be disabled.
Example: Suppose, Manual reconciliation limit = 10 EUR and Authorization limit for Manual reconciliation = 3 EUR. CC-PG will allow to post Adjustment entries up to (less than or equal to) 3 EUR without further approval. If any adjustment entry is posted beyond 3 EUR, then authorization is required. Without the authorization, the amount will not be reconciled.
- Click** Next.** New Account Mapping and Preferences -- Confirmation (3/3) page appears.
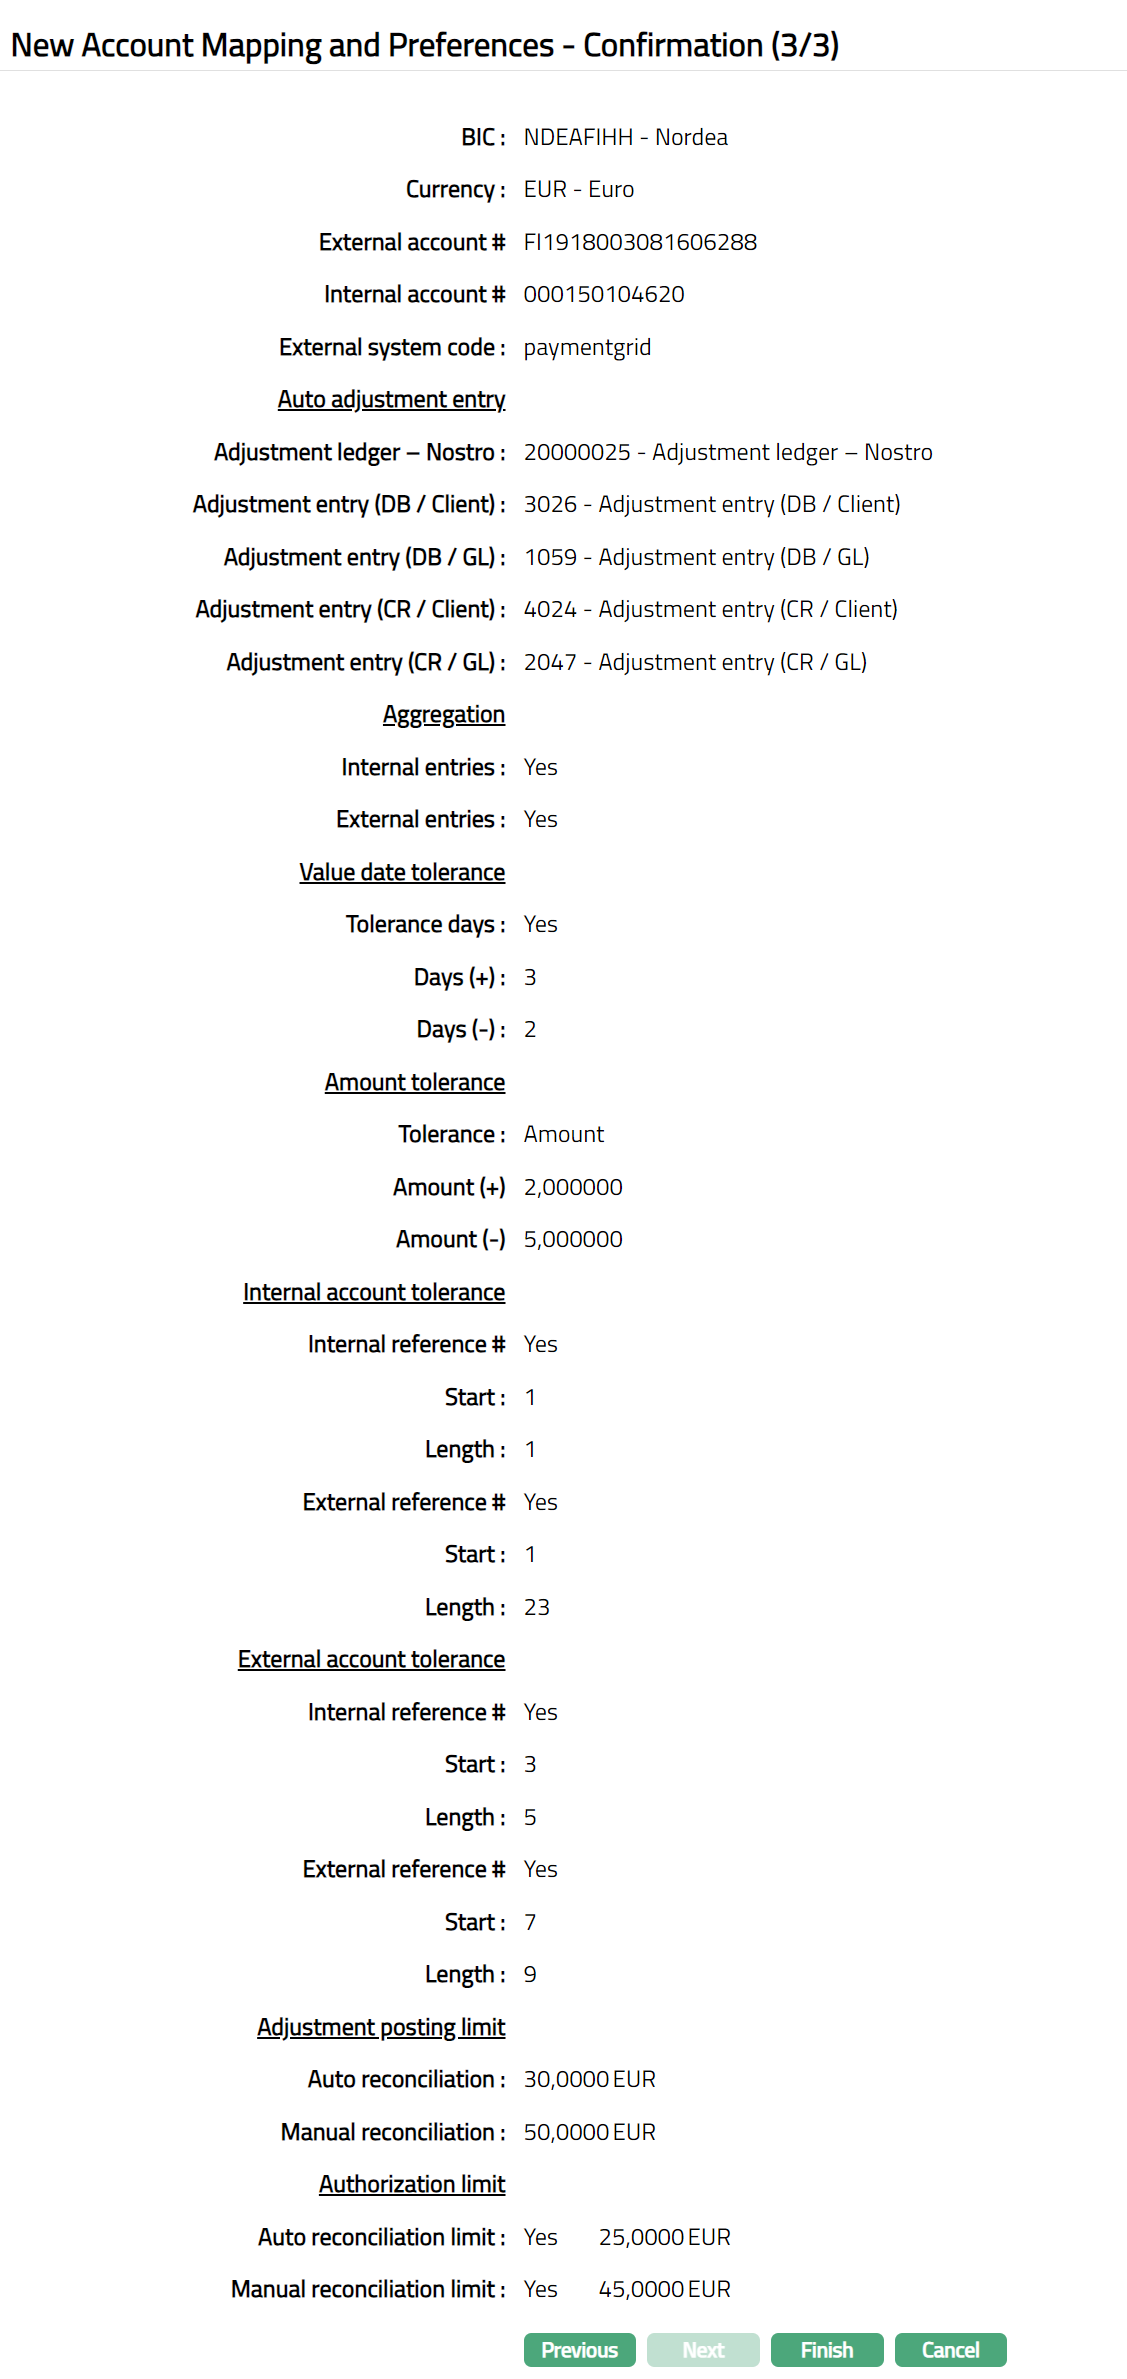
- Click** Finish.** Account Mapping and Preferences page appears showing the details of the record that you saved. Status of the record is Active.
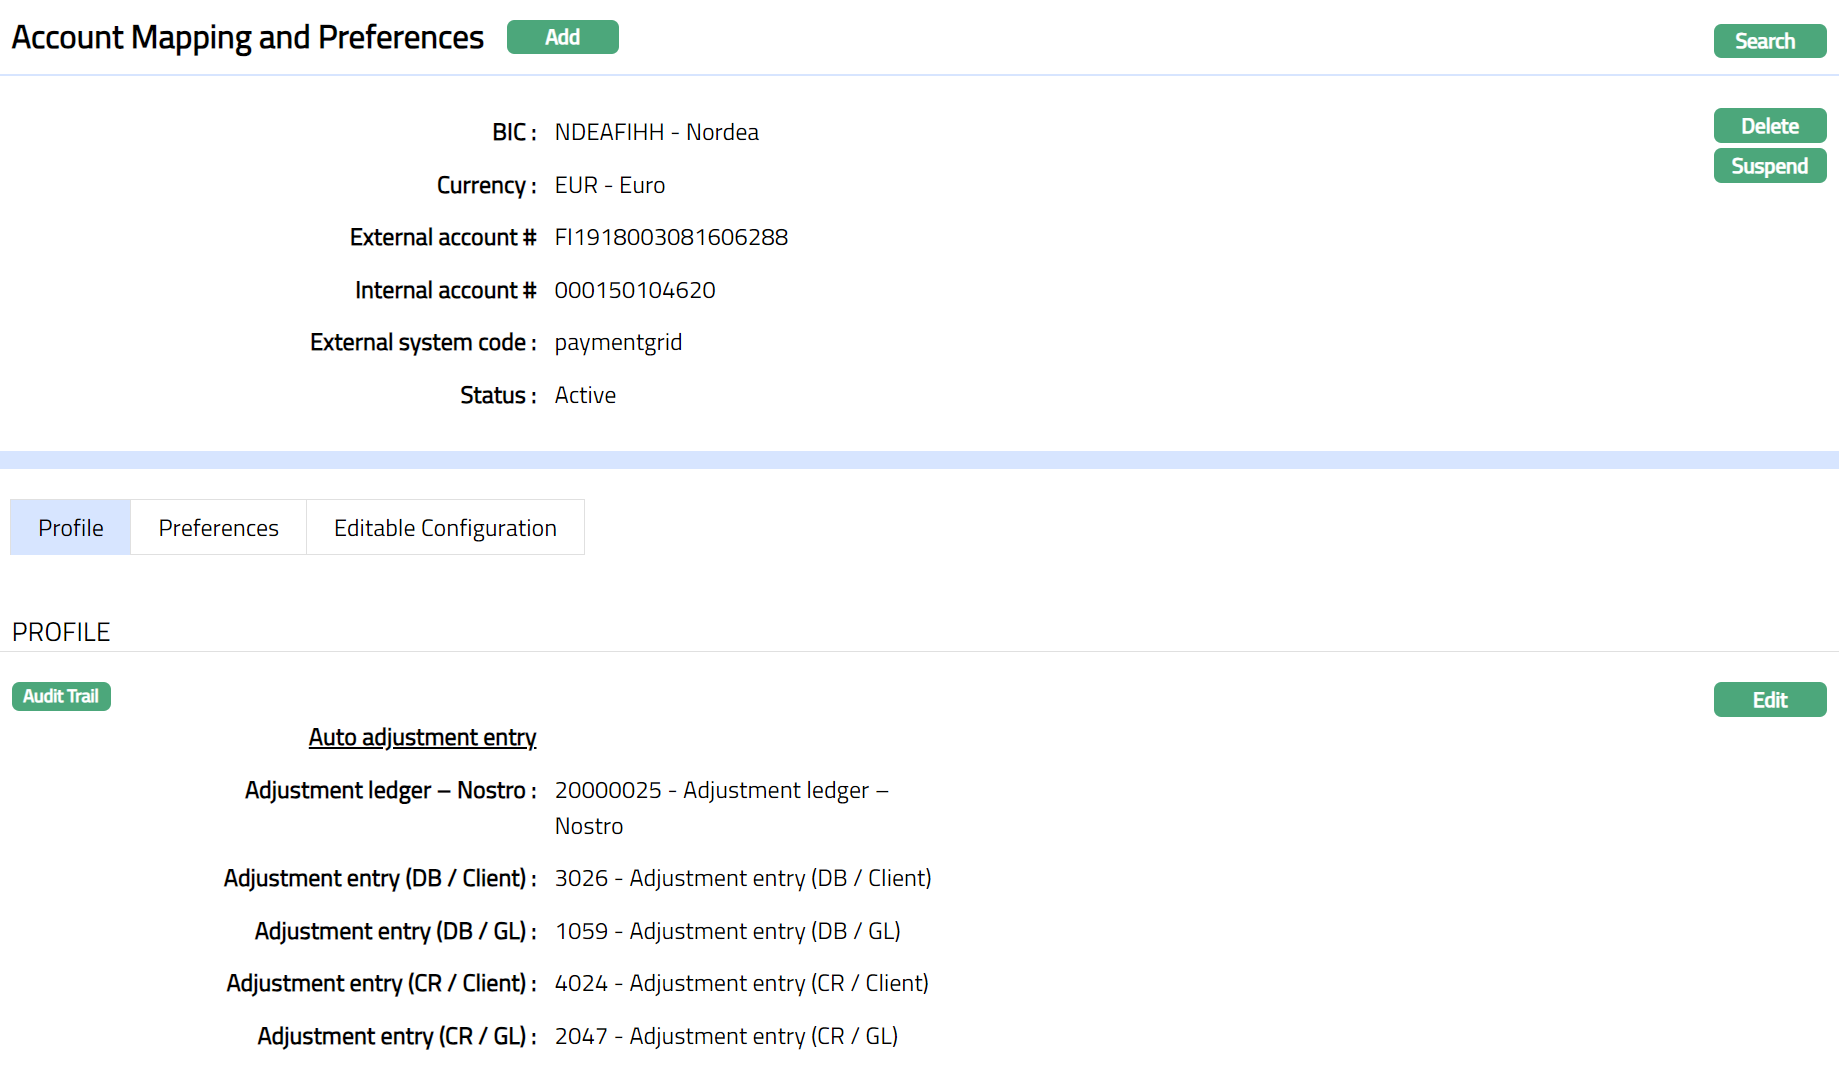
Functions: Add, Edit, Delete, Search, Suspend, Activate
Delete: You can delete an Account Mapping and Preferences record saved in CC-PG by a click on Delete button. CC-PG will ask for confirmation, on approving which the selected record will be deleted.
Suspend: You can suspend the Account Mapping and Preferences record by clicking on Suspend button. When you click on Suspend button, CC-PG will ask for confirmation. On confirmation CC-PG will suspend the Account Mapping and Preferences and Activate button will appear in place of the Suspend button.
Activate: If you want to activate a suspended Account Mapping and Preferences record then click on Activate button. CC-PG will ask for confirmation. On confirmation CC-PG will Activate the Account Mapping and Preferences and Suspend button will appear in place of Activate button.
Profile
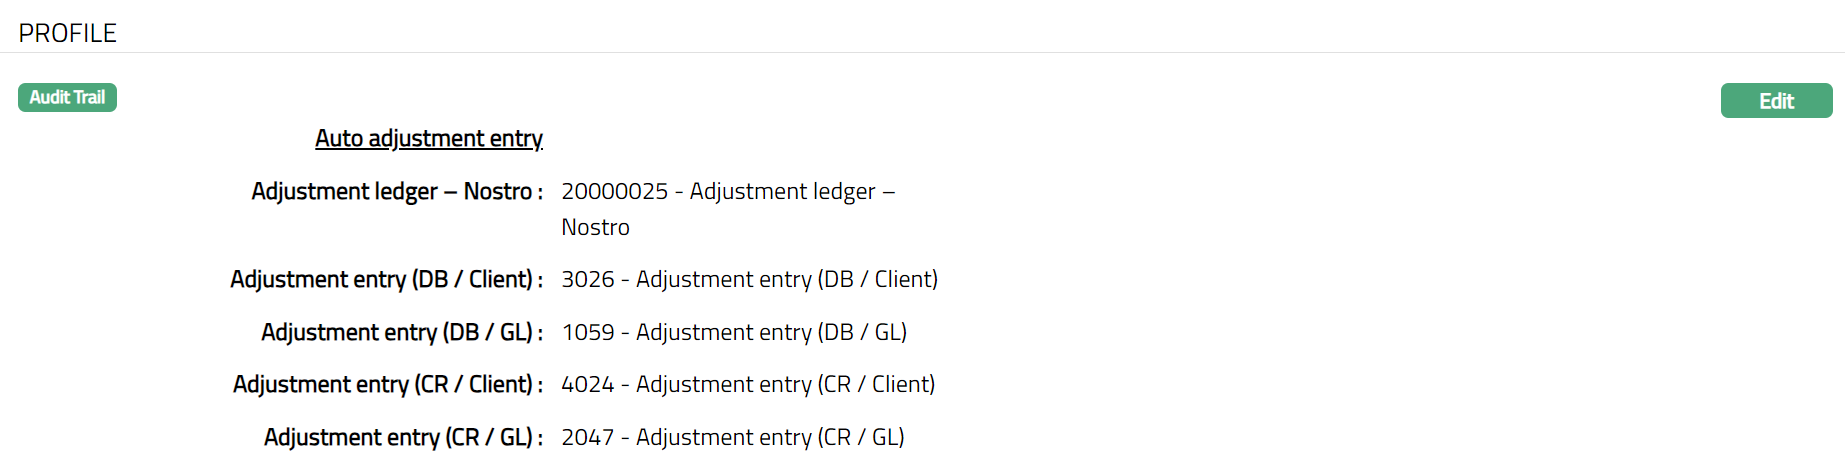
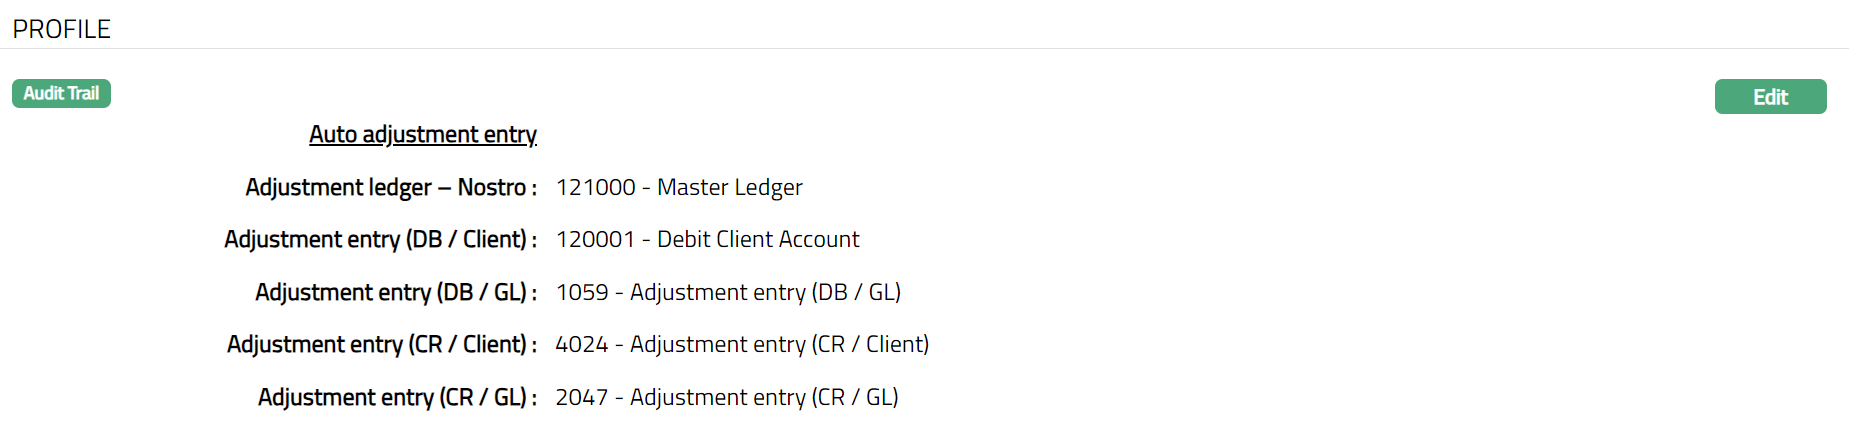
The Profile tab, which is the default tab in the Account Mapping and Preferences screen, shows the basic details for Account Mapping and Preferences set for Auto reconciliation.
To view / edit Profile.
- Access Account Mapping and Preferences page and click Profile tab to view the details as per sample below. The details are defaulted from the entries that you made in New Account Mapping and Preferences -- Profile (1/3).
- Click Edit. Edit Profile page appears.
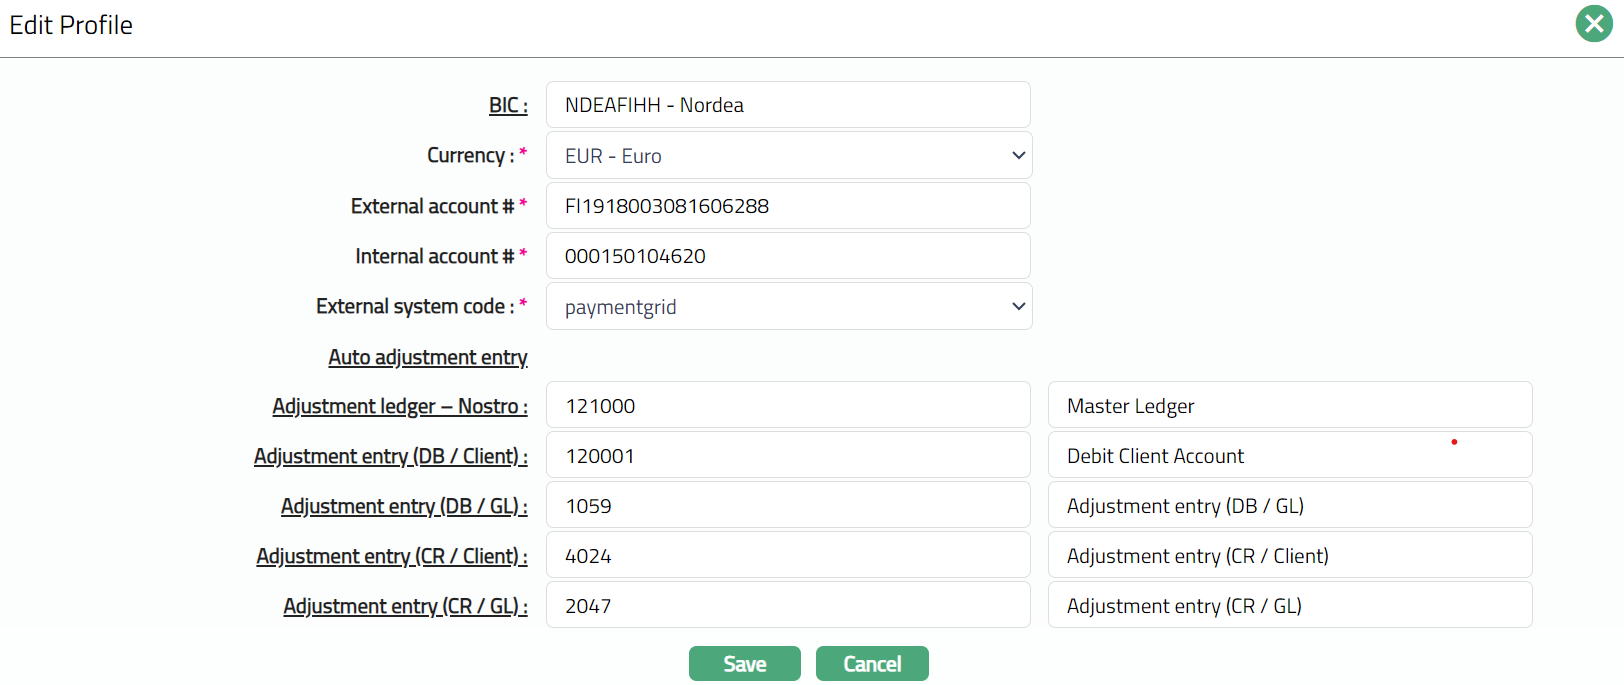
Note: All fields are editable
- Click Save. Profile page appears with the edited details.
Functions: Edit
Preferences
This tab allows you to maintain the tolerances for Auto Reconciliation. You can also maintain Adjustment Posting Limit and Authorization Limit for both Auto and Manual Reconciliation.
- Access Account Mapping and Preferences page and click Preferences tab to view the details as per sample below. The details are defaulted from the entries that you made in New Account Mapping and Preferences -- Preferences (2/3).

- Click Edit. Edit Preferences page appears.
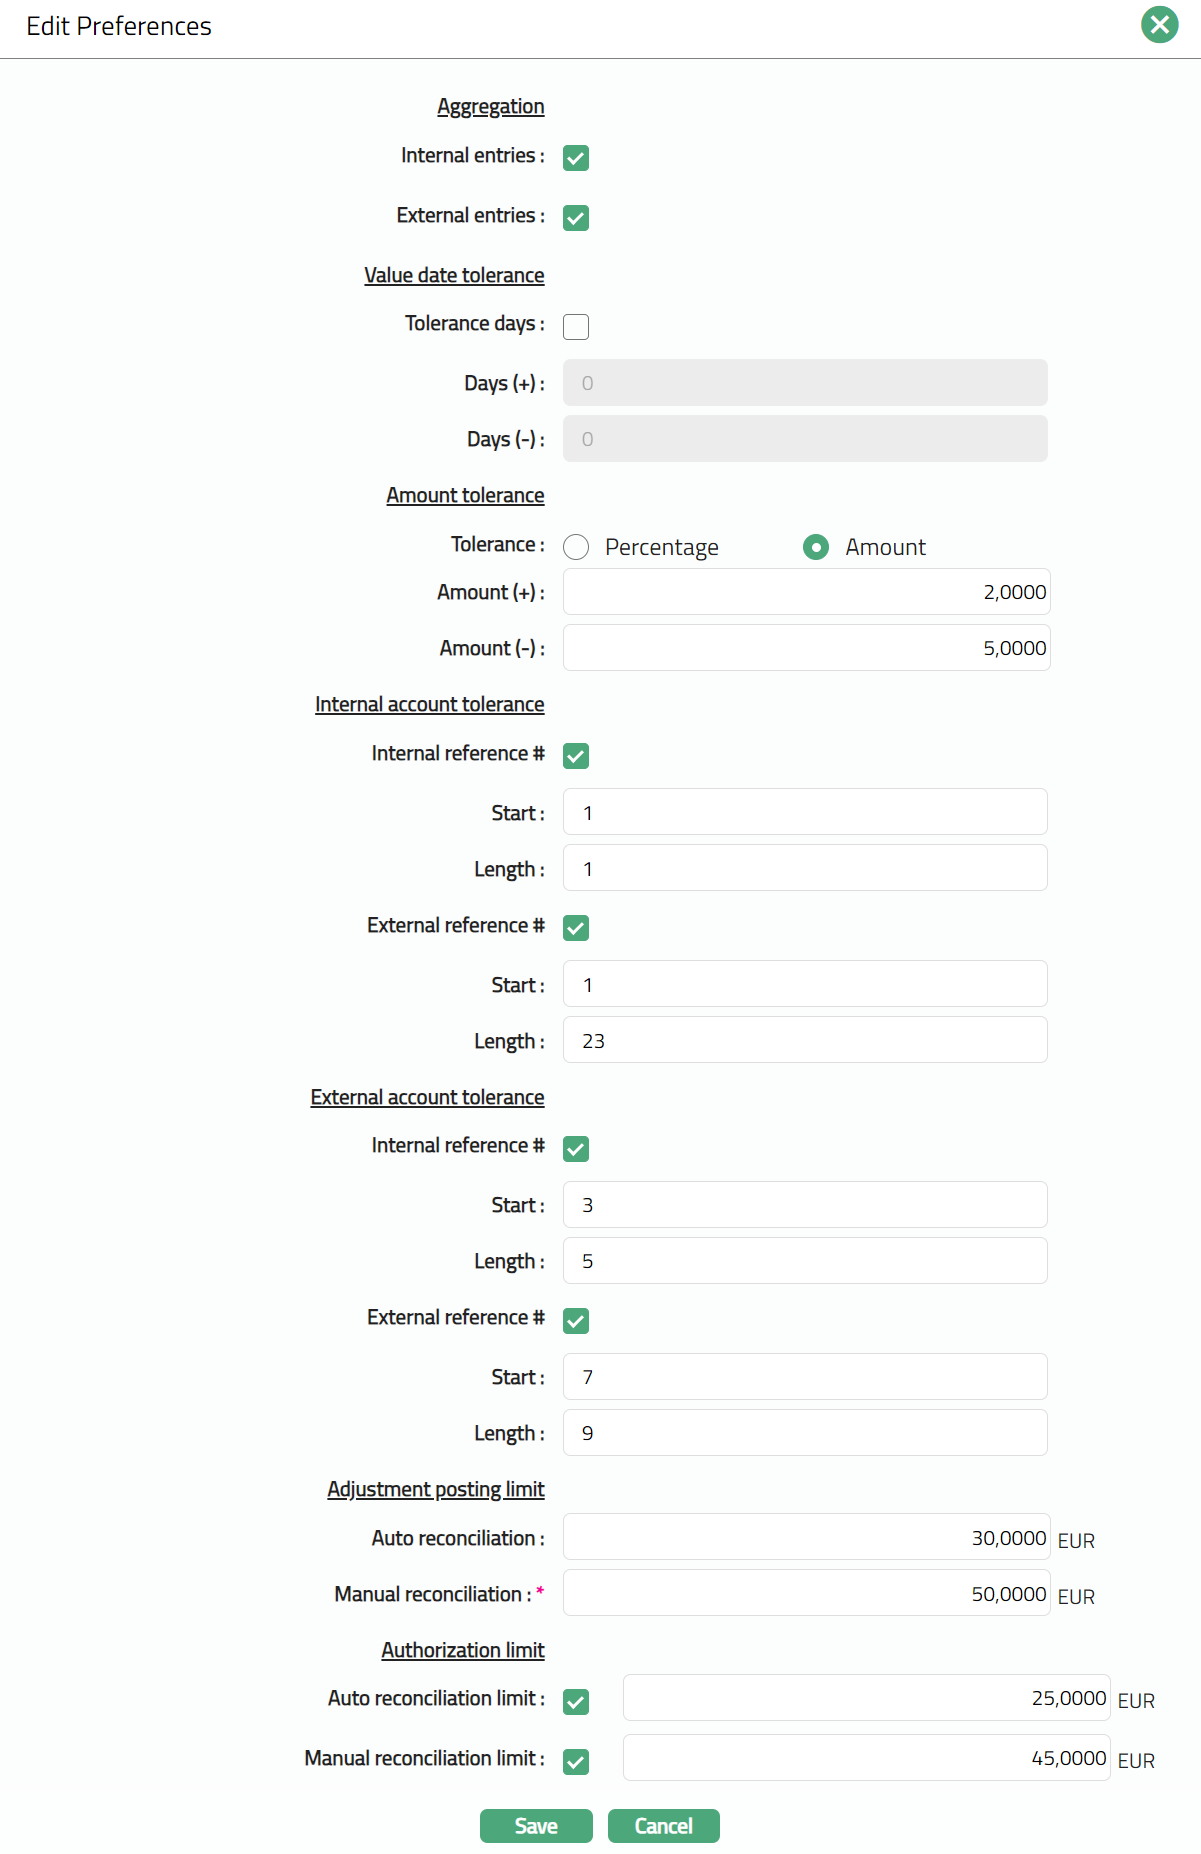
Note: All fields are editable.
- Click Save. Preferences page appears with the edited details.
Functions: Edit
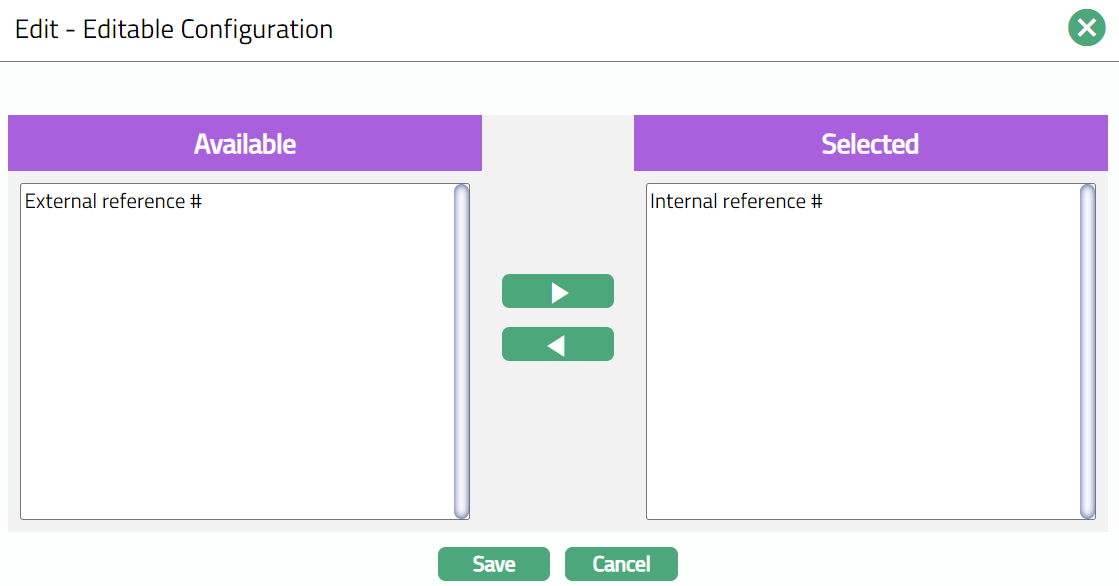
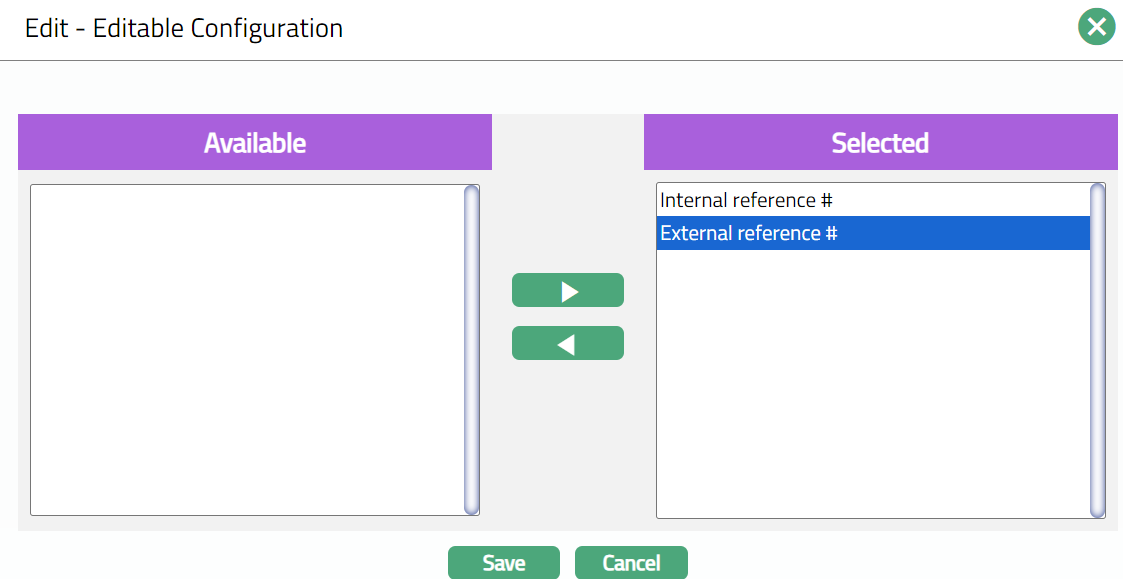
Editable Configuration
This tab allows you to configure Internal and External reference# column.
To view / edit Editable Configuration.
- Access Account Mapping and Preferences page and click Editable Configuration tab to view the details as per sample below. The details are defaulted from the entries that you made in New Account Mapping and Preferences -- Preferences (2/3).

- Click Edit. Edit -- Editable Configuration page appears. Sample screens shown below.
Note: All fields are Editable.
Select required details under Available and Selected with the help of the arrow botton.
Click Save. Editable Configuration page appears with the edited details.

Function: Edit