Client Account Product Maintenance
Product maintenance menu allows you to maintain the details of Client Account Products that are offered by your bank to its customers. Once the product is created, the values in these products are defaulted to the Client Accounts that are created under the product, with an option to change the details at the account level.
The following are the tabs in a Client Account Product:
PROFILE
- Profile
- Currency
- Settings
- Withdrawal Conditions
- Availability
- Statement Parameter
- Document Template Settings
PRICING
REPAYMENT
ACCOUNTING
CUSTOM FIELD
Adding a Client Account Product
To create a new Client Account Product,
1. From the Retail menu, click Settings, and then Product. The Product Search page appears. All products available in Aura appear on the page.

2. Click Add. New Product → Profile (1/10) appears.
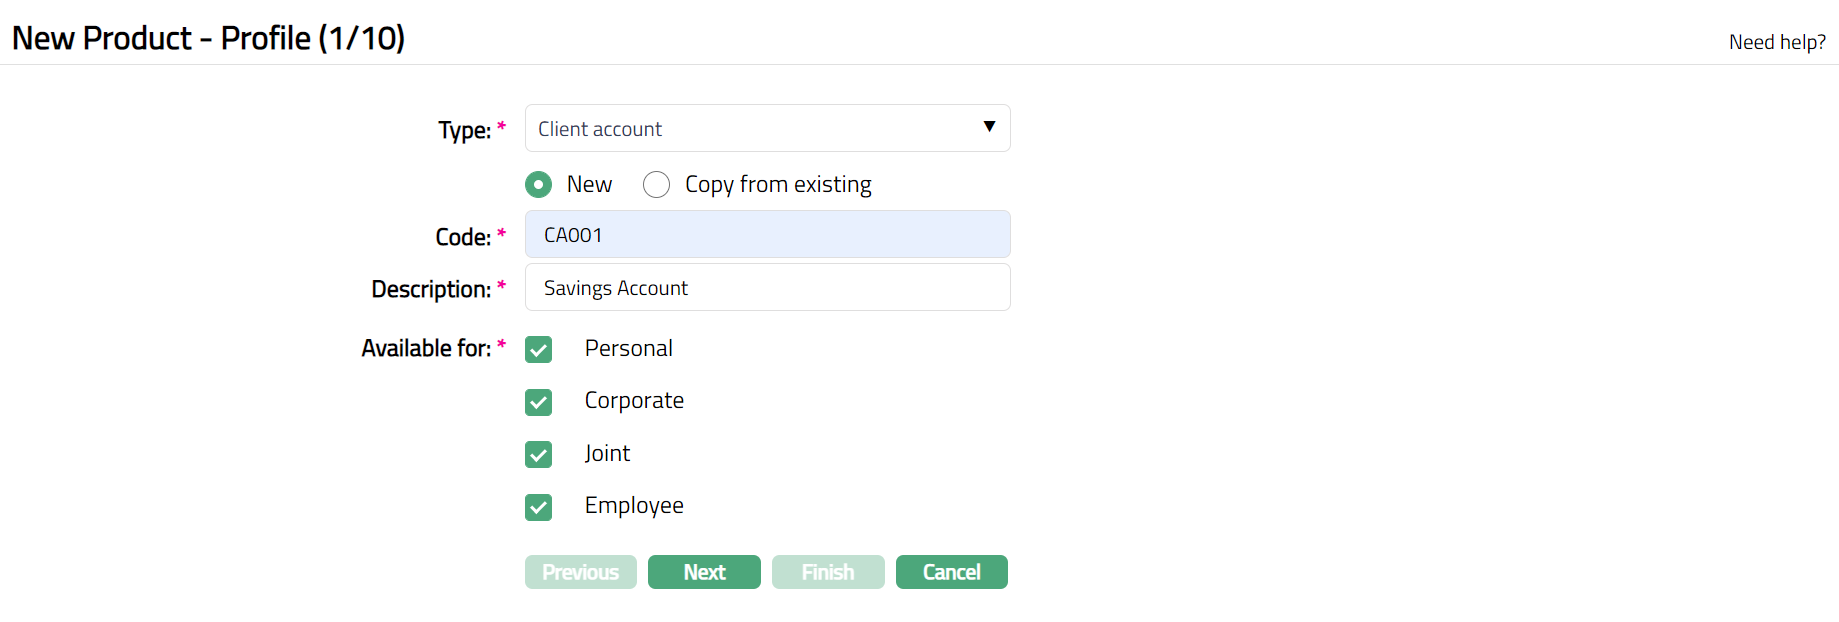
3. Select Client Account as the Type from the drop-down list for the product.
4. Aura allows you to create a new loan product or create a Client account product based on the existing Client account products in the Aura.
To create a new product, select New.
If you want to create a loan product based on the properties of an existing loan product, then select Copy from existing.
5. On selection of Copy from , Copy from Existing drop-down list is displayed with the list of all the Client account products of selected loan Type.
6. Enter the Code for the product. This has to be unique for the entity.
7. Enter the Description for the product.
8. Select the option for Available for field. This will determine the type of clients to which the product will be available. You can choose from:
Personal -- Single person
Corporate -- Organization
Joint -- Group of two or more persons
Employee -- Employee of the Bank.
Thus, if you want the product to be available only for Corporate, check Corporate checkbox.
Note:
Employee and Joint ownership checkboxes will be enabled only when you select Personal.
If the Joint type option is Allowed at CRM → Client → Maintain, only then Joint checkbox is enabled.
9. Click Next. The New Product → Currency (2/10) page appears.

10. Select the Currency for the Product from the dropdown list of GL Currencies. More currencies can be added during Edit using the Currency tab, once the product record is created. Accounts for the product can be opened only in the selected currencies.
11. Enter the Minimum balance that has to be maintained in accounts under the Product.
12. Click Next. The New Product → Settings (3/10) page appears.
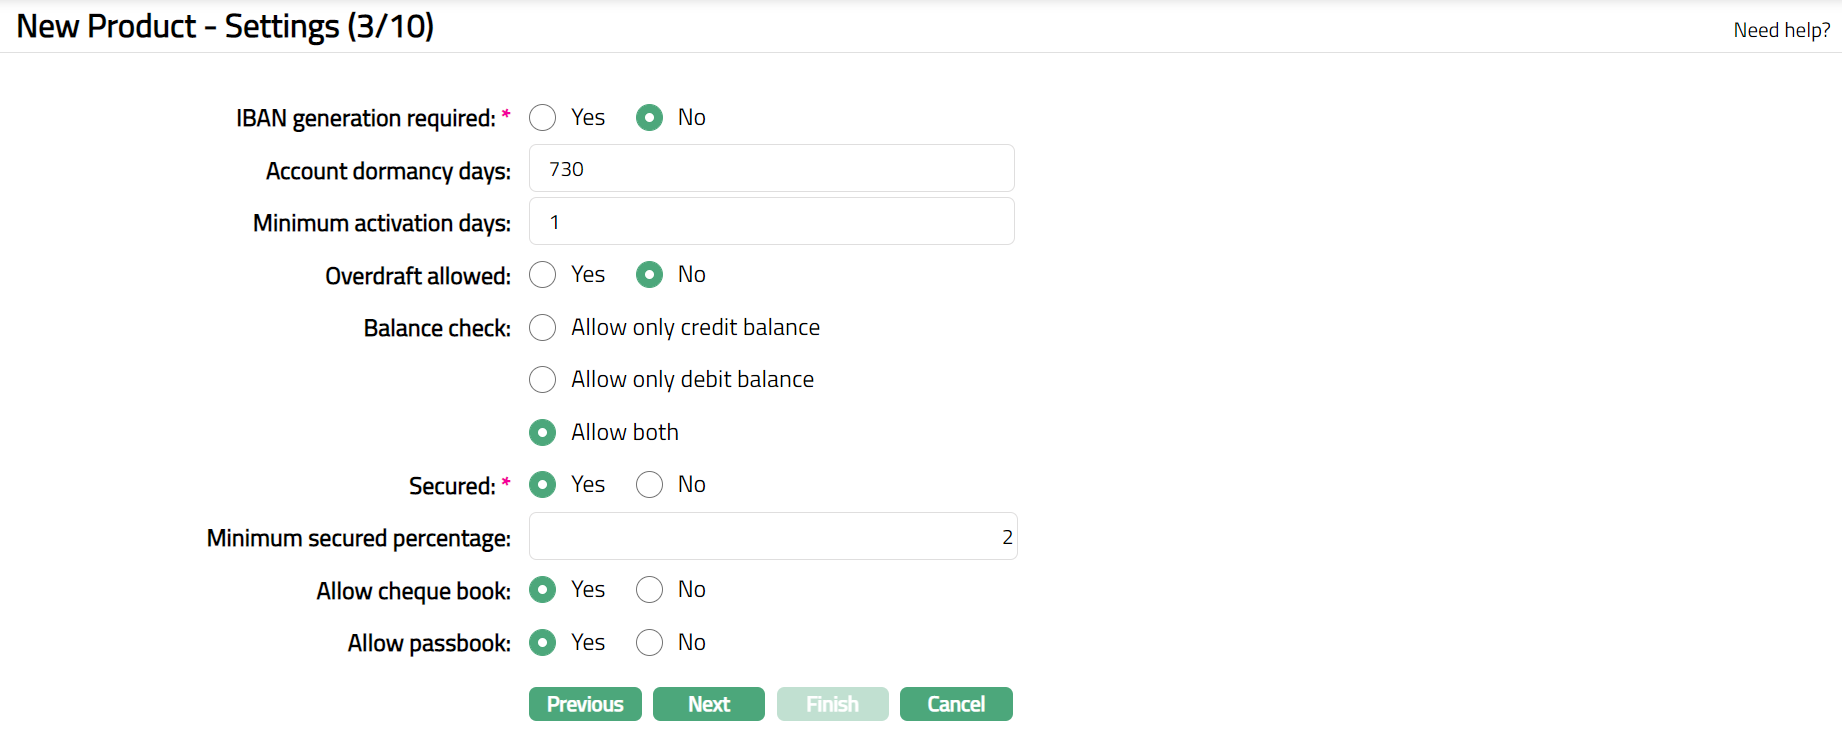
13. Click Yes or No radio button for IBAN generation required for New product. During account creation under the product, if this has been selected as Yes, Aura will automatically create IBAN according to the IBAN format maintained at the entity level.
14. Enter Account dormancy days for the product. It is the number of days beyond which the account should be treated as dormant if there are no activities in that account. Dormancy days should be greater than zero.
15. Click Yes or No radio button for Overdraft allowed for the product. Only when Yes is chosen, overdraft will be allowed for accounts under this product.
16. Enter Minimum activation days for the product.
17. Select the option for Balance check field.
Allow only credit balance -- This option will be enabled only on selecting the Overdraft Allowed as No. If you select Allow only credit balance, then Aura will allow only credit balance for that account. Thus, if a transaction would result in a debit balance, and if this account allows only credit balance, the transaction will fail.
Allow only debit balance -- If you select Allow only debit balance, then Aura will allow only debit balance for that account. If a transaction would result in a credit balance, and if this account allows only debit balance, the transaction will fail.
Allow both -- If you select Allow both, then Aura will allow both credit and debit balances for that account.
18. Select Yes or No radio button for Secured field to specify if the security has to attached for the accounts created based on this product. If this has been selected as Yes, Minimum Secured Percentage will be enabled.
19. Enter the Minimum secured percentage for the product. Minimum secured percentage denotes the percentage applied on the exposure amount as maintained at the account level. Based on the calculated amount, the various accounts that will be created using this product will be linked to the limits.
20. Select Yes or No in the Allow cheque book field to specify if the cheque book facility is extended for the accounts created using this product.
21. Select Yes or No in the Allow passbook field to specify if the passbook facility is extended for the accounts created using this product.
22. Click Next. The New Product → Interest Payable (4/10) page appears.
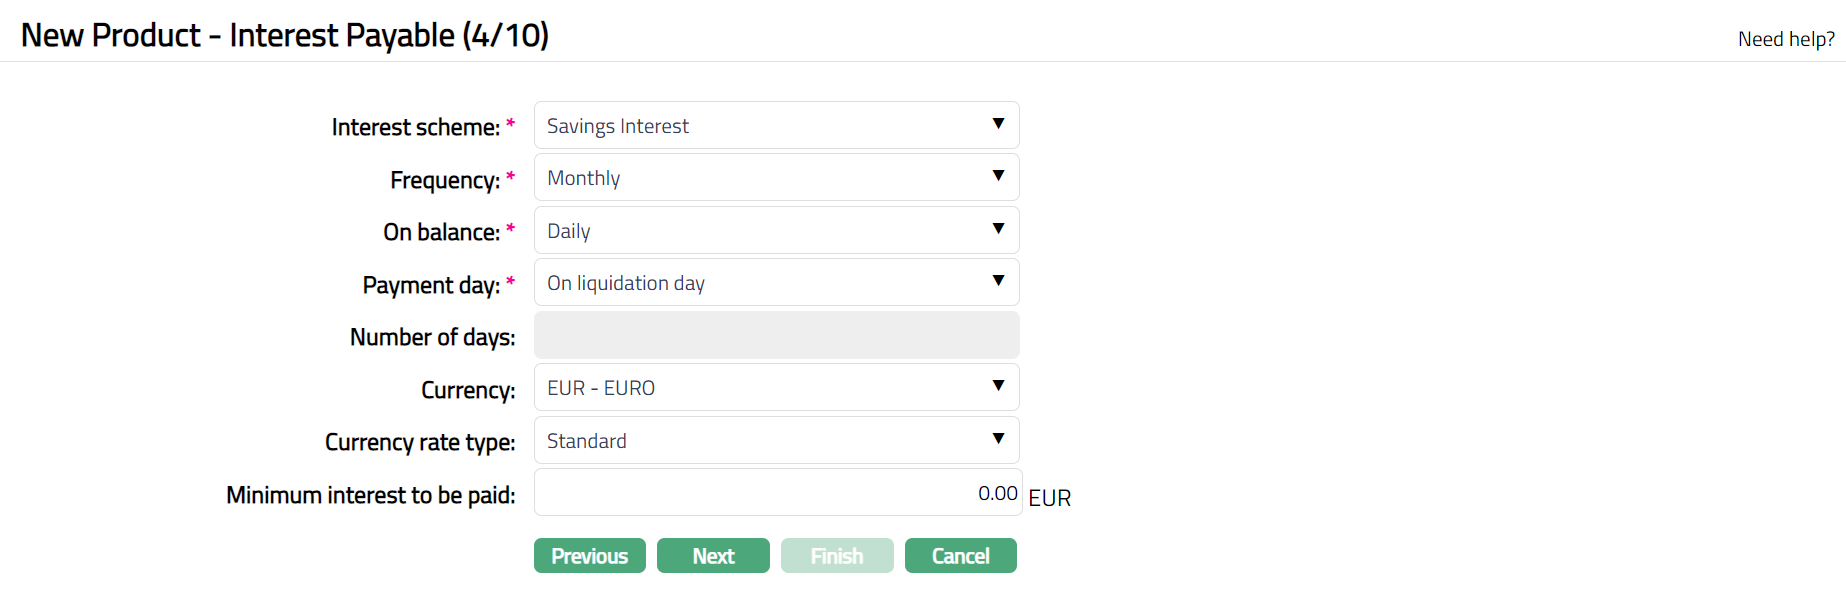
23. Select the Interest scheme that would be applicable to the accounts under this product from the drop-down list of interest scheme maintained under Admin → Pricing → Interest → Interest Scheme
24. Select the interest liquidation Frequency for interest payable accrual from the drop-down list. Available options are: Daily, Monthly, Quarterly, Semi-annual and Annual
25. You can specify the balance amount on which the Interest payable is to be accrued using the On balance drop-down list. Available options are: Daily, Period end, Minimum and Average.
Based on the Selected-On Balance and Frequency Aura accrues the interest. If you select the Frequency as Daily, then the On Balance will be defaulted to Daily and Aura will not allow you to select other options. Accrual and liquidation will be either daily or period end.
26. Select the Payment Day for the Interest payable from the drop-down list. The options available are On liquidation day and Liquidation Day + n day. If you select Liquidation Day + n day, then Number Of Days field will be enabled.
27. Enter the Number of days after which the liquidated interest is to be paid. This field will be enabled only on selecting Payment Day as Liquidation + n day.
If Frequency is Daily, Payment Day can be only On Liquidation Day and hence, this field is disabled.
If Frequency is Monthly, Payment Day can be either of the options and hence this field is enabled. You need to enter the number of days between 1 and 30.
If Frequency is any other option, Payment Day can be either of the options and hence this field is enabled. You need to enter the number of days between 1 and 90.
28. Select the Currency for the Interest Payable from the drop-down list of GL currencies for the entity.
29. Select the Currency rate type for the Interest payable. The interest will be accrued in terms of the Account Currency and will be converted into the equivalent amount in terms of the above Currency using this Currency Rate Type, as on the date of Liquidation.
Note: The amount entered in Minimum interest to be paid and Maximum interest to be paid belongs to the currency chosen in Currency field, and the number of decimals will also depend on the same.
30. Enter the Minimum interest to be paid for the Interest payable. Aura will liquidate the interest only if the accrued interest is greater than or equal to the minimum interest to be paid.
For example, if you have entered the minimum interest to be paid as 100 and the accrued interest is 90, then Aura will not liquidate the interest.
For example, if you have entered the maximum interest to be paid as 1000 and the accrued interest is 1100 then Aura will liquidate only 1000.
31. Click Next. The New Product → Interest Receivable (5/10) page appears.

32. Select the Interest scheme (Authorized overdraft) from the drop-down list of interest schemes maintained under Admin → Pricing → Interest → Interest Scheme. In case any account under this product goes into an overdraft, the interest receivable on the overdrawn amount up to the authorized overdraft limit specified for the account will be calculated using this Interest scheme.
33. Select the Interest scheme (Unauthorized overdraft) from the drop-down list of interest schemes maintained under Admin → Pricing → Interest → Interest Scheme. In case any account under this product goes into an overdraft which is beyond the limit specified for the account, the interest receivable on such unauthorized overdraft will be calculated using this Interest scheme.
34. Select the interest liquidation Frequency for the interest receivable accrual from the drop-down list. Available options are: Daily, Monthly, Quarterly, Semi-annual and Annual
35. You can specify the balance amount on which the Interest receivable is to be accrued using the Select the On balance drop-down list. Available options are: Daily, Period end, Minimum and Average..
36. Select the Currency name for the interest receivable from the drop-down list of GL currencies for the entity.
37. Select the Currency rate type for the interest receivable. If currency rate type is not selected, Aura will consider the Central bank rate type maintained at the Entity level. The interest will be accrued in terms of the Account Currency and will be converted into the equivalent amount in terms of the above Currency using this Currency Rate Type, as on the date of liquidation.
Note: The amount entered in Minimum interest to be collected and Maximum interest to be collected belongs to the currency chosen in Currency field, and the number of decimals will depend on the currency name chosen in Currency field.
38. Enter the Minimum interest to be collected for the interest receivable. This is the minimum interest amount that will be collected for accounts under this product.
For example, if you have entered the minimum interest to be collected as 100 and the accrued interest is 90, then Aura will collect 100.
39. Click Next. The New Product → Charges (6/10) page appears.
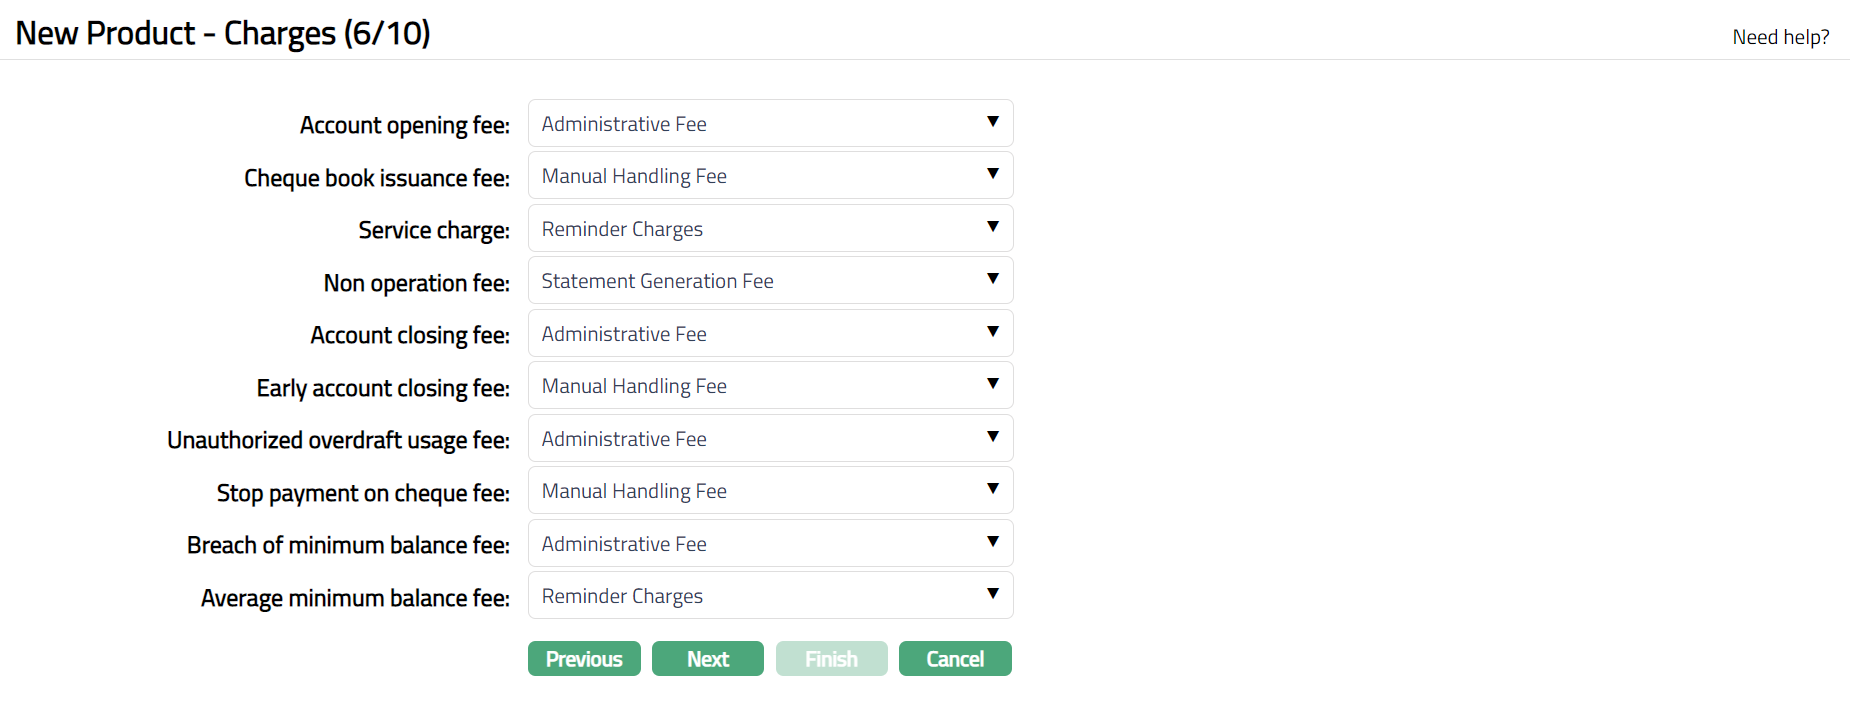
40. If you want to collect charges for opening the account, select the Account opening fee from the list of the Event based, Flat charges for which Treat as receivable is No maintained under Admin → Pricing → Charges → Charge Schemes. This charge may be deferred.
41. If you want to collect charges for Cheque book issuance, select the Cheque book issuance fee from the list of Event based Flat charges for which Treat as receivable is No maintained under Admin → Pricing → Charges → Charge Schemes. This charge may be deferred.
42. If you want to collect charges for early closure of the account, select the Early account closing fee from the list of Event based Flat charges for which Treat as receivable is No maintained under Admin → Pricing → Charges → Charge Schemes.
43. If you want to collect service charges, select the Service charge from the list of Periodic, Flat or Banded charges for which Treat as receivable is No maintained under Admin → Pricing → Charges → Charge Schemes. If banded, the Current Client balance will be the basis for the charge
44. If you want to levy a charge for an account that remains un operated, select the Nonoperation fee from the list of Periodic, Flat charges maintained for which Treat as receivable is No under Admin → Pricing → Charges → Charge Schemes. If there were no transactions during the charge period, the charge will be applied at the end of the period. It will be only arrear charges.
45. If you want to collect charges for closure of the account, select the Account closing fee from the list of Event based Flat charges for which Treat as receivable is No maintained under Admin → Pricing → Charges → Charge Schemes.
46. If you want to levy a charge every time the account goes beyond its authorized limit, select the Unauthorized overdraft usage fee from the list of Event based Flat or Banded charges for which Treat as receivable is No maintained under Admin → Pricing → Charges → Charge Schemes. This can be a deferred charge. If banded, the Current balance will be the basis for the charge
47. If you want to levy a charge every time the payment of cheque is stopped, then, select the Stop payment on cheque fee from the list of Event based Flat charges for which Treat as receivable is No maintained under Admin → Pricing → Charges → Charge Schemes. This charge may be deferred.
48. If you want to levy a charge every time the account's book balance goes beyond the minimum balance maintained for the account, then select Breach of minimum balance fee from the list of Event based Flat or Banded charges for which Treat as receivable is No maintained under Admin → Pricing → Charges → Charge Schemes. This can be a deferred charge. If banded, the Current balance will be the basis for the charge.
49. If you want to levy a charge for an account when its average booking balance goes less than the minimum balance maintained at the account level, then select the Average minimum balance fee from the list of Periodic, Flat or banded charges for which Treat as receivable is No maintained under Admin → Pricing → Charges → Charge Schemes. If there were no transactions during the charge period, the charge will be applied at the end of the period. It will be only arrear charges. If banded, the Current balance will be the basis for the charge.
Note: Any additional charges, apart from those defined above, can be defined for the Product using Additional Charges tab in edit mode.
50. Click Next. The New Product → General Ledger (7/10) page appears.
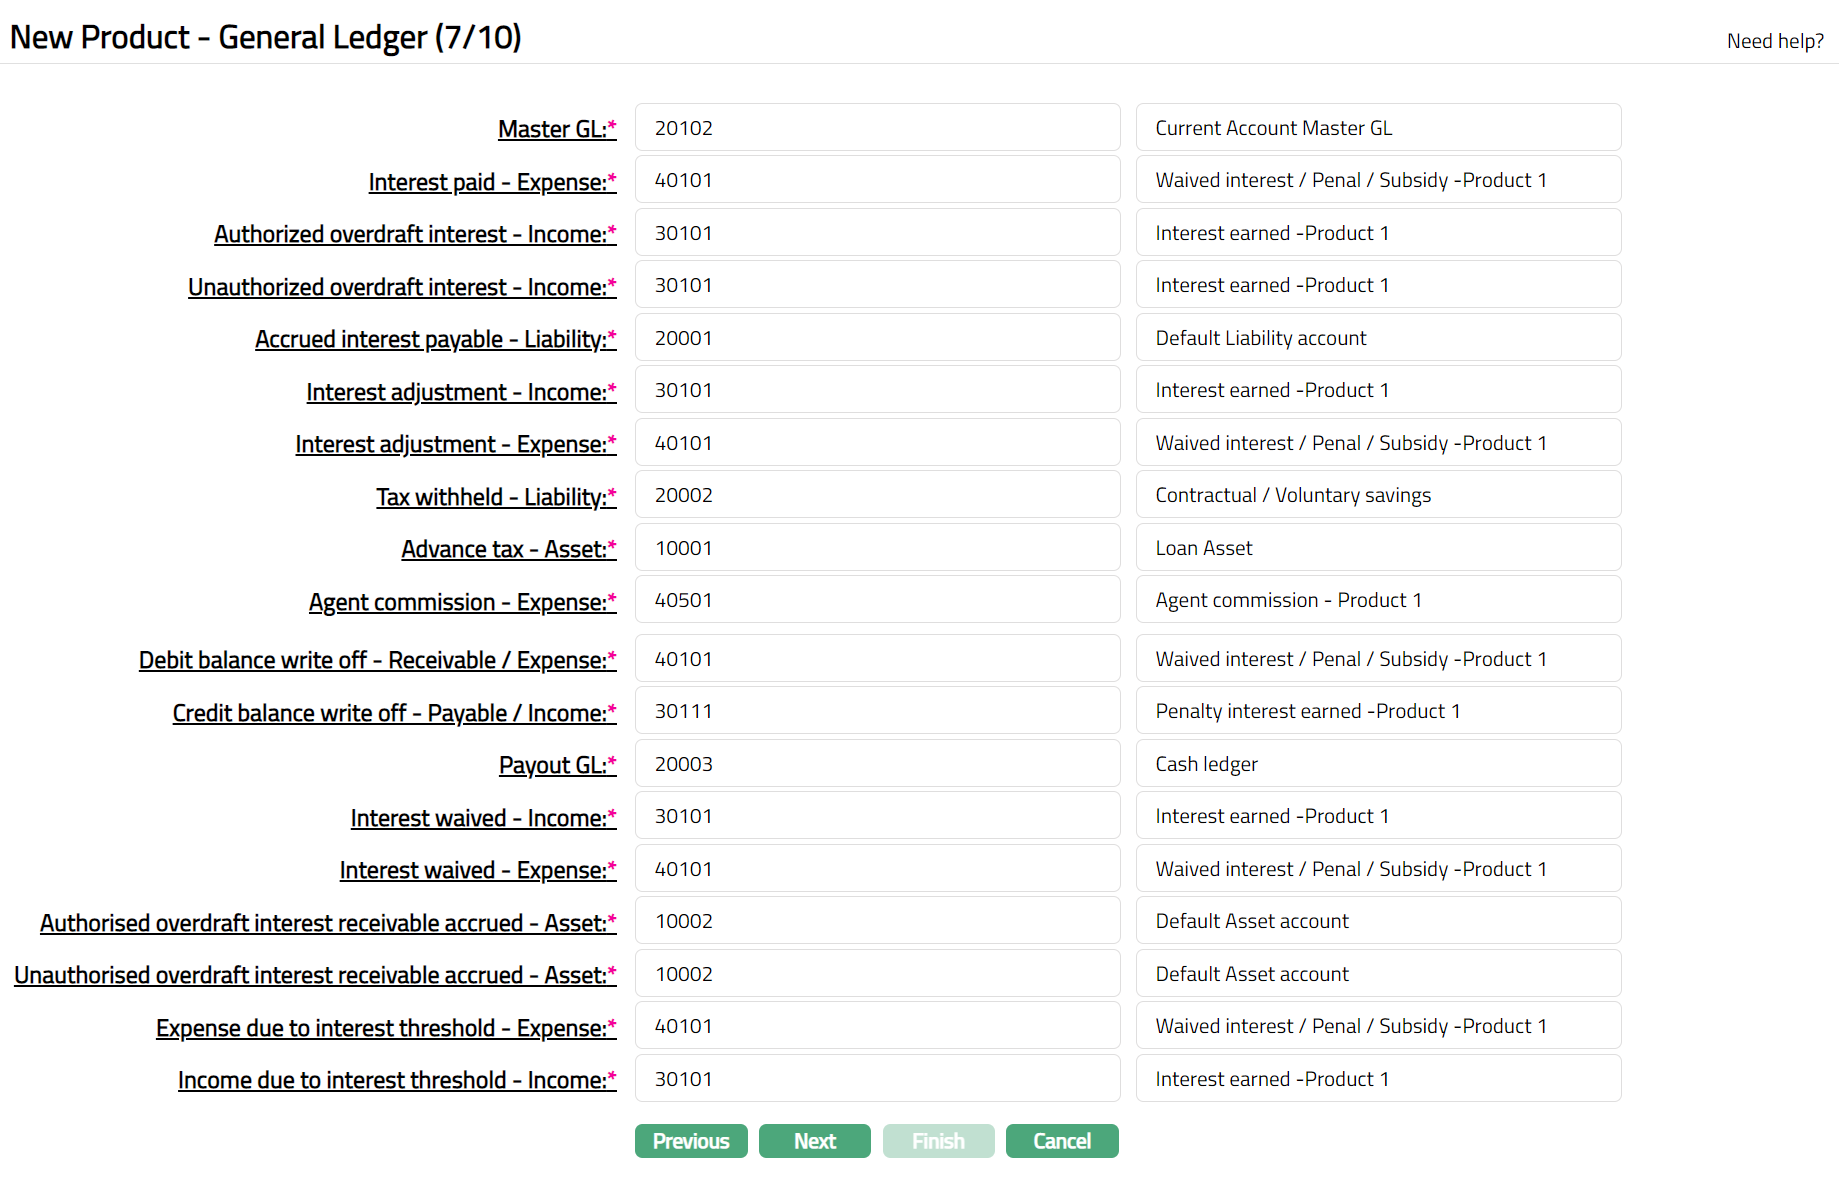
51. You will see the list of various GLs required to account for the events in the life cycle of the Product. The table below gives the fields, the use and the conditions for each of these GLs. You can either directly input the Ledger # or click on the hyperlink to see the list of GLs satisfying these conditions and select the required Ledger #.
| SL.No | Fields | Used | List based on |
|---|---|---|---|
| 1 | Master GL | as the Master GL to record all transactions for accounts under this product | ledger type Asset, Liability or Neutral where the cash account is No, Manual posting is No, and the FX consolidation is blank |
| 2 | Interest paid - Expense | for accounting the interest paid on accounts under this product. | ledger type Expense |
| 3 | Authorised overdraft interest – Income. | for accounting the accrual of Authorised interest receivable on accounts under this product | ledger type Income |
| 4 | Unauthorised interest - Income | for accounting the accrual of Unauthorised interest receivable on accounts under this product | ledger type Income |
| 5 | Accrued interest payable - Liability | for accounting the Accrued interest payable on accounts under this product | ledger type Liability |
| 6 | Interest adjustment - Income | for accounting the Interest adjustment income on accounts under this product | ledger type Income |
| 7 | Interest adjustment - Expense | for accounting the Interest adjustment expense on accounts under this product | ledger type Asset |
| 8 | Tax withheld - Liability | for accounting the Tax withheld on accounts under this product | ledger type Liability |
| 9 | Advance tax - Asset | for accounting the tax calculated Income on accounts under this product | ledger type Asset |
| 10 | Agent commission - Expense | for accounting the Agent commission expense on accounts under this product | ledger type Expense |
| 11 | Debit Balance write off – Receivable / Expense | for accounting the Debit Balance written off on accounts under this product | ledger type Receivable or Expense |
| 12 | Credit Balance write off – Payable / Income | for accounting the Credit Balance written off on accounts under this product | ledger type Payable or Income |
| 13 | Payout GL | for accounting the Payout GL on accounts under this product | ledger type Income and Asset |
| 14 | Interest waived - Income | for accounting the Interest waived income on accounts under this product | ledger type Income |
| 15 | Interest waived - Expense | for accounting the Interest waived expenses on accounts under this product | ledger type Expense |
| 16 | Authorised interest receivable accrued – Asset | for accounting the accrual of Authorised interest receivable on accounts under this product | ledger type Asset |
| 17 | Unauthorised interest receivable accrued - Asset | for accounting the accrual of Unauthorised interest receivable on accounts under this product | ledger type Asset |
| 18 | Expense due to interest threshold – Expense | for accounting the Expense due to interest threshold on accounts under this product | ledger type Asset or Expense |
| 19 | Income due to interest threshold – Income | for accounting the Income due to interest threshold on accounts under this product | ledger type Income or Liability |
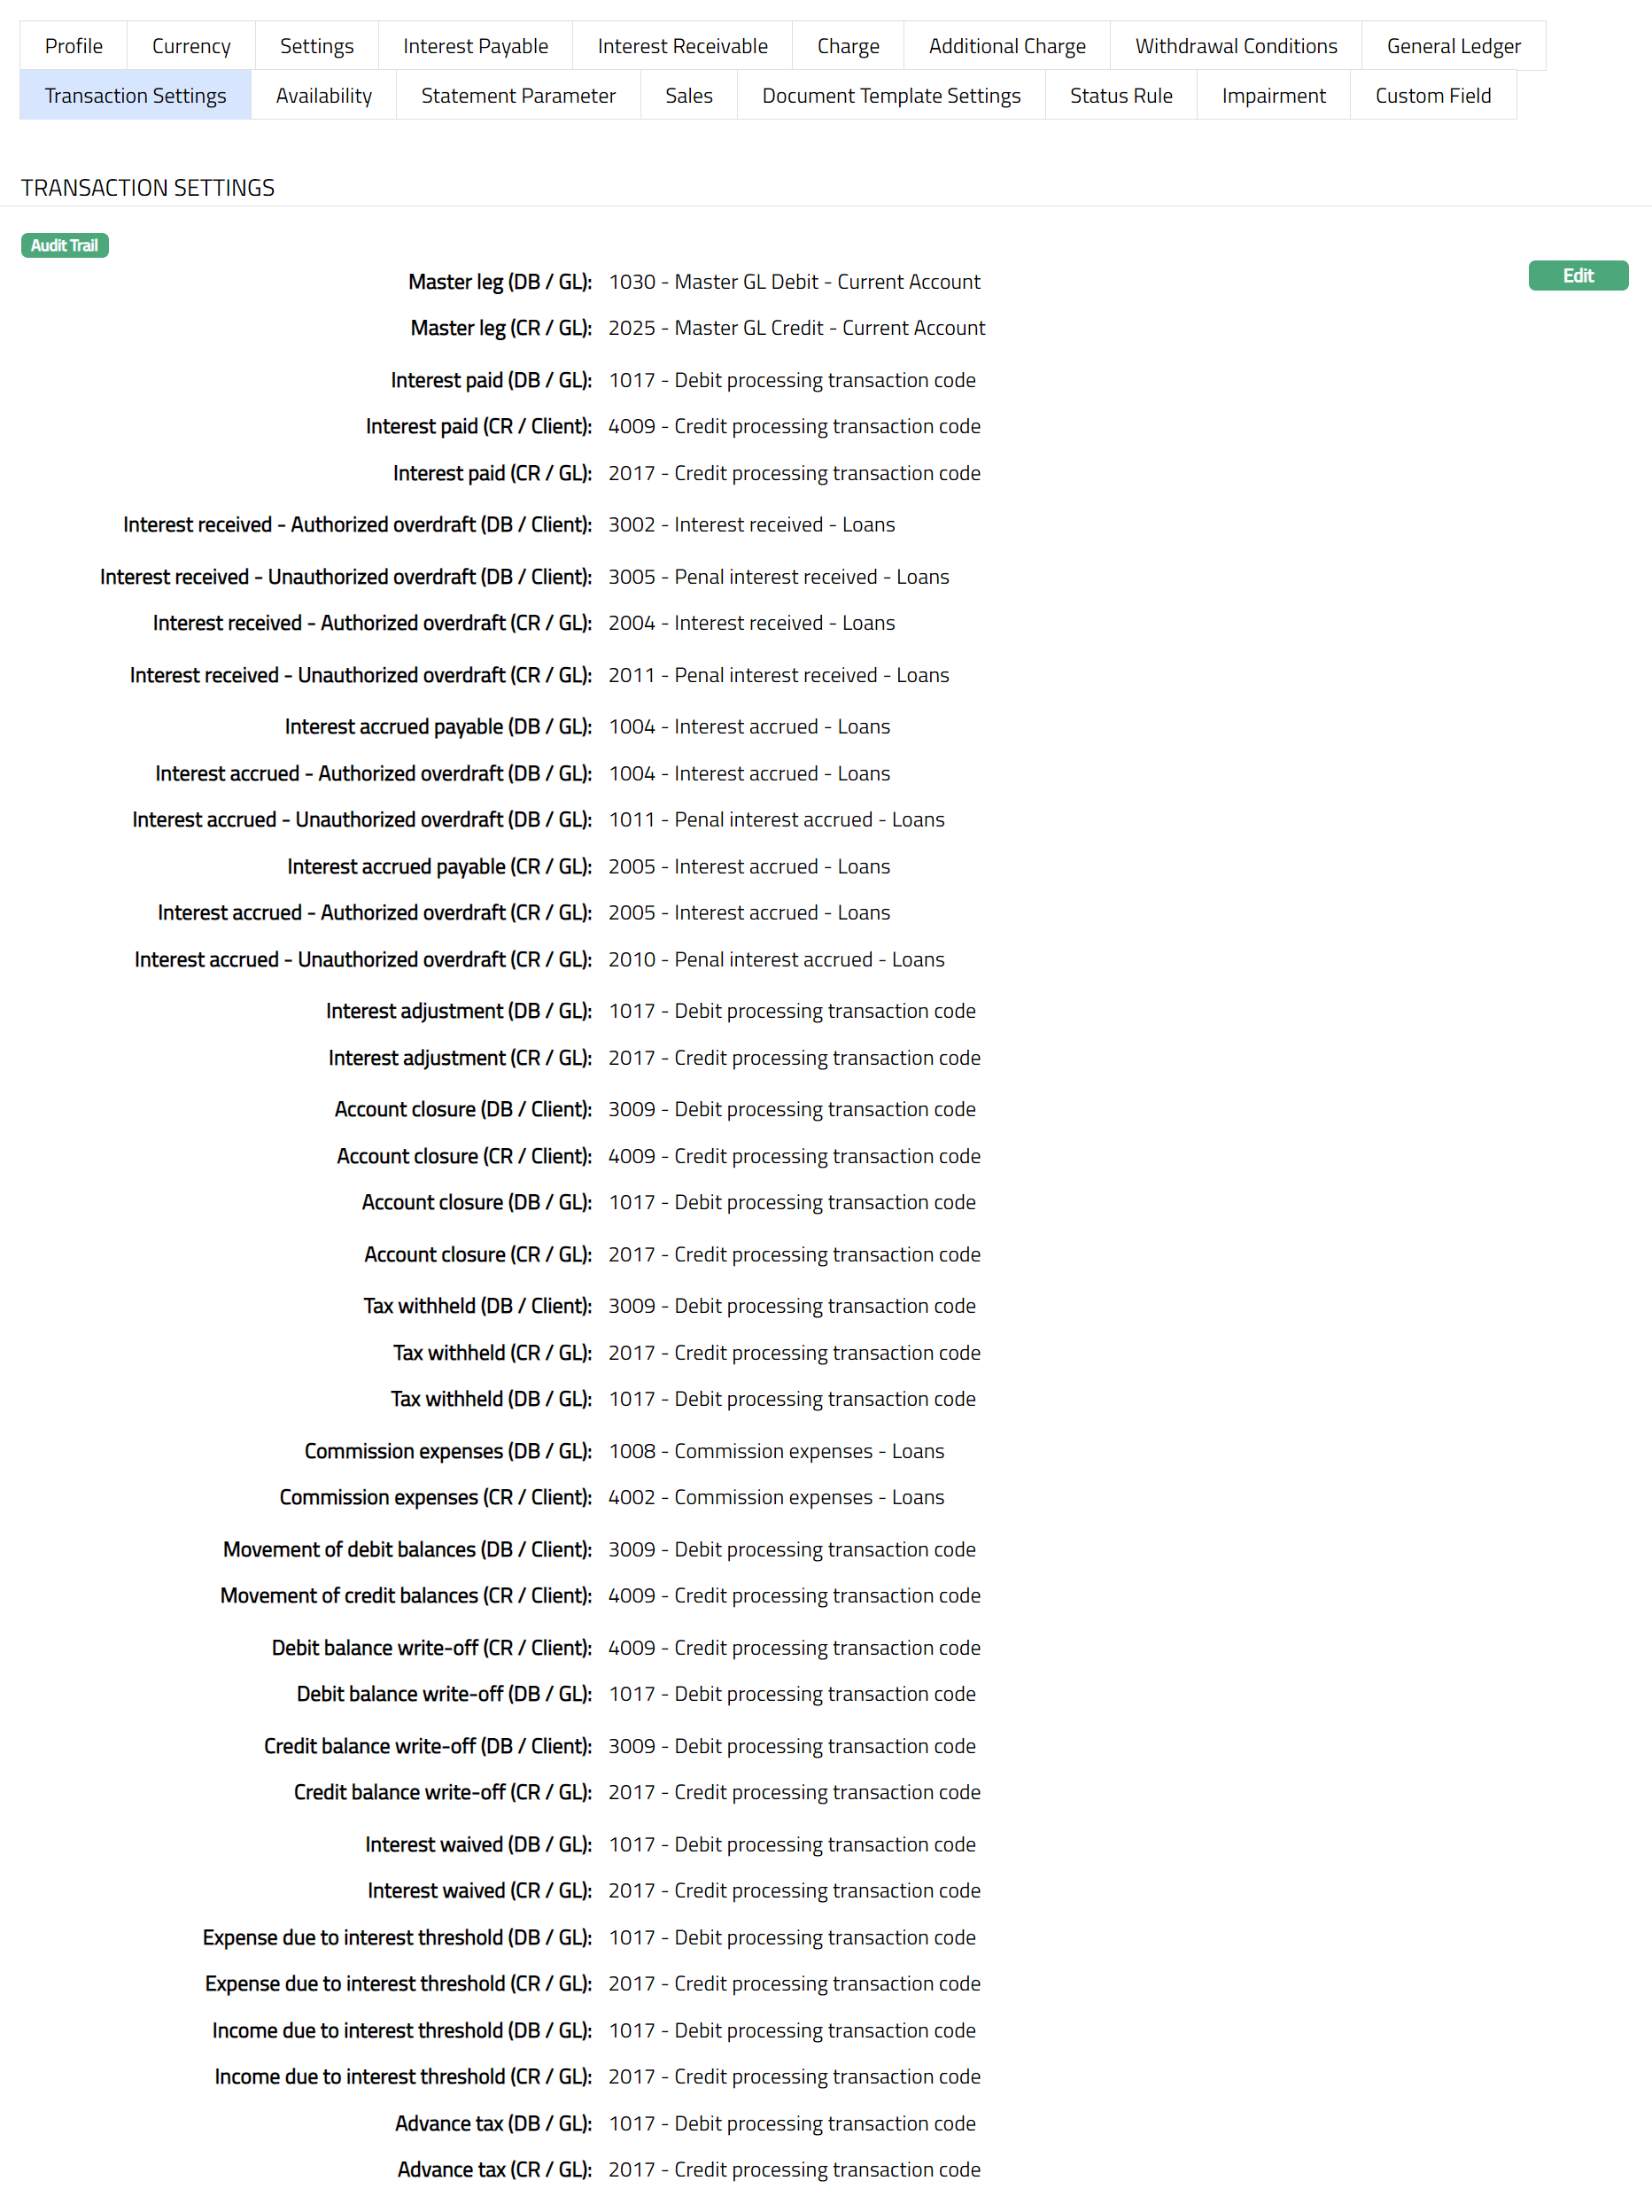
52. Click Next. The New Product → Transaction Settings (8/10) page appears
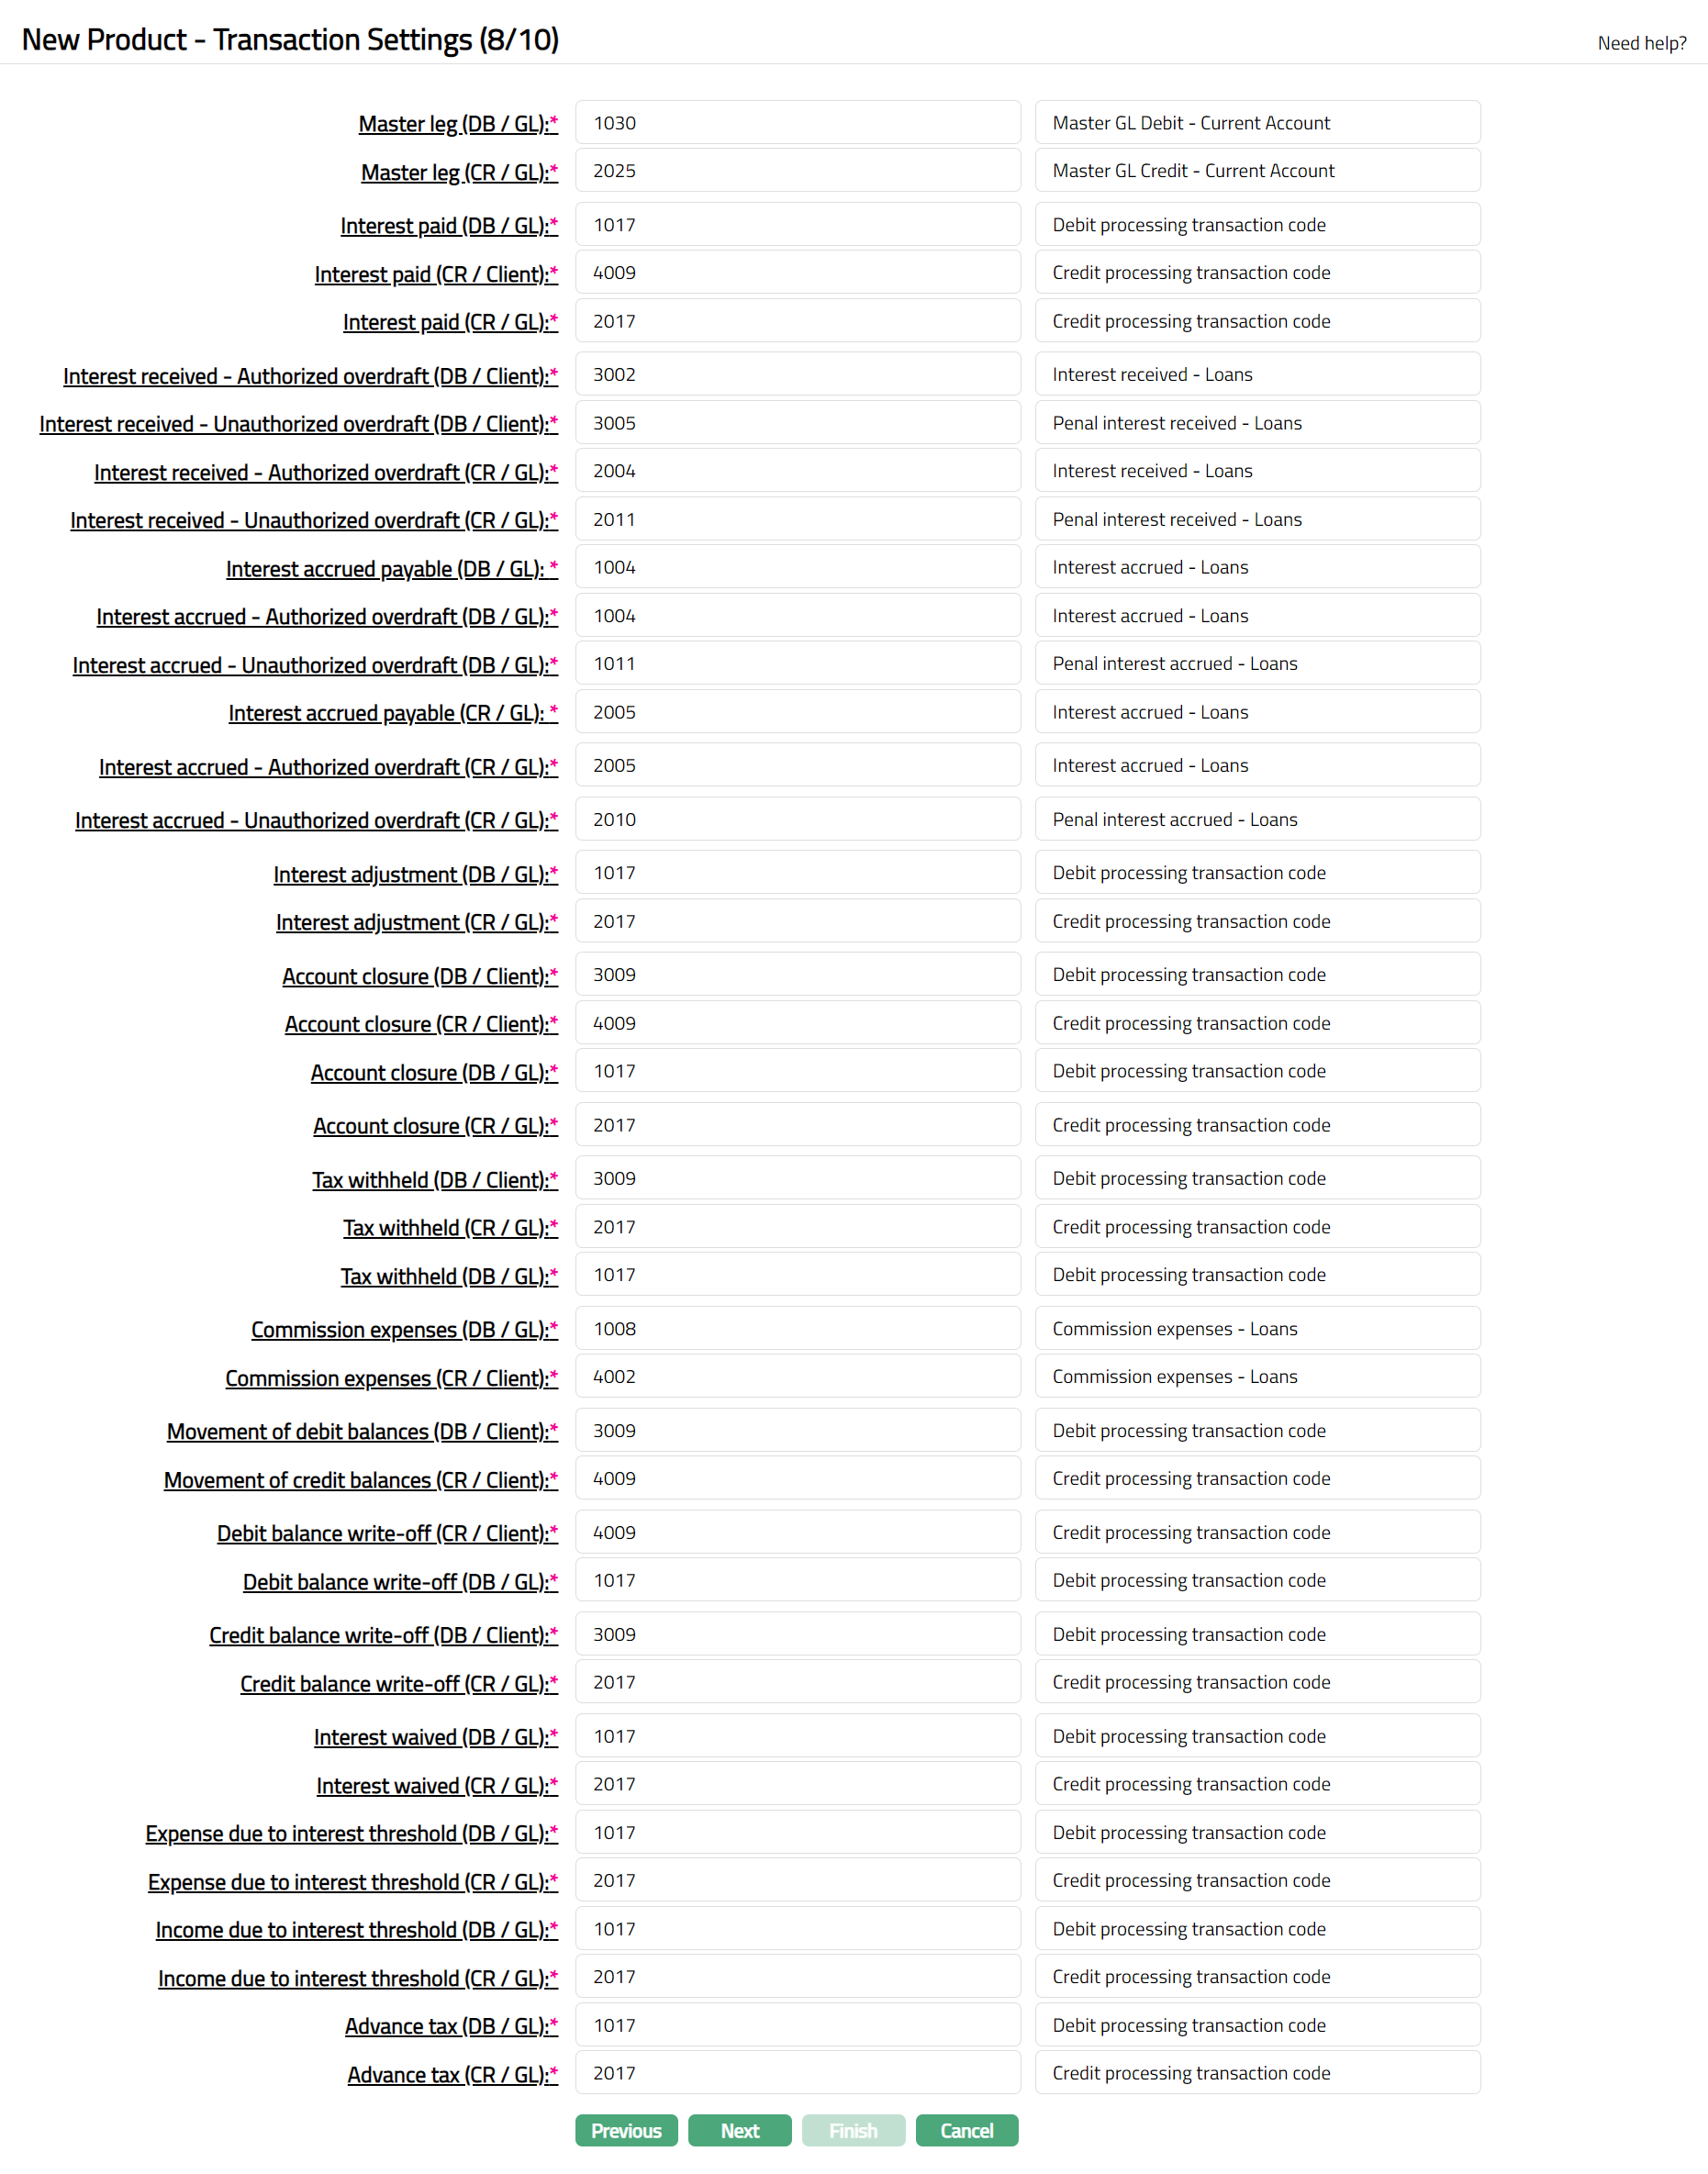
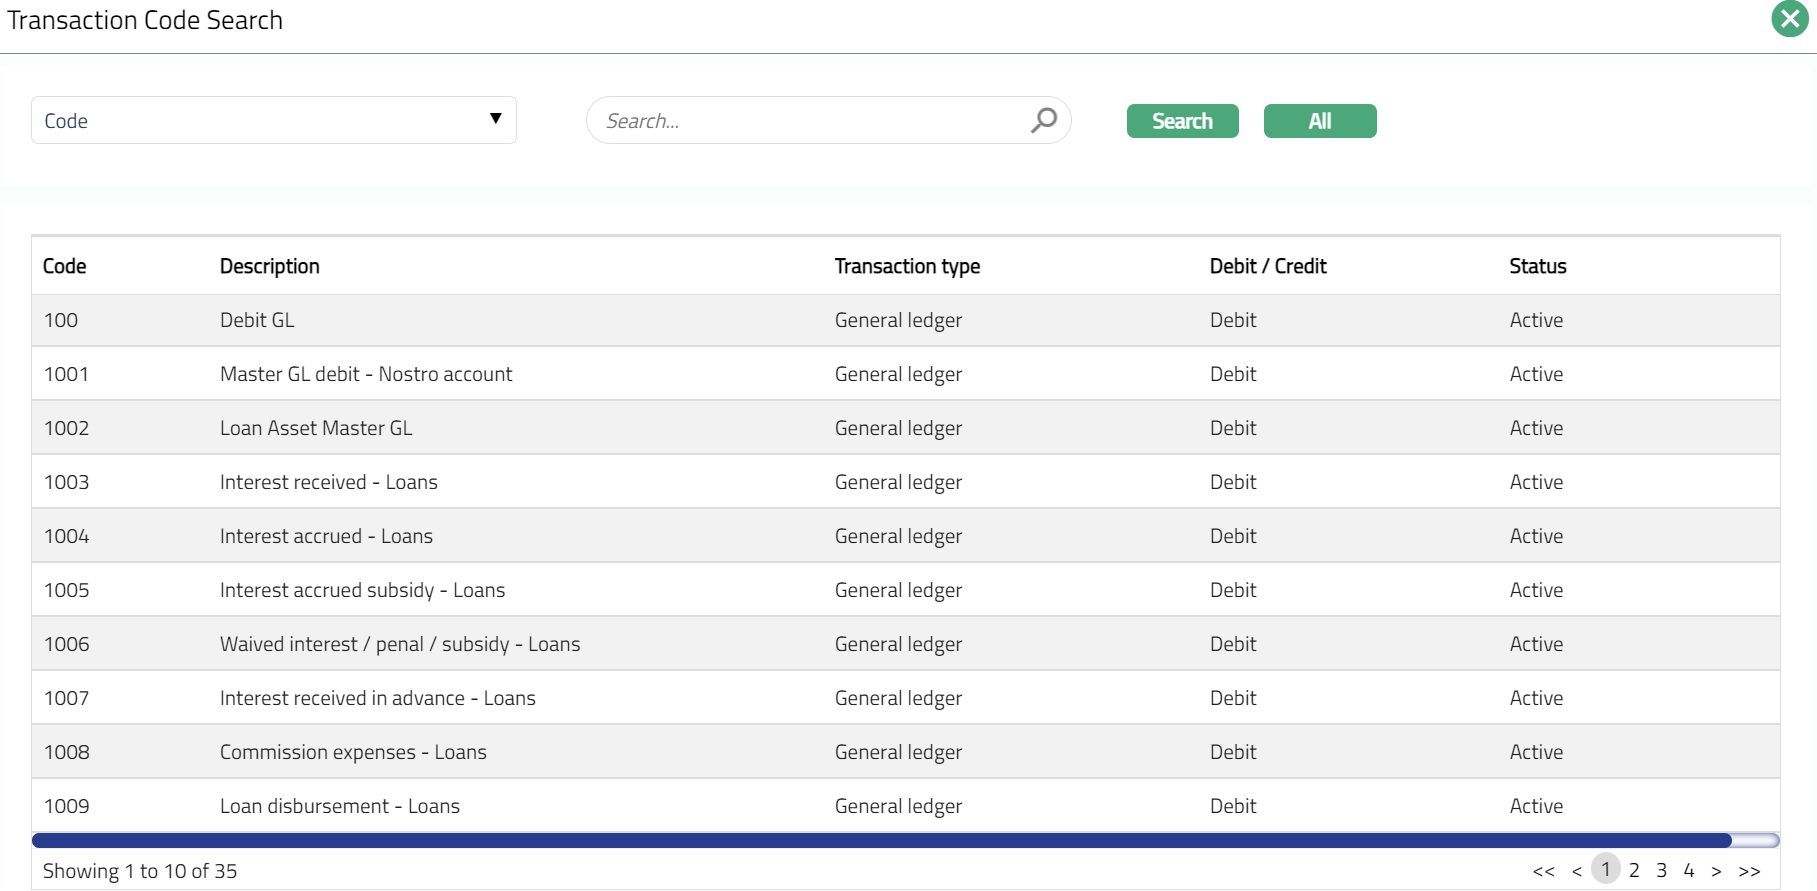
53. Input the required Transaction codes to be used for accounting the various events in the life cycle of the Product. You can directly input the Transaction Code or use the hyperlink to search for and select the required Transaction Code. The list of Transaction codes shown on click of hyperlink is based on certain conditions as listed against each field. Please refer to the sample screenshot as shown above.
| Sl. No. | Field name of Transaction Settings | Used for | List of Transaction codes based on | Event when it will be used |
|---|---|---|---|---|
| 1 | Master leg (DB/GL) | all the debit transactions affecting the accounts under this product. | General Ledger Debit | All |
| 2 | Master leg (CR/GL) | all the credit transactions affecting the accounts under this product | General Ledger Credit | All |
| 3 | Interest paid (DB/GL) | all the Interest paid transactions in the General ledger Account | General Ledger Debit | Liquidation |
| 4 | Interest paid (CR/Client) | all Interest paid transactions in the Client Account | Client account Credit | Liquidation |
| 5 | Interest paid (CR/GL) | all Interest paid transactions in the General Ledger Account | General Ledger Credit | Liquidation |
| 6 | Interest received –Authorized overdraft (DB/Client) | all Interest received transactions on authorized overdraft in the Client Account | Client account Debit | Liquidation |
| 7 | Interest received –Unauthorized overdraft (DB/Client) | all Interest received transactions on unauthorized overdraft in the Client Account | Client account Debit | Liquidation |
| 8 | Interest received –Authorized overdraft (CR/GL) | all Interest received transactions on authorized overdraft in the General Ledger Account | General Ledger Credit | Liquidation |
| 9 | Interest received –Unauthorized overdraft (CR/GL) | all Interest received transactions on unauthorized overdraft in the General Ledger Account | General Ledger Credit | Liquidation |
| 10 | Interest accrued payable (DB/GL) | all Interest accrued payable transactions in the General Ledger account | General ledger Debit | Accrual |
| 11 | Interest accrued - Authorized overdraft (DB/GL) | all Interest accrued transactions on authorized overdraft in the General Ledger Account | General Ledger Debit | Accrual |
| 12 | Interest accrued - Unauthorized overdraft (DB/GL) | all Interest accrued transactions on unauthorized overdraft in the General Ledger Account | General Ledger Debit | Accrual |
| 13 | Interest accrued payable (CR / GL) | all Interest accrued payable transactions in the General Ledger account | General ledger Credit | Accrual |
| 14 | Interest accrued - Authorized overdraft (CR/GL) | all Interest accrued transactions on authorized overdraft in the General Ledger Account | General ledger Credit | Accrual |
| 15 | Interest accrued - Unauthorized overdraft (CR/GL) | all Interest accrued transactions on unauthorized overdraft in the General Ledger Account | General ledger Credit | Accrual |
| 16 | Interest adjustment (DB/GL) | all Interest adjustment transactions in the General Ledger account | General Ledger Debit | Reversal |
| 17 | Interest adjustment (CR/GL) | all Interest adjustment transactions in the General Ledger account | General ledger Credit | Reversal |
| 18 | Account Closure (DB/Client) | all Account Closure transactions in the Client account | Client account Debit | Closure of Accounts |
| 19 | Account Closure (CR/Client) | all Account Closure transactions in the Client account | Client account Credit | Closure of Accounts |
| 20 | Account Closure (DB/GL) | all Account Closure transactions in the General Ledger | General Ledger Debit | Closure of Accounts |
| 21 | Account Closure (CR/GL) | all Account Closure transactions in the General Ledger | General Ledger Credit | Closure of Accounts |
| 22 | Tax withheld (DB/Client) | all Tax withheld transactions in the Client account | Client account Debit | Liquidation |
| 23 | Tax withheld (CR/GL) | all Tax withheld transactions in the General Ledger | General Ledger Credit | Liquidation |
| 24 | Tax withheld (DB/GL) | All Tax withheld transactions in the General Ledger | General Ledger Debit | Liquidation |
| 25 | Commission expenses (DB/GL) | all commission expense transactions in the General Ledger account | General ledger Debit | Expense |
| 26 | Commission expenses (CR/Client) | all commission expense transactions in the Client account | Client account Credit | Expense |
| 27 | Movement of debit balance (DB/Client) | all Movement of debit balance transactions in the Client account | Client account Debit | |
| 28 | Movement of credit balance (CR/Client) | all Movement of debit balance transactions in the Client account | Client account Credit | |
| 29 | Debit balance write off (CR/Client) | all Debit balance write off transactions in the Client account | Client account Credit | |
| 30 | Debit balance write off (DB/GL) | all Debit balance write off transactions in the General Ledger. | Client account Debit | |
| 31 | Credit balance write off (DB/Client) | all Credit balance write off transactions in the Client account | Client account Debit | |
| 32 | Credit balance write off (CR/GL) | all Credit balance write off transactions in the General Ledger | General ledger Credit | |
| 33 | Interest waived (DB/ GL) | all the Interest waived transactions in the General Ledger account. | General ledger Debit | Accrual |
| 34 | Interest waived (CR/ GL) | all the Interest waived transactions in the General Ledger account. | General ledger Credit | Accrual |
| 35 | Expense due to interest threshold (DB/GL) | all the expense due to Interest threshold transactions in the General Ledger account. | General ledger Debit | |
| 36 | Expense due to interest threshold (CR/GL) | all the expense due to Interest threshold transactions in the General Ledger account. | General ledger Credit | |
| 37 | Income due to interest threshold (DB/GL) | all the income due to Interest threshold transactions in the General Ledger account. | General ledger Debit | |
| 38 | Income due to interest threshold (CR/GL) | all the income due to Interest threshold transactions in the General Ledger account. | General ledger Credit | |
| 39 | Advance tax (DB/GL) | all the income due to income tax on the interest accrual transactions in the General Ledger account. | General ledger Debit | Accrual |
| 40 | Advance tax (CR/GL) | all the income due to income tax on the interest accrual transactions in the General Ledger account. | General ledger Credit | Accrual |
54. Click Next. The New Product → Statement Parameter (9/10) page appears
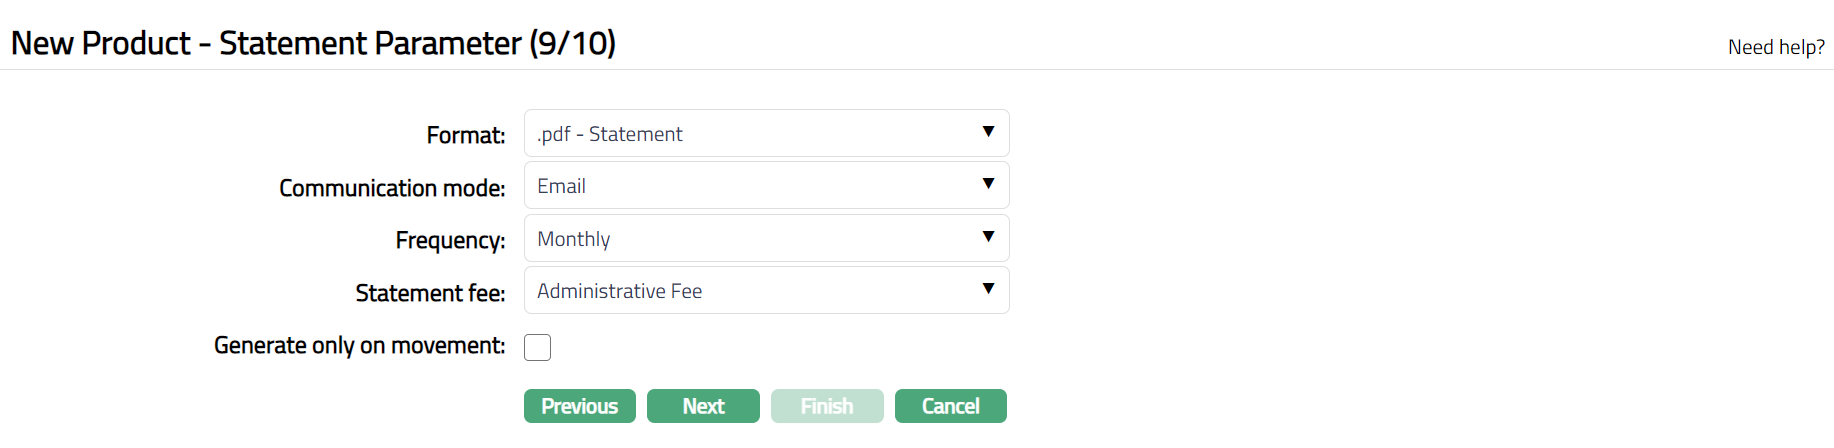
55. Select Format from the drop-down list of formats that have been maintained under Admin → System codes → Generic definition → Statement formats. It is the Format of the statement that is to be generated.
56. Select Communication mode from the drop-down list -- i.e the manner in which you want to send the statement. Available options are Email, Data handoff and Internet Banking.
57. Select Frequency of the statement to be generated from the drop down. Available options are: Daily, Monthly, Quarterly, Semi-annual and Annual
58. Select the Statement fee from drop down list of Event based Flat or Banded charges maintained under Admin → Pricing → Charges → Charge schemes. This is the fee that is to be collected from the client for the statement defined above. This charge may be deferred.
Note: Any additional statements that may be required for the accounts under this product may be defined using Statement tab in edit mode for those accounts.
59. By default, Generate only on movement checkbox is checked. This indicates that, the account statement will be generated only if there are any transactions on the account. If you would like to generate an account statement irrespective of whether there were transactions in the account or not, you may clear this checkbox.
60. Click Next. The New Product → Confirmation (10/10) page appears.
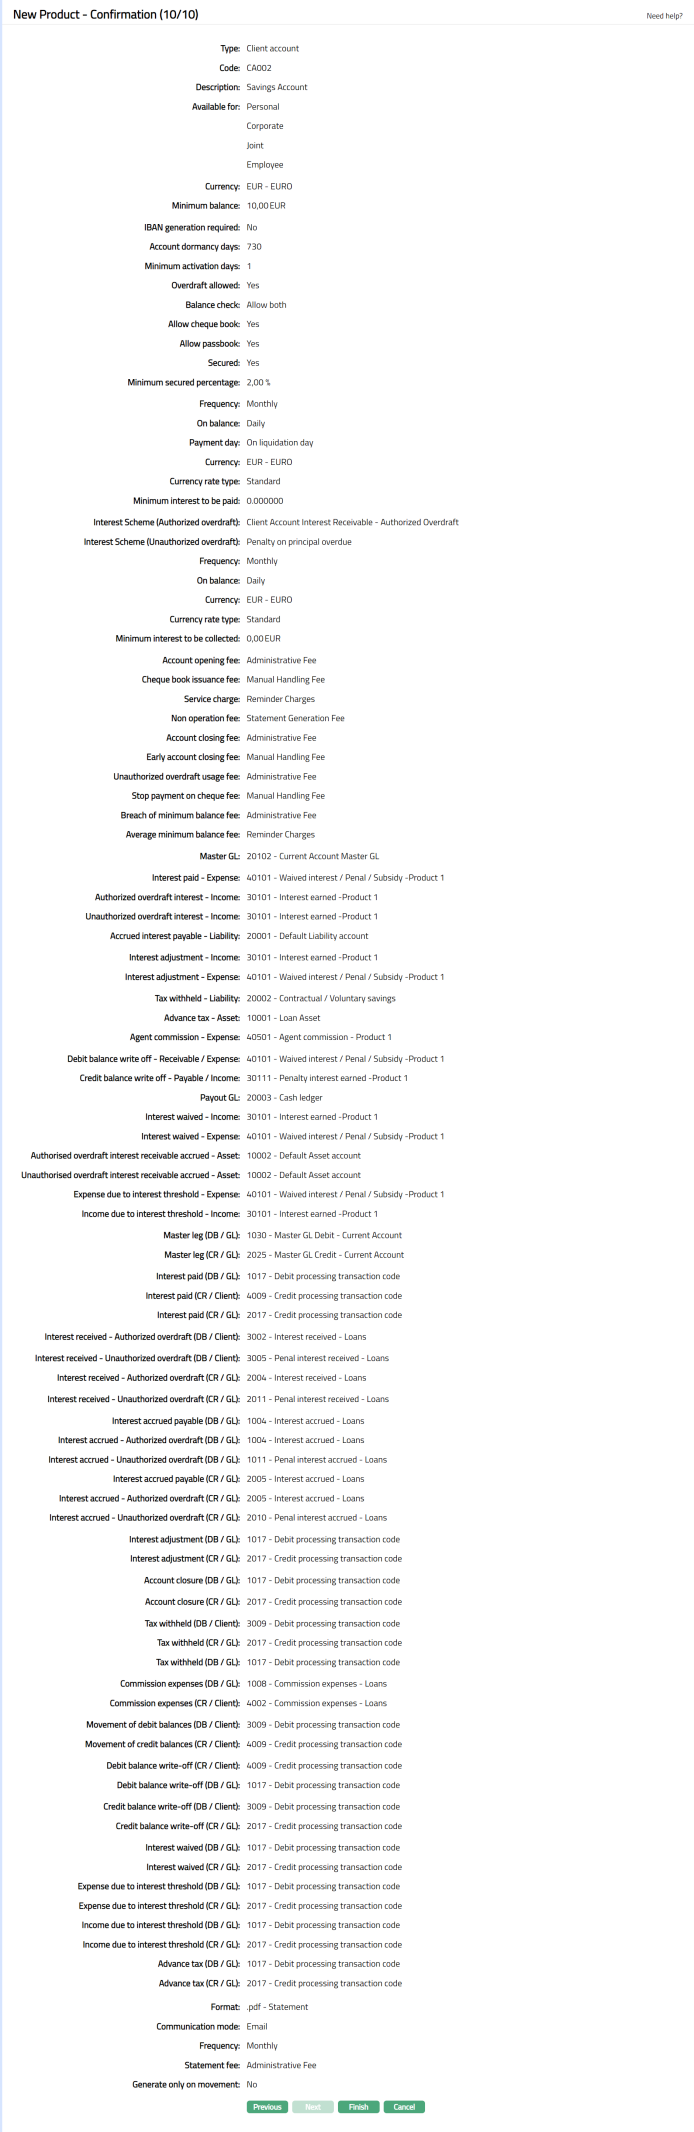
Note: If the custom field is mapped to Client account product at Admin → System Codes → Custom fields → Field mapping, then an additional screen will appear before the confirmation screen. The custom fields will be mandatory or non mandatory based on the rules set at the Field mappings. For more detail on custom field functionality please refer Admin → System codes → Field mapping manual.
61. Click Finish. By default, the Profile tab page appears with the new product record which is created.
Functions: Add, Search, Suspend, Edit, Delete.
Note: The status of the Product is Active as soon as the product is created. The status of the Interest Payable and Interest Receivable tabs and Charge tab if any charges added while creation of the Product; are Pending till they are approved by another user. On approval, the tab status is set to Approved. Until all the above-mentioned tabs are not approved, Aura does not allow you to create an account under this product.
Suspend: You can suspend the product by a click on Suspend button. When you click on Suspend button, Aura displays an alert message. On confirmation Aura will suspend the product. Suspending a product only makes it unavailable in future for any new account creation / any other drop-down list. Existing accounts under the product continue without any impact. Suspended products can be activated by using Activate button.
Delete: You can delete a product by a click on Delete button. When you click on Delete button, Aura displays an alert message. On confirmation Aura will delete the product. The Product can be deleted until any account is created for any client under this product.
PROFILE
Profile
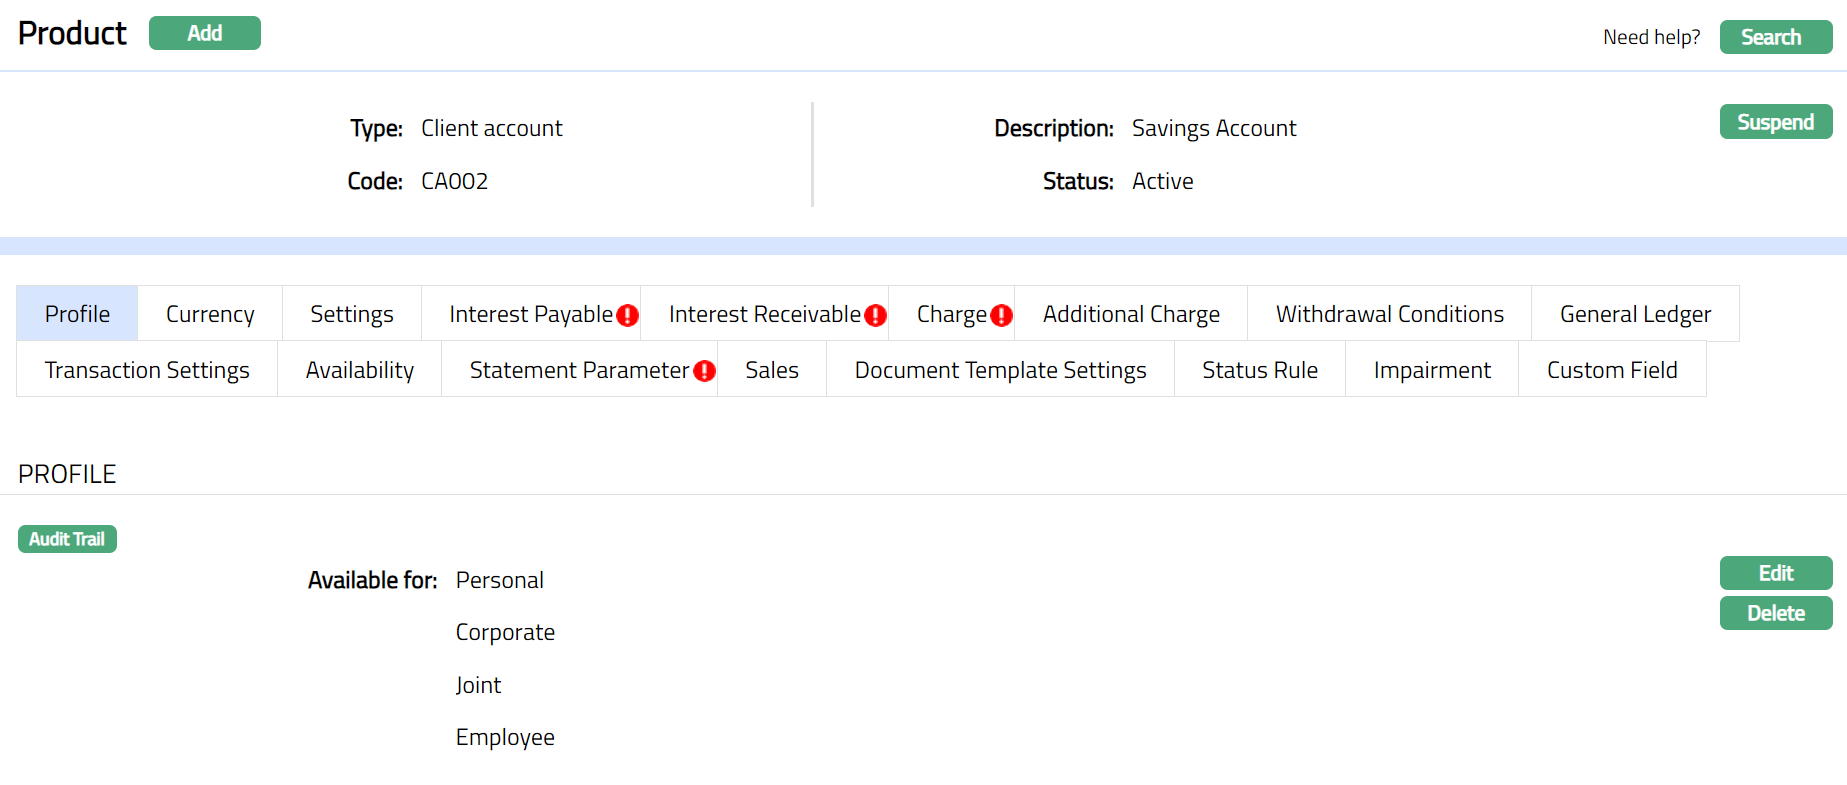
The Profile tab, which is the default tab in the Product Maintenance screen, shows the basic details of the Product.
To view / edit the Profile
1. Access Product page. Click Profile tab to view the details as per sample below. The details are defaulted from the entries that you made during Product creation. For details refer to Client Account → New Product → Profile (1/10).
2. Click Edit. The Edit Product page appears
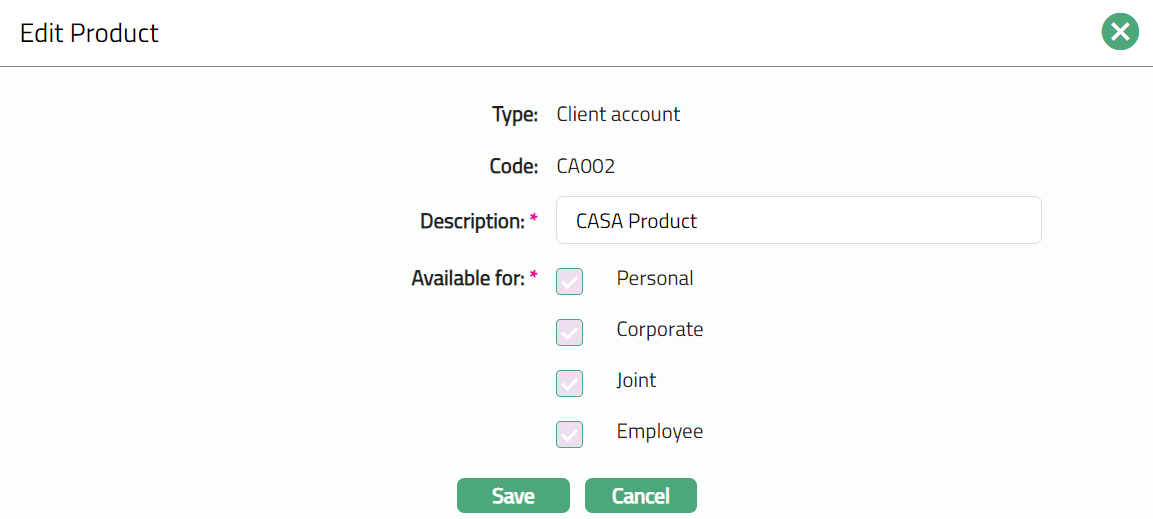
Only the Description field is editable:
Note: In Available for, you can only add client types to the ones that were already added for the Product. You cannot remove any type that was already selected.
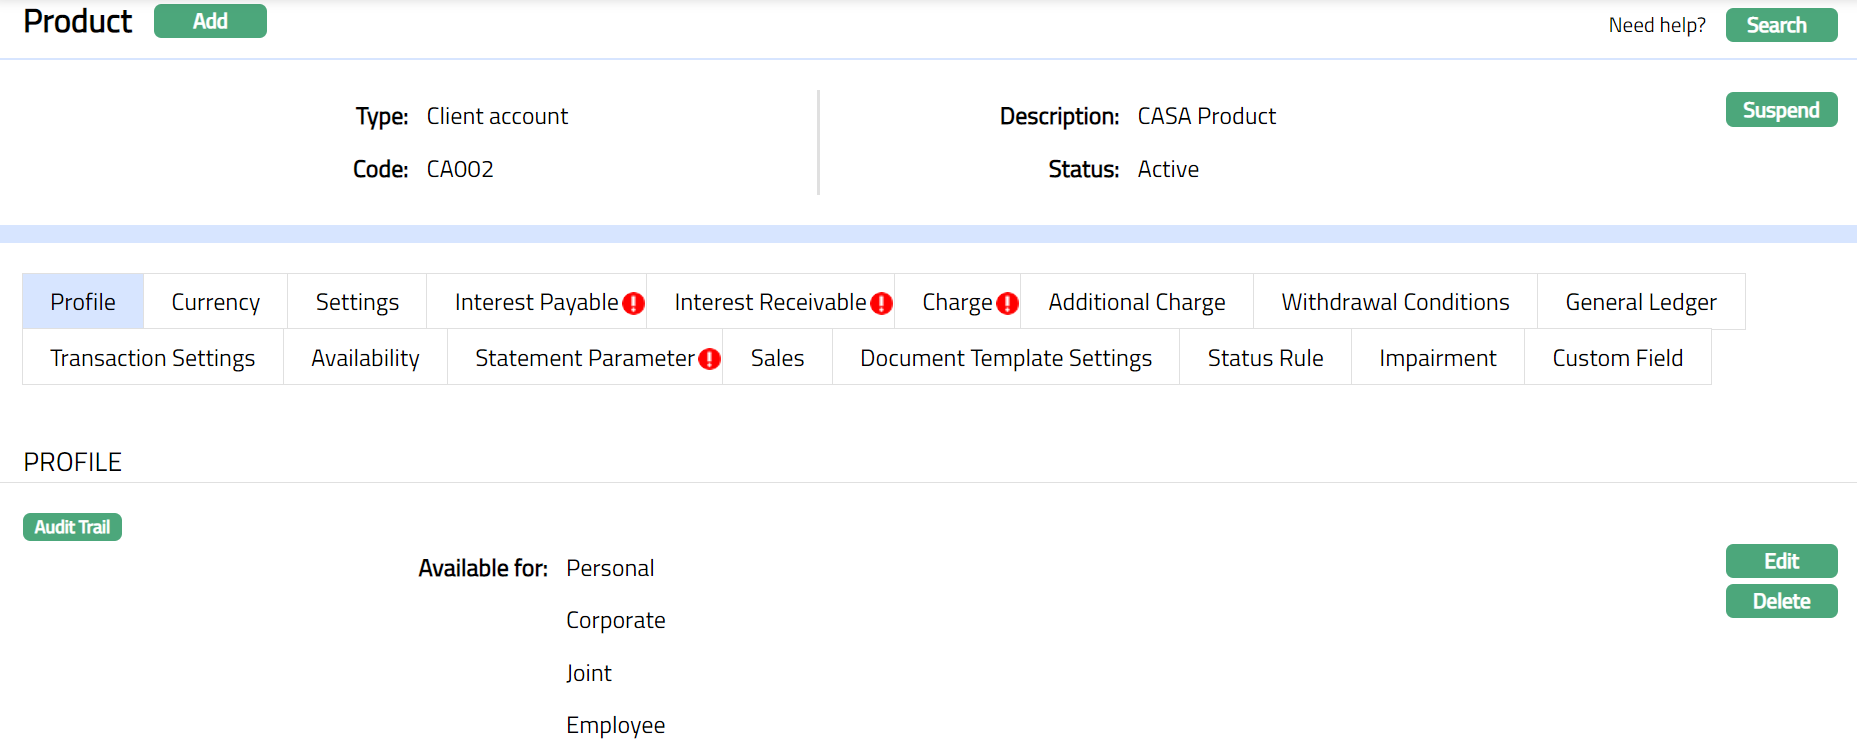
3. Click Save. The Profile page appears with the edited details.
Functions: Edit, Delete
Delete: You can delete a product by a click on Delete button. When you click on Delete button, Aura displays an alert message. On confirmation Aura will delete the product. The Product can be deleted until any account is created for any client under this product.
Currency
Currency tab allows you to maintain the currency for the product. One or more currencies can be added using the Currency tab, once the Product record is created. Accounts for the product can be opened only in the selected currencies.
To Add / View / Edit the currency,
1. Access Product page. Click Currency tab to view the details as per sample below. The details are defaulted from the entries that you made during Product creation. For details refer to Client Account → New Product → Currency (2/10).
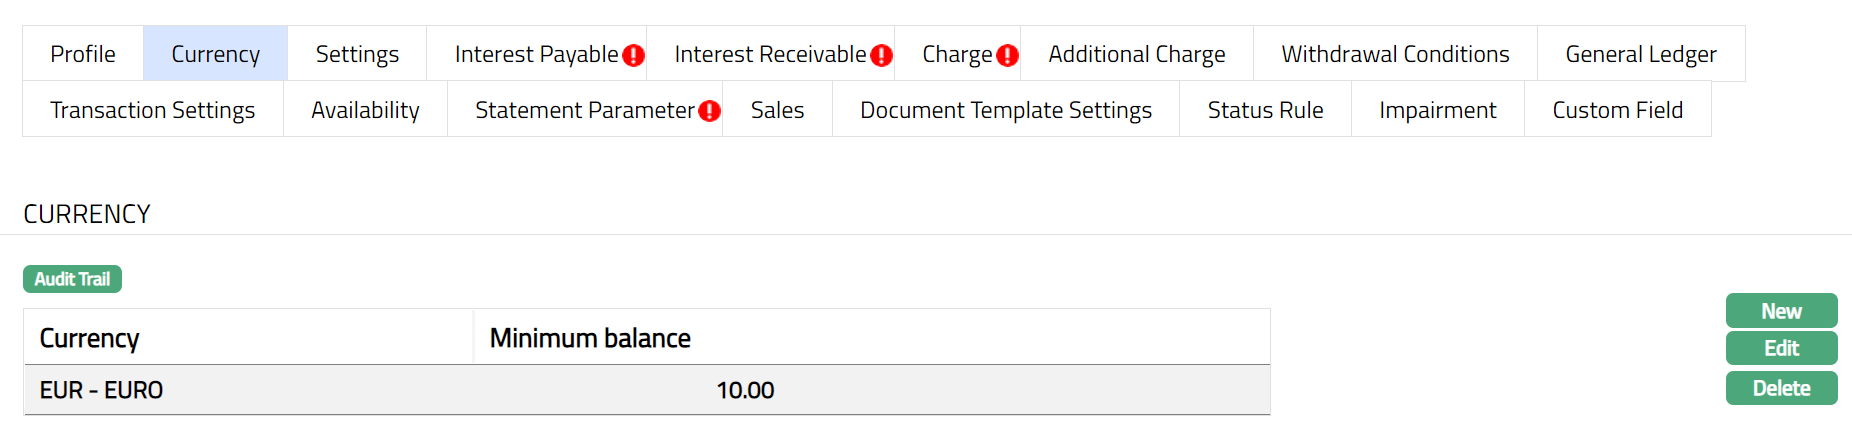
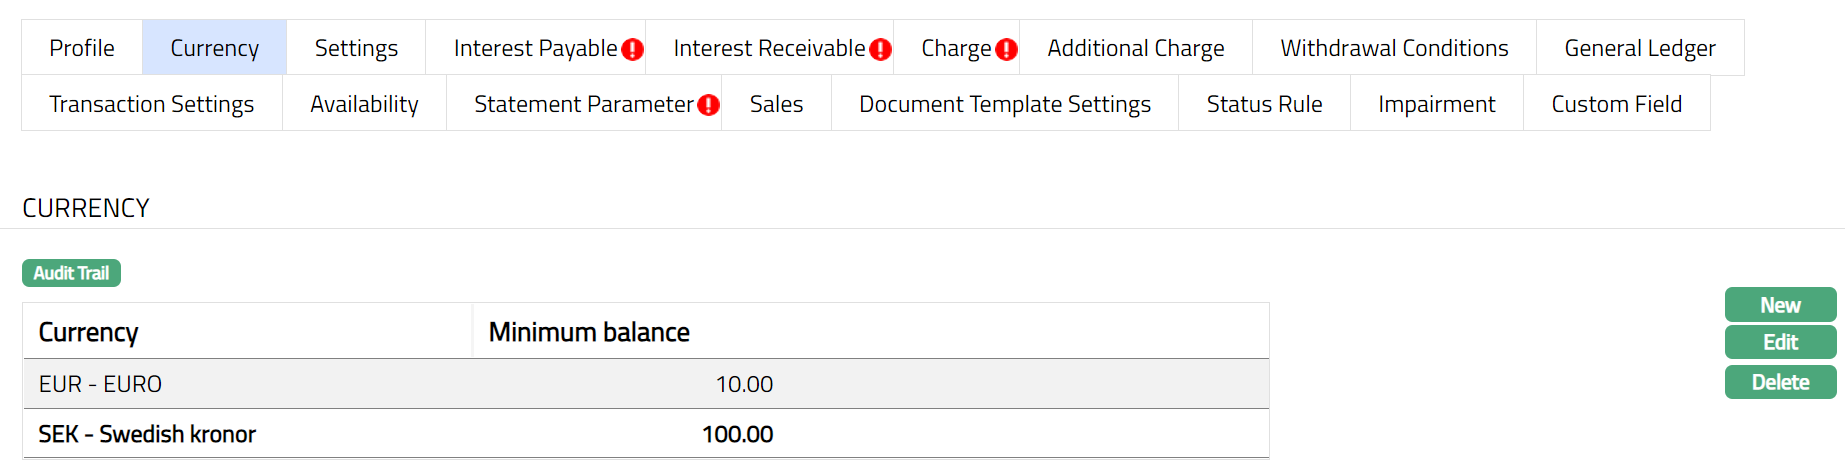
2. Click New. New Currency page will appear.

3. Select the Currency for the product from the drop-down list of GL currencies.
4. Enter Minimum balance for the accounts under the product.
5. Click Save.
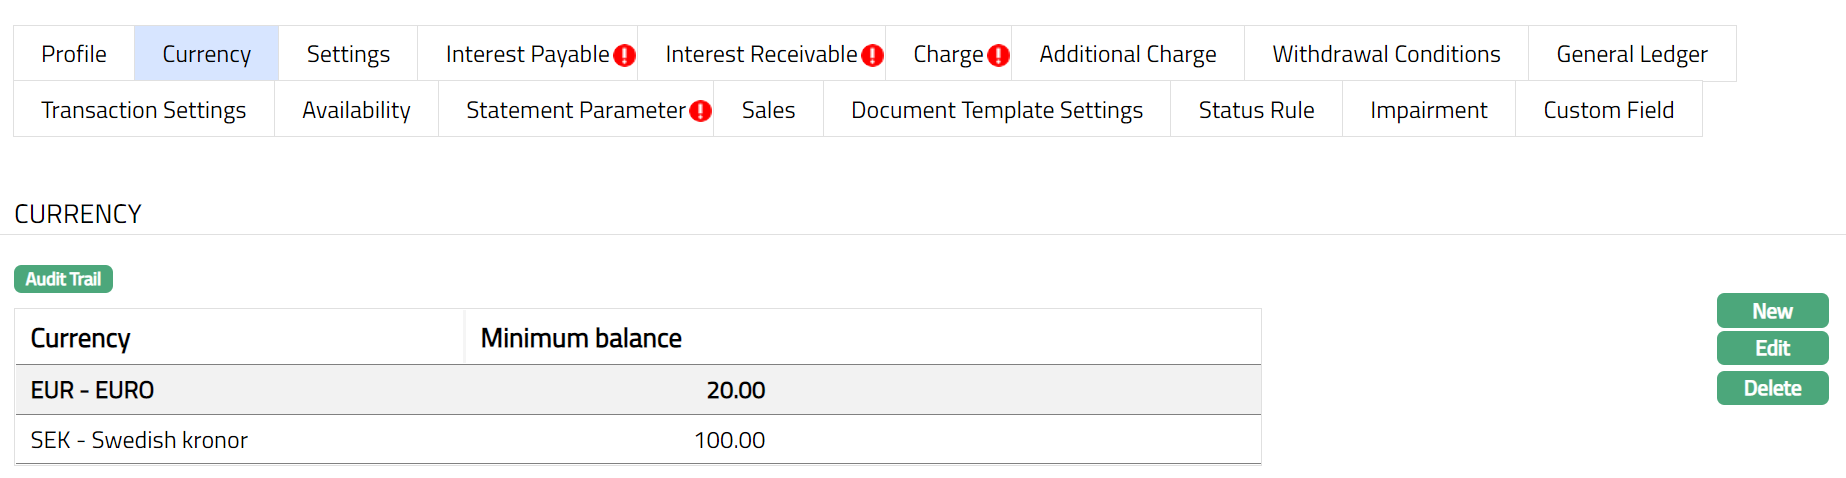
To edit the currency,
1. Click Edit. Edit Currency page appears.

2. Enter Minimum balance as required.
Note: The edited minimum balance will be displayed at the Account level and will be applicable only for the new accounts created and not for the existing accounts.
3. Click Save. Currency page appears with the edited details.
Functions: New, Edit, Delete
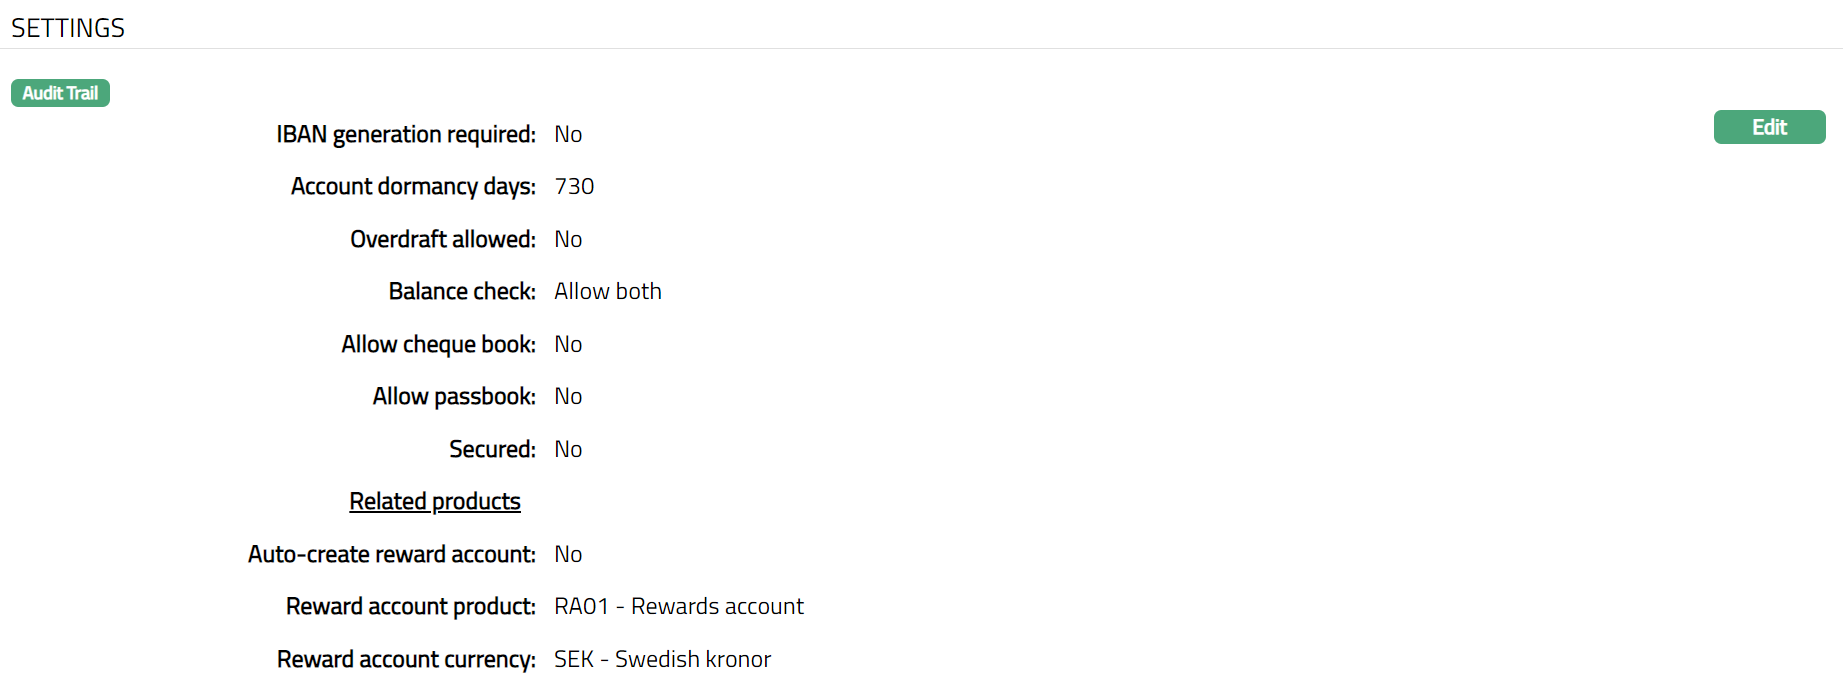
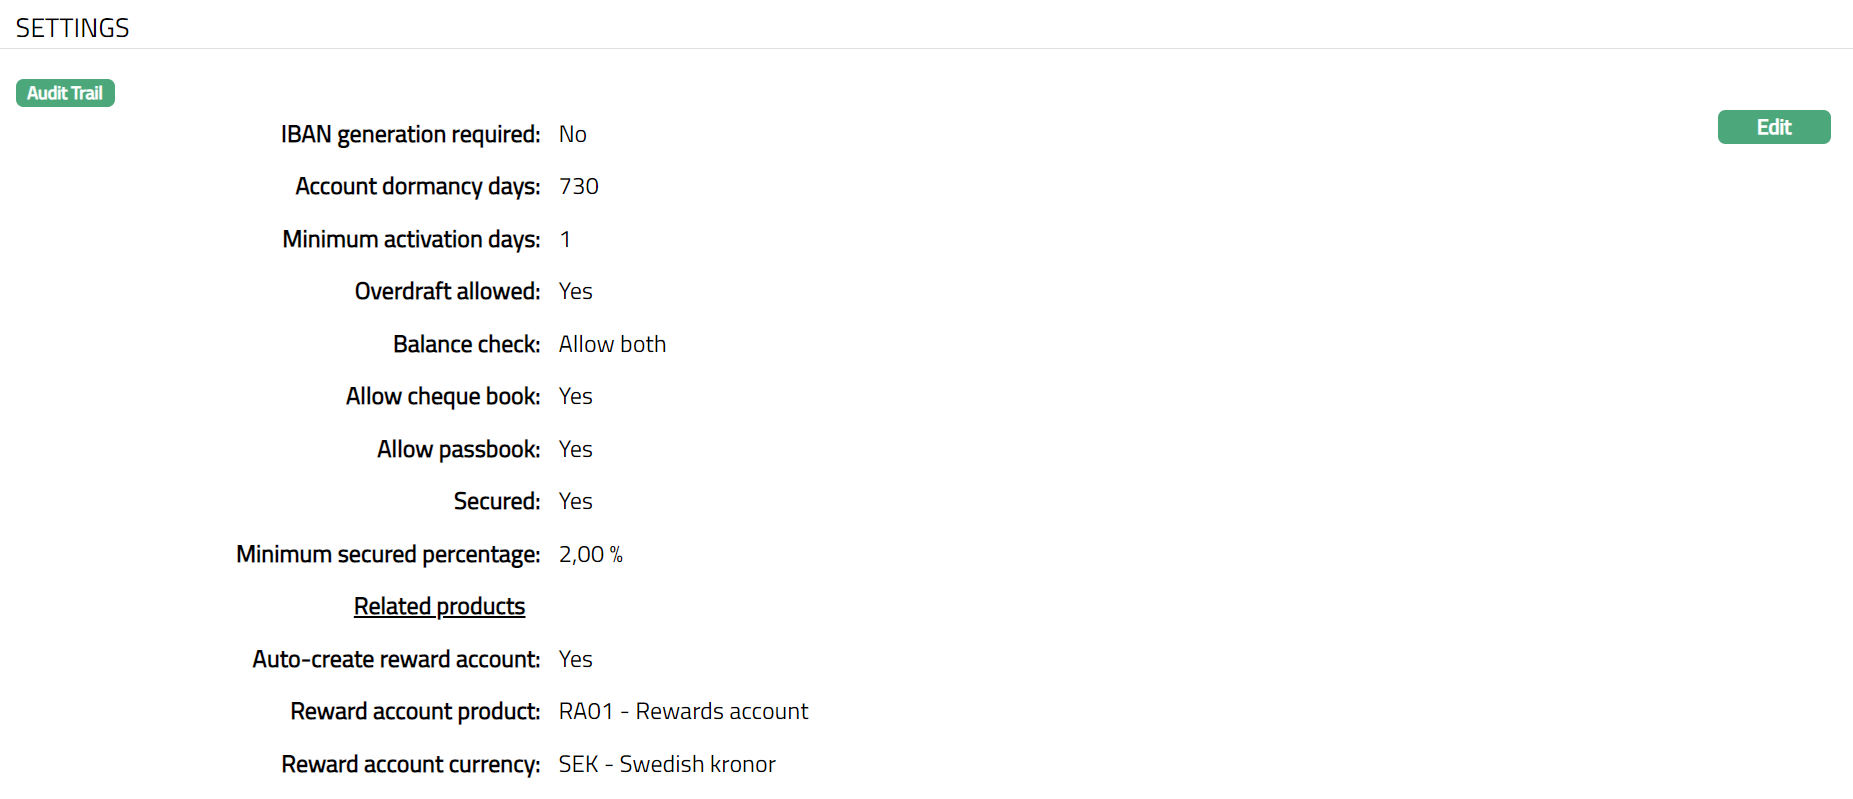
Settings
This Tab allows you to view and maintain certain product settings like IBAN generation required, Account dormancy days, Overdraft allowed and Balance check, Allow cheque book, Secured.
To edit the settings,
1. Access Product page. Click Settings tab to view the details as per sample below. The details are defaulted from the entries that you made during Product creation. For details refer to Retail → Settings → Product → Client Account → Settings (3/10).
Function: Edit
Additional fields available here are:
By Default, Auto create reward account is No and Reward Account will get created only when a transaction eligible for reward points is processed. If this is Yes, then a loyalty account will be automatically created along with the client account creation.
Reward account product denotes the reward account product attached to the Client account product which will be used for auto-creation of reward account.
The Reward account currency will be displayed by default. Aura will display the currency available for the reward account product chosen above.
2. Click Edit. The Edit Product Settings page appears.
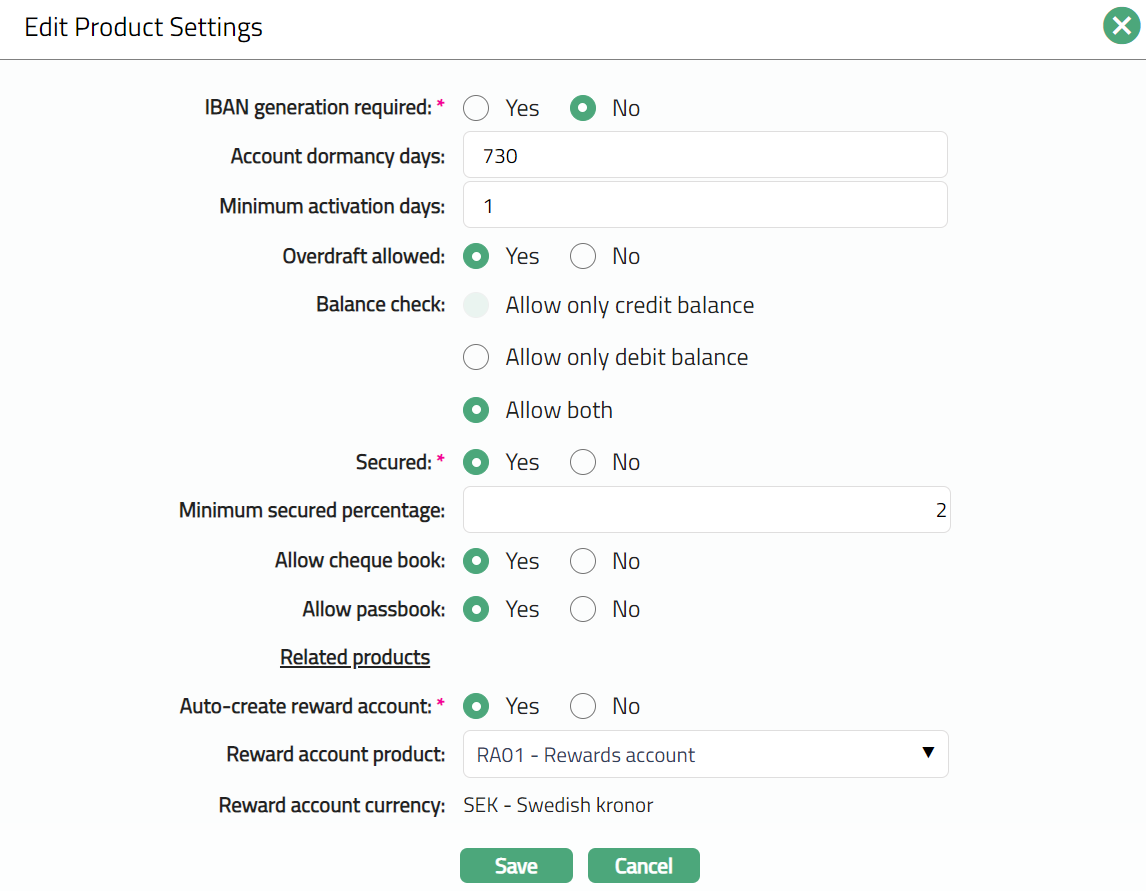
Except Reward Account Currency all other fields are editable.
Note:
If Overdraft Allowed is Yes, then Allow only credit balance option for Balance Check will be disabled.
If Yes is selected for Secured, then Minimum secured percentage field will be enabled.
3. Click Save. The Settings page appears with the edited details.
Function: Edit
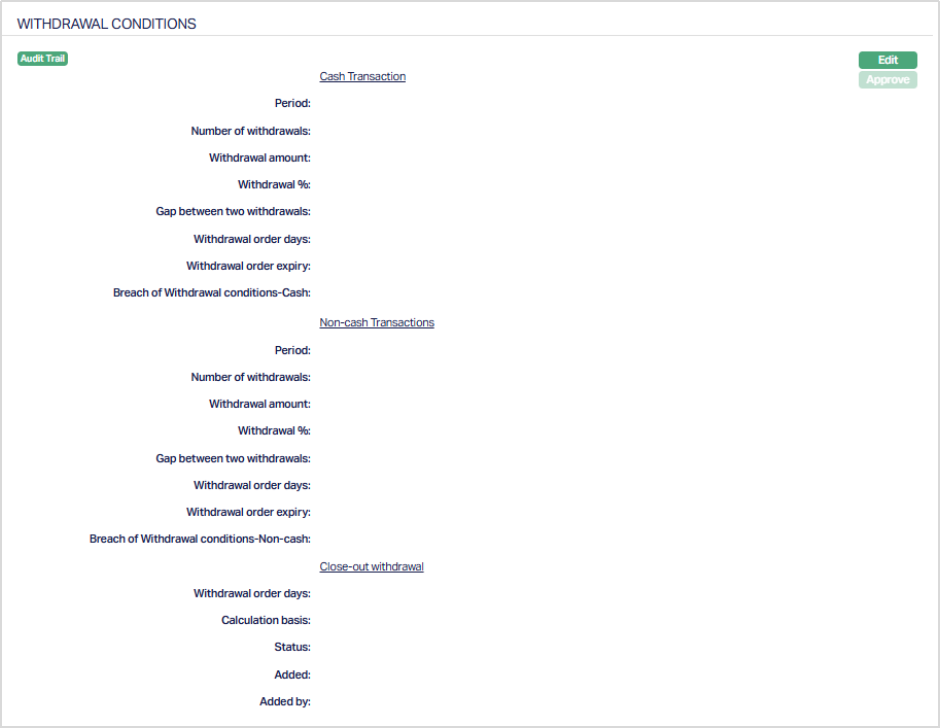
Withdrawal Conditions
The Withdrawal Conditions tab allows you to maintain different withdrawal conditions for all client-initiated debit transactions into the account. You can maintain these conditions separately for cash and non-cash client-initiated transactions. You can also maintain breach of withdrawal conditions fee for cash and non-cash transactions.
To add a withdrawal condition,
1. Access Product page. Click Withdrawal Conditions tab to view the details as per sample below. Initially there will be no data maintained in the tab.
2. Click Edit. The Edit Withdrawal Conditions page appears.
If Calculation basis = Fee Based Rate:
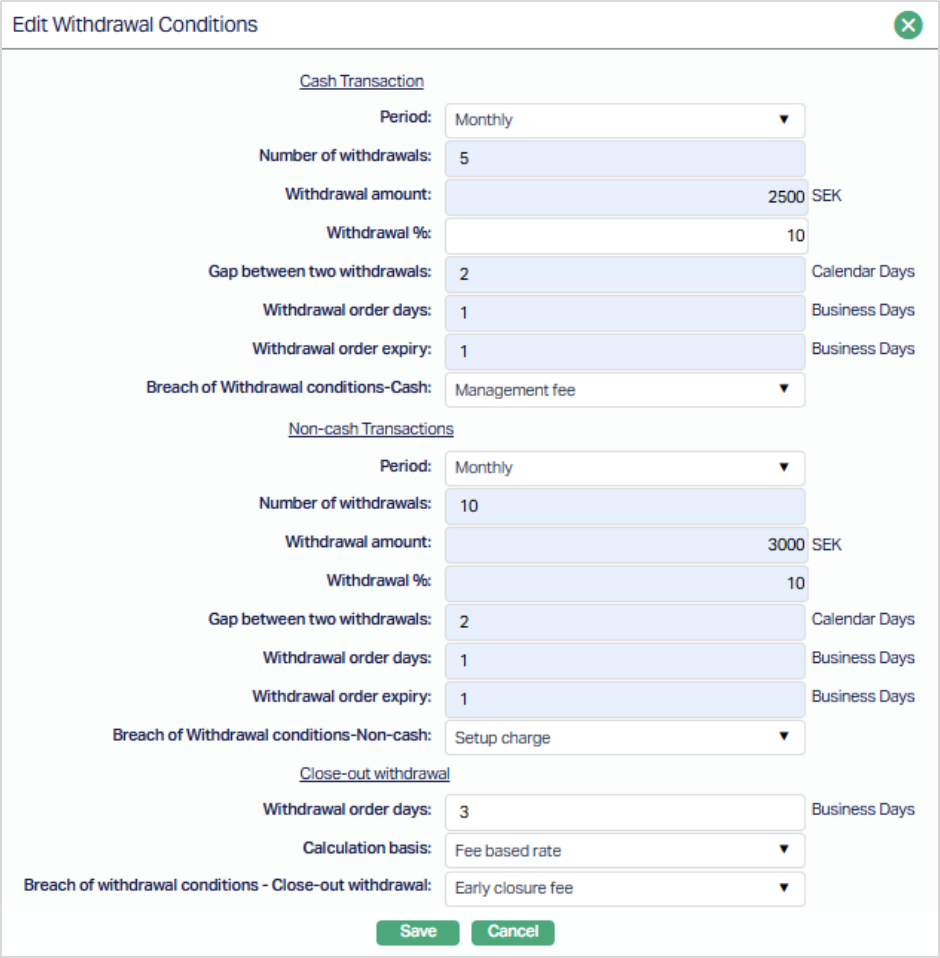
If Calculation basis = Contract Rate Based:
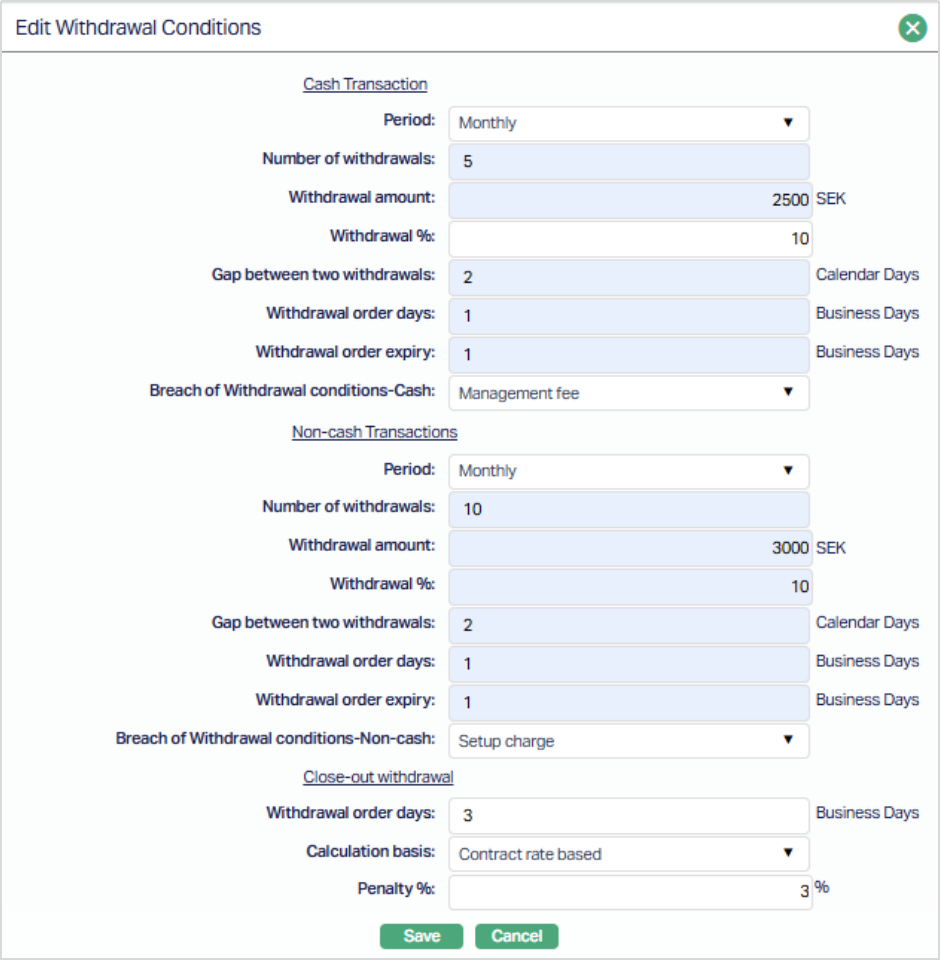
Enter the following for Cash Transaction and Non-cash Transactions
3. Select a Period for which withdrawal conditions will be defined. Aura will display the option below mentioned under the dropdown list of pre-shipped values. The options available are - Daily, Weekly, Monthly, Quarterly, Semi annual and Annual. If any account gets activated in the middle of the month, then the period will continue till the last day of the month and all withdrawal conditions will be applicable for that period.
4. Enter the Number of withdrawals. If the number of withdrawals is zero, then no withdrawals are possible from the account. If this field is blank then the user can do N number of withdrawals without any charge.
5. Enter the Withdrawal Amount. The amount entered here is the maximum limit of withdrawal each time.
Note: If the withdrawal amount is mentioned as 0 then the user is not allowed to withdraw any amount. If the user is withdrawing any amount, then that will be considered as breach of withdrawal conditions. If this field value is null, then the user can withdraw any amount available in the account.
6. Enter the percentage of Available balance eligible for each withdrawal in the Withdrawal % field
Note: If both withdrawal amount and withdrawal percentage are given, whichever is lower Aura will consider that amount as the maximum amount possible for each withdrawal. If the withdrawal amount is 0 then the user will not be allowed to withdraw any amount. If a user withdraws any amount, then that will be considered as breach of withdrawal conditions and if this field value is null then the user can withdraw any amount available in the account.
7. Enter the Gap between two withdrawals in terms of Calendar days. The days will be according to the selected period.
- If period = Daily, then Gap between two withdrawals is disabled.
- If period = Weekly, then Gap between two withdrawals has to be between 1 and 6.
- Period = Monthly then Gap between two withdrawals has to be between 1 and 30
- Period = Quarterly then Gap between two withdrawals has to be between 1 and 90
- Period = Semi annual then Gap between two withdrawals has to be between 1 and 90.
- Period = Annual than Gap between two withdrawals has to be between 1 and 90.
8. Enter the Withdrawal order days in terms of business days. These days will be mentioned working days. Withdrawal order days will always be between 1 to 30 working days for all selected periods.
9. Enter the Withdrawal order expiry in terms of business days. This is the number of days for which the withdrawal order will be kept live, after the activation of the withdrawal Order. These days will always be between 1 to 30.
10. Select the charge to be levied on Breach of withdrawal conditions-Cash/Non-cash. Aura will display the list of all the Event based Flat or Banded charges maintained under Admin → Pricing → Charges → Charge Schemes.
Close-out Withdrawal Conditions
Aura allows you to maintain specific conditions for Close-out withdrawal at the Product level. Close-out withdrawal conditions are applicable when withdrawal order days are maintained for Close-out withdrawal.
11. Enter the Withdrawal order days in terms of business days. These days will be mentioned working days. Withdrawal order days will always be between 1 to 30 working days for all selected periods.
12. Select the Calculation Basis for Close-out withdrawal. The available options are:
- Fee Based Rate: Select this option to apply a penalty based on the charge scheme maintained for breach of withdrawal conditions. When this option is selected, Aura applies the penalty using the selected charge scheme.
- Contract Rate Based: Select this option to apply penalty based on the contract rate along with a flat penalty percentage.
When Contract rate based is selected, the Penalty % field becomes enabled.
13. Penalty % - Enter the flat penalty percentage to be applied for Close-out withdrawal. This penalty will be applied based on the contract rate applicable to the account during close-out withdrawal processing at the account level.
Notes:
- Calculation basis and Penalty % are applicable only when Close-out withdrawal order days are maintained.
- If Fee based rate is selected, penalty is applied using the charge scheme.
- If Contract rate based is selected, penalty is applied using the contract rate along with the flat penalty %.
14. Click Save. The Withdrawal Conditions page appears with the updated details.
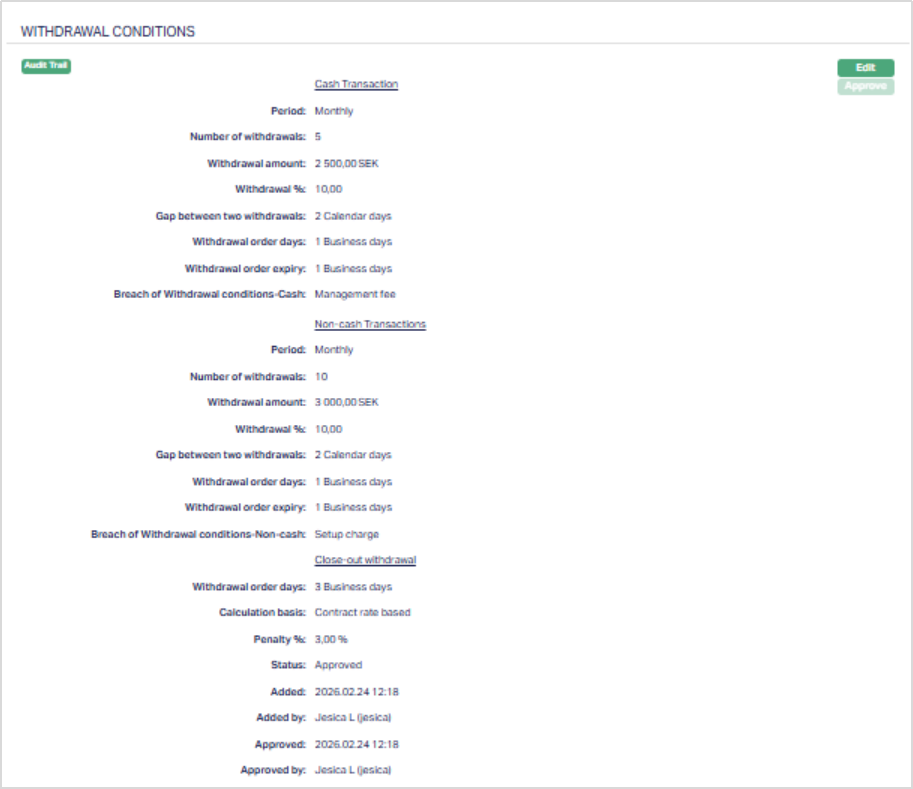
Any change in the tab will set the tab status to Pending till it is approved by another user. On approval, the tab status is set to Approved and the red bubble disappears.
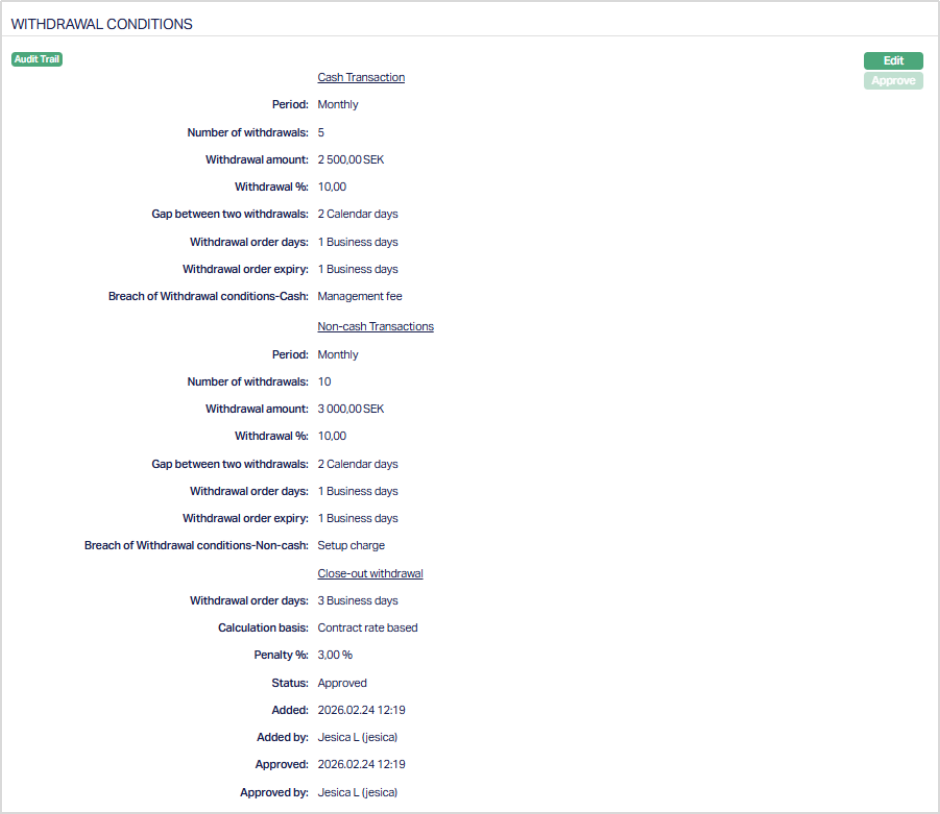
Functions: Edit, Approve.
The additional fields available are:
Status field denotes the status of the tab.
Added field denotes the date on which the record was added.
Added by field denotes the name of the user who created the record.
Approved field denotes date on which the record was approved and is displayed only for approved records.
Approved by field denotes name of the user who approved the record and is displayed only for approved records.
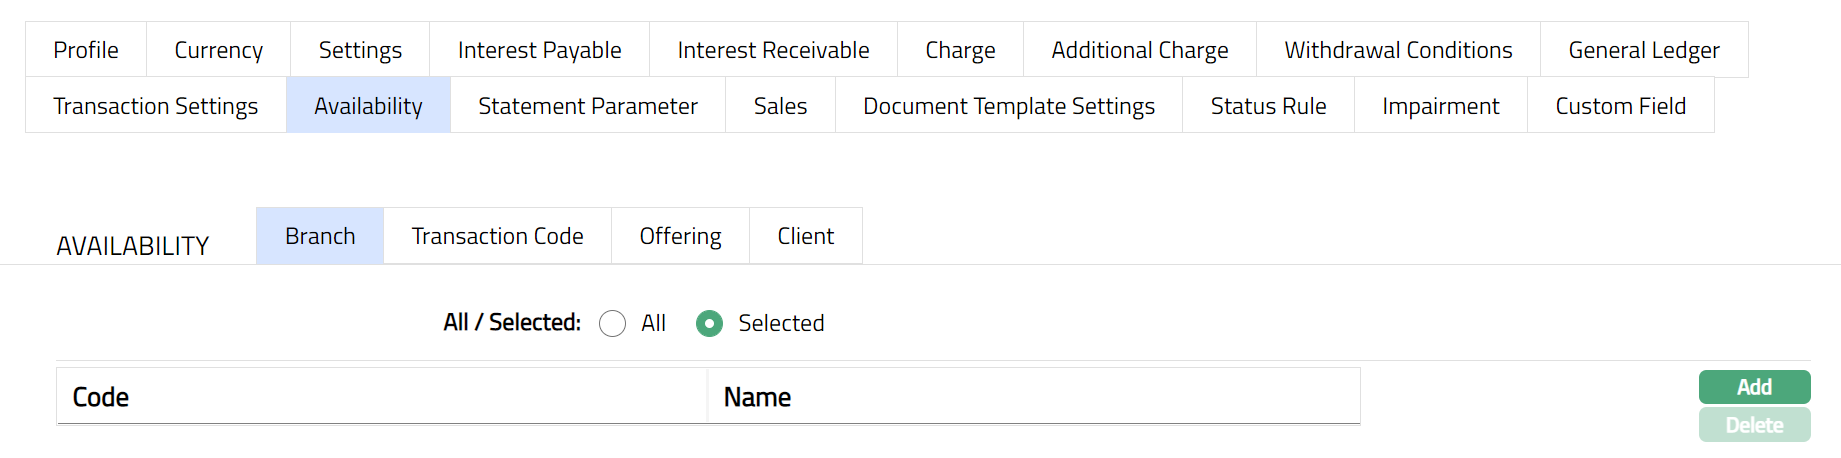
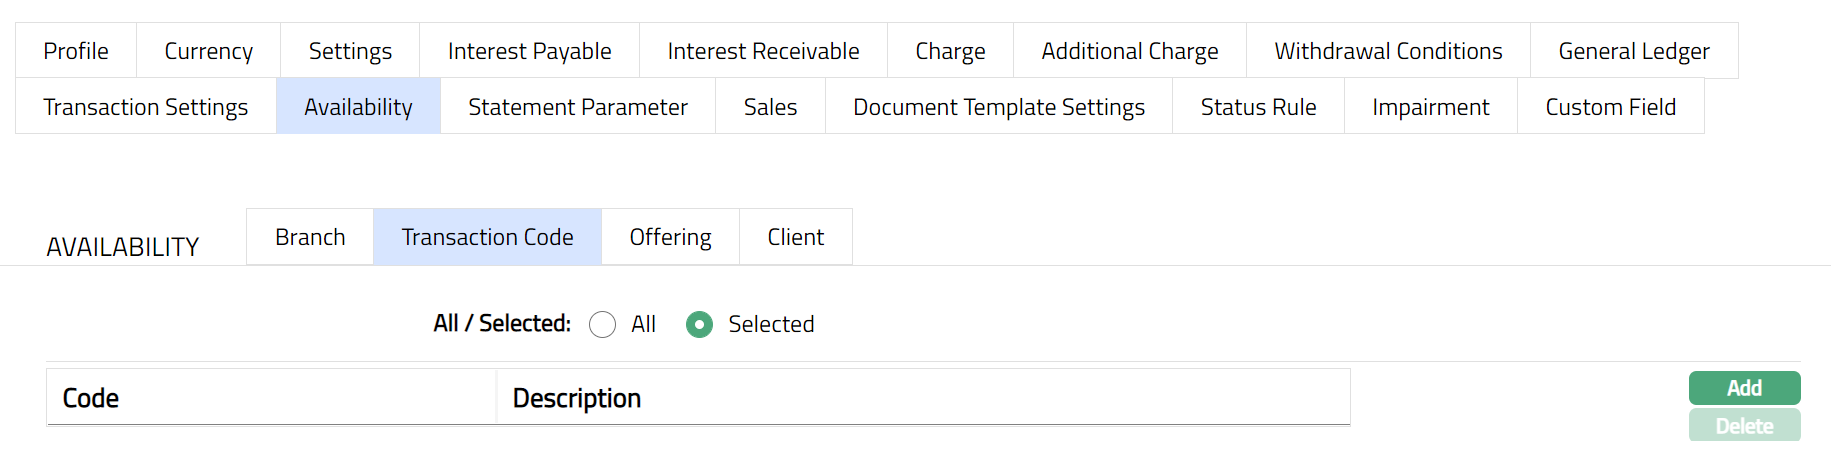
Availability
This tab can be used to control the availability of the product to specific Branch, Transaction Code, Offering or Client. It has four sub-tabs, one for each of these.
Availability-Branch
Using this tab, you can allow the Product to be available for all the Branches or only specific Branch(es). If you select specific branch, then at the Account level; in the Account branch drop-down list only, selected branch will be available. Else all the branches will be displayed in the Account branch drop-down list.
To select the branch
1. Access Product page. Click Availability tab, then click Branch tab.
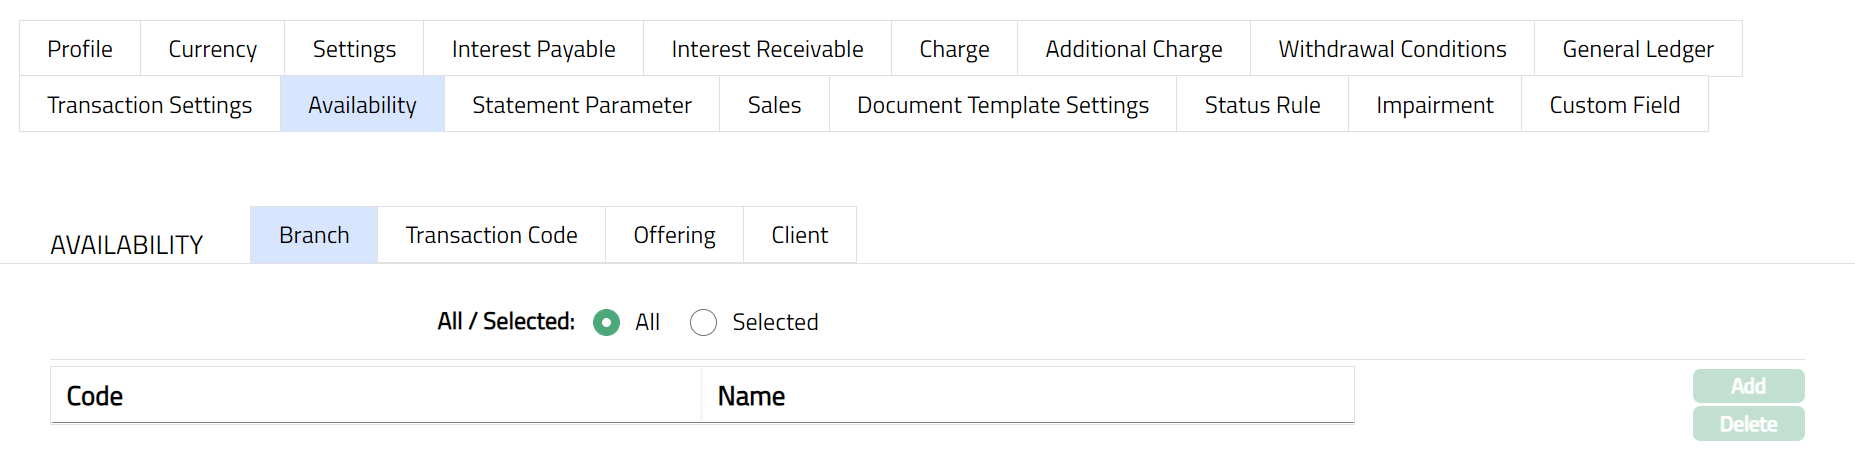
2. By default, All radio button is selected so that this Product is available for all Branches.
3. To restrict the branches for which this Product is available, click Selected radio button. Add button is now enabled.
4. Click Add. The Add Branch screen appears where you can select the required branch from the drop-down of all active Branches of the Entity maintained under Admin → Branches → Maintain.
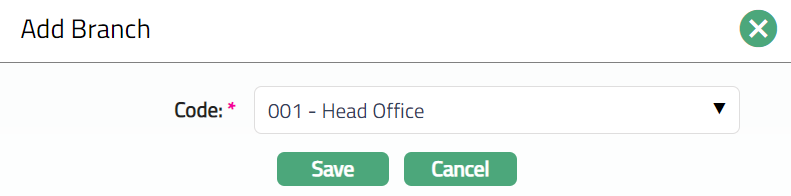
5. Click Save. The Availability tab appears with the added branch details under Branch Sub tab.
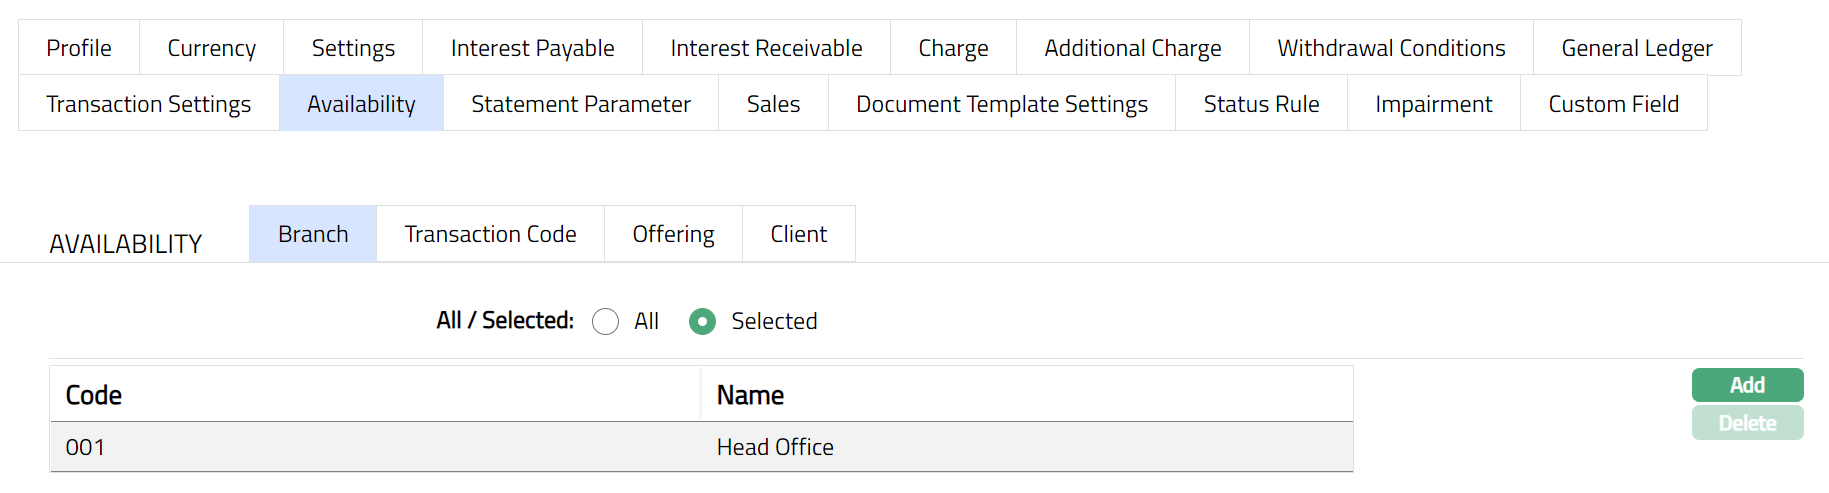
Function: Add, Delete
Note: To delete a branch, select the branch and click Delete. You may choose to allow All branches for the product at any time. However, Aura will prompt you to confirm if the selected branches may be deleted. If confirmed, then all the selected branches will be deleted, and the product will be available for ALL Branches.
Availability-Transaction Code
Using this tab, you can allow the Product to be available for all the Transaction Codes or only specific Transaction Code(s).
1. Access Product page. Click Availability tab, then click Transaction code tab.
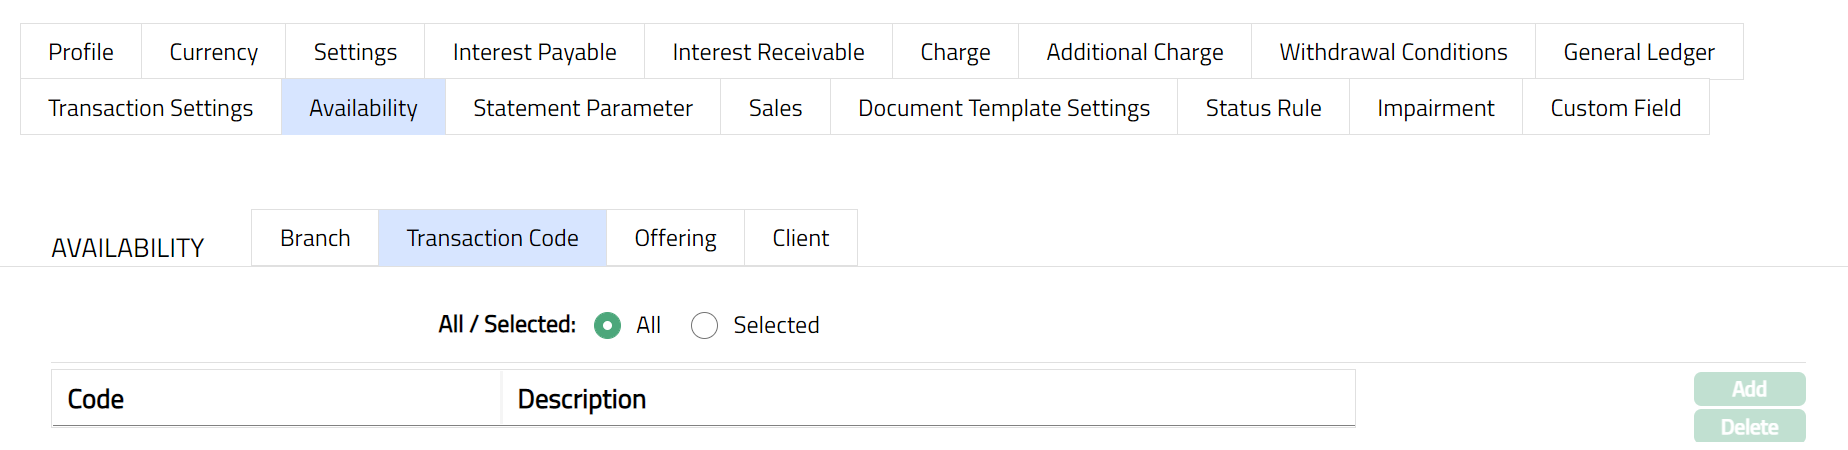
2. By default, All radio button is selected so that this Product is available for all Transaction Codes.
3. To restrict the Transaction Codes that are available under this product, click Selected radio button. Add button is now enabled.
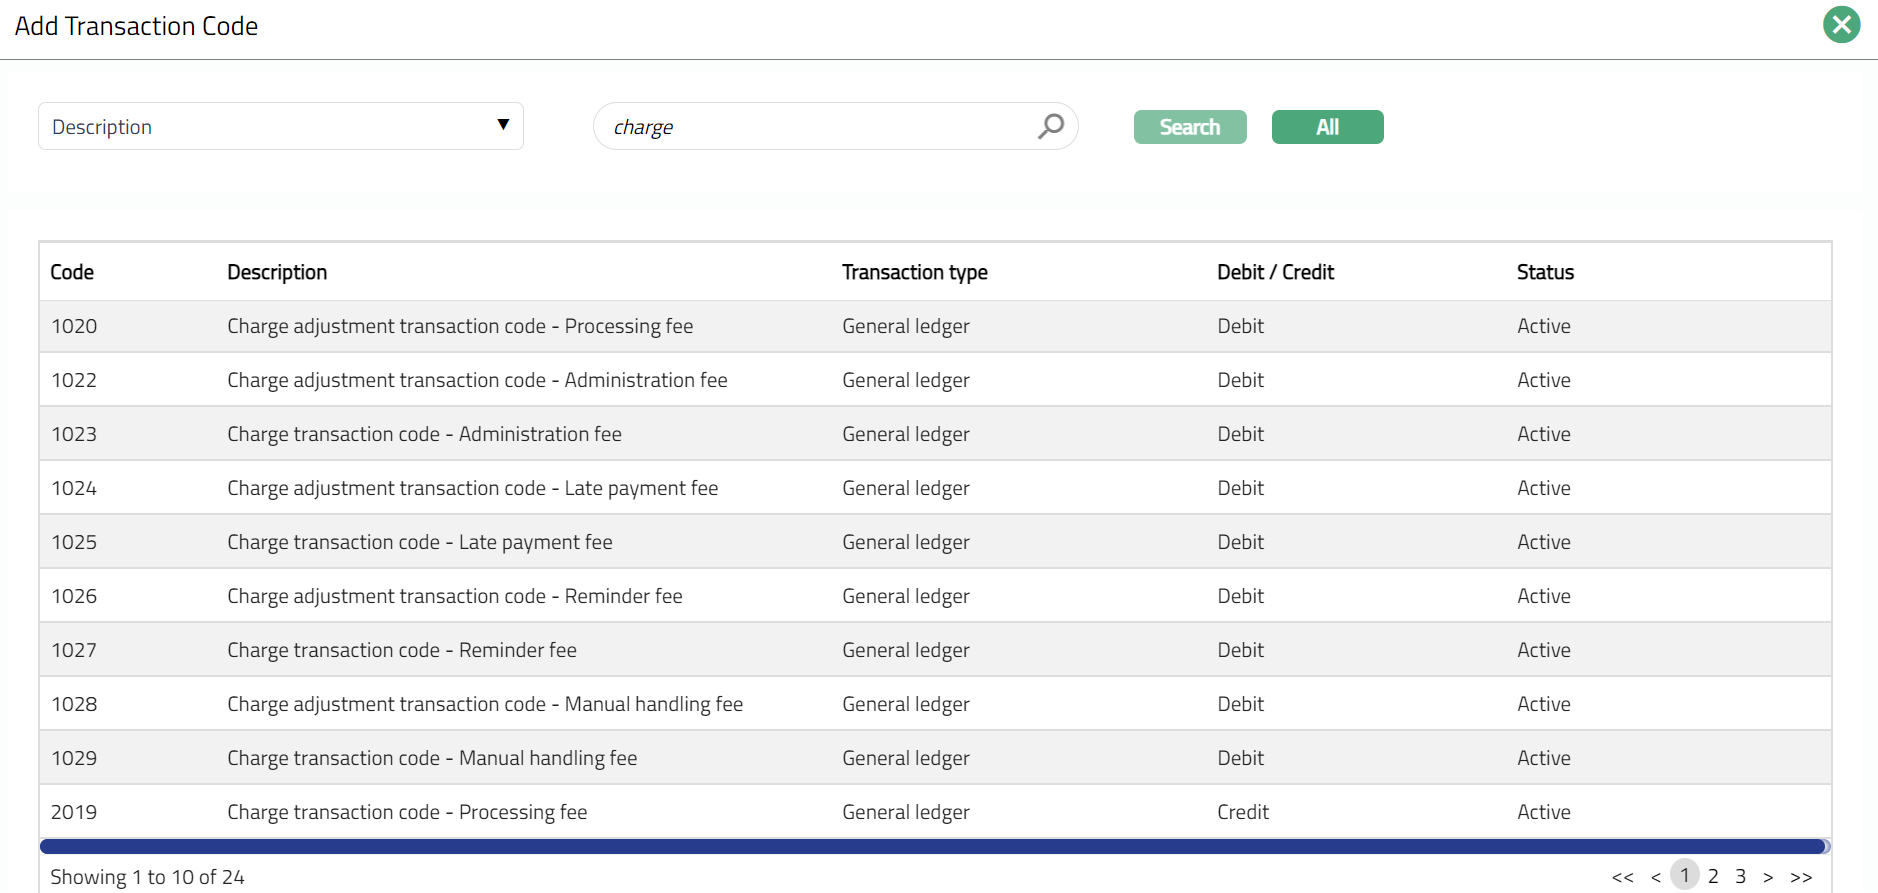
4. Click Add. The Add Transaction Code search page appears. Search and select for the required Transaction code with relevant criteria.
5. The selected Transaction Code will appear in Availability screen under the sub tab Transaction Code screen as shown below.
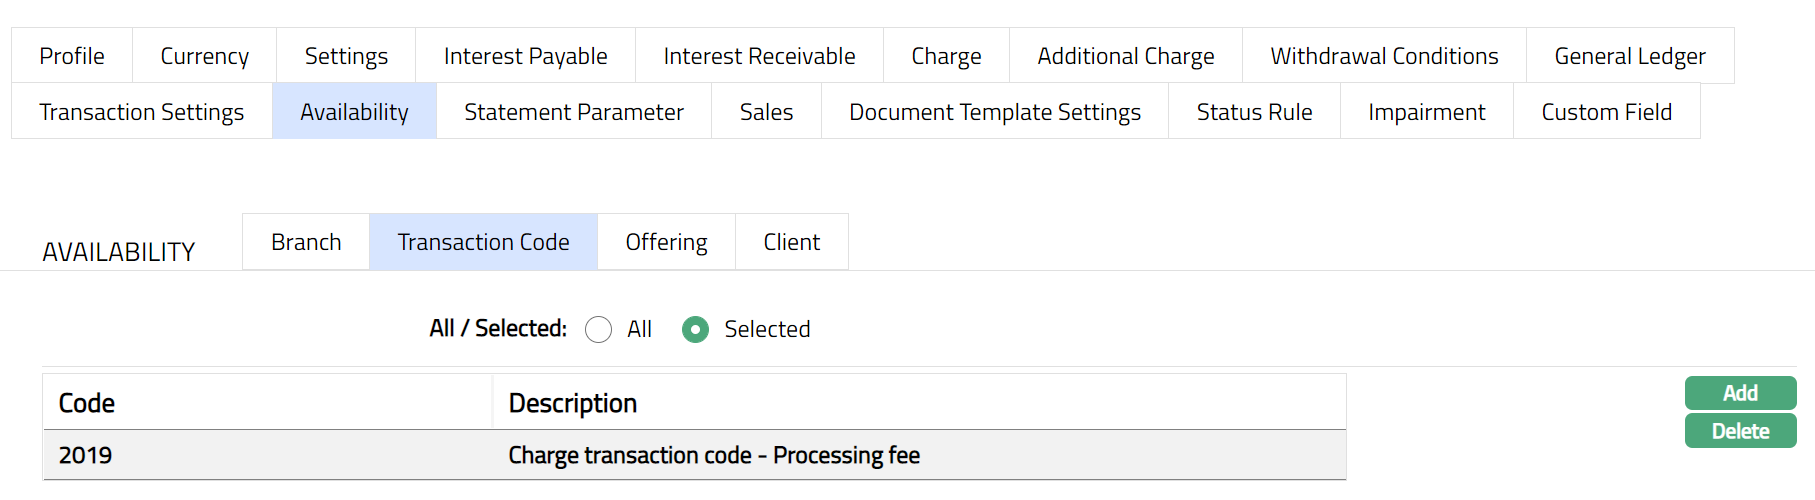
Function: Add, Delete
Note: You may choose to allow All Transaction codes for the product at any time. However, Aura will prompt you to confirm if the selected Transaction code may be deleted. If confirmed, then all the selected Transaction codes will be deleted, and the product will be available for ALL Transaction Codes.
Availability-Offering
Using this tab, you can allow the Product to be available for all the Offerings or only specific Offering(s). If offering has been mentioned at client account product level and client selected at account level do not have similar offering, then at client account level under product drop down system will not display the product. Else you will be allowed to select any client and product combination available in the Aura.
1. Access Product page. Click Availability tab, then click Offering tab.
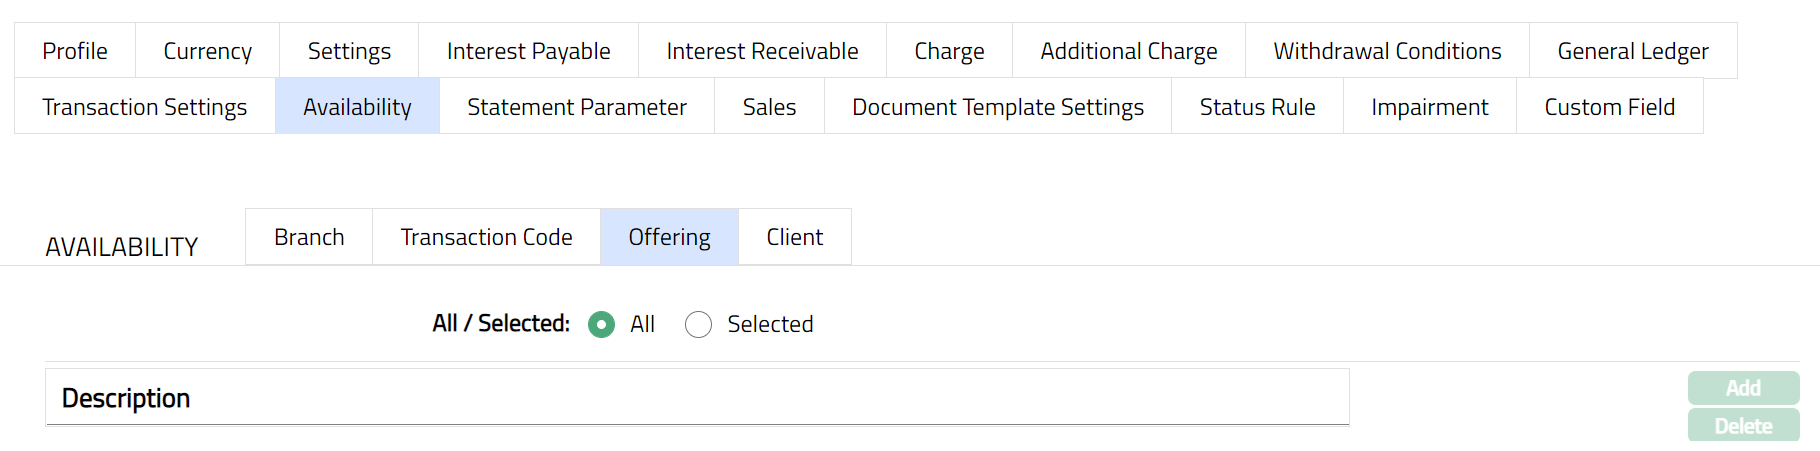
2. By default, All radio button is selected so that this Product is available for all Offerings.
3. To restrict the Offerings that are available under this product, click Selected radio button. Add button is now enabled.
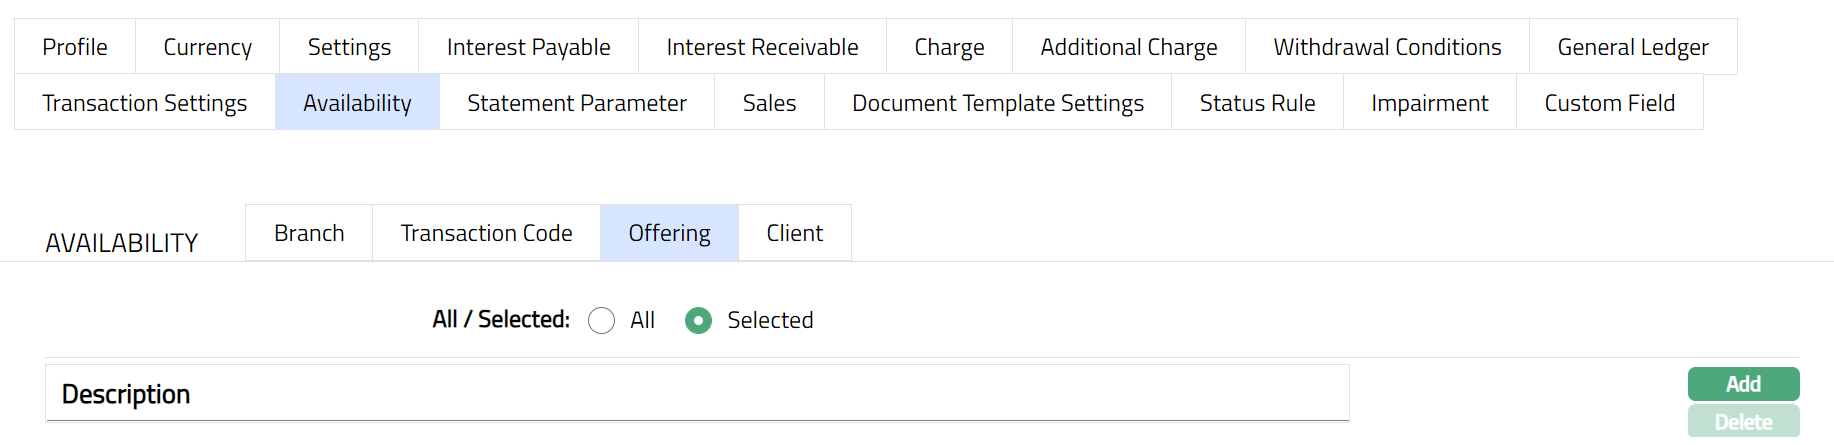
4. Click Add. The Add Offering screen appears where you can select the required Offering from the drop-down list of active Offerings maintained under Admin → System Codes → Categories → offerings.
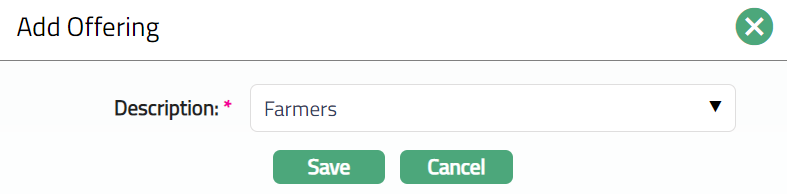
5. Click Save. The Availability tab appears with the added offering details under Offering Sub tab.

Function: Add, Delete
Note: You may choose to allow All Offerings for the product at any time. However, Aura will prompt you to confirm if the selected Offering may be deleted. If confirmed, then all the selected Offering will be deleted, and the product will be available for ALL Offerings.
Availability-Client
Using this tab, you can allow the Product to be available for all the Clients or only specific Client(s). For client account product clients have been mentioned for product availability and at account level user has selected some other client then client account product will not display under product drop down. With availability at product level user will be able to create client account only for the clients available for the product.
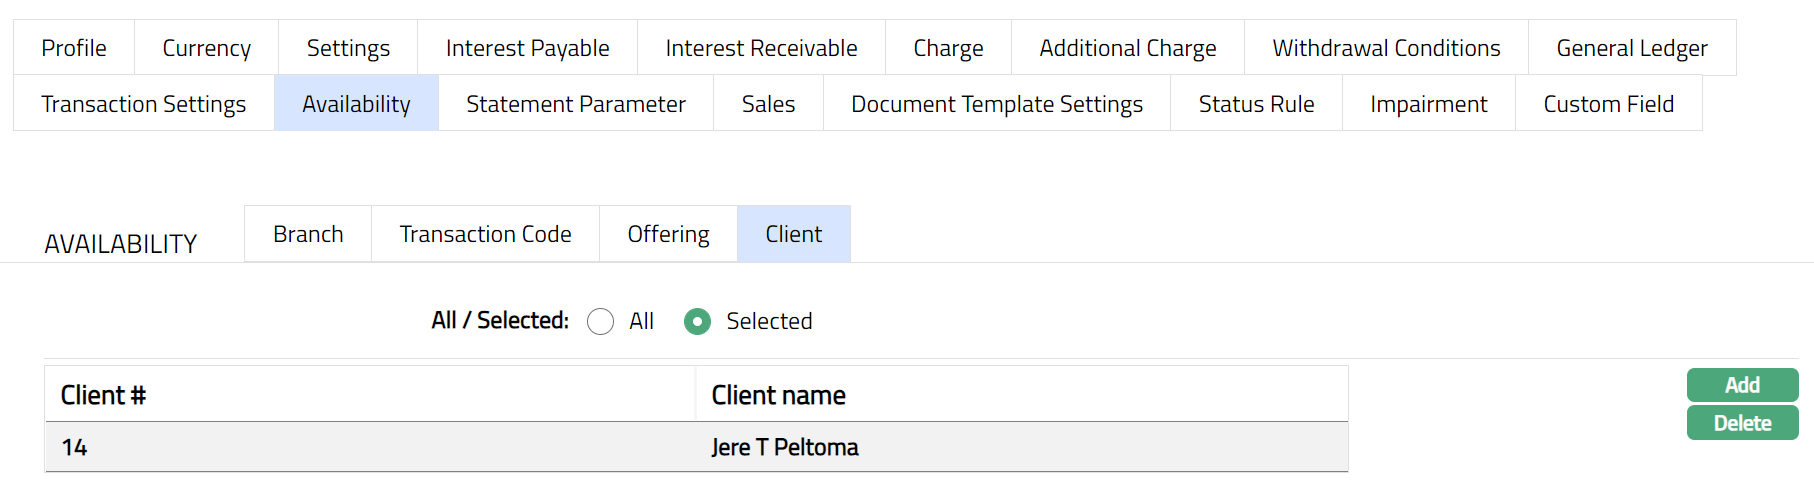
1. Access Product page. Click Availability tab, then click Client tab.
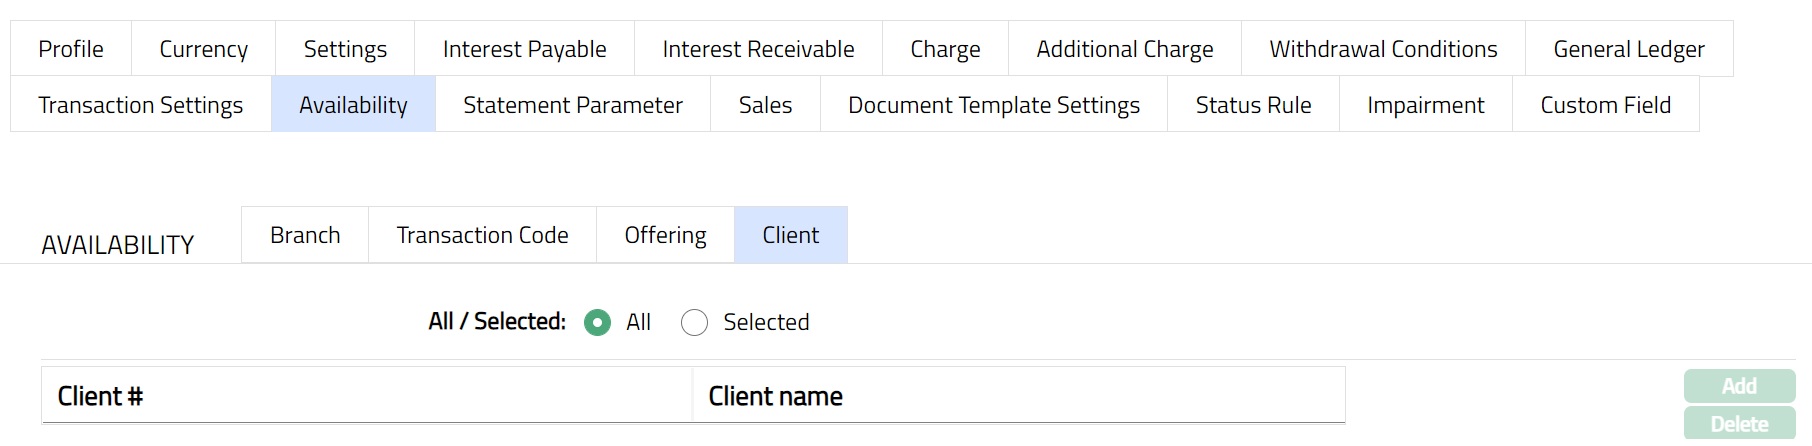
2. By default, All radio button is selected so that this Product is available for all Clients.
3. To restrict the Clients that are available under this product, click Selected radio button. Add button is now enabled.
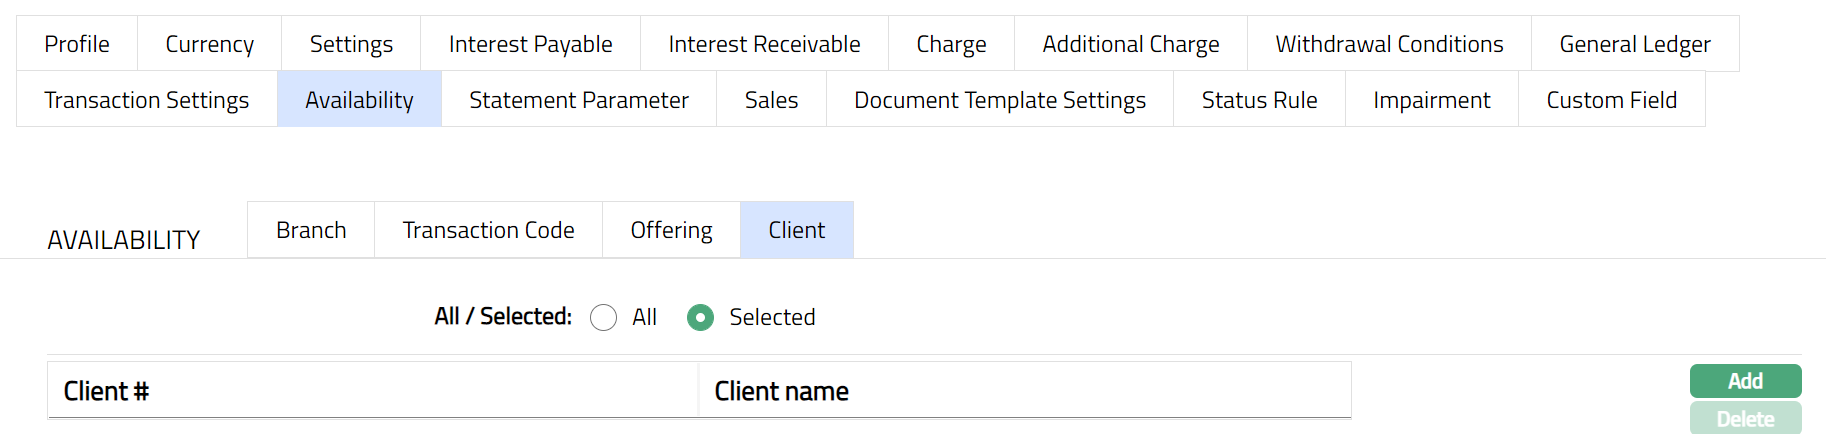
4. Click Add. The Add client page appears, where you can search for the required client with relevant criteria and select the required client.
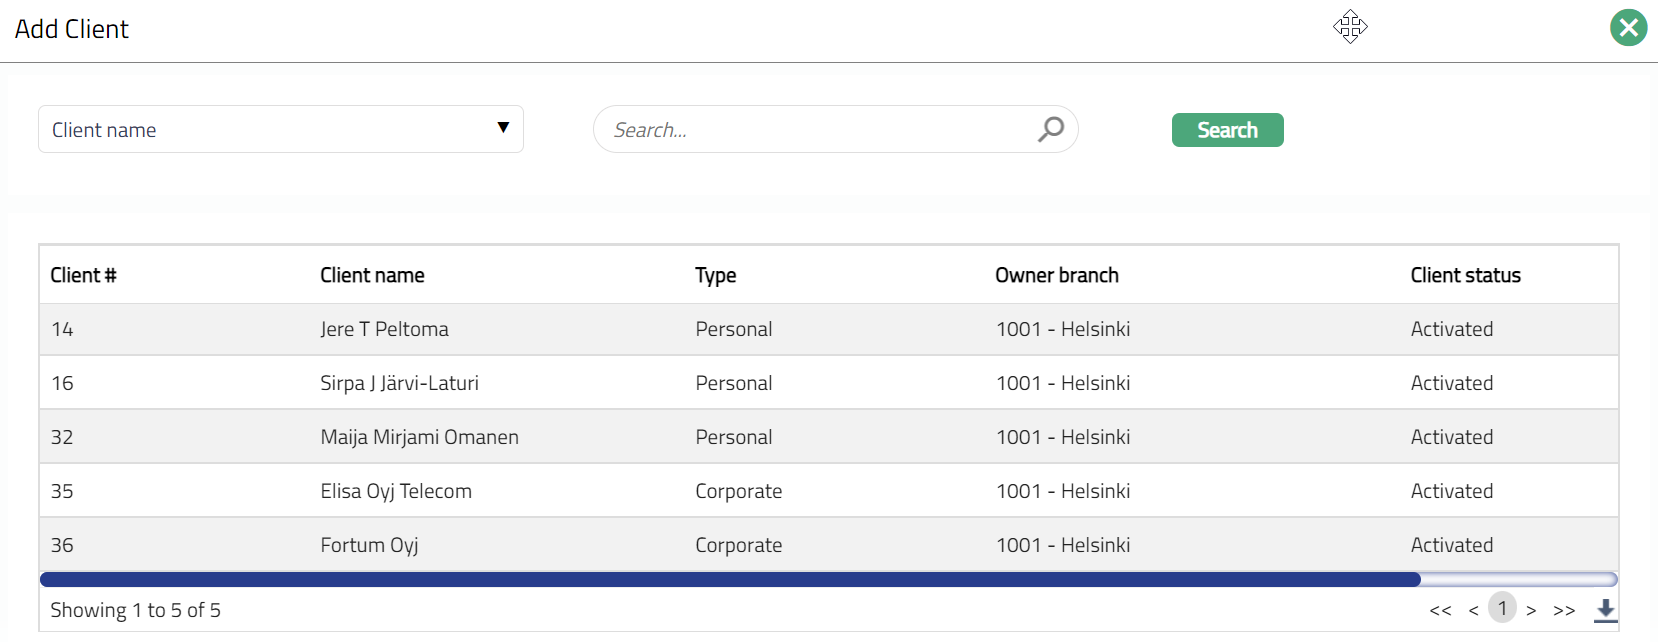
5. The selected Client(s) will appear in Availability screen under the sub tab Client screen as shown below.
Function: Add, Delete
Note: To delete client(s), select the client(s) and click
Delete. You may choose to allow All Clients for the product at any time. However, Aura will prompt you to confirm if the selected Clients may be deleted. If confirmed, then all the selected Clients will be deleted, and the product will be available for ALL Clients.
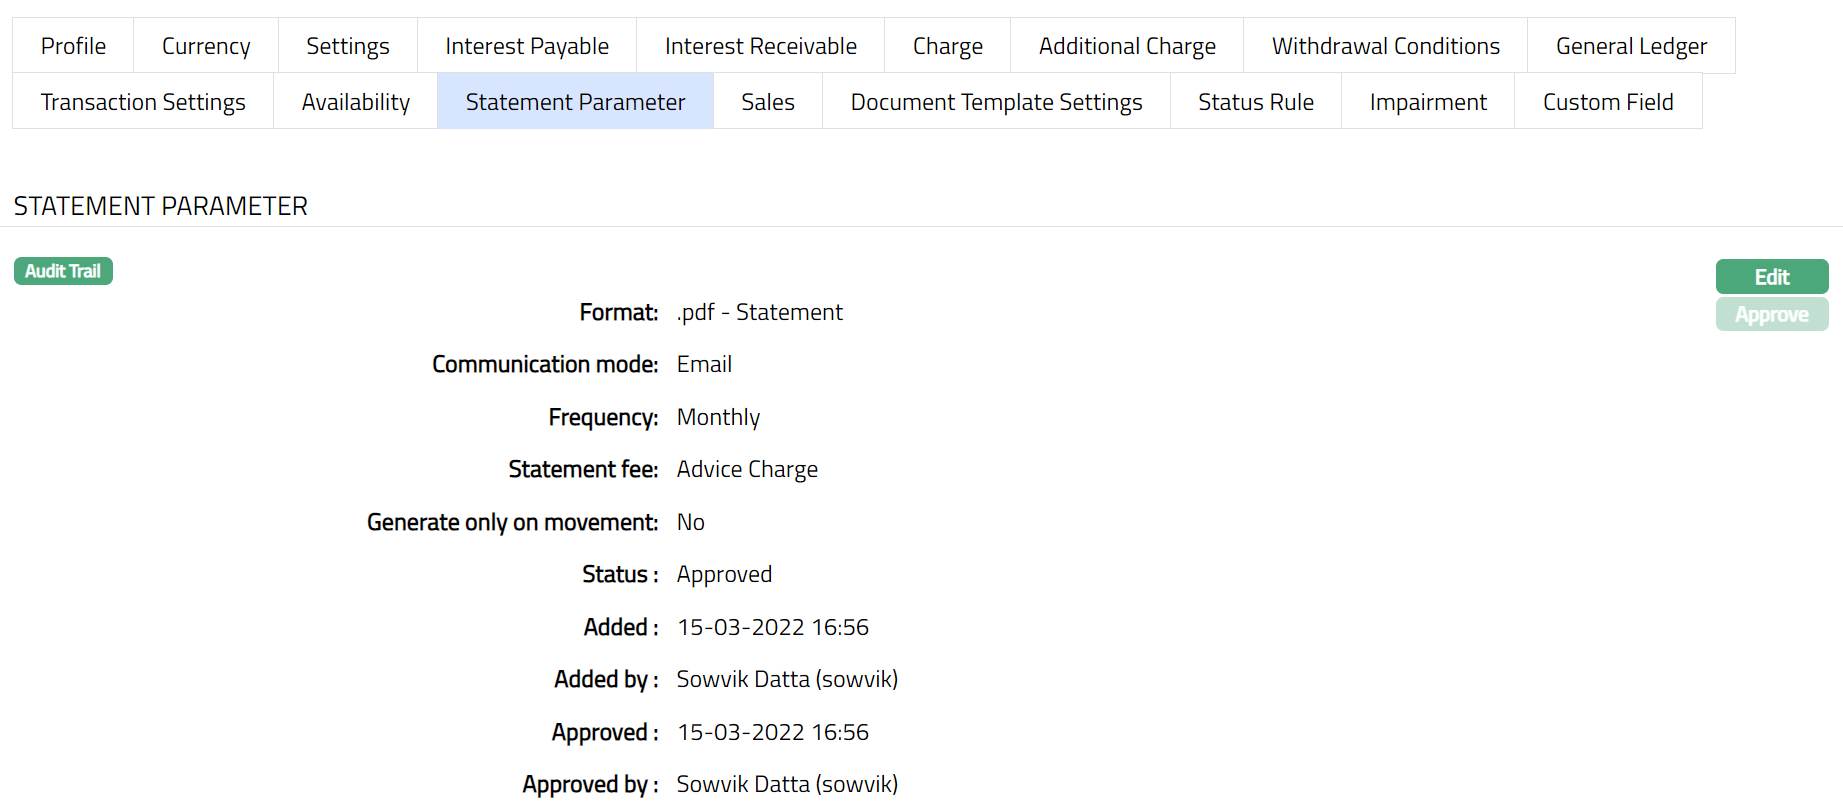
Statement Parameter
Using this tab, you can view and maintain the preferences for generating the statement of client account.
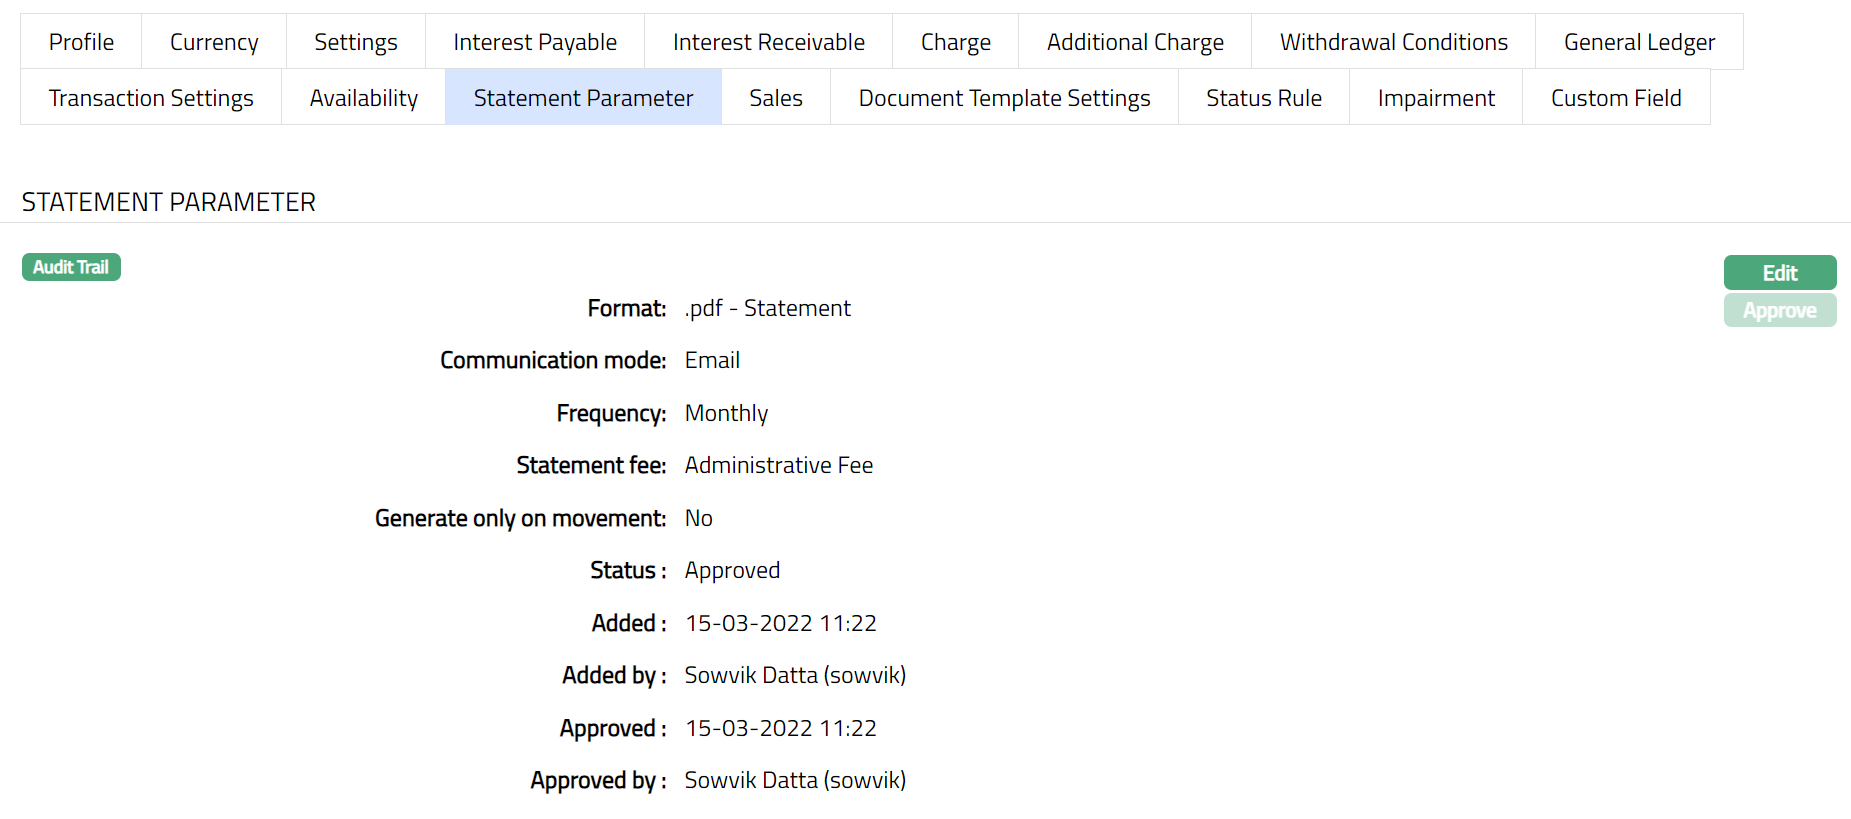
1. Access Product page. Click Statement Parameter tab to view the details as per sample below. The details are defaulted from the entries that you made during Product creation. For details refer to Client Account → New Product → Statement Parameter (9/10).
2. Click Edit. The Edit Statement parameter page appears.
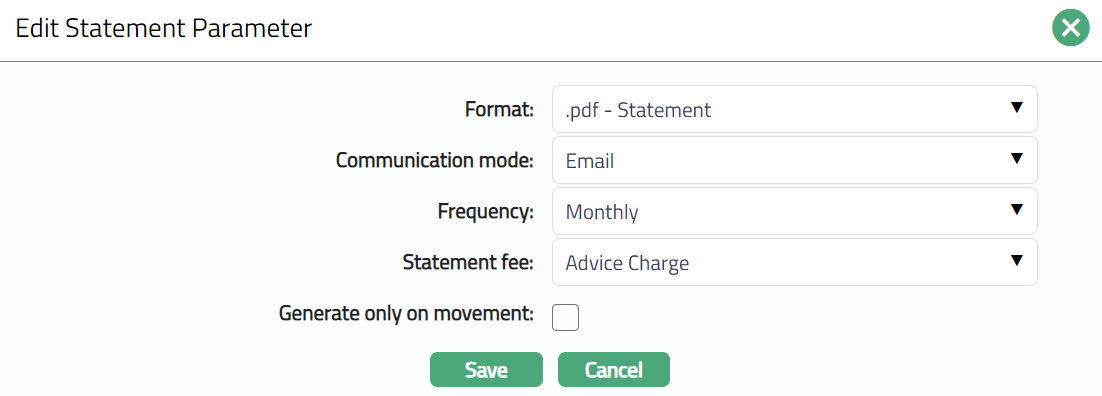
Note: All the fields in Edit Statement parameter can be Edited.
3. Click Save. The Statement Parameter page appears with the Edited details.

Note: If the Statement Parameter details are edited, then the status of the tab will be Pending till it is approved by another user. On approval, the tab status is set to Approved and the red bubble disappears as per the sample shown below.
Function: Edit
The following additional fields shown in the View screen are not editable:
Status field denotes the status of the tab.
Added field denotes the date on which the record was added.
Added by field denotes the name of the user who created the record.
Approved field denotes date on which the record was approved and is displayed only for approved records.
Approved by field denotes name of the user who approved the record and is displayed only for approved records**.**
Document Template Settings
Using this tab, you can maintain the document template which can be used for uploading documents for all the accounts maintained under this Client account product.
1. Access Product Maintenance page. Click Document Template Settings tab.

2. Click New. New Document Template page appears.

3. Select the Document template from the available drop-down as maintained under Admin → System codes → Documents → Document templates.
4. Select the Template applicable type from the available drop-down list. The available options are Closure and Maintain.
5. Click Save. The Document Template page appears with the added details.
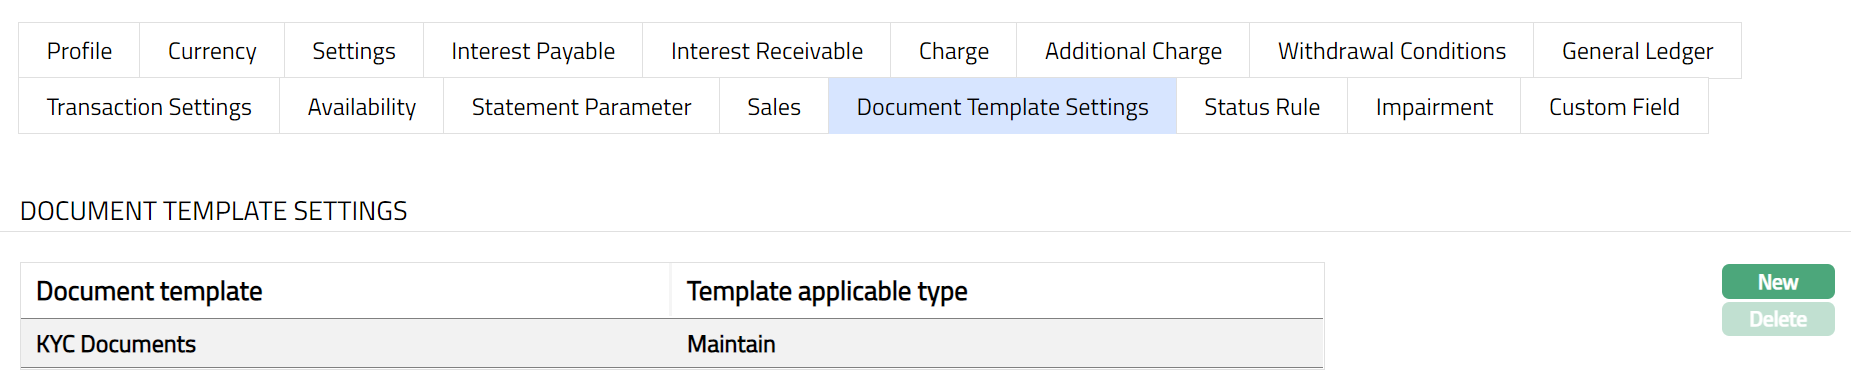
Functions: New, Delete
PRICING
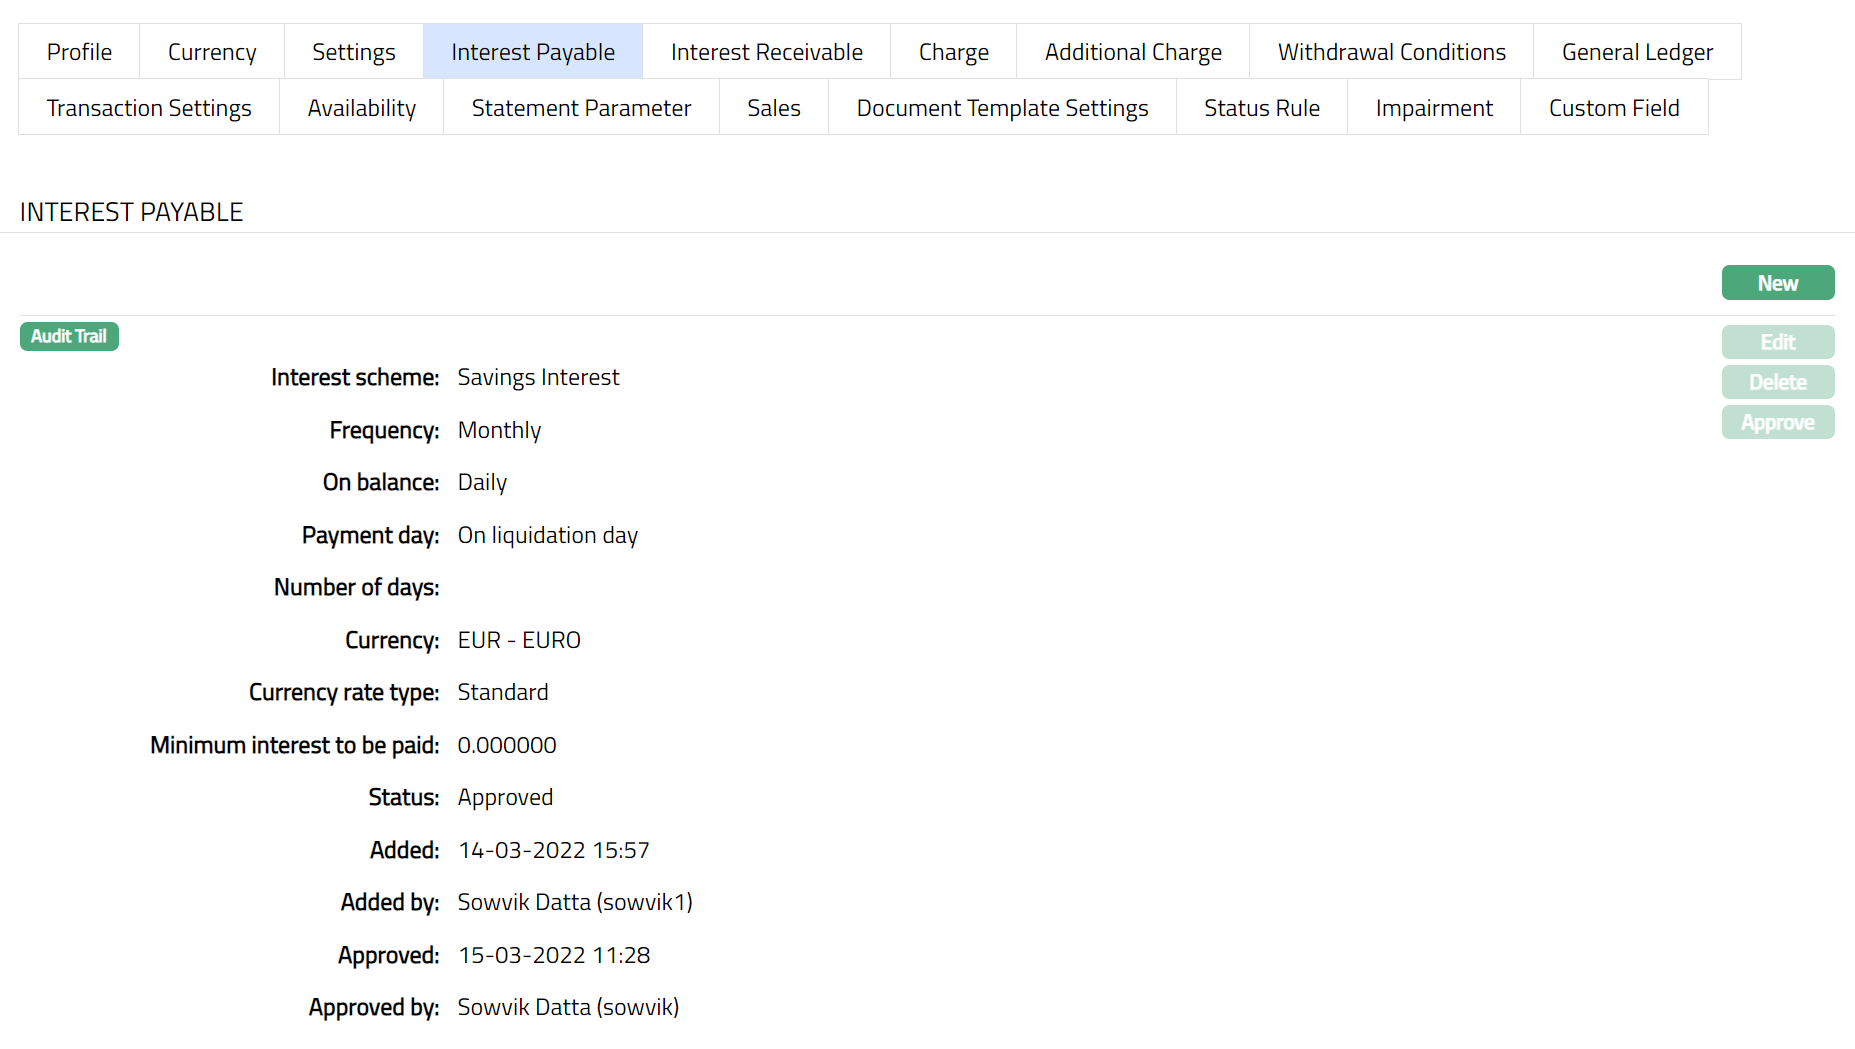
Interest Payable
The Interest Payable tab allows you to create, view and maintain the interest rate offered on a client account under this product. After creation / edit, the tab is in Pending status. Once the tab is approved, no further changes can be done on the Interest Payable tab. If you want to change any settings for the Product under the Interest payable tab, you have to use the New button.
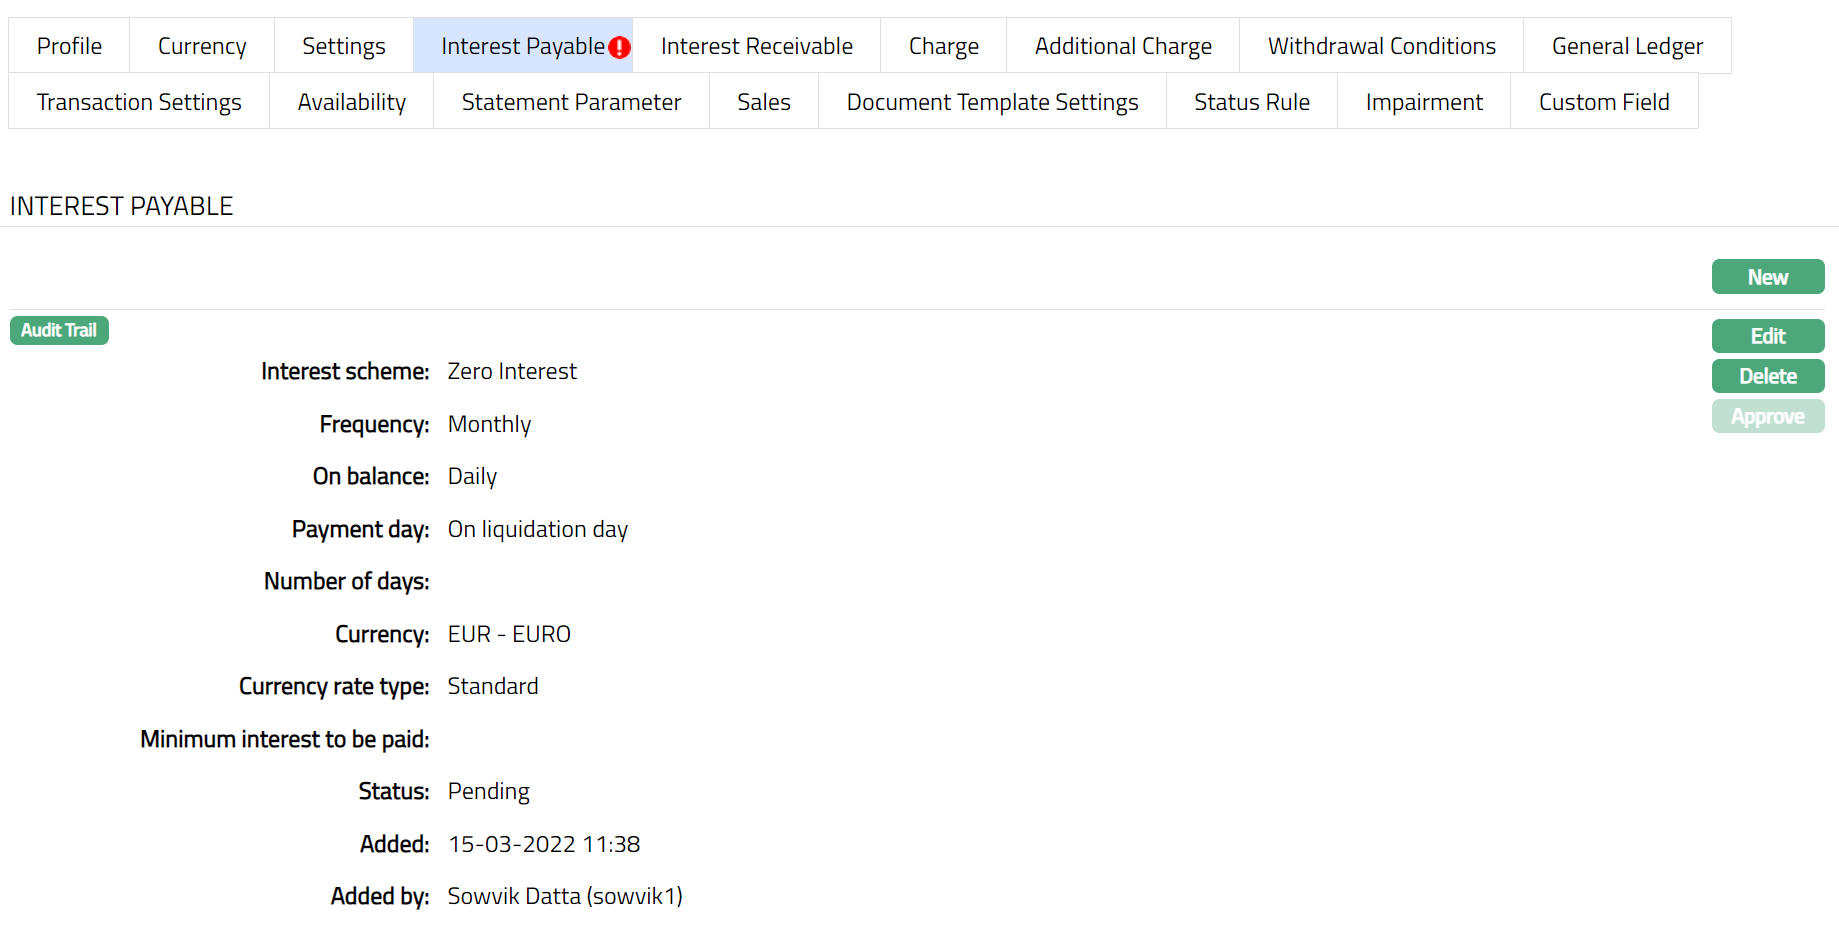
1. Access Product page. Click Interest Payable tab to view the details as per sample below. The details are defaulted from the entries that you made during product creation. For details refer to Client Account → New Product → Interest Payable (4/10).
2. Click New. New Interest payable page appears.
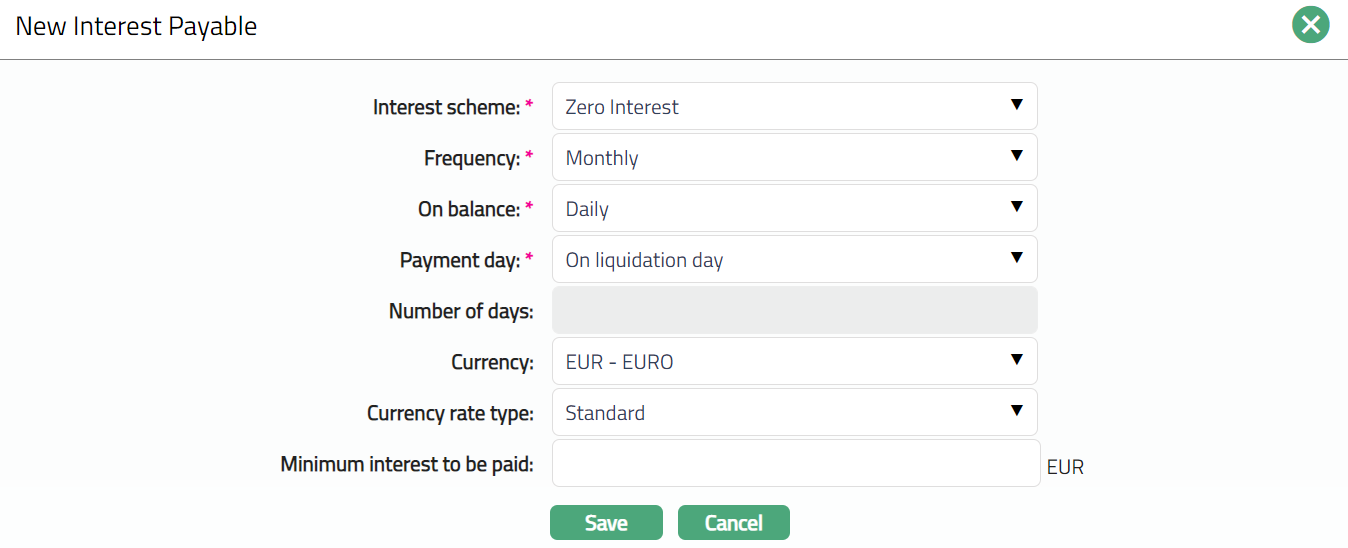
The details are explained during Product creation. For details refer to Client Account → New Product → Interest Payable (4/10).
To edit the interest payable parameters before approval of the tab:
1. Click Edit. The Edit Interest payable page appears.
Note: All fields in the Interest payable are Editable. However, only the person who created the interest payable record can edit it, till it is approved.
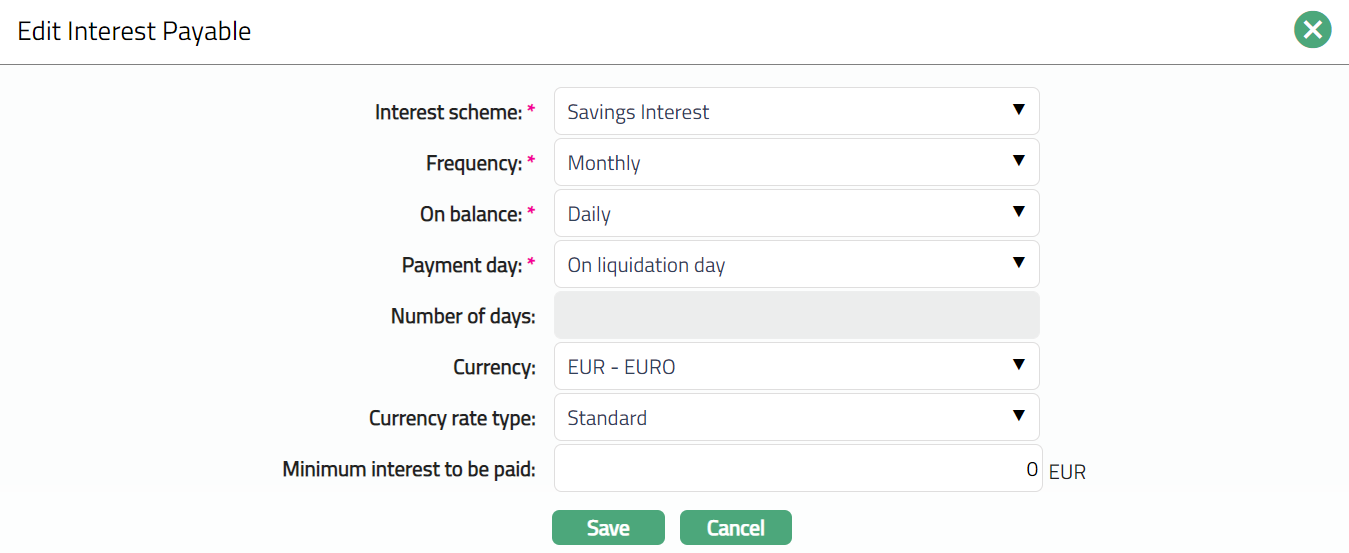
2. Click Save. The Interest Payable page appears with the edited details.
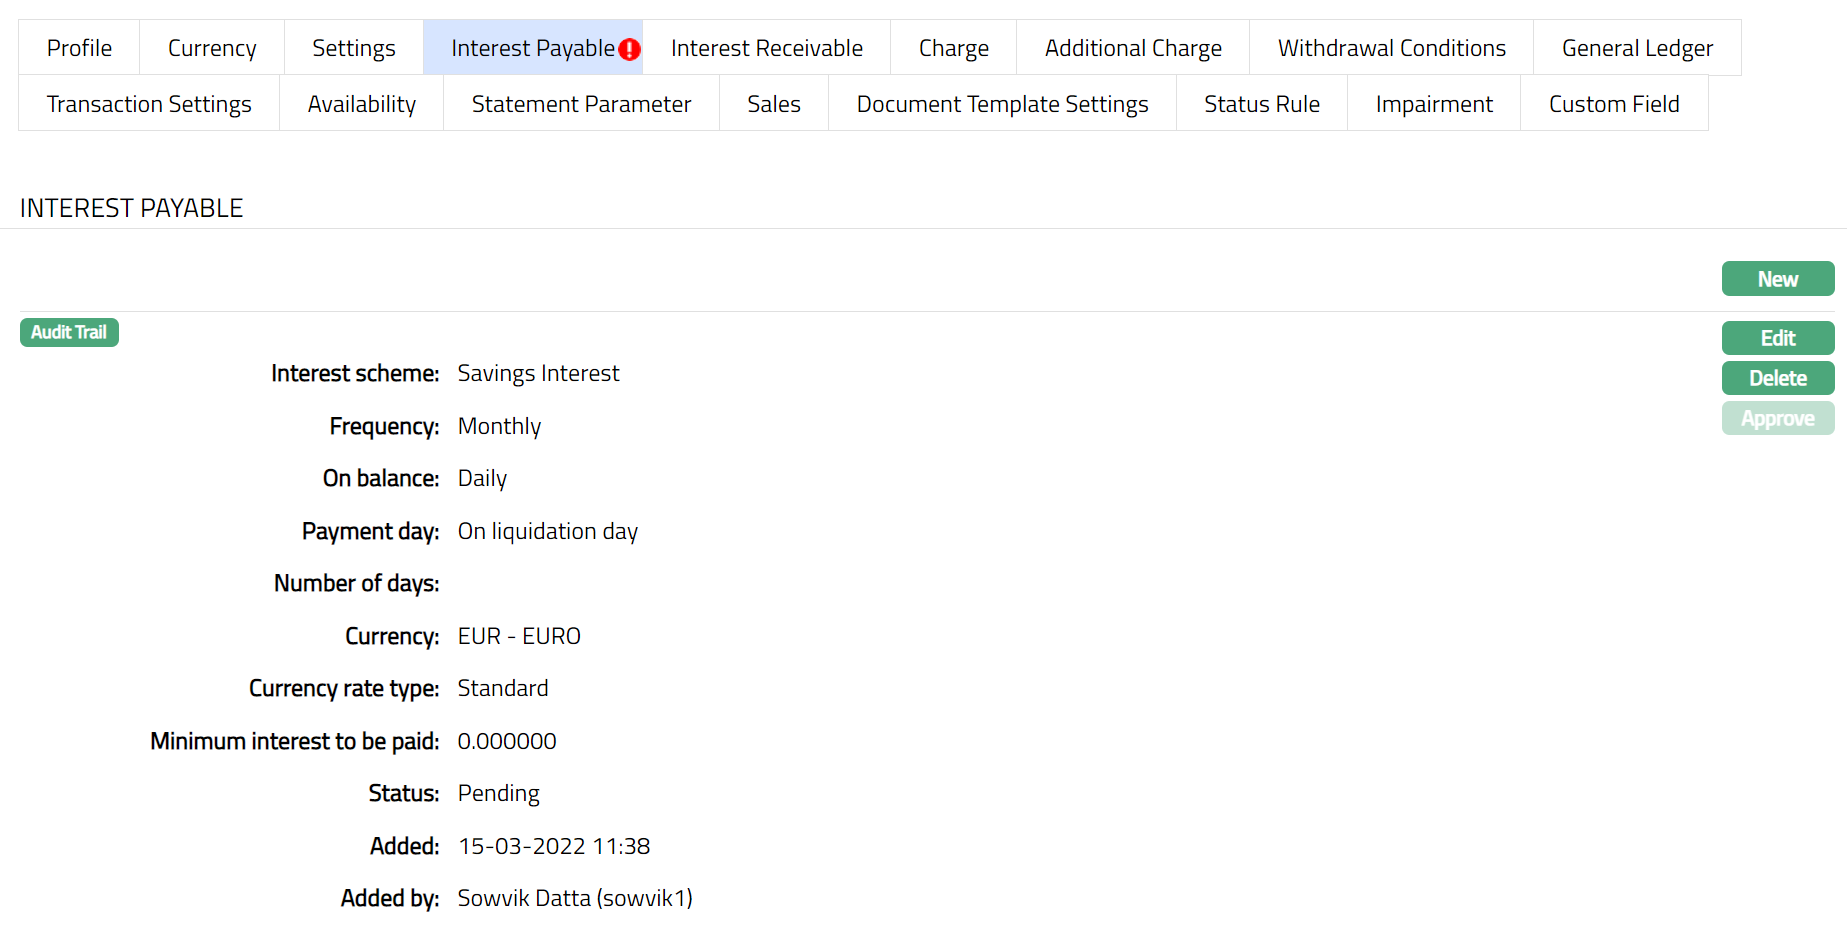
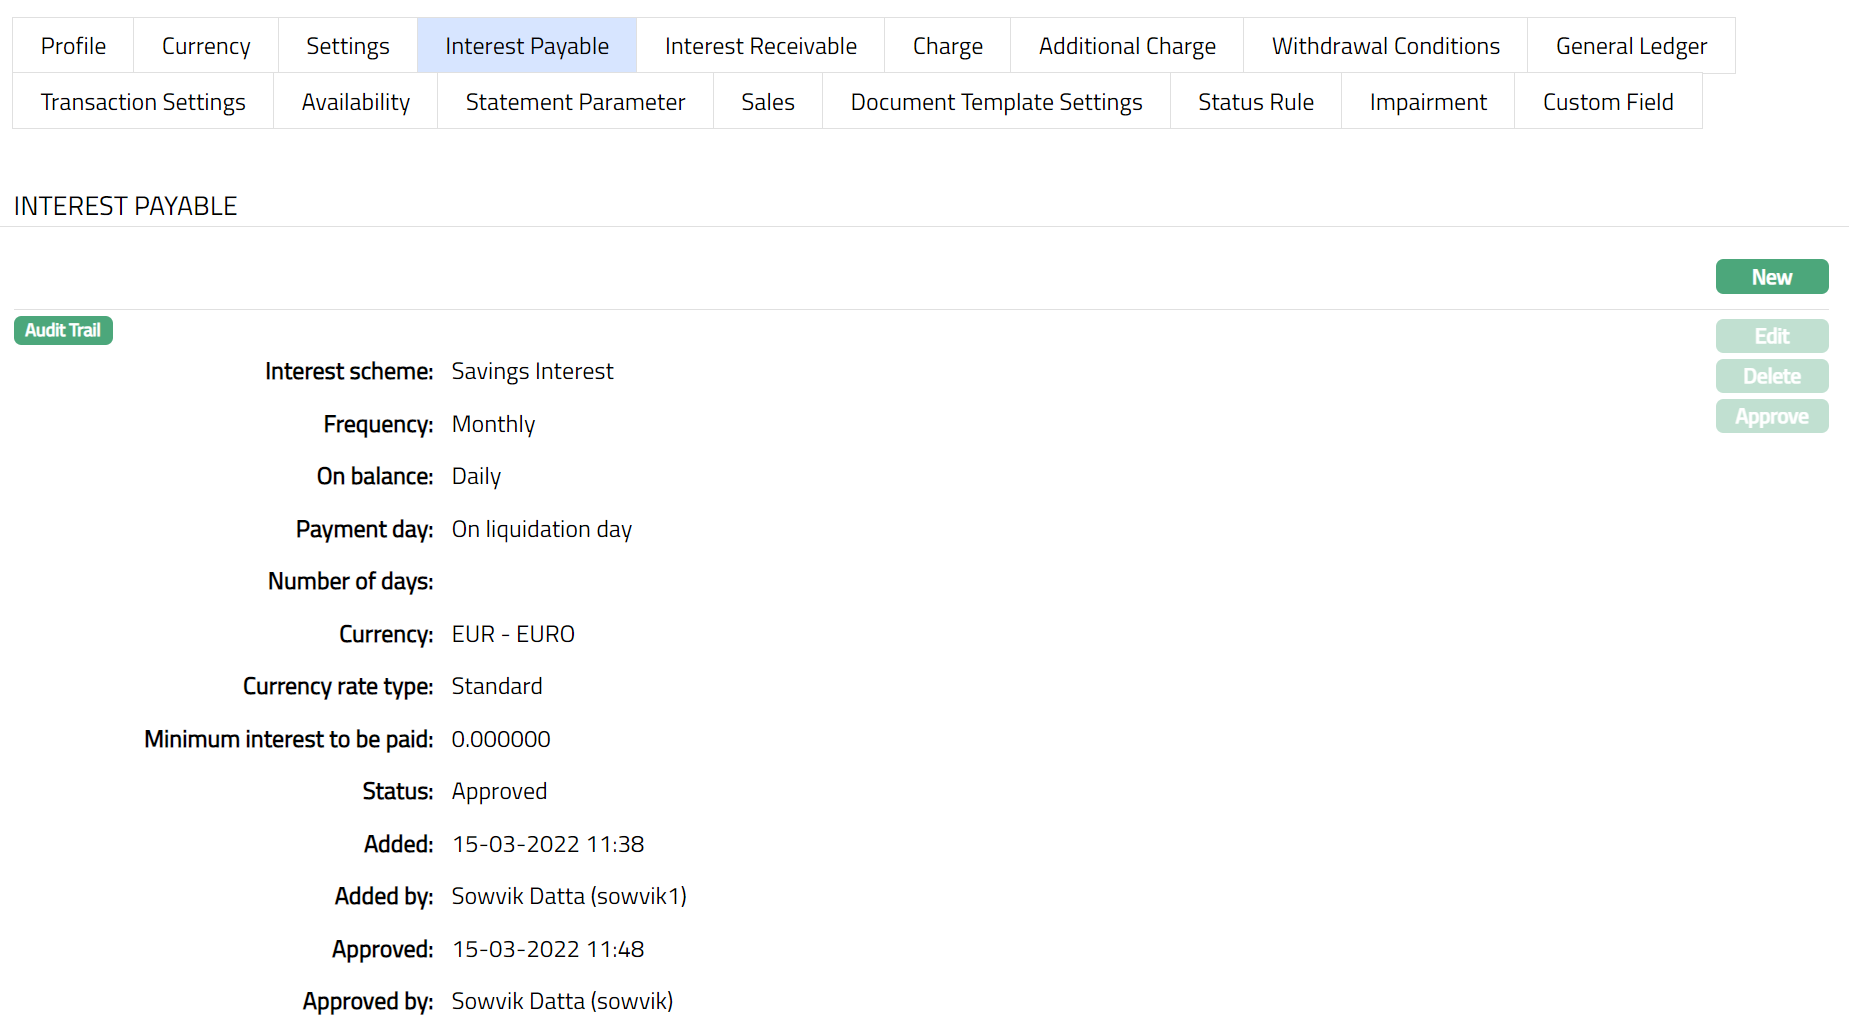
Note: If the Interest Payable details are added / edited, then the status of the tab will be Pending till it is approved by another user. On approval, the tab status is set to Approved and the red bubble disappears. Once the Status is Approved you cannot Edit or Delete. Hence if required you need to first Edit and then the Status need to be Approved.
Functions: New, Edit, Delete, Approve
The following fields are shown only in the View screen and are not editable:
Status field denotes the status of the tab.
Added field denotes the date on which the record was added.
Added by field denotes the name of the user who created the record.
Approved field denotes date on which the record was approved and is displayed only for approved records.
Approved by field denotes name of the user who approved the record and is displayed only for approved records.
Interest Receivable
This menu [option](javascript:TextPopup(this)) allows you to create and maintain the interest which can be charged for authorized and unauthorized overdrafts from the account. After creation / edit, the tab is in Pending status. Once the tab is approved, no further changes can be done on the Interest Receivable tab. If you want to change any settings for the Product under the Interest receivable tab, you have to use the New button.
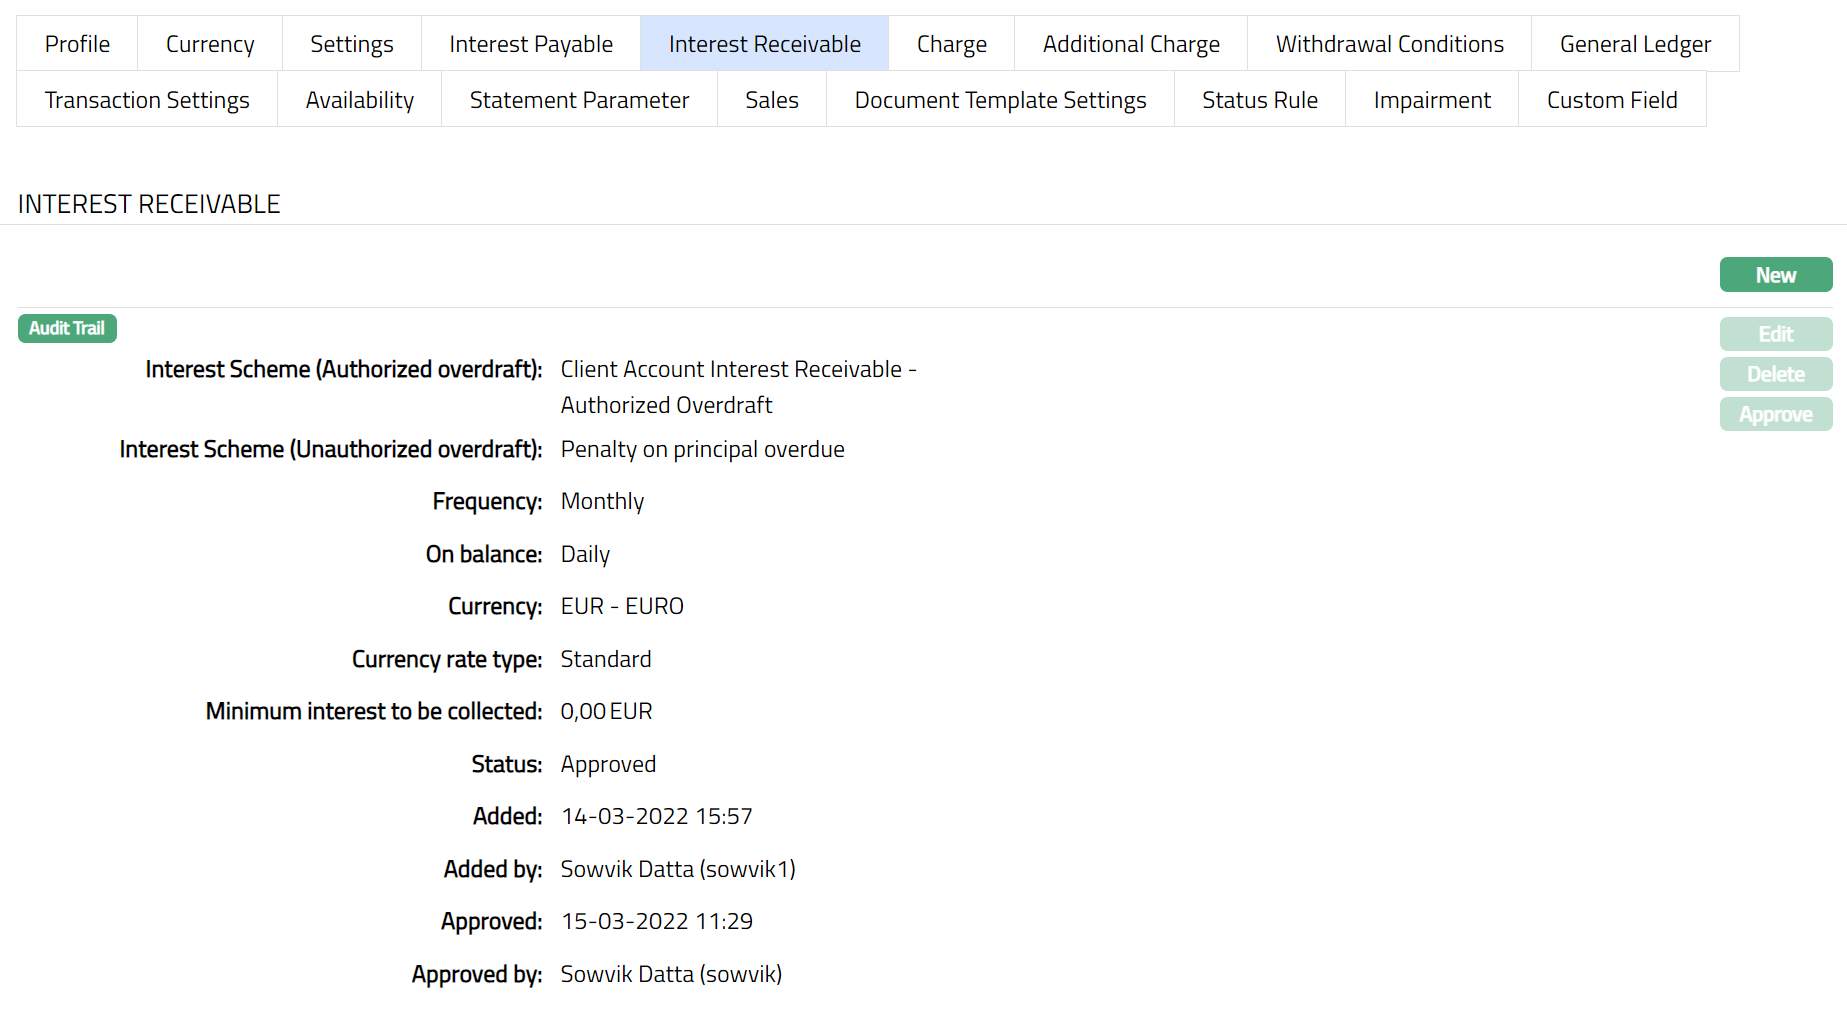
1. Access Product Maintenance page. Click Interest Receivable tab to view the details as per sample below. The details are defaulted from the entries that you made during Product creation. For details refer to Client Account → New Product → Interest Receivable (5/10).
2. Click New. New Interest receivable page appears.
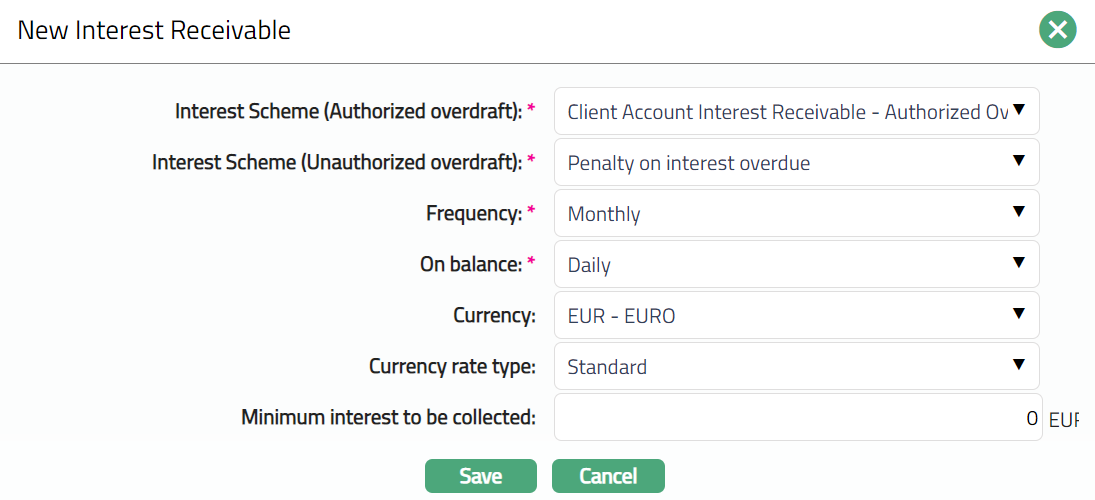
The details are explained during Product creation. For details refer to Client Account → New Product → Interest Receivable (5/10).

To edit the interest receivable parameters before approval of the tab:
1. Click Edit. The Edit Interest Receivable page appears.
Note: All fields in Interest receivable are Editable. However, only the person who created the interest receivable record can edit it, till it is approved.
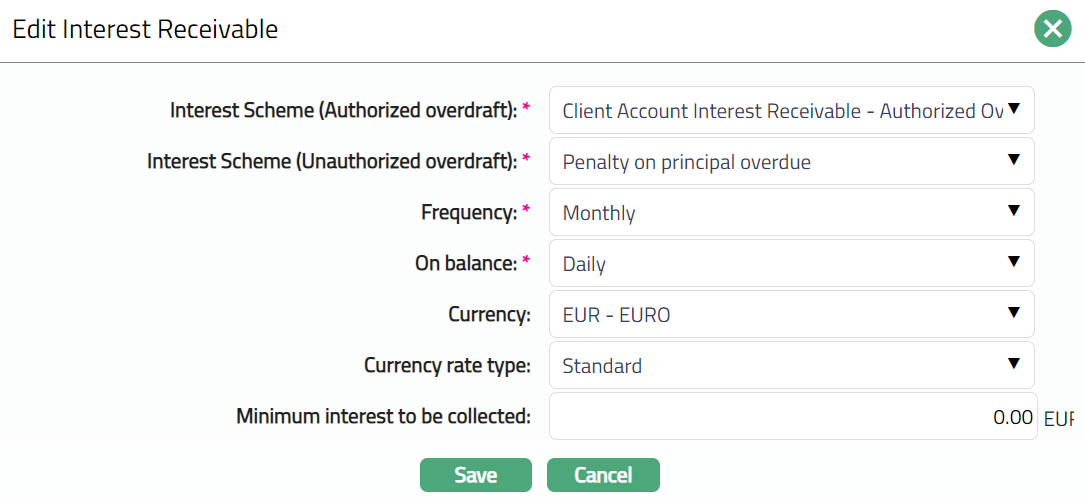
2. Click Save. The Interest Receivable page appears with the edited details.
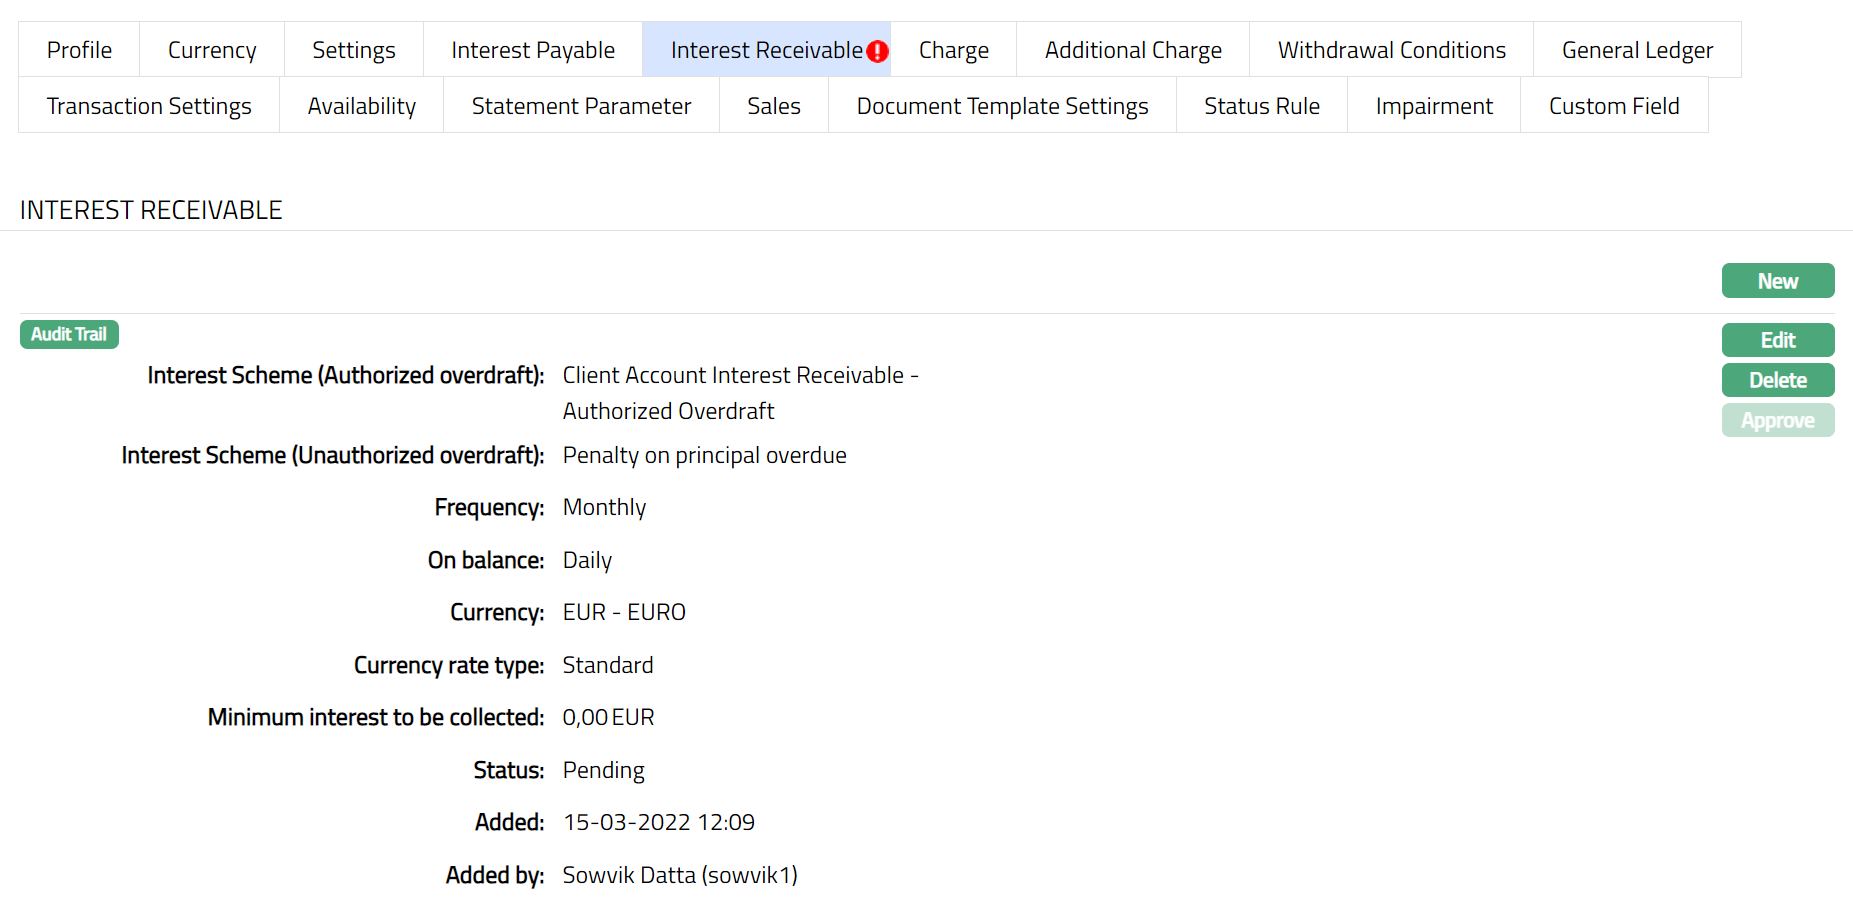
Note: If the Interest Receivable details are added / edited, then the status of the tab will be Pending till it is approved by another user. On approval, the tab status is set to Approved and the red bubble disappears. Once the Status is Approved you cannot Edit or Delete. Hence if required you need to first Edit and then the Status need to be Approved.

Functions: New, Edit, Delete, Approve
The following fields are shown only in the View screen and are not editable:
Status field denotes the status of the tab.
Added field denotes the date on which the record was added.
Added by field denotes the name of the user who created the record.
Approved field denotes date on which the record was approved and is displayed only for approved records.
Approved by field denotes name of the user who approved the record and is displayed only for approved records.
Charge
The Charge tab allows you to view and edit the details of different charges for accounts under the Product.
1. Access Product Maintenance page. Click Charge tab to view the details as per sample below. The details are defaulted from the entries that you made during Product creation. For details refer to Client Account → New Product → Charge (6/10).
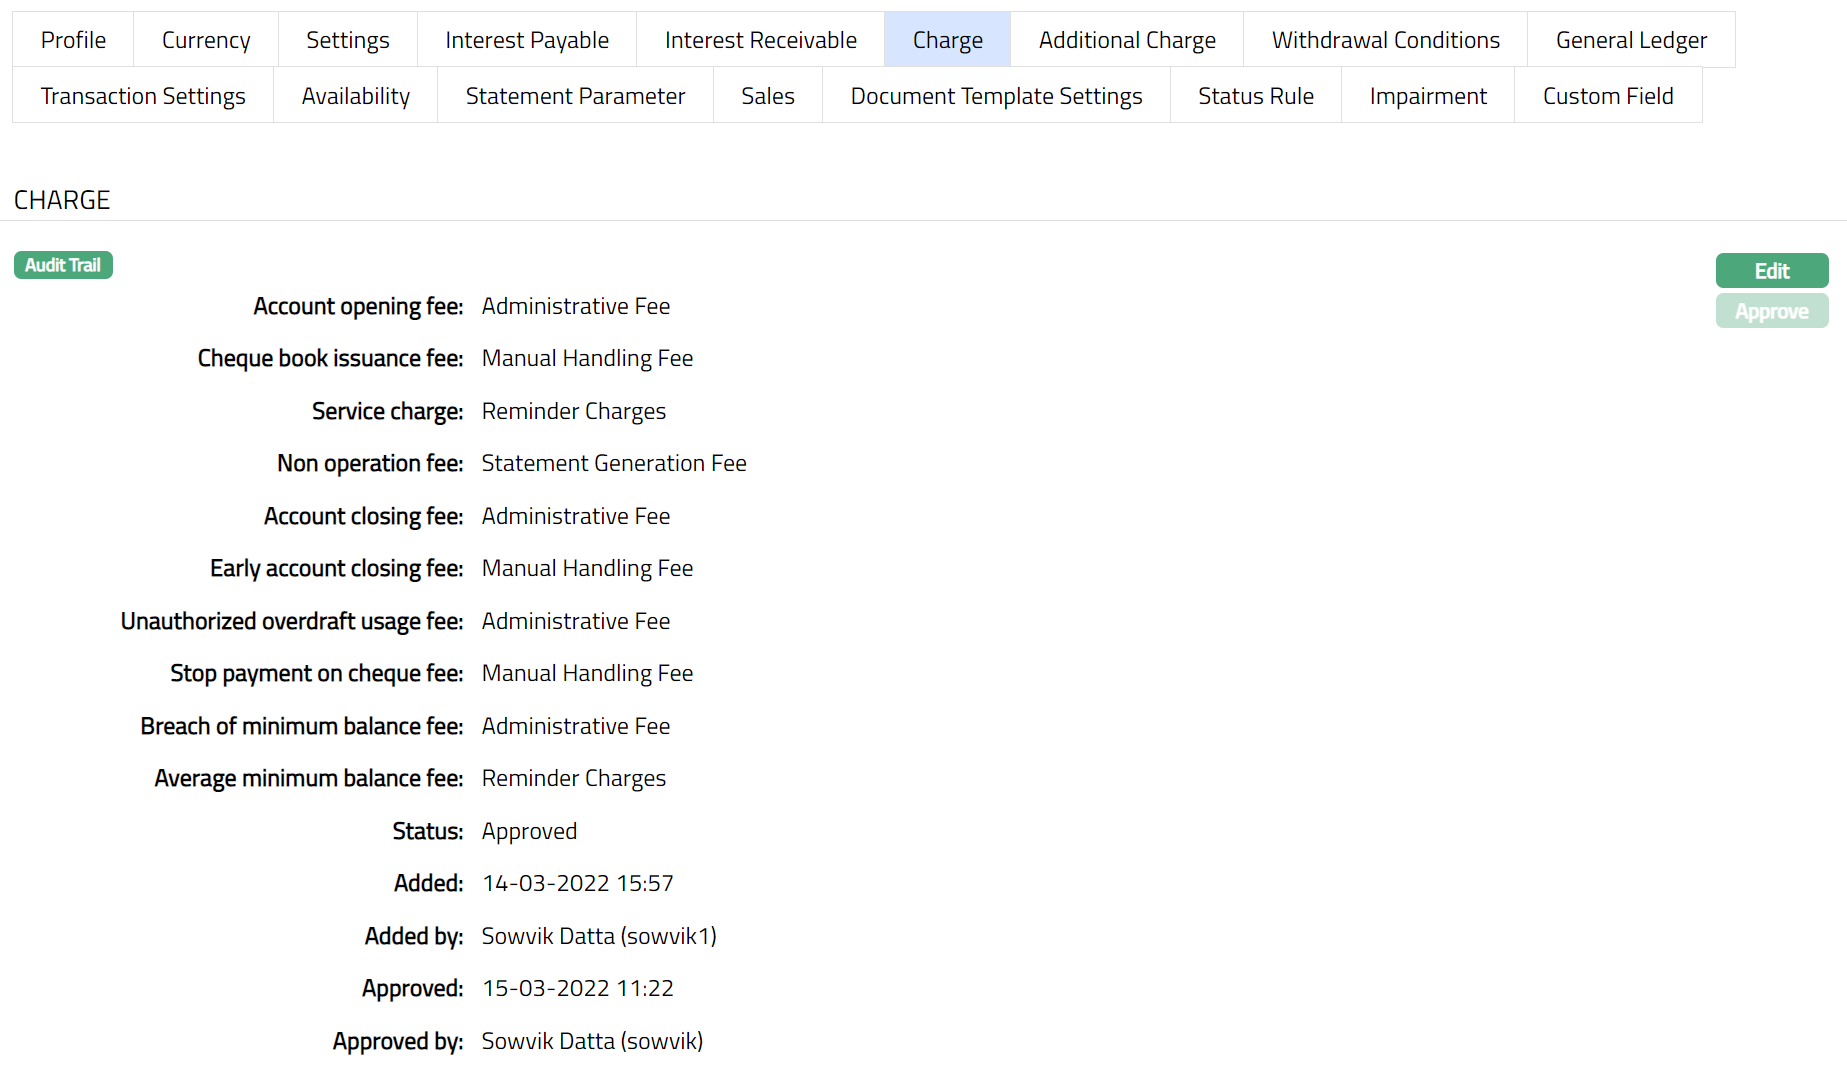
2. Click Edit. Edit Charge page appears.
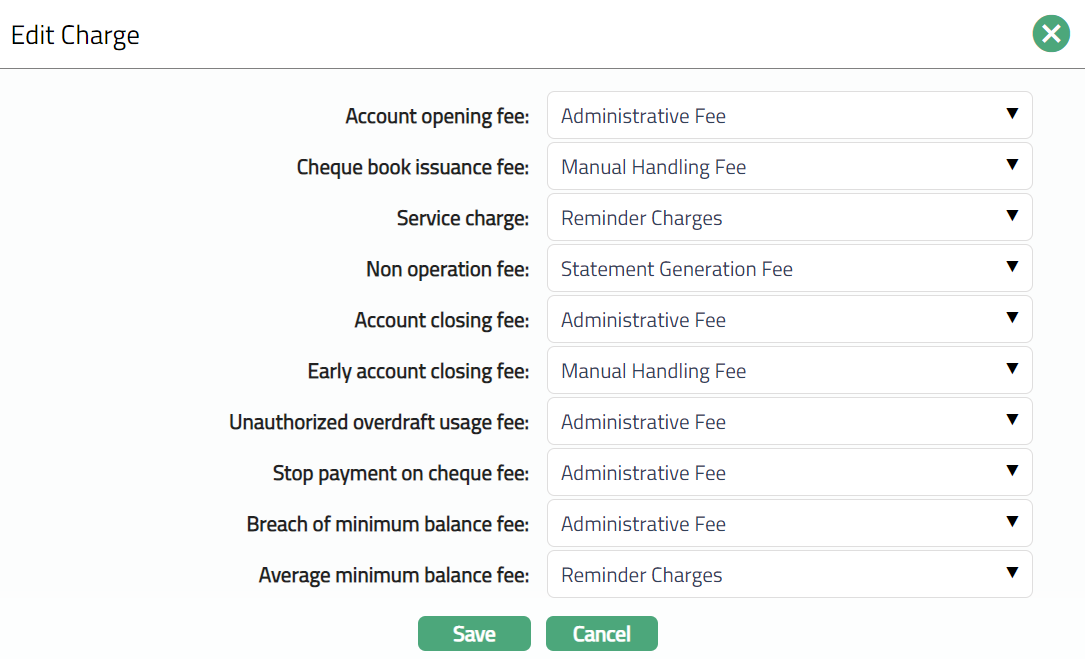
Note: All the fields in Edit Charge page are Editable.
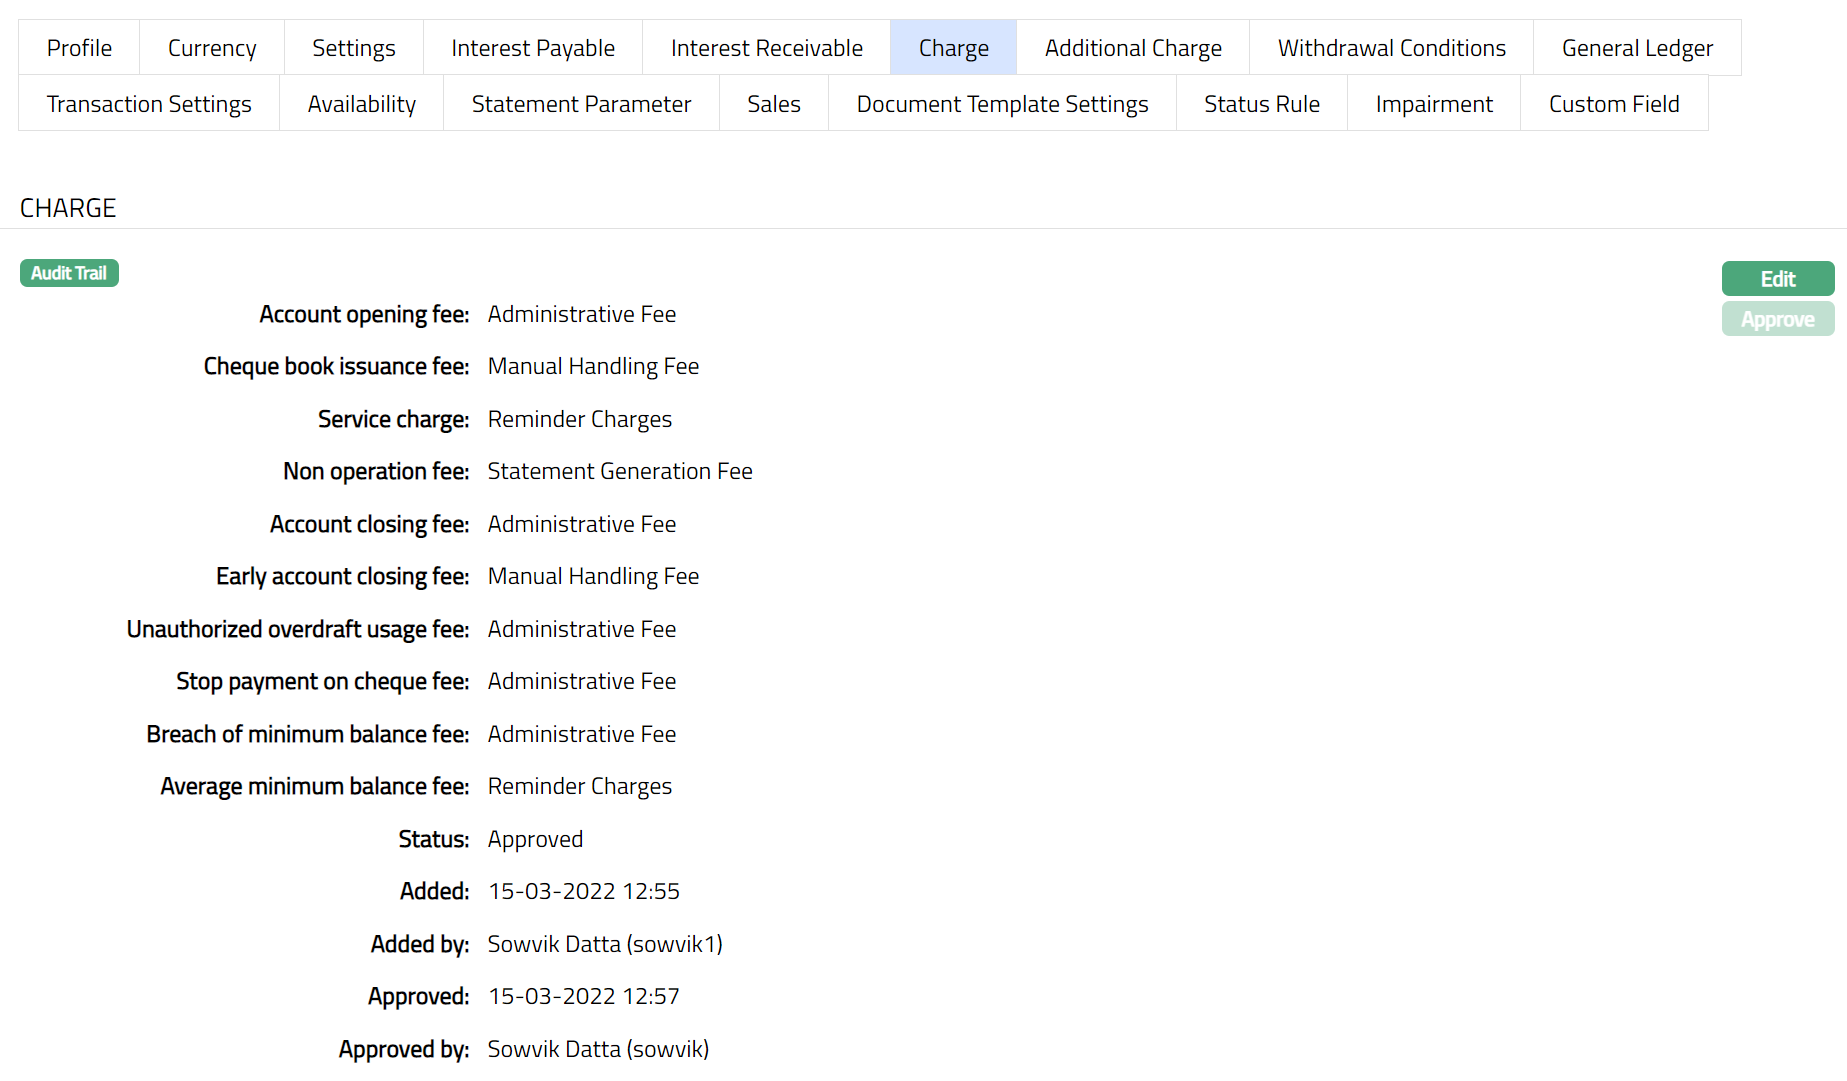
3. Click Save. The Charge page appears with the edited details.
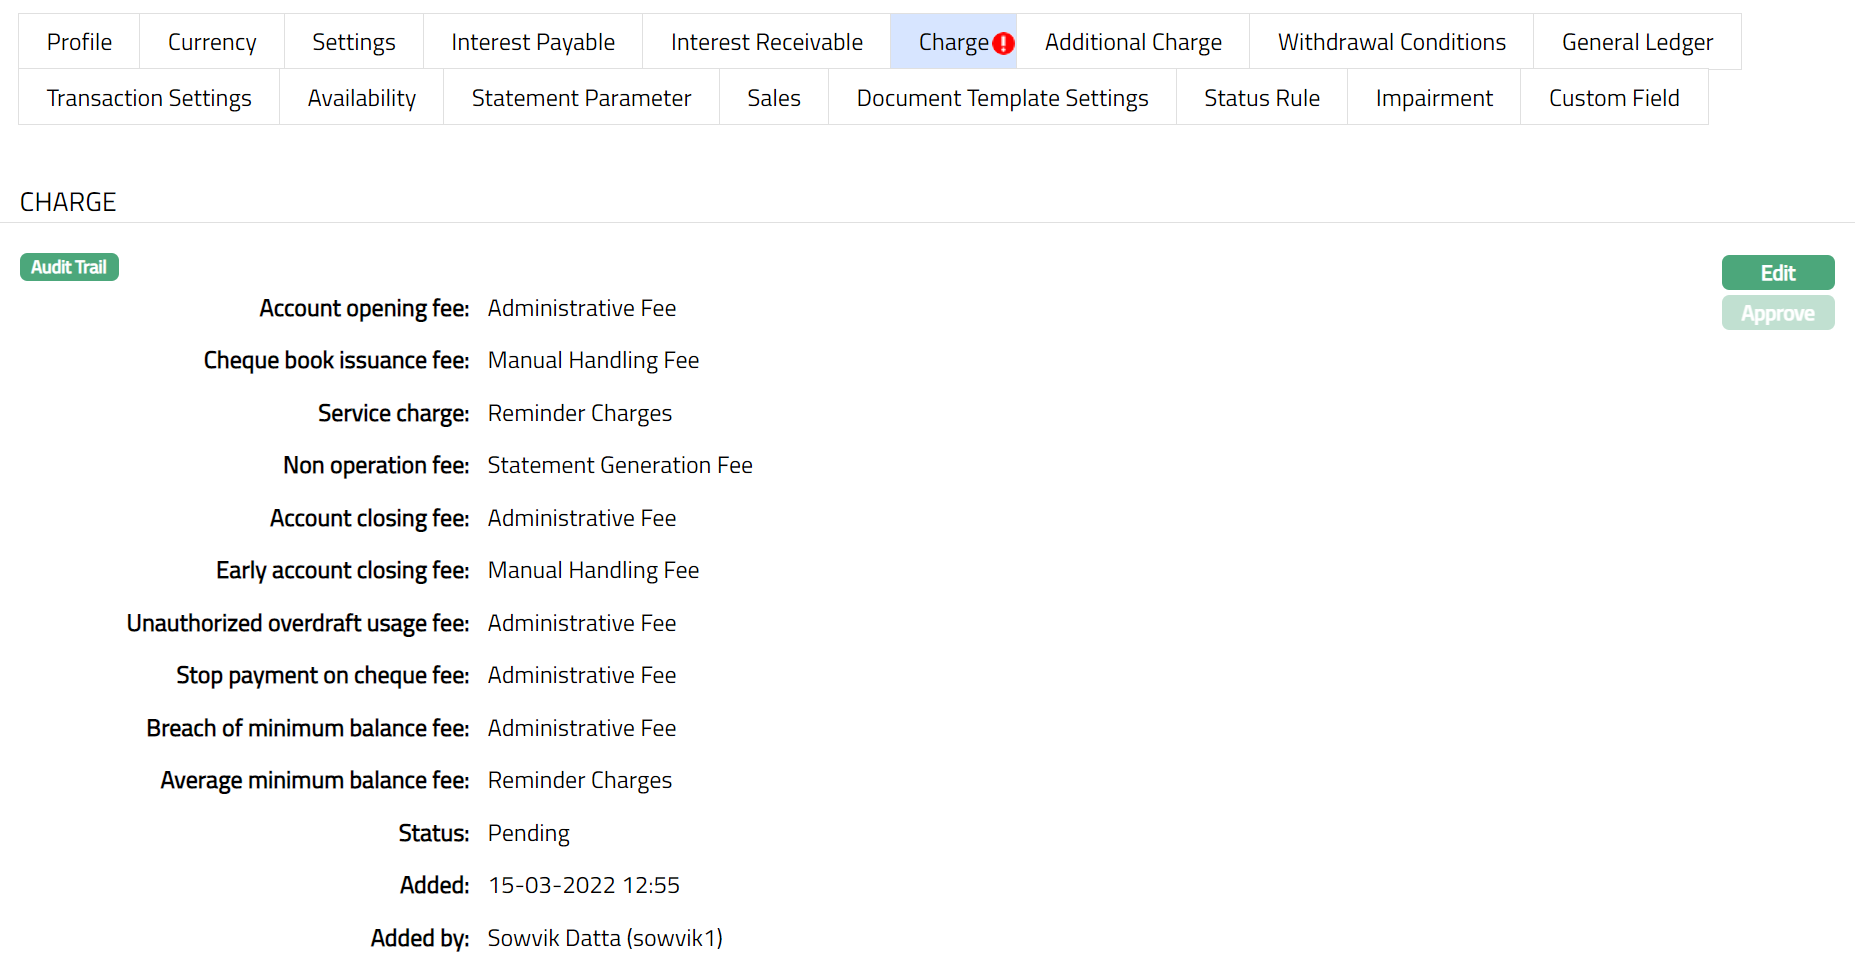
Note: If the Charge details are edited, then the status of the tab will be Pending till it is approved by another user. On approval, the tab status is set to Approved and the red bubble disappears as per the sample shown below.
Function: Edit, Approve
The additional fields available are:
Status field denotes the status of the tab.
Added field denotes the date on which the record was added.
Added by field denotes the name of the user who created the record.
Approved field denotes date on which the record was approved and is displayed only for approved records.
Approved by field denotes name of the user who approved the record and is displayed only for approved records.
Additional Charge
The Additional Charge tab allows you to view and maintain additional charges for the Product -- apart from the ones that are specified under Charges tab.
1. Access Product page. Click Additional charge tab if any additional charges had already been added, these would be displayed; else, it will be blank.
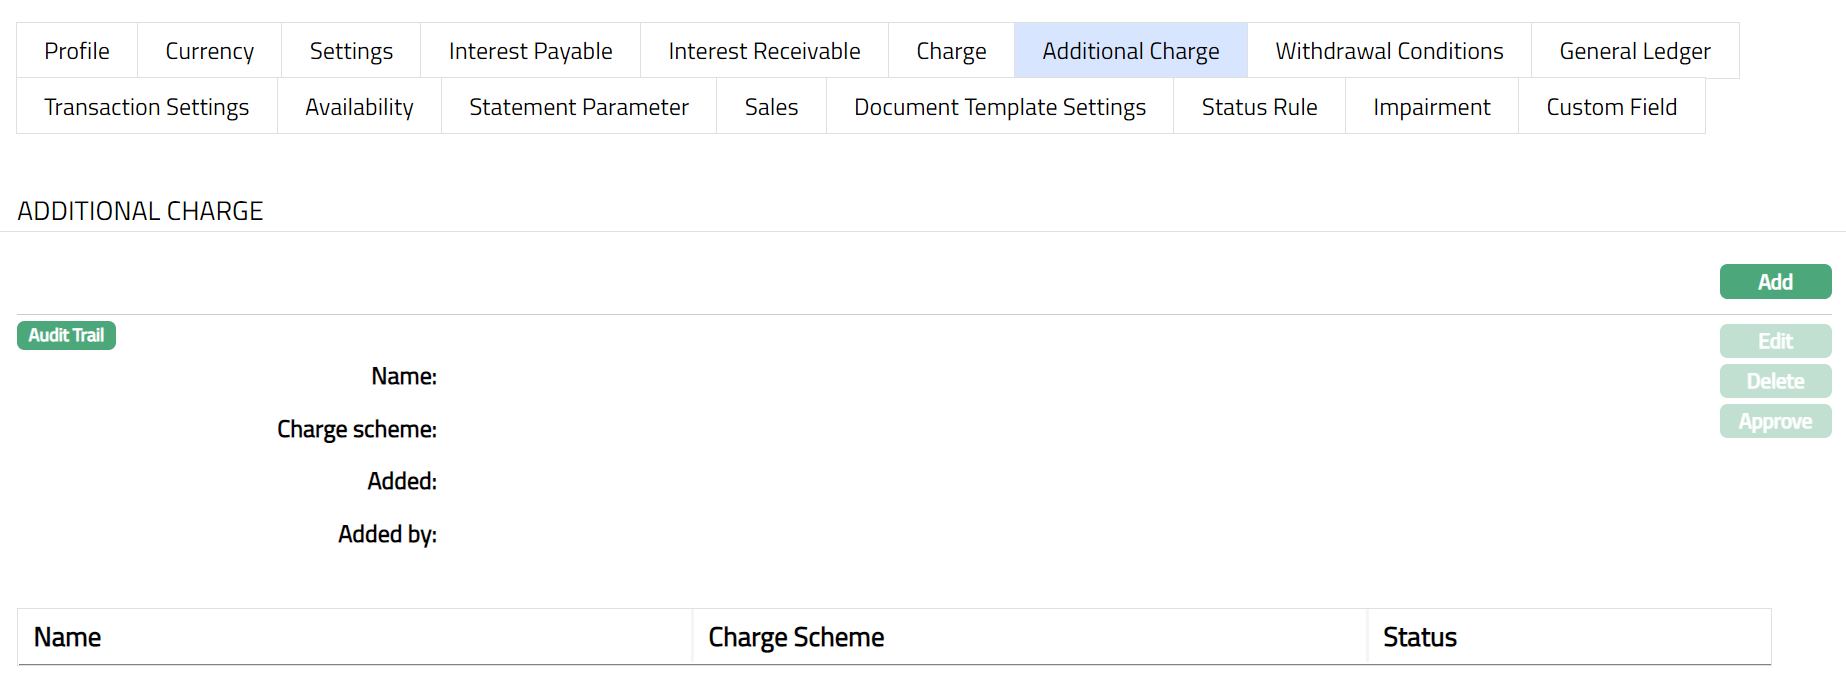
2. Click Add. Add Additional Charge page appears.
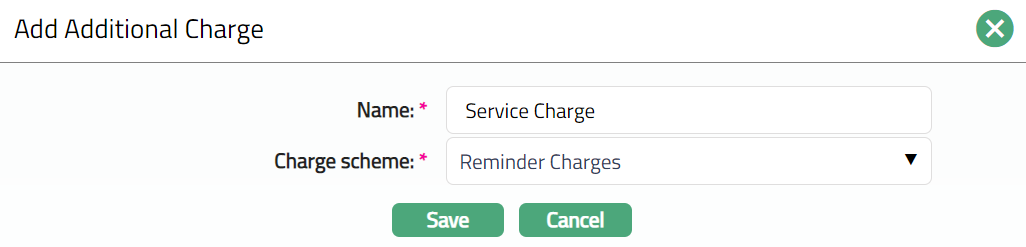
3. Enter Name of the additional charge to be added.
4. Select the Charge scheme for the Additional Charge from the drop-down list which must be maintained under Admin → Pricing → Charges → Charge Schemes. You can add any Periodic charge -- whether Flat or Banded. If Banded, the Current balance will be taken as the basis for the charge.
5. Click Save. Additional Charge page appears with the added details.
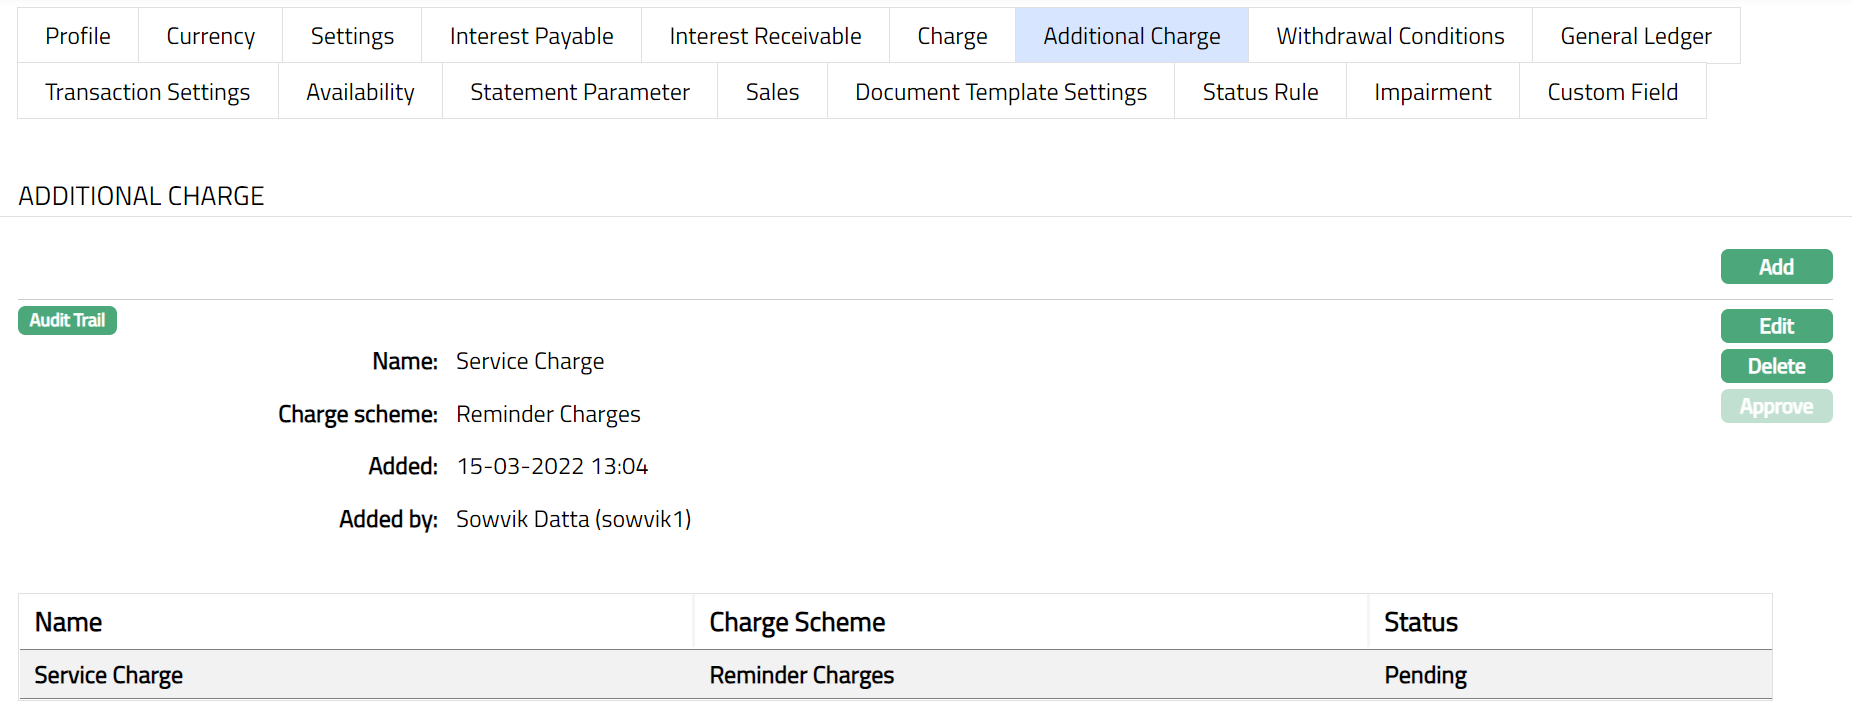
Functions: Add, Edit, Delete, Approve.
Note: If the Additional Charge details are added, then the status of the tab will be Pending till it is approved by another user. On approval, the tab status is set to Approved and the red bubble disappears. Once the Status is Approved you cannot Edit. Hence if required you need to first Edit and then the Status need to be Approved.
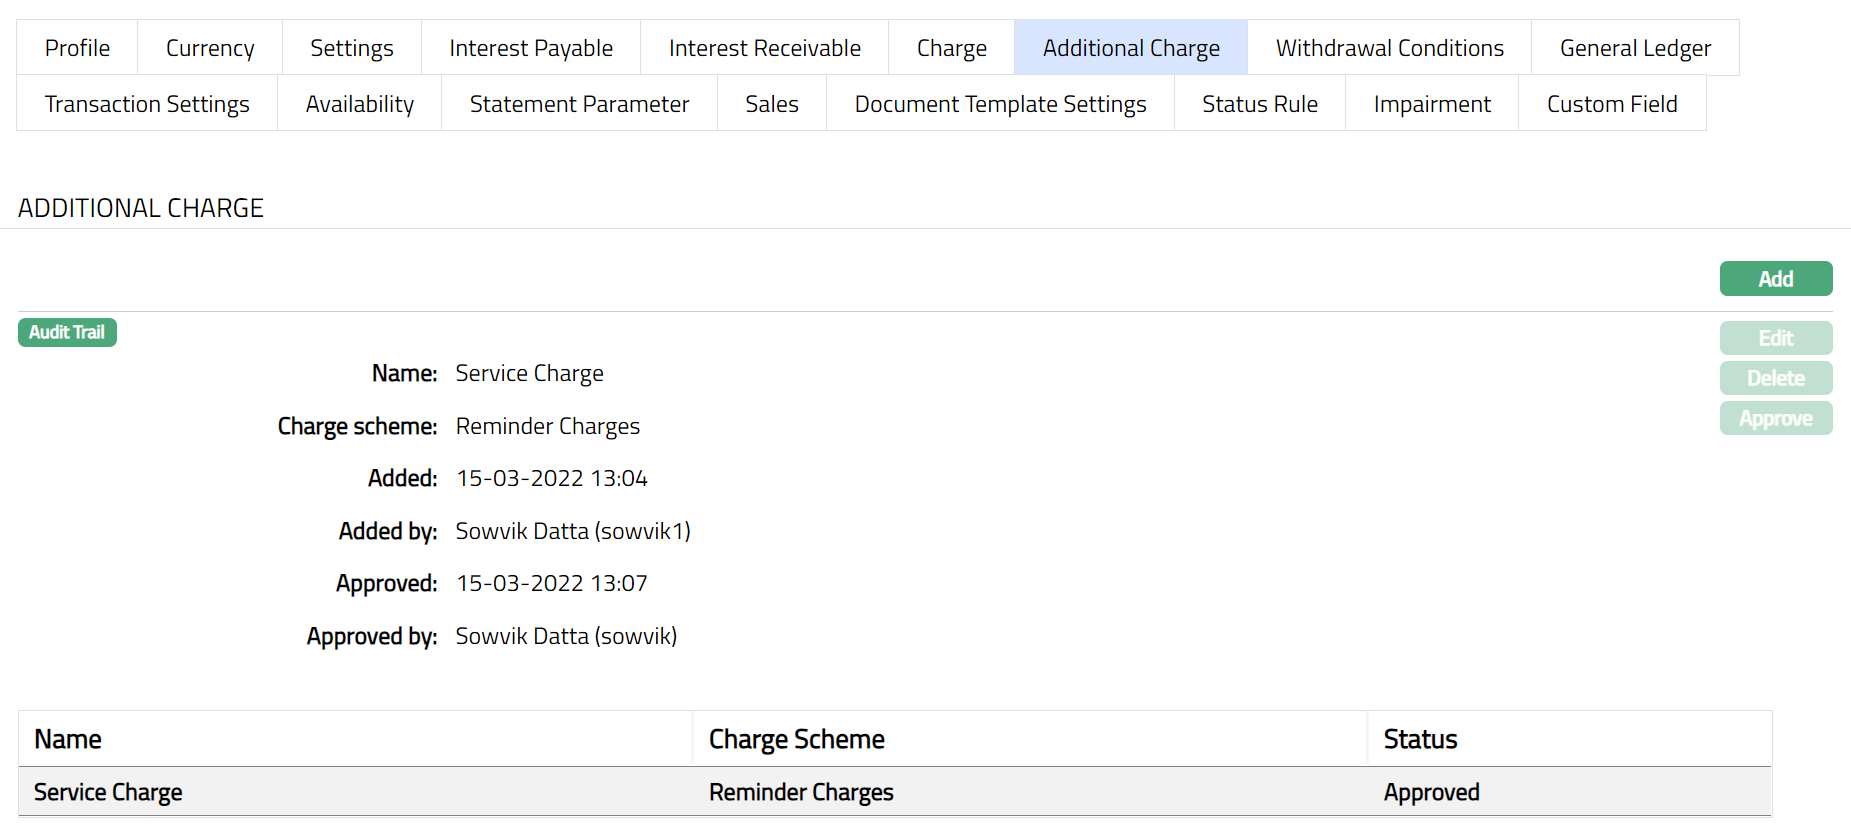
The additional fields available are:
Added field denotes the date on which the record was added.
Added by field denotes the name of the user who created the record.
Approved field denotes date on which the record was approved and is displayed only for approved records.
Approved by field denotes name of the user who approved the record and is displayed only for approved records.
Sales
Using this tab, you can view and maintain the sales commission for the product.
1. Access the Product page, Click Sales tab.
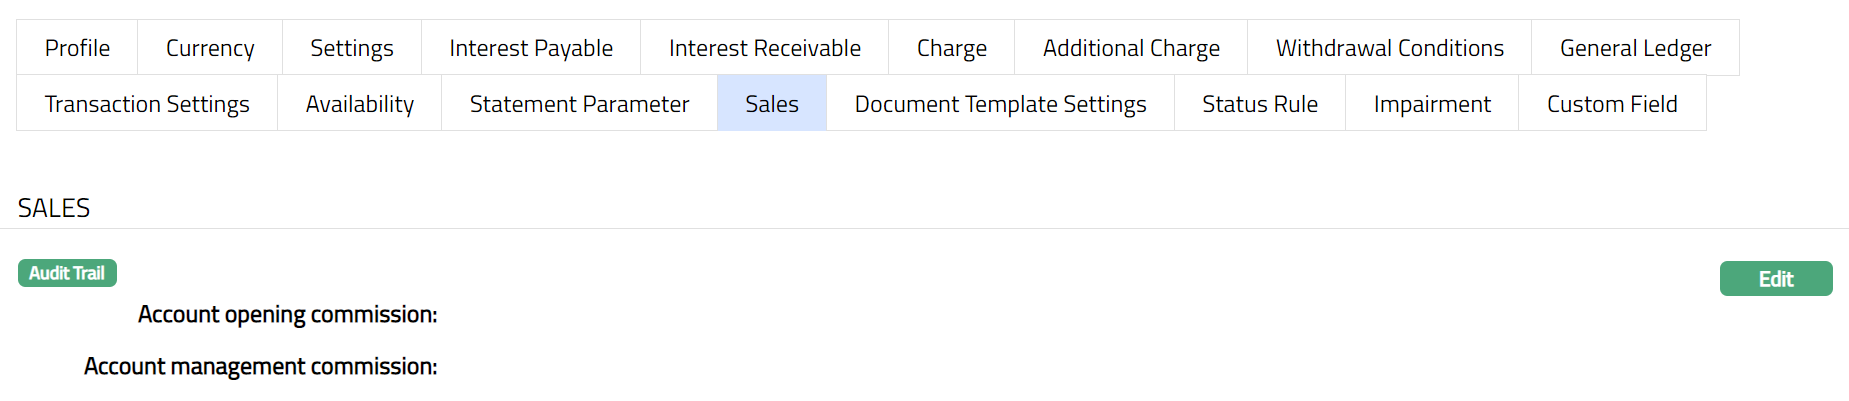
2. Click Edit. Edit Sales page appears.
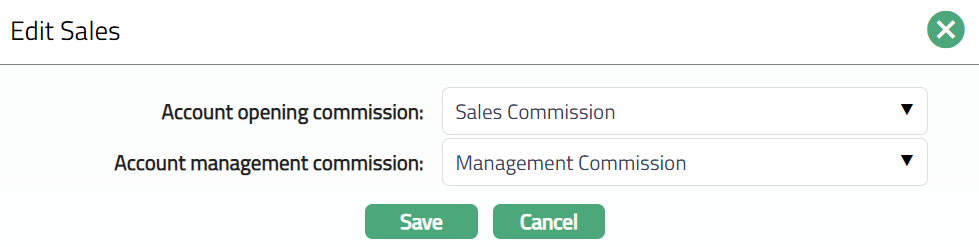
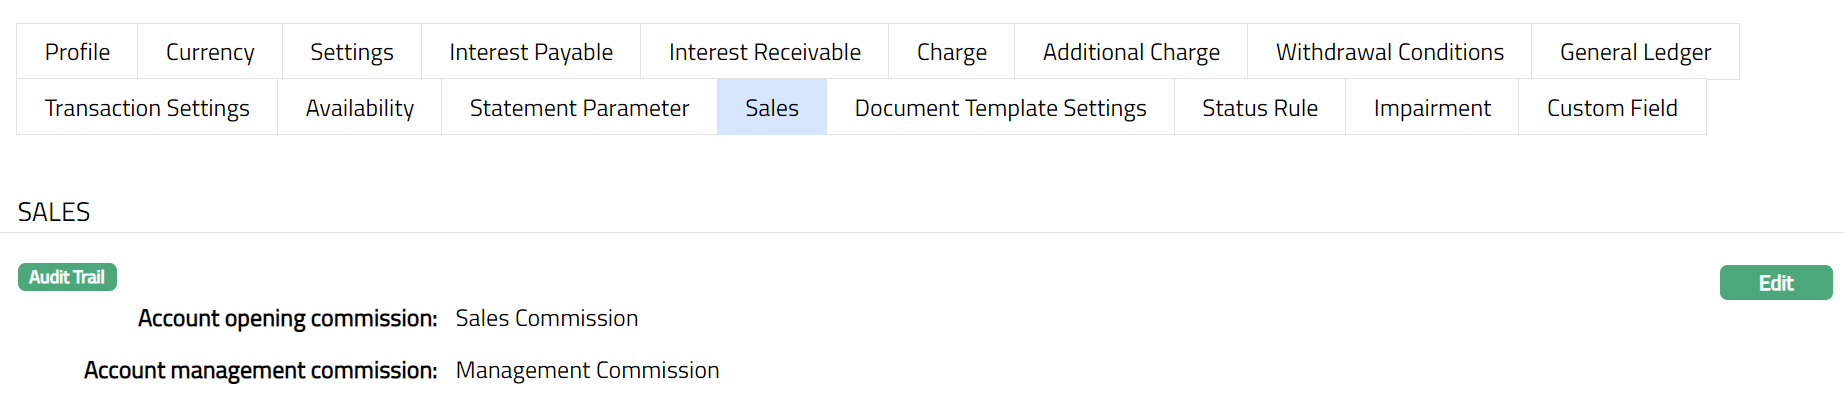
3. If you want to allow a specific commission for account opening, select the Account opening commission from the drop-down list of active Charges maintained under Admin → Pricing → Charges → Charge Schemes, where the Charge type is Event, Flat or Banded and Treat as Commission is Yes.
4. If you want to allow a commission for account management, select the Account management commission from the drop-down list of active Charges maintained under Admin → Pricing → Charges → Charge Schemes, where the Charge type is Periodic, Flat or Banded and Treat as Commission is Yes.
5. Click Save. The Sales tab appears with the edited details.
Function: Edit
REPAYMENT
Impairment
This tab allows you to define the impairment treatment for the Client account under the product. Based on Account status user can parameterize the percentage which is to be impaired and GLs and Transaction Codes against which it is to be accounted. The three types of impairment treatments provided by Aura are Doubtful receivable, Provision and Write off. Aura also allows you to parameterize sequence for the impairment treatment if multiple treatments are booked for same status.
The principles of the impairment treatment are as follows:
Any of the treatment will not change the account balance except Write off.
Treatment percentage is always calculated on component balance.
On the status change - if there were treatment entries made for the previous status, then as per the treatment settings defined for the new status the treatment entries will be reversed, recalculated or rebooked if needed. If there is no treatment booked for the current status, then already booked treatment entries will be reversed and no rebooking will be done.
For an account if Provision/Doubtful receivable treatment is already made, then on write off the balance from Provision / Doubtful receivable GL and then remaining from Primary GL attached to component are considered.
On write off if payments is received write off GL is balanced out and then remaining against the primary GL where component is attached.
Reversal and re-booking will happen in case if 'Recalculate on actual cash flow movement' flag is set Yes and any one of the following business events occurs:
Payment (Prepayment / Partial-full Payment)
Reversal of Payment
Write off
Components are
Principal overdue
Interest
Charge -- (Will not be applicable in case doubtful receivable)
Treatment categorization
| Treatment Name | Primary GL balances impact (Y / N) | Component level balance impact (Y /N) | Charge – as component applicable (Y/ N) |
|---|---|---|---|
| Doubtful receivable | Yes | No | No |
| Provision | No | No | Yes |
| Write off | Yes | No | Yes |
The sub tabs available under Impairment are:
Setting
Sequence
Setting
This tab allows you to set the impairment treatment based on the account status.
To add the settings,
1. Access Product page, click Impairment tab. By default, Settings sub tab will appear.
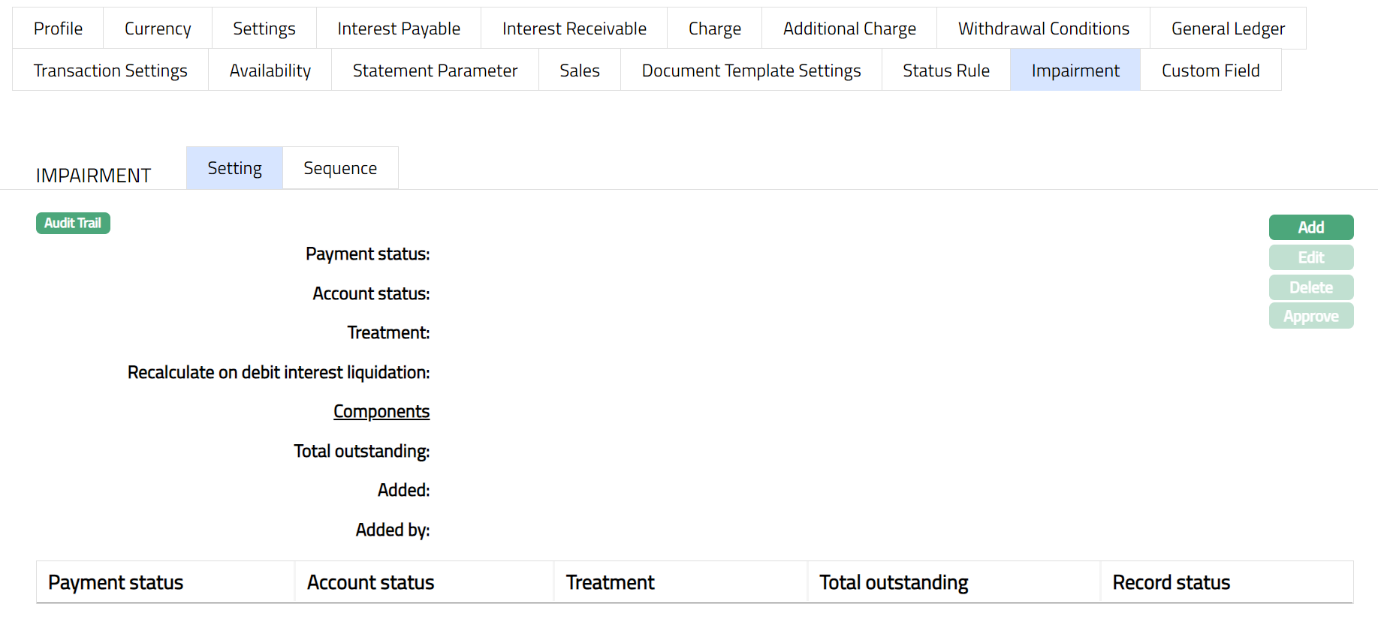
2. Click Add. The New Impairment Settings → General (1/3) page appears.
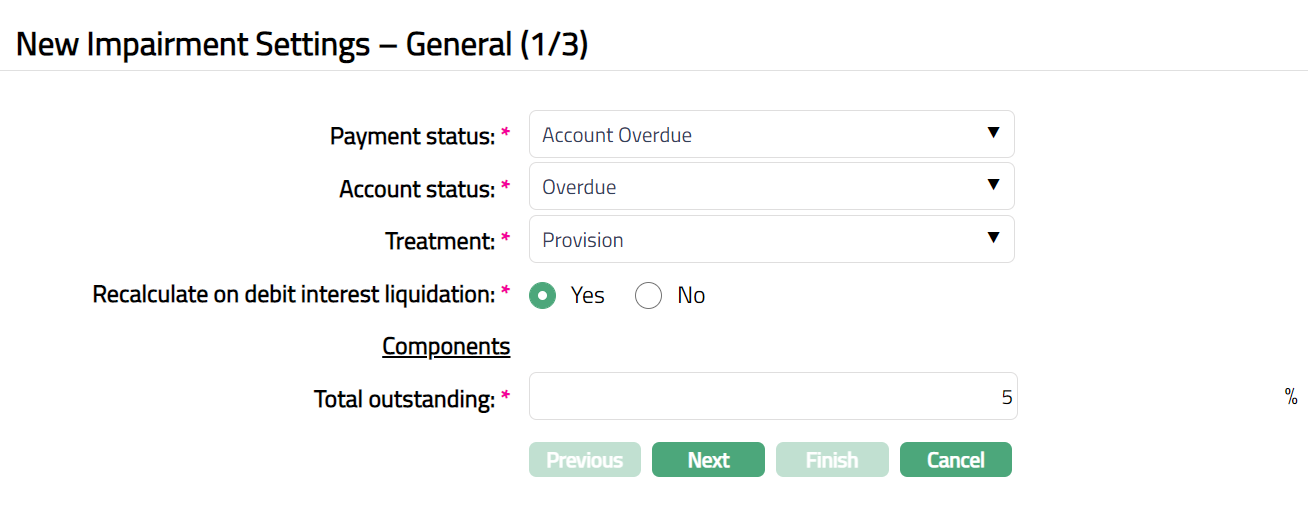
3. Select Payment status from the drop-down list of pre shipped Any and active account statuses maintained under Admin → Status → Client Account status.
4. Select the Account Status from the drop-down list of pre shipped and active account statuses maintained under Admin → Status → Client Account status
5. Select the Treatment type from the drop-down list of impairment types. The pre-shipped values are as Doubtful receivable, Provision and Write off. Doubtful receivable is selected by default.
6. Select the option for Recalculate on debit interest liquidation. This field is enabled only if the Treatment is Doubtful receivable or Provision.
7. By default, it is Yes. When this is Yes with the account being in the selected status; if disbursement, payment (including repayment), reversal -- payment and repayment or write off happens on the accounts then all treatment entries will be reversed and fresh entries will be posted based on % chosen. If the selected Treatment is Write off, then this flag is set as No and is disabled.
8. Enter the following Component. It is mandatory to enter the value for the component.
- Total Outstanding: Based on entered percentage the available amount will be derived. For the derived amounts Master GL (of type asset) entries will be passed.
9. Click Next. The New Impairment Settings → Accounting (2/3) appears.
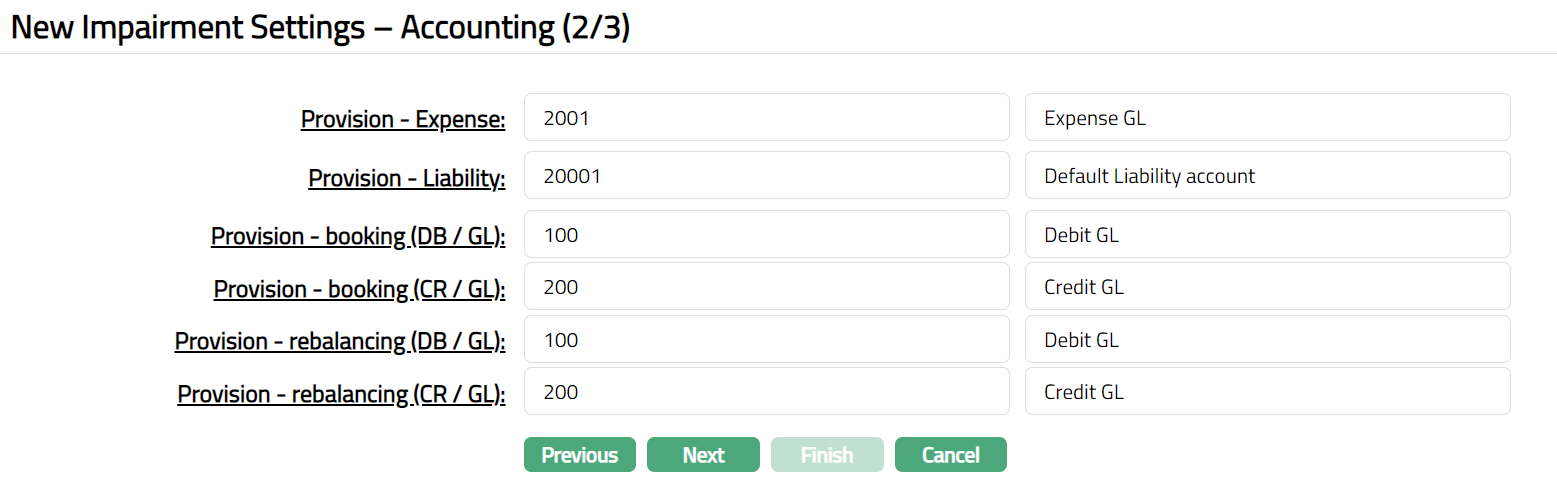
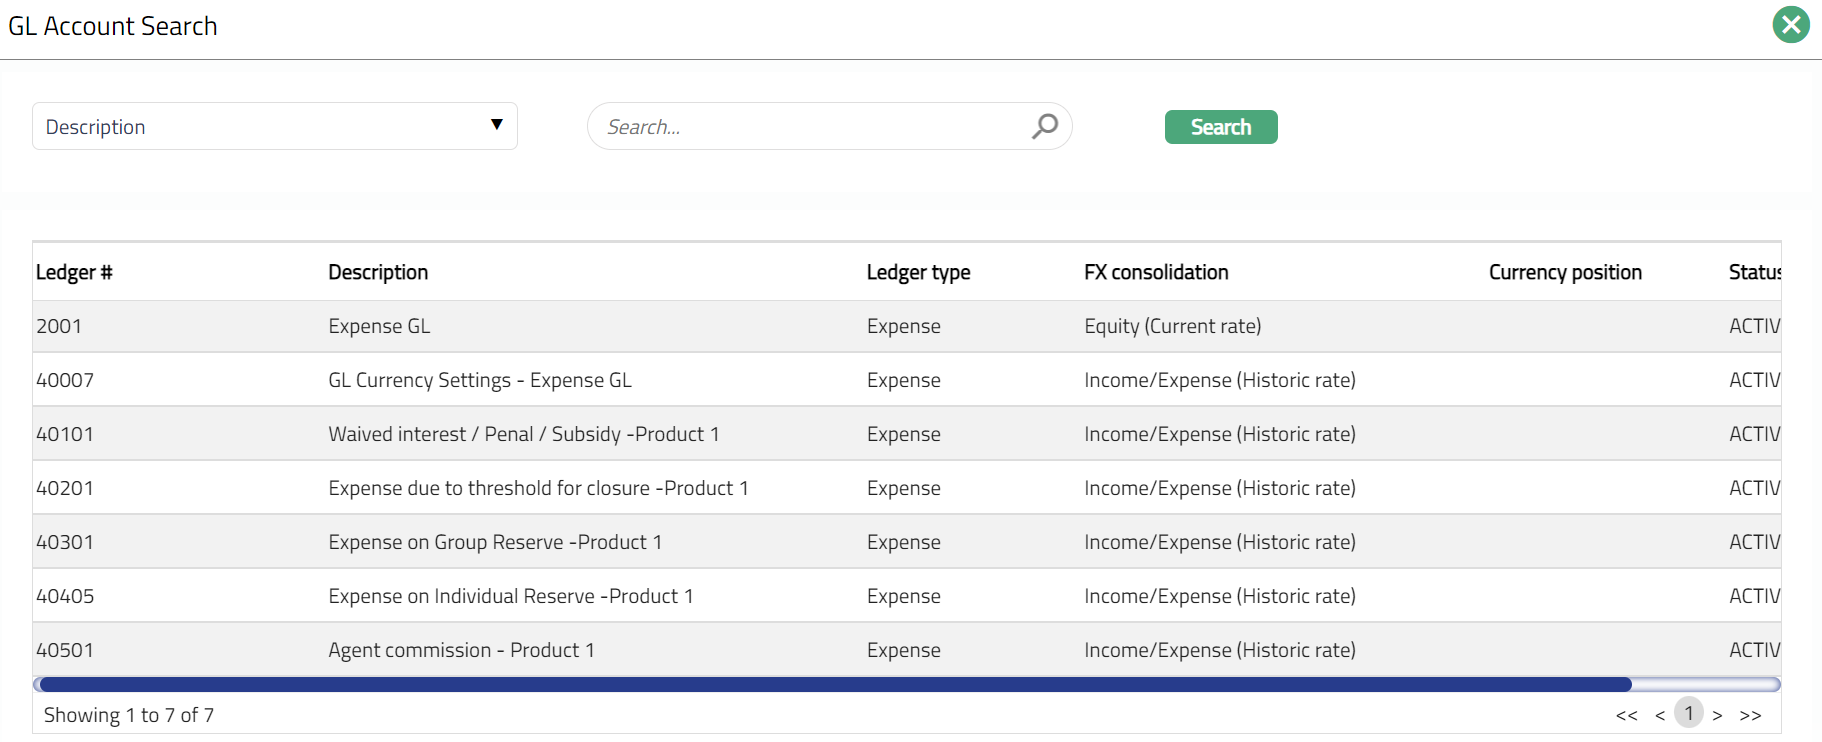
10. You will see the list of various GLs required to account for the events in the impairment treatment defined under this product. The table below gives the fields its use and the conditions for each of these GLs. You can either directly input the General Ledger # or click on the hyperlink to see the list of GLs satisfying these conditions and select the required General Ledger #.
This field will be available if the Treatment is Doubtful receivable
| Sl. No. | Field name | Used | List based on |
|---|---|---|---|
| 1 | Doubtful receivable – Asset | for passing the accounting entries for the transactions receivable on accounts under this product | Ledger type Asset. |
This field will be available if the Treatment is Provision
| Sl. No. | Field name | Used | List based on |
|---|---|---|---|
| 1 | Provision - Expense | for passing the accounting entries of Provision expenses on accounts under this product. | Ledger type Expense. |
| 2 | Provision - Liability | For passing the accounting entries of the Provision liability on accounts under this product. | Ledger type Liability. |
This field will be available if the Treatment is write off
| Sl. No. | Field name | Used | List based on |
|---|---|---|---|
| 3 | Write off -Expense | for passing the accounting entries of the Write off expenses on accounts under this product. | Ledger type Expense. |
11. Input the required Transaction codes to be used for accounting the various events in the impairment treatment for an Account. You can directly input the Transaction Code or use the hyperlink to search for and select the required Transaction Code. The list of Transaction codes shown on click of hyperlink is based on certain conditions as listed against each field.
Below mentioned transaction codes will be used during the following events:
a. Payment (including repayment)
b. Reversal -- payment
c. Repayment
d. Write off.
These fields will be available if the Treatment is Provision
| Sl. No. | Field name of Transaction Settings | Used for | List of Transaction codes based on |
|---|---|---|---|
| 1 | Provision - booking (DB/GL) | recording all the receivable debit transactions booked for the accounts under this product | General Ledger Debit |
| 2 | Provision - booking (CR/GL) | recording all the receivable credit transactions booked for the accounts under this product | General Ledger Credit |
| 3 | Provision -rebalancing (DB/GL) | recording all the debit transactions for balancing the GL and the accounts under this product | General Ledger Debit |
| 4 | Provision -rebalancing (CR/GL) | recording all the credit transactions for balancing the GL and the accounts under this product | General Ledger Credit |
12. Click Next. The New Impairment Settings → Confirmation (3/3) page appears.

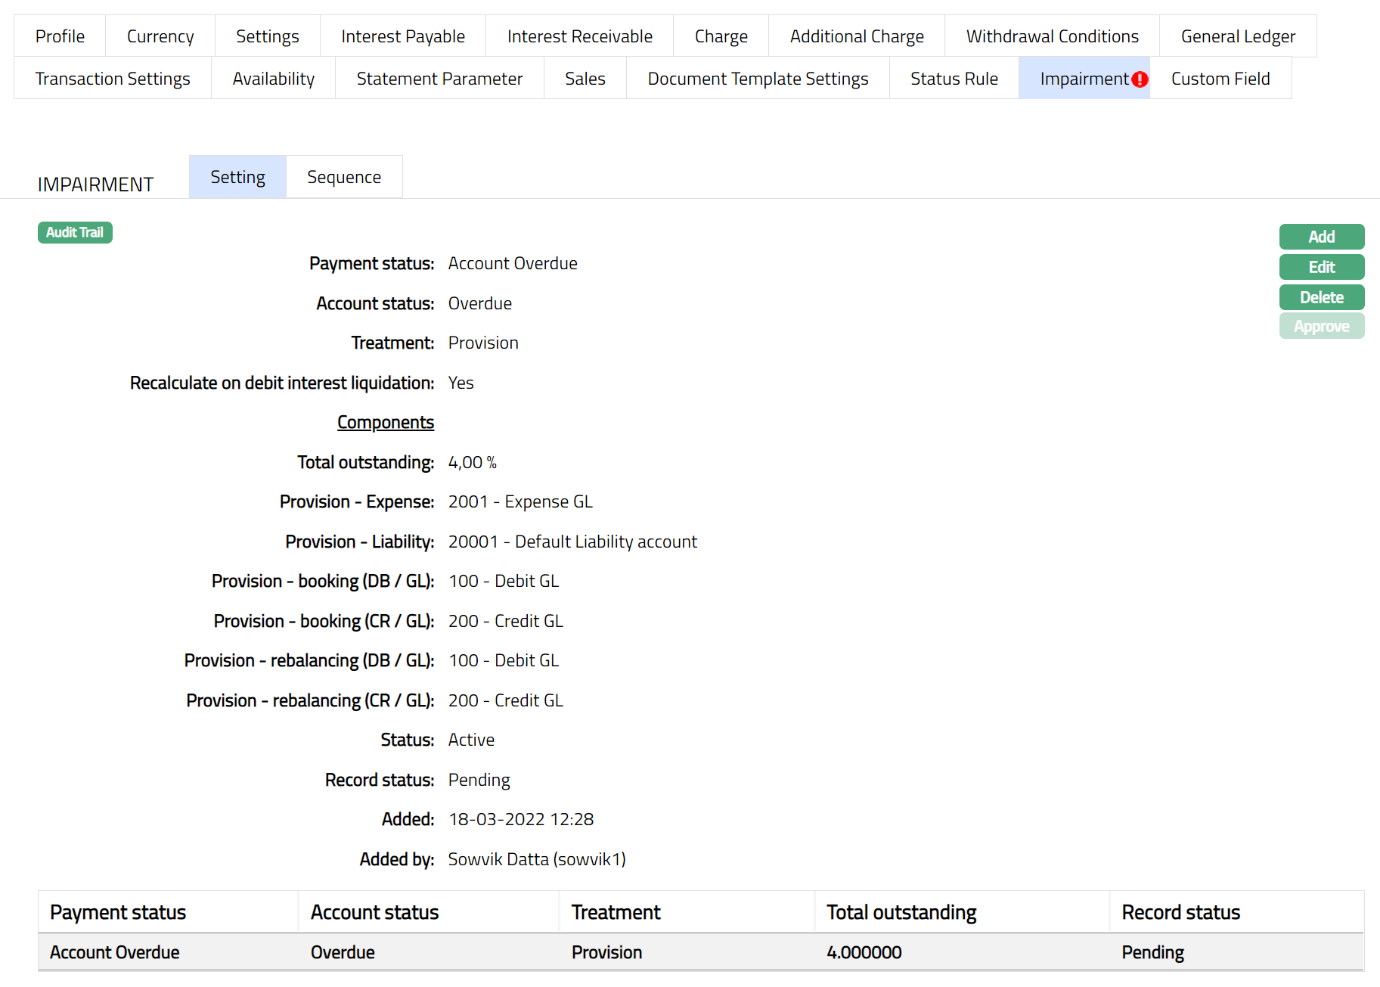
13. Click Finish. The Impairment settings record is created, and the Status will be Active, and the Record Status will be Pending.
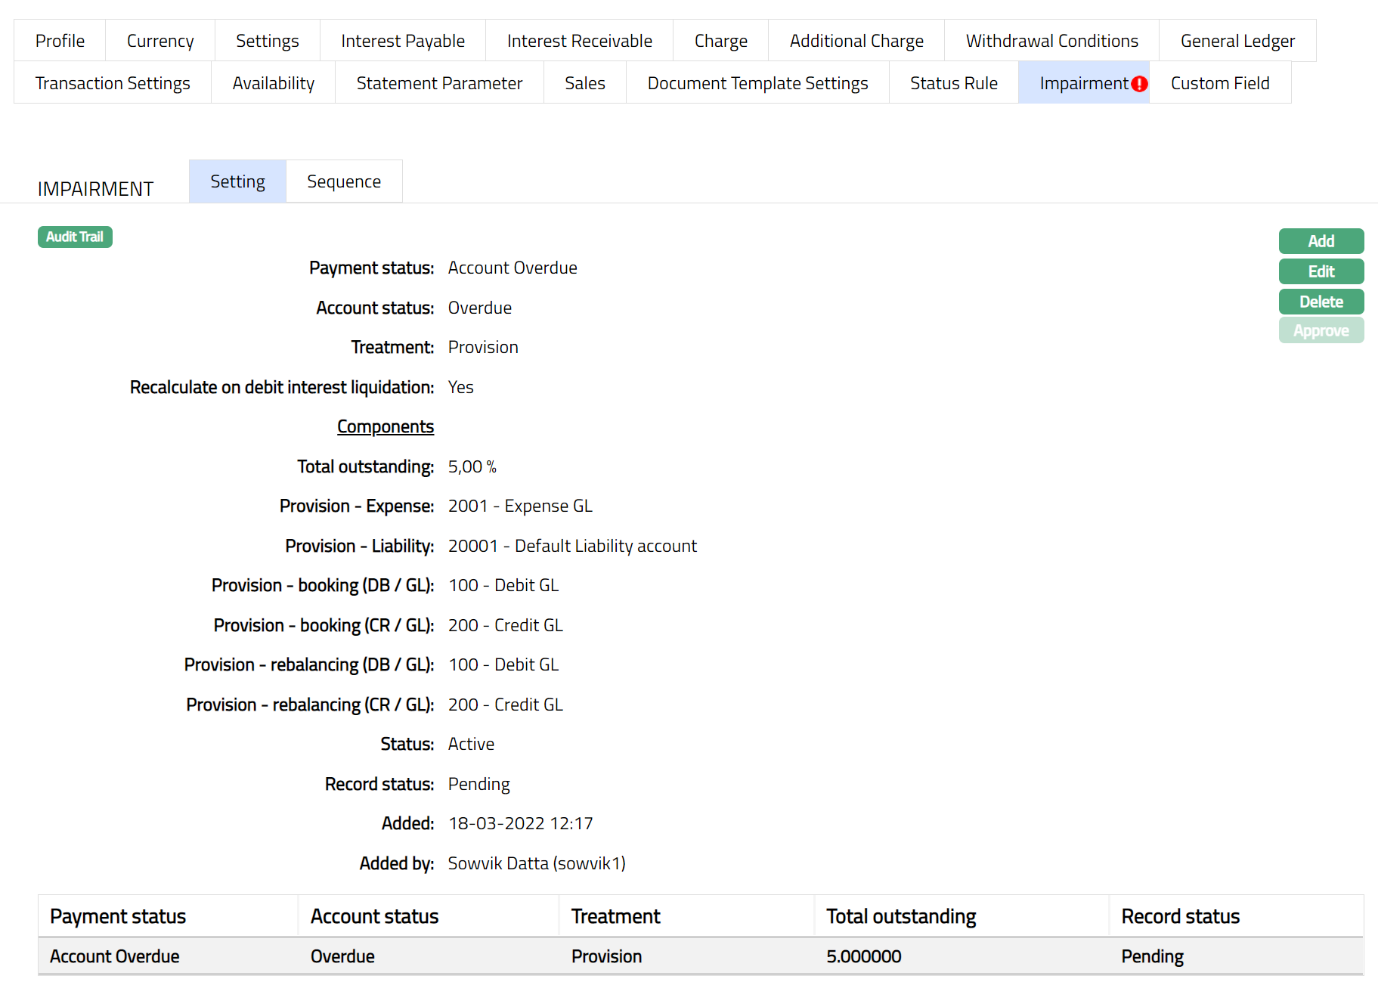
Delete: You can delete an Impairment record by a click on Delete button. If there are no accounts available which are under combination of selected account status and impairment treatment mentioned in the impairment record, then impairment record can be deleted. Aura will ask for confirmation, on approving which the selected record will be deleted.
Approve: If you want to approve an Impairment record, then retrieve the record and click on Approve. Aura will ask for confirmation. Once the tab is approved, status gets changed from Pending to Approved.
Note: Provision does not affect to the component balance neither to component related GL.
To Edit the impairment record,
1. Access Product page, click Impairment tab. By default, Settings sub tab will appear.
2. Click Edit. The Edit Settings page appears.
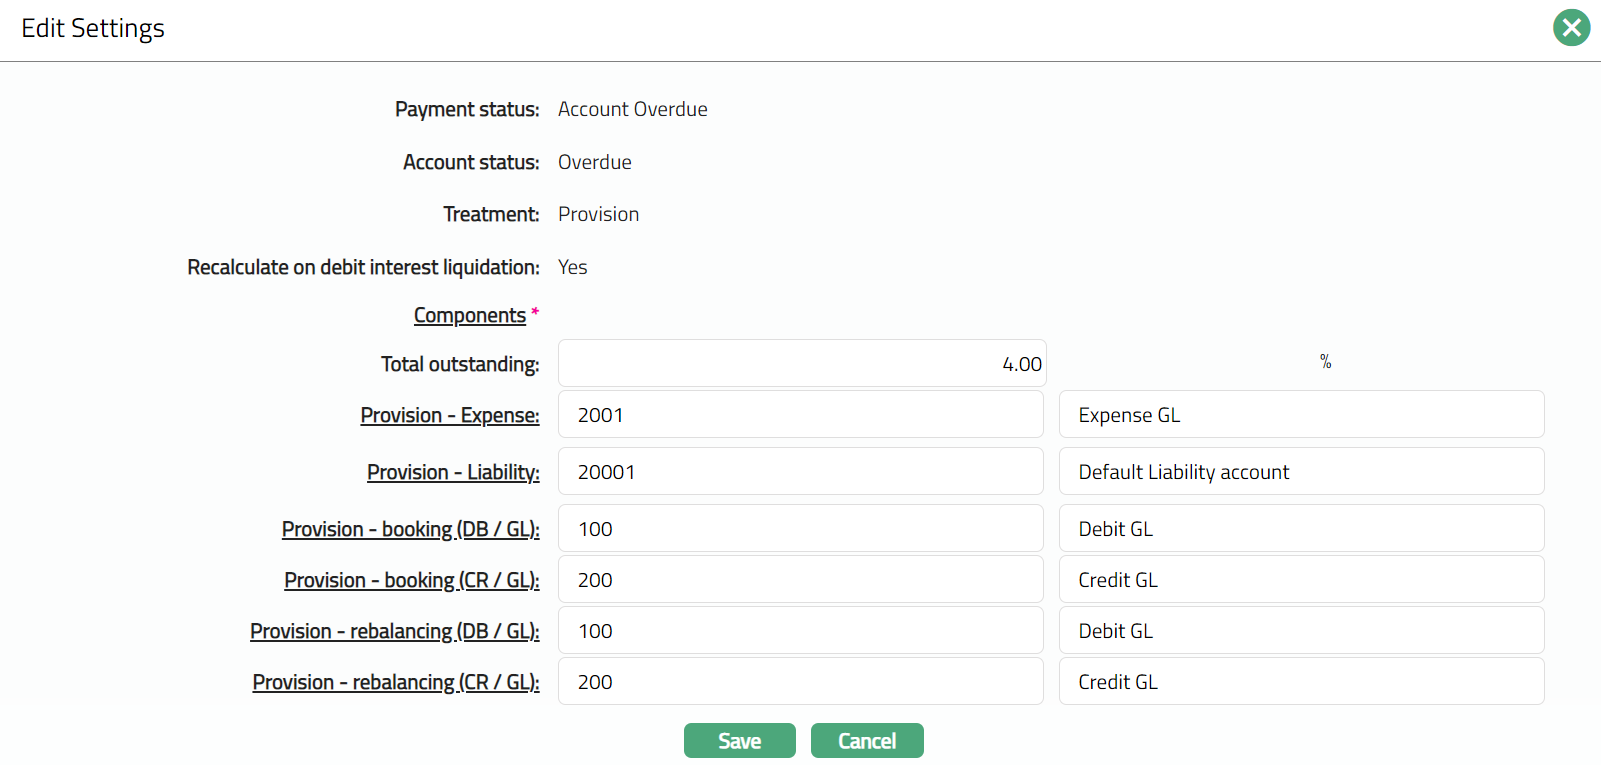
Note: Except Payment Status, Account status, Treatment and Recalculate on debit interest liquidation all other fields are editable.
3. Click Save. The Settings page appears with the edited details.
Note: The changes made here will be applicable on the new accounts created.
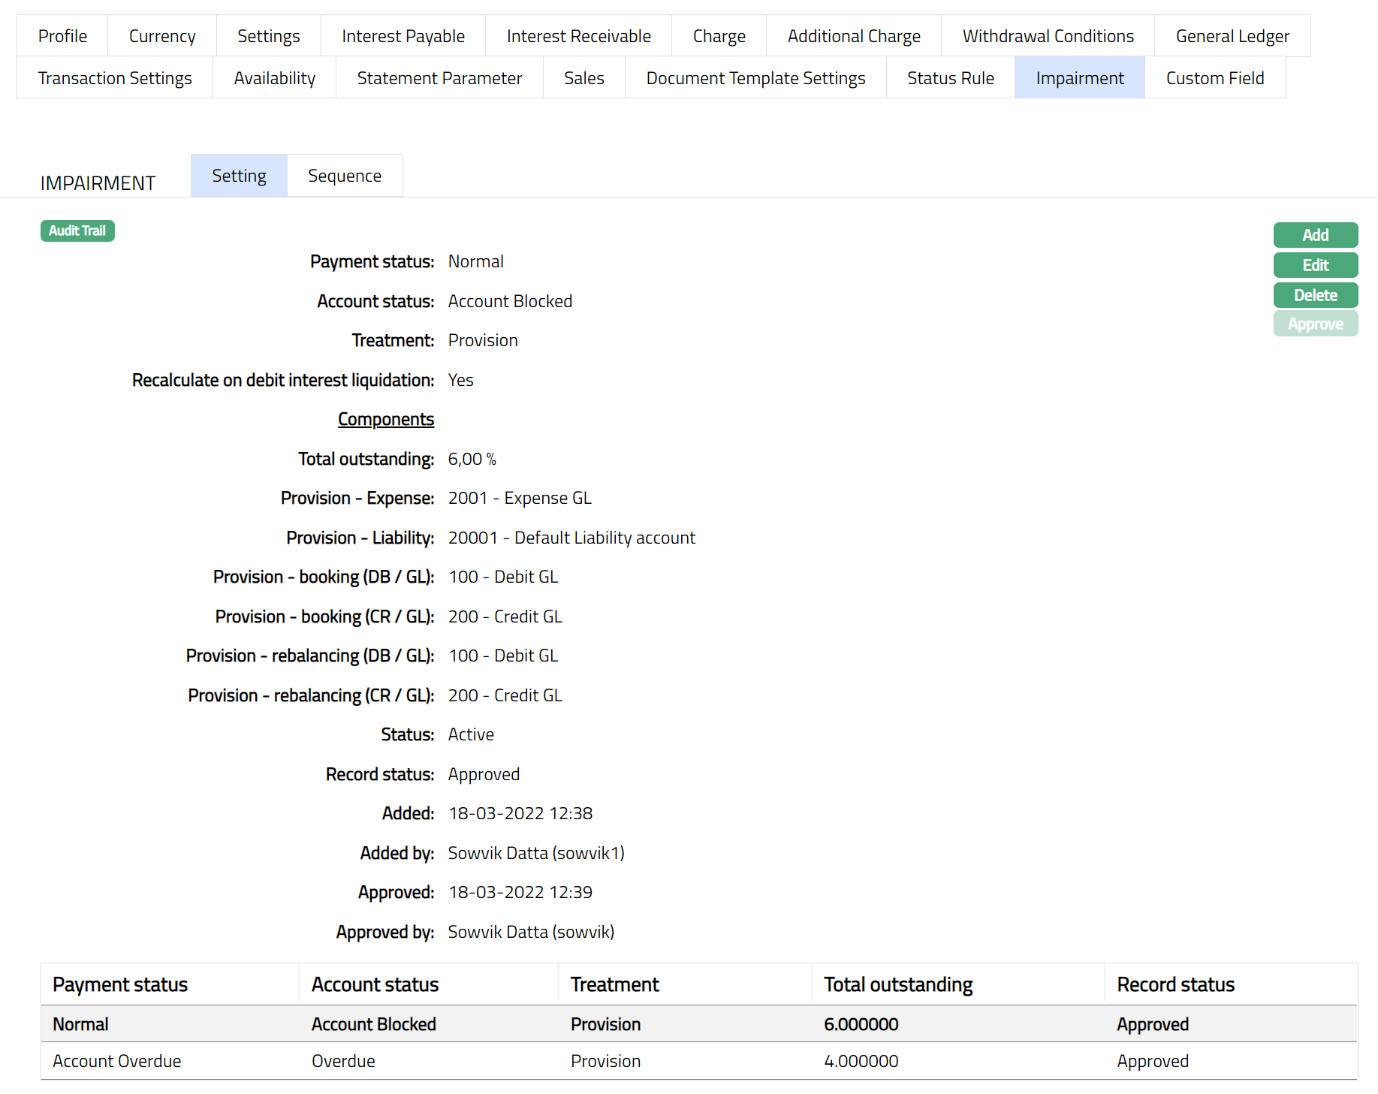
Note: Similarly, you can add another setting as required. Please refer to the sample screen shot as shown below.
Functions: Add, Edit, Delete, Approve
Note: After creation / edit, the tab is in Pending status. To approve, a user different from the one who created / edited has to retrieve the record and click Approve. Once the tab is approved the Status changes to Approved and the red bubble disappears as shown in the Edit screen above.
The additional fields available in view are:
Status denotes status of the record.
Added denotes the date and time on which the record has been added.
Added by denotes the name of the user who has added the record.
Approved denotes the date and time on which record is approved. This field is displayed for the approved record.
Approved by denotes the name of the user who has approved the record. This field is displayed for the approved record.
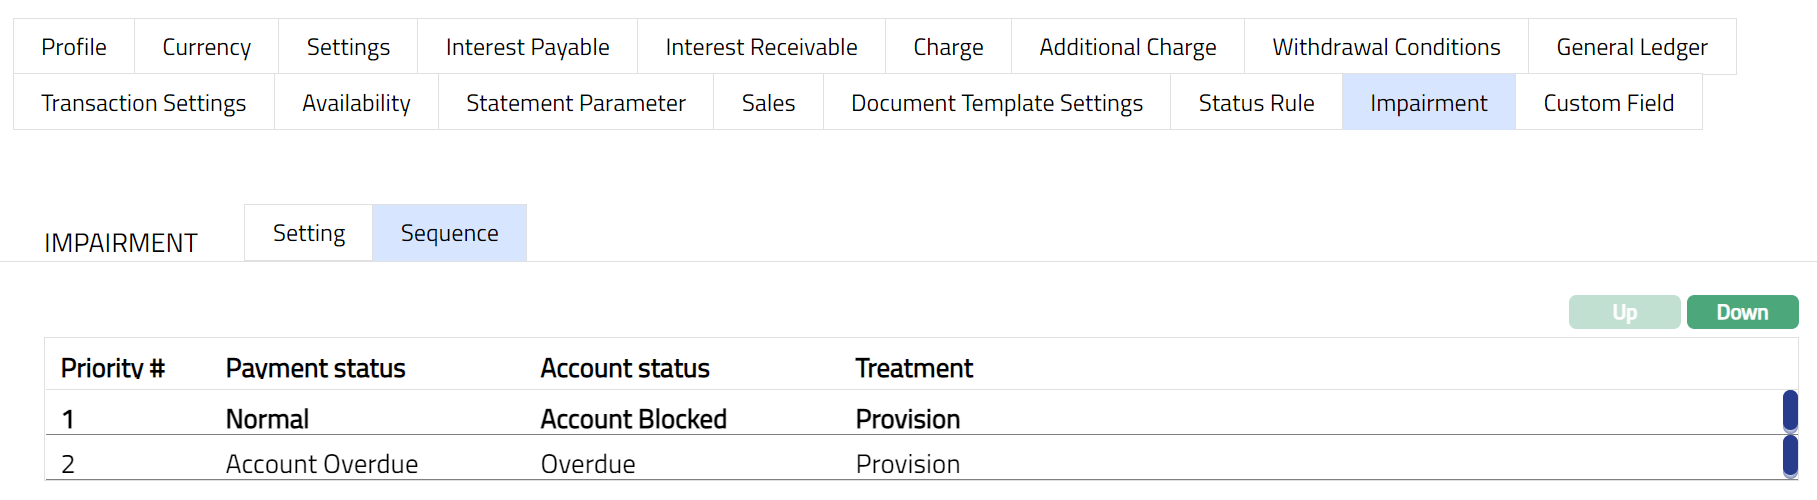
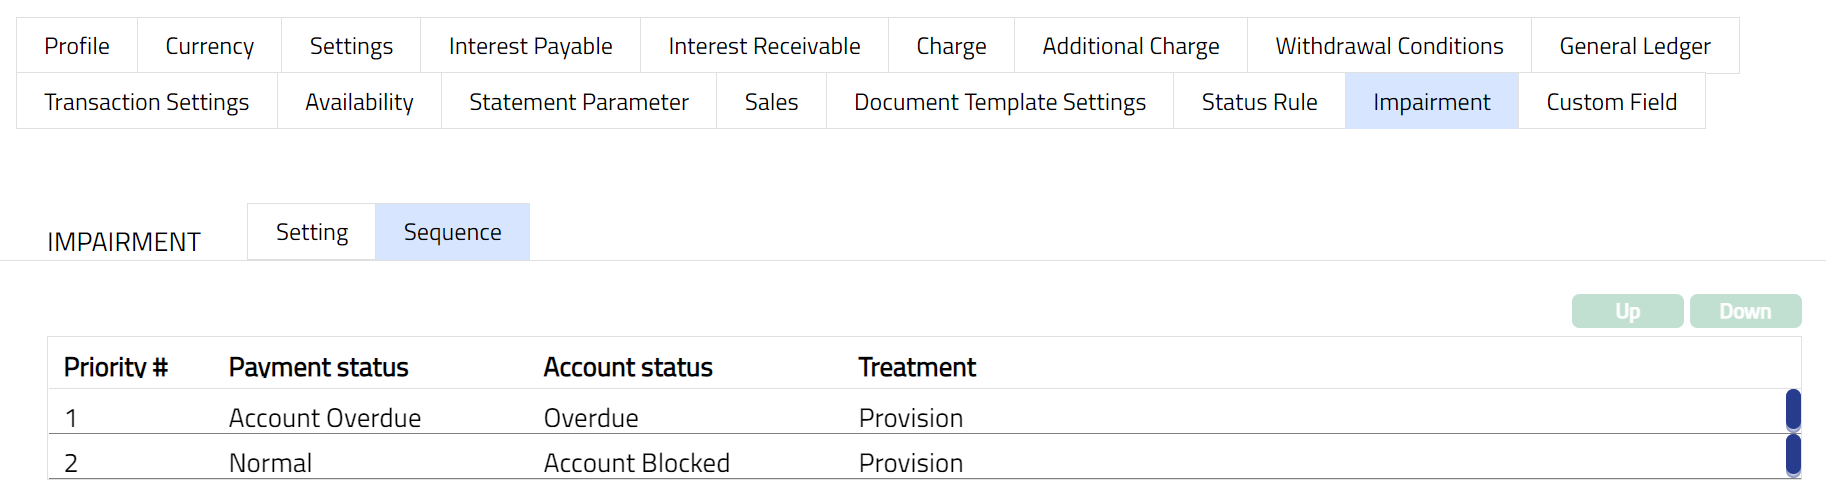
Sequence
The data in this tab is populated as and when user approves new impairment treatment per account status. Also, when user deletes the treatment then data needs to be removed from this tab. User can choose sequence by moving the treatment's priority up and down
To set the priority,
1. Access Product page. Click Impairment tab, and then click Sequence sub tab.
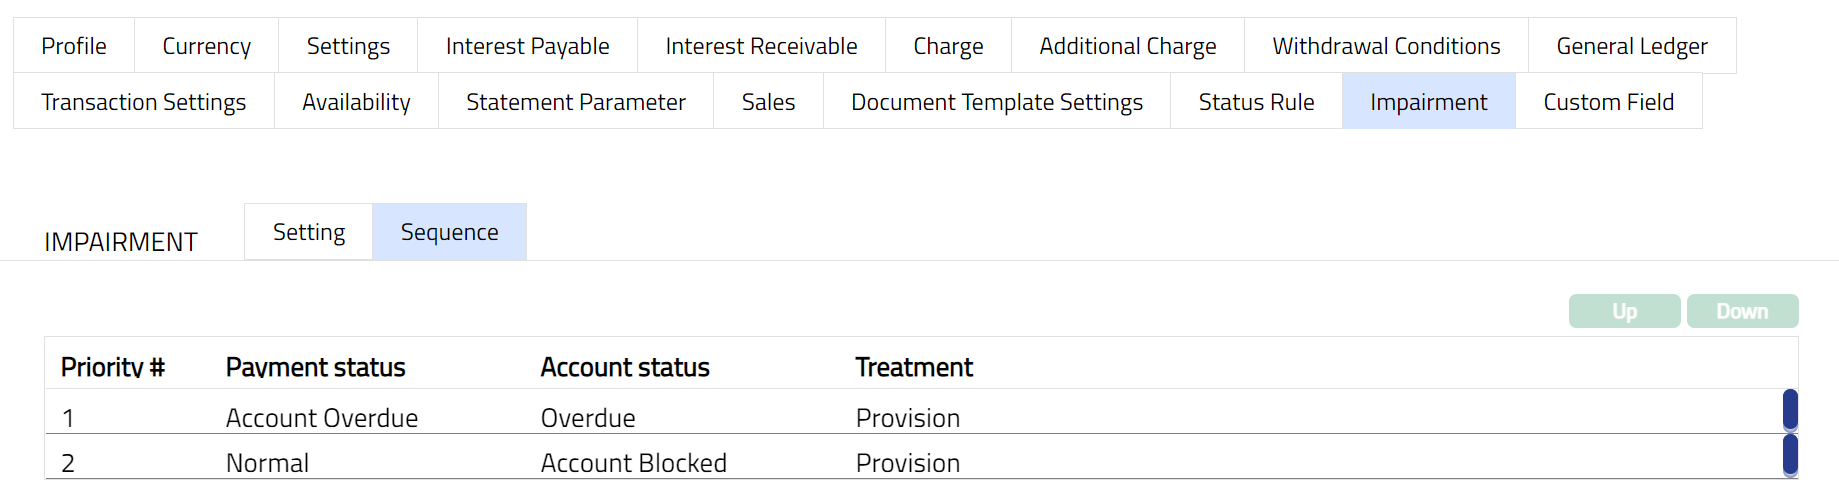
2. By default, the first impairment treatment record will have the first priority and all the other impairment records listed are as per the sequence of creation. The Up and Down button will be disabled.
3. If you want to change the order, select the required impairment treatment record which enables the Up and Down buttons.
4. If you click on Up button, the selected impairment treatment will move to the next higher order of preference and interchange the position between the source and destination. For the topmost treatment the Up button will be disabled.
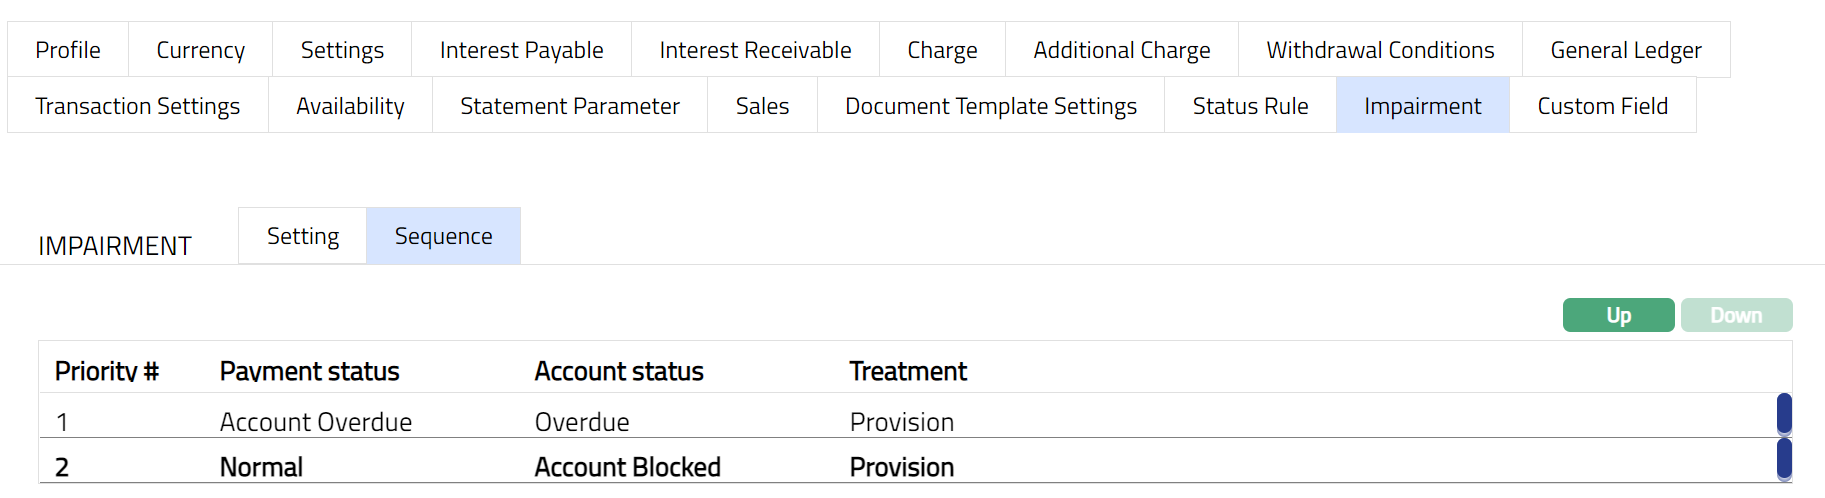
5. If you click on Down button, the selected impairment treatment will move to the next lower order of preference and interchange the position between the source and destination. For the bottom most treatment the Down button will be disabled.
Status Rule
Status rule option allows you to add any rules / triggers between origin account status and destination account status to suit various business rules. For example, if you want to make the account status of an account as Overdue 30 since a payment is overdue for 30 days for the account, you can build a rule as follows: If the Client Account Status of an account is Active, and Overdue days > 30 days, move the Account Status of the account to Overdue 30.
The account statuses could be pre-shipped, or user defined (defined at Admin → Status → Client account status). The rule is available at the product level. At the end of the day based on the rules set up and if they Allow auto movement flag is set as Yes, at the end of the day the account is moved automatically to the defined statuses. The rules will apply in the order of preference that you set up under the Rule Sequence.
The two sub-tabs are:
Rules
To add Rules in Status Rules
1. Access Product page. Click Rule builder and then Rules tab.
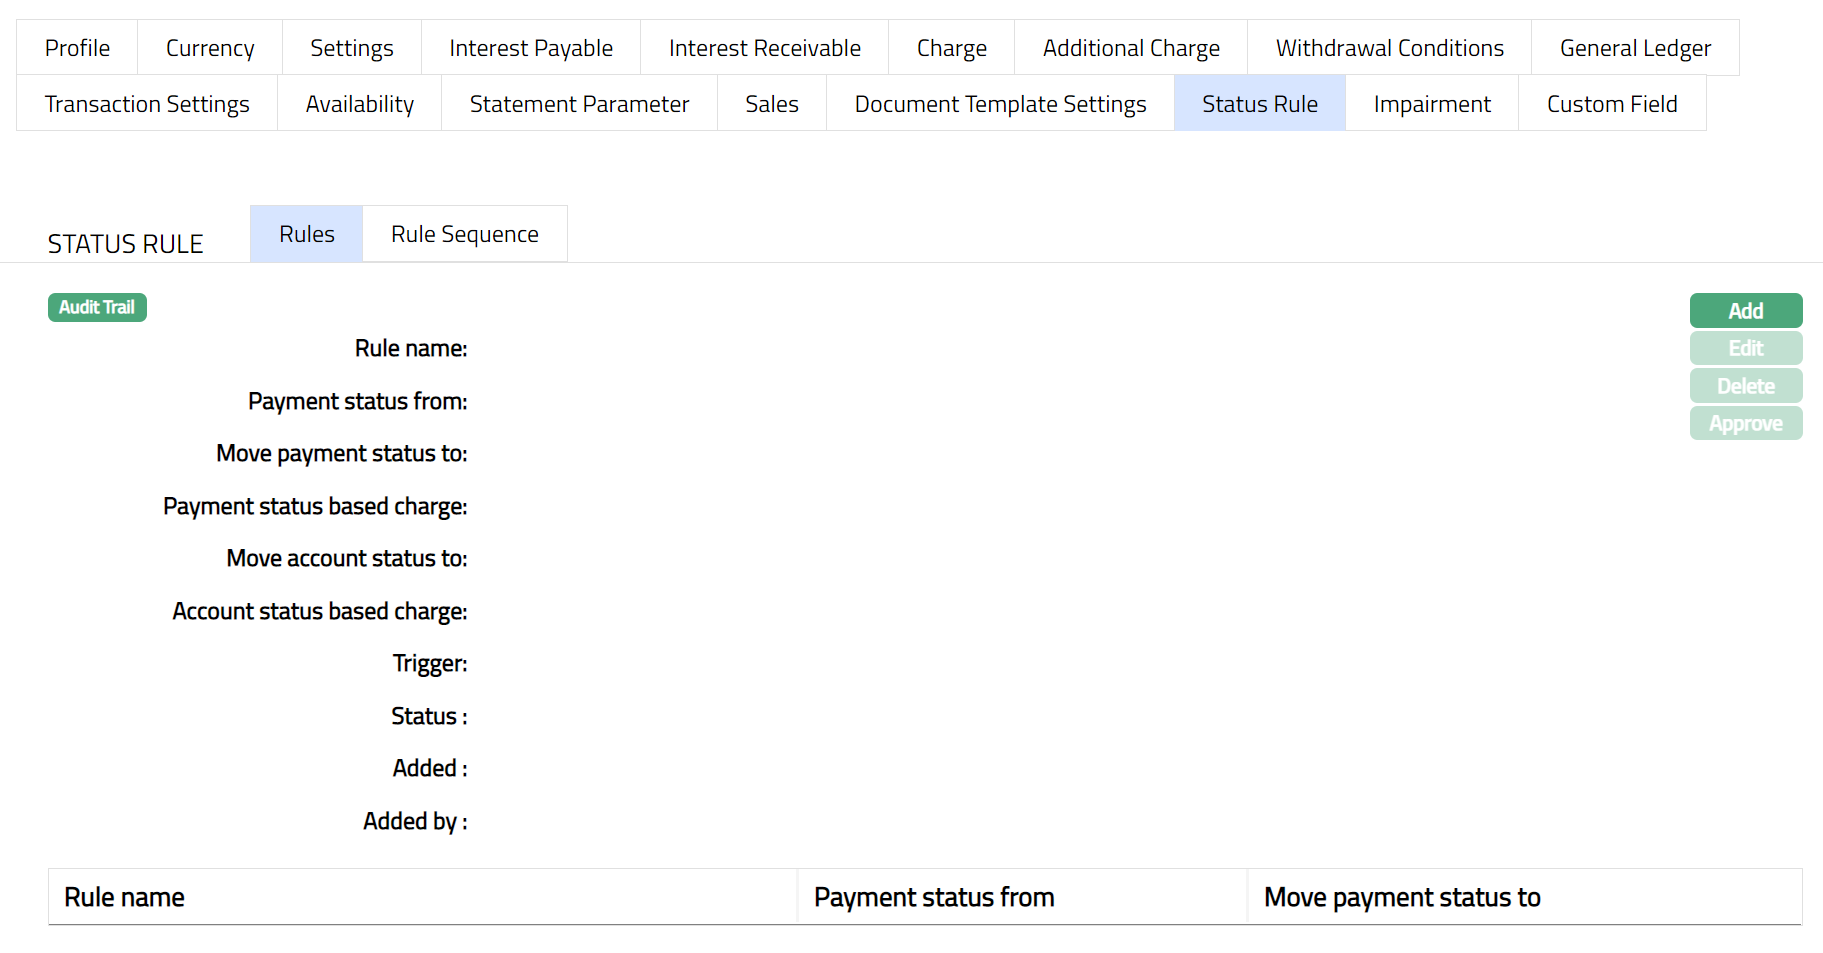
2. Click Add. Add Rule page appears.
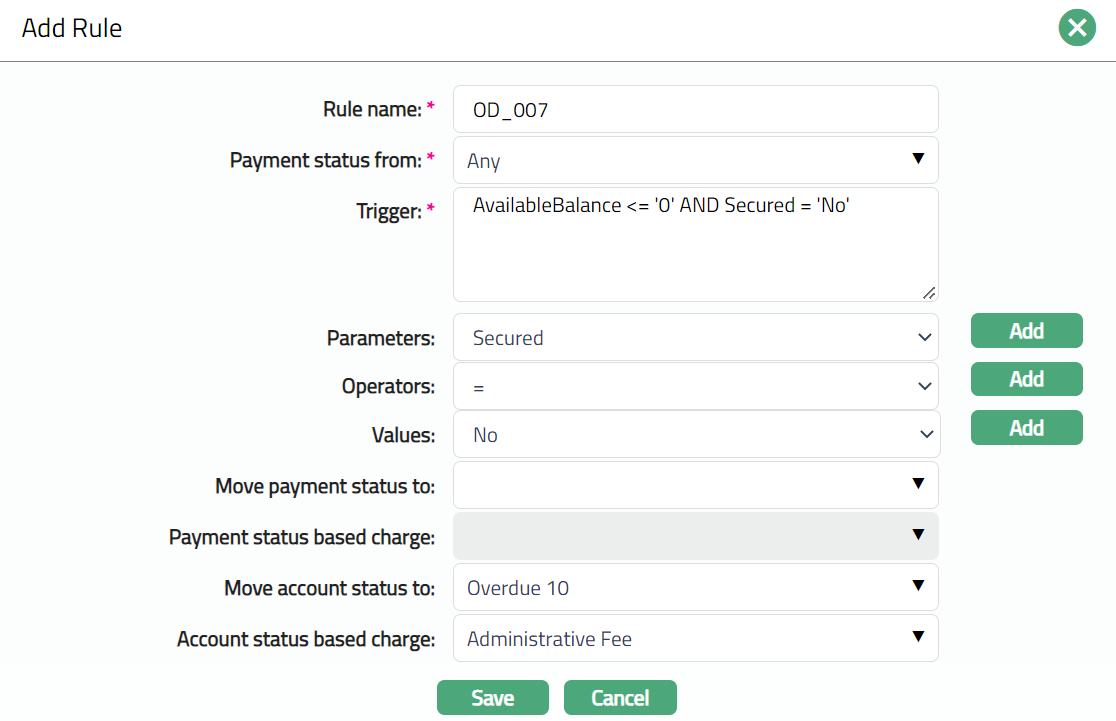
3. Enter the Rule Name.
4. Select the Account Status from the dropdown list of active account statuses maintained under Admin → Status → Client account status. Any, Activated, Blocked and Reopened in the dropdown list are the pre-shipped values.
5. Enter the Trigger details. Each trigger will constitute a collection of individual conditions joined by AND / OR operator. The Trigger details can be built using the Parameter, Operator and Values.
6. Select the Parameter from the pre-shipped list and click Add. Aura will push the selected value of Parameter into the Trigger text area above. Based on the Parameter selected, the Operator and Values will change.
7. Select the Operator from the pre-shipped list and click Add. Aura will push the selected value of Operator into the Trigger text area above.
8. Enter the required Values for the Parameter and click Add. Aura will push the selected value into Trigger text area above.
Details of the Parameter, Operator and Values
Available Balance: If the Parameter is Available balance, then the value field becomes a text box for you to enter an amount. This parameter is used to move the account status (as specified in the rule) based on the amount available in the account.
Account Balance Days: This Parameter is to be used along with the Account balance parameter. If calculated number of days matches with entered Account Status Days in rule, then rule is success.
Account Status: If this parameter is used, then the value field becomes a drop-down list of active account statuses maintained under Admin → Status → Client account status. Any, Activated, Blocked and Reopened in the drop-down list are the pre-shipped values.
Account Status Days: This parameter cannot be used independently and has to be used along with Account Status. Aura gets the parameterized account status and calculate number of days for which account is in this status
Activity: If this parameter is used then the Value field becomes a drop-down list and the options available are Yes or No.
If value = Yes and If transactions are happened for this account for period with Client Transaction Code is set Affect dormancy calculation = Yes, then rule is made Success.
If value = No and If no transactions are happened for this account for period with Client Transaction Code having set Affect dormancy calculation = No then the rule is made Success.
Note:
Transactions -- can be debit and / or credit transactions.
Period = from Max of (Dormant = No) till Booking date if account has not gone into dormant since activation, then Period is from Activation date till Booking date.
Amount Block: If this parameter is used the Value field becomes a drop-down list and the options available are Active amount blocks or No active amount blocks.
Cheque Book Allowed: If this parameter is used then the Value field becomes a drop-down list and the options available are Yes or No.
If value = Yes and If Allow cheque book flag at Product is marked as Yes then rule is made Success.
If value = No and If Allow cheque book flag at Product is marked as No then rule is made Success.
Client Relationship Pricing: If this parameter is used, then the Value field becomes a drop-down list with the Pricing category as maintained at Admin → System Code → Categories → Relationship pricing. If entered value for this parameter matches with that of Pricing category of the client, then rule is made success.
Client AML Category: If this parameter is used, then the Value field becomes a drop-down list with the AML Category as maintained at Admin → System Code → Categories → AML Category. If entered value for this parameter matches with that of client's AML category, then rule is made success.
Client Offering Category: If this parameter is used, then the Value field becomes a dropdown list with the Client Offering Category as maintained at Admin → System Code → Categories → Offerings. If entered value for this parameter matches with that of client's offering category, then rule is made success.
Client Category Type: If this parameter is used, then the Value field becomes a dropdown list with the Client Category Type as maintained at Admin → System Code → Categories →Category type. If entered value for this parameter matches with that of client's category type, then rule is made success.
Client Category Codes: If this parameter is used, then the Value field becomes a dropdown list with the Client Category Code as maintained at at Admin → System Code → Categories → Category type. If entered value for this parameter matches with that of client's category type code, then rule is made success.
Credit Rating: If this parameter is used, then the Value field becomes a dropdown list with the Credit Rating as maintained at Person/Organisation. If entered value for this parameter matches with that of client's category, then rule is made success.
Note: If Client is of Type = Joint then if condition matches for any one person, then make the rule is made success.
Currency: If this parameter is used, then the Value field becomes a dropdown list with the Currency as maintained at General ledger → Settings → Currency. If entered value for this parameter matches with that of Account currency, then rule is made success.
Dormant: If this parameter is used, then the Value field becomes a dropdown list with the values Yes or No.
If value = Yes and If Dormant flag at Account level is marked as Yes, then rule is made Success.
If value = No and If Dormant flag at Account level is marked as No, then rule is made Success.
Dormancy For: This parameter is applicable only for Dormant accounts. If calculated number of days for which the account is in Dormant matches with entered Dormant for in rule then make rule is made success.
Person Status: If this parameter is used, then the Value field will become a dropdown list with the options Living or Dead.
If value = Dead and if Dead flag at Person is marked as Yes, then rule is made Success.
If value = Living and if Dead flag at Person is marked as Yes, then rule is made Success.
Note: If Client is of Type = Joint then if condition matches for any one person's status, then the rule is made success.
Secured: If this parameter is used, then the Value field becomes a dropdown list with the values Yes or No.
If value = Yes and If Limit and / or collateral is attached at account, then rule is made Success.
If value = No and If limit is not attached at account, then rule is made success.
Overdraft Allowed: If this parameter is used, then the Value field becomes a dropdown list with the values Yes or No.
If value = Yes and If Overdraft allowed field at Account is marked as Yes, then make rule as Success.
If value = No and If Overdraft allowed flag at Account is marked as No, then make rule as Success.
9. You can specify in the Move Payment Status to field, the specific Payment Status into which the payment have to be moved in case the rule is satisfied. This will show all the active Payment status maintained under Admin → Status → Client account status, along with the pre-shipped Active and Closed Account Status.
10. You can specify in the Payment status based charge field, the specific Payment Status into which the payment have to be moved in case the rule is satisfied. This will show all the active Payment status maintained under Admin → Pricing → Charges → Charge Schemes, along with the pre-shipped Active and Closed Account Status.
11. You can specify in the Move Account Status to field, the specific Account Status into which the accounts have to be moved in case the rule is satisfied. This will show all the active Account statuses maintained under Admin → Status → Client account status, along with the pre-shipped Active and Closed Account Statuses.
12. If Account Status is moved to any other status and you want to levy a charge for that, you can select the charge from the drop-down list of charges maintained under Admin → Pricing → Charges → Charge Schemes in Account status-based charge field. Aura will display only those charges that are Event-based, Flat or Banded. Account Status Based Charge field will be enabled only if any status is selected in Move Account status to field. The charge will be applied once when the account moves into the new status; and if it is Banded, the basis will be loan amount sanctioned.
13. Click Save. The Rule Sub tab page under Status Rule appears with the added details.

Note: Similarly, you can add as many Rules you want as required as per the sample screenshot shown Above.
The additional fields are explained below.
Status field denotes the status of the record.
Added field denotes the date on which the record was added.
Added by field denotes the name of the user who created the record.
Note: After creation / edit, the tab is in Pending status. To approve, a user different from the one who created / edited has to retrieve the record and click Approve. Once the tab is approved the Status changes to Approved as shown below.
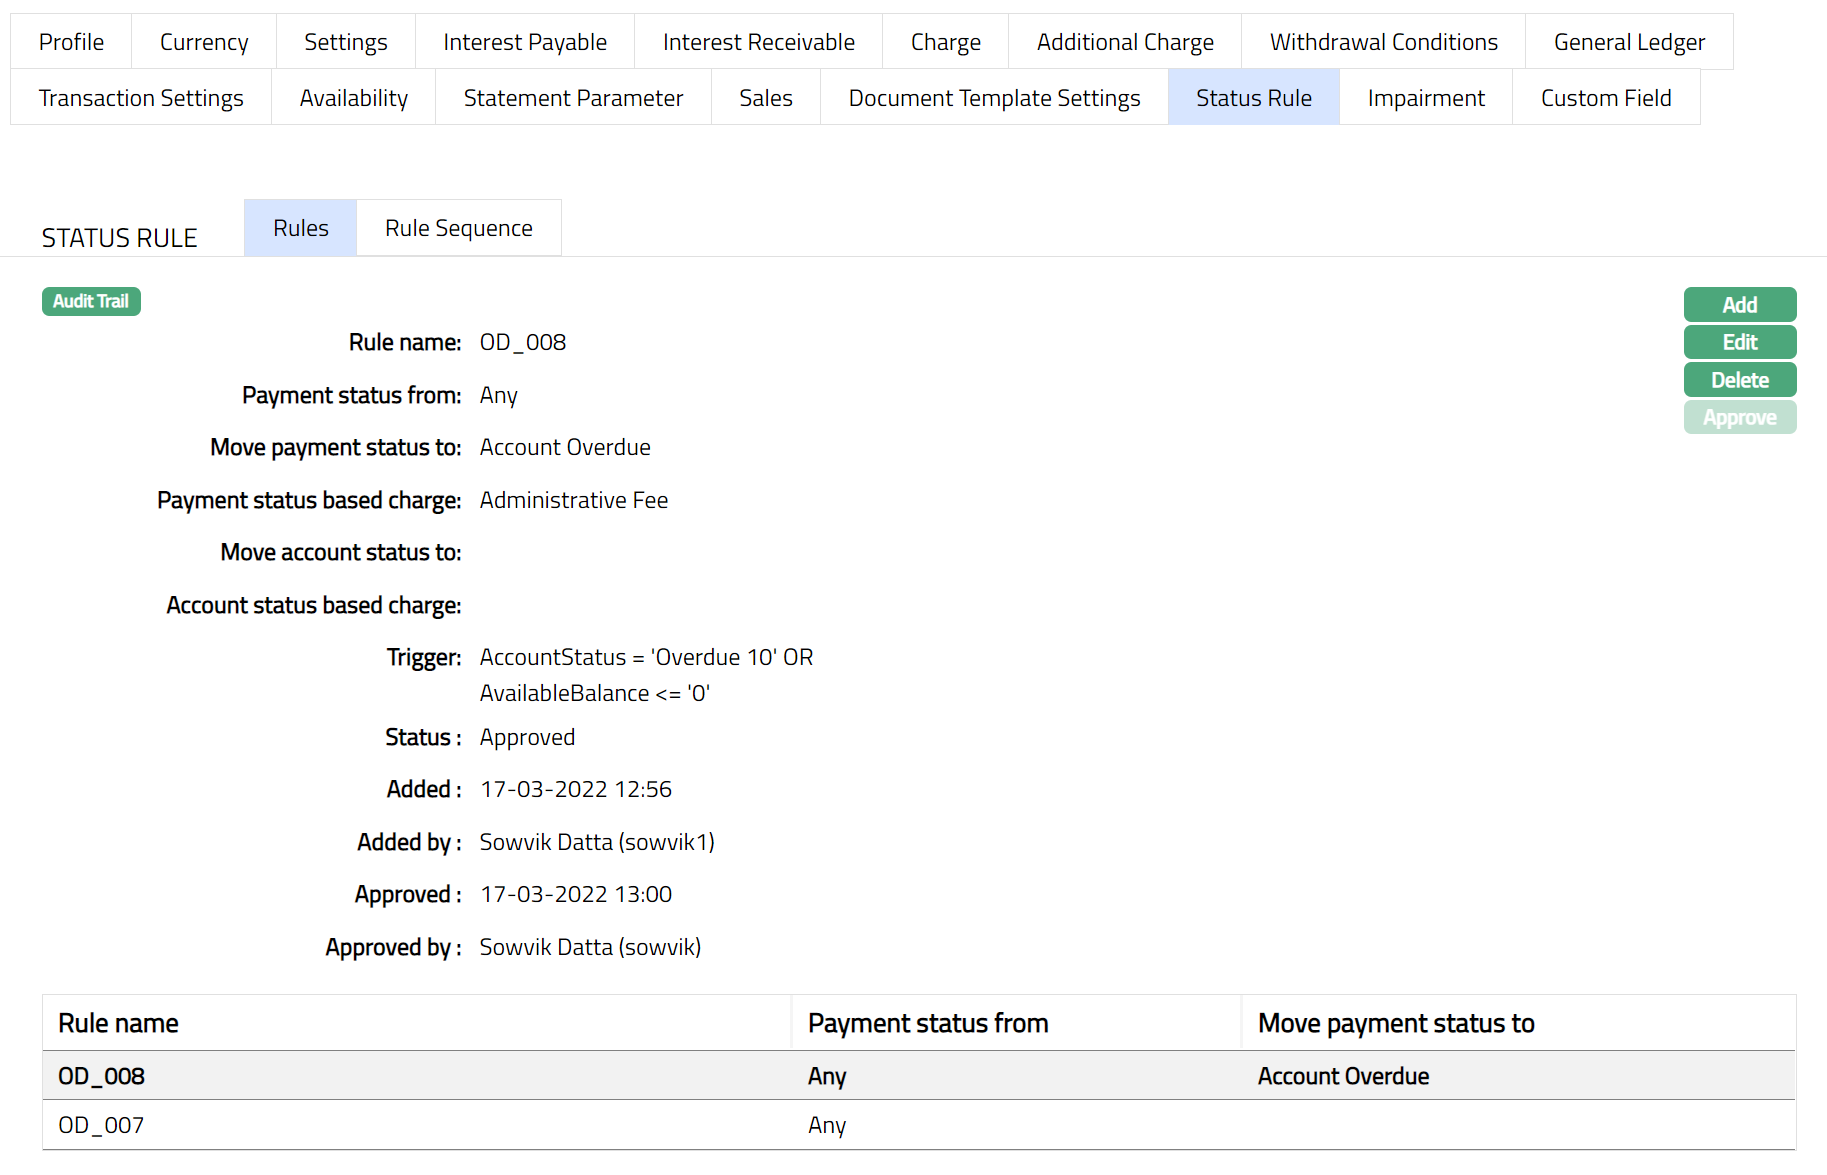
Functions: Add, Edit, Delete and Approve
The additional fields are explained below.
Status field denotes the status of the record.
Added field denotes the date on which the record was added.
Added by field denotes the name of the user who created the record.
Approved field denotes date on which the record was approved and is displayed only on approval.
Approved by field denotes name of the user who approved the record and is displayed only on approval.
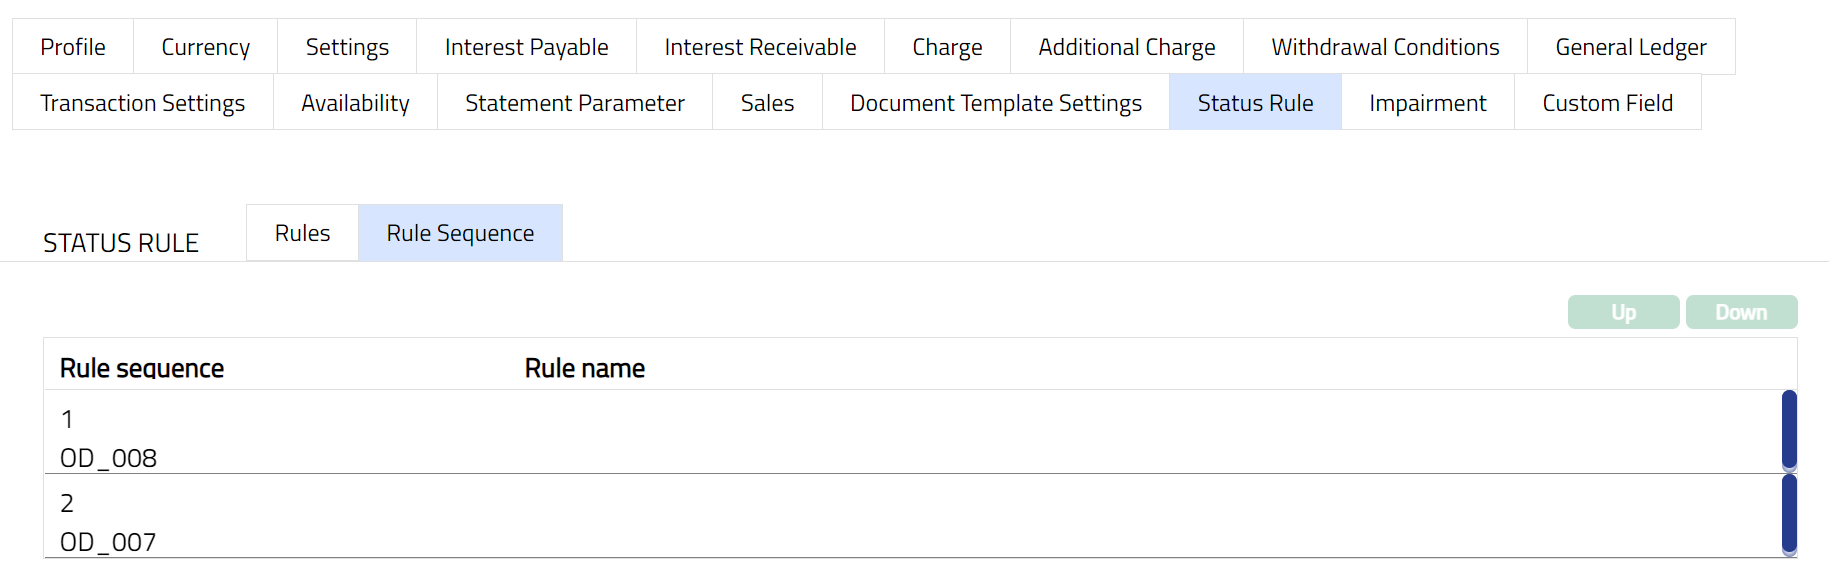
Rule Sequence
You can define the order in which the rules have to be executed using the Rule Sequence tab. By default, it will contain all the maintained Rule names. It will be displayed in ascending order and will have the provision to manipulate the sequence, as you require.
To define the Rule Sequence,
1. Access Product page. Click Status Rule, and then click Rule Sequence tab.
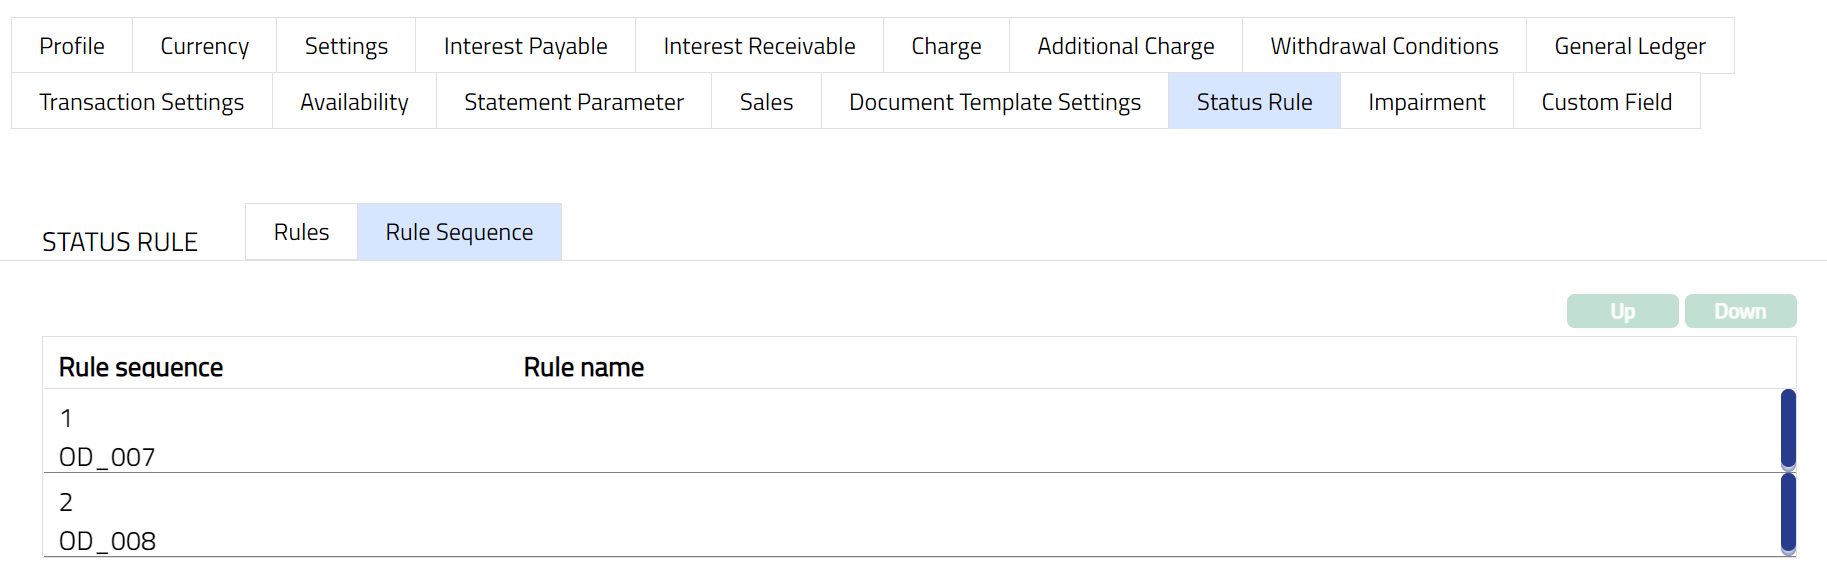
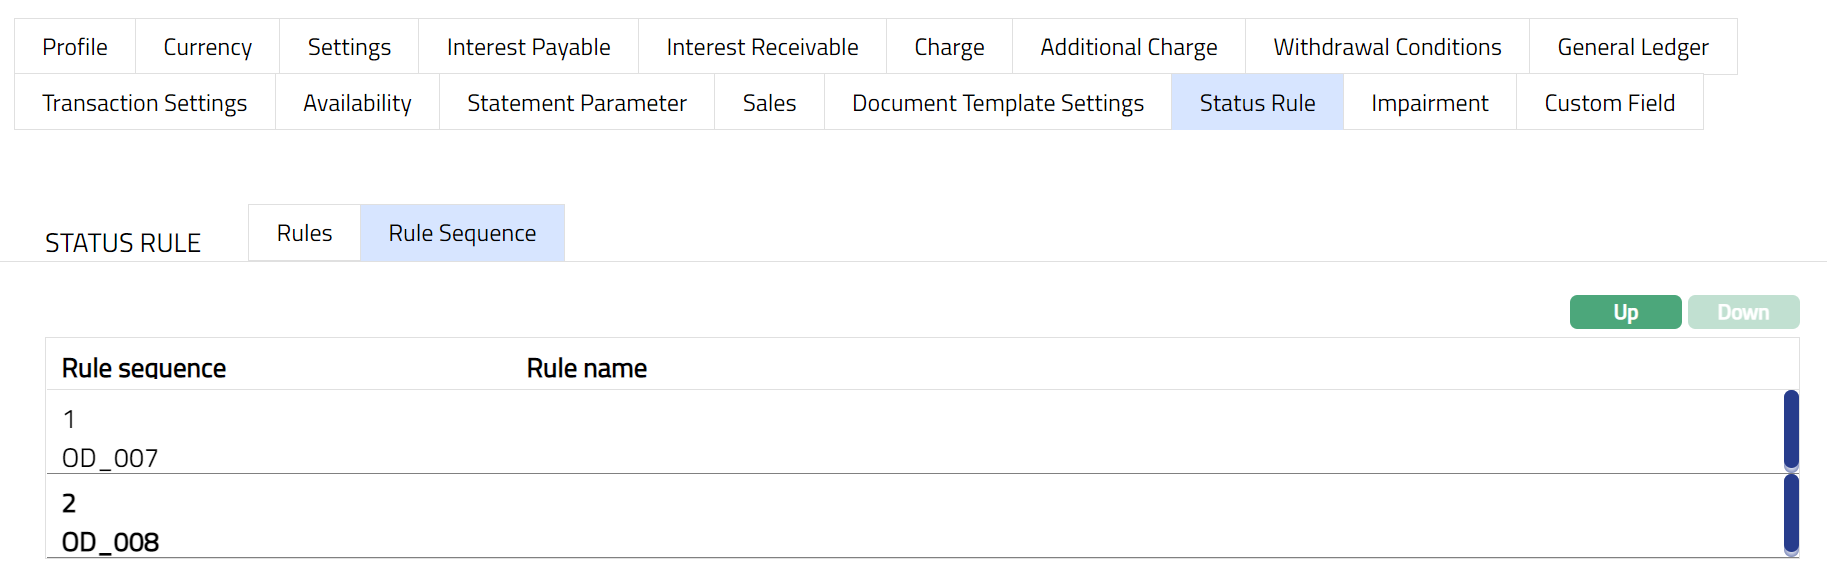
2. All available Rules are displayed in the ascending order of Rule sequence. Select any Rule Name and click on Up or Down button, as required as per the sample screenshots shown below.
Up: If you click on up button, then Aura will move the selected Rule Name to the next higher order of sequence and interchange the position between the source and destination. For the topmost Rule Name the Up button will be disabled.
Down: If you click on down button, then Aura will move the selected Rule Name to the next lower order of sequence and interchange the position between the source and destination. For the bottom most Rule Name the Down button will be disabled.
ACCOUNTING
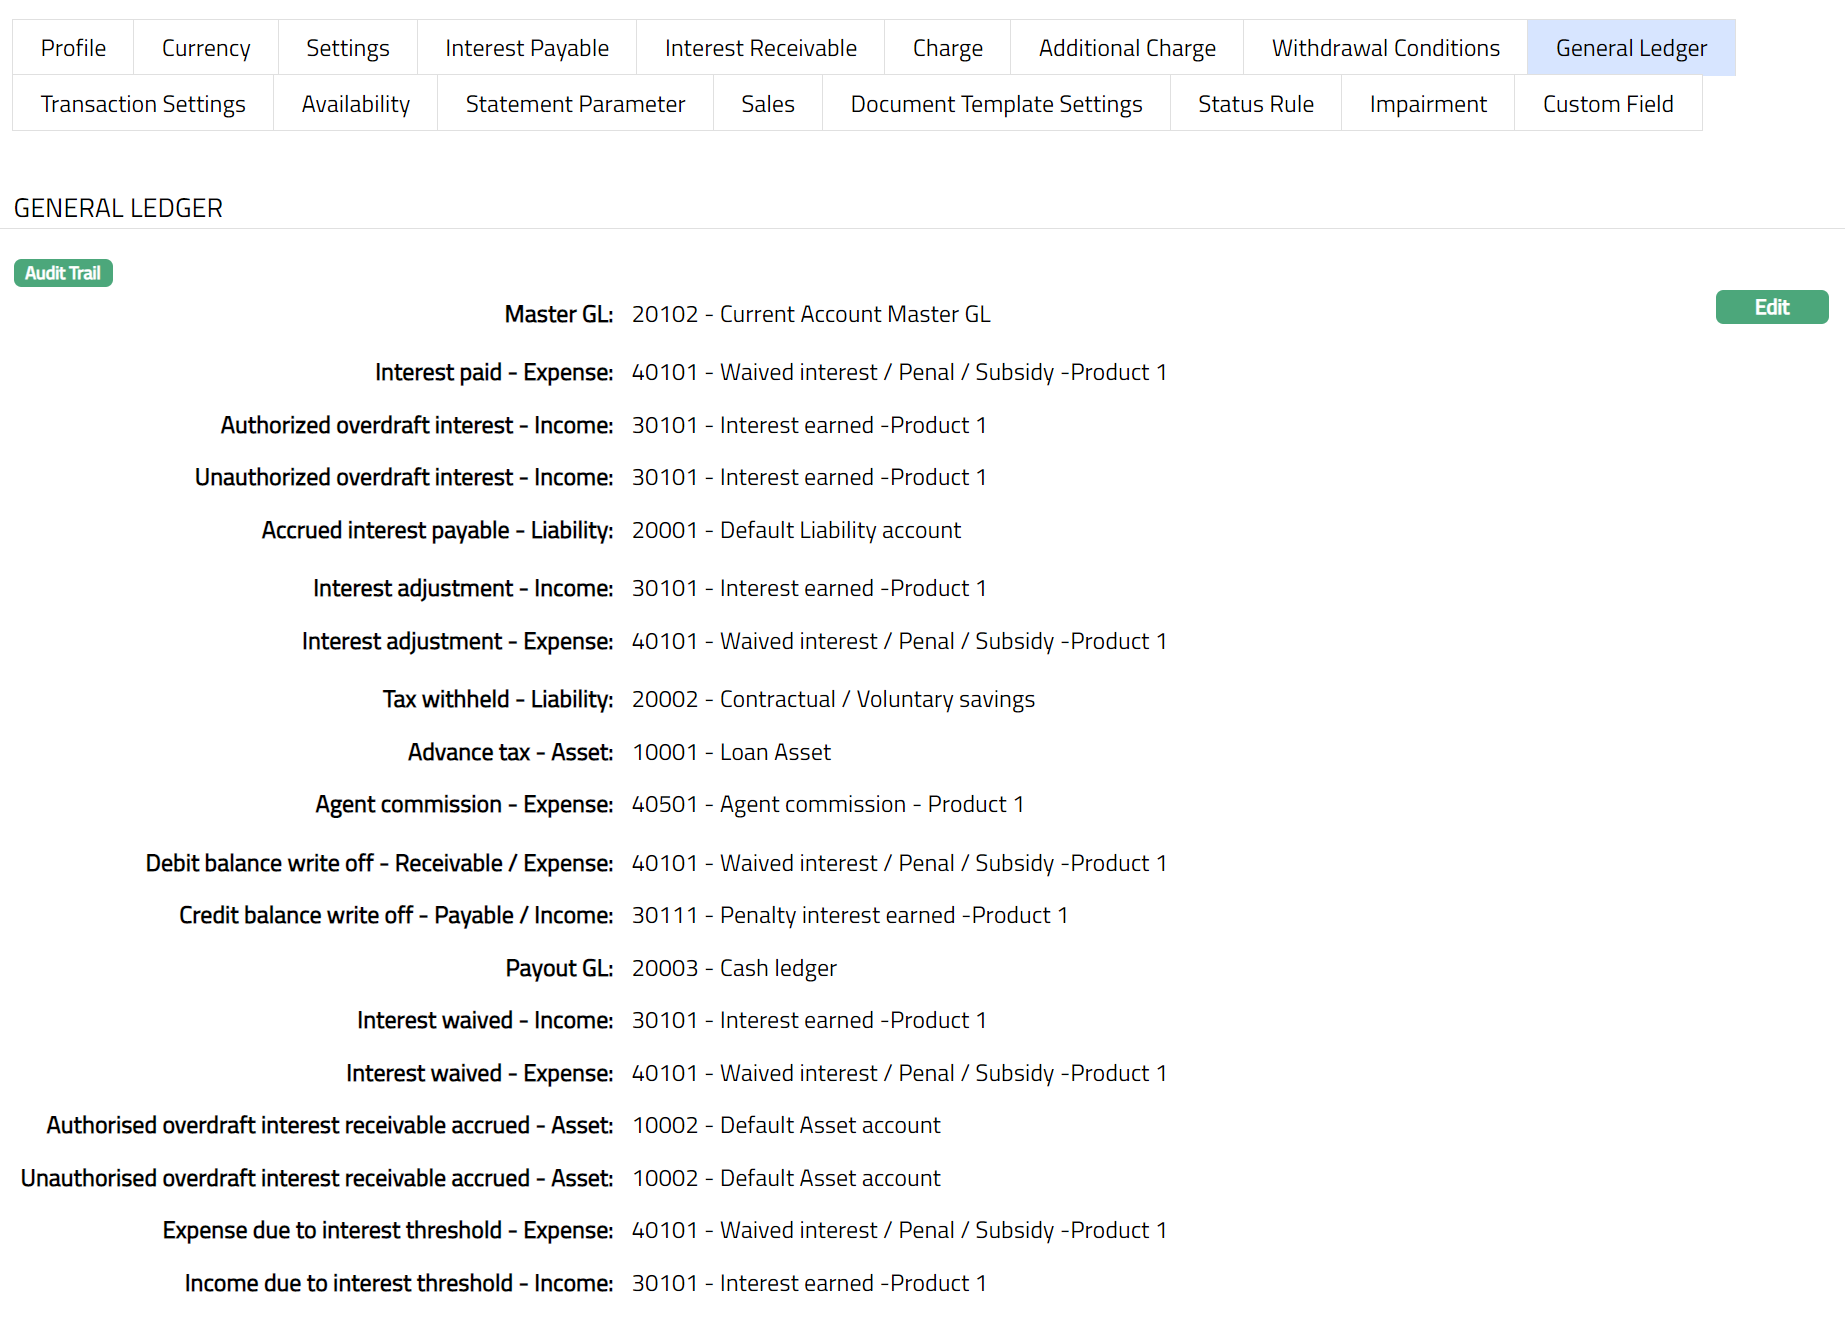
General Ledger
The General Ledger tab allows you to view and maintain the various GL accounts for the product.
1. Access Product page. Click General Ledger tab to view the details as per sample below. The details are defaulted from the entries that you made during Product creation. For details refer to Client Account → New Product → General Ledger (7/10).
2. Click Edit. Edit General Ledger page appears.
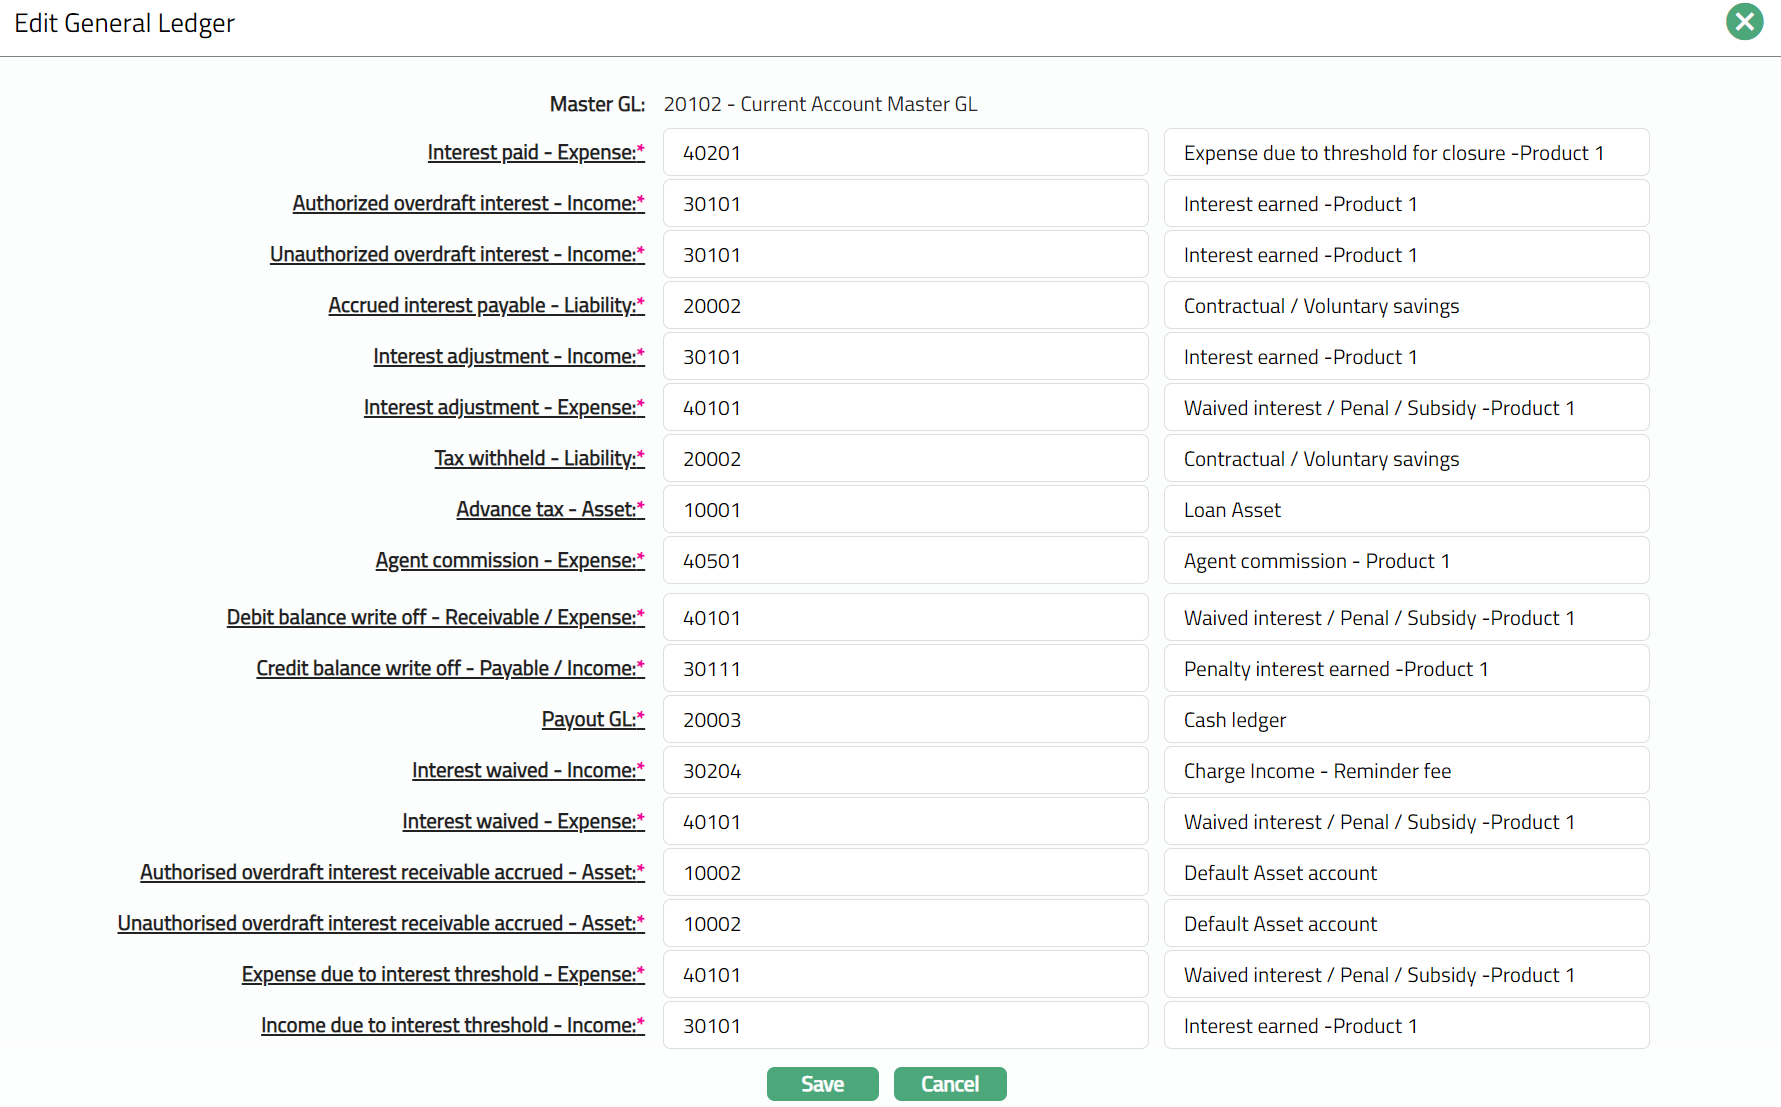
Note: Except Master GL, all the fields in Edit General ledger are Editable.
3. Click Save. General Ledger page appears with the edited details**.**
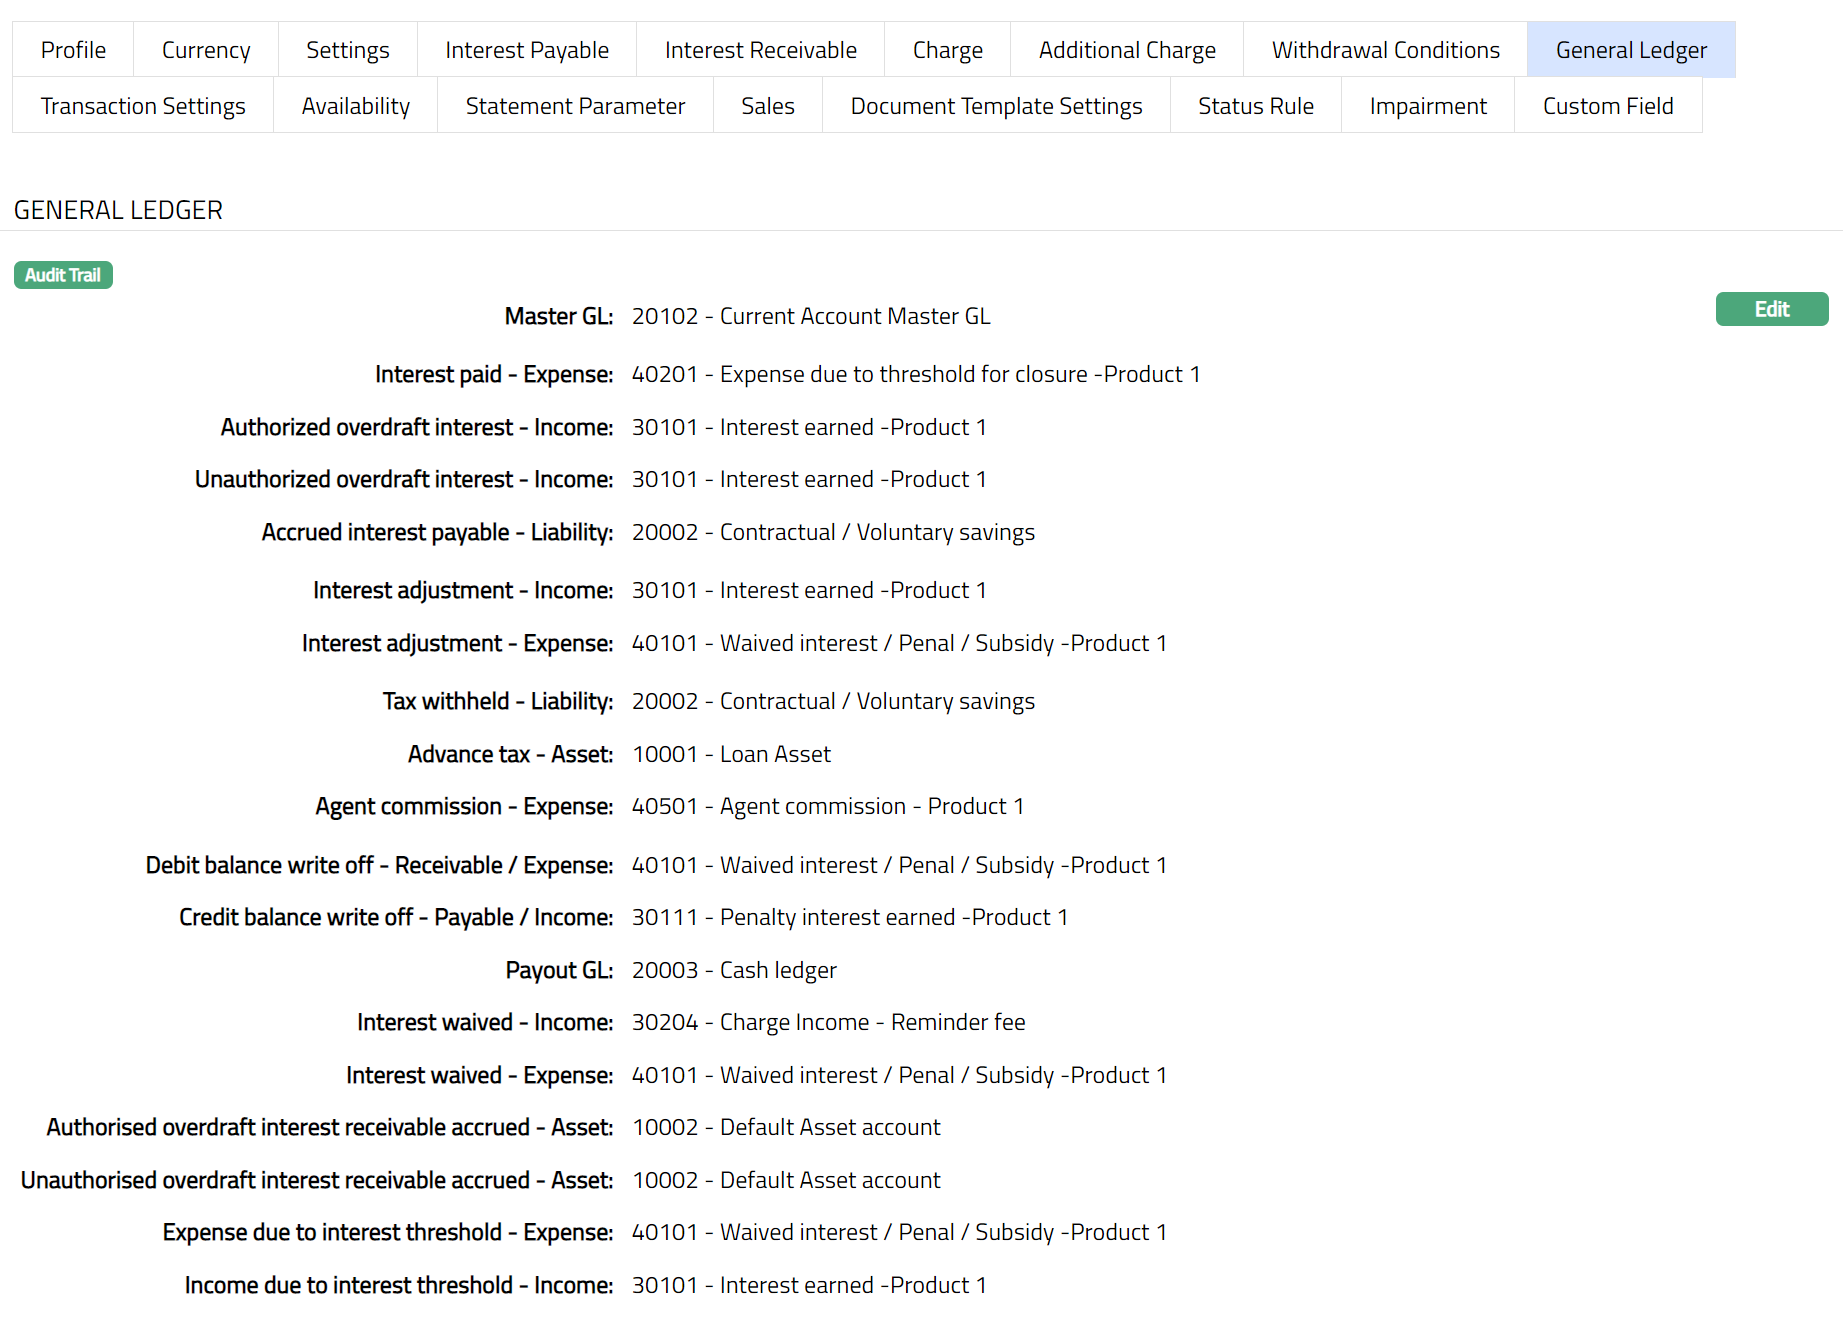
Function: Edit
Transaction Settings
Transaction settings tab allows you to specify the transaction codes that are to be used for the various events in the life cycle of the Product. These transaction codes define what description / narration is used for the account postings / statements and may also be used to trigger other charges.
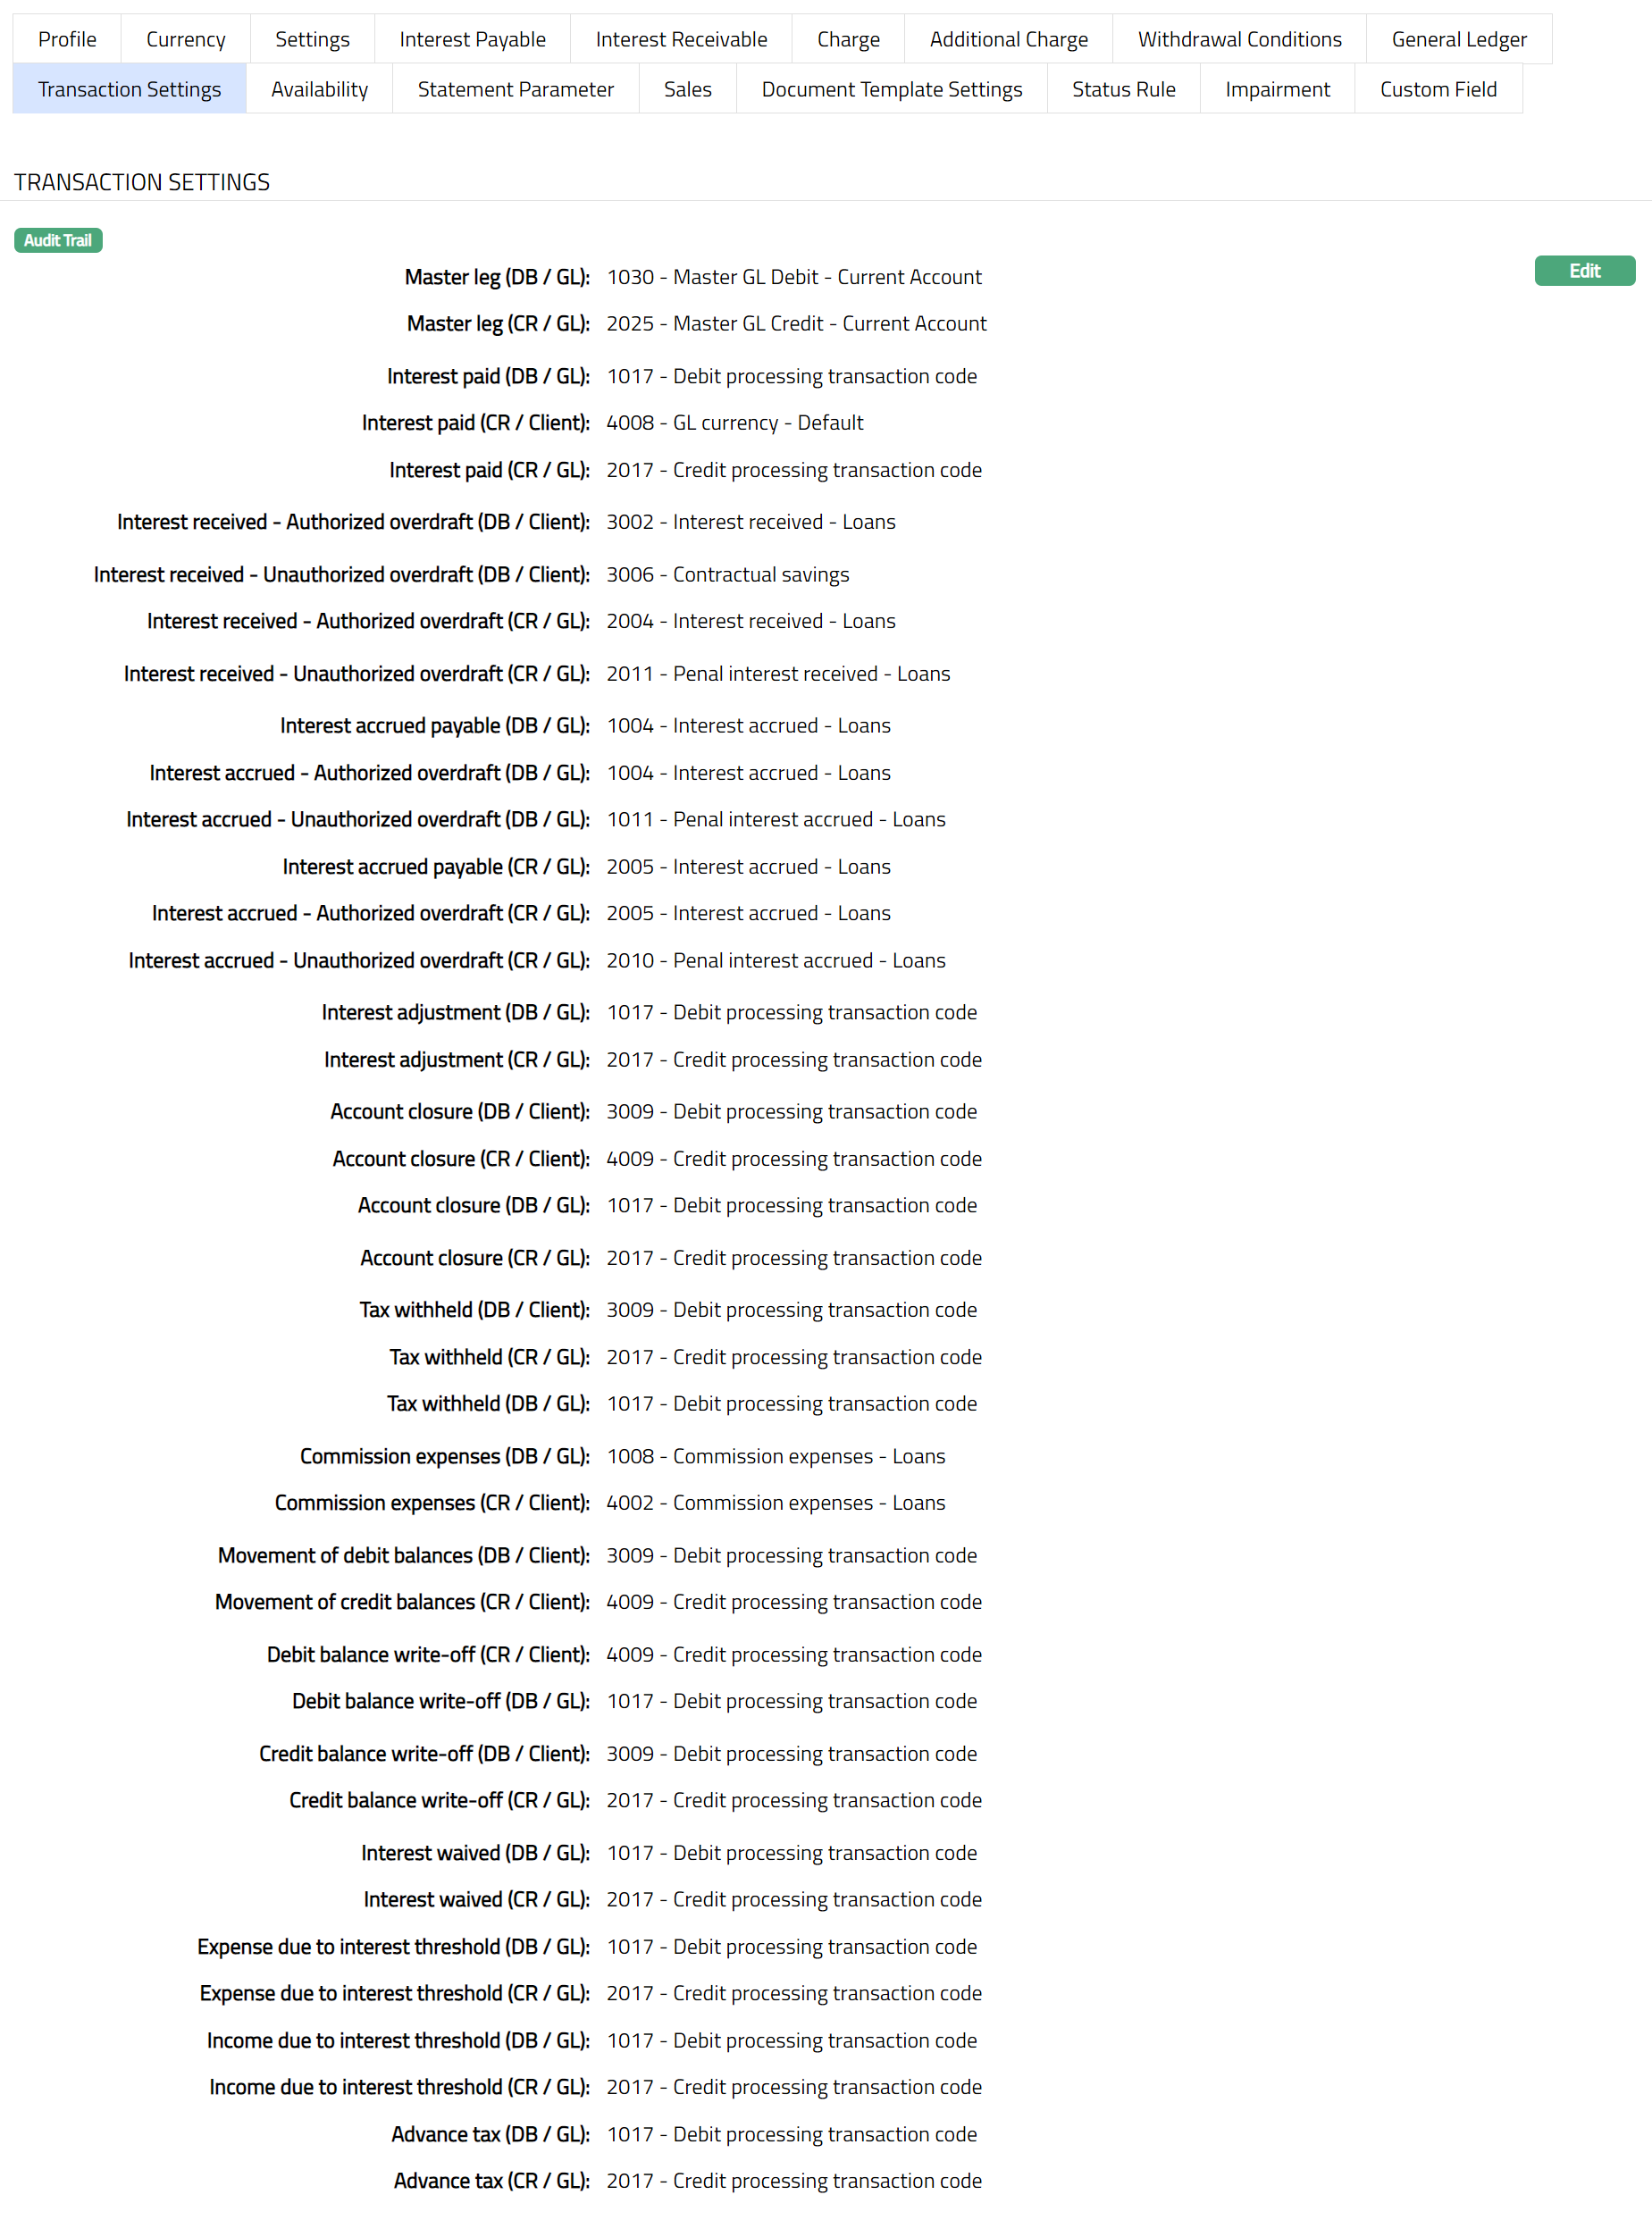
1. Access Product Maintenance page. Click Transaction settings tab to view the details as per sample below. The details are defaulted from the entries that you made during Product creation. For details refer to Client Account → New Product → Transaction settings (8/10).
2. Click Edit. Edit Transaction Settings page appears.
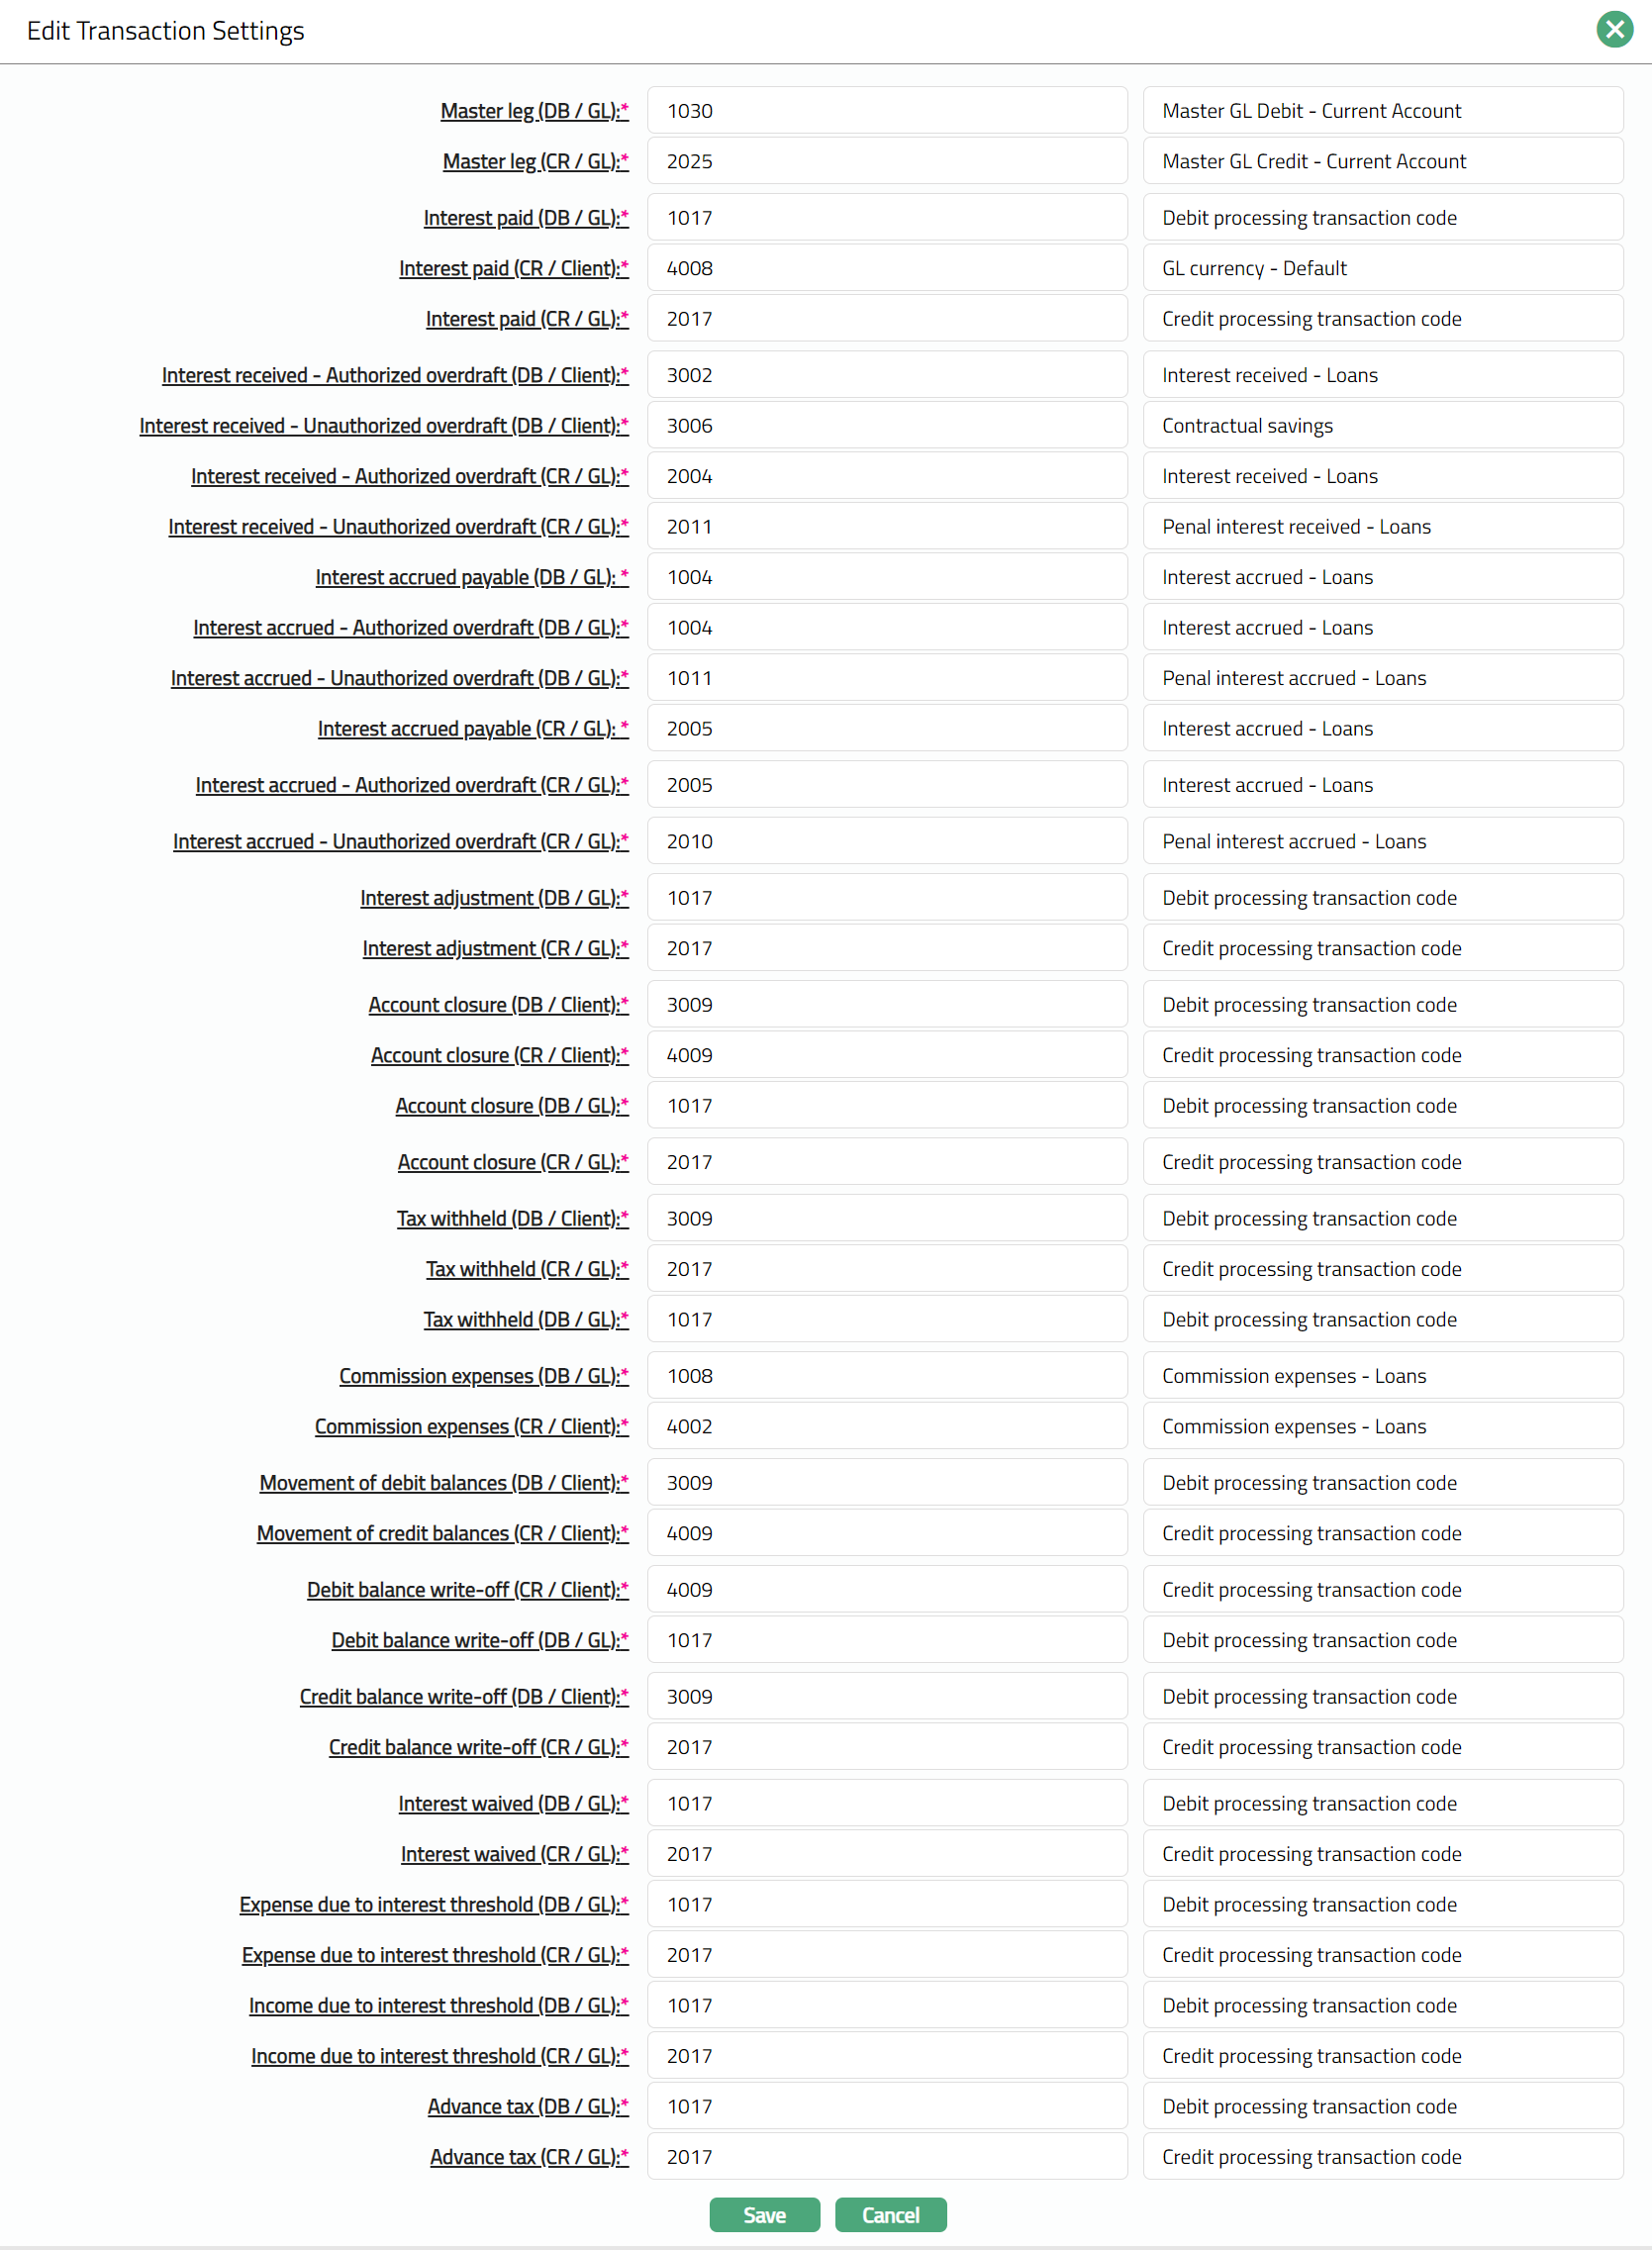
Note: All the fields in Transaction settings are Editable.
3. Click Save. Transaction Settings page appears with the edited details.
Function: Edit
CUSTOM FIELD
Custom Field
This menu option allows you to define fields apart from those that are already available in the standard version of Aura. Thus, it enables you to customize additional data storage and use as required to suit your specific business needs.
To maintain the Custom Field
1. Access Product page. Click Custom Field tab.

2. The custom field(s) appears only when it is created in Admin → System codes → Custom fields → Custom fields and linked to specific Product option in Admin → System codes → Custom fields → Field mappings.
3. Click Edit. The Maintain Custom Field page appears. In the following illustration, custom field called CASA product applicable for is mapped to the Product as shown below:

4. Enter the type of clients for whom the CASA product is applicable for.
5. Click Save. The Custom Field page appears with the edited details.

Function: Edit