Collaterals
Collateral is the pledge of property by a borrower to the lender to secure repayment of the loan. The Collaterals option can be used by the Bank to maintain the guarantees given by the customers that the loans or overdrafts extended to them will be repaid.
The following are the Collateral Types that can be maintained in Aura:
Depending on the type of Collateral, the details to be maintained and the tabs that appear in the Collateral page will change.
Note: All the tabs are explained in detail for the Precious Metal section which is shown below. Thereafter for all the other tab headings in other collateral types please follow the hyperlinks for detailed explanation of the same.
Precious metal
The following tabs appear in the Collateral page if the collateral type is Precious Metal:
To add Precious Metal as a New Collateral,
1. From CRM menu, click Collateral/Limits and then Collaterals. Collateral Search page appears, showing the details of all collaterals created in Aura.
2. Click Add. New Collateral → Select Collateral Type page appears.

3. Select Precious Metal as the Collateral type from the drop-down list.
4. Enter Description of the Collateral

5. Click Next. New Collateral → Precious Metal (1/2) page appears.
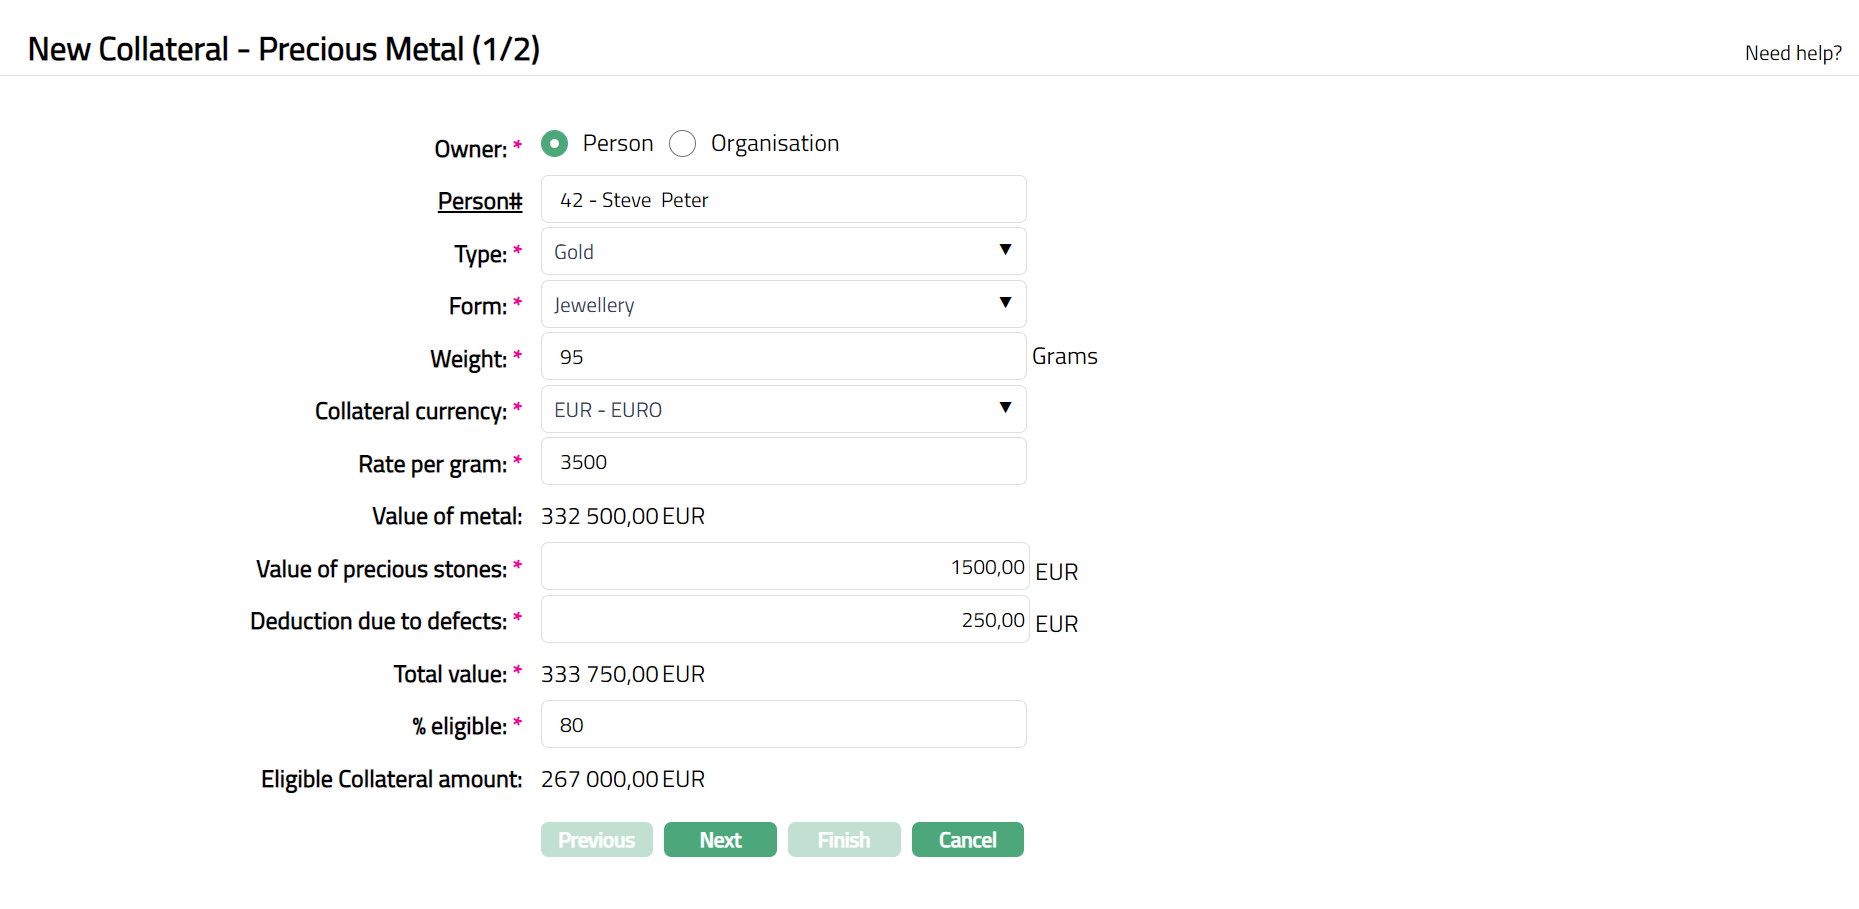
6. Select type of Owner of the Collateral -- if it is owned by a person, select Person; and if it is owned by an organisation, select Organisation.
7. Depending on whether the Owner is chosen as Person or Organisation, you have to enter the Person# or Organisation#.
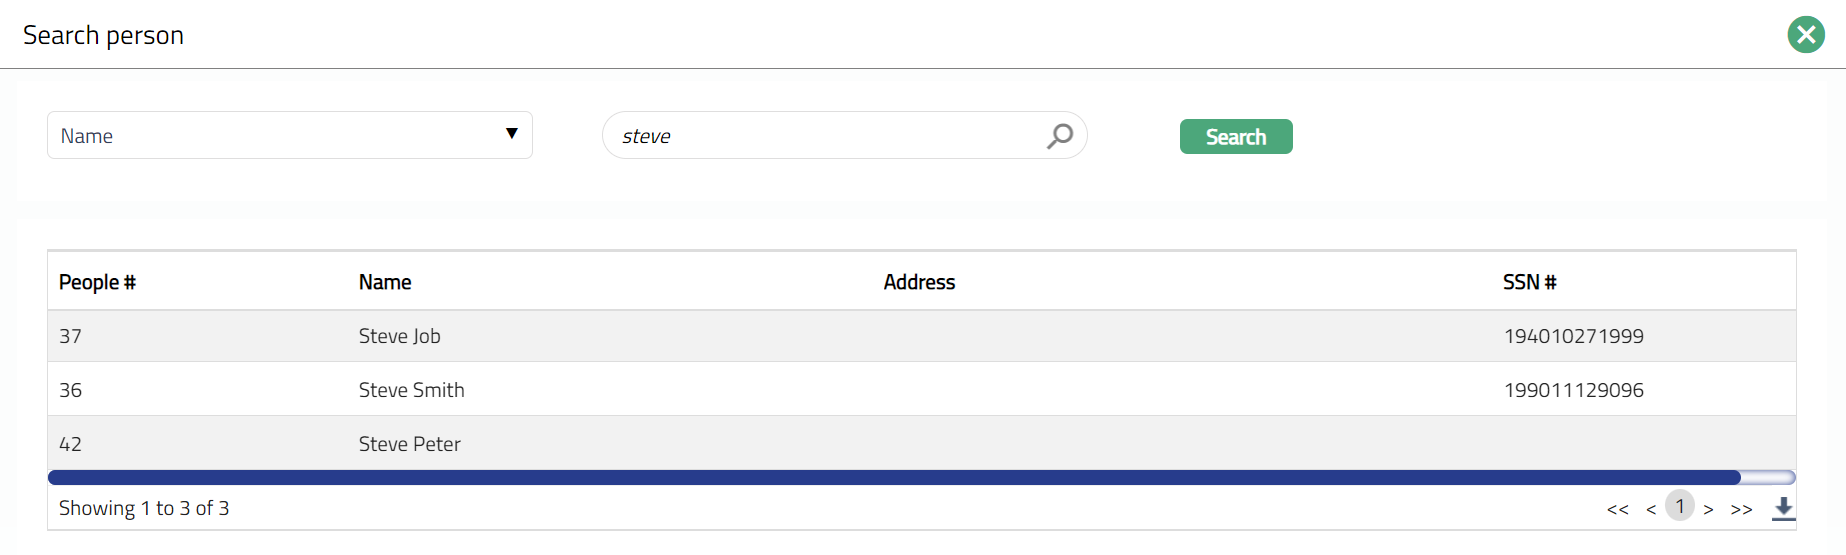
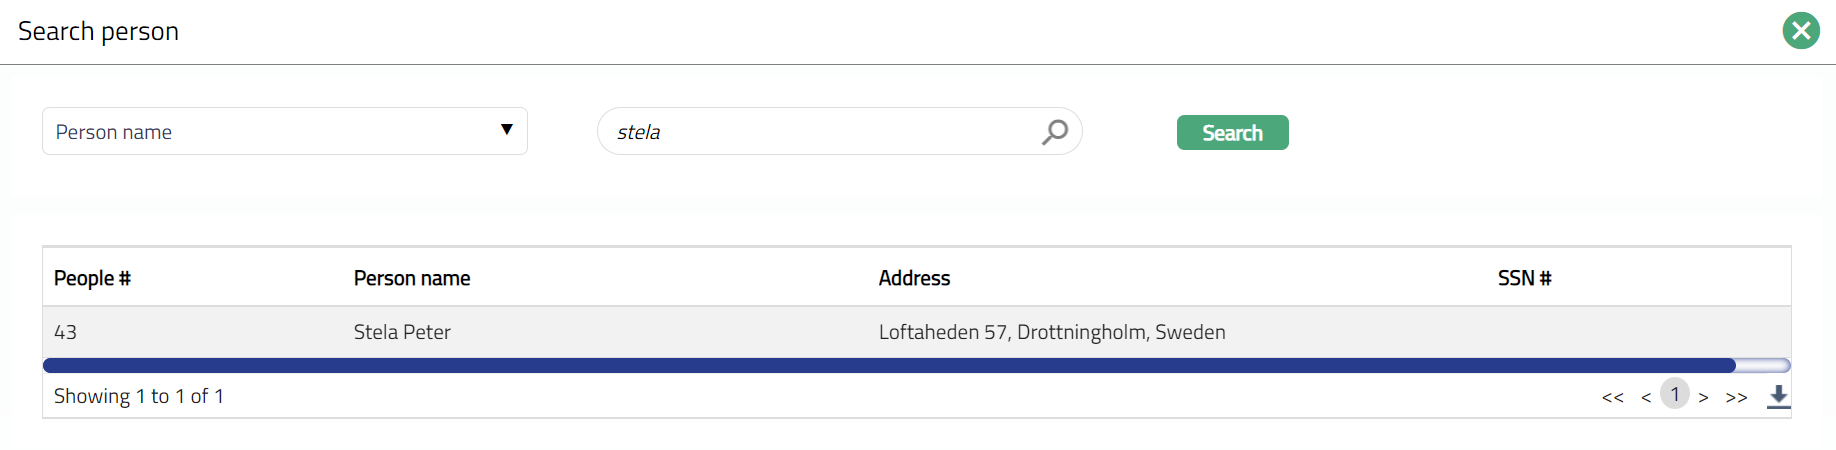
- If the Owner chosen above is a Person, you will have to enter the Person #. Click on the hyperlink to see the list of Persons as maintained in CRM → Person → Maintain or enter the name of the person and select the required person from the list displayed by Aura.
- If the Owner chosen above is an Organisation, you will have to enter the Organisation #. Click on the hyperlink to see the list of Organisations as maintained in CRM → Organisation → Maintain or enter the name of the organisation and select the required organisation from the list displayed by Aura.

8. Input Type of the Precious Metal by selecting one of the pre-shipped values from the drop-down list. The Available options are:
Gold
Silver
Platinum
Rare earth metals
9. Enter Form of the Precious Metal from the pre-shipped values available in the drop-down list. The options available are:
Raw
Casted
Jewelry
Objects
10. Enter Weight of the Collateral (Precious Metal) in grams.
11. Enter Collateral currency. Choose from the dropdown list of active GL currencies.
12. Input Rate per gram of the Collateral.
13. Value of the Precious Metal is calculated automatically by Aura using the formula Rate per gram * Weight.
14. Enter Value of precious stones (if any) present in the Collateral.
15. Input value of Deduction due to defects in the Collateral.
16. Total value of the Collateral is derived by Aura as Value of metal plus Value of precious stones minus Deduction due to defects.
17. Indicate what proportion of the Collateral value is eligible for securing in % eligible. You can enter any value from 1 to 100.
18. Based on the Value and the % eligible, Aura calculates the Eligible collateral amount.
19. Click Next. New Precious Metal Collateral → Confirmation (2/2) page appears.
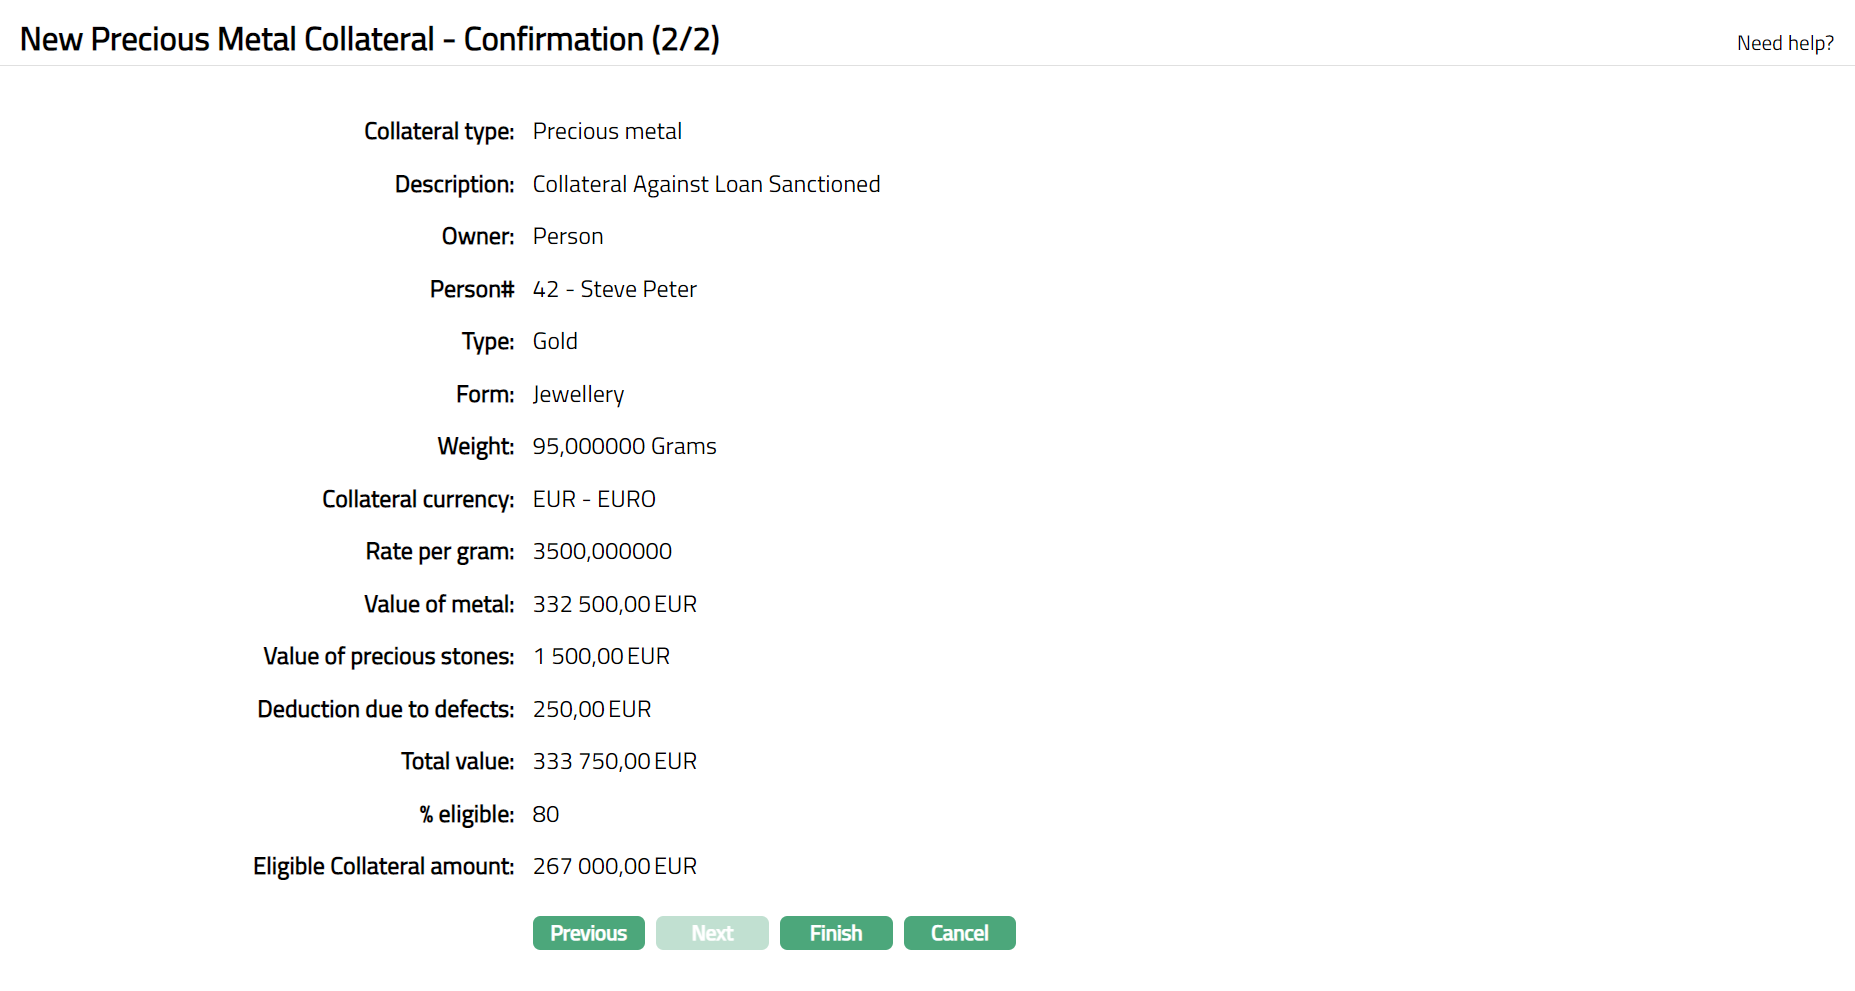
20. Click Finish. Collateral record is created with a unique Collateral id and the Collateral page appears showing the Profile tab by default.
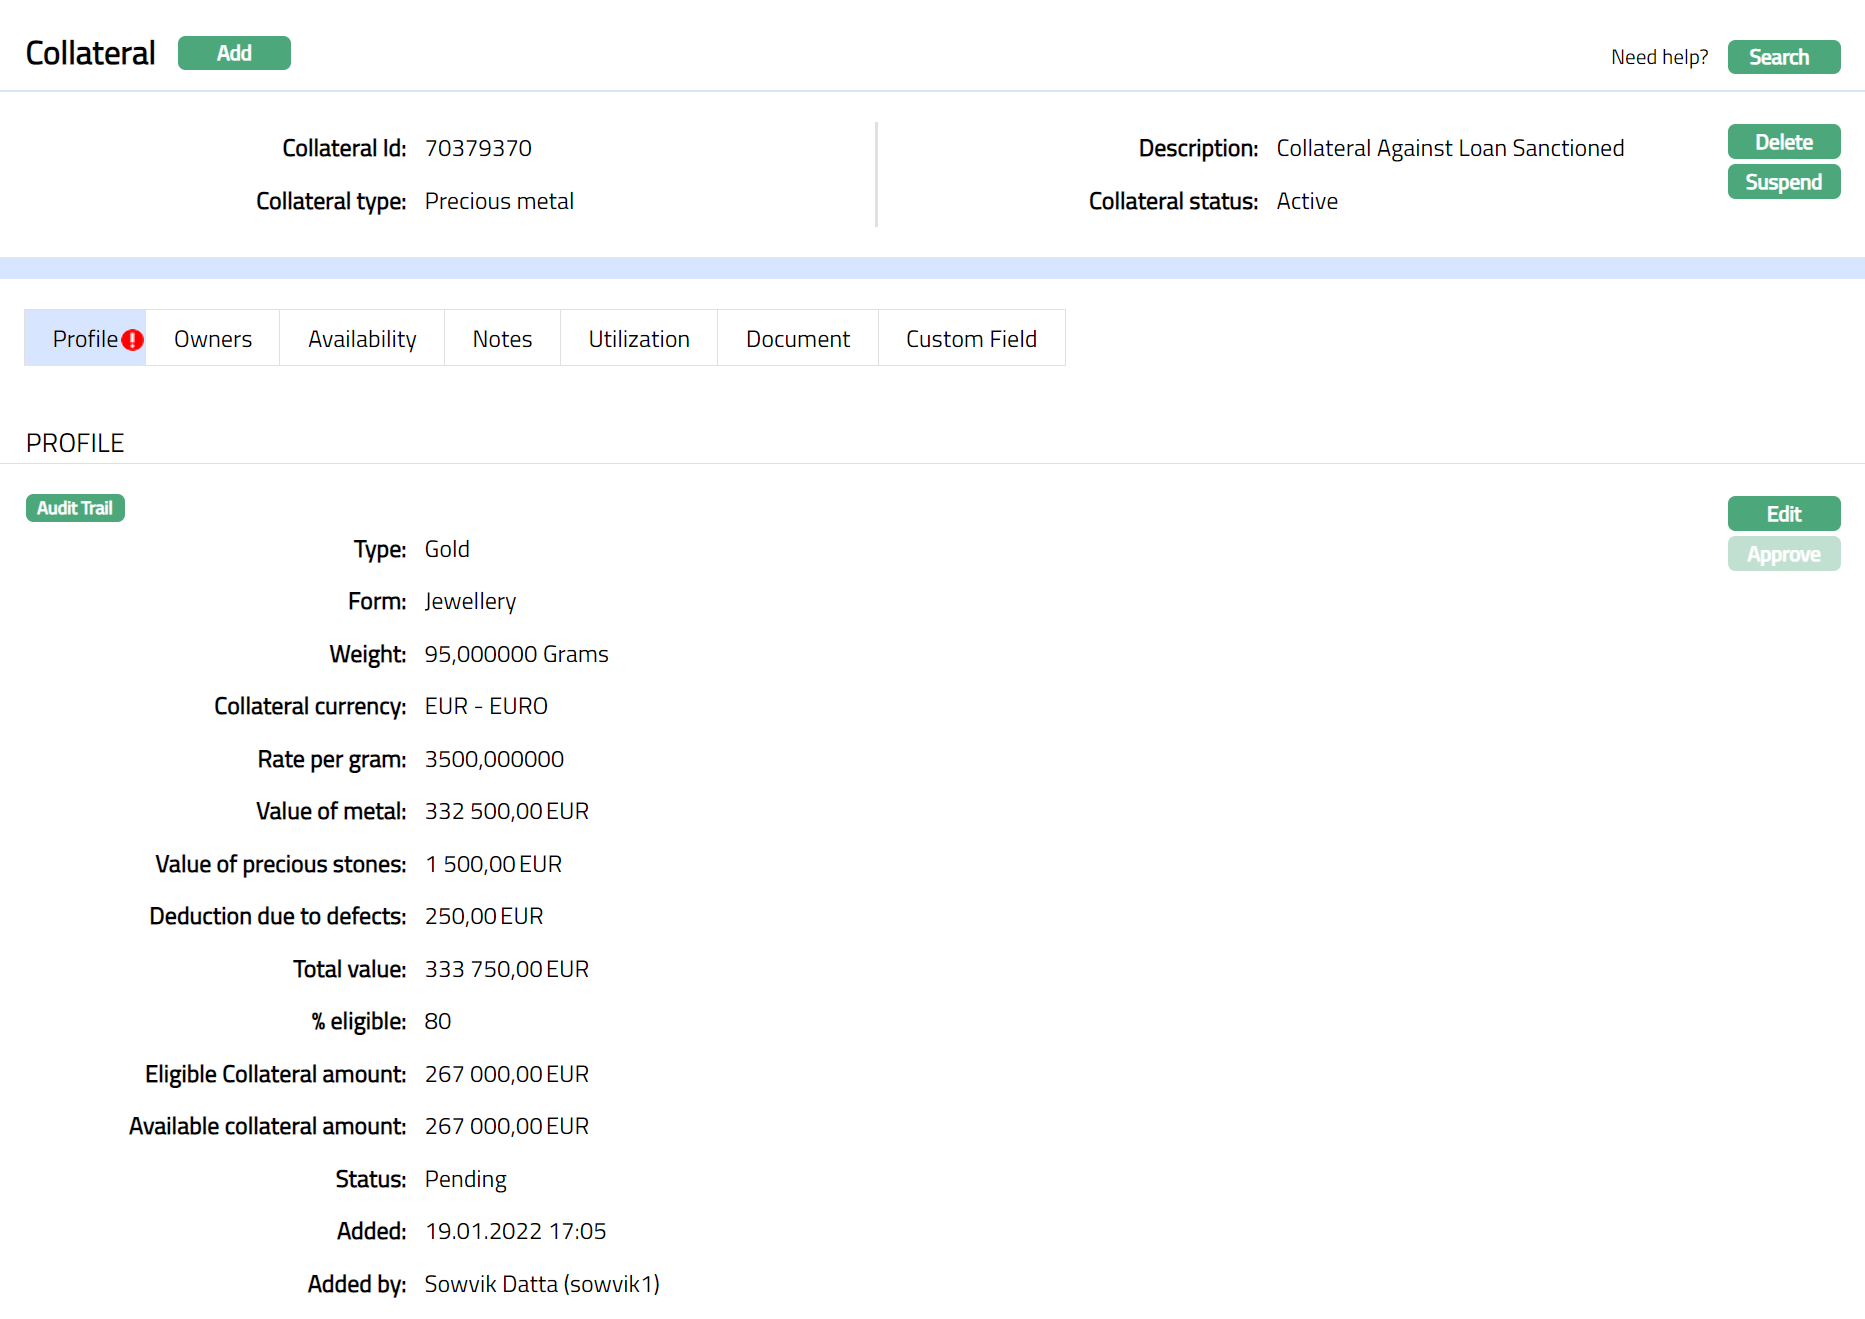
Note: On creation of the Collateral record, the Collateral Status is Active, and the record status will be Pending. Any user other than the one who created the Collateral record can approve the record.
Functions: Add, Search, Delete, Suspend, Activate, Edit, Approve.
Approve: Any user other than the one who created the Collateral record can approve the record. To approve, retrieve the Collateral record and click on Approve. Aura will ask for confirmation. Once confirmed, the record status becomes Approved.
Suspend: You can suspend the Collateral by clicking on Suspend button. When you click on Suspend button, Aura displays an alert message. On confirmation, Aura will suspend the Collateral. Once the Collateral is suspended, it becomes unavailable in the drop-down list while securing any contract / account in other modules in Aura.
Activate: You can activate a Suspended Collateral by clicking on Activate button. When you click on Activate button, Aura displays an alert message. On confirmation Aura will activate the Collateral. Once the Collateral is activated, it becomes available in the drop-down list in other modules.
Note: If the custom field is mapped to Collateral under Admin → System Codes → Custom fields → Field mapping, then an additional screen will appear before the confirmation screen. The custom fields will be mandatory or non-mandatory based on the rules set at the Field mappings. For more detail on custom field functionality please refer Admin → System codes → Custom fields → Field mappings manual.
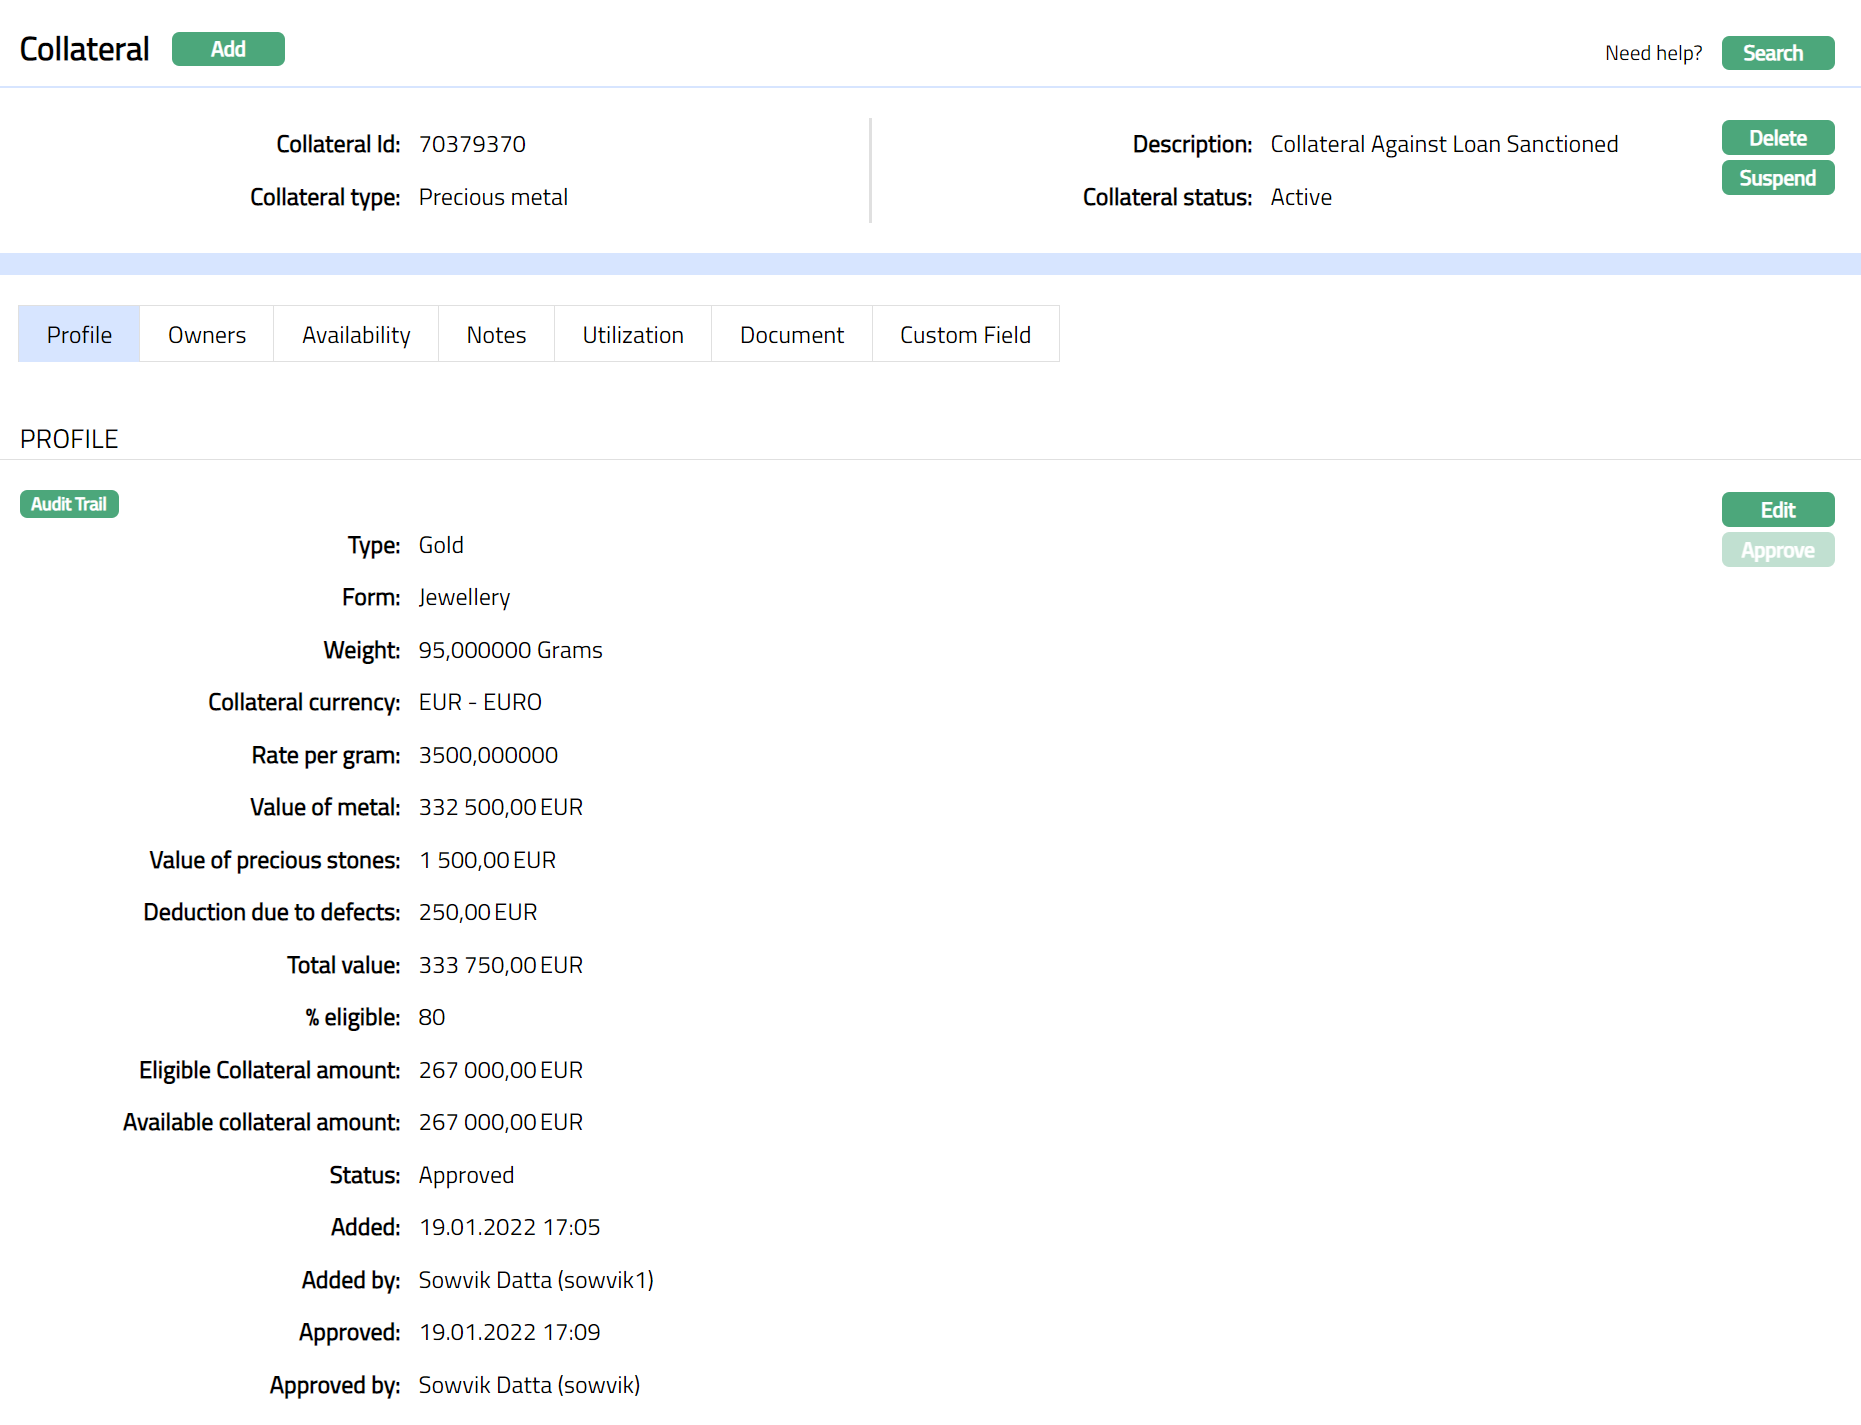
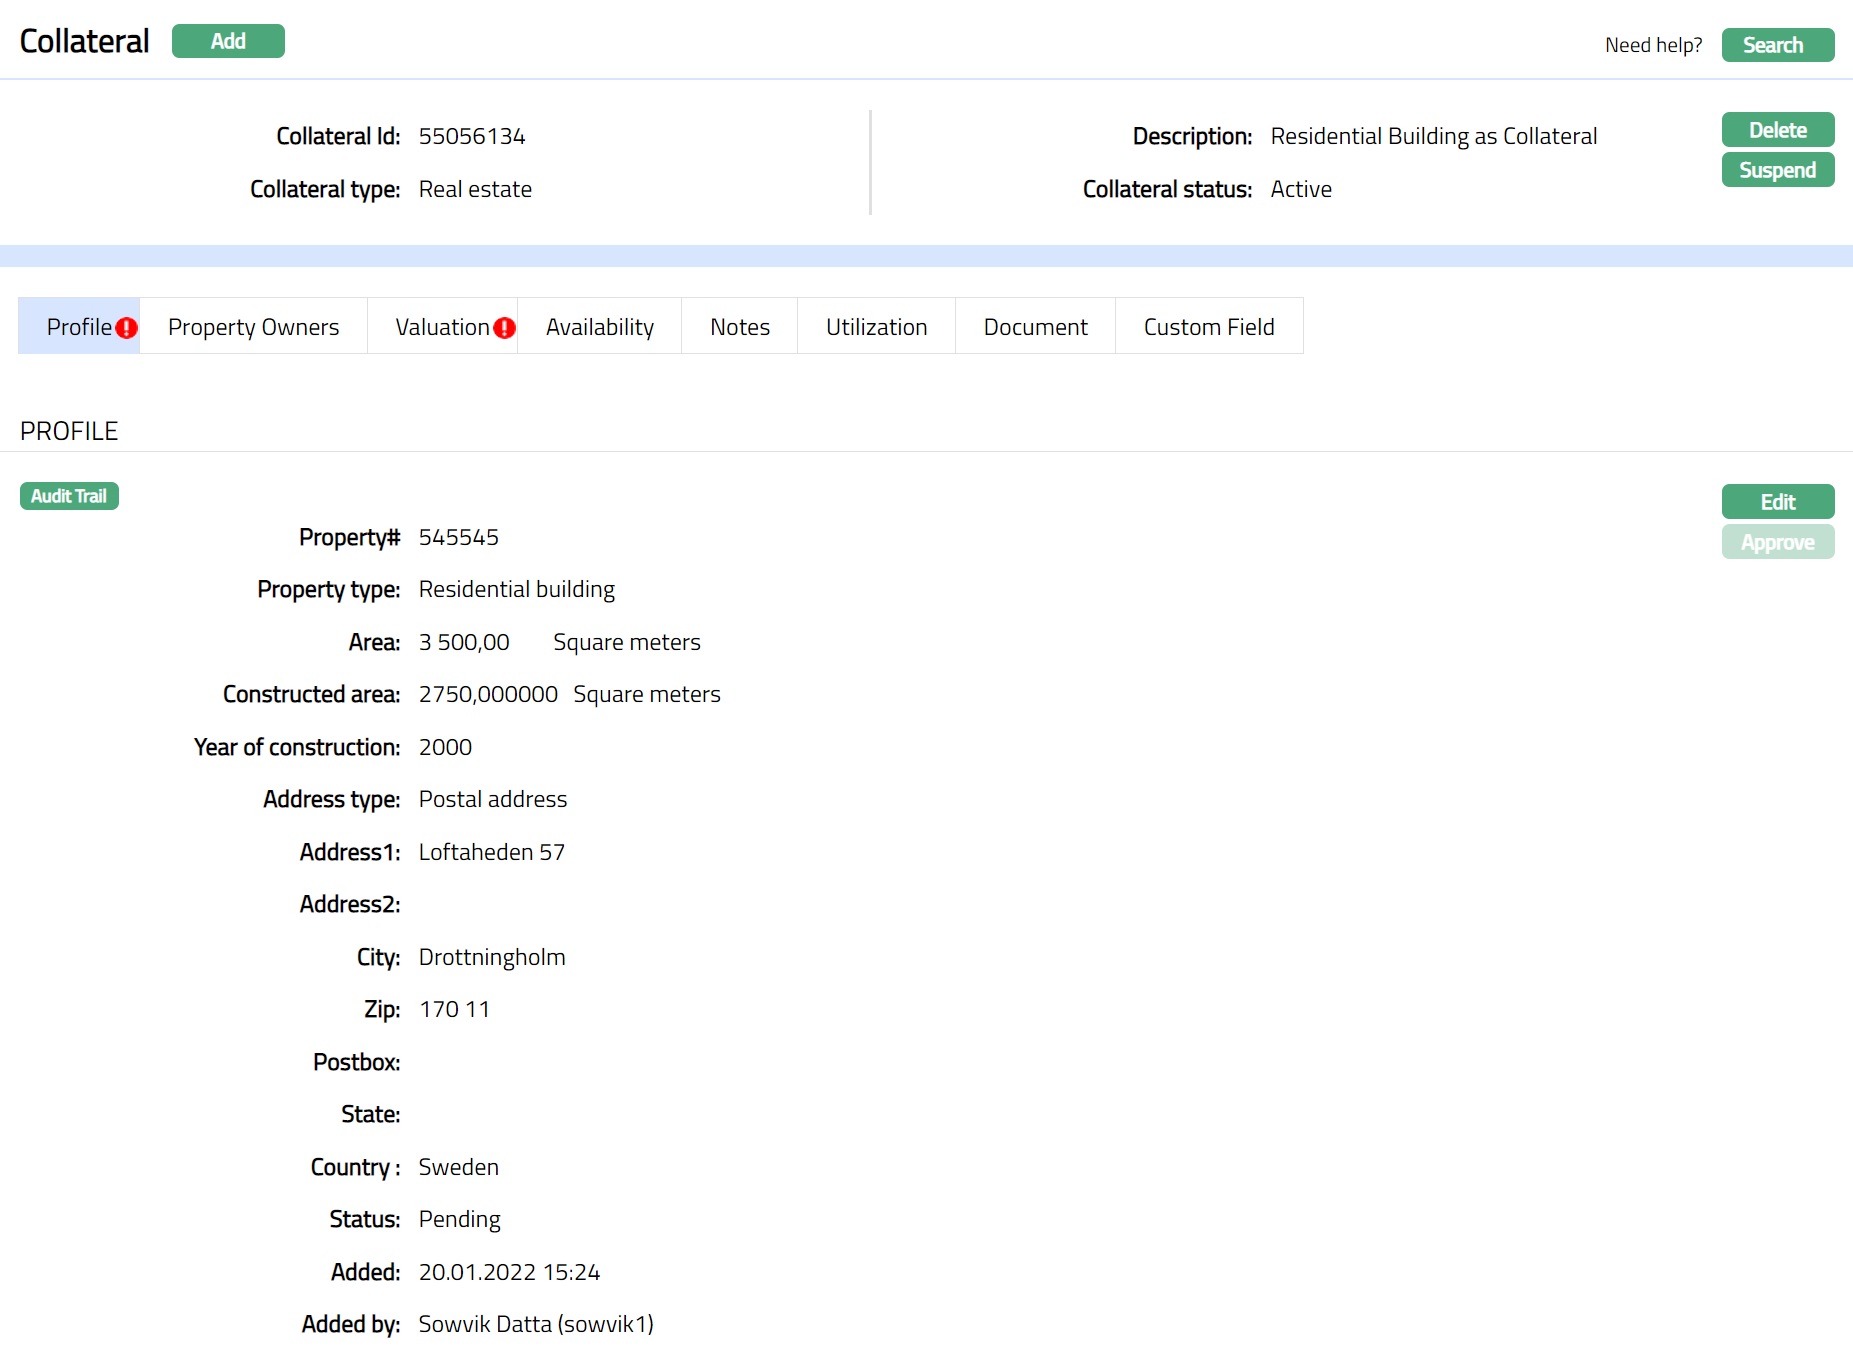
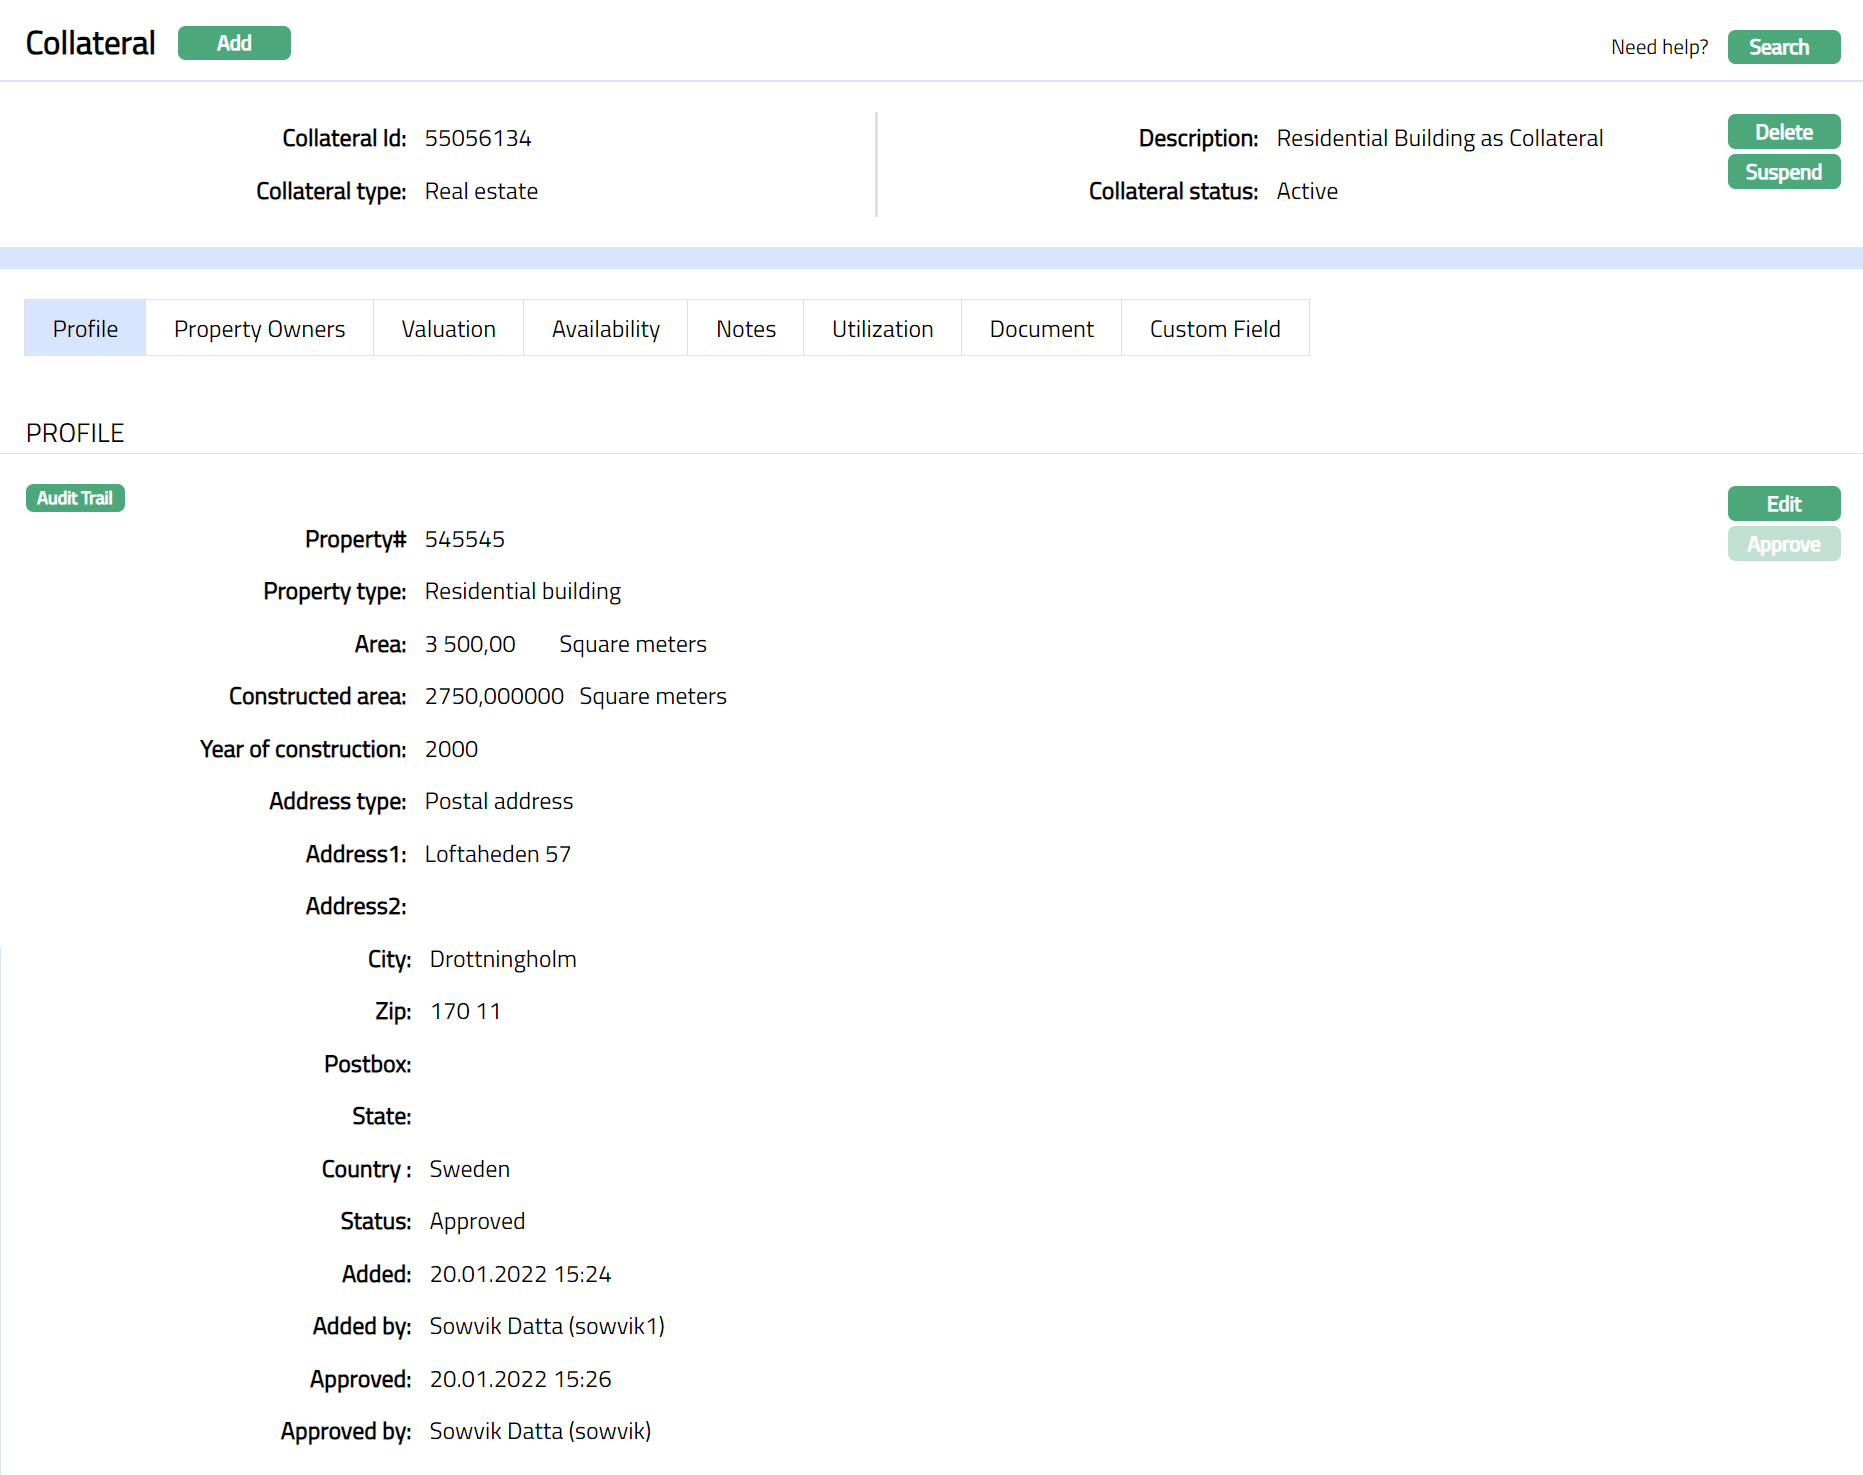
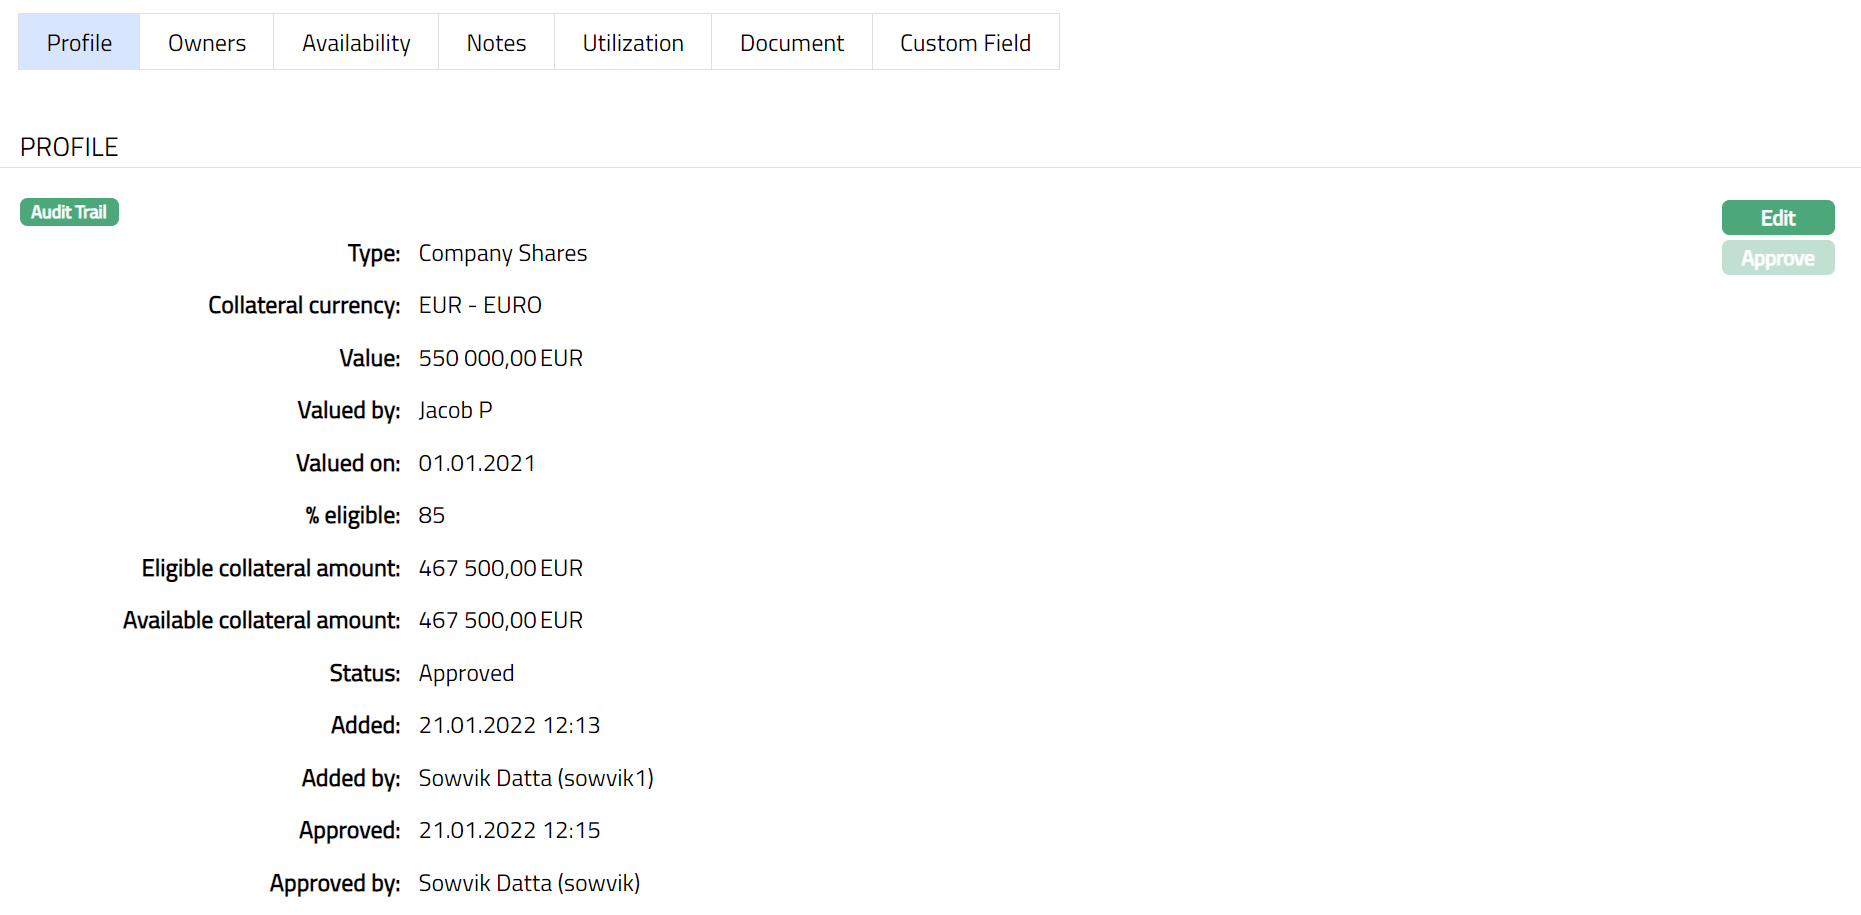
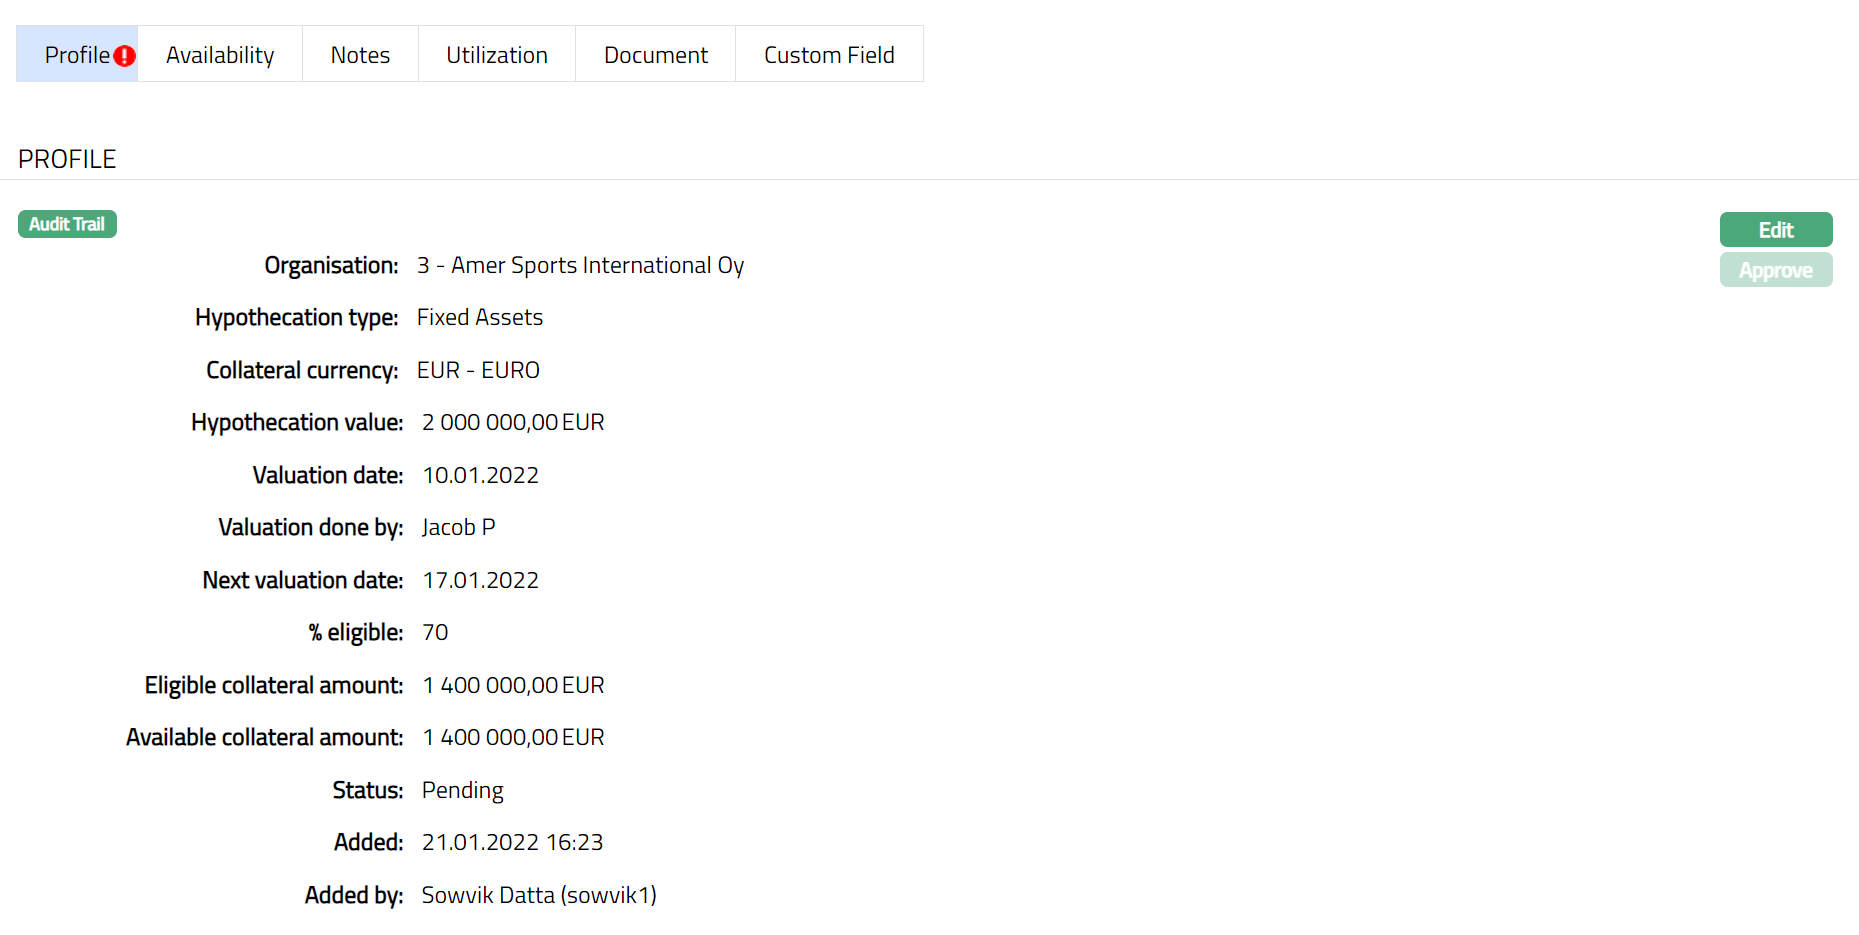
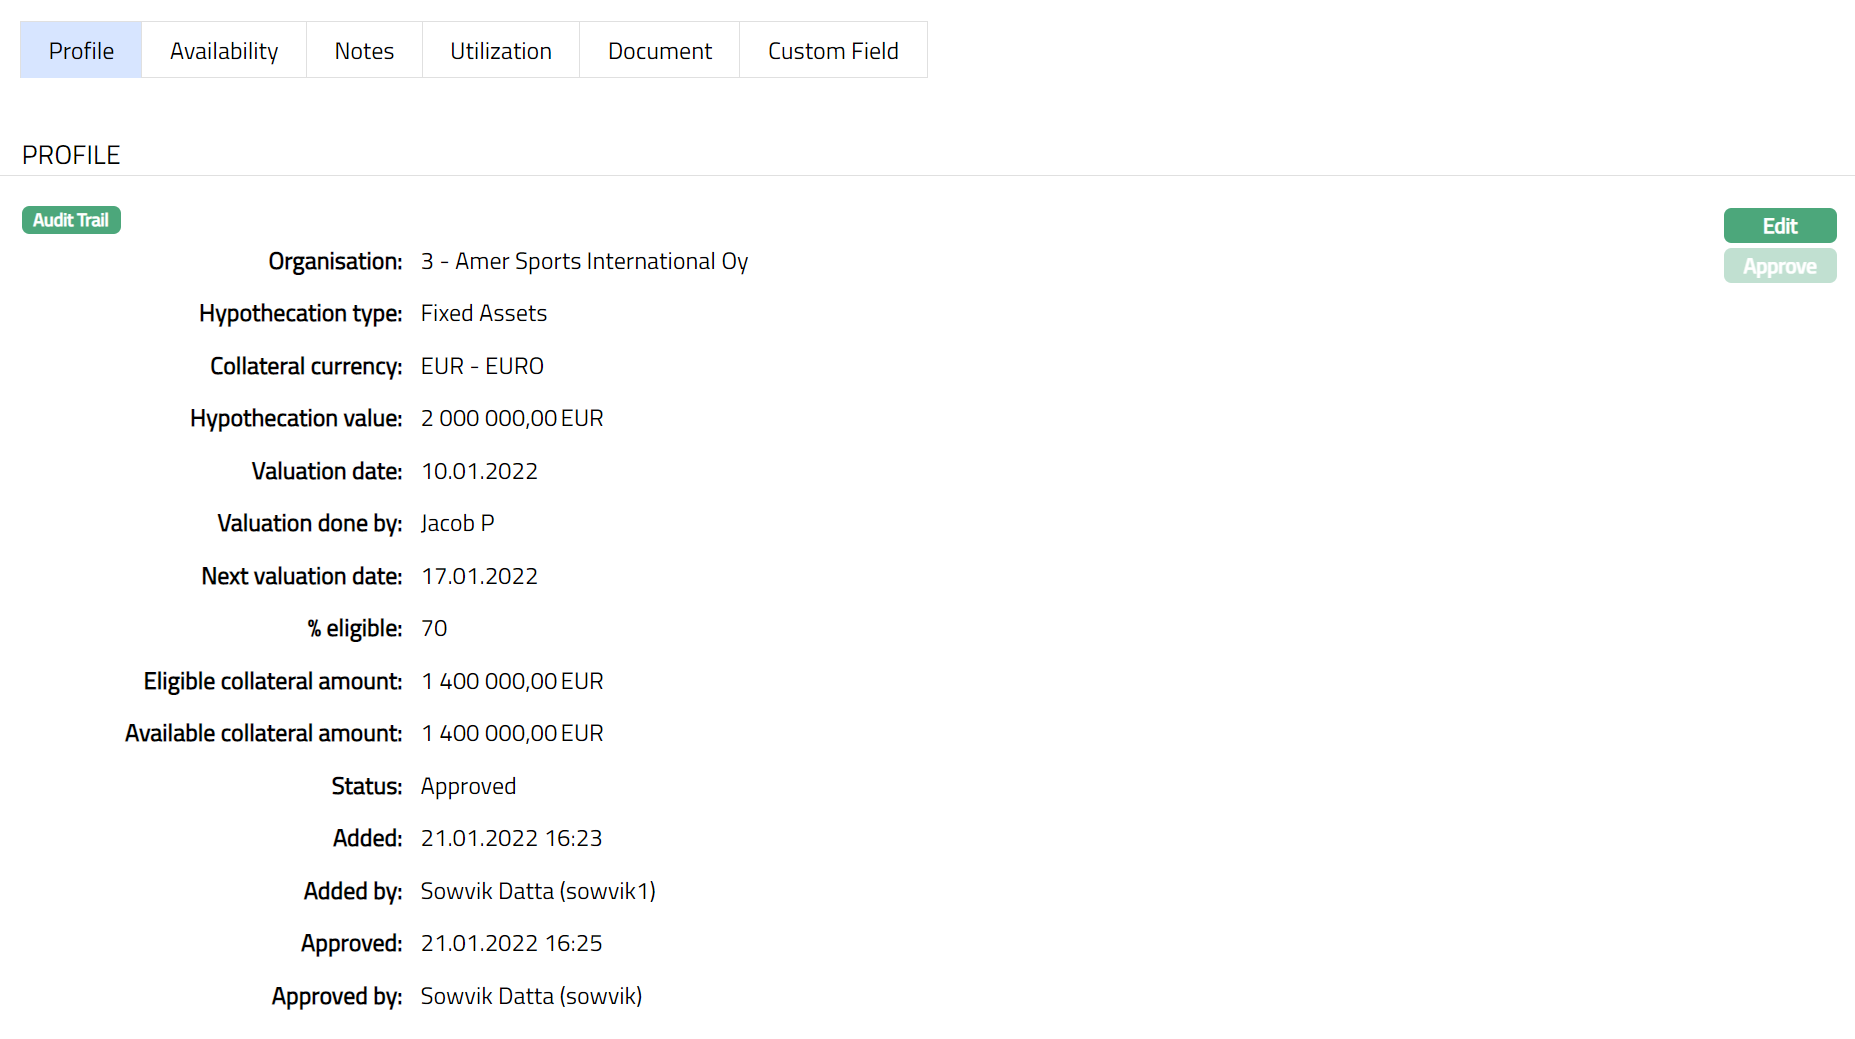
Profile
Profile tab displays the basic details of the Collateral entered during the creation of the Collateral.
To view / edit Profile tab,
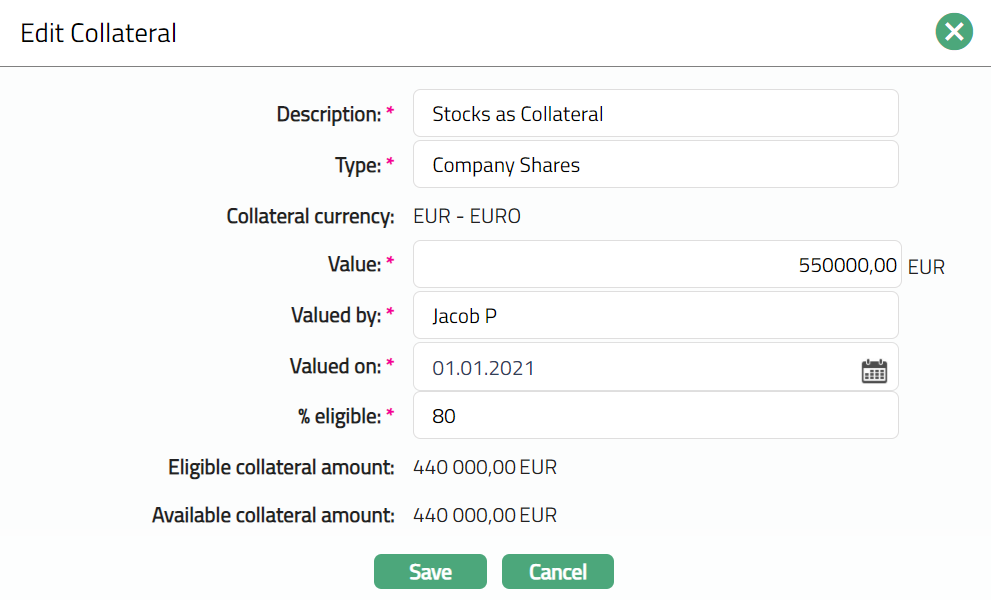
1. Access Collateral page. Click Profile tab to view the details as per sample below. The details are defaulted from the entries that you made during Collateral creation. For details refer to New collateral → Precious metal (1/2).
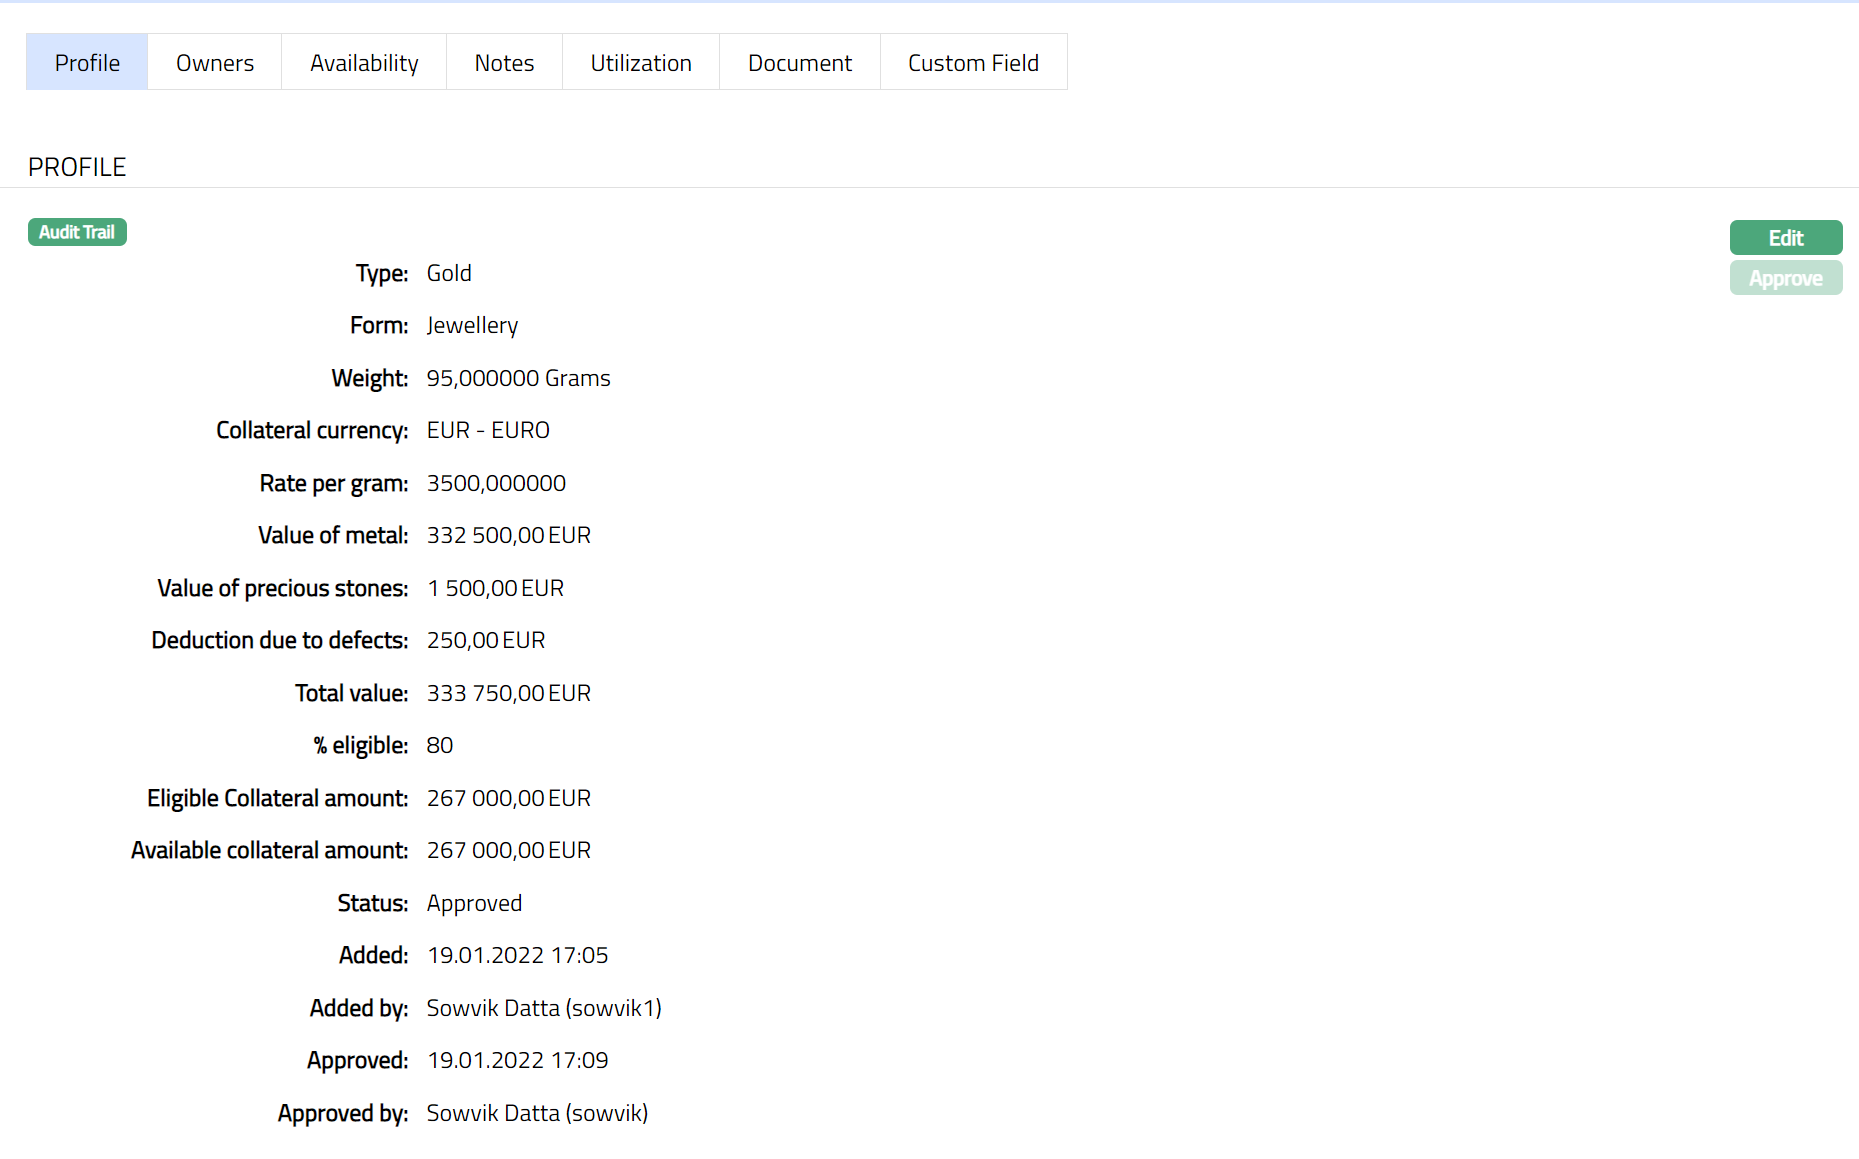
2. Click Edit. The Edit Collateral screen appears as shown below.

3. Description, Rate per gram, Value of precious stones, Deduction due to defects, and % Eligible are editable and all the other fields are non-editable.
4. Enter details as required in the editable fields.
5. Click Save. Profile page appears with the edited details.
Functions: Edit, Approve.
The additional fields that you can view in the Profile tab are explained below:
Status field denotes the status of the record.
Added field denotes the date on which the record was added.
Added by field denotes the name of the user who created the record.
Approved field denotes date on which the record was approved and is displayed only on approval.
Approved by field denotes name of the user who approved the record and is displayed only on approval.
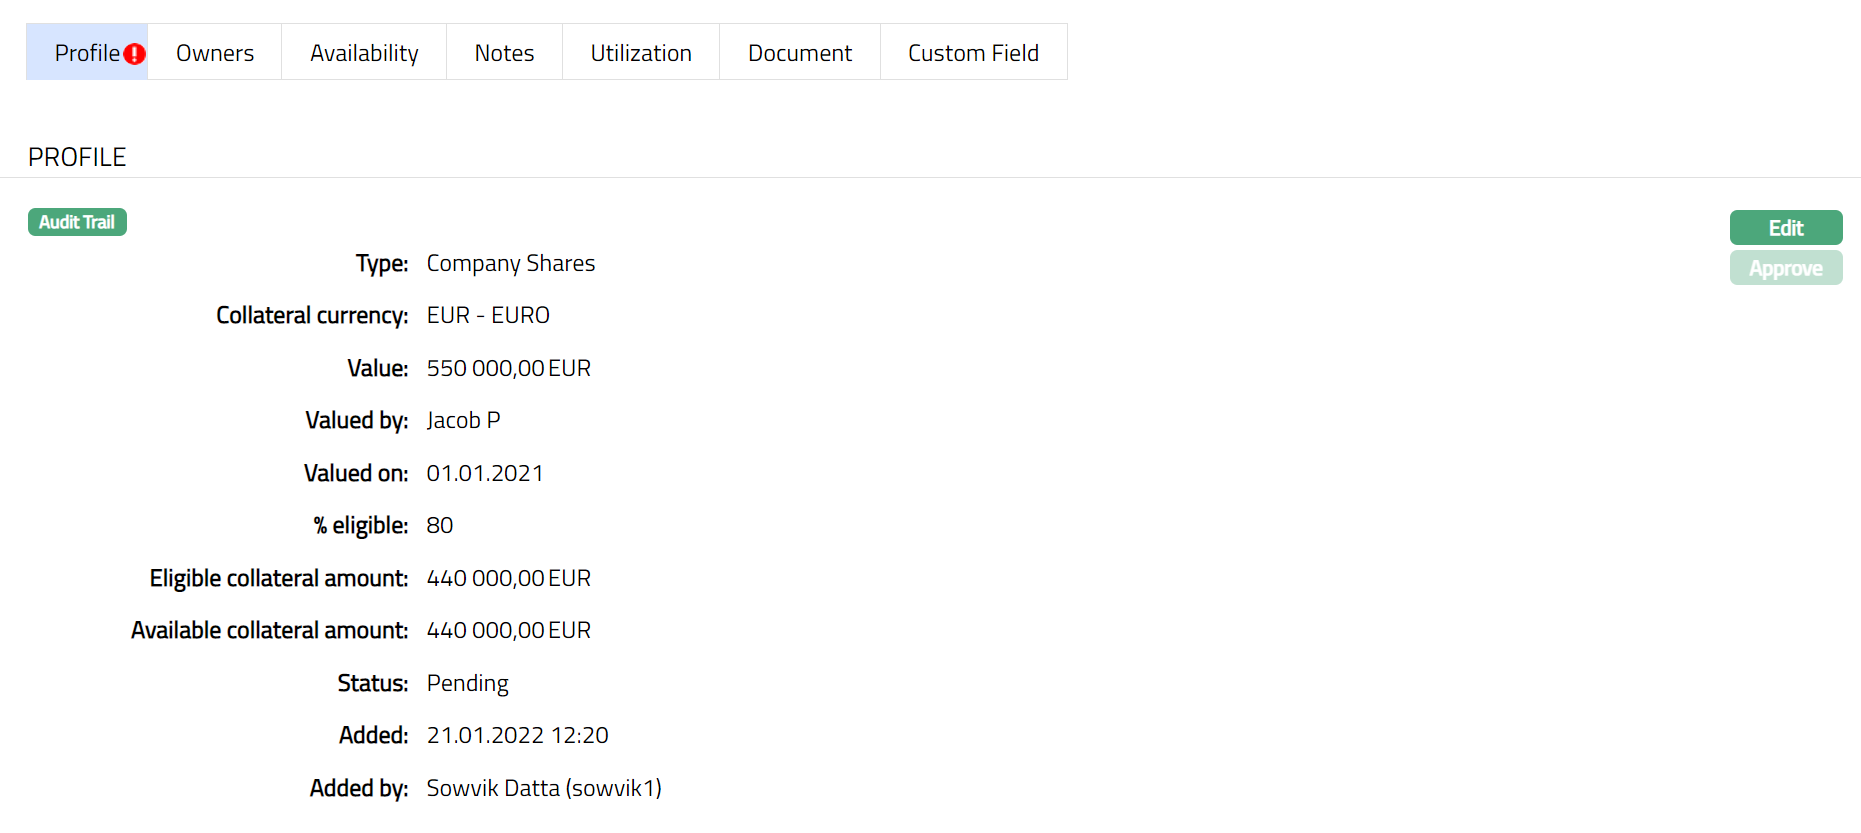
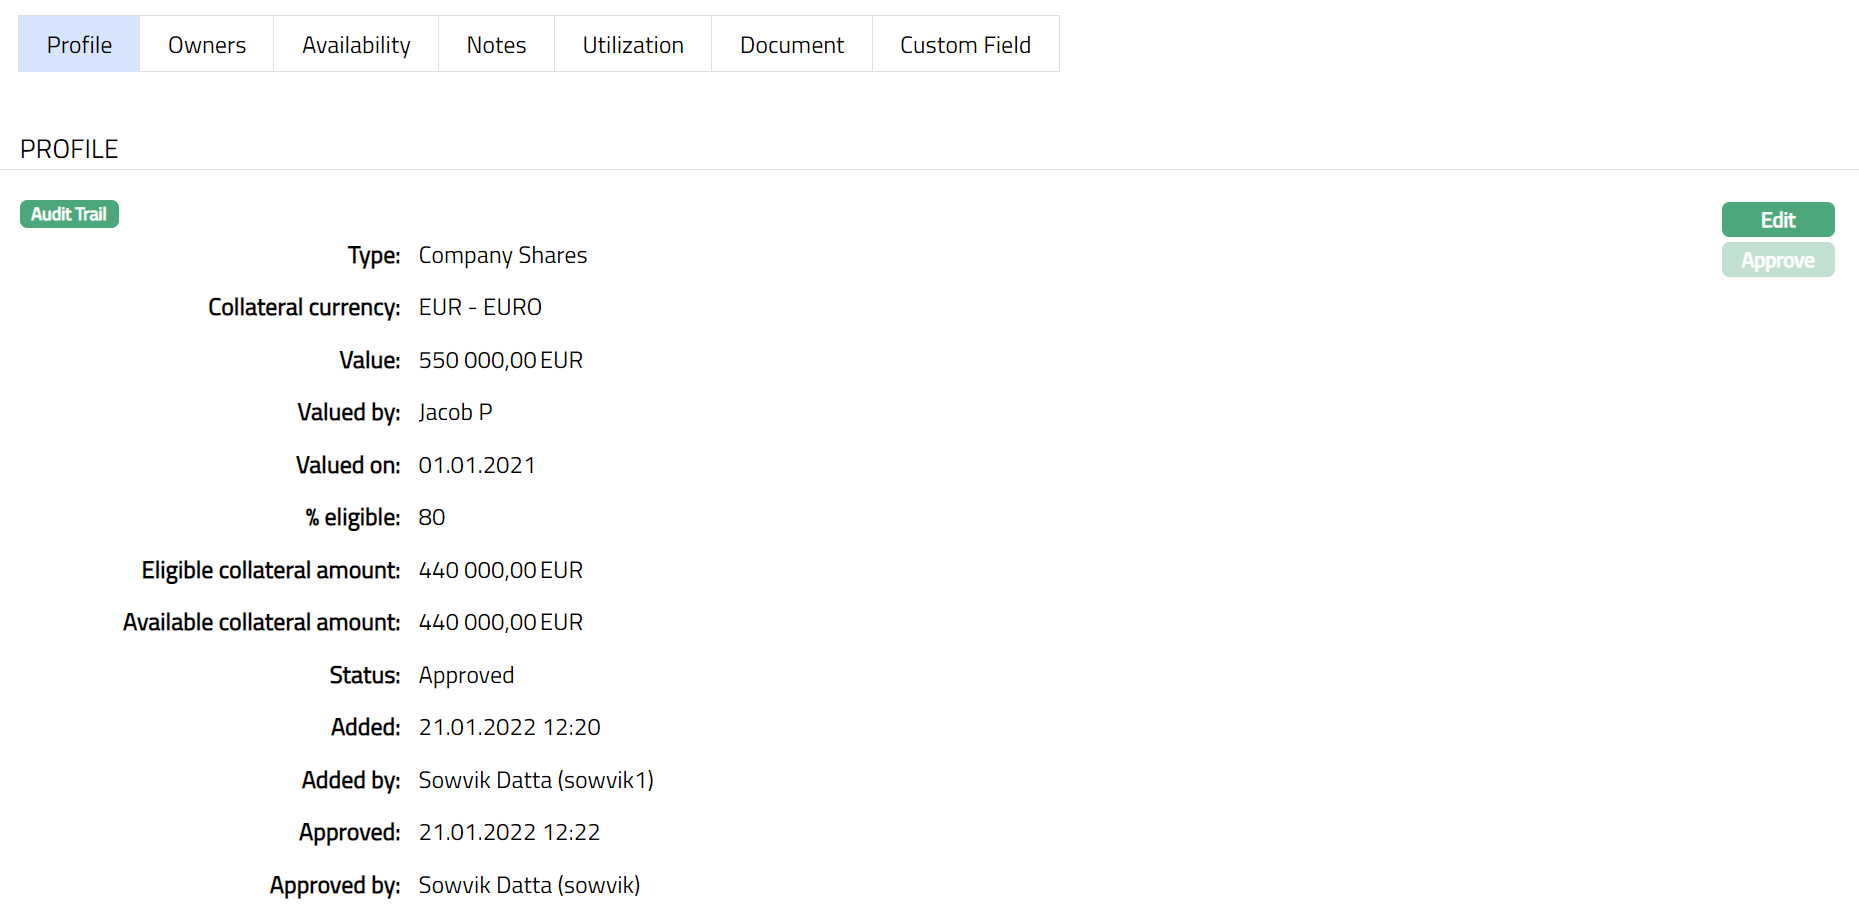
Note: Any change in the tab will set the record status to Pending till it is approved by another user. On approval, the record status is set to Approved and the red bubble disappears.
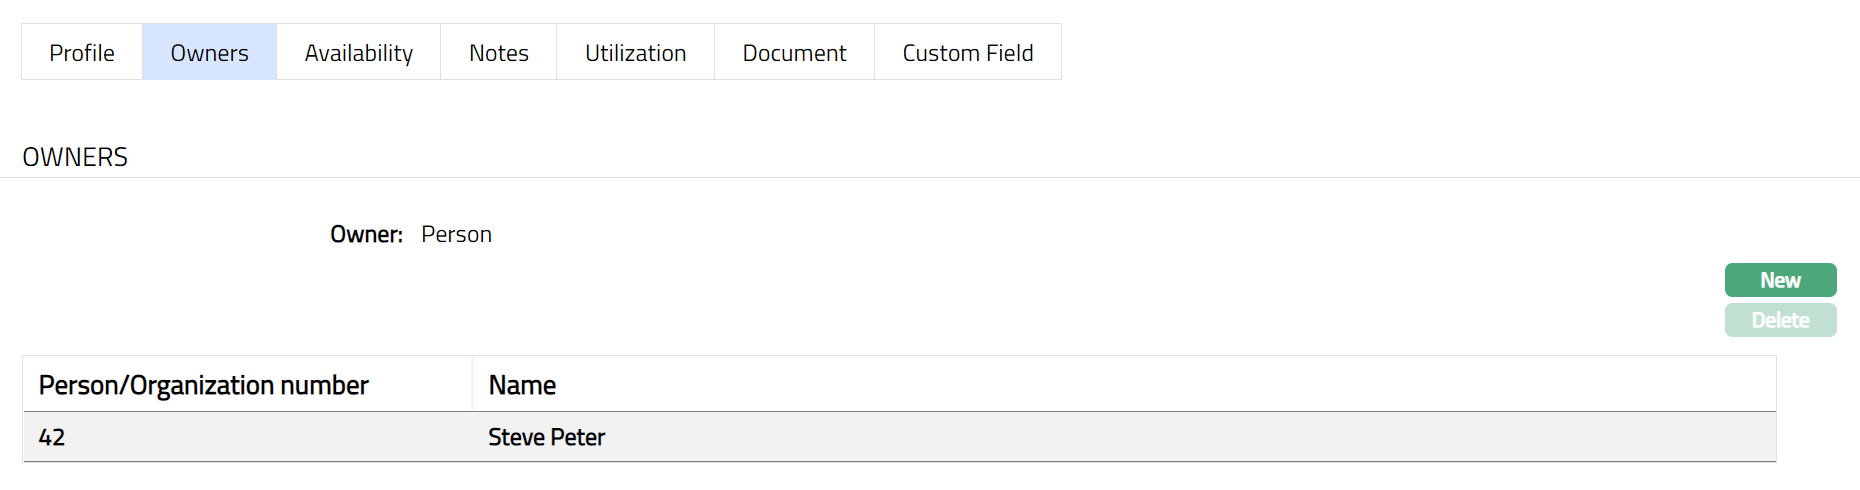
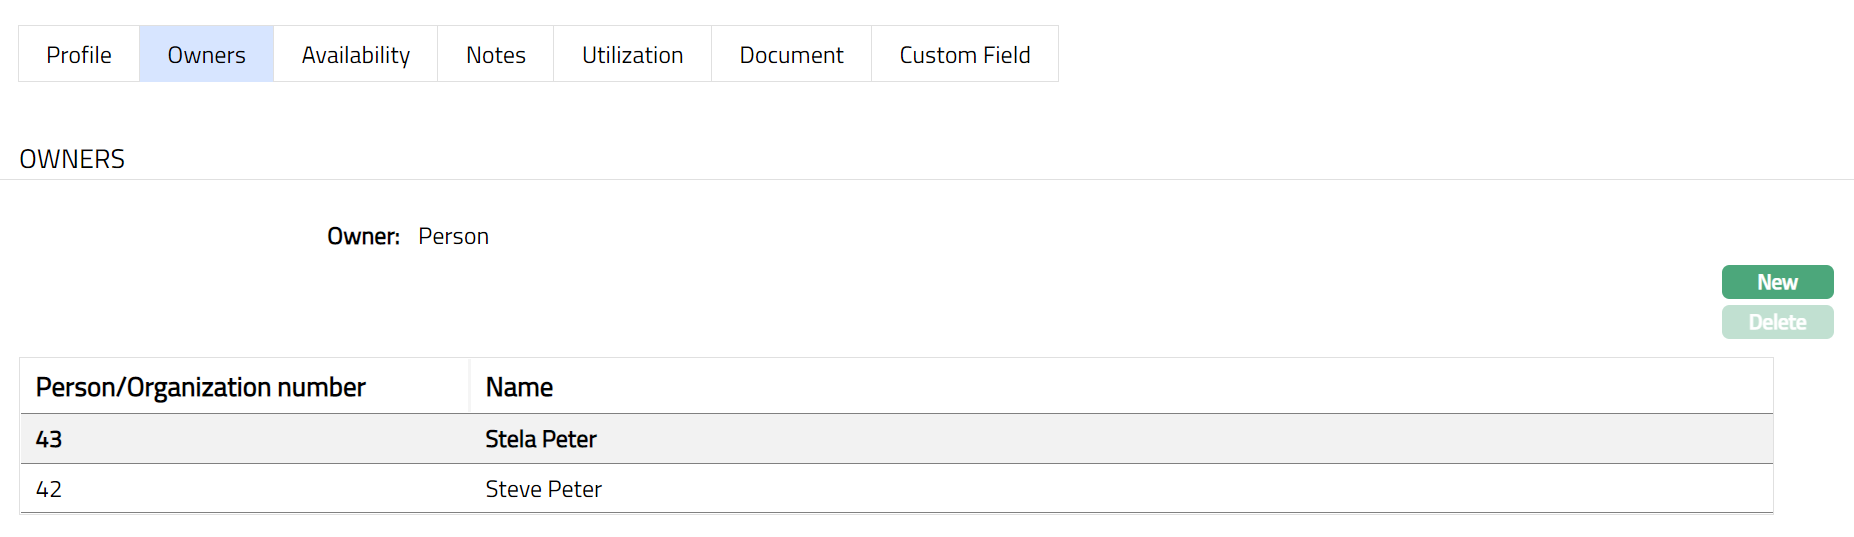
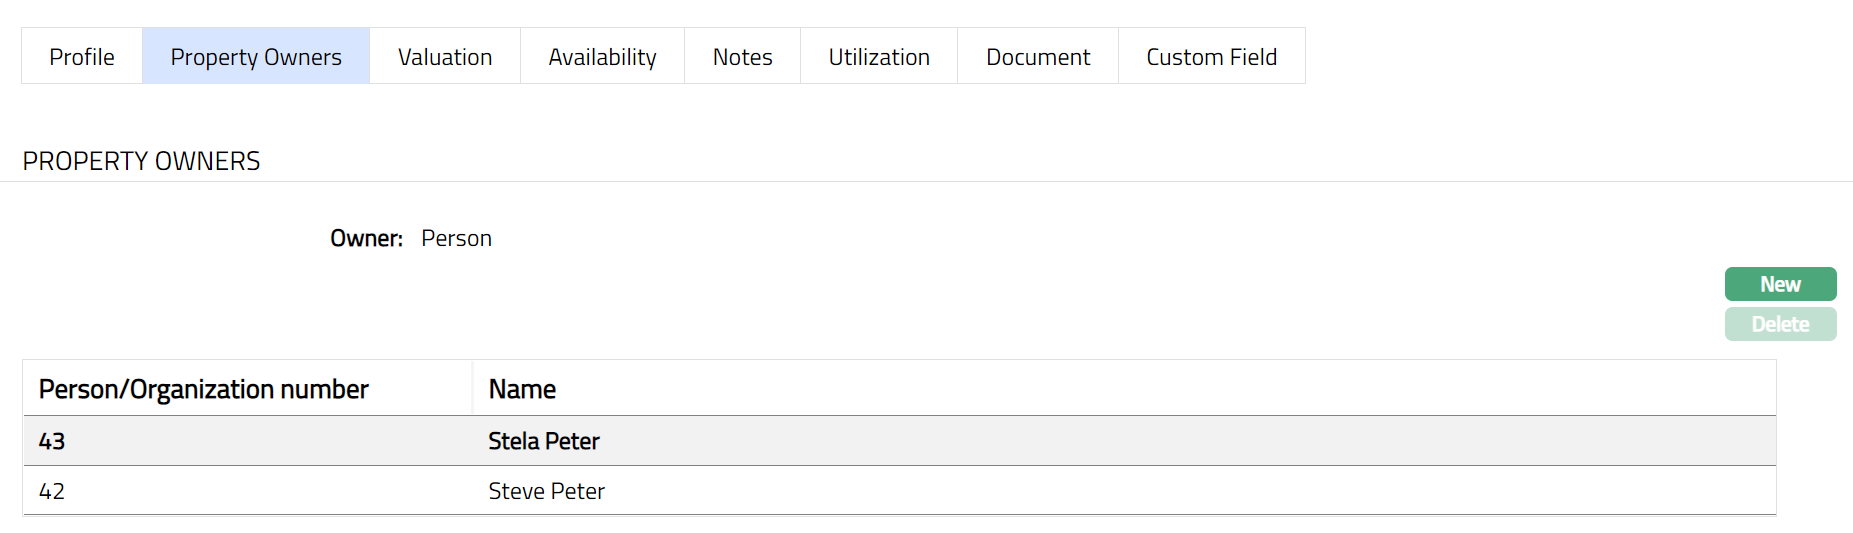
Owners
You can add / view / maintain the details of the Owner (Person / Organisation) of the collateral using this tab. The Owner Type will be Person or Organisation based on your selection during Collateral creation.
To add / view / edit Owners,
1. Access Collateral page. Click Owners tab to view the details as per sample below. The details are defaulted from the entries that you made during Collateral creation. For details refer to New Collateral → Precious metal (1/2).
2. Click New. New Owner screen opens up as shown below.
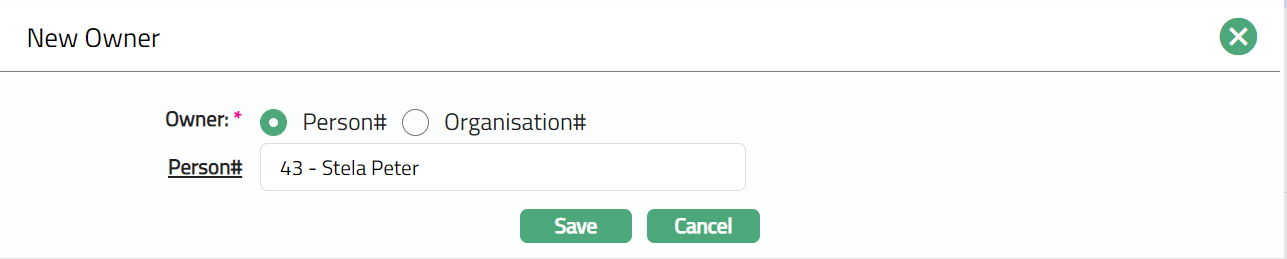
3. Add New Owner details by selecting from the list of person / organisation Names.
4. You can choose Owner type by clicking the appropriate radio button.
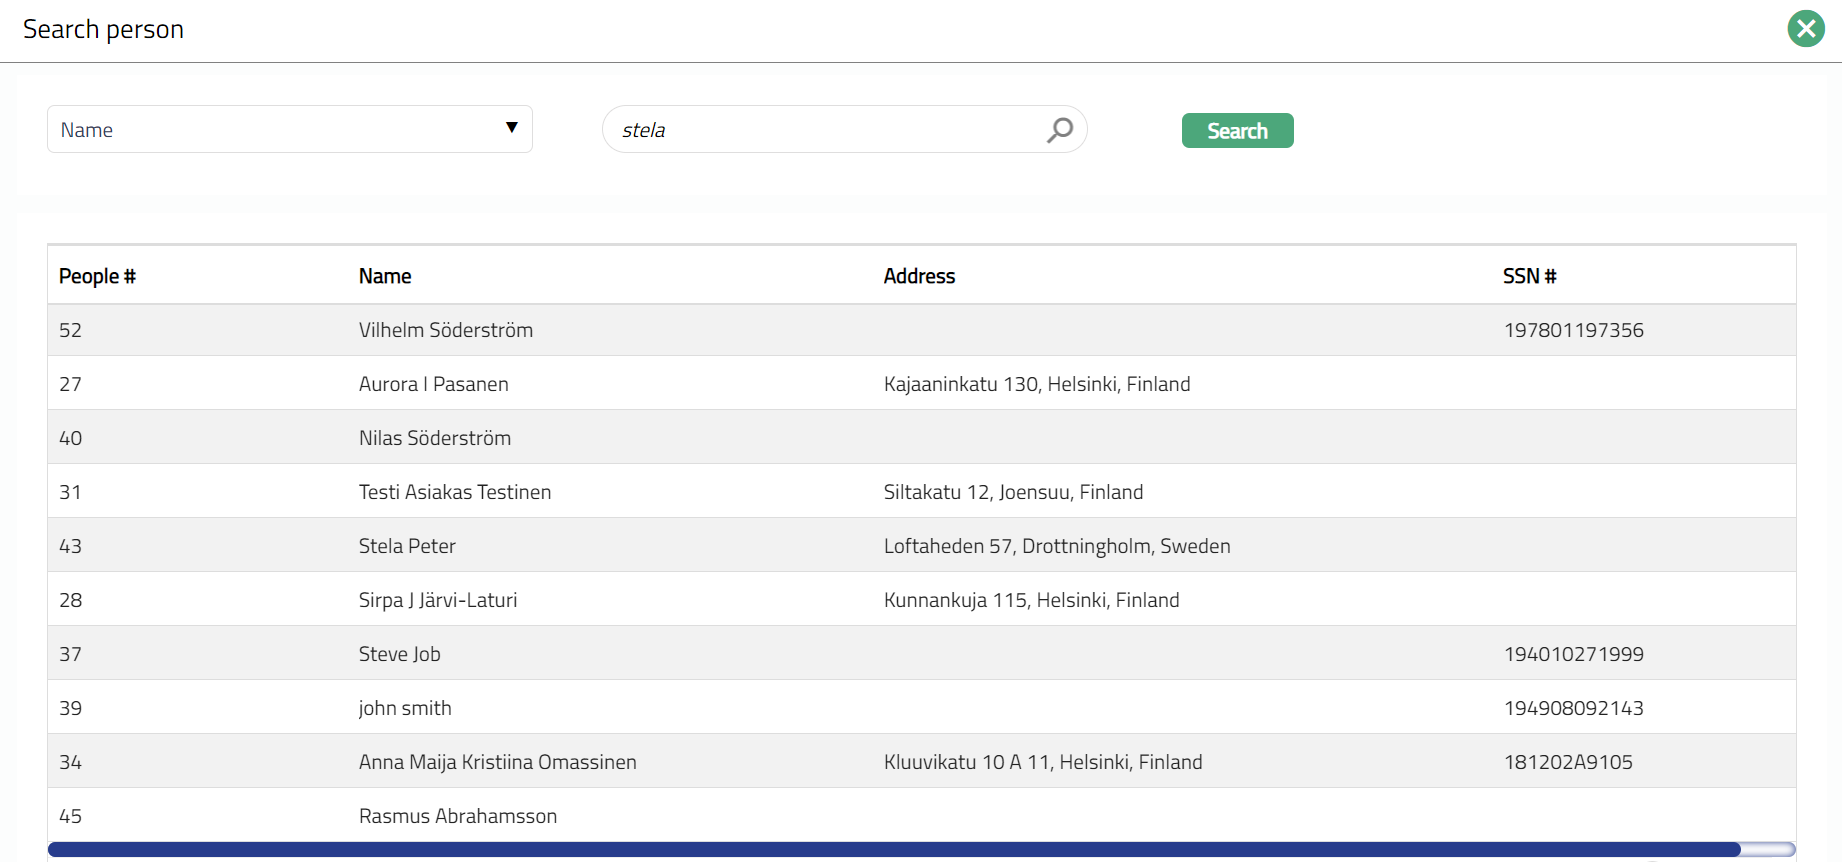
5. Depending on your choice of Owner type, Person# / Organisation # field opens up. Click the hyperlink and you will see the Person Search or Organisation Search screen. Select the required Person / Organisation as per your requirement. A Sample of the updated page is shown below.
6. Click Save. Owner page apears with the added details.
Functions: New, Delete.
Delete: You can delete any person/organisation saved in Aura by a click on Delete button. Aura will ask for confirmation, on approving which the selected person/ organisation record will be deleted.
Note: If Collateral has only one owner mapped at a time, then Delete button will be in disabled mode.
If Collateral has more than one Owner mapped then Delete button will be in enable mode and on selection of any record and on click of Delete button, Aura will delete that collateral owner.
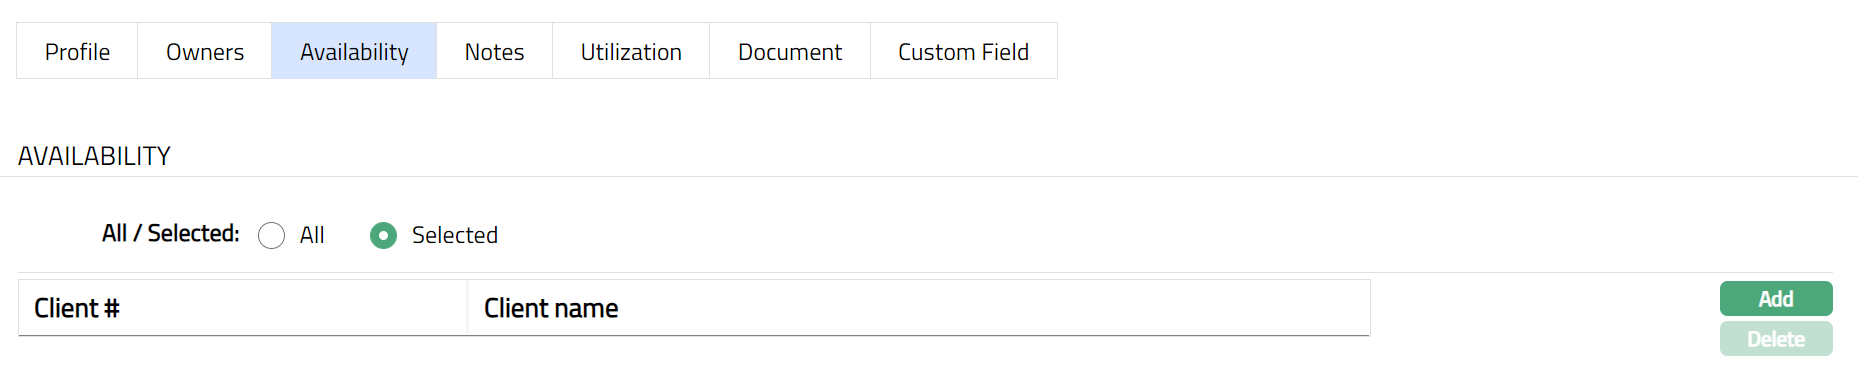
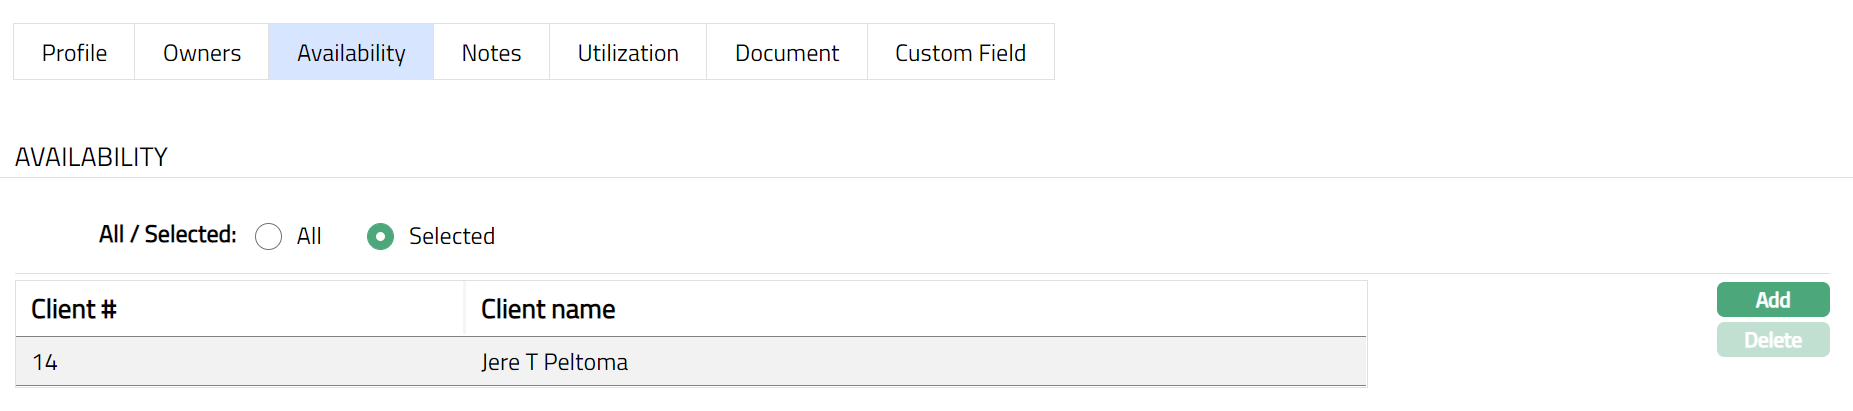
Availability
You can add / delete the Client(s) to which the Collateral is linked or made available using this tab.
To add client,
1. Access the Collateral page. Click Availability tab. If clients were already added, it will show the details as per sample below; else, it will be blank.
2. Click Add. Client Search screen appears.
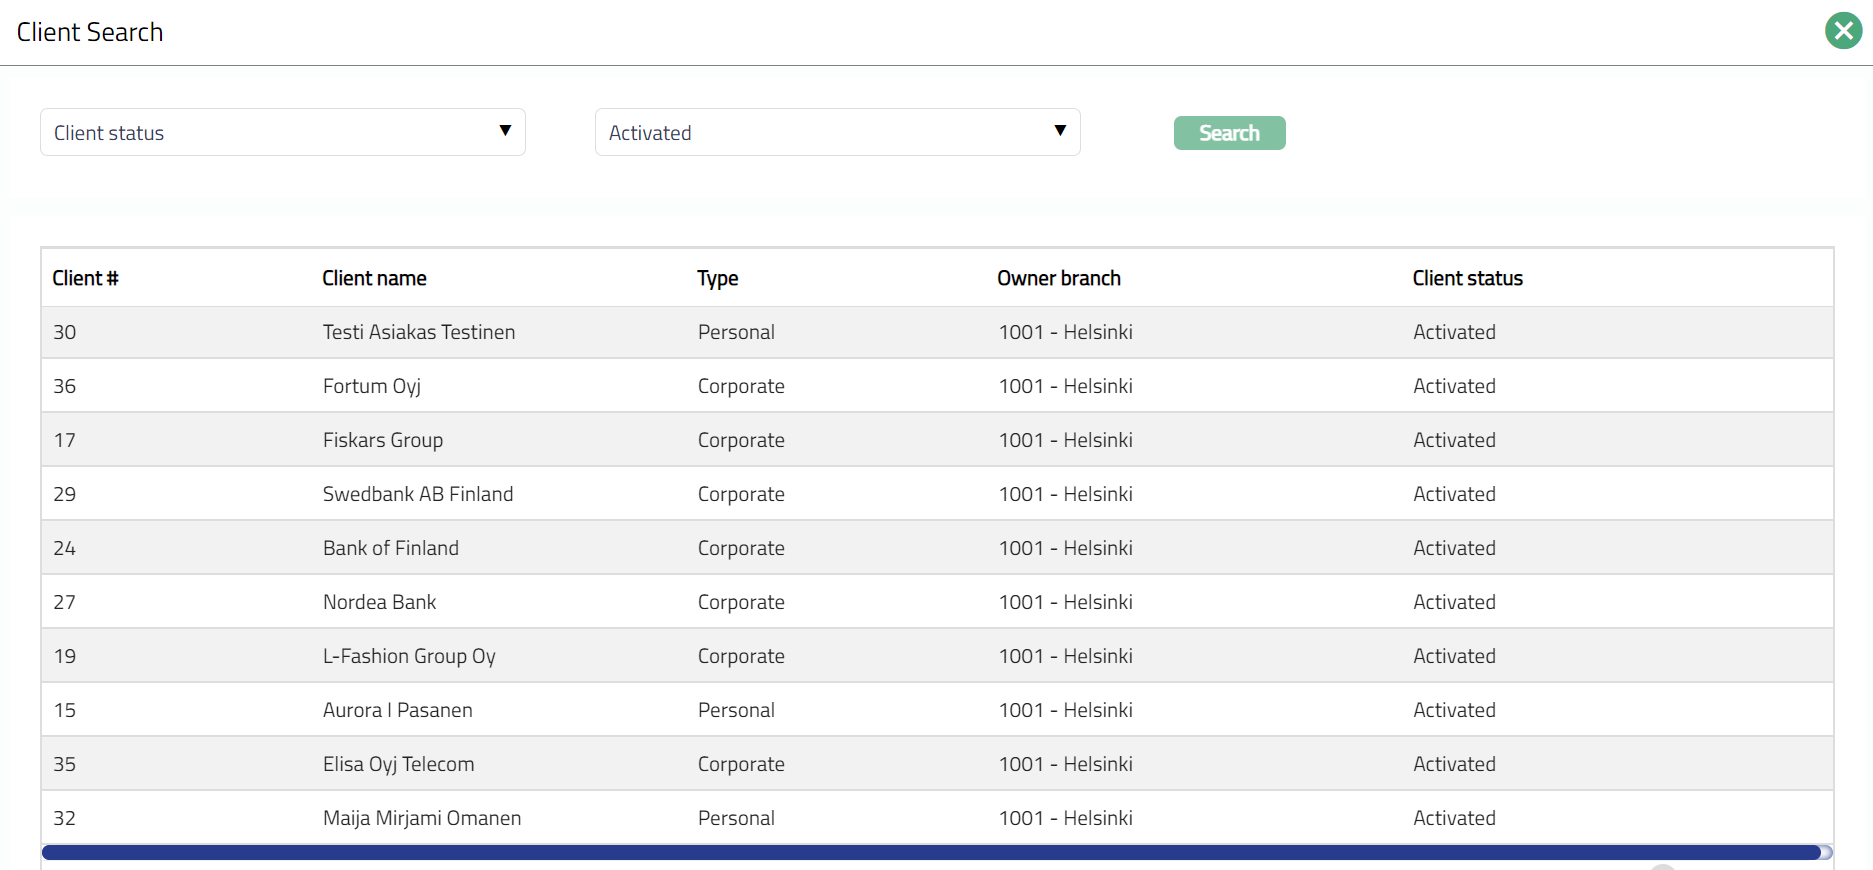
3. Search for and select the required client's name from the available list. The updated screen appears as shown below.
Functions: New, Delete.
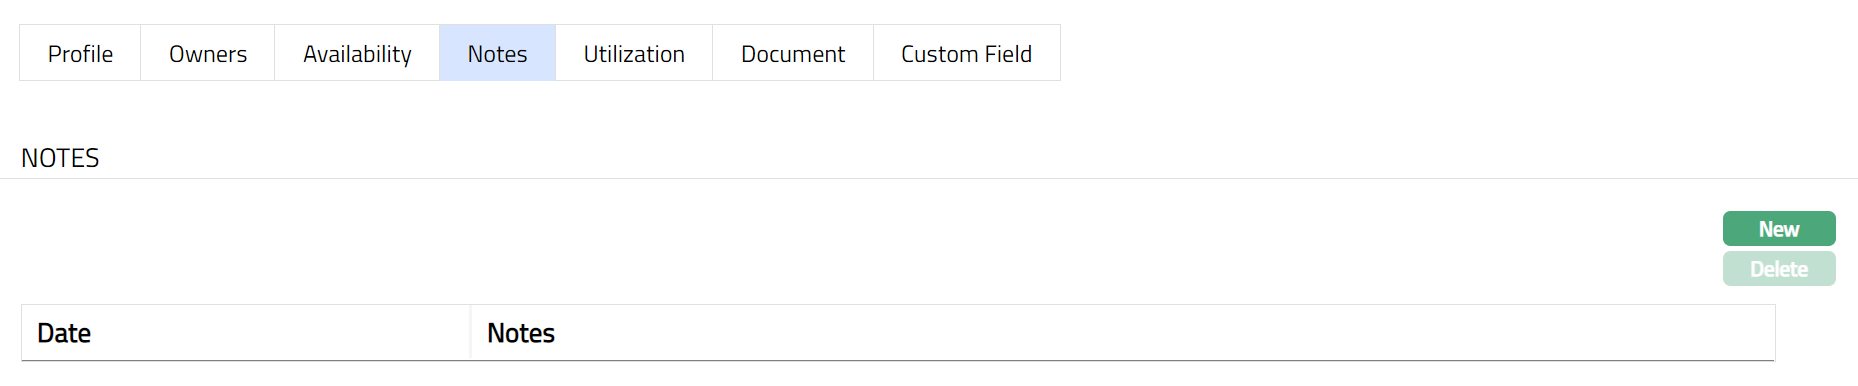
Notes
You can add / view / maintain any Notes relevant to the Collateral using this tab.
To add Notes,
1. Access the Collateral page. Click Notes tab. If Notes were already added, it will show the details as per sample below; else, it will be blank.
2. Click New. New Collateral Note screen appears.
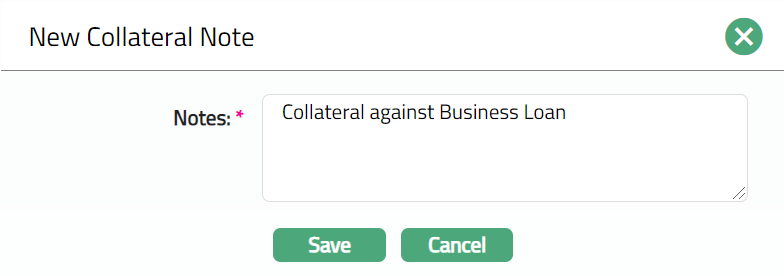
3. Enter the required Notes and click Save. The updated Collateral page appears with the added Notes as shown below.

Functions: New, Delete.
Utilization
Using this tab, you can view the details of how the Collateral has been utilized including the transaction reference number, amount and the date of utilization.
To view details,
1. Access Collateral page. Click Utilization tab. If the collateral has already been utilized, say, by a Limit or Loan account, it will show the details as per sample below; else, it will be blank.

Note:
When Limit which has collateral as one of the contributors is expired, then that collateral's utilization will get released and Collateral Utilized field will be updated as zero.

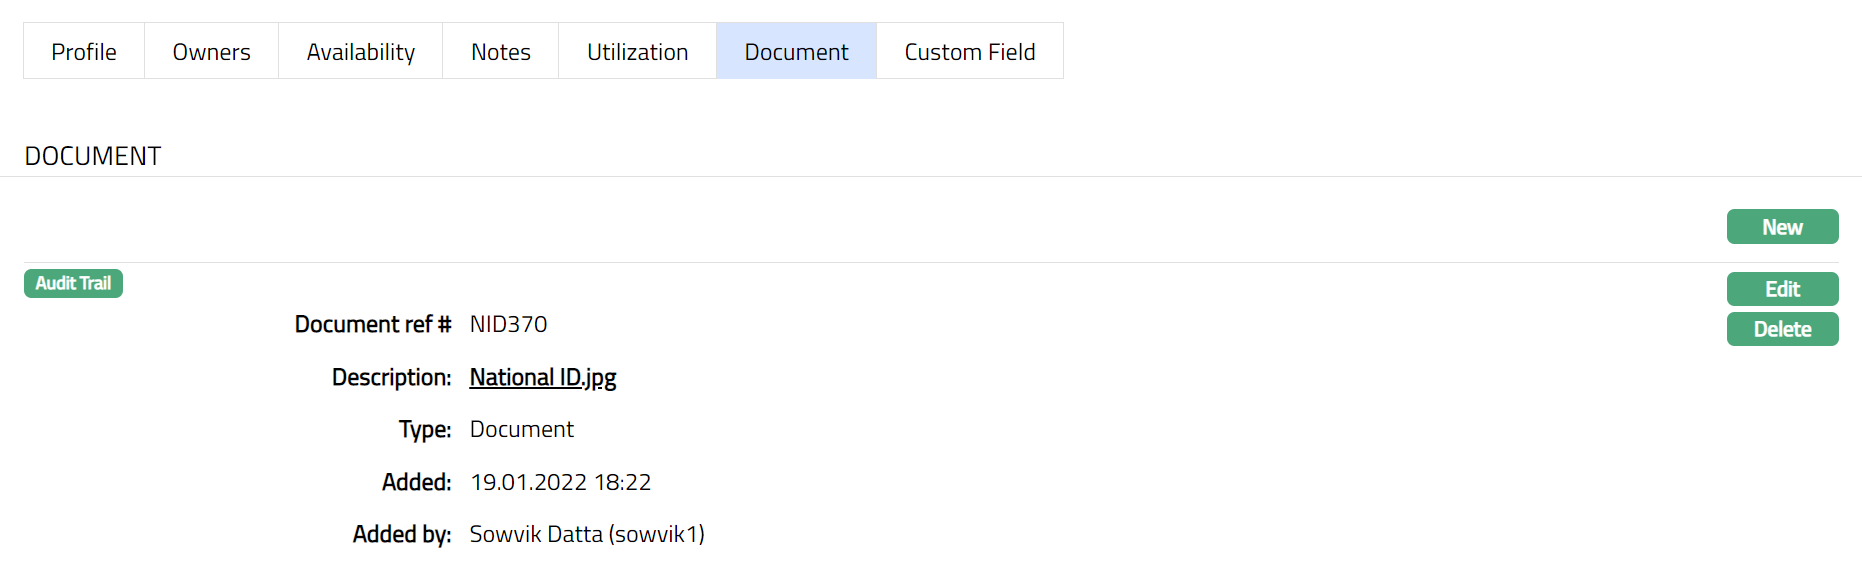
Document
Document tab allows you to upload documents related to the person. These can be in the form of scanned images or files on your computer. You can categorise the documents as per Document Type and store with a document reference number. You can also view the documents that were uploaded using this tab or from Person Maintenance → Documents tab.
To add the New Document,
1. Access Collateral page. Click Document tab.

2. Click New button. New Document page appears.

3. Click Choose File button to select File name and path of the document.
4. Enter Document ref # for the document.
5. Description field denotes the uploaded document with a Hyperlink. To view the document, you need to click on the Hyperlink.
6. Select Type of the Document uploaded from the list of Document types maintained under Admin → Documents → Document type. Once entered, this cannot be edited.
7. Click Save. Document page appears displaying the added details.
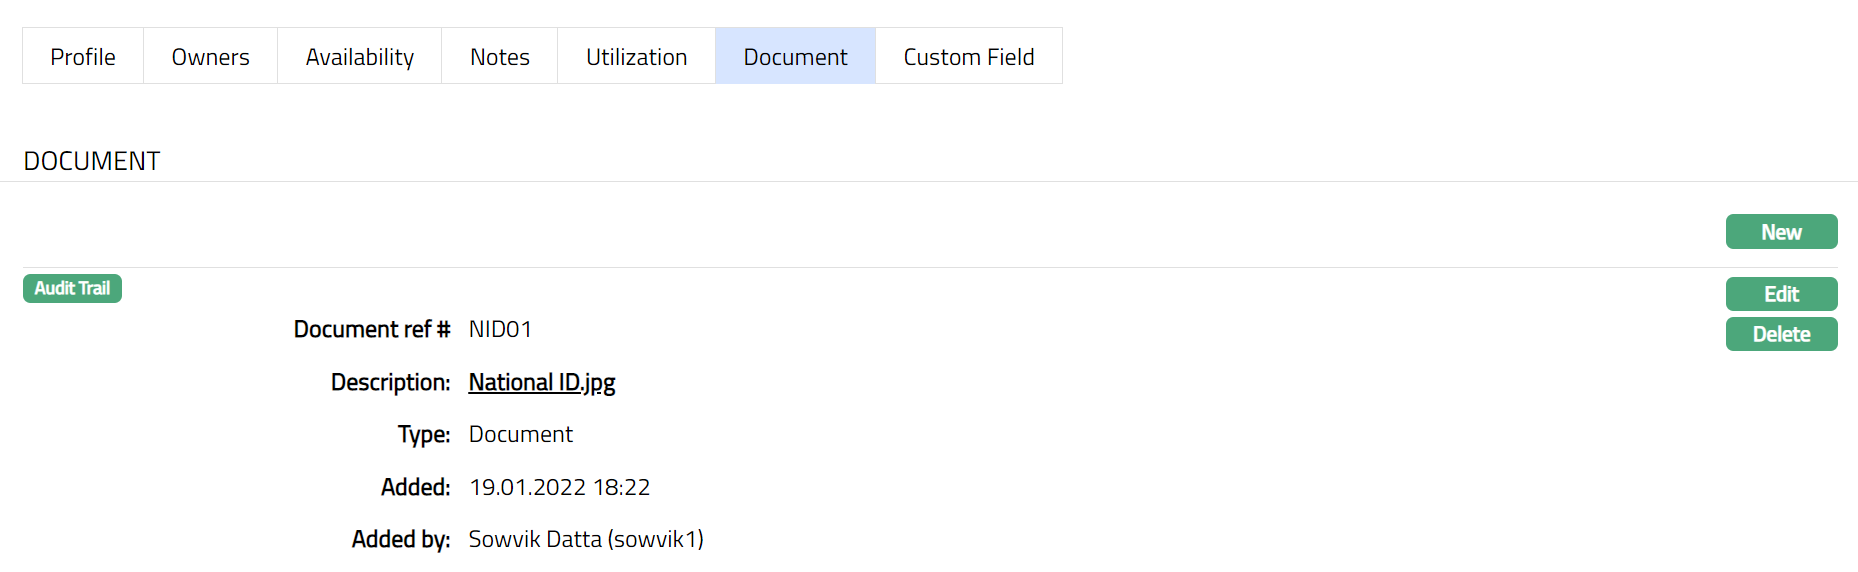
Functions: New, Edit, Delete
The following are the additional fields that are displayed:
Added field denotes the date on which the record was added.
Added by field denotes the name of the user who created the record.
Delete: You can delete a Document record saved in Aura by a click on Delete button. Aura will ask for confirmation, on approving which the selected record will be deleted.
To edit Document record,
1. Access Collateral page and click Document tab.
2. Click Edit. Edit Document page appears.
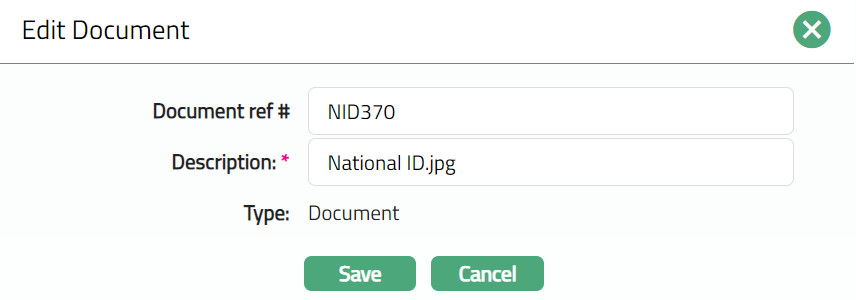
Only the following fields are editable:
Document Ref#
Description
3. Make required changes and click Save. Document page appears with the updated details
Functions: New, Edit, Delete.
The Additional Fields are as follows:
Added field denotes the date on which the record was added.
Added By field denotes the name of the user who added the record.
Custom Field
This option provides you the flexibility to define fields apart from those that are already available in the standard version of Aura. Thus, it enables you to customize additional data storage and use as required to suit your specific business needs.
Using the Custom Field tab, you can maintain the custom fields mapped to the Collateral. Depending on the custom fields created and mapped to Collateral (using Admin → System Codes → Custom Fields), the fields will be displayed on this tab.
To edit the details,
1. Access Collateral page. Click Custom field tab. If the Custom field has already been created and mapped it will show the details as per sample below; else, it will be blank. Custom field is created and maintained under Admin → System codes → Custom fields → Custom fields and mapped to the relevant function using Admin → System codes → Custom fields → Field mappings.

2. Click Edit. Edit Custom Field screen opens as shown below.

3. Make required entries and click Save. Custom Field tab appears with the edited details.

Functions: Edit
Real Estate
The following tabs appear in the Collaterals page if the collateral type is Property:
To add Real Estate as New Collateral,
1. From CRM menu, click Collateral/Limits, and then Collaterals. Collateral Search page appears, showing the details of all collaterals created in Aura.
2. Click Add. New Collateral → Select Collateral Type page appears.

3. Select Real Estate as Collateral type from the drop-down list.
4. Enter Description of the Collateral.
5. Click Next. New Collateral Real Estate → (1/4) page appears.
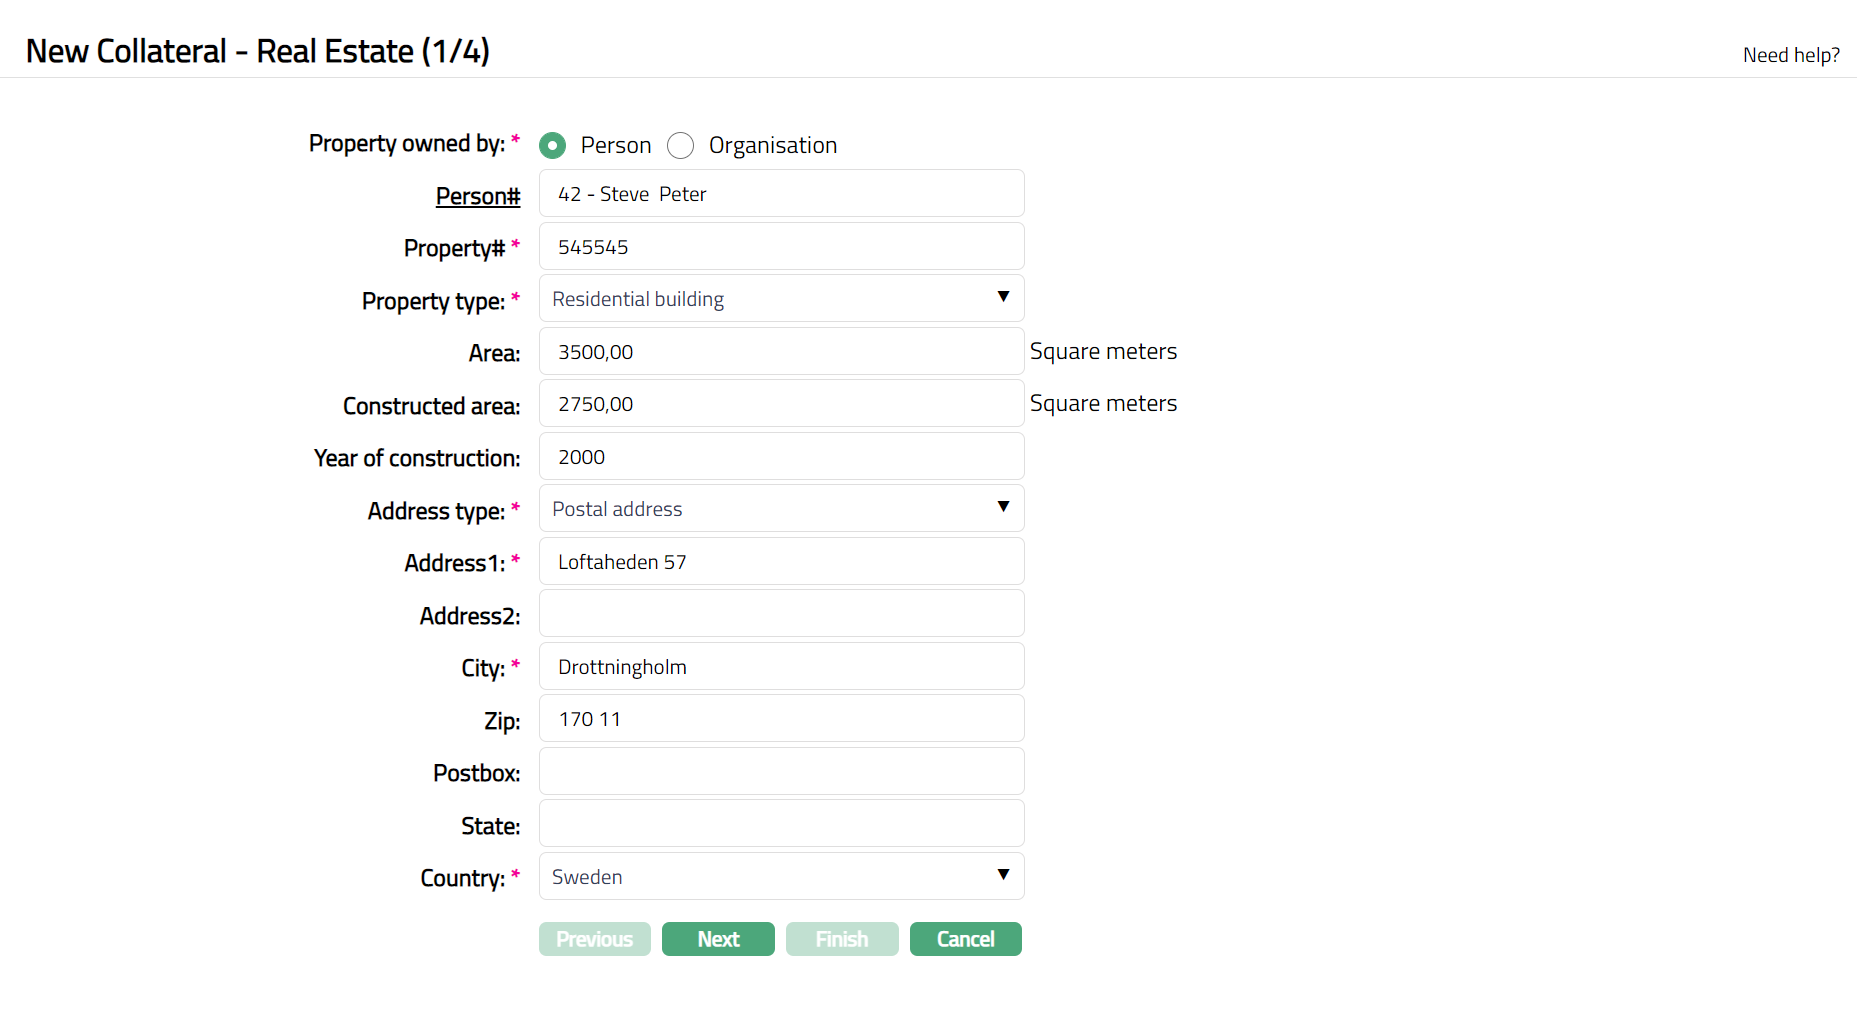
6. Select Property owned by-- if it is owned by a person, select Person; and if it is owned by an organisation, select Organisation.
7. Depending on whether the Property Owned By is chosen as Person or Organisation, you have to enter the Person# or Organisation#.
If the Property Owned By chosen above is a Person, you will have to enter the Person #. Click on the hyperlink to see the list of Persons as maintained in CRM → Person → Maintain or enter the name of the person and select the required person from the list displayed by Aura.
If the Property Owned By chosen above is an Organisation, you will have to enter the Organisation #. Click on the hyperlink to see the list of Organisations as maintained in CRM → Organisation → Maintain or enter the name of the organisation and select the required organisation from the list displayed by Aura.
8. Enter Property# which should be a unique one for that property.
9. Input Property type by selecting one of the pre-shipped values from the dropdown list. The Available options are:
Agricultural land
Commercial Building
Commercial land
Farmland
Forest land
Residential Building
Residential land.
10. Enter total Area of the Collateral property in Square Meters.
11. Enter Built-up Area in the Collateral property in Constructed area. Only if the Property type chosen is Residential building or Commercial building this field is enabled.
12. Input Year of construction of the Collateral property. Only if the Property type chosen is Residential building or Commercial building this field is enabled.
13. Enter Address type from the different Address Types created in Admin → System codes → Address details → Address types.
14. Enter complete Address of the Collateral in the Address 1& 2 fields.
15. Enter Name of the City in which the collateral is located.
16. Enter Zip Code.
17. Input Post box details of the property.
18. Input Name of the State in which the property is located.
19. Choose the name of the Country in which the property is located from the list of Countries Maintained in Admin → Generic definitions → Countries.
20. Click Next. New Collateral → Real Estate (2/4) page appears.
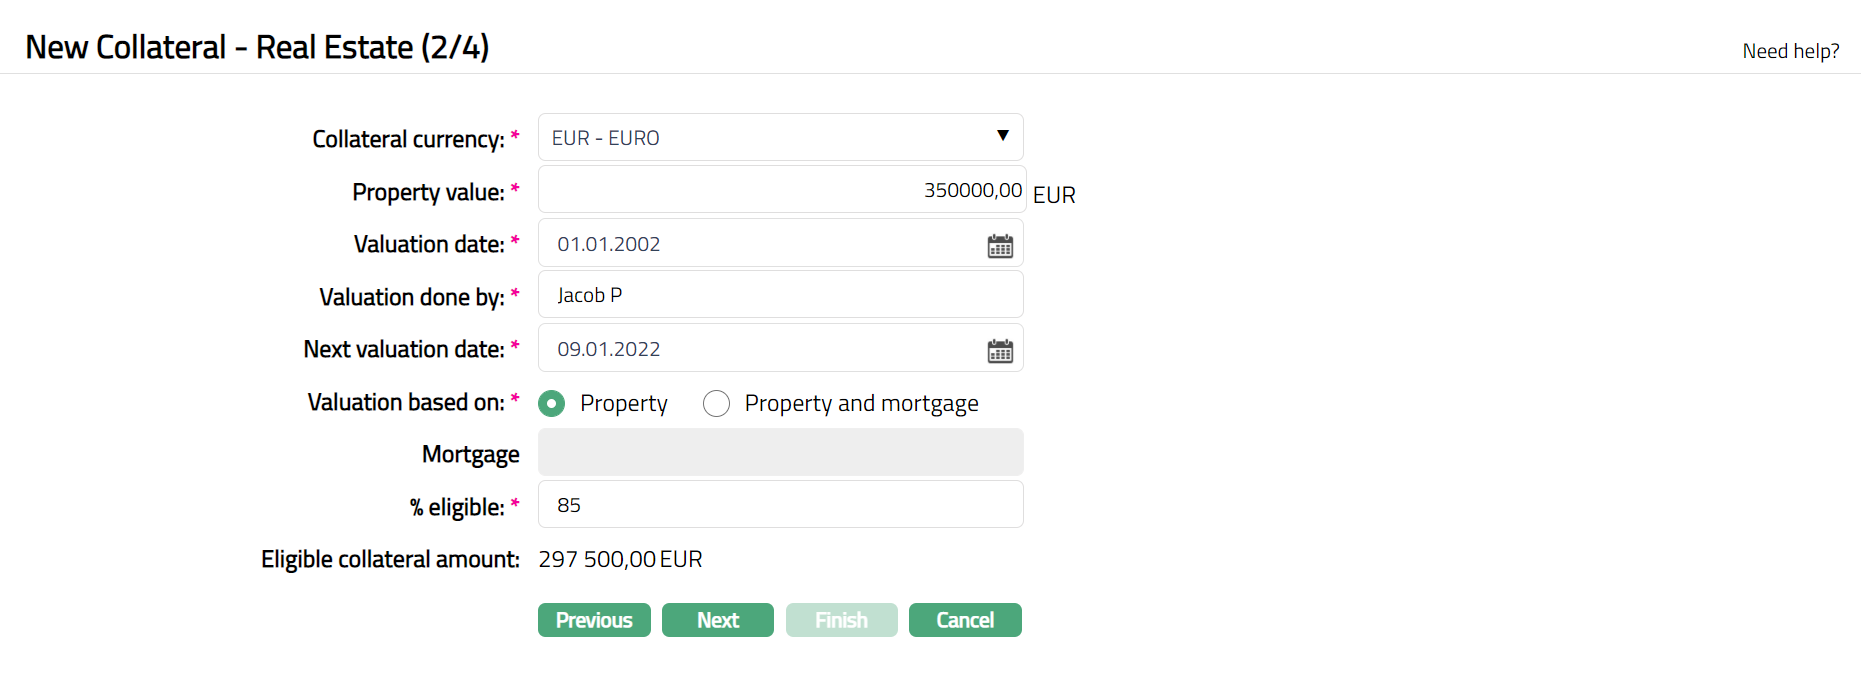
21. Enter Collateral currency. Choose from the dropdown list of active GL currencies.
22. Input value of the property in Property value.
23. Enter date of valuation of the property in Valuation date. The Date entered should not be the current Date or greater than the current date.
24. Input details of the valuator in Valuation done by.
25. Enter Next valuation date of the Collateral. Date equal to and lesser than the Current date cannot be selected.
26. Indicate whether Valuation is based on Property or Property and mortgage by clicking the required radio button. The default option is Property.
27. If you had chosen Valuation based on as Property And Mortgage, Mortgage field is enabled so that you can enter the details of the mortgage. Click on the Mortgage hyperlink to see the list of active electronic mortgages maintained under CRM → Collateral/Limits → Collaterals. Select the required Mortgage from the available list.
28. Indicate what proportion of the Collateral value is eligible for securing in % eligible field. It accepts Value from 1 to 100.
29. Based on the Property Value and the % eligible, Aura calculates the Eligible collateral amount. In case Valuation is based on Property And Mortgage, this is further subject to the mortgage value of the chosen Mortgage.
30. Click Next. New Collateral → Real Estate (3/4) page appears.

31. Enter Custom Field details as required for the Collateral.
32. Click Next. New Collateral → Real Estate (4/4) page appears.
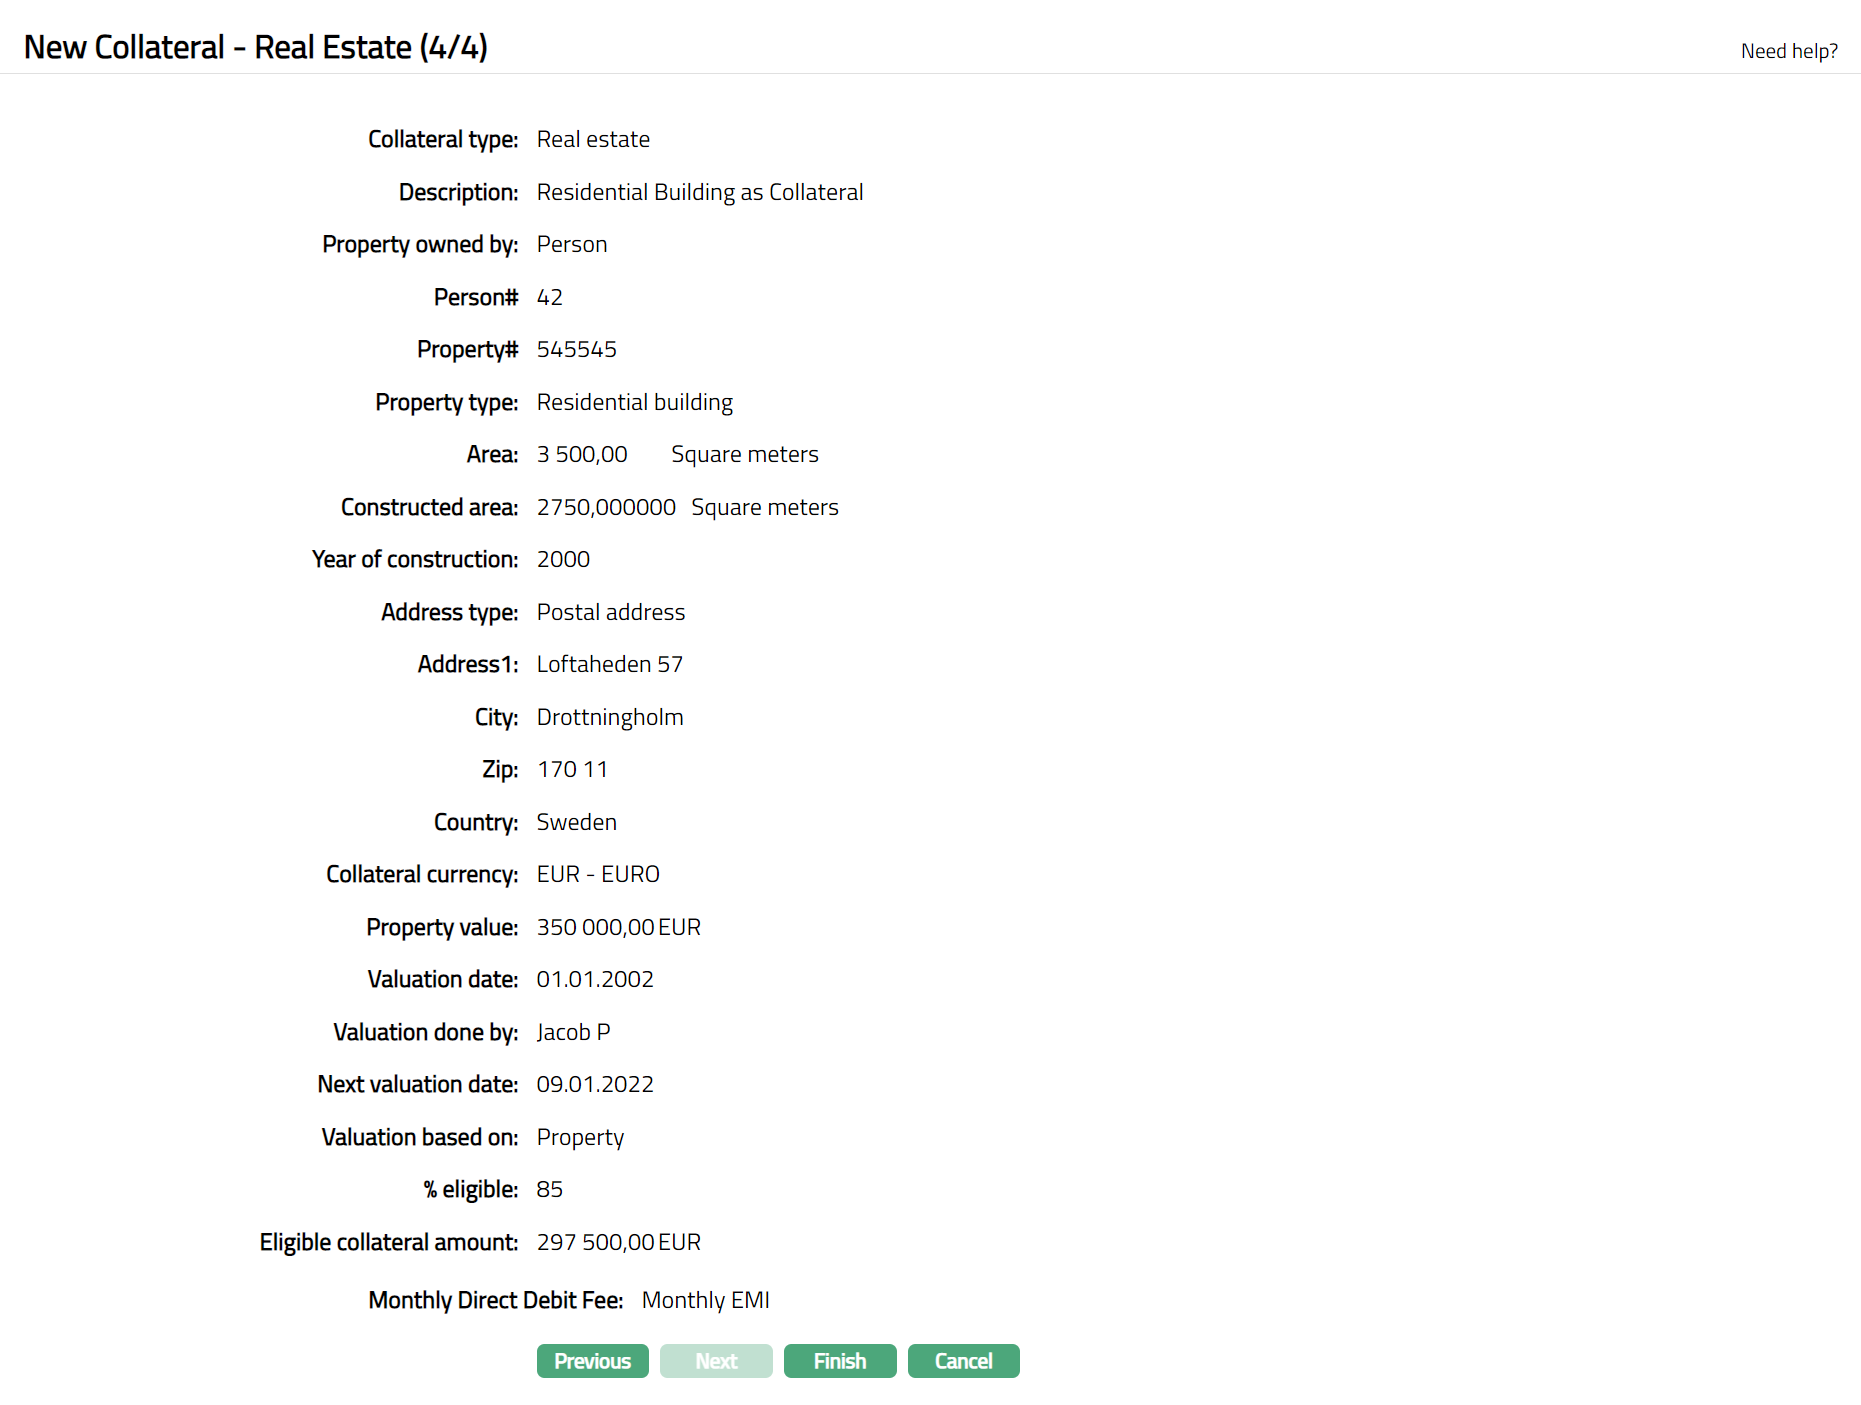
33. Click Finish. Collateral record is created with a unique Collateral id and Collateral page appears showing the Profile tab by default.
Functions: Add, Search, Delete, Suspend, Activate, Edit, Approve
Note: On creation of the Collateral record, the Collateral Status is Active, and the record Status will be Pending. Any user other than the one who created the Collateral record can approve the record. First Valuation Tab Status need to be approved followed by the Profile Tab Status by another user / authorised person. Once Approved the Red bubble disappears.
Approve: Any user other than the one who created the Collateral record can approve the record. To approve, retrieve the Collateral record and click on Approve. Aura will ask for confirmation. Once confirmed, the record status becomes approved.
Suspend: You can suspend the Collateral by clicking on Suspend button. When you click on Suspend button, Aura displays an alert message. On confirmation, Aura will suspend the Collateral. Once the Collateral is suspended, it becomes unavailable in the drop-down list while securing any contract / account in other modules in Aura.
Activate: You can activate a Suspended Collateral by clicking on Activate button. When you click on Activate button, Aura displays an alert message. On confirmation Aura will activate the Collateral. Once the Collateral is activated, it becomes available in the drop-down list in other modules.
Note: If the custom field is mapped to Collateral under Admin → System Codes → Custom fields → Field mapping, then an additional screen will appear before the confirmation screen. The custom fields will be mandatory or non-mandatory based on the rules set at the Field mappings. For more detail on custom field functionality please refer Admin → System codes → Custom fields → Field mappings manual.
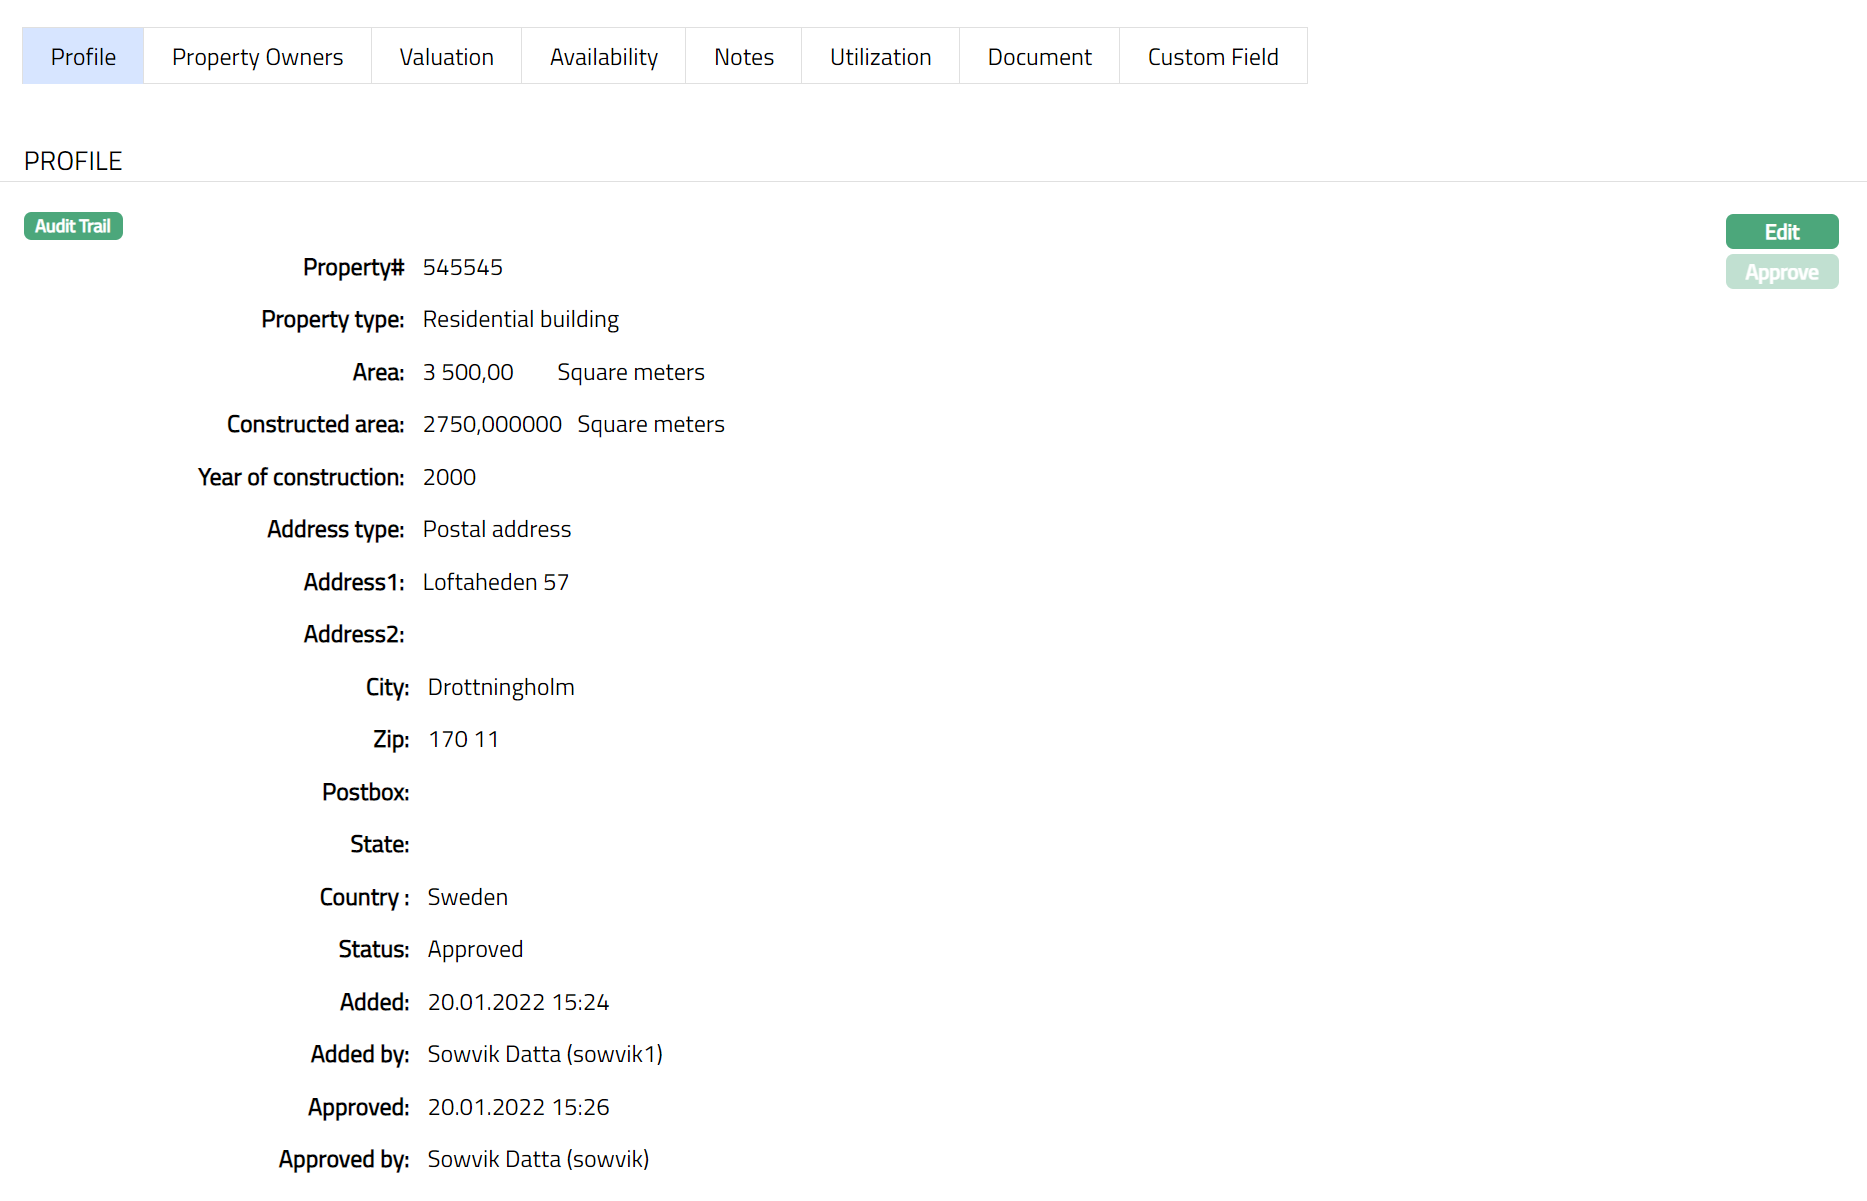
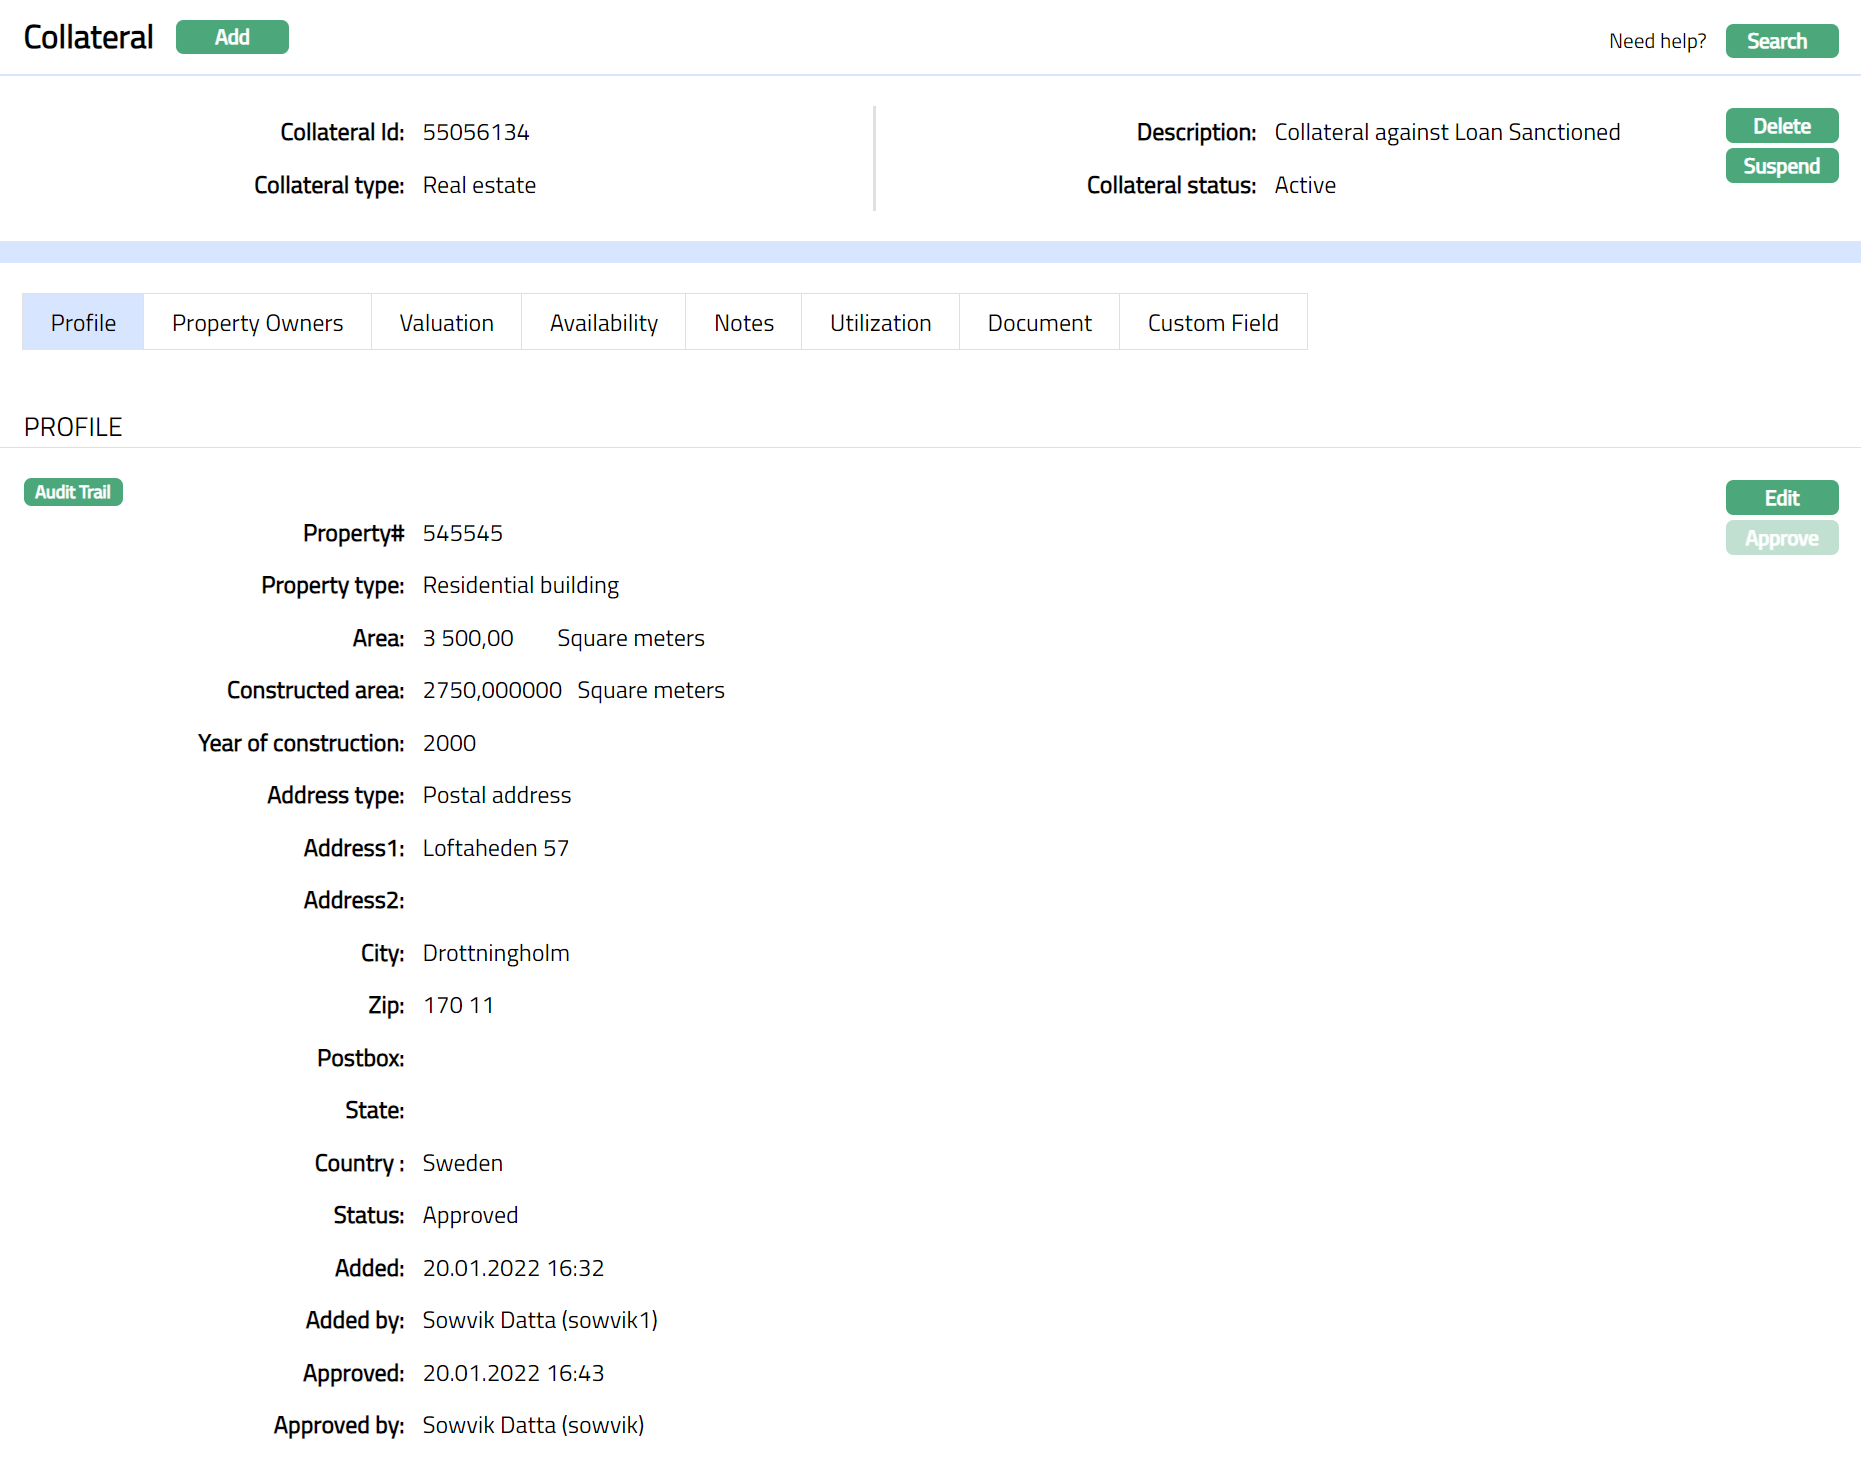
Profile
Profile tab displays the basic details of the Collateral entered during the creation of the Collateral.
To view / edit Profile tab,
1. Access Collateral page. Click Profile tab to view the details as per sample below. The details are defaulted from the entries that you made during Collateral creation. For details refer to New Collateral → Property (1/4).
2. Click Edit. Edit Collateral screen appears as shown below.
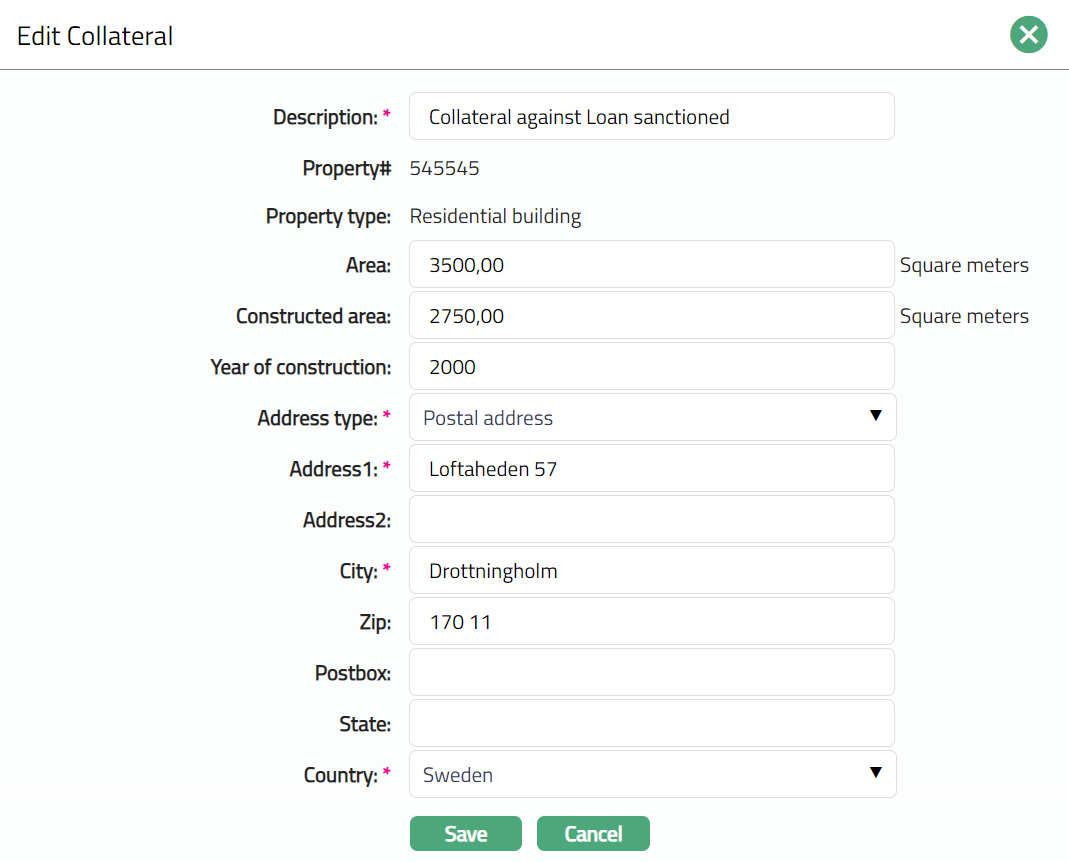
Note: Except Property# and Property Type all other fields are editable.
3. Enter details as required and click Save. Collateral page appears with the edited details.

Note: Any change in the tab will set the record status to Pending till it is approved by another user. On approval, the record status is set to Approved and the red bubble disappears.
Functions: Edit, Approve.
The additional fields that you can view in the Profile tab are explained below:
Status field denotes the status of the record.
Added field denotes the date on which the record was added.
Added by field denotes the name of the user who created the record.
Approved field denotes date on which the record was approved and is displayed only on approval.
Approved by field denotes name of the user who approved the record and is displayed only on approval.
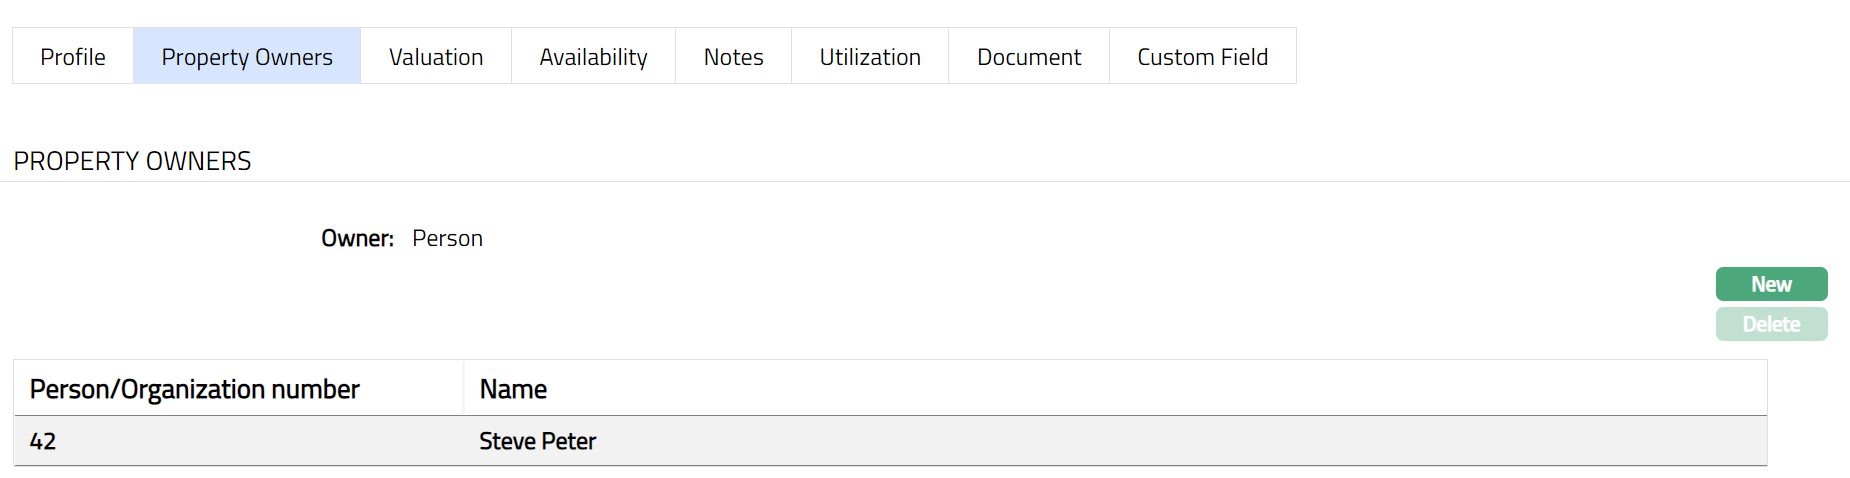
Property owners
This is similar to Owners tab if Collateral type is Precious Metal. Please refer to Owners tab in Precious metal section for details. Sample screen shots are shown below.

Linked Mortgages
When you create a Real Estate Collateral with Valuation Based On = Property and Mortgage, an additional tab Linked Mortgages becomes available.
This tab allows you to view and manage the Mortgages associated with the Collateral.

Functions: New, Delete.
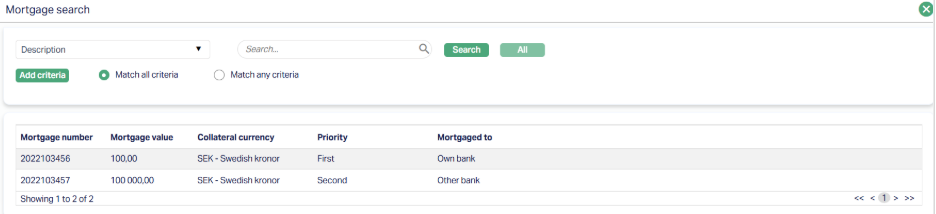
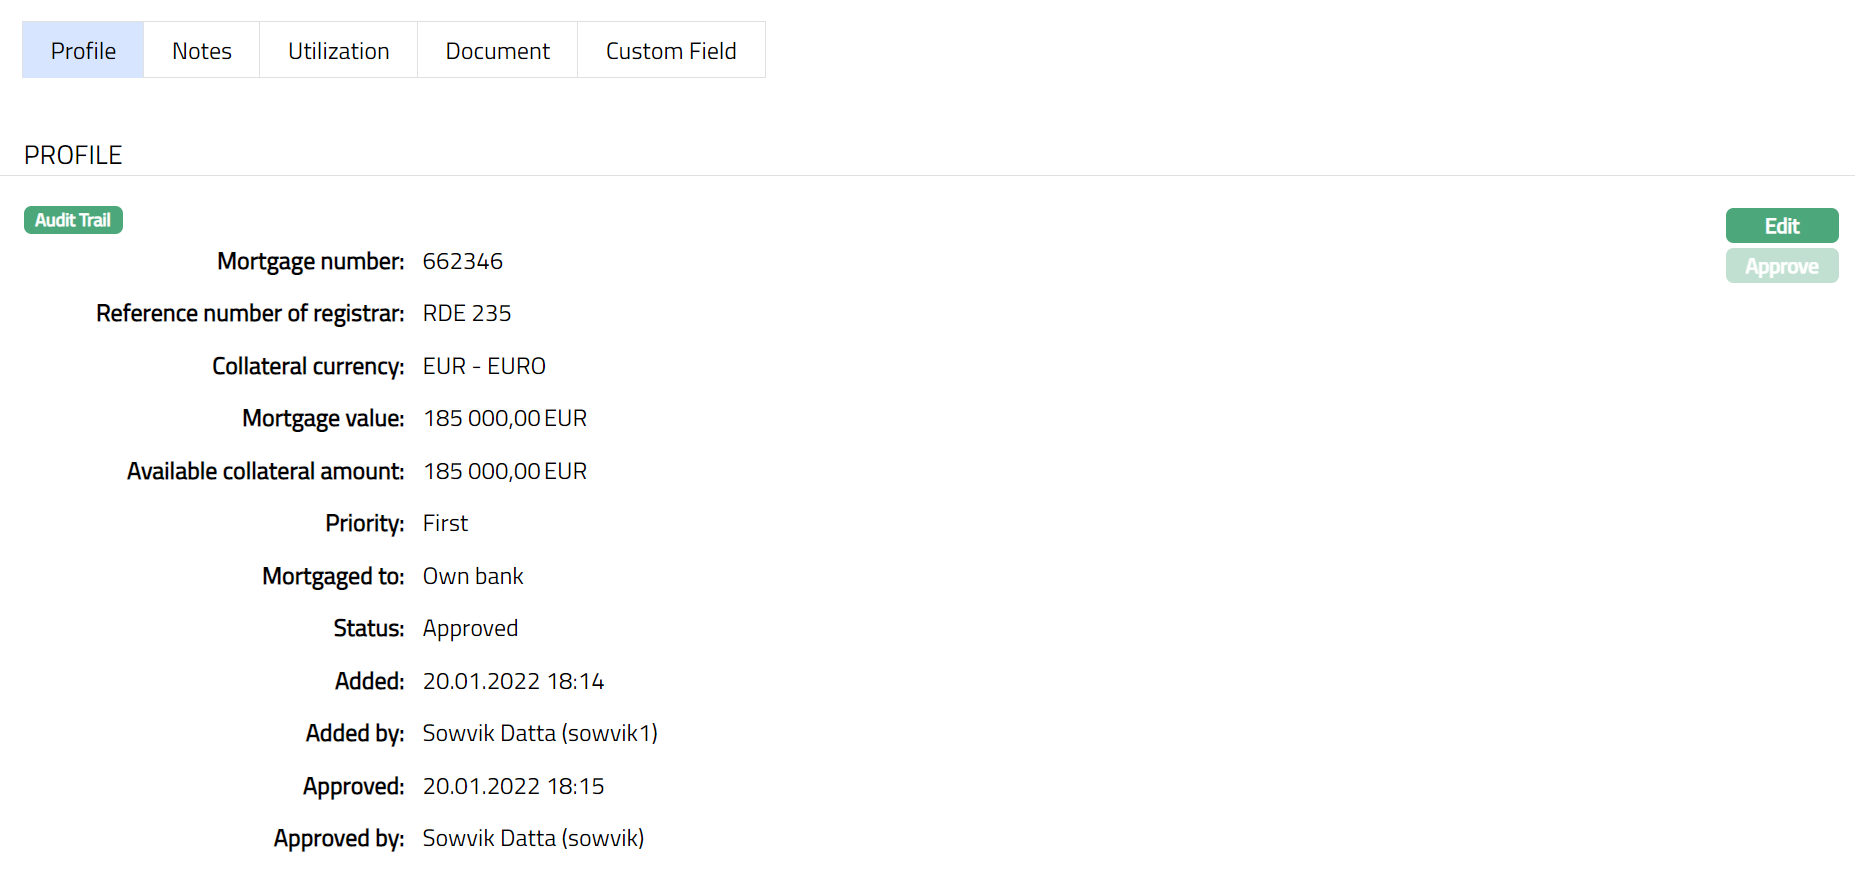
The tab displays the following details for each linked Mortgage -
- Mortgage number: The system-generated identification number of the Mortgage record. This number uniquely identifies the Mortgage and is used for tracking and linking purposes.
- Mortgage value: The amount secured under the Mortgage, displayed in the selected Collateral Currency. This represents the monetary value pledged as security for the Collateral.
- Collateral Currency: The currency in which the Collateral is maintained. All linked Mortgage values are shown in this currency for consistency.
- Priority: Defines the ranking of the Mortgage (First, Second, Third, etc.). Priority determines the order of claim in case of enforcement. Multiple Mortgages can exist with the same priority, provided they belong to the same Mortgage To category.
- Mortgaged to: Specifies whether the Mortgage is assigned to Own Bank or to an Other Bank. This distinction is important for priority rules and determines how the Mortgage is enforced.
To add a new Mortgage,
1. Click New. The Mortgage Search page appears displaying a list of all active Mortgage records maintained under CRM → Collateral/Limits → Collaterals.
2. Select the required Mortgage from the list and link it to the Collateral.
3. Once selected, the Mortgage will appear under the Linked Mortgages tab for the Collateral.

Functions: New, Delete.
Delete: Move between the various records and ensure that the Mortgage you want to delete is highlighted in Bold Font. Then click on Delete.
Aura will display a confirmation message before proceeding. The Mortgage will only be removed from the Linked Mortgages tab of the Collateral; the original Mortgage record under CRM → Collateral/Limits → Collaterals will remain unaffected.
System Behaviour and Validation
- Multiple Mortgages can be linked to a single Collateral.
- When linking Mortgages, Aura enforces the following validation -
- Not Allowed: Linking Mortgages where Own Bank and Other Bank both have the same Priority (e.g., Own Bank - First Bank - First) - Allowed: Linking multiple Mortgages with the same Priority as long as they belong to the same Mortgaged To category (e.g., Own Bank - Second + Own Bank - Second).
- The same rule applies across all priority levels (First, Second, Third, etc.)
This ensures that Mortgage priorities are consistently maintained between Own Bank and Other Bank.
Valuation
All details pertaining to the Value of the property are listed under this tab. You can View / Edit the details of valuation using this tab.
1. Access Collateral page. Click Valuation tab, to see the details as per sample below. The details are defaulted from the entries that you made during Collateral creation. For details refer to New Collateral → Property (2/3).
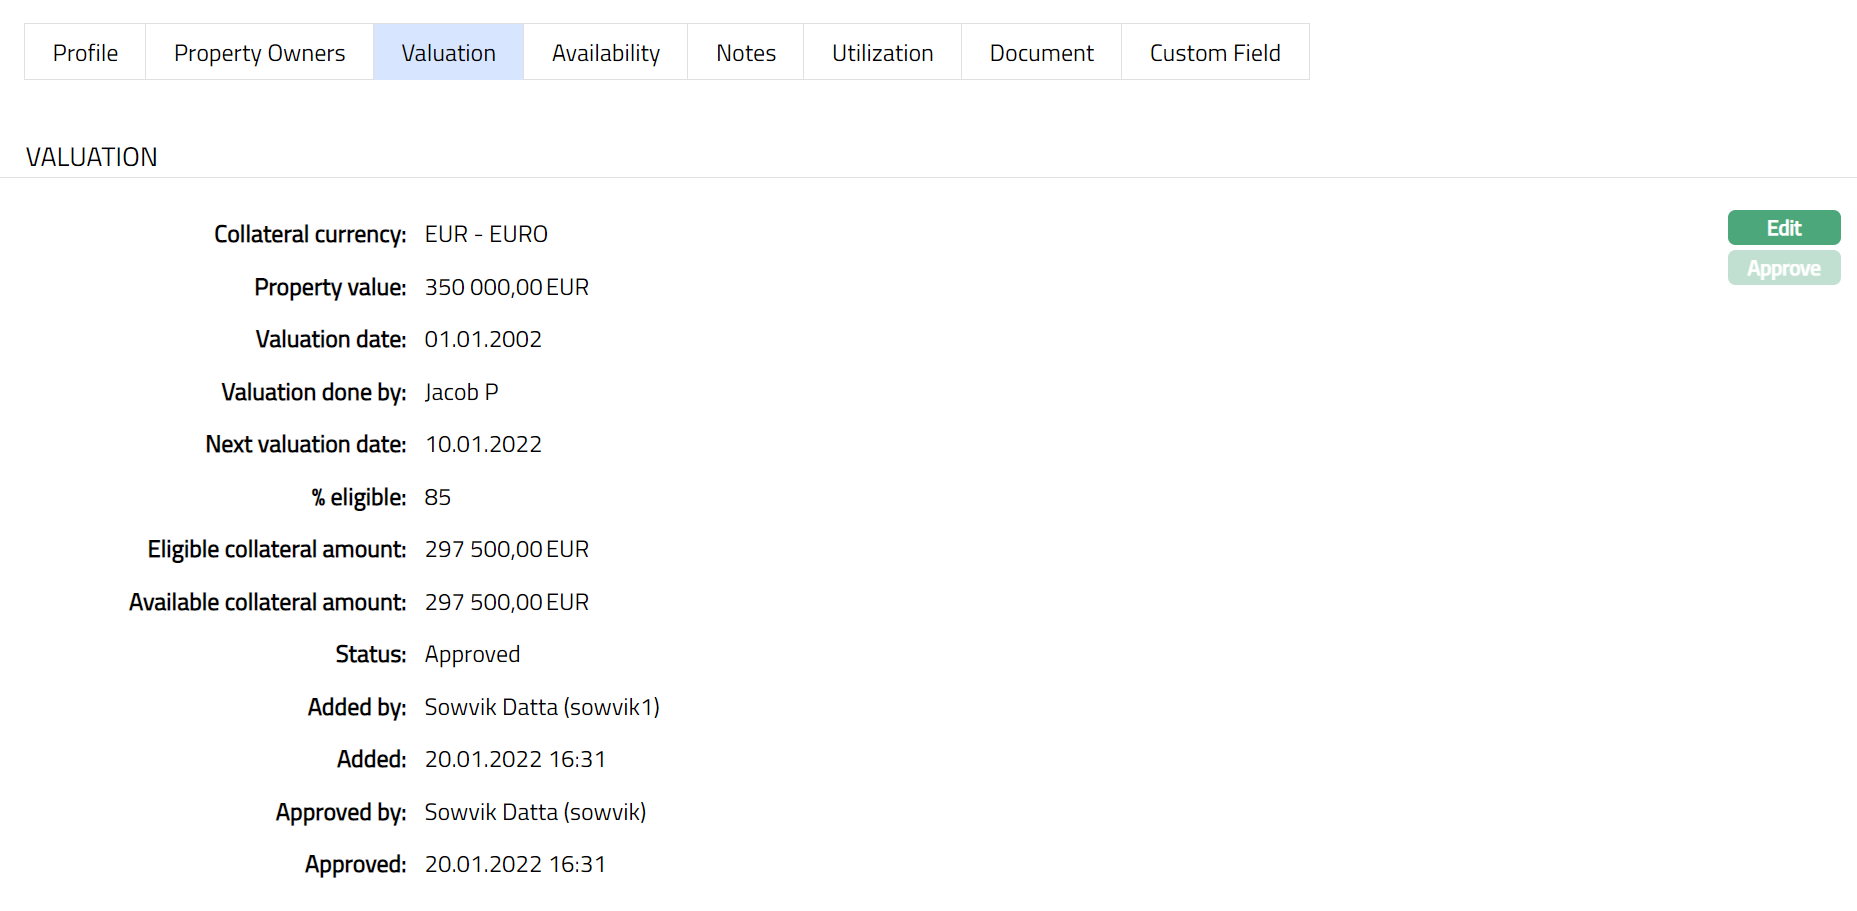
2. Click Edit. Edit Valuation screen appears as shown below.
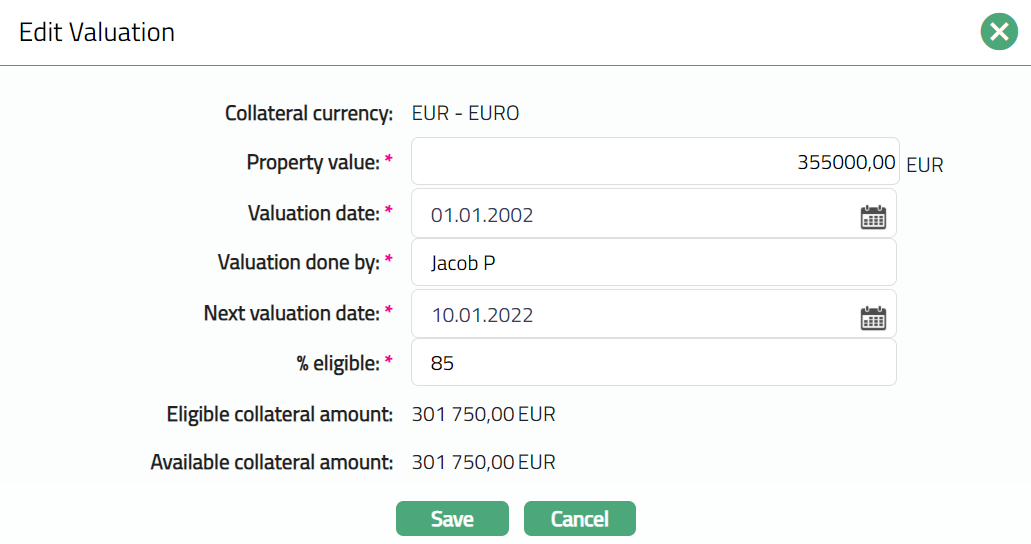
Note: All fields except Collateral currency, Eligible collateral amount and Available collateral amount are editable.
3. Click Save. Valuation page appears with the edited details.
Note: Any change in the tab will set the record status to Pending till it is approved by another user. On approval, the record status is set to Approved and the red bubble disappears.
Functions: Edit, Approve
Availability
This is similar to Availability tab under Collateral type Precious Metal. Please refer to Availability tab in Precious metal section for details.
Notes
This is similar to Notes tab under Collateral type Precious Metal. Please refer to Notes tab in Precious metal section for details.
Utilization
This is similar to Utilization tab under Collateral type Precious Metal. Please refer to Utilization tab in Precious metal section for details.
Document
This is similar to Document tab under Collateral type Precious Metal. Please refer to Document tab in Precious metal section for details.
Custom Field
This is similar to Custom Field tab under Collateral type Precious Metal. Please refer to Custom Field tab under Precious Metal section for details.
Financial instrument
The following tabs appear in the Collateral Maintenance page if the collateral type is Financial Instrument.
To Add Financial Instrument as a New Collateral,
1. From CRM menu, click Collateral/Limits, and then click on Collaterals. Collateral Search page appears showing the details of all Collaterals created in Aura.
2. Click Add. New Collateral → Select Collateral Type page appears.

3. Select Financial Instrument as Collateral type from the drop-down list.
4. Enter Description of the Collateral
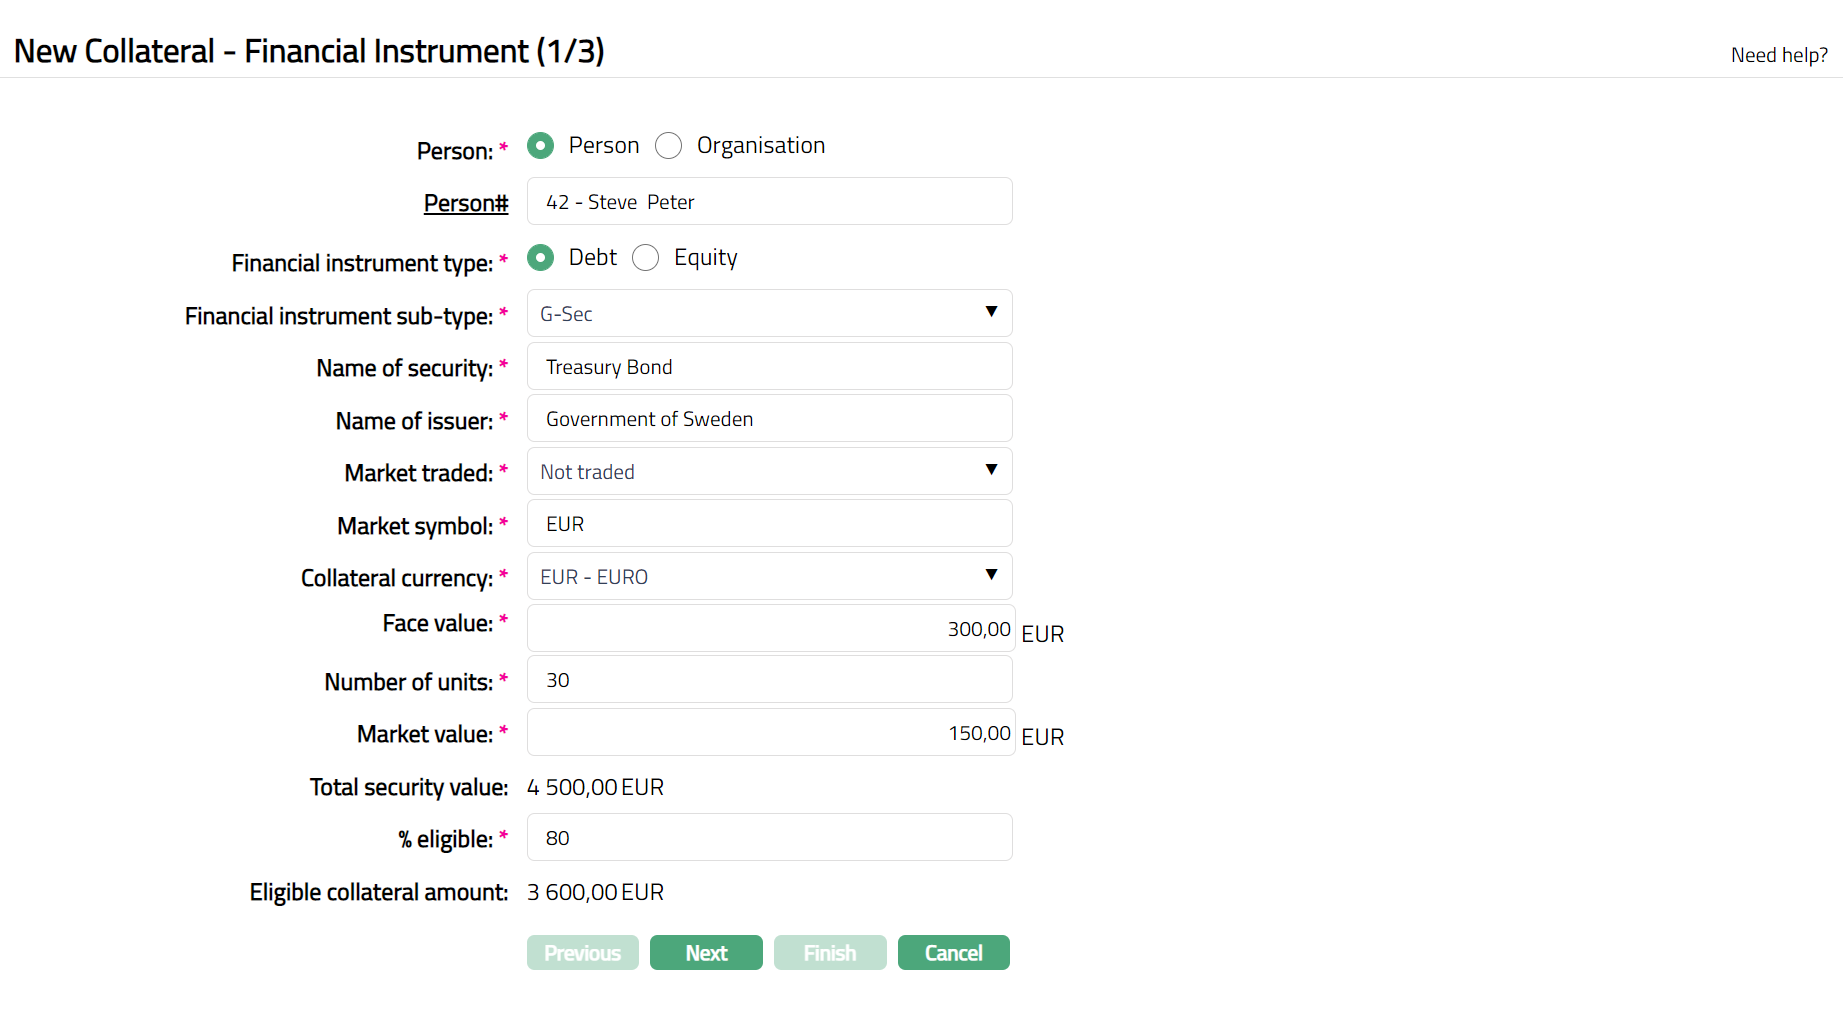
5. Click Next. New Collateral → Financial Instrument (1/3) page appears.
6. Select Owner type of the Collateral -- if it is owned by a person, select Person; and if it is owned by an organisation, select Organisation.
7. Depending on whether the Owner is chosen as Person or Organisation, you have to enter the Person# or Organisation#.
If the Owner chosen above is a Person, you will have to enter the Person #. Click on the hyperlink to see the list of Persons as maintained in CRM → Person → Maintain or enter the name of the person and select the required person from the list displayed by Aura.
If the Owner chosen above is an Organisation, you will have to enter the Organisation #. Click on the hyperlink to see the list of Organisations as maintained in CRM → Organisation → Maintain or enter the name of the organisation and select the required organisation from the list displayed by Aura.
8. Input the Type of the Financial Instrument in Financial instrument type by selecting one of the pre-shipped values by a click on the radio button. The Available options are:
- Debt
- Equity
9. Enter Name of the security such as Shares, Treasury bond, etc.,
10. Enter Name of the issuer of the Security.
11. Input Market traded field by entering the Market Name in which the financial instrument is traded.
12. Enter Market symbol in which the financial instrument is traded.
13. Enter Collateral currency. Choose from the dropdown list of active GL currencies
14. Enter Face value per unit of the Instrument. Any value greater than zero is accepted in this field.
15. Enter Number of units of the financial instrument. This field accepts value greater than zero and decimal values are not accepted.
16. Enter Market value per unit of the financial Instrument.
17. Total security value of Financial Instrument is calculated automatically by Aura using the formula Market value * Number of units.
18. Indicate what proportion of the Collateral value is eligible for securing in % eligible field. It accepts Value from 1 to 100.
19. Based on the Value and the % eligible, Aura calculates the Eligible collateral amount.
20. Click Next. Maintain Custom Field Details (2/3) page appears.

21. Enter Custom Field details as required for the Collateral.
22. Click Next. New Collateral → Financial Instrument confirmation (3/3) page appears.
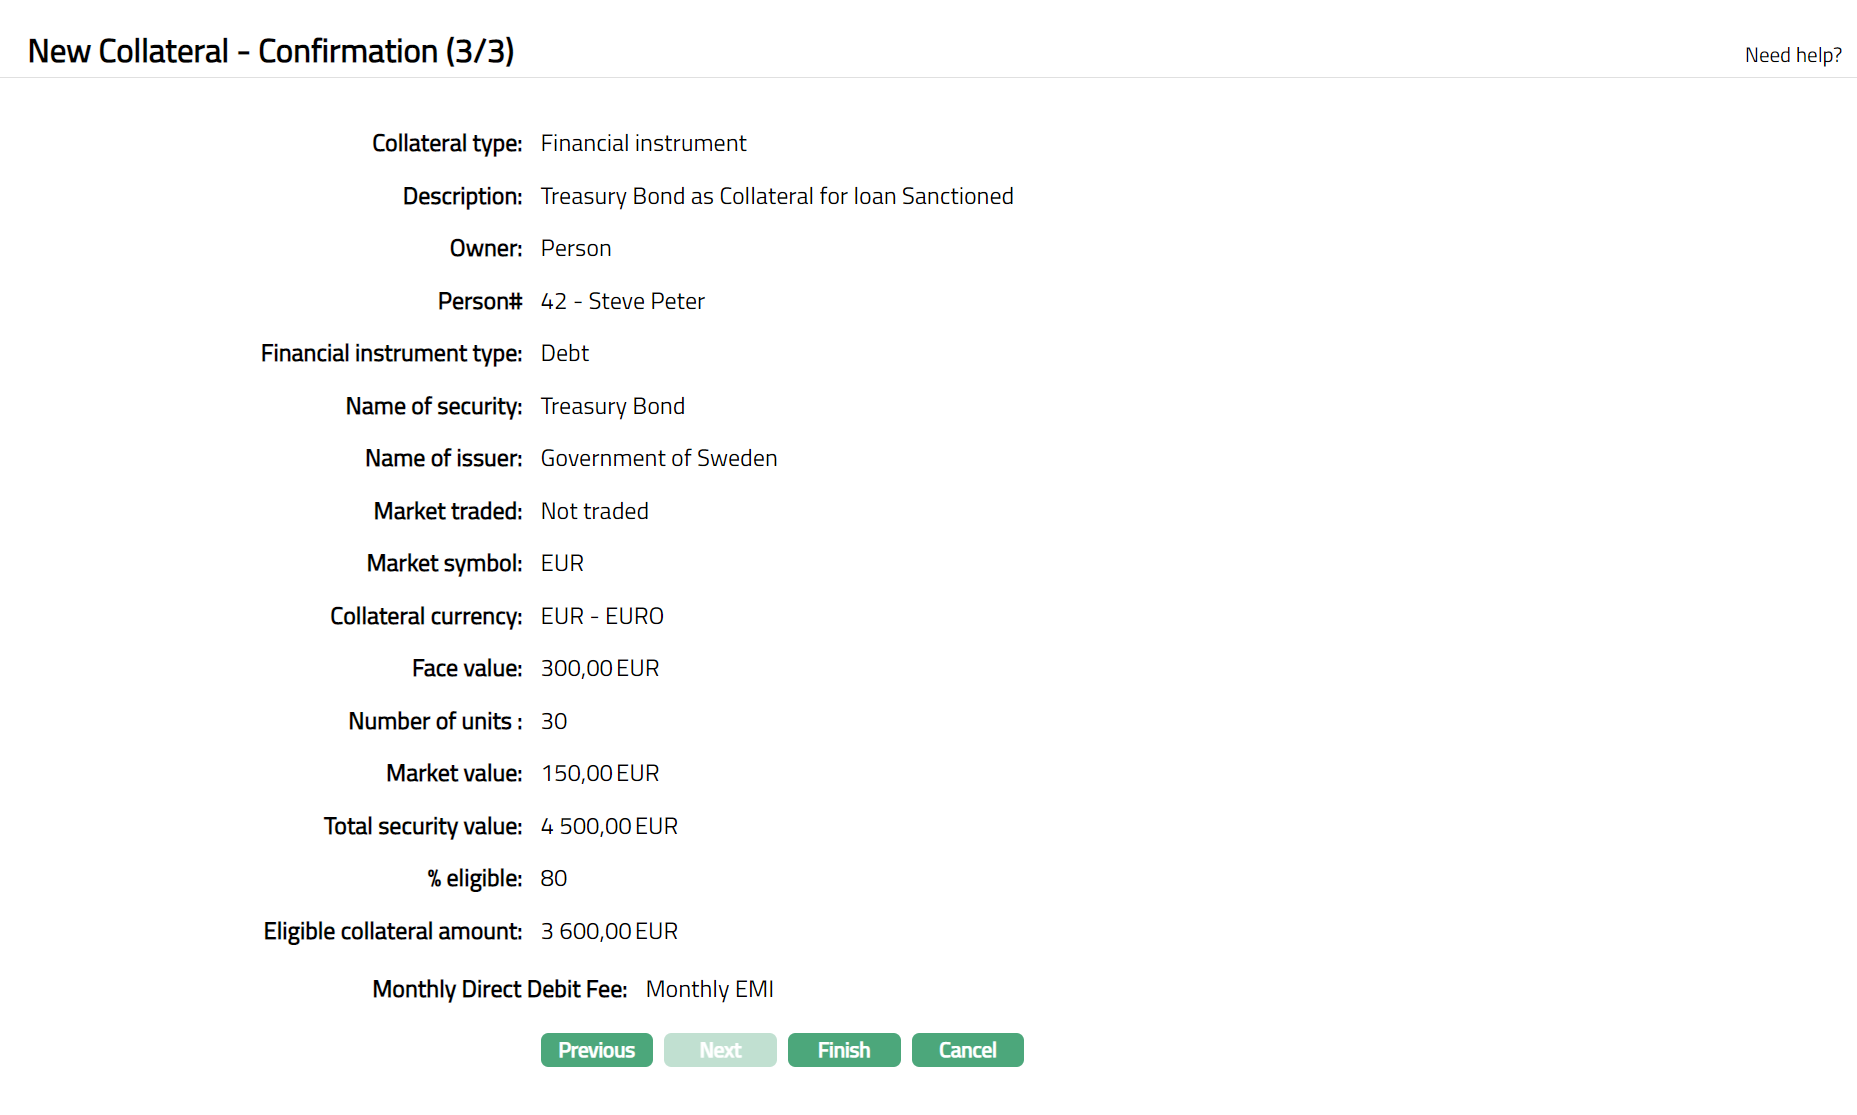
23. Click Finish. Collateral record is created with a unique Collateral id and the Collateral page appears showing the Profile tab by default.
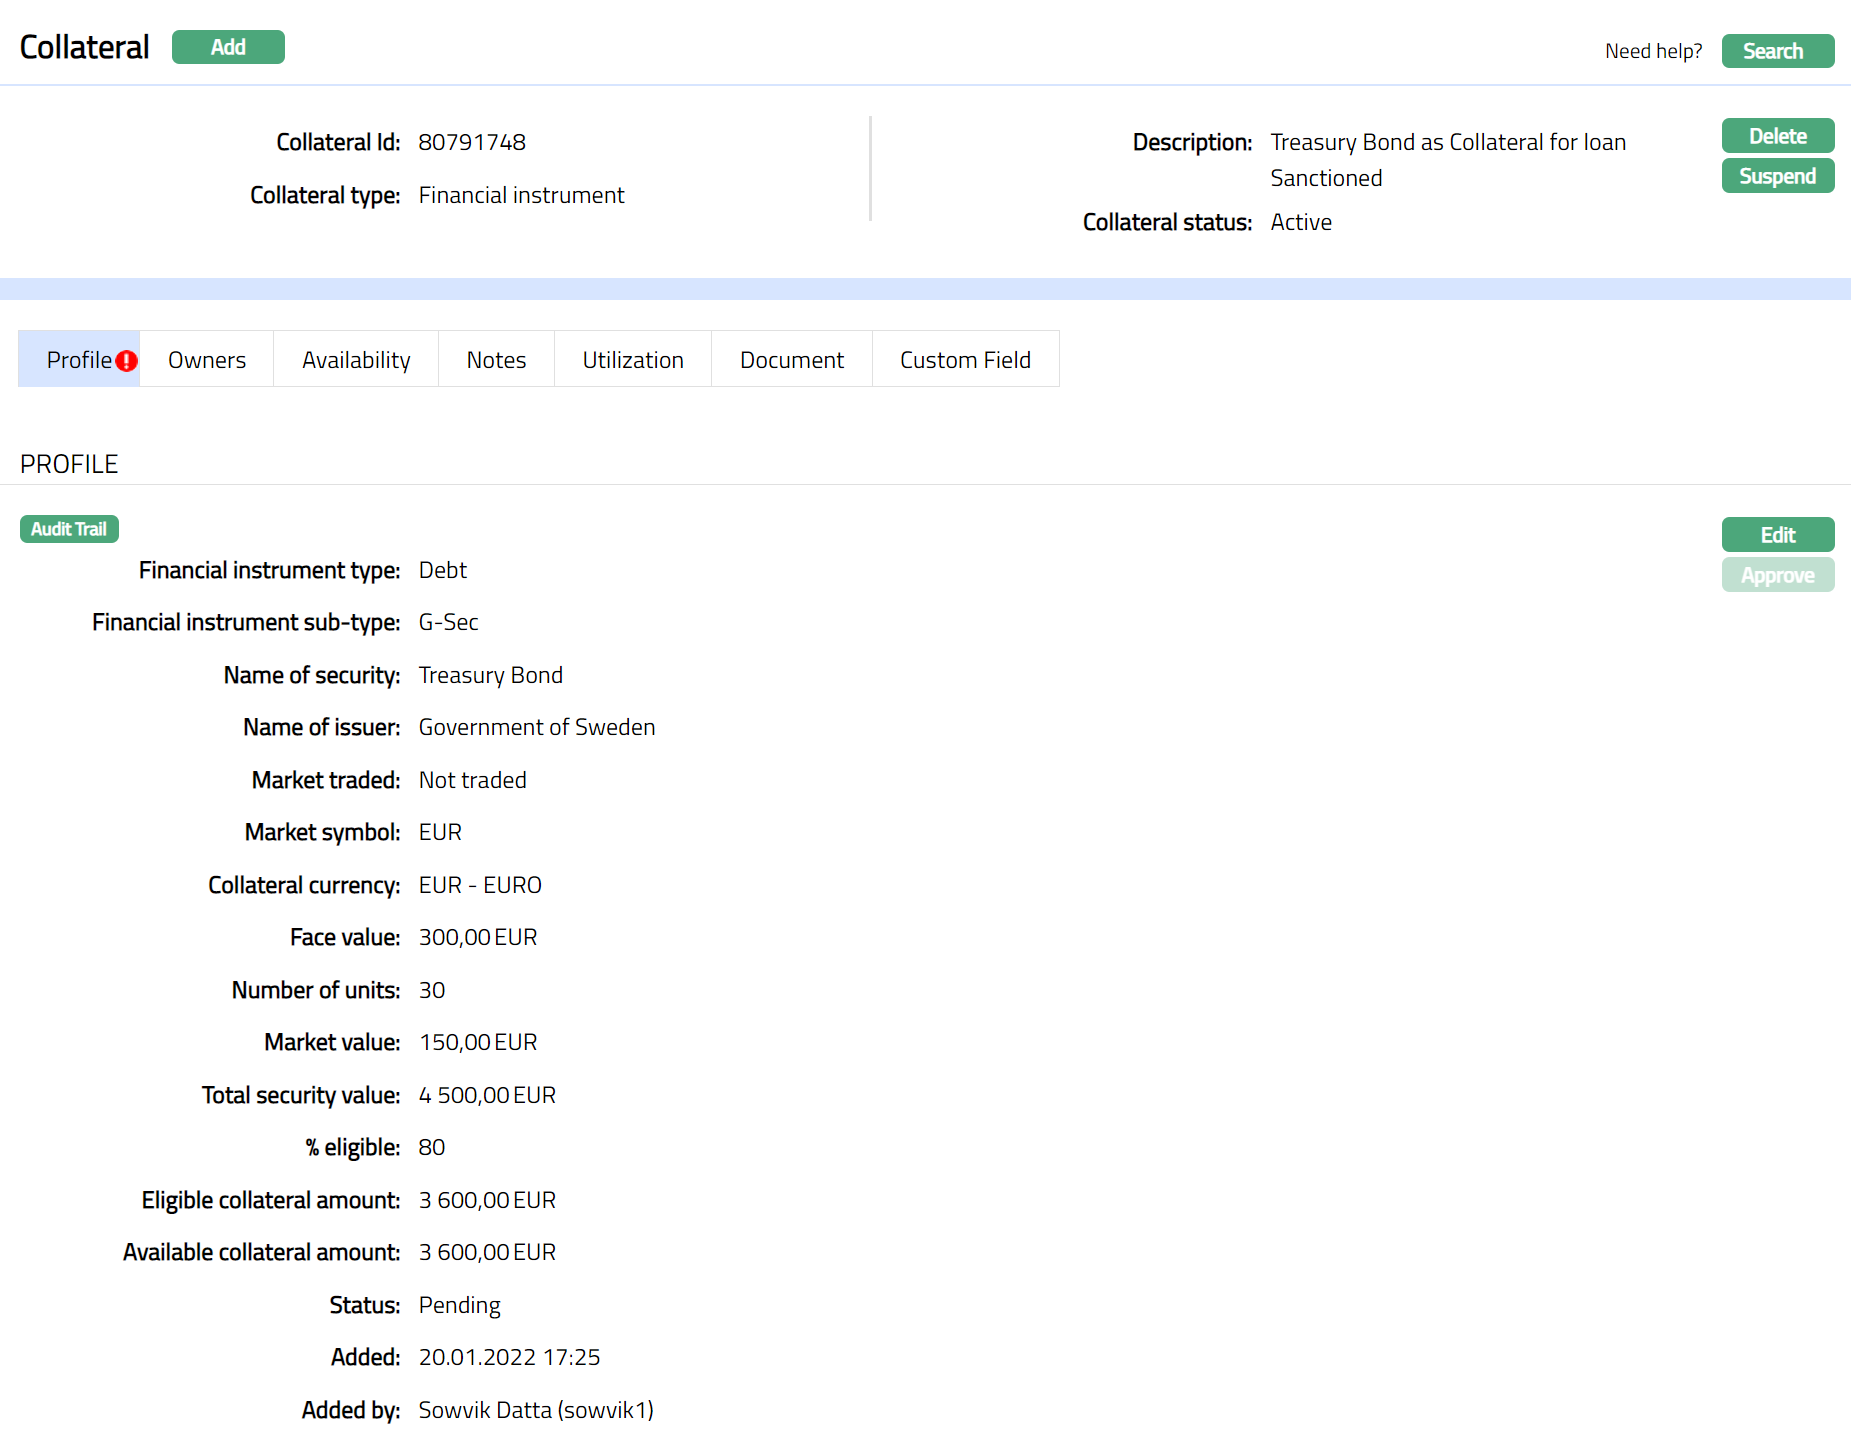
Note: On creation of the Collateral record, the Collateral Status is Active, and the record Status will be Pending. Any user other than the one who created the Collateral record can approve the record. First Valuation Tab Status need to be approved followed by the Profile Tab Status by another user / authorised person. Once Approved the red bubble disappears.
Functions: Add, Search, Delete, Suspend,Activate, Edit, Approve
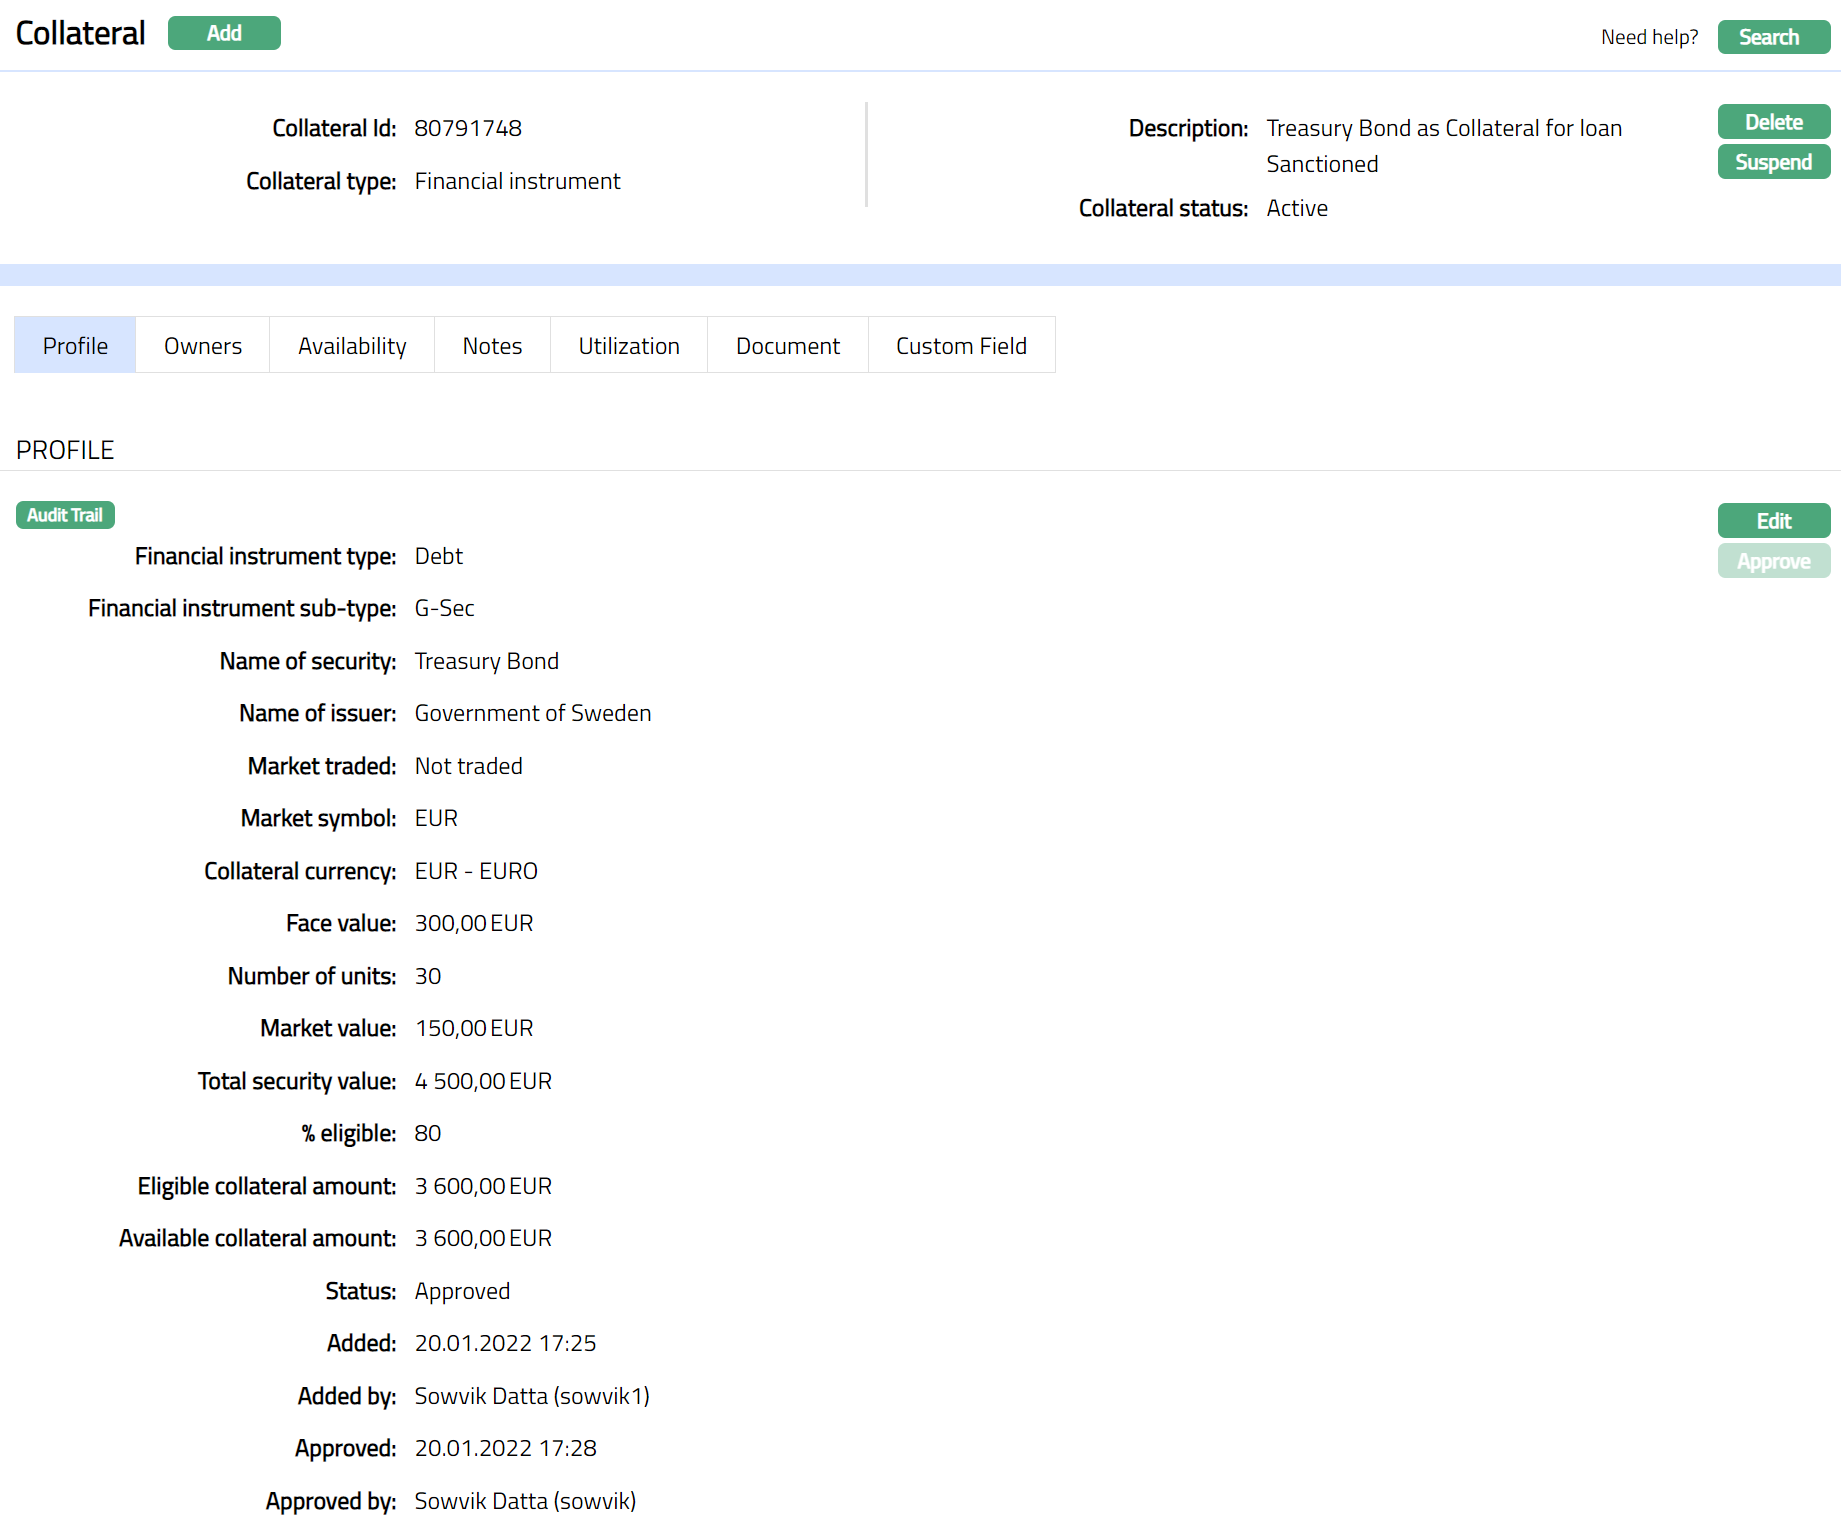
Approve: Any user other than the one who created the Collateral record can approve the record. To approve, retrieve the Collateral record and click on Approve. Aura will ask for confirmation. Once confirmed, the record status becomes approved.
Suspend: You can suspend the Collateral by clicking on Suspend button. When you click on Suspend button, Aura displays an alert message. On confirmation, Aura will suspend the Collateral. Once the Collateral is suspended, it becomes unavailable in the drop-down list while securing any contract / account in other modules in Aura.
Activate: You can activate a Suspended Collateral by clicking on Activate button. When you click on Activate button, Aura displays an alert message. On confirmation Aura will activate the Collateral. Once the Collateral is activated, it becomes available in the drop-down list in other modules.
Note: If the custom field is mapped to Collateral under Admin → System Codes → Custom fields → Field mapping, then an additional screen will appear before the confirmation screen. The custom fields will be mandatory or non-mandatory based on the rules set at the Field mappings. For more detail on custom field functionality please refer Admin → System codes → Custom fields → Field mappings manual.
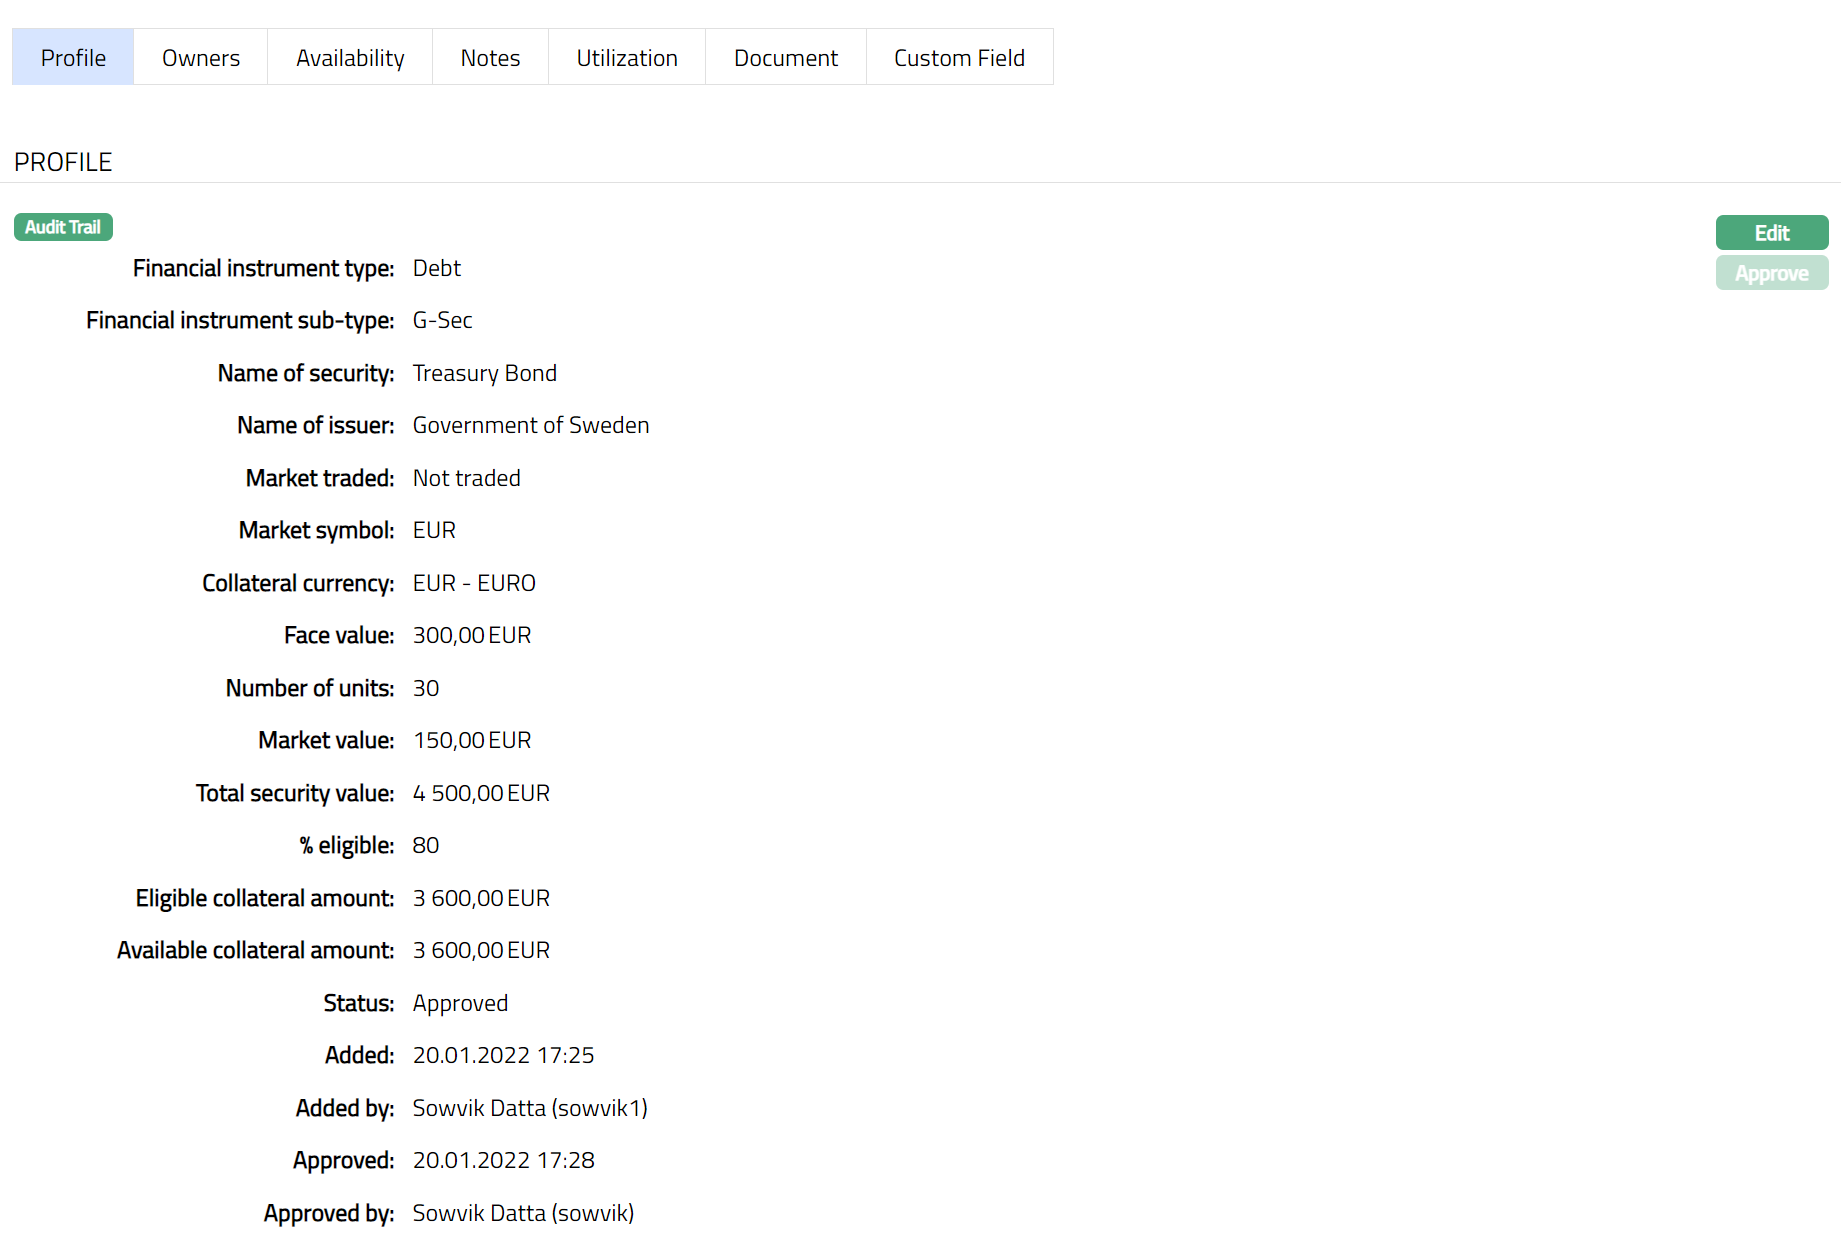
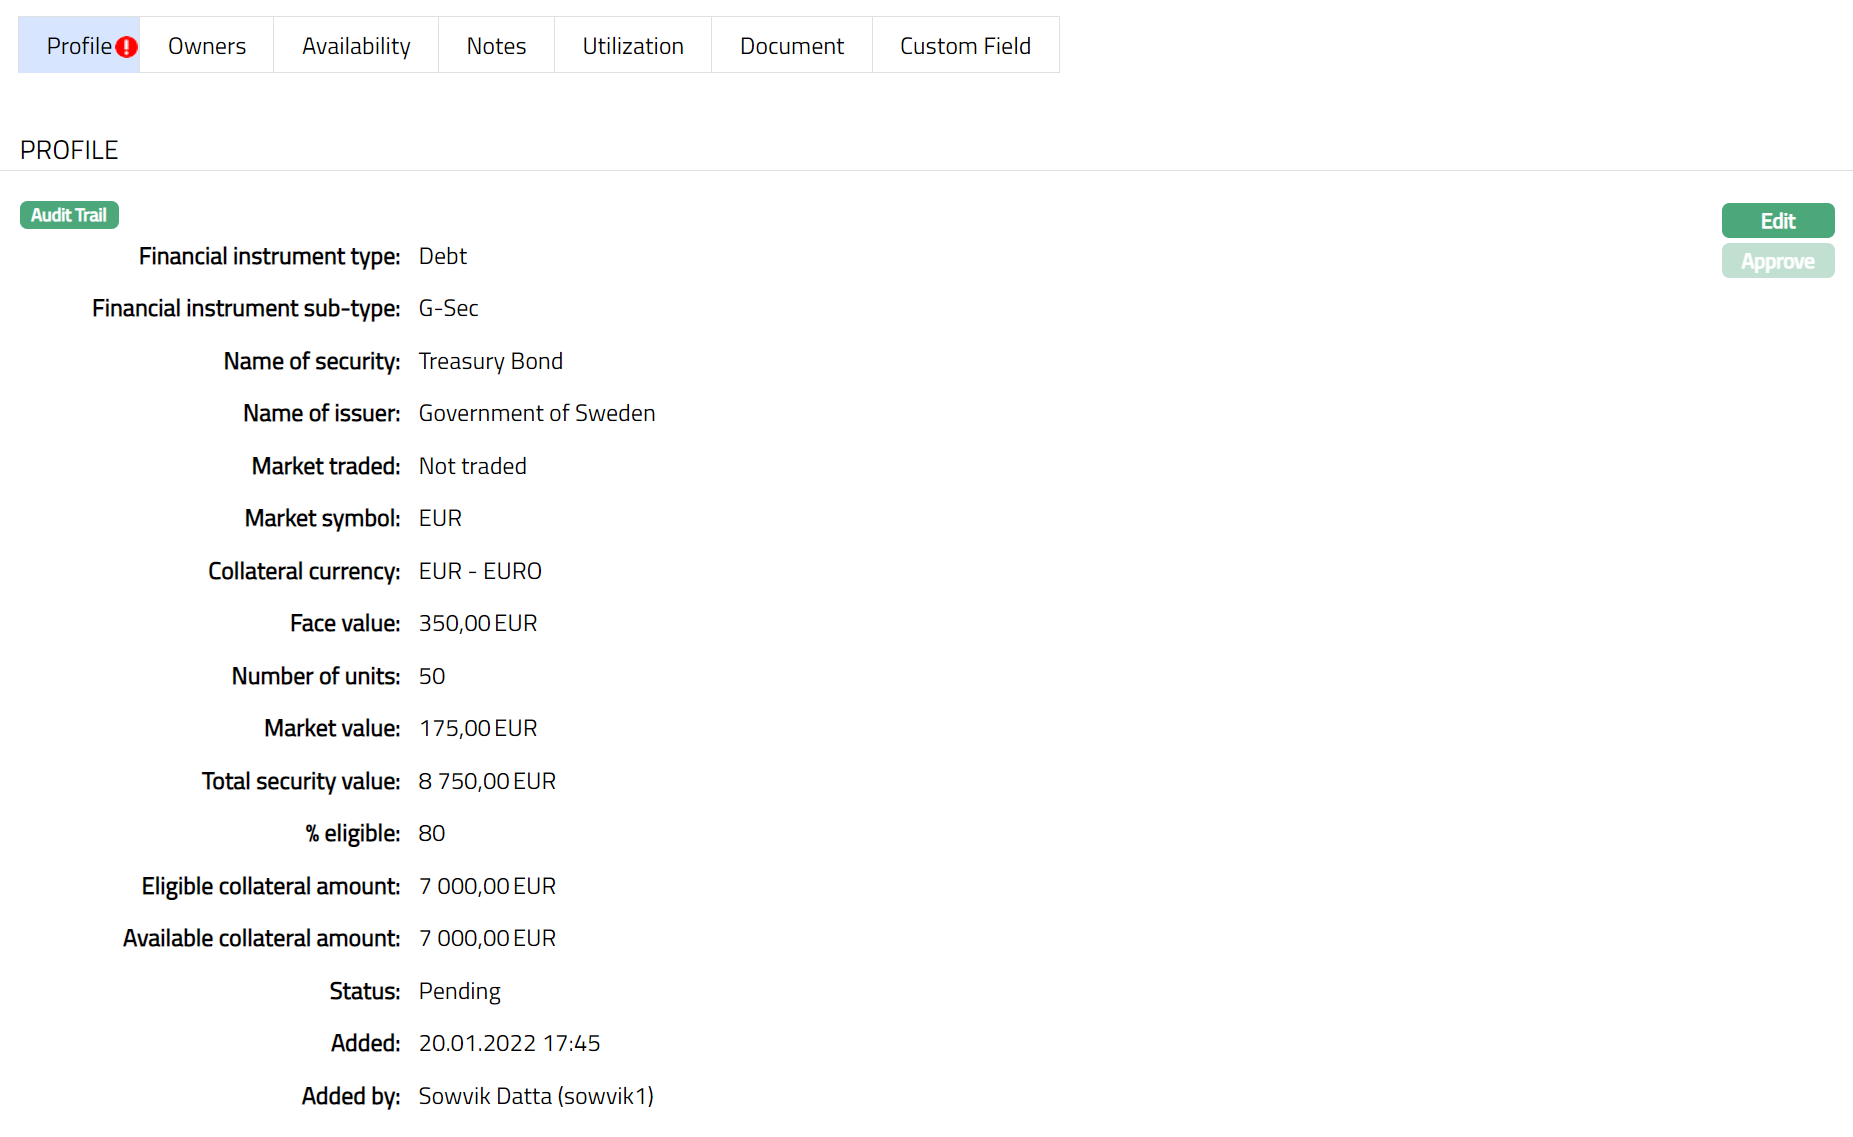
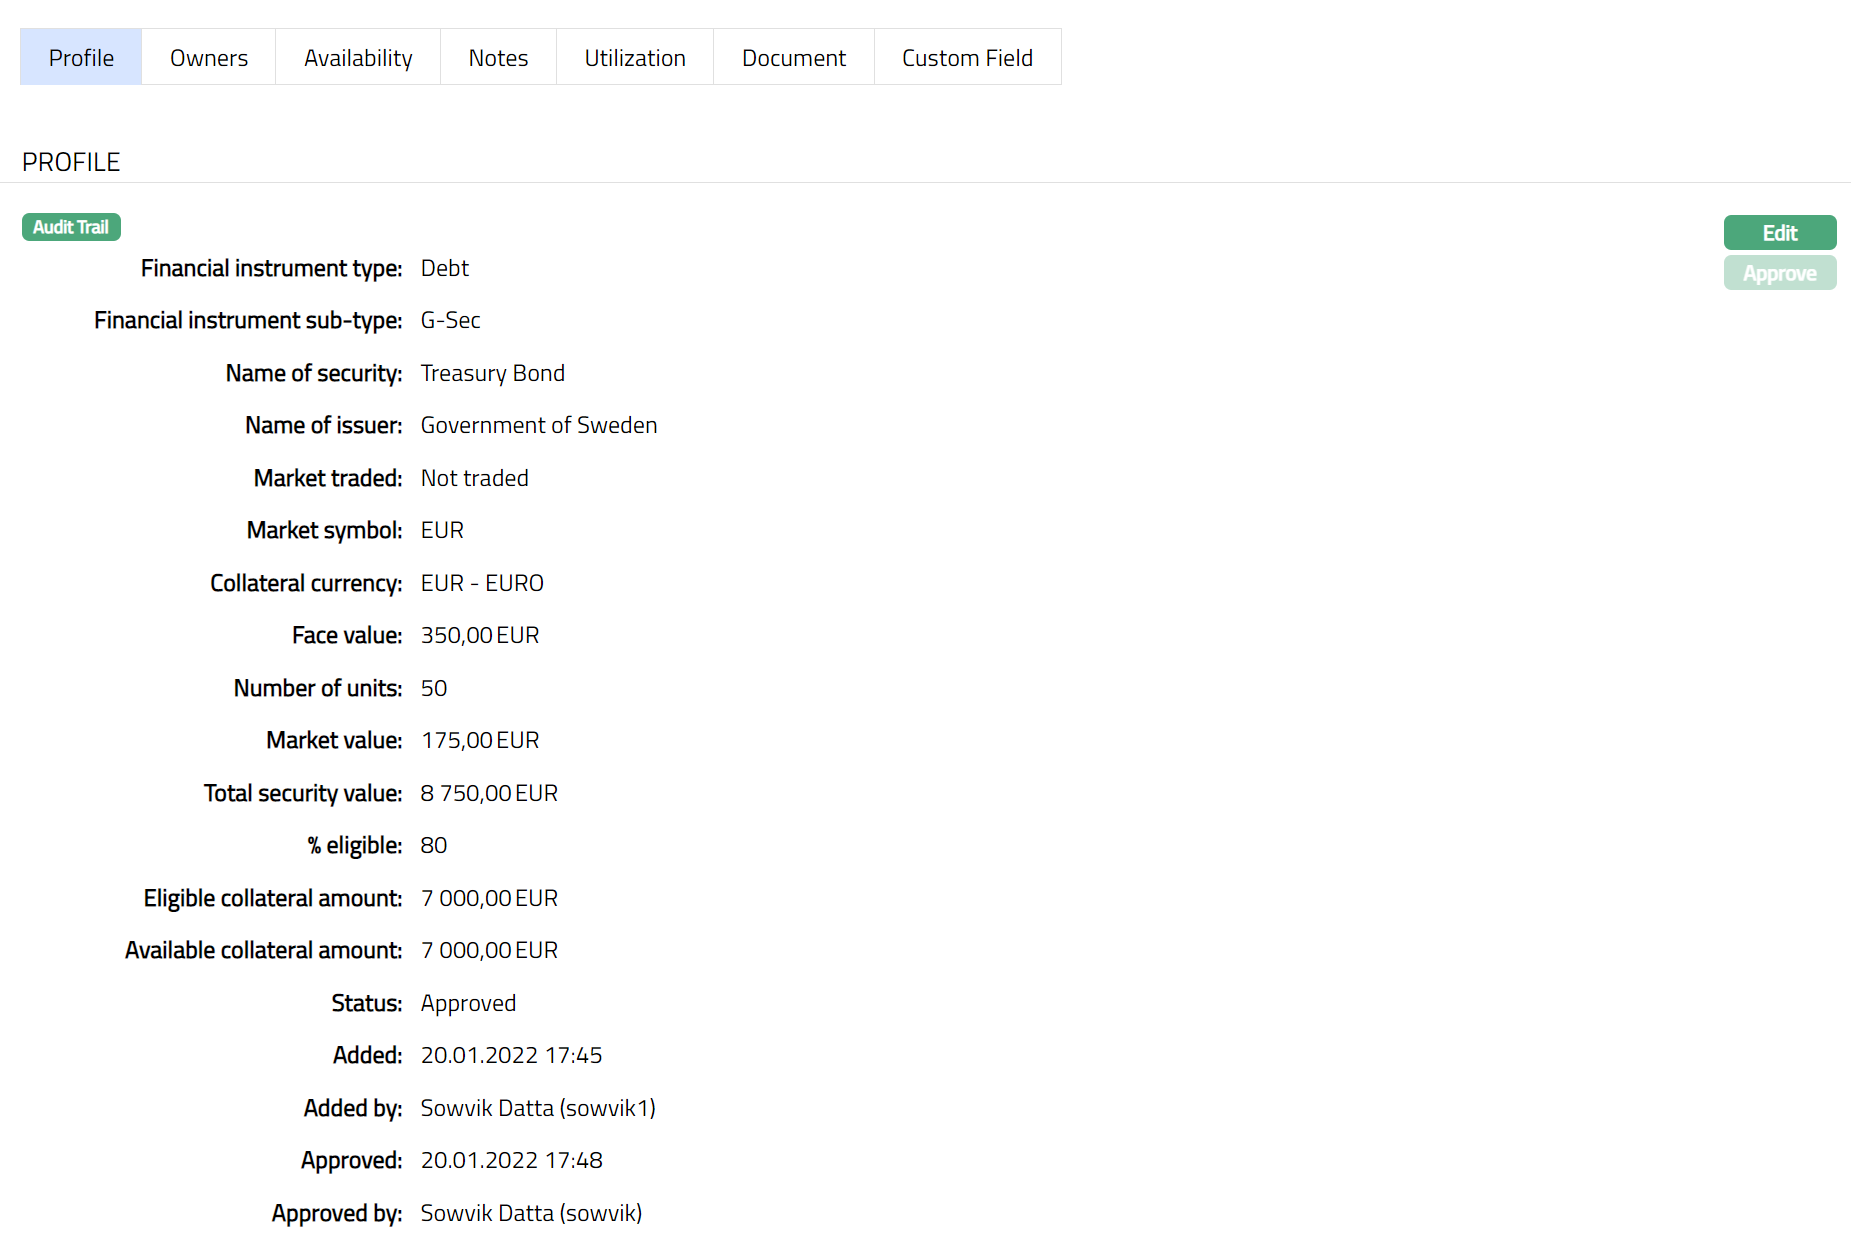
Profile
Profile tab displays the basic details of the Collateral entered during the creation of the Collateral.
To view / edit the Profile tab,
1. Access Collateral page. Click Profile tab to view the details as per sample below. The details are defaulted from the entries that you made during Collateral creation. For details refer to New Collateral → Financial Instrument (1/2).
2. Click Edit. Edit Collateral screen appears as shown below.
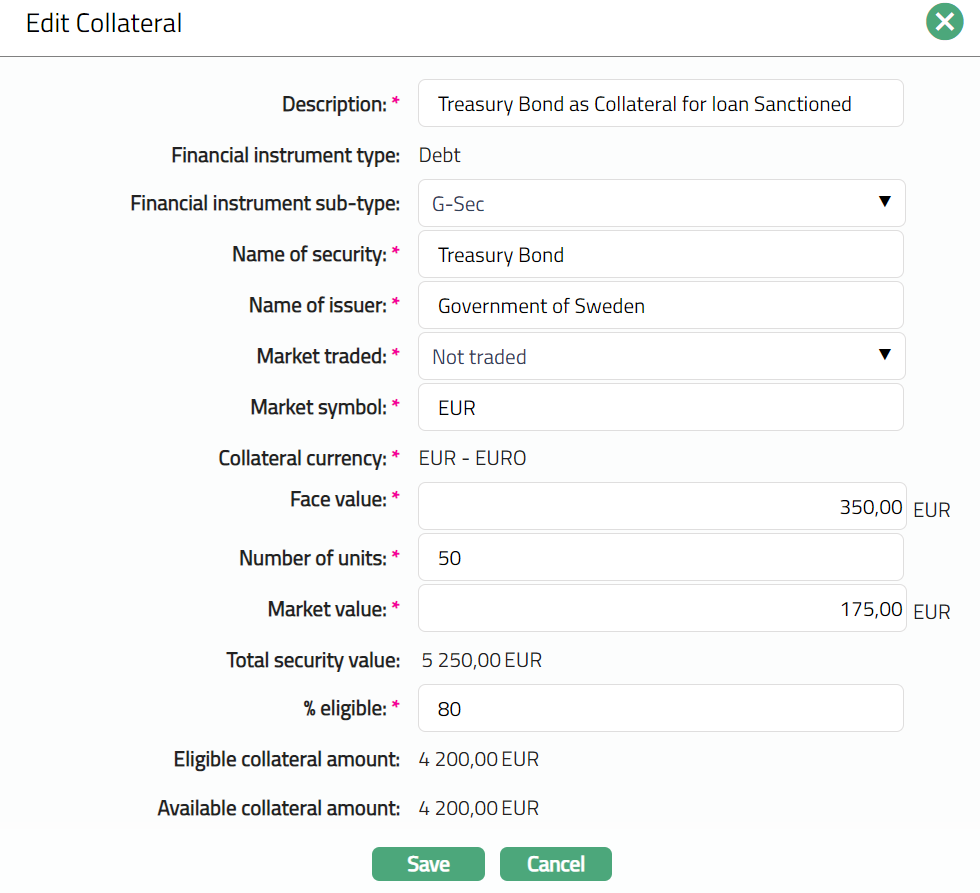
3. Financial Instrument type, Collateral currency, Total security value, Eligible Collateral amount and Available collateral amount fields are non- editable.
4. Make required changes and click Save to update the changes that you made.
Note: Any change in the tab will set the record status to Pending till it is approved by another user. On approval, the record status is set to Approved and the red bubble disappears.
Functions: Edit, Approve
The additional fields that you can view in the Profile tab are explained below:
Status field denotes the status of the record.
Added field denotes the date on which the record was added.
Added by field denotes the name of the user who created the record.
Approved field denotes date on which the record was approved and is displayed only on approval.
Approved by field denotes name of the user who approved the record and is displayed only on approval.
Owners
This is similar to Owner's tab under Collateral type Precious Metal. Please refer to Owners tab in Precious metal section for details.
Availability
This is similar to Availability tab under Collateral type Precious Metal. Please refer to Availability tab in Precious metal section for details.
Notes
This is similar to Notes tab under Collateral type Precious Metal. Please refer to Notes tab in Precious metal section for details.
Utilization
This is similar to Utilization tab under Collateral type Precious Metal. Please refer to Utilization tab in Precious metal section for details.
Document
This is similar to Document tab under Collateral type Precious Metal. Please refer to Document tab in Precious metal section for details.
Custom Field
This is similar to Custom Field tab under Collateral type Precious Metal. Please refer to Custom Field tab in Precious metal section for details.
Electronic Mortgage
The following tabs appear in the Collateral Maintenance page if the collateral type is Electronic Mortgage.
To Add Electronic Mortgage as a New Collateral,
1. From CRM menu, click Collateral/Limits, and then Collaterals. Collateral Search page appears showing the details of all Collaterals created in Aura.
2. Click Add. New Collateral → Select Collateral Type page appears.

3. Select Electronic Mortgage as Collateral type from the drop-down list.
4. Enter Description of the Collateral.
5. Click Next. New Collateral → Electronic Mortgage (1/3) page appears as shown below.
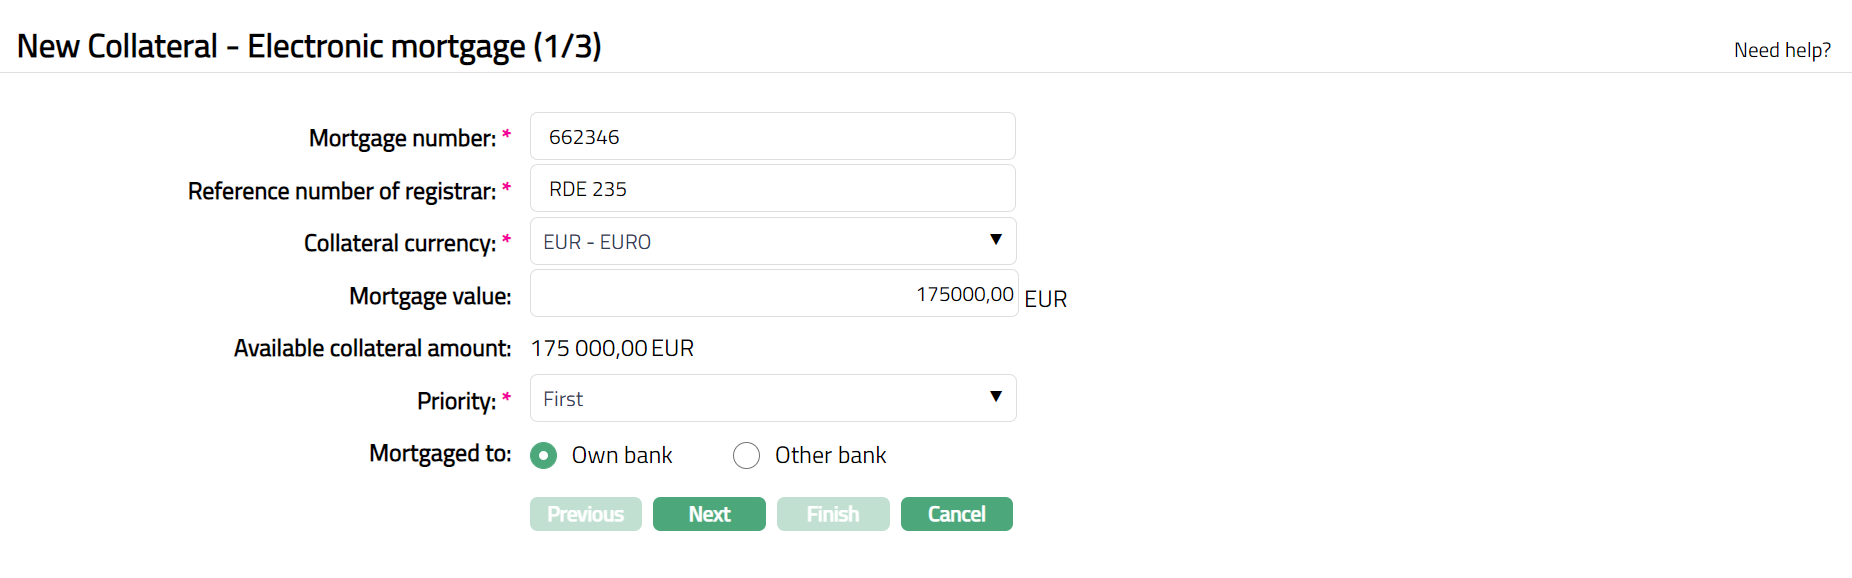
6. Enter Mortgage number which should be a unique one for that particular Mortgage.
7. Input the reference number of the mortgage registrar in Reference number of registrar.
8. Enter Collateral currency. Choose from the dropdown list of active GL currencies.
9. Input Mortgage value and the entered value should be greater than zero.
10. Based on the Mortgage Value, Aura defaults the Available collateral amount.
11. Select the required option from the dropdown list to input the Mortgage Priority. The available options are First, Second and Third.
12. Indicate if the Property is Mortgaged to Own Bank or Other Bank using the appropriate radio button .
13. Click Next. Maintain Custom Field Details - (2/3) page appears.

14. Enter Custom Field details as required for the Collateral.
15. Click Next. New Collateral Confirmation → (3/3) page appears.

16. Click Finish. Collateral record is created with a unique Collateral id and the Collateral page appears showing the Profile tab by default.
Note: On creation of the Collateral record, the Collateral Status is Active, and the record status will be Pending. Any user other than the one who created the Collateral record can approve the record. On approval, the record status is set to Approved and the red bubble disappears.
Functions: Add, Search, Delete, Suspend,Activate, Edit, Approve
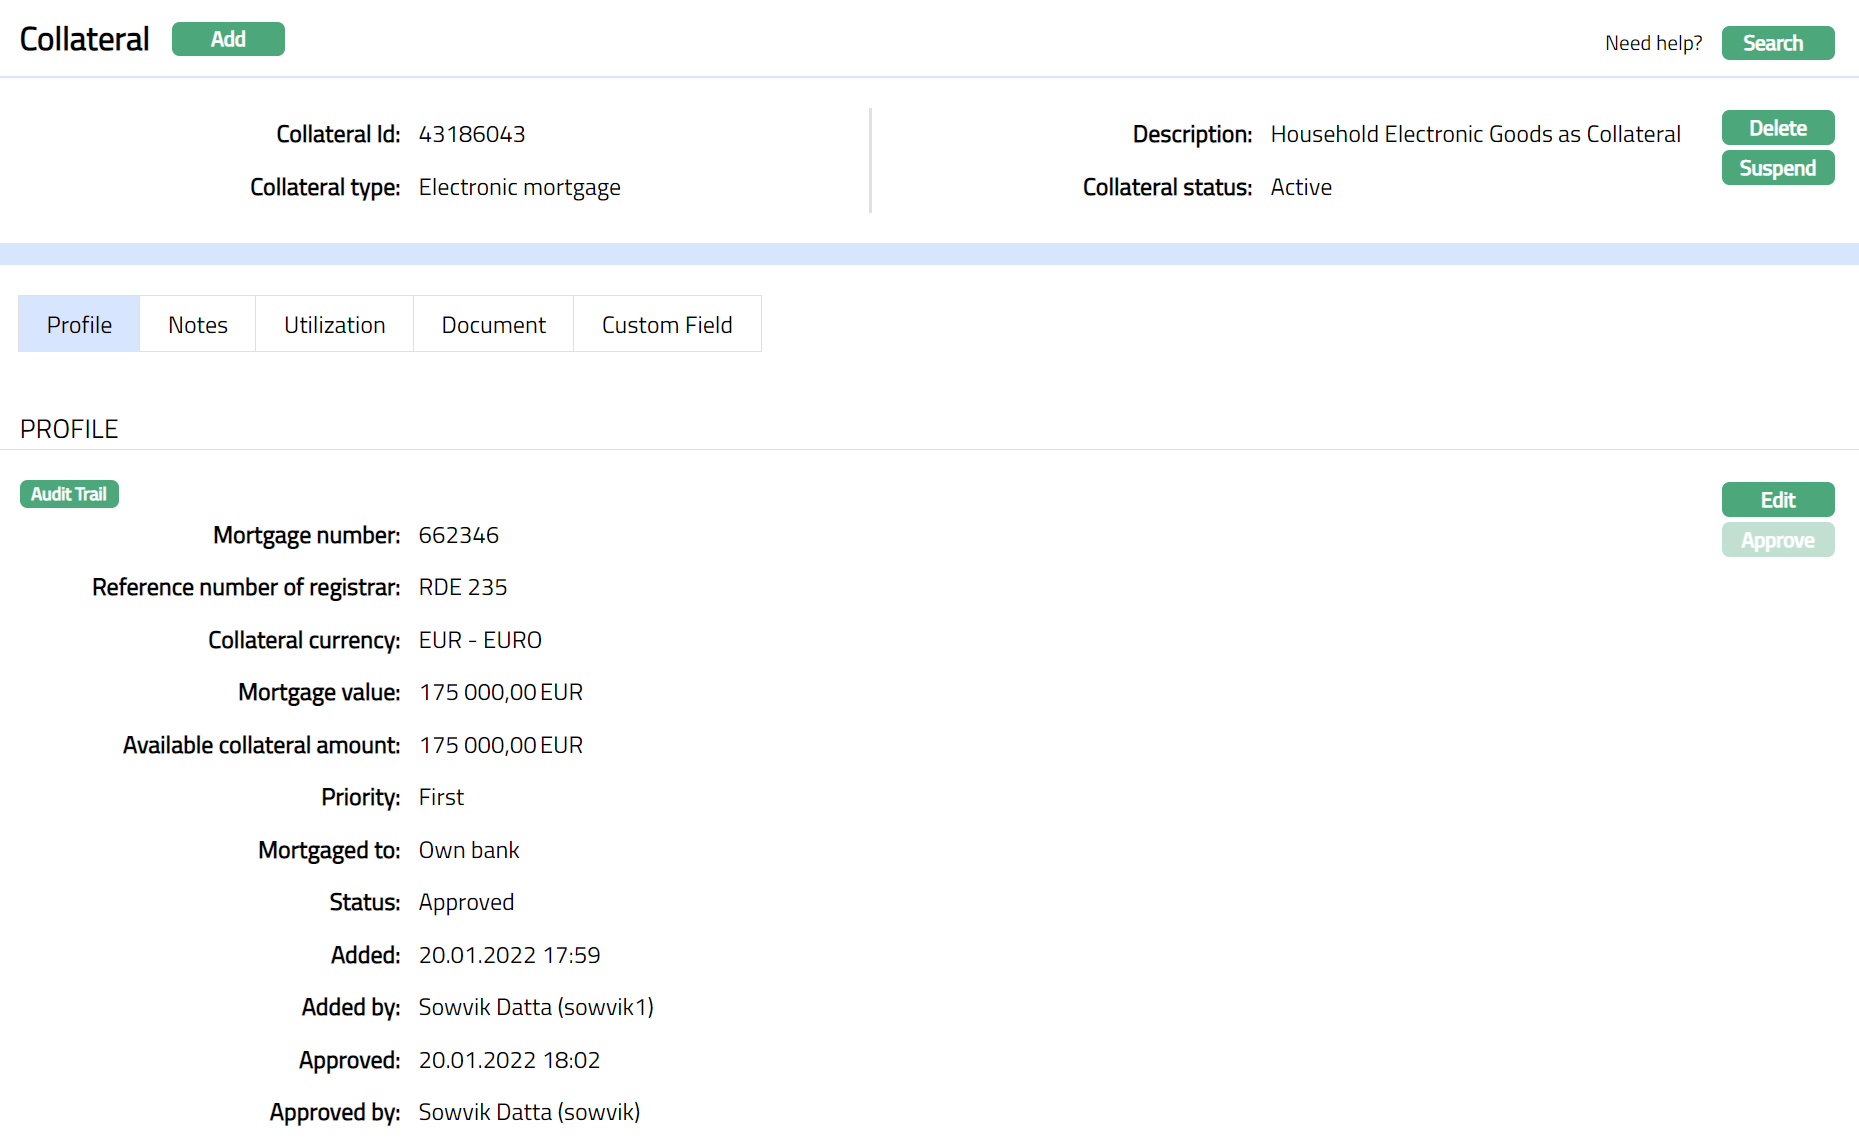
Approve: Any user other than the one who created the Collateral record can approve the record. To approve, retrieve the Collateral record and click on Approve. Aura will ask for confirmation. Once confirmed, the record status becomes approved.
Suspend: You can suspend the Collateral by clicking on Suspend button. When you click on Suspend button, Aura displays an alert message. On confirmation, Aura will suspend the Collateral. Once the Collateral is suspended, it becomes unavailable in the drop-down list while securing any contract / account in other modules in Aura.
Activate: You can activate a Suspended Collateral by clicking on Activate button. When you click on Activate button, Aura displays an alert message. On confirmation Aura will activate the Collateral. Once the Collateral is activated, it becomes available in the drop-down list in other modules.
Note: If the custom field is mapped to Collateral under Admin → System Codes → Custom fields → Field mapping, then an additional screen will appear before the confirmation screen. The custom fields will be mandatory or non-mandatory based on the rules set at the Field mappings. For more detail on custom field functionality please refer Admin → System codes → Custom fields → Field mappings manual.
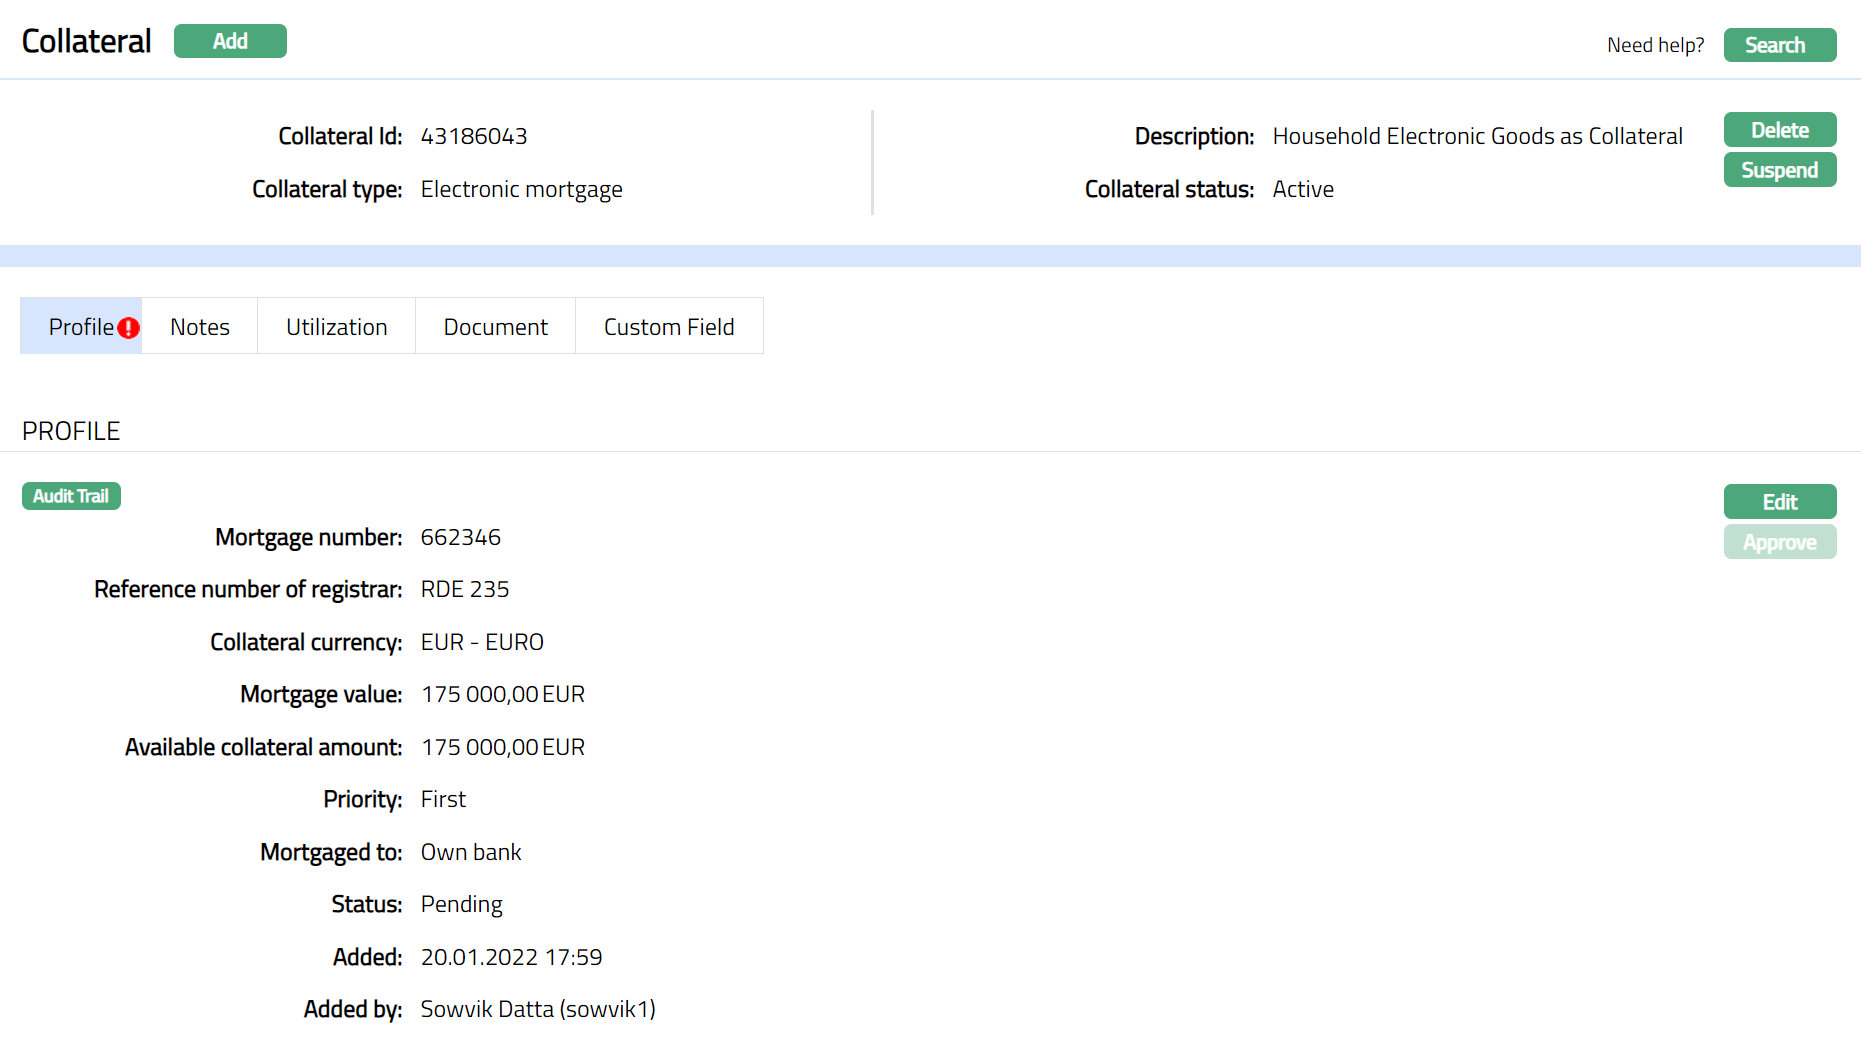
Profile
Profile tab displays the basic details of the Collateral entered during the creation of the Collateral.
To view / edit the Profile tab,
1. Access Collateral page. Click Profile tab to view the details as per sample below. The details are defaulted from the entries that you made during Collateral creation. For details refer to New Collateral → Electronic Mortgage (1/3).

2. Click Edit. Edit Collateral screen appears as shown below.
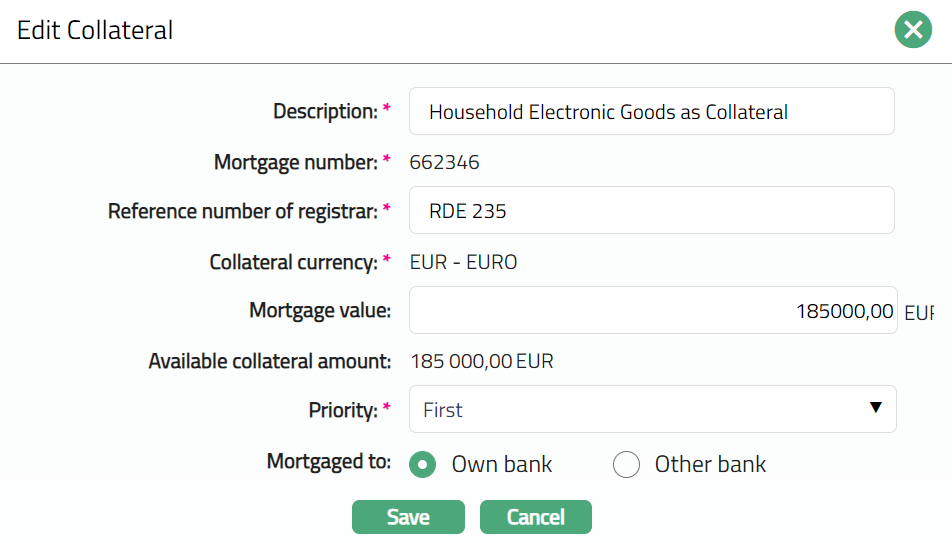
3. All fields except Mortgage number, Collateral currency and Available collateral amount fields are editable.
4. Click Save. Profile tab appears with the edited details.
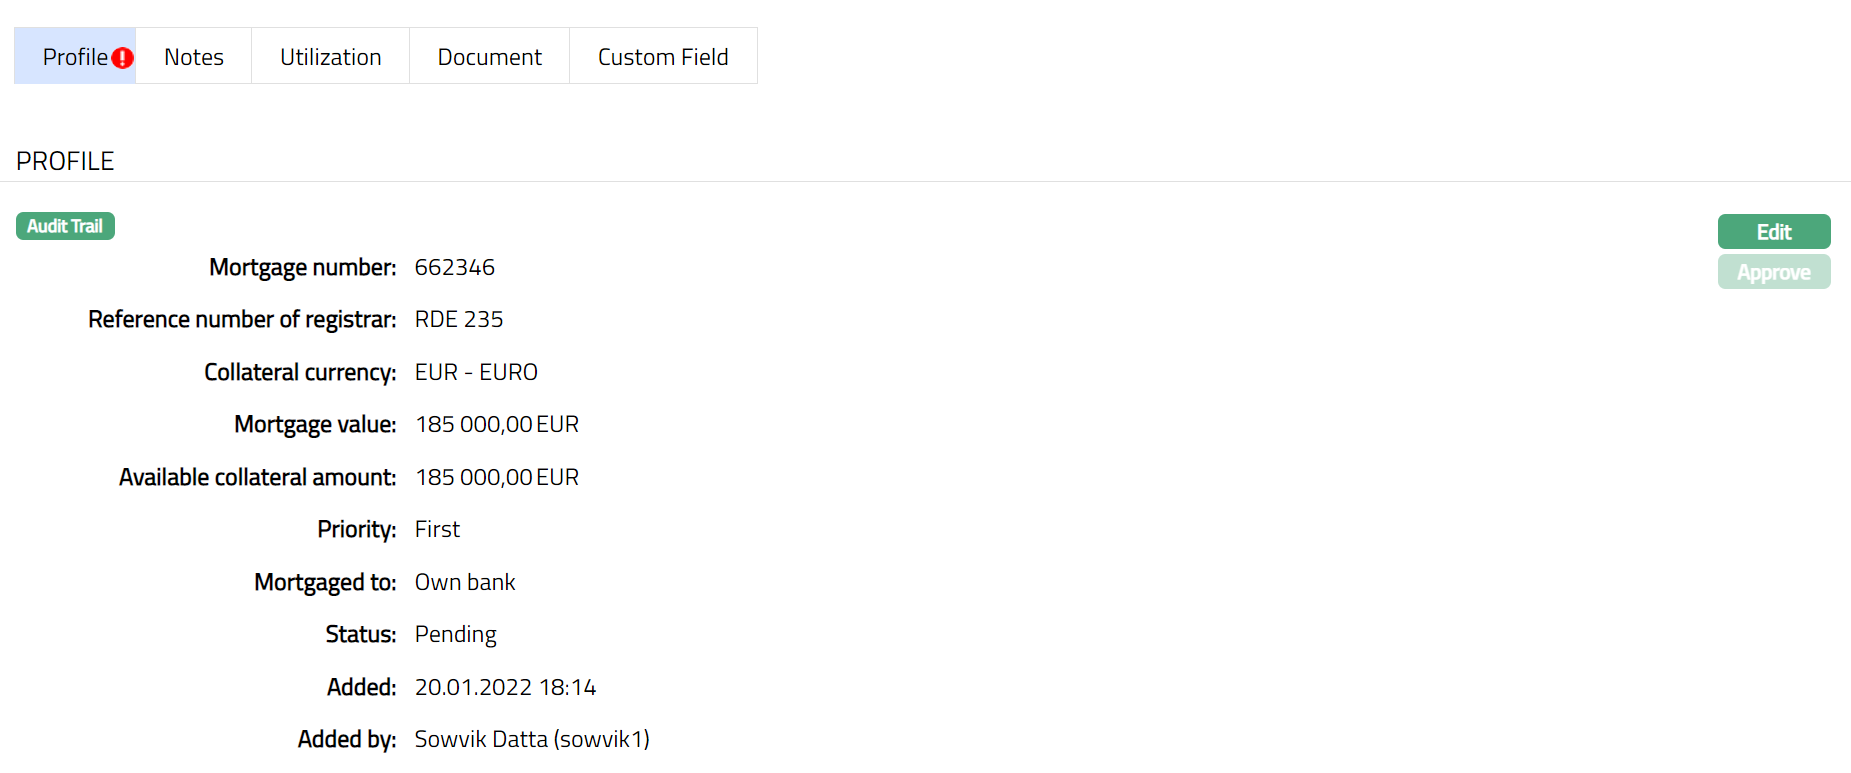
Note: Any change in the tab will set the record status to Pending till it is approved by another user. On approval, the record status is set to Approved and the red bubble disappears.
Functions: Edit, Approve.
The additional fields that you can view in the Profile tab are explained below:
Status field denotes the status of the record.
Added field denotes the date on which the record was added.
Added by field denotes the name of the user who created the record.
Approved field denotes date on which the record was approved and is displayed only on approval.
Approved by field denotes name of the user who approved the record and is displayed only on approval.
Notes
This is similar to Notes tab under Collateral type Precious Metal. Please refer to Notes tab in Precious metal section for details.
Utilization
This is similar to Utilization tab under Collateral type Precious Metal. Please refer to Utilization tab in Precious metal section for details.
Document
This is similar to Document tab under Collateral type Precious Metal. Please refer to Document tab in Precious metal section for details.
Custom Field
This is similar to Custom Field tab under Collateral type Precious Metal. Please refer to Custom field tab in Precious metal section for details.
Art
The following tabs appear in the Collateral Maintenance page if the collateral type is Art.
To Add Art as New Collateral
1. From CRM menu, click Collateral/Limits and then Collateral. Collateral Search page appears, showing the details of all collaterals created in Aura.
2. Click Add. New Collateral → Select Collateral Type page appears.

3. Select Art as Collateral type from the drop-down list.
4. Enter Description of the Collateral.
5. Click Next. New Collateral → Art (1/3) page appears.
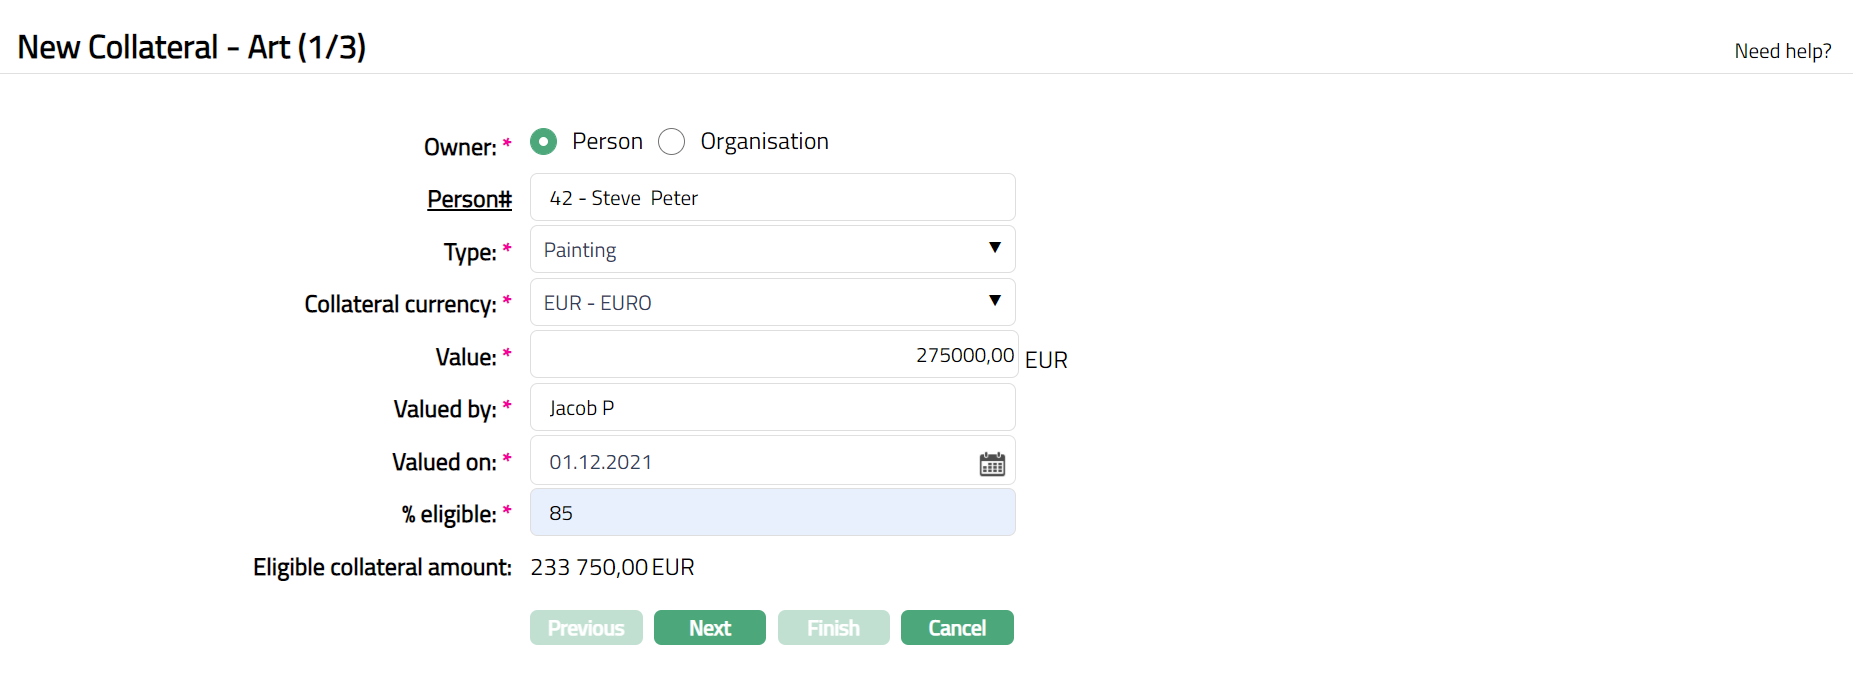
6. Select the type of Owner of the Collateral -- if it is owned by a person, select Person; and if it is owned by an organisation, select Organisation.
7. Depending on whether the Owner is chosen as Person or Organisation, you have to enter the Person# or Organisation#.
If the Owner chosen above is a Person, you will have to enter the Person #. Click on the hyperlink to see the list of Persons as maintained in CRM → Person → Maintain or enter the name of the person and select the required person from the list displayed by Aura.
If the Owner chosen above is an Organisation, you will have to enter the Organisation #. Click on the hyperlink to see the list of Organisations as maintained in CRM → Organisation → Maintain or enter the name of the organisation and select the required organisation from the list displayed by Aura.
8. Input Type of the Art by selecting one of the pre-shipped values from the dropdown list. The Available options are:
Painting
Sculpture
9. Enter Collateral currency. Choose from the dropdown list of active GL currencies.
10. Enter Value of Art (Collateral).
11. Input the information regarding the Valuator of the property in Valued by.
12. Input Valued on by entering the date on which the Art (collateral) was valued. The Date entered should not be the current Date or greater than the current date. Pick the Date using date picker option.
13. Indicate what proportion of the Collateral value is eligible for securing in % eligible. You can enter any value from 1 to 100.
14. Based on the Value and the % eligible, Aura calculates the Eligible collateral amount.
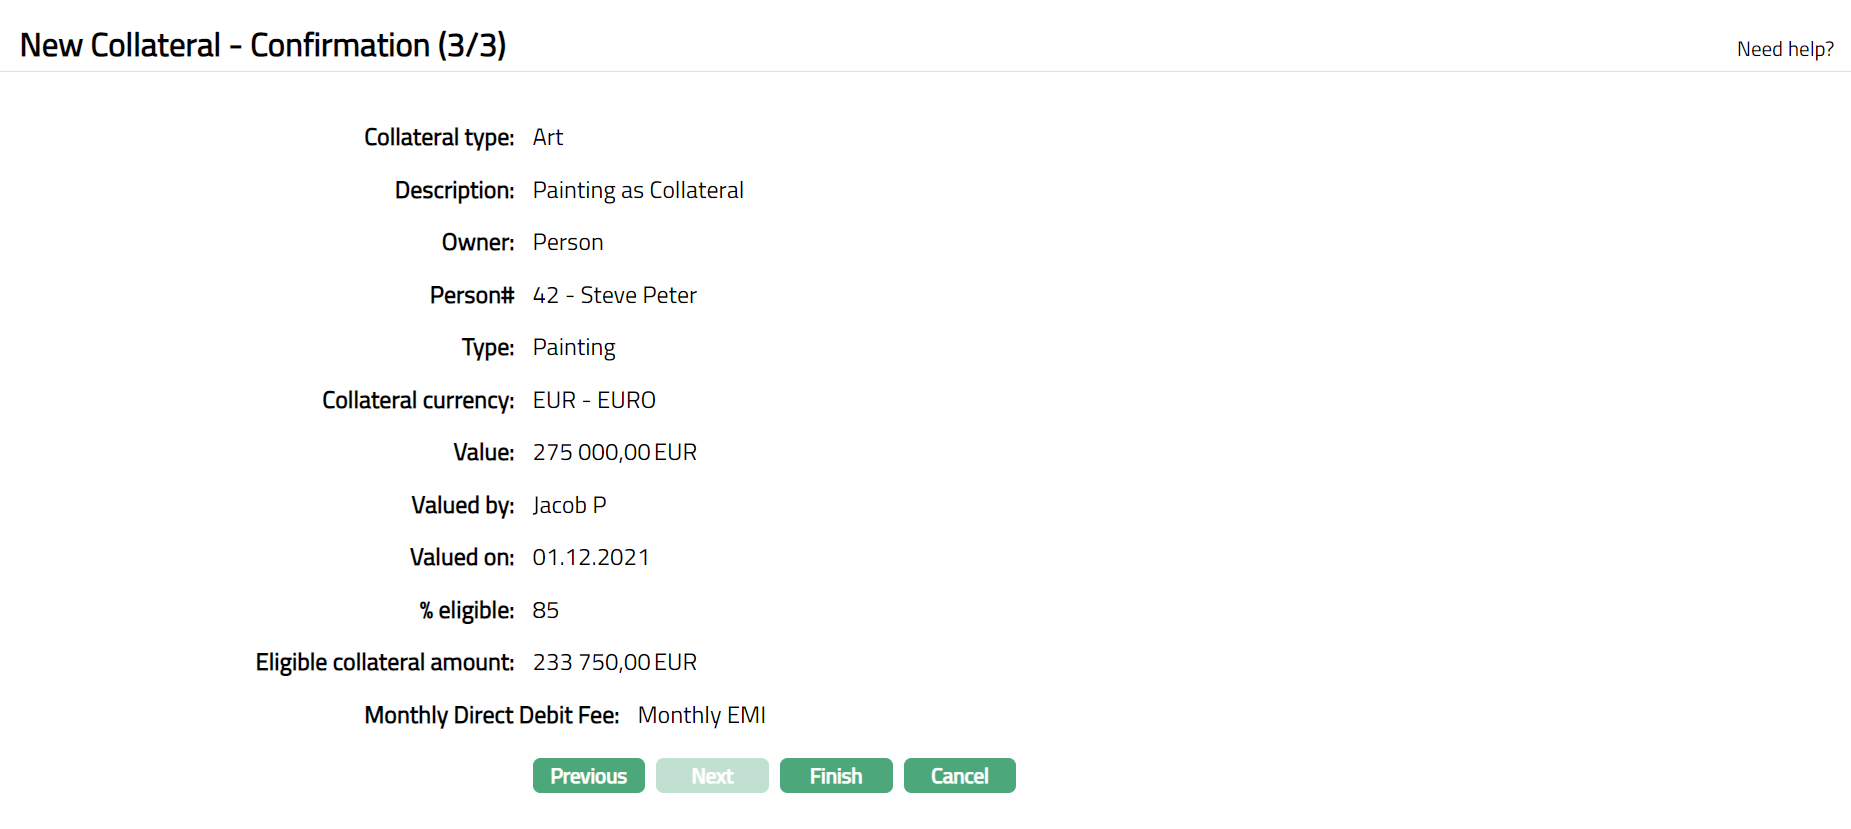
15. Click Next. Maintain Custom Field Details → (2/3) page appears.

16. Enter Custom Field details as required for the Collateral.
17. Click Next. New Collateral Confirmation → (3/3) page appears
18. Click Finish. Collateral record is created with a unique Collateral id and the Collateral page appears showing the Profile tab by default.
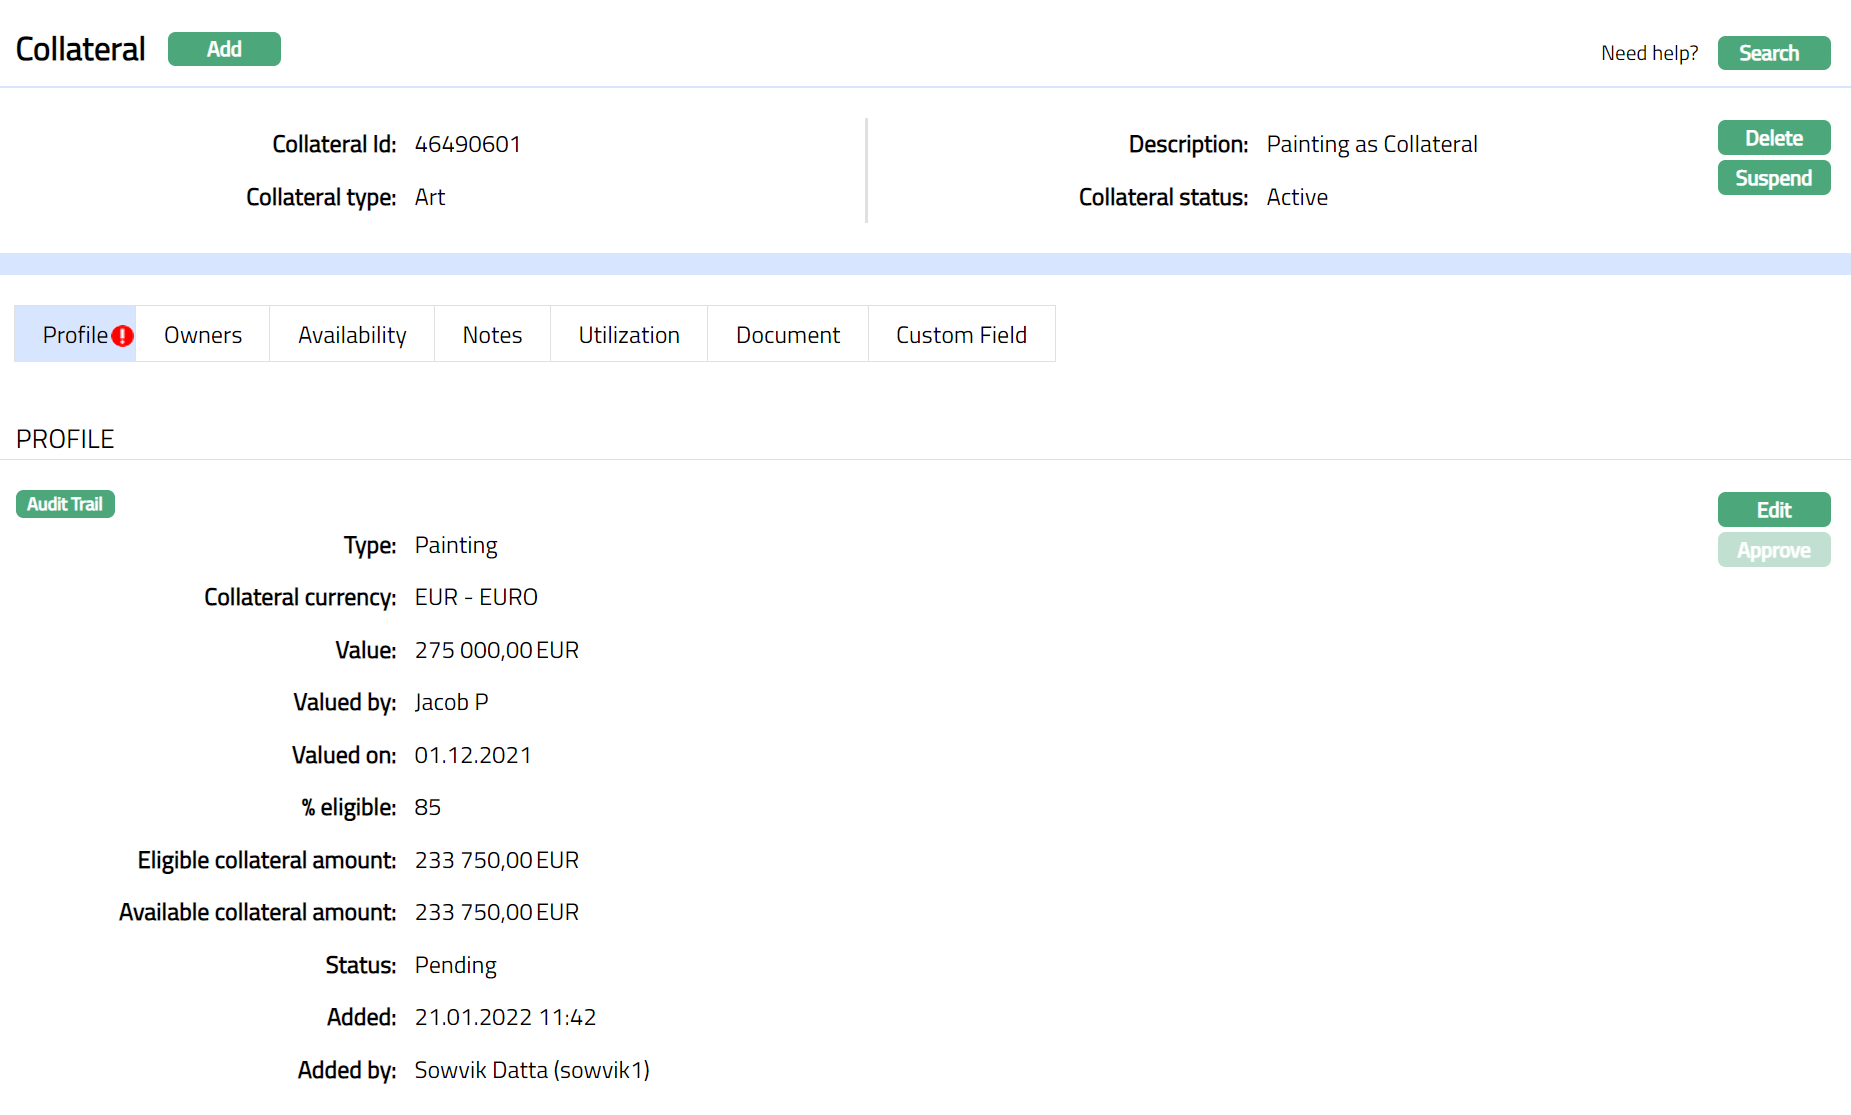
Note: On creation of the Collateral record, Collateral Status is Active, and the record status will be Pending. Any user other than the one who created the Collateral record can approve the record. On approval, the record status is set to Approved and the red bubble disappear.
 Functions: Add, Search, Delete, Suspend, Activate, Edit, Approve
Approve: Any user other than the one who created the Collateral record can approve the record. To approve, retrieve the Collateral record and click on Approve. Aura will ask for confirmation. Once confirmed, the record status becomes approved.
Suspend: You can suspend the Collateral by clicking on Suspend button. When you click on Suspend button, Aura displays an alert message. On confirmation, Aura will suspend the Collateral. Once the Collateral is suspended, it becomes unavailable in the drop-down list while securing any contract / account in other modules in Aura.
Activate: You can activate a Suspended Collateral by clicking on Activate button. When you click on Activate button, Aura displays an alert message. On confirmation Aura will activate the Collateral. Once the Collateral is activated, it becomes available in the drop-down list in other modules.
Note: If the custom field is mapped to Collateral under Admin → System Codes → Custom fields → Field mapping, then an additional screen will appear before the confirmation screen. The custom fields will be mandatory or non-mandatory based on the rules set at the Field mappings. For more detail on custom field functionality please refer Admin → System codes → Custom fields → Field mappings manual.
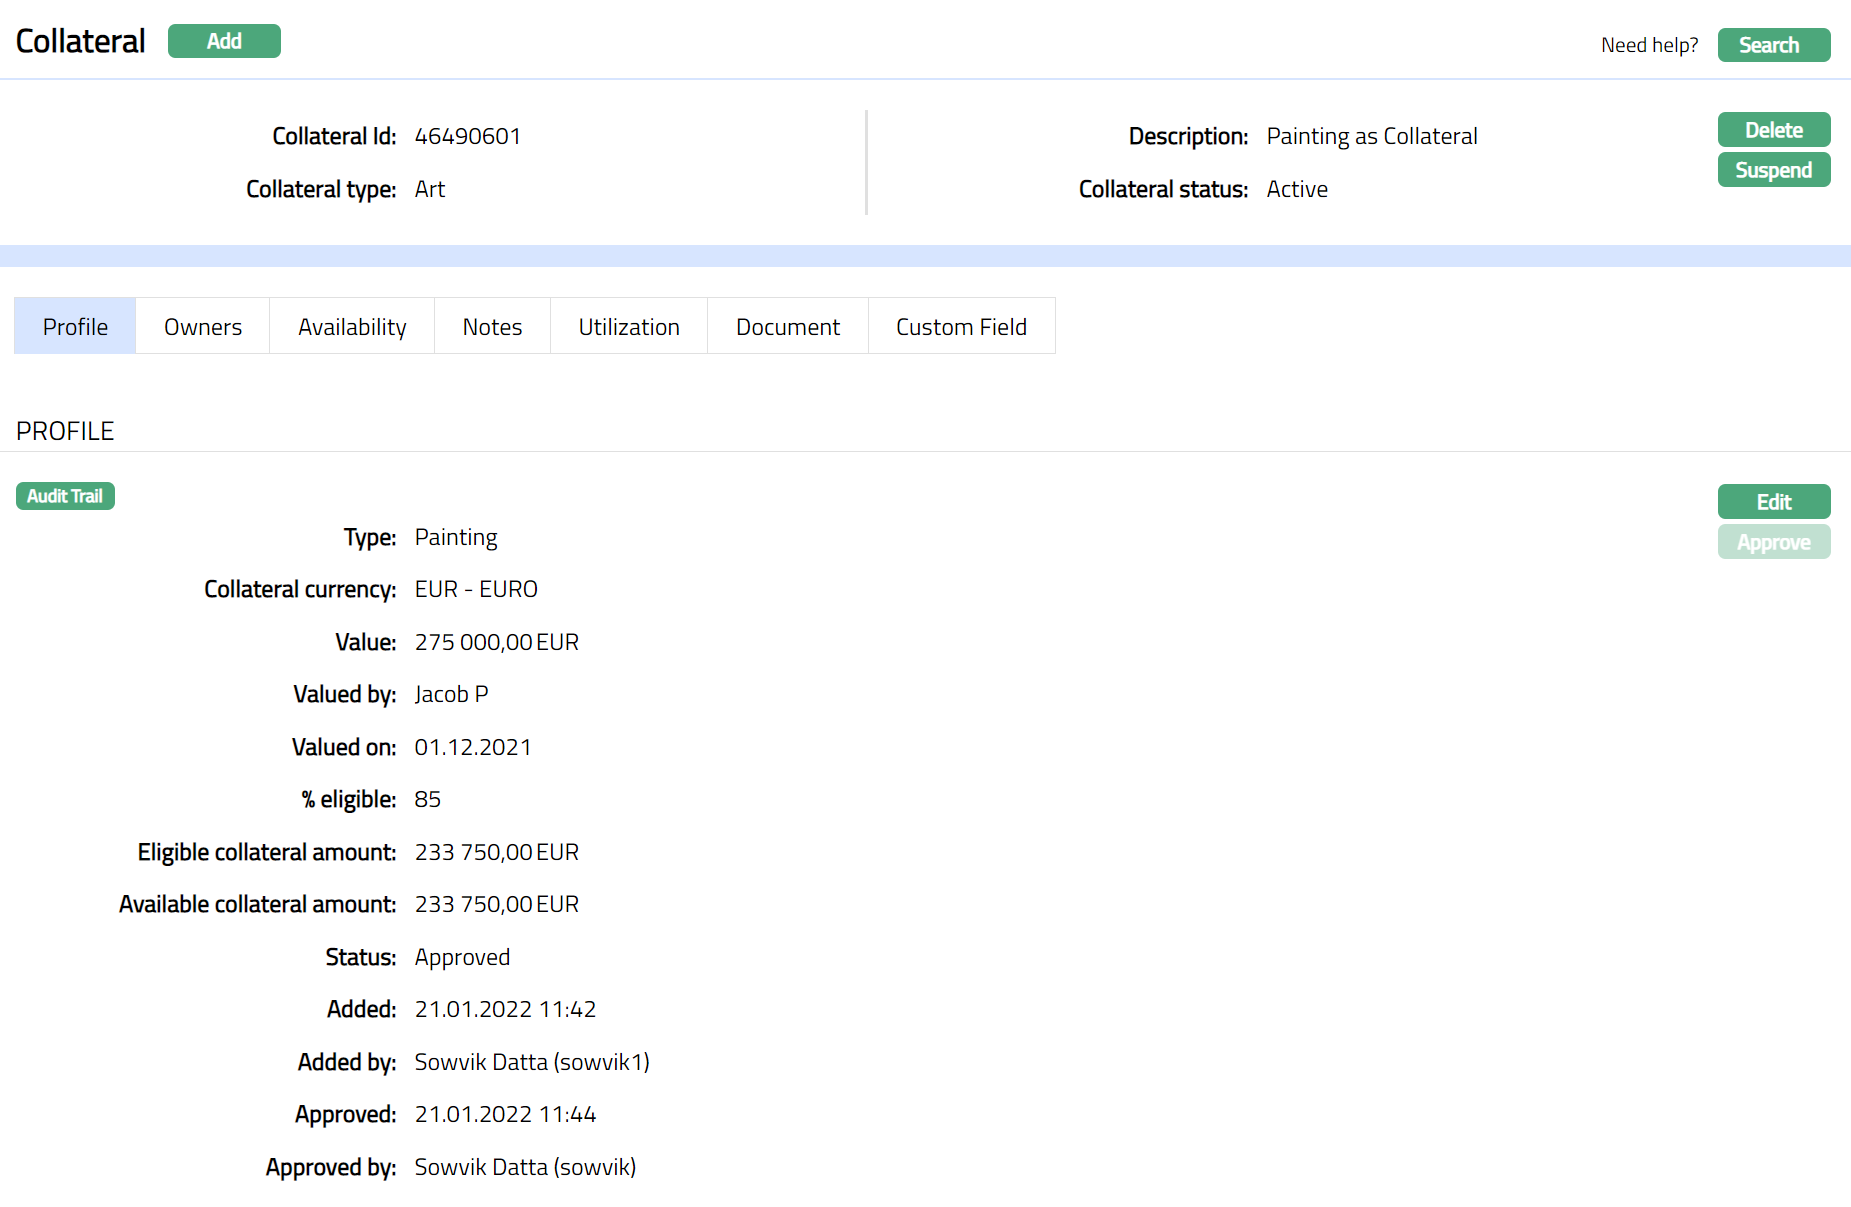
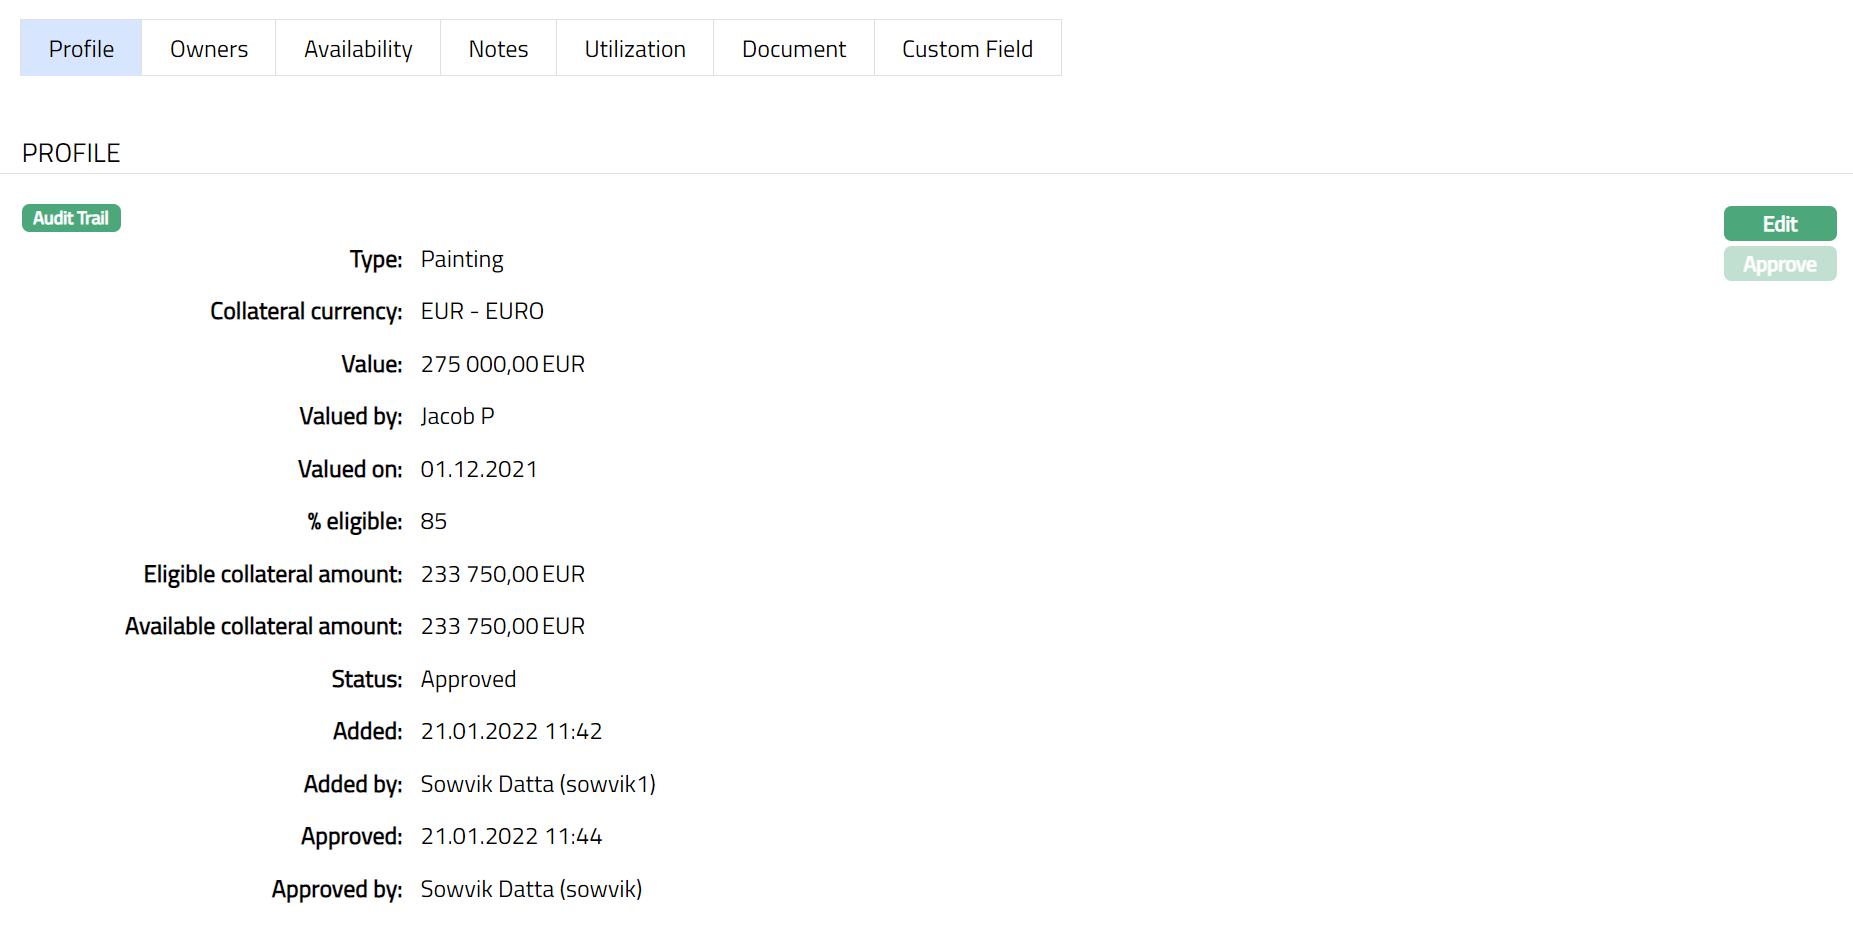
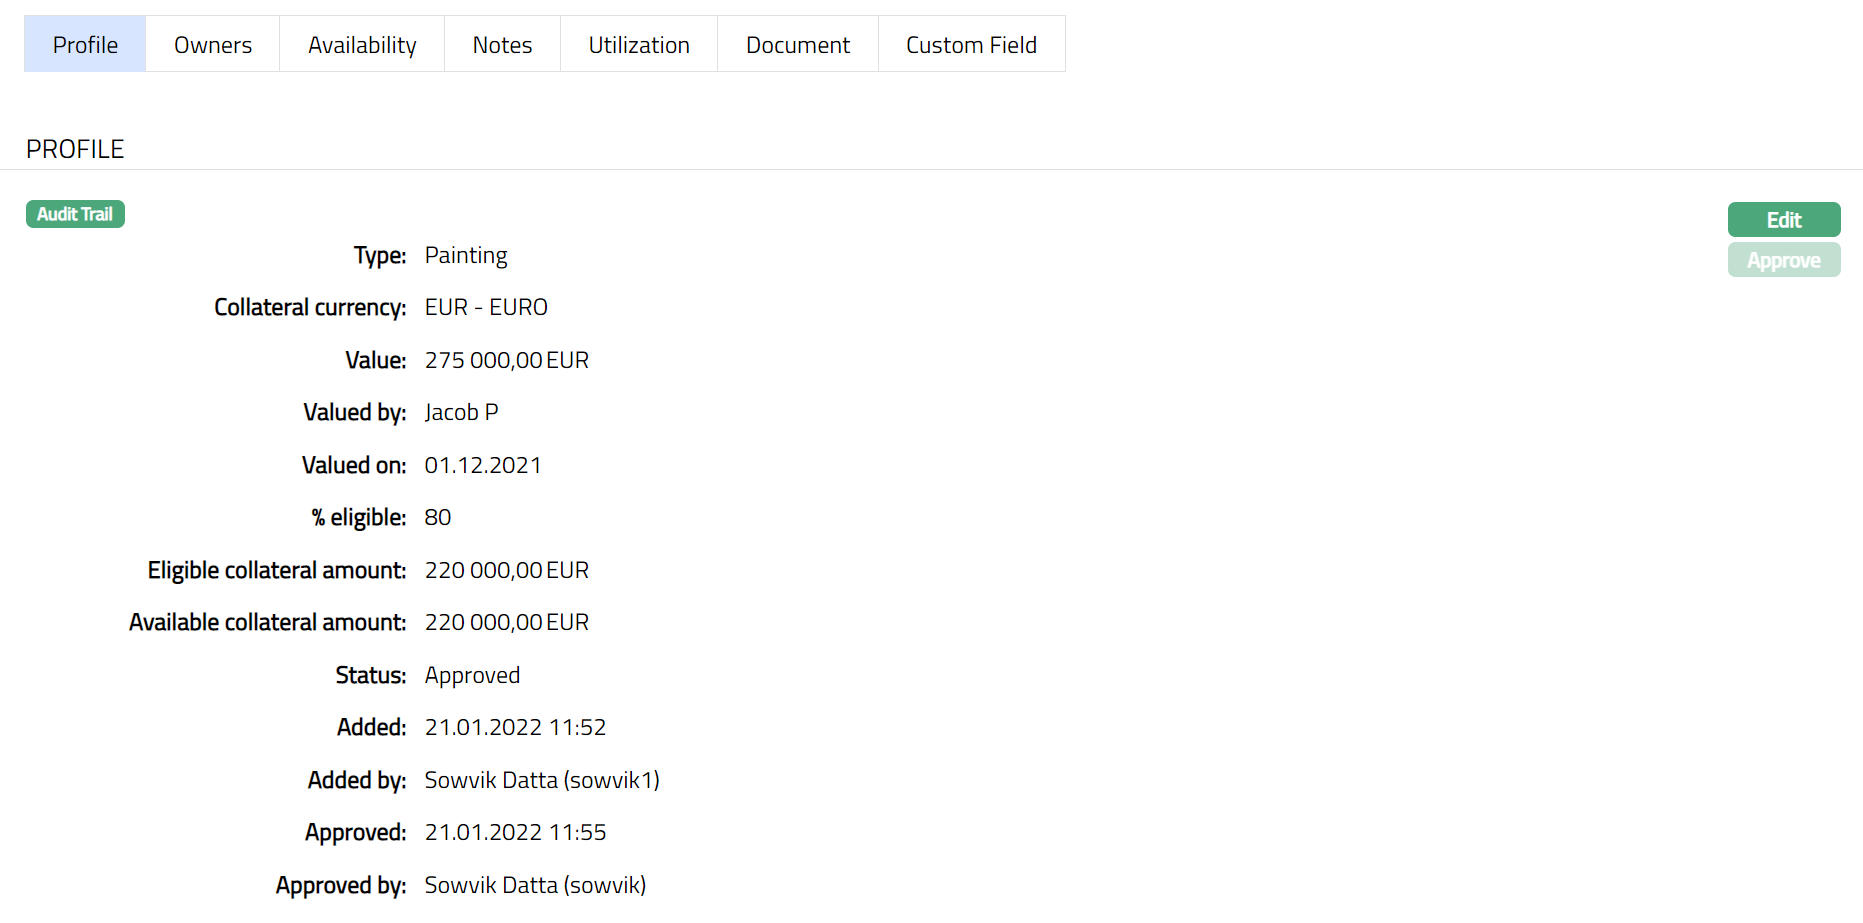
Profile
Profile tab displays the basic details of the Collateral entered during the creation of the Collateral.
To view / edit the Profile tab,
1. Access Collateral page. Click on the Profile tab to view the details as per sample below. The details are defaulted from the entries that you made during Collateral creation. For details refer to New Collateral → Art (1/3).
2. Click Edit. Edit Collateral screen appears as shown below.
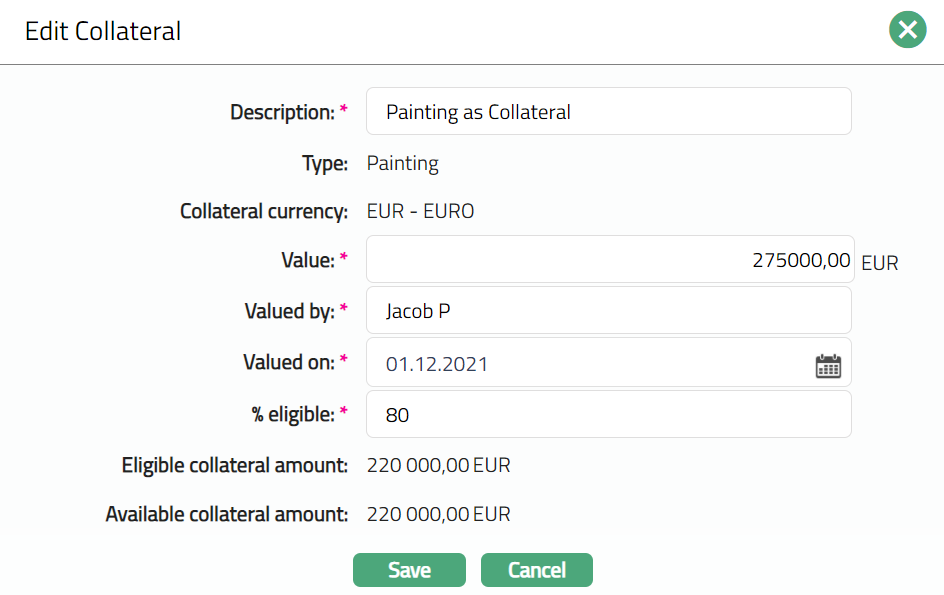
3. All fields except Type, Collateral Currency, Eligible collateral amount and Available collateral amount are editable.
4. Enter the details as required in the editable fields.
5. Click Save to save the changes that you made.
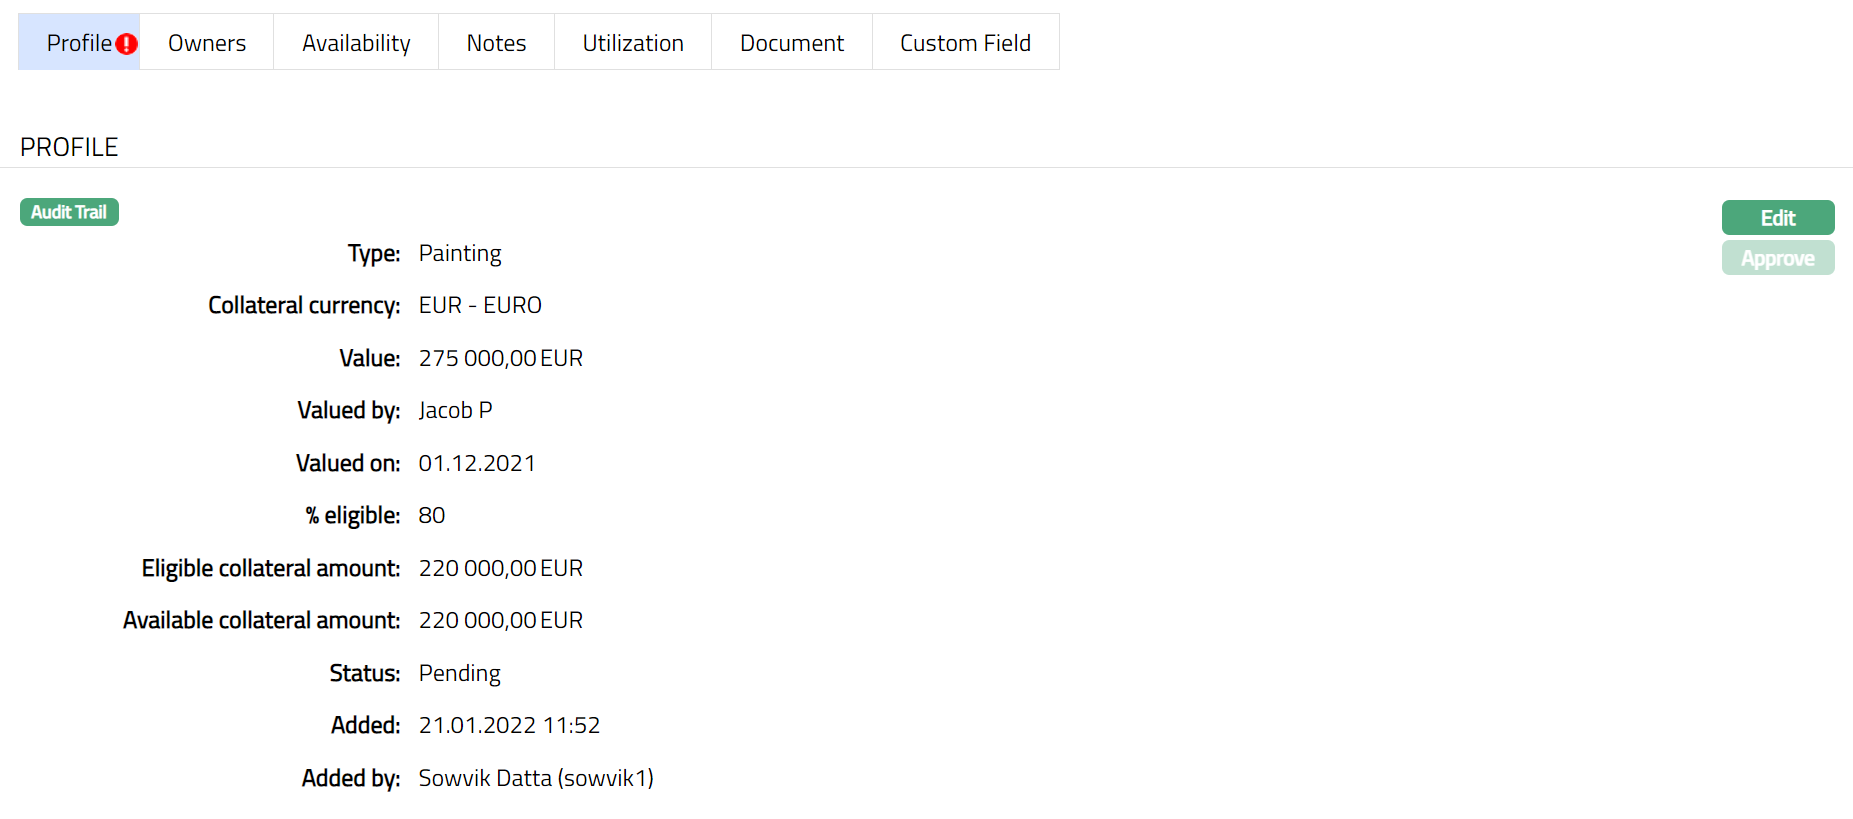
Note: Any change in the tab will set the record status to Pending till it is approved by another user. On approval, the record status is set to Approved and the red bubble disappears.
Functions: Edit, Approve.
The additional fields that you can view in the Profile tab are explained below:
Added field denotes the date on which the record was added.
Added by field denotes the name of the person who created the record.
Approved field denotes date on which the record was approved and is displayed only on approval.
Approved by field denotes name of the person who approved the record and is displayed only on approval.
Status field denotes the status of the tab.
Owners
This is similar to Owner's tab under Collateral type Precious Metal. Please refer to Owners tab in Precious metal section for details.
Availability
This is similar to Availability tab under Collateral type Precious Metal. Please refer to Availability tab in Precious metal section for details.
This is similar to Notes tab under Collateral type Precious Metal. Please refer to Notes tab in Precious metal section for details.
Utilization
This is similar to Utilization tab under Collateral type Precious Metal. Please refer to Utilization tab in Precious metal section for details.
Document
This is similar to Document tab under Collateral type Precious Metal. Please refer to Document tab in Precious metal section for details.
Custom Field
This is similar to Custom Field tab under Collateral type Precious Metal. Please refer to the Custom Field tab under Precious Metal section for more details.
Other Valuables
The following tabs appear in the Collateral Maintenance page if the collateral type is Other Valuables.
To add Other Valuables as a New Collateral
1. From CRM menu, click Collateral/Limits, and then Collaterals. Collateral Search page appears, showing the details of all collaterals created in Aura.
2. Click Add. New Collateral → Select Collateral Type page appears.

3. Select Other Valuables as the Collateral type from the drop-down list.
4. Enter Description of the Collateral.
5. Click Next. **New Collateral → Other Valuables (1/3) page appears.
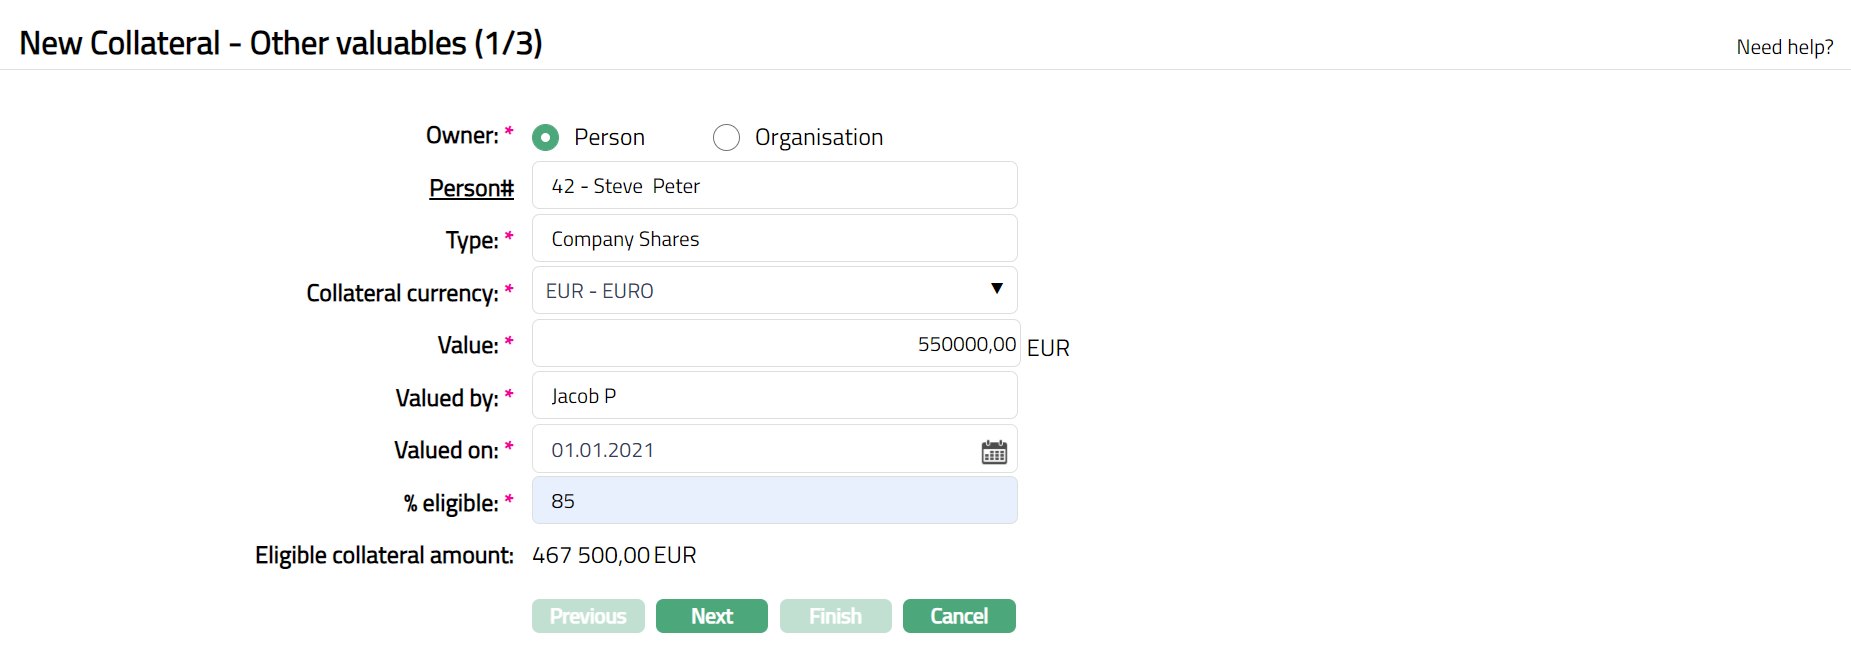
6. Select the type of Owner of the Collateral -- if it is owned by a person, select Person; and if it is owned by an organisation, select Organisation.
7. Depending on whether the Owner is chosen as Person or Organisation, you have to enter the Person# or Organisation#.
If the Owner chosen above is a Person, you will have to enter the Person #. Click on the hyperlink to see the list of Persons as maintained in CRM → Person → Maintain or enter the name of the person and select the required person from the list displayed by Aura.
If the Owner chosen above is an Organisation, you will have to enter the Organisation #. Click on the hyperlink to see the list of Organisations as maintained in CRM → Organisation → Maintain or enter the name of the organisation and select the required organisation from the list displayed by Aura.
8. Enter Type of the Other Valuable.
9. Enter Collateral currency. Choose from the dropdown list of active GL currencies.
10. Enter Value of the collateral. This should be in terms of the Collateral currency that you chose above.
11. Input the name of the valuator in Valued by.
12. Specify the date on which the above collaterals were valued. The date has to be less than or equal to the current date.
13. Indicate what proportion of the Collateral value is eligible for securing in % eligible.
14. Based on the Value and the % eligible, Aura calculates the Eligible collateral amount.
15. Click Next. Maintain Custom Field Details → (2/3) page appears.

16. Enter Custom Field details as required for the Collateral.
17. Click Next. New Collateral Confirmation → (3/3) page appears
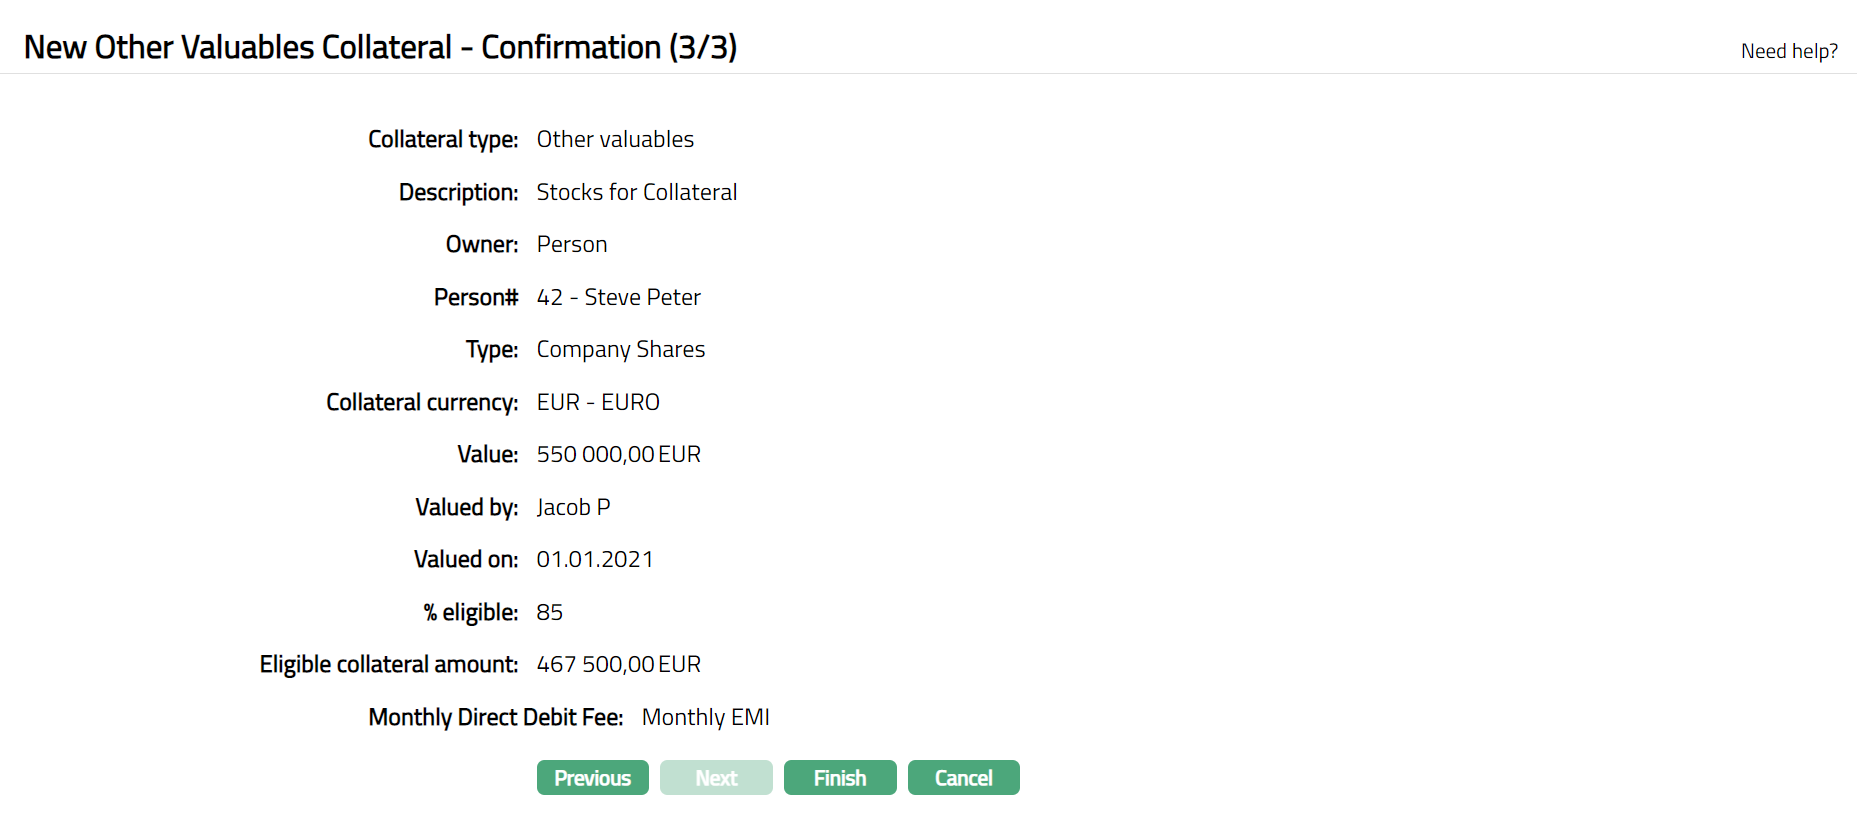
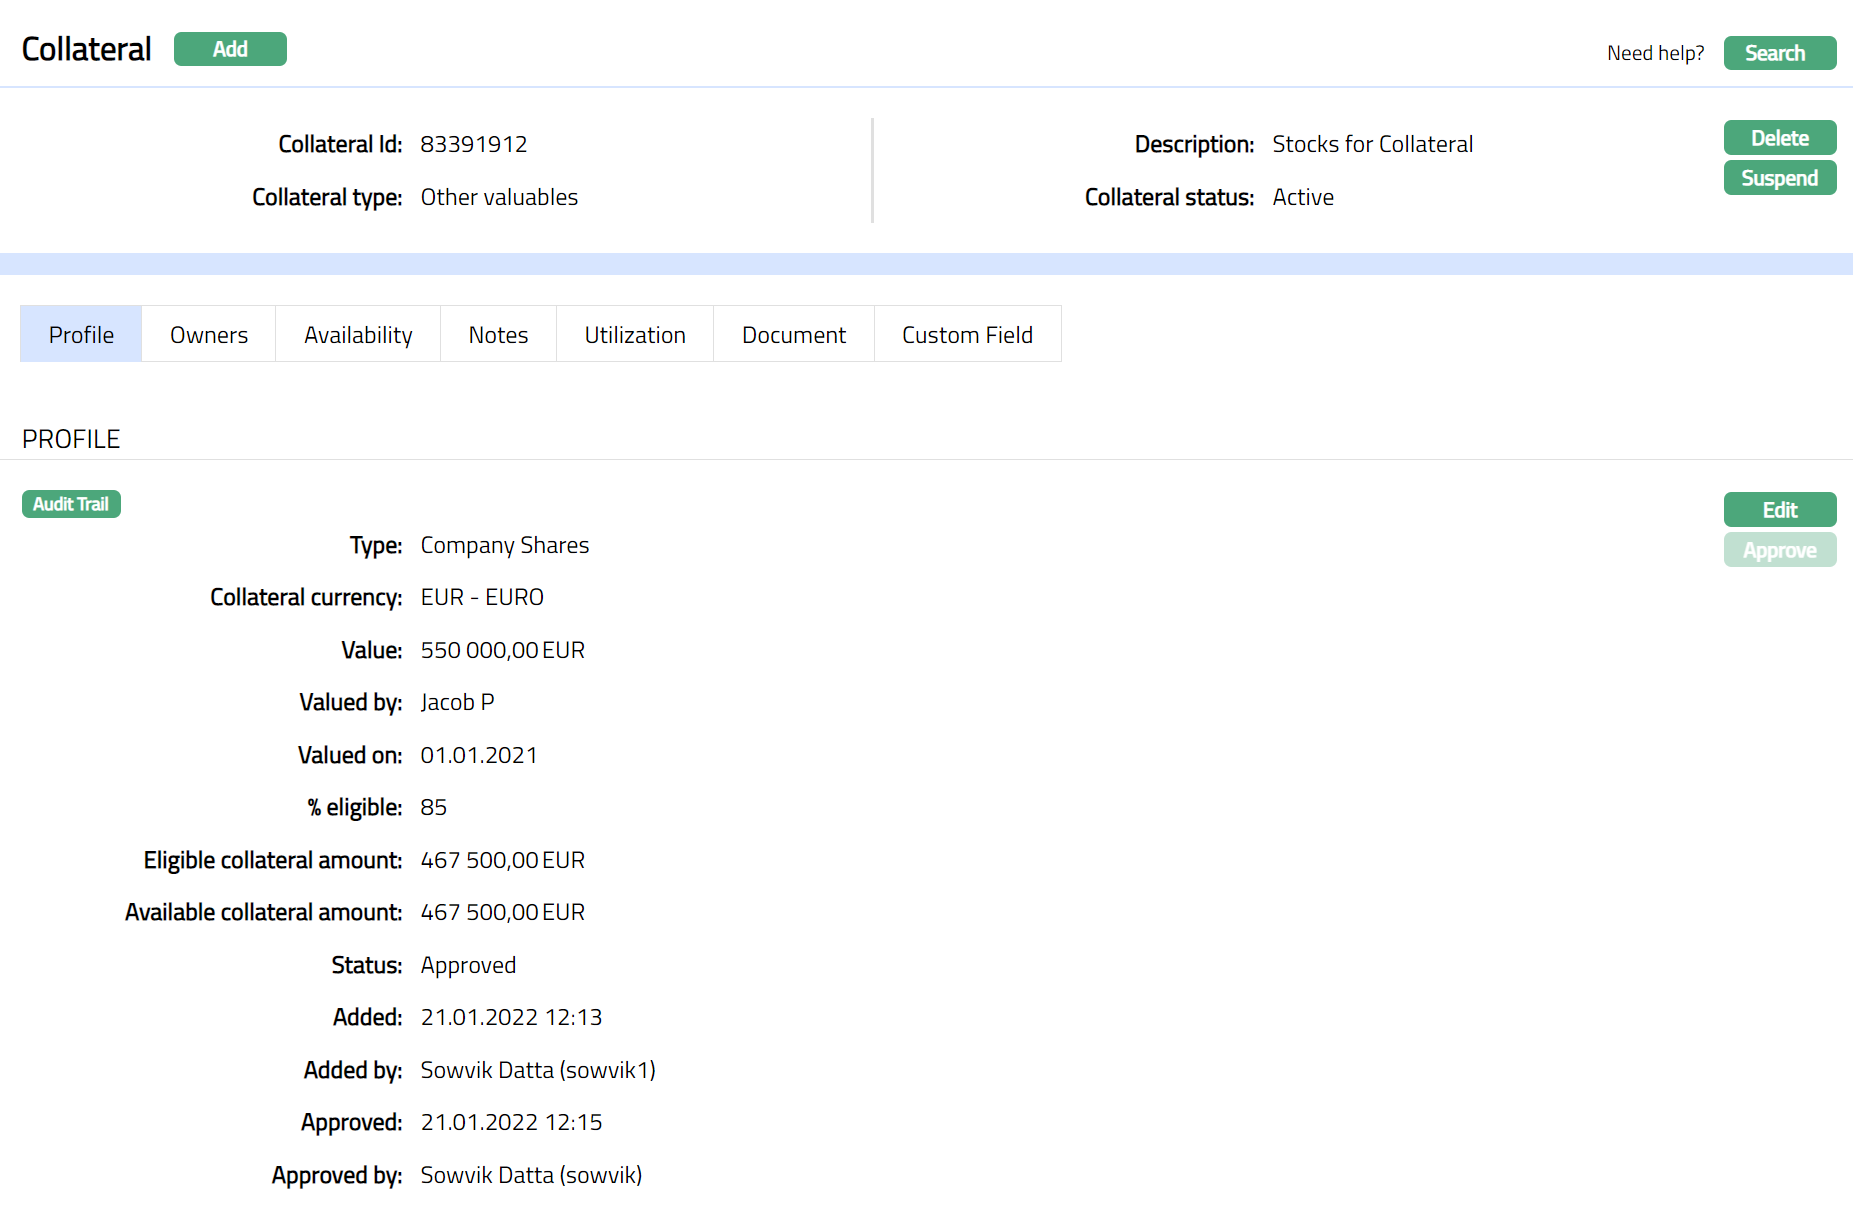
18. Click Finish. Collateral page appears as shown below.

Note: On creation of the Collateral record, the Collateral Status is Active, and the record status will be Pending. Any user other than the one who created the Collateral record can approve the record. On approval, the record status is set to Approved and the red bubble disappear.
Functions: Add, Search, Delete, Suspend, Activate, Edit, Approve
Approve: Any user other than the one who created the Collateral record can approve the record. To approve, retrieve the Collateral record and click on Approve. Aura will ask for confirmation. Once confirmed, the record status becomes approved.
Suspend: You can suspend the Collateral by clicking on Suspend button. When you click on Suspend button, Aura displays an alert message. On confirmation, Aura will suspend the Collateral. Once the Collateral is suspended, it becomes unavailable in the drop-down list while securing any contract / account in other modules in Aura.
Activate: You can activate a Suspended Collateral by clicking on Activate button. When you click on Activate button, Aura displays an alert message. On confirmation Aura will activate the Collateral. Once the Collateral is activated, it becomes available in the drop-down list in other modules.
Note: If the custom field is mapped to Collateral under Admin → System Codes → Custom fields → Field mapping, then an additional screen will appear before the confirmation screen. The custom fields will be mandatory or non-mandatory based on the rules set at the Field mappings. For more detail on custom field functionality please refer Admin → System codes → Custom fields → Field mappings manual.
Profile
Profile tab, which is the default screen in the Collateral screen, shows the basic details of the Collateral.
To view / edit the Profile tab,
1. Access Collateral page. Click on the Profile tab to view the details as per sample below. The details are defaulted from the entries that you made during Collateral creation. For details refer to New collateral → Other Valuables (1/3)
2. Click Edit. Edit Collateral screen appears as shown below.
Note: Except Collateral currency, Eligible collateral amount and Available collateral amount all other fields are editable.
3. Enter required details as required and click Save to save the changes that you made
Note: Any change in the tab will set the record status to Pending till it is approved by another user. On approval, the record status is set to Approved and the red bubble disappears.
Functions: Edit, Approve.
The additional fields that you can view in the Profile tab are explained below:
- Status field denotes the status of the record.
- Added field denotes the date on which the record was added.
- Added by field denotes the name of the user who created the record.
- Approved field denotes date on which the record was approved and is displayed only on approval.
- Approved by field denotes name of the user who approved the record and is displayed only on approval.
Owners
This is similar to Owner's tab under Collateral type Precious Metal. Please refer to Owners tab in Precious metal section for details.
Availability
This is similar to Availability tab under Collateral type Precious Metal. Please refer to Availability tab in Precious metal section for details.
Notes
This is similar to Notes tab under Collateral type Precious Metal. Please refer to Notes tab in Precious metal section for details.
This is similar to Utilization tab under Collateral type Precious Metal. Please refer to Utilization tab in Precious metal section for details.
This is similar to Document tab under Collateral type Precious Metal. Please refer to Document tab in Precious metal section for details.
This is similar to Custom Field tab under Collateral type Precious Metal. Please refer to the Custom Field tab under the Precious Metal section for the details.
Cash
The following tabs appear in the Collateral Maintenance page if the collateral type is Cash.
To add Cash as New Collateral,
1. From CRM menu, click Collateral/Limits and then Collaterals. Collateral Search page appears, showing the details of all collaterals created in Aura.
2. Click Add. New Collateral → Select Collateral Type page appears.

3. Select Cash as the Collateral Type from the drop-down list.
4. Enter Description of the Collateral.
5. Click Next. New Cash Collateral → General (1/3) page appears.
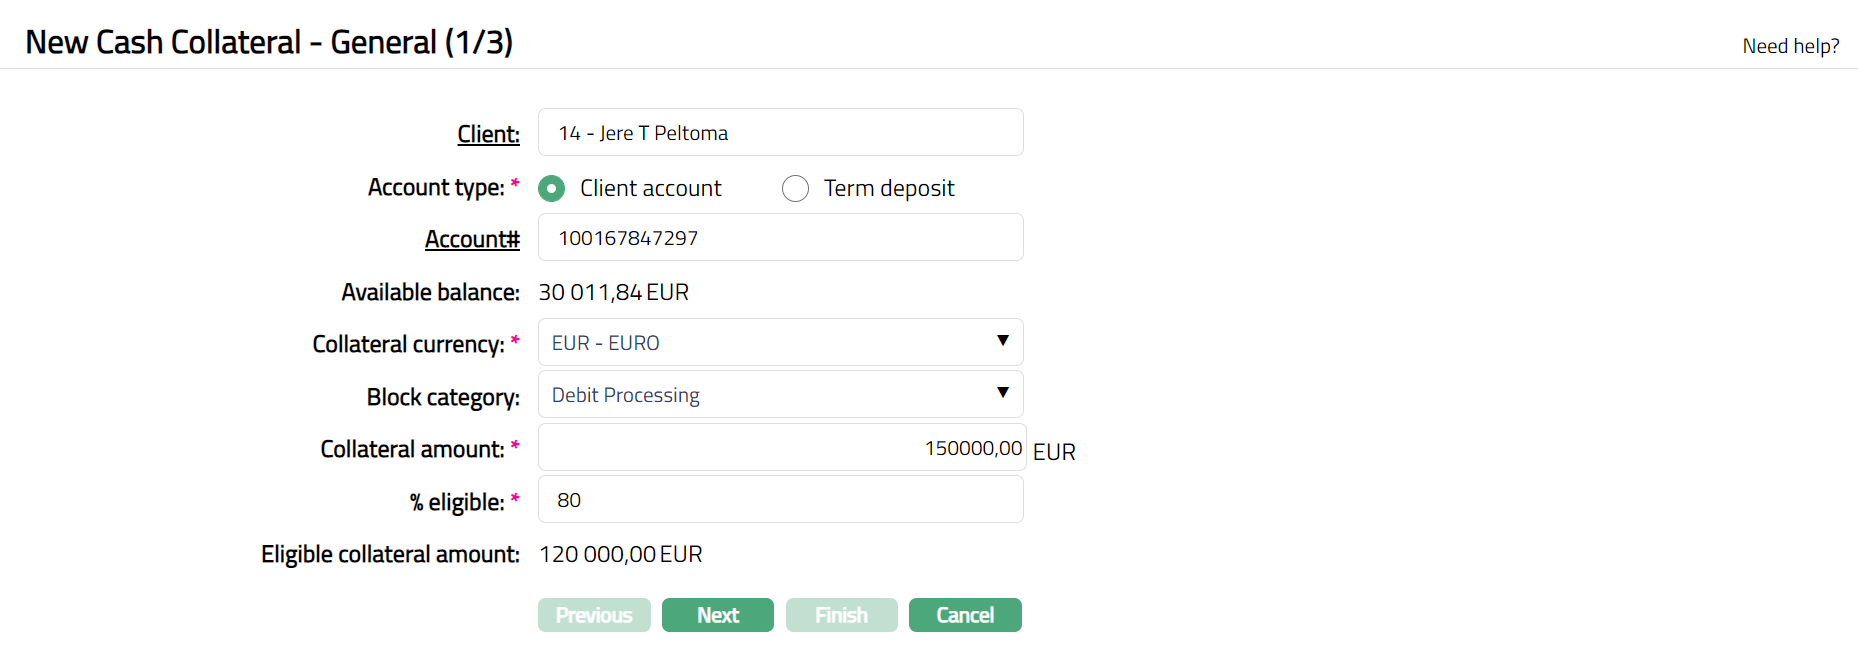
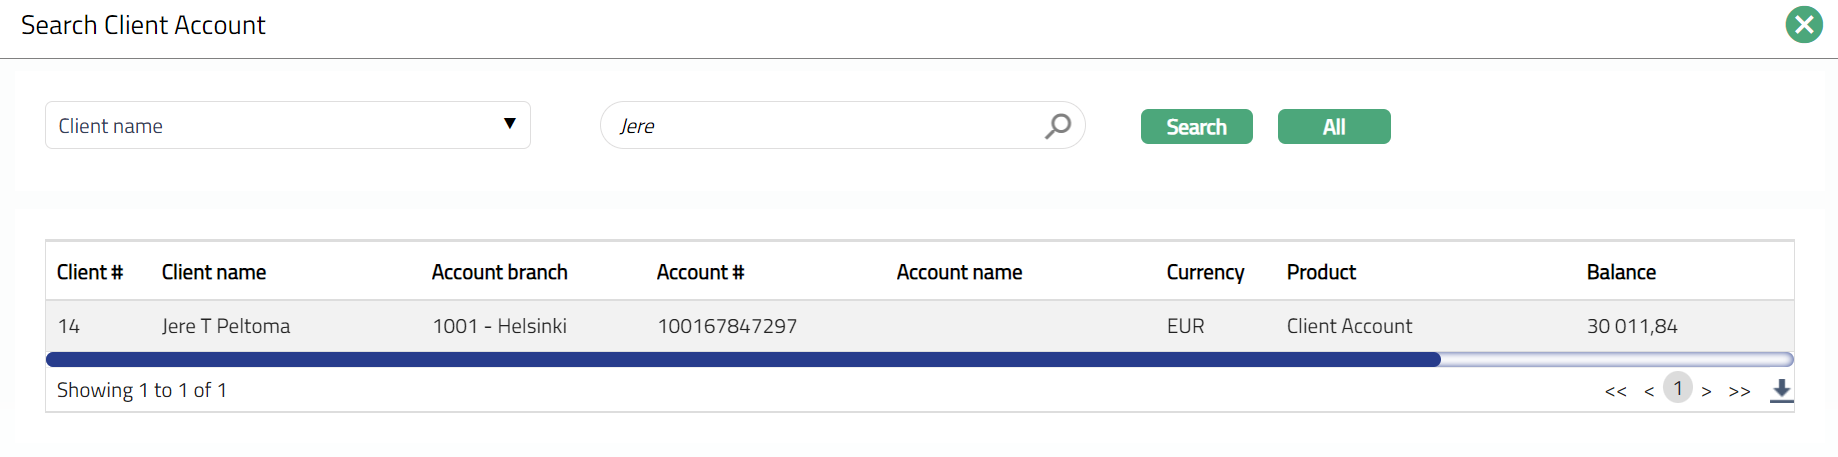
6. Click Client hyperlink. The Client Search page appears with the list of clients maintained under CRM → Clients → Maintain. You can search for a client with relevant criteria and select the required client for whom the Cash Collateral is to be created. Alternatively, you can type in the name of the client and choose the relevant client from the list suggested by Aura.
7. Click the Radio button and select the Account type which has to be used for the Cash Collateral from the pre shipped values. The options are Client account and Term deposit.
8. Input the Account # to be used for the Cash Collateral by a click on the hyperlink. The Account search screen opens showing the list of accounts belonging to the Client and Account Type chosen above. Select the Account for which the cash collateral is to be placed.
9. Aura displays the Available balance in the selected account in terms of the account currency.
10. Enter Collateral currency. Choose from the dropdown list of active GL currencies.
11. Input Block category by selecting from the dropdown list maintained in Admin → System codes → Categories → Block category. When the cash collateral is successfully created, this is the Block Category which will be used to create an amount block from the Account chosen above.
12. Enter amount which is to be treated as collateral in Collateral amount. This has to be less than or equal to the Available Balance in the account.
13. Indicate what proportion of the Collateral value is eligible for securing in % eligible. You can enter any value from 1 to 100.
14. Based on the Value and the % eligible, Aura calculates the Eligible collateral amount.
15. Click Next. Maintain Custom Field Details → (2/3) page appears.

16. Enter Custom Field details as required for the Collateral.
17. Click Next. New Collateral Confirmation → (3/3) page appears
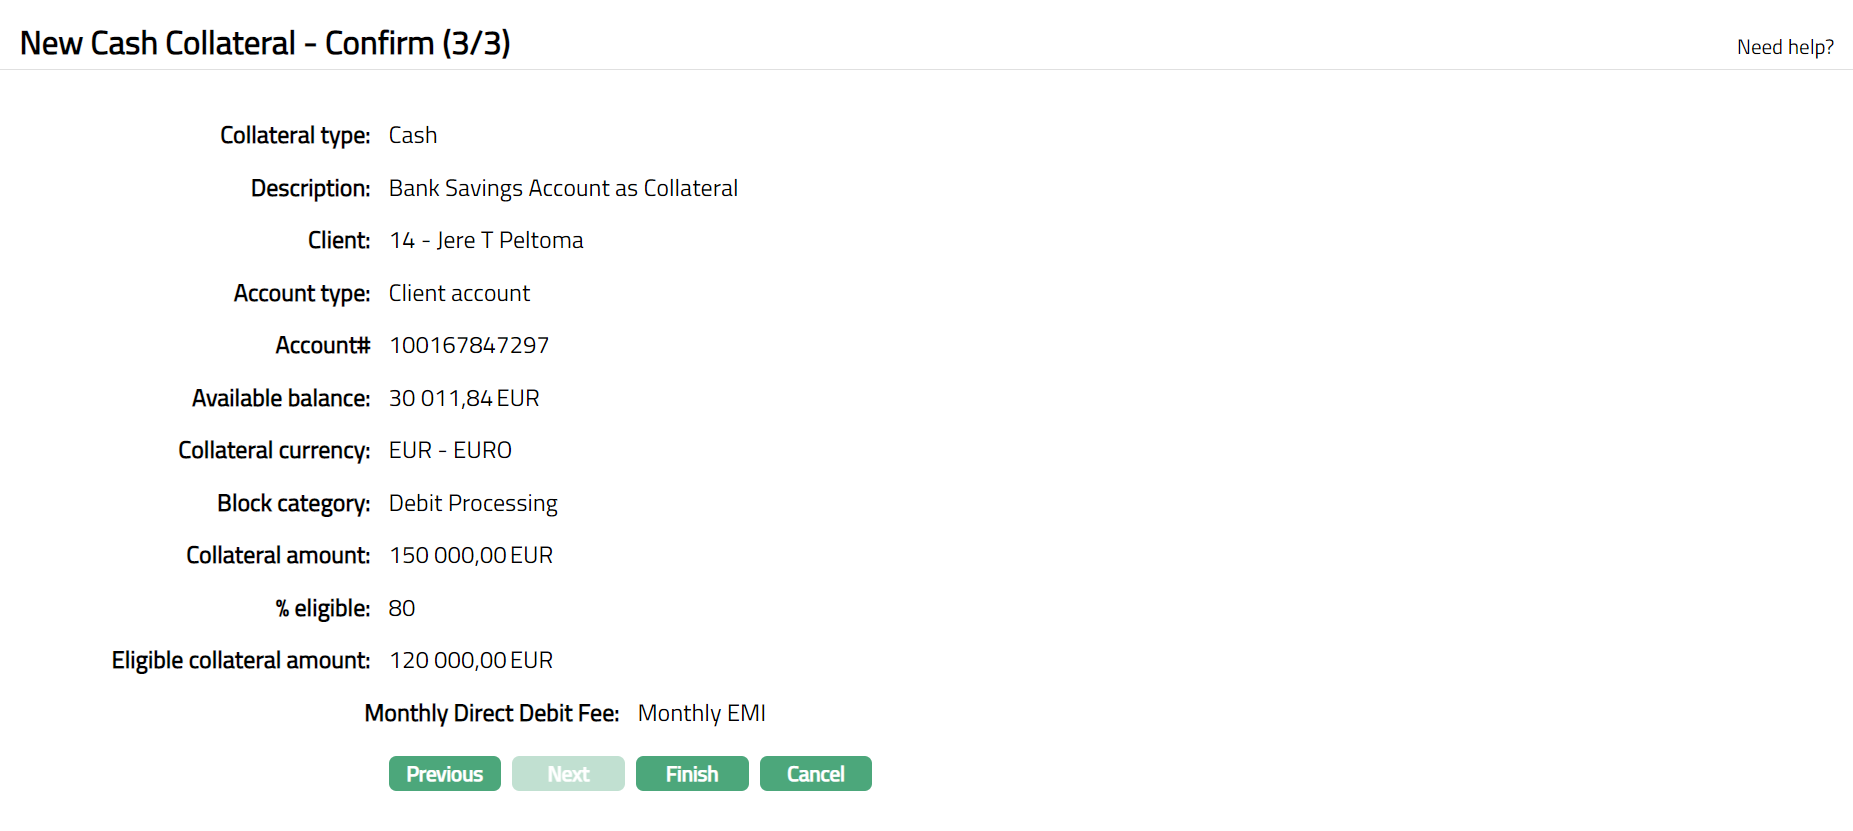
18. Click Finish. Collateral record is created with a unique Collateral id and the Collateral page appears showing the Profile tab by default.
Note: On creation of the Collateral record, the Collateral Status is Active, and the record status will be Pending. Any user other than the one who created the Collateral record can approve the record. On approval, the record status is set to Approved and the red bubble disappear.

Functions: Add, Search, Delete, Suspend, Activate, Edit, Approve
Approve: Any user other than the one who created the Collateral record can approve the record. To approve, retrieve the Collateral record and click on Approve. Aura will ask for confirmation. Once confirmed, the record status becomes Approved.
Suspend: You can suspend the Collateral by clicking on Suspend button. When you click on Suspend button, Aura displays an alert message. On confirmation, Aura will suspend the Collateral. Once the Collateral is suspended, it becomes unavailable in the drop-down list while securing any contract / account in other modules in Aura.
Activate: You can activate a Suspended Collateral by clicking on Activate button. When you click on Activate button, Aura displays an alert message. On confirmation Aura will activate the Collateral. Once the Collateral is activated, it becomes available in the drop-down list in other modules.
Note: If the custom field is mapped to Collateral under Admin → System Codes → Custom fields → Field mapping, then an additional screen will appear before the confirmation screen. The custom fields will be mandatory or non-mandatory based on the rules set at the Field mappings. For more detail on custom field functionality please refer Admin → System codes → Custom fields → Field mappings manual.
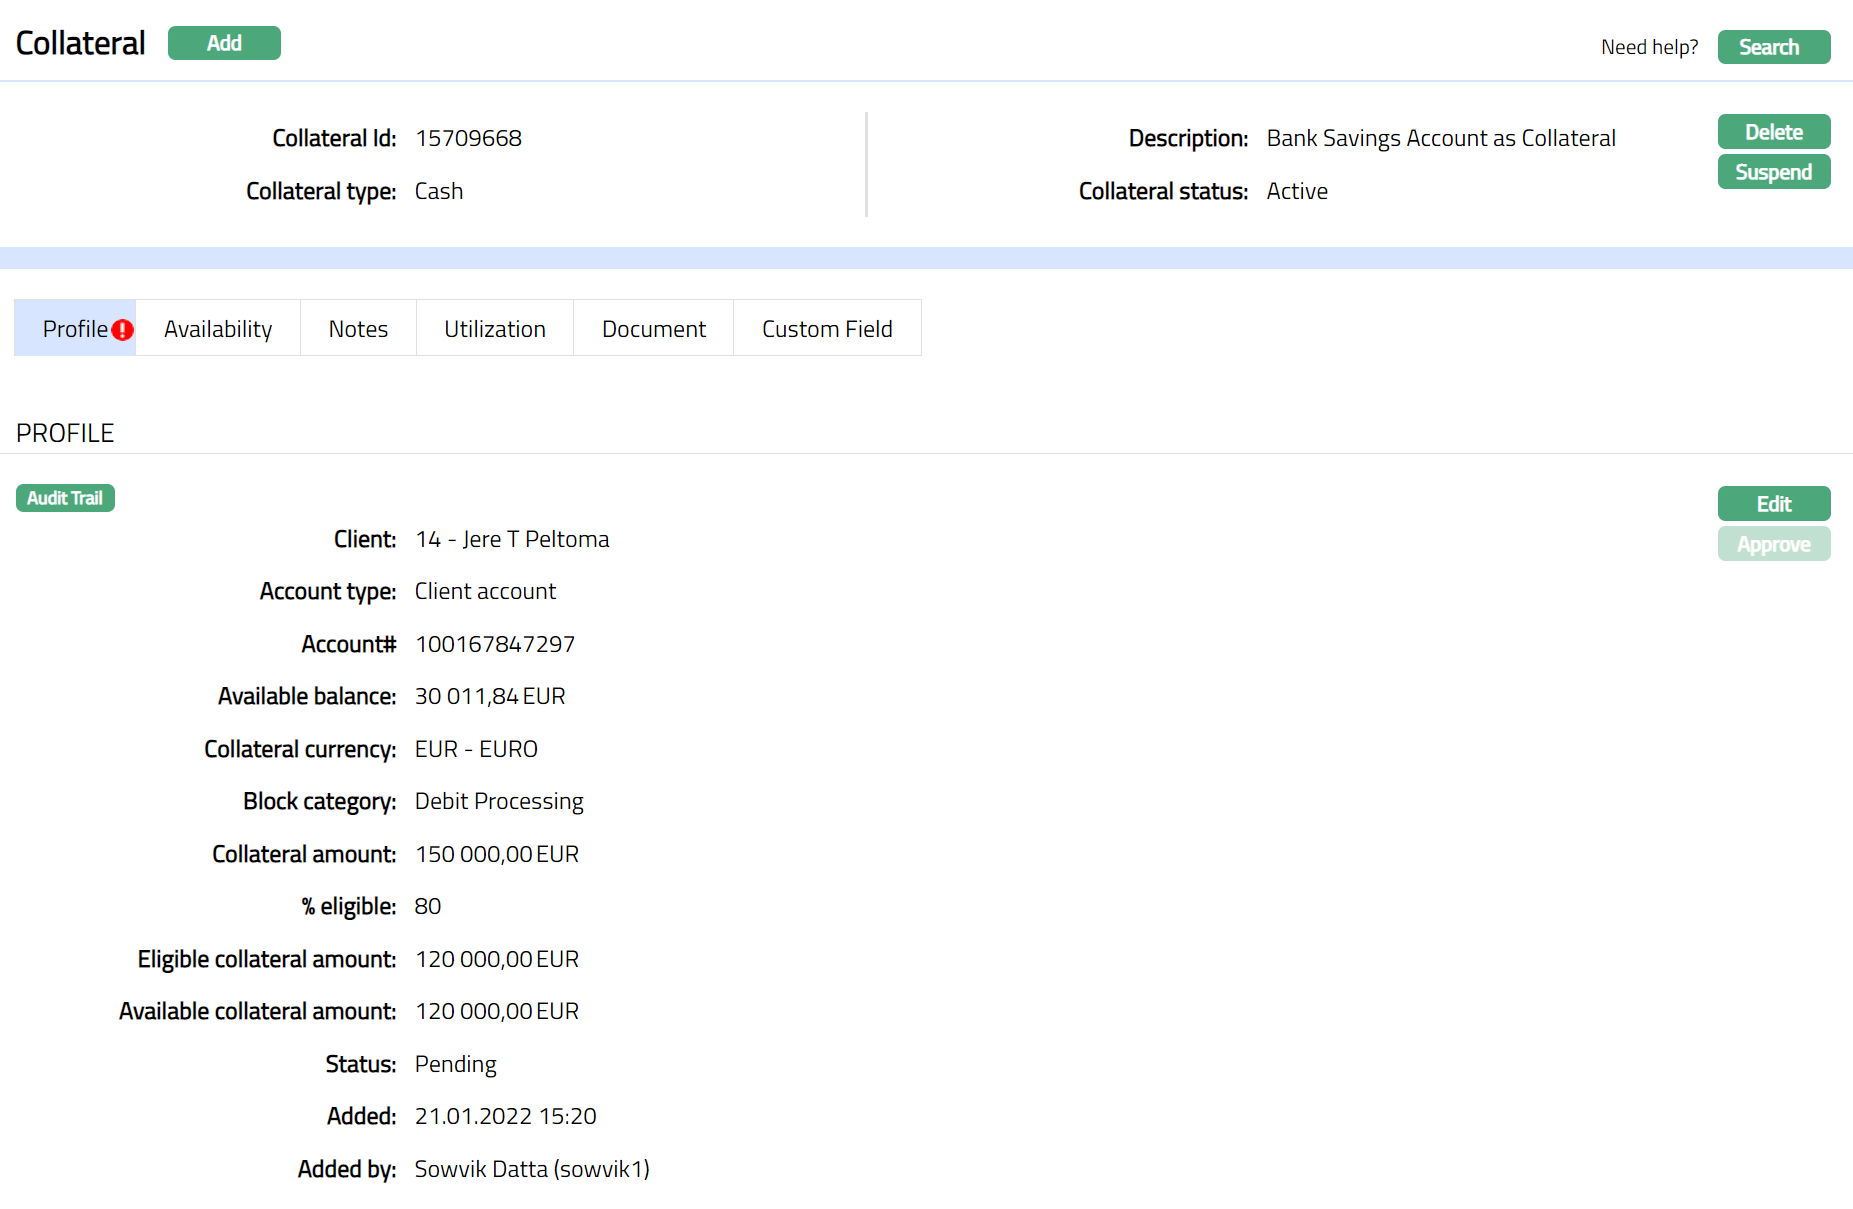
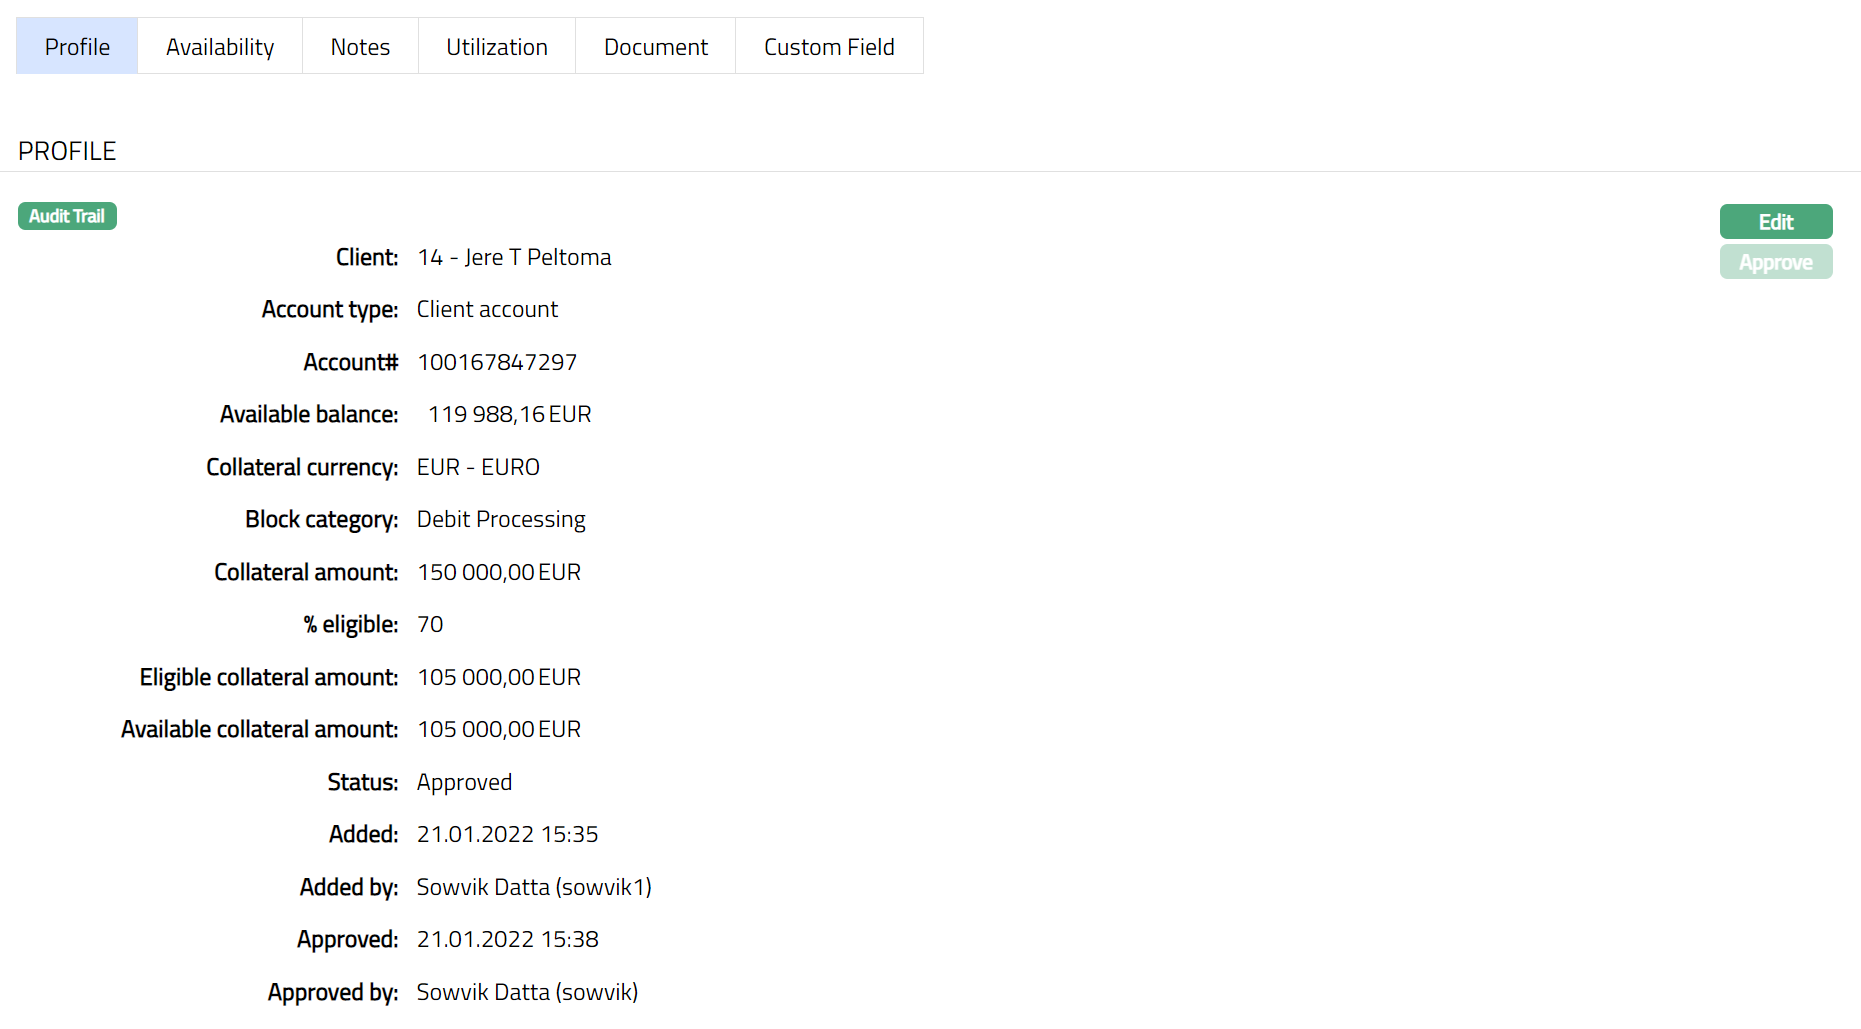
Profile
Profile tab displays the basic details of the Collateral entered during the creation of the Collateral.
To view / edit the Profile tab,
1. Access Collateral page. Click Profile tab to view the details as per sample below. The details are defaulted from the entries that you made during Collateral creation. For details refer to New Collateral → Cash (1/3).

2. Click Edit. Edit Collateral screen appears as shown below.
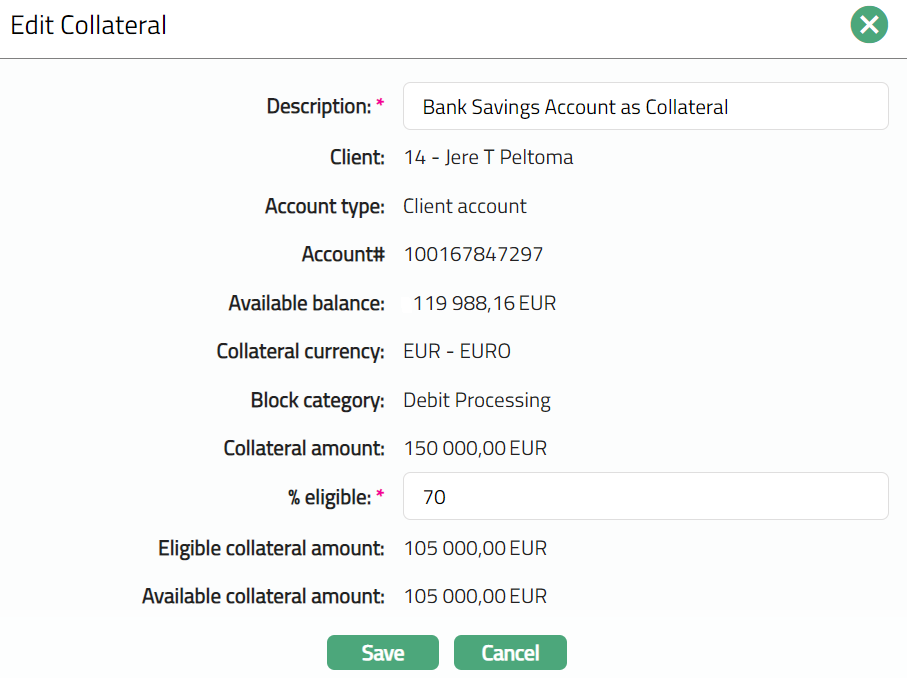
3. Only % eligible and Description are editable.
4. Enter the details as required in the editable fields.
5. Click Save to save the changes that you made.

Note: Any change in the tab will set the record status to Pending till it is approved by another user. On approval, the record status is set to Approved and the red bubble disappears.
Functions: Edit, Approve.
The additional fields that you can view in the Profile tab are explained below:
Status field denotes the status of the record.
Added field denotes the date on which the record was added.
Added by field denotes the name of the user who created the record.
Approved field denotes date on which the record was approved and is displayed only on approval.
Approved by field denotes name of the user who approved the record and is displayed only on approval.
Availability
This is similar to Availability tab under Collateral type Precious Metal. Please refer to Availability tab in Precious metal section for details.
Notes
This is similar to Notes tab under Collateral type Precious Metal. Please refer to Notes tab in Precious metal section for details.
Utilization
This is similar to Utilization tab under Collateral type Precious Metal. Please refer to Utilization tab in Precious metal section for details.
This is similar to Document tab under Collateral type Precious Metal. Please refer to Document tab in Precious metal section for details.
This is similar to Custom Field tab under Collateral type Precious Metal. Please refer to Custom field tab in Precious metal section for details.
Business hypothecation
The following tabs appear in the Collateral Maintenance page if the collateral type is Business Hypothecation.
To add Business hypothecation as a New Collateral,
1. From CRM menu, click Collateral/Limits and then Collaterals. Collateral Search page appears, showing the details of all collaterals created in Aura.
2. Click Add. New Collateral → Select Collateral Type page appears.

3. Select Business Hypothecation as the Collateral type from the drop-down list.
4. Enter the Description of the Collateral.
5. Click Next. New Collateral → Business Hypothecation (1/3) page appears.
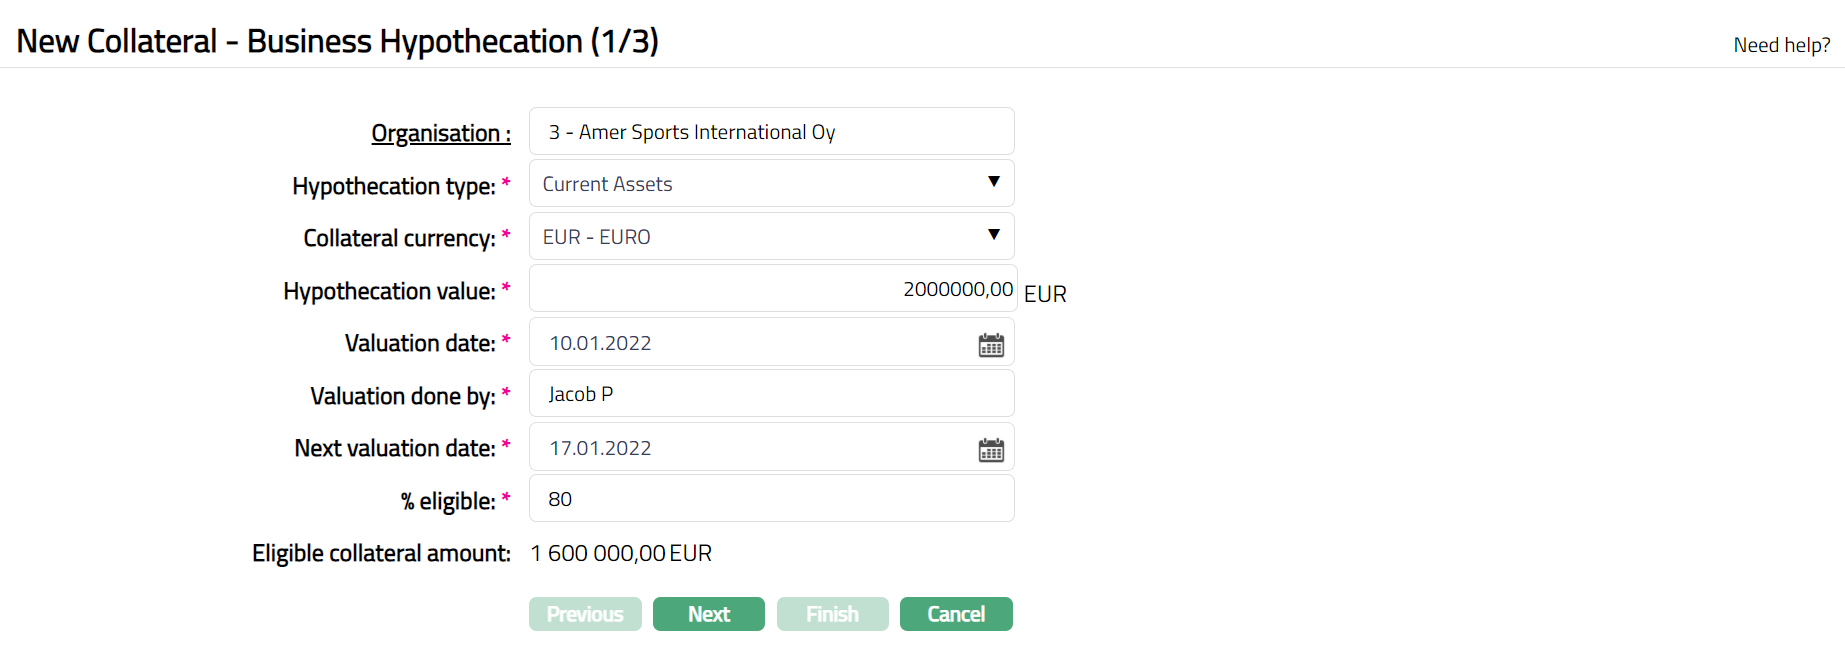
6. Click the hyperlink and select the Business Organization which is being hypothecated from the list of active non-bank Organisations maintained under CRM → Organisation → Maintain.
7. Enter the Collateral currency. Choose from the dropdown list of active GL currencies.
8. Enter the Value of goods in the Organization that is being hypothecated.
9. Input the information regarding the verifying authority of the goods in the organization in Goods verified by.
10.Enter the Next verification date of the Collateral. Date equal to and lesser than the current date cannot be selected.
11. Indicate what proportion of the Collateral value is eligible for securing in % eligible. You can enter any value from 1 to 100.
12. Based on the Value and the % eligible, Aura calculates the Eligible collateral amount.
13. Click Next. Maintain Custom Field Details → (2/3) page appears.

14. Enter Custom Field details as required for the Collateral.
15. Click Next. New Collateral Confirmation → (3/3) page appears
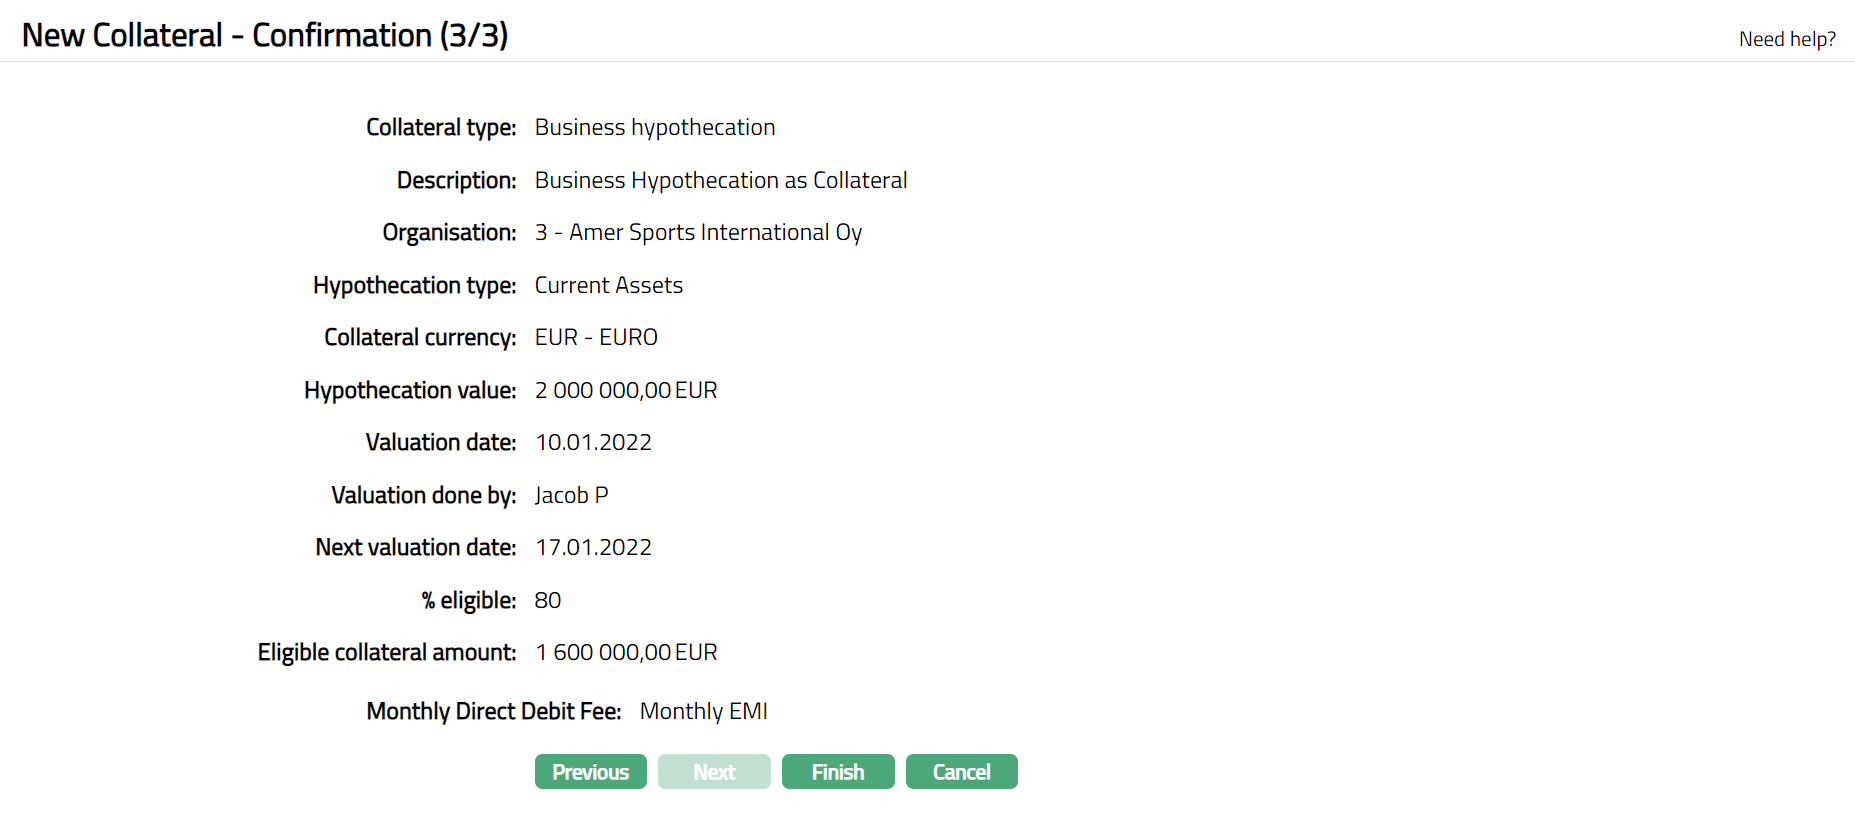
16. Click Finish. Collateral record is created with a unique Collateral id and the Collateral page appears showing the Profile tab by default.
Note: On creation of the Collateral record, the Collateral Status is Active, and the record status will be Pending. Any user other than the one who created the Collateral record can approve the record. On approval, the record status is set to Approved and the red bubble disappear.
Functions: Add, Search, Delete, Suspend,Activate, Edit, Approve
Approve: Any user other than the one who created the Collateral record can approve the record. To approve, retrieve the Collateral record and click on Approve. Aura will ask for confirmation. Once confirmed, the record status becomes approved.
Suspend: You can suspend the Collateral by clicking on Suspend button. When you click on Suspend button, Aura displays an alert message. On confirmation, Aura will suspend the Collateral. Once the Collateral is suspended, it becomes unavailable in the drop-down list while securing any contract / account in other modules in Aura.
Activate: You can activate a Suspended Collateral by clicking on Activate button. When you click on Activate button, Aura displays an alert message. On confirmation Aura will activate the Collateral. Once the Collateral is activated, it becomes available in the drop-down list in other modules.
Note: If the custom field is mapped to Collateral under Admin → System Codes → Custom fields → Field mapping, then an additional screen will appear before the confirmation screen. The custom fields will be mandatory or non-mandatory based on the rules set at the Field mappings. For more detail on custom field functionality please refer Admin → System codes → Custom fields → Field mappings manual.
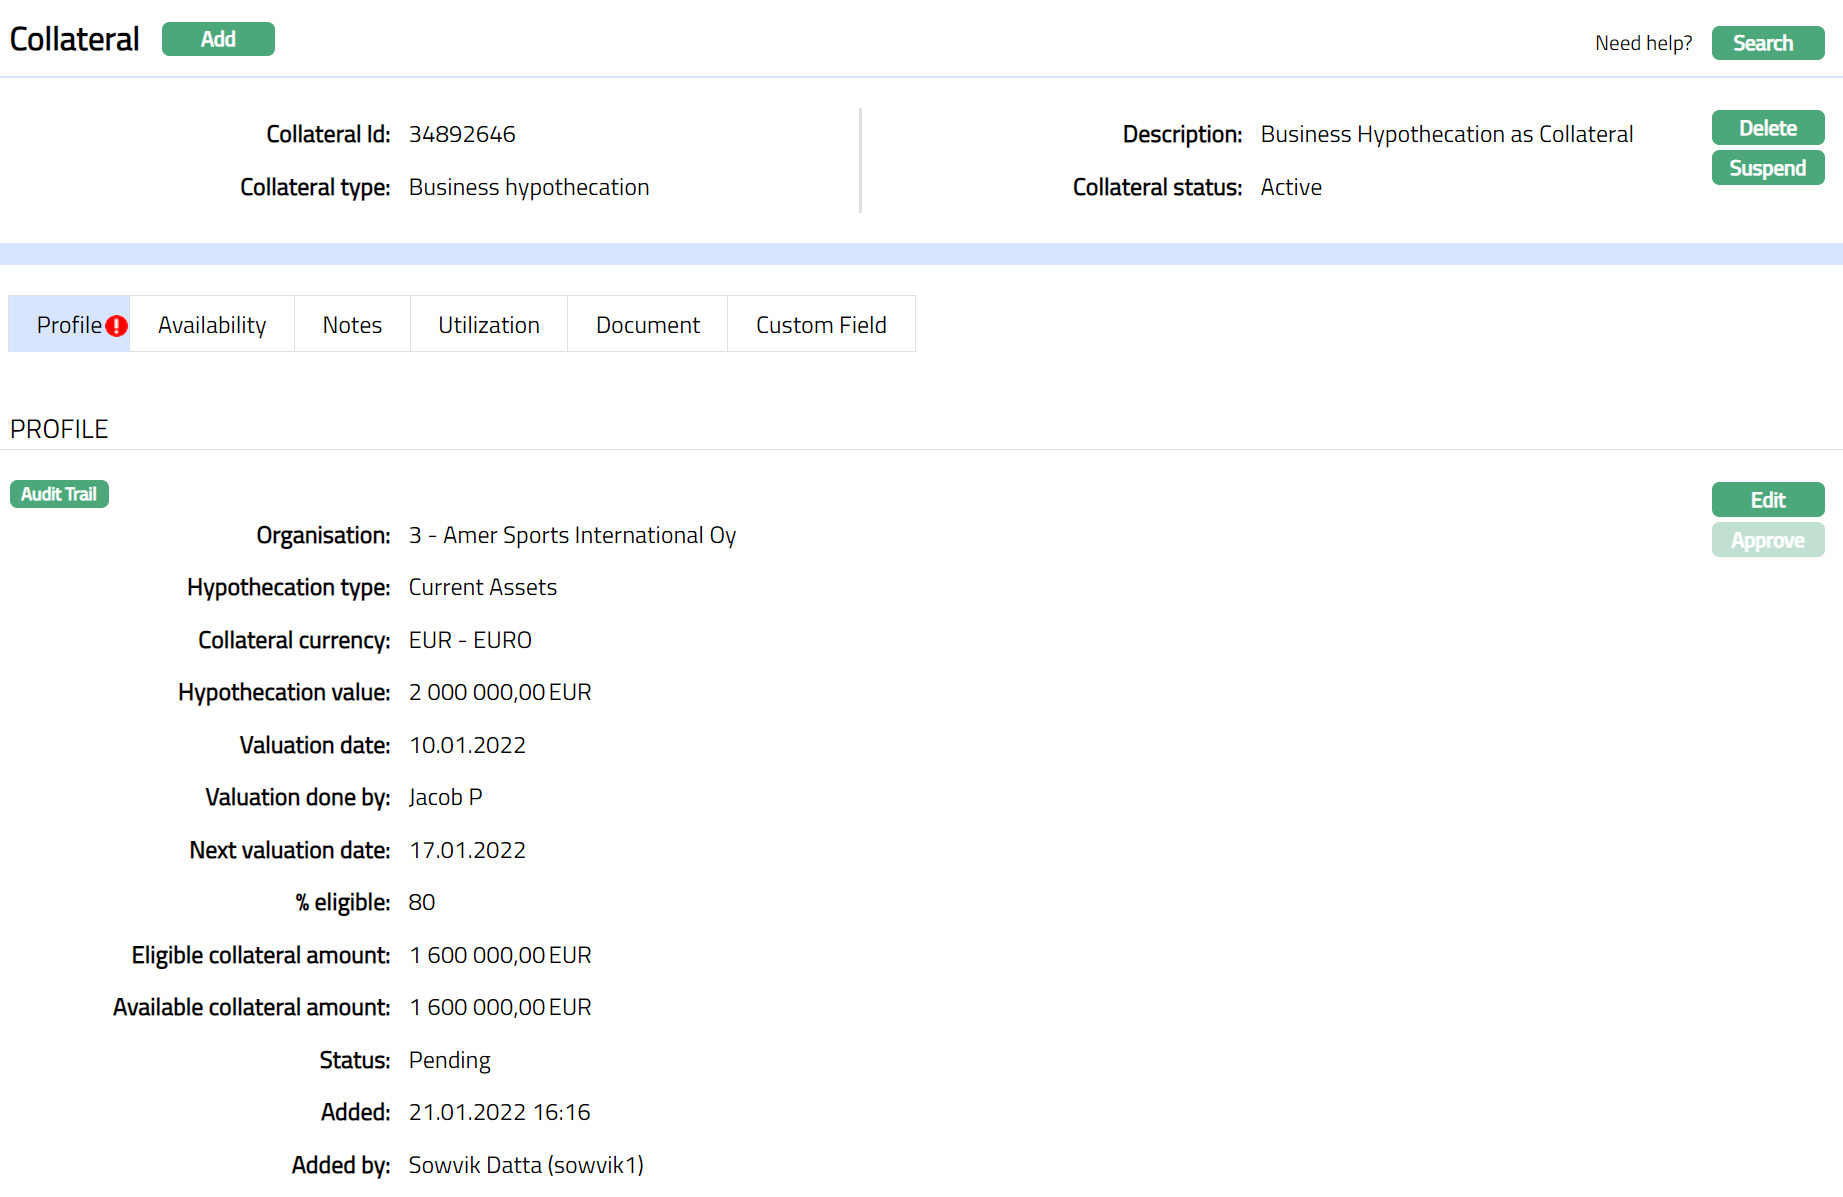
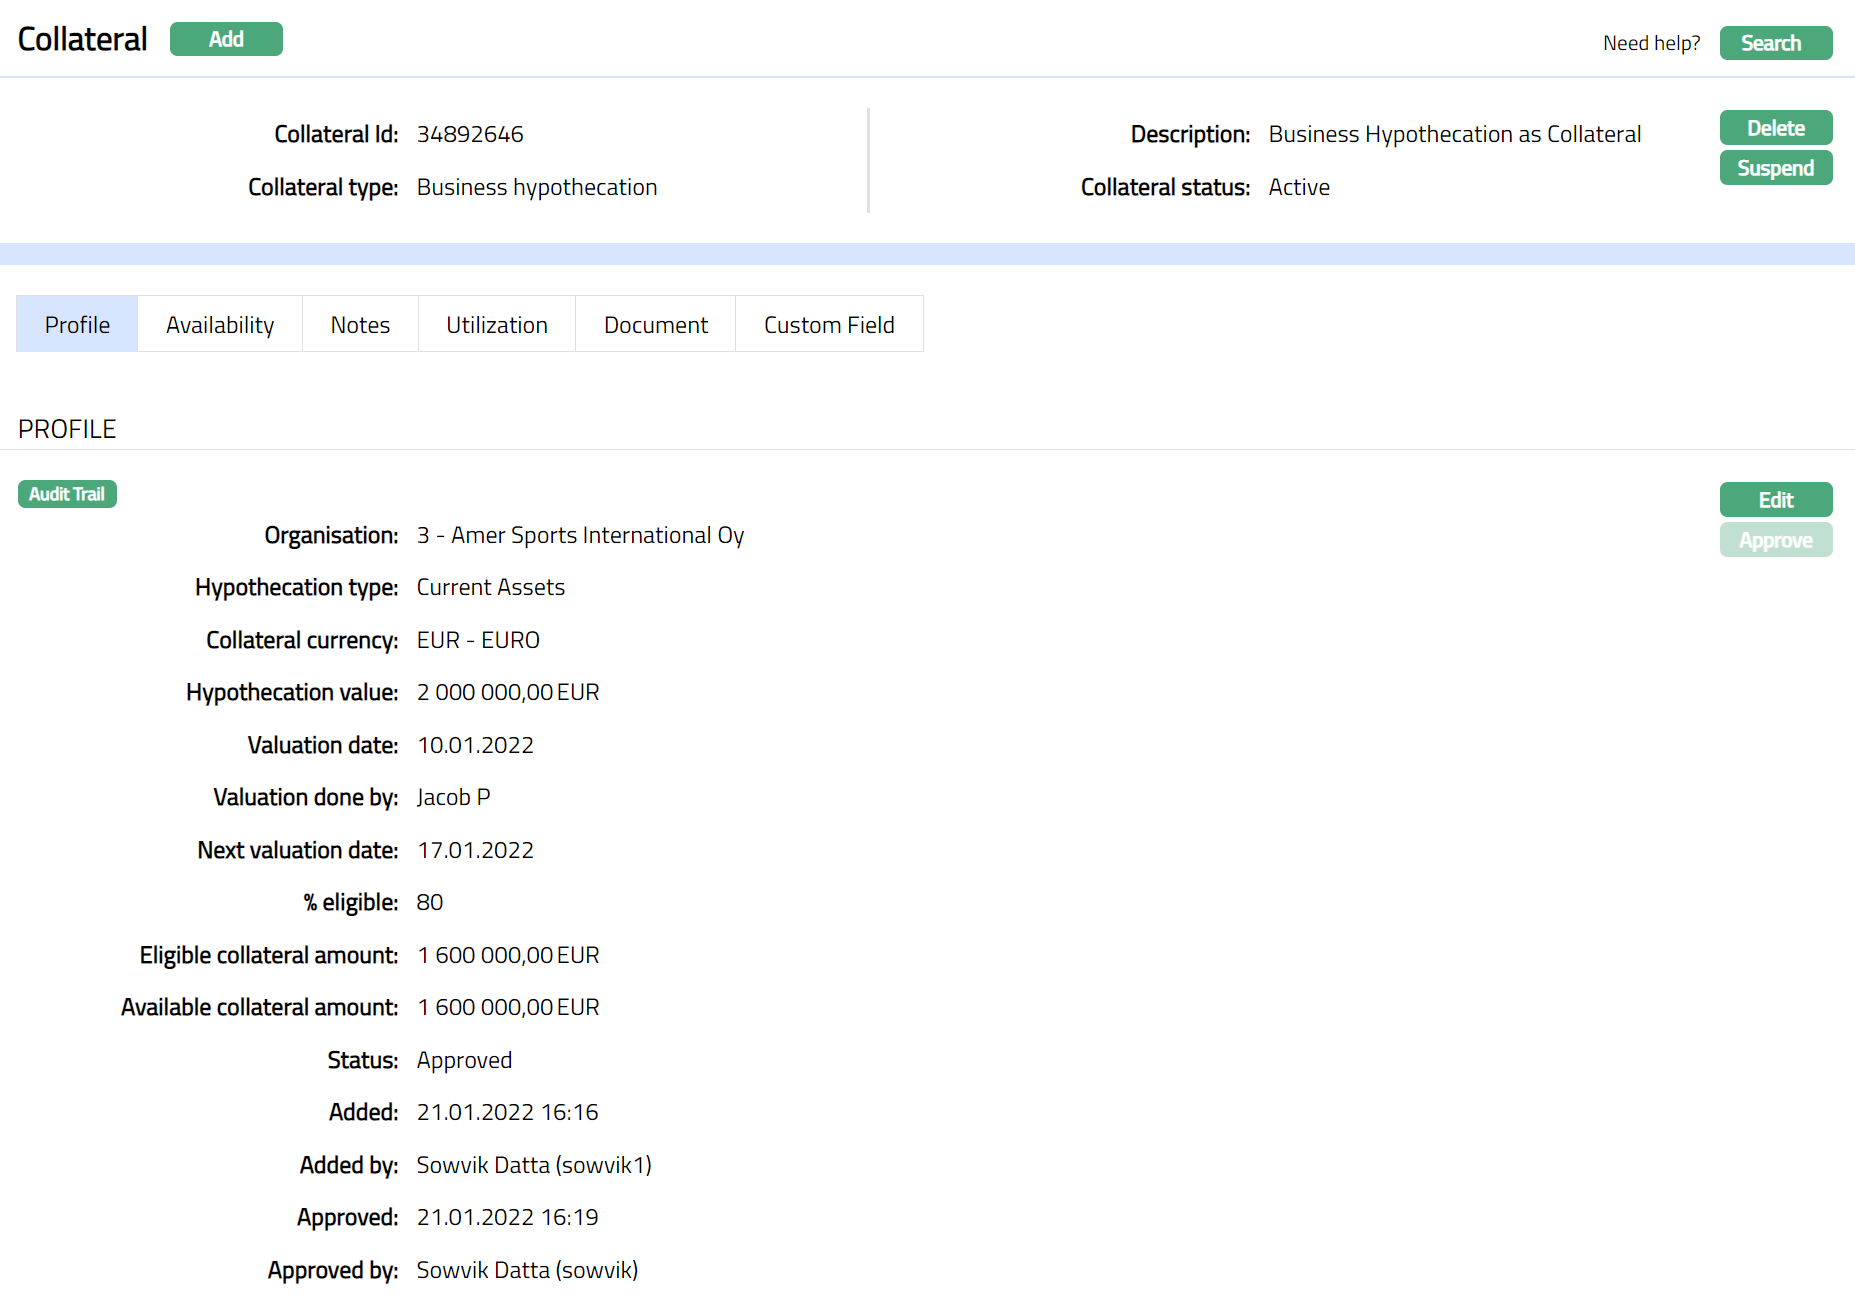
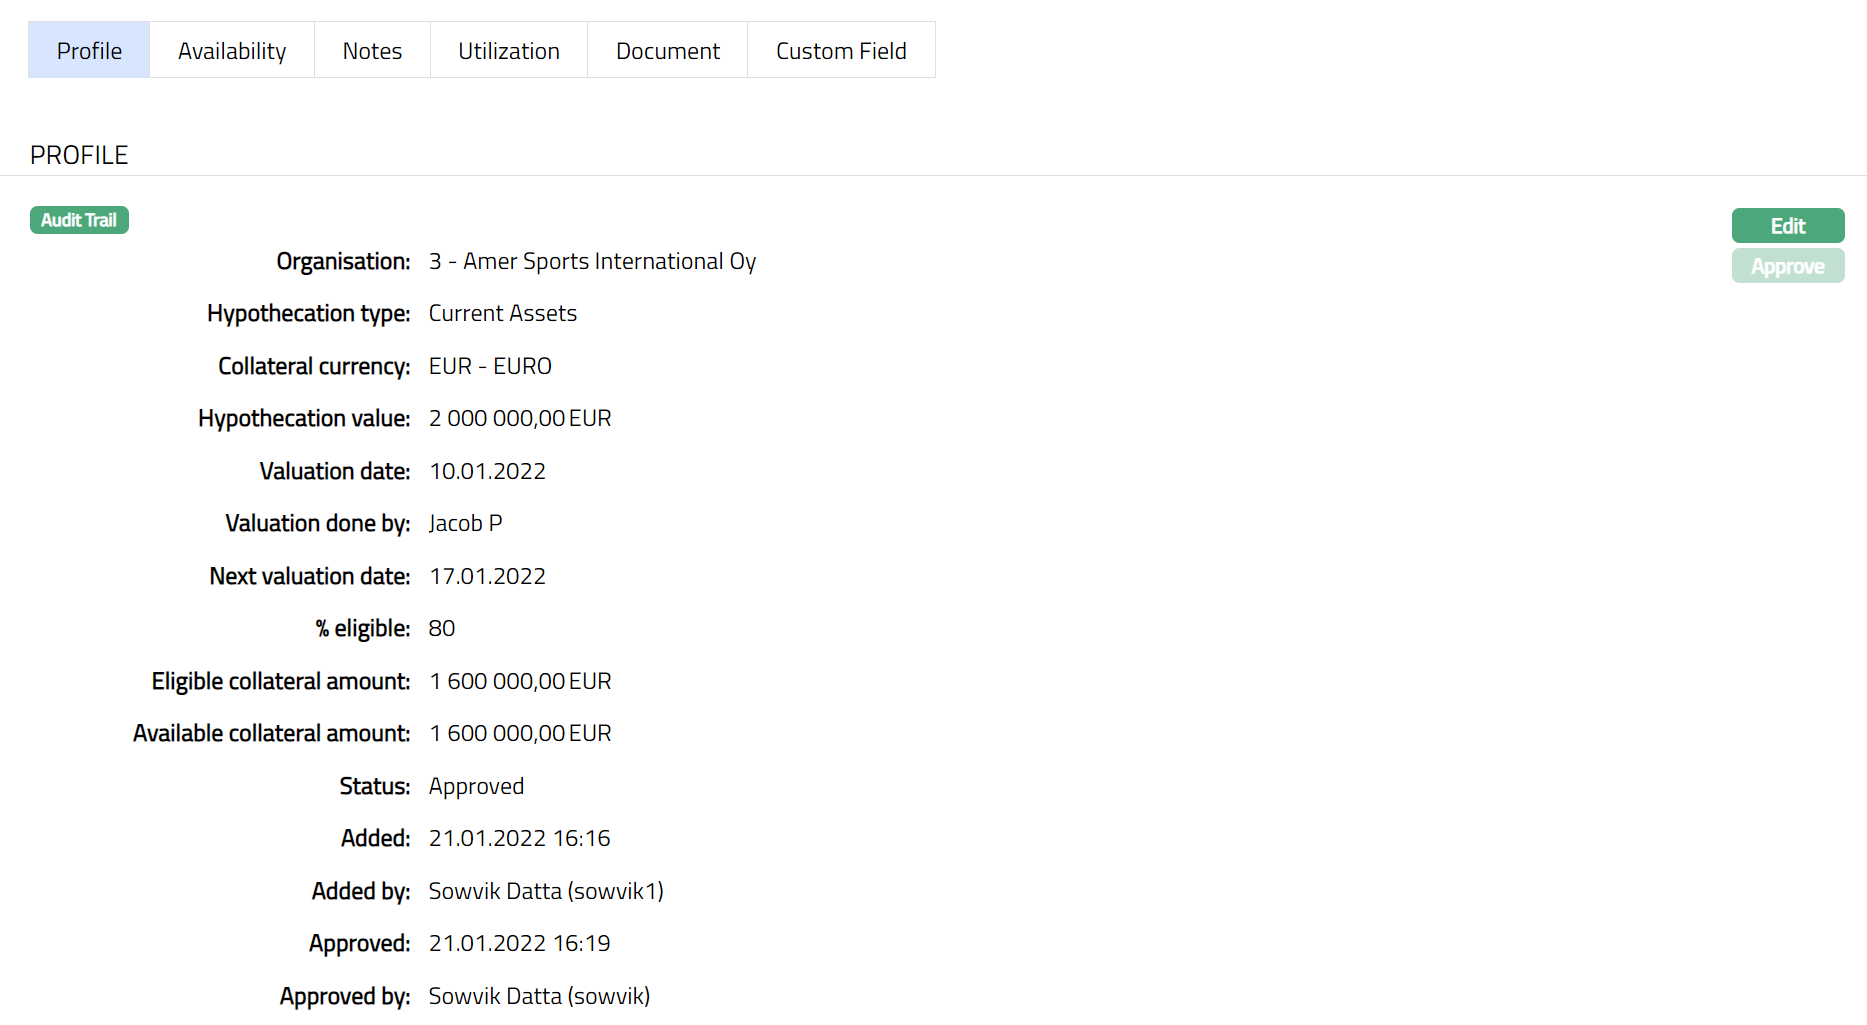
Profile
Profile tab displays the basic details of the Collateral entered during the creation of the Collateral.
To view / edit the Profile tab,
1. Access Collateral page. Click Profile tab to view the details as per sample below. The details are defaulted from the entries that you made during Collateral creation. For details refer to New Collateral → Business Hypothecation (1/3).
2. Click Edit. Edit Collateral screen appears as shown below.
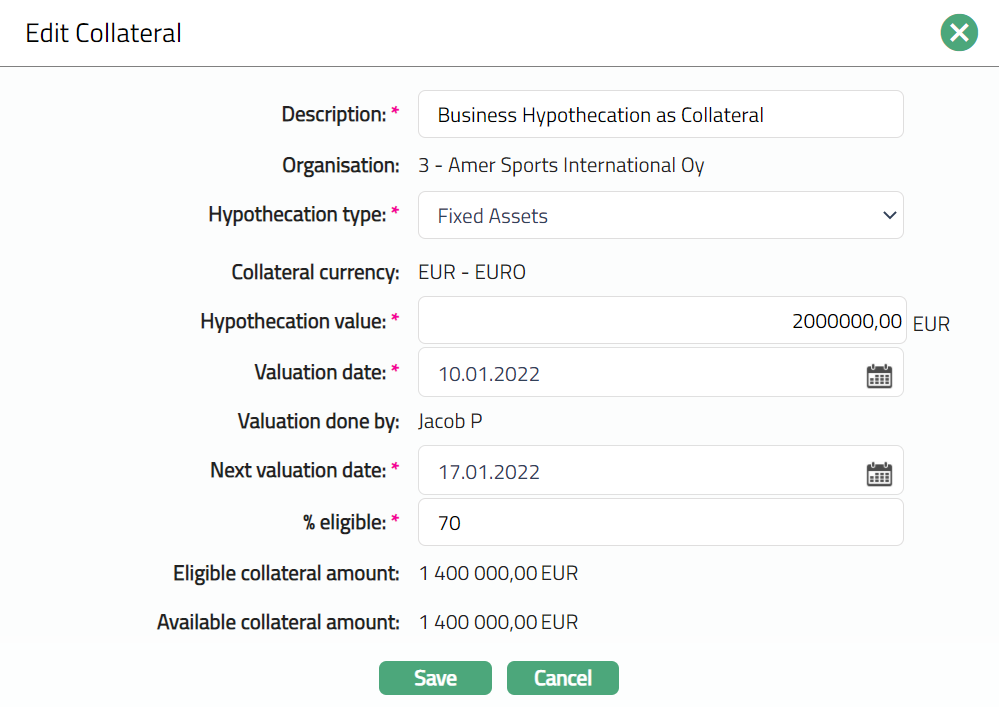
3. All fields except the Organisation, Collateral currency, Goods verified by Eligible collateral amount and Available collateral amount are editable.
4. Enter the details as required in the editable fields.
5. Click Save to save the changes that you made.
Note: Any change in the tab will set the record status to Pending till it is approved by another user. On approval, the record status is set to Approved and the red bubble disappears.
Functions: Edit, Approve.
The additional fields that you can view in the Profile tab are explained below:
- Status field denotes the status of the record.
- Added field denotes the date on which the record was added.
- Added by field denotes the name of the user who created the record.
- Approved field denotes date on which the record was approved and is displayed only on approval.
- Approved by field denotes name of the user who approved the record and is displayed only on approval.
Availability
This is similar to Availability tab under Collateral type Precious Metal. Please refer to Availability tab in Precious metal section for details.
Notes
This is similar to Notes tab under Collateral type Precious Metal. Please refer to Notes tab in Precious metal section for details.
Utilization
This is similar to Utilization tab under Collateral type Precious Metal. Please refer to Utilization tab in Precious metal section for details.
Document
This is similar to Document tab under Collateral type Precious Metal. Please refer to Document tab in Precious metal section for details.
Custom Field
This is similar to Custom Field tab under Collateral type Precious Metal. Please refer to Custom Field tab under Precious Metal section.
Guarantee
The following tabs appear in the Collateral Maintenance page if the collateral type is Guarantee.
To add Guarantee as a New Collateral,
1. From CRM menu, Click Collateral/Limits and then Collateral. Collateral Search page appears, showing the details of all collaterals created in Aura.
2. Click Add. New Collateral → Select Collateral Type page appears.

3. Select Guarantee as the Collateral type from the drop-down list.
4. Enter Description of the Collateral
5. Click Next. New Collateral → Guarantee (1/3) page appears.
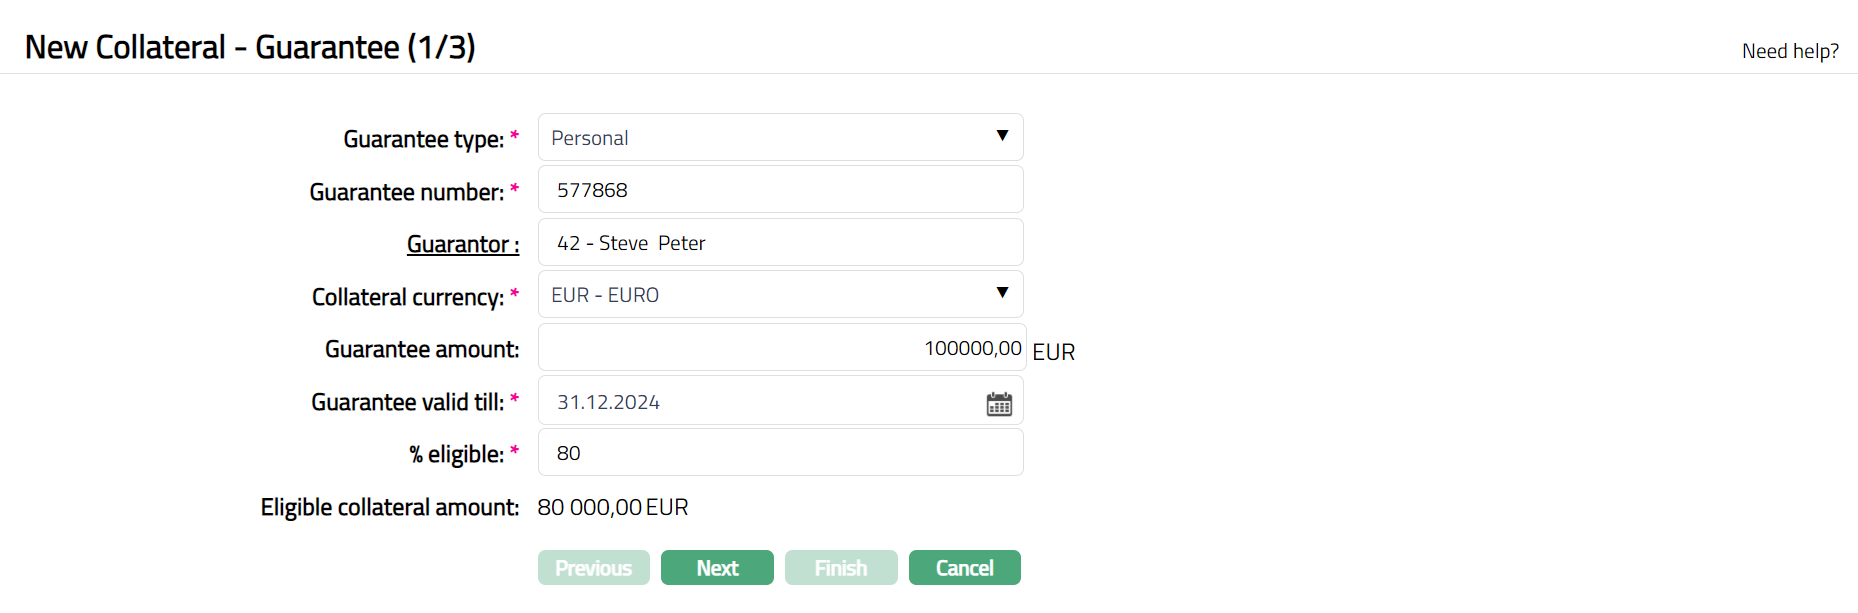
6. Input the guarantee type by selecting from the dropdown list. The Available options are:
- Personal
- Bank
- Business
7. Enter Guarantee number which should be a unique one for that Collateral (Guarantee).
8. Input Guarantor Name by a click on the hyperlink. Based on your selection in the Guarantee Type, Aura will display the list of Persons, Banks or Non-Bank Organisations maintained.
9. Enter Collateral currency. Choose from the dropdown list of active GL currencies.
10. Input the amount guaranteed in Guarantee amount.
11. Enter the date until which the Guarantee is valid in Guarantee valid till.
12. Input Guarantee amount in this field.
13. Indicate what proportion of the Collateral value is eligible for securing in % eligible. You can enter any value from 1 to 100.
14. Based on the Value and the % eligible, Aura calculates the Eligible collateral amount.
15. Click Next. Maintain Custom Field Details → (2/3) page appears.

16. Enter Custom Field details as required for the Collateral.
17. Click Next. New Collateral Confirmation → (3/3) page appears
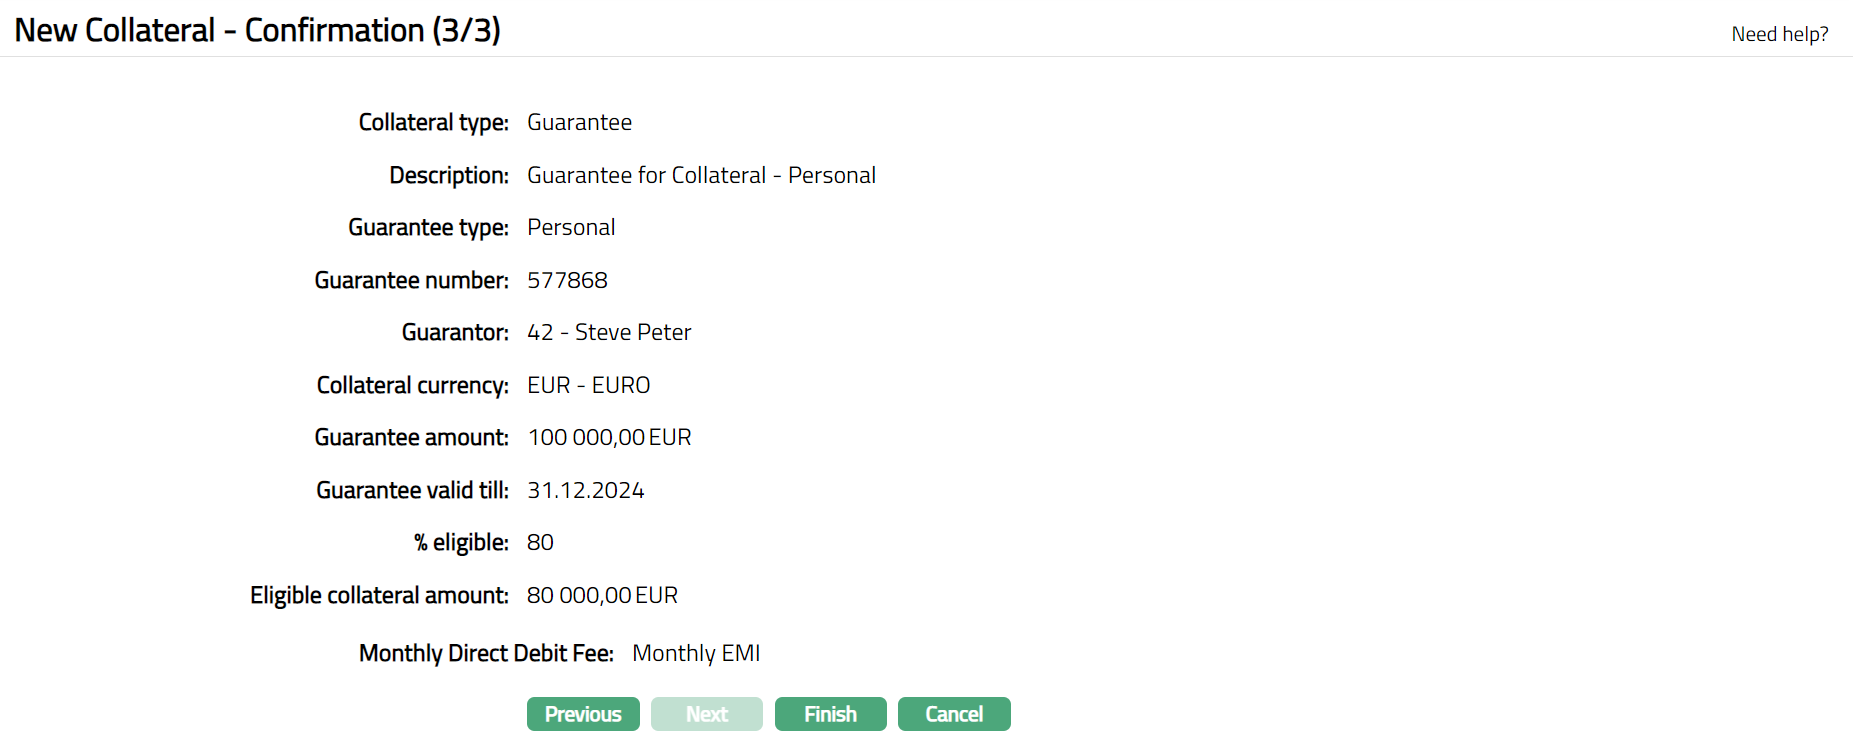
18. Click Finish. Collateral record is created with a unique Collateral id and the Collateral page appears showing the Profile tab by default.
Note: On creation of the Collateral record, the Collateral Status is Active, and the record status will be Pending. Any user other than the one who created the Collateral record can approve the record. On approval, the record status is set to Approved and the red bubble disappear.
Functions: Add, Search, Delete, Suspend, Activate, Edit, Approve
Approve: Any user other than the one who created the Collateral record can approve the record. To approve, retrieve the Collateral record and click on Approve. Aura will ask for confirmation. Once confirmed, the record status becomes approved.
Suspend: You can suspend the Collateral by clicking on Suspend button. When you click on Suspend button, Aura displays an alert message. On confirmation, Aura will suspend the Collateral. Once the Collateral is suspended, it becomes unavailable in the drop-down list while securing any contract / account in other modules in Aura.
Activate: You can activate a Suspended Collateral by clicking on Activate button. When you click on Activate button, Aura displays an alert message. On confirmation Aura will activate the Collateral. Once the Collateral is activated, it becomes available in the drop-down list in other modules.
Note: If the custom field is mapped to Collateral under Admin → System Codes → Custom fields → Field mapping, then an additional screen will appear before the confirmation screen. The custom fields will be mandatory or non-mandatory based on the rules set at the Field mappings. For more detail on custom field functionality please refer Admin → System codes → Custom fields → Field mappings manual.
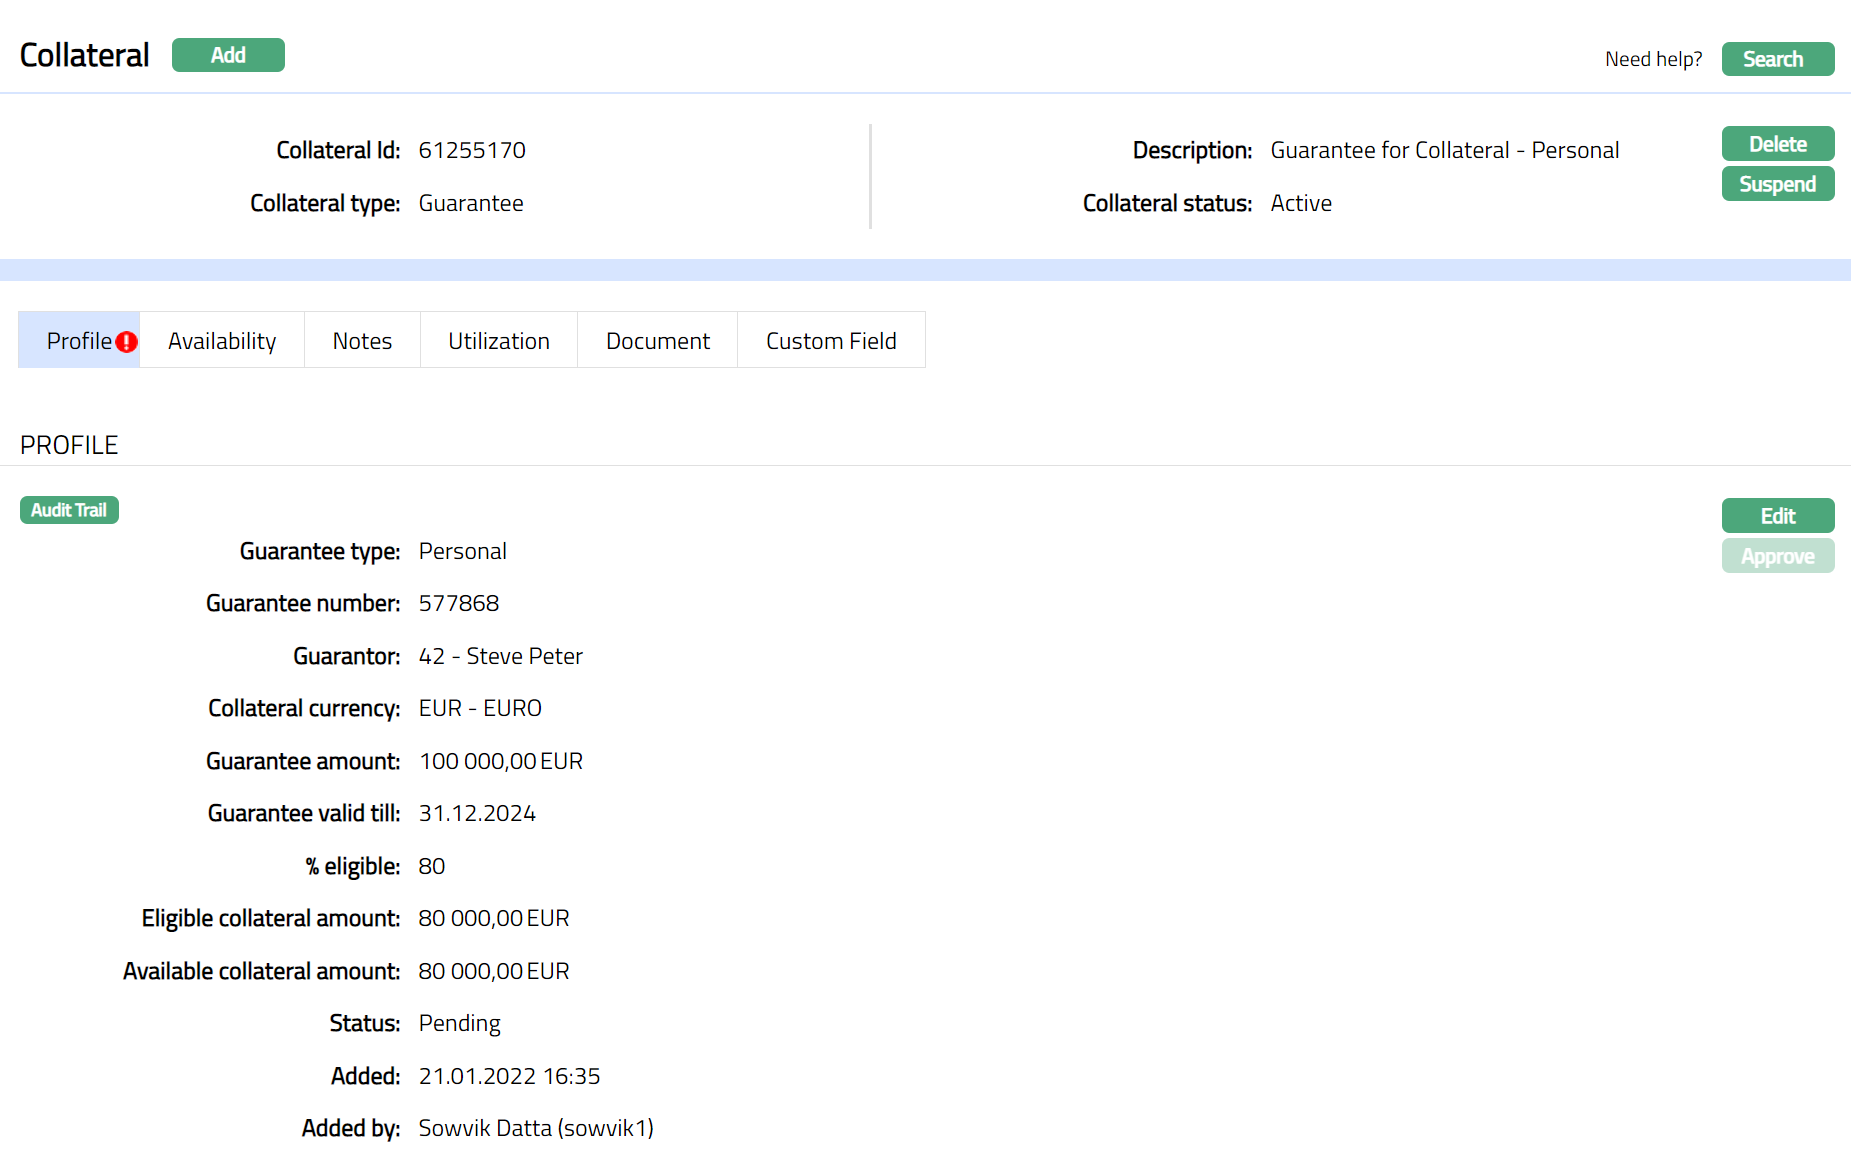
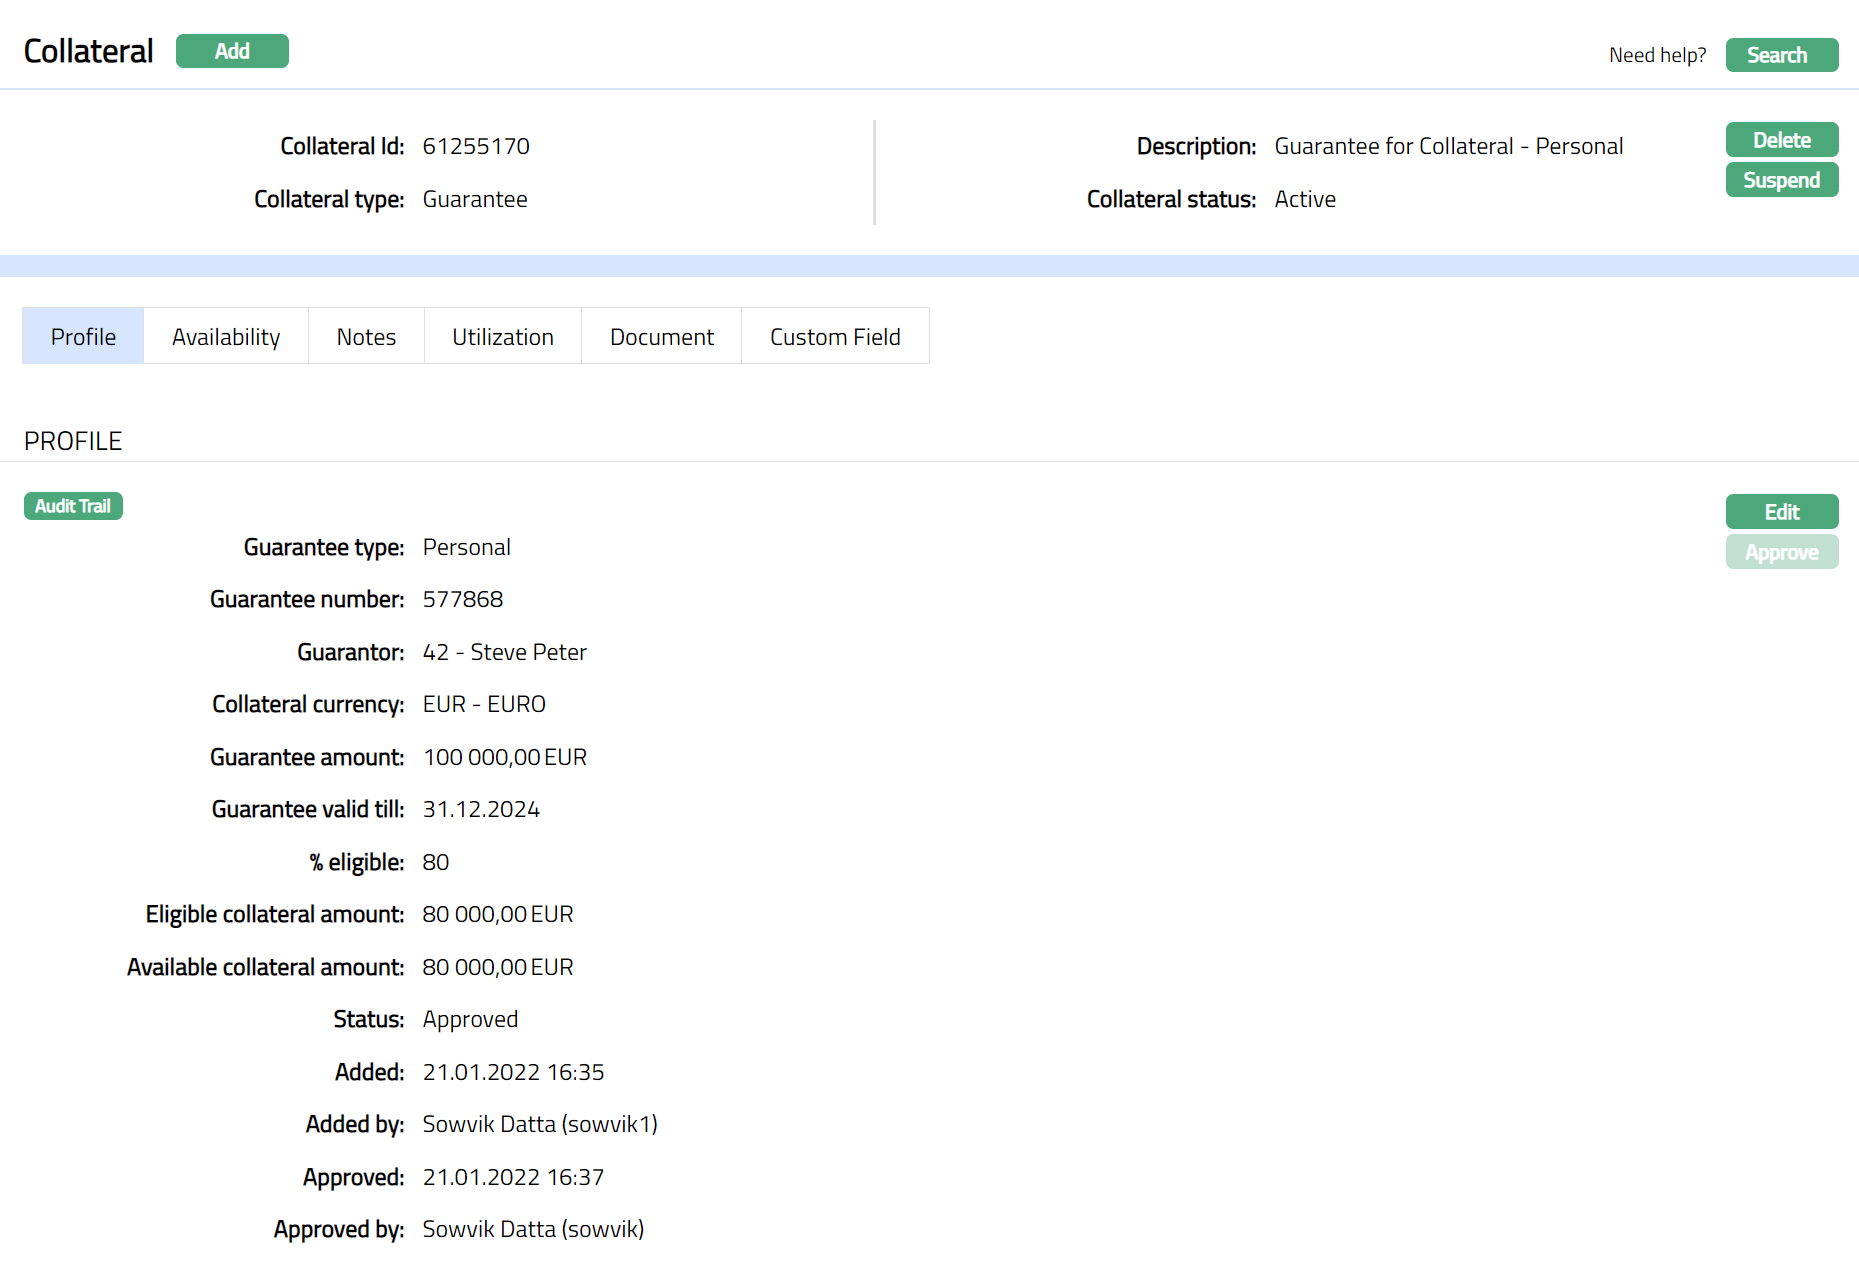
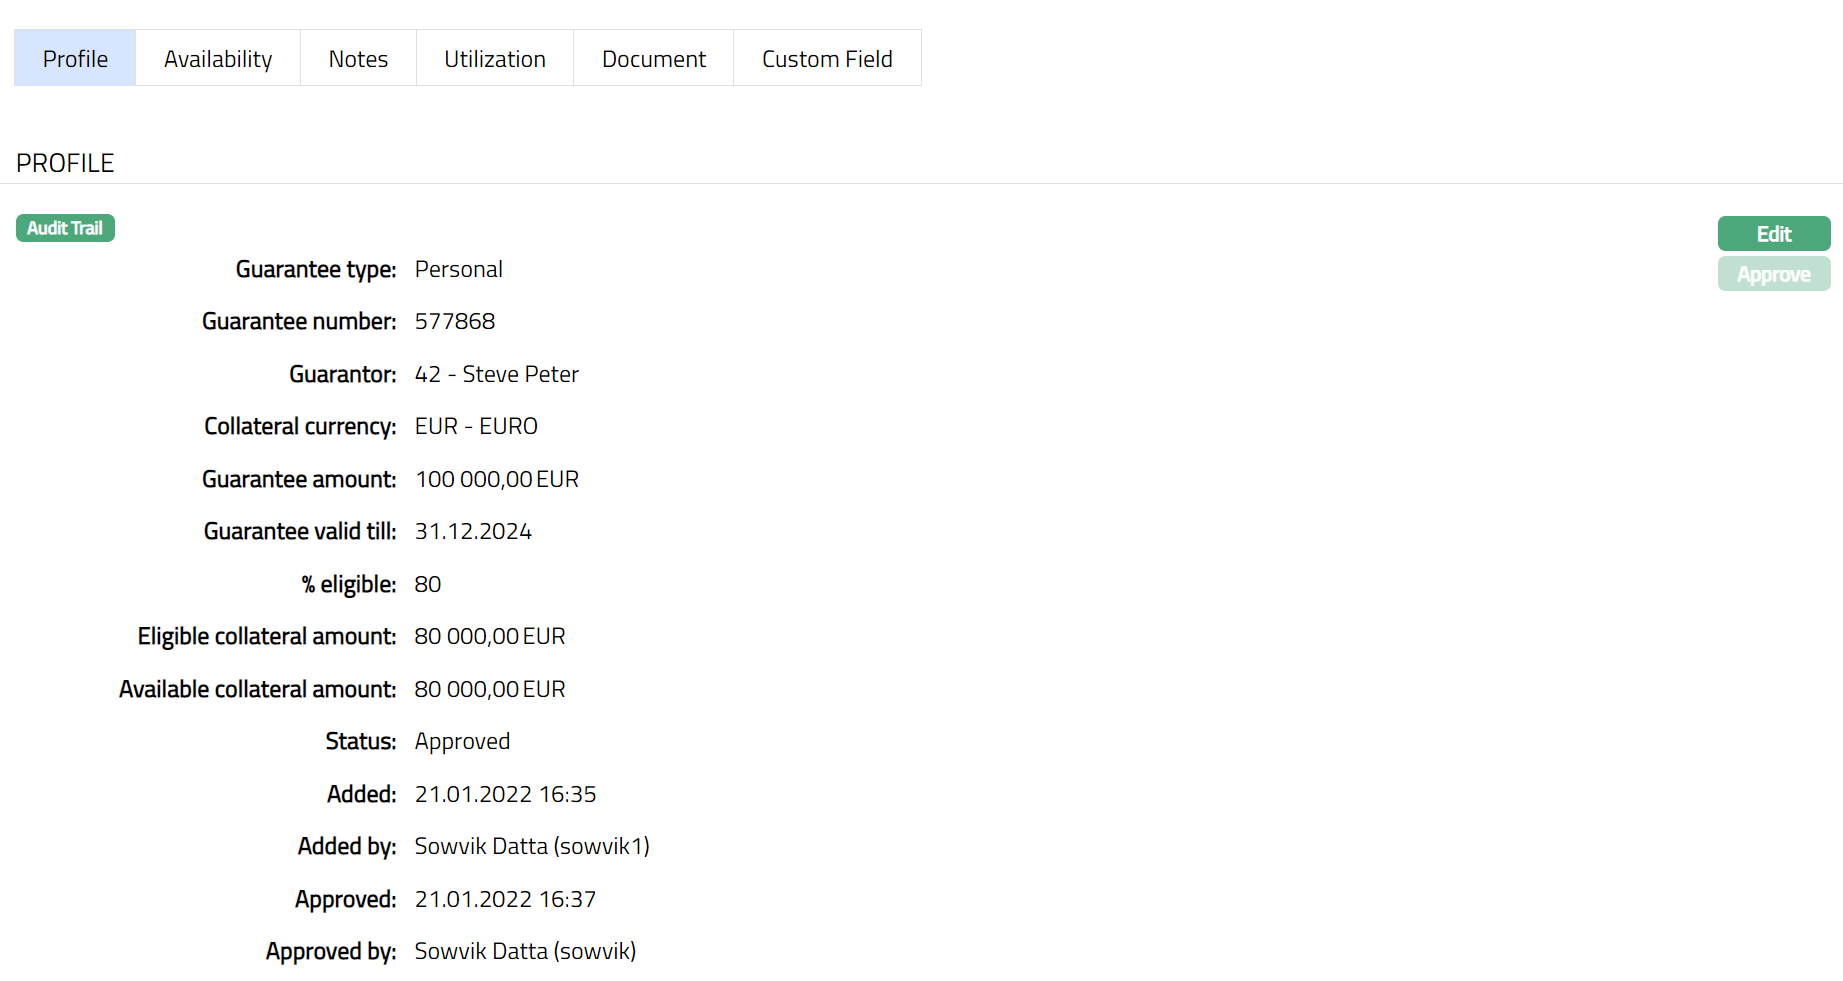
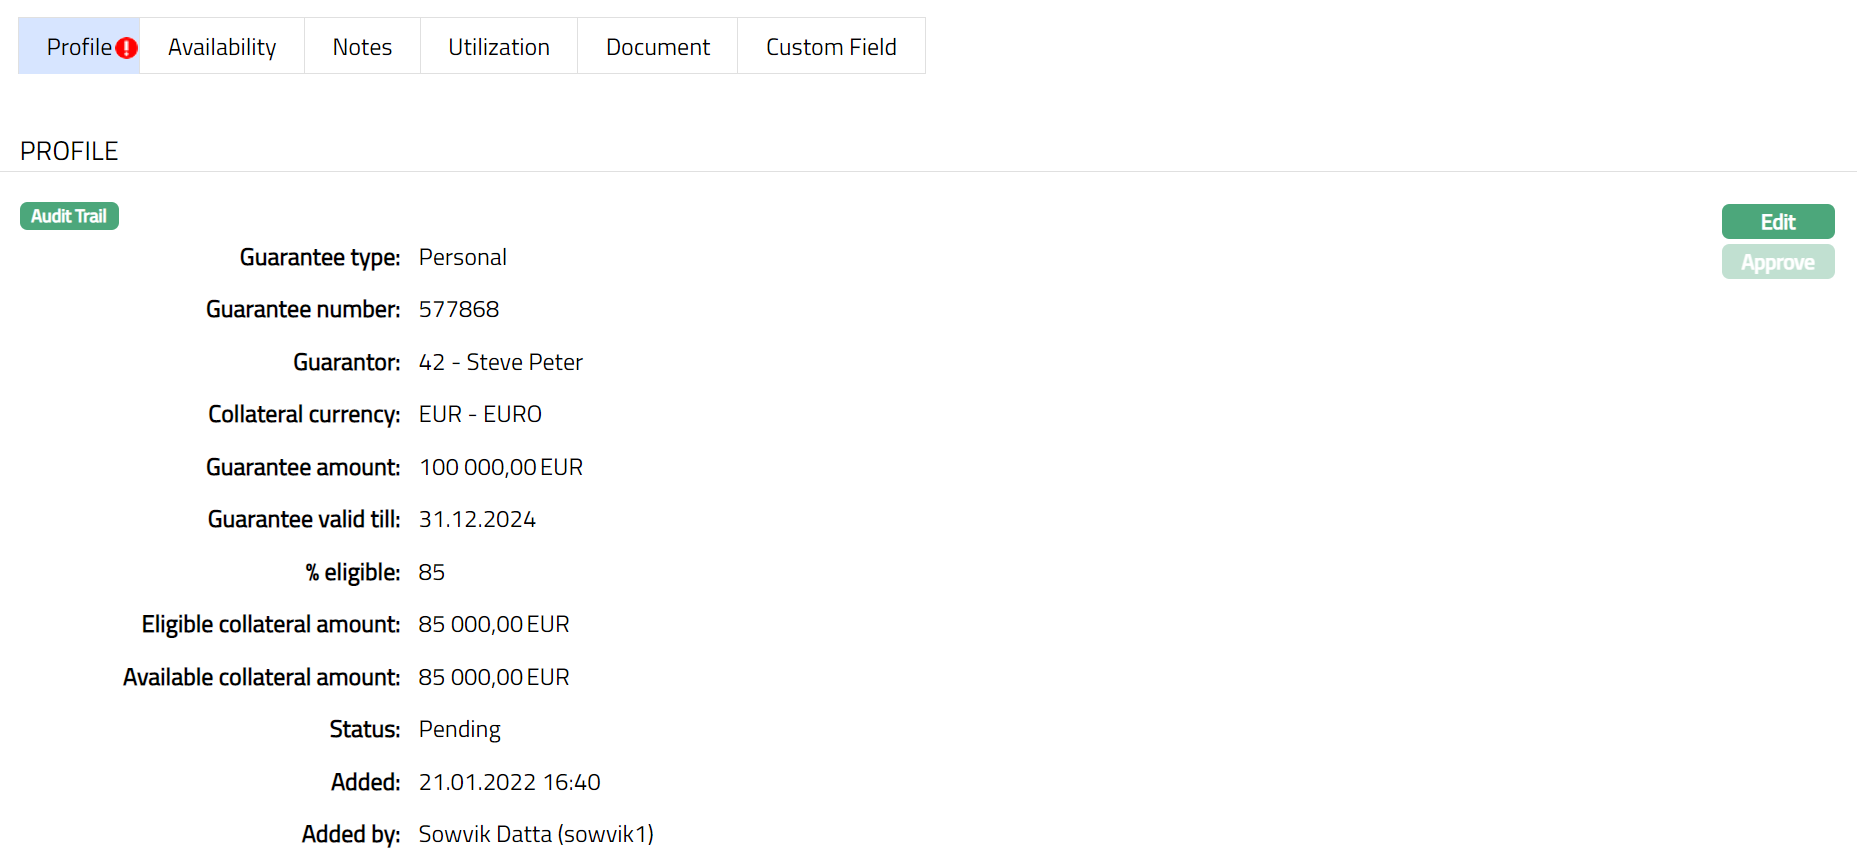
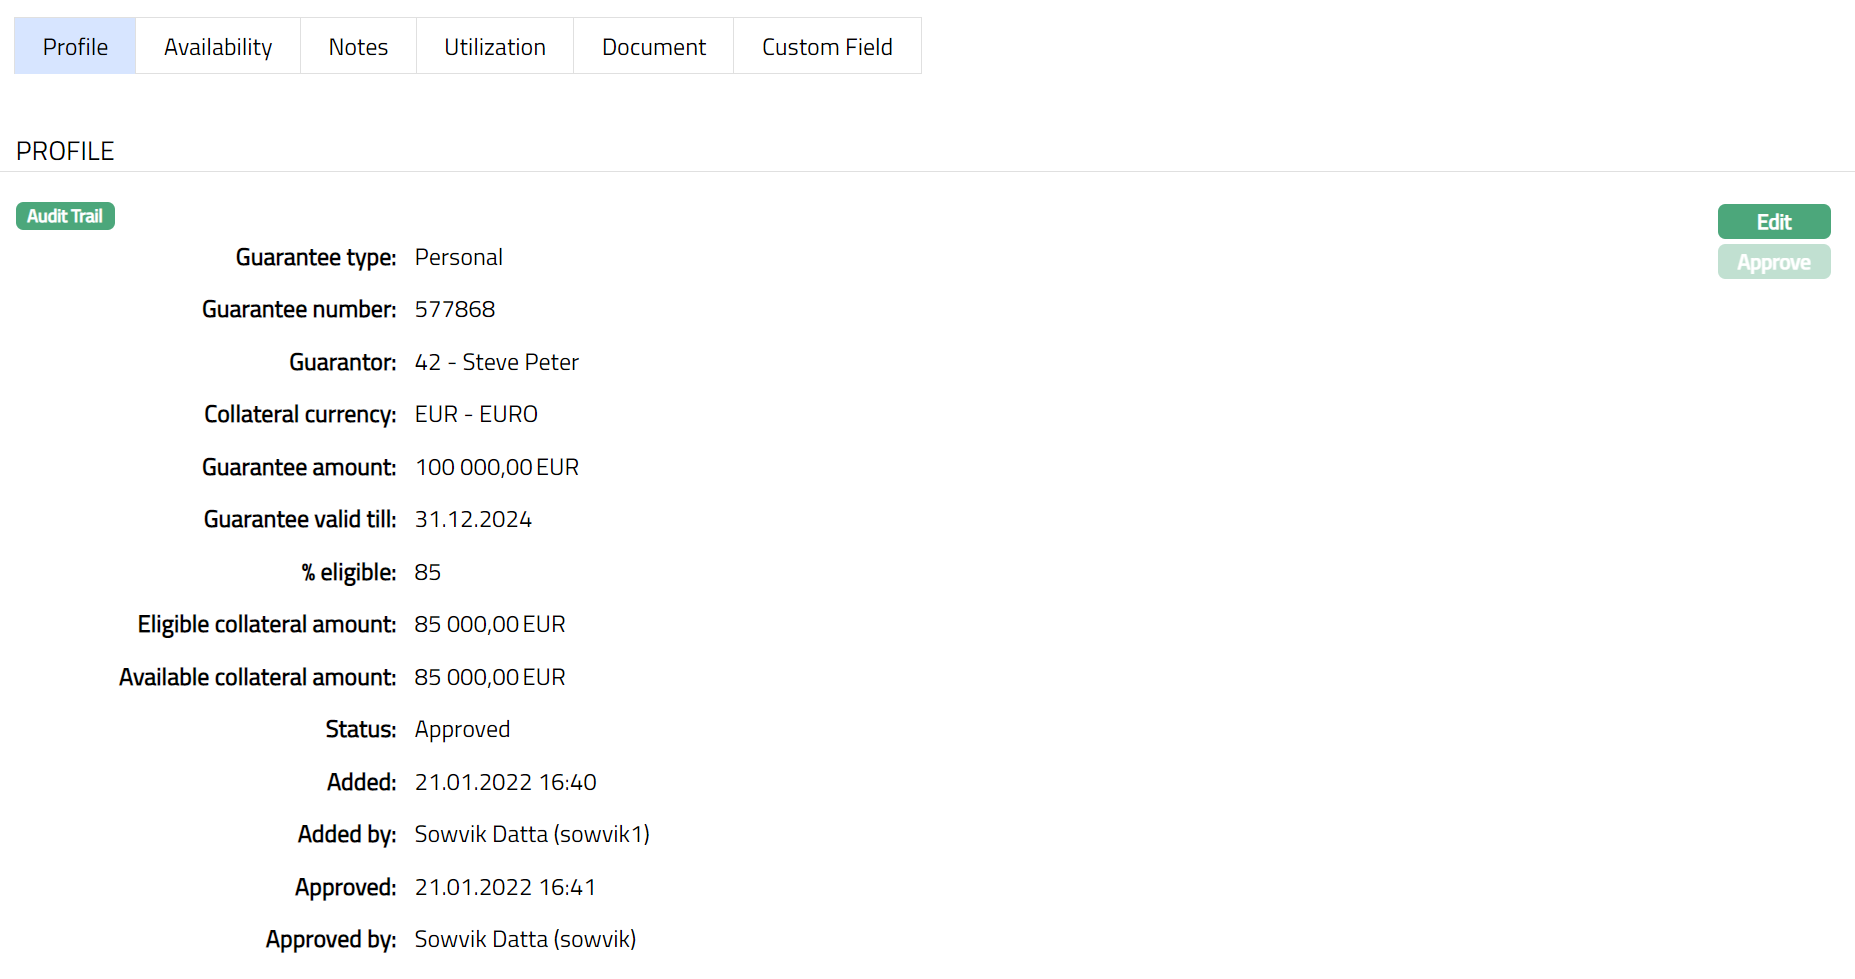
Profile
Profile tab displays the basic details of the Collateral entered during the creation of the Collateral.
To view / edit the Profile tab,
1. Access Collateral page. Click Profile tab to view the details as per sample below. The details are defaulted from the entries that you made during Collateral creation. For details refer to New Collateral → Guarantee (1/3).
2. Click Edit. Edit Collateral screen appears as shown below.
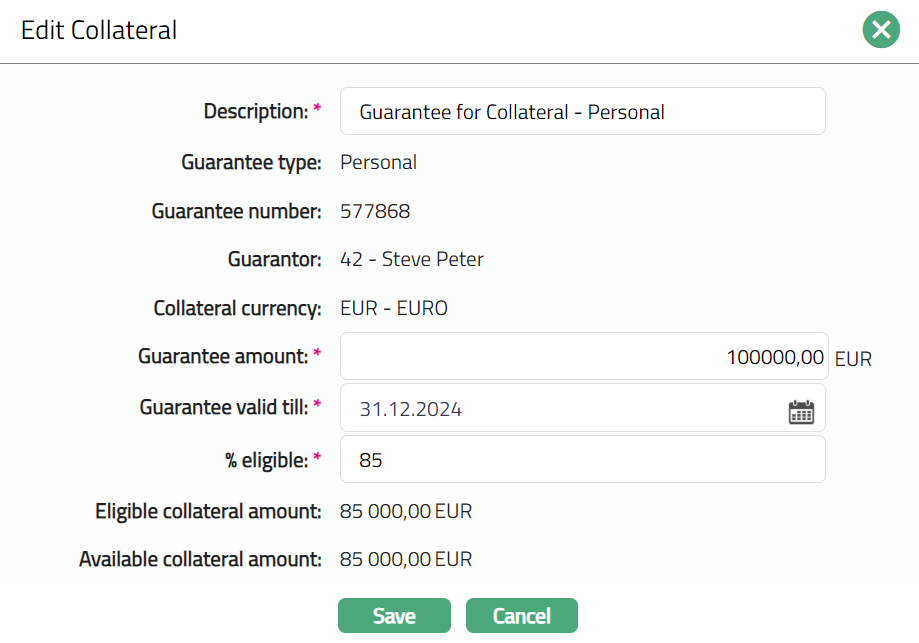
3. All fields except the Description, Guarantee amount, Guarantee valid till and % Eligible fields are non- editable.
4. Enter the details as required in the editable fields.
5. Click Save to save the changes that you made.
Note: Any change in the tab will set the record status to Pending till it is approved by another user. On approval, the record status is set to Approved and the red bubble disappears.
Functions: Edit, Approve.
The additional fields that you can view in the Profile tab are explained below:
Status field denotes the status of the record.
Added field denotes the date on which the record was added.
Added by field denotes the name of the user who created the record.
Approved field denotes date on which the record was approved and is displayed only on approval.
Approved by field denotes name of the user who approved the record and is displayed only on approval.
Availability
This is similar to Availability tab under Collateral type Precious Metal. Please refer to Availability tab in Precious metal section for details.
Notes
This is similar to Notes tab under Collateral type Precious Metal. Please refer to Notes tab in Precious metal section for details.
[Utilization]
This is similar to Utilization tab under Collateral type Precious Metal. Please refer to Utilization tab in Precious metal section for details.
[Document]
This is similar to Document tab under Collateral type Precious Metal. Please refer to Document tab in Precious metal section for details.
Custom Field
This is similar to Custom Field tab under Collateral type Precious Metal. Please refer to Custom Field tab under Precious metal section.
Vehicle
The following tabs appear in the Collateral Maintenance page if the collateral type is Guarantee.
To add Vehicle as a New Collateral,
1. From CRM menu, Click Collateral/Limits and then Collateral. Collateral Search page appears, showing the details of all collaterals created in Aura.
2. Click Add. New Collateral → Select Collateral Type page appears.

3. Select Guarantee as Collateral type from the drop-down list.
4. Enter Description of the Collateral
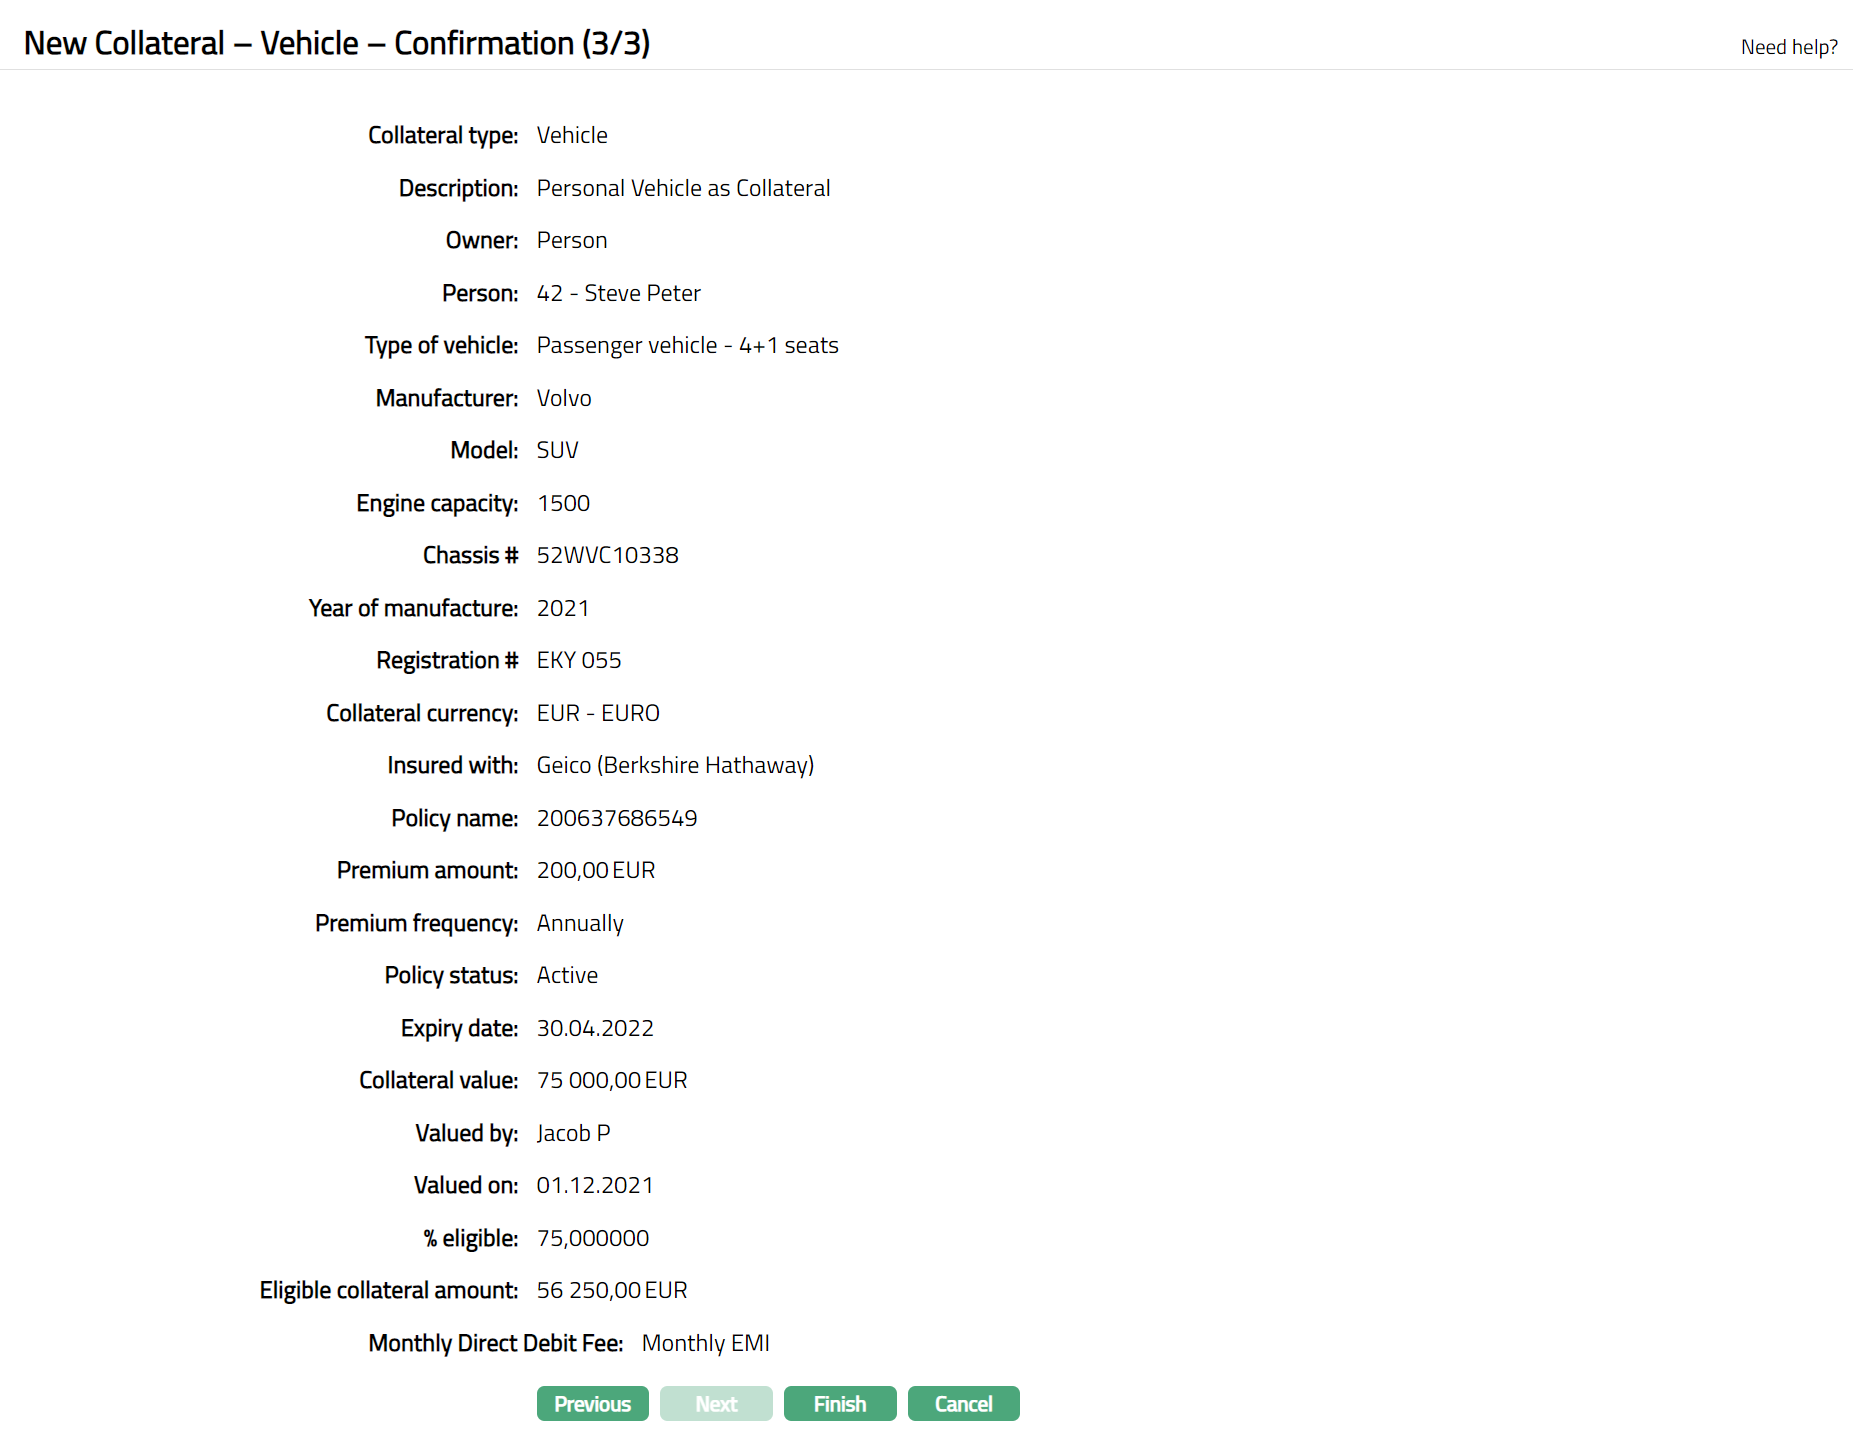
5. Click Next. New Collateral → Vehicle (1/3) page appears.
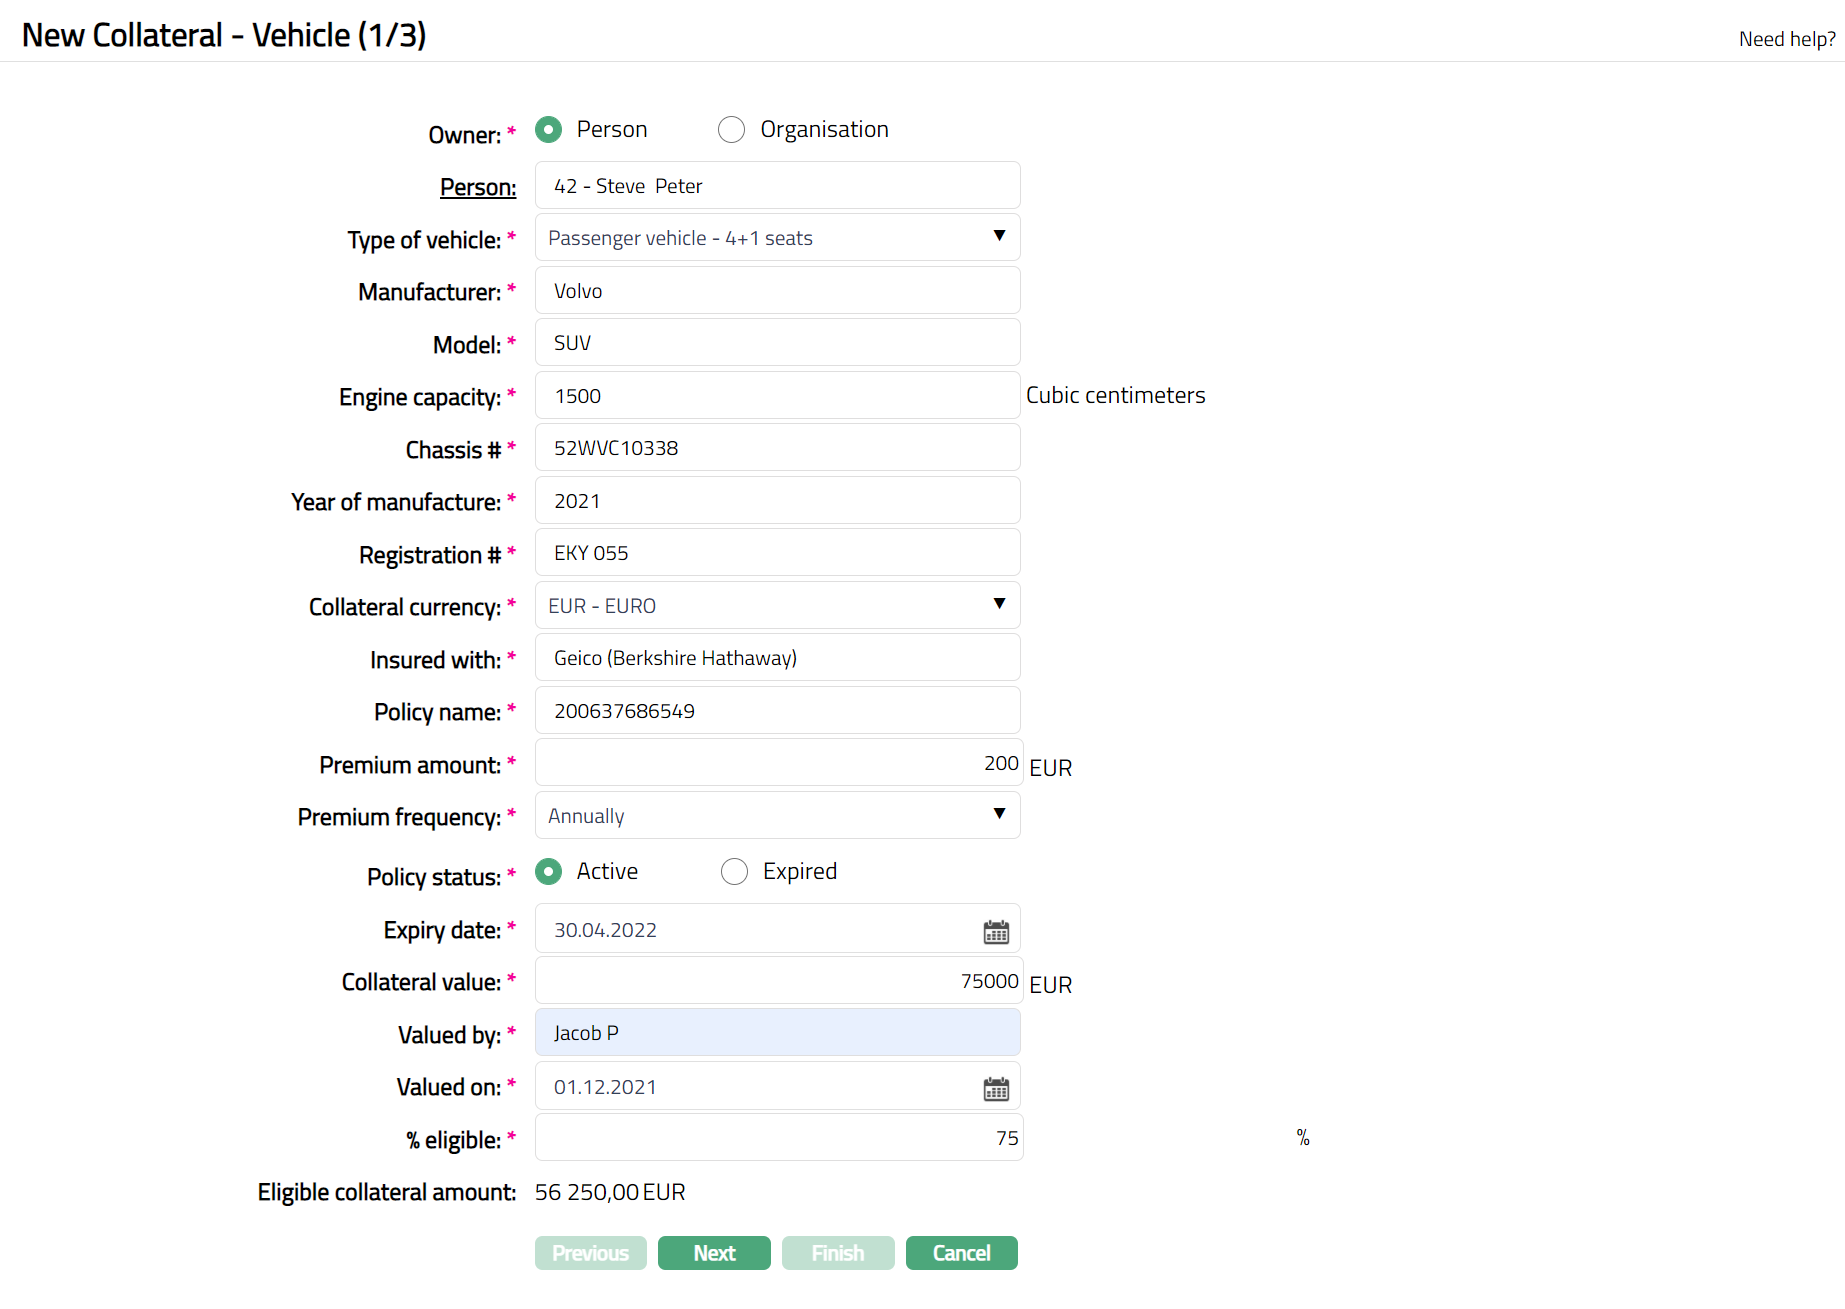
6. Select Type of Vehicle by selecting from the dropdown list.
7. Enter Manufacturer who has manufactured the Vehicle.
8. Enter Model of the vehicle
9. Enter Engine Capacity of the vehicle in CC (Cubic Centimeters).
10. Enter Chassis# of the vehicle.
11. Enter Year of Manufacture of the vehicle.
12. Enter Registration# of the vehicle.
13. Select Collateral currency. Choose from the dropdown list of active GL currencies.
14. Enter Insured with. This is the name of the Insurance company under whom your vehicle is insured.
15. Enter Policy name. Note: You can also mention the Policy Number.
16. Enter Premium Amount.
17. Select Premium Frequency from the available drop-down list. The Available options are:
Monthly
Quarterly
Semi Annually
Annually
18. Select Policy Status by clicking the Radio Button. Available buttons are Active and Expired.
19. Enter Expiry Date of the policy from the available calendar.
20. Enter Collateral Value. This should be in terms of the Collateral currency that you chose above
21. Input the name of the valuator in Valued by.
22. Specify the Valued-on date on which the above collaterals was valued. The date has to be less than or equal to the current date.
23. Indicate what proportion of the Collateral value is eligible for securing in % eligible.
24. Based on the Value and the % eligible, Aura calculates the Eligible collateral amount.
25. Click Next. Maintain Custom Field Details → (2/3) page appears.

26. Enter Custom Field details as required for the Collateral.
27. Click Next. New Collateral Confirmation → (3/3) page appears
28. Click Finish. Collateral record is created with a unique Collateral id and the Collateral page appears showing the Profile tab by default.
Note: On creation of the Collateral record, the Collateral Status is Active, and the record status will be Pending. Any user other than the one who created the Collateral record can approve the record. On approval, the record status is set to Approved and the red bubble disappear.
Functions: Add, Search, Delete, Suspend, Activate, Edit, Approve
Approve: Any user other than the one who created the Collateral record can approve the record. To approve, retrieve the Collateral record and click on Approve. Aura will ask for confirmation. Once confirmed, the record status becomes approved.
Suspend: You can suspend the Collateral by clicking on Suspend button. When you click on Suspend button, Aura displays an alert message. On confirmation, Aura will suspend the Collateral. Once the Collateral is suspended, it becomes unavailable in the drop-down list while securing any contract / account in other modules in Aura.
Activate: You can activate a Suspended Collateral by clicking on Activate button. When you click on Activate button, Aura displays an alert message. On confirmation Aura will activate the Collateral. Once the Collateral is activated, it becomes available in the drop-down list in other modules.
Note: If the custom field is mapped to Collateral under Admin → System Codes → Custom fields → Field mapping, then an additional screen will appear before the confirmation screen. The custom fields will be mandatory or non-mandatory based on the rules set at the Field mappings. For more detail on custom field functionality please refer Admin → System codes → Custom fields → Field mappings manual.
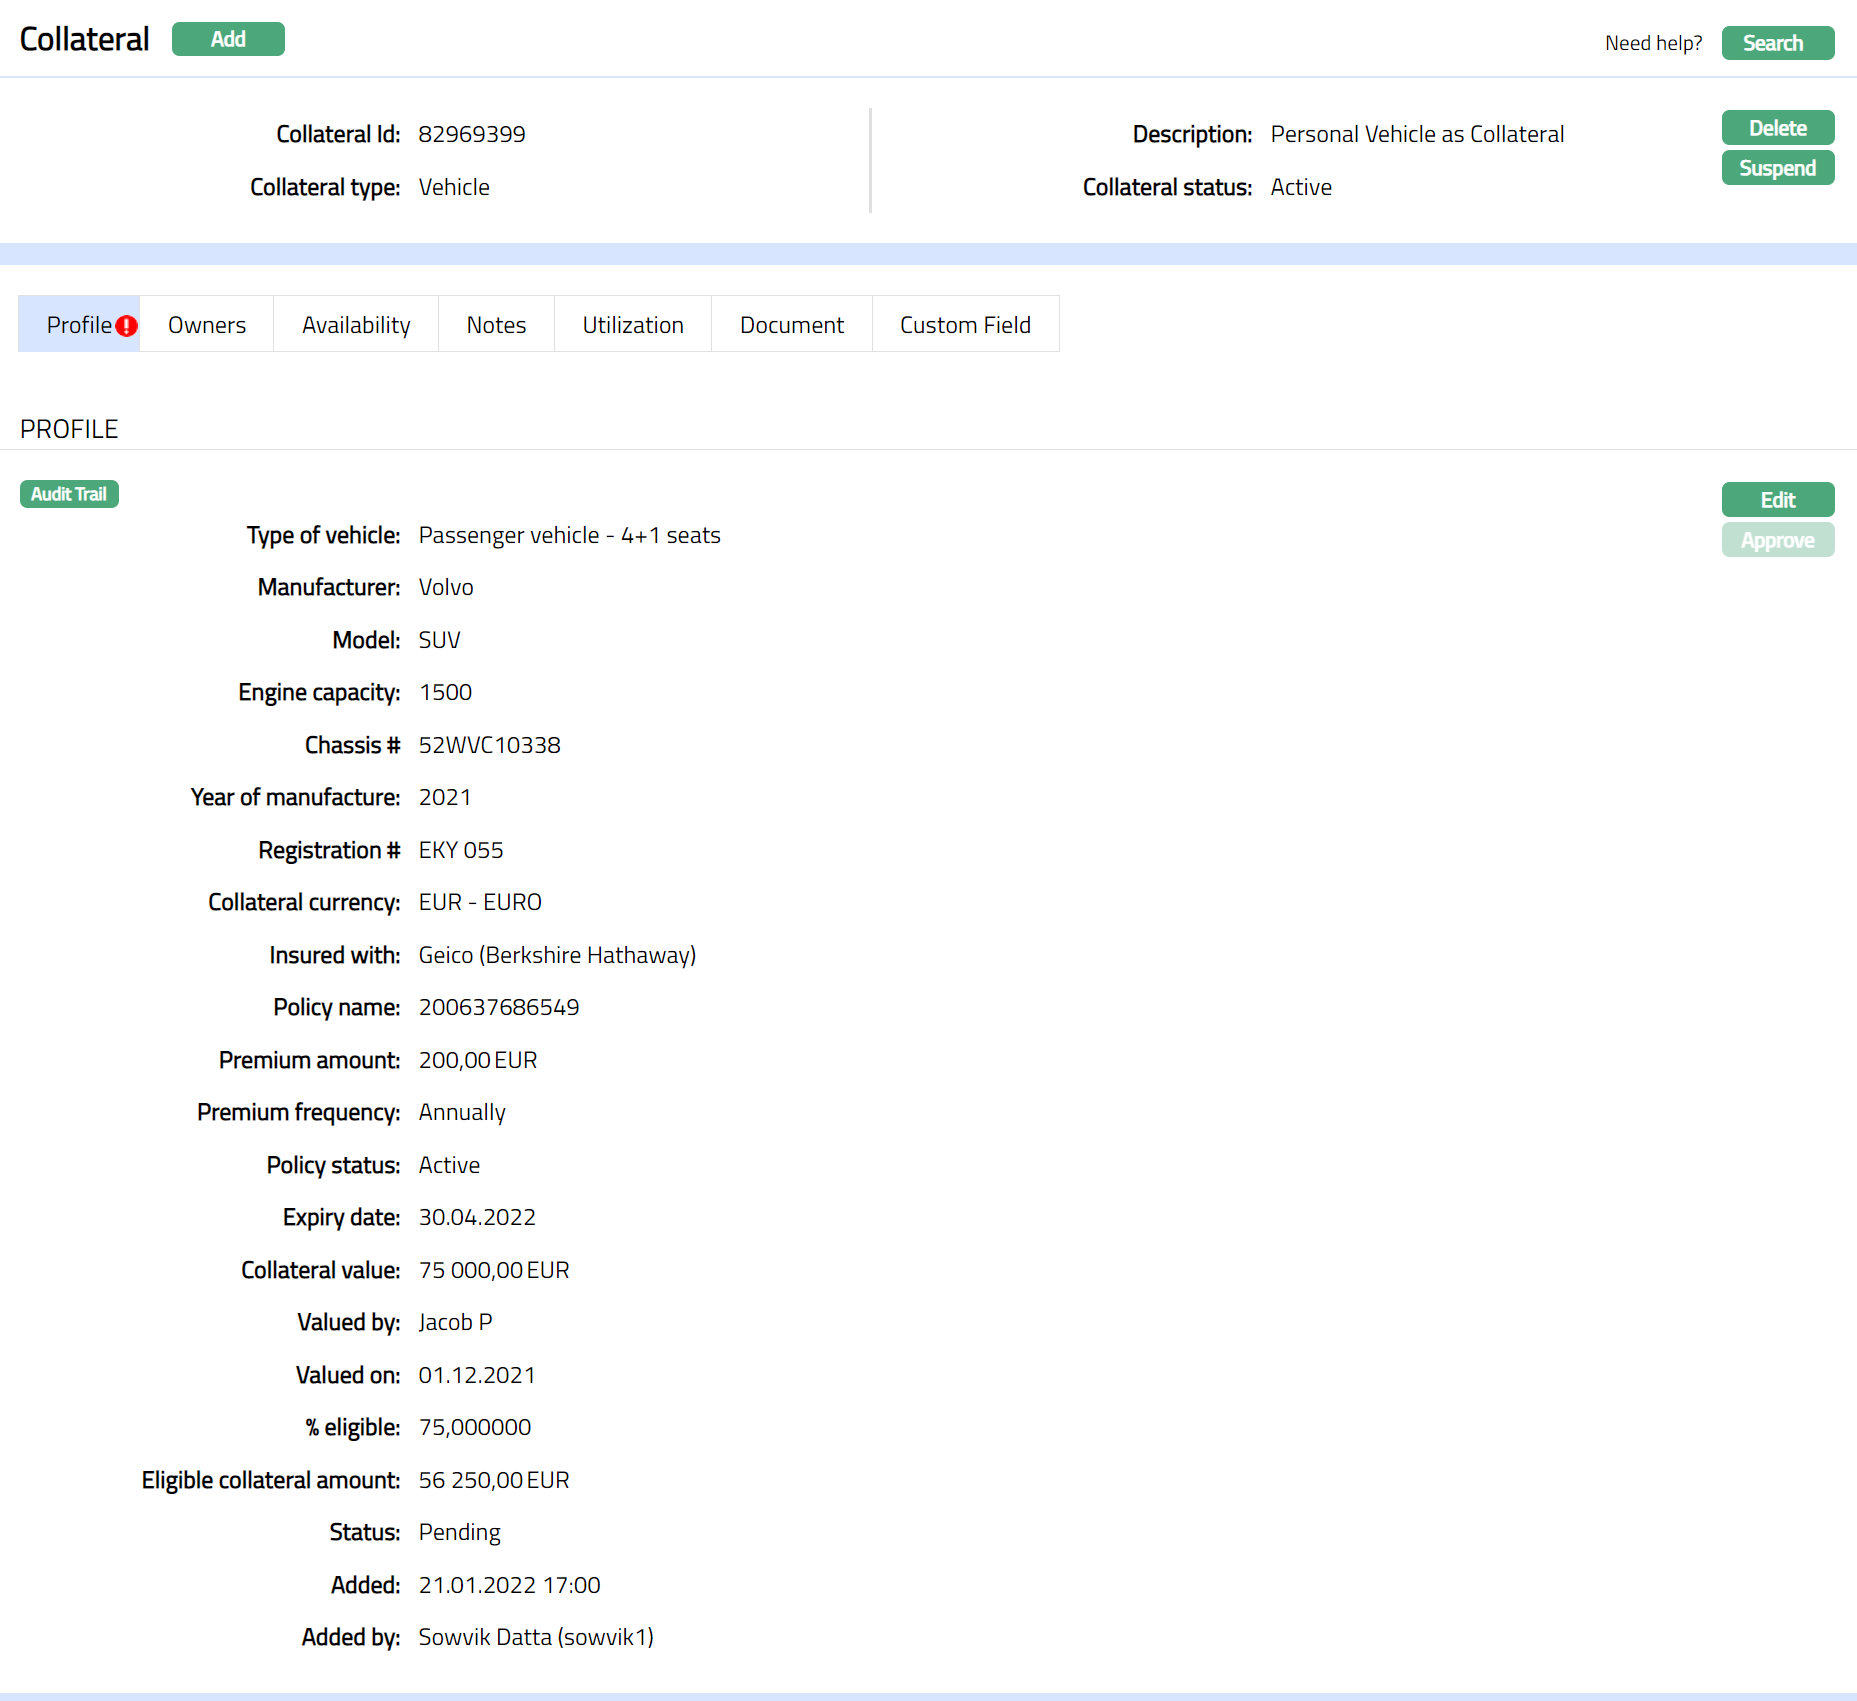
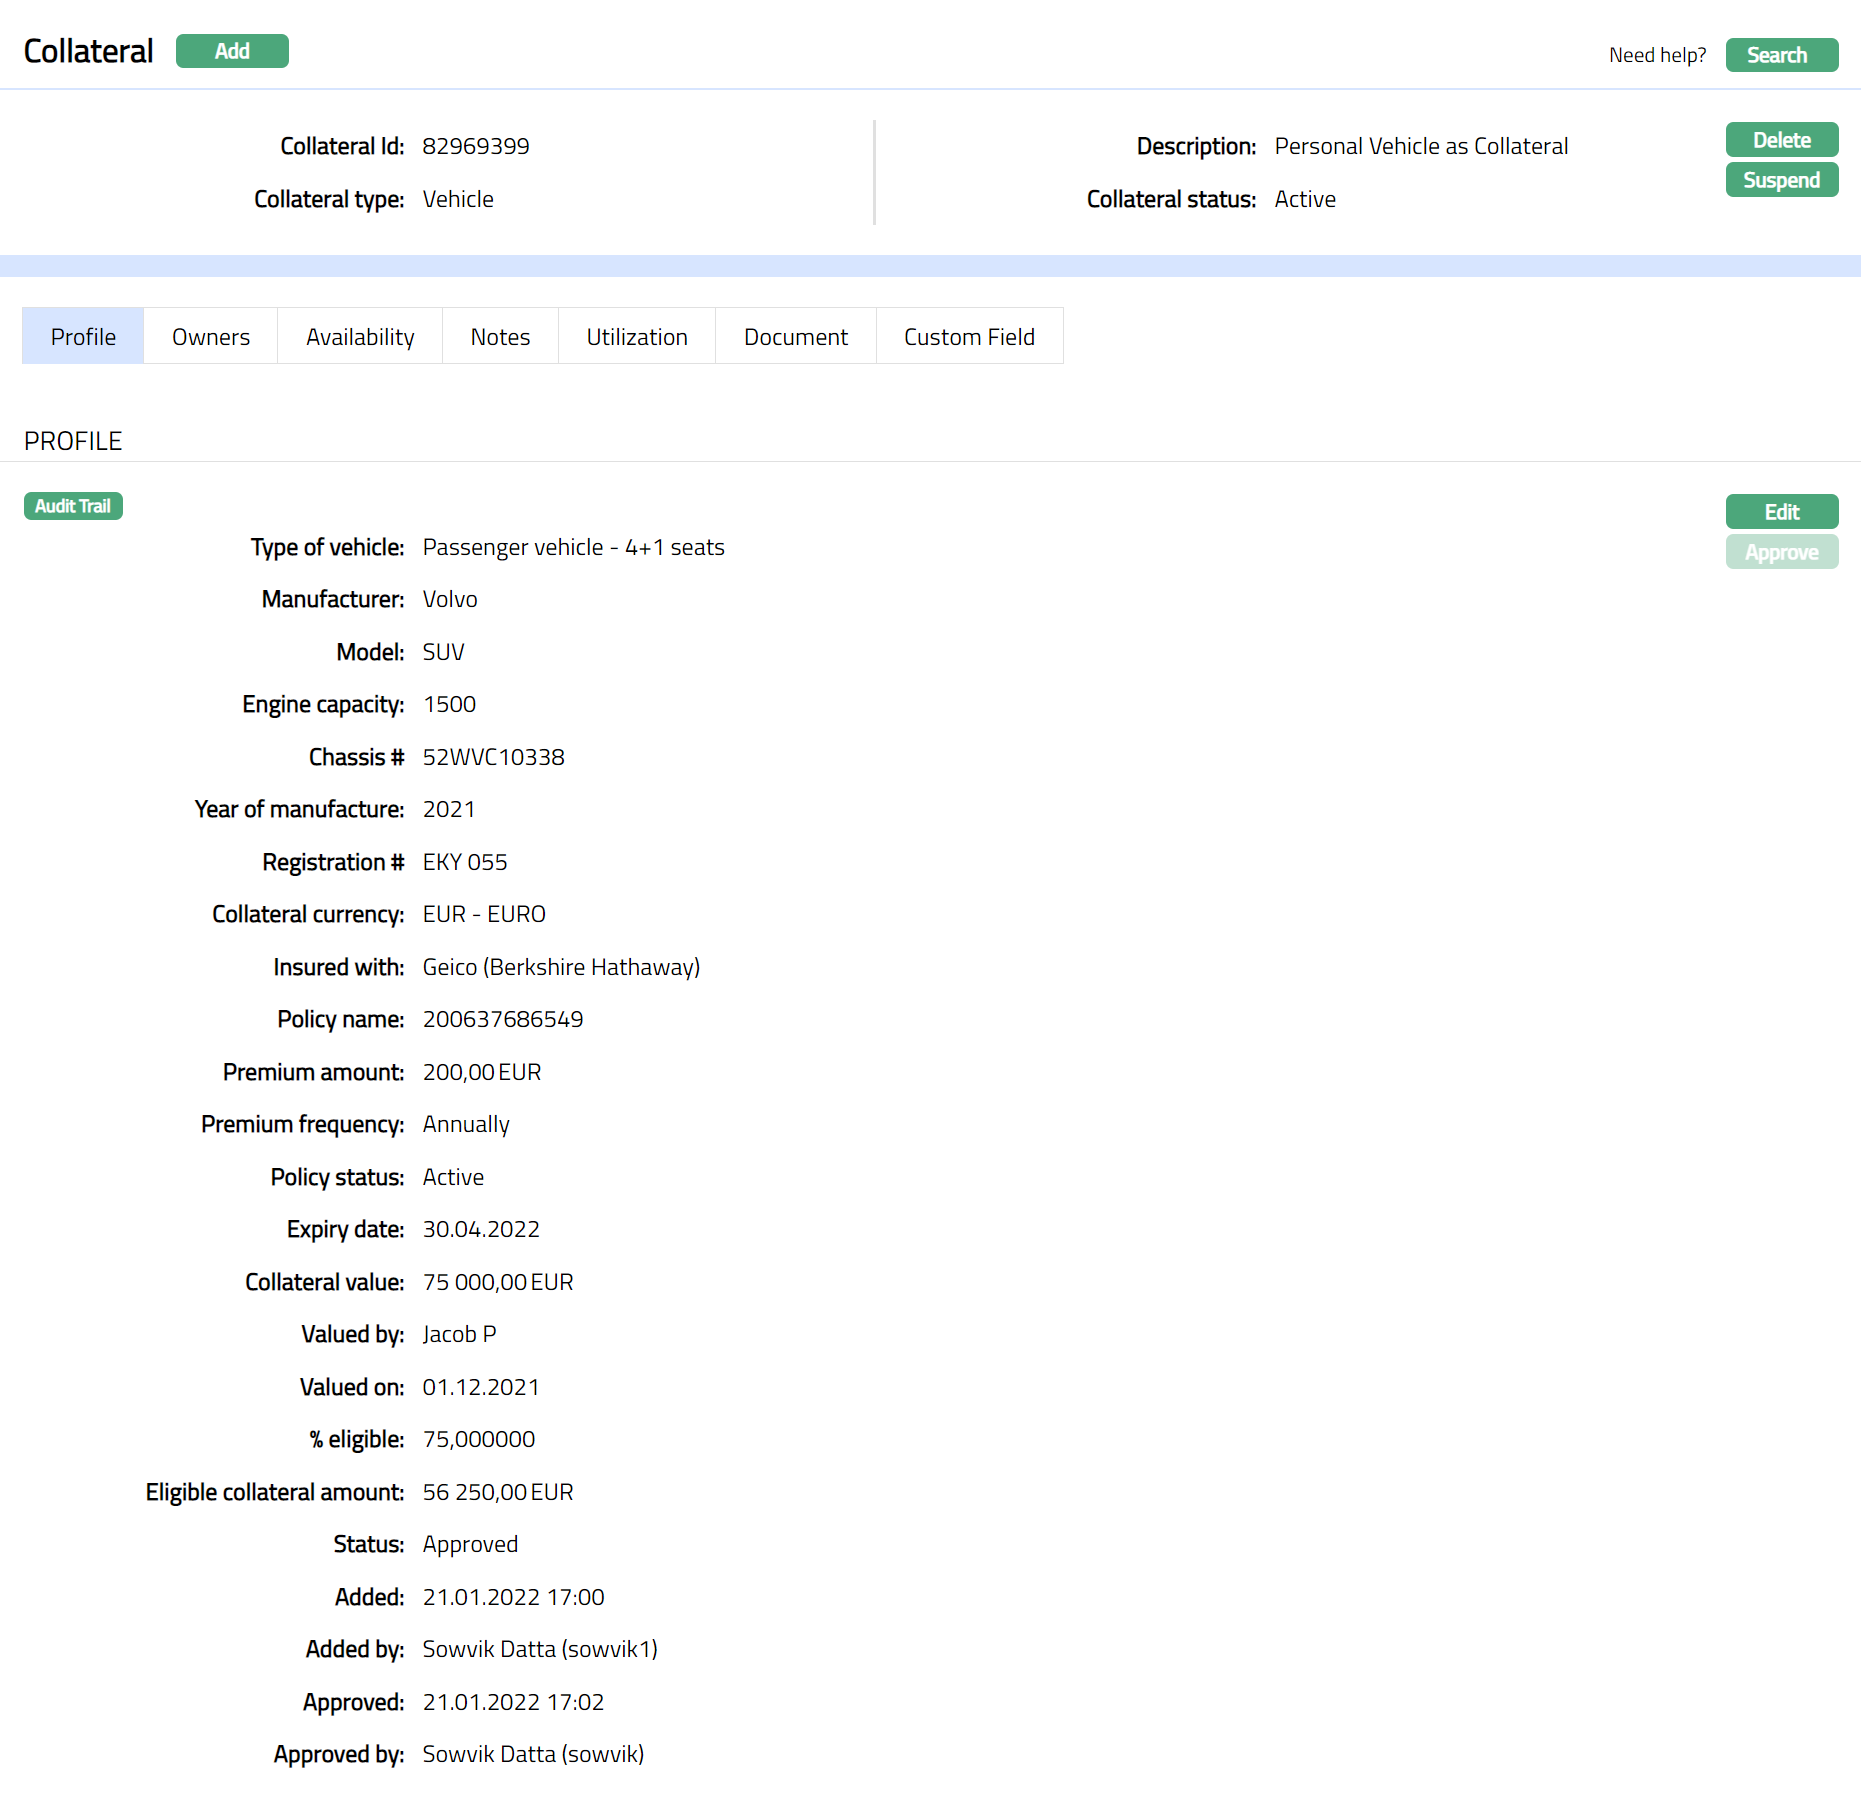
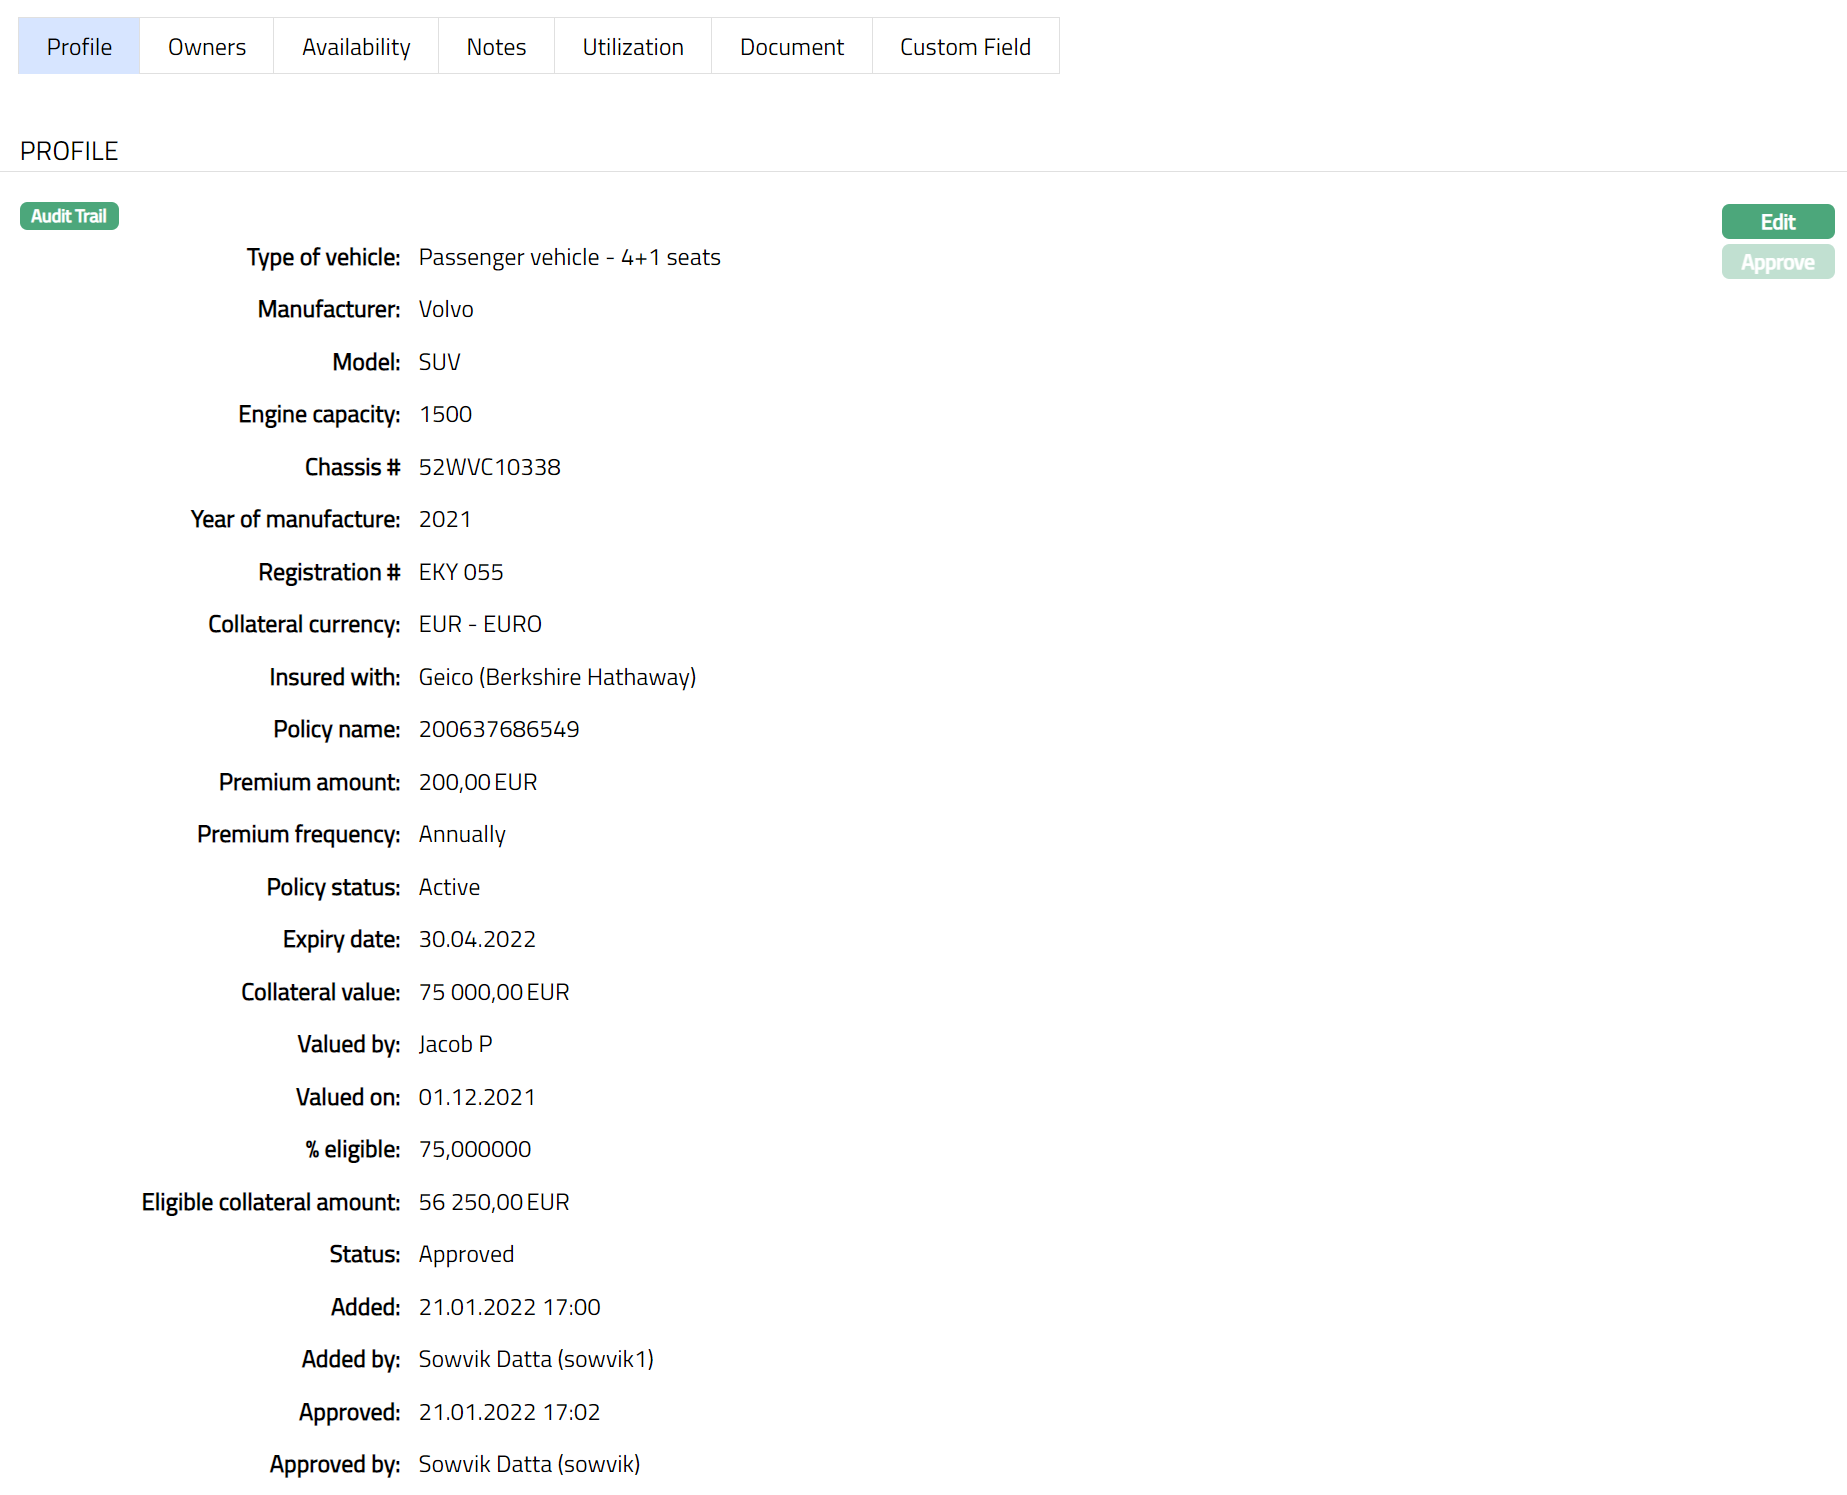
Profile
Profile tab displays the basic details of the Collateral entered during the creation of the Collateral.
To view / edit the Profile tab,
1. Access Collateral page. Click on the Profile tab to view the details as per sample below. The details are defaulted from the entries that you made during Collateral creation. For details refer to New Collateral → Vehicle (1/3).
2. Click Edit. Edit Collateral screen appears as shown below.
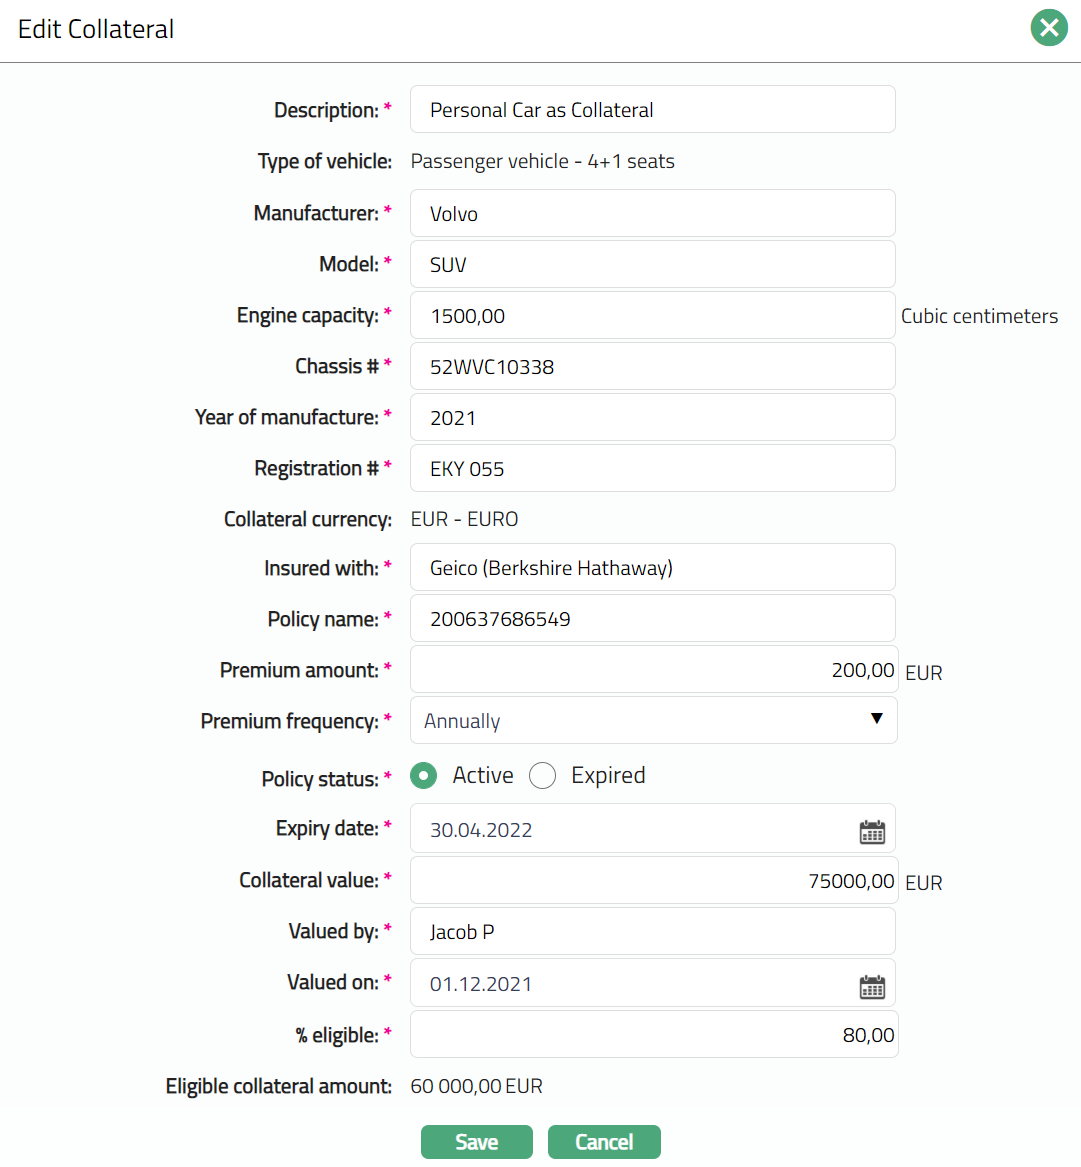
3. All fields except the Type of Vehicle, Collateral Currency and Eligible collateral amount fields are non-editable.
4. Enter the details as required in the editable fields.
5. Click Save to save the changes that you made.

Note: Any change in the tab will set the record status to Pending till it is approved by another user. On approval, the record status is set to Approved and the red bubble disappears.

Functions: Edit, Approve.
The additional fields that you can view in the Profile tab are explained below:
Status field denotes the status of the record.
Added field denotes the date on which the record was added.
Added by field denotes the name of the user who created the record.
Approved field denotes date on which the record was approved and is displayed only on approval.
Approved by field denotes name of the user who approved the record and is displayed only on approval.
This is similar to Owners tab under Collateral type Precious Metal. Please refer to Owners tab in Precious metal section for details.
This is similar to Availability tab under Collateral type Precious Metal. Please refer to Availability tab in Precious metal section for details.
This is similar to Notes tab under Collateral type Precious Metal. Please refer to Notes tab in Precious metal section for details.
[Utilization]
This is similar to Utilization tab under Collateral type Precious Metal. Please refer to Utilization tab in Precious metal section for details.
This is similar to Document tab under Collateral type Precious Metal. Please refer to Document tab in Precious metal section for details.
Custom Field
This is similar to Custom Field tab under Collateral type Precious Metal. Please refer to Custom Field tab under Precious metal section.