Agent
Agent is one who is authorized to act on another's behalf to perform a certain business. Using this functionality, you can maintain an Agent for multiple Outlets. Terminal and Agent users are linked to the Agent and Outlet; but an Agent without having an Outlet can be linked to Terminal and Agent Users.
Agent client type is different from maintained Outlet client type and linkage between Agent and Outlet does not depend on selected Client type.
Each Agent and Outlet will have Maximum Cash Pay In and Cash Displacement Threshold Agent provided by the bank.
Maximum cash pay in -- is the maximum limit of cash deposit to any Agent or Outlet.
Cash displacement threshold -- If any Agent or Outlet has more cash in pocket than the provided threshold; then cash above threshold is transferred into the bank account.
Based on the provided Cash pay in limit and Cash displacement limit, cash deposit is accepted. If there is more cash than given displacement limit, then cash which is more than displacement limit is transferred to bank account.
The following are the various tabs that appear on the Agent Maintenance page.
To add a new Agent
- From CRM menu, click Sales and then Agent. New Agent -- Profile (1/5) page appears.
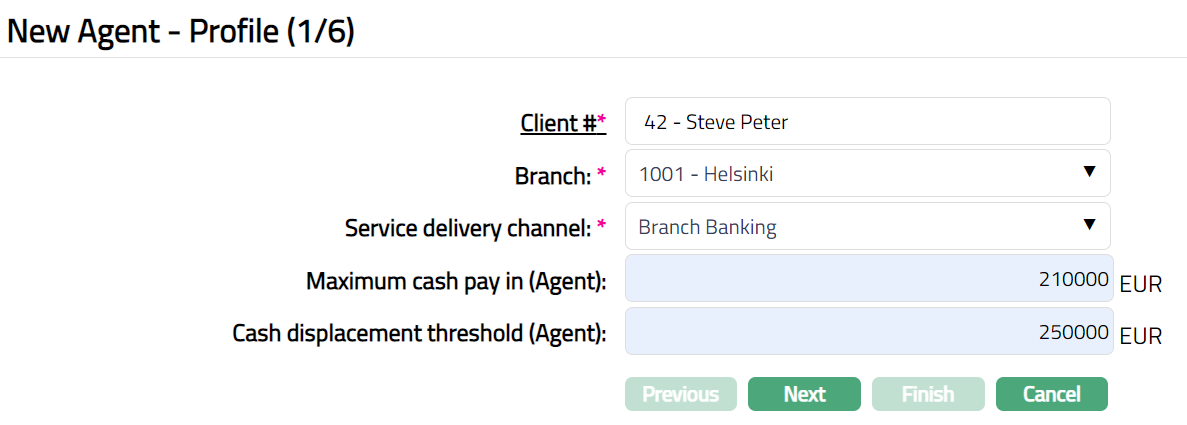
Enter Code for the Agent.
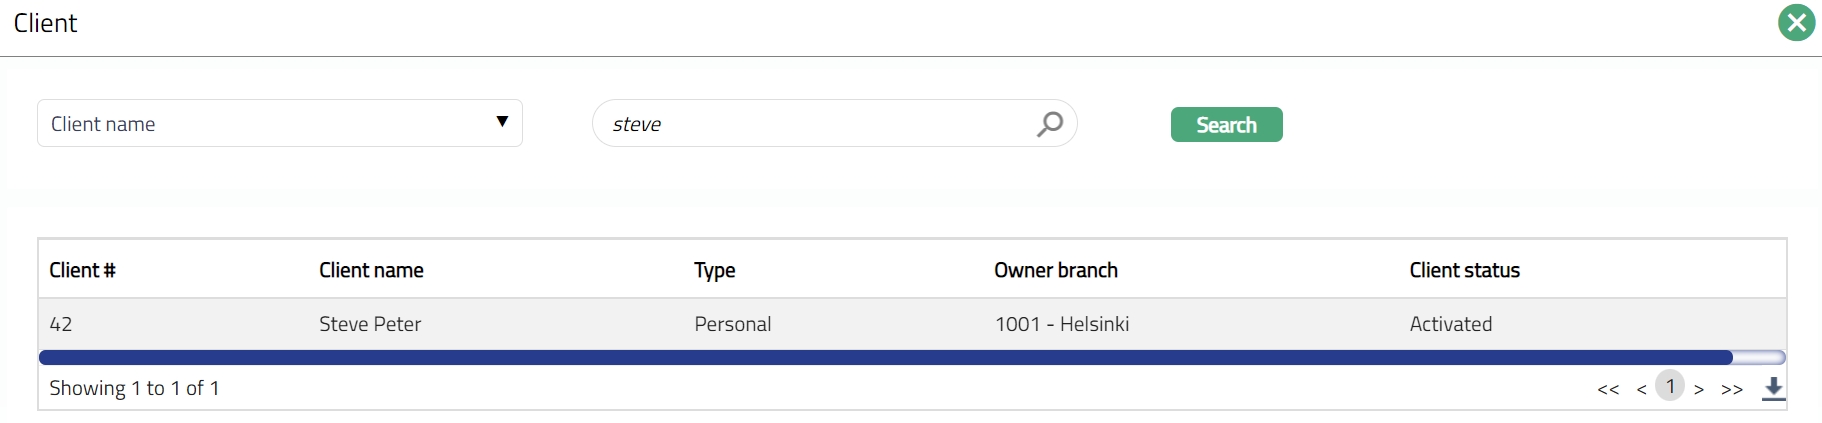
Select Client by clicking on client hyperlink. Client search page appears with the list of all types (Personal, Corporate and Joint) of clients; where you can search for a client with relevant criteria and select the required client. You can also input the client's name and select the required client from the list displayed by Aura. Based on criteria, Aura will display the list of all the clients maintained under CRM > Client > Maintain.
Select Branch for the Agent from the drop-down list of options maintained under Admin > Branches > Maintain.
Select Service delivery channel from the drop-down list of options maintained under Admin > System codes > Categories > Service delivery channel. Service delivery channel is the mode through which the customers interact with the bank and by which the bank delivers its products and services to customers.
Enter Maximum cash pay in (Agent). It is the maximum limit for cash deposit for an Agent or Outlet.
Enter Cash displacement threshold (Agent). If any Agent or Outlet has more cash in pocket than the provided threshold; then cash above threshold is transferred into bank account.
Click Next. New Agent Terminal (2/5) page appears.
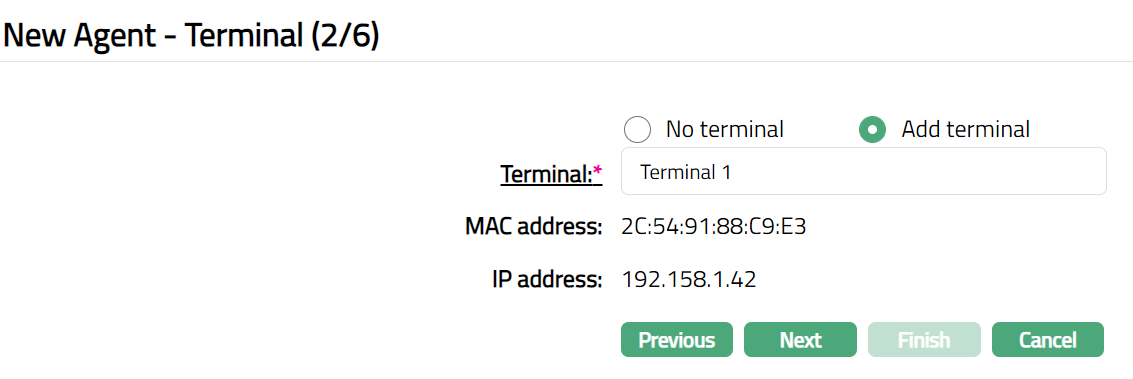
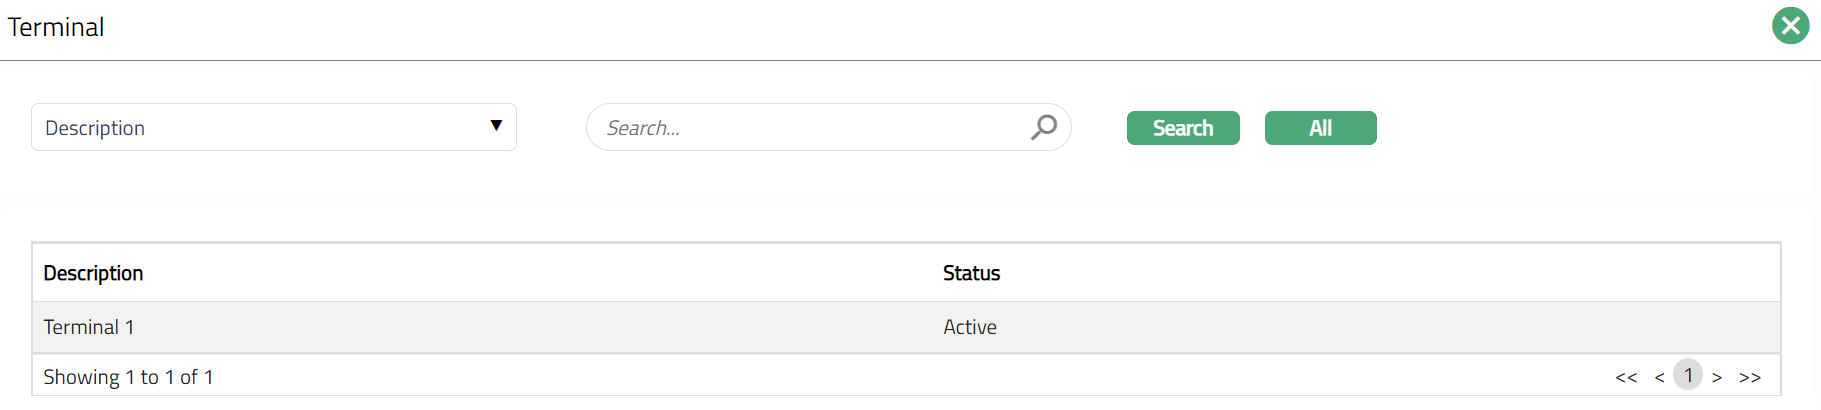
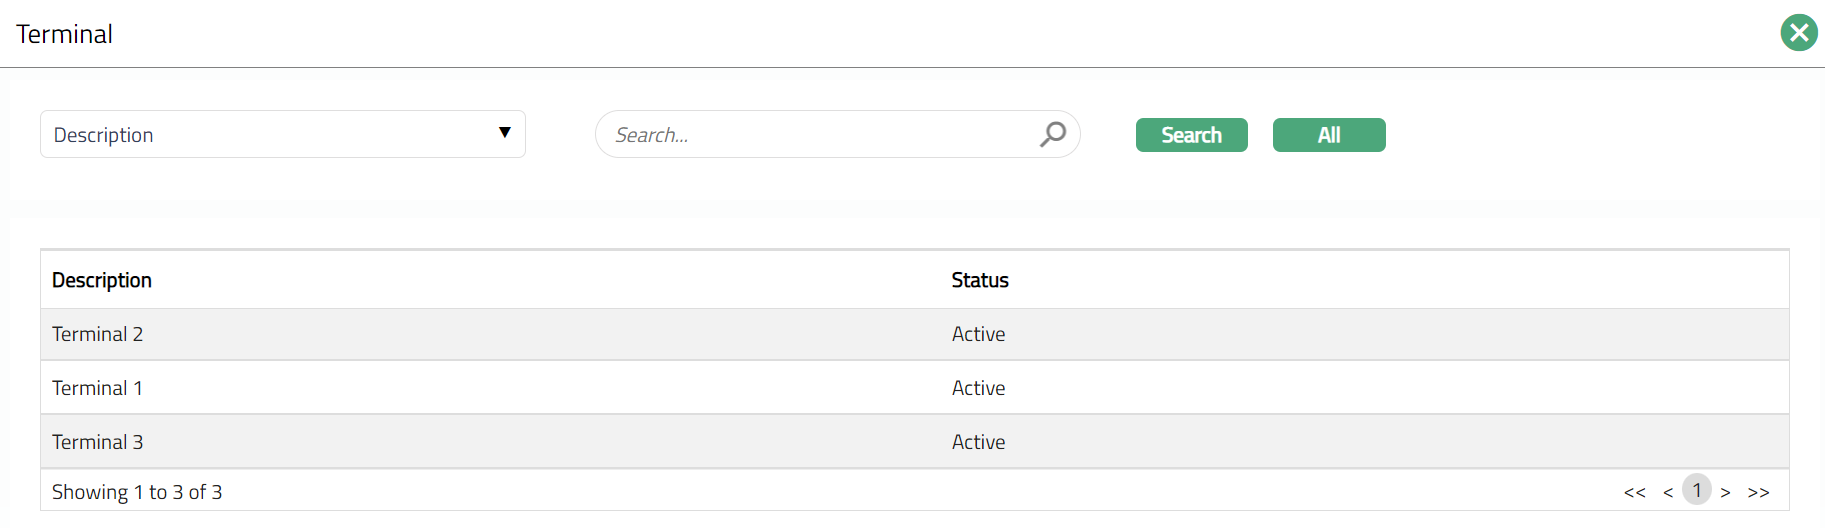
- Select No terminal or Add Terminal option. By default, No terminal option is chosen. If Add terminal option is chosen, then Terminal hyperlink field is enabled. On click of the hyperlink, all the active and unmapped Terminals are displayed in the list. Select the required Terminal.
Aura by default will display the above mapped terminal MAC (Media Access Control) address.
Aura by default will display the mapped Terminal IP (Internet Protocol) address.
Click Next. New Agent -- Agent User (3/5) page appears.
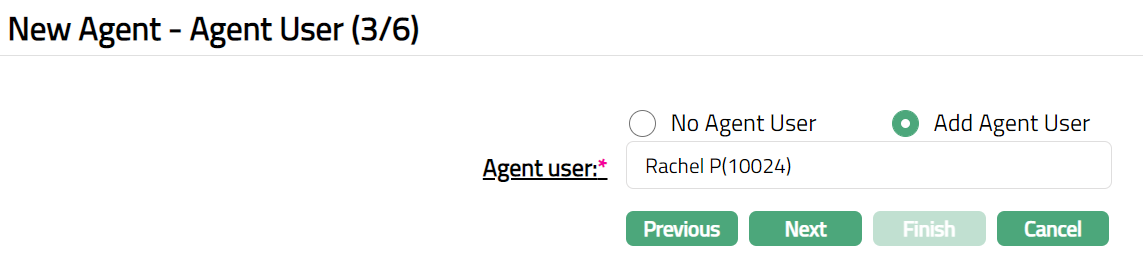
Select No Agent User or Add Agent User option. By default, No Agent User option is chosen.
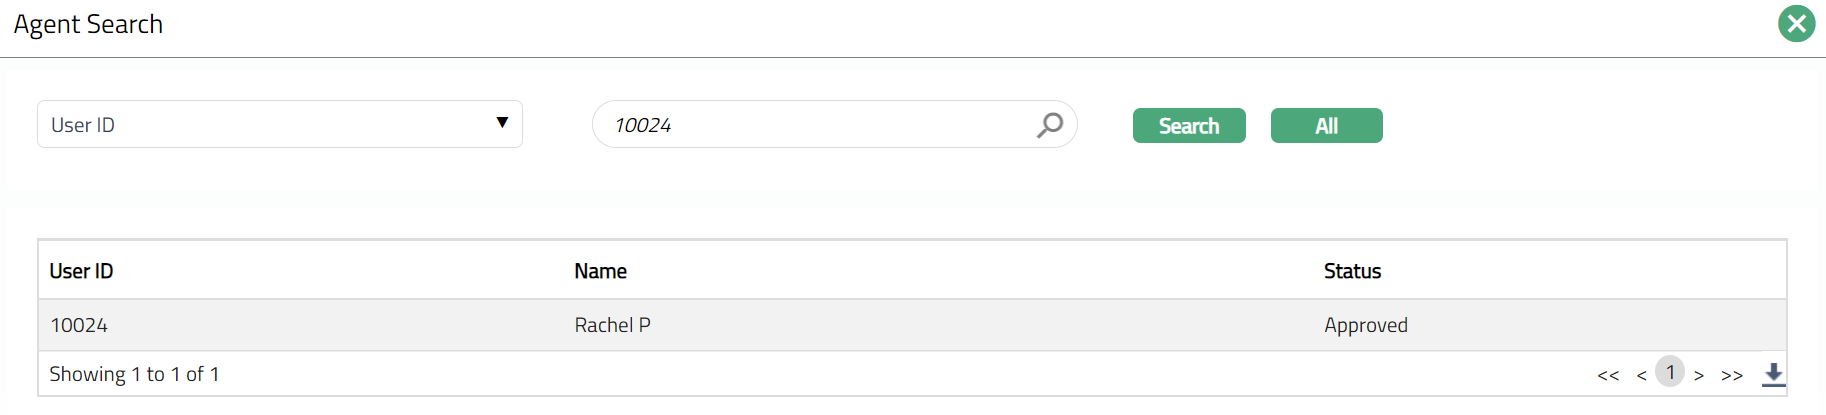
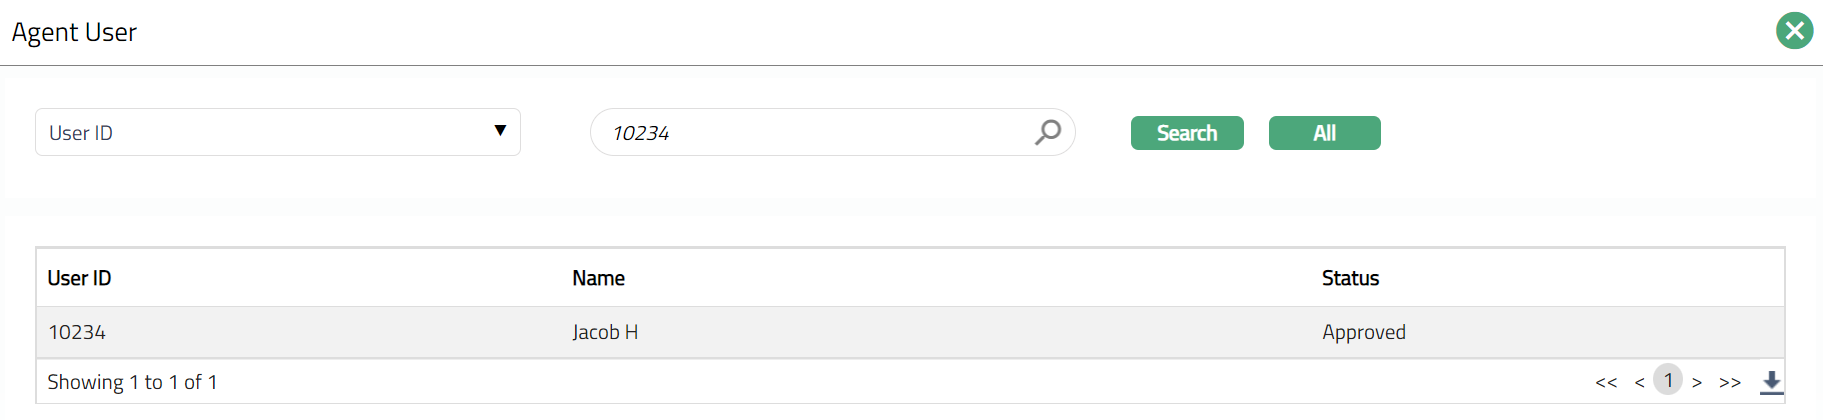
If Add Agent User option is chosen, then Agent user hyperlink is enabled. On click of the hyperlink, all the active and unmapped Agent users maintained under CRM > Sales > Agent user is displayed in the list. Select the required Agent user.
- Click Next. New Agent -- Charge (4/5) page appears.

Select Transaction fee from the drop-down list of options maintained under Admin > Pricing > Charges > Charge Schemes. Aura will display all the event based flat/banded charges, where Treat as receivable is No. If banded charge is attached, transaction amount will be the basis for charge calculation. Based on each transaction, transaction fee is collected for each transaction.
Click Next. New Agent -- Confirmation (5/5) page appears.

- Click Next. Agent page appears displaying the Profile tab by default.
Functions: Add, Delete, Search, Edit, Approve

Note: The Agent Maintenance status is Opened, and the record status is Pending. Unless the Agent Maintenance Status is Activated and record status is Approved, this Agent will not be available for use elsewhere in Aura.
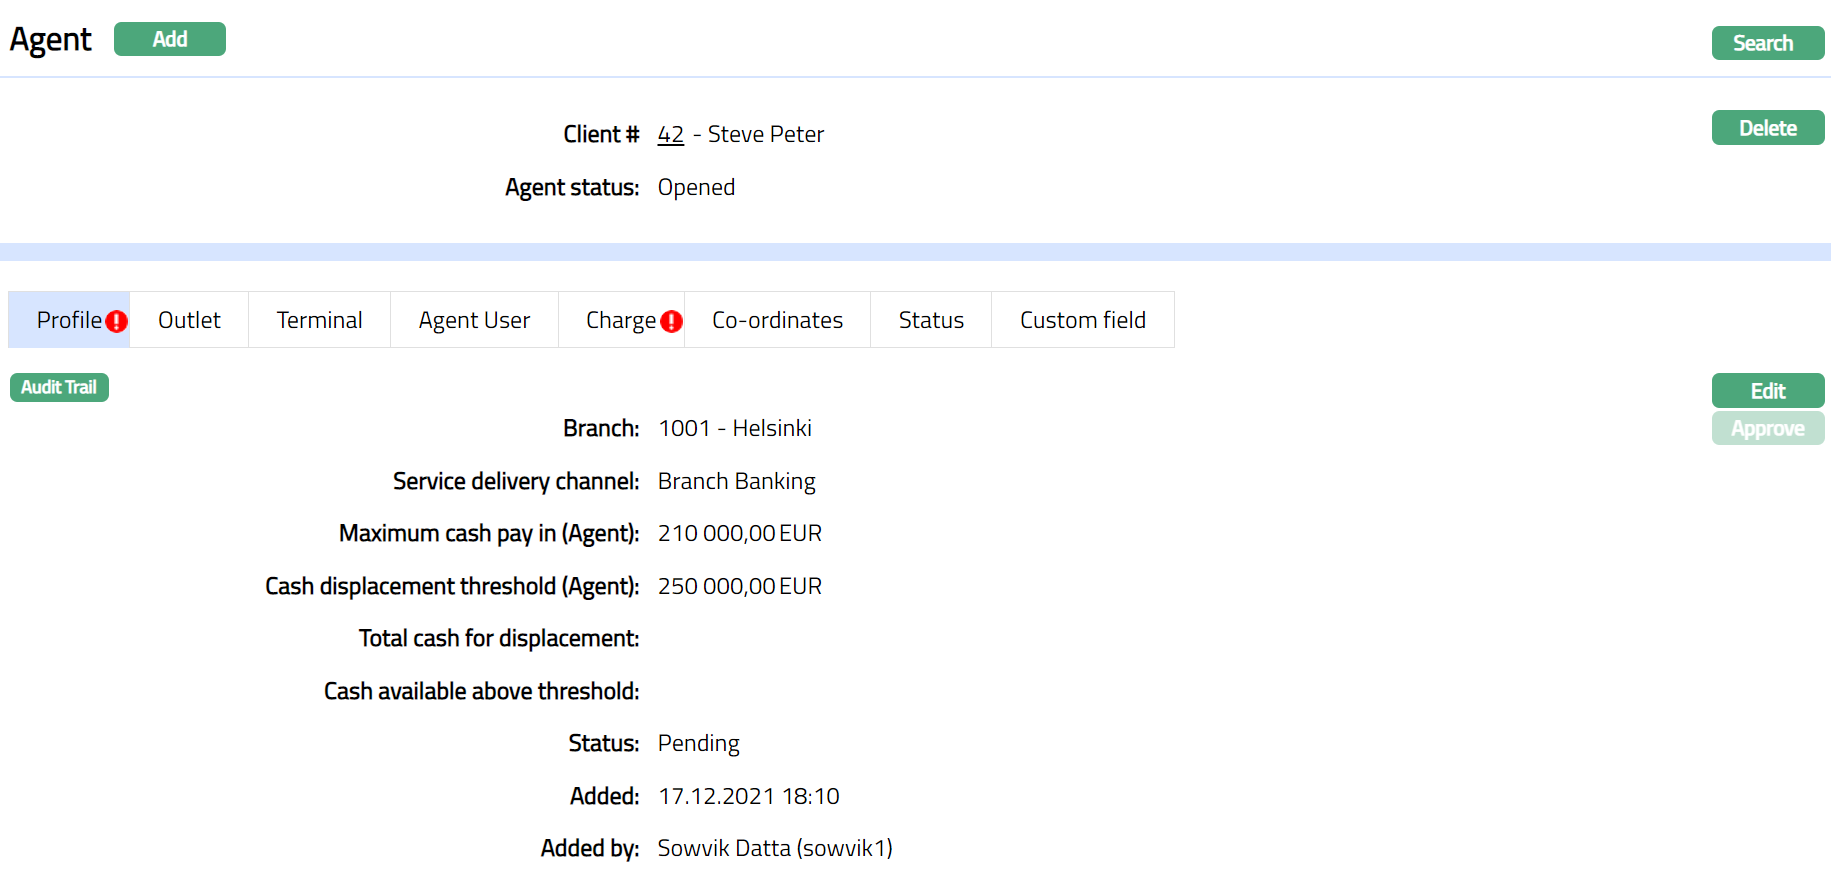
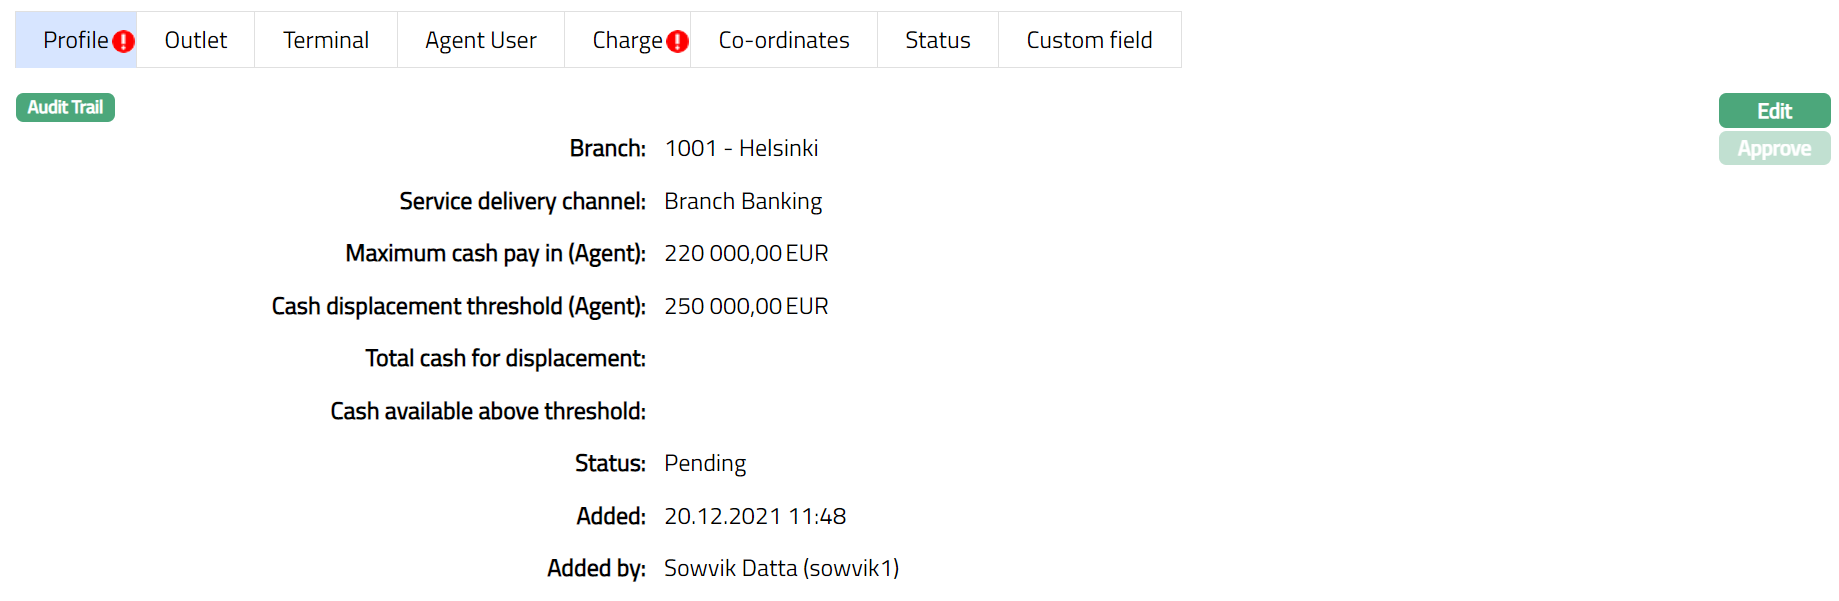
Profile
Profile tab, which is the default tab in the Agent Maintenance screen, shows the basic details of the Agent.
To view/edit Agent Profile
- Access Agent Maintenance page and click Profile tab.

The additional fields are as follows:
Total cash for displacement: It displays the amount that the Agent will have after all the deposits and withdrawal.
Cash available above threshold: Aura calculates Cash available above threshold as Total cash for displacement minus Cash displacement threshold (Agent). If the amount displayed is a positive value, then the Agent record on search screen will appear in red color.
Status field displays the status of the Profile tab.
Added field displays the date on which the record was added.
Added by field displays the name of the user who created the record.
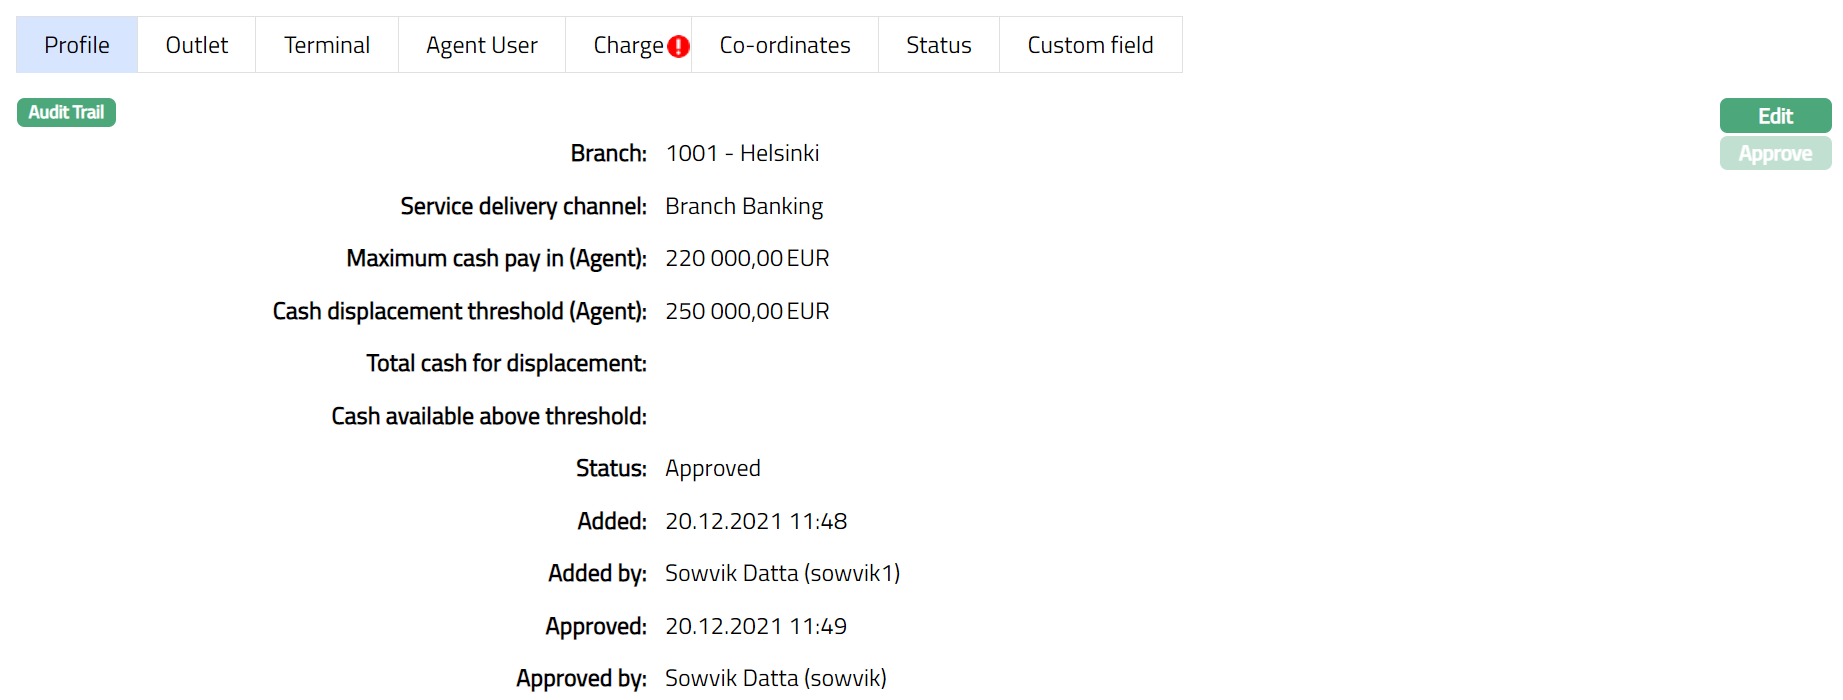
Approved field displays date on which the record was approved and is displayed only for approved records.
Approved by field displays name of the user who approved the record and is displayed only for approved records.
- Click Edit. Edit Profile page appears.
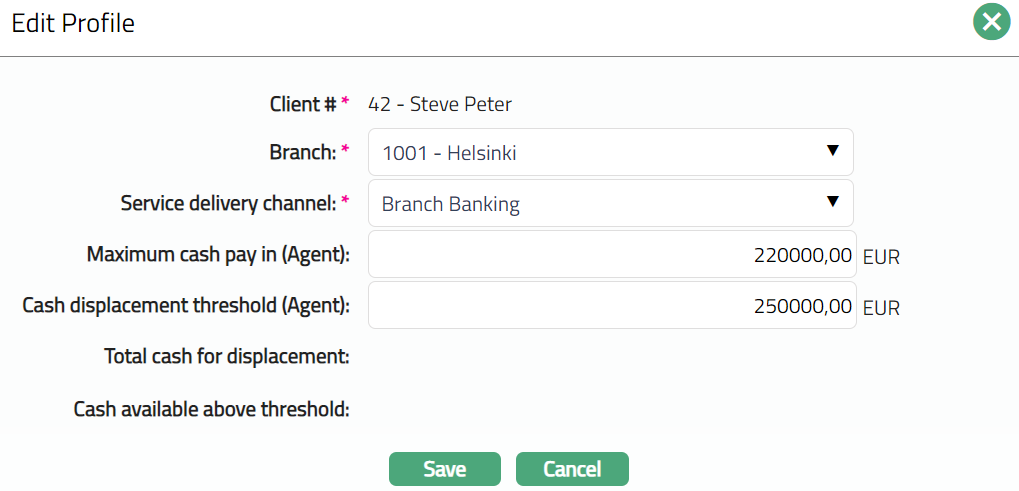
Note: Except Client #, Total cash for displacement, Cash available above threshold, all other fields are editable.
- Make required changes and click Save. Agent page appears with the updated details and the Status field will display as Pending. Once approved by the authorised person then the status files will display as Approved.
 Functions: Edit, Approve.
Outlet
On creation of any Agent record, Outlet tab appears as blank. Only when an outlet is mapped to an Agent, the linked Outlet details appear. On suspension of any Agent at Outlet level, mapping between Agent and Outlet is removed and Outlet details is not displayed under Agent > Outlet Tab.
If the Outlet crosses the Cash displacement limit at Outlet level, then the Outlet record will appear in red color in the grid.
To view Outlet
- Access Agent Maintain page and click Outlet tab. Outlet tab will appear as blank.

- Once Outlet is mapped to the Agent, the linked Outlet details appear. A sample given below.
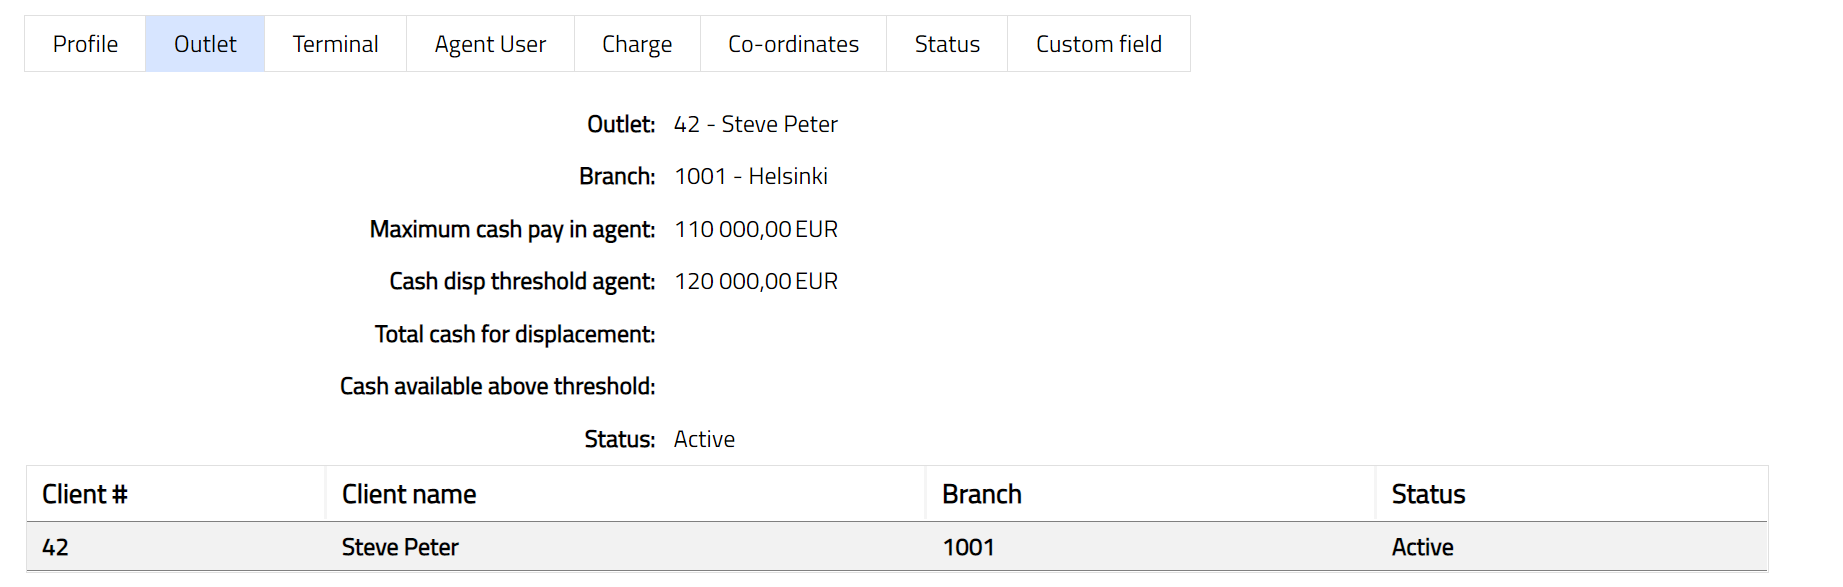
Outlet displays the client maintained for the Outlet.
Branch displays the branch maintained for the Outlet.
Maximum cash pay in agent displays the maximum cash pay in limit maintained for the Outlet.
Cash disp threshold agent displays the cash displacement threshold maintained for the Outlet.
Status displays the status of the mapped Outlet.
Terminal
Terminal tab allows you to View, Add and Suspend the Terminal record. On suspension of any Terminal at Agent Level; the selected Terminal is not suspended at Terminal level. Only the Terminal mapped to the Agent is removed.
To add a terminal
- Access Agent page and click Terminal tab. The values are defaulted from New Agent Terminal (2/5); if Add Terminal option is chosen.
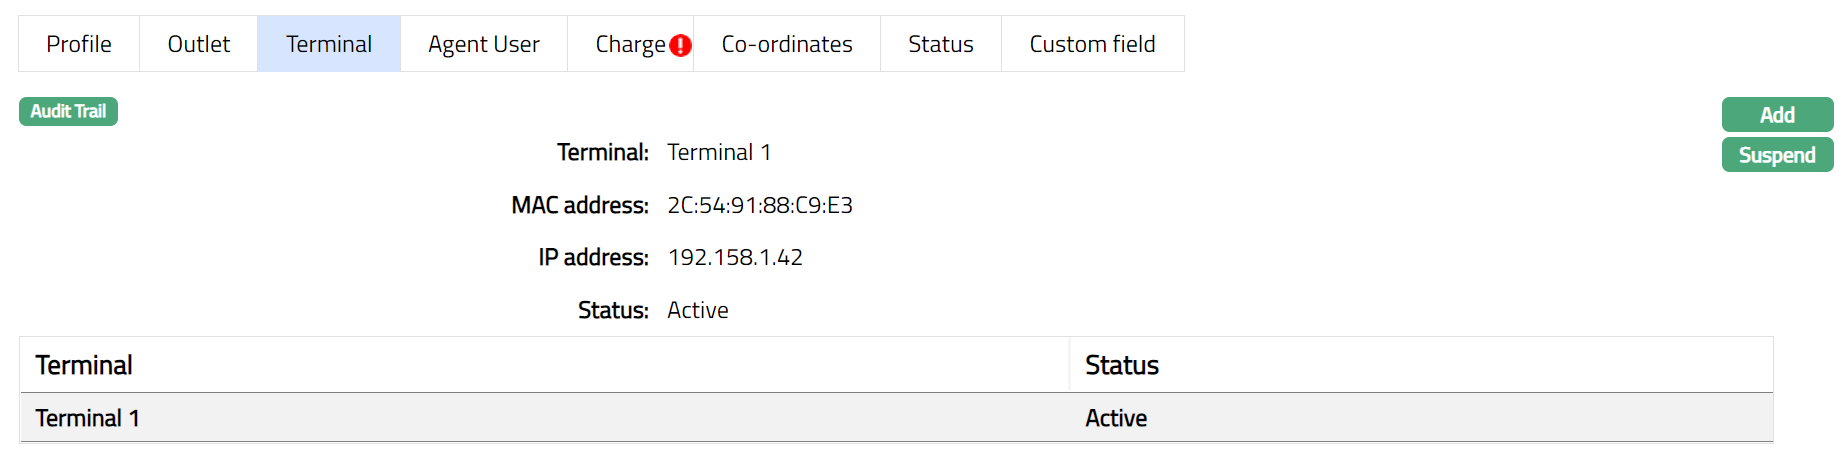
Terminal options display the mapped Terminal id.
MAC address displays the Media Access Control address of the Terminal linked to the Agent
IP address displays the Internet Protocol address of the Terminal linked to the Agent.
Status displays the Status of the Terminal linked to the Agent.
- Click Add. Add Terminal page appears.

- Click Terminal hyperlink to add a Terminal. Aura will display all the maintained active and unmapped Terminal.
By default, the selected Terminal MAC address is displayed.
By default, the selected Terminal IP address is displayed.
Click Save. Terminal page appears with the added details.
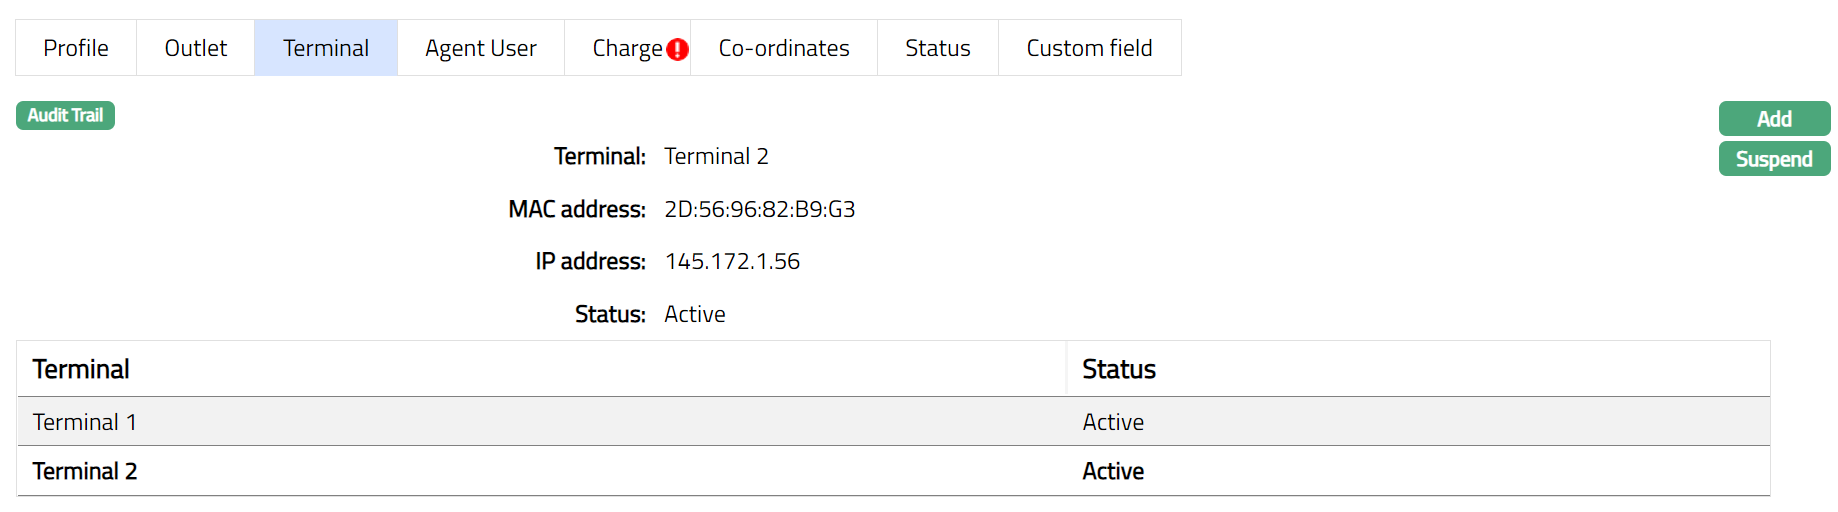
Functions: Add, Suspend.
Agent User
The Agent User tab allows you to View, Add and Suspend the Agent User details. The details are defaulted from New Agent -- Agent User (3/5). Agent user can be suspended only at Agent and Outlet level. On suspension of an Agent User at Agent level, mapped Agent User to an Agent is removed but the Agent User is made available for new mappings.
To add Agent User
- To access Agent page and click Agent User tab.

Agent user page displays the Agent user which is added in New Agent -- Agent User (3/5).
Status displays the status of the Agent user.
- Click Add. Add Agent User page appears.

- If you want to add an Agent User, then click Agent user hyperlink. On click of the hyperlink, all the active and unmapped Agent users maintained under CRM > Sales > Agent user is displayed in the list. Select the required Agent user.
- Click Save. Agent page appears with the added details.
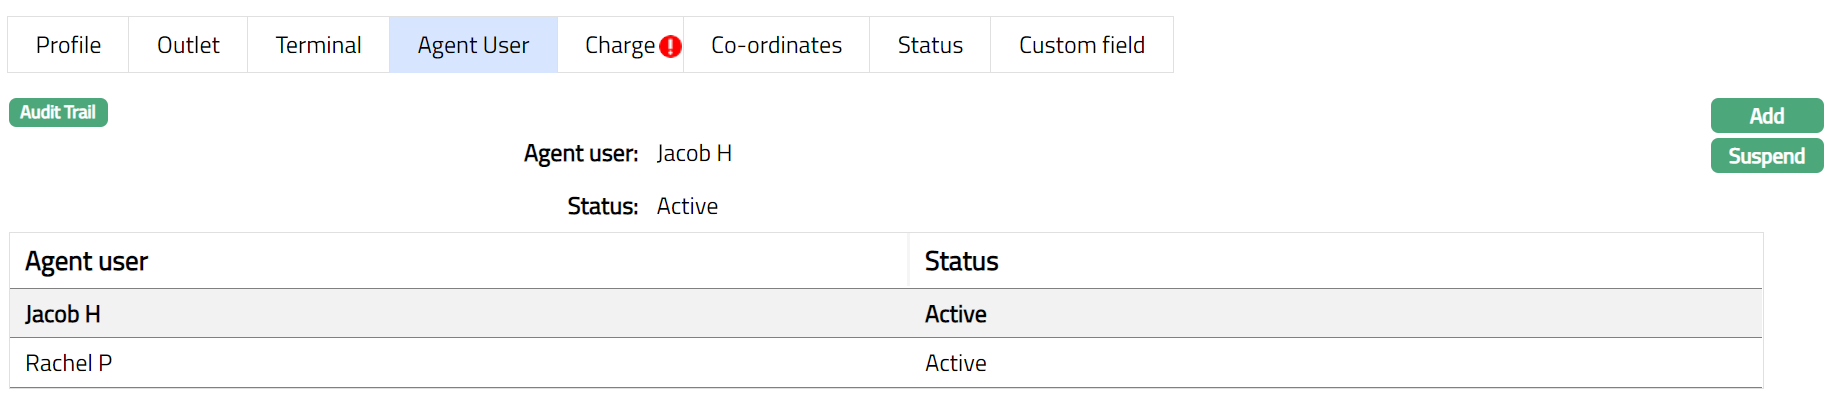
Functions: Add, Suspend.
Suspend: You can suspend the Agent user by clicking on Suspend button. When you click on Suspend button, Aura displays an alert message. On confirmation Aura will suspend the Agent user. Once the Agent user is suspended, mapped Agent User to an Agent is removed but the Agent User is made available for new mappings
Charges
Using this tab, you can view the default charges and additional charges of the Agent record. It has two sub-tabs, one for each of these.
The sub tabs available in the Charge tab are as follows:
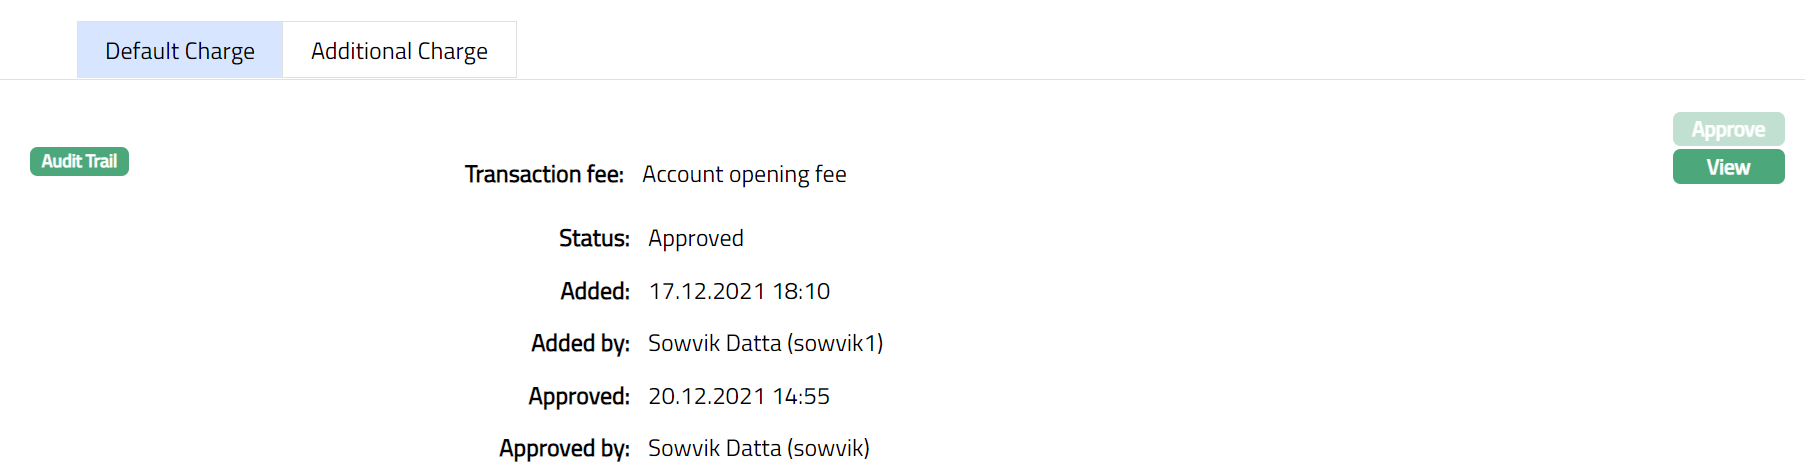
Default Charge
The Default Charges tab allows you to view and maintain the details of different charges applicable for the Agent.
To view/edit the default charges
- Access Agent page. Click Charge tab to view the details as per sample below. Default Charges are displayed by default. The Status field will display as pending. Once Approved by the authorized person the Status filed changed to Approved and the red bubble will disappear.
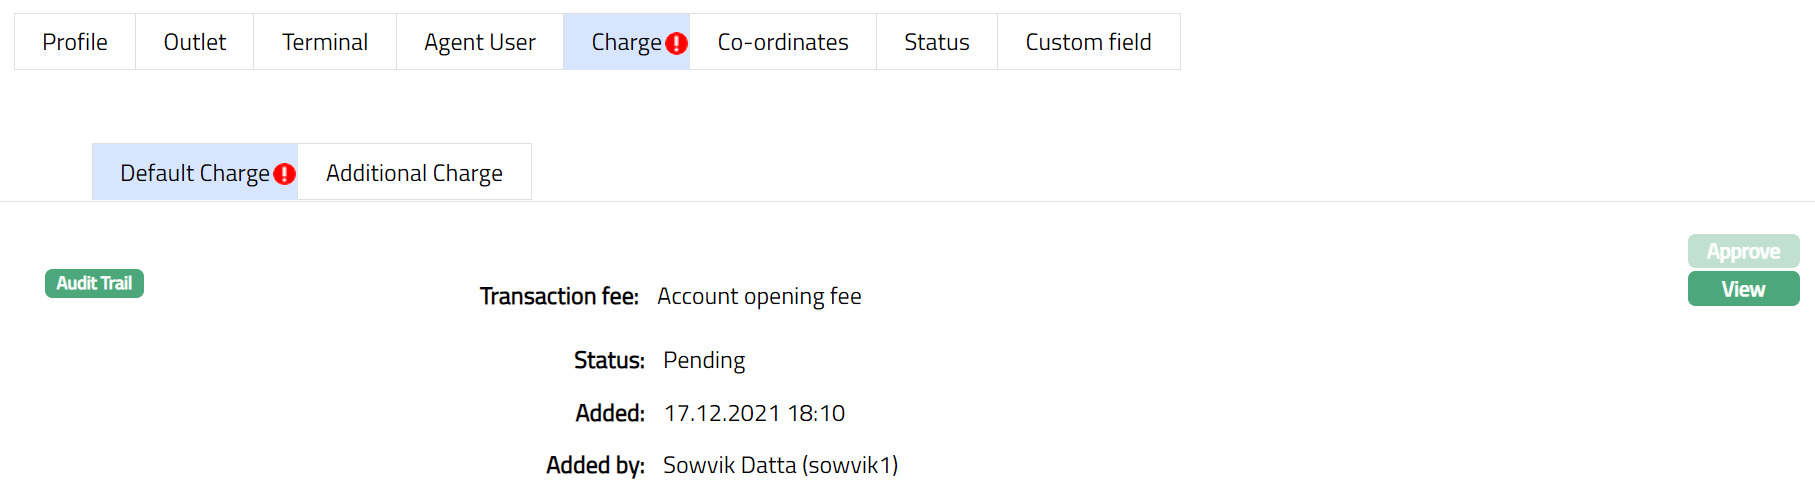
The following fields are shown only in the View screen and are not editable:
Transaction fee field denotes the name of the additional charge.
Status field denotes the status of the tab.
Added field denotes the date on which the record was added.
Added by field denotes the name of the user who created the record.
Approved field denotes date on which the record was approved and is displayed only for approved records.
Approved by field denotes name of the user who approved the record and is displayed only for approved records.
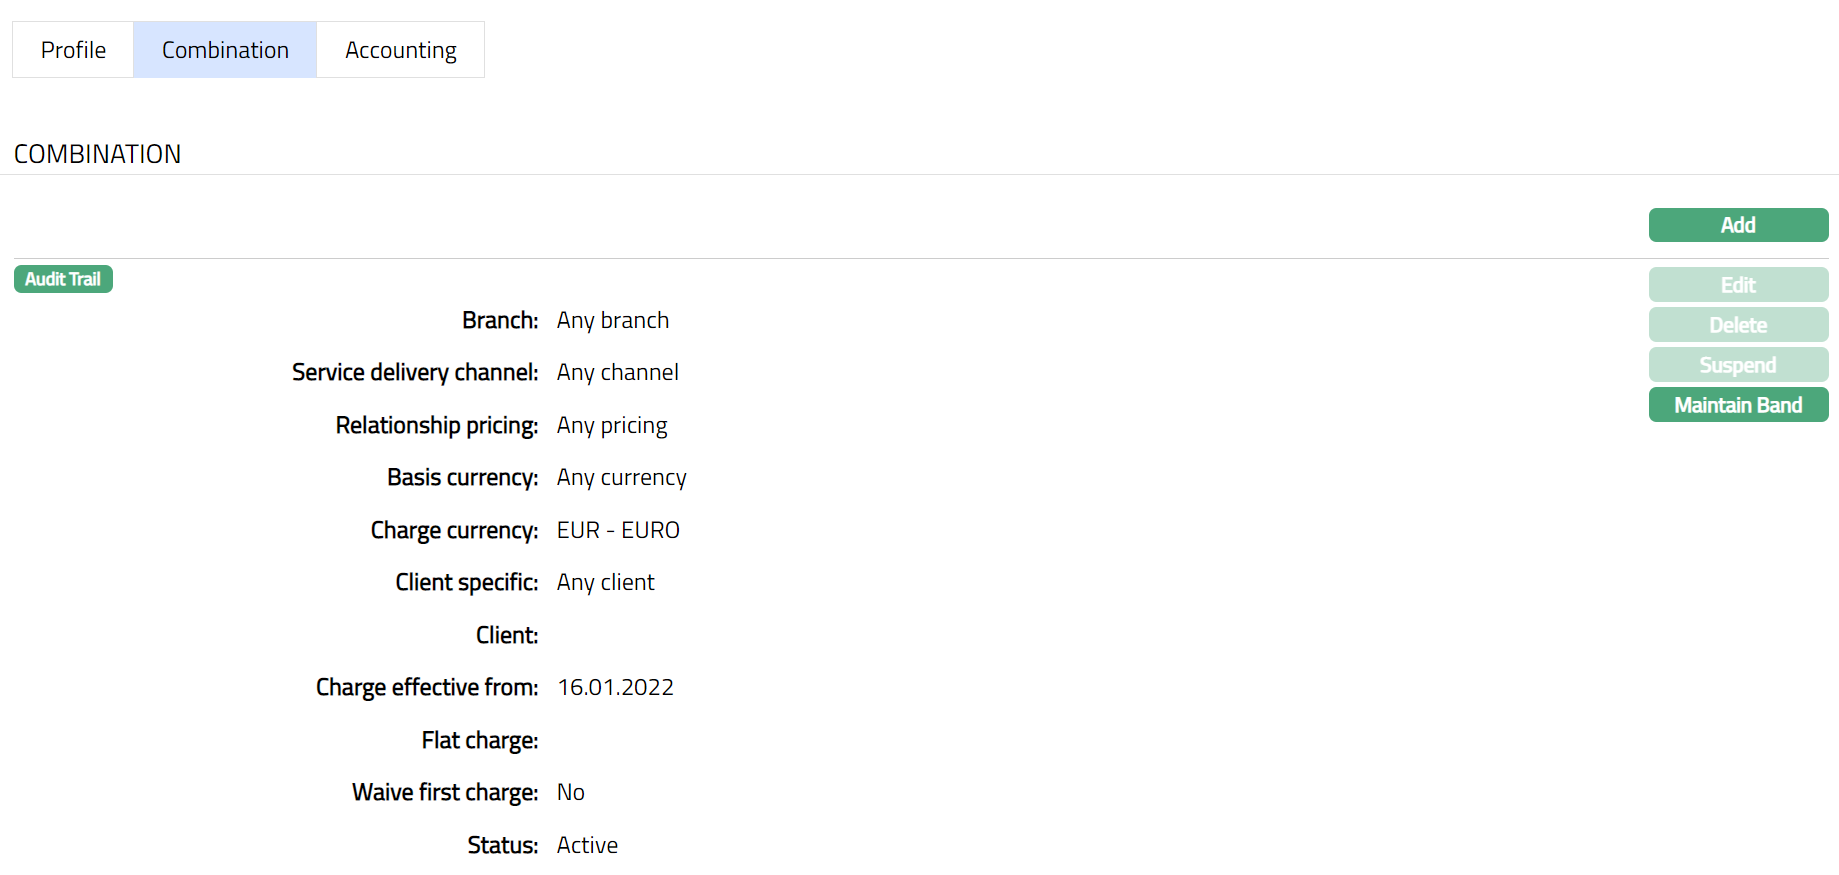
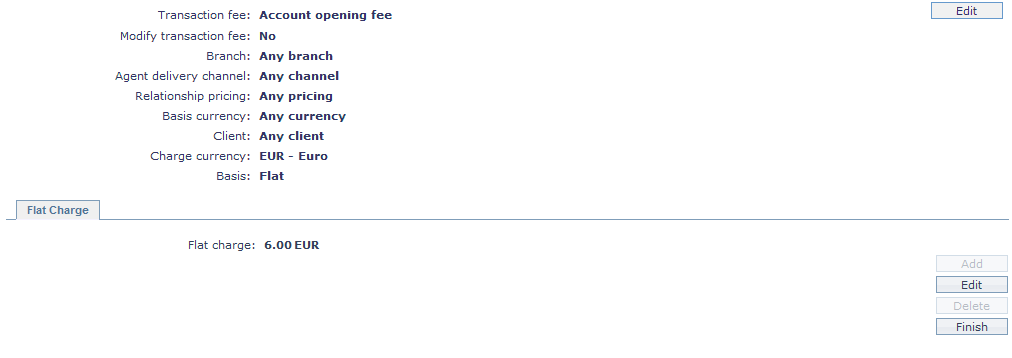
- Click View against each default charges to see the charge details and other parameters for the Charge. The details of the band of an attached charge Scheme is also displayed. The sample of the page is shown below.

- If the charge is Flat
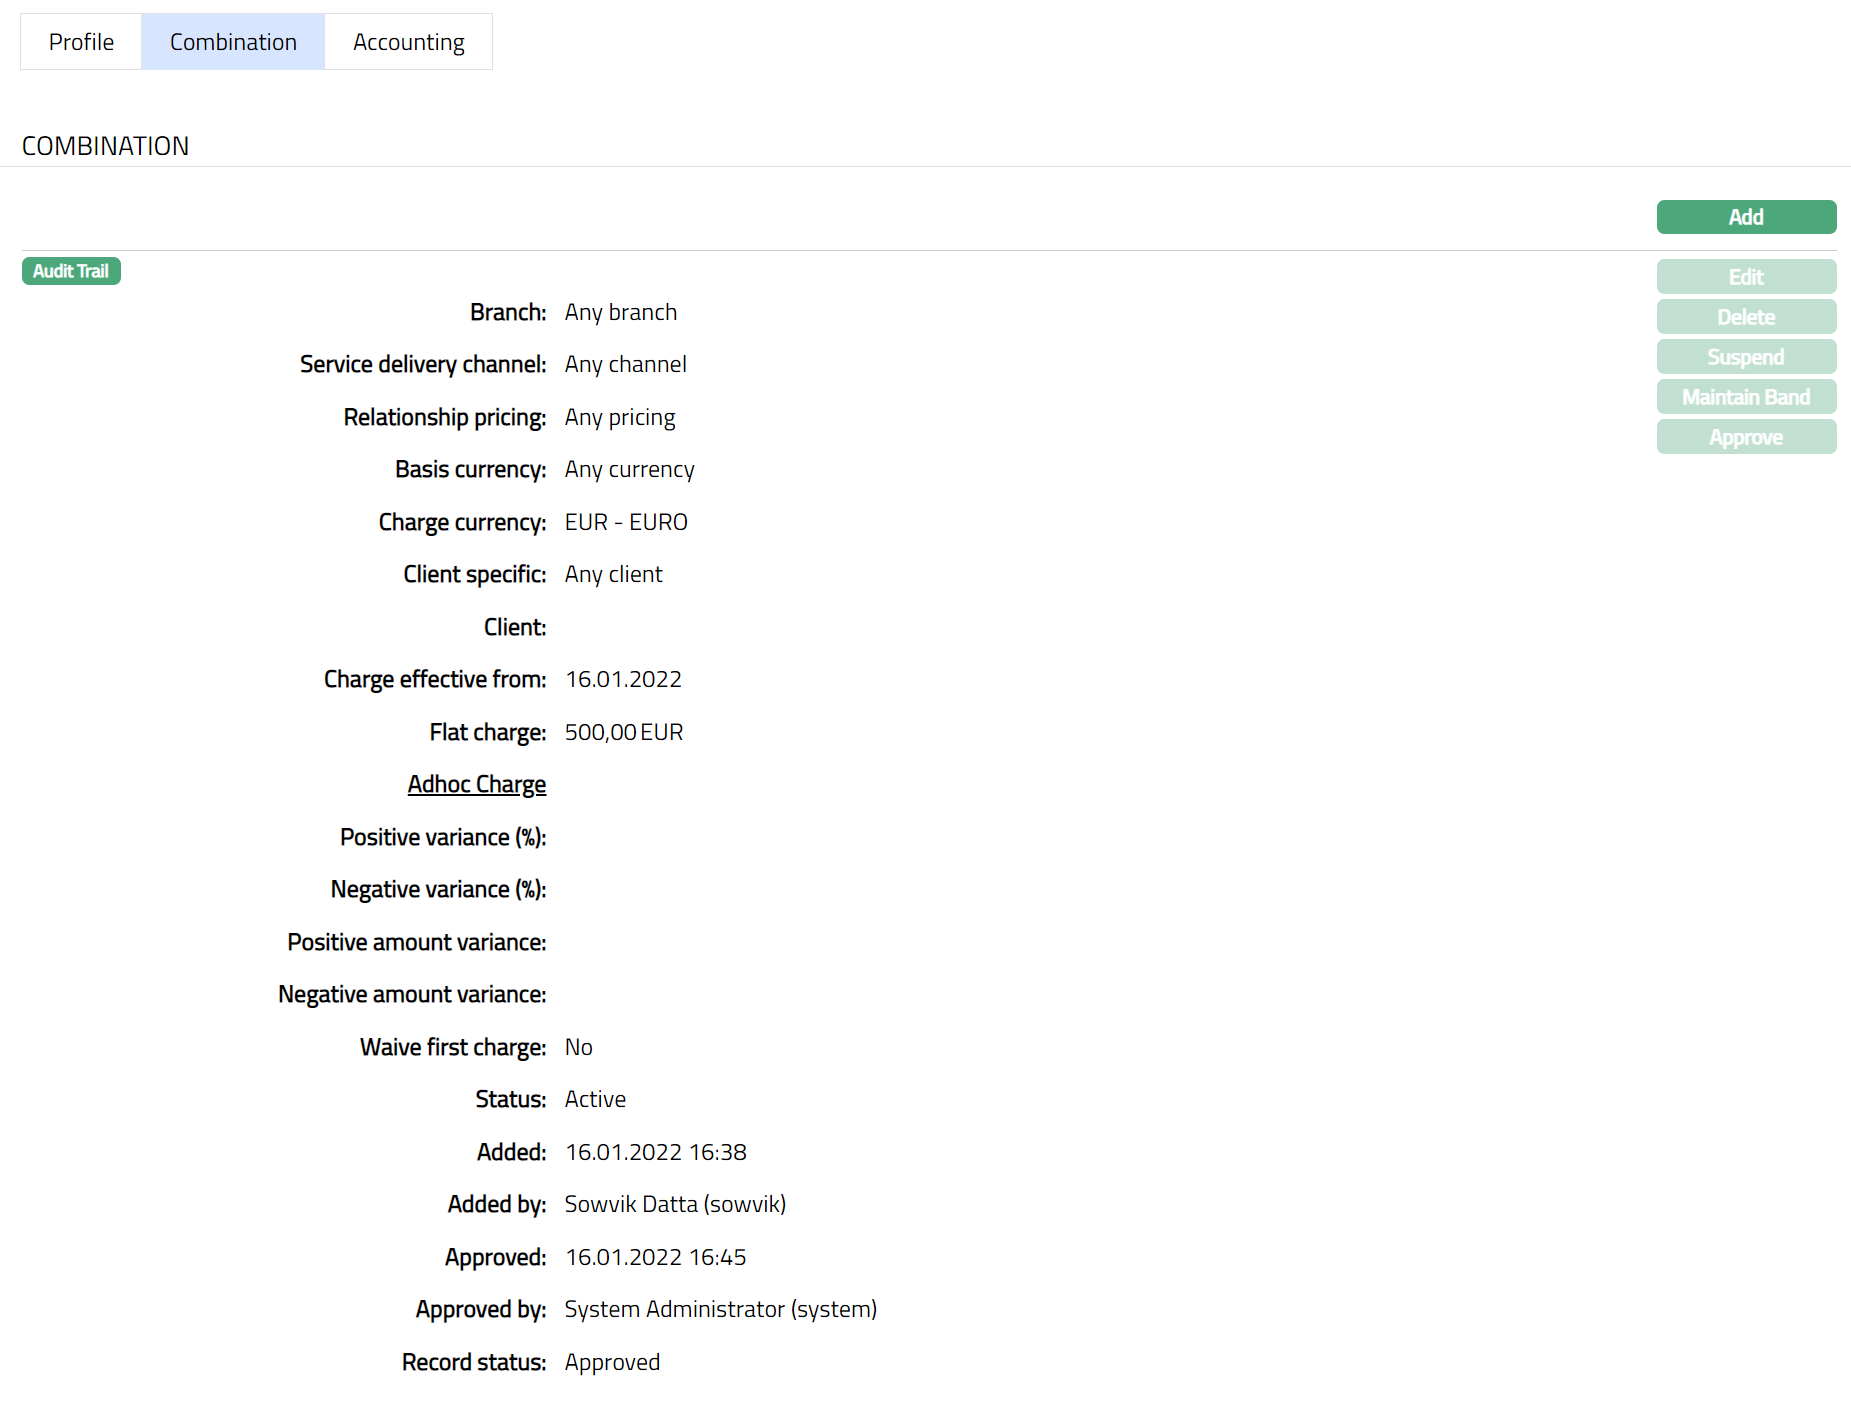
- If the Charge is Banded
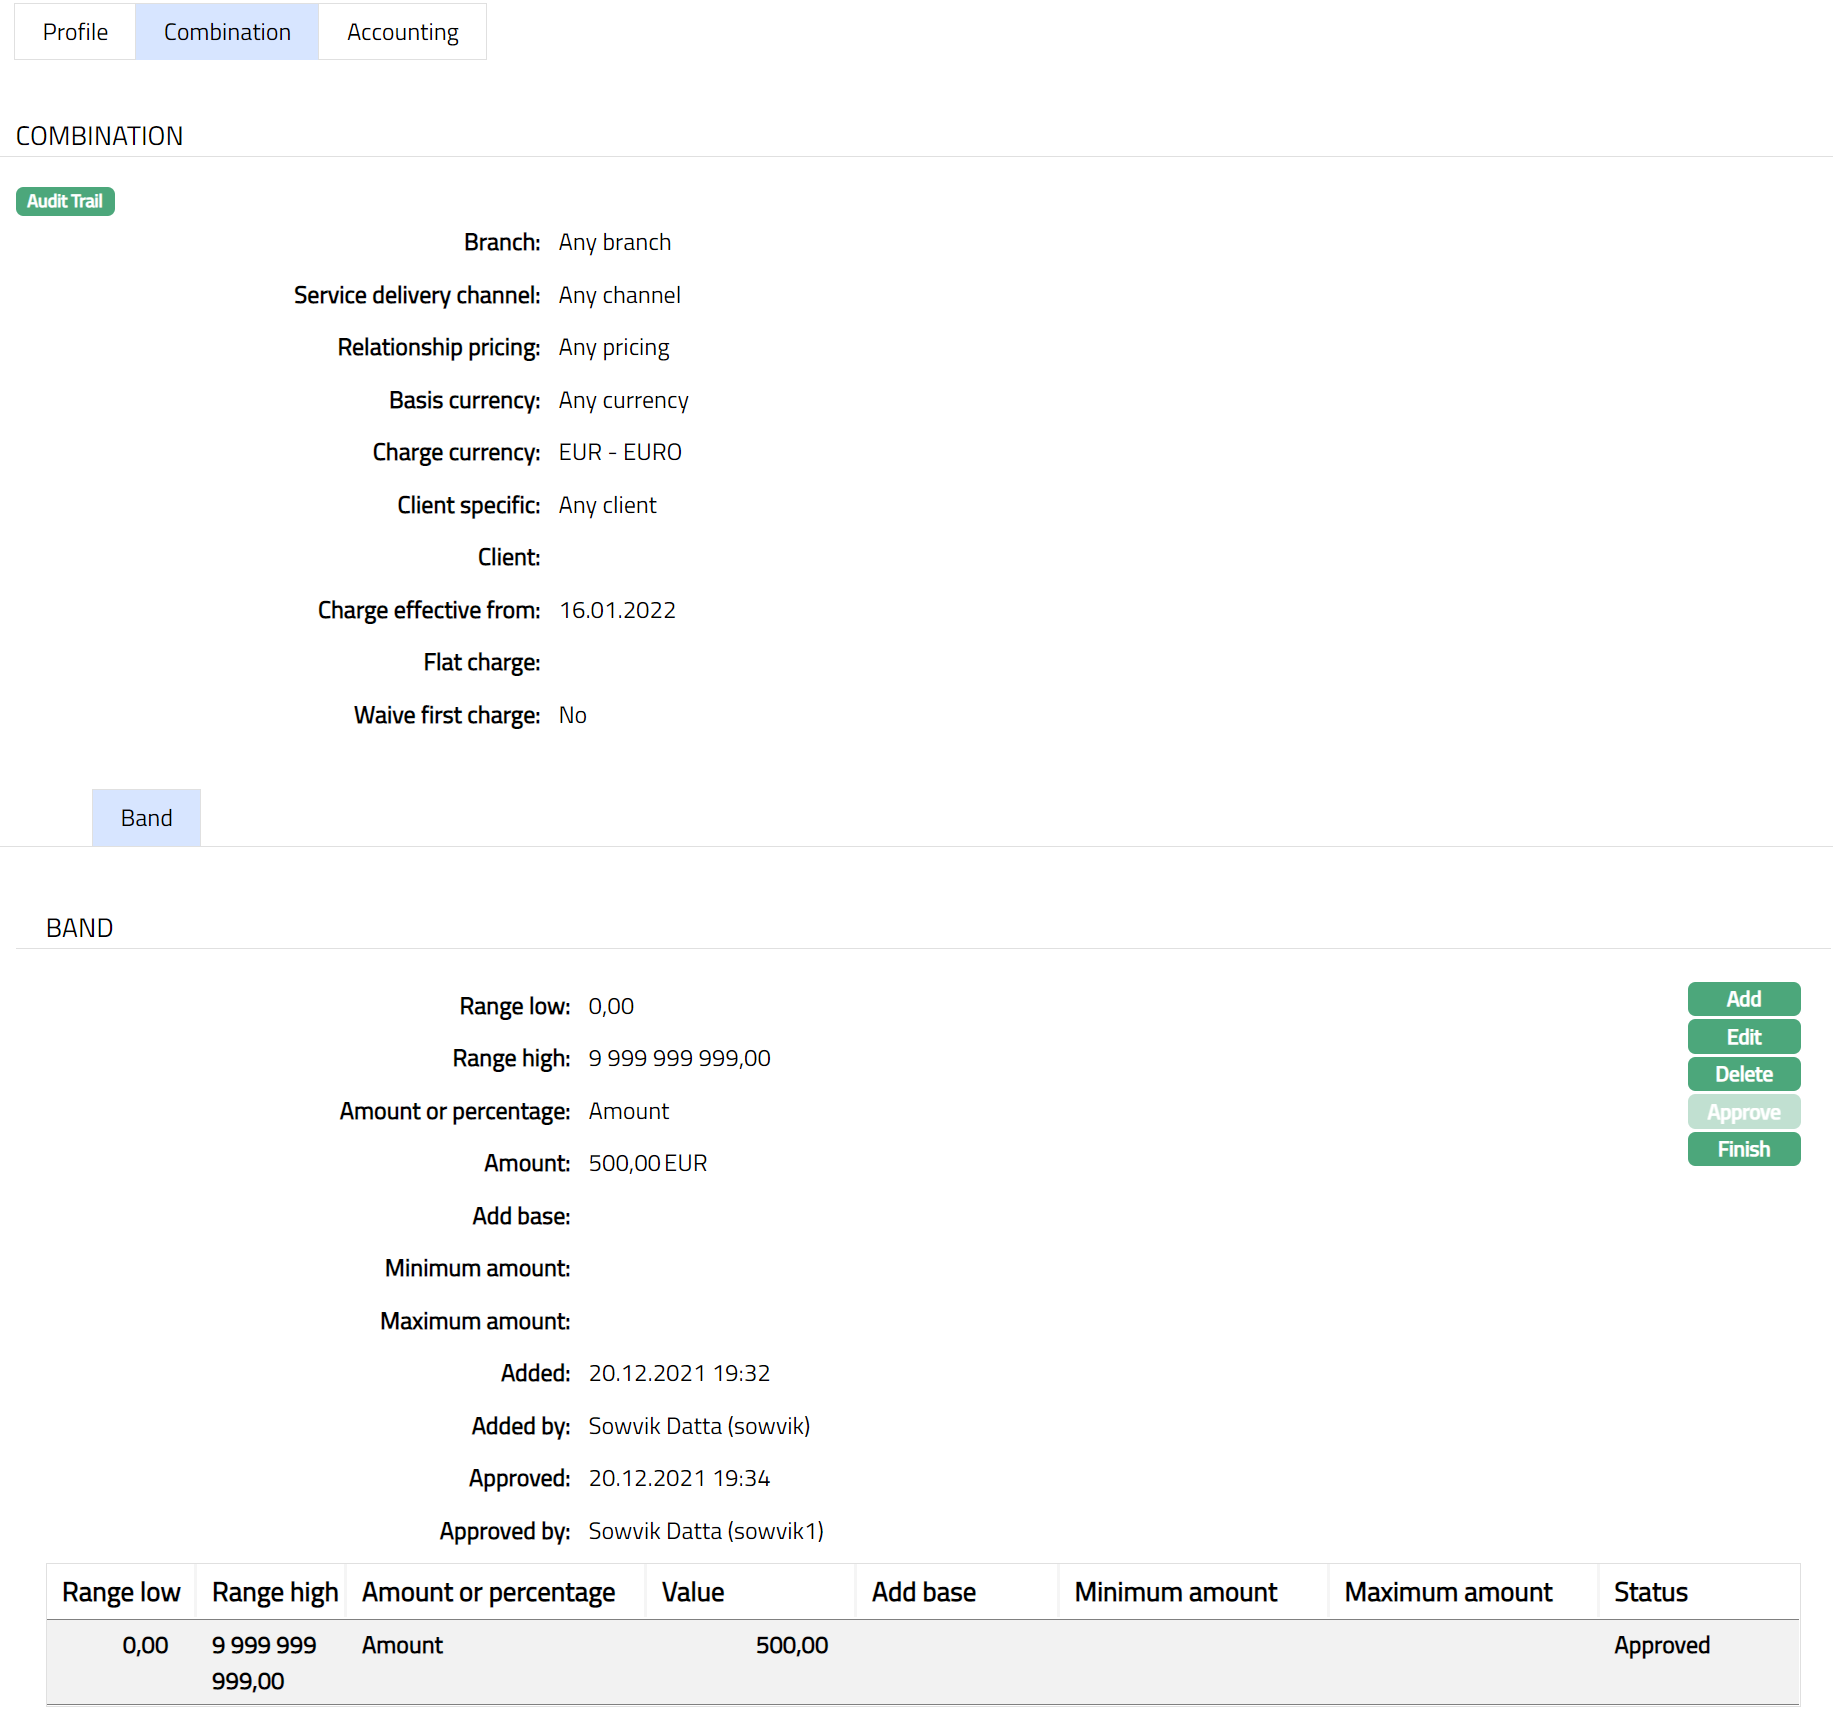
- Once you click Finish the Combination page will appear with the added details.
Click Edit to change the Charge Scheme and modify the parameters attached to the charge scheme. Edit Scheme page appears.
If you want to change Charge scheme, select the required Charge Scheme from the drop-down list of all active schemes that are shown in the dropdown list. You can modify this field irrespective of the Modify charge parameters flag. If the scheme is modified when Modify parameters flag is checked, then all the details of the modified scheme will be displayed in the view screen and the flag will be unchecked.
Using Modify Charge parameter check box you can specify if you want to delink the Charge parameters applicable to this account from the Charge scheme details that are maintained under Admin > Pricing > Charges > Charges schemes. Thus, it enables you to customize the charge applicable to a specific account and keep it tailor-made for that account even if there are changes at the charge scheme level. If this is checked (Yes) the Add, Edit and Delete buttons will be enabled (only for last band) and you can make changes in the charge scheme parameters. If this is unchecked (No) then all the band and band details will get populated from the charge scheme and the Add, Edit & Delete buttons will be disabled. Finish button is always enabled and can be used to close Band view or Flat view.
To add the Band details
- Click Add. Add Band page appears.
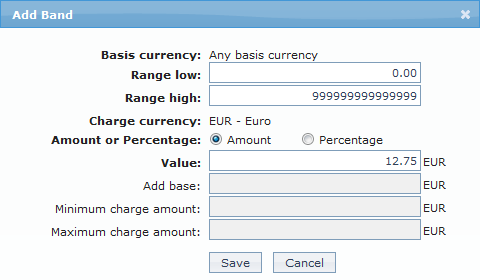
Basis currency is derived from the Basis currency that you had specified for the combination. This is a non-editable field.
Range Low, i.e., the lower limit, is defaulted to Zero for the first band. For the succeeding bands, it is automatically set as Range high of the previous band + least decimal of Basis currency. In case of Any Currency, the number of decimals is taken as 2.
Enter Range high. i.e., the upper limit for the Band.
Note: The Range Low and High should be entered as negative numbers if the charge basis is the debit balance of an account. For example, in case of Card Accounts, if you want to charge a fee based on the balance in the card account, maintain the Band in negative numbers, so that charge would be calculated only if there is a debit balance in the card account.
If the charge basis amount lies outside the Range, the charge will be calculated as 0. Hence, you should maintain the Range values such that it would cover any amount.
Charge currency is what you had specified for the Combination. This is a non-editable field.
Specify if you want the charge for the Band to be a fixed amount or a percentage using the Amount or percentage field. Accordingly, the charge amount will be taken as the fixed amount for the band or calculated using the percentage and the basis amount.
Enter the Amount or Percentage of charge. The name of the field changes depending on the radio button above. This is an editable field.
Add Base enables you to add a fixed amount apart from a percentage-based charge. This field is enabled only if Percentage is selected. It provides you the ability to define the percentage to calculate the charge and add a fixed amount to get the final amount to be charged.
Enter the Minimum amount to be charged. This field will be enabled only if percentage is selected above. Aura will check if the calculated charge amount < Minimum amount, if Yes then the final charge amount will be the Minimum amount.
Enter the Maximum amount to be charged. This field will be enabled only if percentage is selected above. Aura will check whether the calculated charge amount > Maximum amount, if Yes then the final charge amount will be the Maximum amount.
For example:
Band Range is between - 10000.00 to 0.00. Percentage is 8%. Add Base = 10.00 EUR, Minimum amount = 20.00 EUR, Maximum Amount = 100.00 EUR.
Case 1:
If The Account balance = - 1000.00
Percentage Charge = 80 (1000 * 8%).
Add base = 10,
Calculated Charge amount = 80+10= 90.
Case 2:
Account balance = - 100.00
Percentage charge = 8 (100 * 8%)
Add base = 10
Calculated Charge amount = 8 + 10 = 18, which is < Minimum amount of 20.00
Hence, the charge amount that will be booked = 20.00
Case 3:
Account balance = - 10000.00
Percentage charge = 800 (10000 * 8%)
Add base = 10
Calculated Charge amount = 800 + 10 = 810, which is > Maximum amount of 100.00
Hence, the charge amount that will be booked = 100.00
- Click Save. Band Maintain page appears displaying the details of the Band added.
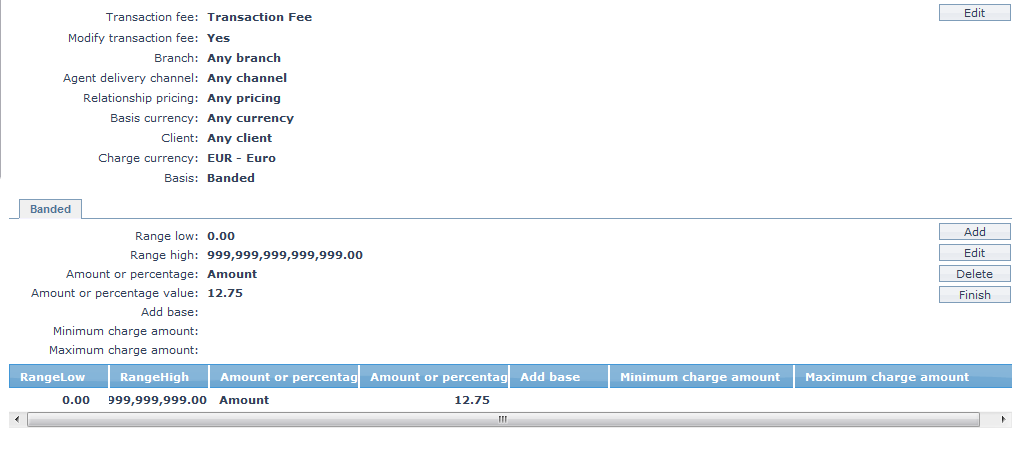
Functions: Add, Edit, Delete, Finish
- Click Finish. Agent Maintain page appears.
Note: Any change in the tab will set the tab status to Pending till it is approved by another user. On approval, the tab status is set to Approved.
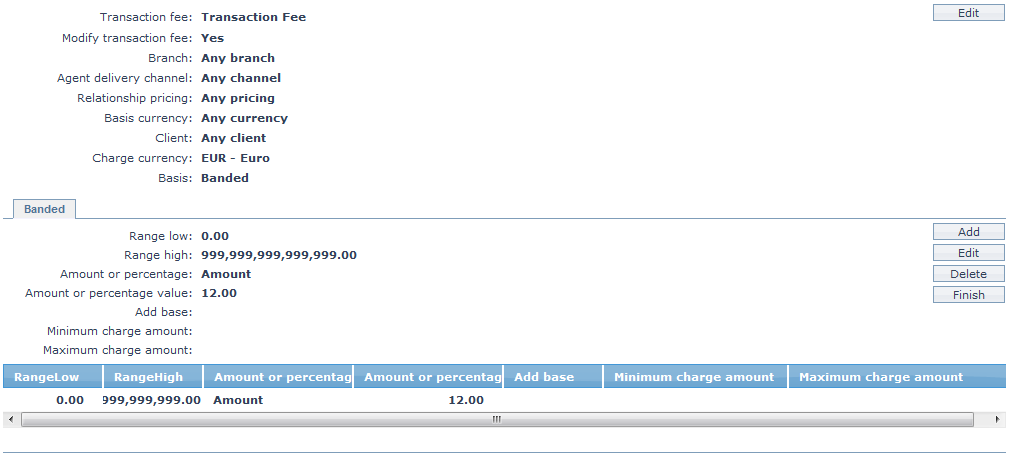
To edit the Band details
- Click Edit. The Edit Band page appears.

All the fields are editable except the Basis Currency, Range Low, Charge Currency.
- Make the required changes and click Save.
 Functions: Add, Edit, Delete, Finish
- Click Finish. The Agent Maintain page appears.
To edit a Flat Charge
- Access the Agent Maintain page, and Charge and then Default charge.
- Click Edit. The Edit Flat charge page appears.

- Make the required changes and click Save and then Finish.
Additional Charge
The Additional Charge tab allows you to add, view and maintain additional charges for the Agent. The charge ID will be generated in sequence for individual charge attached. If any charge is deleted, then the ID of the deleted charge will not be regenerated. Aura will allow you to add only periodic flat charges.
To add an Additional Charge
- Access the Agent Maintain page. Click the Charge tab and then Additional charge tab to view the details as per sample below.
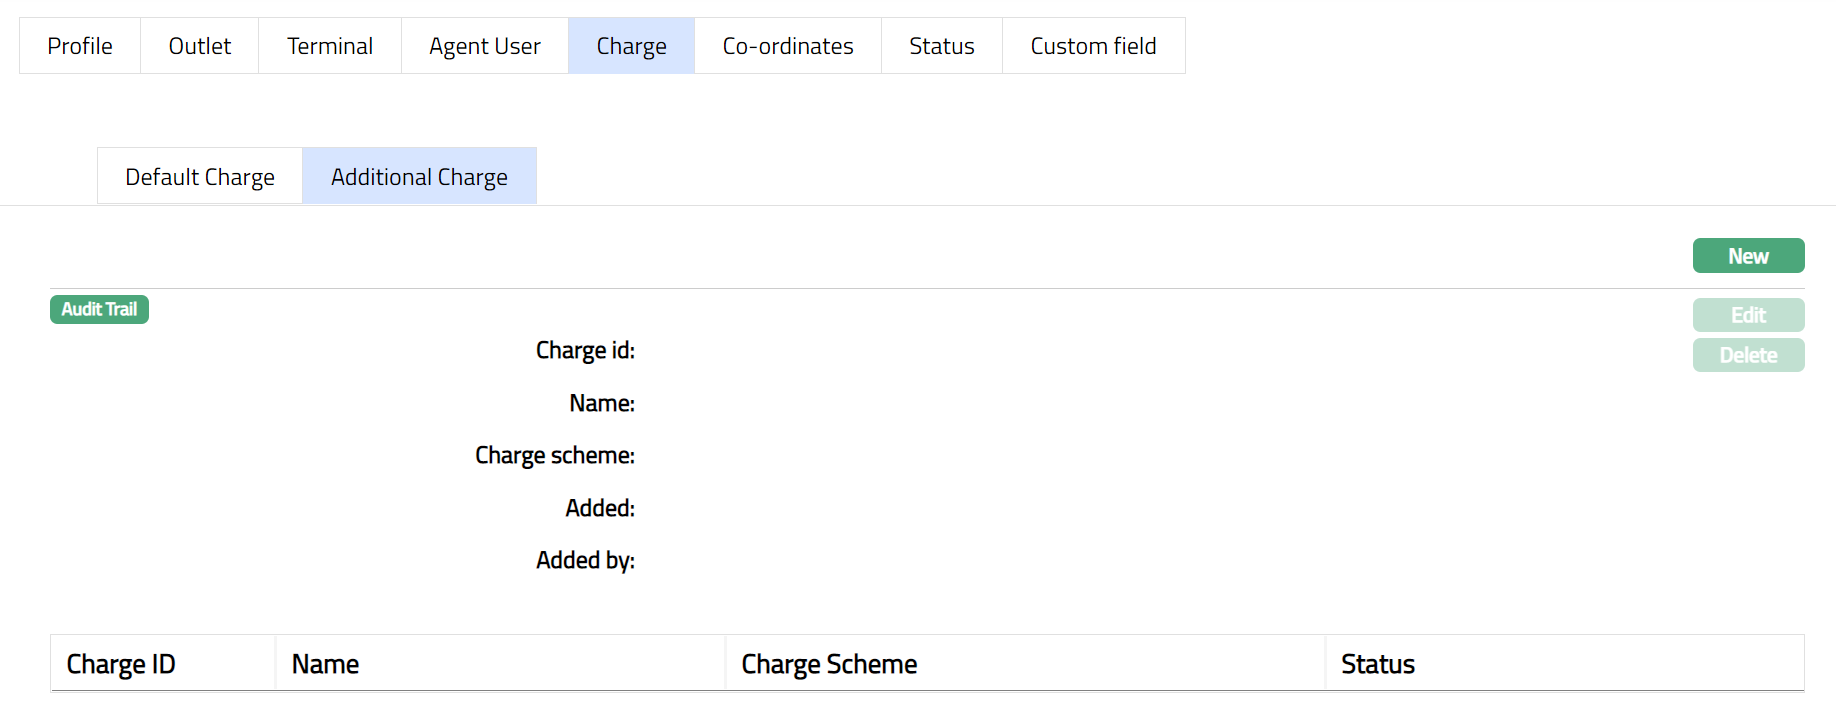
The following fields are shown only in the View screen:
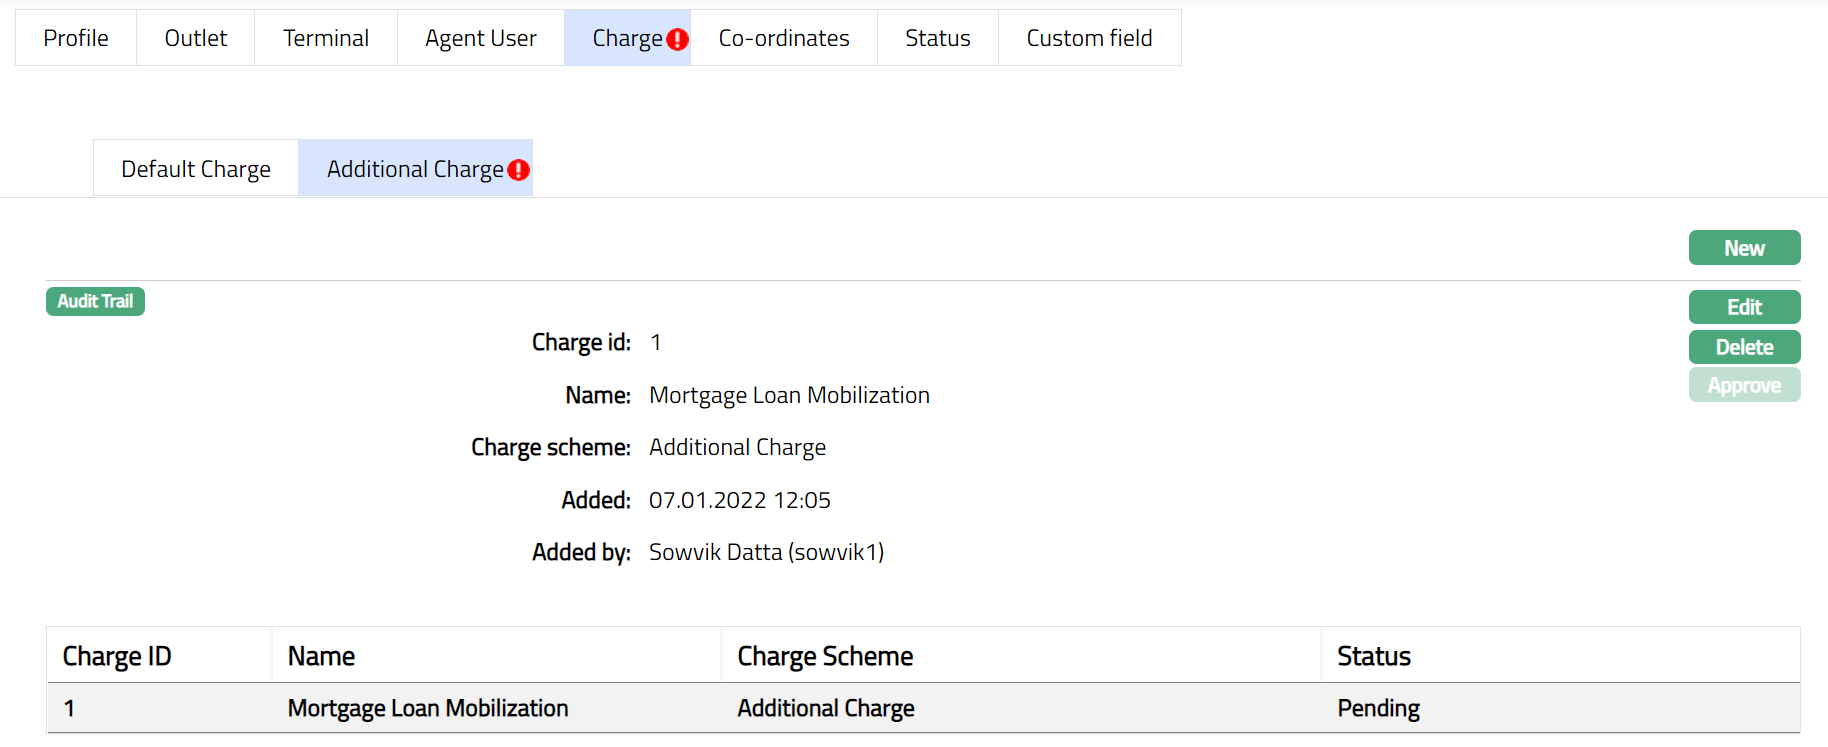
Charge Id field denotes the unique sequential charge id that gets generated for the additional charges.
Name field denotes the name of the additional charge.
Charge Scheme field denotes the name of the charge scheme attached to the additional charge.
Status field denotes the status of the tab.
Added field denotes the date on which the record was added.
Added by field denotes the name of the user who created the record.
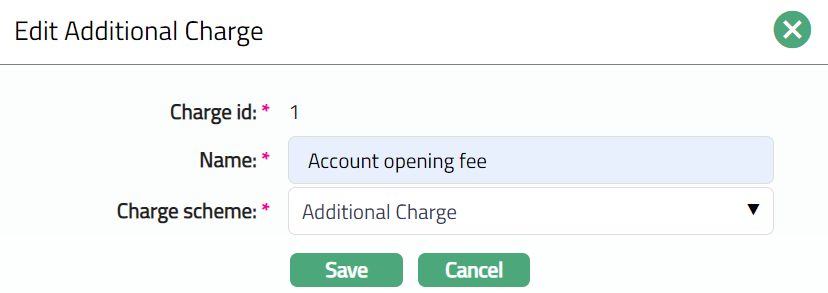
- Click New. The New Additional Charge page appears.
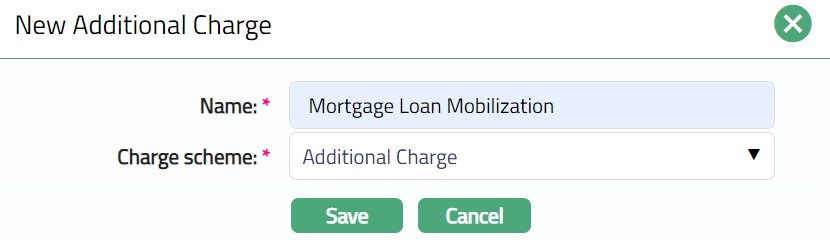
Enter the charge Name.
Select the Charge scheme from the drop-down list of Periodic charges maintained at Admin > Pricing > Charge > Charge scheme.
Click Save. The Additional Charge tab appears with the added details. The Status field will display as pending. Once Approved by the authorized person the Status filed changed to Approved and the red bubble will disappear.
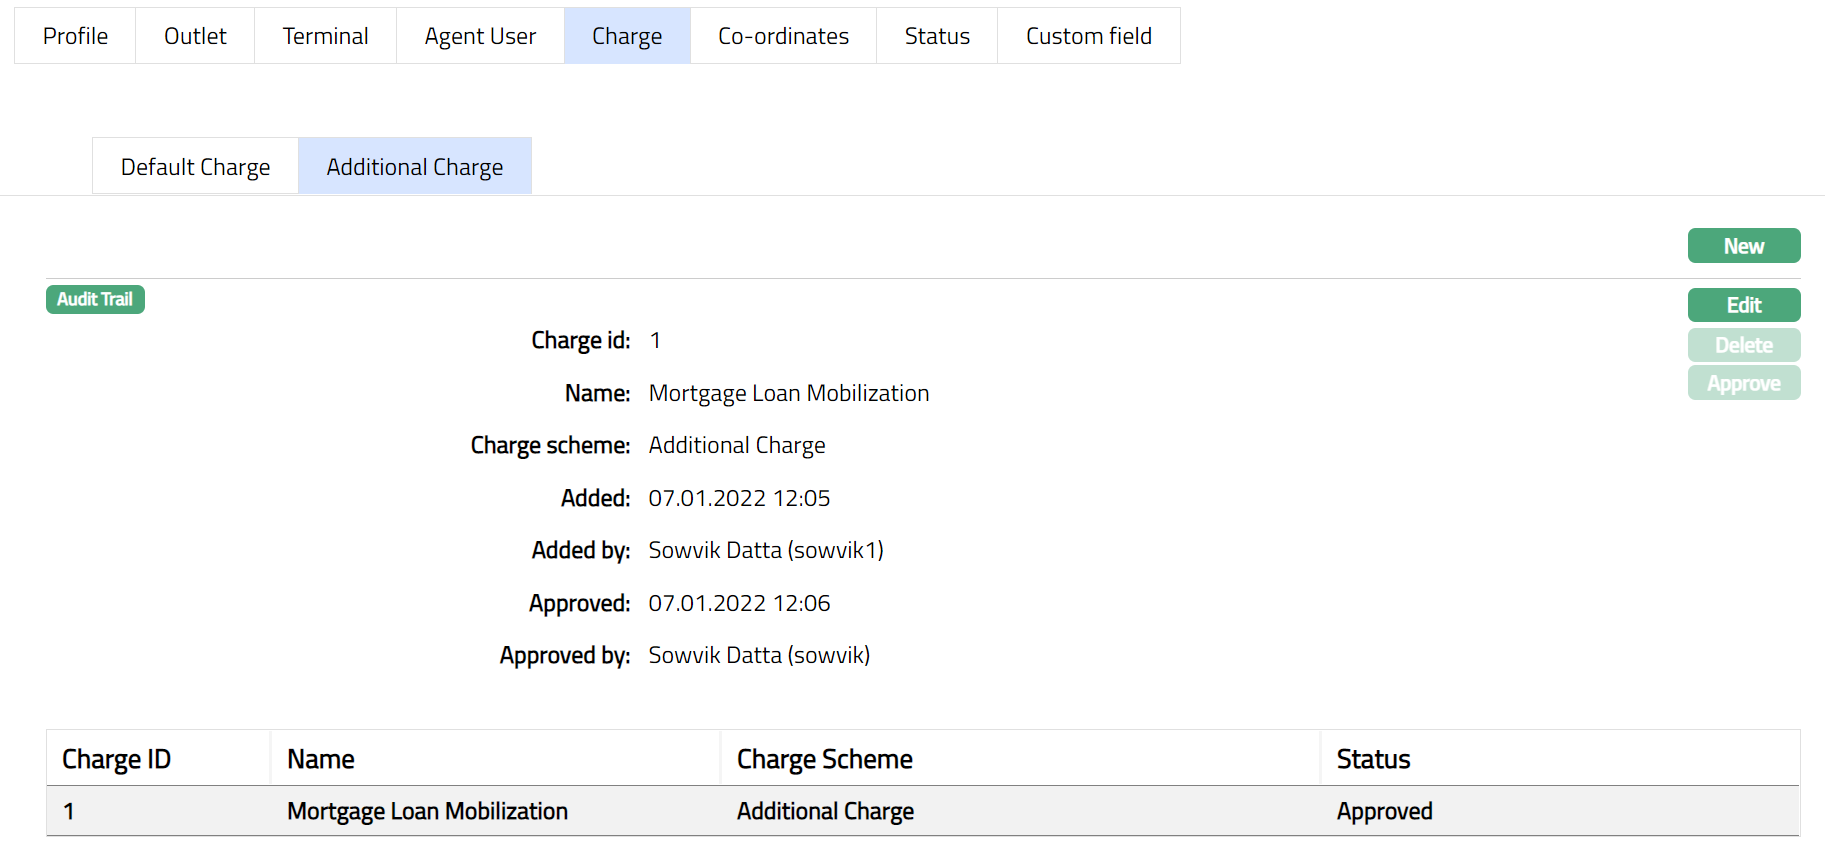
Functions: New, Edit, Delete, Approve
The additional fields are:
Approved field denotes date on which the record was approved and is displayed only for approved records.
Approved by field denotes name of the user who approved the record and is displayed only for approved records.
To edit Additional Charge
Access the Agent Maintain page. Click the Charge tab and then Additional charge tab.
Click Edit. The Edit Additional Charge page appears.
Note: All fields are editable, except Charge Id field.
Make the required changes and click Save.
The Additional Charge tab appears with the edited details.
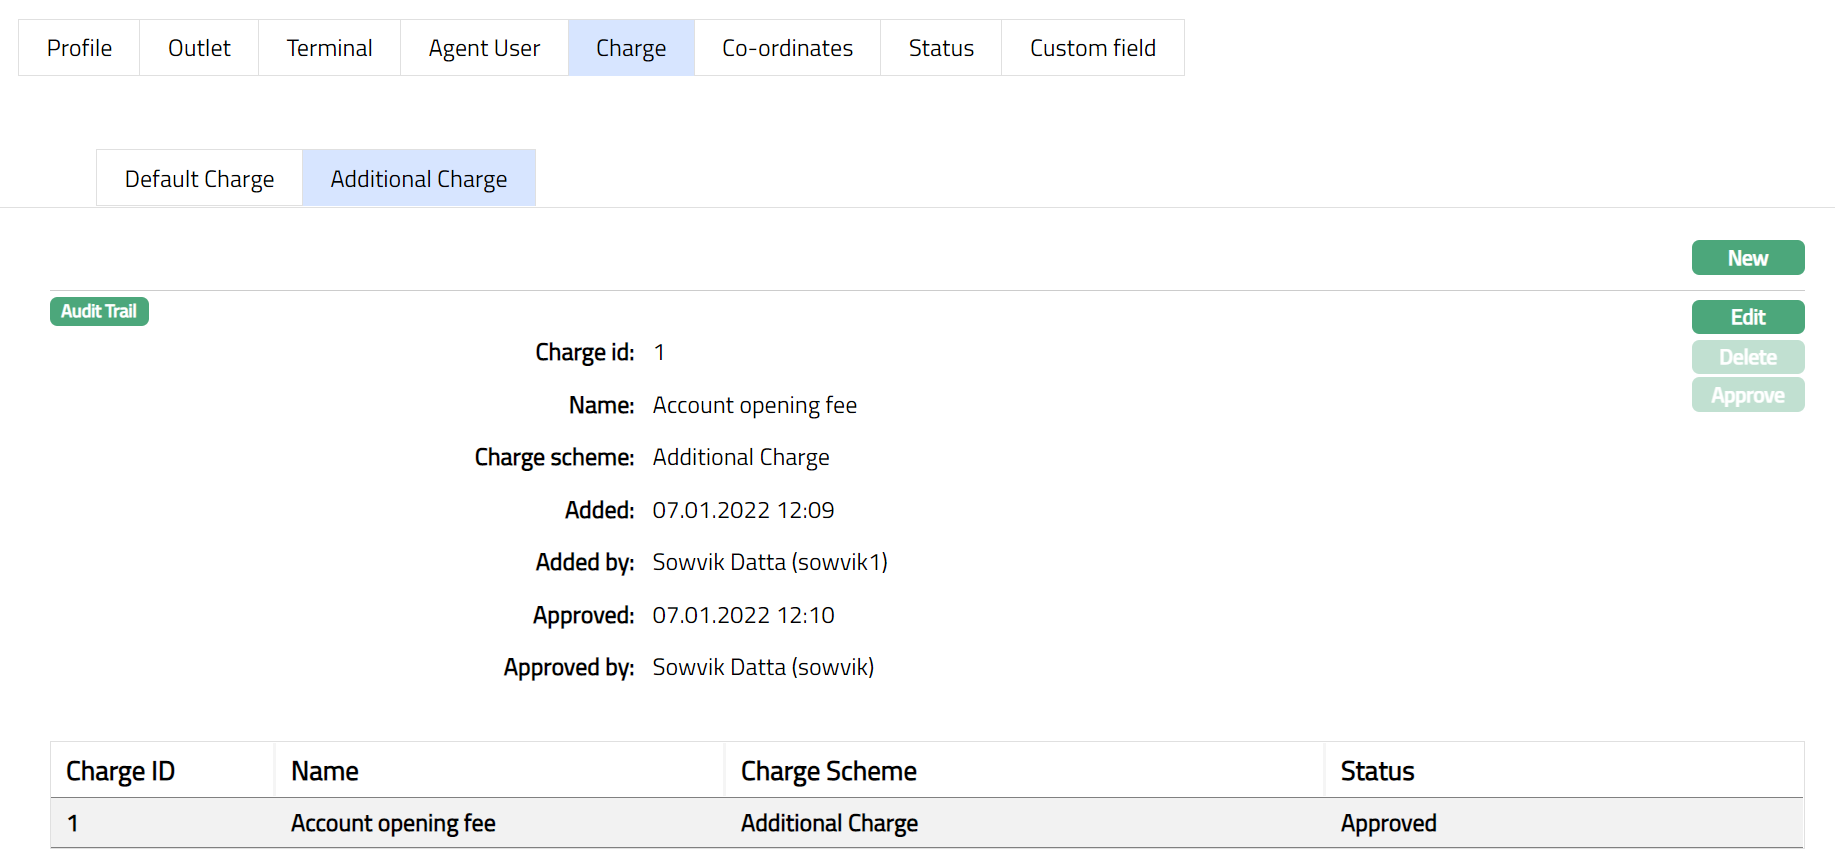 Functions: New, Edit, Delete, Approve
Note: Any change in the tab will set the tab status to Pending till it is approved by authorised person. On approval, the tab status is set to Approved.
Co-ordinates
The Co-ordinates tab allows you to specify the exact location of the branch attached to Agent, in terms of the latitude and longitude of the location. It follows the Google map convention of specifying position as an integer with 2 or 3 digits depending on latitude and longitude, followed by 6 decimal points, rather than the conventional degrees and minutes. You can also upload the picture of the branch.
To add working hours,
- Access Agent page and click New Co-ordinates tab.
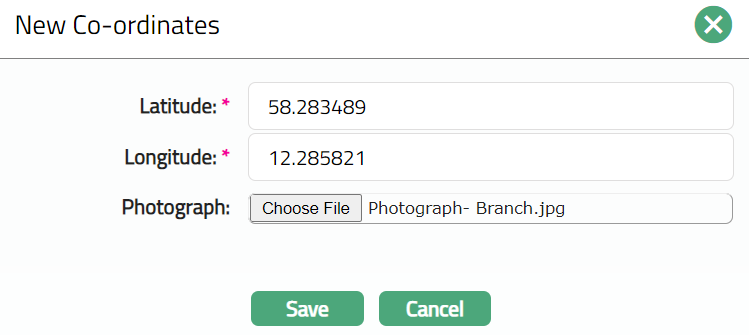
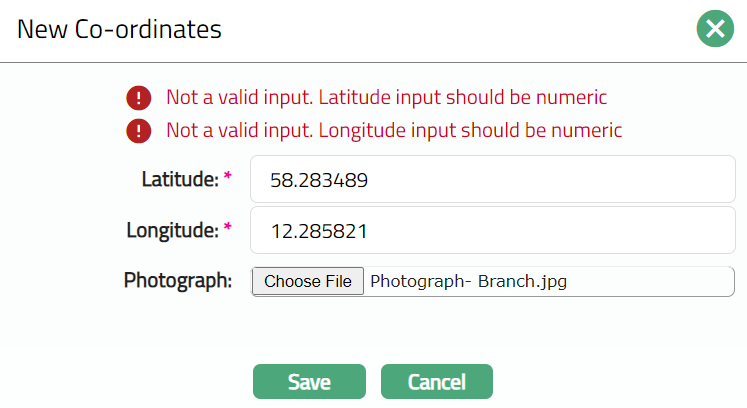
Enter the Latitude location of the branch. The Latitude range should be between 90 and -90. The number of decimals should not exceed 6 digits.
Enter the Longitude location of the branch. The Longitude range should be within 180 and -180. The number of decimals should not exceed 6 digits.
Click on browse button to select the Photograph of the branch. The photograph can either be the image of the branch or any other image related to it.
 Functions: New, Edit
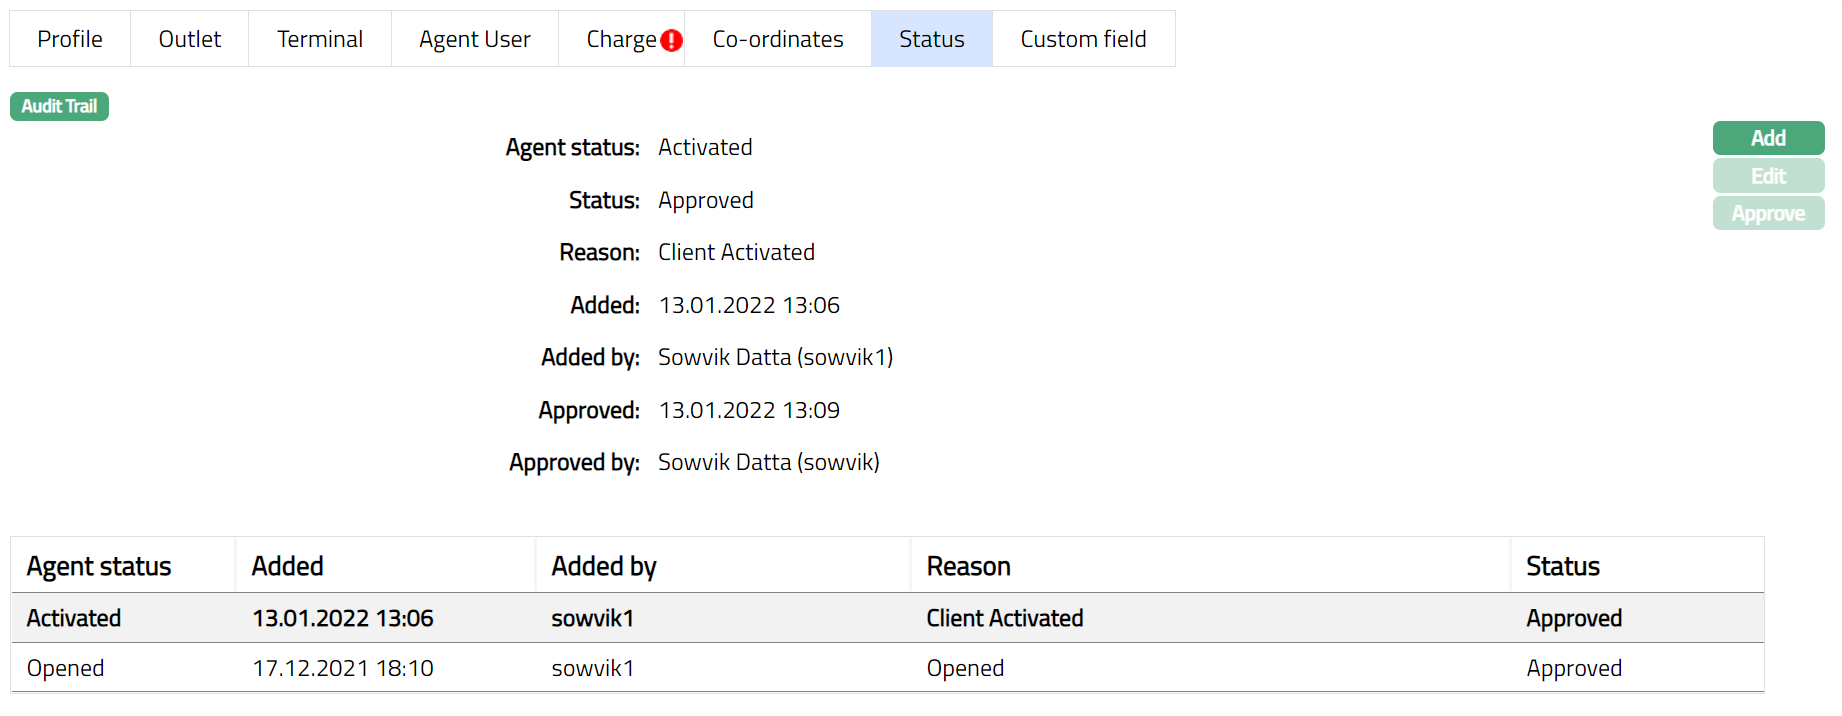
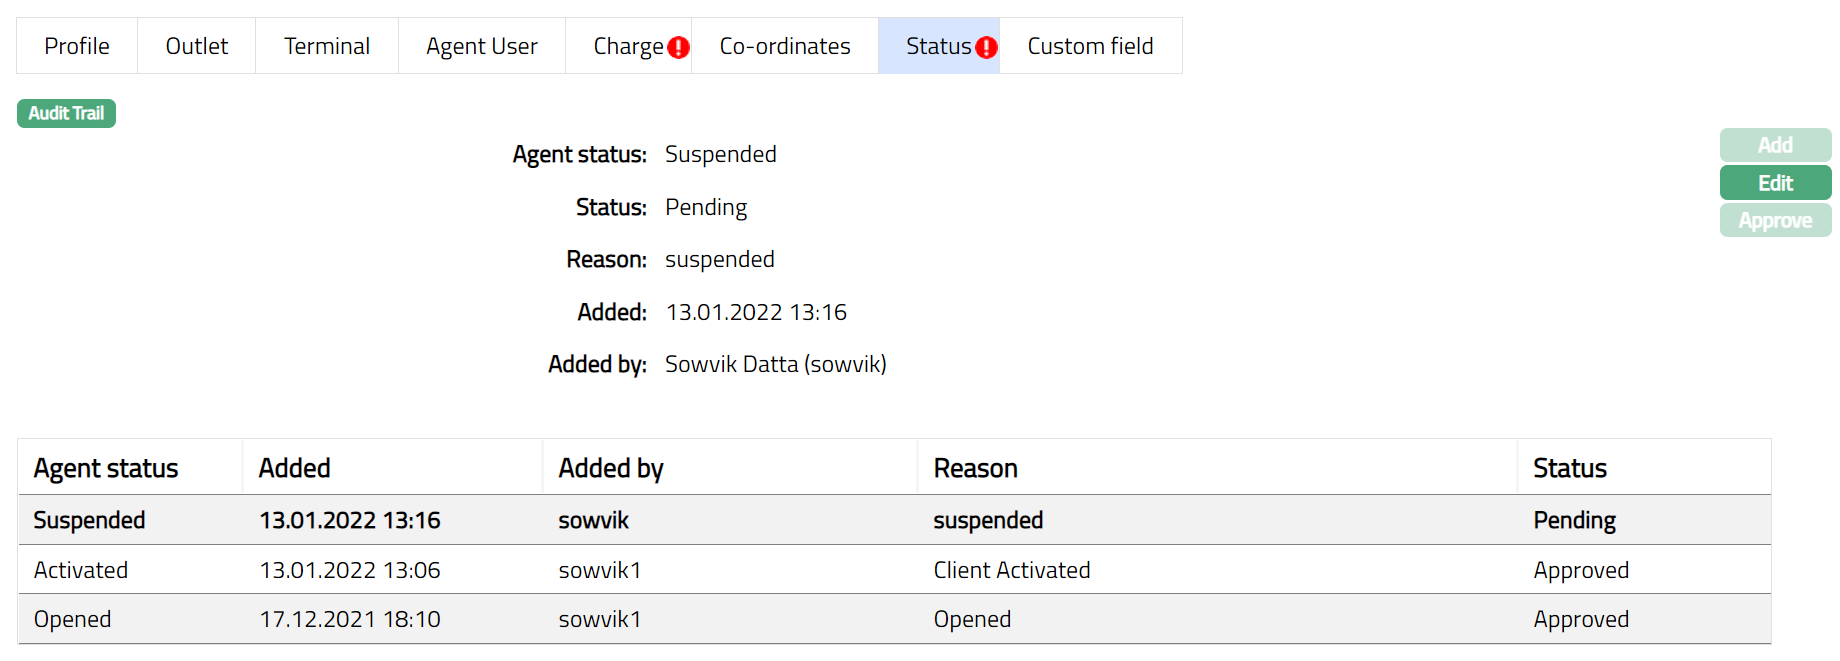
Status
Using this tab you can add and view the history of the Agent status, as well as approve the status records. On creating an Agent, the status is Opened.
To add a Agent status
- Access Agent page and click Status tab.

- Click Add. Add Agent status page appears.
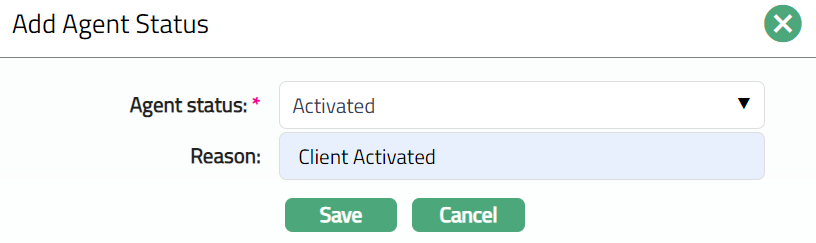
Select Status from the drop-down list. Depending on the current status of the Agent, the possible values are:
a. Activated: This is the status in which transactions are allowed. It has to be manually set by a user different from the one who created the account.
b. Suspended: If you want to suspend the Agent, then you can change the status of the record to suspend. On suspension of the Agent, Aura will suspend all Outlets, Terminals and Agent Users linked to the Agent. Aura will also suspend all Terminals and Agent Users linked to the Outlet, which is suspended at Agent Level.
Aura will validate and allow you to change the status as mentioned below.
Opened to Activate
Opened to suspended.
Activate to Suspended
Suspended to Activate.
Enter Reason for the status selected.
Click Save to save the changes that you made.
 Functions: Add, Edit, Approve
Delete: You can delete the Client Status saved in Aura by a click on Delete button. Aura will ask for confirmation, on approving which the selected record will be deleted.
Note: On creation of a Client, the Client status by default will be Opened and Record status will be Pending. The Client will not be activated unless Activated status is added to the client and is approved by authorized person. Only on Approval , the Client Status becomes Activated, and the Record Status gets changed to Approved and the red bubble disappears.
To edit the Status
Click Edit. Edit client status page appears.
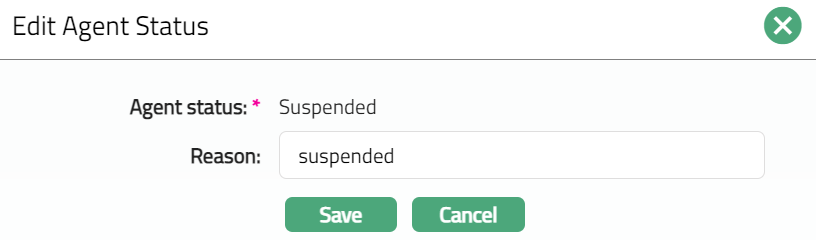
Only the Reason is editable.
Make the required changes and click Save.
Functions: Add, Edit, Approve
Custom Field
This option provides you the flexibility to define fields apart from those that are already available in the standard version of Aura. Thus, it enables you to customize additional data storage and use as required to suit your specific business needs.
Using the Custom Field tab, you can maintain the custom fields mapped to the Sales. Depending on the custom fields created and mapped to Organisation (using Admin > System Codes > Custom Fields), the fields will be displayed on this tab
To edit the Custom field
- Access the Sales Agent page and click Custom Field tab.

- Click Edit. Edit Custom Field page appears.

Enter the details as required and click Save.
Once saved Custom field page appears with the added details.

Functions: Edit