Maintain Card Account
Card Account option allows you to maintain all the details of the card account. For any Card Account created under a Card Account Product, certain values from the Card Account Product will be defaulted, with an option to change some details at the account level. However, such changes at the Account will be subject to Restrictions that have been set at the Product.
When creating a card account, you can create as one of two types: Billing account or Transaction account. Billing Account determines which account interest and charges are debited from. It is also the account into which clients will make their payments.
An account can have only one Billing Account, whereas one account can be the Billing Account for more than one Transaction Account. The Billing Account itself may or may not be a Transaction Account. Once a Billing Account is set up for a certain Transaction Account, the same cannot be changed or edited. The currency of the Transaction Account and the Billing Account must be the same
When a Billing Account is chosen for a Transaction Account certain account parameter of the Transaction Account, like Interest receivable and Payable, are not applicable; and the Billing Account parameters will be applicable.
The tabs in the Card Account page is displayed in two sets: The first set of Profile, Overview, Status and Account Activity appear on the first row with an additional link More information. All the other tabs will be visible in the next rows only on click on More Information.
The following are the various tabs that appear on the Card Account page for a Card account.
Past
Current
Future
Interest
Charge
To add a card account,
- From Card menu, click Cards, and then Maintain card account. Card Account Search page appears.

- Click Add. New Card Account -- Details (1/5) page appears.

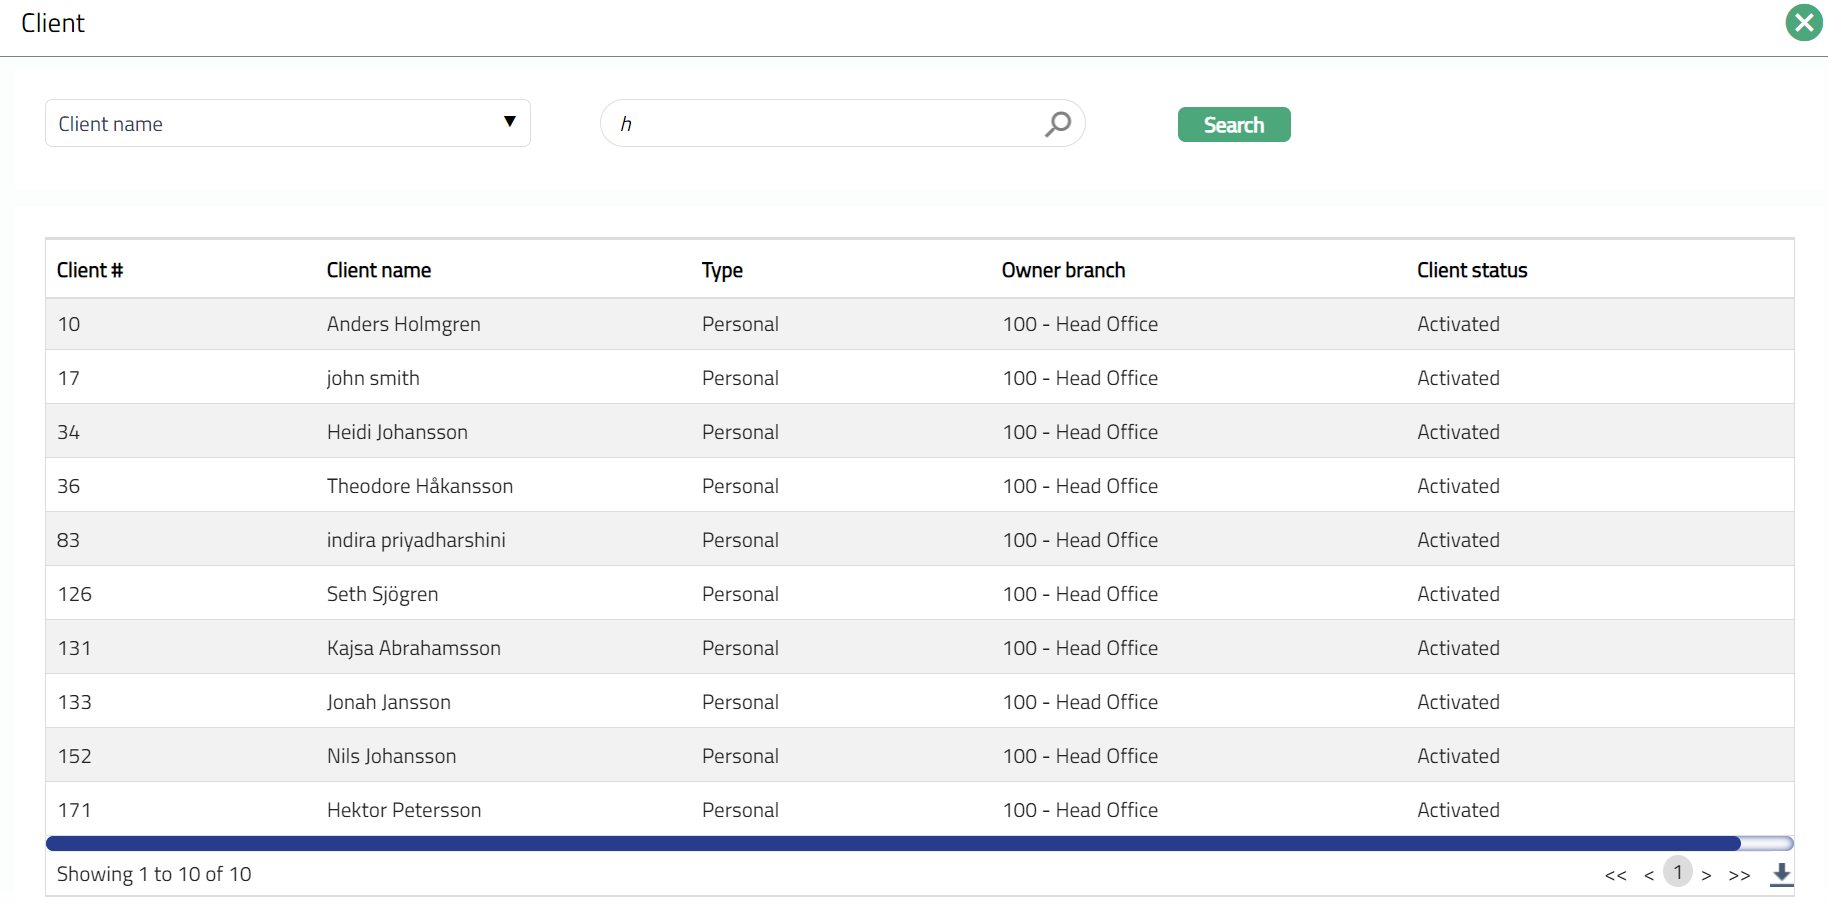
Select Client by clicking on client hyperlink. The Client search page appears with the list of Clients maintained under CRM > Clients > Maintain. You can search for a client with relevant criteria and select the required client. You can also input the client's name and select the required client from the list displayed by Aura.
Select Product from the drop-down list of active Products belonging to Type Card Account Product, where the client type defined for the Product matches the selected client. For example, if a selected client belongs to Client type Personal, then all the Products which are marked for Personal will be displayed.
Input if this new account will be its own billing account or if there will be a different Card Account that is to be treated as the Billing account for this new account. In the case of the former, input Billing account option as Same account, so that a Billing account is created; and in case of the latter, input the Billing account option as Different account so that a Transaction account is created. By default, Same account will be selected. If Same account is selected, then the Billing account field will be disabled and the Currency, Charge group and Interest group fields will be enabled. If Different account is selected, then the Billing account field will be enabled, and Currency and Interest group fields will be disabled.
Click the Billing Account hyperlink to select that Card account which will be the Billing account for this new account. This field will be enabled only in case of Transaction Accounts i.e., if you select Different account in the Billing account option field. In case of a Billing account, i.e., if you select Same account in the Billing account option, this field will be disabled and defaulted with the same account number on creation of the account. Select the required Billing account using the search criteria in the Card Account Search screen.
Select Currency for the card account from the drop-down list of the currencies maintained for the selected Product. Since only in case of a Billing account you can select the currency, this field will be enabled only if Same account is selected; in case of a Transaction Account, the currency will be the same as that of the billing account and hence this field will be disabled
Select Account branch from the drop-down list of all the branches which are allowed for the Product. By default, the user's logged in branch is selected. You can change as required. This is the branch in which the account is maintained.
Select Service delivery channel from the drop-down list. The Service delivery channels should have been maintained under Admin > System codes > Categories > Service delivery channel.
Select Charge group from the drop-down list of all the charge groups maintained for the selected Product.
Select Interest group from the drop-down list of all the interest groups maintained for the selected Product. This field will be enabled only in the case of a Billing Account; and in case of a Transaction Account the Interest Group is inherited from the associated Billing account.
Select Cycle group from the drop-down list of all the Cycle Groups maintained for the selected Product at Cards > Settings > Cycle group. This field will be enabled only in the case of a Billing Account; and in case of a Transaction Account the Cycle Group is inherited from the associated Billing account.
Input how the account number has to be generated in Generate account number. If you want to auto-generate the account number, choose Next in sequence. If you want to give a specific account number for this account, choose pre-assigned number. In case of the former, Aura will generate account number internally using the account number mask maintained at the Entity level. The account number is unique across the Entity.
Account # will be enabled only on selecting pre-assigned number for Generate account number. Enter the required Account #. Aura will validate the Pre - assigned number against the account number mask maintained at the Entity level and also check if it is unique.
Enter Account name. This name will be used for the account.
Enter Account usage, i.e., the purpose of the account.
Select mode by which the client wants to settle the dues in the account in the Settle By field. The following are the available options:
Own account transfer: If the client wants to settle using his own card account or current account, choose this option. You need to enter the relevant account number (next field).
Direct Debit: If the client wants to settle the dues by way of a direct debit on an external account, choose this option. You need to enter the relevant Agreement reference number (next field).
Payment by invoice: If the client wants to settle the dues by any other mode based on the invoice that is sent, choose this option. You need to enter the relevant agreement reference number (next field).
If Direct Debit or Payment by invoice option is selected in Settle by field, then the hyperlinked Agreement reference number will be enabled. If you click on the hyperlink, then the Agreement search page will appear with the list of all active Agreements. If Settle By is Direct Debit all agreements of the client where Agreement Type is Direct Debit will be shown. Similarly, if Settle By is Payment by invoice, all agreements of the client, where Agreement Type is Others and Agreement For is Invoice will be shown. Select the required agreement for the client.
If Own account transfer is selected in Settle By field, then the hyperlinked Own Account # will be enabled. If you click on the hyperlink, the Core Bank Account Search page appears with the list of all active accounts. Select the account from which you want the funds to be transferred to settle the card account dues.
If Auto-Create Reward Account is marked as Yes in the Product Settings, the relevant Reward account Product will be displayed. Else, this field is not displayed. Based on the Reward Account Product and the Reward Account Currency (next field), a Reward Account will also automatically be created, on creation of the Card Account.
If Auto-Create Reward Account is marked as Yes in the Product Settings, the relevant Reward account currency will be displayed. Else, this field is not displayed.
Click Next. New Card Account -- Details (2/5) page appears.
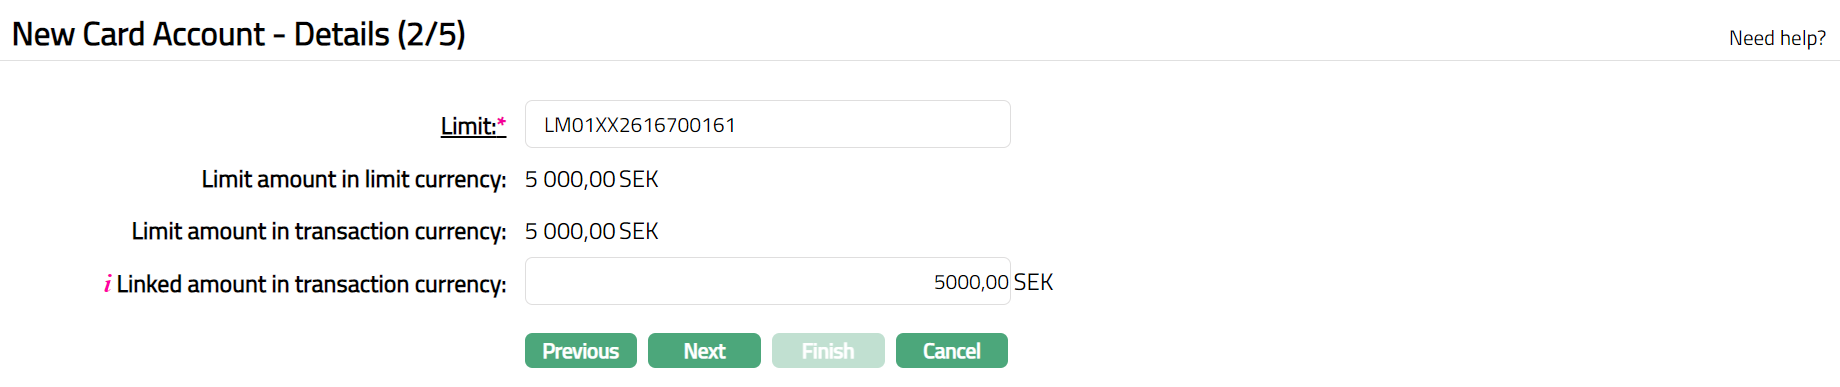
If you click on Limit hyperlink, then the Limit Search page appears with the list of all active revolving limits made available for the Client under CRM > Collaterals & Limits > Limits. Select the required limit for the client.
Limit amount in limit currency will display the unutilized amount of the selected limit id in limit currency by default. Aura will calculate the Limit amount as (Limit amount -- Utilized limit).
Limit amount in transaction currency will display by default the limit amount converted into the account currency. If Limit currency and card account currency are different, then the limit amount in limit currency will be converted into limit amount in transaction currency using the mid-rate of the rate type defined at the entity level.
The Linked amount in transaction currency will by default display the Limit amount in transaction currency. You can enter the actual limit amount that is to be available for this account here, subject to the maximum of the Limit amount in transaction currency shown above.
Click Next. Depending on whether it is a Billing Account or a Transaction Account, the next screen will change. In case of Transaction account, The New Card Account - Confirmation (3/3) appears. (Refer to Confirmation screen at the end of the section). In the case of Billing account, The New Card Account -- Details (3/5) page appears as shown below.
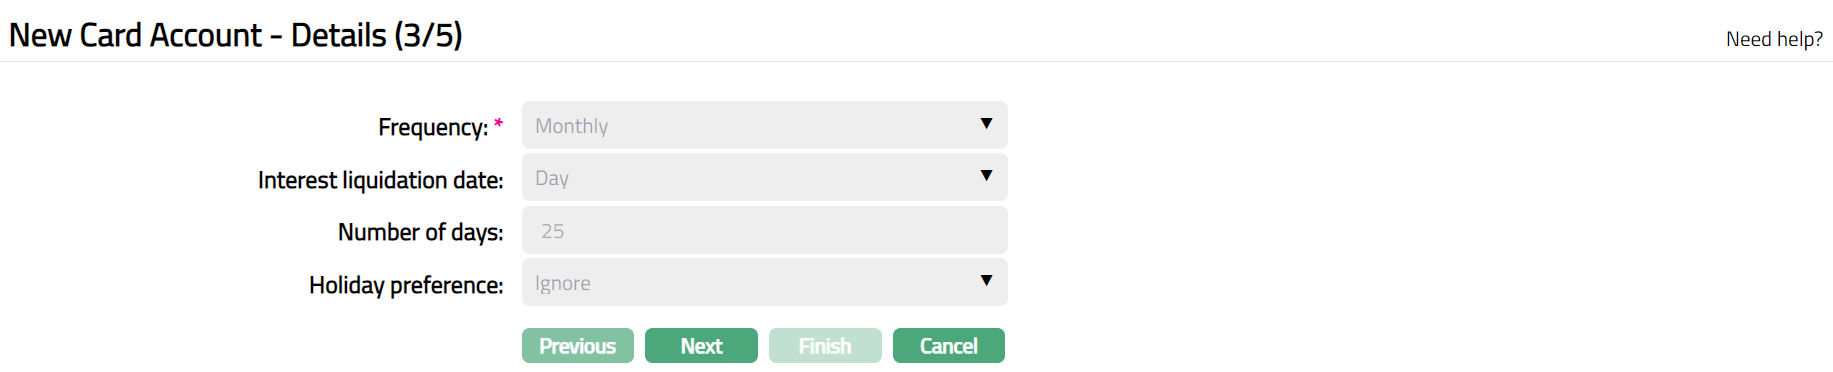
Note: All the values are defaulted from the Cycle Group chosen in The New Card Account -- Details (1/5) page and are disabled:
Frequency.
Interest liquidation date.
Number of days
Holiday Preference.
- Click Next. The New Card Account -- Details (4/5) page appears. This page will not be displayed for a Transaction Account.
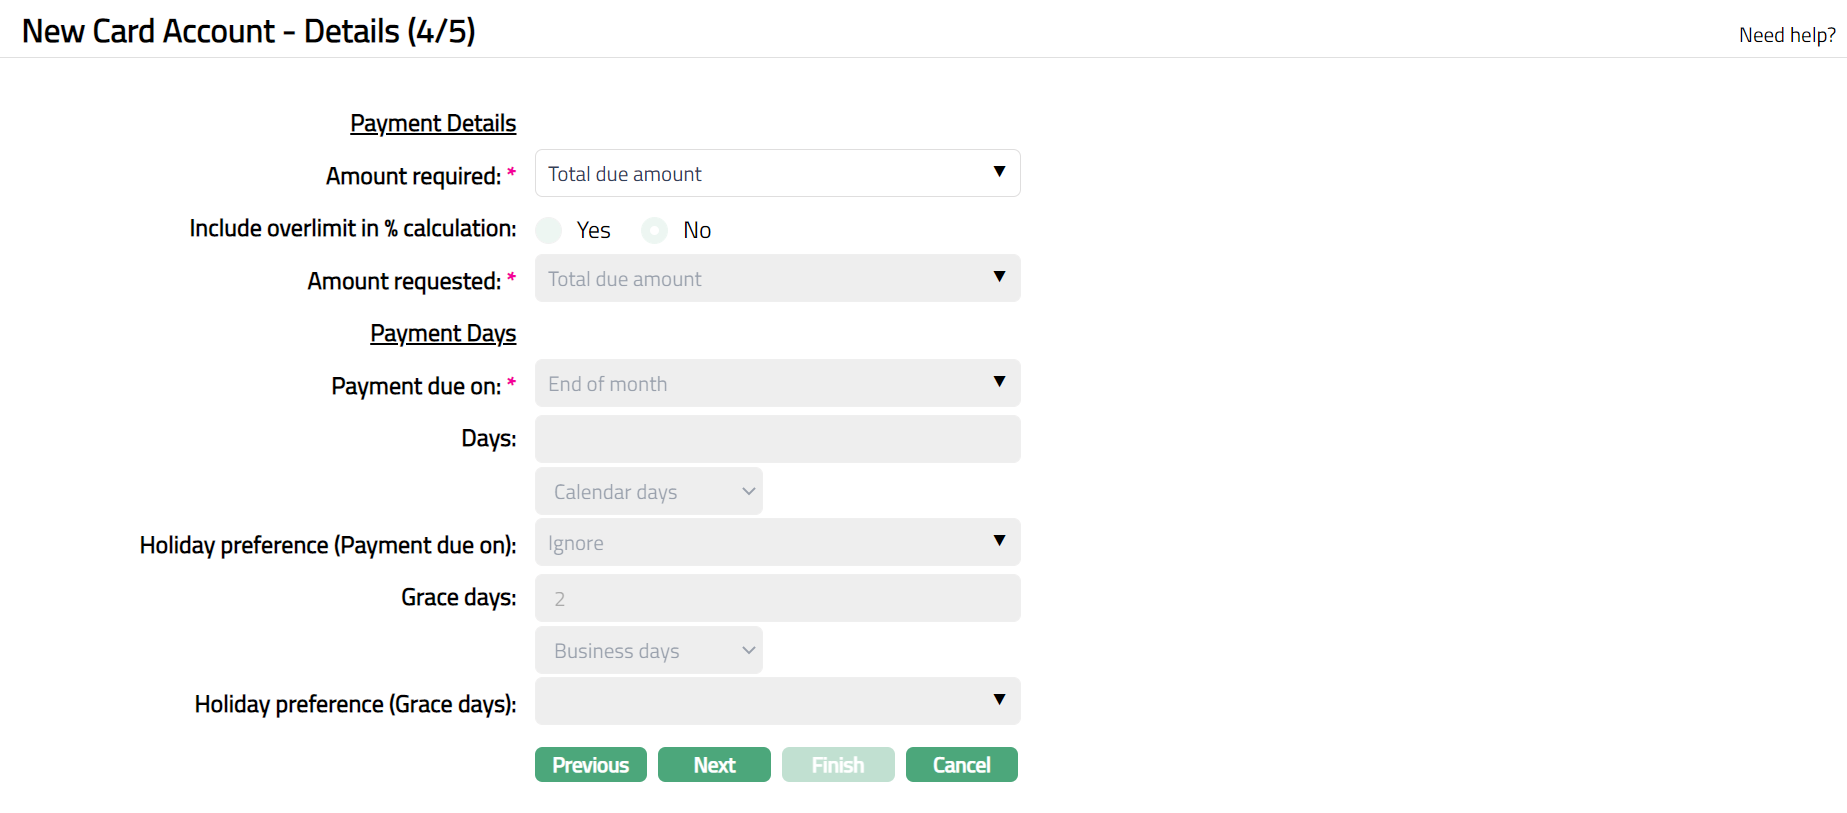
The Payment Details are defaulted from Product and can be changed at the account level, subject to Restrictions that have been set up for the Product.
The Amount required is the minimum amount that the customer has to pay to avoid overdue interest or any overdue-related charges / status changes. The value for the amount required is defaulted from the Product. You can change the amount required by changing the option.
The available options are:
- Partial Amount: If you want the customer to pay only a part amount of the total outstanding amount due for payment, choose this option. If you choose partial amount here, then Aura will ask to enter the percentage of the outstanding amount.
- Total Due Amount: If you want the customer to pay the total outstanding amount due for payment, choose this option.
If Partial amount is selected in the Amount required field above, % of total outstanding will be enabled. The value for the % of total outstanding is defaulted from the Product. If you want to change the % of the total outstanding, then enter the % of total outstanding amount that needs to be paid on the payment due date.
If Partial amount is selected in the Amount required field above, Rounding rule will be enabled. This rule is used to round the Amount required. The value for the Rounding rule is defaulted from the Product. The following options are available:
Up: This option rounds the Amount required up to a higher amount.
Down: This option rounds the amount required down to a lower amount.
None: This option does not round the amount required and gives the exact calculated figure.
- If Partial amount is selected in the Amount required field above, Rounding Unit is enabled. The value for the Rounding unit is defaulted from the Product. You can specify how much the rounding rule should be applied. The available options are:
1
5
10
50
100
Example:
If total balance is (-) 3427.60 and % of total outstanding is 5% and
Round up is marked as 1, then amount required will be calculated as 172
Round up is marked as 10, then amount required will be calculated as 180
Round up is marked as 100, then amount required will be calculated as 200
Note: The Amount required cannot be greater than the total balance outstanding in the account. If it is so during invoice generation, then the total balance outstanding becomes the Amount required.
- The value for the Minimum amount is defaulted from the Product. If the amount calculated using the % is less than the Minimum amount specified here, then, the Minimum amount specified here becomes the Amount required.
Examples:
a. The amount required is 5 % of balance, minimum 10. Total card usage and hence, outstanding = 150. Amount required = 5% of 150 = 7.5, subject to minimum of 10, and hence, 10
b. The amount required is 5% of balance, minimum 10. Total card usage and hence outstanding = 300. Amount required = 5% of 300 = 15, subject to minimum of 10 and hence, 15.
Include Over limit in % calculation enables you to specify how the amount required is to be calculated when the account balance is over limit. By default, it will be No which means the over limit amount will be added in full; if checked, the over limit will be included in the % calculation and the amount required will be a % of the current due amount (including over limit).
The value for the Amount requested is defaulted from Product. If you want to change the Amount requested, then select the Amount requested from the available options. If Total due amount is selected in the Amount required field, then Amount Requested will be defaulted to Total due amount and disabled. If you choose Partial amount in the Amount required field, then Amount Requested can be either Total due amount or Partial Amount.
The Payment Days values are defaulted from the Cycle Group chosen in The New Card Account -- Details (1/5) page and cannot be edited.
Payment due on
Days.
Holiday Preference
Grace days
Holiday Preference (Grace days)
- Click Next. The New Card Account - Confirmation (5/5) page appears.
- Click Finish. Card Account page appears displaying the Profile tab of the Account you added.
Functions: Add, Search
Note: On creation of the account, the Account Status by default will be Opened. Only when the account status is Activated and record status is Approved, the account becomes effective, and transactions can be posted in the account.
To activate the account,
- Add Activated Account status using Account Status tab. This will make the Account Status Activated, but the record status is Pending.
- Another user should approve the Activated Account status, so that the record status becomes Approved.
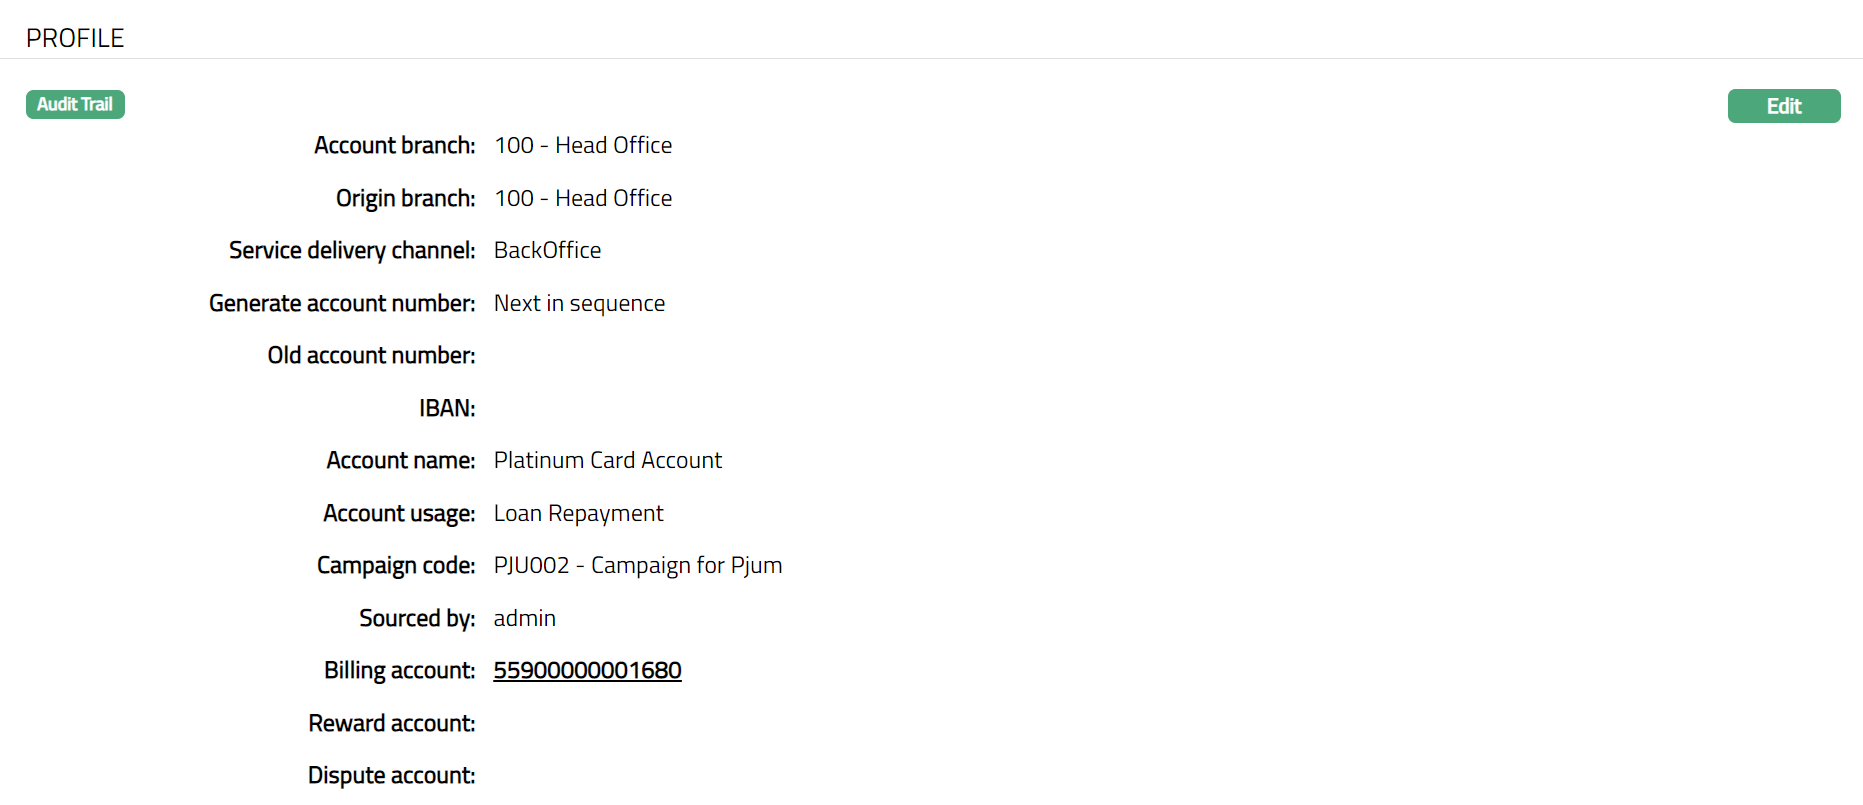
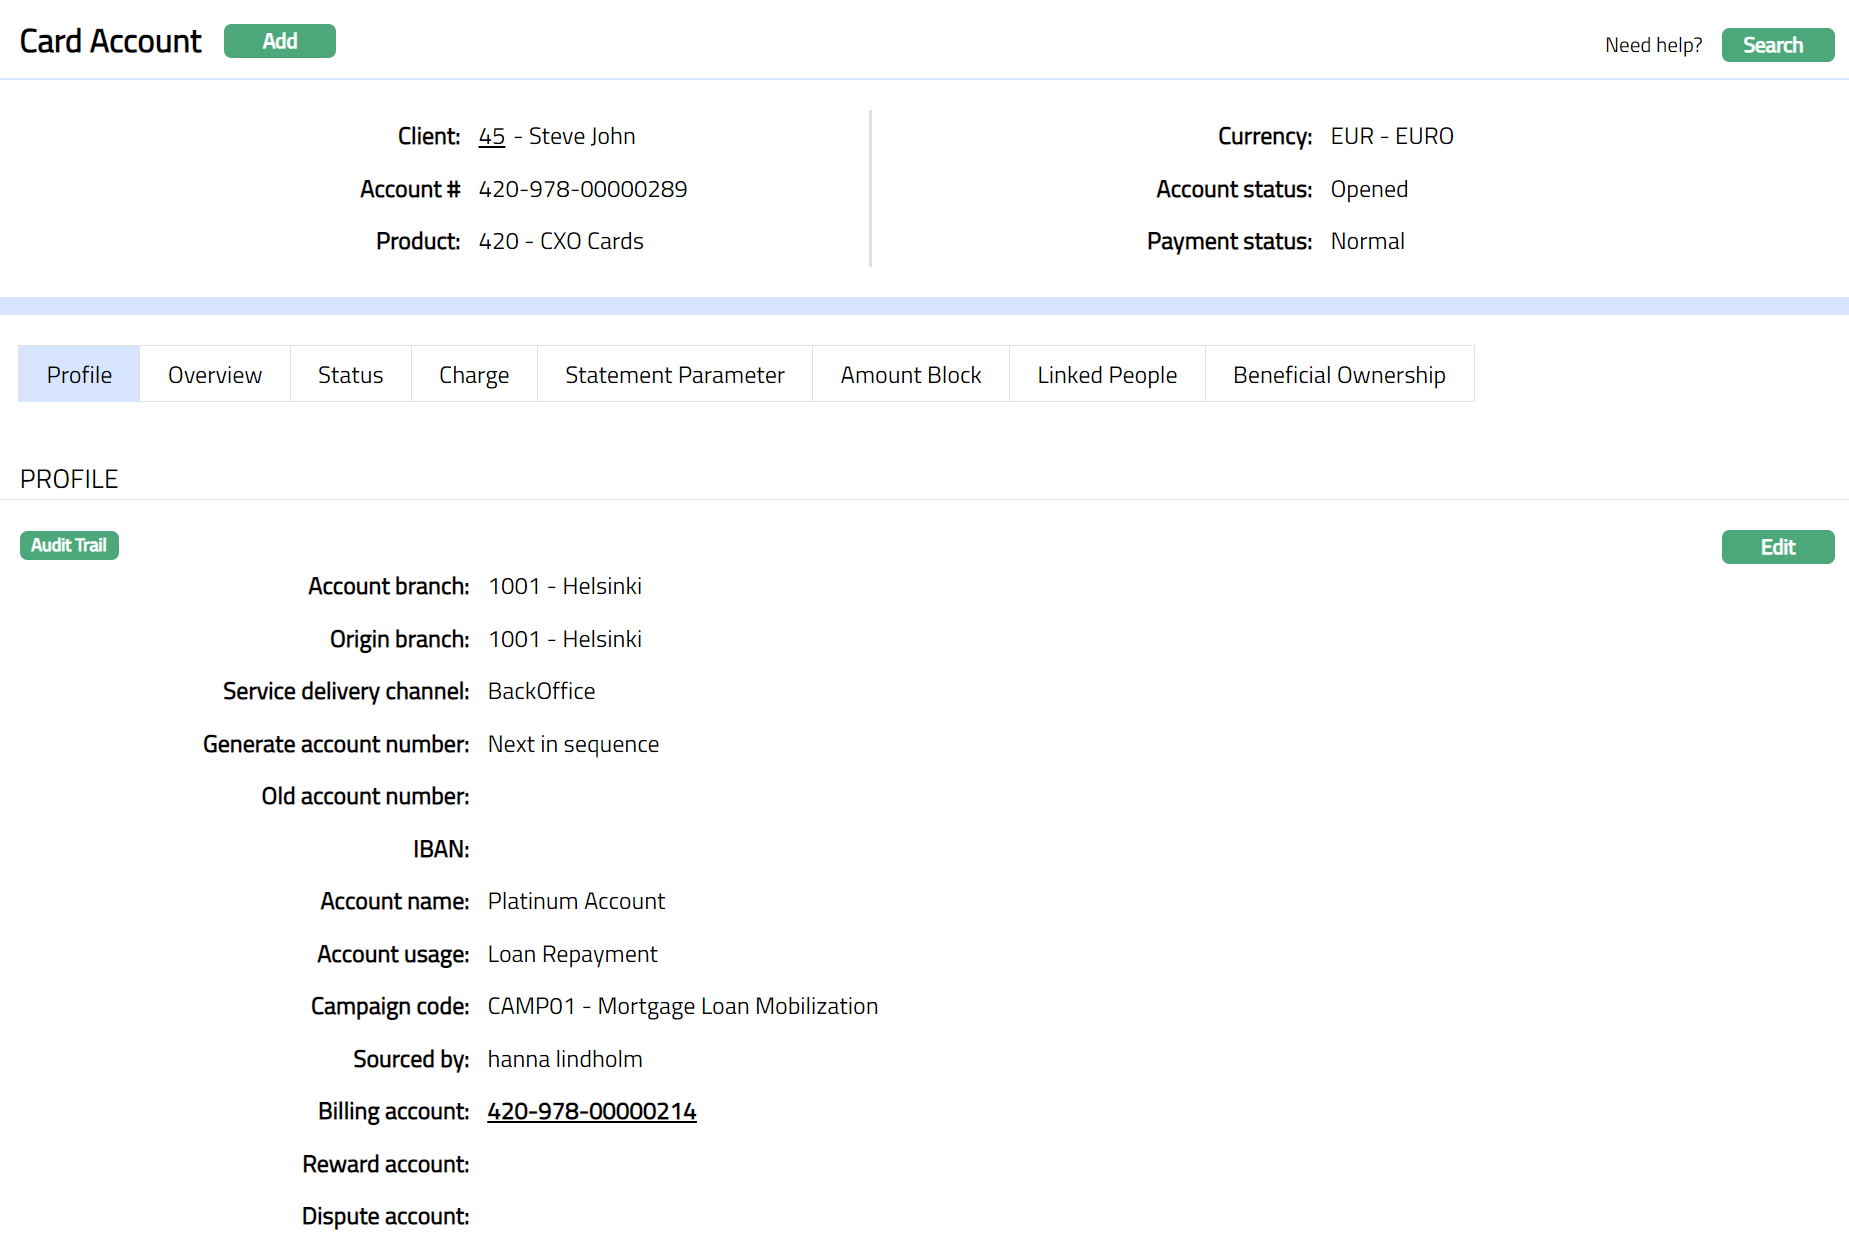
Profile
Profile tab, which is the default tab in the Card Account screen, shows the basic details of the Card Account of the client.
- Access Card Account page and click Profile tab to view the details as per sample below. The details are defaulted from the entries that you made during New Card Account creation. For details refer to New Card Account -- Details (1/2).
The additional fields that you can view in the Profile tab are explained below:
Origin branch denotes the branch name where the Account was created. This field is non-editable.
Old Account number can be used to record the earlier account number, say, from a legacy system, for purposes of reference. You can enter the same during Edit.
Aura displays the IBAN for the Account. IBAN is generated only if you have selected IBAN generation required at Product level. This field is non editable.
Billing Account displays the account number under which billing will be done. It is a non-editable field. In case of Billing accounts, this will show the same account number; while in case of Transaction accounts, this will show a different account number.
Bonus Account is the account where the bonus points get accumulated. It is non-editable field. It will be displayed only in case a Bonus account is mapped to the card account.
Dispute account displays the account number which contains the disputed balance. It is non-editable field. It will be displayed only in case a Dispute account is mapped to the card account.
To edit Profile:
- Access Card Account page. The Profile tab is displayed by default.
- Click Edit. Edit Profile page appears.
Note: The editable fields are as follows:
Service delivery channel
Old account number
Account name
Account usage
Campaign code
Sourced by
- Click Save. Profile page appears with the edited details.
 Functions: Edit
Overview
The Overview tab allows you to see various details of an account to get an immediate overview of the account in terms of the various balances in the account and details of the current cycle, past cycle and overdue. It also shows information on the interest and general activities in the account. The fields that you see would depend on whether it is a Billing account or a Transaction Account.
To view the account details
- Access Card Account page and click Overview tab to view the details.
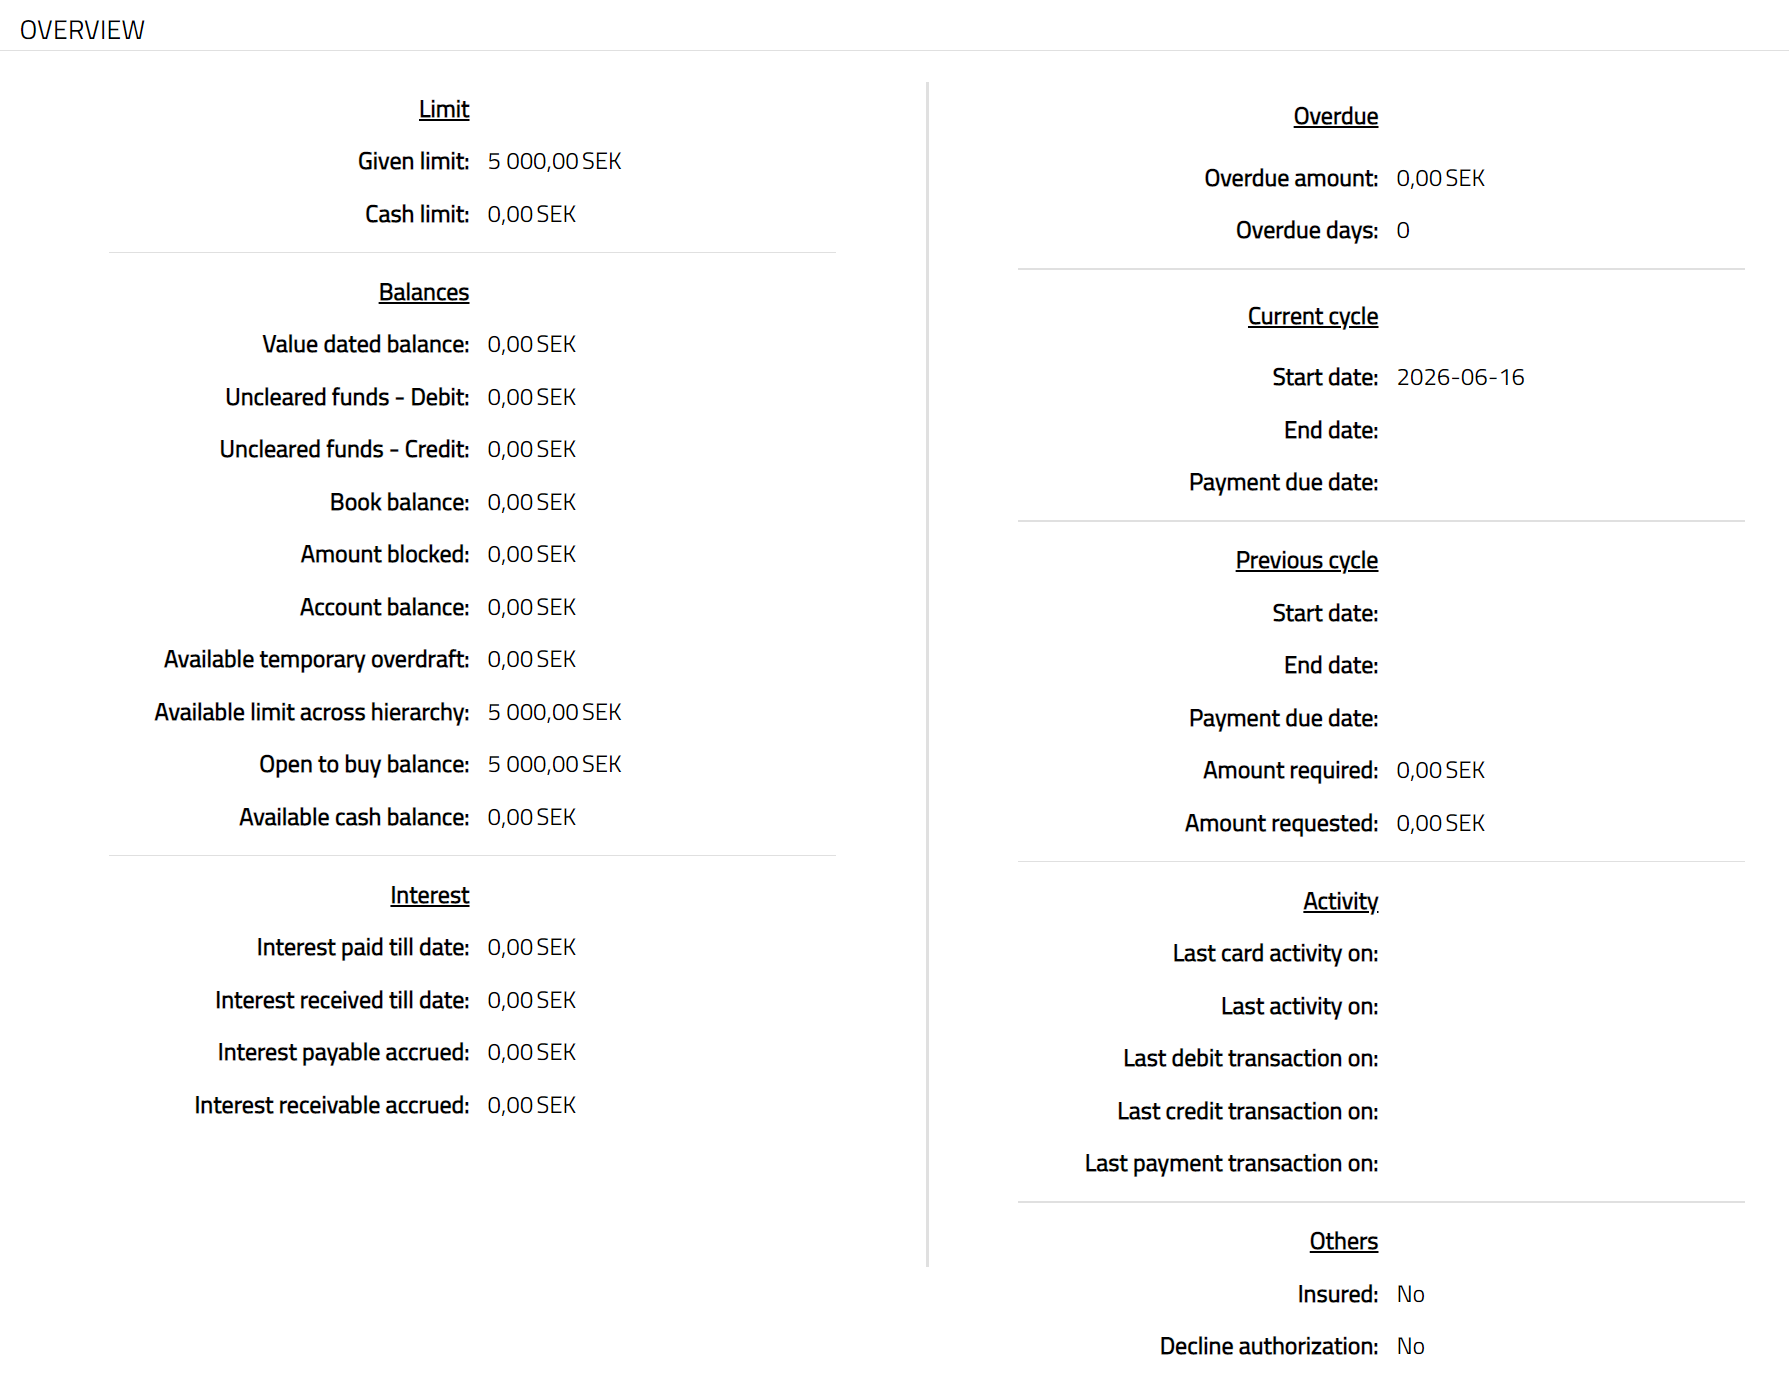
Given limit is the total limit amount attached to the Card account while creating an account. The value is derived from the Secured By tab. This is a static amount.
Cash Limit is the Approved cash limit amount. This is that part of the Credit Limit that will be available as the Cash Limit for the account. This will be calculated using the Approved Cash Limit% and the Secured Limit. The value is derived from the Settings tab.
Value dated Balance will display the current value dated balance in the account. This will be shown as a negative amount in the case of Debit balance and as a positive amount in case of Credit balance.
Uncleared funds -- Debit denotes the total amount of future value dated debits for the account. In case of negative debits (say, for a reversal) with a future value date, it will be shown under Uncleared funds -- Credit.
Uncleared funds -- Credit denotes the total amount of future value dated credits for the account. In the case of negative credits, (say, for a reversal) with future value date, it will be shown under Uncleared funds -- Debit.
Book balance will display the current book dated balance. The Book balance will be calculated as Value dated balance -- Uncleared Funds Debit + Uncleared Funds Credit. This will be shown as a negative amount in the case of Debit balance and as a positive amount in case of Credit balance.
Amount blocked is the sum of authorizations that are pending on the account. The value is derived from the sum of all active amount blocks in the Amount block tab. This is generally shown as a negative amount.
Account balance denotes the available balance in the account and is calculated as Book Balance + Amount Blocked. This will be shown as a negative amount in the case of Debit balance and as a positive amount in case of Credit balance.
Available earmark denotes the earmarked amount available to the account.
For Billing account, Aura will display the sum of all active Allocated earmark amounts. The balance will be displayed with --ve sign.
For Transaction account, Aura will display the sum of all active Available earmark amounts. The balance will be displayed with the +ve sign.
The value for the Allocated earmarked amount is derived from the Earmark tab. By default, the value is 0.
Available temporary overdraft is a temporary additional amount that is granted by the bank. This will be derived from the Settings tab. This is generally shown as a positive amount.
Available limit across hierarchy is the minimum available limit across the limit hierarchy above. If the limit has been over-utilized, this field will be 0.
Open to buy balance displays the available limit balance for both billing and transaction account. By default, it will be 0.
If Account balance is a Debit balance
OTB (open to buy balance) = Available earmark + Available temporary overdraft + Available limit across hierarchy
If Account Balance is a Credit balance
OTB (open to buy balance) = Account balance + Available earmark + Available temporary overdraft + Available limit across hierarchy.
Available cash balance is the cash balance available in the Card account. Available cash balance will be the minimum of [Cash limit minus (sum of all balances under Balance classes where "qualify for cash limit" is YES) minus (Sum of all active Amount Blocks where the Block Category is checked for cash limit balance) and Open to buy balance]. By default, the value will be 0. For Transaction account, Cash limit of the Billing account will be considered.
Interest paid till date denotes the amount of interest paid out till date (credited) to the card account. This field will be displayed only for Billing accounts and not for Transaction account.
Interest received till date denotes the amount of interest received till date (debited) on the account. This field will be displayed only for Billing accounts and not for Transaction account.
Interest payable accrued denotes the amount of interest payable accrued (but not yet credited to the card account) as of the previous day, since interest payable accrual happens at the end of day. This field will be displayed only for Billing accounts and not for Transaction account.
Interest receivable accrued denotes the amount of interest receivable accrued (but not yet debited from the card account) as of the previous day, since interest receivable accrual happens at the end of day. This field will be displayed only for Billing accounts and not for Transaction account.
Overdue amount displays the overdue amount -- i.e., the excess of Amount required over the Payment received. The value is derived from the Overdue adjustment tab.
Overdue days denote overdue days as on date. The value is derived from the Overdue adjustment tab.
Start date (Current Cycle) will display the start date for the current cycle. For the first cycle, the Start date will be the account activation date.
For example, Invoice generated for Cycle: 26^th^ Jan to 25^th^ Feb; Payment due date -- 10^th^ Mar. From 26^th^ Feb to 25^th^ Mar, Start date for current cycle will be 26^th^ Feb.
- End date (Current Cycle) will display the end date for the current cycle.
For example: Invoice generated for Cycle: 26^th^ Jan to 25^th^ Feb; Payment due date -- 10^th^ Mar. From 26^th^ Feb to 25^th^ Mar, End of cycle date will be 25^th^ Mar.
- Payment due date (Current Cycle) will display the payment due date for the current cycle.
For example: Current Cycle: 26th Jan to 25th Feb. From 26th Jan to 25th Feb, Payment due date -- 10th Mar.
- Start date (Previous cycle) will display the start date of the previous cycle. For the first cycle, it will be blank.
For example: Invoice generated for Cycle: 26^th^ Jan to 25^th^ Feb; Payment due date -- 10^th^ Mar. From 26^th^ Feb to 25^th^ Mar, Start date of previous cycle will be 26^th^ Jan.
- End date (Previous cycle) will display the end date of the previous cycle for which invoice has been generated last.
For example: Invoice generated for Cycle: 26^th^ Jan to 25^th^ Feb; Payment due date -- 10^th^ Mar. From 26^th^ Feb to 25^th^ Mar, End date of previous cycle will be 25^th^ Feb.
- Payment due date (Previous cycle) will display the payment due date for the previous cycle.
For example: Invoice generated for Cycle: 26^th^ Jan to 25^th^ Feb; Payment due date -- 10^th^ Mar. From 26^th^ Feb to 25^th^ Mar, Payment due date of last cycle will be 10^th^ Mar.
- Amount Required (Previous cycle): Amount required is the minimum amount that the customer has to pay to avoid overdue interest and / or any overdue-related charges / status changes. The amount required value depends on the option chosen at product level and any changes that have been made at the account level (example: payment plan, negotiated payment, etc.). It will display the amount required for the previous cycle as generated in the invoice.
For example**😗* Invoice generated for Cycle: 26^th^ Jan to 25^th^ Feb; Payment due date -- 10^th^ Mar. From 26^th^ Feb to 25^th^ Mar, the Amount required will show the figure from the above invoice.
- Amount Requested (Previous cycle): Amount Requested denotes the amount requested for payment for the last invoice. The requested amount depends on the option chosen at product level and any changes that have been made at the account level (example: Full payment request).
For example: Invoice generated for Cycle: 26th Jan to 25th Feb; Payment due date -- 10th Mar. From 26th Feb to 25th Mar, Amount requested will show the figure from the above invoice.
Last card activity on displays the date on which the last card activity (debit / credit) was recorded on the account. The transaction code used should have Card Activity as Yes.
Last activity on displays the date on which the last activity (debit / credit) was recorded on the account.
Last debit transaction on displays the date on which the last debit transaction was recorded.
Last credit transaction on displays the date on which the last credit transaction was recorded.
Last payment transaction on displays the date on which the last payment transaction on the account is recorded. The transaction can be a credit transaction code of a balance class where Treat as payment is Yes or a Debit transaction reversal for which Treat reversal as payment is marked.
Insured: If even one Insurance Plan for the account is active, the Insured field will show Yes; else, it will show No.
Decline authorization displays Yes if Decline authorization field is marked as Yes in the Account Status tab or Payment Status tab of the account. Else it shows No.
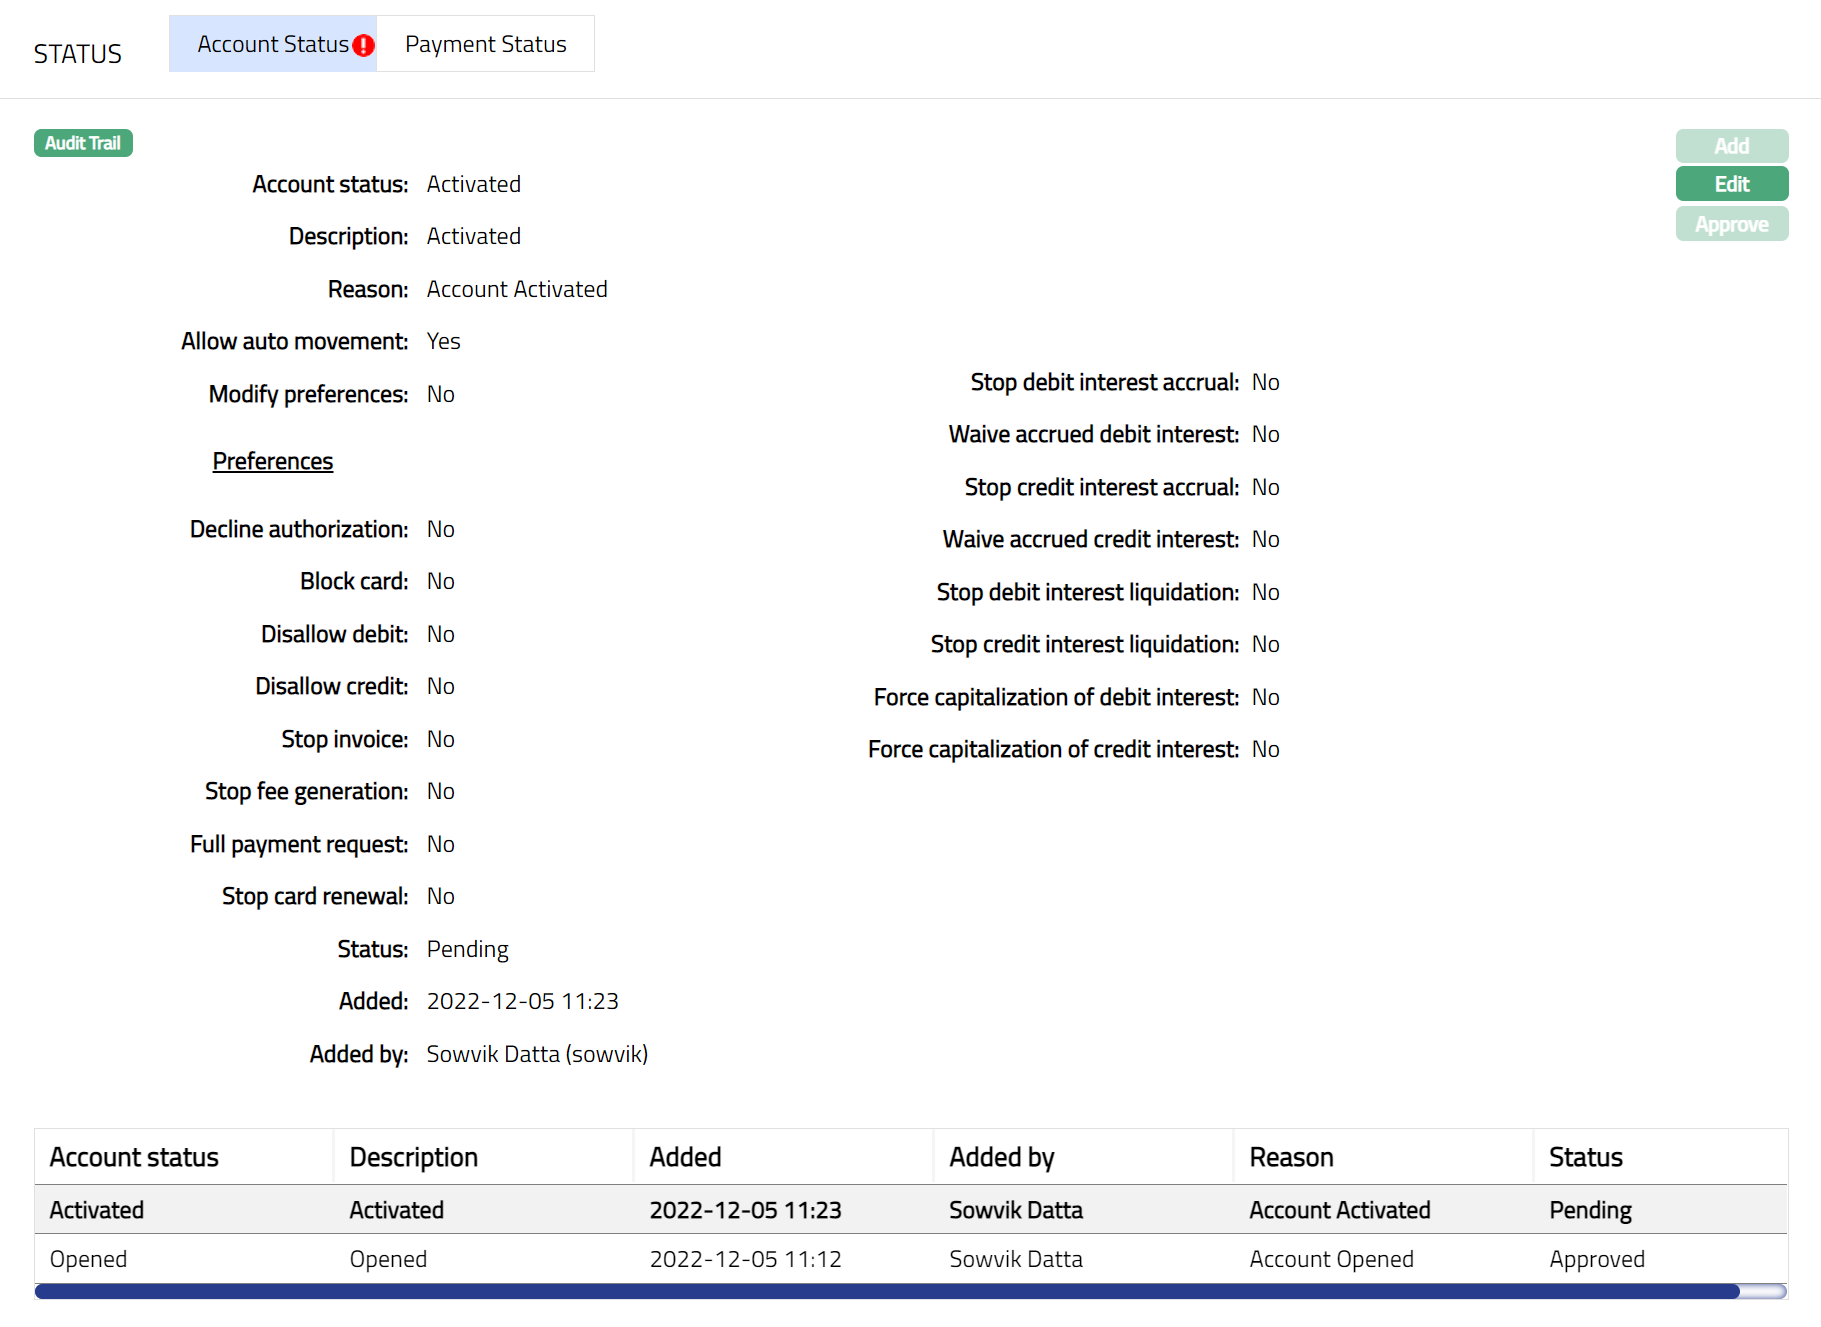
Status
The Status tab allows you to view / set the Account status and Payment Status as well as define the Preferences for the current status of the account. The Preferences will allow you to enable / disable certain functions on the card account like Interest Accrual, Waiver, Liquidation, Disallow Debit, Disallow credit, Stop invoice etc.
There are two sub-tabs
Account Status
The Account Status of an account can be automatically moved based on the Rules that have been defined for the Product; or it can be manually set.
This tab will allow you to set and view the history of the Account Status of the Card Account. The list of Account Statuses and the corresponding Preference details for each status would be defaulted from the Status Maintenance (Admin > System Codes > Generic Definitions > Status). You can edit the defaulted preferences before approval.
The following Account Statuses will be pre-shipped:
Opened: This is the initial account status as soon as it is created. If the Account Status is Opened, then Preferences will not be displayed.
Activated: This is the status in which transactions are allowed on the account. The account creator and the approver should be two different users. If the Account status is Activated, then the Preferences will be displayed and by default the preferences will be No.
Marked for Closure: This is the status to which an account can be moved manually. During the End-Of-Day processing, any account that is in this status will be Closed. Preferences are enabled and pre-defined.
Closed: This account status will be automatically updated when an account closure is processed. If the Account status is Closed, the preferences will not be displayed.
Re-opened: You can open an account that has a Closed account status, if needed. This account status is equivalent to Open account status in all other respects but gives you an indication that the account was once Closed. If the Account status is Reopened, the preferences will not be displayed.
You would be able to set a new status for an account subject to the following:
a. An Account can move between the pre-shipped statuses as follows:
From Opened to Activated
From Activated to Marked for Closure
From Marked for Closure to Activated
From Closed to Reopened
From Reopened to Activated
b. An account can move to any of the user defined account statuses.
c. When the Account Status is changed manually, the Allow Auto movement flag as maintained in Status Maintenance will be inherited for the new Status; however, you can change the same. When the account is in this status, and the flag is No, rule-based status changes will not apply.
Notes related to Transaction Accounts
The Account Status for a Transaction Account will change, whenever the Billing Account's Account status changes. This is however subject to the flag -- Allow Auto Movement. If this flag is Yes at the Transaction Account, the Account Status of the Transaction Account will automatically move as per the Billing Account. If this flag is No at the Transaction Account, the Account Status of the Transaction Account will not be governed by the Billing Account's Account Status. Thus, if Allow auto movement is Yes in the Transaction Account it will automatically take the account status from the Billing Account; else it will remain the same as was before the rule was applied.
For a Transaction Account, the Preferences related to Invoice and Interest are not relevant. These preferences for the corresponding Billing account will prevail.
To view the Account Status
- Access Card Account page and click Status tab and then Account Status tab. On creation of the Card Account, the Account Status is Opened, Record Status is Approved and there are no Preferences as shown below:
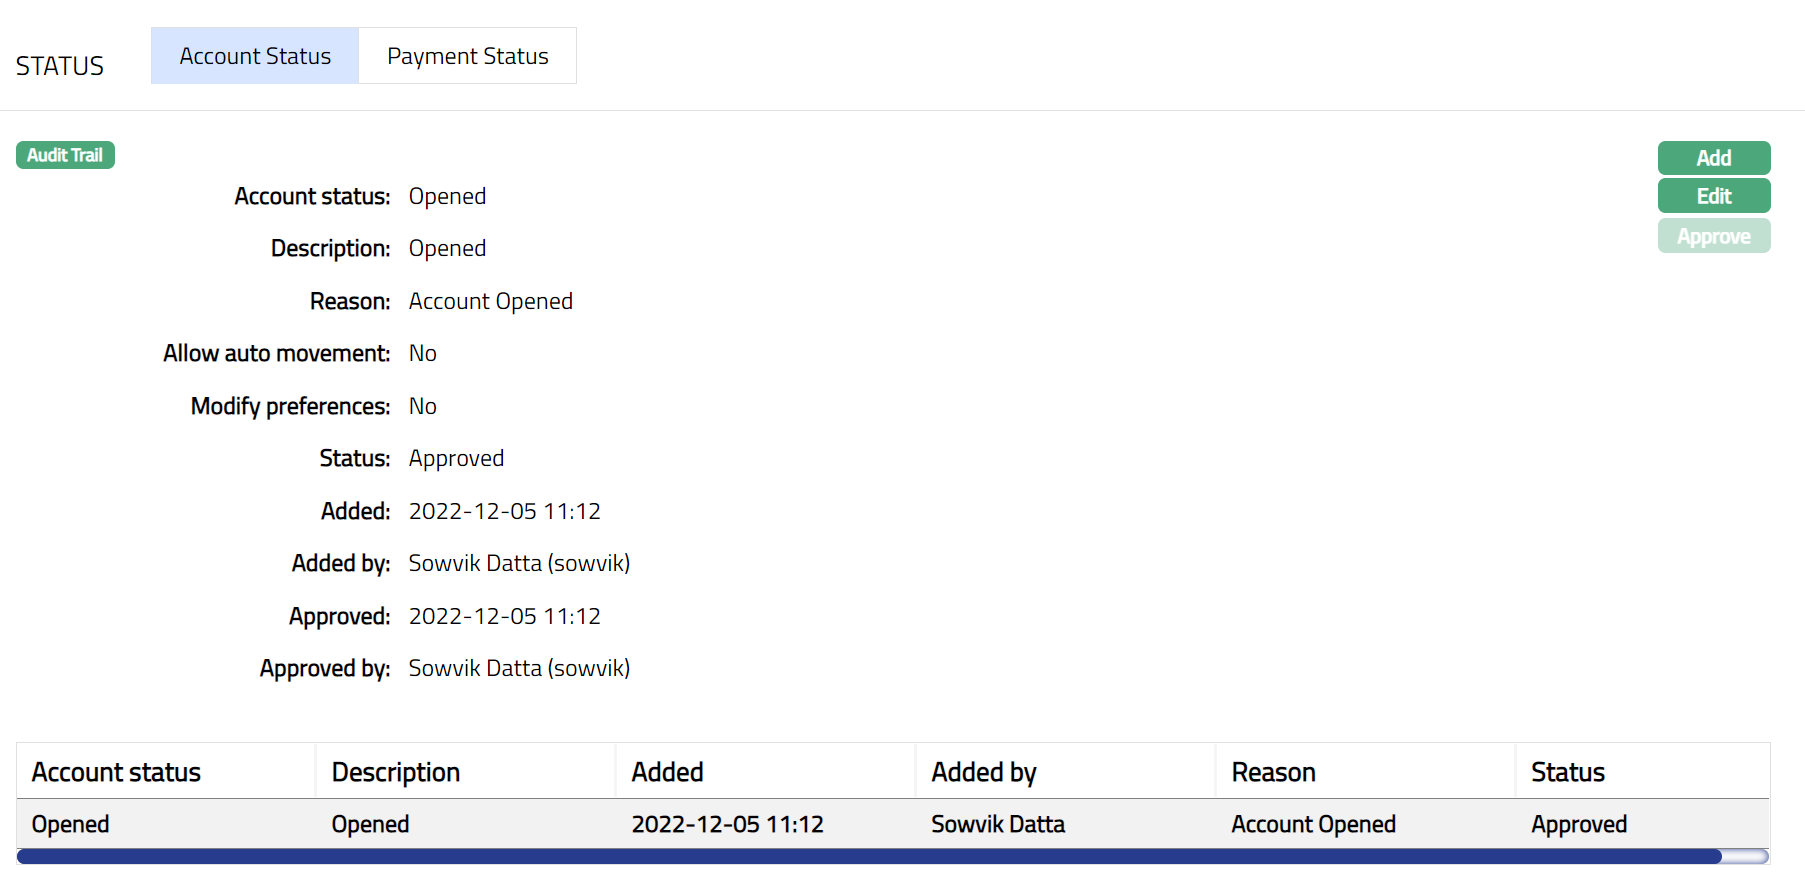
Account Status displays the status of the account. On account creation, the Account Status is Opened.
Description is defaulted from the Account Status in case of user defined Account Statuses; and in case of pre-shipped Account Statuses, Description is the same as the Account Status. On account creation, Description is Opened.
Reason displays the reason for the status selected for the account. In case of automatic status movements, the reasons are predefined; while in case of manual status updates, this will display the reason input during the manual status change.
Allow auto-movement is defaulted from Account status in case of user defined Account Statuses; and in case of pre-shipped Account Statuses, this is predefined. When status is Opened, the Allow auto movement flag is defaulted to No, and is not editable.
Modify Preferences is defaulted from Account status in case of user defined Account Statuses; and in case of pre-shipped Account Statuses, this is predefined. When status is Opened, the Modify Preferences flag is defaulted to No, and is not editable.
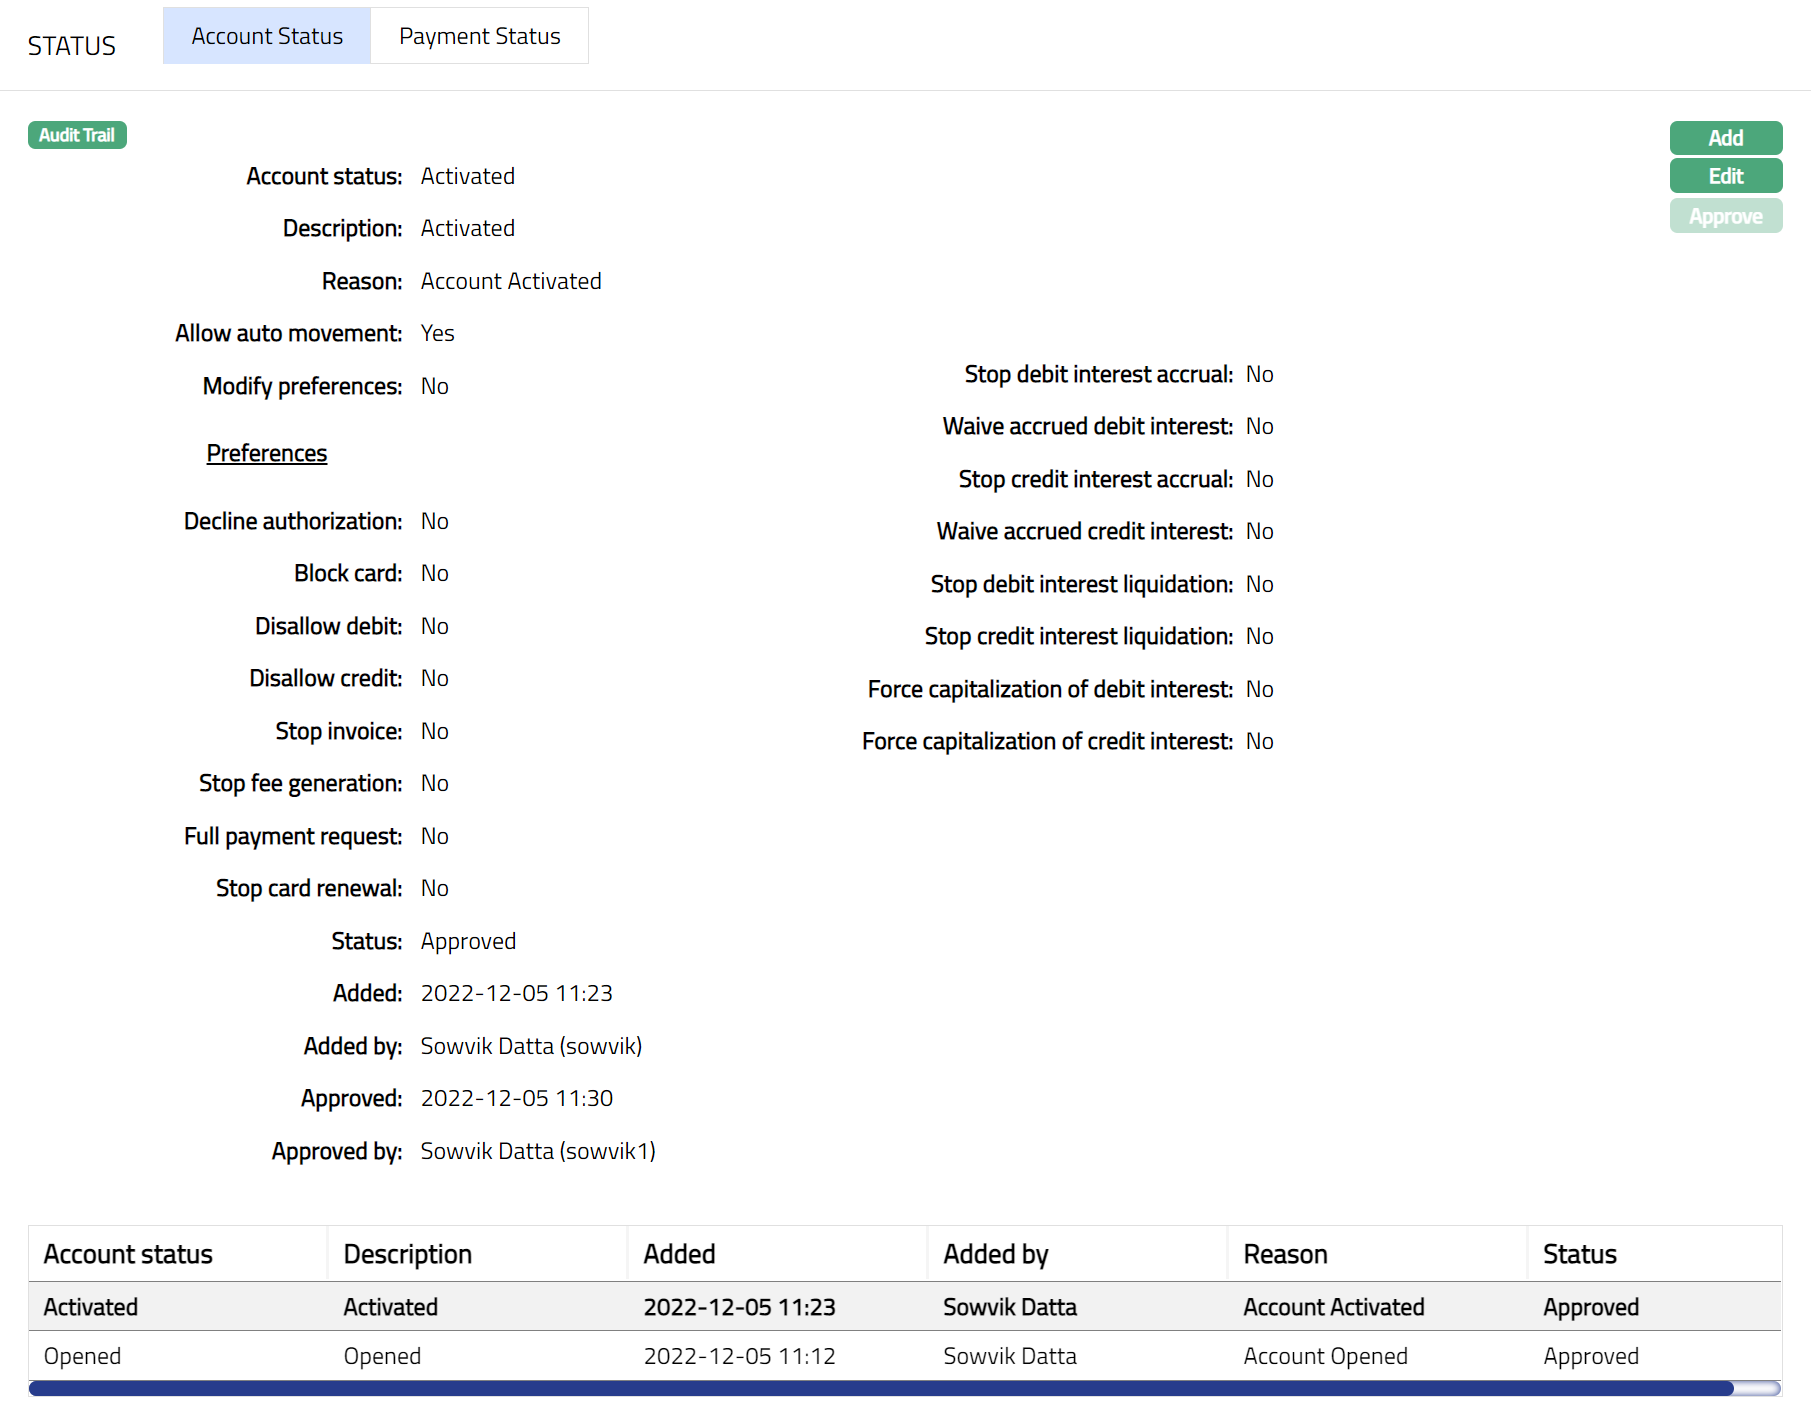
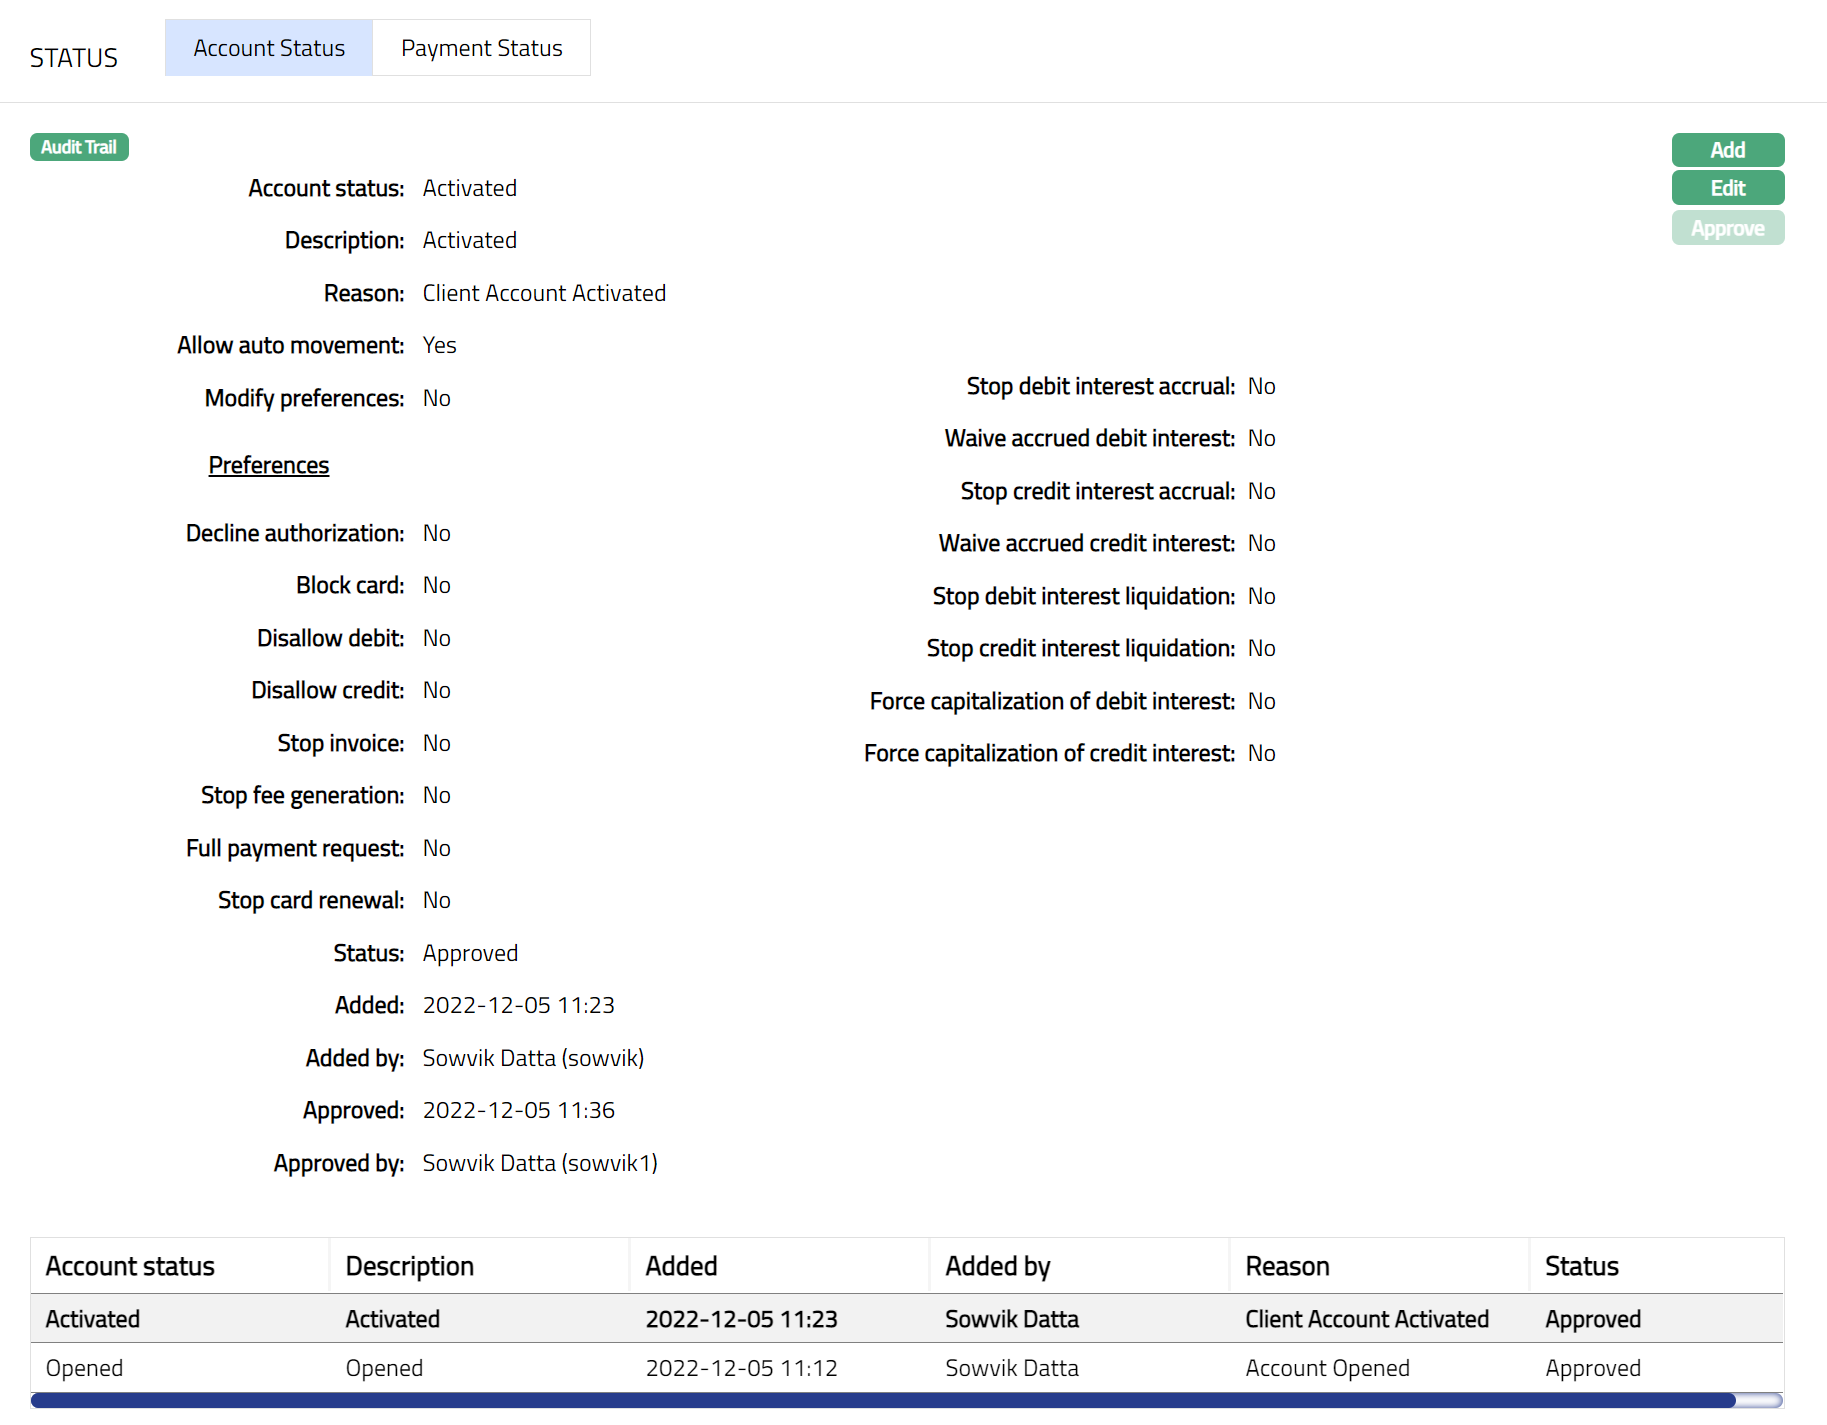
Status field denotes the status of the record. In case of automatic status movements, the Status is automatically set to Approved; while in case of manual status updates, this will be Pending. Once another user manually approves the record, this will be set to Approved.
The following fields are shown only in the View screen and are not editable:
Status field denotes the status of the tab.
Added field denotes the date on which the record was added.
Added by field denotes the name of the user who created the record.
Approved field denotes date on which the record was approved and is displayed only for approved records.
Approved by field denotes name of the user who approved the record and is displayed only for approved records
Note: On account creation, the Account status of the account is opened, and no activities are possible on the account till it is Activated. You need to set the status manually to Activated status so that there can be activities in the account.
To manually add Account Status / Preferences for an Account Status
- Access Card Account page and click Status tab and then Account Status tab.
- Click Add. Add Account status screen appears.
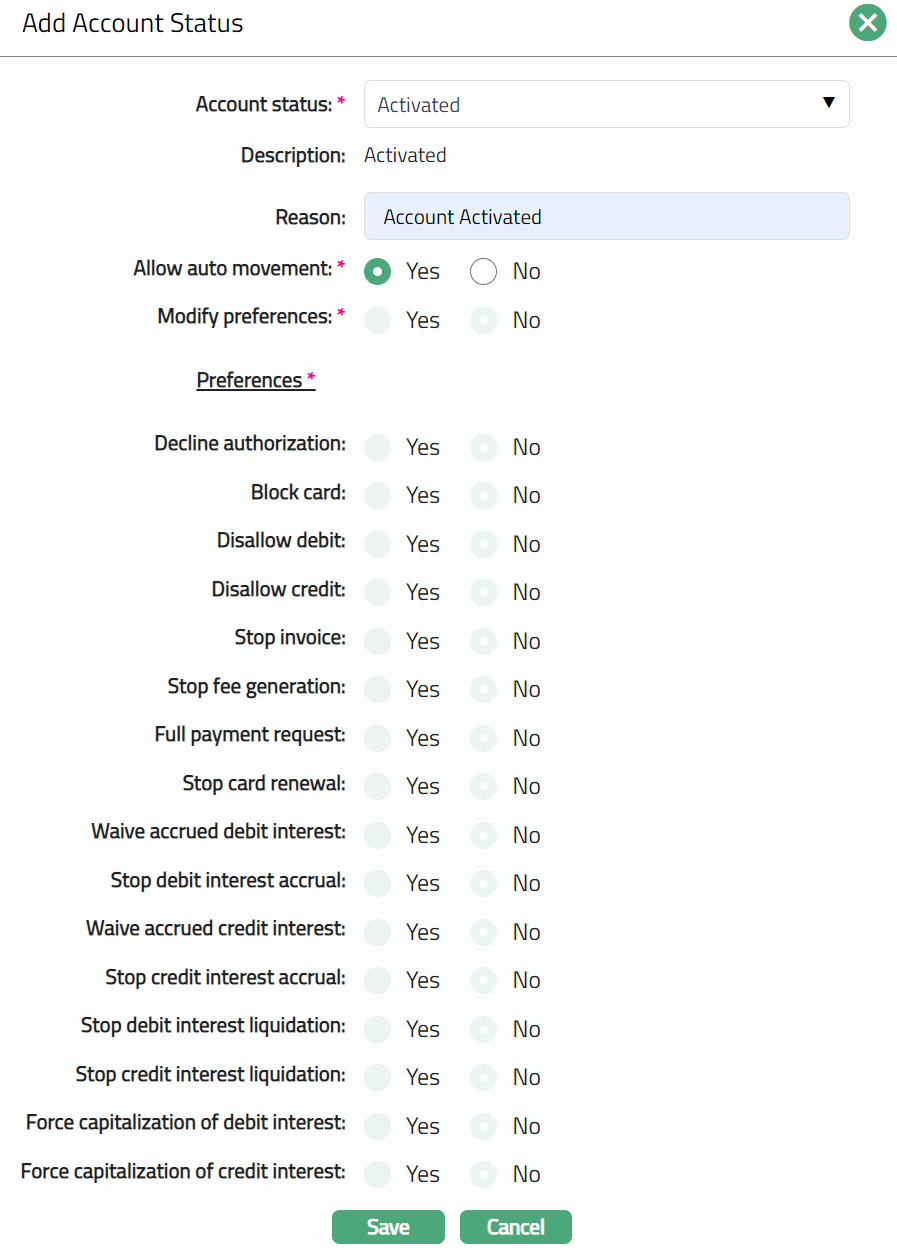
- Select Account status to which you want to move the Account. Depending on the current status of the account, the list of Account Statuses shown here will change as described below:
| Current status | List of Account Statuses |
|---|---|
| Opened | Activated |
| Activated | User defined Account Statuses or Marked for Closure |
| User defined statuses | Activated or any other User defined Account Status or Marked for Closure |
| Closed | Reopened |
| Reopened | Activated |
Description displays the description of the status selected above and is displayed by default.
Enter Reason for the status movement.
If Allow auto movement is Yes, rule-based status changes will automatically be applied to the account; however, if No is selected, then the rule-based status changes will not apply. By default, this will be as explained in the following table:
| Current status | Allow auto movement flag |
|---|---|
| Opened | Defaulted to No and disabled and the Preferences will not be displayed. |
| Activated | Defaulted to Yes and enabled and all the preferences will be displayed. |
| Marked for Closure | Defaulted to No and disabled |
| Closed | Default to No and disabled |
| Reopened | Default to No and disabled |
| User Defined Status | As in Status Maintenance |
- When the Modify Preferences is marked as Yes, then the Preferences will be enabled, and you can modify them as required. When the flag is marked as No, then all Preferences from the Status Maintenance will be defaulted and disabled. By default, this will be as explained in the following table:
| Current status | Modify preferences flag |
|---|---|
| Opened | Defaulted to No and disabled. |
| Activated | Default to Yes and enabled |
| Marked for Closure | Defaulted to Yes and enabled |
| Closed | Default to No and disabled |
| Reopened | Default to No and disabled |
| User Defined Status | As in Status Maintenance |
Decline Authorization: When the flag is marked as Yes, Aura will decline all authorizations irrespective of the balance available in the account. It will be defaulted from the account status maintenance after selection of account status.
Block card: When the flag is marked as Yes then the card will be blocked. It will be defaulted from the account status maintenance after selection of account status.
Disallow Debit: When the flag is marked as Yes, Aura will not allow you to debit from that account. However, based on Allow Forced Debit flag in the Transaction code, debits may still be done. It will be defaulted from the account status maintenance after selection of account status.
Disallow Credit: When the flag is marked as Yes, Aura will not allow you to credit to this account. However, based on Allow Forced Credit flag in the Transaction code, credits may still be done. It will be defaulted from the account status maintenance after selection of account status.
Stop Invoice: When the flag is marked as Yes, no invoice will be generated for this account. This does not stop debit interest liquidation. Only invoice generation is stopped. If debit interest has to be stopped then the relevant flag (Stop Debit interest accrual) has to be marked. It will be defaulted from the account status maintenance after selection of account status.
Stop fee generation: When the flag is marked as Yes, Aura will not process any periodical fee for the account. However, the transaction charges that are generated by the Transaction file upload will continue to apply. It will be defaulted from the account status maintenance after selection of account status.
Full payment request: When the flag is marked as Yes, then Aura will override the payment amount options to always require for full outstanding balance. Amount required and Amount requested will always be full outstanding balance. It will be defaulted from the account status maintenance after selection of account status.
Stop card renewal: When the flag is marked as Yes, then it indicates stoppage of card renewal. It will be defaulted from the account status maintenance after selection of account status.
Stop debit interest accrual: When the flag is marked as Yes, Aura will stop any interest accrual on the debit balances for this account. When the flag is unchecked, Aura will continue to accrue interest from that date. There will not be any accrual for the interim period when this flag is Yes. It will be defaulted from the account status maintenance after selection of account status.
Waive accrued debit interest: This field is enabled only if Stop debit interest accrual is marked as Yes. You can choose to waive the interest that has accrued till that point by marking this Yes. If this is marked as No, then the interest that had accrued till then will not be waived and will remain as an accrual. It will be defaulted from the account status maintenance after selection of account status.
Stop Credit interest accrual: When the flag is marked as Yes, Aura will stop any interest accrual on the credit balances for this account. When the flag is unchecked, Aura will continue to accrue interest from that date. There will not be any accrual for the interim period when this flag is Yes. It will be defaulted from the account status maintenance after selection of account status.
Waive accrued Credit interest: This field is enabled only if Stop credit interest accrual is marked Yes. You can choose to waive the interest that has accrued till that point by marking this Yes. If this is marked as No, then the interest that had accrued till then will not be waived and will remain as an accrual. It will be defaulted from the account status maintenance after selection of account status.
Stop debit interest liquidation: When the flag is marked as Yes, Aura will not liquidate any debit interest even though the liquidation day according to the frequency is reached. The accrual of debit interest continues and thus this flag will only stop the liquidation of interest as long as this option is checked. When the flag is unchecked all the accrued debit interest will be liquidated in the next cycle. It will be defaulted from the account status maintenance after selection of account status.
Stop credit interest liquidation: When the flag is marked as Yes, Aura will not liquidate any credit interest even though the liquidation day according to the frequency is reached. The accrual of credit interest continues and thus this flag will only stop the liquidation of interest as long as this option is checked. When the flag is unchecked all the accrued credit interest will be liquidated in the next cycle. It will be defaulted from the account status maintenance after selection of account status.
Force capitalization of debit interest: When the flag is marked as Yes, Aura will liquidate the accrued debit interest in the account, when the account moves to this payment status. If this is Yes, Stop Debit Interest Accrual will be Yes and disabled. It will be defaulted from the account status maintenance after selection of account status.
Force capitalization of credit interest: When the flag is marked as Yes, Aura will liquidate the accrued credit interest in the account, when the account moves to this payment status. Withholding Tax will be debited. If this is Yes, Stop Credit Interest Accrual will be Yes and disabled. It will be defaulted from the account status maintenance after selection of account status.
Click Save. The Account Status sub tab under Status tab appears with the added details and the Status will be Pending.
Functions: Add, Edit, Approve
Note: Any changes made in this Account status tab, will display the Status as Pending. On Approval by another user who has not created the account, the Status will change to Approve.
The additional fields that you can view in the tab are explained below:
Status field denotes the status of the tab.
Added field denotes the date on which the record was added.
Added by field denotes the name of the person who created the record.
Approved field denotes date on which the record was approved.
Approved by field denotes name of the person who approved the record.
You can edit a record for Account Status for both Billing and Transaction Accounts. To edit,
- Click Edit. Edit Account Status page appears.
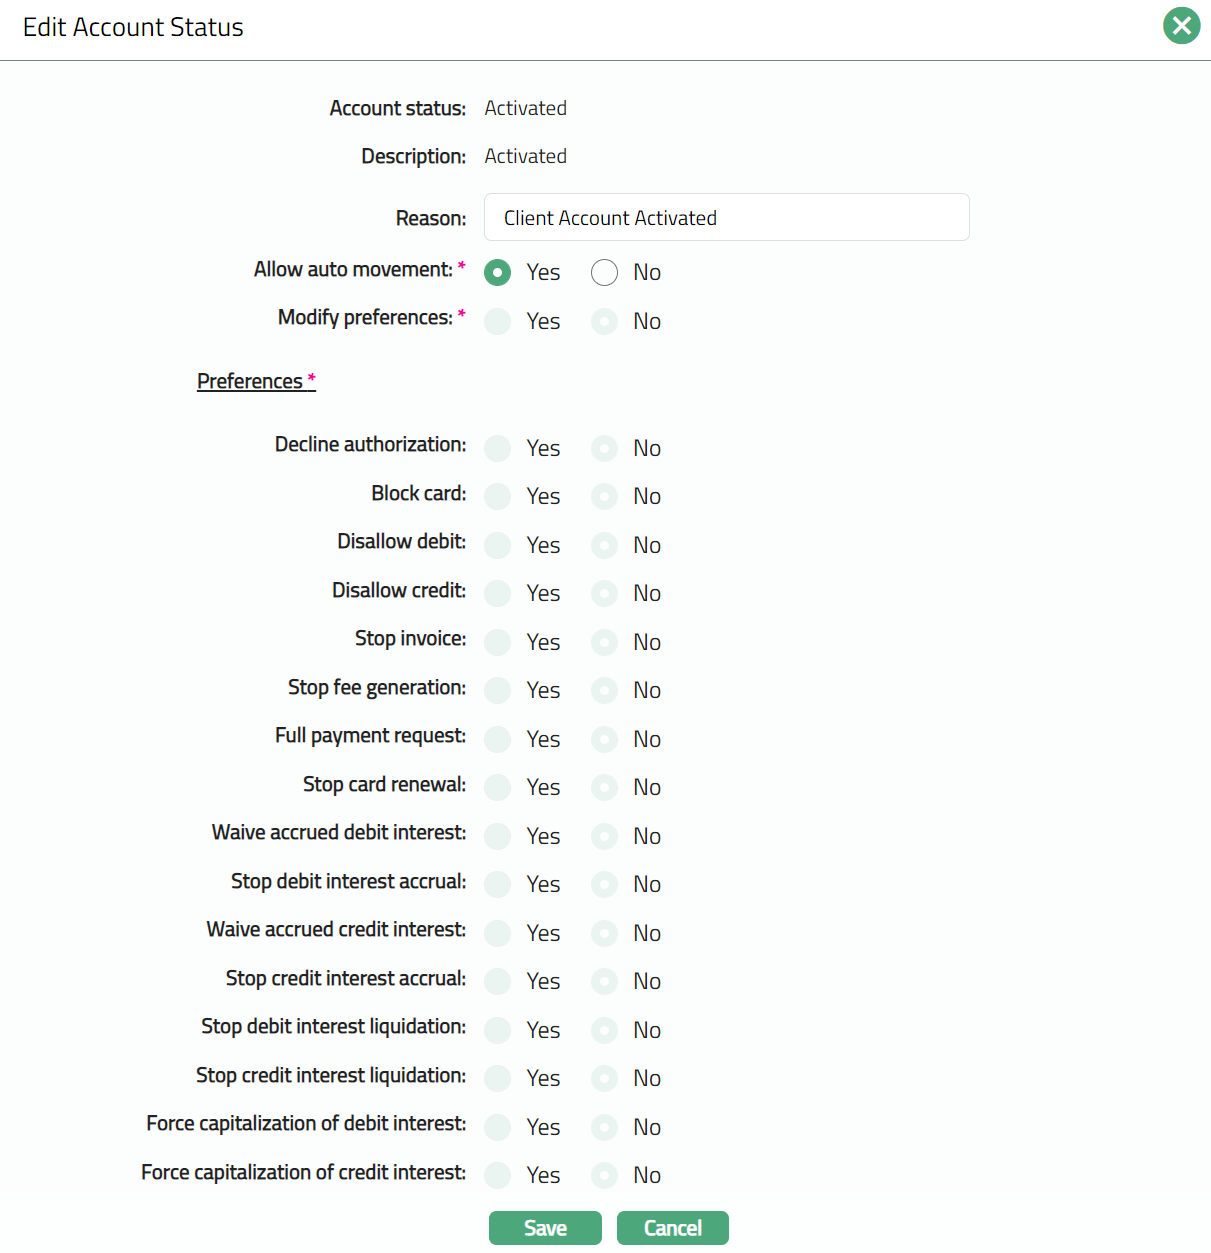
Except Account Status and Description, all other fields are editable**,** subject to certain conditions as described earlier.
The Preferences can be edited, only if the Modify preference is Yes. By default, it will display all the last maintained values for the Account status.
Click Save. Account Status sub tab appears with the edited details.
Functions: Add, Edit, Approve
Note: Edit and Approve buttons will be enabled only when you add a new Account Status, and the status of the record is Pending. Any change in the tab will set the tab status to Pending till it is approved by another user. On approval, the record status is set to Approved and the Add button gets enabled.
Payment status
The Payment Status of an account can be moved only based on the Rules that have been defined for the Product. There will not be any user-input Payment Status at Account level.
This tab will allow you to view the current Payment status and the history of the payment status movements. You will be able to edit the Preferences for Payment Status only at the Billing Account. The same will be cascaded to the underlying Transaction Accounts. When an account is moved into a particular Payment status all the underlying accounts having this account as the billing account will also be changed. Payment statuses are handled only at the billing account level, so if an account has another account as the billing accounts it will derive the payment status from the billing account.
The following Payment Status will be pre-shipped: Normal
To view the Payment Status
- Access Card Account page and click Status and then Payment status tab. On account creation, the Payment Status is Normal as shown below:

Payment status displays the Payment status for the account.
The Description will be defaulted from the Payment Status Maintenance in case of user defined Payment Statuses; and in case of pre-shipped Payment Statuses, Description is the same as the Payment Status. On account creation, Description is Normal.
.
Reason displays the reason for the status selected for the account. In case of automatic status movements, the reasons are predefined; while in case of manual Preferences updates, this will display the reason input during the change.
Modify Preferences is defaulted from Payment status maintenance in case of user defined Payment Statuses; and in case of pre-shipped Payment Statuses, this is predefined. When Payment status is Normal, the Modify Preferences flag is defaulted to No, and is disabled. By default, this will be as explained in the following table:
| Current status | Modify preferences flag | Preferences |
|---|---|---|
| Normal | Defaulted to Yes and enabled. | By default, the Preference will be displayed and will be No. |
- Decline Authorization: When the flag is marked as Yes, Aura will decline all authorizations irrespective of the balance available in the account. It will be defaulted from the payment status maintenance after selection of payment status.
The following fields are shown only in the View screen and are not editable:
Status field denotes the status of the tab.
Added field denotes the date on which the record was added.
Added by field denotes the name of the user who created the record.
Approved field denotes date on which the record was approved and is displayed only for approved records.
Approved by field denotes name of the user who approved the record and is displayed only for approved records.
Note: On account creation, the Payment status of the account is Normal.
To manually set the Preferences for a Payment Status for a Billing Account
- Click Edit. Edit Payment Status page appears.
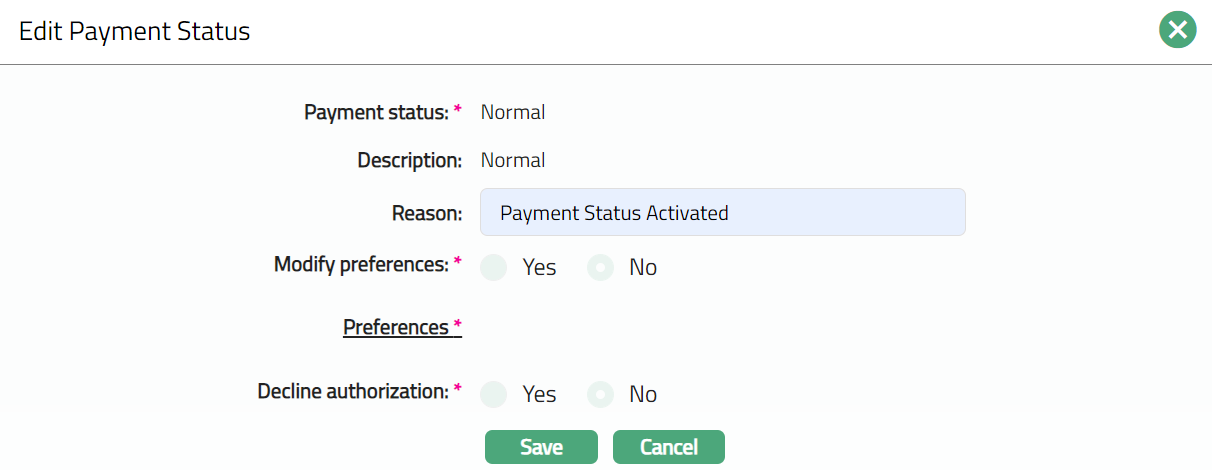
Only Reason field is editable.
The Preferences can be edited, only if Modify preference is Yes. By default, it will display all the last maintained values for the Account status.
Note:
You can edit a record for Payment Status only for Billing Accounts. The edited values will be cascaded to the underlying Transaction Accounts also.
When an account is moved into a particular Payment status all the transaction accounts -- that is accounts that have this account as the billing account -- will also be changed.
When the Decline Authorization flag is not under Account Status Preference or under Payment Status Preference, the Authorization request will be rejected.
- Click Save. Payment Status sub tab appears with the edited details.
Functions: Edit, Approve
Note: Any change in the tab will set the record status to Pending till it is approved by another user. On approval, the record status is set to Approved.
Functions: Edit, Approved.
The additional fields in the View screen are:
Status field denotes the status of the tab.
Added field denotes the date on which the record was added.
Added by field denotes the name of the user who created the record.
Approved field denotes date on which the record was approved and is displayed only for approved records.
Approved by field denotes name of the user who approved the record and is displayed only for approved records.
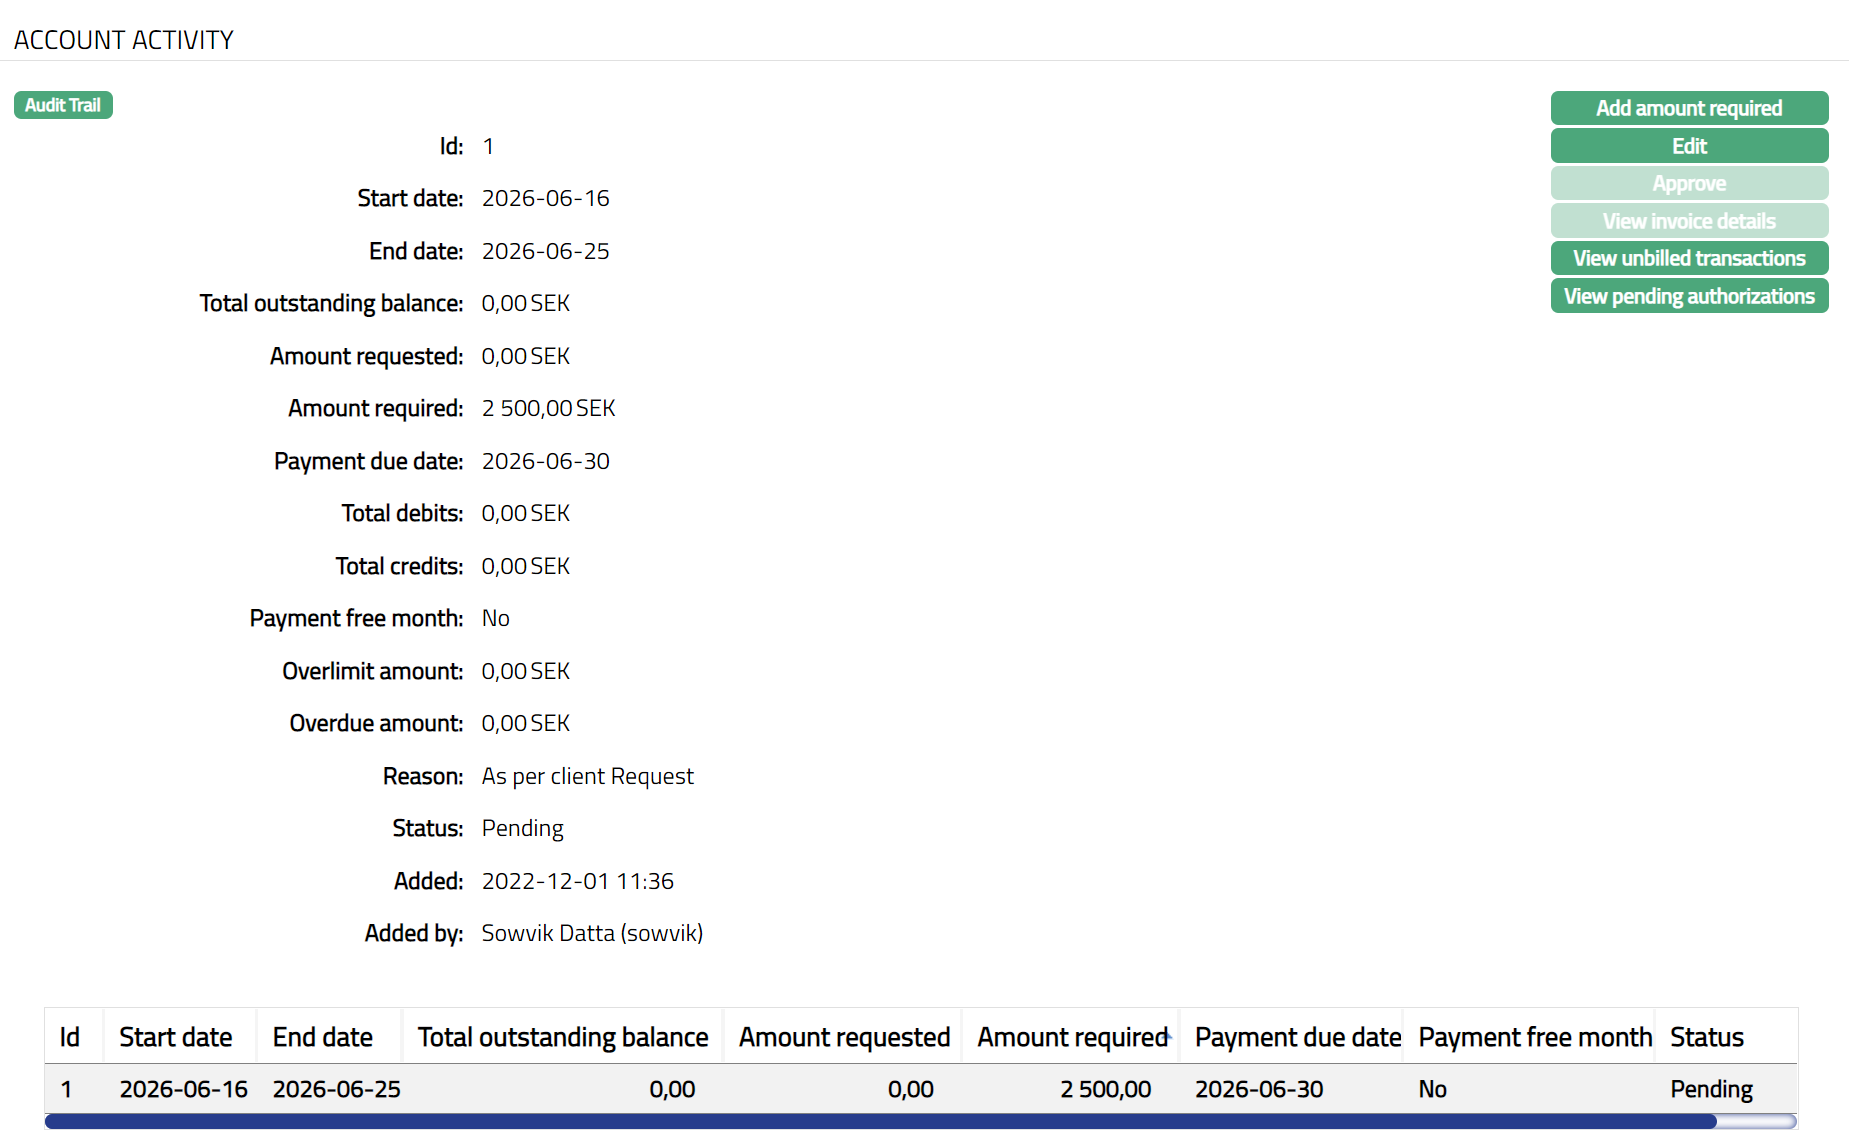
Account Activity
This tab enables the user to view the summary of invoice details, bonus points, balance class with accrued interest, unbilled transactions and pending authorizations (active amount blocks) for a Billing account and its related transaction accounts. This tab also allows the user to edit the Amount required when the invoice is generated till payment due date and also add the Amount required for the next invoice. You can perform the following actions under this tab.
- Access Card Account page and click Account activity tab to view the details as per sample below.
The fields that you can view are explained below:
Id denotes the unique identifier for the selected Invoice.
Start date denotes the cycle start date of the selected invoice.
End date denotes the cycle end date of the selected invoice.
Total outstanding balance is the total outstanding balance in the selected invoice.
Amount requested denotes the amount requested in the selected invoice.
Amount required is the minimum amount that the client is required to pay for the selected invoice.
Payment due date is the date by which the client has to make the payment for the selected invoice.
Total debits is the total of debit transactions in the billing cycle for the selected invoice.
Total credits denote the total of credit transactions in the billing cycle for the selected invoice
Payment free month displays Yes if that month is a Payment Free Month and there are no payments required from the client; else displays No.
Overlimit amount is the amount that was above the given limit as at the end of the billing cycle for the selected invoice.
Overdue amount denotes the amount overdue (amount required minus payments received) as at the end of the billing cycle for the selected invoice.
Reason denotes the reason for the record. For invoice records created by Aura, this is by default "invoice generation". In case of user created records, this displays the reason input by the user during creation of the record
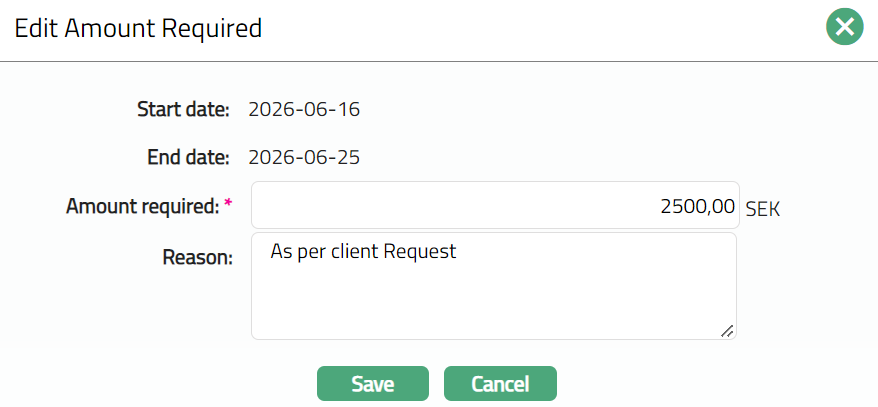
Add Amount Required
To Add amount required that has to be included in the next invoice,
- Click Add amount required button. The Add amount required page is displayed.

Aura automatically populates the current cycle Start date and End date for which the invoice is not yet generated.
Enter Amount required to be claimed in the next invoice. If the Product, Treat Overdue as Balance is set to Yes, this cannot be less than the overdue amount (Overdue Balance + Overdue Interest).
Enter Reason.
Click Save. The Account Activity page appears with the added details.
 Functions: Add amount required, Edit, Approve, View invoice details, View unbilled transactions, view pending authorization
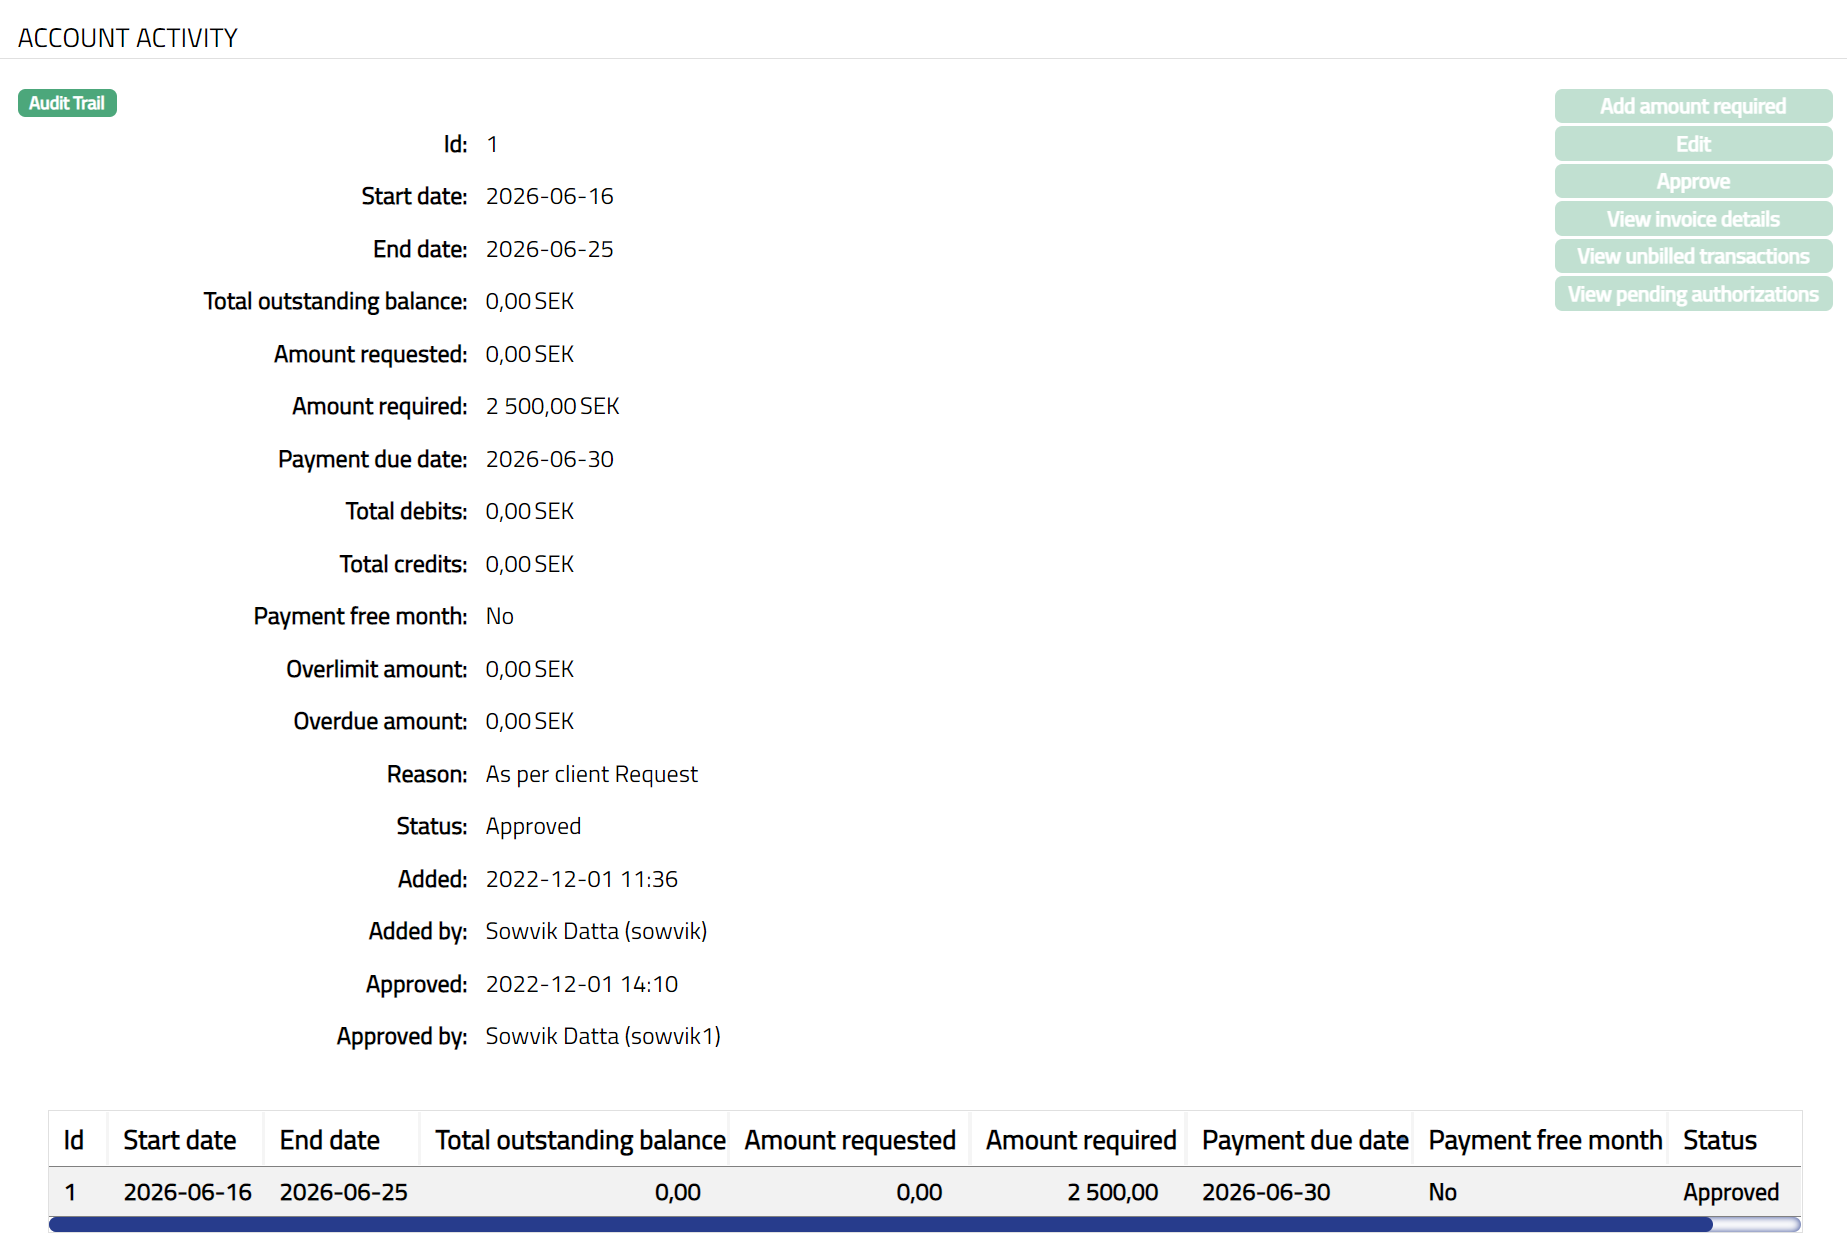
On saving, the amount required is maintained as a new record with a new Invoice Id and all the amounts apart from the Amount required are defaulted to zero. The record will be in Pending status.
Note: Any user other than the one who added the Amount required has to approve this record.
Edit
You will be able to edit an invoice record to give the revised Amount required only when the current date is between invoice generation date and payment due date. Similarly, you can edit a user-created record (which was created using Add Amount Required described above) only till the Invoice is generated.
To Edit Amount Activity,
- click Edit button. Edit Amount Required page will be displayed.
Note: The Amount required, and Reason fields are editable.
- Click Save. Account Activity page appears with the edited details.
Note:
On edit, the record status will be updated to Pending. Any user other than the one who edited the Amount required has to approve the record to make the record status Approved. Only if the record is Approved, the edited values will be applicable.
 Functions: Add amount required, Edit, Approve, View invoice details, View unbilled transactions, view pending authorization
The Additional Fields are as follows
Status denotes status of the record.
Added field denotes the date on which the record was added.
Added by field denotes the name of the user who created the record.
Approved field denotes date on which the record was approved and is displayed only for approved records.
Approved by field denotes name of the user who approved the record and is displayed only for approved records.
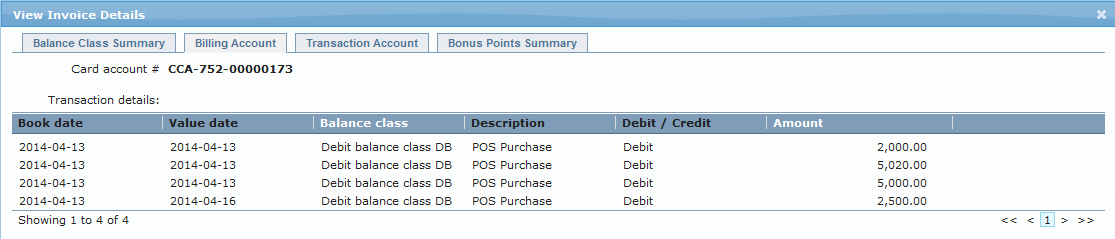
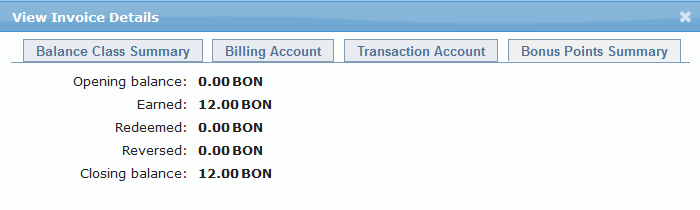
View Invoice Details
You can view the details of any invoice record using the View Invoice Details button.
To View invoice details,
Click View invoice details. The View Invoice details page opens and shows by default, the Balance Class Summary tab
Click Billing Account tab to view the billing account details. All the transaction details of the Billing account in the selected invoice are displayed.
Click Transaction Account tab to view the transaction account details. All the transaction details of the transaction account in the selected invoice are displayed.

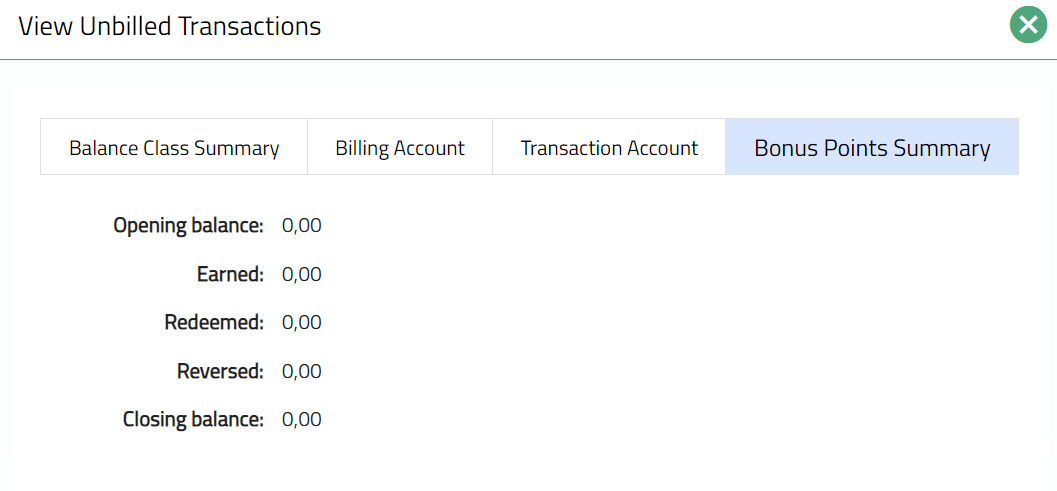
Click ~Bonus~ Points Summary tab to view the details of bonus points in the account.
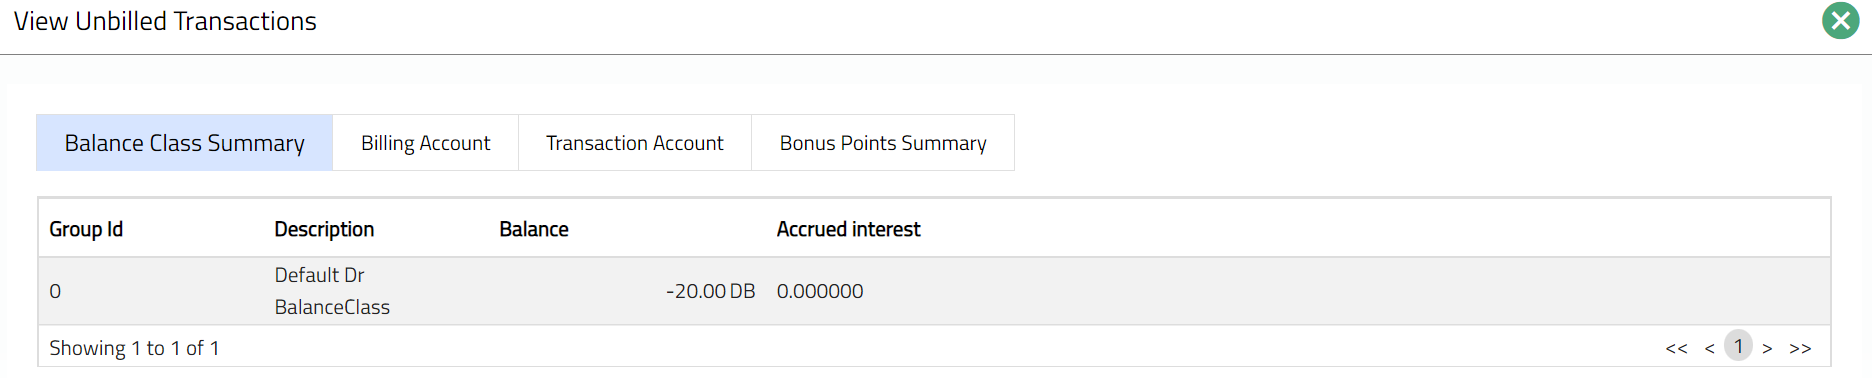
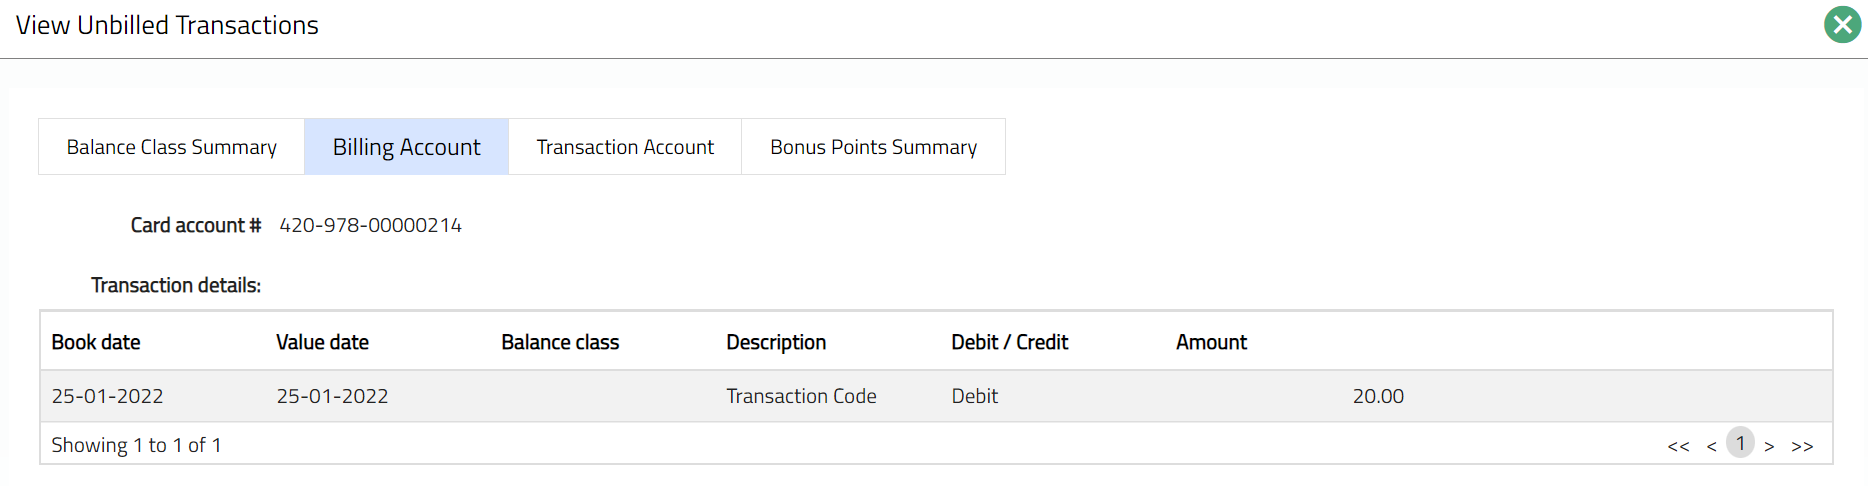
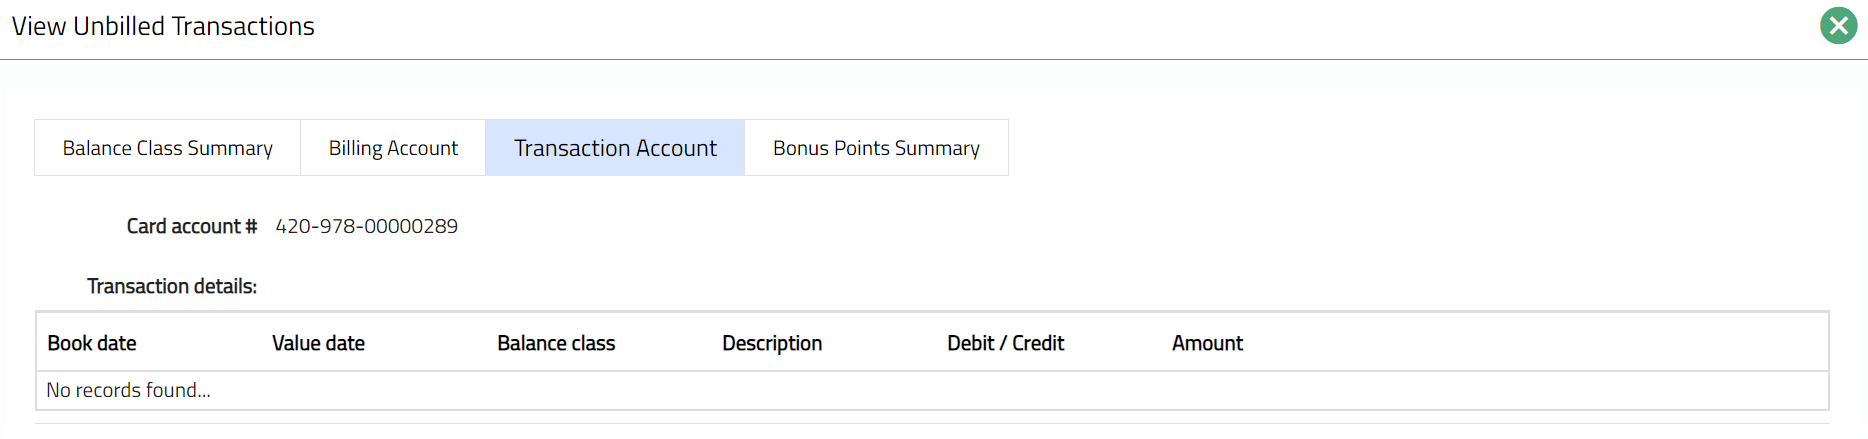
View Unbilled Transactions
Using this button, you will be able to view the unbilled transactions, as well as the current balances and accrued interest in the balance classes in the Billing Account and the associated Transaction Accounts.
To view unbilled transactions,
- Click View unbilled transactions button. The View Unbilled Transactions page is displayed. By default, Balance Class Summary tab is opened, showing the current balances in the various balance classes and the accrued interest on each of these.
- Click Billing Account tab to view the unbilled transaction details in the billing account. The tab displays all unbilled transactions from the oldest transaction to the latest transaction.
- Click Transaction Account tab to view the unbilled transaction details of the associated Transaction accounts. The tab displays all unbilled transactions for each Transaction Account from the oldest transaction to the latest transaction.
- Click Bonus Points Summary tab to view the details of the bonus points in the account.
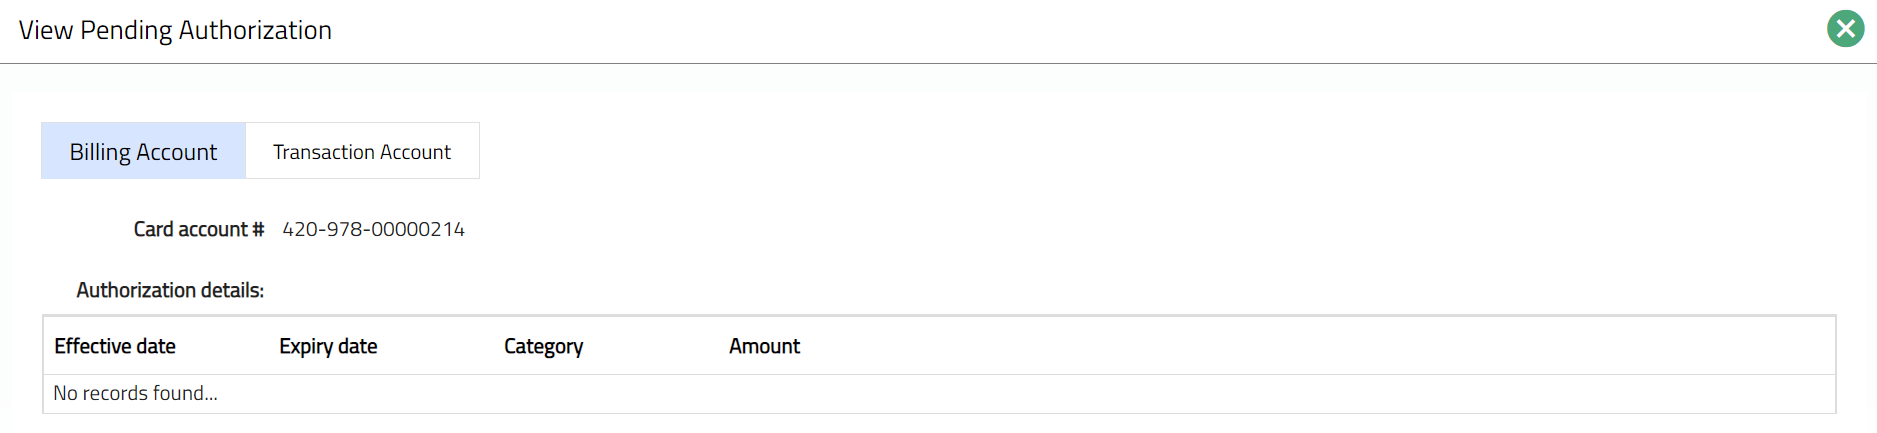
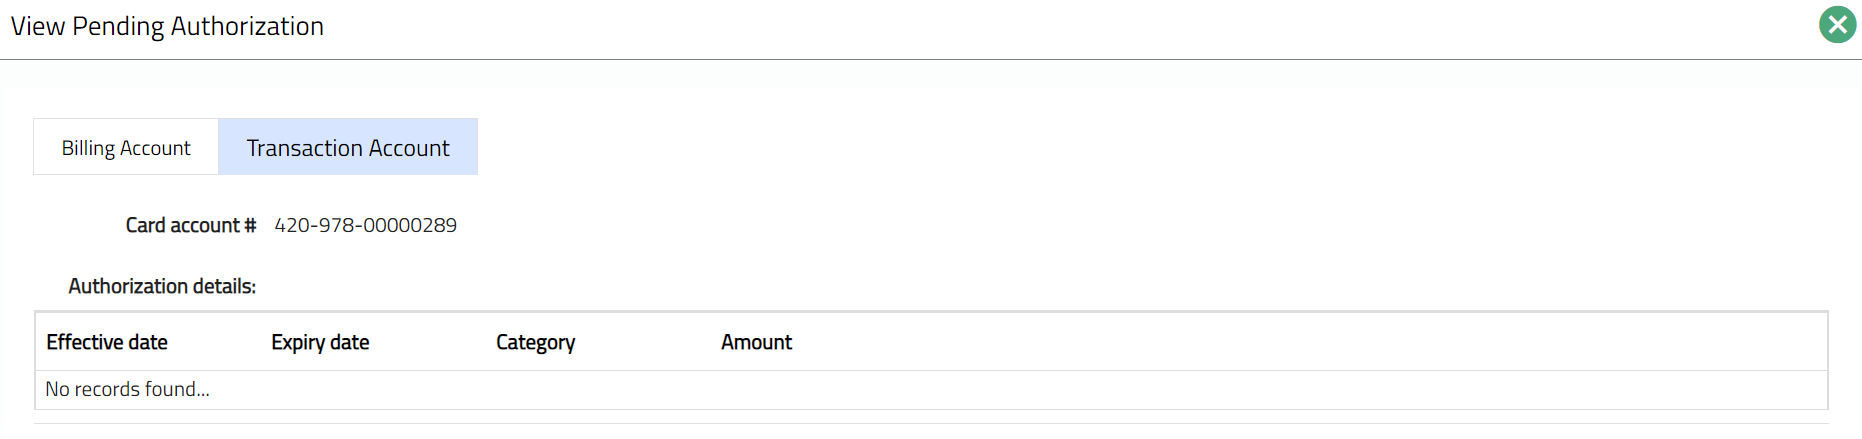
View Pending Authorizations
You will be able to view all the Pending Authorizations i.e., active amount blocks, in the Billing account and associated Transaction accounts.
To view Pending Authorizations,
- Click View pending authorization button. The View Pending authorization page is displayed. By default, the Billing Account tab is opened. All active amount blocks in the billing account, from the earliest Effective date to the latest, are displayed.
- Click Transaction account tab, all active amount blocks in the transaction account, from the earliest Effective date to the latest are displayed.
Categorisation
Charge
This tab allows you to view and edit the default charges and additional charges of the Card account subject to Restrictions that have been set at the Product. The charges displayed in the Card account are defaulted from the Charge Group chosen for the account during creation. It has two sub-tabs, one for each of these.
The Charge tab is displayed for both Billing accounts and Transaction accounts.
Default Charge
The Default Charges tab allows you to view and maintain the details of a set of pre-defined charges applicable for the Card account. The charge scheme and applicable parameters can be updated for each default charge, allowing you to customize the pricing for each Card account.
To view the Default Charges
- Access Card Account page. Click Charge tab to view the Default Charges. On creation of the Account, the charges are defaulted from the Charge group chosen during the account creation. A sample of the screen is shown below:
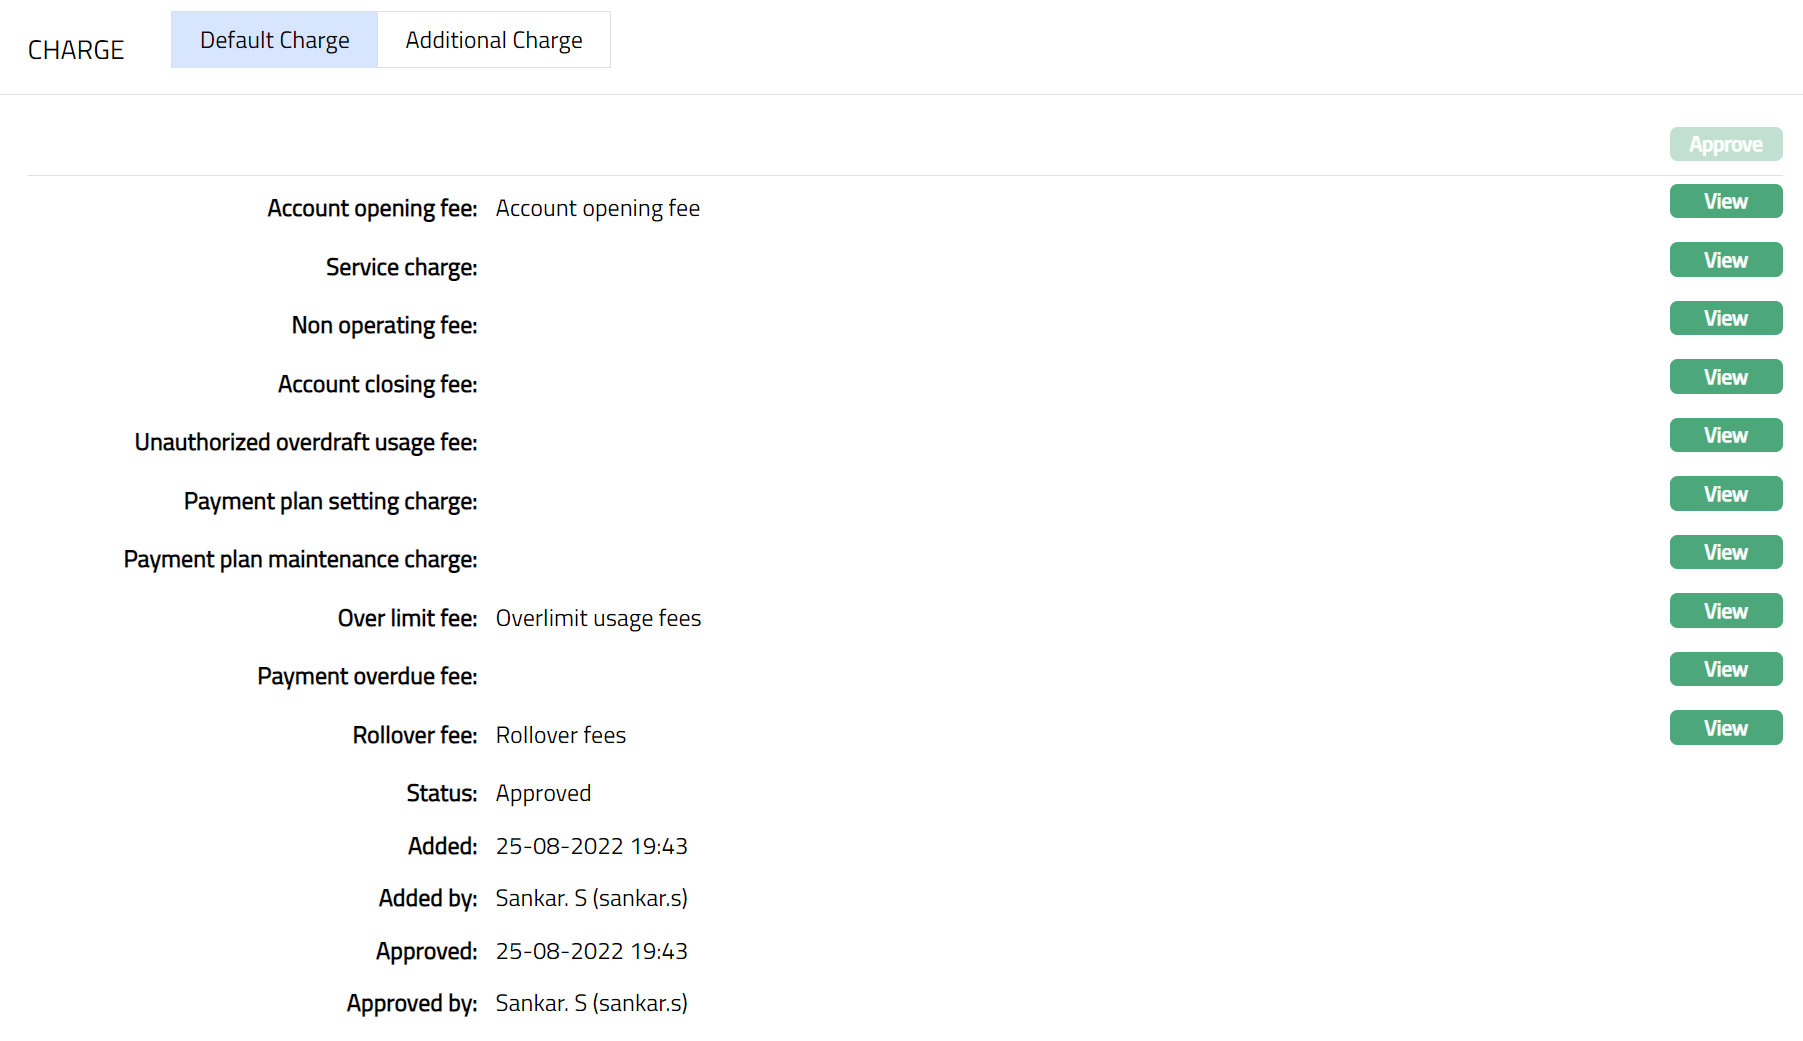
2. Account Opening Fee is the charge for opening the account and is selected from the list of the Event based Flat Charges. The charge scheme is defaulted from the Charge Group chosen during account creation. It is an editable field and if edited, it shows the charge scheme combination that was chosen last for this charge.
3. Service Charge is the charge for the service provided and is selected from the list of Periodic, Flat or Banded Charges. If Banded, the card account outstanding balance will be the basis for the charge. The charge scheme is defaulted from the Charge Group chosen during account creation. It is an editable field and if edited, it shows the charge scheme combination that was chosen last for this charge
4. Non-operating fee is charged for an account that remains un-operated and is selected from the list of Periodic, Flat Charges. If there were no transactions which affect the Dormancy calculation during the charge period, the charge will be applied at the end of the period. It will be only arrear charges. The charge scheme is defaulted from the Charge Group chosen during account creation. It is an editable field and if edited, it shows the charge scheme combination that was chosen last for this charge.
5. Account Closing charges is used for closure of the account and is selected from the list of Event based Flat charges. The charge scheme is defaulted from the Charge Group chosen during account creation. It is an editable field and if edited, it shows the charge scheme combination that was chosen last for this charge.
6. Unauthorized overdraft usage fee charge is levied every time the account goes beyond its authorized limit and is selected from the list of Event based Flat charges. The charge scheme is defaulted from the Charge Group chosen during account creation. It is an editable field and if edited, it shows the charge scheme combination that was chosen last for this charge.
7. Payment plan setting charge will be applied when a payment plan for an account is initiated. Select the charge from the list of Event based Flat charges. The charge scheme is defaulted from the Charge Group chosen during account creation. It is an editable field and if edited, it shows the charge scheme combination that was chosen last for this charge.
The Payment plan maintenance charge will be applied whenever the Amount required for the Invoice is derived from an active Payment plan. Select the charge from the list of Periodic, Flat charges. The charge scheme is defaulted from the Charge Group chosen during account creation. It is an editable field and if edited, it shows the charge scheme combination that was chosen last for this charge.
The Over limit fee will be applied if the account goes beyond limit for even one day during the cycle. Select the charge from the list of Periodic, Flat charges. The charge scheme is defaulted from the Charge Group chosen during account creation. It is an editable field and if edited, it shows the charge scheme combination that was chosen last for this charge.
Payment overdue fee will be levied if the customer miss's payment of amount required and if the payment status is Normal. Select the charge from the list of Event based Flat charges. The charge scheme is defaulted from the Charge Group chosen during account creation. It is an editable field and if edited, it shows the charge scheme combination that was chosen last for this charge.
Rollover fee will be levied when the account balance is rolled over to the next cycle by not paying the amount due for the last cycle. Select the charge from the list of Event based Flat or Banded charges. If Banded, the rolled over amount will be the basis for the charge. The charge scheme is defaulted from the Charge Group chosen during account creation. It is an editable field and if edited, it shows the charge scheme combination that was chosen last for this charge.
The additional fields that you can view in the tab are explained below:
Status field denotes the status of the record.
Added field denotes the date on which the record was added.
Added by field denotes the name of the user who created the record.
Approved field denotes date on which the record was approved and is displayed only for approved records.
Approved by field denotes the name of the user who approved the record and is displayed only for approved records.
To view / edit the parameters for any default Charge
- Click View against the specific Charge to see the charge scheme, charge combination details and other parameters for the charge.
On creation of the account, the Charge Combination values are picked up based on the most suitable combination applicable to the account. The order in which the combination is chosen is shown below:
| Order | Effective Date | Pricing | Client | Service Delivery Channel | Currency | Branch |
|---|---|---|---|---|---|---|
| 1 | Current Date | Specific | Specific | Specific | Specific | Specific |
| 2 | Current Date | Specific | Specific | Specific | Specific | Any |
| 3 | Current Date | Specific | Specific | Specific | Any | Any |
| 4 | Current Date | Specific | Specific | Any | Any | Any |
| 5 | Current Date | Specific | Any | Any | Any | Any |
| 6 | Current Date | Specific | Specific | Specific | Any | Specific |
| 7 | Current Date | Specific | Specific | Any | Any | Specific |
| 8 | Current Date | Specific | Any | Any | Any | Specific |
| 9 | Current Date | Any | Any | Any | Any | Specific |
| 10 | Current Date | Specific | Specific | Any | Specific | Specific |
| 11 | Current Date | Specific | Any | Any | Specific | Specific |
| 12 | Current Date | Any | Any | Any | Specific | Specific |
| 13 | Current Date | Any | Any | Any | Specific | Any |
| 14 | Current Date | Specific | Any | Specific | Specific | Specific |
| 15 | Current Date | Any | Any | Specific | Specific | Specific |
| 16 | Current Date | Any | Any | Specific | Specific | Any |
| 17 | Current Date | Any | Any | Specific | Any | Any |
| 18 | Current Date | Any | Specific | Specific | Specific | Specific |
| 19 | Current Date | Any | Specific | Specific | Specific | Any |
| 20 | Current Date | Any | Specific | Specific | Any | Any |
| 21 | Current Date | Any | Specific | Any | Any | Any |
| 22 | Current Date | Any | Any | Any | Any | Any |
| 23 | Future Dated | Specific | Specific | Specific | Specific | Specific |
Depending on whether the charge Basis is Flat or Banded, you will see the below screen:
Flat Charge view
1. Name of Charge: For example: Account Opening Fee / Service Charge: It is the name of the Default Charge and shows the Charge scheme that is derived from the Charge Group chosen during creation of the account. This is an editable field.
2. Modify charge allows you to modify the charge parameters applicable to this account that are defaulted from the Charge scheme attached to the default charge. By default, it will be No, but is an editable field. Only if this is set to Yes, you will be allowed to change the charge parameters.
The values for Branch, Service delivery channel, Relationship pricing, Basis currency, Client, Chargecurrency, Basis are defaulted from the most suitable charge combination for the account as explained earlier. These fields are non-editable.
The Flat charge value is derived from the flat charge maintained for the Charge scheme attached to the default charge. The Flat charge is displayed only when the Charge Basis is Flat.
In case the charge Basis is Banded, the following fields are displayed:
5. Range Low, i.e., the lower limit, is defaulted to Zero for the first band. For the succeeding bands, it is automatically set as Range high of the previous band + least decimal of Basis currency. In case of Any Currency, the number of decimals is taken as 2. The value is derived from the Band details maintained for the Charge scheme attached to the default charge. See Note below.
6. Range high. i.e., the upper limit for the Band is derived from the Band details maintained for the Charge scheme attached to the default charge. This is an editable field.
Note: The Range Low and High should be entered as negative numbers if the charge basis is the debit balance of an account. For example, in case of Card Accounts, if you want to charge a fee based on the balance in the card account, maintain the Band in negative numbers, so that charge would be calculated only if there is a debit balance in the card account.
If the charge basis amount lies outside the Range, the charge will be calculated as 0. Hence, you should maintain the Range values such that it would cover any amount.
Specify if you want the charge for the Band to be a fixed amount or a percentage using the Amount or percentage field. Accordingly, the charge amount will be taken as the fixed amount for the band or calculated using the percentage and the basis amount. The Amount or Percentage selected while maintaining the Band details for the charge scheme is displayed here. This is an editable field.
On the basis of the Amount or Percentage selected in the above field, the Value will display the input percentage or the input amount to be charged.
9. Add Base enables you to add a fixed amount apart from a percentage-based charge. This field is enabled only if Percentage is selected. It provides you with the ability to define the percentage to calculate the charge and add a fixed amount to get the final amount to be charged.
10. Minimum charge amount field will be enabled only if percentage is selected above. Aura will check if the calculated charge amount < Minimum amount, if Yes then the final charge amount will be the Minimum amount.
11. Maximum charge amount field will be enabled only if percentage is selected above. Aura will again check whether the calculated charge amount > Maximum amount, if Yes then the final charge amount will be the Maximum amount.
For example:
Band Range is between - 10000.00 to 0.00. Percentage is 8%. Add Base = 10.00
EUR, Minimum amount = 20.00 EUR, Maximum Amount = 100.00 EUR.
Case 1:
If The Account balance = - 1000.00
Percentage Charge = 80 (1000 * 8%).
Add base = 10,
Calculated Charge amount = 80+10= 90.
Case 2:
Account balance = - 100.00
Percentage charge = 8 (100 * 8%)
Add base = 10
Calculated Charge amount = 8 + 10 = 18, which is < Minimum amount of 20.00
Hence, the charge amount that will be booked = 20.00
Case 3:
Account balance = - 10000.00
Percentage charge = 800 (10000 * 8%)
Add base = 10
Calculated Charge amount = 800 + 10 = 810, which is > Maximum amount of 100.00
Hence, the charge amount that will be booked = 100.00
- Click Edit to change the Charge Scheme and modify the parameters attached to the charge scheme. The Edit Schema page appears.
Additional Charge
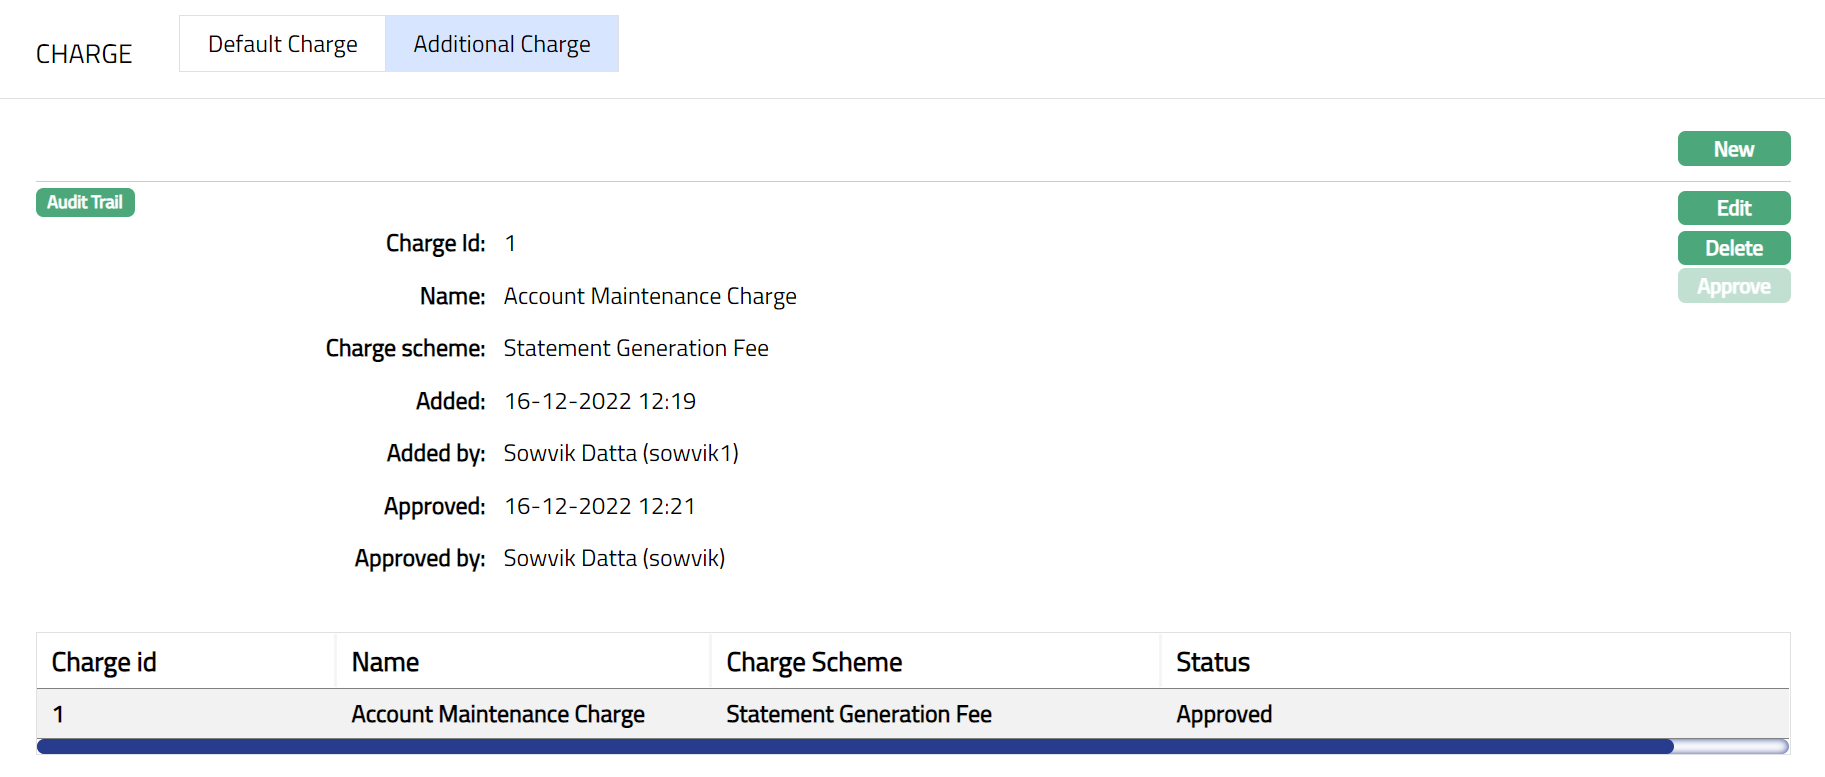
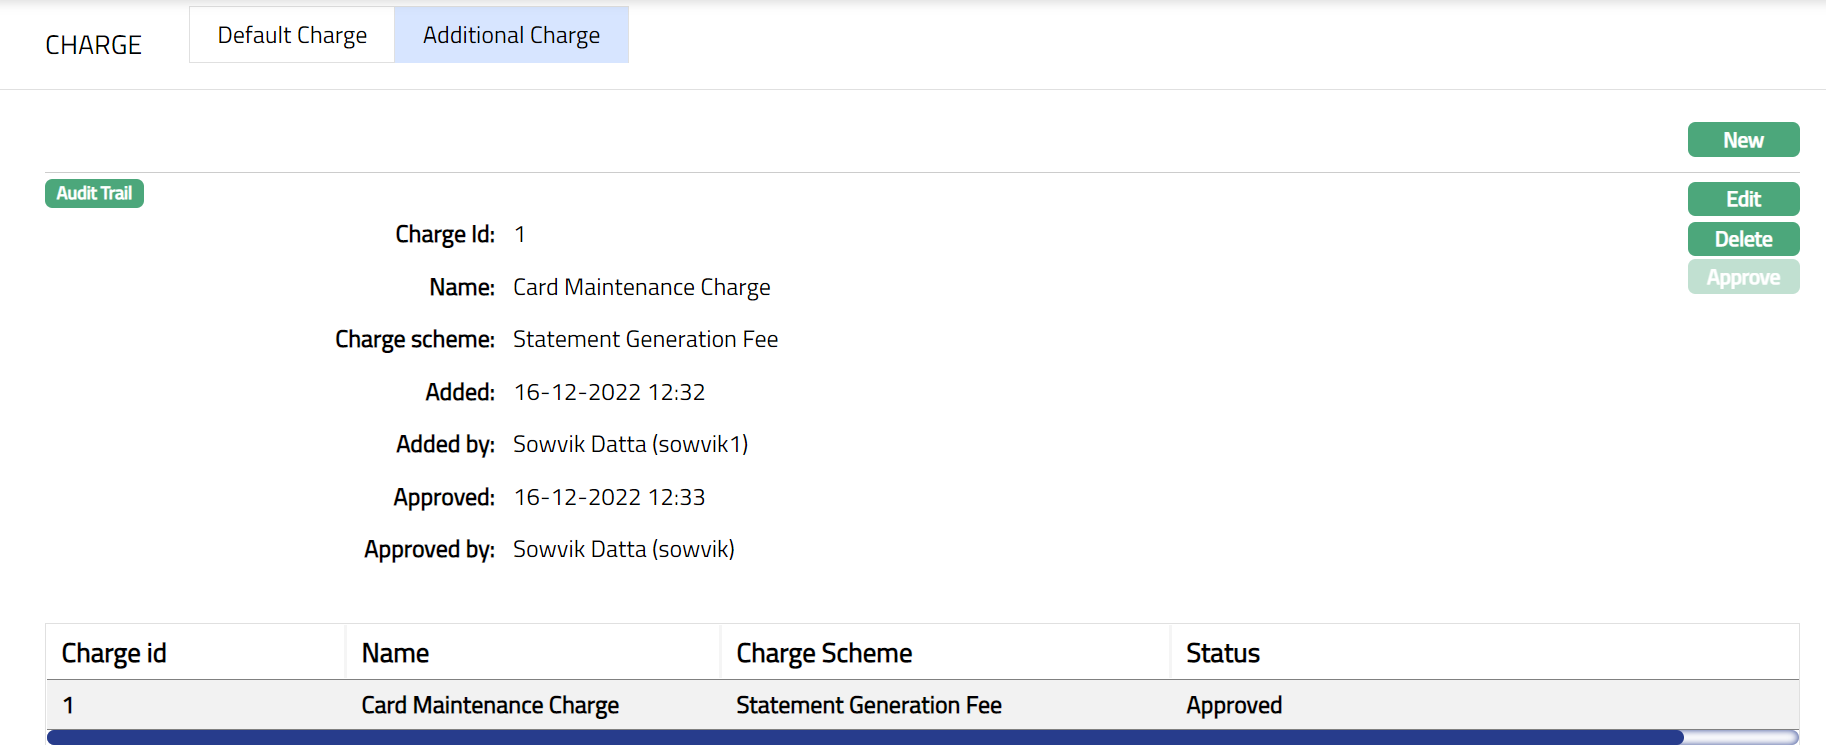
The Additional Charge tab allows you to add, view and maintain additional charges for the card account
To Add a charge
- Access Card Account page. Click Charge tab and then Additional charge tab to view the details as per sample below. On creation of Account, if there are any additional charge maintained at the product level - the details are defaulted from Product > Additional Charge based on the Product that you chose for the account during creation.
The following fields are shown only in the View screen and are not editable:
Charge Id field denotes the unique sequential charge id generated at the Account level for the additional charges.
Name field denotes the name of the additional charge.
Charge Scheme field denotes the name of the charge scheme attached to the additional charge.
Status field denotes the status of the record.
Added field denotes the date on which the record was added.
Added by field denotes the name of the user who created the record.
- Click New. The New Additional Charge page appears.
Enter charge Name.
Select Charge scheme from the drop-down list of Periodic flat or banded charges maintained at Admin > Pricing > Charges > Charge Schemes If the Charge is Banded, the charge amount will be calculated on the basis of the amount sanctioned.
Click Save. The Additional charge page appears with the new added details and the details are displayed on the summary pane.
Note: once added/edited the status will reflect as pending unless approved by another person who has not created the records. Once approved the status will reflect as approved.
Functions: New, Edit, Delete, Approve
The following fields are shown only in the View screen and are not editable:
Status field denotes the status of the record.
Added field denotes the date on which the record was added.
Added by field denotes the name of the user who created the record.
Approved field denotes date on which the record was approved and is displayed only for approved records.
Approved by field denotes the name of the user who approved the record and is displayed only for approved records.
Approve: Any new additional charge attached or edited at the account level has to be Approved. You can approve the additional charge by clicking on Approve button. Aura will ask for confirmation. On confirming, the charge status will be Approved.
Delete: You can delete an Additional charge at the account level at any time irrespective of the charge is attached at the Product level or not. To delete the Additional charge click Delete. Aura will ask for confirmation. On confirming, the additional charge will be deleted. Alt the future dated pending events related to this charge for this account will be deleted.
To edit Additional Charge
- Click Edit. The Edit Additional Charge page appears.
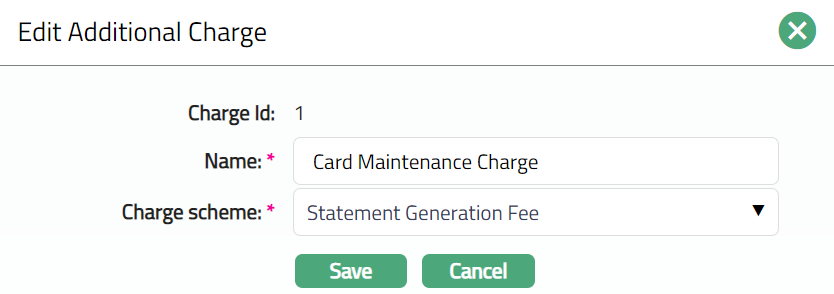
The Charge Id field is not editable.
- Click Save. The Additional Charge page appears with the edited details.

Any change in the tab will set the tab status to Pending till it is approved by another user. On approval, the tab status is set to Approved.
Functions: New, Edit, Delete, Approve
Transaction Accounts
This tab allows you to view the list of transaction accounts associated with a billing account. This tab is displayed only in case of a Billing account.
To view the Transaction Accounts for a Billing Account
Access Card Account page.
Click Transaction Accounts tab. The transaction accounts associated with the current billing account are listed under this tab.

- To view and access the transaction account details, click the required transaction account number hyperlink listed under this tab. The transaction account details will be displayed in a new tab.
Settings
This tab allows you to view and maintain certain account settings. The values from the Card Account Product / Cycle Group are defaulted to the Card Account and you can edit the settings according to the requirement, subject to Restrictions that have been set up for the Product.
To view / edit settings
- Access Card Account page and click Settings tab to view the details as per samples below.
- When an account shows no activity for some specified period, then the account is considered as Dormant. The Dormancy calculation depends on the Dormancy days set in the Product and the Transaction Code settings for the entries posted to the account. By default, the Dormant checkbox is unchecked and the value displayed is No. If Account Dormancy days is defined in the Product, and if the Dormancy days for the account becomes 0, then Aura will automatically check the Dormancy checkbox. The Dormant value will be displayed as Yes and Aura will display the Dormant From date by default. If you want the account to be no longer treated as Dormant, click Edit and then uncheck the Dormant checkbox.
For Example:
An Account is opened and activated on 01-Jan-2012 and the Dormancy Day for the product is 45 days.
| Date | Transactions | Dormancy Days Calculation |
|---|---|---|
| 01-Jan-2012 | No transaction done | 45 - 30 = 15 |
| to | ||
| 30-Jan-2012 | ||
| 31-Jan-2012 | a) Transaction done using transaction | a) 15 - 1 = 14 |
| code where "Affect dormancy | ||
| calculation" is selected as No. | b) 45 | |
| b) If transaction is done using a | ||
| transaction code where "Affect | ||
| dormancy calculation" is selected | ||
| as Yes. | ||
| 01-Feb-2012 | a) No transaction done | a) 14 - 14 = 0 -- |
| to | The account will be marked as Dormant on | |
| 14-Feb-2012 | b) No transaction done | 15-Feb-2012 |
| b) 45 - 14 = 31 |
If the account becomes dormant, Aura will automatically display the date from when the account is Dormant. The Dormant from date will be displayed based on the Dormancy days. In the above example, the Dormant from in case a) would be 15-Feb-2012. This is a non-editable field.
Balance Check specifies the type of balance -- whether credit, debit or both -- to be allowed in the account. The value will be defaulted from the Product selected for this account and is editable. The options for Balance check are as follows:
- Allow only credit balance -- If you select Allow only credit balance, then Aura will allow only credit balance for that account. If a transaction would result in a debit balance, and if this account allows only credit balance, the transaction will fail.
Allow only debit balance -- If you select Allow only debit balance, then Aura will allow only debit balance for that account. If a transaction would result in a credit balance, and if this account allows only debit balance, the transaction will fail.
Allow both -- If you select Allow both, then Aura will allow both credit and debit balances for that account.
Secured Limit is the credit limit for the card account. Once the limit is attached to the account under the Secured By tab and approved, the linked amount in transaction currency under the Secured By tab will be displayed here. This is a non-editable field.
Approved Cash Limit % is the percentage of the Credit (Secured) Limit that will be available as the Cash Limit for the account. The Cash Limit% should be between 0 and 100. By default, the value from the Product will get displayed and you can edit it as required. This is an editable field.
Approved Cash Limit Amount is the amount that will be available as the Cash Limit for the account. This will be calculated using the Approved Cash Limit% and the Secured Limit. For example, if Secured Limit is 1000 EUR and Approved Cash Limit % is 25%, the Approved Cash Limit Amount is calculated as 25/100 * 1000 = 250 EUR. This is a non- editable field.
Temporary overdraft is a temporary arrangement. It is an additional amount for a temporary period that is granted by the bank, which will have an expiry date and increases the Account Balance for the account. Soon after the expiry date, the arrangement will become unavailable, and the Account Balance will be reduced to that extent. It is an editable field.
Expiry date is the date when the temporary overdraft will get expired. It is an editable field.
Aura will generate Amount required only if the balance in the account is more than the Margin to require payment. If the balance is less than this amount, then no payment due is requested; but the statement will still be generated. By default, the value will be 0 and is an editable field.
For Example: Margin to require payment is 100 EUR and Total outstanding is 90 EUR. In this case, no payment due is requested but a statement will be generated.
Note: If edited, the updated amount will be applicable for the next invoice generation.
- Payment margin for overdue is the margin allowed for designating an account as overdue. If the Payment margin for overdue is 5 EUR, Amount required is 100 EUR and Payment received is 95 EUR, Aura will check whether the payment amount is less than the amount required + payment margin for overdue i.e., 95 EUR + 5 EUR. If the condition is satisfied, then no overdue interest or charges will be applied. If the condition is not satisfied, then overdue interest and charges will be applied. By default, the value will be 0 and is an editable field.
Note**😗* If edited, the updated amount will be applicable for the next Payment Due Date / End of Grace Days.
- Total payment margin amount is taken into consideration if the payment falls short by this amount to qualify the payment as Total payment amount. The account will get all the benefits as though the Total payment amount is received. By default, the value will be 0 and is an editable field.
Note**😗* If edited, the updated amount will be applicable for the next Payment Due Date / End of Grace Days.
Limit threshold % ensures that over limit charges and interest are not marked if the limit is breached by an amount set within the threshold. Limit threshold % will be calculated on the limit amount. By default, the value will be 0 and is an editable field.
Limit threshold amount is similar to Limit threshold % but is entered as an amount. Aura will charge over limit charge and interest only if the account balance goes beyond the (limit + limit threshold amount). By default, the value will be 0 and is an editable field.
Note: If both Limit threshold % and Limit threshold amount are entered, Aura will consider the lesser of the two as the actual threshold.
- Authorization buffer % ensures that the authorization is not rejected for small amounts. It is a % of the overall limit. The authorization buffer applies only when the account is within the limit at the start of the transaction. If the account is already above the limit at the start of the transaction, then the buffer does not apply, and the authorization is declined with appropriate codes. Therefore, the buffer can only be applicable for one transaction at any given point of time. By default, the value will be 0 and is an editable field.
For example, the limit is 10,000 EUR. The Authorization buffer is set to 1.5% of the limit. With a limit of 10,000 EUR this means that a maximum of 150 EUR is allowed as the authorization buffer. The available balance is 100 EUR. An authorization with the amount of 120 EUR is received. It will be approved since it is (120-100=20 EUR) within the authorization buffer. If the available balance had been 0 the authorization would have been rejected because the available balance at the start of the transaction was 0 even though the threshold was 150 EUR.
- Buffer amount ceiling is the maximum authorization buffer amount. By default, the value will be 0 and is an editable field.
For Example: If the account has a limit of 10,000 EUR and if the authorization buffer is maintained as 3% subject to maximum threshold amount of 200 EUR, then the authorization buffer is 200 EUR. If the limit is changed from 10,000 EUR to 5000 EUR, then the buffer becomes 150 EUR.
Note: If both Authorization buffer % and Buffer amount ceiling are entered, Aura will consider the lesser of the two as the actual buffer.
- Amount required is the minimum amount that the customer has to pay to avoid overdue interest or any overdue-related charges / status changes. The following options are available:
Partial Amount: If you want the customer to pay only a part amount of the total outstanding amount due for payment, you can choose this option. If you choose partial amount here, then Aura will ask to enter the percentage of the outstanding amount.
Total Due Amount: If you want the customer to pay the total outstanding amount due for payment, choose this option.
Fixed Amount: If you want the customer to pay a fixed amount irrespective of the total outstanding amount due for payment, choose this option.
By default, the value will be derived from the product and is editable.
Note: If edited, the updated option will be applicable for the next invoice generation.
Note: The Amount required cannot be greater than the total balance outstanding in the account. If it is so during invoice generation, then the total balance outstanding becomes the Amount required.
Example
Amount required: 5% of total outstanding, minimum amount: 100, rounding up to 0.
Account Limit: 10 000If total outstanding is 95
Amount required = 5% of 95 = 4.75, subject to minimum amount of 100. However, since the total outstanding is only 95, the amount required will be 95.
If Fixed amount is selected in the Amount required field above, Fixed amount field will be displayed. Enter the fixed amount that the customer has to pay.
If Partial amount is selected in the Amount required field above, then % of total outstanding will be enabled. You need to input the % of total outstanding amount that needs to be paid by the payment due date. By default, the value will be derived from the product and is editable.
Note: If edited, the updated option will be applicable for the next invoice generation
- If Partial amount is selected in the Amount required field above, rounding rule field will be enabled. This rule is used to round the Amount required. The following options are available:
Up: This option rounds the Amount required up to a higher amount.
Down: This option rounds the amount required down to a lower amount.
None: This option does not round the amount required and gives the exact calculated figure.
By default the value will be derived from the product and is editable.
Note: If edited, the updated option will be applicable for the next invoice generation.
Example
Amount required: 5% of total outstanding, minimum amount: 0, rounding up to 100. Account Limit: 10000
If total outstanding is 5000
Amount required = 5% of 5000 = 250, rounded up to [300.]
- If Partial amount is selected in the Amount required field above, Rounding unit will be enabled. You can specify how much the rounding rule should be applied. By default, the value will be derived from the product and is editable. The available options are:
1
5
10
50
100
Example:
If total balance is (-) 3427.60 and % of total outstanding is 5% and
Round up is marked as 1, and then amount required will be calculated as 172
Round up is marked as 10, and then amount required will be calculated as 180
Round up is marked as 100, and then amount required will be calculated as 200
If edited, the updated option will be applicable for the next invoice generation.
- Minimum amount enables you to specify the minimum amount for Partial amount. If the amount calculated using the % is less than the Minimum amount specified here, then, the Minimum amount specified here becomes the Amount required. By default, the value will be derived from the product and is editable.
Examples:
a. Amount required is 5% of the balance, with a minimum of 10 EUR. Total card usage and hence, outstanding = 150 EUR. Amount required = 5% of 150 = 7.5, subject to minimum of 10, and hence, 10 EUR
b. The amount required is 5% of the balance, with a minimum of 10 EUR. Total card usage and hence outstanding = 300 EUR. Amount required = 5% of 300 = 15, subject to minimum of 10 and hence, 15 EUR.
Example
Amount required: 5% of total outstanding, minimum amount: 100, rounding up to 0.
Account Limit: 10 000If total outstanding is 1000
Amount required = 5% of 1000 = 50, subject to minimum amount and hence, [100].
- Include Over limit in % calculation enables you to specify how the amount required is to be calculated when the account balance is over limit. By default, it will be No which means the over limit amount will be added in full; if checked, the over limit will be included in the % calculation and the amount required will be a % of the current due amount (including over limit). This is an editable field.
Note: If edited, the updated option will be applicable for the next invoice generation.
Example 1
Amount required: 5% of total outstanding, minimum amount: 100, rounding up to 0. Include Overlimit in % calculation is Yes
Account Limit: 10 000
If total outstanding is 11000
Amount required = 5% of 11000 = 550.
Example 2
Amount required: 5% of total outstanding, minimum amount: 100, rounding up to 0. Include Overlimit in % calculation is No
Account Limit: 10 000
If total outstanding is 11000
Amount required = 5% of 10000 = 500 plus amount over limit 1000 = 1500.
Include overdue in % calculation enables you to specify how the amount required is to be calculated when the account balance is overdue. If it is No, the Amount required will be calculated using the following formula: (Total Outstanding -- (Overdue balance + Overdue interest)) * %age + Overdue Amount + Overdue Interest. If it is Yes, then Amount required = (Total Outstanding * %age) + Overdue Amount. By default, this is No. Note that this is set to No and disabled if Amount Required is Fixed Amount.
If Treat overdue as balance is Yes, then Aura will internally create and track the overdue balance / interest as a balance class bucket. By default, this is No.
Amount Requested is the amount that the client chooses to pay. If Total due amount is selected in the Amount required field, then Amount Requested will be defaulted to Total due amount and disabled. If the user chooses Partial amount or Fixed Amount in the Amount required field, then Amount Requested can be either Total due amount or Amount Required. The value will be derived from the product and is an editable field.
Note: If edited, the updated option will be applicable for the next invoice generation
- Settle by enables you to specify the mode of settlement of the card account outstanding balance. The available options are
Own account transfer: If you choose this option then the settlement is made by transferring the funds from the client's own account.
Direct Debit: If you choose this option, enter the Agreement reference number for the Direct Debit. The settlement will be done on the basis of this agreement.
Payment by invoice: If you choose this option, enter the Agreement reference number for invoice. The settlement will be done on the basis of this agreement i.e., an invoice is generated, and payment is made according to the details maintained in the Agreement.
Note: If edited, the updated option will be applicable for the next invoice generation.
- If Own Account Transfer is selected above, then the hyperlinked Account # will be enabled. If you click on the hyperlink, the Core Bank Account Search page appears with the list of all active accounts. Select the account from which you want the funds to be transferred for settling the dues on this card account.
Note: If edited, the updated option will be applicable for the next invoice generation.
- If Direct Debit or Payment by invoice option is selected in Settle by field, then the hyperlinked Agreement reference number will be enabled. If you click on the hyperlink, then the Agreement search page will appear with the list of all active agreements. Select the required agreement for the client.
Note: If edited, the updated option will be applicable for the next invoice generation
- Payment due on denotes the date on which payment is due on the account. The value is defaulted from the Cycle Group chosen during creation of Card Account.
The following table shows how the Payment due on is arrived at for each of the options. In this table, the Start date and End date for the cycle is taken as 26-Apr-2013 and 25-May-2013 respectively and X days is taken as 5 days.
| Sl No | Option Chosen | Payment due on |
|---|---|---|
| 1. | End of cycle | 25-May-2013 |
| 2. | End of month | 31-May-2013 |
| 3. | Last business day of month | 31-May-2013 |
| 4. | Next end of cycle | 25-Jun-2013 |
| 5. | Next end of month | 30-Jun-2013 -- but, since this is beyond Next End of Cycle (i.e., 25-Jun-2013), Payment due on will be 25-Jun-2013 |
| 6. | Last business day of next month | 28-Jun-2013 -- but, since this is beyond Next End of Cycle (i.e., 25-Jun-2013), Payment due on will be 25-Jun-2013 |
| 7. | X days after End of Cycle | 30-May-2013 |
| 8. | X days after End of Month | 5-Jun-2013 |
| 9. | X days before next End of Cycle | 20-Jun-2013 |
| 10. | X days before next End of Month | 25-Jun-2013 |
| 11. | X days after next End of Month | 5-Jul-2013 -- but, since this is beyond Next End of Cycle (i.e., 25-Jun-2013), Payment due on will be 25-Jun-2013 |
If option 11 is chosen above, Interest receivable Liquidation frequency option Monthly will be disabled
Note: During every Invoice generation, if Payment due date is greater than next EOC, Payment due date will be taken as the next EOC. Similarly, if during invoice generation, if Payment due date falls within the same cycle, Payment due date will be taken as the current EOC date. This will be the case even if the Fix Payment Date at account level is marked Yes.
Also, the actual Payment Due Date will be in conjunction with the Invoice generation date (i.e., the Debit Interest liquidation date). For example, if the Frequency is quarterly and the Payment due on is Last business day of month, the payment due date for the invoice generated during March 2013 will be 29th Mar 2013, assuming 30th and 31st Mar are holidays.
If you have selected options 7 to 11 above, you need to specify the number of Days to be taken for the Payment due date calculation and also indicate if the number days should be taken as calendar days or business days. The value is defaulted from the Cycle Group chosen during creation of Card Account.
Indicate the Holiday Preference for the Payment due date calculated using the above values. The value is defaulted from the Cycle Group chosen during creation of Card Account.
Following options are available:
Ignore: If the Payment due date falls on a holiday, and you still want to retain that date as the payment due date, choose Ignore. For Example, if the Payment due date is 25^th^ Dec which is a holiday and you have chosen Ignore, the payment due date will still remain 25^th^ Dec.
Next Business Day: If the Payment due date falls on a holiday, and you want to move it to the next business day, choose this option. In our above example, if this option is chosen, the Payment due date would be 26^th^ Dec.
Previous Business Day: If the Payment due date falls on a holiday, and you want to move it to the previous business day, choose this option. In our above example, if this option is chosen, the Payment due date would be 24^th^ Dec.
Note: If edited, the payment due date for the invoice generated at the end of the current cycle will show as per the updated value.
- Grace days enables you to provide a few additional days for the customer to make his payment; and if the customer makes the payment by the end of the Grace days period, the payment is considered as having been received by the Payment due date. Enter the required number of Grace days and indicate if these days should be calendar days / business days. The value is defaulted the Cycle Group chosen during creation of Card Account.
Note: If payment is made within the grace days, even if it is after the payment due date, the payment is not treated as overdue and associated charges / interest is not applied. If payment is not received within the payment date + grace days then overdue interest accrual starts from the payment due date onwards.
Indicate the Holiday preference for end of grace days calculated using the above values. If Grace days is business days, then this field will be disabled. In case of calendar days, indicate if the end of grace days arrived at is a holiday, whether it should not be moved / moved to next / previous working day. The value is defaulted from the Cycle Group chosen during creation of Card Account.
By default, Replenish across cycles will be unchecked. If this field is checked, Aura will replenish Balance classes according to the Replenishment order but across cycles. If this is not checked Aura will replenish within a cycle and then move on to next cycle in the same order. This is an editable field.
Example:
| Replenishment Order | Balance Class | Past Cycle (Balance) | Current Cycle (Balance) |
|---|---|---|---|
| 1 | ATM_Interest | 100 | 150 |
| 2 | ATM_Balance | 300 | 200 |
| 3 | POS_Interest | 200 | 150 |
| 4 | POS_Balance | 800 | 600 |
Case 1: Payment of 200 has been made and the Replenish across cycles is YES. The payment made will be replenished across the cycles as shown below:
| Replenishment Order | Balance Class | Past Cycle (Balance) | Current Cycle (Balance) |
|---|---|---|---|
| 1 | ATM_Interest | 100-100=0 | 150-100=50 |
| 2 | ATM_Balance | 300 | 200 |
| 3 | POS_Interest | 200 | 150 |
| 4 | POS_Balance | 800 | 600 |
Case 2: Payment of 200 has been made and the Replenish across cycles is NO. The payment made will be replenished within the cycles as shown below:
| Replenishment Order | Balance Class | Past Cycle (Balance) | Current Cycle (Balance) |
|---|---|---|---|
| 1 | ATM_Interest | 100-100=0 | 150 |
| 2 | ATM_Balance | 300-100=200 | 200 |
| 3 | POS_Interest | 200 | 150 |
| 4 | POS_Balance | 800 | 600 |
Payment free months displays the number of months that is allowed as Payment free months. This cannot be greater than 6.
Type displays the type of Payment free month. The available options are
Fixed holiday months: Choose this option if you want specific months in the year to be designated as payment free months for the client.
Floating months: In this case, the months are not fixed but will be floating on a sliding year as per the choice of the client.
Fixed holiday months displays those months chosen as fixed holiday. If you have chosen Fixed months, then, the Fixed holiday months check boxes are enabled. Check the required checkboxes equal to the number input above to choose the Fixed holiday months.
If you have entered Payment free months, then, you also need to specify the conditions for the payment free months. The first check for payment free month applicability is whether the customer has had any card transactions in his account. This can be specified under Transaction check. The available options are:
No check: If you want to specify that the payment free month is applicable irrespective of any transactions in the account, choose No check. No transaction check will be done.
Check for card transaction in X cycles: If you want to specify that the payment free month is applicable only if the account has had card transaction in the past X cycles, choose this option. Aura will check for card transactions in x cycles.
Check for any transaction in X cycles: If you want to specify that the payment free month is applicable only if the account has had some transaction (not necessarily card transactions) in the past X cycles, then, choose this option. Aura will check for any kind of transactions in x cycles.
The value is defaulted from Product level and is an editable field.
If you have chosen any option other than No check above, you need to specify the number of cycles for the transaction check in Number of cycles (transaction check). The value is defaulted from the Product level and is an editable field.
One other eligibility condition for payment free month is whether the account has any debit balance. You can use the DebitBalance check options for the same:
No check: If you want to specify that the payment free month is applicable irrespective of any balance in the account, use this option. No balance check for the account will be performed.
Check for current debit balance: If you want to specify that the payment free month is applicable only if the card account has a current debit balance, use this option. Aura will check for the current debit balance.
- Overdue Status check is the next eligibility condition for payment free month applicability. The following options are available:
No check: If you want to specify that the payment free month is applicable irrespective of whether the account is overdue or not, choose this option. No overdue status check for the account will be performed.
Check not overdue for X cycles: If you want to specify that the payment free month is applicable only if the account has not been overdue for the past X cycles, choose this option. Aura will check that the account has not gone overdue for the past X cycles.
If you have chosen any option other than No check above, you need to specify the number of cycles for the overdue status check in Number of cycles (overdue status check).
First Interest liquidation date denotes the date on which the interest will be liquidated into the account for the first time. The date is calculated on the basis of the interest receivable parameters and the account activation date. It is a non-editable field.
Using the Ignore Interest liquidation for first cycle you can set the condition that the interest will not be liquidated at the end of the first cycle. By default, it is No -- so that interest is liquidated at the end of the first cycle, but, if required, you can set it to No.
Note: After the first interest liquidation cycle, this field will be disabled.
- Using the Ignore invoice generation for first cycle you can set the condition that the invoice will not be generated at the end of the first cycle. By default, it is No -- so that the invoice is generated at the end of the first cycle, but, if required, you can set it to No.
Note**😗* After the first invoice generation, this field will be disabled.
- First payment due date denotes the date when the first payment is due. This date is calculated on the basis of the parameters for the account under Payment days, Payment free months and the above flags.
Examples: An Account is activated on 17-May-2014 and Interest Receivable Liquidation Date is set to Last calendar day. Payment due on is set to 5 days after EOC.
| Interest Receivable Frequency | Ignore Interest Liquidation for First Cycle | First Interest Liquidation Date | Ignore Invoice Generation for First Cycle | First Invoice Generation Date | First Payment Due Date |
|---|---|---|---|---|---|
| Monthly | Yes | 30-Jun-2014 | Yes | 30-Jun-2014 | 5-Jul-2014 |
| Yes | 30-Jun-2014 | No | 31-May-2014 | 5-Jun-2014 | |
| No | 31-May-2014 | Yes | 30-Jun-2014 | 5-Jul-2014 | |
| No | 31-May-2014 | No | 31-May-2014 | 5-Jun-2014 |
- Fix payment due date denotes the fixed date when the payment will be due on. By default, it is No, but is an editable field. If you choose Yes, then the Payment date calculated for the first invoice will be taken as the payment due date for all invoices where there is a payment due, irrespective of other parameters. If No is chosen, then the payment due date will be calculated afresh for each invoice.
The following fields are shown only in the View screen:
Dormant from denotes the date from when the account is Dormant.
Status field denotes the status of the tab.
Added field denotes the date on which the record was added.
Added by field denotes the name of the user who created the record.
Approved field denotes date on which the record was approved and is displayed only for approved records.
Approved by field denotes the name of the user who approved the record and is displayed only for approved records.
- Click Edit. Edit Settings page appears.
Note: All fields are editable except Secured Limit and Approved cash limit amount, subject to Restrictions that have been set up for the Product.
- Click Save. Settings page appears with the edited details.

Note: Any change in the tab will set the tab status to Pending till it is approved by another user. On approval, the tab status is set to Approved.
Functions: Edit, Approve
The following fields are shown only in the View screen and are not editable:
Status field denotes the status of the tab.
Added field denotes the date on which the record was added.
Added by field denotes the name of the user who created the record.
Approved field denotes date on which the record was approved and is displayed only for approved records.
Approved by field denotes name of the user who approved the record and is displayed only for approved records
Interests
The Interests Tab allows you to view / edit the various parameters for Interest Receivable and Payable on the Card Account for each of the Balance Classes. This tab is displayed only for a Billing Account and is not displayed for a Transaction account. The following are the sub-tabs:
Interest Payable
The Interest Payable tab allows you to view and maintain the parameters for interest payable for the credit balance on a Card account for the Default Credit Balance Class.
On creation of the account, the interest payable tab shows the Interest base, Rate %, Premium / Discount and Final Rate % as defaulted from the System codes, based on the Interest scheme in the Interest Group chosen for the Account. The values pertain to the most suitable Interest Combination applicable for the account, based on the card account outstanding as on the previous end-of-day. The order in which the combination is chosen is shown below:
| Band | Currency | Client | Pricing |
|---|---|---|---|
| 1 | Specific | Specific | Specific |
| 2 | Specific | Specific | Any |
| 3 | Specific | Any | Specific |
| 4 | Specific | Any | Any |
| 5 | Any | Specific | Specific |
| 6 | Any | Specific | Any |
| 7 | Any | Any | Specific |
| 8 | Any | Any | Any |
The other parameters are defaulted from the Product chosen for the Account.
If you want to customize the interest applicable to a specific account and keep it tailor-made for that account even if there are changes at the interest scheme or Product level, you can check the Modify Interest Parameters checkbox during Edit. All the parameters (interest and other) in this tab for the specific account will be de-linked from the Interest Scheme under System Codes and the Card Account Product. Once delinked, the interest payable tab view shows details that are derived from the specific values maintained for this specific account.
To view the Interest payable
- Access Card Account page and click Interests tab and then Interest Payable tab to view the details as per sample below.
Function: View
Interest scheme displays the interest scheme for the interest payable on the default Credit balance class. On creation of the account, it is defaulted from the Interest Group but is editable. If edited, it shows the interest scheme that was chosen last for this account.
Modify interest parameter indicates if you have customized the interest scheme details applicable to this specific account. As soon as the account is created, by default, this is No indicating that the default values have been retained. However, if you have chosen to modify the interest parameters during Edit, this will be Yes.
Premium/Discount displays the premium rate (with a + sign) or discount rate (with a -- sign) applicable for the account. On creation of the account, it will be 0. If edited, it shows the value that was input last for this account.
Last Applied Rate indicates the last rate applied based on the Card Account's previous day balance as of last EOD and the interest rate maintained for the combination. As soon as the account is created and activated, by default it will display 0.
Modify interest parameter indicates if you have modified the other general parameters applicable for interest payable for the account. As soon as the account is created, by default, this is No. However, if you have chosen to modify the other interest parameters during Edit, this will be Yes.
Frequency displays the frequency for interest payable accrual. The available options are: Monthly, Quarterly, Semi-annual and Annual. On creation of the account, it is defaulted from the product but is editable. If edited, it shows the value that was chosen last for this account.
On balance displays the type of balance on the basis of which the Interest payable is to be accrued. Available options are: Daily and Period end. Based on the selected On balance and Frequency, Aura accrues the interest. If you select the Frequency as Daily then the On balance will be defaulted to Daily and you will not be allowed to select other options. Accrual and Liquidation will be either daily or period end. On creation of the account, it is defaulted from the product but is editable. If edited, it shows the On value that was chosen last for this account.
Payment day is the day when the interest will be liquidated. Based on this, and the Number of days (next field), the date on which the interest will be paid to the accounts is determined. Available options are On Liquidation Day and Liquidation plus n day. The latter will be allowed only on selecting the frequency as Monthly or Quarterly or Semiannual or Annual. On creation of the account, it is defaulted from the product but is editable. If edited, it shows the value that was chosen last for this account.
Number of days displays the days after which the liquidated interest is to be paid. This field will be enabled only on selecting Payment Day as Liquidation plus n day.
If Frequency is Daily, Payment Day can be only On Liquidation Day and hence, this field is disabled.
If Frequency is Monthly, Payment Day can be either of the options and hence this field is enabled. You need to enter the number of days between 1 and 30.
If Frequency is any other option, Payment Day can be either of the options and hence this field is enabled. You need to enter the number of days between 1 and 90.
On creation of the account, it is defaulted from the product but is editable. If edited, it shows the value that was chosen last for this account.
Currency displays the currency for the minimum interest. On creation of the account, it is defaulted from the Gl currencies maintained for the Product but is editable. If edited, it shows the Currency that was chosen last for this account.
Currency rate type displays the rate type for the minimum Interest. The interest will be accrued in terms of the Account Currency and will be converted into the equivalent amount in terms of the above Currency using this Currency Rate Type, as on the date of Liquidation. On creation of the account, it is defaulted from the product but is editable. If edited, it shows the value that was chosen last for this account.
Minimum interest to pay is the minimum threshold amount for interest payable. Aura will liquidate the interest to the account only if the accrued interest on the Account is greater than or equal to this amount. On creation of the account, it is defaulted from the product but is editable. If edited, it shows the value that was input last for this account
The following fields are shown only in the View screen and are not editable:
Status field denotes the status of the tab.
Added field denotes the date on which the record was added.
Added by field denotes the name of the person who created the record.
Approved field denotes date on which the record was approved and is displayed only for approved records.
Approved by field denotes the name of the person who approved the record and is displayed only for approved records.
To view / edit the parameters of the Interest scheme for Interest Payable for the Default Credit Balance Class.
- Click View against the Interest scheme to see the interest combination details and other parameters for the Interest. A sample of the page is shown below.
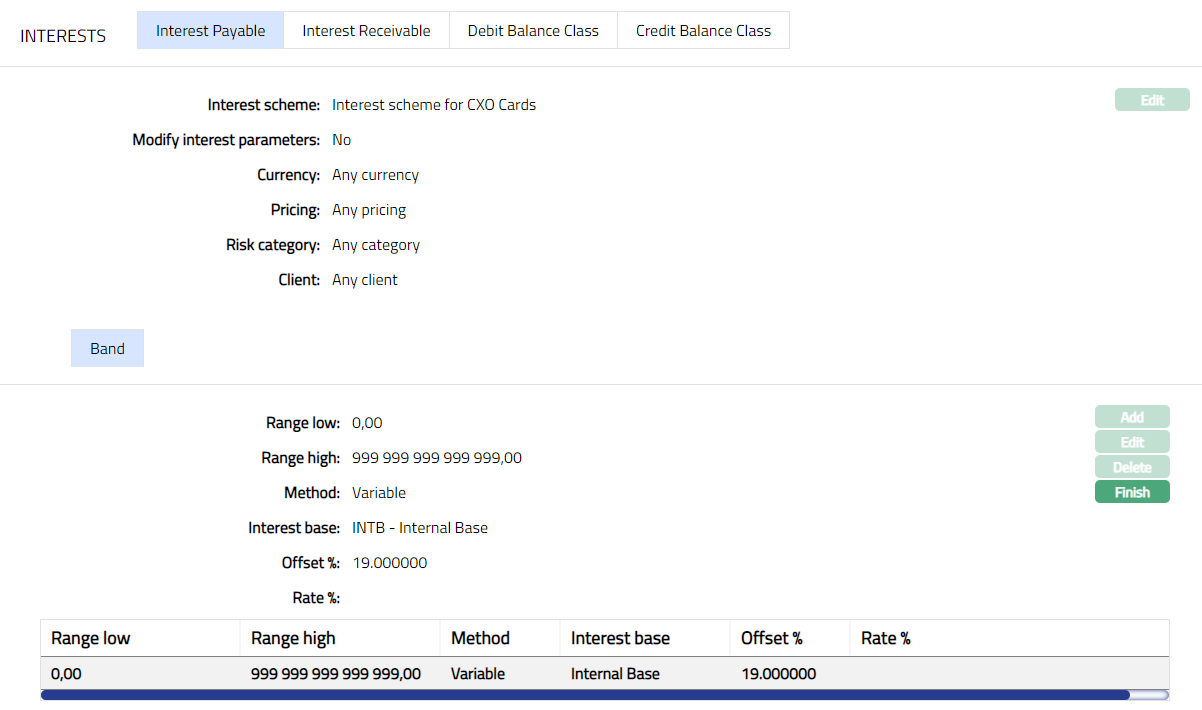
Function: Finish
Interest scheme displays the interest scheme selected for the interest payable in interest group, chosen during creation of the account. If edited, it shows the interest scheme that was chosen last for this account.
Modify interest parameter allows you to modify the Interest parameters applicable to this account that are defaulted from the Interest scheme. By default, it will be No, but is an editable field. Only if this is set to Yes, you will be allowed to change the interest parameters.
The values for Currency, Pricing and Client fields are defaulted from the most suitable Interest combination applicable for the account as explained earlier. These fields are non-editable.
Risk category displays the Risk category maintained under Admin > System codes > Category > Risk Category. Based on the below mentioned combinations, Aura will pick the interest combination for interest calculation.
| Currency | Client | Pricing | Risk Category |
|---|---|---|---|
| Specific | Specific | Specific | Specific |
| Specific | Specific | Specific | Any |
| Specific | Specific | Any | Specific |
| Specific | Specific | Any | Any |
| Specific | Any | Specific | Specific |
| Specific | Any | Specific | Any |
| Specific | Any | Any | Specific |
| Specific | Any | Any | Any |
| Any | Specific | Specific | Specific |
| Any | Specific | Specific | Any |
| Any | Specific | Any | Specific |
| Any | Specific | Any | Any |
| Any | Any | Specific | Specific |
| Any | Any | Specific | Any |
| Any | Any | Any | Specific |
| Any | Any | Any | Any |
The Range low, Range high, Method, Interest base, Offset % and Rate % are displayed based on the bands maintained for the chosen interest scheme. New bands can be added, or the existing bands can be modified as needed, if you have checked Modify Interest Parameters check box.
The Range Low i.e., the lower limit, is defaulted to Zero for the first band. For the succeeding bands, it is automatically set as Range high of the previous band + least decimal of Basis currency. In case of Any Currency, the number of decimals is taken as 2. The value is derived from the Band details maintained for the Interest scheme. See Note below
The Range high i.e., the upper limit for the Band is derived from the Band details maintained for the Interest This is an editable field.
Note: If the Interest basis amount lies outside the Range, the Interest will be calculated as 0. Hence, you should maintain the Range values such that it would cover any amount.
Method displays the interest method option. The available options are None, Fixed or Variable.
Offset%: It is the % by which the base interest rate will be offset to get the actual interest to be applied for interest calculation. This field will be enabled only if Variable Method is chosen. If edited, it shows the value that was chosen last for this account.
Rate % indicates the interest rate applied based on the card account's balance as of last EOD and the interest bands maintained for the Combination and is calculated as the Interest Rate % + Offset. For Fixed Interest, Offset will be taken as 0. If the card account balance does not have a credit balance or if there is no corresponding band, then this will be 0. On creation of the account, it is defaulted from the System Codes > Interest Scheme > Maintain Band. If the interest parameters for the account have been edited, it shows the rate % based on the bands maintained for this account.
Interest Receivable
The Interest Receivable tab allows you to view and maintain the parameters for interest receivable for the Debit balance on a Card account for the Default Debit Balance Class.
On creation of the account, the interest receivable tab shows the Interest base, Rate %, Premium / Discount and Final Rate % as defaulted from the System codes, based on the Interest scheme in the Interest Group chosen for the Account. The values pertain to the most suitable Interest Combination applicable for the account, based on the card account outstanding as on the previous end-of-day. The order in which the combination is chosen is shown below.
| Band | Currency | Client | Pricing |
|---|---|---|---|
| 1 | Specific | Specific | Specific |
| 2 | Specific | Specific | Any |
| 3 | Specific | Any | Specific |
| 4 | Specific | Any | Any |
| 5 | Any | Specific | Specific |
| 6 | Any | Specific | Any |
| 7 | Any | Any | Specific |
| 8 | Any | Any | Any |
The other parameters are defaulted from the Product chosen for the Account.
If you want to customize the interest applicable to a specific account and keep it tailor-made for that account even if there are changes at the interest scheme or Product level, you can check the Modify Interest Parameters checkbox during Edit. All the parameters (interest and other) in this tab for the specific account will be de-linked from the Interest Scheme under System Codes and the Card Account Product. Once delinked, the interest receivable tab view shows details that are derived from the specific values maintained for this specific account.
To view the Interest receivable
- Access Card Account page. Click Interests tab and then Interest Receivable tab to view the details as per sample below.
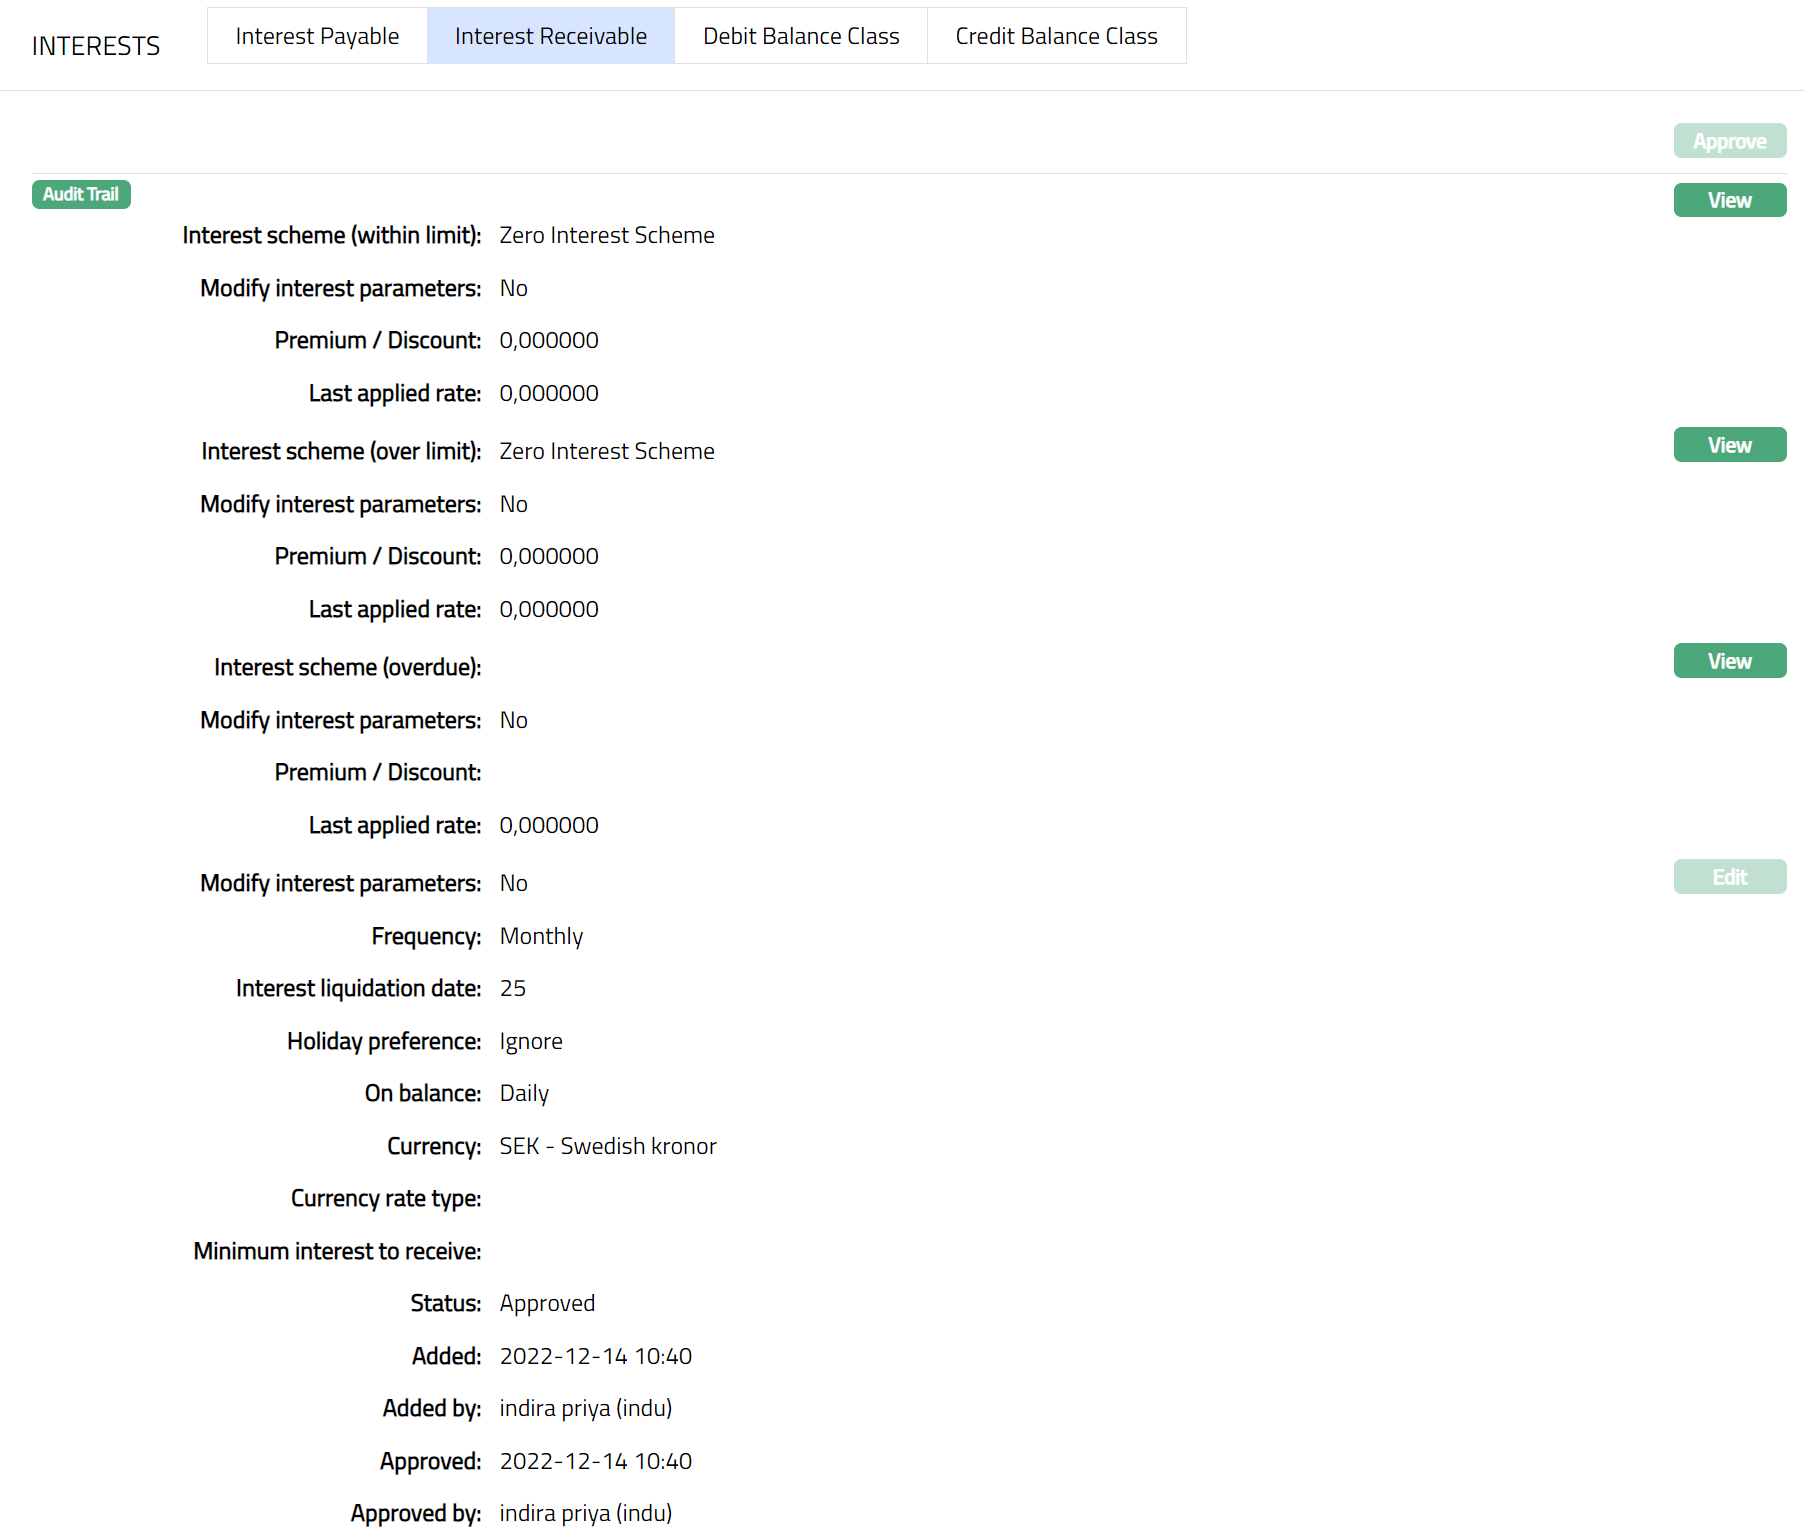
Function: View
Interest scheme (within limit) is used to calculate the interest receivable up to the approved limit for the default debit balance class. On creation of the account, it is defaulted from the Interest Group but is editable. If edited, it shows the interest scheme that was chosen last for this account.
Modify interest parameter indicates if you have customized the interest applicable to this specific account for the Default debit balance class. As soon as the account is created, by default, this is No indicating that the default values have been retained. However, if you have chosen to modify the interest parameters during Edit, this will be Yes.
Premium/Discount displays the premium rate (with a + sign) or discount rate (with a -- sign) applicable for the account. On creation of the account, it will be 0. If edited, it shows the value that was input last for this account.
Last Applied Rate indicates the last rate applied based on the Card Account's previous day balance as of last EOD and the interest rate maintained for the combination. As soon as the account is created and activated, by default it will display 0.
Interest scheme (Over limit) is used when the balance of the account goes beyond the limit specified for the account. The interest receivable on such over limit amount will be calculated using this Interest scheme. On creation of the account, it is defaulted from the Interest Group but is editable. If edited, it shows the interest scheme that was chosen last for this account.
Interest scheme (Overdue) is used to calculate the interest receivable on the overdue amounts -- i.e., where the payments received by due date + grace days do not cover the Amount required. On creation of the account, it is defaulted from the Interest Group but is editable. If edited, it shows the interest scheme that was chosen last for this account.
Modify interest parameters indicate if you have modified the other general parameters applicable for interest receivable for the account. As soon as the account is created, by default, this is No. However, if you have chosen to modify the other interest parameters during Edit, this will be Yes.
Frequency displays the frequency for interest receivable accrual. The available options are: Monthly, Quarterly, Semi-annual and Annual. On creation of the account, it is defaulted from the product but is editable. If edited, it shows the value that was chosen last for this account.
If you select a Frequency other than daily, you need to specify when the Interest has to be liquidated (capitalized) in the Interest Liquidation date. It is the date on which the interest will be posted to the accounts under this product. Available options are as follows:
Day: If you want the interest to be liquidated on a specific date of the calendar month, choose this option. You need to then specify the day in the Day field.
Last Calendar Day: If you want the interest to be liquidated on the last calendar day of the selected frequency instead of the specified date, choose this option.
Last Business Day: If you want the interest to be liquidated on the last business day, then choose this option.
X days before last calendar day: If you want the interest to be liquidated x days before the last calendar day, then choose this option.
X days before last business day: If you want the interest to be liquidated x days before the last business day, then choose the option.
The day parameter will hold values from 1 to 30
If any date between 1 and 30 is chosen Aura will liquidate interest on that day of the month.
If 30 is chosen and if the month has 29 days, it will liquidate on 29th of the month
If 30 is chosen and if the month has 28 days it will liquidate on 28th of the month
Note:
If frequency is Monthly
If 31 is chosen and if the month has 30 days interest will be liquidated on 30th of the month
If 30 is chosen and if the month has 31 days interest will be liquidated on 30th of the month
If frequency is quarterly, semi-annual or annual, the 'Day' parameter is interpreted in the same way as month; however, the month will be
March, June, September and December -- if it is quarterly,
June and December -- if it is semi-annual
December -- if it is annual
On creation of the account, it is defaulted from the Product and is editable.
- The value for Holiday Preference is defaulted from the Product but can be changed while creating an account. If the interest liquidation date arrived at is a holiday, specify how it should be treated using the Holiday preference. The options are:
Ignore: If this option is chosen, then the holiday will be ignored, and interest will be liquidated on same day. This is the default option selected.
Next business day: If this option is chosen, then interest will be liquidated on the next business day.
Previous business day: If this option is chosen, then interest will be liquidated on the previous business day.
On balance displays the type of balance on the basis of which the Interest receivable is to be accrued. Available options are: Daily and Period end. Based on the selected On balance and Frequency, Aura accrues the interest. If you select the Frequency as Daily, then the On balance will be defaulted to Daily and you will not be allowed to select other options. Accrual and Liquidation will be either daily or period end. On creation of the account, it is defaulted from the product but is editable. If edited, it shows the On value that was chosen last for this account.
Currency displays the currency for the minimum interest to receive. On creation of the account, it is defaulted from the Product but is editable. If edited, it shows the Currency that was chosen last for this account.
Currency rate type displays the rate type for the minimum Interest to receive. The interest will be accrued in terms of the Account Currency and will be converted into the equivalent amount in terms of the above Currency using this Currency Rate Type, as on the date of Liquidation. On creation of the account, it is defaulted from the product but is editable. If edited, it shows the value that was chosen last for this account.
Minimum interest to receive is the minimum threshold amount for interest receivable. Aura will liquidate the interest to the account only if the accrued interest on the Account is greater than or equal to this amount. On creation of the account, it is defaulted from the Product but is editable. If edited, it shows the value that was input last for this account.
The additional fields that you can view in the tab are explained below:
Status field denotes the status of the tab.
Added field denotes the date on which the record was added.
Added by field denotes the name of the person who created the record.
Approved field denotes date on which the record was approved and is displayed only for approved records.
Approved by field denotes name of the person who approved the record and is displayed only for approved records
To view / edit the parameters of the Interest scheme for Interest Receivable for the Default Debit Balance Class
- Click View against the Interest scheme to see the interest combination details and other parameters for the Interest. A sample of the page is shown below.
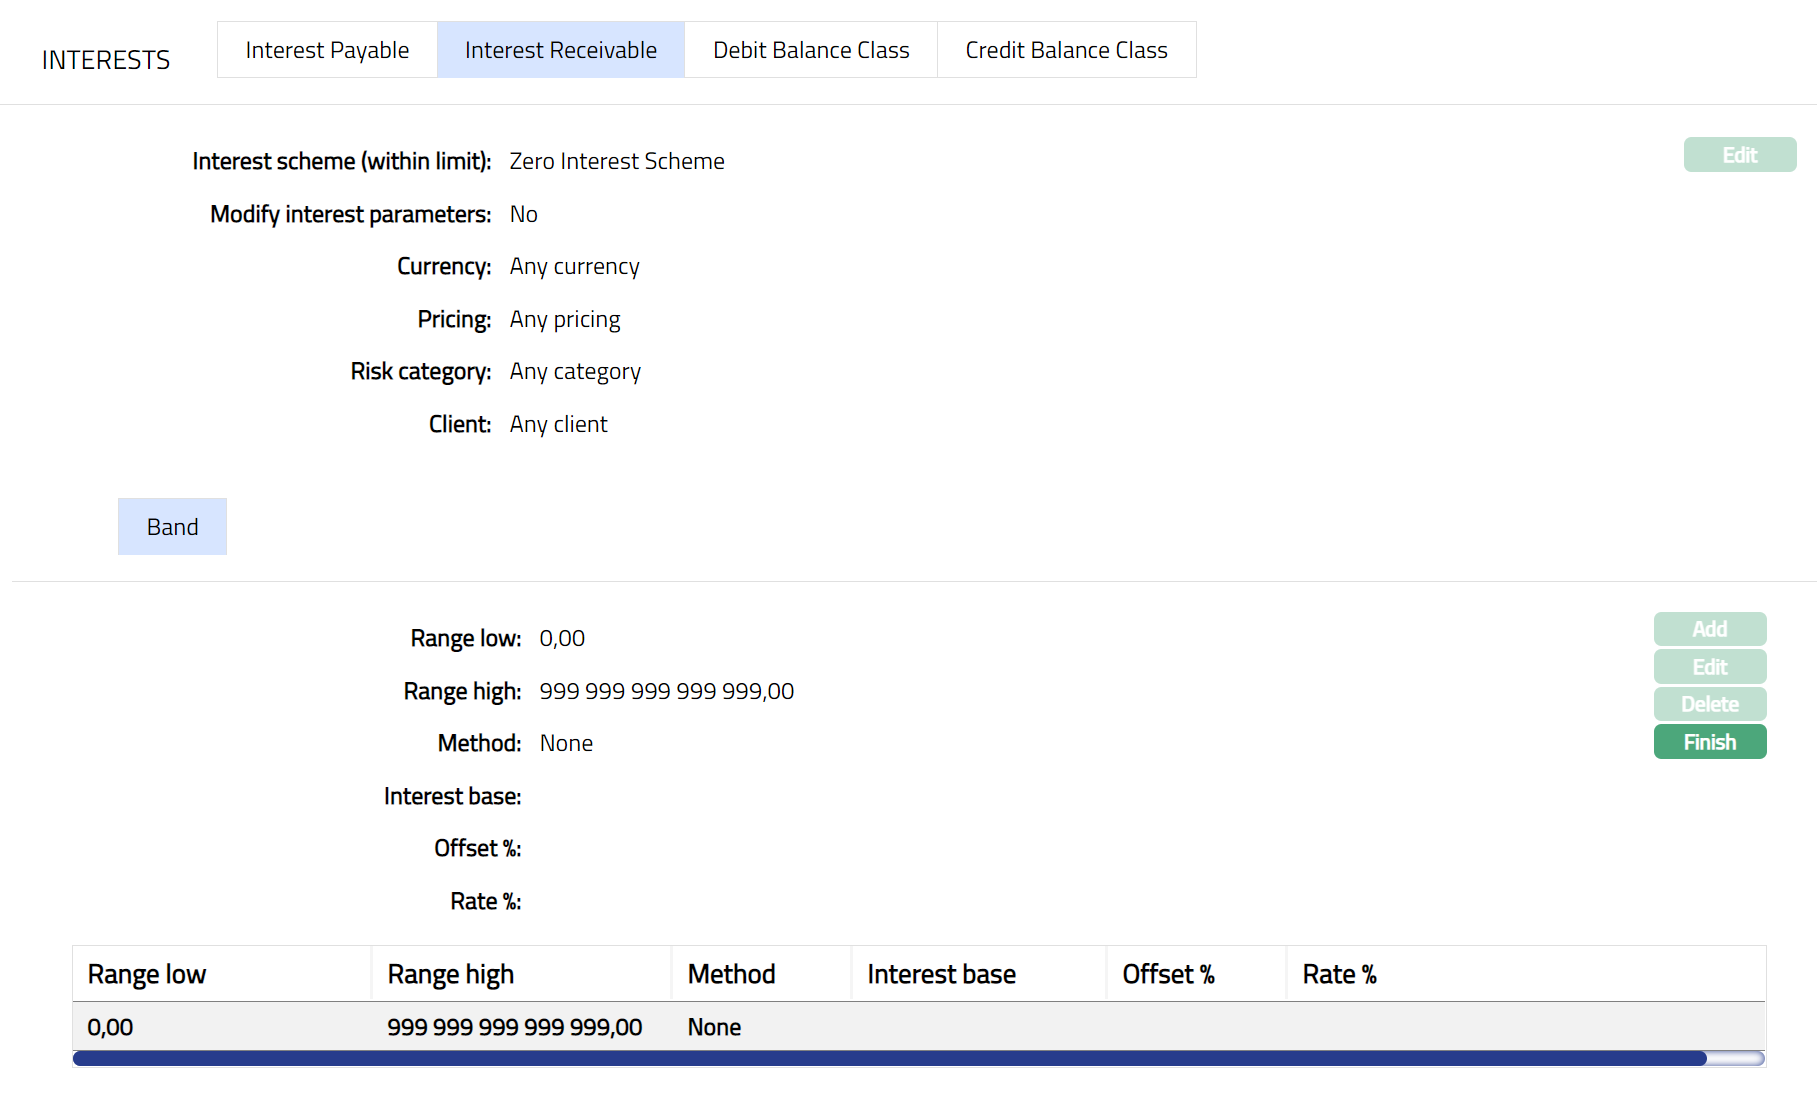
Function: Finish
Interest scheme (within limit) is used to calculate the interest receivable up to the approved limit for the default debit balance class. On creation of the account, it is defaulted from the Interest Group but is editable. If edited, it shows the interest scheme that was chosen last for this account.
Interest scheme (Over limit) is used when the balance of the account goes beyond the limit specified for the account. The interest receivable on such over limit amount will be calculated using this Interest scheme. On creation of the account, it is defaulted from the Interest Group but is editable. If edited, it shows the interest scheme that was chosen last for this account.
Interest scheme (Overdue) is used to calculate the interest receivable on the overdue amounts -- i.e., where the payments received by due date + grace days do not cover the Amount required. On creation of the account, it is defaulted from the Interest Group but is editable. If edited, it shows the interest scheme that was chosen last for this account.
View / Edit of Interest Scheme, Add / View / Edit of Bands and View / Modify of other Interest parameters for Interest Receivable are exactly the same as that for Interest Payable. Please refer to the Interest Payable section for the details
Debit Balance Class
This sub-tab enables you to view / edit the interest parameters of different debit balance classes for a specific account. On creation of the account, all the balance classes defined for the product and their interest parameters are defaulted to the account.
If you want to customize the interest of a balance class applicable to a specific account and keep it tailor-made for that account even if there are changes at the interest scheme or Product level, you can check the Modify Interest Parameters checkbox during Edit. All the parameters in this tab for the specific account will be de-linked from the Interest Scheme under System Codes and the Card Account Product. Once delinked, the Debit Balance Class sub-tab view shows details that are derived from the specific values maintained for this specific account.
To View Debit Balance Class interest parameters
- Access Card Account page, click Interest and then Debit Balance Class tab. You will see all the balance classes at the bottom and the interest details of the selected balance class at the top.
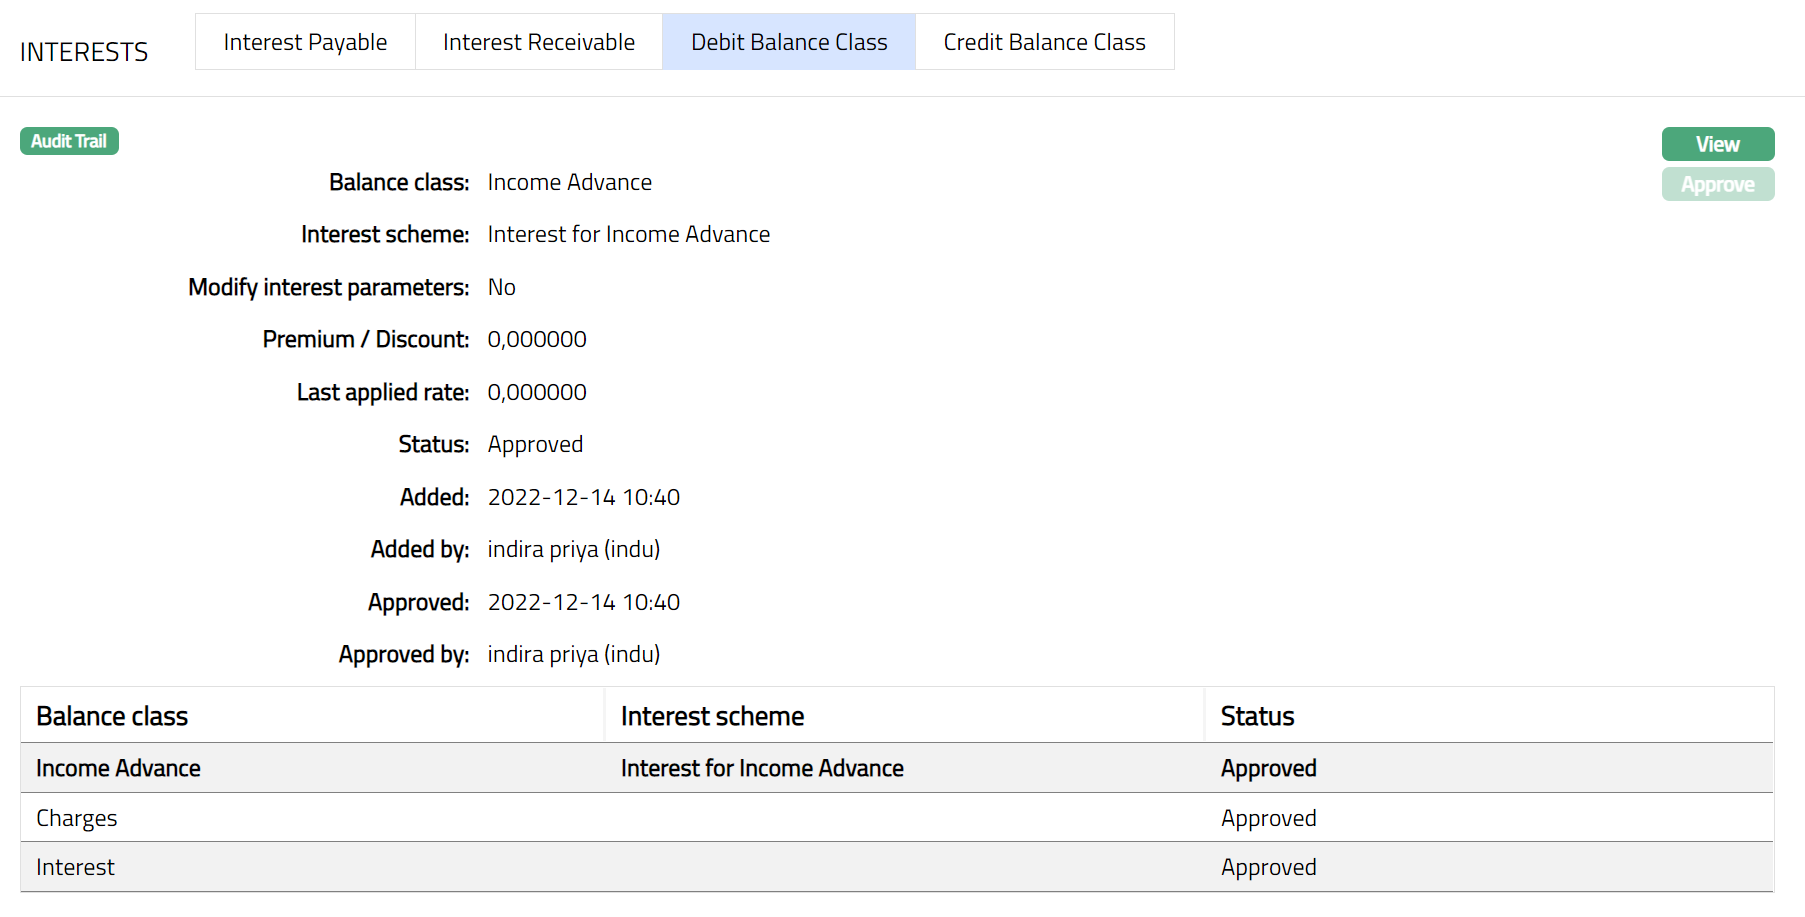
Function: View
Balance class displays the description of the Debit group.
Interest scheme displays the interest scheme for the Debit balance class. On creation of the account, it is defaulted from the Interest Group but is editable. If edited, it shows the interest scheme that was chosen last for this account.
Modify interest parameter indicates if you have customized the interest scheme details applicable to this specific account. As soon as the account is created, by default, this is No indicating that the default values have been retained. However, if you have chosen to modify the interest parameters during Edit, this will be Yes.
Premium/Discount displays the premium rate (with a + sign) or discount rate (with a -- sign) applicable for the account. On creation of the account, it will be 0. If edited, it shows the value that was input last for this account.
Last Applied Rate indicates the last rate applied based on the Card Account's previous day balance as of last EOD and the interest rate maintained for the combination. As soon as the account is created and activated, by default it will display 0.
The additional fields that you can view in the tab are explained below:
Status field denotes the status of the tab.
Added field denotes the date on which the record was added.
Added by field denotes the name of the person who created the record.
Approved field denotes date on which the record was approved and is displayed only for approved records.
Approved by field denotes the name of the person who approved the record and is displayed only for approved records.
To edit the parameters of the Debit Balance Class.
- Click View against the Interest scheme. A sample of the page is shown below.

Function: Finish
- Refer to the Interest Payable sections for details regarding the fields.
Note: Any change in the tab will set the tab status to Pending till it is approved by another user. On approval, the tab status is set to Approved
Credit Balance Class
This sub-tab enables you to view / edit the interest parameters of different credit balance classes for a specific account. On creation of the account, all the balance classes defined for the product and their interest parameters are defaulted to the account.
If you want to customize the interest of a balance class applicable to a specific account and keep it tailor-made for that account even if there are changes at the interest scheme or Product level, you can check the Modify Interest Parameters checkbox during Edit. All the parameters in this tab for the specific account will be de-linked from the Interest Scheme under System Codes and the Card Account Product. Once delinked, the Credit Balance Class sub-tab view shows details that are derived from the specific values maintained for this specific account.
To View Credit Balance Class interest parameters
- Access Card Account page, click Interest and then Credit Balance Class tab.
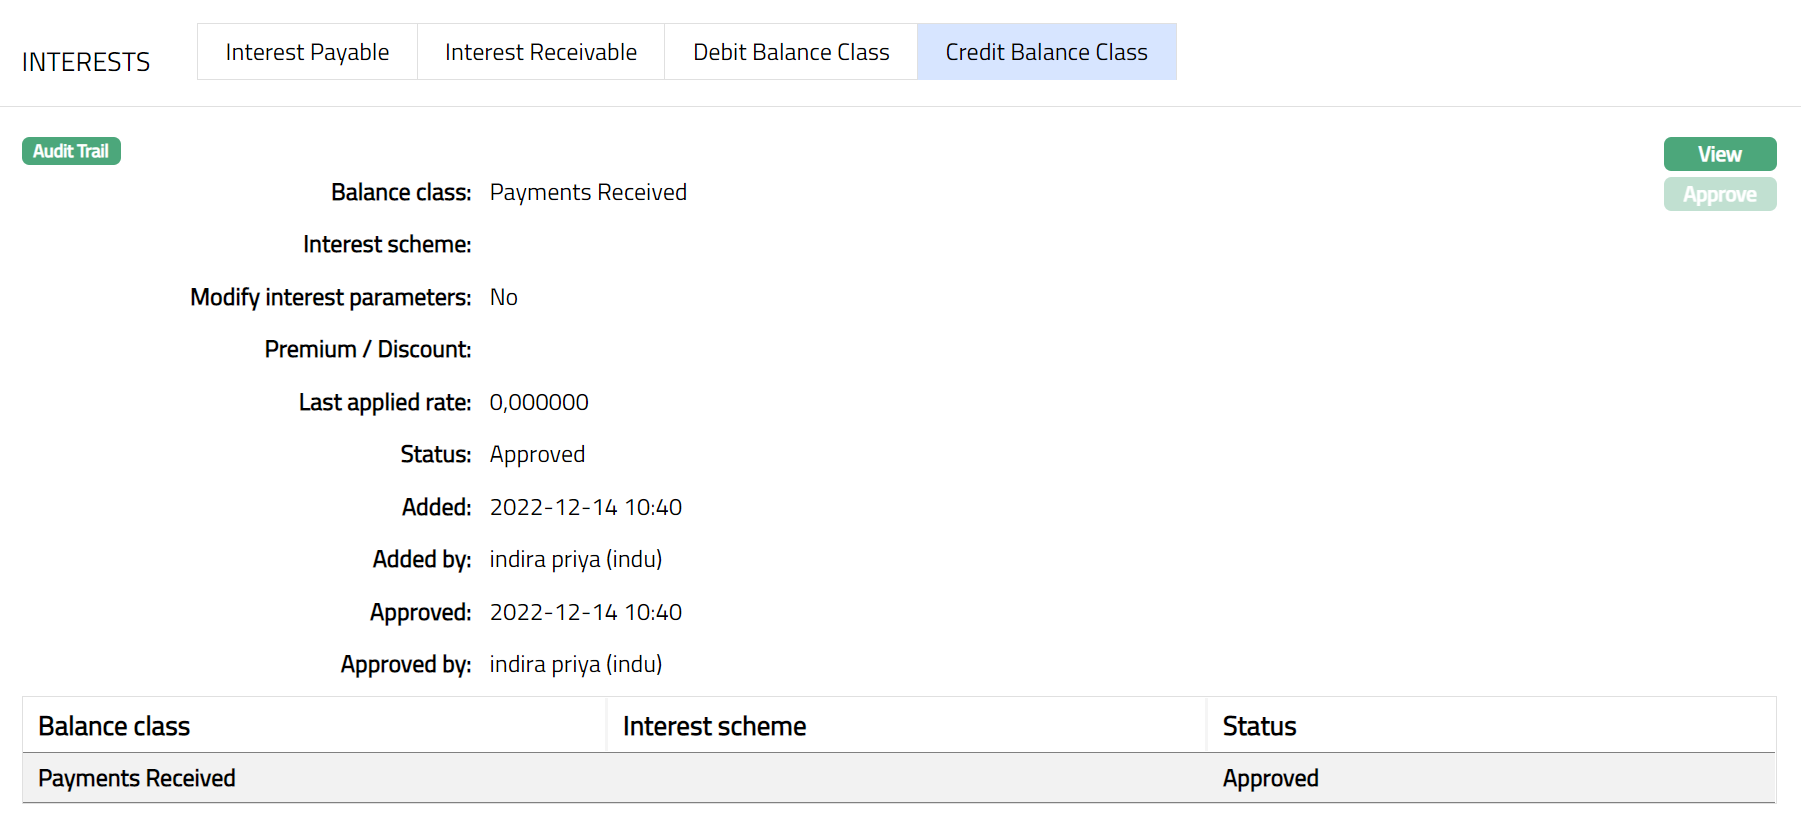
Function: View
Balance class displays the description of the Credit group.
Please refer to the Interest Payable section for the details regarding the View and Edit screen. The View and Edit screen details for Credit Balance class is same as Debit Balance class.
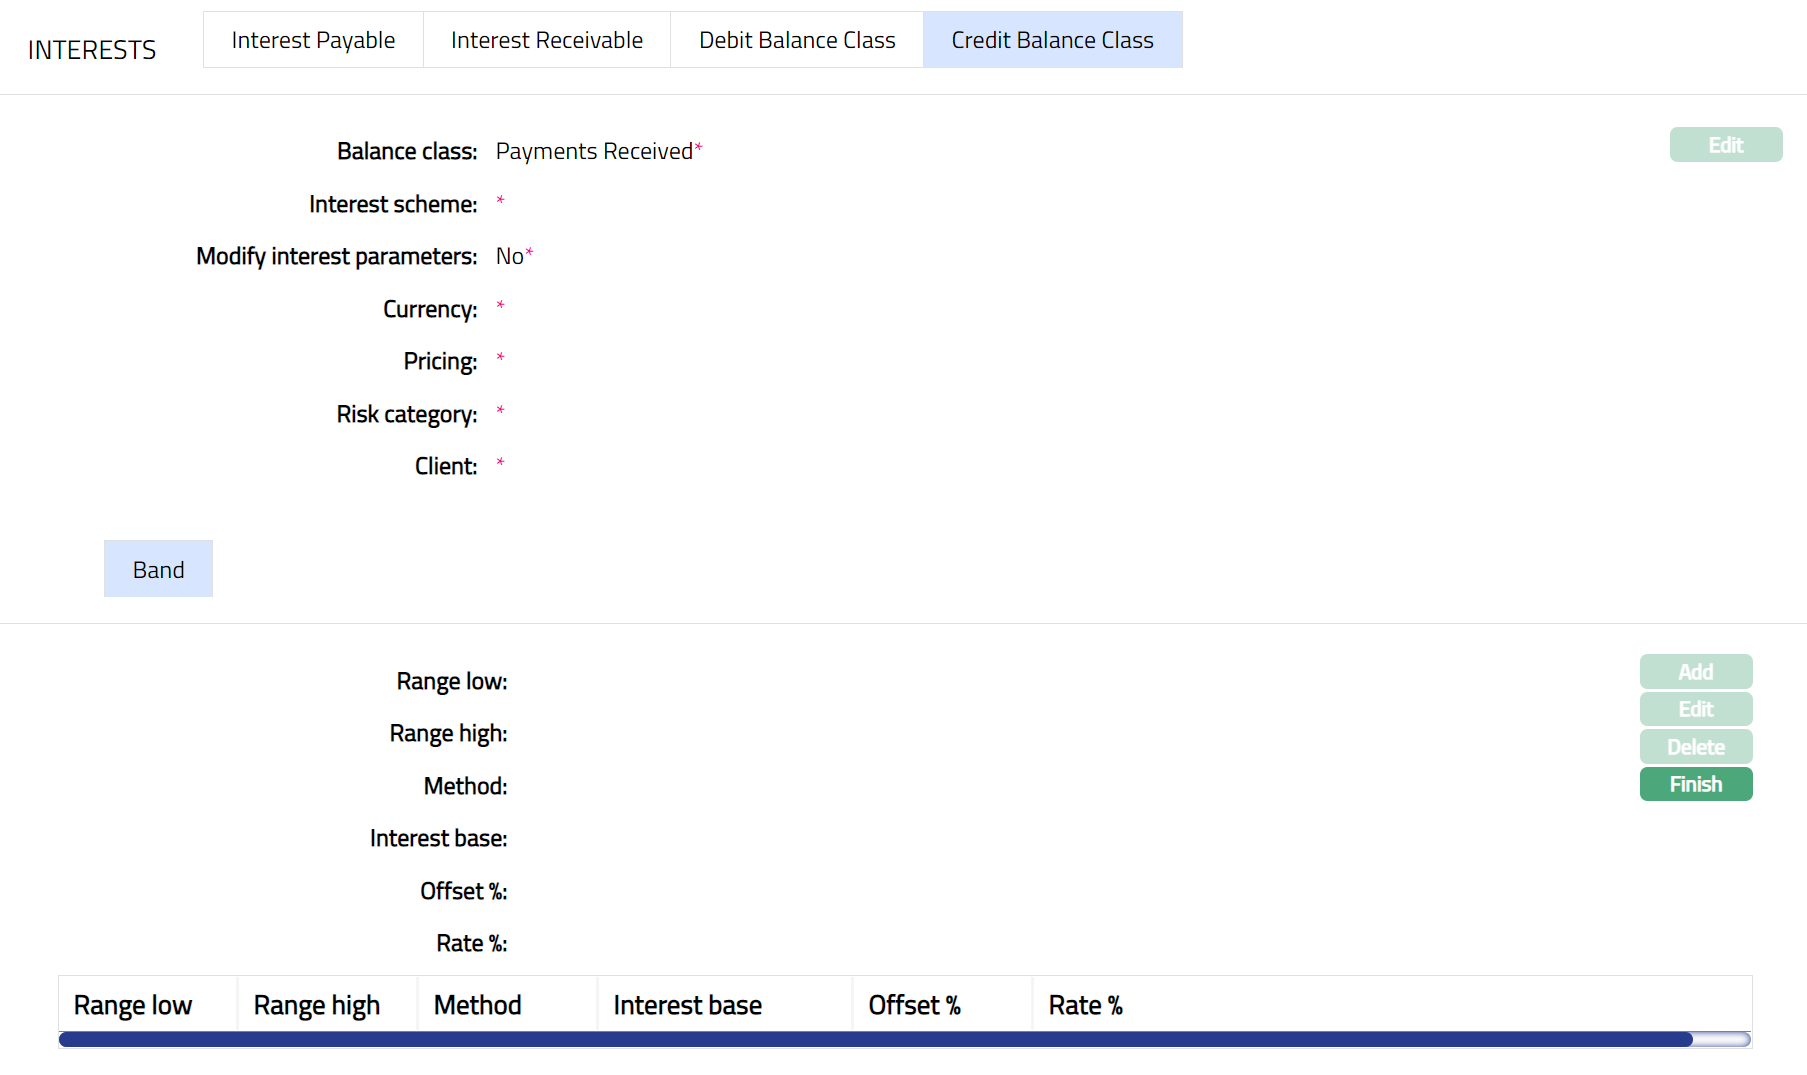 Function: Finish
Statement Parameter
Using this tab, you can add, view and maintain the preferences for generating the statements. The first statement defaulted from the Product is considered to be the Invoice for the account and cannot be deleted. However, any changes required in the parameters and additional statements, as required, can be maintained using this tab.
To View the existing statement
Access Card Account screen and click Statement Parameter tab. As soon as the card account is created, the details of the first statement (Invoice) are defaulted from the Product. Later, apart from the invoice, any other statements that are added are also listed under this tab.
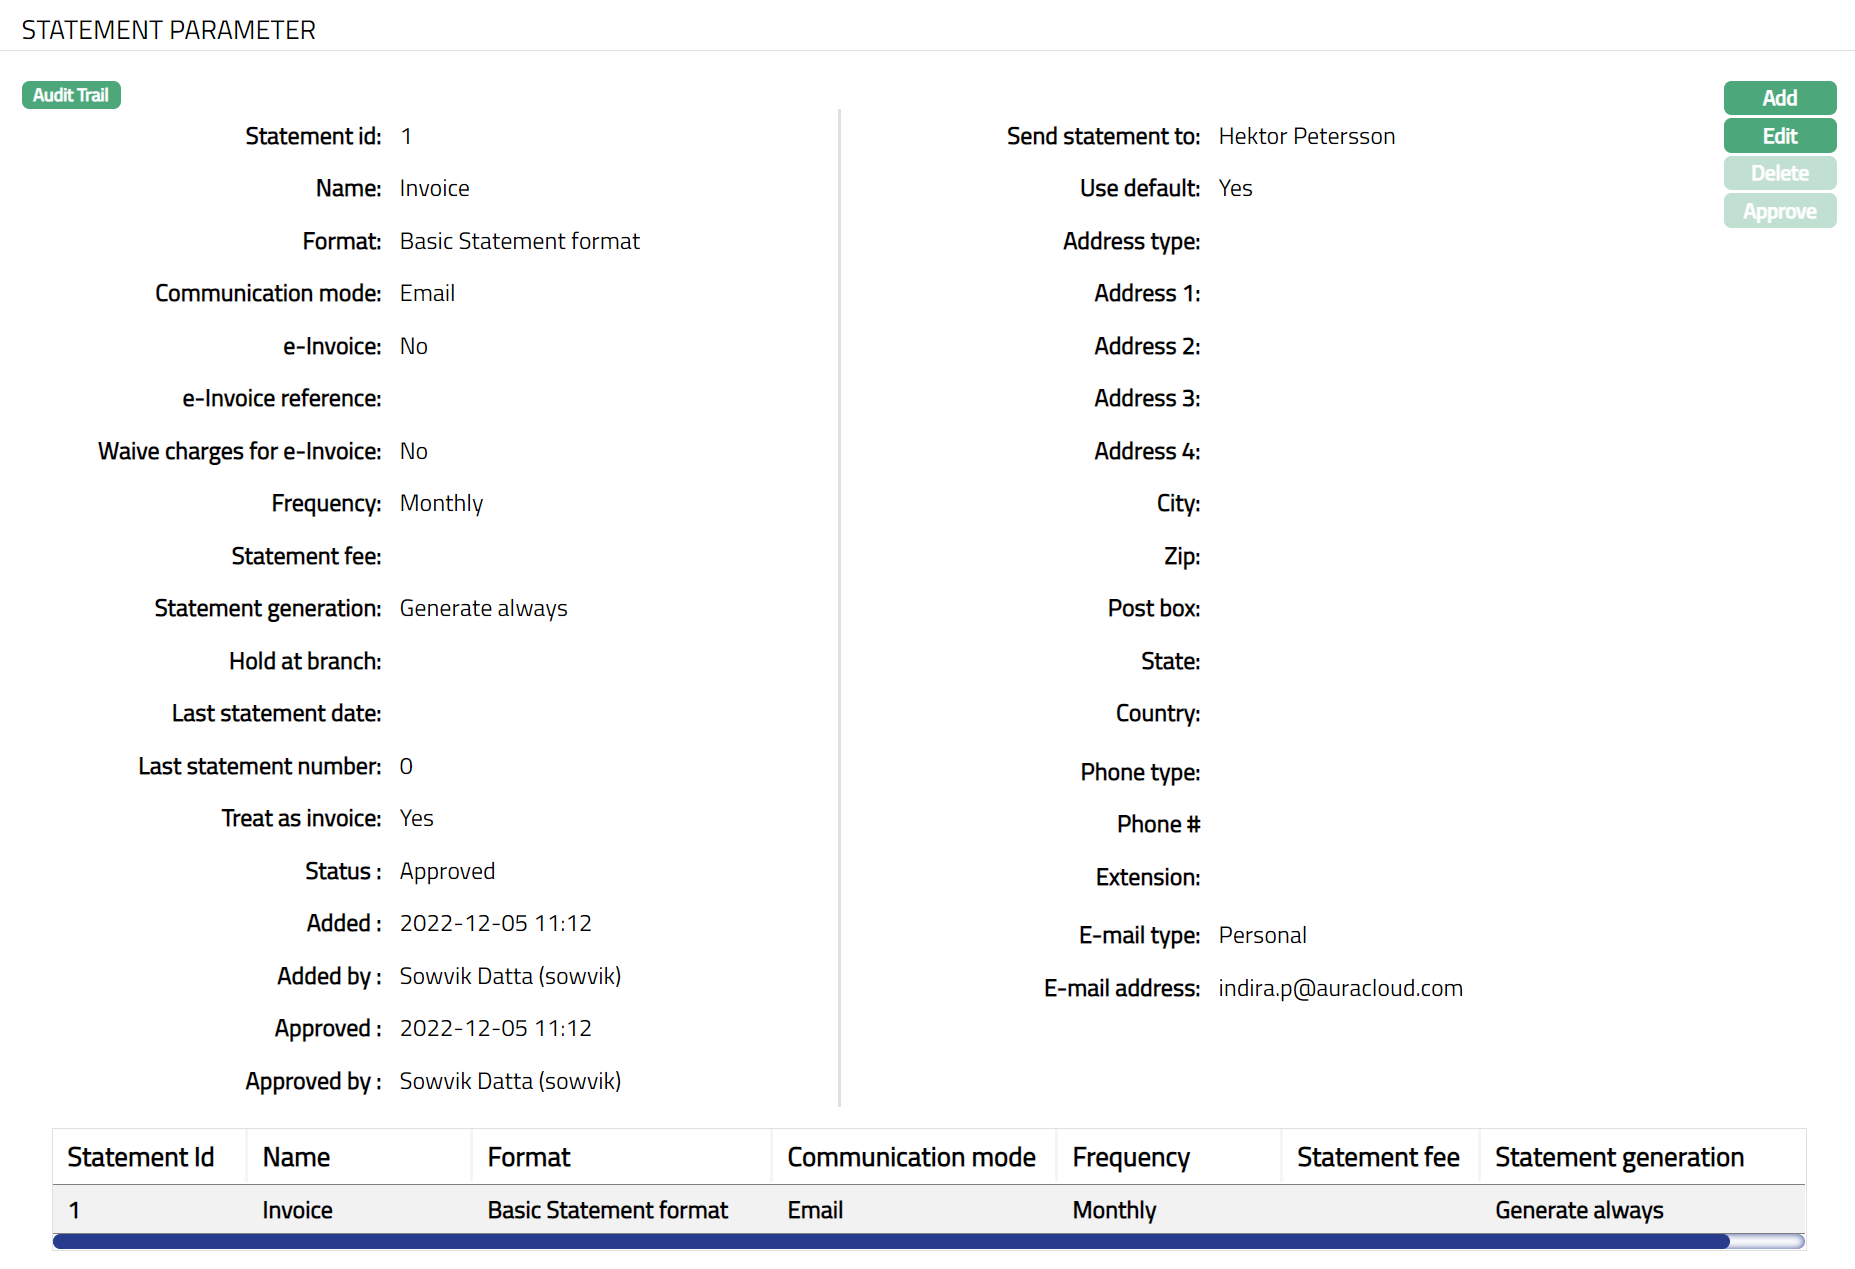
Note: The above screenshot shows you the instance where the account has only the statement maintained at the product level. The fields available here are:
Statement id denotes the identification number of the statement. It is automatically generated by Aura.
Name denotes the name of the statement. By default, the name for the first statement will be Invoice, but is editable.
Format denotes the format in which the statement has to be sent. For the first statement, this is defaulted from the Product, but is editable.
Communication mode denotes the mode through which the statement details are to be communicated -- i.e., the manner in which you want to send the statement. For the first statement, this is defaulted from the Product, but is editable.
The e-invoice flag is unchecked on creation of an account, indicating that the statement is not sent as an e-invoice.
If the e-invoice field above is unchecked, waive charges for e-invoice is also unchecked indicating that the statement charges are waived. For the first statement, this is defaulted from the Product, but is editable.
Frequency denotes the frequency at which the statement has to be generated and sent to the concerned person. For the first statement, the data for this field is populated from Frequency maintained under Statement parameter for the Card Account Product based on which the current card account is created.
Statement fee is the fee that is to be collected from the client for the statement defined above. Aura will display the values from Admin > Charges, if the charge Type is Periodic Flat / Banded. If banded, the card account outstanding balance will be the basis for the charge.
Statement generation denotes the condition for the statement generation maintained at the product level.
Hold at Branch denotes if the statement generated has to be dispatched to client or held back at the branch.
Last statement date denotes the date on which this statement was generated last.
Last statement number denotes the number of this statement that was generated last.
Treat as invoice denotes if the statement is treated as invoice or not. The first statement is always treated as invoice, and any additional statements are always treated as Not Invoice.
Send statement to denotes the name of the person to whom the statement has to be sent and depends on the type of client. See details under Add Statement
For the first statement, the Use Default flag will be checked, and the address maintained as a default address at CRM > Person > Maintain, will be displayed.
Address type denotes the type of the address to which the statement is to be sent.
For the first statement, as the Use default flag is checked, the data for the following fields will not be displayed.
Address 1
Address 2
Address 3
Address 4
City
Zip
Post Box
State
Country
Phone type
Phone #
Extension
E-mail type
E-mail address
If you want to have additional statements for the account, you can do so using the Add button in the view screen.
To Add a new Statement,
Click Add. The Add Statement Parameter page appears.
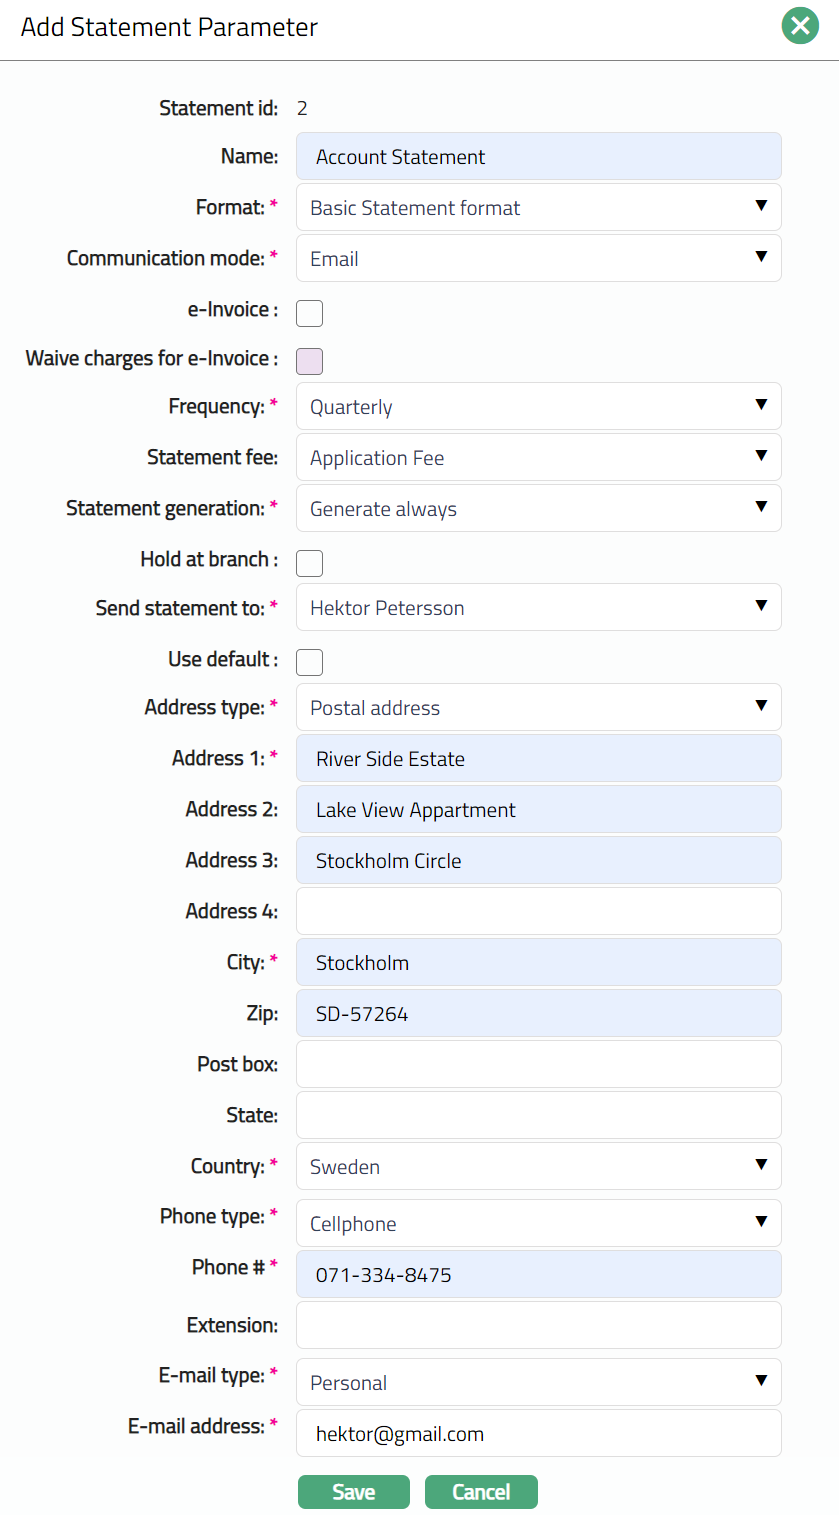
The Statement id is automatically displayed by Aura.
Enter Name for the statement.
Select Format from the drop-down list of formats that have been maintained under Admin > System codes > Generic definition > Statement formats.
Select Communication mode from the drop-down list. Available options are Email, Data handoff, Email, Paper, SMS, Web hotel.
By default, e-invoice flag will be unchecked. If the e-Invoice is to be generated for the statement, then check the e-Invoice flag.
If e-invoice flag is checked, then the e-invoice reference hyperlink will be displayed. Click on the hyperlink. Aura will display the list of e-invoice agreements maintained under CRM > Client > Agreement. Select the required e-invoice agreement.
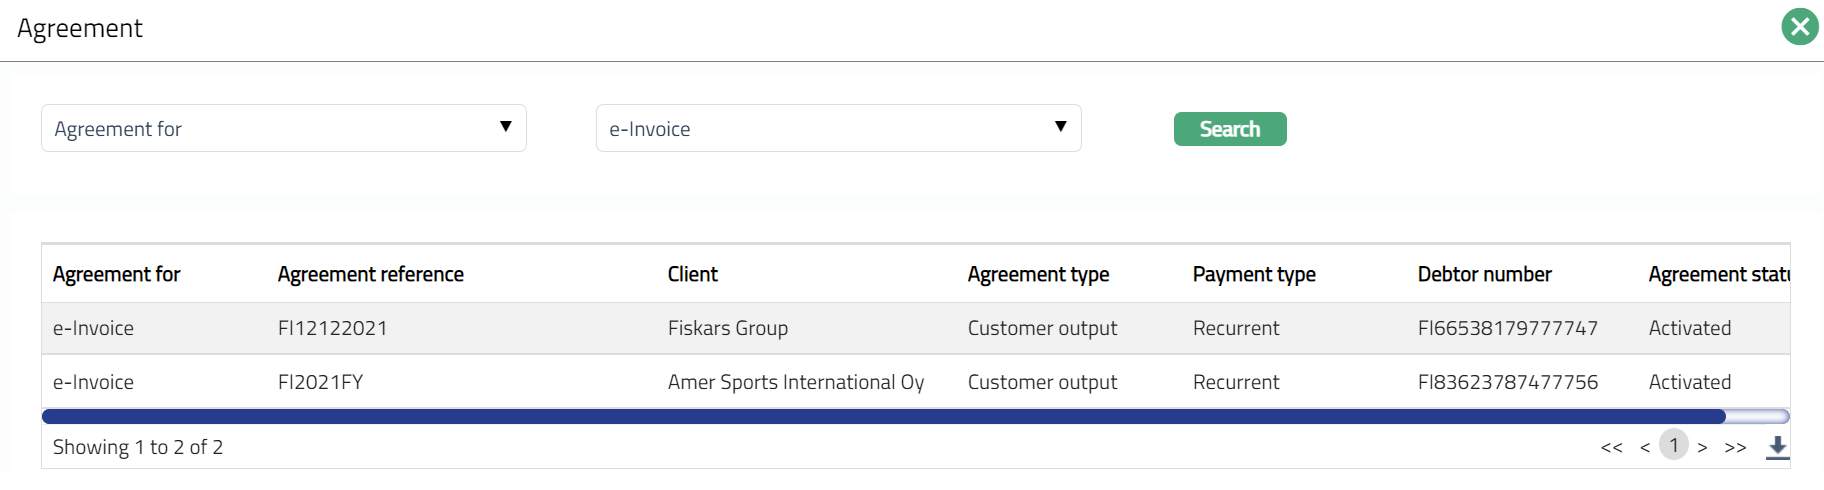
The value for the Waive charge for e-invoice flag is defaulted from the Product level and is enabled only if e-invoice flag is checked. If Waive charge for e-invoice flag is checked and the e-Invoice reference agreement selected in the above step is Active, then the charges for e-invoice will be waived off. If the flag is unchecked, then the charges will be levied for the e-invoice based on the statement fee chosen.
Select the Frequency of the statement from the drop-down list. Available options are: Daily, Monthly, Quarterly, Semi-annual and Annual.
Select the Statement fee from drop down list. This is the fee that is to be collected from the client for the statement defined above. Aura will display the values from Admin > Charges, if the charge Type is Periodic Flat / Banded. If banded, the card account outstanding balance will be the basis for the charge.
Select the conditions for Statement generation from the following options available:
By default, Generate only on movement is selected. This indicates that the account statement will be generated only if there is any activity / balance in the card account / associated bonus account
If Generate Always flag is selected, then the account statement will be generated irrespective of the transactions or the balance in the card account / associated bonus account.
If Suppress is selected, then the account statement is not generated irrespective of the transactions or balance in the card account / associated bonus account.
If Hold at Branch flag is checked, then the statement is generated but instead of despatch to client, it is held back at the branch.
Treat as invoice denotes if the statement is treated as invoice or not. The first statement is always treated as invoice, and any additional statements are always treated as Not Invoice.
Select the person from the list of card account holders to whom the Statement will be sent. The options shown will depend on the type of client.
Personal: The name of the Person will get displayed in the drop-down list.
Joint Client: The names of the Joint account holders will get displayed in the drop-down list.
Corporate: The name of the corporate client will get displayed in the drop-down list.
The list will also include the people who are linked to the client / account under the Linked People tab under Client Maintenance / Account Maintenance.
By default, Use Default flag is checked. However, if you want the statement to be sent to a different address, you can uncheck the flag and enter the required address details.
If the flag is checked, Aura will consider the default address maintained at CRM > Person > Maintain, for the person chosen under Send Statement To as the address to which the statement has to be dispatched.
If the flag is unchecked, the below mentioned fields will be enabled and you can enter the address details.
i. Select Address type from the drop-down list. The address types maintained under Admin > System Codes > Address details > Address types are displayed in the drop-down list.
ii. Enter address details of the receiver in Address 1, Address 2, Address 3 and Address 4 fields.
iii. Enter the City of the receiver.
iv. Enter Zip code of the receiver.
v. Enter Post box number of the receiver.
vi. Enter the State of the receiver.
vii. Select Country from the drop-down list which is maintained under Admin > System codes > Generic definitions > Countries.
viii. Select Phone type from the drop-down list which is maintained under Admin > System Codes > Address details > Phone types.
ix. Enter Phone# of the receiver.
x. Enter Extension of the receiver.
xi. Select E-mail type from the drop-down list which is maintained under Admin > System Codes > Address details > E-mail types.
xii. Enter E-mail address of the receiver.
Click Save. Statement Parameter page appears with the added details.
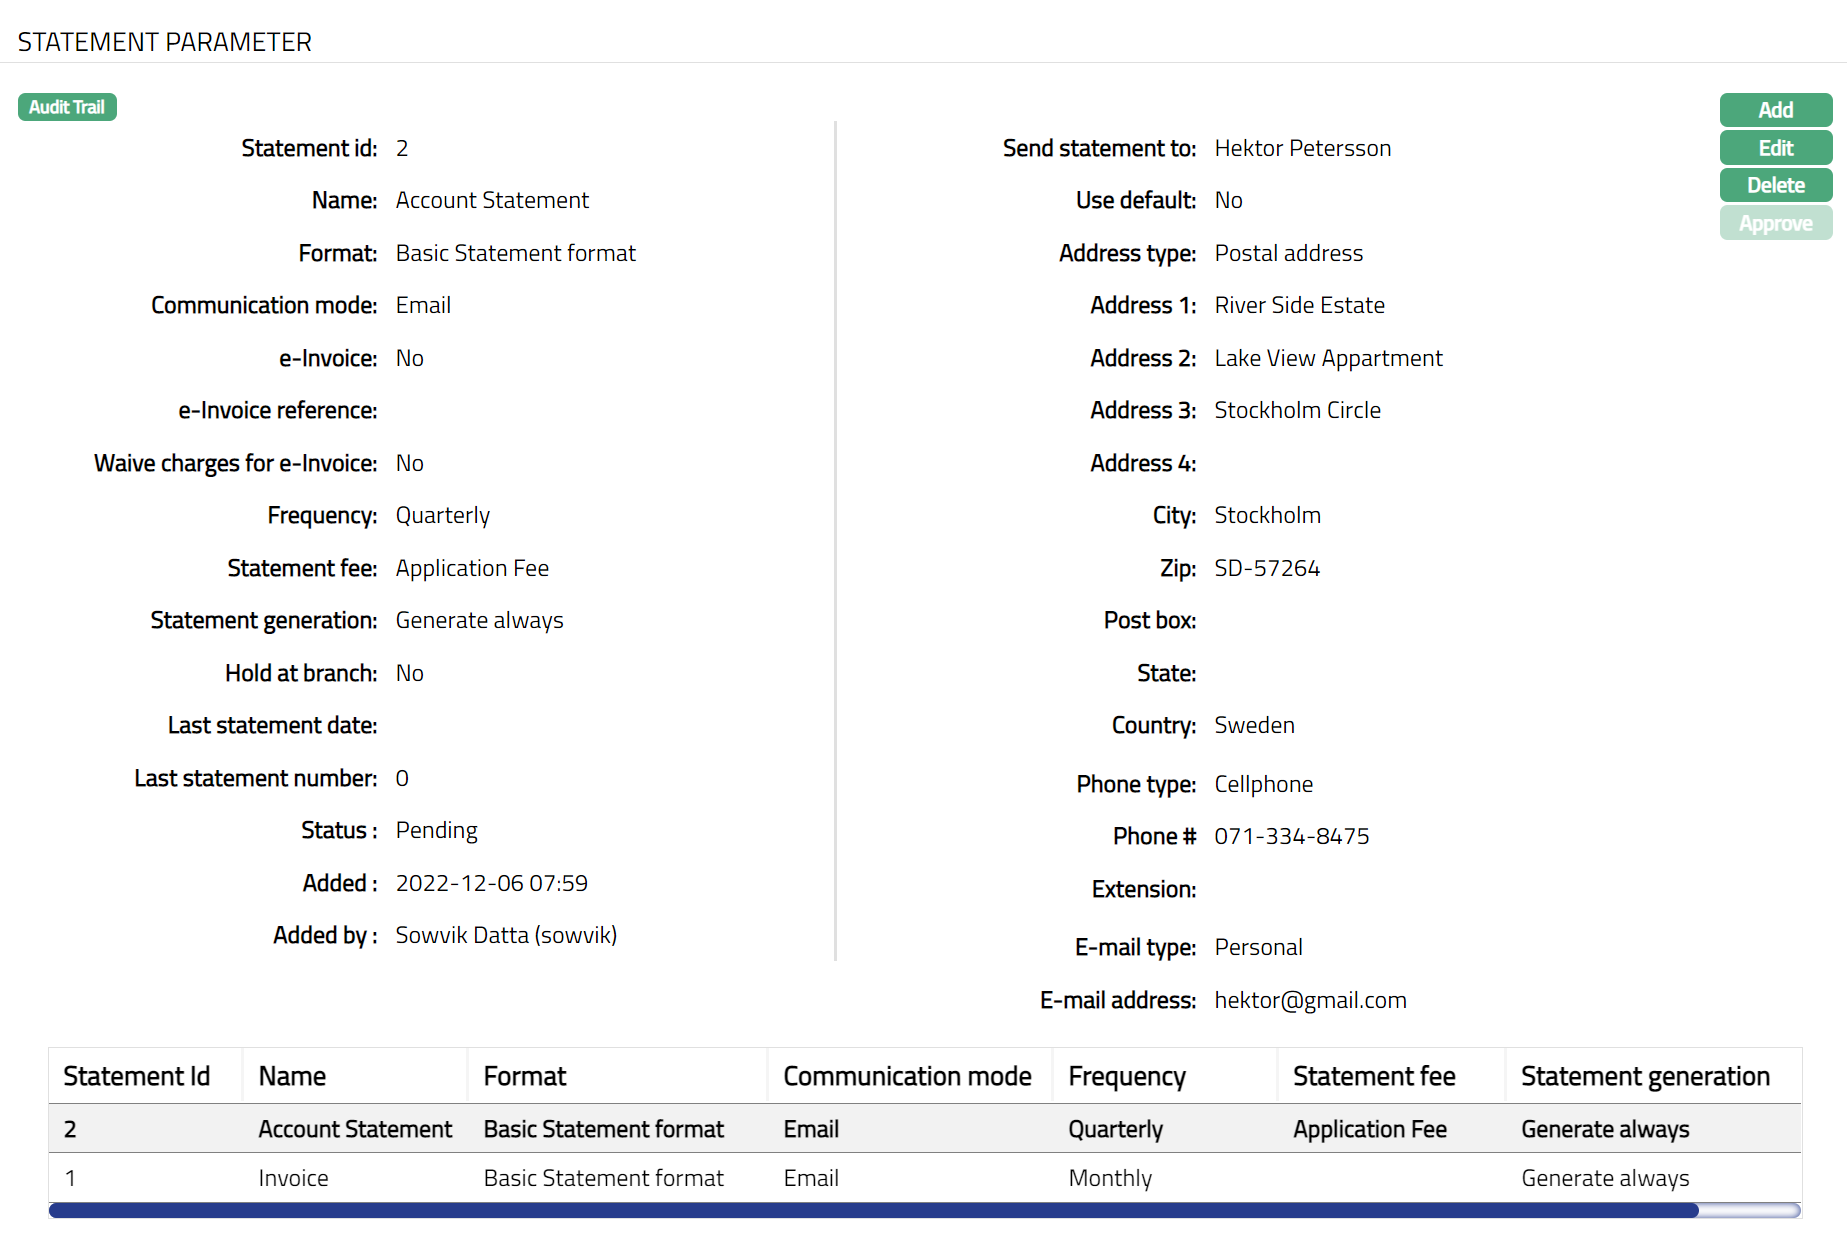
Note: Any change in the tab will set the tab status to Pending till it is approved by another user. On approval, the tab status is set to Approved.
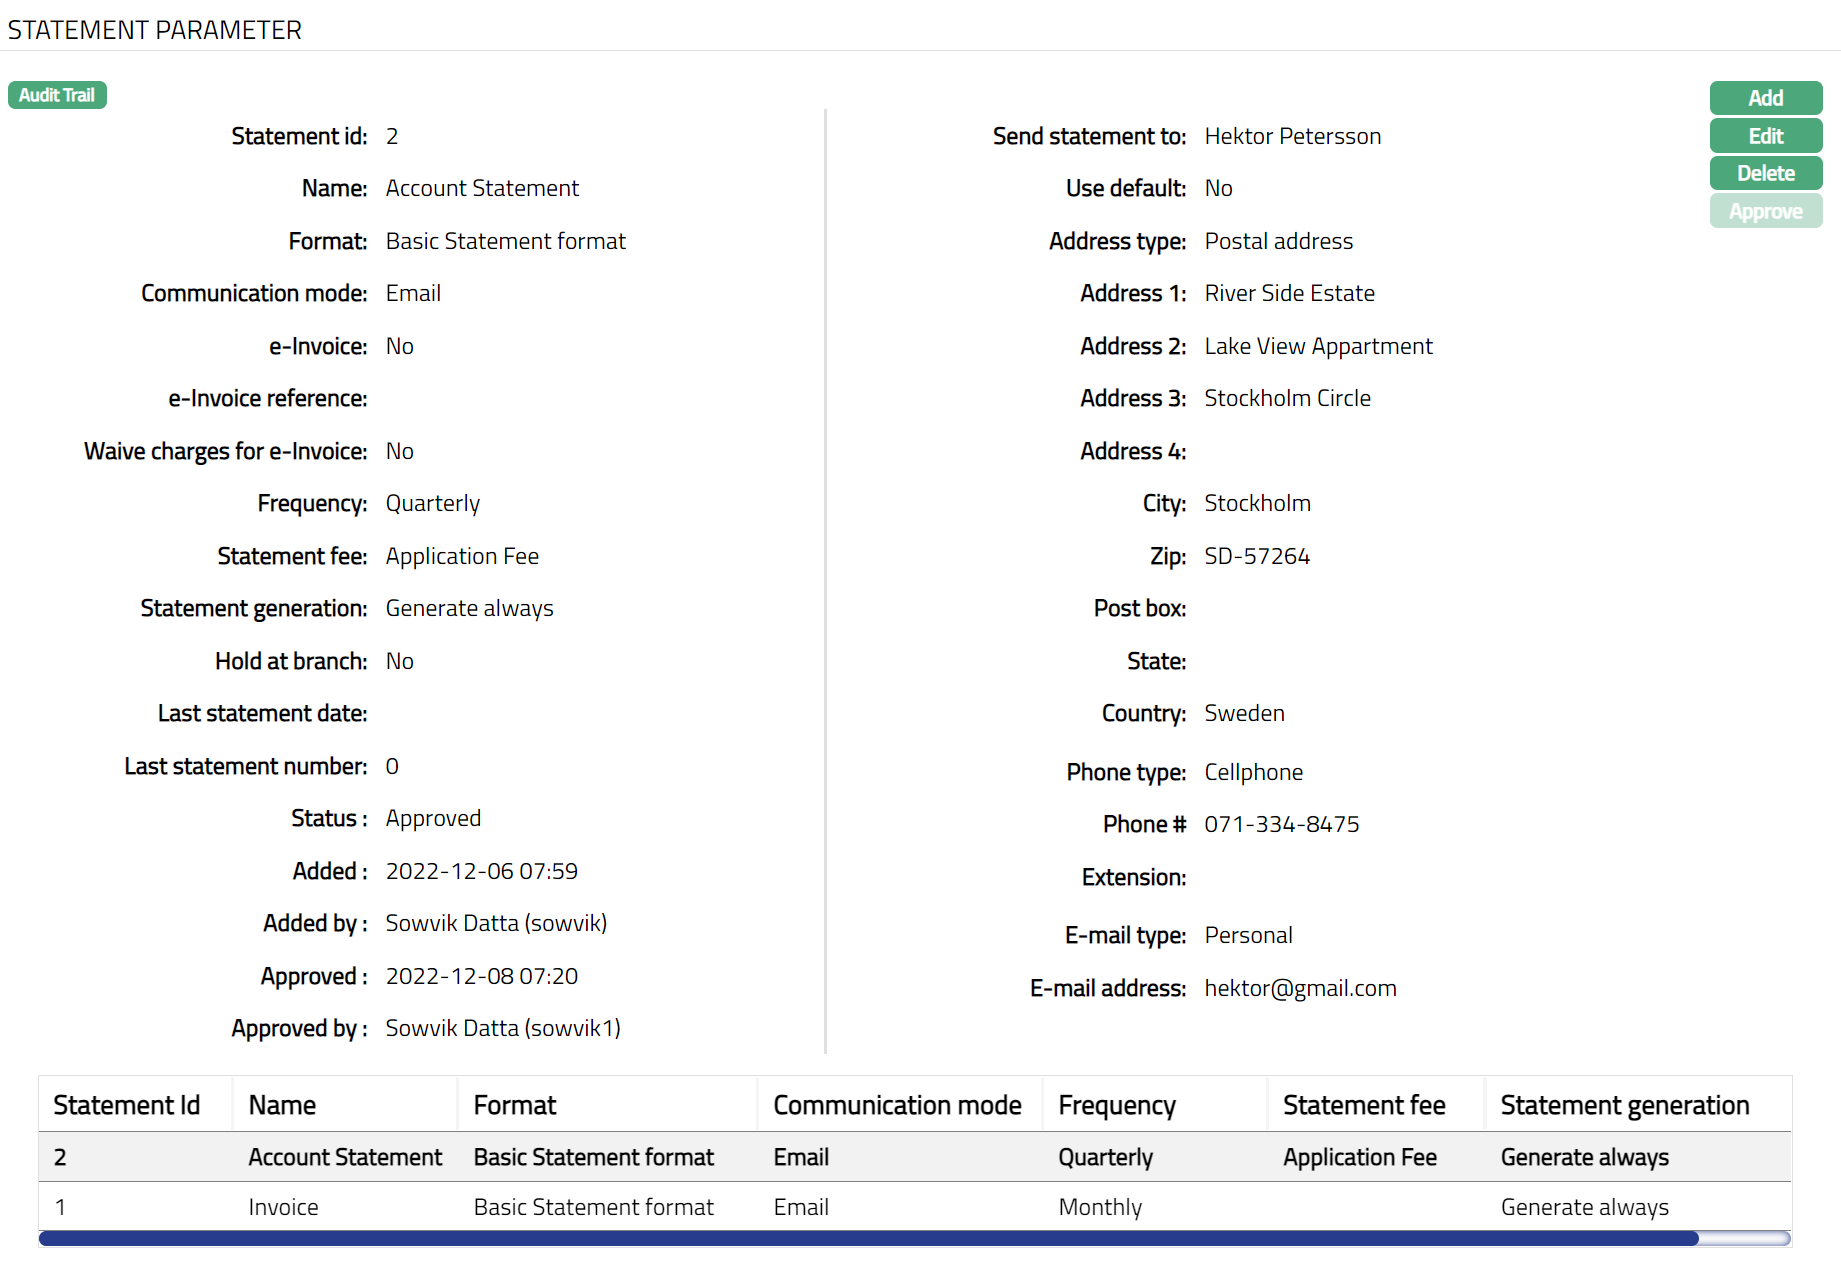 Functions: Add, Edit, Delete, Approve
The following fields are shown only in the View screen and are not editable:
Status field denotes the status of the tab.
Added field denotes the date on which the record was added.
Added by field denotes the name of the user who created the record.
Approved field denotes date on which the record was approved and is displayed only for approved records.
Approved by field denotes name of the user who approved the record and is displayed only for approved records
To Edit the Statement Parameters
Click Edit. Edit Statement Parameter page appears.
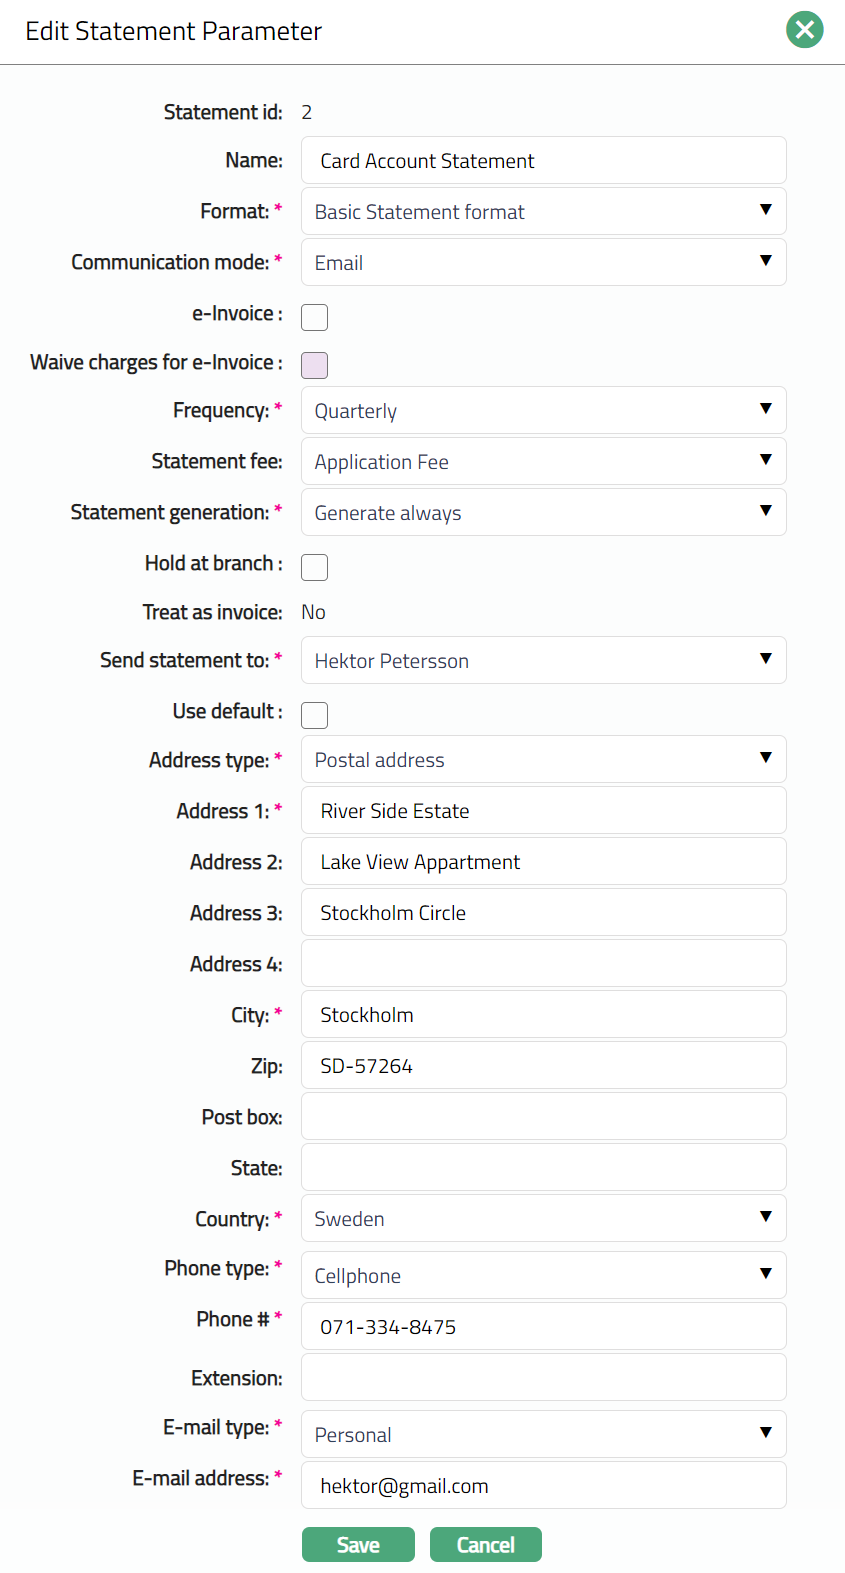
Note: All fields except Statement Id and Treat as Invoice, are editable.
Note:
Fields from Address type to E-mail address will be editable only if the Use default flag is unchecked.
All the statements other than the first statement, will not be treated as invoice; therefore, the Treat as invoice field will be No.
For the first statement, i.e., the invoice, additionally, Frequency and Statement generation are not editable.
Click Save. Statement Parameter page appears with the edited details.
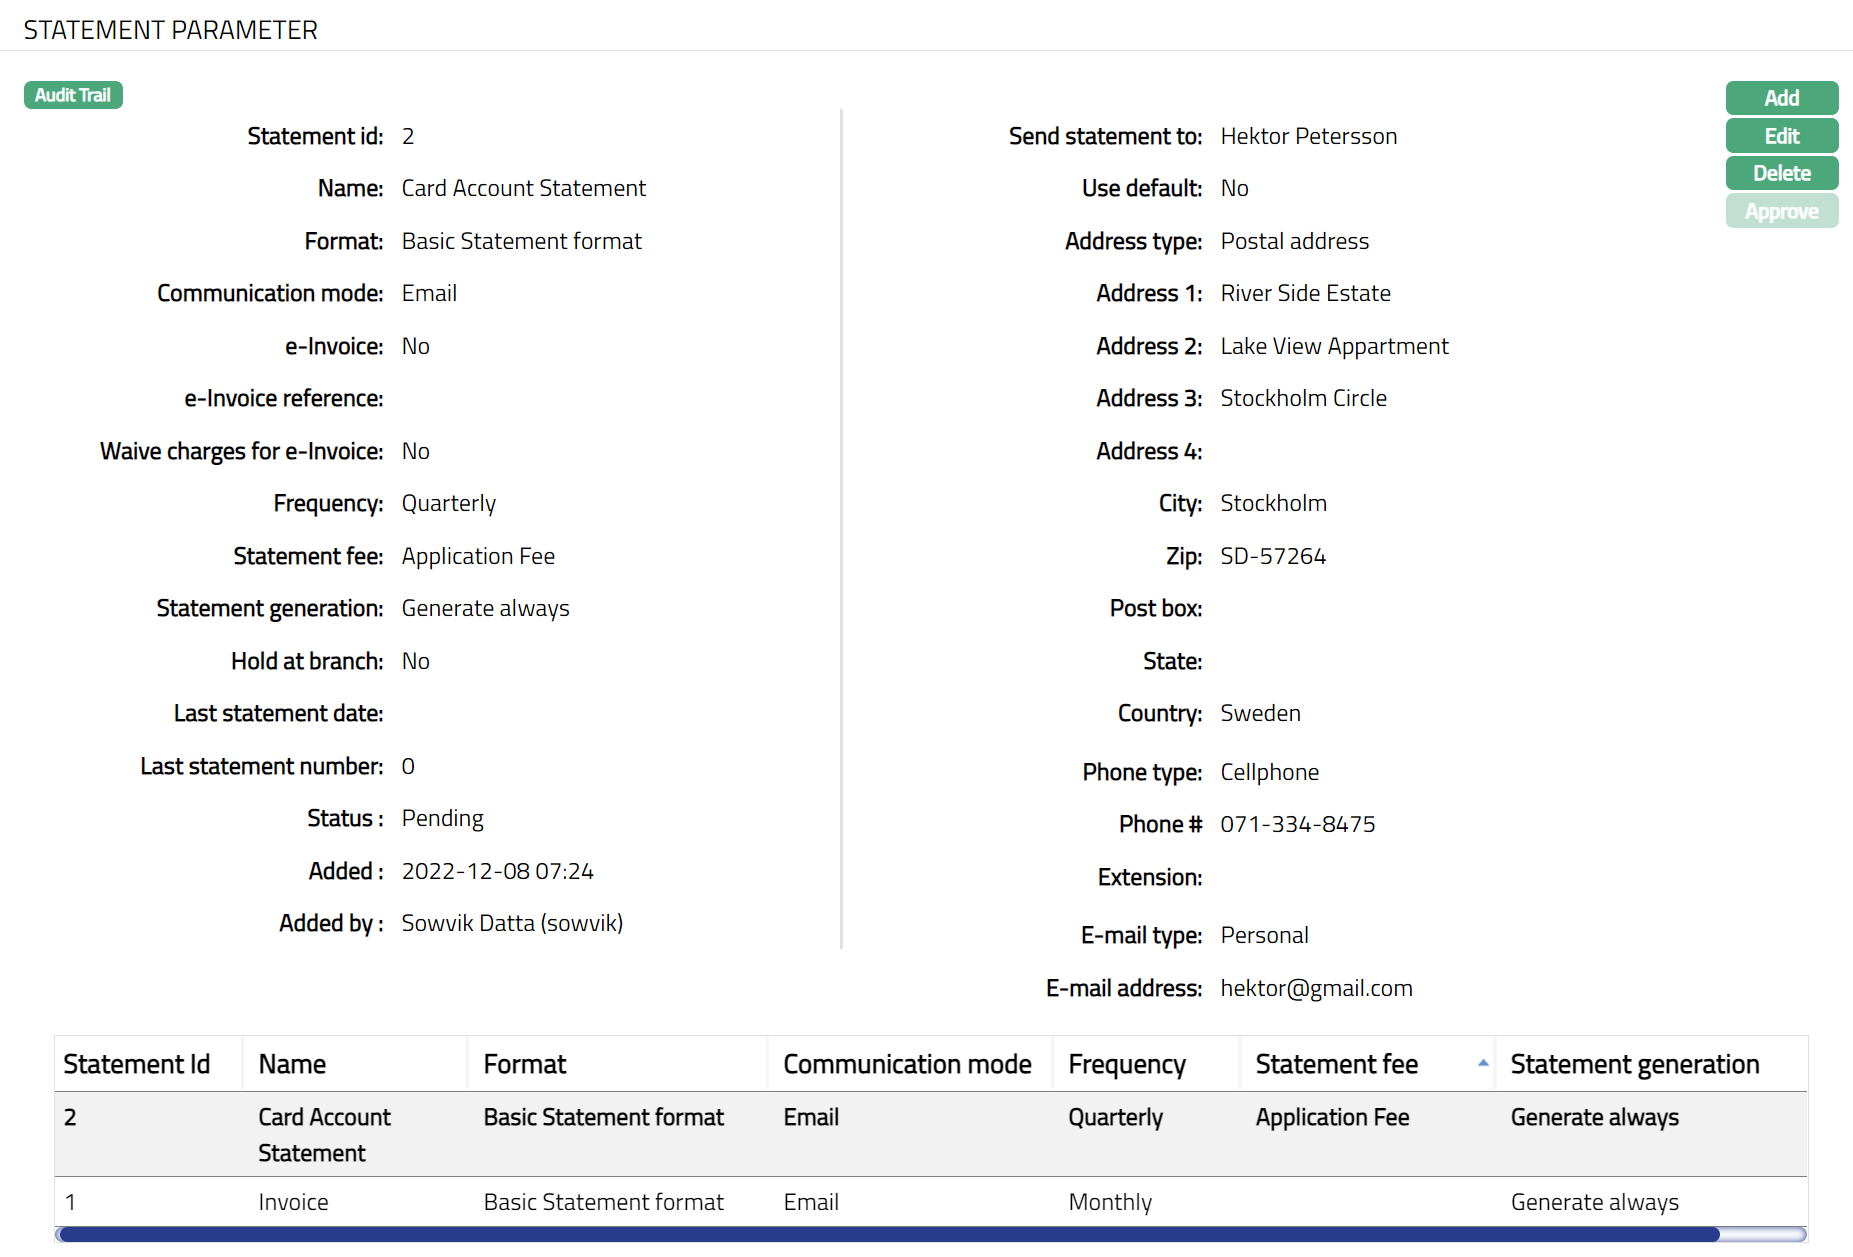
Note: Any change in the tab will set the tab status to Pending till it is approved by another user. On approval, the tab status is set to Approved.
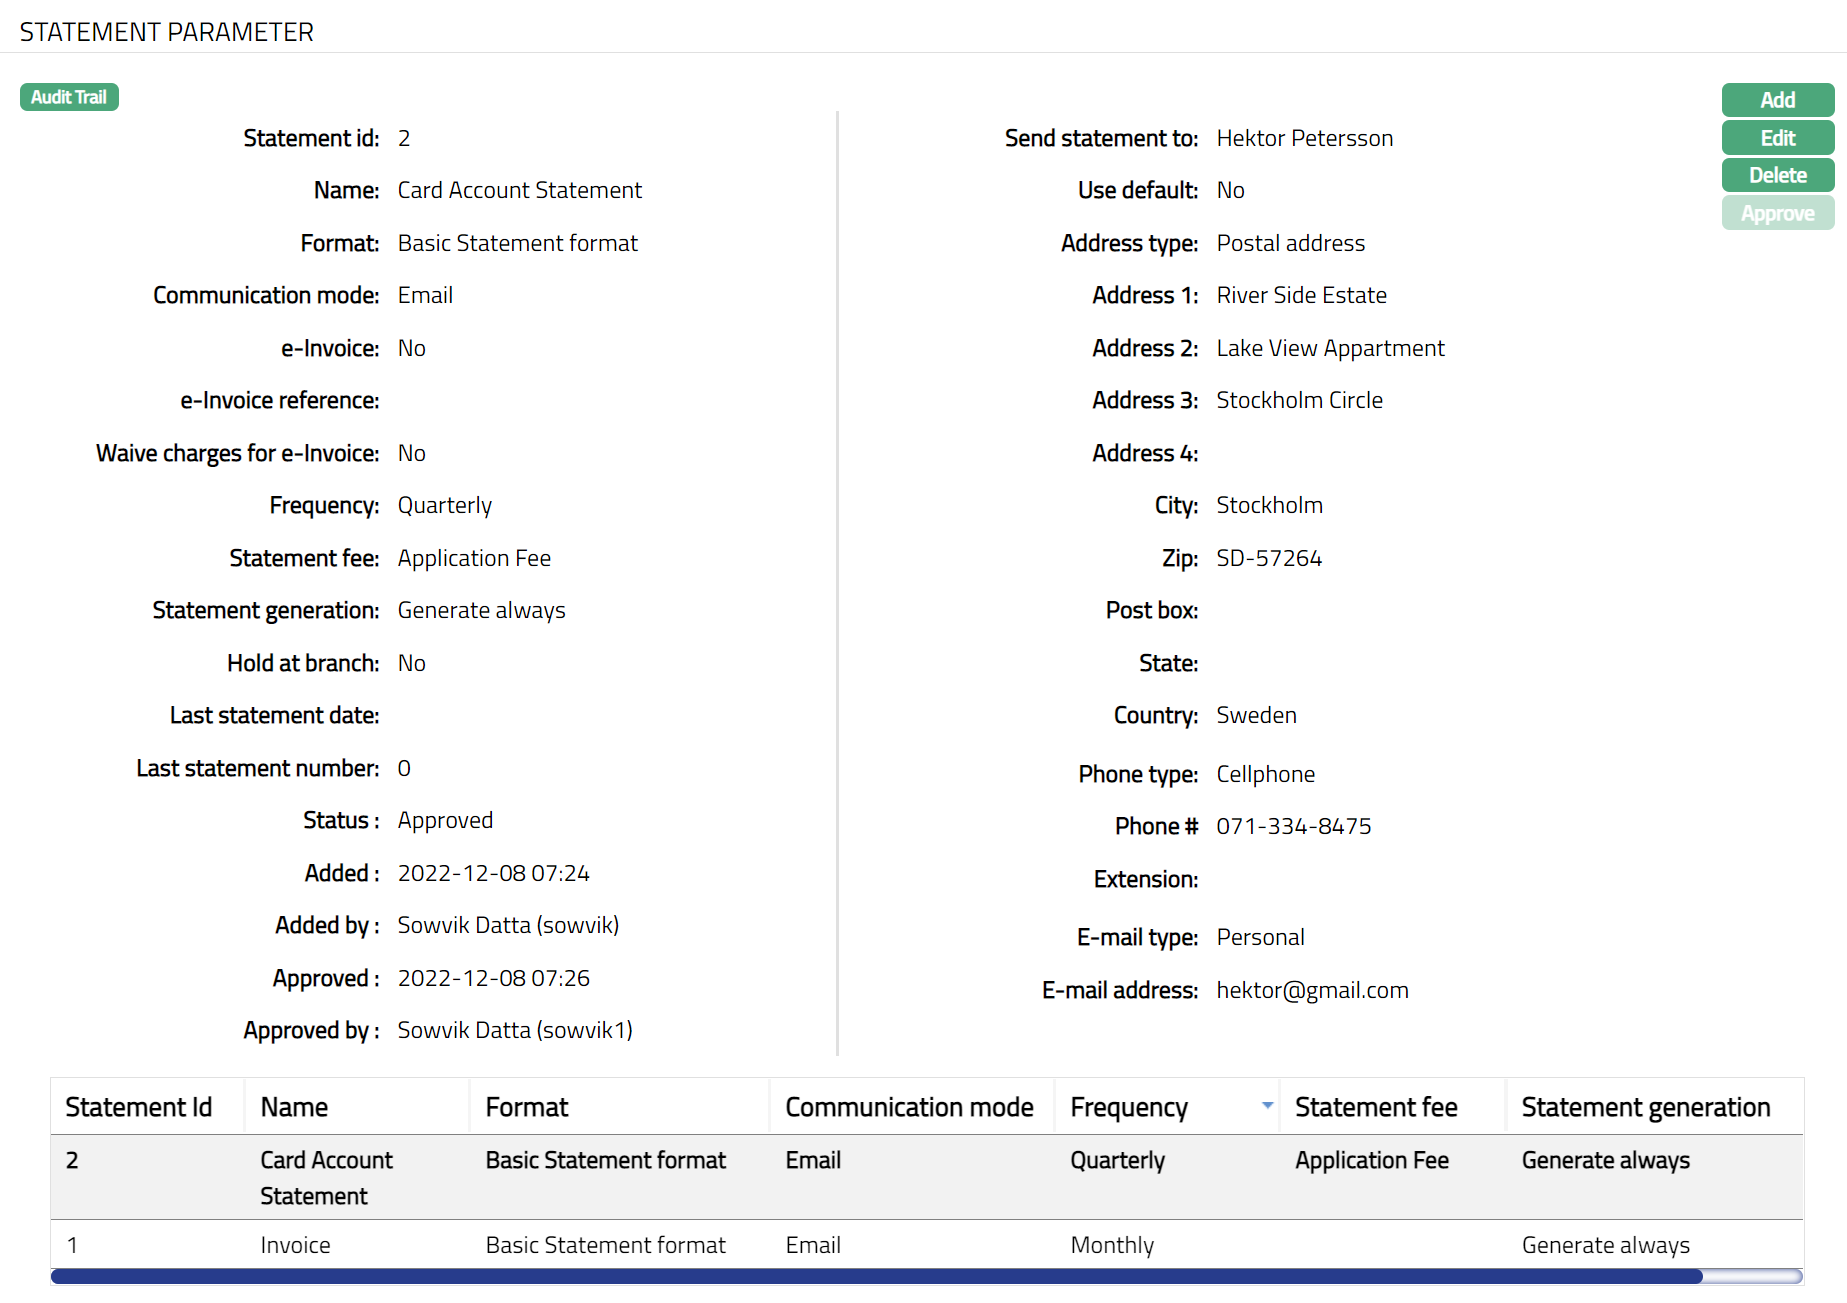 Functions: Add, Edit, Delete, Approve
Amount Block
Amount block refers to the authorization amount in the Cards business. An amount block can be created automatically during the authorization process by the authorization interface or manually by a user. Similarly, the transaction upload process releases the amount block automatically if a matching amount block is found or it can be done manually.
Using this tab you can create, view and maintain an amount block on the card account. Amount blocks created by the authorization process are automatically approved. But manual amount blocks need to be approved manually. Once the amount block is approved, the limit attached to the account will be utilized to that extent and hence, the available balance in the account will reduce to that extent. If the amount block expires or gets suspended, the limit utilization will be reduced and hence, available balance will increase to that extent. The sum of all active amount blocks will be displayed in the Account overview tab.
To add a new Amount Block
Access Card Account screen and click Amount Block tab. Details of existing amount blocks, if any, will be displayed.
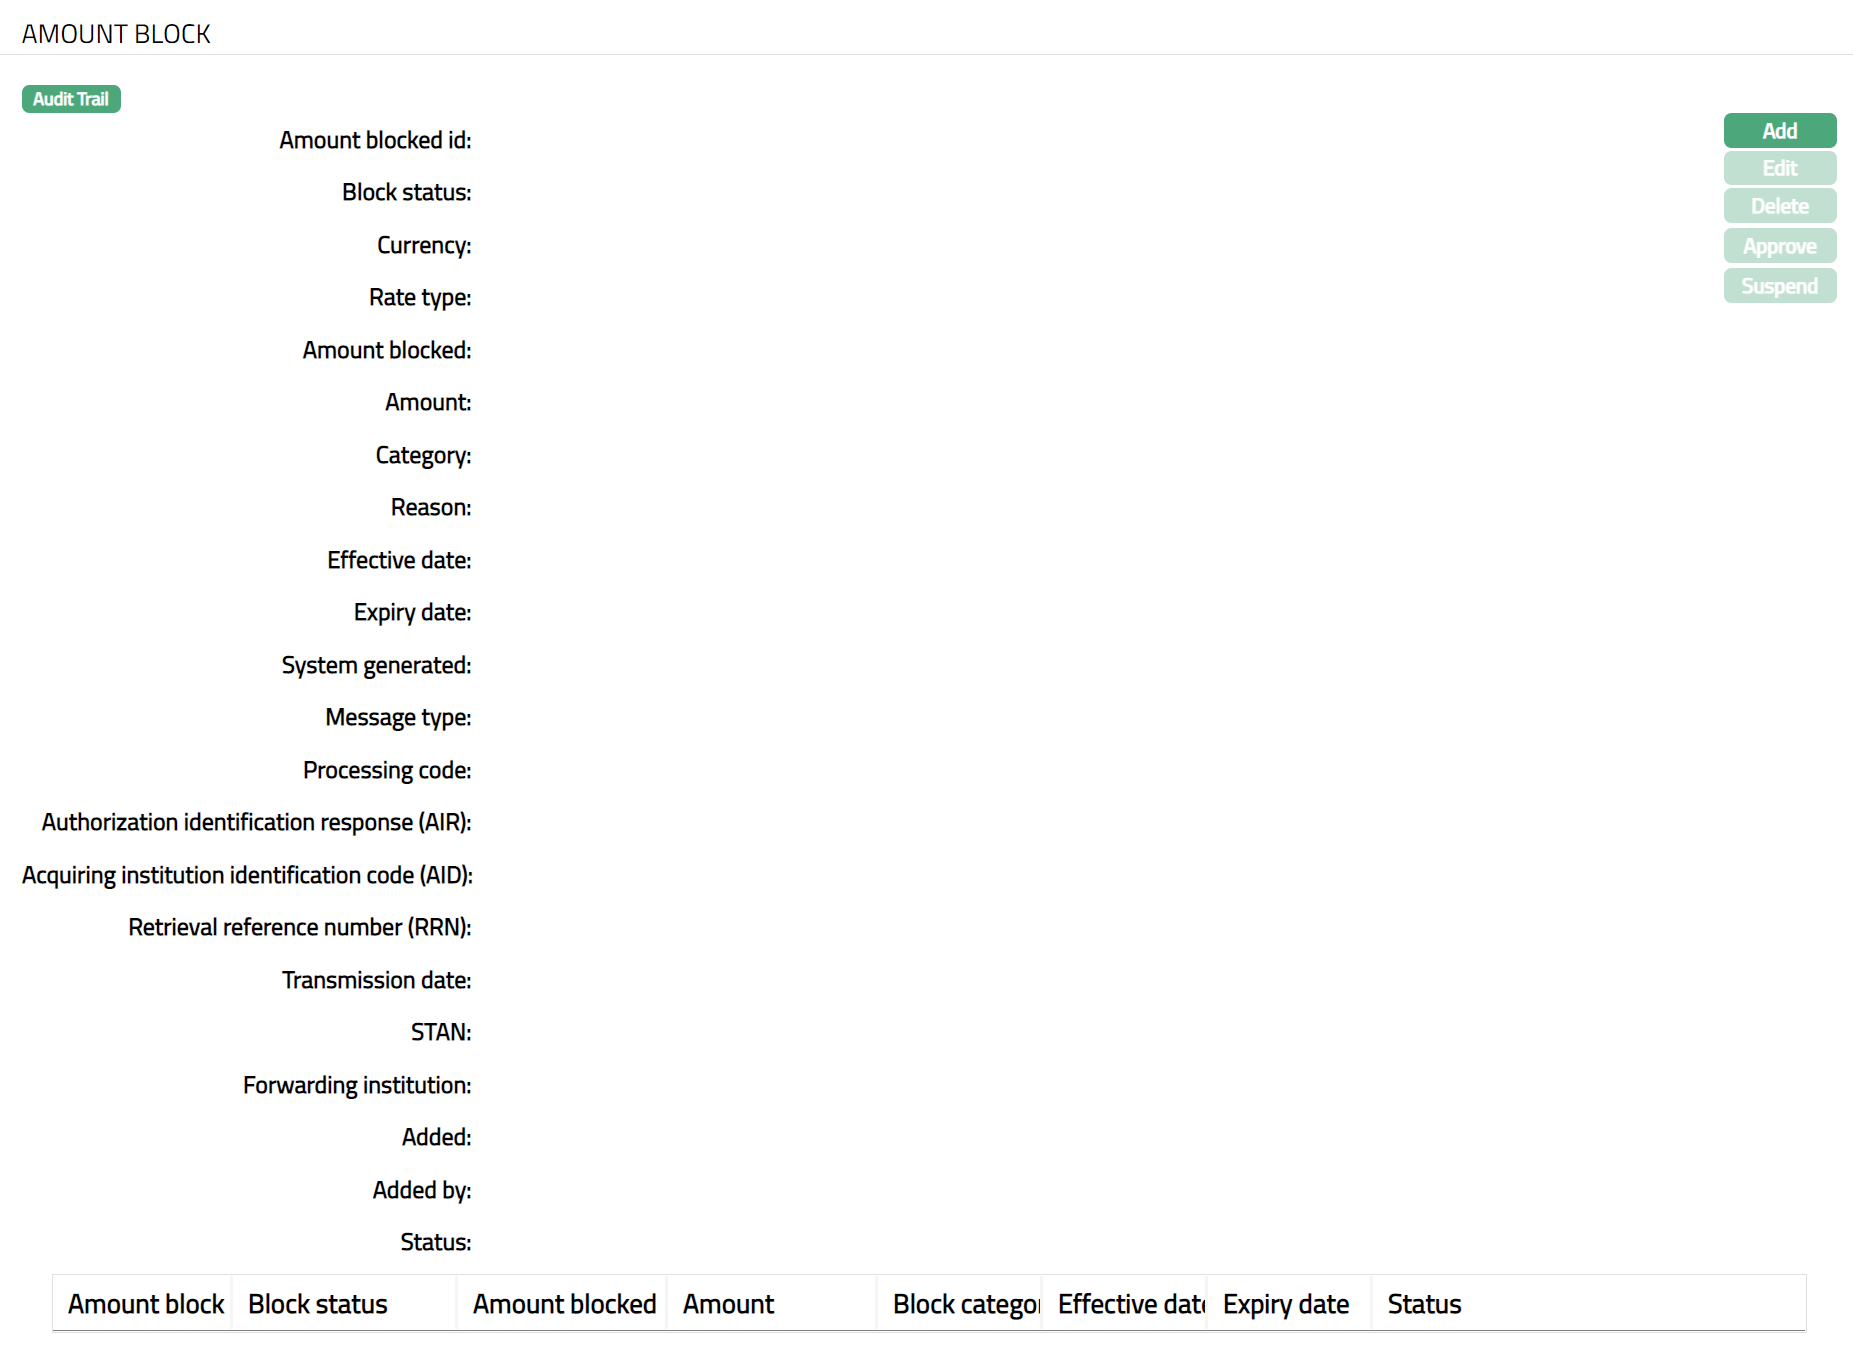
Click Add. Add Amount Block screen appears.
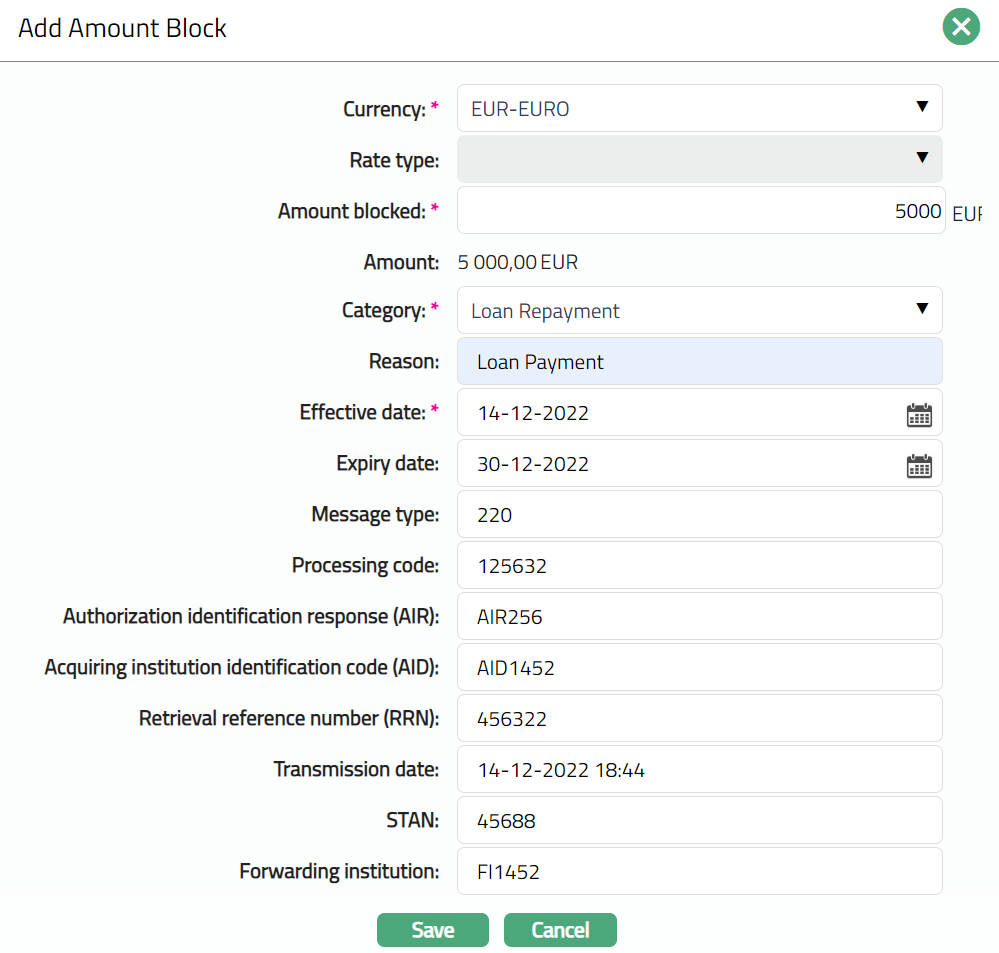
Select Currency from the drop-down list of GL currencies. This is the currency in which you want the amount to be blocked (block currency). Generally, this would be the account currency.
Select Currency Rate type from the drop-down list. Aura will display the list of rate types maintained for the Entity. This field will be enabled only when you select a Currency other than the Account currency for the above field.
Enter Amount to be blocked. It is the block amount in block currency.
Aura will retrieve the mid rate for the currency pair (block currency and account currency) and convert Amount blocked to an equivalent Amount in Account currency. If block currency and account currency are same, then Amount will be equal to Amount blocked.
Select Block Category from the drop-down list. It is the category to which the amount block belongs and should have been maintained under Admin > System codes > Categories > Block categories.
Enter Reason for amount block.
Enter Effective date. It is the date from which the amount block is effective. You cannot enter a past date.
Expiry date is the date when the amount block expires. Based on the Expiry days maintained for the Category chosen above, Expiry date will be calculated and displayed. You can however change it. This date should be greater than or equal to the effective date. If you don't enter the expiry date, then the amount block is effective till you release the amount block.
Enter Message type. These are the ISO message types. Three message types are:
200 - Authorization. This message type checks for available funds and reserves amount from bank account if request is accepted.
220 - Advice. This message type is sent if acquirer / IGW has performed STIP on behalf of issuer (Ledger system). The amount is already authorised and should be reserved from bank account.
420 - Reversal. This message type is sent to cancel previous 200 or 220 messages.
Enter Processing Code. This is a 6-digit code which is taken from the ISO message type. It is used for checking duplicate transactions.
Enter Authorization Identification Response (AIR). This is taken from the ISO message type and is similar to reference number and is used for matching.
Enter Acquiring Institution Identification Code (AID). This is taken from the ISO message type and is similar to reference number and is used for matching.
Enter Retrieval Reference Number (RRN). This is a unique reference number for the transaction and is used for matching with reversal. This is a number assigned by the message initiator to uniquely identify a transaction.
Enter Transmission date. This is the date on which authorization transaction has been done. This date is used for matching the original Authorization to be reversed. By default, it is the current system date and time.
Enter STAN. It is used for matching the original authorization to be reversed.
Enter Forwarding Institution. It is used for matching the original authorization to be reversed.
Click Save. Amount Block page appears with the Added details.
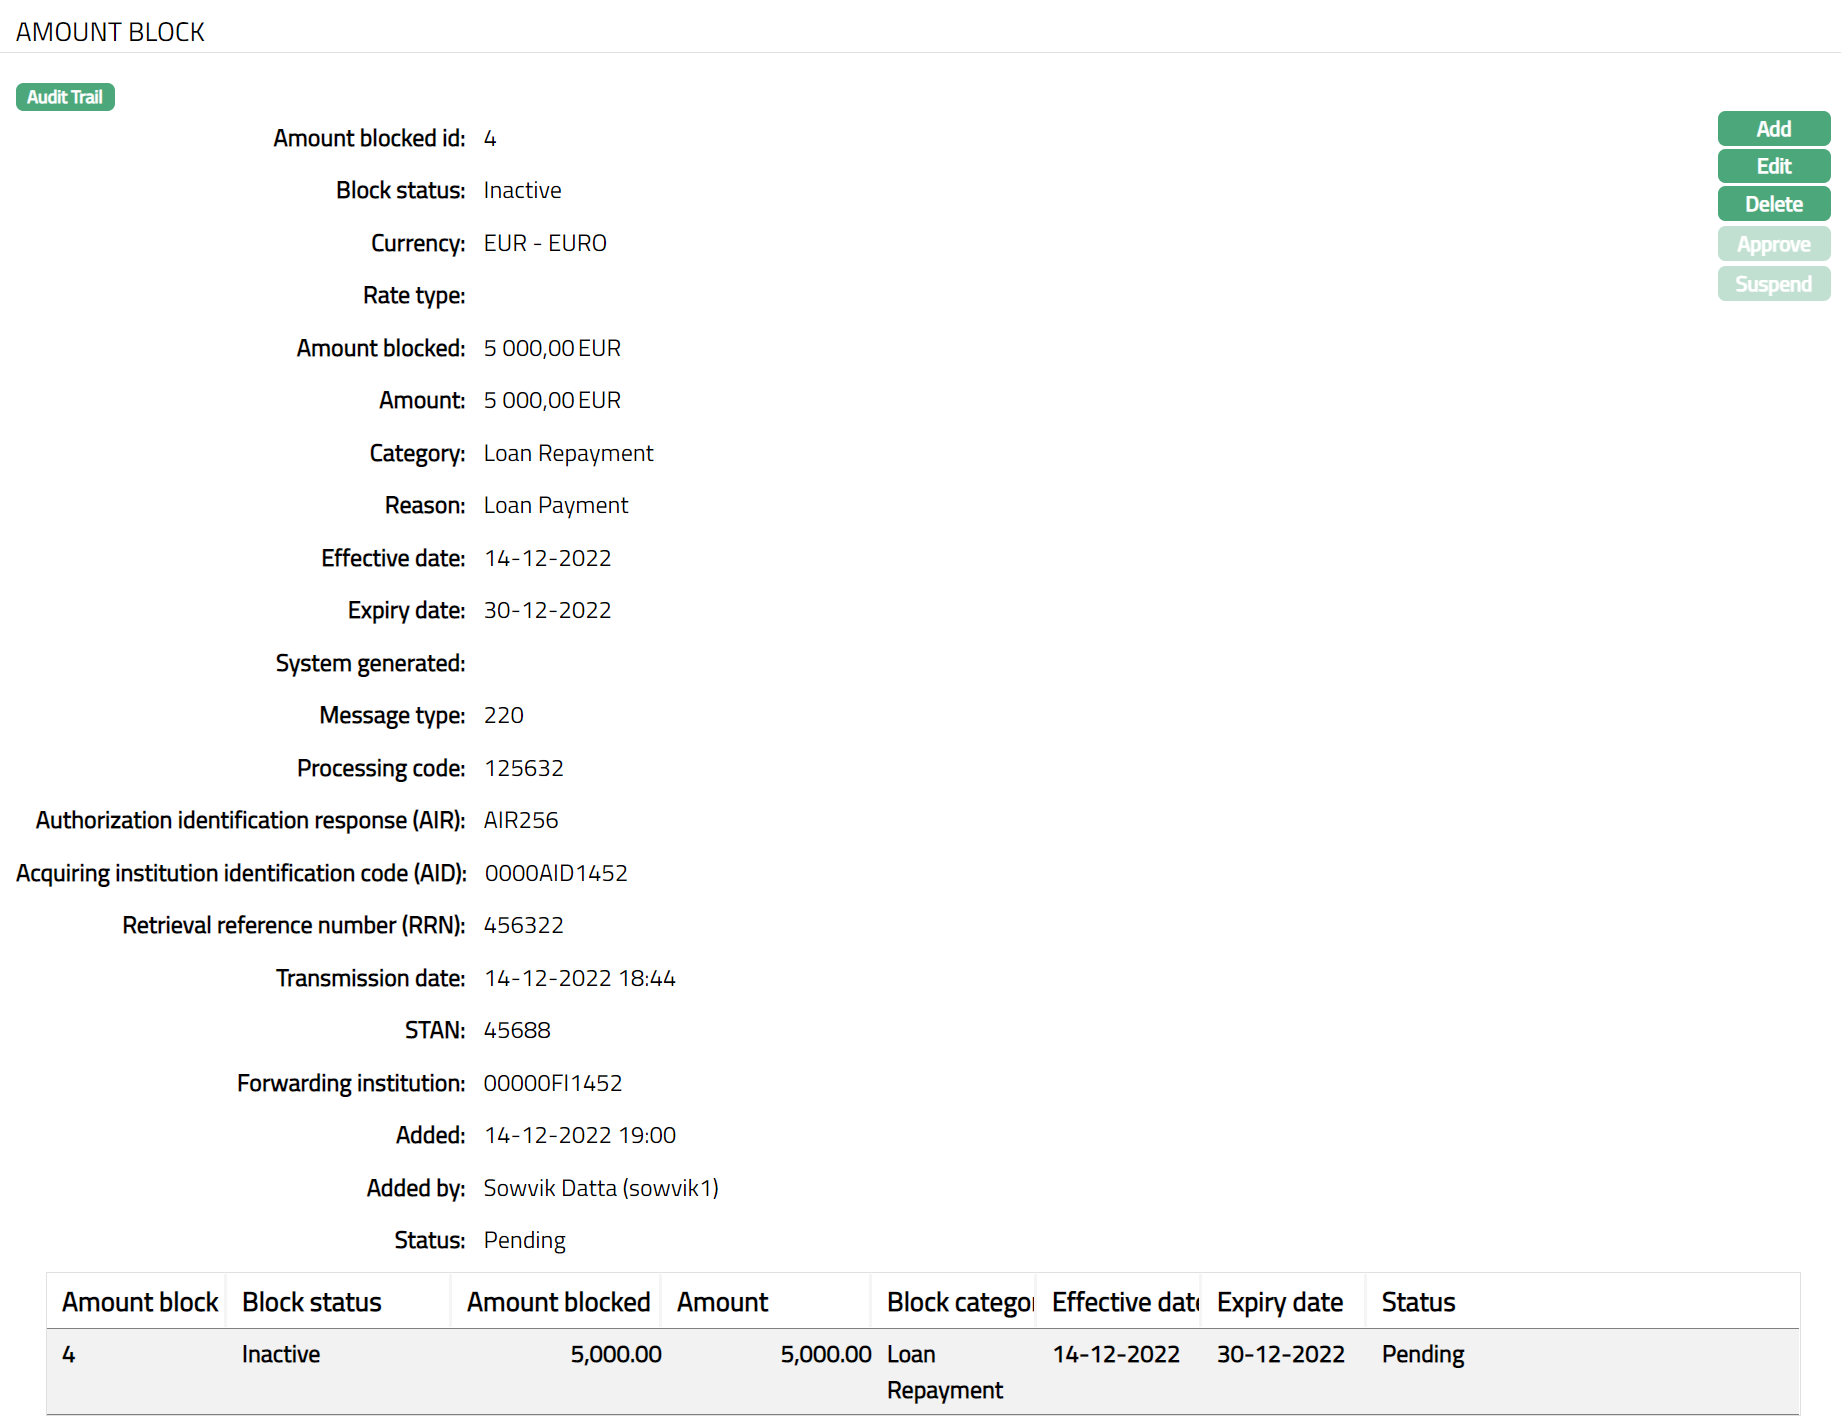
Functions: Add, Edit, Delete, Approve, Suspend.
Note: Once amount block is added, The Block status of the Amount block will be Inactive, and the record status will be Pending. Any user other than the one who has added the record can approve the Amount block record. On approval, the record status will be Approved.
The additional fields that you can view in the tab are explained below:
Block Status field denotes the status of the Amount block. The statuses available are:
Inactive: If the Effective date for the Amount block is greater than the current date, the Block status will be Inactive.
Active: If the Effective date is equal to the current date the Block status of the Amount block will be active.
Suspended: You can Suspend (release) an Active Amount block any time before expiry date. On such suspension / release, the Block status will be Suspended.
Expired: When the Expiry date is equal to the current date, the Block status of the Amount block is changed to Expired.
Added field denotes the date on which the record was added.
Added by field denotes the name of the person who created the record.
Approved field denotes date on which the record was approved.
Approved by field denotes name of the person who approved the record.
Status field denotes the status of the record
To edit an Amount Block
- Click Edit. Edit Amount Block page appears.
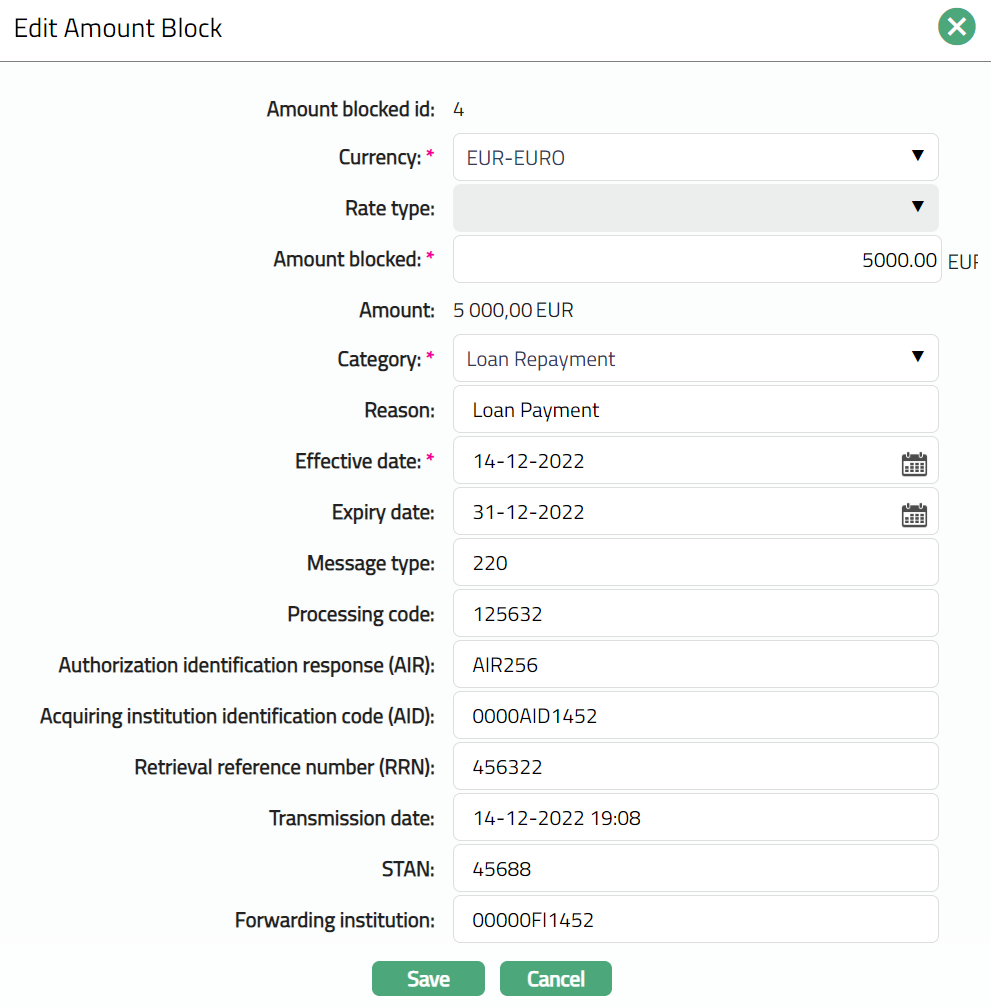
If the record status of the Amount block is Pending and the Block status is Inactive or Active, then, except Rate type field, you can edit all the fields available in the Edit Amount Block screen.
If the record status of the Amount block is Approved and the Block status is Inactive, then you can edit only Amount Blocked, Effective date and Expiry date in the Edit Amount Block screen.
Click Save. Amount Block page appears with the edited details.
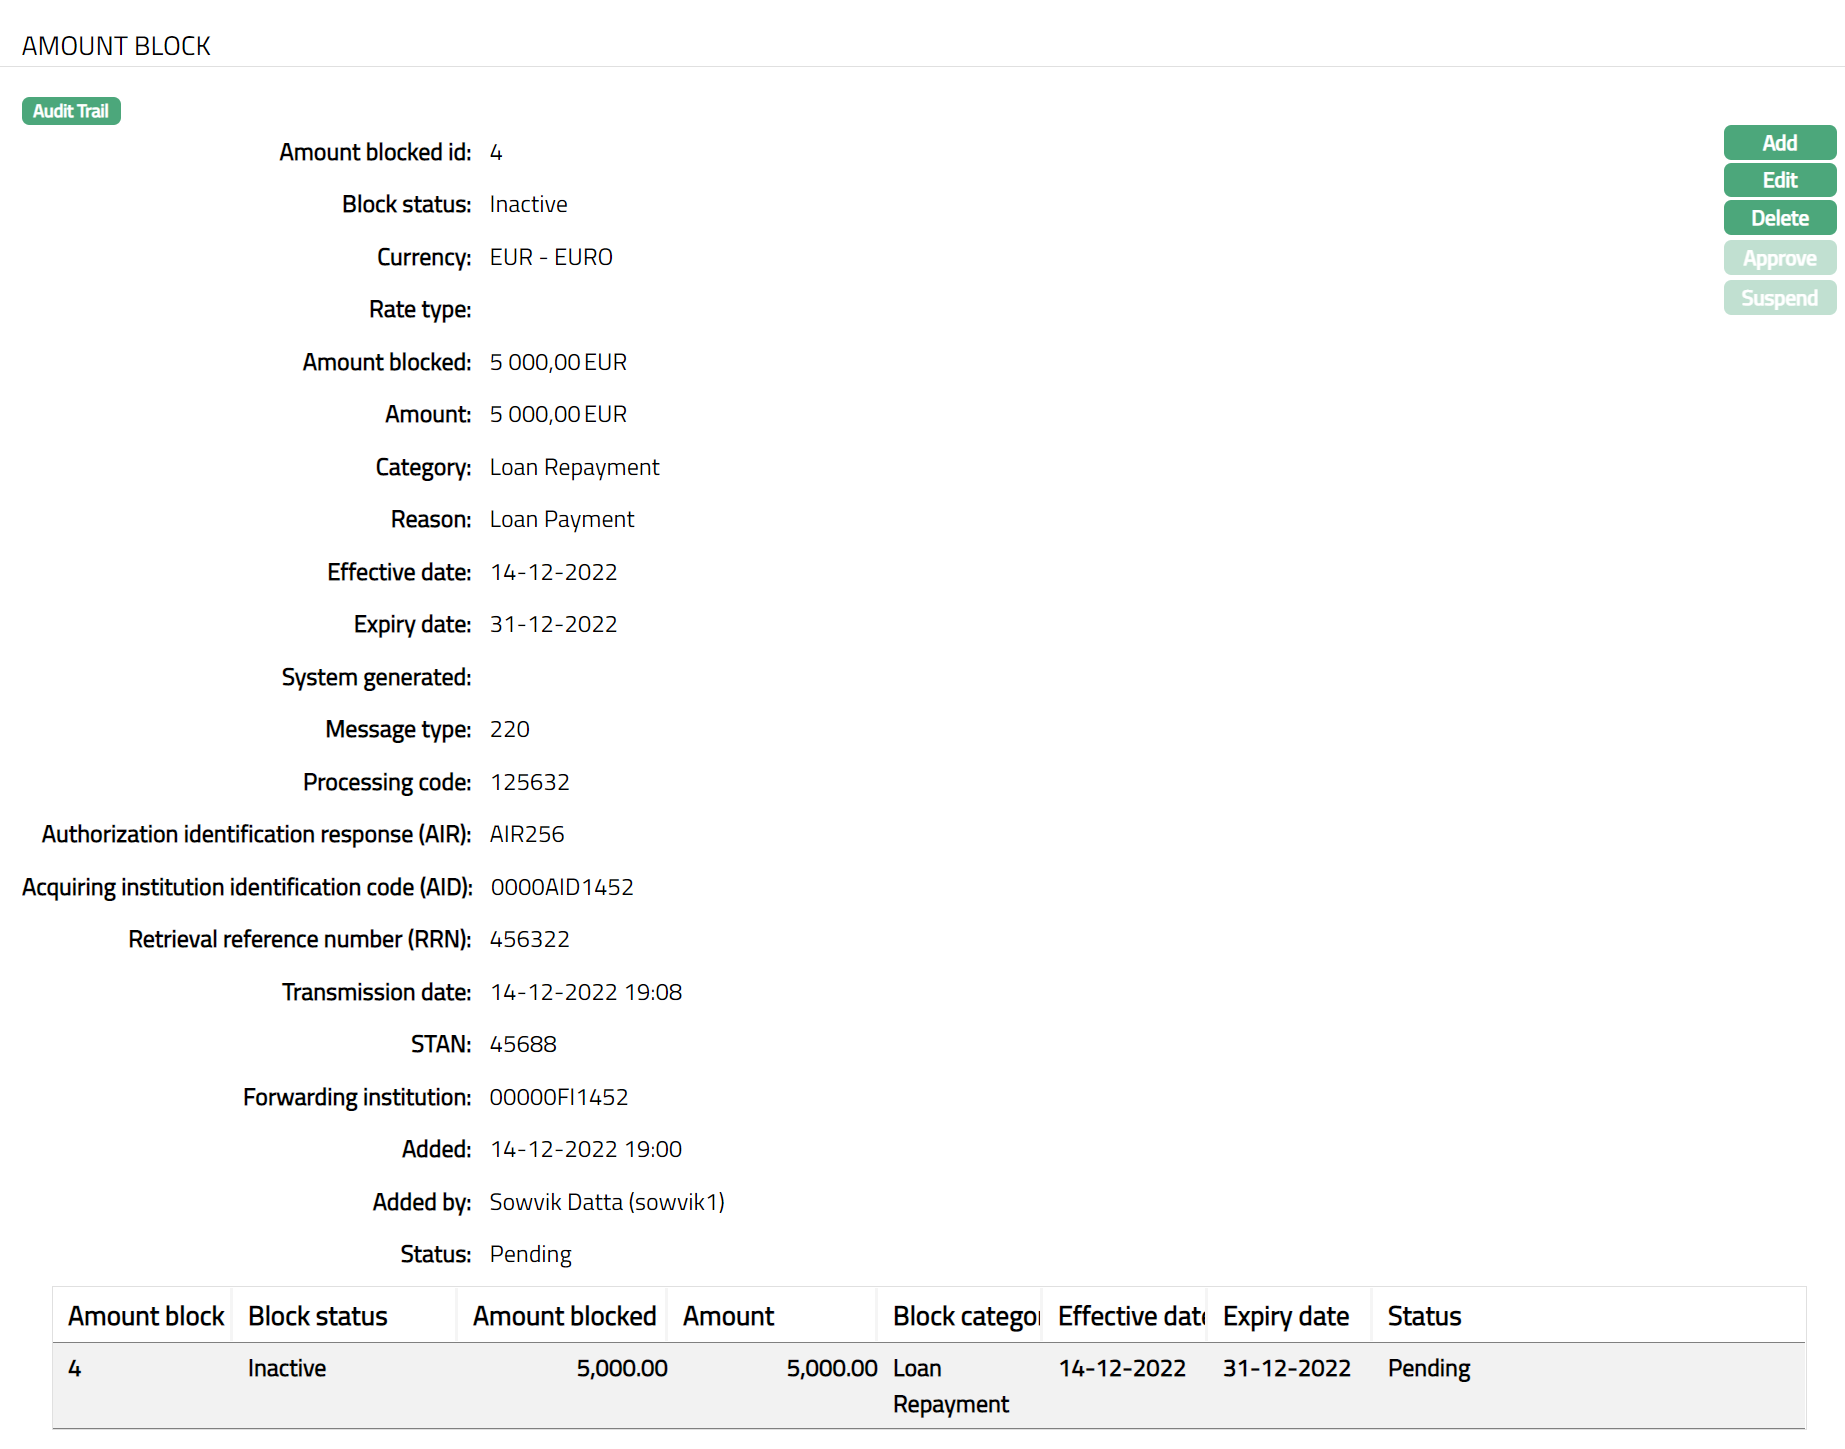
Note: Any change in the tab will set the tab status to Pending till it is approved by another user. On approval, the tab status is set to Approved.
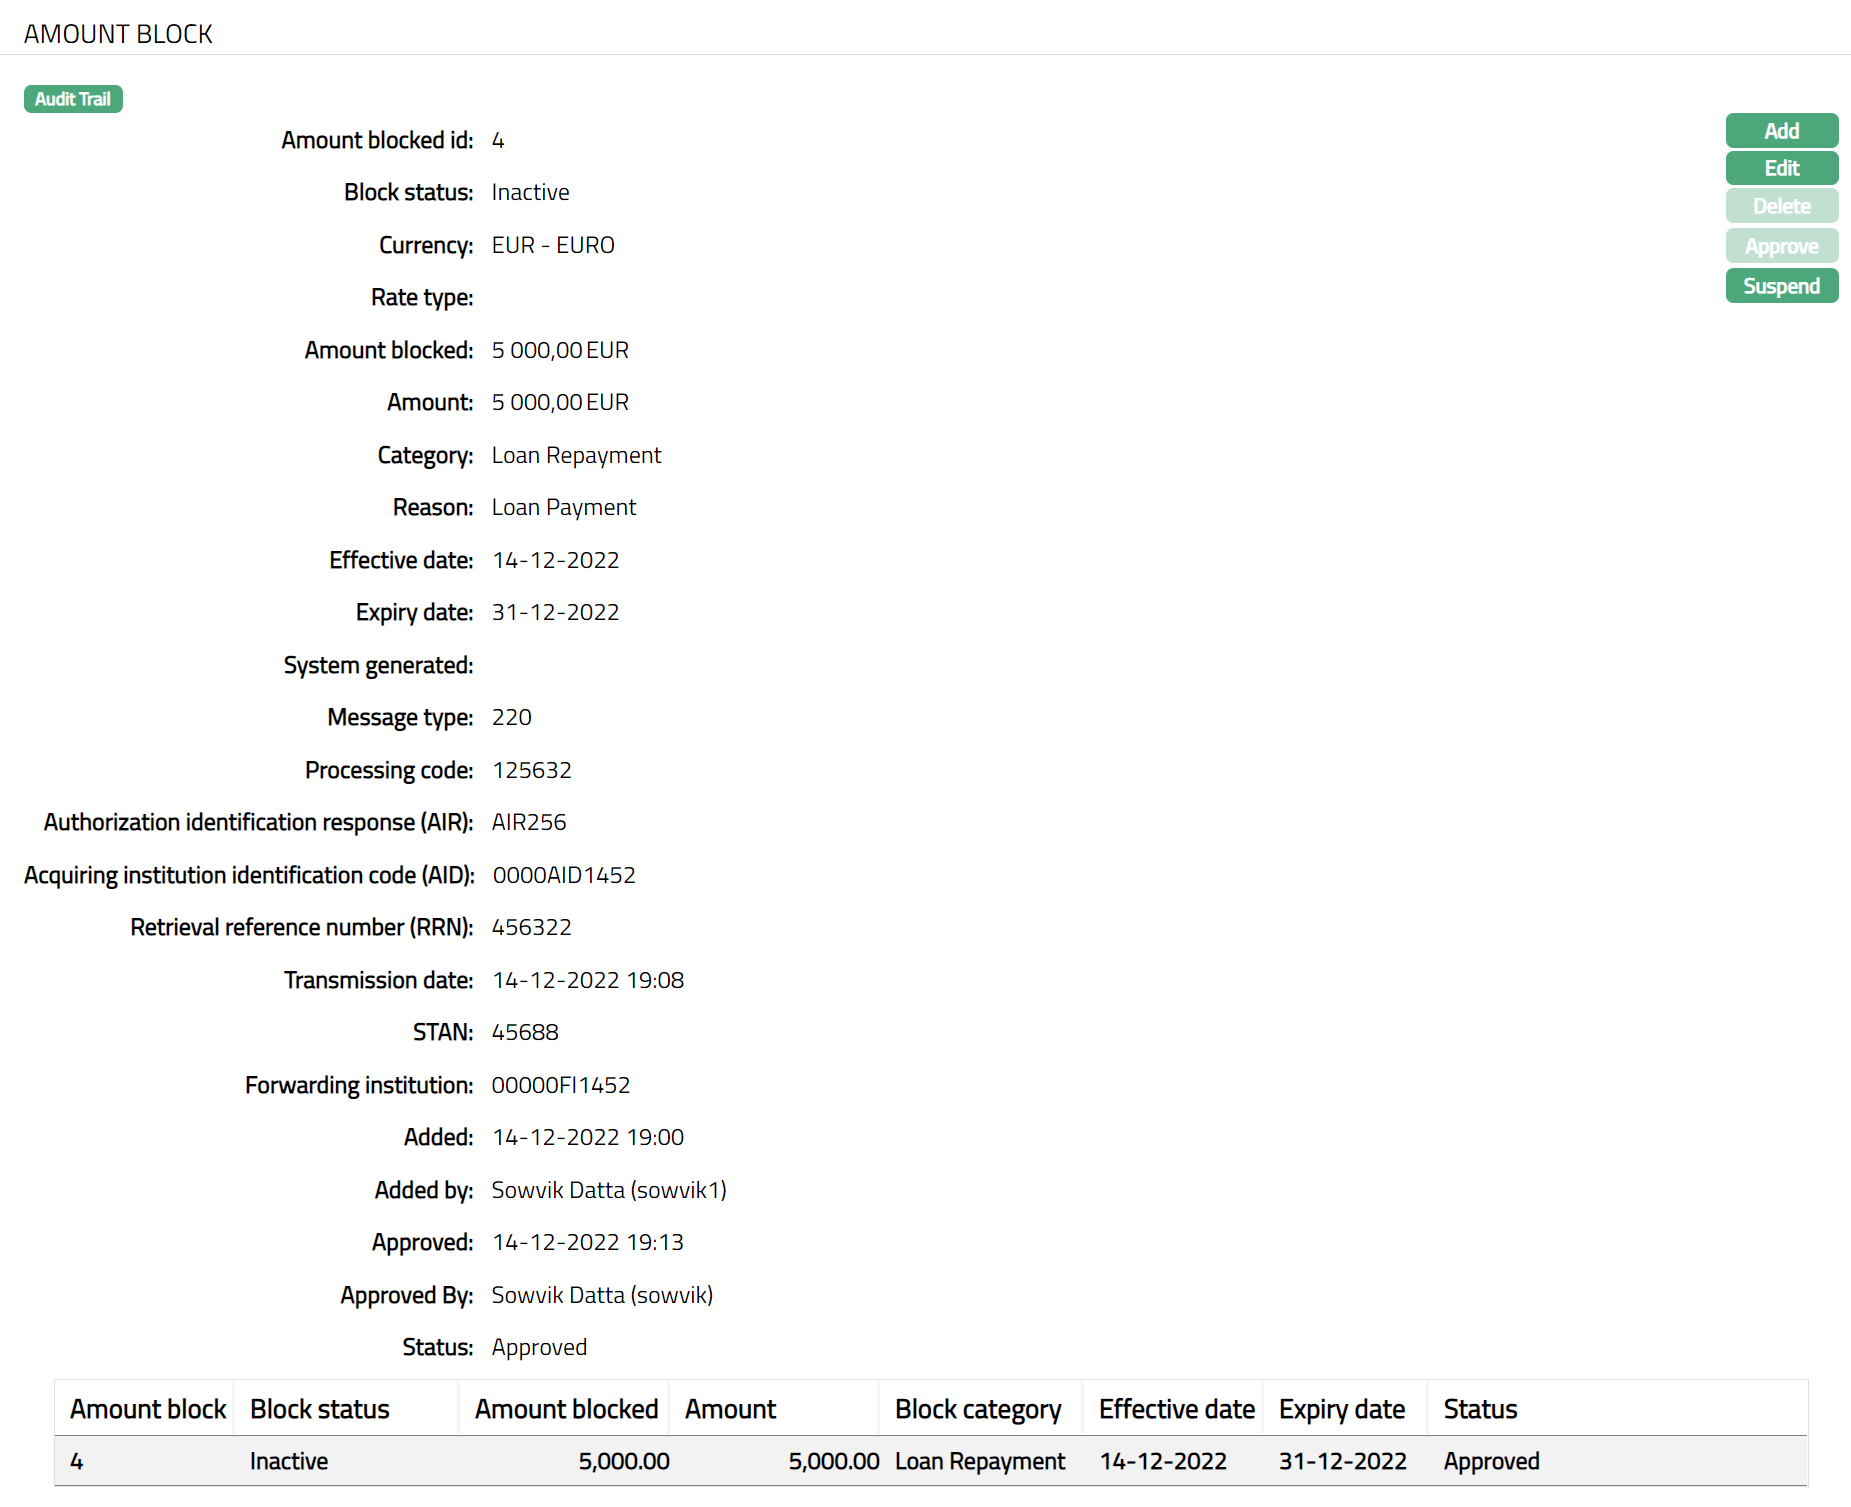
Functions: Add, Edit, Delete, Approve, Suspend.
The additional fields that you can view in the tab are explained below:
Block Status field denotes the status of the Amount block. The statuses available are:
Inactive: If the Effective date for the Amount block is greater than the current date, the Block status will be Inactive.
Active: If the Effective date is equal to the current date the Block status of the Amount block will be active.
Suspended: You can Suspend (release) an Active Amount block any time before expiry date. On such suspension / release, the Block status will be Suspended.
Expired: When the Expiry date is equal to the current date, the Block status of the Amount block is changed to Expired.
Added field denotes the date on which the record was added.
Added by field denotes the name of the person who created the record.
Approved field denotes date on which the record was approved.
Approved by field denotes name of the person who approved the record.
Status field denotes the status of the record
Approve: An amount block can be approved only by a user different from the one who created it. To approve, access the Amount block view from the search page and click Approve.
Suspend: Suspend button will be enabled only for amount blocks where there is no expiry date or where the expiry date is on or after current business date and where the amount block has been approved.
To Suspend an Amount block,
- Click Suspend button. Suspend Amount block page appears.
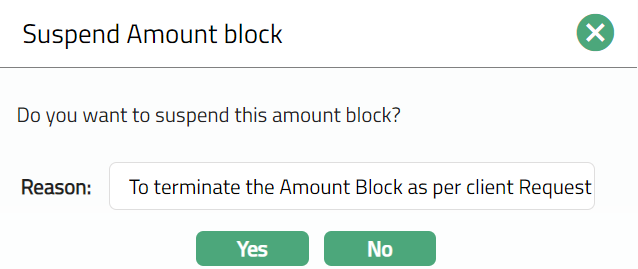
Enter Reason for the suspension of the Amount block.
If you want to suspend the amount block, click Yes; else click No.
Delete: When the Status is set to Pending, the Delete button is enabled and amount block can be deleted, but once the status is set to Approved, Delete button will be disabled.
Linked People
This tab allows you to link people -- say, an Accountant or Attorney -- to the card account. Only when a person is linked to an account, the account statement or reminder can be set up to be sent to the Linked Person.
To add linked people
- Access Card Account page and click Linked People tab.

- If you want to link a person who has already been created as a Person under CRM > Person Maintain, then click Add. Aura will display the Add Linked People window with the list of Persons maintained in Aura. Select the required Person.
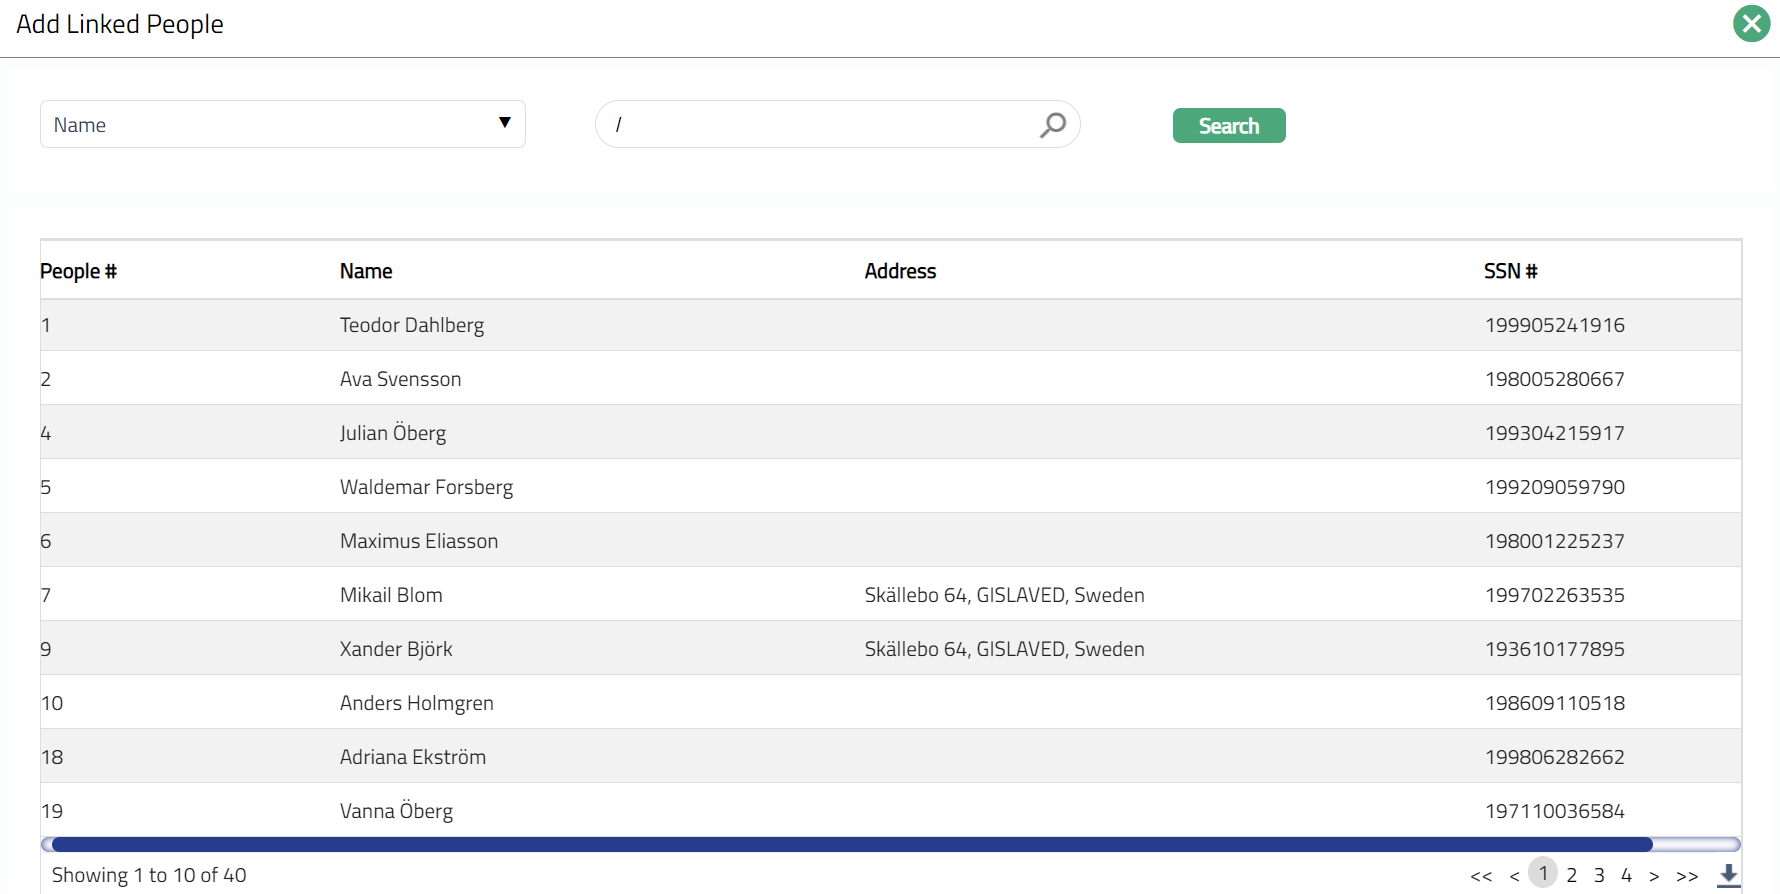
- Click the required person to add, the Linked People page appears with the added details.

Functions: Add, New
- If you want to enter the details of a Person who has not yet been created as a Person under CRM > Person Maintain, then click New. The New Linked People page appears.
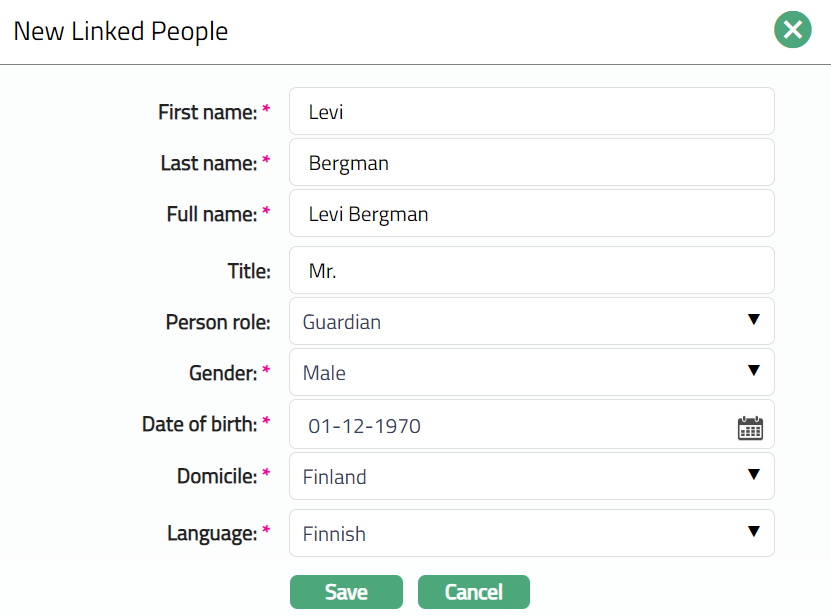
Enter First name of the person.
Enter Last name of the person.
On entering the First Name and Last Name Aura derives Full name of the person.
Enter Title of the person that is to be prefixed to the person's First name.
Select the role of the Person in relation to this account using the Person role drop-down, which shows the list of Person Roles maintained under Admin > System codes > Generic definitions > Person role.
Select Gender of the person from the drop-down list.
Select Language of the person from the drop-down list maintained under Admin > Generic definitions > Languages.
Click Save. Linked People page appears with the newly added details.
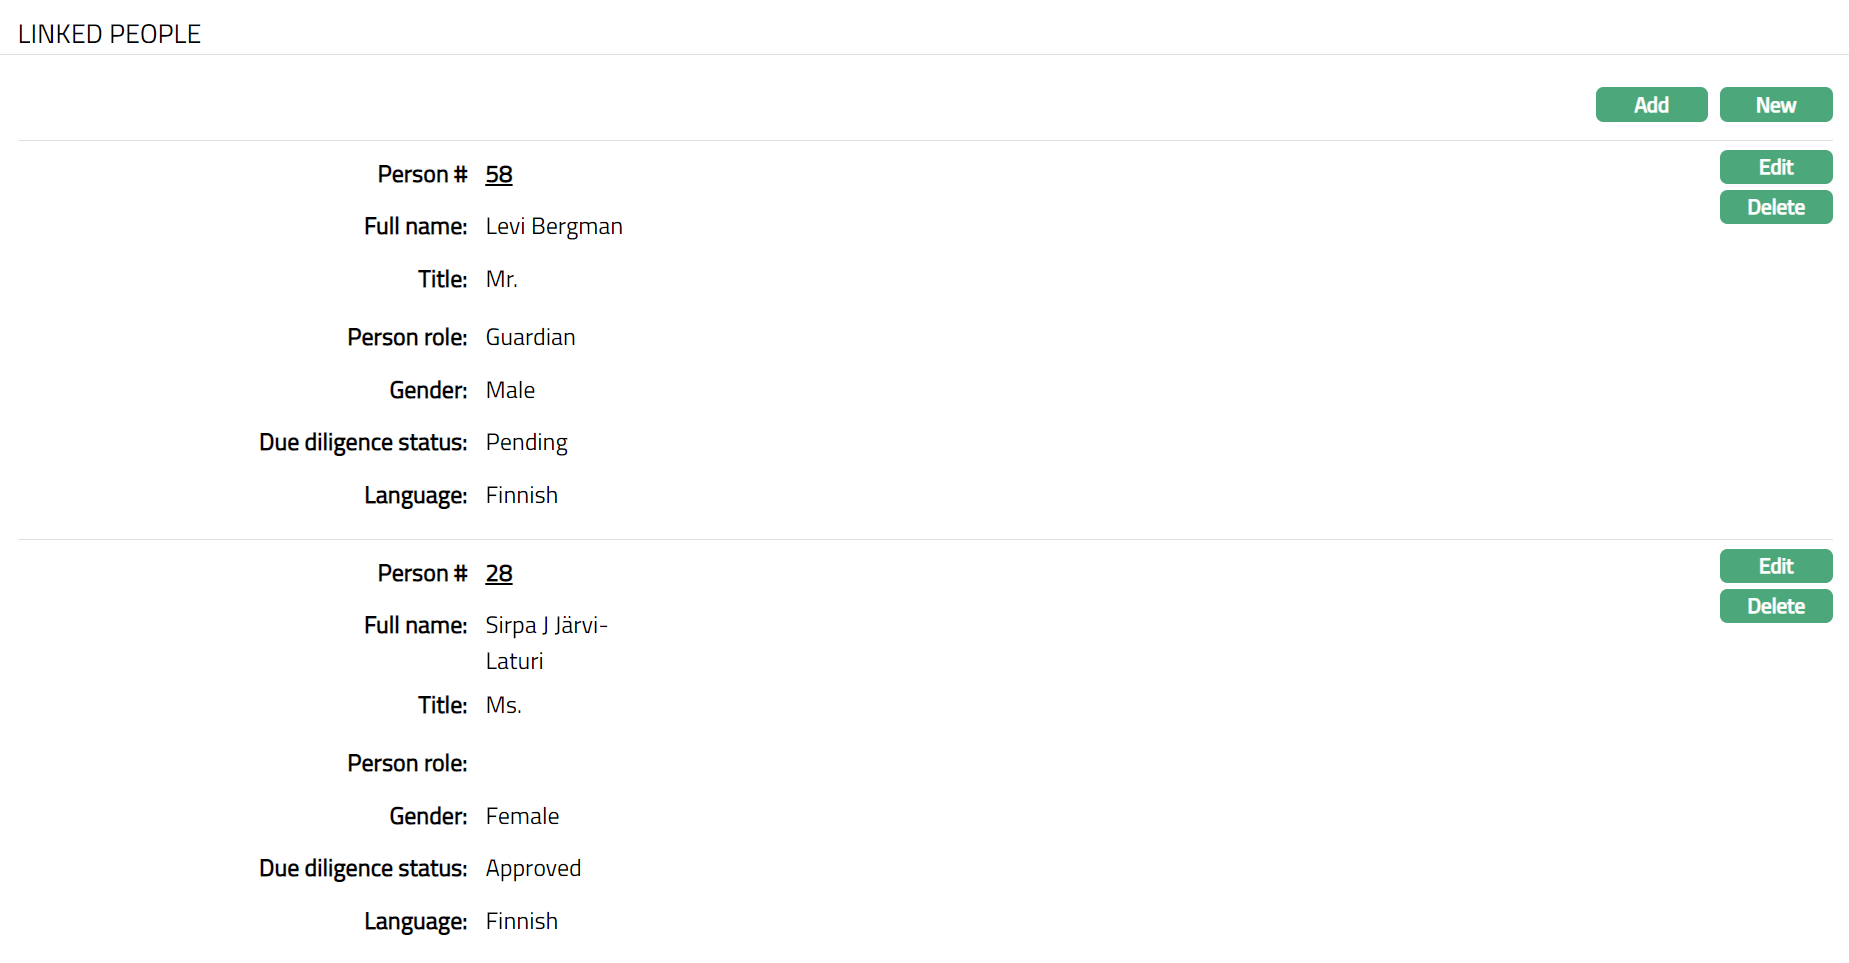
Functions: Add, New, Edit, Delete.
Note: Once added new person / edited Due diligence status will appear as pending, unless the same is approved under CRM > Due Diligence > Person > Status. Once approved the status will appear as Approved.
To Edit linked people.
- Click Edit. Edit Linked People page appears.
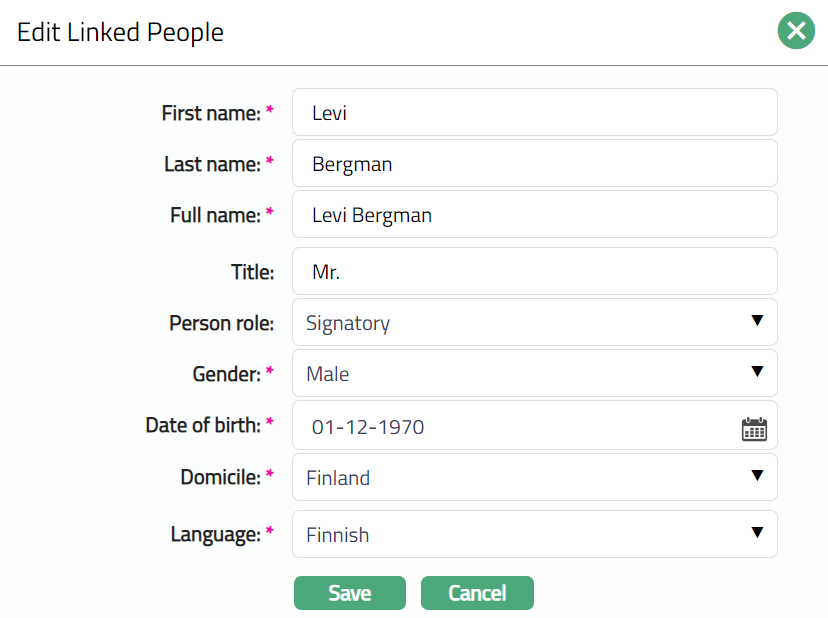
Note: All fields are editable.
- Click Save. Linked People page appears with the edited details.
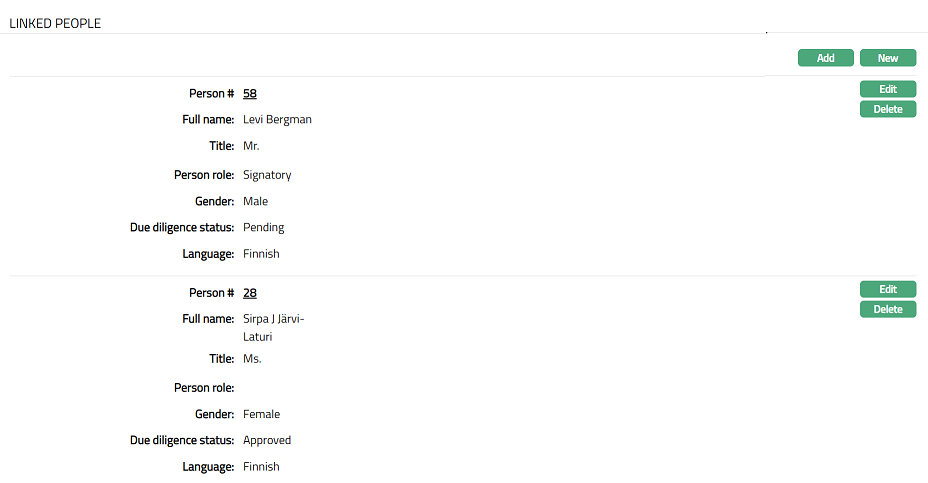
Note: Once added new person / edited Due diligence status will appear as pending, unless the same is approved under CRM > Due Diligence > Person > Status. Once approved the status will appear as Approved.
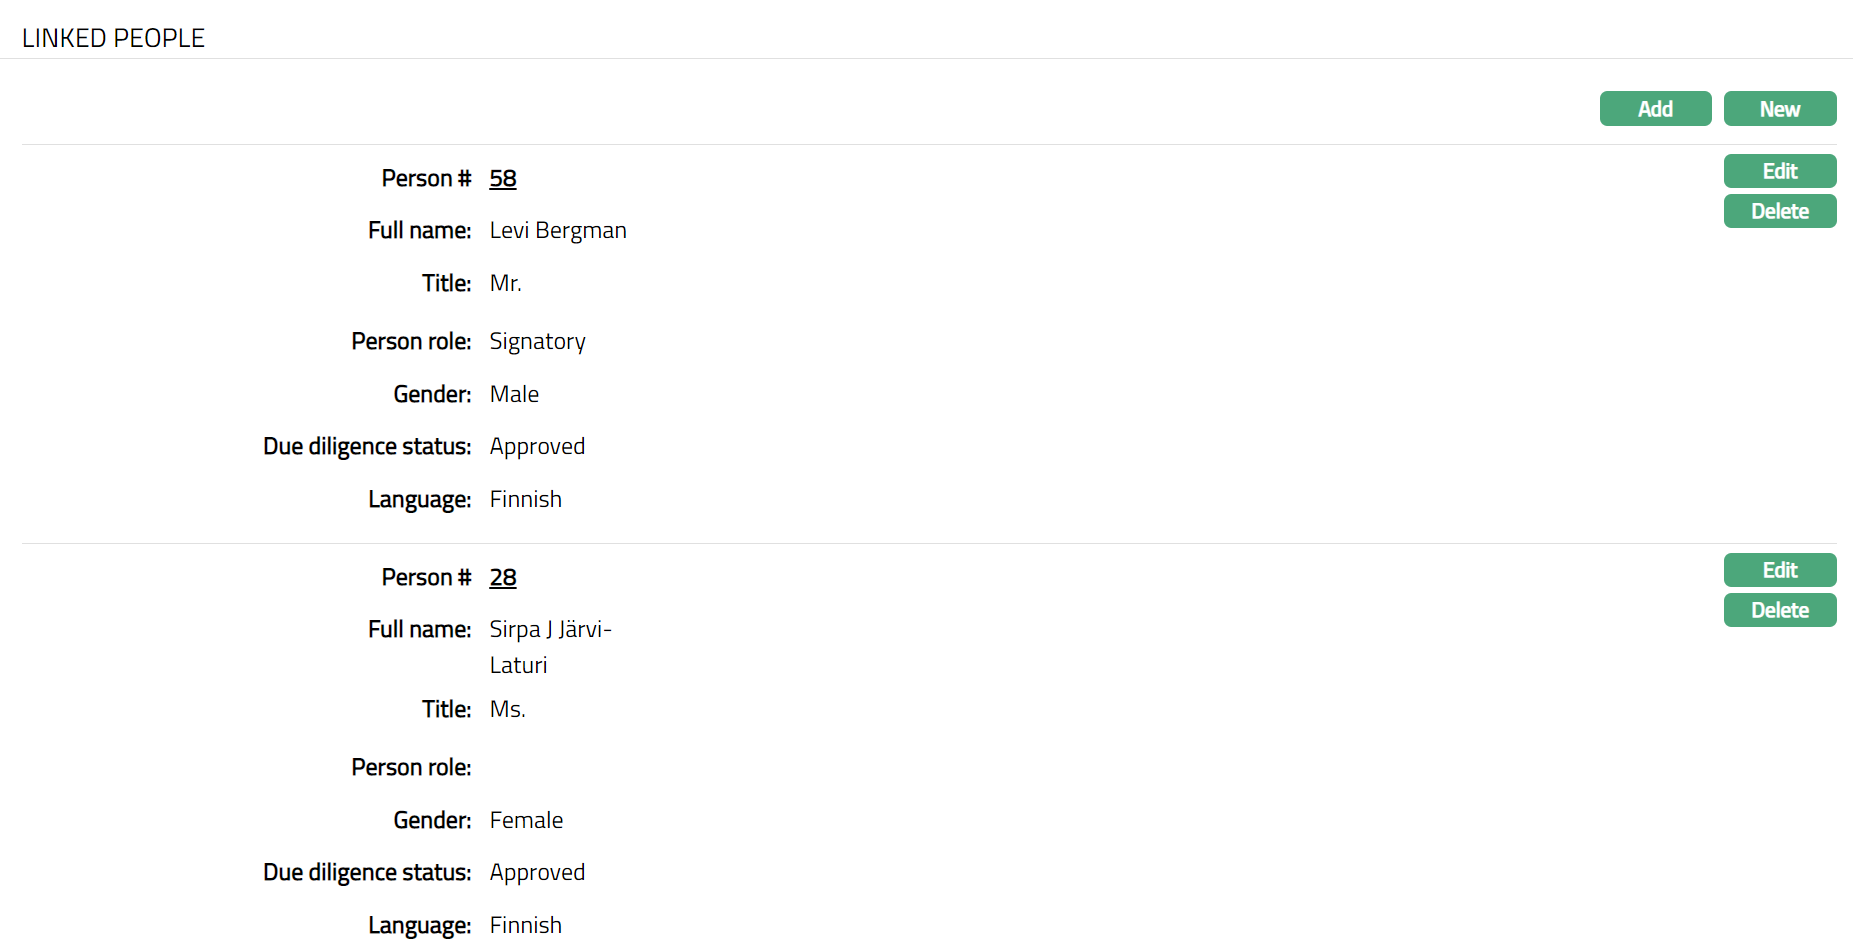 Functions: Add, New, Edit, Delete.
Beneficial Ownership
The Beneficial Ownership tab allows you to view and edit the beneficial ownership details for the Card Account. In case the account is for Personal or Corporate client, you can only view the details of the beneficial owner. In case of Joint client, you can view and edit the details of the beneficial owners.
To view the Beneficial ownership details
Access Card Account page.
Click Beneficial Ownership tab to see details as shown below.
In case of Personal / Corporate

Note: Beneficial Ownership can be edited only if the account is a Joint Account.
Payment Plan
This tab will allow you to add, view and maintain a payment plan. For any Billing account, a Payment plan can be introduced at an account level for any given period.
When the Payment Plan is active, Invoice generation will take the Amount Required from the Payment Plan instead of the one calculated using the settings. When the Payment Plan expires or is suspended, the Amount required as per the settings will take effect.
You can set up the Status rules in such a way that when an account has an active payment plan, it moves into a specified status. Similarly, the rules can also be set to move the account out of that specified status into any other required status, when the payment plan is suspended or has expired.
To add a new Payment Plan
- Access Card Account page and click Payment Plan tab.
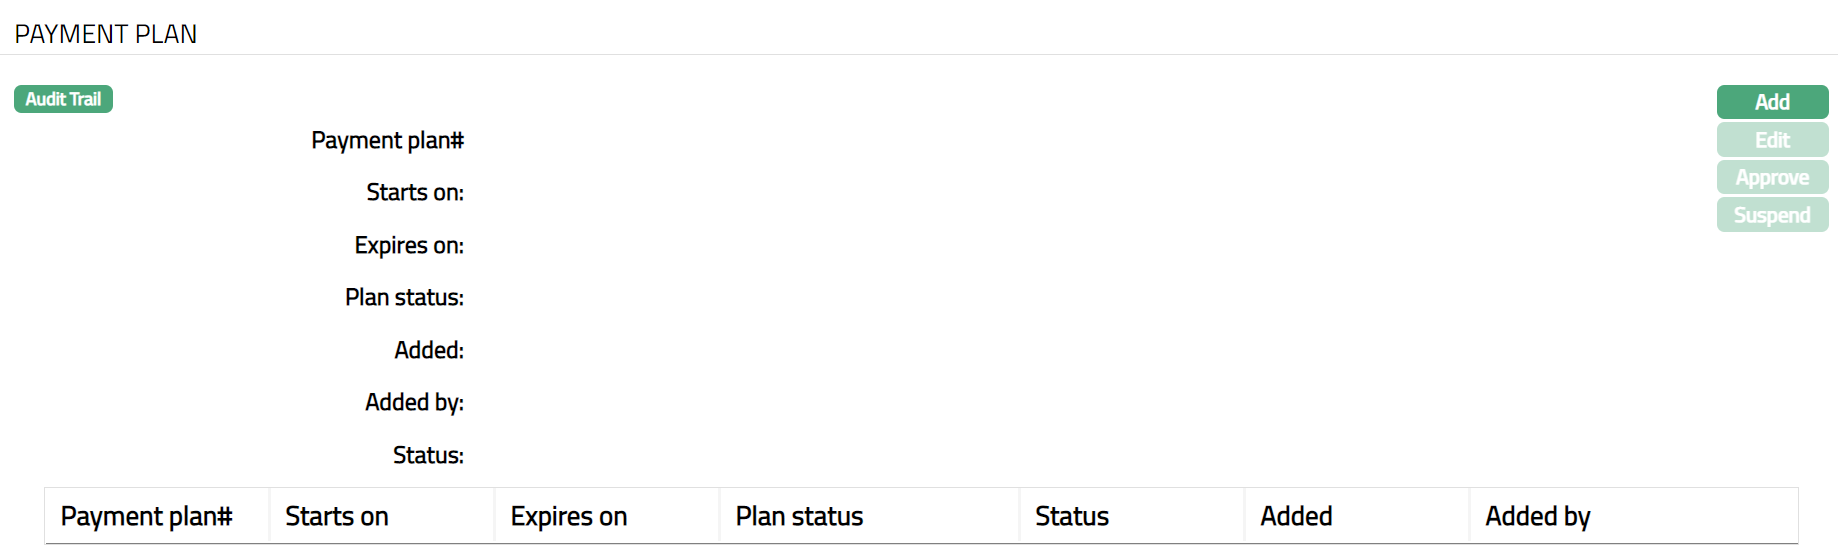
- Click Add. Add Payment Plan screen appears.
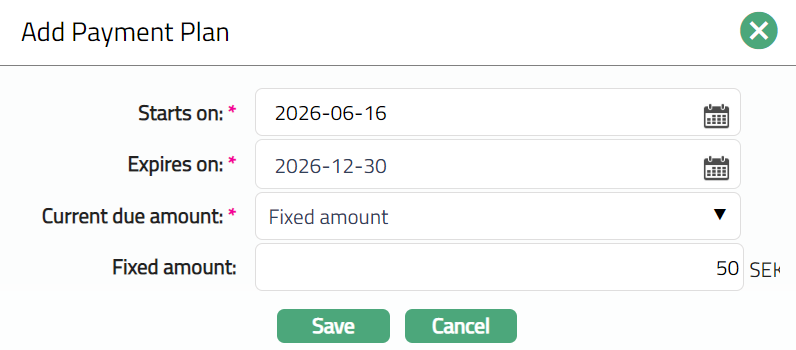
By default, Current cycle start date is auto populated in the Starts on date field. You can update the start date to any other date greater than the Current cycle start date.
Enter Expires on date. This date should be greater than Starts on date.
Select how the Current due amount should arrive at when the payment plan is active. This is the amount that will be shown in the Invoice as Amount required. The following options are available:
Fixed amount: If the Amount Required in the Invoice should be a fixed amount when the Payment Plan is active, choose this option.
% Of total amount due: If the Amount Required in the Invoice should be a percentage of the total amount due when the Payment Plan is active, choose this option.
Depending on the option chosen above, you need to specify the Fixed Amount or the % of total amount due in the next field.
Click Save. Payment Plan page appears with the added details along with a Payment Plan #, which is the unique identifier for the Payment Plan for the account.
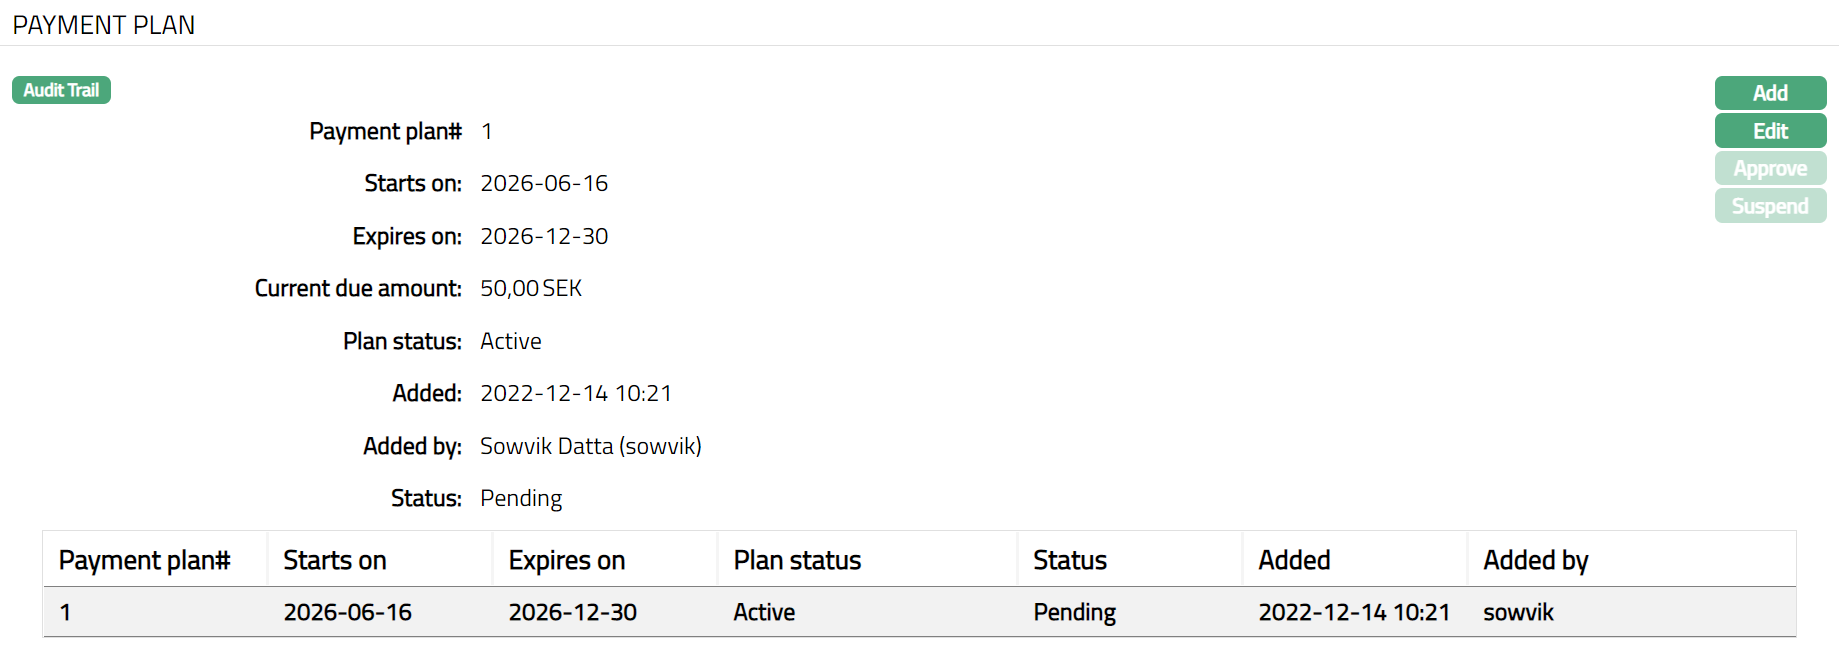
Functions: Add, Edit, Approve, Suspend
Note: Once the Payment plan is created, Plan status will be Active and record Status will be Pending. Any user other than the one who has created the Payment plan can Approve the Payment plan. On Approval, the record status is Approved, and the payment plan set up charge, if any, is booked to the account.
To Edit Payment Plan,
- Click Edit. Edit Payment Plan page appears.
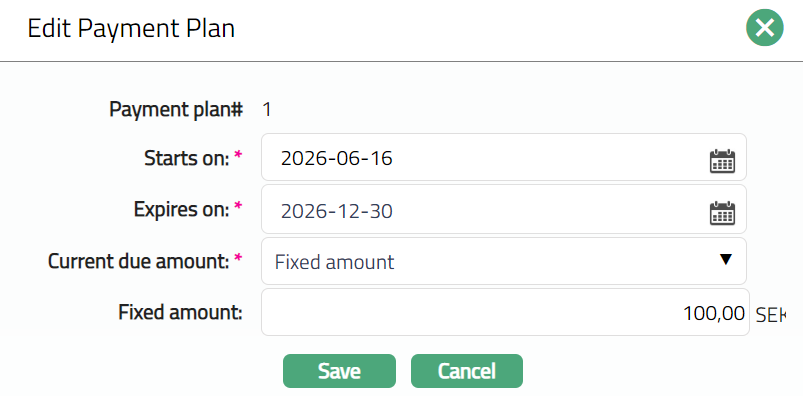
Note: All fields except Payment plan # are editable. Edit button will be enabled ONLY if the plan status is Active
- Click Save. Payment Plan page appears with the edited details.

Note: Once the Payment plan is edited, Plan status will be Active and record Status will be Pending. Any user other than the one who has created the Payment plan can Approve the Payment plan. On Approval, the record status is Approved, and the payment plan set up charge, if any, is booked to the account.
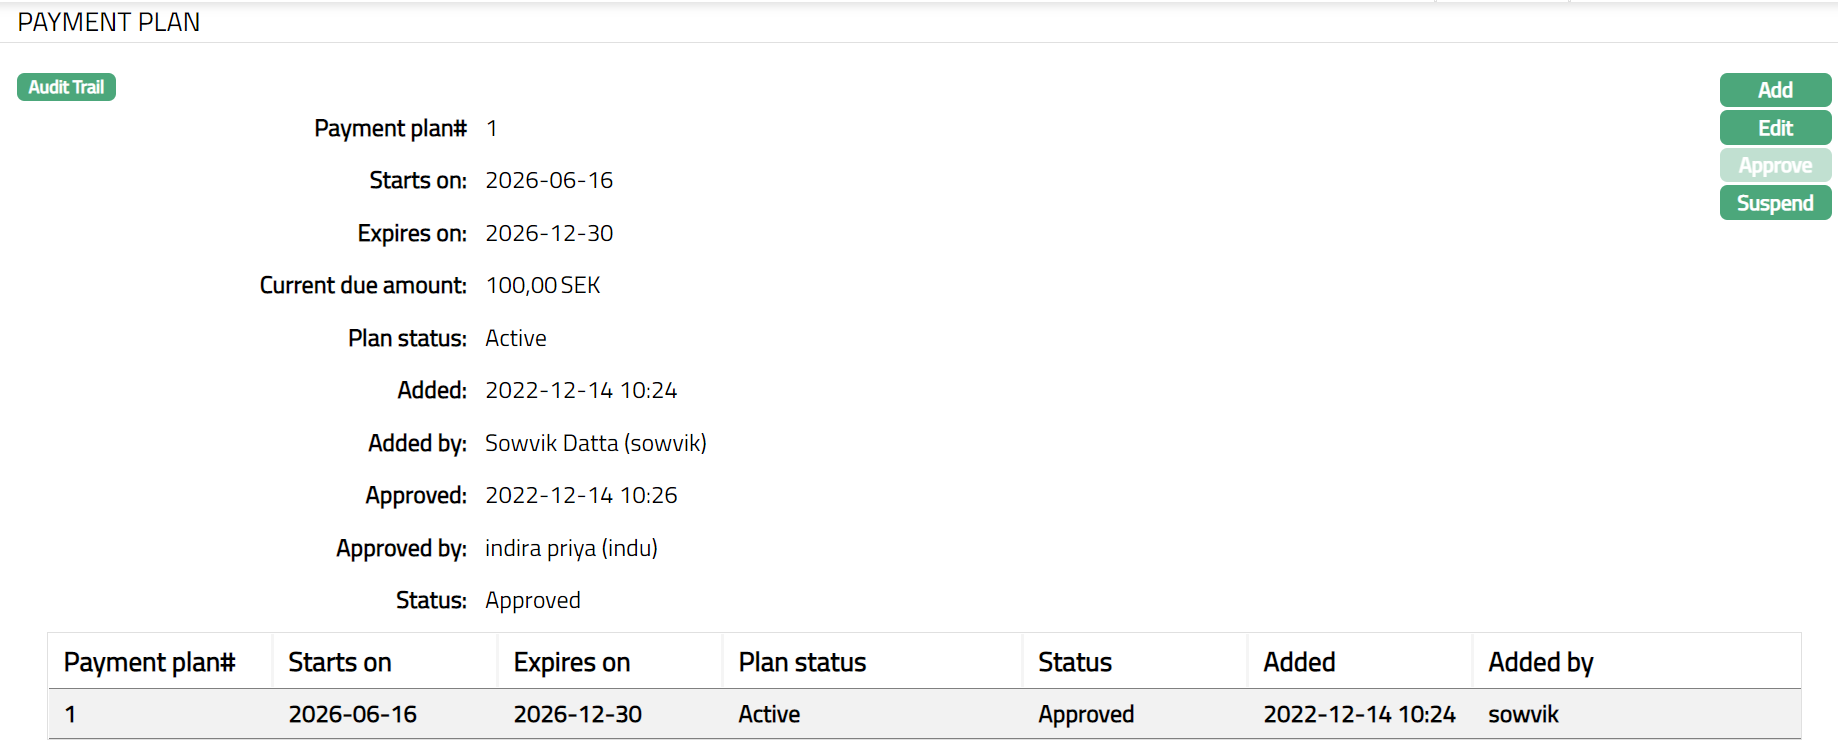
Functions: Add, Edit, Approve, Suspend
The additional fields that you can view in the tab are explained below:
- Plan Status field denotes the status of the Payment Plan.
Available Plan statuses are:
Active: On approval of the payment plan, the Plan status will be Active. During the period that the Payment Plan is Active and Approved, the amount required for the card account is calculated using the parameters in the Payment Plan. Any Payment Plan maintenance charge that has been defined will be applicable on the account as long as the Plan is in this status.
Suspended: If the Plan status is Suspended and the Record status is Approved, then the amount required for the card account does not get calculated based on the Payment Plan.
Expired: If the Application date is equal to the date mentioned in Expire on field, then the Payment plan will be automatically suspended, and the plan status will be Expired. The amount required for the card account does not get calculated based on the Payment Plan
Added field denotes the date on which the record was added.
Added by field denotes the name of the person who created the record.
Approved field denotes date on which the record was approved and is displayed only for approved records.
Approved by field denotes name of the person who approved the record and is displayed only for approved records.
Status field denotes the status of the record.
Event
The Events tab allows you to view the past, current and future events. This tab is non-editable.
To view the Events
- Access Card Account screen. Click Event tab. There are three sub-tabs within it -- Past, Current and Future. By default, the Current tab is displayed. It shows the details of the Events that have value date = current business date. The Past tab and Future tab show details of events that have value date earlier than / later than the current business date respectively.
A sample of the Past tab is shown below:
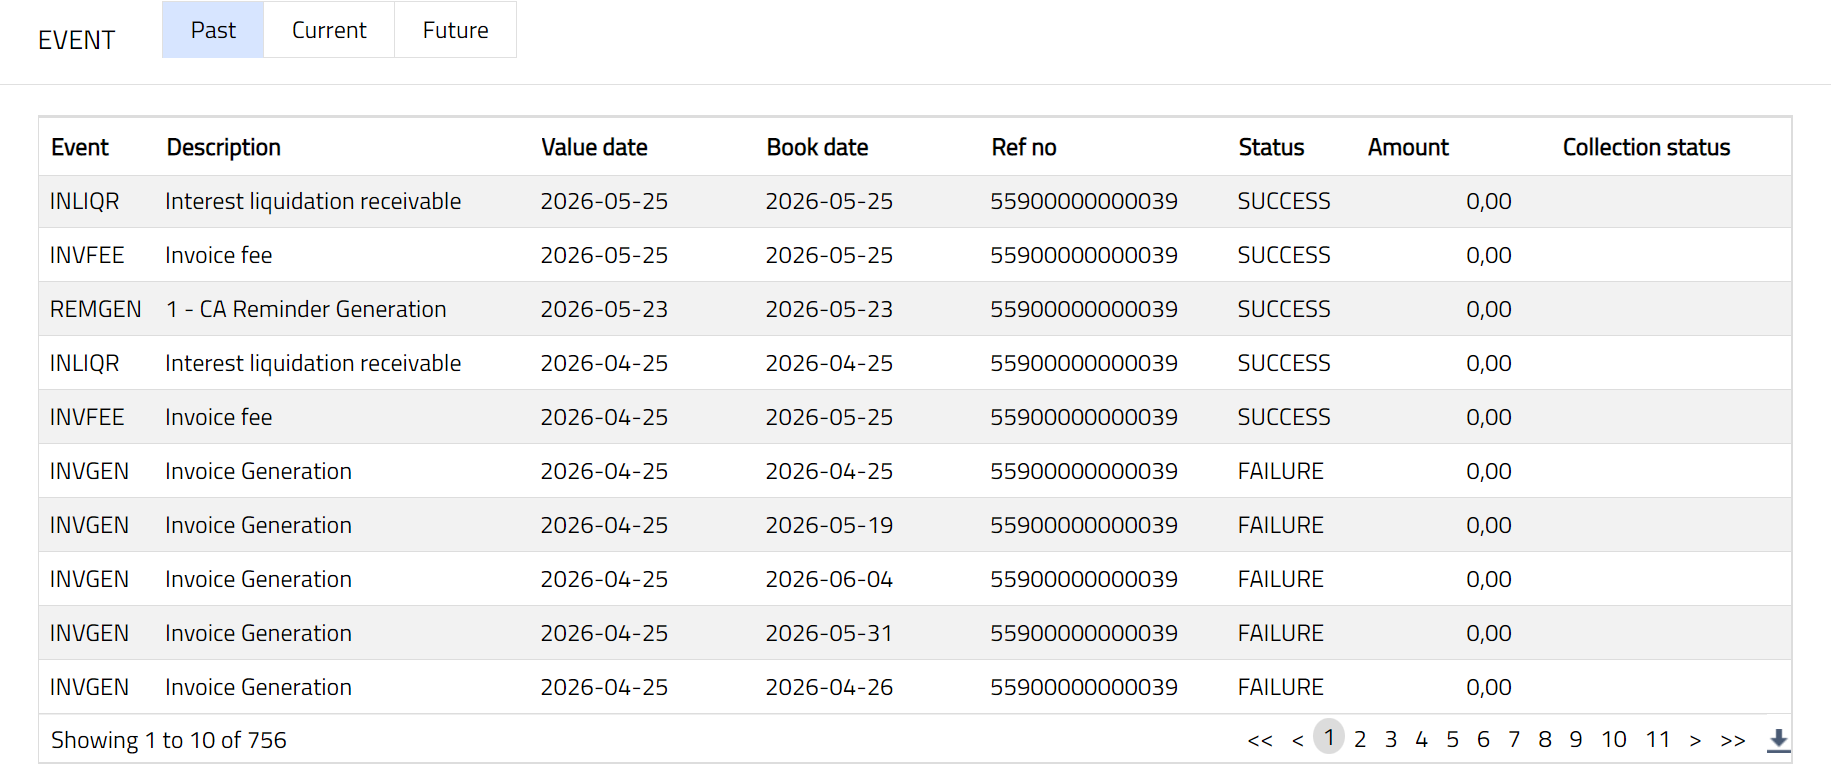
A sample of the Current tab is shown below:
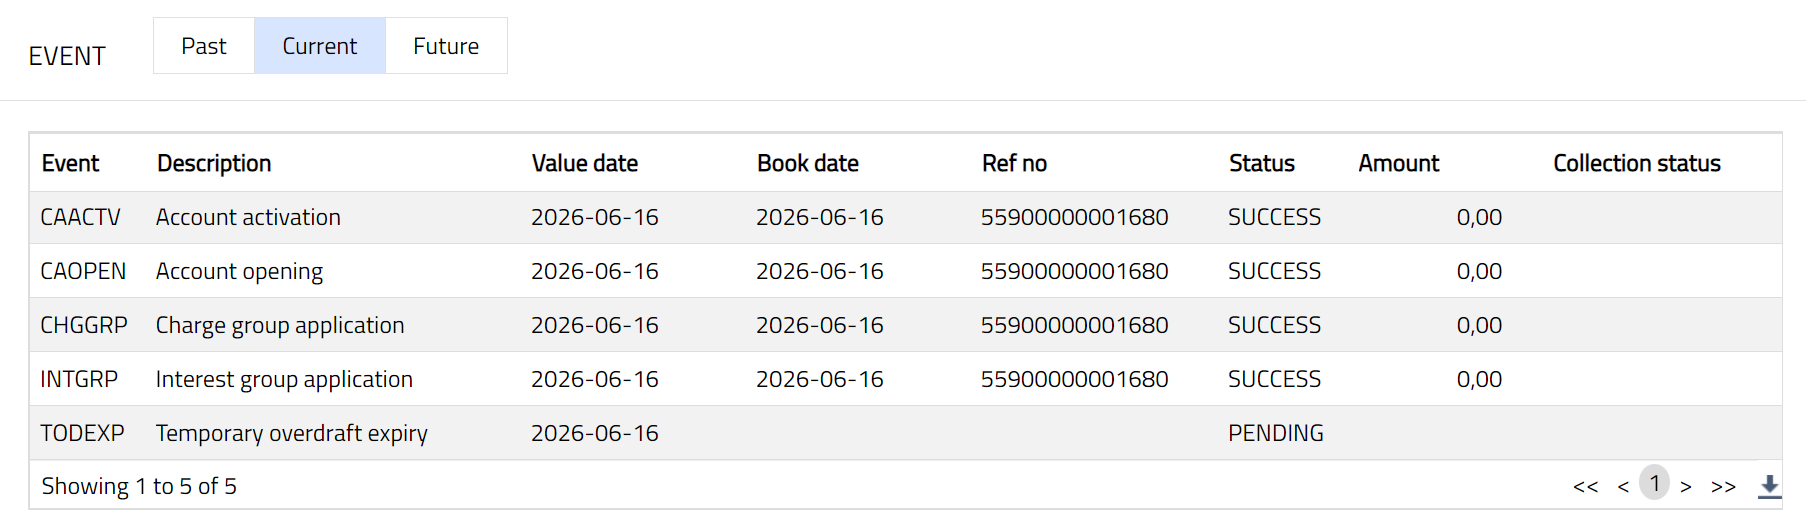
A sample of the Future tab is shown below:
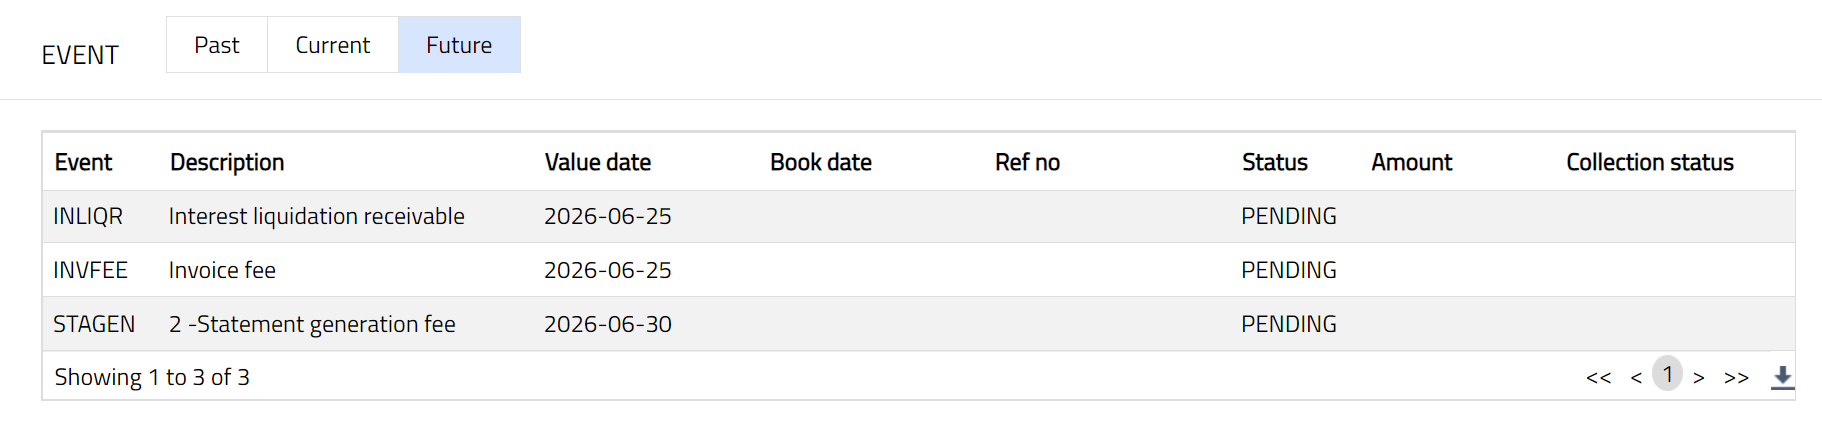
All the tabs show the following data:
Event: It displays the code for the event.
Description: It displays the description of the event.
Value Date: It is the date on which interest starts applying. For example: Booking date is 29^th^ June, Value date is 5t July- interest will start applying from 5^th^ July
Book Date: The date of entry / input of the event.
Ref No: The transaction reference number under which the event is processed.
Status: It displays the status of the event. It status can be of the following types.
Pending: Where the event is not yet processed.
Success: Where the event has been processed successfully.
Failure: Where the event has failed during process.
Retry: Indicates a failed event where the system retries to process the event on subsequent business days.
Amount: It indicates the amount processed by the event. Example: Interest liquidation event will have the amount of interest liquidated.
Collection Status: If the Collection status is Pending, it indicates that the deferred charges has not been collected and if the Collection Status is Success, it indicates that the deferred charges has been collected
The Events in a Card account are listed below.
| Event Codes | Description | Condition |
|---|---|---|
| ADDFEE | Additional Fee | This event occurs when an additional charge is maintained, and additional charge fee is collected. |
| AMTBLK | Amount Block | This event is triggered for each amount block created |
| AUTBON | Automatic Bonus Redemption | This event is triggered whenever there is automatic redemption of bonus points. |
| BLKREL | Block Release | This event is triggered for every release of an amount block. |
| BALUPD | Balance update on Payment due date | This event is triggered on the payment due date and updates balances for past, rolled over, overdue buckets. |
| CAACST | Account status Fee | If Move Account Status To is maintained as a rule at product level with an associated fee and if the rule satisfies, then this event is triggered, and Accounts Status fee is charged at the account level. |
| CAACTV | Card Account Activate | This event occurs when a card account is activated. |
| CACLOS | Card Account Close | This event occurs when a card account is closed. |
| CACOMM | Card Account Opening Commission | This event occurs when bonus points are credited as Account opening commission |
| CADORM | Card Account Dormancy | If the dormancy days is maintained, then this event is triggered which makes the account dormant |
| CAEOGD | Card Account End of Grace Days | This event is triggered at the end of grace days. |
| CAINPR | Card Account Insurance Premium Fee | This event is triggered when insurance premium fee is attached to card account |
| CAOPEN | Card Account Opened | This event occurs when the card account is opened and account opening fee is collected on account activation. |
| CAPAST | Payment Status Fee | If Move Payment Status To is maintained as a rule at product level with an associated fee and if the rule satisfies, then this event is triggered, and Payment status fee is charged at the account level |
| CHGCOL | Charge Collection | This event is triggered for all Event based charges which are deferred. |
| CHGGRP | Charge Group | This event occurs when a charge group is attached to the card account. |
| CHGWAV | Charge Waived | This event is triggered when charges are waived. |
| EARACT | Earmark Activate | This event is triggered when an earmark created for an account is approved. |
| EAREXP | Earmark Expired | This event is triggered when an earmark expires. |
| EVNPOP | Event Population | On account activation, this event is inserted to trigger other events for charges, accruals and interests. |
| INACRP | Interest Accrual Payable | This event is triggered whenever interest payable is accrued. This event is triggered every day. |
| INACRR | Interest Accrual Receivable | This event is triggered whenever interest receivable is accrued. This event is triggered every day |
| INACTV | Insurance Activation | This event is triggered when insurance is attached to Card Account and activated. |
| INCAPP | Interest Capitalization Payable | If Force capitalization is checked and accrued interest is capitalized for Payable, then this event is triggered. |
| INCAPR | Interest Capitalization Receivable | If Force capitalization is checked and accrued interest is capitalized for Receivable, then this event is triggered. |
| INEXPY | Insurance Expired | This event is triggered, when Insurance plan attached to the card account expires. |
| ININIT | Insurance Initiation | When an Insurance Plan is attached to the Card account, but not activated, then this event is triggered. |
| INLIQP | Interest Liquidation Payable | This event is triggered based on the liquidation frequency for liquidation of the accrued interest payable into the account. |
| INLIQR | Interest Liquidation Receivable | This event is triggered based on the liquidation frequency for liquidation of the accrued interest receivable into the account. |
| INSUSP | Insurance Suspension | This event is triggered when an insurance plan is suspended. |
| INTGRP | Interest Group | When an Interest group is attached to a Card Account, then this event is triggered. |
| INTPAY | Interest Payable | After the interest liquidation payable, this event will trigger which will payout the amount that has been liquidated to the account. |
| INVFEE | Invoice Fee | This event is triggered if an invoice fee is associated with invoice generation whenever an invoice is generated for the account |
| INVGEN | Invoice Generation | This event is created when an invoice is generated. |
| INWAVP | Interest Waived for Payable | This event occurs, when the Waiver Flag is checked, and accrued interest Payable is waived. |
| INWAVR | Interest Waived for Receivable | This event occurs, when the Waiver Flag is checked, and accrued interest receivable is waived. |
| NODORM | No Dormancy | When a dormant card account is reset, this event is triggered. |
| NOPFEE | Non-Operation Fee | If the card account has an associated non- operation fee and there are no operations on the account, then this event is triggered. |
| NPDUPD | Next Payment Due Date | This event occurs to update next payment due date and triggers at the end of every cycle. |
| OLMFEE | Over Limit Fee | This event is triggered if the Card account balance is beyond limit and over limit fee is attached to the Account. |
| OVDFEE | Overdue Fee | This event occurs when Card Account has an overdue balance and overdue fee is attached to the account. |
| PDDUPD | Payment due date update | This event occurs to update the payment due date for the current cycle and triggers on the payment due date. |
| PLNACT | Plan Activate | This event occurs when a Payment plan is set up. |
| PLNEXP | Plan Expiry | This event occurs when a Payment plan expires. |
| PLNFEE | Plan Fee | This event occurs when a periodic charge is collected for the payment plan maintenance charge. |
| PROCHG | Pro rata Charge | This event will trigger if any amount has to be refunded for the pro rata charges. |
| REMGEN | Reminder Generation | This event occurs when a reminder is attached to the card account; and based on the frequency, the reminder is generated. |
| SERFEE | Service Fee Charge | This event occurs if service charge is maintained for the Card Account. |
| STAGEN | Statement Generation | This event occurs when a statement attached to the card account is generated; and based on the frequency, the statement is generated. |
| TODEXP | Temporary Overdraft Expiry | This event occurs when a Temporary Overdraft expires. |
| UODFEE | Unauthorized Overdraft Fee | This event occurs when Card Account is in over limit and unauthorized overdraft fee is attached to the account. |
| WRITOF | Write Off | This event is triggered when there is a write-off of the card account balance. |
| DBTPRO | Debit processing | This event occurs when a debit transaction is processed on the Card Account. |
| ADHFEE | Adhoc charge fee | This event occurs when an adhoc charge fee is applied to the Card Account. |
| TAXACR | Tax accrual | This event occurs when tax amounts are accrued on the Card Account based on the configured tax accrual rules. |
| TAXLIQ | Tax liquidation | This event occurs when accrued tax amounts are liquidated from the Card Account as per the configured tax liquidation settings. |
| CAREIN | Transaction account reinstate | This event occurs when a previously restricted or suspended Transaction Account linked to a Billing Account is reinstated and made active again. |
| ROLFEE | Rollover fee | This event occurs when the outstanding balance of a Card Account is rolled over to the next billing cycle due to non-payment of the amount due for the previous cycle. |
| TAXPAY | Tax payout | This event occurs when tax amounts payable are paid out from the Card Account. |
| BONCOM | Bonus commission | This event occurs when bonus commission is calculated and applied to the Card Account based on eligible transactions or configured bonus rules. |
Reminder
Reminder option allows you to set up reminders to be sent to the client or any linked person informing about the card account. As soon as the Card Account is created, the reminder(s) added at the product level is(are) defaulted and displayed under this tab. Later, apart from the defaulted reminder, any other reminders that are added at the account are also listed under this tab.
To add a Reminder
- Access Card Account page and click Reminder tab. The reminders already added at the product / account are displayed.
- Click Add. Add Reminder Page appears.
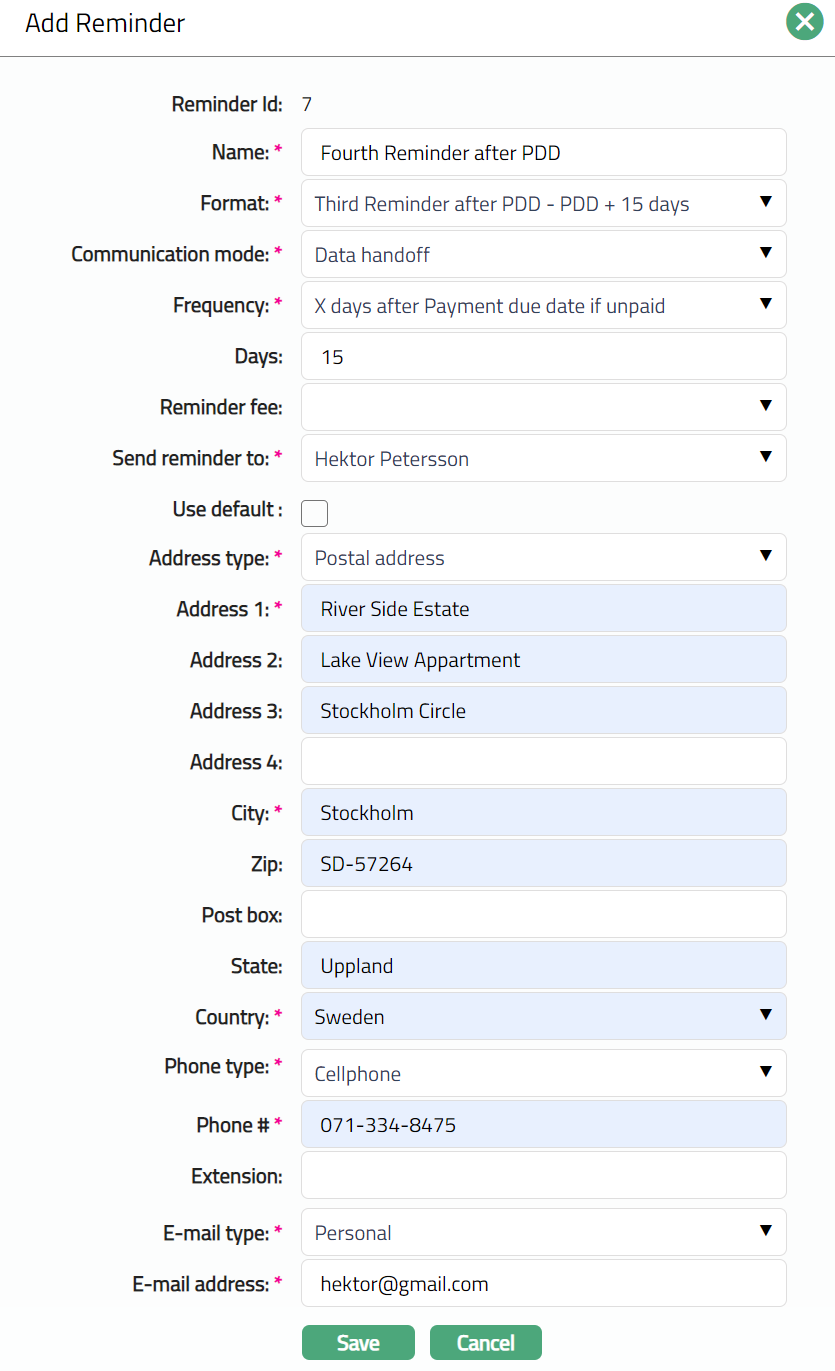
The Reminder Id is a unique identifier for the Reminder of the account and is auto- generated by Aura.
Enter Name of the reminder.
Select Format from the drop-down list, which must be maintained under Admin > System Codes > Generic definitions > Reminder Format. It is the format of the reminder that is to be generated.
Select Communication mode for the reminder. Available options are:
Data handoff
Email
Paper
SMS
Web hotel
- Select Frequency at which this reminder has to be sent.
The available options are:
On End of Cycle: The Reminder will be generated on the end of the cycle.
On payment due date: The Reminder will be generated on the payment due date.
X days before End of Cycle: Reminder will be generated X number of days before End of Cycle. If you select this option, enter the number of days in the Days field.
X days after End of cycle: The Reminder will be generated X number of days after the end of the cycle. If you select this option, enter the number of days in the Days field.
X days before payment due date: The Reminder will be generated X number of days before the payment due date. If you select this option, enter the number of days in the Days field.
X days after payment due date, if unpaid: The Reminder will be generated X number of days after the payment due date, if it remains unpaid (i.e., payment < amount required). If you select this option, enter the number of days in the Days field.
X days after grace days if overdue: If the payment is overdue, then the Reminder will be generated X days after grace days. If you select this option, enter the number of days in the Days field.
X days after payment status Y: The Reminder will be generated X number of days after the account moves into payment status Y. If you select this option, enter the number of days in the Days field and select the Payment status from the drop-down list.
X days after reminder Y: The Reminder will be generated X number of days after reminder Y. If you select this option, enter the number of days in the Days field and select the Reminder from the drop-down list.
X days before N overdue cycles: The Reminder will be generated X number of days before N overdue cycles. If you select this option, enter the number of days in the Days field and number of overdue cycles in the Overdue cycle field
X days after N overdue cycles: The Reminder will be generated X number of days after N overdue cycles. If you select this option, enter the number of days in the Days field and number of overdue cycles in the Overdue cycle field.
Select the Reminder Fee from the drop-down list which must be maintained under Admin > System Codes > Charges, where the charge is Active, Periodic and it is either Banded or Flat amount charge. In case of Banded charges, the charge amount will be calculated on the basis of the card amount outstanding.
Select the person from the list of card account holders to whom the Reminder will be sent. The options shown will depend on the type of client.
Personal: The name of the Person will get displayed in the drop-down list.
Joint Client: The names of the Joint account holders will get displayed in the drop-down list.
Corporate: The name of the corporate client will get displayed in the drop-down list.
The list will also include the people who are linked to the client / account under the Linked People tab under Client Maintenance / Account Maintenance.
- By default, Use Default flag is checked. However, if you want the Reminder to be sent to a different address, you can uncheck the flag and enter the required address details.
If the flag is checked, Aura will consider the default address maintained at CRM > Person > Maintain, for the person chosen under Send Reminder To as the address to which the Reminder has to be dispatched.
If the flag is unchecked, the below mentioned fields will be enabled and you can enter the address details.
i. Select Address type from the drop-down list. The address types maintained under Admin > System Codes > Address details > Address types are displayed in the drop-down list.
ii. Enter address details of the receiver in Address 1, Address 2, Address 3 and Address 4 fields.
iii. Enter City of the receiver.
iv. Enter Zip code of the receiver.
v. Enter Post box number of the receiver.
vi. Enter State of the receiver.
vii. Select Country from the drop-down list which is maintained under Admin > System codes > Generic definitions > Countries.
viii. Select Phone type from the drop-down list which is maintained under Admin > System Codes > Address details > Phone types.
ix. Enter Phone# of the receiver.
x. Enter Extension of the receiver.
xi. Select E-mail type from the drop-down list which is maintained under Admin > System Codes > Address details > E-mail types.
xii. Enter E-mail address of the receiver.
- Click Save. Reminder page appears with the added details.
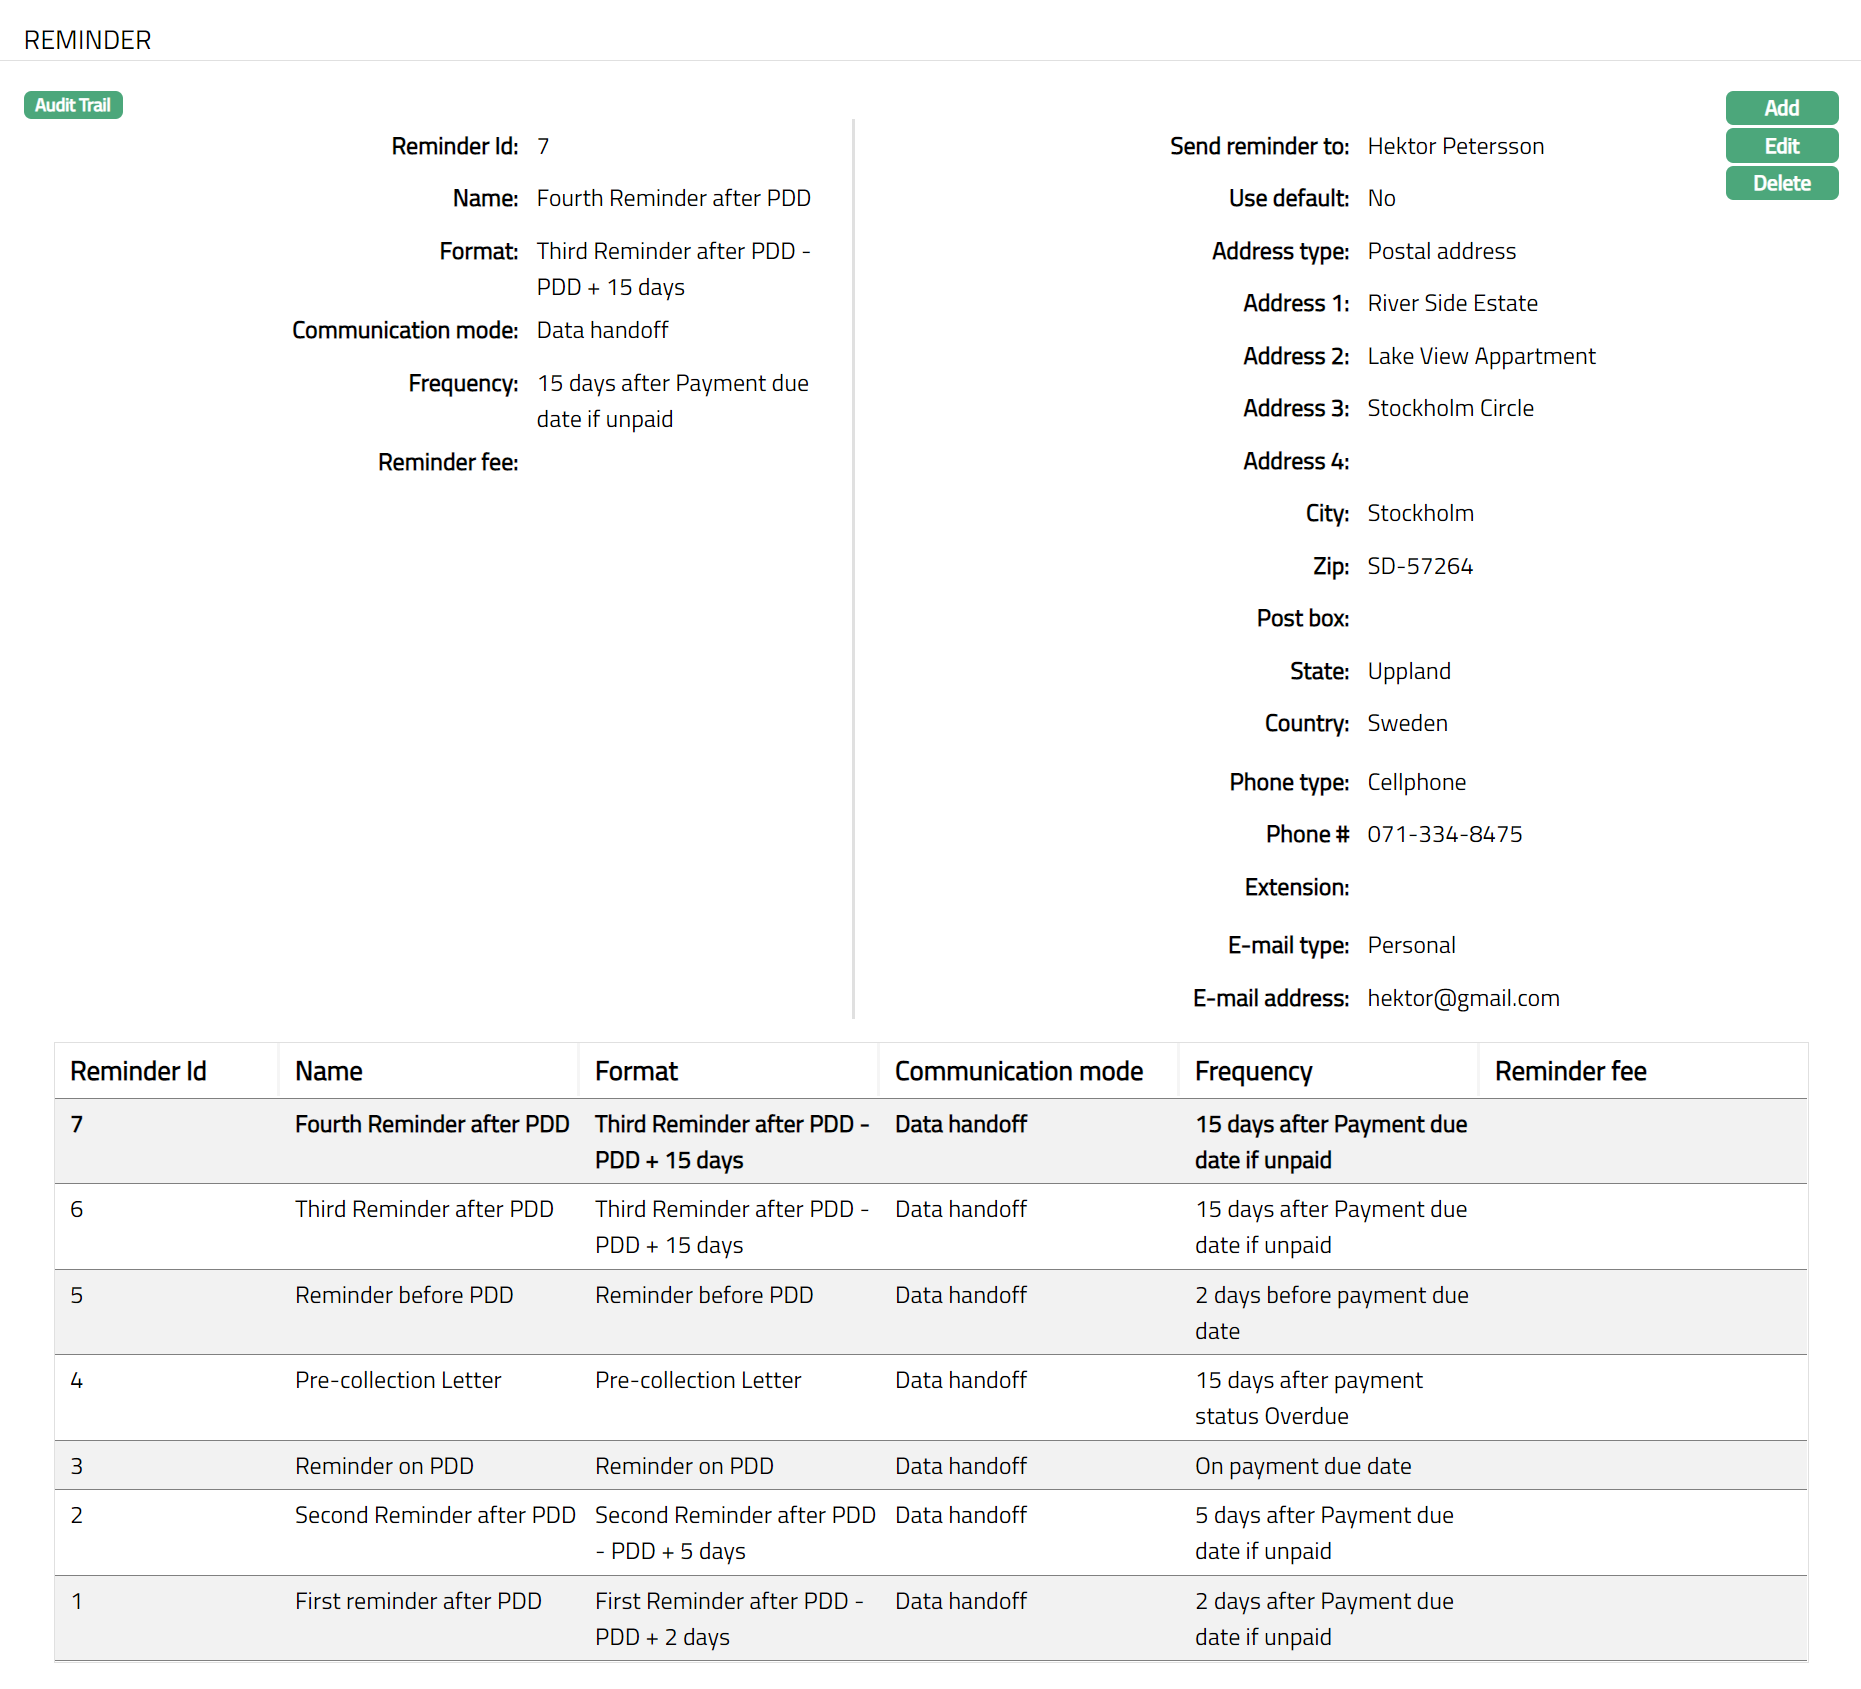
Functions: Add, Edit, Delete.
To Edit Reminder,
- Click Edit. Edit Reminder page appears.
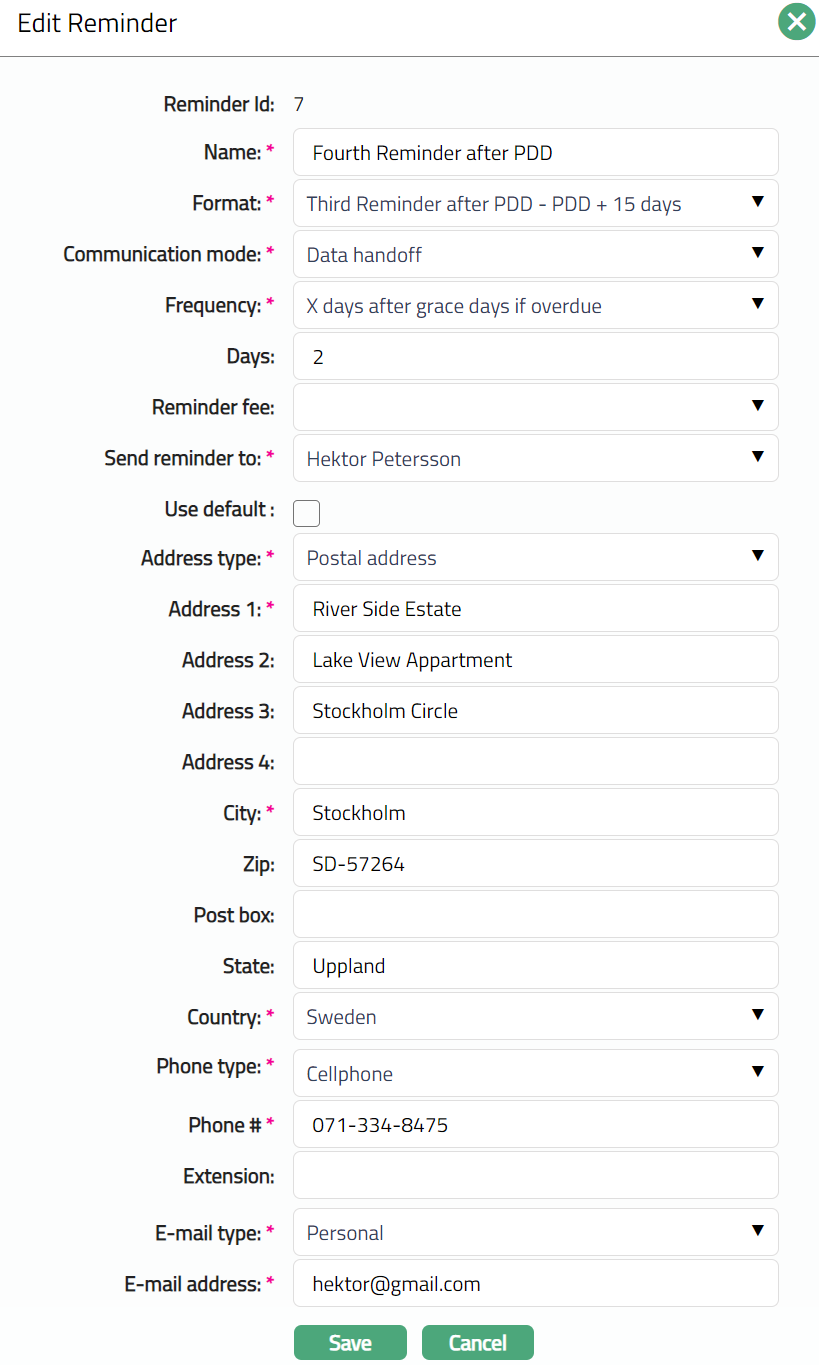
Note: Except Reminder id, rest all fields are editable.
Note:
The fields from Address type to E-mail address will be Editable only if the Use default flag is unchecked.
- Click Save. Reminder page appears with the edited details.
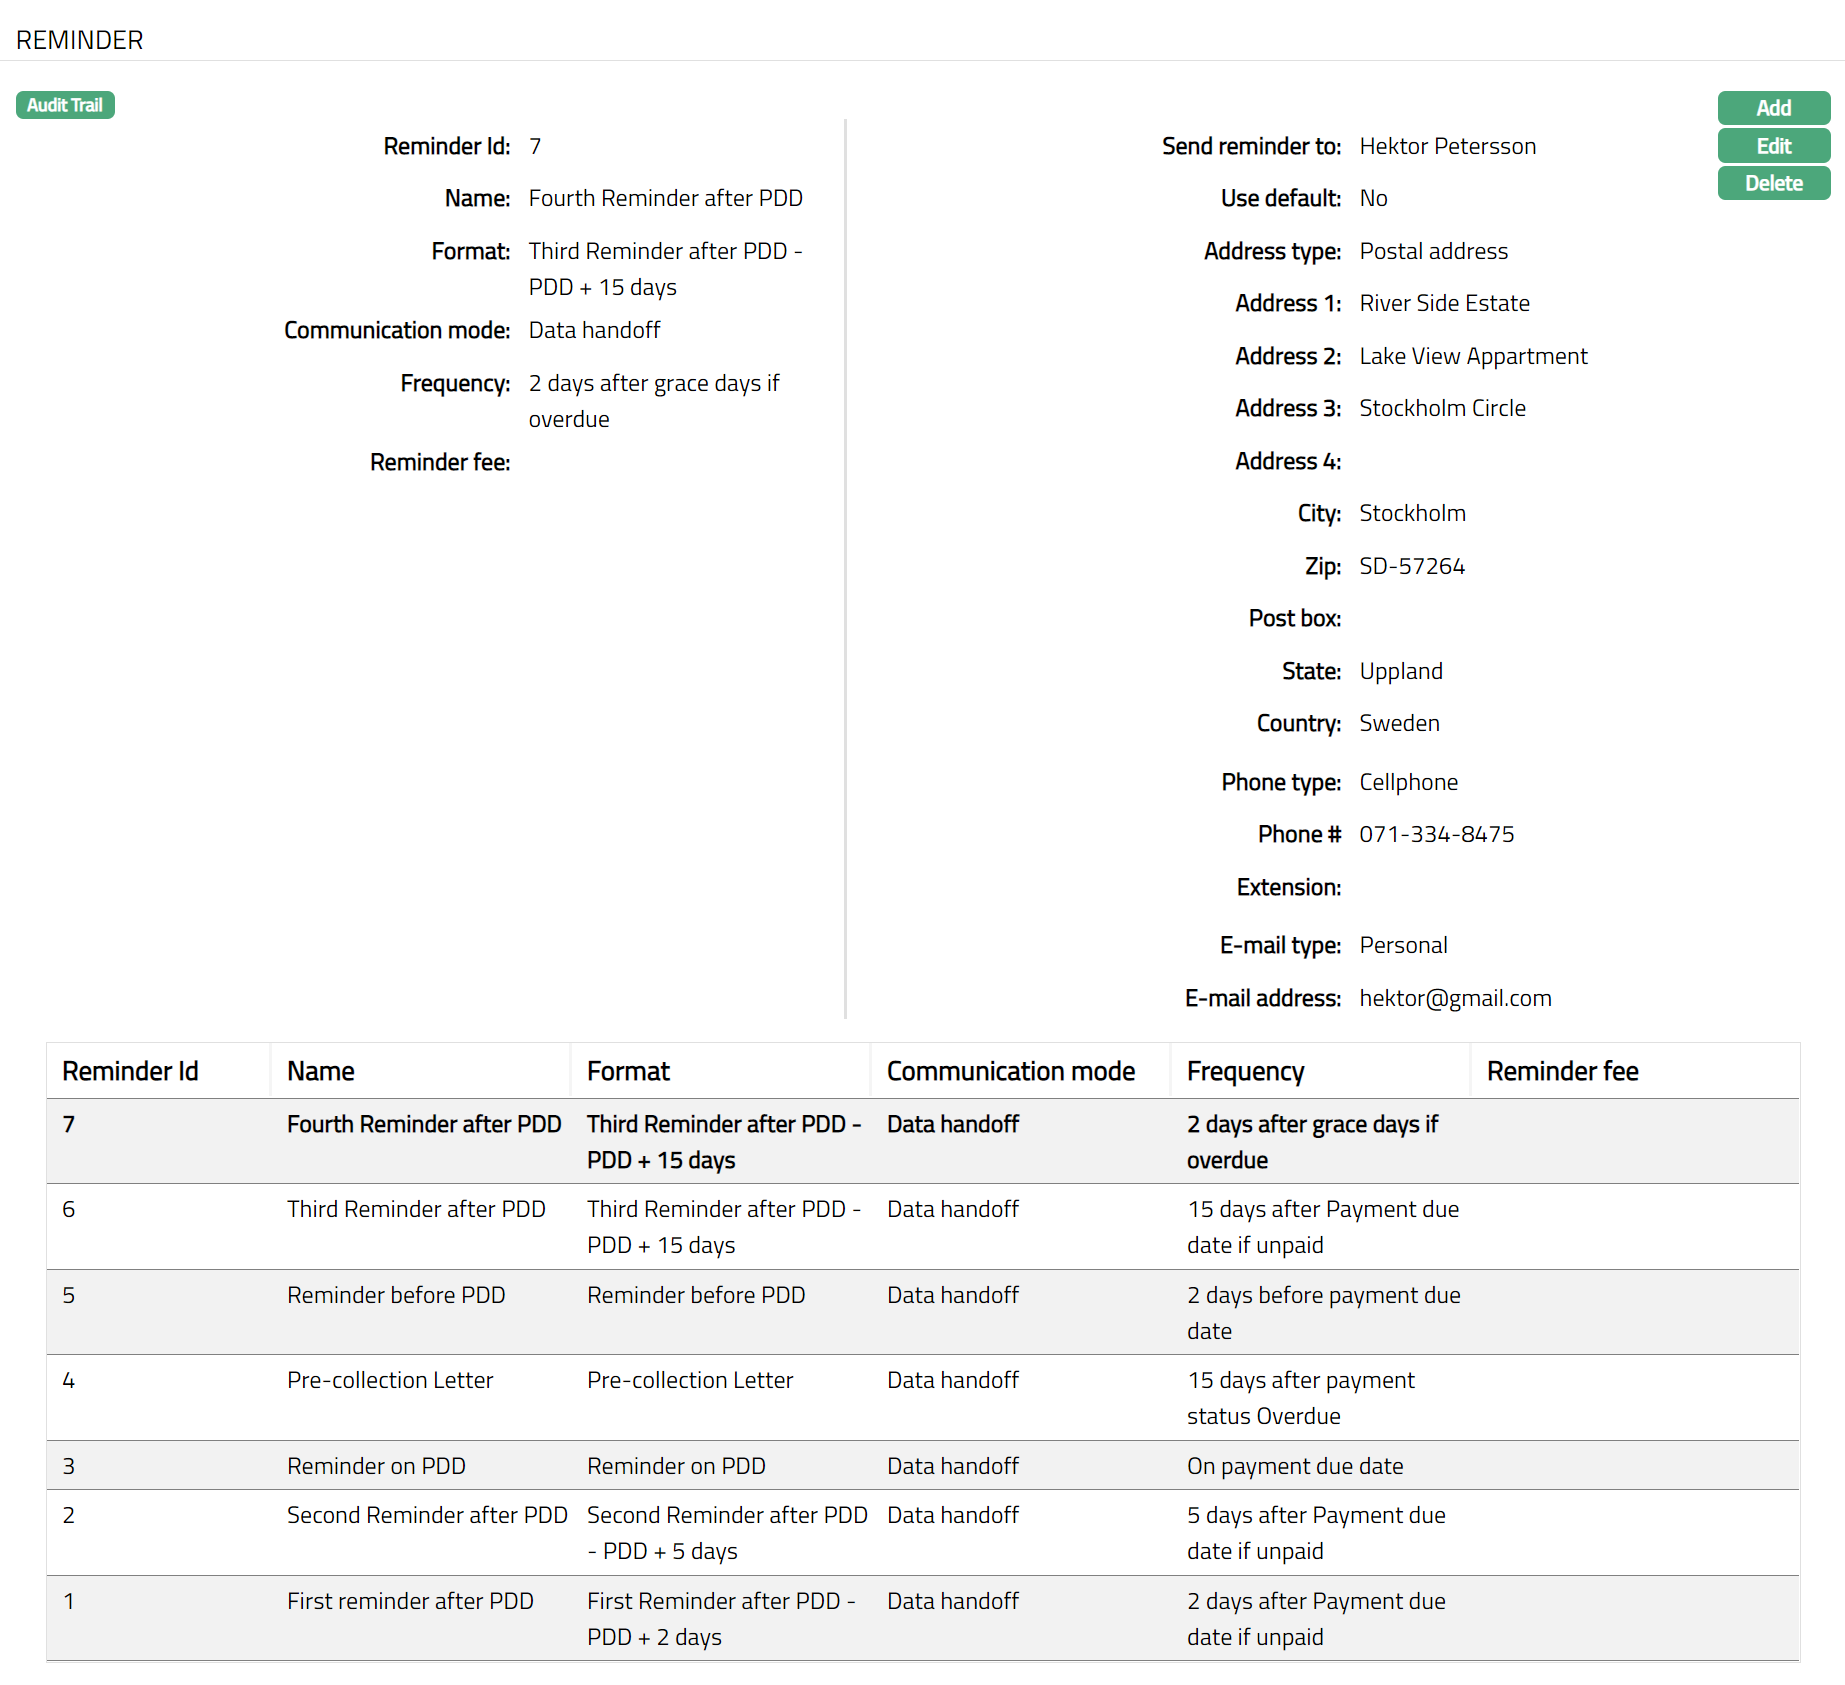
Functions: Add, Edit, Delete
Secured By
During account creation a limit is attached to an account, specifying the amount of the limit for the account. You can view and maintain these details using the Secured By tab. You can also change the attached limit. However, at any point of time, only one limit can be attached to an account.
To view the limit attached to the account,
- Access Card Account page and click Secured By tab. The details of the limit attached to the account while creating the account are displayed as shown below.
Functions: Edit and Delete
The fields available are:
Total linked amount denotes the total amount that is linked to the account
Secured ID denotes the id of the limit attached to the account as security.
Linked amount in transaction currency denotes the amount of the Limit linked to the account in the account currency.
Added denotes the date on which the limit is added to the Card account while creation of the account.
Added by denotes the name of the person who has added the limit to the card account while creation of the account.
Approved denotes date on which the record was approved and is displayed only if the record is approved.
Approved by denotes name of the person who approved the record and is displayed only if the record is approved.
Status denotes the status of the record.
The following details of the limit attached to the account while creating the account are displayed under respective columns.
Serial #: This column lists the auto generated serial number of the security
Type: The type of the security attached to the account is listed in this column. In case of card accounts, it is generally Limit
Secured ID: This column lists the auto generated ID of the security -- i.e., the Limit
Secured Amount: Shows the total limit amount attached to the account
Secured amount in transaction currency: Shows the Secured amount in the account currency.
Linked amount in transaction currency: Shows the Linked amount in the account currency.
To Edit the Limit,
- Click Edit button. Edit Secured By page is displayed.
Click the Limit hyperlink. The Limit Search page appears with the list of all active Revolving, Manual limits made available for the Client under CRM > Collaterals & Limits > Limits. Select the required Limit for the account.
Limit amount in limit currency will display the total limit amount of the selected limit id in limit currency.
Limit amount in transaction currency is the total limit amount of the selected limit in terms of the account currency.
The Linked amount in transaction currency is the limit amount that has to be linked to the Card account. By default, this will display the Limit amount in account currency. However, you can edit to any other lower value.
Functions: Add, Edit, Delete, Approve
Note: Any change in the tab will set the tab status to Pending till it is approved by another user. On approval, the tab status is set to Approved.
Functions: Add, Edit, Delete, Approve.
To Add a new limit to an account,
Note: A limit can be added to the account only on deletion of an expired or existing limit.
- On deletion of a limit, the following screen appears with the Add button enabled.
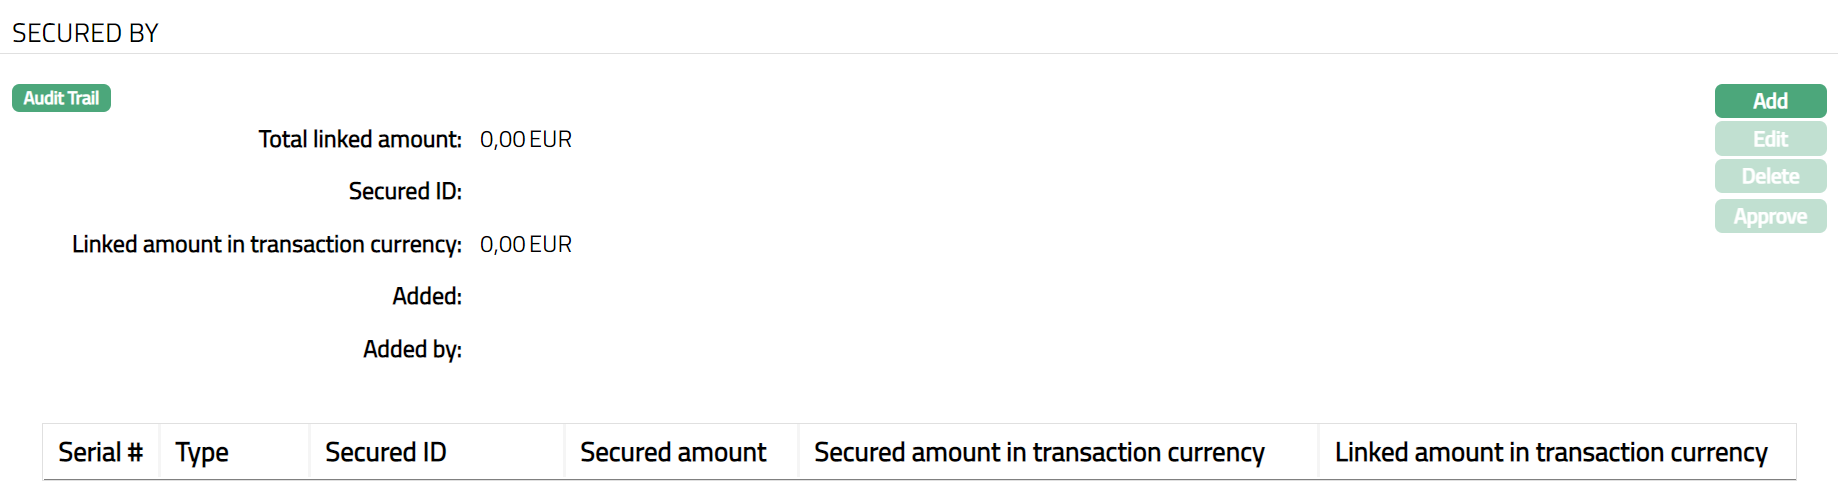
- Click Add. The Add Secured By page appears.
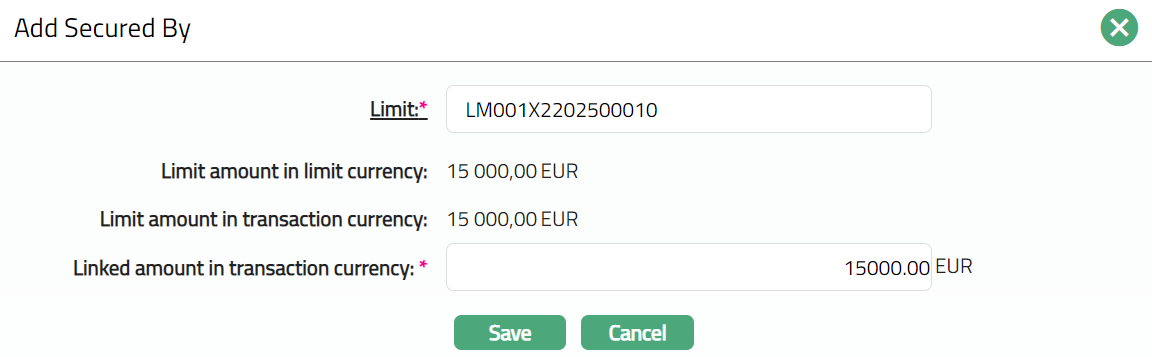
Select Limit or Collateral from the drop-down list. (here we are taking an example where limit is considered.)
Click limit hyperlink, the limit search screen appears displaying the list of limits with 'Actived' status maintained under CRM > Collaterals & Limits > Limits.
Limit amount in limit currency will display the unutilized amount of the selected limit id in limit currency by default. ConnectCore will calculate the Limit amount as (Limit amount -- Utilized limit).
Limit amount in transaction currency is the limit amount in terms of the account currency. The value will get displayed by default. This value is defaulted to the Linked amount in transaction currency is defaulted from limit amount in transaction currency. The value cannot be greater than limit amount in transaction currency. Currency code of the transaction currency will be displayed beside the Linked amount in transaction currency.
The Linked amount in transaction currency will display the linked amount in account currency.
- Click Save. The Secured By page appears with the added limit.
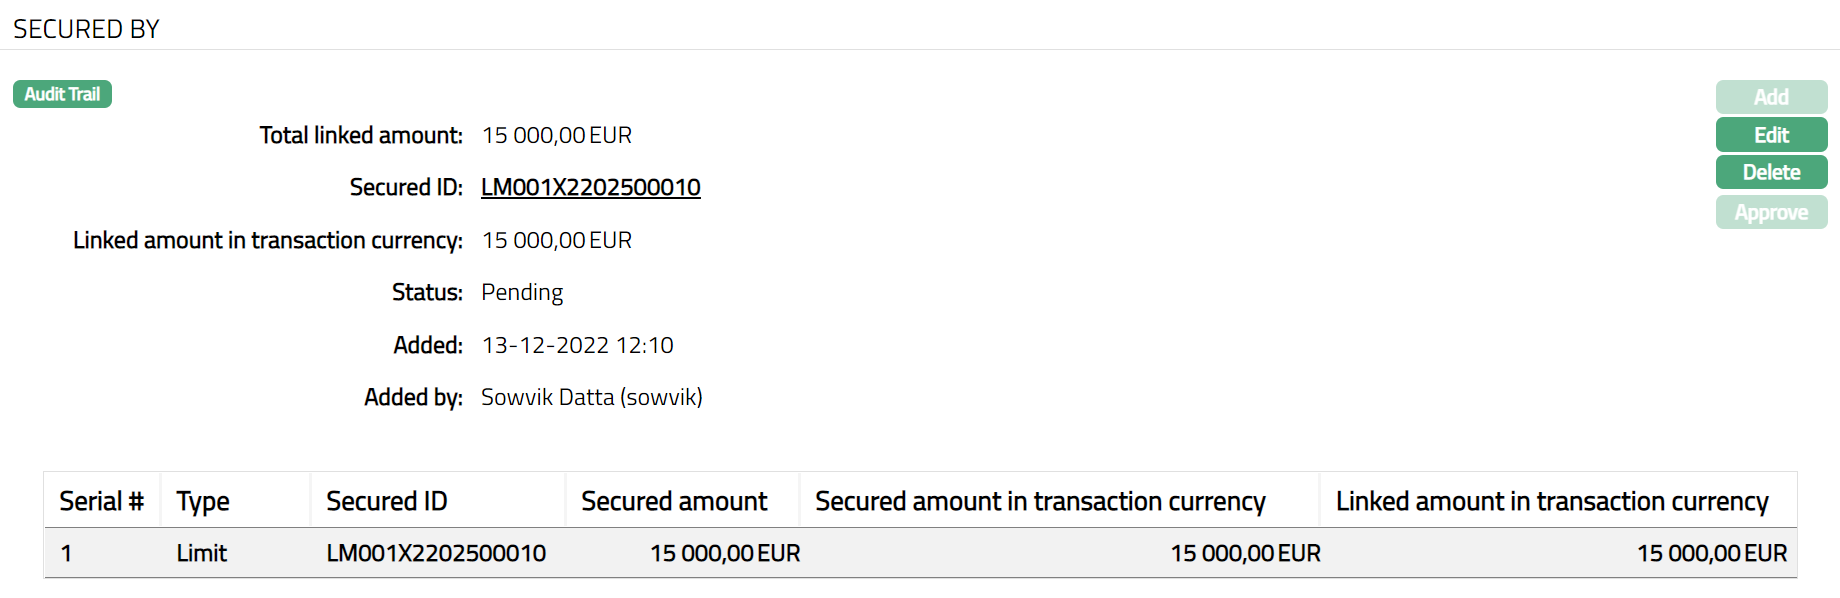
Note: On approval, the secured amount in transaction currency is displayed in the
Secured amount in transaction currency column is displayed as shown in the image below.
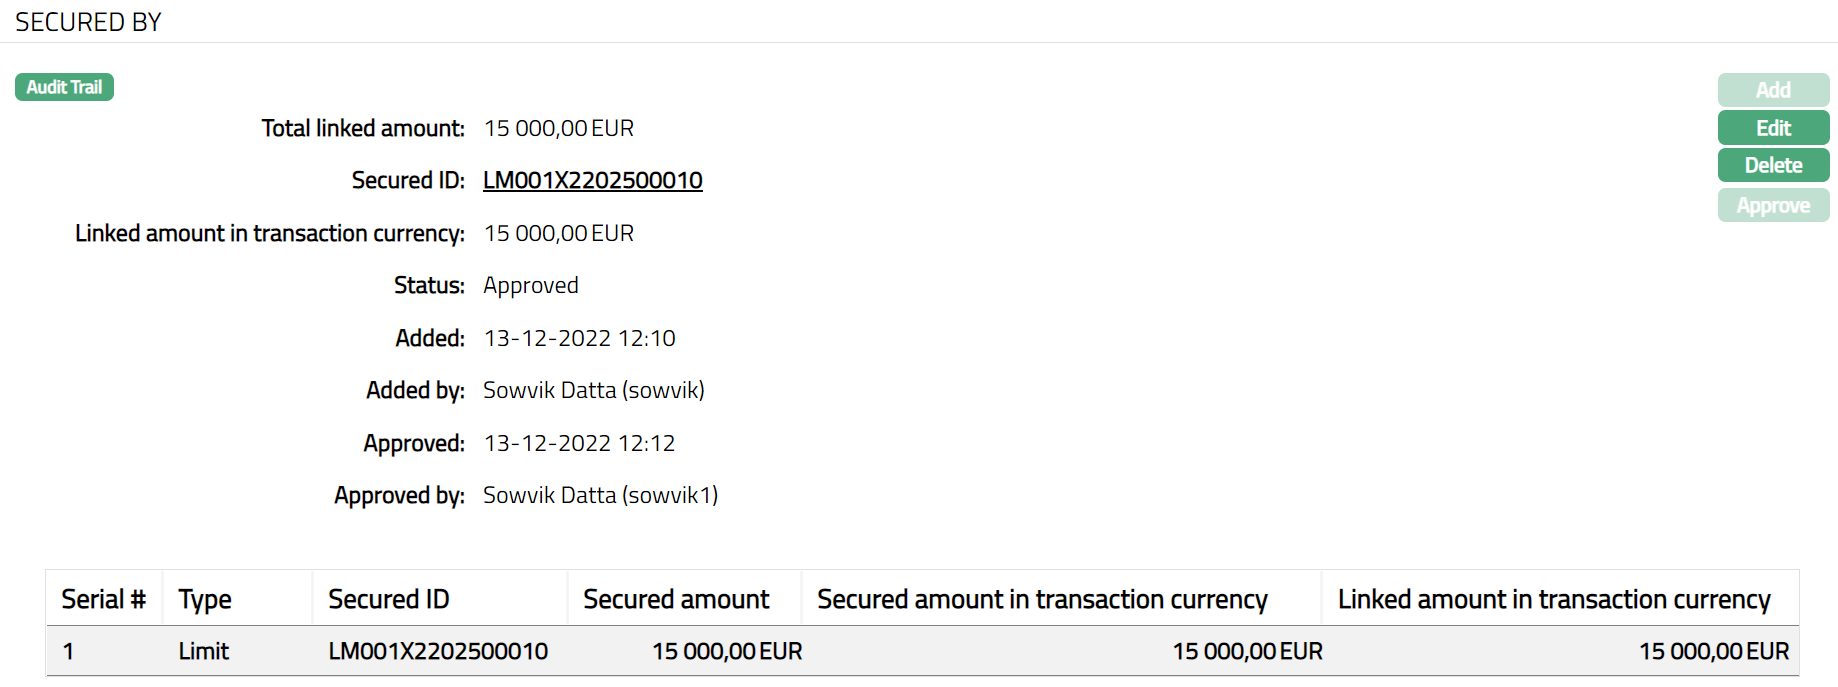
Functions: Add, Edit, Delete, Approve
Scheme Group
Scheme group tab allows you to maintain the Interest group and Charge Group for the account. Using this tab, you will be able to move the account into various pricing schemes that could become effective from the current date or a future date.
During creation of an account, you will be able to specify the Interest Group and Charge Group that are applicable for the account from the date of creation. Any changes required in these settings can be done using the Scheme Group Tab. The interest and charges tabs will display the appropriate values based on the Interest Group / Charge Group that are applicable for the account currently.
A Billing Account will show both the Interest Group and Charge Group sub-tabs, while a Transaction Account will show only the Charge Group sub-tab.
Interest
This tab will allow you to view and change the interest group for an account, which will automatically change the interest schemes across tabs (Interest Receivable, Interest Payable, Balance Class Credit and Balance Class Debit).
To view / add an Interest group
- Access Card Account page and click Scheme Group.Interest sub-tab is displayed by default.
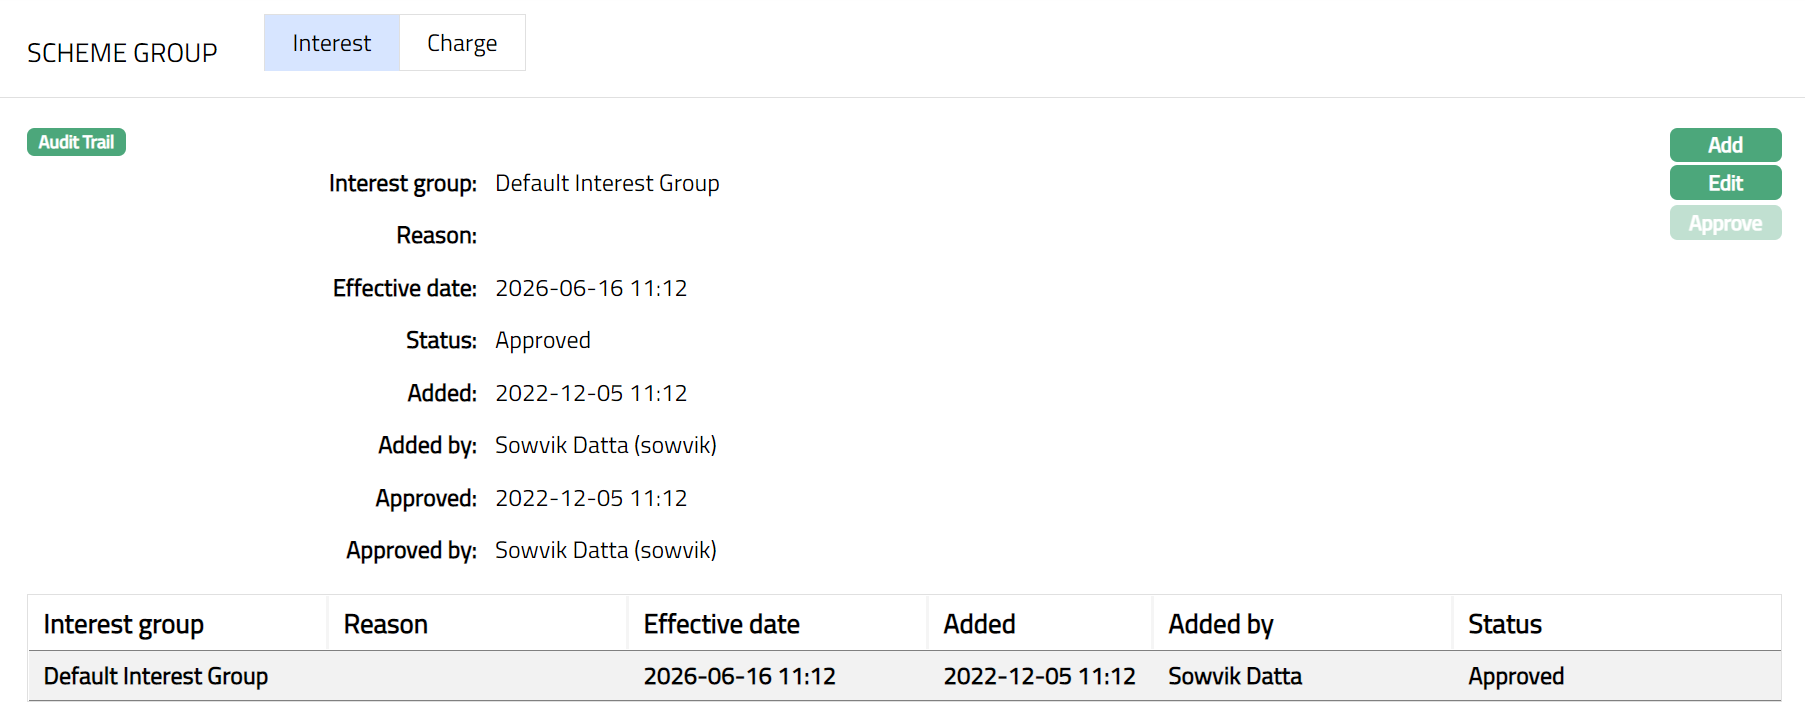
- Click Add. Add Interest Group page appears.
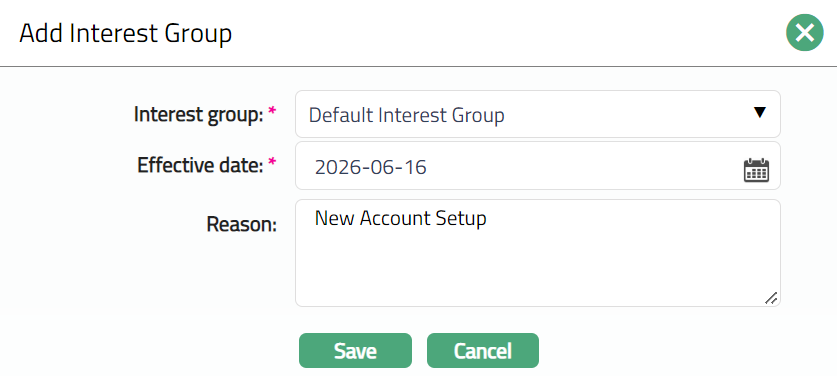
Select Interest Group from the drop-down list mapped to the Product. The list displays all the Interest groups maintained for the Product under Card > Settings > Interest group.
Select Effective Date. The effective date cannot be a past date.
Enter Reason for adding the interest group to the account.
Click Save. Interest Sub Tab under Scheme Group tab appears with the added details. The status of the record is set to Pending.
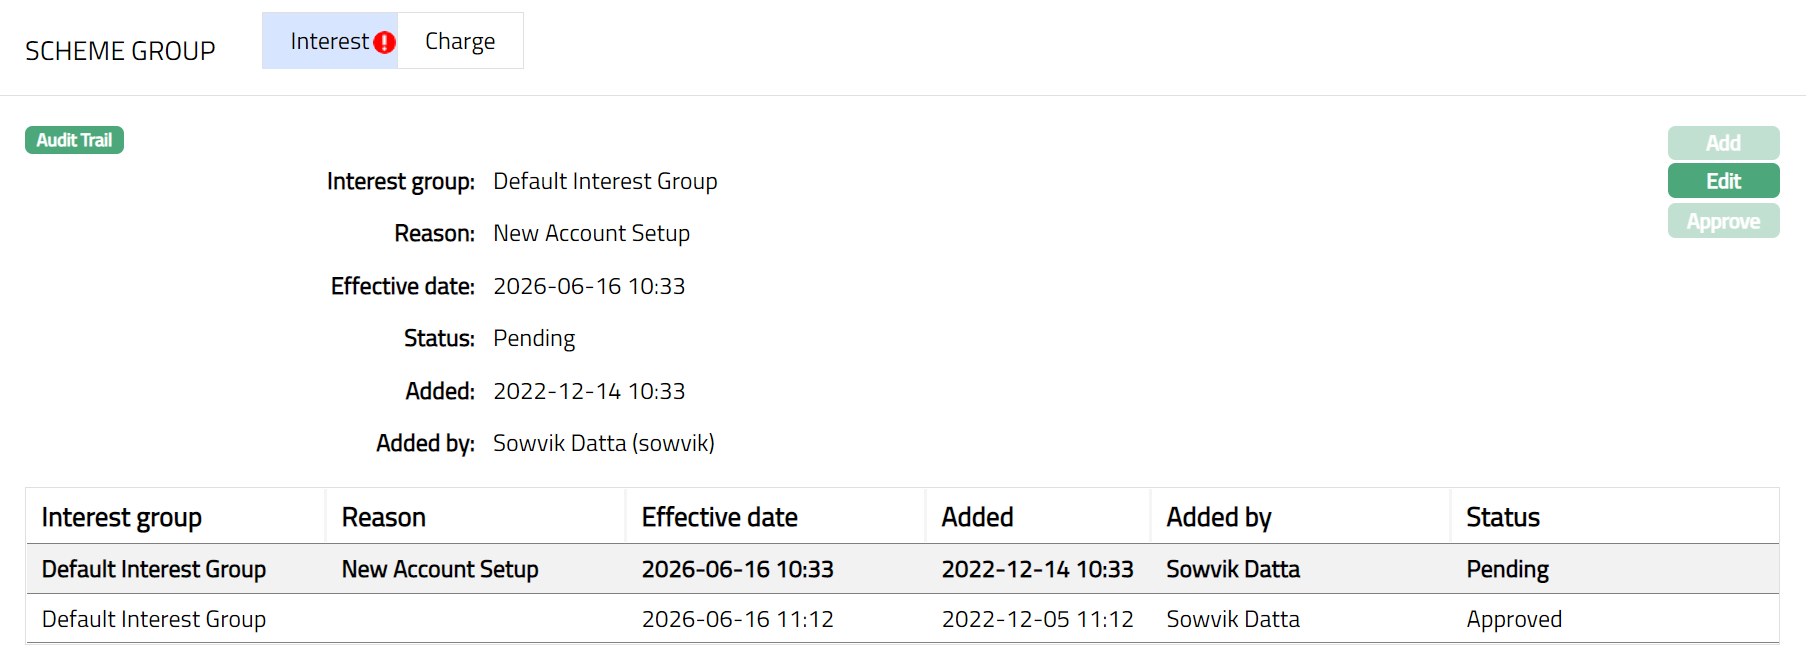
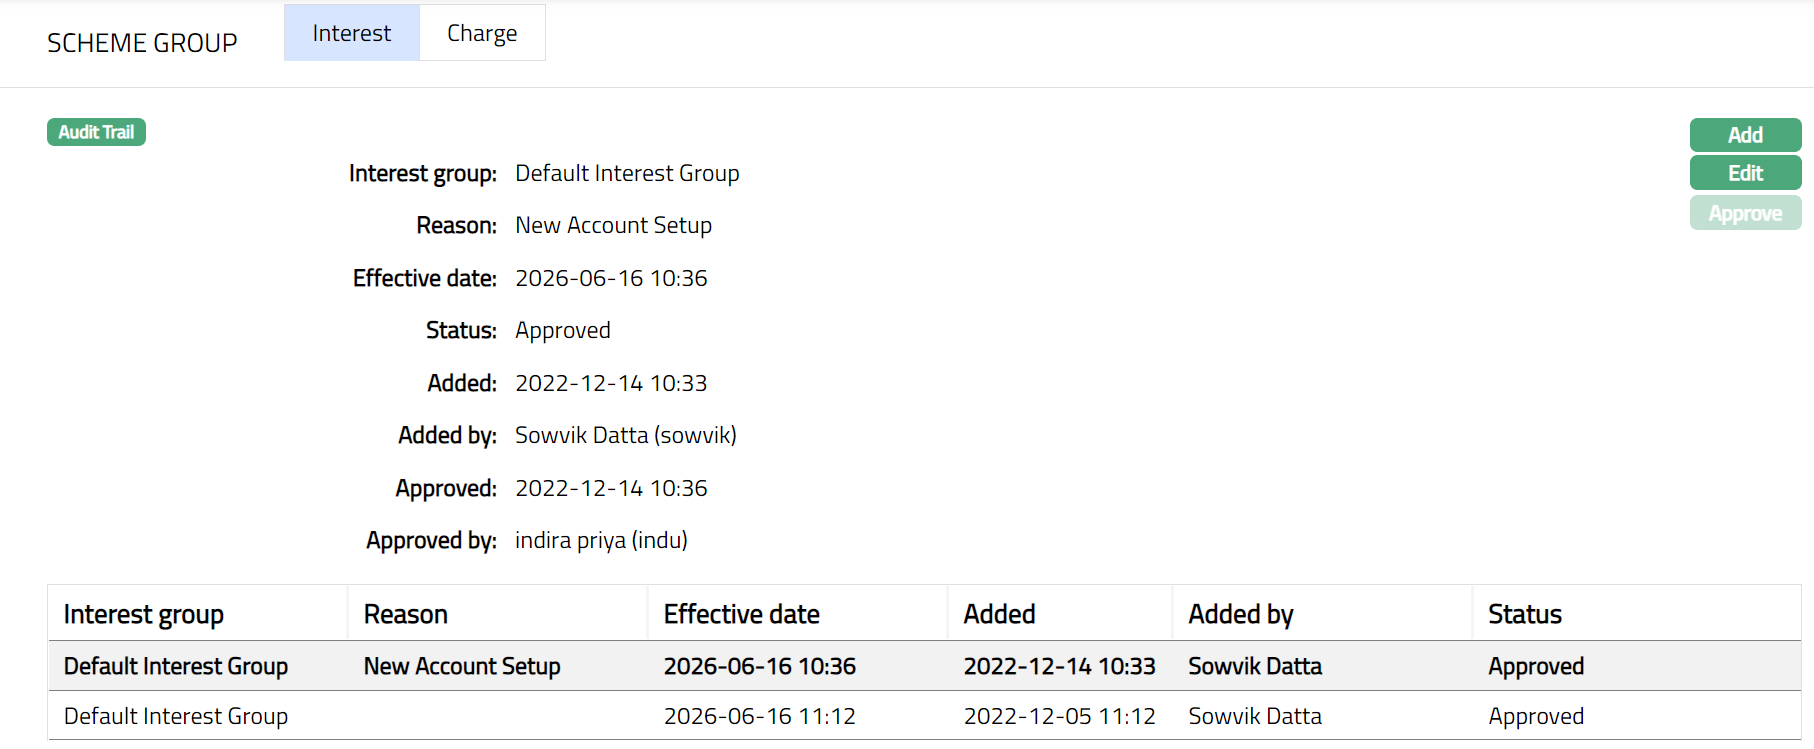
Functions: Add, Edit, Approve
The additional fields are as follows:
Status field denotes the status of the tab.
Added field denotes the date on which the record was added.
Added by field denotes the name of the person who created the record.
Approved field denotes date on which the record was approved and is displayed only on approval.
Approved by field denotes name of the person who approved the record and is displayed only on approval.
Note: Any change in the tab will set the status to Pending till it is approved by another user. On approval, the status is set to Approved.
The interest group added to the account will be applicable from the effective date (current or future date). If the effective date is the current date, then the added Interest group will be effective by EOD. At the end of the day, the interest schemes attached to the Interest group will be populated across the tabs. The Modify Interest Parameters for the schemes will be set as No irrespective of whether the earlier Modify Interest Parameters was YES/NO.
To Edit Interest
- Click Edit. Edit Interest Group page appears.
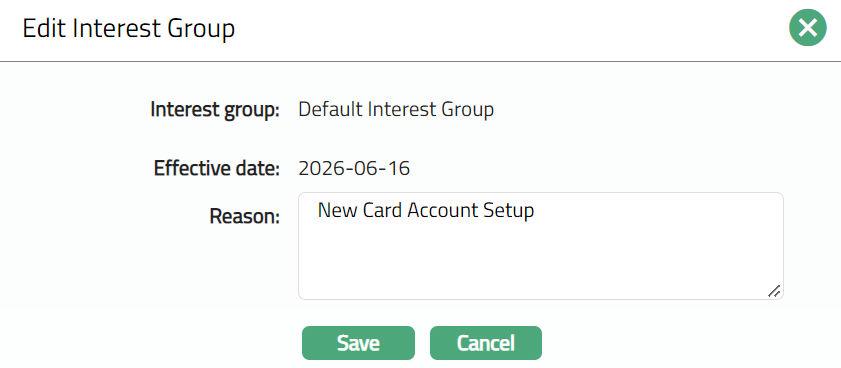
Note: Only Reason Field is editable.
- Click Save. Interest sub tab under Scheme Group appears with the edited details.
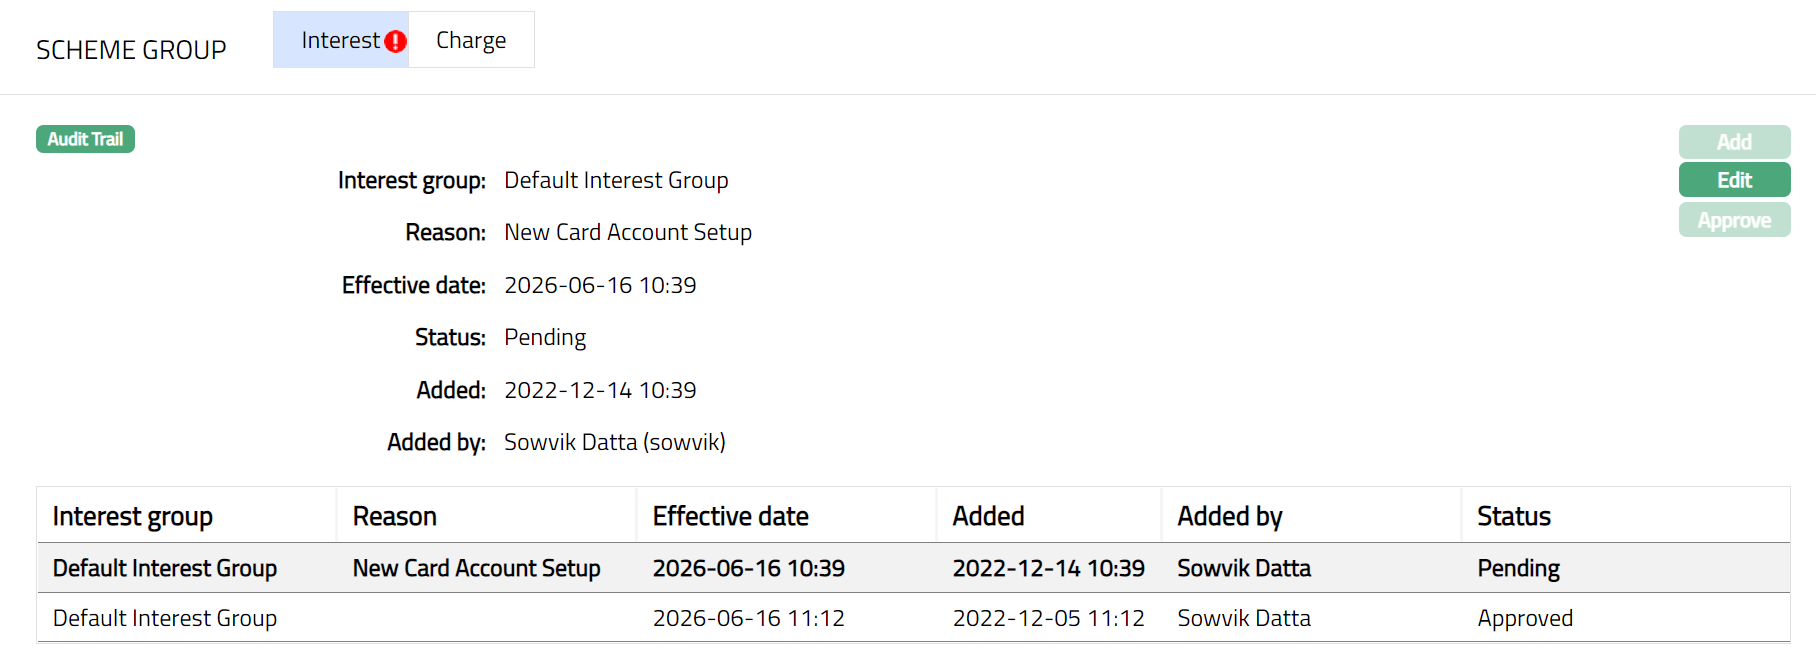
Note: Any change in the tab will set the status to Pending till it is approved by another user. On approval, the status is set to Approved.
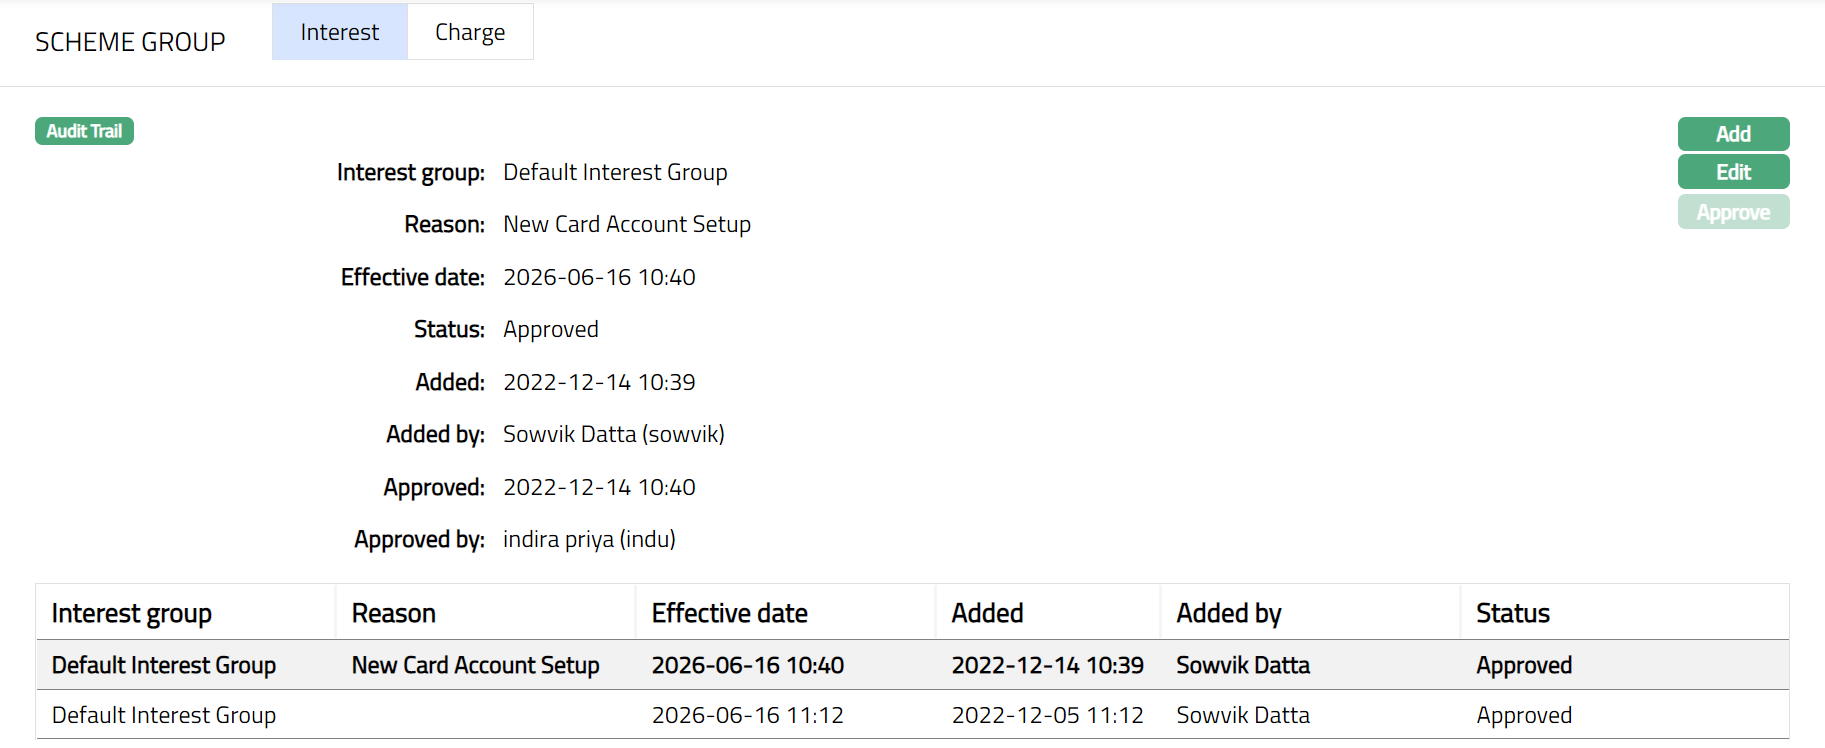 Functions: Add, Edit, Approve
Charge
This tab will allow you to view and change the charge group for an account, which will automatically change the charge schemes across tabs (Default charge, Additional charge, Reminder Charge and Status charge)
To view / add a Charge group
- Access Card Account page and click Scheme Group and then on Charge.
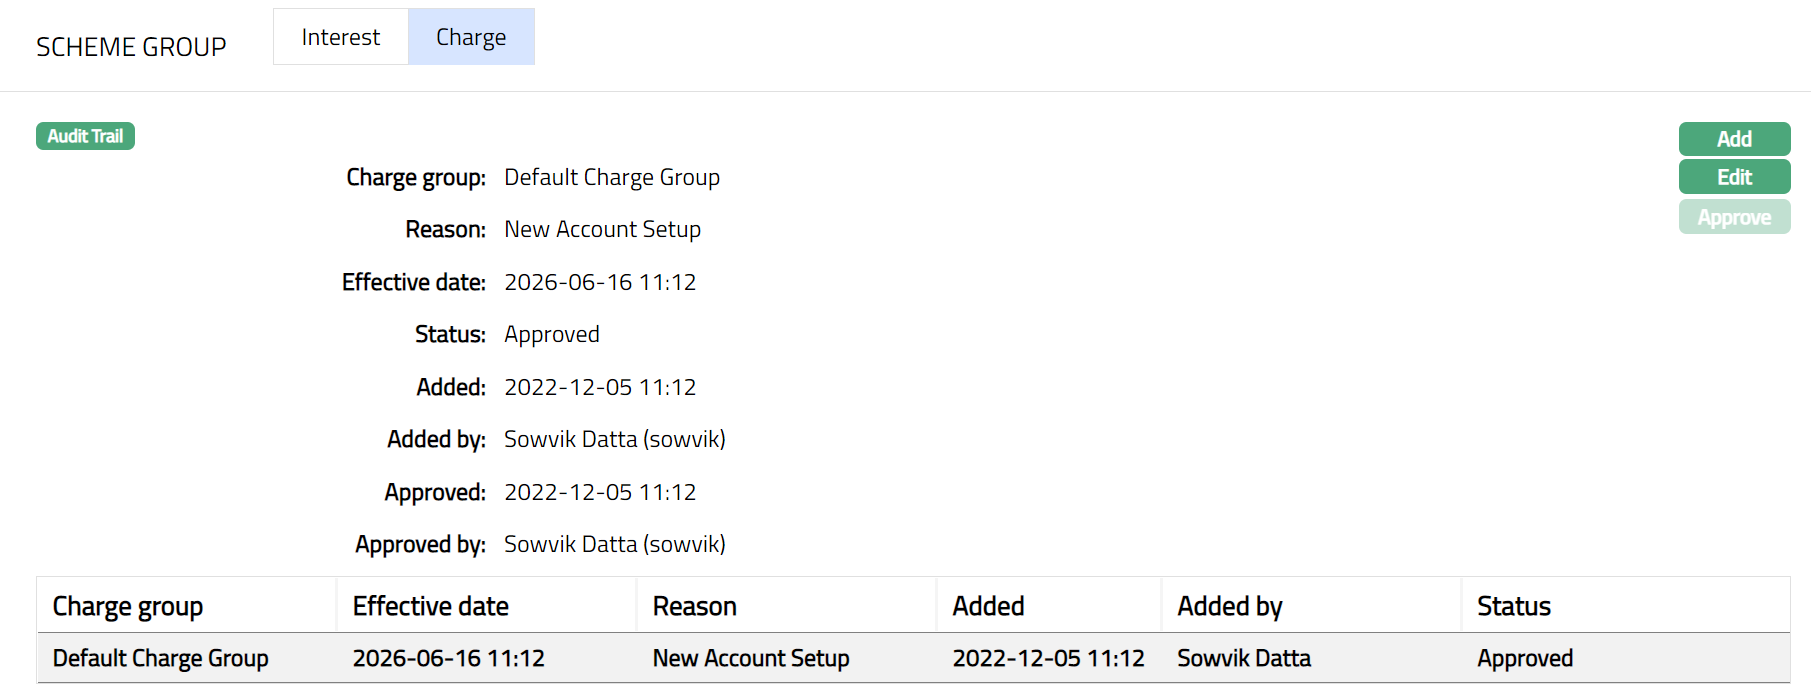
The additional fields are as follows:
Status field denotes the status of the tab.
Added field denotes the date on which the record was added.
Added by field denotes the name of the person who created the record.
Approved field denotes date on which the record was approved and is displayed only on approval.
Approved by field denotes name of the person who approved the record and is displayed only on approval.
- Click Add. Add Charge Group page appears.
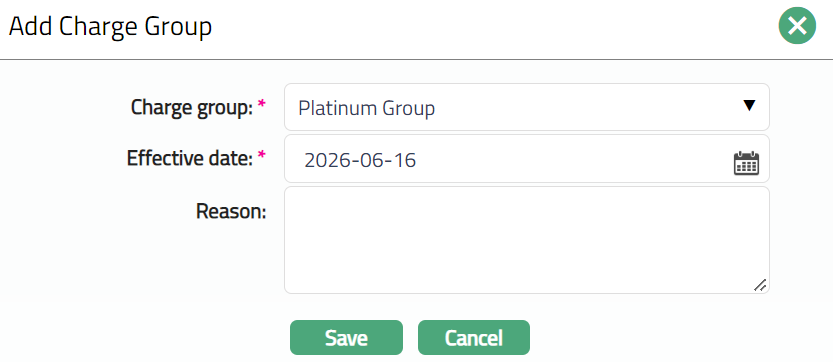
Select Charge Group from the drop-down list mapped to the Product. The list displays all the Charge groups maintained for the Product under Card > Settings > Charge group.
Select Effective Date. The effective date cannot be a past date.
Enter Reason for adding the Charge group to the account.
Click Save to save the changes. The status of the record is set to Pending.
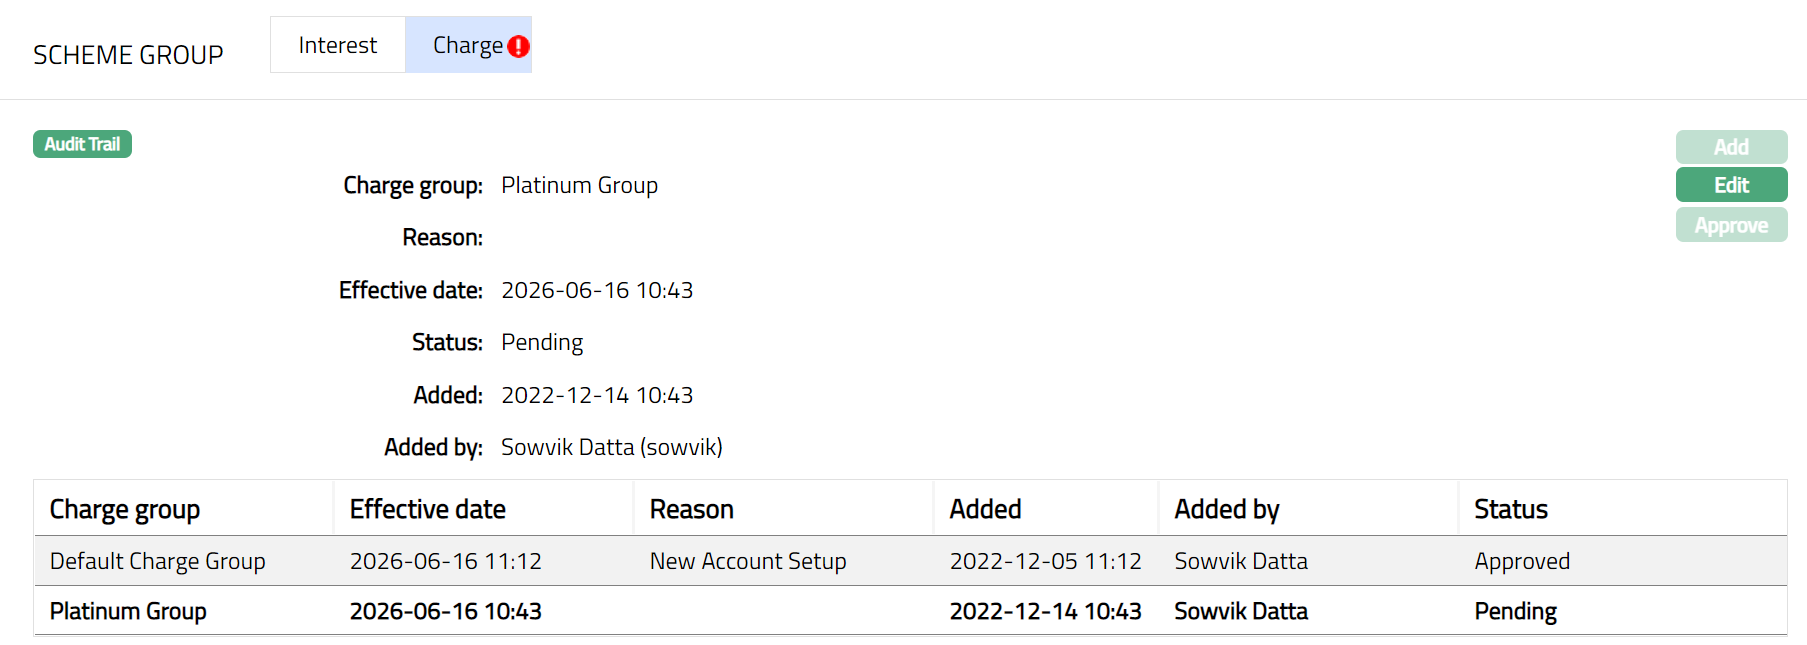
Note: Once Approved the Status will reflect as Approved. Sample Screen shot shown below.
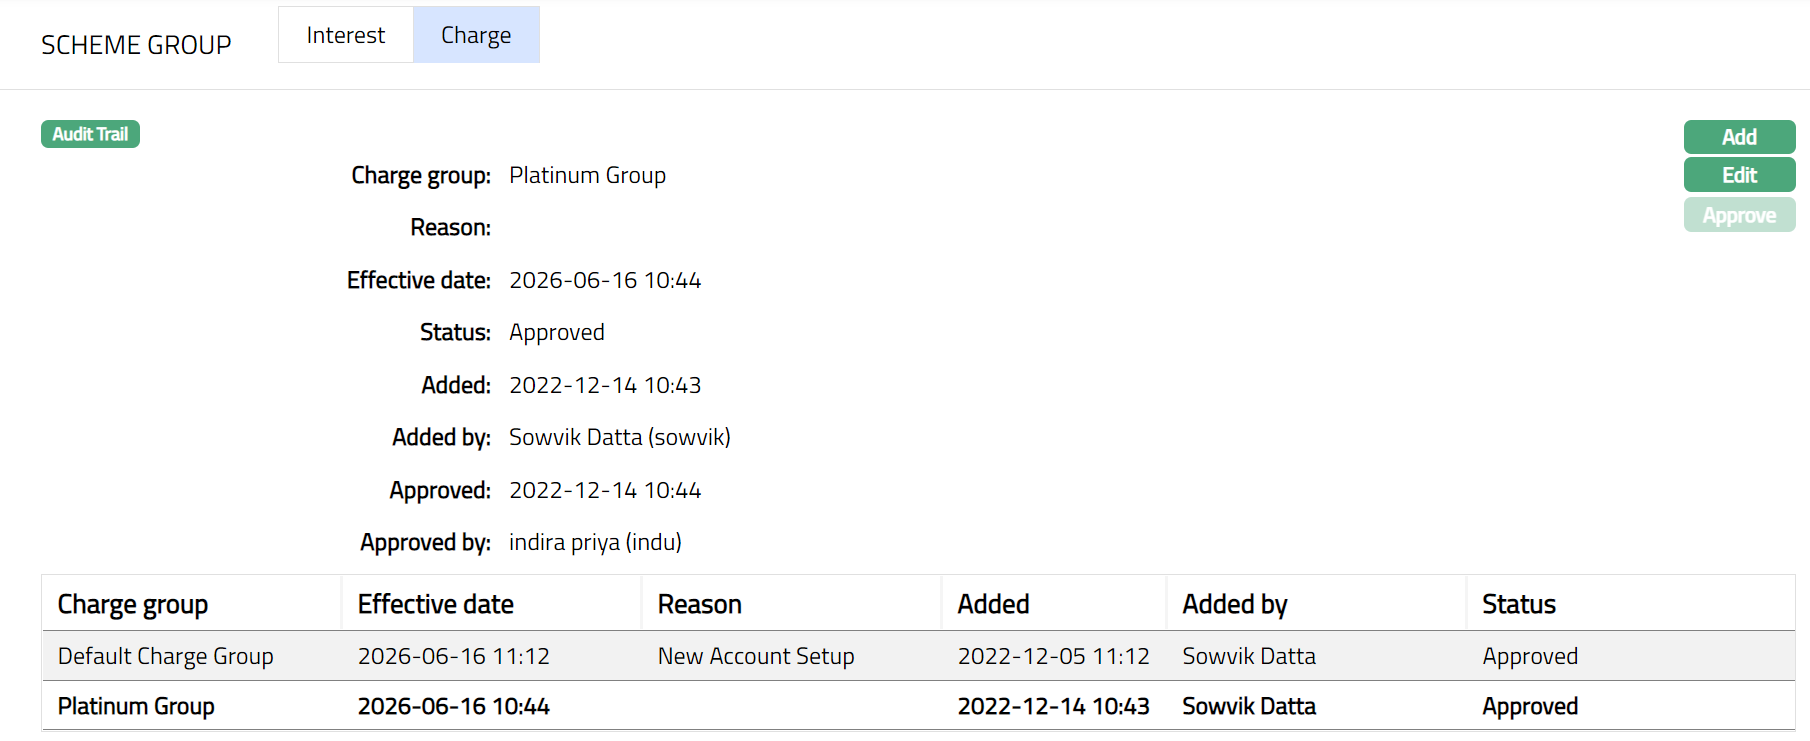 Functions: Add, Edit, Approve.
The additional fields are as follows:
Status field denotes the status of the tab.
Added field denotes the date on which the record was added.
Added by field denotes the name of the person who created the record.
Approved field denotes date on which the record was approved and is displayed only on approval.
Approved by field denotes name of the person who approved the record and is displayed only on approval.
Note: Any change in the tab will set the status to Pending till it is approved by another user. On approval, the status is set to Approved.
The Charge group added to the account will be applicable from the effective date (current or future date). If the effective date is the current date, then the added Charge group will be effective by EOD. At the end of the day, the charge schemes attached to the Charge group will be populated across the tabs. The Modify Charge Parameters will be set as No irrespective of whether the earlier Modify Charge Parameters was YES/NO.
To Edit Charge
- Click Edit. Edit Charge Group page appears.
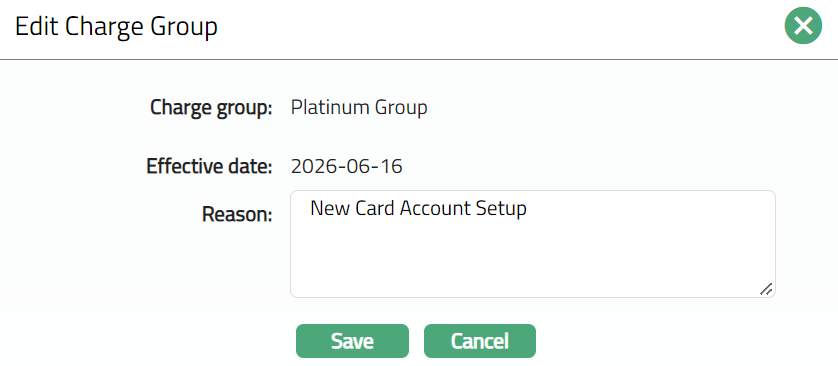
Note: Only Reason field is editable.
- Click Save. The Charge sub tab under Scheme Group tab appears with the edited details.
Note: Any change in the tab will set the status to Pending till it is approved by another user. On approval, the status is set to Approved.
Functions: Add, Edit, Approve.
Earmark
This tab allows you to earmark funds for a specific period to a particular transaction account, from a billing account. The earmarked amount will not be available for use to any other card account.
Thus, from a billing account you can add / edit / suspend earmarked funds to any of its transaction accounts. However, from the transaction account you will only be able to view the details of the earmarked funds.
On creating the earmark in favour of a transaction account, the balance of the billing account will be reduced to the extent of the earmarked funds, while for the earmarked account (i.e., the transaction account); the balance will be increased by the same extent.
Earmark in Billing Account
To add a new Earmark.
- Access Card Account page and click Earmark tab. The Add button is enabled only if it is a Billing Account. If there are no earlier earmarks, this tab will show no records.
- Click Add. Add Earmark page appears.
Open to buy balance will display the amount of Open to buy balance of the account.
To select a transaction account to which the earmark will be applied, click Account earmarked to hyperlink. The Card Account Search page appears with the list of active Transaction accounts. Select the appropriate transaction account.
The Earmarked currency is defaulted from the Billing account's account currency.
Enter amount that is to be earmarked to the Transaction account in the Allocated earmarked amount.
The Earmark from date will by default be the current date and is not editable. It is the date from when the funds will be earmarked from the Billing account to the Transaction Account.
Enter Earmark to date. It is the date till when the funds will be earmarked from the Billing account to the Transaction account.
Click Save to save the added details. On save, the Earmark is created with a unique Earmark # as the identifier. The Earmark status is Active and record status is Pending.
 Functions: Add, Edit, Approve and Suspend
The additional fields that are displayed here are:
Earmark #: denotes the auto generated earmark id.
Earmark status: denotes the current status of the earmark record. The following are the possible statuses:
Active: This is the normal status of the Earmark when it is created and approved. The Billing Account will have a reduced Account Balance and the Transaction Account will have an increased Account Balance when the Earmark is Active and approved.
.
Expired: At the end of the day on the Earmark to date, the Earmark status is updated to Expired. The effect of this is similar to Suspend described above.
Utilized earmark amount: denotes the utilized earmarked amount for the selected earmark record. It is updated as and when the Transaction Account utilizes the earmarked funds.
Available earmark amount: denotes the Available earmark amount. It is the Allocated earmark amount minus the Utilized earmark amount for the selected earmark record.
Status: denotes the status of the record.
Added: denotes the date on which the earmark record is added.
Added by: denotes the name of the person who has added the earmark record.
Note: Once added/edited the status will reflect as pending. Any user other than the one who has created the earmark record will have to approve the earmark record. On approval, the record status becomes Approved. Only when the earmark is Activated and Approved, it will be available to the Transaction Account.
 Functions: Add, Edit, Approve and Suspend
The additional fields are as follows
Status: denotes the status of the record.
Added: denotes the date on which the earmark record is added.
Added by: denotes the name of the person who has added the earmark record.
Approved: denotes date on which the record was approved and is displayed only for approved records.
Approved by: denotes name of the person who approved the record and is displayed only for approved records.
Suspend: Any Active earmark can be suspended at any time within the expiry date by clicking on Suspend button. On suspension, allocated earmark amount will become zero in the Billing account for the selected earmark record. Allocated earmark amount in the underlying transaction account will become Zero. The limit utilization in the Billing account will be reduced, the utilized earmark amount in the transaction account will be made zero.
To suspend Earmark
- Click Suspend. The Earmark Status will reflect as Suspend. Sample screen shot shown below.
Note: A billing account can have multiple earmark records with the same earmark period for different transaction accounts associated with it.
To add another Earmark. Click Add and follow the same process as mentioned earlier. Sample Screen shot is shown below after adding a new Earmark. Status will reflect as pending.

Functions: Add, Edit, Approve and Suspend
To Edit Earmark
Note: The Edit button is enabled only if the Earmark Status is Active and record status is Pending.
- Click Edit button. The Edit Earmark page is displayed.

Note: Only Earmark to field is editable.
- Click on Save. The Earmark page appears with the edited details. The Status will reflect as Pending.
Note: Once added/edited the status will reflect as pending. Any user other than the one who has created the earmark record will have to approve the earmark record. On approval, the record status becomes Approved. Only when the earmark is Activated and Approved, it will be available to the Transaction Account.
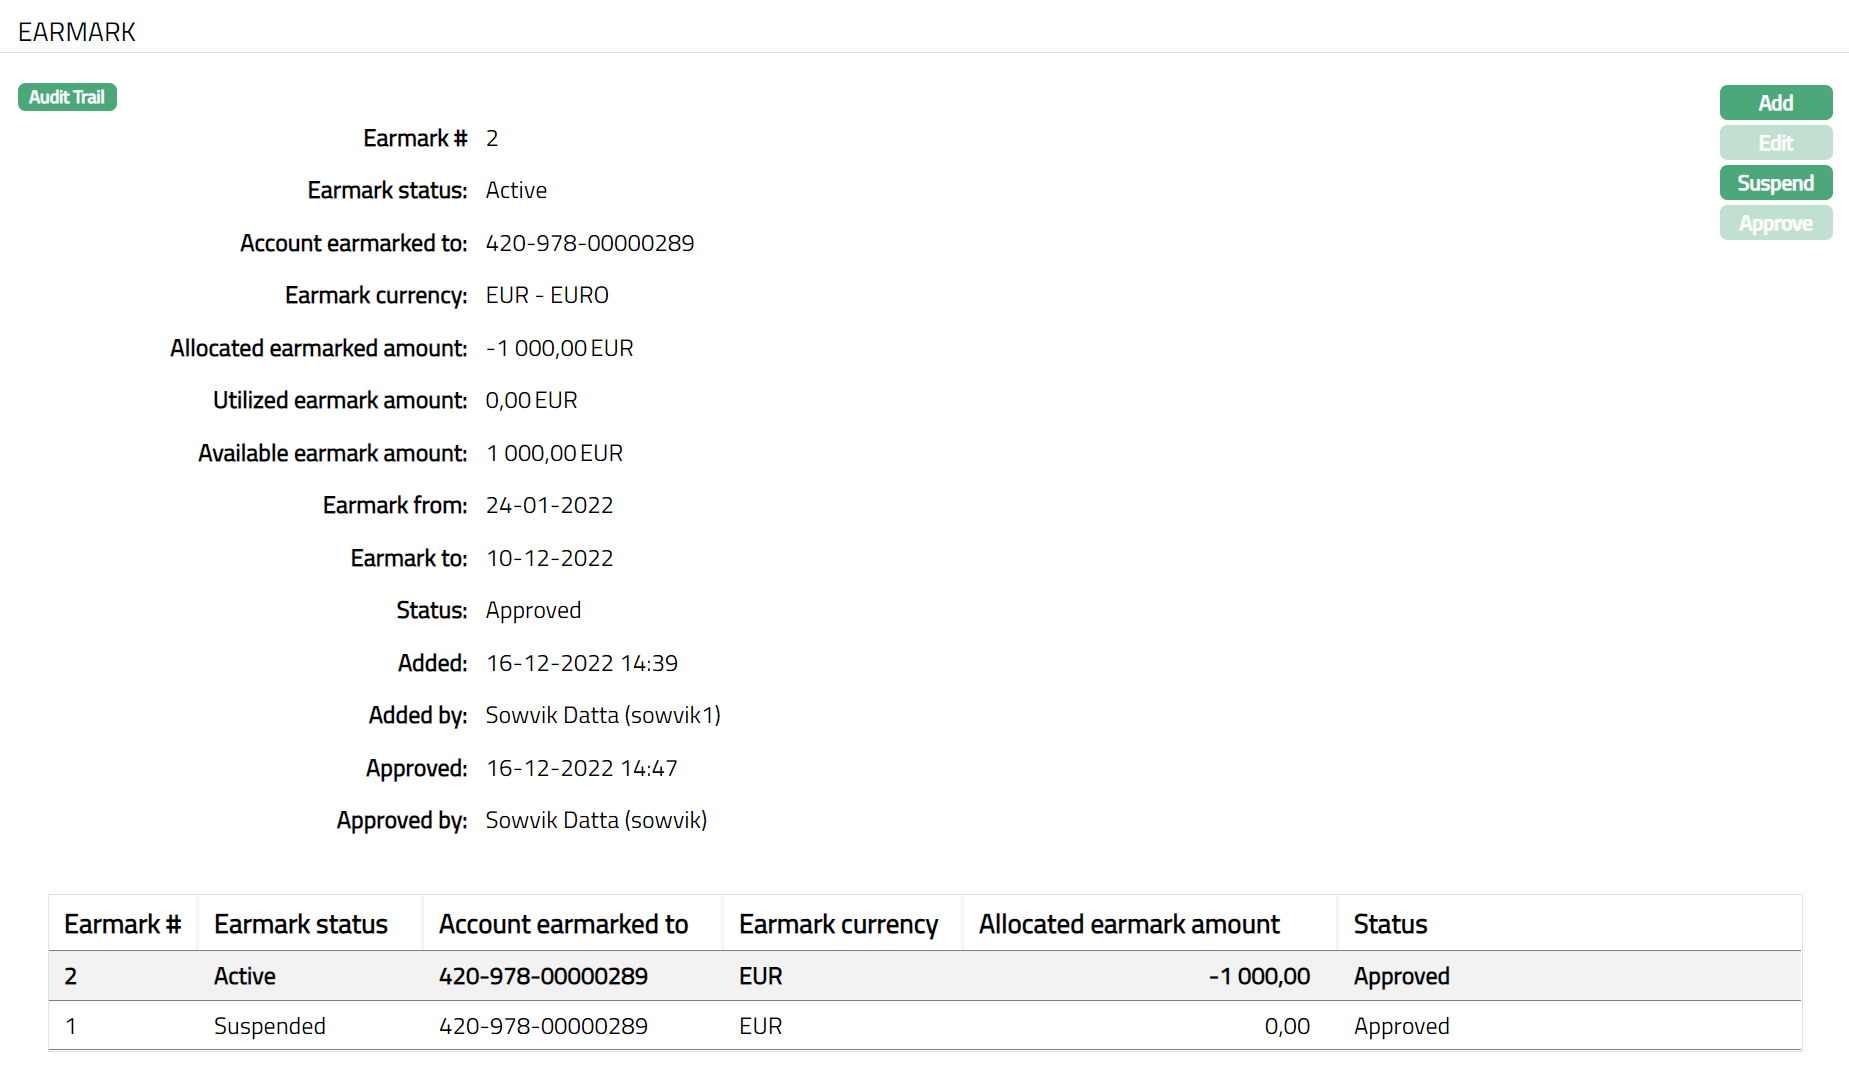
Functions: Add, Edit, Approve and Suspend
Overdue Adjustment
This tab will allow the user to add or revise the overdue amount. Aura will automatically recalculate the number of overdue days for the revised overdue amount. This tab will be available only for Billing accounts and not for Transaction accounts.
To Modify Overdue amount,
Access Card Account screen and click Overdue Adjustment tab. If there are any Invoices for which the Payment is less than the Amount Required as on the End-Of-Grace-Days (EOGD), it is considered as Overdue and will be shown in this tab.
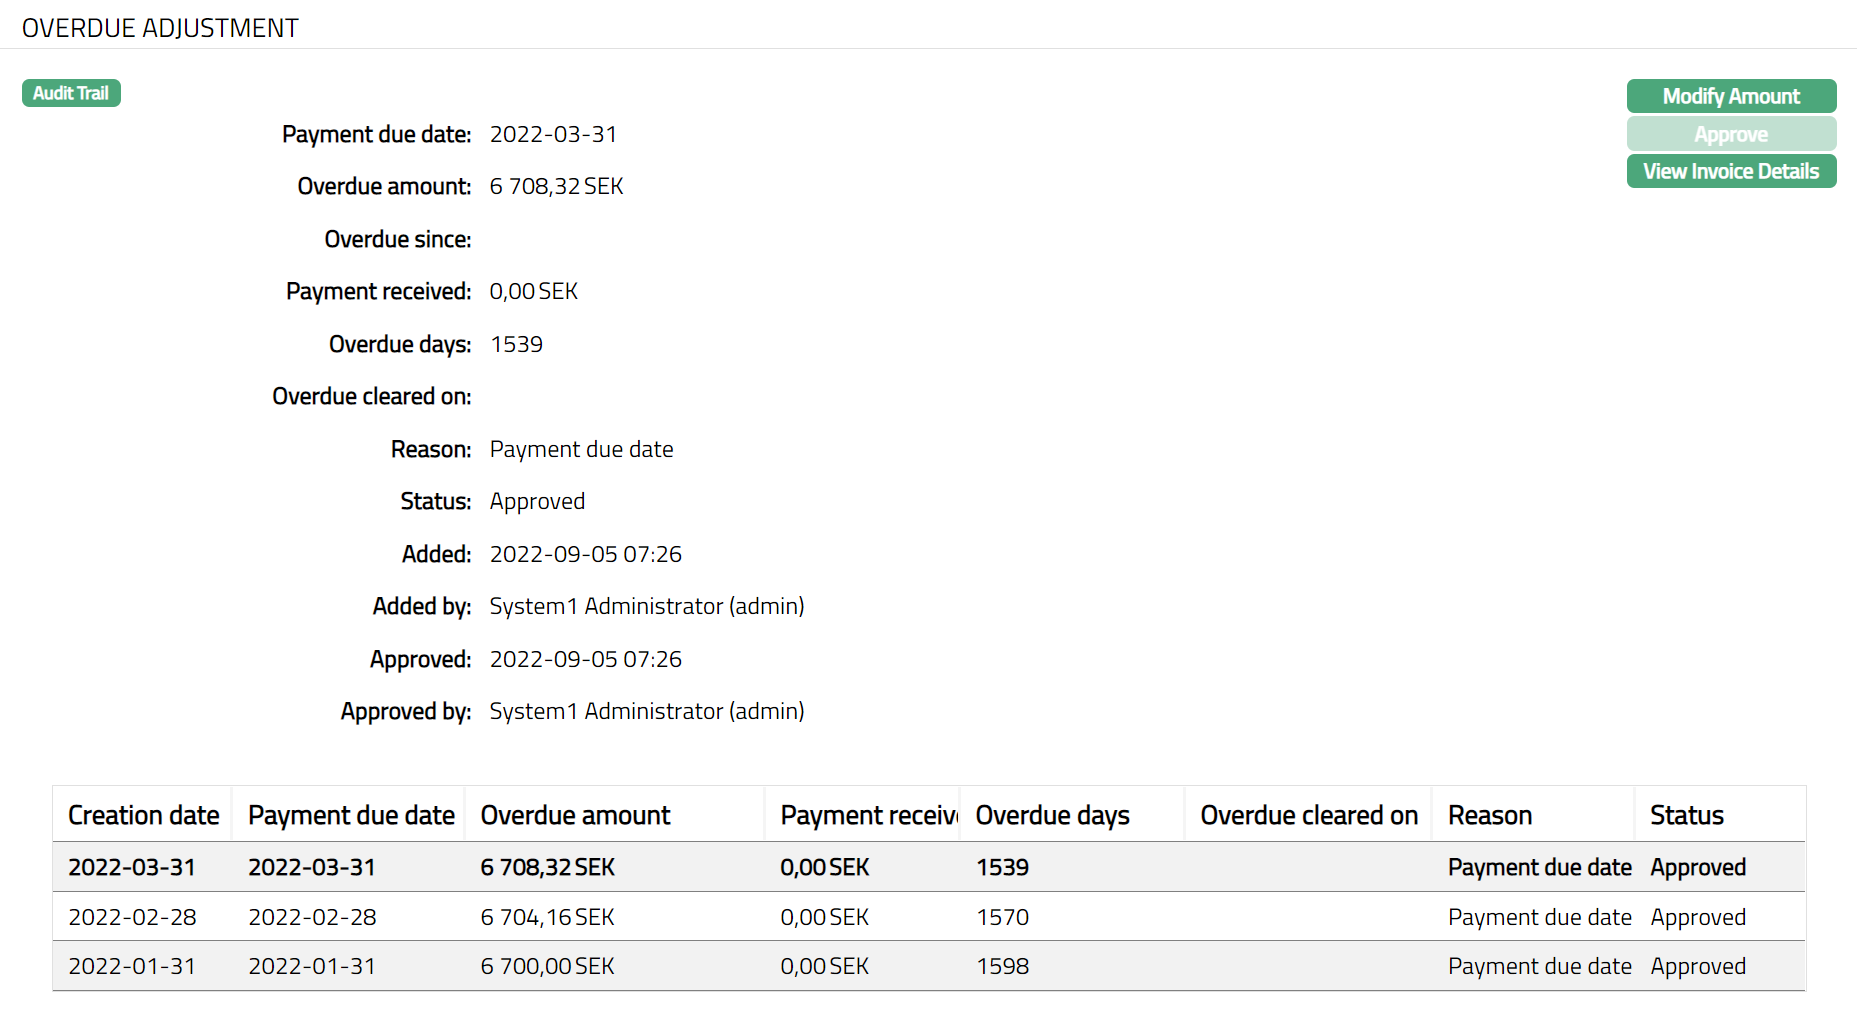
The fields available are:
Creation date denotes the date on which the record is created. In case of Invoice records, this will be the date on which the grace days end; for Payments received, this will show the date on which the payment is received; and in case of overdue adjustment records created by the user, this will show the date of creation of the record
Payment due date shows the date on which payment was due on the Invoice.
Overdue amount shows the overdue amount i.e., Amount Required minus Payments received as on the End-Of-Grace-Days.
Payment received shows the amount received.
Overdue days denotes the number of days that the invoice has been overdue and is calculated as current date minus Payment Due Date.
Overdue cleared on shows the date on which the overdue was cleared, i.e., when Paid Amount >= Overdue Amount
Reason displays the reason why the record was created. For EOGD Records, it is by default "End of Grace Days" and for Payment records, it is "Payment received"; for records created by the user, it will show the reason that was input during the creation of the record
Status denotes the status of the record.
Added denotes the date of creation of the record.
Added By denotes the name of the user who created the record.
Approved denotes date on which the record was approved and is displayed only for approved records.
Approved by denotes name of the user who approved the record and is displayed only for approved records. Click Modify Amount button. Modify Amount page is displayed.
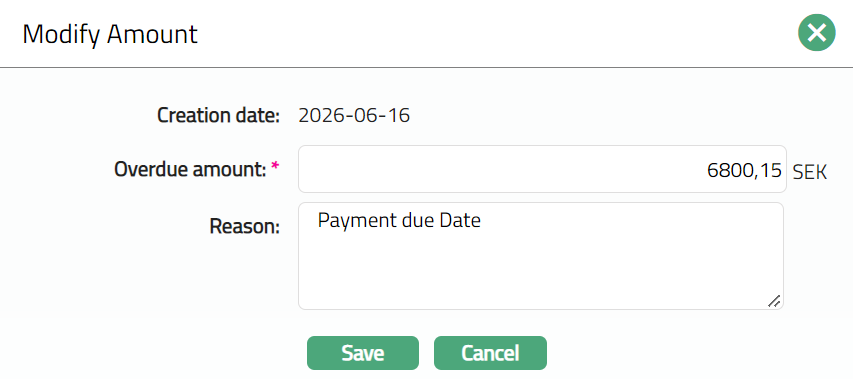
By default, Aura will display current date as Creation date and this field is not editable.
Enter amount that has to be the new Overdue Amount. This amount should be less than or equal to the total outstanding on the billing account.
Enter Reason for modifying the overdue amount.
Click Save. Overdue Adjustment page appears with the modified amount.
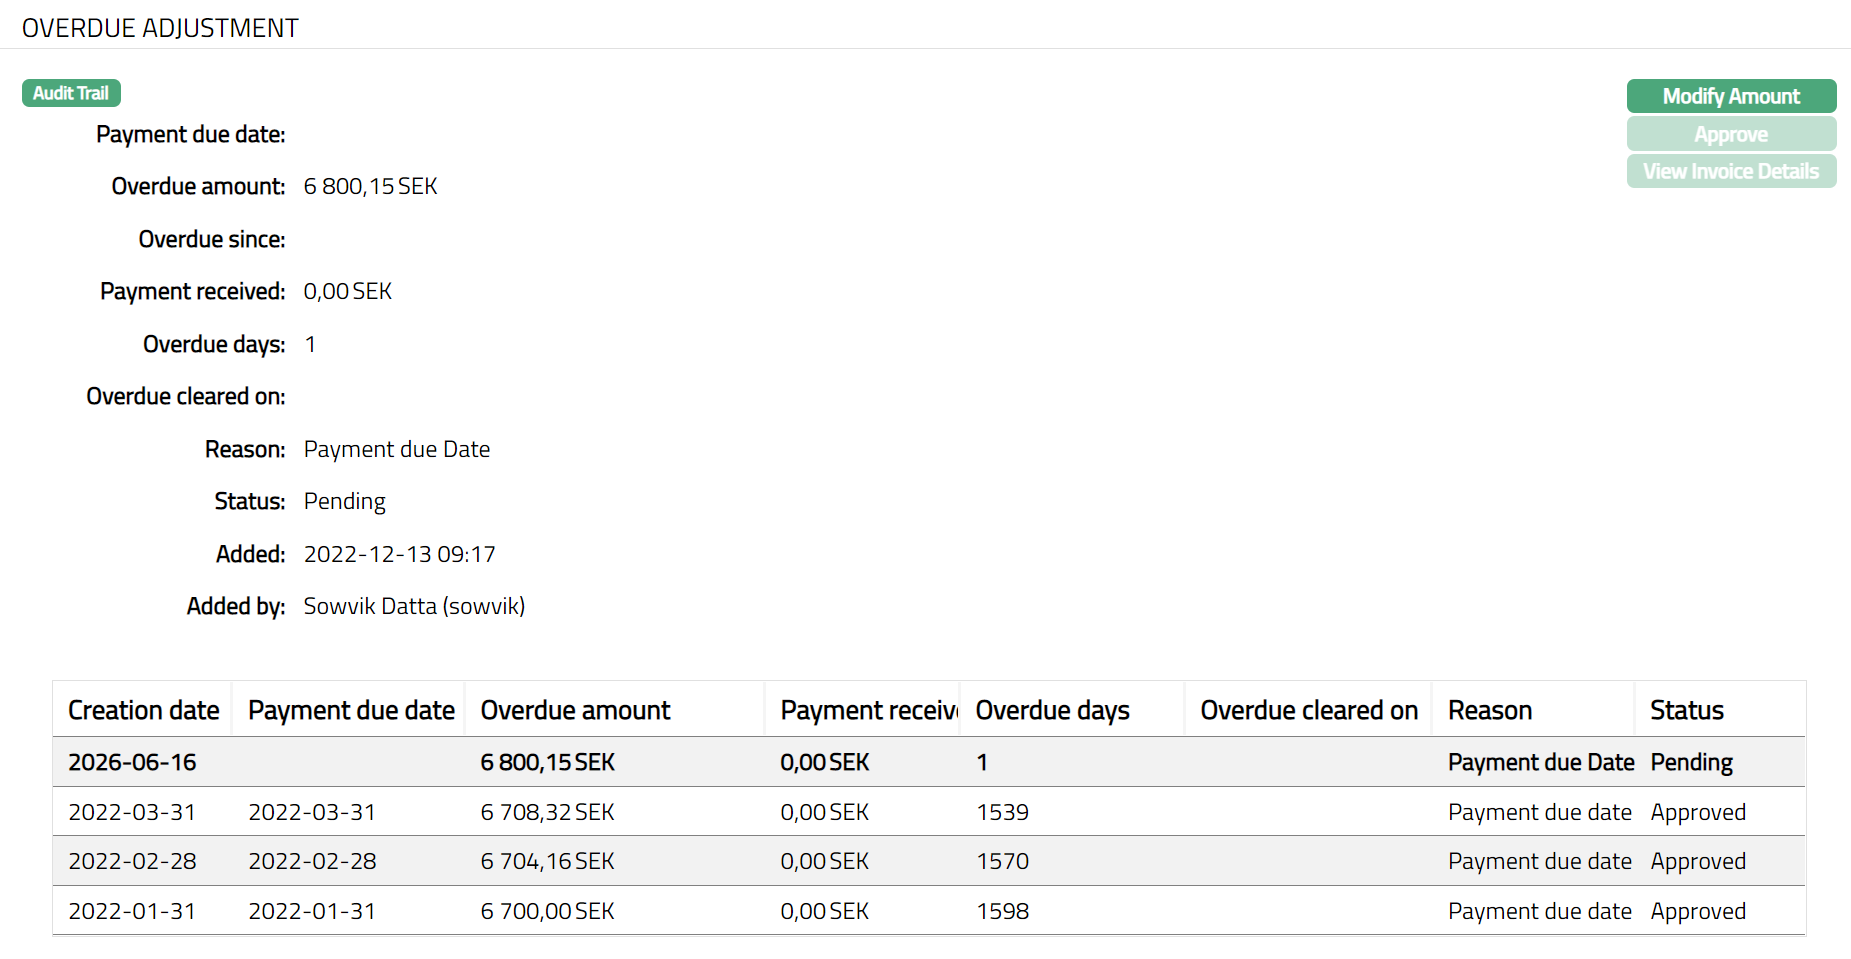
Approve On creation, the status of the record will be Pending, and Overdue Days will be 1. This record has to be approved by any person other than the one who has created the record. Once Approved the status will be changed to Approved.
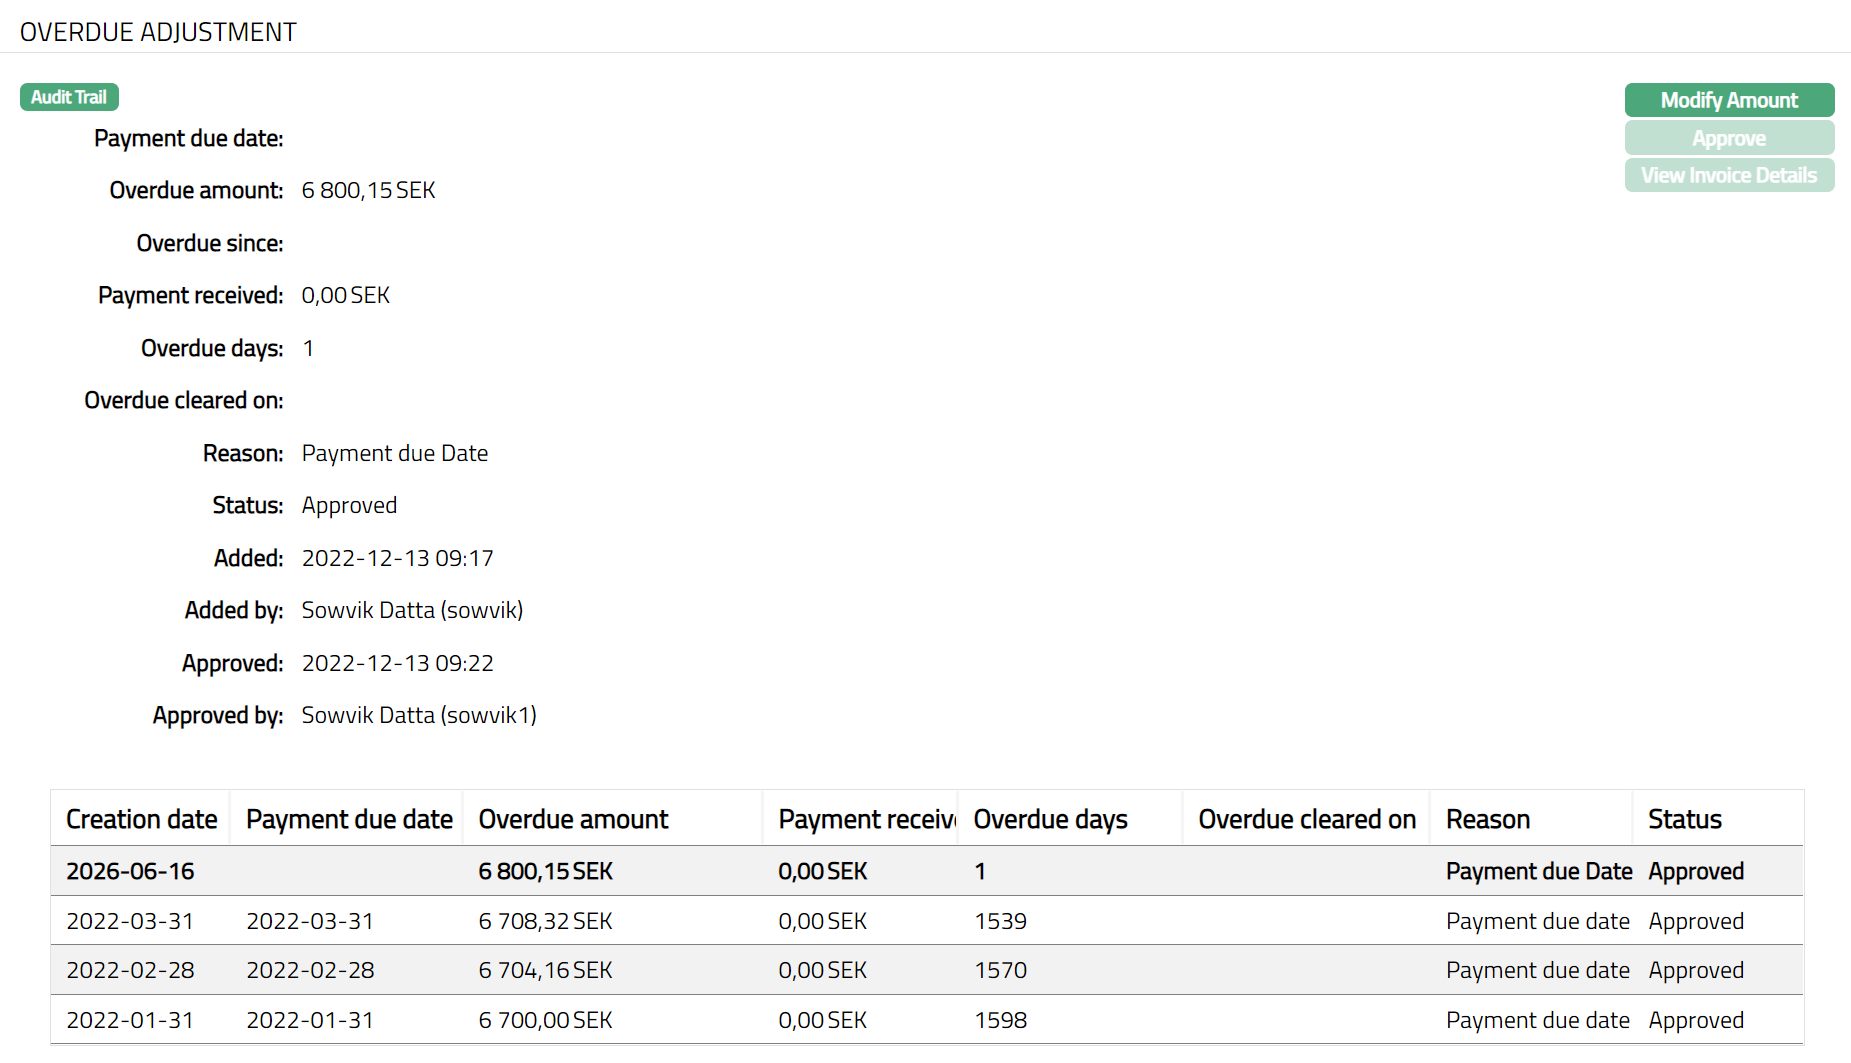
Functions: Modify Amount, Approve and View invoice details
To approve:
Retrieve the Pending record and click on Approval. On approval, if the new overdue amount is less than the existing overdue amount, it is considered as if a payment has been received to that extent of the difference between the old and the new overdue amounts; and accordingly, the oldest overdue amount will be adjusted; and if that oldest overdue amount becomes zero, the Overdue Cleared On will be updated to the approval date and Overdue days will be 0. This is carried out successively for all the overdue amounts from the oldest to the latest till the difference is exhausted.
If the new overdue amount is greater than the existing overdue amount, none of the old overdue records will be updated.
If the approval is after an Invoice is created and on or before the Payment Due Date, the Amount required in the last invoice will also be adjusted to reflect the new Overdue Amount. If the approval is after the Payment Due Date and before the Invoice generation, the new Overdue amount will be considered during the next invoice generation.
View Invoice Details
For the overdue records created on the End of Grace Days, you will be able to see the details of the invoice using the View Invoice button.
To View invoice details,
- Click View Invoice Details. View Invoice Details page appears as shown below:
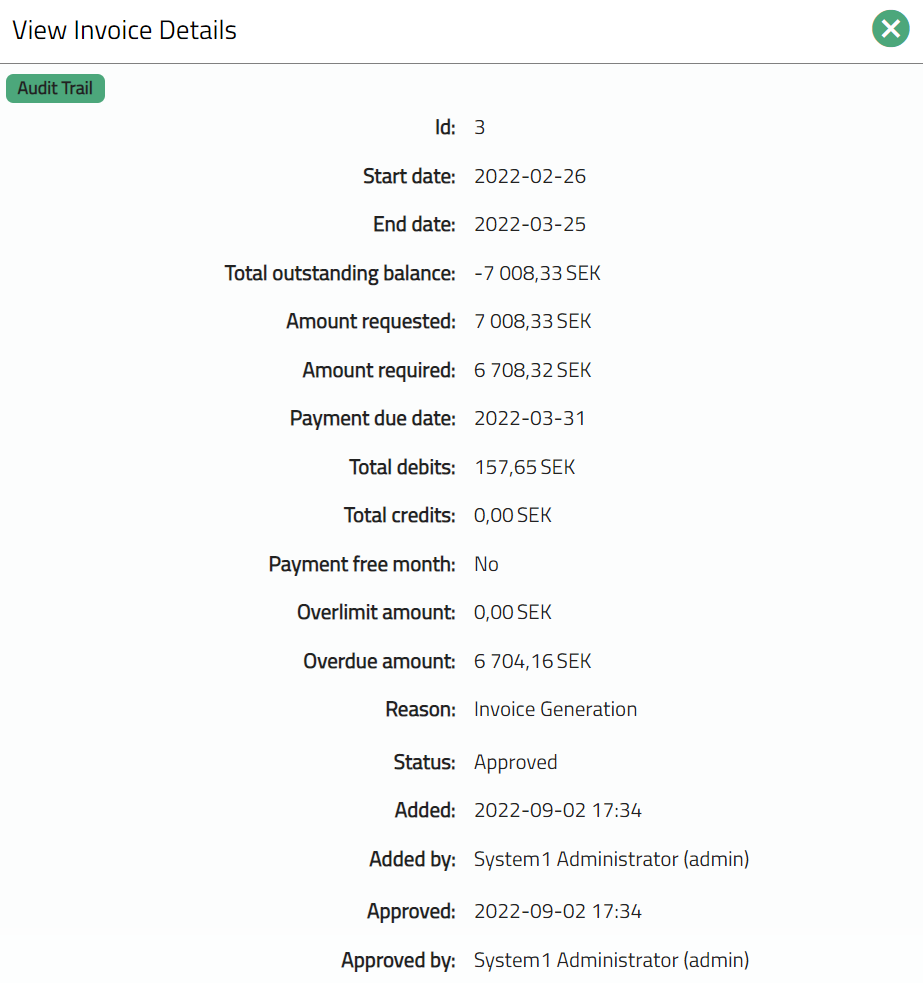
The fields that you can view are explained below:
Id denotes the unique identifier for the invoice.
Start date denotes the cycle start date of the selected invoice.
End date denotes the cycle end date of the selected invoice.
Total outstanding balance is the total outstanding balance in the selected invoice.
Amount requested denotes the amount requested in the selected invoice.
Amount required is the minimum amount that the client is required to pay for the selected invoice.
Payment due date is the date by which the client has to make the payment for the selected invoice.
Total debits is the total of debit transactions in the billing cycle for the selected invoice.
Total credits denote the total of credit transactions in the billing cycle for the selected invoice
Payment free month displays Yes if that month is a Payment Free Month and there are no payments required from the client; else displays No.
Overlimit amount is the amount that was above the given limit as at the end of the billing cycle for the selected invoice.
Overdue amount denotes the amount overdue (amount required minus payments received) as at the end of the billing cycle for the selected invoice.
Reason denotes the reason for the record. For invoice records created by Aura, this is by default "invoice generation". In case of user created records, this displays the reason input by the user during creation of the record.
Status denotes the status of the record.
Added denotes the date of creation of the record.
Added by denotes the name of the user who created the record.
Approved denotes the date on which the record was approved and is displayed only for approved records.
Approved by denotes name of the user who approved the record and is displayed only for approved records.
Reminder Details
The details of Reminders created for a Billing Account are listed under this tab. This tab option is available only for Billing Account Accounts. All Reminder Details are listed on the basis of the Reminder date. i. e. the latest Reminder Detail is shown at the top of the table. The details can only be viewed using this tab.,
- Access Card Account page and click Reminder Details tab to view the details as per sample below.
The fields that you can view in the Reminder Details tab are explained below.
Date denotes the date of the reminder generation.
Id denotes the identifier for the reminder.
Description shows the name of the reminder.
Custom Field
This option provides you the flexibility to define fields apart from those that are already available in the standard version of Aura. Thus, it enables you to customize additional data storage and use as required to suit your specific business needs.
To maintain Custom Field.
- Access Card Account page and click Custom Field tab.

The field appears only when it is created in Admin > System codes > Custom fields > Custom fields and linked to the specific Card Accounts option in Admin > System codes > Custom fields > Field mappings.
Click Edit. Edit Custom Field page appears. In the following illustration, a custom field, Additional Field has been mapped to the Account as shown below.

Enter Additional Field details.
Click Save. Custom Field page appears with the edited details.

Functions: Edit