Standing Instructions
Standing instructions page allows the user to create and maintain Standing instructions.
This enables you to enter a client's standing instruction once to schedule recurring payments that are made at regular intervals or on certain conditions. Based on the parameters defined under Standing Instruction Settings you can maintain a client's Standing instructions as required by the client.
Following are the various tabs that appear on Standing Instruction page:
To add Standing Instruction for a Client.
- From Retail menu, click Payments and then Maintain under Standing Instructions. Standing Instruction -- Search page appears.

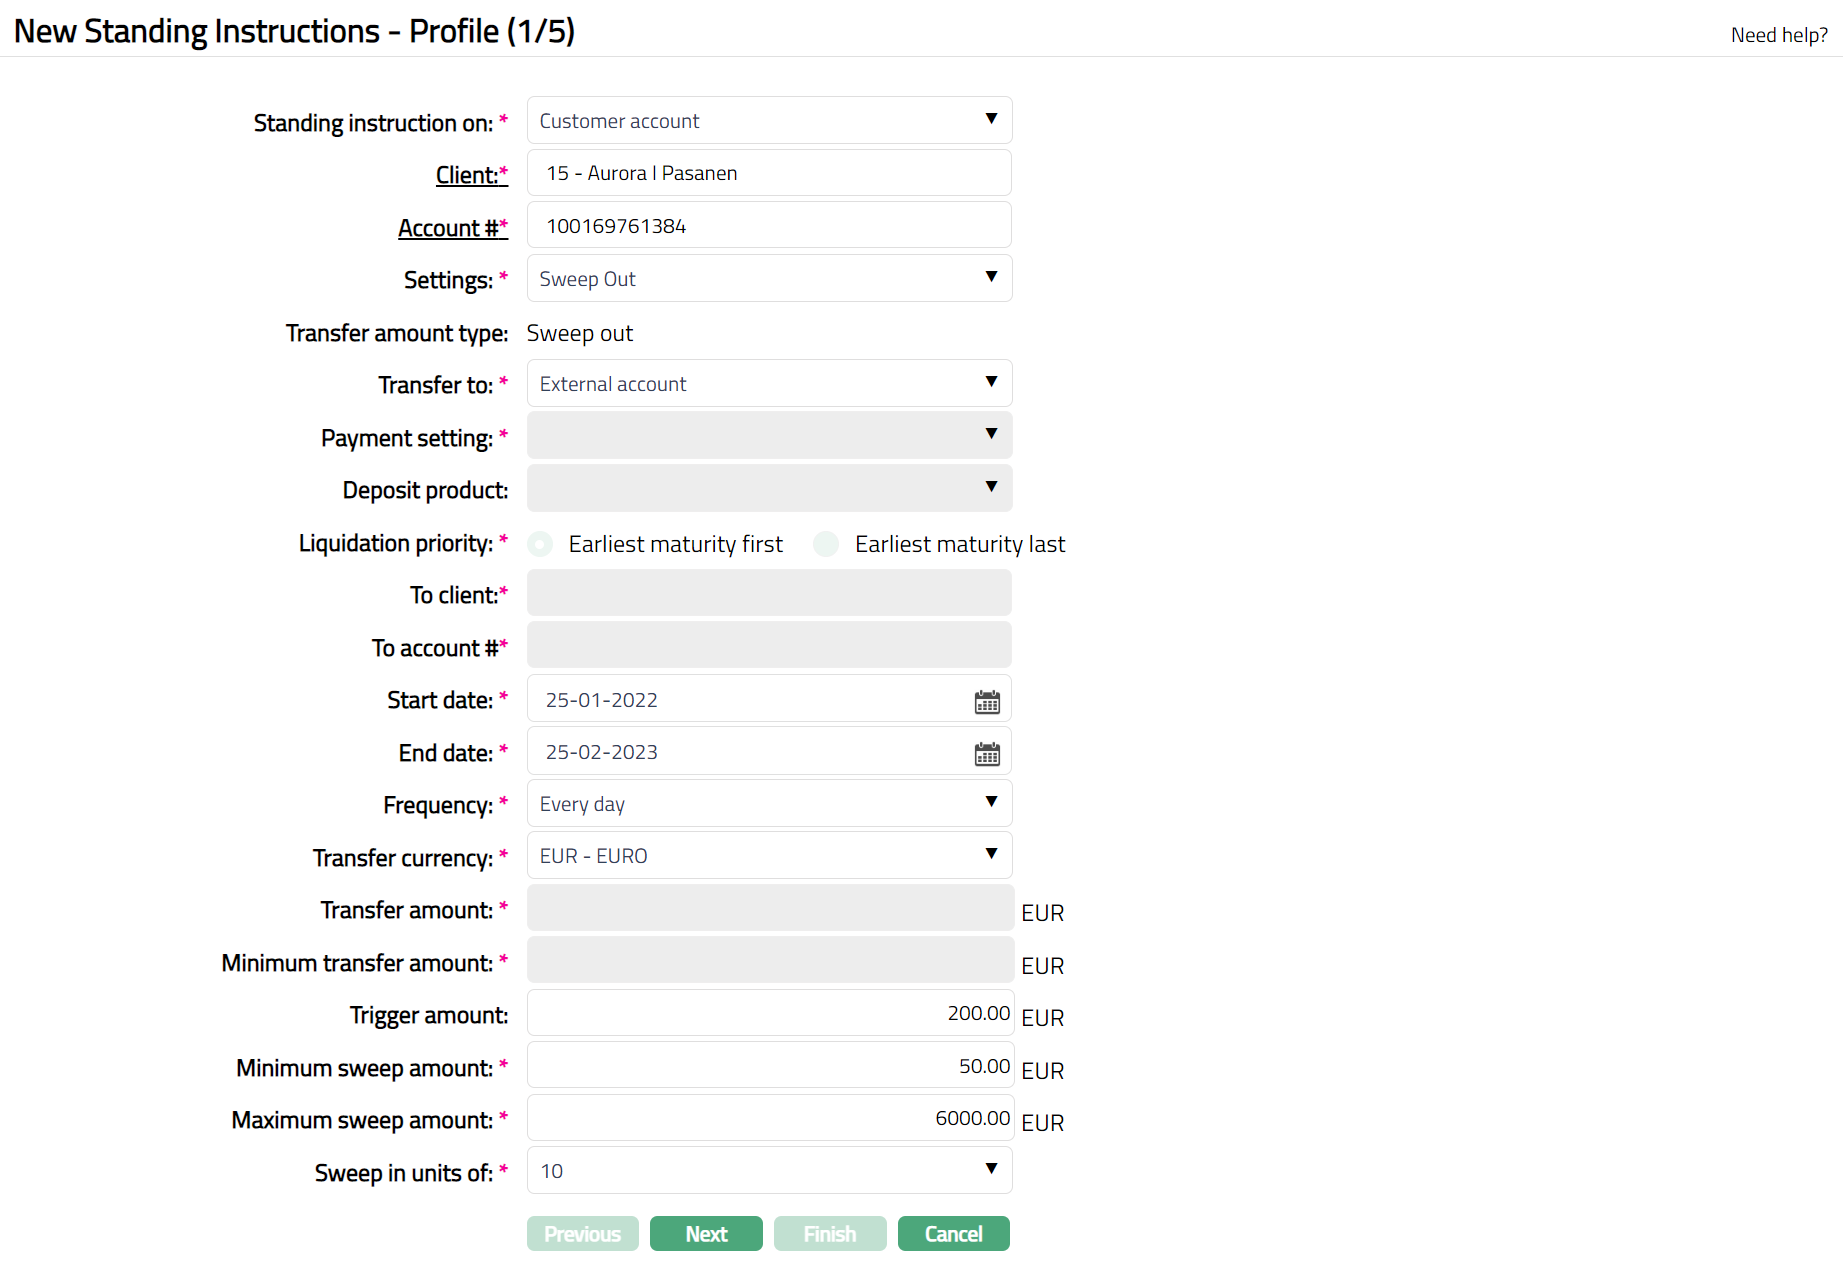
- Click Add. New Standing Instructions -- Profile (1/5) page appears.
If Standing Instruction on is Customer Account
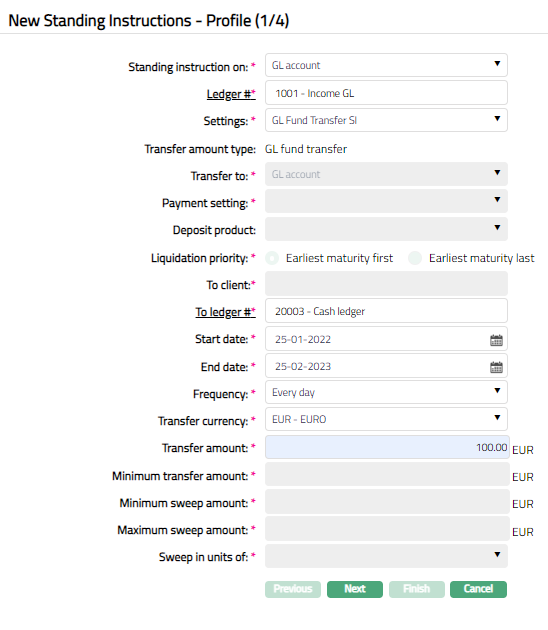
If Standing Instruction on is GL Account
Select account on which the Standing instruction is to be created. The options are GL account and Customer account.
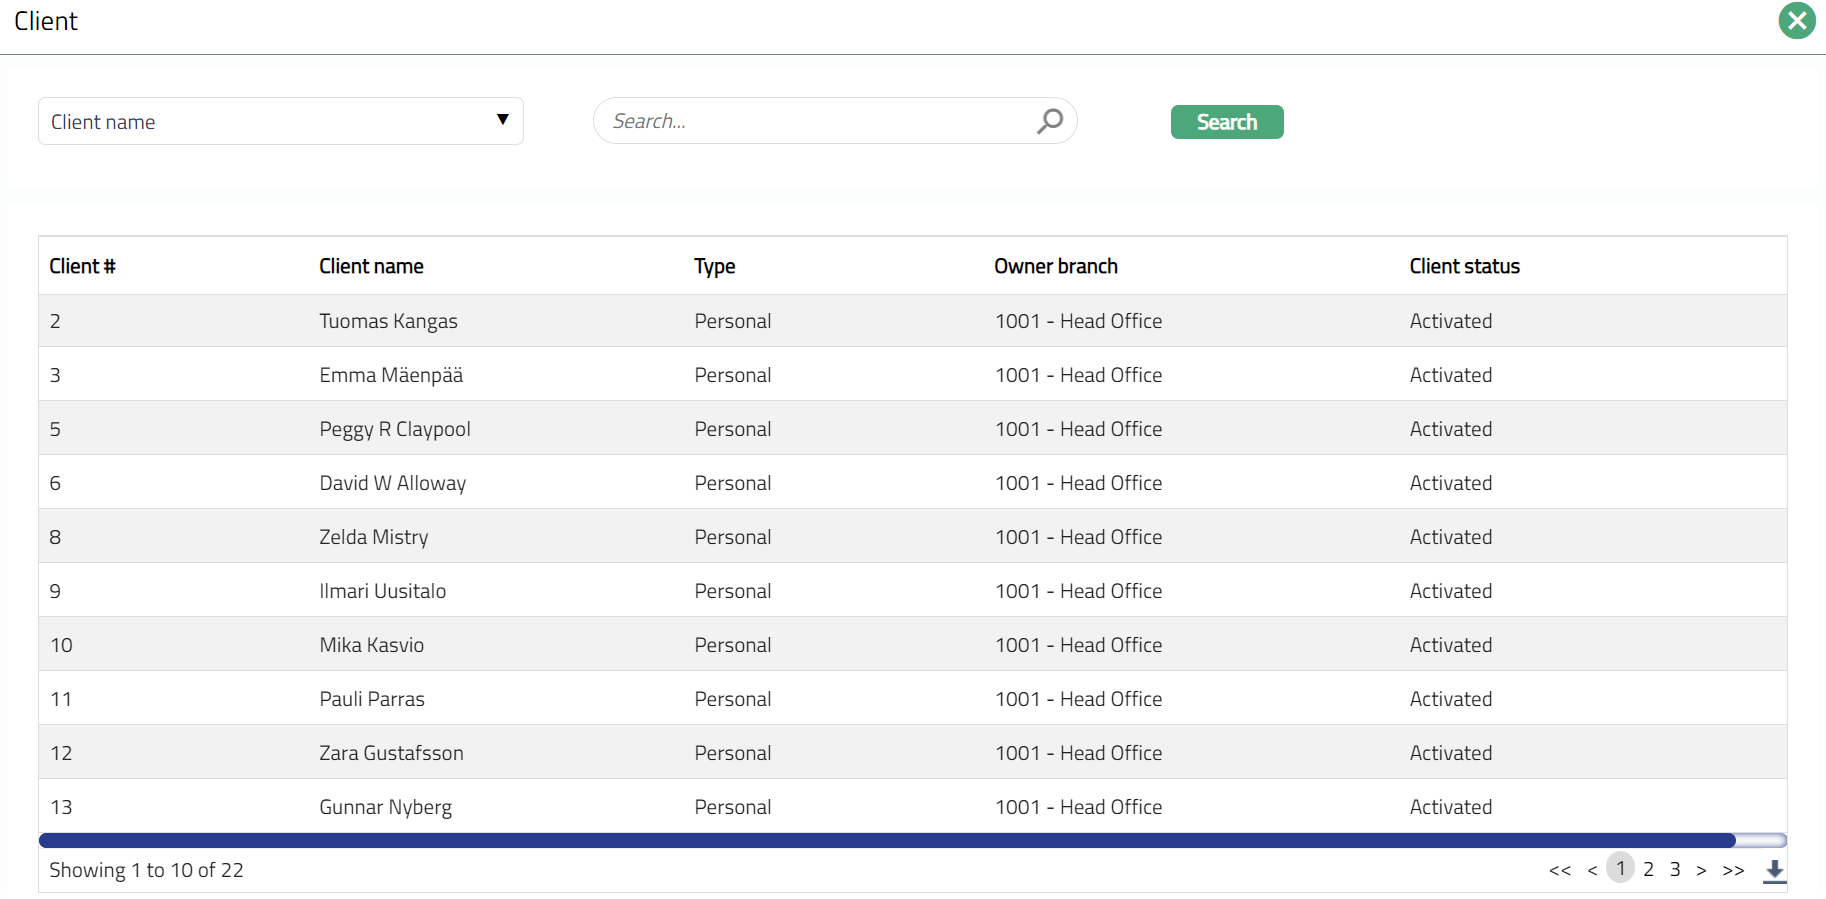
On selection of Customer account option in the above field, Client field appears with a hyperlink. Click Client hyperlink. Client search page appears with the list of clients maintained under CRM > Clients > Maintain. You can search for a client with relevant criteria and select the required client from whose account the funds have to be transferred. Alternatively, you can type in the name of the client and choose the relevant client from the list suggested by Aura.
- On selection of the Customer account option in Standing Instruction on field, Account # field appears with a hyperlink. On click of the hyperlink, Core Bank Account Search page appears with the list of active CASA/ Credit Card account numbers. Select the required client account number.
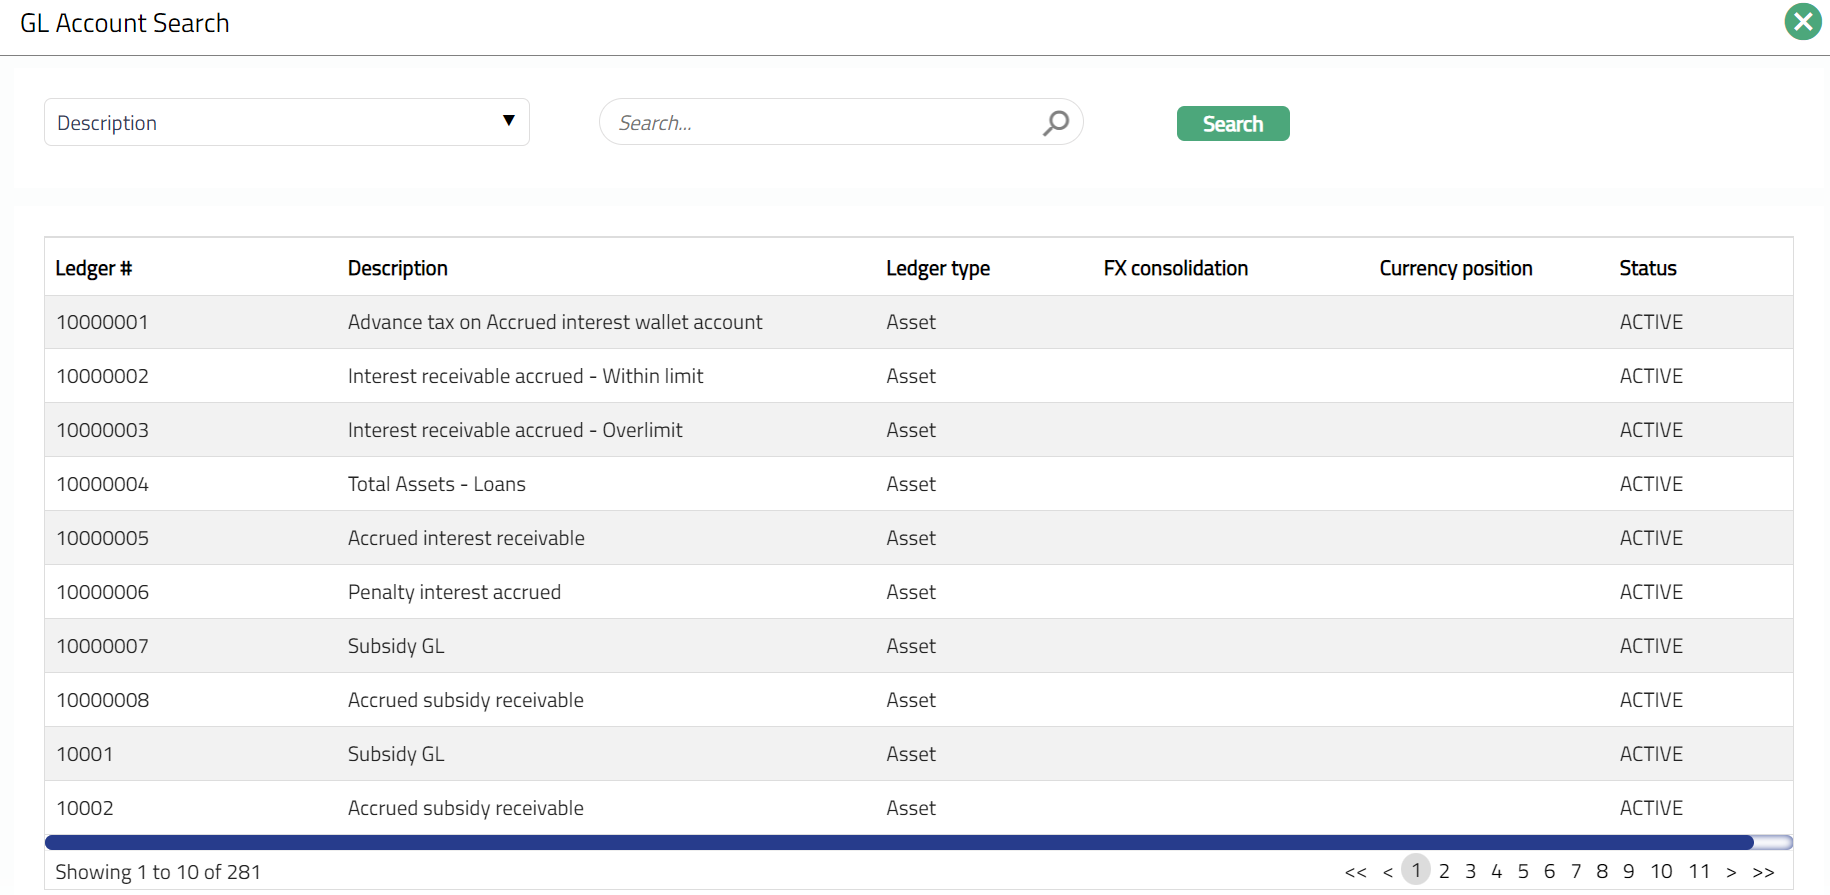
If GL account option is chosen; then the Account # field gets replaced by Ledger # that appears with a hyperlink. On click on the hyperlink, GL Account search page appears with the list of all Income, Asset, Expense and Liability GL Accounts except contingent and memo GL.
Select Settings from the available drop-down list of active Standing Instruction Settings as maintained under Retail > Settings > Standing instruction settings.
Based on the selection for settings, Transfer amount type field displays the defaulted Transfer Amount Type which is updated during Standing instruction settings creation. The list of options are as follows:
Fixed Amount SI
Sweep Out to Deposit
Sweep Out
Auto Debit -- Credit Card Payment
Sweep In
Sweep In for Liquidity Management
GL Fund Transfer SI
Based on the option displayed for Transfer Amount Type, the field label changes between Transfer to and Transfer from. Refer to the table below, which describes the details about the fields.
Transfer Amount Type Field Name Transfer From (values) Editable Sweep in Transfer from Own account Yes Sweep in from deposit Transfer from Deposit Account Yes Sweep out to deposit Transfer to Deposit Account No Fixed amount/Sweep out Transfer to Other client account Yes Own Account External Account GL Account GL Fund Transfer Transfer to GL Account No Based on the option chosen for Transfer to/Transfer from, the next set of fields is enabled / disabled. The available options and the corresponding fields are explained below.
Own account: This option enables transfer from one account to another account of the same client within the bank.
a. Select Payment setting to be used for the Standing Instruction from the list of active Payment settings maintained under Retail > Settings > Payment settings where type is Own account.
b. Deposit Product, Liquidation Priority, From Client and From Account # fields are disabled.
c. Select To Account # hyperlink. Core bank Account Search screen appears. Select the account # of the client to which the amount has to be transferred from the list of active CASA / Credit card account numbers.
Other Client Account: This option enables a transfer from one client account to another client's account.
a. Select Payment setting to be used for the Standing Instruction from the list of active Payment settings maintained under Retail > Settings > Payment settings where type is Other Client account.
b. Deposit product and Liquidation priority field will be disabled.
c. Click To Client hyperlink. The Client search page appears with the list of clients maintained under CRM > Clients > Maintain. You can search for a client with relevant criteria and select the required client to whose account funds have to be transferred. Alternatively, you can type in the name of the client and choose the relevant client from the list suggested by Aura.
d. Click To Account # hyperlink. Core bank Account Search screen appears. Select the account # of the above client to which the amount has to be transferred from the list of active CASA / Credit card account numbers.
External Account: This option enables a transfer from a client's account to an account in another Bank.
a. Payment Setting, Deposit Product, Liquidation Priority, To Client and To account# will be disabled.
b. An additional screen New Standing Instructions -- External Account (2/4) is displayed, which is explained in the later part of the document.
Deposit Account: This option enables a Sweep out to a term deposit account. This option will be available in the dropdown list only if the Transfer amount type is Sweep out to Deposit.
a. Payment setting, Liquidation priority, To client and Toaccount# will be disabled.
b. Select Deposit product from the drop-down list of all active term deposit products. This field is enabled only when the Transfer Amount Type is Sweep out to Deposit and Sweep in from deposit.
c. Select Liquidation Priority from the available options. The options are Earliest Maturity First or Earliest Maturity Last. This field will be enabled only when the Transfer Amount Type is Sweep in from Deposit and a deposit product is specified. By default, it will display the option as maintained in Term Deposit Product. However, you can make changes, if required.
GL Account: This option enables you to transfer funds to another GL account with a defined frequency. This option will be available in the drop-down list only if the Transfer amount type is Fixed amount / Sweep out.
a. Payment Settings, Deposit product, Liquidation priority, To client, To account will be disabled.
Start date is the date from which the Standing Instruction needs to be executed and is the current date by default. However, you can change it to any future date.
End date is the date until which Standing instruction needs to be executed and is blank by default. End date should be greater than the start date.
Select Frequency of the execution of the Standing Instruction. The available options are explained with an example below:
Example:
Start date for the Standing Instruction is 16-Jun-2013 and Holiday Preference at Standing Instruction Settings is Ignore.
| If Frequency is | Standing instruction will be executed |
|---|---|
| Every Day | Everyday viz 17-Jun-2013, 18-Jun-2013 etc. |
| Every Month | Every month viz., 16-Jul-2013, 16-Aug-2013 etc. |
| Every Quarter | Every three months viz 16-Sep-2013, 16-Dec-2013 etc. |
| Every Half Year | Every half year viz 16-Dec-2013, 16-Jun-2014 etc. |
| Every Year | Every year viz 16-June-2013 to 16-June-2014 |
| Last Day of Every Month | Every month end viz 30-Jun-2013, 31-Jul-2013 |
| Last Day of Every Quarter | Every Last day of quarter viz 30-Jun-2013, 30-Sep-2013, 31-Dec-2013 etc. |
| Last Day of Every Half Year | Every last day of half year 31-Dec-2013, 30-June-2014 |
| Last Day of Every Year | Every Last day of every year viz 31-Dec-2013, 31-Dec-2014 |
| Every X Days | Every X day where X denotes the number of days as assigned by the user. An additional field Frequency day is displayed upon this selection. For example, if 10 days is assigned, the Standing Instruction will be executed every 10 days i.e., on 26-Jun-2013, 6-Jul-2013, etc. |
Enter Frequency days if Frequency option selected above is Every X days.
Indicate currency in which the standing instruction should be executed in Transfer currency.
If Transfer to Own Account or Other client account, the dropdown will show the currencies of From account and To account. Default currency will be From Account currency.
If Transfer to External account, the drop-down will show the list of all active GL currencies. Default currency will be From account currency.
If Transfer to is GL Account, the drop-down will show the list of all active GL currencies mapped to the GL account.
Enter Transfer amount. Transfer Amount is the amount to be transferred from the From Account to the To Account for every execution of the Standing Instruction. This is enabled and mandatory only if the Transfer Amount Type is Fixed Amount.
Enter Minimum Transfer Amount. Minimum transferable amount is the minimum amount to be transferred from the From Account to the To Account for every execution of Standing Instruction. This is enabled and mandatory only if the Transfer Amount Type is Fixed Amount.
Enter Trigger Amount field. If the account balance is greater than the assigned trigger amount, only then Sweep out will be triggered. This is enabled only if the Transfer Amount Type is Sweep out and Sweep out to deposit.
Enter Target Amount field. If the account balance is lesser than the assigned target amount, only then Sweep in triggers. This is enabled only if the Transfer Amount Type is Sweep in or Sweep in from deposit.
Enter Minimum Sweep Amount. If balance in from account is greater than the trigger amount, then this field helps in indicating the minimum amount transferable. It is displayed only if the Transfer Amount Type is Sweep Out
For Example --
Available balance in From account is 1050 SEK
If Trigger amount is 1000 SEK and Minimum sweep amount is 100 SEK, then Amount transferred will be zero.
If Trigger amount is 1000 SEK and Minimum sweep amount is 10 SEK then the Amount transferred will be 50 SEK.
Enter Maximum Sweep Amount. It denotes to what extent the Sweep in instruction is to be executed. The value is defaulted from Minimum sweep amount; cannot be less than Minimum sweep amount and cannot be made null or zero. This field is editable, if the Transfer amount type is Sweep in from deposit or Sweep in.
Enter Sweep in units of. This field is enabled only if the Transfer Amount Type is Sweep out. The available options are: 1, 10, 100 and 1000.
For Example --
Available balance in From Account is 1522 SEK
Trigger amount is 1000 SEK and Minimum sweep amount is 100 SEK
| > If Sweep in units of is | > Amount transferred will be |
|---|---|
| > 1 | > 522 SEK |
| > 10 | > 520 SEK |
| > 100 | > 500 SEK |
| > 1000 | > 0 SEK |
- Click Next. New Standing Instructions -- External Account Details (2/5) page appears if Transfer to is External account.
External account details screen is displayed only if Transfer to is External account.
If Transfer to Own Account or Other Client account then the next screen --Preferences will be displayed.
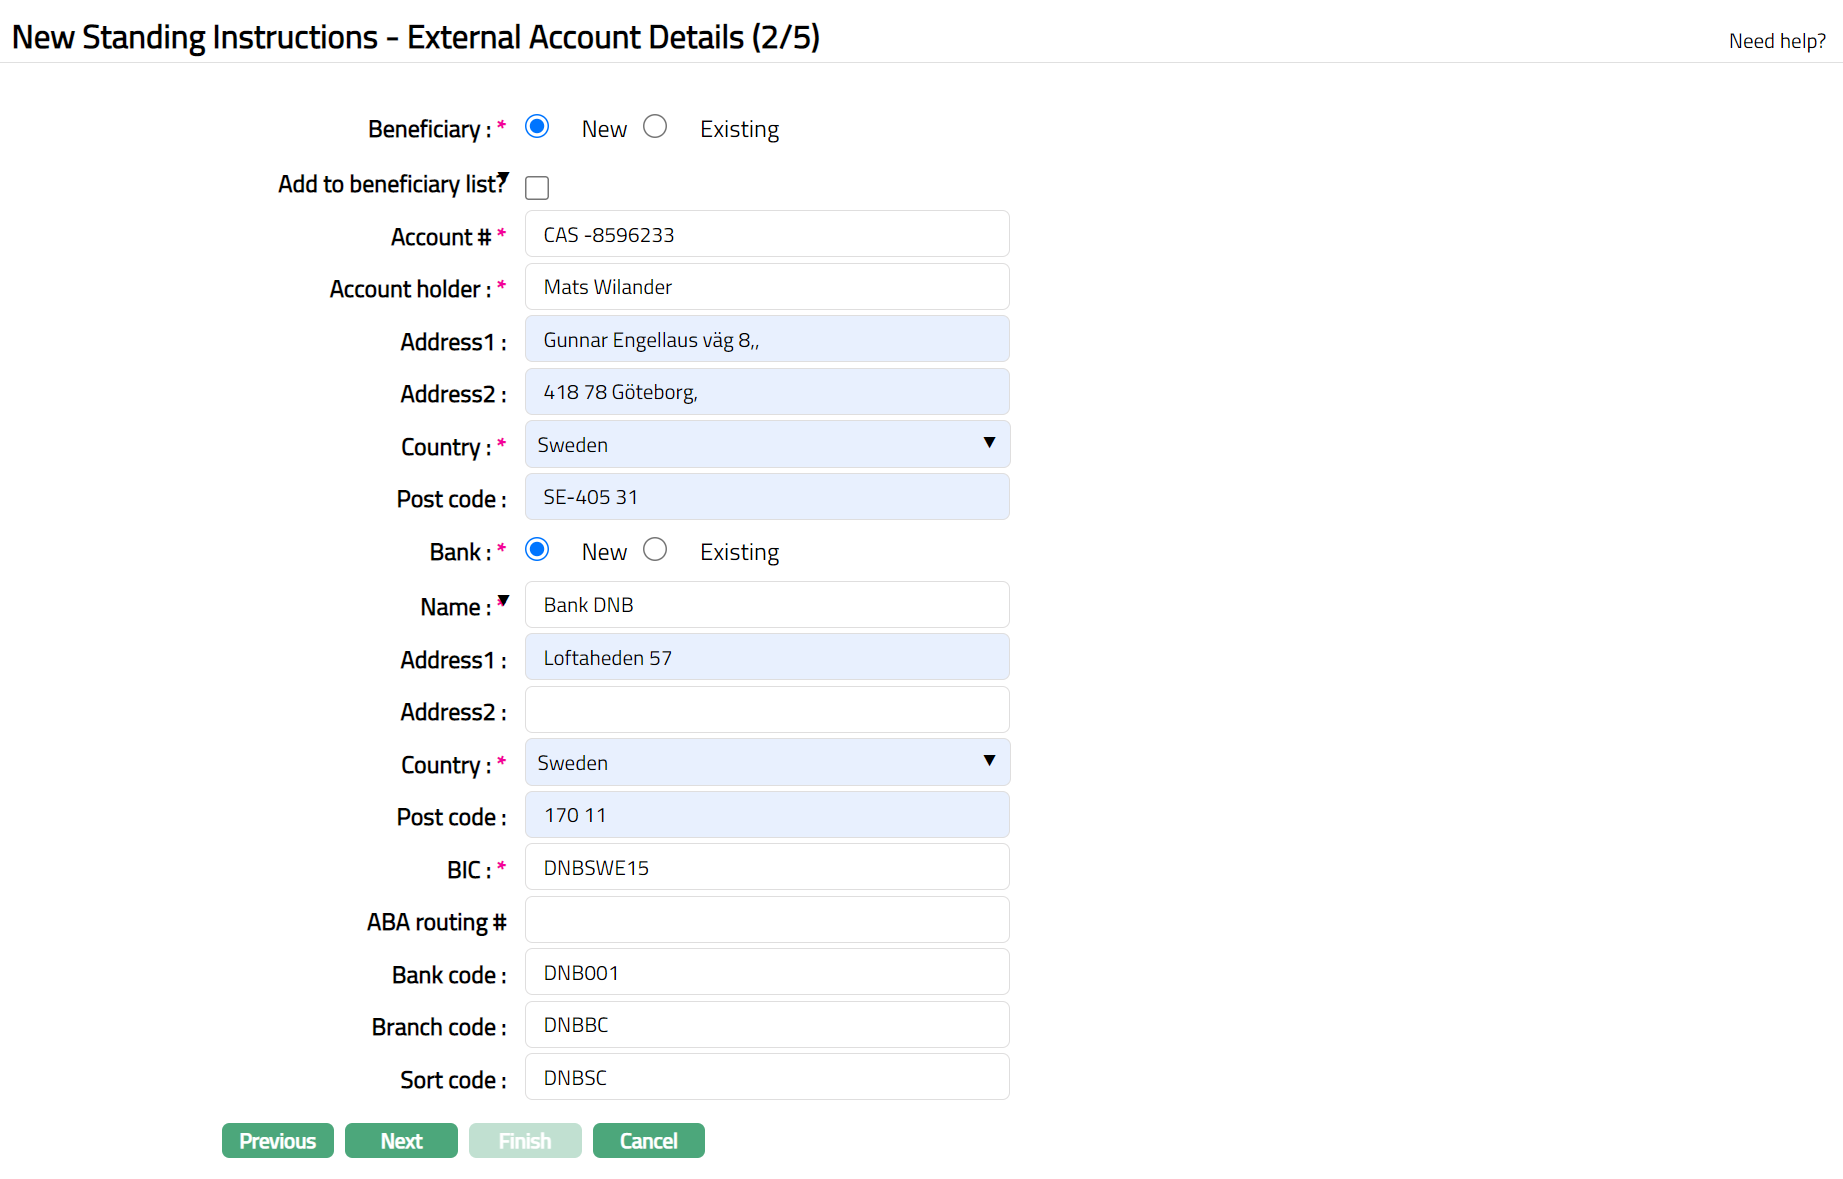
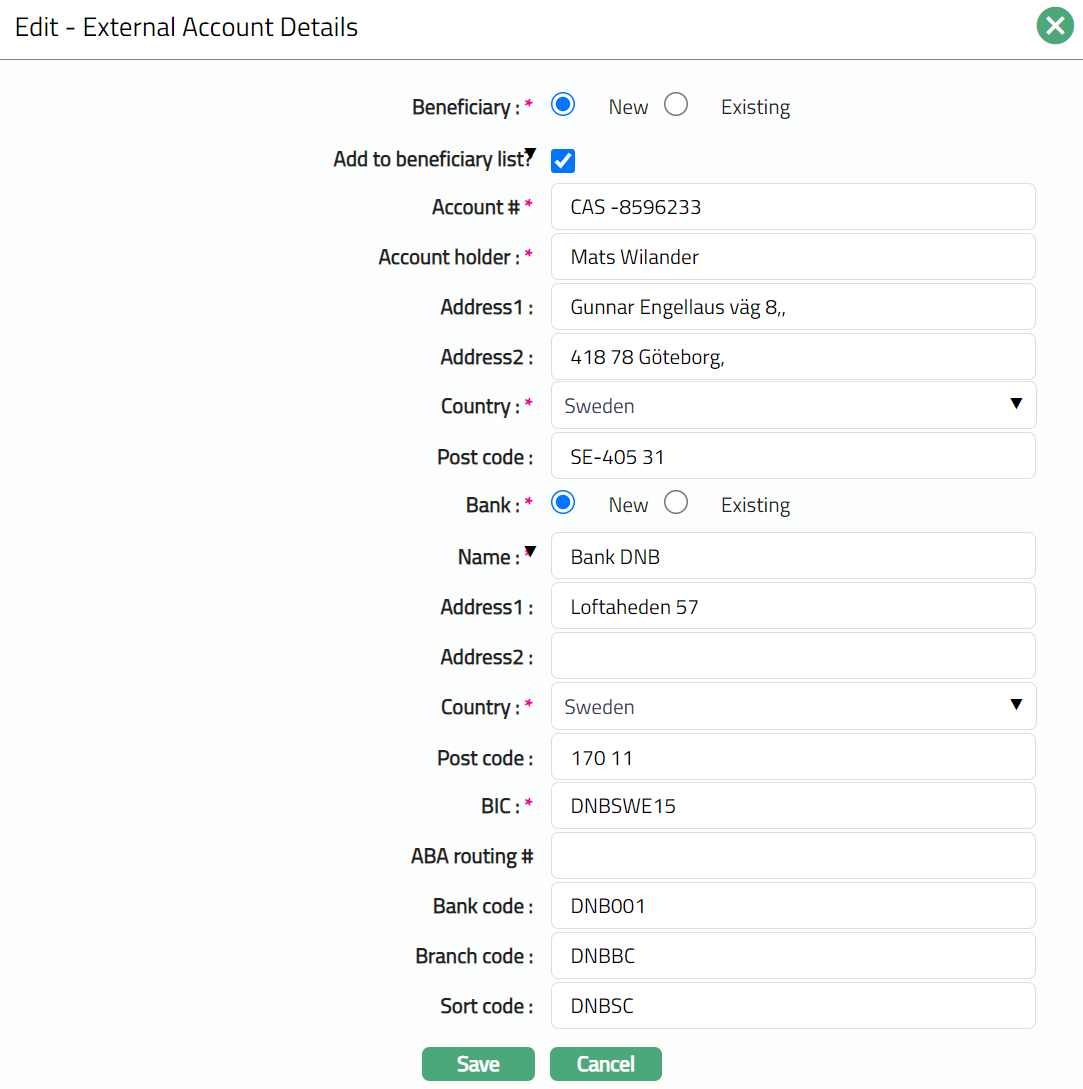
Click New or Existing radio button for Beneficiary to indicate if the Beneficiary is new or already exists in Aura. If you select Beneficiary as Existing, Aura will display the list of beneficiary details from CRM > Clients > Maintain > Beneficiary. Select the required beneficiary. Aura will derive the beneficiary details in the following fields, and these cannot be edited.
Check Add to beneficiary list checkbox if you want to add the new Beneficiary under CRM > Clients > Maintain > Beneficiary. This checkbox is only enabled when the Beneficiary is selected as New.
Enter Account# of the beneficiary to which the specified amount will be credited.
Enter name of the Account holder.
Enter address of the beneficiary in the Address 1 and Address 2 fields.
Select Country in which the beneficiary is located from the list of available countries as maintained under Admin > System codes > Generic definitions > Countries.
Enter Post code of the beneficiary.
Click New or Existing radio button for Bank to indicate if the Bank is new or already exists in Aura. If you select Bank as Existing, Aura will display the list of banks from Retail > Management > Settlement directory. Select the required beneficiary bank. Aura will derive the beneficiary bank details in the following fields, and these cannot be edited.
Enter Bank name.
Enter address of the Bank in the Address 1 and Address 2 fields.
Select Country in which the bank is located from the list of available countries as maintained under Admin > System codes > Generic definitions > Countries.
Enter Post Code.
Enter BIC of the beneficiary bank.
Enter ABA Routing# of the beneficiary's bank.
Enter Bank code of the beneficiary bank if applicable.
Enter Branch code of the beneficiary bank if applicable.
Enter Sort code of the beneficiary bank if applicable.
Click Next. New Standing Instructions -- Preferences (3/5) page appears.
Note: This page appears immediately after Step 1 If Transfer to Own Account, Other Client account and Deposit account

- Using Action on insufficient funds, you can specify what course of action should be followed by Aura in case there are insufficient funds in the account on the date of the instruction. This field is enabled only if the Transfer Amount type is Fixed Amount. However, if Transfer Amount type is Sweep out and Sweep out to deposit, this will be defaulted to Ignore instruction and disabled. The following options are available:
- Ignore Instruction: This is the default option and enables you to ignore a Standing Instruction.
For example, a Standing Instruction given for a transfer of fixed amount will fail if the From Account has insufficient funds. Aura will attempt to execute the instruction again only on the next instruction date (which would be the next month in case instruction frequency is Monthly).
Execute with available amount: Enables to execute the instruction with the available balance in the account.
Retry for full amount: Enables Aura to execute the action only if sufficient balance is available in the account. If the instruction fails due to insufficient balance on the date instruction and if this option is chosen, Aura will attempt to attempt to execute the instruction again the next day. This will go on till the instruction actually succeeds or if the maximum number of retry days is reached.
No balance check: Enables Aura to execute the action on insufficient funds without having a check on the balance. If GL Fund Transfer is selected as Transfer amount type, then Aura will by default display No balance check and will be in disabled mode.
- Specify what should happen in case the instruction date falls on a holiday in Holiday preference field. The following options are available:
Ignore: Choose this option if you want the standing instruction to be ignored if the instruction date falls on a holiday. Aura will attempt to execute the instruction again on the next instruction date (which would be the next month in case instruction frequency is Monthly).
Next Business Day: Choose this option if you want the instruction to be executed on the next working day if the Instruction Date falls on a holiday.
Previous working day: Choose this option if you want the instruction to be executed on the previous working day if the Instruction Date falls on a holiday.
Click Maximum retry Days and fill the number of days for which the Standing Instruction should be repeatedly tried for execution in case it fails. This field is enabled only when the Transfer Amount Type is Fixed Amount and option selected in the Action on insufficient funds should be Retry for ful amount / Execute with available Fund.
Enter Remarks, if any.
Click Next. New Standing Instruction Customer Field page (4/5) appears.
Enter Additional Field for Custom field.

- Click Next. New Standing Instructions -- Confirmation page (5/5) appears.
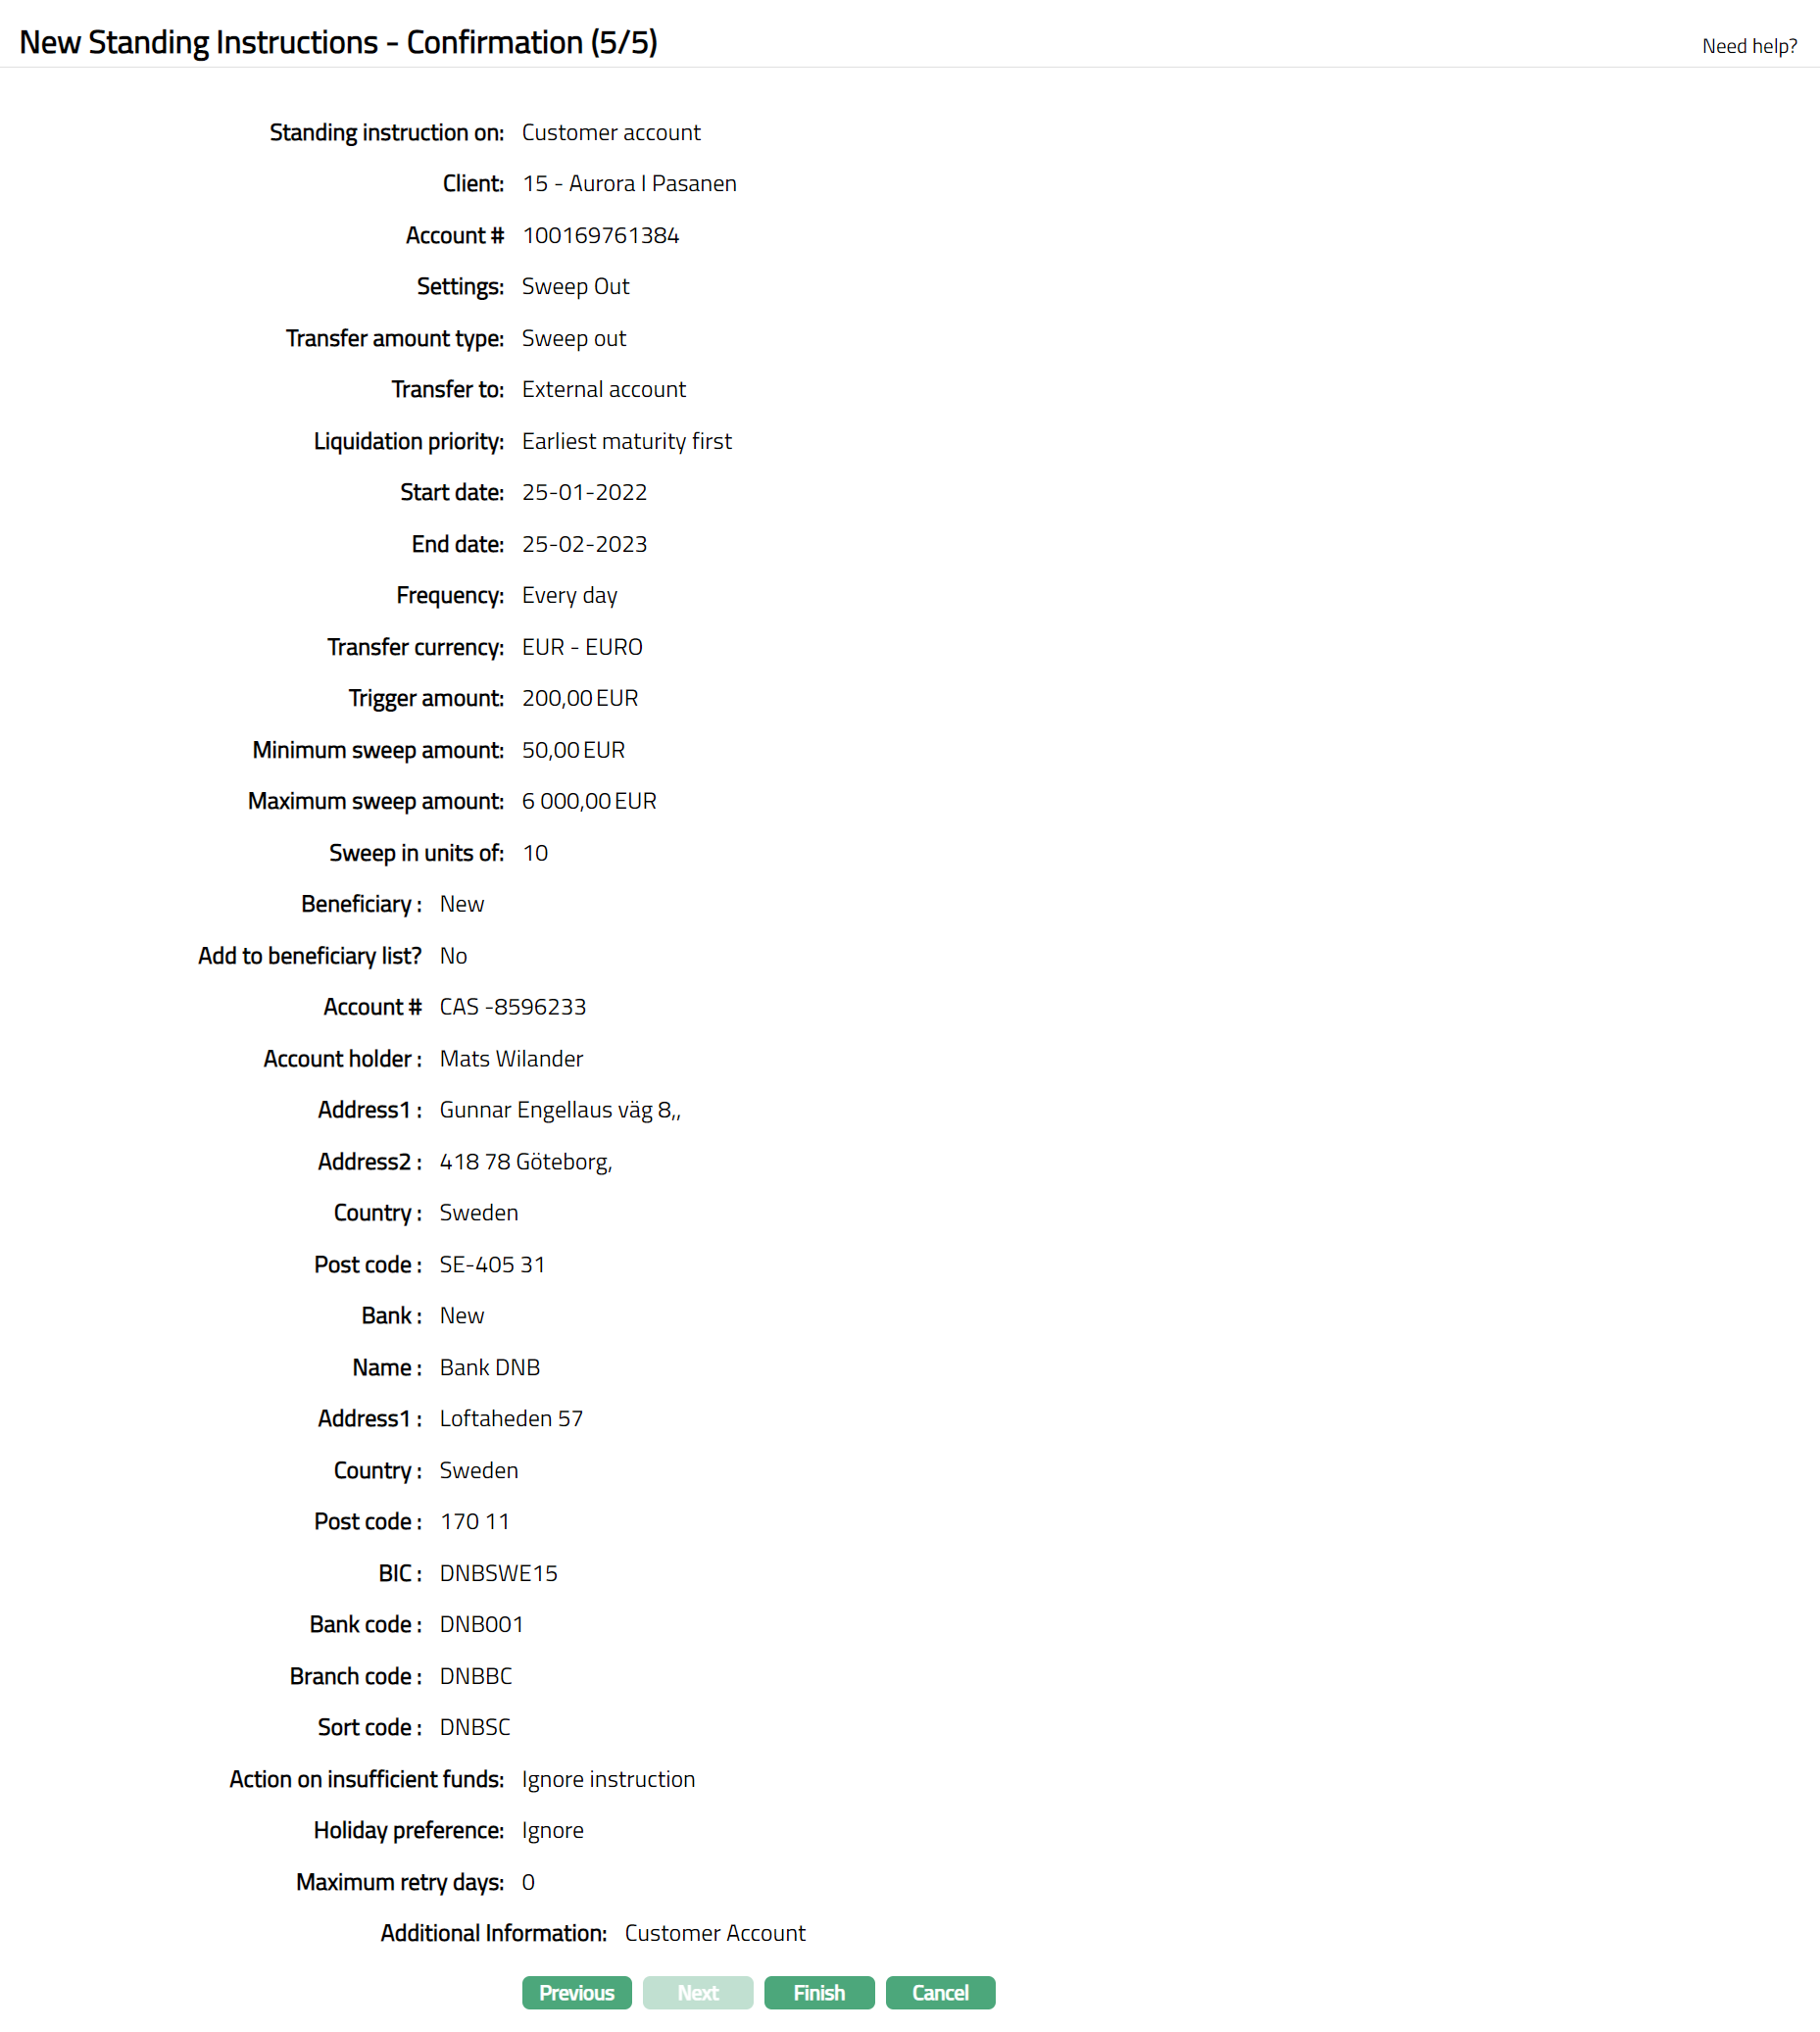
- Click Finish. New Standing Instruction is created with a unique Instruction ref#. Standing Instruction page appears, displaying Profile tab by default.
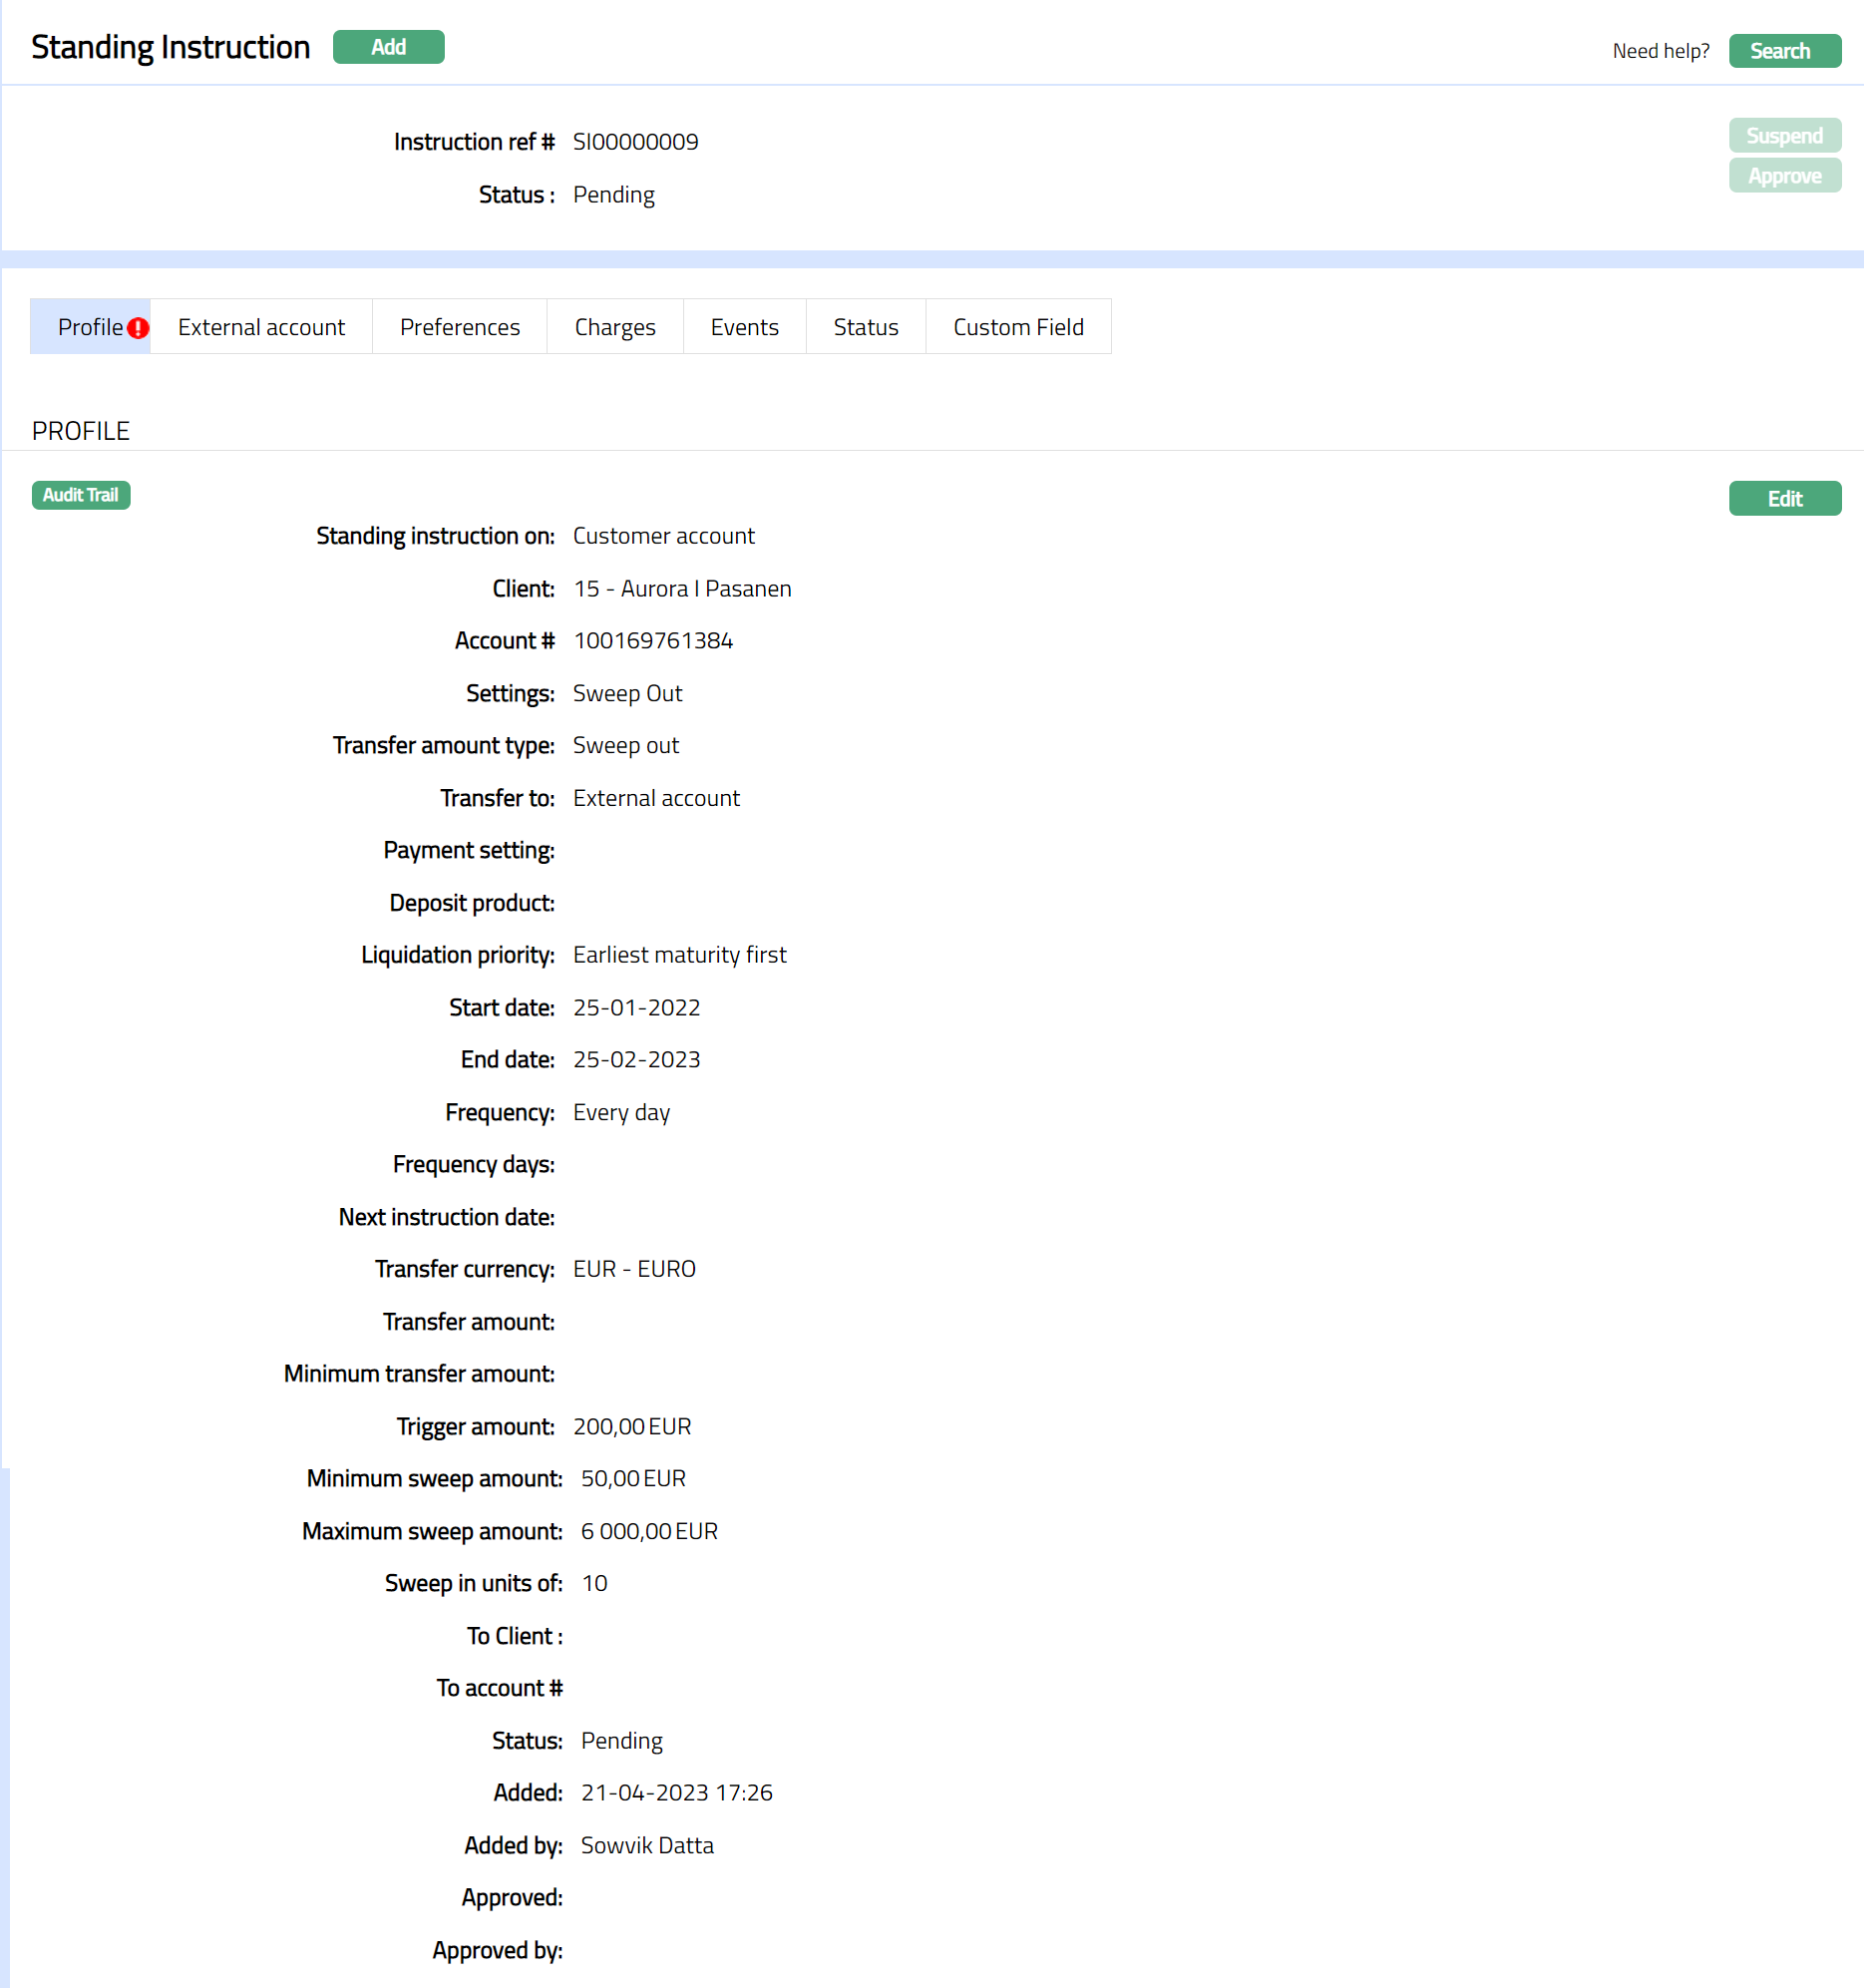
Functions: Add, Search, Suspend, Approve
Note: The status will be Pending on creation of the Standing Instruction maintenance. Any user other than the one who created it can approve the record. On Approval, the status of the Standing Instruction will be Active.
Suspend: You can suspend the Standing Instruction by clicking on Suspend button. When you click on Suspend button, Aura will ask for confirmation. On confirmation, Aura will suspend the Standing Instruction.
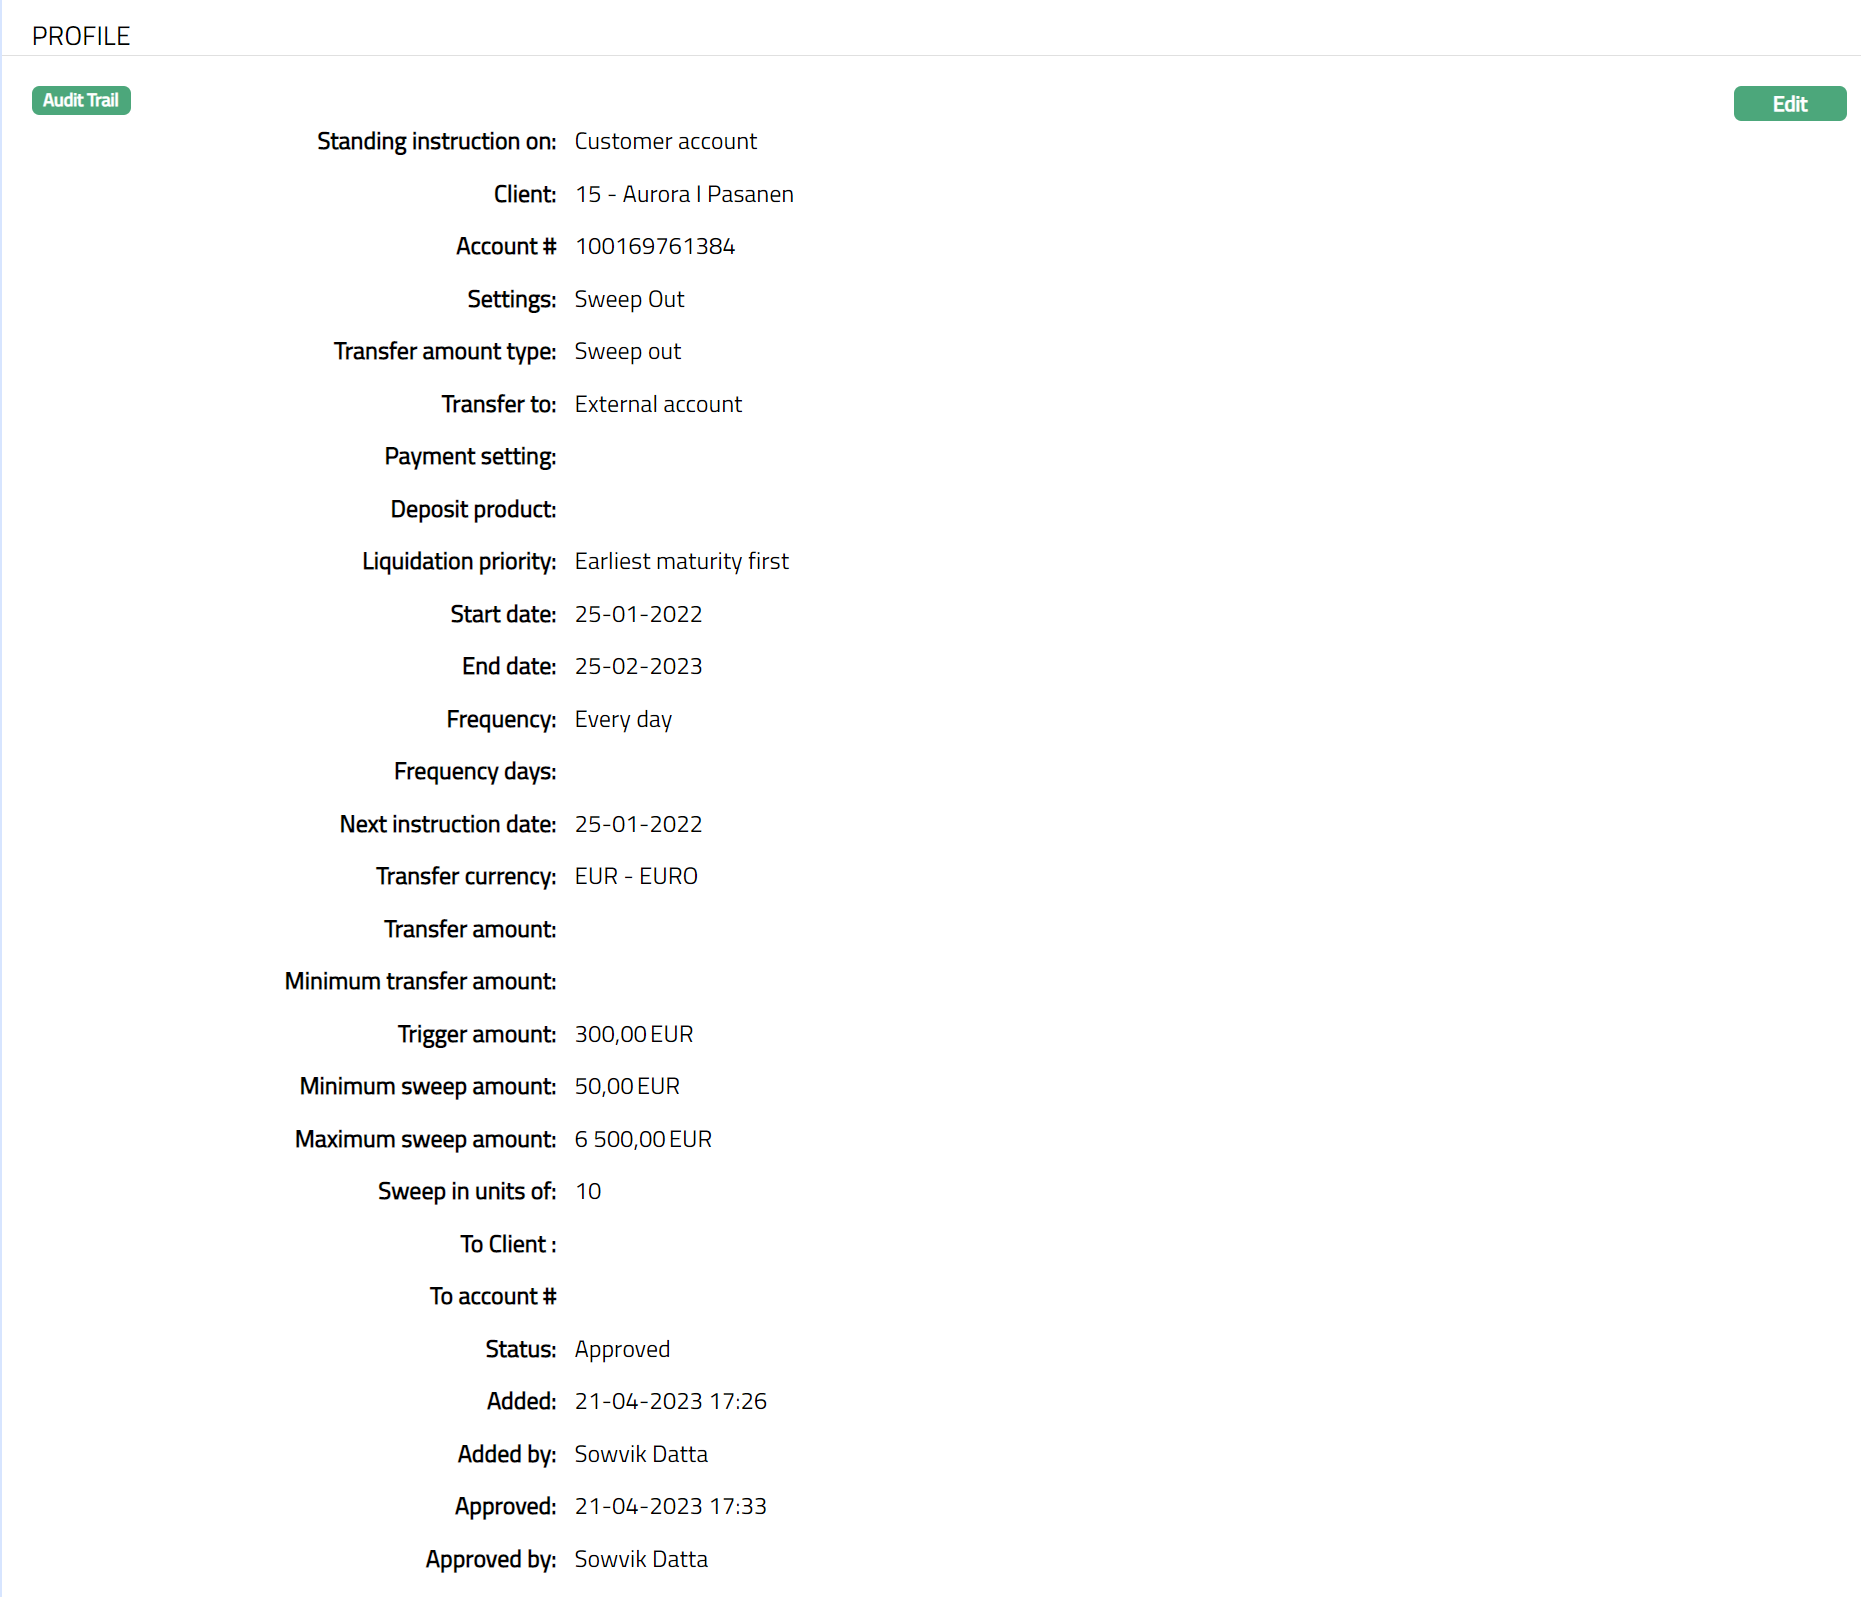
Profile
Profile tab, which is the default tab in the Standing Instruction page, shows the basic details of the Standard Instruction.
To View / Edit Profile
- Access Standing Instruction page. Profile tab appears by default. The details are defaulted from the entries that you made during Standing instruction creation. For details refer to New Standing Instruction -- Profile (1/5).
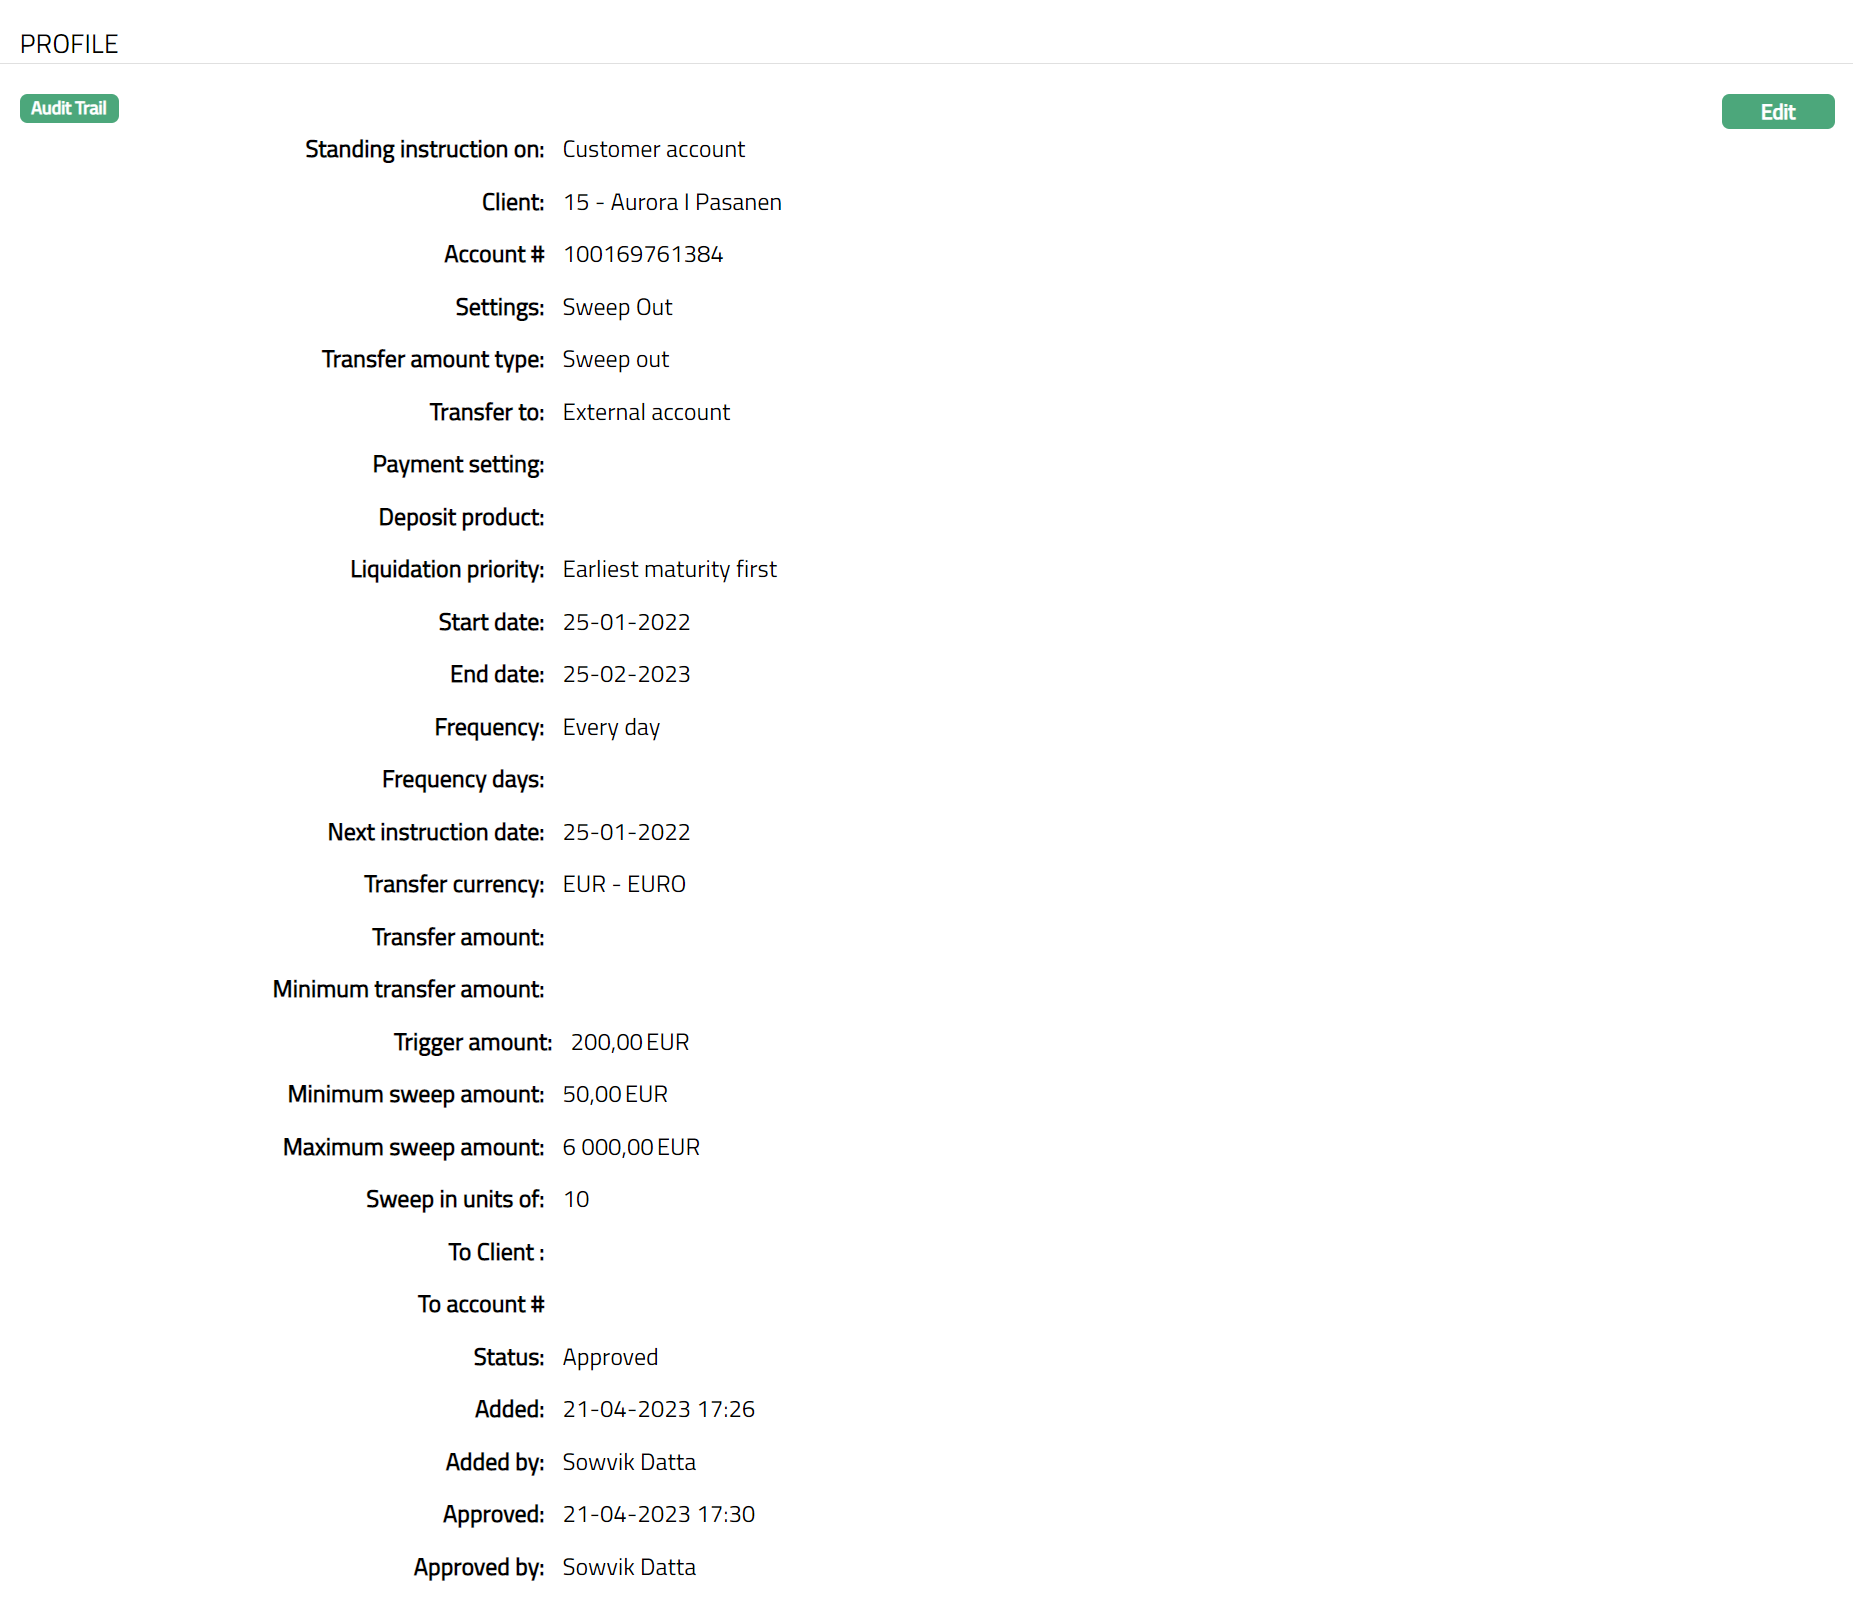
The additional fields that you can view in the tab are explained below.
- Next Instruction date = Start Date + Frequency for the first execution. From the successive execution Next Instruction date = Last execution date + Frequency.
For Example --
Start date is 16-Jun-2013 and Frequency is Monthly. On click of Finish, the Next instruction date will be 16-Jul-2013. Once execution is done on 16-Jul-2013, the Next instruction date will change to 16-Aug-2013.
Status field denotes the status of the record -- Approved or Pending.
Added denotes the date on which the Standing instruction record was added.
Added by denotes the name of the user who created the Standing instruction record.
Approved denotes date on which the Standing instruction record was approved. This is displayed only if the record is approved.
Approved by denotes name of the user who approved the Standing instruction record. This is displayed only if the record is approved.
To Edit profile
- Click Edit. Edit -- Profile screen appears.
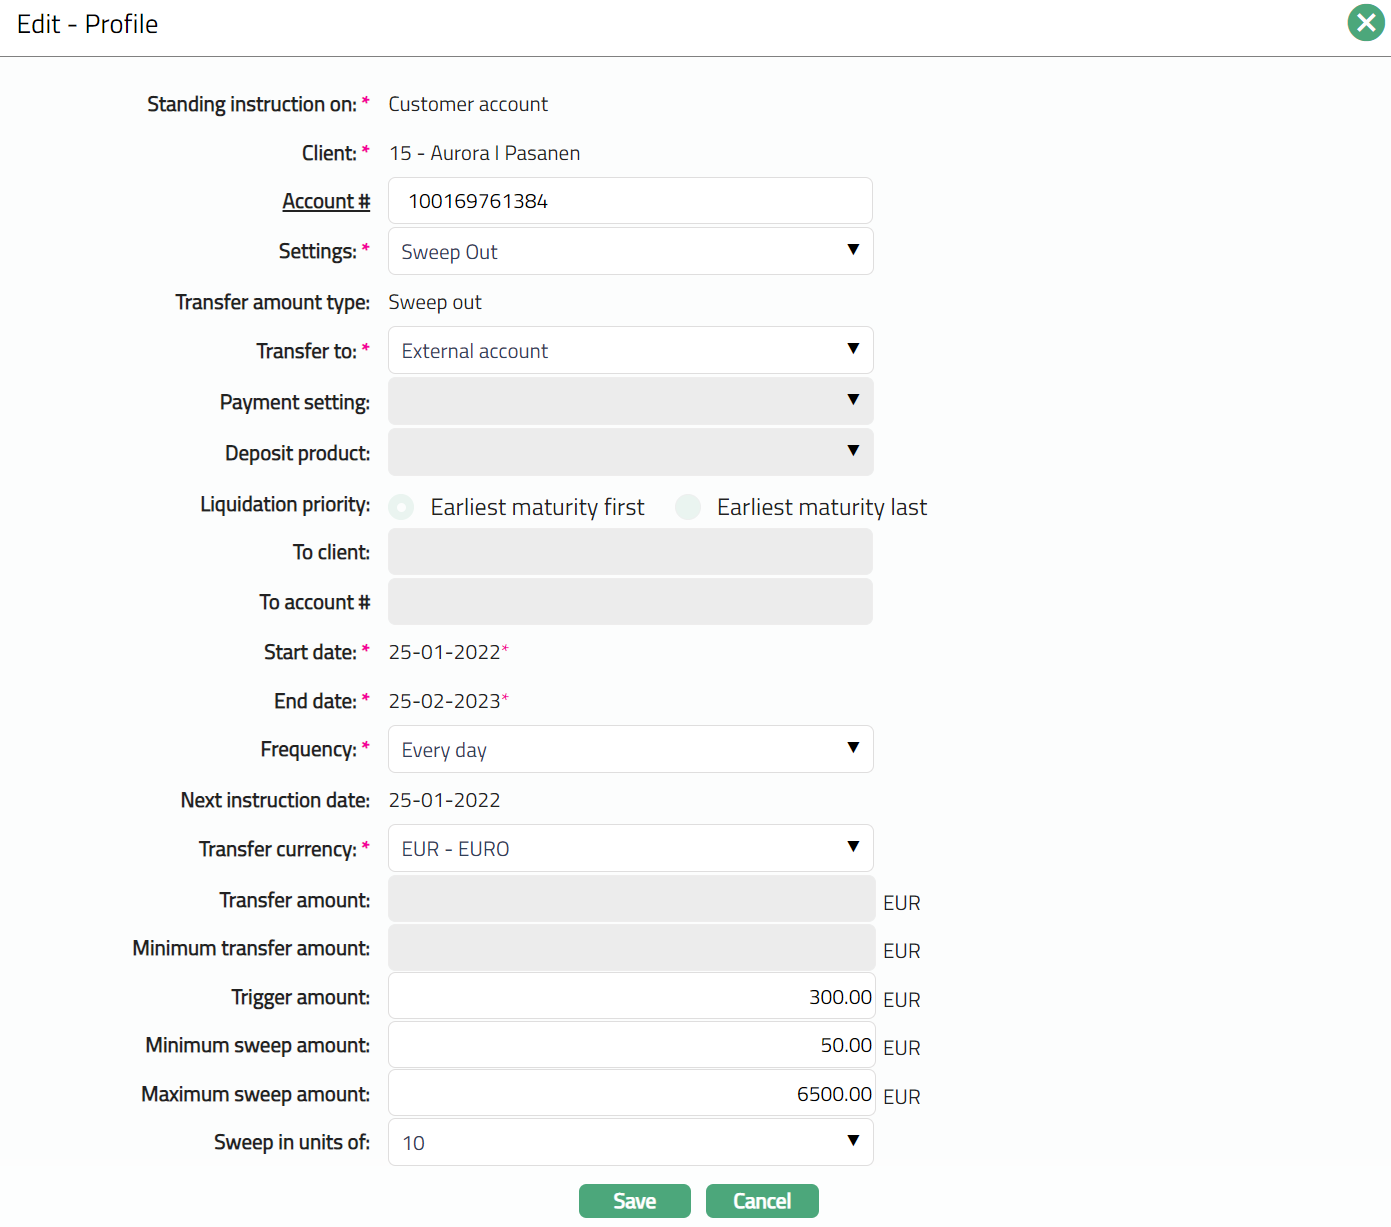
Note: Except Standing instruction on, Client, Transfer amount type, and Next instruction date all other fields are editable.
- Click Save. Profile page appears with the edited details.
Function: Edit
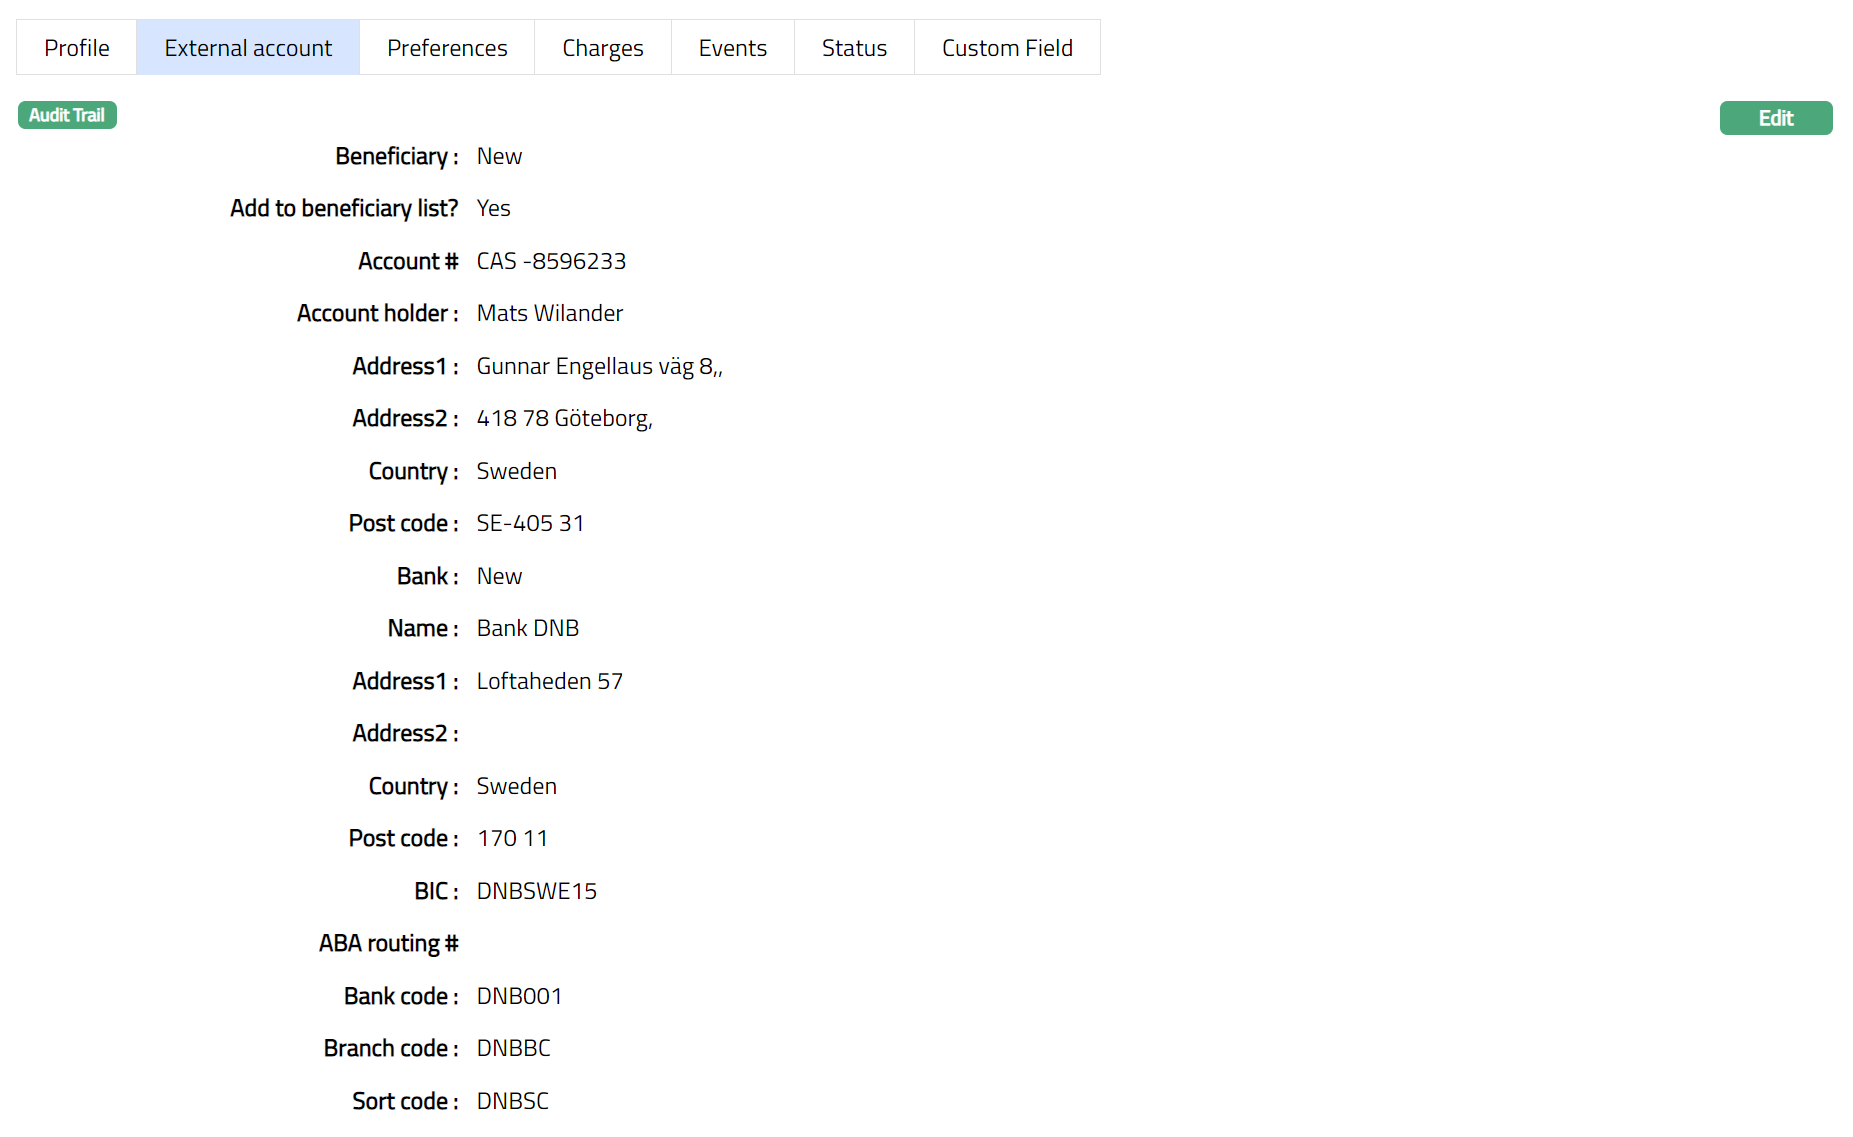
External account
External account tab option allows you to view and maintain the details of a client's account with another bank. This tab appears only if External Account option is chosen in Transfer from field in New Standing Instructions -- Profile (1/4). The details are defaulted from New Standing Instruction -- External account (2/5).
- Access Standing Instruction page and click External account tab.
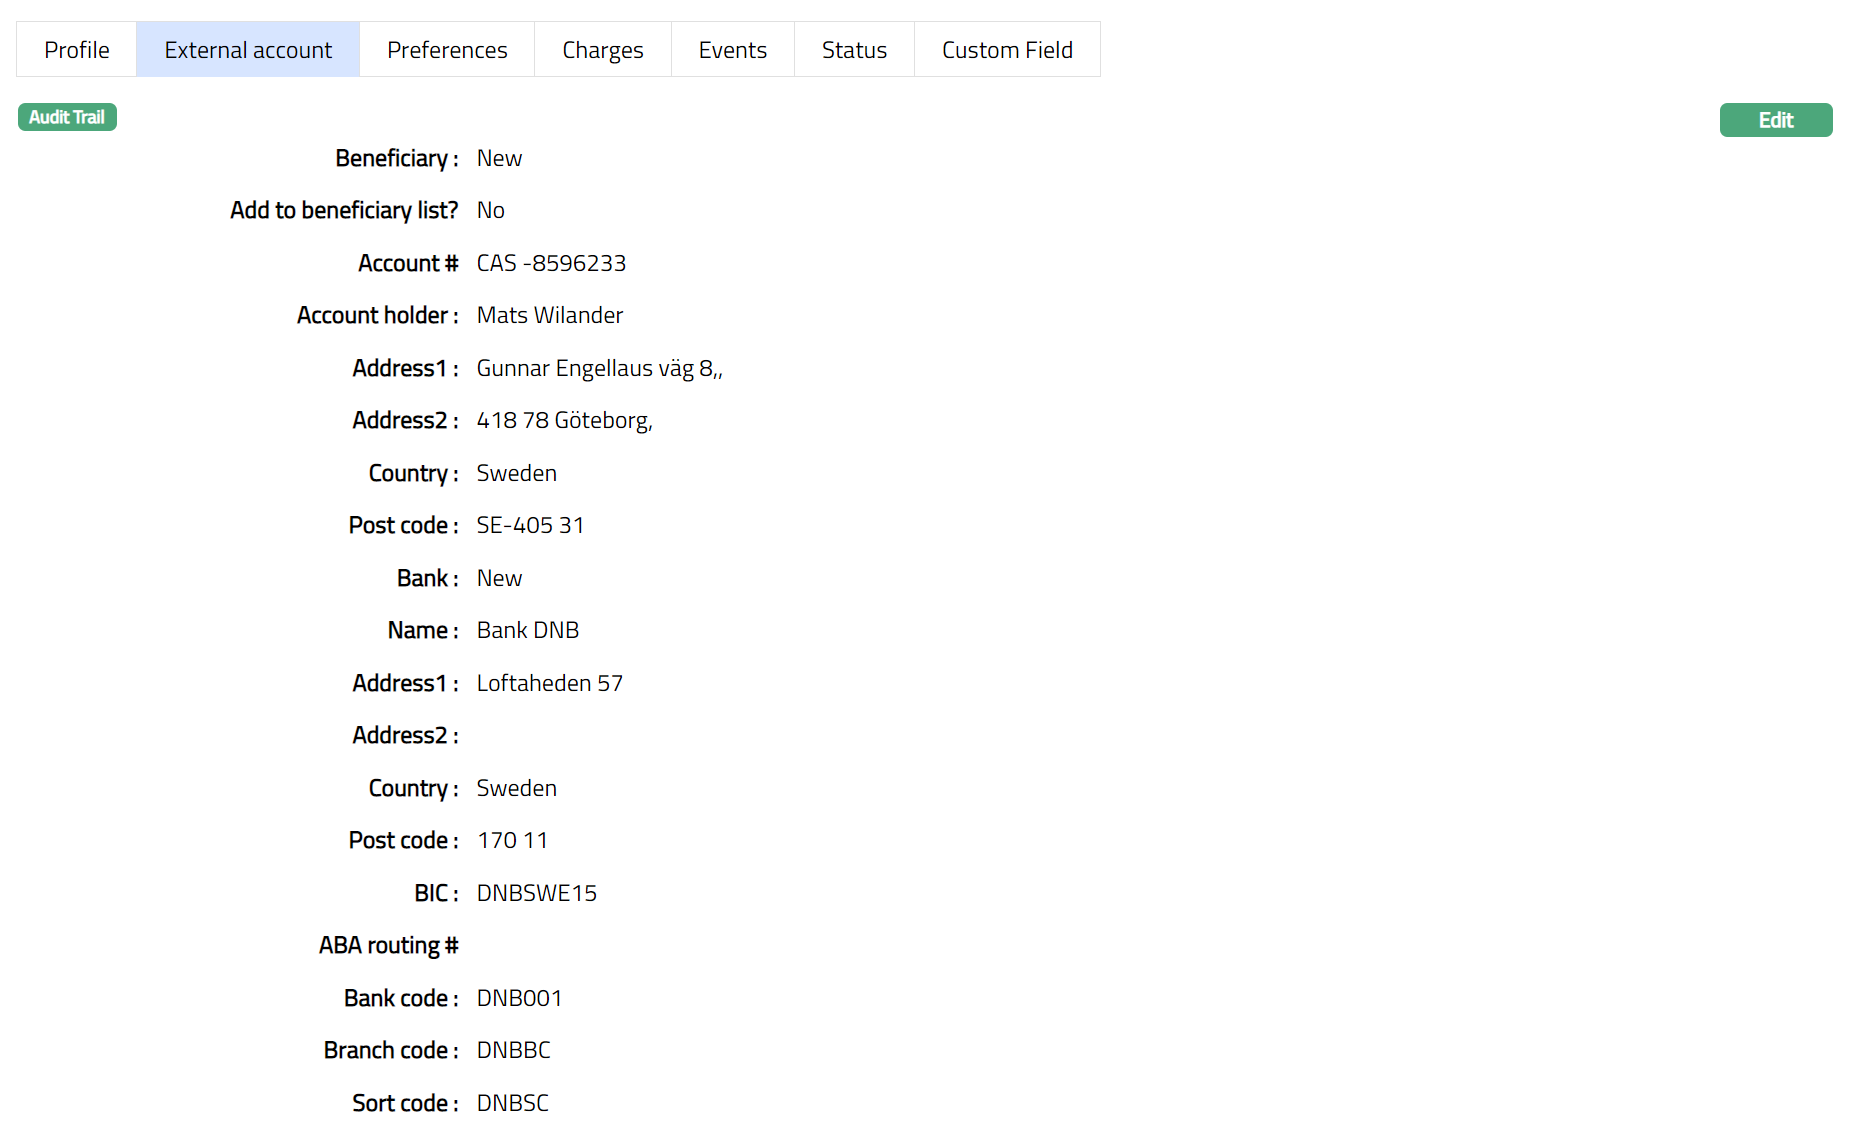
- Click Edit. Edit - External Account Details page appears.
Note: All fields are editable.
- Click Save. External Account page appears with the edited details.
Functions: Edit
Preferences
Preferences tab displays the details of preferences set for the Standing Instructions.
- Access Standing Instruction page. Click Preferences tab. The details are defaulted from the entries that you made during Standing instruction maintenance. For details refer to New Standing instruction -- Preferences (3/5)

- Click Edit. Edit - Preferences page appears.
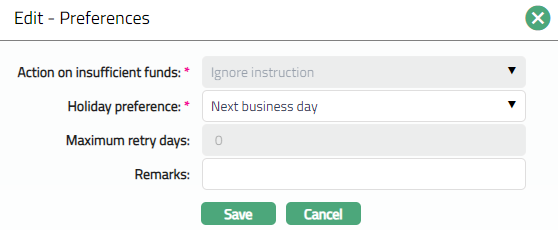
Note: Only Holiday preference and Remarks fields are editable.
- Click Save. Preferences page appears with the edited details.

Functions: Edit
Charges
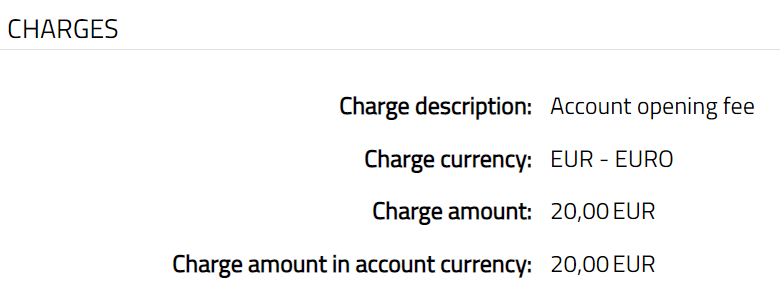
Charges tab allows you to view the details of charges for the Standing Instruction. The details are displayed only after the Standing Instruction is in Active Status.
- Access Standing Instruction page. Click Charges tab. Charge details are defaulted from the Activation charge that you selected for the Standing instruction -- Settings. These charges are booked to the From Account that you selected in New Standing Instruction -- Profile (1/5). A sample of the screen is shown below:
Events
Using this tab, you can view the past, current and future events in the life cycle of the Standing Instruction.
Access Standing Instruction page.
Click Event tab. There are three sub-tabs within it -- Past, Current and Future. By default, the Current tab is displayed. It shows the details of the Events that have value date = current business date. The Past tab and Future tab show details of events that have value date earlier than / later than the current business date respectively.
A sample of the Past tab is shown below.

A sample of Current tab is shown below:

A sample of the Future tab is shown below.

Note: The following data are displayed under each tab:
Event: Code for the event.
Description: Description of the event.
Value Date: The value date for the event.
Book Date: The date of entry / input of the event.
Ref No: The transaction reference number under which the event is processed.
Status: Status of the event:
Pending: Where the event is not yet processed.
Success: Where the event has been processed successfully.
Failure: Where the event has failed during process.
Retry: Indicates a failed event where the system retries to process the event
on subsequent business days.
- Amount: Indicates the amount processed by the event. Example: Interest liquidation event will have the amount of interest liquidated.
List of Events for Standing Instructions are.
| Event Code | Description | Condition |
|---|---|---|
| SIACTV | Standing instruction | This event occurs when the standing instruction is activated. |
| SIEXEC | Standing instruction | This event occurs when standing instruction is executed. |
| SISUSP | Standing instruction | This event occurs when standing instruction is suspended. |
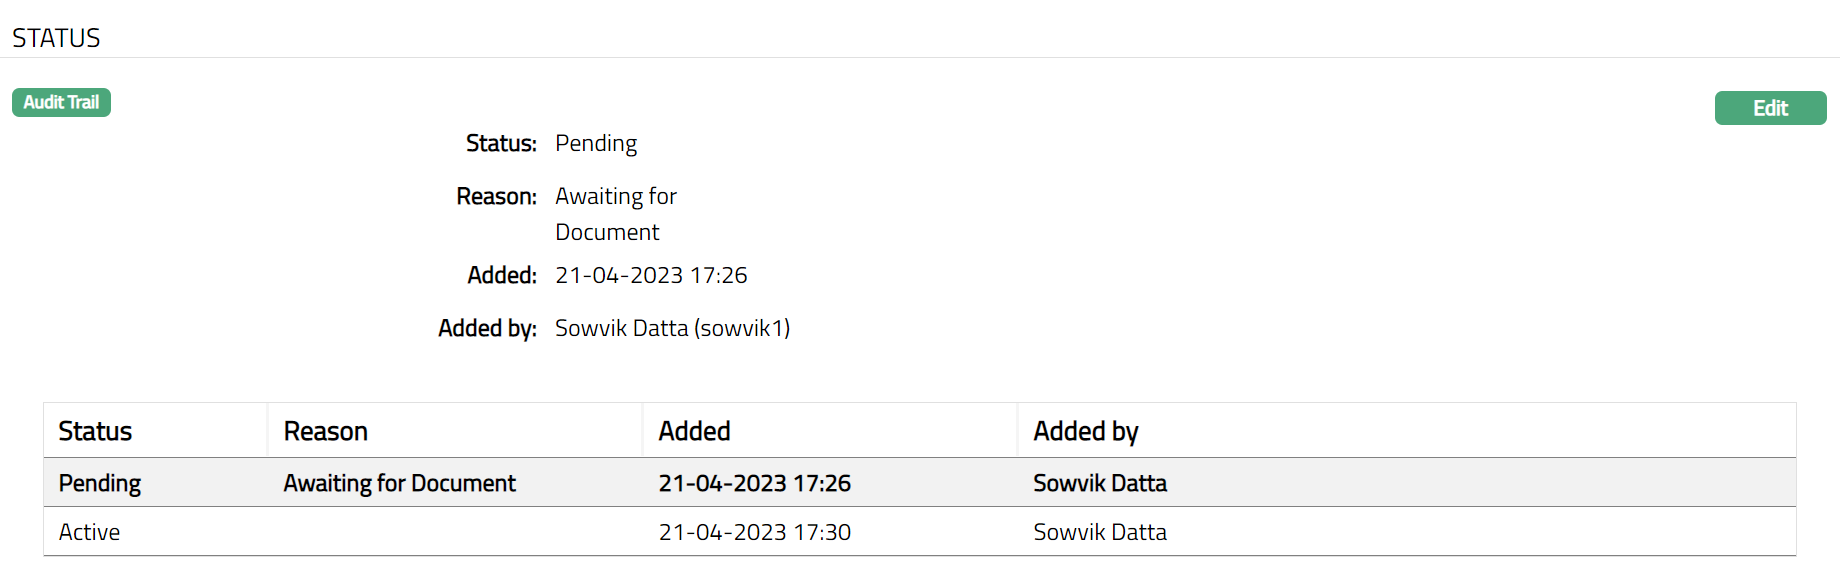
Status
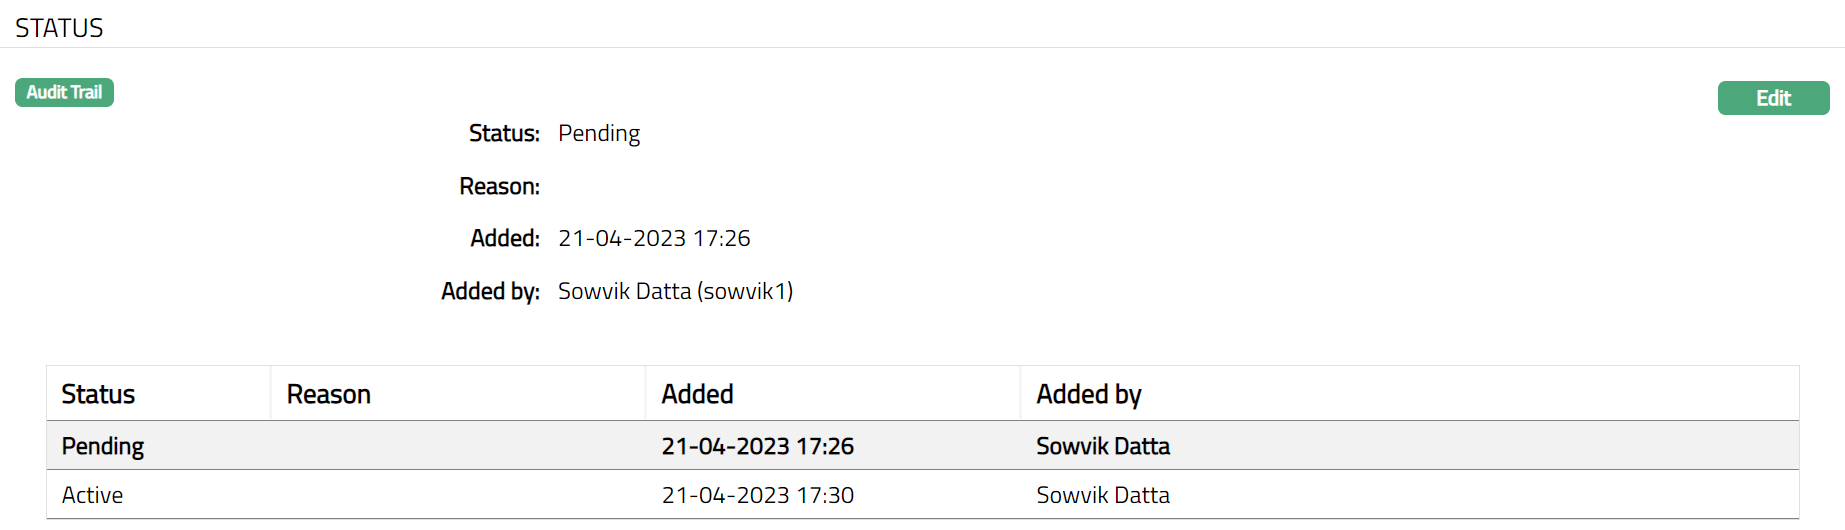
Status tab allows you to view the status of the Standing Instruction and to add a reason for it.
Status tab denotes the Status of a Standing Instruction record whether it is in Active, Suspended or Pending state. The Edit button becomes enabled only if the status is in Pending or Suspended status.
Edit is disabled if the status is Active.
- Access Standing Instruction page and click Status tab.
- Click Edit. Edit - Status page appears.

Note: Only Reason field is editable.
- Click Save. Status page appears with the edited details.
Functions: Edit
Note: Status will display as Pending, till the same is approved by another user who has not created the record. Once approved the status will display as Active. Note: Once approved you cannot edit the record further.
After Approval screen shot Pending
The additional fields are:
Status denotes the status of the Standing instruction.
Reason denotes the reason for status updates.
Added denotes the date and time when the record was added.
Added by denotes the user who added the record.
Approved denotes the date and time when the record was approved.
Approved by denotes the user who approved the record.
Custom Field
Custom field allows you to define fields apart from those that are already available in the standard version of Aura. Thus, it enables you to customize additional data storage and use a required to suit your specific business need.
- Access Standing Instruction page and click Custom field tab.

- Click Edit. Edit Custom Field page appears. In the below example one custom field -- Additional Information has been mapped to the account as shown below.

- Click Save. Custom field page appears with the edited.

Function: Edit