Limit
Limit option allows you to define the risk exposure of the credit which is given to the customers. You can define the limit for a particular client and Limit contributions can be one of the following types:
Collateral -- secured limit backed by a collateral.
Manual -- unsecured limit
Both -- a combination of secured and unsecured limit
The created limit will be linked with the contracts or accounts and all the linked contracts information will be available at the limit definition level. Aura will allow you to edit the limit which is created but deletion will not be allowed once the limit is activated and approved.
The sub-tabs in Limit page are as follows:
To add new Limit,
1. From CRM menu, click Collateral & limits and then Limit. Limit Search page appears.

2. Click Add. New Limit → Details (1/2) page appears.
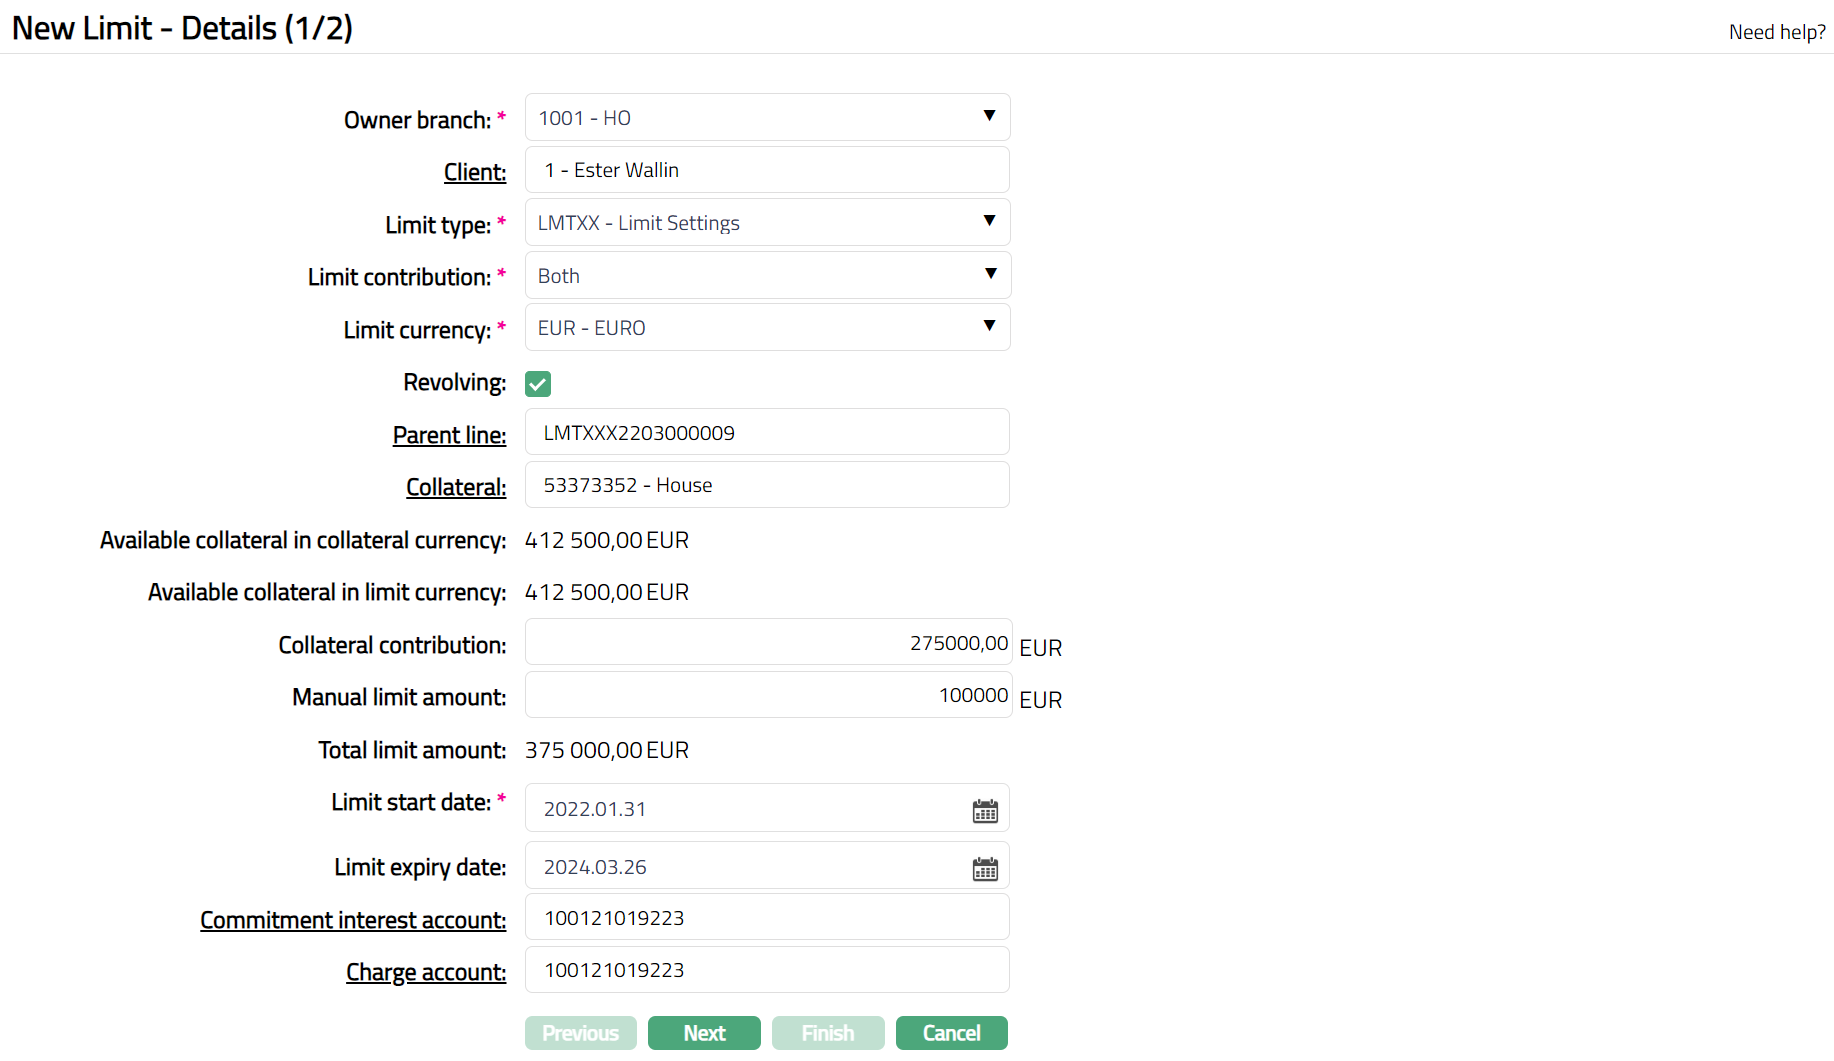
3. Select Owner Branch from the drop-down list of active branches. By default, the user's logged in branch is displayed. You can change to any other branch as required. This is the branch in which the Limit is maintained.
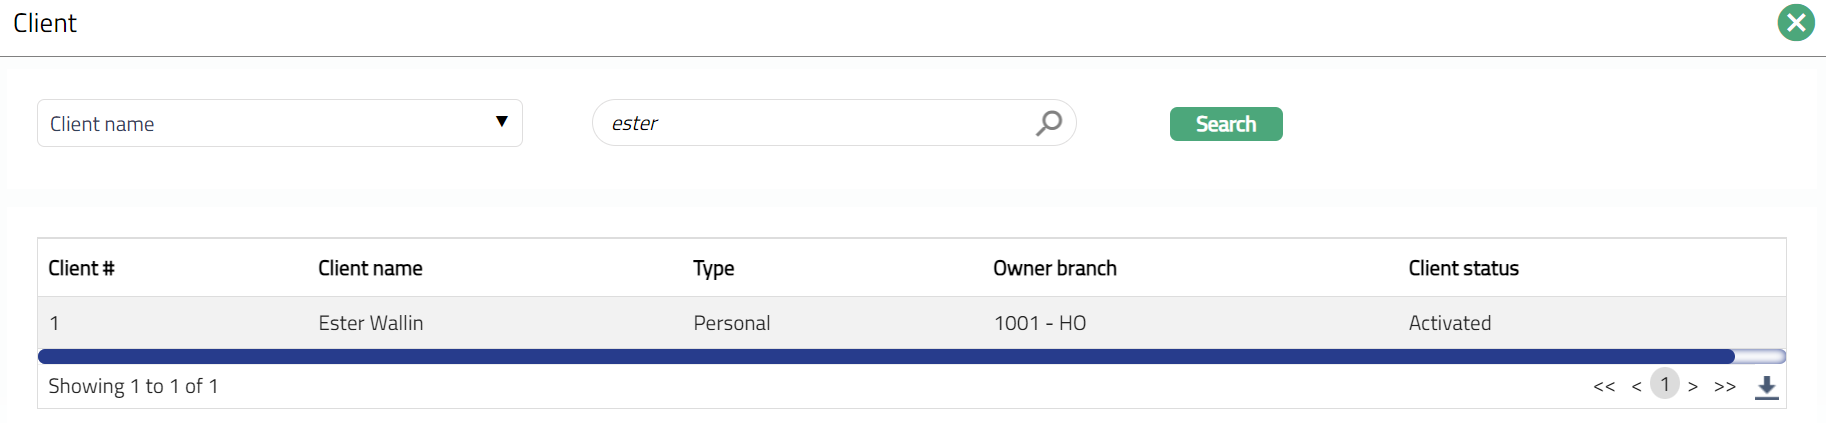
4. Select Client by clicking client hyperlink. Client search page appears where you can search for a client with relevant criteria and select the required client. You can also input the client's name and select the required client from the list displayed by Aura.
5. Select Limit type from the drop-down list of active Limit Settings maintained under CRM → Settings → Limit Settings.
6. Select what components will contribute to the Limit in Limit contribution. The available options are as follows:
Collateral: If the Limit amount is secured by collaterals, select this option. If collateral is selected, one Collateral has to be entered during the creation of the Limit; more Collaterals can be added using the Add option in the Linked Collateral tab.
Manual: If the Limit amount is not secured by collaterals, select this option. If manual is selected, then manual limit details should be maintained.
Both: If the Limit amount is partly secured by collaterals, select this option. If Both option is selected, then both manual and collateral limit details should be maintained; one Collateral has to be entered during the creation of the Limit; more Collaterals can be added using the Add option in the Linked Collateral tab.
7. Select Limit currency from the drop-down list. The list will display all the active GL currencies maintained under General Ledger → Setting → Currency where Commodity is selected as No.
8. If Revolving flag is checked then Aura will recalculate the Available Limit field value on every payment by the client; else, the Available Limit field value will remain the same even when there is a repayment.
Note: When parent line is non-revolving then child line will also be non-revolving. When Parent line is revolving, then child line can be both non-revolving and revolving.
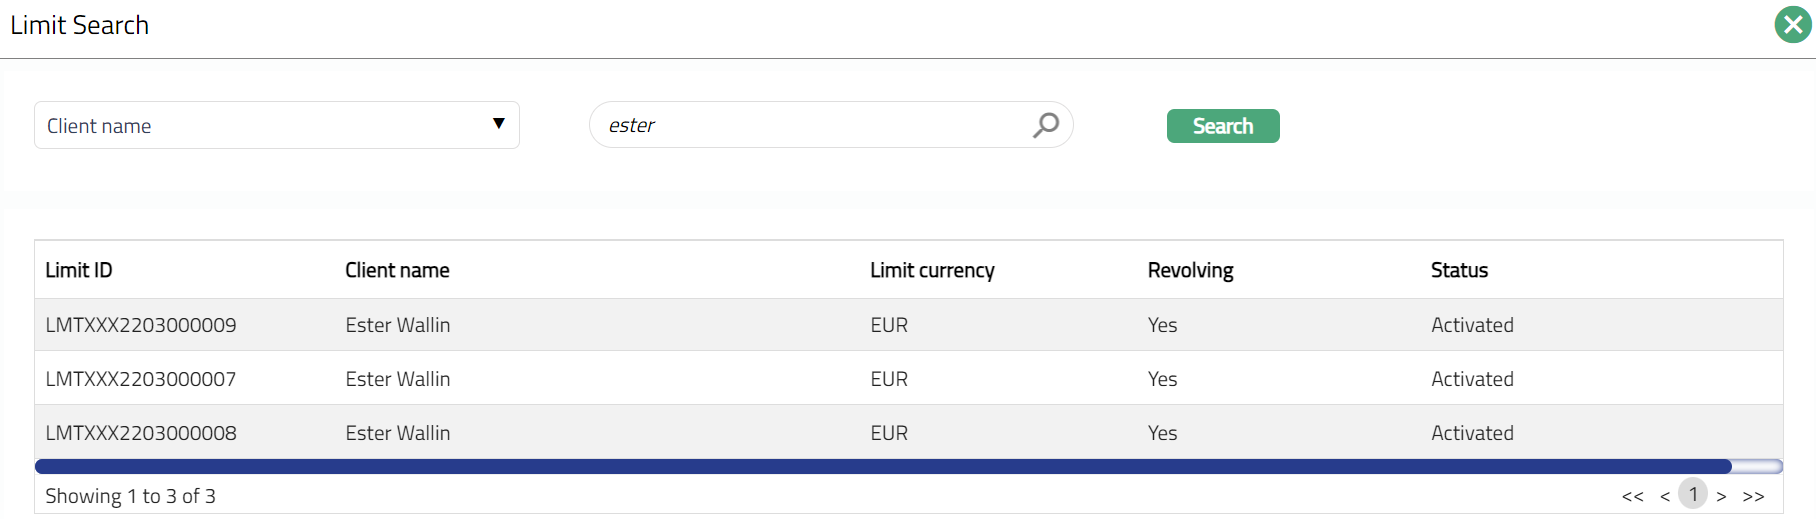
9. If you want to create this limit as a sub-limit (Child line) of another already existing Limit (Parent line), click the hyperlinked Parent Line. Limit search page appears with the list of all active Limits, as per the following conditions:
If you have marked the limit as Revolving, the search page will display only Active and Revolving limits.
If you have marked the limit as Non-Revolving, the search page will display all Active, Revolving and Non revolving limits.
If the parent line is changed during the creation of limit, the same existing values will be available in Aura.
Only those Limits that are made available to this Client under the Availability tab.
Note: If the Parent Line is attached to a Limit, it is considered as the Child Limit of that Parent Limit. If the Parent Line is left blank, the Limit is considered to be a Parent Line on its own.
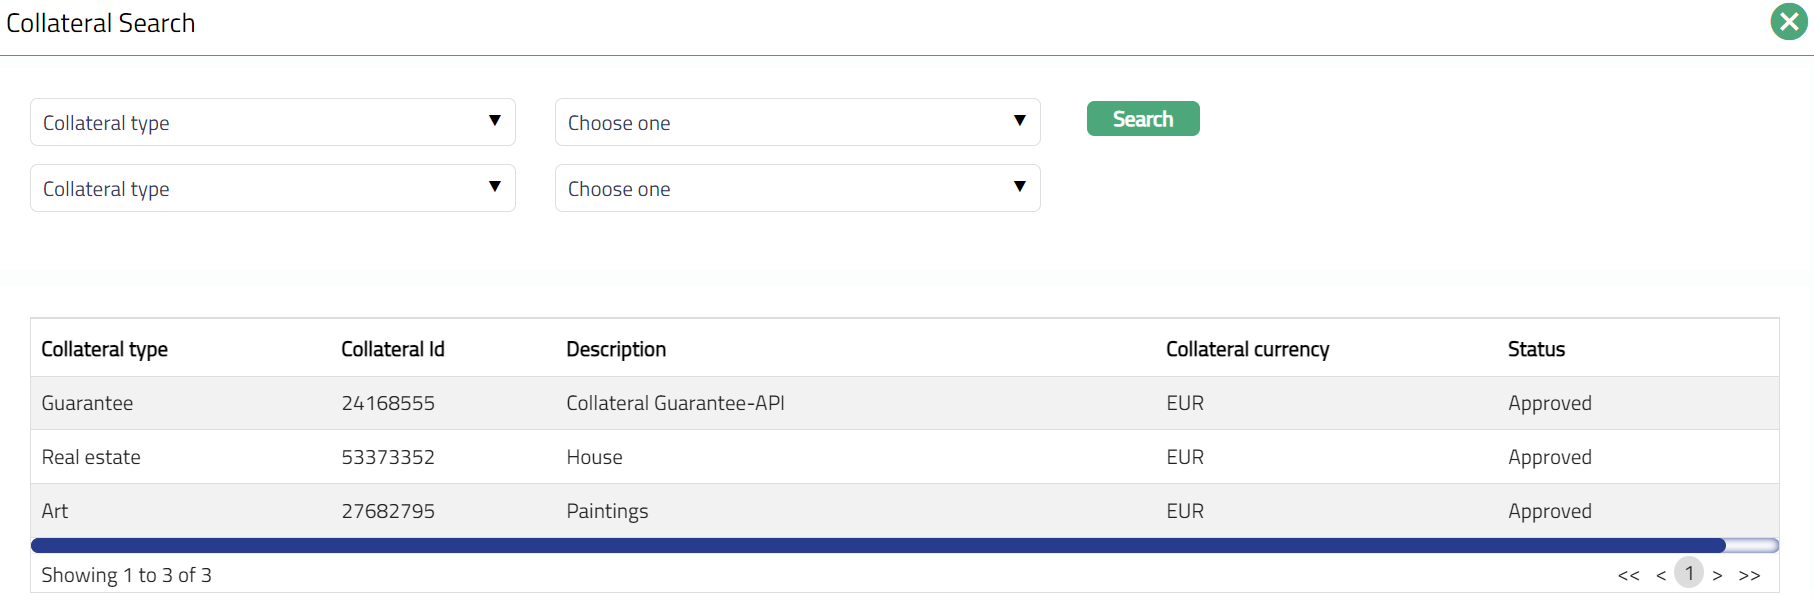
10. If Limit contribution type is selected as Collateral or Both, Collateral field will be enabled; else the field will be disabled. You can map collaterals that contribute to this Limit using this field. If you click on the Collateral hyperlink, Aura will display the Collateral Search screen showing all types of active collaterals that have been made available to this client.
11. Available collateral in collateral currency field will be enabled only if Limit contribution type is selected as Collateral or Both. It is automatically derived by Aura as the sum of the Available Collateral amount for the selected collaterals and cannot be input.
12. Available collateral in limit currency field will be enabled only if Limit contribution type is selected as Collateral or Both; else it will be disabled. If the Limit currency is different from the collateral currency, then Aura will check for the exchange rate for these two currencies from the default rate type maintained in the entity level and display the values after conversion. If the limit currency is the same as the collateral currency, then this will be the same as Available collateral in collateral currency. It is automatically derived by Aura and cannot be input.
13. Input how much of the Available collateral in limit currency will contribute to this limit in the Collateral Contribution amount. This field will be enabled only if Limit contribution type is selected as Collateral or both; else, it will be disabled. Negative numbers will not be allowed. Entered Collateral contribution value should be less than the Available collateral in limited currency.
14. Enter Manual limit amount. This field will be enabled only if Limit contribution type is selected as Manual or both; else, it will be disabled. Negative numbers will not be allowed.
15. Total limit amount is calculated as (Manual limit amount + Collateral contribution). If you make any changes in any of the fields like limit contribution, Limit currency, Collateral, Collateral contribution and manual limit during creation of limit, Aura will refresh the Total limit amount field and recalculate the total limit amount.
16. Enter the date from which the limit will be effective in Limit start date. Aura will by default take the current date, but you can change the date to any future date. If you have chosen a Parent line for this limit, then, the limit start date should not be greater than selected Parent line limit expiry date.
17. Enter the date up to which the limit will be effective in Limit expiry date. If you have chosen a Parent line for this limit, then, the limit expiry date should be less than or equal to the selected Parent line limit expiry date. Limit expiry date can be left blank.
18. If the Limit Setting that you chose above has a commitment interest defined, you need to specify which account of the client will be used for debiting this commitment interest from in the Commitment interest account. You can either input the account number or use the hyperlink. If client owns a single account, then that account number will be displayed by default. If client has multiple accounts, click the hyperlink, the Search Client account page will appear displaying all the active current accounts held by the client. Select the required account.
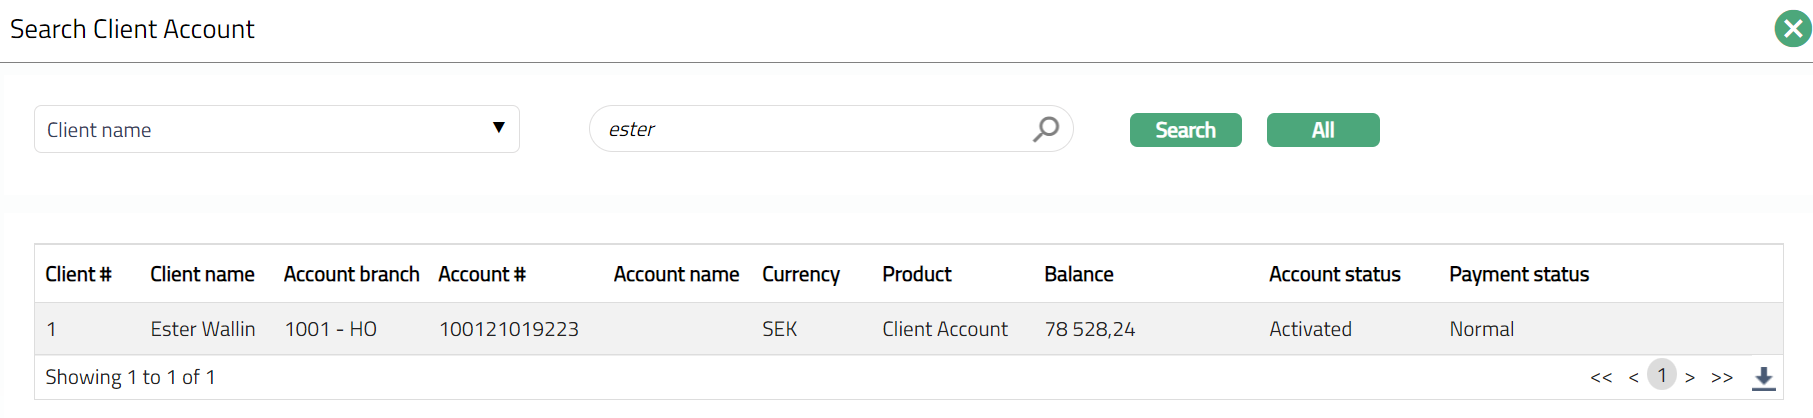
19. Select Charge account by clicking on Charge account hyperlink. The Search Client account page appears with the list of all active accounts held by the client. You can also input the Account # and select the required Charge account from the list displayed by Aura. If there are any charges for the Limit, then Charge account will be mandatory field and by default the Commitment interest account will get displayed.
20. Click Next. New Limit → Confirmation (2/2) page appears.
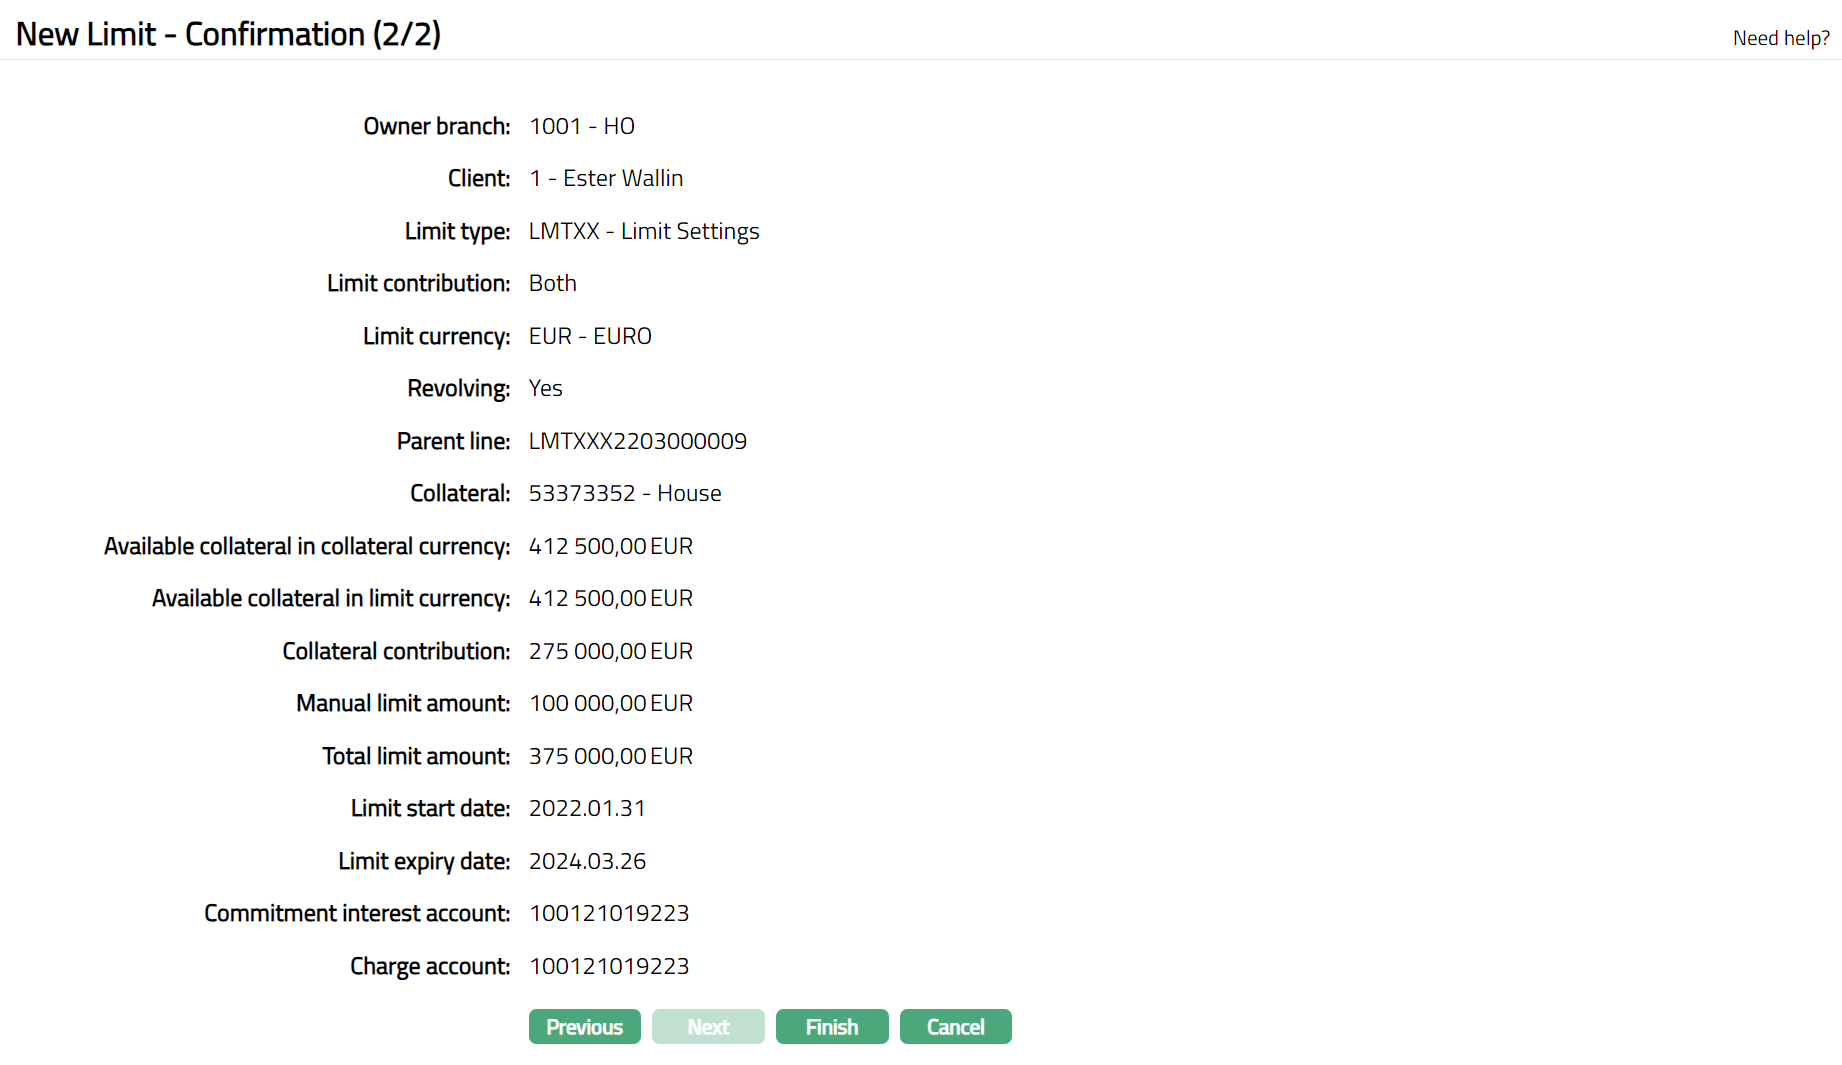
21. Click Finish. limit is saved with a system generated Limit id and the Limit page appears showing the Profile tab by default.
Functions: Add, Search, Delete, Edit, Approve
Note: On creation of the Limit, the Limit Status by default will be Activated and status of the record is Pending. Only on approval, the Limit will be Activated and Approved; and will be available to all modules.
Note: On expiry of the limit, only Add and Search radio buttons will be enabled. Add, Edit, Delete and Approve buttons will remain disabled inside all the tabs.
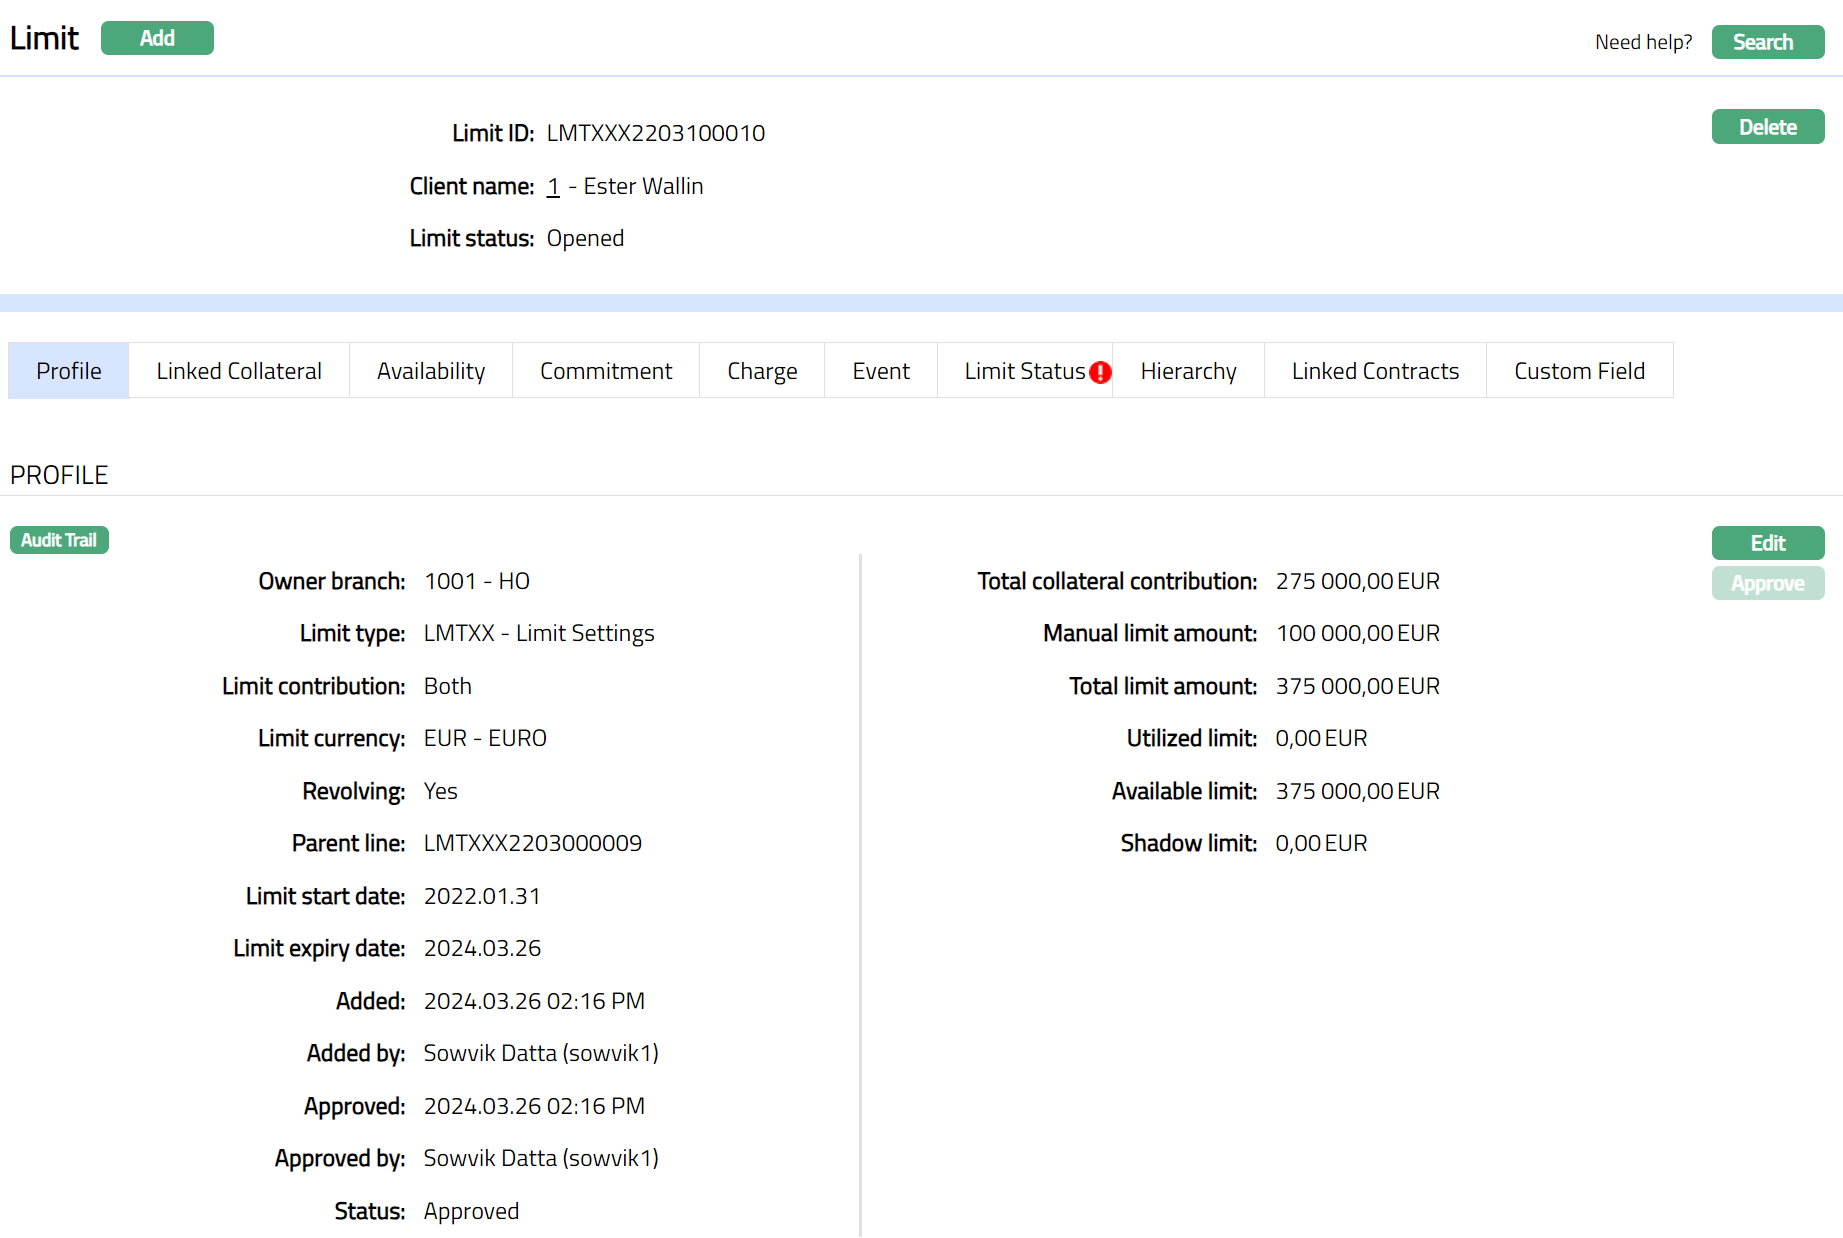
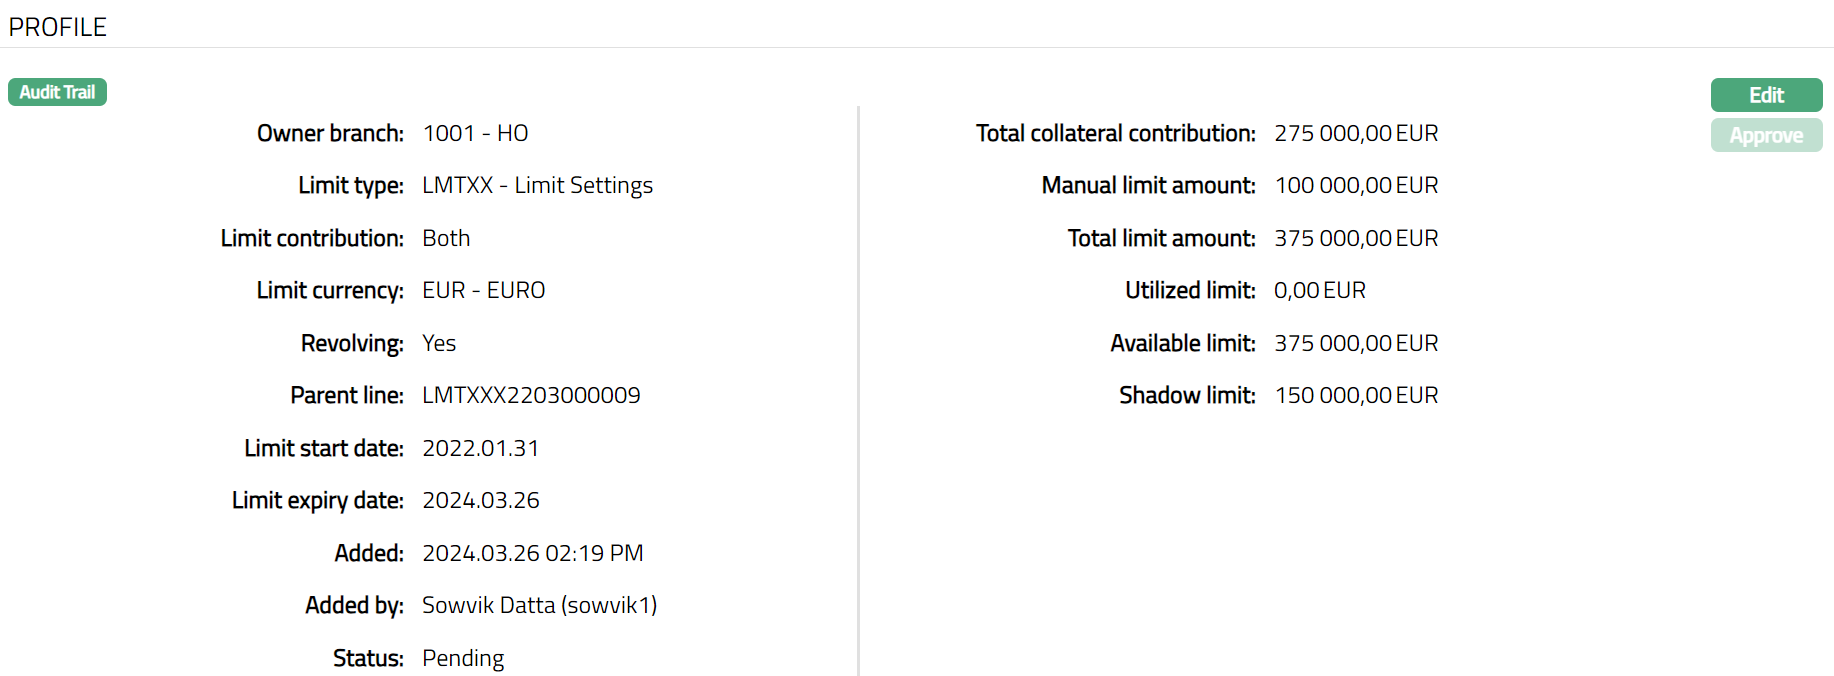
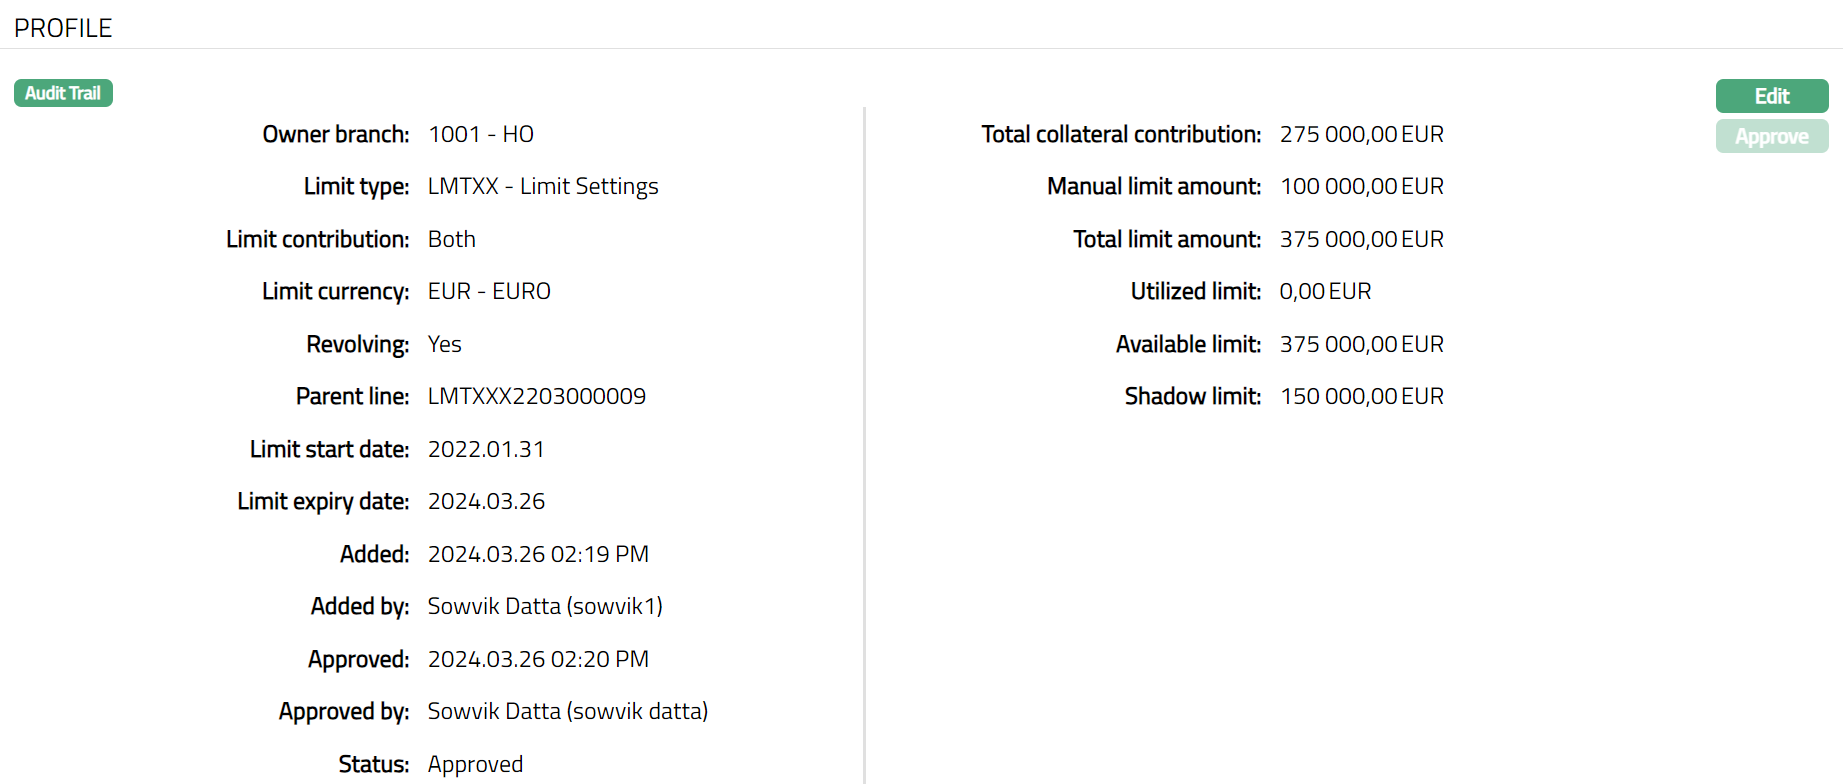
Profile
Profile tab, which is the default tab in the Limit Maintenance page, shows the details of the Limit added in New Limit → Details (1/2).
To view / edit limit Profile,
1. Access Limit page and click Profile tab. It will display all the details defaulted from New Limit → Details (1/2) screen.

The additional fields that you can view are as follows:
Utilized amount: Amount Utilized out of this limit.
Available Limit: This is calculated as Total limit -- Utilized limit.
Shadow Limit: It is a limit that is not actually provided to the customer but internally scored and kept in waiting. This field can only be viewed and edited and will not be added to the total limit amount. Since it is not an actual exposure, it will not qualify for capital charge. This is an editable field.
Status field denotes the status of the record.
Added field denotes the date on which the record was added.
Added by field denotes the name of the person who created the record.
Approved field denotes date on which the record was approved and is displayed only for approved records.
Approved by field denotes name of the person who approved the record and is displayed only for approved records.
2. Click Edit. Edit Profile page appears.
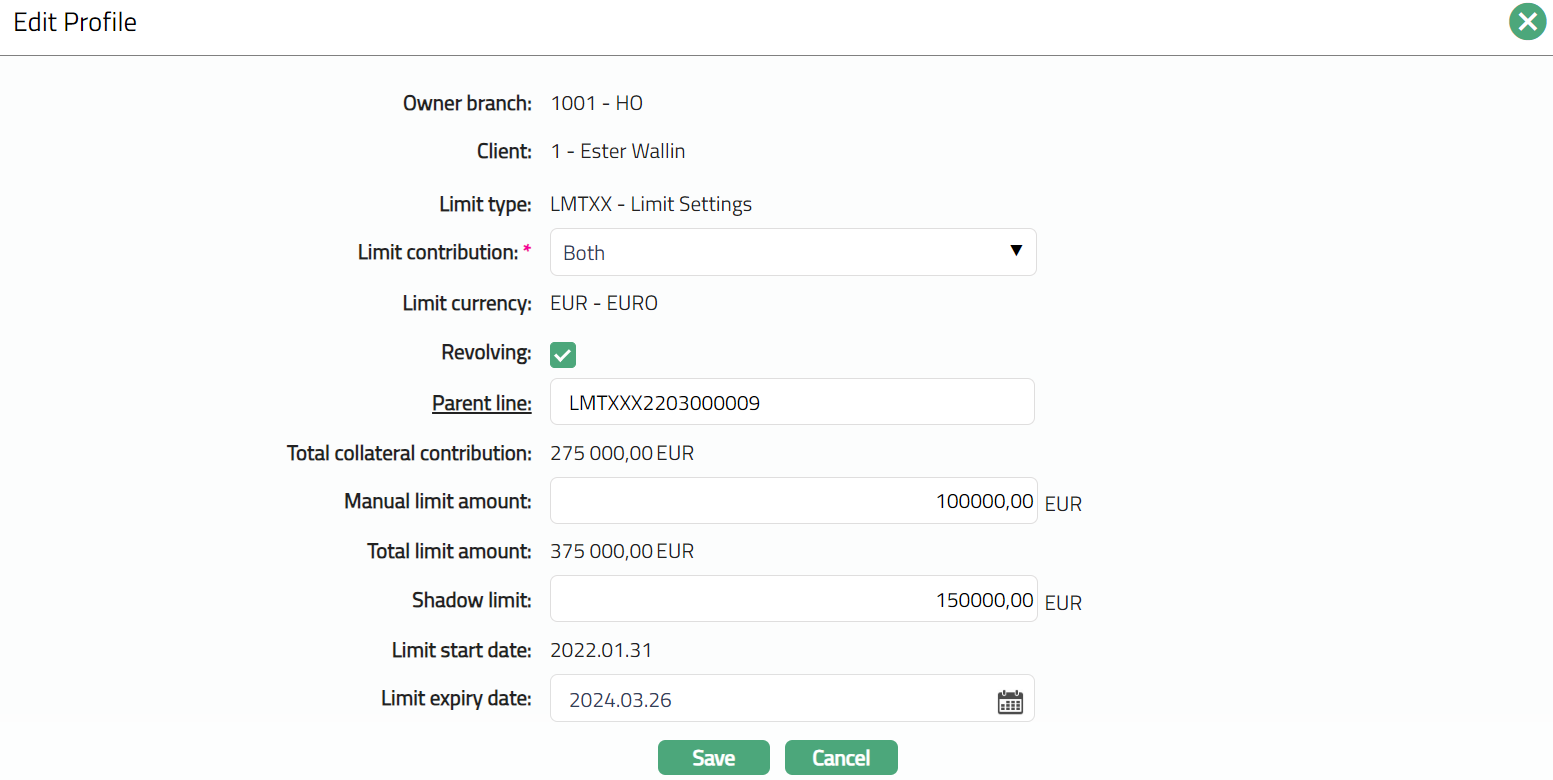
3. The non-editable fields include Owner Branch, Client, Limit type, Limit currency, Total collateral contribution and Total limit amount.
The editable fields are as follows:
Limit Contribution
Revolving
Parent Line
Manual limit amount
Shadow limit
Limit start date.
Limit expiry date.
Note: If you want to establish a Parent-Child relationship between two existing limits, access the Child Limit and enter the Parent Limit in the Parent Line. Thus, during edit, you can change or introduce a parent line for a child limit.
4. Click Save. Profile page appears with the edited details.
Functions: Edit, Approve
Note: Any change in the tab will set the tab status to Pending till it is approved by another user. On approval, the tab status is set to Approved.
Functions: Edit, Approve
Linked Collateral
The details in the Linked Collateral tab will be displayed only if Limit Contribution type is selected as Collateral or Both. If the Limit contribution type is Manual, then, this tab does not show any details.
Using this tab, you can add or edit multiple collaterals; however, this is possible only if the Collateral has been made available to the Client under CRM → Collateral & Limits → Collaterals → Availability tab.
To View / Add collateral,
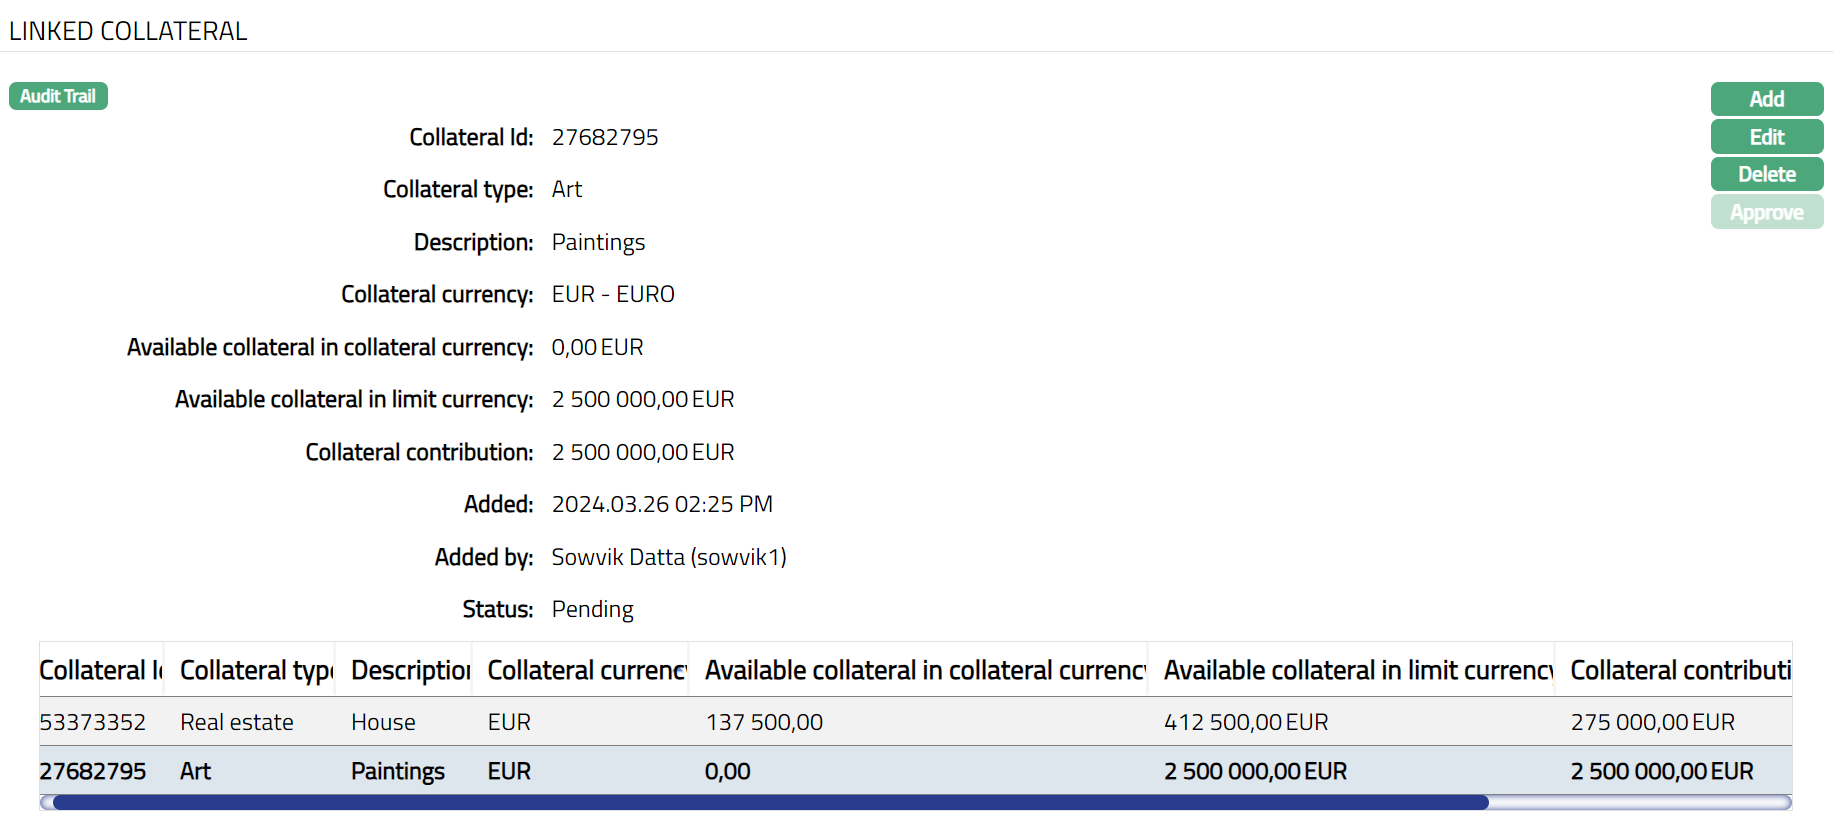
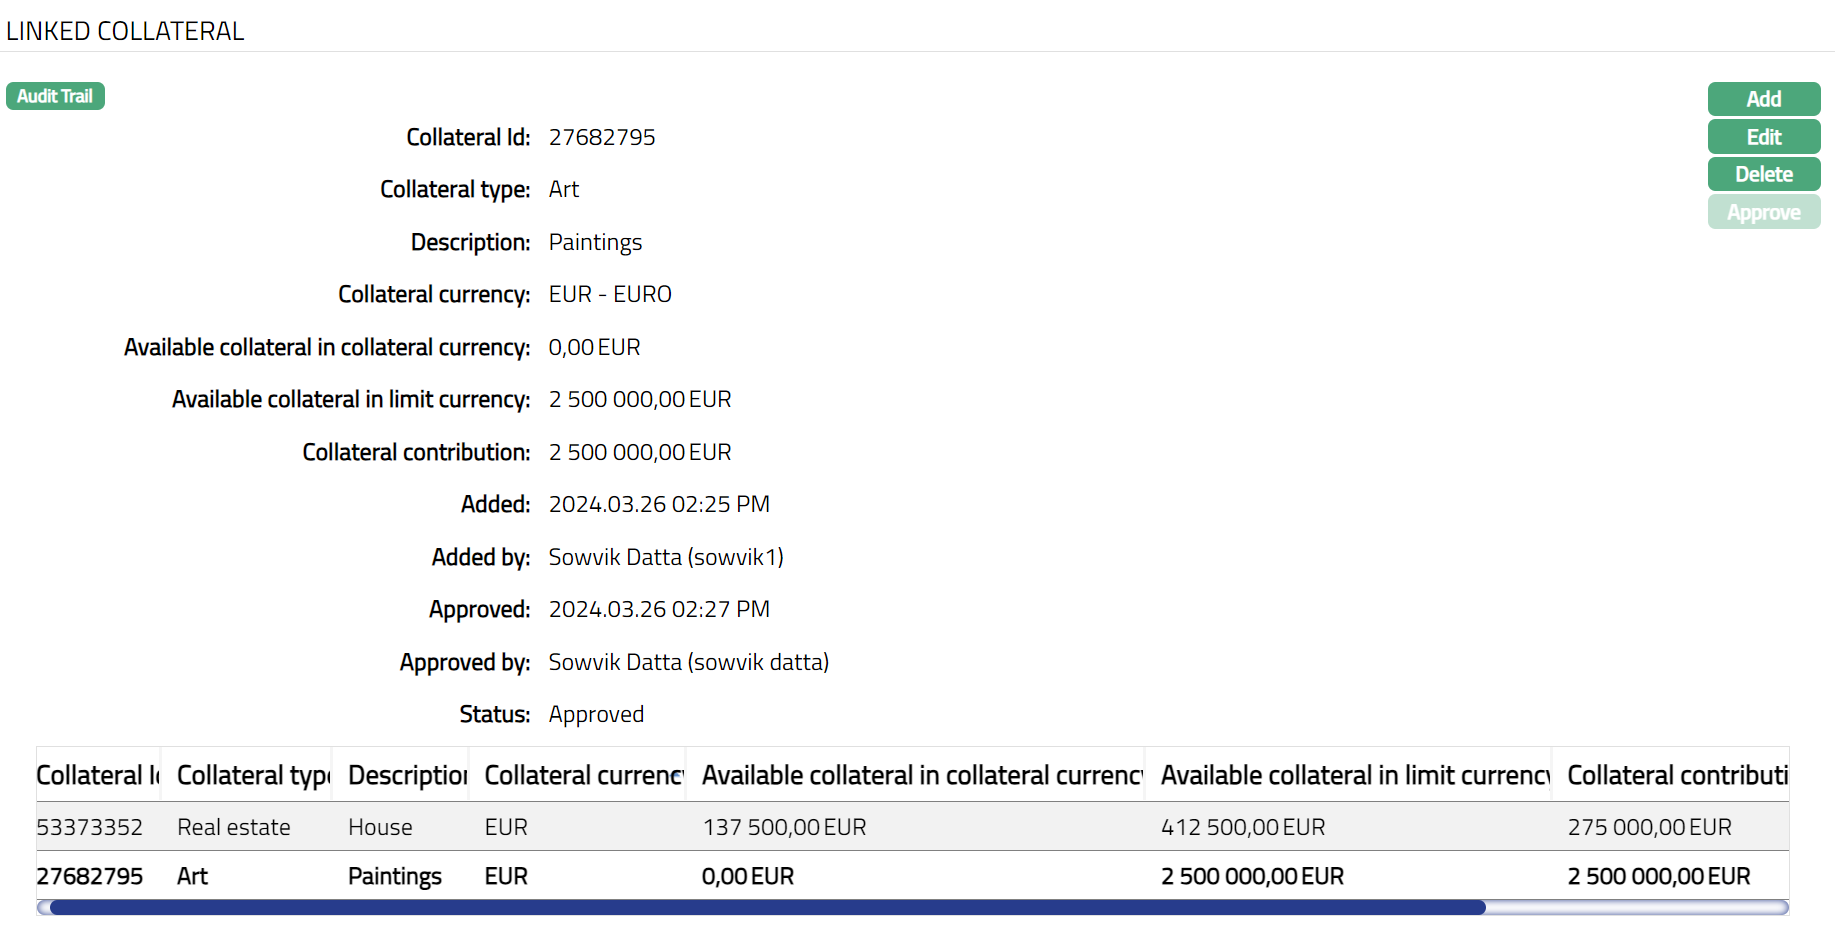
1. Access Limit page and click Linked collateral tab. Details of the Collateral(s) that was added to the Limit will be shown as per sample below:
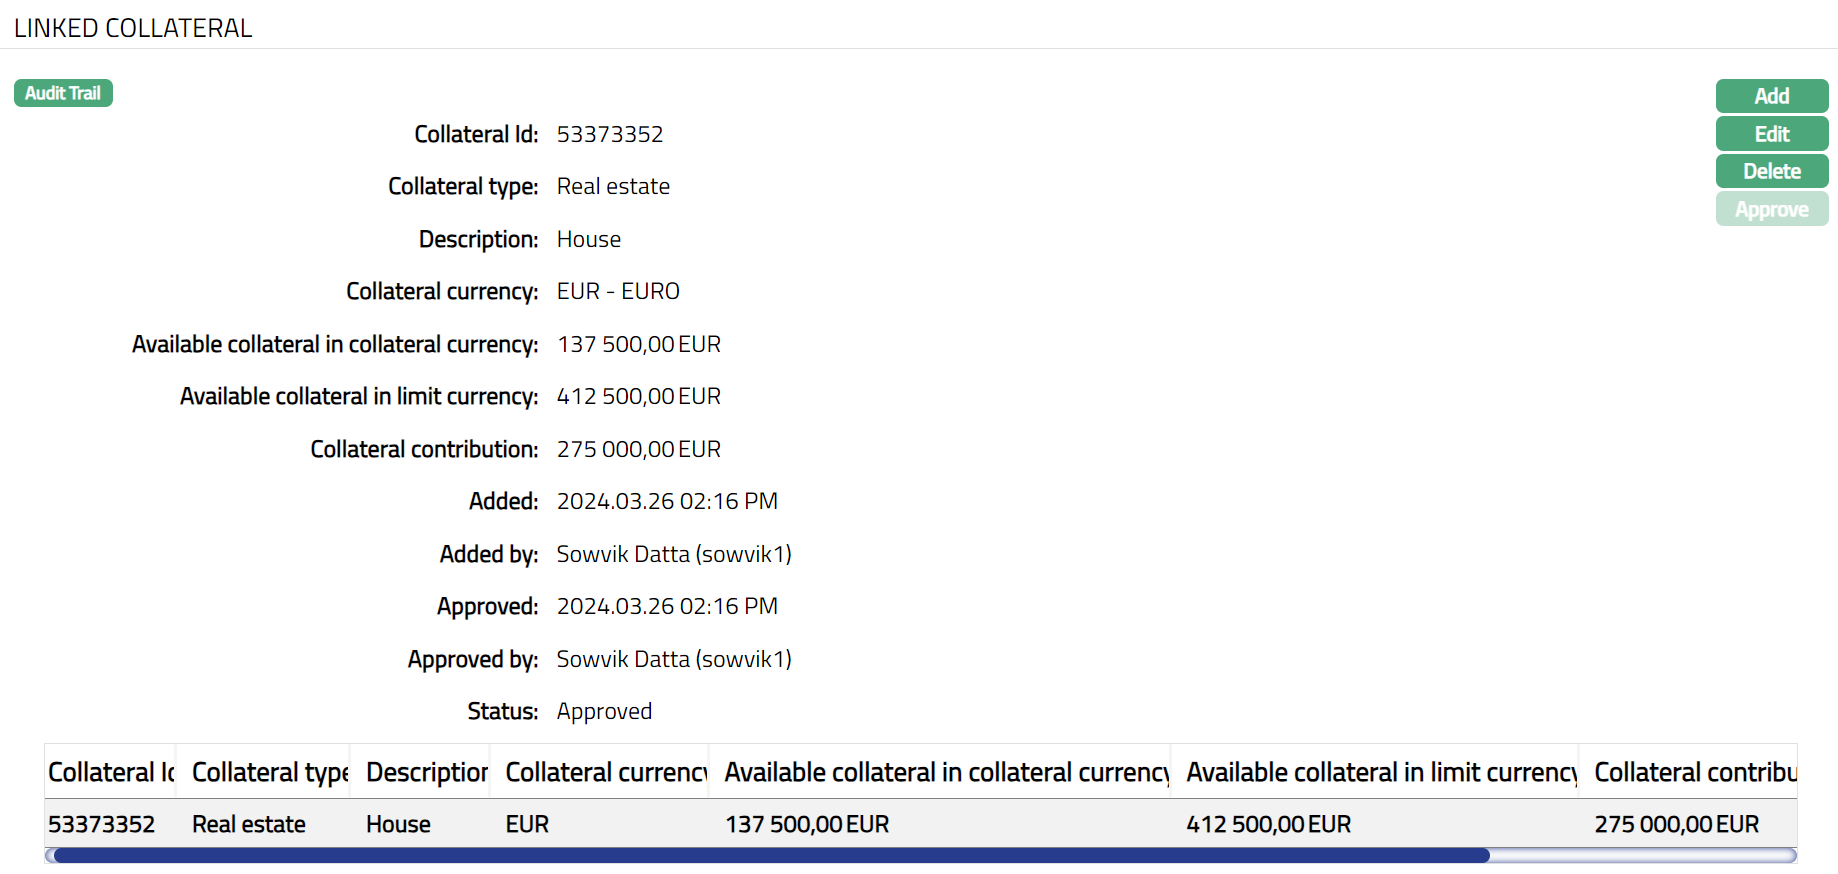
2. Collateral id is the unique id of the Collateral that is linked to the Limit.
3. Collateral Type is the type of Collateral that is linked to the Limit.
4. Description is the description for the above Collateral type.
5. Collateral currency displays the currency maintained for the above Collateral.
6. Available collateral in collateral currency displays the available collateral amount in collateral currency for the above Collateral.
7. Available collateral in limit currency displays the Available Collateral amount in limit currency for the above Collateral.
8. Collateral contribution displays the amount available for utilization as a contribution from the above collateral.
The following fields are shown only in the View screen and are not editable:
Added field denotes the date on which the record was added.
Added by field denotes the name of the person who created the record.
Approved field denotes date on which the record was approved and is displayed only for approved records.
Approved by field denotes name of the person who approved the record and is displayed only for approved record.
Status field denotes the status of the tab.
If you want to add another Collateral to the Limit
9. Click Add. Add Linked Collateral page appears.
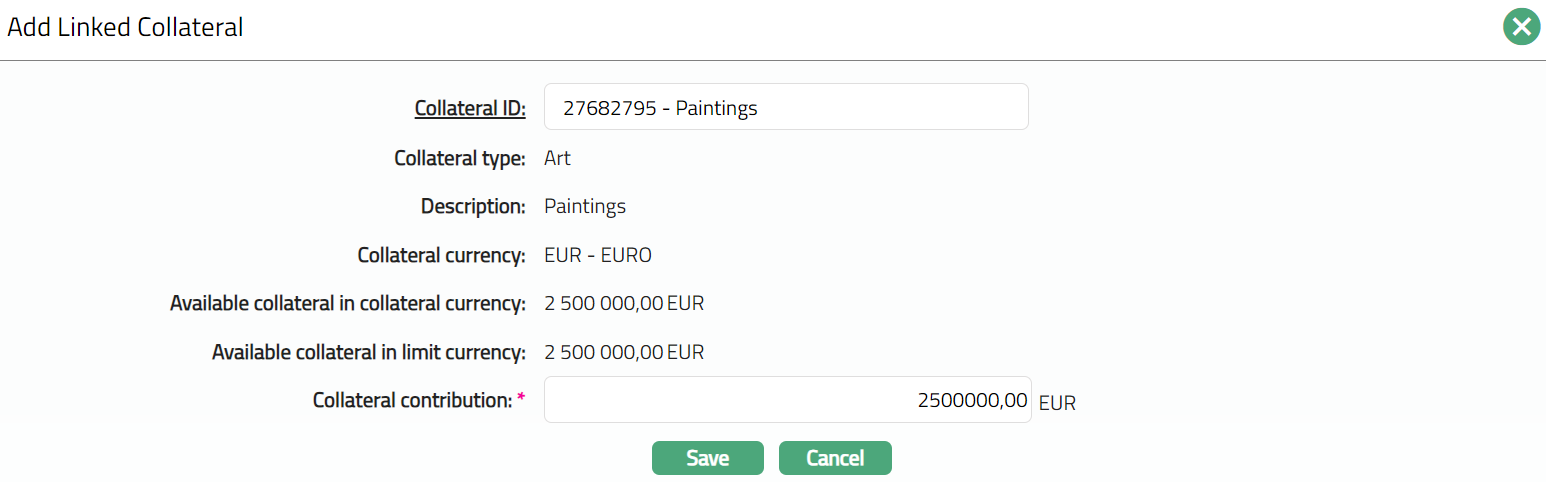
10. Click the hyperlinked Collateral ID and the Collateral Search page appears with the list of all the active Collaterals that are made available for the selected client. Select the appropriate Collateral to be added.
11. Once Collateral is selected above, the values for the Collateral type, Description, Collateral currency, Available collateral in collateral currency, Available collateral in limit currency and Collateral contribution fields gets auto populated. The values are derived from Collateral maintenance for the selected collateral.
12. Collateral contribution shows the amount available for utilization from the collateral for this Limit. This is defaulted from the Amount Available for the Collateral but can be edited to any lesser amount.
13. Click Save. Limit Collateral page appears with the added details.
Functions: Add, Edit, Delete, Approve
Note: Any change in the tab will set the tab status to Pending till it is approved by another user. On approval, the tab status is set to Approved.
Functions: Add, Edit, Delete, Approve
To edit Collateral details,
1. Click Edit. Edit Linked Collateral page appears.
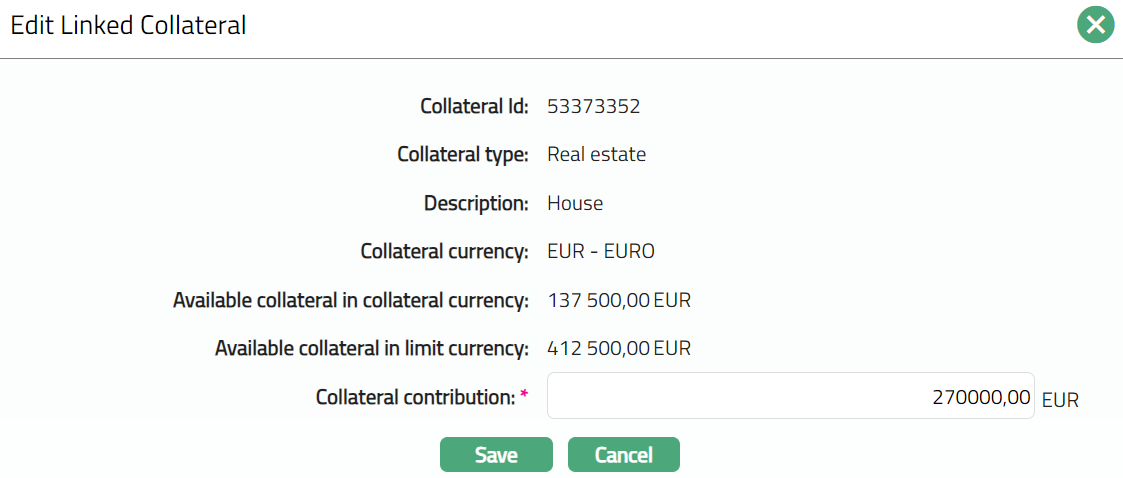
Note: Only Collateral contribution field is editable.
2. Do required changes and click Save. Linked Collateral page appears with the edited details.
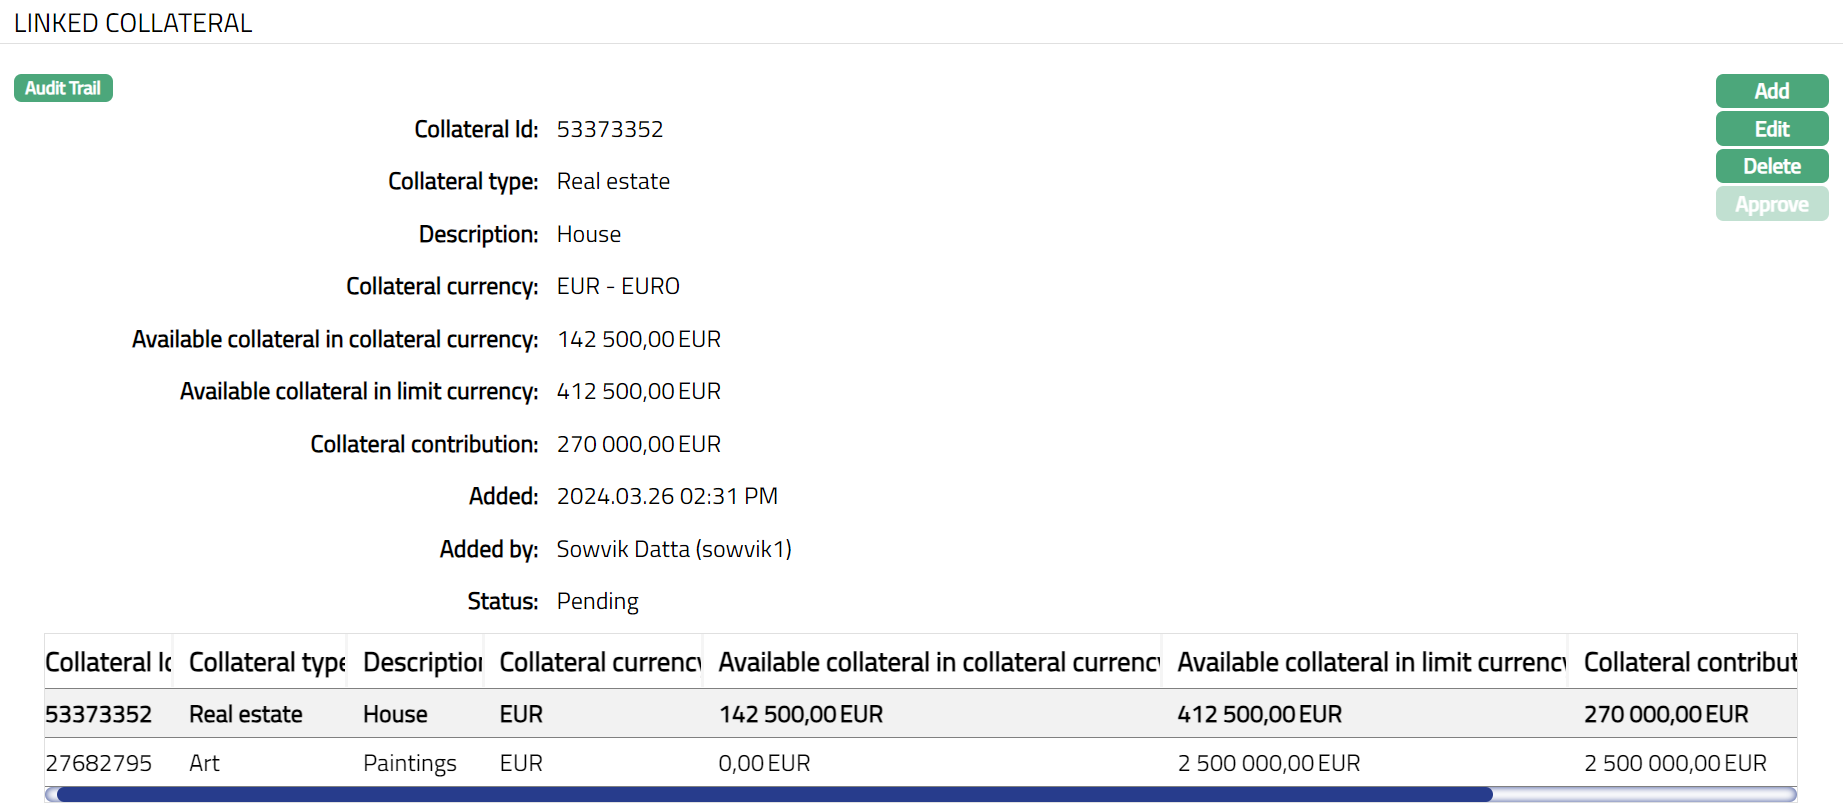
Note: Any change in the tab will set the tab status to Pending till it is approved by another user. On approval, the tab status is set to Approved.

Functions: Add, Edit, Delete, Approve
Availability
Using this tab, you can allow the Limit to be available for the Loan, Client, and Card Account. It has the following sub-tabs.
Client Account
Loan
Forex
Client
Card Account
Factoring Contract
Client Account
To make Limit available for Client Account
1. Access Limit page and click Availability tab and then Client Account.

Loan
To make Limit available to a Loan
1. Access Limit page and click Availability tab and then Loan.

2. Code displays the Product code for the type of Loan.
3. Description displays the description of the Loan product.
4. Limit allocated displays the part of the limit amount that is allocated to the particular selected product.
5. All-radio button is selected by default. To restrict the availability of the limit to the Loan products, click Selected radio button. Once elected button is chosen, the Add button will be enabled.

6. Click Add. Add Product page appears.
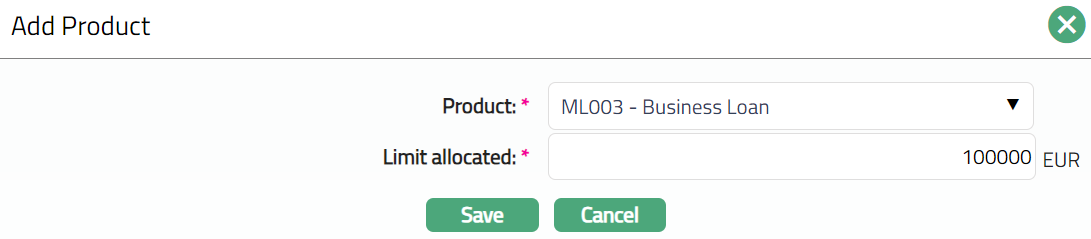
7. Select Loan Account Product from the drop-down list maintained under Card → Settings → Card Loan Product. The Product selected can be added only once.
8. Enter Limit allocated amount for the selected product. The amount allocated here is the part of the limit amount that is allocated to the particular selected product.
9. Click Save. Loan page appears with the added details.

Functions: Add, Edit, Delete
To Edit Loan,
1. Click Edit. Edit Product page appears.

Note: Only Limit allocated field is editable.
Make required changes and click Save. Loan page appears with the edited details.

Functions: Add, Edit, Delete
Forex
To make Limit available to Forex,
1. Access Limit page and click Availability tab and then Forex.

2. Code displays the Product code for the type of Loan.
3. Description displays the description of the Loan product.
4. Limit allocated displays the part of the limit amount that is allocated to the particular selected product.
5. All-radio button is selected by default. To restrict the availability of the limit to the Loan products, click Selected radio button. Once Selected button is chosen, Add button will get enabled.

6. Click Add. Add Product page appears.
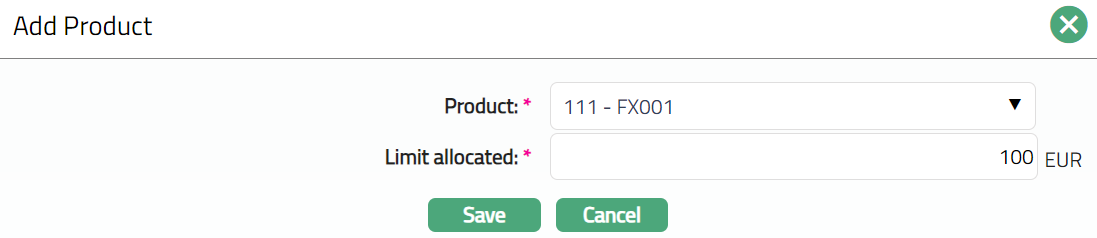
7. Select Loan Account Product from the drop-down list maintained under Card → Settings → Card Loan Product. The Product selected can be added only once.
8. Enter Limit allocated amount for the selected product. The amount allocated here is the part of the limit amount that is allocated to the particular selected product.
9. Click Save. Forex page appears with the added details.

Functions: Add, Edit, Delete
To Edit Forex,
1. Click Edit. Edit Product page appears.
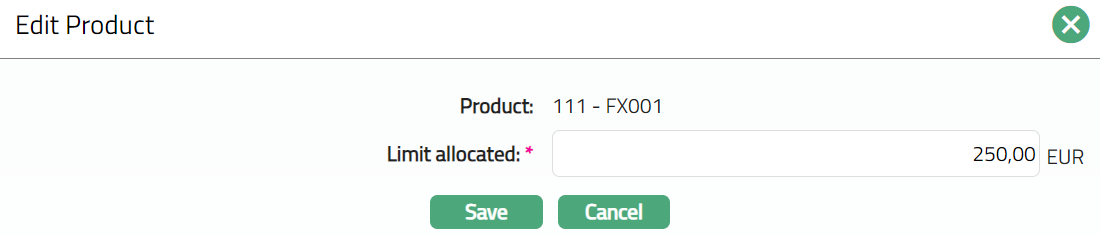
Note: Only Limit allocated field is editable.
Make required changes and click Save. Forex page appears with edited details.

Functions: Add, Edit, Delete
Client
To make Limit available to a Client,
1. Access Limit page and click Availability tab and then Client.

2. Client# displays the id for the Client.
3. Client Name displays the name of the client.
4. All-radio button is selected by default. To restrict the availability of the Limit to the clients, click on Selected radio button. Once the Selected button is chosen, the Add button will be enabled.
5. Click Add. Add Client page appears.
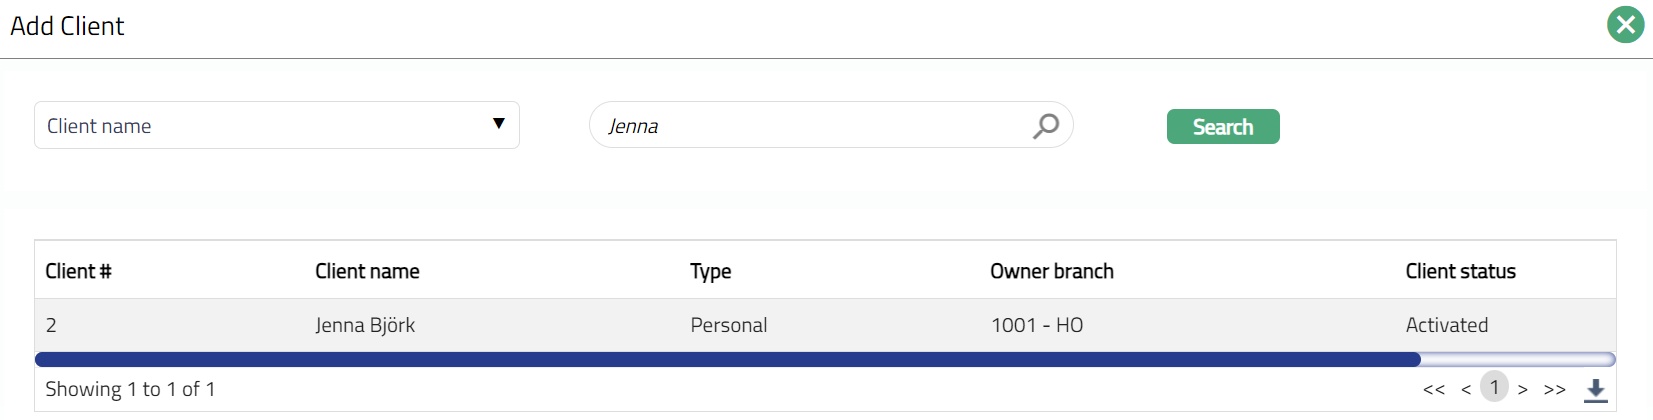
6. Select client from the list. The client chosen can be added only once.
7. Click Save to save the changes.
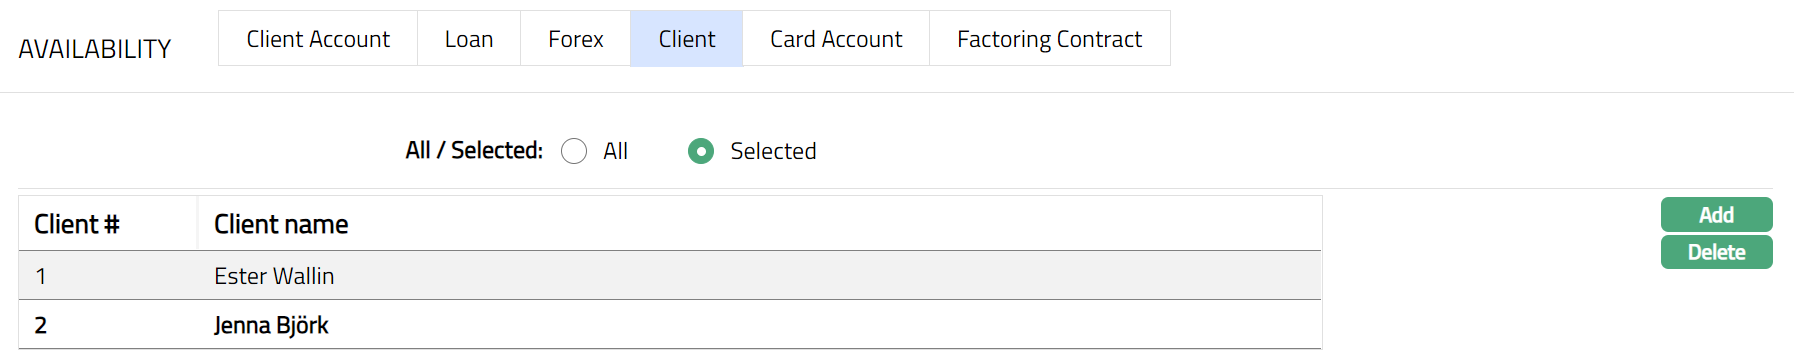
Functions: Add, Delete
Card Account
To make Limit available to a Card Account
1. Access Limit page and click Availability tab and then Card Account.

2. Code displays the Product code for the type of Card Account.
3. Description displays the description of the Card Account product.
4. Limit allocated displays the part of the limit amount that is allocated to the particular selected product.
5. All radio button is selected by default. To restrict the availability of the Limit to the Card Account Products, click on Selected radio button. Once the Selected button is chosen, the Add button will be enabled.

6. Click Add. Add Product page appears.
7. Select Card Account Product from the drop-down list maintained under Card → Settings → Card Account Product. The Product selected can be added only once.
8. Enter Limit allocated amount for the selected product. The amount allocated here is the part of the limit amount that is allocated to the particular selected product.
9. Click Save. Card Account page appears with the added details.

Functions: Add, Edit, Delete
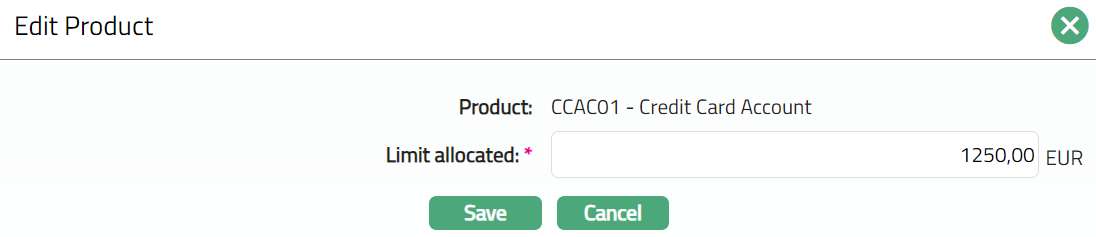
To Edit Card Account,
1. Click Edit. Edit Product page appears.
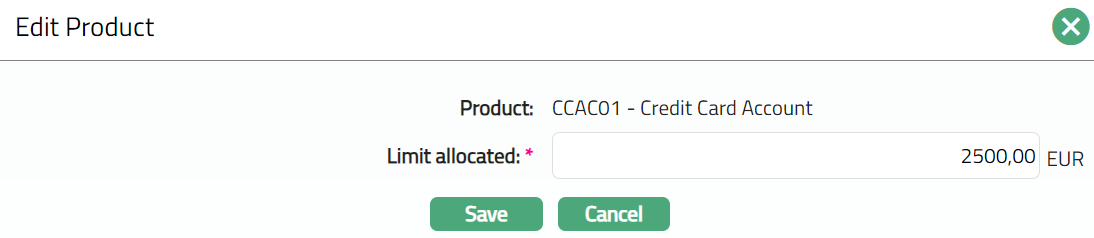
Note: Only Limit allocated field is editable.
2. Make required changes and click Save. Card Account page appears with the edited details.

Functions: Add, Edit, Delete
Factoring Contract
To make Limit available to Factoring Contract,
1. Access Limit page and click Availability tab and then Factoring Contract.

2. Code displays the Product code for the type of Loan.
3. Description displays the description of the Loan product.
4. Limit allocated displays the part of the limit amount that is allocated to the particular selected product.
5. All radio button is selected by default. To restrict the availability of the limit to the Loan products, click on Selected radio button. Once Selected button is chosen, the Add button will be enabled.

6. Click Add. Add Product page appears.

7. Select Loan Account Product from the drop-down list maintained under Card → Settings → Card Loan Product. The Product selected can be added only once.
8. Enter Limit allocated amount for the selected product. The amount allocated here is the part of the limit amount that is allocated to the particular selected product.
9. Click Save. Factoring Contract page appears with the added details.

Functions: Add, Edit, Delete
To Edit Factoring Contract,
1. Click Edit. Edit Product page appears.
Note: Only Limit allocated field is editable.
2. Make required changes and click Save. Factoring page appears with the edited details.

Functions: Add, Edit, Delete
Commitment
This tab allows you to edit the commitment interest details for the Limit. The details are defaulted from the Limit Setting that was chosen when you created the Limit. If the Limit Settings chosen for this Limit does not have any commitment interest, then Aura will not display any values in this tab and edit button will be in disabled mode. If commitment interest scheme is attached in Limit Settings Maintenance, the values in commitment tab will get displayed and edit button will be enabled. However, please note that this will be applicable only for new limits created after the Limit Setting is changed and will not affect the limits which were already created.
To edit Commitment,
1. Access Limit page and click Commitment tab.
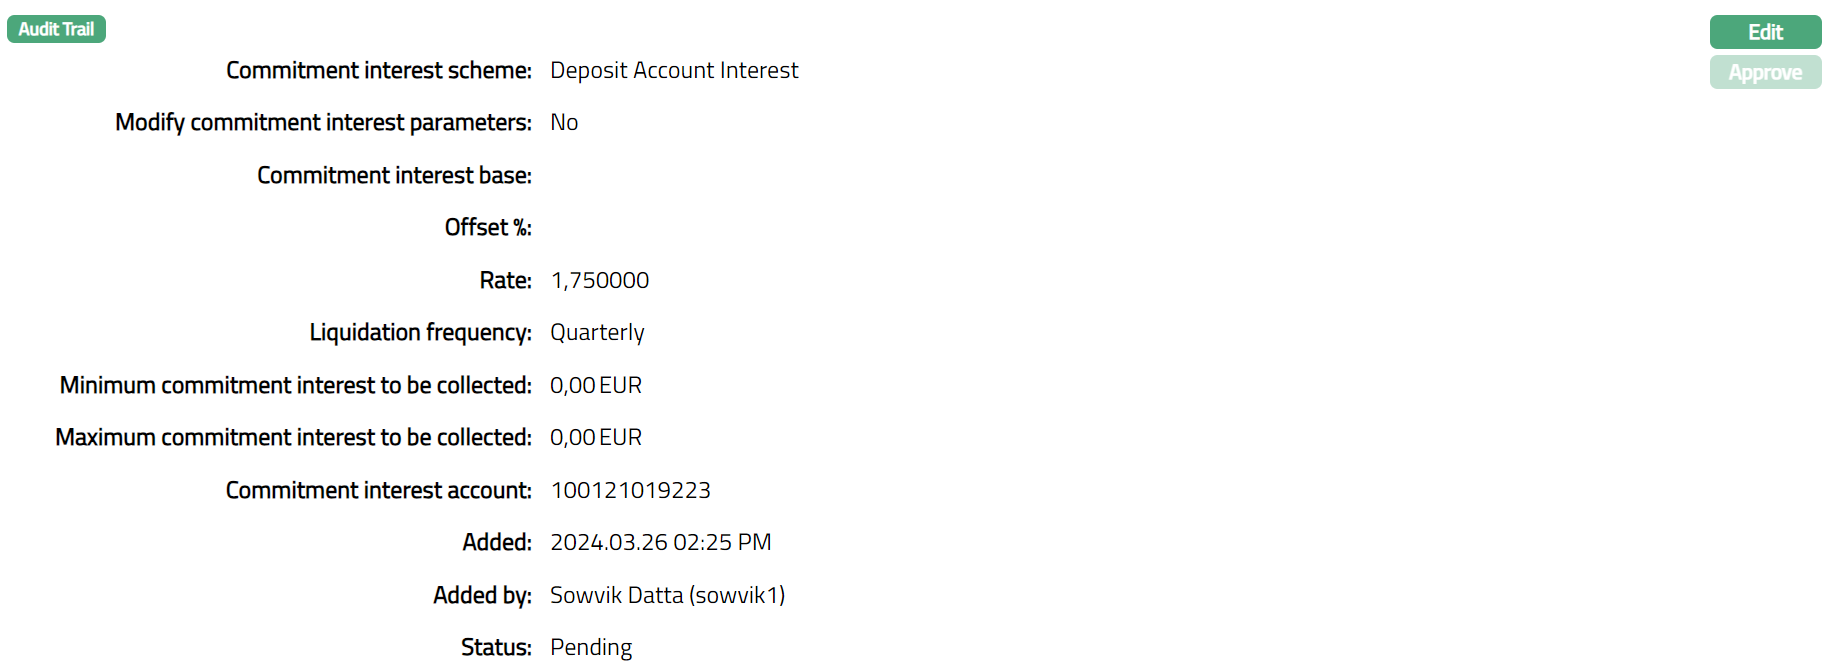
2. Commitment interest scheme displays the interest scheme linked for commitment and is defaulted from Limit Settings and is editable. If edited, it shows the interest scheme that was chosen last for this Limit.
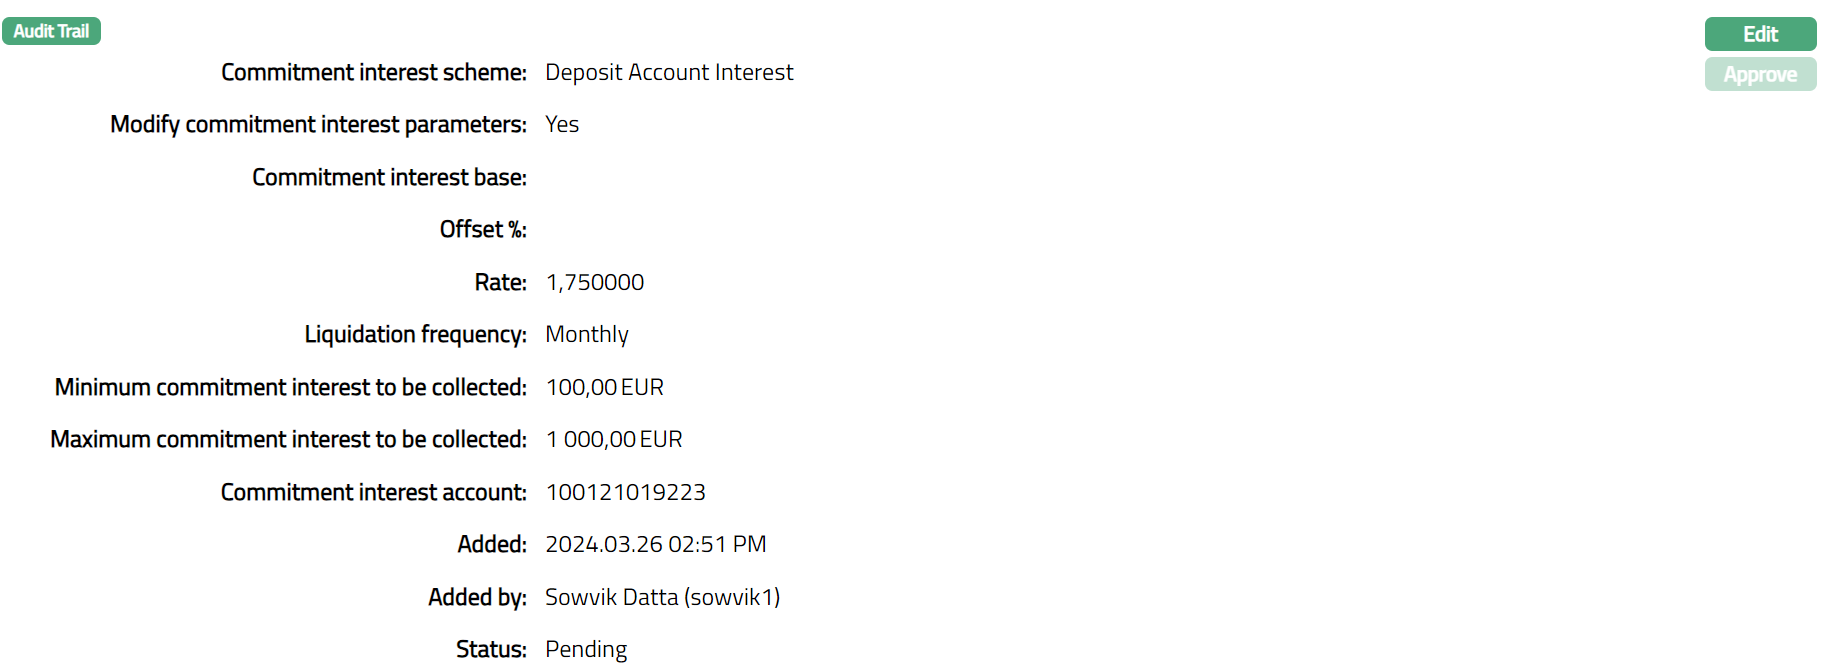
3. Modify Commitment interest parameter indicates if the parameters defined for the interest scheme can be edited. As soon as the Limit is created, by default, this is No indicating that the default values have been retained. However, if you have chosen to modify the interest parameters during Edit, this will be Yes.
4. Commitment Interest base is the interest base linked to the interest scheme and is applicable for Variable interest schemes only. On creation of the Limit, it is defaulted from the System Codes → Interest Scheme but is editable. If edited, it shows the value that was chosen last for this Limit.
5. Offset% is the Offset% defined in the interest scheme selected. It is the % by which the base interest rate should be offset to get the actual interest to be applied for interest calculation.
6. Rate % is the rate % defined in the interest scheme selected. On creation of the Limit, it is defaulted from the System Codes → Interest Scheme → Maintain Band. If the interest parameters for the Limit have been edited, it shows the rate % based on the bands maintained for the Limit.
7. Liquidation Frequency displays the liquidation frequency defined in the selected limit setting. The available options are: Annual, Daily, Monthly, Quarterly, Semi-annual and Weekly. On creation of the Limit, it is defaulted from Limit Settings but is editable. If edited, it shows the value that was chosen last for this account.
8. Minimum Commitment interest to be collected displays the minimum commitment interest that is to be collected and is an editable field. Aura will check if the calculated Commitment interest amount < Minimum Commitment interest to be collected, If yes then the final commitment interest will be the minimum commitment interest to be collected.
9. Maximum Commitment interest to be collected displays the maximum commitment interest that is to be collected and is an editable field. Aura will check if the calculated Commitment interest amount > Maximum Commitment interest to be collected, If yes then the final commitment interest will be the Maximum Commitment interest to be collected.
10. Commitment interest account displays the Client account number that is to be used for booking the commitment interest. The Account number is defaulted from New Limits → Details (1/2) screen and can be changed.
11. Click Edit. Edit Commitment page appears.
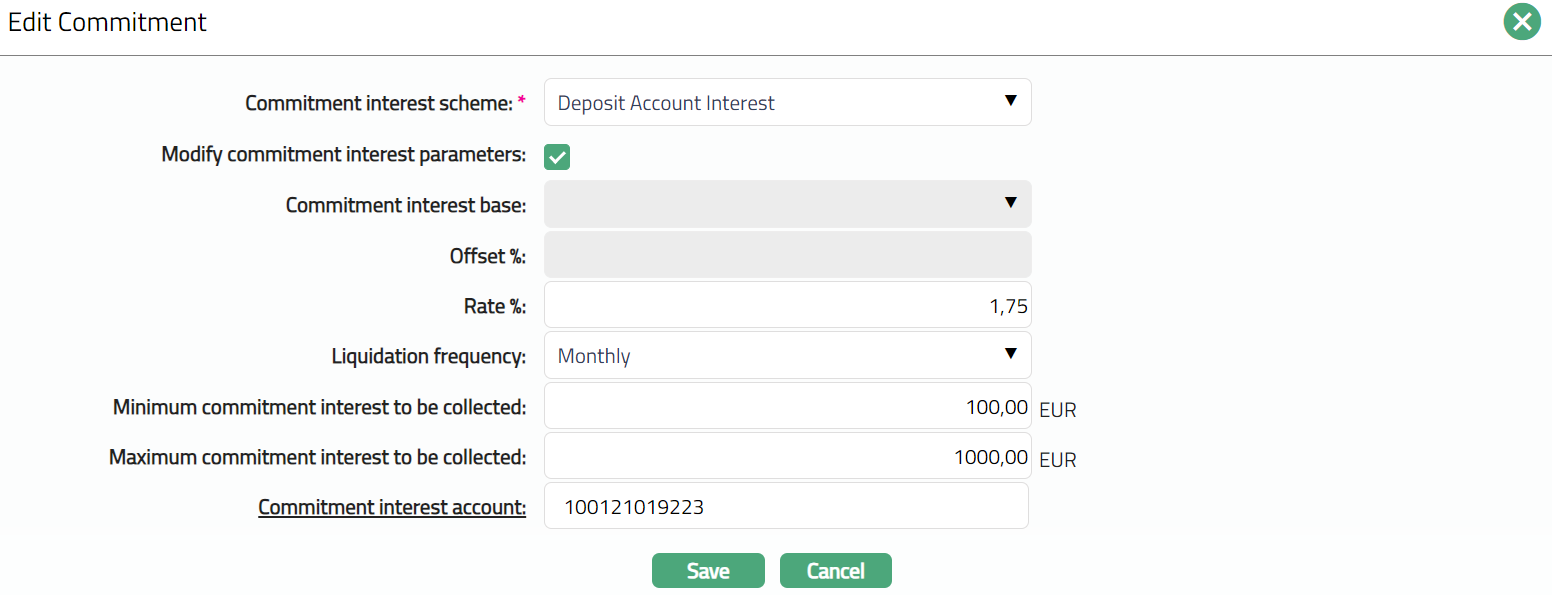
12. You can edit the Commitment Interest scheme irrespective of whether Modify commitment interest parameters checkbox is checked or not.
13. Except Comment interest base and Offset % fields, rest all other fields are editable.
14. Make required changes and Click Save. Commitment page appears with the edited details.
Functions: Edit, Approve
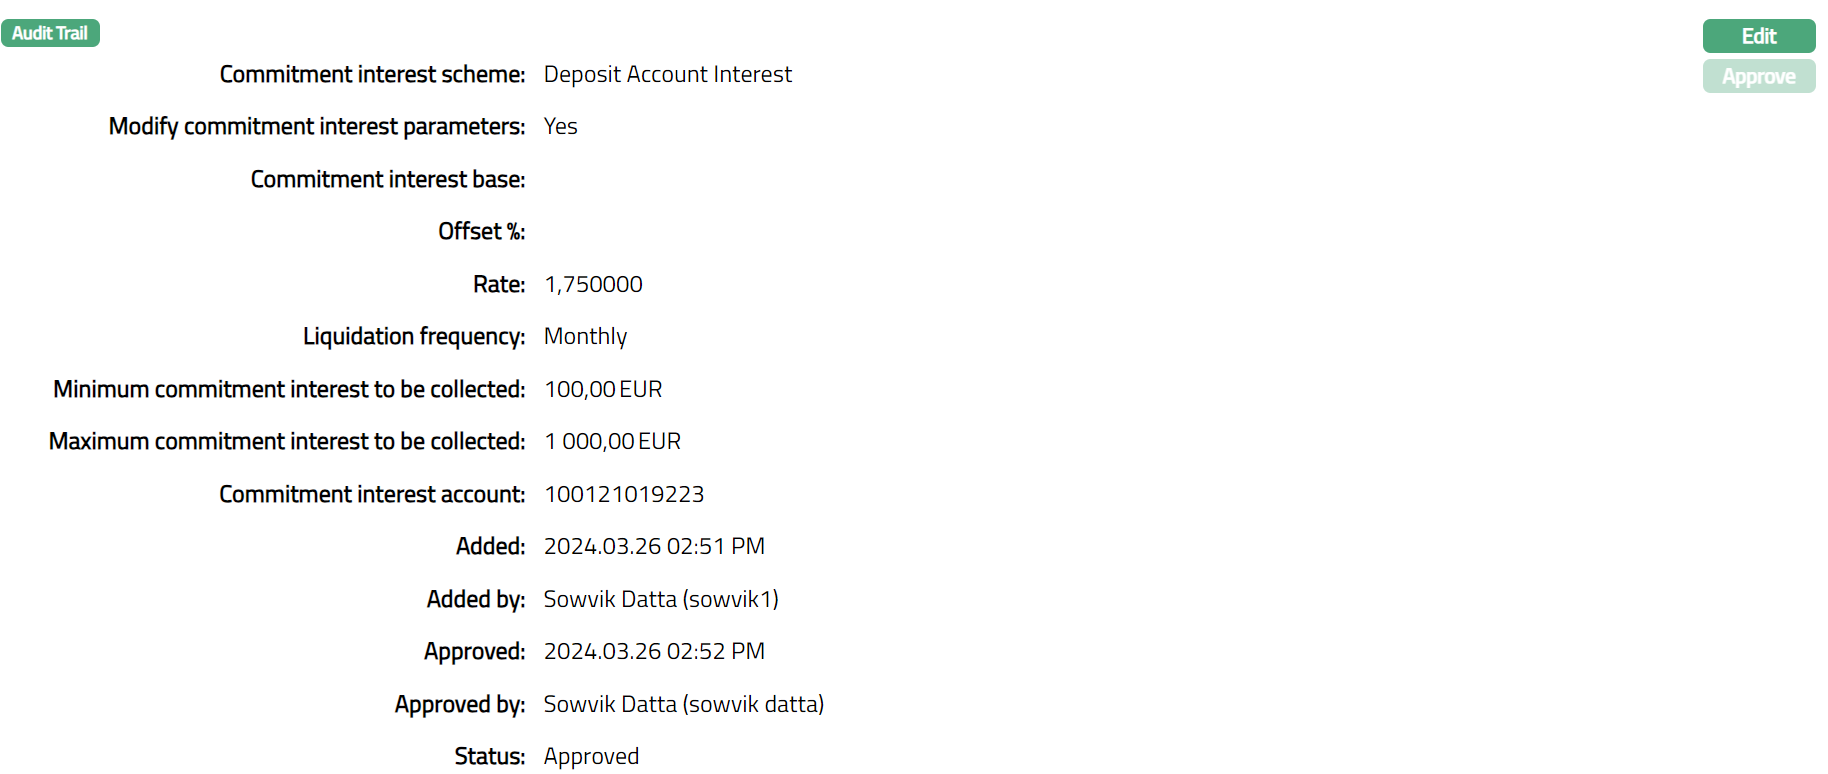
Note: Any change in the tab will set the tab status to Pending till it is approved by another user. On approval, the tab status is set to Approved.
Functions: Edit, Approve
The additional fields are as follows:
Added field denotes the date on which the record was added.
Added by field denotes the name of the person who created the record.
Approved field denotes date on which the record was approved and is displayed only for approved records.
Approved by field denotes name of the person who approved the record and is displayed only for approved records.
Status field displays the status of the record.
Charge
Using this tab, you can view and edit the charges applicable to the Limit.
To View / edit Default Charges,
1. Access Limit page and click Charge tab to view the details as per sample below.
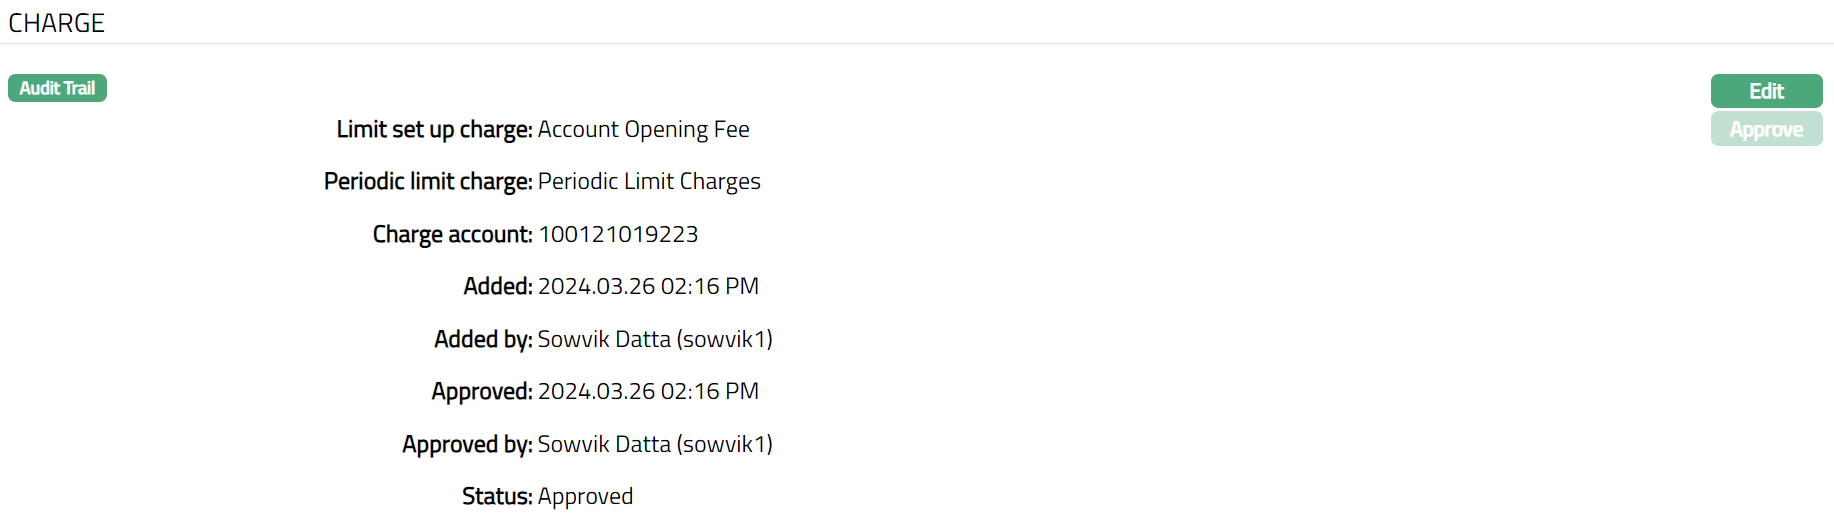
2. Limit set up charge displays the charge that is to be applied whenever a limit is created. It is an Event based Flat charge. The charge scheme is derived from the Limit Set Up Charge maintained in the Limit Setting chosen for creating the Limit.
3. Periodic limit charge displays the periodic charge that is to be applied for the limit. The charge scheme is defaulted from Periodic Limit Charge maintained in the Limit Setting chosen for creating the Limit.
4. Charge Account displays the account number of the client that is to be used for booking the above charges. It is defaulted from the New Limit → Details (1/2) screen. It is an editable field.
The additional fields that you can view in the tab are explained below:
Status field denotes the status of the tab.
Added field denotes the date on which the record was added.
Added by field denotes the name of the person who created the record.
Approved field denotes date on which the record was approved and is displayed only for approved records.
Approved by field denotes name of the person who approved the record and is displayed only for approved records.
To edit Charge details,
1. Click Edit. Edit Charge page appears.

Note: All fields are editable.
2. If Limit set up charge is defined in Limit settings chosen to create the limit, then the field will be enabled and editable or else disabled. This charge will be editable only when the Limit is in Opened status and not activated and approved. Once the limit is approved, then the Limit set up field will be disabled.
3. Make required changes and Click Save. Charge page appears with the edited details.

Functions: Add, Edit, Delete and Approve
Note: Any change in the tab will set the tab status to Pending till it is approved by another user. On approval, the tab status is set to Approved.

Functions: Add, Edit, Delete and Approve
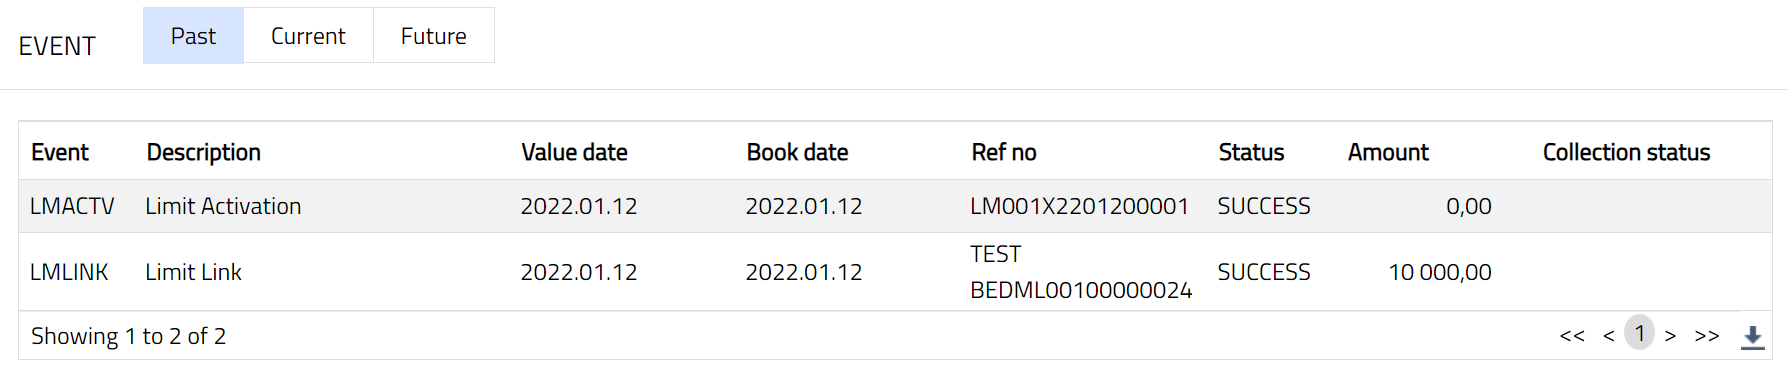
Event
Events tab allows you to view the past, current and future events for Limits.
To view the Events,
1. Access Limit screen. Click on Event tab. There are three sub-tabs within it -- Past, Current and Future. By default, the Current tab is displayed. It shows the details of the Events that have value date = current business date. The Past tab and Future tab show details of events that have value date earlier than / later than the current business date respectively.
Past
A sample of the Past events.
Current
A sample of the Current events

Future
A sample of the future events:
Note: A sample of when limit expired is shown below.
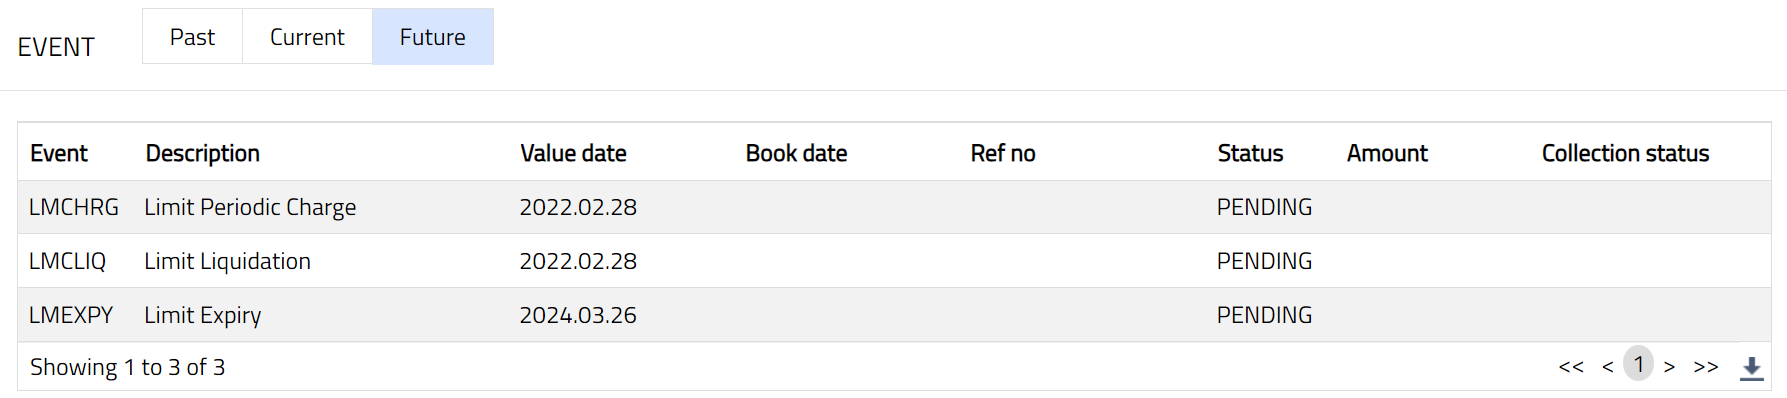
All the tabs show the following data:
Event: It displays the code for the event.
Description: It displays the description of the event.
Value Date: It is the value date for the event.
Book Date: It displays the date of entry / input of the event.
Ref No: It displays the transaction reference number under which the event is processed.
Status: It indicates the status of the event. The status can be of the following types.
Pending: Where the event is not yet processed.
Success: Where the event has been processed successfully.
Failure: Where the event has failed during process.
Retry: Indicates a failed event where the system retries to process the event on subsequent business days.
Amount: It indicates the amount processed by the event. Example: Interest liquidation event will have the amount of interest liquidated.
Collection Status: It displays the status of the charges collection. If the Collection Status is Pending, it indicates that the deferred charges has not been collected and if the Collection Status is Success, it indicates that the deferred charges has been collected.
| Event | Description | Condition |
|---|---|---|
| LMTACTV | Limit Activation | This event occurs when the Limit is Activated and approved. Only if the Post contingent entry flag is Yes in Limit type (settings), the accounting entries will be posted. |
| LMCHRG | Limit Charge | This event occurs when the Limit is Activated and is approved. Once approved, the Periodic limit charge is triggered, and the accounting entries are posted. |
| LMAMND | Limit Amendment | This event occurs when any addition/deletion of a collateral or increase/decrease in the "Manual collateral amount" takes place. Once the changes in the limit are approved, the event is triggered, and accounting entries are posted. |
| LMCONT | Limit Contingent | This event triggers and accounting entries get posted, when Post contingent entries is set as Yes in the Limit type (Settings) and the Parent line is not maintained for the limit. |
| LMLINK | Limit Linkage | This event will trigger when the limit is linked with any account or contract (example: CASA, Loan, Cards, or Forex) and approved. No accounting entries get posted for this event. |
| LMDLNK | Limit Delete | This event is triggered when the limit is deleted from the account or contract (CASA, Loan, Cards, or Forex). No accounting entries are posted for this event. |
| LMEXPY | Limit Expiry | This event triggers and accounting entries get posted when the limit is expired, and Post contingent entries are set as Yes. If the Parent line is attached, then the debit contingent entries will not be posted for the limit which is expired. If the Parent line is not attached, then the debit contingent entries will be posted for the limit which is expired. |
| LMCACR | Limit Accrual | This event gets triggered during the End of the Day process. The interest for the limit gets accrued and accounting entries get posted. |
| LMCLIQ | Limit Liquidation | This event gets triggered during the End of the Day process. The interest for the limit gets liquidated and accounting entries get posted. |
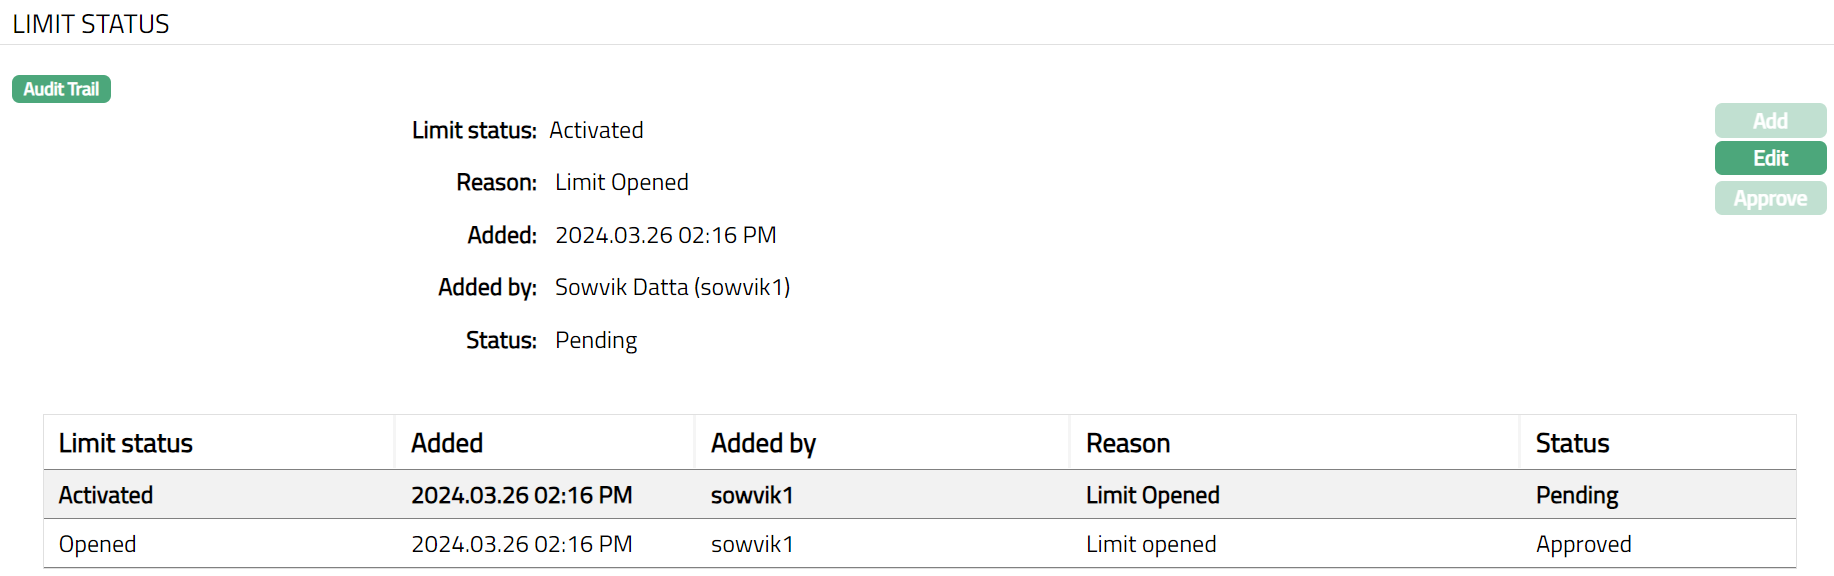
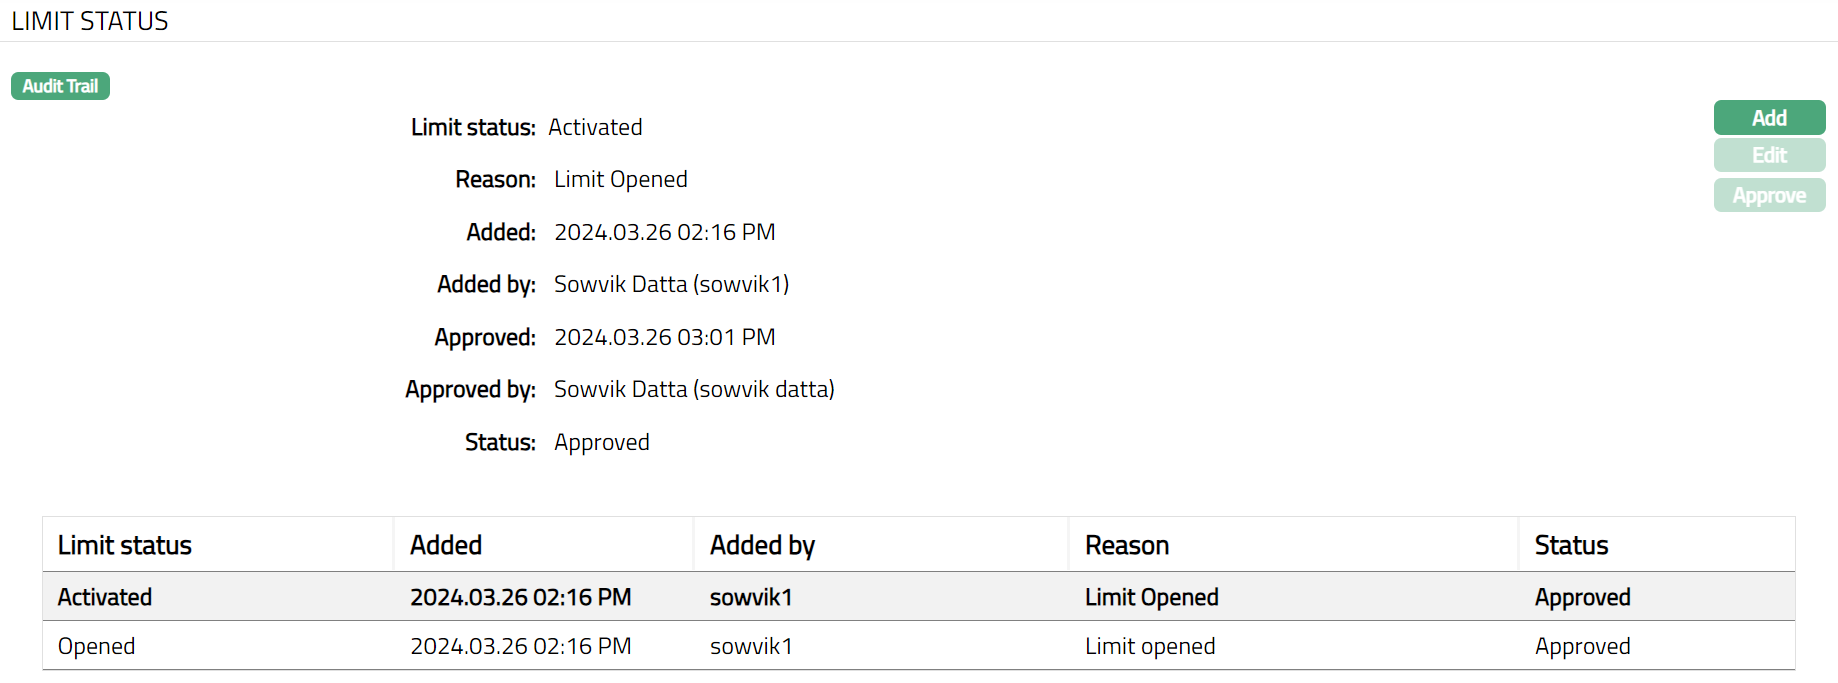
Limit Status
This tab will allow you to View / Add / Edit the status of Limit.
To view Limit Status,
1. Access Limit page and click Limit Status tab.

2. Limit Status displays the status of the limit. The status of a Limit can be Opened, Activated, Suspended and Expired. As soon as the limit is created, by default the Limit status will be Opened and Activated, status of the record will be Approved and Pending. The blue bubble will appear on the tab. If you click on Opened status, Add, Edit, Approve button will be disabled and if you click on Activate status, Edit button will be enabled and Add, Approve button will be disabled. On approval, the Limit status gets changed to Activated and Approved, Add button will get enabled and Edit and Approve button will be in disabled status.
3. Reason displays the reason for the Limit status.
4. Status field displays the status of the record.
The additional fields that you can view in the tab are explained below:
Added field displays the date on which the record was added.
Added by field displays the name of the person who created the record.
Approved field denotes date on which the record was approved and is displayed only for approved records.
Approved by field denotes name of the person who approved the record and is displayed only for approved records.
To edit Limit status,
1. Click Edit. Edit Limit Status page appears.
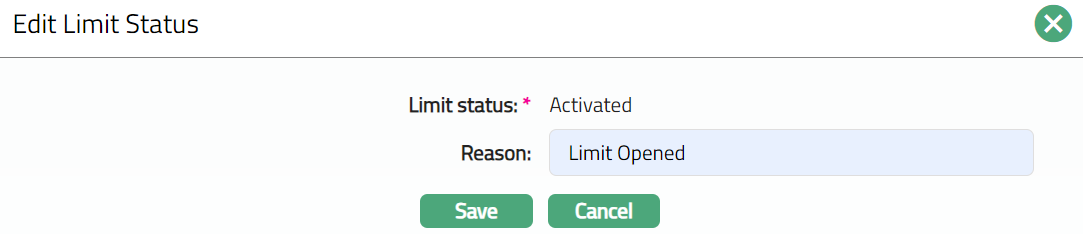
Note: Only Reason field is editable.
2. Make required change and click Save. Limit Status page appears with the edited details.
Functions: Add, Edit, Approve
Note: Any change in the tab will set the tab status to Pending till it is approved by another user. On approval, the tab status is set to Approved.
Functions: Add, Edit, Approve
Hierarchy
This tab enables you to view the details of the limit's hierarchy in terms of the parent line and child line. The values will be a hyperlink. On clicking the hyperlinks, the Limit Maintenance page will appear showing the details of the chosen Limit.
1. Access Limit page and click Hierarchy tab.
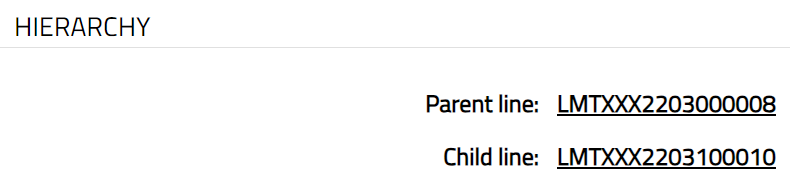
2. Parent line: It will display the parent line limit which is linked to the created limit.
3. Child line: It will display the child line limit linked to the created limit.
Note:
a. There can be multiple child lines for one Parent line. When a Parent line is attached to the child lines, then the Parent line will display all the linked child lines.
b. If parent limit expires then all child limits in the hierarchy will expire.
Example:
L1-Parent limit
L2- child limit
L3-Child limit of L2
If L1 expires then L2 and L3 will also expire at the same time. Hence, Contract/Accounts linked to L1, L2, L3 will be impacted.
c. If any child limit expires then total utilization of limit amount will get reversed from all parent limits in the hierarchy.
Example:
L1-Parent limit
L2- child limit
L3-Child limit of L2
All the transaction of accounts which is linked to L3 will have an impact on L2 and L1 limit utilization and if L3 expires then L2 and L1 will get impacted. Limit utilization because of L3 will get reversed on L3, L2 and L1.
Linked Contracts
This tab allows you to view the contracts / accounts that are linked with this Limit. The details are displayed under the following sub-tabs:
Client Account
Loan
Forex
Card Account
Factoring Contract
Client Account
This tab shows all the client accounts that are linked with the Limit.
1. Access Limit page and click Linked Contracts tab and then on Client Account.

2. Account # displays the Current account to which the Limit is linked. You can click on the actual account # hyperlink to see the respective current account in the account maintenance screen.
3. Account Currency displays the currency of the current account.
4. Product displays the Product of the current account.
5. Limit Currency displays the currency of the limit.
6. Linked amount in limit currency displays the amount of the limit linked to the current account, in terms of the limit currency.
Loan
This tab shows all the Loan accounts that are linked with the limit.
1. Access Limit page and click Linked Contracts tab and then Loan.

2. Contract ref # displays the loan contract to which the Limit is linked. You can click on the Contract Ref # hyperlink to see the respective loan account in the Loan account maintenance screen.
3. Account Currency displays the currency of the loan account.
4. Product displays the Product of the selected loan account.
5. Limit Currency displays the currency of the limit linked to the loan account.
6. Linked amount in limit currency displays the amount in limit Currency linked to the loan account.
Forex
This tab shows all the Forex contracts that are linked with the Limit.
1. Access Limit page and click Linked Contracts tab and then Forex.

2. Contract ref # displays the Forex contract to which the Limit is linked. The value will be a hyperlink. On clicking the hyperlink, the respective loan account in the Forex account maintenance screen will get displayed.
3. Account Currency displays the currency of the Forex account.
4. Product displays the Product of the selected Forex account.
5. Limit Currency displays the currency of the limit linked to the Forex account.
6. Linked amount in limit currency displays the amount in limit Currency linked to the Forex account.
Card Account
This tab shows all the Card accounts that are linked with the limit.
1. Access Limit page and click Linked Contracts tab and then Card Account.

2. Account # displays the Card account to which the limit is linked. You can click on the actual account # hyperlink to see the respective card account in the card account maintenance screen.
3. Account Currency displays the currency of the Card account.
4. Product displays the Product of the selected Card account.
5. Limit Currency displays the currency of the limit.
6. Linked amount in limit currency displays the amount of the limit linked to the card account, in terms of the limit currency.
Factoring Contract
This tab shows all the Factoring contracts that are linked with the Limit.
1. Access Limit page and click Linked Contracts tab and then Factoring Contracts.
Custom Field
This option provides you the flexibility to define fields apart from those that are already available in the standard version of Aura. Thus, it enables you to customize additional data storage and use as required to suit your specific business needs.
To edit Custom Field,
1. Access Limit page and click Custom Field tab.

2. The field appears only when it is created in Admin → System codes → Custom fields → Custom fields and linked to the specific Card Accounts option in Admin → System codes → Custom fields → Field mappings.
3. Click Edit. Edit Custom Field page appears. In the following illustration, a custom field, Initial account opening date has been mapped to the Account as shown below.

4. Enter Custom field details.
5. Click Save. Custom Field page appears.

Functions: Edit