Charge Bundle Group
Charge Bundle Group (CBG) allows you to maintain a consolidated charge for your client for all the types of transactions the client executes in Aura. Charge bundling is applicable to Event and Transaction types of charges only. Charge Bundle allows you to maintain multiple combinations based on the currencies and for each of these combinations, you can select various charge schemes separately. It also allows you to define bands and based on these bands, charges are presented to the client.
The following are the tabs under the Charge Bundle group:
To add a Charge Bundle,
1. From Admin menu, click Pricing, then click Charge bundle group under Settings. Charge Bundle Group - Search page appears.

2. Click Add. New Charge Bundle Group → Profile (1/3) page appears.

3. Enter Name for the Bundle Group.
4. Click Client hyperlink, which opens up a new screen called Client Search. This allows you to select one of the existing clients for Charge Bundle.
5. Click Charge Bundle Settings hyperlink, which opens up a new screen Charge Bundle Settings Search. The available lists are maintained under Admin → Pricing → Charges → Charge Bundle Setting.
Note: If the custom field is mapped to Branch under Admin → System Codes → Custom fields → Field mapping, then an additional screen will appear before the confirmation screen. The custom fields will be mandatory or non-mandatory based on the rules set at the Field mappings. For more detail on custom field functionality please refer Admin → System codes → Custom fields → Field mappings manual.

6. Click Next. New Charge Bundle Group → Confirmation (3/3) page appears.
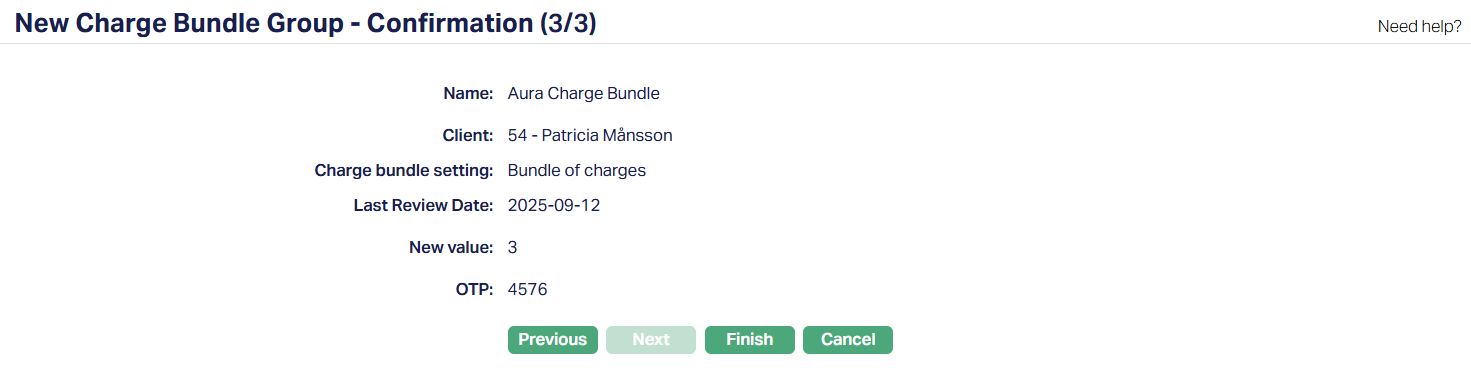
7. Click Finish. The Charge Bundle Group Maintenance page appears with the added details.
Functions: Add, Search, Edit, Approve.
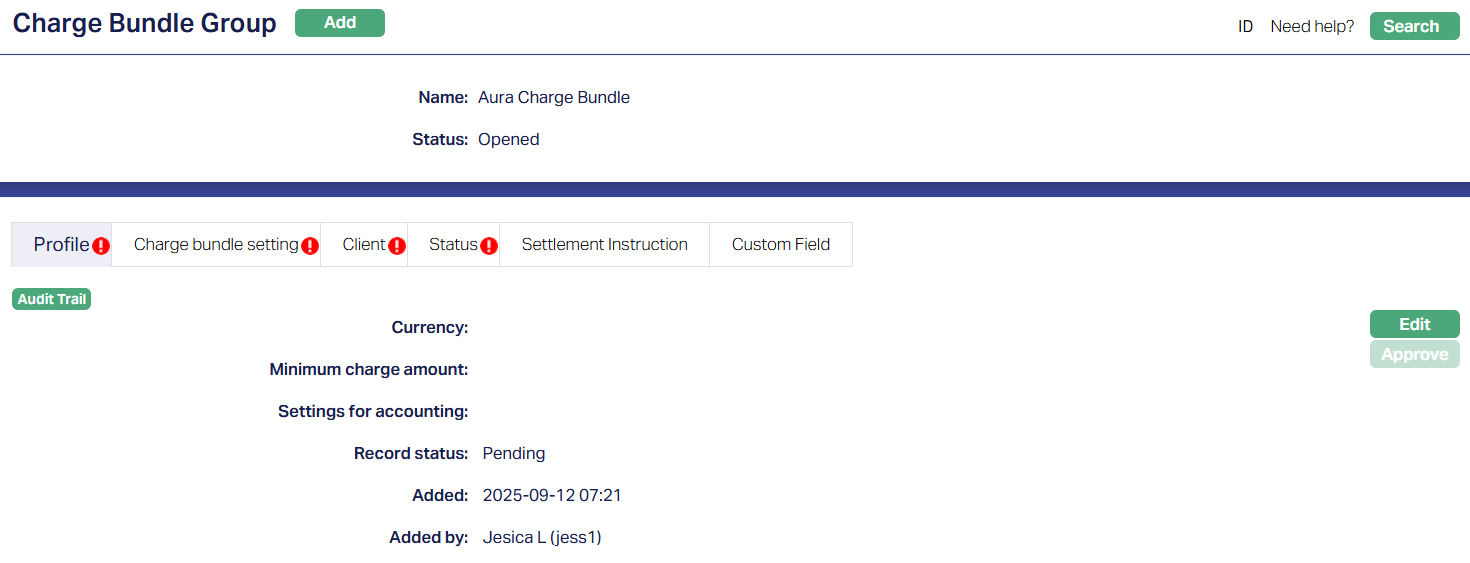
Upon completion, Aura assigns the Charge Bundle Group an Opened status which indicates that the contract has been successfully created and is active, making it available for further management and approvals.
The fields - Currency, Minimum charge amount and Settings for accounting are blank on creation. You can configure them from the Edit option in the Profile tab.
Profile
Profile tab, which is the default tab in the Charge Bundle Group screen, shows the basic details of the charge. It defines the core setup of the group, including the currency, minimum charge, and accounting settings.
To view / edit
1. Access Charge Bundle Group Maintenance page and click Profile tab to view the Charge Bundle group details as per sample below. The details are defaulted from the entries that you made during charge creation. For details refer to New Charge Bundle Group → Profile (1/3).

2. Click Edit. Edit Profile page appears.
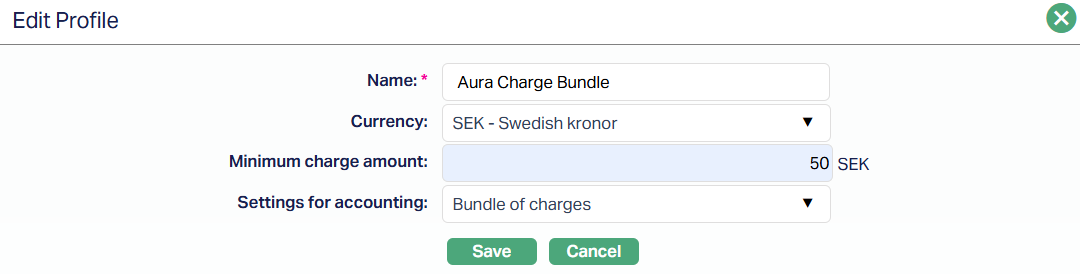
All fields are editable. You can modify the fields as long as the status is still in Pending status and you are the user who created it.
3. Currency - You can specify the currency in which the Minimum Charge Amount will be enforced. This field is relevant only if you're entering a Minimum Charge Amount field. You can select the active currencies from the drop-down list maintained under General Ledger → Settings → Currency.
4. Minimum Charge Amount defines the minimum charge of the selected currency that should apply when the client's total consolidated charges across all mapped Charge Bundle Settings fall below this value during a liquidation cycle. It must be >= 0.00. Up to 2 decimal places allowed.
5. Settings for accounting - This field lets you decide how the consolidated charge for the group will be posted into the General Ledger.
When you open the drop-down, Aura shows all the Charge Bundle Settings that are mapped under the Charge Bundle Setting tab, regardless of whether they are already approved or still pending.
If you enter a Minimum Charge Amount, you must also select a Charge Bundle Setting here. In this case, Aura will use the accounting setup from the selected Charge Bundle Setting to post in the consolidated charge.
If you leave this field blank, Aura posts charges individually using the accounting setup of each mapped Charge Bundle Setting.
In short, use this field when you want all charges under the group to be posted consistently from a single Charge Bundle Setting.
6. Click Save. Profile tab appears with the edited details.

Functions: Edit, Approve
Record status will display as Pending. Once approved by another user who has not created the record, the status will display as Approved. Sample screen shown below.

The additional fields that are shown are:
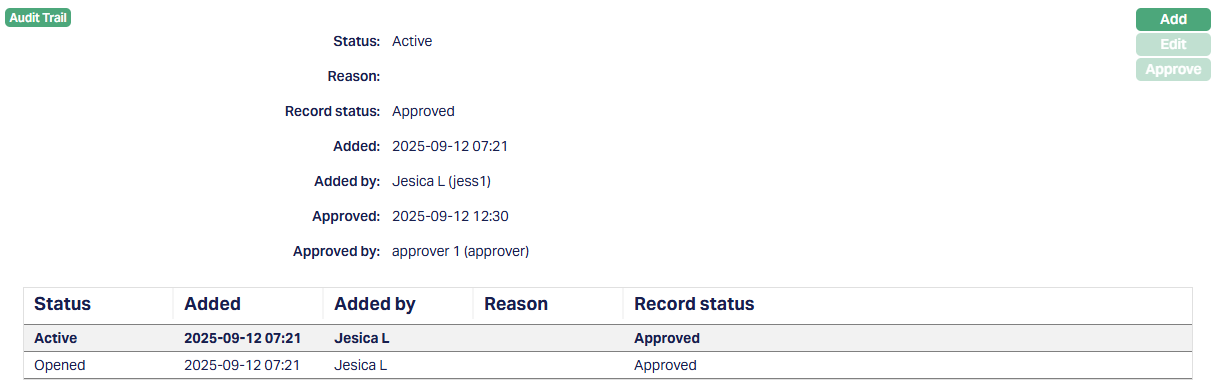
1. Added shows the date and timestamp when this record was created and Added by displays the user ID and full name of the person who created the record.
2. Approved shows the date and time when the record was approved and Approved by displays the user ID and full name of the person who approved the record.
Charge Bundle Setting
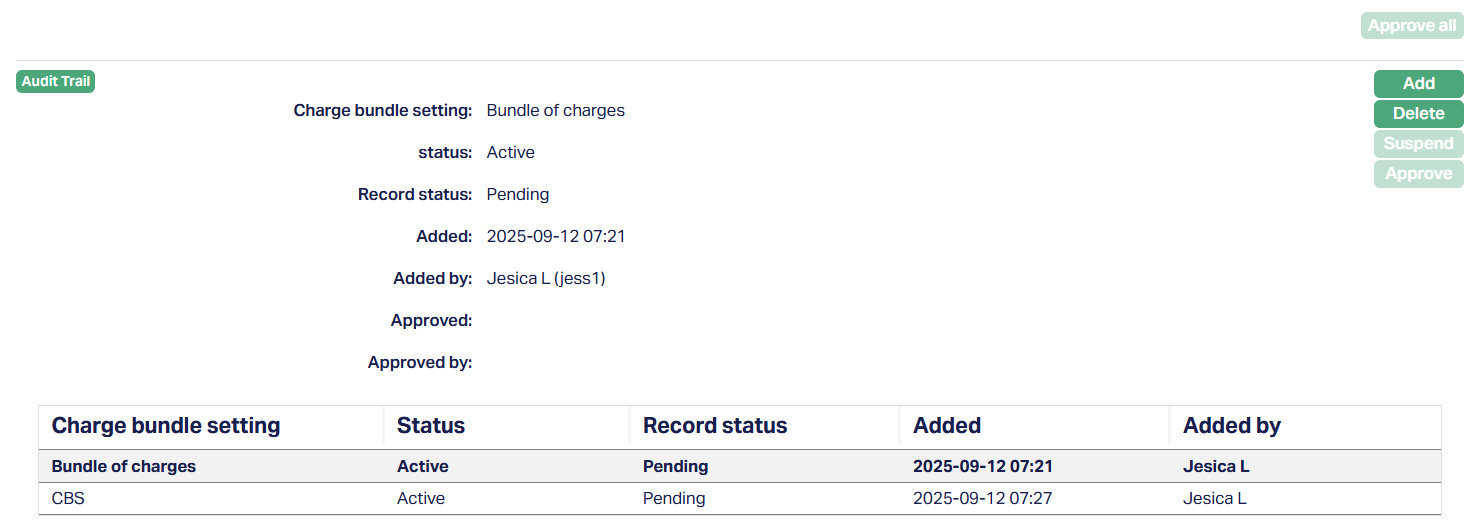
The Charge Bundle Setting tab allows you to link one or more existing Charge Bundle Settings (CBS) to a Charge Bundle Group (CBG). Each Charge Bundle Setting defines how charges are grouped and calculated for the clients under the group.
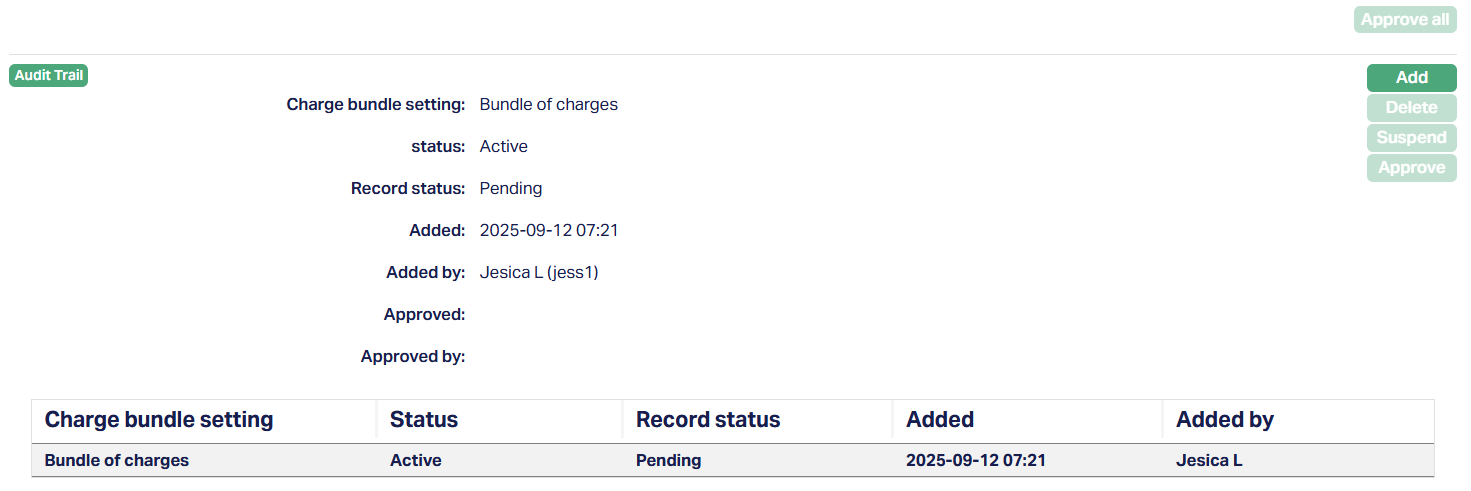
Functions: Add, Delete, Suspend, Approve, Approve all.
You can add multiple Charge Bundle Settings to a single Charge Bundle Group. This supports flexible bundling for different types of transactions. Aura will not allow you to suspend or delete if there's only one Charge Bundle Setting recorded and mapped.
When a new Charge Bundle Setting is added to the group, Aura sets its status to Active and its record status to Pending, waiting approval.
To add a Charge Bundle Setting,
1. Click Add button. Add Charge Bundle Setting page appears.

2. From the hyperlink, select an active Charge Bundle Setting that is not already mapped to this Charge Bundle Group.
3. Click Save. The Charge Bundle Setting is now added with an active status and Record status as Pending.
Functions: Add, Delete, Suspend, Approve, Approve all
The Add button lets you link a new Charge Bundle Setting to the group. Clicking on the hyperlink opens a new page where all active Charge Bundle Setting records are already mapped to the group. Suspended Charge Bundle Setting records that are approved can also be re-mapped.
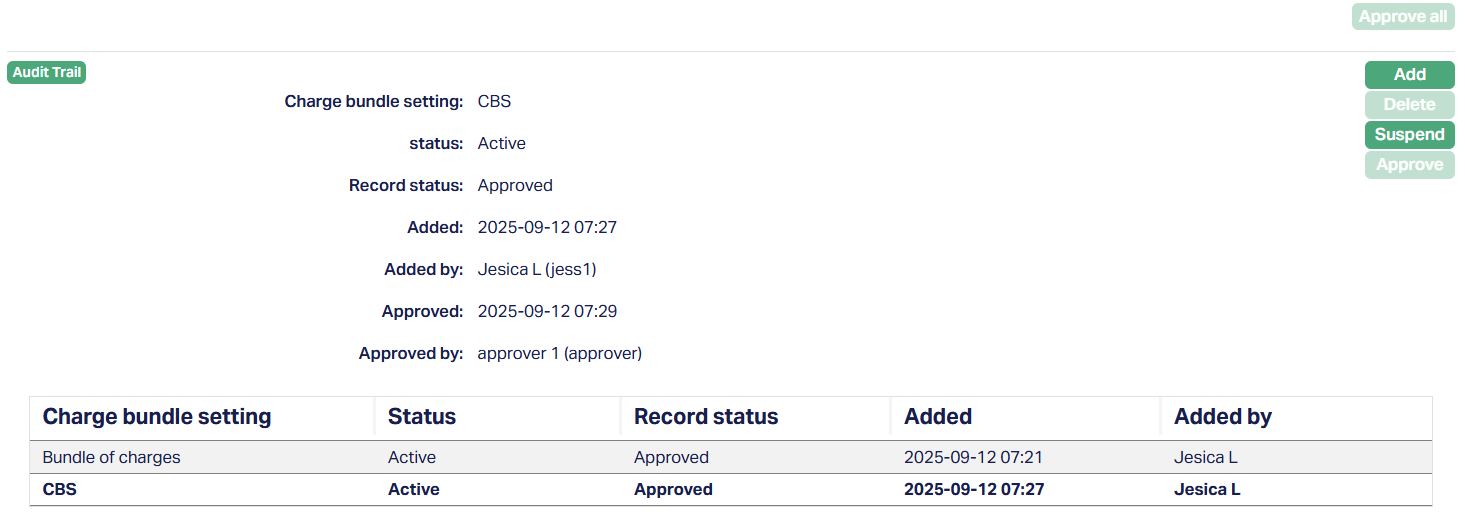
The Approve button is enabled only if the record status is Pending and for the user who did not create the record. On approval, Aura checks that the Charge Bundle Setting's charge scheme is not already linked to another active CBS in the same group. If the validation passes, Aura approves the record and starts aggregating charges.
Approve all lets you approve all pending records in one action. Records created by the approver remain in Pending, while those created by the other users move to Approved.
Delete is allowed only if the Charge Bundle Setting record is still Pending and if there is more than one Charge Bundle Setting mapped to the group.
Suspend button is enabled only if the Charge Bundle Setting is Active and Approved, and if there is more than one Charge Bundle Setting mapped to the group. If the Charge Bundle Setting is the only record or is referenced in the Profile tab, the Suspend button is disabled.
On suspension, Aura changes the status to Suspended and the record status back to Pending, pending re-approval.
After approval of the record status, the Suspend button is now active.
To suspend a Charge Bundle Setting,
1. Select the Charge Bundle Setting you want to Suspend and click on the Suspend button.

2. Aura will show a confirmation message. Click Yes.
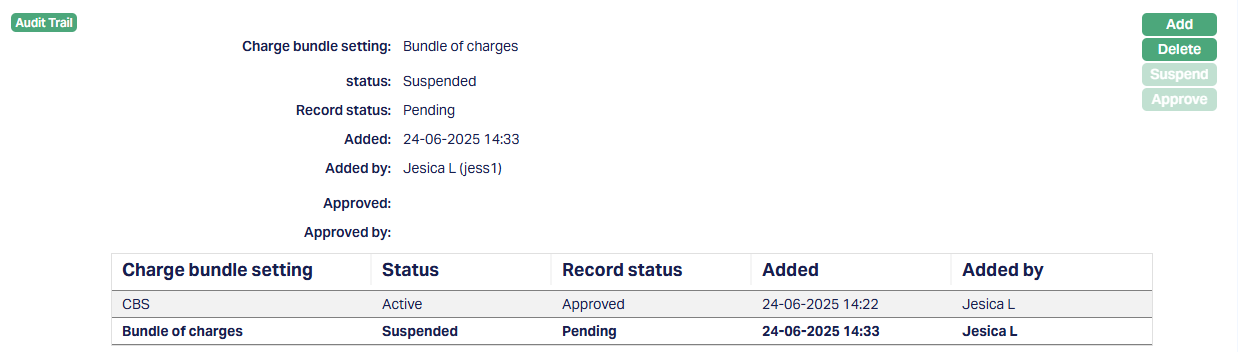
Status of the Charge Bundle Settings changes to Suspended and the Record status will now be Pending.
Notes:
When a Charge Bundle Setting is suspended, Aura stops aggregating charges related to that Charge Bundle Setting for all clients under the group. Charges resume only after the Charge Bundle Setting is re-approved.
The suspended Charge Bundle Setting record must be re-approved by another user before it can become active again.
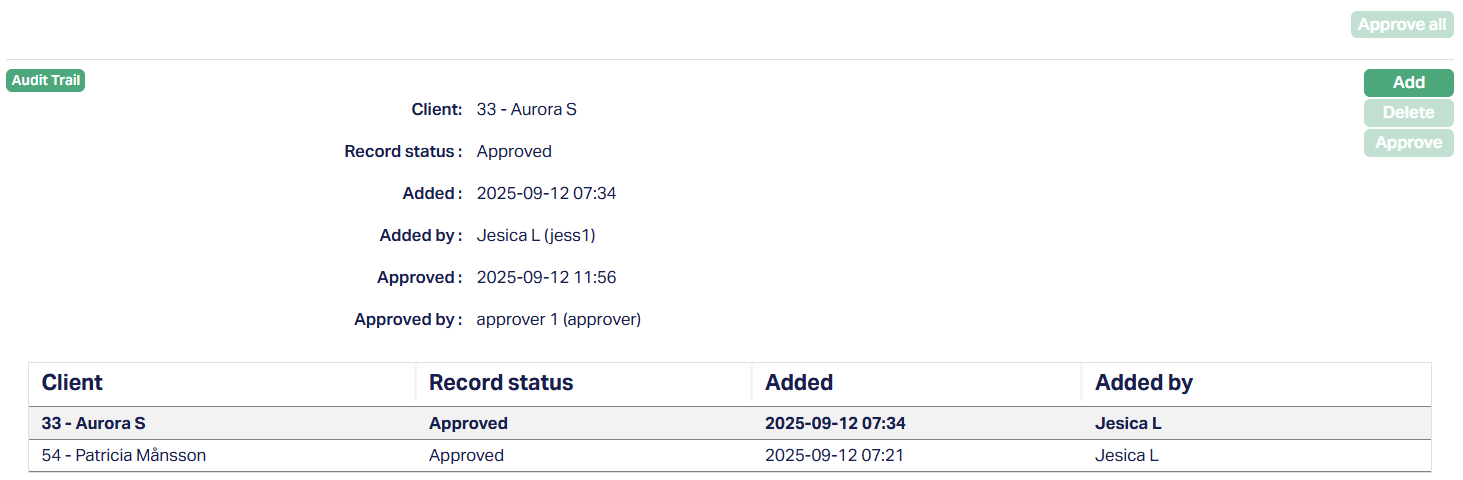
Client
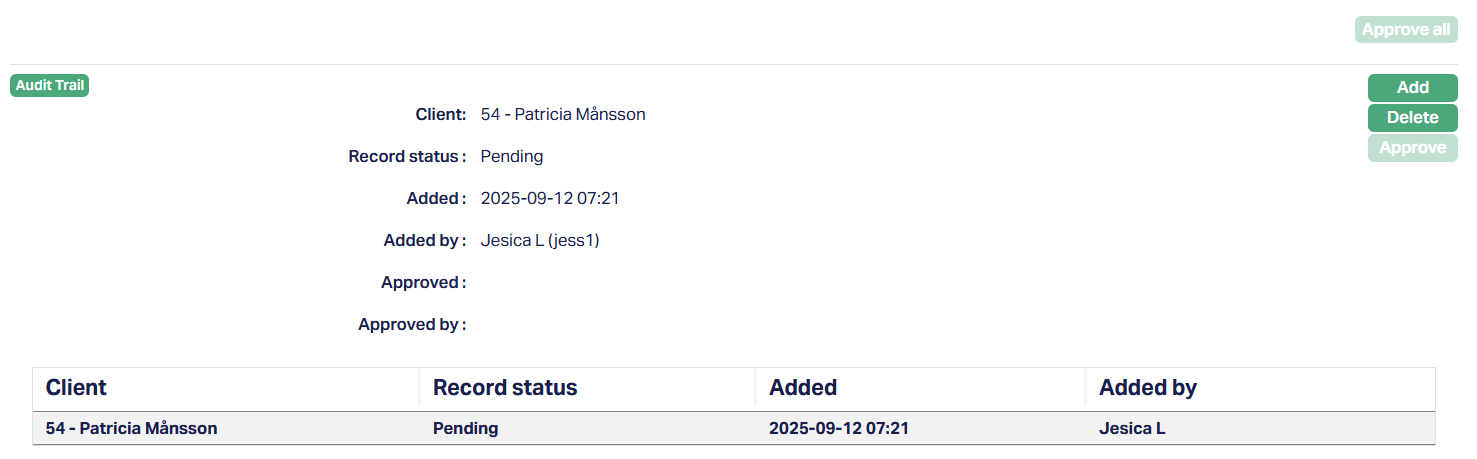
Client tab, under Charge Bundle Group maintenance screen, shows the basic details of the Client. You can add multiple clients under Charge Bundle Group. Once added and approved, charges for those clients will be calculated based on the Charge Bundle Settings linked to the group.
Functions: Add, Delete, Approve, Approve all.
To Add a client,
1. Access Charge Bundle Group Maintenance page and click Client tab to view the basic details of the client as per sample below. The details are defaulted from the entries that you made during charge creation. For details refer to New Charge Bundle Group → Profile (1/3).
2. Click Add. Add Client page appears.

3. Click on the Client hyperlink, which opens up a new screen called Client Search. This allows you to select one of the existing clients for the Charge Bundle.
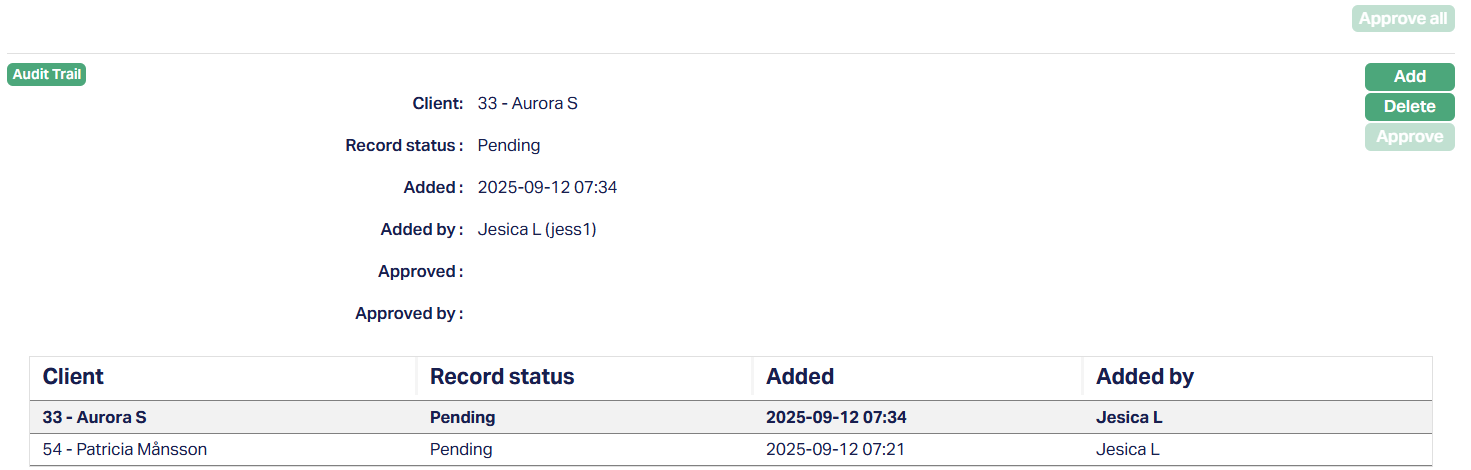
4. Click Save. Client tab appears with the added client.
Record status will display as Pending. Once approved by another user who has not created the record, the status will display as Approved. Sample screen shown below.
If multiple client records are pending, you can use Approve All to approve them in bulk. Any records created by the approver remain in Pending, while others move to Approved.
Removing/Deleting a Client
If the record is still Pending - you can delete it directly using the Delete button.
If the record is Approved - you cannot delete it from this tab. Instead, you must remove or move the client through CRM > Client > Maintain > Profile tab > Edit.
From here, you can either unmap the client from the current Charge Bundle Group, or map them to a different one.
Once Approved, Aura automatically updates the Client tab in the Charge Bundle Group - the client is removed from the old group and added to the new one.
Notes:
A client can belong to only one Active Charge Bundle Group at a time.
If the client was previously mapped to a group that is now Closed (Approved), they can be added to another group.
Removing or moving an approved client always requires going through the CRM Client Profile screen.
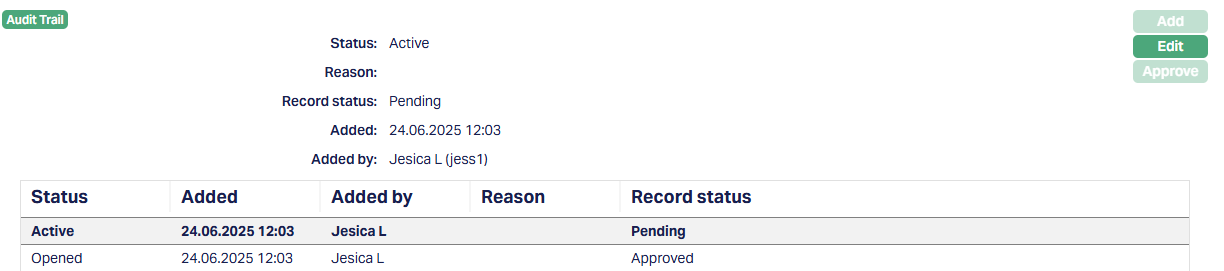
Status
Status tab shows the lifecycle of a Charge Bundle Group (CBG) and lets you manage its state. Aura maintains a history of all status changes, including who made the change and when it was approved.
To Add/ Edit status,
1. Access Charge Bundle Group Maintenance page and click Status tab to view the details of the Charge Bundle Group status as per sample below, displaying Record Status as Pending till the same is approved.
2. Click Edit. Edit Status screen appears.
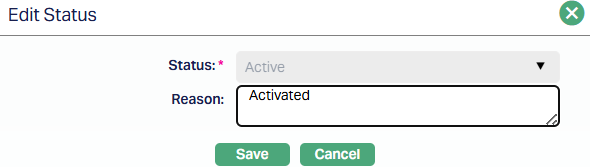
Note: Only Reason field is editable.
3. Click Save. Status tab appears with the edited details.
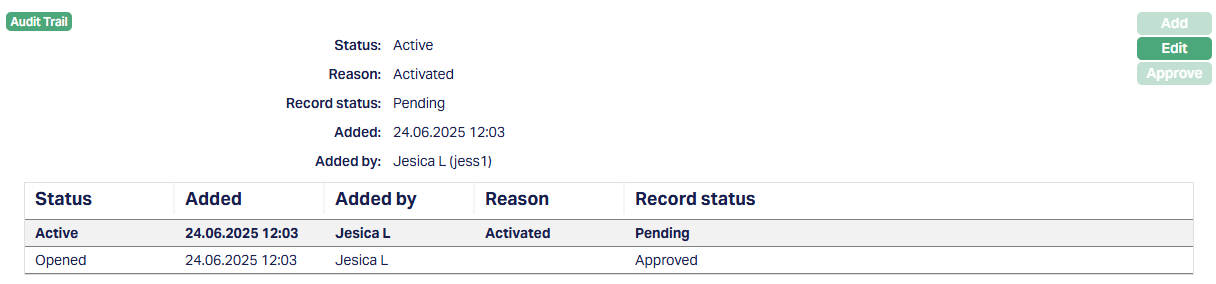
Record status will display as Pending. Once approved by another user who has not created the record, the status will display as Approved. You cannot Edit status once the record is Approved.
Function: Add, Edit, Approve.
Note: Status Tab activation and approval can be done only after Settlement Instruction is added and approved.
Closing a Charge Bundle Group
Once a Charge Bundle Group is no longer needed for charge aggregation or liquidation, you can close a Charge Bundle Group by adding and approving the "Closed" status.
Make sure all approved Settlement Instructions are suspended beforehand. Aura will not allow you to approve the "Closed" status if there is any Approved Settlement Instruction linked to the group.
To close a Status,
1. Click Add. Add Status Page appears.
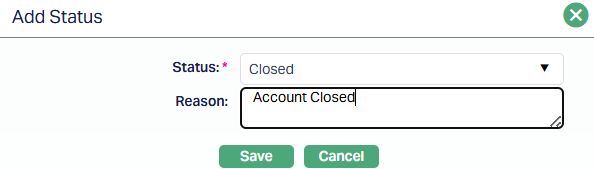
2. Select Closed from the drop-down list on the Status field and enter the Reason.
3. Click Save. Status tab appears with the edited details.
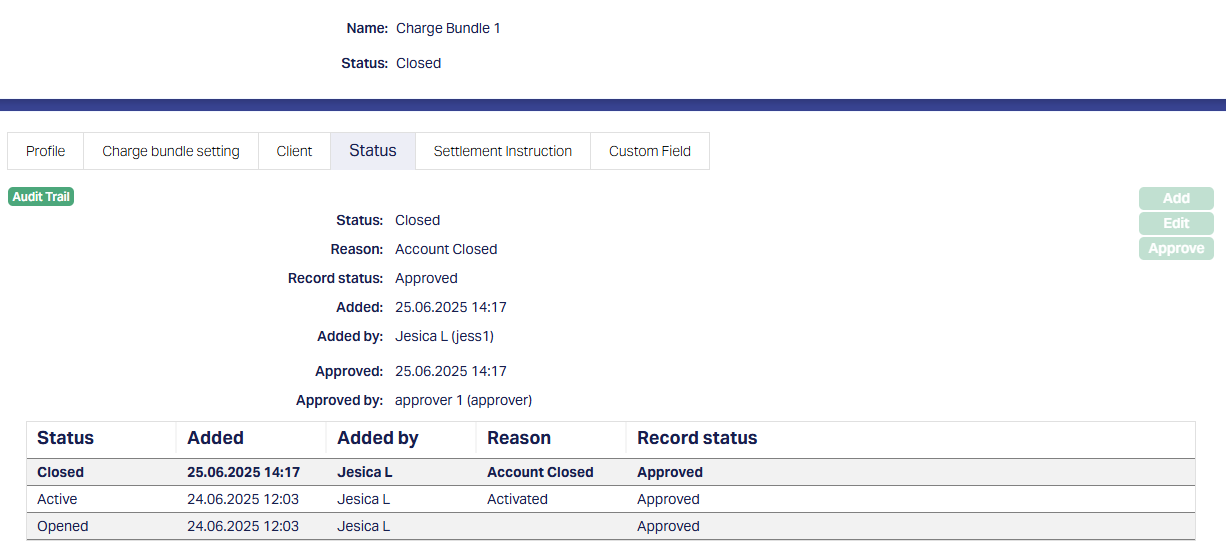
Once closed, the group becomes read-only and inactive for charge aggregation.
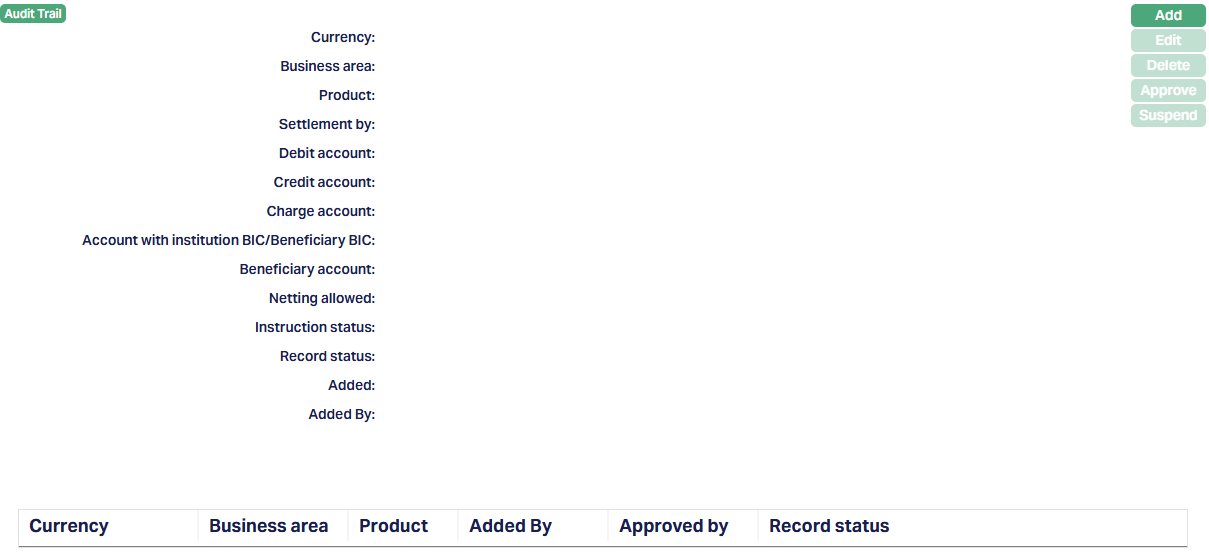
Settlement Instruction
The Settlement Instruction tab is where you define how consolidated charges under the Charge Bundle Group will be settled. You can maintain multiple settlement instructions, but at least one approved instruction is required before liquidation can post entries.
To add a Settlement Instruction,
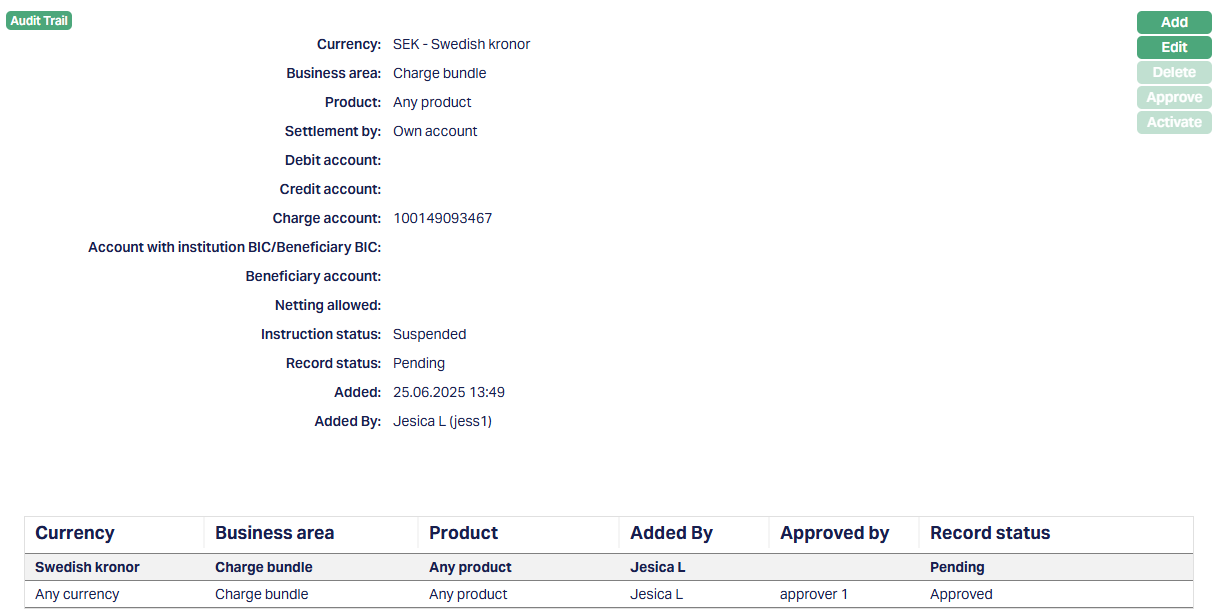
1. Access Charge Bundle Group Maintenance page and click Settlement Instruction tab to view the details of the settlement instruction related to Charge Bundle Group. Initially it will be blank unless the same is maintained.
2. Click Add. Add Settlement Instruction Screen appears.
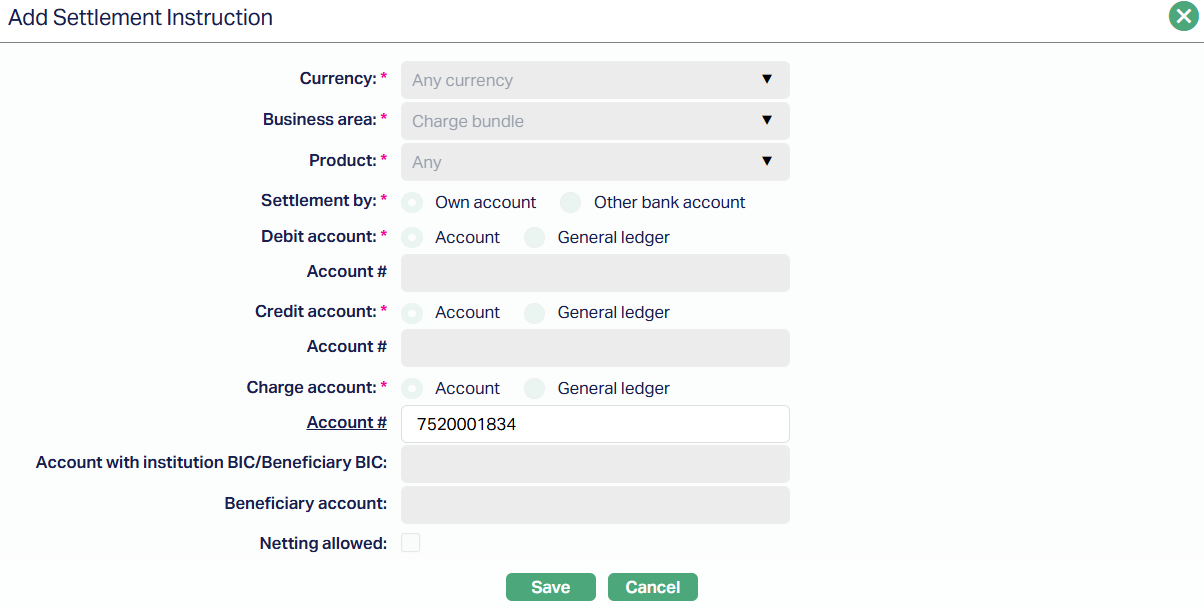
All fields except Account # for Charge Account are pre-defined from system configuration and appear automatically.
3. Select Account # for Charge Account. Click Save.
Record status will display as Pending. Once approved by another user who has not created the record, the status will display as Approved.
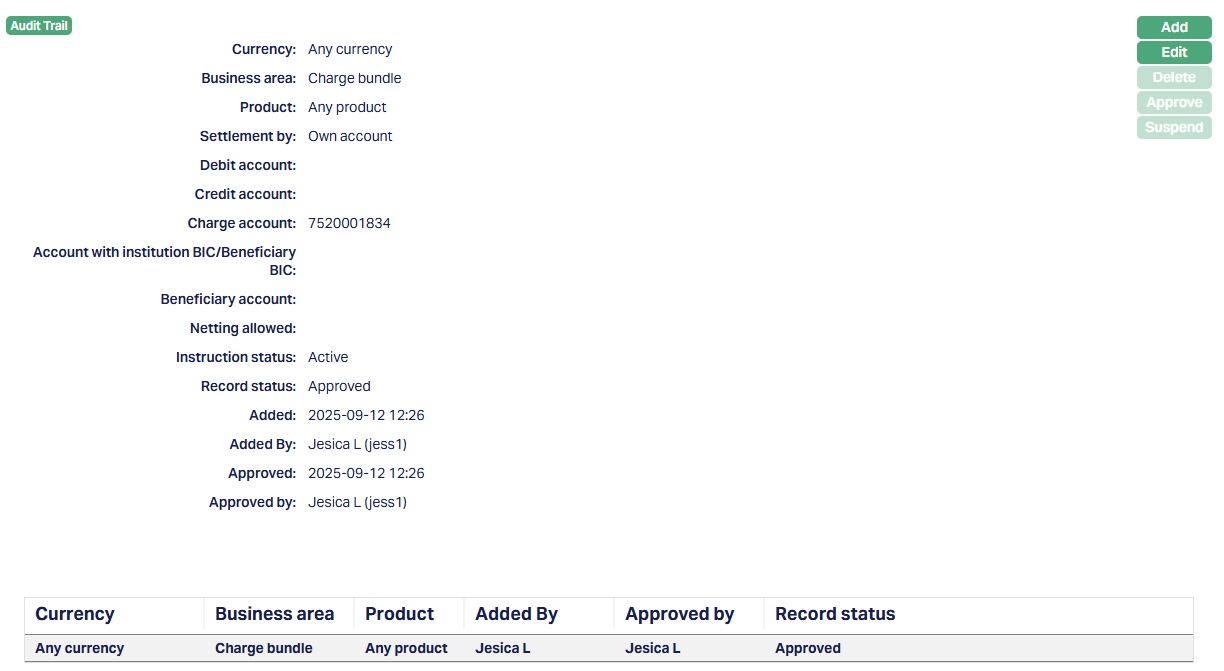
Functions: Add, Edit, Delete, Approve, Suspend.
To Edit a Settlement Instruction,
1. Click Edit. Edit Settlement instructions screen appears.
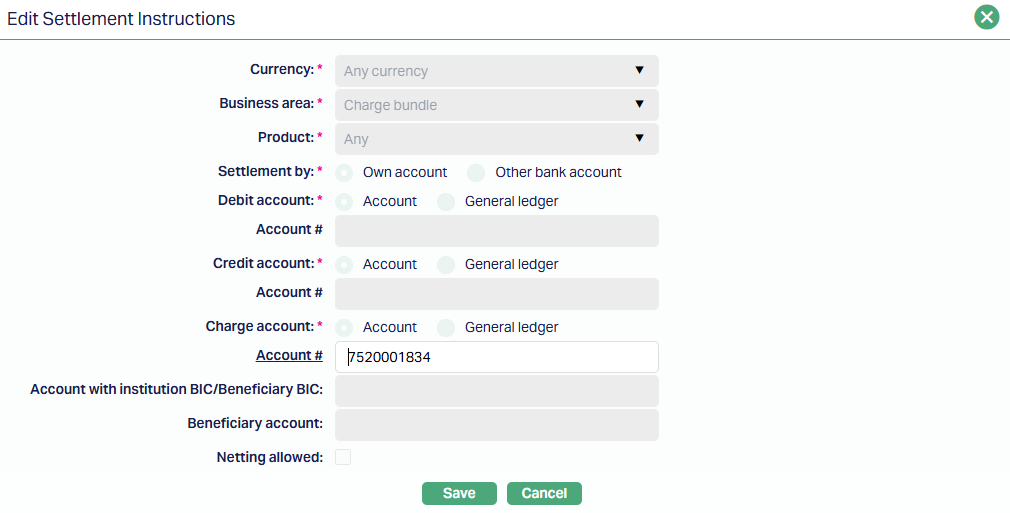
Note: Only Account # field is editable.
2. Click Save. The Settlement instructions tab appears with the edited details, displaying the Record Status as Pending.
The Record status will be Pending. The same has to be approved by a user other than the one who created the closure record. Once approved, the Record status will display as Approved.
The Suspend button is enabled only when one or more Settlement Instructions are added.
To Suspend a Settlement Instruction,
1. Select the Settlement Instruction you want to Suspend and click on the Suspend button.

2. Aura will show a confirmation message. Click Yes.
Record Status of the Settlement Instruction changes to Suspended and the Record status will now be Pending.
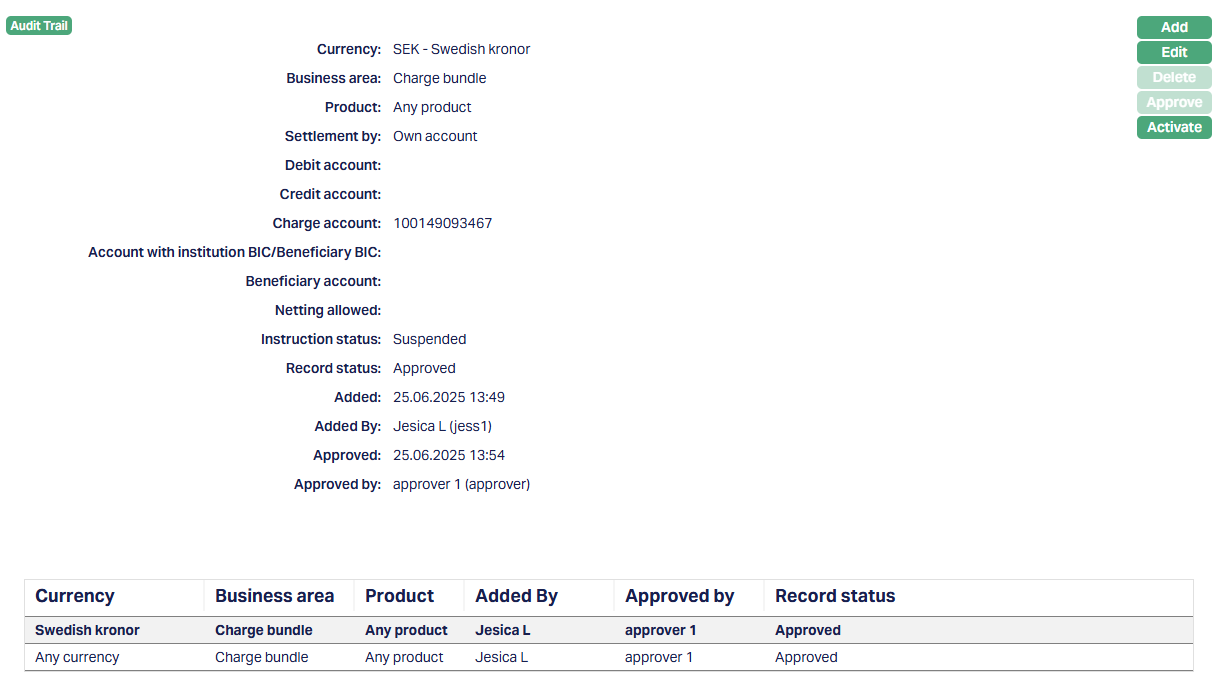
On approval of Suspension, the Activate button will be enabled. If you want to activate a suspended Settlement Instruction then click on the Activate button. Aura will ask for confirmation. On confirmation, Aura will activate the Settlement Instruction and Suspend button will appear in place of the Activate button.
Liquidation - Charge Calculation and Processing Logic
Aura automatically performs liquidation to aggregate, calculate, and post charges based on the configuration of the Charge Bundle Group and the Charge Bundle Settings mapped to it.
Liquidation takes place in the following scenarios:
At the scheduled liquidation frequency (as defined in each Charge Bundle Setting)
When a Charge Bundle Group is closed.
When a client is removed from a Charge Bundle Group.
How Aura performs Liquidation -
1. Identity Eligible Transactions - Aura scans for transactions linked to clients in the Charge Bundle Setting and has not yet been liquidated, it is picked up - even if the Charge Bundle Setting status has since been suspended.
2. Aggregated Transactions -
Transactions are based on the Charge Bundle Setting configuration:
Value-based CBS : Total transaction amounts are summed.
Number-based CBS: Number of chargeable transactions is counted.
3. Conversion to Consolidation Currency -
If the transaction currency is different from the Charge Bundle Setting's Consolidation Currency, Aura performs conversion using:
Rate Type - Central Bank Mid-rate.
Effective By date - The most recent approved rate record with Effective By =< Liquidation Date.
The converted transaction amount is stored for charge calculation.
4. Band-Based Charge Calculation -
Aura calculates charges based on the Charge Bundle Setting setup:
Cumulative - Applies a single charge for the consolidated total.
Additive - Applies charges incrementally across bands until the total is exhausted.
5. Apply Minimum Charge (if defined in Profile) -
If a Minimum Charge Amount is configured for the CBG, Aura compares the consolidated total against this minimum.
If the currencies differ, Aura converts the total into the Minimum Charge Currency before comparison.
If the consolidated charge is less than the minimum, Aura overrides and debits the Minimum Charge Amount instead.
6. Accounting Logic -
If Settings for Accounting is defined in the Profile tab:
- Aura uses the General Ledger, Transaction Codes, and Settlement Account of the selected Charge Bundle Settings for all charges.
If left blank:
- Aura posts charges using the accounting setup of each individual Charge Bundle Setting.
For conversion into the settlement account currency, Aura uses the Sell-rate with Effective By =< Liquidation date.
7. Posting and Status Update -
After posting, Aura marks the transactions as liquidated and records the following in the Charge Bundle tables:
The amount charged.
The currency used.
The Charge Bundle Setting and Charge Bundle Group applied.
The combination details.
The Liquidation Account from which the debit was made.
The Transaction Ref # for the debit entry.
Liquidation ensures that clients are charged accurately based on actual usage, charge frequency, and any defined minimum thresholds. This process is fully automated and follows all validation, approval, and FX rules defined in Aura.
Notes:
Transactions linked to a Charge Bundle Setting before it was suspended will still be liquidated. Suspension only prevents new aggregation going forward.
If the settlement account has insufficient funds, handling follows the standard exception process defined for charges.
All liquidation steps and postings are logged in the Audit Trail.
Custom Field
This option provides you the flexibility to define fields apart from those that are already available in the standard version of Aura. Thus, it enables you to customize additional data storage and use as required to suit your specific business needs.
To Edit a Custom Field,
1. Access Charge Bundle Group page. Click Custom Field tab.

2. The field appears only when it is created in Admin > System codes > Custom fields > Custom fields and linked to specific Accounts option in Admin > System codes > Custom fields > Field mappings.
3. Click Edit. Edit Custom Field page appears. In the following illustration, a custom field, Last Review Date has been mapped to the Account as shown below.
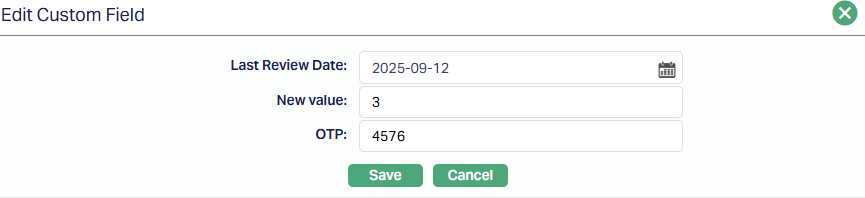
4. Enter Last Review Date, New Value and OTP.
5. Click Save. Custom Field page appears with the edited details.

Functions: Edit