Debit Order
Debit order is a payment instruction given to a third party to collect the amount from your account. Using this functionality, you can maintain debit order details for Outward Instrument types. Instrument types can be cheque, Demand Drafts, Banker's cheque, Payment order.
The following are the tabs in a Debit Order
Profile
Charges
Events
To add a Debit Order,
1. From the Retail menu, click Net Settlement, and then Debit Order. The New Outward Debit Order → Profile (1/3) page appears.
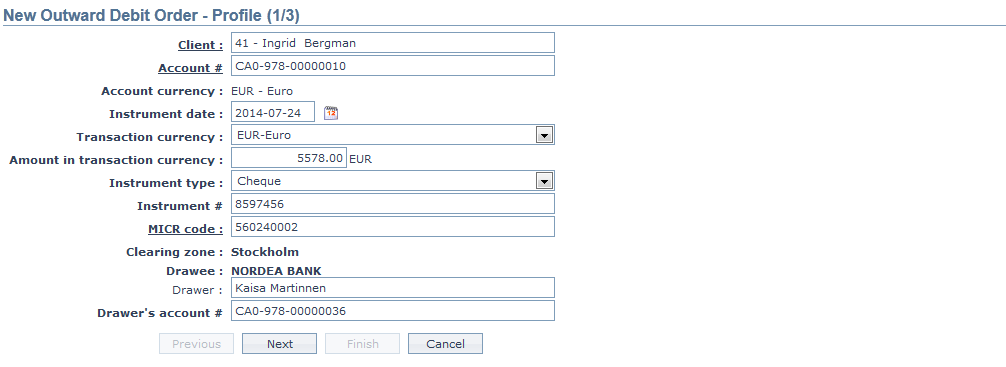
2. To select a client whose account will be credited; click on Client hyperlink. The Client Search page appears where you can search for a client with relevant criteria and select the required client. Alternatively, you can type in the name of the client and choose the relevant client from the list suggested by Aura.
3. Click on Account # hyperlink. The Search Client Account page appears. Aura will display all active CASA account numbers of the selected Client as maintained under Retail → Accounts → Client account → Maintain. Alternatively, you can type in the account number of the selected client and choose the relevant Account# from the list suggested by Aura.
4. The Account Currency will get populated by default on selection of the above client. It will display the currency of the client account #.
5. Select the Instrument date from the date picker. It is the date when the instrument type (for e.g. cheque) is sent for collection.
6. Select the Transaction currency from the dropdown list of active GL currencies maintained under GL → Settings → Currency. Transaction currency denotes the currency in which the transfer needs to be executed. By default the account currency gets displayed.
7. Enter the Amount that is to be transferred in transaction currency.
8. Select the Instrument type from the drop down list of pre-shipped values. The pre-shipped value is Cheque.
9. Enter the unique Instrument #. For example: Cheque number.
10. MICR (Magnetic Ink Character Recognition) code is a 9 digit unique code that is used for the cheque clearing process to identify the branch and entity. Click on the MICR code hyperlink. The MICR code page appears with the list of MICR codes maintained under Admin → Management → Settlement Directory.
Note: Clearing zone, MICR Code needs to be maintained while creation of Settlement Directory for listing the MICR code.
11. Clearing Zone specifies the Clearing Zone of the Drawee Bank. It is the zone where the Drawee bank clears the cheque. On selection of the MICR code, the mapped Clearing Zone gets populated by default.
12. Drawee specifies the Drawee Bank name. On selection of the MICR code, the mapped Drawee bank name gets populated by default.
13. Enter the Drawer name. It is the customer who instructs the bank to withdraw money from his account to pay to the payee.
14. Enter the Drawer's account #. It is the account number of the Drawer.
15. Click Next. The New Debit Order → Charges (2/3) page appears.

16. Charge Amount in charge currency will display the resolved charges from Payment Grid. In case of multiple charges, you can select a charge from the grid and can update the charge amount.
17. Amount in account currency will display the amount in account currency.
18. Total charge amount in account currency will display in case of multiple charges, cumulative of total charges in account currency
19. Aura calculates the Net amount in account currency as Amount in account currency -- Net charge amount in account currency.
20. Charge Description displays the charge scheme as resolved by Payment Grid. Charge scheme is used to create and maintain fees / charges which can be charged on client bank accounts / contracts / transactions. Aura provides you with a very flexible option through which you can maintain the charge details.
21. Charge currency displays the charge currency as resolved by PaymentGrid.
22. Charge amount in charge currency displays the charge amount in charge currency as resolved by PaymentGrid.
23. Charge amount in account currency displays the charge amount in account currency as resolved by PaymentGrid.
24. Click Next. The New Outward Debit Order → Confirmation (3/3) page appears.
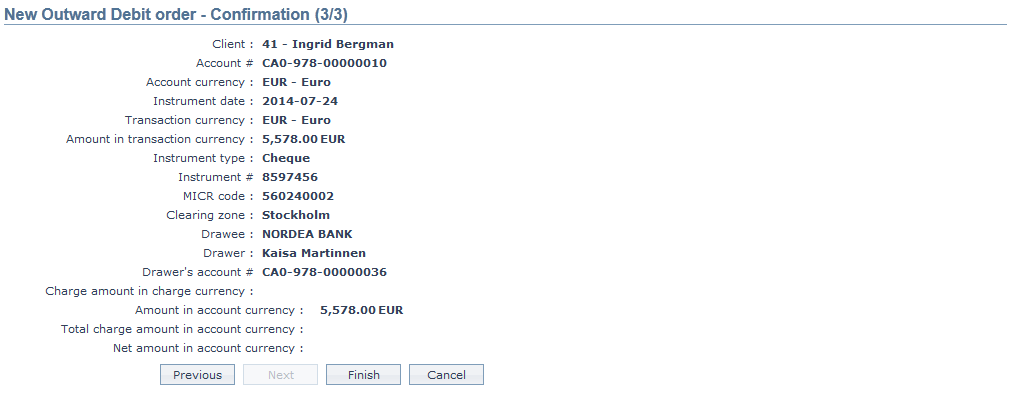
25. Click Finish. The Debit Order Maintenance page appears with a unique Collection ref #, Collection status as Registered, Record status as Pending and a Profile tab by default.
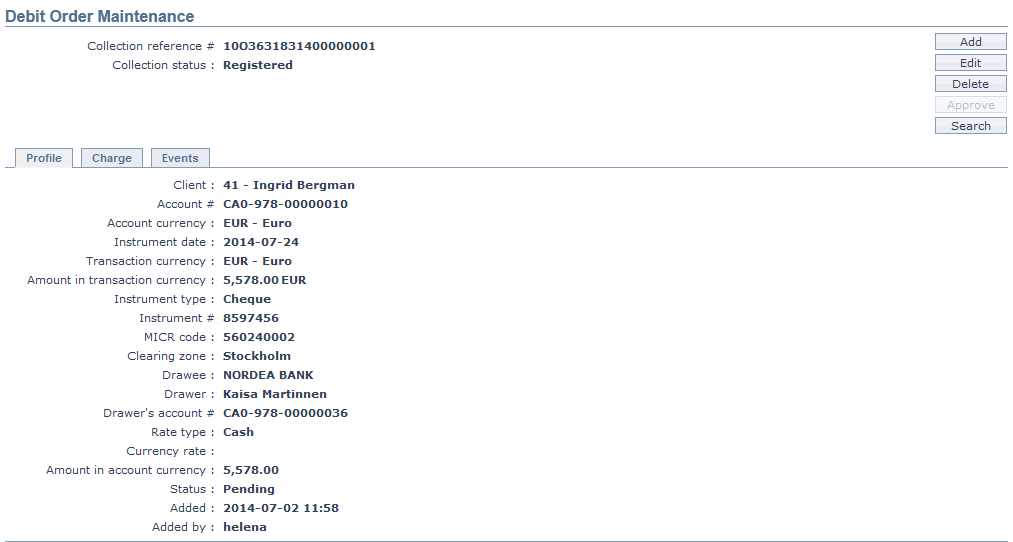
Functions: Add, Edit, Delete, Approve,Search.
Delete: You can delete a Debit Order record by a click on Delete button. Aura will ask for confirmation. On confirmation, Debit Order will be deleted.
Approve: You can approve a Debit Order record by a click on Approve button. Aura will ask for confirmation. On confirmation, the selected record will be approved.
Interaction of Aura with the Payment Grid
When you click Finish, the following takes place:
- All entered transaction details will be saved with audit trail versioning.
- A unique Collection reference # will be generated.
- The record status of the transaction of this Debit Order is Pending and collection status is registered.
- Aura will call Payment Grid to resolve Product and Charges.
- If the resolution is successful, then Aura will update the Collection Status as Sent for Collection.
- If the resolution fails, then Aura will update the Collection status as failed.
The events in Debit Order are as follows:
| Events | Description | Collection status |
|---|---|---|
| COLLBK | This event will trigger, if the Collection is booked in Core bank. | Registered |
| COLLDP | This event will trigger if debit processing occurs in Core bank | Registered |
| COLLCP | This event will trigger if credit processing occurs in Core bank | Processed |
| COLLRV | This event will trigger if collection is reversed in Core bank | Reversed |
| COLLCN | This event will trigger if collection is cancelled in Core bank | Cancelled |
| COLLRT | This event will trigger if collection is executed in Core bank | Returned |
| COLLSF | This event will trigger if collection is Sent for collection in core bank | Sent for collection |
To edit the Debit Order,
1. Access the Debit Order Maintenance page and click on Edit.
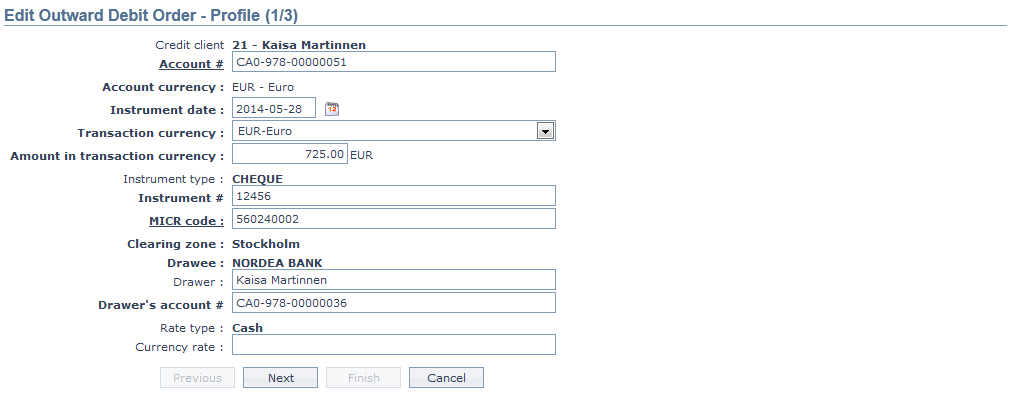
All the fields are editable except
Credit Client
Account Currency
Instrument type
Clearing Zone
Drawee
Rate type
2. The Rate type will be defaulted from Collection settings, which is attached to the Payment Grid Product which is again mapped to the Debit order.
3. Enter the Currency rate. It is editable based on the variance limit maintained in Collection Settings.
4. Click Next. The Edit Outward Debit Order → Charge (2/3) page appears.

Note: The Resolved charges from Payment Grid will get displayed.
5. Click Next. The Edit Outward Debit Order → Confirmation (3/3) page appears.
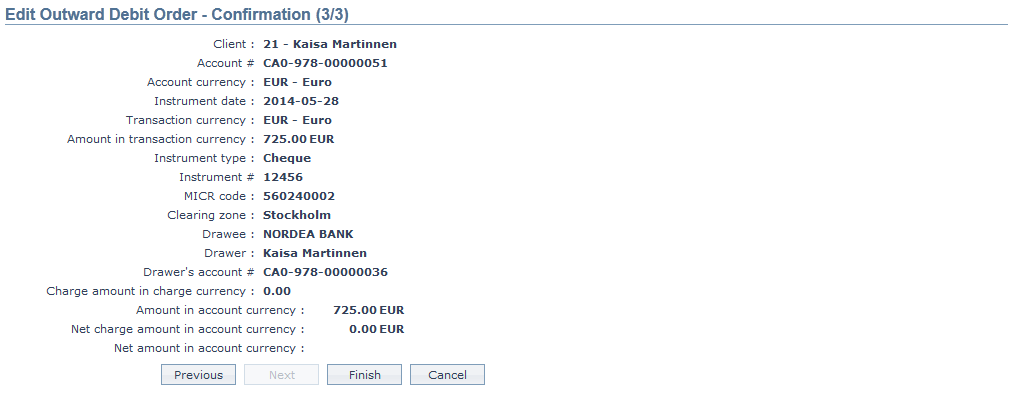
6. Click Finish. The Debit Order Maintenance page appears with the changes.