Card Maintenance
Card maintenance menu allows you to create and maintain the cards. These cards can be created under the Cards product that you have maintained. Based on the card product defined, the various details are defaulted with options to modify some of the fields. You can manage primary and secondary cards, thus adding ease and flexibility for the maintenance of cards.
The following are the tabs in a Card page:
To add new Card
- From Card menu, click Cards, and then Maintain card. Card - Search page appears. All Cards available in Aura appear on the page.

- Click Add. New Card Maintenance -- Profile (1/3) page appears.
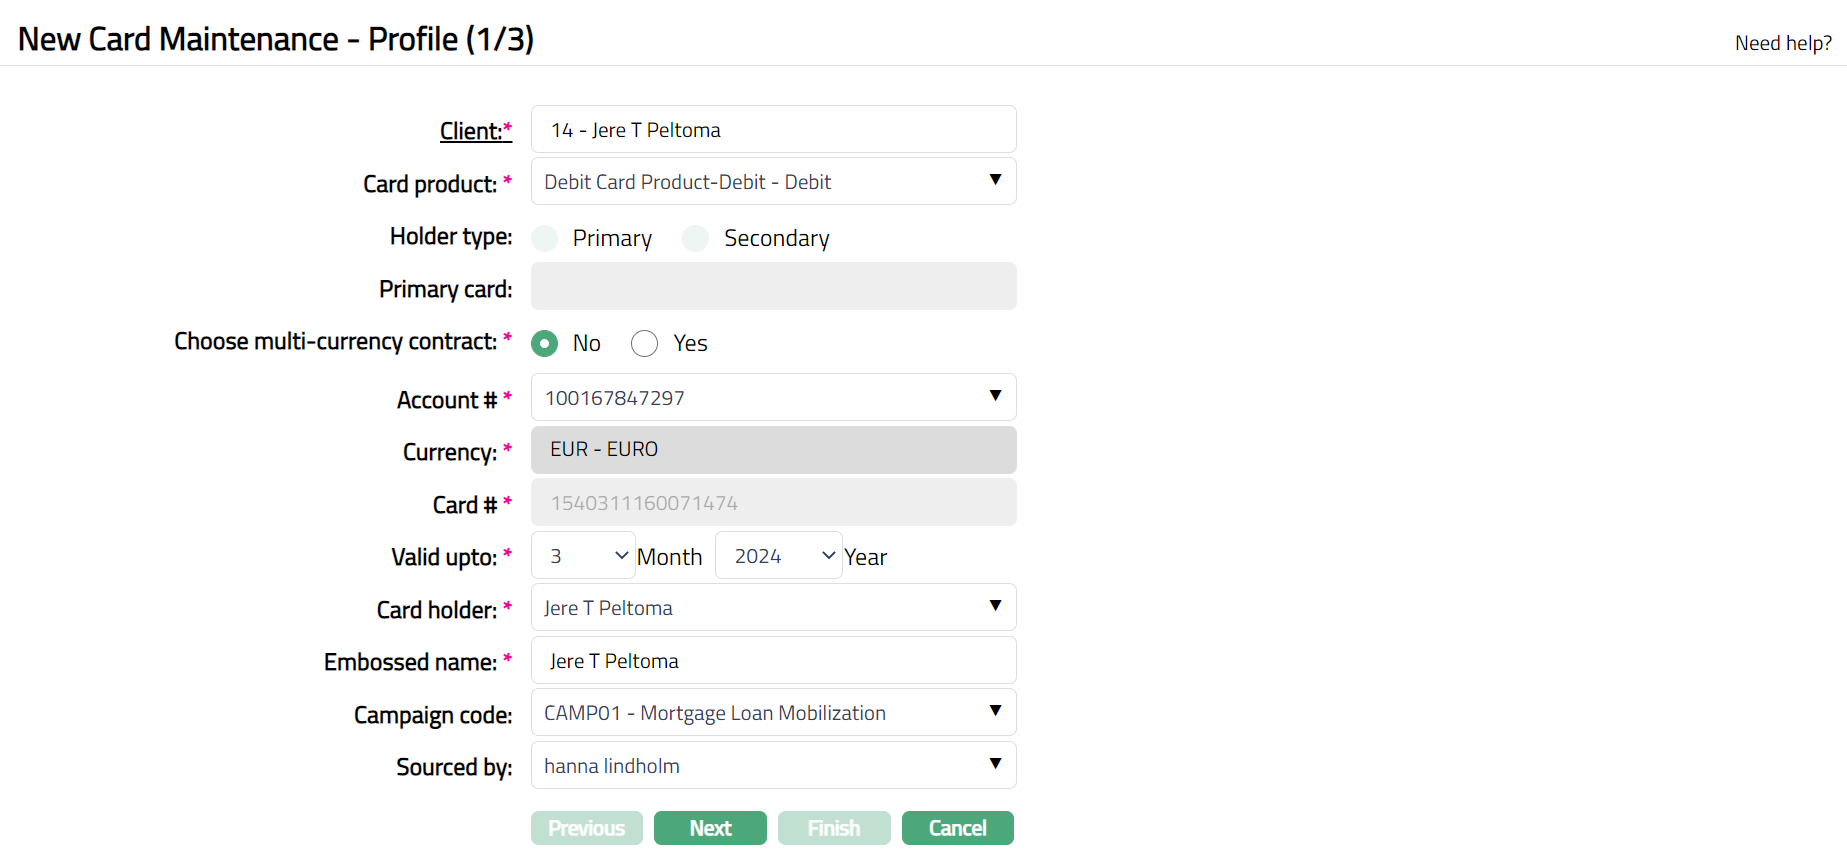
Select Client by clicking client hyperlink. Client search page appears where you can search for a client with relevant criteria and select the required client. You can also input the client's name and select the required client from the list displayed by Aura.
Select Card product from the drop-down list of active card products maintained under Cards > Settings > Card product.
The field Holder type is only enabled if Card Product selected has Card type as Credit. You can then click on the radio button to select the Holder Type as Primary or Secondary.
In case of Cards where Holder Type is Secondary, Primary card field will be enabled so that you can associate the Primary Card on which this secondary card is being issued. Click on the Primary Card hyperlink to see a list of all active Primary Cards and select the required card.
Select Account # that is to be associated with the card.
In case of Credit cards, this field is enabled only if the Holder Type is Primary. Select the required account number from the dropdown list of active current accounts of the client selected above. In case the Holder Type is Secondary for Credit cards, the Account # is defaulted from the Account # of the Primary Card and you cannot edit.
In case of Debit cards and Load cards, this field is enabled. Select the required account number from the dropdown list of active client accounts of the client selected above.
Once the Account# is selected, the account currency will be defaulted in the Currency field.
Card # will be auto generated by Aura.
Valid upto denotes the expiry date of the card. It will be displayed by Aura in the format of month and year and is arrived at as explained below, with an option for you to change as needed.
- For Debit and Load cards, the expiry month will be defaulted to the current month. Expiry year will be calculated as the current year plus product validity years.
- For Credit cards, if Holder Type is Primary, the expiry month will be defaulted to the current month. Expiry year will be calculated as the current year plus product validity years.
- For Credit cards if Holder Type as Secondary, expiry date is defaulted from the selected Card Product and selected primary card. Whichever is lesser is considered as expiry date.
Select Card holder from the list of linked people maintained at the account level. Aura will display all the people linked to the client as Joint, or person role as Beneficial owner. This field is enabled only for card product type Debit.
Embossed name will be defaulted from the Client name. But only for joint account card holders and for Card type as Debit, Aura will display the embossed name based on selection of the card holder.
Select Campaign code from the drop-down list of options maintained under Admin > Sales > Campaigns. Campaigns code is a unique code which can be used as campaign identifier in Aura.
Select Sourced by. It is the Aura user whose status is activated. All activated Aura user's will be available in the drop-down list.
Click Next. New Card Issuance -- Confirmation (2/3) page appears.
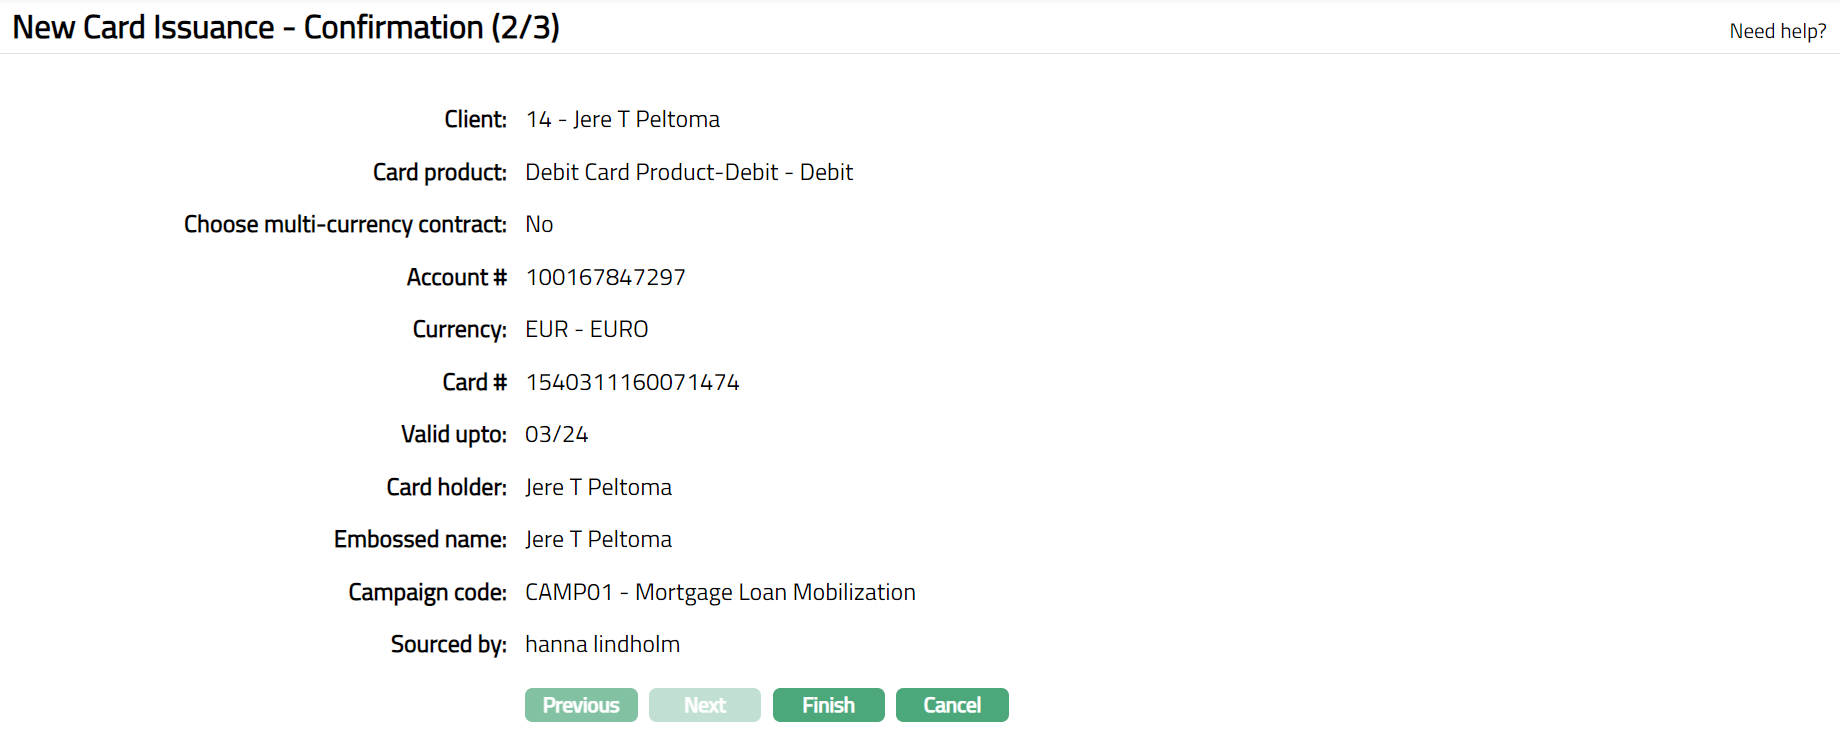
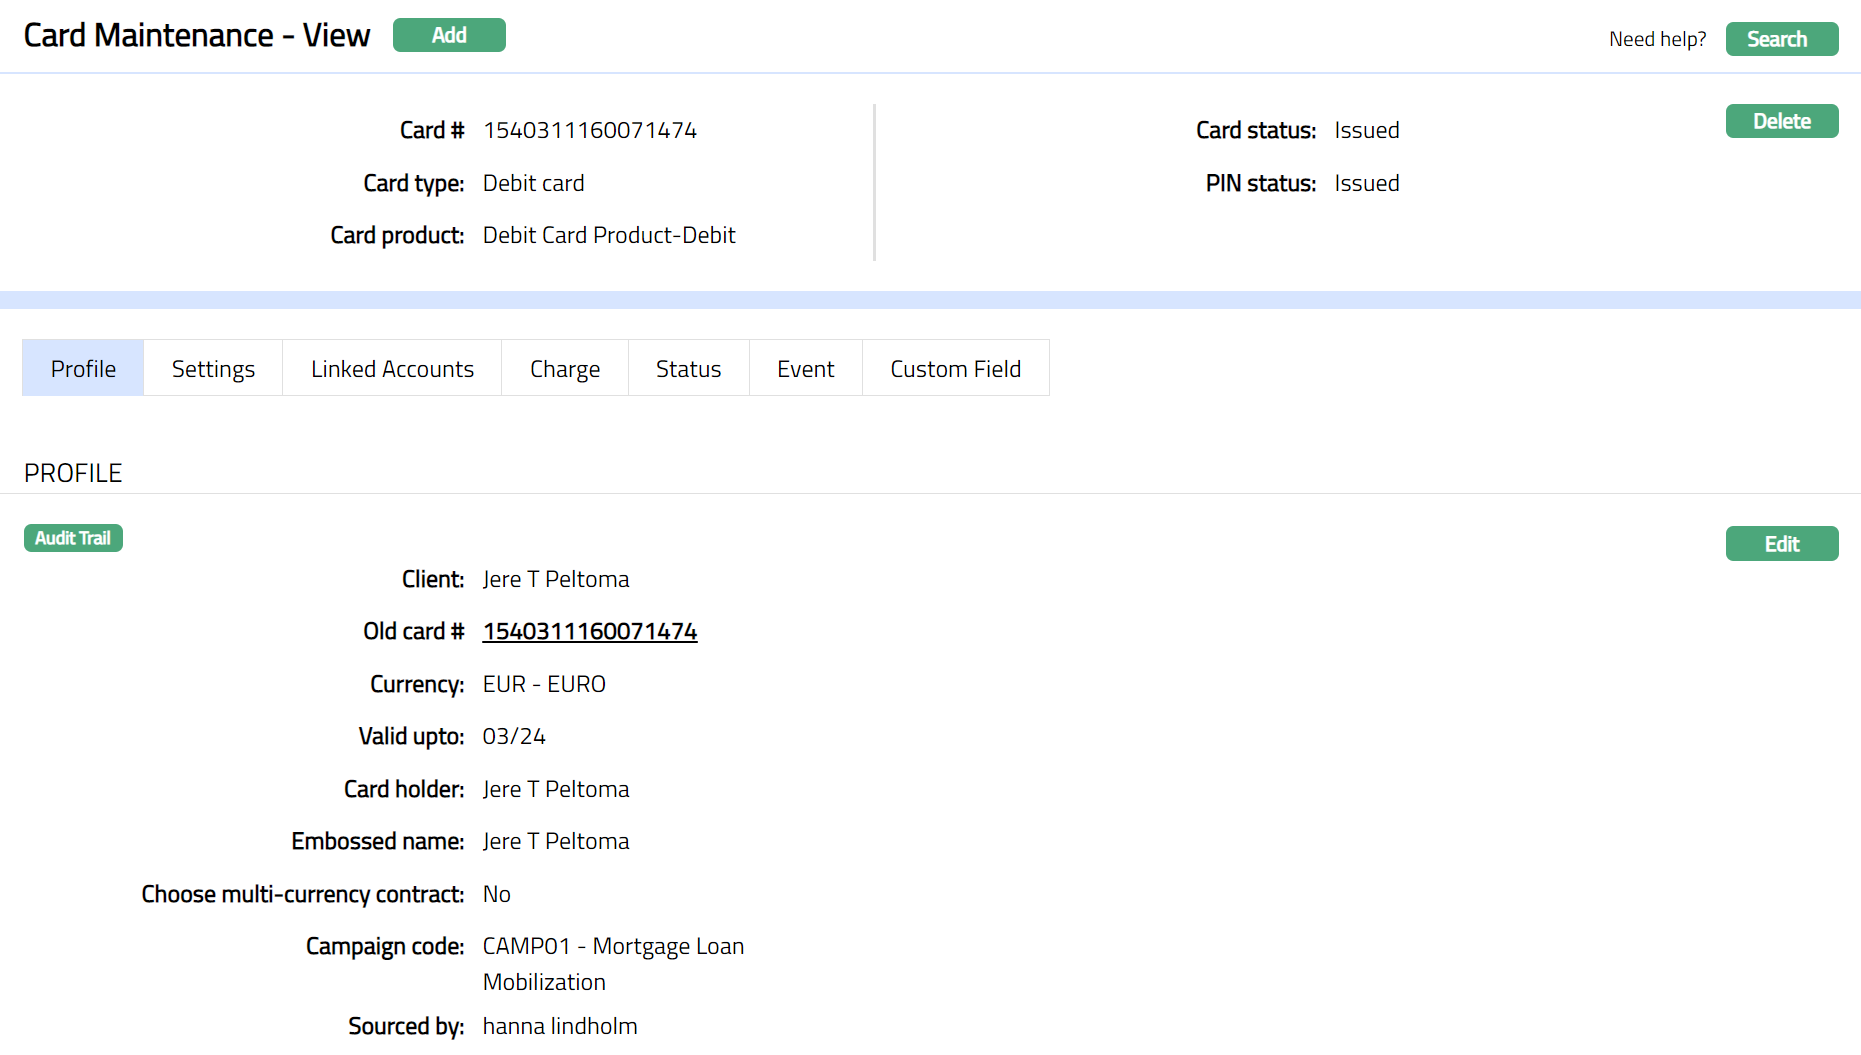
- Click Finish. The Card Maintenance - View page appears displaying the details of the card that you created.
If the Card Type is Debit Card, then the Card page with the following tabs as shown in the sample below will appear.
 Functions: Add, Delete, Search
Note:
On creation of a Card, The Card status and the Pin status is issued and the record status is Pending.
If the Card type is Credit and Holder type is Primary, Secondary Cards tab will be displayed under Card Maintenance --View page and Linked Accounts tab will not be displayed.
If the Card type is Credit and Holder type is Secondary, both Linked Accounts and Secondary Cards tabs will not be displayed.
If the Card type is Debit, Linked Accounts tab will be displayed.
If Card type is Load Card, then both Linked Accounts and Secondary Cards tabs will not be displayed.
Delete: You can delete a card by clicking on Delete button. When you click on Delete button, Aura displays an alert message. On confirmation Aura will delete the card.
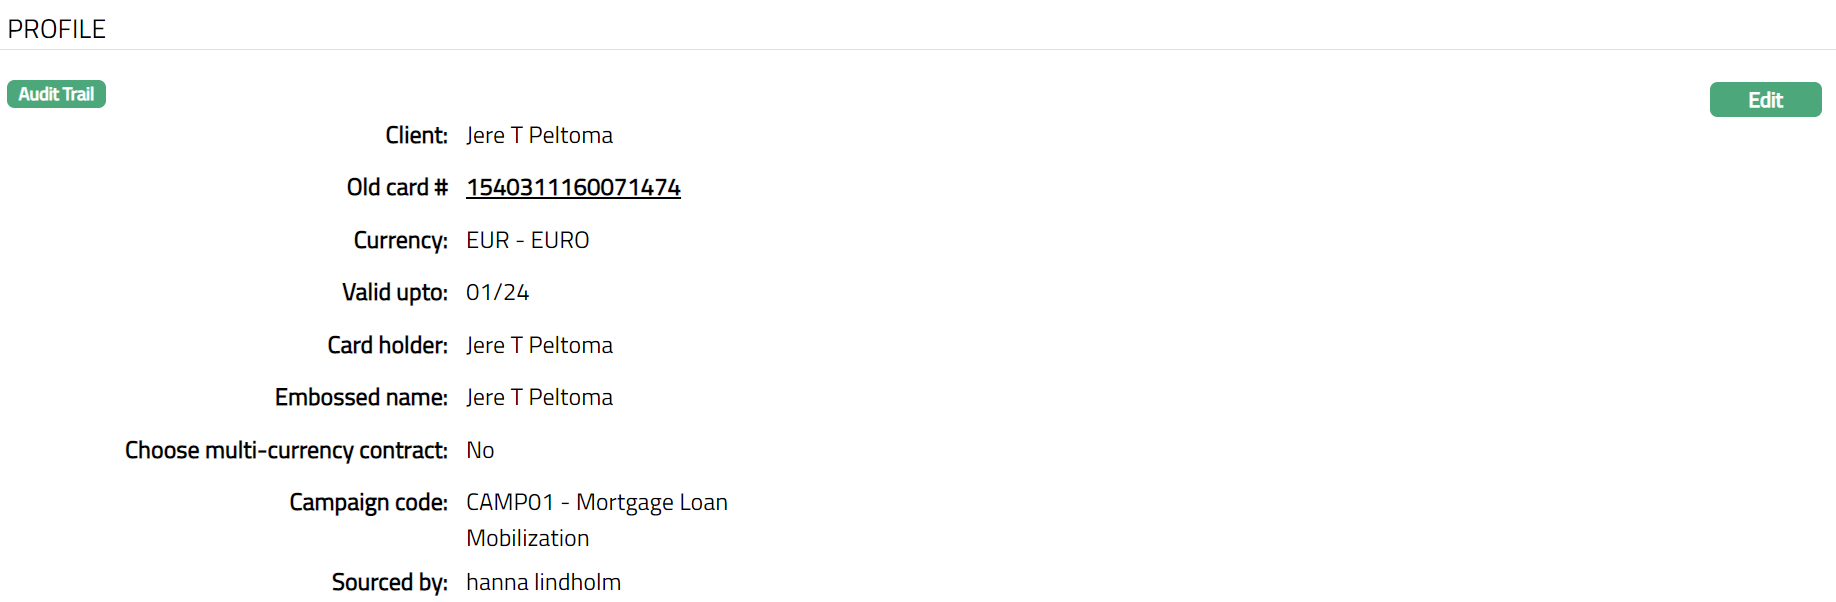
Profile
The Profile tab, which is the default tab in the Card Maintenance -View screen, shows the basic details of the Card.
To view / edit the Profile
- Access the Card Maintenance - View page. Click the Profile tab to view the details as per sample below. The details are defaulted from the entries that you made during Card Maintenance creation. For details refer to New Card Maintenance -- Profile (1/3).
Profile tab sample if the Card Type is Credit.
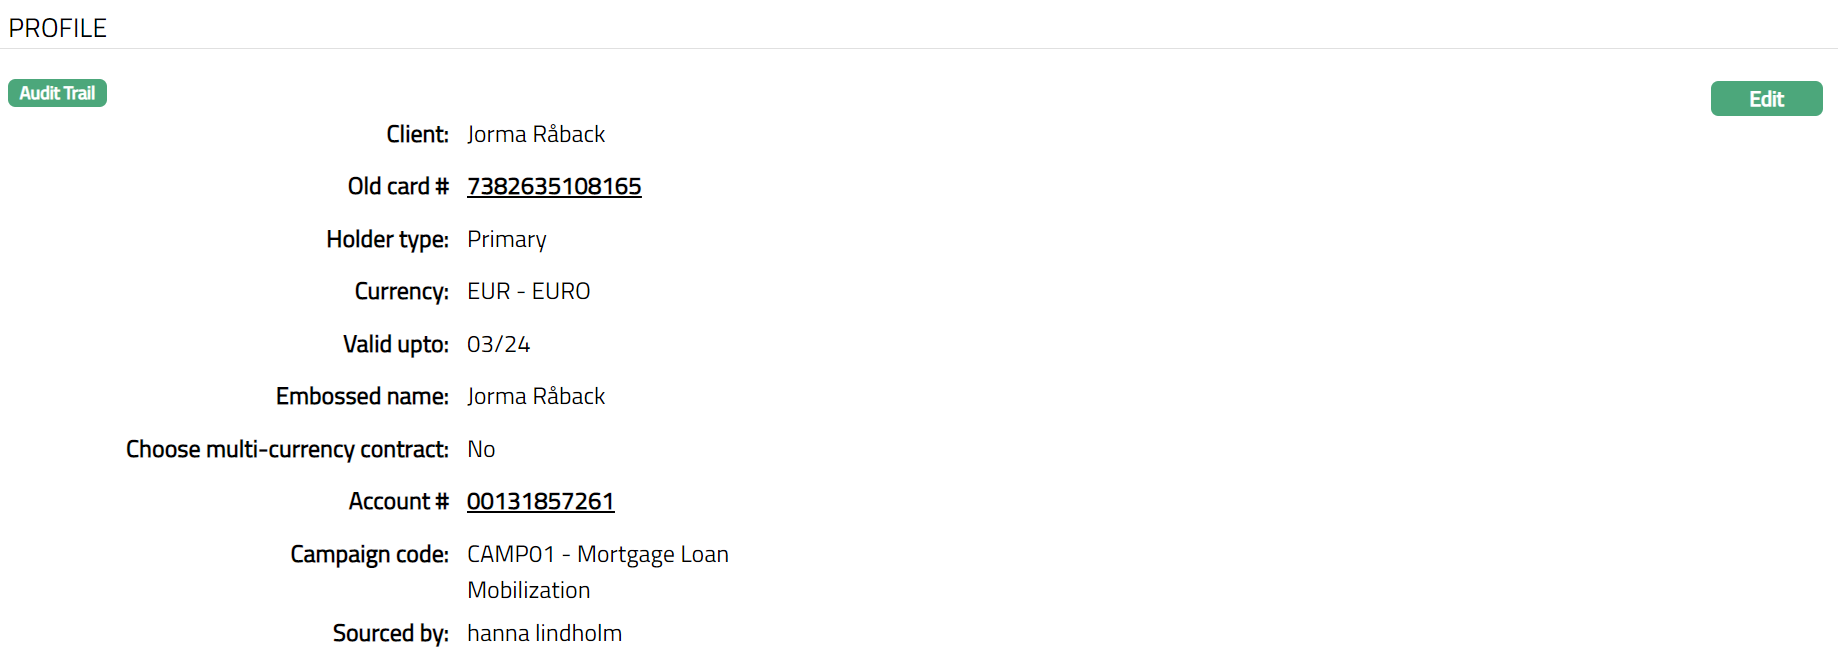
Note: If Card type is Credit and Holder type is Secondary; Primary card field with hyperlink will be displayed. A click on the hyperlink will route you to the Profile of the card account.
Profile tab sample if the Card Type is Debit

Profile tab sample if the Card Type is Load.

- Click Edit. Edit Profile page appears.

- You can edit only the following fields:
Valid upto
Embossed name
Campaign code
Secured by
- Click Save. Profile page appears with the edited details.
 Functions: Edit
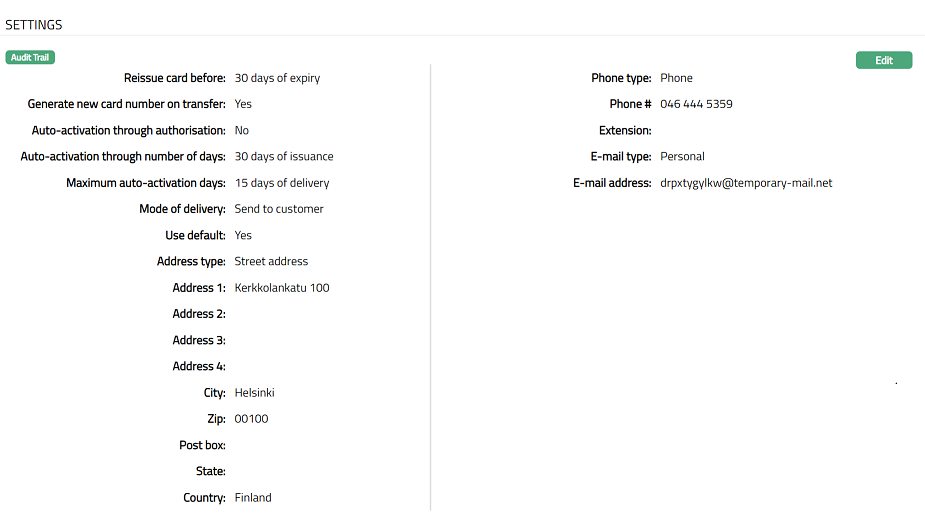
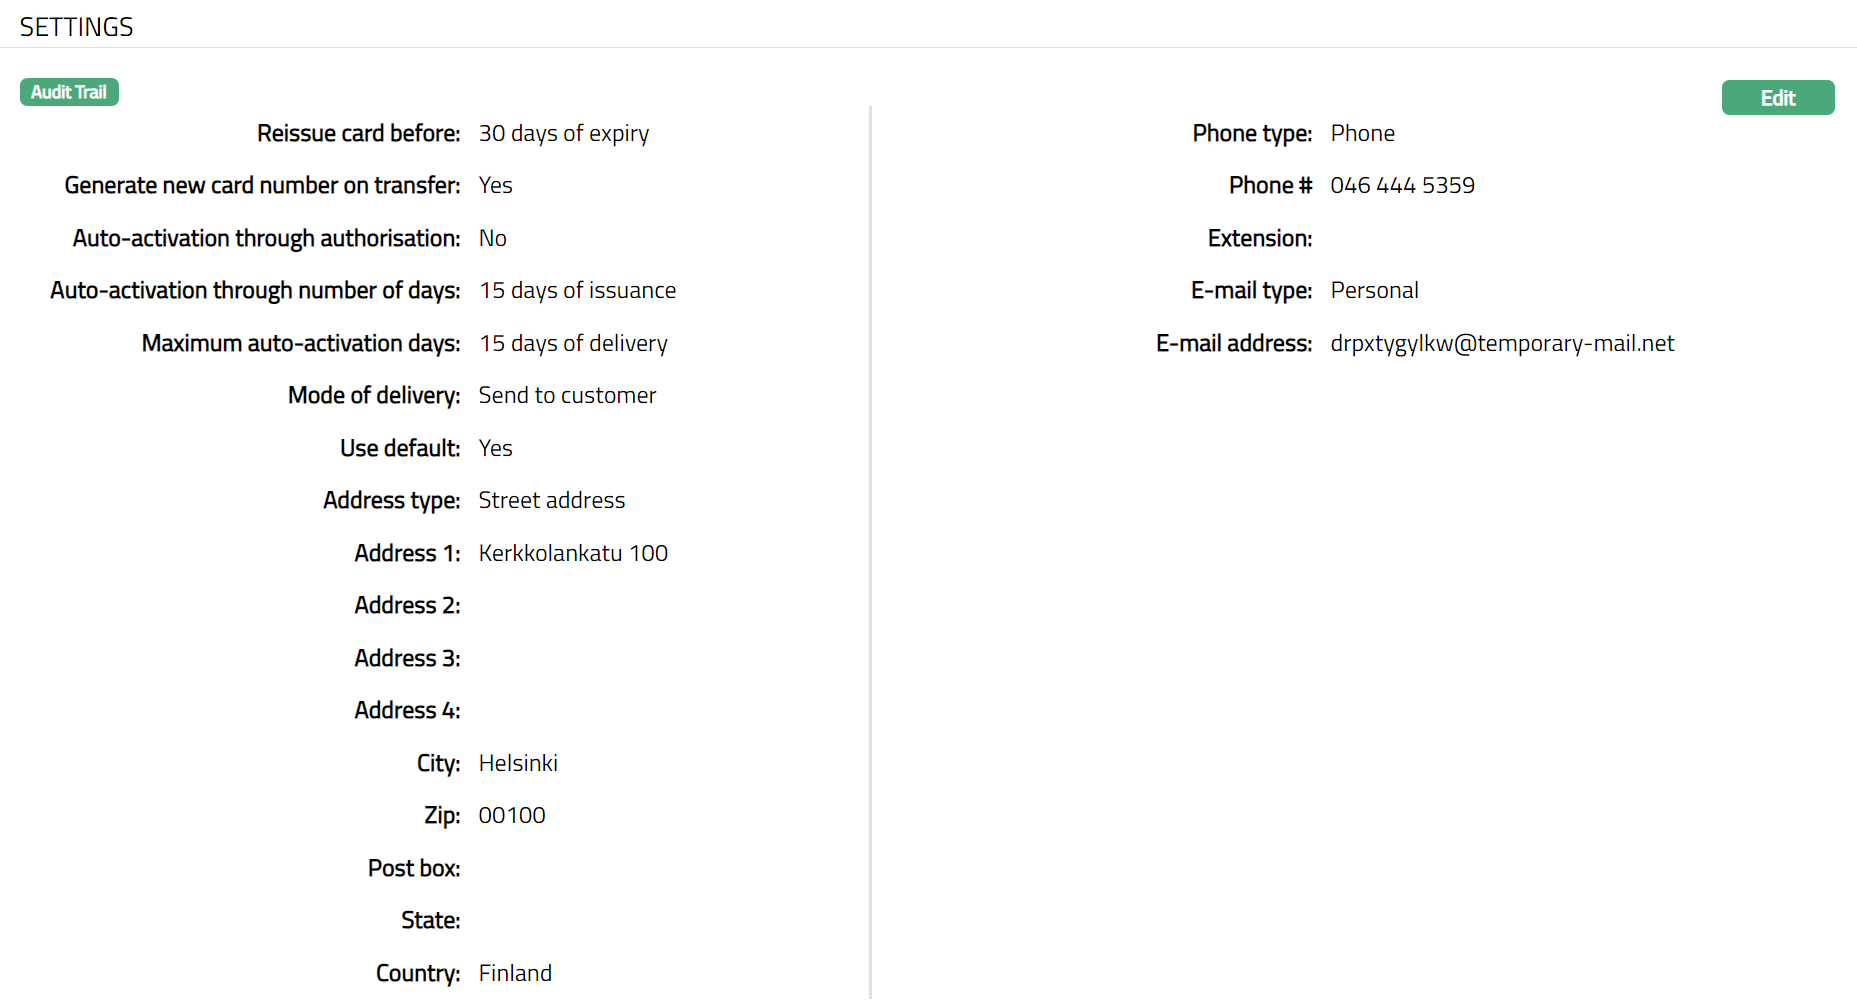
Settings
This tab will allow you to view and maintain the settings for the card such as card activation, re-issuance. that are defaulted from the card product.
To view / Edit the settings
- Access Card page. Click Settings tab to view the details as per sample below.
Function: Edit
- Click Edit. Edit Settings page appears.
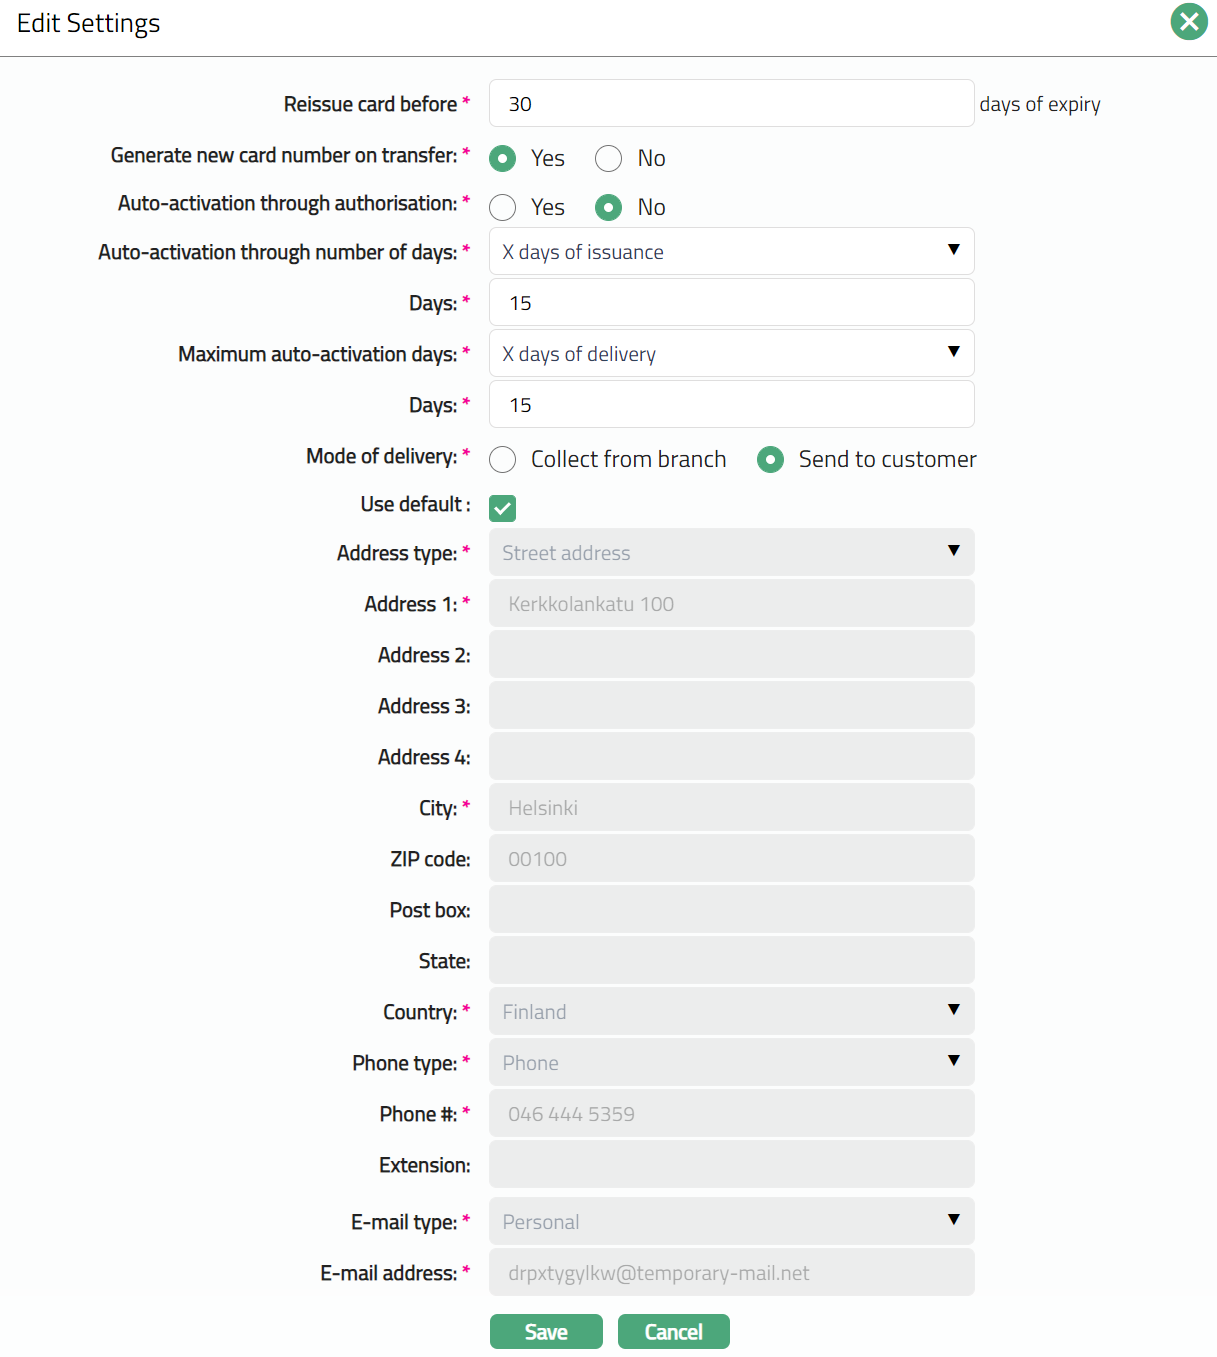
Note: All fields are editable
In Reissue card before field, enter the number of days. This denotes the number of days before which the card re-issue process needs to start before the card gets expired.
Select option for Generate new card number on transfer. If you select Yes, then new number will be generated based on settings at account. If the user selects No, then new card record will have same card number as old.
Select option for Auto-activation through authorization. This sets parameters for Auto-activation through authorization, if you select yes, then card is automatically activated on first pin enabled transaction (i.e, on first swipe). If you select No, then you will have to follow the manual process of card authorization.
Select option from the auto-activation of card from the Auto-activation through number of days. This stores parameters for Auto-activation through number of days The options are:
X days of issuance -- If this option is selected, then the card is automatically activated within x days after the card is issued to the client.
X days of dispatch - If this option is selected, then the card is automatically activated within x days after the card is issued to the client.
X days of delivery - If this option is selected, then the card is automatically activated within x days after the card is issued to the client.
Enter number of Days.
Select option from the Maximum auto-activation days drop-down list. This option allows you to define the maximum days till when the bank can wait for the auto -- activation of the card to happen. The options available are:
X days of issuance -- If this option is selected, then the bank will wait for x days after the card is issued. The client has to do the first transaction within the X days and the card is activated. Else the card is de-activated.
X days of dispatch - If this option is selected, then the bank will wait for x days after the card is dispatched. The client has to do the first transaction within the X days and the card is activated. Else the card is de-activated.
X days of delivery - If this option is selected, then the bank will wait for x days after the card is delivered. The client has to do the first transaction within the X days and the card is activated. Else the card is de-activated.
Enter number of Days.
Select Collect from Branch or Send to Customer radio button for Mode of delivery.
Use default radio button will be selected by default for the default Address. If you want to change the address, then deselect the Use default radio button, and the address fields will be enabled for editing.
Click Save. Settings page appears with the edited details.
 Function: Edit
Linked Accounts
Using this tab, you can view, add and edit the linked account number of the clients for a card. This tab will be available only if the Card Type is Debit. By default, the account linked to the card on creation of the card will be displayed in this tab and this account will be the default account to which the card will be linked.
To Add linked account,
- Access Card page. Click Linked Accounts tab.

- Click Add. Add Linked Account window appears where the linked client is displayed, and you can select the required account from the drop down. All active client accounts of card owner as maintained under Retail > Accounts > Client account > Maintain are displayed. Only those account numbers linked to the client will be displayed which are not being used for the card.
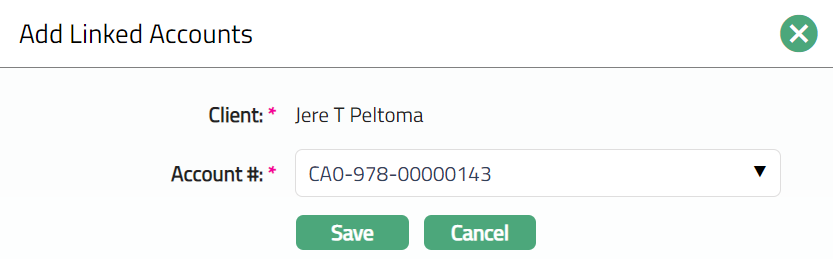
- Click Save. Linked Accounts page appears with the added details.
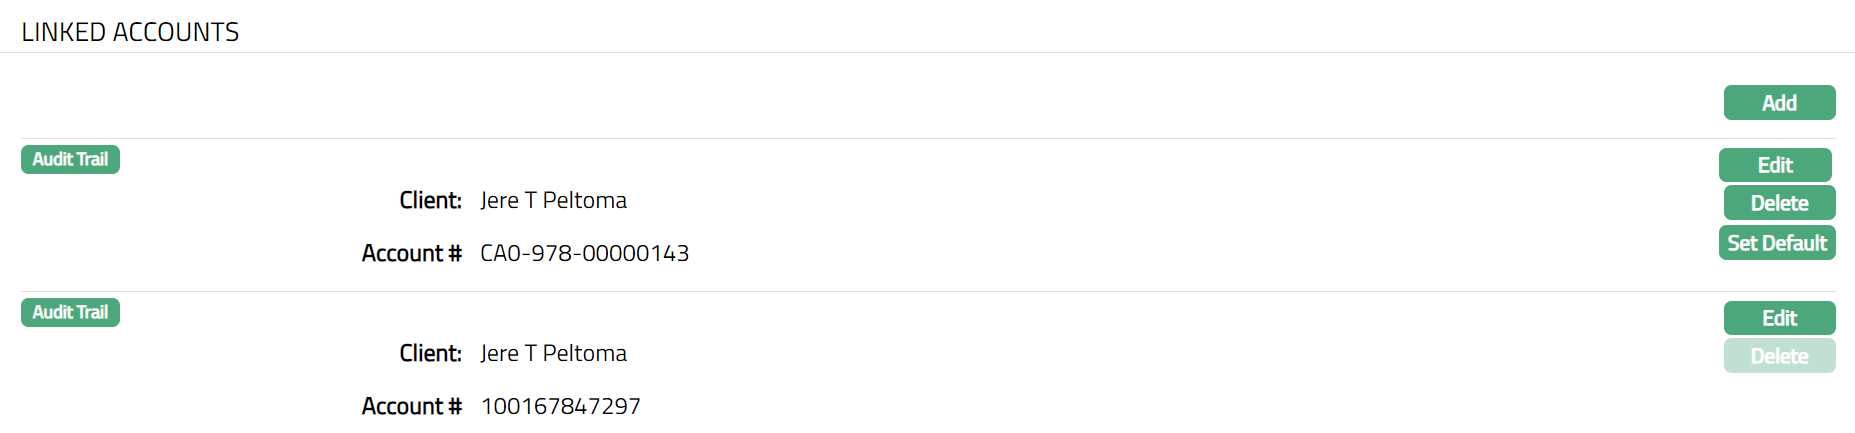 Function: Add, Edit, Delete, Set Default
Note: On addition of a new account, Set Default button will be enabled. A click on this button will set the account as a default account linked with the card.
To edit linked accounts
- Click Edit. The Edit Linked Accounts page appears.
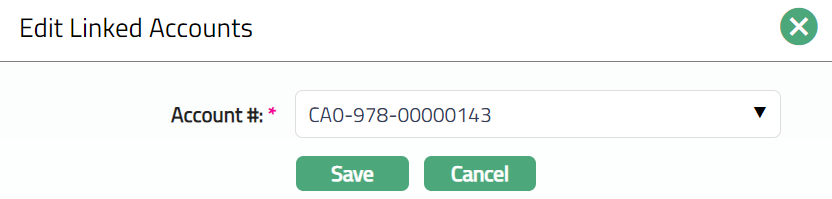
Select Account # from the drop-down list of active client accounts owned by the selected client that are not used for any card. The account is maintained under Retail > Accounts > Client account > Maintain.
Click Save. Linked Accounts page appears with the edited details.
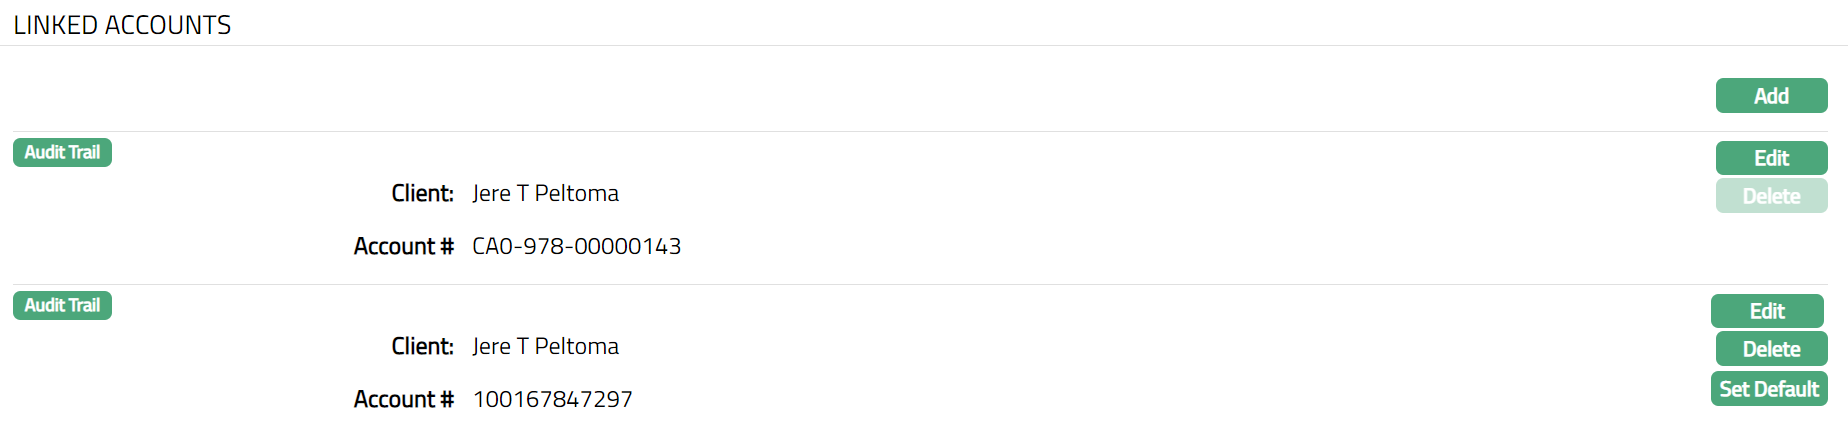 Function: Add, Edit, Set Default.
Charge
Charge tab allows you to view and edit the details of different charges for the Card Maintenance. The sub tabs available in this tab are Default charge and Additional charge.
Charge tab has two sub tabs:
Default Charge
Additional Charge
Charge -- Default Charge
- Access Card page. Click Charge tab and then Default Charge. A sample of the screen is shown below: The details are defaulted from Product > Charges based on the Product that you chose for the Card during creation.
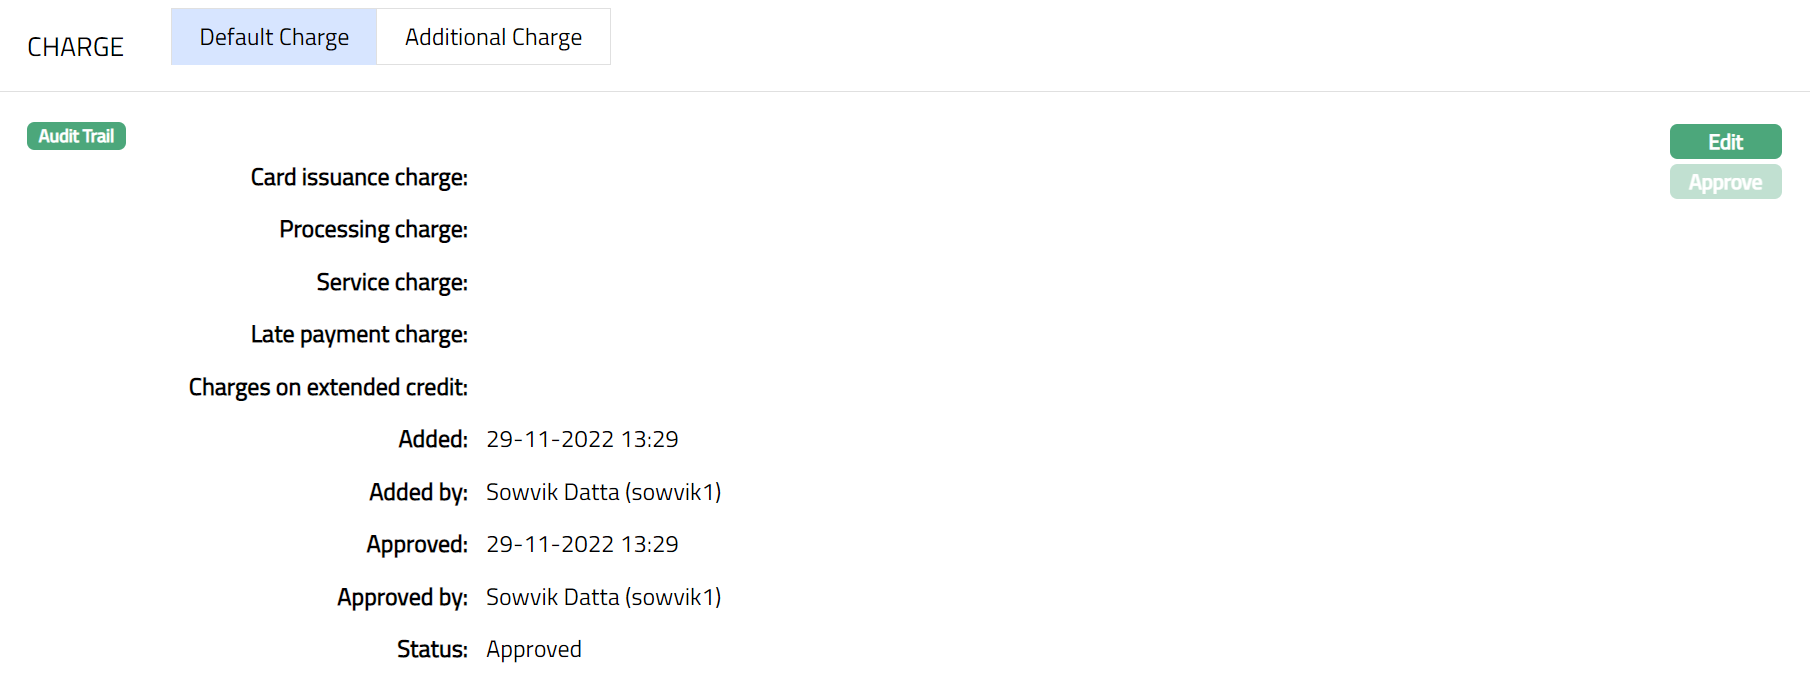
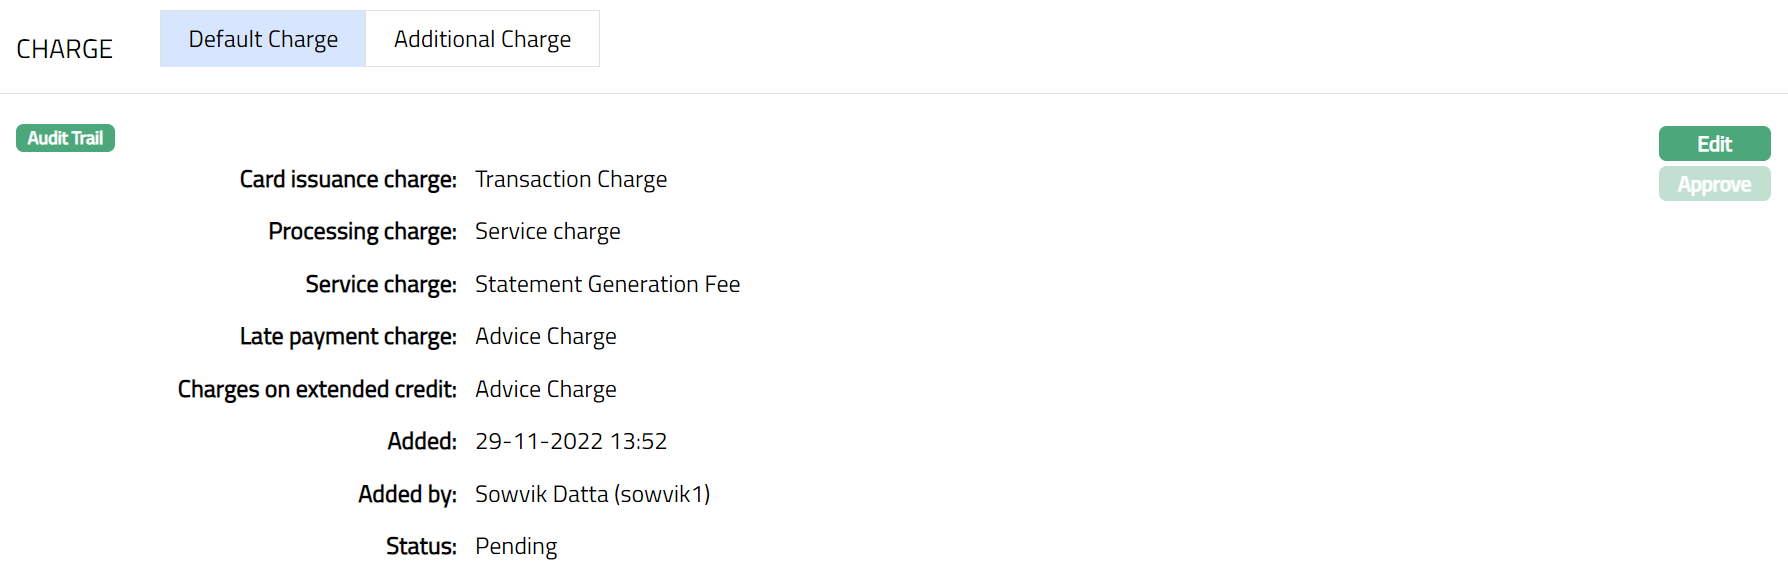
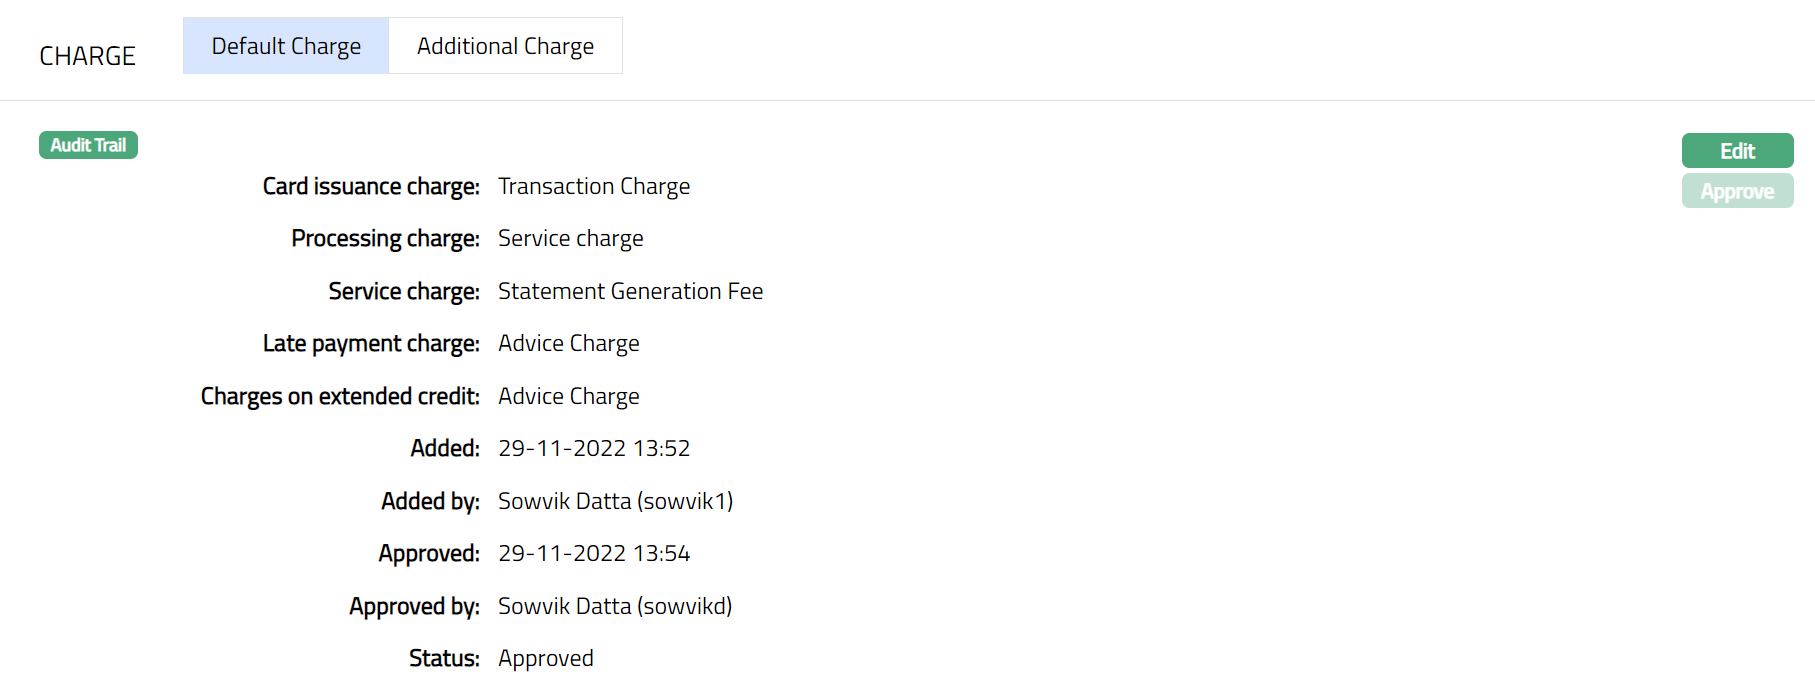
Functions: Edit, Approve.
The additional fields that you can view in the tab are explained below:
Status field denotes the status of the tab.
Added field denotes the date on which the record was added.
Added by field denotes the name of the person who created the record.
Approved field denotes date on which the record was approved.
Approved by field denotes name of the person who approved the record.
- Click Edit. Edit Charge window appears.
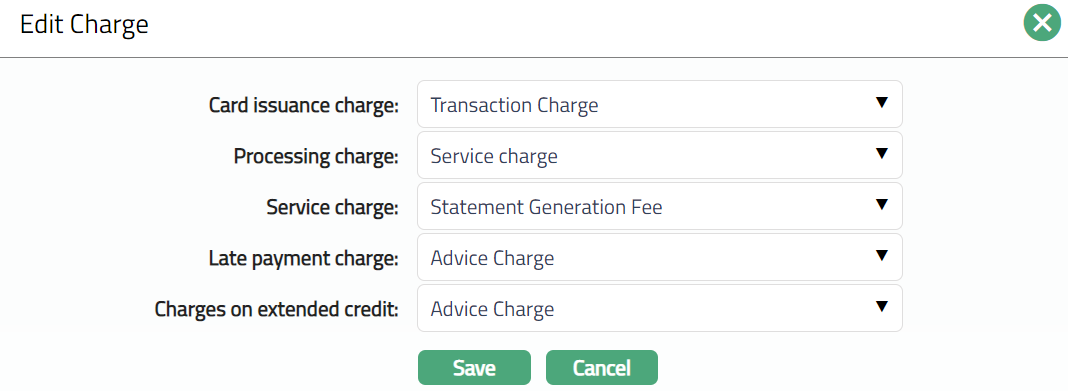
Select charges from the drop-down list maintained at the product level.
Click Save. Default Charge page appears with the edited details.
Functions: Edit, Approve
Note: Once the charges are added or any changes made, the default charge tab will be in the Pending status. On Approval, the charges will be applicable on the new Accounts created based on this product.
The additional fields that you can view in the tab are explained below:
Status field denotes the status of the tab.
Added field denotes the date on which the record was added.
Added by field denotes the name of the person who created the record.
Approved field denotes date on which the record was approved.
Approved by field denotes name of the person who approved the record.
Additional Charge
Additional Charge tab allows you to view and maintain additional charges for the Product -- apart from the ones that are specified under the Charges tab.
- Access Product page. Click Additional charge tab if any additional charges had already been added, these would be displayed; else, it will be blank.
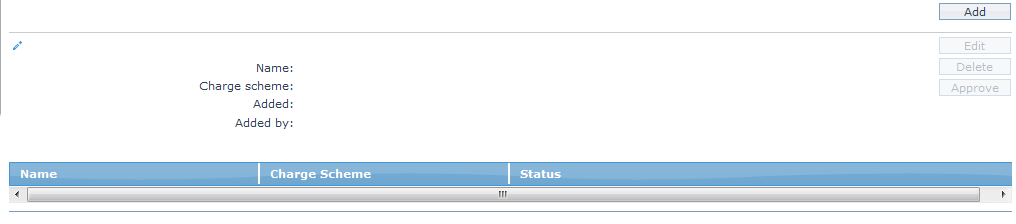
- Click Add. The Add Additional Charge page appears.
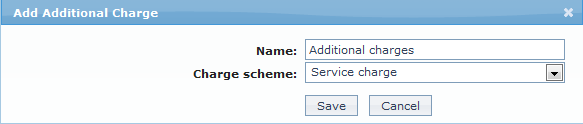
Enter Name of the additional charge to be added.
Select Charge scheme for the Additional Charge from the drop-down list which must be maintained under Admin > System codes > Charges > Charges. You can add any Periodic charge -- whether Flat or Banded. If banded, the Current balance will be taken as the basis for the charge.
Click Save. Additional Charge page appears with the added details.
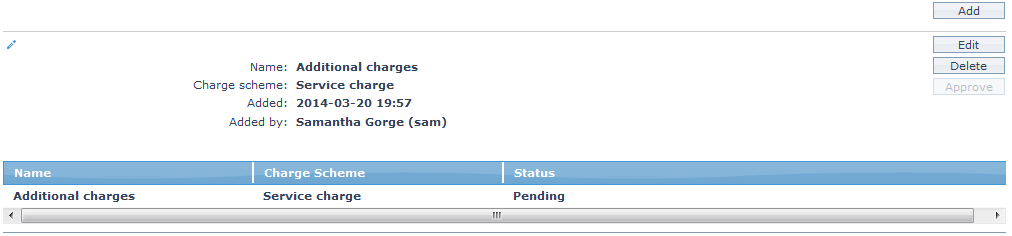 Functions: Add, Edit, Delete, Approve.
Note: Once the charge is added or any changes made, the charge tab will be in the Pending status. On Approval, the charges will be applicable on the new Accounts created based on this product.
The additional fields available are:
Added field denotes the date on which the record was added.
Added by field denotes the name of the user who created the record.
Approved field denotes date on which the record was approved and is displayed only for approved records.
Approved by field denotes the name of the user who approved the record and is displayed only for approved records.
Status
The Status tab allows you to view and maintain the card status and the pin status. The Status tab consists of two sub tabs. One is Card Status, and the other is Pin Status. Status movement for Card Status and PIN status is done manually except for Auto activation, expiry and re-issuance.
This tab has two sub tabs:
Pin Status
Card Status
PIN Status:
To view and Edit the PIN status
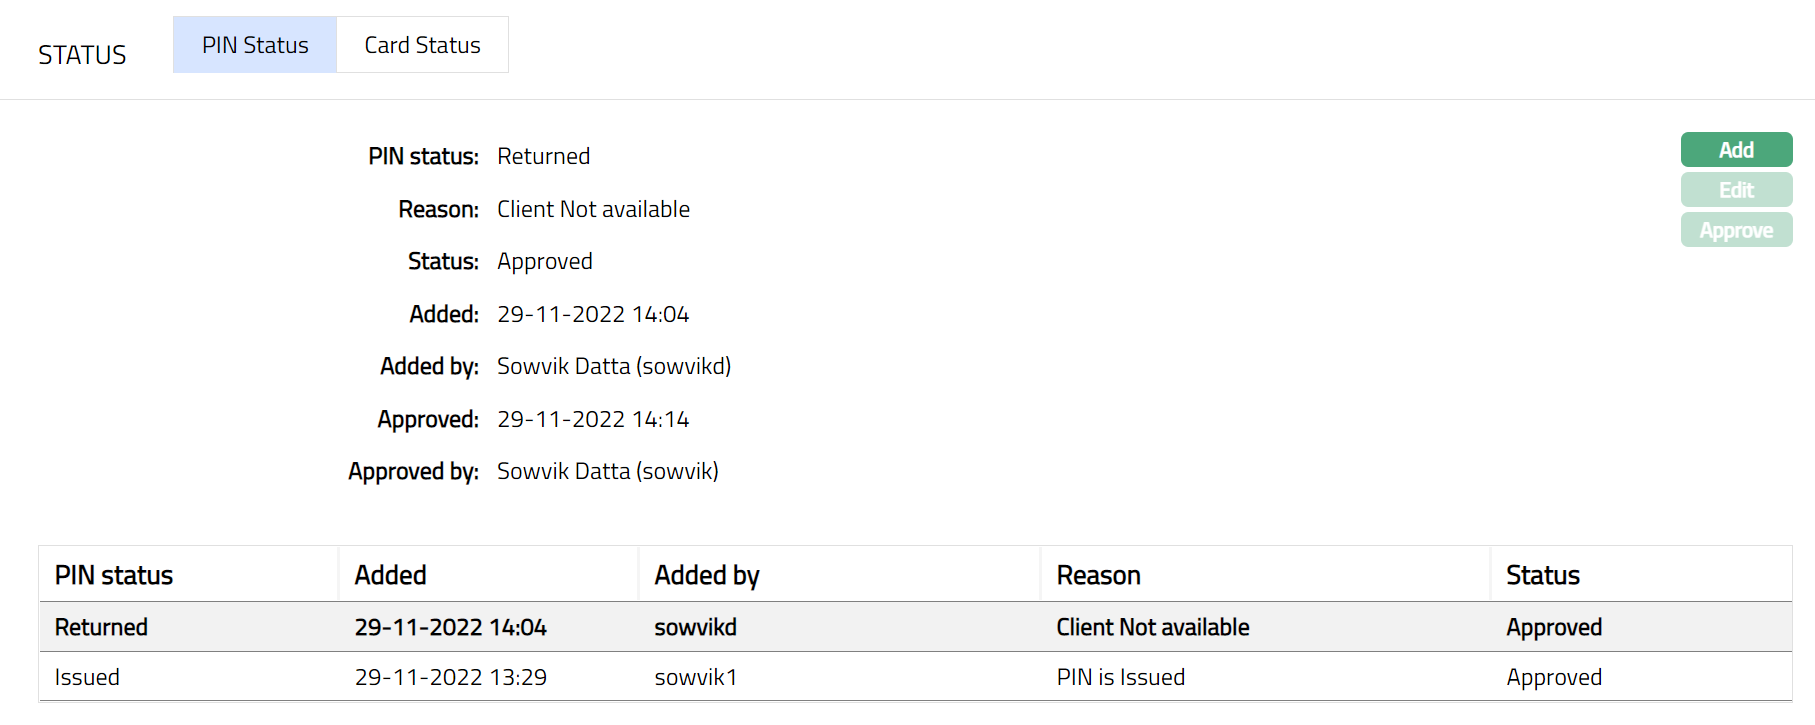
- Access Card page. Click Status tab and then on the PIN tab to view the details as per the sample below. By default, the pin status will be issued --Approved.
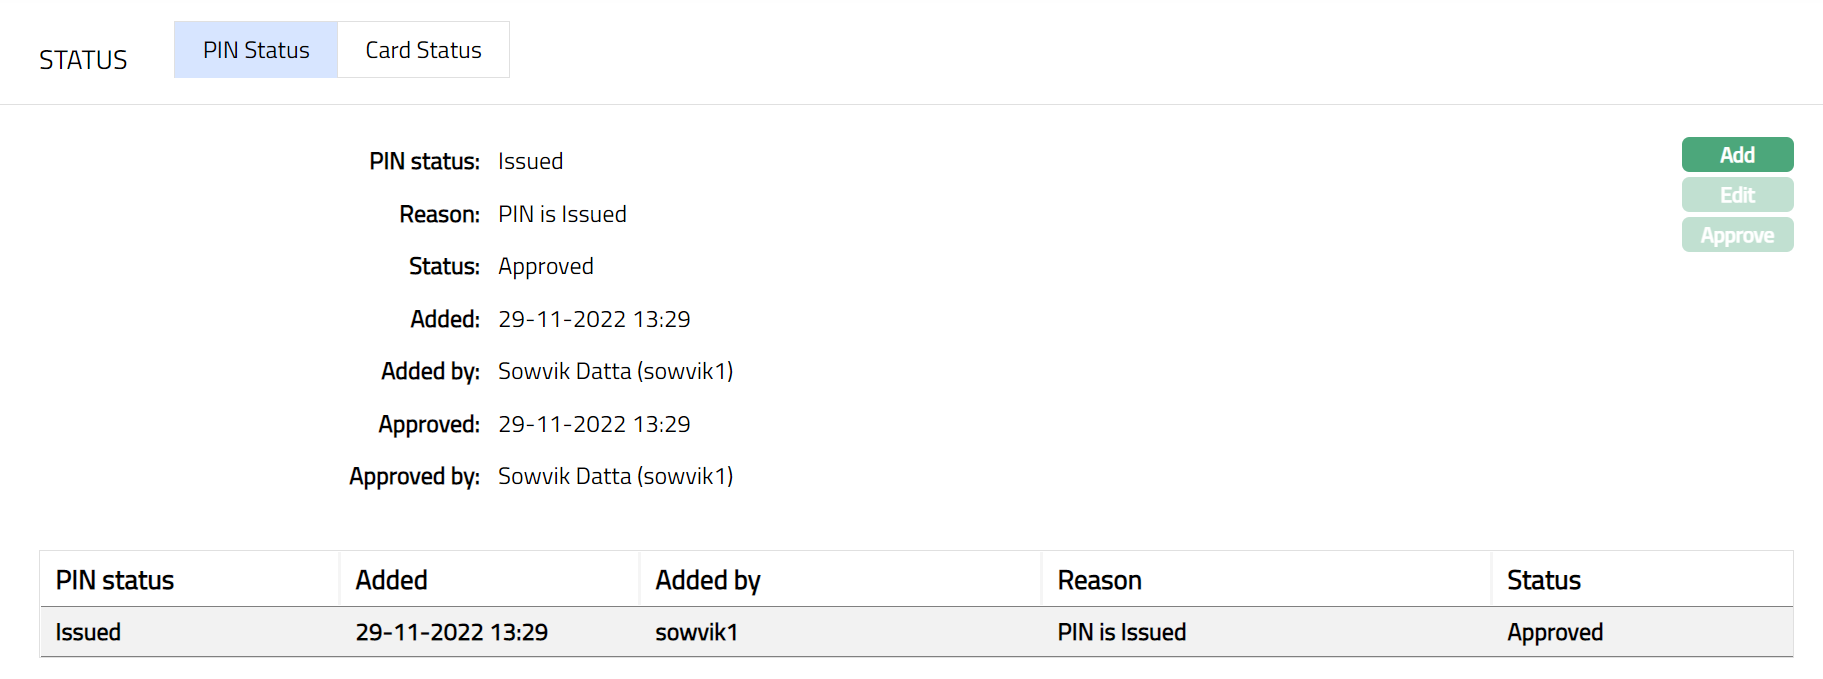
The following fields are shown only in the View screen and are not editable:
Pin status field denotes the pin status of the card.
Reason field denotes the reason for the change of the status
Status field denotes the status of the tab.
Added field denotes the date on which the record was added.
Added by field denotes the name of the user who created the record.
Approved field denotes date on which the record was approved and is displayed only for approved records.
Approved by field denotes name of the user who approved the record and is displayed only for approved records
- Click Add. Add PIN Status window appears.

- Select PIN Status from the drop-down list. Depending on the current status of the card account, the possible values are:
Issued: This is the initial account status as soon as the card is created.
Pre-ordered: if the client requests the pin number before the card is received, then the pin status will be pre-ordered.
Dispatched: This is the status under which the pre-ordered pin number is dispatched to the client.
Delivered: This is the status under which the pre-ordered pin number is delivered to the client.
Re-issued: This is the status under which the pre-ordered pin number is re-issued to the client.
Returned: This is the status under which the pre-ordered pin number is not received by the client and is returned to the bank.

Functions: Add, Edit, Approve.
Aura validates and allows you to change status as mentioned below. Based on the current status, Aura auto populates the values when you click on Add button:
Issued to Pre -- ordered
Issued to Returned
Pre- ordered to Dispatched
Pre -- ordered to Issued
Dispatched to Delivered
Delivered to Re -- issued
Re -- issued to Returned
Re -- issued to Pre -- ordered
Returned to Dispatched
To Edit Pin Status
- Click Edit. Edit Pin Status page appears.
Note: Once Approved you cannot edit further.
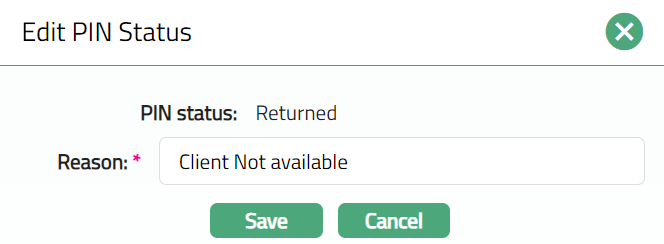
Note: Only Reason Field is editable.
- Click Save. Pin Status sub tab appears with the edited details.
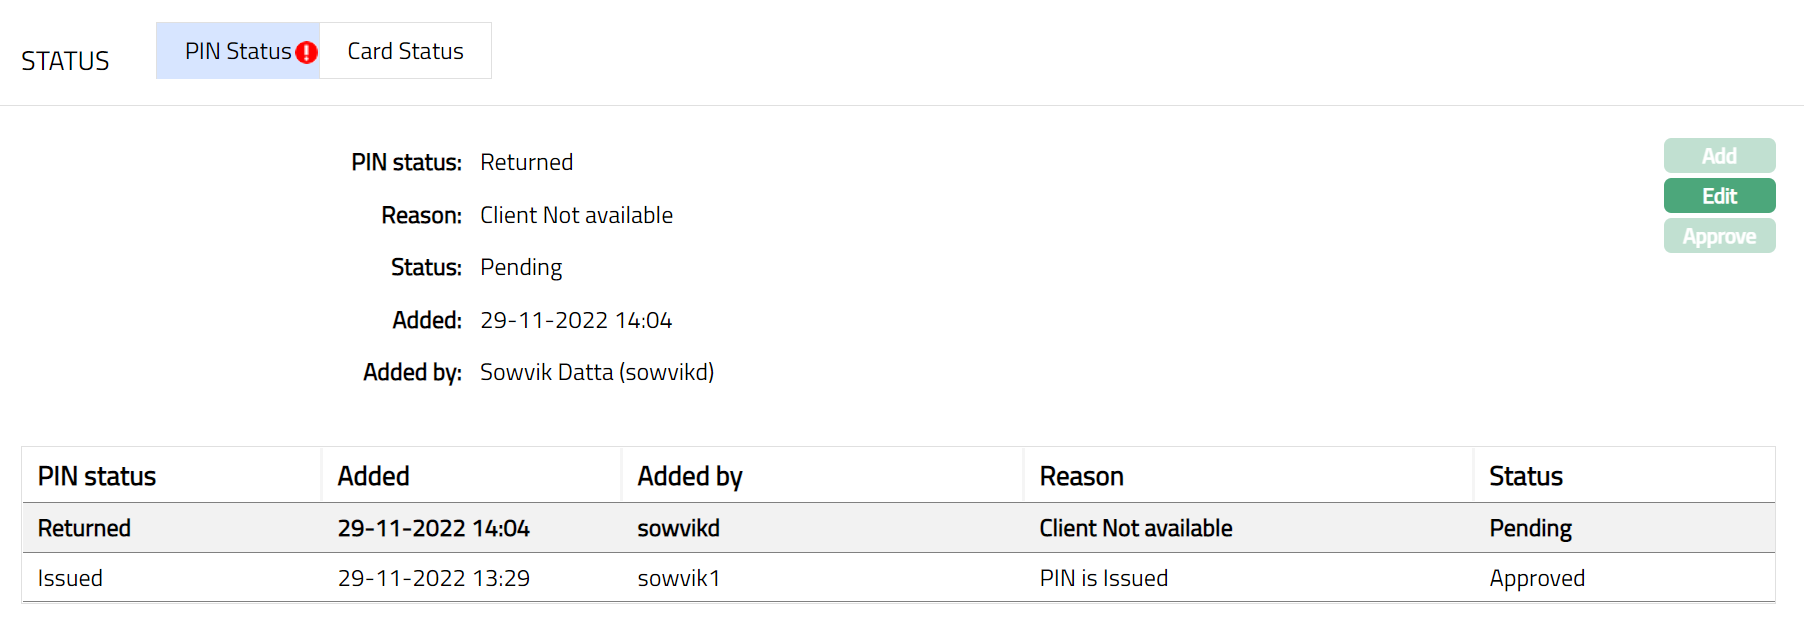
Note: Any changes made, the tab will be in the Pending status. On Approval, the status will change to Approve Status.
 Functions: Add, Edit, Approve.
The additional fields are:
Status field denotes the status of the tab.
Added field denotes the date on which the record was added.
Added by field denotes the name of the user who created the record.
Approved field denotes date on which the record was approved and is displayed only for approved records.
Approved by field denotes name of the user who approved the record and is displayed only for approved records
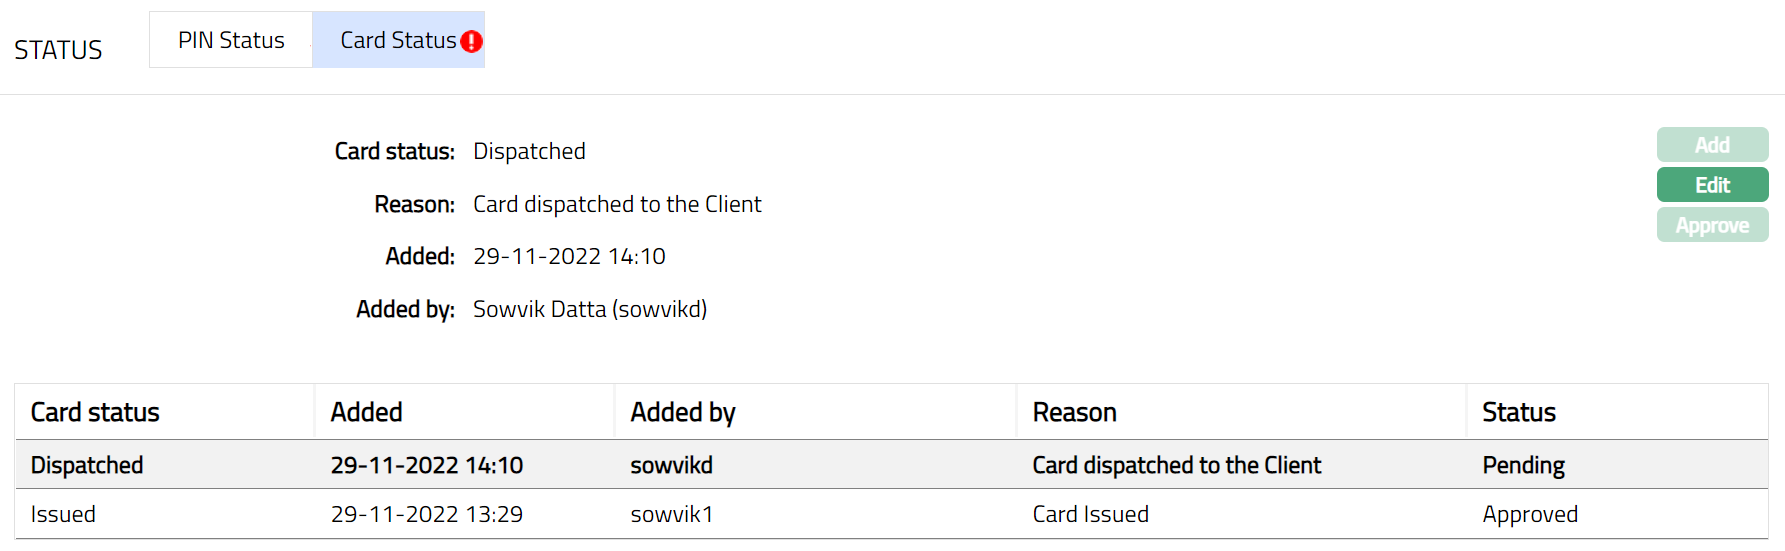
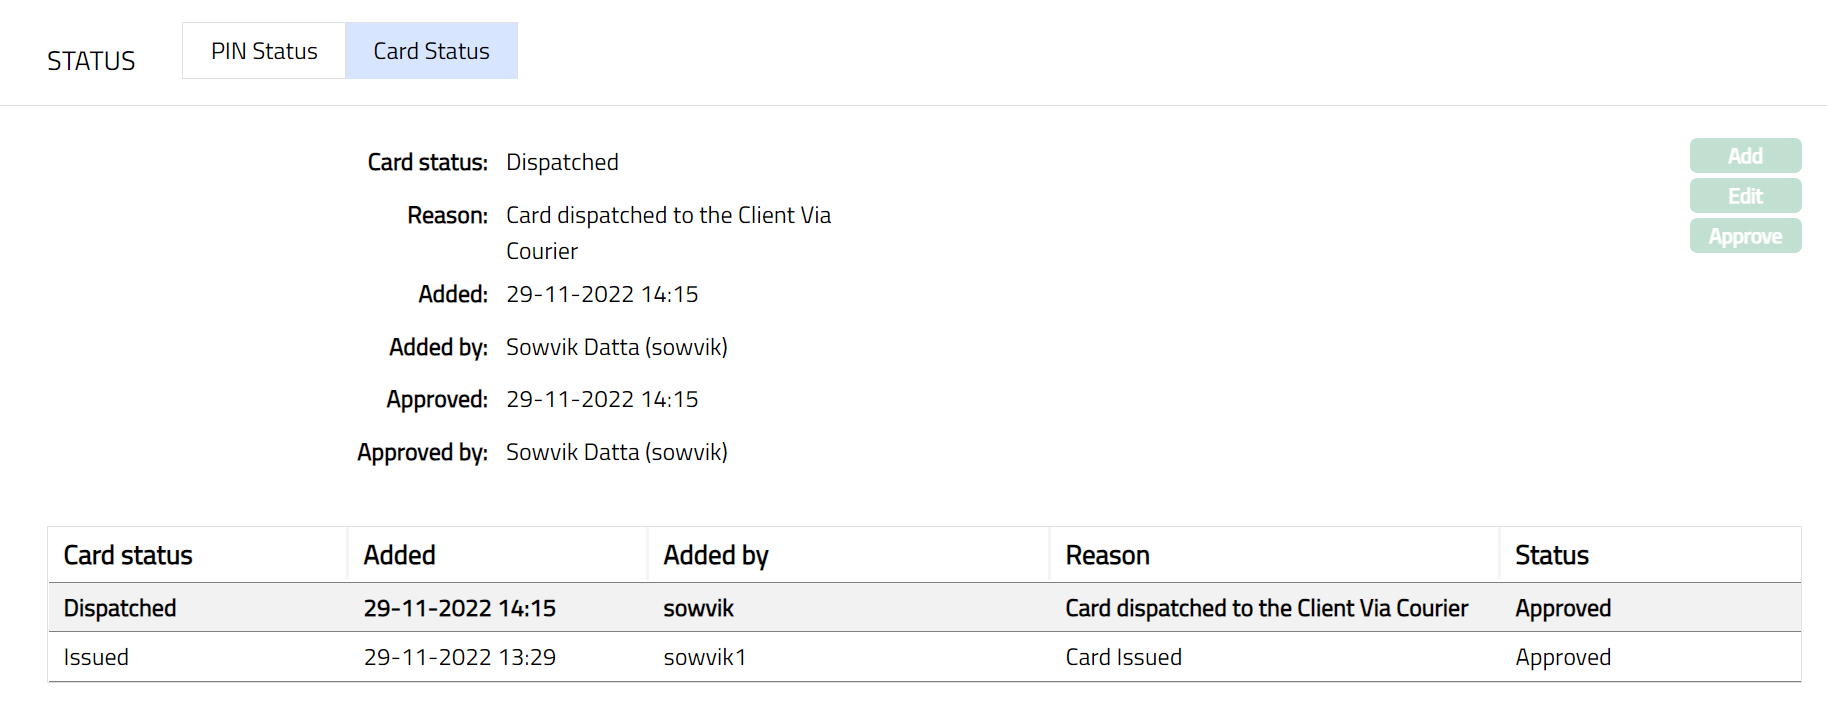
To view and Edit card status
- Access Card page. Click Status tab by default the Card status tab is opened to view the details as per the sample below. On creation card status will be Issued.
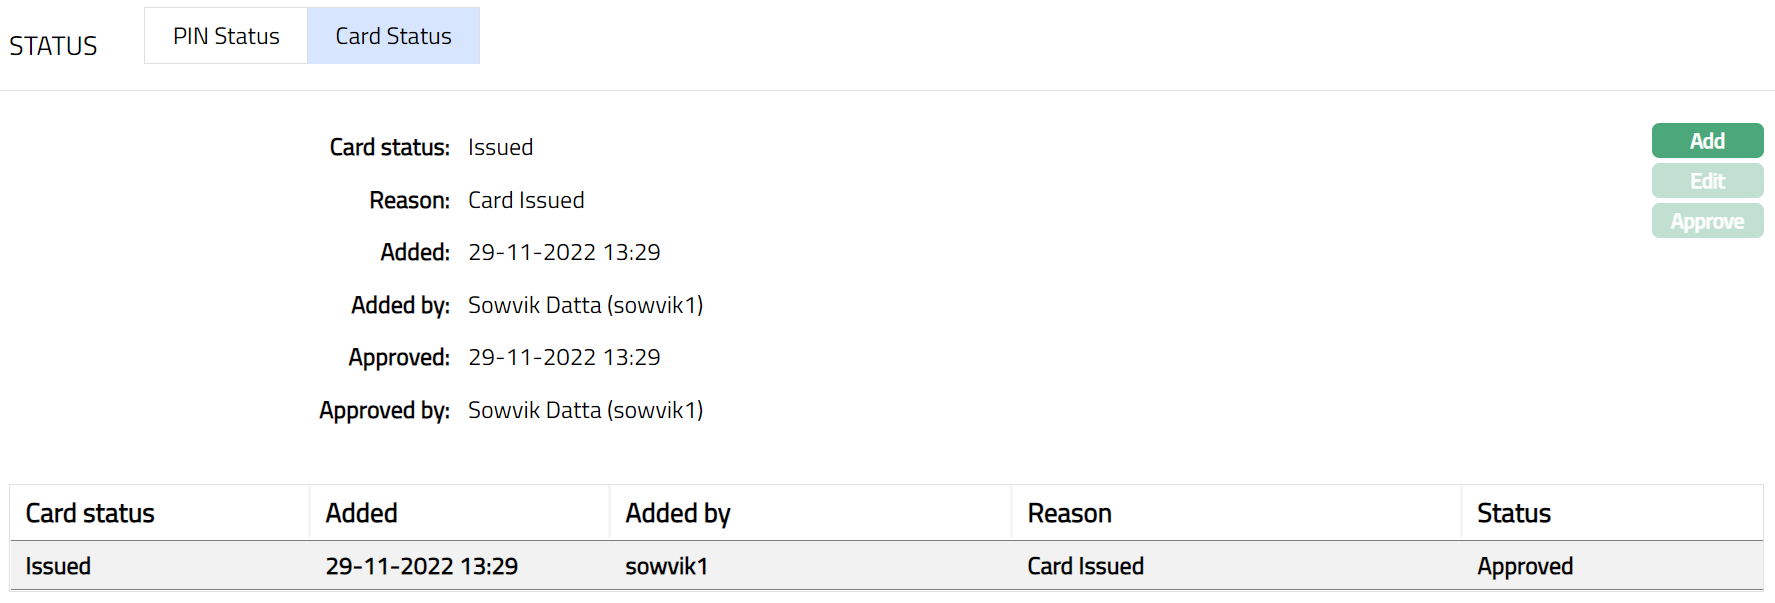
The following fields are shown only in the View screen and are not editable:
Card status field denotes the status of the tab.
Reason field denotes the reason for the change of the status.
Added field denotes the date on which the record was added.
Added by field denotes the name of the user who created the record.
Approved field denotes date on which the record was approved and is displayed only for approved records.
Approved by field denotes name of the user who approved the record and is displayed only for approved records
- Click Add. Add card status window appears.
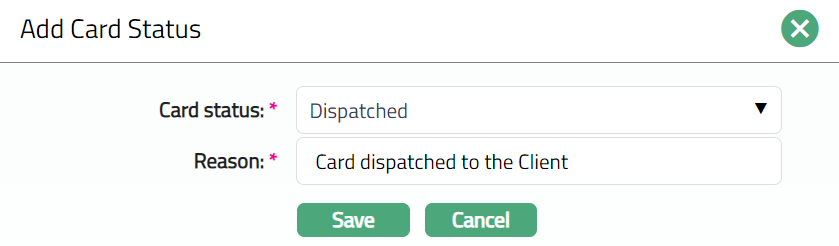
- Select Card Status from the drop-down list. Depending on the current status of the card account, the possible values are:
Issued: This is the initial card status as soon as card is created.
Activated: This is the status in which the card is active transactions are allowed on the account. It has to be manually set by a user different from the one who created the account.
Suspended: This is the status in with the card will be inactive.
Hot listed: Based on the client request if the client has lost the card, then the card status is changed to Hot listed Which will block the card from using it further.
Expired: if the card exceeds its validity, then Aura will change the status of the card as Expired.
Dispatched: This is the card status in which the card will be dispatched to the client from the bank.
Delivered: This is the status of the card in which the card is received and acknowledged by the client.
Returned: This is the status in which the card is not delivered to the client and is returned to the bank. In this stage the card will be in the Re-issued status.
Re-issued: Once the card is returned back to the bank, on request of the client the card will be re-issued to the client.
Transferred: When card status is chosen as transferred then a new card record is created with Card status and PIN status as Issued. On approval of Activated status for this new card record the existing record's Card status will become Expired and PIN status remains as Delivered.
Functions: Add, Edit, Approve.
Aura validates and allows you to change status as mentioned below. Based on the current status, Aura auto populates the values when you click on Add button:
Issued to Dispatched
Issued to Activated
Issued to Expired
Dispatched to Delivered
Dispatched to Returned
Returned to Dispatched
Delivered to Activated
Activated to Hot listed.
Activated to Suspended
Activated to Transferred
Suspended to Activated
Activated to Expired
Activated to Re-issued
Expired to Re-issued
Re-issued to Dispatched
Re-issued to Transferred
Transferred to Expiry (Auto process when another record is activated)
To Edit Cad Status
- Click Edit. Edit Card status page appears.
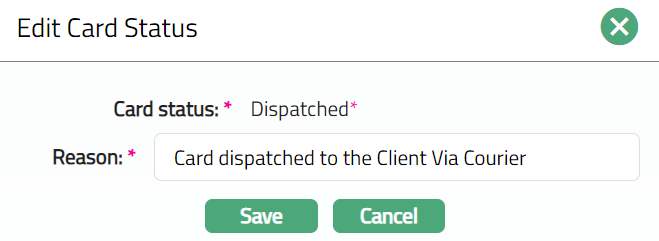
Note: Only Reason field is editable.
- Click Save. Card Status sub tab page appears with the edited details.
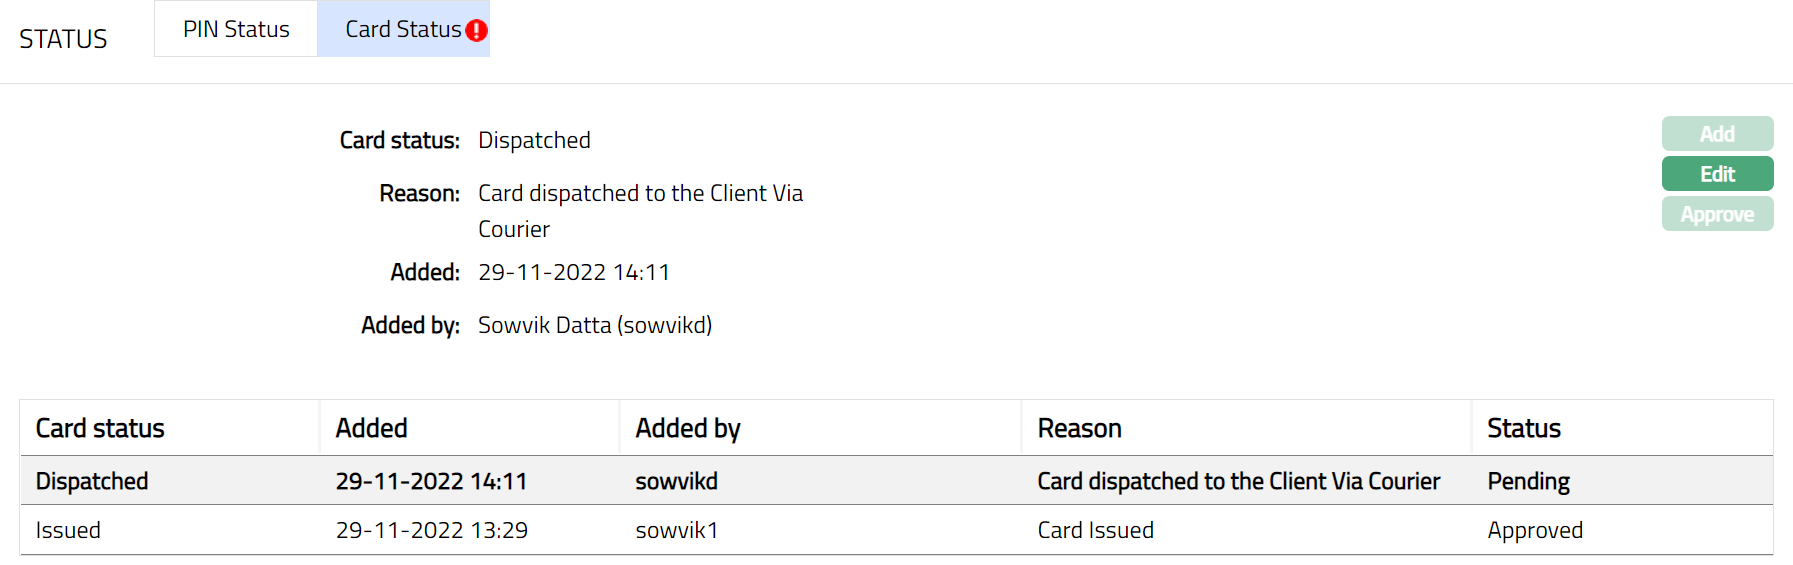
Note: Any changes made, the tab will be in the Pending status. On Approval, the status will change to Approve Status.
 Functions: Add, Edit, Approve
The additional fields are:
Status field denotes the status of the tab.
Added field denotes the date on which the record was added.
Added by field denotes the name of the user who created the record.
Approved field denotes date on which the record was approved and is displayed only for approved records.
Approved by field denotes name of the user who approved the record and is displayed only for approved records.
Event
Event tab allows you to view the past, current and future events. This tab is non-editable.
To view Events
- Access Card page. Click Event tab. There are three sub-tabs within it -- Past, Current and Future. By default, the Current tab is displayed. It shows the details of the Events that have value date = current business date. The Past tab and Future tab show details of events that have value date earlier than / later than the current business date respectively.
A sample of the Past tab is shown below:

A sample of the Current tab is shown below:

A sample of the Future tab is shown below:

All the tabs show the following data:
Event: It displays the code for the event.
Description: It displays the description of the event.
Value Date: It is the date on which interest starts applying. For example: Booking date is 29^th^ June, Value date is 5t July- interest will start applying from 5^th^ July
Book Date: The date of entry / input of the event.
Ref No: The transaction reference number under which the event is processed.
Status: It displays the status of the event. It status can be of the following types.
Pending: Where the event is not yet processed.
Success: Where the event has been processed successfully.
Failure: Where the event has failed during process.
Retry: Indicates a failed event where the system retries to process the event on subsequent business days.
Amount: It indicates the amount processed by the event. Example: Interest liquidation event will have the amount of interest liquidated.
Collection Status: If the Collection status is Pending, it indicates that the deferred charges has not been collected and if the Collection Status is Success, it indicates that the deferred charges has been collected
The Events in a Card account are listed below.
| Event Codes | Description | Condition |
|---|---|---|
| CDACTV | Card Activation | This event is triggered for each amount block created |
Custom Field
This option provides you the flexibility to define fields apart from those that are already available in the standard version of Aura. Thus, it enables you to customize additional data storage and use as required to suit your specific business needs.
To edit Custom Field
- Access Card page. Click Custom Field tab.

The field appears only when it is created in Admin > System codes > Custom fields > Custom fields and linked to Card maintain in Admin > System codes > Custom fields > Field mappings. Based on the rule set in the rule builder at Admin > System codes > Custom fields > Field mappings, certain custom maintenance will be mandatory.
Click Edit. Edit Custom Field page appears. In the following illustration, a custom field, Activation of New Card has been mapped to the Account as shown below:

Enter Initial account opening date. This is the custom field mapped to client account at Admin > System codes > Custom fields > Field mappings,
Click Save. Custom Field page appears with the edited details.
 Functions: Edit
Note: Custom field functionality has been explained in detail in Admin > Custom field manual.