Mortgage and Loan Account
Mortgage and Loan Account option allows you to create and maintain Mortgage and Loan Accounts. These accounts can be created under various Mortgage and Loan Products that you have maintained. Based on the Product defined, the account level details are defaulted, with options to modify these for specific accounts. Thus, it combines ease of maintenance with flexibility to suit the specific needs of each account.
The following are the various tabs that appear on the Loan Account page:
Creating a Mortgage and Loan Account
To Create a Mortgage and Loan Account,
1. From the Retail menu, click Loans, and then click on Maintain. The Loan Search page appears.

2. Click Add. The New Loan → Profile (1/6) page appears
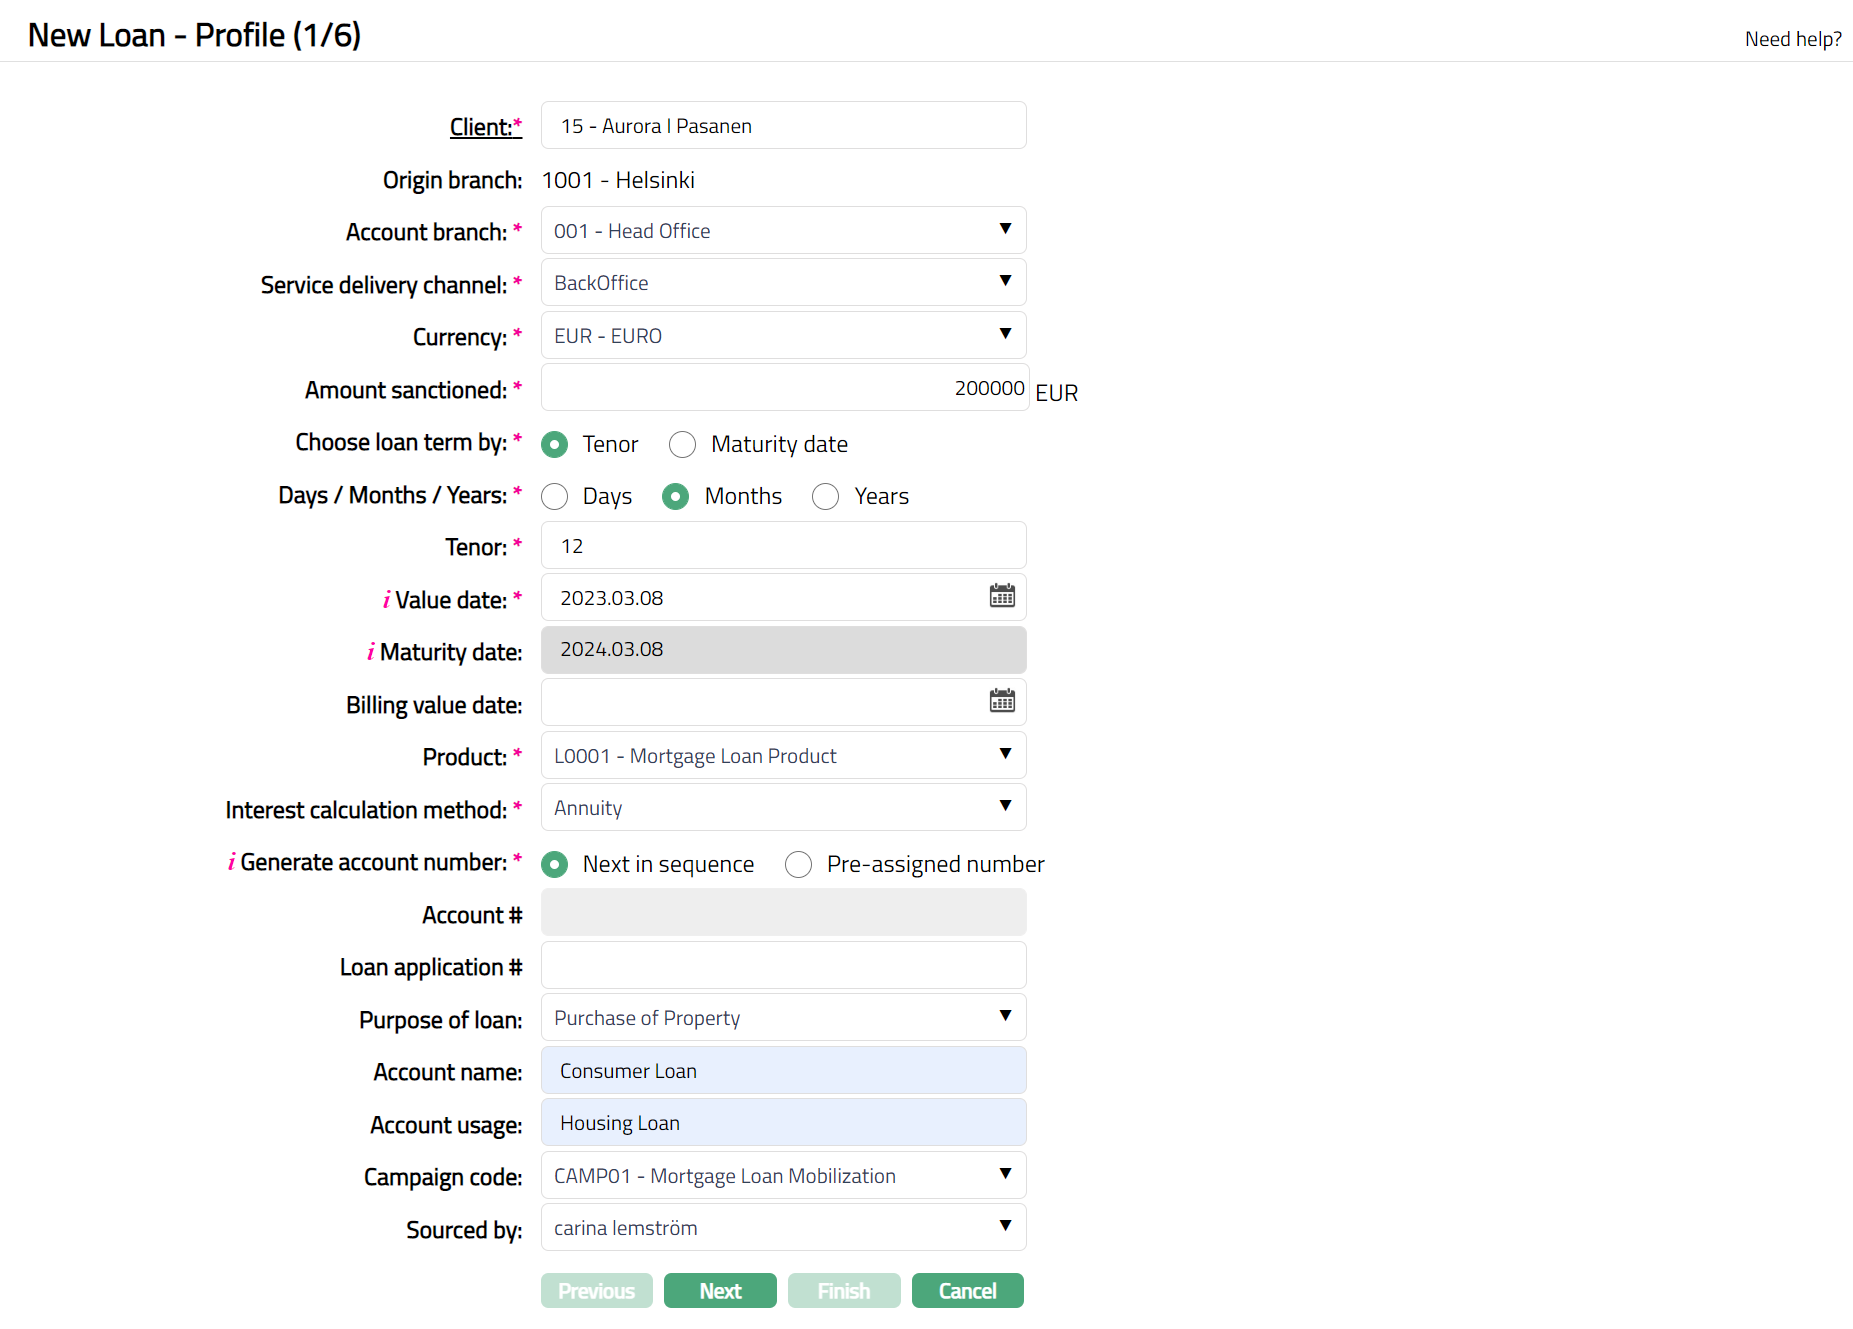
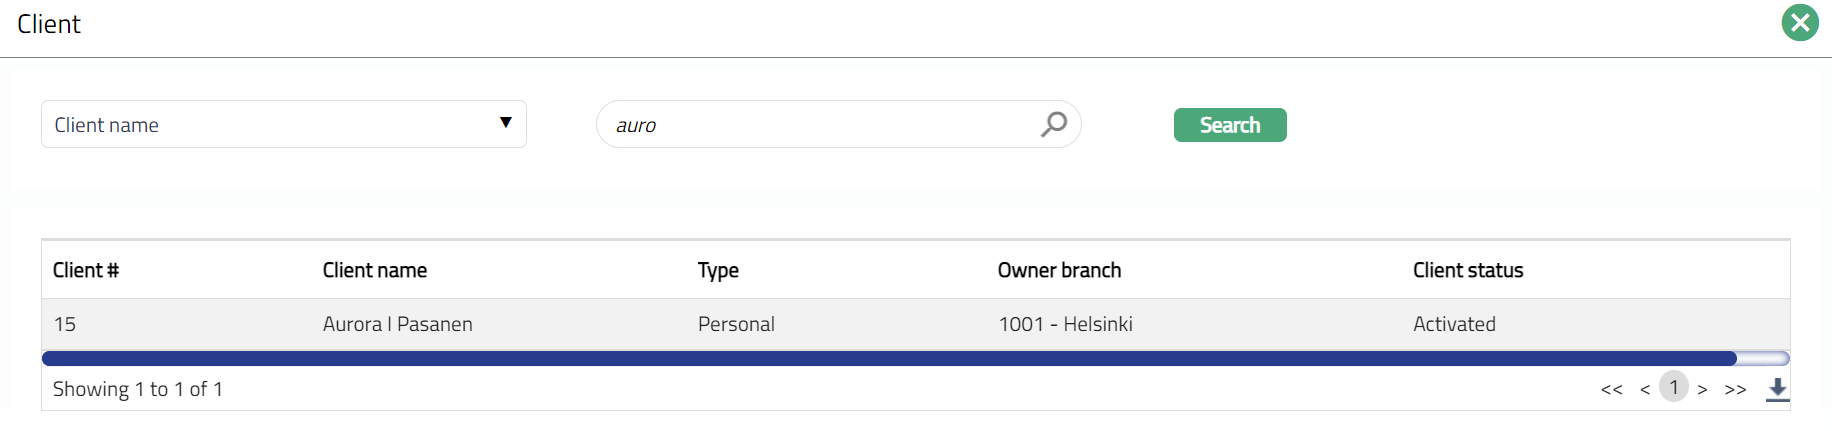
3. Click on Client hyperlink. The Client Search page appears where you can search for a Client with relevant criteria and select the required Client. Alternatively, you can start typing in the name of the Client in the text box and choose the required Client from the list suggested by Aura.
4. The Origin branch will be automatically populated as the Branch into which you have logged in and it cannot be edited. This indicates the Branch in which the Loan Account record is being created.
5. Select the Owner branch from the drop-down list of active Branches to indicate the Branch in which the Loan Account will be maintained.
6. Select the Service delivery channel for the account. The service delivery channels should have been maintained under Admin → System codes → Categories → Service delivery channel.
7. Select the loan Currency from the drop-down list of currencies that have been maintained under General ledger → Settings → Currency.
8. Enter the loan Amount sanctioned for the account.
9. Select Tenor or Maturity Date radio button to Choose loan term by. If you want to indicate the loan's term by way of a specific duration / period, choose Tenor. If you want to indicate the loan's term by way of a specific Maturity Date, choose Maturity Date.
10. The Days / Months / Years depends on what was selected for Choose Loan Term By.
If you had selected Tenor, this field will be enabled, and you can select the appropriate radio button to specify the loan term in Days / Months / Years
If you had selected Maturity Date, this field is disabled and is automatically defaulted to Days.
11. Tenor denotes the period / duration of the Loan Account and depends on what was selected for Choose Loan Term By.
If you had selected Tenor, this field is enabled, and you can input the number of days / months / years for which the loan is sanctioned
If you had selected Maturity Date, this field is disabled and is automatically calculated as Maturity Date minus Value Date.
Example: If Value Date = 27-Feb-23 and Maturity Date = 31-Dec-24, the Tenor would be calculated as the difference between the two dates = 673 Days
12. Value Date denotes the date on which the loan is to be disbursed. By default, Aura will display the current system date, and if required, you can change it to a future date.
13. Maturity date denotes the date when the Loan Account will mature and depends on what was selected for Choose Loan Term By.
If you had selected Maturity Date, this field is enabled and is mandatory. You need to input a date greater than the Value Date.
If you had selected Tenor, this field is not editable. Aura automatically calculates it as Tenor plus Value Date. See examples below:
| Days / Months / Years | Tenor | Value Date | Maturity Date Derived |
|---|---|---|---|
| Days | 30 | 27-Feb-24 | 28-Mar-24 |
| Days | 30 | 28-Feb-24 | 29-Mar-24 |
| Days | 30 | 29-Feb-24 | 30-Mar-24 |
| Months | 1 | 27-Feb-24 | 27-Mar-24 |
| Months | 1 | 28-Feb-24 | 28-Mar-24 |
| Months | 1 | 28-Feb-25 | 31-Mar-25 |
| Months | 1 | 29-Feb-24 | 31-Mar-24 |
| Months | 1 | 29-Apr-24 | 29-May-24 |
| Months | 1 | 30-Apr-24 | 31-May-24 |
| Months | 1 | 30-May-24 | 30-Jun-24 |
| Months | 1 | 31-May-24 | 30-Jun-24 |
| Months | 2 | 31-May-24 | 31-Jul-24 |
| Years | 1 | 27-Feb-24 | 27-Feb-25 |
| Years | 1 | 28-Feb-23 | 29-Feb-24 |
| Years | 1 | 28-Feb-24 | 28-Feb-25 |
| Years | 1 | 29-Feb-24 | 28-Feb-25 |
| Years | 1 | 29-Apr-24 | 29-Apr-25 |
| Years | 1 | 30-Apr-24 | 30-Apr-25 |
| Years | 1 | 30-May-24 | 30-May-25 |
| Years | 1 | 31-May-24 | 31-May-25 |
14. If you want to specify the date on which the loan has to be transferred to the card account, you can input the same in Billing Value Date. This date should be greater than or equal to Maturity Date. On Maturity Date of the loan, the amount will be transferred to the Card Account with the specified Value Date. If no specific date is input here, the date is derived based on the Transaction Code settings for Value Date movement.
15. Based on the combination of Client, Owner Branch, Currency, Amount Sanctioned, Tenor, Aura will display a list of active Mortgage and Loan Products that are maintained subject to the Availability for these parameters. Select the required Product from the list.
16. Interest calculation method is defaulted from the Product that you chose above. However, you can change the same from the dropdown list. The options available are Annuity and Amortized.
Amortized: Under this, the Loan Principal is spread out into a series of fixed payment amounts that you can specify. You have the ability to set different frequencies for Interest and Principal payment. The interest calculation will be based on the outstanding principal at the beginning of the period and is calculated based on the amount and length of time period.
Annuity: Annuity is a payment option where the repayment interval and the amount of repayment are fixed. Aura will automatically split the required repayment amount between Principal and Interest and you cannot change the same.
17. Input how the account number has to be generated in Generate account number. If you want to auto-generate the account number, choose Next in sequence. If you want to give a specific account number for this account, choose pre-assigned number. In case of the former, Aura will generate account number internally using the Client Account Mask maintained at the Entity level. In case of the latter, you need to input the account number in the next field. The account number is unique across the Entity.
18. If you select pre-assigned number in the above field, the next field Account Number will be enabled where you can enter an Account number. Aura will validate the entered account number against the Client Account Mask format defined at the Entity level as well as check whether it is unique across the Entity. However, if you select Next in Sequence, this field is disabled as Aura will generate the Account number internally based on the Client Account Mask format defined at the Entity level..
19. Enter Loan application # if applicable.
20. Select the Purpose of loan from the available drop-down list of values as maintained under Admin → System Codes → Generic Definitions → Purpose of Loan.
21. Enter Account name. This name will be used for the account.
22. Enter Account usage, i.e. how the account will be used.
23. Select Campaign Code if applicable for this account, from the available drop-down list as maintained under CRM → Sales → Campaign.
24. Enter Sourced by from the list of active Bank Users and Agent Users as maintained under Admin → Users → Maintain and under CRM → Sales → Agent user respectively
25. Click Next. The New Loan → Settings (2/6) page appears.

26. The Disbursement currency will be defaulted to the currency selected in Step 1. If required, you can change the Disbursement Currency from the drop-down list of GL currencies maintained under General Ledger → Settings → Currency.
27. Choose the Disbursement option - whether Automatic or Manual by choosing the appropriate radio button.
If you select the option as Auto, then the disbursement happens automatically on Value Date
If you select the option as Manual, then the disbursement has to be done manually by a user on or after the Value Date.
28. Select the Disburse through method from the drop down. This denotes the method in which the loan amount is to be disbursed and depends on what you selected as the Disbursement Option above. The following are the options available in Aura:
Settlement GL - This option appears only if you had selected the Disbursement Option as Manual. If this option is selected, then disbursement of the amount will happen to a General Ledger.
If you select Settlement GL as the Disburse Through Method:
- To ledger # field will be displayed. The Settlement GL specified at the Product will be defaulted and it cannot be edited. All other fields related to Disbursement will be disabled
Own Account - This option appears for both Auto and Manual Disbursement Options. If this option is selected, then Sanctioned Loan Amount will be disbursed to the Client's account in the same bank.
If you select Own Account as your Disburse Through Method:
- To Client field is enabled. By default, the Client you chose in Step 1 is displayed. If required, you can change to a different Client. To change the Client, click on Client hyperlink to see the Client Search page. Search for the required Client using appropriate inputs and select the required Client. Alternatively, you can start typing in the name of the Client in the text box and choose the required Client from the list suggested by Aura.
- Click on To account hyperlink to select the Client's active Client Accounts maintained under Retail → Accounts → Client Account → Maintain from which the repayment should be made.
External Account - This option appears for both Auto and Manual Disbursement Options. If this option is selected, then disbursement will be made to the specified external account.
If you select External Account as your Disburse Through Method:
- Client is displayed. By default, the Client you chose in Step 1 is displayed. If required, you can change to a different Client. To change the Client, click on Client hyperlink to see the Client Search page. Search for the required Client using appropriate inputs and select the required Client. Alternatively, you can start typing in the name of the Client in the text box and choose the required Client from the list suggested by Aura.
- Specify if the details of the Disbursement beneficiary are to be taken afresh or from records already maintained at the Client by choosing New or Existing. By default, the option New is selected so that you can input all the details of the external bank account to which the disbursement amount has to be credited. If required, you can change the option to Existing so that you can select a Beneficiary record that has already been maintained under CRM > Client > Maintain. In this case, all the details of the external bank Account as well as the Bank are defaulted from the Beneficiary record and the fields are disabled for any input.
- Choose the Clearing network through which the disbursement will be done. The drop-down list will display Clearing Networks that support payment in the Disbursement Currency chosen above. Based on the Clearing Network chosen, the subsequent fields related to Bank Account details will change. See the table below for more details.
- Specify if the details of the Bank of the Disbursement Beneficiary are to be taken afresh or from records already maintained by choosing New or Existing. By default, the option New is selected so that you can input all the details of the external bank in which the Disbursement Beneficiary Account is held. If required, you can change the option to Existing so that you can select a record that has already been maintained under Admin > Correspondent Bank Management > Maintain. In this case, all the details of the external bank are defaulted from the chosen record and the fields are disabled for any input. See the table below for more details.
- By checking the Add to Beneficiary List checkbox, you can indicate if you would like the New Beneficiary Account and Bank Details to be added to the Client's Beneficiary List under CRM → Client → Maintain. By default, this is unchecked and hence, the beneficiary details are not added to the Client record.
Note: If you had selected the Disbursement Beneficiary Option as Existing, Bank option will be automatically defaulted to Existing and disabled.
If you had selected Clearing Network = GIRO, Bank option will be disabled.
| External Account Details | Descriptions | GIRO | TARGET2 | SEPA | SWIFT | Bankgiro | Banking Circle | SEPA-INST | DCL- Bank Account |
|---|---|---|---|---|---|---|---|---|---|
| Sub-network | The sub-network to be used for the disbursement. Options are Bankgiro & Plusgiro | Mandatory | Not displayed | Not Displayed | Not Displayed | Not Displayed | Not Displayed | Not Displayed | Not Displayed |
| Bankgiro # / Plusgiro # | The Bankgiro / Plusgiro number to indicate the bank account into which the disbursement has to be made | Enabled | Not displayed | Not Displayed | Not Displayed | Not Displayed | Not Displayed | Not Displayed | Not Displayed |
| Account number | The Account Number in the External Bank into which the Disbursement has to be made. | Disabled. If Clearing Network = GIRO and the Bankgiro / Plusgiro Directory is available, this will be displayed based on the Bankgiro# / Plusgiro# input | Enabled - Mandatory | Enabled - Mandatory | Enabled - Mandatory | Enabled - Mandatory | Enabled - Mandatory | Enabled - Mandatory | Enabled - mandatory. Displayed as two separate text boxes to input Clearing # & Account # |
| Account holder | The name of the Account Holder in the External Bank Account to which the disbursement has to be made | Enabled - Optional | Enabled - Mandatory | Enabled - Mandatory | Enabled - Mandatory | Enabled - Mandatory | Enabled - Mandatory | Enabled - Mandatory | Not displayed |
| Address1 | Address1 of the Disbursement Beneficiary | Not displayed | Enabled - Mandatory | Enabled - Mandatory | Enabled - Mandatory | Enabled - Mandatory | Enabled - Mandatory | Enabled - Mandatory | Not displayed |
| Address 2 | Address2 of the Disbursement Beneficiary | Not displayed | Enabled - Optional | Enabled - Optional | Enabled - Optional | Enabled - Optional | Enabled - Optional | Enabled - Optional | Not displayed |
| City / State | City / State of the Disbursement Beneficiary | Not displayed | Enabled - Mandatory | Enabled - Mandatory | Enabled - Mandatory | Enabled - Mandatory | Enabled - Mandatory | Enabled - Mandatory | Not displayed |
| Post Code | Post code of the Disbursement Beneficiary | Not displayed | Enabled - Optional | Enabled - Optional | Enabled - Optional | Enabled - Optional | Enabled - Optional | Enabled - Optional | Not displayed |
| Country | Country of the Disbursement Beneficiary. List of countries as maintained under Admin > System Codes > Generic Definitions > Countries | Not displayed | Enabled - Mandatory | Enabled - Mandatory | Enabled - Mandatory | Enabled - Mandatory | Enabled - Mandatory | Enabled - Mandatory | Not displayed |
| External Bank Details | Description | GIRO | TARGET2 | SEPA | SWIFT | Bankgiro | Banking Circle | SEPA-INST | DCL-Bank Account |
|---|---|---|---|---|---|---|---|---|---|
| Bank Name | Name of the Bank in which the Beneficiary Account is maintained | Disabled | Enabled - Mandatory | Enabled - Mandatory | Enabled - Mandatory | Enabled - Mandatory | Enabled - Mandatory | Enabled - Mandatory | Enabled - Mandatory |
| Address1 | Address1 of the Bank in which the Beneficiary Account is maintained | Disabled | Enabled - Optional | Enabled - Optional | Enabled - Optional | Enabled - Optional | Enabled - Optional | Enabled - Optional | Enabled - Optional |
| Address 2 | Address2 of the Bank in which the Beneficiary Account is maintained | Disabled | Enabled - Optional | Enabled - Optional | Enabled - Optional | Enabled - Optional | Enabled - Optional | Enabled - Optional | Enabled - Optional |
| City / State | City / State of the Bank in which the Beneficiary Account is maintained | Disabled | Enabled - Optional | Enabled - Optional | Enabled - Optional | Enabled - Optional | Enabled - Optional | Enabled - Optional | Enabled - Optional |
| Post Code | Post code of the Bank in which the Beneficiary Account is maintained | Disabled | Enabled - Optional | Enabled - Optional | Enabled - Optional | Enabled - Optional | Enabled - Optional | Enabled - Optional | Enabled - Optional |
| Country | Country of the Bank in which the Beneficiary Account is maintained. List of countries as maintained under Admin > System Codes > Generic Definitions > Countries | Disabled | Enabled - Mandatory | Enabled - Mandatory | Enabled - Mandatory | Enabled - Mandatory | Enabled - Mandatory | Enabled - Mandatory | Enabled - Mandatory |
| SWIFT BIC | The Bank Identifier Code (BIC) of the Bank in which the Beneficiary Account is maintained | Disabled | Enabled - Mandatory | Enabled - Mandatory | Enabled - Mandatory | Enabled - Mandatory | Enabled - Mandatory | Enabled - Mandatory | Enabled - Mandatory |
| OCR Reference | The OCR reference number associated with the disbursement transaction. This reference is used by the beneficiary for payment identification and reconciliation purposes. | Conditionally mandatory. Either OCR Reference or Message to Beneficiary must be specified. | Not displayed | Conditionally mandatory. Either OCR Reference or Message to Beneficiary must be specified. | Not displayed | Not displayed | Not displayed | Not displayed | Conditionally mandatory. Either OCR Reference or Message to Beneficiary must be specified. |
| Message to Beneficiary | The message or payment remarks to be sent to the beneficiary along with the disbursement transaction. | Conditionally mandatory. Either OCR Reference or Message to Beneficiary must be specified. | Not displayed | Conditionally mandatory. Either OCR Reference or Message to Beneficiary must be specified. | Not displayed | Not displayed | Not displayed | Not displayed | Conditionally mandatory. Either OCR Reference or Message to Beneficiary must be specified. |
29. Use the Repay through method to indicate the method in which the amounts due on the loan is to be repaid. The available options are:
Direct Debit: If this option is selected, then repayment happens through an external account based on the Direct Debit instructions recorded.
By default, Repayment option will be Auto and disabled as Direct Debit instructions will be automatically handeld and you do not have to initiate any other manual action.
You have to mandatorily select the direct debit Agreement reference number that is to be used for this loan. Click on the hyperlink to select the required Activated Direct Debit Agreements where the Client is the Debtor Agreement Party as maintained under CRM → Client → Agreement. Alternatively, you can type the Agreement Reference as maintained in the Agreement Record to get a list of Agreements for the Client and select the required one.
The following fields will be auto-populated from the Agreement and disabled:
- Repayment account detail
- From account
- Repayment account holder
- From bank
- From branch
- From SWIFT BIC
- From bank clearing code
Own account: If this option is selected, then repayment happens through Client's account in the same bank
Repayment option can be Auto or Manual.
- If you select the option as Auto, then the Repayment happens automatically on Repayment date
- If you select the option as Manual, then you have to manually initiate the Repayment on the Repayment date.
Agreement reference can be used optionally to link the agreement under which the Client Account has to be debited for the Loan repayments. Click on the hyperlink to select the required Activated Direct Debit Agreements for the Client as maintained under CRM → Client → Agreement. Alternatively, you can type the Agreement Reference as maintained in the Agreement Record to get a list of matching agreements for the client and select the required one.
From Client identifies the Client whose Client Account should be debited for the loan payments. By default, the Client you chose in Step 1 is displayed. If required, you can change to a different Client. To change the Client, click on Client hyperlink to see the Client Search page. Search for the required Client using appropriate inputs and select the required Client. Alternatively, you can start typing in the name of the Client in the text box and choose the required Client from the list suggested by Aura.
Click on From account hyperlink to select the Client Accounts of the selected Client where the Loan Account Currency matches the Client Account Currency.
The following fields will be auto-populated from the Agreement and disabled:
- From Branch
- From SWIFT BIC
- From bank clearing code
Payment by invoice: If this option is selected, then the payment will be made against the invoice generated using an external account in a different bank.
Repayment option can be Auto or Manual.
- If you select the option as Auto, then the Repayment happens automatically on Repayment date
- If you select the option as Manual, then you have to manually initiate the Repayment on the Repayment date.
Agreement reference can be used optionally to link the agreement for the Loan repayments. Click on the hyperlink to select the required Activated Invoice Agreements for the Client as maintained under CRM → Client → Agreement. Alternatively, you can type the Agreement Reference as maintained in the Agreement Record to get a list of matching agreements for the Client and select the required one.
Optionally, you can specify if the Repayment account details are to be taken afresh or from records already maintained at the Client by choosing New or Existing. By default, the option New is selected so that you can input all the details of the external bank account from which the repayment will be made. If required, you can change the option to Existing so that you can select a Beneficiary record that has already been maintained under CRM → Client → Maintain. In this case, all the details of the external bank Account as well as the Bank are defaulted from the Beneficiary record and the subsequent repayment related fields are disabled for any input.
- In the From account field enter the account number from which the repayment is supposed to happen.
- Enter the account holder's name in the Repayment account holder field.
- Enter the name of the Bank in which the above account is maintained. Alternatively, you can click on the From Bank hyperlink to select a record that has already been maintained under Admin → Correspondent Bank Management → Maintain. In this case, all the details of the external bank are defaulted from the chosen record and the following fields are disabled for any input.
- From SWIFT BIC
- From bank clearing code
- In the From Branch field enter the name of the Branch of the bank which holds the account through which repayment is supposed to be done.
Settlement GL: If this option is selected, then repayment happens in the form of cash through the Client.
- Repayment option is defaulted to Manual and is disabled.
- Click on the Agreement reference hyperlink to select the agreement. Aura will display the list of agreements maintained under CRM → Client → Agreement.
- From ledger# field will be displayed. The Settlement GL specified at the Product will be defaulted and it cannot be edited.
- The following fields will be disabled:
- From Branch
- From SWIFT BIC
- From bank clearing code.
Postdated cheques: If this option is selected, then repayment happens through post-dated cheques
Note: Invoice can be generated for any of the Repay through method option. Even in case of Repay Through Own Account, Invoice can be generated and sent to the Client.
30. If you want to be able to reset the interest rate at a specified frequency, check Periodic interest rate re-pricing checkbox. This enables the next two fields Reset Frequency and Next Reset Date.
31. Select the Reset frequency from the dropdown list. The following are the available options: Monthly, Quarterly, Semi Annual and Annual.
32. Select the Next reset date. This date should be greater than the Value Date specified in Step 1.
Note on Re-pricing:
If the Interest Band applicable to the Account is Variable, and Periodic Interest Re-pricing check box = No, it means that the interest rate is truly variable for that account; and the interest will change as and when the interest base rate is changed. If Periodic Interest Re-pricing is Yes, it means that the interest rate will change only on the specified reset date, though there may be changes in the base interest rate. If the interest band applicable to the Account is Fixed, then, there is no change in the interest rate at any time.
33. Apply special interest scheme will automatically be defaulted from the Product. If it is defaulted as No, you cannot change it to Yes. However, if it is defaulted as Yes, you can change it to No. When it is Yes, it indicates that the loan will be subject to concessional rates of interest till there isn't any payment default; and on payment default, the loan will move to normal interest rates as specified in the Special Interest Scheme defined in the Product.
34. Select the holiday preference for loan payment from the Holiday preference (payments) to determine when the payment is actually due on the account if the scheduled due date is a holiday. This is defaulted from the Product but can be changed during loan creation. The options available are:
Ignore: When this preference is selected No holiday preference will be applicable for the payment date on the Loan Account and payment is due on the same date as per the Schedule Due Date.
Next business day: When this preference is applied to the loan account, Aura will check if the payment schedule due date is a holiday. If yes, then the Payment Due On for the schedule is updated with next business date.
Previous day: When this preference is applied to the loan account, Aura will check if the payment schedule due date is a holiday. If yes, then the Payment Due On for the schedule is updated with previous business date
Note: You can see the Payment Due Date and the Payment Due On Date in the Payment Schedule tab.
35. Grace days for Penalty determines when the Penalty on Principal / Interest Overdue and Late Payment fees are applicable on the loan account. Thus, even if the payment is received after the Due Date, but within the Grace Days specified, penalties / late payment fee will not be applicable. The values are defaulted from the Product, but you can change during loan creation. You can also specify if the Grace Days are to be counted in terms of Calendar Days or Business Days.
36. Enter the holiday preference for grace days for penalty from the Holiday preference (grace days for penalty) dropdown list. If the End of Grace Days is a holiday, this value indicates how the revised End of Grace Days should be arrived at so that Penalty and Late Payment Fees, if any, can be applied on the revised End of Grace Days. If the full payment is not received by such date, penalty interest will be calculated with effect from the Due Date on the Overdue amount. The values are defaulted from the Product, but you can change during loan creation. The options available are:
Ignore: When this preference is selected, No holiday preference will be applicable for the end of Grace Days and grace days will end on the same date as per the payment schedule.
Next business day: When this preference is applied to the loan account, Aura will check if the day on which the Grace Days end is a holiday. If yes, then the End of Grace Days is updated with next business date.
Previous day: When this preference is applied to the loan account, Aura will check if the day on which the Grace Days end is a holiday. If yes, then the End of Grace Days is updated with previous business date.
Note: If Grace Days for Penalty is defined as Business Days, then the field Holiday Preference(Grace Days for Penalty) will not be applicable as the Grace Days will never end on a Holiday; and hence, will be disabled..
Example:
Holidays: 25-Dec-2025, 26-Dec-2025, 27-Dec-2025, 28-Dec-2025
Schedule's Payment Due Date: 26-Dec-2025
Grace Days: 2 calendar days End of Grace Days will be as follows for the different Holiday Preferences:
| Preference | End of Grace Days |
|---|---|
| Ignore | 28-Dec-2025 |
| Next business day | 29-Dec-2025 |
| Previous business day | 24-Dec-2025 |
37. Select the holiday preference for periodic interest re-pricing from the Holiday preference (periodic interest re-pricing) dropdown list. If the Periodic Interest Re-pricing Reset Date is a holiday, this field indicates when the interest re-pricing should apply. The options available are:
Ignore: When this preference is selected No holiday preference will be applicable for the periodic interest re-pricing and rate reset will happen on the same date as per the payment schedule.
Next business day: When this preference is applied to the loan account, Aura will check if the Next Reset Date is a holiday. If yes, then the Next Reset Date is updated with next business date.
Previous day: When this preference is applied to the loan account, Aura will check if the Next Reset Date is a holiday. If yes, then the Next Reset Date is updated with previous business date.
38. Click Next. The New Loan → Interest Receivable (3/6) page appears.
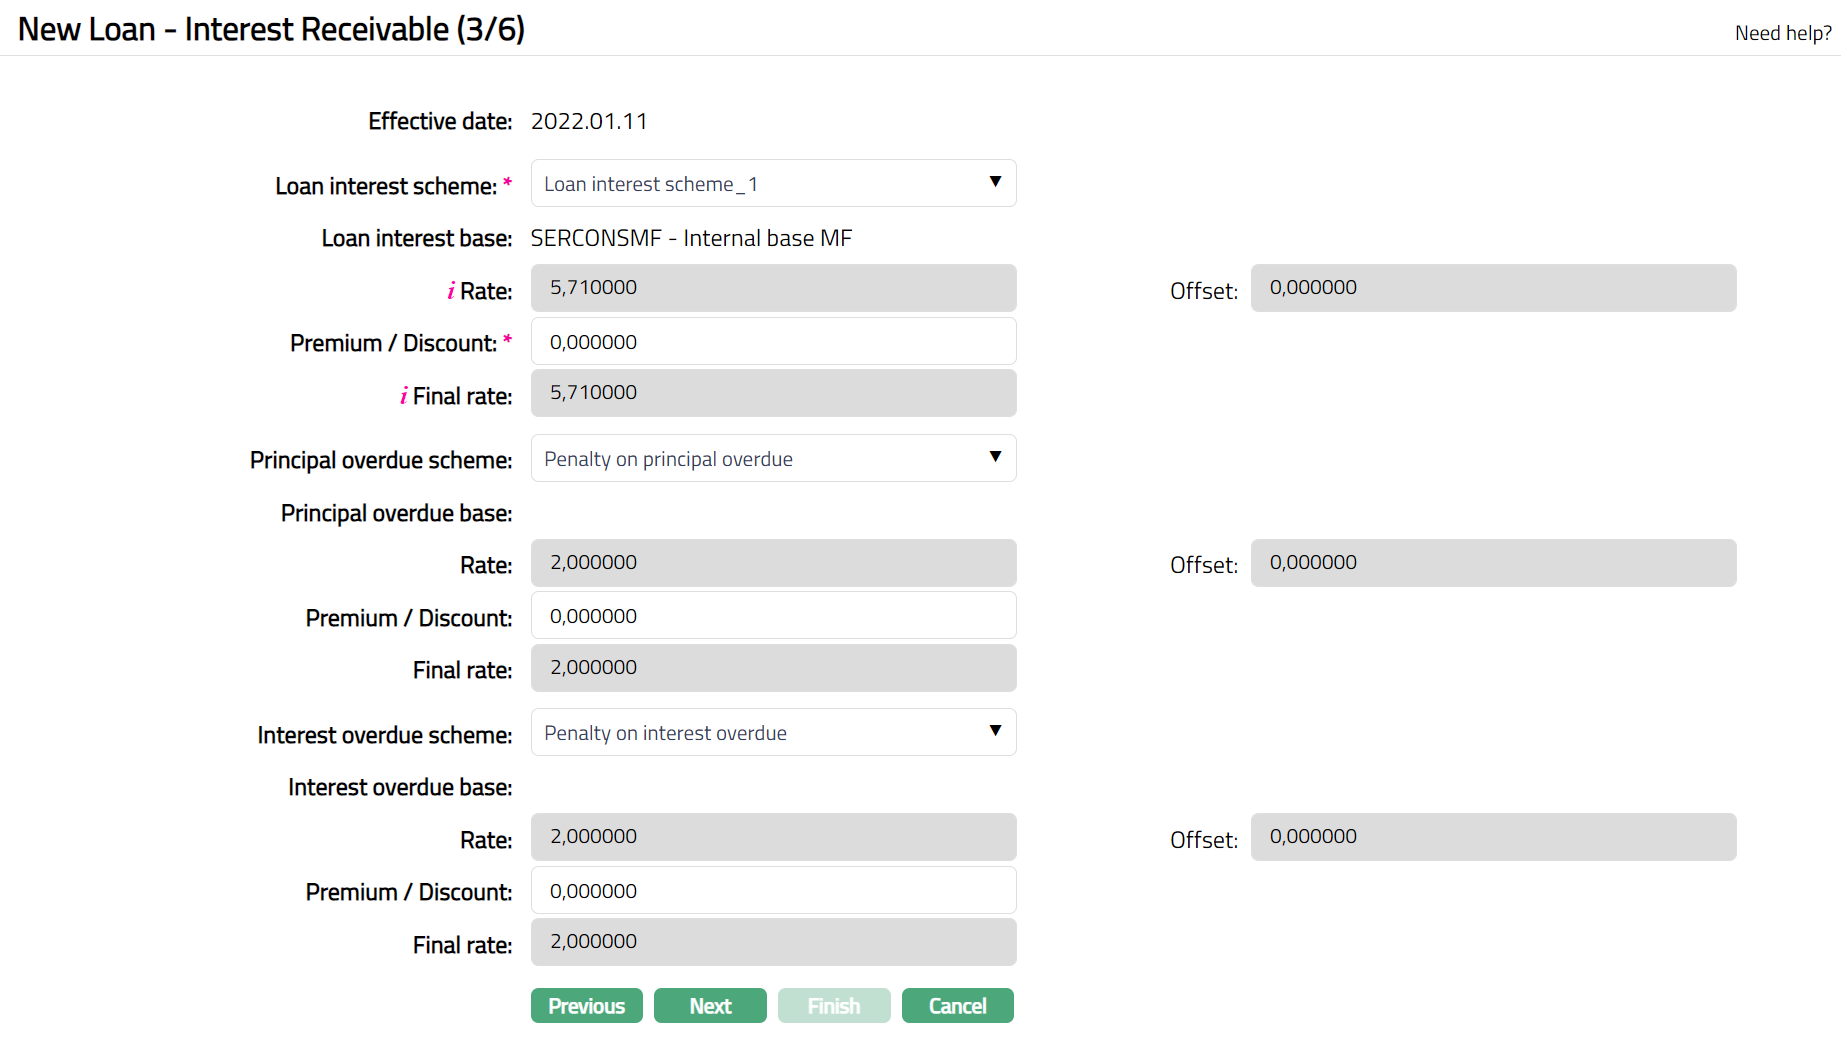
39. By default, current system date is populated as Effective date; and you cannot change this.
40. The Loan interest scheme field is defaulted from the Product and denotes the interest scheme for the main interest on the loan principal amount. This field is editable while creating the loan. Before activating the Loan Account, you can change it using Settings Tab → Edit. After activation of the Loan Account, you have to use Change of Terms → Interest parameters for any changes.
41. Based on the Loan Account Currency, Client, the Client's current Relationship Pricing and Risk Category, Aura determines the Interest Combination that is the most appropriate for the Loan from the Combinations maintained for the above Interest Scheme; and derives the Band that is applicable for the Loan Amount Sanctioned.
- If the Band's Interest Method is Variable, Loan interest base that is mapped to that Band will be displayed.
- If the Band's Interest Method is Fixed, Loan interest base will be blank.
42. Rate is defaulted from the Band as derived above and is non-editable.
- If the Band's Interest Method is Variable, Rate = latest approved Rate from the Interest Base where currency matches the Loan Account Currency and Effective By in the Interest Base <= Effective Date displayed above.
- If the Band's Interest Method is Fixed, Rate = Rate from Band in the Interest Scheme.
Note: If the Interest Method is Variable, Aura will apply the changes to existing Loans only when the Rate is changed at Interest Base level. If the Offset is changed at the Interest Scheme level, it will be applied only to new loans and not to existing loans.
43. Offset field is defaulted from the Band as derived above and is non-editable.
- If the Band's Interest Method is Variable, Offset = Rate from Band in the Interest Scheme.
- If the Band's Interest Method is Fixed, Offset will be blank.
44. Enter the Premium / Discount that is to be applied on the above Rate. By default it will be zero. Both positive and negative values are allowed. A positive value is considered as a Premium and negative value is considered a Discount.
45. Final rate is calculated as Rate + Offset + Premium / Discount. This field is non-editable.
Examples:
| Rate | Off-set | Premium / Discount | Final Rate |
|---|---|---|---|
| 7.25 | 2.00 | 1.00 | 10.25 |
| 7.25 | 2.00 | -1.00 | 8.25 |
46. The Principal overdue scheme field is defaulted from the Product and denotes the interest scheme for the principal overdue on the loan. This field is editable while creating the loan. Before activating the Loan Account, you can change it using Settings Tab → Edit. After activation of the Loan Account, you have to use Change of Terms → Interest parameters for any changes.
47. Based on the Loan Account Currency, Client, the Client's current Relationship Pricing and Risk Category, Aura determines the Interest Combination that is the most appropriate for the Loan from the Combinations maintained for the above Interest Scheme; and derives the Band that is applicable for the Loan Amount Sanctioned.
- If the Band's Interest Method is Variable, Principal overdue base that is mapped to that Band will be displayed.
- If the Band's Interest Method is Fixed, Principal overdue base will be blank.
48. Rate is defaulted from the Band as derived above and is non-editable.
- If the Band's Interest Method is Variable, Rate = latest approved Rate from the Interest Base where currency matches the Loan Account Currency and Effective By in the Interest Base <= Effective Date displayed above.
- If the Band's Interest Method is Fixed, Rate = Rate from Band in the Interest Scheme.
Note: If the Interest Method is Variable, Aura will apply the changes to existing Loans only when the Rate is changed at Interest Base level. If the Offset is changed at the Interest Scheme level, it will be applied only to new loans and not to existing loans.
49. Offset field is defaulted from the Band as derived above and is non-editable.
- If the Band's Interest Method is Variable, Offset = Rate from Band in the Interest Scheme.
- If the Band's Interest Method is Fixed, Offset will be blank.
50. Enter the Premium / Discount that is to be applied on the above Rate. By default it will be zero. Both positive and negative values are allowed. A positive value is considered as a Premium and negative value is considered a Discount.
51. Final rate is calculated as Rate + Offset + Premium / Discount. This field is non-editable.
Examples:
| Rate | Off-set | Premium / Discount | Final Rate |
|---|---|---|---|
| 18.00 | 2.00 | 1.00 | 21.00 |
| 18.00 | 2.00 | -1.00 | 19.00 |
52. The Interest overdue scheme field is defaulted from the Product and denotes the interest scheme for the interest overdue on the loan. This field is editable while creating the loan. Before activating the Loan Account, you can change it using Settings Tab → Edit. After activation of the Loan Account, you have to use Change of Terms → Interest parameters for any changes.
53. Based on the Loan Account Currency, Client, the Client's current Relationship Pricing and Risk Category, Aura determines the Interest Combination that is the most appropriate for the Loan from the Combinations maintained for the above Interest Scheme; and derives the Band that is applicable for the Loan Amount Sanctioned.
- If the Band's Interest Method is Variable, Interest overdue base that is mapped to that Band will be displayed.
- If the Band's Interest Method is Fixed, Interest overdue base will be blank.
54. Rate is defaulted from the Band as derived above and is non-editable.
- If the Band's Interest Method is Variable, Rate = latest approved Rate from the Interest Base where currency matches the Loan Account Currency and Effective By in the Interest Base <= Effective Date displayed above.
- If the Band's Interest Method is Fixed, Rate = Rate from Band in the Interest Scheme.
Note: If the Interest Method is Variable, Aura will apply the changes to existing Loans only when the Rate is changed at Interest Base level. If the Offset is changed at the Interest Scheme level, it will be applied only to new loans and not to existing loans.
55. Offset field is defaulted from the Band as derived above and is non-editable.
- If the Band's Interest Method is Variable, Offset = Rate from Band in the Interest Scheme.
- If the Band's Interest Method is Fixed, Offset will be blank.
56. Enter the Premium / Discount that is to be applied on the above Rate. By default it will be zero. Both positive and negative values are allowed. A positive value is considered as a Premium and negative value is considered a Discount.
57. Final rate is calculated as Rate + Offset + Premium / Discount. This field is non-editable.
Examples:
| Rate | Off-set | Premium / Discount | Final Rate |
|---|---|---|---|
| 18.00 | 2.00 | 1.00 | 21.00 |
| 18.00 | 2.00 | -1.00 | 19.00 |
58. Click Next. The New Loan → Payment Settings (4/6) page appears
59. There are two different Payment Settings screens based on whether Interest Calculation Method that you chose for the loan is defined as Amortized or Annuity.
If the Interest Calculation Method for the loan is Amortized, then you will get the following screen:

Select the Principal payment frequency from the drop-down. The available options are:
- Weekly: Principal should be paid every week
- Semi-Monthly: Principal should be paid twice a month
- Monthly: Principal should be paid every month
- Quarterly: Principal should be paid every quarter
- Semi-annual: Principal should be paid twice a year
- Annual: Principal should be paid every year
- On maturity: Principal should be paid only on the Maturity Date of the loan
- Flexible: You can define the specific dates on which Principal should be paid using the Payment Settings Tab - Edit
By default, the First principal payment date will be Value Date + Principal Payment Frequency. If required, you can change the date to any date greater than Value Date and less than or equal to Maturity Date. If Principal Payment Frequency is On Maturity or Flexible, then this field is defaulted to Maturity Date and cannot be changed.
Aura derives the Number of principal payments based on First Principal Payment Date, Maturity Date and Principal Payment Frequency. If required, you can change the same, but it has to be less than the number calculated by Aura. If Principal Payment Frequency is On Maturity or Flexible, then this field is defaulted to 1 and is non-editable. This field will not be displayed for Annuity Loans.
The Principal payment amount is defaulted by Aura based on the following formula: Loan Approved amount/ Number of Principal Payments. If required, you can change the same, but it has to be less than the number calculated by Aura. If Principal Payment Frequency is On Maturity or Flexible, then this field is defaulted to the Approved amountand is non-editable. This field will not be displayed for Annuity Loans.
On change of value date defines how Aura handles the payment schedule Due Dates when the Value Date of the loan during Disbursement is different from the Value Date in the Loan Account. It enables you to retain dates that you input for Flexible Schedules based on your negotiations with the borrower. Also, you can sync up the payment dates for consumer loans based on when you want all loan payments to be received. You can select the following options from the radio-button:
- Retain Payment Schedule Date: Aura retains the existing payment schedule Due Dates even if the Value Date changes.
- Revise Payment Schedule Date: Aura recalculates the payment schedule Due Dates based on the new Value Date and the defined Tenor.
During Loan Creation:
- If Choose Loan Term By = Maturity Date and Interest Calculation Method = Amortized, this field is displayed with the default value Retain Payment Schedule and is disabled for all principal payment frequencies.
- If Choose Loan Term By = Tenor and Interest Calculation Method = Amortized, the field behaves as follows:
- When Principal Payment Frequency = Flexible, the field defaults to Retain Payment Schedule and is disabled.
- When Principal Payment Frequency = On Maturity, the field defaults to Retain Payment Schedule and is disabled.
- When Principal Payment Frequency = Any other, the field defaults to Retain Payment Schedule and is enabled, allowing you to change it to Revise Payment Schedule, if required.
During first disbursement:
- If the selected value is Revise Payment Schedule, Aura regenerates the simulated schedule using the new Value Date and Tenor.
- If the selected value is Retain Payment Schedule, Aura does not regenerate the schedule but retains the existing one. Note: Once the Loan Account is Activated Approved, there is no way to change this field.
Select the Interest payment frequency from the drop-down. The available options are:
- Weekly: Interest should be paid every week
- Semi-Monthly: Interest should be paid twice a month
- Monthly: Interest should be paid every month
- Quarterly: Interest should be paid every quarter
- Semi-annual: Interest should be paid twice a year
- Annual: Interest should be paid every year
- On maturity: Interest should be paid only on the Maturity Date of the loan
- Flexible: You can define the specific dates on which Interest should be paid using the Payment Settings Tab - Edit
By default, the First interest payment date will be Value Date + Interest Payment Frequency. If required, you can change the date to any date greater than Value Date and less than or equal to Maturity Date. If Interest Payment Frequency is On Maturity or Flexible, then this field is defaulted to Maturity Date and cannot be changed.
Aura derives the Number of interest payments based on First Interest Payment Date, Maturity Date and Interest Payment Frequency. If required, you can change the same, but it has to be less than the number calculated by Aura. If Interest Payment Frequency is On Maturity or Flexible, then this field is defaulted to 1 and cannot be changed. This field will not be displayed for Annuity Loans.
In the Number of advance interest payments field, enter the number of interests you would want the customer to pay in advance. The interest amount for that many instalments will be netted off during first disbursement.
Threshold for closure is defaulted from the Product. During the end-of-day run, if it is found that the remaining unpaid amount is less than the threshold amount for closure, then Aura will pass threshold entries for the account and will close the Loan Account. If required, you can change it.
If you have selected the interest calculation method as Annuity, then you will get the following screen.
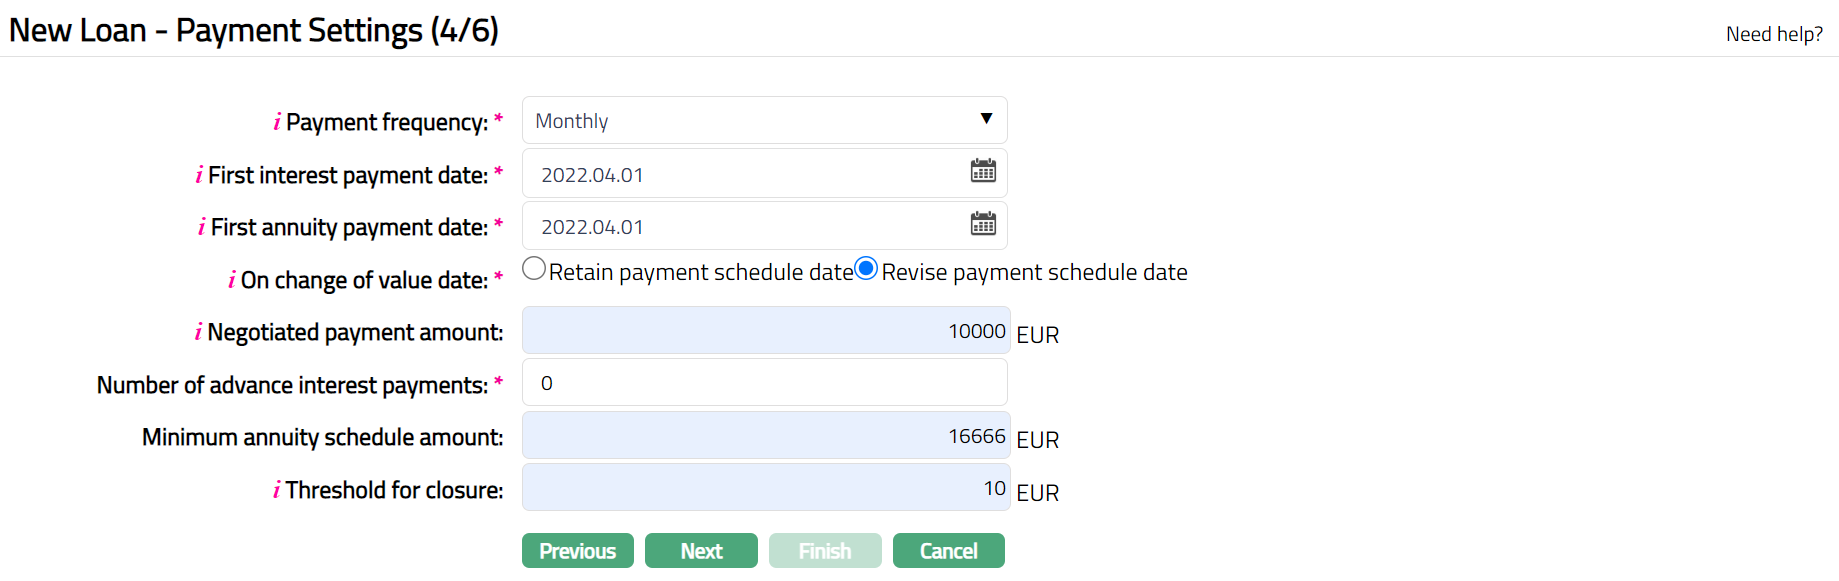
- Select the Payment frequency from the drop down. The available options are:
- Weekly: Interest should be paid every week
- Semi-Monthly: Interest should be paid twice a month
- Monthly: Interest should be paid every month
- Quarterly: Interest should be paid every quarter
- Semi-annual: Interest should be paid twice a year
- Annual: Interest should be paid every year
- By default, First interest payment date will be Value Date + Frequency. You can change the date to any date greater than Value Date and less than / equal to Maturity Date, if required.
- By default, the First annuity payment date will be Value Date + Frequency. You can change the date to any date greater than Value Date and less than / equal To Maturity Date, if required. First Annuity Payment Date cannot be less than the First Interest Payment Date. If First Annuity Payment Date is greater than First Interest Payment Date then Aura will calculate simple interest between Value Date and First Annuity Payment Date based on the Frequency specified and there will not be any Principal repayment required till the First Annuity Payment Date.
- Select the Payment frequency from the drop down. The available options are:
⚠ Note of Caution - Automatic Update of First Payment Dates
When you update the Next Payment Date in COT - Payment Terms, Aura automatically updates the First Annuity Payment Date and First Interest Payment Date in the Loan Account’s Payment Settings tab.
System Behaviour and Impact -
- System Behaviour: Once the COT record is saved, Aura synchronises the Next Payment Date with the First Annuity Payment Date and First Interest Payment Date.
- Impact: Any previous values are overwritten.
Example-
- During COT - Payment Terms, you update Next Payment = 10 November 2025.
- Aura automatically updates:
- First Annuity Payment Date = 10 November 2025
- First Interest Payment Date = 10 November 2025
- If the loan had special terms (grace period, irregular installments), this automatic update may shift dates unexpectedly. Always double-check the Payment Settings to confirm accuracy.
Quick Summary -
| Do’s | Don’ts |
|---|---|
| Review the First Annuity Payment Date and First Interest Payment Date in the Loan Account > Payment Settings tab after performing COT - Payment Terms. | Assume the original first payment dates remain unchanged - they will be overwritten with the Next Payment Date from COT. |
| Ensure the updated dates align with your intended repayment schedule. | |
| Double-check loans with special terms (grace periods, irregular installments) to avoid unexpected shifts. |
Additional Note for Amortized Loans: For amortized loans, the same behaviour applies when defining the First Principal Payment Date in COT. Aura uses this date as the starting point to generate the amortization schedule.
On Change of Value Date: By default, Retain Payment Schedule Date will be selected. If required, you can change it to Revise Payment Schedule Date. This indicates what should happen to the payment schedule Due Dates if the Value Date during full Disbursement is different from the Value Date in the Loan. If the option chosen here is Retain Payment Schedule Date, even if the Disbursement Value Date is different from the Loan Value Date, the Payment Schedule dates will remain the same i.e., as it was during loan creation. If the option chosen here is Revise Payment Schedule Date, if the Disbursement Value Date is different from the Loan Value Date, the entire Payment Schedule Due Dates will be changed with reference to the Disbursement Value Date.
Enter Negotiated payment amount. Negotiated payment amount enables you to input an EMI (Equated Monthly Instalment) amount that is different from the one computed by Aura. However, the amount cannot be greater than the loan Approved Amount. Also the amount cannot be lesser than the interest that is payable for each instalment.
Note:
If Negotiated payment amount is greater than the computed EMI (Equated Monthly Instalment) amount, then Aura will consider the Negotiated Payment Amount as the EMI (Equated Monthly Instalment) amount and schedules will be generated based on this. In this case the payment schedule will get over before Maturity Date; however, Maturity Date will not change.
If Negotiated payment amount is lesser than the computed EMI (Equated Monthly Instalment) amount, then too Aura will consider the Negotiated Payment Amount as the EMI (Equated Monthly Instalment) amount and schedules will be generated based on this. In this case the payment schedule will be displayed until Maturity Date and the last instalment will adjust the balance amount with no change in Maturity Date.
In the Number of advance interest payments field, enter the number of interests you would want the customer to pay in advance. The interest amount for that many instalments will be netted off during first disbursement.
Enter the Minimum annuity schedule amount. By default, the value is defaulted from the Product, and if required, you can change it. This field is displayed only if the Interest Calculation Method is selected as Annuity. When a value is input here and during schedule generation, if the Total Outstanding Amount in the last schedule is less than the Minimum Annuity Schedule Amount then Aura adds minimum annuity schedule amount in previous schedule.
Threshold amount for closure is defaulted from the Product. During the end-of-day run, if it is found that the remaining unpaid amount is less than the threshold amount for closure, then Aura will pass threshold entries for the account and will close the Loan Account. If required, you can change it
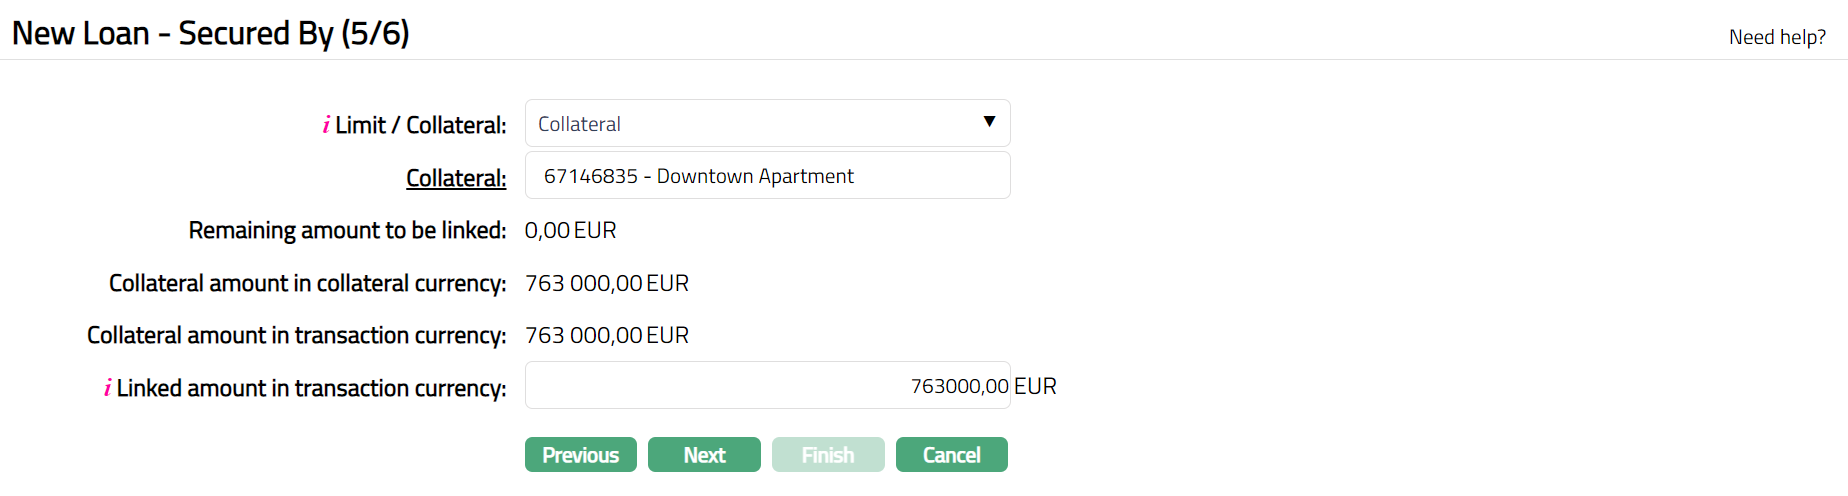
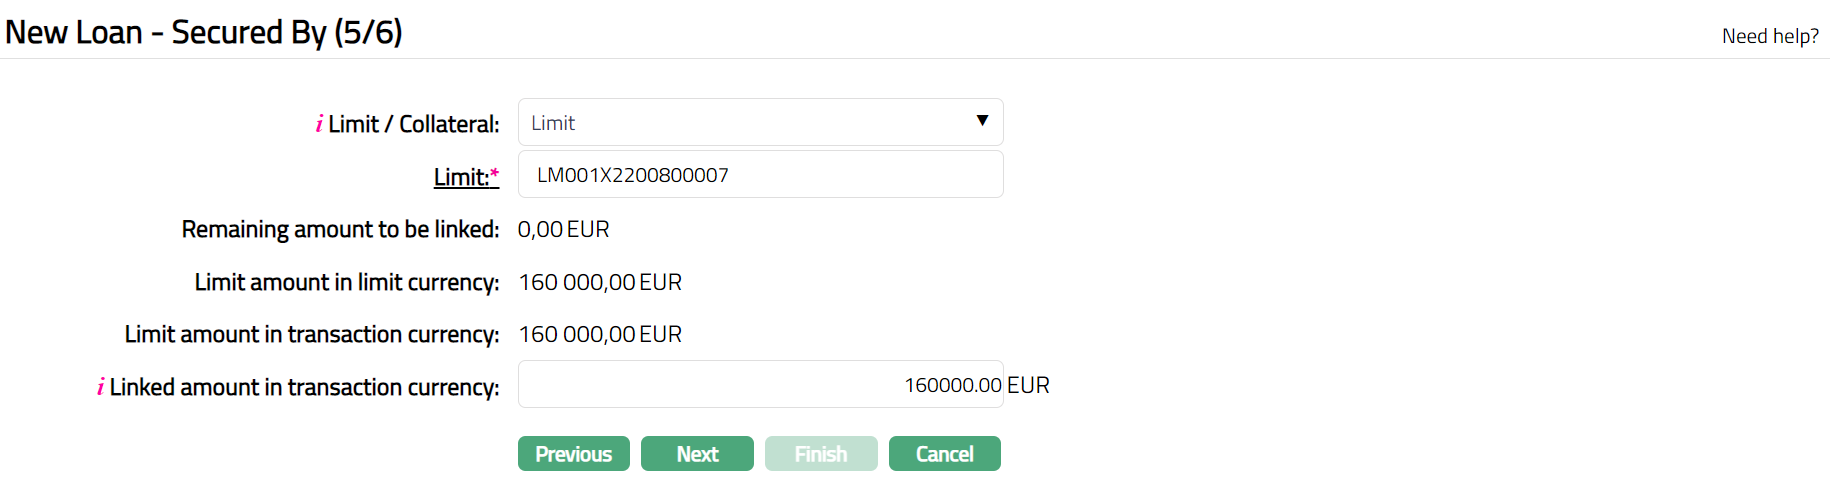
60. Click Next. The New Loan → Secured By (5/6) page appears. If Secured By is marked as Yes at the Product level, then it is mandatory to attach a Security by way of a Limit or Collateral to the Loan Account.
- If Collateral is chosen, you will see the following screen:
- If Limit is chosen, you will see the following screen:
61. Specify whether the Loan Account is to be secured by a Limit or Collateral using the Limit / Collateral drop-down. It is mandatory only if Secured By is Yes at the Product level.
62. Based on the selection above, enter the details of the specific Limit or Collateral as described below:
If you select Limit, Limit hyperlink will be displayed. On click of the hyperlink, Aura displays the Limit Search screen and the list of Active Limits that are available for the Client chosen in Step 1 as maintained under CRM → Collaterals & Limits → Limits having Available Limit Amount > 0.
If you select Collateral Collateral hyperlink will be displayed. On click of the hyperlink, Aura displays the Collateral Search screen and the list of Active collaterals that are available for the Client chosen in Step 1 as maintained under CRM → Collaterals & Limits → Collaterals, having Available Collateral Amount > 0.
63. Remaining amount to be linked denotes the pending amount to be linked to the Loan Account when the limit amount is less than the amount calculated based on Minimum secured percentage and loan amount sanctioned. If the Secured by flag is marked as No and still a Limit or Collateral is attached, then Remaining Amount To Be linked is Calculated as 0.
64. Based on the selection of Limit/Collateral, Limit amount in limit currency field or Collateral amount in collateral currency field is displayed. The value for the displayed fields is derived from the limit id or collateral id maintained under CRM → Collaterals & Limits.
65. Based on the selection of Limit/Collateral, Limit Amount in Transaction Currency or Collateral Amount in Transaction Currency is displayed.
For Limit amount in transaction currency, the value is derived from selected limit id. If the limit currency is different from the transaction (account) currency, then Aura will apply the mid-rate for these two currencies from the default rate type maintained in the Entity level and display the values after respective conversion. If Account currency is the same as the Limit Currency, Aura will display the same amount as in Limit Amount In Limit Currency.
For Collateral amount in transaction currency, the value is derived from selected Collateral ID. If the collateral currency is different from the transaction (account) currency, then Aura will apply the mid-rate for these two currencies from the default rate type maintained in the Entity level and display the values after respective conversion. If Account currency is the same as the Collateral Currency, Aura will display the same amount as in Collateral Amount In Limit Currency.
66. Based on the selection of Limit/Collateral, Linked amount in transaction currency is defaulted from Limit (or Collateral) Amount In Transaction Currency. You can modify this, but, this amount cannot be greater than Limit (Collateral) Amount In Transaction Currency.
67. Click Next. The New Loan → Confirmation (6/6) page will appear.
Note: If any Custom Field is mapped to Loan account at Admin → System Codes → Custom fields → Field mapping, then an additional screen will appear before the Confirmation screen. The Custom Fields will be mandatory or non-mandatory based on the rules set at the Field Mapping. For more details on Custom Field functionality, please refer Admin → System codes → Custom fields → Field mappings manual
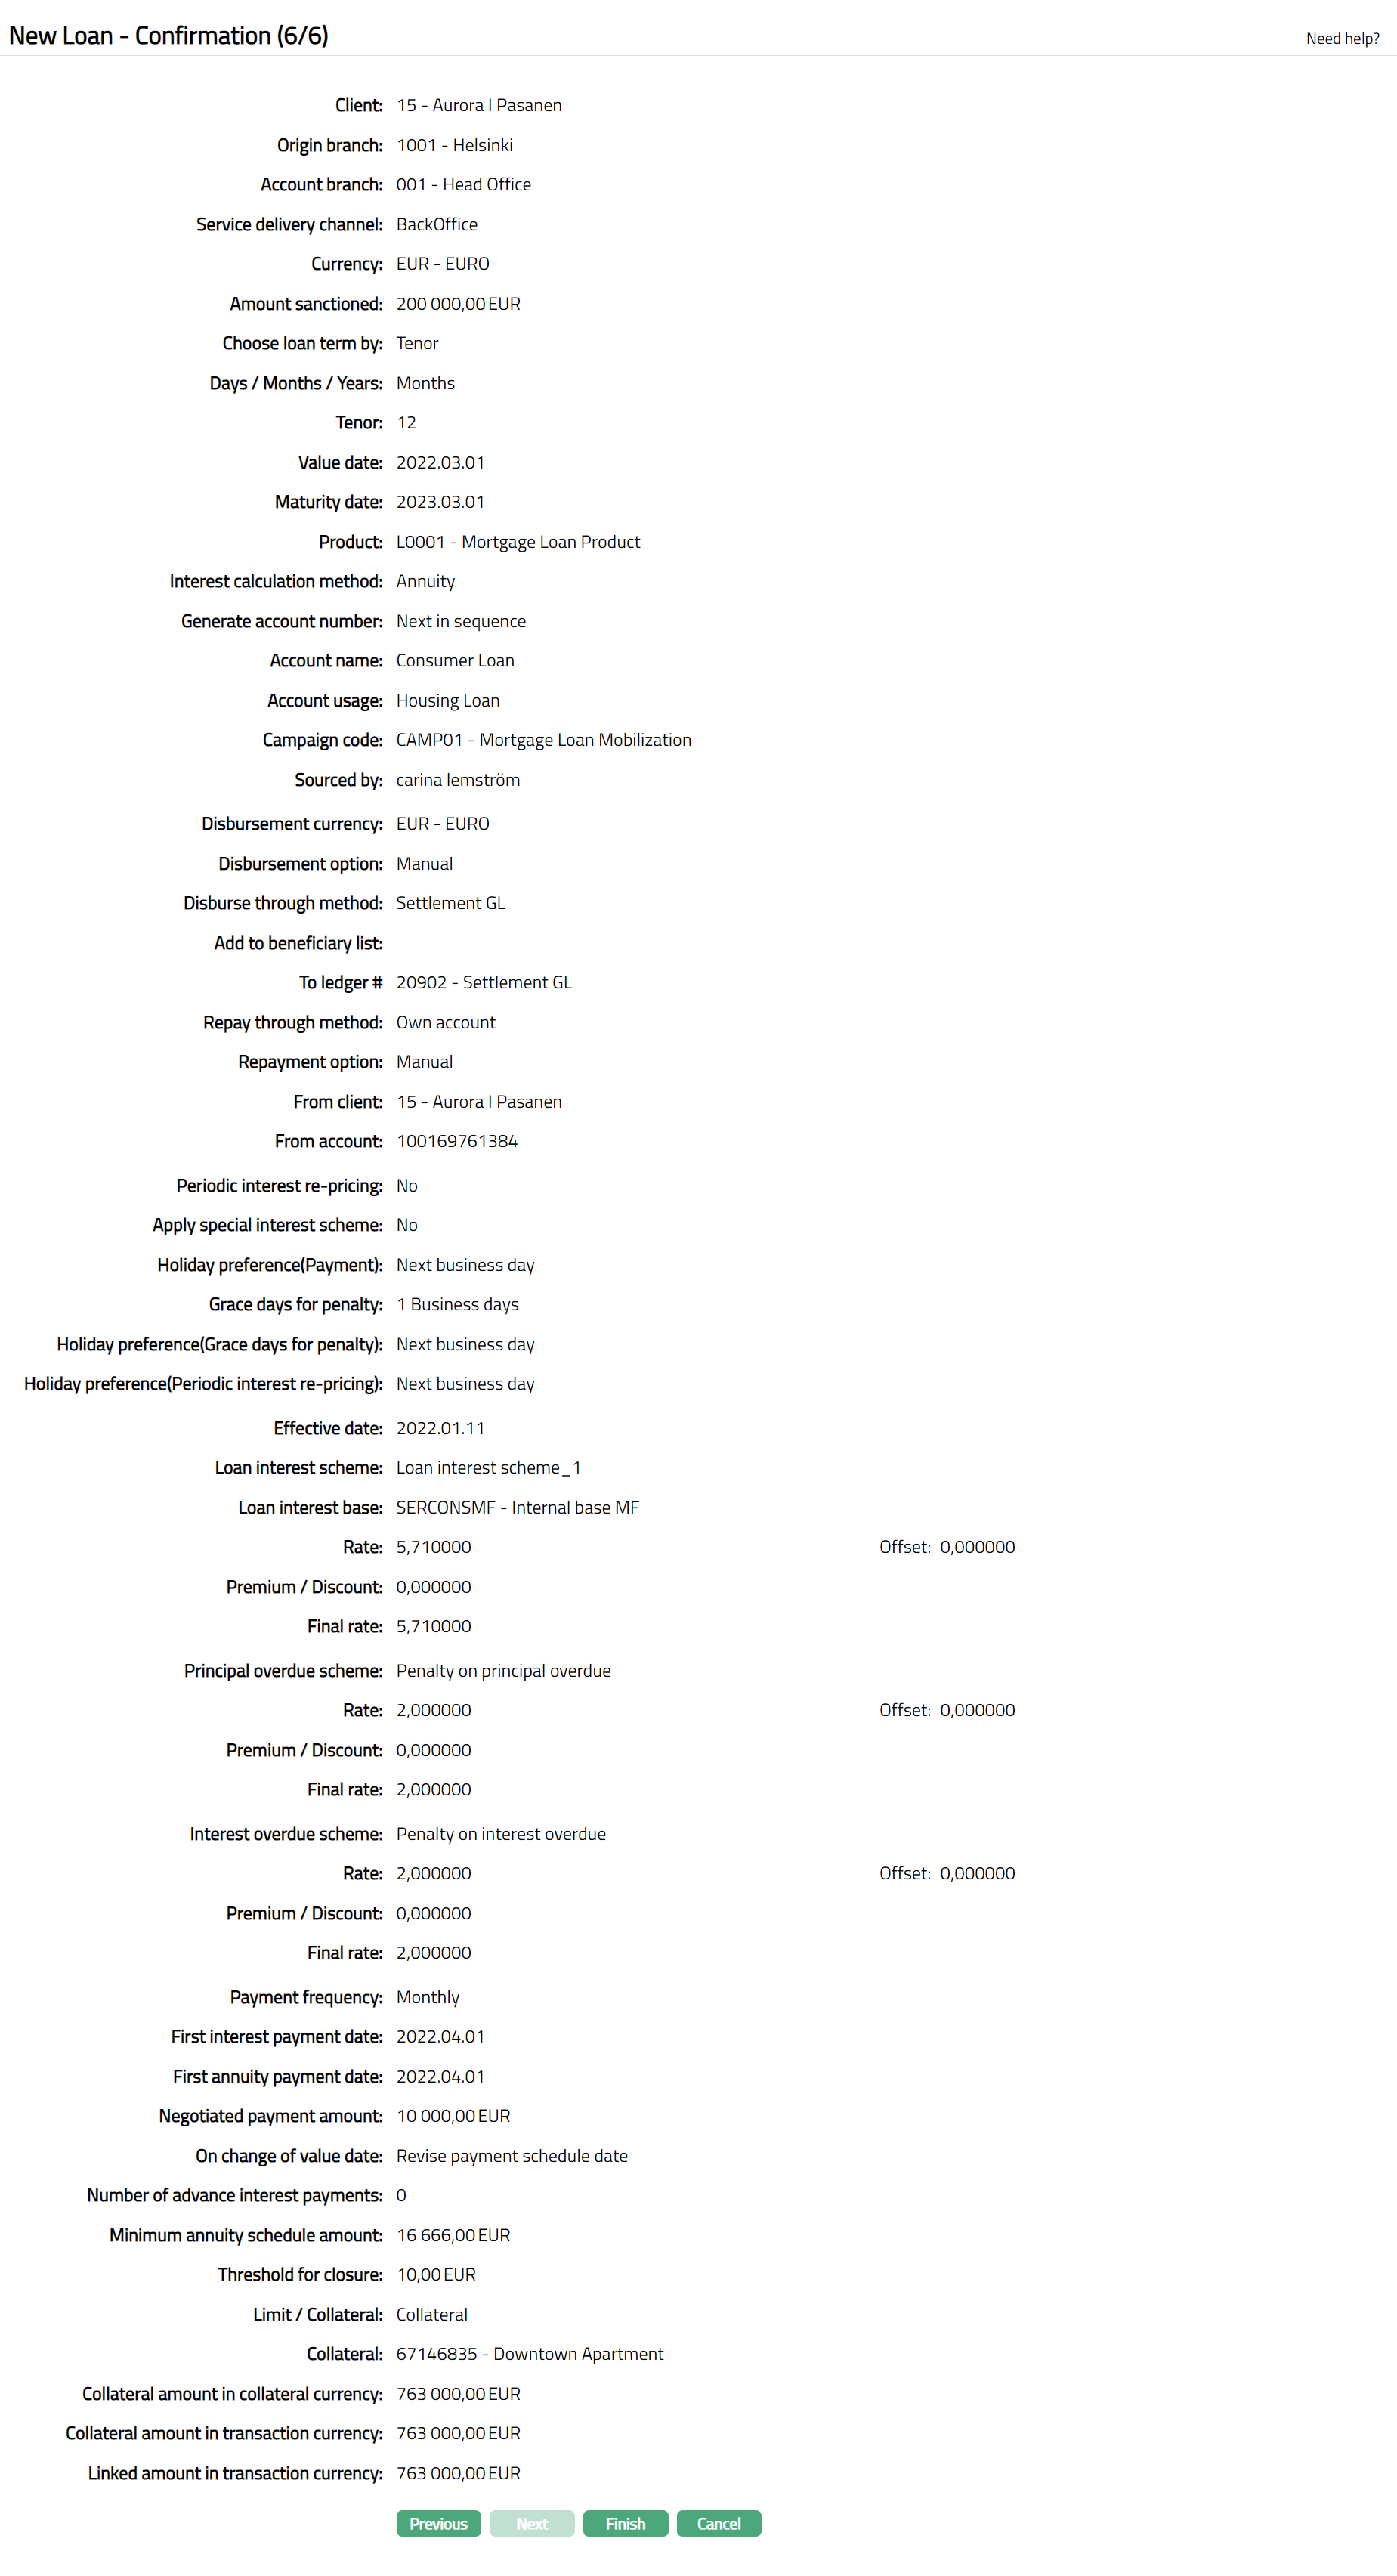
68. Click Finish. The Mortgage and Loan Account is created with a unique Account # and the Loan Account page appears displaying the Overview tab of the account that you created.
Functions: Add, Search, Edit
Notes:
Loan Status: On click of Finish,
The Loan Account Status will be as follows:
If KYC of the customer is not approved:
- The Account Status is Opened, and the record status is Approved.
- Add the Activated Account Status using Account Status tab. The record status will be Pending.
- Another user should approve the Account Status, so that the record status becomes Approved and Account Status becomes Activated
If KYC is approved
- The Account Status is Opened, Approved and Activated Pending.
- Another user should approve the Account Status, so that the record status becomes Approved and Account Status becomes Activated.
The Loan Payment Status will be Normal, Approved.
Refer to the Account Status section for a detailed explanation
Edit: Once Loan is activated, Edit is allowed only for specific tabs. To make changes to the interest / Payment parameters / certain Settings, after activation of Loan Account, you can use Retail → Loan → Change of terms .
Any changes to the Interest Receivable, Payment Settings, Charge and Account Status tabs will render the status of these tabs to Pending. Only when it is Approved by another user, the changes will be effective.
For activating a Loan Account, the value of the Limit / Collateral attached under the Secured By Tab should be >= Approved Amount * Minimum Secured Percentage. Unless the loan has enough coverage based on this formula, the activation approval will fail.
Only when the Account status is Activated and Record status is Approved, the account becomes effective and further actions like Disbursements, Repayment, Change Of Terms, etc., can happen in the account.
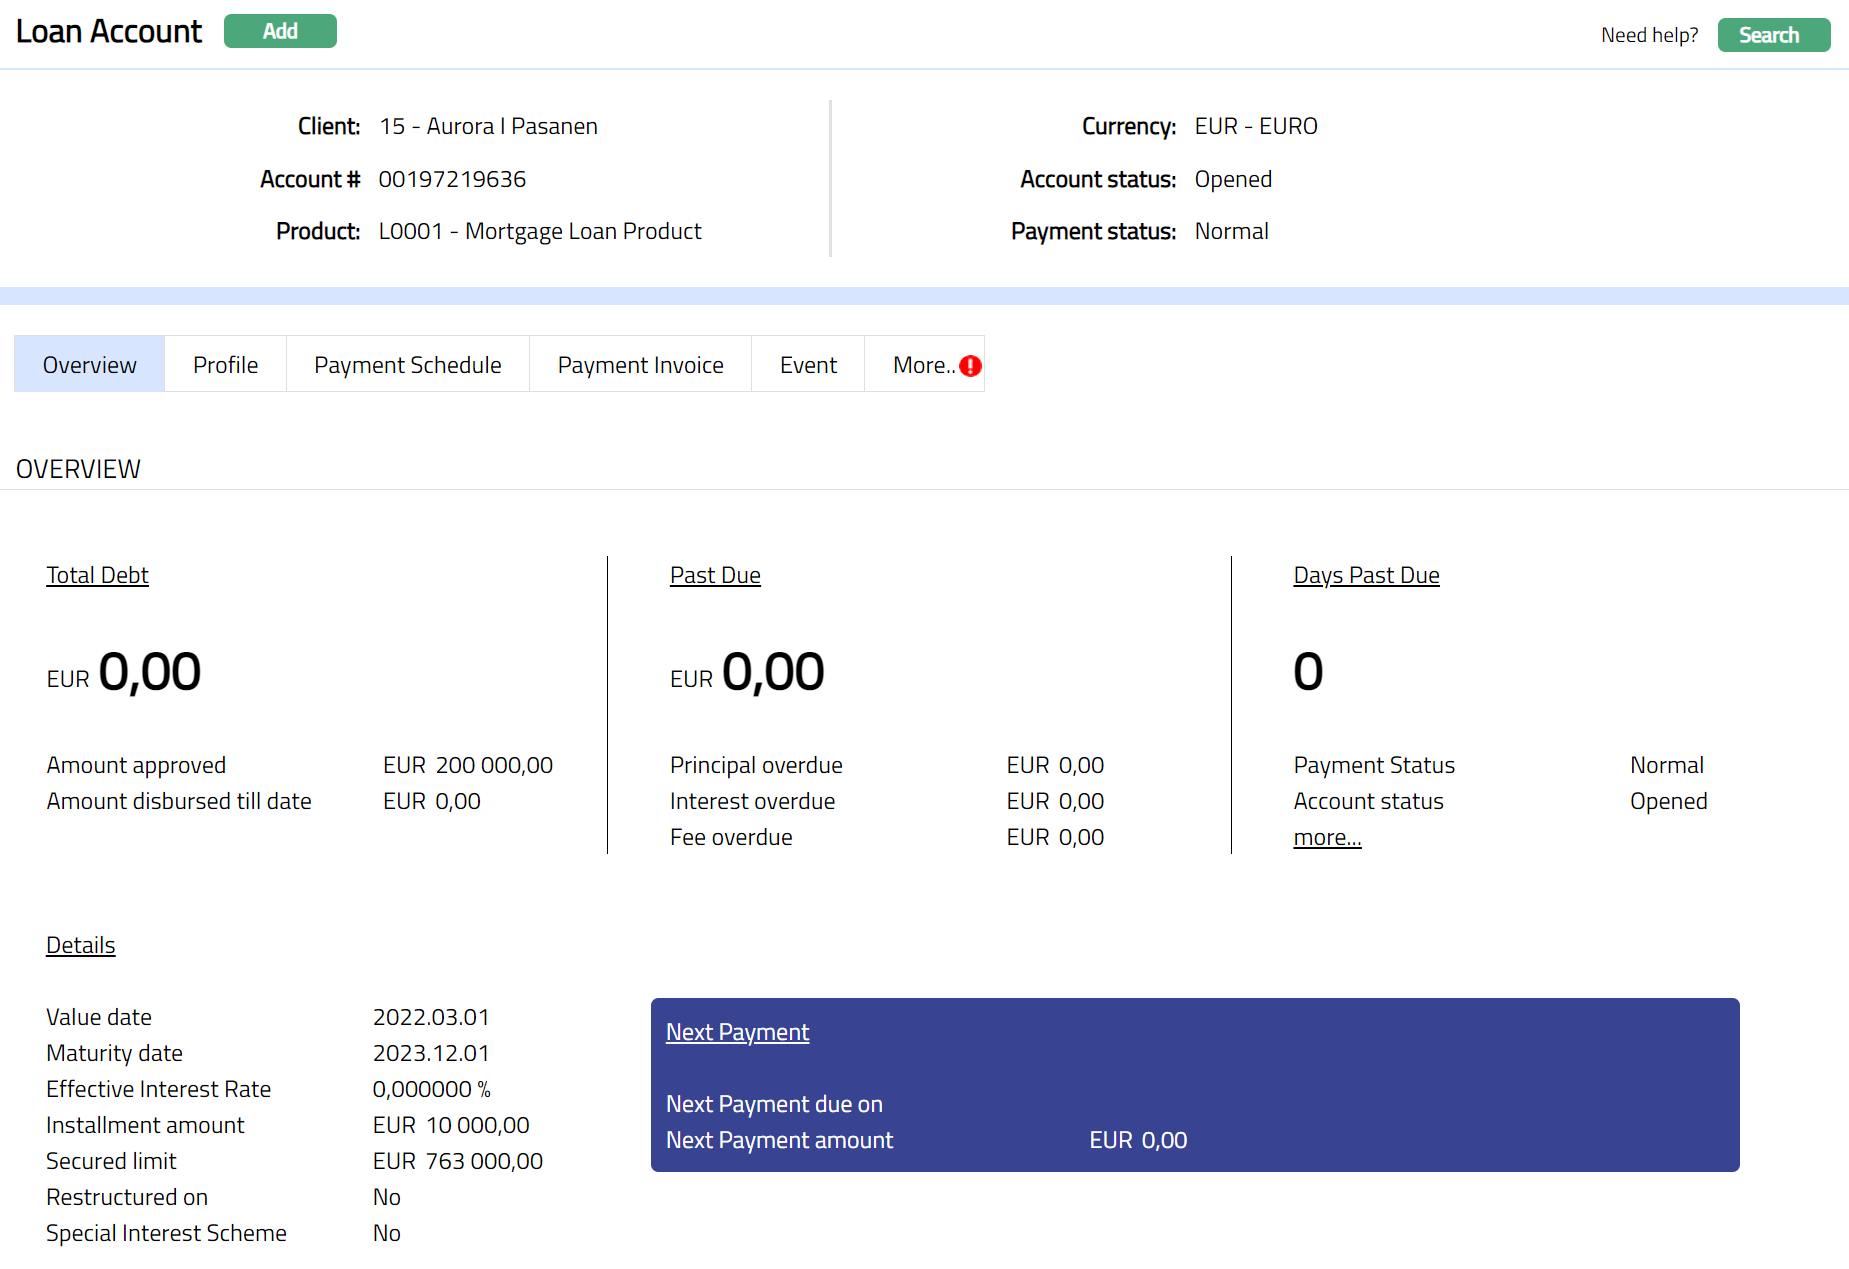
Overview
The Overview tab, which is the default tab in the Loan Account, allows you to see various details of a Loan Account to get an immediate overview of the account in terms of the various balances in the account, amounts that are past due, overdue days, significant dates related to the account and such other details.
To view the Overview details
1. Access Loan Account page using Retail → Accounts → Loans → Maintain → Search. The Overview tab will be displayed by default.
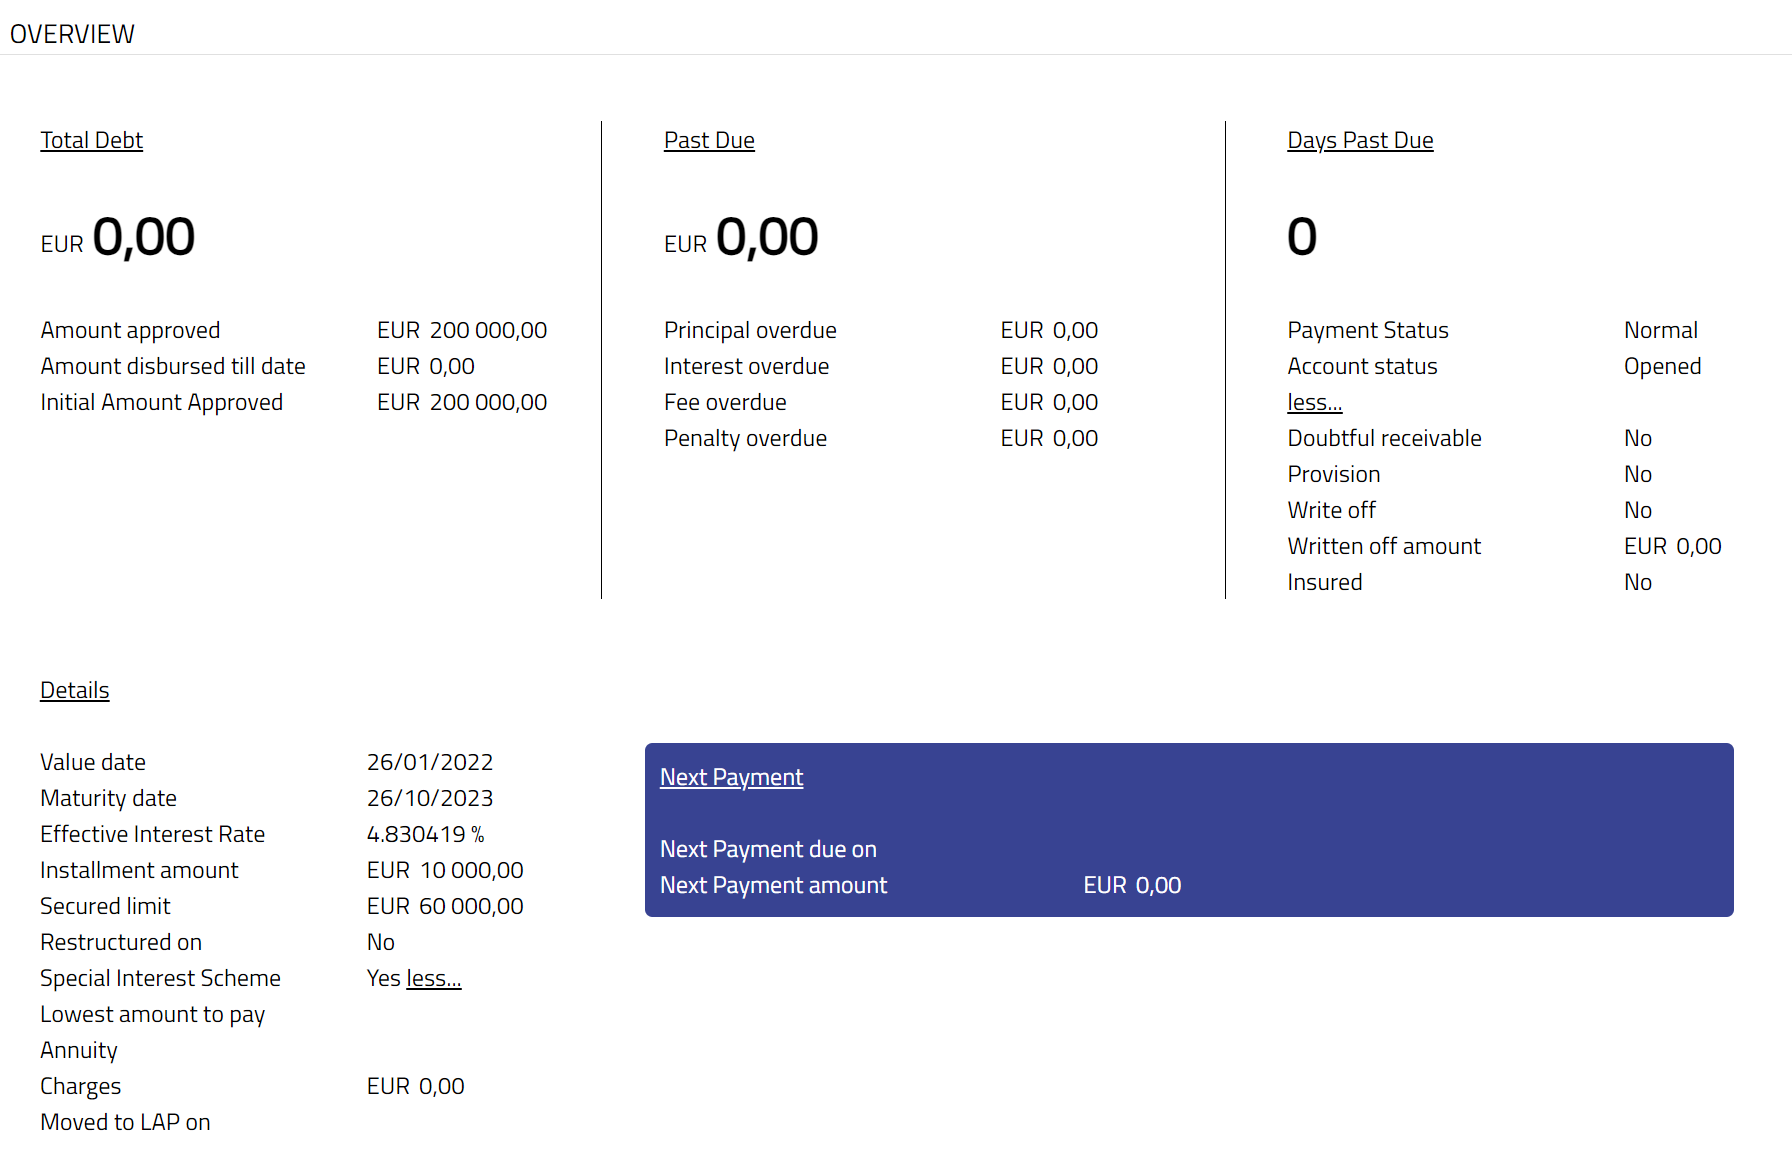
The following are displayed under the head Total Debt: 2. Amount approved: It denotes the amount that is approved for the Loan Account - i.e., Loan's Approved Amount as input at the time of loan activation or subsequently topped-up using Change of Terms.
3. Amount disbursed till date denotes the amount which has been disbursed for the Loan Account till that point of time.
4. Initial Amount Approved denotes the amount which was approved initially - i.e., Loan's Approved Amount as input at the time of loan activation.
The following are displayed under the head Details:
5. Value Date denotes the date from which the loan starts - i.e., from when the interest would be applicable.
6. Maturity Date denotes the day when the loan matures or ends.
7. Effective interest rate (EIR) denotes the interest rate after adjusting for the frequency of compounding during the year. It is based on the projected cash flows for the loan. Aura calculates the EIR when
- the loan is created
- the loan is approved
- the loan is disbursed
- there is any change in the loan's interest parameters or payment terms
- there is any schedule regeneration, say, due to Prepayment or any other change
8. Installment amount is the EMI (Equated monthly instalments) amount calculated by Aura if the Loan type is Annuity. This field is not visible if the Type is Amortized.
9. Secured Limit denotes the total of the linked collaterals / limits that have been mapped to the Loan as Security for the Loan.
10. Restructured on denotes the day when the Loan Account was Restructured. If there has not been any restructuring for the Loan Account, this will display No
11. Special Interest Scheme (SIS) indicates whether or not a Special Interest Scheme is applicable for this loan. If this is Yes, you can click on the More button to see the expanded details as follows:
Lowest Amount to Pay is the minimum amount which needs to be paid as calculated at the time of creation / activation of the loan.
Principal: If SIS = Yes and Interest Calculation Method = Amortized, it is the Principal part of the amount calculated as the lowest amount to pay. This will be displayed only for Amortized Loans.
Interest: If SIS = Yes and Interest Calculation Method = Amortized, it is the Interest part of the amount calculated as the lowest amount to pay. This will be displayed only for Amortized Loans.
Annuity: If SIS = Yes and Interest Calculation Method = Annuity, it is the annuity amount calculated as the lowest amount to pay. This will be displayed only for Annuity Loans.
Charges: If SIS = Yes, this denotes the regular charges that are part of the Payment Schedule (like Instalment Fees / Loan Management Fees). If there are no such charges, this will display 0.00
Moved to LAP on: If Special Interest Scheme = Yes, this indicates the date on which the loan moved to the Lowest Amount to Pay slab. If loan has not yet moved to the Lowest Amount to Pay slab & is continuing in the Chosen Amount to Pay slab, this will be blank.
12. Payment plan active: Indicates if a Payment Plan is active (on-going) on the Loan Account.
13. Past Due section displays the amounts that have not been paid by the due date.
14. Principal overdue denotes the principal amount which was due before the current booking date but has not been received from the Client.
15. Interest overdue denotes the interest amount which was due before the current booking date but has not been received from the Client. This would include amounts for all Interest related components viz., Interest, Interest Intermediate and Interest Difference.
16. Fee overdue denotes the sum of charges that was due before the current booking date but has not been received from the Client.
17. Penalty overdue denotes if there are any penalties (Penalty on Principal Overdue + Penalty on Interest Overdue) that were applied on the loan but has not yet been received from the Client.
18. Days Past Due indicates the number of days by which the loan account is overdue. It is calculated as the difference between the current booking date and the earliest Due Date of the schedule that remains unpaid. If there are no such unpaid amounts past the due date, this will show 0.
19. Payment status denotes the current Payment Status of the loan to indicate the payment behaviour of the loan account.
20. Account status denotes the current Account Status of the loan.
21. Payment received in excess displays the amount of funds received in excess of the due amounts for that loan as at that point of time.
Click on More hyperlink under Payment Received in Excess to see the following details:
22. Doubtful receivable will be Yes if Doubtful Receivable Impairment treatment is currently booked for the account.
23. Provision will be Yes if Provision Impairment treatment is currently booked for the account.
24. Write off will be Yes if Write-off Impairment treatment is currently booked for the account.
25. Written off Amount denotes the total amount which is written off as on date for this Loan Account under the impairment.
26. Insured field denotes if the active insurance plan is attached to the Loan Account.
27. Next Payment Due On: The date on which the next instalment is payable.
28. Next Payment Amount: The amount of payment that is due on the above date.
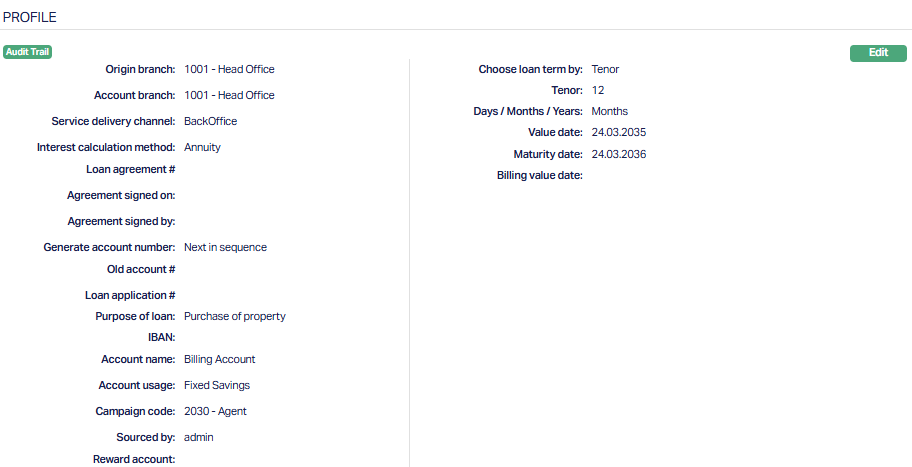
Profile
Profile tab shows the basic details of the Loan Account. For details refer to New Loan → Profile (1/6).
To view/edit Profile.
Access Loan Account page. Then click Profile tab.
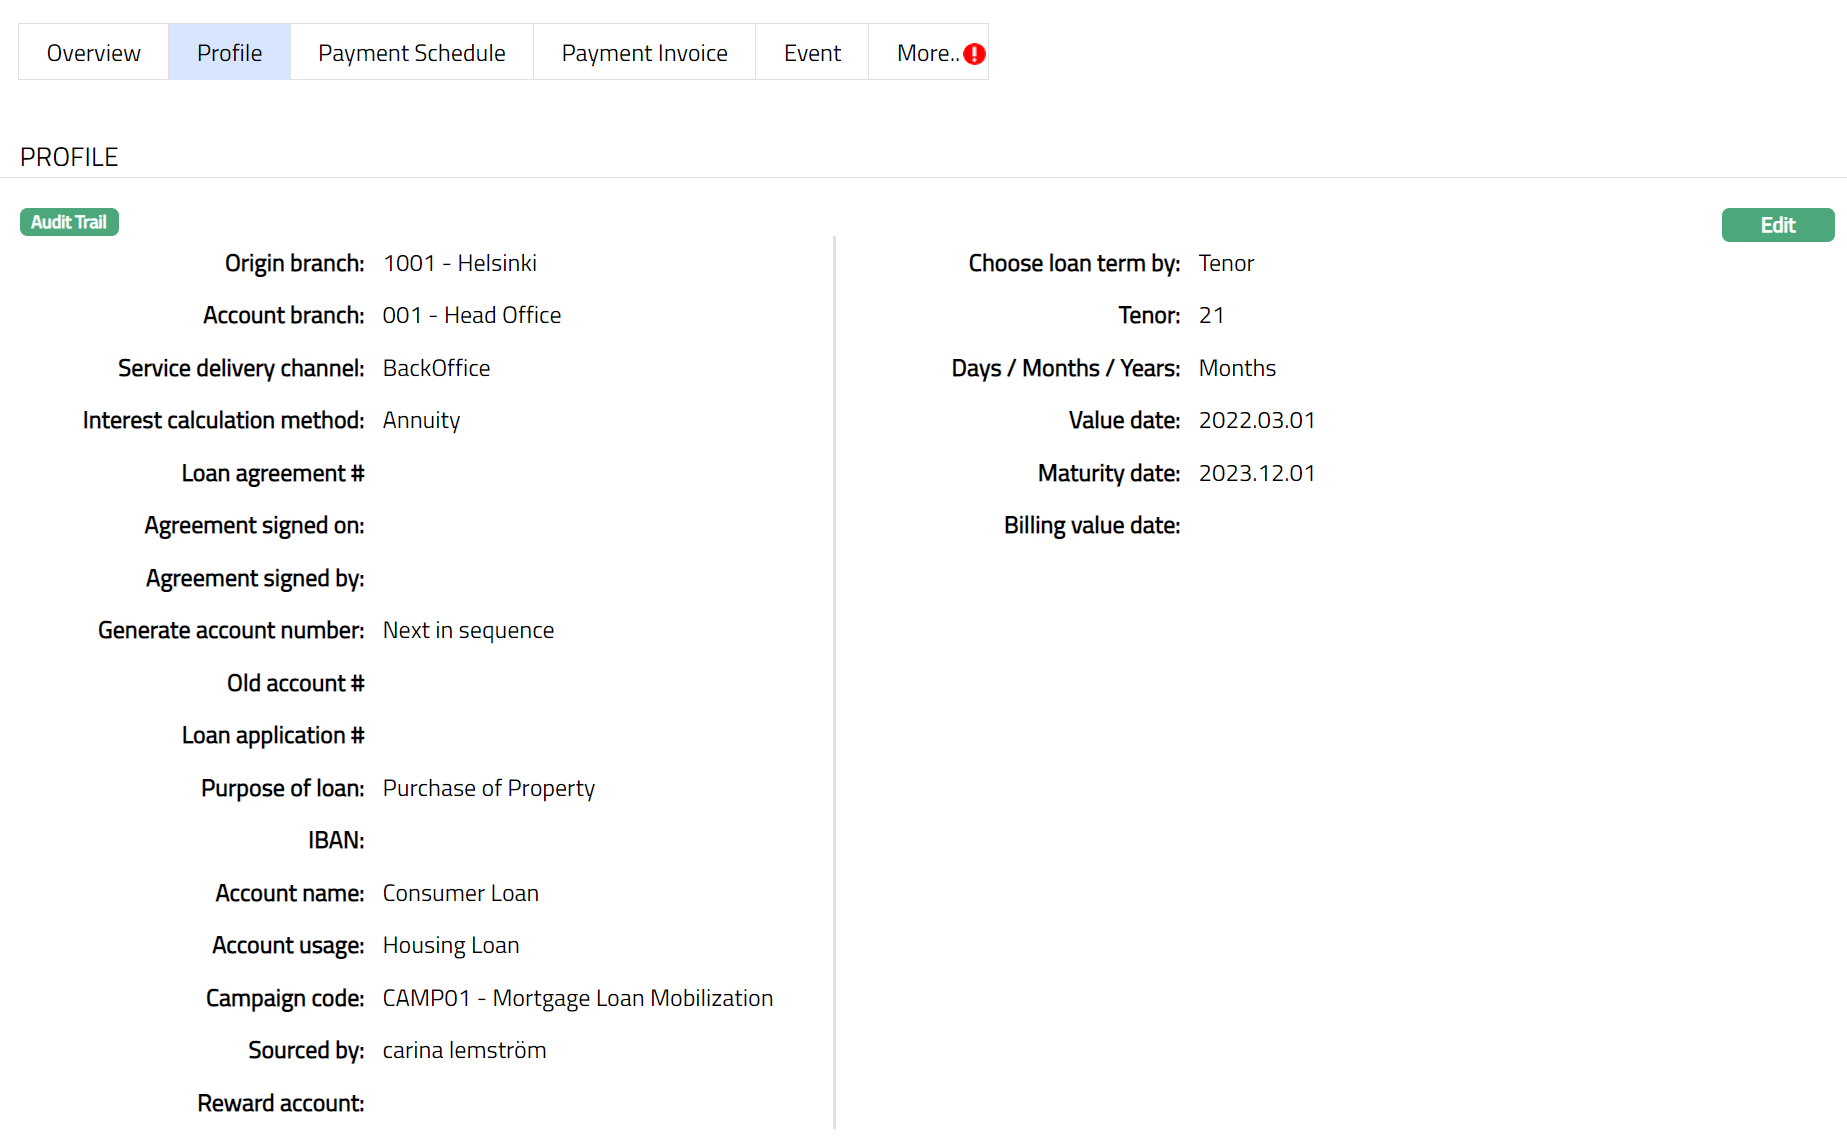
The additional fields that you can view in the Profile tab are explained below:
Loan agreement # denotes the agreement number attached to the Loan Account. You can enter the same during Edit.
Agreement signed on date denotes the date when the Agreement was signed. You can enter the same during Edit.
Agreement signed by denotes the name of the person who signed the agreement. You can enter the same during Edit.
Old account # can be used to record the earlier account number, say, from a legacy system, for purposes of reference. You can enter the same during Edit.
IBAN is the International Bank Account Number that is generated by Aura, if applicable, as per the Product used for creating the Loan Account.
Reward account denotes the reward account created for this loan account, if applicable, as per the Product used for creating the Loan Account.
To edit Profile,
1. Click Edit. The Edit Loan Account page appears.
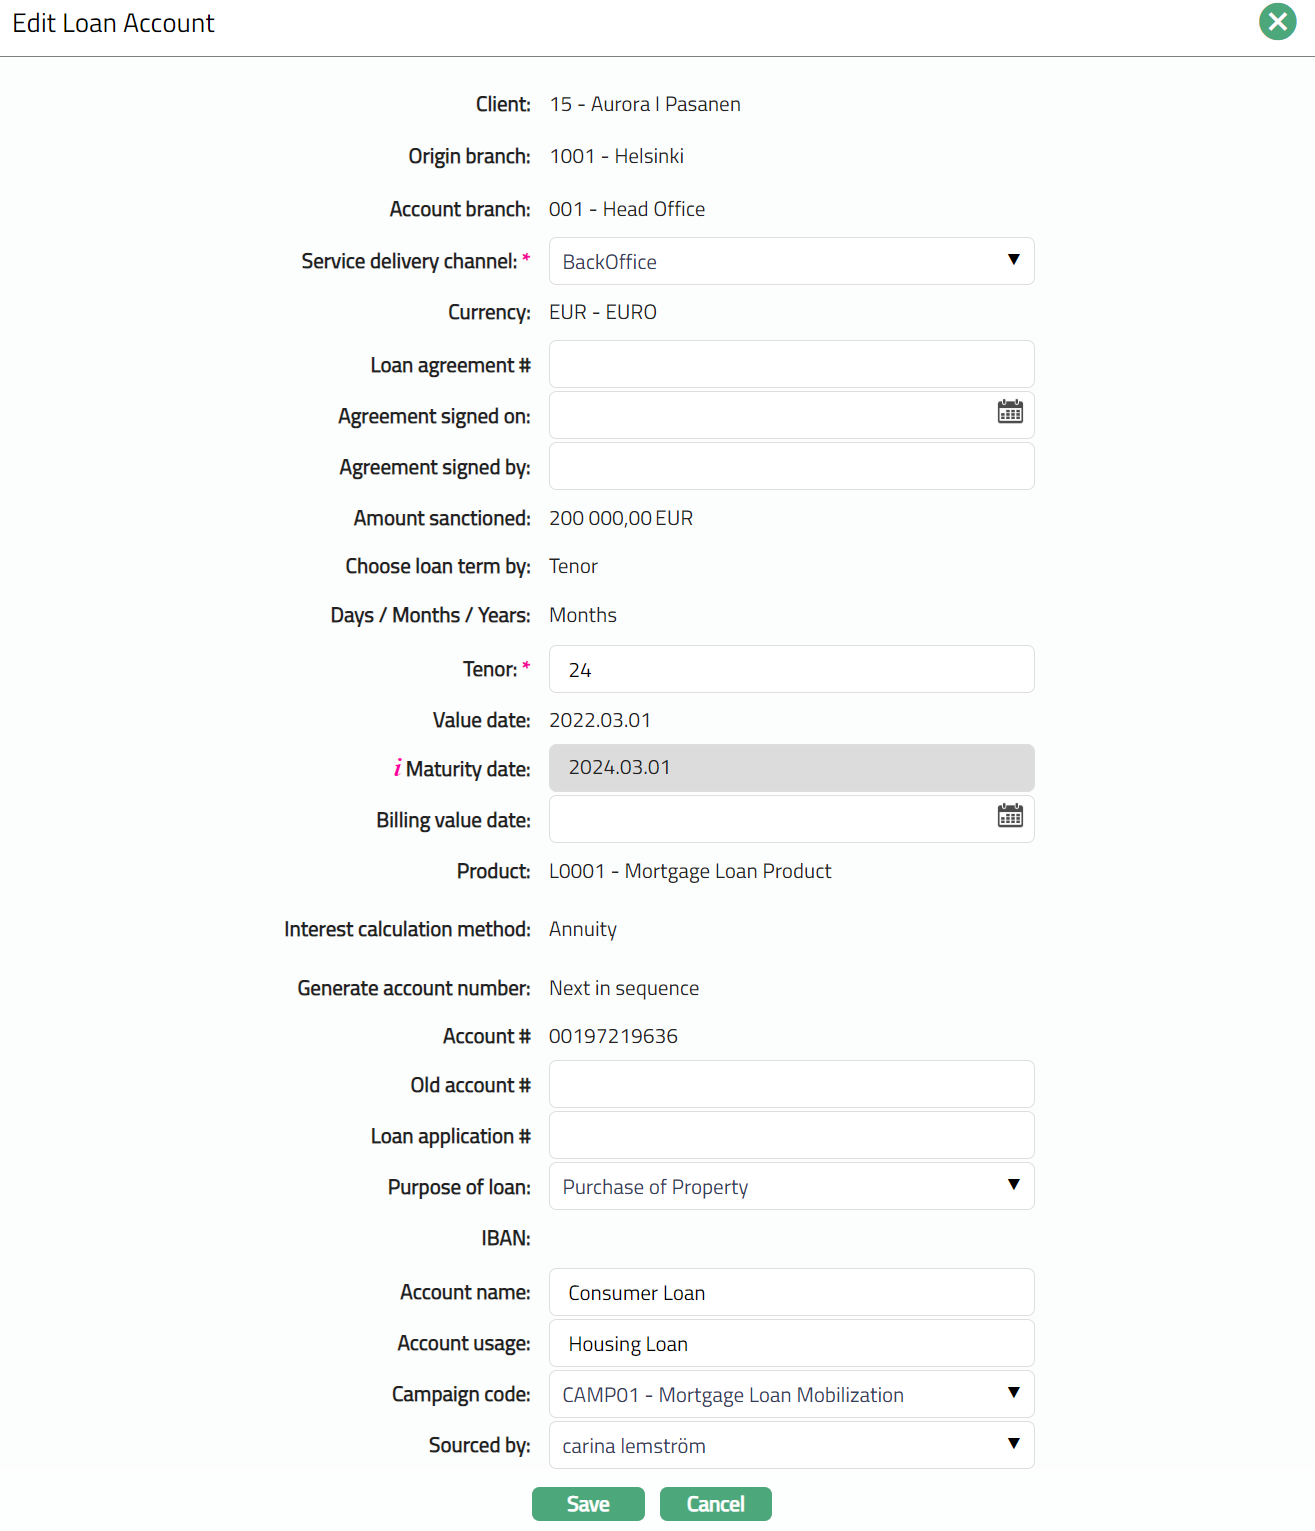
The editable fields are:
Service delivery channel
Loan agreement #
Agreement signed on.
Agreement signed by
Tenor (If user has opted for Choose by Tenor)
Maturity Date (If user has opted for Choose by Maturity Date)
Billing Value Date
Old account #
Loan application #
Purpose of loan
Account name
Account usage
Campaign code
Sourced by
Note:
If you select Choose Loan Term by as Tenor, then Tenor will be available for edit; else Maturity Date will be available as per the selection.
If Tenor or Maturity Date is changed, Aura will validate the Tenor with Maximum term days and Minimum term days specified at the Product level.
If you change Tenor, Maturity Date will be changed.
If you change Maturity Date, Tenor will be changed.
Editing after Account Activation -
Once the Loan Account's status is Approved and Activated, only the following fields are editable -
- Purpose of loan
- Account name
- Account Usage
- Campaign Code
- Sourced by
2. Click Save. Profile page appears with the edited details.
Function: Edit
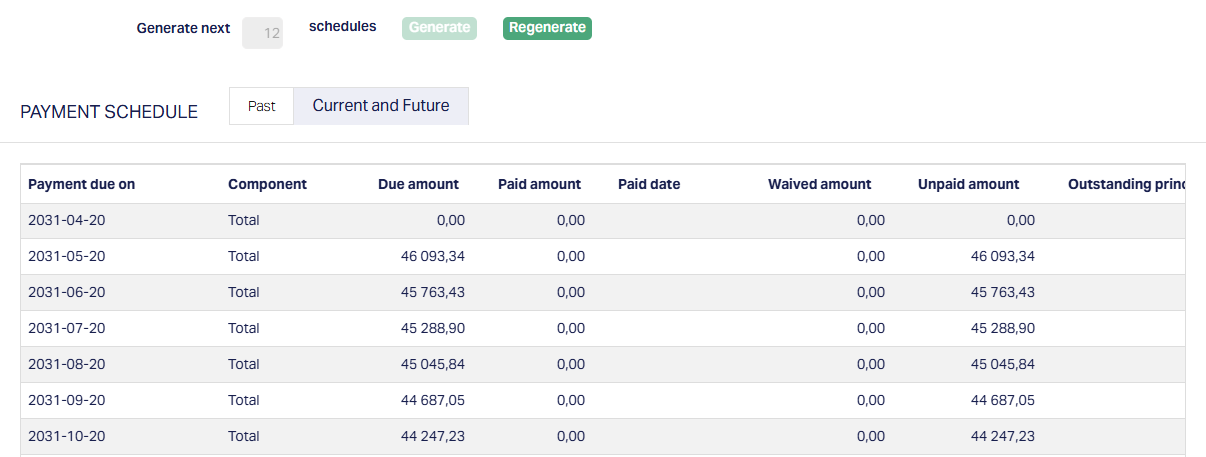
Payment Schedule
Payment Schedule tab allows you to view / generate / regenerate the Payment Schedule details.
By default, Current and Future tab is displayed. All the current and future payment schedules for each Payment Due On date are shown with the total amounts. The details of all the Components due on that date will be displayed when you click on any specific row. To view the past schedules, click on Past tab. Both the tabs are identical and display schedules as the tab names indicate.
1. Access Loan Account page. Click Payment Schedule tab to view the details as per sample below.

The columns available here are:
Payment due on denotes the date on which the payment is to be made. This date is generated based on the holiday preferences applicable on the account or on the number of advance interest payments done. Once the disbursement is done, this column will be visible in the payment schedule.
Component denotes the loan components i.e., the different heads under which the due amounts are to be paid. The details of the break-down of the amount for each loan component will be displayed in a pop-up when you click on a specific row. Sample screenshot shown below.

The list of components and a brief description of each is given below:
| Component Name | Description |
|---|---|
| Principal | Principal amount of the loan |
| Principal Intermediate | Principal added or reduced when there is any additional disbursement or pre-payment |
| Interest | Main interest on the loan |
| Interest Difference | Difference in Interest component for change of interest during a period after invoice has been generated for the period |
| Interest Intermediate | Interest calculated on a fraction for a split period before invoice is generated for that period |
| Penalty On Interest Overdue | Penalty interest on un-paid interest |
| Penalty On Principal Overdue | Penalty interest on un-paid Principal |
| Additional Charge | Additional period fee charged during life cycle of a loan |
| Additional Disbursement Charge | Disbursement fee for a loan in case of additional disbursement |
| Adhoc Charge | Adhoc fee charged on a loan |
| Appraisal Charge | Appraisal fee for a loan collateral. For example, appraisal of land |
| Credit Report Charge | Fee for credit report for a credit check |
| Documentation Charge | Documentation fee for a loan |
| Installment Charge | Fee on loan installment |
| Insurance Charge | Fee for Insurance set up |
| Invoice Charge | Fee on loan invoice |
| Late Payment Charge | Fee on late payment of a loan |
| Legal Charge | Legal fee for a loan |
| Lender Inspection Charge | Inspection fee for a loan collateral |
| Loan Management Charge | Fee for loan management |
| Notary Charge | Fee for Notary |
| Premium Charge | Fee for insurance premium |
| Prepayment Charge | Fee on pre-payment for a loan |
| Charge Processing Charge | Processing fee for a loan |
| Charge Reminder Charge | Fee for Payment Reminder |
| Charge Service Charge | Service fee for a loan |
| Stamp Charge | Stamp fee for a collateral or an agreement register |
| Statement Charge | Fee for statement of account |
| Status Charge | Fee charged on status movement |
| Contractual Savings | Savings that are contractual when providing a loan |
| Voluntary Savings | Savings that are voluntary when providing a loan |
| Total | Total of the amounts for that schedule |
Due Date: The date on which the payment is due
Written off amount denotes that amount that has been written off on this Loan Account based on the impairment settings at the Product.
Subsidy amount denotes the amount of interest subsidy applicable on this account.
Due amount denotes the amount that is due for payment
Paid amount denotes the amount that is paid.
Paid date denotes the date on which the last payment is made.
Waived amount denotes the amount that is waived / written off as per the impairment setting maintained at the Product level for that account.
Unpaid amount denotes the amount that is unpaid for schedule. If the amount is written off as per the impairment setting maintained at the Product level, then Unpaid amount = Due amount + written off amount - paid amount - waived amount.
Outstanding principal denotes the Total principal amount that remains to be paid as on the Due Date and will be displayed only when the Component is related to Principal. If the amount is written off as per the impairment setting maintained at the Product level, then New outstanding principal = original outstanding principal - written off amount
Notes:
As soon as the loan account is created, the Account Status is Opened and a Simulated Payment Schedule is generated giving the details of the amounts due on the different due dates. You can make required changes in certain parameters of the loan using the Edit button in the various tabs.
To ensure that the changed values are considered in the Simulated Schedules, it is recommended that you Regenerate the Payment Schedule. To do so, click on the Regenerate button that is displayed when the Account Status is Opened (see sample screenshot below).
Once the Account Status is Activated, you can change the parameters by using Retail > Loans > Change of Terms; and on approval of such records, the schedules will be regenerated. Such regeneration will happen whether or not the loan has been disbursed.
On disbursement (whether automatic or manual), schedules will be regenerated and the Due Dates will be retained or revised based on the parameter On Change of Value Date. Schedules generated on and after disbursement are the Actual Schedules.
You can use the Generate button to generate the next 12 schedules, if applicable. The button will be enabled in case schedules for the full tenor have not yet been generated based on the flag at the Product.
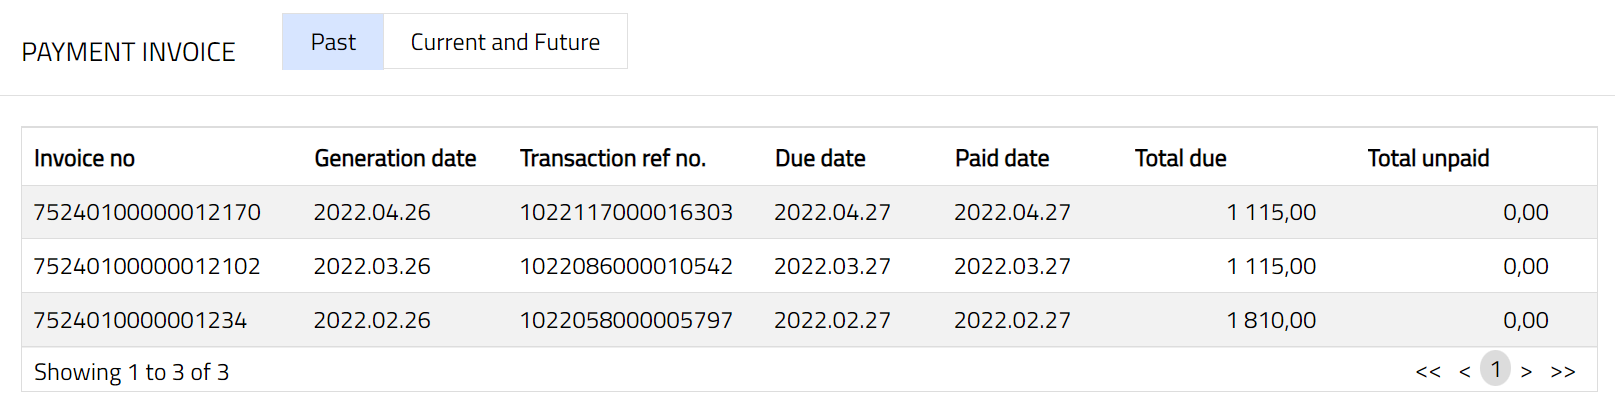
Payment Invoice
Payment Invoice tab allows you to view the details of invoices generated for this Loan Account. By default, Current and future payment invoice details are displayed. If the Product under which the loan is created has Invoice Generation Required = No, then, this tab will not be displayed at all.
Note: Depending on the Due Date of the invoice, it will be shown either under Current and Future sub-tab or under Past sub-tab. If there are no records to be displayed, the tab will be blank. For example, if invoices have not yet been generated, then both the sub-tabs will display blank as per the sample screen shot shown below.

To view the invoices
1. Access Loan Account page. Click Payment Invoice tab to view the details of the Current and Future Invoices as per sample below.

The available fields are:
Invoice no denotes the invoice number generated by Aura.
Generation date denotes the date on which the invoice is generated.
Transaction ref no denotes the transaction reference number generated by Aura on the last repayment of the due amount for the invoice.
Due date denotes the date for which the payment is due.
Paid date denotes the date on which the last repayment was made on that invoice.
Total due denotes the due amount in that invoice.
Total unpaid denotes the amount that is unpaid for that invoice.
2. Click the required record. Payment Invoice Details pop-up screen will appear displaying all the details related to that invoice. Sample screen shot shown below.
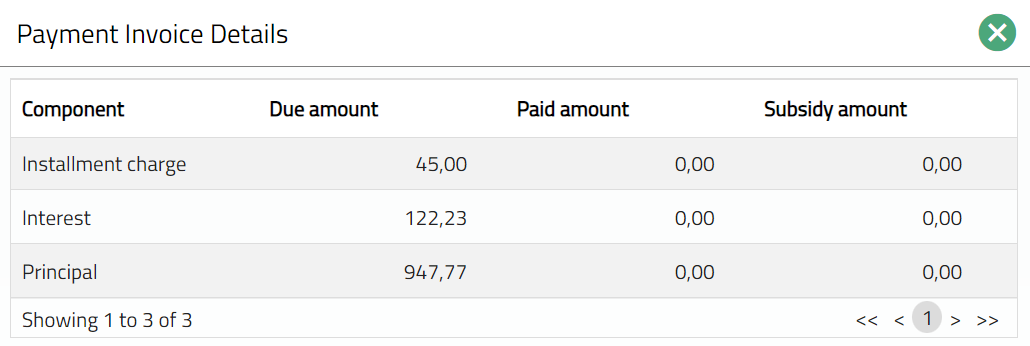
The available fields are:
Component denotes the loan components that are to be paid.
Due amount denotes the amount that is due for payment under that invoice.
Paid amount denotes the amount that is paid against that component under that invoice.
Subsidy amount denotes the amount that is subsidised for the schedule.
3. Click Past tab to view the old invoices generated.
Event
Event tab allows you to view the past, current and future events. This tab is non-editable.
To view the Events
1. Access Loan Account screen. Click Event tab. There are three sub-tabs within it -- Past, Current and Future. By default, the Current tab is displayed. It shows the details of the Events that have Value Date as current business date. The Past tab and Future tab show details of events that have Value Date earlier than / later than the current business date respectively.
Note: If there are no event then the sub-tab will display blank as per the sample screen shot shown below.

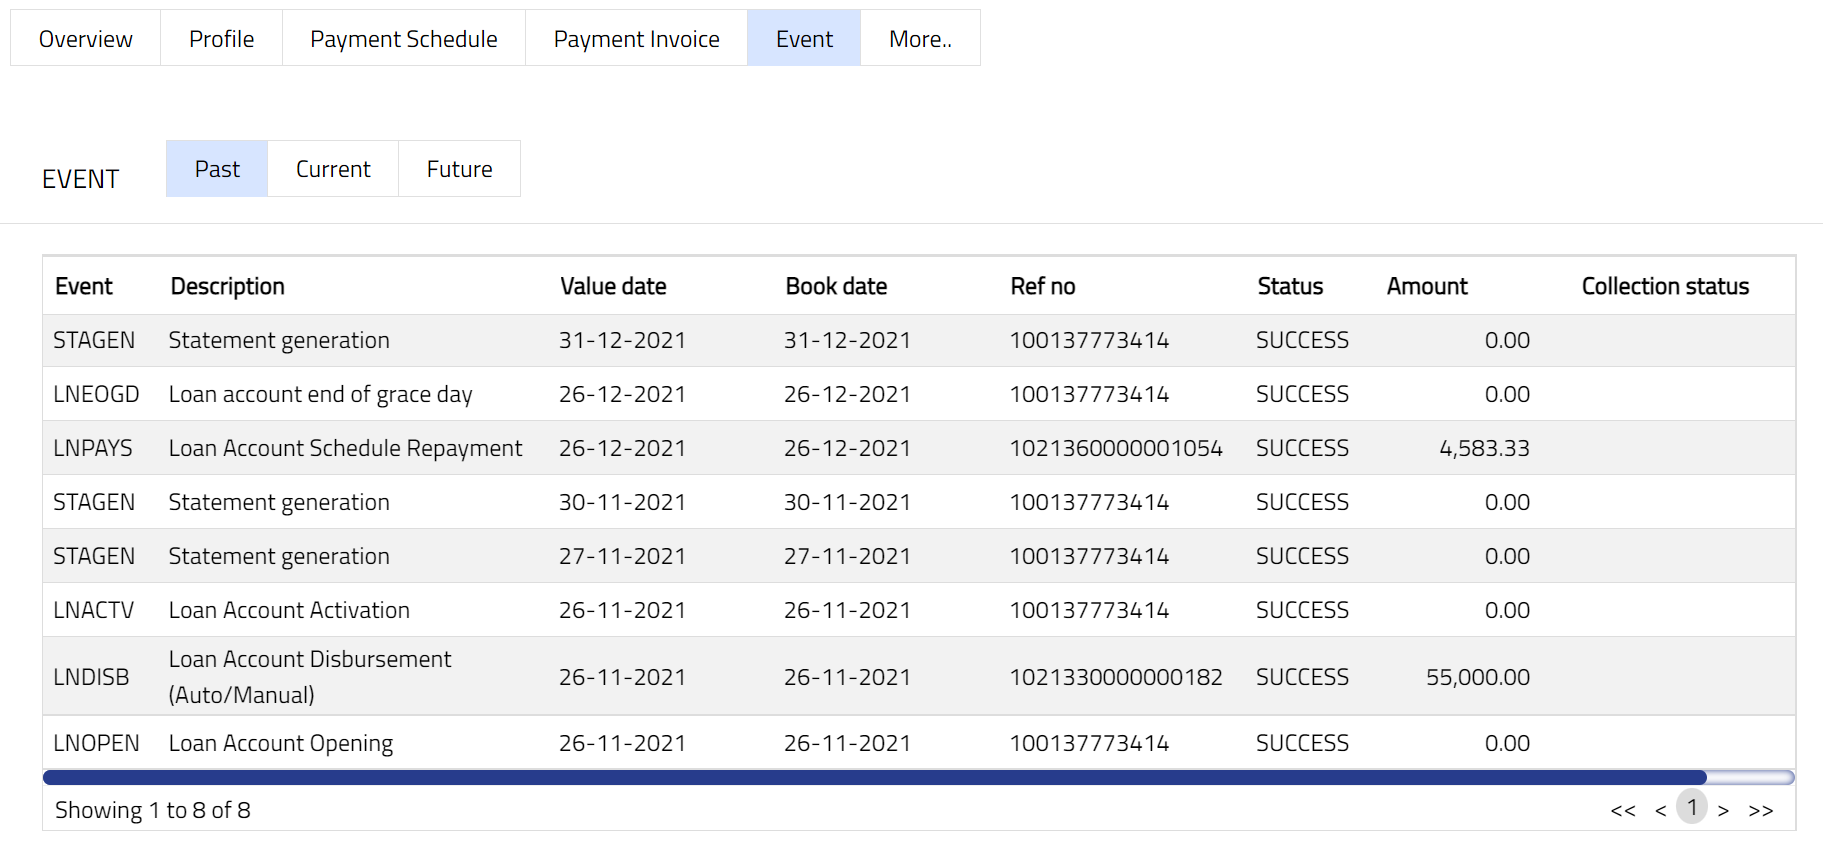
A sample of the Past tab is shown below:
A sample of the Current tab is shown below:

A sample of the Future tab is shown below:
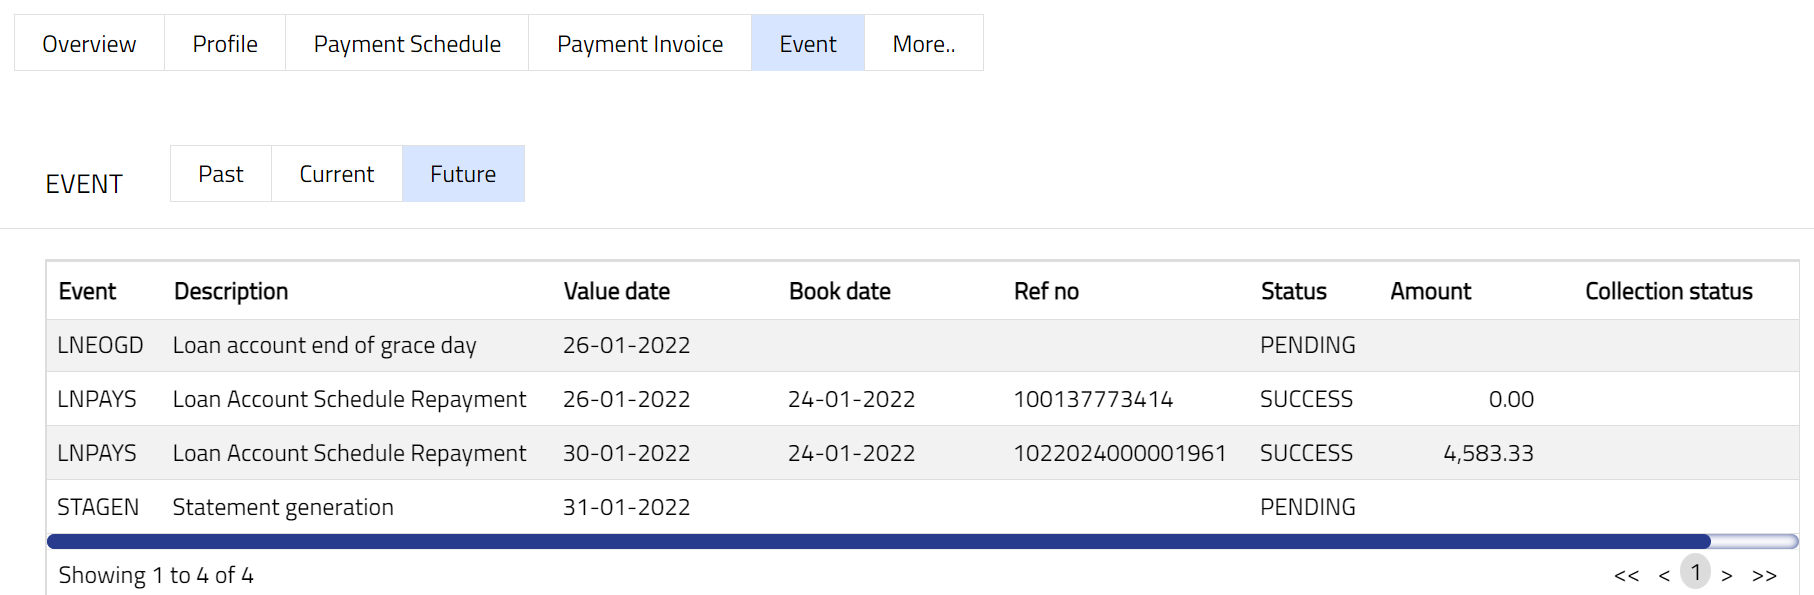
All the tabs show the following data:
Event: It displays the code for the event.
Description: It displays the description of the event.
Value Date: It indicates the date on which any event pertaining to the account gets applied. It can be back date, future date or current date.
Book Date: The date of entry / input of the event.
Ref No: The transaction reference number, if applicable, under which the event is processed.
Status: It displays the status of the event. The status can be of the following:
Pending: Where the event is not yet processed.
Success: Where the event has been processed successfully.
Failure: Where the event has failed during process.
Retry: Indicates a failed event where the system retries to process the event on subsequent business days.
Amount: It indicates the amount processed by the event. Example: Interest liquidation event will have the amount of interes liquidated.
Collection Status: If the Collection status is Pending, it indicates that the deferred charges has not been collected and if the Collection Status is Success, it indicates that the deferred charges has been collected.
The following shows the list of events for a Loan Account:
| Sl no | Event Code | Description | Condition |
|---|---|---|---|
| 1 | LNDISB | Loan Disbursement | This event occurs when the loan amount is disbursed to the Loan Account |
| 2 | LNPAYS | Loan Account schedule payment | This event occurs when the payment is made based on the Payment frequency maintained under the Payment Settings tab. Payment made can be Auto or Manual |
| 3 | LNPAYP | Loan Account Prepayment | This event occurs when there is a manual prepayment of the loan |
| 4 | LNOPEN | Loan account opening | This event occurs when the account is opened, and it occurs only once, i.e., at the time of account opening |
| 5 | LNACTV | Loan account activation | This event occurs when the account is in opened status and the user changes manually the status of the account from Opened to Activated |
| 6 | LNCLOS | Loan Closure | This event occurs when the Loan Account is closed, and it occurs only once. It can happen on maturity when there is a full payment of the loan or in case of pre-closure when the user does a full prepayment |
| 7 | LNRATE | Interest rate revision | This event occurs on approval of the latest interest record in Interest Base. On rate revision, the new rate is brought into effect by assigning the new rate to existing accounts |
| 8 | LNSCHG | Loan account schedule generation | This event triggers the next LNPAYS |
| 9 | STAGEN | Statement generation fee | This event occurs when a statement is generated in the Loan Account based on the frequency. If a statement fee is attached, it will also be displayed |
| 10 | REMGEN | Reminder generation | This event occurs when a reminder is attached to the Loan Account and, based on the frequency, the reminder is generated. If a reminder fee is attached, it will also be displayed |
| 11 | LNACCR | Loan interest accrual | This event occurs every day for loan interest accrual |
| 12 | EVNPOP | Event population | This event triggers other events |
| 13 | LNRVPP | Reversal prepayment | This event is manually triggered for reversal of Loan Account Prepayment |
| 14 | LNRVPY | Reversal payment | This event is manually triggered for reversal of Loan Account Payment |
| 15 | LNACST | Loan account status | If Move Account Status To is maintained as a rule at the Product level with an associated fee, and if the rule satisfies, then this event is triggered, and an Account Status fee is charged at the account level |
| 16 | RBIMPR | Re-book/re-calculate impairment on cash flow | This event triggers when re-booking is done for already booked impairment in case of cash flow, and in case of account, the status remains the same as the booked impairment status |
| 17 | RIMPAR | Impairment re-balancing for loans | This event triggers when booked impairment is reversed as per previous status, i.e., if statuses (account & payment) change happen |
| 18 | IMPAIR | Impairment booking for loans | The account status maintained in Impairment settings for the loan Product, which is attached to the Loan Account; and when the Loan account moves into the status as per the rules maintained in Impairment settings for the loan Product, then the IMPAIR event triggers, and impairment is booked |
| 19 | DOUREC | Doubtful receivable processing for loans | The account status maintained in Impairment settings for the loan Product, which is attached to the Loan Account; when the Loan account moves into the status as per the rules maintained in Impairment settings for the loan Product, and if the treatment is Doubtful receivable, then DOUREC event triggers |
| 20 | AWRTOF | Write off processing for loans | The account status maintained in Impairment settings for the loan Product, which is attached to the Loan Account. When the Loan account moves into the status as per the rules maintained in Impairment settings for the loan Product, and if the treatment is Write off, then AWRTOF event triggers. When the AWRTOF event triggers, if a write-off amount is maintained at the Loan Product, the amount specified will be written off from the loan current balance. If the booking amount is maintained as the Principal amount, then the principal amount is reduced from the loan current balance |
| 21 | PROVIS | Provision processing for loans | The account status maintained in Impairment settings for the loan Product, which is attached to the Loan Account. When the Loan account moves into the status as per the rules maintained in Impairment settings for the loan Product, and if the treatment is Provision, then PROVIS event triggers and impairment amount is booked |
| 22 | INSUSP | Insurance Suspension | This event is triggered when an insurance plan is suspended |
| 23 | INACTV | Insurance Re-activation | This event is triggered when an insurance plan is reactivated |
| 24 | INEXPY | Insurance expiry | This event is triggered when an insurance plan is expired. This event will trigger only on the effective date |
| 25 | ININIT | Insurance plan initiation | This event is triggered when an insurance plan is initiated |
| 26 | LNLIQD | Loan Account Liquidation | This event occurs only when a Loan has been liquidated or paid back |
| 27 | CAINPR | Insurance premium | This event is triggered when an insurance premium is paid. This event will trigger only on the date when the premium is paid |
| 28 | ADDFEE | Additional charge | This event occurs based on the periodicity of the charges linked to the account as Additional charges |
| 29 | ADHFEE | Adhoc charge fee | This event occurs when an account is charged for an adhoc charge fee |
| 30 | CHGAMR | Charge Amortization | Ths event occurs when the system processes the amoritzation of a charge and recognizes a portion of the deferred charge as income |
| 31 | LNPYST | Loan Account Payment Status | This event occurs when the status of the Loan Account changes automatically after the payment is made |
| 32 | LNAMRT | Loan account advance interest accrual | This event occurs when interest that has been accumulated on a Loan Account is paid in advance |
| 33 | CONSAV | Contractual savings due | This event occurs when Contractual savings (Savings which are made on a regular basis) become due |
| 34 | VOLSAV | Voluntary savings amount | This event occurs when a user (individuals or organizations) voluntarily deposits |
| 35 | LNRVDB | Loan Account Disbursement Reverse | This event occurs when any Loan Account disbursement is reversed |
| 36 | LNEOGD | Loan account end of grace day | This event occurs only when the grace day for the Loan Account ends |
| 37 | INVCNC | Invoice Cancellation | This event occurs when you cancel any invoice |
| 38 | LNPSIM | Loan Payment Simulation | |
| 39 | LNPPSU | Payment plan suspend | This event occurs when an active payment plan linked to the Loan Account is suspended before completion. |
| 40 | LNPPEX | Payment plan expiry | This event occurs when the payment plan linked to the Loan Account reaches its configured end date and expires. |
| 41 | LNPRNO | Loan account product novation | This event occurs when the product associated with a Loan Account is changed through a product novation process. |
| 42 | LNCURC | Loan Curing Capitalization | This event occurs when curing capitalization is applied to the Loan Account as part of the loan curing process. |
| 43 | LNINPR | Insurance premium | This event occurs when an insurance premium linked to the Loan Account is paid. |
| 44 | LNINSP | Insurance suspension | This event occurs when an insurance plan linked to the Loan Account is suspended. |
| 45 | LNINCN | Insurance cancellation | This event occurs when an insurance plan linked to the Loan Account is cancelled. |
| 46 | LNRSTR | Loan account restructuring | This event occurs when the Loan Account is restructured using the restructuring functionality. |
| 47 | LNCOTP | Change of term payment term | This event occurs when payment terms of the Loan Account are modified using Change of Terms. |
| 48 | LNSPML | Loan Account - Apply special interest scheme to move to lowest amount to pay | This event occurs when a special interest scheme is applied to the Loan Account, resulting in recalculation to the lowest payable amount. |
| 49 | INVGEN | Invoice Generation | This event occurs when an invoice is generated for the Loan Account based on the configured repayment or invoice settings. |
| 50 | LNRVPY | Loan Account Payment Reverse | This event occurs when a previously processed Loan Account payment is reversed. |
| 51 | LNPPAC | Payment plan activation | This event occurs when a payment plan linked to the Loan Account is activated. |
| 52 | LNRFND | Loan refund | This event occurs when a refund is processed for the Loan Account. |
Beneficial Ownership
Beneficial Ownership tab allows you to view and edit the beneficial ownership details for the account.
To view Beneficial ownership details,
1. Access Loan Account page. Click Beneficial Ownership tab to see details as shown below.

Functions: Add, Edit, Delete
The available fields are:
Person#: This column denotes the unique identifier for each person involved in the Loan Account.
Client#: This column denotes the unique identifier for each Client involved in the Loan Account.
Name: This column denotes the names of the Clients who jointly own the account.
Ownership: This column denotes the share of ownership held by each person.
To Add a beneficial owner to the Loan Account
2. Click Add. Add Beneficial ownership page appears with the list of all active Clients maintained at CRM → Clients → Maintain.
3. Select the required Client. Client is added as a beneficial owner. The ownership % is automatically derived based on the number of Beneficial Owners as follows: 100 / Number of Beneficial owners.

To Edit a beneficial owner to the Loan Account,
4. Click Edit. Edit Beneficial Ownership page will be displayed.
Note: Only Ownership fields are editable.
5. Enter the required percentage of Ownership for each individual Client involved in the account such that the sum of the ownership is exactly equal to 100.
6. Click Save. Beneficial Ownership page appears with the edited details.

Functions: Add Edit, Delete
Delete: This option is used to delete a Beneficial Owner. Aura will ask for confirmation, on confirmation of which the selected Beneficial Owner will be deleted. The Ownership percentage will automatically be updated for the remaining Clients based on 100 / No. of Client. Note that you cannot delete a Client that is the primary Client (i.e., the Client using which the Loan Account was created).
Categorisation
The Categorisation tab allows you to categorise the accounts and add the parameters in the Status Rules defined at the Product. Based on the categorization done, the account can be moved to the required statuses. It also helps in classifying the same account under different categories for various reporting purposes.
To add Category,
1. Access Loan Account page and click Categorisation tab. The Categorisation page appears.
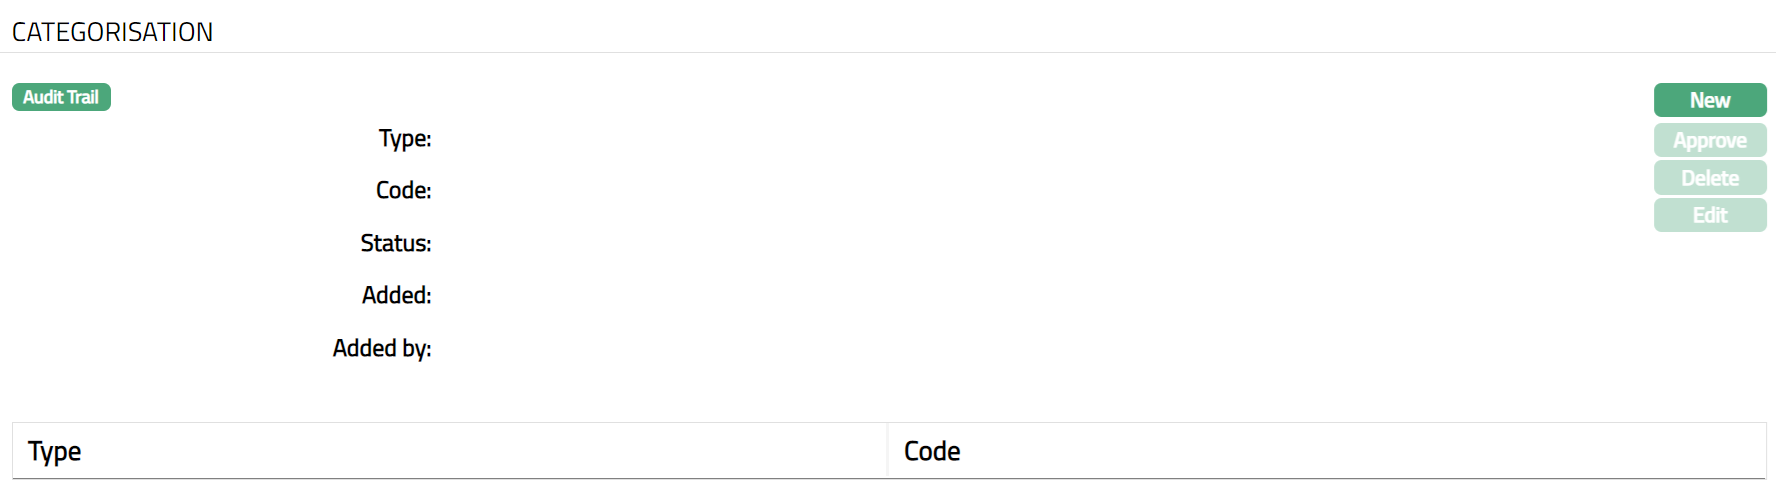
To Add new category,
2. Click New. New Category page appears.
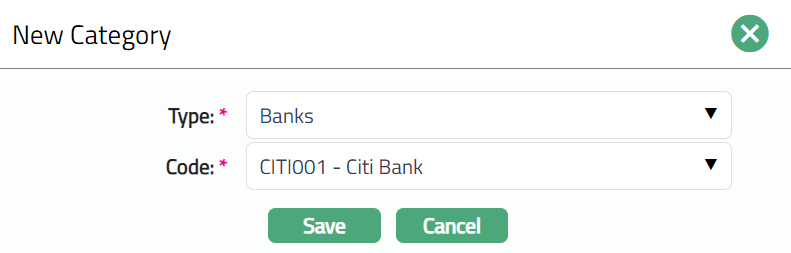
3. Select Category Type from the drop-down list maintained under Admin → Categories → Category type for which Applicable for is selected as Account. This should not be a Type that has already been mapped for the Account.
4. Select Code from the drop-down list of category codes maintained for the Category Type selected above, at Admin → Categories → Category type.
5. Click Save. Categorisation page appears with the added details. page
Note: Categorisation added has to be unique.
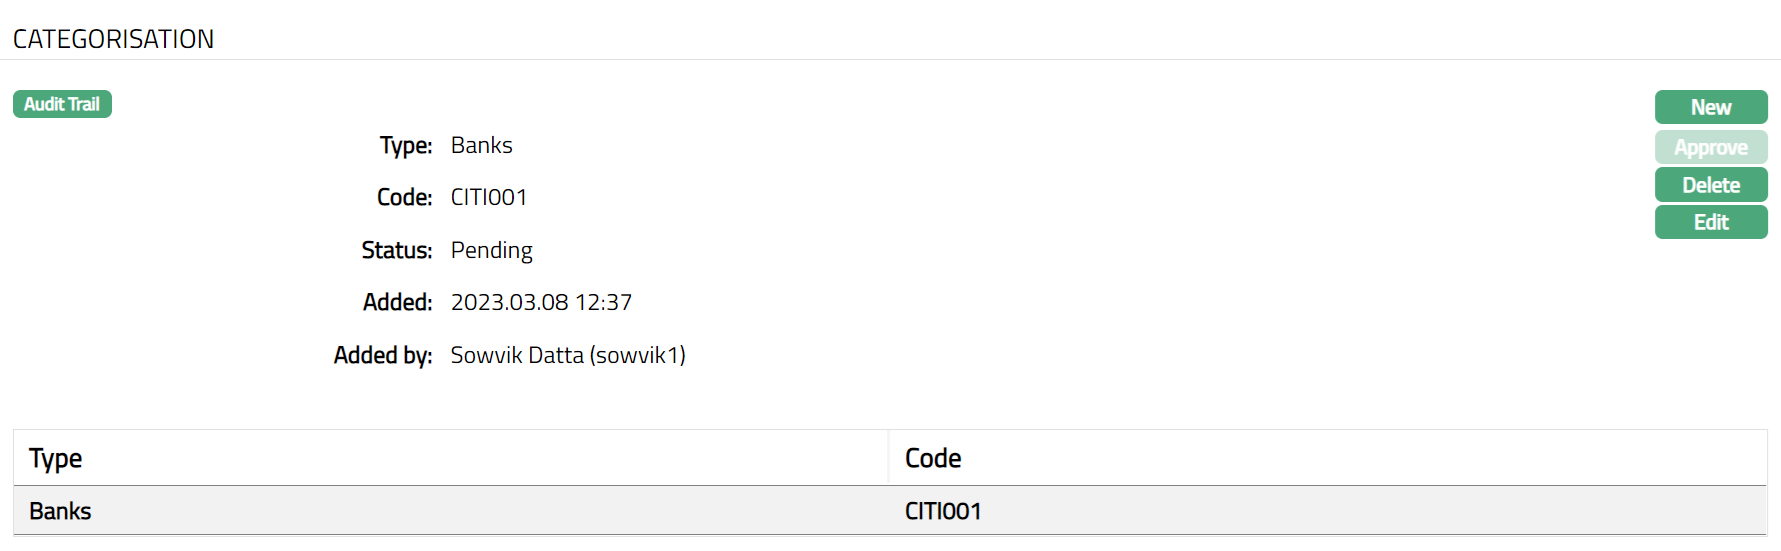
Functions: New, Approve, Edit, Delete.
Note: Any change in the tab will set the tab status to Pending till it is approved by another user. On approval, the tab status is set to Approved and the red bubble disappears.

Functions: New, Approve, Edit, Delete.
The additional fields available are:
Status field denotes the status of the tab.
Added field denotes the date on which the record was added.
Added by field denotes the name of the user who created the record.
Approved field denotes date on which the record was approved and is displayed only on approval.
Approved by field denotes name of the user who approved the record and is displayed only on approval.
To edit Category record,
1. Select required Category record you wish to edit.
2. Click Edit. Edit Categorisation page appears.
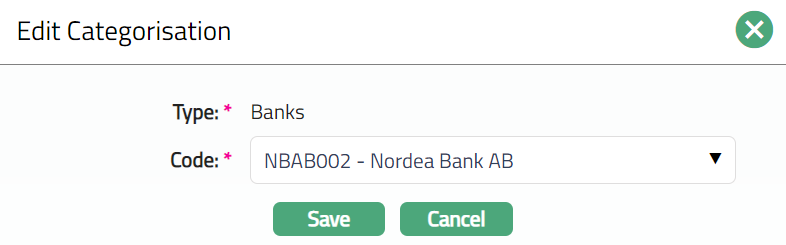
Note: Only Code field is editable.
- Click Save. Categorisation page appears with the edited details.

Note: Any change in the tab will set the tab status to Pending till it is approved by another user. On approval, the tab status is set to Approved and the red bubble disappears.
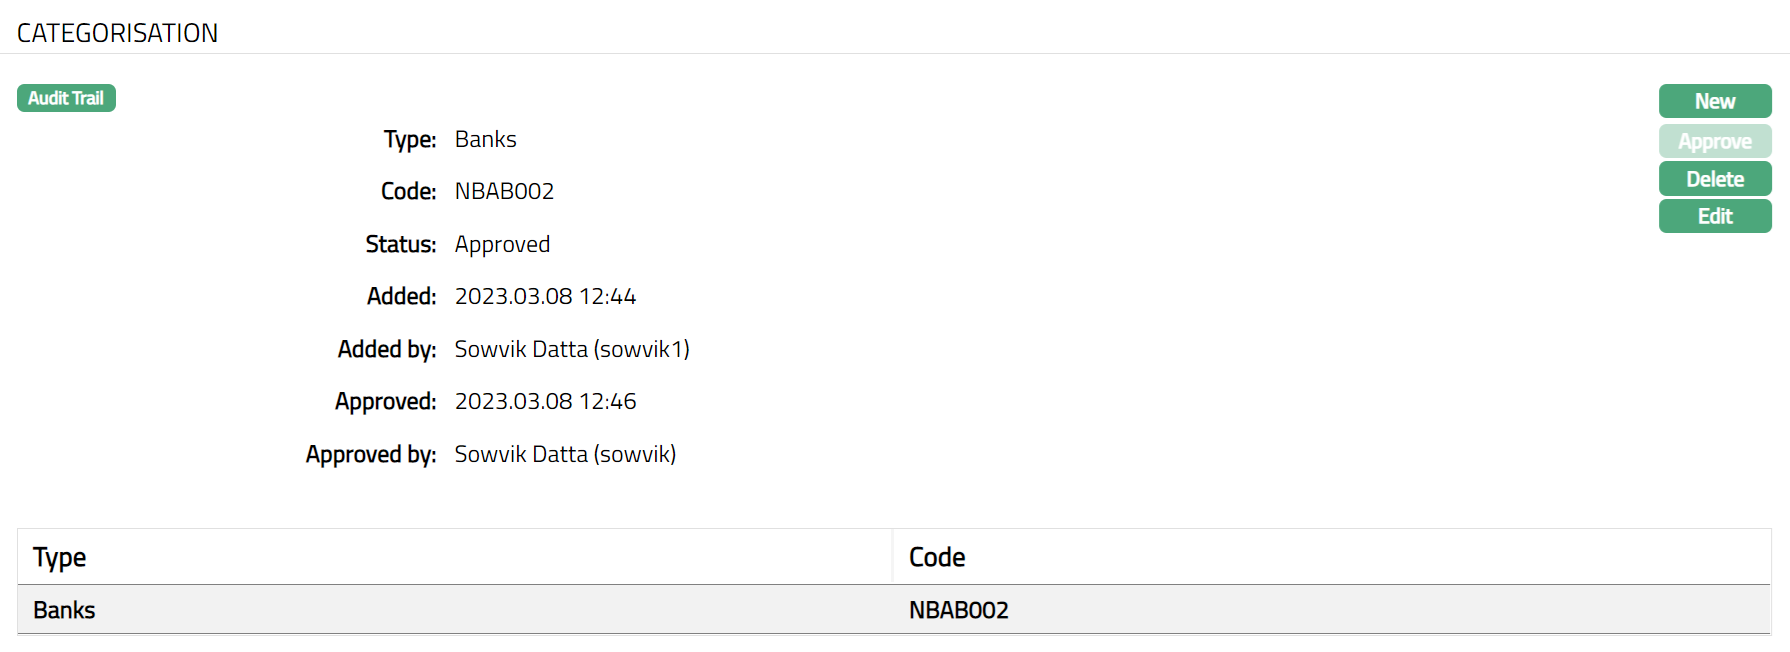
Functions: New, Approve, Edit, Delete
Delete: Click on the Delete button to delete the categorisation record. On click, Aura will ask for confirmation based on which the record will be deleted.
Approve: A categorisation record has to be approved by any user other than the one who had created / edited the record.
Charge
The Charge tab allows you to maintain the details of different charges applicable for the Loan Account and the account from which the charge amount has to be debited.
The Sub tabs available in the Charge tab are:
Default Charge
The Default Charges tab allows you to view and maintain the details of different charges applicable for the Loan Account.
To View/Edit the Charges,
1. Access Loan Account page. Click Charge tab to view the details as per sample below. The details are defaulted from Product → Charges based on the Product that you chose for the account during creation.
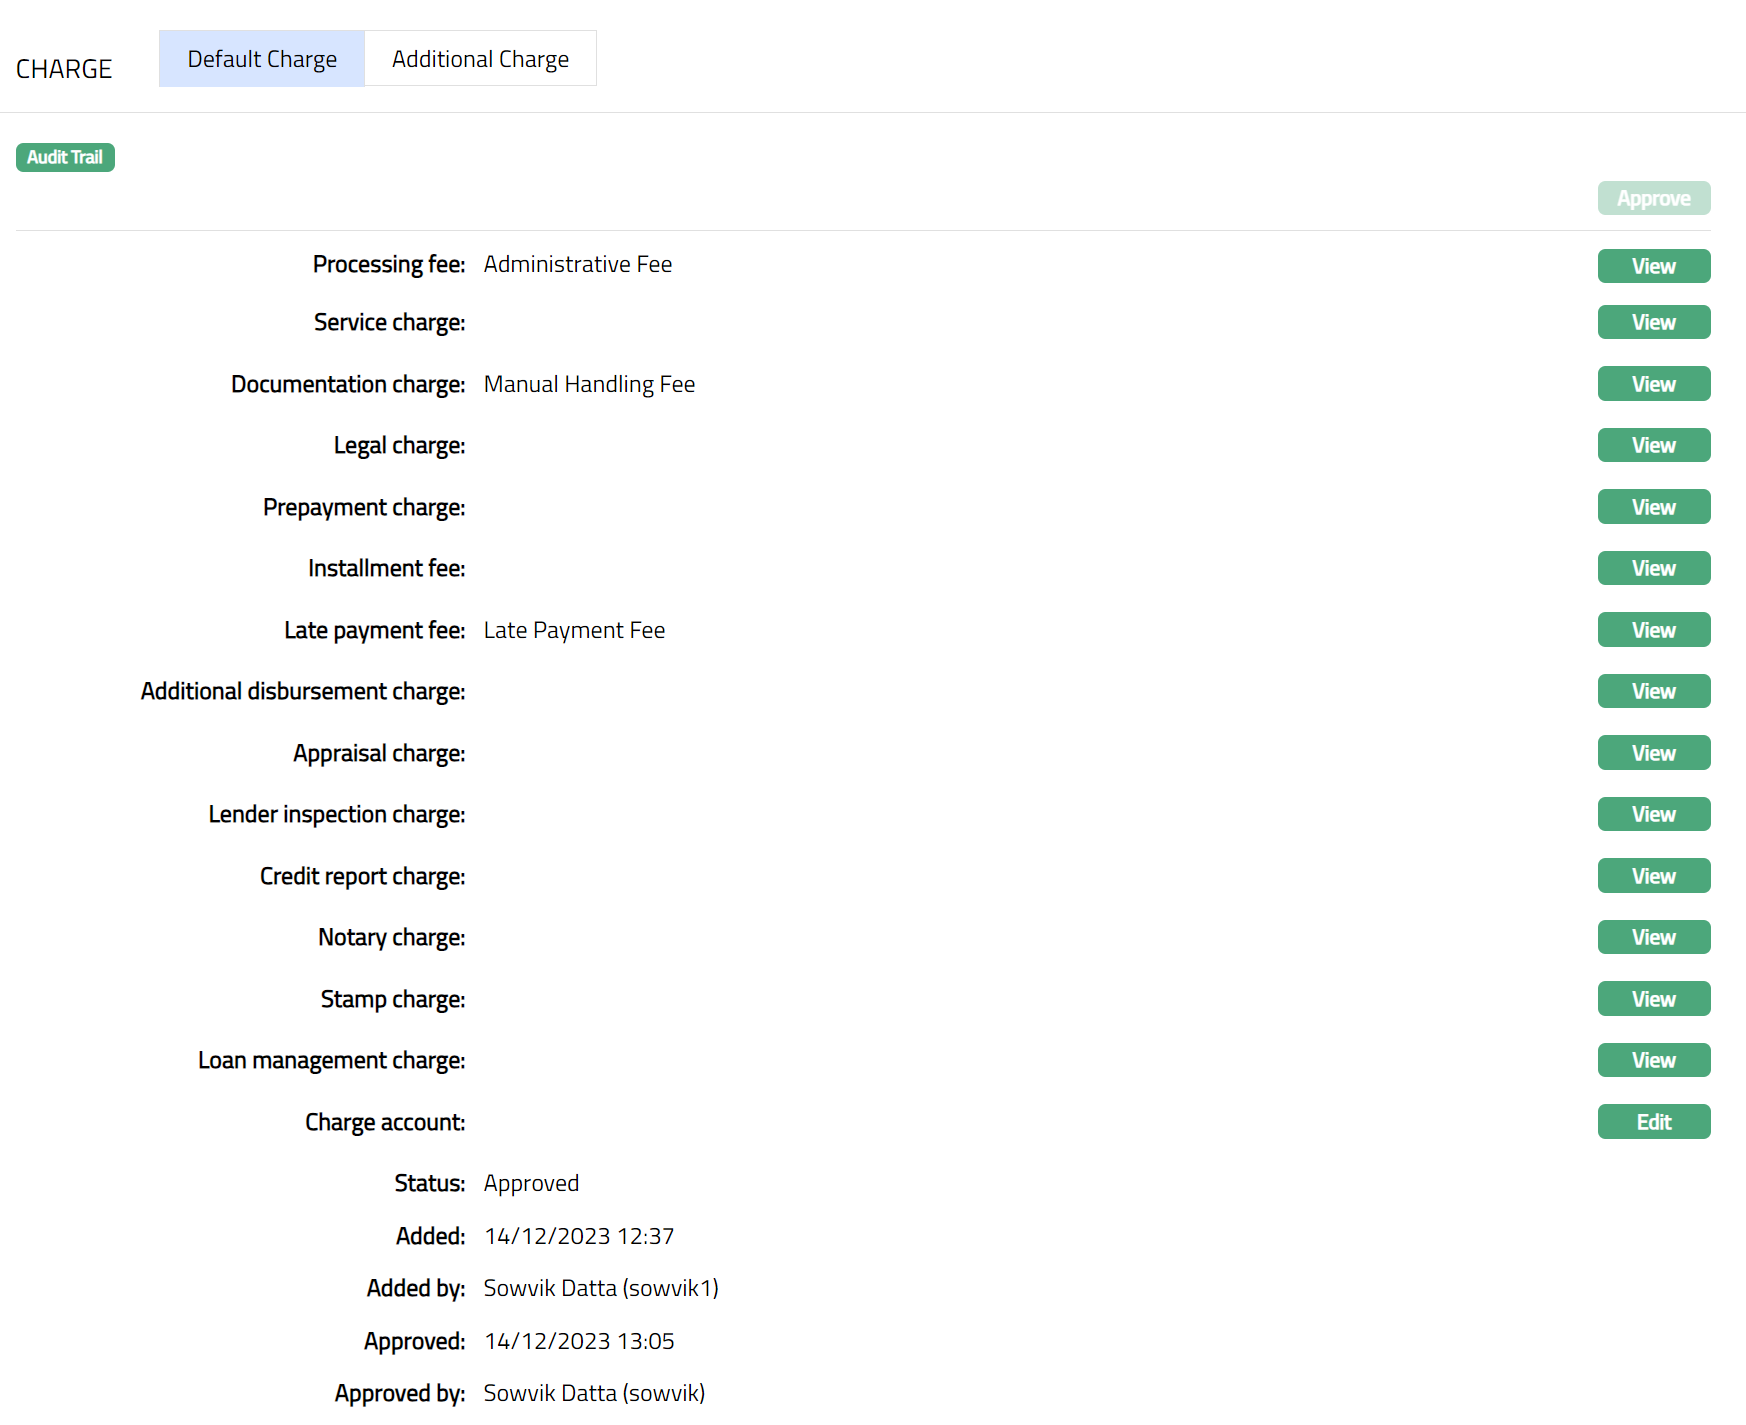
The additional fields that you can view in the tab are explained below:
Status field denotes the status of the tab.
Added field denotes the date on which the record was added.
Added by field denotes the name of the user who created the record.
Approved field denotes date on which the record was approved and is displayed on approval.
Approved by field denotes name of the user who approved the record and is displayed on approval.
2. To edit Charge account, click Edit. Edit Charge page appears.
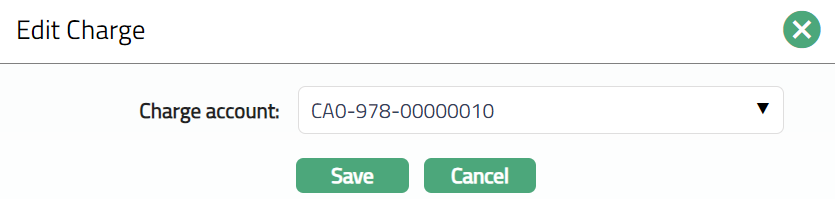
3. Select Charge account from the available drop-down list, from which all the above to charges will be debited. The Charge account must be an activated current account with the attribute Disallowed debit as No.
4. Click Save. Default Charge page appears with the edited details. Sample screen shot shown below.
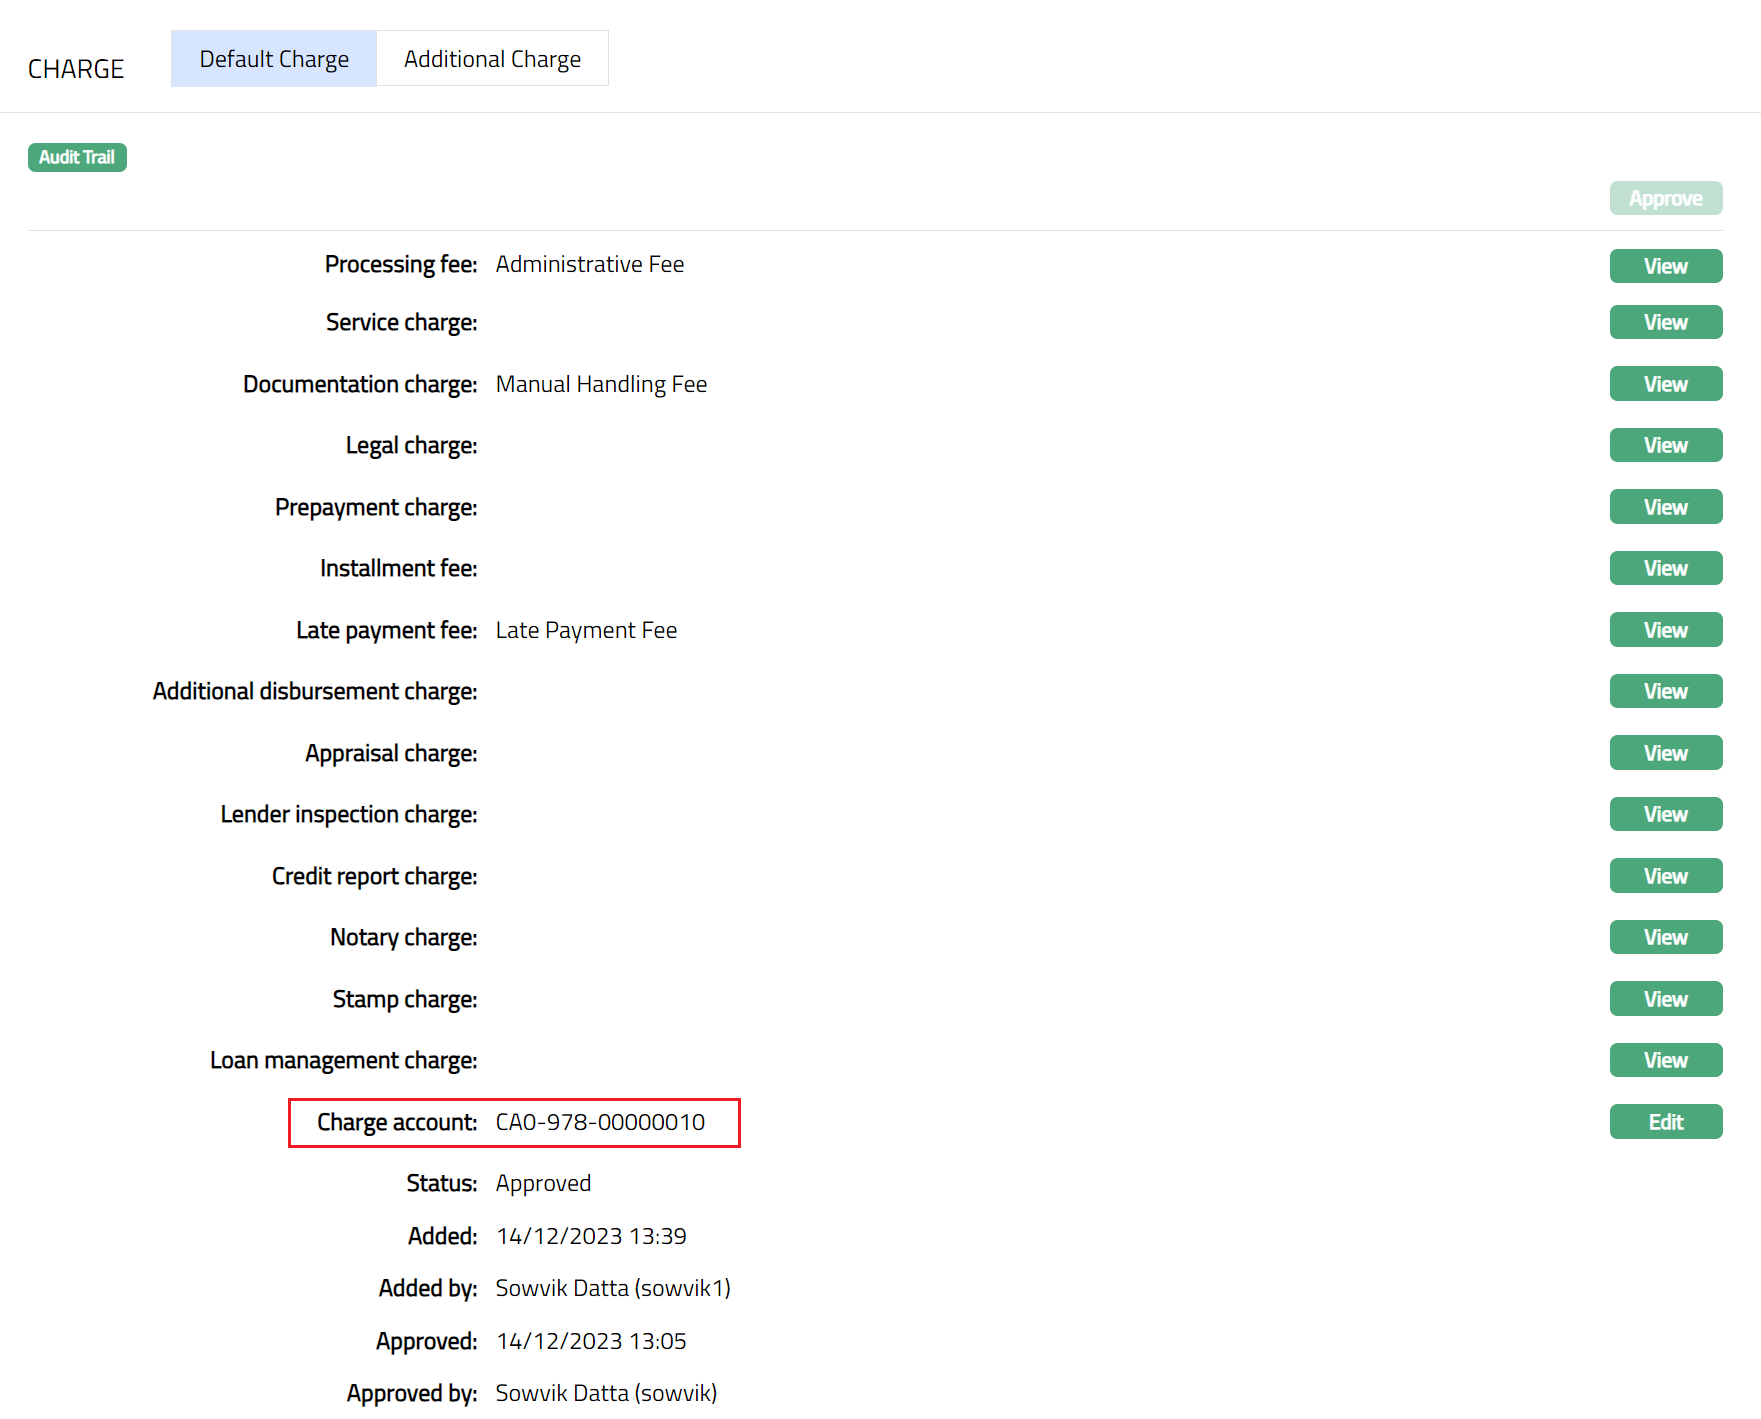
Function: Edit
Note:
Processing of charges will be based on Charge account and Repay through option.
If Charge account is not defined & Repay through = Own Account, then Aura will debit the charges from Own account at the time of disbursement
If Charge account is not defined & Repay through is not Own Account, then charges will not settle at the time of disbursement.
The payment schedule will display corresponding charge amount with due date as next schedule date.
If charge account is defined, then Aura will debit charges from Charge account at the time of disbursement.
To View/Edit other charges,
1. Click View button. Page along with the details of that particular charge which you wanted to view will appear.
Note: You need to view and edit each charge separately as required.
Sample screen shot shown above.
2. Click Edit. Edit Charge page appears.
3. Sellect Service Charge from the available drop-down list of charges as required.
4. Select Modify charge if you wish to modify the charge at a later stage.
5. Click Save. Selected charge gets added for the Service charge.
Sample screen shown below.
Functions: Edit
Note: There are two Edit buttons. The first Edit button is used to edit the charge which you have selected by clicking the view button. In this case Service charge. Sample screen shown above. The second edit button is used to edit the charge amount for the selected charge. In this case Flat charge. Sample screen shown below. Also if the charge is banded, the charge amount will be calculated on the basis of the amount sanctioned.
To edit Flat charge,
1. Click Edit. Edit Flat Charge page appears.
2. Enter the Flat charge as required.
3. Click Save. Flat Charge page appears with the edited details.

Functions: Edit, Finish
4. Click Finish. Default charge page appears with the edited details with Status set to Pending.
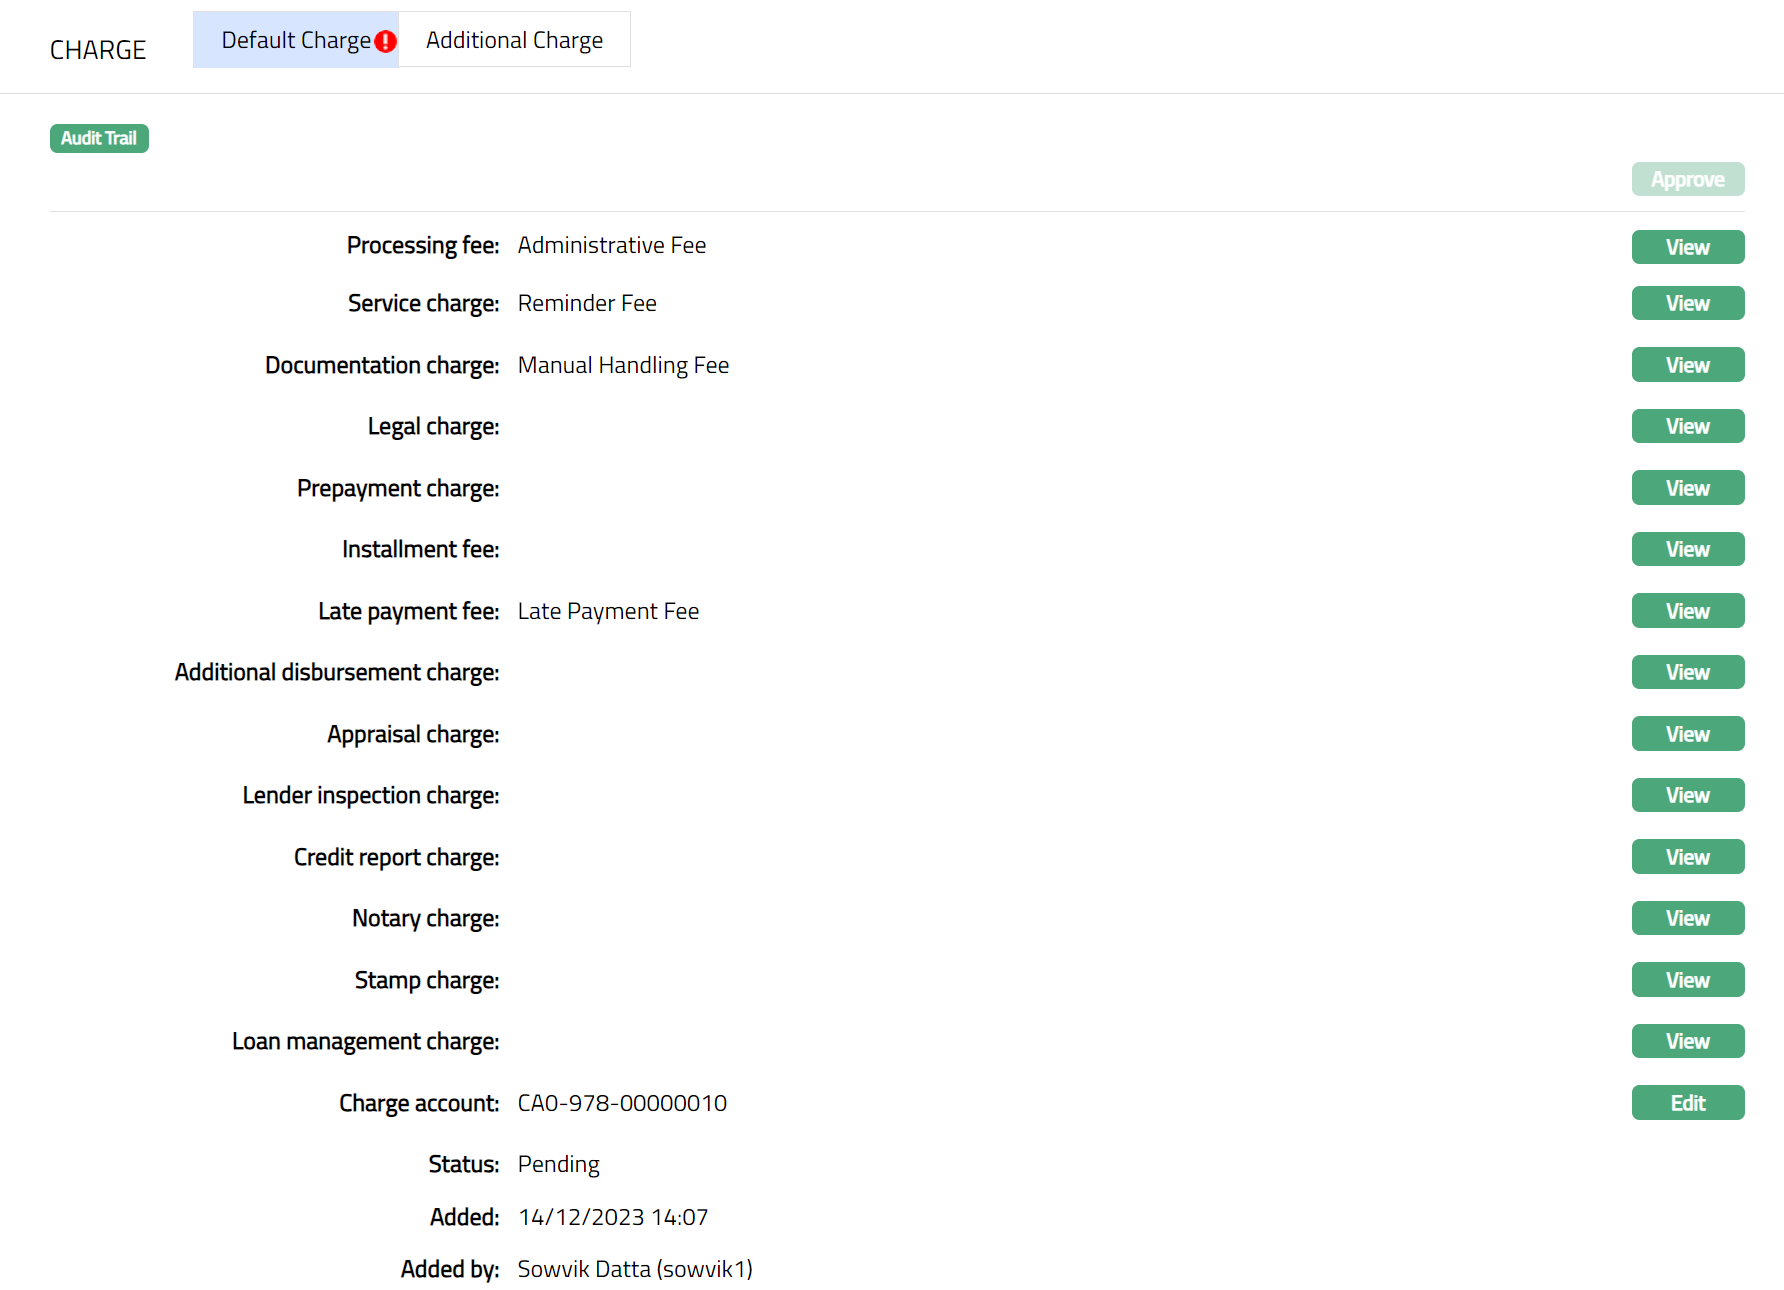
Note: Any change in the tab will set the tab status to Pending till it is approved by another user. On approval, the tab status is set to Approved. Also, once the default Charge status is Approved, the amount mentioned against each added charges will be deducted from the selected Charge account.
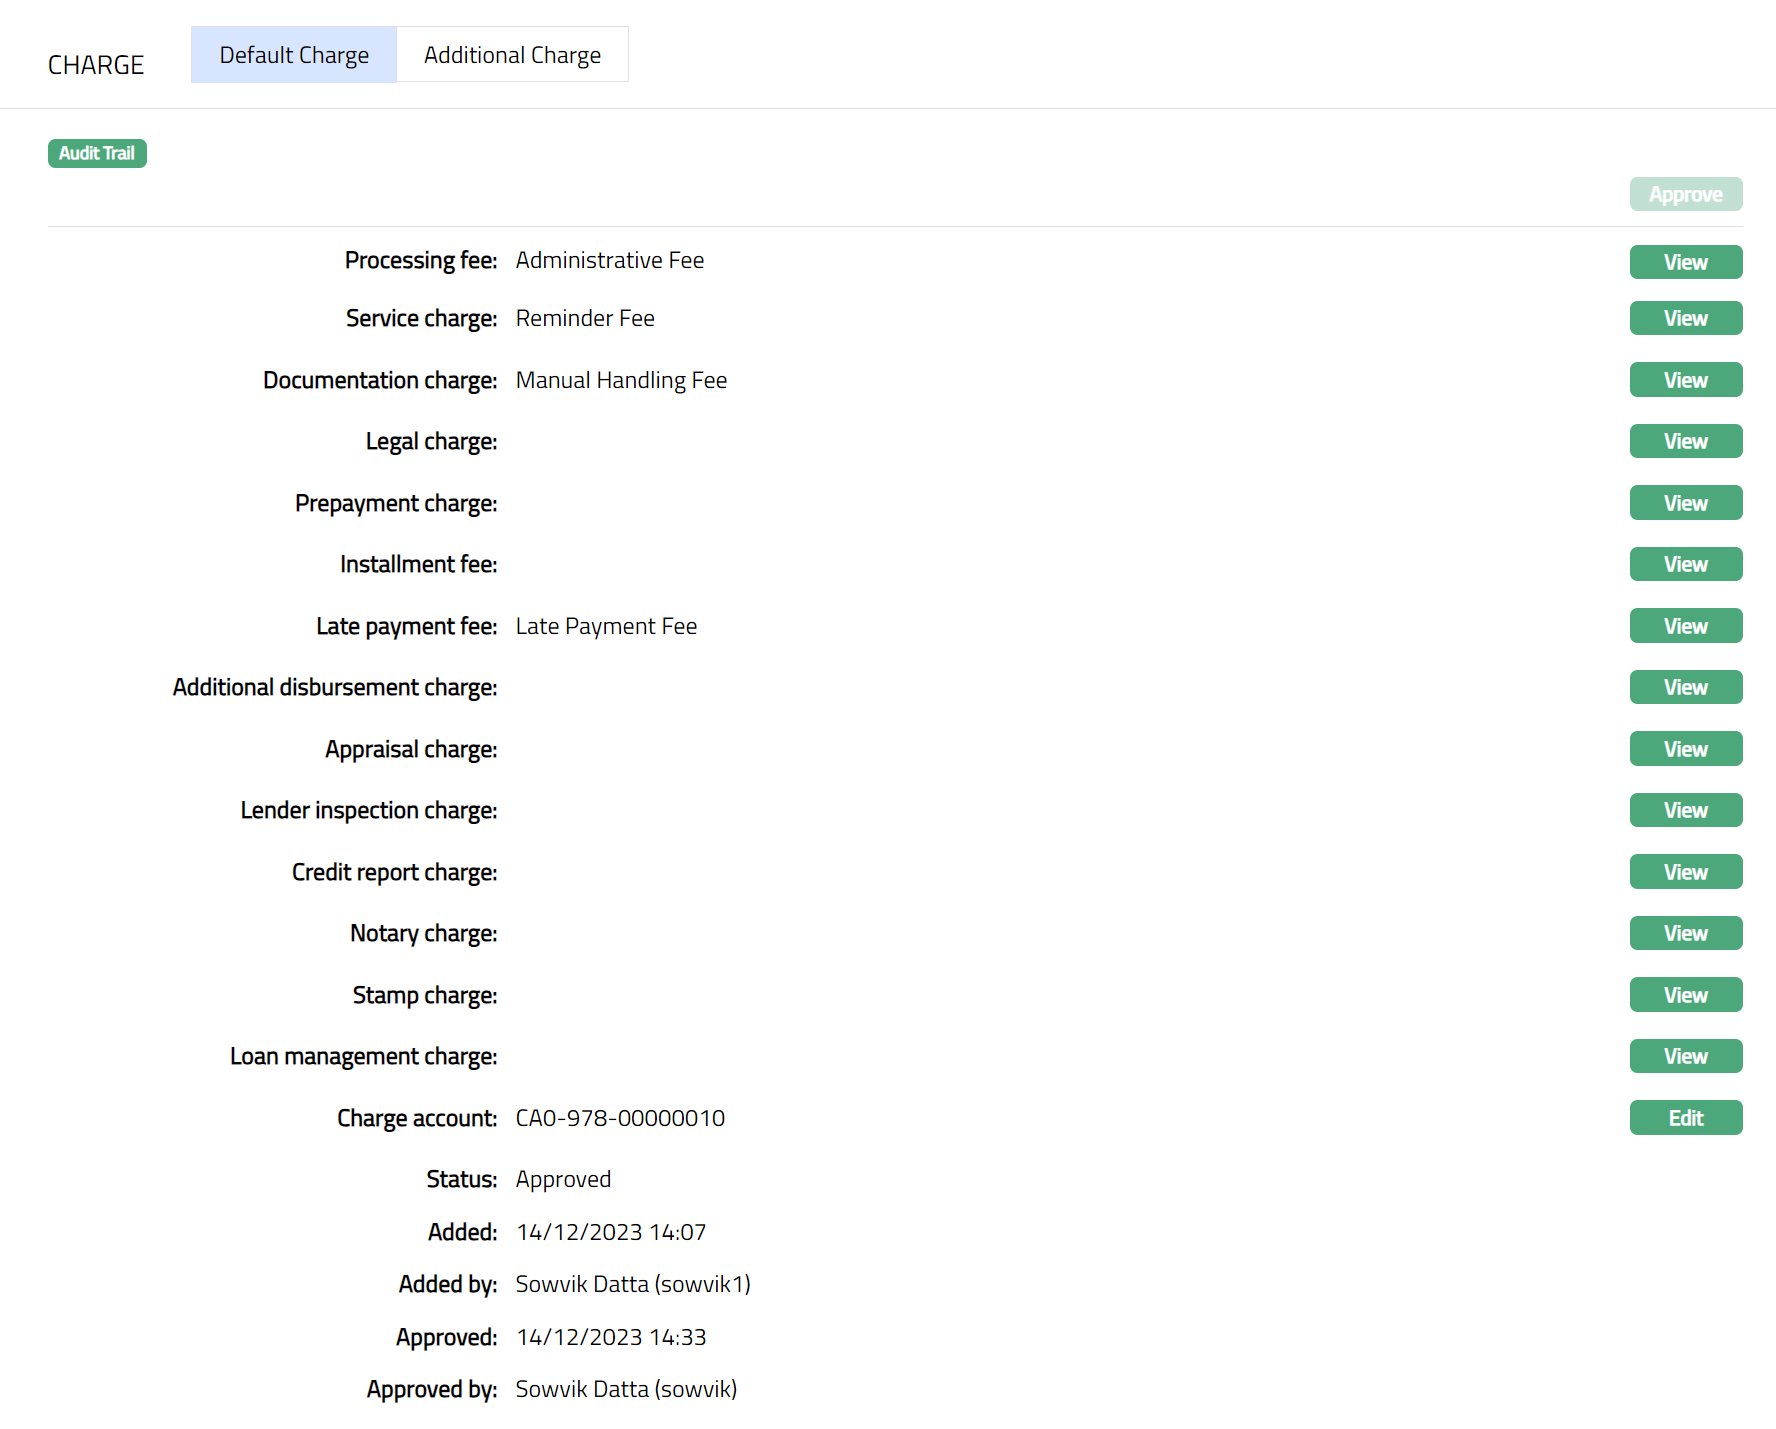
Functions: Approve, View, Edit
Additional Charge
The Additional Charge tab allows you to add, view and maintain periodic charges for the Loan Account.
To Add a charge,
1. Access Loan Account page. Click Charge tab and then Additional charge tab to view the details as per sample below. On creation of Account, if there are any additional charges maintained at the Product level - the details are defaulted from Product → Additional Charge based on the Product that you chose for the account during creation.
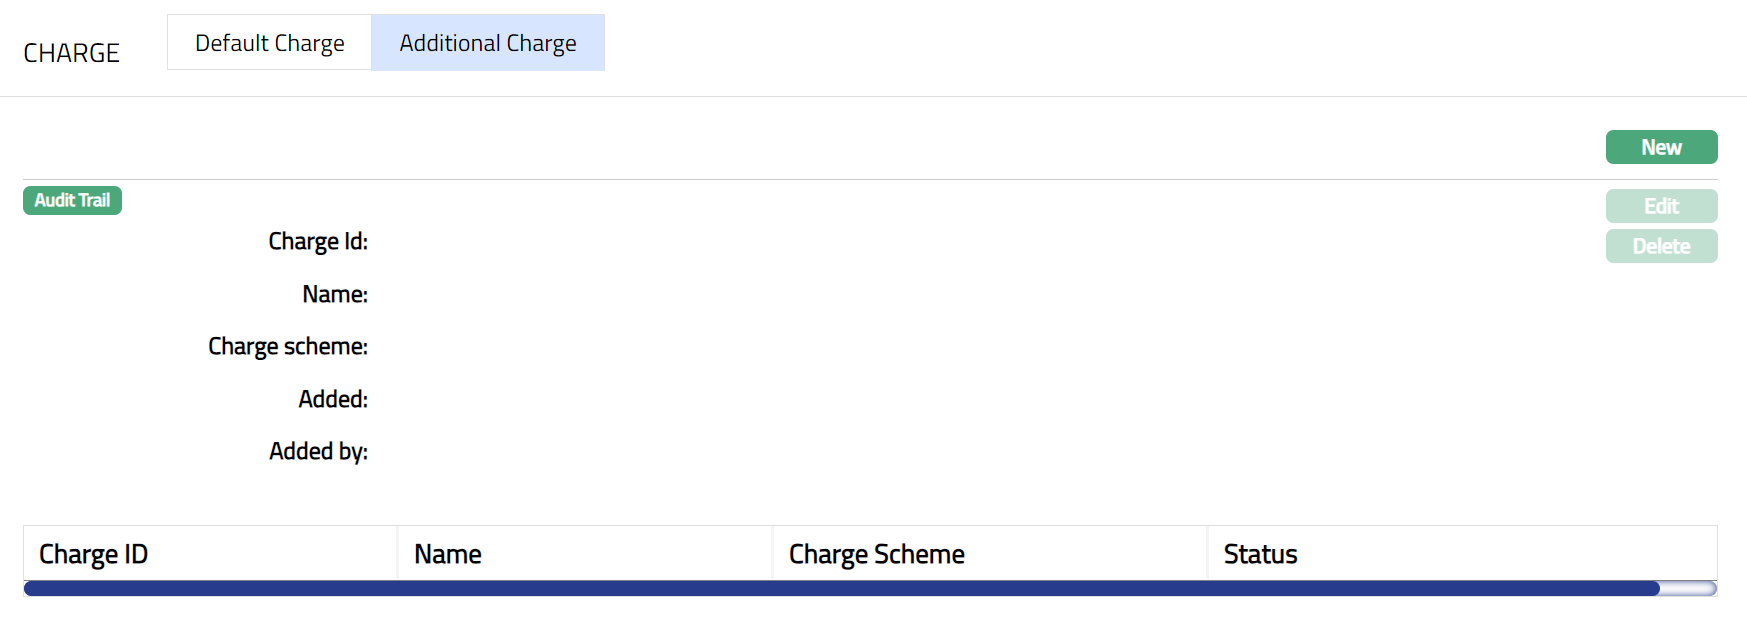
2. Click New. New Additional Charge page appears.
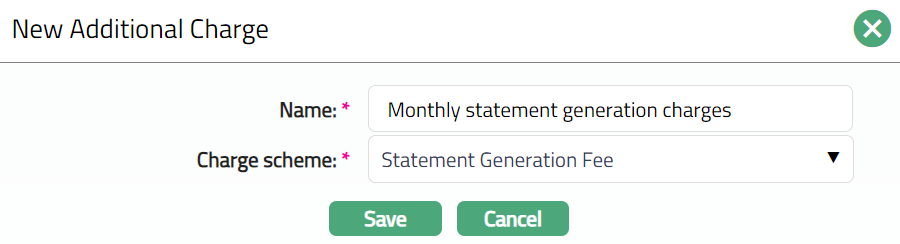
3. Enter charge Name.
4. Select Charge scheme from the drop-down list of Periodic flat or banded charges maintained at Admin → Pricing → Charge → Charges. If the Charge is Banded, the charge amount will be calculated on the basis of the amount sanctioned.
5. Click Save. Additional charge page appears with the added details.
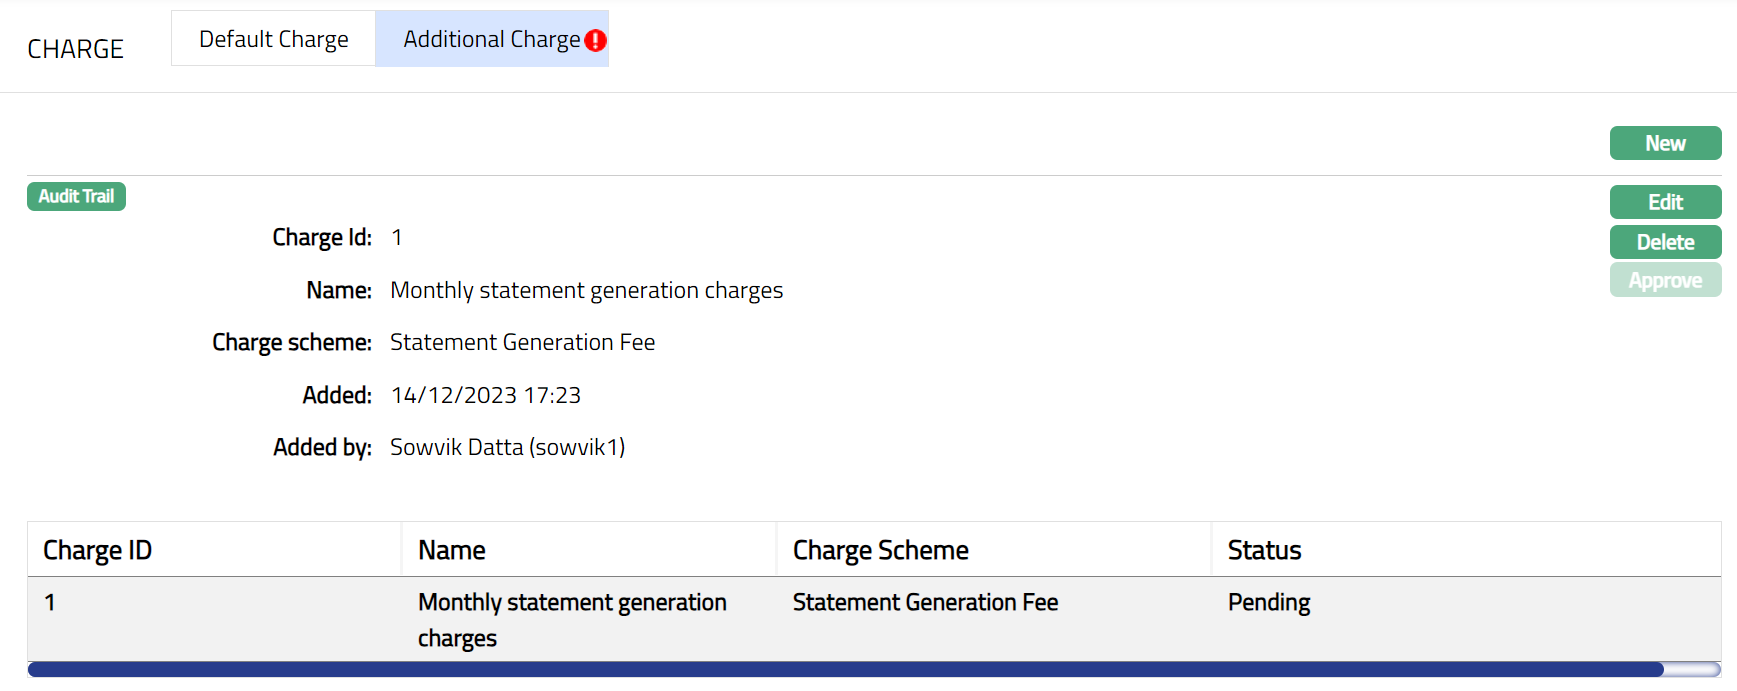
Note: Any change in the tab will set the tab status to Pending till it is approved by another user. On approval, the tab status is set to Approved and the red bubble disappears.
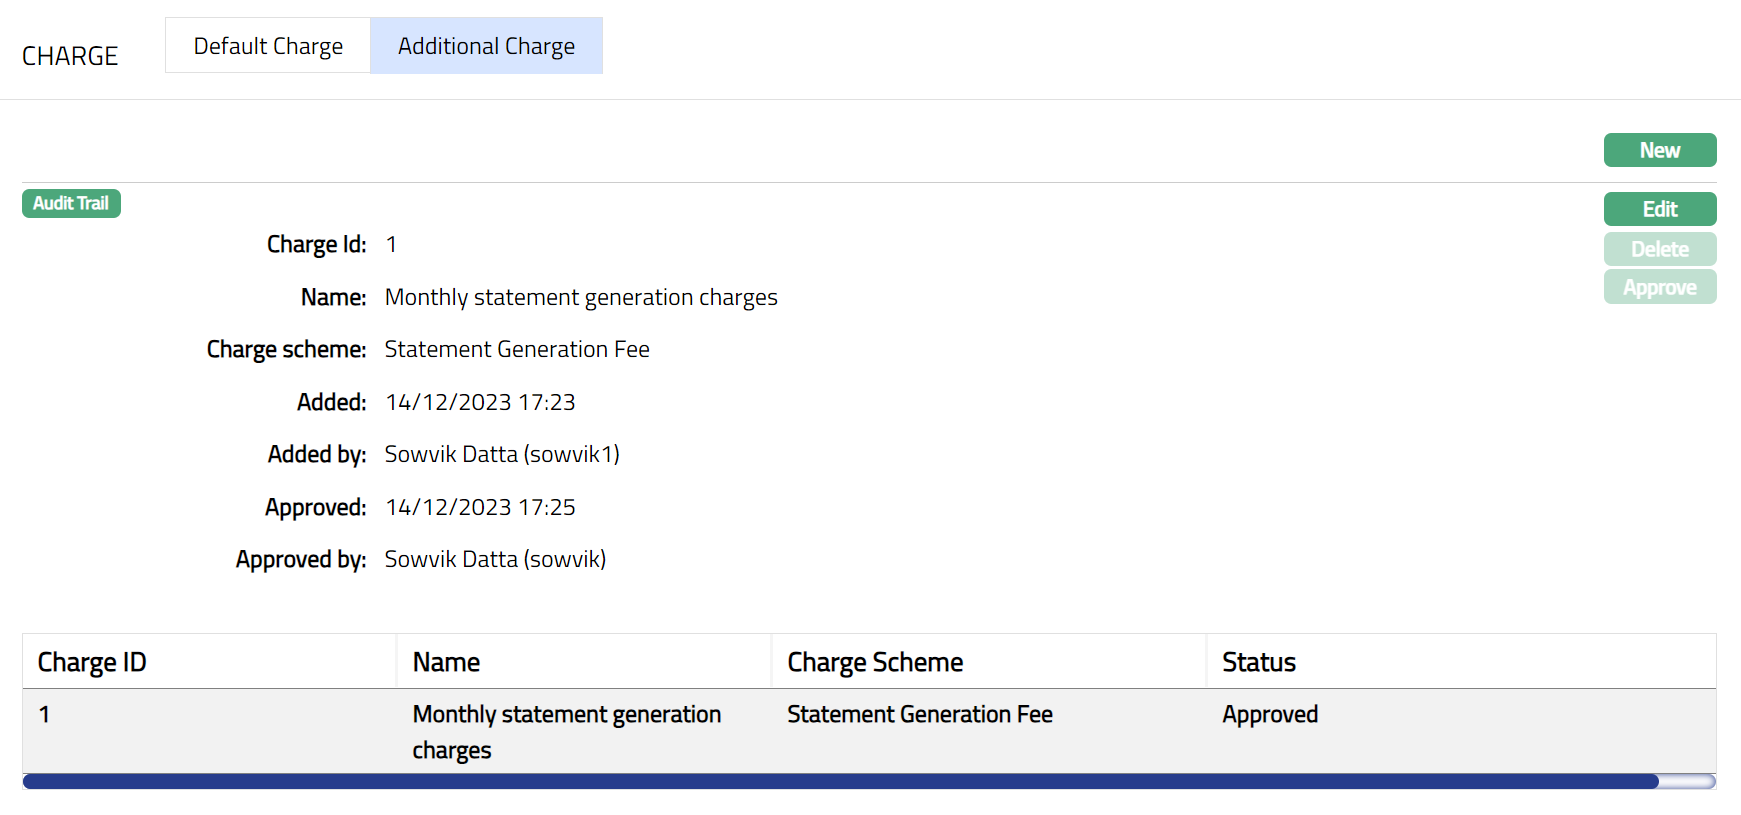
Functions: New, Edit, Delete, Approve
Note: Similarly, you can add as many Additional charges as required.
Sample Screen shot shown below.
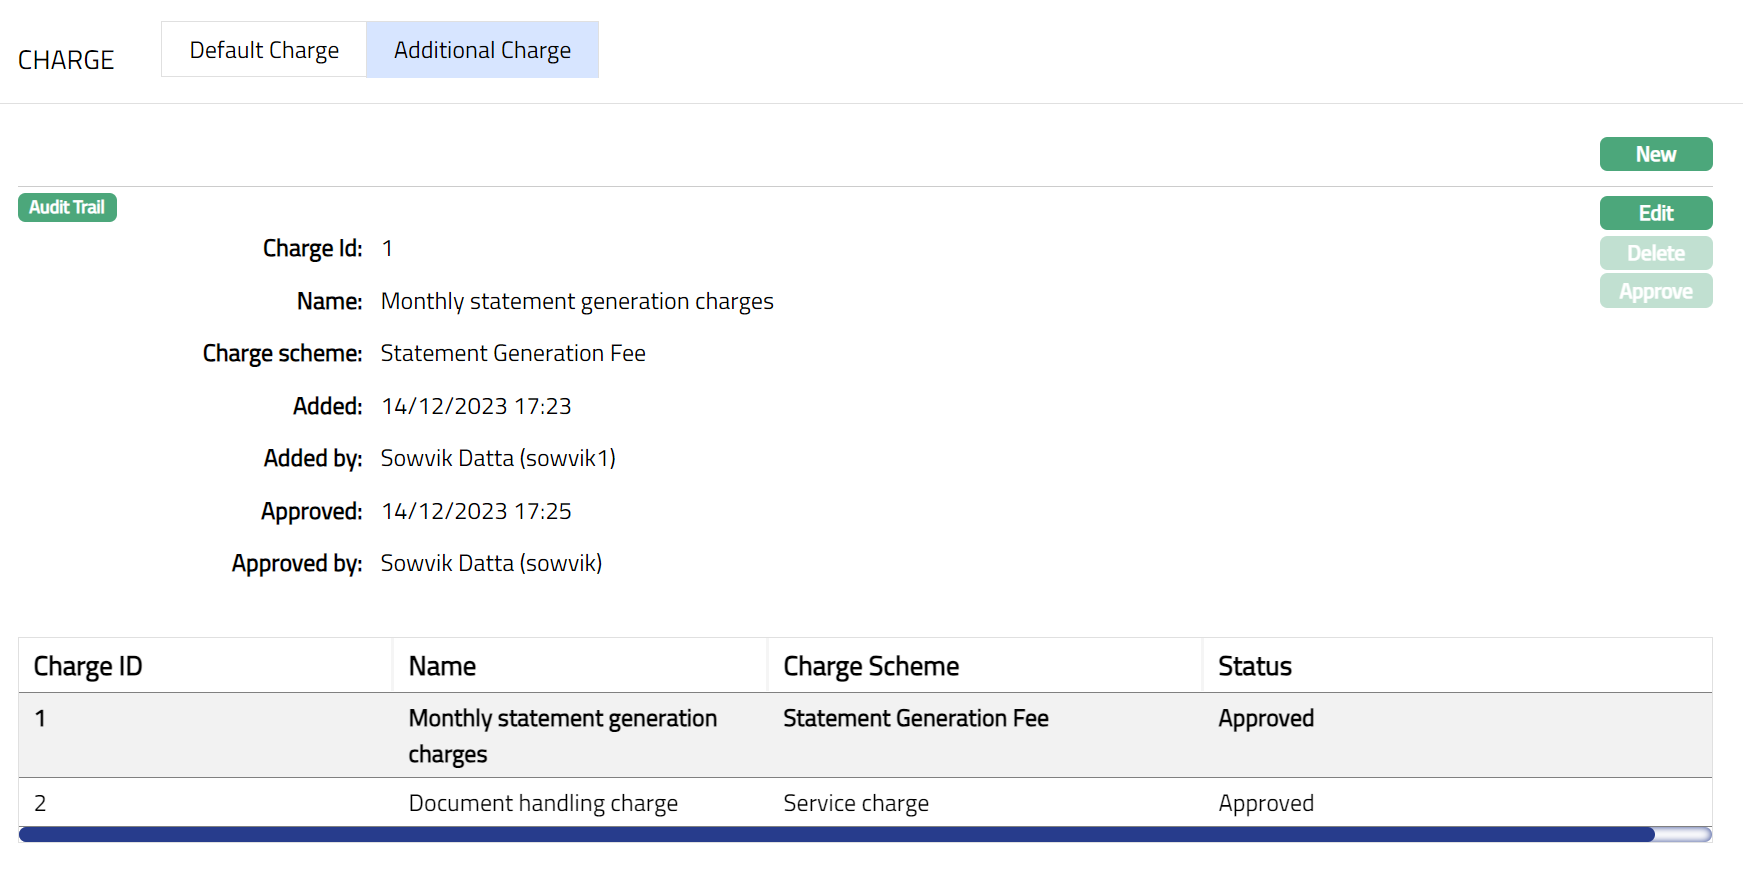
The following fields are shown in the View screen:
Charge Id field denotes the unique sequential charge id generated at the Account level for the additional charges.
Name field denotes the name of the additional charge.
Charge Scheme field denotes the name of the charge scheme mapped to the additional charge.
Status field denotes the status of the record.
Added field denotes the date on which the record was added.
Added by field denotes the name of the user who created the record.
Approved field denotes date on which the record was approved and is displayed only for approved records.
Approved by field denotes name of the user who approved the record and is displayed only for approved records.
To edit Additional Charge,
1. Select the charge from the list of available charges which you want to edit.
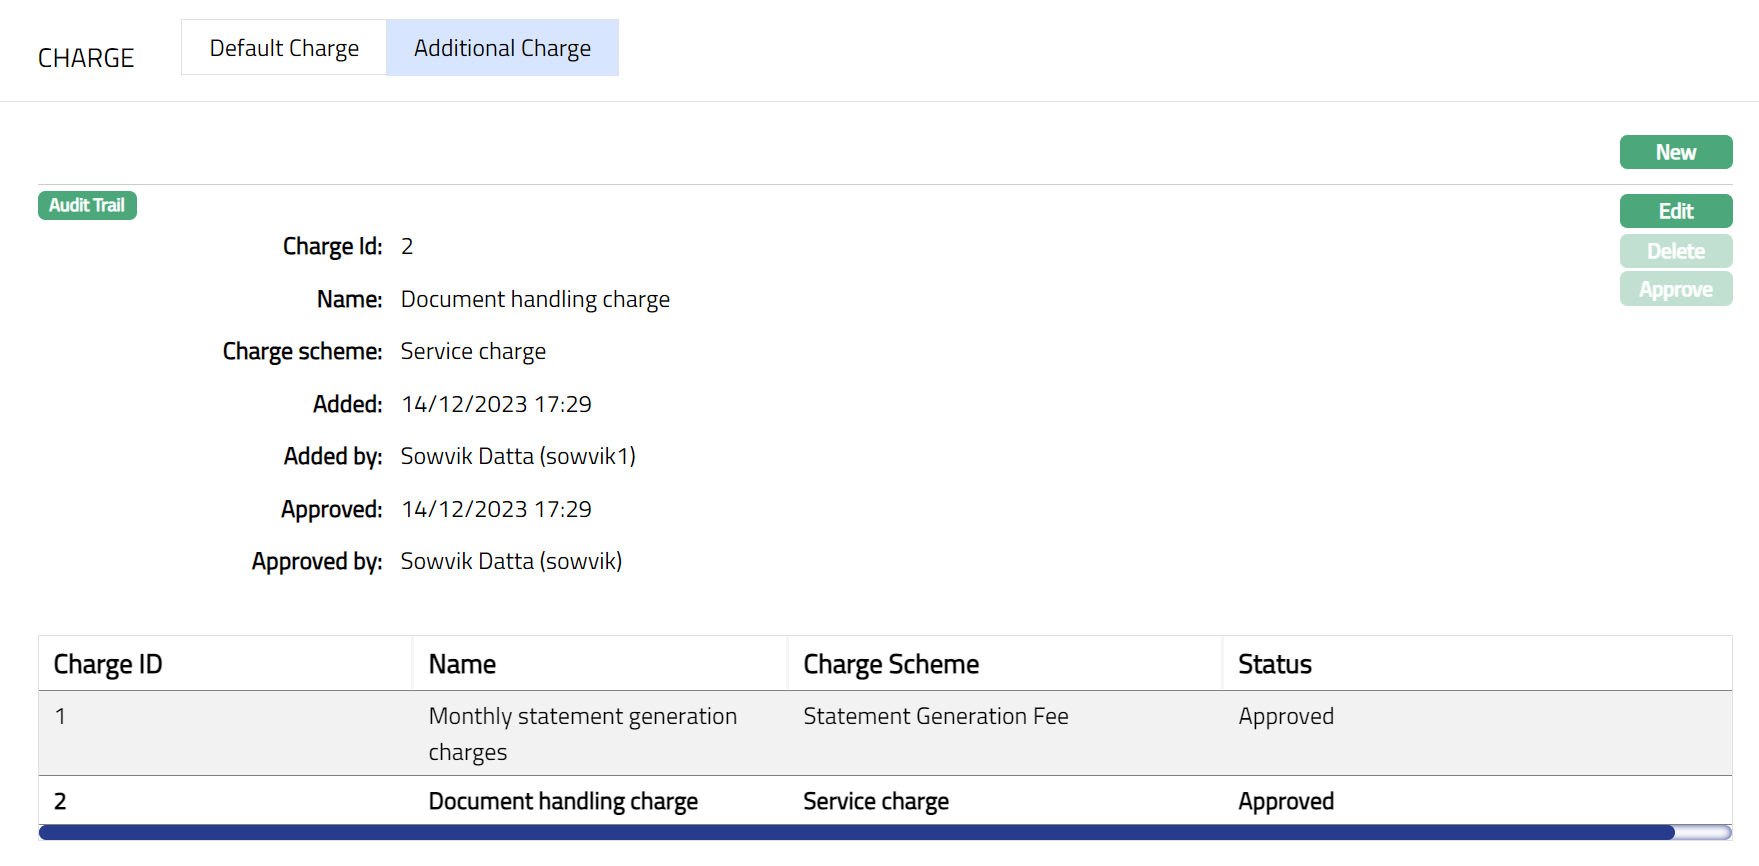
2. Click Edit. Edit Additional Charge page appears.
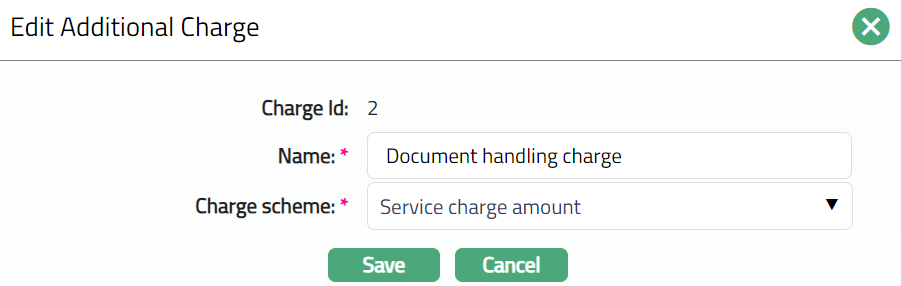
Note: Except Charge Id field all other fields are editable.
3. Click Save. Additional Charge page appears with the edited details.
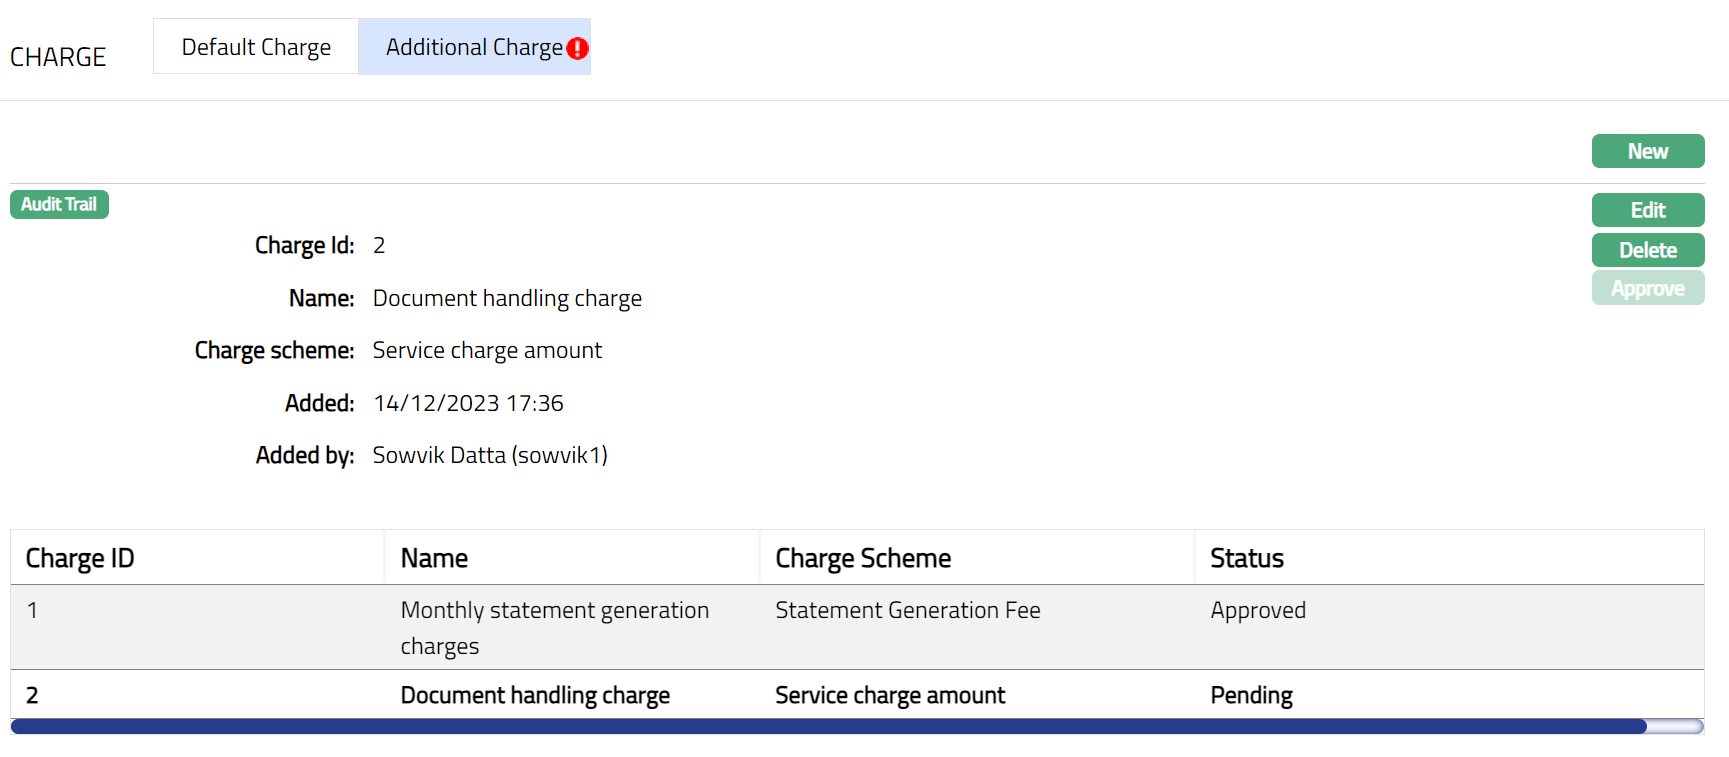
Functions: New, Edit, Delete, Approve
Note: Any change in the tab will set the tab status to Pending till it is approved by another user. On approval, the tab status is set to Approved and the red bubble disappears. Also, once the Additional Charge status is Approved, the amount mentioned against each added charges will be deducted from the selected Charge account.
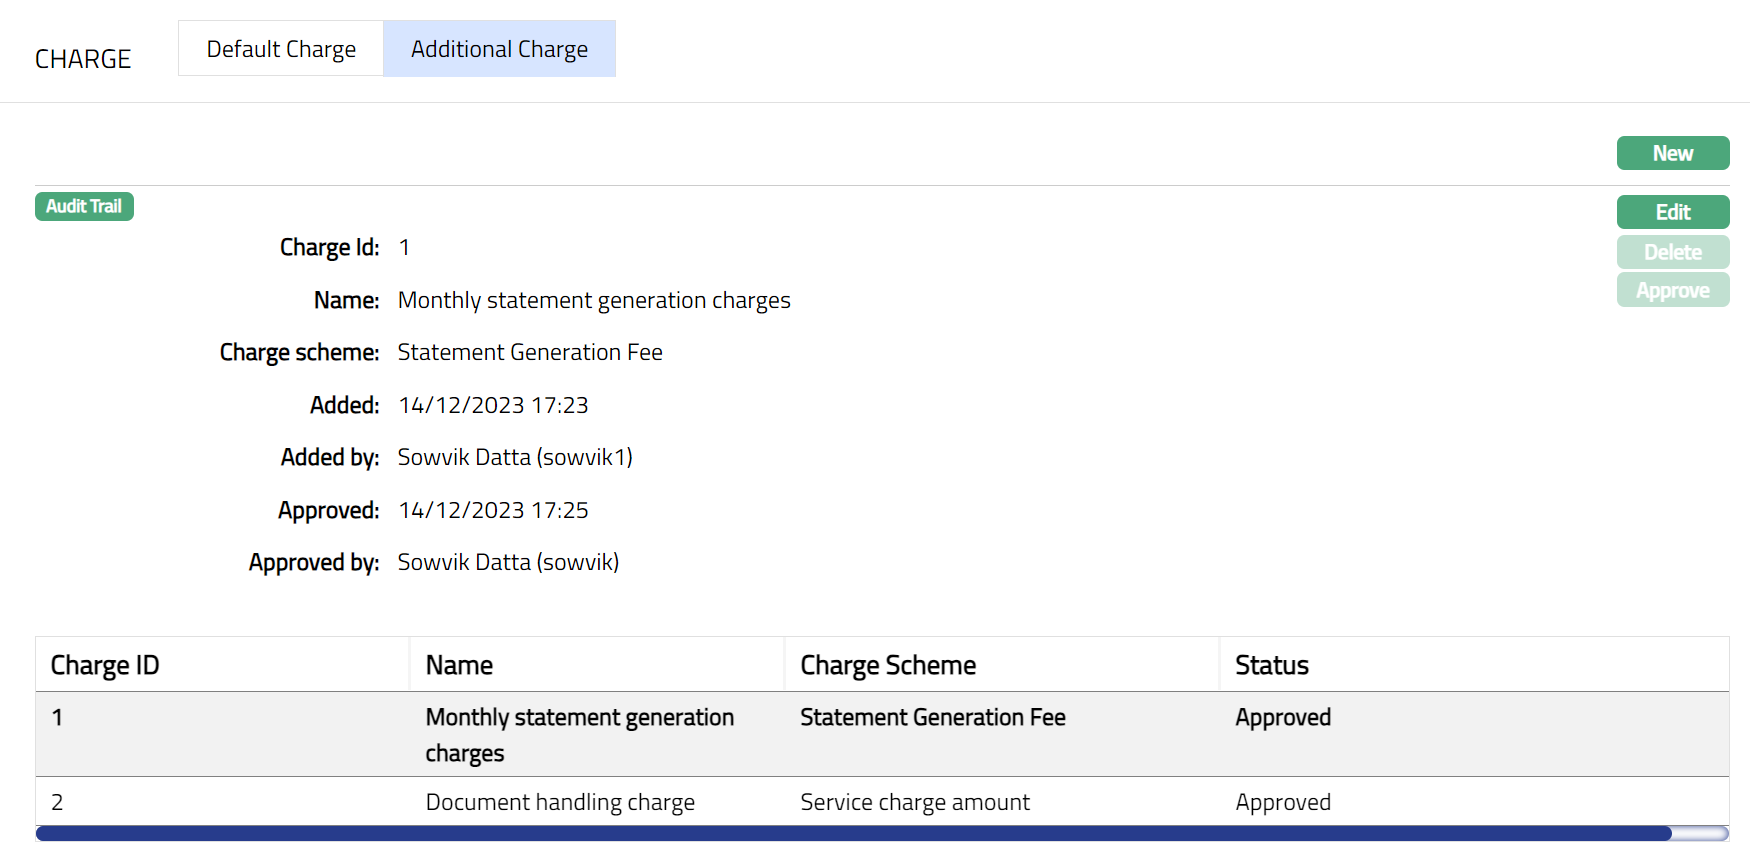
Functions: New, Edit, Delete, Approve
Delete : You can delete an Additional Charge record by a click on Delete button. Aura will ask for confirmation, on approving which the selected record will be deleted. Once the record is approved, it cannot be deleted.
Communication
Communication tab allows you to maintain preferences and recipients for Notifications on this account as well as to view all notifications related to account.
Following are the sub tabs under Communication.
Preferences
Preferences sub-tab shows the basic details of the Communication preferences for this account.
To view / edit Preferences,
1. Access Loan Account page, click Communication tab, then click Preferences sub-tab. On creation of Account, by default, Suspend dunning process outputs, Suspend transaction notifications and Suspend event notifications will be set to No. Notification mode will be set to Email and SMS.
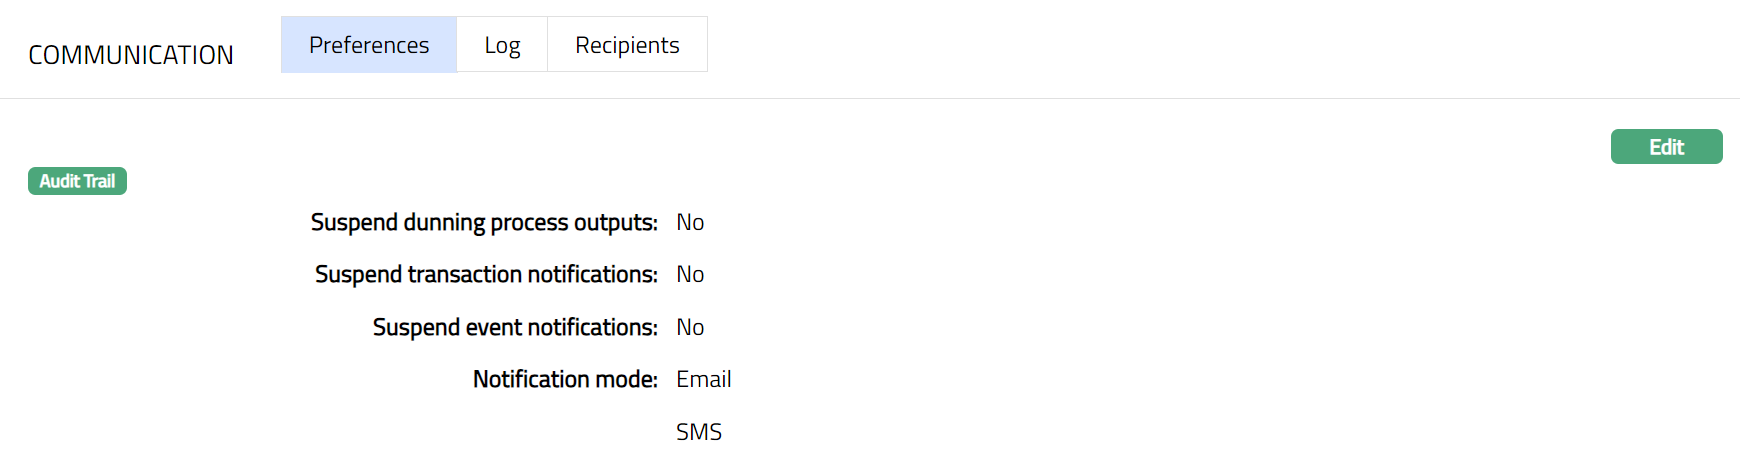
2. Click Edit. Edit Communication Preferences page will be displayed.
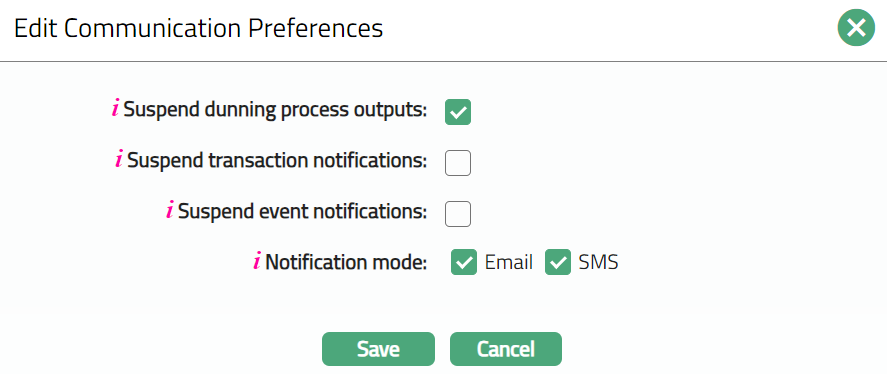
3. If you want to temporarily stop the Dunning Process outputs for this account, select check box for Suspend dunning process outputs. All dunning process outputs like Invoice, Reminders, etc., for the Loan Account will be stopped.
4. If you want to temporarily stop the Transaction Notifications for this account, select check box for Suspend transaction notifications. All notifications based on Admin → Notifications → Notification Settings → Maintain where Notification Trigger = Transaction will be suspended.
5. If you want to temporarily stop the Event Notifications for this account, select check box for Suspend event notifications. All notifications based on Admin → Notifications → Notification Settings → Maintain where Notification Trigger = Event will be suspended.
6. Select required check boxes for Notification mode.
Note: Please ensure that the Mode selected here is also available in the relevant Notification Configuration; else, Notifications will not be sent.
7. Click Save. Preferences page will appear with the edited details.
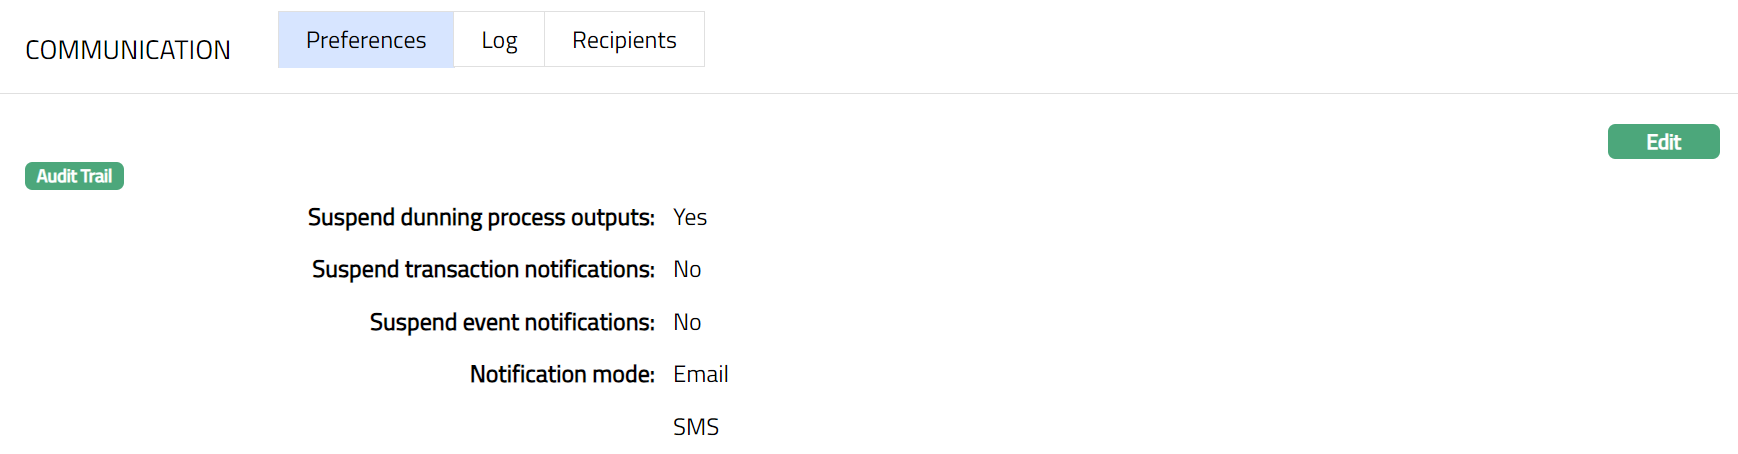
Function: Edit
Log
Log sub-tab, which is the default sub-tab, shows the details of all the Communications sent related to this Account.
To view Log,
1. Access Loan Account page, click Communication tab. Log sub-tab will be open by default. A sample of Log sub-tab is shown below.
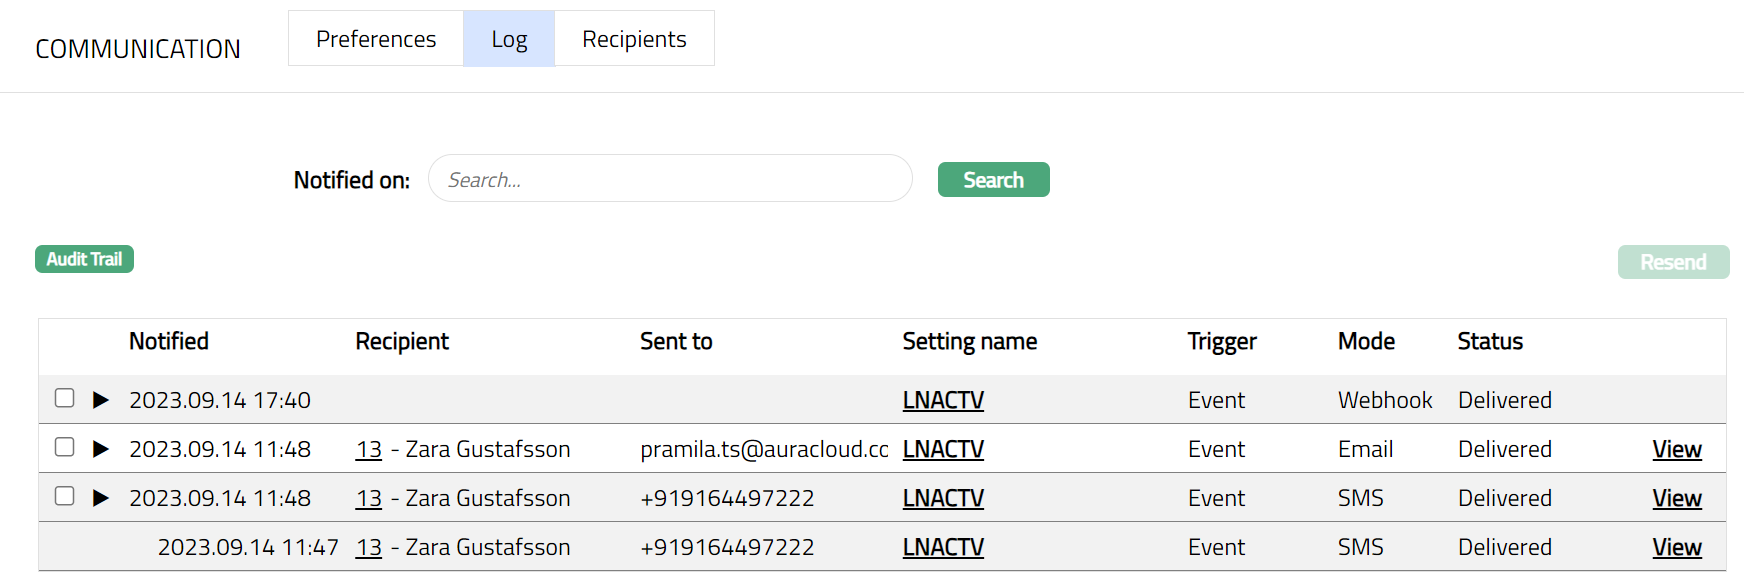
Notified on and Search: You can also find a specific log details as required by selecting a particular date. To select a date click on the empty box next to Notified on field, calender will pop up. Once you select the date click Search, the selected log details will be displayed, as shown in the sample screen below.
Resend: If the Status of the communication / Notification displays as Failed to Send or Failed to Deliver, then you can correct the underlying reason (say, incorrect email id or phone number) and try resending the communication once again by clicking on the Resend button. In such cases, the notification record will appear with the latest instance at the top; and all earlier instances will be collapsed under the same. To expand and view all the instances, you can click on the arrow button
 ; all resent communication related to Email, SMS and Webhook will be displayed.
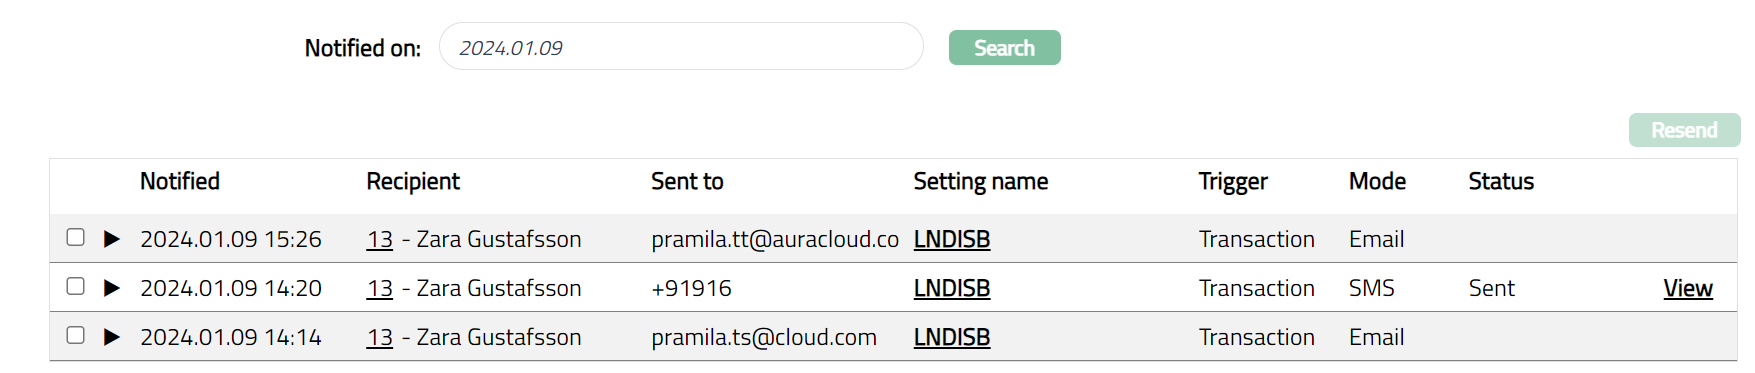
SMS
Status -- Sent & Delivered
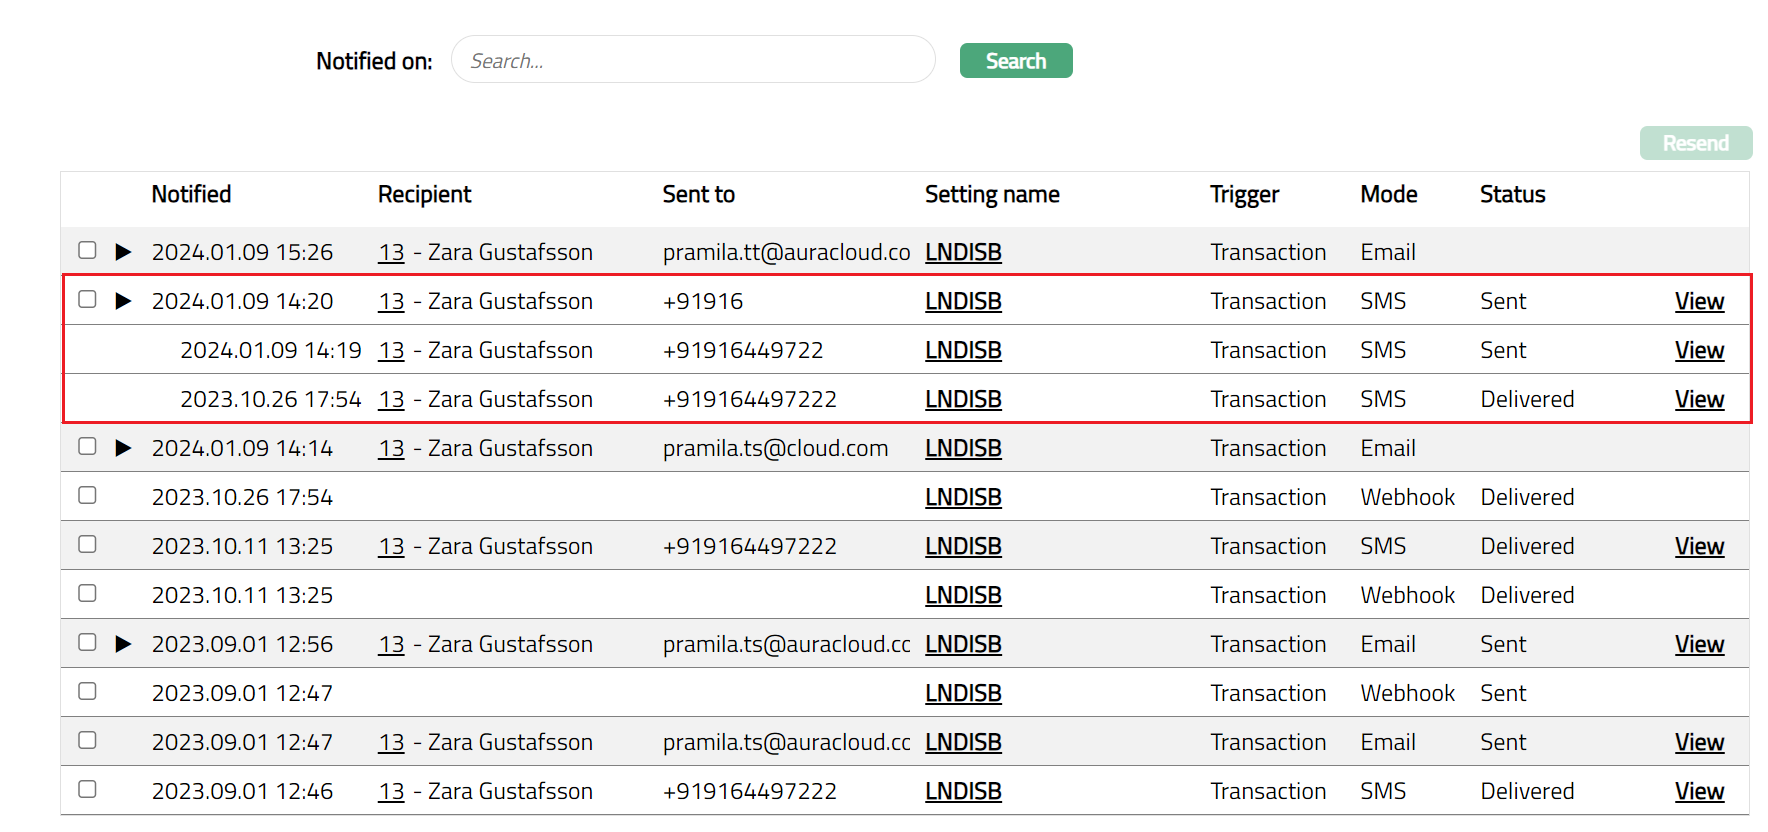
Status -- Sent & Delivered
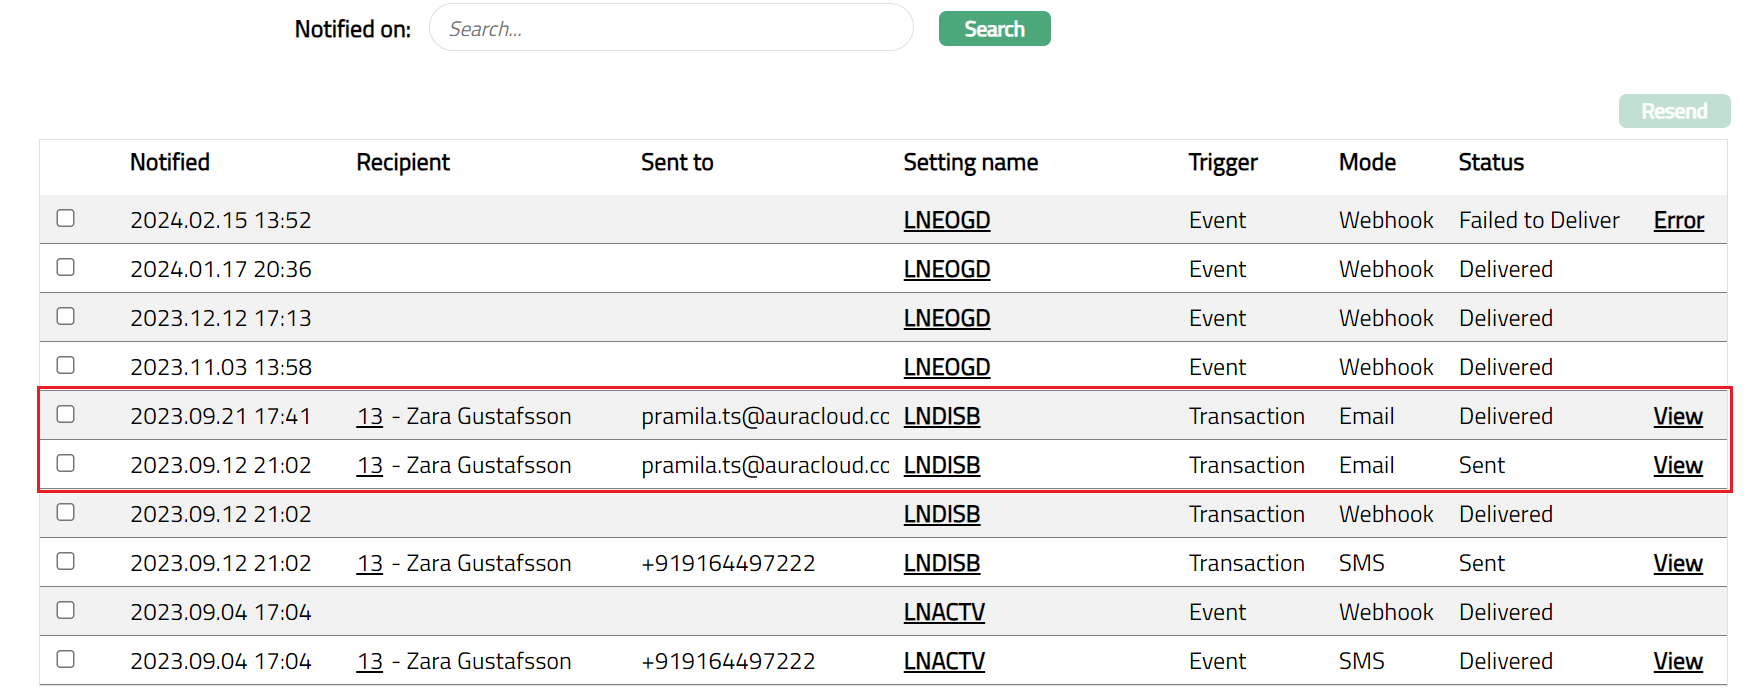
Webhook
Status -- Sent & Delivered
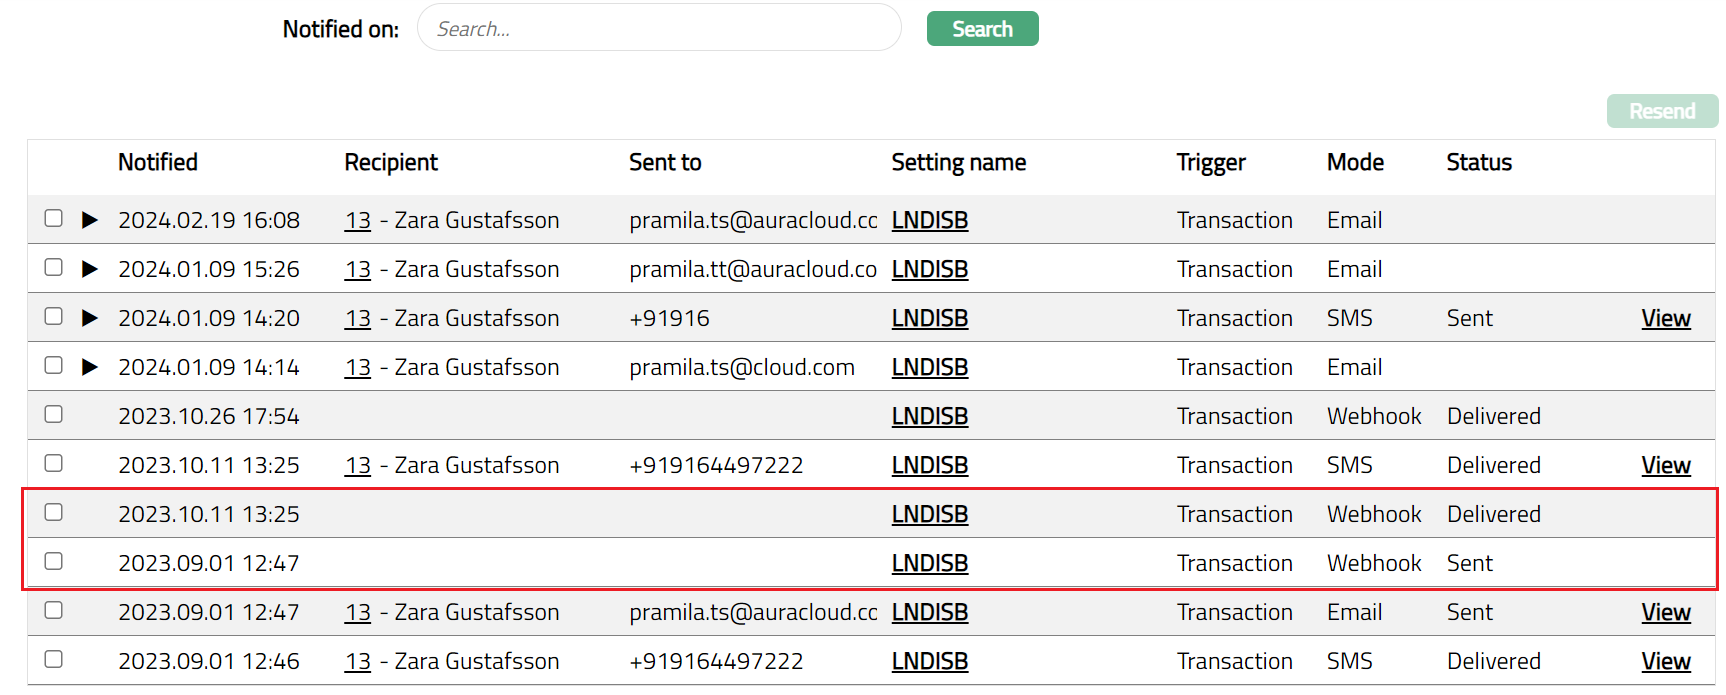
The available details of the Log are as follows:
- Notified: This field depicts exactly when i.e., the date and time the notification was sent out from Aura platform. If this is blank, the Status will be Failed to Send
- If notification Status is Failed to Send and Failed to deliver, then you can check the reason for the same by clicking on the Error hyperlink. Relevant error message will appear as shown below:
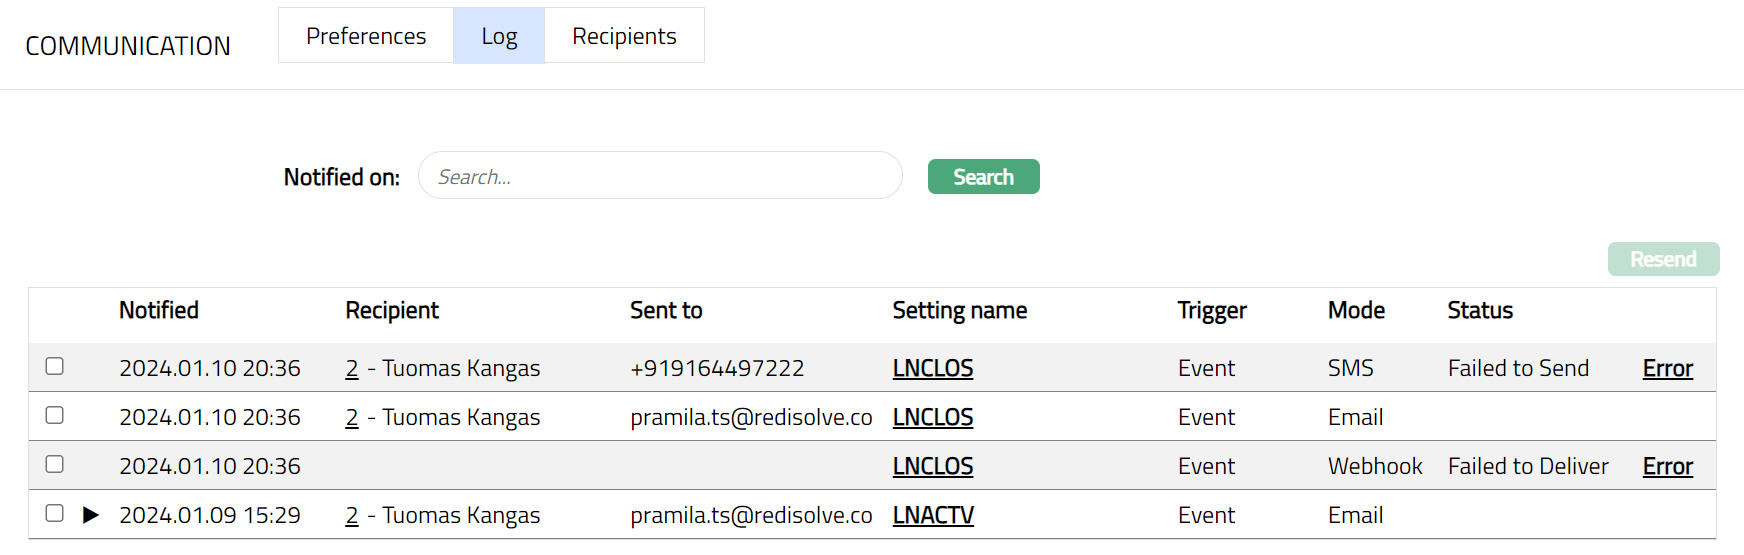

Recipient: This field displays the name of the person to whom this communication was sent. Once you click on the hyperlink, Person screen will be displayed in a new tab.
Sent to: This displays the e-mail id or the phone number of the recipient, if the mode is Email or SMS respectively. In case of Webhook, Sent To will be blank.
Setting Name: This shows the exact name of the Notification Setting under which the notification was sent. Once you click on the hyperlink, Notification settings screen will be displayed in a new tab.
Trigger: This indicates if the notification was triggered by an Event or Transaction or Generic.
Mode: This displays the mode in which the notification was sent -- Email, SMS or Webhook.
Status: This displays the status of the Notification whether the notification is Delivered, Sent, Failed to Send or Failed to deliver.
a. Delivered: This status means that the communication is delivered.
b. Sent: This status means that the communication has been sent from the Aura but has not yet been delivered to the Recipient.
c. Failed to send: This status means that the communication which has to be sent has failed to be sent from Aura. This may be due to connection failure between the systems involved. Note: If this happens please check and ensure that the configuration and maintenance is correct.
d. Failed to deliver: This status means that the communication has been sent successfully from Aura but has failed during delivery. This may be due to wrong email id or phone number. Note: If this happens then you can click on the Recipient hyperlink, verify the Phone and E-mail tabs of the Person record to check if the details entered are correct. If required, you can update the correct details and try resending the communication once again by clicking on the Resend button.
To View Log
- Click on the View Hyperlink available at the end of each Notification record. Notification View page pops up displaying the content of the notification in original format. If Notification mode is Webhook 'View' icon will not be available. Note: You can only view the Notification details sent for the selected account. Sample screen shots for both E-Mail and SMS Notification view are shown below.
For E-Mail

For SMS

Recipients
Recipients sub tab shows the details of the person linked to the Loan Account to whom the communication is sent.
To add / view / edit Recipients.
1. Access Loan Account page, click Communication tab, then click Recipients sub tab. The system will display the Recipients screen with all the default details.
Note: On creation of new Loan account, Communication → Recipients sub tab will be populated from the Loan Account's Client → Beneficial ownership → Person / Organization → Default Phone and E-mail address details.
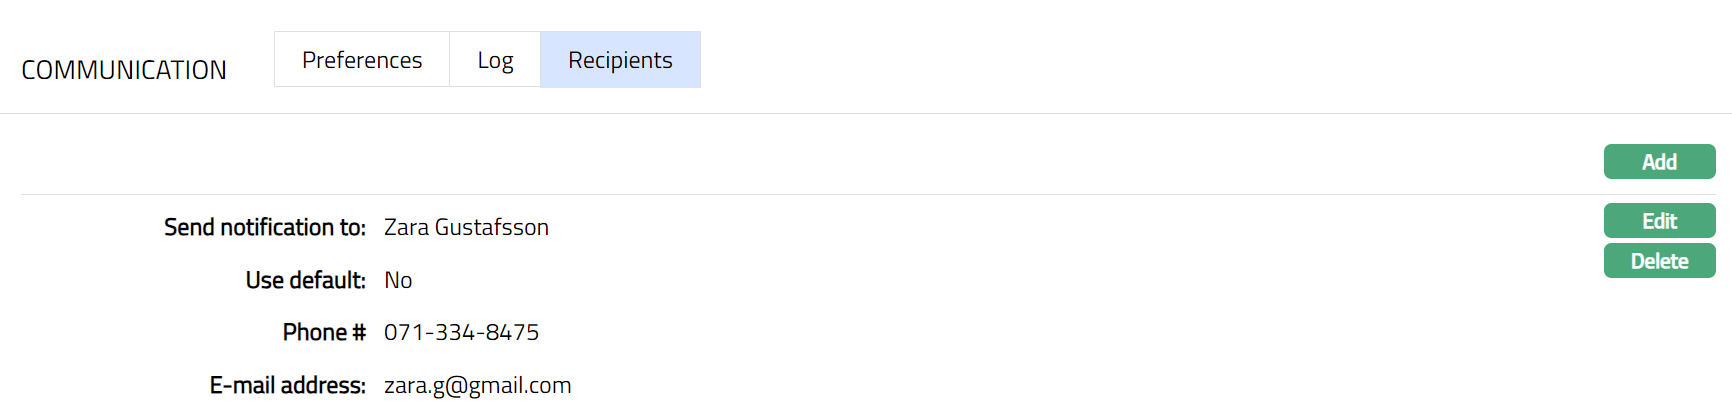
2. Click Add. Add Notification Recipients screen appears.
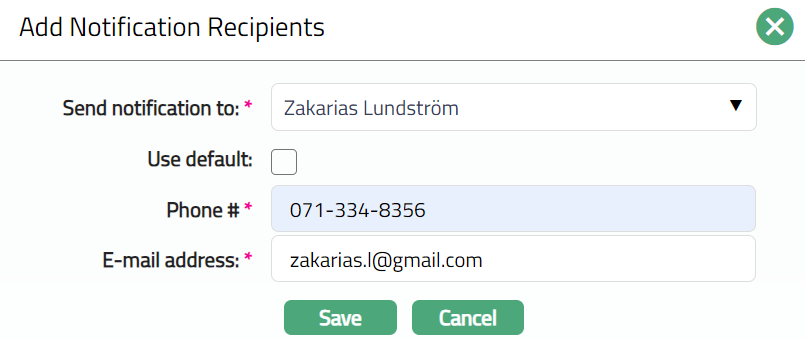
3. Select a recipient under Send notification to using the available drop-down list which shows the list of records maintained under Retail → Loans → Maintain → Linked People.
4. If Use default is checked, then Phone # and E-mail address fields will be populated from the default Phone and E-mail records of the Person chosen above; and those fields will be disabled. If unchecked, Phone # and E-mail address fields will be enabled and you can input the details as required.
5. Click Save. Recipients sub tab appears with the added details.
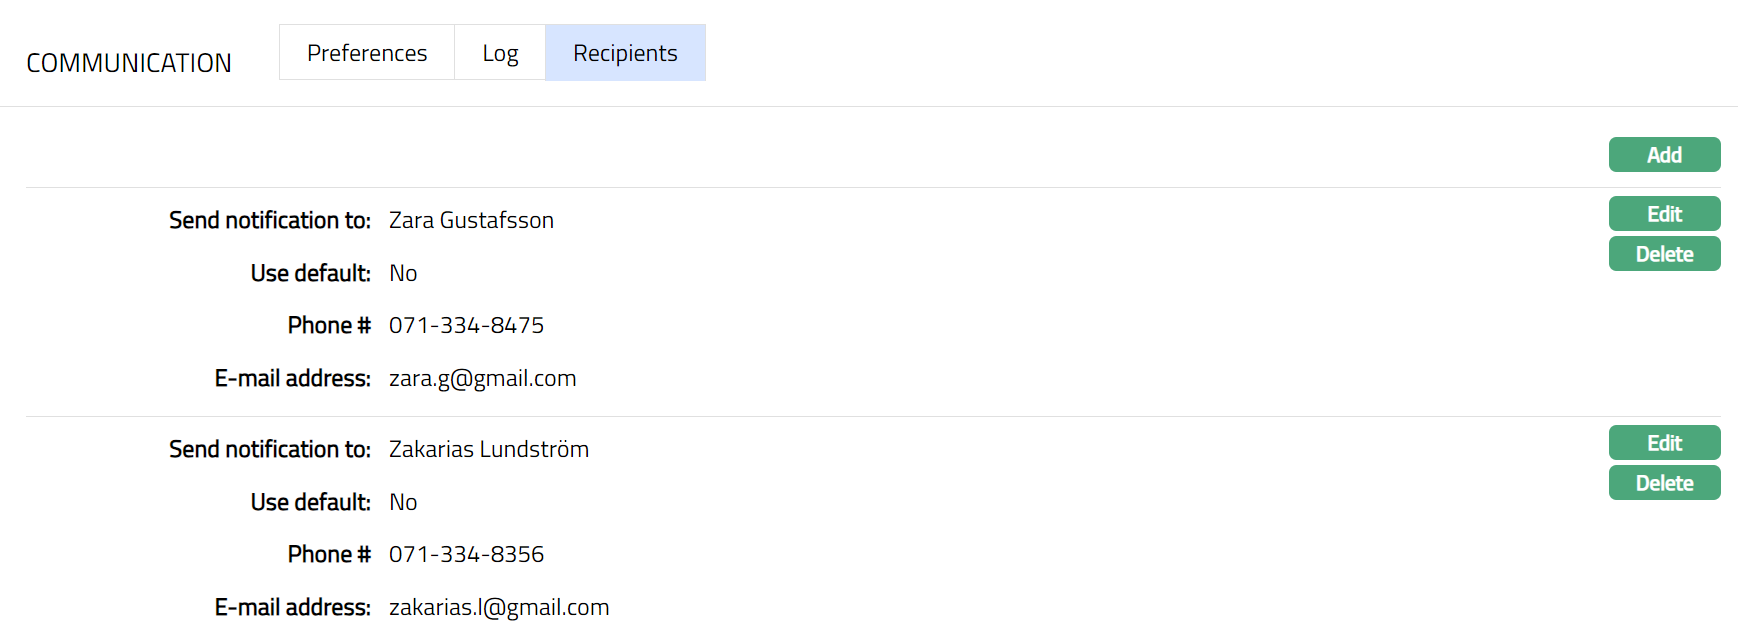
Functions: Add, Edit, Delete.
To view / edit Recipients,
1. Access Loan Account page, click Communication tab, then click Recipients sub-tab.
2. Click Edit for the Recipient which you want to edit. Edit Notification Recipients page appears.
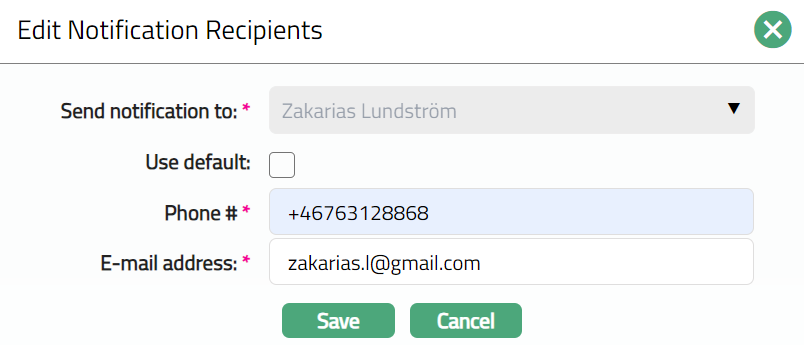
Note: Except Send Notification to, all other fields are editable.
3. Click Save. Recipients sub-tab appears with the edited details.
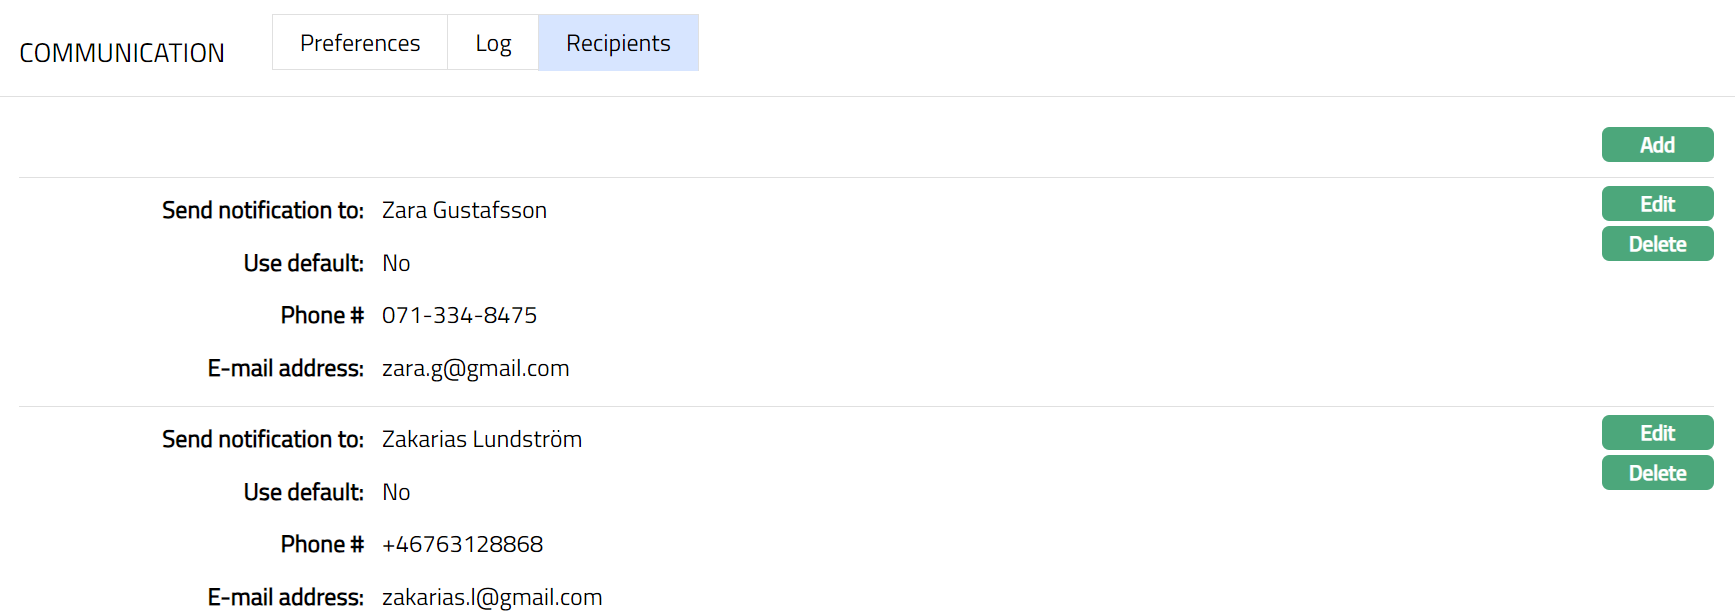
Functions: Edit, Delete.
Document
The Document tab allows you to upload / generate documents related to the Loan Account. Documents in the form of scanned images or files on your computer can be uploaded. You can categorise the documents as per Document Type and store with a document reference number. You can generate documents related to the Account based on Templates mapped to the Product.
To upload a document,
1. Access Loan Account screen. Click Document tab and then click on New. New Document page appears.
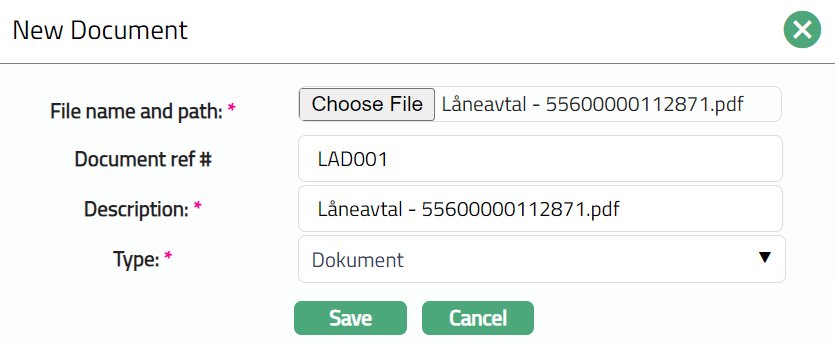
2. Click Choose File button to select the File name and path of the document.
3. Enter Document ref no. for the document. This document reference number is used in Branch view → Documents.
4. Based on the file selected the Description field will be derived. If required, you can change the description.
5. Select Type of the document uploaded. The document types should have been maintained using Admin → System codes → Documents → Document types. Once entered, this cannot be edited.
6. Click Save. Document gets uploaded, and the details are displayed.
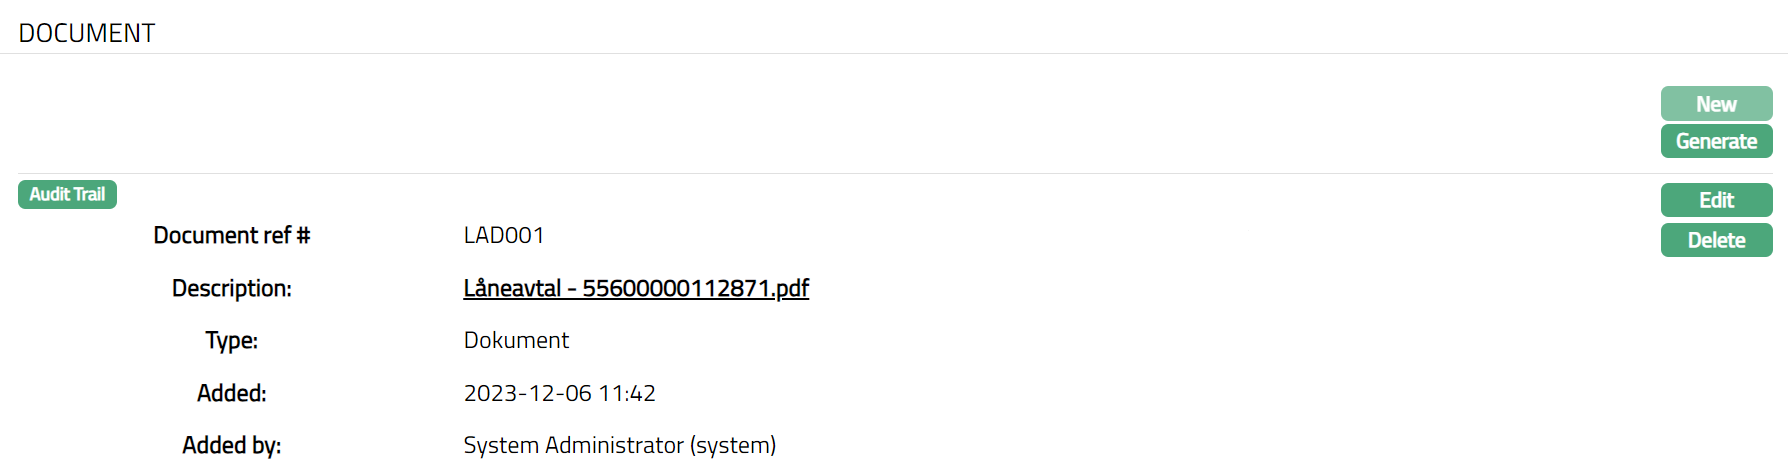
Functions: New, Generate, Edit, Delete.
To generate a document,
1. Click Generate to generate the .pdf file using the template as maintained under Admin → System codes → Documents → Document templates. You have to map the document template for Loan Account using the Document Template Settings tab as maintained under Retail → Settings → Product. Generate Document page will appear where the mapped templates will be displayed.
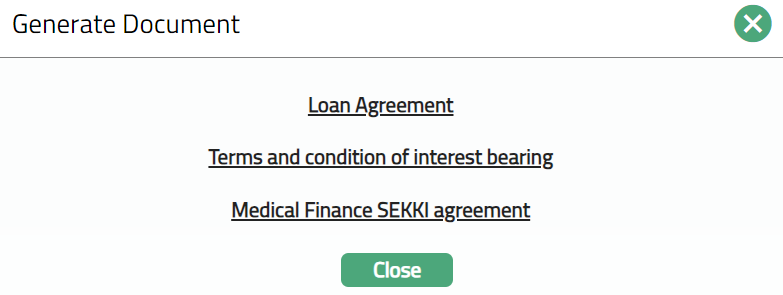
Functions: Generate
2. Click any template from the list of templates after which the document will be generated based on the selected template as shown below.
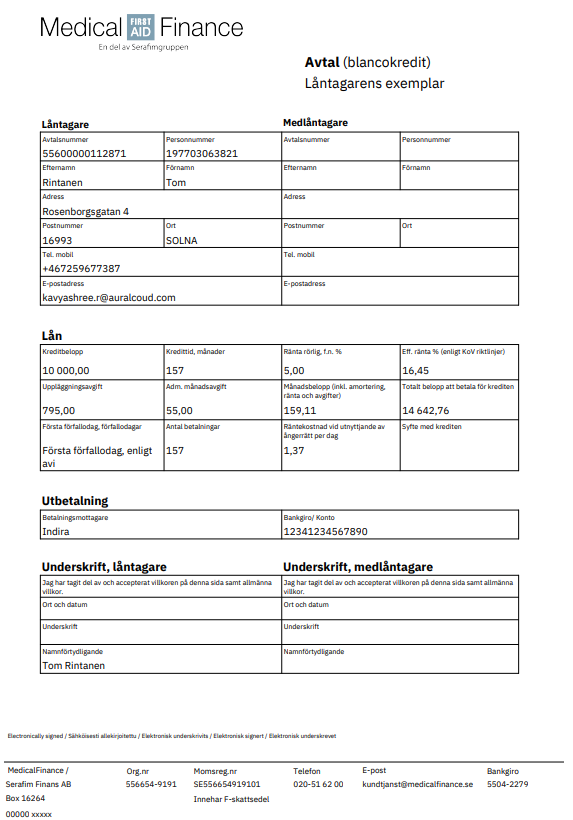
Delete: You can delete a document by a click on Delete button. Aura will ask for confirmation, on approving which the selected document will be deleted.
To Edit document,
1. Access Loan Account page. Click Document tab.
2. Click Edit. Edit New Document page appears.
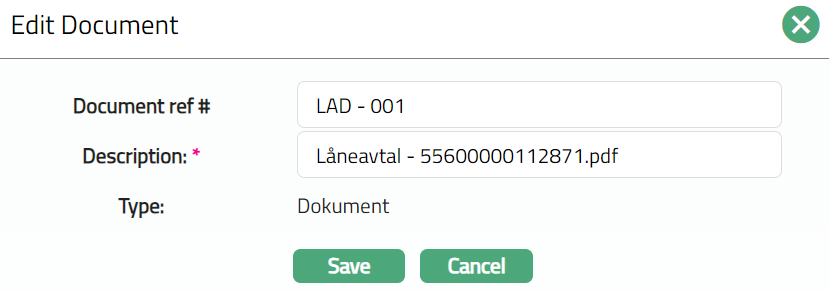
Note: Only Document ref no and Description fields are editable.
3. Click Save. Document page appears with the edited details.
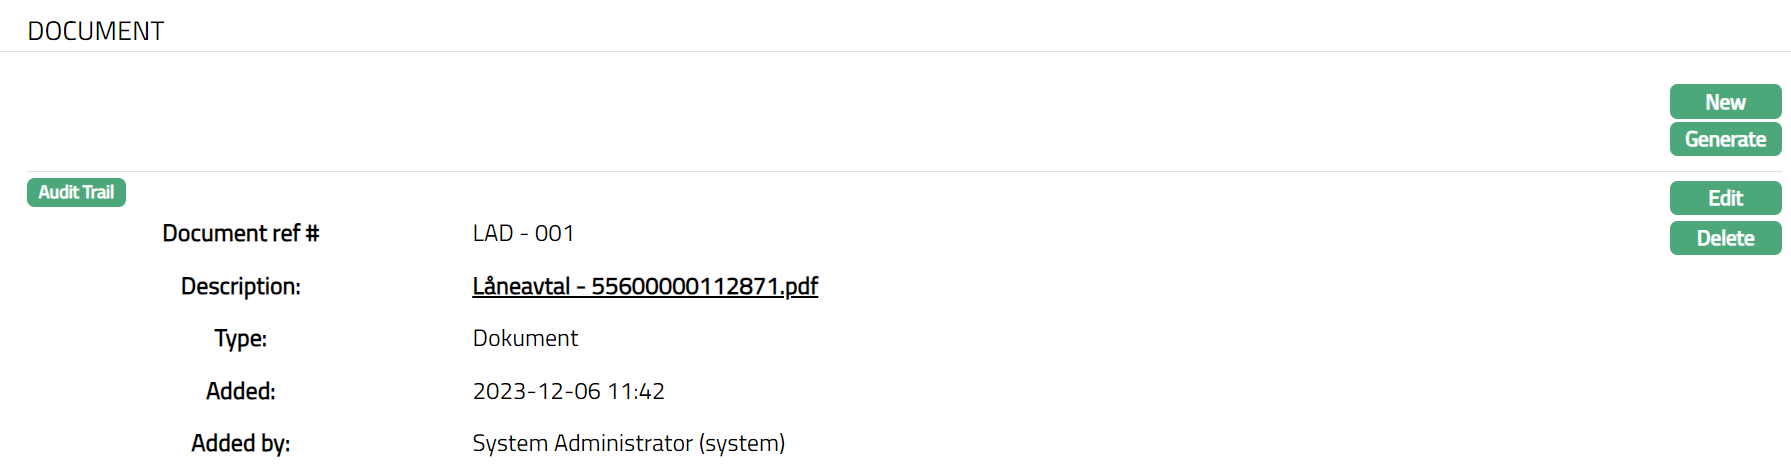
Functions: New, Generate, Edit, Delete
GL Account Balances
This tab allows you to view the summary of the component level balances on impairment treatment as per General Ledger (GL). Please refer to the Impairment tab in Product Maintenance.
To view the GL Account Balances,
Access Loan Account screen, Click GL Account Balances tab to view the details as per sample below.
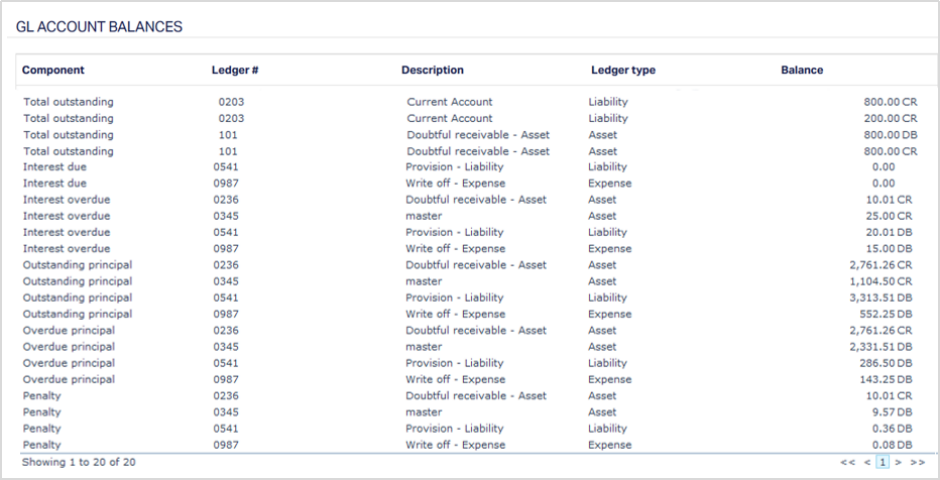
The columns available on the page are:
- Component - Displays the loan component to which the balance belongs. The list includes: Outstanding Principal, Overdue Principal, Interest Due, Interest Overdue, Penalty, Charge Due.
- Ledger# - Shows the ledger number (GL code) where the accounting entry for that component is posted. Each component’s financial transactions are mapped to a specific ledger.
- Description - Displays the ledger description as maintained in the chart of accounts or GL setup. It helps identify what the ledger is used for.
- Ledger Type - Indicates the type of ledger — for example, Asset, Liability, Income, or Expense. This helps understand how the balance affects the financial statements.
- Balance - Displays the current balance in the ledger for that component. The field is right-aligned for numeric readability.
Insurance
This tab allows you to attach any number of Insurance Plans to an account, using the insurance plans mapped to the Product. You can also manually suspend an insurance plan attached to the account or re-activate a plan that was earlier suspended manually or automatically based on certain conditions.
To add / view an Insurance Plan
1. Access Loan Account page and click Insurance tab. As soon as the account is created, this tab will show no records, as there are no insurance plans attached to the account.
2. To add any Insurance Plan to an account, ensure that the Account Status is Activated and Approved so that the Add button is enabled. Click Add. The Add Insurance page appears.
3. Select the Insured Person from the drop-down list of the Beneficial Owners of the Loan Account and any Linked person(s) associated with the loan.
4. Enter the Insurance number - the reference number for the insurance for the account.
5. Select the Plan Name from the drop-down list of all the active insurance plans mapped to the Loan's Product at Retail → Settings → Product → Insurance Plan.
Note: The combination of Insurance Number and Insurance Plan for the loan account should be unique.
Once you select the Plan Name, Aura automatically populates the following fields from the insurance plan configuration defined at the Product level. These fields are read-only at the account level and are used by Aura for all premium fee processing and automatic suspension logic.
Premium fee basis: Displays the base used to calculate the insurance premium fee for this account. This reflects one of the following values inherited from the Product -
- Outgoing Balance - the Premium fee is calculated based on the current outstanding principal balance of the loan.
- Total Schedule Due Amount (P+I) -- the premium fee is calculated based on the total Principal and Interest due as per the upcoming repayment schedule.
- Total Schedule Due Amount (P+I+C) -- the premium fee is calculated based on the total amount of Principal, Interest, Instalment Fee, and Loan Management Fee due as per the upcoming repayment schedule.
Restrict premium fee to max cover: Displays whether the premium fee calculation is capped at the maximum insurance cover amount. If this is Yes, Aura uses the insurance cover amount as the basis for the premium fee calculation when the outstanding loan balance exceeds the insurance cover amount. If this is No, Aura uses the actual outstanding balance regardless of the insurance cover amount.
Balance exceeding insurance cover: Displays whether the insurance plan will be automatically suspended when the outstanding loan balance exceeds the insurance cover amount. If this is Yes, Aura suspends the insurance plan during End-of-Day processing when the balance exceeds the cover amount, and automatically reactivates it when the balance falls below the cover amount.
Minimum balance for cover: Displays the minimum outstanding balance required for the insurance coverage to remain active. If the outstanding balance falls below this amount, Aura automatically suspends the insurance plan during End-of-Day processing and reactivates it when the balance meets or exceeds this threshold.
Suspend on status: Displays whether the insurance plan will be automatically suspended when the loan account moves into specific statuses. If this is Yes, Aura displays the inherited statuses directly below this field and automatically suspends the insurance plan during End-of-Day processing when the account enters any of those statuses. The insurance plan is automatically reactivated when the account moves out of those statuses.
Note: All five fields above are inherited from the Product at the time the insurance plan is added to the account. If the insurance plan configuration is updated at the Product level after the account insurance has been created, the account-level values remain unchanged. Aura uses the account-level values for all premium fee processing and automatic suspension logic.
6. Enter the Description for the Insurance Plan.
7. The Insurance cover amount is automatically defaulted from the Insurance Cover amount maintained at the Product for this Insurance Plan. You can however change it to any other lower amount.
8. The Effective from date is defaulted to the current booking date, once the Plan name is chosen above. If required, you can change it to any future date. If the Effective From date is the Current Booking Date, then the Insurance Status will change to Active as soon as it is approved. If the Effective From date is a future date, then the Insurance Status will be Inactive and will get activated on that future date.
9. Option for Effective till comes with two radio buttons Specific Date and Maturity Date. You can select whether the insurance coverage should end on a specific pre-defined date, or continue until the Maturity Date of the loan. Choosing Maturity Date auto-sets the coverage to align with the loan's end date whenever there is any change in the Loan's Maturity Date due to Change of Terms, Prepayment or any other such events. By default, Specific date is selected; but you can change it to Maturity Date.
10. Enter the Effective to date. This is the date till which the Insurance plan will be active and applicable to the account, subject to other conditions. The value of this field depends on the selected Effective Till option as input above:
If Specific Date is selected, you must manually enter the Effective To date. It must be greater than or equal to the Effective From date; and must be on or before the Maturity Date. On that Effective To date specified here, during the end of day processing, the status of the Insurance Plan will be set to Expired.
If Maturity Date is Selected, Aura automatically sets the Effective To date to match the loan's Maturity Date, and the field becomes non-editable. During end of day processing on the Maturity Date, the status of the Insurance Plan will be set to Expired.
In both cases, the Insurance Premium Fee, if applicable, will be calculated from the Effective From date to the Effective To date.
11. Enter Notes i.e., remarks, if any, for the Insurance.
12. Click Save. The Insurance Plan page appears with the added details along with the applicable charges (i.e., Insurance enty fee and Premium fee based on the Insurance Plan configuration as maintained in Admin → System Codes → Generic Definitions → Insurance Plan → Charges Tab as shown below:
Functions: Add, Edit, Maintain Status, View.
Validations for Adding Insurance
Aura does not restrict you from adding multiple Insurance records with the same Insured Person, the same Insurance Plan, or overlapping Effective From / Effective To dates.
You can enter duplicate or overlapping records if required. If duplicates exist, you can review them directly in the Insurance tab and delete or suspend the ones you do not need.
Note: On Save, two Insurance Status records are inserted - Open, Approved and Active, Pending. Till it is approved by another user, this is indicated by a red bubble on the Maintain Status button as well as on the Insurance Tab.
On approval, the record Status is set to Approved and the Insurance Status moves to Active (if the Effective From date = Current Date) or Inactive (if the Effective From Date is > Current Date); and the red bubble disappears.
The additional fields that are shown are:
Last premium applied date: Displays the date on which the most recent Insurance Premium Fee was applied to the loan account. This date is updated during premium fee event processing.
Last premium due date: Displays the due date of the previous Insurance Premium Fee as per the payment schedule.
Last premium amount: Displays the due amount of the previous Insurance Premium Fee from the payment schedule.
Note: Last premium applied date and Last premium due date may show different dates. Last premium applied date reflects when the premium fee event was processed. Last premium due date reflects the scheduled due date of the previous premium fee entry.
For example, if the premium fee is processed on 25-02-2026, the Last premium applied date shows 25-02-2026, while the Last premium due date shows 25-01-2026, which is the due date of the previous schedule entry. Last premium amount shows the due amount of that 25-01-2026 schedule. If no previous premium fee schedule exists, Last premium due date and Last premium amount will be empty.
Insurance entry fee: It is an event based Flat fee that the Client is charged when the borrower / co-borrower take(s) up the Insurance Plan. At the account, when you add the Insurance Plan, the Insurance entry fee is defaulted from the Insurance Plan maintained under Admin → System codes → Generic definitions → Insurance plan. The insurance Entry Fee amount will be applied when the Insurance Status moves to Active; and will be shown in the Payment Schedule as a separate component.
The Insurance Entry Fee can be edited as long as the Insurance status is Inactive. Once the status moves to Active, the Edit button has no effect, as the one time event has already been triggered and the fee is applied.
Premium fee: It is the Periodic Premium fee that the Client is charged when the borrower / co-borrower take(s) up the Insurance plan. At the account, when you add the Insurance Plan, the Premium fee is defaulted from the Insurance Plan maintained under Admin → System codes → Generic definitions → Insurance plan. See more details in the section below.
The Premium Fee is always editable, irrespective of the Insurance Status. If the Premium Fee has already been triggered, any changes made will be applied to upcoming future schedules, and the previously generated schedules will not be affected by the updated fee.
To add / customize charges for the Insurance Plan
Click on the View button against the Insurance entry fee / Premium fee to review and edit the charge details associated with the insurance record.
Sample screenshot, if the mapped Charge Scheme Basis is Flat:
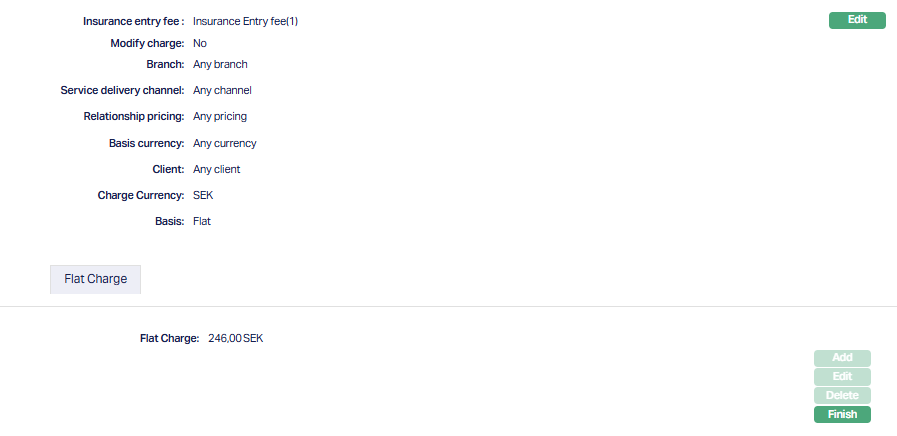
Sample screenshot, if the mapped Charge Scheme Basis is Banded:
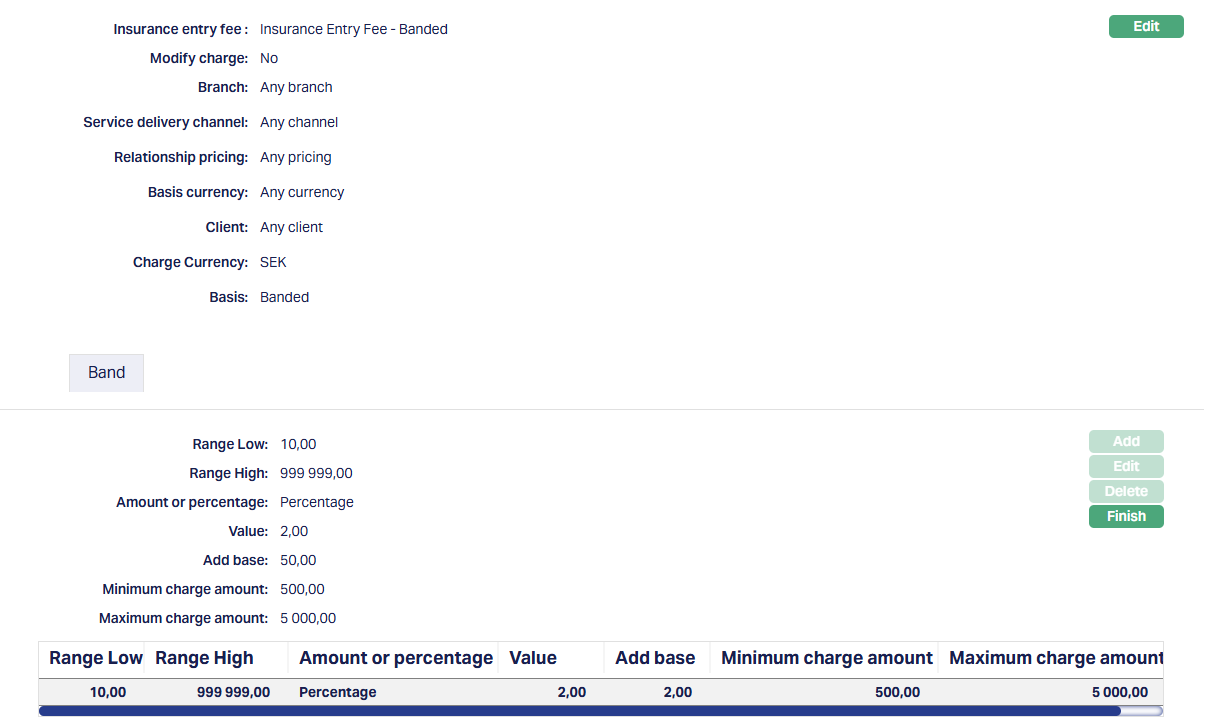
The following fields are displayed:
Insurance entry fee / Premium fee Displays the name of the Charge Scheme mapped to the Insurance Plan chosen for that charge. This is an editable field.
Modify Charge allows you to modify the charge parameters that are defaulted from the Charge scheme mapped to the charge as required for this insurance. By default, it will be No and is an editable field. Only if this is set to Yes, you will be allowed to change the charge parameters.
The values for Branch, Service delivery channel, Relationship pricing, Basis currency, Client, Charge currency, Basis are all defaulted from the most suitable Charge Combination for the Account as maintained in the Charge Scheme. These fields are not-editable.
If the Charge Basis in the Combination is Flat, the Flat charge value is displayed.
- If the Charge Basis is Banded, the following fields are displayed, with values defaulted from the Bands maintained for the Combination: - Range Low - Range high - Amount or percentage - Value - Add Base - Minimum charge amount - Maximum charge amount
For more details on these fields, refer to the user manual under Admin > Pricing > Charge Schemes
In the Insurance Tab, you will be able to add / edit / delete the parameters as described below: - Add: You can add any number of bands till the Range High reaches 999 999 999 999 999. - Edit: You cannot edit the Range Low, Range High and Charge Currency for any of the Bands. For the highest band, you cannot edit the Range Low and Charge Currency. All other fields are editable. - Delete: You can delete only the highest Band
To modify the charge parameters,
1. Click Edit; the Edit Charge Page appears.
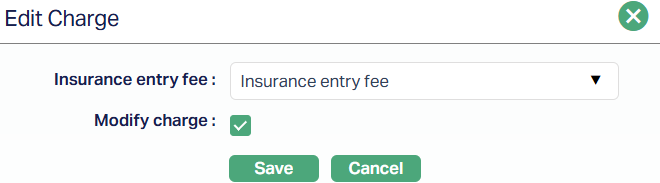
2. Insurance Entry Fee / Premium fee drop-down consists of a list of all the all the Active Charge Schemes maintained under Admin > Pricing > Charge Schemes, where the Charge Type is Event, it is not a Deferred Charge, Treat as Commission = No and Treat as Receivable = No.
3. Select the Modify Charge check Box and click Save. If it is a Flat Charge, this will enable the Edit Button under the Flat Charge tab.
4. Click Edit. The Edit Flat Charge page appears.
5. Enter the new Flat charge for the Insurance Entry Fee. Click Save. The Insurance Entry fee page appears with the updated details.
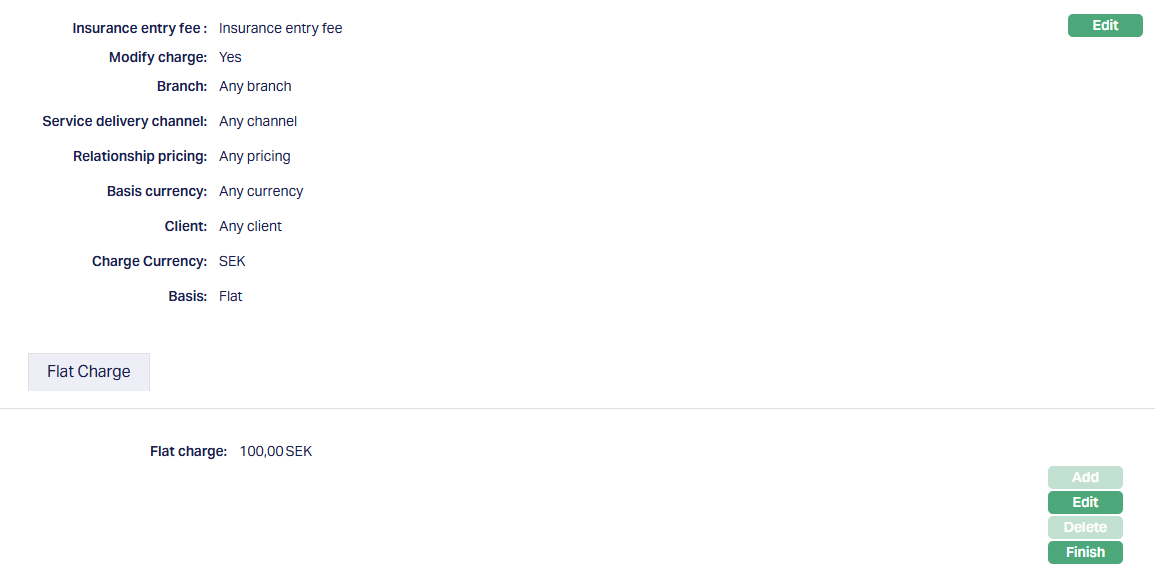
Premium Fee
The Premium Fee is always editable, irrespective of the Insurance Status. If the Premium Fee has already been triggered, any changes made will be applied to upcoming future schedules, and the previously generated schedules will not be affected by the updated fee.
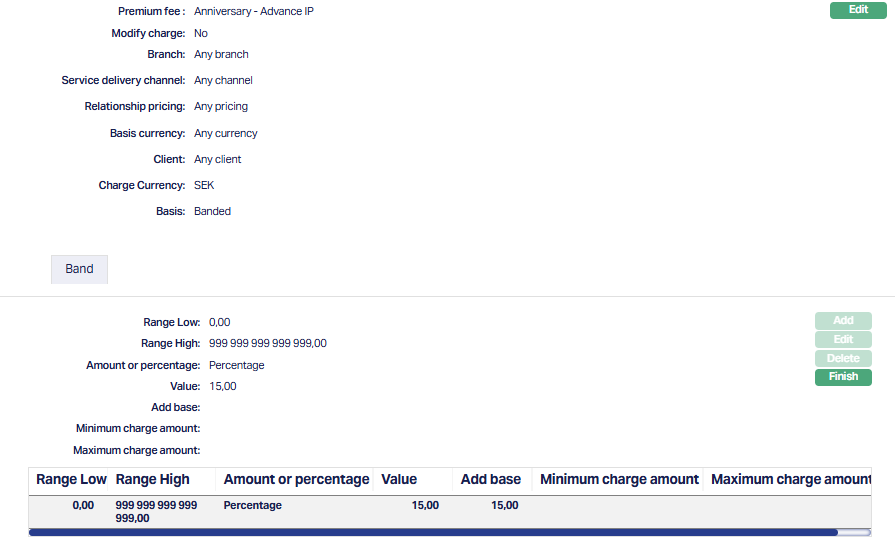
Insurance Status: Displays the status of the Insurance Plan. The following are the possible values:
Open: Indicates that the Insurance plan is yet to be approved.
Inactive: On approval, if the Effective From date is greater than the current date, then the Insurance status will be Inactive.
Active: On approval, if the Effective From date is less than or equal to the current date, then the Insurance status will be Active. In case the status was Inactive when the insurance plan was attached to the account and if the booking date reaches the Effective From date, the Insurance Status will be updated to Active.
Suspended: Indicates that the Insurance Plan is suspended. Suspension could be manual or automatic based on certain conditions as specified at the Loan Product. Please refer to the Suspension of Insurance Plan section for further details.
Expired: Indicates that the Insurance Plan is no longer active. At the end of the day on the Effective To date or when the Insurance plan is suspended due to Age, the Insurance status will be updated to Expired.
Cancelled: Indicates that the Insurance Plan is no longer active. You can manually cancel the Insurance using the Maintain Status button; and on approval, the Insurance Status will be updated to Cancelled.
To edit an Insurance Plan,
1. Choose the required Insurance Plan and click Edit. The Edit Insurance page appears.
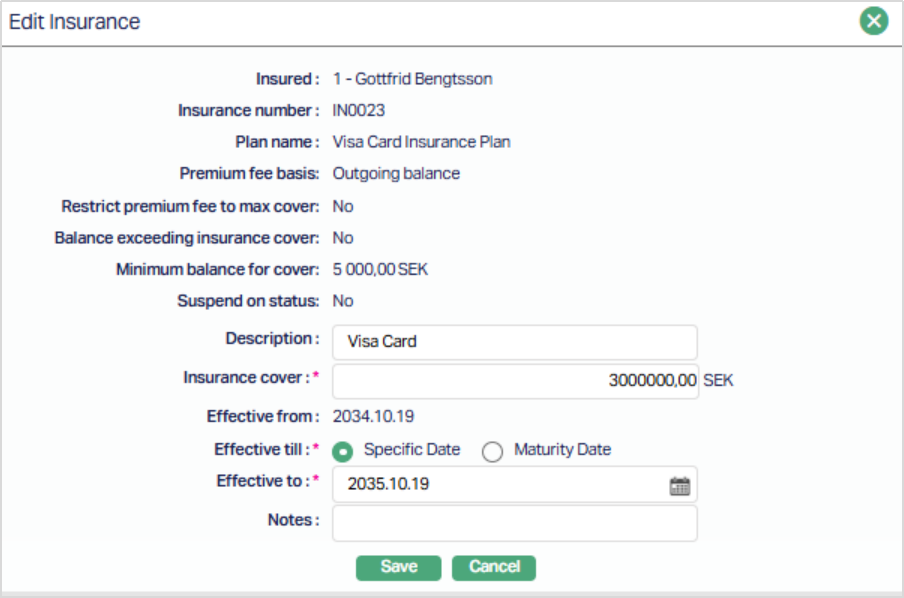
Note: All fields are editable except Insured, Insurance number and Plan name. Effective From is editable only if the Insurance Status is Inactive.
2. Make the required changes and click Save to see the updated details.
Insurance Status
The Maintain Status button opens the Status history tab for the selected insurance record. You can manually move the Status of the insurance as well as view the full lifecycle of Insurance Status changes -- including timestamps, reasons, and approval details.
When a new Insurance record is created, this tab shows two records:
- Insurance Status = Open, record Status = Approved
- The second record depends on the Effective From date a. If Effective From date <= Current Booking Date, Insurance Status = Active, record Status = Pending. b. If Effective From date > Current Booking Date, Insurance Status = Inactive, record Status = Pending
On approval, the record Status moves to Approved.
You can manually move the Insurance Status to Suspend, Cancel or Active, depending on the current Insurance Status. Each such change must be approved by another user before it takes effect, subject to auto-approval settings as configured for your Role under User → Roles.
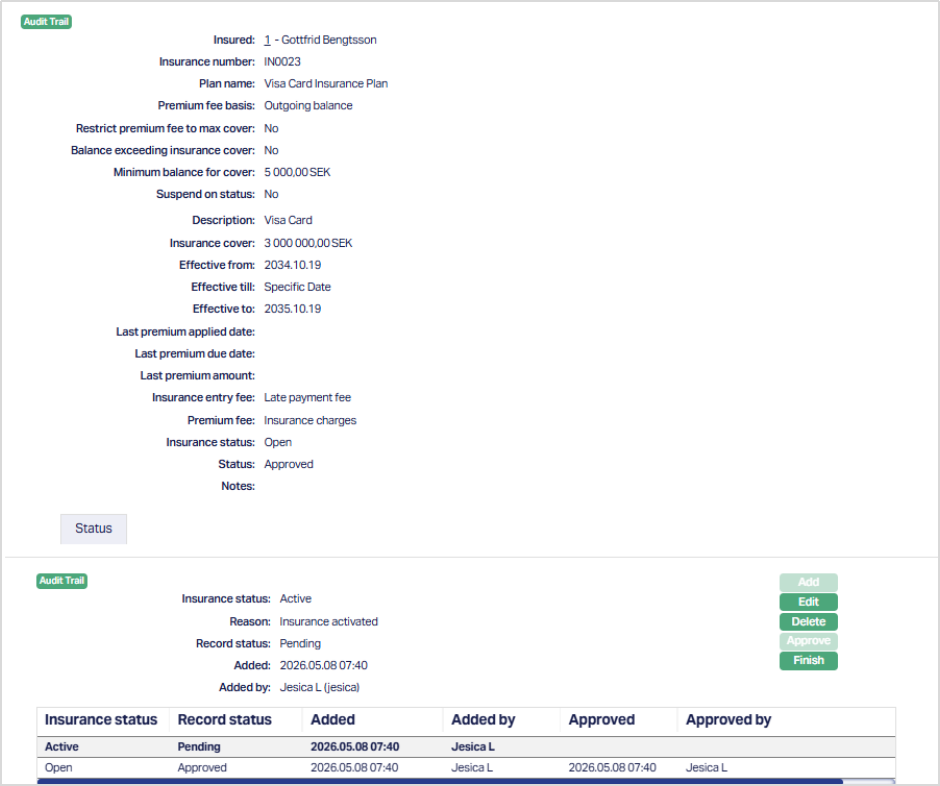
The Add button allows you to add a new status for the insurance record. (e.g., Active, Suspended and Cancelled)
To add / approve Status
When you click Add, Aura opens the Add Status window, where you can update the Insurance Status manually based on the latest status of the record.
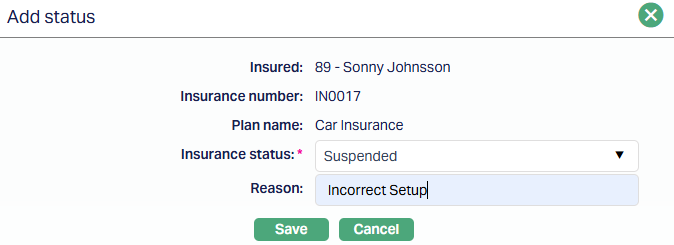
The Add Status page contains the following fields:
- Insured: Displays the Beneficial Owner or Person linked to this Insurance record.
- Insurance number: Auto-populated from the Insurance record.
- Plan name: The Insurance Plan selected during the Add Insurance.
- Insurance status: Drop-down list where you choose the new Status.
- Reason: Enter the reason for the status update. This field is Optional.
The available values in the Insurance Status drop-down depend on the latest Approved Status:
- Open → Active
- Active → Suspended/Cancelled
- Inactive → Suspended/Cancelled
- Suspended → Active/Cancelled (if Current Booking Date => Effective From Date)
- Suspended → Cancelled (if Current Booking Date < Effective From Date)
- Expired → No further updates allowed
- Cancelled → No further updates allowed
The Add button is enabled only if the following conditions are satisfied:
- the latest record is Approved
- the latest approved status is not terminal (i.e., Expired / Cancelled)
- the Account Status of the Loan Account is not Closed
- the current date <= Loan Account Maturity Date
On Save, Aura inserts a new Status record with the Record Status set to Pending.
To edit Status
1. Click Edit. The Edit Status page appears.

Note: You can edit only a Status record which is yet to be approved. Only the Insurance status and Reason fields are editable.
2. Make the required updates and click Save. The Status page appears with the edited details.
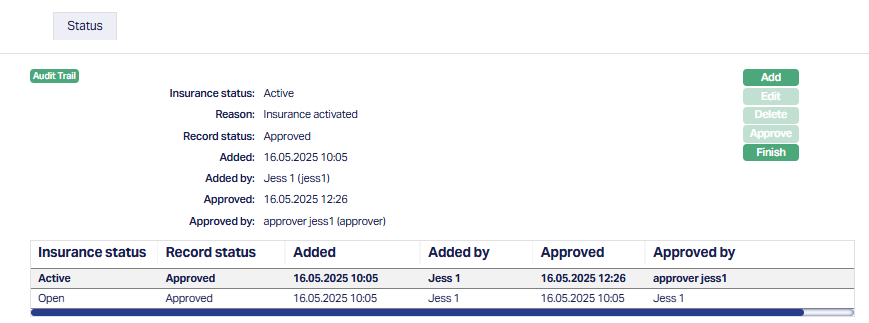
The Finish button closes the Status Tab and returns you to the main Insurance screen.
1. Insurance status: Shows the status applied (e.g., Active, Suspended, Cancelled)
2. Reason: The explanation for the status change (if provided)
3. Record Status: Indicates whether the status is Pending or Approved.
4. Added / Added by: Timestamp and user who created the status.
5. Approved / Approved by: Timestamp and user who approved the status.
Note: Once the status has been Approved, Edit and Delete buttons are disabled. Make sure you edit all the necessary fields before Approval.
Suspension of an Insurance Plan
The Insurance Plan can be suspended either manually or automatically.
Manual Suspension
1. Access Loan Account page and click Insurance tab and select the Insurance Plan you want to suspend.
2. Click on the Maintain status button. Status tab appears.
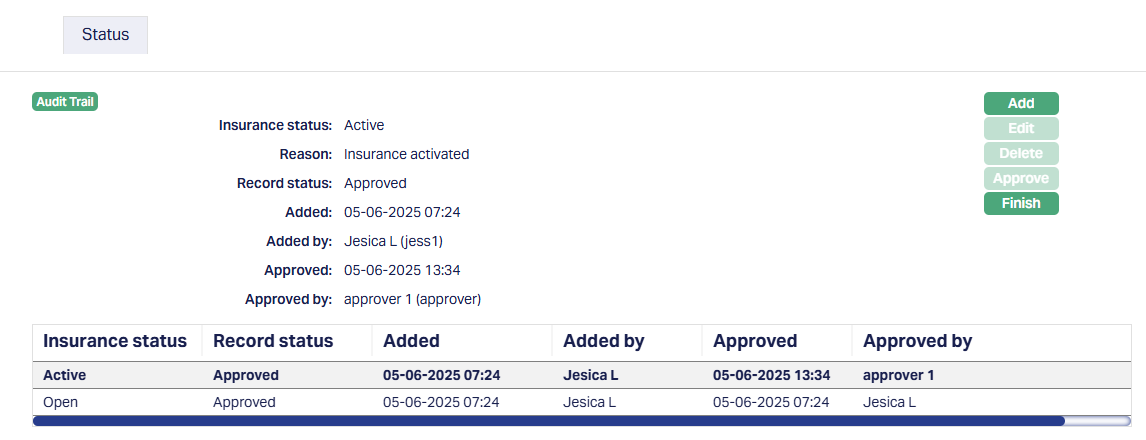
3. Click on the Add button. The Add Status page appears.
4. Select Suspended from the drop-down list. The list will consist of Suspended and Cancelled Status.
5. Enter the Reason for suspension of the insurance.
6. Click Save. Insurance page appears with the suspension details.
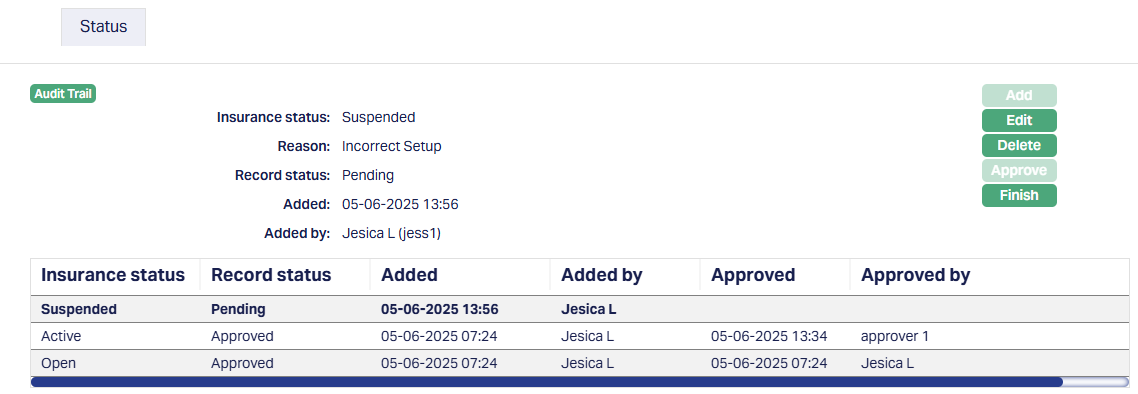
7. Once suspension is approved, Aura will display the status and record history.
The status in the grid is displayed in reverse chronological order - the latest status appears first.
Functions: Add, Finish.
- Automatic Suspension
An Insurance Plan can be automatically suspended on the basis of the following conditions. In all cases, Aura uses the account-level insurance configuration values during End-of-Day processing.
1. Balance exceeding insurance cover: For an insurance plan attached to the account, if the Balance exceeding insurance cover is marked as Yes at the Product level, and when the outstanding balance of the Account exceeds Insurance cover, amount specified in the Product, the insurance plan will be suspended for this account. The insurance plan status will automatically be changed to Suspended during the End-Of-Day processing.
2. Minimum Balance insurance cover: If at the Product a minimum balance for insurance cover has been specified and when the outstanding balance of the Account goes below this amount, the Insurance Plan status will automatically be changed to Suspended during the End-Of-Day processing.
3. Status: If Suspend on Statuses is marked as Yes at Product level, and whenever the account moves into any of these statuses, then the insurance plan status will automatically be changed to Suspended during the End-Of-Day processing.
In all the above cases, Aura automatically updates the Reason for the suspension based on the condition that the account satisfied due to which it moved into suspension / expiry.
Re-activation of Insurance plan after Suspension
Similar to suspension, Re-activation of a Suspended insurance plan can be manual or automatic.
- Manual Re-activation
1. Access Loan Account page and click Insurance tab and select the Insurance Plan you want to re-activate.
2. Click on the Maintain status button. Status tab appears.
3. Click on the Add button. Add Status page appears.
Note: The Add button is enabled only if the latest record is approved, and the latest approved status is not terminal (i.e., Expired / Cancelled), and the loan is not closed or past maturity.
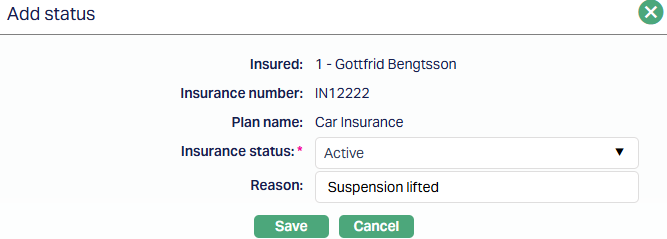
4. Select Active from the drop-down list. The list will consist of Active and Cancelled Status.
5. Enter the Reason for Activation of the insurance.
6. Click Save. Insurance page appears with the Activation details.
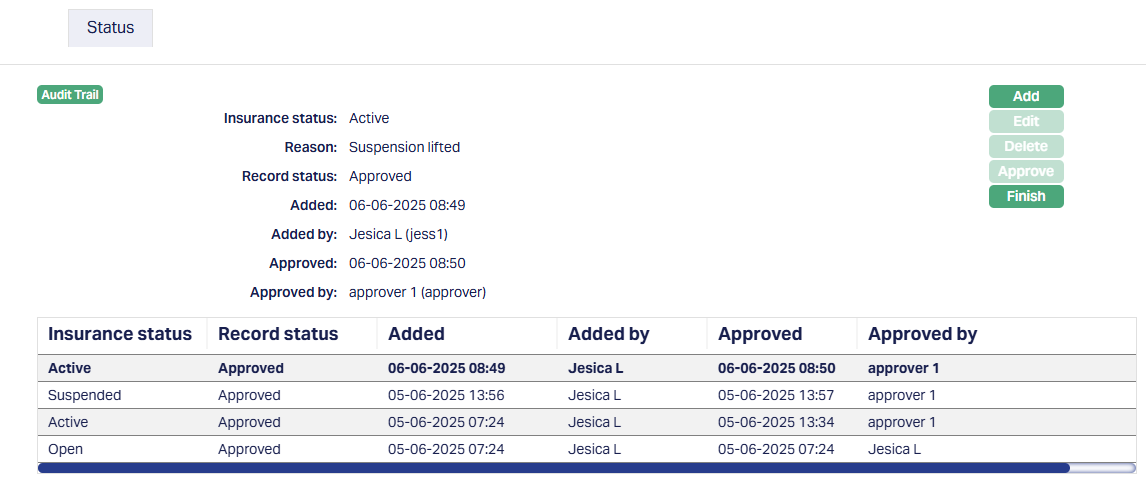
7. Once suspension is approved, Aura will display the status and record history.
The status in the grid is displayed in reverse chronological order - the latest status appears first.
- Automatic Re-Activation
If the account does not satisfy the condition based on which the insurance plan was automatically suspended, the insurance plan is automatically re-activated.
Cancellation of an Insurance Plan
At any time you want to cancel an insurance plan attached to a loan, you can do so by using Insurance Tab > Maintain Status > Add. Once the insurance record is marked as Cancelled and the status is approved, it becomes terminal. This means no further status updates can be added to the record, and the Add button on the Maintain Status screen will be disabled. If insurance needs to be started again after cancellation, a new insurance record must be created.
Insurance Expiry
An Insurance Plan mapped to a loan can expire in the following ways:
- Age Based: If the Insurance Plan maintenance under Admin defines an age at which the insurance has to be suspended and when the Insured reaches that age, then the insurance plan status will automatically be changed to Expired during the End-Of-Day processing.
- Effective To: When the current booking date reaches the Effective To date, the Insurance Status for that plan will automatically be changed to Expired during the End-of-Day processing.
Interest Receivable
Interest Receivable tab allows you to view the Interest Scheme Details for the Loan Interest, Principal Overdue and Interest Overdue. These details are defaulted from Product. You can change the values using the Edit option in this tab only when the Account Status is Opened. For any further changes, you have to use the Change of Terms options.
To edit Interest Receivable
1. Access Loan Account page. Click Interest Receivable tab to view the details as per sample below. For details refer to New Loan → Interest receivable (3/6).
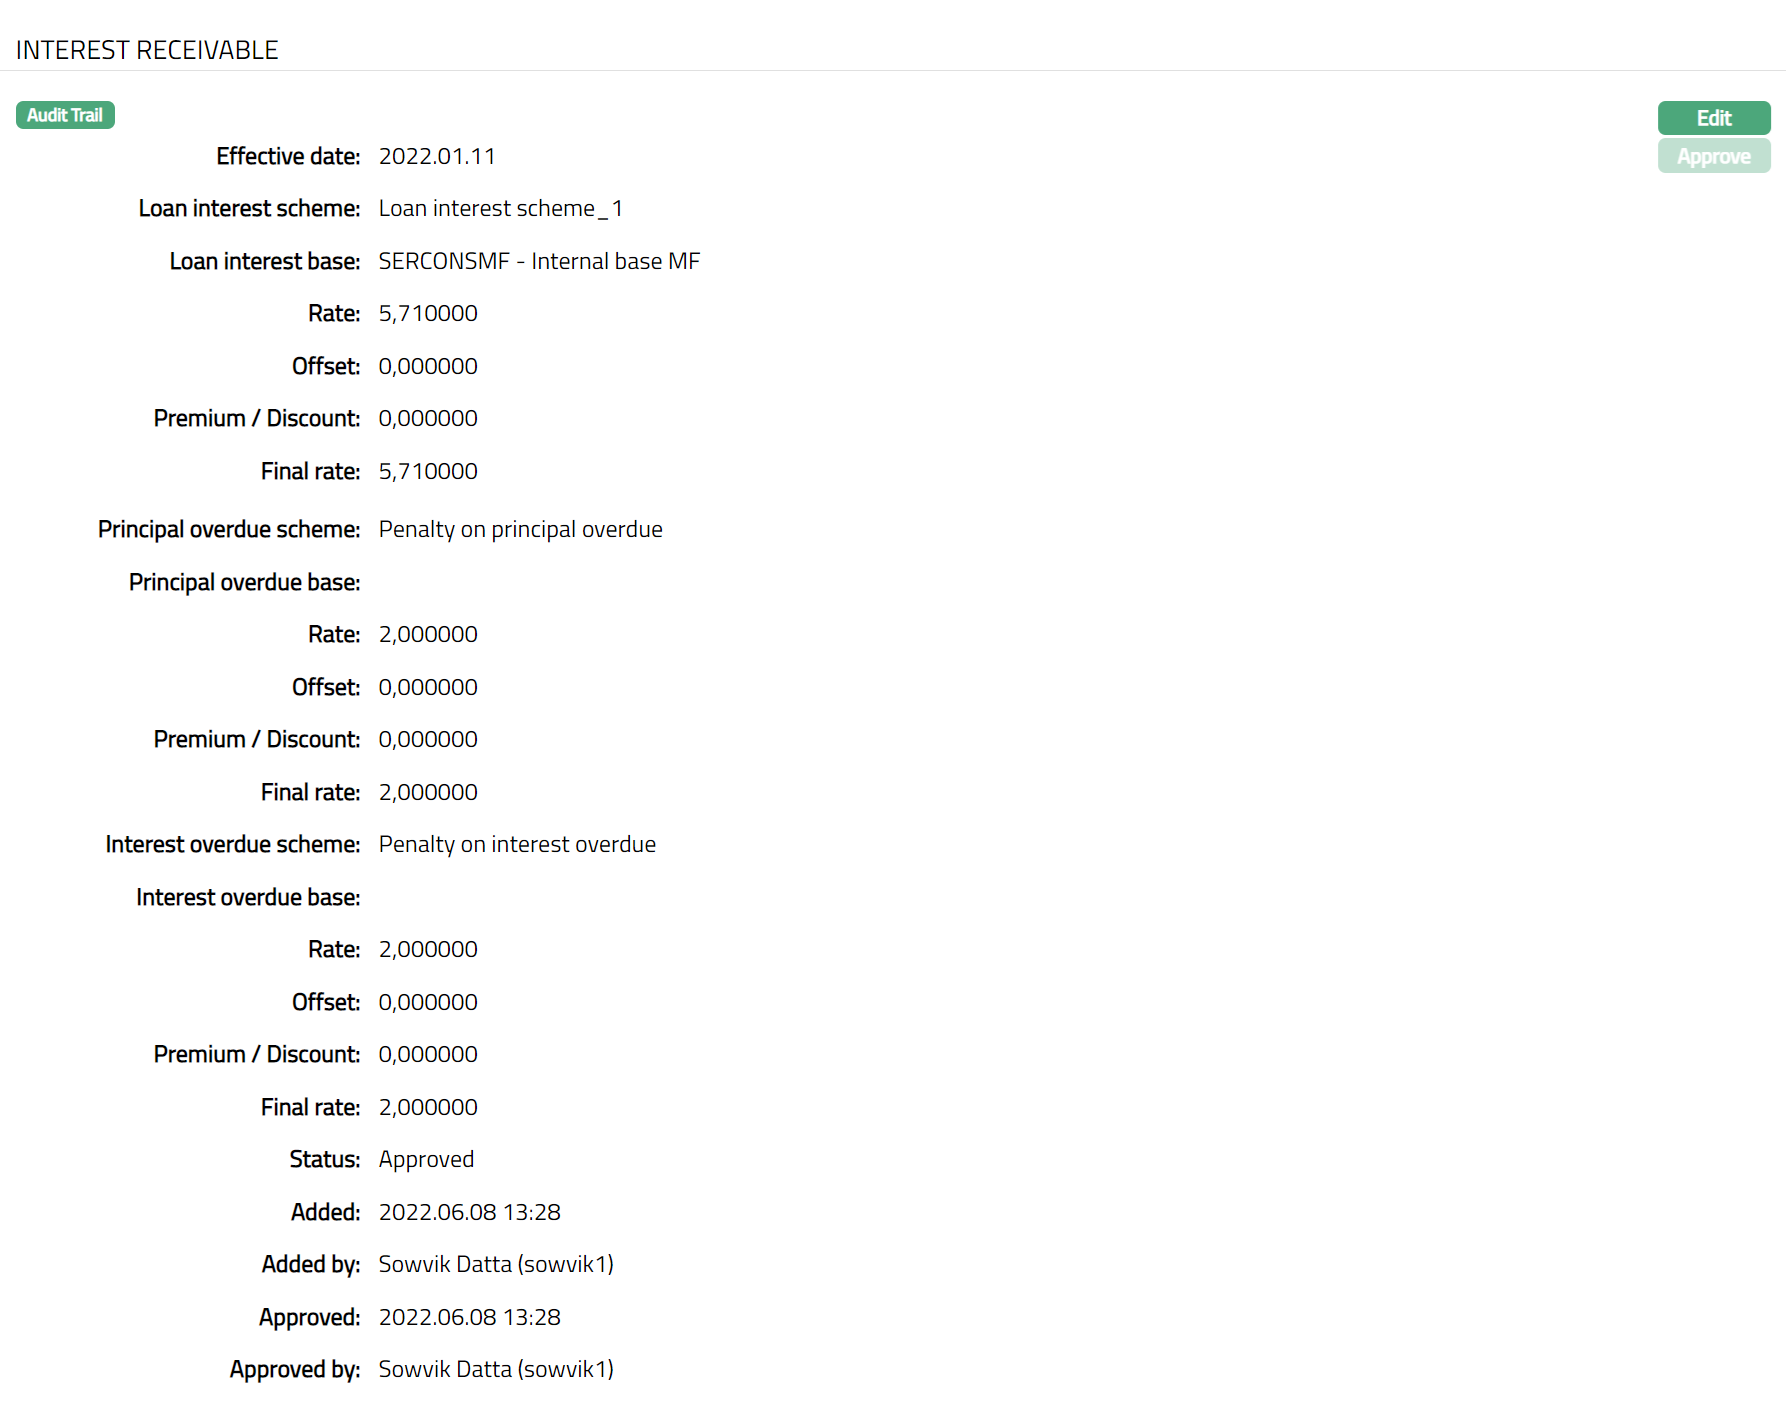
The additional fields that you can view in this tab are explained below:
Status field denotes the status of the tab.
Added field denotes the date on which the record was added.
Added by field denotes the name of the user who created the record.
Approved field denotes the date on which the record was approved. This is displayed only on approval.
Approved by field denotes the name of the user who approved the record. This is displayed only on approval.
2. Click Edit. Edit Interest Receivable page appears.
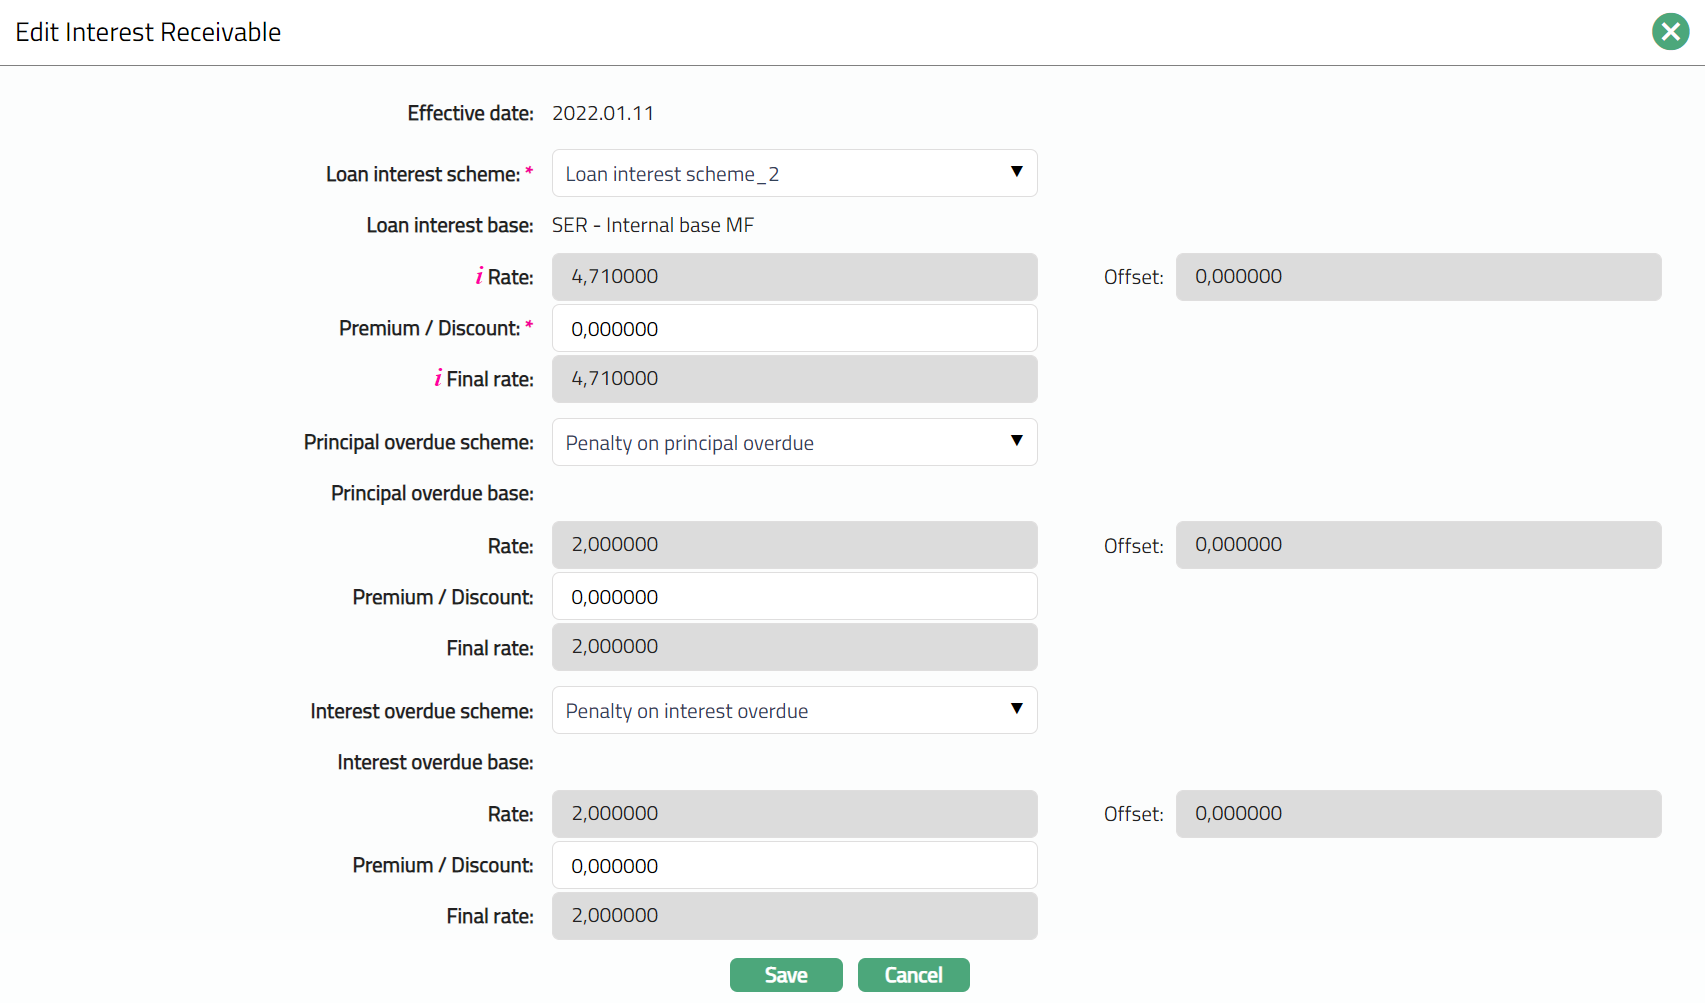
You can edit only the following fields:
Loan Interest Scheme
Premium / Discount for Loan interest scheme
Principal Overdue Scheme
Premium / Discount for Principal overdue scheme
Interest Overdue Scheme
Premium / Discount for Interest overdue scheme.
3. Click Save. Interest Receivable page appears with the edited details.
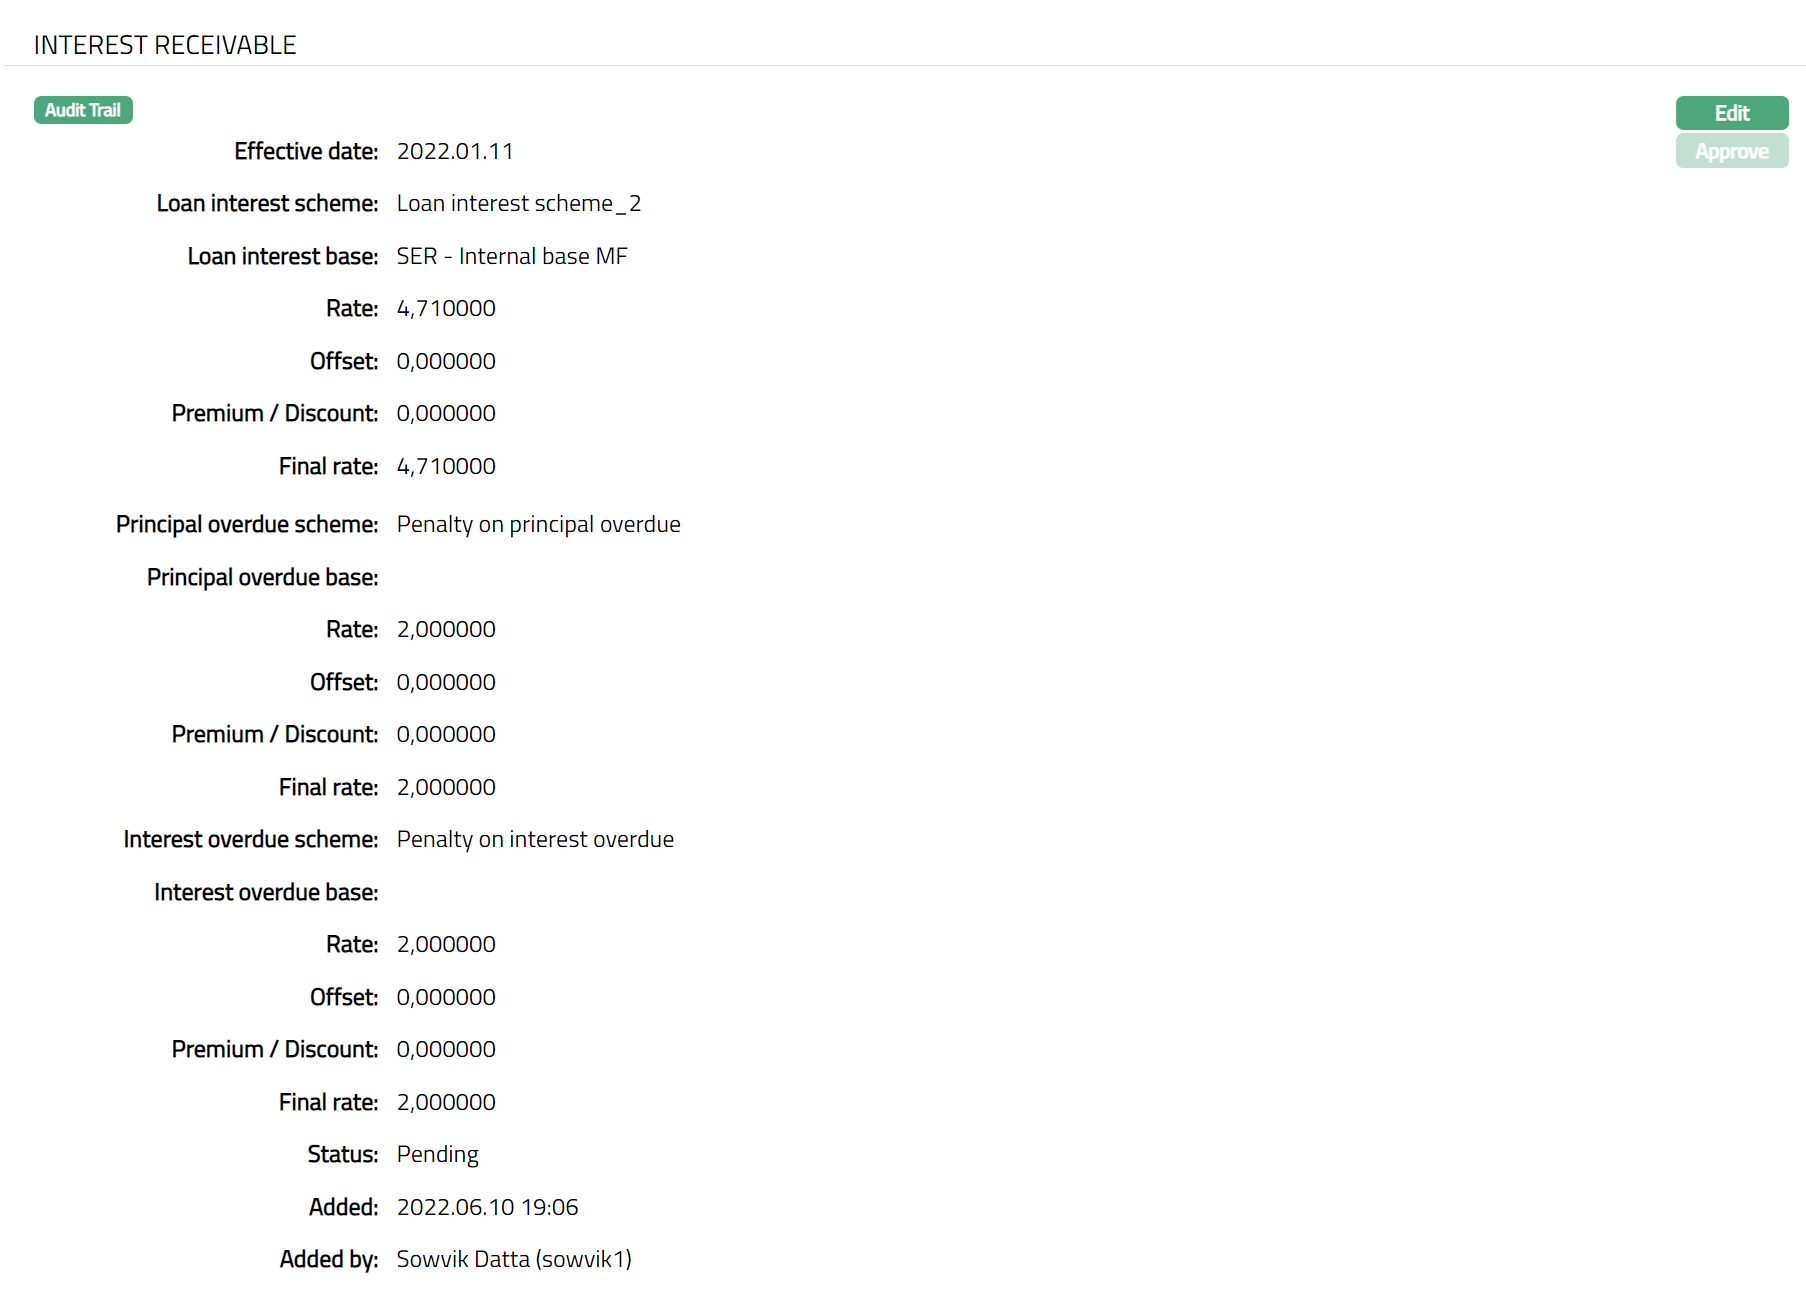
Note: By default, Interest Receivable tab is in the Approved status when the Loan Account is created. If you make any changes, then the status will change to Pending. Any user other than the one who made the change can approve by click on Approve button. Aura will ask for a confirmation. If you select Yes, the interest receivable settings will be approved else it will be in pending state. Once Approved the red bubble disappears.
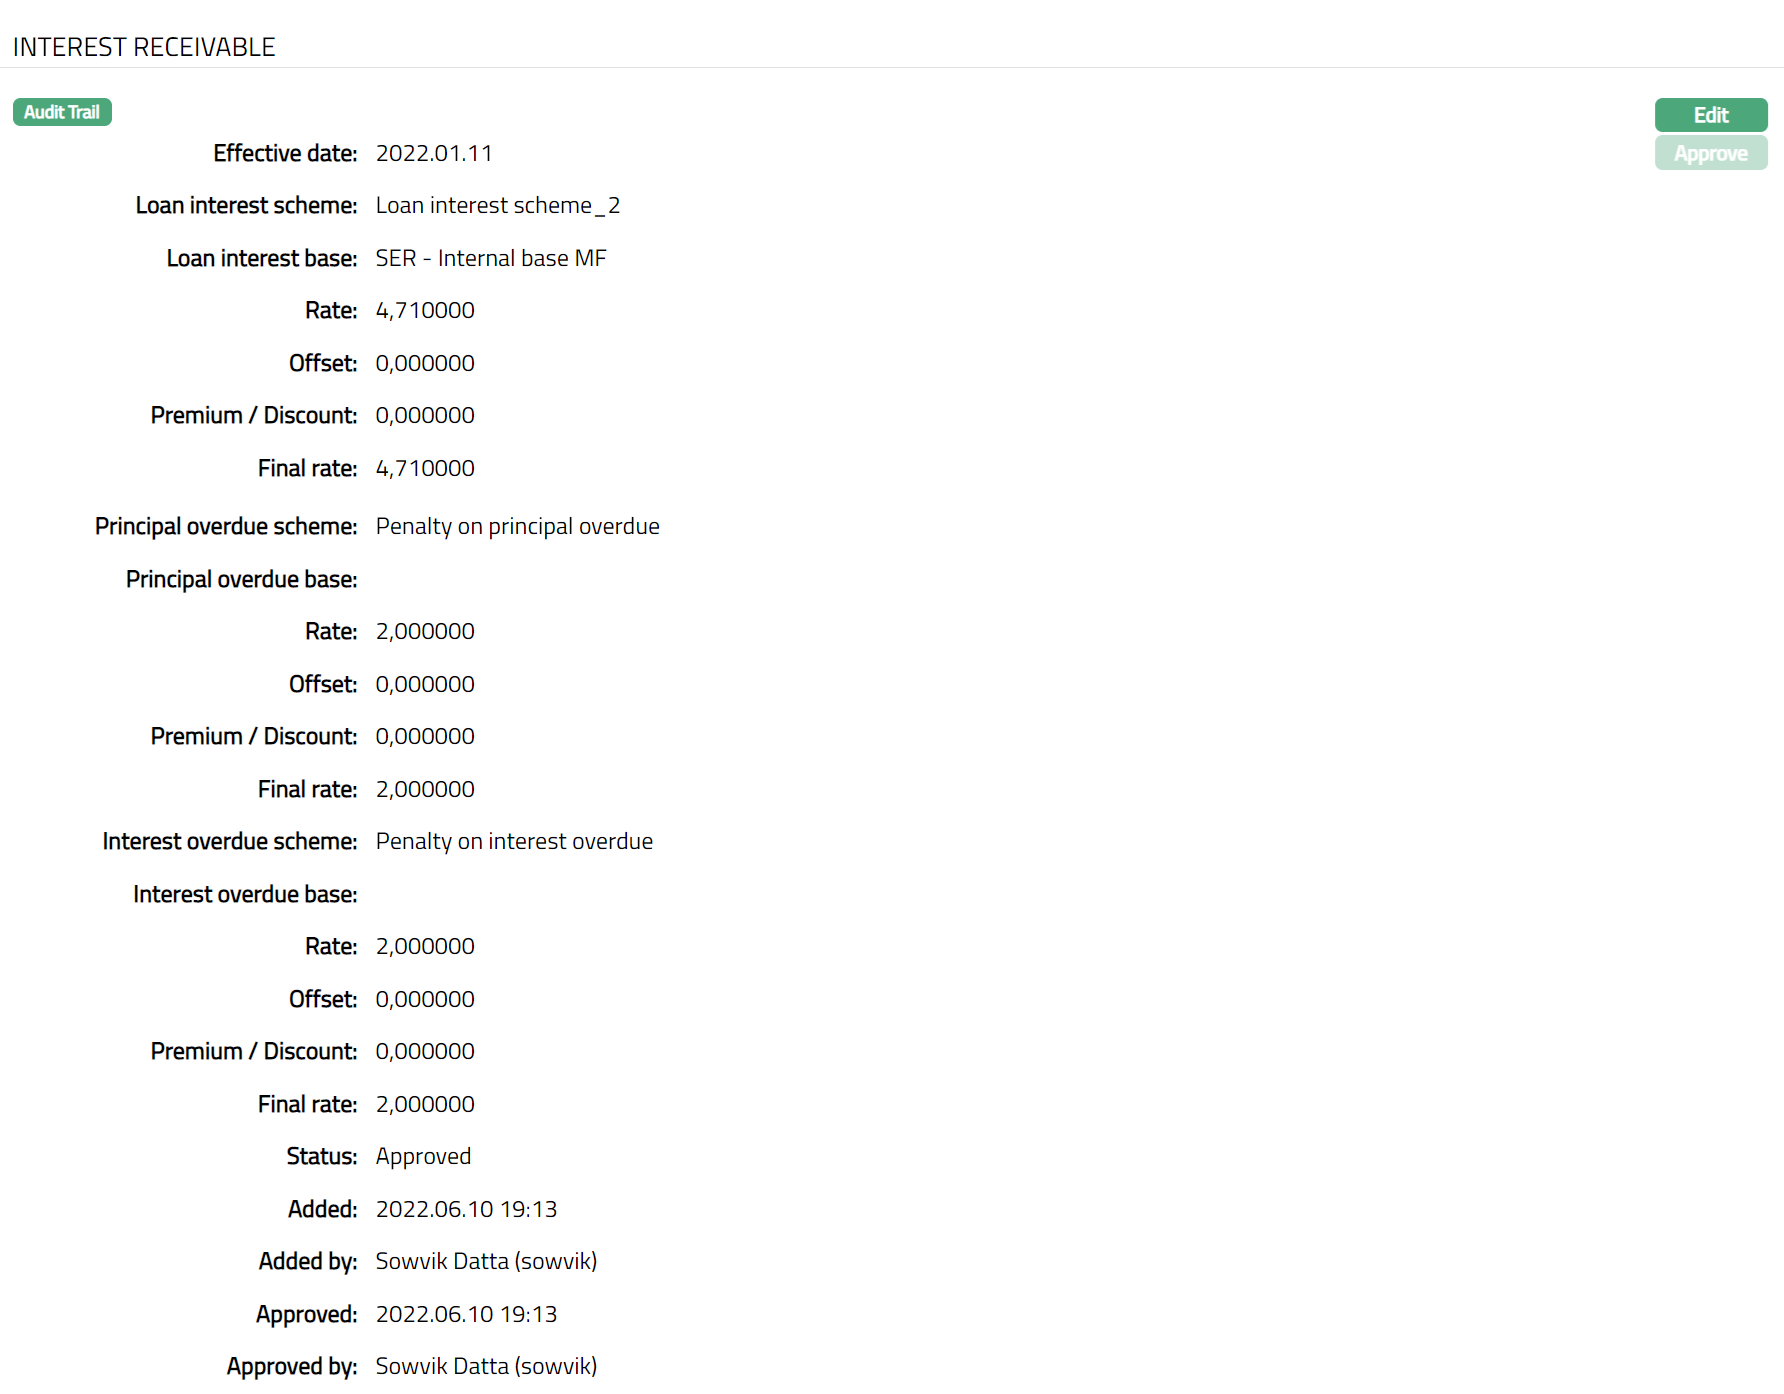
Functions: Edit, Approve
The additional fields that you can view in this tab are explained below:
Added field denotes the date on which the record was added.
Added by field denotes the name of the user who created the record.
Approved field denotes the date on which the record was approved. This is displayed only on approval.
Approved by field denotes the name of the user who approved the record. This is displayed only on approval.
Invoice Settings
The Invoice Settings tab allows you to view and edit the invoice settings for the loan. You can set the day on which the invoice has to be generated and the mode through which it has to be communicated to the Client. You can also add and maintain details of the invoice recipients.
Invoice-Settings
To view / edit the invoice settings,
1. Access Loan Account page. Click Invoice Settings tab and then Settings sub tab to view the details as per sample below. Details are defaulted from the Product chosen during Loan account creation; and these can be edited as described below.
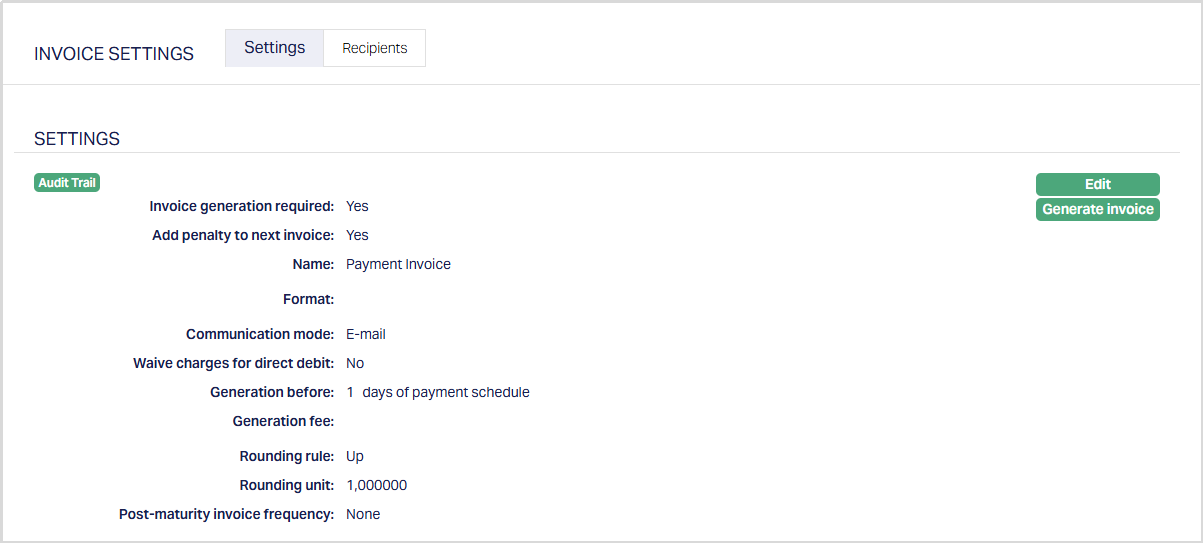
2. Click Edit. Edit Settings page appears.
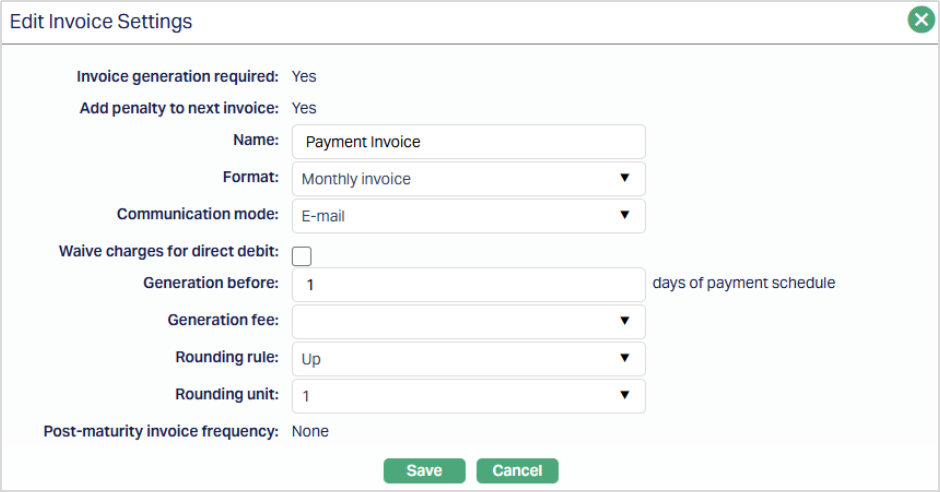
Note: If Account Status is Opened, all the fields except Invoice Generation Required, Add Penalty to Next Invoice and Post-maturity Invoice Frequency are editable. Once the Loan Account is Activated, only Generation Before, Rounding Rule and Rounding Unit fields are editable.
3. Invoice generation required option will be defaulted from the Product and is not editable. If this is marked as Yes, invoices will be generated for the Account based on the parameters that are set in the other fields in this tab. If this is marked as No, all other fields are not relevant and hence, will be disabled.
4. Add penalty to the next invoice will be enabled only if Invoice Generation Required = Yes. If this is marked as Yes, penalty will be included in the next invoice. If this is marked as No, penalty will not be included in the invoice. However, during repayment, the unpaid penalty till date for each schedule will be shown alongside other components due on the corresponding invoice; and will be allocated as per the repayment order to add the penalty charged for a Loan Account in the same invoice or in the next invoice.
- If Add penalty to the next invoice is marked as Yes, then for repayment of type Payment of invoice amounts; the penalty charges to be collected in the current schedule will not be added in the invoice for that schedule and it will be included in the invoice of the next schedule.
- If Add penalty to the next invoice is marked as No, then for repayment of type Payment of invoice amounts; the penalty charges to be collected in the current schedule will be included in the invoice for the current schedule.
5. Enter the name of the invoice in the Name field.
6. Select Format from the drop-down list of statement formats that have been maintained under Admin → System codes → Generic definition → Statement formats. It is the Format of the statement that is to be generated.
7. Select Communication mode from the drop-down list -- i.e. the manner in which you want to send the invoice. Available options are Data handoff, Email and Internet banking.
8. Waive charges for direct debit option allows you to control whether the Invoice Generation Fee should be applied for loan accounts that are repaid through Direct Debit.
This option is enabled only if Invoice Generation Required is marked as Yes.
- If this option is marked as Yes, Aura evaluates the loan account during invoice generation and waives the Invoice Generation Fee only when all the following conditions are satisfied:
- The loan account is configured with Repay Through method as Direct Debit
- A valid Direct Debit Agreement is available and its status is Activated or Accepted
- An Invoice Generation Fee is defined for the loan account
If all the above conditions are met, the Invoice Generation Fee is not applied and is treated as zero during invoice generation.
If any of the above conditions are not satisfied, the Invoice Generation Fee is applied as defined
- If this option is marked as No, the Invoice Generation Fee is applied for the loan account irrespective of whether a Direct Debit Agreement exists.
9. In the Generation before field, enter the number of days before payment due date on which the invoice has to be generated. If the Payment Schedule has a Principal or Interest component that is due, the invoice will be generated before that many days as specified here based on the Payment Schedule Due On Date.
10. Select required Generation fee from the drop-down. Aura will display the list of Charges from Admin → System codes → Charges where the charge is Active, Event-based and it is either Banded or Flat amount charge. In case of Banded charges, the charge amount will be calculated on the basis of the amount sanctioned. If there is a Generation fee defined here, the Charge amount is applied on the Loan Account whenever an invoice is generated for the account. The invoice Generation Fee is reflected in the invoice whether the charge account is linked to the Loan Account or not. If a Charge account is attached to the Loan Account, then the charge amount is debited from the charge account on invoice generation; else the charge is collected during repayment.
11. Select Rounding Rule from the drop-down list to indicate how the Invoice Amount should be rounded. Available options are Up and Down.
Note: Round Up: Round up if the digit you are rounding is followed by a 5, 6, 7, 8, or 9. For example, 48 rounded to the nearest ten is 50. Round down if the digit you are rounding is followed by a 0, 1, 2, 3, or 4. For example, 23 rounded to the nearest 10 is 20.
12. Rounding Unit is enabled only if the Rounding Rule is not None. Available options are 0.10, 1, 10 .
13. Post-Maturity Invoice frequency is defaulted from the Product and is not editable. It indicates how often the invoices will be generated for this Loan Account if the loan goes past its maturity date without being closed.
14. Click Save. The Settings page appears with the edited details.
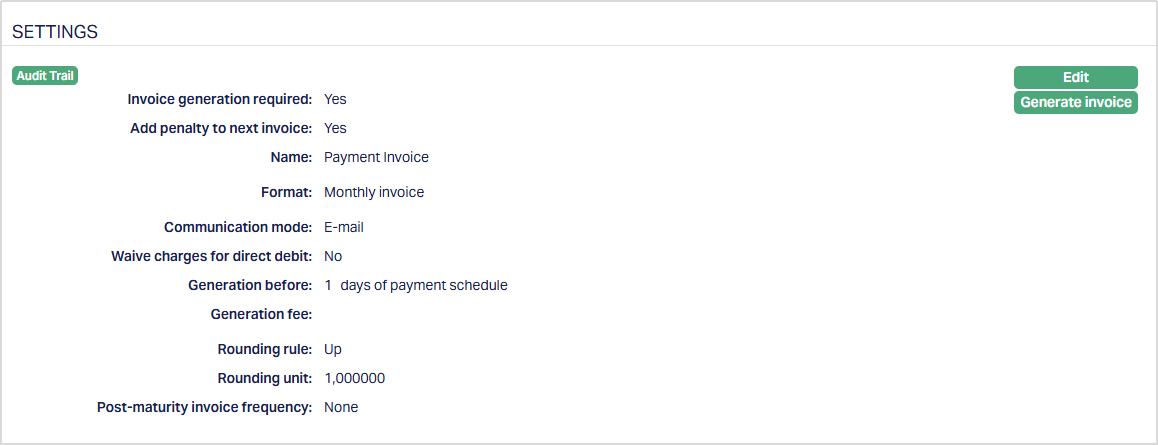
Functions: Edit, Generate Invoice
Generate Invoice
The Generate Invoice button allows you to manually trigger invoice generation for a Loan account without waiting for the End of Day (EOD) process. This is primarily used in scenarios such as restructuring or Change of Terms (COT), where an updated invoice is required immediately.
When triggered, Aura generates the invoice for the applicable upcoming payment schedule and makes it available instantly, without considering the configured “Generation Before” days.
To generate an Invoice,
1. Click on the Generate Invoice button. A confirmation message is displayed.
2. Click Yes to proceed. On successful execution, Aura displays a confirmation message indicating that the Invoice has been generated successfully.
The generated invoice is immediately:
- Available under the Payment Invoice tab
- Recorded in the Event tab with event type INVGEN and status as Success
Payment Invoice tab:

Event tab:

System Behaviour:
When you trigger invoice generation, Aura executes the invoice generation logic immediately using the same validations and processing logic as the EOD INVGEN batch, with the exception that the configured “Generation Before” days are ignored.
The system identifies the applicable schedule based on the upcoming due date (minimum Due Date greater than or equal to the current business date) and generates the invoice for that schedule.
Once generated:
- The invoice is attached to the Loan Account and available for viewing and download.
- The invoice will not be regenerated again during the EOD process for the same schedule.
- All downstream processes, including creation of Direct Debit collection entries (if applicable), are executed as part of the same action.
Button Availability:
The Generate Invoice button is available only when the loan account meets the required conditions. The button is enabled only when:
- The loan account is approved
- The loan is disbursed
The button is disabled when:
- The loan is not approved
- The loan is not disbursed
- The loan account is closed
Invoice generation will not proceed in the following scenarios:
- If an invoice has already been generated for the applicable upcoming schedule
- If the previous invoice’s PDD (Payment Due Date) has not yet been crossed
- If invoice generation is stopped for the account
Invoice generation is controlled based on schedule progression. The system requires the previous invoice’s PDD to be crossed before allowing generation of the next invoice, irrespective of whether the previous invoice is fully or partially paid.
Once the PDD has been crossed, invoice generation is allowed for the next schedule even if the previous invoice is only partially paid.
If an invoice has already been generated for the schedule, the system displays the message: “Invoice already generated, cannot proceed.”
Regeneration Behaviour:
If a previously generated invoice is cancelled (for example, through Change of Terms), Aura allows you to generate a new invoice for the same schedule.
Concurrency Handling:
If multiple users attempt to generate an invoice simultaneously for the same loan account, Aura ensures that only once invoice is generated and prevents duplicate creation.
Direct Debit Handling:
For loan accounts with Direct Debit:
- Invoice generation also triggers creation of the corresponding “Sent for Collection” entry
- Aura ensures that collection entries are created only once
- If the invoice is cancelled, the associated collection status is updated accordingly
Notes:
- The Generate Invoice option can be used even after the loan has passed its maturity date, allowing invoice generation for outstanding dues.
- The invoice generation process triggered through this option is treated as successful INVGEN execution and is recorded in the system accordingly.
- Any invoices generated using this option are excluded from regeneration during the EOD batch for the same schedule.
Invoice-Recipients
To view / edit the invoice recipients,
1. Access Loan Account page. Click Invoice Settings tab and then Recipients sub tab to view the details as per sample below. On loan creation, Send Invoice To will be automatically set to the beneficial owner associated with the Client for whom the loan was created and Use Default will be automatically set to Yes. Thus, the invoices for the loan will be sent to the beneficial owner's default address as maintained under CRM → Person / Organisation → Maintain.
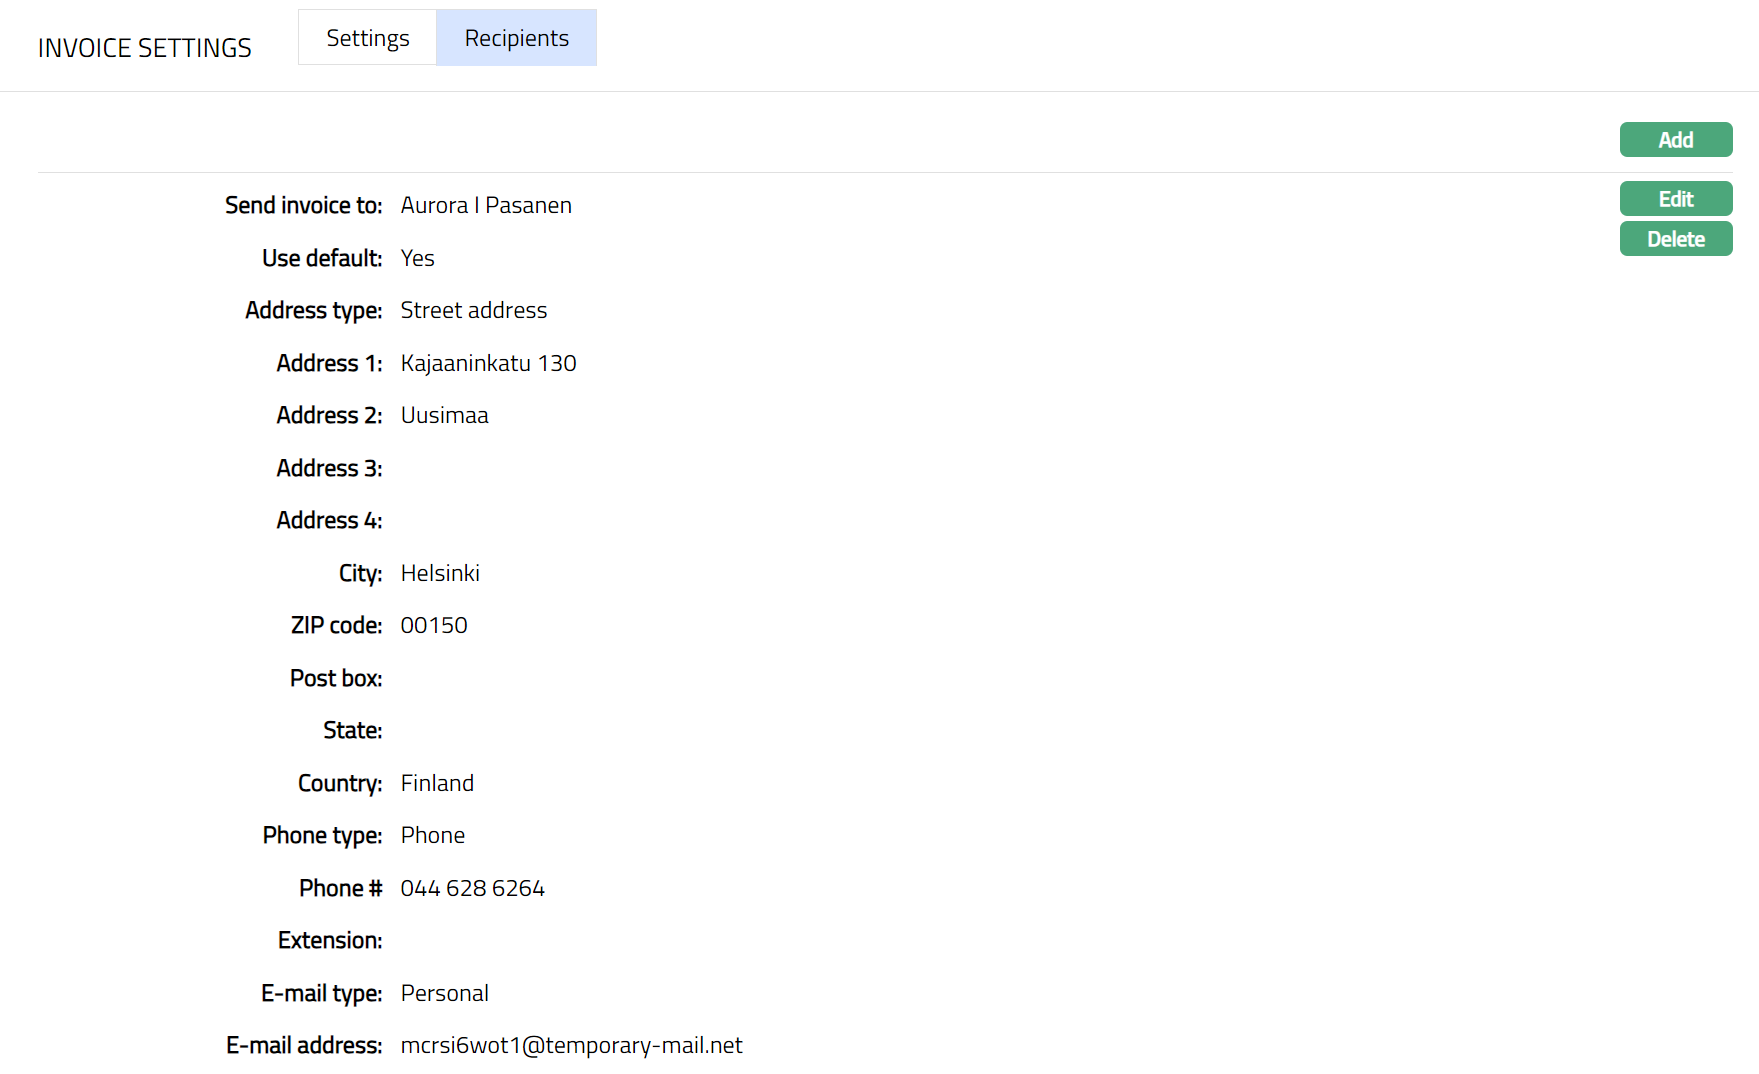
2. If you need to change the details, click Edit.
Edit Invoice Recipients page appears.
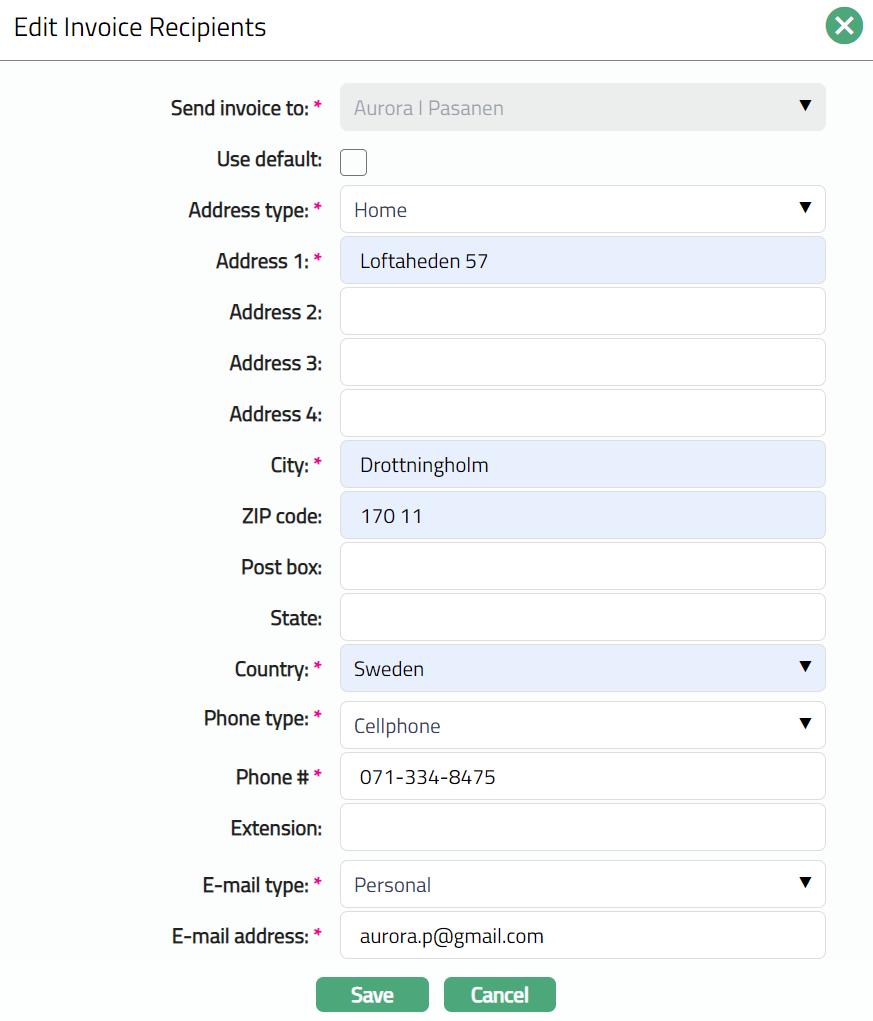
Except Send Invoice To, all fields are editable subject to the Use Default flag.
3. If you want the invoice to be sent to an address different from the default address of the recipient specified under Send Invoice To, you can uncheck the flag to enable the following fields and enter the required details.
Select the Address type from the drop-down list. The address types maintained under Admin → System Codes → Address details → Address types are displayed in the drop-down list.
Enter the address details of the receiver in Address 1, Address 2, Address 3 and Address 4 fields.
Enter the City of the receiver.
Enter the Zip code of the receiver.
Enter the Post box number of the receiver.
Enter the State of the receiver.
Select the Country from the drop-down list which is maintained under Admin → System codes → Generic definitions → Countries.
Select the Phone type from the drop-down list which is maintained under Admin → System Codes → Address details → Phone types.
Enter the Phone# of the receiver.
Enter the Extension of the receiver.
Select the E-mail type from the drop-down list which is maintained under Admin → System Codes → Address details → E-mail types.
Enter the E-mail address of the receiver.
4. Click Save. Recipient page appears with the updated details.
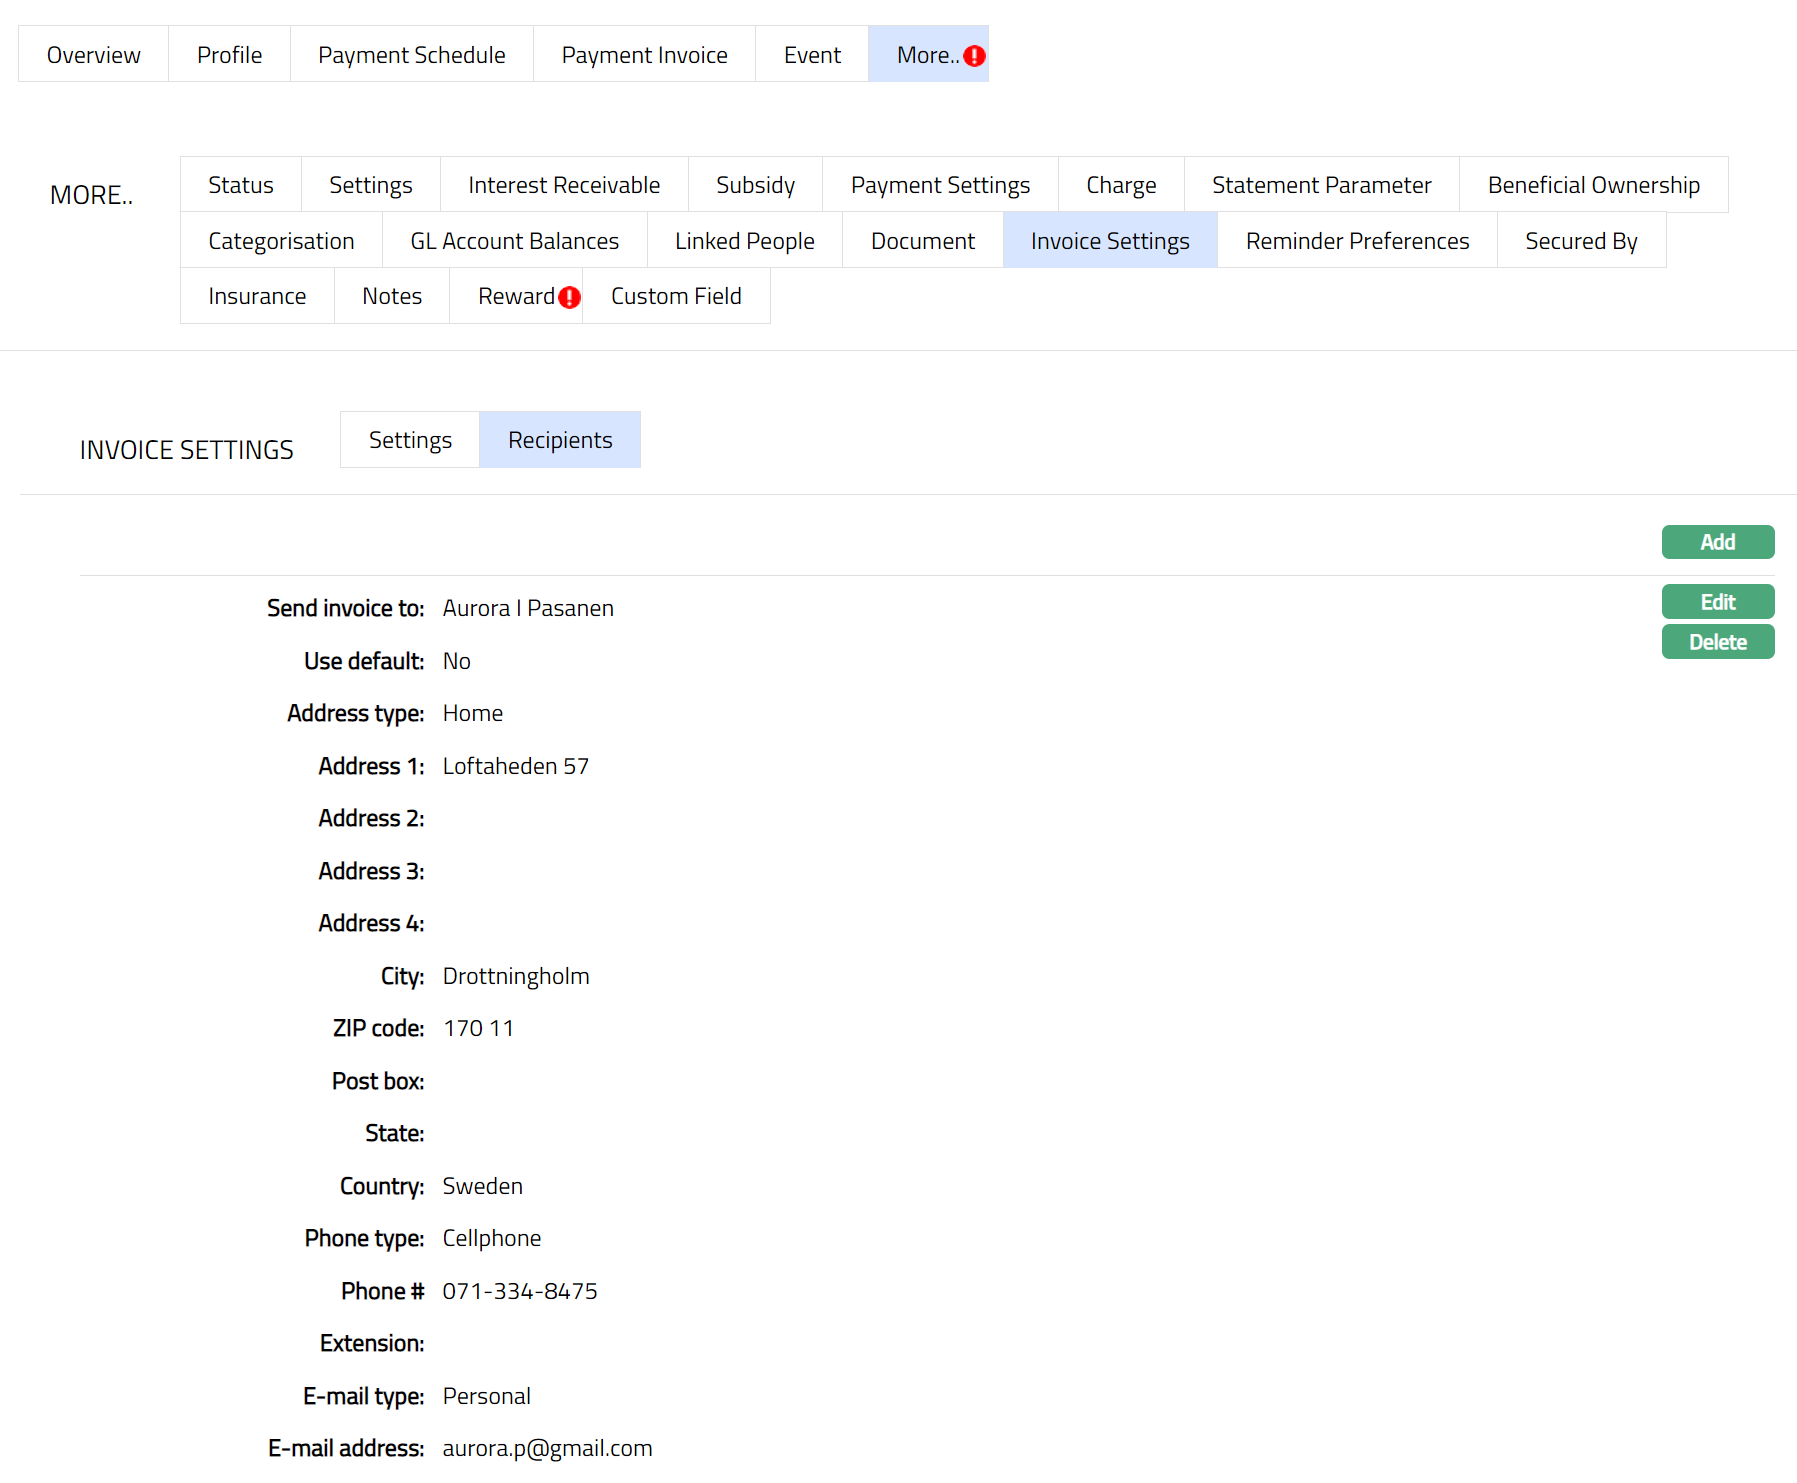
Function: Edit, Delete.
To Add a new Recipient,
1. Access Loan Account page. Click Invoice Settings tab and then Recipients sub tab, then click Add. Add Invoice Recipients page appears.
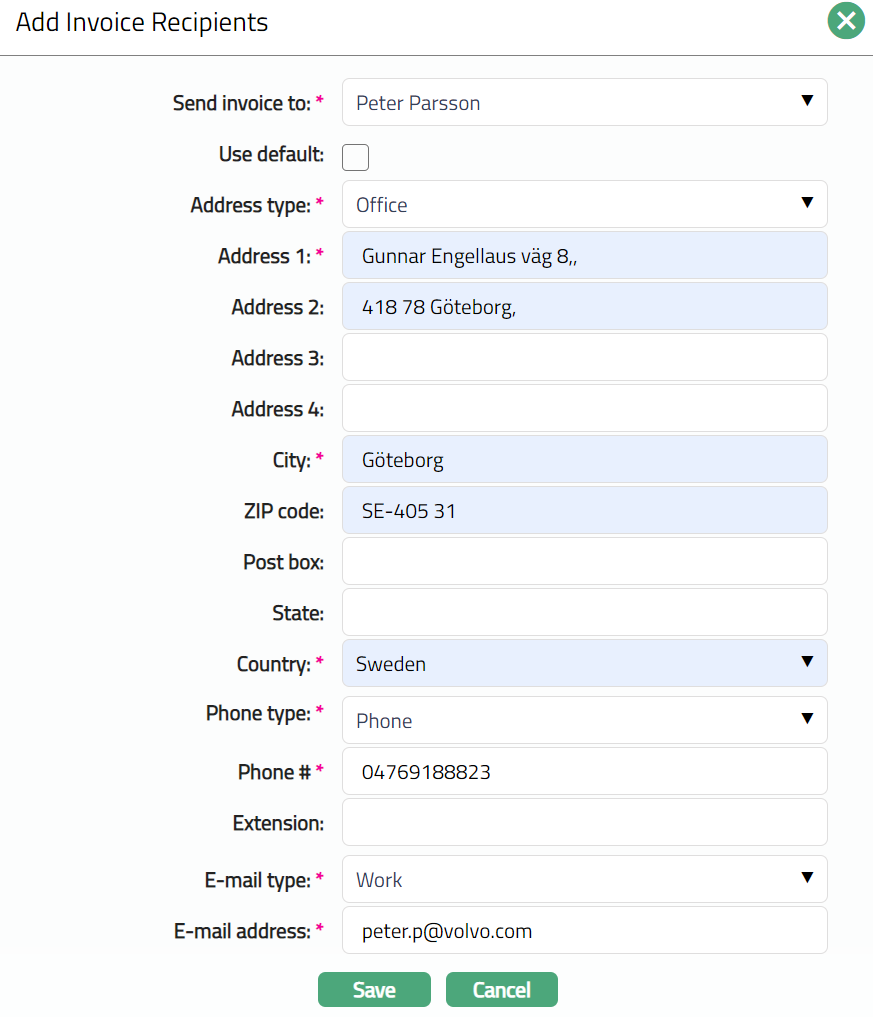
2. Send Invoice To will show the list of persons linked to the Client for which the loan was created. Choose the required person from the drop-down list.
3. Check Use Default flag if you want to use the default address of the linked person as maintained under CRM → Person → Maintain. Else, uncheck the flag and enter the other required details (see details under Edit section above)
4. Click Save. Recipients page appears with the added details.
Functions; Add, Edit, Delete
Secondary Collection
You use the Secondary Collection tab at the account level to control whether Secondary Collection should be applied for a specific loan account and to configure the Beneficial Owners from whom the collection should be attempted.
This configuration acts as an exception layer over the product-level setup. While the product defines whether Secondary Collection is allowed, the account level allows you to selectively suspend the functionality or define collection recipients and repayment methods for that specific account.
Secondary Collection at the account level is applied only if it is enabled at the product level.
To configure Secondary Collection,
1. Access the Loan Account page. Go to Invoice Settings tab and select Secondary Collection sub-tab.
2. Click Edit. Edit Secondary Collection page appears.
Note: The Edit button is enabled only when Allow Secondary Collection = Yes at the product level and when you have the required access rights. If Secondary Collection is not enabled at the product level, the Edit button is disabled.

3. You use the Edit option to modify the Secondary Collection behaviour for the loan account.
When you click Edit, Aura opens the Edit Secondary Collection page, where you can update the Suspend Secondary Collection setting.
Suspend Secondary Collection: This field determines whether Secondary Collection should be executed for the selected loan account. You can select Yes or No.
4. Yes: When you select Yes, Secondary Collection is suspended for the account. Aura will:
- Exclude the account from Secondary Collection processing
- Not initiate any collection attempts from Beneficial Owners
Even if all other conditions are met (overdue invoices, status match, threshold exceeded), the account will not be considered for Secondary Collection.
5. No: When you select No, Secondary Collection is allowed for the account. Aura will:
- Consider the account for Secondary Collection processing
- Attempt collection from configured Beneficial Owners
This is subject to:
- Product-level configuration
- Status conditions
- Collection scope
- Threshold validation
Impact of Product vs Account Selection
The value selected here does not independently control Secondary Collection. It works in combination with the product-level configuration.
Case 1: Product = No
If Allow Secondary Collection = No at the product level:
- Secondary Collection is completely disabled
- Suspend Secondary Collection is automatically set to Yes and is not editable
- You cannot change it
Even if you attempt to allow it at account level, Aura will not process Secondary Collection.
Case 2: Product = Yes + Account = Yes
If:
- Product allows Secondary Collection
- You select Suspend Secondary Collection = Yes
Then:
- Secondary Collection is disabled only for this account
- Other accounts under the same product are not affected
This acts as an exception or override to stop processing
Case 3: Product = Yes + Account = No
If:
- Product allows Secondary Collection
- You select Suspend Secondary Collection = No
Then:
- The account becomes eligible for Secondary Collection processing
- Aura proceeds with evaluation based on:
- Status trigger
- Collection scope
- Threshold conditions
6. Click Save. The Secondary Collection page appears with the edited details.
Functions: Approve, Edit, Maintain Detail
Status of the record is Pending till it is approved by another user. On approval, the tab status is set to Approved and the red bubble disappears.
Maintain Detail
You use the Maintain Details option to configure the Beneficial Owners from whom Secondary Collection should be attempted and to define the repayment method for each recipient.
This section becomes available only when Suspend Secondary Collection is set to No at the account level. If Suspend Secondary Collection is set to Yes, the Maintain Details option is disabled.
To add details,
1. Click on the Maintain detail button. The Details tab will appear. On account creation, Beneficial Owners may be defaulted, but details are not configured until maintained.
2. Click Add. The Add Secondary Collection details page appears.
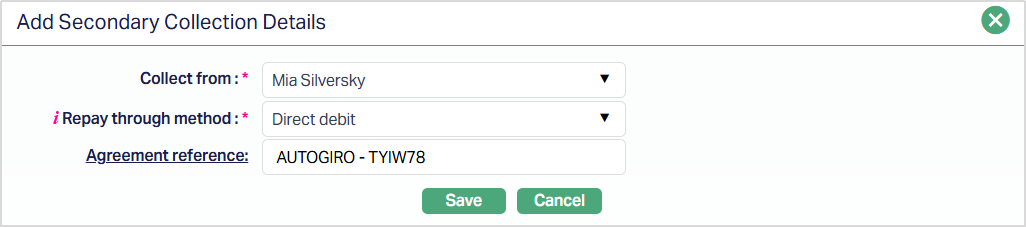
3. Collect from - This field displays the Beneficial Owner selected for Secondary Collection. Only clients linked as Beneficial Owners to the loan account are available for selection.
Aura does not allow:
- Selection of the primary borrower
- Duplicate selection of the same Beneficial Owner
Note: Each Beneficial Owner can be configured only once for Secondary Collection.
4. Repay through method - This field defines how Aura will initiate collection from the selected Beneficial Owner. You can select one of the following options:
Direct Debit: When you select Direct Debit, Aura initiates collection using the Beneficial Owner’s mandate. In this case:
- You must provide a valid Agreement Reference
- The agreement must be active and approved
- The agreement should be linked to the Beneficial Owner
During processing:
- Secondary Collection records are picked up by batch processing
- Outward debit instructions are generated and sent for processing
Payment by Invoice: When you select Payment by Invoice, Aura generates a Secondary Invoice for the Beneficial Owner. In this case:
- Aura sends invoice details to the Beneficial Owner
- Payment is expected externally
Aura does not use the Secondary Invoice reference for payment processing. Payments must be made using:
- Loan account number
- Main invoice reference
Use Default: (Applicable for Payment by Invoice)
This option determines how contact details are populated for invoice delivery. When Use Default is selected:
- Aura uses the default address, email, and phone details from the Beneficial Owner’s CRM record
When Use Default is not selected:
- You must manually enter the contact details
- Aura allows you to provide address, phone, and email details
As per the sample screenshot shown below.
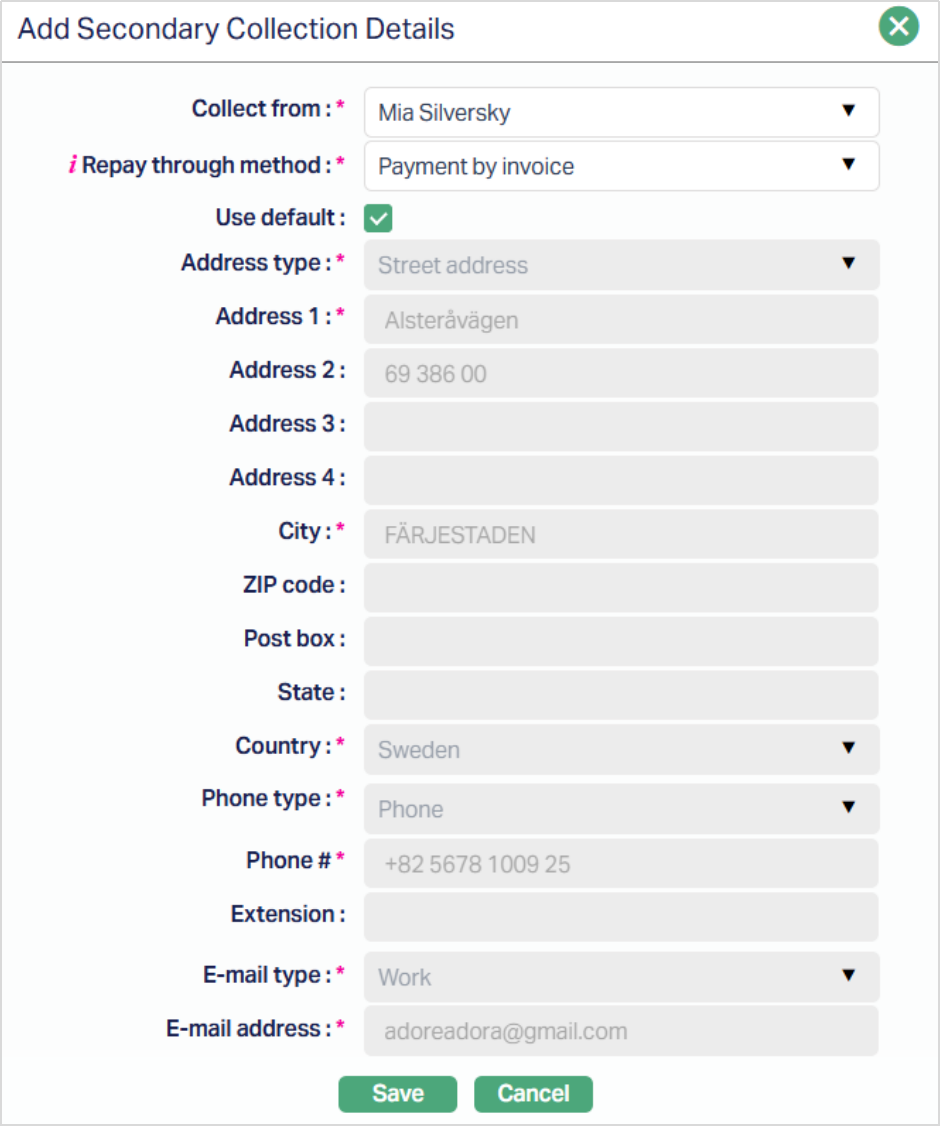
5. Click Save. The Details tab appears with the added details.
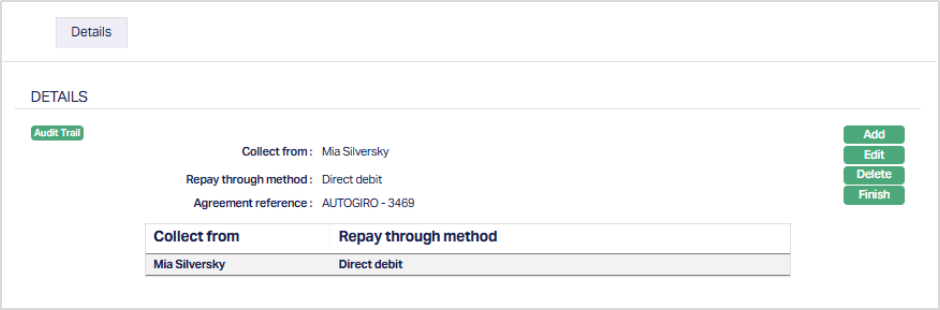
To edit Details,
1. Click Edit. The Edit Secondary Details page appears.
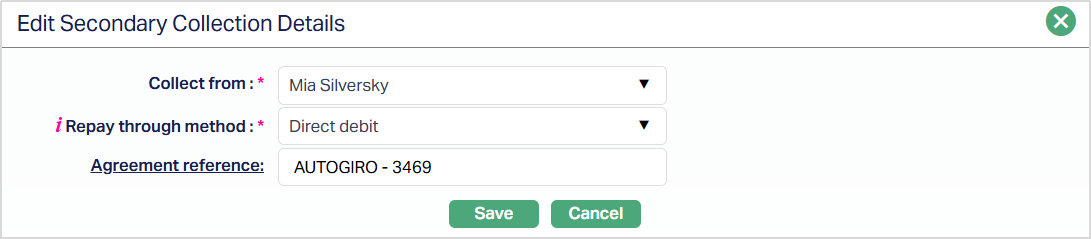
All fields are editable based on the selected repayment method.
2. Click Save. The tab appears with the edited details.
Functions: Add, Edit, Delete, Finish.
Linked People
This tab allows you to link people -- say, Signatory or Guardian -- to the Loan Account.
To add linked people,
1. Access Loan Account page and click Linked People tab.

2. If you want to link a person who has already been created as a Person under CRM → Person Maintenance, then click Add. Aura will display Add Linked People window with the list of Persons maintained in Aura.
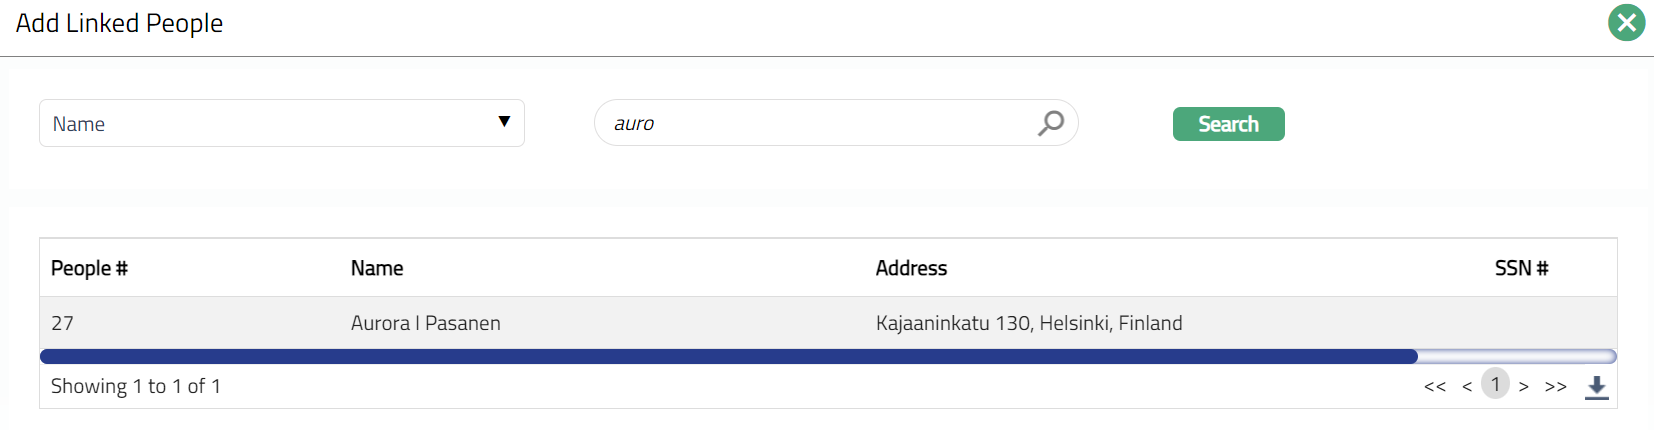
3. Select the required Person. Linked People page appears with the selected person details.
4. Person role field will be blank. To input Person role for the existing person, click edit and select role of the Linked person in relation to this Account using the Person role drop-down, which shows the list of Person Roles maintained under Admin → System codes → Generic definitions → Person role.
5. If you want to enter the details of a Person who has not yet been created as a Person under CRM → Person → Maintain, then click New. New Linked People page appears.
6. Enter First name of the person.
7. Enter Middle name of the person.
8. Enter Last name of the person.
9. On entering the First Name, Middle Name and Last Name, Aura derives Full name of the person.
10. Enter Title of the person that is to be prefixed to the person's First name.
11. Select role of the Person in relation to this account using the Person role drop-down, which shows the list of Person Roles maintained under Admin → System codes → Generic definitions → Person role.
12. Select Gender of the person from the drop-down list.
13. Enter Date of birth of the person.
14. Select Domicile of the person i.e., country of residence from the drop-down list.
Note: The list of countries for Citizen and Domicile should have been maintained under Admin → System codes → Generic definitions → Countries.
15. Select Language of the person from the drop-down list maintained under Admin → Generic definitions → Languages.
16. Click Save. Linked People page appears with the added New People details.
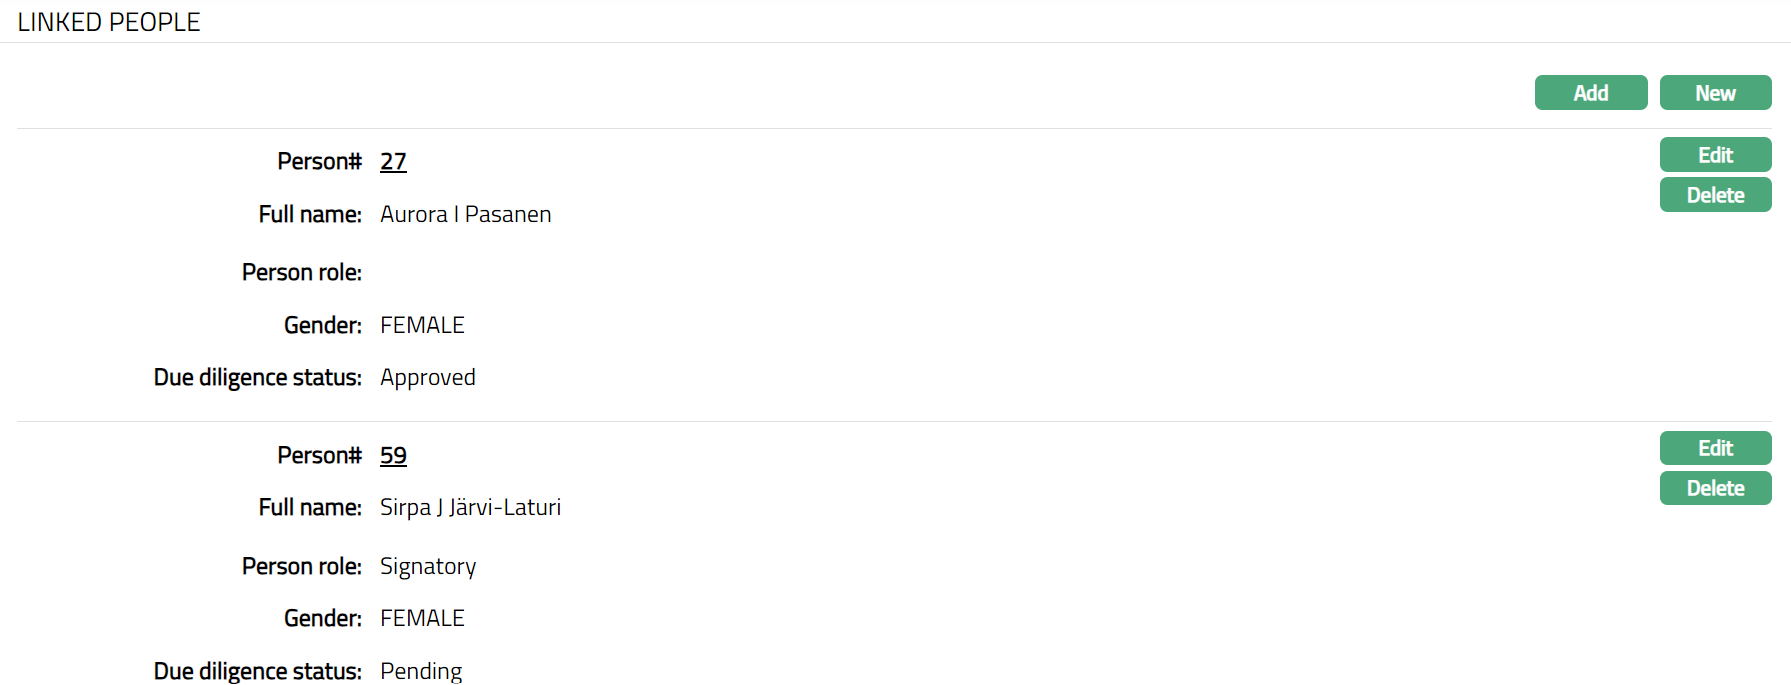
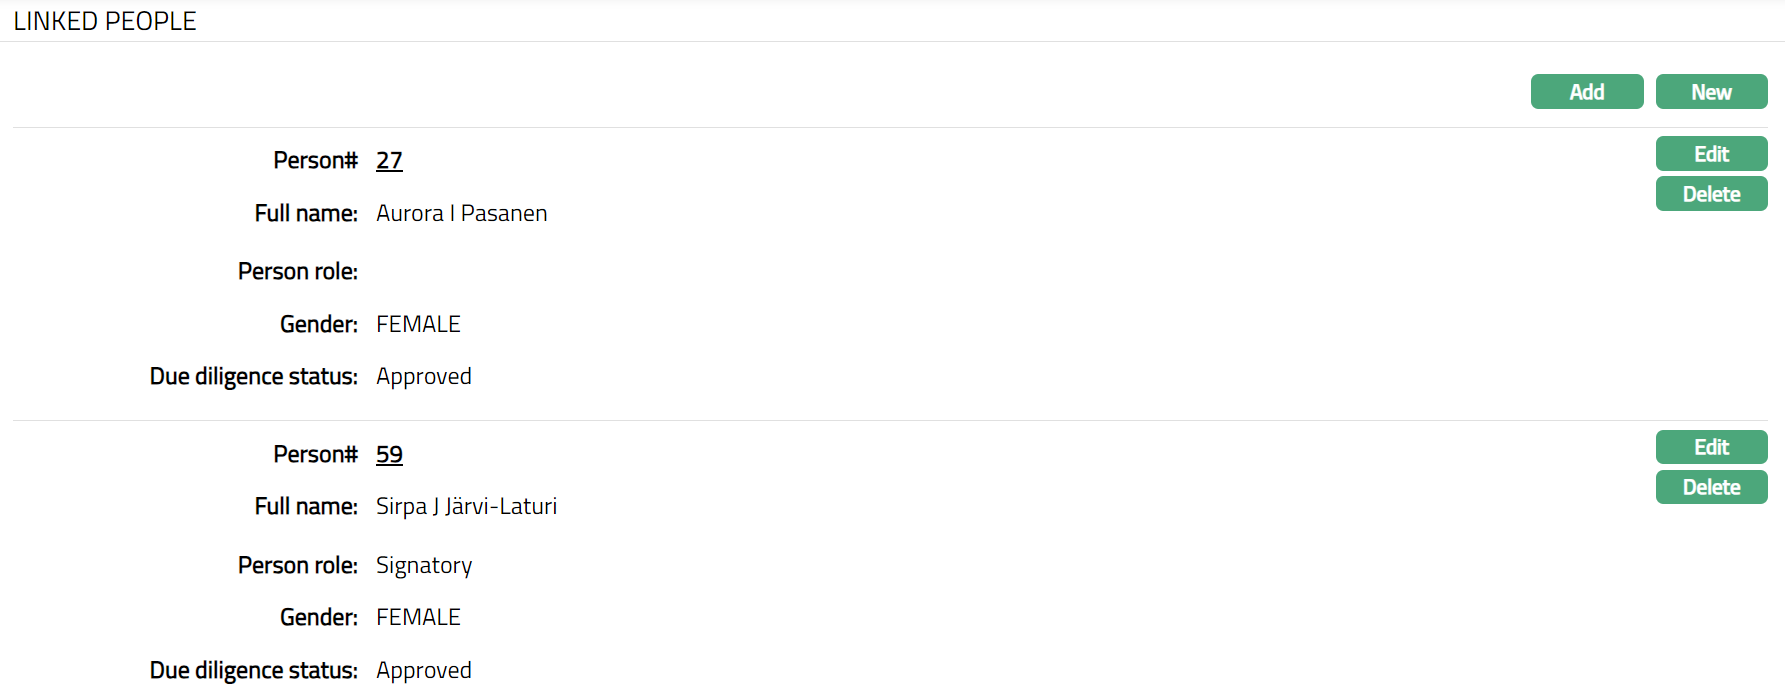
Functions: Add, New, Edit, Delete.
Delete: You can delete a linked person by a clicking Delete button. When you click Delete button, Aura displays an alert message. On confirmation, Aura will delete the linked person.
To edit linked people record,
1. Click Edit. Edit Linked People page appears.
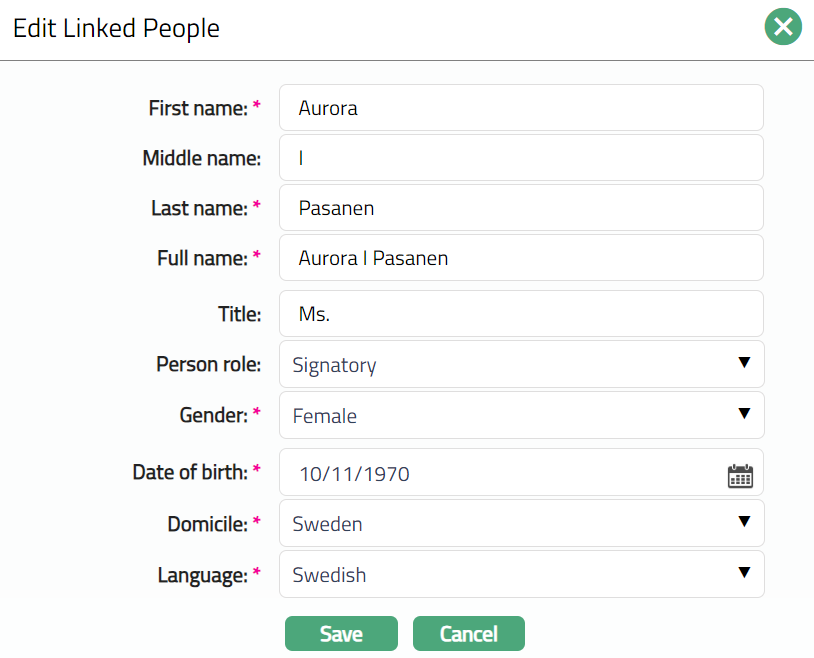
Note: All fields are editable.
2. Make the required changes and click Save. Linked People page appears with the edited details.
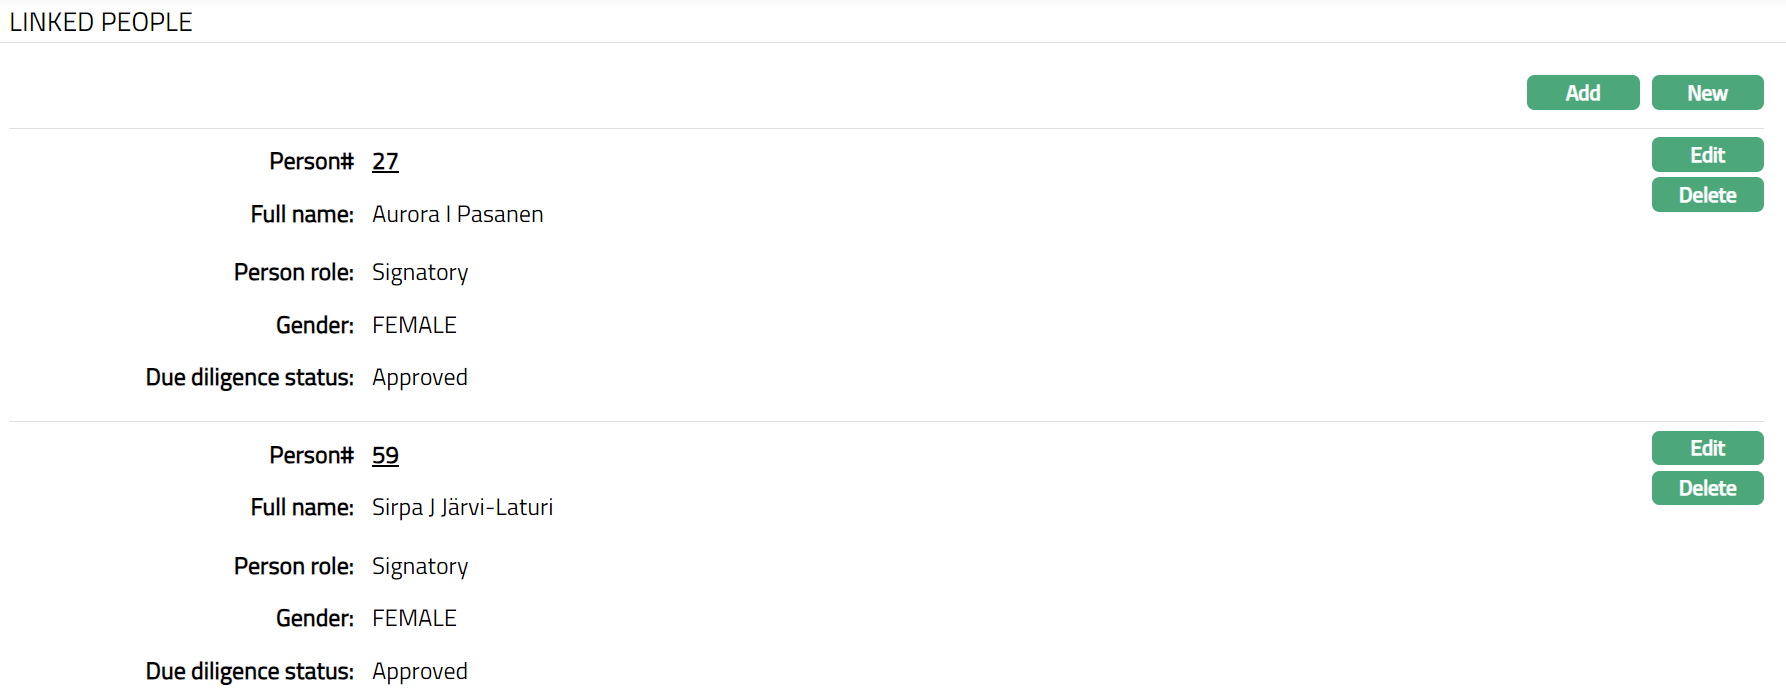
Functions: Add, New, Edit and Delete
Notes
The Notes tab allows you to maintain the notes entries for the Loan Account.
To add Notes,
1. Access Loan Account page and click Notes tab.

2. Click Add button. Add Notes page appears.
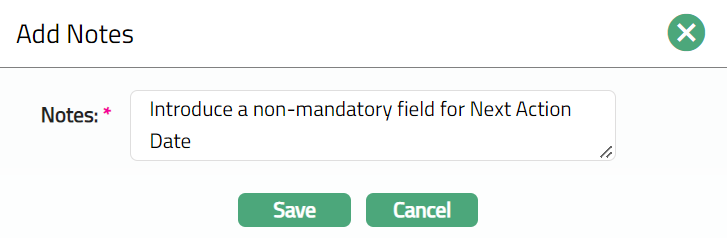
Note: You can add multiple notes as required. Sample screen shot shown below.
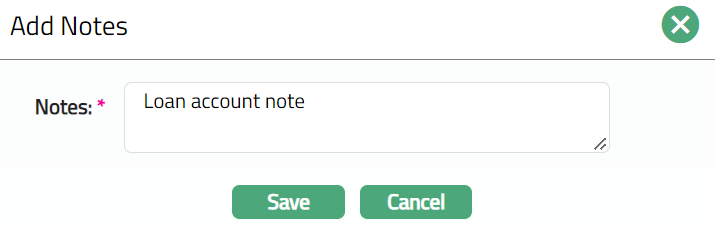
3. Enter the contents for the notes in the Notes field. It is used to record the general details of the discussion so that the same may be recalled later.
4. Click Save. The Notes page appears with the added details with Status field displaying open as per the sample screen shot shown below.
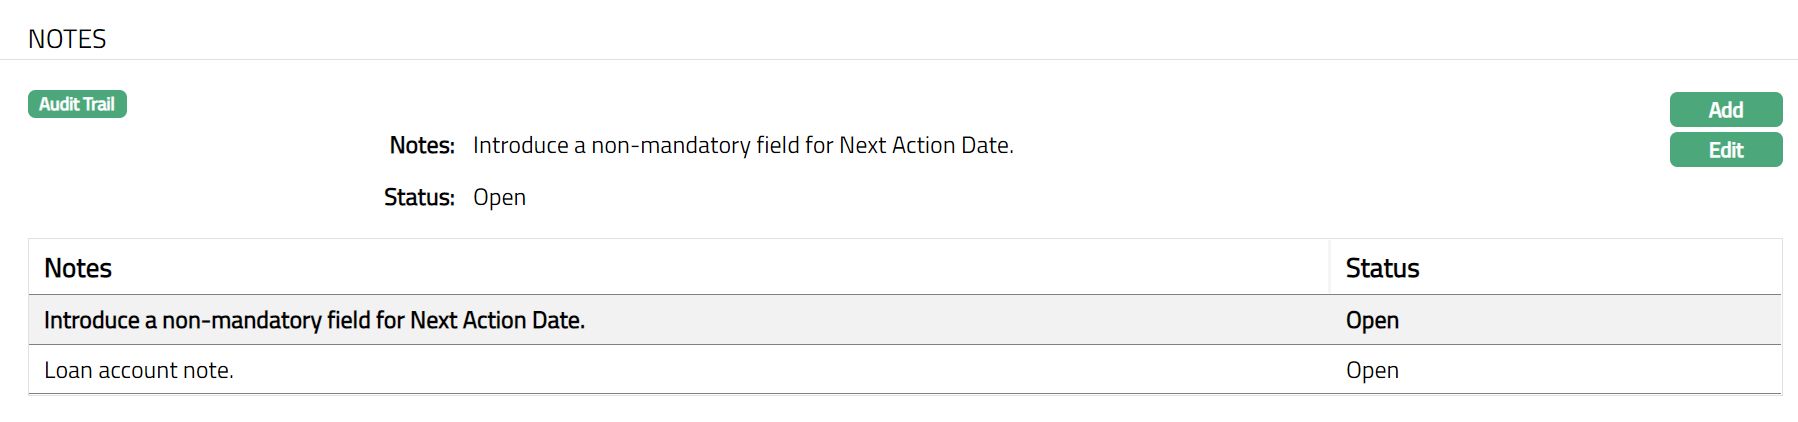
To edit Notes,
1. Click Edit button. Edit Notes page appears.
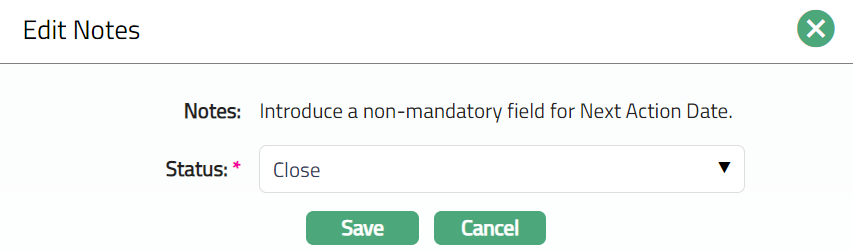
Note: Only Status field is editable.
2. Select Status from the drop-down list. Available statuses are Open and Close. Note: By default, the Status field will select as Close.
3. Click Save. The Notes page appears with the edited details displaying the Status as Closed for the selected note as per the sample screen shot shown below.
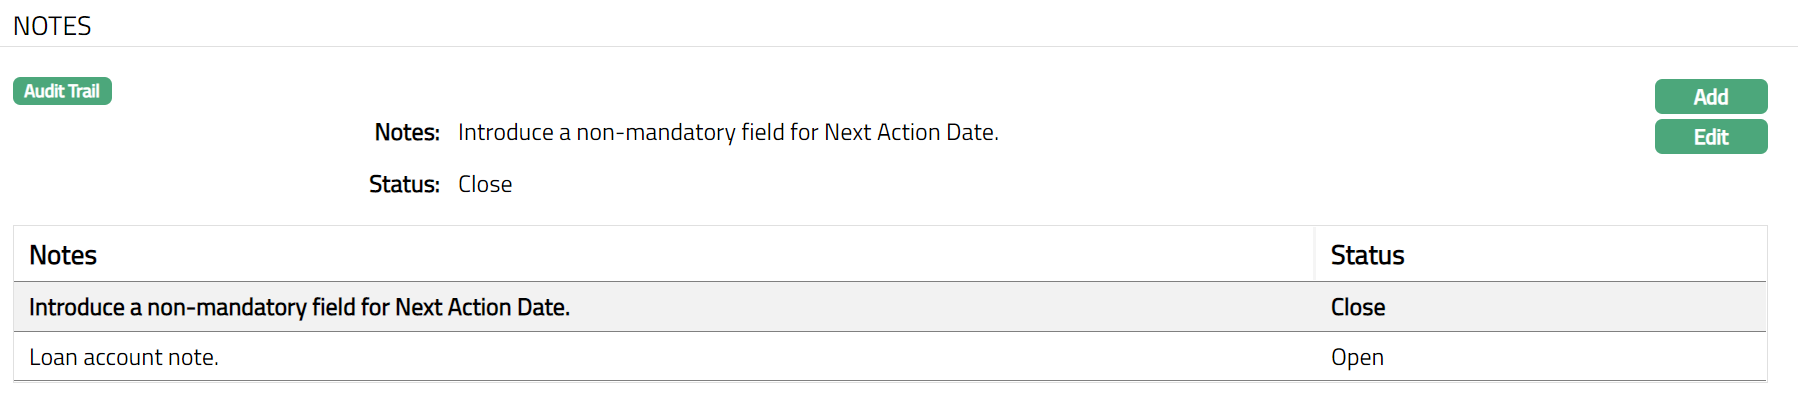
Functions: Add, Edit
Payment Plan
The Payment Plan tab allows you to offer a temporary payment arrangement for borrowers without changing the original loan schedule. This is especially useful for borrowers going through short-term financial difficulties, where a reduced repayment structure is agreed upon for a specific period.
Aura ensures that the difference between the scheduled and reduced repayment amounts is earmarked and added back to the loan through capitalization, without changing the loan's tenor.
Functional Overview
You can create a Payment Plan for a specific loan account for a defined period, during which Aura invoices the borrower according to the plan’s defined amounts. The original repayment schedules continue to exist in Aura, and the plan acts as a temporary billing arrangement without altering those schedules.
You can specify the Principal and Interest amounts payable during the Payment Plan. The difference between these values and the original schedule is earmarked for capitalization. Any unpaid penalties at the time of activation are marked as non-payable and capitalized when the plan ends, while unpaid charges remain as outstanding.
A Payment Plan automatically ends on the defined end date, but you can also terminate it early using the Suspend option. Payment Plan–related documents can be generated through configured templates in Aura.
Comparison : Payment Plan, Restructuring and COT
| Criteria | Payment Plan | Restructuring | COT |
|---|---|---|---|
| When can it be initiated | Can be initiated only when Current Balance > 0 | Can be initiated only when Current Balance > 0 | Can be initiated even when Current Balance = 0 |
| Impact on Schedules | Existing schedules remain unchanged. Temporary schedules are used for invoicing during the Payment Plan period. Any unpaid Principal, Interest, and Penalties as of approval are earmarked for curing so the unpaid amount becomes zero. | Past fully paid schedules remain unchanged; past unpaid ones are deleted; partly paid ones are adjusted to the paid amount. | Current and past schedules remain unchanged. Future schedules are regenerated based on the new Change of Terms setup. |
| Impact on Invoices | Existing invoices remain unchanged. Invoices generated after plan approval follow the Payment Plan schedules. | Unpaid invoices are cancelled, paid ones remain unchanged, and partly paid ones are adjusted. | Past invoices remain unchanged. Future invoices are based on the regenerated schedules. |
| Waiver | Not allowed | Possible – overdue charges, penalties and interest can be waived | Not allowed |
| Schedule Dates / Frequency of P / I | Cannot be changed | Can be changed | Can be changed through COT – Payment Terms |
| Maturity Date | Cannot be changed | Can be changed | Can be changed through COT – Payment Terms |
| Accounting entry | Only when Capitalization occurs | Accounting entry only if there is a waiver of Penalty on Principal / Interest Overdue and Interest components. Principal cannot be waived | No accounting entry |
| Product Types allowed | Both Mortgage&Loans and Marketplace Loans | Both Mortgage & Loans and Marketplace Loans | Both Mortgage & Loans and Marketplace Loans |
To add a new Payment Plan,
1. Access Loan Account page and click on Payment Plan tab. As soon as the account is created, this tab will show no records, as there are no payment plans attached to the account.
The Add button opens the Payment Plan entry screen, allowing you to define the plan duration and repayment amounts. The button is enabled only if the following conditions are satisfied -
The Loan has been disbursed (Disbursed Amount > 0)
There are no other pending records for Disbursement, Repayment, Reversal, Restructuring, Product Novation and Change of Terms.
The loan is not under Impairment.
The loan has not already been Restructured.
There is no other Payment Plan ongoing for the account.
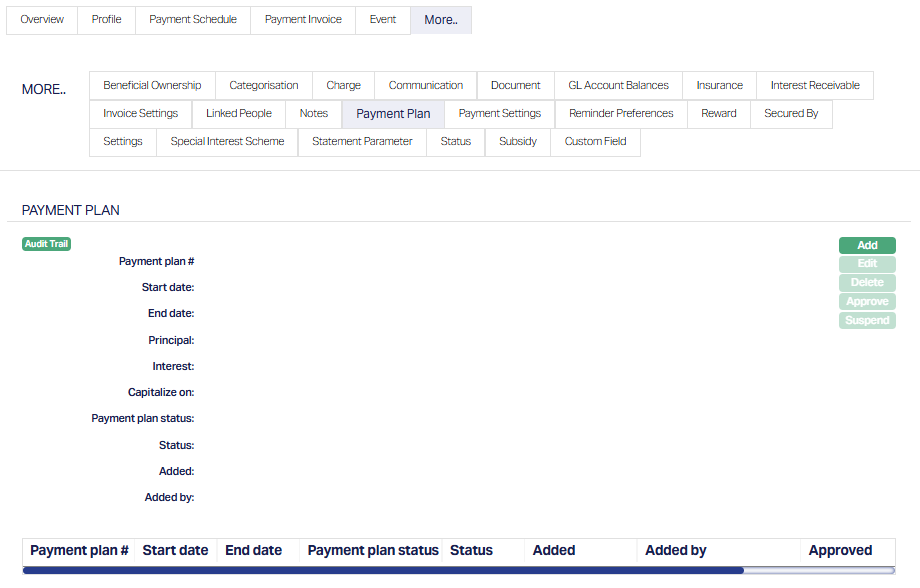
2. Click Add. Add Payment Plan page appears.
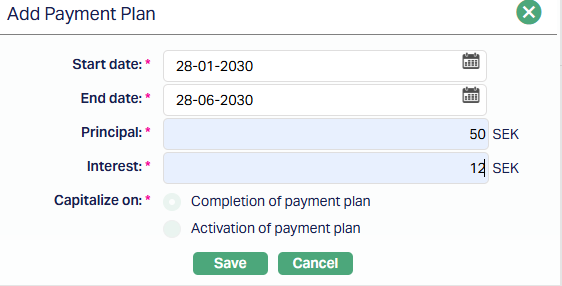
3. Start date is the date on which the Payment Plan begins. It must be a valid schedule due date (Principal, Interest, or Annuity), and can be in the past, present or future - even if an invoice has already been generated. However, the Start Date cannot be later than the Maturity Date of the loan.
4. End date indicates when the Payment Plan should end. The End date must be equal to or greater than the Start date but less than the loan's Maturity Date. It must align with a valid Principal or Interest schedule date.
- End Date can be the same as Start Date if you want to have a Payment Plan for a single schedule (e.g., a Payment Free month)
5. Enter the Principal amount that the borrower is expected to pay during the Payment Plan period. This must be >= 0 and must be <= the minimum unpaid Principal amount in the actual Payment Schedule for the Payment Plan period. If there is a negative Principal in the Payment Schedule during the Payment Plan period, Aura will prevent continuation.
6. Similar to Principal, Interest field captures the Interest amount payable during the Payment Plan period. It must be >= 0 and must be <= the minimum unpaid Interest amount (i.e., sum of interest-related components like Interest, Interest Intermediate and Interest Difference) in the actual Payment Schedule for the Payment Plan period. If there is a net negative Interest (i.e., sum of interest-related components like Interest, Interest Intermediate and Interest Difference) in the Payment Schedule during the Payment Plan period, Aura will prevent continuation.
7. Capitalize on indicates when the difference between the regular and Payment Plan amounts will be capitalized (added to the outstanding principal). Currently, this is set to Completion of Payment Plan and is disabled. The second option, Activation of Payment Plan, is for future enhancement.
8. Click Save. The Payment Plan page appears with the details you have entered; and the Status shows Pending subject to auto-approval settings.
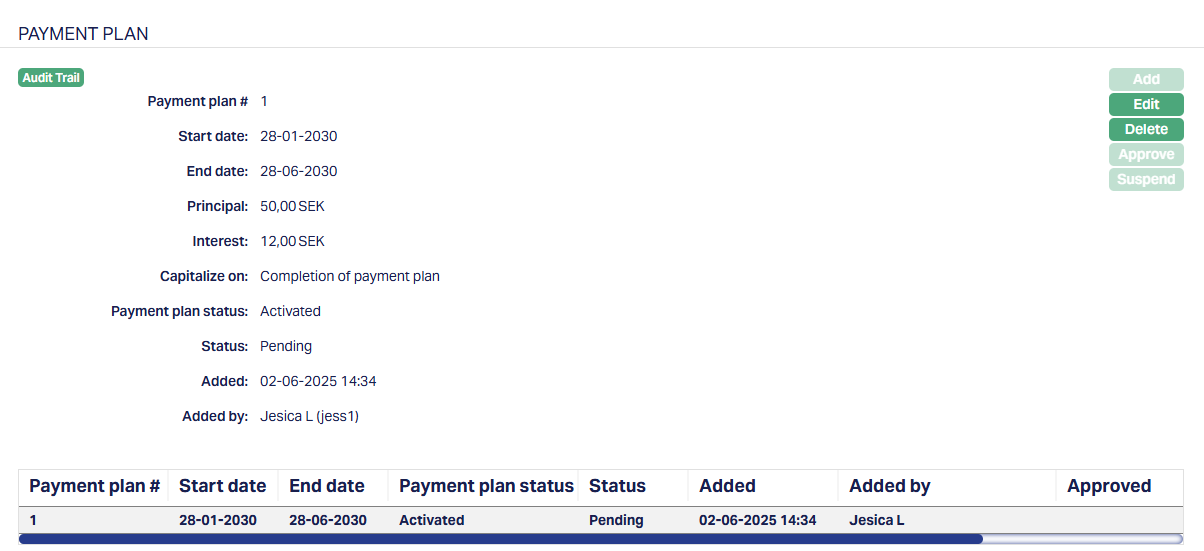
Functions: Add, Edit, Delete, Approve, Suspend.
Note: Status is shown as Pending until it is approved. On approval, the Status will change to Active. Once the status has been Approved, all buttons are restricted. Make sure you enter and edit all the necessary fields before Approval.
Edit
The edit button is available only when the Payment Plan status is Pending, and the current user is the one who created the plan.
To edit a Payment Plan,
1. Click on Edit. Edit Payment Plan page appears.
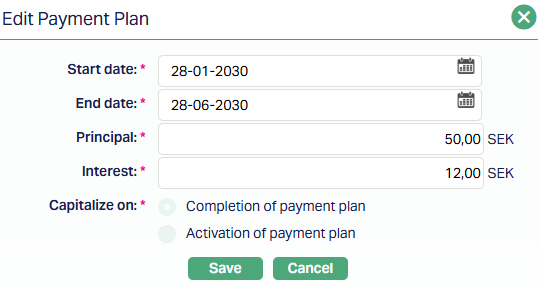
Note: All fields are editable except Capitalize On, which is fixed to Completion of Payment Plan and is currently "read-only."
You can modify the fields as long as the plan is still in Pending status and you're the user who created it.
2. Click Save. Payment Plan page appears with the edited details.
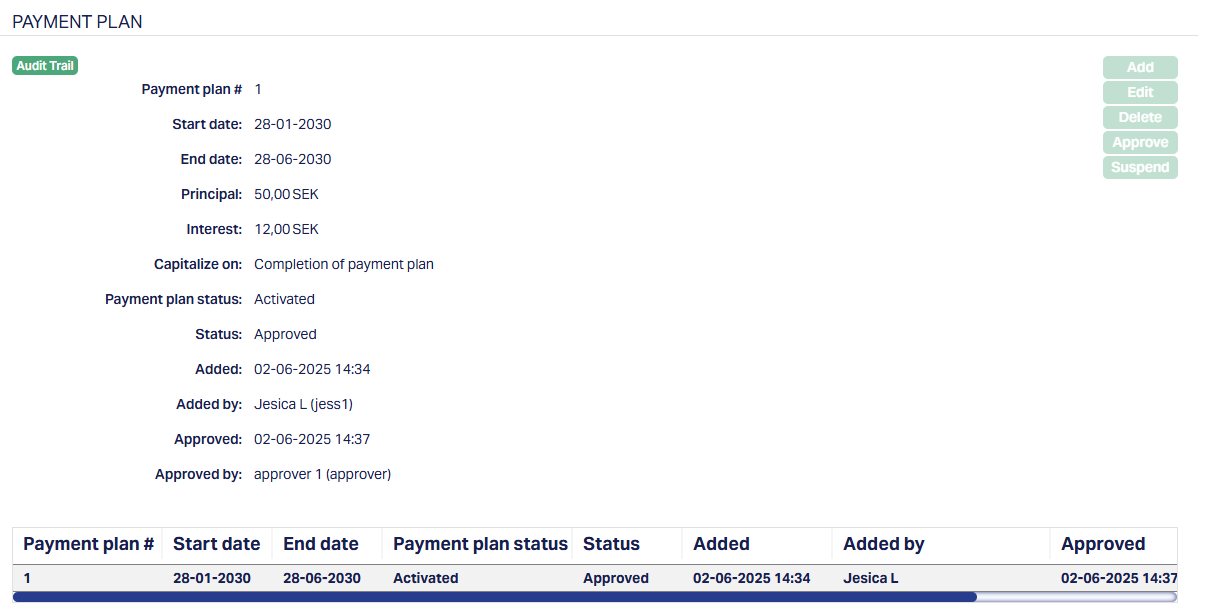
The Delete button is also enabled only for Pending plans. It removes the record after user confirmation. Once a plan is approved, deletion is no longer allowed.
The additional fields that are shown are:
1. Payment Plan Status is the current state of the of the Payment Plan. It will be either: Activated - Currently Active, Suspended - Suspended by the bank or due to policy or Expired - All schedules have been processed or due.
2. Status indicates the current state of the Payment Plan record. It will be either: Pending - If the record is waiting for approval or Approved - If the plan has been reviewed and finalized.
3. Added shows the date and timestamp when this Payment Plan was created and Added by displays the user ID and full name of the person who created the record.
4. Approved shows the date and time when the record was approved and Approved by displays the user ID and full name of the person who approved the novation.
Approval Behaviour
Once a Payment Plan is saved in Pending status, it must be approved by a different user.
On approval, Aura determines how the plan should behave based on the types of schedules included in the selected period. The approval process triggers earmarks for curing, invoice adjustments, and either keeps the plan active or expires it immediately.
1. If the entire Payment Plan is related to Past Schedules - If all selected schedules fall into the past or are future-dated schedules where invoices have already been generated, Aura immediately expires the plan after activation. The Record Status is updated to Approved, and the Payment Plan Status becomes Expired.
Aura earmarks the full unpaid amount for each schedule in the plan period. (Except for charges). Any unpaid penalties as on the activation date are marked as non-payable and are capitalized automatically when the Payment Plan ends.
Related invoices are marked as fully paid.
The original End Date remains unchanged.
Aura performs all expiry-related processing, including capitalization and schedule regeneration.
Capitalization entries are posted with Booking Date = Current Booking Date; and Value Date = Due Date of the schedule where the capitalized amount is added to the Outstanding Principal.
Note: If the Payment Plan includes only past schedules or schedules where an invoice has already been generated, the Principal and Interest fields are disabled. This means you cannot modify these amounts for those schedules, as they are already due.
Prohibition of Manual Payments and Excess Payments:
Manual payments (partial or full) are prohibited while the Payment Plan is active.
Excess payments are not allowed, even if the configuration normally allows excess payments. This guarantees that payments follow the defined plan and prevents excess payments from causing reconciliation issues.
2. If the Payment Plan includes both past schedules and future schedules - If the plan period spans both past schedules and future schedules that are yet to be invoiced, Aura keeps the plan Active after approval and applies different earmark logic for each part of the period.
For past schedules and schedules that are already invoiced (even if future-dated), Aura earmarks the full unpaid amount. (Earmark = Full unpaid amount)
For Future schedules where invoices have not yet been generated, Aura earmarks only the difference between the original due amount and the Payment Plan amount. (Earmark = Schedule due minus Payment Plan amount)
Any invoices already generated for schedules within the plan period are marked as fully paid.
The plan remains in Activated status until it is either suspended or reaches its defined End Date. Capitalization and schedule adjustments are handled at the time of suspension or expiry.
Suspension of a Payment Plan
The Suspend button is used to terminate an ongoing Payment Plan before the defined End Date. The button is enabled only when the record status is Approved, the Payment Plan status is Activated, and the Current Booking Date is later than the plan's Start Date.
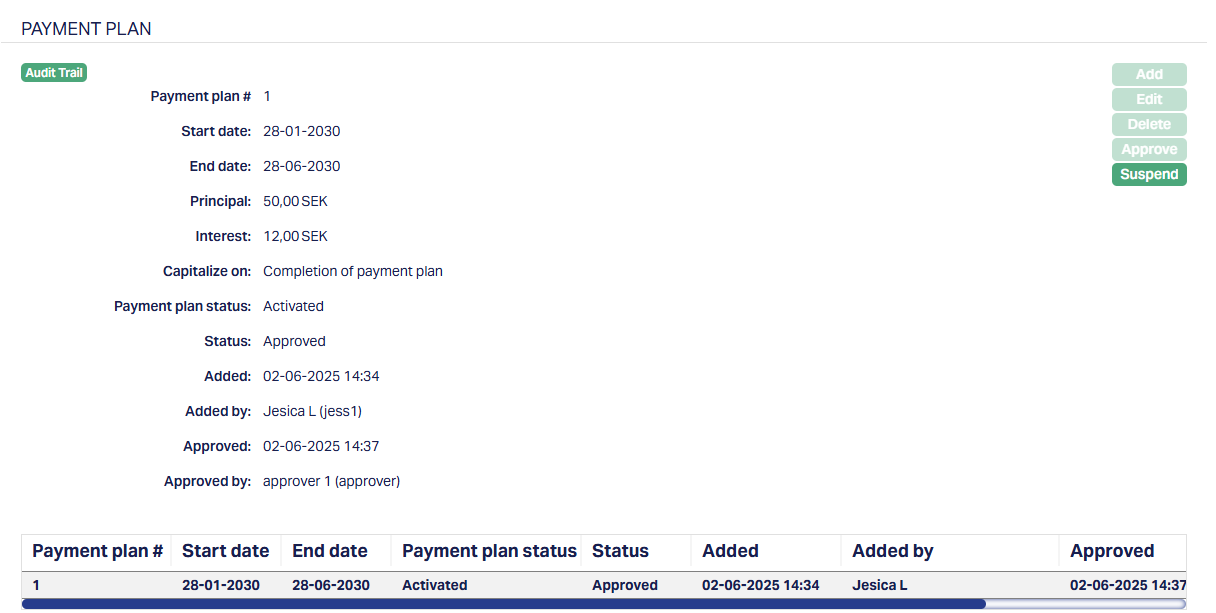
When you click Suspend, Aura checks if any invoices have already been generated for future schedules within the plan period. If no future invoices are found, the system proceeds with the suspension. On suspension, the Payment Plan status is updated to Suspended, while the record status remains Approved.
To suspend a Payment Plan,
1. Click on the suspend button on the Payment Plan's main page. The confirmation for suspension pop-up will appear.
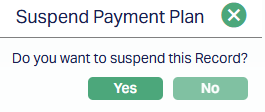
2. Click on Yes. The Payment Plan page appears with the updated details - the Payment Plan status will change from Activated to Suspended and the Status will change from Approved to Pending .
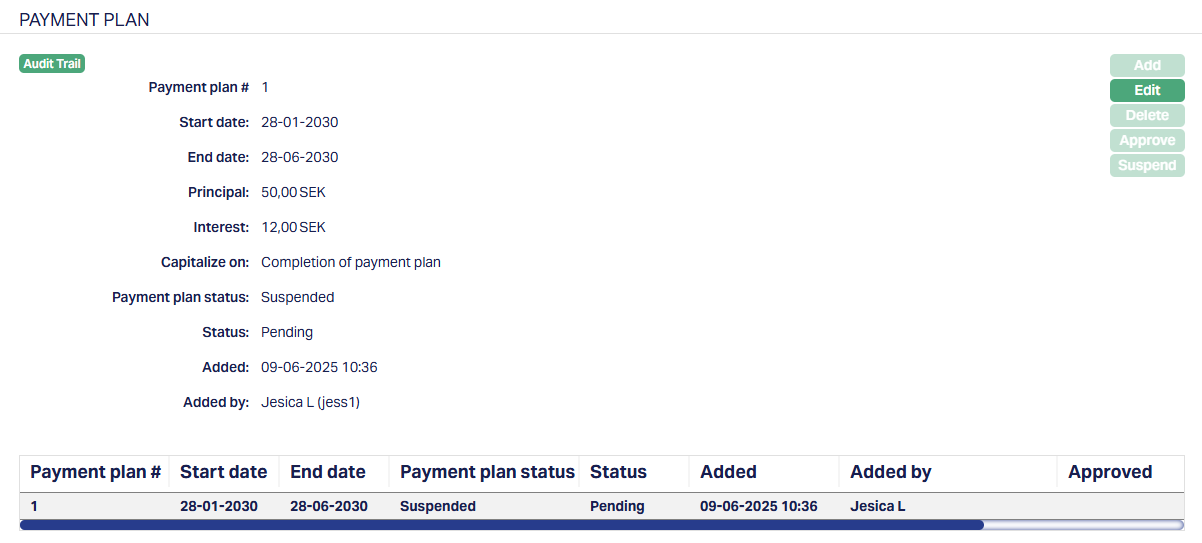
3. On Approval, the Payment Plan status remains suspended while the status is changed to Approved.

On successful suspension, aura inserts a LNPPSU event.
The user is able to suspend without any error messages or popup when future schedules have already been invoiced. Once a Payment Plan is suspended, it cannot be reactivated. If a new arrangement is needed, a fresh Payment Plan must be created. However, Aura allows a second Payment Plan only after all dues under the previous plan have been fully paid.
Invoices
Once a Payment Plan is approved, Aura updates all existing and future invoices within the plan period to align with the defined Payment plan values.
For invoices that were already generated before approval - whether the invoices were for past or future-dated schedules - Aura applies the Earmark for Curing amounts and updates the invoice as if it has been fully paid.
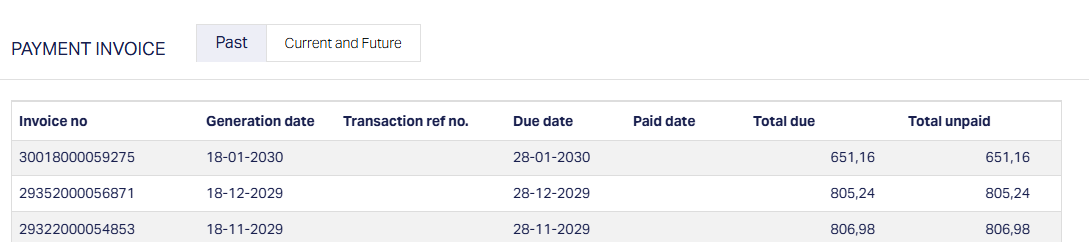
Aura also continues to generate invoices for the remaining schedules in the Payment Plan period, even if the Principal or Interest defined in the plan is zero. This ensures invoice tracking remains consistent and curing amounts can still be referenced. In such cases, the invoice reflects the plan values and is adjusted through automated curing processes.
For any invoice linked to a schedule within the Payment Plan period, the system recalculates the Unpaid Amount as : Unpaid Amount = Due minus Paid minus Waived minus Earmarked for Curing
This updated unpaid value is then used in all subsequent validations, repayments, and simulations. Aura ensures that the invoice accurately reflects what remains truly due after accounting for the curing logic introduced by the Payment Plan.
If the Approval is for a Suspended Status - If the Payment Plan includes only past schedules or future schedules with already generated invoices, Aura does not keep the plan active. Upon approval, the plan is directly marked as Suspended. The Record Status becomes Approved, and the Payment Plan Status becomes Suspended, without entering the Activated state.
In this case, Aura processes the plan as if it were suspended: earmark for curing and capitalization are triggered, invoices are updated, and future schedules are regenerated based on the updated Outstanding Principal. The original End Date remains unchanged and is not reset to the Current Booking Date.
This automatic suspension ensures immediate regularization of past dues. After approval, the plan becomes read-only, and all action buttons are disabled.
Payment Plan Completion -- Suspension or Expiry
When a Payment Plan ends - either because it reaches its End Date (Expiry) or is manually terminated early (Suspension) - Aura performs a set of automated actions as part of the End-of-Day (EOD) batch process. It handles both expiry and suspension in a consistent way, ensuring that earmarks for curing and capitalization are accurately applied, and future repayment schedules are regenerated based on the updated loan balance.
If there is a gap between the Payment Plan End Date and the next uninvoiced schedule, Aura inserts an Interest Difference (INT DIFF) component into the next schedule to account for interest accrued during the gap period.
1. Capitalization of Earmarked Accounts - Aura capitalizes all applicable amounts earmarked during the Payment Plan period, including - Interest, Penalty on Principal Overdue and Penalty on Interest Overdue. These amounts are added to the loan's Outstanding Principal through automated accounting entries. No capitalization is done for Principal, as it is already part of the loan balance.
All capitalization entries are posted during batch processing with the following details:
Transaction Code = Capitalization of curing (New TC)
Event Code = LNCURC
Booking Date = Current Booking Date.
Value Date = Due Date of the schedule where the Outstanding Principal is adjusted.
A single Transaction Reference Number is used for all related entries.
2. Update to Payment Plan and Events -
If the plan expires (LNPPEX), Aura updates the Payment Plan Status to Expired and retains the Record Status as Approved
If the plan is suspended (LNPPSU), the End Date is updated to the Current Booking Date. If future invoices have already been generated, Aura first updates the End Date to match the latest due date among the invoiced schedules. This ensures capitalization happens correctly before suspension is processed.
In case of suspension, Aura inserts a new LNPPSU event with zero amount to log the action and deletes any pending expiry event (LNPPEX) that was scheduled for a future date.
3. Regeneration of Future Schedules - Aura identifies the next uninvoiced schedule after the revised End Date and uses it as the starting point for recalculating all subsequent schedules.
The basis amount for regeneration includes - The Outstanding Principal as of the plan's End Date and All the capitalized Interest and Penalties.
The tenor of the loan remains unchanged.
For annuity and amortized loans, schedules are recalculated using the Revise Annuity method.
The applicable interest rate is the current rate on the Loan Account.
All regenerated schedules will have Earmark for Curing = 0.
Note: If the Payment Plan ends early (e.g., through Suspension), some future schedules may still show Earmark for Curing. However, Aura only considers past schedules when calculating capitalization. All future schedules - whether earmarked or not - are deleted and fully regenerated.
Additionally, if there are unpaid amounts during the Payment Plan period, penalties continue to accrue as usual, but these are not earmarked or capitalized when the plan ends.
Reminder Preferences
The Reminder Preferences tab allows you to add, view and edit the preferences based on which the reminders are sent to Client or any linked person informing about the Loan account, for recovering their dues. As soon as the Loan Account is created, the reminder added at the Product level is (are) defaulted and is displayed under this tab. Later, apart from the defaulted reminder, any other reminders that are added at the account are listed under this tab.
To add a Reminder,
1. Access Loan Account page and click Reminder preferences tab. If any reminders are added at the Product level are displayed by default.
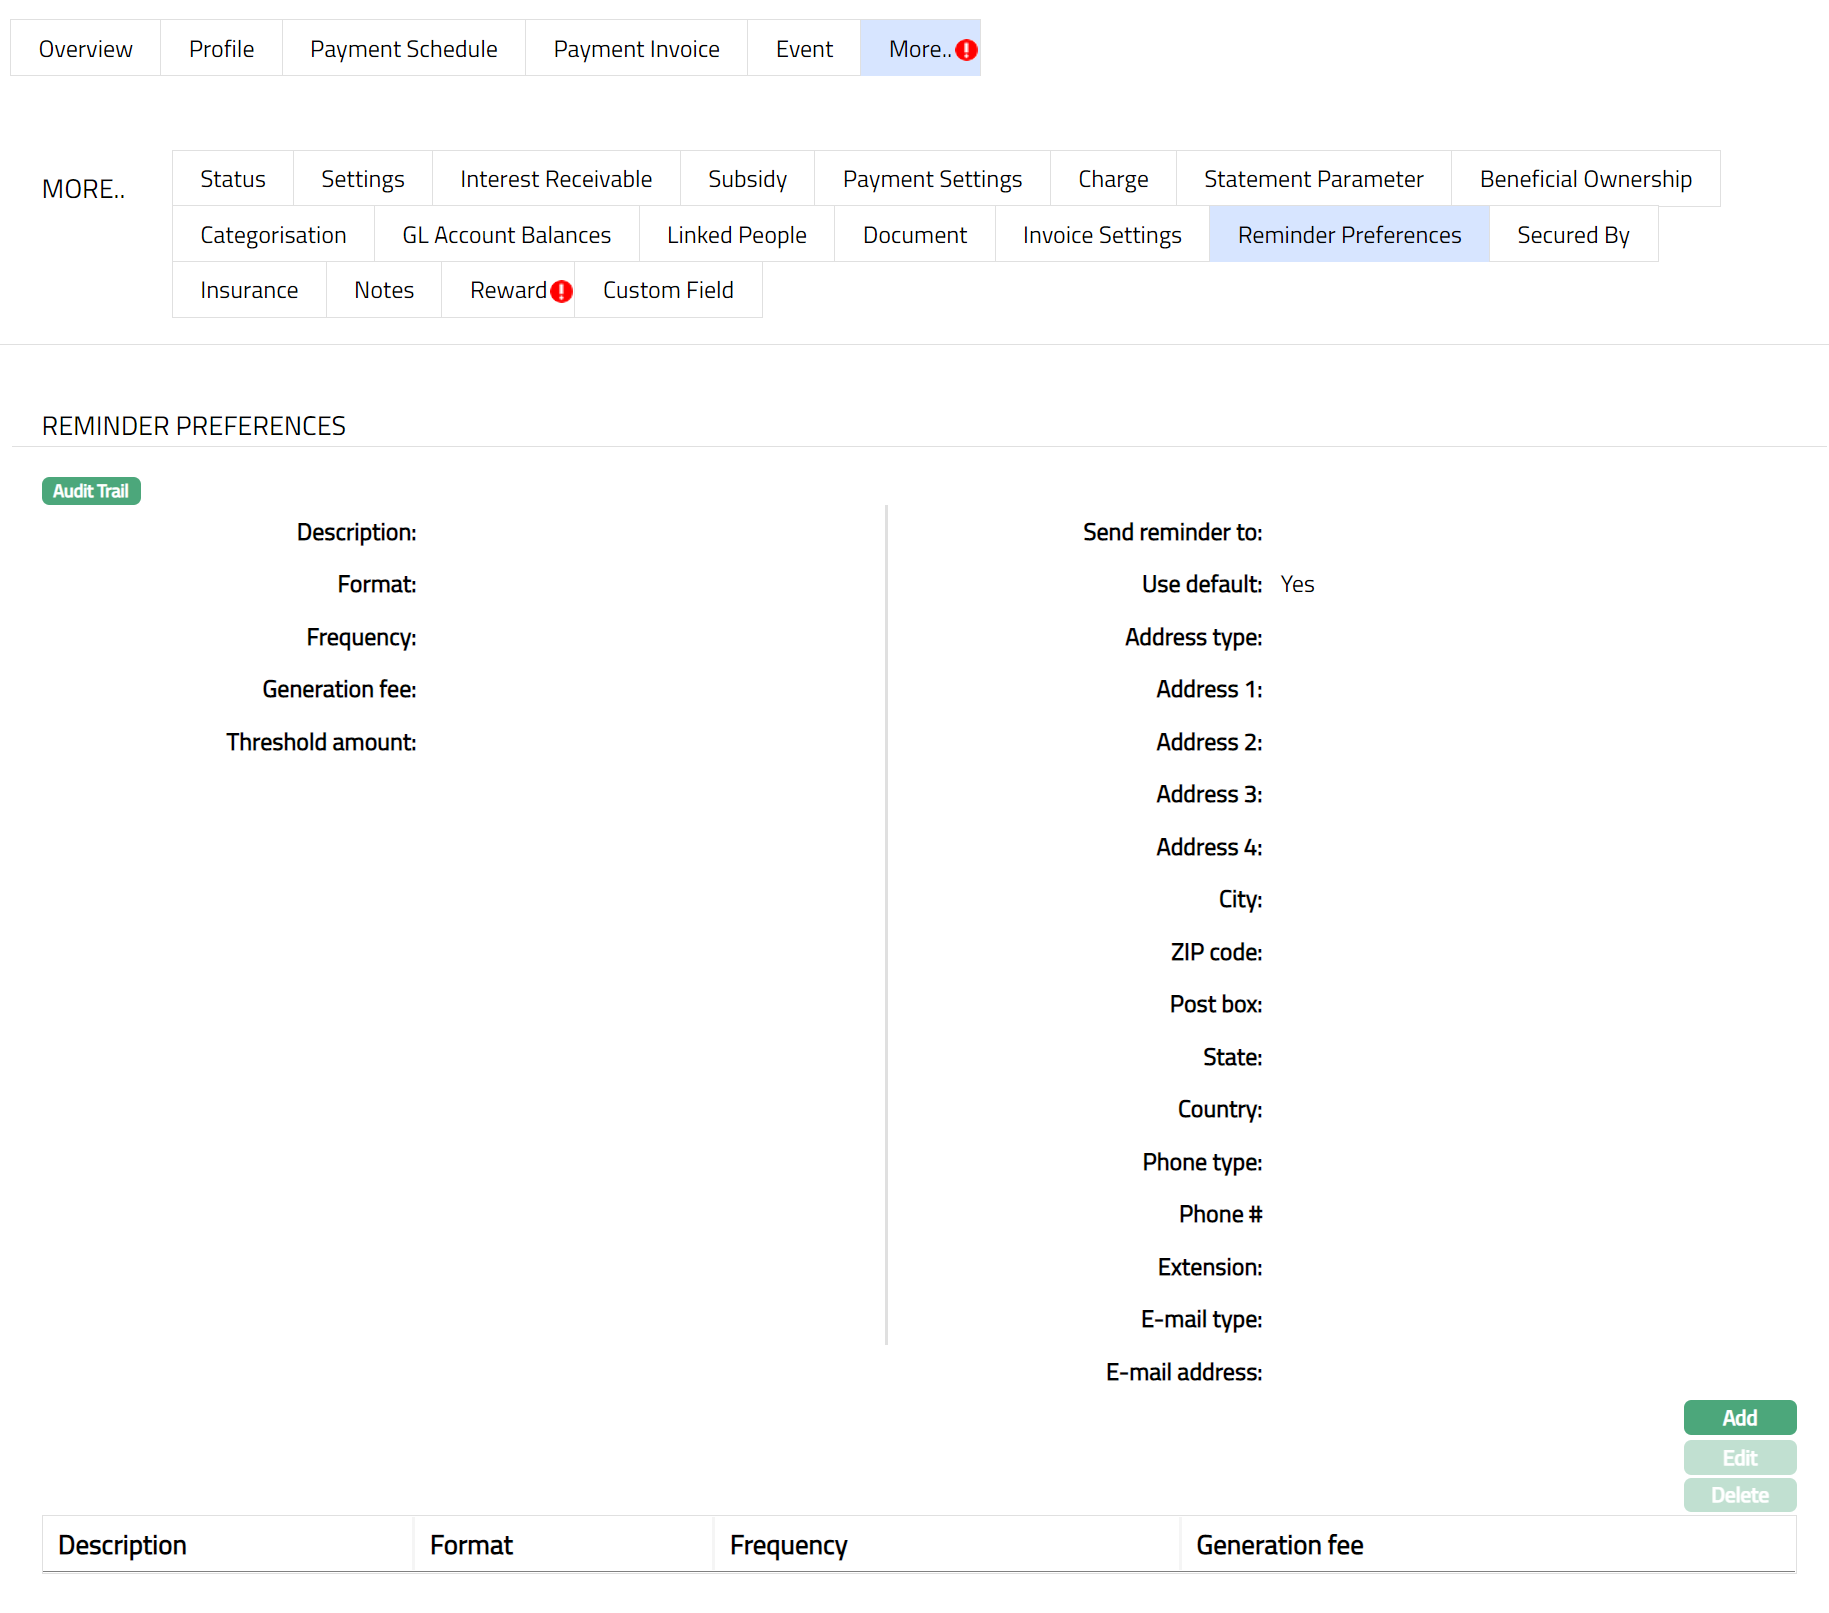
2. Click Add. Add Reminder Page appears.
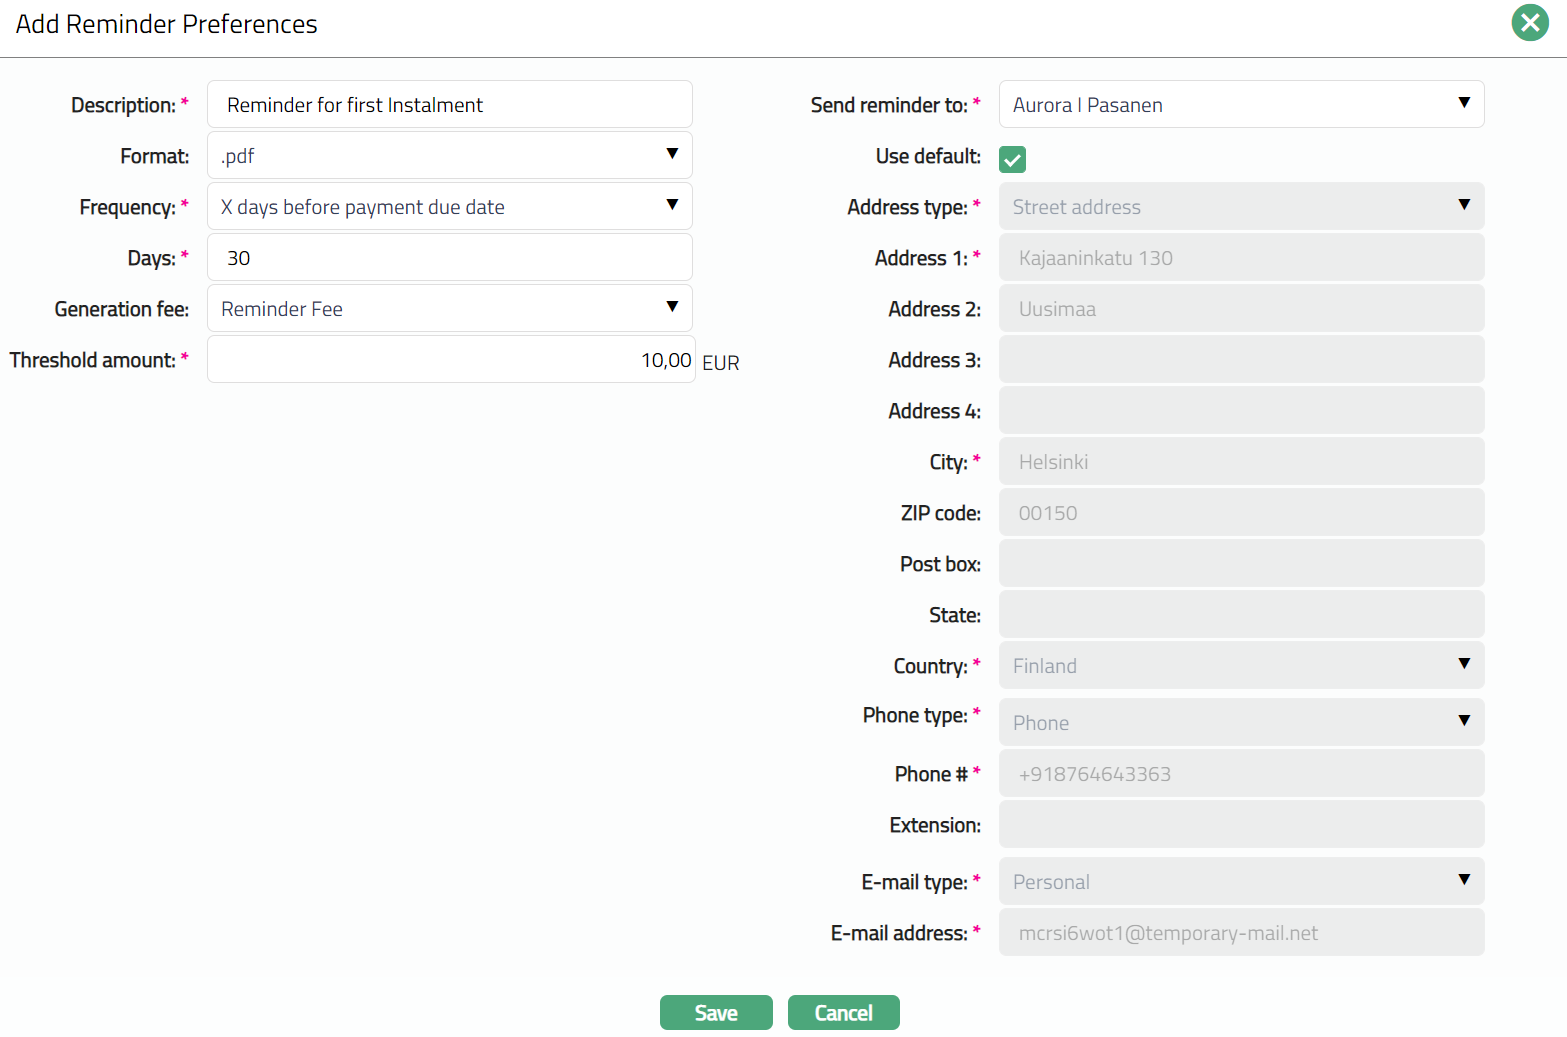
3. Enter the description in the Description field.
4. Select the Reminder Format from the drop-down. Aura lists reminder formats that have been maintained under Admin → System codes → Generic definition → Reminder formats. It is the Format of the reminder that is to be generated.
5. Select the Frequency at which this reminder has to be sent.
The available options are:
On Payment Due Date: The reminder will be sent on the payment due date.
X days before Payment due date: The Reminder will be generated X number of days before the payment due date. If you select this option, enter the number of days in the Days field.
X days after payment due date: The Reminder will be generated X number of days after the payment due date. If you select this option, enter the number of days in the Days field.
X days after grace days if overdue: If the payment is overdue, then the Reminder will be generated X days after grace days. If you select this option, enter the number of days in the Days field.
X days after reminder Y: The Reminder will be generated X number of days after reminder Y. If you select this option, enter the number of days in the Days field and select the Reminder from the drop-down list.
6. The Days field will be displayed only if the below mentioned options are chosen as Frequency.
X days before Payment due date
X days after payment due date
X days after grace days if overdue
X days after reminder Y
7. The Reminder field will get displayed only if X days after reminder Y option is chosen as Frequency. Select the Reminder from the drop-down list of options maintained for the Reminder.
Note: Only after the default reminder is generated, any other reminders that are added at the account appears in the drop-down list.
8. Select the required Generation fee from the drop down. Aura will display the list of Charges from Admin → System codes → Charges where the charge is Active, Event-based and it is either Banded or Flat amount charge. In case of Banded charges, the charge amount will be calculated on the basis of the amount sanctioned. Charge amount is collected from the Client, if an invoice fee is associated with invoice generation whenever an invoice is generated for the account. Fee is reflected in the invoice whether charge account is linked to the Loan Account or not.
9. If a Charge account is attached to the Loan Account, then the charge amount is debited from the charge account on invoice generation; else the charge is collected during repayment.
10. Select the person from the list of current Loan Account holders to whom the Reminder will be sent. The options shown will depend on the type of Client.
Personal: The name of the Person will get displayed in the drop-down list.
Joint Client: The names of the Joint account holders will get displayed in the drop-down list.
Corporate: The name of the corporate Client will get displayed in the drop-down list.
The list will also include the people who are linked to the Client / account under the Linked People tab under Client Maintenance / Account Maintenance.
11. By default, the field Use Default flag is checked. However, if you want the Reminder to be sent to a different address, you can uncheck the flag and enter the required address details.
If the flag is checked, Aura will consider the default address maintained at CRM → Person → Maintain, for the person chosen under Send Reminder To as the address to which the Reminder has to be dispatched.
If the flag is unchecked, below mentioned fields will be enabled and you can enter the address details.
Select the Address type from the drop-down list. The address types maintained under Admin → System Codes → Address details → Address types are displayed in the drop-down list.
Enter the address details of the receiver in Address 1 and Address 2 fields.
Enter the City of the receiver.
Enter the Zip code of the receiver.
Enter the Post box number of the receiver.
Enter the State of the receiver.
Select the Country from the drop-down list which is maintained under Admin → System codes → Generic definitions → Countries.
Select the Phone type from the drop-down list which is maintained under Admin → System Codes → Address details → Phone types.
Enter the Phone# of the receiver.
Enter the Extension of the receiver.
Select the E-mail type from the drop-down list which is maintained under Admin → System Codes → Address details → E-mail types.
Enter the E-mail address of the receiver.
12. Click Save. Reminder Preferences page appears with the added details.

Functions: Add, Edit, Delete
To Edit Reminder settings,
1. Click Edit. Edit Reminder page appears.

All the fields are editable.
Note: The fields from Address type to E-mail address will be Editable only if the Use default flag is unchecked.
2. Click Save. The Reminder Preferences page appears with the edited details.

Functions: Add, Edit and Delete.
Reward
The Reward tab in a Loan Account allows you to view, manage, and apply rewards that are applicable to the loan. Rewards can be inherited from the loan product through a Reward Group or added specifically for an individual Loan Account.
The Reward tab contains the following sub-tabs:
General Reward
Specific Reward
Reward Schedule
This tab remains available until the loan account is closed.
General Reward
The General Reward sub-tab shows the Reward Group that is applied to the Loan Account.
When you create a Loan Account, Aura automatically defaults the Reward Group mapped to the Loan Product into the General Reward sub-tab. The defaulted Reward Group is created with Status = Pending and requires Approval.
Note: If no Reward Group is mapped at the product level, this sub-tab will be blank.
To view/edit General Reward
1. Access the Loan Account Maintenance page. Click on the Reward tab and select the General Reward sub-tab.
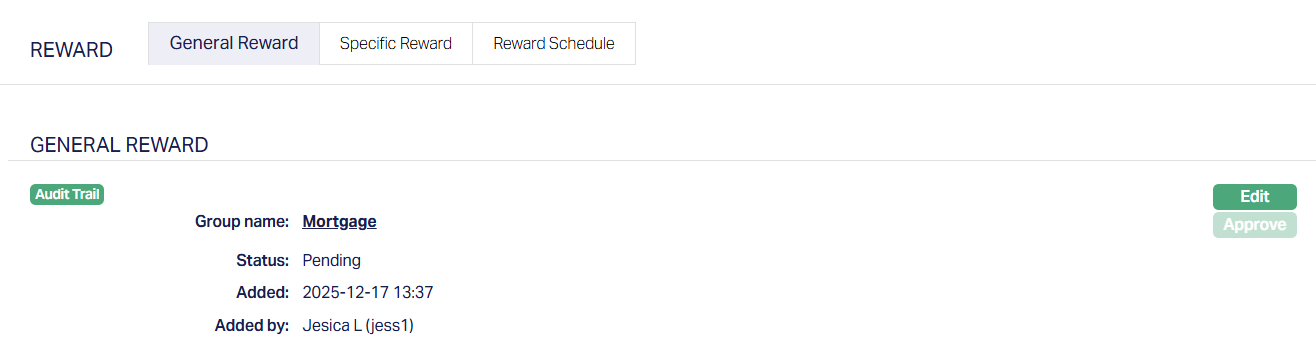
2. Click Edit. Edit Settings page appears.
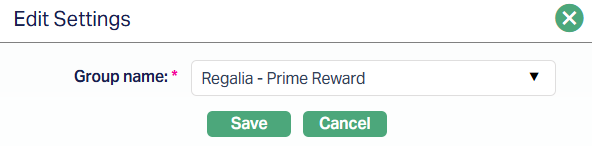
3. Select the Group name from the drop-down list of all Active Reward Groups applicable to Mortgage and Loan Products. This is maintained under CRM → Loyalty Program → Settings → Reward Group.
4. Click Save. The General Reward sub-tab appears with the edited details with the Status as Pending.
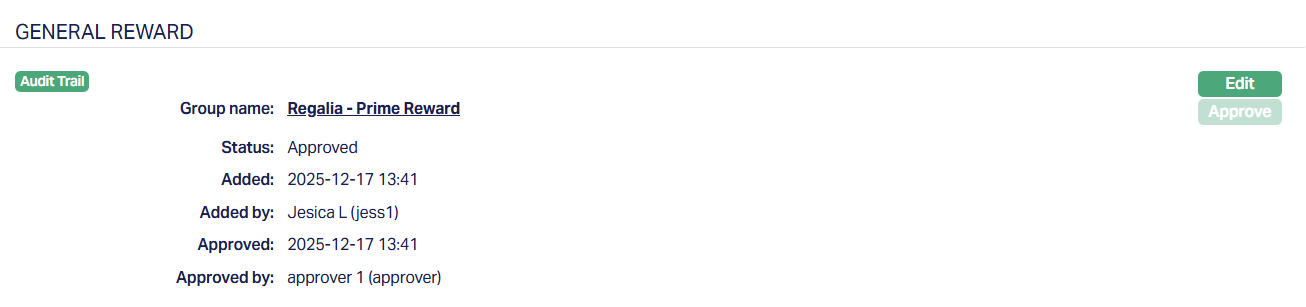
Function: Edit
Status of the reward is Pending till it is approved by another user. On approval, the tab status is set to Approved. The General Reward tab remains editable until the Loan Account is closed.
Notes:
On Approval, Aura marks the loan account for Reward Schedule generation during EOD.
Rewards with Valid From dates greater than the EOD date are considered for Schedule Generation.
If any Reward-related sub tab is not approved, Aura does not allow the Loan Account status to be approved as Activated.
Specific Reward
The Specific Reward sub-tab allows you to define rewards that apply only to the selected Loan Account. These rewards are used to provide exceptions or additional benefits and are independent of the Reward Group.
To view/add Specific Reward
1. Access the Loan Account Maintenance page. Click on the Reward tab and select the Specific Reward sub-tab.
When a Loan Account is created, this sub-tab is initially empty.
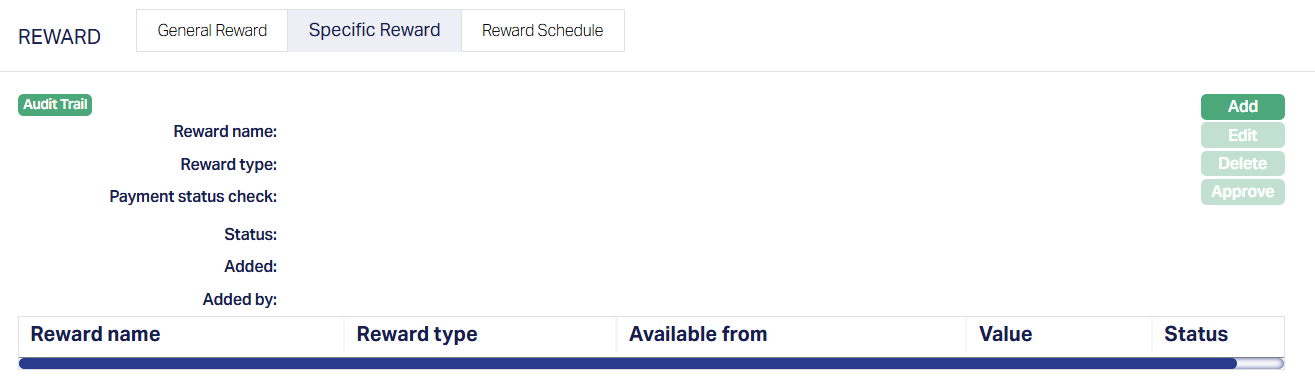
2. Click Add. The Add Specific Reward tab appears.
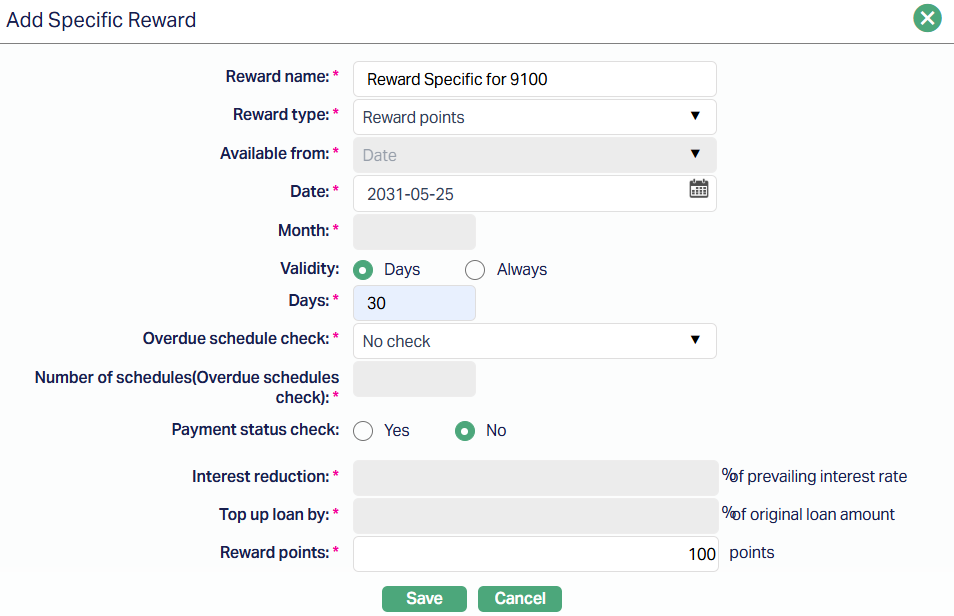
When adding a Specific reward:
Available From is fixed to Date.
The selected date must be greater than the Current Booking Date and less than the Maturity Date minus one.
Eligibility criteria can be defined using Overdue Schedule Checks or Payment Status Checks.
If the Reward Type is Reward Points, Aura checks whether a Reward Account is linked to the Loan Account. If no Reward Account is mapped, Aura displays an error and does not allow you to proceed.
Note: The fields and behaviour for adding a Specific Reward are similar to adding a reward under CRM → Loyalty Program → Settings → Reward Group. However, Specific Rewards apply only to the selected loan account, and certain options such as Available From are restricted at the loan level.
3. Click Save. The Specific Reward tab appears with the details you have entered/added with the Status as Pending.
Status of the reward is Pending till it is approved by another user. On approval, the tab status is set to Approved.
The reward is not added to the Reward Schedule until it is approved.
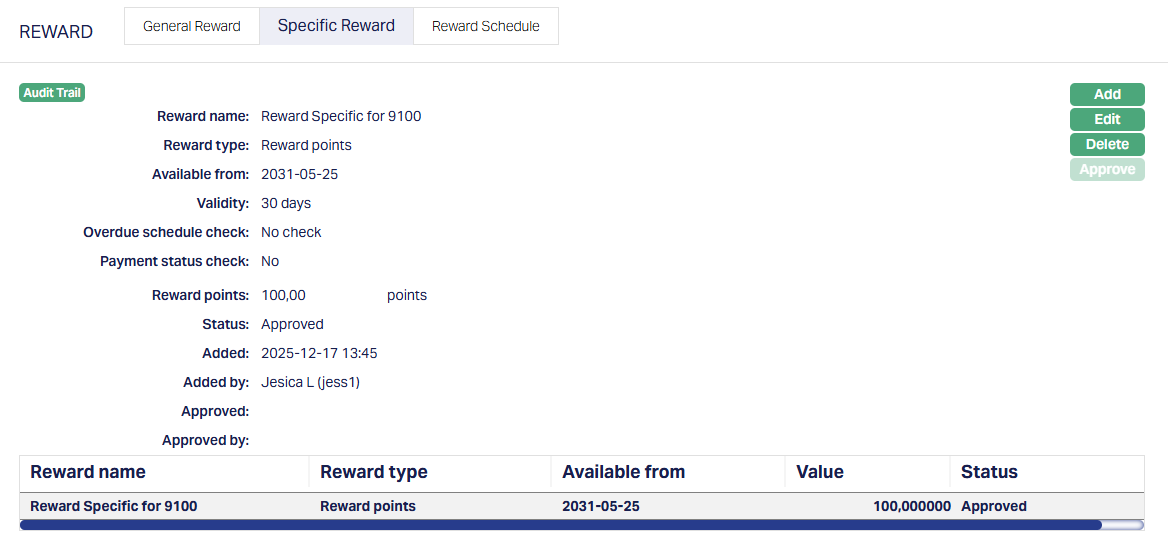
Functions: Add, Edit, Delete, Approve.
Edit: You can edit a specific reward only if its Available From date is greater than the Current Booking Date. Editing is also subject to the reward status and maker-checker rules.
Delete: Delete is allowed only when Status is Pending and Available From date is greater than the current booking date.
Reward Schedule
The Reward Schedule sub-tab shows all rewards applicable to the Loan Account. This includes:
Generic rewards inherited from the approved General Reward.
Specific rewards added and approved at the Loan Account level.
How the Reward Schedule is populated:
Aura populates or updates the Reward Schedule in the following cases:
At first loan disbursement, based on approved rewards.
When a change to General Reward is approved, during EOD.
When a Specific Reward is approved, online.
Note: Rewards where Available From is less than or equal to the First Disbursement Date or Current Booking Date are ignored.
To view Reward Schedule
Access the Loan Account Maintenance page. Click on the Reward tab and select the Reward Schedule sub-tab.
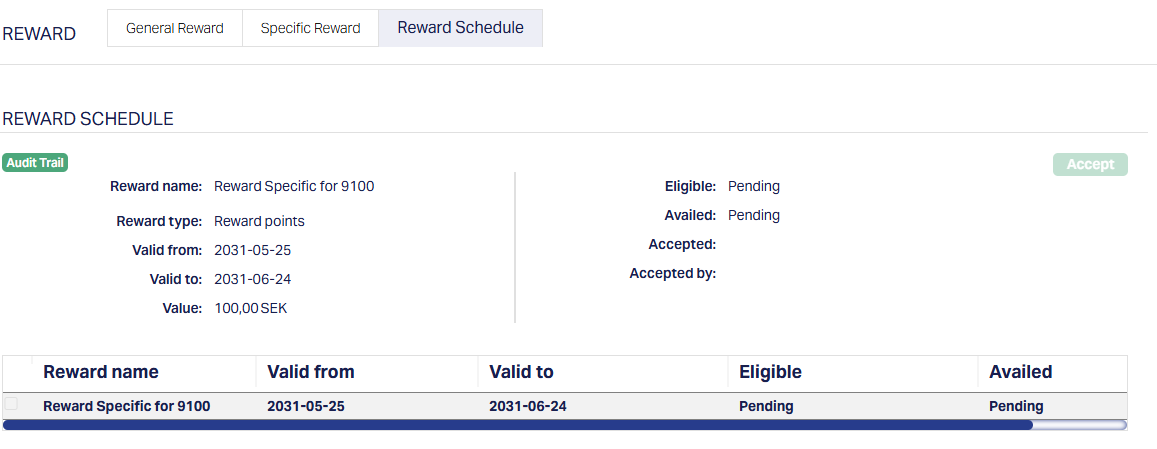
For each reward, Aura displays:
Reward Name - Shows the name of the reward as defined in the Reward Group or Specific Reward setup.
Reward Type - Indicates the type of reward, such as Reduced Interest Rate, Payment Free Month, Top Up Loan, or Reward Points.
Valid From - Shows the date from which the reward becomes available for the Loan Account.
Valid To - Shows the last date on which the reward can be accepted. If the reward is not accepted by this date, it expires.
Value - Displays the benefit associated with the reward, such as the percentage reduction, top-up amount, reward points, or number of payment-free months.
Eligible - Indicates whether the Loan Account qualifies for the reward. This is evaluated during EOD processing on the day before the Valid From date. Until then, the status appears as Pending.
Availed - Shows whether the reward has been accepted by the borrower. If the reward is accepted, the status is shown as Yes. If the reward is not accepted, the status remains Pending until the Valid To date.
Accepted - Displays the Date on which the reward was accepted.
Accepted By - Displays the user ID and name of the user who accepted the Reward.
Eligibility is evaluated during EOD processing on Valid From minus one day. Until eligibility is evaluated, the Eligible status is shown as Pending. The reward remains locked and cannot be accepted.
All rewards in the Reward Schedule are initially locked. A reward is unlocked only after the Loan Account passes the eligibility check during EOD processing on the day before the Valid From date. If eligibility fails, the reward remains locked. Expired rewards are indicated once the validity period ends.
Accepting a Reward:
You can accept a reward only when:
Eligible = Yes
Availed = Pending
Aura allows you to select and accept only one reward at a time.
On acceptance:
Aura applies the reward benefit based on the reward type.
Related system actions such as COT creation, disbursement, or reward point credit are triggered automatically.
Availed status is updated accordingly.
If a reward is not accepted within its validity period, it is marked as Expired.
Notes:
Changes to Loan parameters after disbursement do not impact the Reward Schedule.
If schedule regeneration causes any reward's Valid From date to fall on or after the maturity date, such rewards are removed from the Reward Schedule.
Specific Rewards should be used only for exceptions. Rewards inherited from the Reward Group do not need to be re-added under Specific Reward.
Secured By
During account creation if needed, a limit or collateral is attached to an account, specifying the amount as a security for the loan. You can view and maintain these details using the Secured By tab. You can add multiple limits or collaterals and also change the attached limit / collateral.
To view the Collateral attached to the account,
1. Access Loan Account page and click Secured By tab. The details of the Collateral or Limit attached to the account on creation of an account are displayed as shown below.
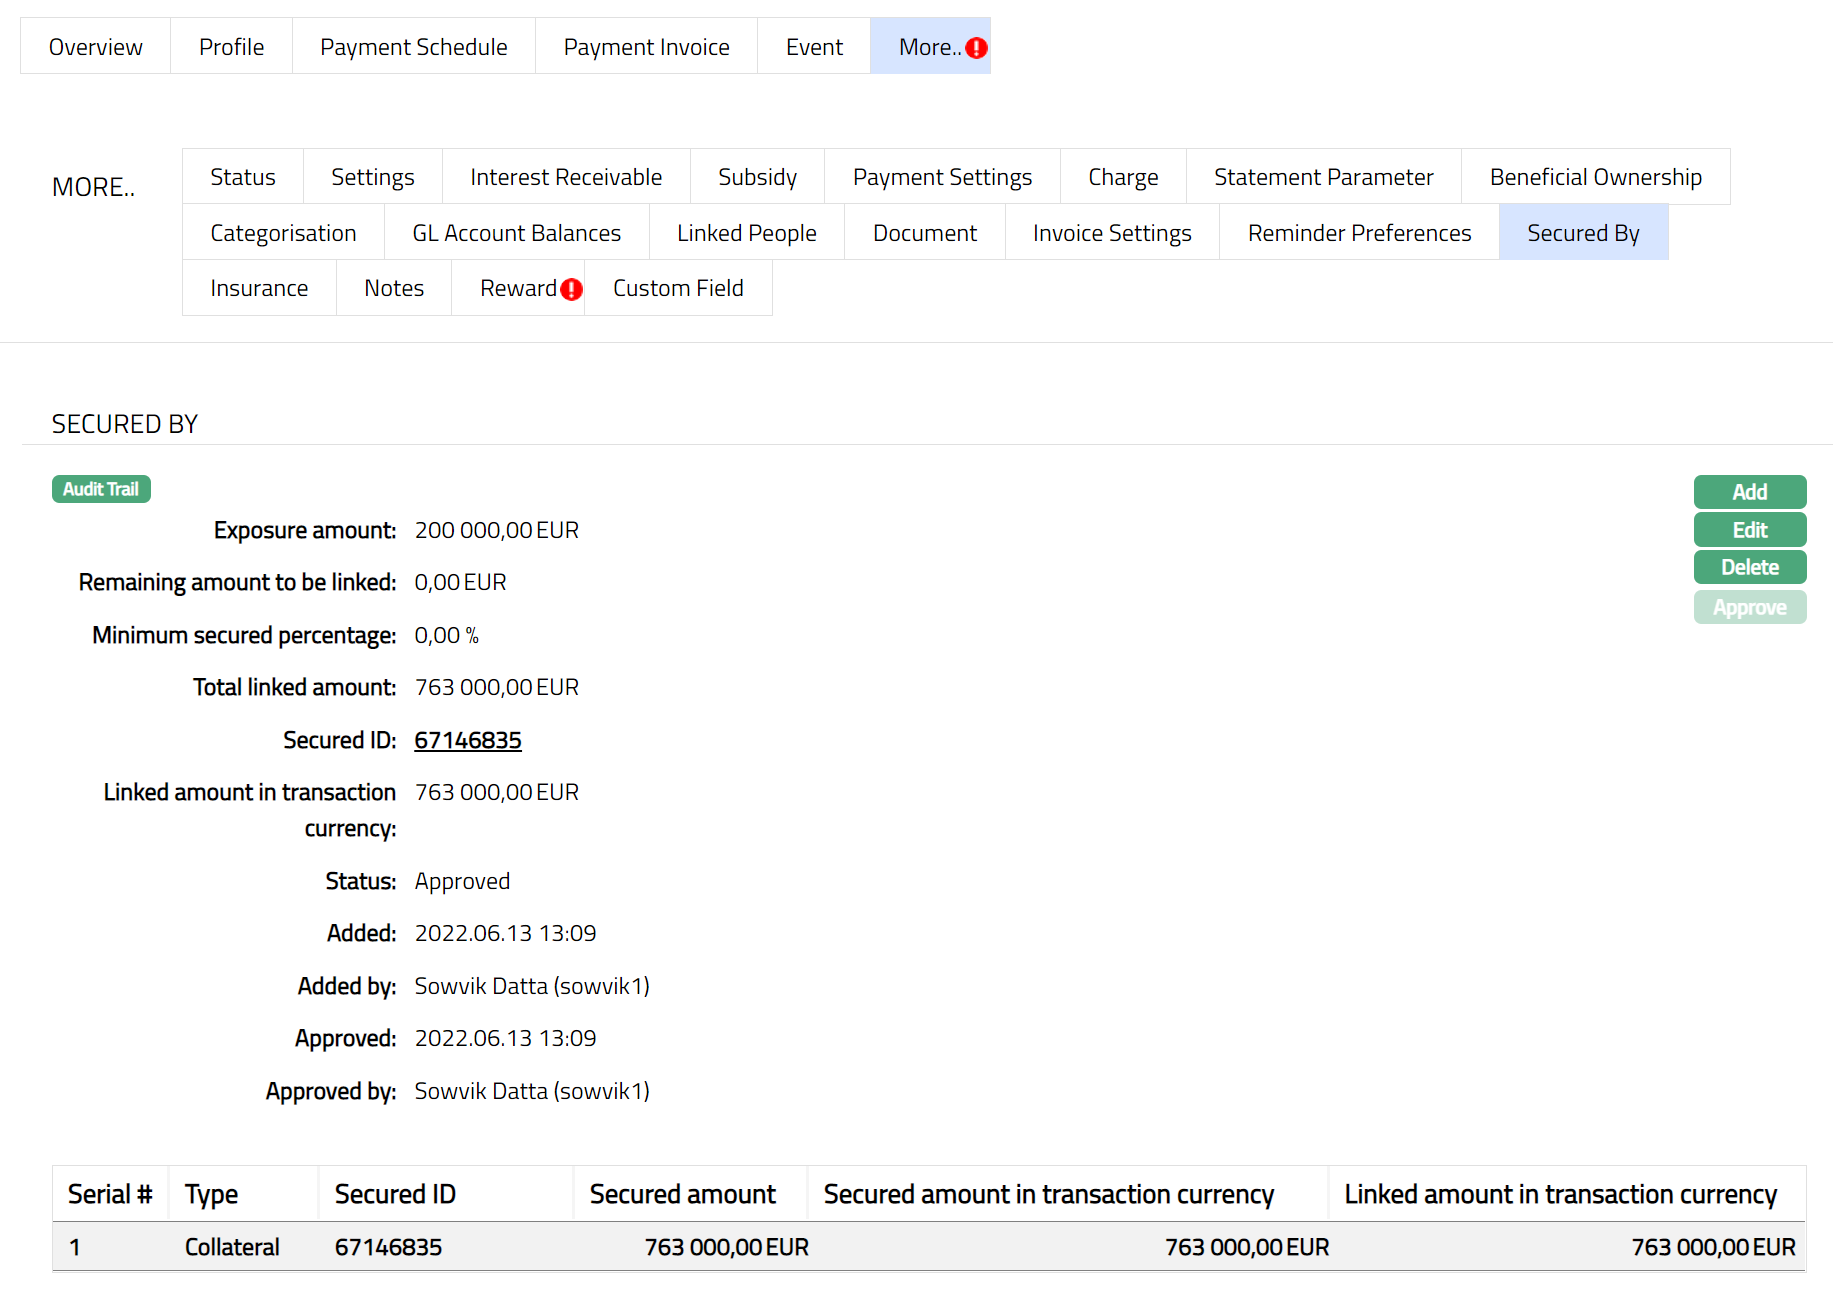
Available fields are:
Secured ID denotes the ID of the security that is attached to the Loan Account
Secured amount denotes the amount of the loan that are protected by collateral
Secured amount in transaction currency denotes the amount which is protected during the Currency Transaction.
Linked amount in transaction currency is the security amount linked to the Mortgage Loan Account in account currency
The additional fields that you can view in the tab are explained below:
Exposure amount: In case of the loans the amount disbursed is the exposure amount.
Remaining amount to be linked: The balance amount, i.e. Remaining amount to be linked = (Exposure amount * Minimum secured percentage) -- Total linked amount. The balance might be negative or positive. Both kinds of balances will get displayed.
Minimum Secured Percentage should be maintained while setting up a Product and if the Secured By tab is mentioned as "No", then the display value will be 0.
Note: Minimum secured percentage settings will default from Product to account and change at Product level will always be applicable on new Loan Accounts.
The Total linked amount is the total amount of the security linked to Mortgage Loan Account in currency of the security attached.
Status denotes the status of the record.
Added field denotes the date on which the record was added.
Added by field denotes the name of the user who created the record.
Approved denotes date on which the record was approved and is displayed only if the record is approved
Approved by denotes name of the user who approved the record and is displayed only if the record is approved.
To add a Collateral,
1. Click Add. Add Secured By page appears.
2. Select the security from the drop-down list. It can be Collateral or Limit. In the screen above, Collateral is selected for this account as the security.
3. If you select Collateral, the Collateral hyperlink will get displayed. If you click on the Collateral hyperlink, the collateral search screen appears displaying the list of collaterals with active status maintained under CRM → Collaterals & Limits → Collateral.
Collateral amount in collateral currency will display the unutilized amount of the selected collateral id in collateral currency by default. Aura will calculate the collateral amount as (collateral amount -- Utilized collateral).
Collateral amount in transaction currency is the collateral amount in terms of the account currency. The value will get displayed by default. This value is defaulted to the Linked amount in transaction currency is defaulted from collateral amount in transaction currency. You can modify the value, but the value cannot be greater than collateral amount in transaction currency. Currency code of the transaction currency will be displayed beside the Linked amount in transaction currency.
The Linked amount in transaction currency will display the linked amount in account currency. The value is defaulted from Collateral and can be changed while creating an account.
Functions: Add, Edit, Delete, Approve
Note: Any change in the tab will set the tab status to Pending till it is approved by another user. On approval, the tab status is set to Approved and the red bubble disappears.

4. Click Edit. The Edit Secured By page appears.

Note: Only the Collateral hyperlink and linked amount in transaction currency fields are editable.
5. Click Save. The Secured By page appears with the edited details.

Note: Any change in the tab will set the tab status to Pending till it is approved by another user. On approval, the tab status is set to Approved and the red bubble disappears.

Functions: Add, Edit, Delete, Approve
Note: Aura allows you to add multiple limit or collateral. The sum of the linked amount in collateral currency of all the collaterals attached has to be greater than or equal to the coverage amount in terms of (Approved Amount * minimum percentage of secured amount defined for an account).
Delete: To delete a limit or collateral, select the limit or collateral record and click Delete. Aura will allow you to delete any collateral only if the linked amount in collateral currency of all the collaterals attached is greater than or equal to the coverage amount in terms of (Approved Amount * minimum percentage of secured amount defined for an account). Aura will ask for confirmation. On confirmation the record will be deleted. If only one collateral is attached, then system will not allow you to delete that collateral.
Settings
Settings tab allows you to view and maintain certain account settings like Disbursement Option, Disbursement Through Method and Repay Through Method. However, edit is disabled once the Loan Account moves to Activated status. If you want to make any changes in the Settings after this, you need to use Retail → Loans → Change of Terms.
1. Access Loan Account page. Click Settings tab to view the details as per sample below. For details refer to New Loan → Settings (2/6).
2. Click Edit. Edit Settings page appears.
Note: Based on the selection of the Disbursement through method and the Repayment through method, some fields are enabled and disabled during edit. For details refer to New Loan → Settings (2/6)
3. Following are the additional fields that you see in Settings Tab:
a. Allow excess receipts during external payments: This is defaulted from the Product chosen during Loan Account creation; and can be edited when the Loan Account status is Opened. If this is No, and any external payment is received where the payment amount is more than the unpaid due amounts on the loan account, the payment will fail. If this is Yes, and any external payment is received where the payment amount is more than the unpaid due amounts on the Loan Account, but less than or equal to the Total dues on the Loan Account (including Principal Outstanding and any other future dues), the payment will be processed; and the excess amount will be treated as Prepayment, subject to repayment order defined for the Account Status -- Payment Status of the Loan account.
4. Click Save. Settings page appears with the edited details.
Functions: Edit
Special Interest Scheme
The Special Interest Scheme (SIS) tab in the Loan Account is displayed only when the underlying Product linked to the account has an approved Special Interest Scheme mapped. If the Product does not include any Special Interest Scheme setup, this tab will not appear in the Loan Account screen.
This tab allows concessional (special) interest rates to be applied on the account based on pre-defined criteria configured at the Product level. These schemes are typically used to offer preferential interest rates to select customers or loan types, with conditional behaviour when payment defaults occur.
To view Special Interest Scheme,
Access Loan Account screen, Click Special Interest Scheme tab to view the details as per sample below. The screen is read-only and reflects the finalized, approved schemes.
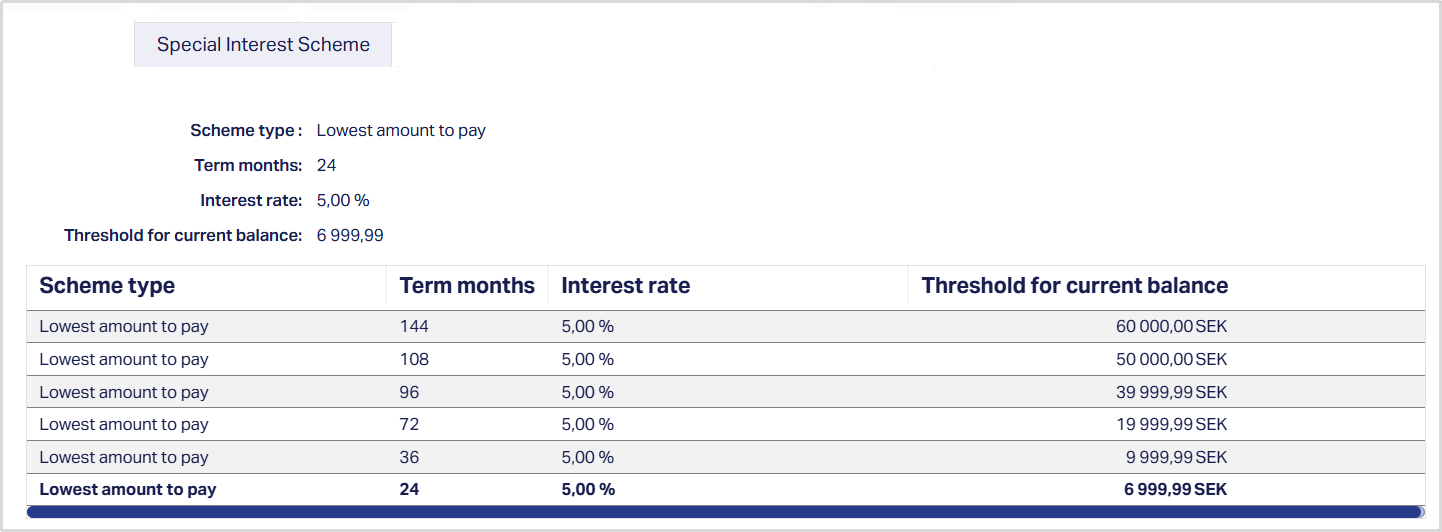
The Special Interest Scheme (SIS) tab displays the lot of concessional rate schemes configured for the Product and applied to the Loan Account.
The fields that are shown are:
- Scheme Type - displays the category or structure of the Special Interest scheme (e.g., Lowest amount to Pay).
- Term months - indicates the applicable loan term for which the scheme’s rate and threshold apply.
- Interest rate - displays the concessional rate of interest applicable under this scheme.
- Threshold for Current Balance - defines the outstanding balance threshold to which this concessional rate applies.
Notes:
- When creating a new Loan Account, the “Apply Special Interest Scheme” flag in the Add Wizard → Settings (Step 2/6) will automatically default from the Product configuration.
- A Special Interest Scheme must be mapped and approved at the Product level before it can be applied to a Loan Account, else Aura will display an error message and the SIS tab will not be available.
- Concessional interest applies only until a payment default occurs. Once a payment default is triggered, Aura automatically shifts the loan to normal interest rates as defined in the scheme configuration.
Statement Parameter
Using this tab, you can add, view and maintain the preferences for generating the statements. Such actions can be carried out on the account at any time during the life cycle of the loan.
To add a new Statement parameter
1. Access Loan Account screen. Click Statement parameter tab to view the details as per sample below. The details are defaulted from Product → Statement Parameter based on the Product that you chose for the account during creation.
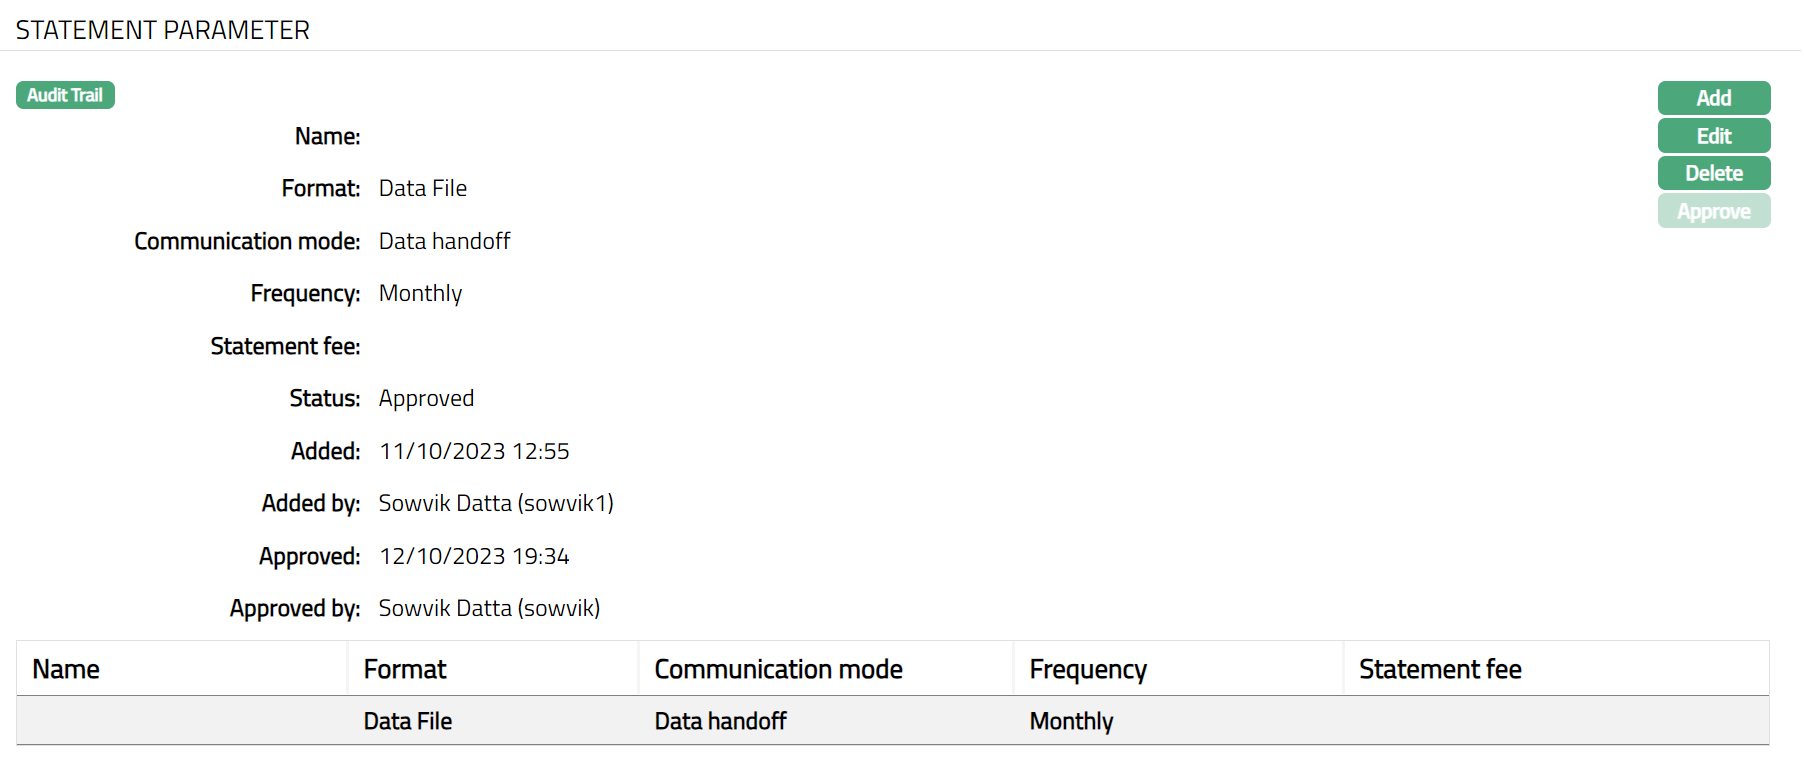
2. Click Add. Add Statement Parameter page appears.
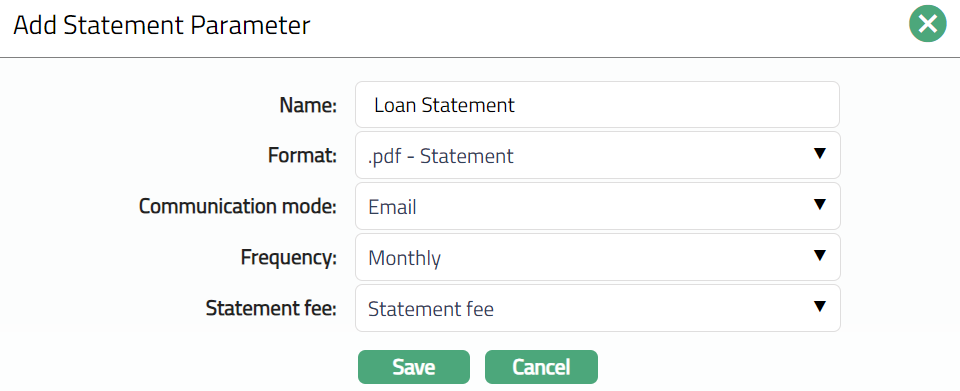
3. Enter the Name for the statement.
4. Select Format from the drop-down list of formats that have been maintained under Admin → System codes → Generic definition → Statement formats. It is the format of the statement that is to be generated.
5. Select Communication mode from the drop-down list -- i.e., the manner in which you want to send the statement. The available options are Data handoff, e-Invoice, Email, Paper, SMS, Web hook.
6. Select the Frequency for the statement to be generated from the drop down. The available values are, Daily, Weekly, Fortnightly, Monthly, Quarterly, Semiannual, Annual.
7. Select the Statement fee, if any, from drop-down list. This is the fee that is to be collected from the Client for the statement defined above. Aura will display the values only if the Charge Type is Event based while creating charges from Admin → Charges.
8. Click Save. Statement Parameter page appears with the added details.
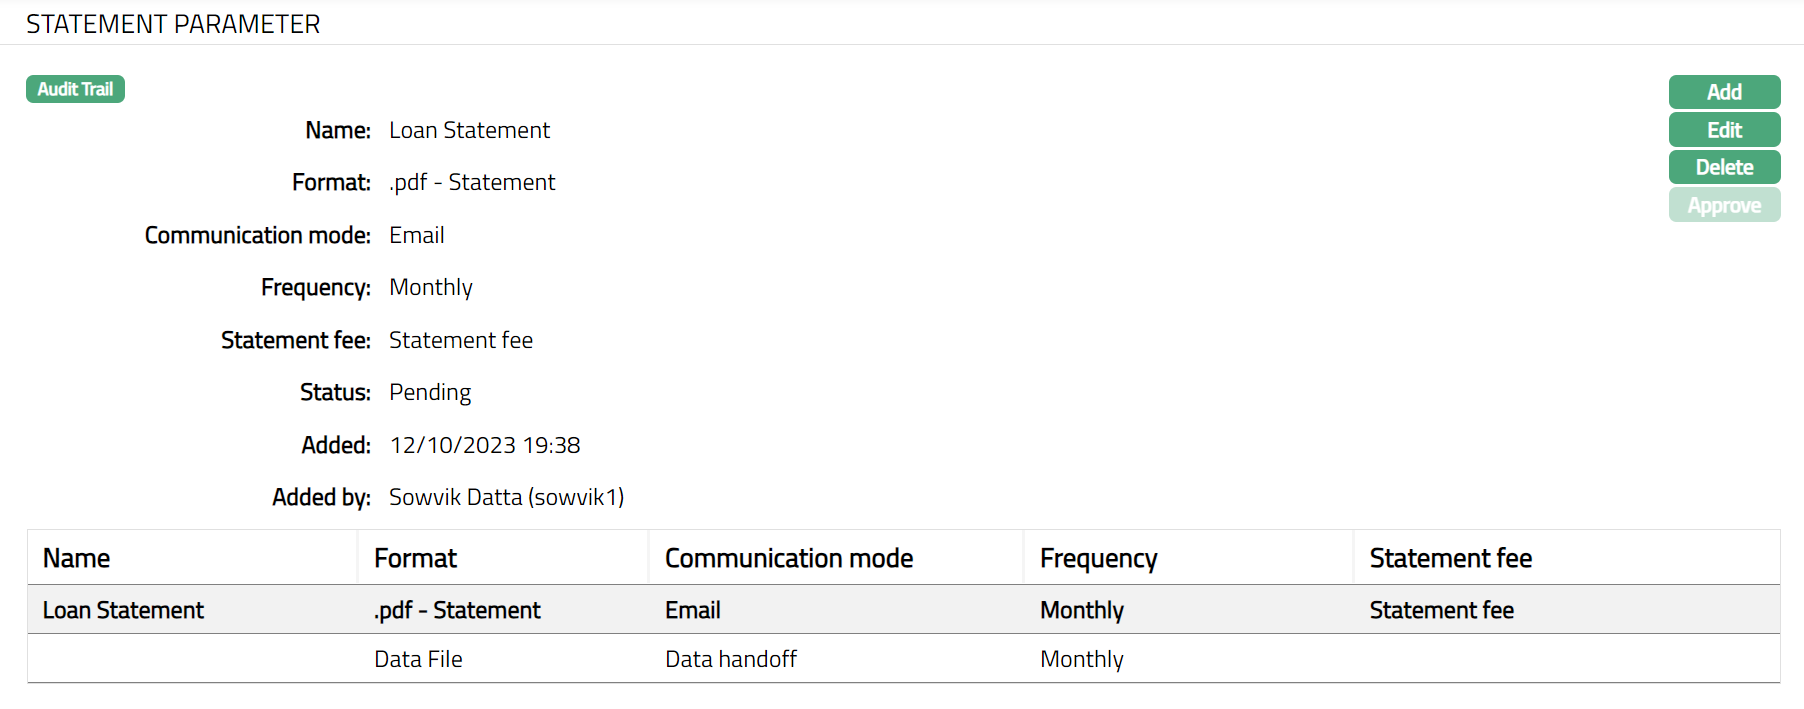
Functions: Add, Edit, Delete
Delete: You can delete a Statement parameter record by a click on Delete button. Aura will ask for confirmation, on approving which the selected record will be deleted.
To edit Statement Parameter
1. Access Loan Account page and click Statement Parameter tab. Select specific record which you want to edit.
2. Click Edit. Edit Statement Parameter page appears.
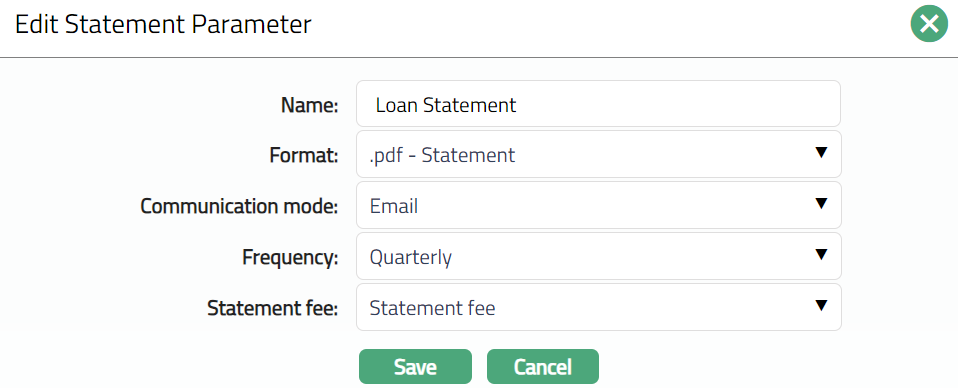
Note: All fields are editable.
3. Click Save. Statement Parameter page appears with the edited details.
Note: Any change in the tab will set the tab status to Pending till it is approved by another user. On approval, the tab status is set to Approved and the red bubble disappears. The statement will be generated with the revised parameters only after such approval.
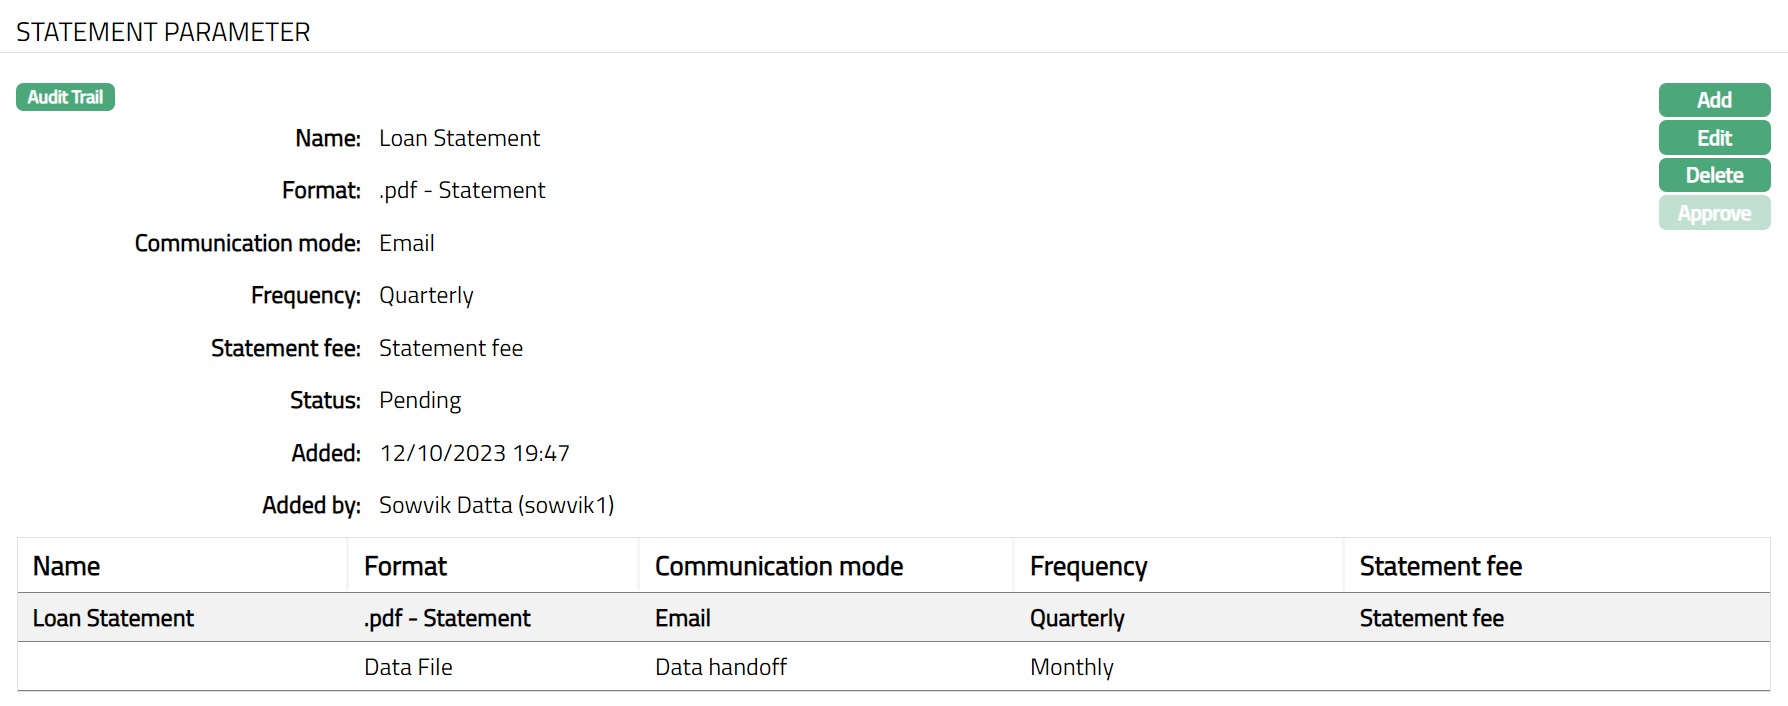

Functions: Add, Edit, Delete and Approve
The additional fields that you can view in the tab are explained below:
Status field denotes the status of the tab.
Added field denotes the date on which the record was added.
Added by field denotes the name of the user who created the record.
Approved field denotes date on which the record was approved and is displayed on approval.
Approved by field denotes name of the user who approved the record and is displayed on approval.
Status
Status tab allows you to view / set the Loan Account status as well as define the preferences for the current status of the account. The preferences will allow you to enable / disable certain functions on the Loan Account like interest accrual, waiver, liquidation, disallow debit, disallow credit, disallow disbursement, stop invoice etc.
The sub tabs available are:
Account Status
The Account Status of an account can be automatically moved based on the Rules that have been defined for the Product; or it can be manually set. This tab will allow you to set and view the history of the Account Status of the Loan Account. Before approval, you can also edit the preferences that are defaulted for the Account Status using this tab. Only when the Account Status is approved, the preferences as set in that Account Status record will apply on that account.
The following Account Statuses are pre-shipped:
Opened: This is the initial account status as soon as the loan account is created, if the KYC for the Client is Pending. If the Account Status is Opened, then Preferences will not be displayed. You have to add the Activated Account Status and approve it before disbursing the loan.
Activated: This is the status into which the Account moves as soon as it is created, if the KYC for the Client is Approved. However, the record status will be Pending; and another user has to approve the same. If the Account Status is Activated, then the Preferences will be displayed and by default all the Preferences will be No. Only when the Account Status is Activated, the first disbursement can be made on the account.
Closed: The status of the account is marked Closed by the system on the following conditions.
When the full prepayment is done, and the current balance of the account is equal to 0.
When the current date is equal to Maturity Date and the payment is done as per the schedule.
Note: This status cannot be manually set by the user.
Account Status automatically moves based on Status Rules set at the Product; however, if the Allow Auto Movement Flag for the current Account Status of the Loan is No, the rule-based status changes will not apply. If required, you can manually set a new status for an account. Note that the Allow Auto Movement Flag as maintained in Status Maintenance will be inherited for the new status and you can change the same before approval.
An Account can move between the pre-shipped statuses as follows:
- From Opened to Activated
- From Activated to Closed
An account can move to any of the user defined account statuses when its last approved Account Status is Activated or any other user-defined Account Status.
To view Account Status
1. Access Loan Account page. Click Status tab, Account Status tab will display by default. A sample of the tab is shown below if KYC is pending for the Client.
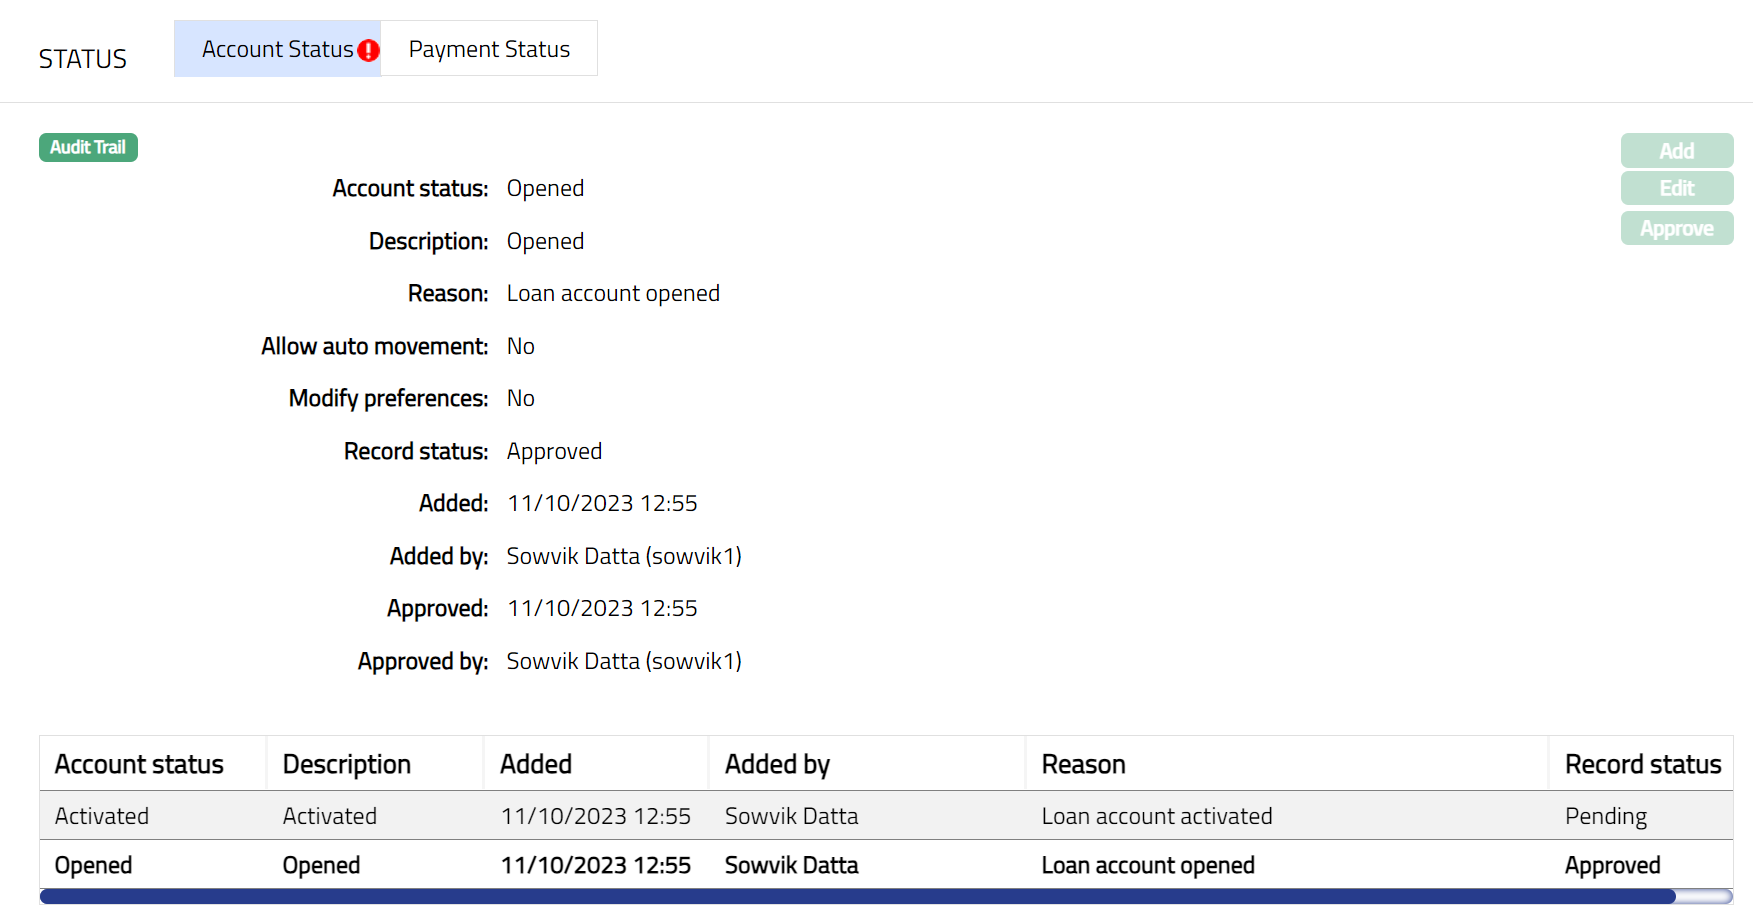
2. Account Status denotes the Account status as per the chosen record.
3. Description is defaulted from the Account Status Maintenance in case of user defined account statuses; and in case of pre-shipped account statuses, Description is the same as the Account Status.
4. Reason displays the reason for the status selected for the account. In case of automatic status movement, the reason is predefined; while in case of manual status updates, this will display the reason input during the manual status change.
5. Allow auto-movement is defaulted from Account status maintenance in case of user defined Account Statuses; and in case of pre-shipped Account Statuses, this is predefined. When status is Opened, the Allow auto movement flag is defaulted to No, and is not editable.
6. Modify Preferences is defaulted from Account status maintenance in case of user defined Account Statuses; and in case of pre-shipped Account Statuses, this is predefined. When status is Opened, the Modify Preferences flag is defaulted to No, and is not editable.
7. Record Status denotes the status of the record. In case of automatic status movements, the Status is automatically set to Approved; while in case of manual status updates, this will be Pending. Once another user manually approves the record, this will be set to Approved.
Note: Another user should approve the added Account status, so that the record status becomes Approved.
To edit the account status,
1. Click Edit. Edit Account Status page appears.
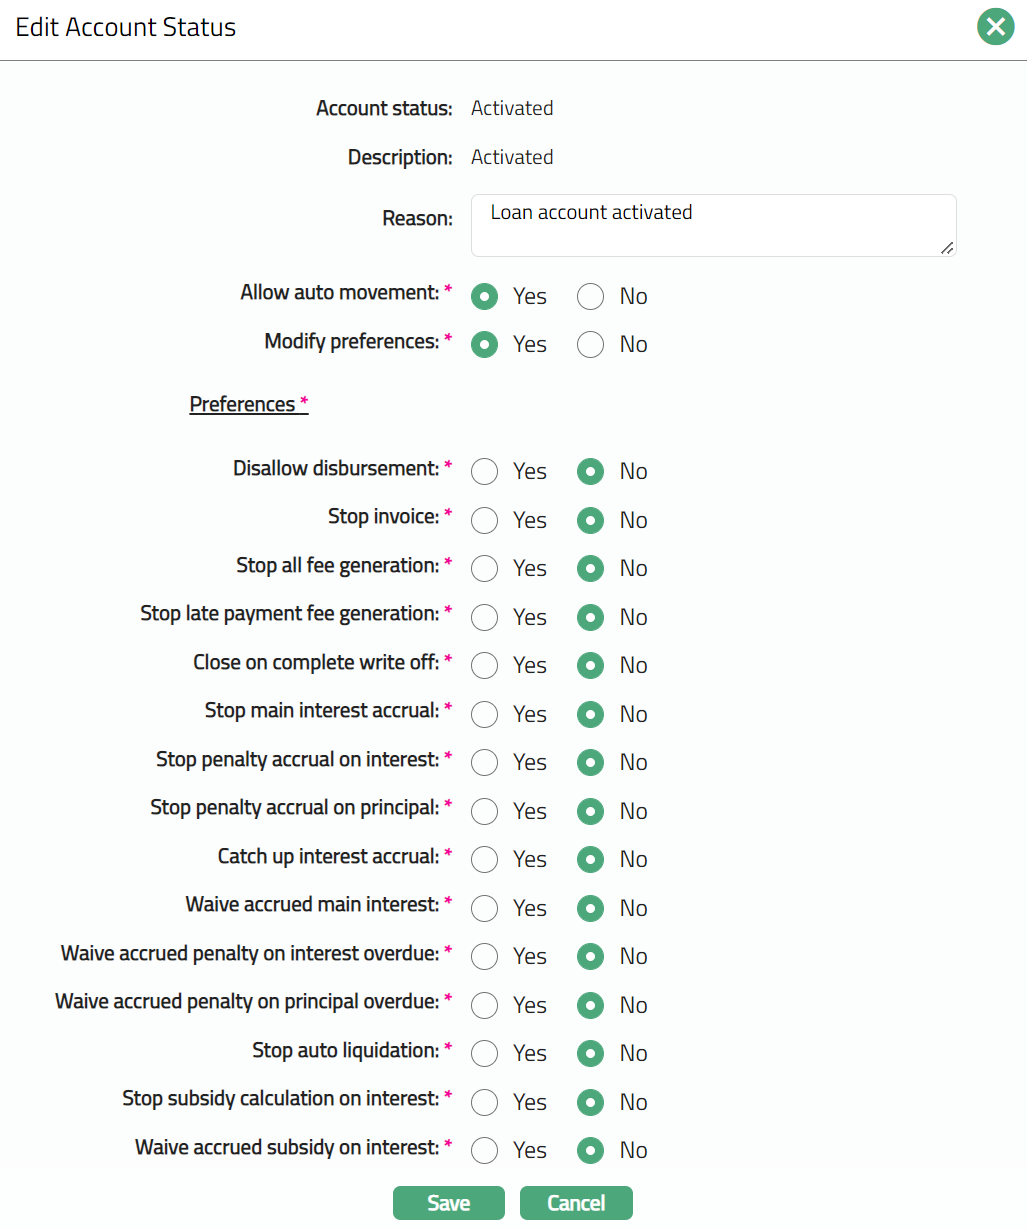
2. Note: Except Account Status and Description, all other fields are editable.For detailed description of the various preferences associated with Account Status, refer the user manual on Admin → Status → Loan Status.
3. Make the required changes and click Save. Account Status page appears with the edited details and the record Status will be Pending.
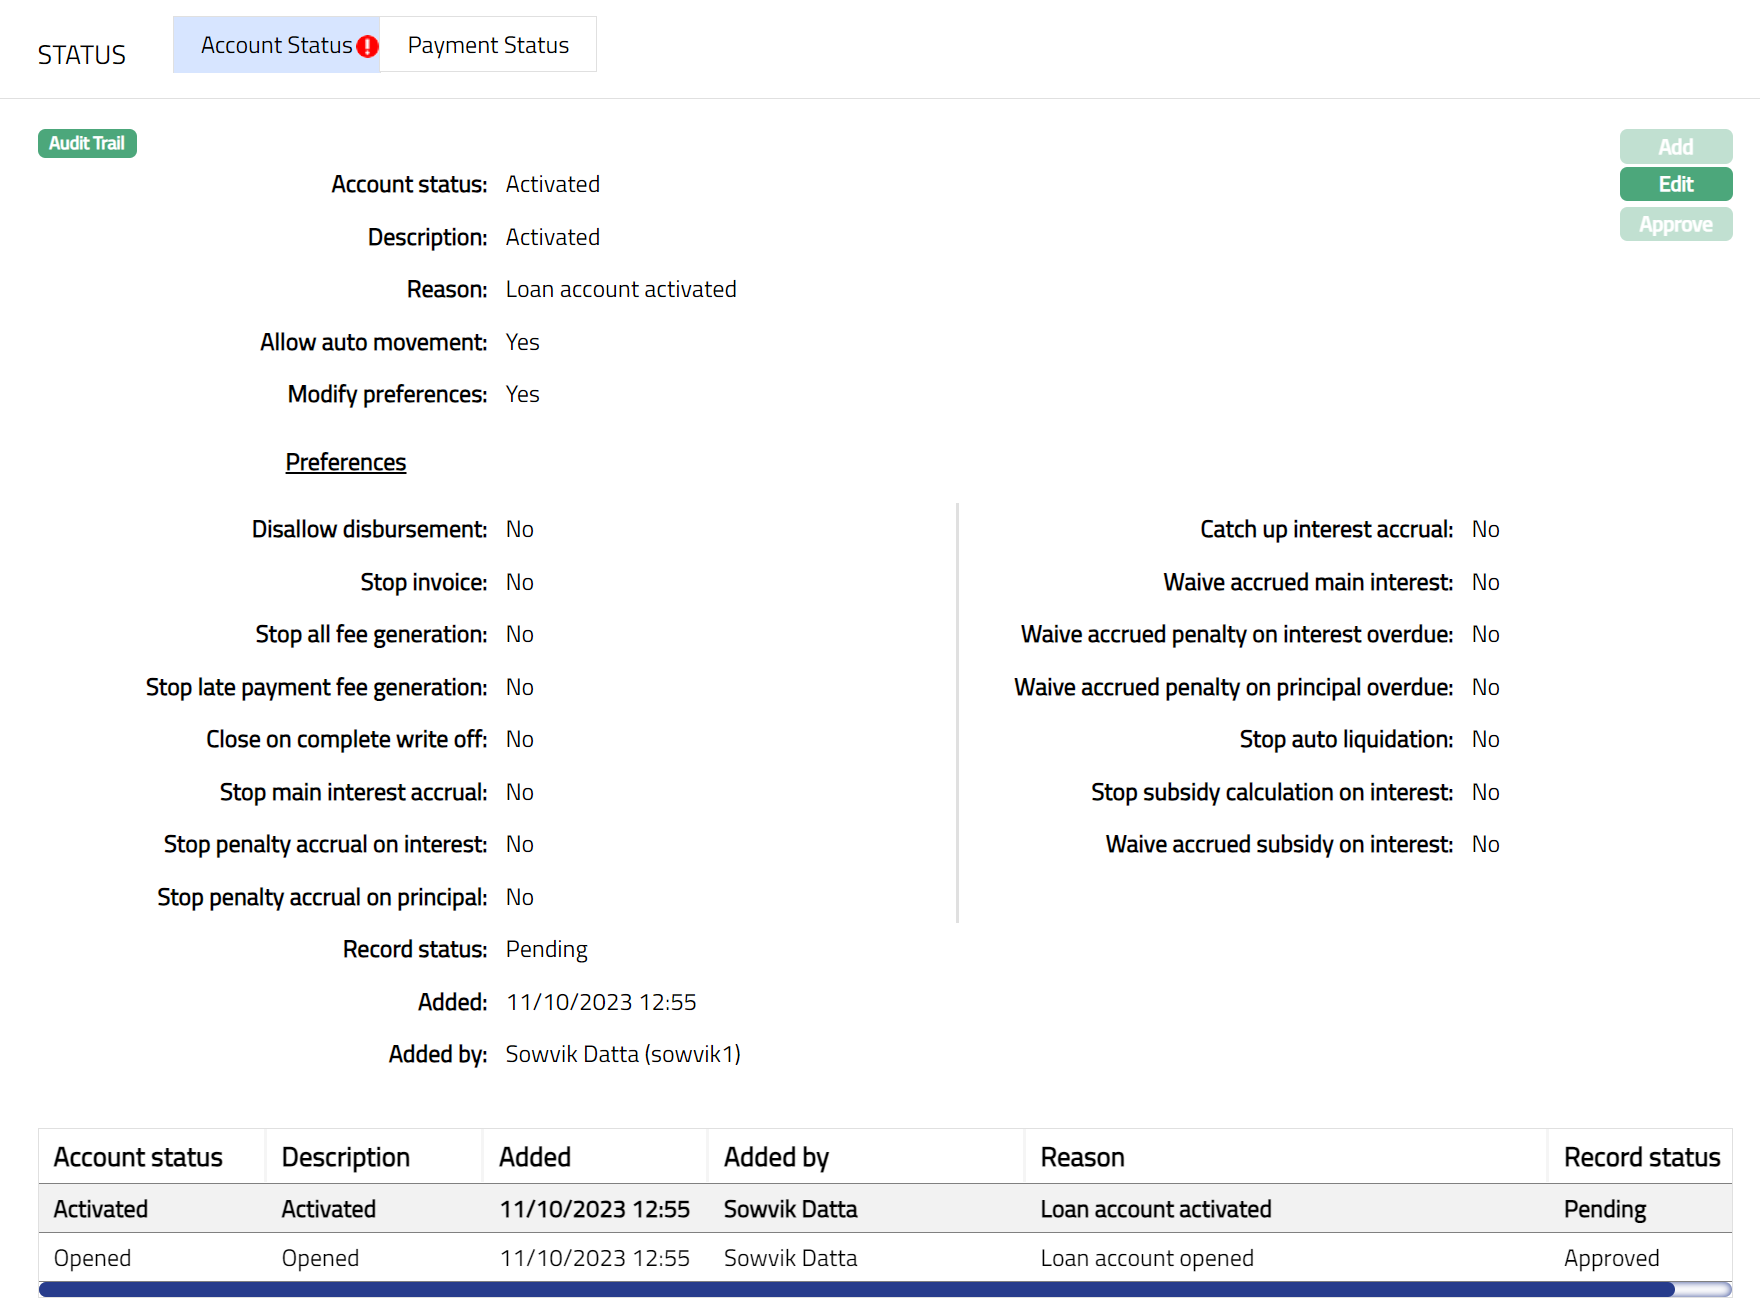
Note: Another user should approve the added Account status, so that the record status becomes Approved.
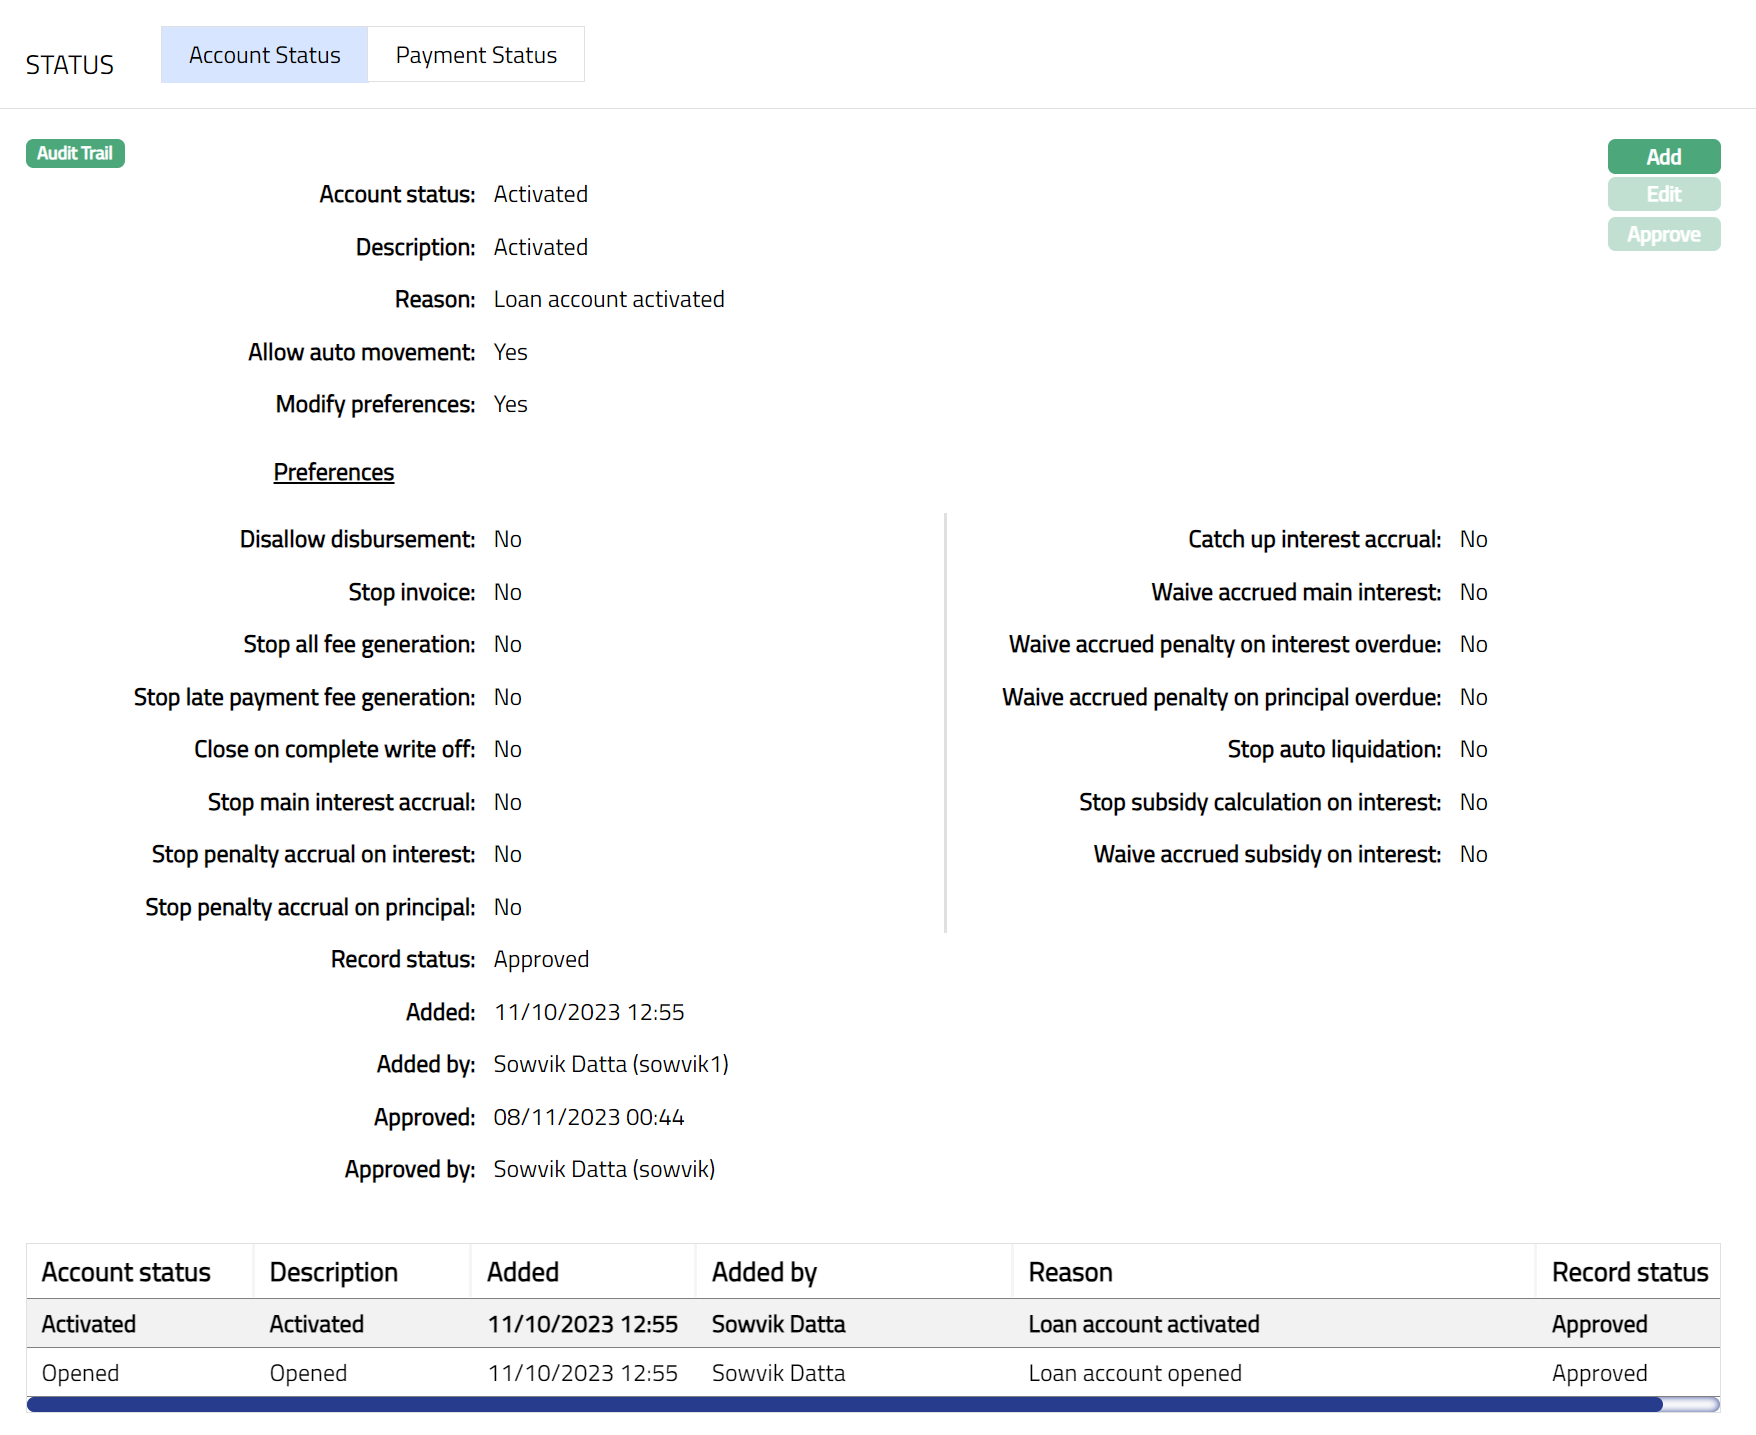
Functions: Add, Edit, Approve
The additional fields that you can view in the Account Status tab are explained below.
Added field denotes the date on which the record was added.
Added by field denotes the name of the user who created the record.
Approved field denotes date on which the record was approved. This is displayed only if the record is approved.
Approved by field denotes name of the user who approved the record. This is displayed only if the record is approved.
To add account status,
1. Click Add. Add account Status page will appear.
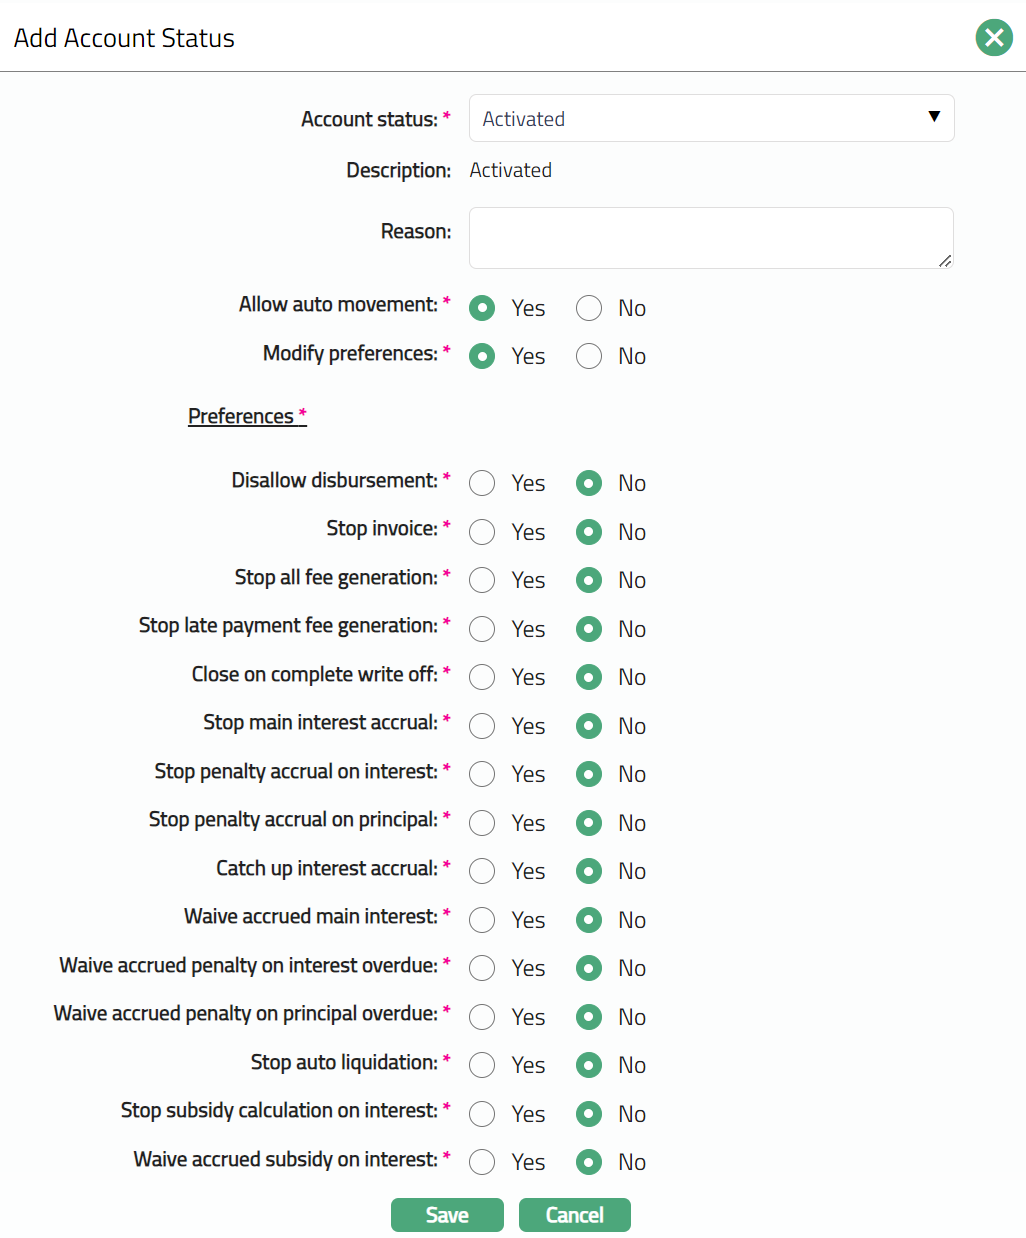
2. Select Account status to which you want to move the Account. Depending on the current status of the account, the list of Account Statuses shown here will change as described below:
| Current status | List of Account Statuses |
|---|---|
| Opened | Activated |
| Activated | User defined account statuses |
| User defined statuses | Any other User defined account statuses |
3. Description displays the description of the status selected.
4. Enter Reason for the status movement.
5. If Allow auto movement is Yes, rule-based status changes will automatically be applied to the account; however, if No is selected, then the rule-based status changes will not apply. By default, this will be as explained in the following table:
| Current status | Allow auto movement flag |
|---|---|
| Opened | Defaulted to No and disabled; Preferences will not be displayed |
| Activated | Defaulted to Yes and enabled; all the Preferences will be displayed. |
| User defined status | As defined for the status in Admin > Status > Loan Status |
| Closed | Defaulted to No and disabled |
6. When Modify Preferences is marked as Yes, then the Preferences will be enabled, and you can modify them as required. When the flag is marked as No, then all Preferences from the Status Maintenance will be defaulted and disabled. By default, this will be as explained in the following table:
| Current status | Modify preferences flag |
|---|---|
| Opened | Defaulted to No and disabled; Preferences will not be displayed |
| Activated | Defaulted to Yes and enabled; all the Preferences will be displayed. |
| User defined status | As defined for the status in Admin > Status > Loan Status |
| Closed | Defaulted to No and disabled |
7. Click Save. Account Status page appears with the added details and the record Status will be Pending.
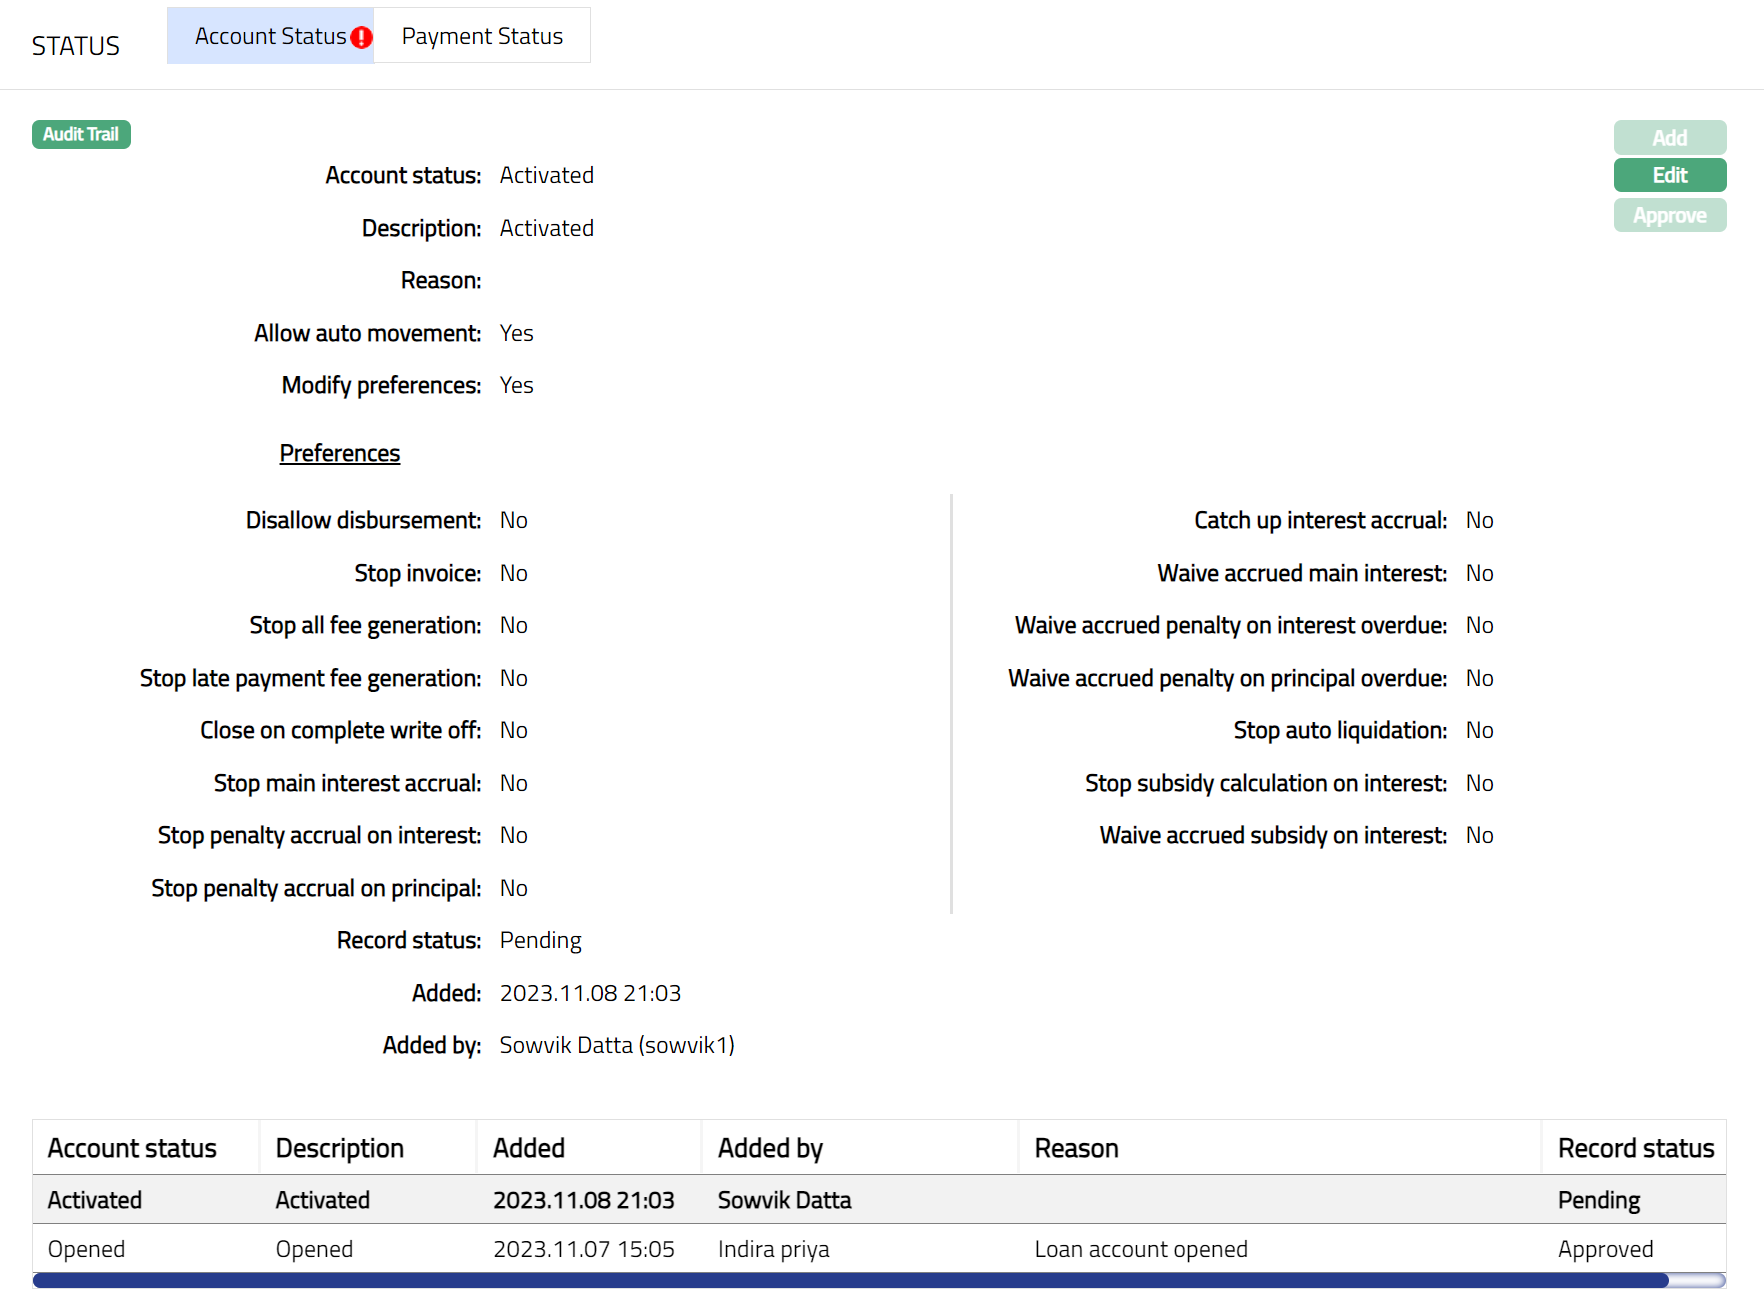
Approve: Any person other than the one who has added the Account Status record can approve the same. Once approved the record status changed to Approved and the red bubble disappears.
Functions: Add, Edit, Approve
Repayment after Complete Write-Off (Write-Off Recovery)
Aura supports repayment for loans that are fully written off (100%) but kept open, where unpaid balances still exist. Such repayments are treated as Write-Off Recovery Payments and are handled differently from normal repayments.
Eligibility Conditions: A repayment is treated as Write-Off Recovery Payment only when all of the following conditions are met:
- The loan is 100% written off
- The loan status is Open
- Payment Due Amount is Zero (0) for one or more components
If these conditions are not met, the payment is processed using standard repayment rules.
Repayment Allocation: When an eligible repayment is received:
- The payment is allocated only against unpaid amounts
- Allocation is performed component-wise
- The due amount is not increased
- The written-off amount remains unchanged
Accounting Treatment: For Write-Off Recovery Payments:
- Aura posts recovery entries against the write-off ledger
- The same GL account used during the original write-off are reused for recovery
- Accounting entries are limited to unpaid balance
Excess Payment Handling: If the payment amount exceeds the unpaid amount, the excess amount is treated as Received in Excess (RIE). Aura does not apply payment amounts beyond the unpaid balance.
Loan Closure: The loan is closed only when the unpaid amount becomes zero. A positive account balance alone does not result in automatic loan closure.
Payment Status
This tab will allow you to view the history of the Payment Status of the Loan Account. The Payment Status of a Loan Account can only be moved based on the Status Rules set at the Product; and can never be set manually.
The following Payment Status is pre-shipped:
- Normal: This is the initial Payment Status as soon as the loan account is created. This is automatically approved.
To View/Edit Payment status.
1. Access Loan Account page. Click Status → Payment Status tab. A sample of the tab is shown below.
2. Payment Status and Description shows the Payment Status and Description for the chosen record. In case of user-defined Payment Statuses, it is defaulted from the Payment Status Maintenance under Admin → Status → Loan Status. For the pre-shipped Normal Status, the Payment Status and Description will be the same as the Payment Status.
3. Reason displays the reason for the Payment Status selected. In case of automatic status movement, it will be the same as the Loan Payment Status.
4. For user-defined Payment Statuses, the Preferences are defaulted from the user maintenance in Admin. For the pre-defined Payment Status Normal, all the preferences are set to No. For a detailed description of the various Preferences associated with the Payment Status, refer the user manual on Admin → Status → Loan Status.
5. Status denotes the status of the record. In case of automatic status movements, the Status is automatically set to Approved.
6. Added field denotes the date on which the record was added.
7. Added by field denotes the name of the user who created the record.
8. Approved field denotes date on which the record was approved and is displayed only on approval.
9. Approved by field denotes name of the user who approved the record and is displayed only on approval.
10. Click Edit. Edit Payment Status page appears.
Only Reason field is editable.
11. Enter Reason as required for editing the preferences of the Payment status.
12. Click Save. Payment Status page appears with the edited details and the record status will be Pending.
Approve: Any person other than the one who has edited the payment status can approve the payment status record. Once approved the record status changes to approved and the red bubble disappears.
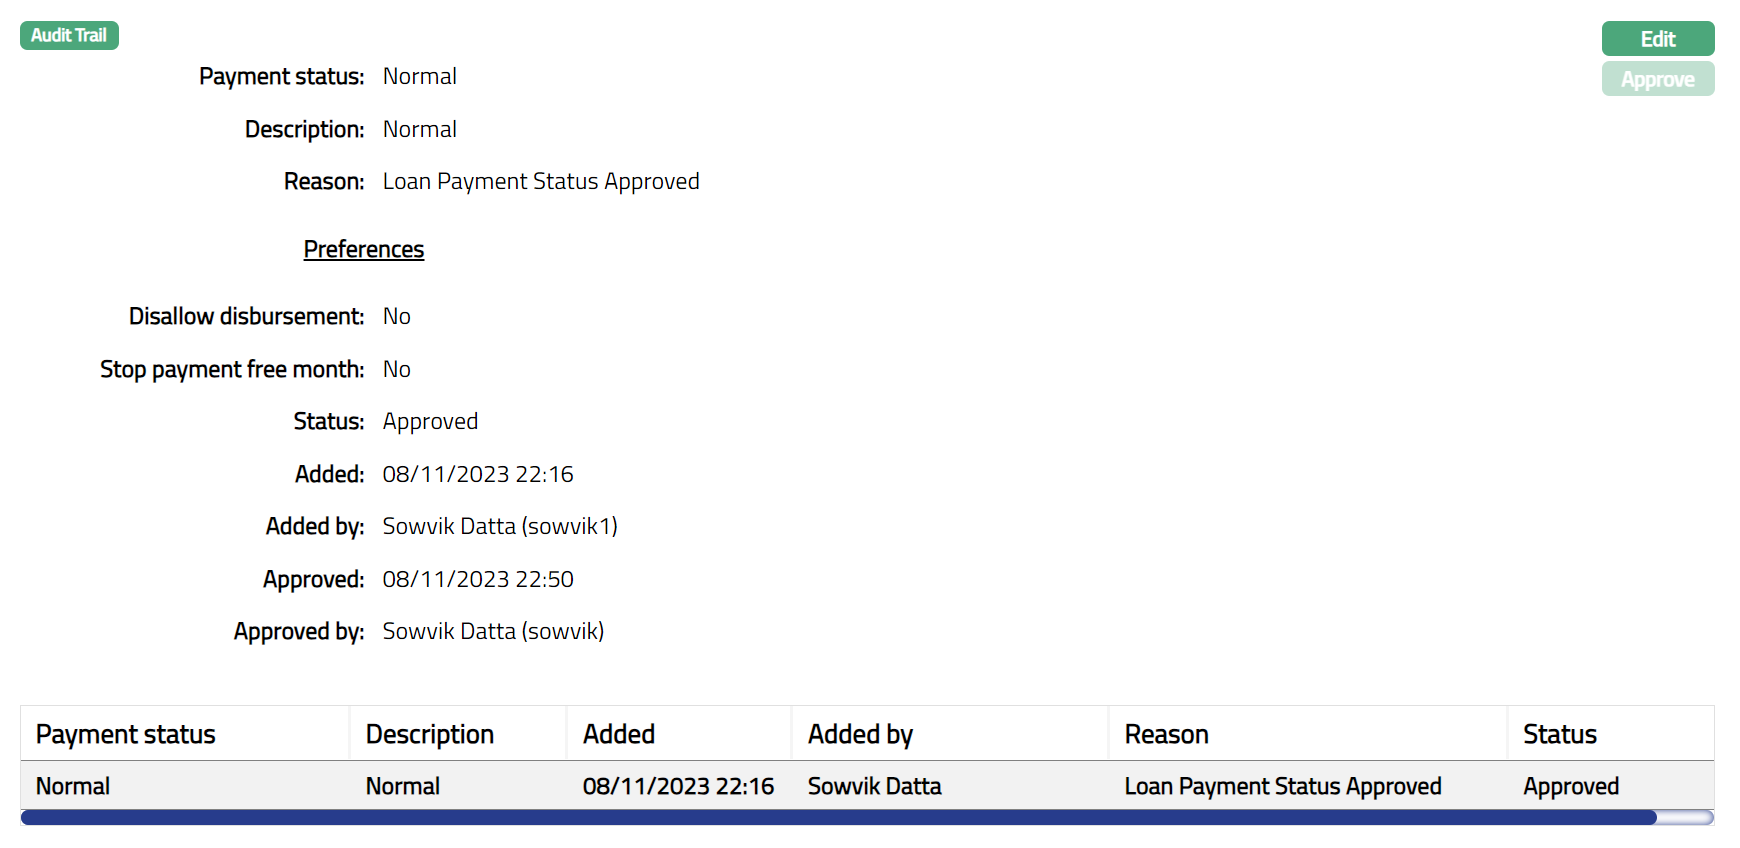
Functions: Edit, Approve.
Subsidy
This tab allows you to add / maintain the subsidy for a Loan Account. Aura allows you to create subsidy of two types. It can be Claim or Payback. If it is of type Claim, then bank will claim the subsidized amount from the third party. If it is of type Payback, then Client has to claim the subsidized amount from the third party. While creating a subsidy you can choose the loan component to be subjected to the subsidy. You can also define parameters such as maximum qualifying threshold and the subsidy period for the subsidy. If the Subsidy is added at the Product level the details of the subsidy are defaulted from the Product level to the Account level. If there are multiple interest components available for the subsidy, then you can add a subsidy at the account level.
To add a Subsidy,
1. Access Loan Account page, click subsidy tab, and then click Add. On creation of a Loan Account, the subsidy details from the Product is defaulted and displayed here. The record status will be Approved.
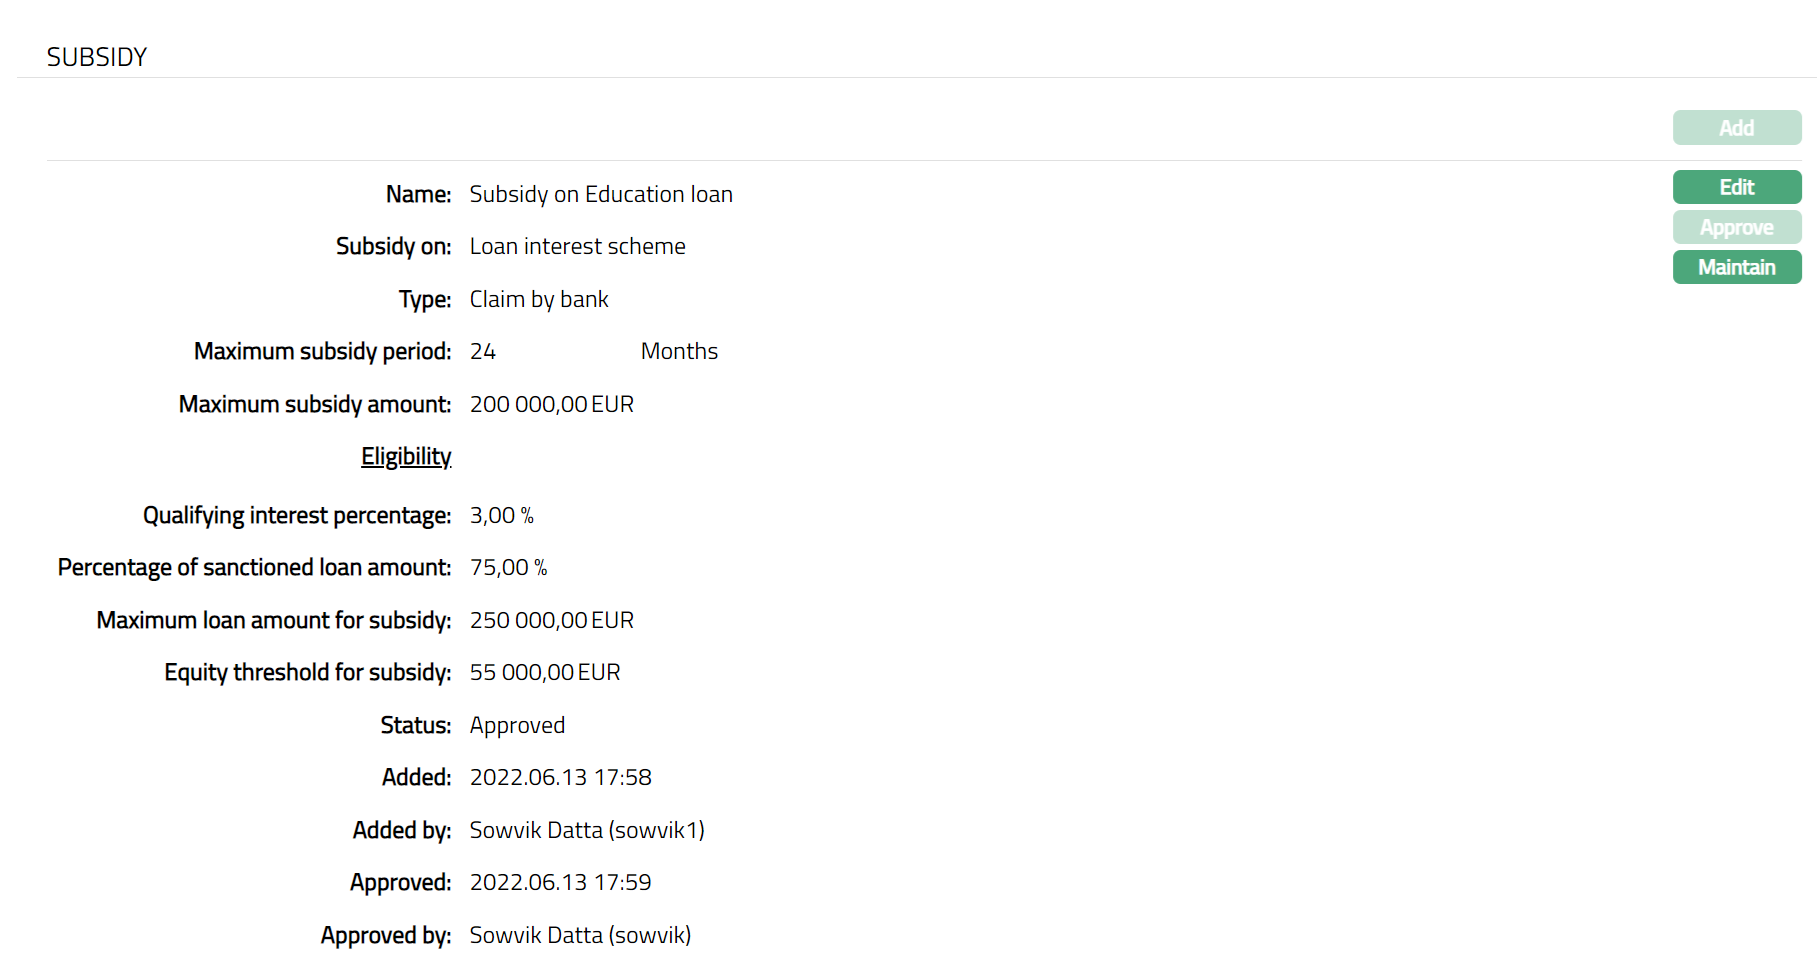
The available fields are:
Name denotes name of the subsidy.
Subsidy on denotes interest component on which the subsidy is applicable.
Type denotes type of subsidy. The available types are Claim by bank and Claim by customer.
Maximum subsidy period denotes subsidy period in months. The Loan Account will be eligible for this subsidy only within this period.
Maximum subsidy amount denotes maximum subsidy for the loan component in base currency. If the Loan Account currency is different from the base currency, Aura will consider the rates for Central Bank Rate Type as specified in Entity Maintenance.
Qualifying interest percentage denotes interest percentage that qualifies the loan for the subsidy i.e. when the Interest % of the loan component is higher than the Qualifying Interest Percentage; the Loan Account is eligible for subsidy.
Percentage of sanctioned loan amount denotes percentage of the sanctioned loan amount that is eligible for subsidy.
Maximum loan amount for subsidy denotes maximum loan amount up to which the subsidy will be allowed. If the Loan Account currency is different from the base currency, Aura will consider the rates for Central Bank Rate Type as specified in Entity Maintenance.
Equity threshold for subsidy denotes repayment threshold of the loan which decides the eligibility of the subsidy for the loan account. As long as the loan amount repaid is less than equal to Equity Threshold For Subsidy, loan is not eligible for subsidy.
Note: Please refer to the Mortgage Loan Product Subsidy section for your reference.
Status field denotes status of the tab.
Added field denotes date on which the record was added.
Added by field denotes name of the user who created the record.
Approved field denotes date on which the record was approved and is displayed only for approved records.
Approved by field denotes name of the user who approved the record and is displayed only for approved records.
Note: Add button is disabled if the subsidy at the Product level is suspended or if there are multiple interest components for subsidy.
To edit a subsidy,
1. Click Edit. Edit Subsidy page appears.
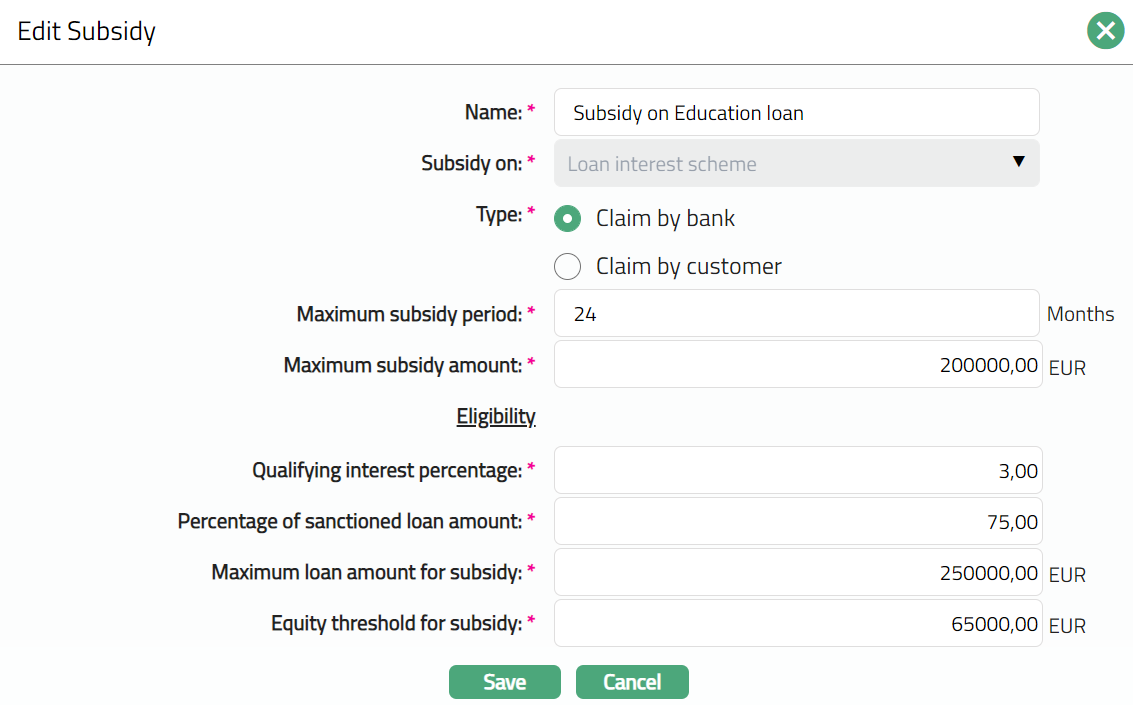
Note: Except Subsidy on, all other fields are editable.
2. Click Save. Subsidy page appears with the edited details. Status will show as Pending.
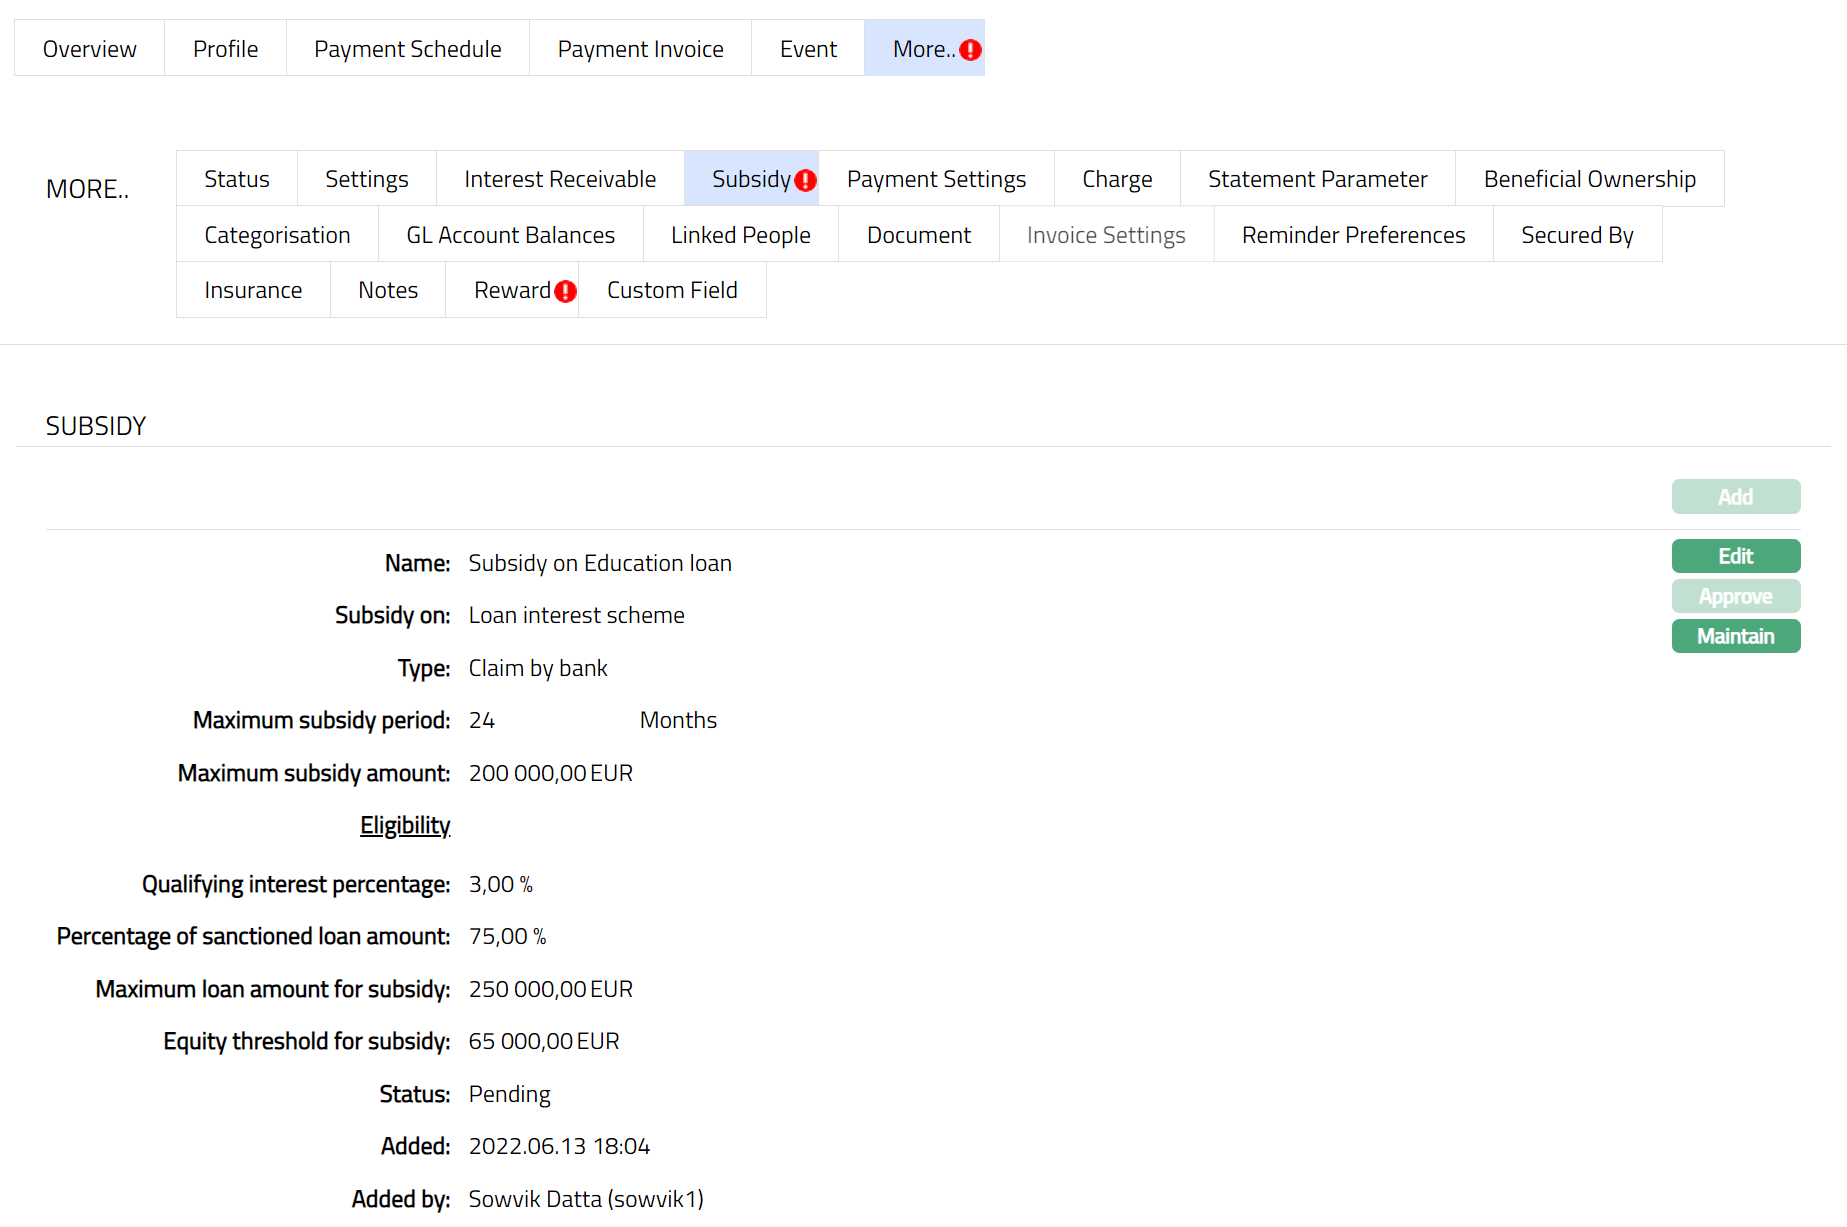
Note:
Edit button is enabled only when Loan Account status is Opened and Approved or when it is Activated and Pending.
Approve button will only be enabled if record status is Pending, this button will be enabled only for the users other than the one who created the record. On each edit of the Subsidy record and the tenor record Approve button is enabled.
In case of Auto Approval is activated system will display the Status as Approved and No manual Approval is required.
Once the Status is approved the status will show as Approved and the red bubble disappears.
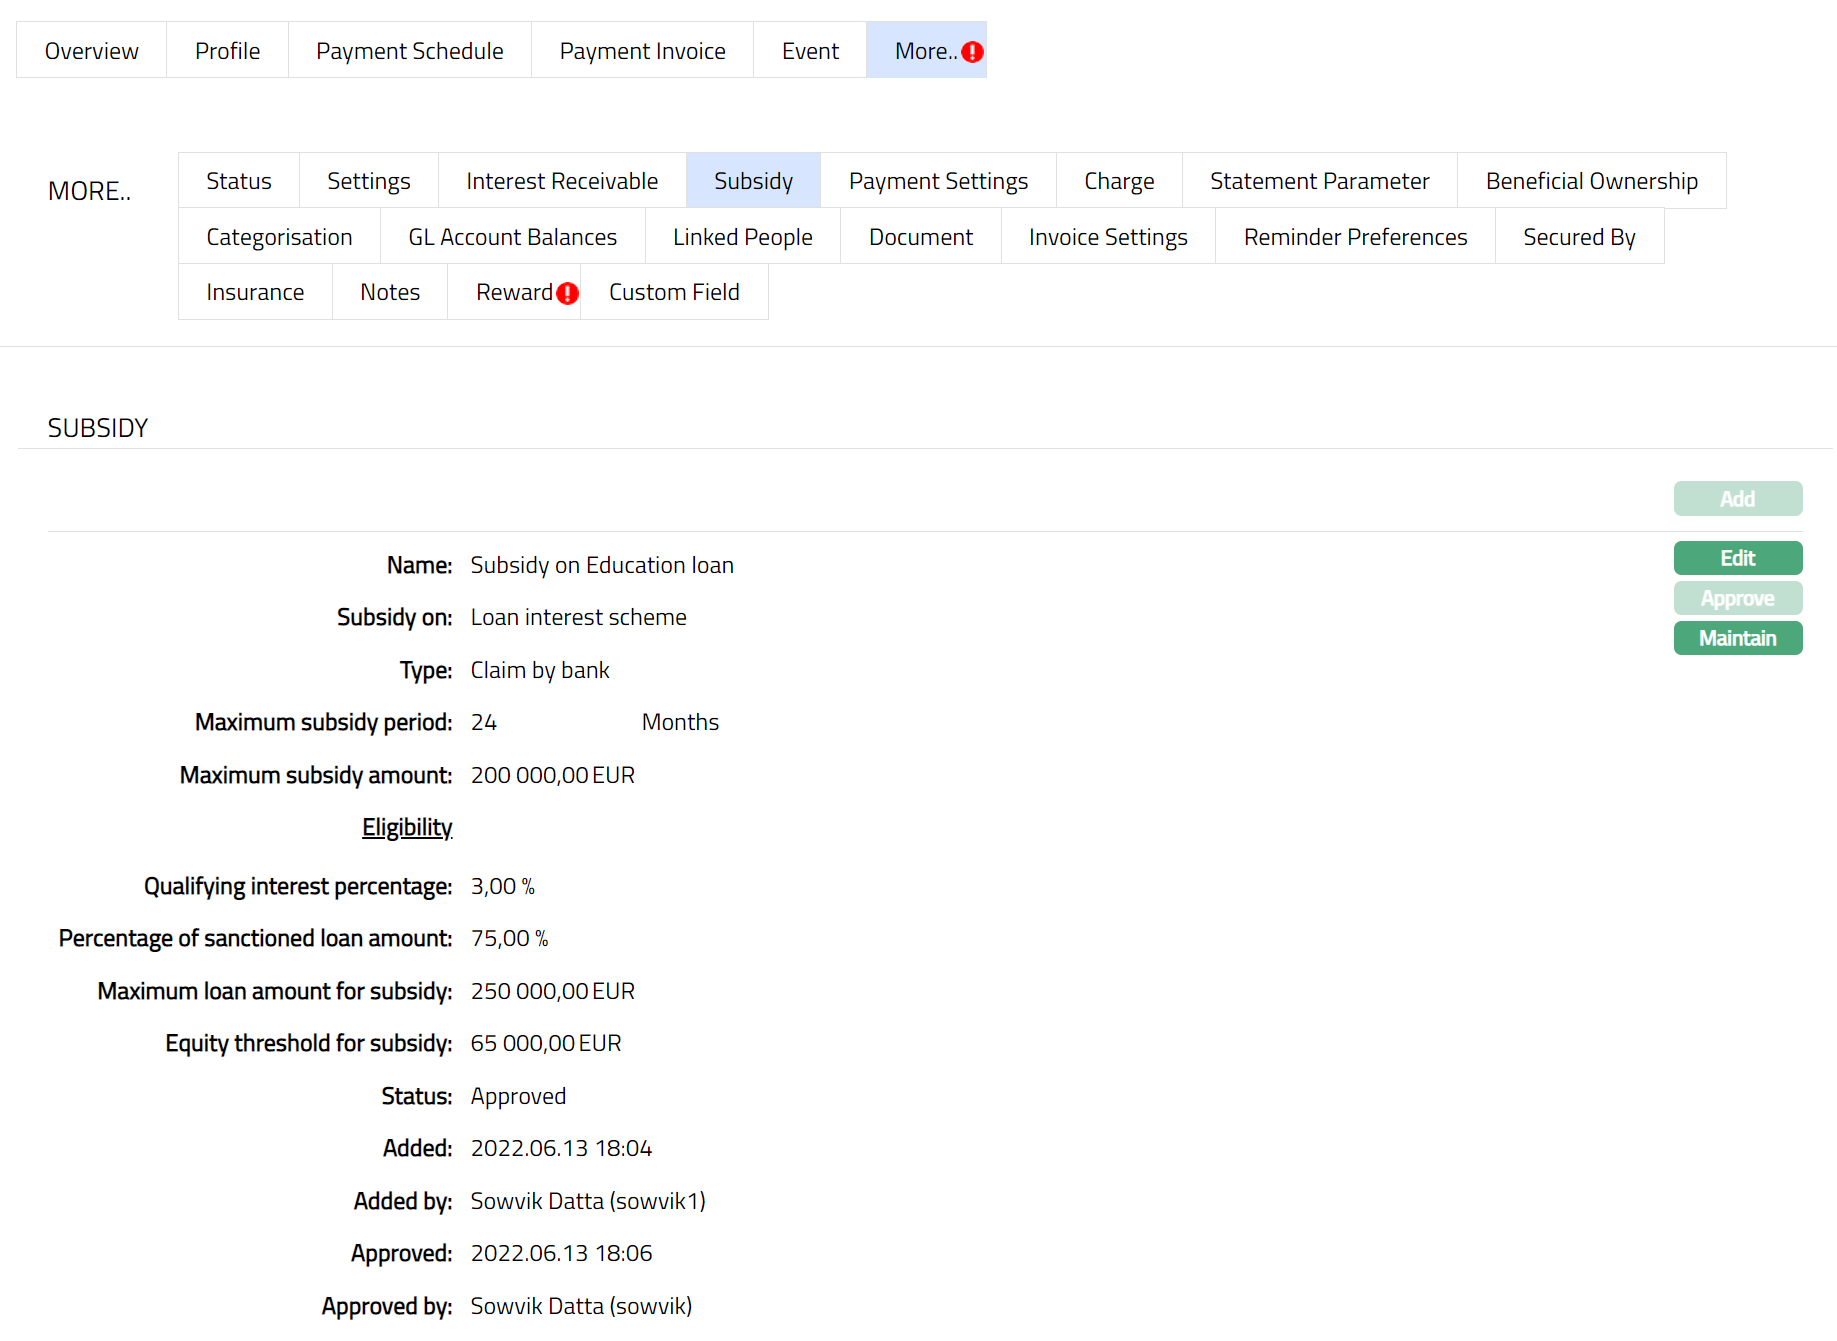
Functions: Add, Edit, Approve, Maintain Tenor
To Add Tenor,
3. Access Loan Account page, click subsidy tab, and then click Maintain Tenor. Tenor tab is displayed.
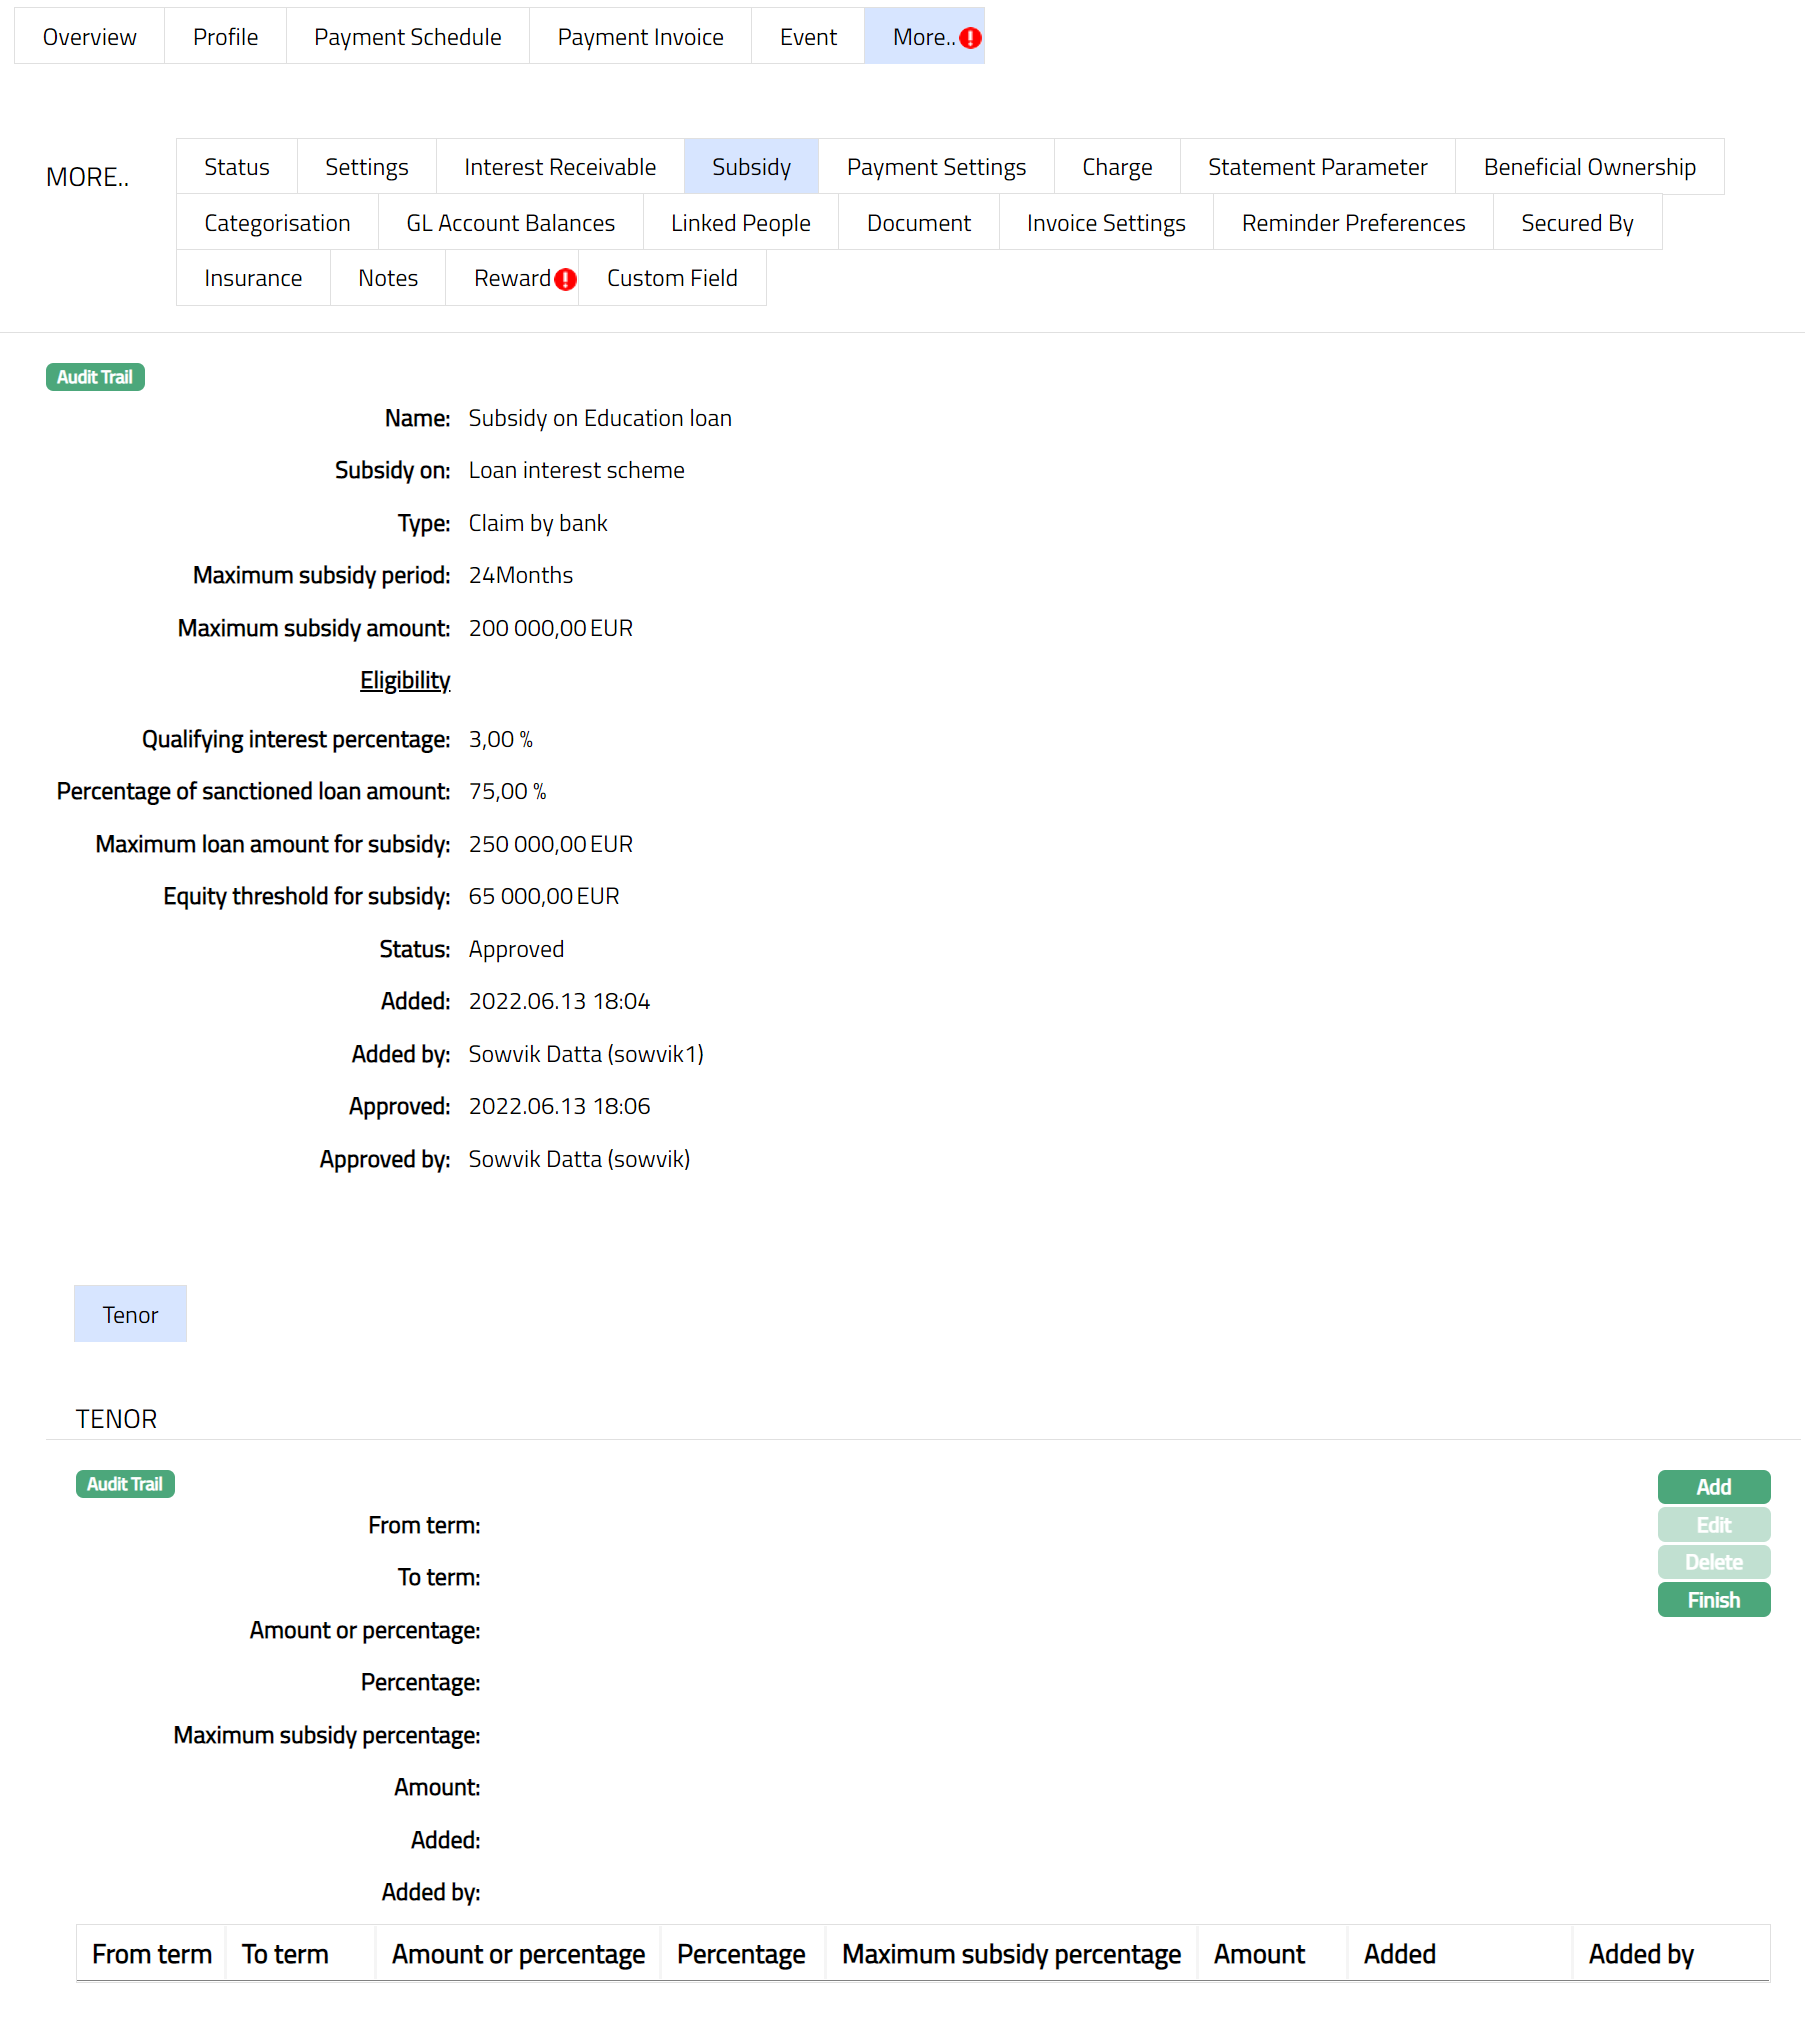
4. Click Add. Add tenor page appears.
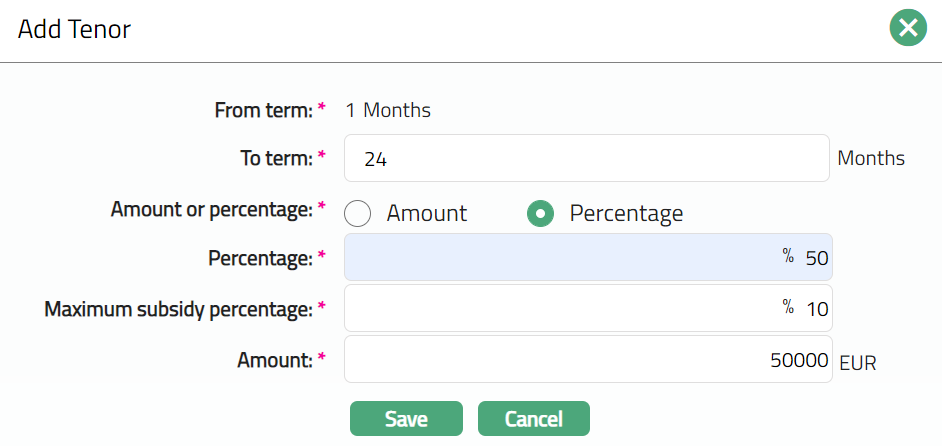
5. From term denotes subsidy tenor in months. This is the month from which the subsidy will be available for the Loan Account.
6. To term denotes the tenor in months for which the subsidy will be available for the Loan Account.
7. Amount or percentage denotes If the subsidy is in terms of Amount or Percentage.
8. Percentage denotes the percentage of the loan interest component which is eligible for subsidy. This field will be displayed only when Percentage is selected as an option for Amount or Percentage.
9. Maximum subsidy percentage denotes the maximum subsidy percentage on the loan interest component. For example, If Percentage above is given as 50 %, Loan Component interest is 8 %, then 4 % is Qualified for the Subsidy. However, if Maximum subsidy Percentage is given as 2 % then, only 2 % is to be subsidized. This field will be displayed only when Percentage is selected as an option for Amount or Percentage.
10. Amount denotes the amount of subsidy.
11. Click Save. Tenor page appears with the added details.
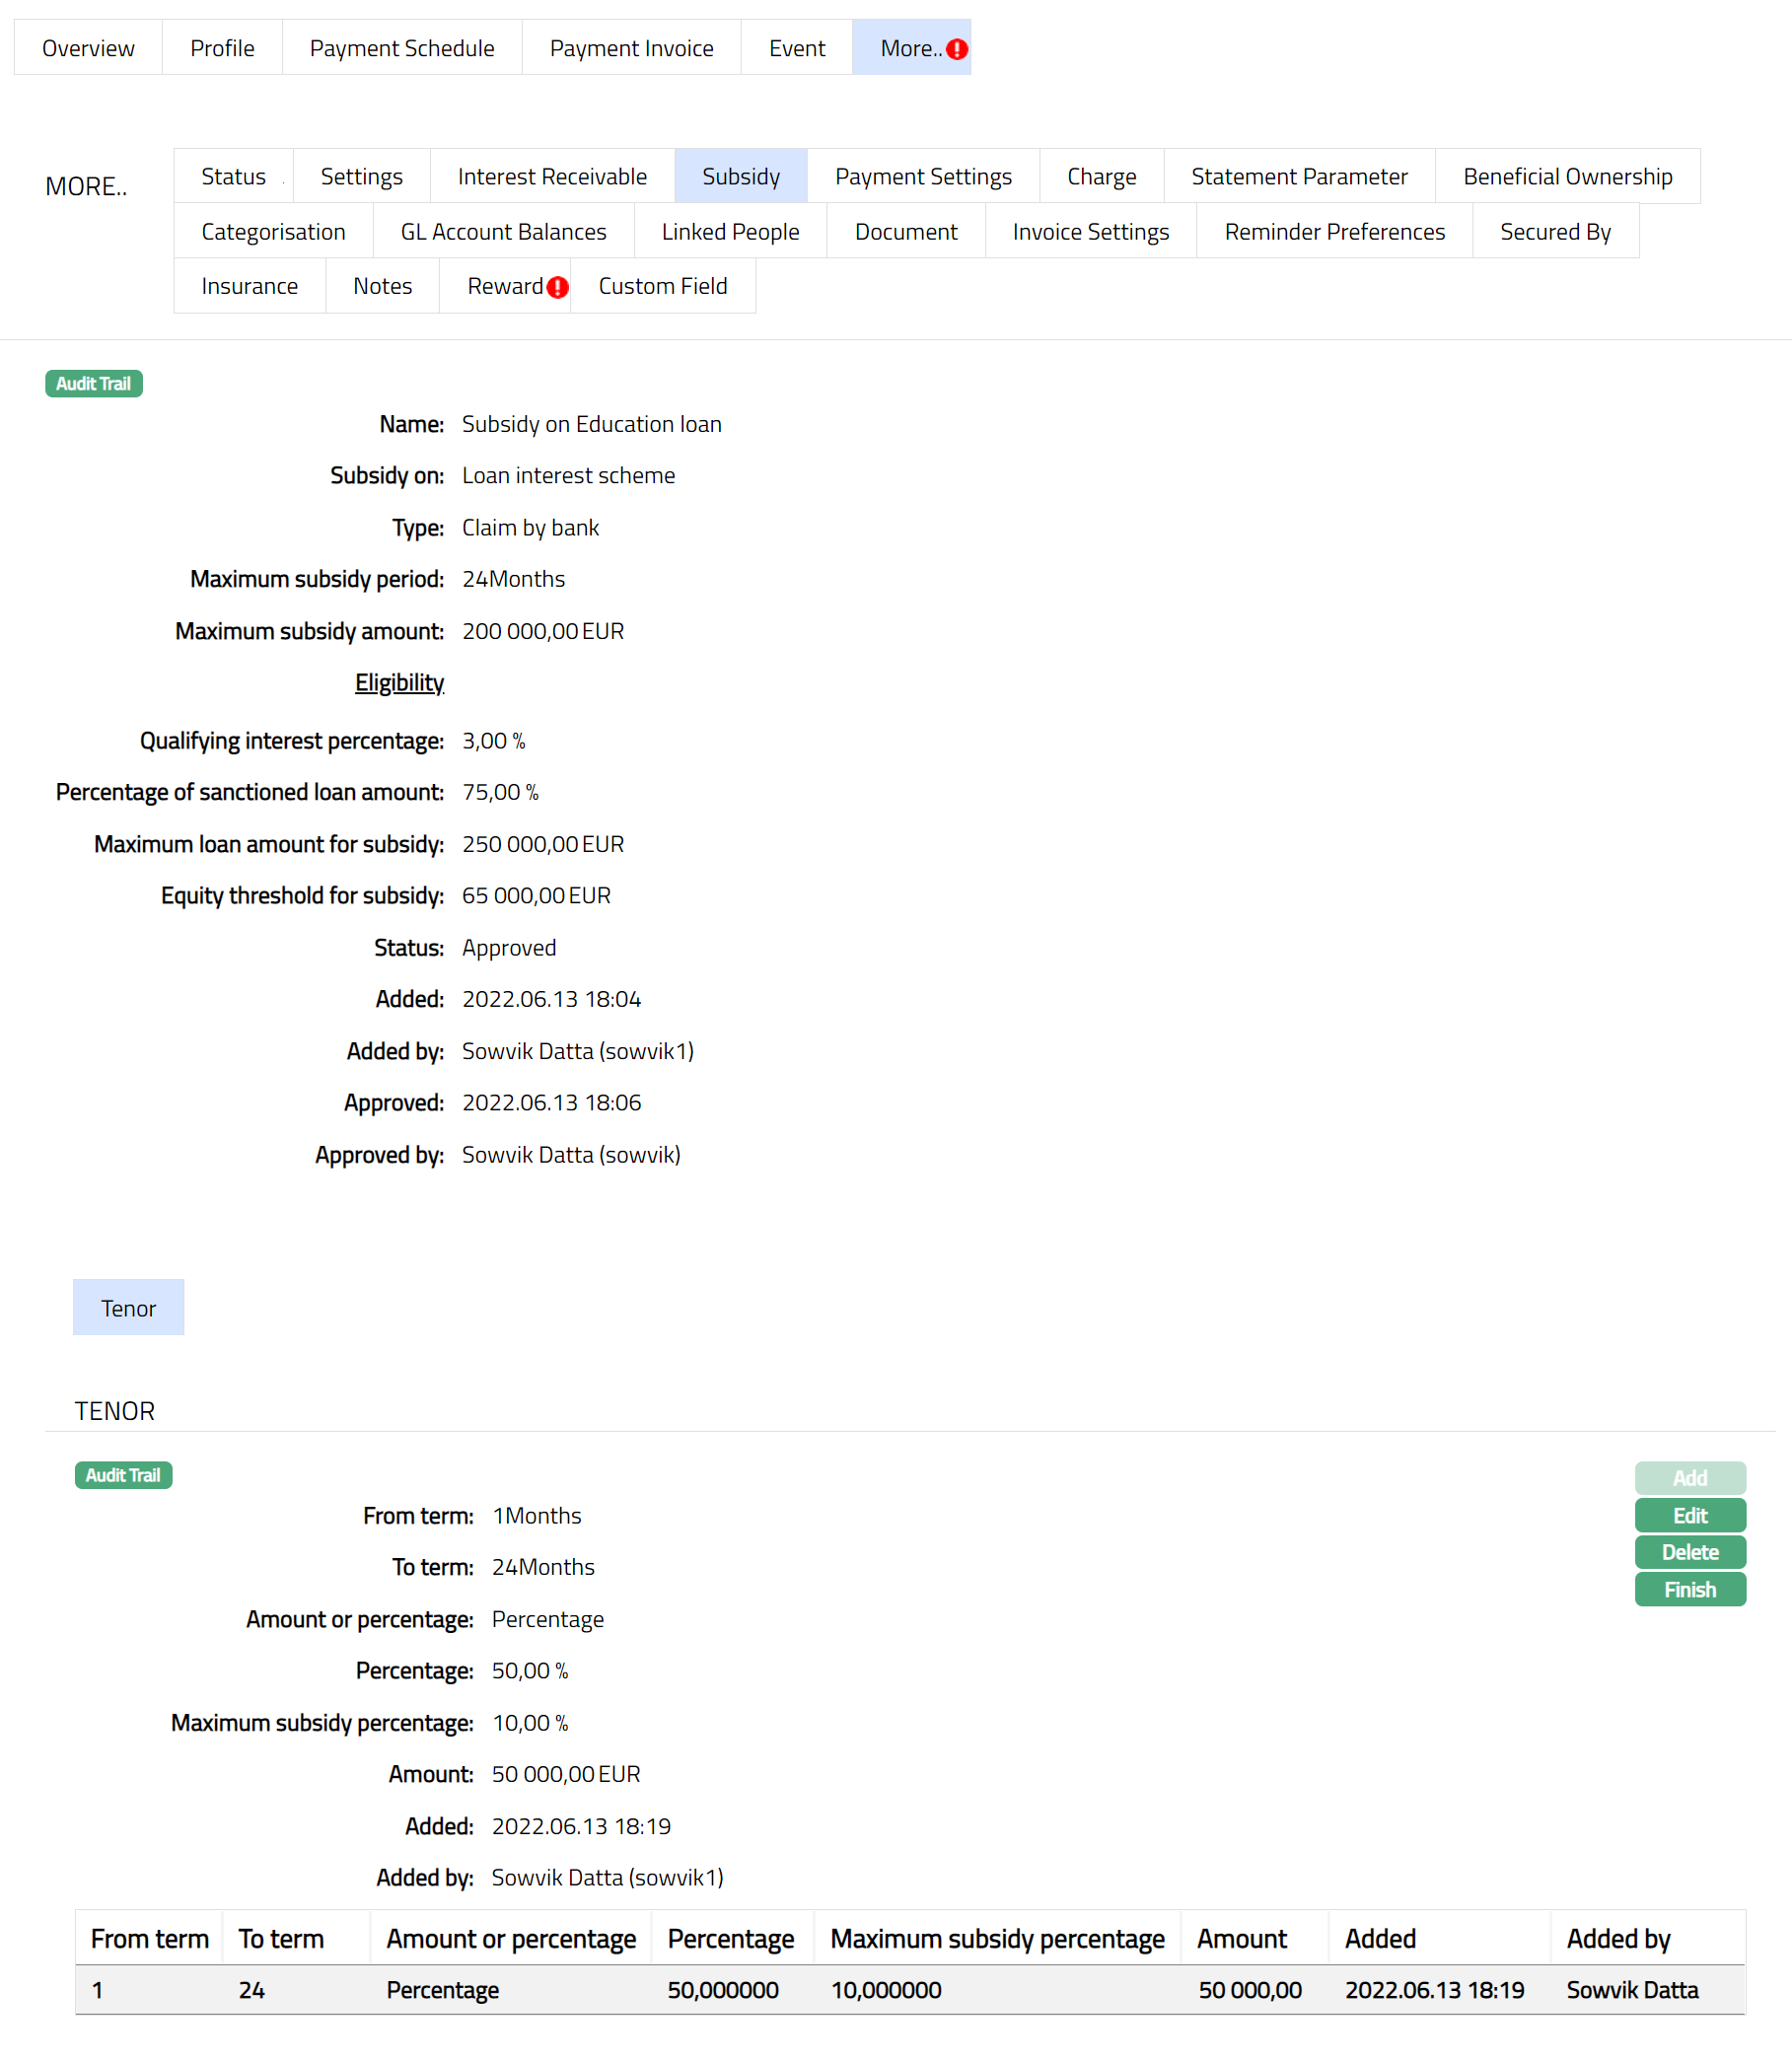
The Additional fields available are:
Added field denotes the date on which the record was added.
Added by field denotes the name of the user who created the record.
To Edit the Tenor,
1. Click Edit. Edit Tenor page will appear.
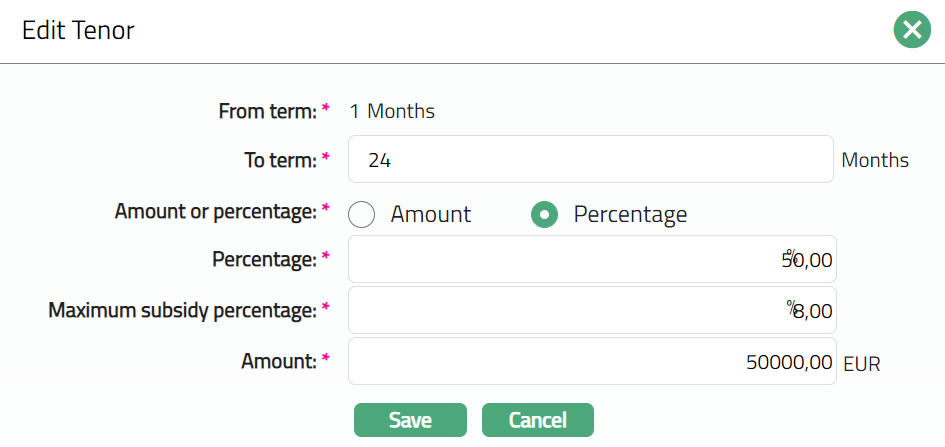
Note: All fields are editable except From term field.
2. Click Save. Tenor field appears with the edited details.
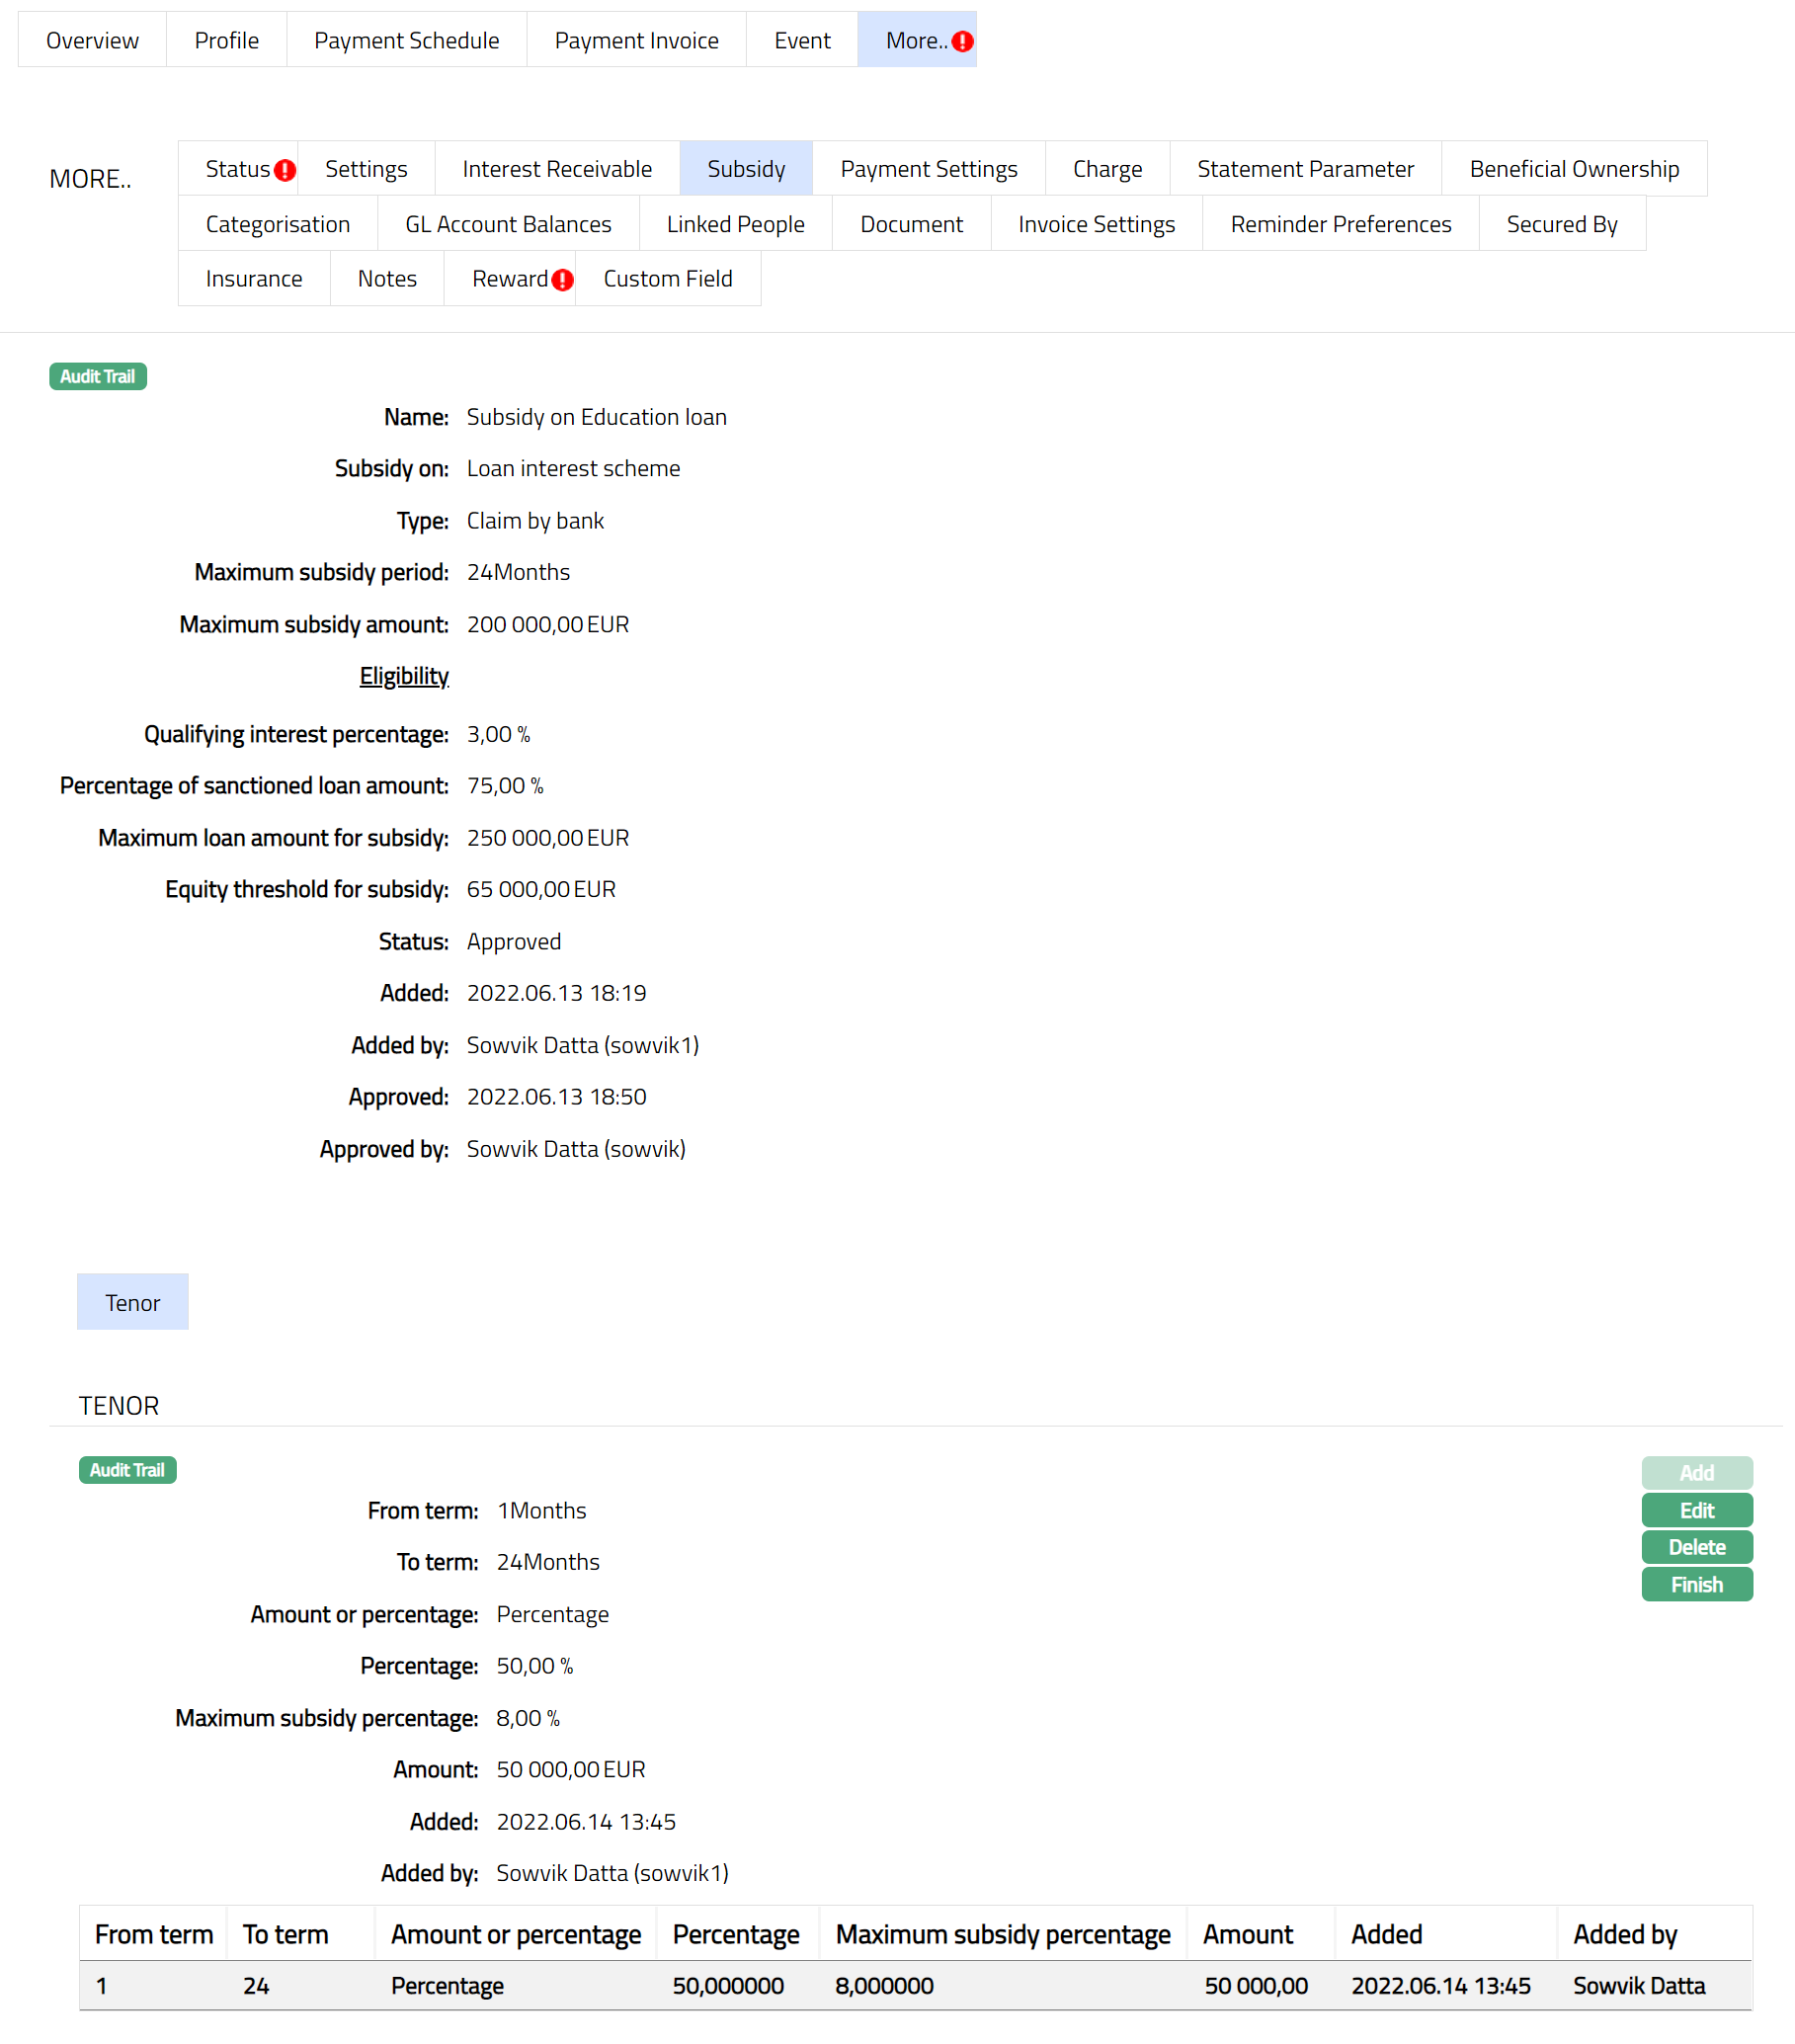
Functions: Add, Edit, Delete, and Finish.
3. Click Finish. Loan Account page appears.
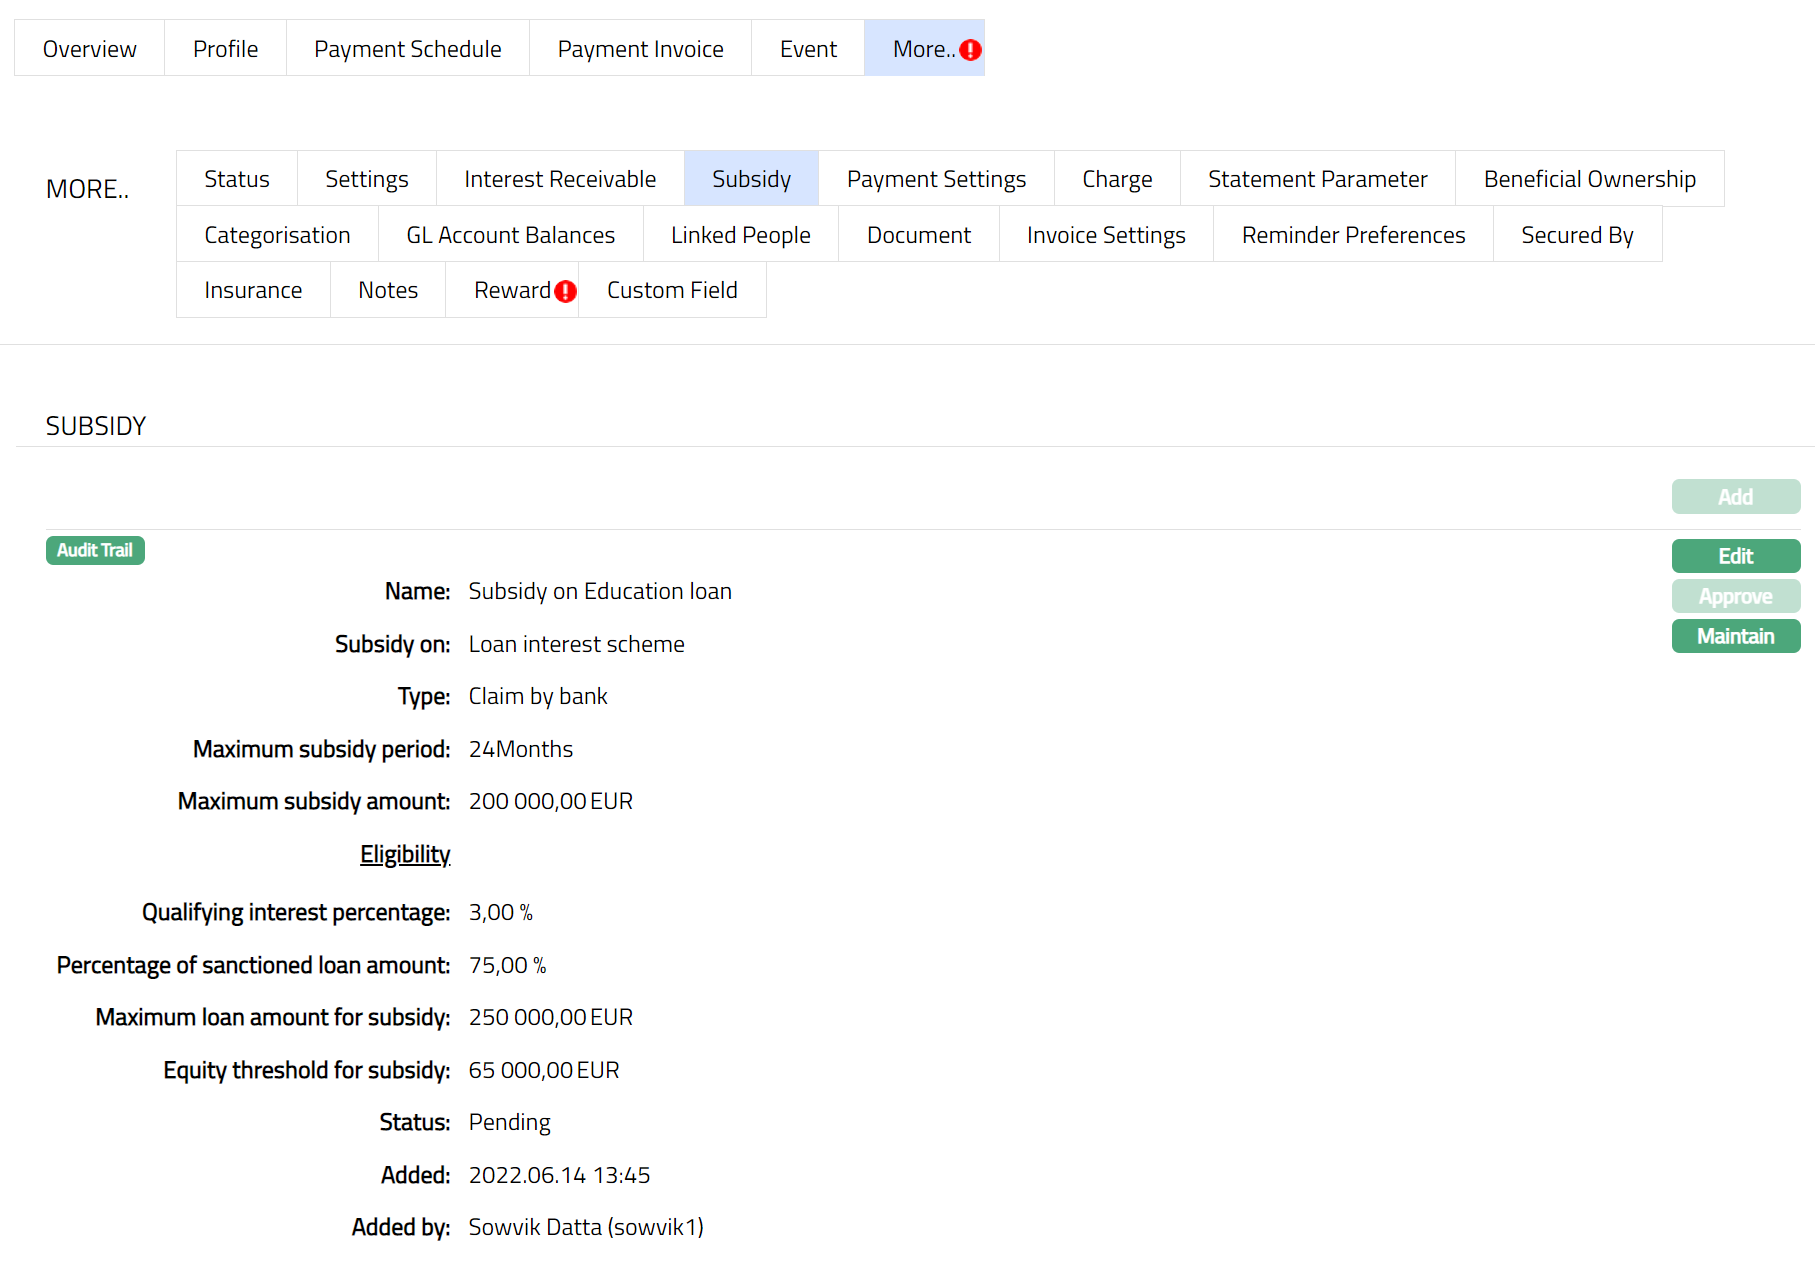
Note: Status will reflect as Pending. Once approved by different user the Status will change to Approved.
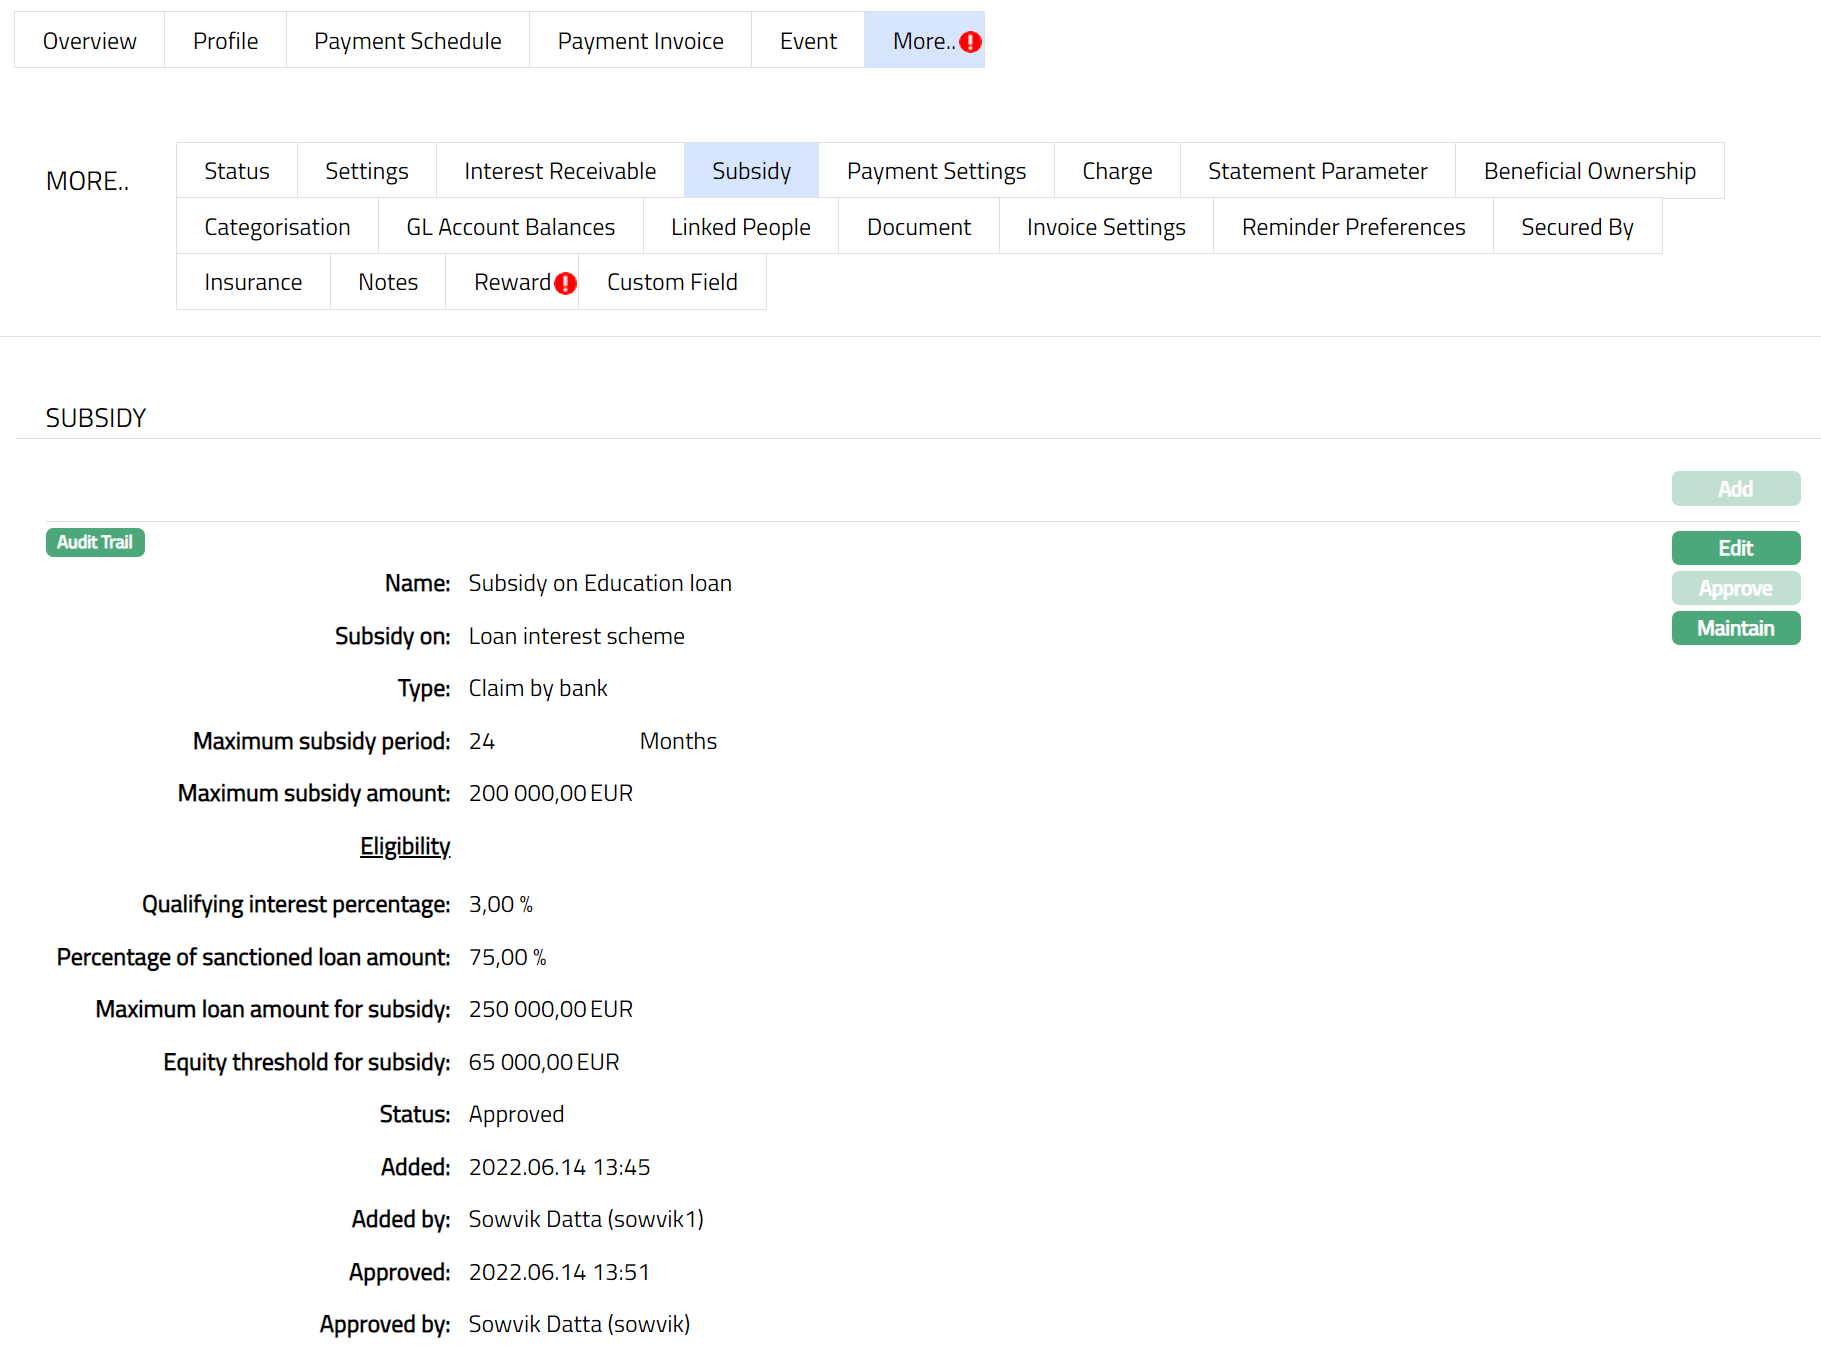
Functions: Add, Edit, Approve and Maintain.
The Additional fields are:
Status field denotes the status of the tab.
Added field denotes the date on which the record was added.
Added by field denotes the name of the user who created the record.
Approved field denotes date on which the record was approved and is displayed only for approved records.
Approved by field denotes name of the user who approved the record and is displayed only for approved records.
Payment Settings
Payment Settings tab allows you to view the payment settings details like Principal / Interest / Annuity/Amortized Payment Frequency, First Interest Payment Date.
To edit Payment Settings,
1. Access Loan Account page. Click Payment Settings tab to view the details as per sample below. For details refer to New Loan → Payment settings (4/6).
If Annuity -
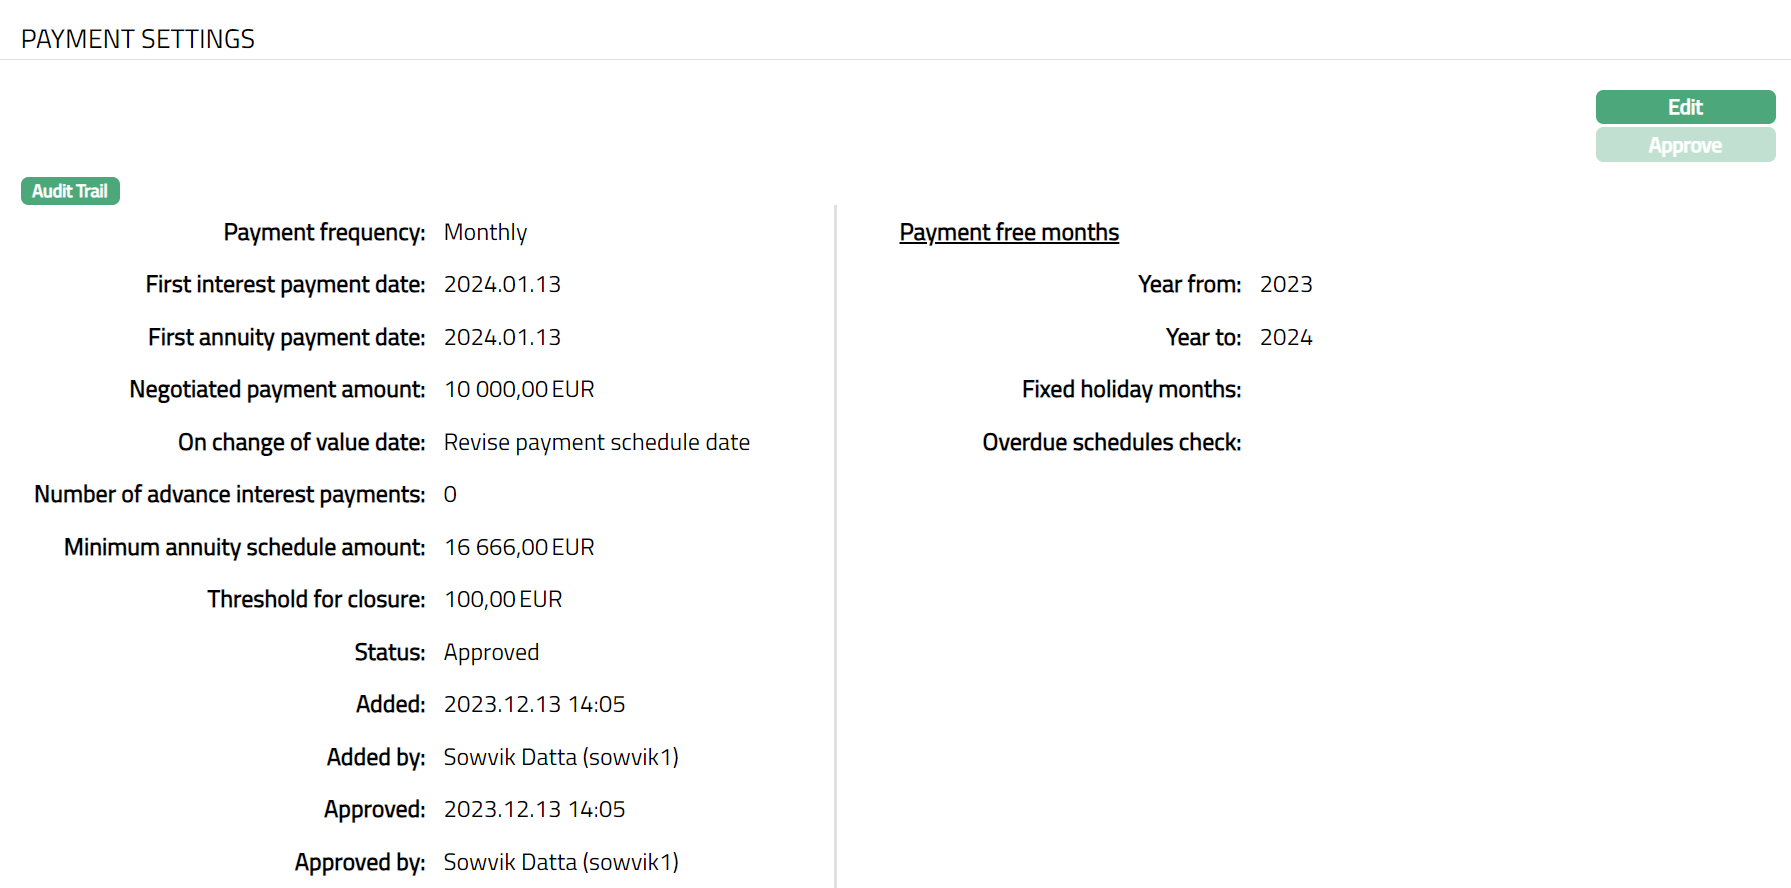
If Amortized -
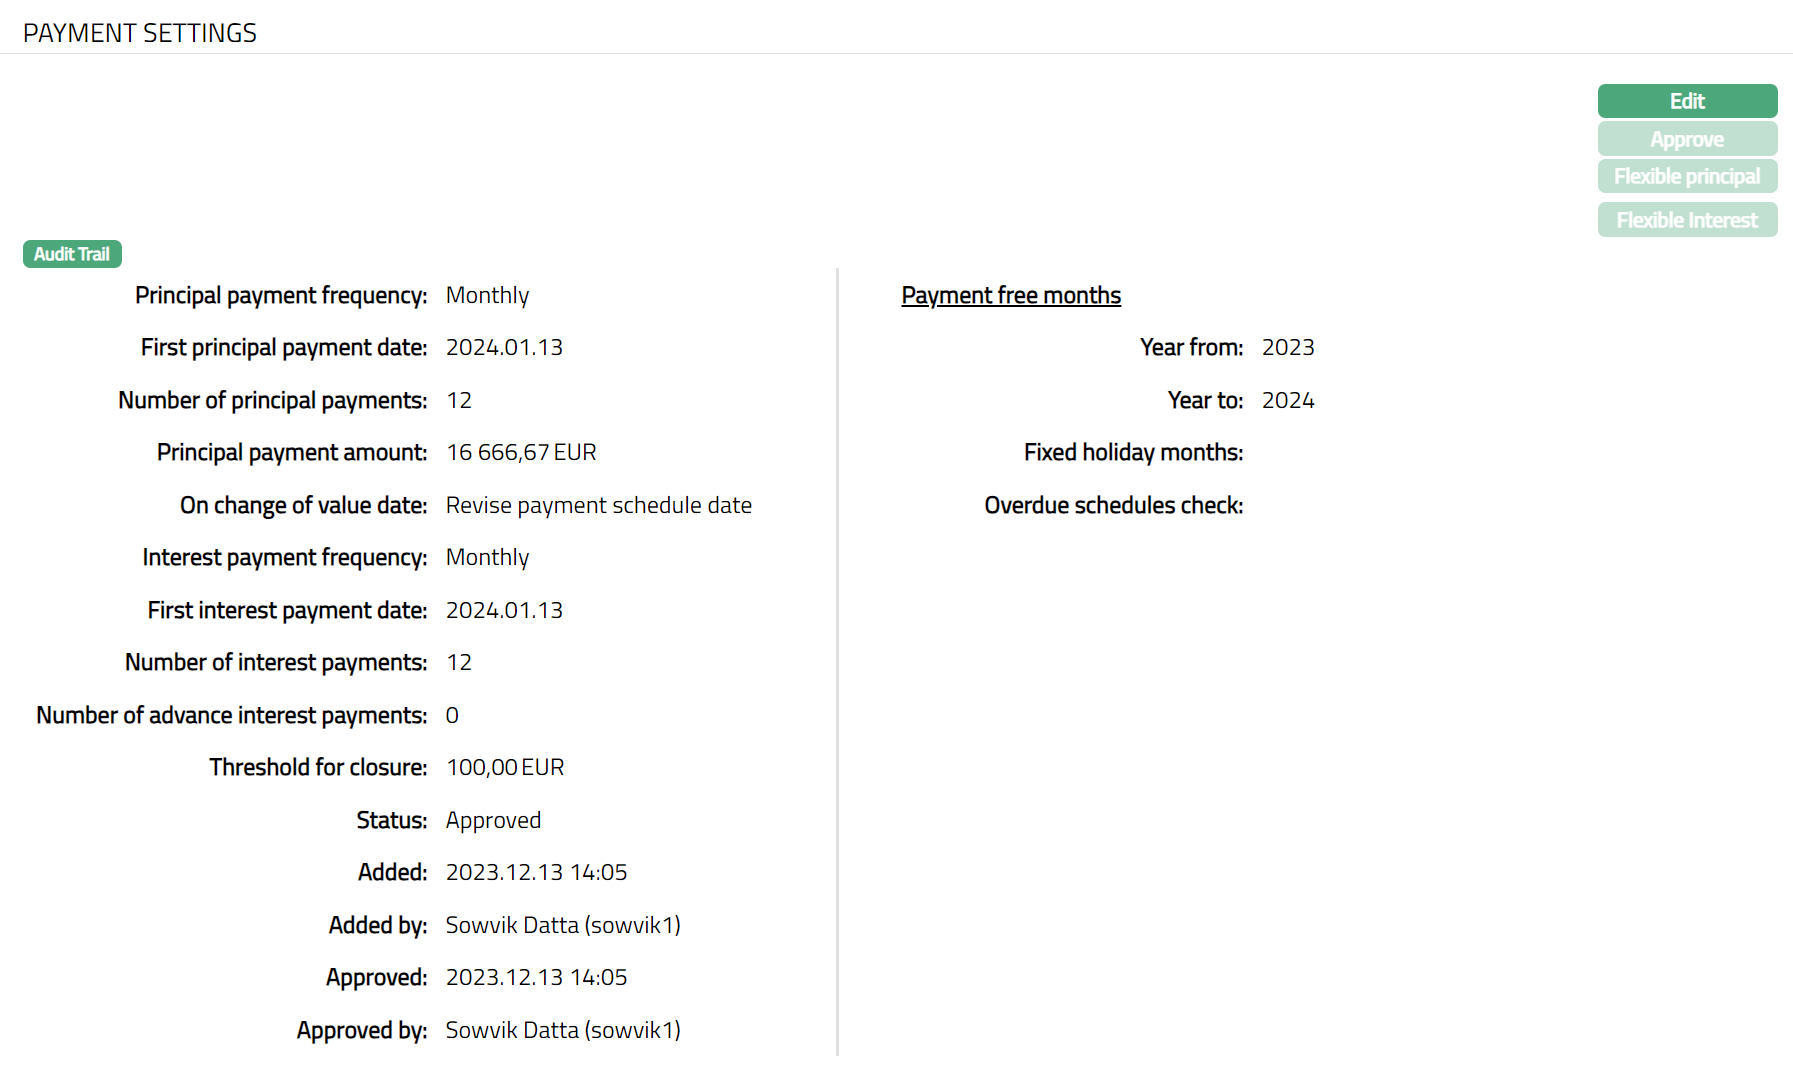
The additional fields that you can view in the tab are explained below:
Year from denotes the year on which the loan is created (year of the loan Value Date)
Year to denotes the year on which the loan is matured (year of the loan Maturity Date)
Fixed holiday months field -- denotes the months for which the holiday preferences will be applicable. Aura allows you to select the months for which the holiday preference will be applicable.
Overdue Schedule check is an eligibility condition for payment free month applicability. The following options are available:
No check: If you want to specify that the payment free month is applicable irrespective of whether the account is overdue or not, choose this option. No overdue status check for the account will be performed.
Check overdue for X cycles: If you want to specify that the payment free month is applicable only if the account has not been overdue for the past X cycles, choose this option. Aura will check that if the account has not gone overdue for the past X cycles.
Status field denotes the status of the tab.
Added field denotes the date on which the record was added.
Added by field denotes the name of the user who created the record.
Approved field denotes date on which the record was approved and is displayed only on approval.
Approved by field denotes name of the user who approved the record and is displayed only on approval.
2. Click Edit. Edit Payment Settings page appears. Edit button will be enabled only if the account status is Opened.
If Annuity -
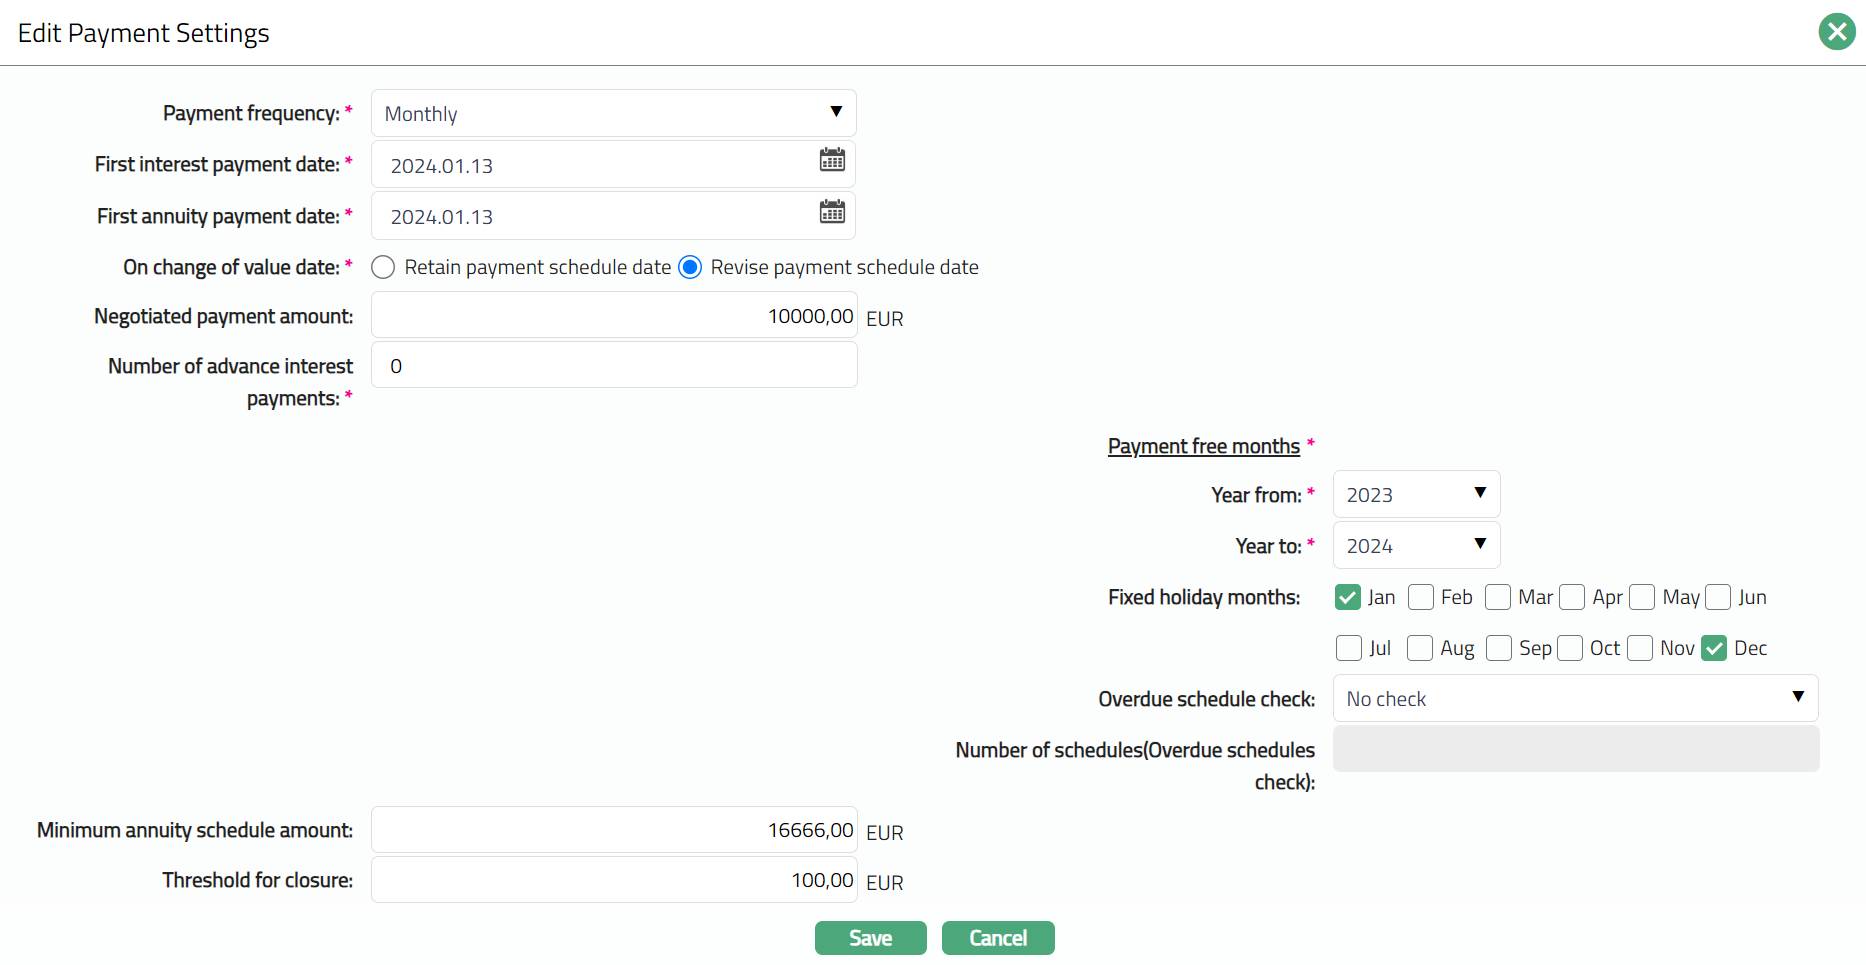
If Amortized -
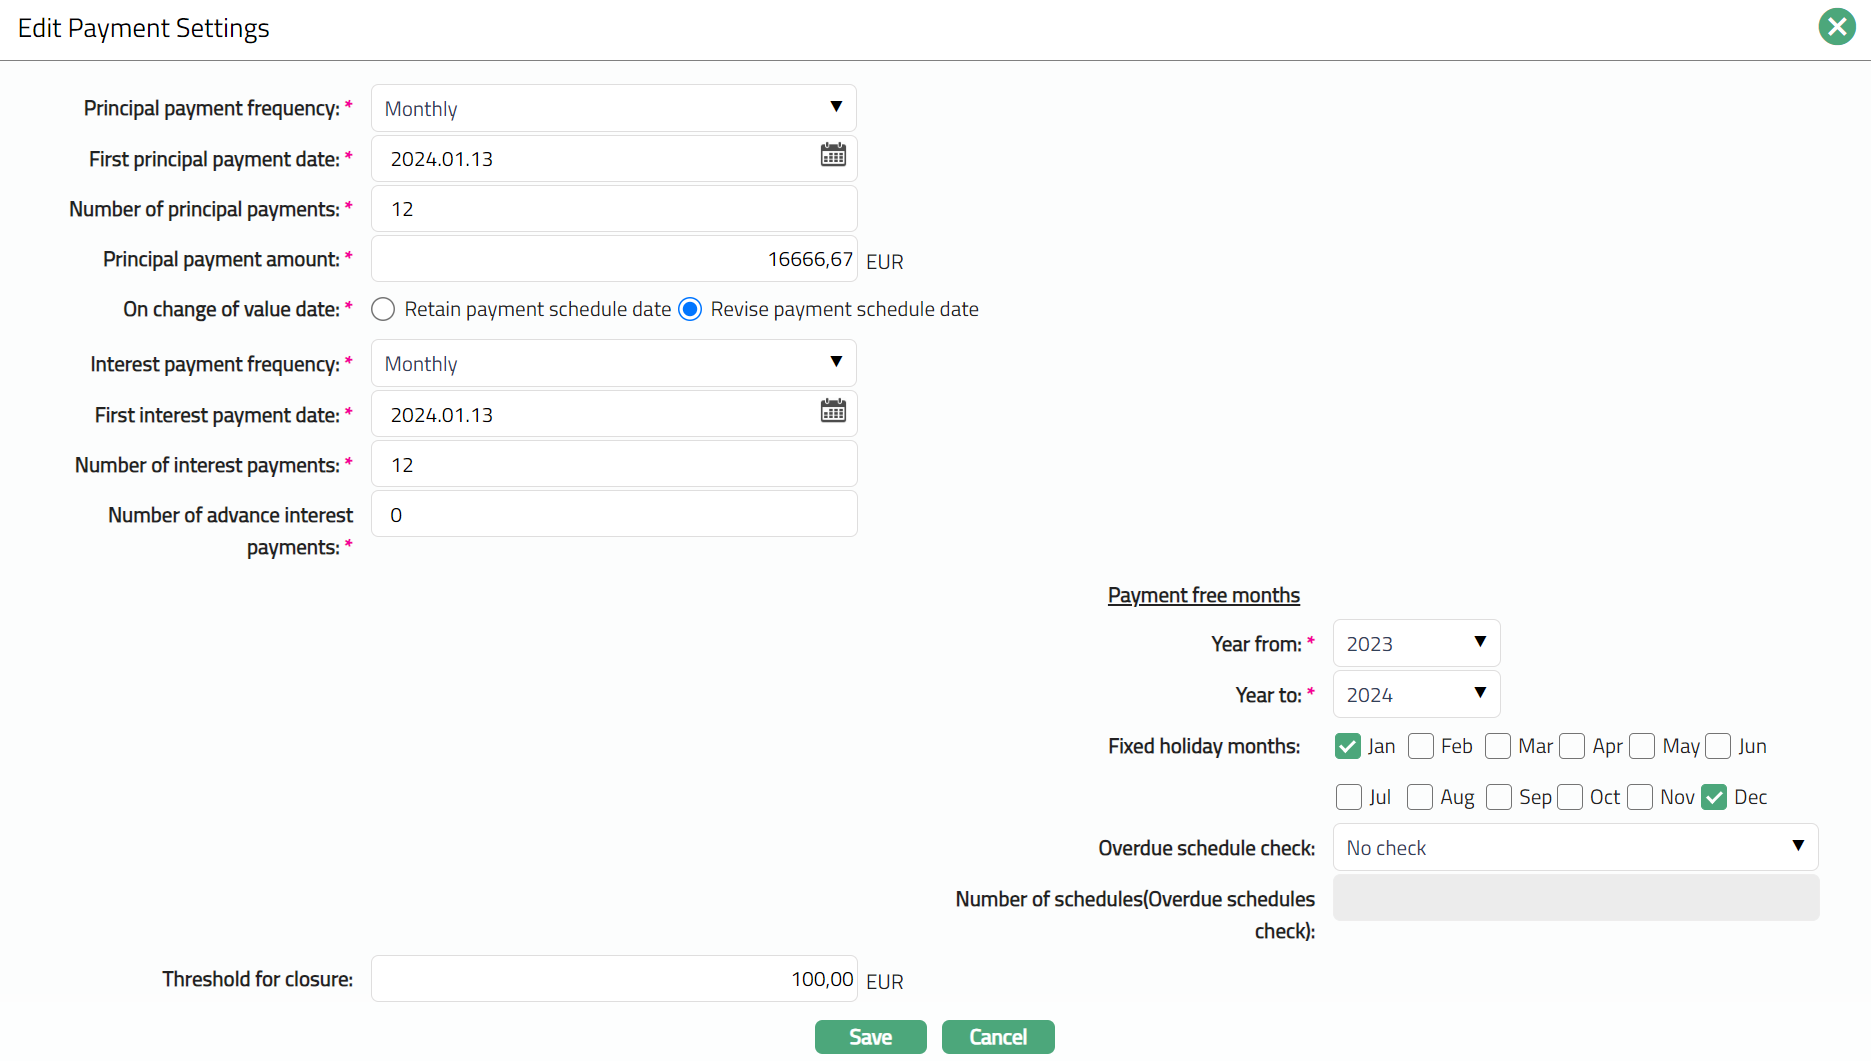
Note: All fields are editable.
3. If No check is selected as an option for Overdue schedule check, then Number of schedules (Overdue schedules check) field will be disabled.
4. Click Save. Payment Settings page appears with the edited details.
If Annuity -
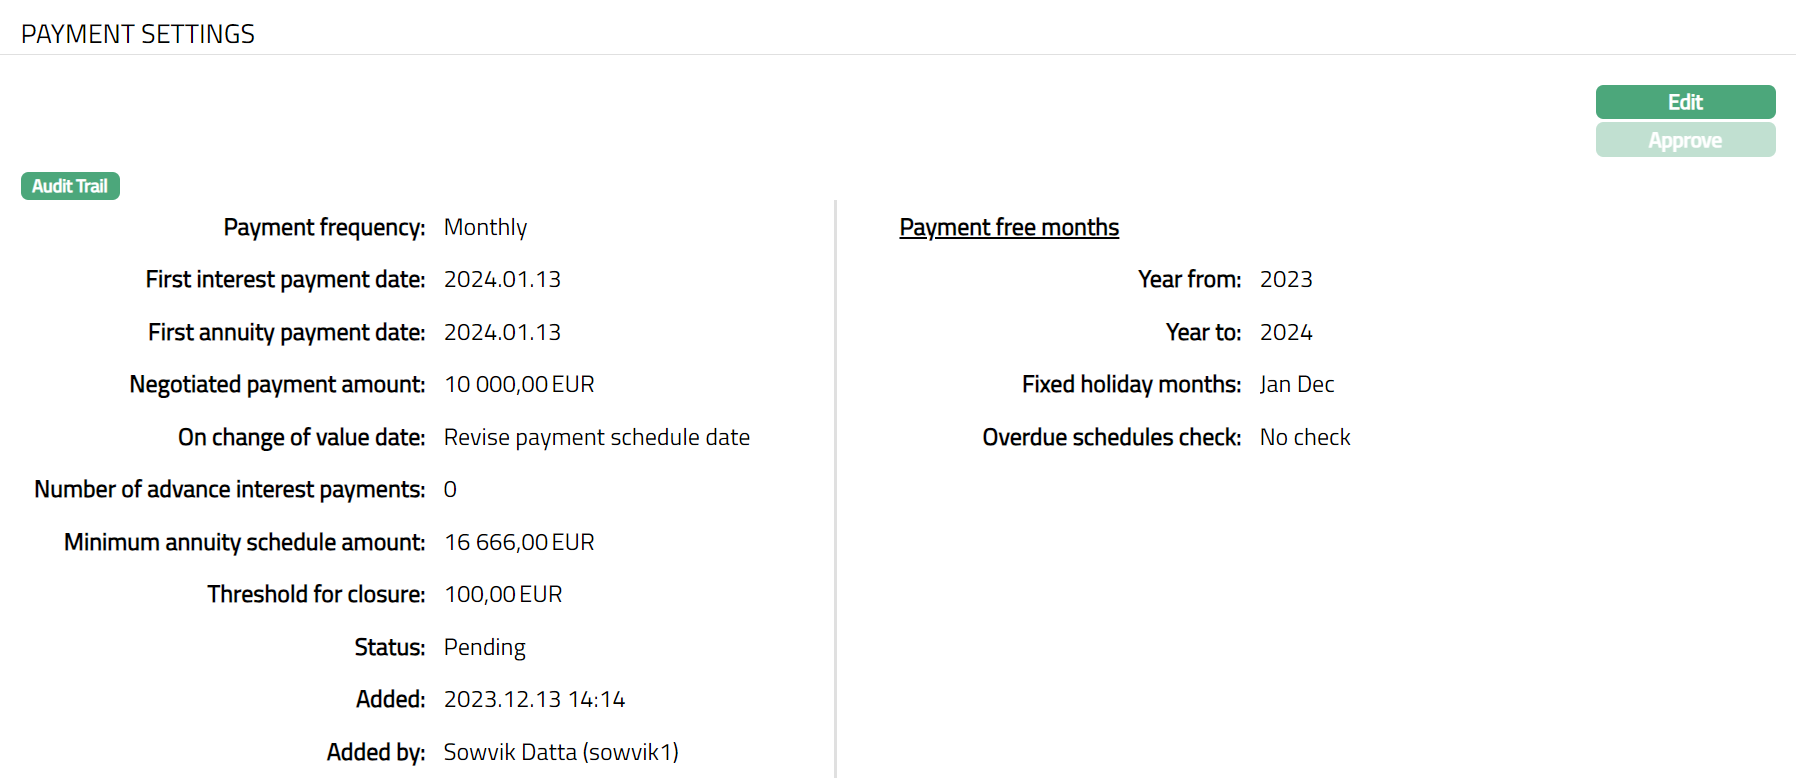
Functions: Edit, Approve
If Amortized -
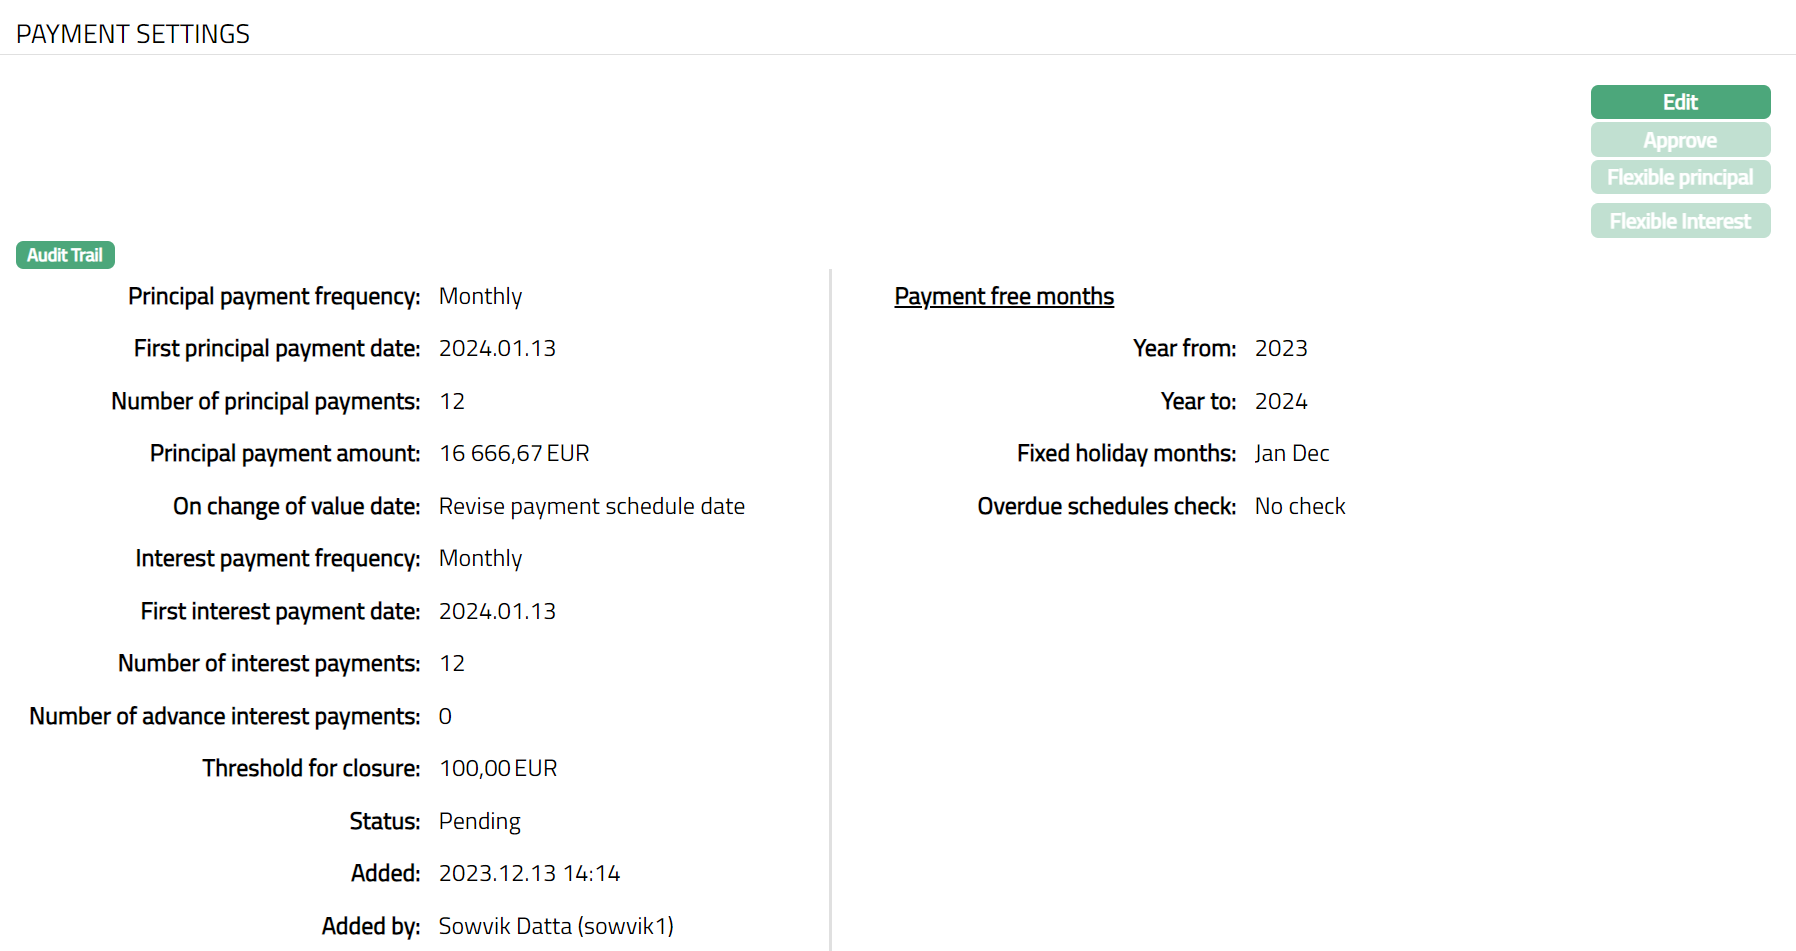
Functions: Edit, Approve
Note: When edited/modified the status will reflect as Pending. Once the record is approved the status will reflect as Approved and the red button disappears.
If Annuity -
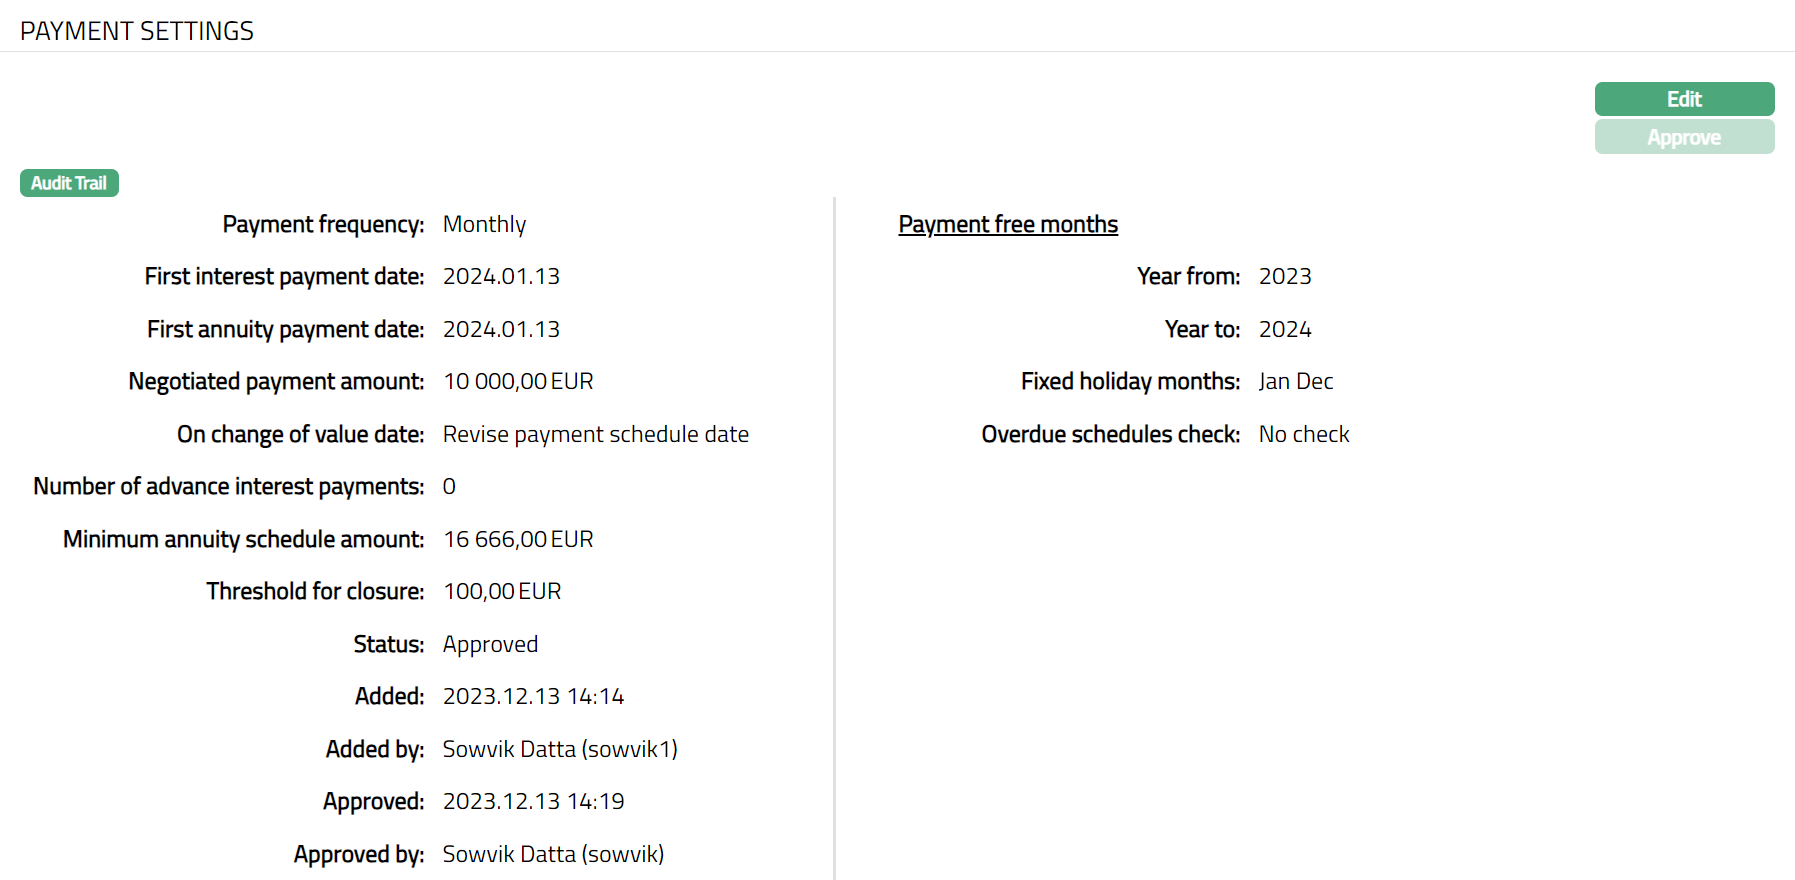
Functions: Edit, Approve
If Amortized -
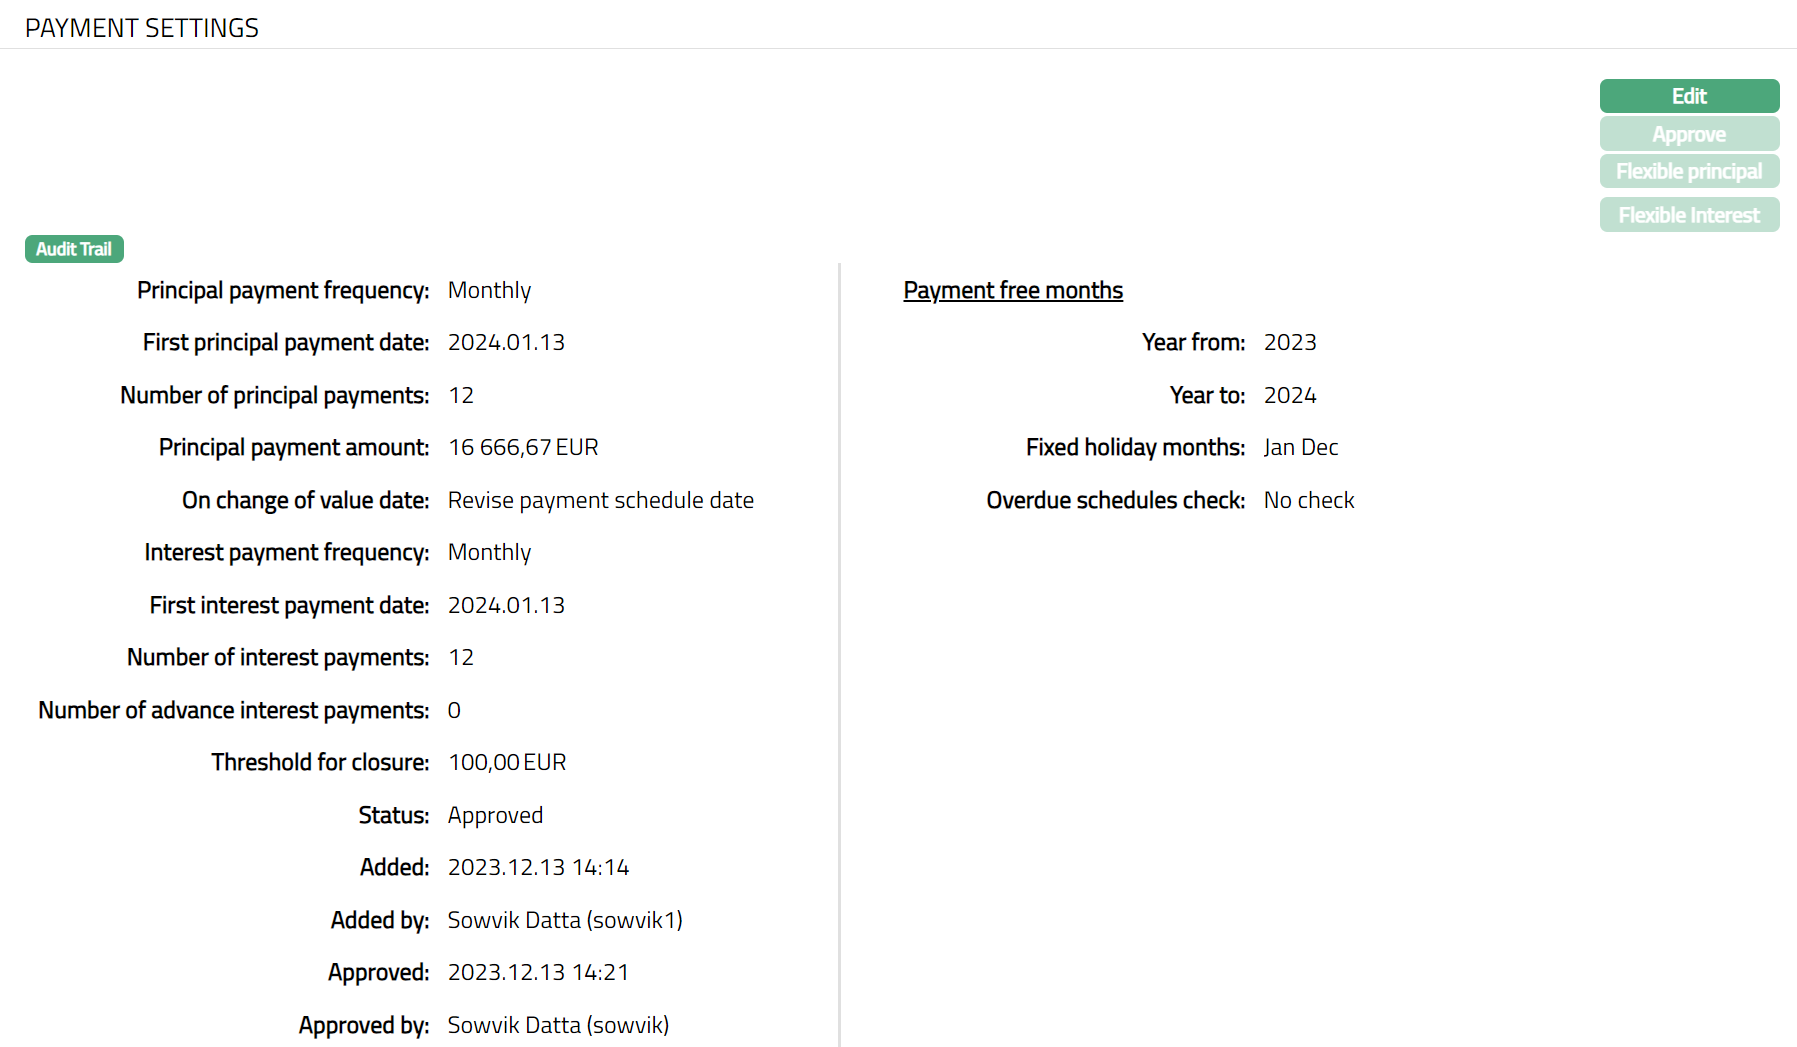
Functions: Edit, Approve
Note: Flexible principal and Flexible interest buttons will be enabled only if the Principal payment frequency and Interest payment frequency fields are selected as Flexible. This option will be available only for Amortized loans. Sample screens shown below.
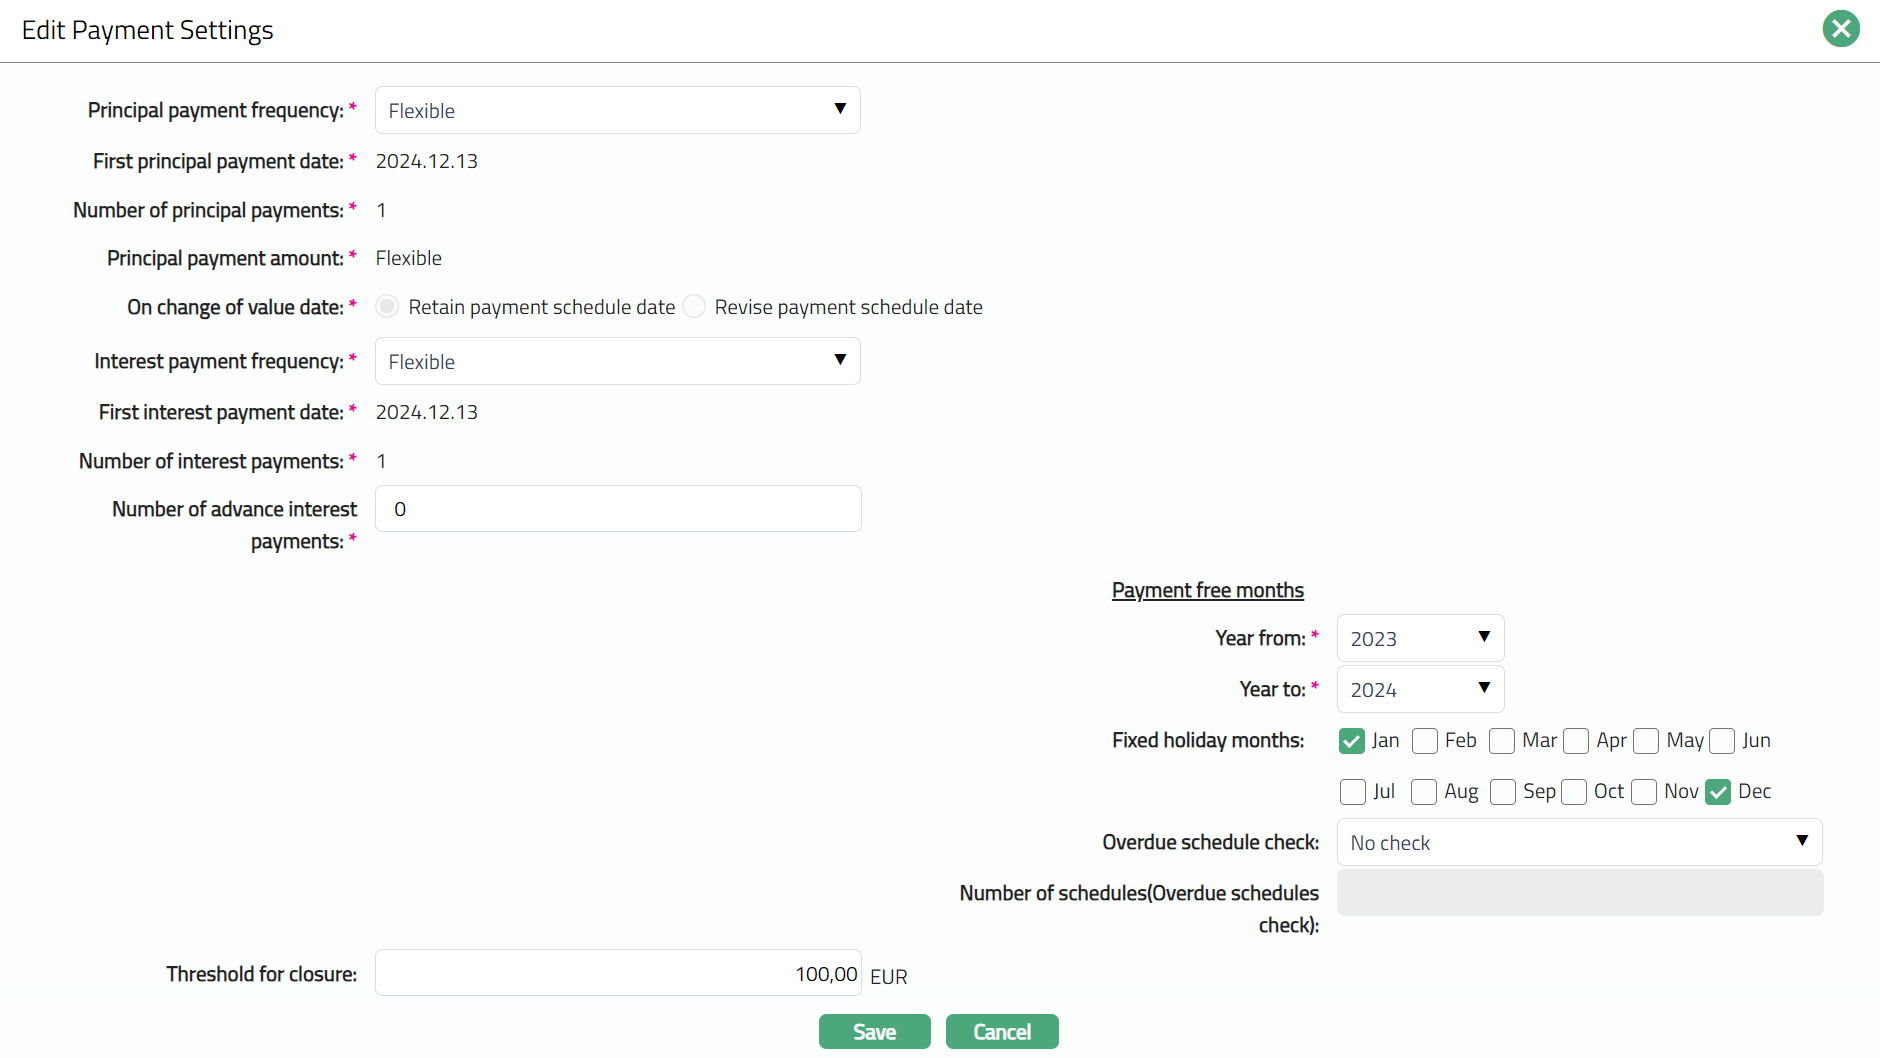
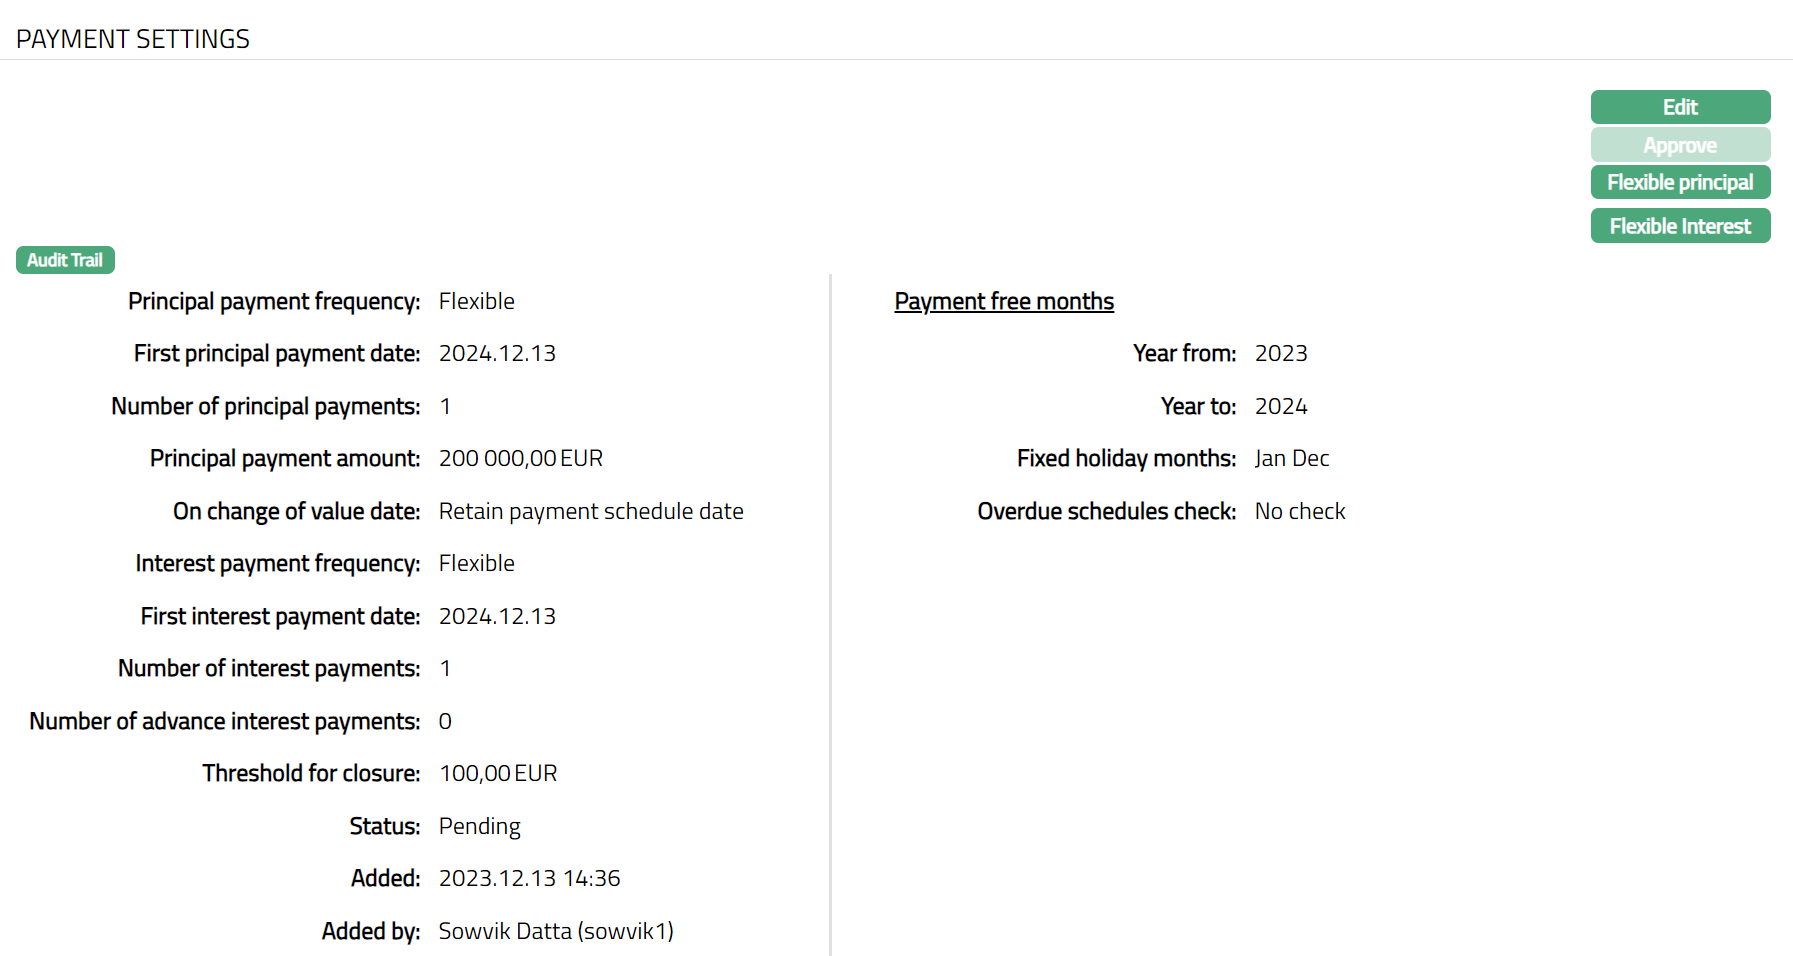
Flexible Principal
To View/Add flexible Principal,
1. Click Flexible principal. Flexible principal schedule details are displayed.
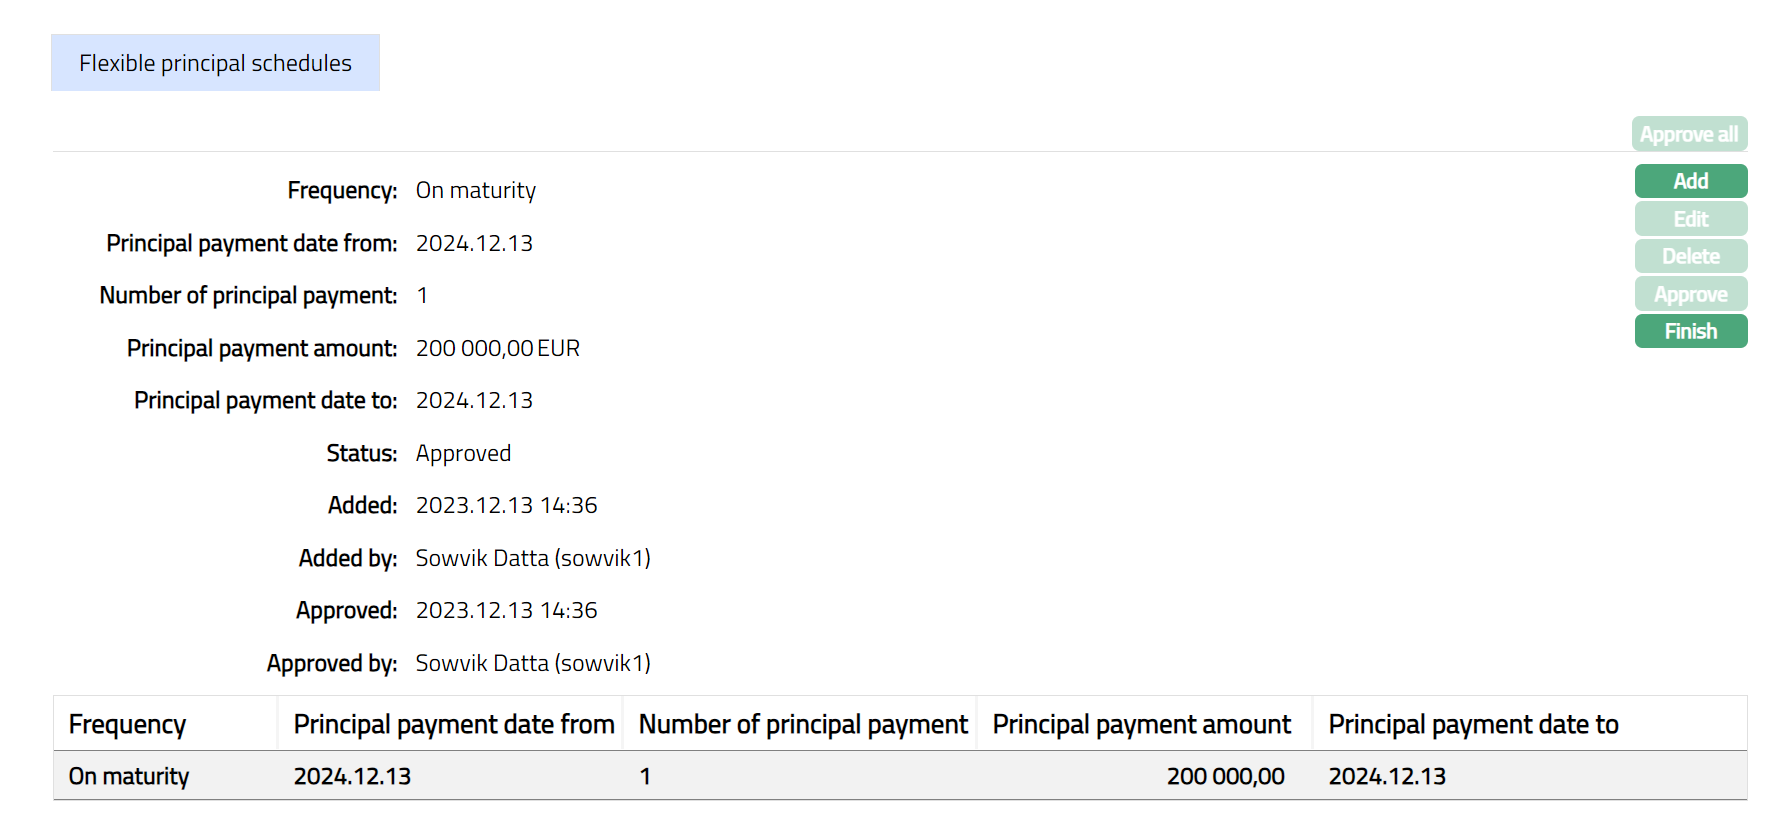
2. Click Add. Add flexible principal schedules page is displayed.
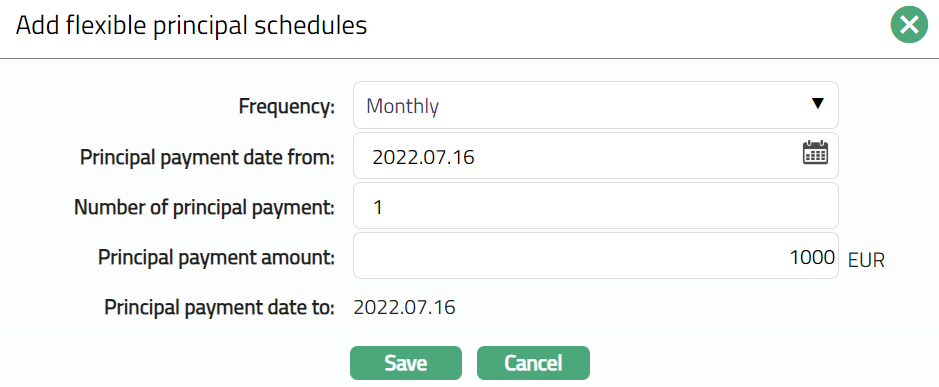
3. Select Frequency from the available drop-down list. The available list are: Weekly, Semi Monthly, Monthly, Quarterly, Semi Annual and Annual.
5. By default, Principal payment date from will be Value Date + Principal payment Frequency. You can change the date to any date greater than Value Date and less than equal to Maturity Date if required.
6. Enter Number of principal payments. The allowed values are in the range 0 to 9999.The number of principal payments must be less than or equal to the tenor. If Frequency is On maturity or Flexible, then this field is defaulted to 1 and will not be allowed for editing. This field will be disabled for the Annuity Loans.
Note: Number of Interest Payment will always be less than equal to Number of Principal Payments
7. Enter Principal payment amount, but it has to be less than the amount calculated by Aura. If Frequency is On maturity or Flexible, then Approved amountis defaulted here.
8. By default, Principal payment date will be Value Date + Principal payment Frequency. If Frequency is On maturity or Flexible, then this field is defaulted to Maturity Date and cannot be changed.
9. Click Save. Flexible principal schedule page appears with the added details.
Note: When Added/edited the status will reflect as Pending. Once the record is approved the status will reflect as Approved.
Functions: Approve All, Add, Edit, Delete, Approve, Finish.
To Edit flexible principal schedules,
1. Click Edit. Edit flexible principal schedules page is displayed.
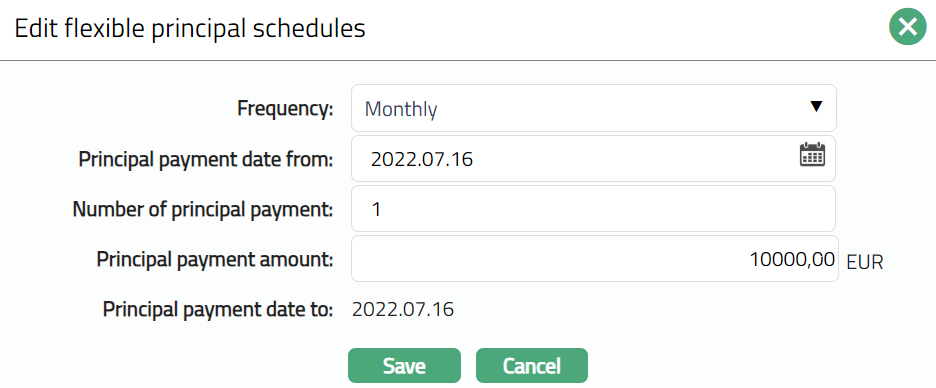
Note: All fields are editable.
2. Click Save. Flexible principal schedule page appears with the edited details.
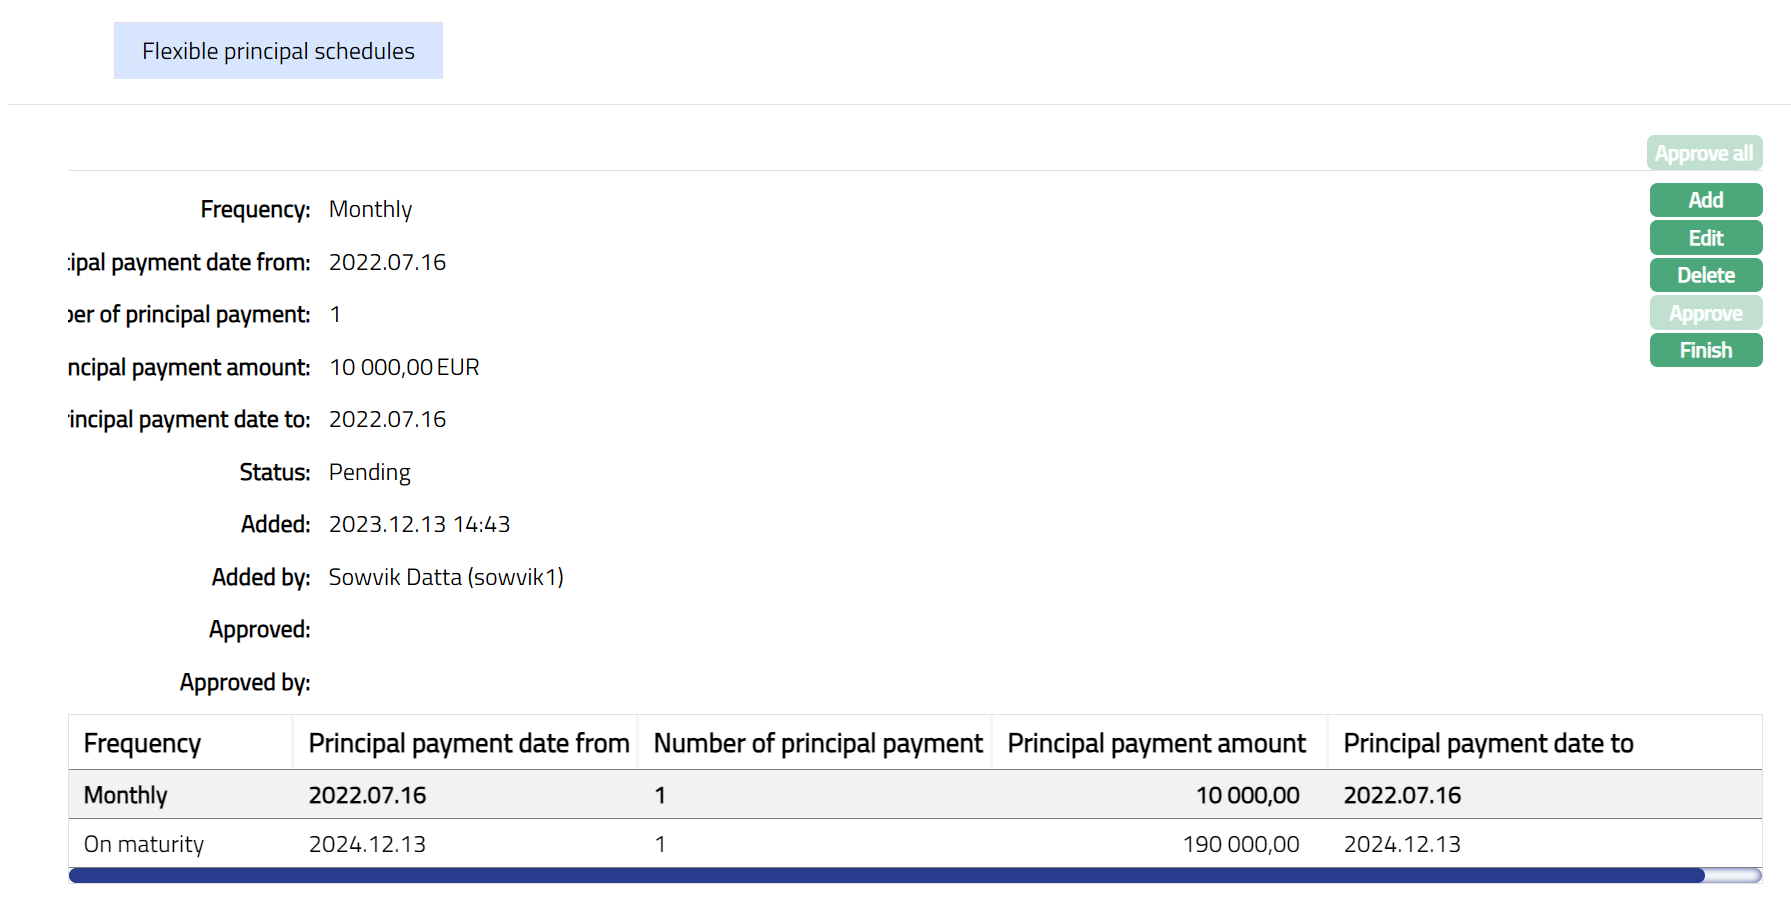
Note: When edited/modified the status will reflect as Pending. Once the record is approved the status will reflect as Approved and the red button disappears.
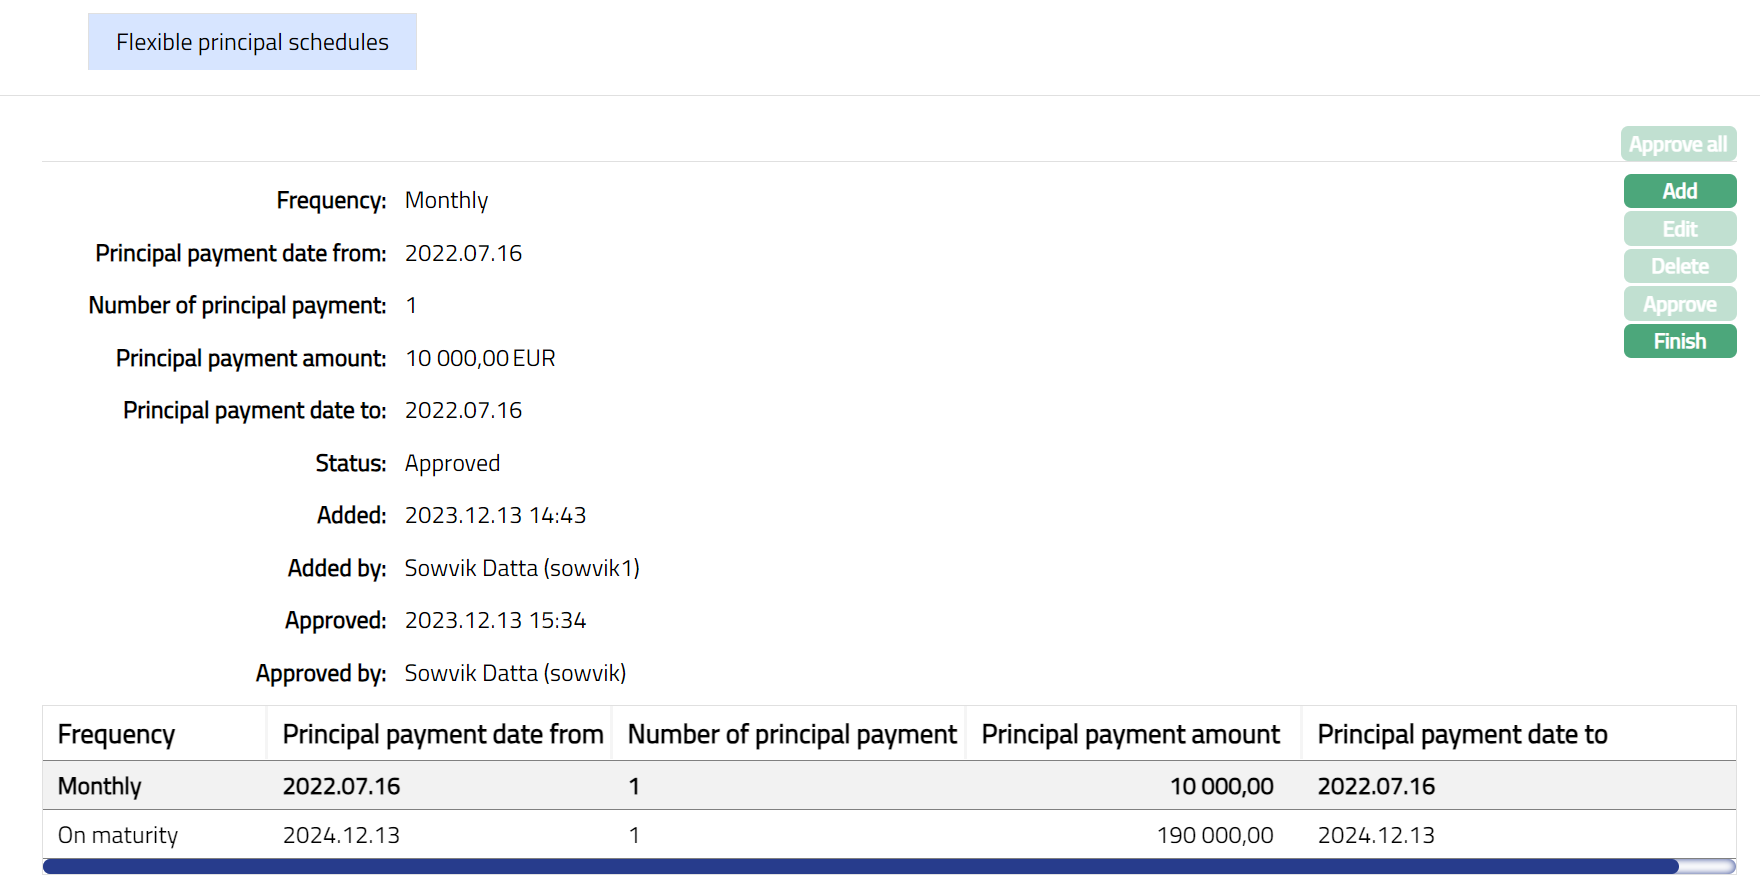
Functions: Approve All, Add, Edit, Delete, Approve, Finish
The additional fields are:
Status field denotes the status of the tab.
Added field denotes the date on which the record was added.
Added by field denotes the name of the user who created the record.
Approved field denotes date on which the record was approved and is displayed only on approval.
Approved by field denotes name of the user who approved the record and is displayed only on approval.
Delete: Click on the Delete button to delete the flexible schedule record. A flexible schedule can be deleted until it is approved. Record can be deleted only if the date is greater than or equal to current business day.
Approve: A flexible schedule record has to be approved by any user other than the one who has initiated the record.
Flexible Interest
To View/Add Flexible interest,
1. Click Flexible interest Flexible schedule details are displayed.
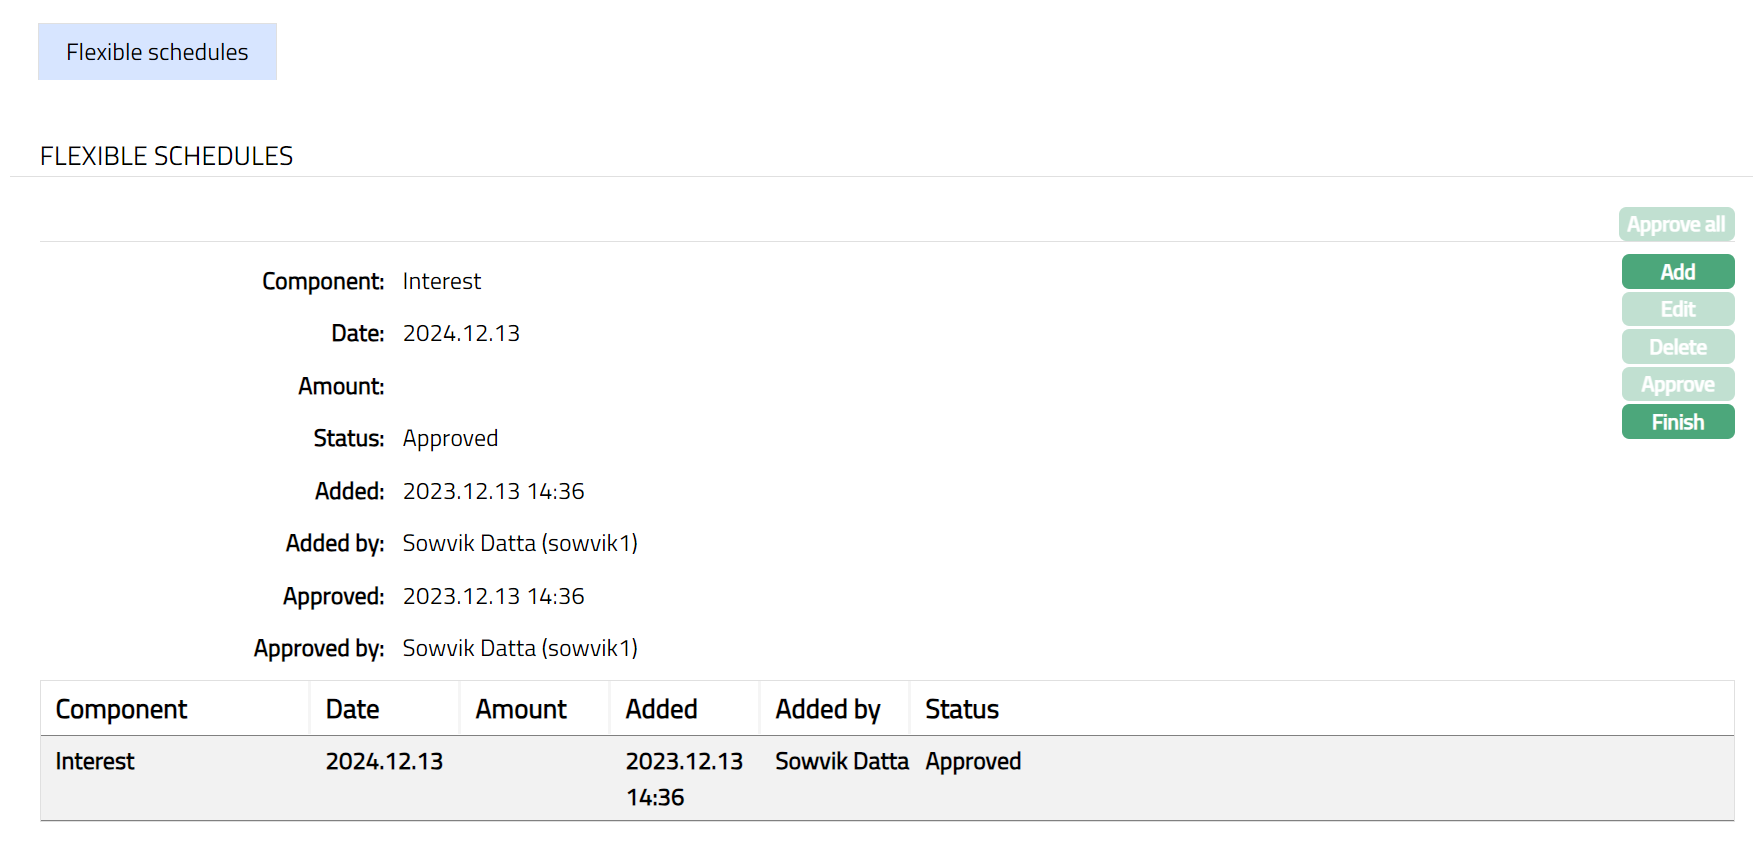
2. Click Add. Add flexible schedules page is displayed.
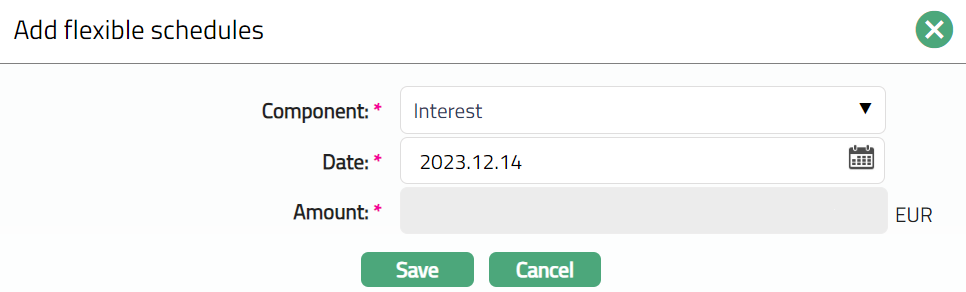
3. Select loan Component for which the flexibility will be applicable. If Either one of Principal or Interest component is selected as Flexible, then only the component selected as Flexible will be available under drop-down.
4. Select Date from which the flexible schedule set is applicable for interest accrual. By default, current date will be displayed. You can edit the date. The date entered here has to be greater than current business date and less than the Maturity Date. The interest accrual for the schedule will happen till the schedule end date Enter the principal.
5. Amount on which the interest has to be accrued for the flexible schedule. Based on the interest component and the amount selected here; the amount entered here has to be less than the loan amount sanctioned. This field will be enabled only if the component selected is Principal.
6. Click Save. Flexible schedule page appears with the added details.
Note: When edited/modified the status will reflect as Pending. Once the record is approved the status will reflect as Approved and the red button disappears.
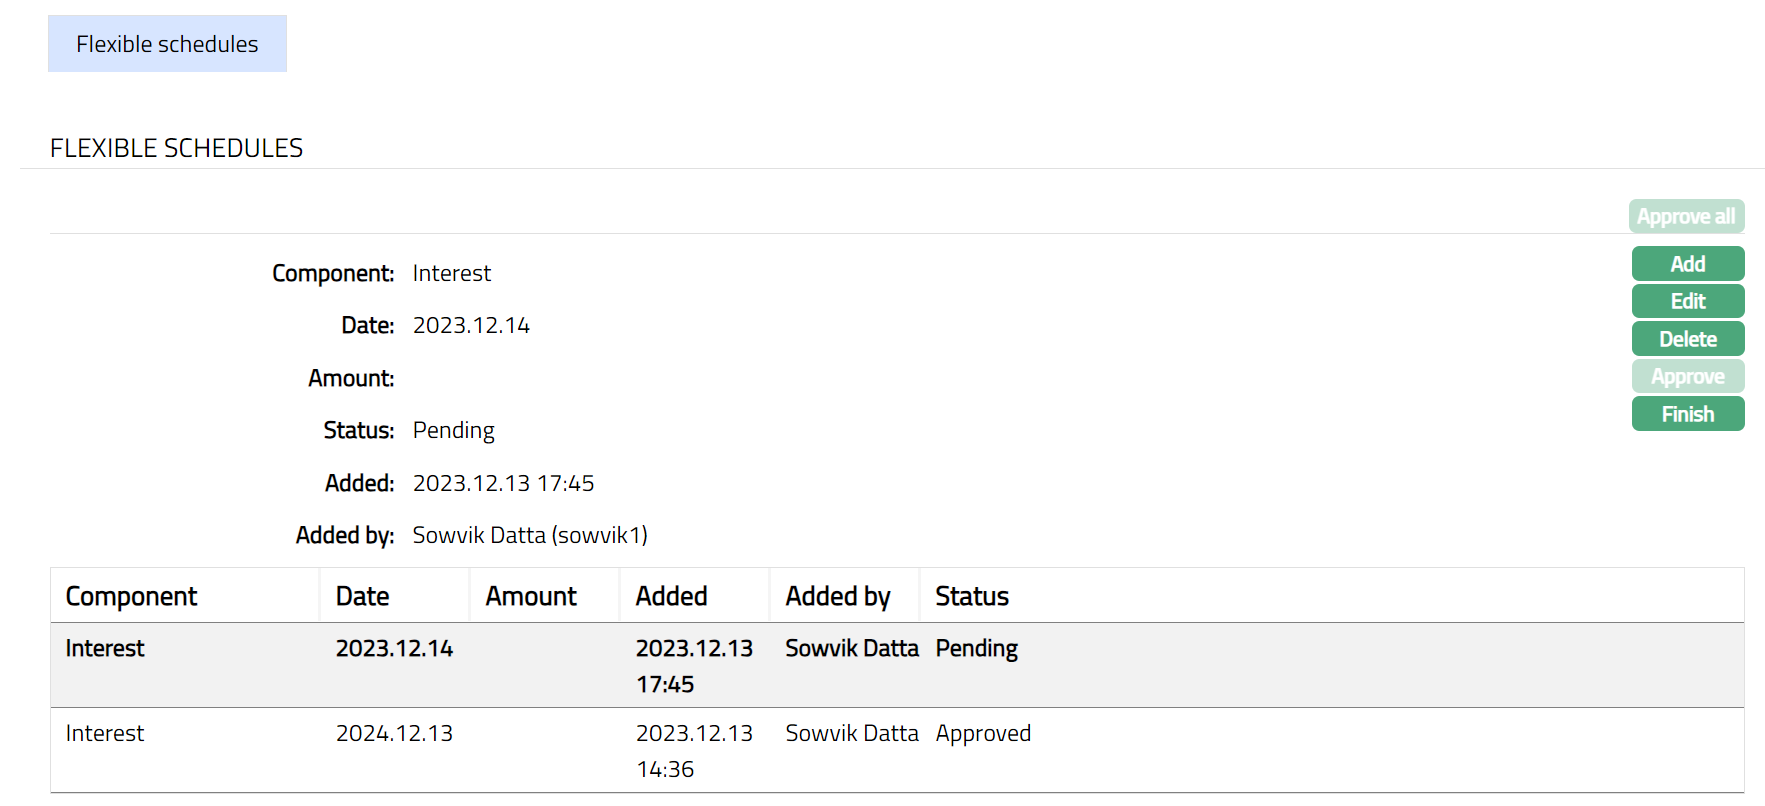
To edit the flexible schedule,
1. Click Edit. Edit flexible schedules page will be displayed.
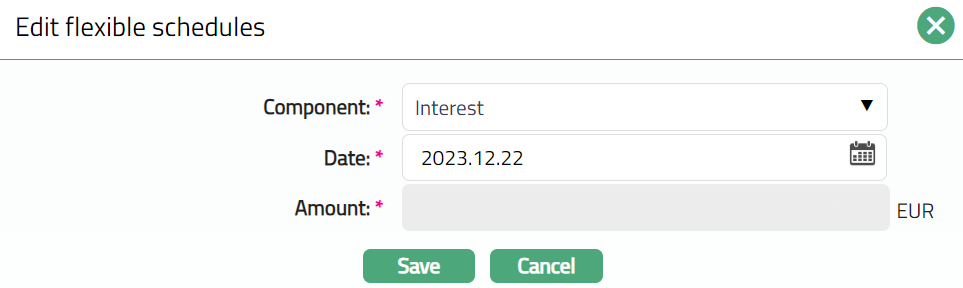
Note: Except Amount field, all fields are editable.
2. Click Save. Flexible schedule page appears with the edited details.
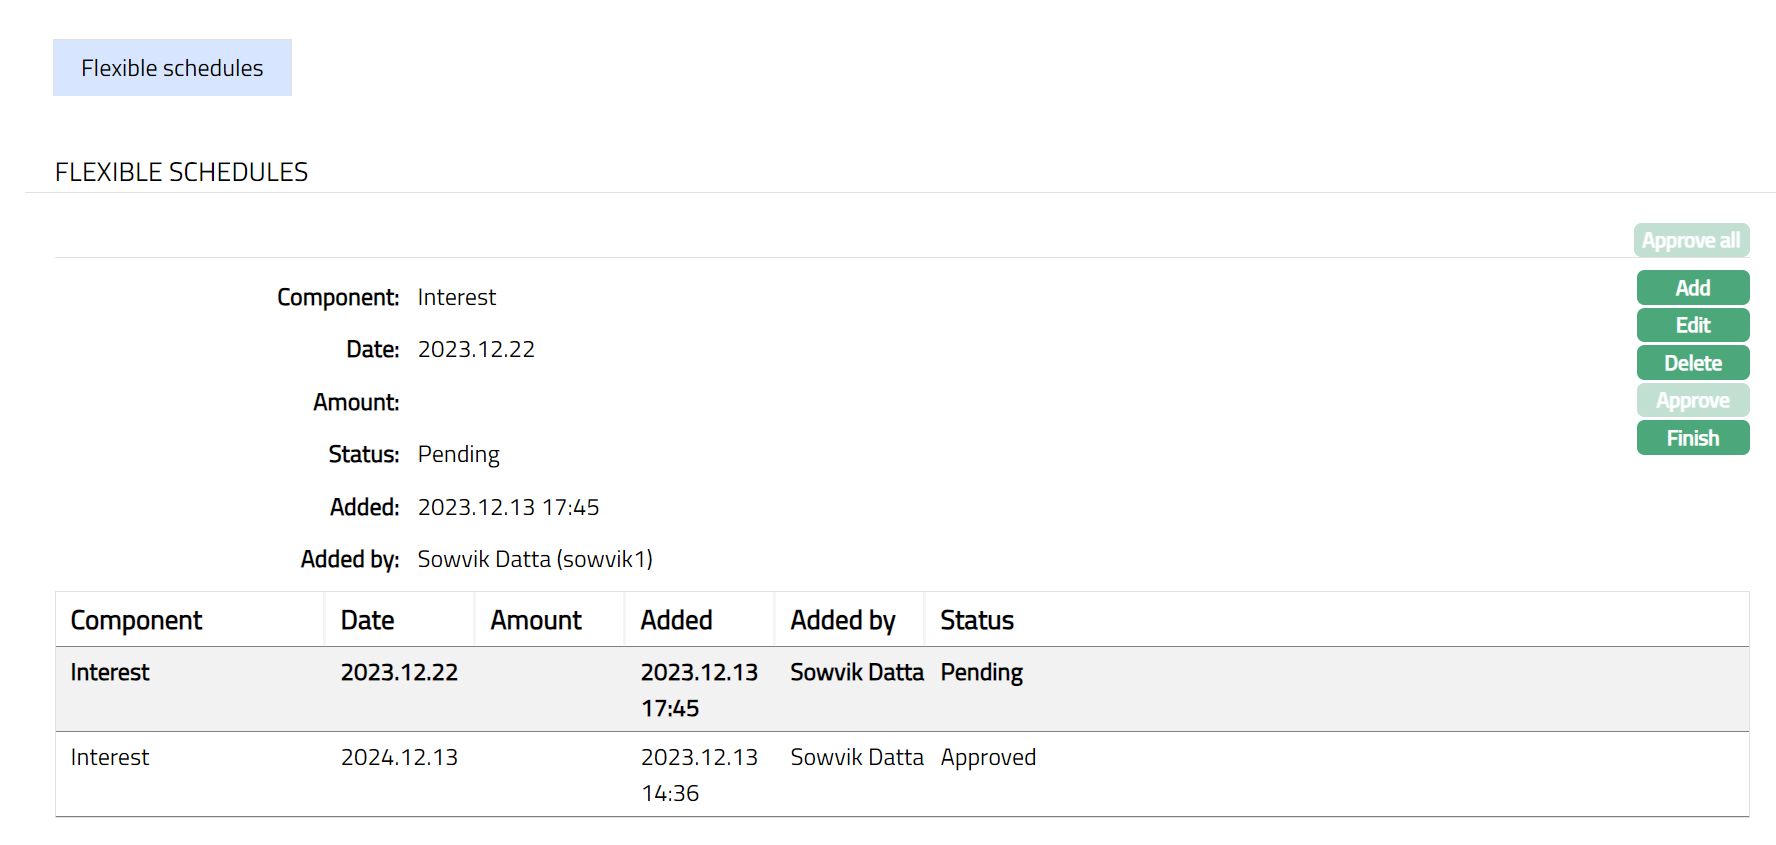
3. Click Approve. Once Approved the status of the record will change to Approved.
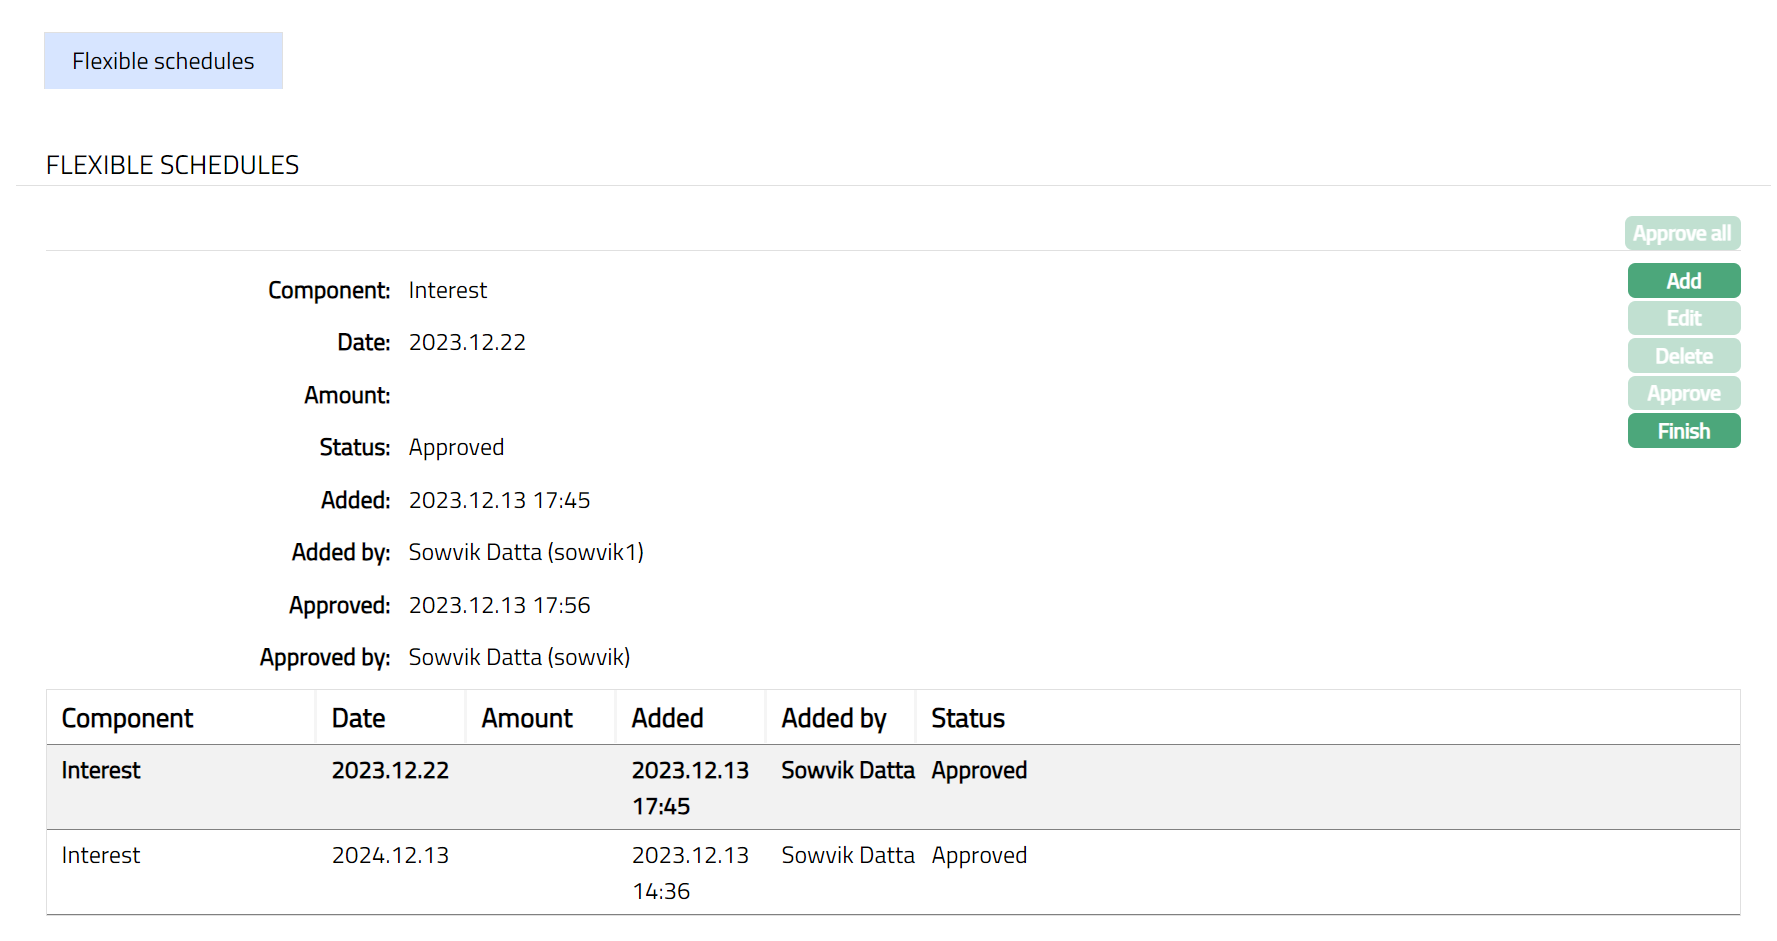
Functions: Approve All, Add, Edit, Delete, Approve, Finish
The additional fields are:
Status field denotes the status of the tab.
Added field denotes the date on which the record was added.
Added by field denotes the name of the user who created the record.
Approved field denotes date on which the record was approved and is displayed only on approval.
Approved by field denotes name of the user who approved the record and is displayed only on approval.
Delete: Click on the Delete button to delete the flexible schedule record.** **A flexible schedule can be deleted until it is approved. Record can be deleted only if the date is greater than or equal to current business day.
Approve: A flexible schedule record has to be approved by any user other than the one who has initiated the record.
Custom Field
This option provides you the flexibility to define fields apart from those that are already available in the standard version of Aura. Thus, it enables you to customize additional data storage and use as required to suit your specific business needs.
To maintain Custom Field
1. Access Loan Account page. Click Custom Field tab.
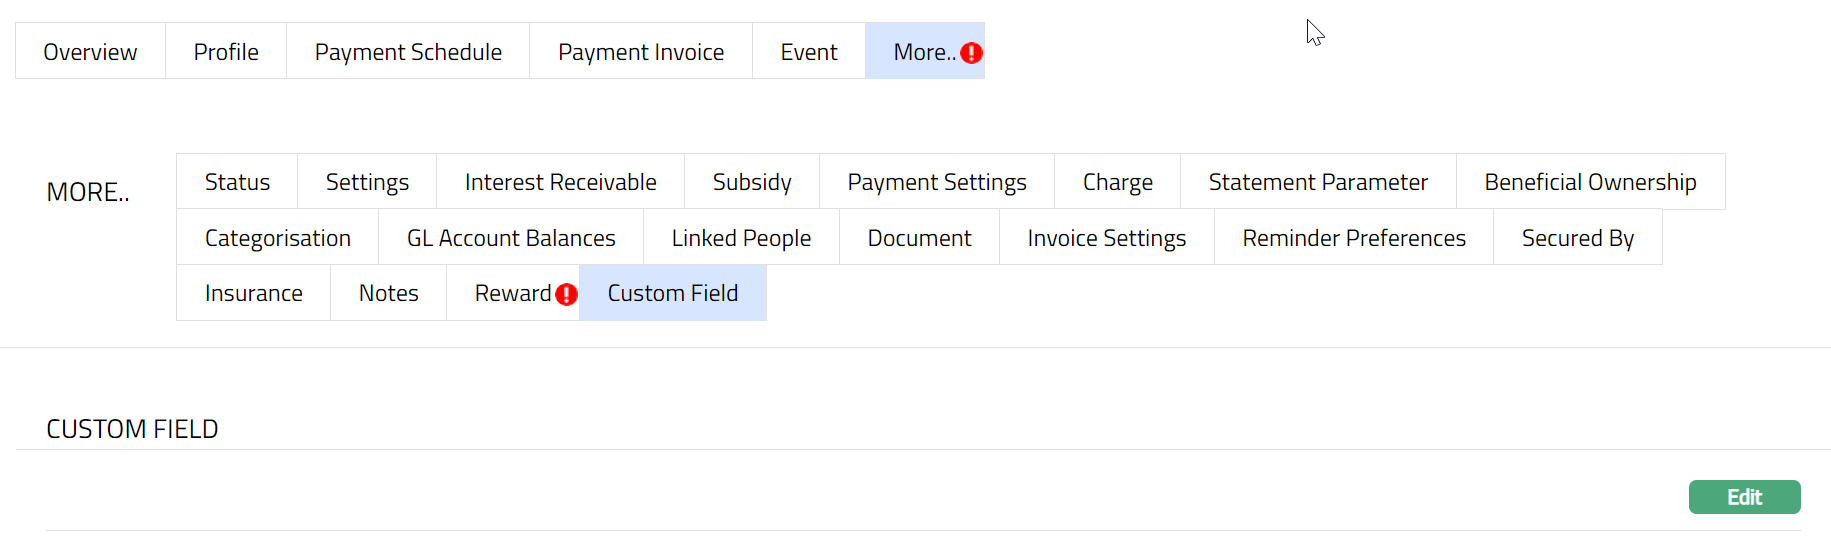
2. The field appears only when it is created in Admin → System codes → Custom fields → Custom fields and linked to Loan account option in Admin → System codes → Custom fields → Field mappings.
3. Click Edit. The Edit Custom Field page appears. In the following illustration, one custom field Loan Category has been mapped to the Mortgage Loan Account as shown below:

4. Enter the Loan Category to which the Loan Account belongs.
5. Click Save. Loan Account screen appears displaying the details added to the custom field.
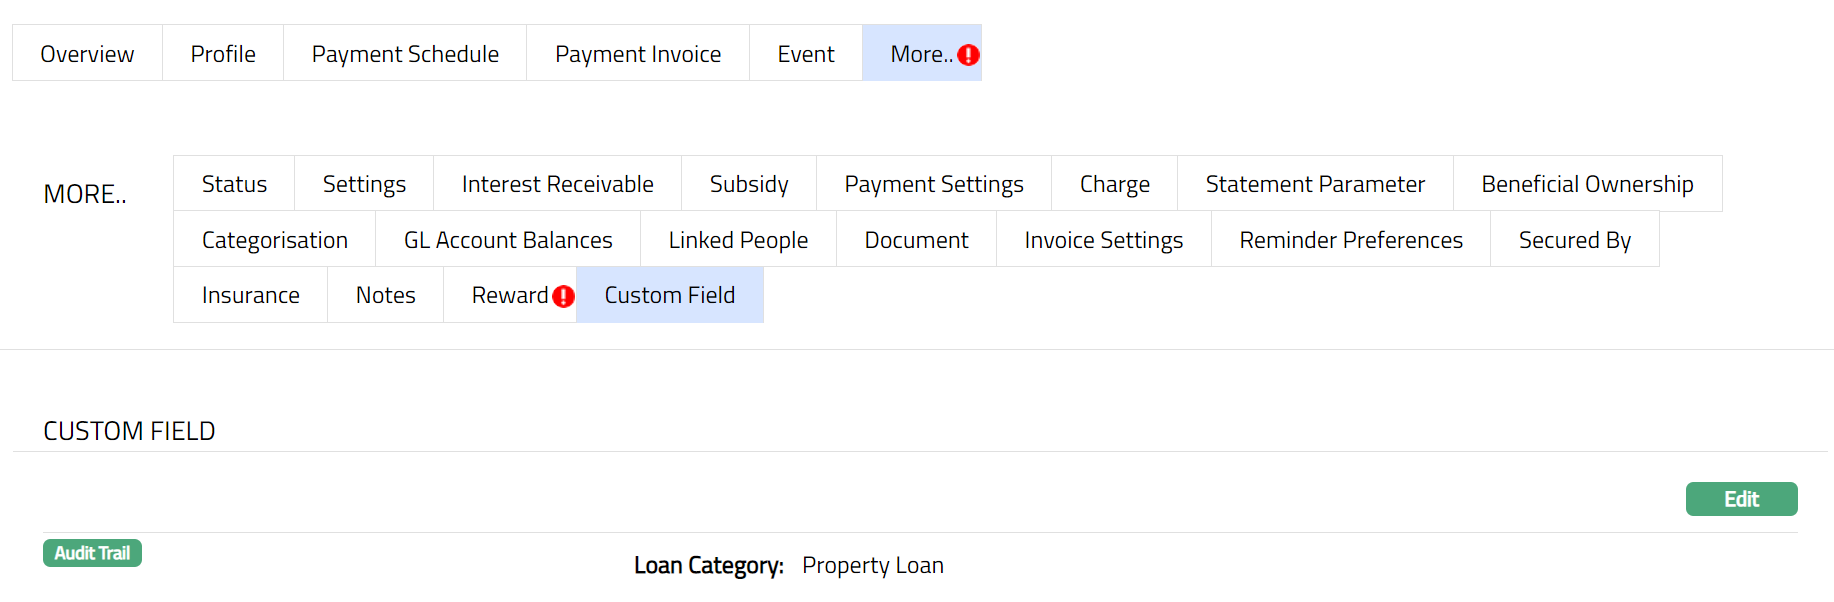
Function: Edit