Loan Application Broker -- Personal
The Loan Application Personal function in Aura allows you to capture and manage loan applications for individual customers. You can record applicant details, define loan requirements, include co-applicant information, and process the application through to bank offer selection.
Aura retrieves credit information from external credit rating agencies and shares the loan application with eligible banks based on predefined criteria. The process continues until the customer reviews and accepts a loan offer.
Once created, Aura generates a unique loan application number and maintains the record for tracking and further processing.
The following are the various tabs that appear in Loan Application page:
To add a Loan Application Broker - Personal,
1. From the Retail menu, click Loan Broker and then on Maintain. The Loan Application Broker → Personal page appears. From this screen, you can search for existing Loan Application Broker or create a new application.

2. Click Add. The New Loan Application Personal (1/4) page appears.
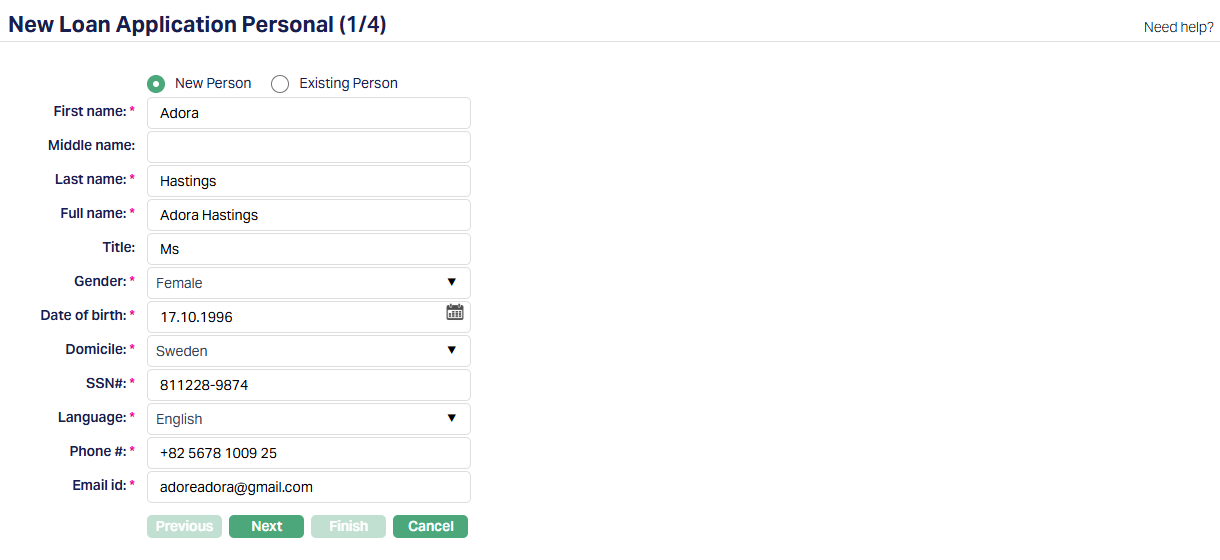
3. You can choose how to provide applicant details - either New Person or Existing Person.
If you select New Person, you can manually enter all applicant details.
If you select Existing Person, the Person Search screen is displayed, where you can search and select active clients maintained in Aura under CRM. Once selected, the applicant details are automatically populated on the screen. You can edit the Phone # and Email id even after selecting an existing person.
4. Enter the First Name of the applicant. This field is mandatory when creating a new person.
5. Enter the Middle Name of the applicant. This field is optional.
6. Enter the Last Name of the applicant. This field is mandatory when creating a new person.
7. Aura automatically derives the Full Name based on the First Name and Last Name. You can modify it if required.
8. Enter the Title of the applicant.
9. Select the Gender of the applicant from the available list. This field is mandatory.
10. Enter the applicant's Date of Birth.
11. Select the Domicile of the applicant from the available options.
12. Enter the SSN # of the applicant.
13. Select the preferred Language of the applicant.
14. Enter the Phone # of the applicant. When an existing person is selected, this field remains editable.
15. Enter the Email ID of the applicant. When an existing person is selected, this field remains editable.
Note: When the Phone # or Email ID is modified for an existing person, Aura prompts for confirmation and updates the values in both the Person record and the Loan Application.
16. Click Next. The New Loan Application Personal → Loan Details (2/4) page appears.
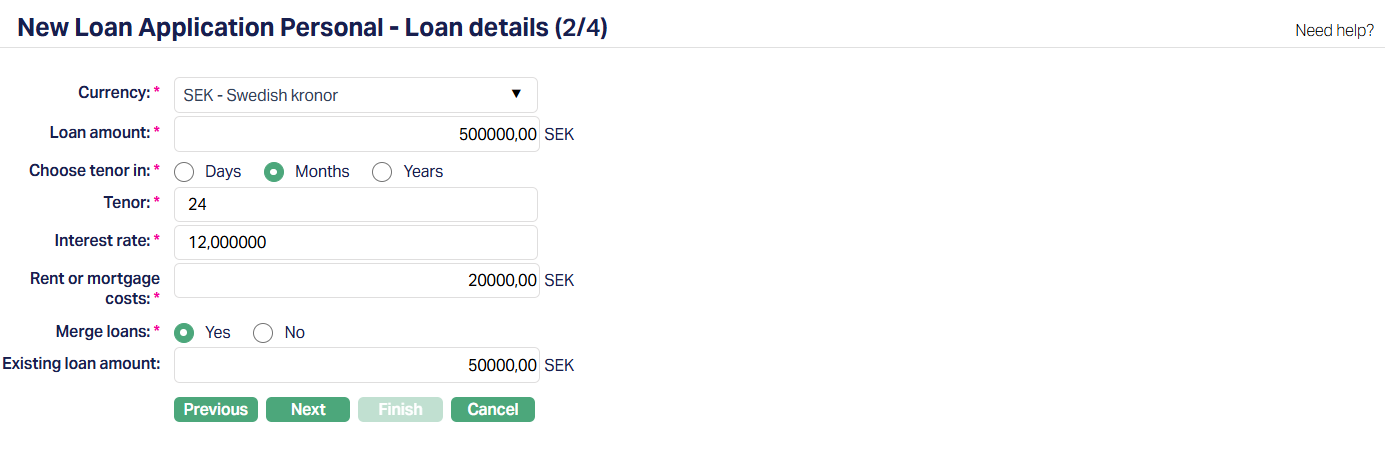
17. Select the Currency in which the Loan amount is requested. The list displays active currencies configured in Aura under system codes.
18. Enter the total Loan Amount requested by the customer.
19. Choose Tenor in - Select how the loan duration should be defined. You can choose from:
Days
Months
Years
By default, Days is selected.
20. Tenor - Enter the duration of the loan based on the selected term (Days, Months, or Years)
21. Enter the Interest Rate the customer is willing to pay for the loan.
22. Rent or Mortgage costs - Enter the amount the customer is currently paying towards rent or mortgage.
23. Merge Loans - Select whether the customer wants to merge existing loans. No is selected by default
If Yes is selected, the Existing Loan amount field is enabled.
If No is selected, the field remains disabled.
24. Existing loan amount - Enter the loan amount of existing loans. This field becomes mandatory only when Merge loans = Yes.
25. Click Next. The New Loan Application Personal → Co-applicant details (3/4 ) page appears.
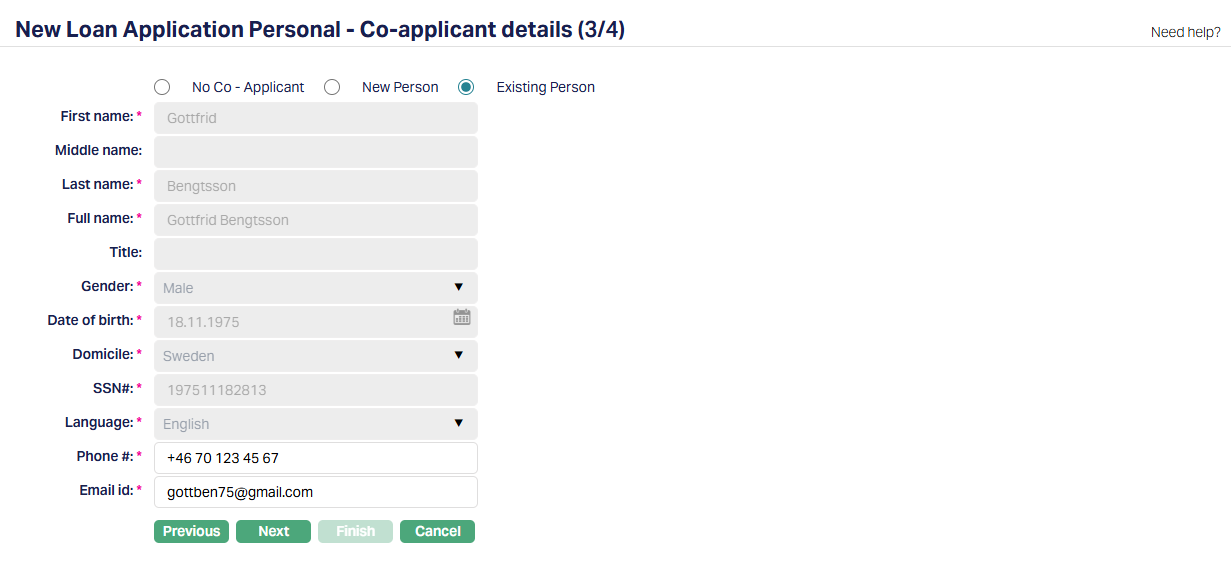
26. You can choose one of the following options - No Co-applicant, New Person or Existing person.
If you select No Co-applicant, no additional details are required, all fields are disabled and you can proceed to the next step.
If you select New Person, you can manually enter the co-applicant's details.
If you select Existing Person, Aura allows you to select a person already maintained in Aura, and the details are populated automatically.
The following fields are enabled when you select New Person or Existing Person:
First name
Middle name
Last name
Full name
Title
Gender
Date of birth
Domicile
SSN #
Language
Phone #
Email ID
When you select an Existing Person, Aura retrieves and displays the co-applicant details from the selected record.
You can edit the Phone # and Email ID after selection. If modified, the updated values are saved in both:
The Person record
The Loan application
The co-applicant details become part of the loan application and are considered during evaluation and processing.
27. Click Next. The New Loan Application → Confirmation (4/4) page appears.
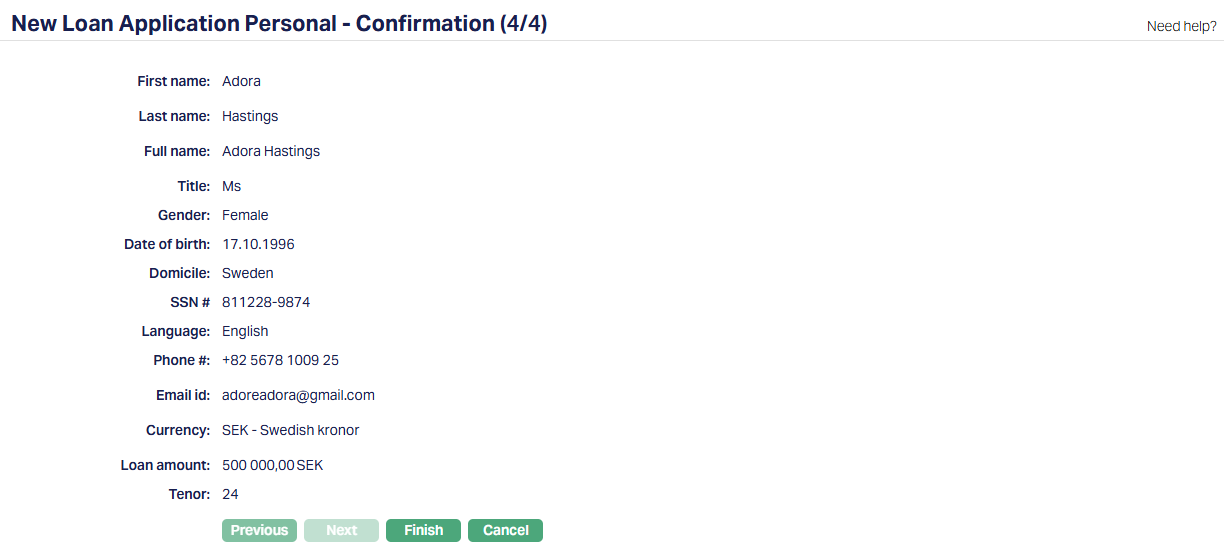
Aura displays a summary of all the details entered in the previous steps. You can review the information before creating the Loan Application Broker record.
28. Click Finish. Aura then opens the Loan Application Maintenance screen, where you can view and manage the application details.
Functions: Add, Search, Suspend, Edit.
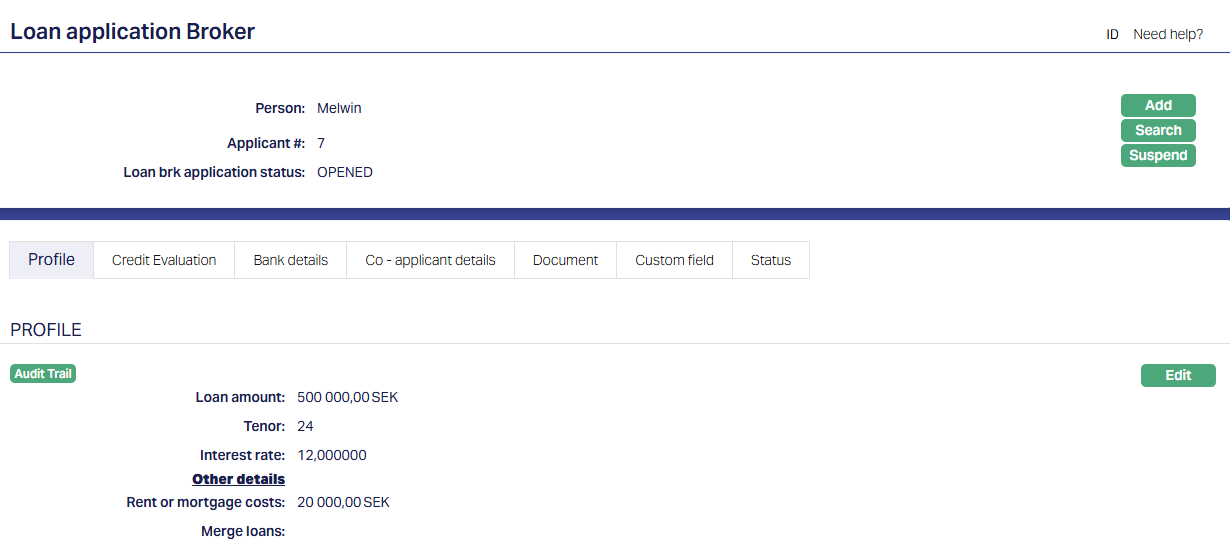
Profile
The Profile tab, which is also the default tab shows the basic details of the Loan Application Broker. For details refer to the New Loan Application Personal → Loan Details (2/4) page.
To view/edit Profile,
1. Access Loan Application page. Then click the Profile tab.

2. Click Edit. Edit loan application profile page appears.
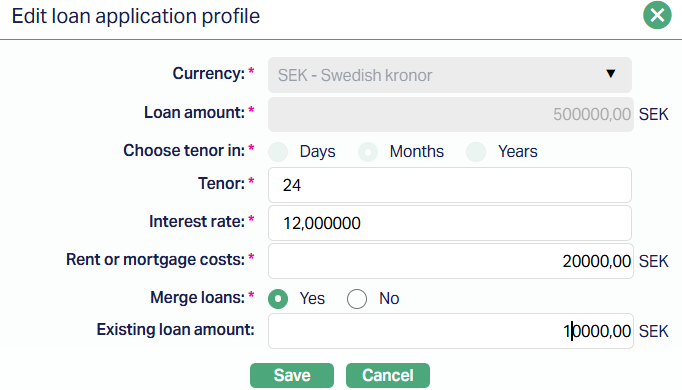
Note: All fields are editable except Currency, Loan amount and Choose tenor in fields.
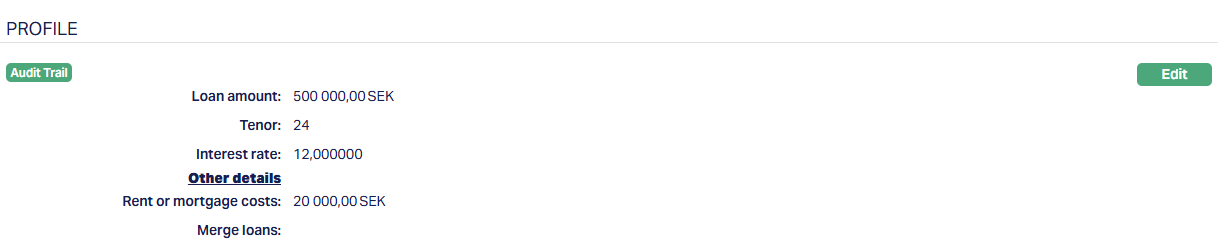
2. Click Save. The profile tab appears with the edited details.
Function: Edit.
Note: You can edit the Loan Application Broker details after creation, including after bank approval. Editing is restricted only when the loan status becomes Disbursed.
Credit Evaluation
The Credit Evaluation tab allows you to capture and manage the credit details of the applicant used to record credit details of the applicant. Each credit evaluation record is maintained independently and can be updated as required.
To view/add Credit Evaluation,
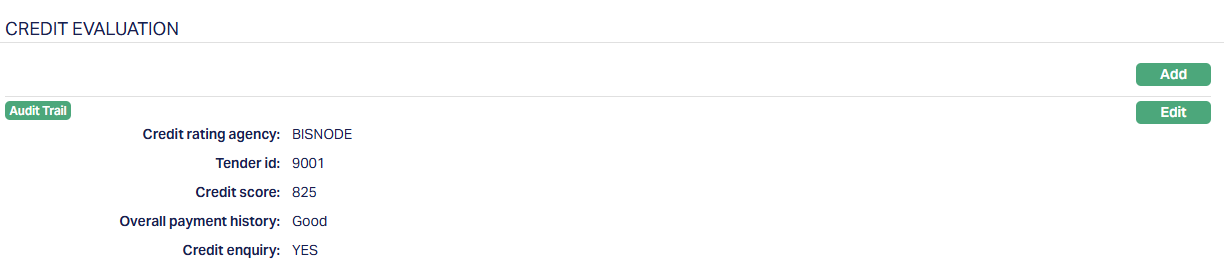
1. Access Loan Application Broker page. Then click the Credit Evaluation tab. As soon as the account is created, this tab will show no records, as there are no credit evaluations attached to the account.

2. Click Add. The Add Credit Evaluation page appears.
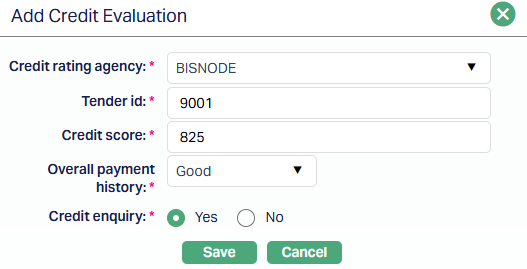
2. Select the Credit rating agency for credit evaluation from the drop-down list maintained under Admin → System Codes → Credit rating agency.
3. Enter the Tender ID provided by the credit rating agency for the loan application.
4. Enter the Credit Score of the applicant as received from the credit agency.
5. Select the Overall Payment History of the applicant based on the credit report. The list of values are Good, Bad and Excellent.
6. Credit Enquiry - Indicate whether a credit enquiry has been performed.
Yes
No
7. Click Save. The Credit Evaluation page appears with the addeddetails.
Functions: Add, Edit.
To edit a Credit Evaluation,
1. Access Loan Application Broker page. Then click the Credit Evaluation tab. Click Edit.
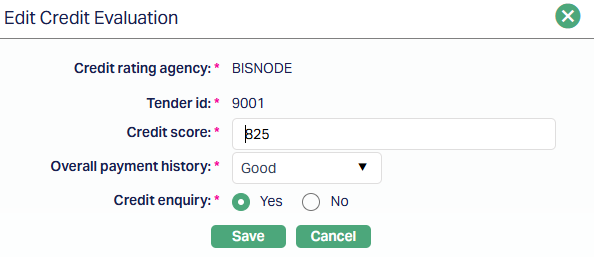
All fields are editable except Credit rating agency and Tender ID.
2. Click Save. The Credit Evaluation page appears with the edited details.
Functions: Add, Edit.
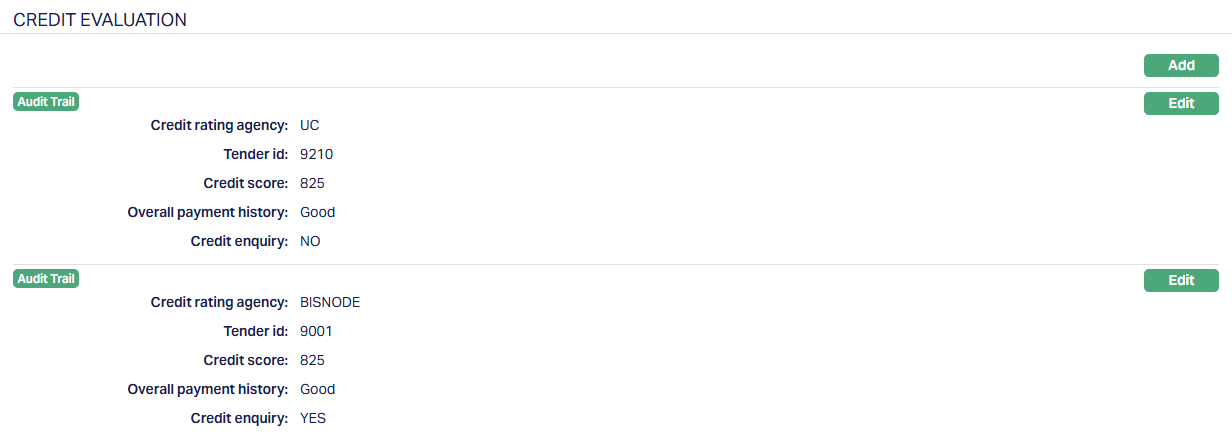
Note: You can add multiple credit evaluation records for a single loan application. Each record represents credit details obtained from a Credit Rating Agency.
All added records are displayed in the Credit Evaluation section, and you can edit each record individually.
Bank Details
The Bank Details tab allows you to associate banks with the loan application, capture their responses, and manage the status of each bank's offer.
To add a Bank Detail,
1. Access Loan Application Broker page. Then click the Bank Details tab. As soon as the account is created, this tab will show no records, as there are no Bank Details attached to the account.
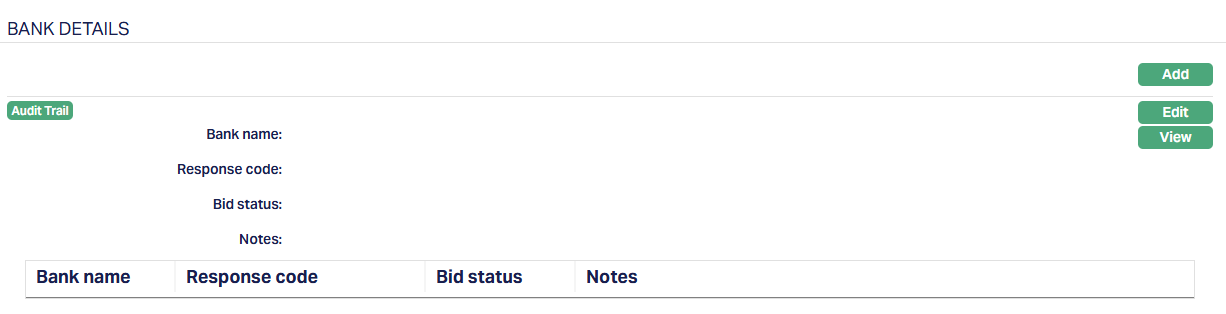
2. Click Add. The Add Bank page appears.
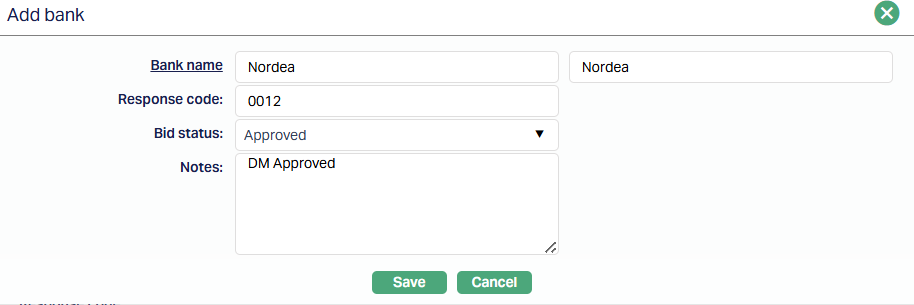
3. Bank name - Select the Bank to which the loan application is sent. The list displays eligible banks based on system-defined criteria, including:
Active banks maintained in Aura.
Banks whose clearing zone matches the selected credit rating agency.
Bank whose credit score range matches the applicant's credit score.
This ensures that only eligible banks are available for selection based on the applicant's profile.
4. Enter the Response code received from the bank for the loan application broker.
5. Bid Status - Select the status of the bank's response. Available values include:
Approved
Rejected
Add - On
6. Notes - Enter any remarks or additional information provided by the bank.
7. Click Save. The Bank Details tab appears with the added details.
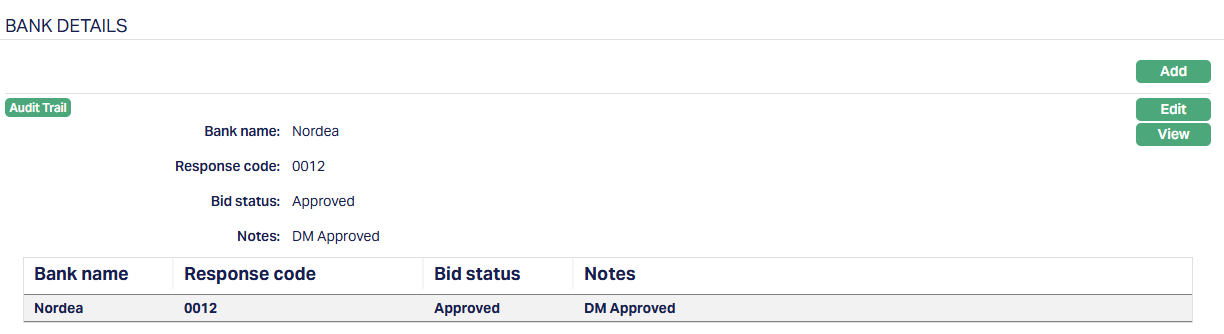
Functions: Add, Edit, View.
To edit Bank details,
1. Click Edit. The edit Bank Details page appears.
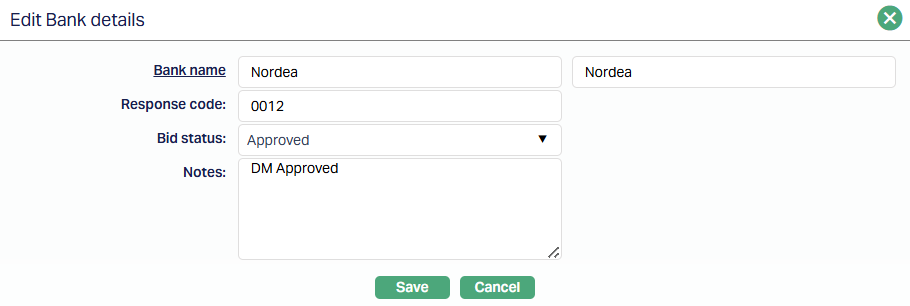
All fields are editable.
2. Click Save. The Bank Details page appears with the edited details.
Functions: Add, Edit, View.
Note: You can add multiple bank records for a single loan application broker. Each record represents a response from a bank. All added records are displayed in the Bank Details section, where you can view and edit individual entries.
Bank Decision Actions:
Accept - allows you to accept a bank's loan offer. When a bank offer is accepted:
The Accept option is disabled for all other bank records.
The selected bank becomes the accepted loan offer.
The Accept option is not available once the loan is disbursed. Once a bank is accepted, it becomes the selected offer for the loan application.
Reject - allows you to reject a bank's offer. When a bank offer is rejected:
Further updates from the bank for that application are not applied.
The Accept option is disabled for that bank record.
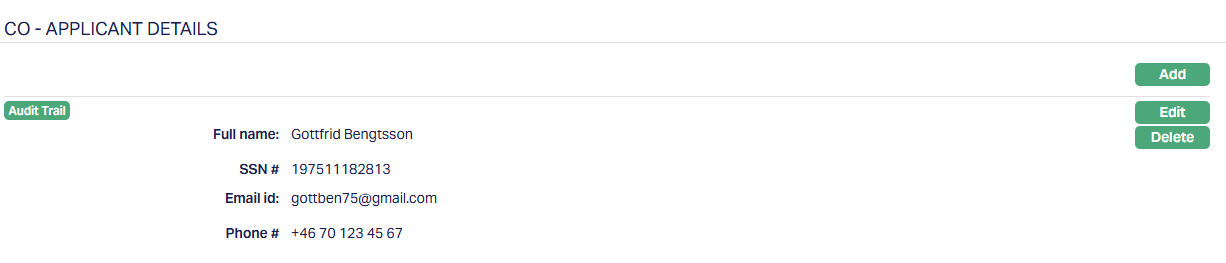
Co-Applicant Details
The Co-Applicant details tab displays the co-applicant information captured during the loan application creation. For details, refer to the New Loan Application Personal → Co-applicant details (3/4 ) page. You can add, modify, or remove co-applicant details from this tab.
To view/edit Co-Applicant details,
1. Access Loan Application Broker page. Then click the Co-Applicant Detail tab.
2. Click Edit. Edit Co-Applicant details page appears.
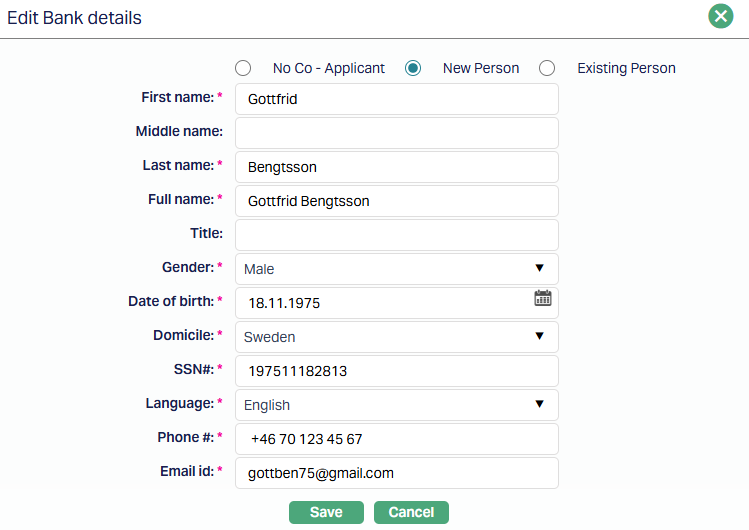
All fields are editable. However, before saving the edited record, you must re-enter the Phone # and Email ID before saving, even if values are already populated.
2. Click Save. The Co-Applicant Details tab appears with the edited details.
Functions: Add, Edit, Delete.
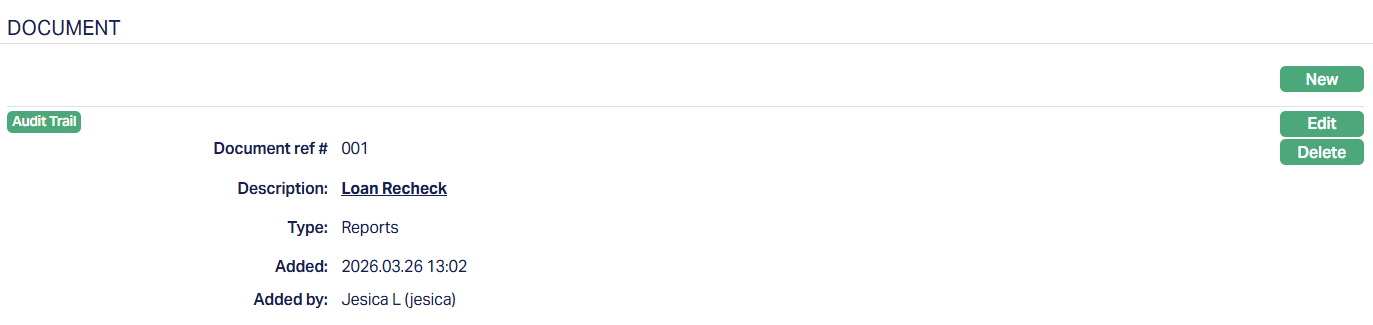
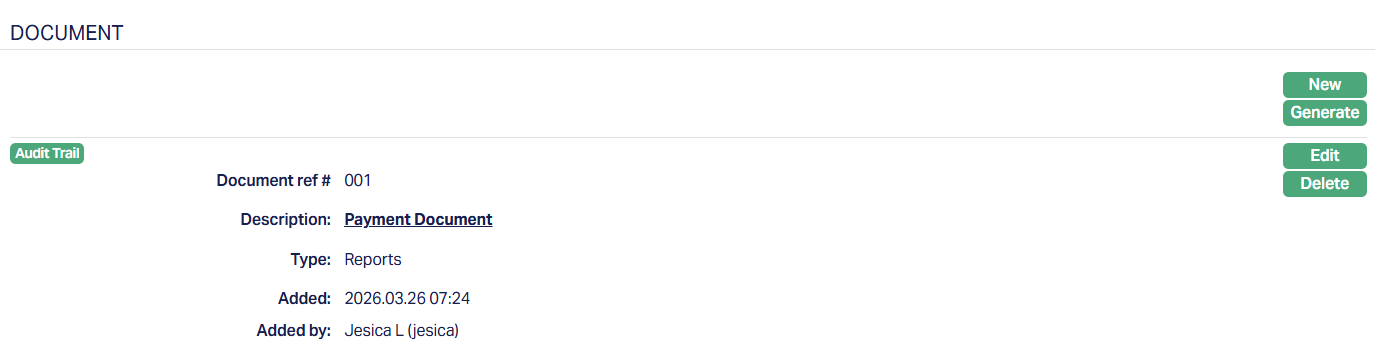
Document
The Document tab allows you to upload / generate documents related to the Loan Application broker. Documents in the form of scanned images or files on your computer can be uploaded. You can categorise the documents as per Document Type and store them with a document reference number. You can generate documents related to the Account based on Templates mapped to the Product.
To upload a document,
1. Access Loan Application Broker page. Click Document tab.

2. Click New. The New Document page appears.
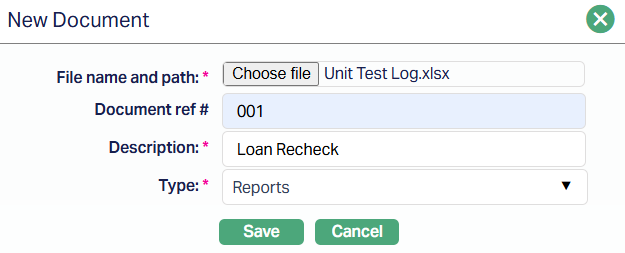
3. Click Choose File button to select the File name and path of the document.
4. Enter Document ref no. for the document. This document reference number is used in Branch view → Documents.
5. Based on the file selected the Description field will be derived. If required, you can change the description.
6. Select Type of the document uploaded. The document types should have been maintained using Admin → System codes → Documents → Document types. Once entered, this cannot be edited.
7. Click Save. Document gets uploaded, and the details are displayed.
Functions: New, Edit, Delete.
To Edit document,
1. Access Loan Application Broker page. Click the Document tab.
2. Click Edit. Edit Document page appears.
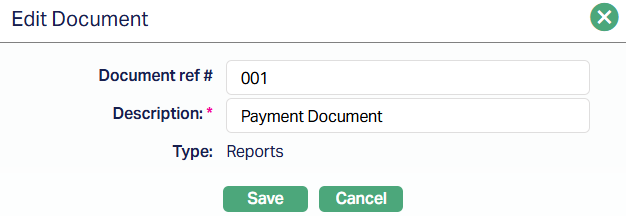
Note: Only Document ref no and Description fields are editable.
3. Click Save. The Document tab appears with the edited details.
Functions: New, Edit, Delete.
You can multiple documents as required.
Delete: You can delete a document by a click on the Delete button. Aura will ask for confirmation, on approving which the selected document will be deleted.
Custom Field
This menu option allows you to define fields apart from those that are already available in the standard version of Aura. Thus, it enables you to customize additional data storage and use as required to suit your specific business needs. These fields are system-defined and vary based on configuration.
To maintain Custom Field,
1. Access Loan Application Broker page. Click the Custom Field tab.

2. This field appears only when it is created in Admin → System codes → Custom fields and is linked to the Loan Application Broker maintain option in Admin → System codes → Custom fields → Field mappings.
3. Click Edit. Edit Custom Field page appears. In the following illustration, one custom field Pan number Category has been mapped to the Product as shown below:

4. Enter the Pan number to be associated with the Product.
5. Click Save. Custom Field tab appears with the edited details.

Function: Edit.
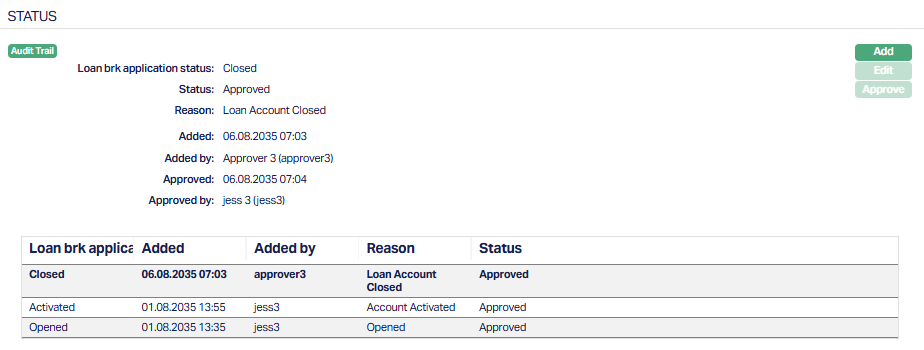
Status
The Status tab allows you to manage and track the lifecycle of the loan application. It records status changes along with approval details, reasons, and audit information.
To view/add status,
1. Access Loan Application Broker page. Click the Status tab.
2. Click Add. Add loan application status page appears.

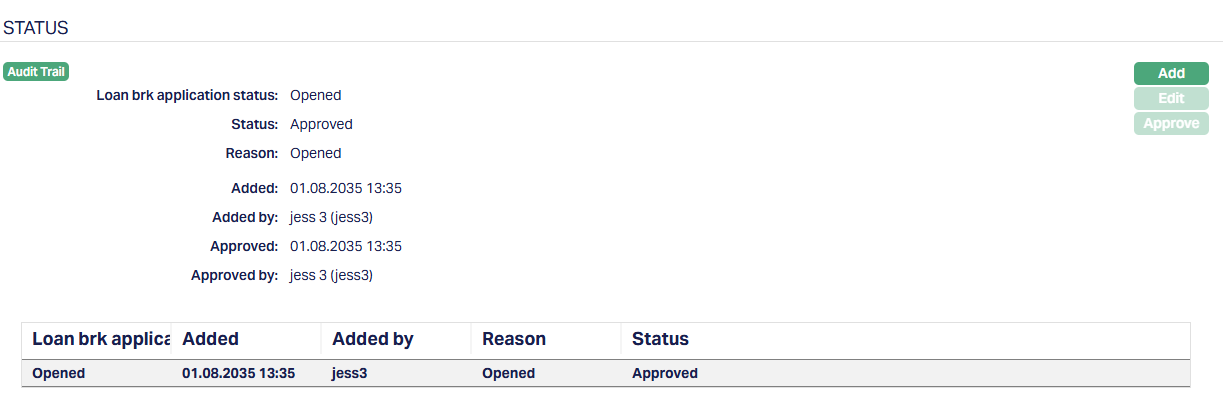
3. Depending on the current status of the loan application, Status could be:
Opened - This is the initial status of the loan application when it is created in Aura.
Activated - This status indicates that the loan application is active and has progressed beyond the initial stage. You can assign this status manually. Once added, the status must be approved by another user to become effective.
Closed - This status indicates that the loan application has been completed or closed. You can assign this status manually along with a reason. Once approved, the application is marked as closed.
4. Enter the Reason for the Status change.
5. Click Save. The Status tab appears with the added lifecycle.
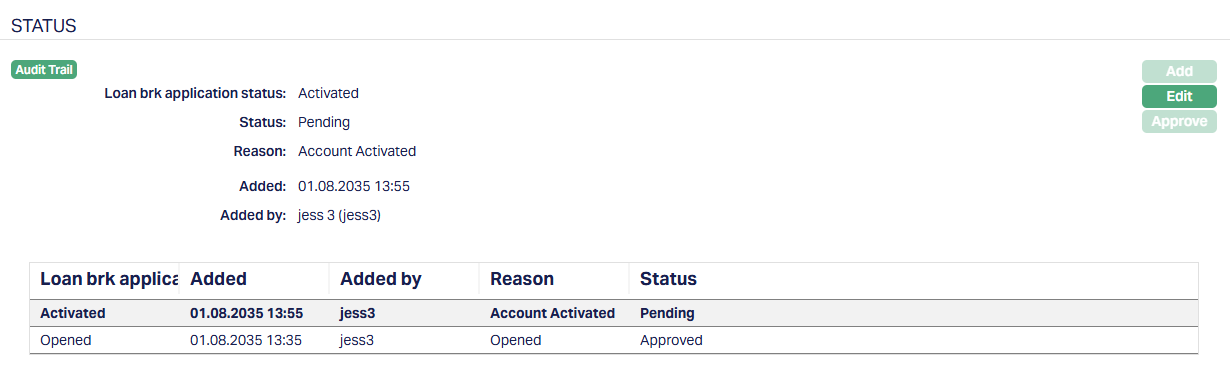
Status of the Record is Pending until it is approved by another user.
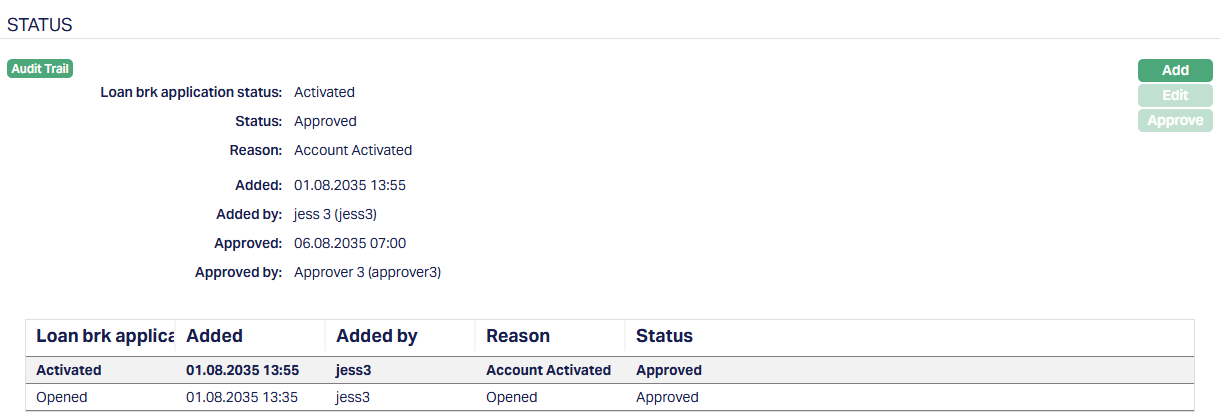
Functions: Add, Edit, Approve.
Reactivation Behaviour:
After the status is set to Closed, you can add a new status using the Add button. This allows the loan application to be activated again.
Functions: Add, Edit, Approve.
Suspend: You can suspend a Loan application record by clicking on the Suspend button. When you click on the Suspend button, Aura will ask for confirmation. On confirmation Aura will suspend the Loan application and the Activate button will appear in place of the Suspend button. The status of the Loan application is set to Suspended. When suspended, the loan application is temporarily inactive and cannot be processed further until reactivated.
Activate: If you want to activate a suspended Loan application record then click on the Activate button. Aura will ask for confirmation. On confirmation Aura will activate the Loan application and Suspend button will appear in place of the Activate button. The status of the Loan application is set to Active.