Journal Template
Journal Template menu allows you create and maintain the types of journal entries to be used in the Aura system, to designate different types of financial information recorded.
Journal templates make it convenient to create preset defaults for journal posting with the flexibility to have control on the type of postings being done through each template. It also helps in identifying the type of journal being posted and handy when repeated postings are required of the same kind.
Adding Journal Template
To add Journal Template
- From General ledger menu, click Settings, and then Journal Template. Journal Template Search page appears. All Journal Templates available in Aura appears on the page, sorted based on the Codes.
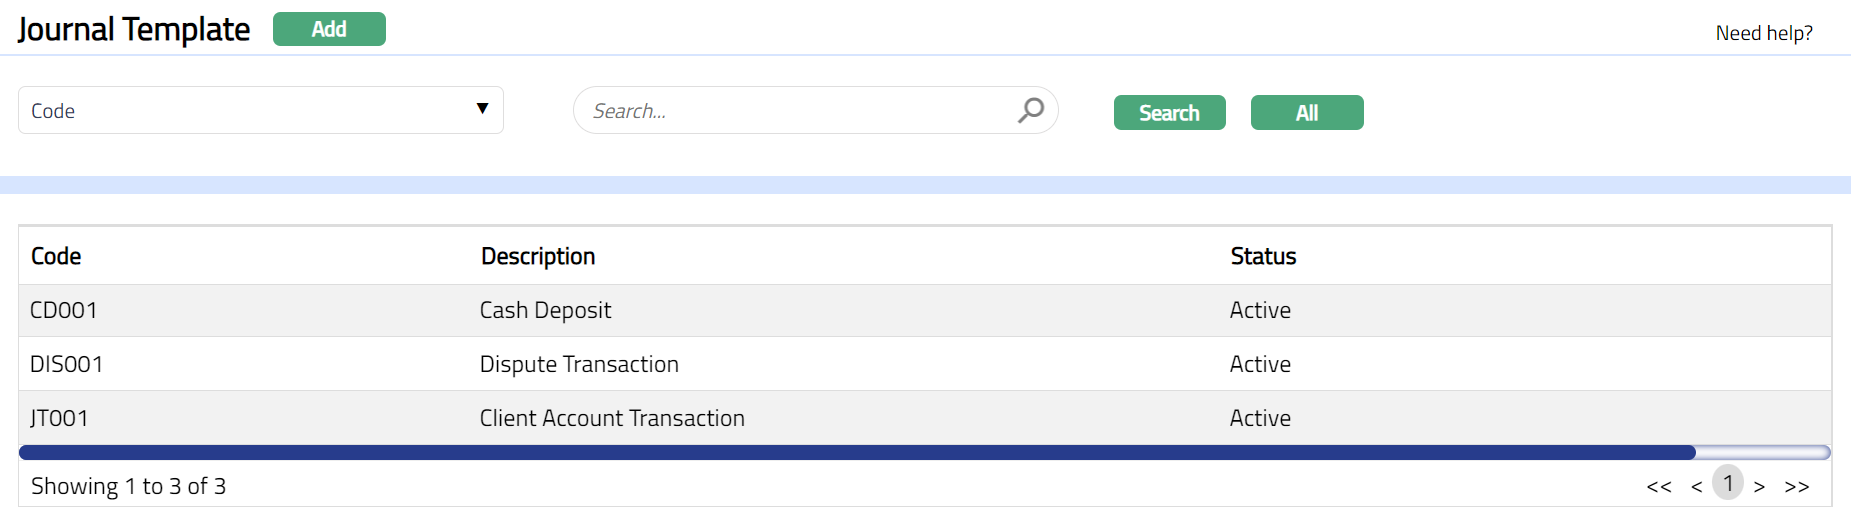
- Click Add. New Journal Template -- General (1/2) page appears.
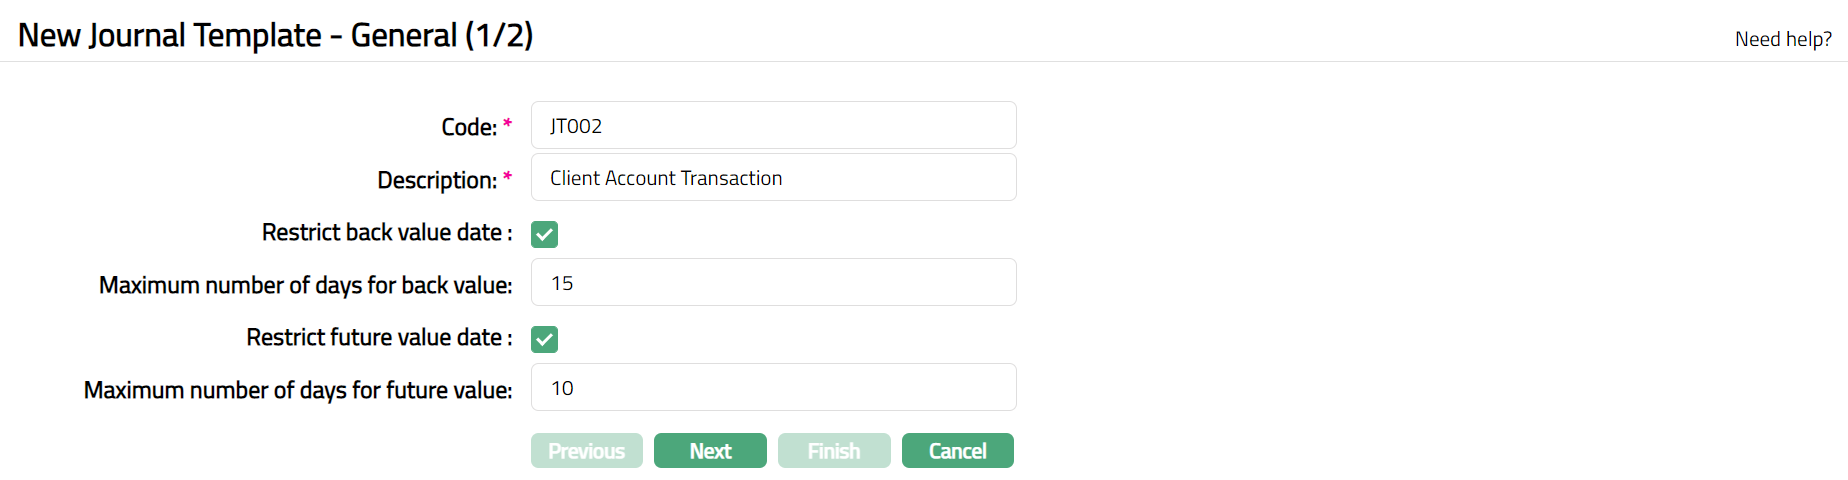
Enter Code to be assigned to the Journal template.
Enter Description i.e., descriptive name to be assigned to the Journal Template. For example, enter Interest Adjustment.
Click Restrict back value date checkbox, if you want to restrict back value dated transactions under this Journal Template. If Restrict back value date flag is checked**,** then the Maximum number of days for back value field will be enabled. If Restrict back value date flag is not checked, then the Maximum number of days for back value field will be disabled.
Enter Maximum number of days for back value. Transactions cannot be back dated beyond this period.
Click Restrict future value date checkbox if you want to restrict future value dated transactions under this Journal template. If Restrict future value date flag is checked**,** then the Maximum number of days for future value field will be enabled. If Restrict future value date flag is not checked, then the Maximum number of days for future value field will be disabled.
Enter Maximum number of days for future value. Transactions cannot be future dated beyond this period.
Click Next. New Journal Template -- Confirmation (2/2) page appears.
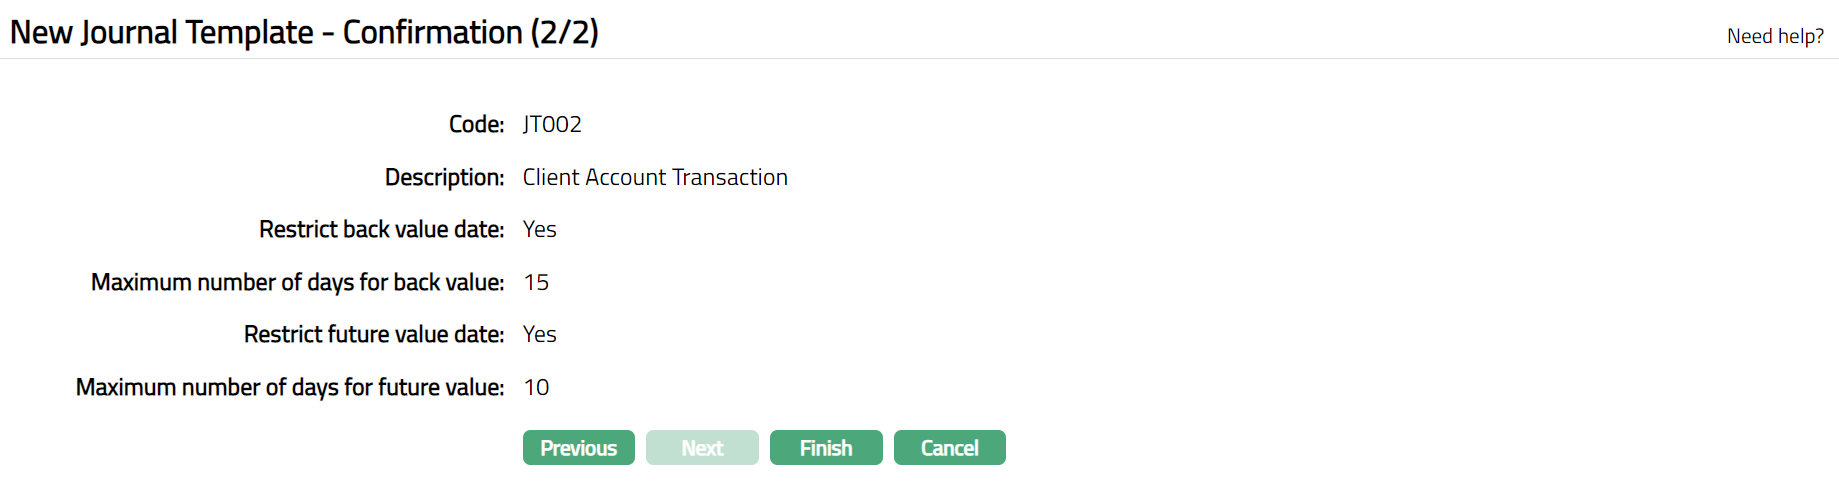
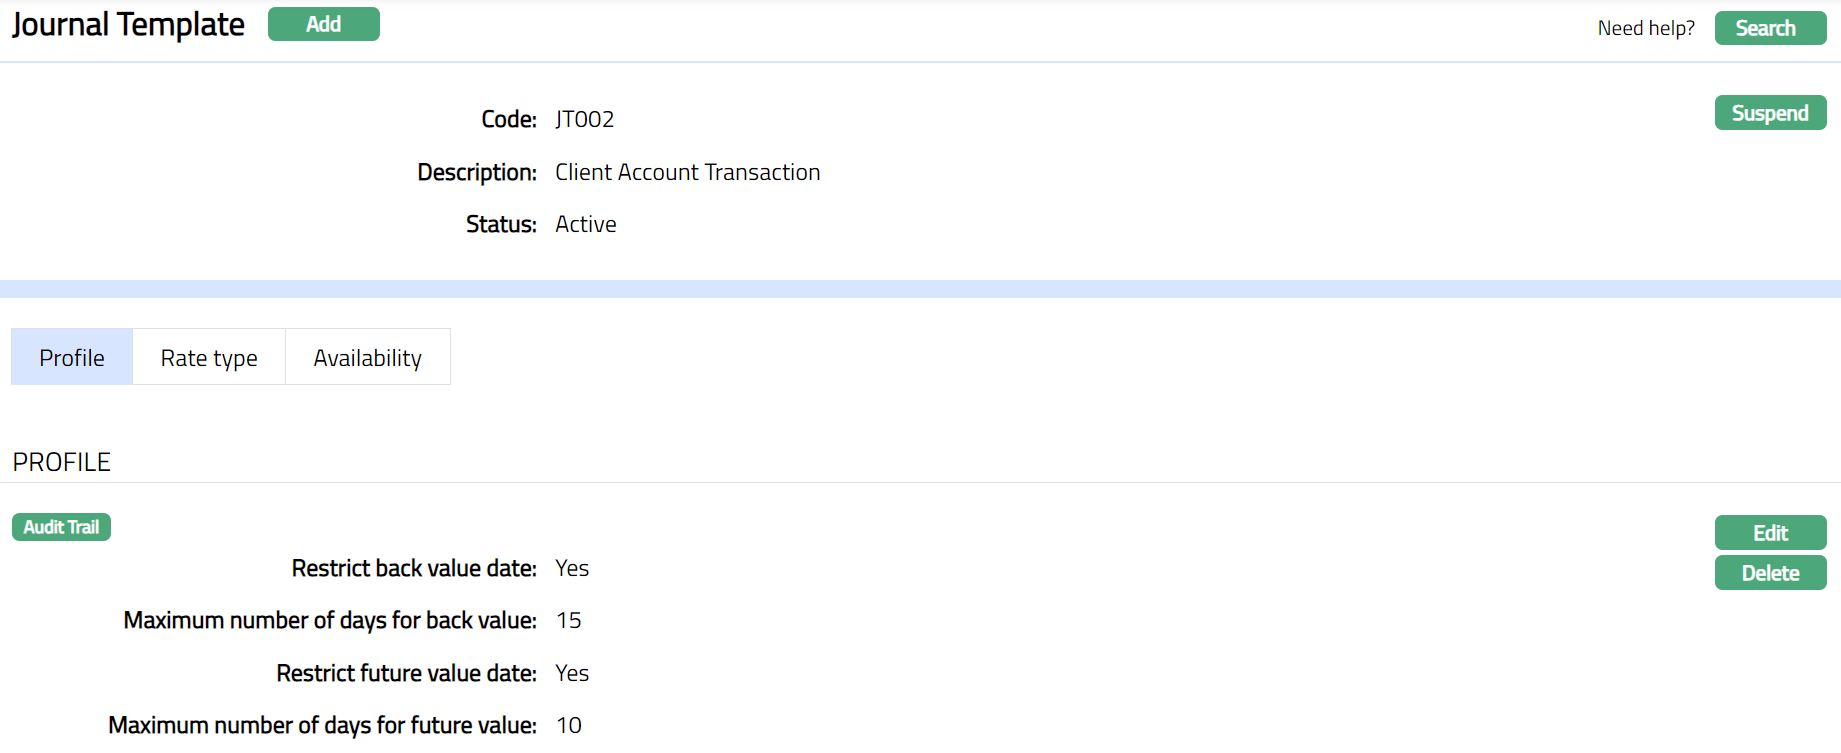
- Click Finish. Journal Template page appears displaying the details of the Journal Template you added.
 Functions: Add, Search, Suspend, Activate
Suspend: You can suspend a Journal Template by clicking on Suspend button. When you click on Suspend button, Aura will ask for confirmation. On confirmation, Aura will suspend the Journal Template and Activate button will appear in place of the Suspend button.
Activate: If you want to Activate a suspended Journal Template then click on Activate button. Aura will ask for confirmation. On confirmation Aura will Activate the Journal Template and Suspend button will appear in place of Activate button.
Profile
Profile tab, which is the default screen in the Journal Template screen, shows the basic details of the Journal Template. Refer New Journal Template -- General (1/2) for details.
To edit
- Access Journal Template screen. Profile tab is displayed by default.

- Click Edit button. Edit Journal Template page appears.
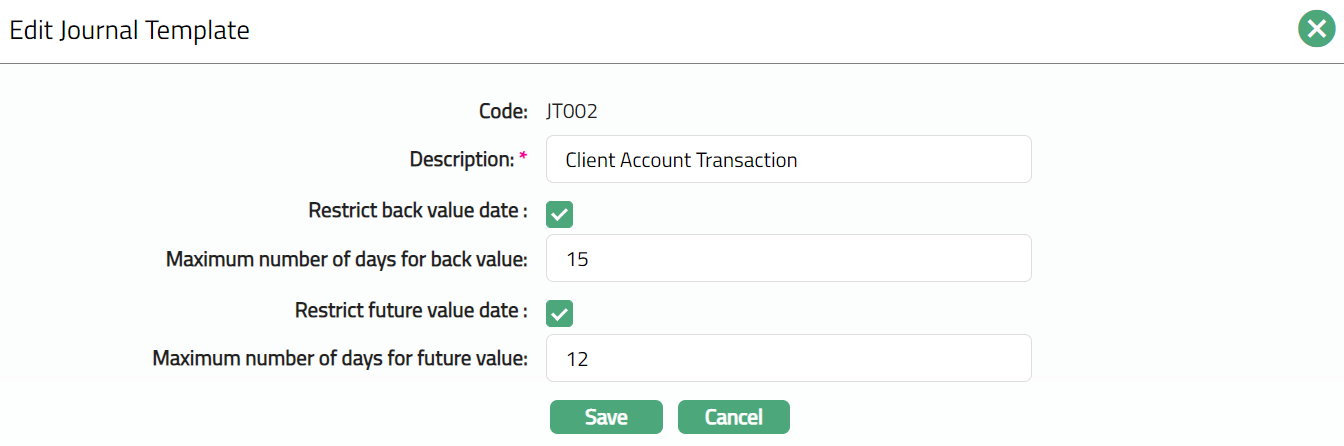
Note: Except Code field all other fields are editable. For details refer to Add Journal template (1/2) above.
- Click Save. Journal Template page appears with the edited details.

Functions: Edit, Delete
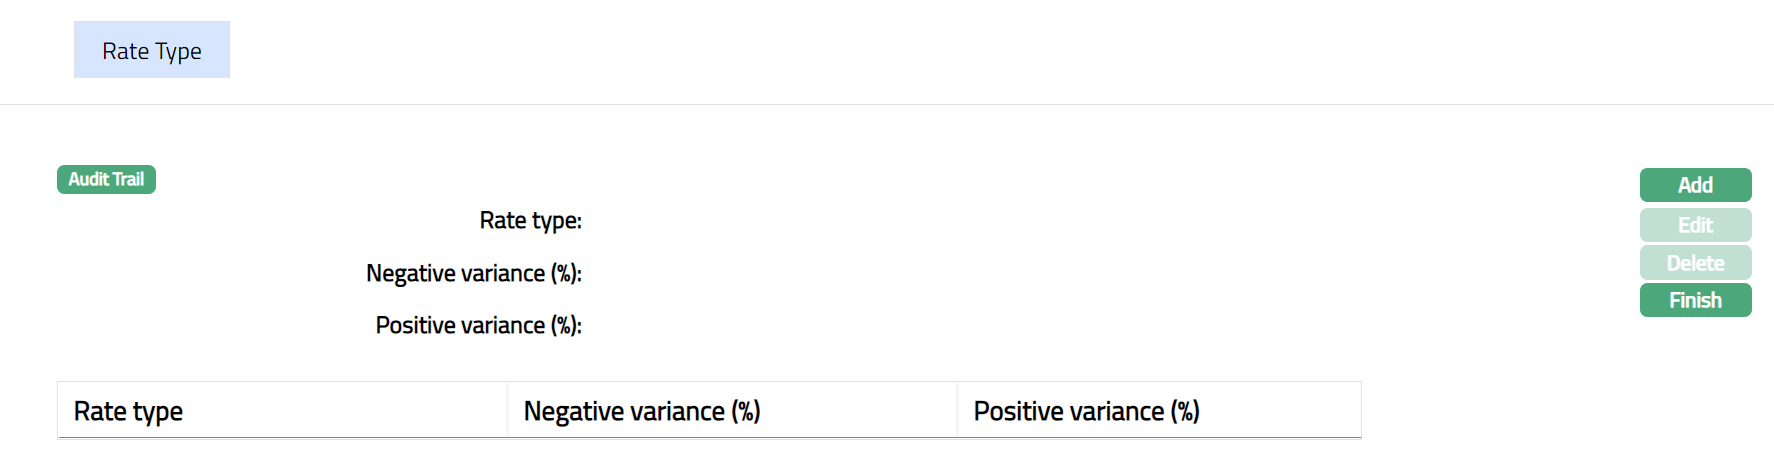
Rate type
You can control the branches that can be used in the debit leg during transaction entries for each Journal Template using this tab. Using this tab, you can also specify the exchange rate that has to be used between two currencies for each branch for a specific Template for cross currency journal entries.
To add new Branch
- Access Journal Template screen, click Rate Type. Rate Type page appears.

- Click Add button. Add Branch screen appears.

- Select Branch from the available drop-down list. Once a branch has already been added, it will no longer appear in the drop-down.
Note: Aura will display only those Branches in the drop-down, as per the availability defined in the Availability > Branch (Debit) tab.
- Click Save. Rate Type page appears with the added branch details.
 Functions: Add, Delete, Maintain rate.
- To add rate, click Maintain rate button. The following screen will be displayed.
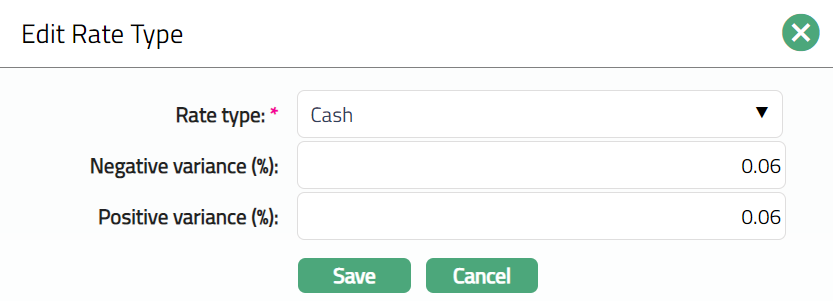
- Click Add. Add Rate Type page appears.
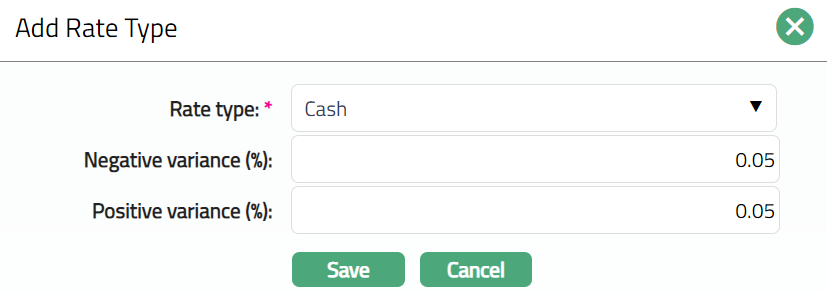
Select Rate type from the available drop-down list. You can add multiple Rate Types for each branch. Aura will restrict you from maintaining duplicate rate types for the branch. Rate types should have been maintained in Rate Type under System Codes.
By default, Negative variance (%) will be 0%. If required, you can enter the required negative variance %. The exchange rate entered during a transaction cannot be lower than the approved mid-rate beyond this variance %.
By default, Positive variance (%) will be 0%. If required, you can enter the required positive variance value. The exchange rate entered during a transaction cannot be more than the approved mid-rate beyond this variance %.
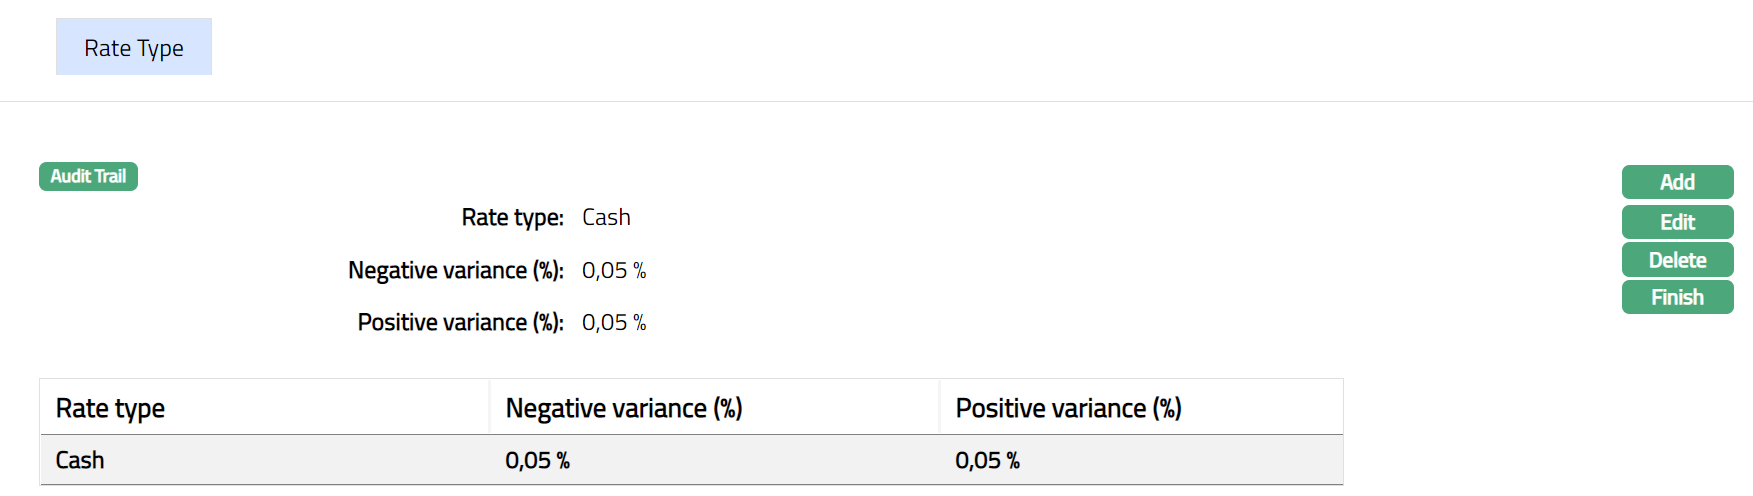
Based on the negative and positive variance percentages specified, the Cross Currency Journal verifies that the FX rate for the transaction is within the negative and positive variance range.
Click Save, Rate Type page for the Branch appears with the added details.
Functions: Add Edit, Delete and Finish.
- To edit Rate Type, click Edit. Edit Rate Type page appears.
Note: All fields are editable.
- Click Save. Rate Type page for the Branch appears with the edited details.
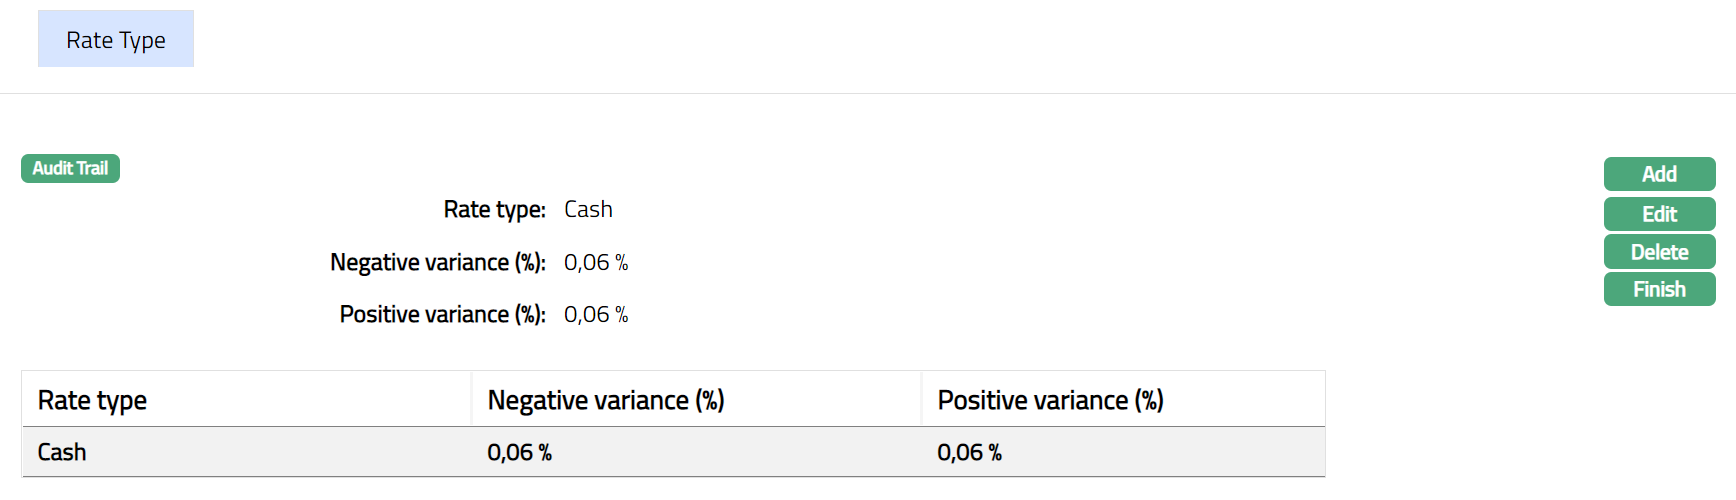
- Click Finish to close the Rate Type sub tab for the Branch.

Functions: Add, Delete, Maintain rate
Availability
Availability tab allows you to define specific transaction codes and clients that can be used under the Journal Template. It has six sub tabs. The subtabs are as follows:
Transaction code (Debit)
Transaction code (Credit)
Client
Branch (Debit)
Branch (Credit)
Role/User
Transaction code (Debit)
Using this tab, you can allow only specific Debit transaction codes to be used for specific Journal Template codes. You can thus restrict the Debit transaction codes that are available for posting entries under each Journal Template Code.
Access Journal Template screen, click Availability tab and then on Transaction Code (Debit) sub tab.
Click All radio button, if you want all the debit transaction codes to be allowed under this Journal Template.

- To restrict the debit transaction codes that are available under this Journal Template, click Select radio button. Add button is now enabled.

- Click Add. Add Transaction code search page appears where you can search for a required transaction code with relevant criteria and select the required transaction code.
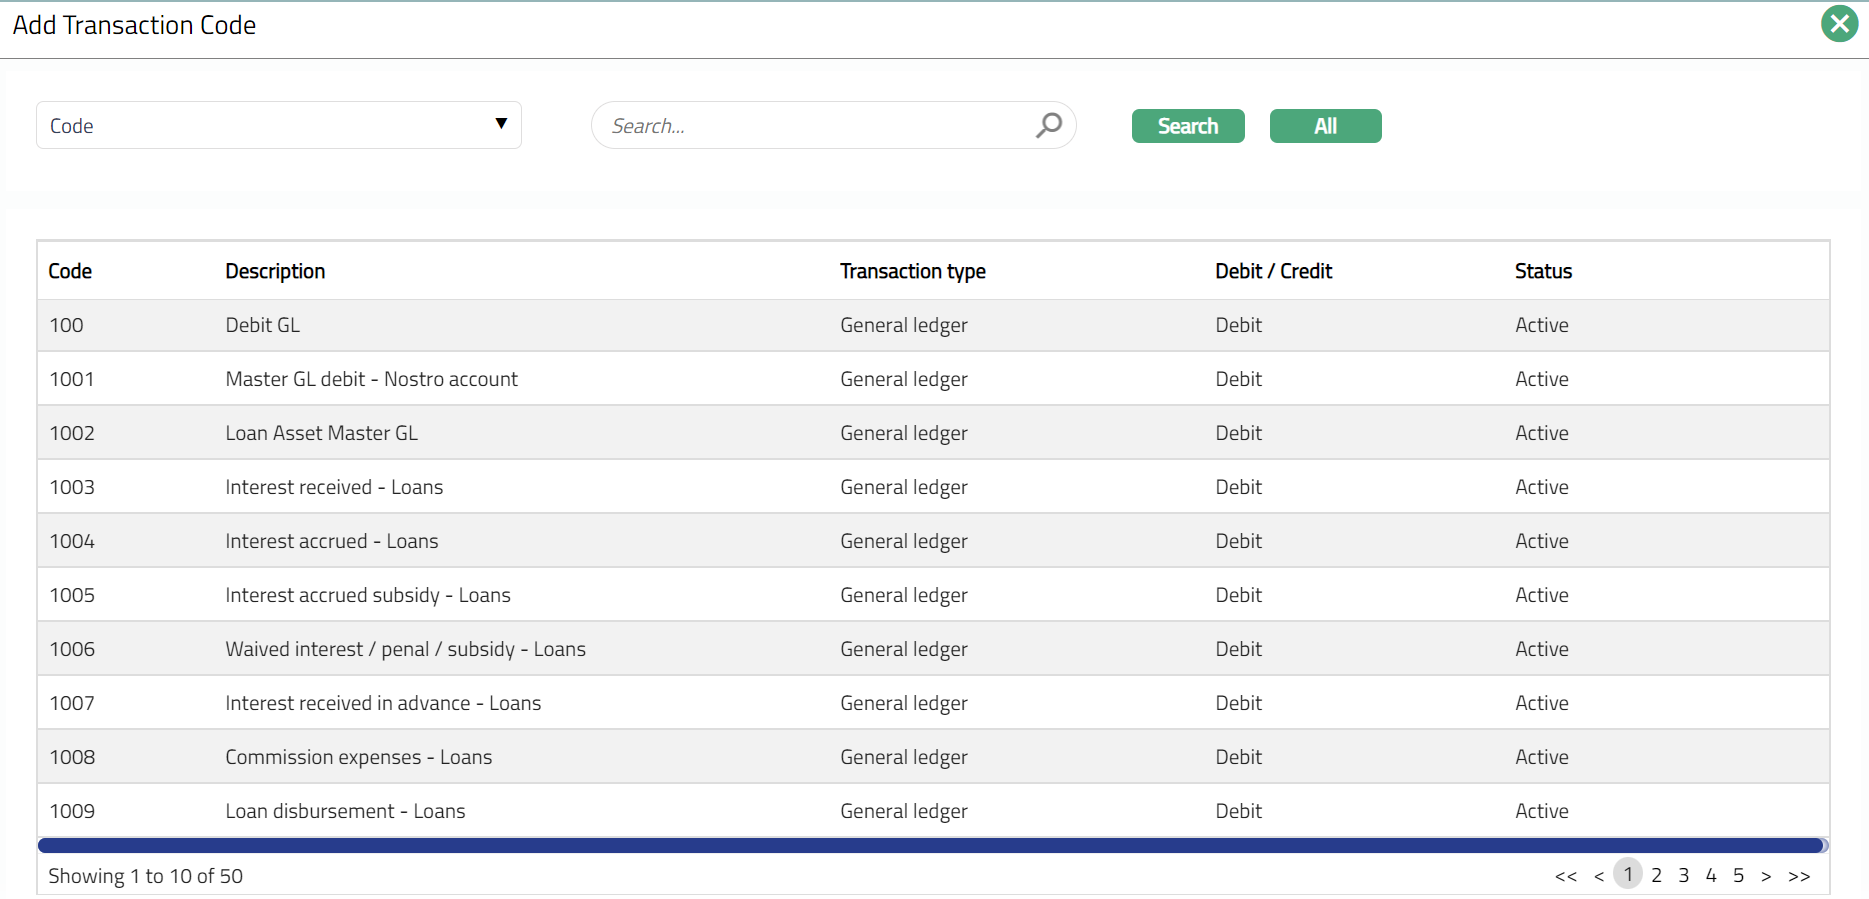
- Selected transaction code will appear in Transaction code (Debit) screen as shown below.

Functions: Add, Delete
Note: You may choose to allow All Debit Transaction Codes for the Journal Template at any time. However, Aura will prompt you to confirm if the Selected Transaction Codes may be deleted. If confirmed, then all the selected debit transaction codes will be deleted, and the Journal Template will allow ALL debit transaction codes to be used.
Transaction code (Credit)
Using this tab, you can allow only specific credit transaction codes to be used for specific Journal Template codes. You can thus restrict the Credit transaction codes that are available for posting entries under each Journal Template Code.
Access Journal Template screen, Click Availability tab and then Transaction Code (Credit) sub tab.
Click All radio button if you want all the Credit transaction codes to be allowed under this Journal Template.

- To restrict the Credit transaction codes that are available under this Journal Template, click Select radio button. Add button is now enabled.

- Click Add. Add Transaction code search page appears where you can search for a required transaction code with relevant criteria and select the required transaction code.
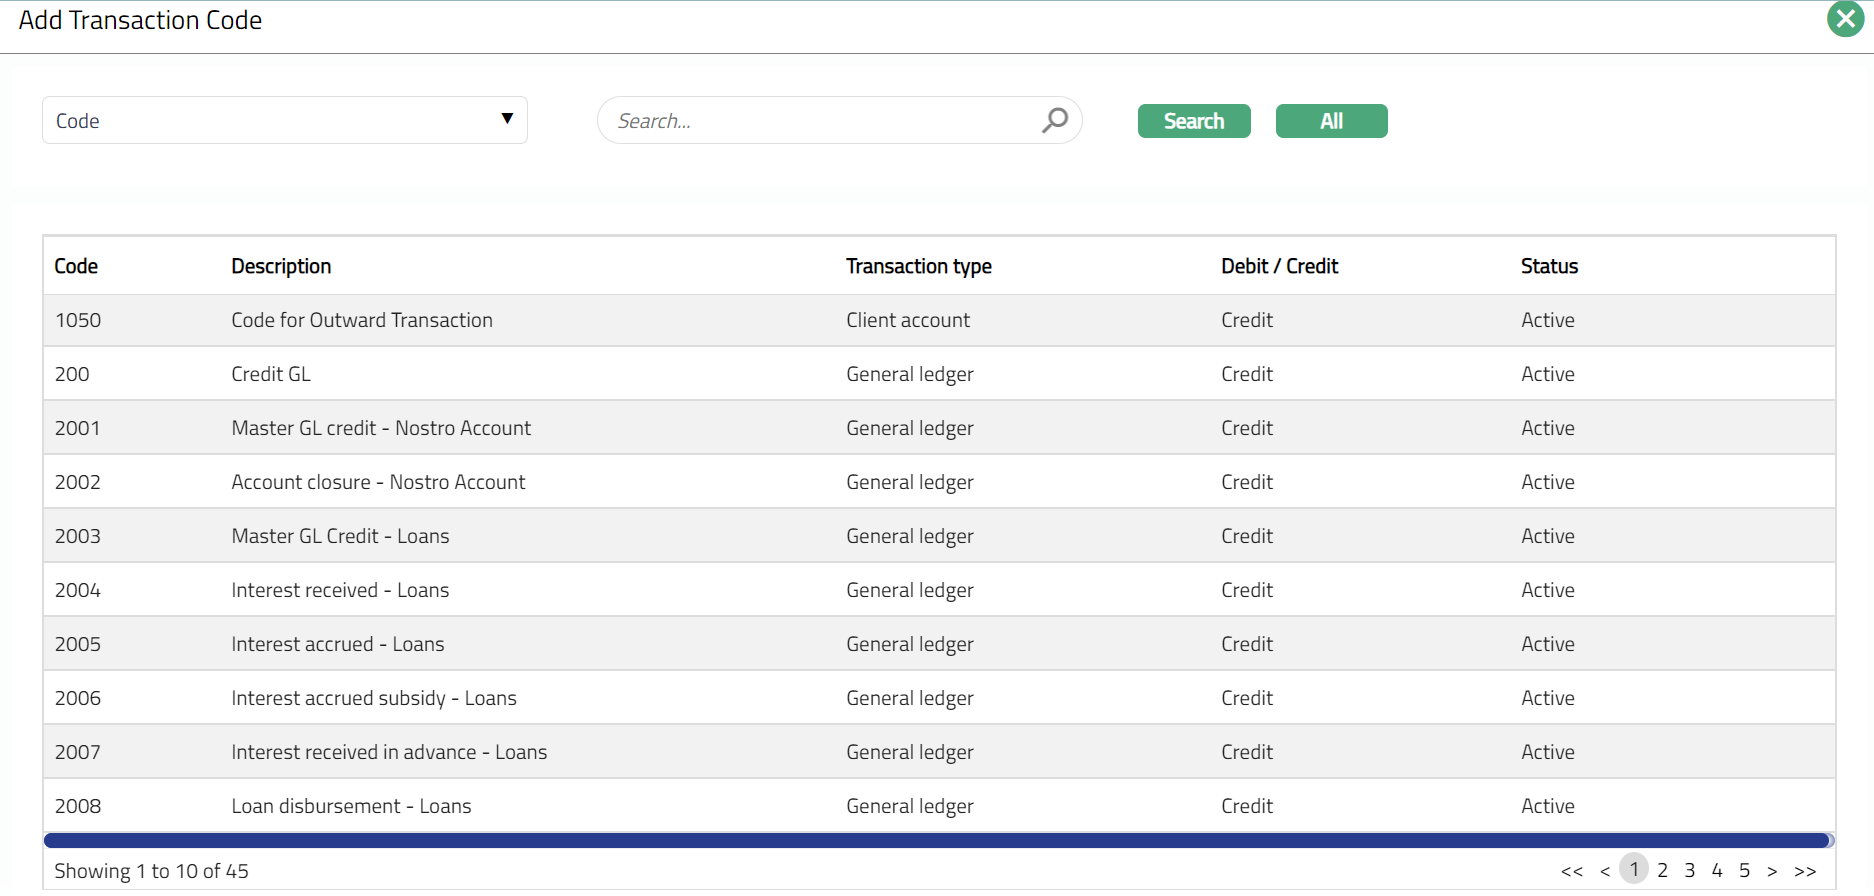
- Selected transaction code will appear in Transaction Code (Credit) screen as shown below.

Functions: Add, Delete
Note: You may choose to allow All Credit Transaction Codes for the Journal Template at any time. However, Aura will prompt you to confirm if the Selected Transaction Codes may be deleted. If confirmed, then all the selected Credit transaction codes will be deleted, and the Journal Template will allow ALL Credit transaction codes to be used.
Client
Using this tab, you can allow only specific clients to be used for specific Journal Template codes. You can thus restrict the client ids that are available for posting entries under each Journal Template Code.
To select Client.
Access Journal Template screen, Click Availability and then Client sub tab.
Click All radio button if you want all the clients to be allowed under this Journal Template.

- To restrict clients that are available under this Journal Template, click Select radio button**. Add** button is now enabled.

- Click Add. Add Client page appears, where you can search for a required client with relevant criteria and select the required client.
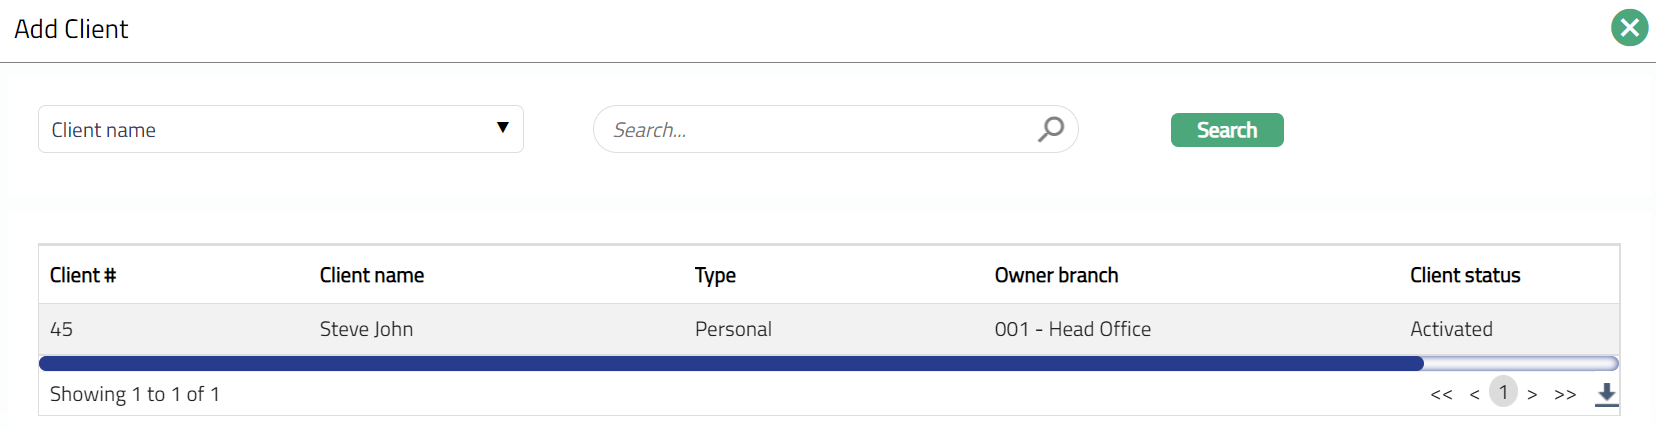
- Selected client will appear on the Client screen as shown below.

Functions: Add, Delete.
Note: You may choose to allow All clients for the Journal Template at any time. However, Aura will prompt you to confirm if the selected clients may be deleted. If confirmed, then all the selected clients will be deleted, and the Journal Template will allow ALL clients to be used.
Journal Template will be used in Transaction entry > Station Journal > New Journal Template. It is also used in Transaction entry > Cross currency journal > Transaction details, where you can select the desired journal from the journal template dropdown.
Branch (Debit)
Using this tab, you can allow specific Branches for debit entry, to be used for specific Journal template codes. You can thus restrict the Branches that are available for debit entry under each Journal Template code. The branches maintained here will be available for Rate type, Cross currency journal and Station Journal.
Based on the Branch specified here, Aura will display those accounts in Station Journal and Cross Currency journal where account branch matches the selected Branch under Journal template > Availability > Branch (debit).
To select Branch (Debit)
Access Journal Template page and click Branch (Debit) Tab.
Click All radio button if you want all the Branches to be allowed under this Journal Template.

- To restrict Branches that are available under this Journal Template, click Select radio button**. Add** button is now enabled.

- Click Add. Add Branch page appears where you can search for a required Branch with relevant criteria and select the required Branch.
- Selected Branch will appear in Branch (Debit) screen as shown below.
 Functions: Add, Delete
Delete: You can delete Branch (Debit) saved in Aura by clicking on Delete button. Aura will ask for confirmation, on approving which the selected record will be deleted.
Note: You may choose to allow All Branches for the Journal Template at any time. Branches added here will have an effect on Station Journal and Cross Currency Journal and Rate type tab.
Branch (Credit)
Using this tab, you can allow specific Branches for credit entry, to be used for specific Journal template codes. You can thus restrict the Branches that are available for credit entry under each Journal Template code. The branches maintained here will be available for Cross currency journal and Station Journal.
Based on the Branch specified here, Aura will display those accounts in Station Journal and Cross Currency journal where account branch matches the selected Branch under Journal template > Availability > Branch (credit).
To select Branch (credit)
Access Journal Template page and click Branch (Credit) Tab.
Click All radio button if you want all the Branches to be allowed under this Journal Template.

- To restrict the Branches that are available under this Journal Template, click Select radio button**. Add** button is now enabled.

- Click Add. Add Branch page appears where you can search for a required Branch with relevant criteria and select the required Branch.

- Selected Branch will appear in Branch (Credit) screen as shown below.

Functions: Add, Delete
Delete: You can delete Branch (Debit) saved in Aura by a click on Delete button. Aura will ask for confirmation, on approving which the selected record will be deleted.
Note: You may choose to allow All Branches for the Journal Template at any time. The Branches added here will have an effect on Station Journal and Cross Currency Journal.
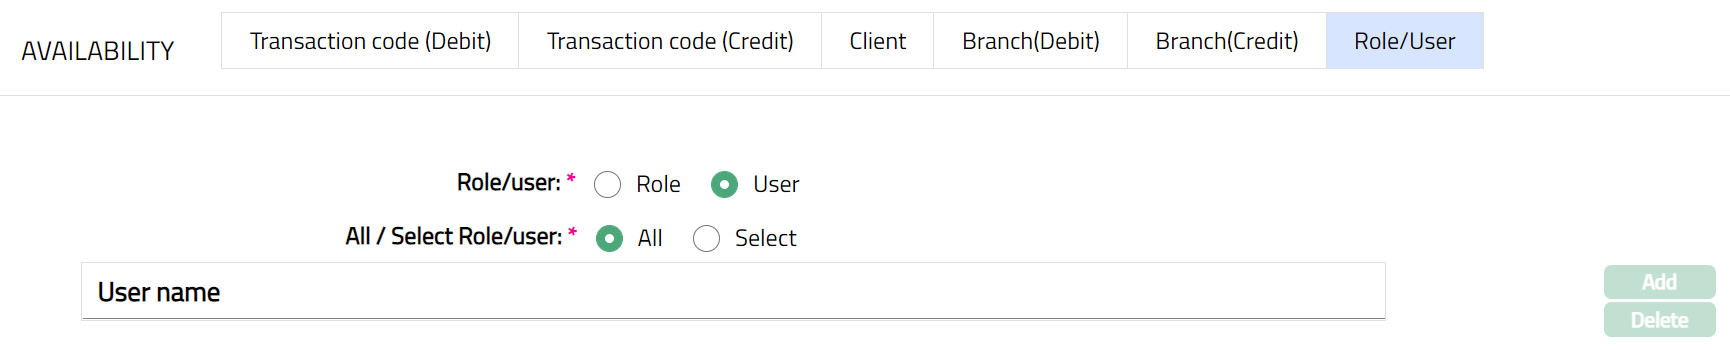
Role User
Using this tab, you can allow specific User or Role, to be used for specific Journal template codes. You can thus restrict the Role/User under each Journal Template code.
Based on the Availability for User/Role, the Journal Template is filtered in Station Journal and Cross Currency Journal.
To select a Role/user
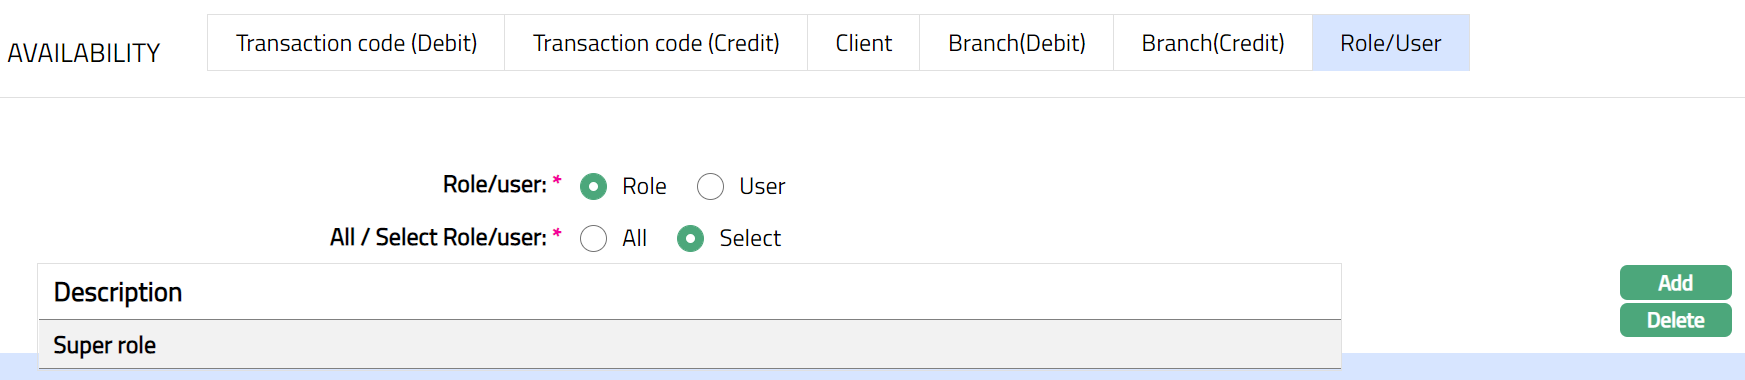
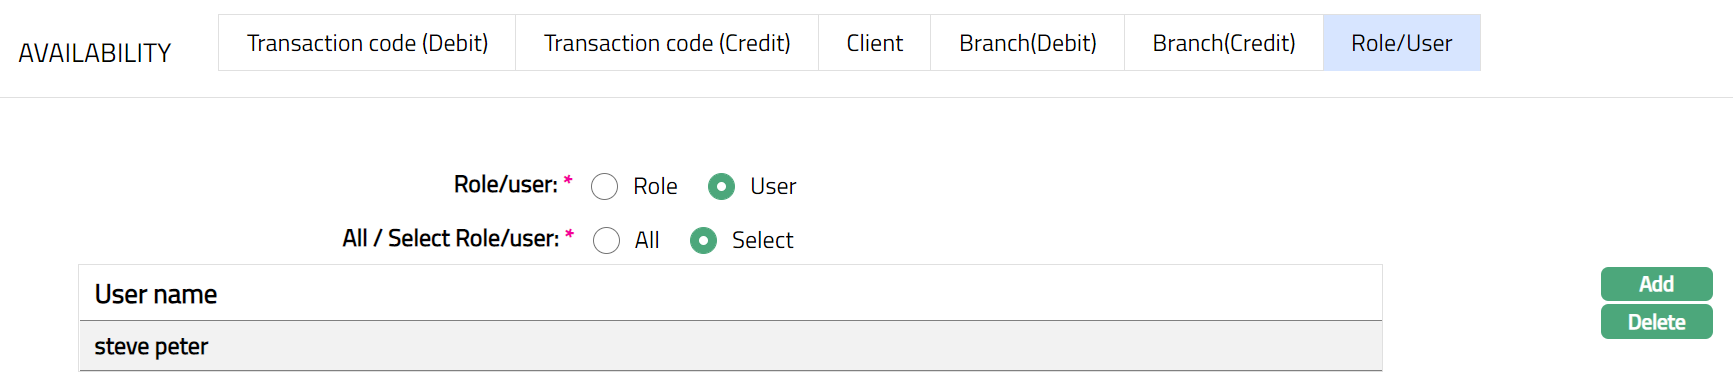
Access Journal Template page and click Role/User Tab.
Select Role /User for Journal Template. You can toggle between Role or User and create either one of them.
If User is chosen after previously choosing Role button or vice versa, then Aura will ask for confirmation, whether you want to delete the selected Role/User. Only on confirmation, you can switch between User and Role.
Click All radio button if you want all the Role/User to be allowed under this Journal Template.
When Role is selected

When User is selected
- To restrict the Role/User that are available under this Journal Template, click Select radio button**. Add** button is now enabled.
When Role is selected

When User is selected
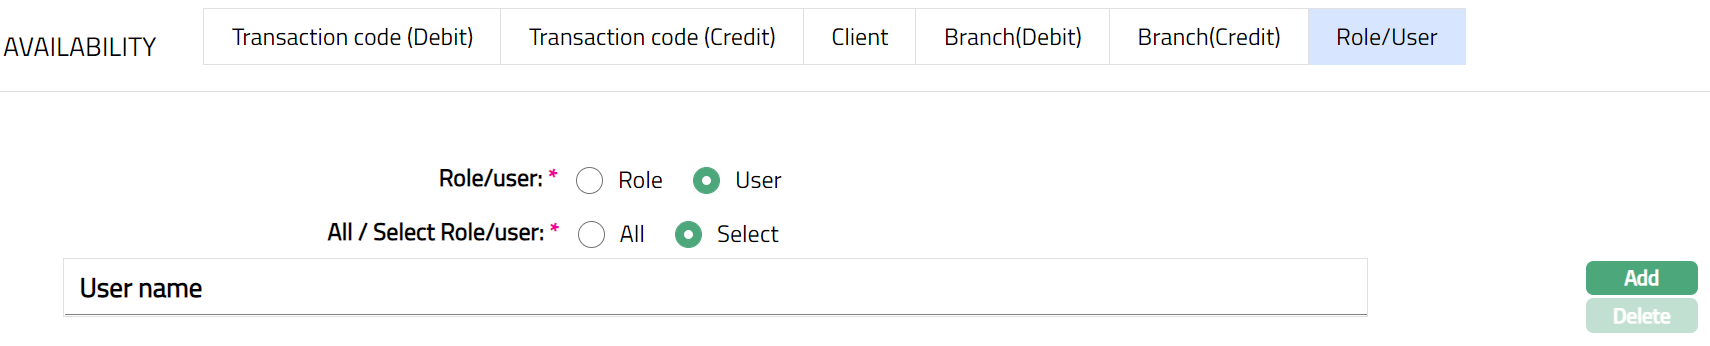
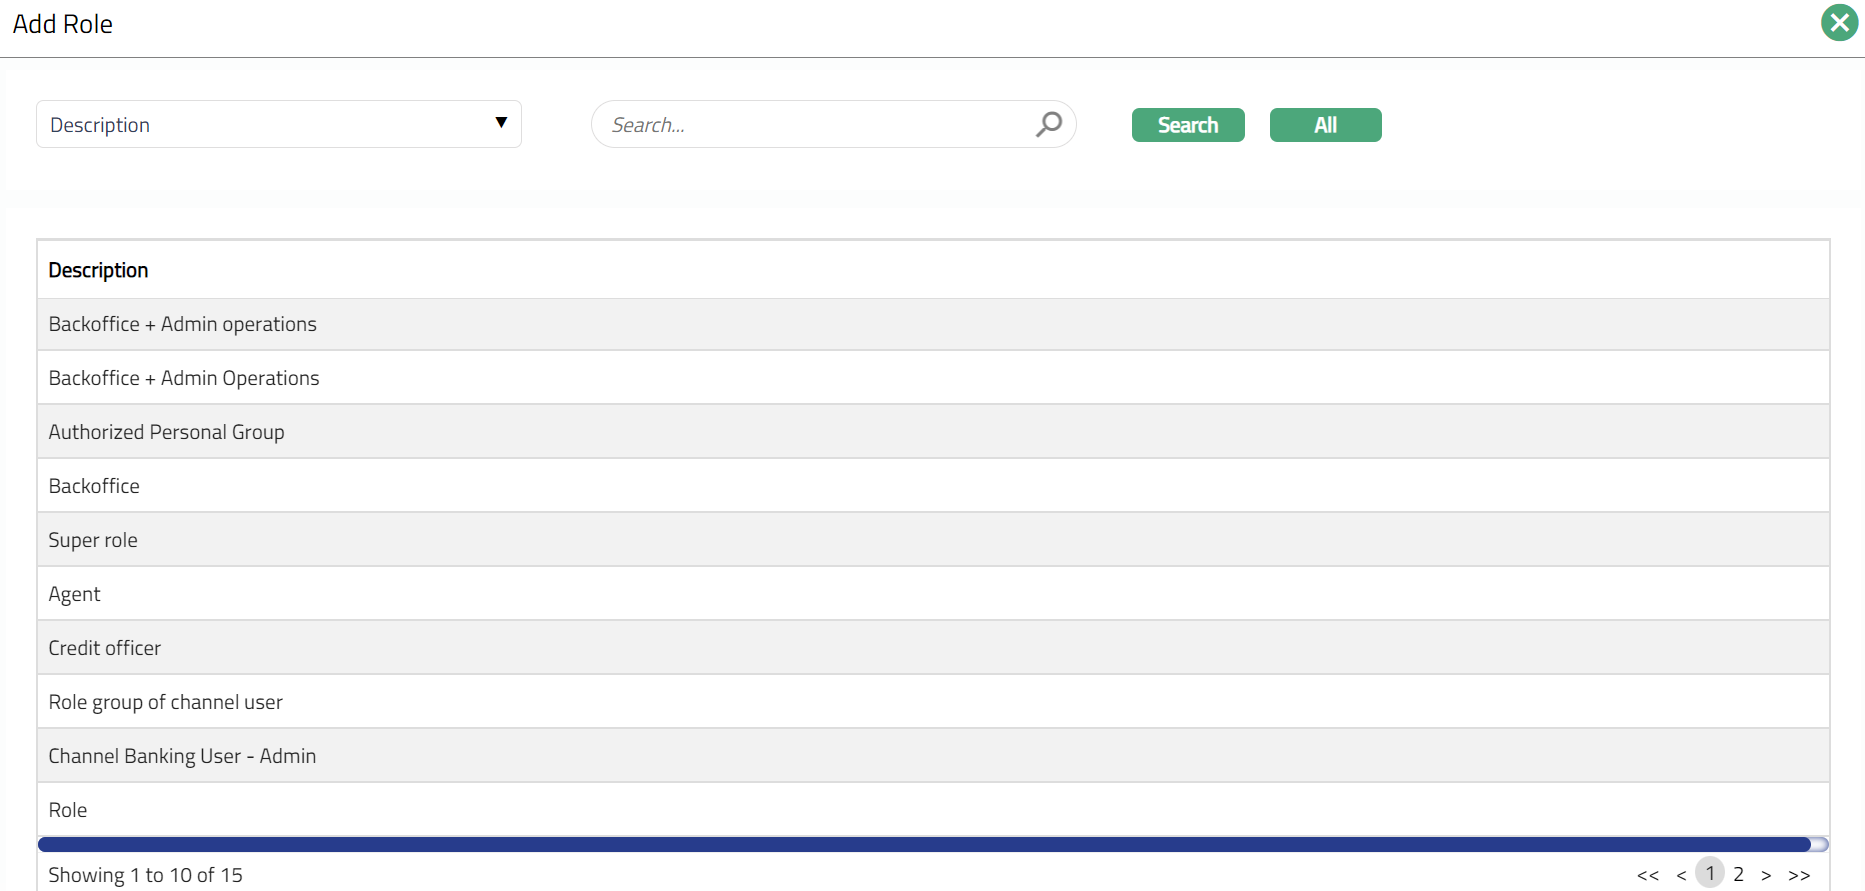
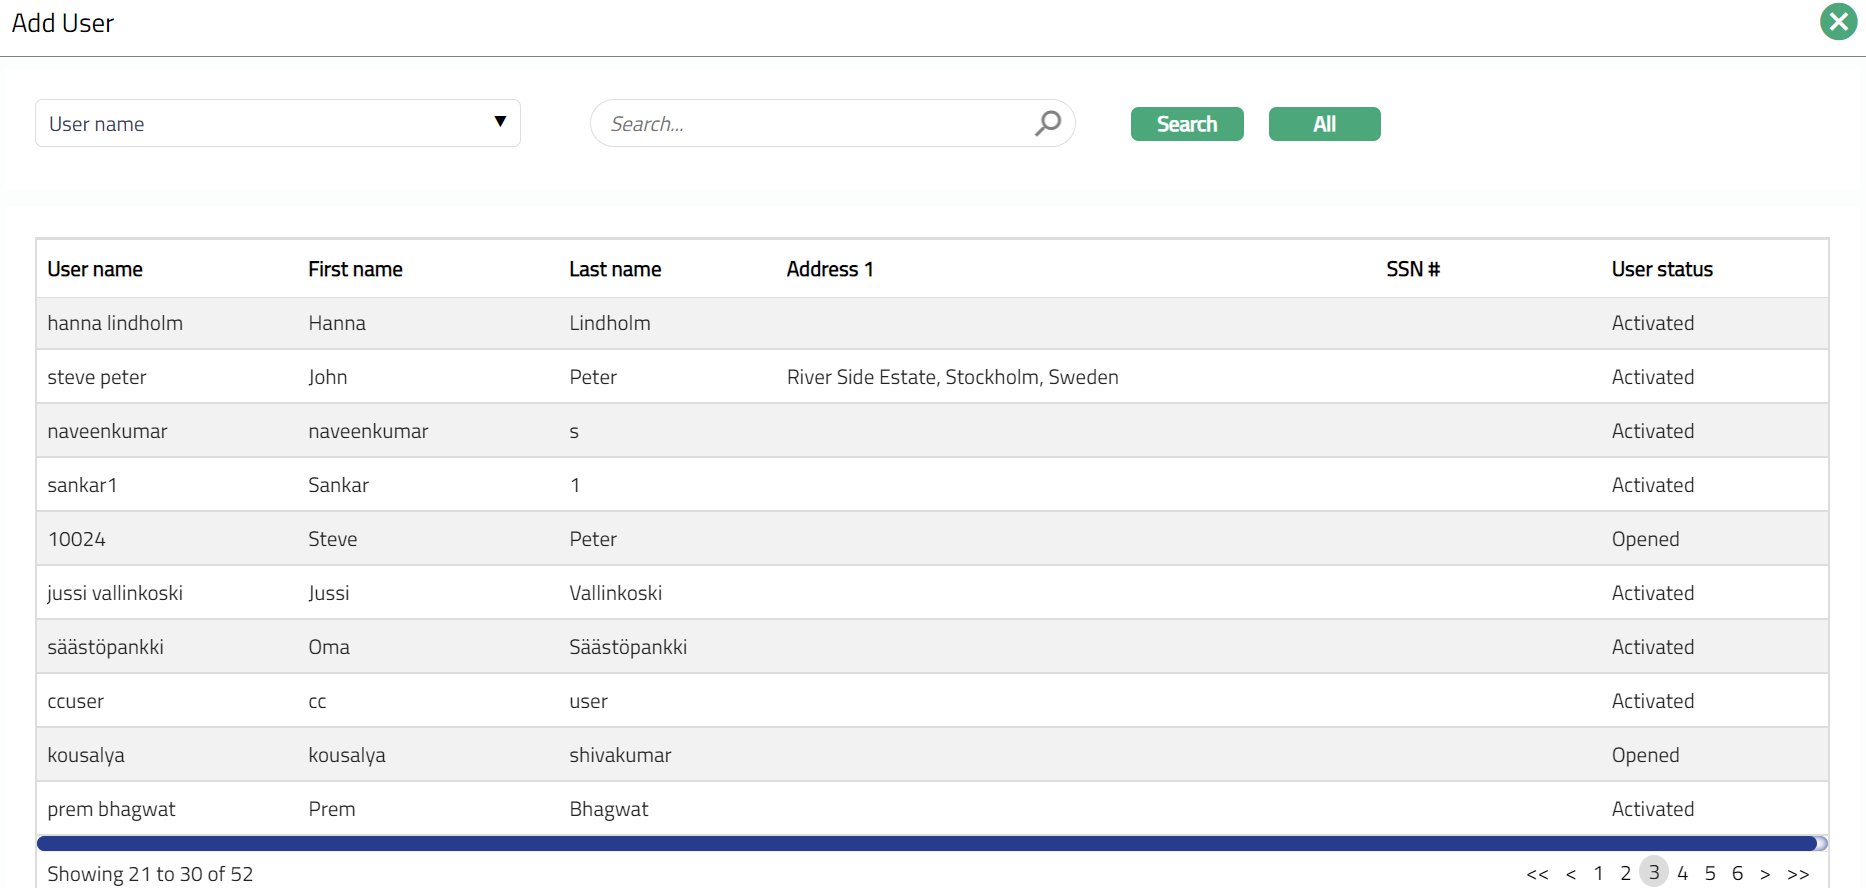
- Click Add. Add Role/User page appears where you can search for a required Role/user with relevant criteria and select the required Branch.
Adding Role
Adding User
- Selected Role/User will appear in Role/User screen as shown below.
Added Role
Added User
 Functions: Add, Delete
Delete: You can delete Role/User saved in Aura by clicking on Delete button. Aura will ask for confirmation, on approving which the selected record will be deleted.
Note: You may choose to allow All Role/User for the Journal Template at any time. The Role/User added here will have an effect on Station Journal and Cross Currency Journal.