Payment Grid - Product
Product menu allows you to maintain the details of various products that are offered to the customers. Using this Product, you can configure the parameters for Straight Through Processing of the payment messages without any manual intervention.
There are three tabs which will allow you to maintain the Product.
To add new Product
- From PaymentGrid menu, click Settings, and then Product. Product Search page appears.

- Click Add. New Product -- Profile (1/4) page appears. Sample screen shots shown below.
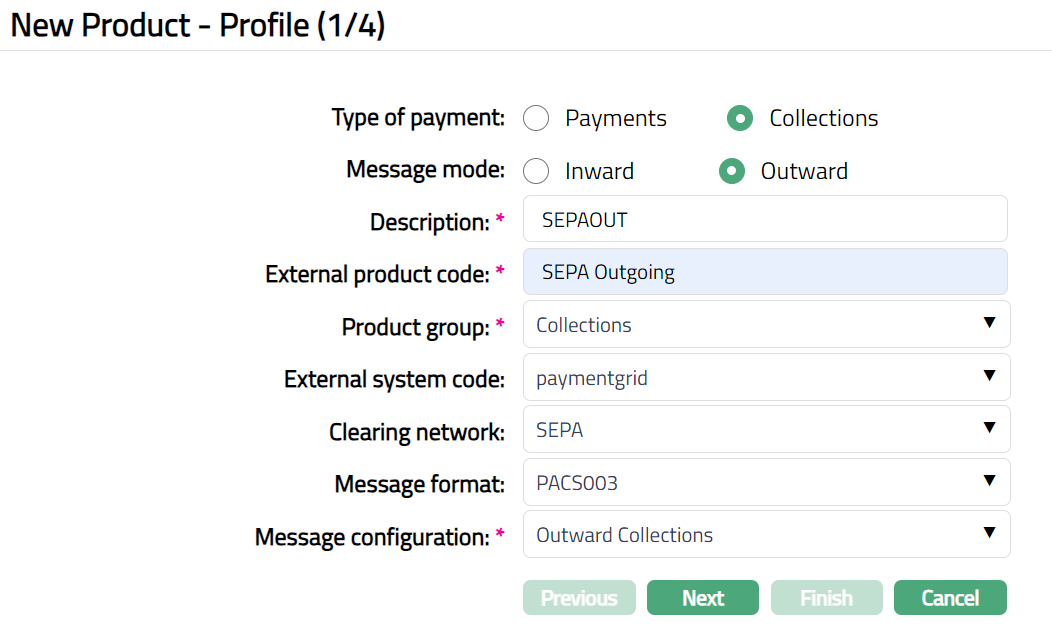
Collections -- Outward
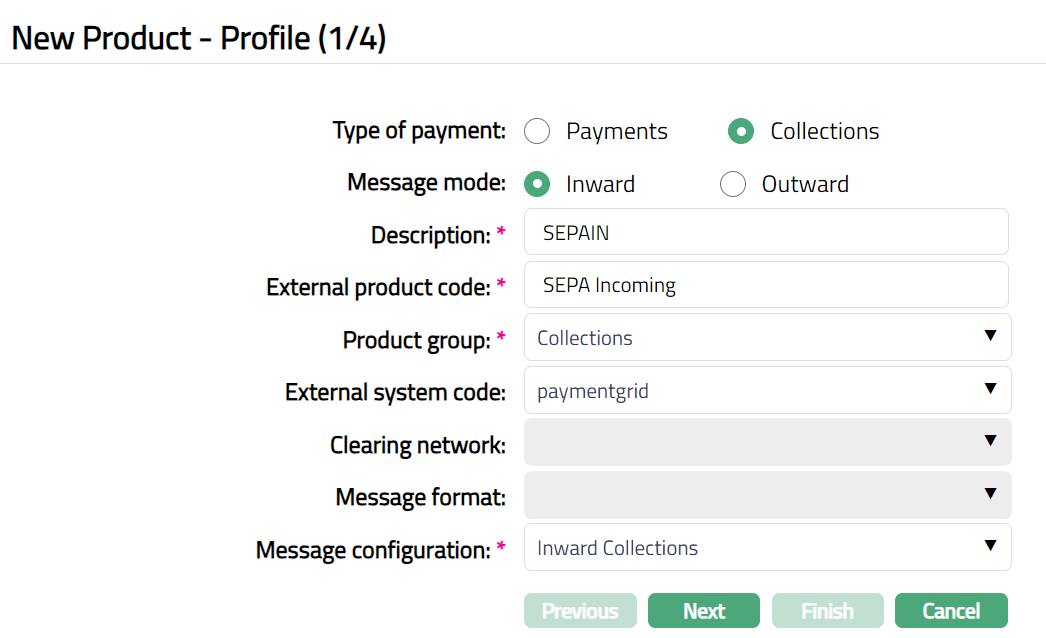
Collections - Inward
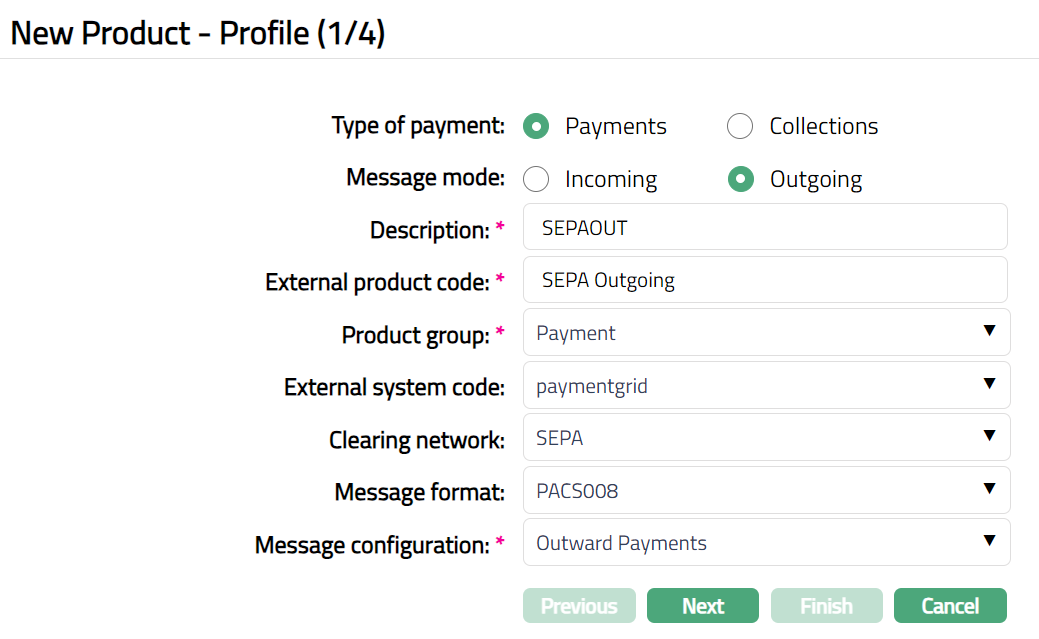
Payments -- Outgoing
Payments - Incoming
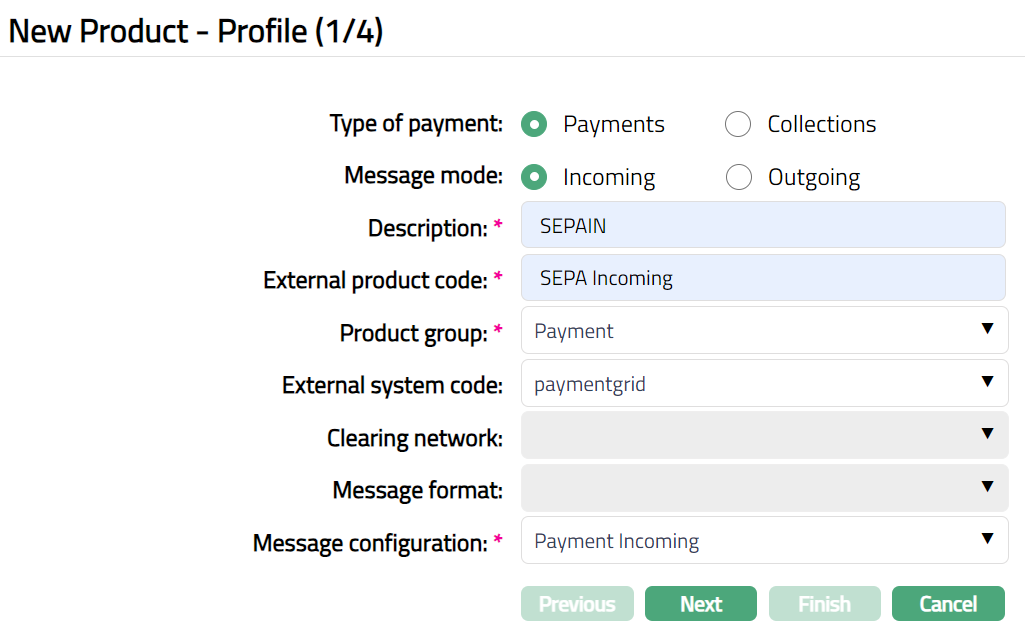
Select Type of payment. Payments or Collections. By default, payments are chosen
Select Message mode. The options are Incoming, Outgoing, Inward and Outward. Based on the Type of Payment selected above; options for Message mode will change. If Type of Payment is chosen as Payments, then Message mode will display Incoming and Outgoing options. If Type of Payment is chosen as Collections, then Message mode will display Inward and Outward options.
Enter Description for the product.
Enter External product code. It is the product code maintained in the external system. PaymentGrid allows up to 120 alphanumeric characters.
Select Product group from the drop-down list. The pre-shipped options are:
Loan Repayment
Payments
Collection
Others
Based on the option chosen in Product group, the appropriate services will be invoked in the core system.
Select External system code from the drop-down list of active External System Codes maintained under Admin > System codes > Interface definition > Maintain. External system code is the code of the external Core Bank.
Select Clearing network from the drop-down list. The pre- shipped options are based on the Entity country. For example, if Entity country is Sweden, options are SWIFT, SEPA, TARGET2, GIRO and DCL etc. The field will be enabled only if Message Mode is selected as Outgoing.
Select Message format from the available drop-down list. The pre-shipped values depend on the clearing network chosen above:
| Clearing Network | Message Format Options |
|---|---|
| SWIFT / TARGET2 | MT103PLUS, MT200, MT103 and MT202 |
| SEPA | PACS008, PACS003 |
The field will be enabled if Message Mode is Outgoing and if Clearing network is not blank.
Select Message configuration from the list of active Message configurations maintained under PaymentGrid > Settings > Message configuration. PaymentGrid will display the values for Message configurations based on the selection of Type of payment, Message mode and Clearing network.
Click Next. New Product -- Process Settings (2/4) page appears.
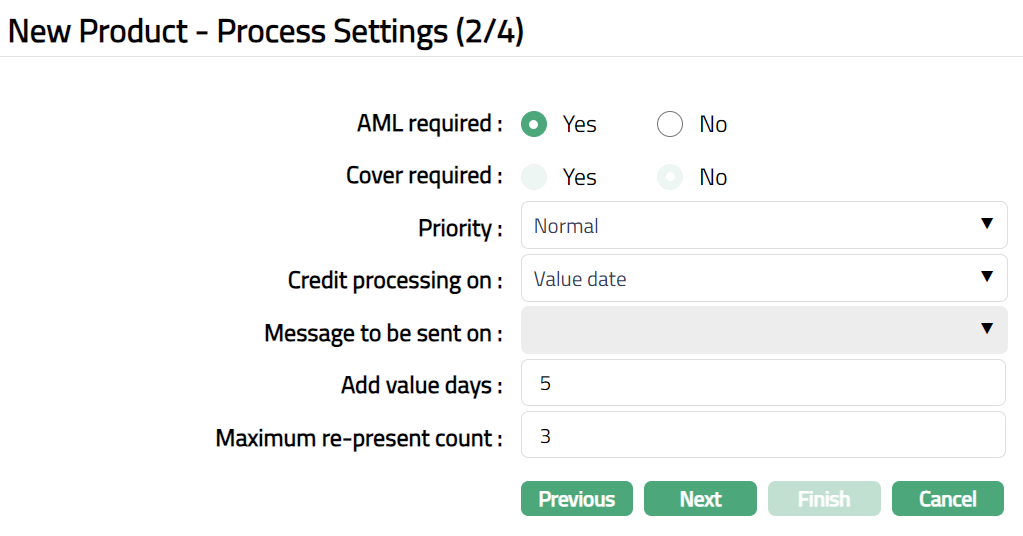
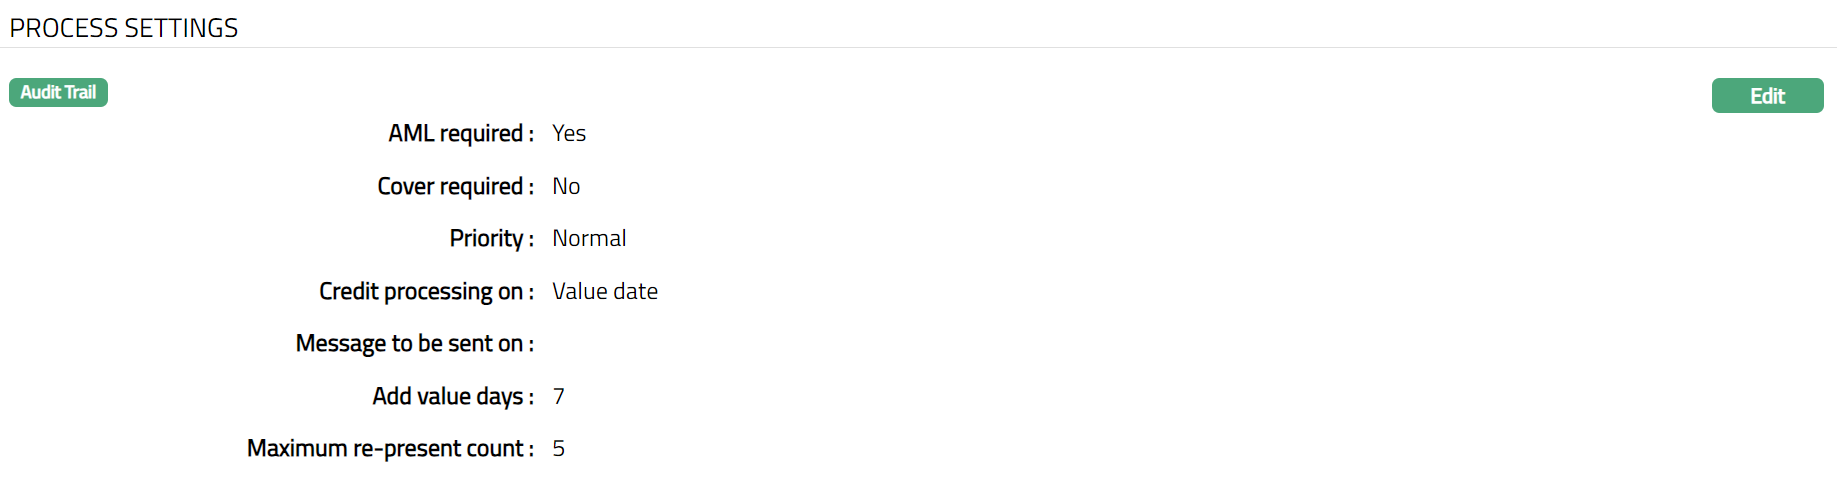
Specify if AML check is required during the processing by selecting Yes or No. If Yes is chosen, then AML (Anti Money Laundering) check will be done and if No is chosen, then AML check will not be done. By default, No is chosen.
Select if Cover is required for the message. If Yes is chosen, then the Cover message (it is MT202COV -- required, when bank does not have direct relationship with a bank) is required and if No is chosen, then the Cover message is not required. By default, No is chosen. The field will be enabled only if the Clearing network is SWIFT or TARGET2 and Message mode is Outgoing.
Select Priority from the drop-down list. The pre-shipped options are System, Normal, and Urgent.
If System option is chosen
SWIFT/TARGET2 -- The message priority tag in Block 2 will display as S.
If Normal option is chosen,
SWIFT/TAREGET2 -- The message priority tag in Block 2 will display as N.
SEPA -- The Instruction priority tag will display NORM (SEPA network will have Priority only as Normal).
If Urgent option is chosen,
SWIFT/TAREGET2 message priority tag in Block 2 will display as U.
The field will be enabled only if Message Mode is Outgoing and can be maintained for SWIFT, TARGET2, SEPA networks.
- Specify whether Credit processing will be on the Payment due date or the Value date. Credit Processing On field specifies on which date the account will be credited. The Pre-shipped options are as follows:
Payment due date: It specifies the date on which the payment is due.
Value date: It specifies the date when the transaction actually takes place.
The field will be enabled only if Message mode is Incoming.
Specify whether Message for an outgoing payment is to be sent either on Payment due date or on Value date. Select the appropriate from the pre-shipped options: Payment date and Value date. The field will be enabled only if Message mode is Outgoing.
If you want to add a payment day, then enter the additional number of days in Add payment day field.
For example:
Suppose the value date = 18-April-2014
Add Payment days = 2.
The account is debited on 18-April-2014 but the credit will happen on 20-April-2014 (18-April-2014 + 2= 20-April-2014).
If Value date=18-April-2014
Add payment day=0,
Account will be debited on 18-April-2014 and also will be credited on 18-April-2014.
If no additional payment days are given, then AURA will by default credit the account on value date i.e., 18-April-2014.
The field will be enabled only if Message mode is Incoming and Payment date option is chosen in Credit Processing On field. It can accept value only from 0 to 99.
Enter Maximum re-present count. It is the maximum re-present count allowed for Aura to re-present the instrument. On re-presentment, Aura will follow the normal outward collection process. This field will be enabled only when Type of Payment is Collections and Message Mode is Outward.
Click Next. New Product -- Authorisation Settings (3/4) page appears.
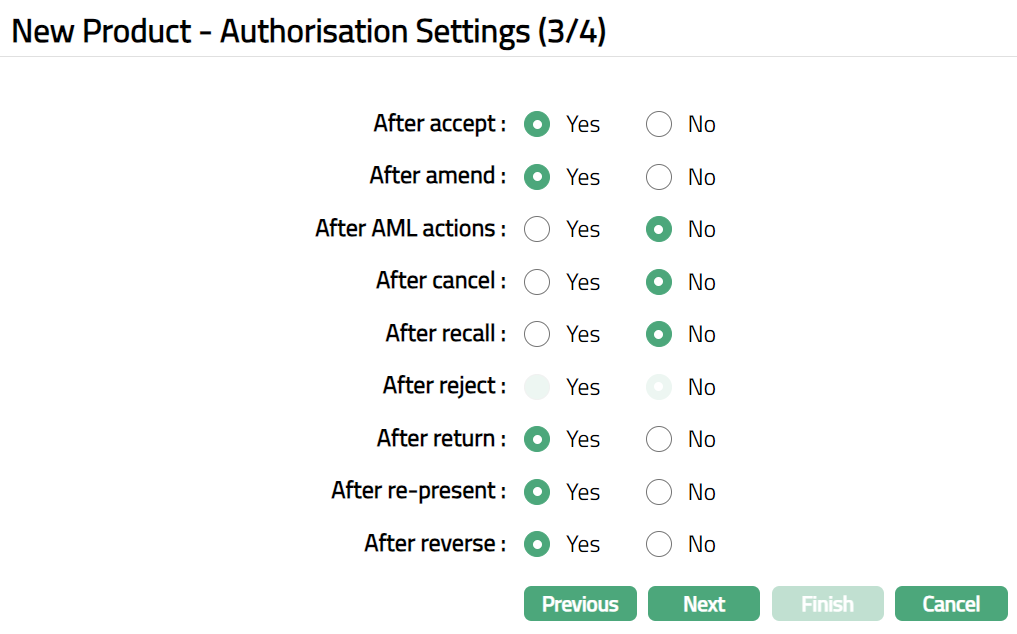
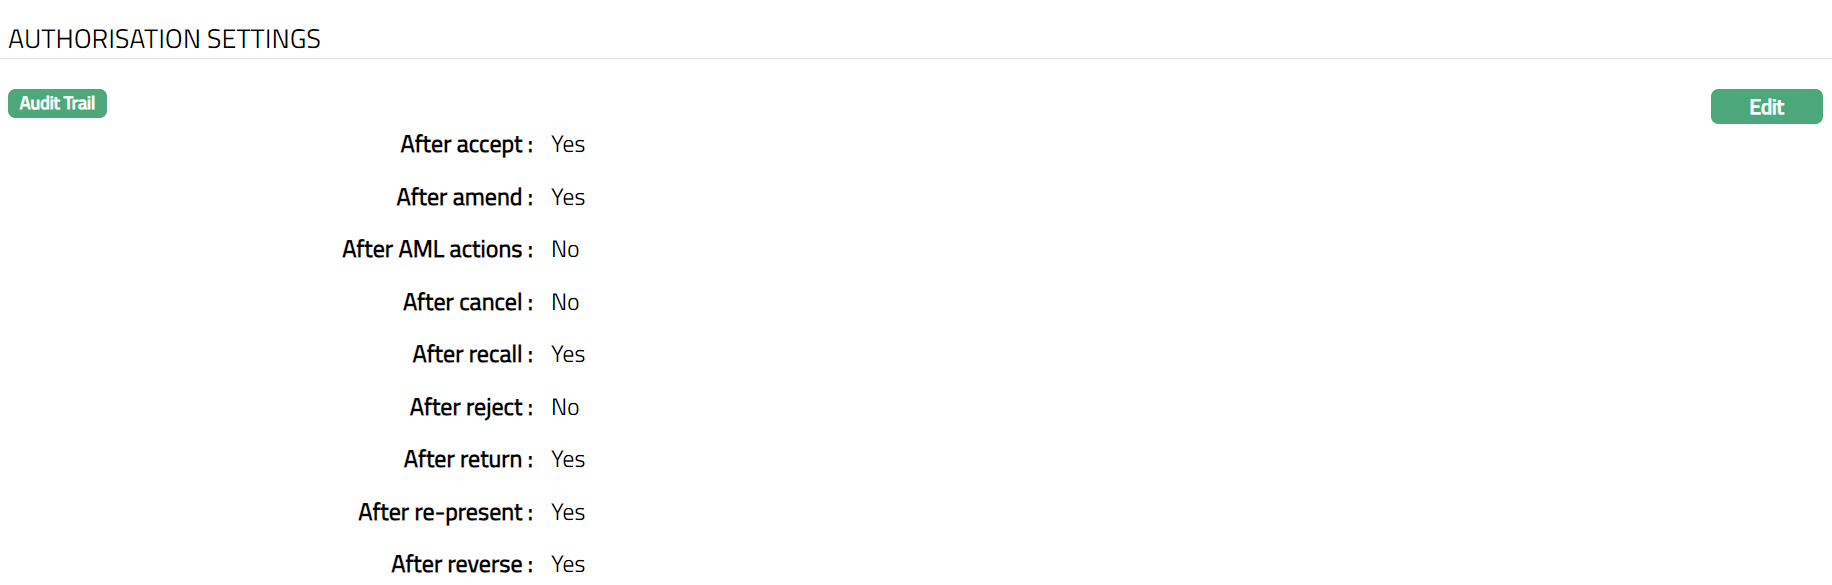
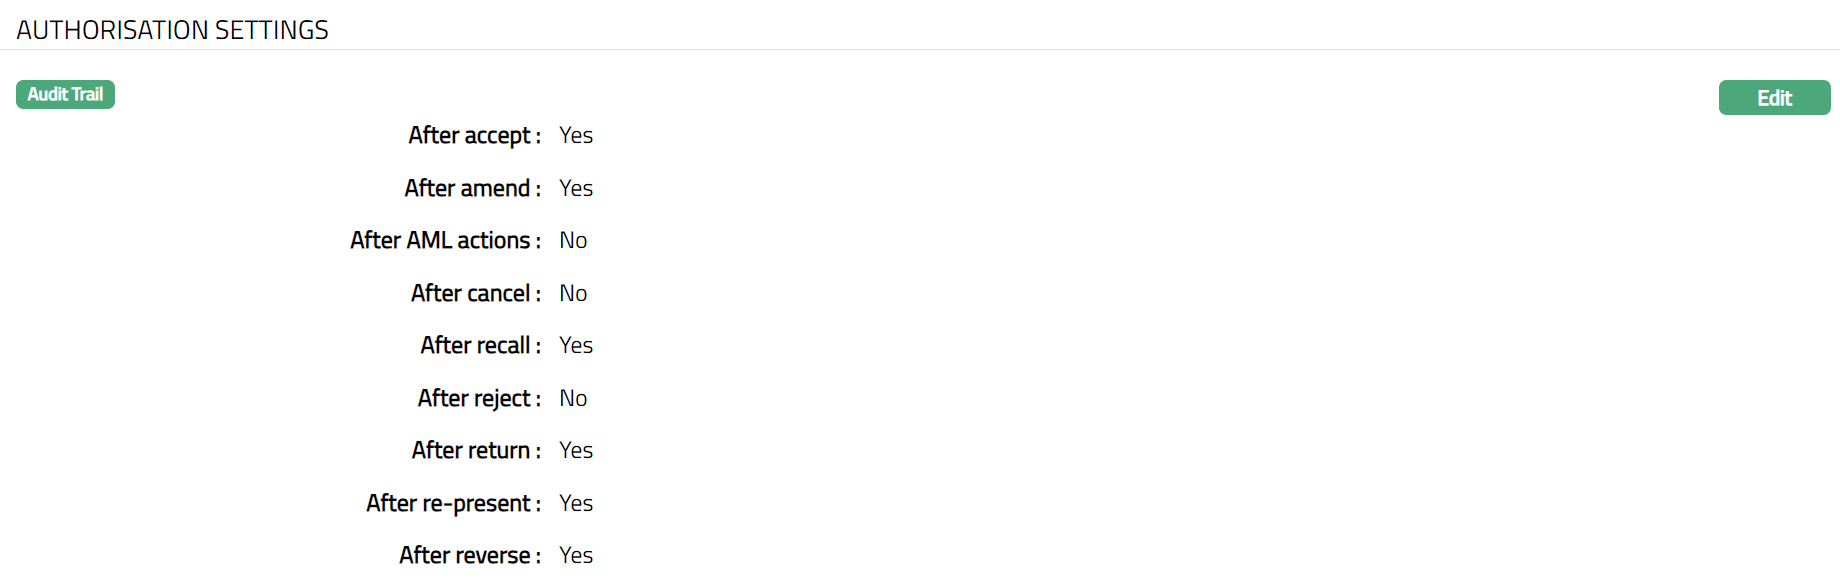
Select Yes or No to specify if an authorisation is required **After accept. **If Yes is chosen, then after the accept event occurs; AURA will wait for authorisation. If No is chosen, then it is assumed as auto authorisation and AURA will move to the next event. By default, No is selected.
Select Yes or No to specify if an authorisation is required After amend. If Yes is chosen, then after the amend event occurs, AURA will wait for authorisation. If No is chosen, then it is assumed as auto authorisation and AURA will move to the next event. By default, No is selected.
Select Yes or No to specify if an authorisation is required After AML actions. If Yes is chosen, then after the AML actions event occurs; AURA will wait for authorisation. If No is chosen, then it is assumed as auto authorisation and AURA will move to the next event. By default, No is selected.
Select Yes or No to specify if an authorization is required After cancel. If Yes is chosen, then after the cancel event occurs, AURA will wait for authorisation. If No is chosen, then it is assumed as auto authorisation and AURA will move to the next event. By default, No is selected.
Select Yes or No to specify if an authorization is required After recall. If Yes is chosen, then after the recall event occurs, AURA will wait for authorisation. If No is chosen, then it is assumed as auto authorisation and AURA will move to the next event. By default, No is selected.
Select Yes or No to specify if an authorization is required After reject. If Yes is chosen, then after the reject event occurs, AURA will wait for authorisation. If No is chosen, then it is assumed as auto authorisation and AURA will move to the next event. By default, No is selected. The field will be enabled only if the Message Mode is Incoming.
Select Yes or No to specify if an authorization is required After return. If Yes is chosen, then after the return event occurs, AURA will wait for authorisation. If No is chosen, then it is assumed as auto authorisation and AURA will move to the next event. By default, No is selected.
Select Yes or No to specify if an authorization is required After re-present. If Yes is chosen, then after the re-present event occurs, AURA will wait for authorisation. If No is chosen, then it is assumed as auto authorisation and AURA will move to the next event. By default, No is selected.
Select Yes or No to specify if an authorization is required After reverse. If Yes is chosen, then after the reverse event occurs, AURA will wait for authorisation. If No is chosen, then it is assumed as auto authorisation and AURA will move to the next event. By default, No is selected.
Click Next. New Product -- Confirmation (4/4) page appears.
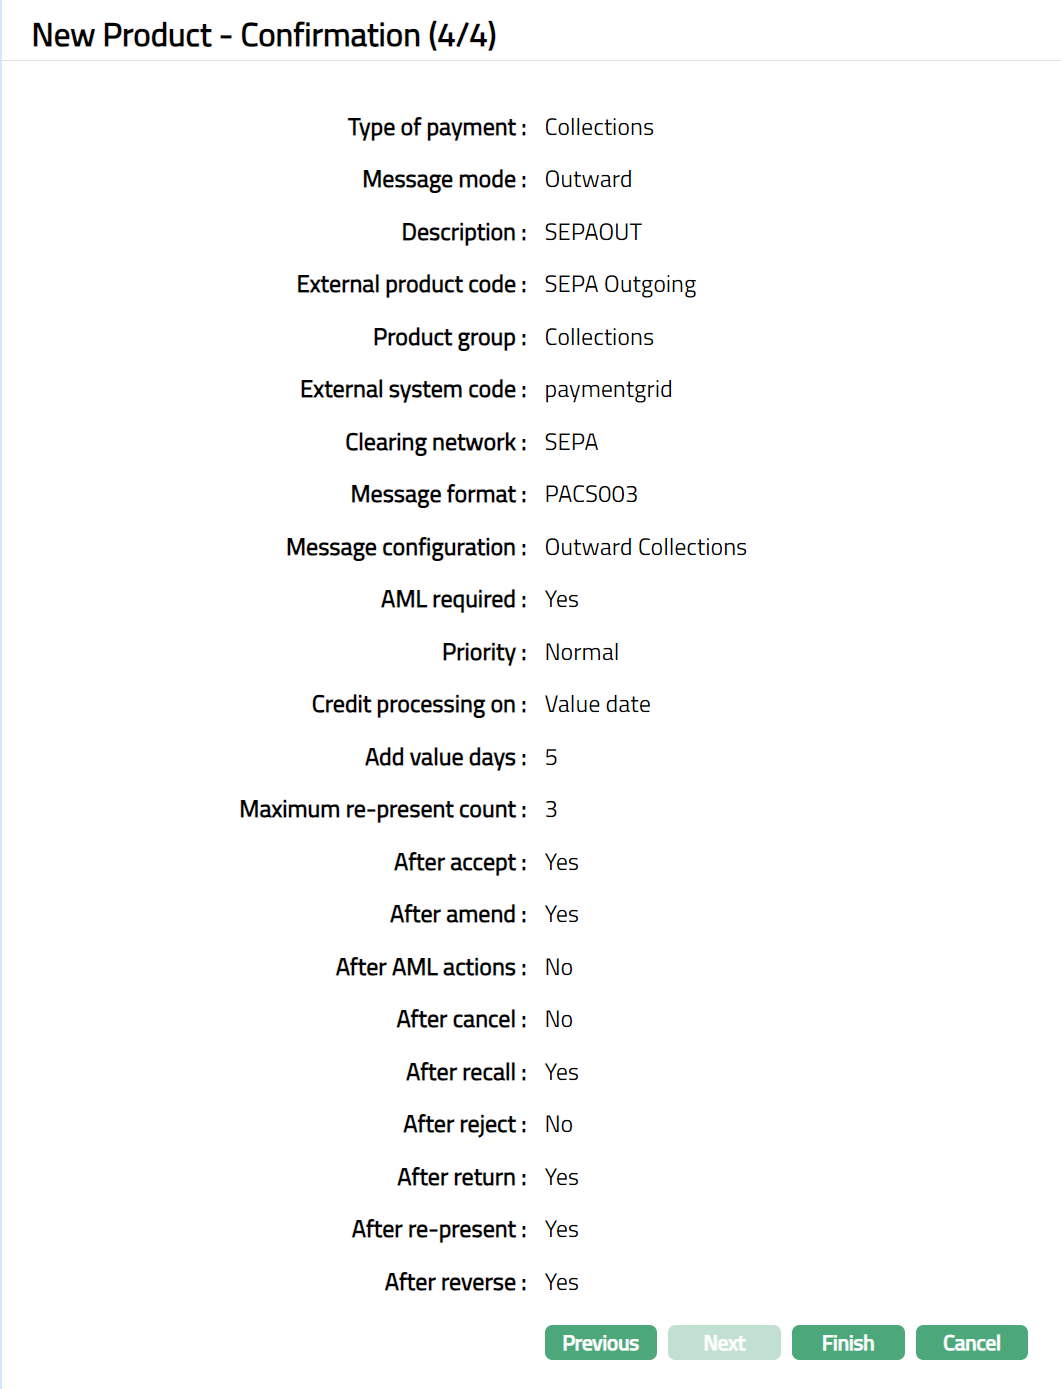
- Click Finish. Product page appears displaying the Profile tab by default. New Product is created. Status of the record will display as Active.
Functions: Add, Search, Suspend, Activate.
Suspend: You can suspend a Product by clicking on Suspend button. When you click on Suspend button, AURA will ask for confirmation. On confirmation AURA will suspend the Product and Activate button will appear in place of the Suspend button. Suspending a product only makes it unavailable in future for any other dropdown list. Suspended products can be activated by using Activate button.
Activate: If you want to activate a suspended Product then click on Activate button. AURA will ask for confirmation. On confirmation AURA will Activate the Product and Suspend button will appear in place of Activate button.
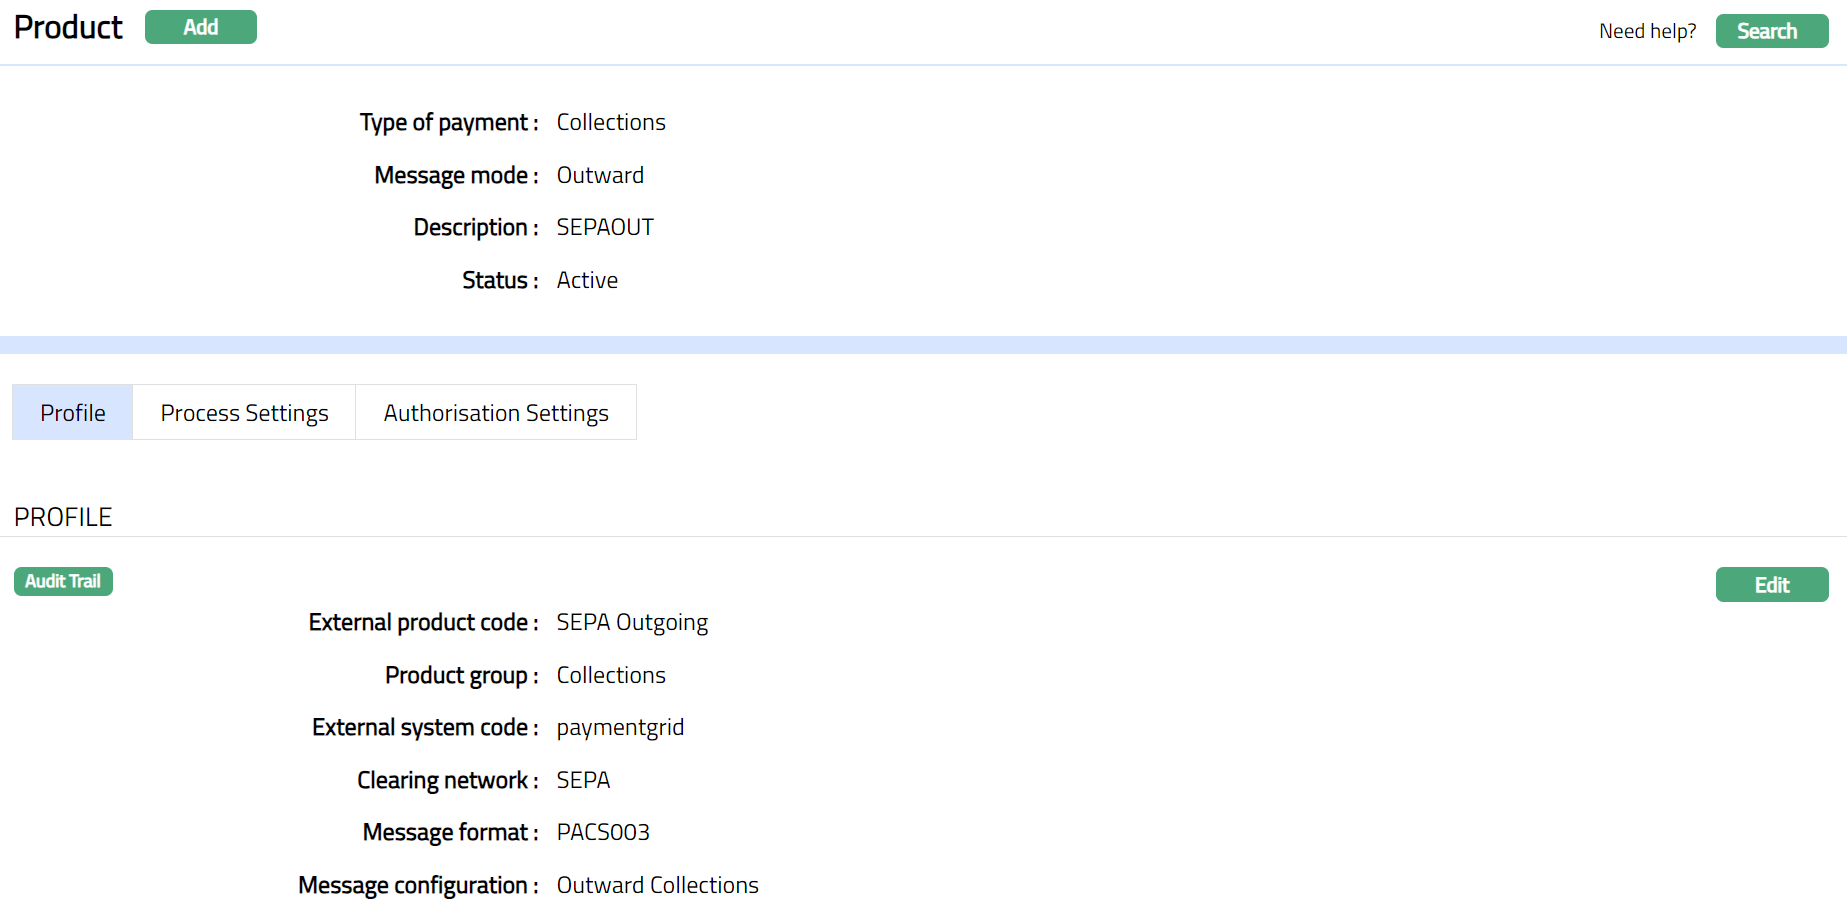
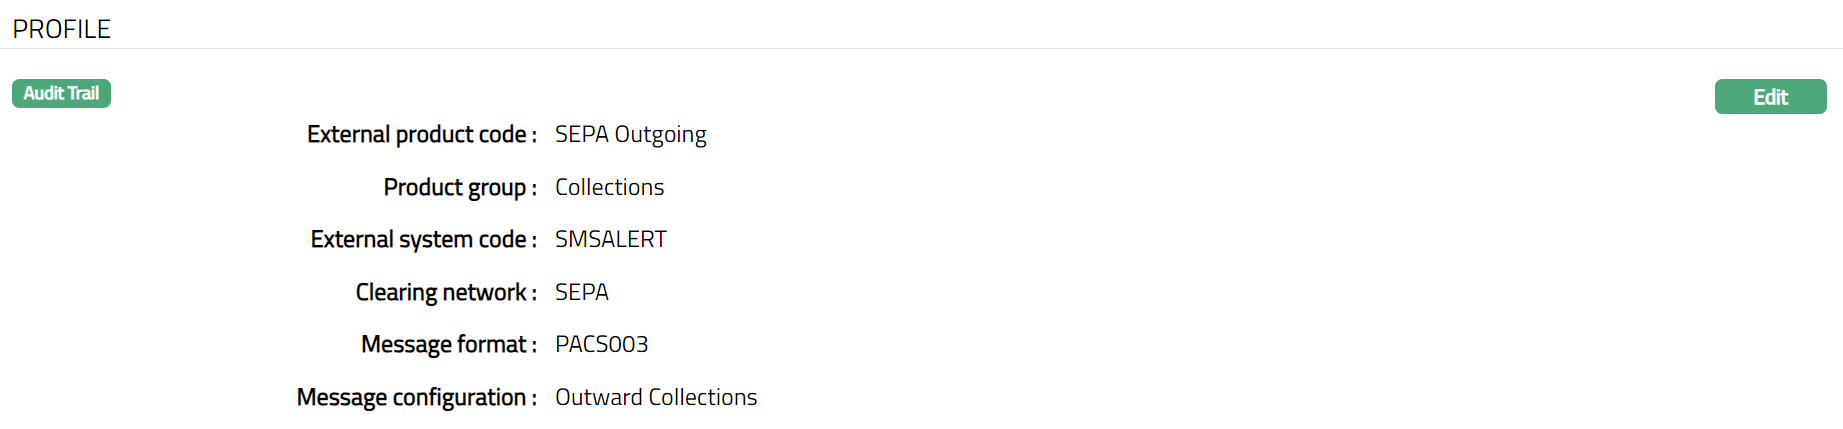
Profile
Profile tab, which is the default tab in the Product screen, shows the basic details of the Product created.
To view / edit Profile.
- Access Product page and click Profile tab to view the details as per sample below. The details are defaulted from the entries that you made during creation of a new Product. For details refer to New Product -- Profile (1/4) page.

- Click Edit. Edit - Profile page appears.
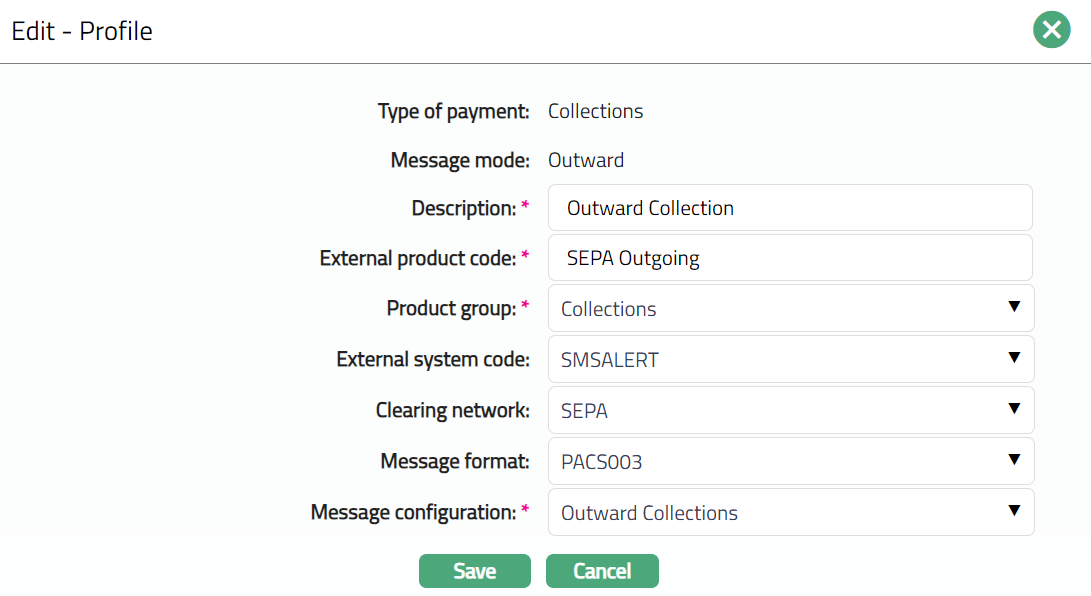
Note: Except Type of payment and Message mode, rest all other fields are editable.
- Click Save. Profile tab appears with the edited details. Once edited, Product settings will change but will not impact those transactions that are already processed using the Product. The updated Product will be applicable only to the new transaction that comes in.
Functions: Edit
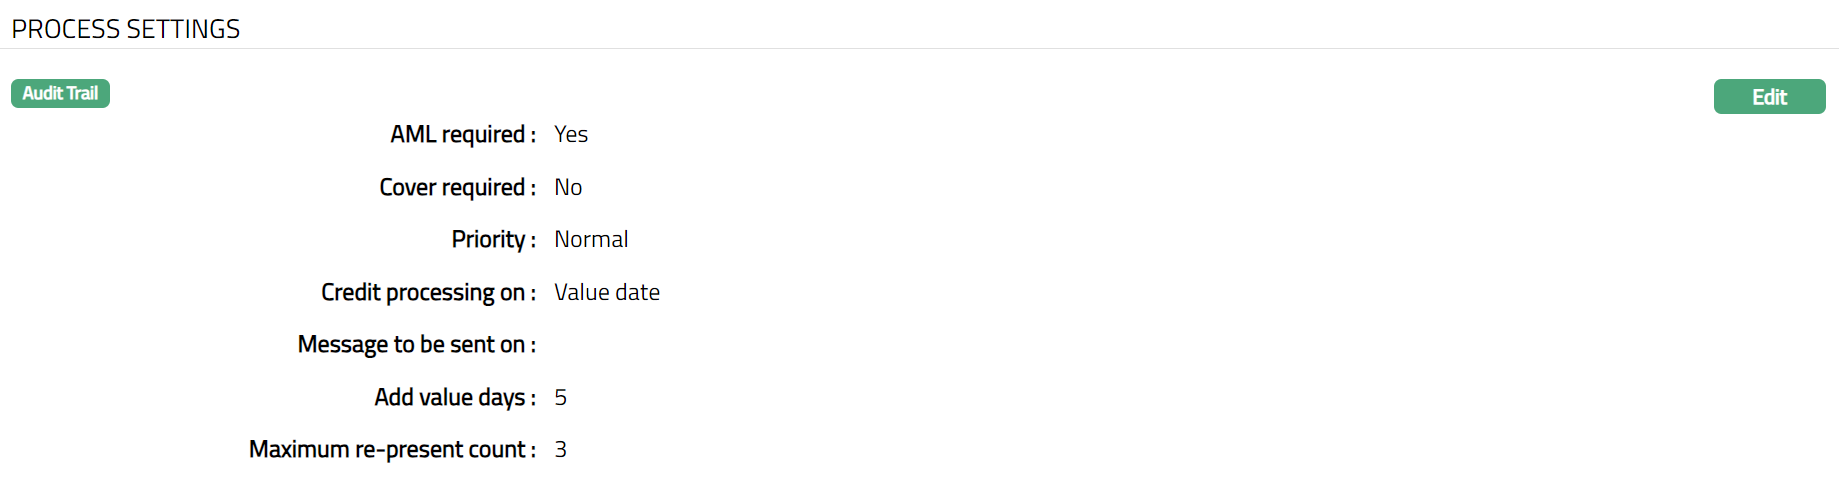
Process Settings
This tab allows you to maintain the settings of the Process for the Product.
- Access Product page and click Process Settings tab to view the details as per sample below. The details are defaulted from the entries that you made during creation of a new product. For details refer to New Product -- Process Settings (2/4) page.
- Click **Edit. Edit -- Process Settings **page appears.
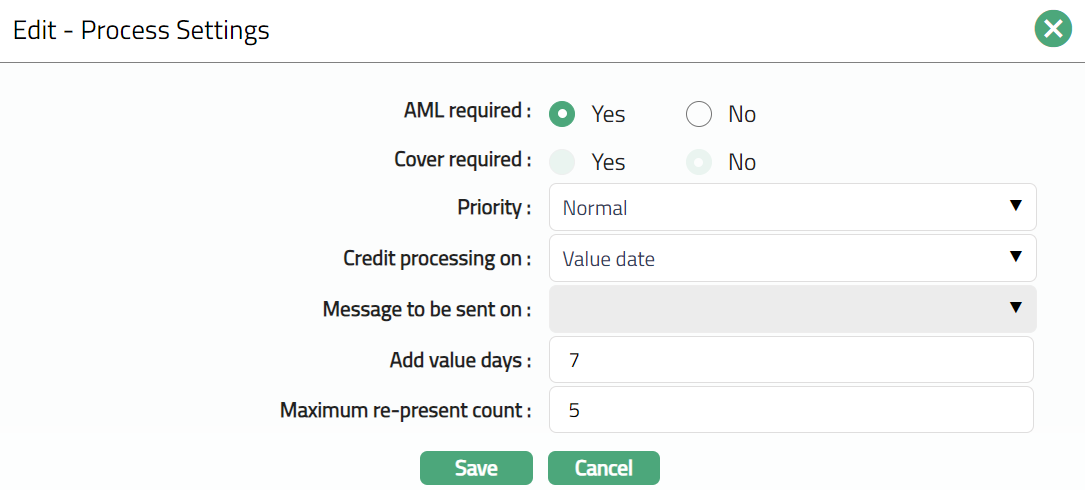
Note: All fields are editable depending on the Clearing Network and Message Mode as described in the Process settings 2/4 section.
- Click Save. Process Settings tab appears with the edited details.
Functions: Edit
Authorisation Settings
This tab allows you to maintain authorisation settings for the Product.
- Access Product page and click Authorisation Settings tab to view the details as per sample below. The details are defaulted from the entries that you made during creation of a new product. For details refer to New Product -- Authorisation Settings (3/4).
- Click Edit. Edit -- Authorisation Settings page appears.

Note: Except After reject field, rest all other fields are editable. The field will be editable only if the Message Mode is Incoming.
- Click Save. Authorisation Settings tab appears with the edited details.
Functions: Edit