Loan Application
The Loan Application menu allows you to capture and process loan requests for individuals and organisations.
Using this menu, you can maintain applicant, loan, offer, credit evaluation, and payment details required for loan processing. Once the Loan Application is approved and all required validations are completed, Aura allows you to create the Loan Account using the latest approved Offer details.
Following are the tabs in Loan Application:
Creating a Loan Application
To create a new Loan Application,
1. From the Retail menu, click Loans, then Loan Application and then Maintain. Loan Application page appears. All applications available in Aura appear on the page.

2. Click Add. The New Loan Application → Select Type page appears.

3. Select Type:
- Personal - If the Application is for individual customers/applicants.
- Organisation - If the Application is for a Company/Organisation
By default, Personal is selected. You can change this as required. Your selection determines the fields and steps shown in the rest of the application.
4. Origin Branch - This shows the branch where the loan application is created. It is automatically populated based on your logged-in branch.
5. Click Next. New Loan Application → Applicant (1/5) page appears.
For both Personal and Organisation applications, you can choose to create a new record or select an existing one.
If Personal Applicant is selected:
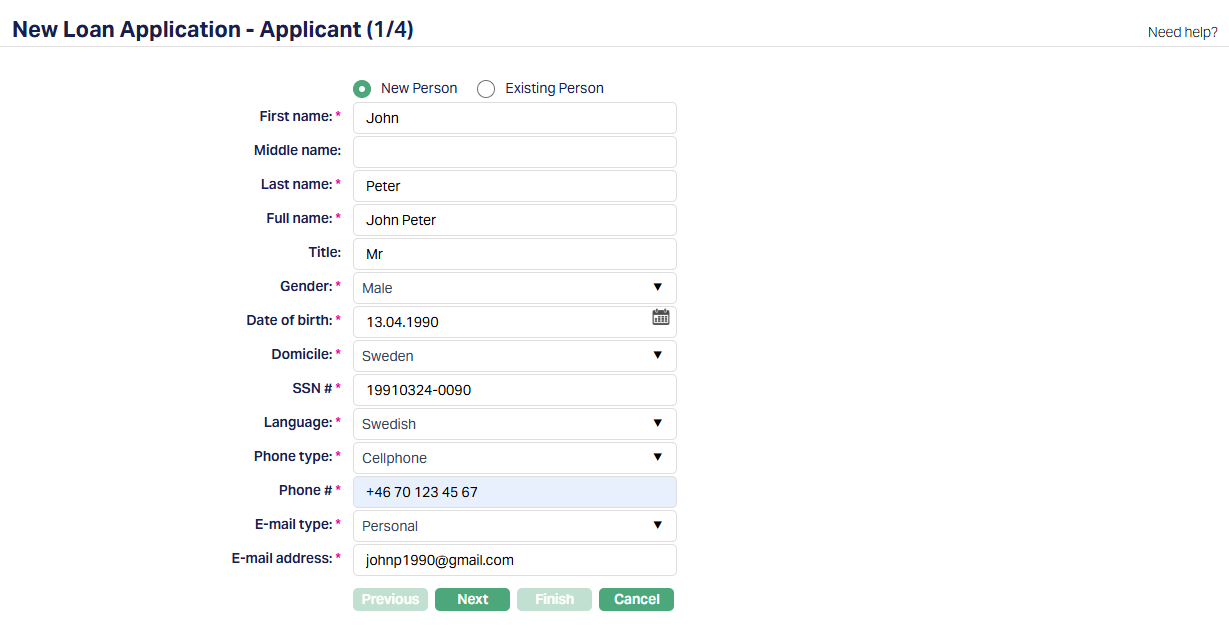
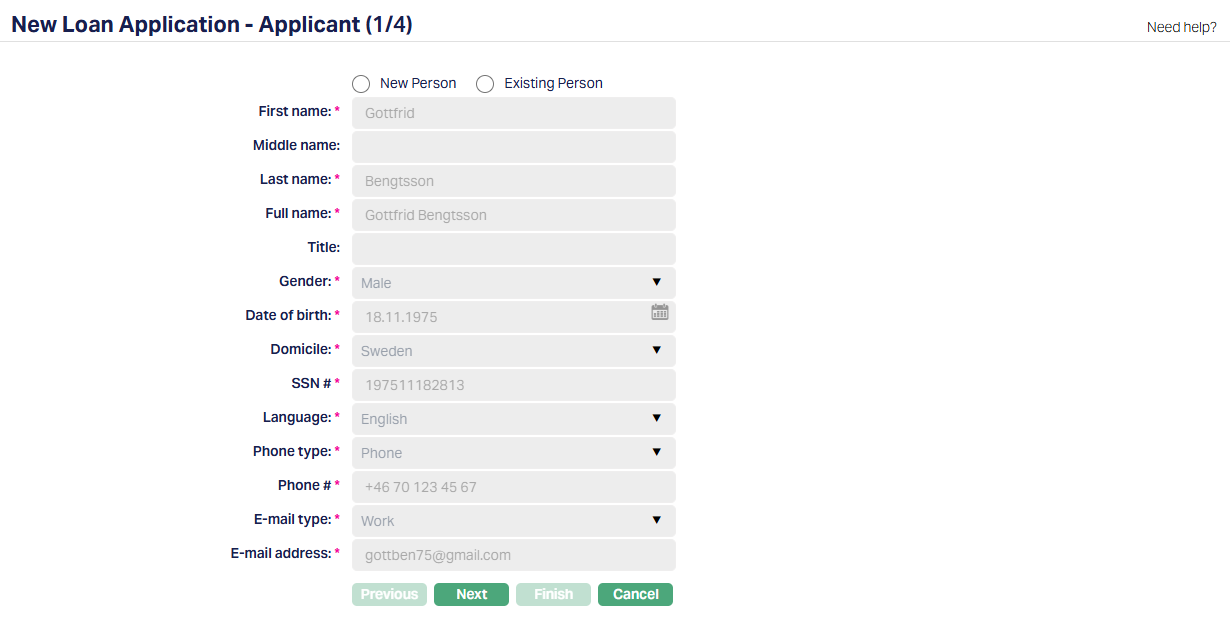
6. By default, New Person is selected. If you want to add the details of a New Person, then select this option. Once you select Existing Person, the Person Search screen appears. Select the person and the details will be defaulted. Sample screenshots shown below when you select Existing Person.

7. Enter the First Name of the person.
8. Enter the Middle Name of the person (If applicable).
9. Enter the Last Name of the person.
10. On entering the First Name and Last Name, the system derives the Full Name of the person. You can modify it if required.
11. Enter Title of the person that is to be prefixed to the person's name.
12. Select Gender of the person from the drop-down list.
13. Input Date of birth of the person. You can either enter the date manually or select using the calendar. Aura will validate the date format using the format maintained under Entity maintenance → Regional → Date format.
14. Select Domicile of the person i.e., country of residence from the drop-down list. The list of countries for Citizen and Domicile should be maintained under Admin → System codes → Generic definitions → Countries.
15. Enter SSN#. It is the person's Social Security Number i.e., a unique number provided by the person's residence country. The validation for SSN, if required, may be customized during implementation.
16. Select Language i.e., Language of the person from the available drop-down list maintained under Admin → System codes → Generic definitions → Languages.
17. Select Phone Type from the available drop-down list maintained under Admin → System codes → Address Details → Phone Types.
18. Select E-mail Type from the available drop-down list maintained under Admin → System codes → Address Details → E-mail Types.
19. Enter E-mail Address for the person.
20. Click Next. The New Loan Application → Loan Details (2/5) page appears.
If Organisation Applicant is selected:
21. By default, New Organisation is selected. If you want to add the details of a New Organisation, then select this option. Once you select an Existing Organisation, the Organisation Search screen appears. Select the Organisation and the details will be defaulted. Sample screenshots shown below when you select Existing Organisation.

22. Enter the Organisation name.
23. Select Type of the organisation from the available drop-down list of Organisation type maintained under Admin → System codes → Generic definitions → Organisation type.
24. Select Corporate Registration Country from the available drop-down list of countries maintained under Admin → System codes → Generic definitions → Countries.
25. Select Jurisdiction in which the organisation works from the available drop-down list of countries maintained under Admin → System codes → Generic definitions → Countries.
26. Enter Registration # of the Organisation.
27. Select Tax country of the Organisation from the available drop-down list of countries maintained under Admin → System codes → Generic definitions → Countries.
28. Enter Organisation Tax # in the Tax country.
29. Select Domicile of the Organisation from the available drop-down list of the countries maintained under Admin → System codes → Generic definitions → Countries.
30. Select Default currency of the Organisation from the available drop-down list of active currencies maintained under Admin → System codes → Currencies → Currencies.
31. Select Language for correspondence from the available drop-down list of languages maintained under Admin → System codes → Generic definitions → Languages.
32. Enter website URL for the Home page of the Organisation.
33. Select Phone type from the available drop-down list maintained under Admin → System codes → Address details → Phone types.
34. Select E-mail Type from the available drop-down list maintained under Admin → System codes → Address Details → E-mail Types.
35. Enter E-mail Address for the organisation.
36. Click Next. The New Loan Application → Loan Details (2/5) page appears.
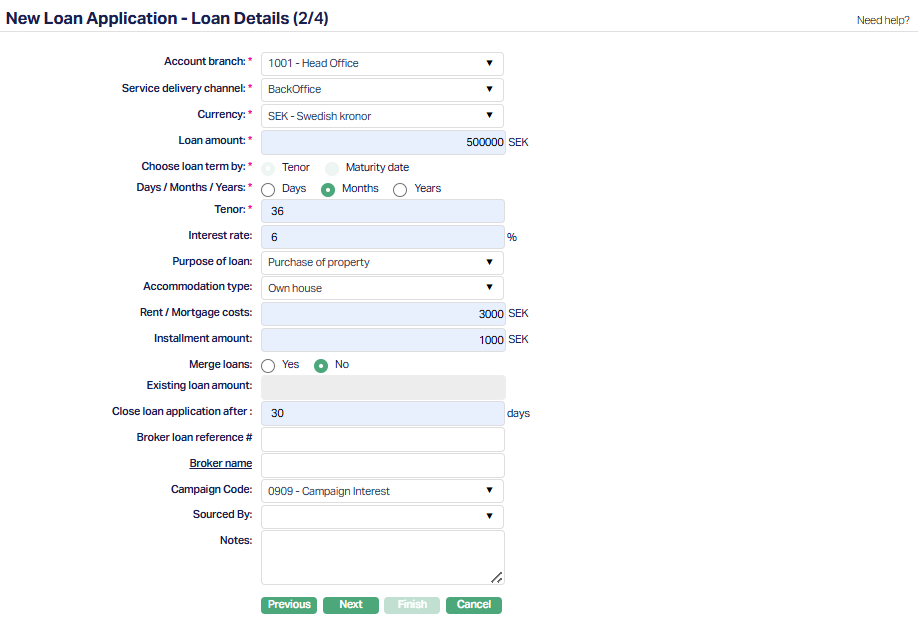
37. Select Account Branch from the drop-down list. This displays all active branches. By default, the logged-in user's branch is selected.
38. Select Service delivery channel from the drop-down list of Service Delivery Channels that are maintained under Admin → System codes → Categories → Service delivery channel.
39. Select Currency from the drop-down list maintained under Admin → System codes → Currency → Currency. The drop-down list displays all the currencies maintained for the selected product.
40. Enter Loan Amount for the account.
41. Select Tenor or Maturity date radio button to Choose loan term by.
If you want to indicate the loan's term by way of a specific duration / period, choose Tenor.
If you want to indicate the loan's term by way of a specific maturity date, choose Maturity date.
42. Select Days / Months / Years depends on what was selected for Choose Loan Term By.
43. If you have selected Tenor, this field will be enabled, and you can select the appropriate radio button to specify the loan term in Days / Months / Years. Enter the Tenor.
44. If you had selected Maturity date, this field is disabled and is automatically defaulted to Days.
45. Enter Interest Rate for the account to specify the interest rate for the Loan amount.
46. Select Purpose of Loan from the drop-down list.
47. Select Accommodation Type from the drop-down list.
48. Enter Rent/Mortgage costs of the property.
49. Enter Installment Amount for the loan.
50. Select Merge Loans. By default, No is selected. Select Yes if you want to merge an existing loan.
51. Enter the loan amount for an Existing loan. This field becomes enabled when you select the Yes button under Merge Loans. If No is selected, the field remains disabled.
52. Enter Close Loan Application after in terms of days. If a value is entered, Aura will move the Loan Application status to "Other Reject" after the specified number of days, based on the Loan Application creation date or the latest approved Offer record date, whichever is later.
This change will not occur if the Loan Application is in "Hold" status. If this field is left blank, the Loan Application will remain in the current status.
53. Enter Broker loan reference # if applicable.
54. Click Broker Name hyperlink to select the name of the active Broker if applicable maintained under CRM → Sales → Agent.

55. Select Campaign Code if applicable for this account.
56. Select Sourced by. The name of the individual who has sourced this account.
57. Enter Notes for this account if applicable
58. Click Next. The New Loan Application → Co-applicant details (3/4) page appears.
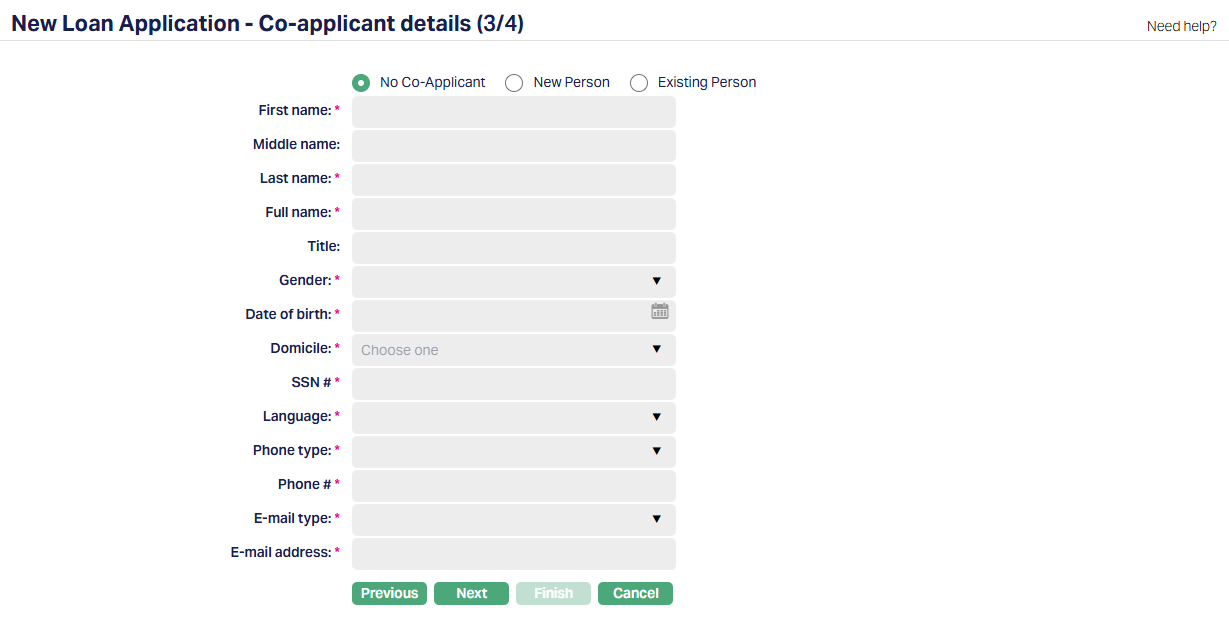
By default, No Co-Applicant is selected. Sample screenshot as shown above. If you do not want to add a co-applicant, keep No Co-Applicant selected and proceed.
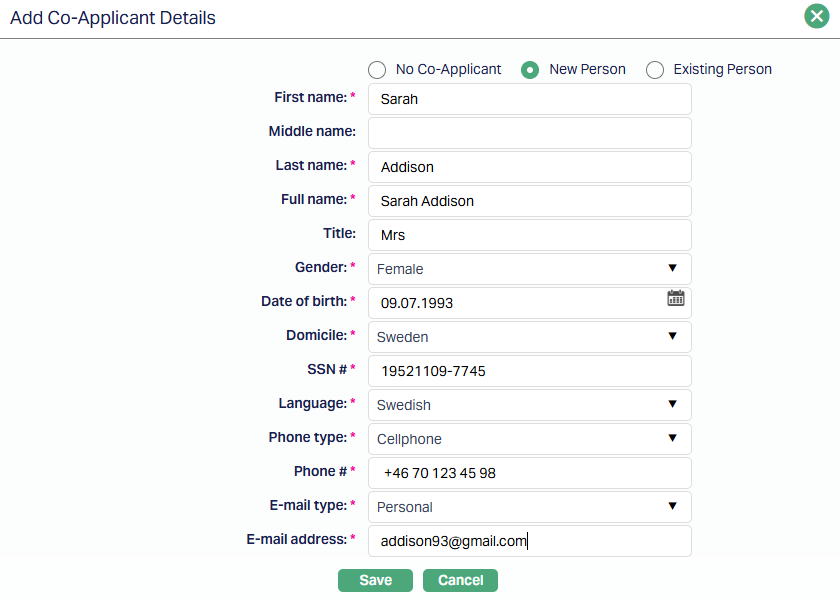
If you select New Person, all fields are enabled and you can enter the Co-Applicant details.
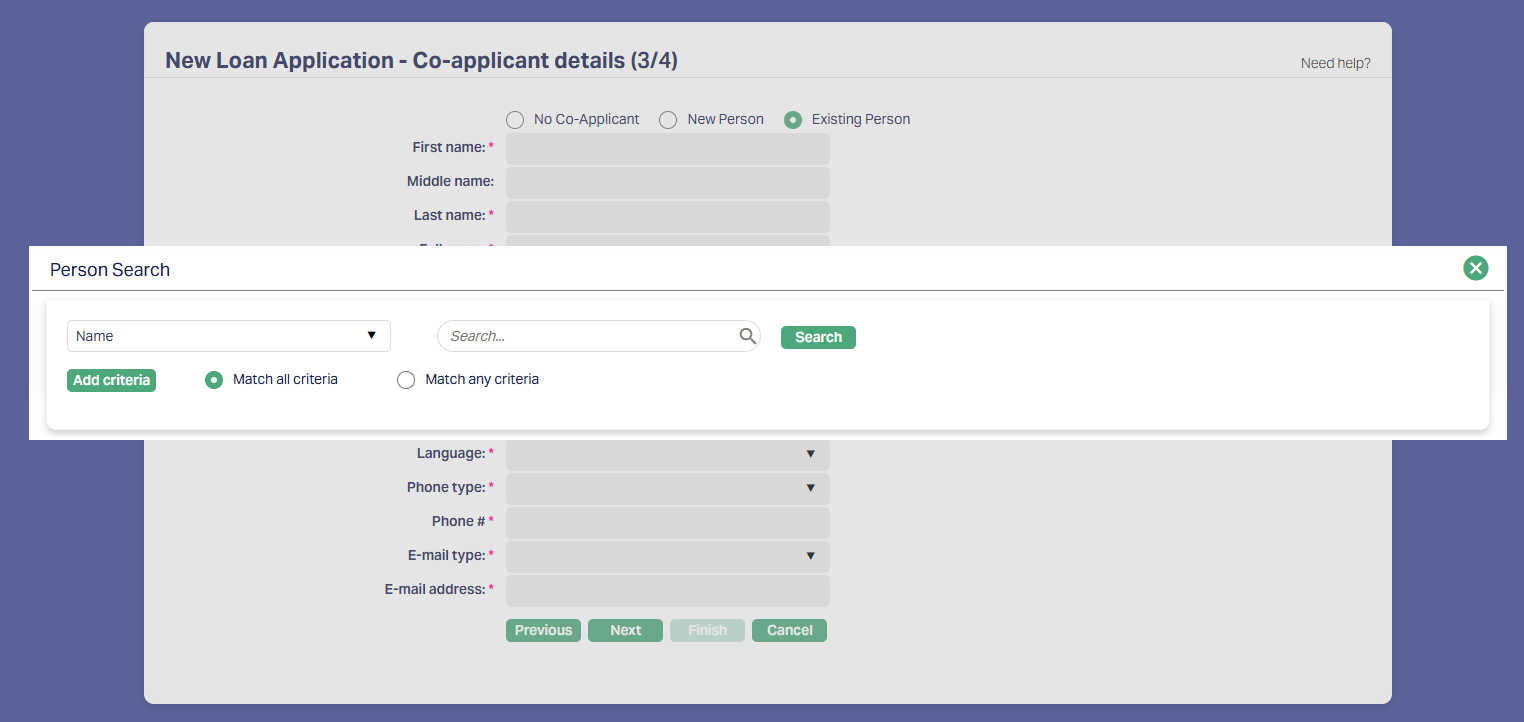
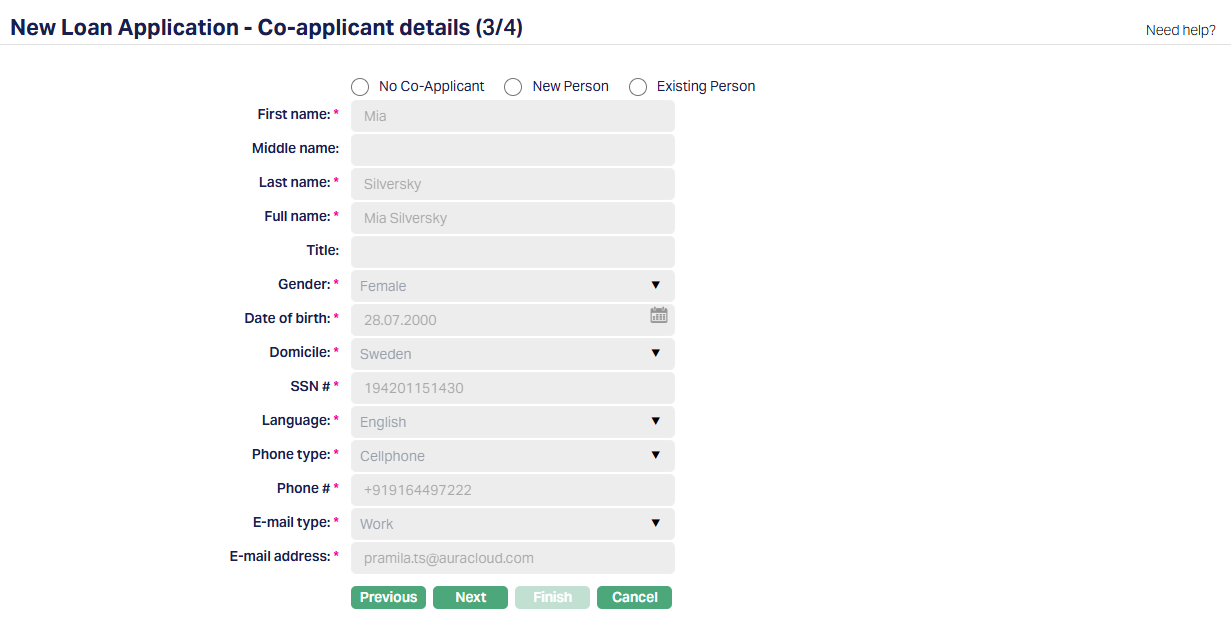
If you select Existing Person, the Person Search page appears. Search and select the required person. The details are automatically populated and the fields become non-editable. Sample screenshots shown below.
59. Click Next. The New Loan Application → Confirmation (4/4) page appears.
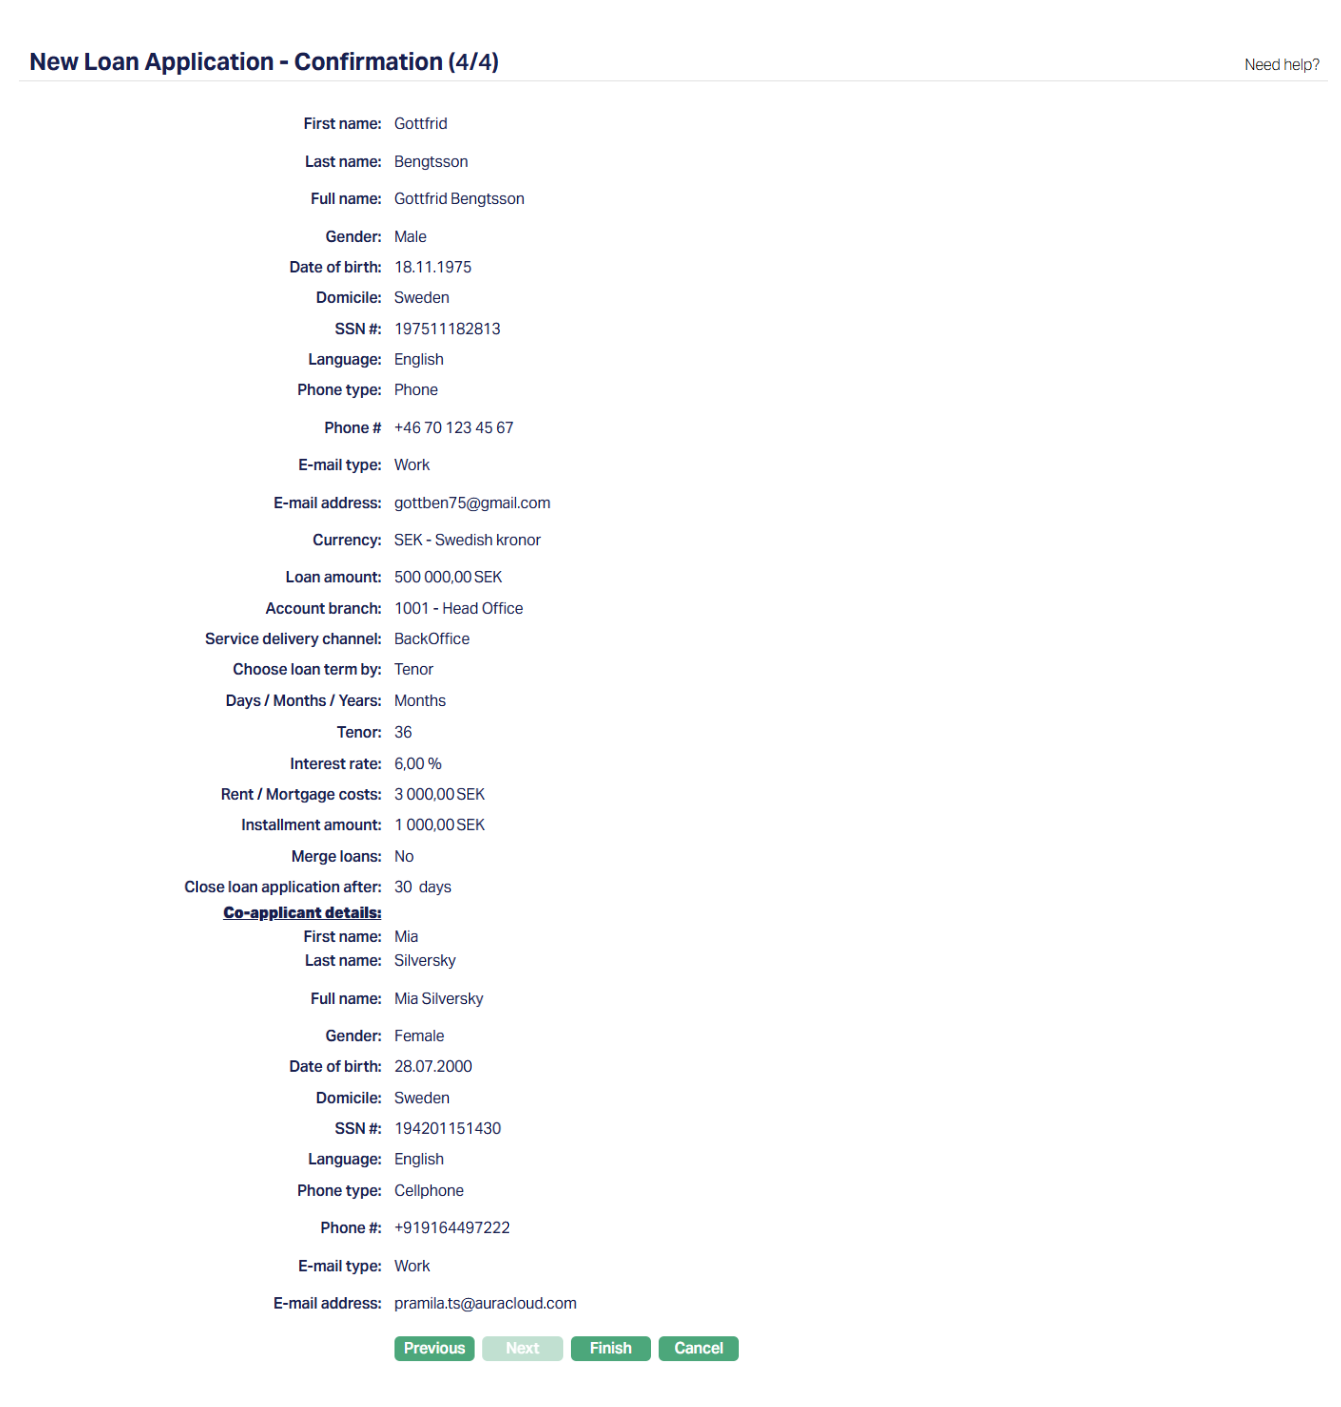
60. Click Finish. The Loan Application is created with a Unique Application #. Aura sets the initial status of the Loan Application as Opened (Approved).
Based on the selected type:
For Organisation: Aura creates the Organisation and associated Person records if they do not already exist, links the Person as Linked Person, and creates Due Diligence records with Pending status.
For Personal: Aura creates the applicant and co-applicant Person records if they do not already exist, and creates Due Diligence records for them.
The Loan Application is then displayed in the Profile tab.
Functions: Add, Search, Edit.
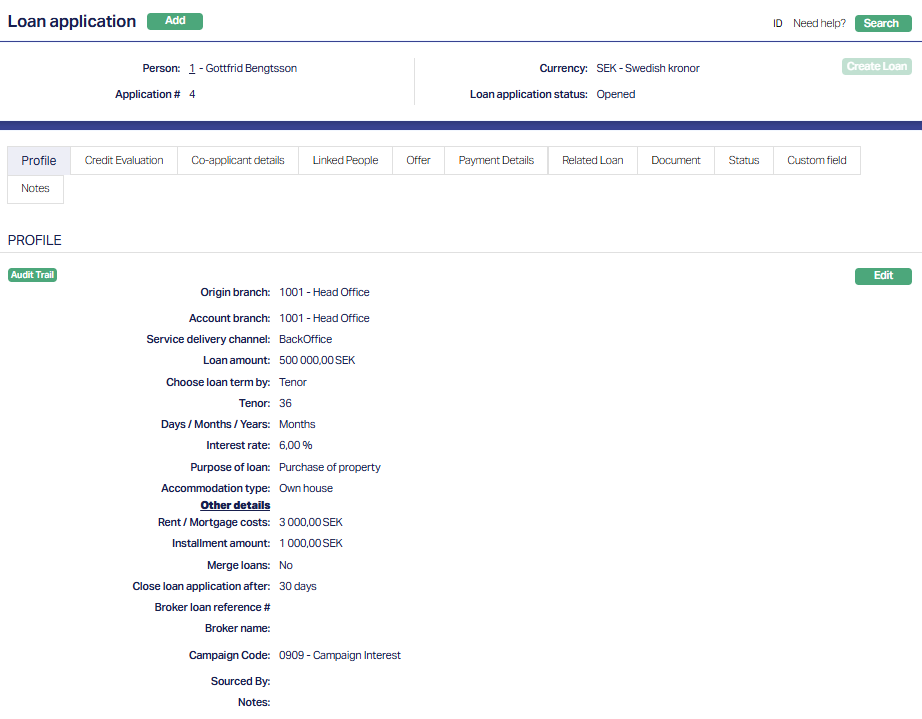
Profile
The Profile tab, which is the default screen in the Loan Application screen, shows the basic details of the Loan Application. For details refer to New Loan Application → Loan Details (2/5).
To view/edit Profile,
1. Access Loan Application page. Then click the Profile tab.
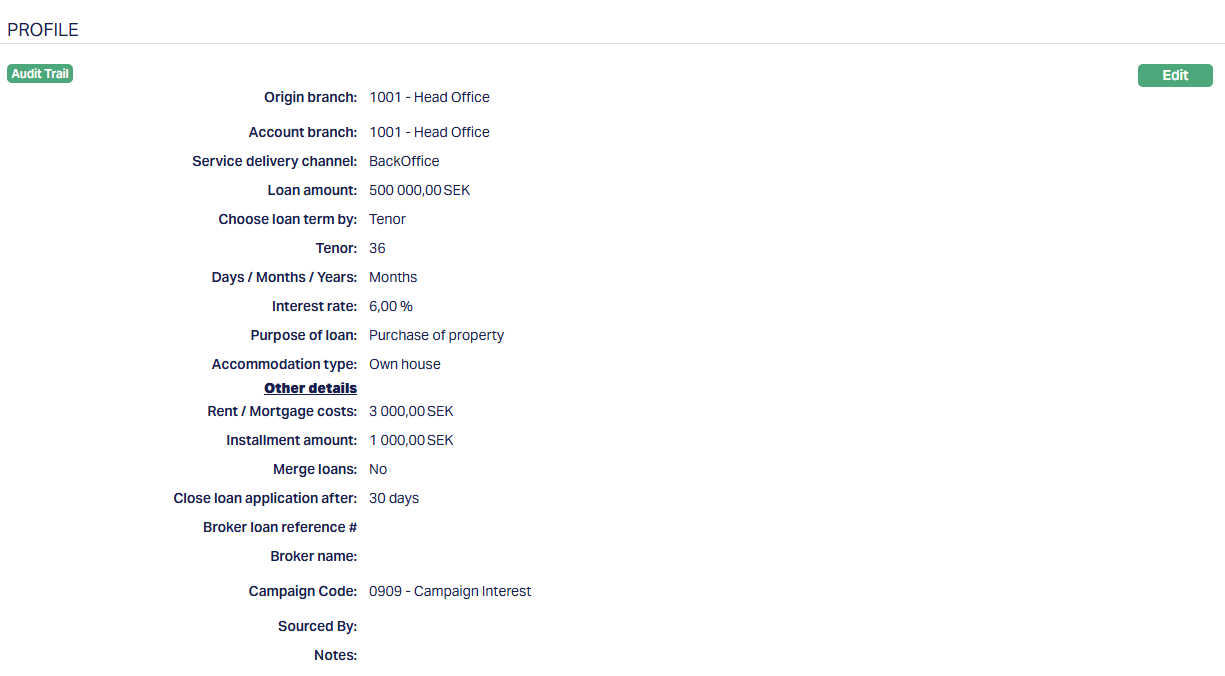
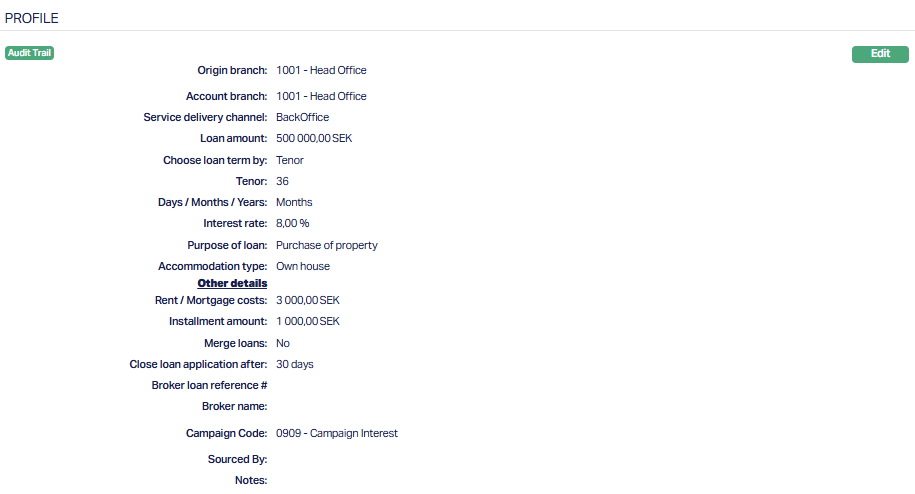
2. Click Edit. The Edit Loan Application profile page appears.
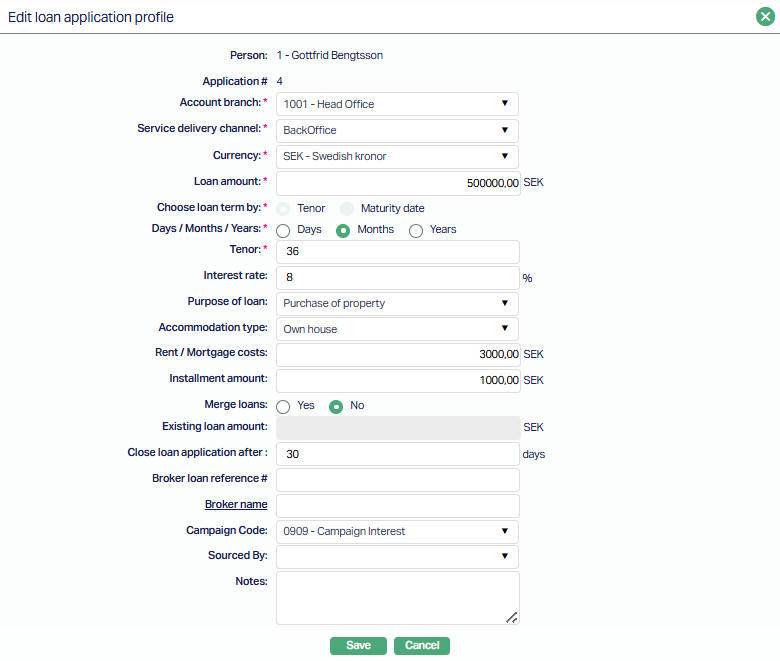
All fields are editable except Person and Application #.
3. Click Save. The Profile page appears with the edited details.
Function: Edit
Note: Editing is allowed only when the Loan Application status is Pending.
Create Loan
The Create Loan option allows you to create a Loan Account from the Loan Application.
This button is enabled only when the Loan Application status is Accepted - Approved.
To create loan,
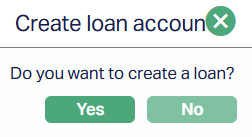
1. Click the Create Loan button on the Overview screen.

A confirmation message appears asking whether you want to create the loan. Click Yes to proceed with loan creation or No to cancel the action.
Aura then validates the Loan Application before creating the Loan Account.
The following validations are performed -
A valid Client record must exist for the applicant
The Client must be in Activated Status
The selected Loan Product must be Activated
Due Diligence must be approved
Payment Details must be maintained
If any validation fails, Aura displays an appropriate error message and the Loan Account is not created.
Loan Creation
If all validations are successful, Aura creates the Loan Account using the details maintained in the Loan Application.
The Loan Account is created using:
- Product
- Amount
- Interest Rate
- Loan Term
from the latest approved Offer record.
Payment Details and Linked People details are also carried forward to the Loan Account.
Charges maintained in the Offer tab are created in the Loan Account with the same charge amounts.
Status Update
After successful loan creation:
The Loan Account status is updated based on the product approval settings.
The Loan Application status is updated to Loan Created.
All actions and buttons in the Loan Application become disabled.
Credit Evaluation
The Credit Evaluation tab allows you to view and maintain credit score details for the account to become eligible for a loan.
To view/add Credit Evaluation,
1. Access Loan Application page. Then click the Credit Evaluation tab. If any credit evaluation details have already been added, these are displayed; otherwise, the section is blank.
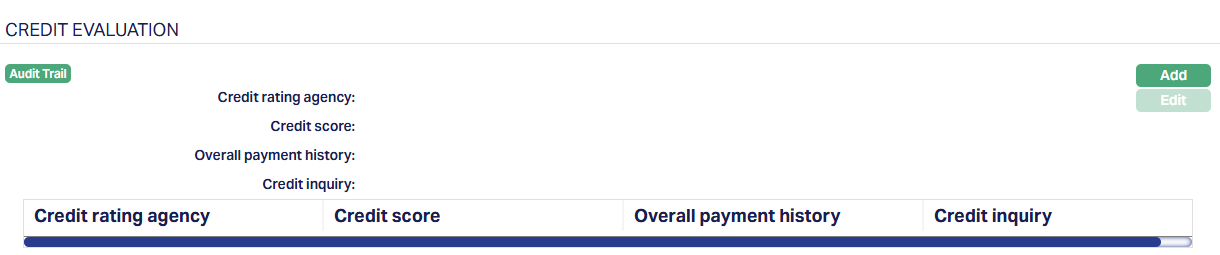
2. Click Add. The Add Evaluation page appears.
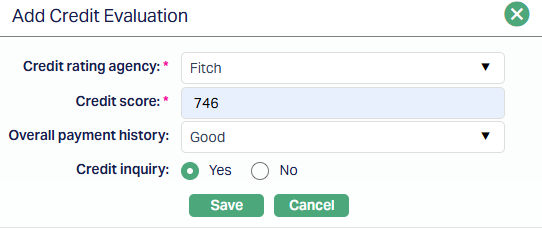
3. Select the Credit rating agency for credit evaluation from the drop-down list which is maintained under Admin → System Codes → Generic Definitions → Credit Rating Agency.
4. Enter the Credit Score as provided by the Credit rating agency. Only positive values are allowed.
5. Select Overall payment history from the drop-down list of values. The list of values are - Good, Bad and Excellent.
6. Select Yes or No radio button for further Credit Inquiry.
7. Click Save. The Credit Evaluation page appears with the added details.
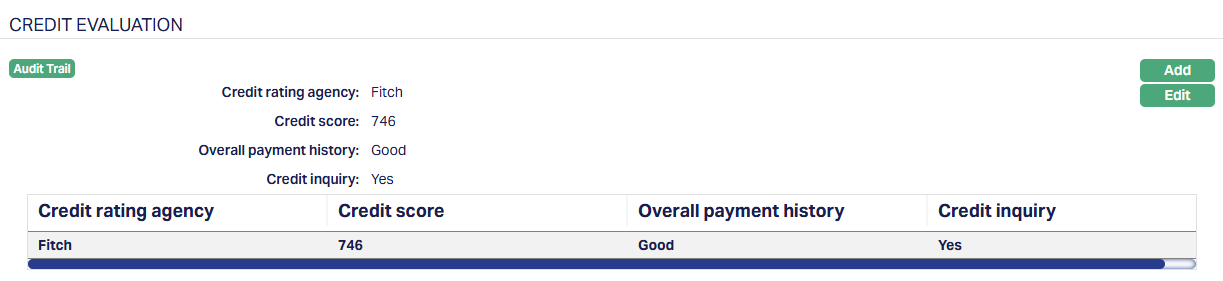
Note: You can add credit evaluation details for different Credit Rating Agencies. The same Credit Rating Agency cannot be selected more than once.
The Add option is available only when the Loan Application status is - Opened, Activated, Hold, Accepted, Any User-defined status.
The Add option is NOT available when the status is - Other Reject, Credit Reject, Customer Reject, Loan Created.
To edit Credit Evaluation,
1. Click Edit. The Edit Credit Evaluation page appears.
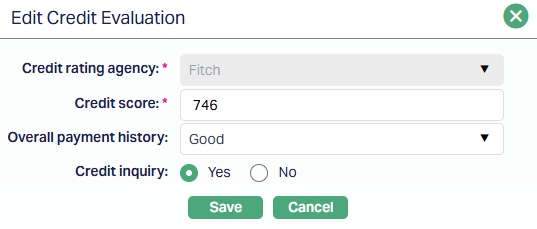
All fields are editable except Credit Rating Agency.
2. Click Save. The Credit Evaluation page appears with the edited details.
Functions: Add, Edit.
Note: Editing is not allowed once the Loan Application status becomes Activated - Approved.
The Edit option is available only when the Loan Application status is - Opened, Activated, Hold, Accepted, Any User-defined status.
The Edit option is NOT available when the status is - Other Reject, Credit Reject, Customer Reject, Loan Created.
Co-Applicant Details
The Co-applicant section allows you to view and maintain details of the co-applicant associated with the Loan Application.
If a co-applicant was added during the Add Wizard, the details are displayed. If not, this section remains blank.
To View / Add Co-Applicant details,
1. Access Loan Application page. Then click the Co-applicant details tab.

2. Click Add. The Add Co-Applicant details page appears.
For details, refer to New Loan Application → Co-applicant detail (3/5)
3. Click Save. The Co-Applicant details page appears with the new added co-applicant details.
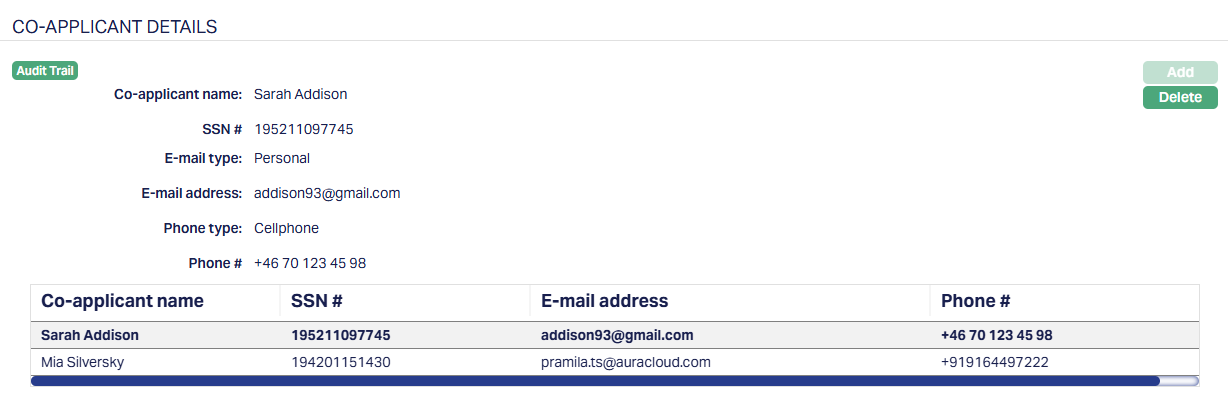
Functions: Add, Delete.
Notes:
This section is applicable only for Personal Loan Applications.
Co-applicant details are carried forward during loan creation along with the applicant details.
Delete: You can delete a co-applicant by clicking on the Delete button. When you click on the Delete button, Aura displays an alert message. On confirmation, Aura will delete the co-applicant.
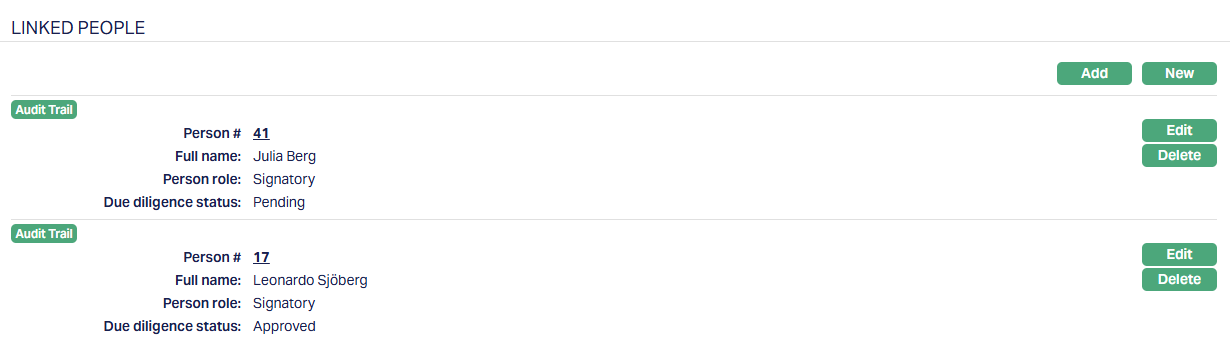
Linked People
The Linked People tab allows you to view and maintain people associated with the Loan Application.
For Organisation applications - The person added as Signatory during the Add Wizard is displayed here. You can add additional persons as required.
For Personal applications - This tab is available after the Co-applicant section to Add linked persons if required.
To Add Linked people,
1. Access Loan Application page and click Linked People tab.

If you want to link a person who has already been created as a Person under CRM → Person Maintenance, then click Add. Aura will display the Add Linked People window with the list of Persons maintained in Aura. Sample screenshot below.

2. Select the required person. The Linked People page appears with the selected person's details.

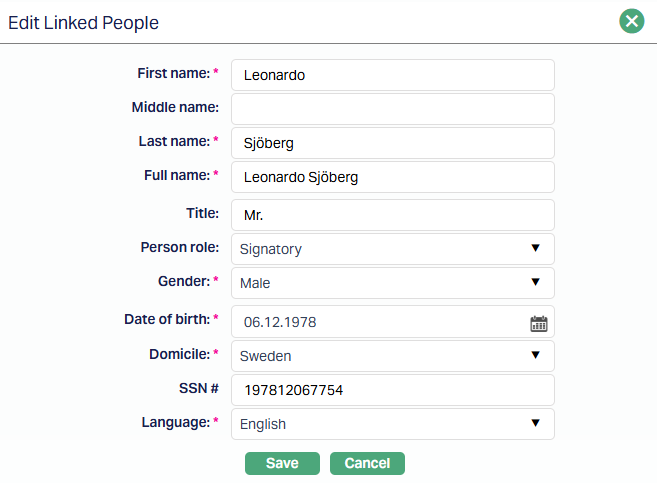
If you want to enter the details of a Person / Client who has not been created as a Person under CRM → Person Maintenance, then click New. New Linked People page appears.
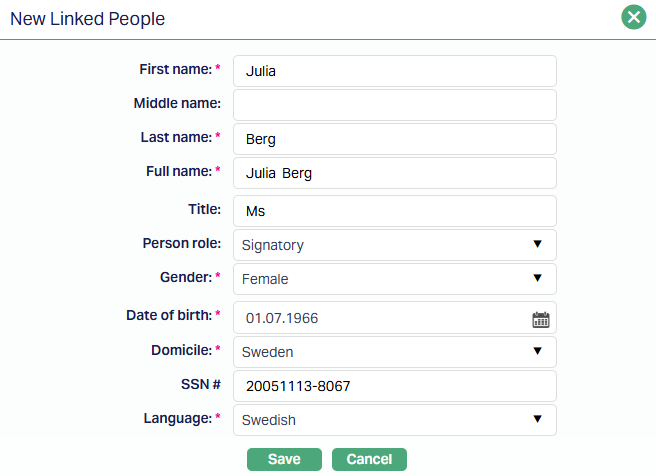
3. Enter the First name of the person.
4. Enter Last name of the person.
5. On entering First Name and Last Name Aura derives Full name of the person.
6. Enter Title of the person that is to be prefixed to the person's First name.
7. Select the role of the Person in relation to this account using the Person role drop-down, which shows the list of Person Roles maintained under Admin → System codes → Generic definitions → Person role.
8. Select Gender of the person from the drop-down list.
9. Input Date of birth of the person. You can either enter the date manually or select using the calendar. Aura will validate the date format using the format maintained under Entity maintenance → Regional → Date format.
10. Select Domicile of the person i.e., country of residence from the drop-down list. The list of countries for Citizen and Domicile is maintained under Admin → System codes → Generic definitions → Countries.
11. Enter SSN#. It is the person's Social Security Number i.e., a unique number provided by the person's residence country. The validation for SSN, if required, may be customized during implementation.
12. Select Language of the person from the drop-down list maintained under Admin → System codes → Generic definitions → Languages.
13. Click Save. The Linked People page appears with the added New People details.

Functions: Add, New, Edit, Delete.
To edit linked people record,
1. Click Edit. The Edit Linked People page appears.
All fields are editable.
2. Click Save. The Linked People page appears with the edited details.
Functions: Add, New, Edit, Delete.
Note: Any change in the tab will set the Due diligence status to Pending till it is approved by another user. On approval, the Due diligence status is set to Approved.
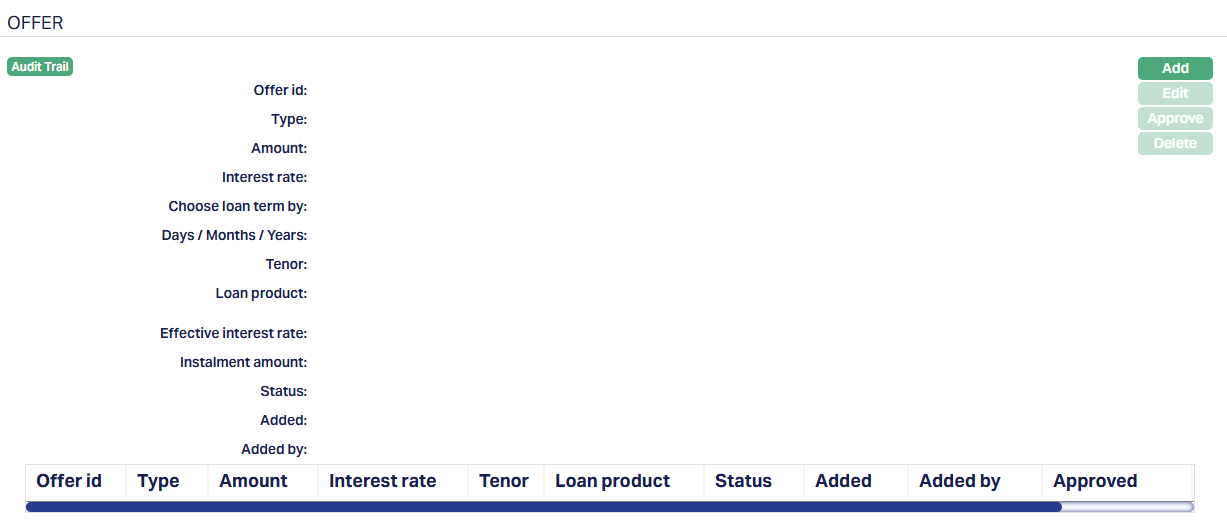
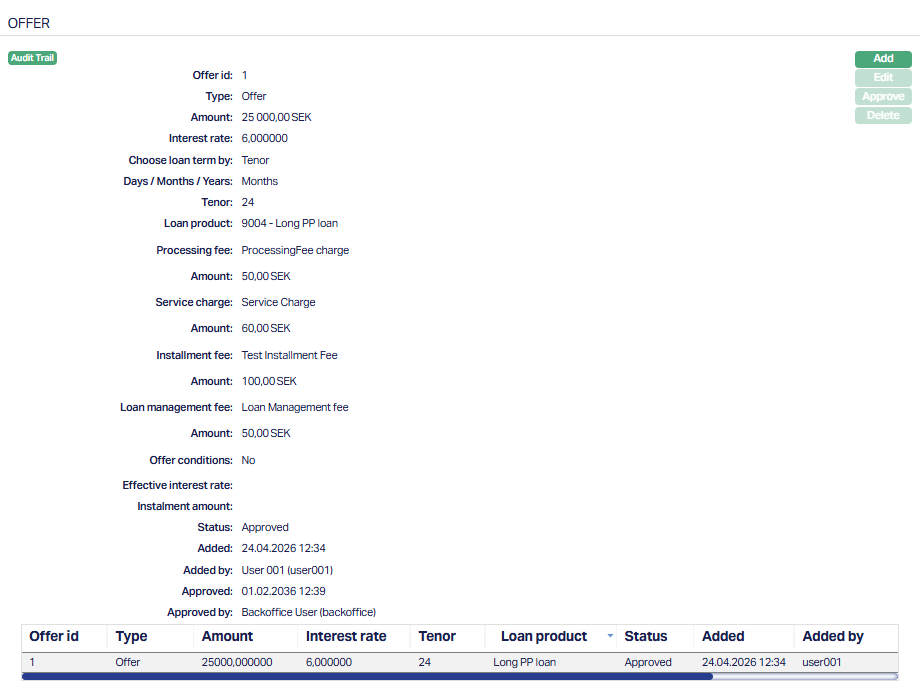
Offer
The Offer tab allows you to view and maintain offer details for the Loan Application. These offers represent the terms proposed between the bank and the borrower.
To view/Add offer,
1. Access the Loan Application page. Then click the Offer tab. If any offer details have already been added, these are displayed; otherwise, the section is blank.
2. Click Add. The Add Offer page appears.
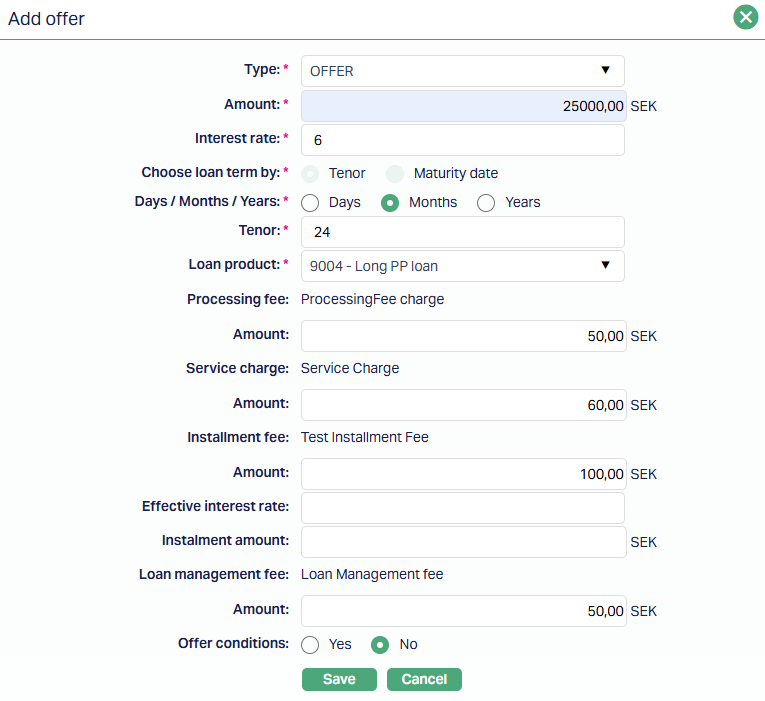
3. Select the Type of offer from the drop-down list of values. The list of values are - Offer and Counteroffer.
4. Enter the Amount for which the offer is applicable.
5. Enter the applicable Interest rate for the offer.
6. Choose loan term by is defaulted to Tenor option and is not editable.
7. Select Days / Months / Years of the Tenor
8. Enter Tenor.
9. Select Loan Product. This field is applicable only for Offer and is not available for Counter-offer. Based on the selected Loan Product, the applicable charges are displayed. The charge amounts are derived and can be modified.
10. For each charge (such as Processing Fee, Service Charge, Installment Fee, etc.) enter or modify the Amount. These fields are defaulted based on the Product selected, maintained under Retail → Loans → Maintain → Mortgage and Loan → Charge. The value cannot be negative.
11. Enter Effective Interest Rate if applicable.
12. Enter Installment Amount for the loan amount.
13. Select Yes or No for the Offer Condition.
14. Click Save. The Offer page appears with the added details.
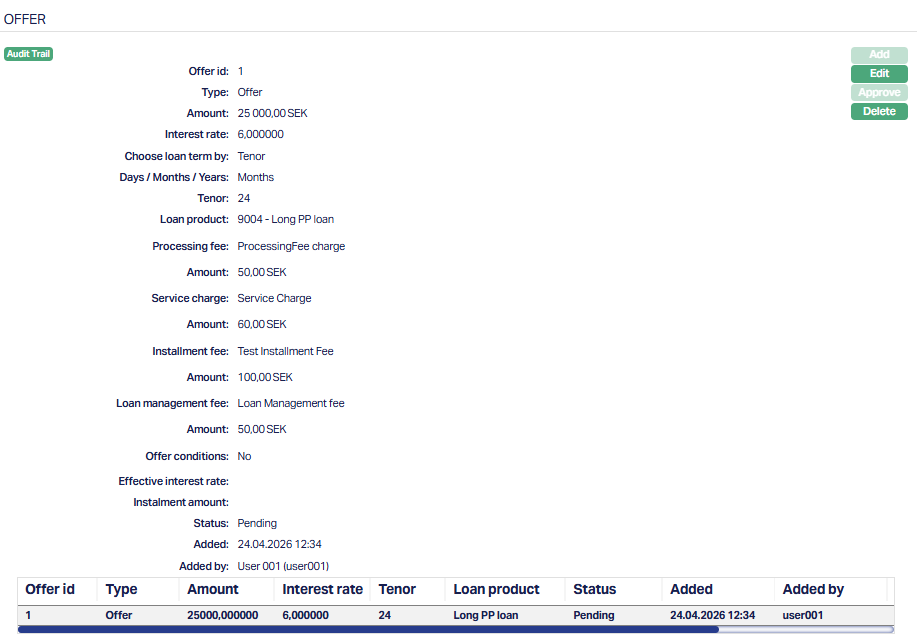
Functions: Add, Edit, Approve, Delete.
Note: Any change in the tab will set the tab status to Pending till it is approved by another user. On approval, the tab status is set to Approved and the red bubble disappears.
To edit Offer record,
1. Click Edit. Edit Offer page appears. Note: You can edit the Offer record before approving. Once approved you cannot edit further.
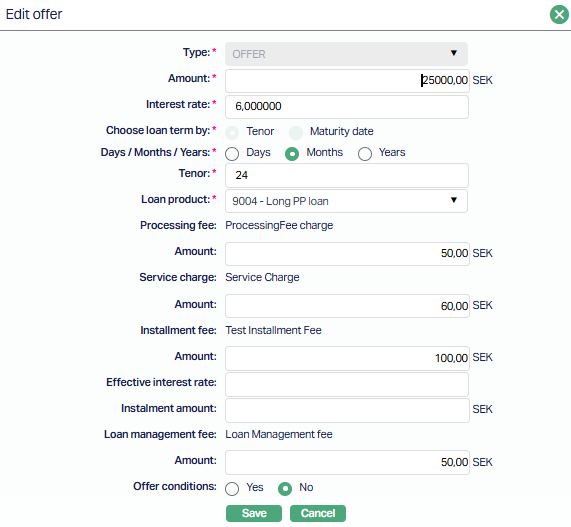
All fields are editable except Type, Processing Fee, Service Charge, Installment Fee & Loan management fee.
2. Click Save. The Offer page appears with the edited details.
Note: Any change in the tab will set the tab status to Pending till it is approved by another user. On approval, the tab status is set to Approved and the red bubble disappears.
Delete: You can delete an offer by clicking on the Delete button. When you click on the Delete button, Aura displays an alert message. On confirmation, Aura will delete the Offer.
You can delete the offer record before approving. Once approved you cannot delete.
Functions: Add, Edit, Approve, Delete.
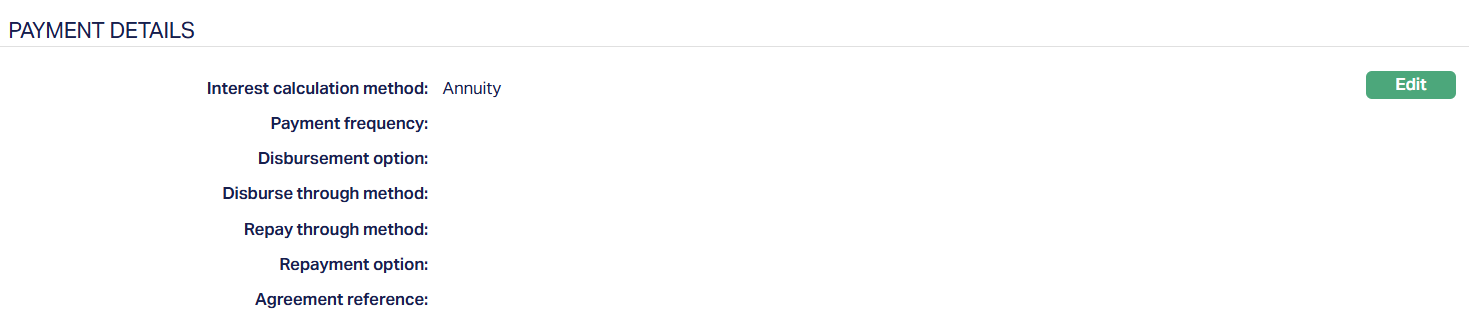
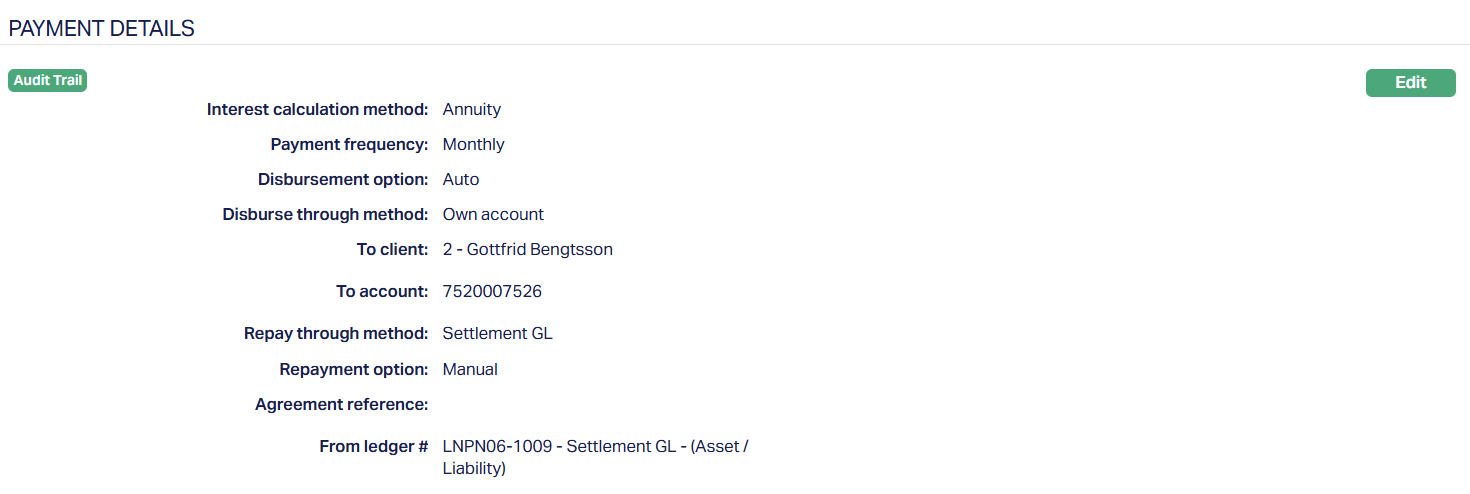
Payment Details
The Payment Details tab allows you to view and maintain payment-related details for the Loan Application.
The fields displayed depend on the selected Interest Calculation Method.
To edit Payment Details,
1. Access the Loan Application page and click the Payment Details tab. If payment details were already added, the details are displayed; otherwise, the section remains blank.
2. Click Edit. The Edit Payment Details tab appears.
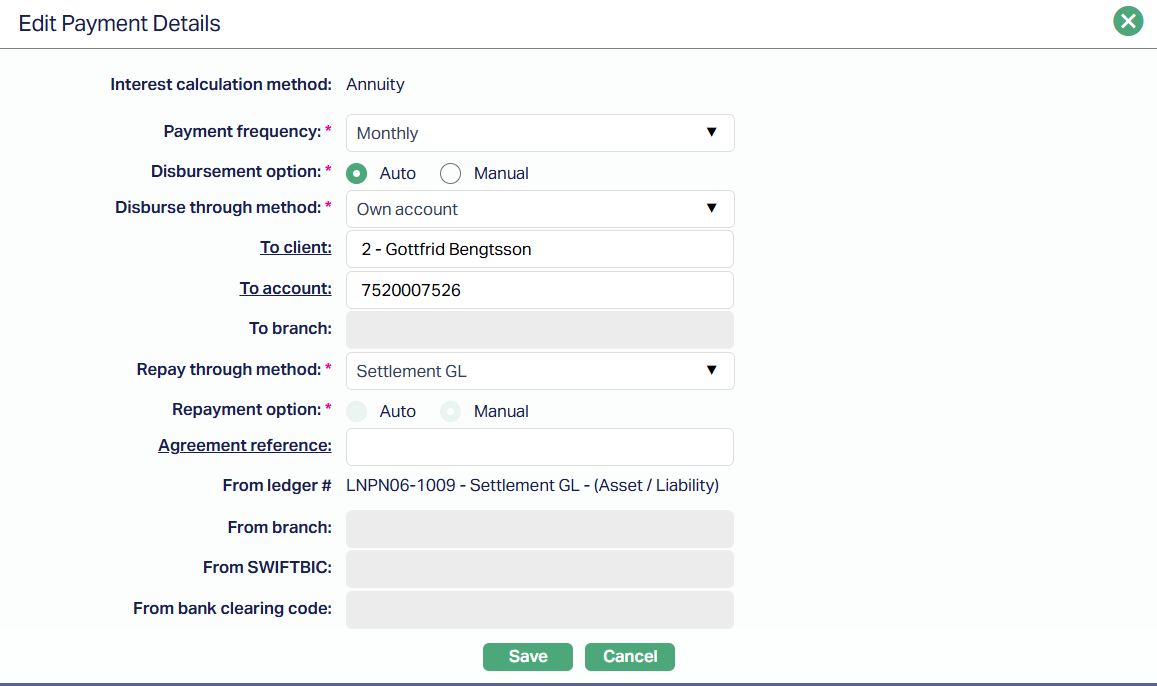
Note: Except Interest calculation method all other fields are editable.
3. Interest Calculation Method is defaulted based on the selected Loan Product and is not editable.
4. Payment Frequency can be used to input how Principal and Interest amounts are to be paid by the borrower. Flexible payment frequency is available only for Principal during creation of the Loan; if Interest payment has to be flexible, it will have to be done using the Change of Terms option. The available options are: Weekly, Semi-Monthly, Monthly, Quarterly, Semi-Annual, Annual and on Maturity.
5. Select Disbursement Option by selecting the required radio button Auto or Manual.
Disburse through method can be either Automatic or Manual. Generally, the disbursement option should be Manual to ensure that the borrower completes all the documentation and other formalities before the money is actually disbursed. In case of Manual disbursement, you can disburse to the Borrower's account maintained with another Bank (External Account), or with your Bank (Own Account) or through the Settlement GL. Depending on the Disbursement Method chosen, input the associated other relevant details.
Note: Payment message initiation to the bank in case of External Account should be customized during implementation
6. To client will depend on Interest Payout Method that you have chosen:
If you have selected Credit to account in the interest payout method, the To client field will be enabled. To client will be defaulted to client selected in the profile stage. However, you can change the client if required by clicking the client hyperlink.
If you have selected Transfer to another bank, this field will be disabled.
To bank depends on the Interest Payout Method that you have chosen.
If you have selected Credit to account, this field is disabled.
If you have selected Transfer to other account, select the bank to which the interest is to be sent from the drop-down list. The list of banks should have been maintained under Banking → Management → Banks. You can choose Others, if the Bank has not been so maintained.
7. Select Repay through Method from the drop-down list. The available options are: Direct Debit, Own Account, Payment by Invoice, Settlement GL and Post-dated Cheques.
8. Select Repayment Option by selecting the required radio button Auto or Manual.
9. Enter Agreement Reference for the account by clicking on the hyperlink.
10. From Ledger will be defaulted from the Settlement GL mapped to the client.
11. From branch is enabled only if the funding method is Transfer from another bank. Enter the branch of the Bank from where the funds are to be received. This field cannot be edited once it is created.
12. Aura will automatically display From SWIFT BIC code of the above bank from Admin → Management → Settlement directory if maintained. If the From Bank is 'Other' then you can input the SWIFT BIC code.
13. From bank clearing codes are defaulted for the account selected. Note: Aura will automatically display the SWIFT BIC code of the above bank from Admin → Management → Settlement directory if maintained.
14. Click Save. Payment Details tab appears with the edited details.
Function: Edit
Related Loan
The Related Loan tab displays the loan accounts associated with the Loan Application.

Once a Loan Account is created from the Loan Application, the related loan details are displayed in this tab.
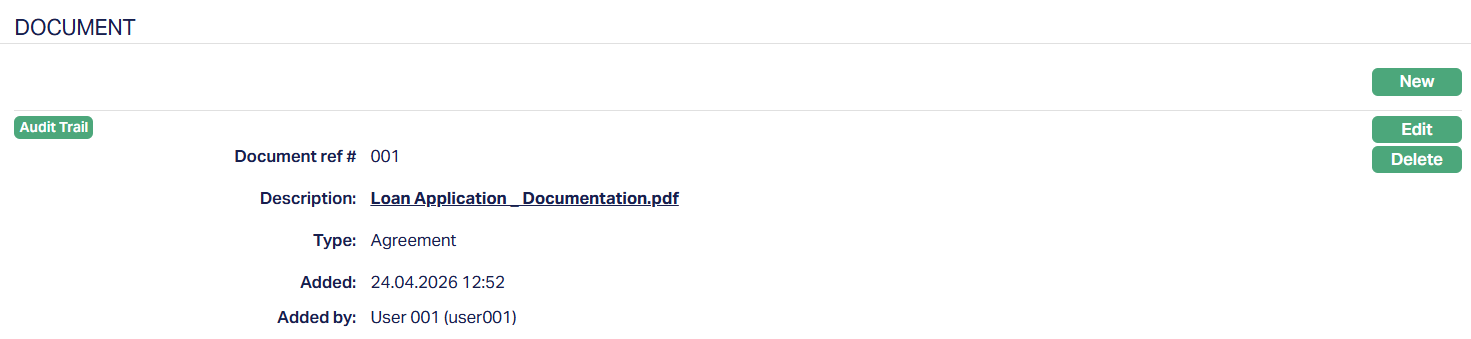
Document
The Document tab allows you to upload / generate documents related to the Loan Account. Documents in the form of scanned images or files on your computer can be uploaded. You can categorise the documents as per Document Type and store them with a document reference number. You can generate documents related to the Account based on Templates mapped to the Product.
To upload document,
1. Access Loan Application page. Click the Document tab.

2. Click New. A new Document page appears.
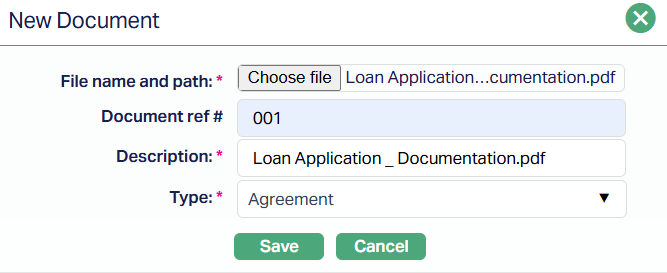
3. Click the Choose File button to select the File name and path of the document.
4. Enter Document ref no. for the document. This document reference number is used in Branch view → Documents.
5. Based on the file selected, the Description field will be derived. If required, you can change the description.
6. Select Type of the document uploaded. The document types should have been maintained using Admin → System codes → Documents → Document types. Once entered, this cannot be edited.
7. Click Save. The document page appears with the added details.
To Edit document,
1. Access Loan Application page. Click Document tab.
2. Click Edit. Edit New Document page appears.
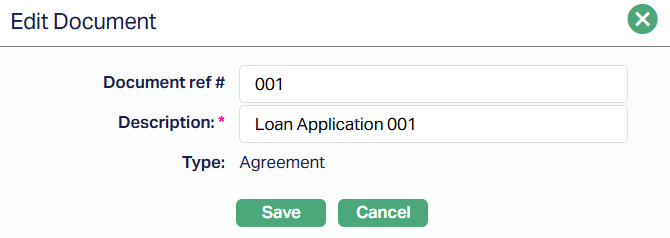
Note: Only Document ref # and Description fields are editable.
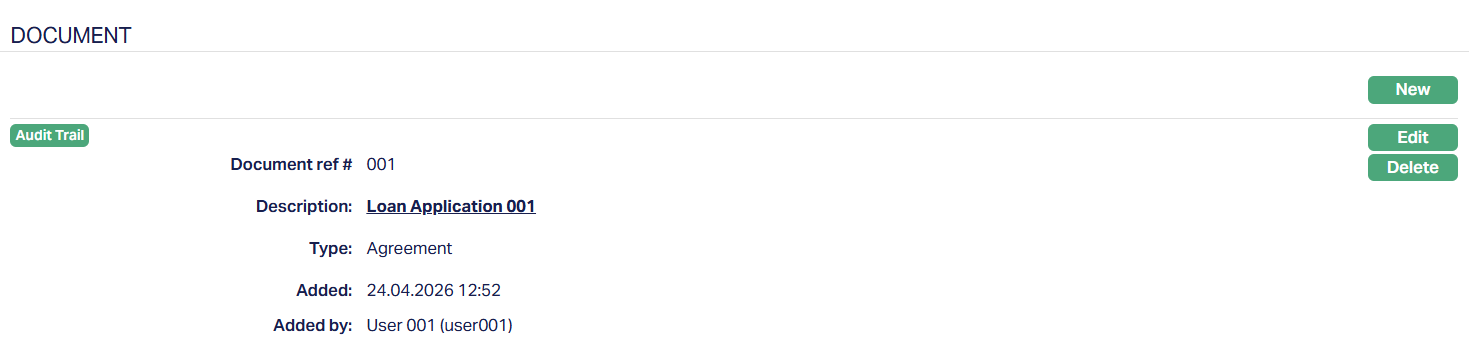
Functions: New, Edit, Delete
Delete: You can delete a Document by clicking on the Delete button. When you click on the Delete button, Aura displays an alert message. On confirmation, Aura will delete the Document.
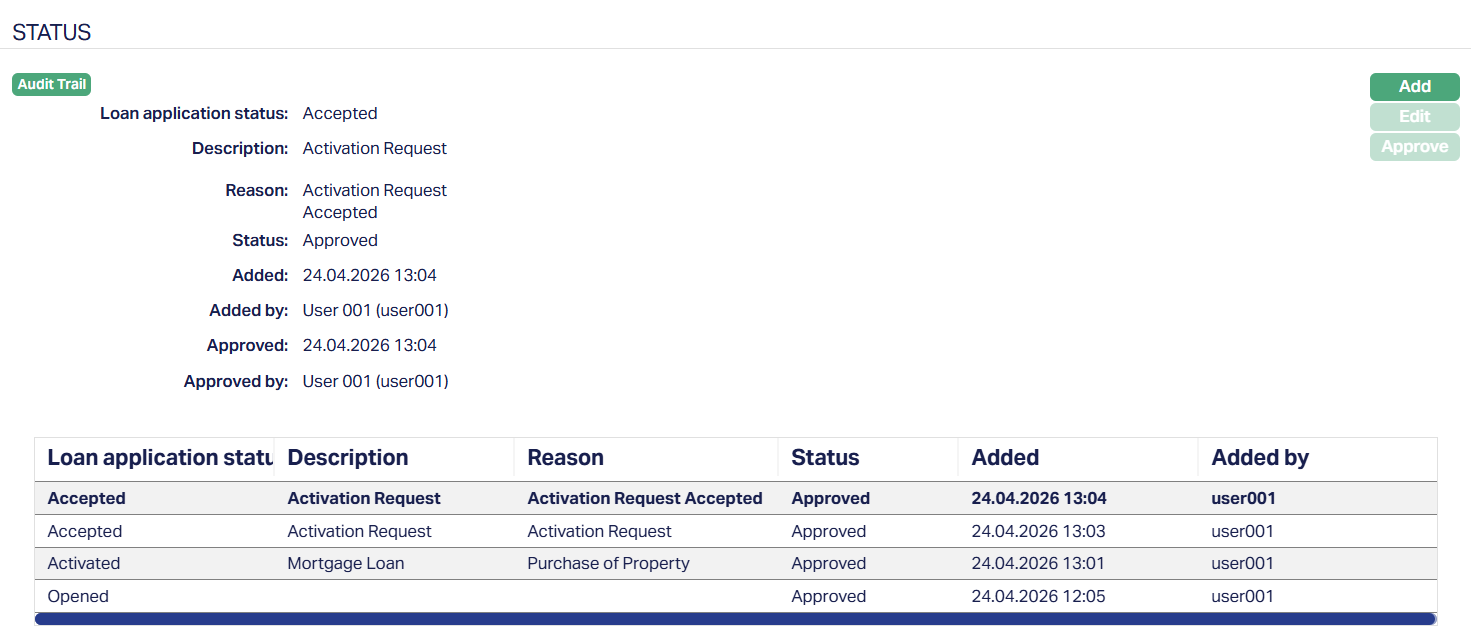
Status
The Status tab allows you to view and update the current stage of the Loan Application.
Each status represents a step in the processing of the application, and you can update it based on the progress of the Loan Application.
To add/view status tab,
1. Access Loan Application, then Maintain, then click Status tab.
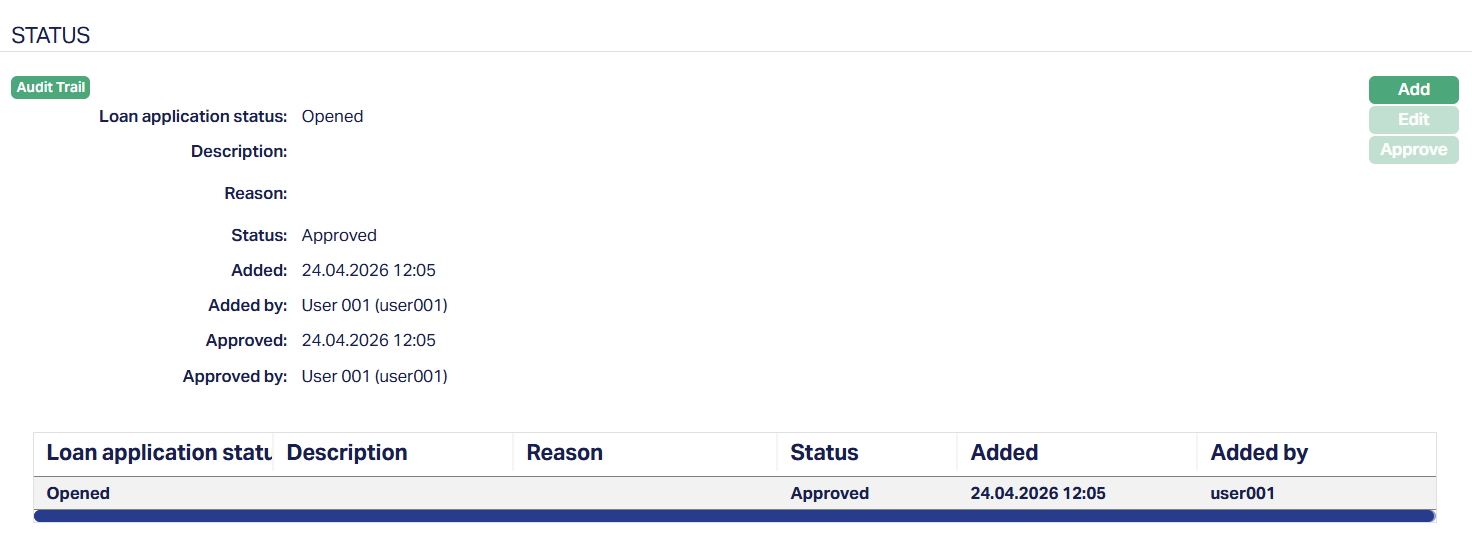
2. Click Add. The Add Loan Application status page appears.
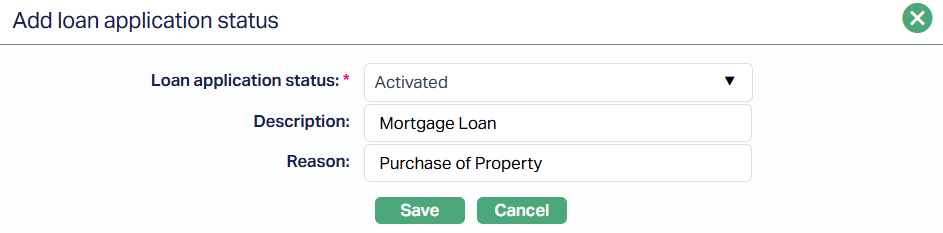
3. Loan Application status - This field allows you to select the next status for the Loan Application. The values available in this field depend on the current stage of the application. Aura allows only valid next statuses based on the lifecycle of the Loan Application.
For example -
After creation, you can move the application from Opened to Activated.
From Activated, you can move to stages such as Accepted, Hold, or Reject statuses.
4. Enter the Description for the status update. This helps you provide additional context about the status movement. For example, you may describe the purpose of the update or the stage of processing.
5. Mention the Reason for the Loan Application Status. This is especially useful when:
Moving the application to Hold
Moving to any Reject status
Indicating a specific business decision
The reason helps clearly explain why the status was updated.
6. Click Save. The Status tab appears with the added details.

Functions: Add, Edit, Approve.
To Edit status,
1. Click Edit. The Edit Loan Application status page appears.
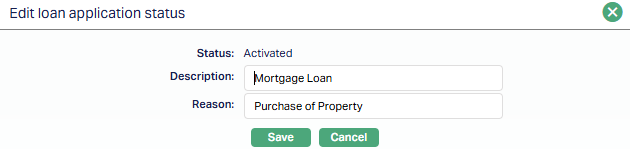
The Description and Reason fields are editable.
2. Click Save. The Status tab appears with the edited details.
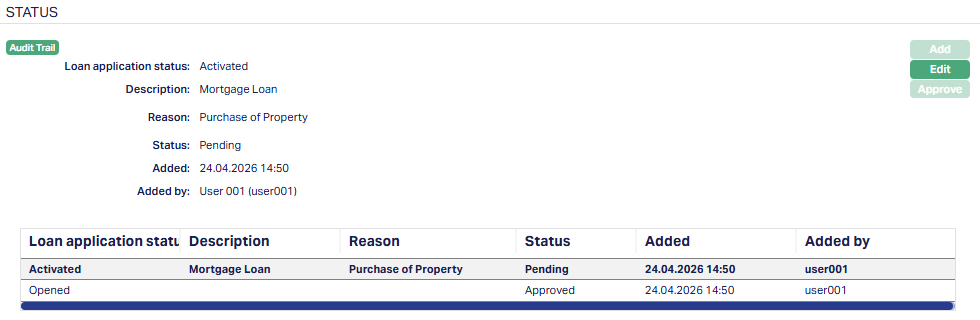
Status of the record is Pending till it is approved by another user. On approval, the tab status is set to Approved and the red bubble disappears. Once approved, the edit button becomes disabled.
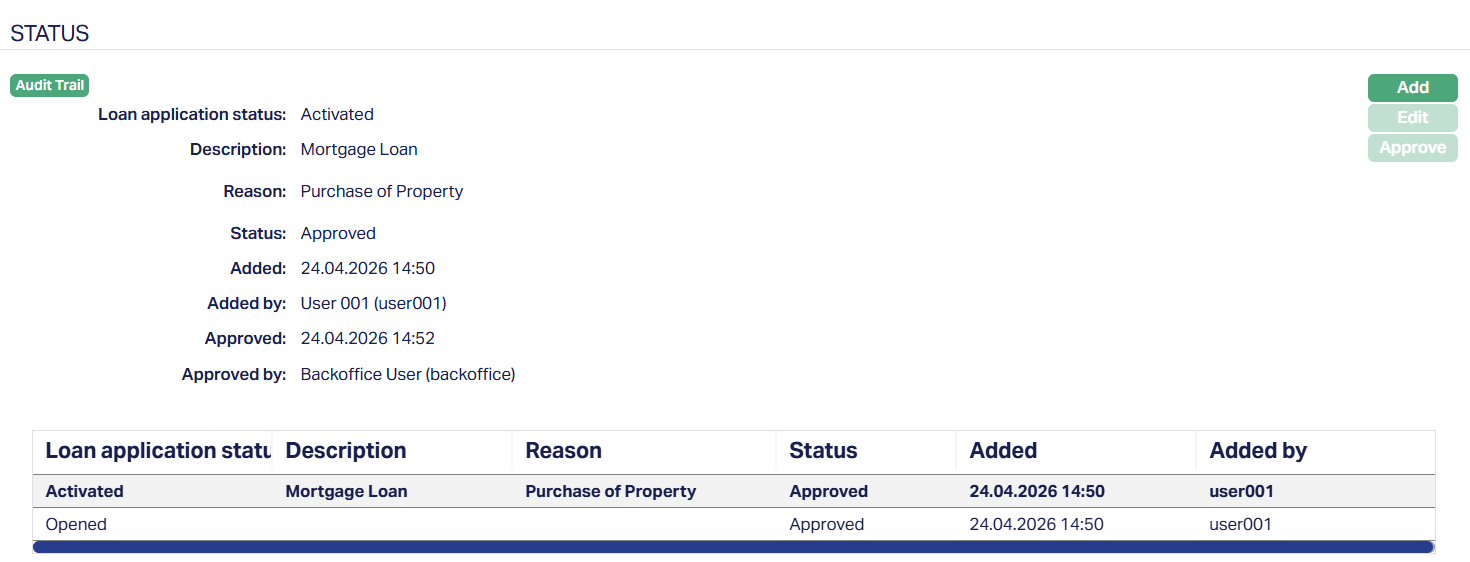
Functions: Add, Edit, Approve.
Once approved, the status becomes effective.
You can continue this process to move the Loan Application through different stages such as Accepted, Hold, or Reject statuses, based on business requirements.
How Status progression works:
When you create a Loan Application, Aura automatically assigns the initial status as Opened (Approved). To proceed, you must add and approve the next status - Activated. Only after Activated is approved can the application move to subsequent stages.
To move to the next stage, after approving Activated -
1. Click Add. The Add loan application status page appears.
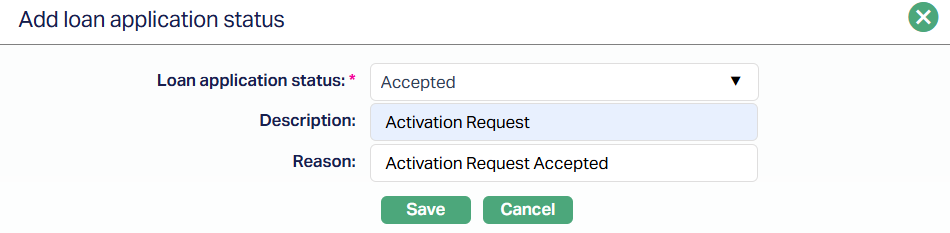
2. Select the next status from the drop-down from the Loan application status field. (Example - Accepted)
3. Enter the Description and Reason.
4. Click Save. The status tab appears with the added status update.
Functions: Add, Edit, Approve.
Note: The Add option remains available until the Loan Application reaches a terminal stage.
Status Movement Conditions
| Status Name | Record Status | Possible Status Movements | Conditions | Manual/Auto Movement |
|---|---|---|---|---|
| Opened | Approved | Activated | Initial status on Loan Application creation. Activated must be added manually and proceed with approval. | Auto |
| Activated | Approved | Accepted, Hold, Other Reject, Credit Reject, Customer Reject, Any other User defined status | If the Loan Application is created manually, the status will be in Pending and must be approved. If created via API, it may already be Approved based on auto-approval settings. | Manual |
| Accepted | Approved | Hold, Handoff, Other Reject, Credit Reject, Customer Reject, Any other User Defined status | Can be selected only when at least one Offer record exists in the Offer tab. Represents acceptance of the offer by borrower/broker. | Manual |
| Hold | Approved | Accepted, Other Reject, Credit Reject, Customer Reject, Any other User Defined status | Used to pause processing. Even if “Close Application After” is maintained, the status will not change automatically. Remains in Hold until manually updated. | Manual |
| Other Reject | Approved | - | Used when the bank decides not to proceed for non-credit reasons. Once selected, no further status movement is allowed. | Manual |
| Credit Reject | Approved | - | Used when the application is rejected due to credit evaluation. Once selected, no further status movement is allowed. | Manual |
| Customer Reject | Approved | - | Used when a borrower or broker declines the application. Once selected, no further status movement is allowed. | Manual |
| Loan Created | Approved | - | Automatically set by Aura when a Loan Account is created. No manual update is required. | Auto |
| Any other User Defined Status | Approved | Accepted, Hold, Other Reject, Credit Reject, Customer Reject, Any other User Defined status | Used for immediate stages such as credit evaluation. Can be applied and moved manually as required. | Manual |
| Handoff | Approved | Accepted | Used when the Loan Account will be created in an external system. Can be moved back to Accepted if selected by mistake. | Manual |
When a status is added manually, it is created in Pending record status and must be approved to become effective, unless auto-approval is enabled.
Custom Field
This option provides you the flexibility to define fields apart from those that are already available in the standard version of Aura. Thus, it enables you to customize additional data storage and use as required to suit your specific business needs.
To Edit Custom Field,
1. Access Loan Application page. Click the Custom Field tab.

2. The field appears only when it is created in Admin → System codes → Custom fields → Custom fields and linked to specific Accounts option in Admin → System codes → Custom fields → Field mappings.
3. Click Edit. Edit Custom Field page appears. In the following illustration, a custom field, Last Review Date has been mapped to the record as shown below.
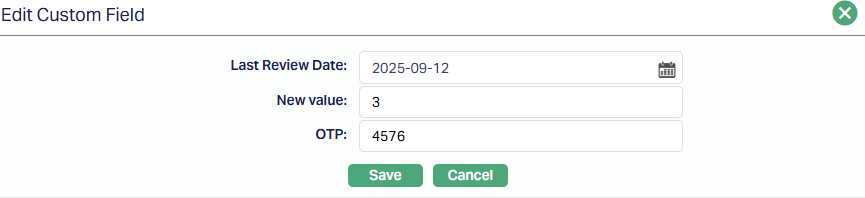
4. Enter Last Review Date, New Value and OTP.
5. Click Save. Custom Field page appears with the edited details.

Functions: Edit
Notes
The Notes tab allows you to maintain the note entries for the Loan Application.
To add Notes,
1. Access the Loan Application page and click the Notes tab.
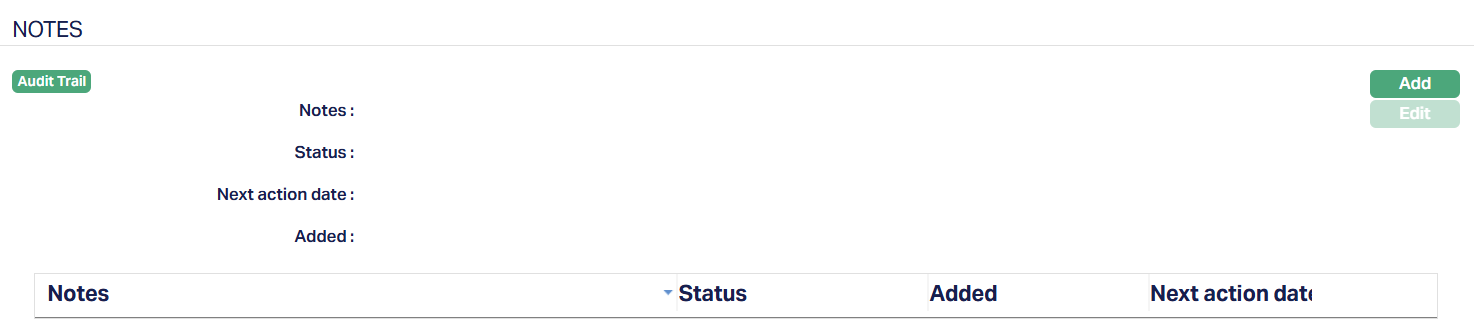
2. Click Add. The Add Notes page appears.
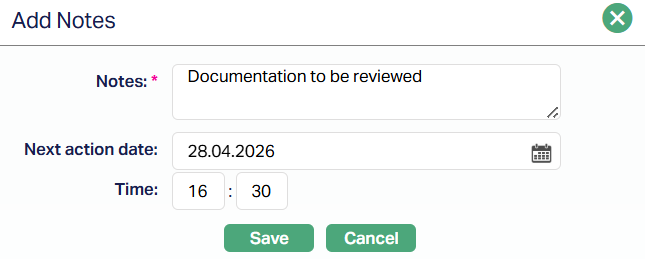
3. Enter the contents for the notes in the Notes field. It is used to record the general details of the discussion so that the same may be recalled later.
4. Select the Next action date.
5. Enter the time the note was added.
6. Click Save. The Notes page appears with the added details with Status field displaying Open as per the sample screenshot shown below.
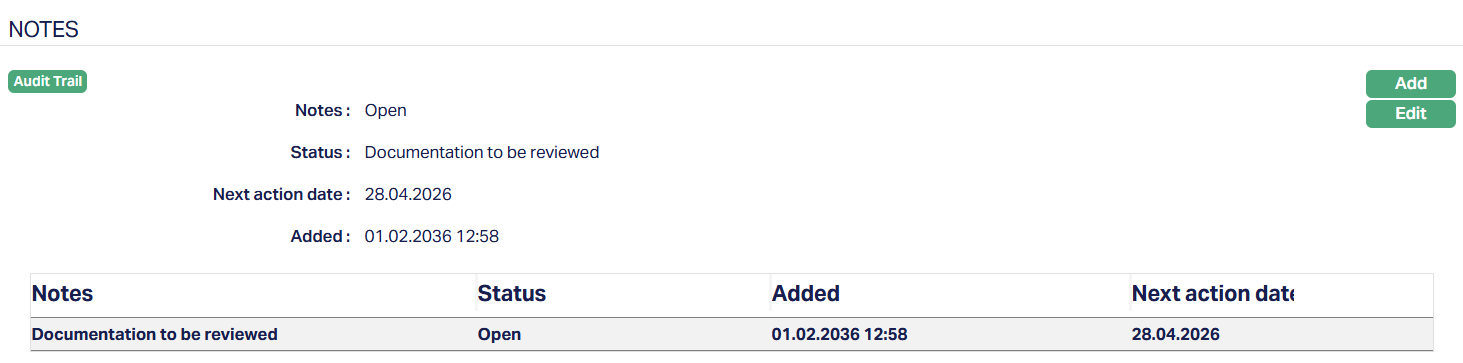
Functions: Add, Edit.
To Edit Notes,
1. Click Edit. Edit Notes page appears.
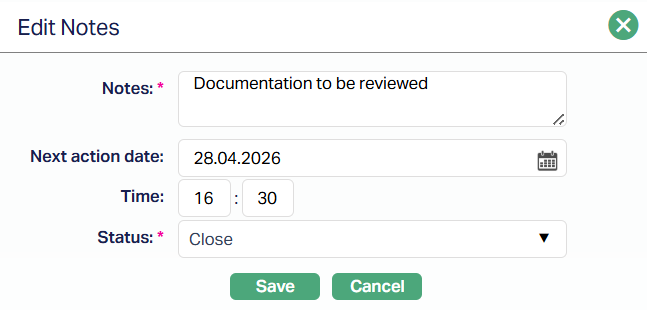
All fields are editable
2. Select Status from the drop-down list. Available statuses are Open and Close. By default, the Status field will select as Close.
3. Click Save. The Notes page appears with the edited details displaying the Status as Closed for the selected note as per the sample screenshot below.
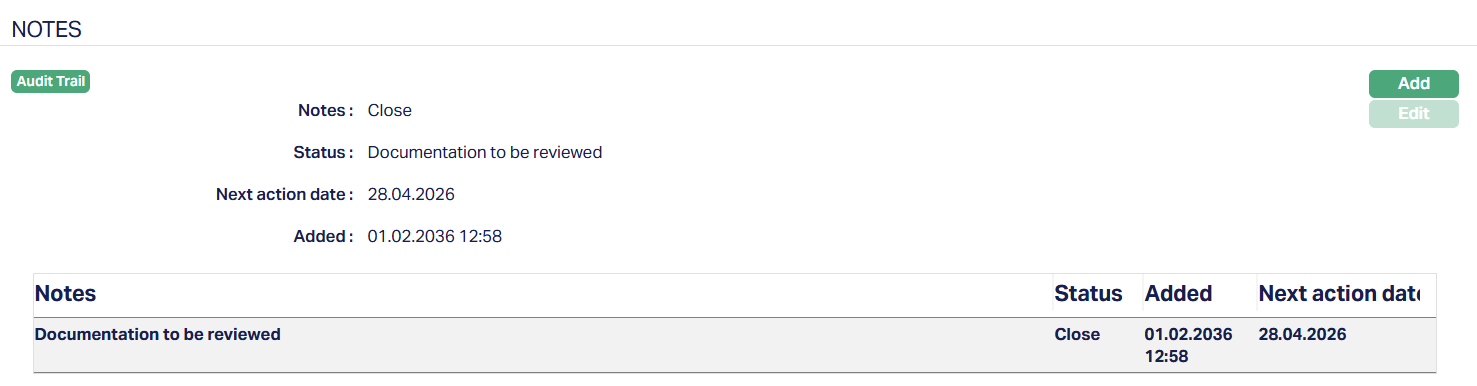
Functions: Add, Edit.