Adhoc Charges
Adhoc Charges in Aura allow you to raise one-time charges on a Factoring Contract for services that are not covered under the regular charge structure. These charges provide flexibility to debit or invoice specific costs directly to the Seller or, in some cases, to the Buyer.
Examples of such charges include:
Charges for verifying or attesting contract-related documents.
Charges for photocopies or additional document services.
Service-related charges not predefined in the Product setup.
Adhoc Charges in Factoring allow you to apply one-time charges on a contract for services or activities that are not covered under the standard charge structure.
Adhoc Charges ensure that additional service-related costs in Factoring contracts are correctly recorded and settled, either through direct account debit or through the subsequent invoice cycle.
Following is the tab under Adhoc Charge:
To add an Adhoc Charge,
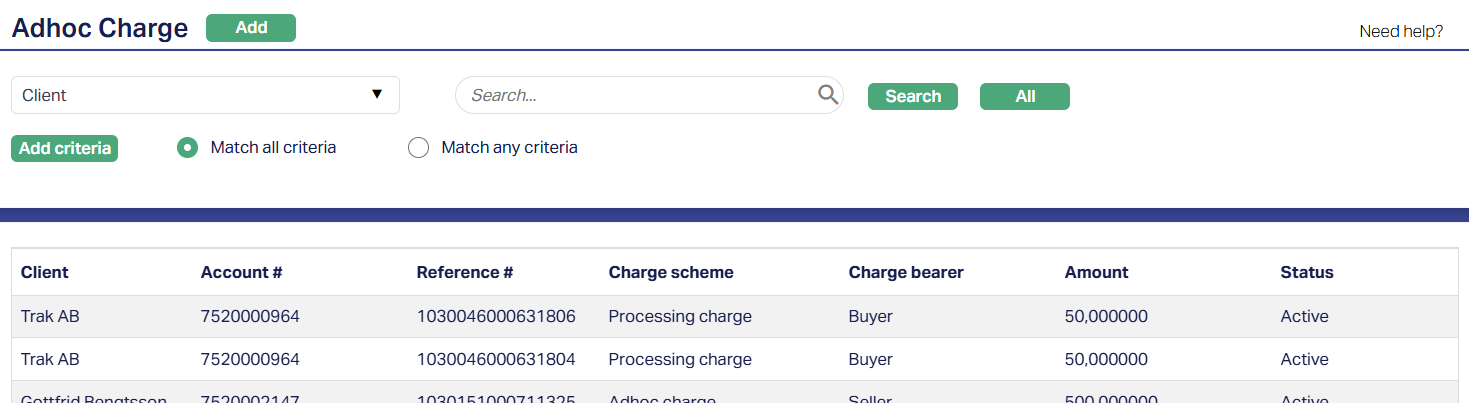
1. Access Commercial menu, click Factoring, Operations and then Adhoc Charge. Aura will display the Adhoc Charge Search screen. The list of all the Adhoc charges issued in Aura will be displayed.
2. Click Add. The New Adhoc Charge → Profile (1/2) page will be displayed.
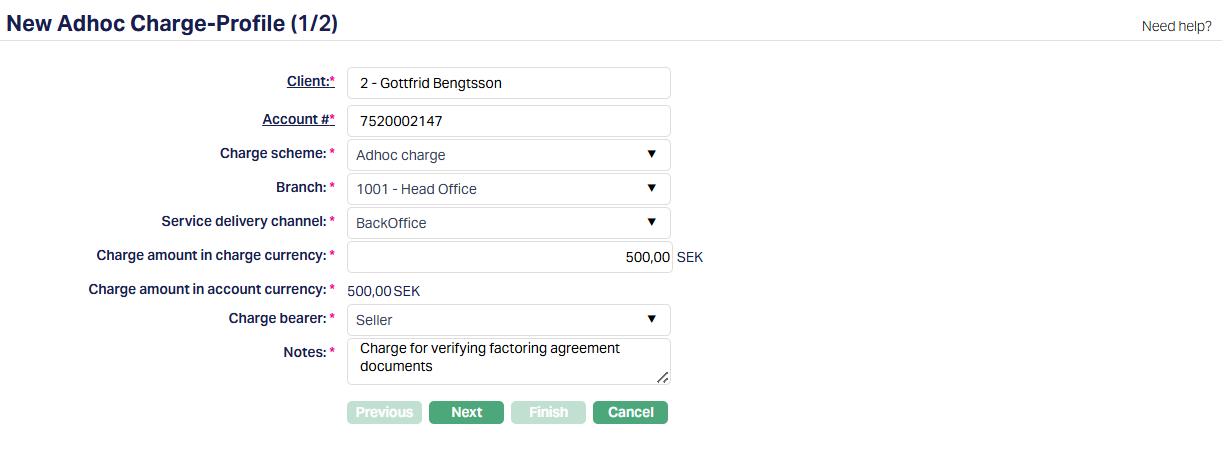
3. Select Client by clicking on client hyperlink. The Client Search page appears with the list of Clients maintained under CRM → Clients → Maintain. You can search for a client with relevant criteria and select the required client. You can also input the client's name or client number and select the required client from the list displayed by Aura.
4. Select account number by clicking on the Account # hyperlink. Aura will display all active Factoring contracts where the selected Client is the Seller and the Account Status is not in Registered or Closed.
5. Select Charge Scheme from the drop-down list of all the active Charges where the Charge Type is Event based Flat Charge schemes where Defer Charges is not defined. The Charge Scheme in the drop-down list will be populated based on the charge scheme combination maintained at Admin → Pricing → Charges → Charge Schemes.
6. Select Branch from the drop-down list of all the active branches maintained at Admin → Branches → Maintain.
7. Service Delivery Channel that will be used for transactions initiated by the Backoffice. You can select the required Service Delivery Channel from the list of service delivery channels maintained at Admin → System Codes → Categories → Service Delivery Channel.
8. Enter the amount to be charged in Charge amount in charge currency field. The charge currency will be defaulted from the charge scheme based on the combination maintained at Admin → Pricing → Charges → Charge Schemes. The Charge Amount in Charge Currency has to be within the allowed variance range. Charge amount is derived according to the charge combinations maintained and else the default combination to get the charge amount based on the below parameters:
Client = Selected client
Branch = Selected branch
Charge currency = Selected Charge scheme,
Service delivery channel = Channel selected in the above fields
9. If the charge currency is different from the account currency, then Aura will convert the Charge Amount in Charge Currency to the Charge amount in account currency based on the currency conversion rate maintained at Admin → System code → Currency → Currency.
10. Select whether the charge is borne by the Seller or the Buyer. By default, Aura sets the charge bearer to Seller. You may change this to Buyer when required, subject to validations explained later.
11. Enter the reason for raising the Adhoc Charge in Notes field. This is a mandatory free-text field and should clearly describe the purpose of the charge.
12. Click Next. The New Adhoc Charge → Confirmation (2/2) page will appear.

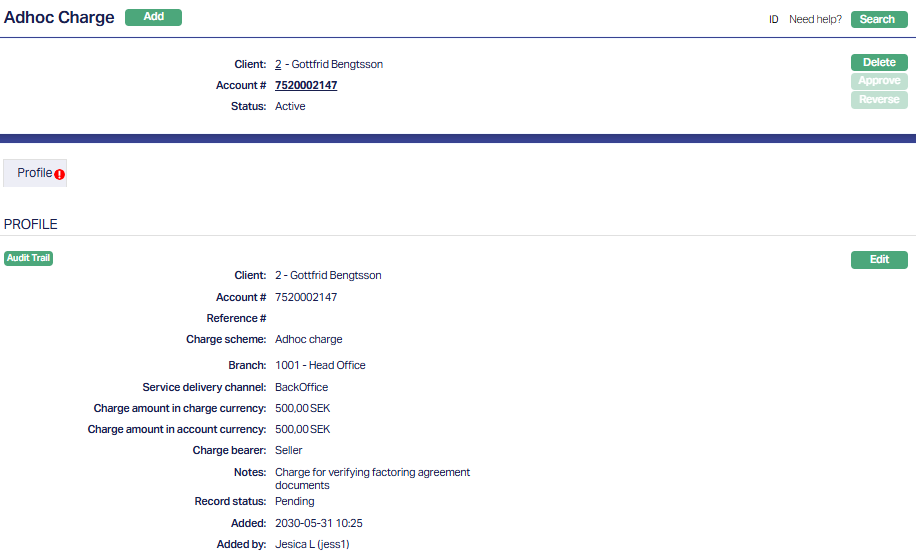
13. Click Finish. The Adhoc Charge page will appear with all the added details.
Functions: Add, Search, Delete, Approve, Reverse.
On clicking Finish, an Adhoc charge is created, and the status will be Active and record status will be Pending. If the Auto Approve Setting is marked as Yes then, the charge status will be Active and the record status will be Approved.
Delete: You can delete an Adhoc charges record by a click on Delete button until the record status is approved. Aura will ask for confirmation, on approving which selected record will be deleted. Once the record is approved, it cannot be deleted.
Note: Aura does not allow you to delete the Adhoc charge record when the charge record is Reversed, and the record status is Pending or Approved.
Approve: If you want to approve an Adhoc charge record, then retrieve the record and click on Approve. Aura will ask for confirmation. Once the record is approved, status gets changed from Pending to Approved. You can Approve the record only if you have initiated /reversed the record.
Approval of Adhoc Charges
When you approve an Adhoc Charge, Aura validates the charge based on the selected Charge Bearer.
If Charge Bearer = Seller:
Upon approval, Aura debits the charge amount from the Seller's Charge Account, provided Recourse Through Invoice is not yet activated. At the same time, Aura credits the Charge Income GL as defined in the selected Charge Scheme.
If Recourse Through Invoice is already activated for the contract, the charge is not debited immediately but instead included in the next invoice generated for the Seller.
If the Seller's Charge Account cannot be debited, Aura creates an Amount Block, provided the selected Charge Scheme is marked as Treat as Receivable. If the scheme does not allow receivables, Aura prevents approval and displays an error message until corrective action is taken.
If Charge Bearer = Buyer:
Upon approval, Aura includes the charge in the next invoice generated for the Buyer, provided that a Final Invoice has not yet been generated and Recourse Through Invoice is not activated. At the time of invoicing, Aura credits the Charge Income GL defined in the selected Charge Scheme.
If either condition is not met (a Final Invoice already exists or Recourse Through Invoice is activated), Aura prevents approval and displays an error message until corrective action is taken.
Reverse: The Reverse button becomes enabled only if record status is Active/Approved.

Reversal of Adhoc Charges
Aura allows you to reverse an Adhoc Charge only if it has not yet been invoiced or if the charge amount has only been debited but not invoiced.
If the charge has already been included in an invoice (either for the Seller or Buyer), reversal is not permitted. Aura will display an error message: Charge already included in Invoice. Cannot be reversed.
When reversal is permitted, Aura passes the reversal entries (opposite of approval accounting entries) and updates the status to Reversed.
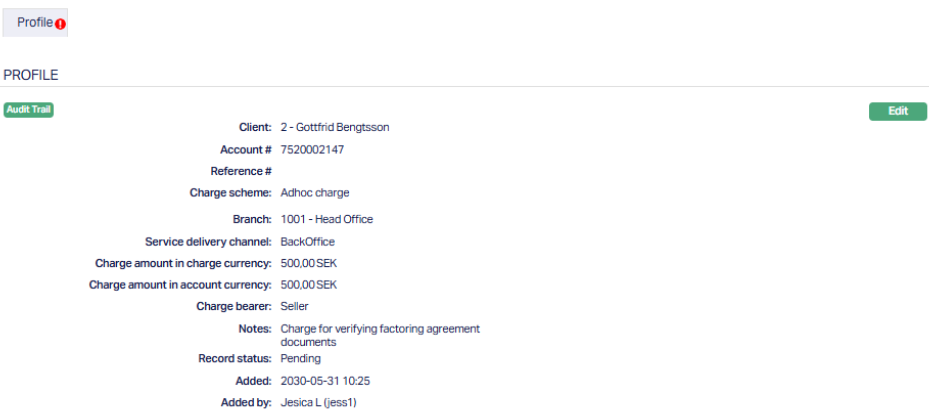
Profile
The Profile tab, which is the default tab in the Adhoc Charge screen, shows the basic details of the Adhoc Charges.
To view / edit Profile,
1. Access Adhoc Charges page. Click on Profile tab, which is the default tab. The details are defaulted from the entries that you have made during charge creation. For details refer to -- New Adhoc Charge → Profile (1/2)
2. Click Edit. Edit Profile page appears.
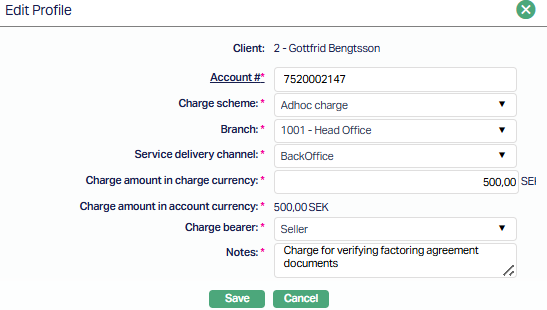
3. All fields are editable except Client and Charge amount in account currency.
4. Click Save. Profile page appears with the edited details.
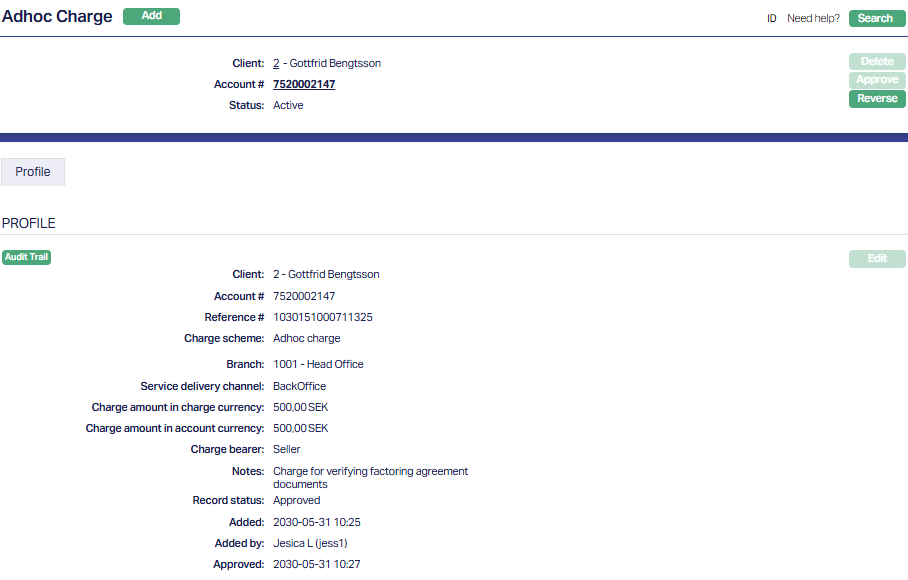
Status of the Adhoc charge record is pending till it is approved by another user. On approval, the status is set to Approved and the Adhoc Charge status is Active.
The additional fields that are shown are:
Record status indicates the current state of the record. It will be either: Pending - If the record is waiting for approval or Approved - If the record has been reviewed and finalized.
Added shows the date and timestamp when the record was created and Added by displays the user ID and full name of the person who created the record.
Approved shows the date and time when the record was approved and Approved by displays the user ID and full name of the person who approved the record.
Note: The edit button becomes disabled once the status is approved, make sure to review and edit all the necessary changes before approval.