Dispute Account
A Dispute account will not have any interest or charge calculation and will be only a repository to keep disputed balances. The balance kept in the disputed account will not reflect or impact in any way available balance, statements or any other feature of the card account.
You can open a disputed account under the dispute account product and link it to a card account. There will be a 1:1 relationship between disputed account and card account.
If a disputed transaction comes in a transaction file, the interface system will auto-create a disputed account for that card account and post the entry into the disputed account.
The following are the sub-tabs in Dispute Account.
To add new Dispute account
- From Card menu, click Cards, then Maintain Dispute Account. Dispute Account search page appears.

- Click Add. New Dispute Account -- Details (1/2) page appears.
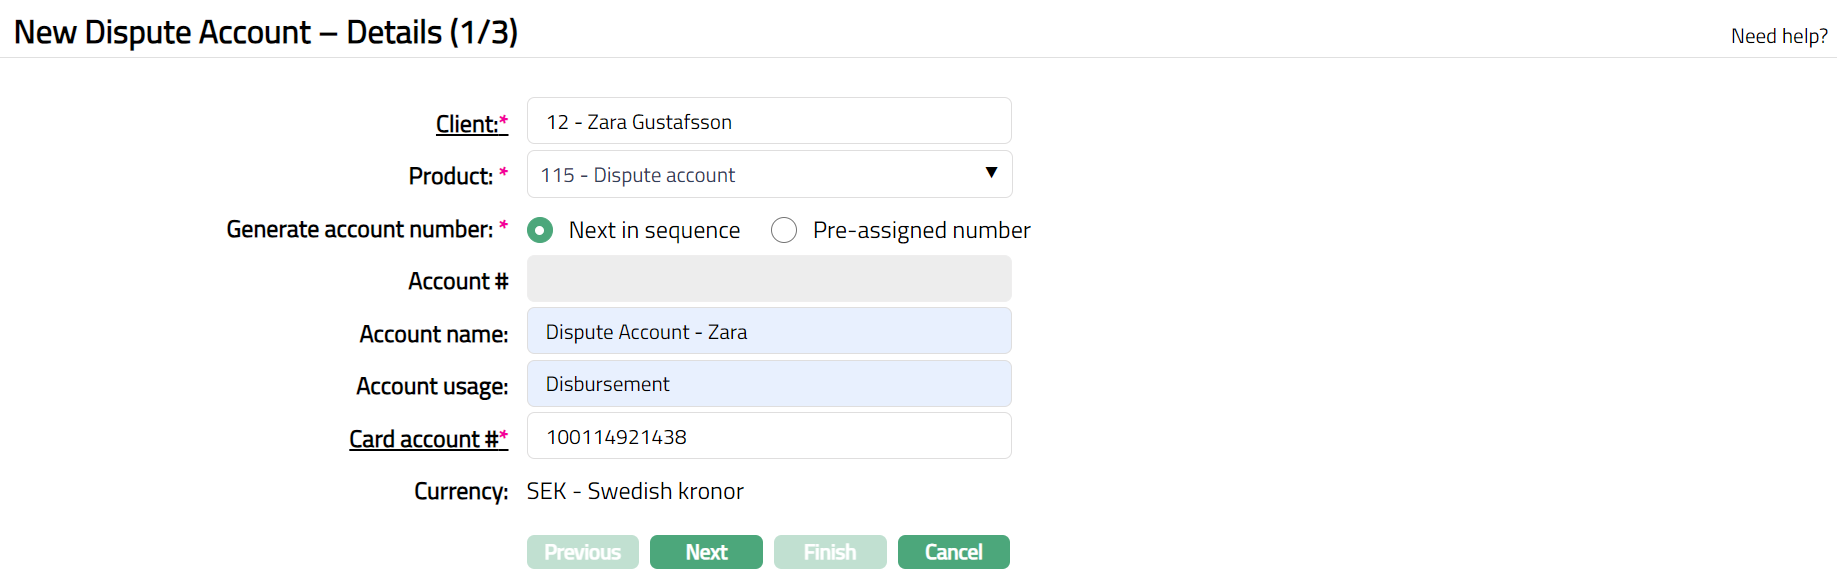
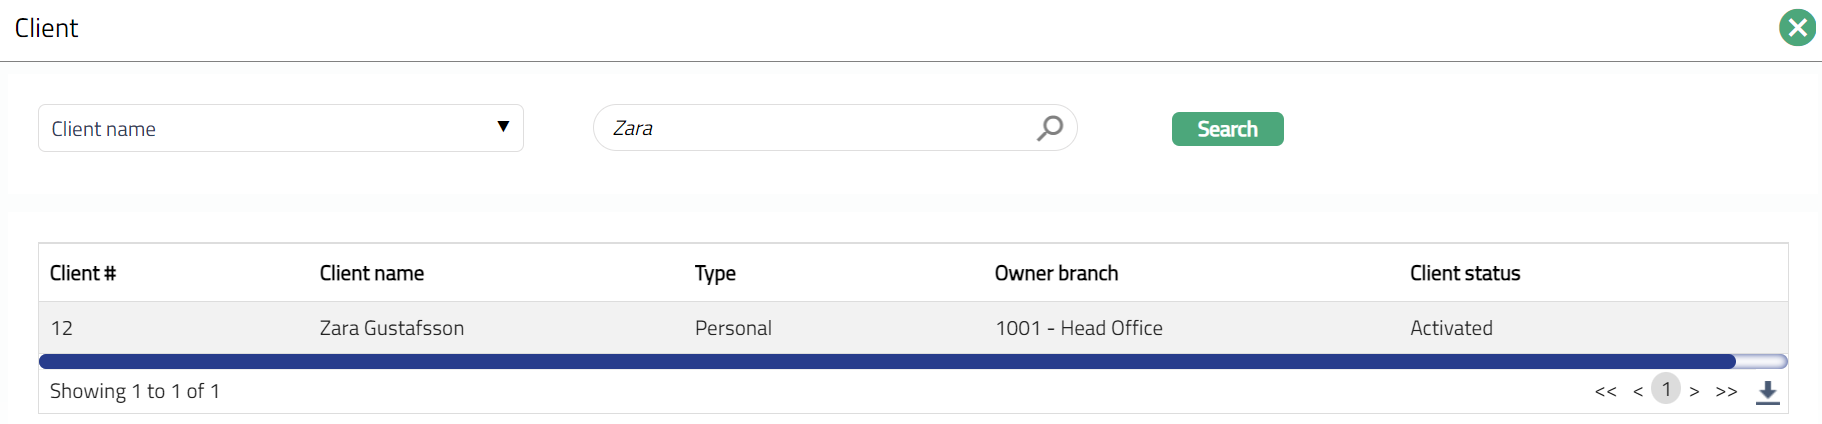
- Select Client by clicking client hyperlink. Client search page appears where you can search for a client with relevant criteria and select the required client. You can also input the client's name and select the required client from the list displayed by Aura.
Select required Dispute Account Product from the drop-down list of active Dispute Account Products maintained in Aura.
Input how the account number has to be generated in Generate account number. If you want to auto-generate the account number, choose Next in sequence. If you want to give a specific account number for this account, choose Pre-assigned number. In case of the former, Aura will generate account number internally using the account number mask maintained at the Entity level. The account number is unique across the Entity.
Dispute Account # will be enabled only on selecting Pre-assigned number for Generate account number. Enter the required Account #. Aura will validate the Pre - assigned number against the account number mask maintained at the Entity level and also checks if it is unique.
Enter Account name. This name will be used for the account. In case of dispute accounts opened by the system during Transaction file processing this will be defaulted to Dispute account.
Enter Account usage, i.e. the purpose of the account. In case of dispute accounts opened by the system during Transaction file processing this will be defaulted to Dispute transactions.
You need to specify the Card account # for which this Dispute Account is being created. Click on the hyperlinked Card account #. Aura will display the list of active Card Accounts for the chosen client, for which there are no linked Dispute Accounts. Select the required account.
Based on the card account # selected above, the card account currency will be automatically displayed as the Dispute Account Currency.
Click Next. New Dispute Account - Confirmation (2/2) page appears.
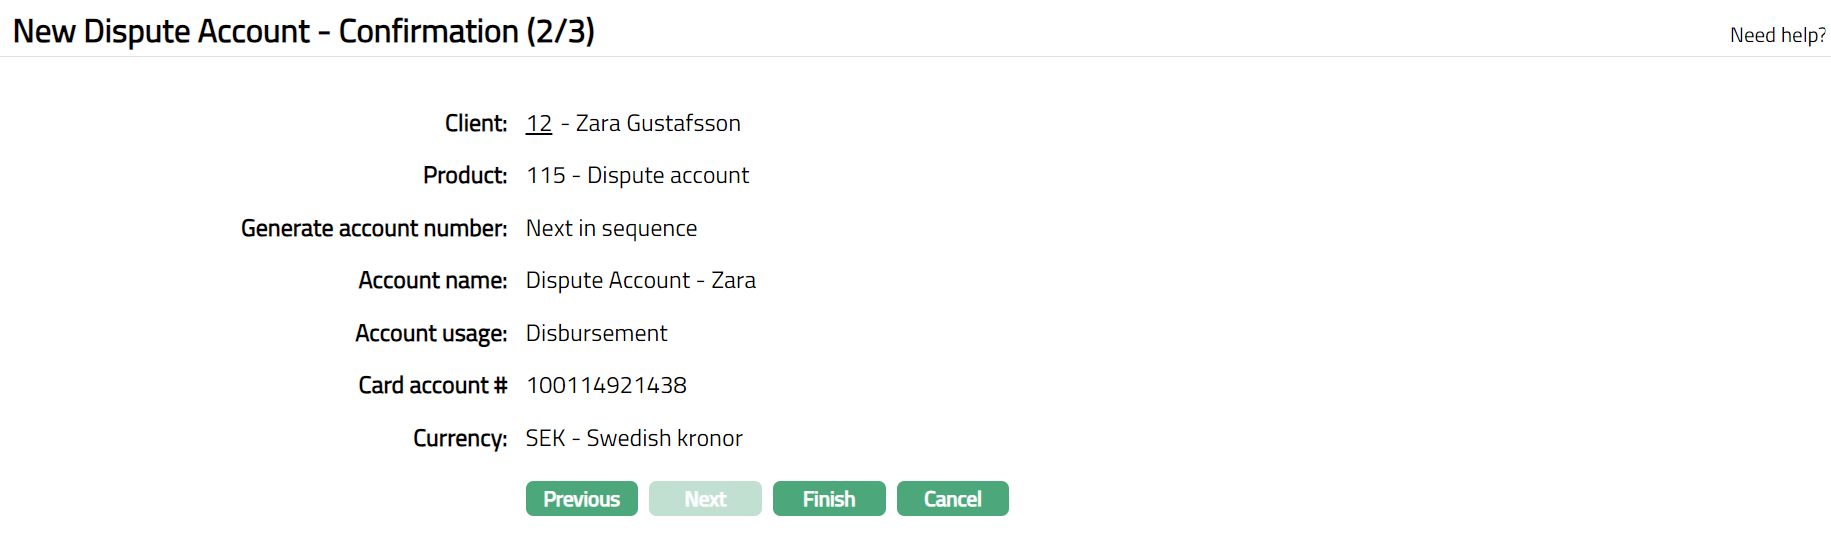
- Click Finish. Dispute Account will get created and the Dispute Account window will appear displaying the Profile tab by default.
 Functions: Add, Search
Note:
In case of a Dispute account that is manually created, on click of Finish, the Account status is Open, and the record status is Approved. Only when the account status is Activated and record status is Approved, the account becomes effective, and transactions can be posted in the account.
To activate the account,
- Add the Activated Account status using Account Status tab. This will make the Account Status Activated, but the record status is Pending.
- Another user should approve the Activated Account status, so that the record status becomes Approved.
If the dispute account is auto created, automatically, the account status is set as Activated and the record status is Approved.
Profile
Profile tab, which is the default tab in the Dispute Account Maintenance screen, shows the basic details of the dispute account. For details refer to the Add Dispute Account - New Dispute Account -- Details (1/2). These are non-editable fields.
- Access Dispute Account page. Click Profile tab.

The additional fields that you can view in the Profile tab are explained below:
- Dispute balance: Dispute balance is the balance of all the disputed transactions posted to this account.
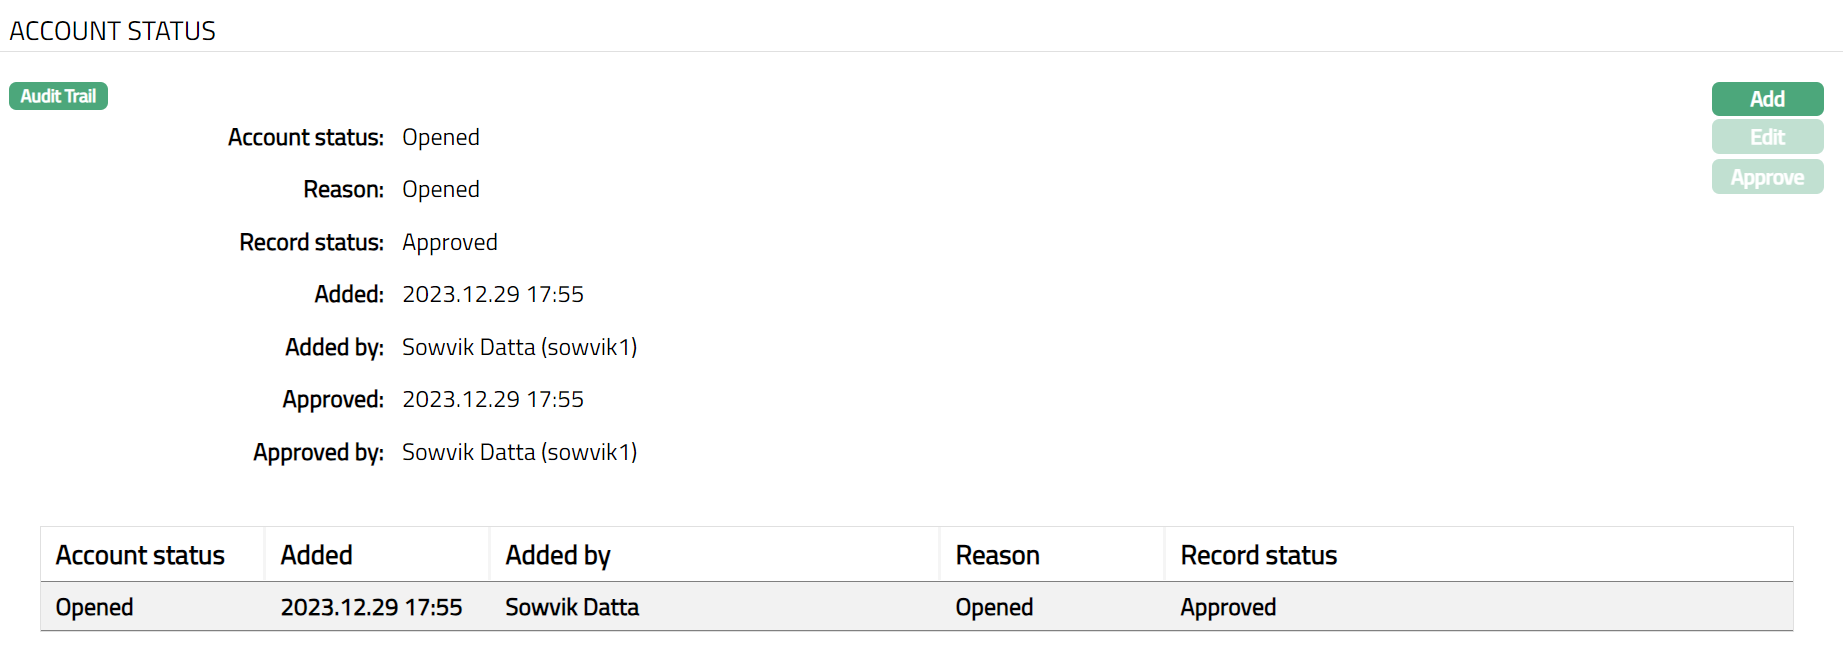
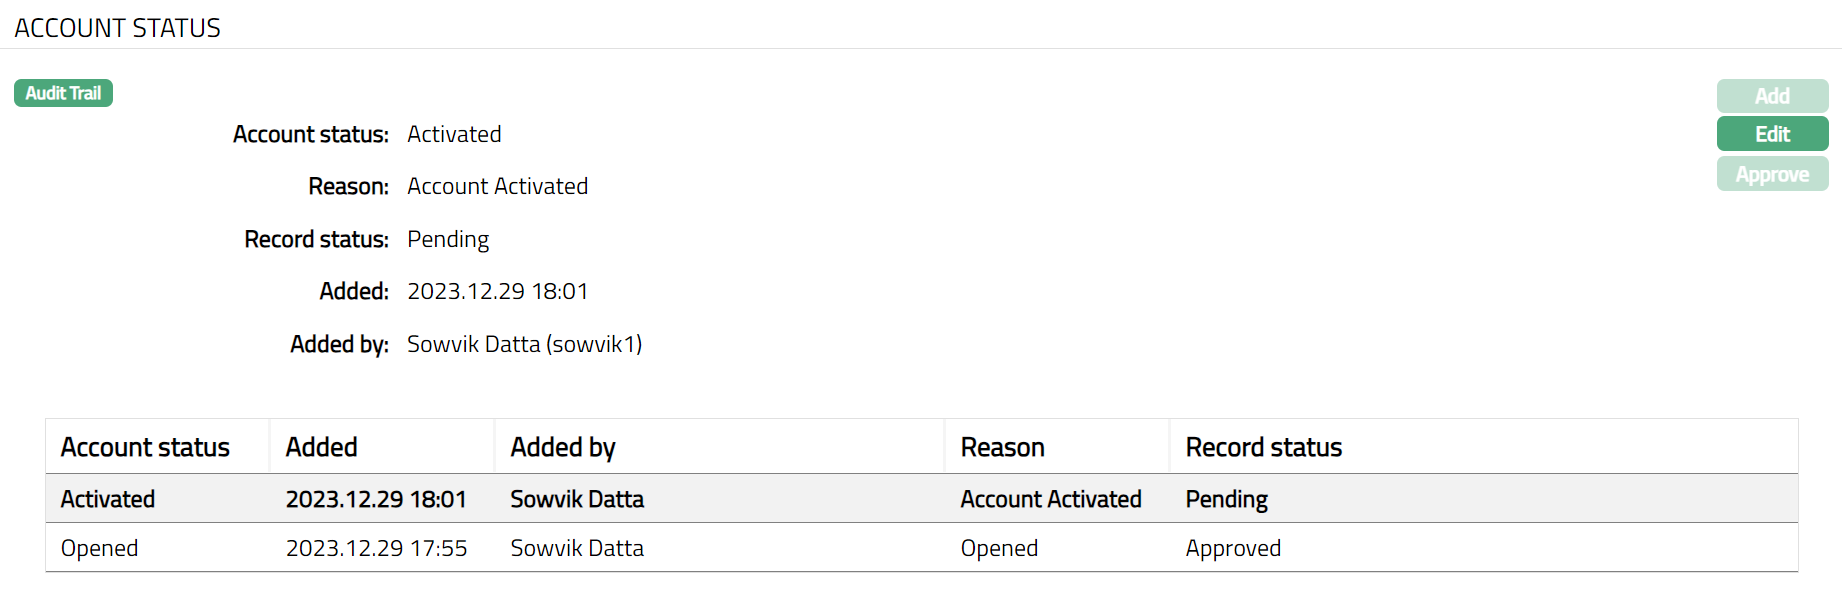
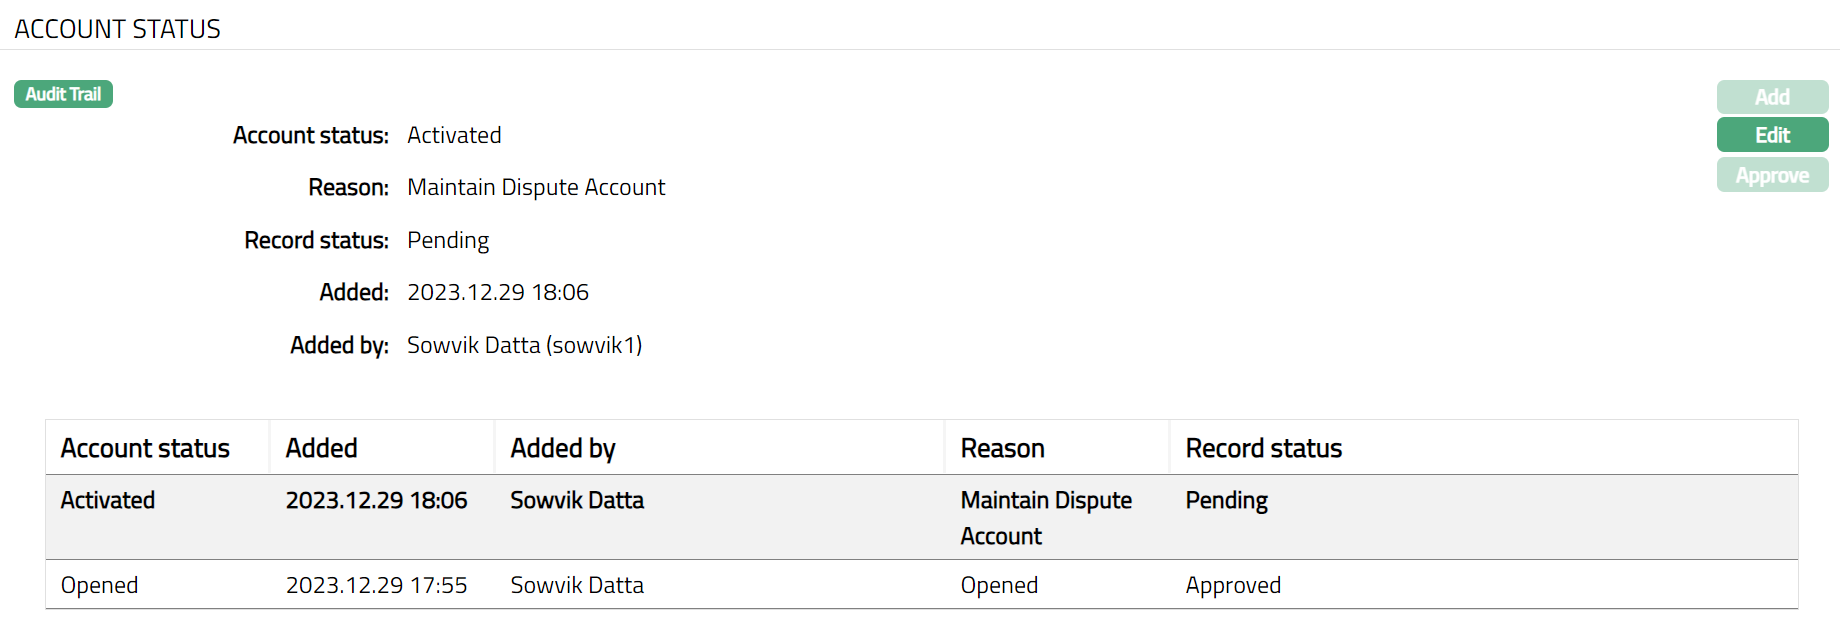
Account Status
Using this tab you can set and view the history of the account status. You can change the account status of the Dispute account.
To add new account Status
- Access Dispute Account page. Click Account Status tab.
- Click Add. Add Account Status page appears.
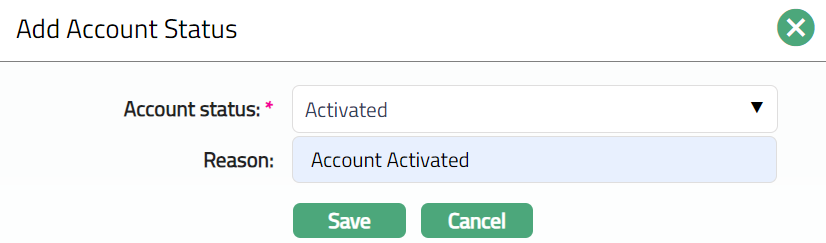
Select Account Status from the drop-down list. Depending on the current status of the Dispute account, the possible values are:
a. Opened: This is the initial account status as soon as it is created.
b. Activated: This is the status in which transactions can be posted into the account. It has to be manually set by a user different from the one who created the account.
c. Closed: This is the status of the Account when it is closed.
Enter Reason for status selected.
Click Save to save the updated changes. Account status will be Activated, and the record status will be Pending.
Functions: Add, Edit, Approve
Note: Any user other than the one who added the status can approve it. On approval, the Account status will be Activated, and record status Approved.
The additional fields that you can view in the Account Status tab are explained below.
Record Status field denotes the status of record.
Added field denotes the date on which the record was added.
Added by field denotes the name of the person who created the record.
Approved field denotes date on which the record was approved. This is displayed only if the record is approved.
Approved by field denotes name of the person who approved the record. This is displayed only if the record is approved.
Note: Only the user who added the account status record can edit it.
To Edit Account Status
- Click Edit. Edit Account Status page is displayed.
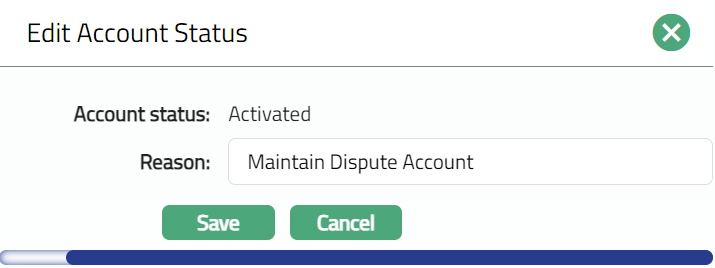
Only Reason field is editable. Make the changes if required.
Click Save. Account Status tab appears with the edited details.
Functions: Add, Edit, Approve
Custom Field
This tab allows you to define fields apart from those that are already available in the standard version of Aura. Thus, it enables you to customize additional data storage and use as required to suit your specific business needs.
To maintain Custom Field
- Access Dispute Account page. Click Custom Field tab.

The field appears only when it is created in Admin > System codes > Custom fields > Custom fields and linked to Card Loan product option in Admin > System codes > Custom fields > Field mappings.
Click Maintain. Maintain Custom Field page appears. In the following illustration, one custom field Initial Account opening date has been mapped to the account as shown below.

Enter Initial Account opening date.
Click Save. Custom Field page appears with the edited details.

Function: Maintain