Currency
Aura enables you to maintain a list of currencies and associated details like various currency exchange rates, denomination and calendar for the currency. The currencies are identified using their respective ISO Alpha-3 Codes specified by the ISO 4217 standard.
The following are the tabs in Currency:
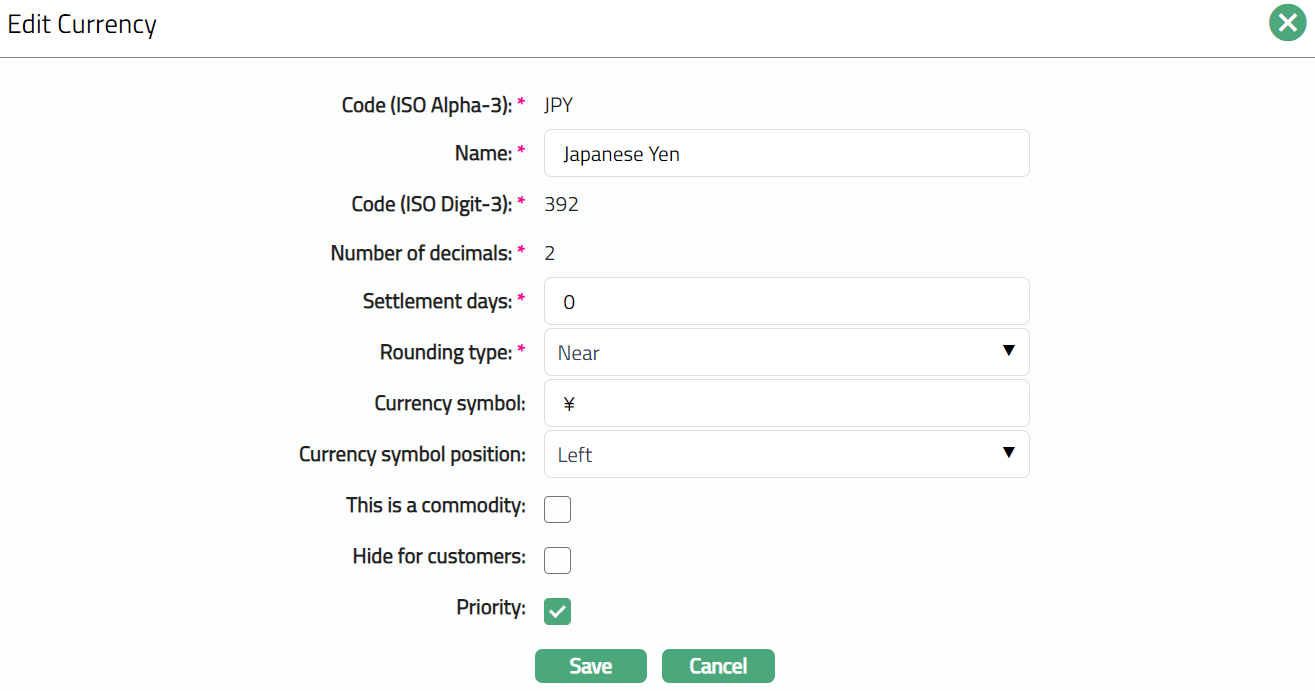
To add currency,
1. From Admin menu, click System Codes, Currency, and then Currency. All currencies available in Aura appear on the page, sorted alphabetically based on their ISO Alpha-3 codes.

2. Click Add. New Currency → General (1/3) page appears.
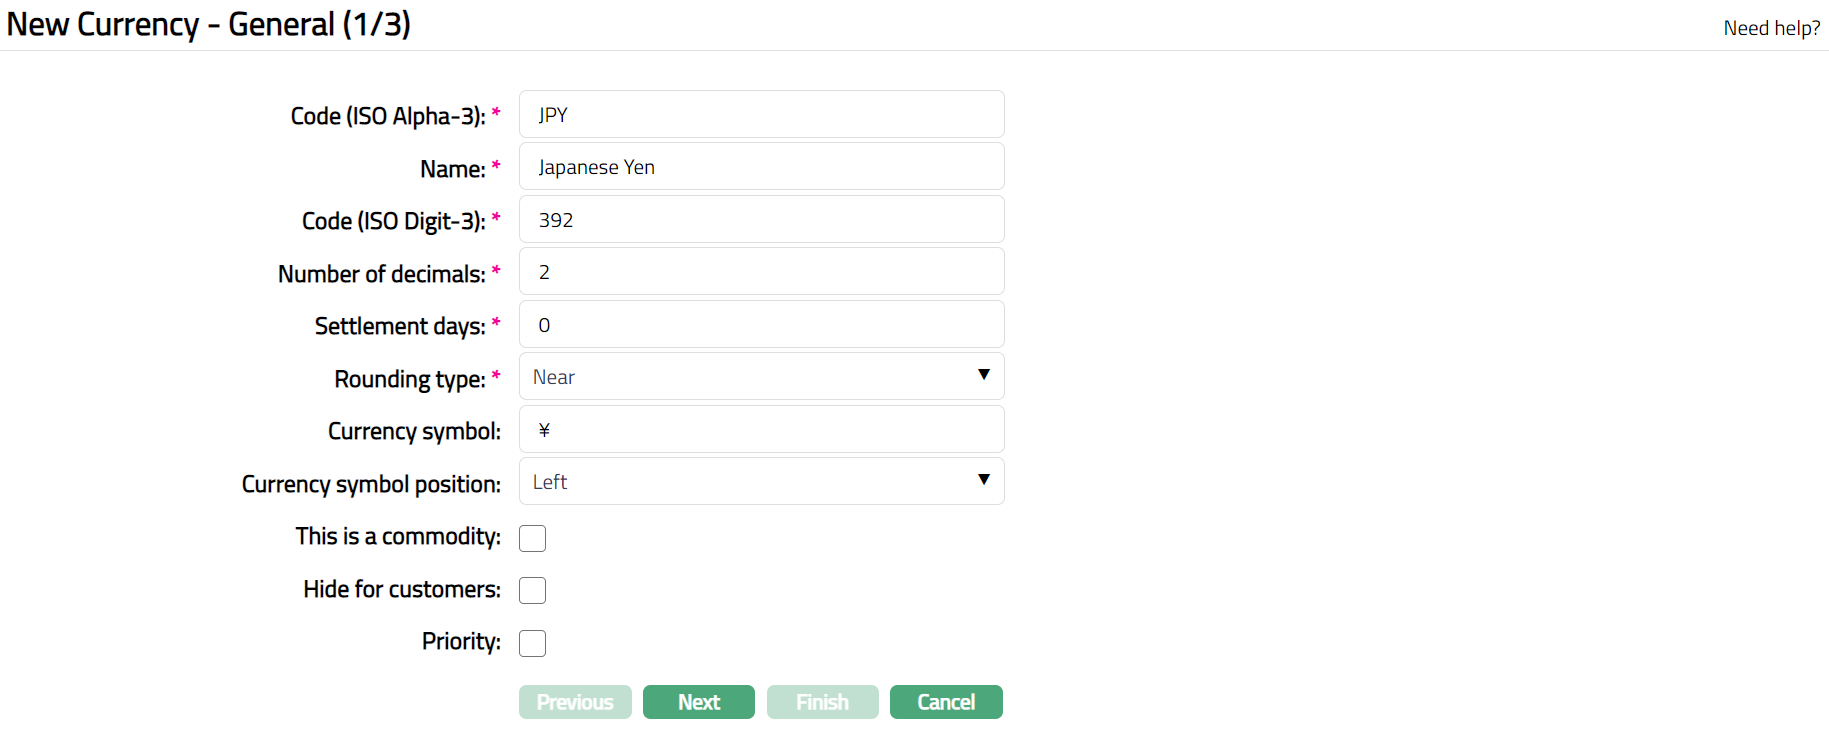
3. Specify Code (ISO Alpha-3) of the currency. For example, for Japanese Yen, type JPY.
4. Enter Name of the currency. For example, Japanese Yen.
5. Enter Code (ISO Digit-3) for the currency. For example, enter 392 for Japanese Yen.
6. Enter Number of decimals i.e., the number of minor units into which the base unit of the Currency can be divided into. This must be equivalent to the "minor unit" as specified by the ISO 4217 standard. For example, for Australian Dollar, 1 AUD = 100 cents and hence, the number of decimals is 2. For Japanese Yen, the number of decimals is 0. By default, the number of decimals will appear as 2. You can update it as required.
7. Enter Settlement days -- the number of days to settle transactions in that currency. By default, the Settlement days will appear as 0. You can update it as required.
8. Select Rounding type, Choose one of the following rounding methods to convert currency values in transactions:
- Up
For example, if Aura encounters a value of 10.677 it is rounded off to 10.68
- Down
For example, if Aura encounters a value of 10.674 it is rounded off to 10.67
- Near
For example:
Consider the amount is Rs 123. 343 and two decimals are allowed for the currency then Aura will near it to Rs 123.34.
Consider the amount is Rs 123. 346 and two decimals are allowed for the currency then Aura will near it to Rs 123.35.
Consider the amount is Rs 123. 345 and two decimals are allowed for the currency then Aura will near it to Rs 123.35.
9. Enter Currency symbol for the currency. For instance, enter ¥ for Japanese Yen.
10. Enter Currency Symbol position from the available drop-down list, choose one of the following options:
Left: Choose this option if the Currency symbol should appear on the left-hand side of the amount. For instance, ¥ 800
Right: Choose this option if the Currency symbol should appear on the right-hand side of the amount. For instance, 800 ¥
11. Select This is a Commodity check box if you are adding a currency the value of which is based on weight or other physical characteristics.
12. Select Hide for customers check box to indicate that this currency is not available for customers' web-based transactions.
13. Select Priority check box to make this currency appear at the top of the list of currencies in any other drop-down list of currencies in Aura.
Note: If multiple currencies are selected as priority, Aura sorts them in the alphabetic order of their currency codes. Other currencies that have not been assigned priority appear after the prioritized currencies and are also sorted in the alphabetic order.
14. Click Next. Maintain Custom Field Details (2/3) page appears.

15. Enter entityid as required.
16. Click Next. New Currency → Confirmation (3/3) page appears.
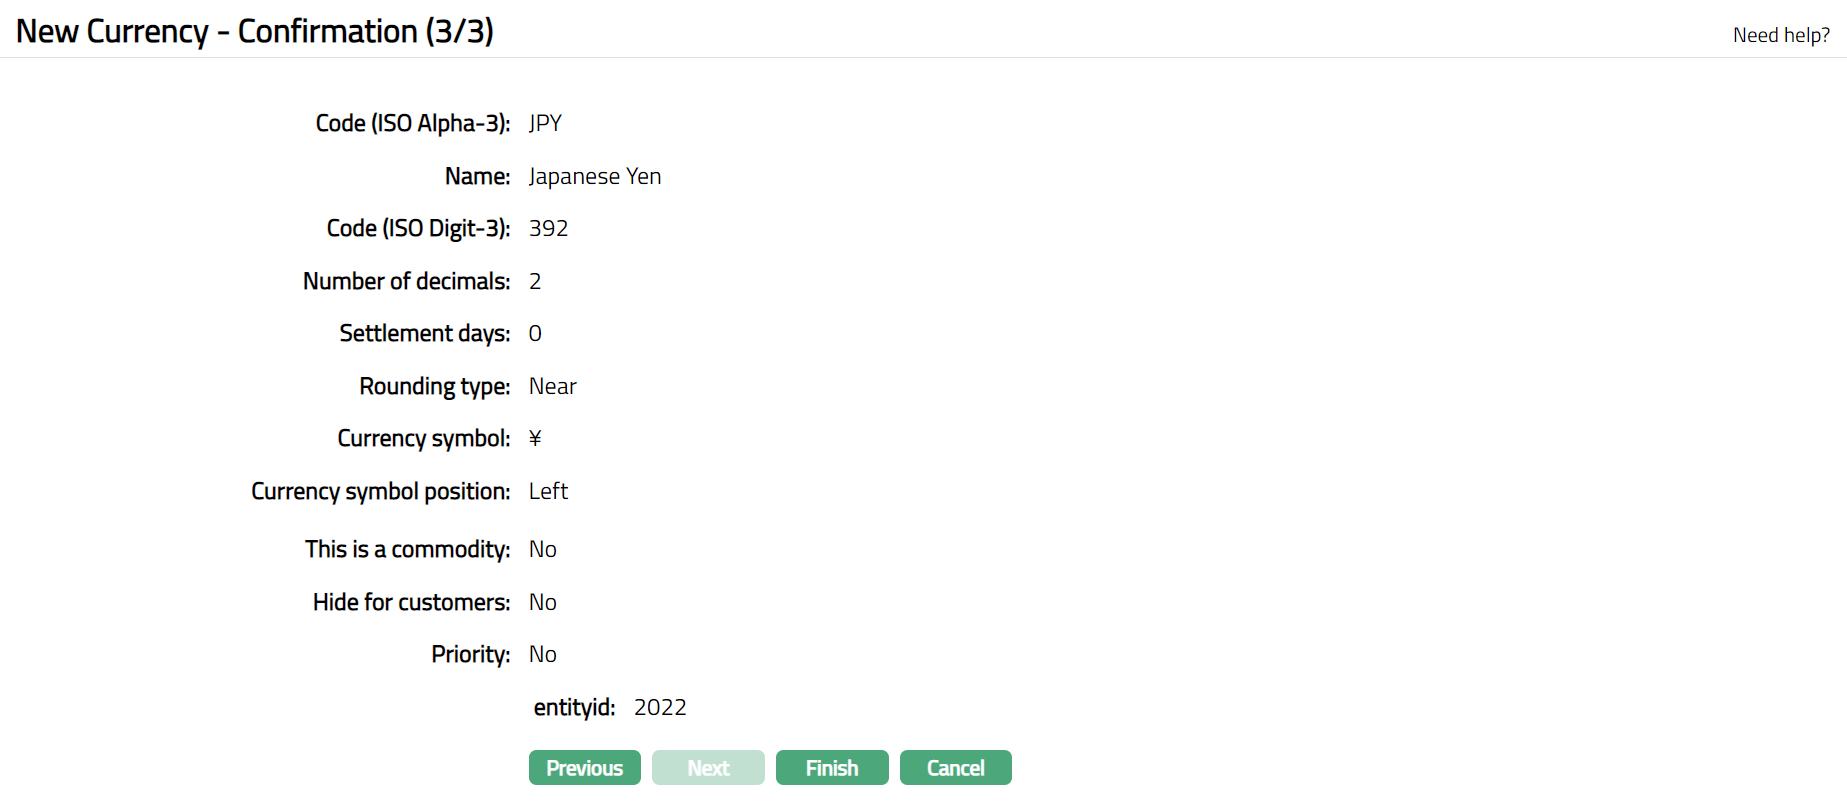
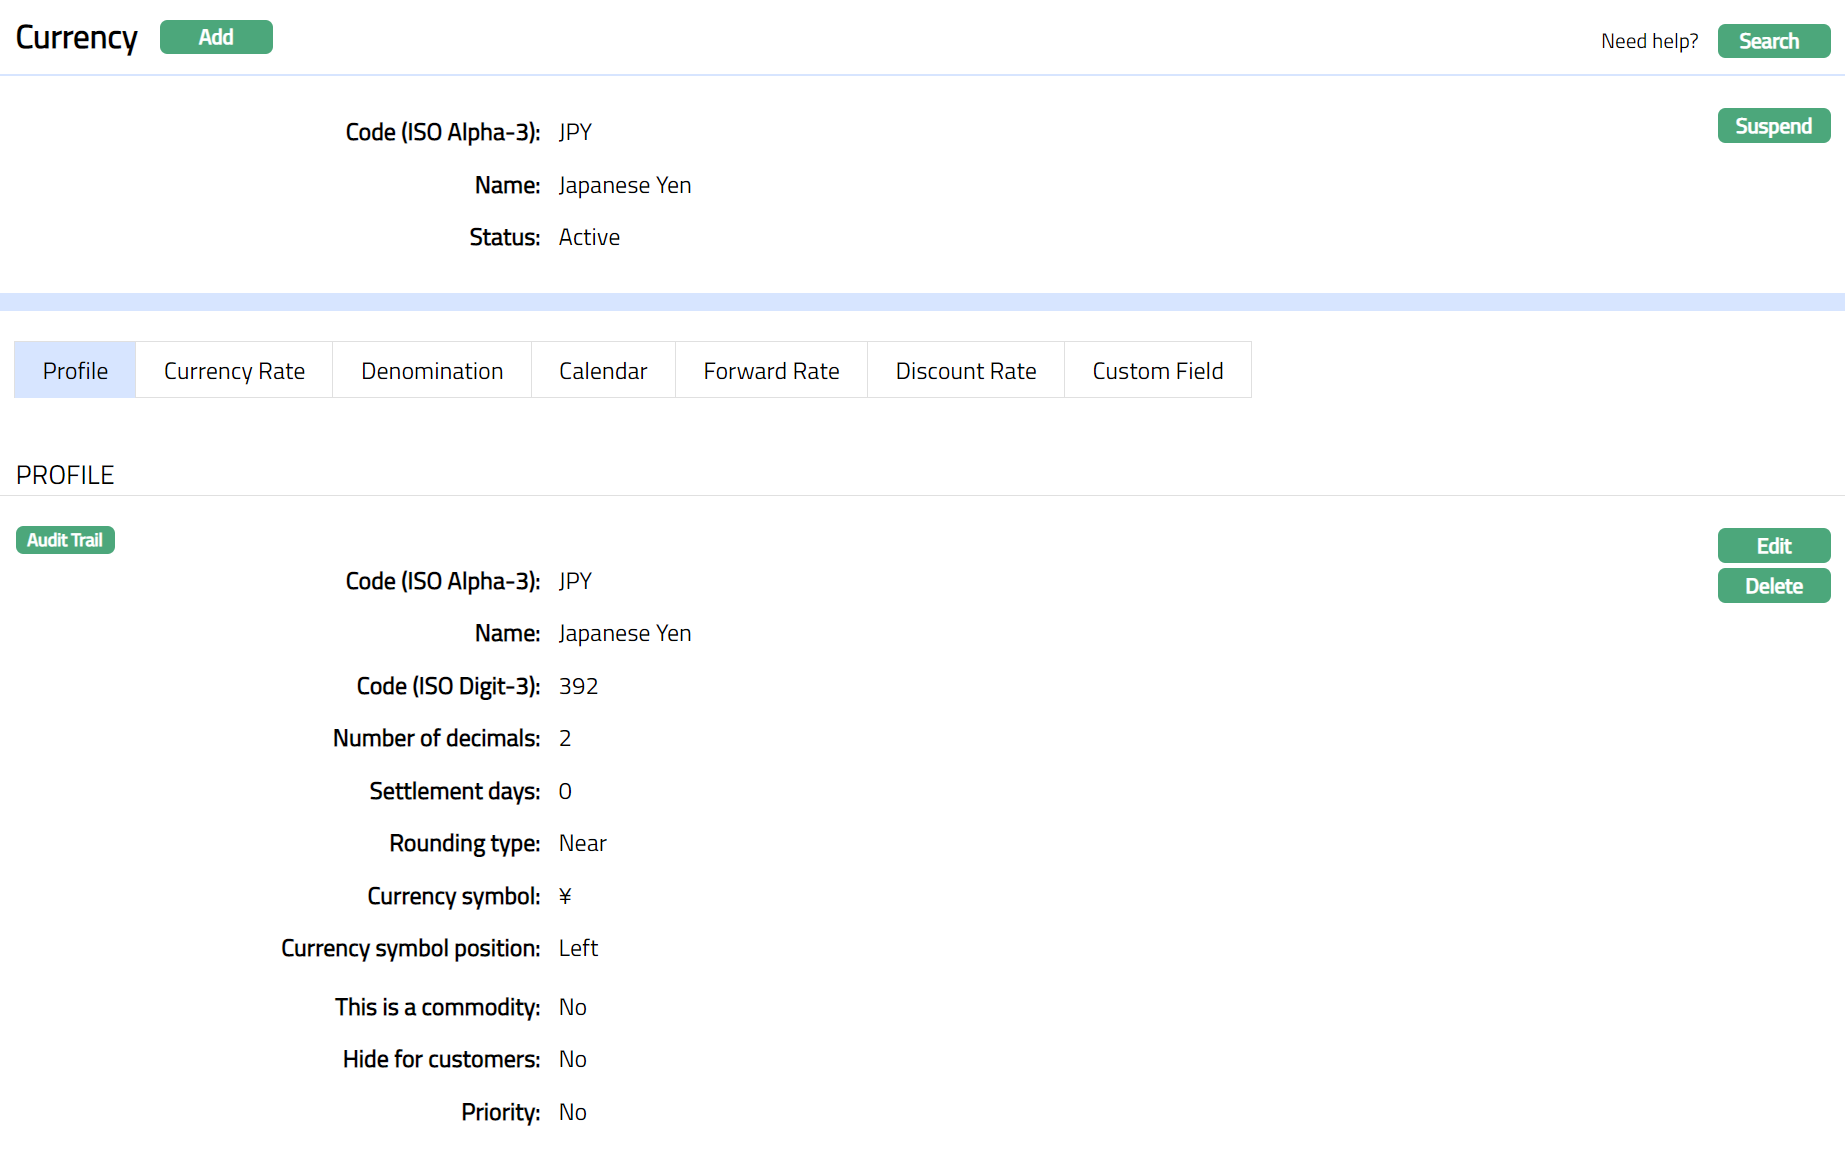
17. Click Finish. Currency page appears displaying the Profile tab by default with the details of the currency you added.
Functions: Add, Search, Suspend
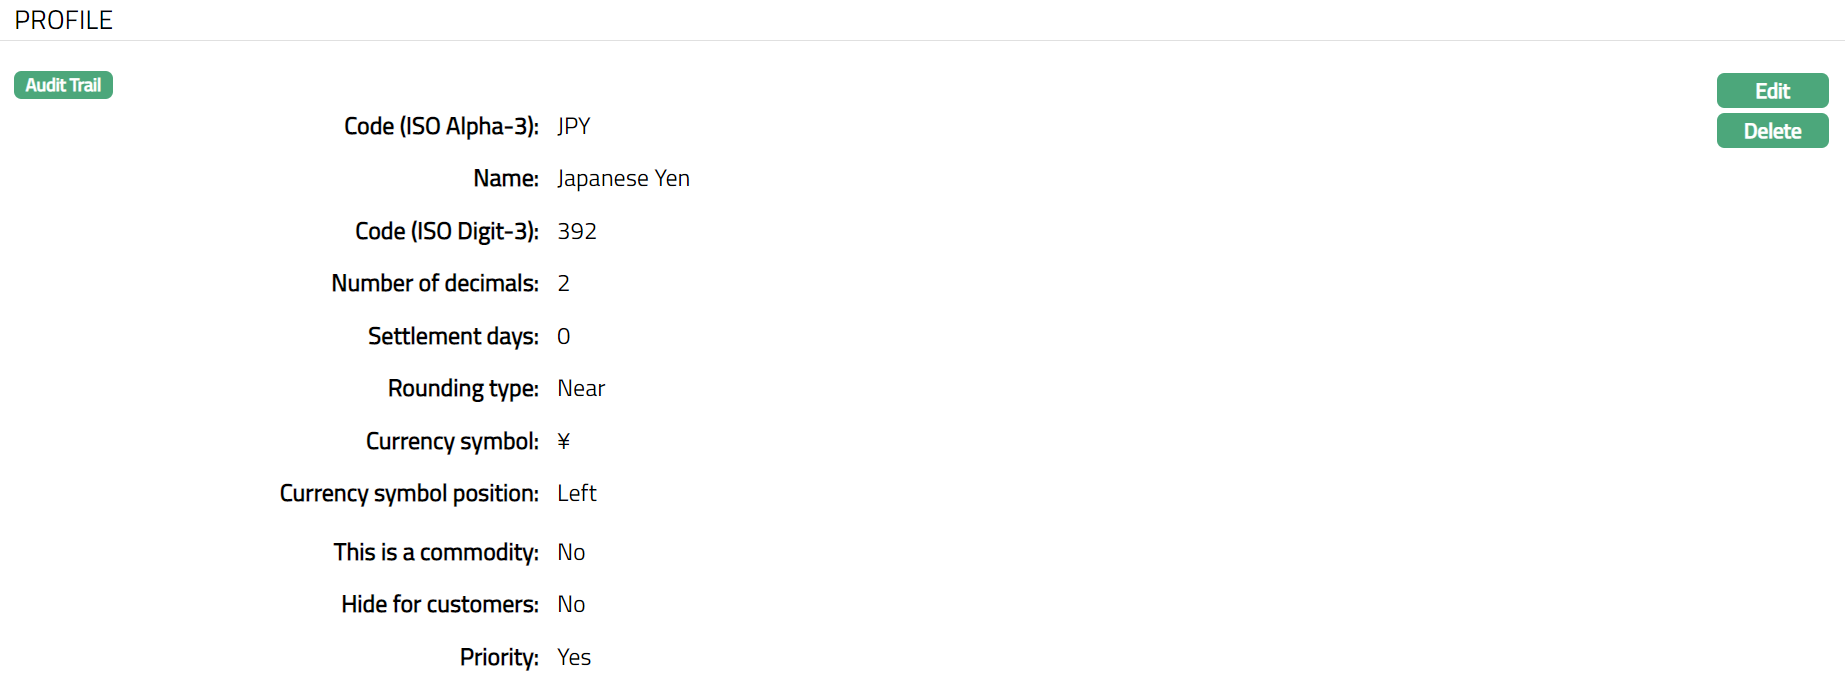
Profile
Profile tab shows the basic details of the currency.
1. From Admin menu, click System Codes, Currency, and then Currency. The Currency Search page appears. All Currencies available in Aura appear on the page.
2. Click on any of the existing Currency records to access the Currency page. The Profile tab appears by default.
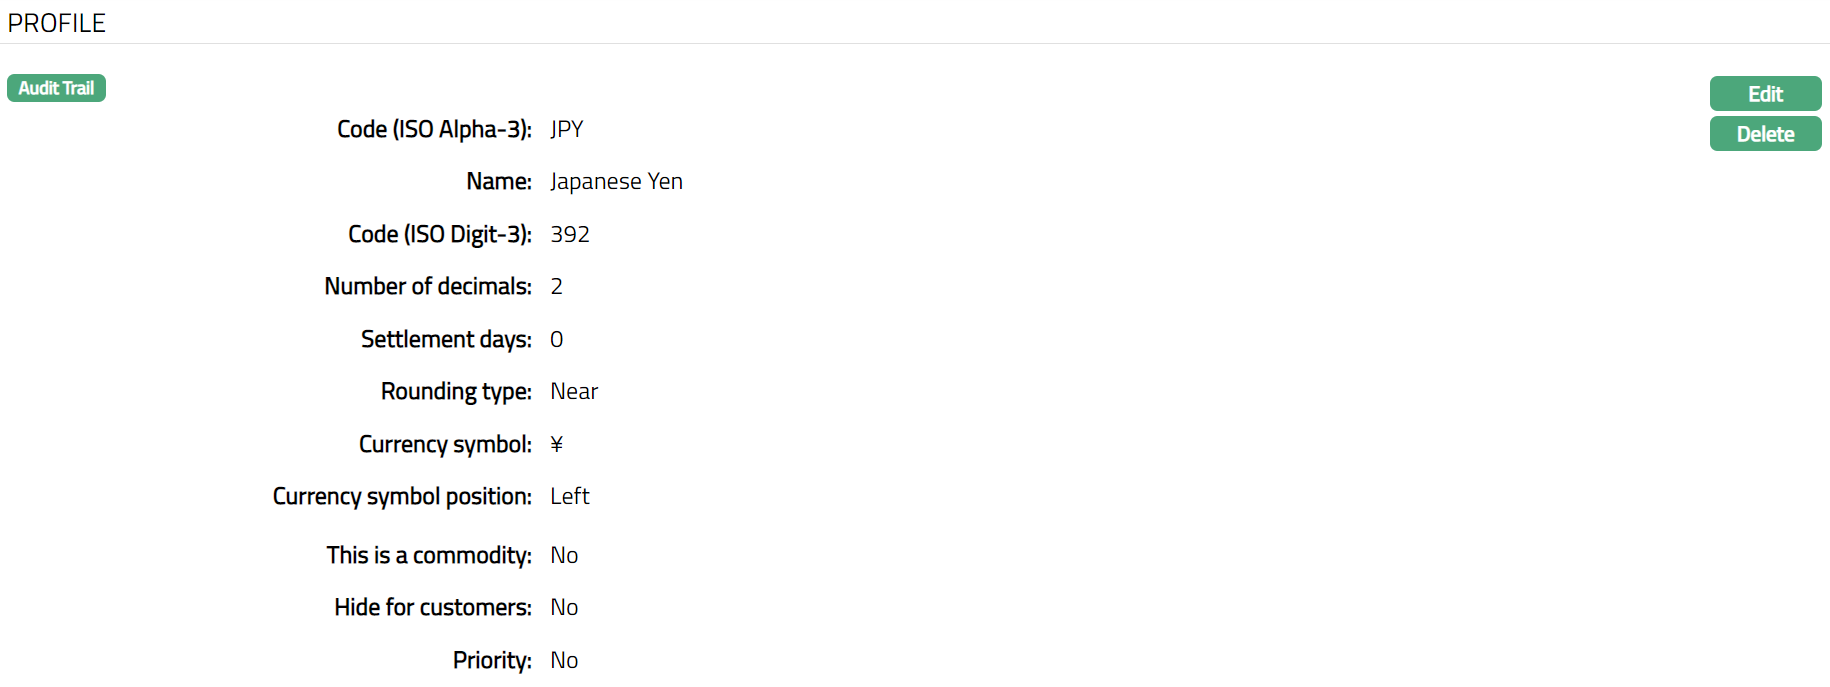
3. Click Edit. Edit Currency page appears.
Note: Except Code (ISO Alpha-3), Code (ISO Digit-3) and Number of decimals, all other fields are editable.
4. Click Save. Currency page appears with the edited details.
Functions: Edit, Delete
Delete: You can delete the Currency saved in Aura by a clicking on Delete button. Aura will ask for confirmation, on approving which the selected record will be deleted.
Currency Rate
Currency Rates are the exchange rates used while the bank carries out buy and sell transactions with customers. Customers can buy currency from or sell currency to the bank in the form of Telegraphic Transfer (TT), Traveler's Checks (TC), Bills, and Cash. The rates for each of these currency instruments and transactions vary and can be maintained with the help of Currency Rate.
To add a Currency Rate,
1. From Admin menu, click System Codes, Currency, and then Currency. The Currency Search page appears. All Currencies available in Aura appear on the page.
2. Click on any of the existing Currency records to access the Currency Rate page.
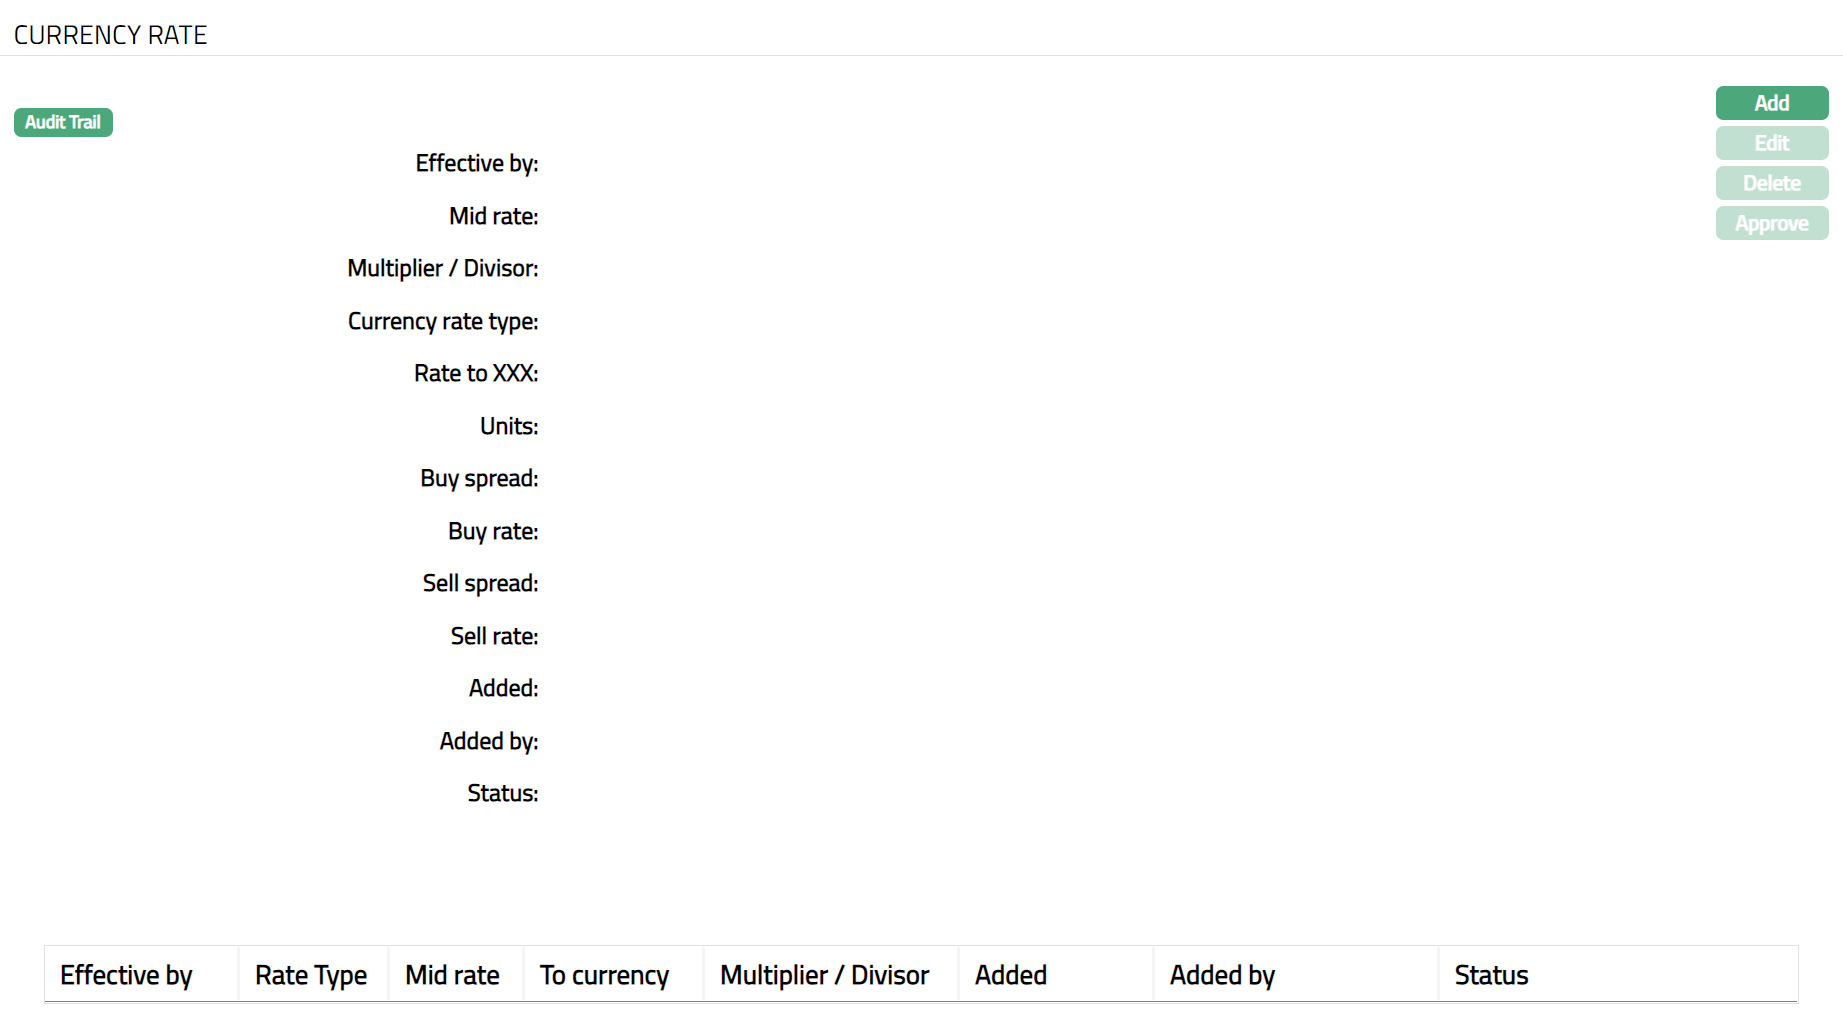
3. Click Add. New Currency Rate page appears.
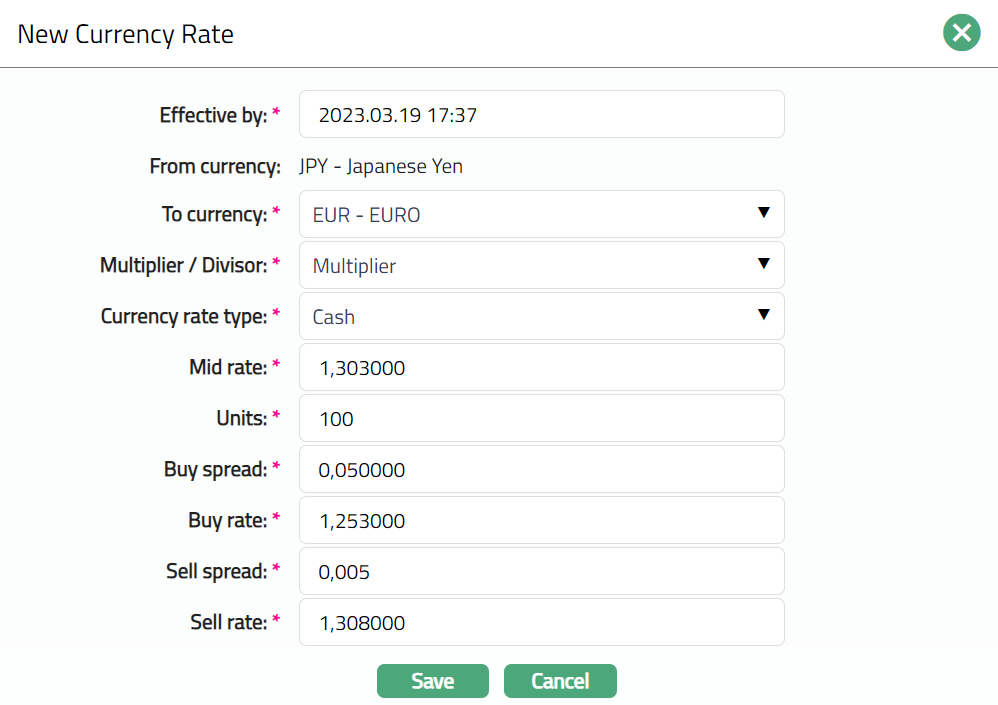
4. Effective by box shows the current business date and time by default. Update the date and time when the new rate should come into effect. The date can be only current or future date.
5. From currency is defaulted to the currency that you chose in the Currency page.
6. Select To currency from the available drop-down list, choose the currency against which the new rate becomes applicable.
7. Select Multiplier/Divisor from the drop-down list, choose the mathematical method you wish to use to compute the rate. The available list are Multiplier and Divisor.
8. Select Currency rate type from the drop-down list, choose the rate type to which this currency rate would be applicable. Currency Rate Types are maintained under System Codes → Currency → Currency rate types.
9. Enter the number in Units box, this is the number of units of the From currency for the currency pair. See also the examples under Mid rate below.
10. In the Mid rate box, enter the exchange rate that should be applied for transactions between the two currencies. You should enter the mid rate based on the selected mathematical method as detailed below:
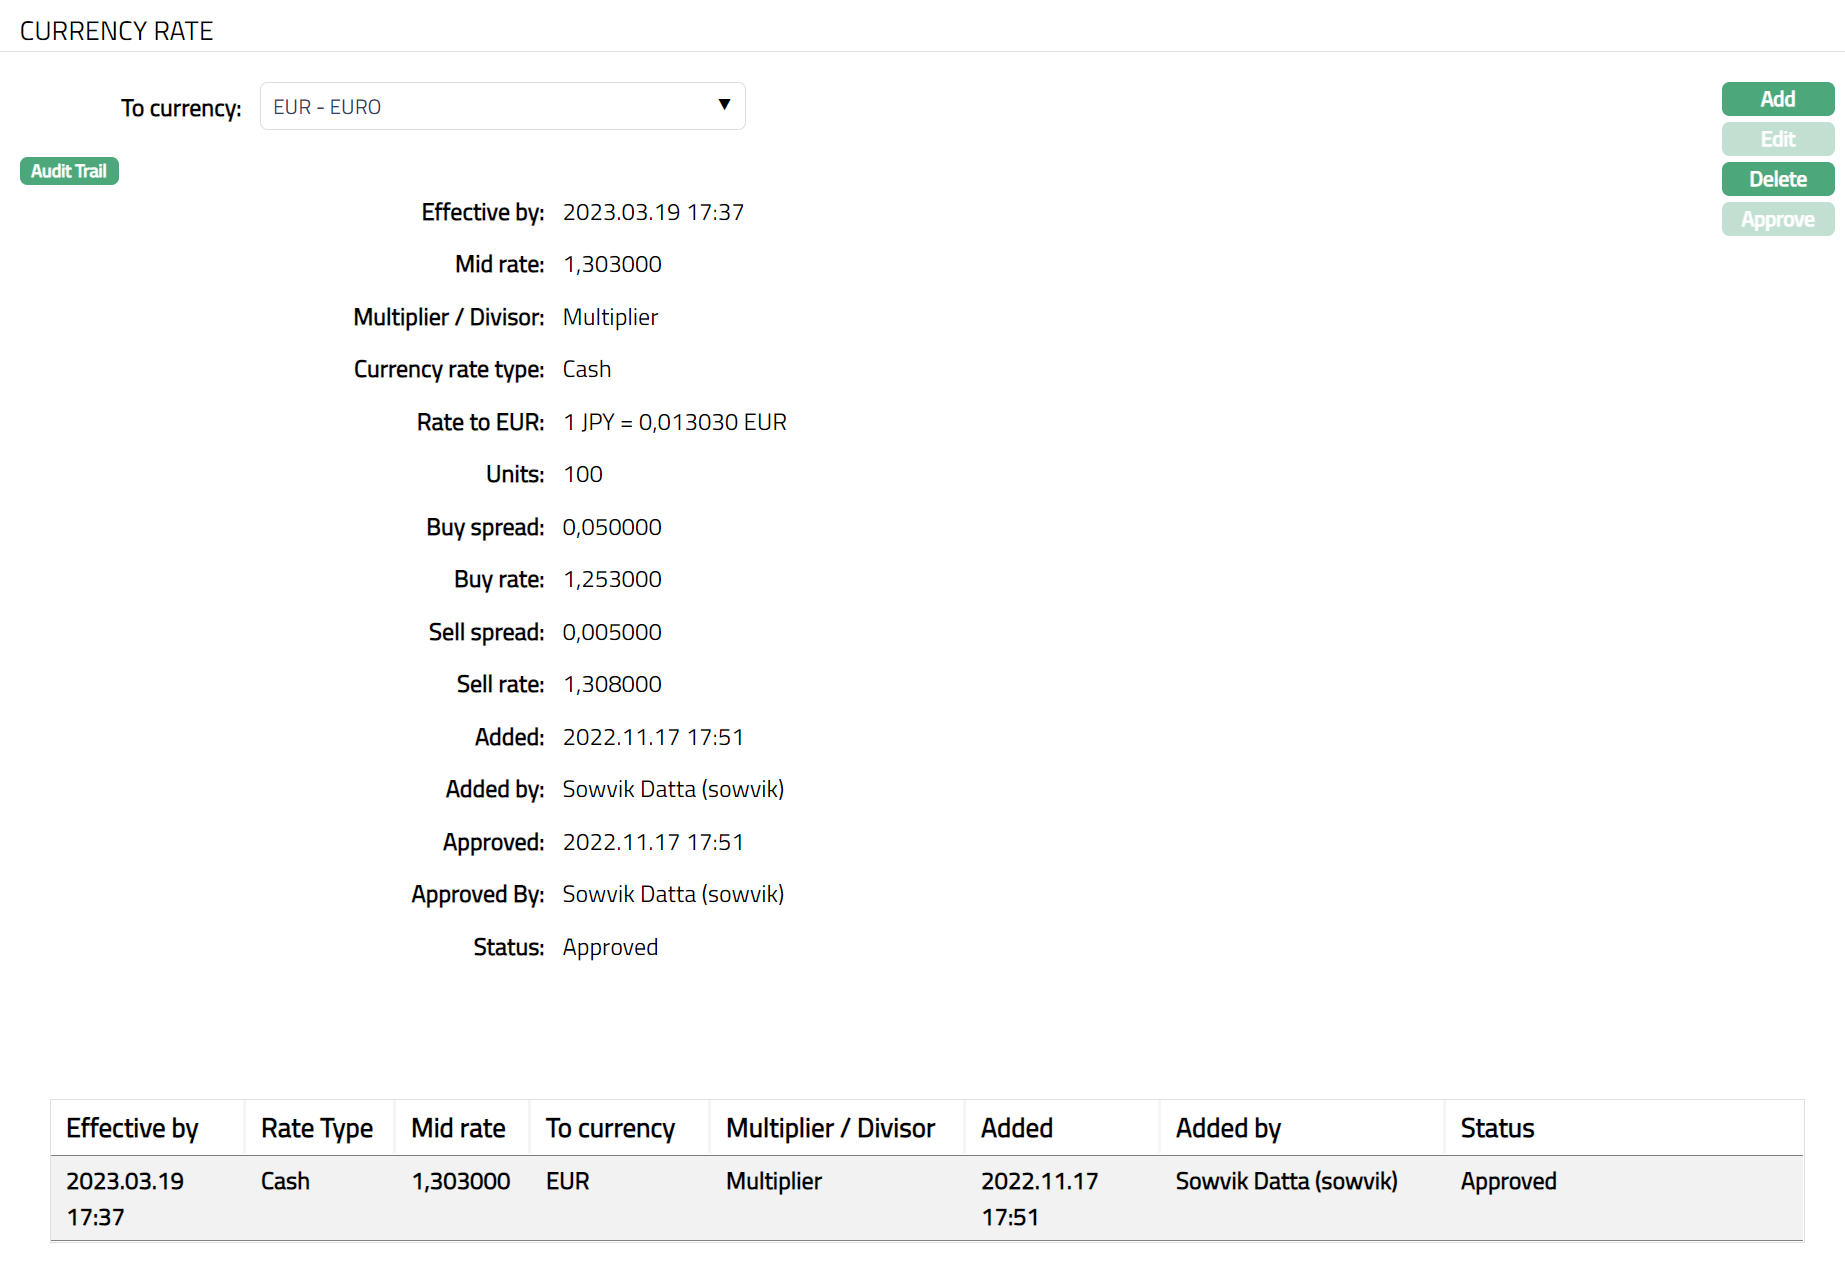
Consider for example the exchange rate for 100 JPY = 1.303000 EUR. If you have chosen the mathematical method as Multiplier, you must maintain 1.303000 as mid rate and units as 100 for the currency pair JPY: EUR as shown below:
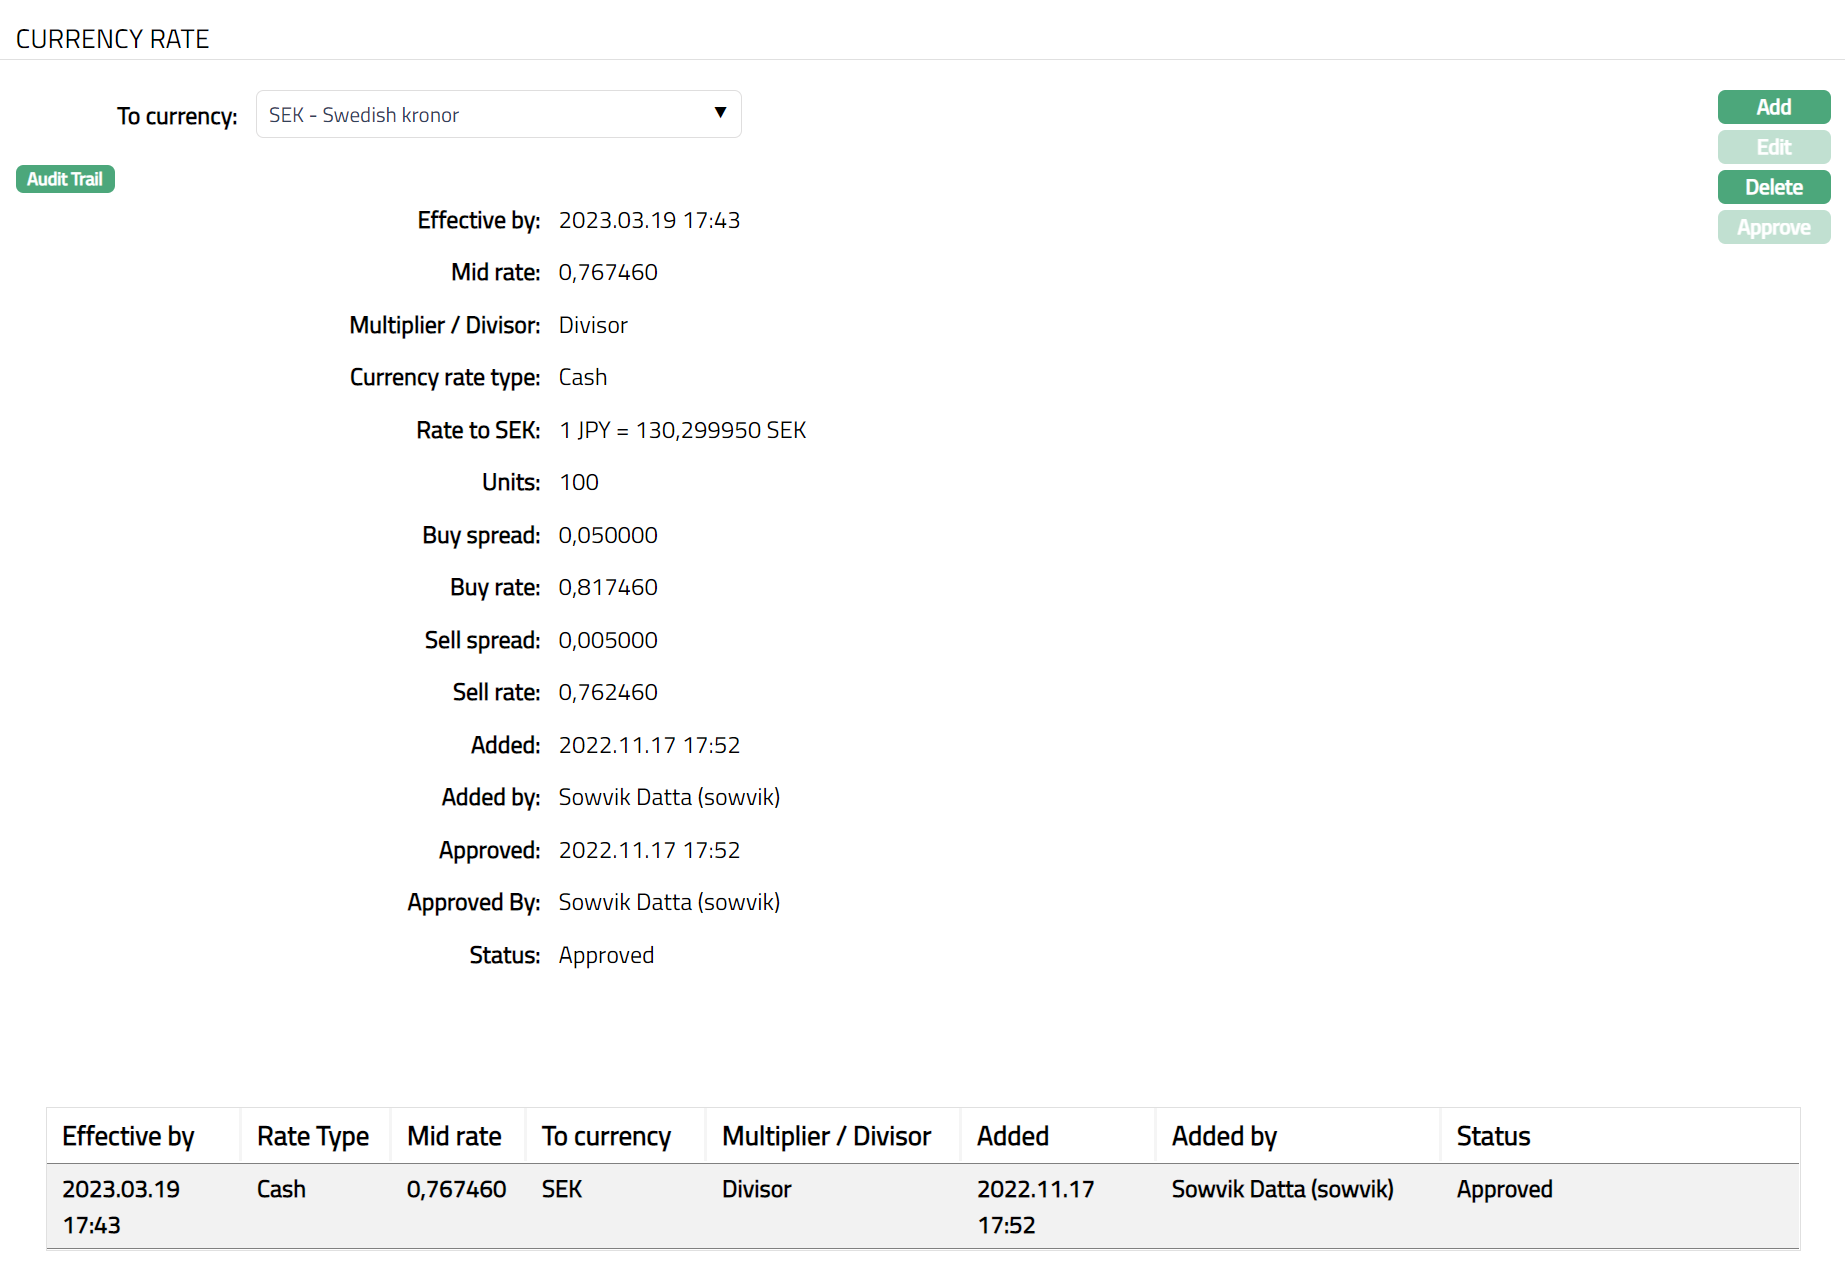
If you select the mathematical model Divisor, then you must maintain the mid rate as 0.767460 (i.e., 1/ 1.3030) and units as 100 for the currency pair JPY: SEK as shown below:
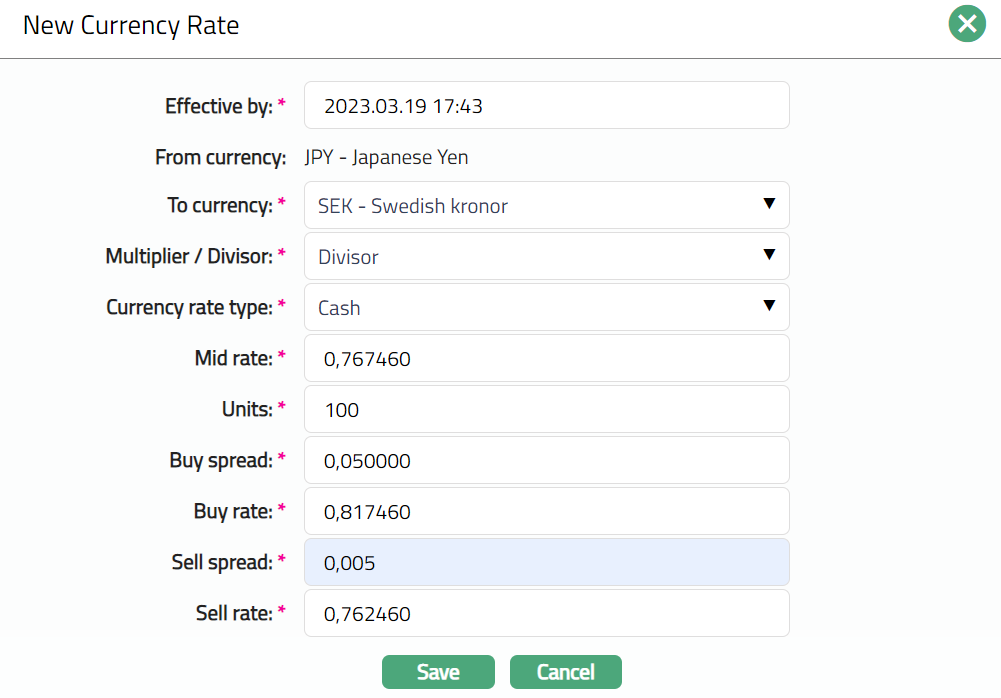
11. Enter the profit margin in the Buy spread box, the profit margin specified over the Mid Rate when your bank buys the To currency using From currency. If you enter the Mid Rate and the Buy Rate, Aura computes the Buy spread based on the Multiplier / Divisor option specified.
12. Enter the rate in the Buy rate box, the rate at which your bank buys the To currency using the From currency. If you enter the Mid Rate and the Buy Spread, Aura computes the Buy Rate based on the Multiplier / Divisor option specified.
13. Enter the profit margin in the Sell spread box, the profit margin specified over the Mid Rate when your bank sells the To currency against the From currency. If you enter the Mid Rate and the Sell Rate, Aura computes the Sell spread based on the Multiplier / Divisor option specified.
14. Enter the rate in the Sell rate box, the rate at which your bank sells the To currency against the From currency. If you enter the Mid Rate and the Sell Spread, Aura computes the Sell Rate based on the Multiplier / Divisor option specified
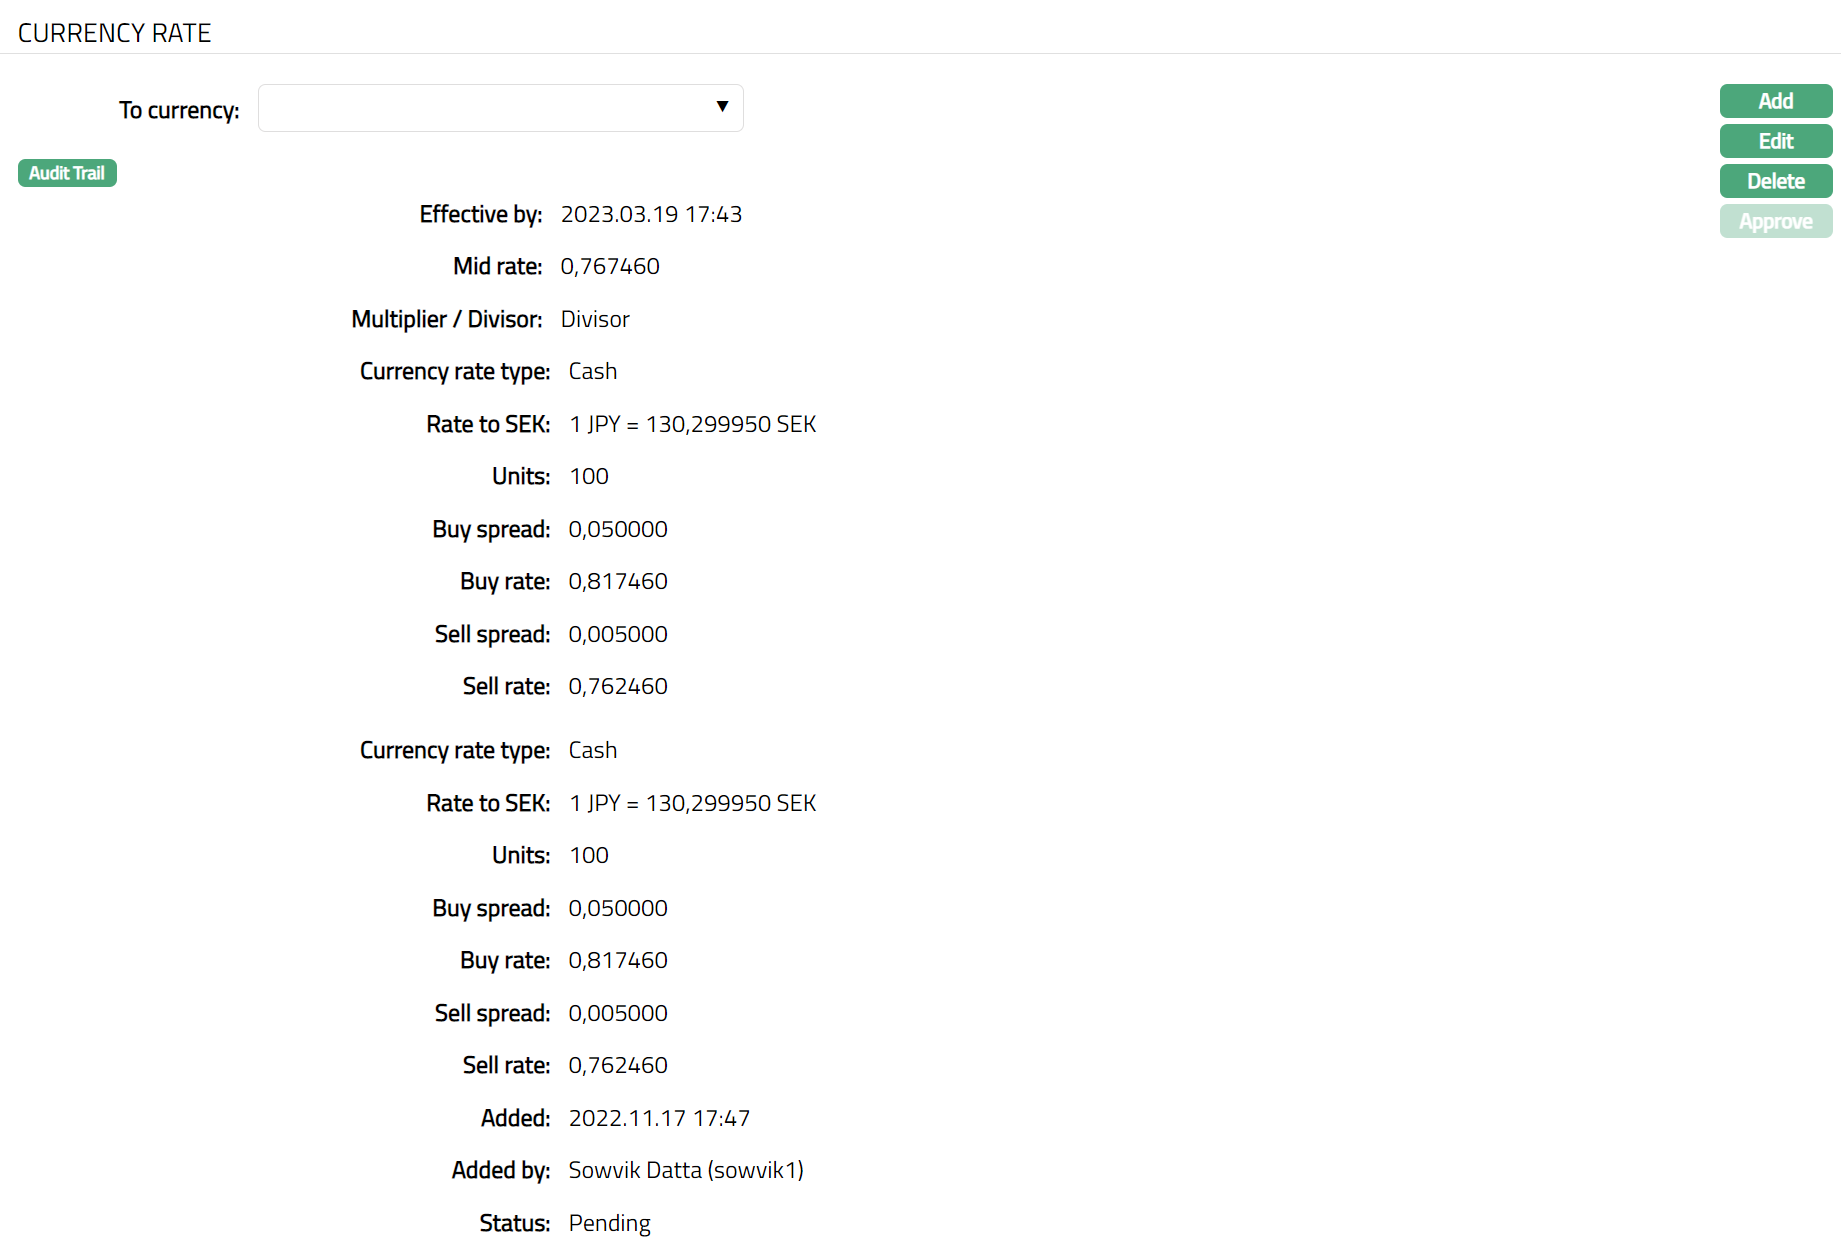
15. Click Save. Currency Rate page appears with the added details.
In the currency rate view page, Aura displays the Mid-rate as per the following logic: a) If you have maintained the mathematical method as Multiplier, Units as 100 and mid rate of 1.3030000 for the currency pair JPY: EUR, Aura will display the Mid rate as 100 JPY = 1.303000 EUR
b) If you have maintained the mathematical method as Divisor, Units as 100 and mid rate as 0.767460 for the currency pair JPY: SEK, Aura will display the Mid rate as 100 JPY = 1.303000 SEK (i.e., 1/ 0.767460).
Functions: Add, Edit, Delete, Approve
Note: You cannot edit the currency rate once the rates are approved.
Delete: You can delete the Currency Rate saved in Aura by a clicking on Delete button. Aura will ask for confirmation, on approving which the selected Currency rate will be deleted.
Approve: If you want to Approve a Currency Rate, then retrieve the record and Click on Approve. Aura will ask for confirmation. Once the tab is approved, status gets changed from Pending to Approved.
The additional fields that you can view in the Settings tab are as follows:
Status field denotes the status of the record.
Added field denotes the date on which the record was added.
Added by field denotes the name of the user who created the record.
Approved field denotes the date on which the record was approved and is displayed only on approval.
Approved by field denotes the name of the user who approved the record and is displayed only on approval.
Computing Currency Rates using the Multiplier Method
Here are some examples that can help you understand how currency rates are computed in Aura.
Essential Formulae
Buy Rate = Mid Rate --- Buy Spread
Sell Rate = Mid Rate + Sell Spread
Buy Spread = Mid Rate --- Buy Rate
Sell Spread = Sell Rate --- Mid Rate
Example
Mid-Rate for 100 JPY: EUR = 1.3030
Buy Spread = 0.5
Sell Spread = 0.5
Computed Values
Buy Rate = 1.3030 - 0.05 = 1.253000
Sell Rate = 1.3030 + 0.05 = 1.353000
Computing Currency Rates using the Divisor Method
Essential Formulae
Buy Rate = Mid Rate + Buy Spread
Sell Rate = Mid Rate --- Sell Spread
Buy Spread = Buy Rate --- Mid Rate
Sell Spread = Mid Rate --- Sell Rate
Example
Mid-Rate for 100 JPY: SEK = 0.767460
Buy Spread = 0.005
Sell Spread = 0.005
Computed Values
Buy Rate = 0.767460 + 0.005 = 0.772460
Sell Rate = 0.767460 --- 0.005 = 0.762460
Denomination
Denomination comprises a series of valid values of Notes or Coins in a currency.
To add a Denomination for a currency
1. Click Denomination tab. Denomination page appears

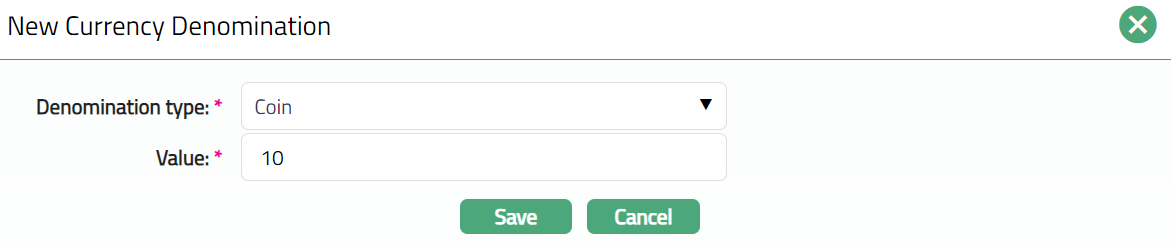
2. Click New. New Currency Denomination page appears.
If Coin is selected.
If Note is selected.
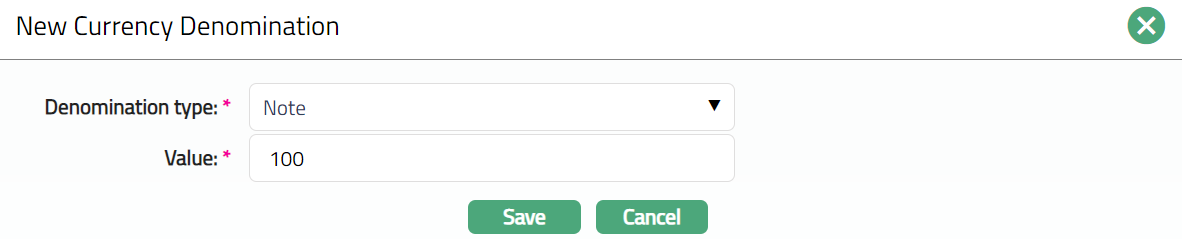
3. Select the Denomination Type from the drop-down list, choose one of the following values:
- Note
- Coin
4. Enter the amount in the Value box, the amount or value associated with the specified denomination type.
5. Click Save. Denomination page appears with the list of denomination types and the values updated for the currency.

Functions: New, Edit, Delete
To Edit denomination,
1. Select the required Denomination type you want to edit.
2. Click Edit. Edit Currency Denomination page appears.
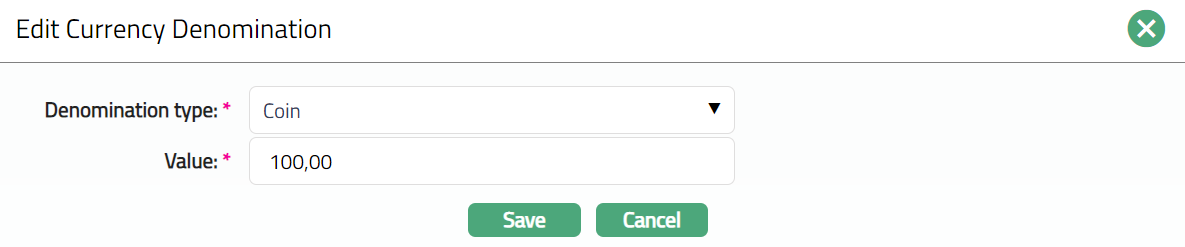
Note: All fields are editable.

Functions: New, Edit, Delete
Delete: You can delete a Denomination saved in Aura by a clicking on Delete button. Aura will ask for confirmation, on approving which the selected Denomination will be deleted.
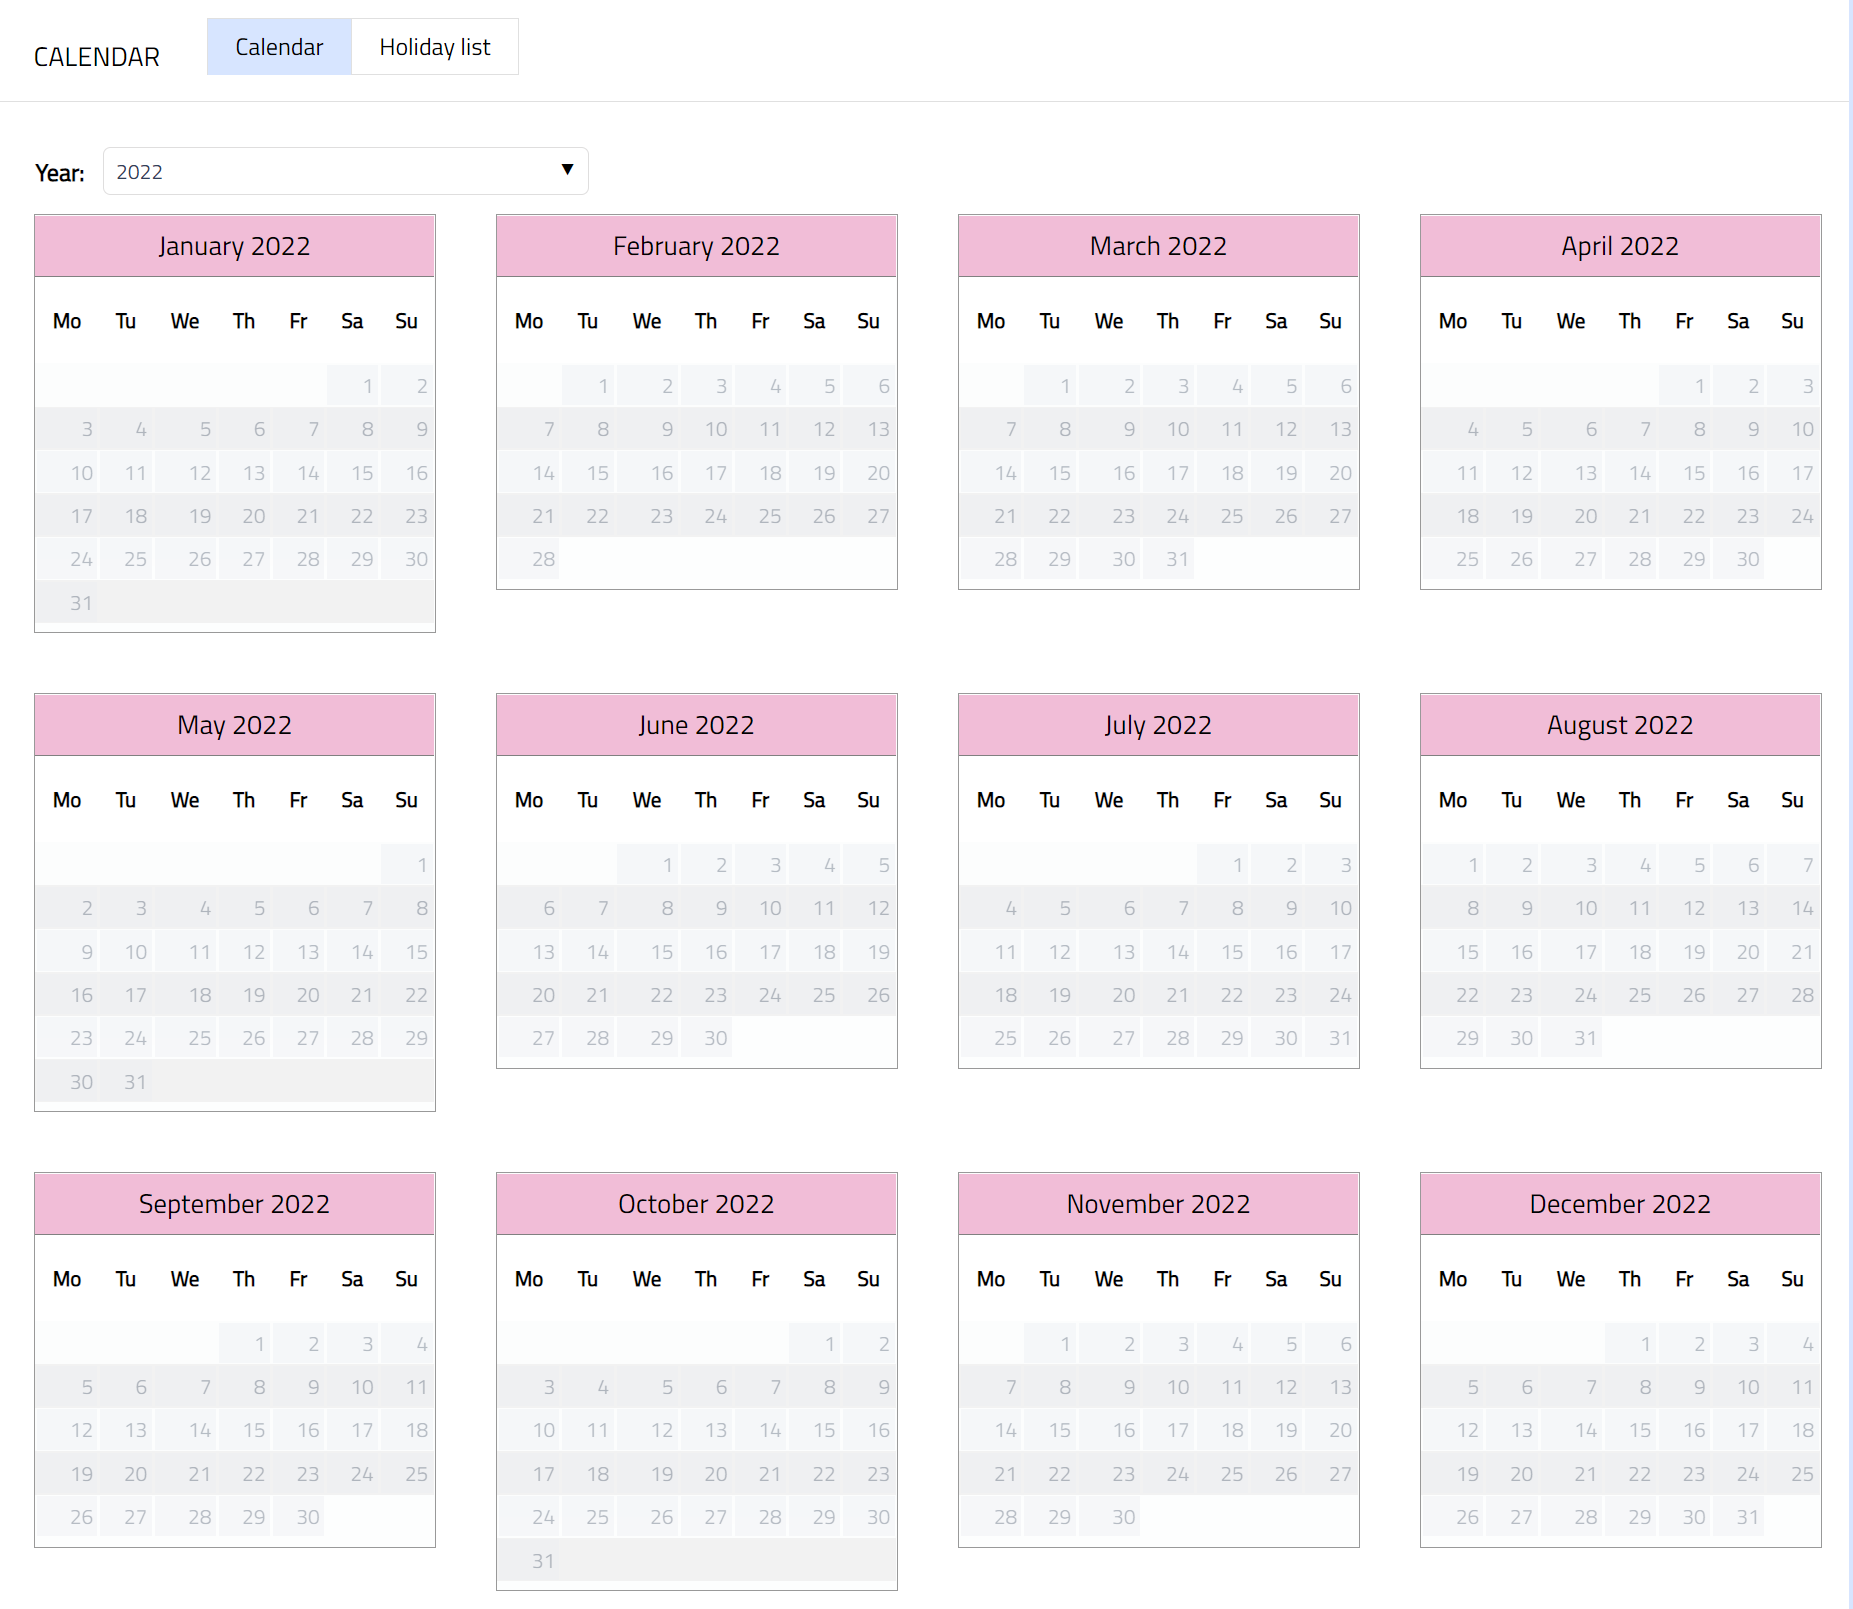
Calendar
The Calendar tab allows you to maintain the holiday(s) for the Currency. This consists of two sub-tabs -- Calendar and Holiday List. The Calendar sub-tab displays the holidays created in the Holiday List sub-tab.
Holiday List:
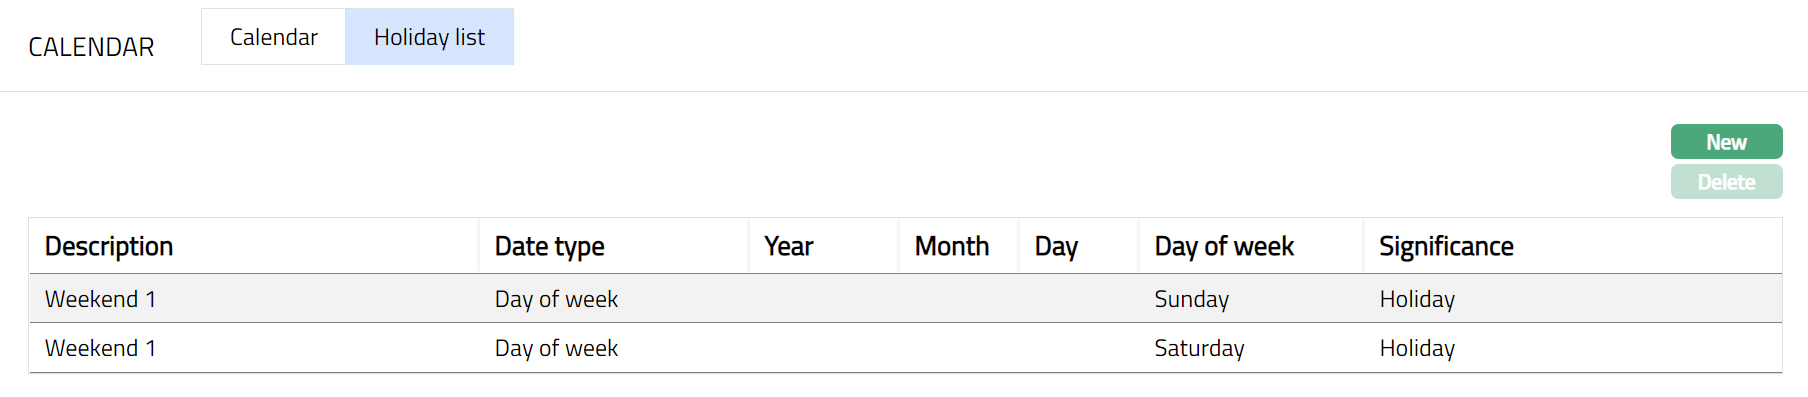
For a new Currency record, the Holiday records will not be available under the Holiday List sub-tab (as shown below) and therefore, need to be added.

1. Click New. New Holiday List page opens up.

2. Enter Description for the new Holiday record. For example, Weekend 1.
3. Select Date type from the available list of drop-down options.
For example, select Day of week.
Note: The available options are:
| Criteria | Description |
|---|---|
| Day of Week | Recurrence for that day of all the weeks |
| Month and Day | Recurrence for that day of the month every year |
| Date | One-time holiday / working day for this particular date |
| End of Month | Recurrence for every month end |
4. Based on the Date type selected above (see Sl. No. 3), the following additional field(s) will open up:
Date type = Day of week; new field Day of week is added, which has the drop-down options from Monday to Sunday.
Date type = Month and day; new fields Month and Date are added, which have drop-down options from January to December (for Month) and 1 to 31 (for Date).
Date type = Date; new field Date is added, which allows you to select any date from a date picker.
Date type = End of month, new field Month is added, which has the drop-down options from January to December
Based on the example given in Sl. No. 3, select Saturday in the Day of week field, as shown below:
5. Select Significance of the day / date specified from the radio button options -- either Holiday or Working day. For example, select Holiday.
6. Click Save. Holiday page appears with the new Holiday record.
Note: Similarly, you can add another day as Holiday.
Functions: New, Delete
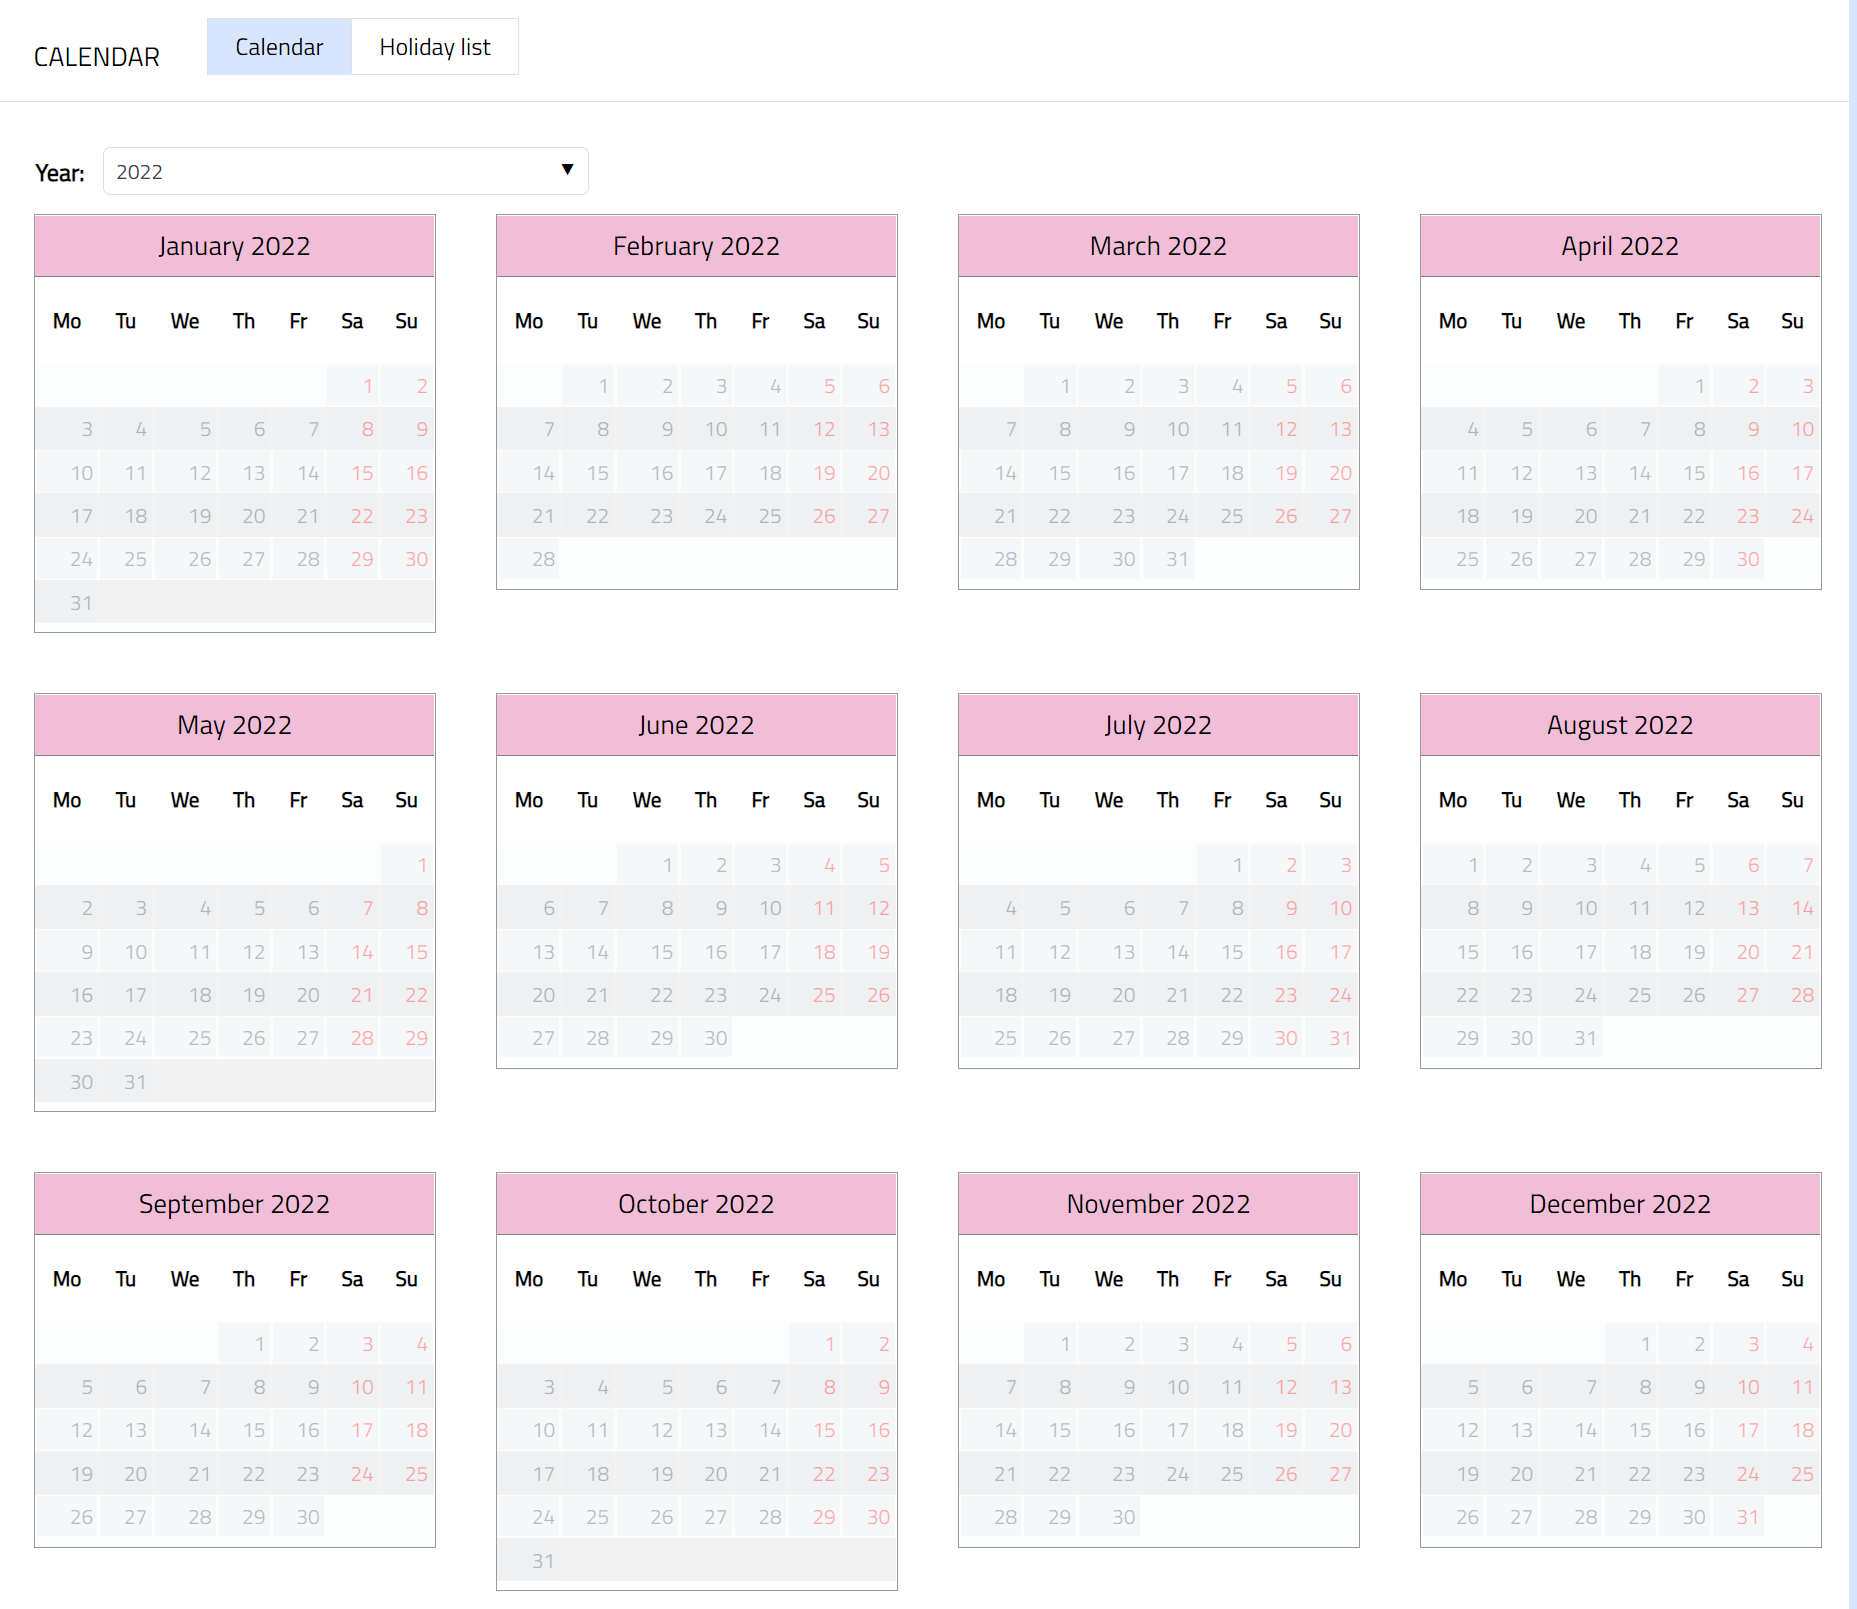
Calendar:
1. All the Holidays in Aura will be displayed in red for different years chosen in the Calendar sub-tab. For example, all Saturdays and Sundays will be displayed in red.
Holiday List:
For a new Currency record, the Holiday records will not be available under the Holiday List sub-tab (as shown below) and therefore, need to be added.
1. Click New. New Holiday List page opens up.
2. Enter Description for the new Holiday record. For example, Weekend 1.
3. Select Date type from the available list of drop-down options. For example, select Day of week.
Note: The available options are:
| Criteria | Description |
|---|---|
| Day of Week | Recurrence for that day of all the weeks |
| Month and Day | Recurrence for that day of the month every year |
| Date | One-time holiday / working day for this particular date |
| End of Month | Recurrence for every month end |
4. Based on the Date type selected above (see Sl. No. 3), the following additional field(s) will open up:
Date type = Day of week; new field Day of week is added, which has the drop-down options from Monday to Sunday.
Date type = Month and day; new fields Month and Date are added, which have drop-down options from January to December (for Month) and 1 to 31 (for Date).
Date type = Date; new field Date is added, which allows you to select any date from a date picker.
Date type = End of month, new field Month is added, which has the drop-down options from January to December
Based on the example given in Sl. No. 3, select Saturday in the Day of week field, as shown below:
5. Select Significance of the day / date specified from the radio button options -- either Holiday or Working day. For example, select Holiday.
6. Click Save. Holiday page appears with the new Holiday record.
Note: Similarly, you can add another day as Holiday.
Functions: New, Delete
Calendar:
1. All the Holidays in Aura will be displayed in red for different years chosen in the Calendar sub-tab. For example, all Saturdays and Sundays will be displayed in red.
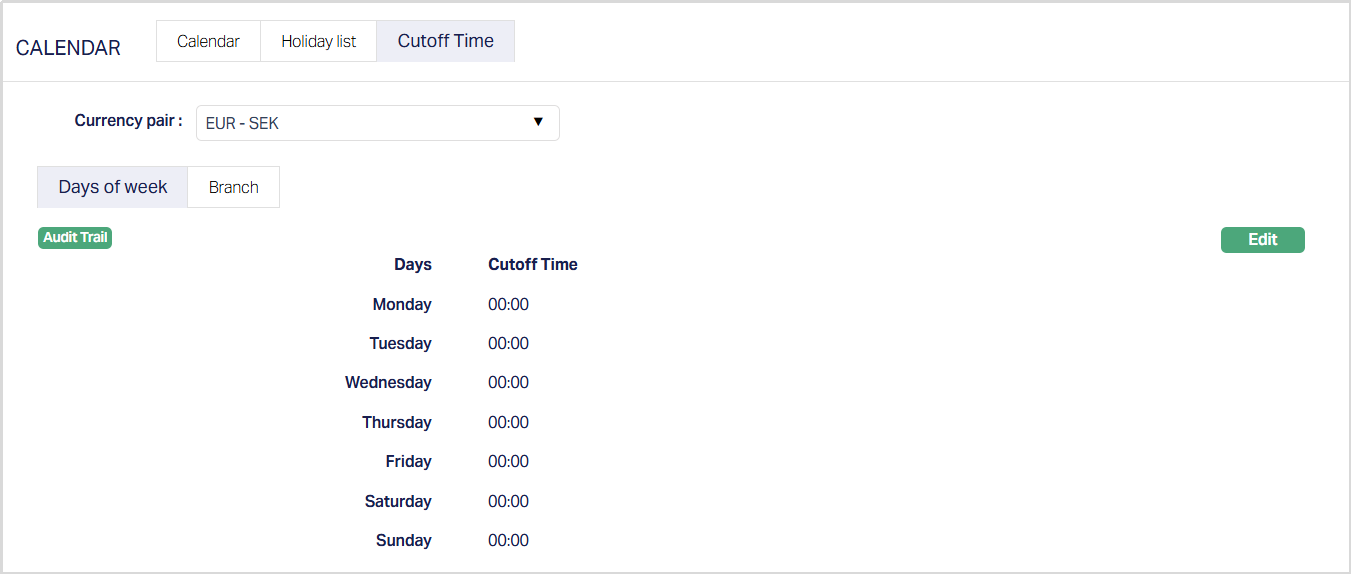
Cutoff Time
The Cutoff Time sub-tab allows you to maintain the latest time by which transactions for a currency pair can be processed for the same day’s value. When a transaction comes after the cut-off time, the module handling the transaction decides whether it should move to the next value date based on the Currency Calendar and Holiday List.
Whenever a currency pair is created in Aura, a default Cut-off Time record is inserted automatically for all days of the week with the Cut-off Time set to 00:00 (24-hour format). You can update the cut-off Time as required.
Aura always uses the Entity’s time zone when you maintain the cut-off time.
To view or update Cut-off Time
1. Access the Cutoff Time tab under the Calendar tab. The Currency pair field appears.
This field will be blank because no currency pair is selected yet. You must choose/select the required currency pair from the drop-down list to view or maintain the Cutoff Time.
Aura displays the list of currency pairs created through the Currency Rate tab. A currency pair is created automatically when you maintain a currency rate between two currencies.

After you select the currency pair from the drop-down list, Aura displays the Days of week and Branch sub-tabs. Sample screenshot is shown below.
Function: Edit
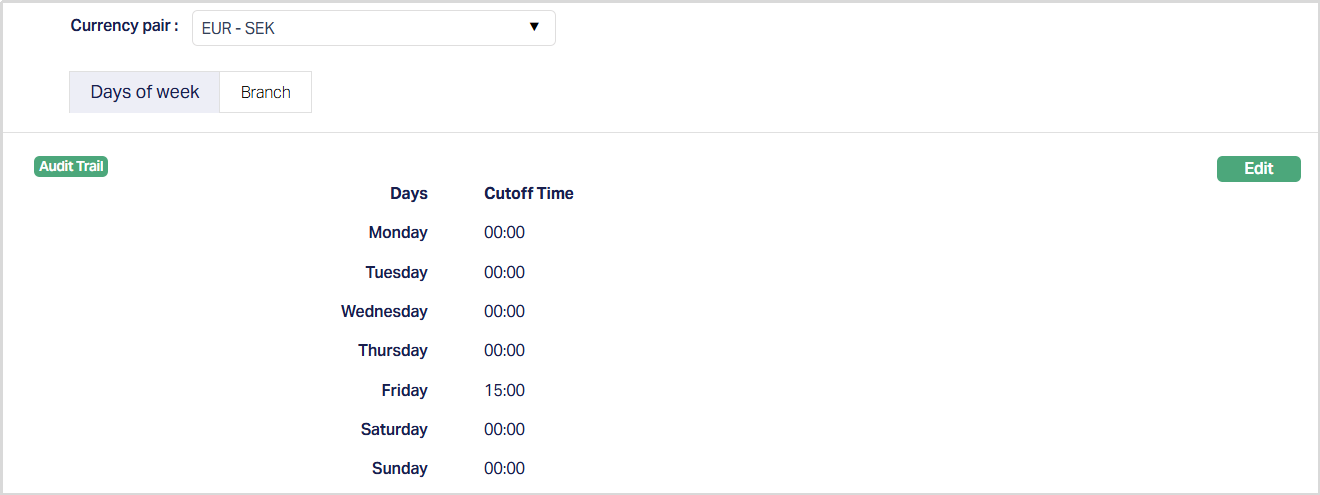
Days of week
The Days of week tab displays the cutoff time maintained for each day of the week for the selected currency pair. The default cutoff time is 00:00 for all days when a new currency pair is created.
To Edit,
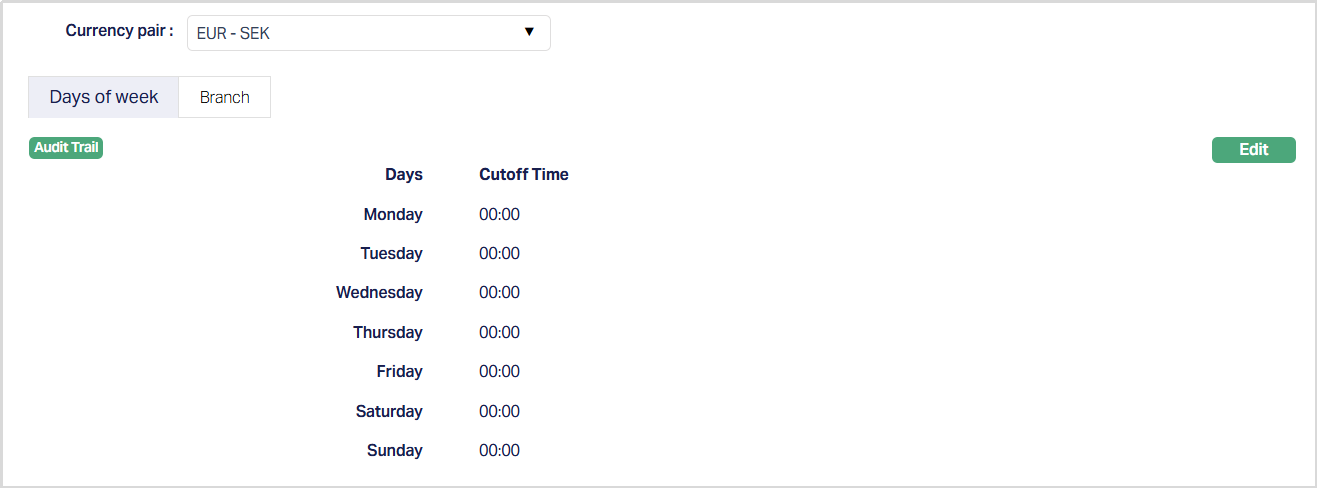
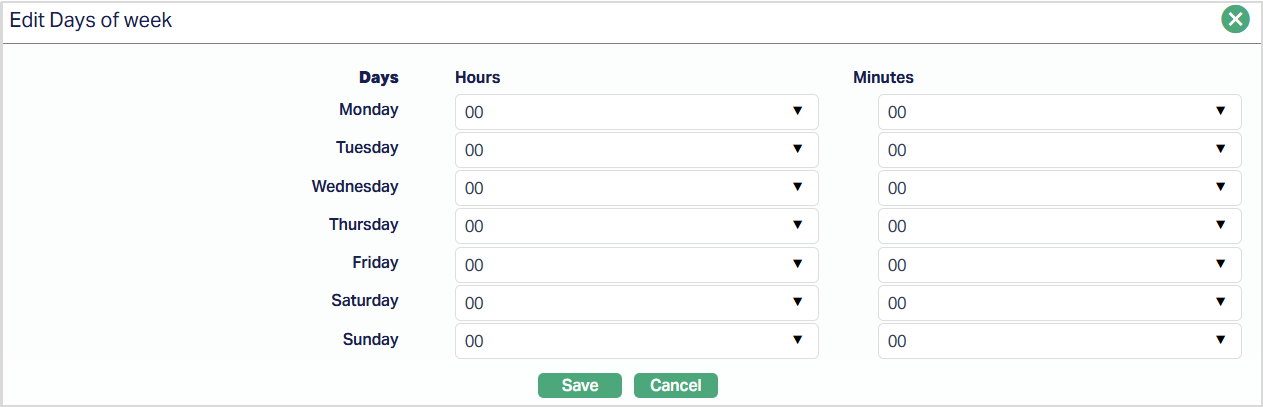
1. Access the Days of week sub-tab under the Cutoff Time tab and Click Edit. Edit Days of week page appears.
Example:
Earlier cut-off time of Fridays - If your bank processes international transactions only until the afternoon on Fridays, you can update Friday’s cutoff time to 15:00. Sample screenshot is shown below.
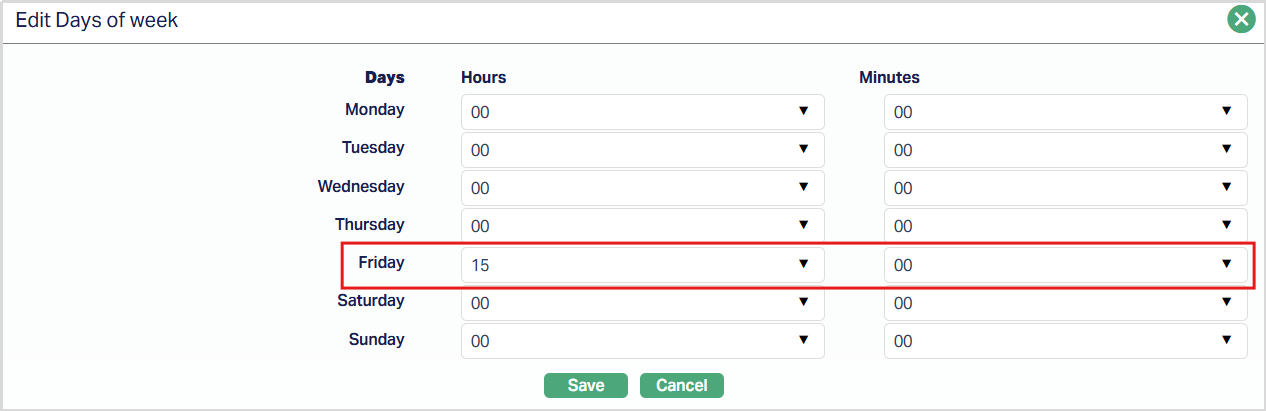
Any transaction received after 15:00 will move to the next value based on the Calendar and Holiday List.
2. Click Save. The Days of week tab appears with the edited/updated details.
Function: Edit
Edit remains enabled for all active currencies. Aura uses the entity time zone.
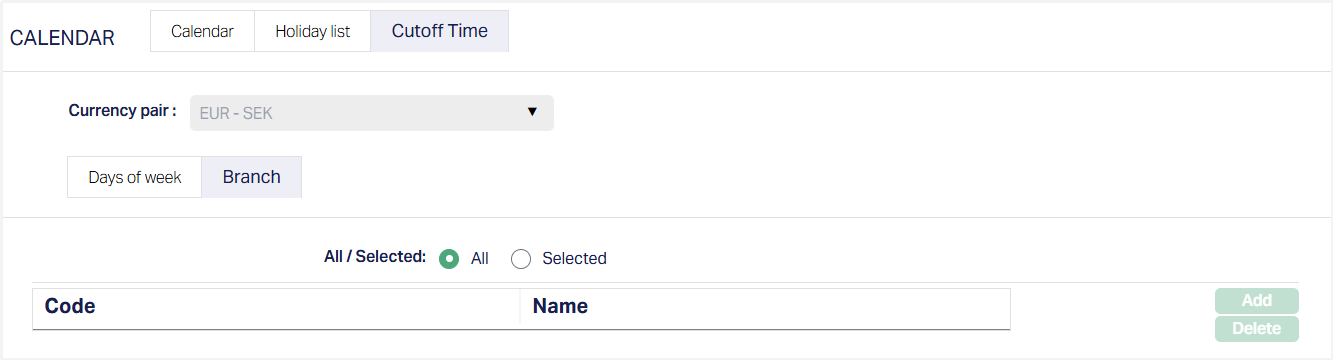
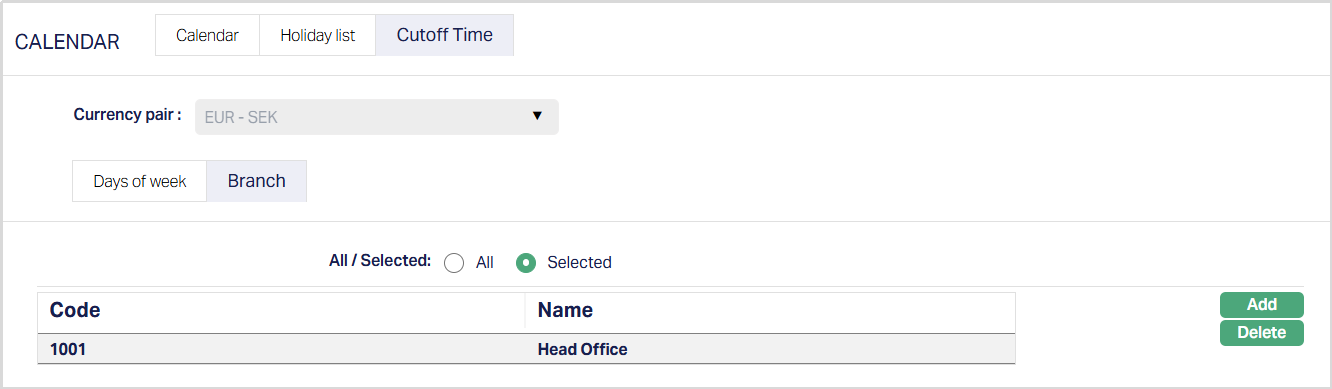
Branch
The Branch sub-tab allows you to map the maintained cutoff time for the selected currency pair to all branches or to specific branches.
When you click on the Branch sub-tab, Aura displays two options under All / Selected. The All option is selected by default, which means the cutoff time applies to all branches.
When All is selected, the Add button is disabled because no branch selection is required.
To maintain cutoff time for selected branches,
1. Access Branch sub-tab under the Cutoff Time tab and click on the Selected radio button.
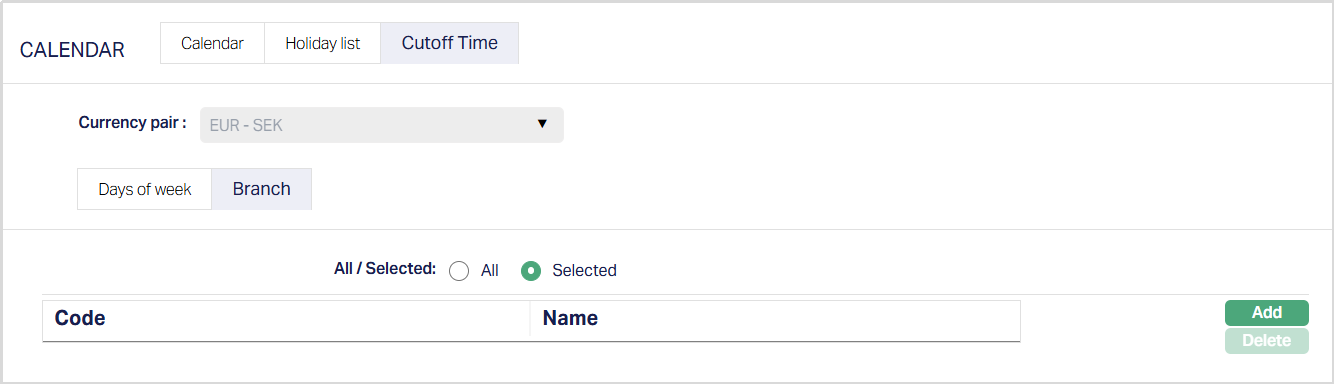
The Add button becomes enabled.
2. Click Add. The Add Branch page appears.
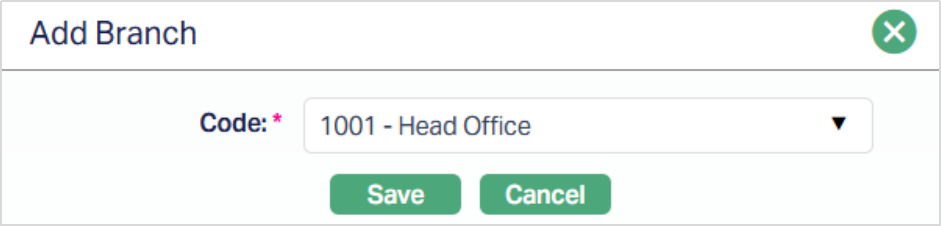
3. Select the required branch from the Code drop-down list. Aura displays the list of active branches maintained under Admin > Branches.
4. Click Save. The Branch tab appears with the added details.
Functions: Add, Delete.
Add: You can add more than one branch. After saving the first branch, the Add button remains enabled so you can continue to add additional branches as required.
Delete: You can delete a branch by clicking Delete. Aura will ask for confirmation, and upon approval, the selected record will be deleted.
Note: You may switch between All and Selected any time. If you switch from Selected to All, Aura will ask for confirmation and remove all the branches that were previously selected.
Forward Rate
The forward rate is the rate at which your bank is willing to exchange one currency for another at some specified future date. It is the exchange rate negotiated today between the bank and a client upon entering into a forward contract agreeing to buy or sell some amount of foreign currency at a future date.
In Aura, forward rates maintained here are used as a reference point for the deal rates entered for Forward Contracts.
To add a Forward Rate for the currency,
1. Access Admin menu, click System Codes, Currency, then Currency. The Currency Search page appears. All Currencies available in Aura appear on the page.

2. Click any of the existing Currency records to access the Currency page.
3. Click Forward Rate tab. Forward Rate page appears.
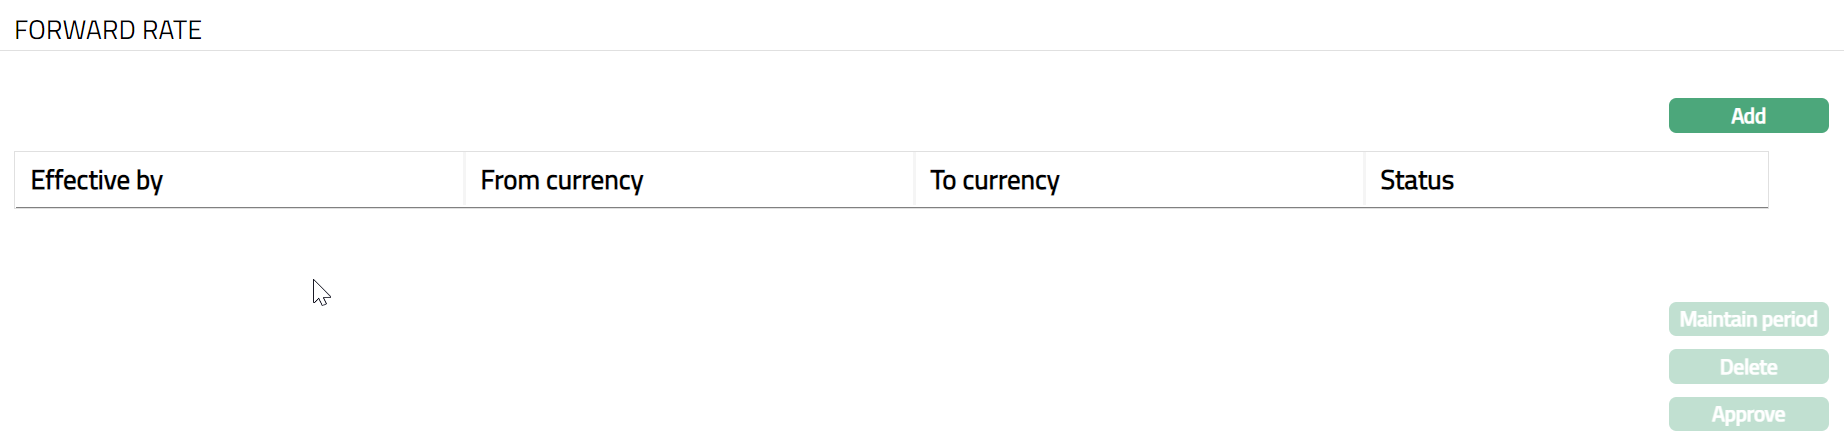
4. Click Add. Add Forward Rate page appears.
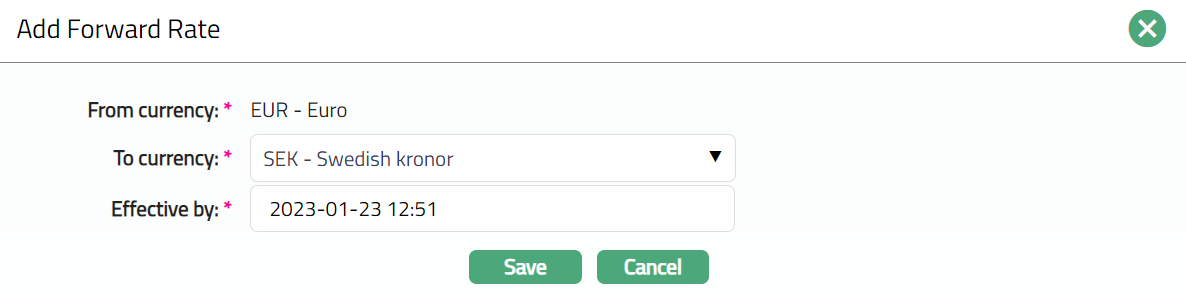
5. From Currency is defaulted to the currency that you chose in the Currency page.
6. Select To Currency to which the forward rate would be applicable from the drop-down list, Aura will display the currencies maintained under General ledger → Settings → Currency whose status is Active.
7. The Effective by box shows the current business date and time by default. Update the date and time from when the new rate should come into effect. The date-time can be only the current or the future date-time.
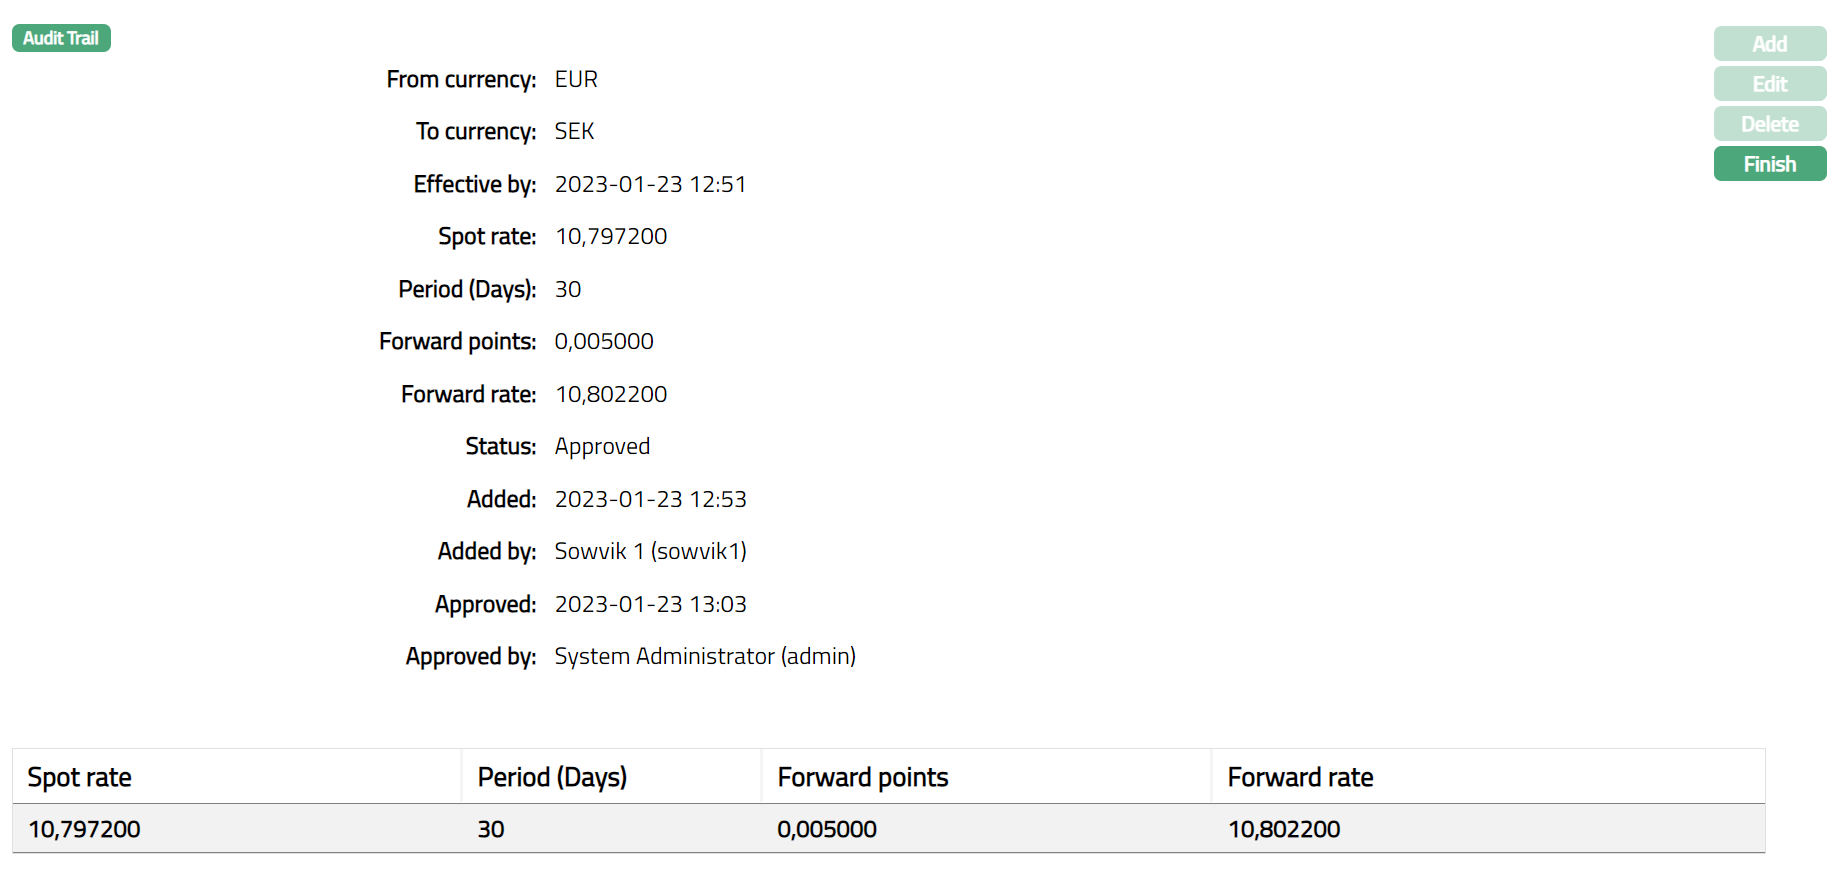
8. Click Save. The Forward Rate page appears displaying the details of the currency you added displaying the Status as pending.
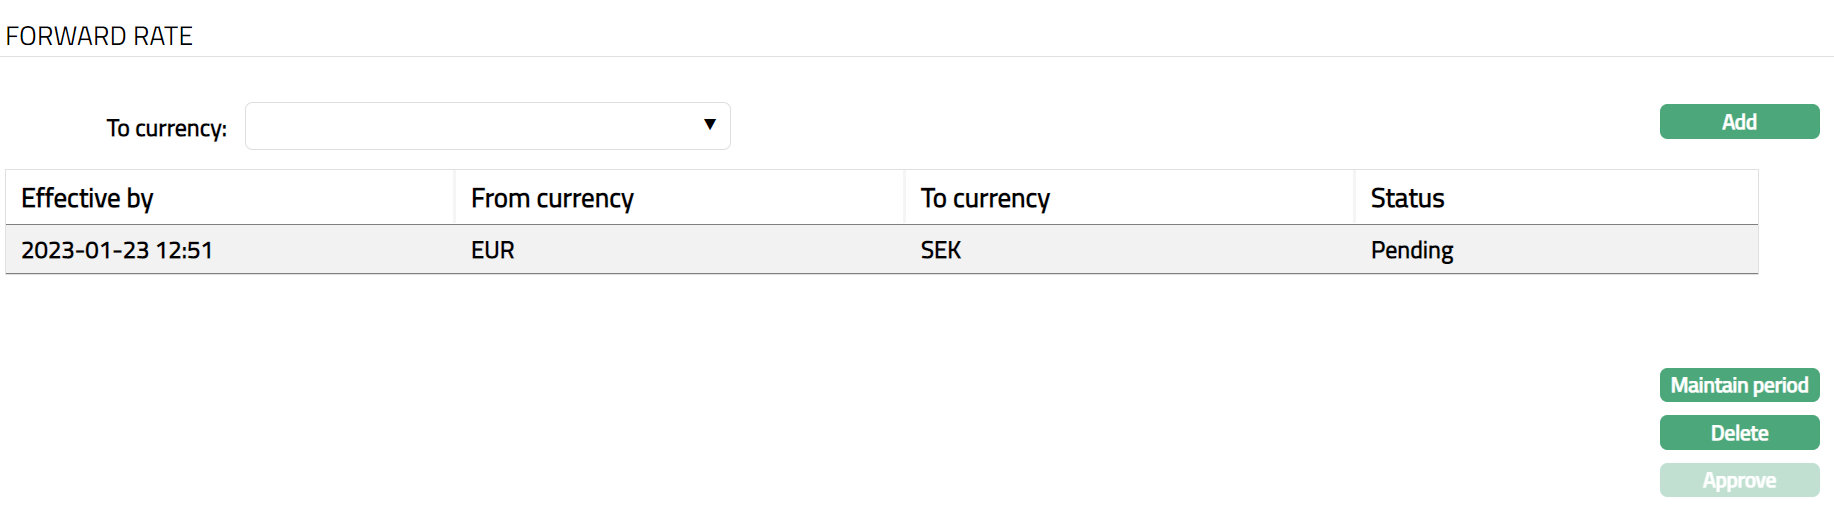
Functions: Add, Maintain period, Delete, Approve
Note: The Forward Rate record status is set to Pending till it is approved by another user. On approval, the record status is set to Approved. Till it is Approved, the rate cannot be used elsewhere.
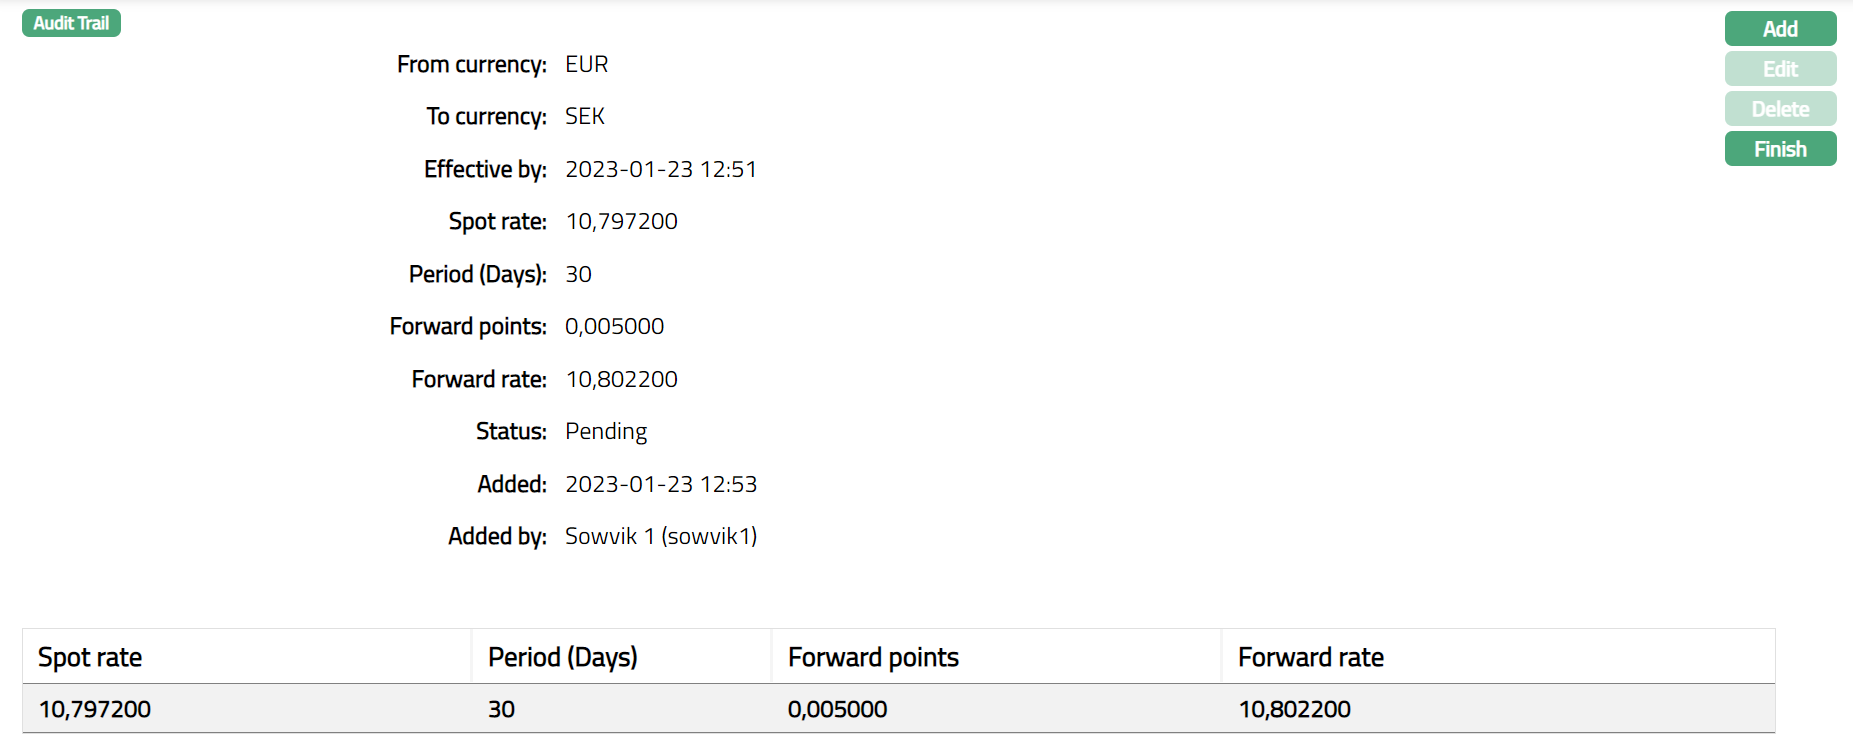
To maintain the details of the forward rates for different Periods (Days), click on the Maintain period button. You can maintain the Forward rate for multiple periods for the same effective date.
9. Click Maintain period. The Maintained Period page appears displaying the details of the Period tab.
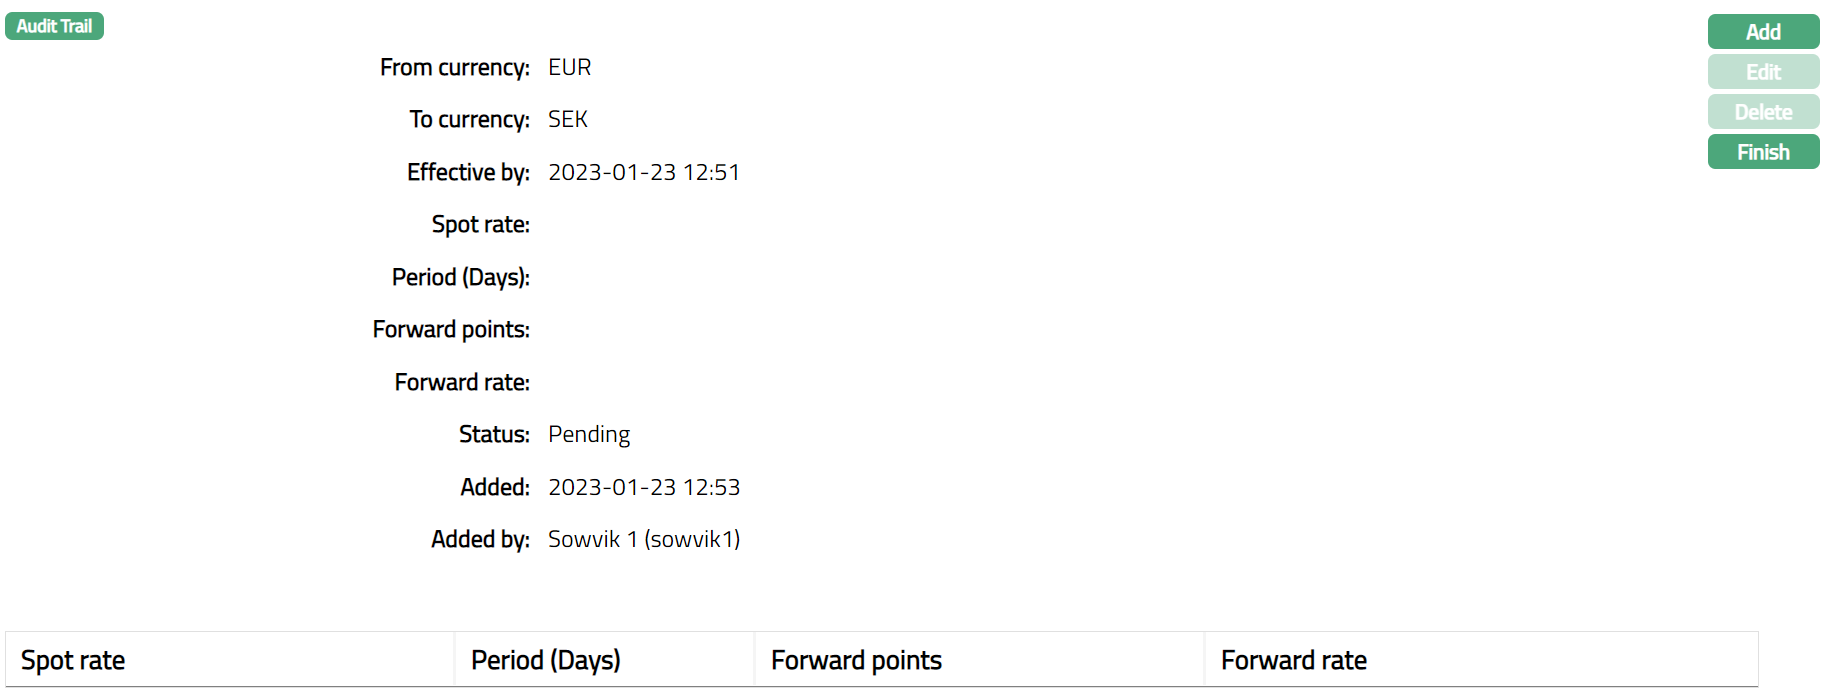
10. Click Add. Add Period page appears.
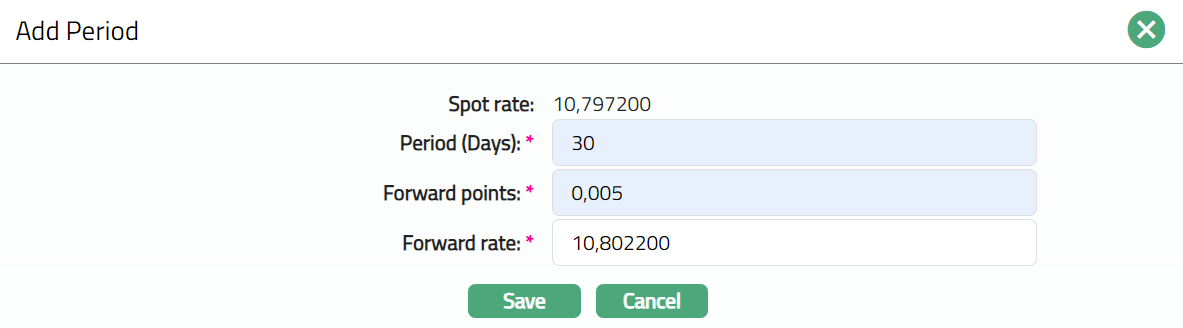
11. Spot rate denotes the spot rate for the From currency and To currency pair based on the Default spot rate type defined for the Entity at Admin → Entities → Entity. Aura retrieves the latest approved mid rate based on the combination of From currency To currency and Default spot rate type. This is not an editable field in the Add Period dialog.
12. Enter Period (Days) for which the Forward rate will be effective. For example, enter 30.
13. Enter Forward point that will be applicable for the respective forward rate. For example, enter 0,005
14. The Forward rate is calculated by Aura by adding the Spot rate and the value entered in the Forward point field. If you enter the Forward rate, Aura calculates the Forward points by subtracting the Spot rate from the entered Forward rate. Forward rate should always be greater than zero.
For example, Spot rate = 10,797200 and you enter Forward point = 0,005
Then Aura will calculate the Forward rate by the formula Forward rate = Spot rate + Forward point = 10,797200 + 0,005 = 10,802200
Suppose, Spot rate = 1.5 and you enter Forward rate = 2,0
Then Aura will calculate the Forward point by the formula Forward point = Forward rate -- Spot rate = 2.0 - 1.5 = 0.5
15. Click Save. The Maintained period page appears displaying the list of Period, Forward rate and Forward point updated for the currency for the Effective by date displaying the Status as pending.
Functions: Add, Edit, Delete, Finish
16. Click Finish. Forward Rate page appears displaying the details of the forward rate currency pairs.
To approve a Forward Rate,
1. Access Currency page.
2. Click Forward Rate tab.
3. Click the rate to be approved.
4. Click Approve.
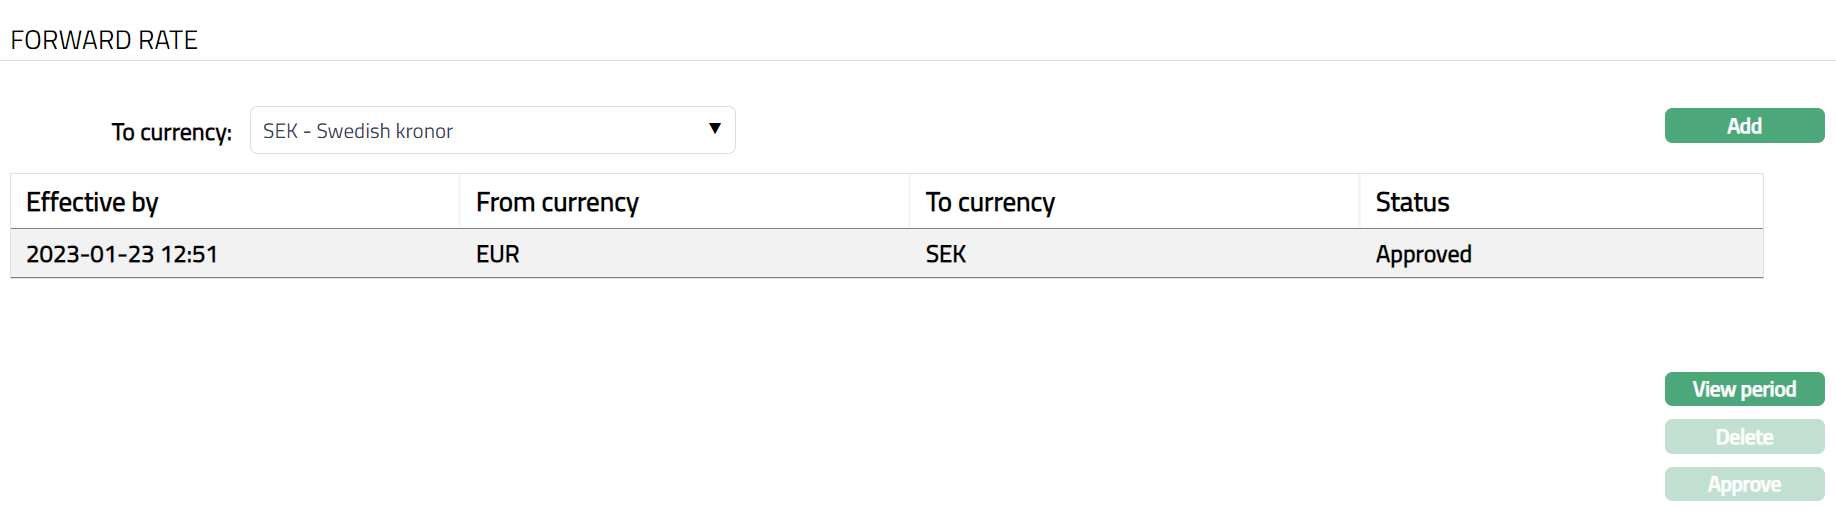
Function: View period, Delete, Approve
NOTE: Once the forward rate is approved, Maintain period button will appear as View period -- as you can only view the approved rates and not make any further changes. Sample screen shot shown below.
Function: View Period
Discount Rate
Discount Rate is the interest rate used in discounted cash flow analysis to determine the present value of future cash flows. The discount rate takes into account the time value of money (the idea that money available now is worth more than the same amount of money available in the future because it could be earning interest) and the risk or uncertainty of the anticipated future cash flows (which might be less than expected).
You can maintain various discount rates for the list of currencies that has been created in Aura. In Aura, the discount rate is applied on the re-valuated profit / loss of the FX contract to calculate the discounted profit / loss respectively. For example, if you have booked a FX contract at 48 units today, but you will purchase it after 2 days. Suppose after 2 days the value of the contract increases from 48 to 50 units. So, the difference of 2 units is the re-valuated profit on which the discount rate will be applied to calculate the discounted profit for the respective FX contract.
To add a Discount Rate for the currency,
1. From Admin menu, click System Codes, Currency, and then Currency. The Currency Search page appears. All Currencies available in Aura appear on the page.
2. Click on any of the existing Currency records to access the Currency page. Then click Discount Rate. Discount Rate Page appears.
3. Click Add. Add Discount Rate page appears.
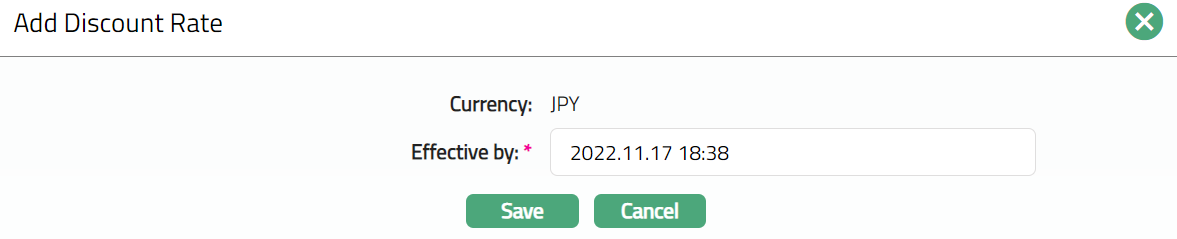
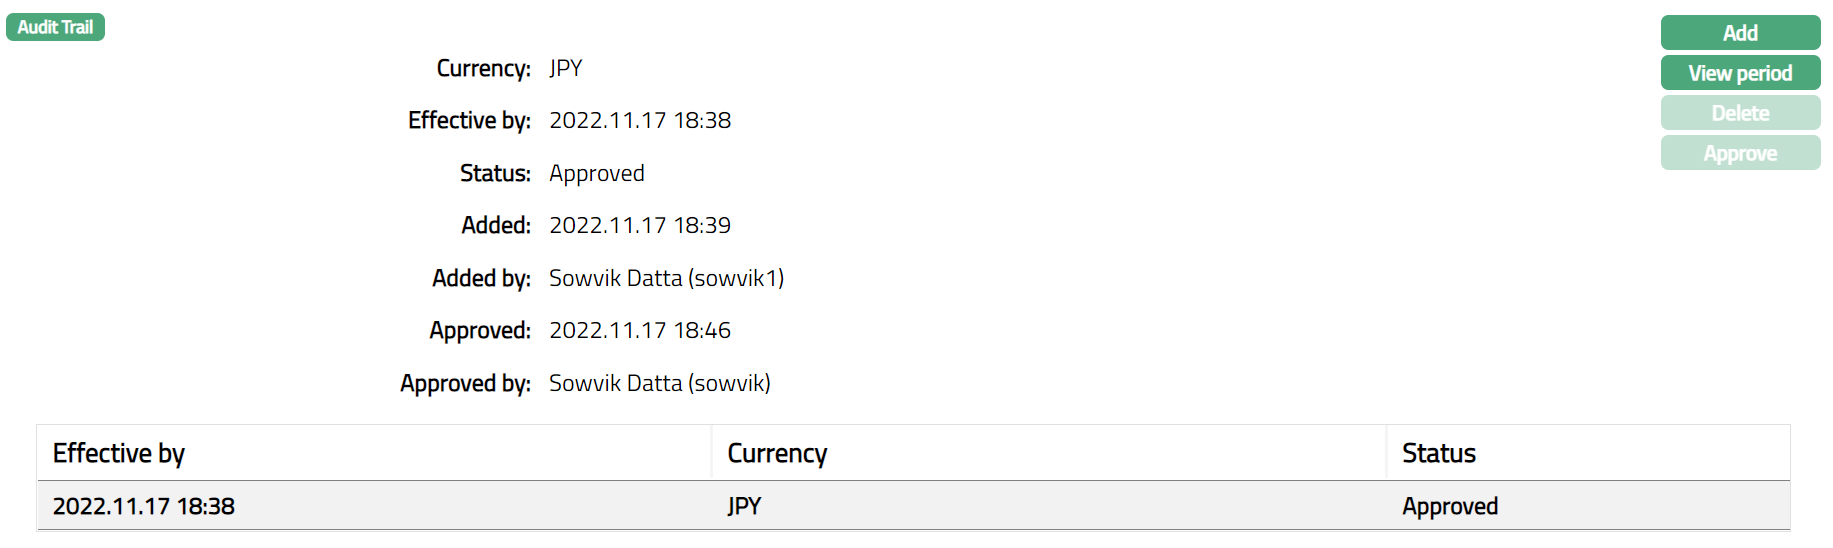
4. Currency is defaulted to the currency that you chose in the Currency page.
5. The Effective by box shows the current business date and time by default. Update the date and time from when the new rate should come into effect. The date-time can be only the current or the future date-time.
6. Click Save. Discount Rate page appears with the added details.
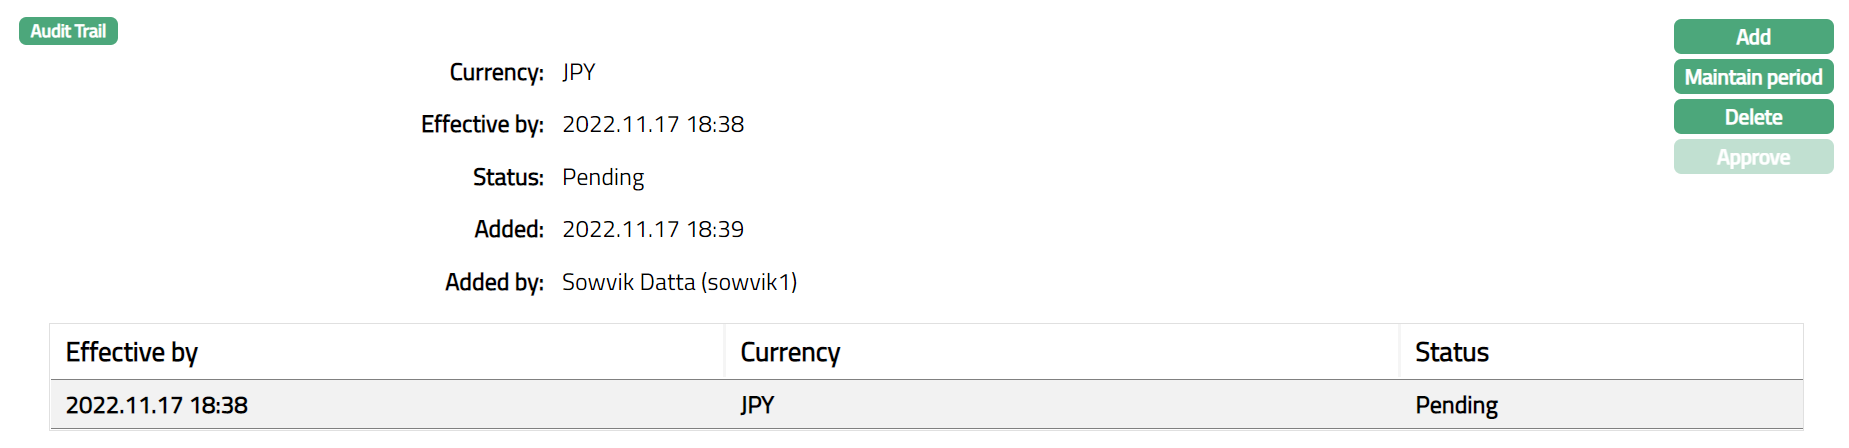
Functions: Add, Maintain period, Delete, Approve
Note: The Discount Rate record status is set to Pending till it is approved by another user. On approval, the record status is set to Approved. Till it is Approved, the rate cannot be used elsewhere.
To maintain the details of the Period (Days) for which the Discount rate is applicable, click on the Maintain period button. You can maintain the Discount rate for multiple periods for the same effective date.
7. Click Maintain Period. The Period page appears.
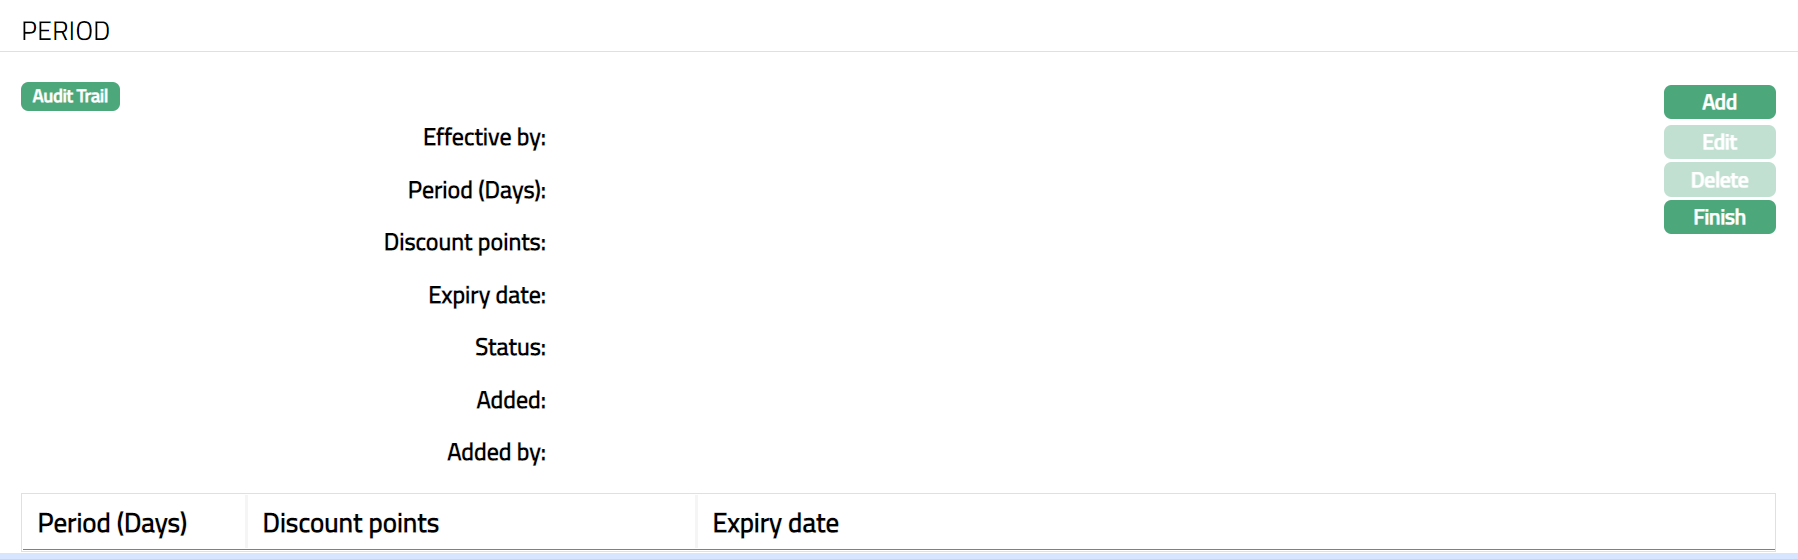
8. Click Add. The Add Period page appears.
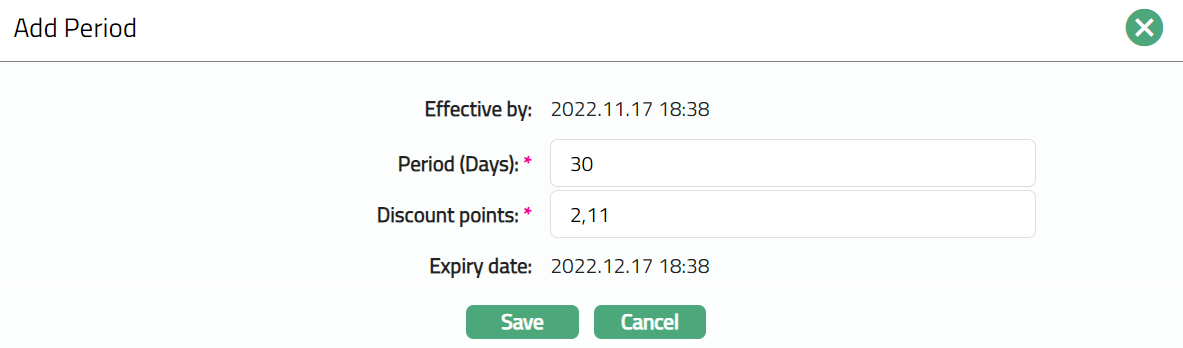
9. The Effective by field automatically displays the date and time which was entered in the Add Discount Rate dialog box. This is not an editable field in the Add Period dialog.
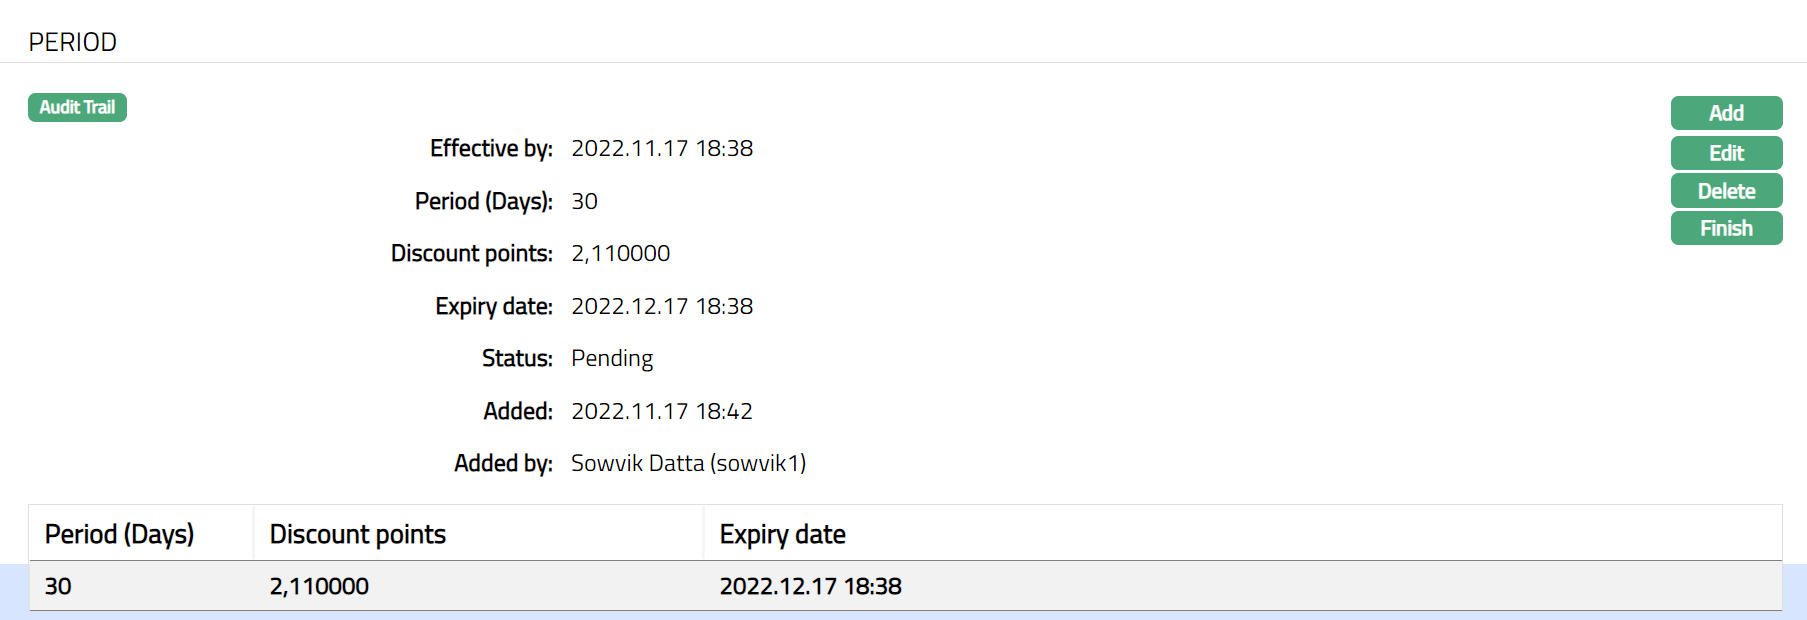
10.Enter Period (Days) for which the Discount rate will be effective. For example, enter 30.
11. Enter Discount points that will be applicable for the respective discount rate. For example, enter 2.11
12. The Expiry date is calculated by the system based on the Effective by date-time and the number of days entered in the Period (Days) field. This is not an editable field in the Add Period dialog.
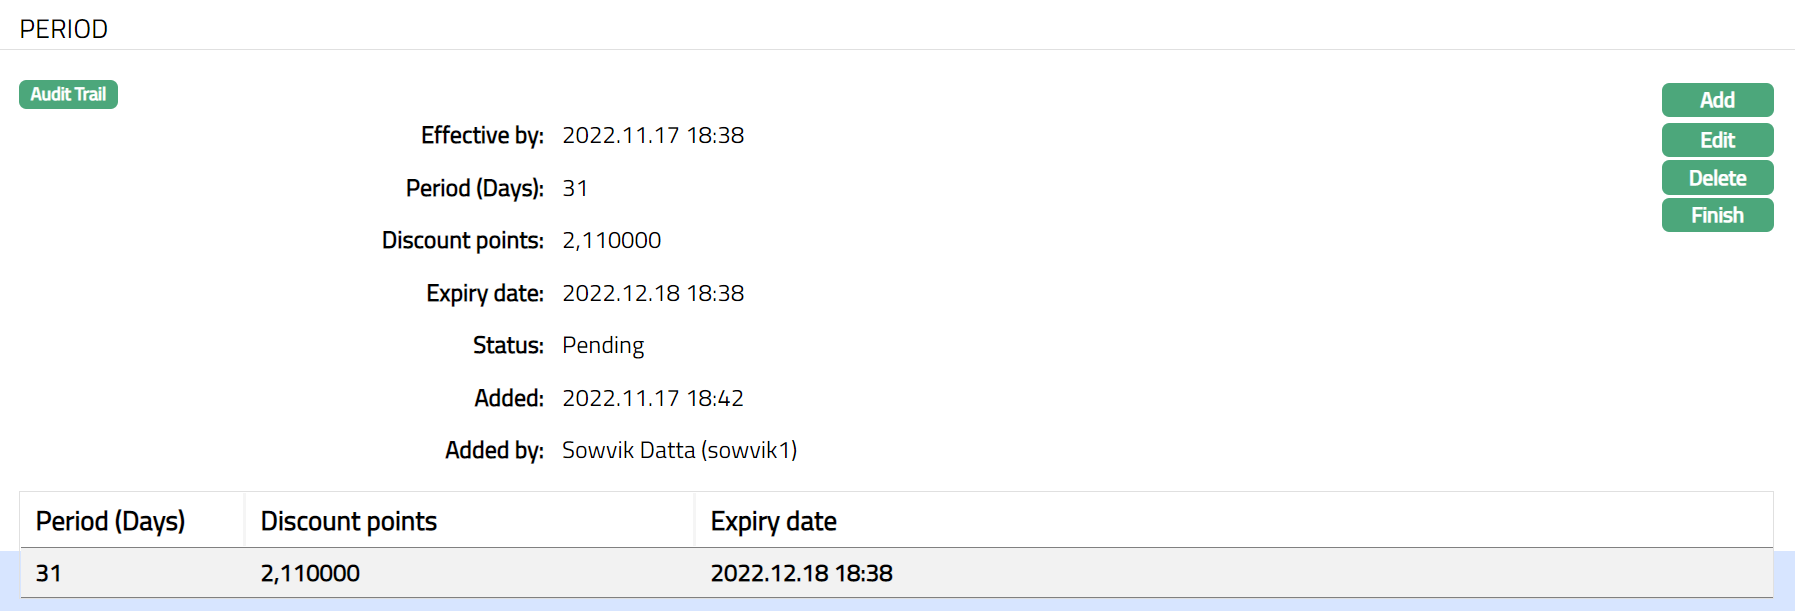
13. Click Save. The Period page appears displaying the list of periods, discount rate and expiry date updated for the currency for the Effective by date.
Functions: Add, Edit, Delete, Finish
Note: The Period record status is set to Pending till it is approved by another user. On approval, the record status is set to Approved. Till it is Approved, the rate cannot be used elsewhere.
To edit Period,
1. Edit Period Click Edit. page appears.
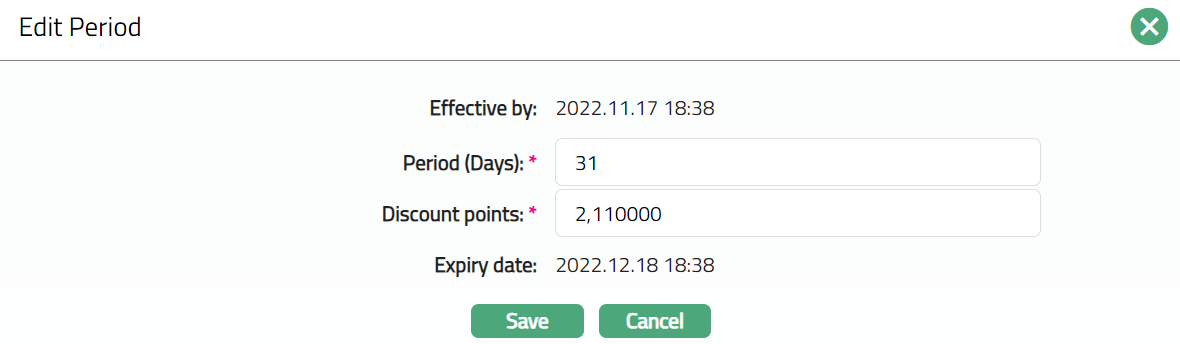
Note: Except Effective by and Expiry date, all other fields are editable.
2. Click Save. Period page appears with the edited details.
3. Click Finish. Discount Rate page appears with the added details.
Functions: Add, Edit, Delete, Finish
Note: Once the discount rate is approved, Maintain period button will appear as View period -- as you can only view the approved rates and not make any further changes.
The additional fields that you can view in the Settings tab are as follows:
Status field denotes the status of the record.
Added field denotes the date on which the record was added.
Added by field denotes the name of the user who created the record.
Approved field denotes the date on which the record was approved and is displayed only on approval.
Approved by field denotes the name of the user who approved the record and is displayed only on approval.
Approve: If you want to Approve a Discount Rate, then retrieve the record and Click on Approve. Aura will ask for confirmation. Once the tab is approved, status gets changed from Pending to Approved.
Delete: You can delete the Discount Rate saved in Aura by a clicking on Delete button. Aura will ask for confirmation, on approving which the selected record will be deleted.
Custom Field
This option provides you the flexibility to define fields apart from those that are already available in the standard version of Aura. Thus, it enables you to customize additional data storage and use as required to suit your specific business needs.
Using the Custom Field tab, you can maintain the custom fields mapped to the User. Depending on the custom fields created and mapped to User module (using Admin → System Codes → Custom Fields), the fields will be displayed on this tab.
To edit Custom Field,
1. Access Currency page and click Custom Field tab.

2. Click Edit. The Edit Custom Field page appears.

3. Enter the details as required for entityid.
4. Click Save. The Custom Field page appears with the edited details.

Functions: Edit.