Message Configuration
Message Configuration allows you to configure the message related attributes for incoming or outgoing messages. Based on the configuration, the messages are processed. You can configure the messages using the functionalities like Language Converter, PDE (Possible Duplicate Emission), Editable Columns.
There are three sub-tabs which allow you to maintain the Message Configuration. The three sub-tabs are.
To add new Message Configuration
- From PaymentGrid menu, click Settings and then Message configuration. Message Configuration **Search **page appears.

- Click Add. New Message Configuration - General (1/2) page appears.
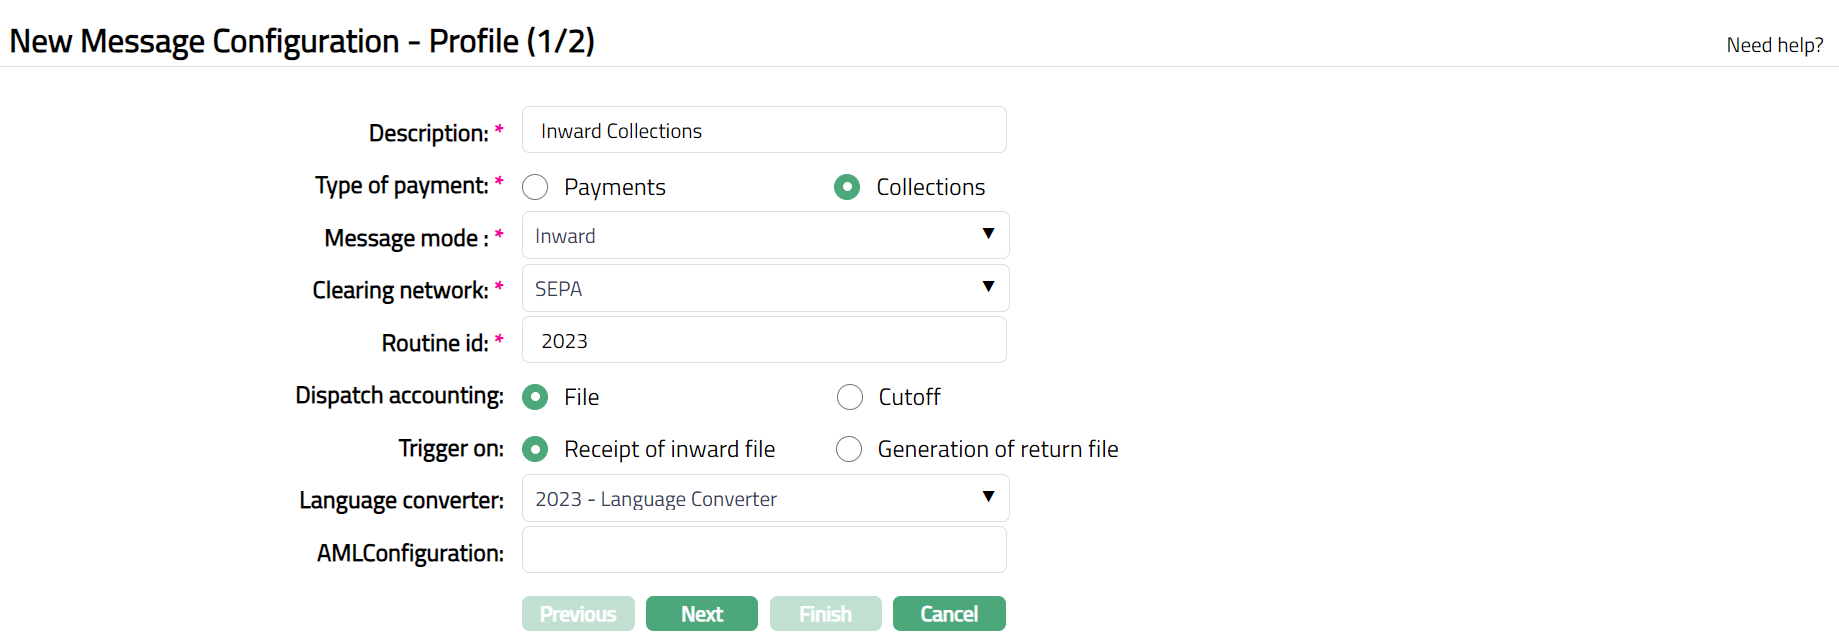
Enter Description for the message configuration.
Enter Type of Payment. The available options are Payments and Collections. By default, Payments is selected.
Select Message mode. Message mode with options changes based on Type of payment. If the Type of payment is Payments, then available options are Incoming and Outgoing. If the Type of payment is Collections, then available options are Inward and Outward. By default, Incoming is selected.
Select Clearing network from the drop-down list. The pre-shipped options are SEPA, TARGET2, BANKGIRO and SWIFT. If message configuration has already been created for a network, then CC-PG will display the remaining networks. By default, the field will be blank.
Enter DataMatrice Routine id.
Select Dispatch accounting. The options are File and Cut off. If File option is chosen, then Dispatch accounting is performed whenever PaymentGrid receives an Incoming or inward file or generates an Outgoing or outward file. If Cut off option is chosen, then Dispatch accounting is performed at the time of Network cut off.
- Select Trigger on. The options are Receipt on inward file and Generation of return file. If Receipt on inward file option is chosen, then Dispatch accounting will trigger on receipt of an inward file. If Generation of return file option is chosen, then Dispatch accounting will trigger on generation of return file. This field will be enabled only if Type of Payment is Collections, Message mode is Inward and Dispatch accounting is File.
- Select Cut off time from the Hour dropdown and Minute drop-down. It specifies the network cut off time. Example - If you want to set the cut off time as 4 PM, then Cut off time is to be configured as 16 and 00.
Select Language converter from the drop-down list. The list will display all the active Language Converters maintained under PaymentGrid > Settings > Language Converter. Language converter allows you to auto-translate a string from any language to English.
Enter AML (Anti--Money Laundering) Configuration Code.
Click Next. Message Configuration -- Confirmation (2/2) page appears.
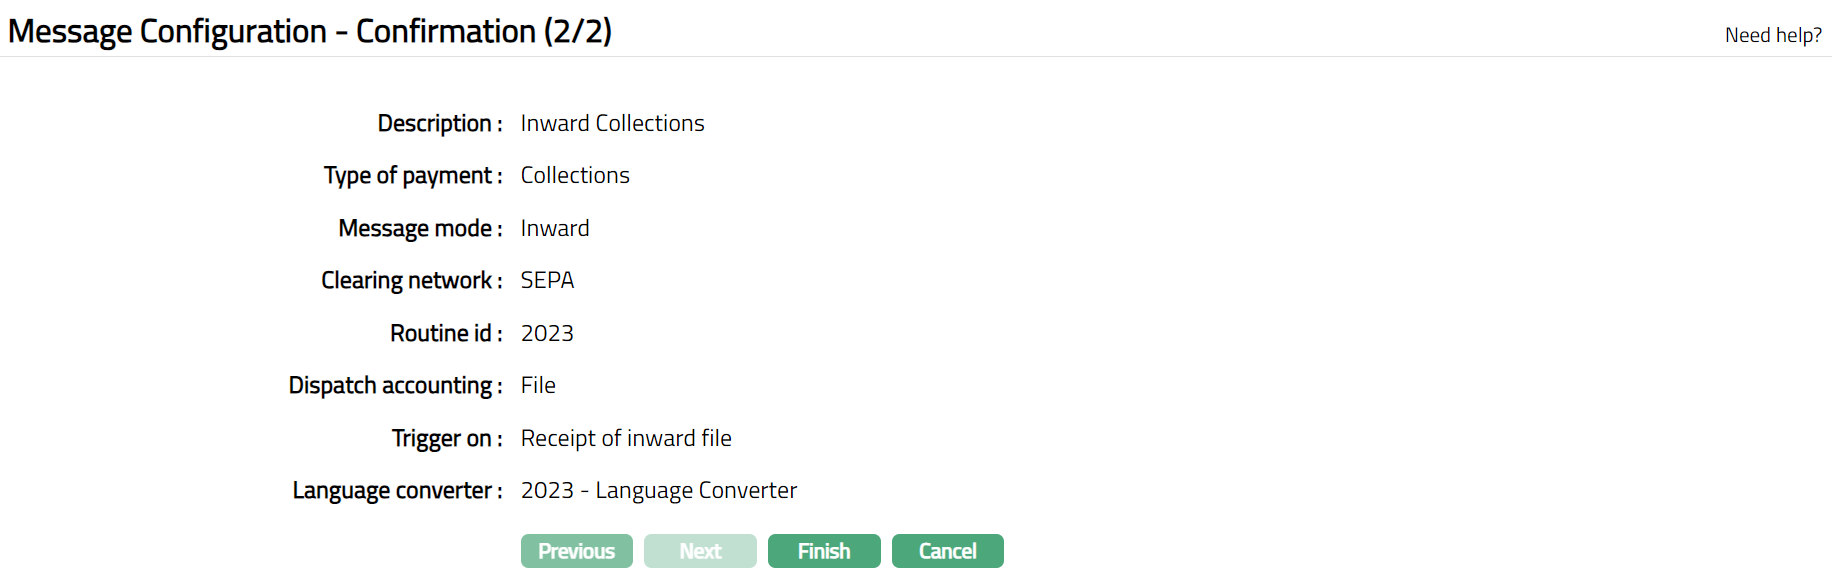
- Click Finish. Message Configuration page appears showing the details of the record that you saved. Status of the record will be Active.

Functions: Add, Search, Edit, Delete, Approve, Suspend, Activate
Note: On creation of a new Message Configuration record, the Status by default will be Active, record status will be Pending, and a blue bubble appears on the Profile tab. Only on Approval, the record Status gets changed to Approved and the blue bubble disappears.
Delete: You can delete Message Configuration record saved in CC-PG by a click on Delete button. CC-PG will ask for confirmation, on approving which the selected record will be deleted. Once the record is approved, it cannot be deleted.
Approve: If you want to approve a Message Configuration, then retrieve the record and click on Approve. CC-PG will ask for confirmation. Once the tab is approved, status gets changed from Pending to Approved.
Suspend: You can suspend a Message Configuration record by clicking on Suspend button. When you click on Suspend button, CC-PG displays an alert message. On confirmation CC-PG will suspend the Message Configuration record. Once the record is suspended, the messages will not be configured on the basis of these attributes. Suspended records can be activated by using Activate button.
Activate: You can activate a suspended Message Configuration record by clicking on Activate button. When you click on Activate button, CC-PG displays an alert message. On confirmation CC-PG will activate the Message configuration record. Once the record is activated, the messages will be configured on the basis of this attributes.
Profile
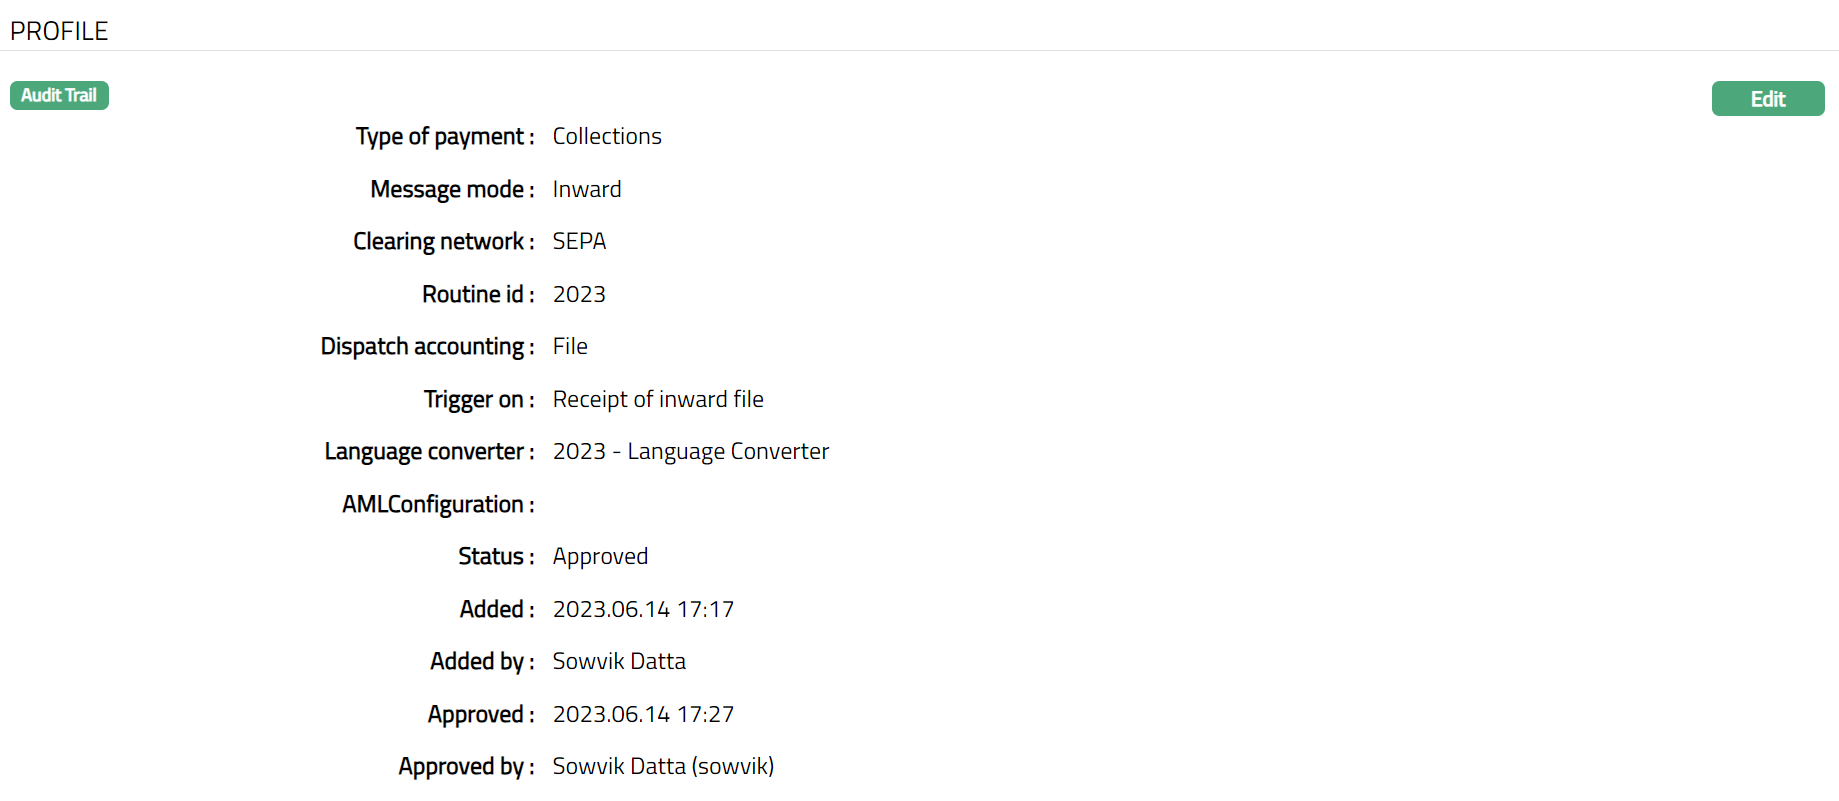
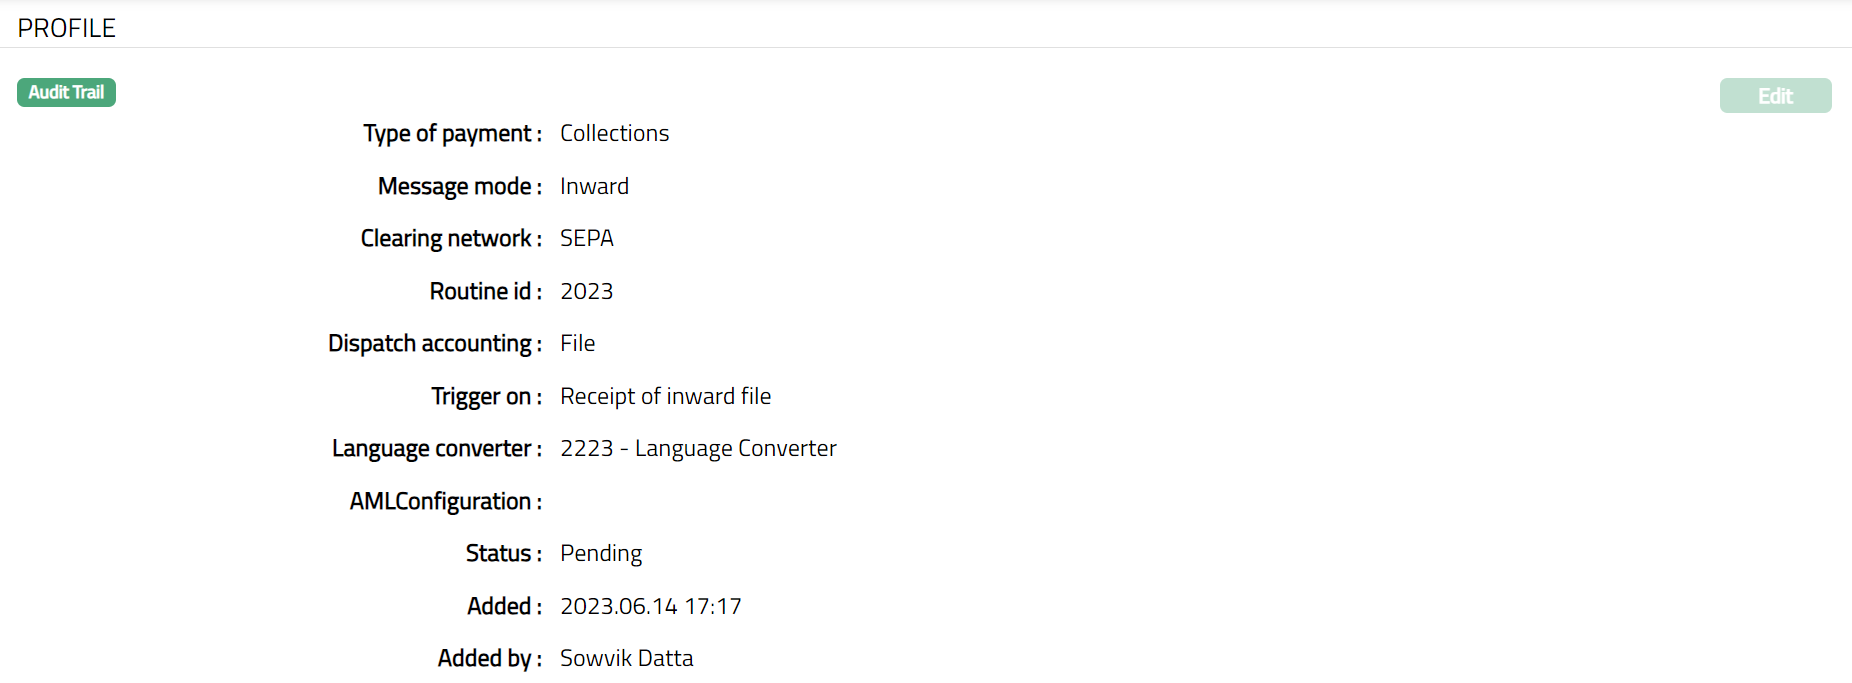
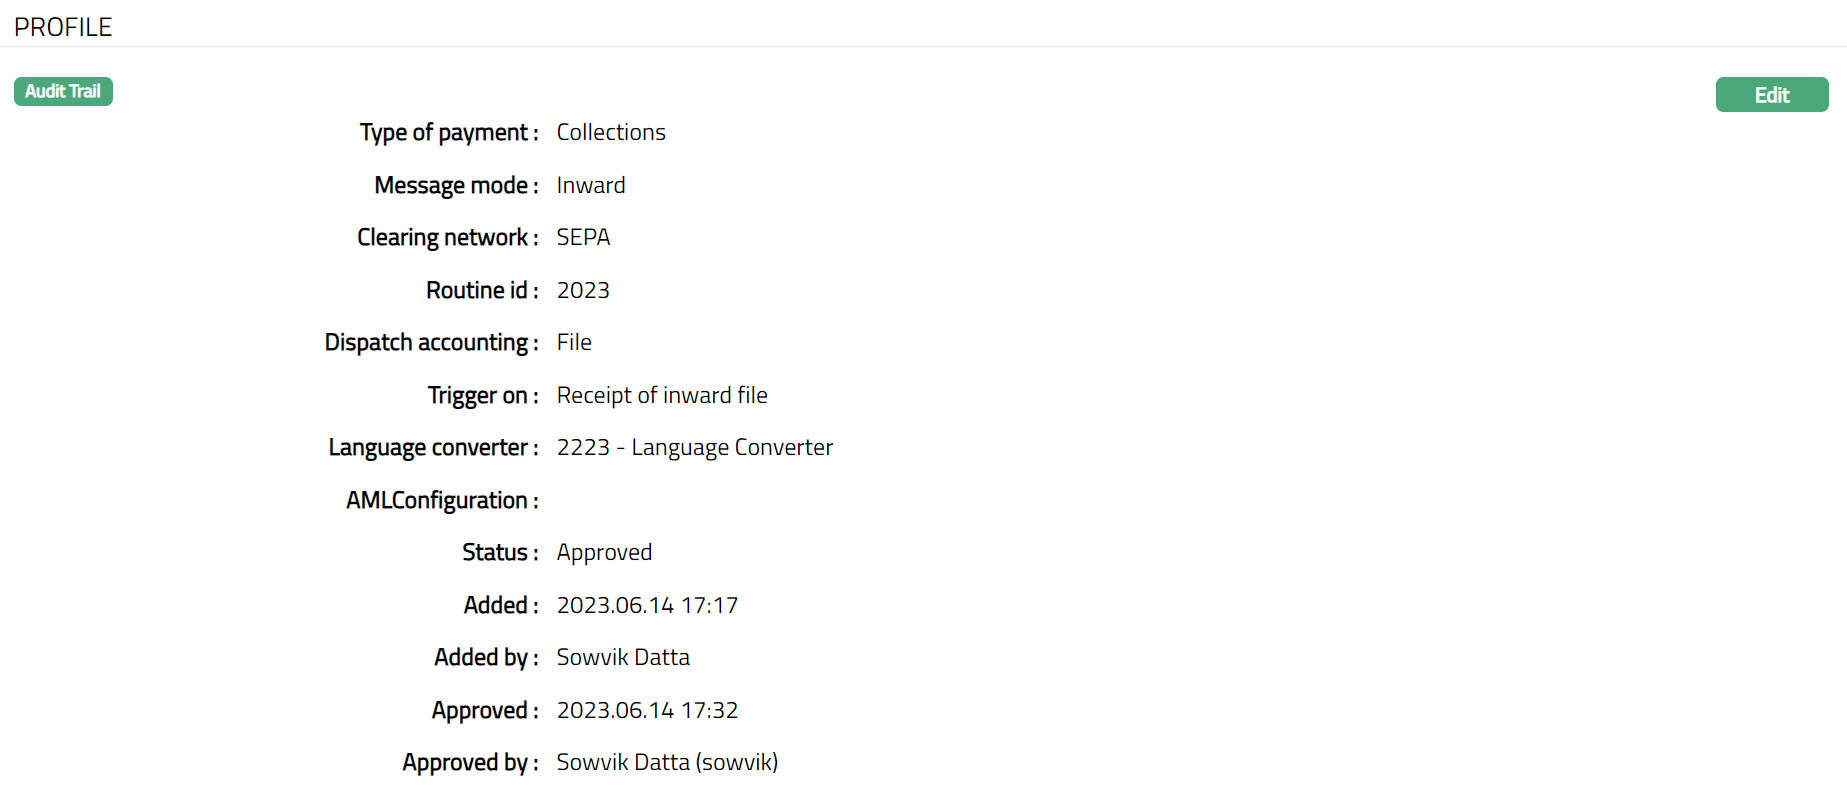
Profile tab, which is the default tab in the Message Configuration screen, shows the basic details of the Message configuration.
To view / edit the Profile.
- Access Message Configuration page and click Profile tab to view the details as per sample below. The details are defaulted from the entries that you made during creation of a New Message Configuration. For details refer to New Message Configuration - General (1/2).
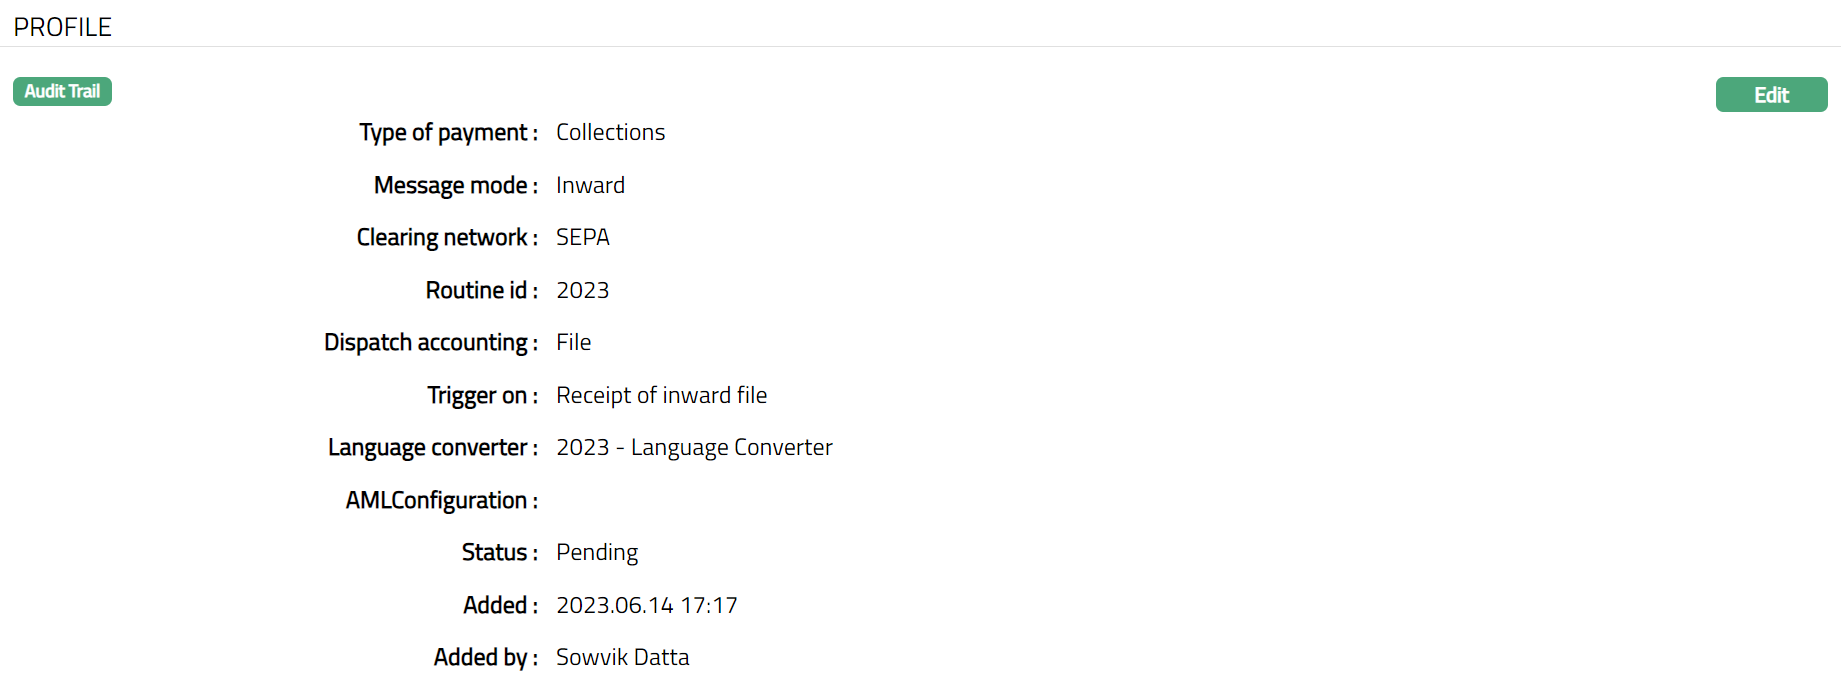
Note: Status of Profile tab will be in pending, untill the same is approved by anothet user who has not created the record. Once Approved the status will change to Approved.
The additional fields are as follows:
Status field denotes the status of the tab.
Added field denotes the date on which the record was added.
Added by field denotes the name of the user who created the record.
Approved field denotes date on which the record was approved and is displayed only for approved records.
Approved by field denotes name of the user who approved the record and is displayed only for approved records.
To edit Profile
- Click **Edit. Edit - Profile **page appears.
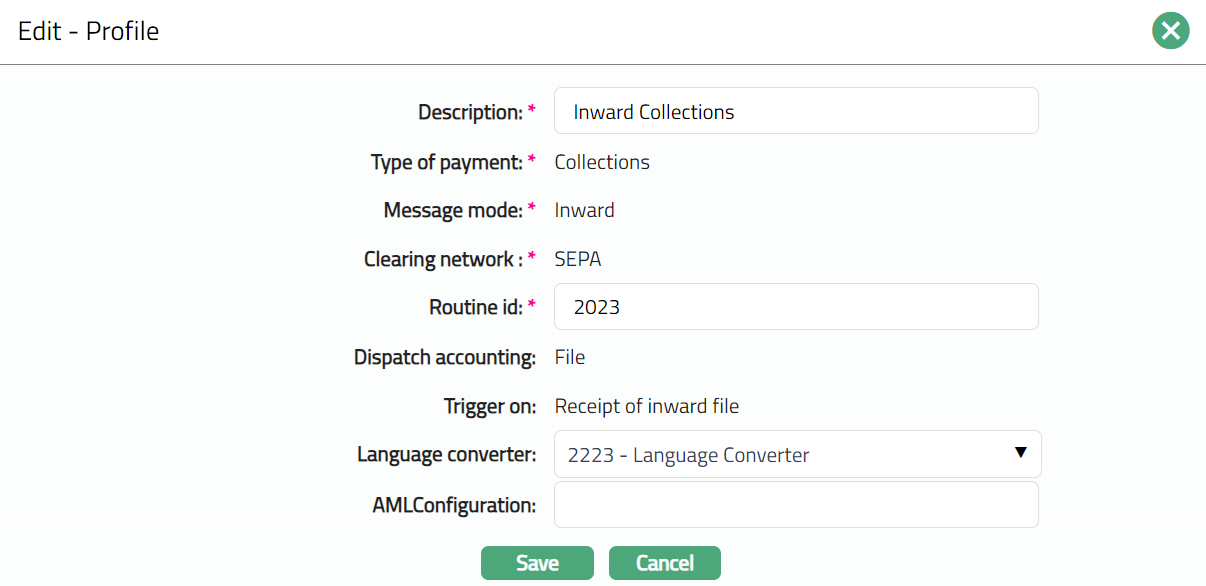
Note: Except Message Mode, Clearing Network, Dispatch accounting and Trigger on fields, rest all other fields are editable.
- Click Save. Profile tab appears with the edited details.
Note: Once edited the status will change to Pending. Unless the same is approved by another user who has not created the record. Once Approved the status will change to Approved.
Functions: Edit
The additional fields that you can view in the Profile tab are as follows:
Status field denotes the status of the tab.
Added field denotes the date on which the record was added.
Added by field denotes the name of the user who created the record.
Approved field denotes date on which the record was approved and is displayed only for approved records.
Approved by field denotes name of the user who approved the record and is displayed only for approved records.
PDE Configuration
PDE (Possible Duplicate Emission) allows you to check for messages that could be duplicate. Based on the settings configured, PDE will check for duplicate messages.
To view / edit PDE Configuration
- Access Message Configuration page and click PDE Configuration tab. Initially, there will be no data. A sample screen is given below.

- Click Edit. Edit -- PDE Configuration page appears. Sample Screens shown below.
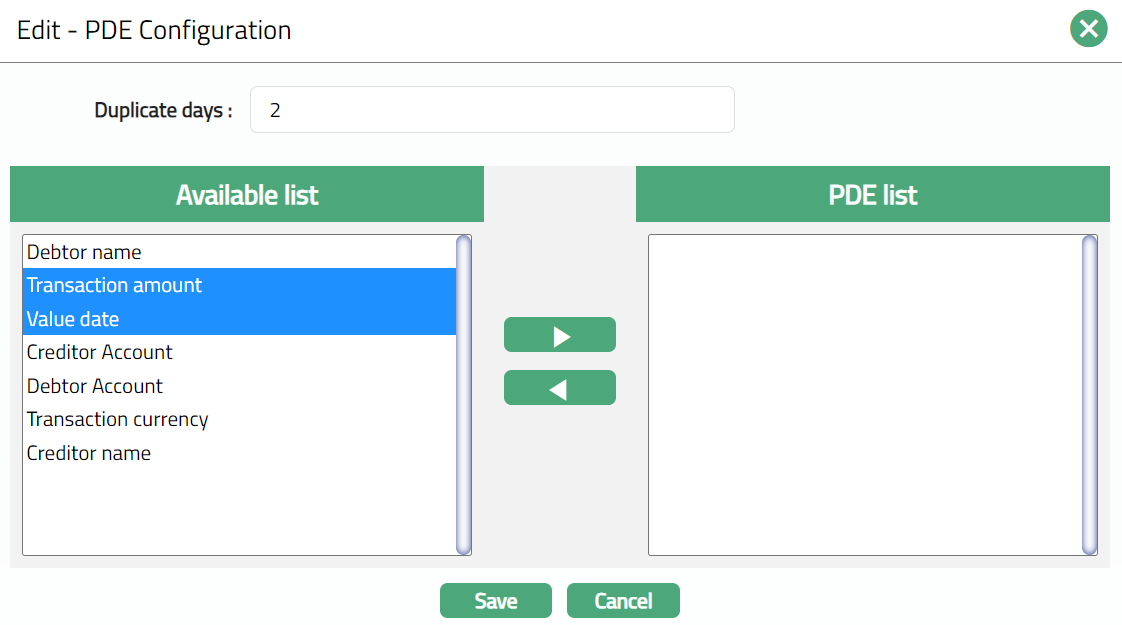
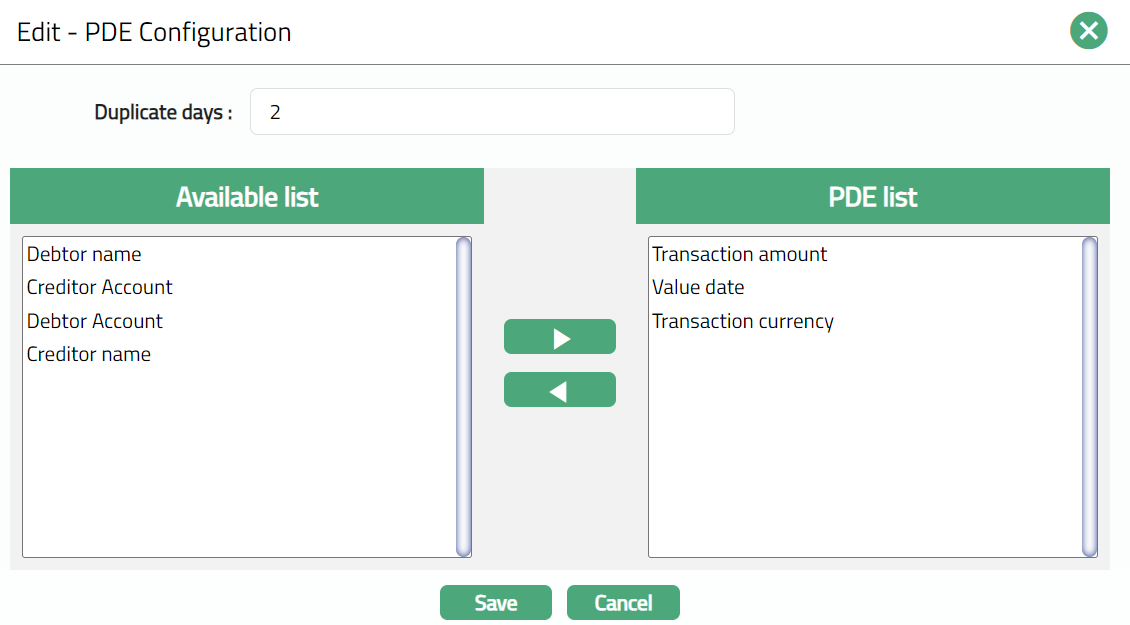
Enter Duplicate days. PDE will check for the duplication of messages on the basis of the number of days specified here. Each message will be checked for the past x number of days based on the settings to check for possible duplicates.
Available list contains the list of parameters (tokens) which is used by PDE to check for duplication of messages. The list includes the following tokens:
Transaction Amount
Transaction Currency
Value date
Creditor name
Debtor name
Debtor Account
Creditor Account
Click the required Token (left) from Available list.
Click
 to add a token i.e. move one token at a time from Available list to PDE list.
Click
 to remove a token i.e. move one token at a time from PDE list to Available list
- Click Save. PDE Configuration tab appears with the edited details.

Functions: Edit
Editable Columns
Editable columns allow you to define the specific fields that can be amended in case of failed messages, so that the messages can be processed. This tab appears only for SWIFT and TARGET2 Incoming messages.
To view / edit Editable columns.
- Access Message Configuration page and click Editable Columns tab. Initially, there will be no data. A sample screen is given below.

- Click Edit. Edit - Editable Columns page appears. Sample screens shown below.
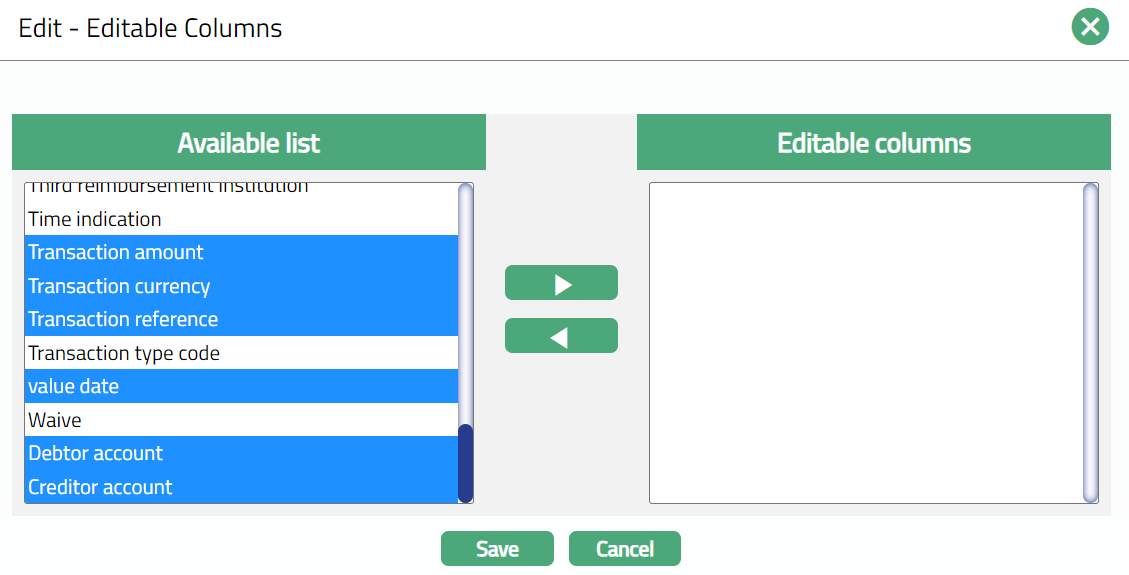

Available list contains the list of tokens to be used for amending the messages. The tokens in the list will be available based on the Message mode and Clearing network selected in New Message Configuration - General (1/2) screen. If the Clearing Network is SWIFT or TARGET2 and Message mode is Incoming, only then the Available list column will display the following tokens:
Account with institution
Bank operation code
Beneficiary customer
Beneficiary details of charges
Beneficiary institution
Charge amount
Cover message
Envelope contents
Exchange rate
Instructed amount.
Instructed currency.
Instruction code
Intermediary institution
Message user reference
Ordering customer
Ordering institution
Receivers charges amount
Receivers charges currency
Receivers correspondent
Regulatory reporting
Related reference
Remittance information
Sender to receiver Information
Senders charges amount
Senders charges currency
Senders correspondent
Senders reference
Sending institution
Third reimbursement institution
Time indication
Transaction amount
Transaction currency
Transaction reference
Transaction type code
value date
waive
Click the required Token (left) from Available list.
Click
to add a token i.e. move one token at a time from Available list to Editable columns.Click
to remove a token i.e. move one token at a time from Editable column to Available list
- Click Save. Editable Columns tab appears with the edited details. On the basis of the tokens added, the failed messages will be amended.

Functions: Edit