Series
Series allows you to generate the instrument inventory against the series for types of instruments used in banks such as cheques, passbook, Term deposit certificate, demand drafts etc. Currently Aura supports only generation of instrument inventory of Cheques, Passbook and Term deposit certificate.
The following are the tabs in Series Maintenance:
Type - Cheque
You can generate series of cheque books with different number of cheque leaves in it. User can allocate the cheque books to clients as per the series of books generated here.
To add new series
From Admin menu, click Secure stationery, and then Series. The system will display Series Search screen.
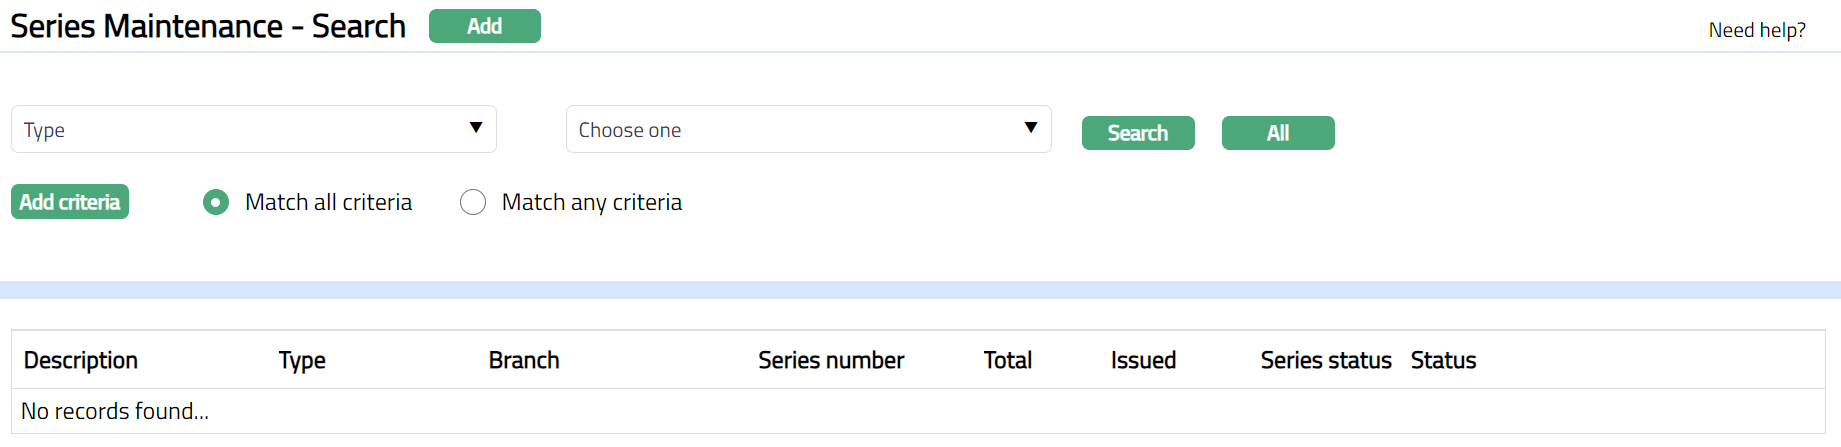
Click Add. New Series -- General page appears.
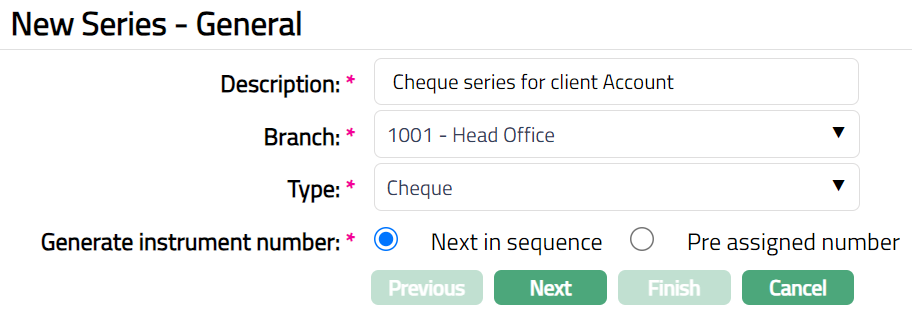
Enter Description for the series.
From drop-down list of active branches maintained at Admin > Branches > Maintain, select Branch for which the series is generated.
Select Cheque as the Series Type.
Select Next in Sequence for Generate instrument number.
Click Next. New Series -- Allocation (1/2) appears.
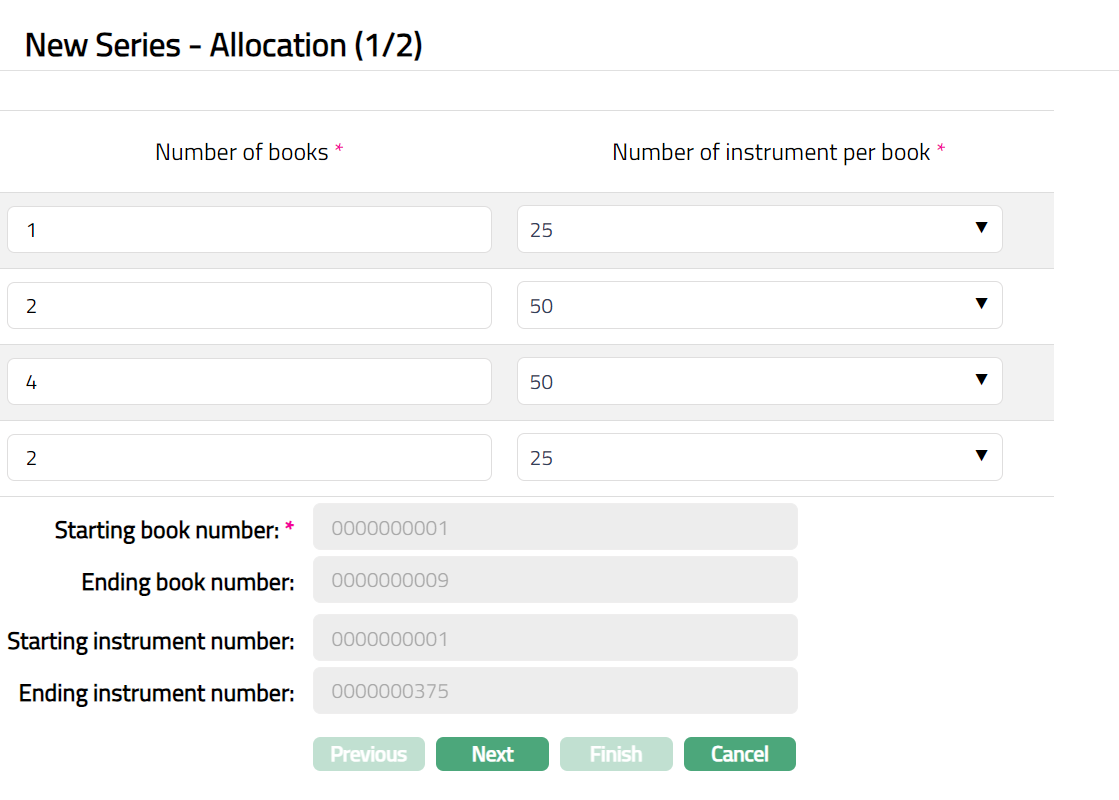
Enter Number of books required.
Select Number of instrument per book required in the corresponding Number of Books.
Aura will calculate the cheque book/instrument number as last cheque book/instrument number +1 and display it in Starting book/instrument Number.
Note: The Starting number will be greater than the book number of the last book generated.
Example: If the book number of the last generated book is 0000000010 then the Starting number will be 0000000011.
Aura will calculate the Ending book/instrument number as (Starting number + Total Number of cheque books selected in the rows above - 1) and display it in the Ending book/instrument number field.
Example: If the starting number of the series is 0000001019 and the total number of books is 25, then the Ending number will be 0000001043.
Click Next. New Series -- Confirmation (2/2) page appears.
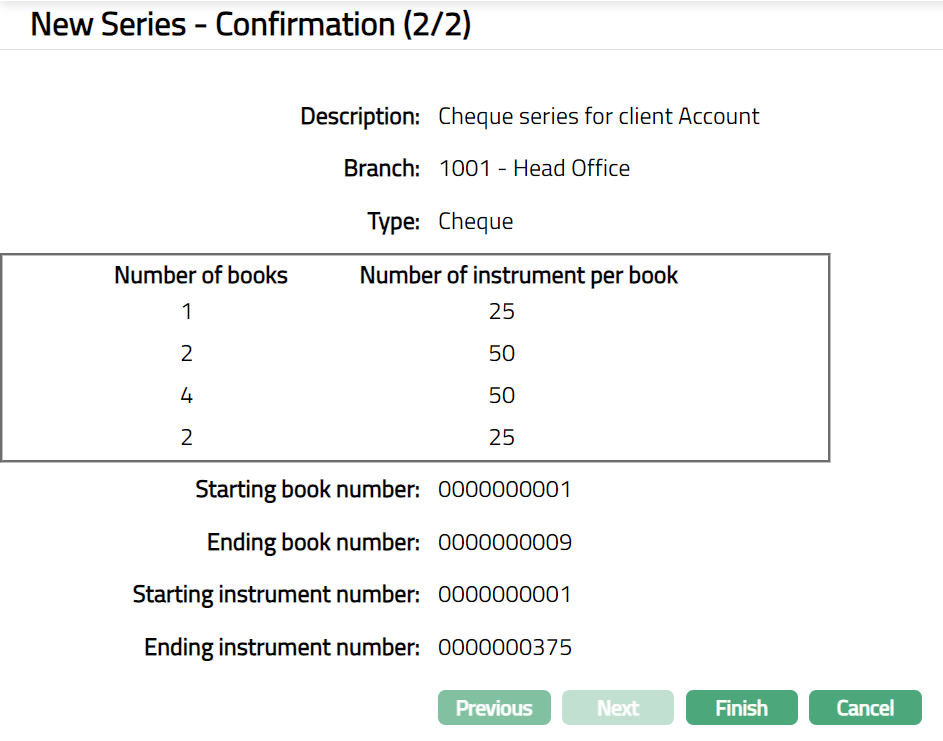
Click Finish. Series Maintenance page appears.
Functions: Add, Search, Print, Edit,Delete, Approve
Note: On click of Finish button, the following actions will take place.
The Unique 10-digit Series number (9 digit random + 1 check digit -- Mod 10) is generated and display the Series Maintenance screen.
The Series status will be Initiated and Record status will be Pending.
Number of books issued till date and Number of books reserved will be defaulted to Zero.
Print: Once the Series record status is Approved, the cheque books for the approved series can be printed. Click on Print to print the cheque book. Aura will ask for confirmation.
Note:
When the record is created and status is Initiated, any user other than the one who created the record can Approve this record. Once Approved status of the cheque series is updated to Generated and record status will be Approved. You are allowed to edit the record until this stage.
Once Generated, the initiator of the record can click on Print and change the status to Printed. No approval required for the same.
Print button is enabled only when the series status is Generated.
Once status is Generated -- Book numbers are generated at the back end.
Once status is Printed -- Cheque numbers which have been set aside for the corresponding Book number is generated at the back end and made available for Print.
Example -- Book number 0001111111111 has 10 leaves from 000031 to 000039. Book number will be generated on Approval of series and will set aside the cheque numbers which in turn will be generated on Print.
Delete: You can delete a Series record by clicking on Delete button until it is approved. Aura will ask for confirmation, on approving the selected record will be deleted. Once the record is approved, it cannot be deleted.
Approve: If you want to approve a series record, then retrieve the record and click on Approve. Aura will ask for confirmation. Once the record is approved, status gets changed from Pending to Approved
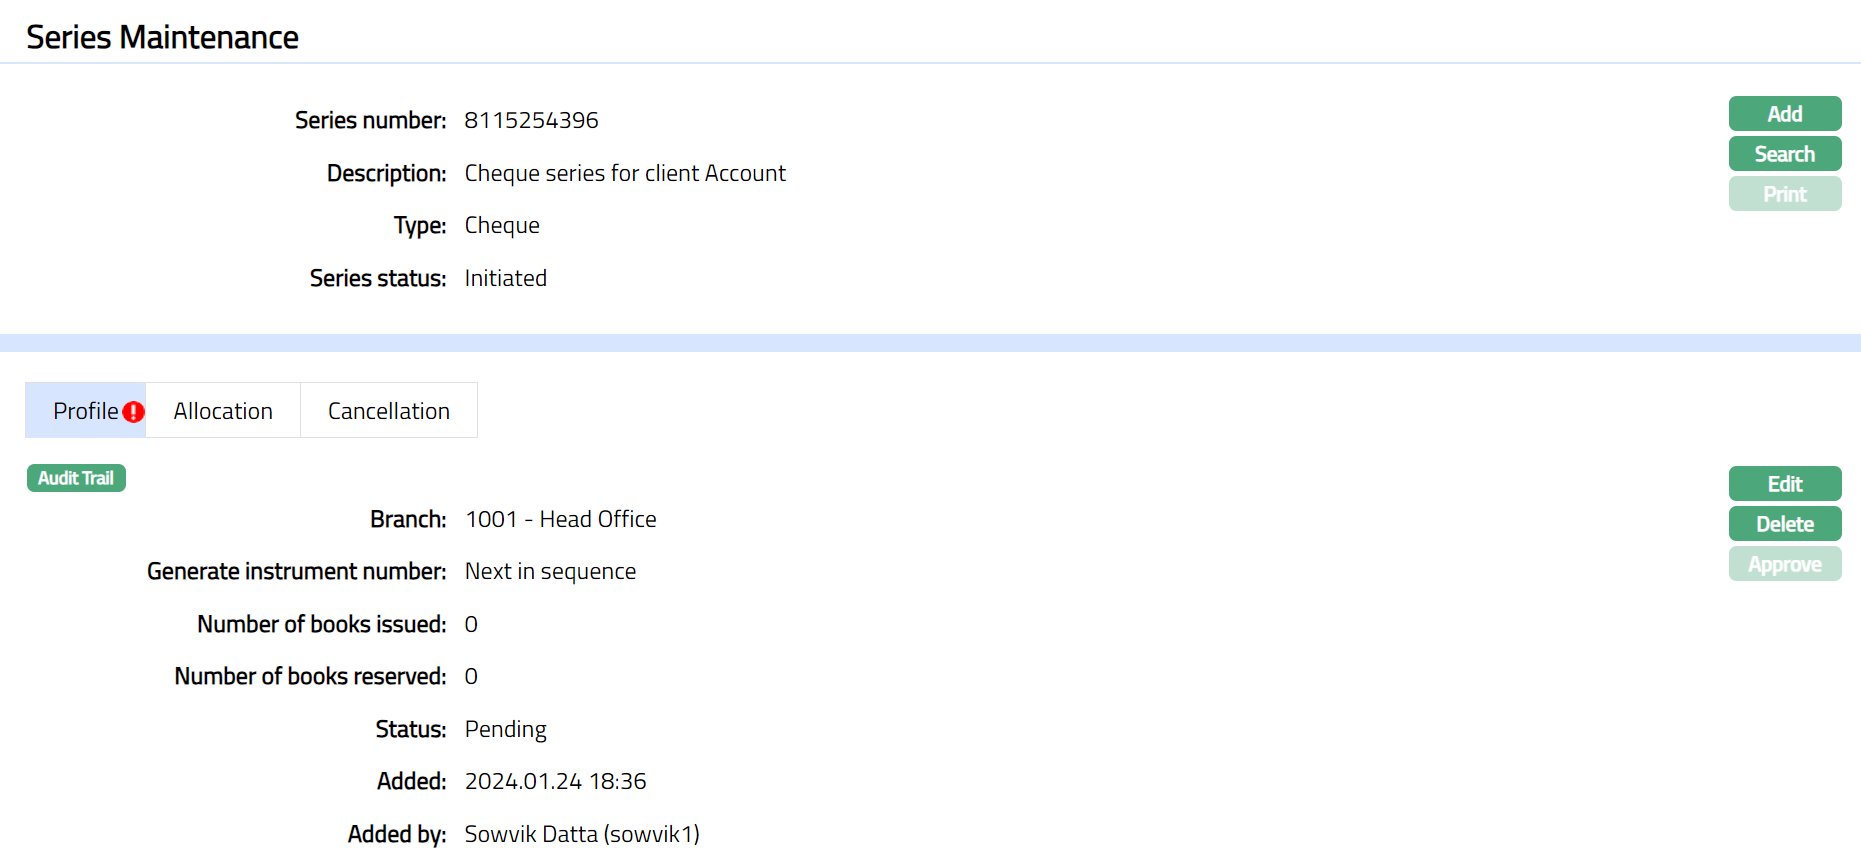
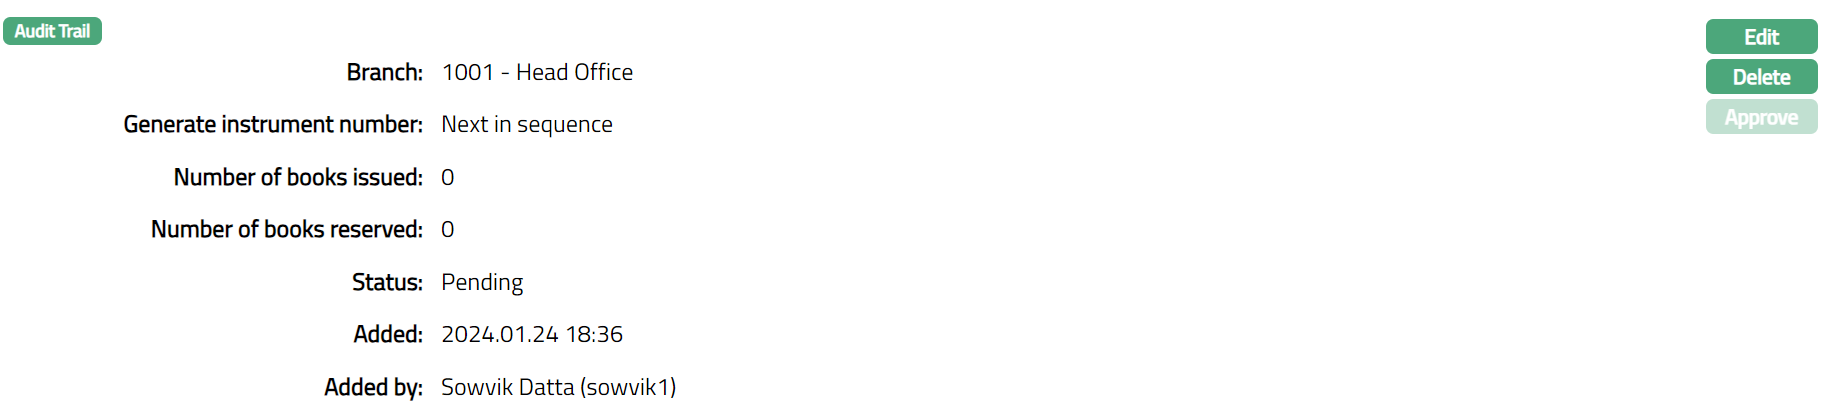
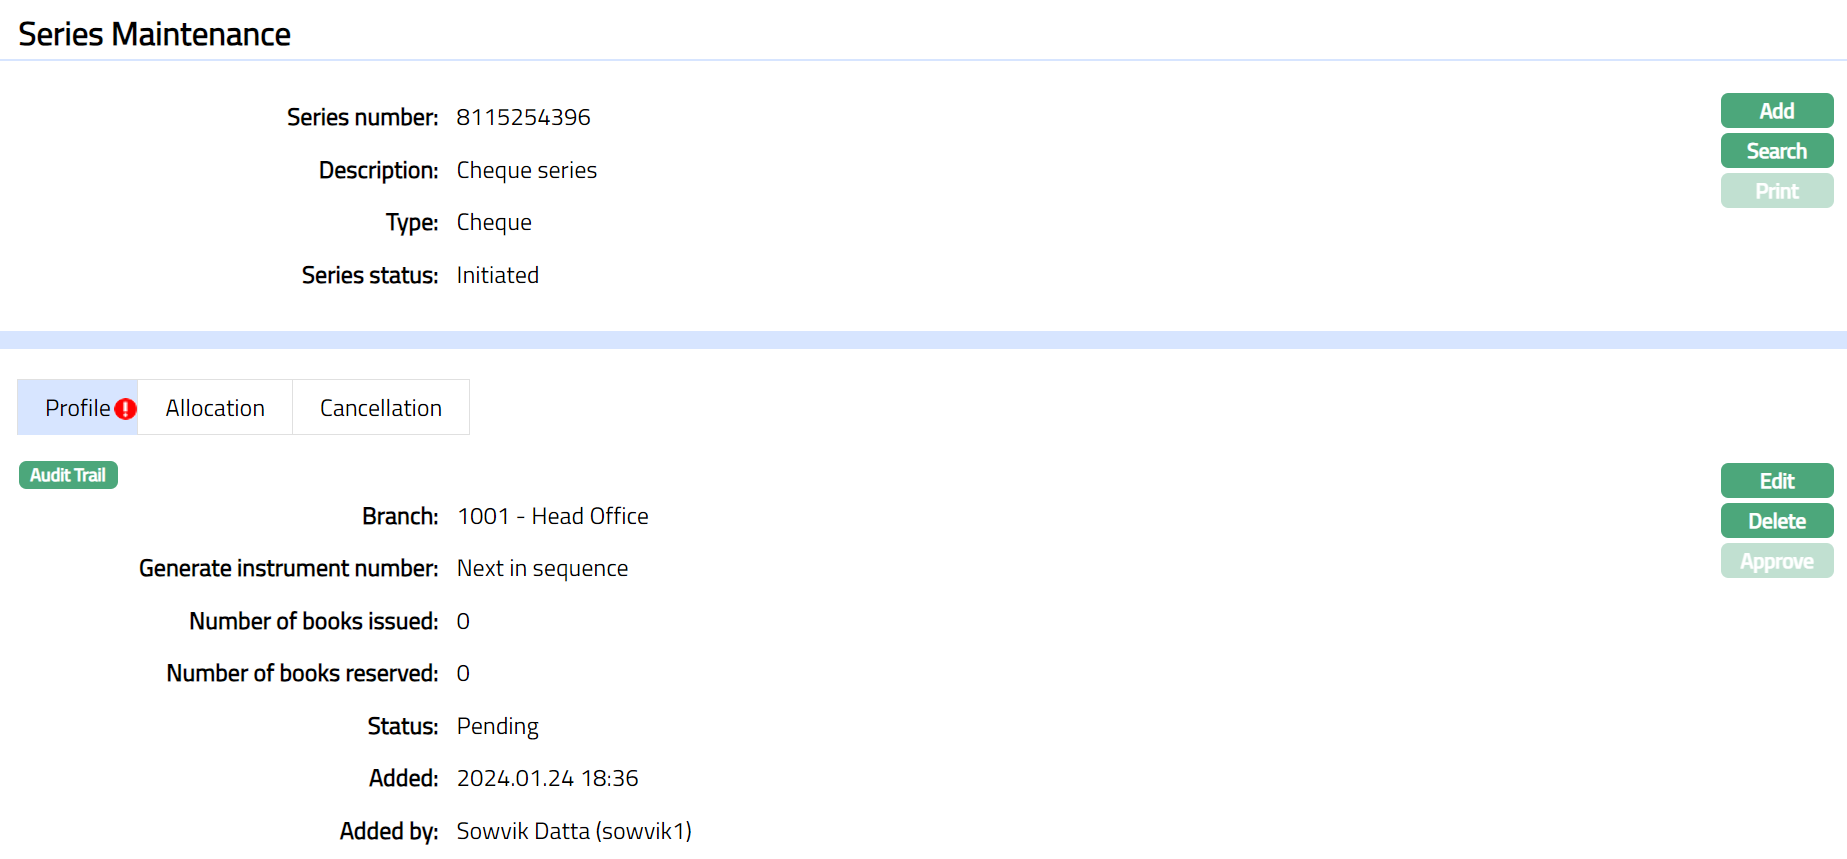
Profile
Profile tab, which is the default tab in the Series Maintenance screen, shows the basic details of the Series record.
To View / Edit Profile.
- Access Series Maintenance page and click Profile tab.
Additional fields available are:
Number of books issued denotes the total number of books in particular series are issued till date. Initially the number of books issued will be 0. When a cheque book is issued for a client and the corresponding record maintained at Retail > Client account > Operations > Cheque book issue is approved, then the value against this field will get updated accordingly.
Number of books reserved denotes the total number of books in particular series that are issued to clients, but the record is pending for approval. Initially the number of books issued will be 0. When a cheque book is issued for a client and the corresponding record maintained at Retail > Client account > Operations > Cheque book issue is pending, then the value against this field will get updated.
Status denotes the status of the record. Status changes as mentioned below:
From Initiated to Generated.
From Generated to Printed.
To edit Profile
Click Edit. Edit Profile page will appear.
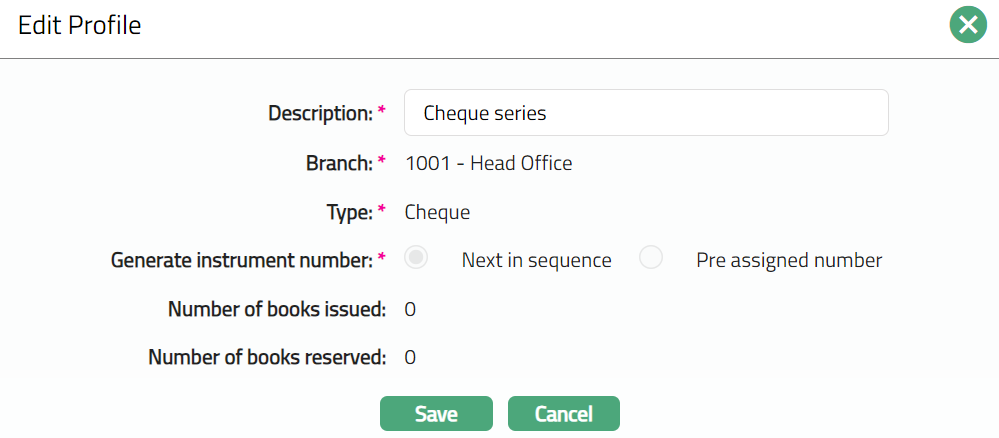
Note: Only Description field is editable.
Make required changes and click Save. Profile page appears with the edited details.
Note: Once added/edited the record status is set to Pending till it is approved by another user. On approval, the record status is set to Approved and the series status will display as Generated. Aura allows you to edit the profile until the series record is in the Initiated stage.
 Functions: Edit, Delete, Approve
The additional fields are:
Added denotes the date on which the Series record was added.
Added by denotes the name of the user who created the Series record.
Approved denotes date on which the Series record was approved. This is displayed only if the record is approved.
Approved by denotes name of the user who approved the Series record. This is displayed only if the record is approved.
Note: Once approved click Print to print the cheque book. The Series status will be displayed as Printed. Sample screen shown below.
 Functions: Add, Search, Print.
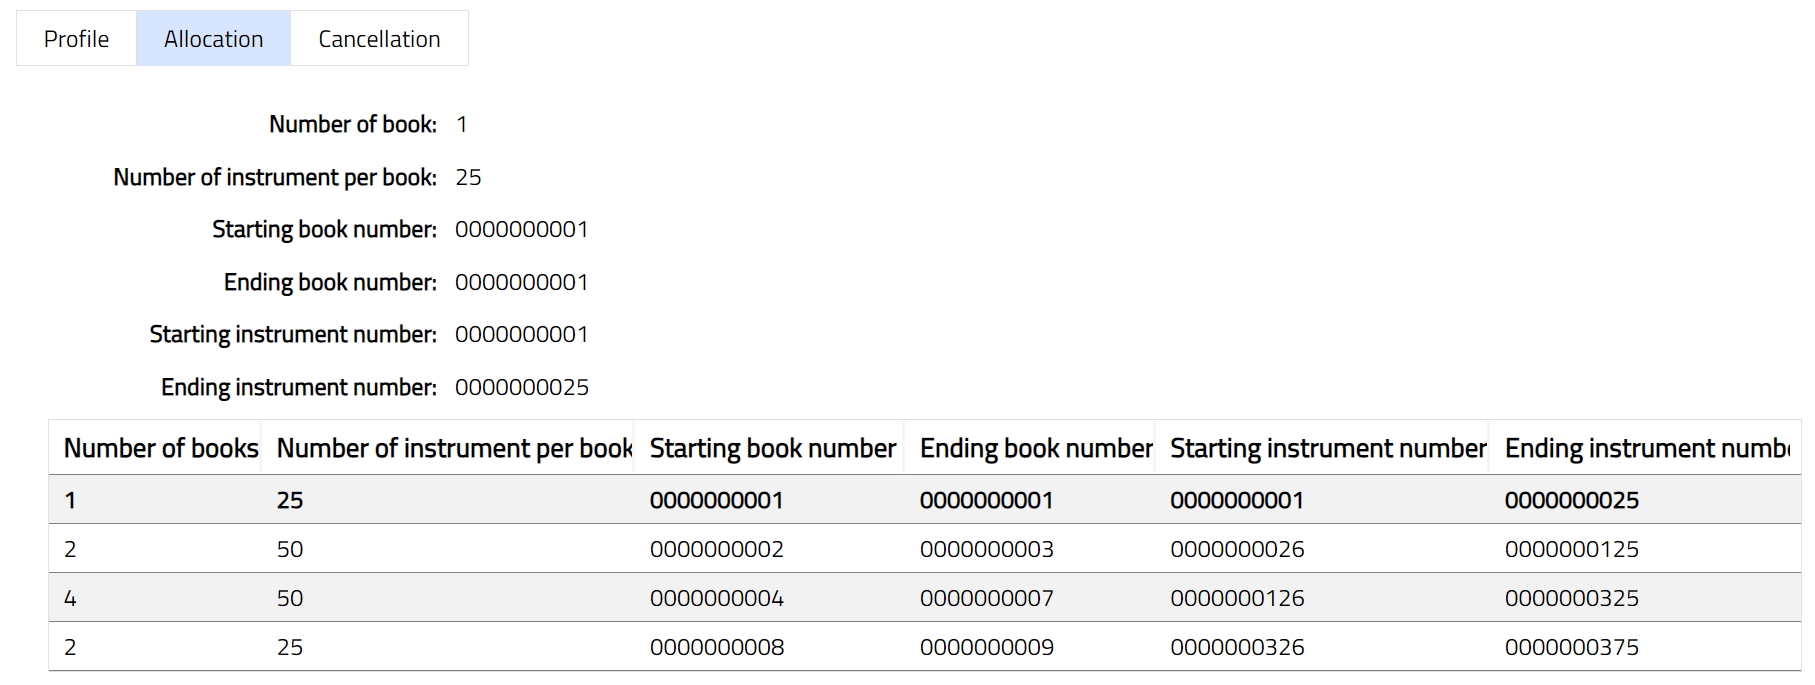
Allocation
Allocation tab allows you to view the details
of the number of cheque leaves allocated per cheque book. It also
displays starting and ending series numbers.
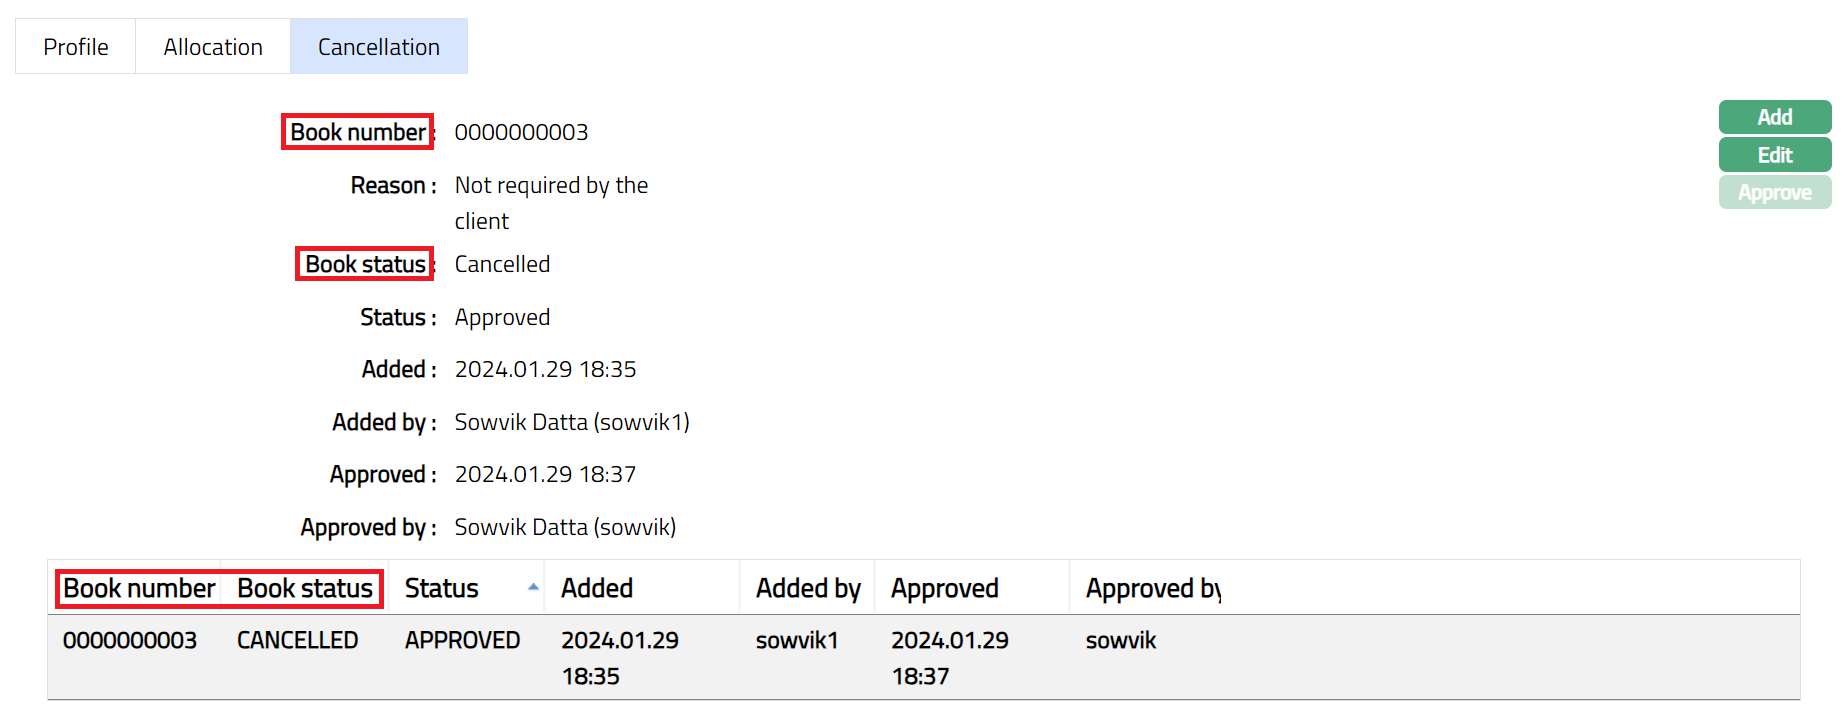
Cancellation
Cancellation tab allows you to cancel the required cheque book allocated to the client. It also displays the cheque book and instrument number which is deleted.
To add book number which needs to be cancelled.
- From Admin menu, click Secure stationery, and then Series. The system will display the Series Search screen. The list of all the series maintained in Aura will be displayed. Select the required series related to the cheque book and then click Cancellation tab. Initially the tab will be blank.
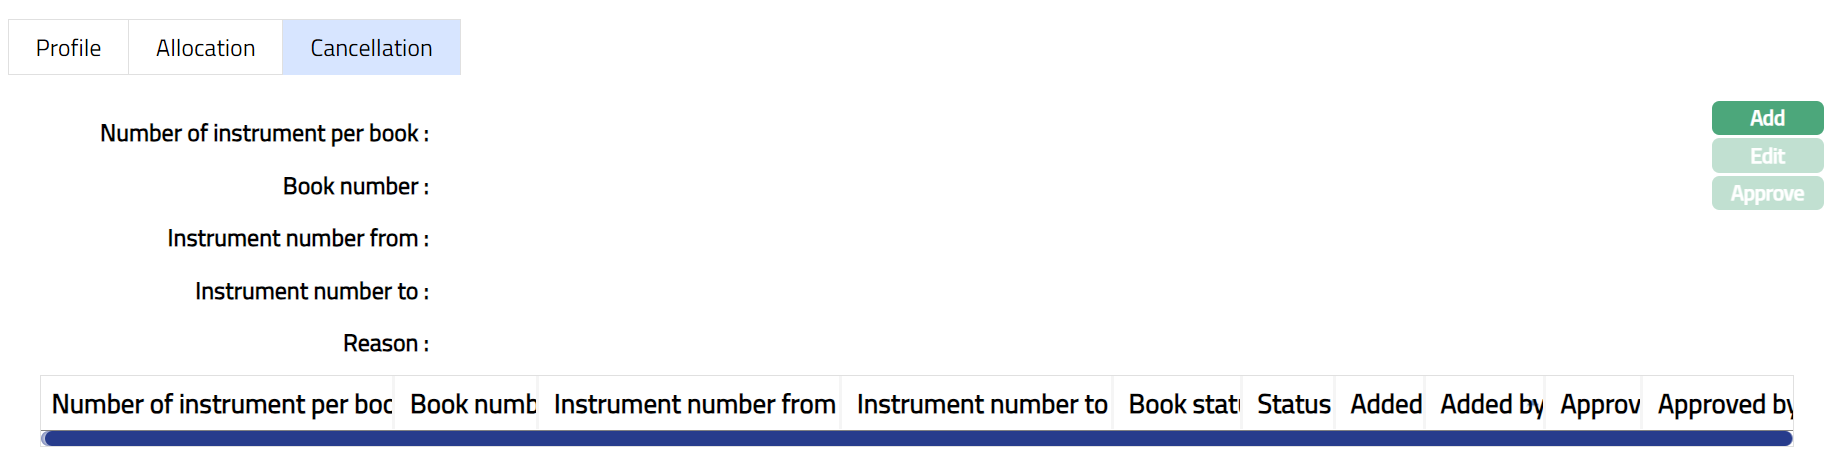
- Click Add. Add Cancellation page appears.
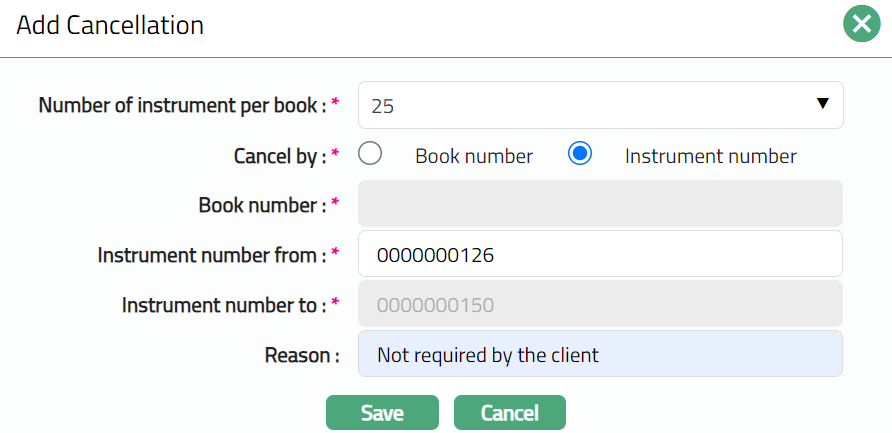
Select Number of instrument per book required in the corresponding Number of Books.
For Cancel by select Book number or Instrument number radio button. Note: Book number field will be highlighted only when Book number radio button is selected.
Enter Instrument number from which you want to cancel.
Aura will calculate the number of cheques based on the Number of instrument per book and Instrument number from selected under Instrument number to field.
Mention Reason for cancellation.
Click Save.
Type -- Passbook
To add new series
From Admin menu, click Secure stationery, and then Series. The system will display the Series Search screen.
Click Add. New Series -- General page appears.
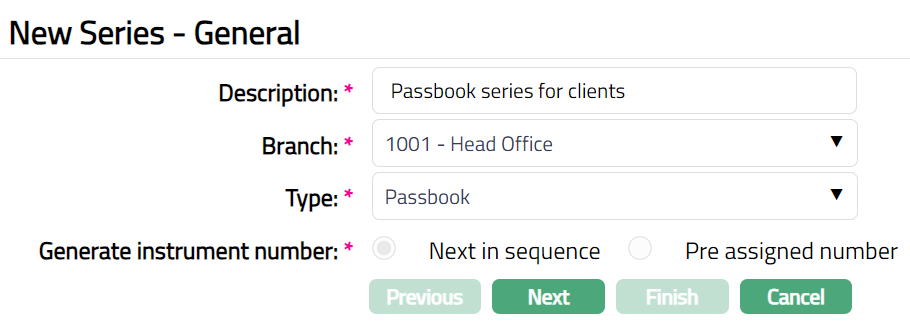
Enter Description for the series.
From drop-down list of active branches maintained at Admin > Branches > Maintain, select the Branch for which the series is generated.
Select Passbook as the Series Type.
Next in Sequence will be selected by default for Generate instrument number.
Click Next. New Series -- Allocation (1/2) appears.
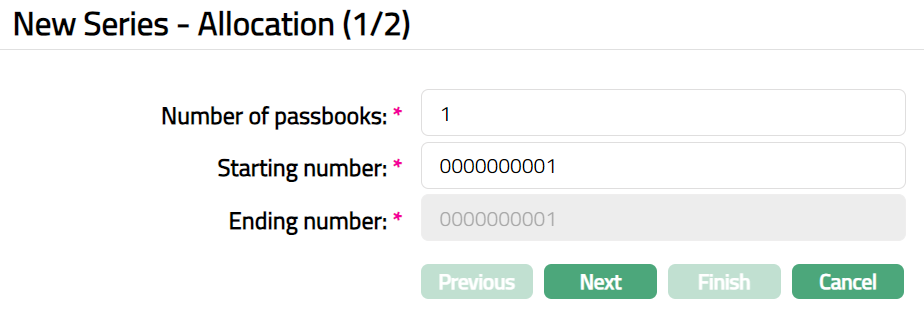
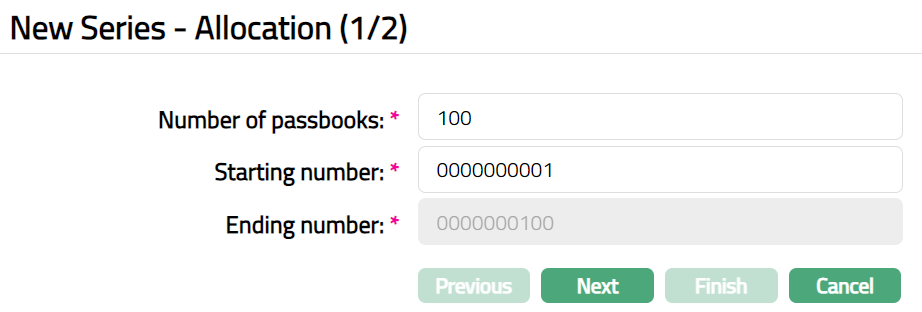
Enter Number of Passbooks required.
Aura will calculate the Passbook number as last Passbook number +1 and display it in Starting number. You can also enter the Starting number with maximum of 10 digits.
Note: The Starting number has to be greater than the passbook number of the last passbook generated. If there was no passbook generated earlier, then you can enter as 1.
Example: If the passbook number of the last generated passbook is 0000000010 then the Starting number will be 0000000011.
Aura will calculate the Ending number as (Starting number + Total Number of Passbooks selected in the rows above - 1) and display it in the Ending number field.
Example: If Starting number is 0000000001 and the number of passbooks entered is 100, then Ending number will display as 00000000100 (00000000001 + 100 -- 1 = 0000000100). Sample screen shown below.
Click Next. New Series -- Confirmation (2/2) page appears.
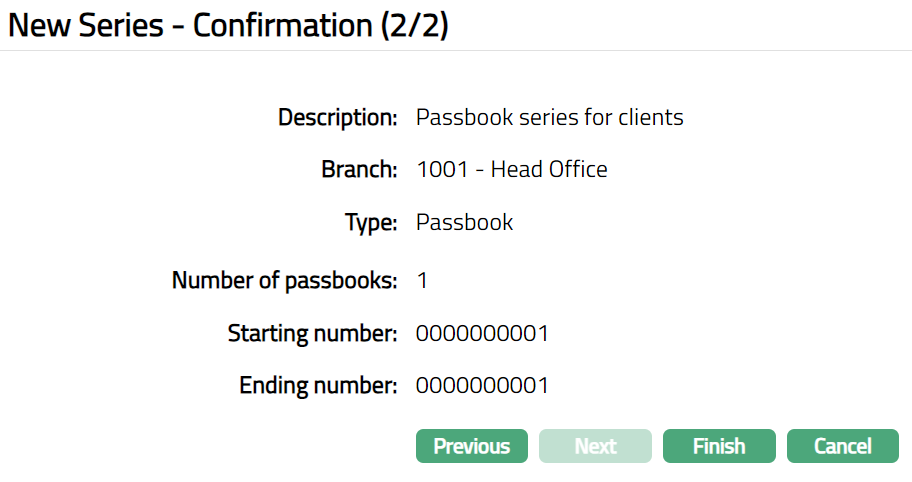
Click Finish. Series Maintenance page appears.
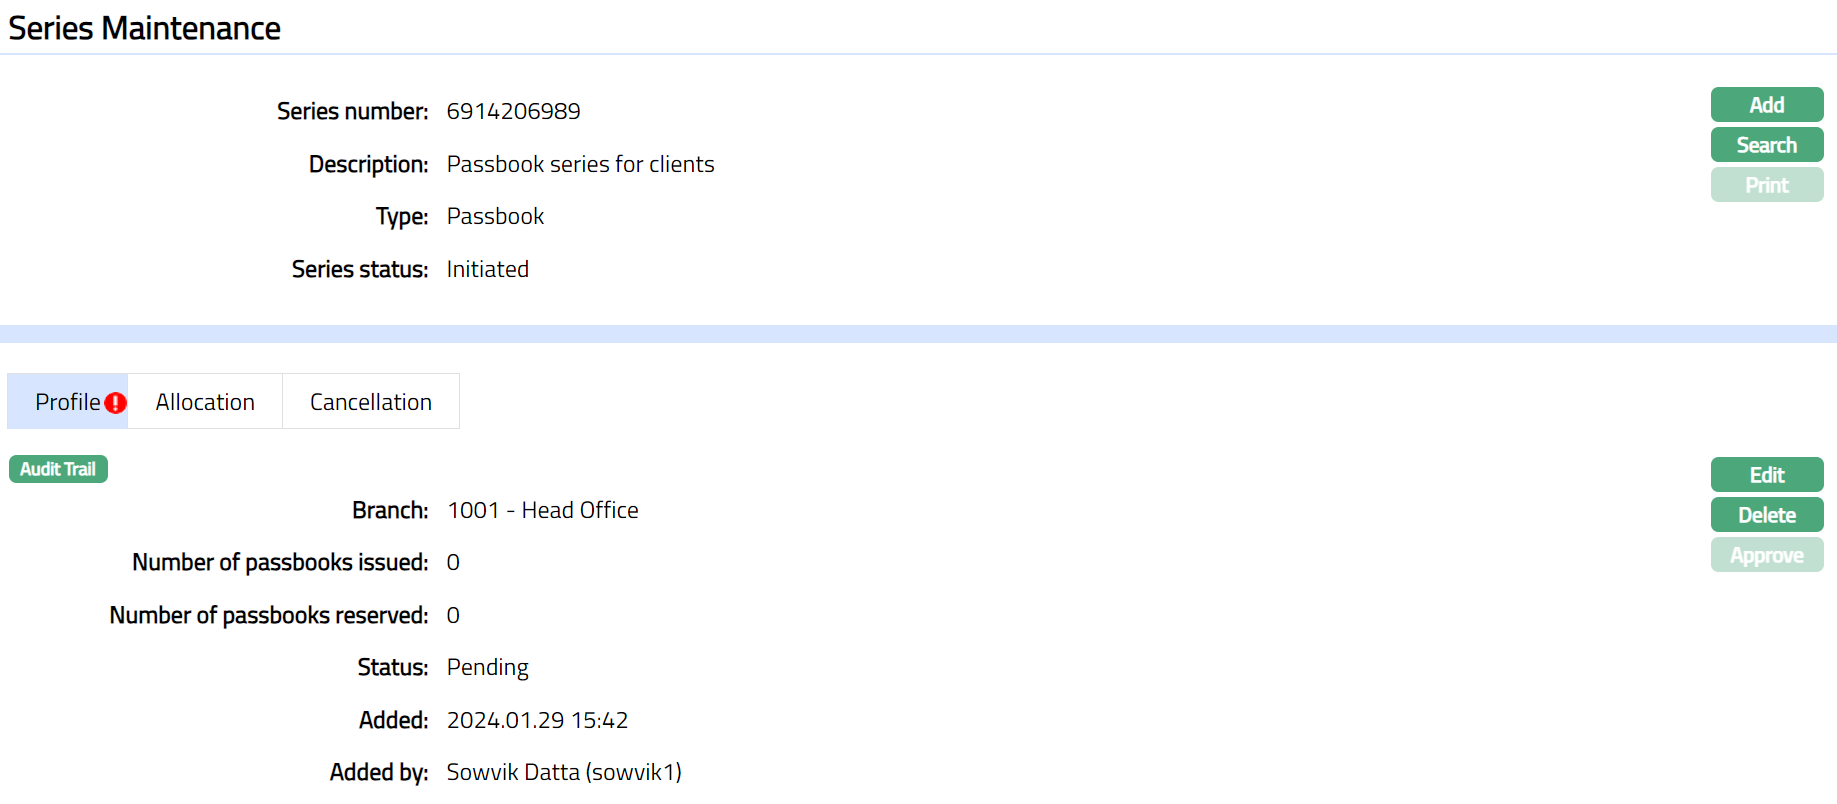
Functions: Add, Search, Print, Edit, Delete, Approve
Note: On click of Finish button, the following actions will take place.
The unique 10-digit Series number (9 digit random + 1 check digit -- Mod 10) is generated and displays the Series Maintenance screen.
The Series status will be Initiated and Record status will be Pending.
Number of passbooks issued till date and Number of passbooks reserved will be defaulted to zero.
Print: Once the Series record status is Approved, the Passbooks for the approved series can be printed. Click on Print to print the Passbook. Aura will ask for confirmation.
Note:
When the record is created and status is Initiated, any user other than the one who created the record can Approve this record. Once Approved, status of the passbook series is updated to Generated and record status is Approved. You can edit the record until this stage.
Once Generated, the initiator of the record can click on Print and change the status to Printed. No approval required for the same.
Print button is enabled only when the series status is Generated.
Once status is Generated -- Book numbers are generated at the back end.
Once status is Printed --The Series status is changed from Generated to Printed. Passbooks with status as Printed are available for issuance. .
Delete: You can delete a Passbook series record by clicking on Delete button until it is approved. Aura will ask for confirmation, on approving which selected record will be deleted. Once the record is approved, it cannot be deleted.
Approve: If you want to approve a Passbook series record, then retrieve the record and click on Approve. Aura will ask for confirmation. Once the record is approved, status gets changed from Pending to Approved.
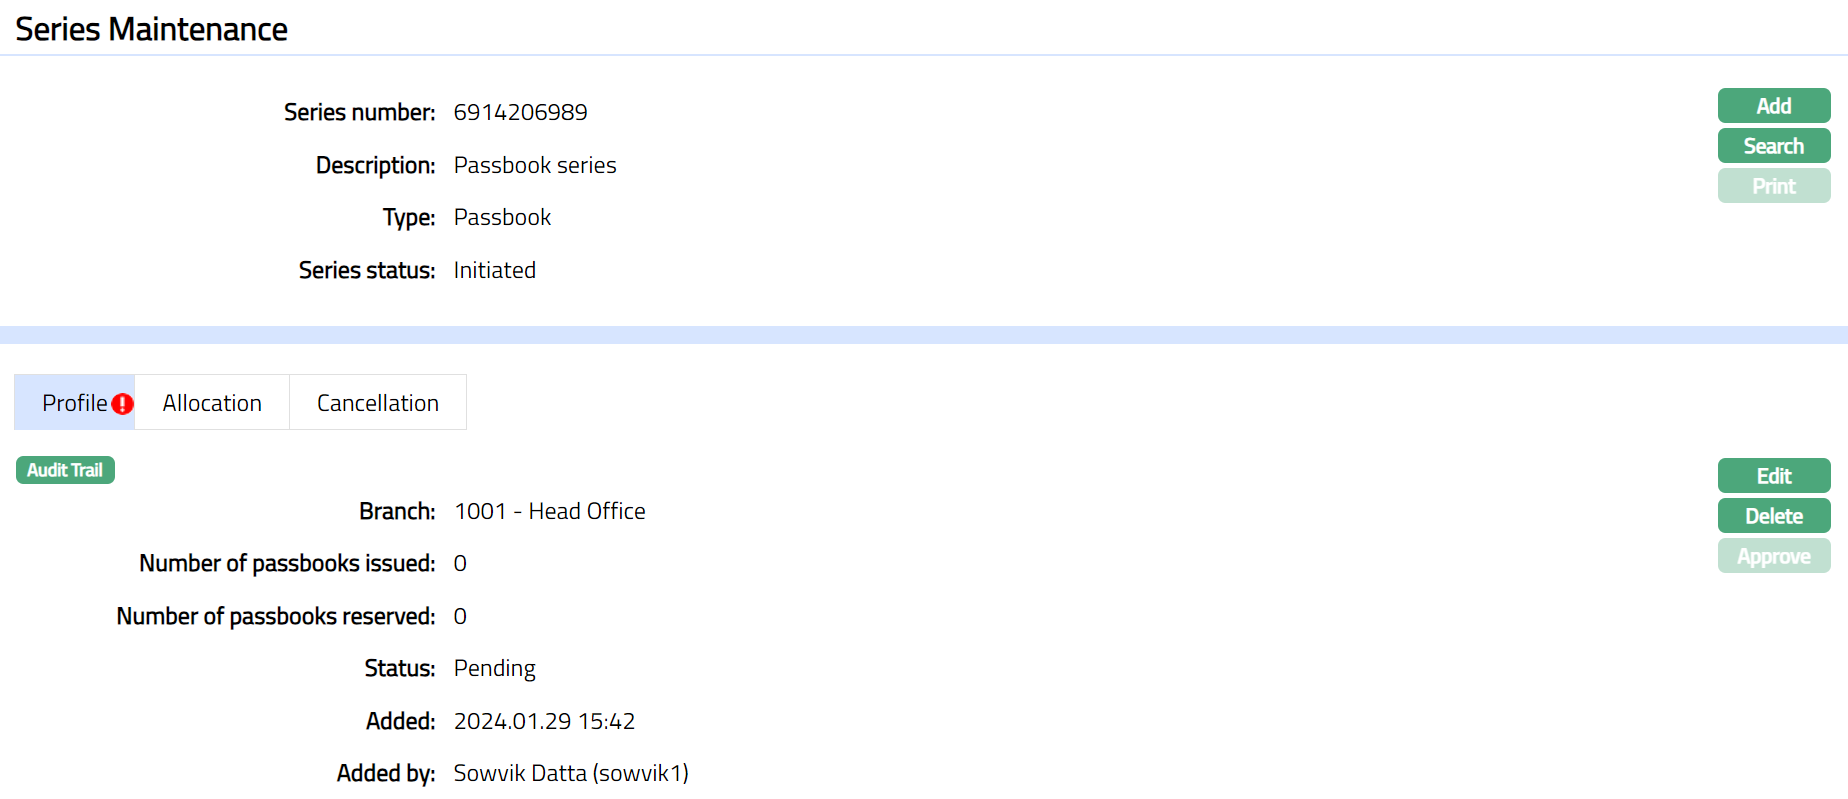
Profile
Profile tab, which is the default tab in the Series Maintenance screen, shows the basic details of the Series record.
To view / edit Profile.
- Access Series Maintenance page and click Profile tab.
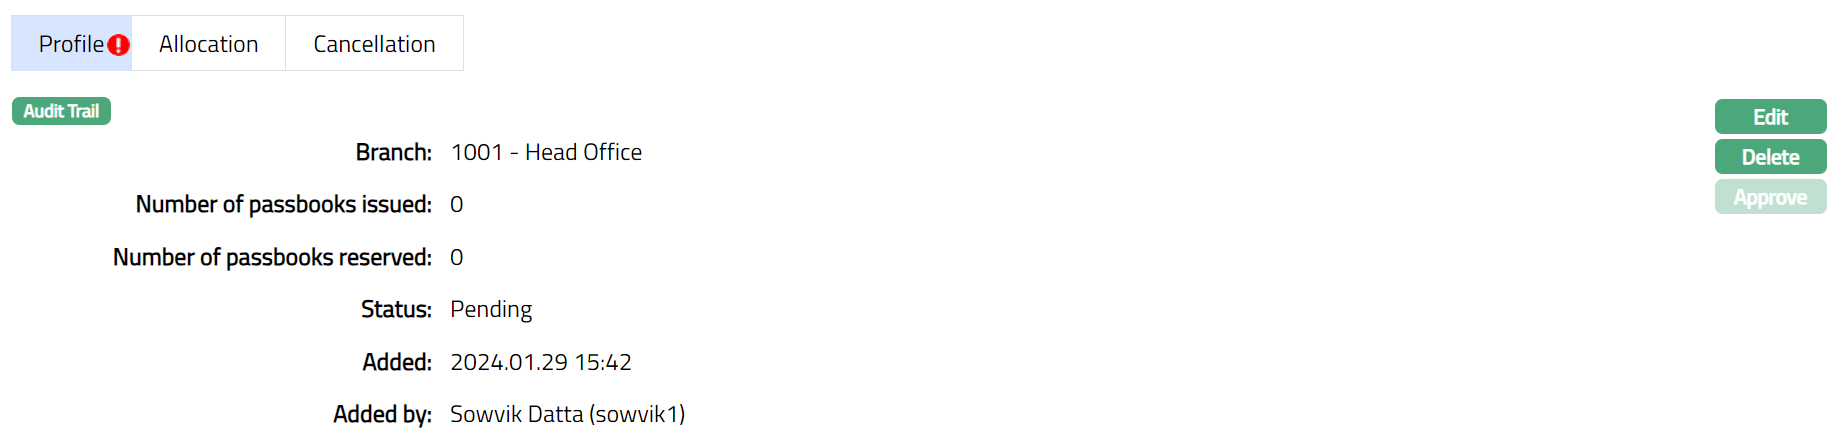
The additional fields available are:
Number of passbooks issued: It denotes the number of passbooks issued till date. By default, value is Zero. It displays the Number of passbooks which have passbook status as issued and Record status as Approved.
Number of passbooks reserved: It denotes the number of passbooks in reserved status. By default, the value is Zero. It displays the Number of passbooks which have passbook status as issued and Record status as Pending.
Status denotes the status of the record. Status changes as mentioned below:
From Initiated to Generated.
From Generated to Printed.
To edit Profile
- Click Edit. Edit Profile page will appear.
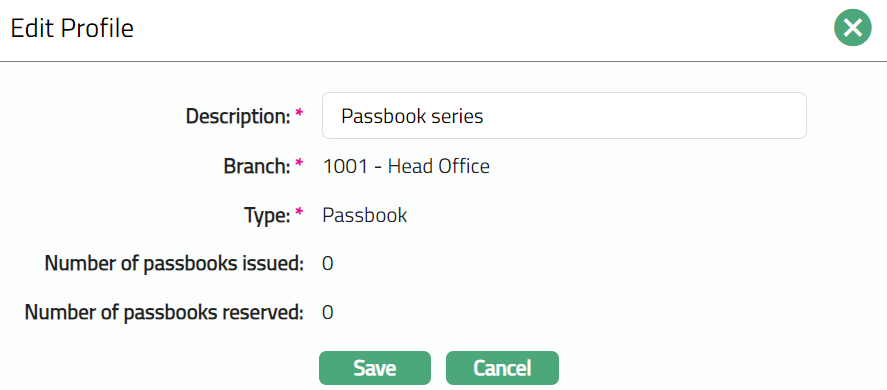
Note: Only Description field is editable.
- Make required changes and click Save. Profile page appears with the edited details.
Note: Once added/edited the record status is set to Pending till it is approved by another user. On approval, the record status is set to Approved and the series status will display as generated. Aura allows you to edit the profile until the series record is in the Initiated status.
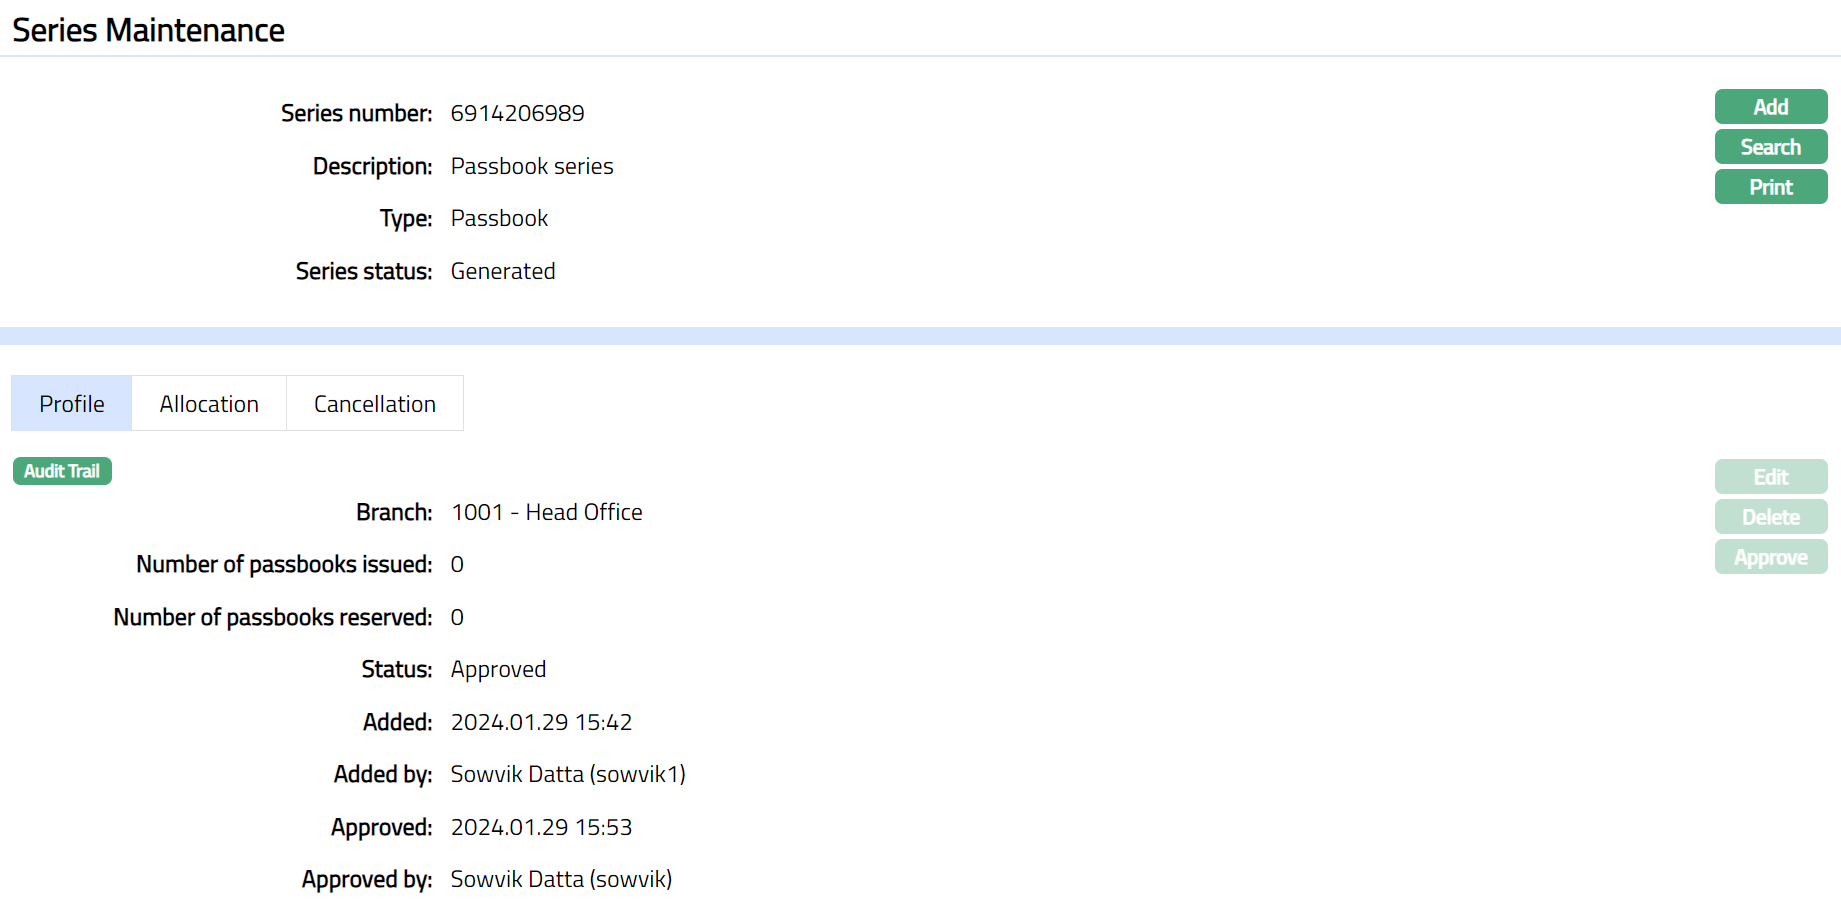
Functions: Edit, Delete, Approve
The additional fields are:
Added denotes the date on which the Series record was added.
Added by denotes the name of the user who created the Series record.
Approved denotes date on which the Series record was approved. This is displayed only if the record is approved.
Approved by denotes name of the user who approved the Series record. This is displayed only if the record is approved.
Note: Once approved click Print to print the passbook. Series status will be displayed as Printed. Sample screen shown below.

Functions: Add, Search, Print.
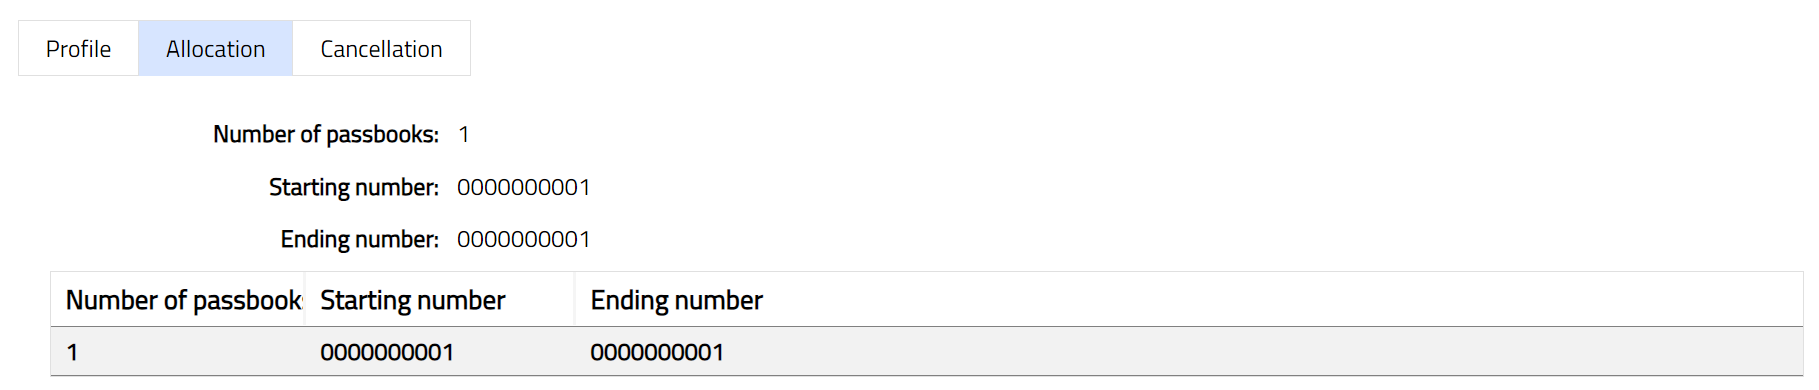
Allocation
Allocation tab allows you to view the details of the number of passbooks allocated to the client. It also displays starting and ending series numbers.
Cancellation
Cancellation tab allows you to cancel the required passbooks allocated to the client. It also displays the book number which is deleted.
To add book number which needs to be cancelled.
From Admin menu, click Secure stationery, and then Series. The system will display the Series Search screen. The list of all the series maintained in Aura will be displayed. Select the required series related to the passbook and then click Cancellation tab. Initially the tab will be blank.

Click Add. Add Cancellation page appears.
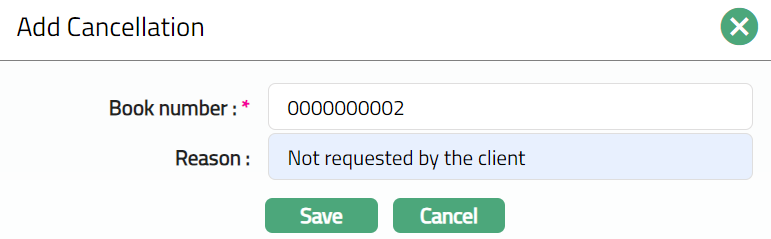
Book number: Enter the required book number you wish to cancel
Reason: mention the reason as why you want to cancel the pass book
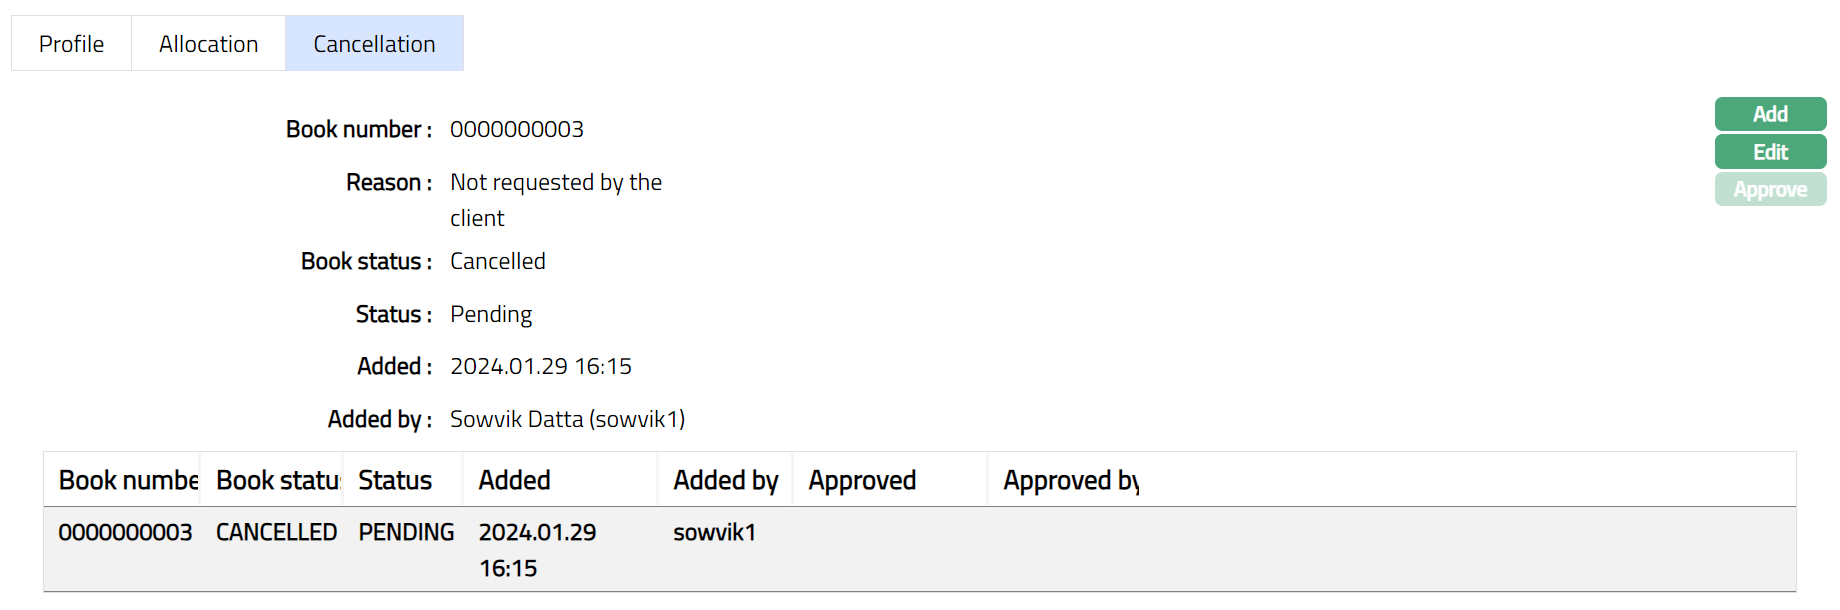
Click Save. Cancellation tab appears with the added details, displaying Status of the record as Pending.
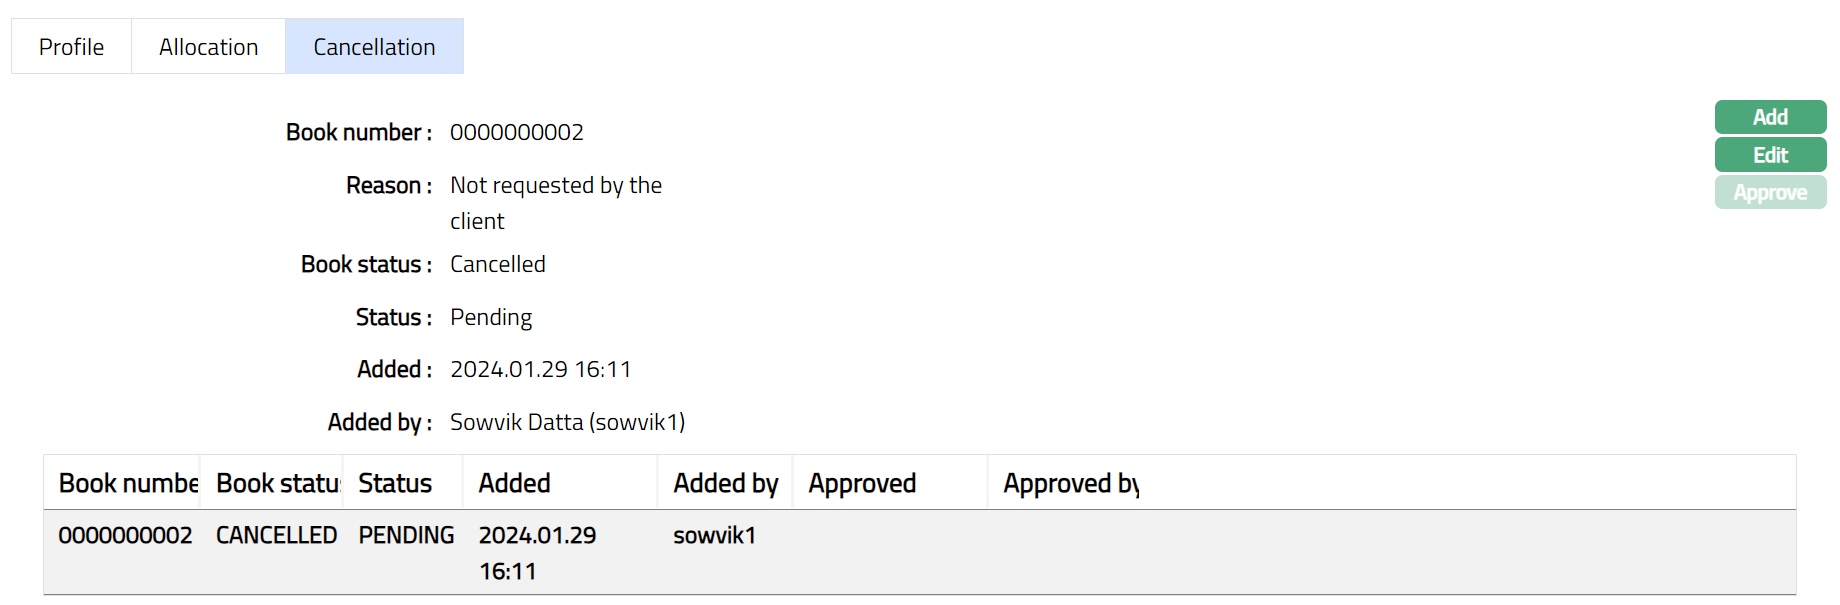
Functions: Add, Edit, Approve.
To edit cancellation record
Click Edit. Edit Cancellation page appears.

Enter details as required and click Save. Cancellation page appears with the edited details.
Functions: Add, Edit, Approve.
Note: Once added/edited the record status is set to Pending till it is approved by another user. On approval, the record status is set to Approved and the series status will display as generated. Aura allows you to edit the profile until the series record is in the Initiated status.

Functions: Add, Edit, Approve.
The additional fields are:
Added denotes the date on which the Series record was added.
Added by denotes the name of the user who created the Series record.
Approved denotes date on which the Series record was approved. This is displayed only if the record is approved.
Approved by denotes name of the user who approved the Series record. This is displayed only if the record is approved.
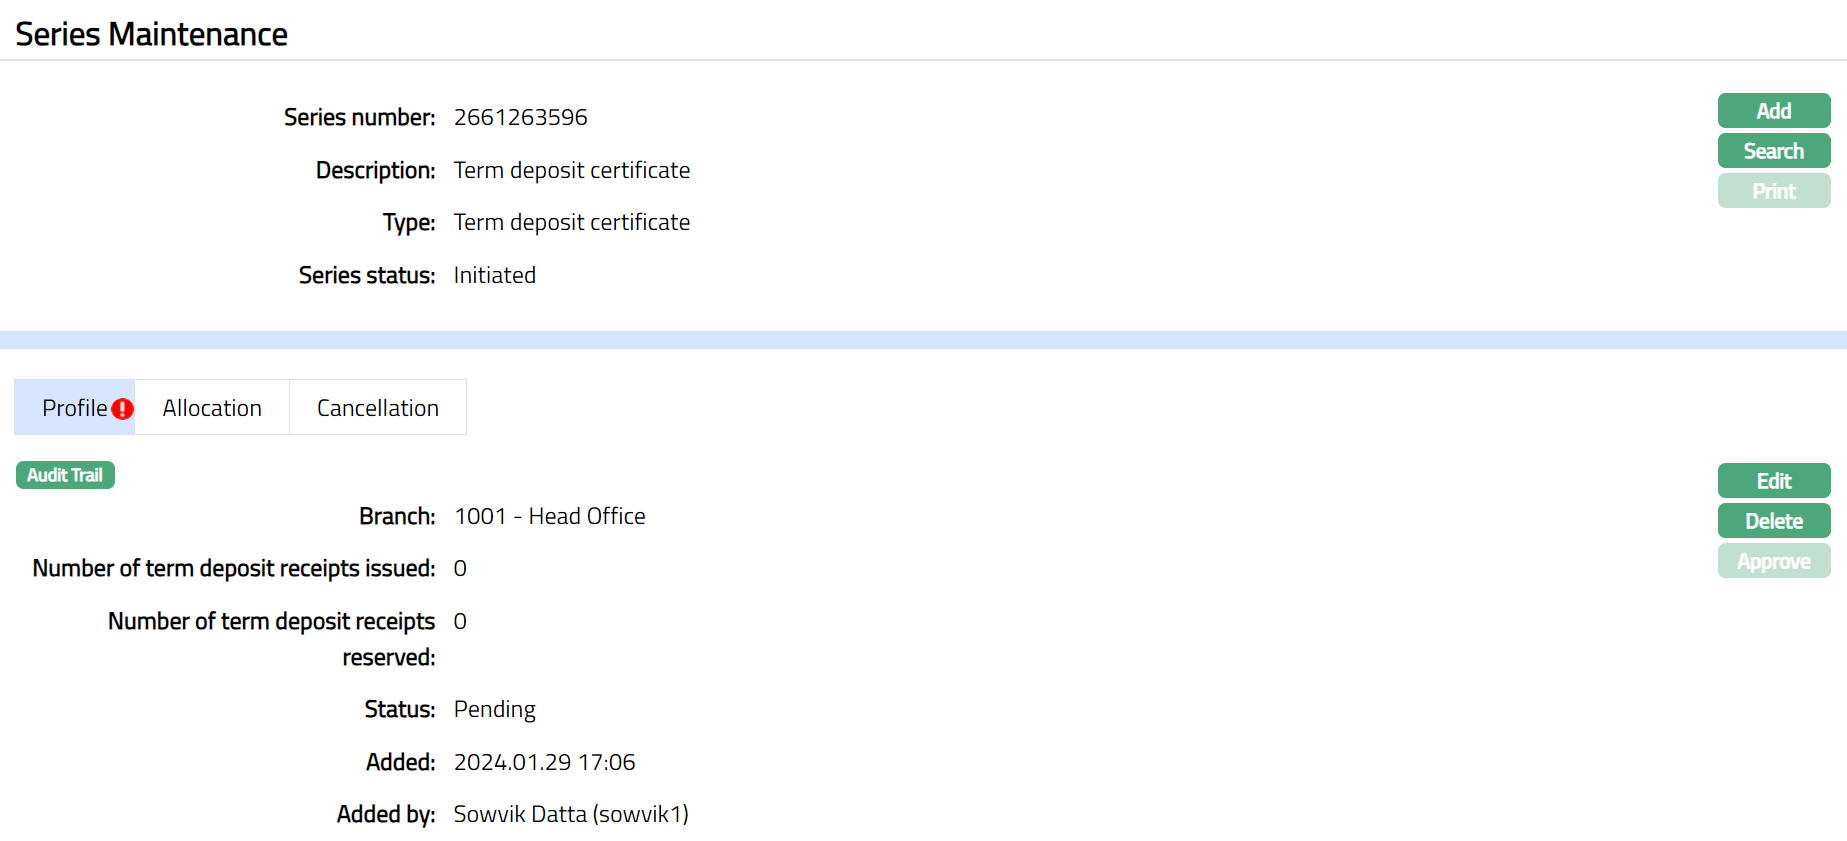
Type -- Term Deposit Receipt
To add new series
From Admin menu, click Secure stationery, and then Series. The system will display the Series Search screen.
Click Add. New Series -- General (1/3) page appears.
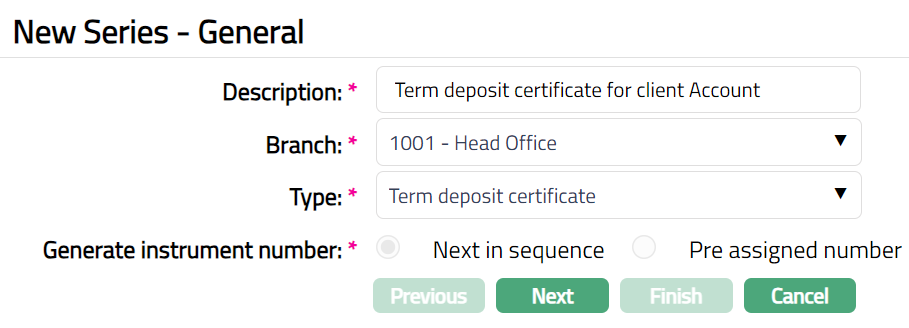
Enter Description of the series.
From drop-down list of active branches maintained at Admin > Branches > Maintain, select the Branch for which the series is generated.
Select Term deposit receipt option as the Series Type.
Next in Sequence will be selected by default for Generate instrument number.
Click Next. New Series -- Allocation (1/2) appears.
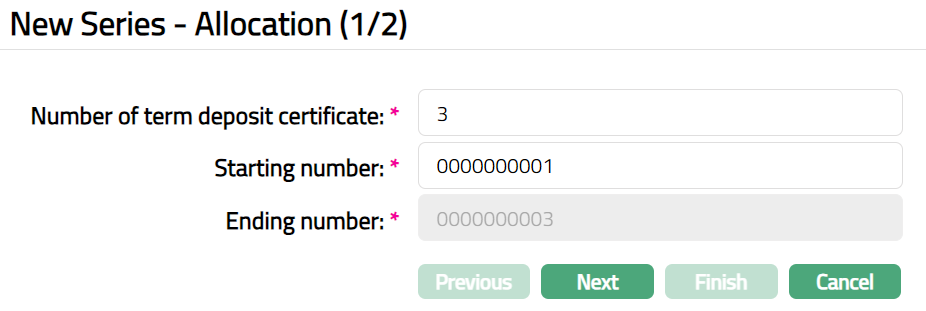
Enter Number of Term deposit certificate required.
Aura will calculate the Term Deposit Receipt number as last Term Deposit Receipt number +1 and display it in Starting Number. You can also enter the Starting Number with maximum of 10 digits.
Note: The Starting number has to be greater than the Receipt number of the last receipt generated.
Example: If the receipt number of the last generated book is 0000000010 then the Starting number will be 0000000011.
Aura will calculate the Ending number as (Starting number + Total Number of Term deposit receipt selected in the rows above - 1) and displays it in the Ending number field.
Example: If Starting number is 0000000001 and the number of Term deposit certificate entered is 25, then Ending number will display 00000000025 (00000000001 + 25 -- 1 = 0000000025).
Click Next. New Series -- Confirmation (2/2) page appears.
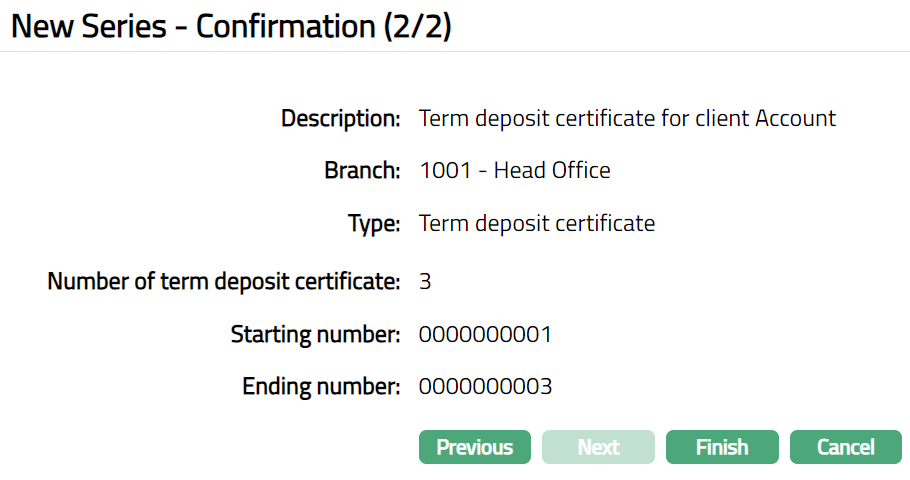
Click Finish. Series Maintenance page appears.
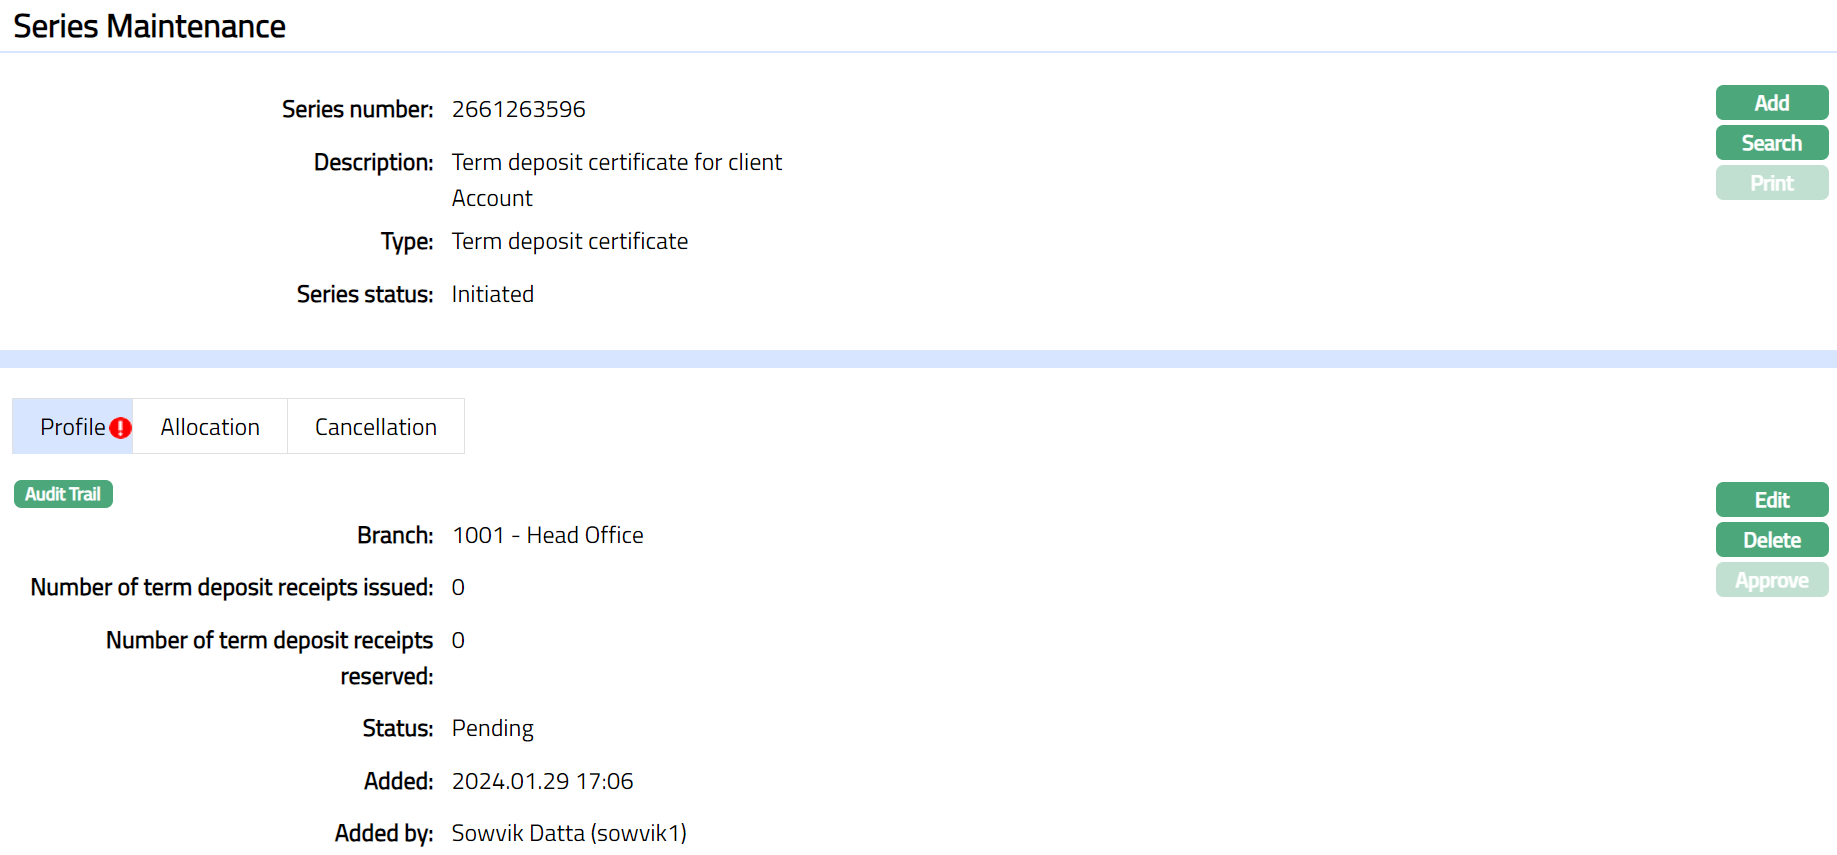
Functions: Add, Search, Print, Edit,Delete, Approve.
Note: On click of Finish button, the following actions will take place.
The unique 10-digit Series number (9 digit random + 1 check digit -- Mod 10) is generated and display the Series Maintenance screen.
The Series status will be Initiated and Record status will be Pending.
Number of term deposit receipts issued till date and Number of term deposit receipts reserved will be defaulted to zero.
Print: Once the Series record status is Approved, the Term deposit receipt for the approved series can be printed. Click on Print to print the Term deposit receipt. Aura will ask for confirmation.
Note:
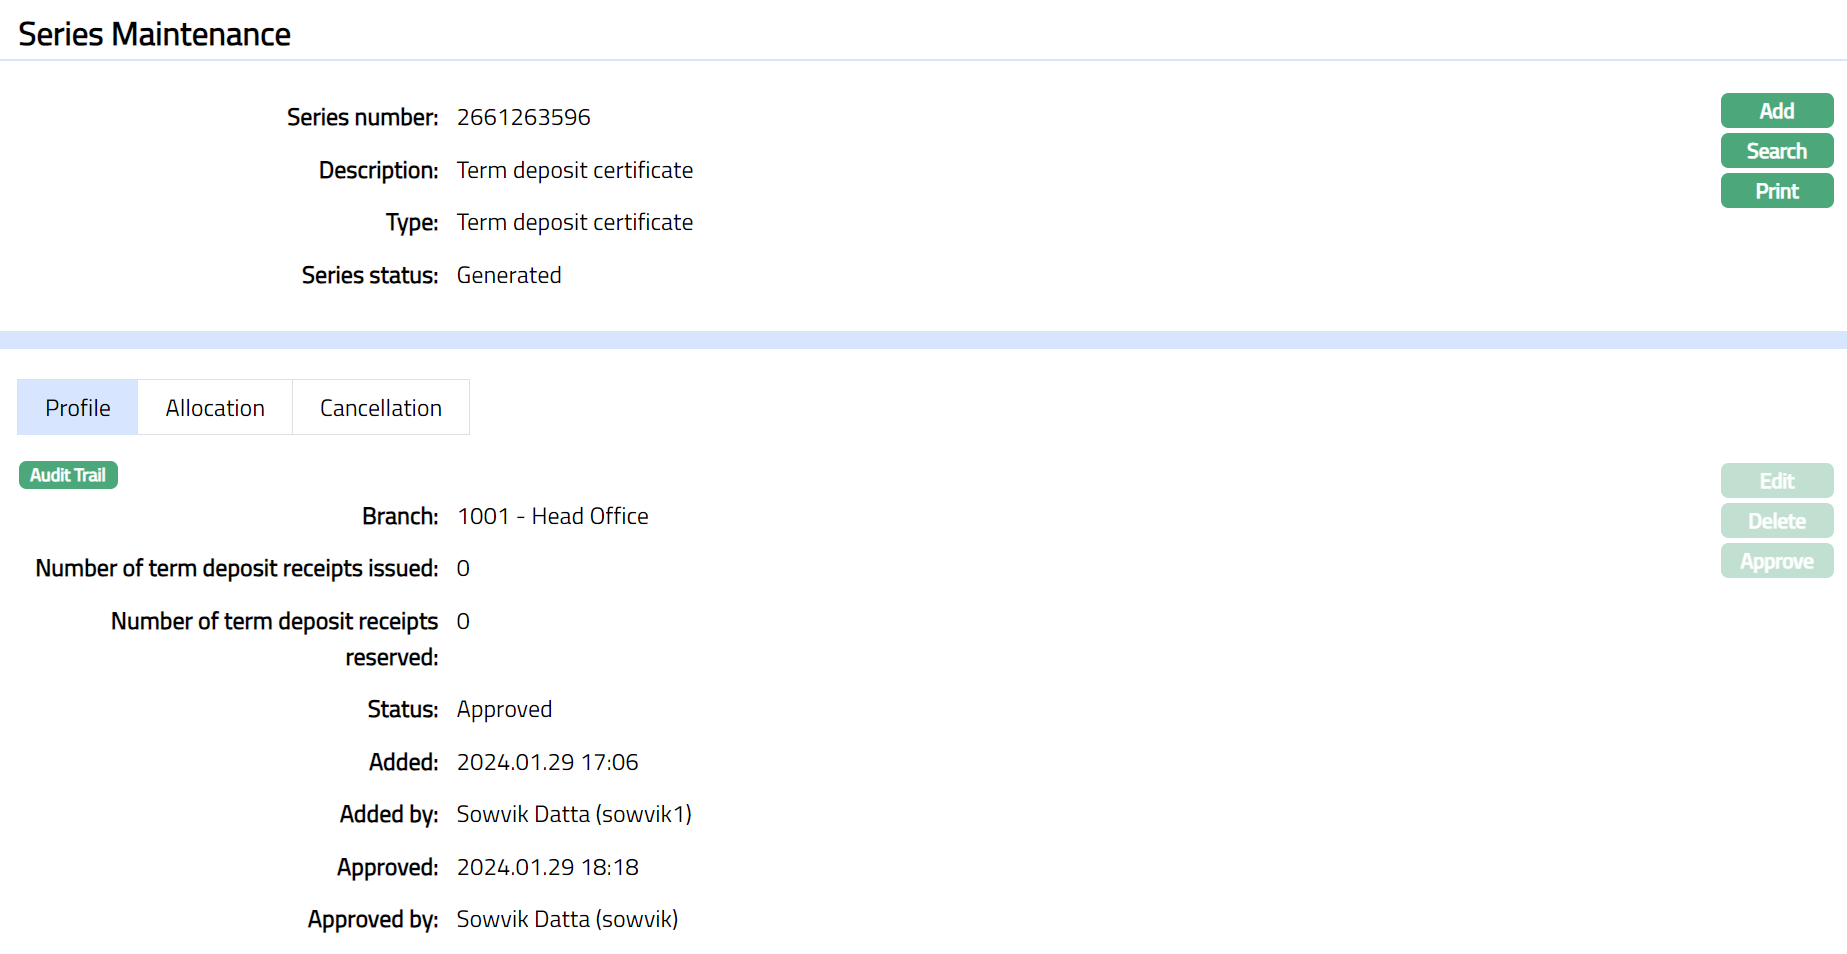
When the record is created and status is Initiated, any user other than the one who created the record can Approve this record. Once Approved status of the Term deposit receipt series is updated to Generated and record status will be Approved. You are allowed to edit the record until this stage.
Once Generated, the initiator of the record can click on Print and change the status to Printed. No approval required for the same.
Print button is enabled only when the series status is Generated.
Once status is Generated -- Term deposit receipts number is generated at the back end.
Once status is Printed -- Once status is Printed --The Series status is changed from Generated to Printed. Term deposit receipts with status as Printed are available for issuance.
Delete: You can delete a Term deposit receipt series record by a click on Delete button until it is approved. Aura will ask for confirmation, on approving which selected record will be deleted. Once the record is approved, it cannot be deleted.
Approve: If you want to approve a Term deposit receipt series record, then retrieve the record and click on Approve. Aura will ask for confirmation. Once the record is approved, status gets changed from Pending to Approved.
Profile
Profile tab, which is the default tab in the Term Series Maintenance screen, shows the basic details of the Series record.
To view / edit Profile.
- Access Series Maintenance page and click Profile tab.
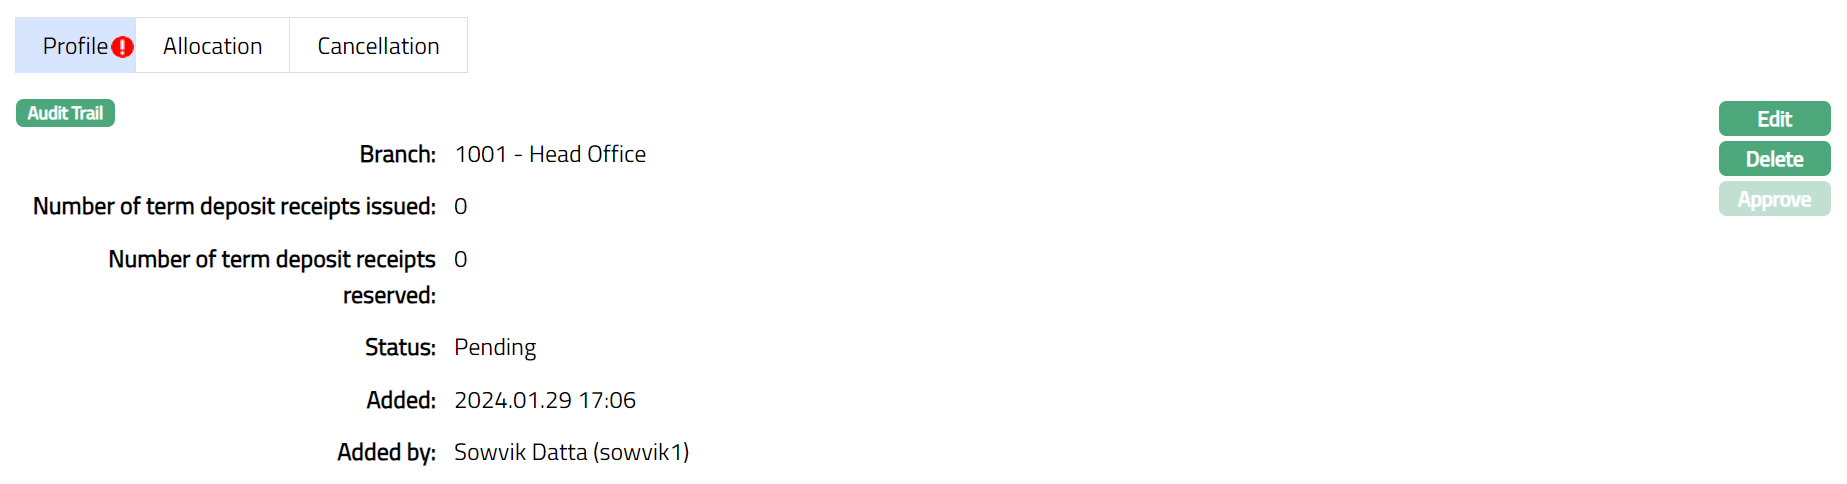
The additional fields available are:
Number of term deposit receipts issued: It denotes the number of term deposit receipts issued till date. By default, value is Zero. It displays the Number of term deposit receipts which have term deposit receipts status as issued and Record status as Approved.
Number of term deposit receipts reserved: It denotes the number of term deposit receipts in reserved status. By default, the value will be Zero. It will display the Number of term deposit receipts which have term deposit receipts status as issued and Record status as Pending.
Status denotes the status of the record. Status changes as mentioned below:
From Initiated to Generated.
From Generated to Printed.
To edit Profile
- Click Edit. Edit Profile page will appear.
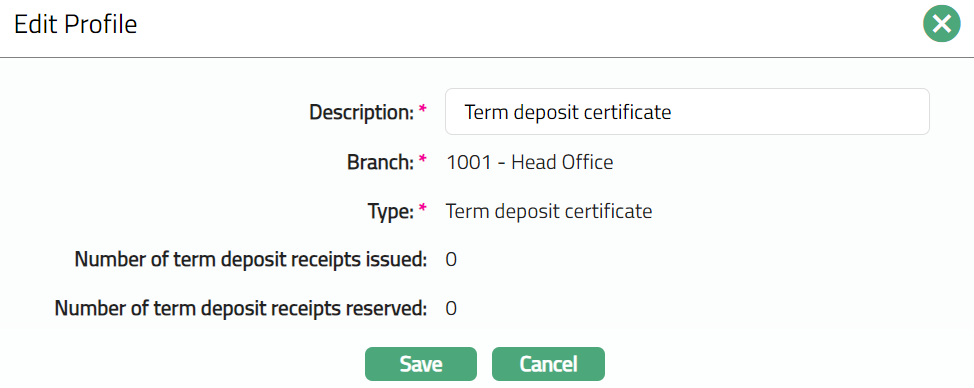
Note: Only Description field is editable.
- Make required changes and click Save. Profile page appears with the edited details.
Functions: Edit, Delete, Approve
Note: Aura allows you to edit the profile until the series record is in the Initiated status.
Note: Once added/edited the record status is set to Pending till it is approved by another user. On approval, the record status is set to Approved and the series status will display as generated. Aura allows you to edit the profile until the series record is in the Initiated status.
Functions: Edit, Delete, Approve
The additional fields are:
Added denotes the date on which the Series record was added.
Added by denotes the name of the user who created the Series record.
Approved denotes date on which the Series record was approved. This is displayed only if the record is approved.
Approved by denotes name of the user who approved the Series record. This is displayed only if the record is approved.
Note: Once approved click Print to print the Certificate. Series status will be displayed as Printed. Sample screen shown below.

Functions: Add, Search, Print.
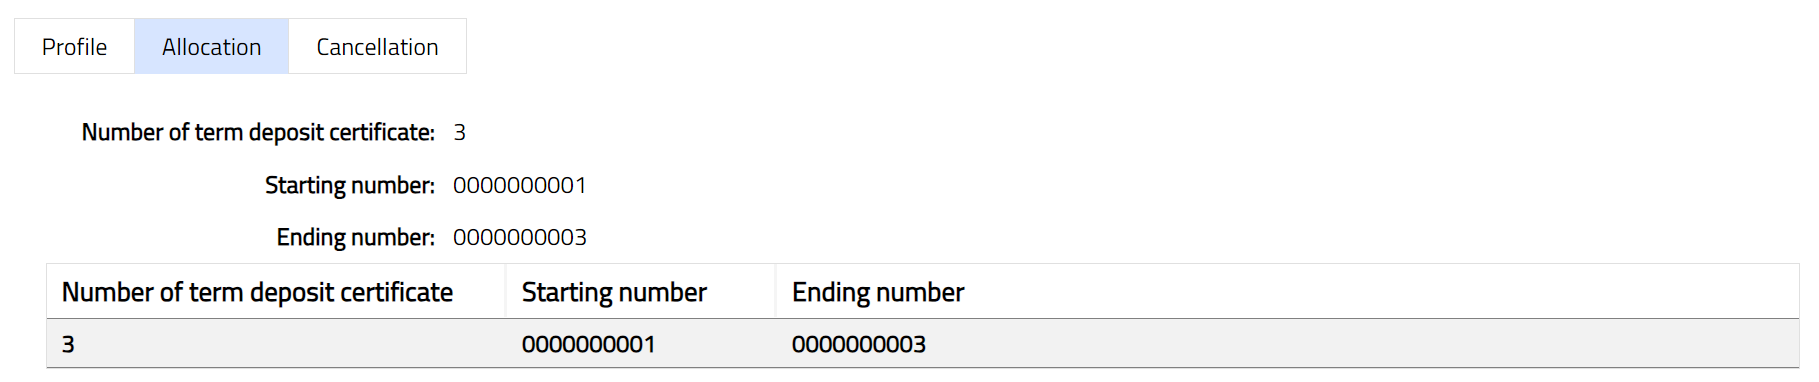
Allocation
Allocation tab allows you to view the details of the number of Term deposit certificate allocated to the client. It also displays starting and ending series numbers.
Cancellation
Cancellation tab allows you to cancel the required certificate allocated to the client. It also displays the Certificate number which is deleted.
To add book number which needs to be cancelled.
From Admin menu, click Secure stationery, and then Series. The system will display the Series Search screen. The list of all the series maintained in Aura will be displayed. Select the required series related to the Certificate and then click Cancellation tab. Initially the tab will be blank.

Click Add. Add Cancellation page appears.
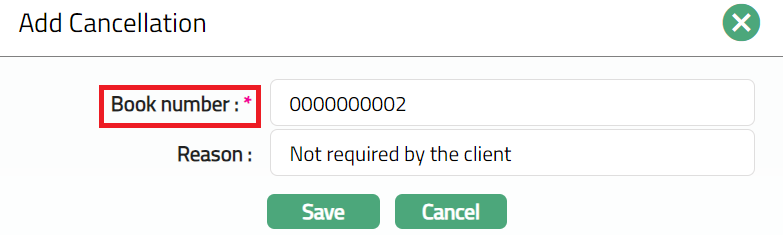
Certificate number: Enter the required book/certificate number you wish to cancel
Reason: mention the reason as why you want to cancel the certificate.
Click Save. Cancellation tab appears with the added details, displaying Status of the record as Pending.
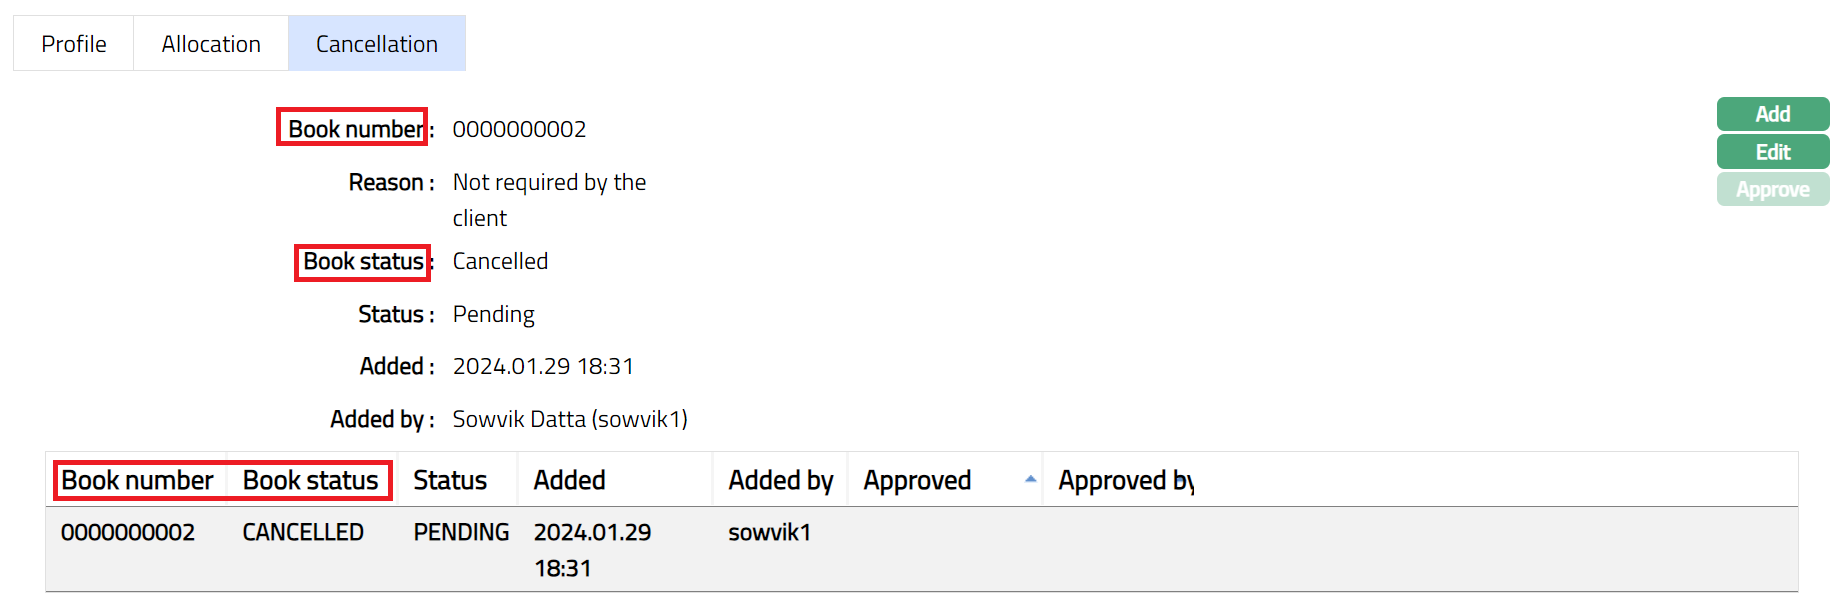
Functions: Add, Edit, Approve.
To edit cancellation record
Click Edit. Edit Cancellation page appears.
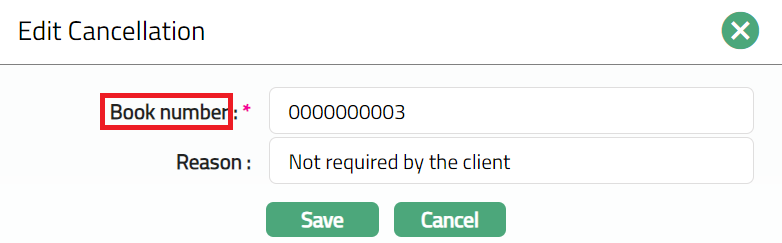
Enter details as required and click Save. Cancellation page appears with the edited details.

Functions: Add, Edit, Approve.
Note: Once added/edited the record status is set to Pending till it is approved by another user. On approval, the record status is set to Approved and the series status will display as generated. Aura allows you to edit the profile until the series record is in the Initiated status.
Functions: Add, Edit, Approve.
The additional fields are:
Added denotes the date on which the Series record was added.
Added by denotes the name of the user who created the Series record.
Approved denotes date on which the Series record was approved. This is displayed only if the record is approved.
Approved by denotes name of the user who approved the Series record. This is displayed only if the record is approved.