Payment Processing in Aura
The aim of this document is to facilitate the configuration and validation of parameters that are set up in Aura to handle payments
Aura can be implemented in a financial institution (i.e., any organisation that does not act as a Bank on its own) or in a Bank. The set up would be a bit different in each case.
The set up generally is based on the country in which the Bank / FI (Entity, from now on) is implemented, the clearing network that will be used for the payments and the currencies that are to be handled. Also, the bank in which the FI has its account may have specific requirements which need to be taken into account.
Payments can be of the following types:
1. External Payment: Payment made to a customer's account with a Bank that is different from the Entity / Entity's Bank. It can be Outgoing or Incoming. When funds are transferred out of the Entity, it is Outgoing Payment; and when the funds are transferred into the Entity, it is Incoming Payment.
Example: Demo Bank is a Bank in which Aura is implemented. X is customer of Demo Bank and has an account also with Other Bank. When X transfers funds from her account in Demo Bank to her account in Other Bank, it is an Outgoing Payment. When X transfers funds from her account in Other Bank to her account in Demo Bank, it is an Incoming Payment.
Example: Pro AB is a Financial Institution in which Aura is implemented. Pro AB maintains its accounts with Bank1 and also with Bank2. X is a customer of Pro AB and has an account either with Bank1 or Bank2 or with Bank 3. When funds have to be transferred to X's account with Bank1 or Bank 2 or Bank3, it is an External Payment.
Examples of Outgoing Payments:
- Loan Account Disbursement
- Refunds of moneys received in excess
- Transfer of funds from customer's Client Account
Examples of Incoming Payments:
- Payments towards Loan Account
- Receipt of funds into a customer's Client Account
2. Direct Debit: Payments that are to be debited from the Debtor (Payer)’s account with a Bank on the basis of a request initiated by the Creditor (Payee) under a mandate provided by the Debtor to the Creditor. The mandate has to be registered with the Payer’s Bank.
3. Internal Payment: Payment made to a customer's account within Aura. It can be Own Account Transfer or Other Client Transfer.
a. Own Account Transfer: When the customer transfers funds among her own accounts, it is Own Account Transfer. Example: Demo Bank is a Bank in which Aura is implemented. X is customer of Demo Bank and has two accounts. When X transfers funds from one account to the other, it is an Own Account Transfer.
b. Other Client Transfer: When the customer transfers funds between her account and that of another customer, it is Other Client Transfer.
Example: Demo Bank is a Bank in which Aura is implemented. X and Y are two customers of Demo Bank and each has an account. When X transfers funds from her account to Y's account, it is Other Client Transfer.
In case of Internal Payments, funds do not move out of the Bank in which Aura is implemented; while in case of External Payments, funds move out of the Bank / FI in which Aura is implemented.
This document focusses on External Payments, using a pain.001 file format for the Outgoing Payments; and camt.053 for Incoming Payments.
In Aura, three modules are used to process payments:
- Aura Transaction Processing – where the accounts / contracts lifecycle is tracked
- Aura PaymentGrid – where the payments are processed and routing determined
- Aura Data Management – where the payment information is exchanged with external parties
We will see in the following sections how the configurations have to be done in each of the above modules so that there is a seamless processing of the payments.
ABBREVIATIONS USED
| Abbreviation | Expanded form | Notes |
|---|---|---|
| CC | ConnectCore | The Transaction Processing part of Aura |
| DM | DataManagement | The Data Management part of Aura |
| PG | PaymentGrid | The part of Aura that is the Payment Hub |
| FI | Financial Institution | Usually, an organization in which Aura is implemented, and it is not a Bank. |
COMMON MAINTENANCES
There are a few that are common for any type of External Payment.
1. Aura Transaction Processing
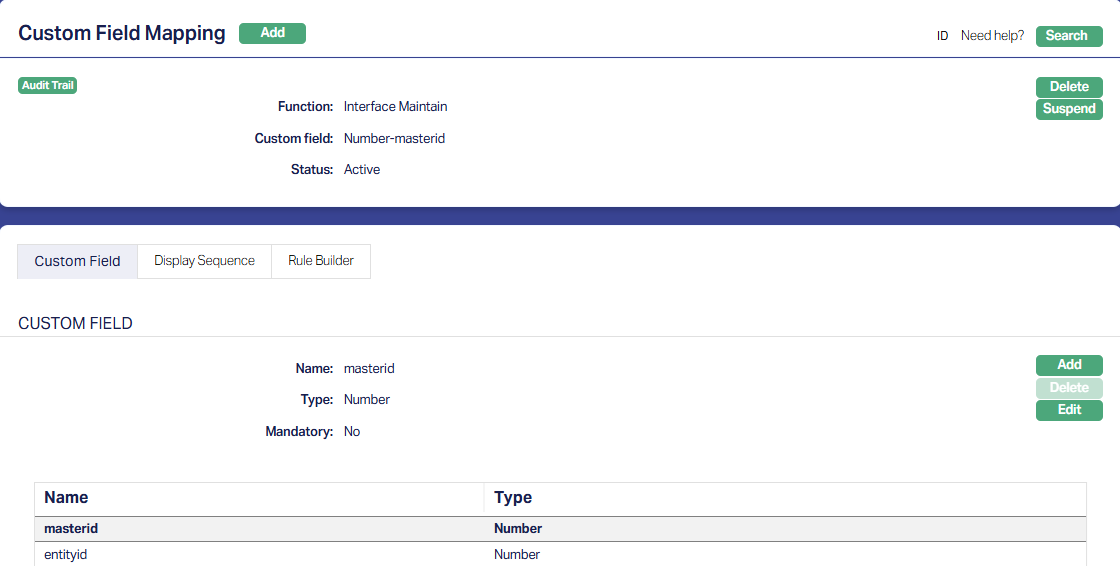
1.1 Admin → System Codes → Custom Fields
Two custom fields have to be maintained as follows:
1.1.1 Masterid

The Custom Field name MUST be maintained as given above.
1.1.2. Entityid

The Custom Field name MUST be maintained as given above.
1.2. Admin → System Codes → Custom Fields → Field Mappings
Map the above custom fields to Interface Definition:
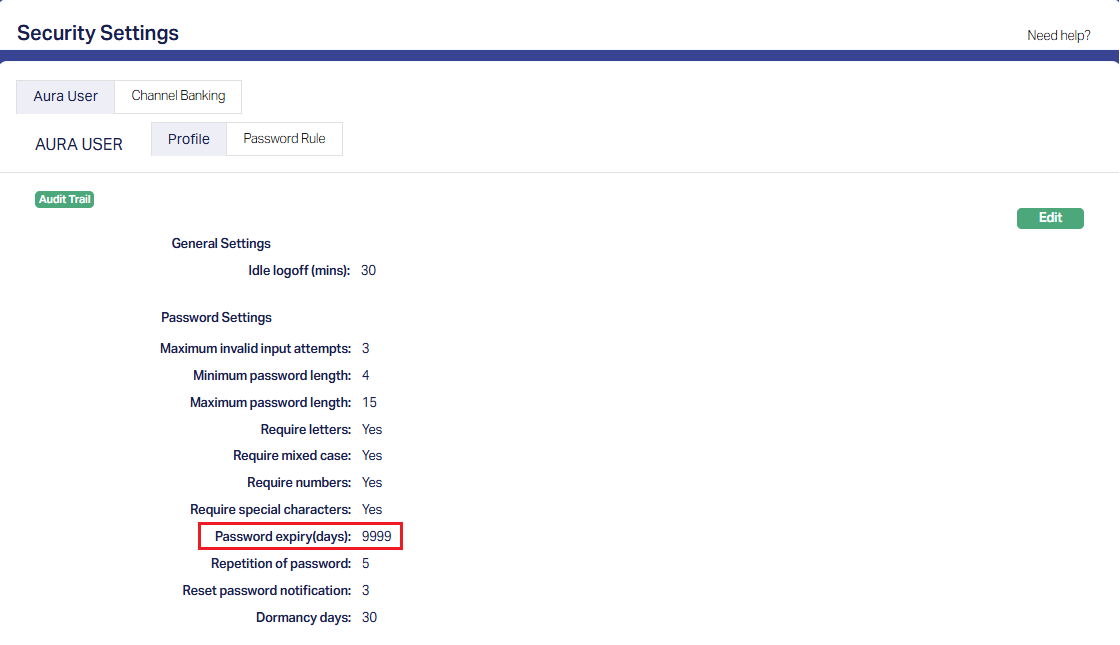
1.3. Admin → Settings → Security Settings
Ensure that the Password expiry is set to its maximum, as otherwise, the user records that are created for Aura's use for communication between the modules may expire and result in payments failing
1.4. Admin → Users → Maintain
Aura uses specific user names for its internal communication between modules and these are to be set up as follows:
| User id | Role Group | Use | Notes |
|---|---|---|---|
| pguser | Super Role | When CC accesses PG | |
| ccuser | Super Role | When PG responds to CC | |
| dmuser | Super Role | When PG accesses DM | Allow access to ADM=Yes |
| dmpguser | Super Role | When DM accesses PG | Allow access to ADM=Yes |
| dmccuser | Super Role | When DM accesses CC | Allow access to ADM=Yes |
Note:
- The user ids MUST be maintained as given above
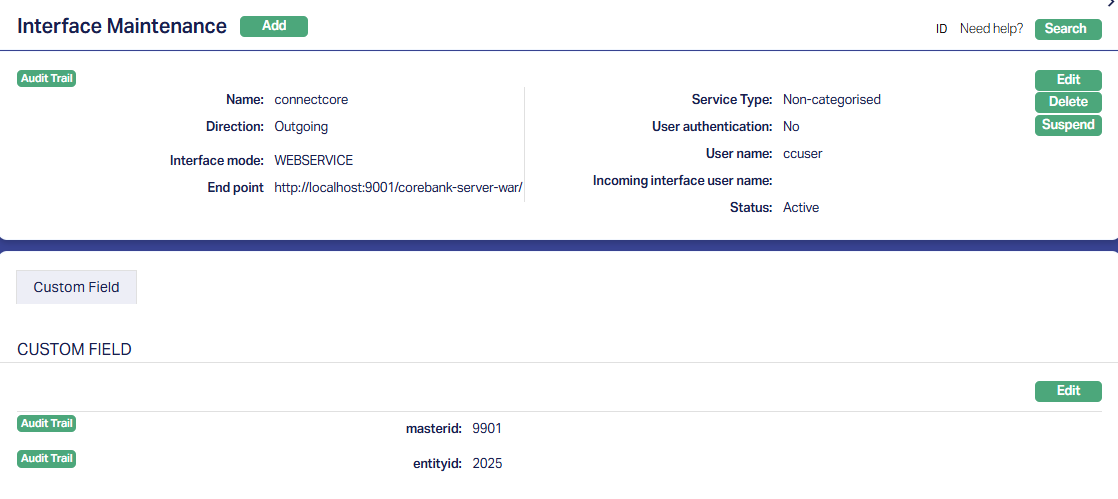
1.5. Admin → System Codes → Interface Definition → Maintain
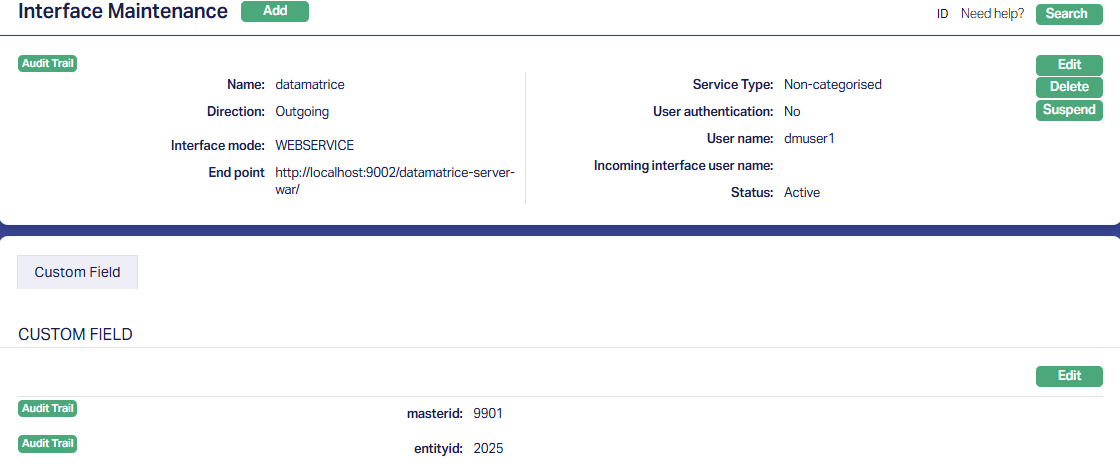
1.5.1. Connectcore
1.5.2. Paymentgrid
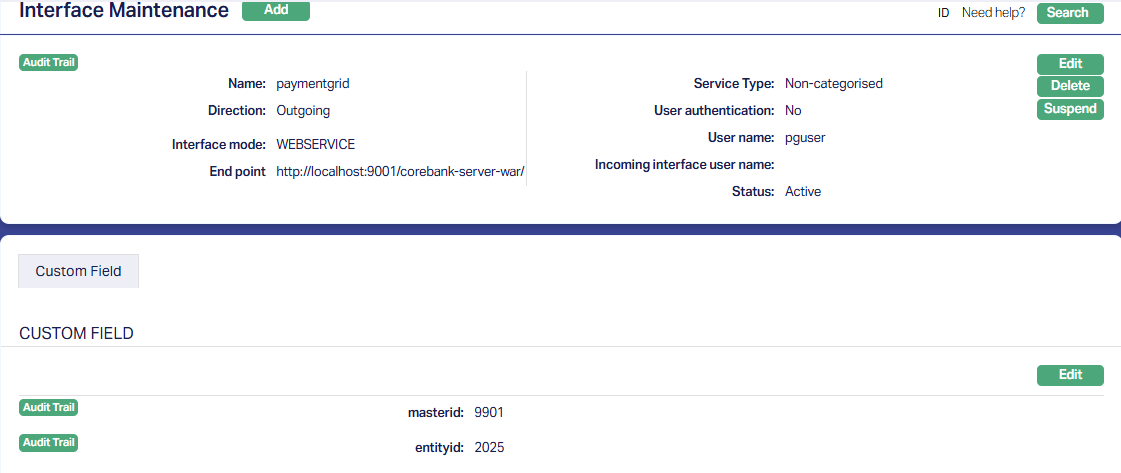
1.5.3. Datamatrice
Note:
- All fields MUST be maintained as above, except values for End Point and the Custom fields viz., masterid and entityid. These will be decided at the time of installation and the values will be provided by IT. The masterid and entityid will be numeric. For an installation, there will be a single masterid, but there can be multiple entityids (if it is a multi-Entity installation).
2. Aura Data Management
2.1. Admin → System Codes → Custom Fields → Custom Fields
Two custom fields have to be maintained as follows:
2.1.1. Masterid

2.1.2. Entityid

2.2. Admin → System Codes → Custom Fields → Field Mappings
Map the above custom fields to External System:
2.2.1. Masterid

2.2.2. Entityid

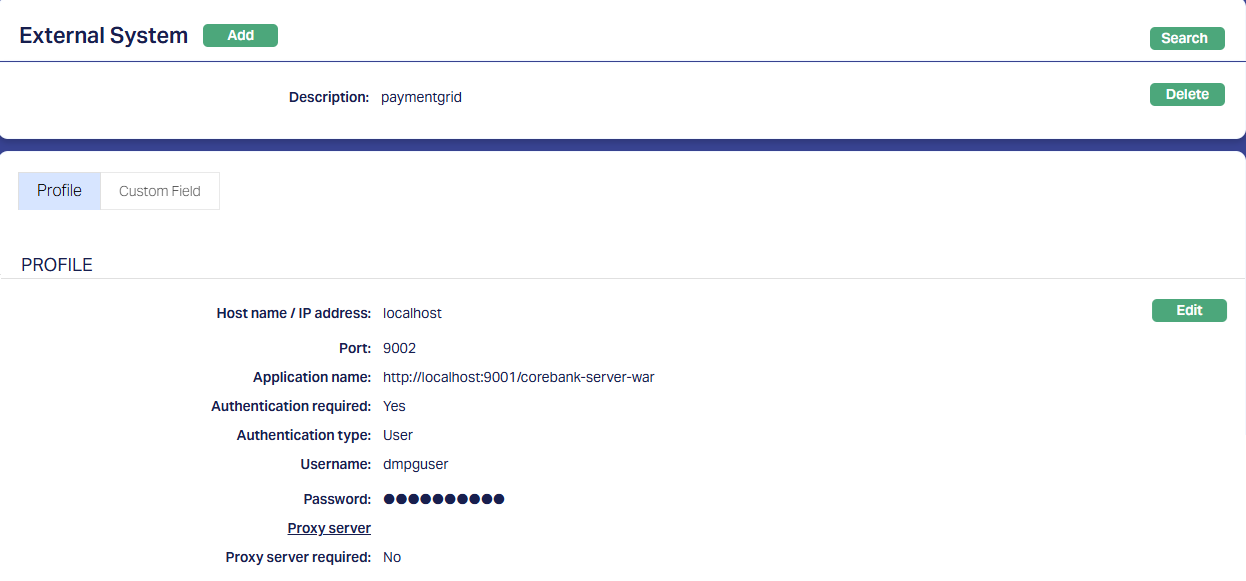
2.3. Data Management → Configurations → Settings → External System
2.3.1. paymentgrid
2.3.1.1. Profile
Note:
- The input in the Application Name field should be exactly the same as in Interface Definition where Interface Name = External System Description = paymentgrid
2.3.1.2. Custom Field
The value for the Custom Fields – entityid and masterid – should be exactly the same as in Interface Definition.

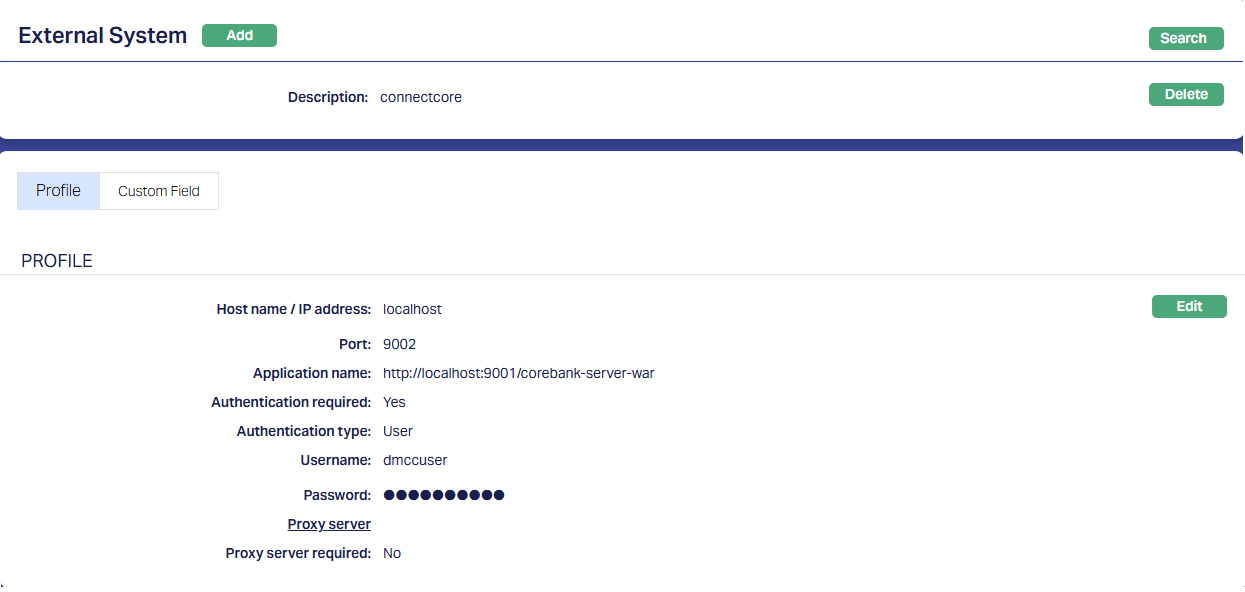
2.3.2. Connectcore
Note:
- The Application Name as input for both External Systems (paymentgrid and connectcore) is the same, as both CC & PG are hosted on the same server
OUTGOING PAYMENTS
The following are the specific maintenances for Outgoing Payments:
1. Aura Transaction Processing
1.1. Retail → Settings → Payment Settings
This is required to be set up to define the Ledger Accounts and Transaction Codes that are to be used for posting accounting entries related to the outgoing payments. Only one Payment Setting is to be maintained for Outgoing Payments
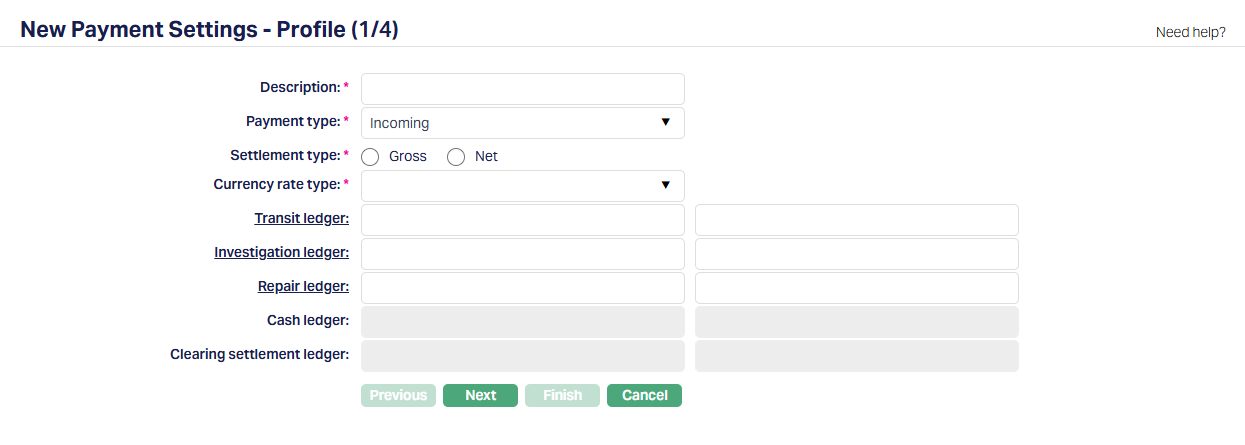
1.1.1. Profile

| Field Name | Field Description | Field Value | Notes |
|---|---|---|---|
| Description | The description of the Payment Setting | Can be anything – Should be such that one can easily identify what this Payment Setting is for | This has to be copied to the PG > Settings > Product as this field is used to relate the Retail > Payment Settings to the PG > Product. Usually, the Description for all maintenances is input as the same for ease of use, though, this need not strictly be so IMPORTANT: If you make any changes to this field value, please make sure that the same is copied to the PG > Settings > Product > External Product Code |
| Payment Type | Indicates the Type of Payment. | If Entity is an FI, this should be Outgoing | |
| Settlement Type | Can be Gross or Net | If Entity is an FI, this should be Gross | |
| Currency Rate Type | Indicates the exchange rate type to be used in case of cross-currency transactions | Can be anything. | If there are no cross-currency transactions, this will not be used. If there are cross-currency transactions, provide the correct Rate Type to be used to derive the exchange rates |
| Transit Ledger | The GL Account into which funds will be moved before hitting the nostro account | ||
| Investigation Ledger | The Ledger into which funds will be parked if there is any investigation to be carried out – for example, if AML check is positive | ||
| Cash Ledger | The ledger to be debited for Cash Transactions, if any. |
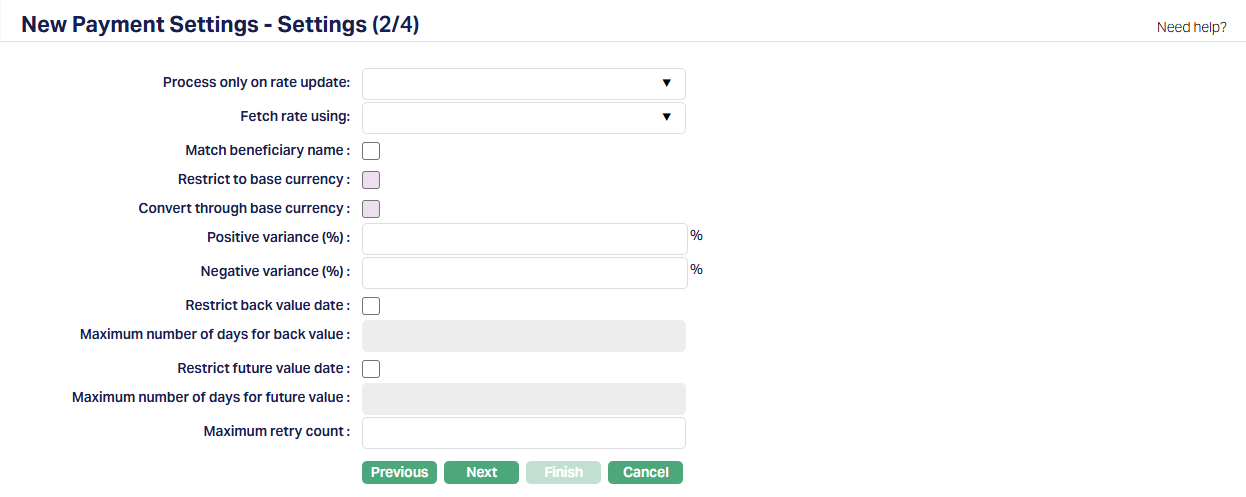
1.1.2. Settings
| Field Name | Field Description | Field Value | Notes |
|---|---|---|---|
| Process only on Rate Update | Applicable only if there are cross-currency transactions. Else, leave it blank | ||
| Fetch Rate Using | Applicable only if there are cross-currency transactions. Else, leave it blank | ||
| Positive Variance % | Applicable only if there are cross-currency transactions. Else, leave it blank | ||
| Negative Variance % | Applicable only if there are cross-currency transactions. Else, leave it blank | ||
| Restrict back value date | If Entity is a Financial Institution, this will depend on the Bank in which the account is maintained. | ||
| Restrict future value date | If Entity is a Financial Institution, this will depend on the Bank in which the account is maintained. |
1.1.3. Branch
Applicable only in a multi-branch set up, if the Payment Setting is to be used for only selected branches.
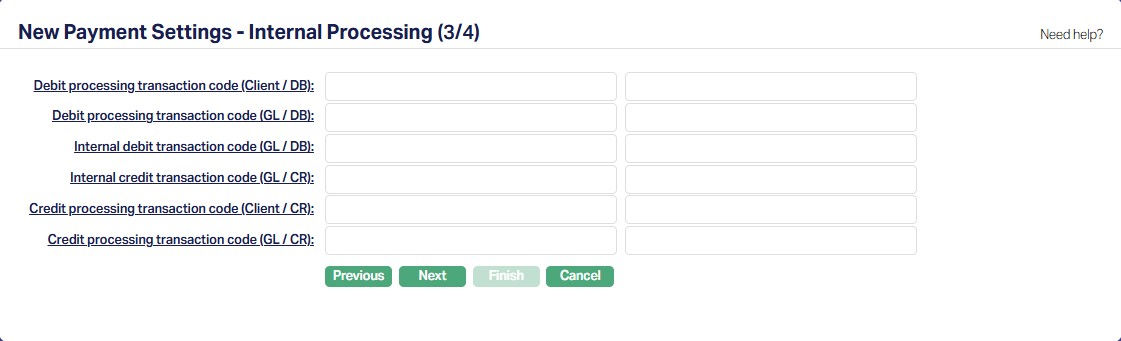
1.1.4. Transaction Codes for Internal Processing

| Field Name | Field Description | Field Value | Notes |
|---|---|---|---|
| Debit Processing Transaction Code (Client / DB) | Used to debit a client’s account during Debit Processing (Event Code: PAYMDP) | Example: Debit a Client Account during Fund Transfer from Client Account (say, refund of excess receipts on a loan that was credited to an Internal Operations Account or a Client Account Transfer from an account in Aura to an external Account) | |
| Debit Processing Transaction Code (GL / DB) | Used to debit a GL during Debit Processing (Event Code: PAYMDP) | Example: Debit Loan Product > Suspense GL during Loan Disbursement to an External Bank Account and credit Transit GL | |
| Internal Debit Transaction Code (GL / DB) | Used to debit the Transit GL during Nostro accounting (Event Code: PAYMCP) | Example: Loan Account disbursement to an external bank account. The Transit GL will be debited and Nostro account (of the FI’s account with the Bank) will be credited | |
| Internal Credit Transaction Code (GL / CR) | Used to credit the Transit GL during Debit Processing (Event Code: PAYMDP) | Example: Debit Loan Product > Suspense GL during Loan Disbursement to an External Bank Account and credit Transit GL | |
| Credit Processing Transaction Code (Client / CR) | Used to credit a Nostro Account during Nostro Accounting (Event Code: PAYMCP) | Example: Loan Account disbursement to an external bank account. The Transit GL will be debited and Nostro account (of the FI’s account with the Bank) will be credited | |
| Credit Processing Transaction Code (GL / CR) | Used to credit a GL account during Nostro Accounting (Event Code: PAYMCP) | Example: This will be used if Nostro Resolution results in a GL to be credited |
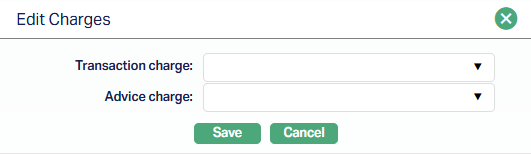
1.1.5. Charge

| Field Name | Field Description | Field Value | Notes |
|---|---|---|---|
| Transaction Charge | Depends on solution / fitment. Can be blank | ||
| Advice Charge | Depends on solution / fitment. Can be blank |
1.1.6. Custom Field
Depends on solution / fitment. Can be blank
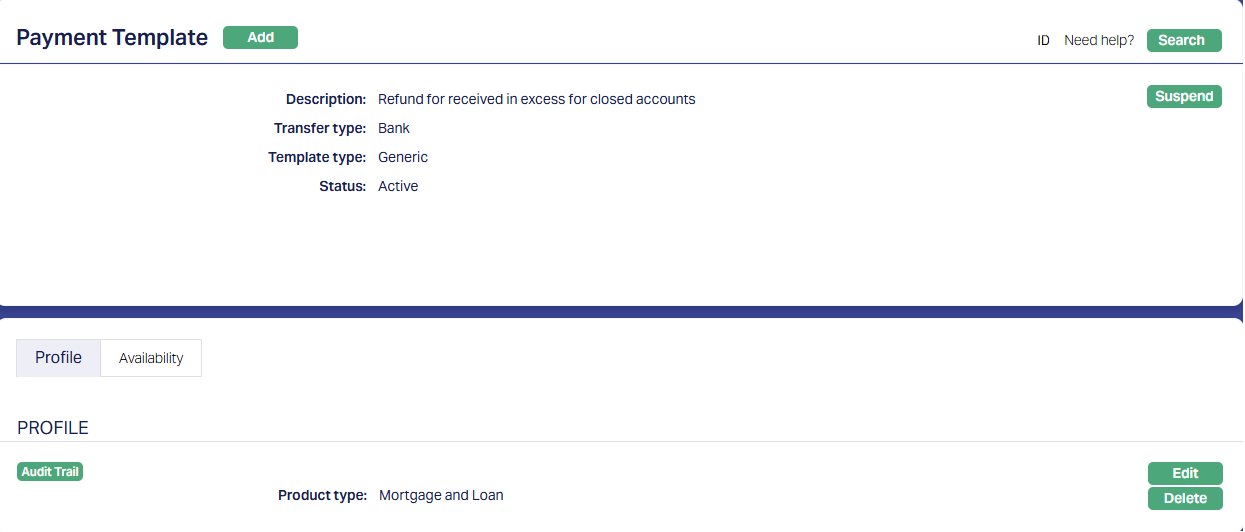
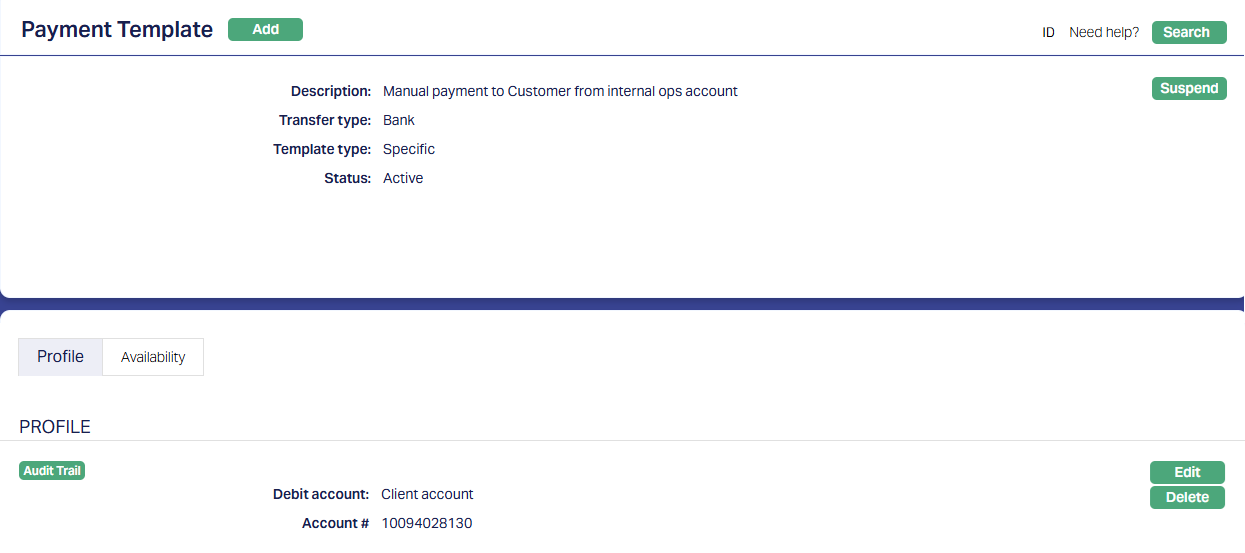
1.2. Retail → Settings → Payment Template
This is required to be set up when you have to manually initiate an Outgoing Payment from the Retail > Payments UI. For creating a record in Retail → Payments → Credit Transfer or RTGS/SWIFT/TARGET2, you need to have an appropriate Payment Template
1.2.1. Profile
If Template Type = Generic
If Template Type = Specific
| Field Name | Field Description | Field Value | Notes |
|---|---|---|---|
| Description | Description for the Payment Template | Can be anything | |
| Transfer Type | Bank / Customer that initiates the Payment | Bank | If payments are to be initiated by the Entity, this should be Bank |
| Template Type | Generic / Specific | Depends on solution / fitment. | |
| If Generic: | |||
| Product Type | List of different Product Types | Depends on solution / fitment. If you want to be able to choose any Loan Account for which payment has to be initiated, choose Mortgage and Loan | |
| If Specific: | |||
| Debit Account | Account or General Ledger | Depends on solution / fitment. | |
| Account # / Ledger # | Depends on solution / fitment. If you want to be able to choose a specific Client Account (say, Internal Ops Account) or General Ledger, choose that specific Account # / GL # |
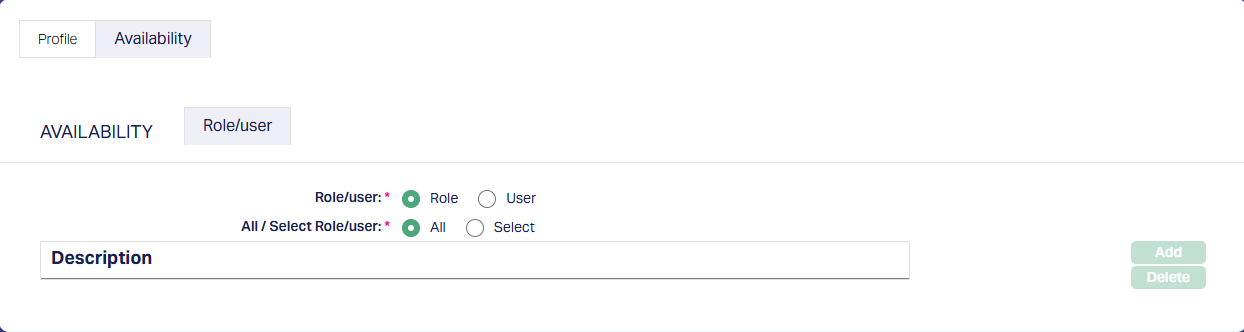
1.2.2. Availability
Depending on the need to restrict the availability of this Payment Template on the Retail → Payment screens, you can specify the Role > User
2. PaymentGrid
2.1. Settings → Message Configuration
There should be one Active Message Configuration per Clearing Network – Message Mode combination.
2.1.1. Profile
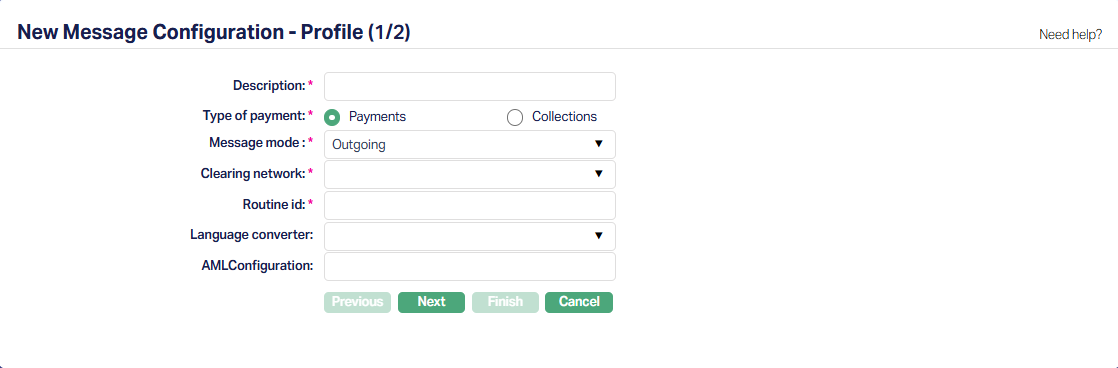
| Field Name | Field Description | Field Value | Notes |
|---|---|---|---|
| Description | The description of the Message Configuration | Can be anything – Should be such that one can easily identify what this Message Configuration is for | Usually, the Description for all maintenances is input as the same for ease of use, though, this need not strictly be so. |
| Type of Payment | To indicate Payment / Collection | Should be Payment | |
| Message Mode | Should be Outgoing | ||
| Clearing Network | To define the Clearing Network | Choose as required | List of Clearing Networks as required for the implementation based on the country, currencies & payment services offered by the Entity. This is decided during Implementation |
| Routine Id | This is the Routine Id in ADM that will be used to generate the outgoing payment message. | See Notes | If Entity = Bank it should be the valid actual Routine id in DM for the payment message generation. If Entity = FI, it can be any random number as Aura always generates a pain.001 message |
| Language Converter | Used to convert characters as required | Depends on solution / fitment. Can be blank | |
| AML Configuration | This is the Routine Id in ADM that will be used for AML Checks, if any. | Depends on solution / fitment. Can be blank. Note that it should be the valid actual Routine id in DM for the AML Check, if any. |
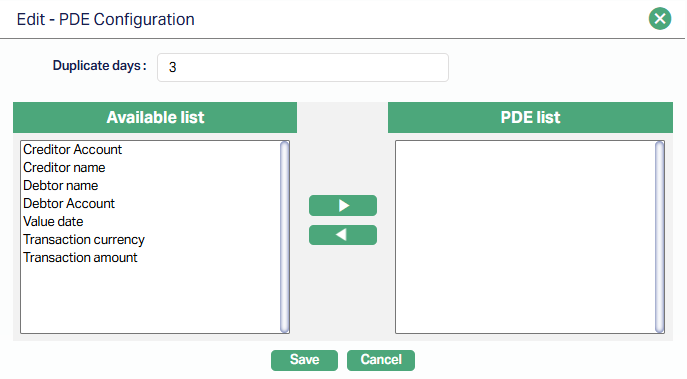
2.1.2. PDE Configuration
Based on the settings configured here, Aura will check for duplicate messages. If nothing is input, there will not be any check for duplicate messages. If this is configured and a possible duplicate is identified, the transaction will either be stopped during manual input / approval or it will appear in PaymentGrid → Operations → Net Settlement as a failed transaction with Exception = PDE. Unless this is sorted, the payment will not go through.
2.2. Settings → Product
The PG → Settings → Product is the linkage between the payment hub and the transaction processing system. Based on the transactions initiated in CC, the Payment Product is determined through the STP configuration to send the Payment Message as defined in the Message Configuration and accounting entries related to the Payment are initiated by PG and posted in CC. The Product defined here, thus, has reference to the Retail → Settings → Payment Settings (using the External Product Code) and the Message Configuration for a Clearing Network for a Product Group
2.2.1. Profile
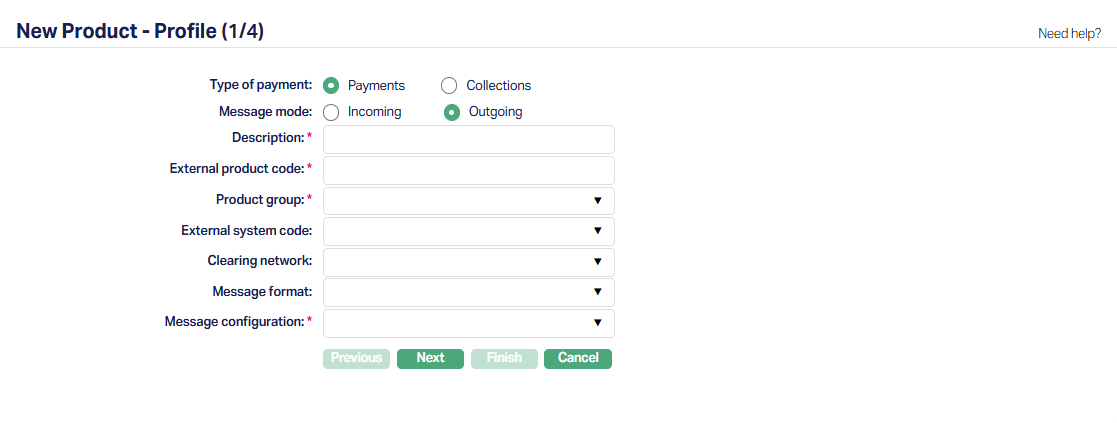
| Field Name | Field Description | Field Value | Notes |
|---|---|---|---|
| Type of Payment | Should be Payments | ||
| Message Mode | Should be Outgoing | ||
| Description | The description of the Product | Can be anything – Should be such that one can easily identify what this Product is for | Usually, the Description for all maintenances is input as the same for ease of use, though, this need not strictly be so. |
| External Product Code | This will be the linkage between the Retail > Payment Settings and the PG > Settings > Product | Should be exactly the same as in Retail > Payment Settings > Description | Copy the Description from Retail > Payment Settings and paste it into this field so that it is exactly the same. |
| Product Group | Should always be Payments | The other option – Others – is for future use | |
| External System Code | List of active interfaces as defined in Admin > System Codes > Interface Definition > Maintain | Should be paymentgrid | |
| Clearing Network | To define the Clearing Network | Choose as required | List of Clearing Networks as required for the implementation based on the country, currencies & payment services offered by the Entity. This is decided during Implementation |
| Message format | The format in which the payment message is to be sent out | Applies only for certain Clearing Networks. This has to be decided at the time of implementation based on whether Aura is being implemented at a Bank or FI; and also based on the arrangement between the FI and its Bank | |
| Message Configuration | List of active Message Configurations that match the Type of Payment, Message Mode and Clearing Network chosen above |
2.2.2. Process Settings
| Field Name | Field Description | Field Value | Notes |
|---|---|---|---|
| AML Required | Depends on solution / fitment. | ||
| Cover Required | Enabled only for certain Clearing Networks | ||
| Priority | Enabled only for certain Clearing Networks | ||
| Credit Processing On | Enabled only if Message Mode is Incoming Not applicable for Outgoing | ||
| Message To Be Sent On | The date on which the Outgoing Payment Message should be sent. | Can be Payment Date or Value Date | |
| Add Payment Days | Enabled only if Message Mode is Incoming Not applicable for Outgoing | ||
| Maximum Re-present Count | Enabled only if Message Mode is Outward Not applicable for Outgoing |
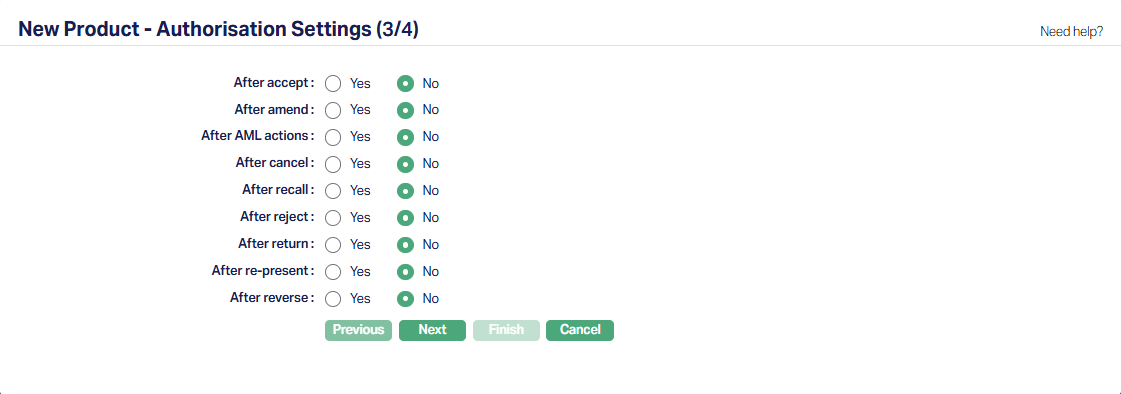
2.2.3. Authorisation Settings
| Field Name | Field Description | Field Value | Notes |
|---|---|---|---|
| <All fields> | Depends on solution / fitment. |
2.3. Settings → STP Configuration
A Straight-Through-Processing (STP) Configuration should be defined to resolve a PG → Product for each payment. Several handles are available to configure suitable rules such that for each payment, a unique Product can be resolved. Multiple rules can be defined.
Note:
- If a Product cannot be resolved using the STP Configuration, the transaction will either be stopped during manual input / approval or it will appear in PaymentGrid → Operations → STP Exception. Unless the Product is resolved, the payment will not go through.
A sample is shown below:
In the above sample, the Trigger uses only the Transaction Currency and the Clearing Network of the Payment Transaction to map to a unique Product. It is also important to set the Rule Sequence in such a way that the broadest filter is defined as the last.
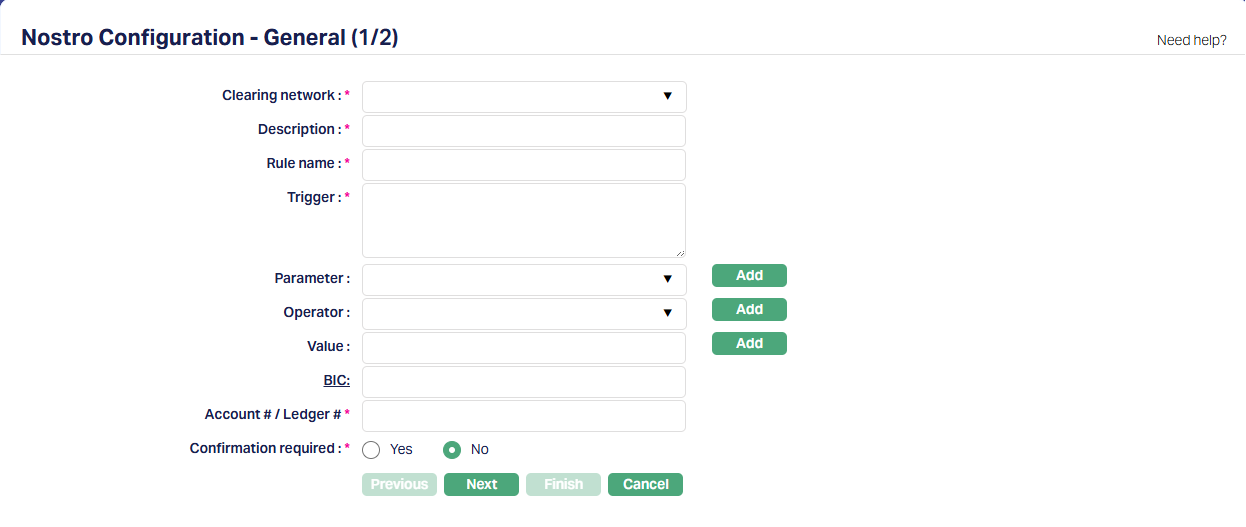
2.4. Settings → Nostro Configuration
This enables you to set up the Nostro that is to be used for the Outgoing Payment. The Nostro entries will mirror the entries in the Bank Account from which the Outgoing funds will be moved to the external accounts as input during Loan Disbursement / Credit Transfer / RTGS
One Nostro Configuration should be defined to resolve the Nostro Account for each Clearing network . Several handles are available to configure suitable rules such that for each payment, a unique Nostro Account can be resolved. Multiple rules can be defined.
Note:
- If a Nostro Account cannot be resolved using the Nostro Configuration, the transaction will be stopped during manual input / approval; and in case of automatic payment processing (for example, Loan Disbursement), the error will only be logged and the transaction will not be found in any exception queue. However, the payment will not go through. You need to check the Nostro entries every day to ensure that the Nostro posting has been completed for all such transactions.
2.4.1. Profile

| Field Name | Field Description | Field Value | Notes |
|---|---|---|---|
| Clearing Network | To define the Clearing Network | Choose as required | List of Clearing Networks as required for the implementation based on the country, currencies & payment services offered by the Entity. This is decided during Implementation |
| Description | The description of the Nostro Configuration | Can be anything – Should be such that one can easily identify what this Nostro Configuration is for | Usually, the Description for all maintenances is input as the same for ease of use, though, this need not strictly be so. |
| Rule Name | Any free text that identifies what the Rule is for | ||
| Trigger, Parameter, Operator, Value | Use as required to build the Rule | ||
| BIC | The Bank Identifier Code of the Bank in which the Entity maintains the Bank Account | ||
| Account # / Ledger # | The Nostro Account # or the Ledger # into which the Nostro entries have to be posted. | This has to be exactly the same as maintained in CC for the Nostro Accounting entries to be successfully posted. Copy from CC and paste here | |
| Confirmation Required | Depends on solution / fitment. This is applicable only for SWIFT & TARGET2. For others, it can remain as No |
A sample is shown below:
In the above sample, the Trigger uses certain handles that facilitate mapping of the Payment Transaction to a unique Nostro Account. It is also important to set the Rule Sequence in such a way that the broadest filter is defined as the last.
3. Aura Data Management
3.1. Admin → System Codes → Generic Definitions → Classifications
Classification enables you to categorize / label the various configurations in Data Management so that it is easier to know what the configuration is for. Create a Classification record where the Description identifies the purpose that is sought to be achieved.

3.2. Data Management → Settings → External System
Depending on the Bank / external system to which the payment files have to be transferred and the mode of upload / transmission, you may have to create more records under External System. See sample below:

3.3. Data Management → Definitions → Reference Data → Data Feed
If Aura is being implemented in a FI and they have a Bank account to which a pain.001 file is to be sent, the following Reference Data > Data Feed details have to be input, based on the agreement between the FI and the Bank
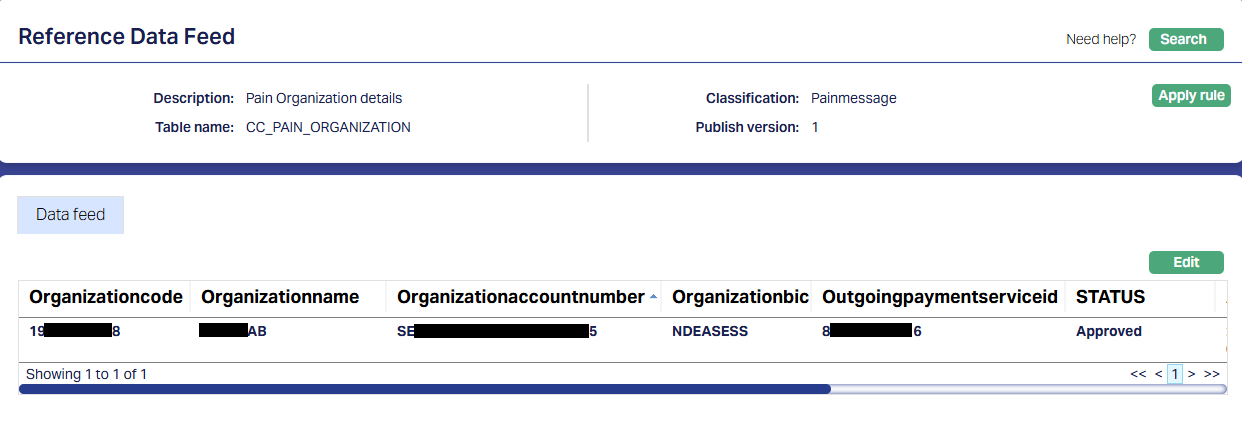
| Field Name / Description | Field Value | Notes |
|---|---|---|
| Organization Code | xxxxxxx4248 | Parameter value changes based on implementation |
| Organization Name | xxxxxx AB | Parameter value changes based on implementation |
| Organization Account Number | xxxxxxxxxxxxxxxxxxxx5295 | Parameter value changes based on implementation |
| Organization BIC | NDExxxxx | Parameter value changes based on implementation |
| Outgoing Payment Service ID | xxxxxxxx0316 | Parameter value changes based on implementation |
Note:
- The Status of the Data Feed record should be Approved. The audit trail related fields appear when you scroll right and are not shown in the screenshot above.
3.4. Data Management → Configurations → Uploads → Maintain
For pain.001, the following TWO Upload Functions should be available. Usually, these are part of the installation, but you need to verify that the Status of both is Published.
3.4.1. PAIN_UPLOAD

3.4.2. PAIN_UPLOAD_GROUPHEADER

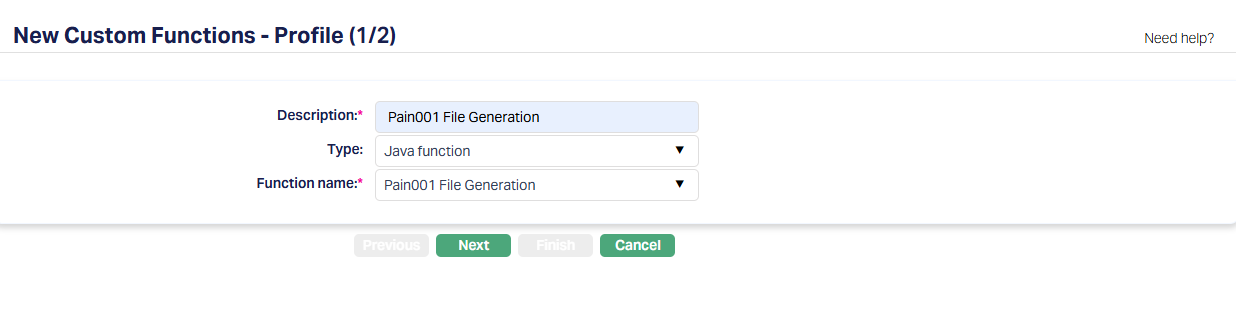
3.5. Data Management → Metadata → Custom Functions
For pain.001, the following Custom Function should be configured. Usually, this is part of the installation. If not, you need to create a new Upload using the Java Function already available. And you need to ensure that the Status is Published and the Parameters are correct for that Implementation.
3.5.1. Pain001 File Generation
3.5.1.1. Profile
3.5.1.2. Parameter
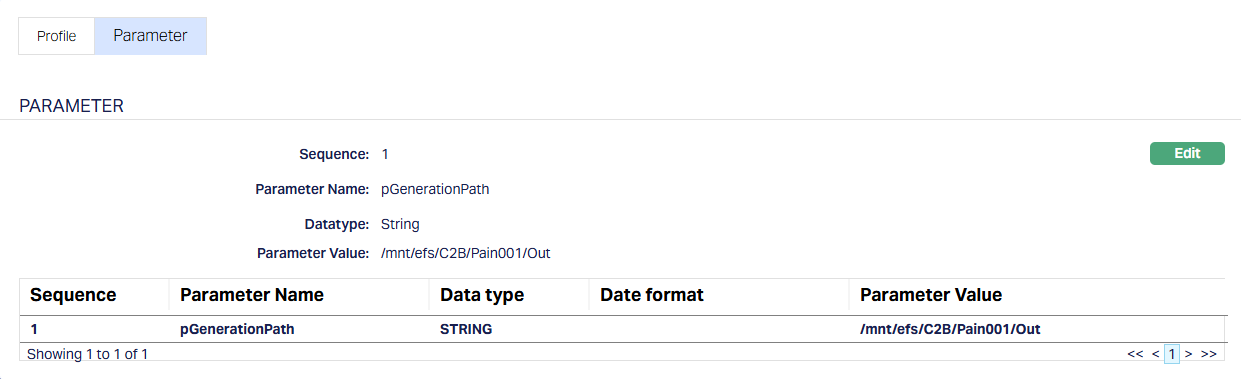
| Parameter Name | Description | Parameter Value | Notes |
|---|---|---|---|
| pGenerationPath | Outgoing Pain File generation path | /xxx/efs/xxx/Pain001/Out | Parameter value changes based on implementation |
| pCommand | Command | UploadFile | Remains same for all implementation |
| pApplicationRequestFilePath | Application Certificate Path | /xxx/efs/xxxx/ | Parameter value changes based on implementation |
| pUploadEnvironment | Environment - Test or Production | PRODUCTION | Parameter value will change based on the Environment |
| pResponseFileGeneration | Purpose of File Generation | YES | Remains same for all implementation |
| pNordeaAliasName | Nordea Bank Alias name | nsc_xxxcontainer_xxxxxxxxxxxxxx7450 | Parameter value changes based on implementation |
| pSoapMessageFilePath | Soap Message file path | /xxx/efs/xxxx/ | Parameter value changes based on implementation |
| pCertificateFileName | Certificate file name | Plus1xxxxxx.p12 | Parameter value changes based on implementation |
| pNordeaServiceUrl | Nordea Service URL | https://xx.ebridge.xxxx.xxxxx.com/ws/Corporatexxxxxxxxxxx | Parameter value changes based on implementation |
| pFileType | File Type - pain.001 | xxxxPXMLI | Remains same for all implementation |
| pStatus | Status | NEW | Remains same for all implementation |
| pTargerId | Target ID | xxxxxxx4248 | Parameter value changes based on implementation |
| pNordeaAlgorithmType | Nordea Algorithm Type | xxxxx Pain upload | Parameter value changes based on implementation |
| pPainFilePath | Pain file Generation path | /xxx/efs/xxx/Pain001/Out/ | Parameter value changes based on implementation |
| pFileReference | File Reference | YES | Remains same for all implementation |
| pCustomerId | Customer ID | xxxxx8168 | Parameter value changes based on implementation |
| pSoftwareId | Software ID | xxxxxxxxxxClient | Parameter value changes based on implementation |
| pEnvironment | Environment - Test or Production | PRODUCTION | Parameter value will change based on the Environment |
| pCertificatepath | Certificate Path | /xxx/efs/xxxx/ | Parameter value changes based on implementation |
3.5.2. Other Custom Functions
Depending on the specific needs in an Implementation, you may have to create other Custom Function records and input the required Parameter values. In general, if the payment file has to be encrypted and / or handed off using a Webservice, etc., such additional Custom Function records have to be created and Published.
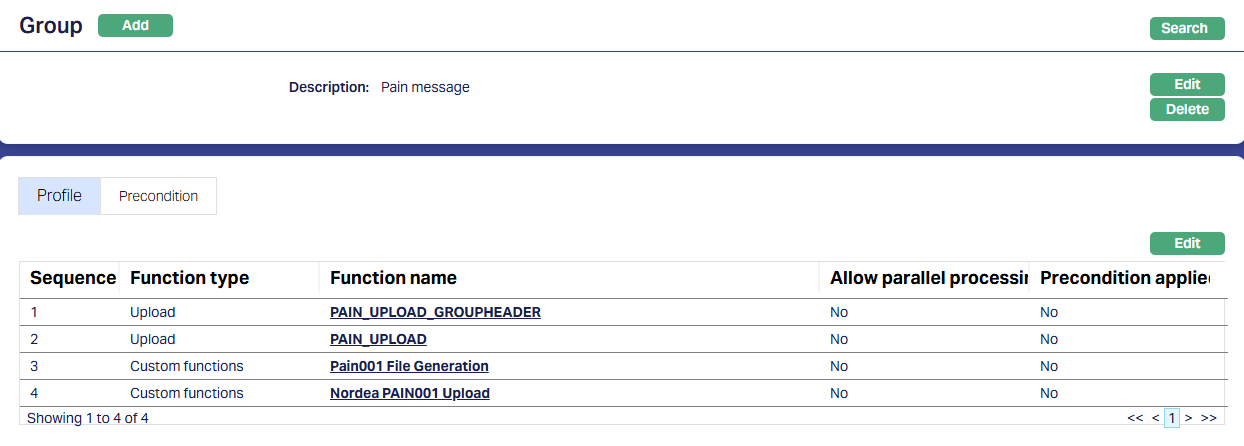
Data Management → Configurations → Groups → Maintain
Once the Upload and Custom Function records are Published, you have to create a Group and map all the required functions to that Group. This ensures that all the functions required for the pain.001 file generation are executed in the specific sequence. Usually, this is part of the installation. If not, you will have to do the same.
Note:
- The sequence of the functions is very critical and should be strictly set up as shown below.
The last in the sequence in the sample below is the additional Custom Function that is created to upload the file to the Bank as required for that Implementation.

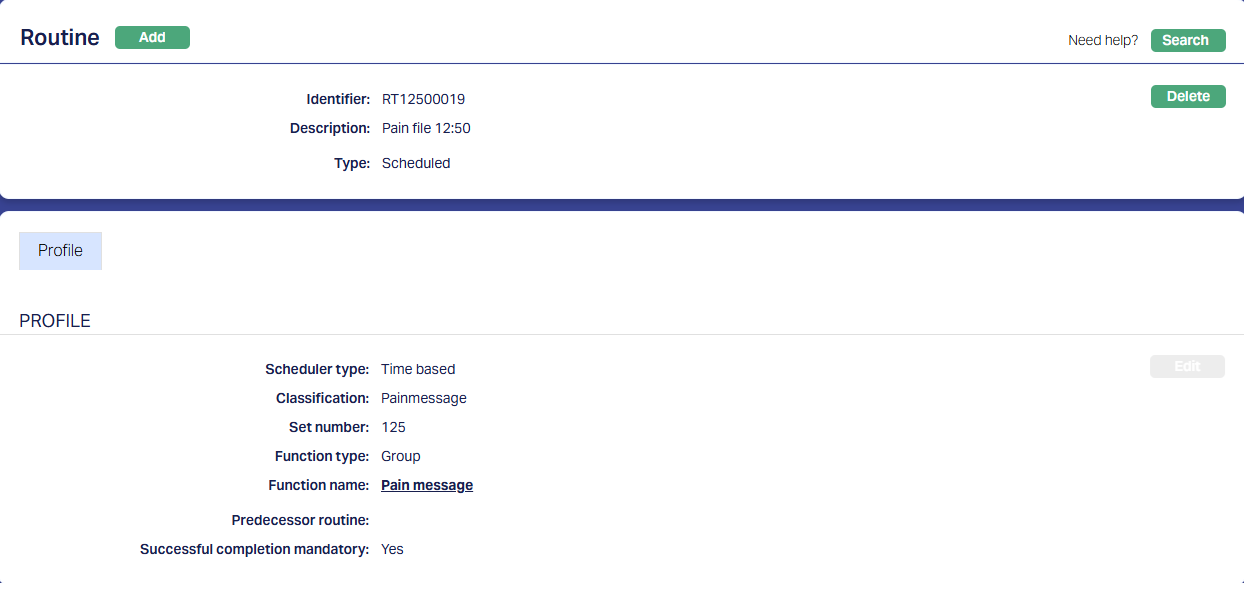
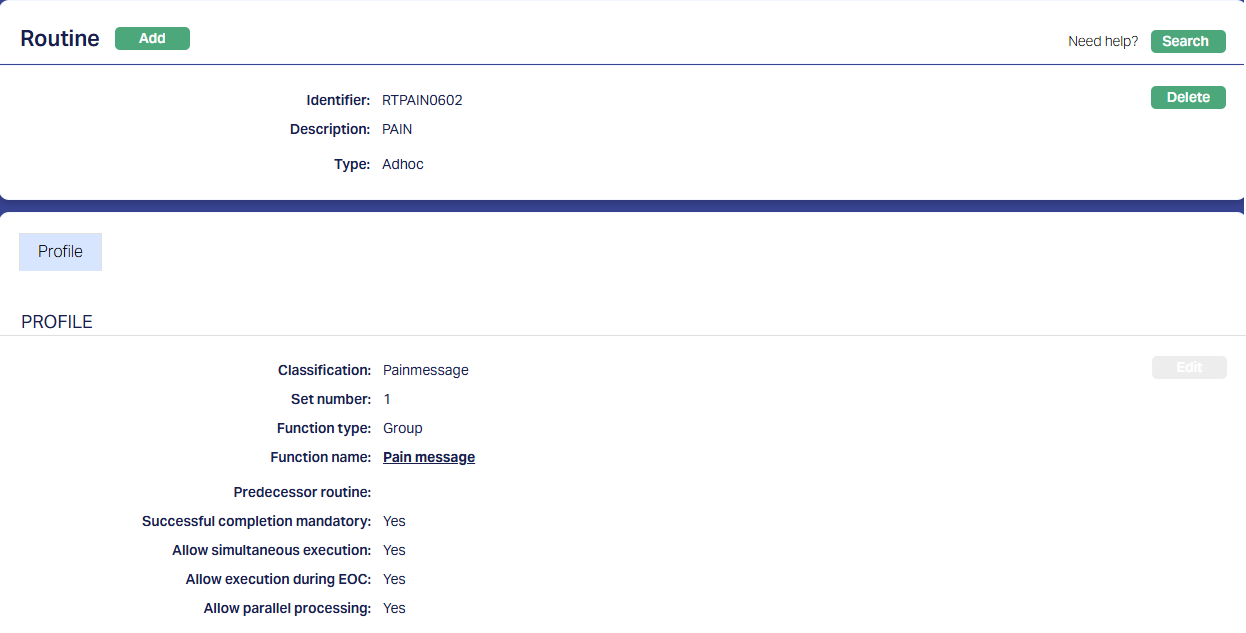
3.6. Data Management → Configurations → Routines → Maintain
You have to create a Routine and map the Group as well as the Classification. You must always create two Routines for each Group: One of Type Scheduled / Auto as required; and one other of Type Adhoc. The Scheduled / Auto routine will be automatically executed at the Scheduled Time / during EOD/BOD as defined in the Routine; and in case there is any issue with such automatic execution, and a manual intervention is required, the Adhoc Routine can be used to run the routine after such manual intervention.
Usually, this is part of the installation. If not, you will have to do the same.
3.6.1. Scheduled Routine
3.6.2. Adhoc Routine
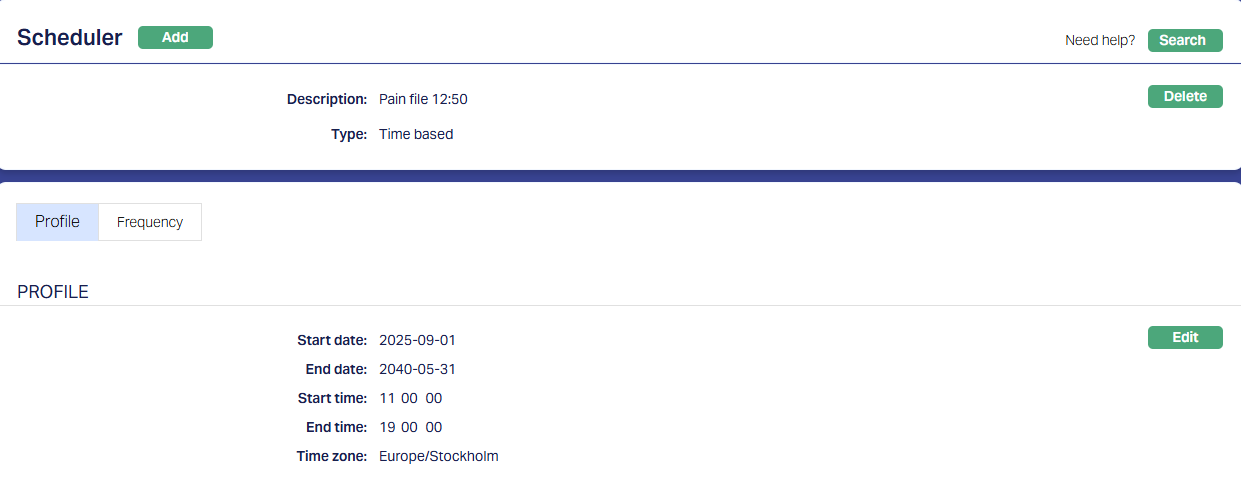
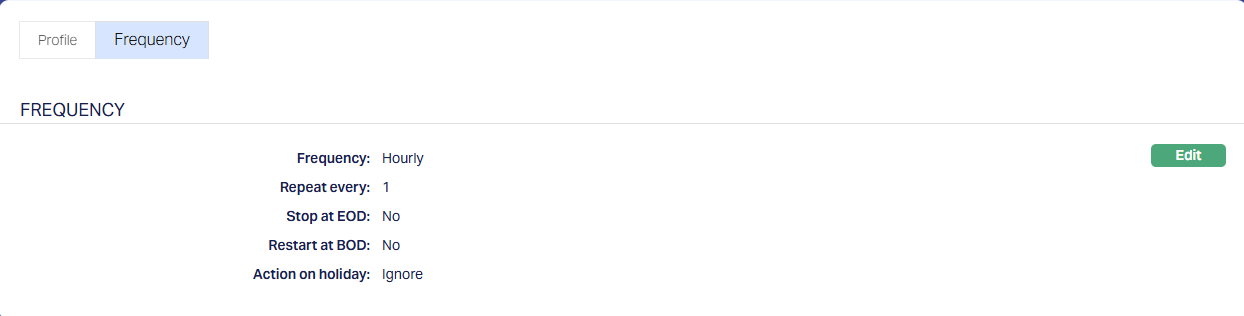
3.7. Data Management → Configurations → Scheduler → Maintain
If the Routine has been created with Type = Scheduled, you need to create a Scheduler to define the frequency & time of execution.
3.7.1. Scheduler for pain file
A sample is shown below where the scheduler will run every hour between 11:00 and 19:00 for the period selected and as per the time zone selected.
Note:
- The scheduler has to be set up as per the needs of that specific implementation.
3.7.1.1. Profile
3.7.1.2. Frequency
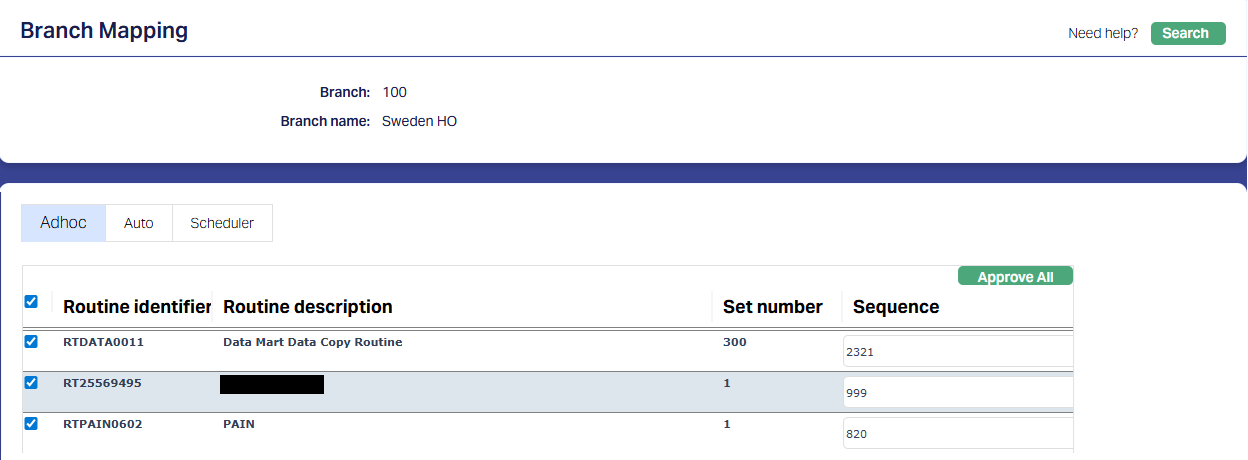
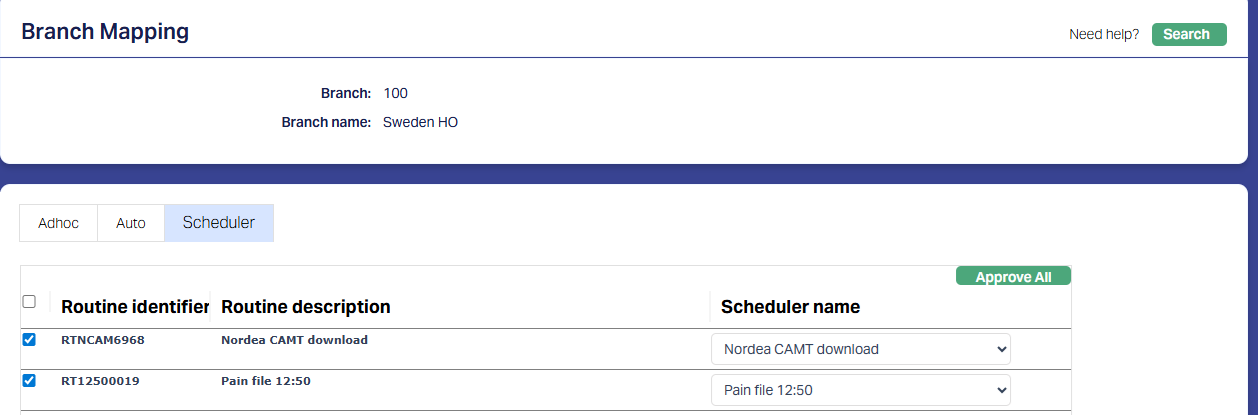
3.8. Data Management → Configurations → Routines → Branch Mapping
Once the Routines and Schedulers are configured, these should be mapped for the Branch(es) for which the Routines should be executed. You have to map both the Adhoc and Scheduled / Auto routines.
3.8.1. Adhoc → Edit
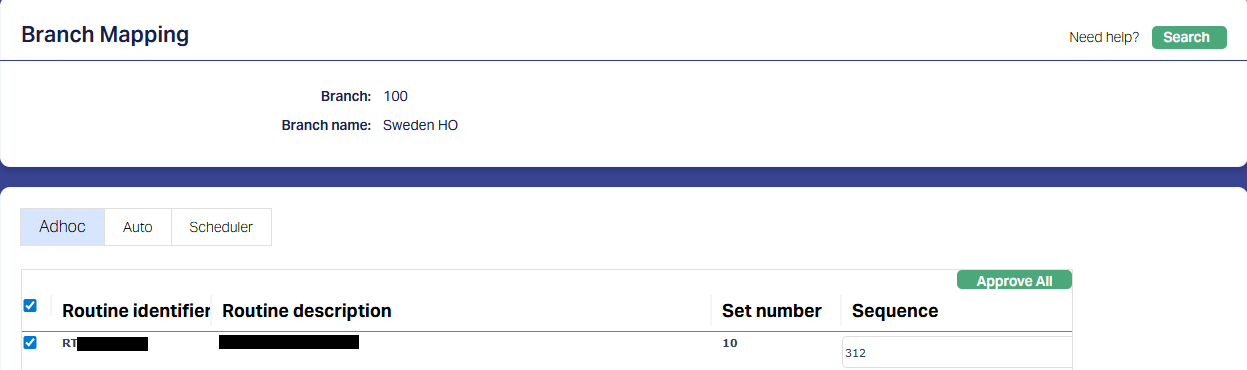
All Routines that are defined as Adhoc Type will display; check the relevant checkbox to map the Routine to the Branch; uncheck to unmap. Only mapped Routines can be manually executed for that Branch using Data Operations > Adhoc Routines
3.8.2. Scheduled → Edit
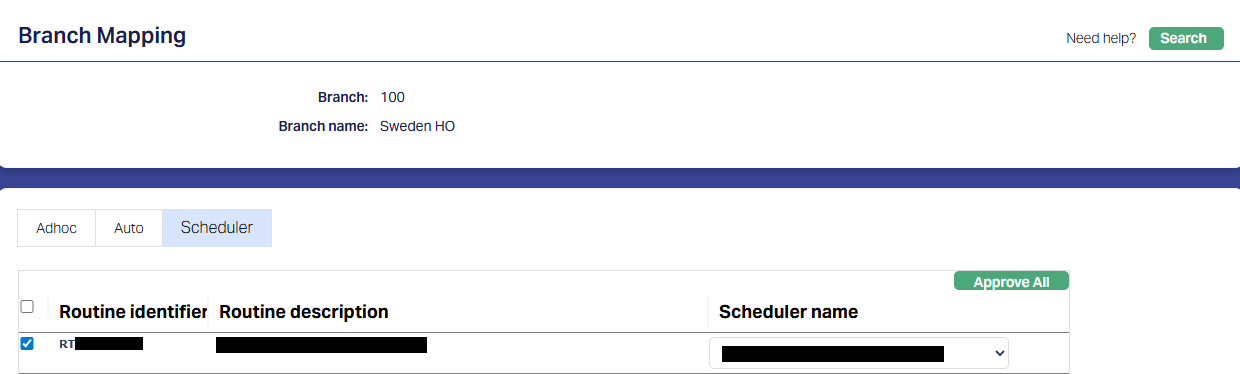
All Routines that are defined as Scheduled Type will display; check the relevant checkbox to map the Routine to the Branch; uncheck to unmap. Only mapped Routines will be automatically executed for that Branch as per the Scheduler mapped.
PROCESS OF LOAN DISBURSEMENTS
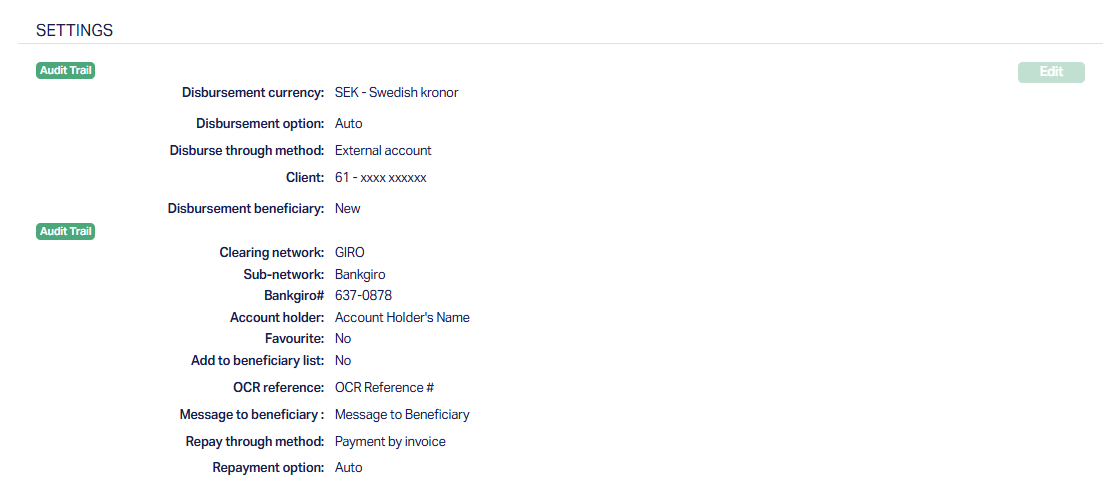
The Loan Disbursement could be initiated manually by users or automatically, as specified in the Loan Account → Settings → Disbursement Option. When the Disbursement Through Method for any such disbursement is External Account, the process flow is as below:
1. Disbursement is initiated in CC → Retail → Loans. It can be in the following ways:
a. In case of Auto, when the Loan Account is activated by approving the Account Status Tab for Account Status = Activated.
b. In case of Manual, when the Loan Disbursement record is approved.
2. Accounting entries in CC on the above approval
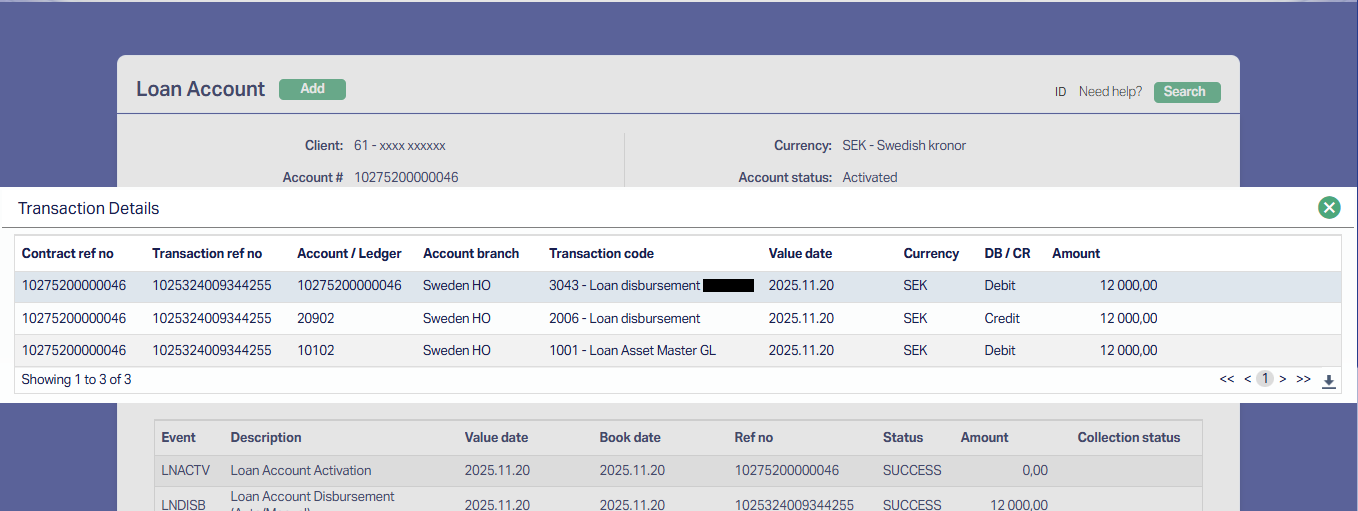
a. The following accounting entry is passed with a unique Transaction Reference #. You can see details by clicking on the LNDISB event in the Loan Account > Events Tab
| Event Code | Book Date | Value Date | Db / Cr | GL / Account # | Transaction Code | Amount |
|---|---|---|---|---|---|---|
| LNDISB | Current Booking Date | Value Date in Loan / Disbursement record | Db | Loan Account | Loan disbursement (DB / Client) | Loan / Disbursement Amount |
| Value Date in Loan / Disbursement record | Db | Master GL of Loan Product | Master leg (DB/GL) from Loan Product | Loan / Disbursement Amount | ||
| Cr | Suspense GL - (Asset / Liability) | Loan disbursement (CR / GL) | Actual amount of transfer (net of receivables) | |||
| Cr | Charge Income GL | <> | Charge Amount |
Retail → Loans → Maintain
i. Settings Tab
ii. Events Tab – LNDISB Event
3. Process in PG & DM:
a. PG Product is resolved using the STP Configuration.
b. The Nostro Configuration is used to arrive at the Nostro Account to be used for the Payment.
c. Based on the Retail → Payment Settings that is mapped as External Product Code in the PG Product, Debit Processing accounting entries are posted in CC
d. Based on the Nostro Account arrived at, Credit Processing accounting entries are posted in CC
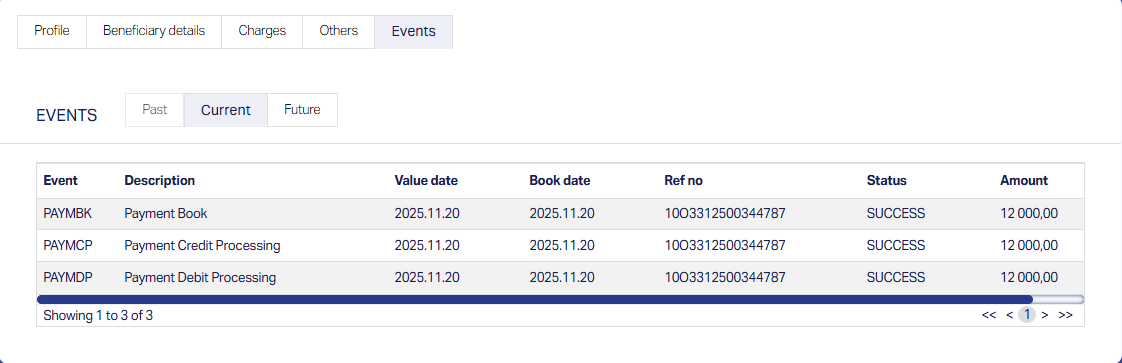
The following are the events in the Payment record:
1. PAYMBK – Payment book. There will be no accounting entry for this event.
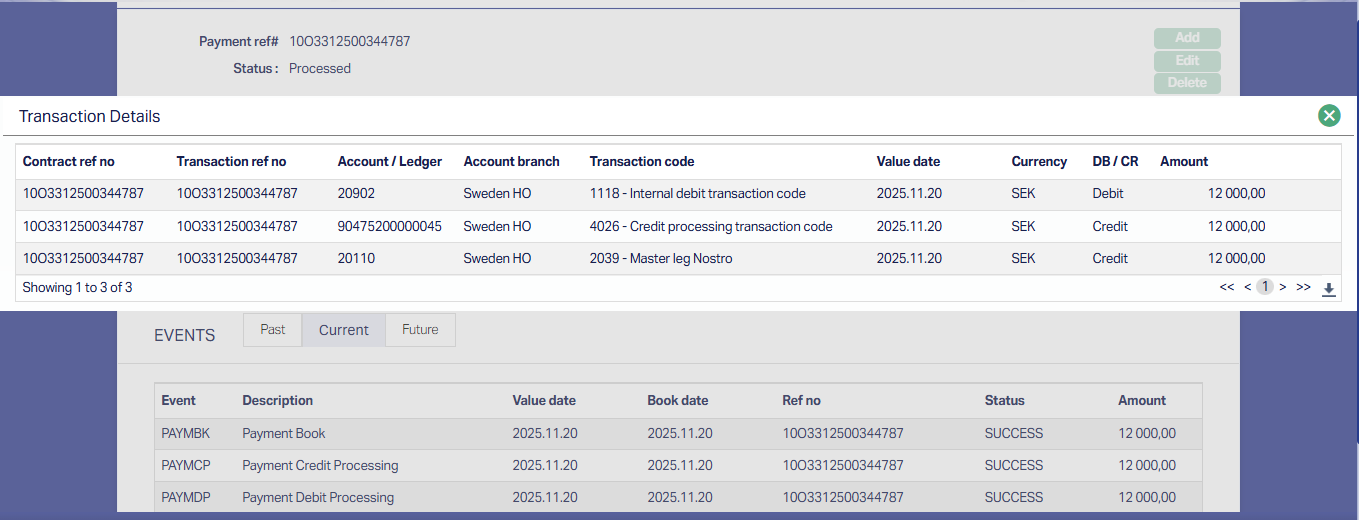
2. PAYMDP – Payment Debit Processing. The following accounting entry will be posted:
| Event Code | Book Date | Value Date | Db / Cr | GL / Account # | Transaction Code | Amount |
|---|---|---|---|---|---|---|
| PAYMDP | Current Booking Date | Value Date in Loan / Disbursement record | Db | Suspense GL from Product | Actual amount of transfer (net of receivables) | |
| Cr | Transit GL from Payment Settings | Actual amount of transfer (net of receivables) |
3. PAYMCP – Payment Debit Processing. The following accounting entry will be posted:
| Event Code | Book Date | Value Date | Db / Cr | GL / Account # | Transaction Code |
|---|---|---|---|---|---|
| PAYMCP | Current Booking Date | Value Date in Loan / Disbursement record | Db | Transit GL from Payment Settings | |
| Cr | Nostro account / GL resolved |
e. The payment record's Status is updated as Processed, Approved.
f. Data is also moved to the relevant payment tables in DM as preparation of the Payment File that is to be generated. However, you will not be able to view these details on the UI in DM. You can however query the database if needed.
Retail → Payments → Net Payment Settlement → Enquiry
You can see the outgoing payment record in Retail → Payments → Net Payment Settlement → Enquiry. You can use any search criterion. The Loan Account # is stored as the Debit Account #
Sample screenshots are shown below:
i. Profile Tab
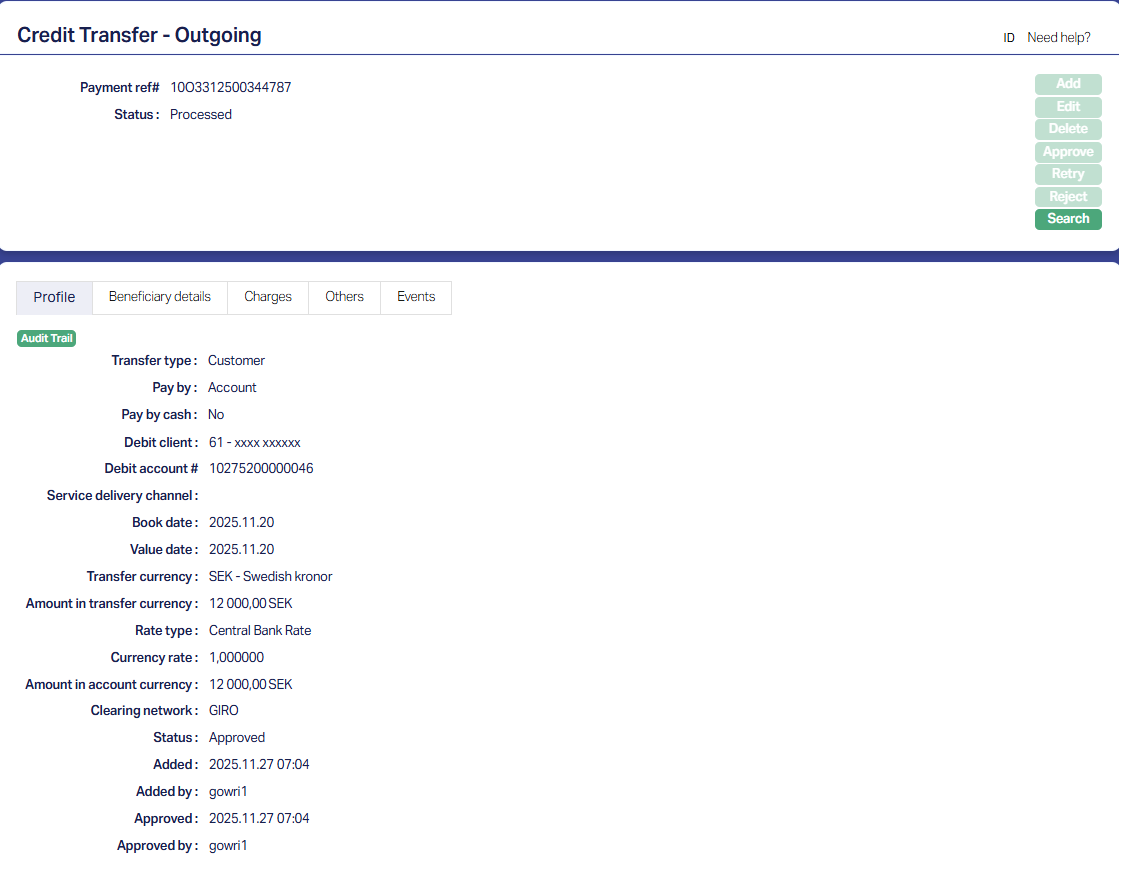
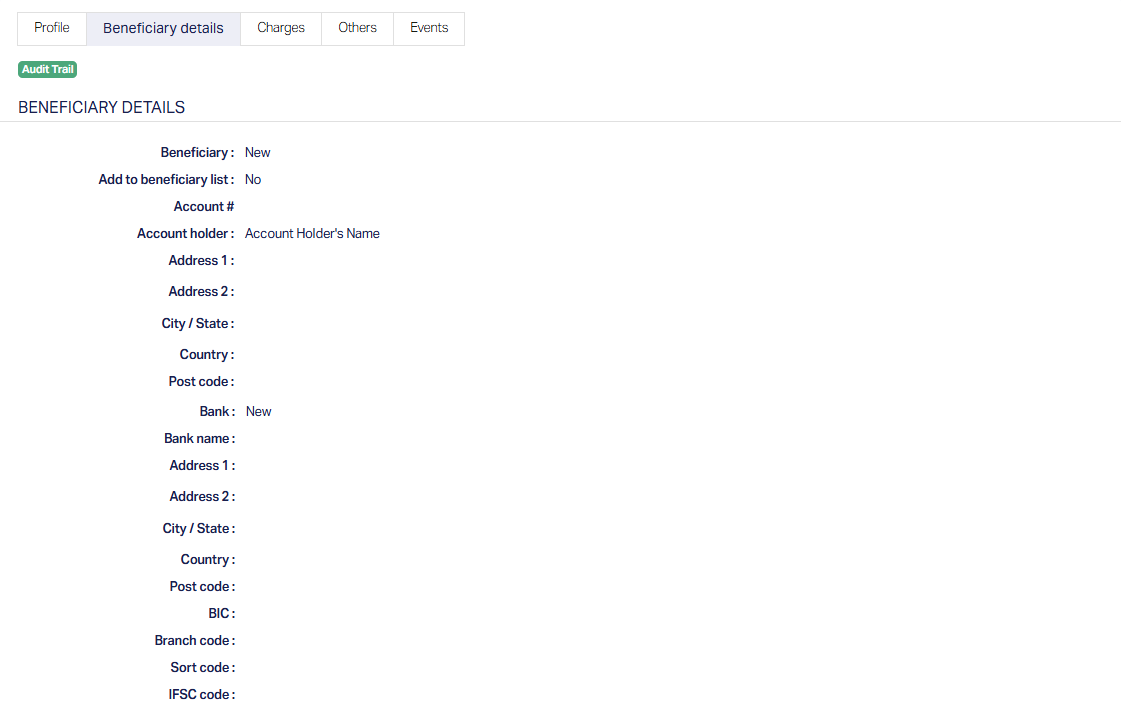
ii. Beneficiary Details Tab
iii. Charges Tab

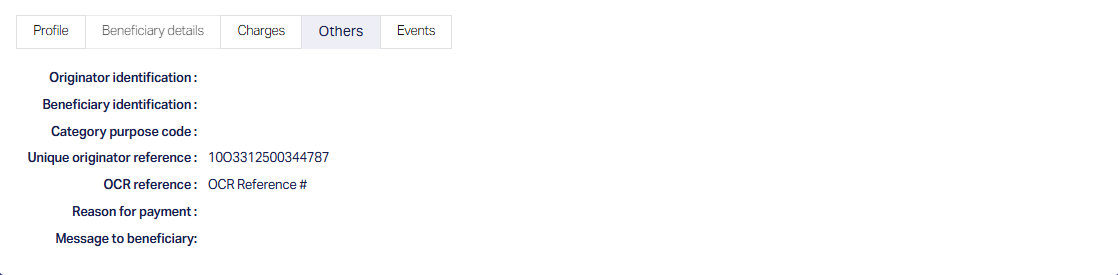
iv. Others Tab
v. Events Tab
PAYMDP Event – Details

PAYMCP Event – Details
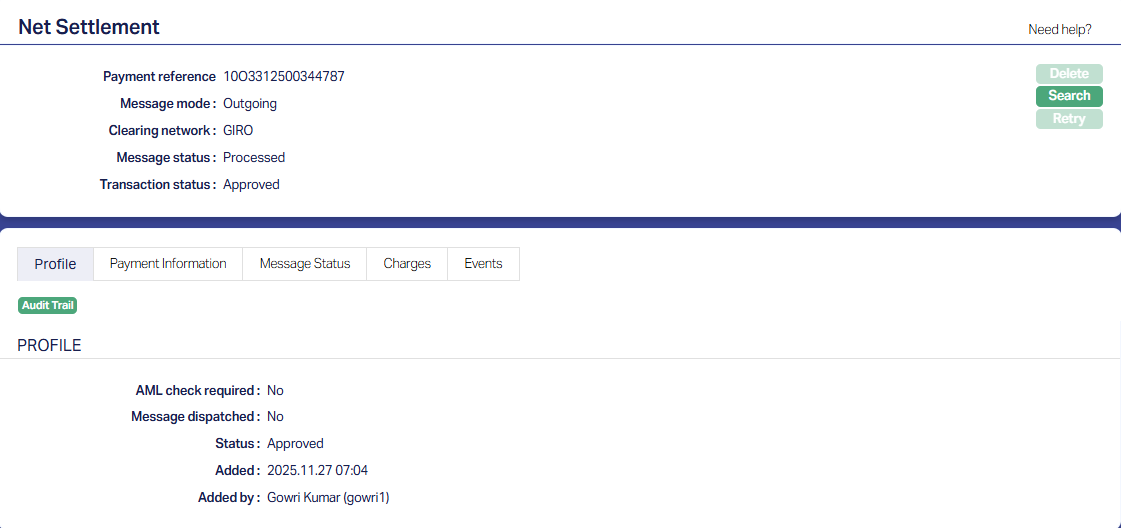
Payment Grid → Operations → Net Settlement
You can see the payment record in Payment Grid → Operations → Net → Settlement. Use any search criterion.
See sample screenshots below
i. Profile tab
| Field Name | Field Description | Field Value | Notes |
|---|---|---|---|
| Header Pane | |||
| Payment Reference | Reference # for the Payment. | This will be the same as the Transaction Reference # in Loan Maintain > Event Tab for the LNDISB event | |
| Message Mode | Outgoing | ||
| Clearing Network | Clearing network through which the payment will be made | As selected in the Loan Disbursement | |
| Message Status | Registered / Processed | For Loan Disbursements, this will always be Processed | |
| Transaction Status | Pending / Approved | For Loan Disbursements, this will always be Approved | |
| Profile | |||
| AML Check required | Yes / No | Depends on solution / fitment. | |
| Message dispatched | Yes / No | Initially, this will be No; and once the outgoing payment message is sent to the Bank by the ADM, this field will be updated to Yes |
ii. Payment Information tab:

| Field Name | Field Description | Field Value | Notes |
|---|---|---|---|
| Header Pane | |||
| Message Reference | Reference # for the Message. | This will be the same as the Payment Reference for the Outgoing Payment | |
| Transaction Amount | Disbursement Amount | ||
| Transaction Currency | Disbursement Currency | ||
| Value Date | Value date of the Disbursement | ||
| Debtor Name | Loan Client | ||
| Debtor Account # | Loan Account # | ||
| Creditor Name | Account Holder Name as input in the Disbursement | ||
| Creditor Account # | External Account # as input in the Disbursement | ||
| Creditor Country | Country as input in the Disbursement |
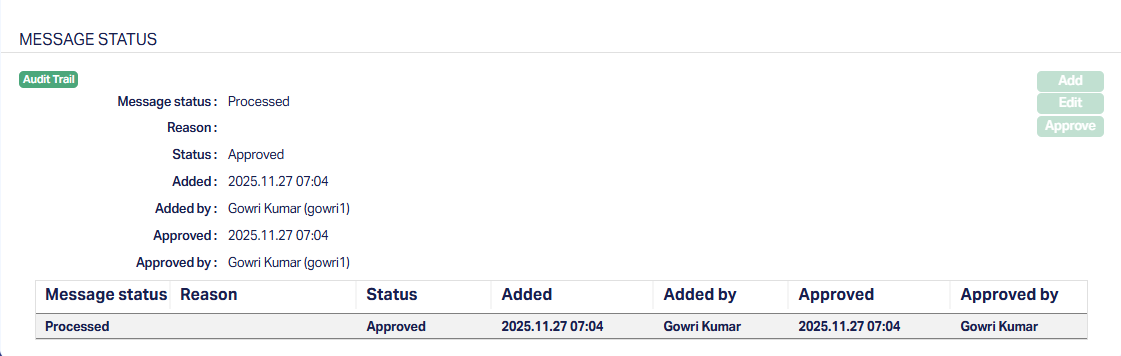
iii. Message Status tab
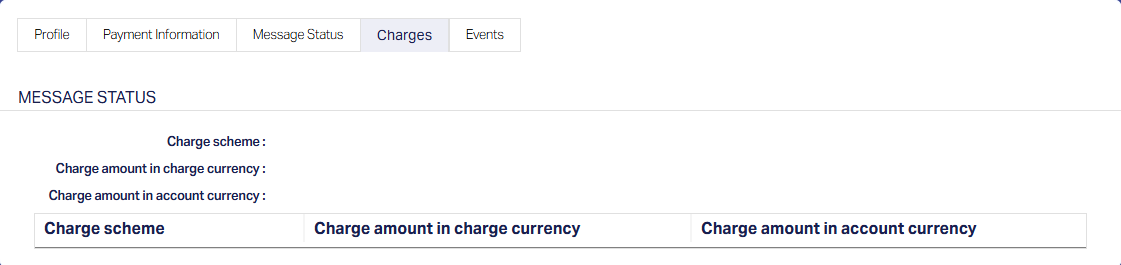
iv. Charges tab
v. Events Tab


There will not be any accounting entries in PG when you click on any of the above events.
4. Automatic Payment File Generation
Based on whether it is a Scheduled / Auto Routine for the Payment, the payment file will be generated at the scheduled time or at EOD / BOD.
5. Manual Payment File Generation
You may want to run the routine manually:
a. If there was an error during automatic execution which you have corrected and want to generate the file before its next automatic execution
b. There are some urgent payments that need to be sent to the Bank immediately / before the next automatic execution
In such a case, you need to do the following:
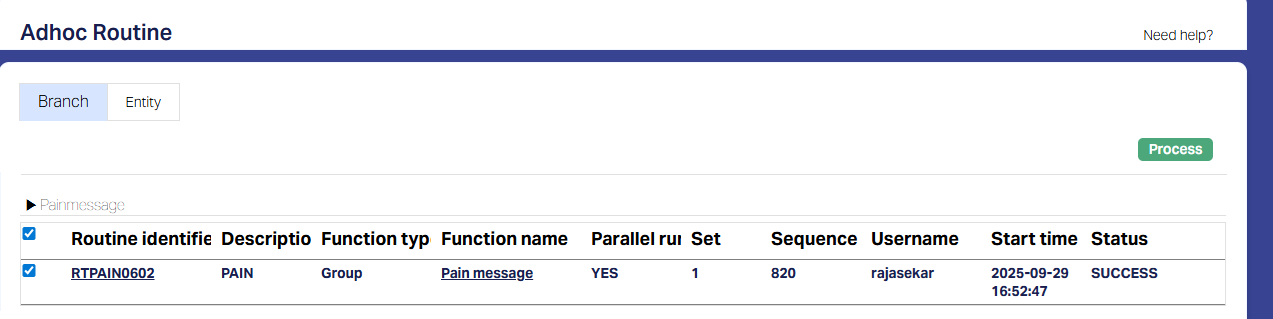
1. Access Data Operations → Adhoc Routine → Branch Tab and select the specific Adhoc Routine that pertains to the Outgoing Payment file generation
2. If you want to check the file before sending to the Bank, do the following:
a. INITIATE A REQUEST FOR APPROVAL OF THE REQUIRED CHANGES TO THE APPROPRIATE INTERNAL AUTHORITY. Once approved, follow the next steps.
b. Click on the Function name hyperlink.
c. The Group maintenance page will open in a new browser tab.
d. Click on Edit and remove the function pertaining to the Upload to Bank
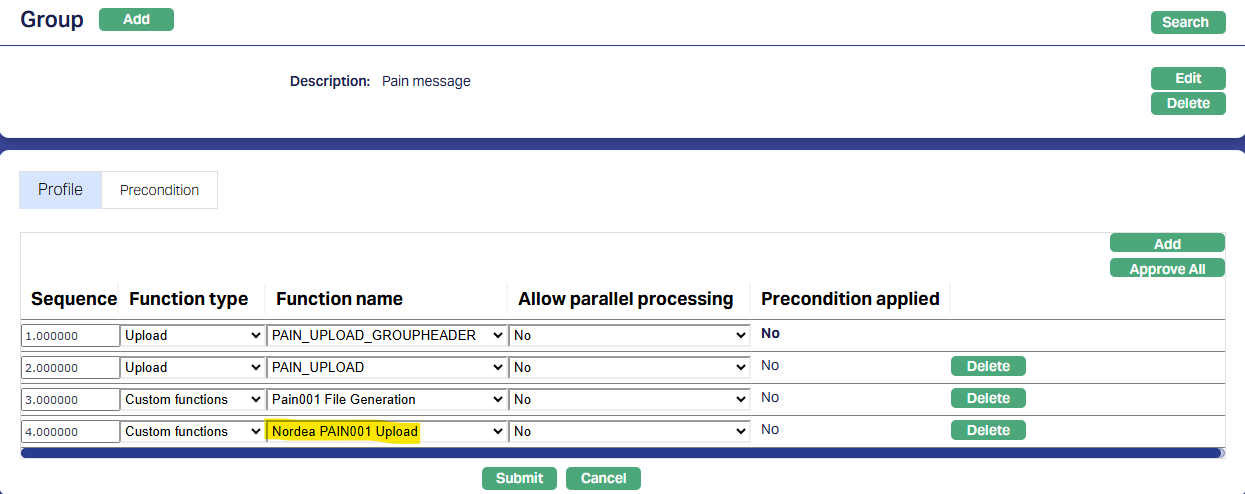
e. Click on Approve
3. Click on Process to see this pop-up
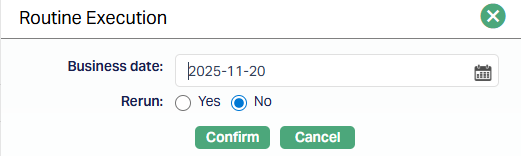
4. Input the following details:
a. Business date = Current booking date
b. Rerun = No
5. Click on Confirm to execute the Routine
6. The Payment File will be available in the path specified.
7. You can do the required checks and once satisfied, you can edit the Group to retain only the function pertaining to the Upload to Bank and execute the Routine.
8. ENSURE TO PUT BACK ALL THE FUNCTIONS IN THE GROUP ONCE THE PAYMENT FILE IS UPLOADED TO THE BANK
PROCESS OF CREDIT TRANSFER
To initiate a manual Payment (as opposed to an automatic payment, say, automatic Loan Disbursement), a Payment Template should already have been defined. Depending on the Settlement Type, one of the following options should be used:
Retail → Payments → Net Settlement → Credit Transfer
Retail → Payments → Gross Settlement → RTGS/SWIFT/TARGET2
Here, we will see an example using Net Settlement → Credit Transfer
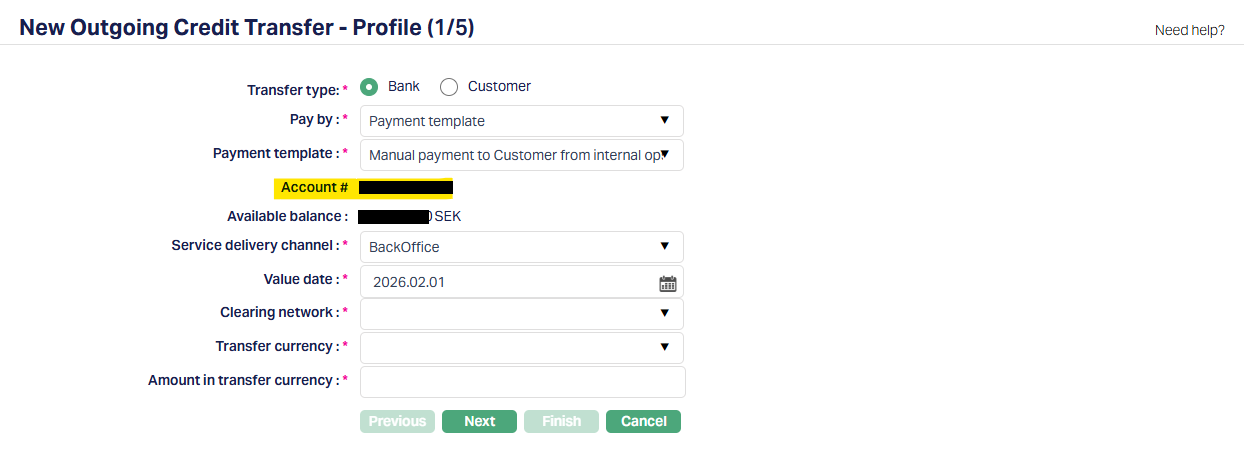
1. Step 1 fields change depending on the Transfer Type, Pay By and Payment Template Type. Here we will see a sample using Transfer Type = Bank and Pay By = Payment Template and Value Date = Current Booking Date.
2. Choose the required Template
3. Input the required details in Steps 1 to 5
If Template Type = Generic
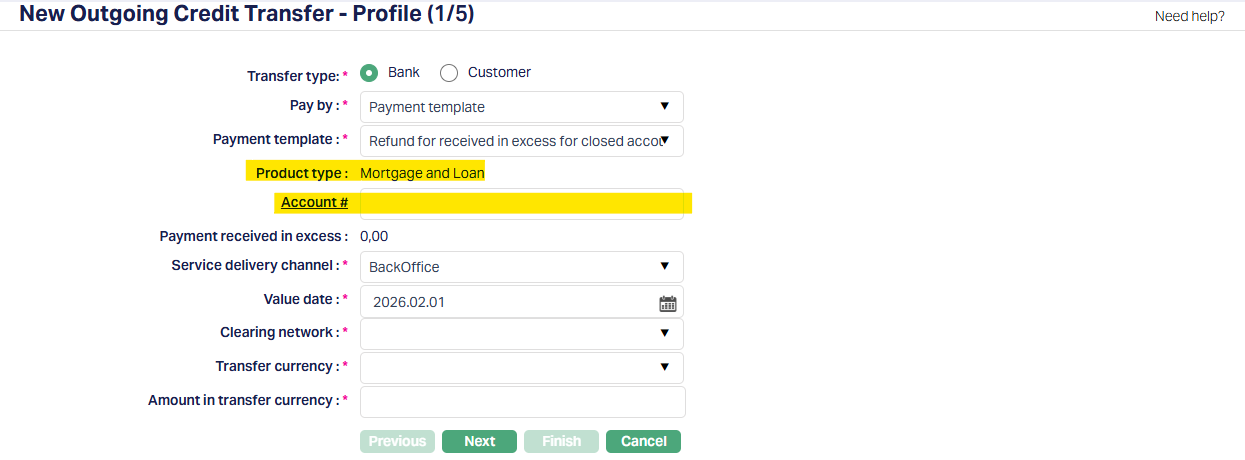
| Field Name | Field Description | Field Value | Notes |
|---|---|---|---|
| Transfer Type | Always Bank | ||
| Pay by | Always Payment Template | ||
| Payment Template | Choose the required value depending on the Payment | ||
| Product Type | Will be displayed based on the Payment Template chosen | ||
| Account # | Will be displayed based on the Payment Template chosen | Choose required Account # | |
| Payment received in excess | Will be displayed based on the Product Type above. For Mortgage & Loans, it will always display the amount received in excess, if any, in terms of the Account currency | ||
| Service Delivery Channel | |||
| Value Date | |||
| Clearing Network | The Network to be used for the payment | ||
| Transfer Currency | Currency in which the payment has to be made | ||
| Amount in Transfer Currency | Amount for the payment |
If Template Type = Specific
| Field Name | Field Description | Field Value | Notes |
|---|---|---|---|
| Transfer Type | Always Bank | ||
| Pay by | Always Payment Template | ||
| Payment Template | Choose the required value depending on the Payment | ||
| Account # | Will be displayed based on the Payment Template chosen | ||
| Available balance | It will display the Available Balance in the above account, in terms of the Account currency | ||
| Service Delivery Channel | |||
| Value Date | |||
| Clearing Network | The Network to be used for the payment | ||
| Transfer Currency | Currency in which the payment has to be made | ||
| Amount in Transfer Currency | Amount for the payment |
Note:
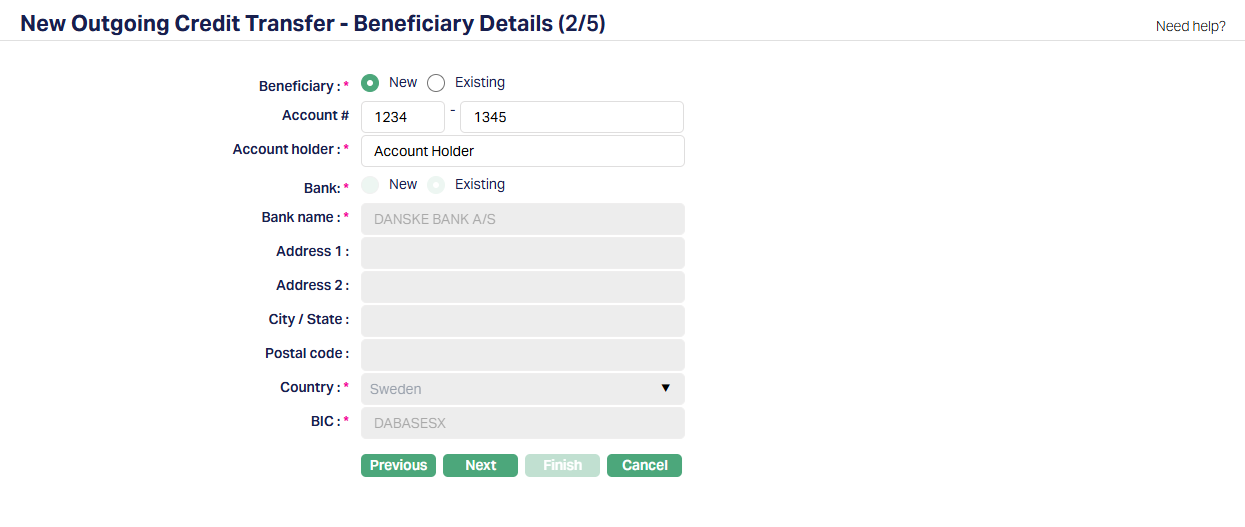
- Depending on the Clearing Network chosen in Step 1, the fields will change.
| Field Name | Field Description | Field Value | Notes |
|---|---|---|---|
| Beneficiary | If you want to use a beneficiary record already linked to the Account, use Existing; else New | ||
| Subsequent fields | Will depend on the Network chosen in Step 1 and whether Beneficiary is New / Existing as above. | In case Beneficiary = New, the fields will be enabled for input; in case of Existing, values will be defaulted from the Beneficiary record chosen above |
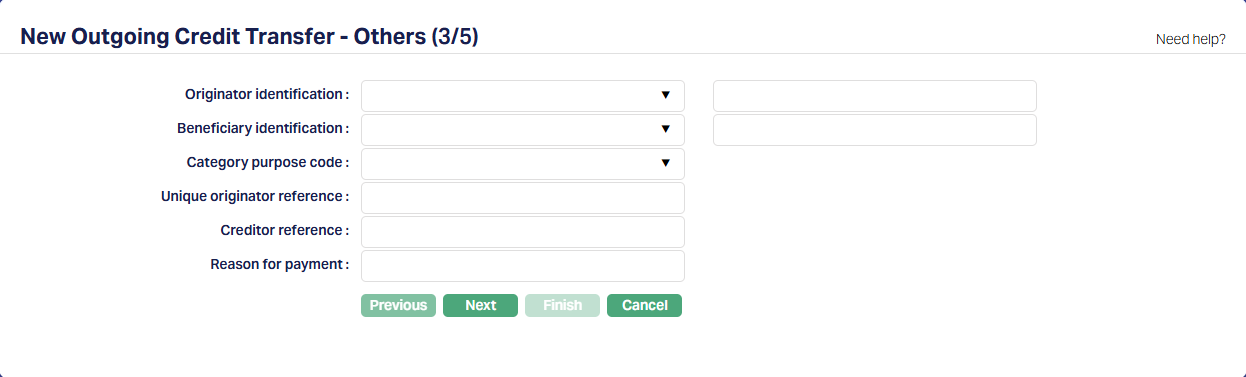
Note:
- Depending on the Clearing Network chosen in Step 1, the fields will change.
| Field Name | Field Description | Field Value | Notes |
|---|---|---|---|
| Originator Identification | |||
| Beneficiary Identification | |||
| Category Purpose Code | Will be displayed depending on the Clearing Network chosen in Step 1 | ||
| Unique Originator Reference | |||
| Creditor Reference | Will be displayed depending on the Clearing Network chosen in Step 1 | ||
| Reason for Payment | |||
| OCR Reference | |||
| Message to beneficiary | Will be displayed depending on the Clearing Network chosen in Step 1 |
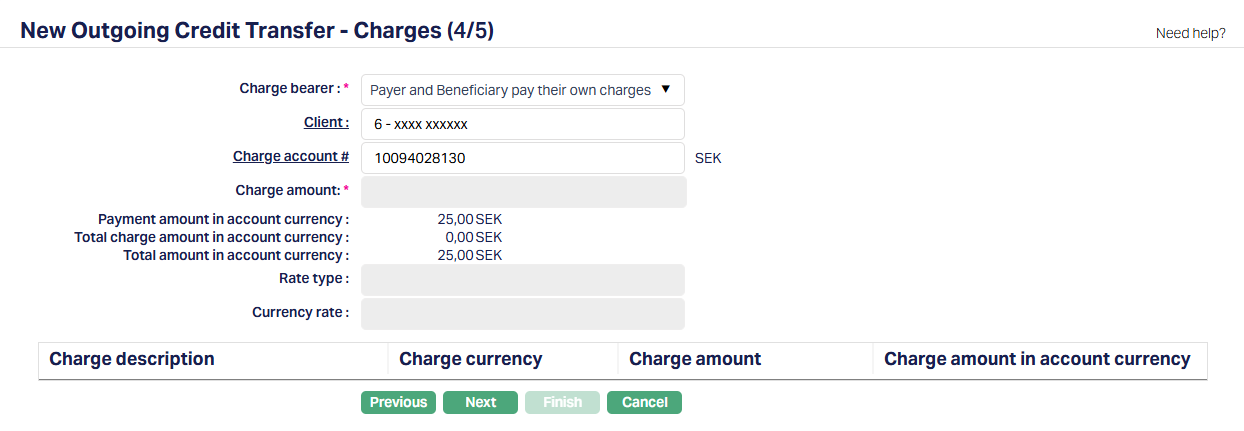
Note:
- Depending on the Debit Account, the fields will change.
| Field Name | Field Description | Field Value | Notes |
|---|---|---|---|
| Charge bearer | |||
| Client | |||
| Charge Account # | |||
| Charge Amount |
On Finish,
The Status of the Payment record will be Registered, Pending.
You can see the PAYMBK Event with Status = Success in the Events Tab → Current sub-tab. There will not be any accounting entry at this point.
The Unique Originator Reference, if not input, will be automatically updated using the Payment Ref # generated by Aura on creation of the Payment record.
Editing a Payment record
Only the user who created the record would be able to make changes to a Payment record, and only when the Status = Registered, Pending. To make changes, go to Retail → Payments → Net Settlement → Enquiry; use the various search criteria available to retrieve the required record and click on the same to view details. Click Edit to make changes and Save.
Approving a Payment record
Only a user who did not create the record would be able to approve a Payment record, and only when the Status = Registered, Pending. To approve, go to Retail → Payments → Net Settlement → Enquiry; use the various search criteria available to retrieve the required record and click on the same to view details. Click Approve. If there is some reason for the payment to not get processed, the error will be shown on the screen; and you will have to take appropriate corrective action.
On approval, the internal processing is similar to what is described in the section on Process in PG & DM under Loan Disbursement above. Additionally, the Status of the Payment record will be updated as Registered, Approved.
HANDLING PAIN002 REJECT
When Aura sends an Outgoing Payment Instruction to the bank in Pain.001 format, the bank responds with a Pain.002 message indicating whether the payment is Accepted or Rejected.
The Outgoing Payment instruction status is reflected in the Message Status tab of the Net Settlement maintenance screen.
If the payment is Accepted, no further action is required. Aura updates the Message Status accordingly and the payment lifecycle is completed.
If the payment is Rejected, the payment is displayed in the Aura Dashboard notification panel for operational follow-up. The notification remains visible until the Message Status is updated or appropriate action is taken.
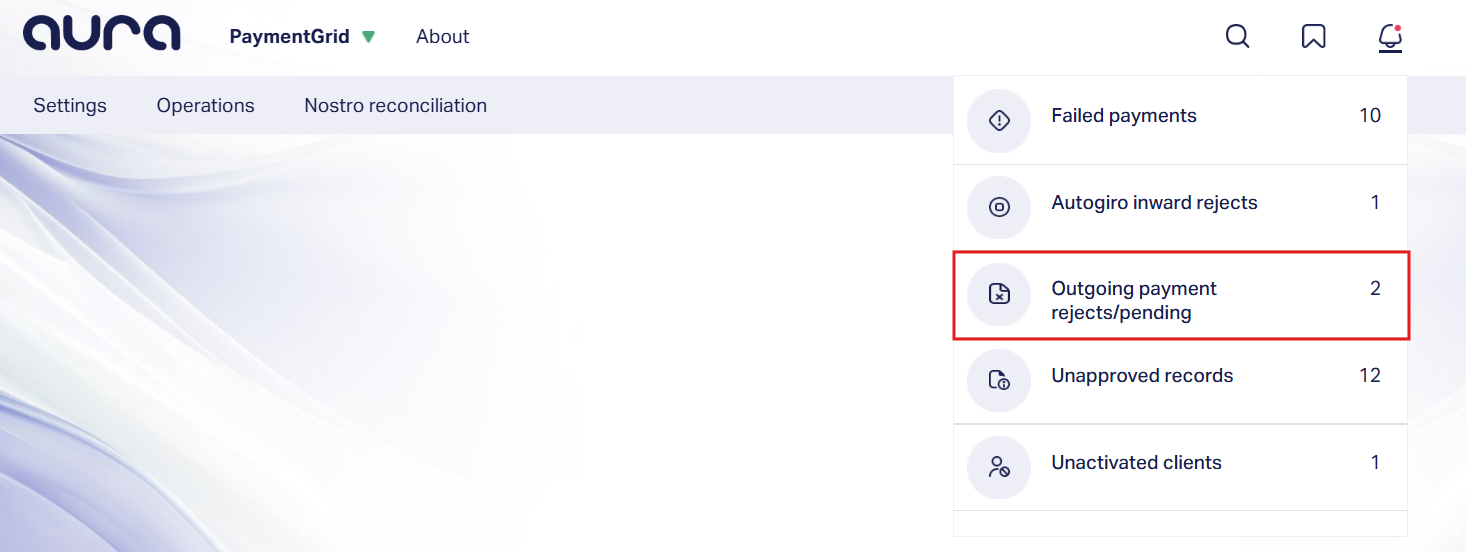
Where Pain.002 Rejected Status is Displayed
1. Notification Panel (Bell icon):
Rejected outgoing payments are displayed in the Notification Panel under Outgoing Payment Rejects. This acts as the primary alert mechanism and provides immediate visibility to payments that require attention.
When you click on the notification entry, Aura redirects you to the PaymentGrid → Operations → Net Settlement search page and automatically displays the corresponding Rejected record(s) in the grid.
2. Net Settlement - Message Status:
Aura also updates the Message Status to Rejected in the Net Settlement maintenance screen. You can view this under - PaymentGrid → Operations → Net Settlement → Message Status tab.
This view provides the detailed transactional and accounting information required to verify and update the payment status.
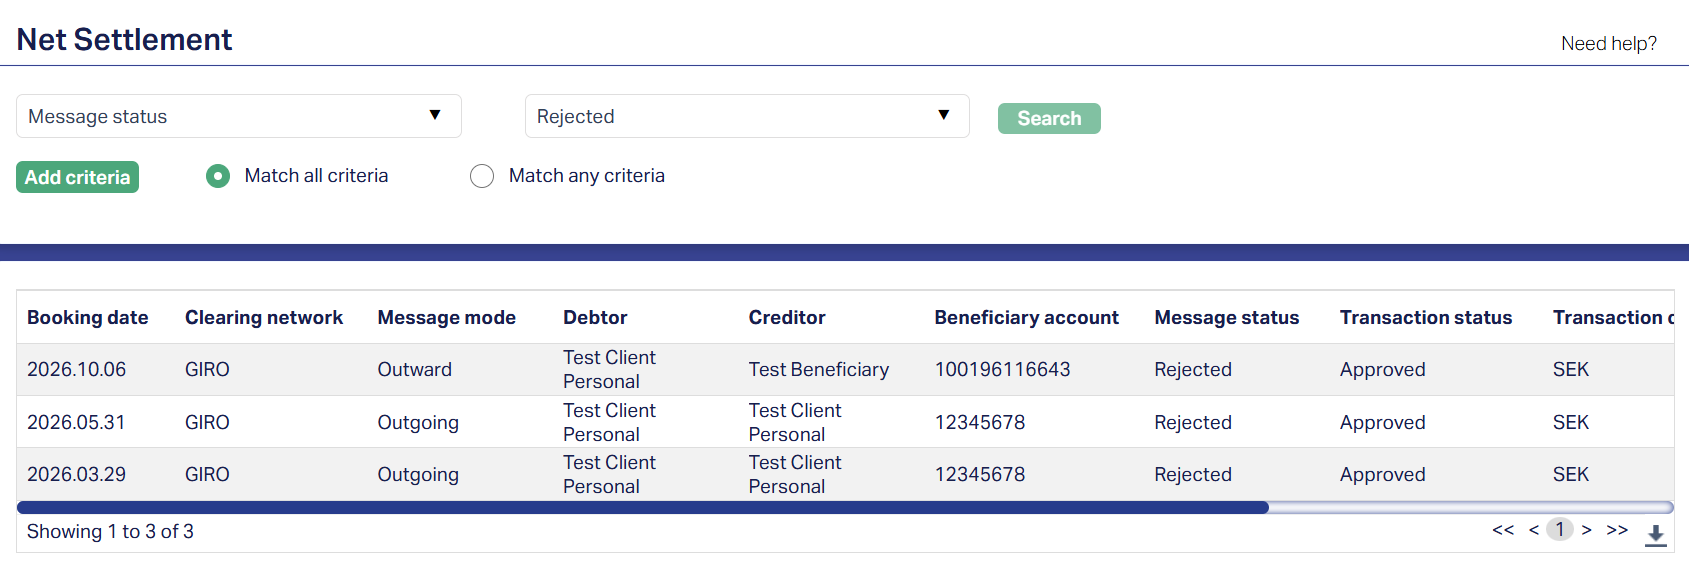
Note: The rejected item remains visible until the Message Status is updated to Processed.
Identifying the Reason for Rejection
To identify the reason for a rejected payment,
Access the Net Settlement maintenance screen and click the Message Status tab.
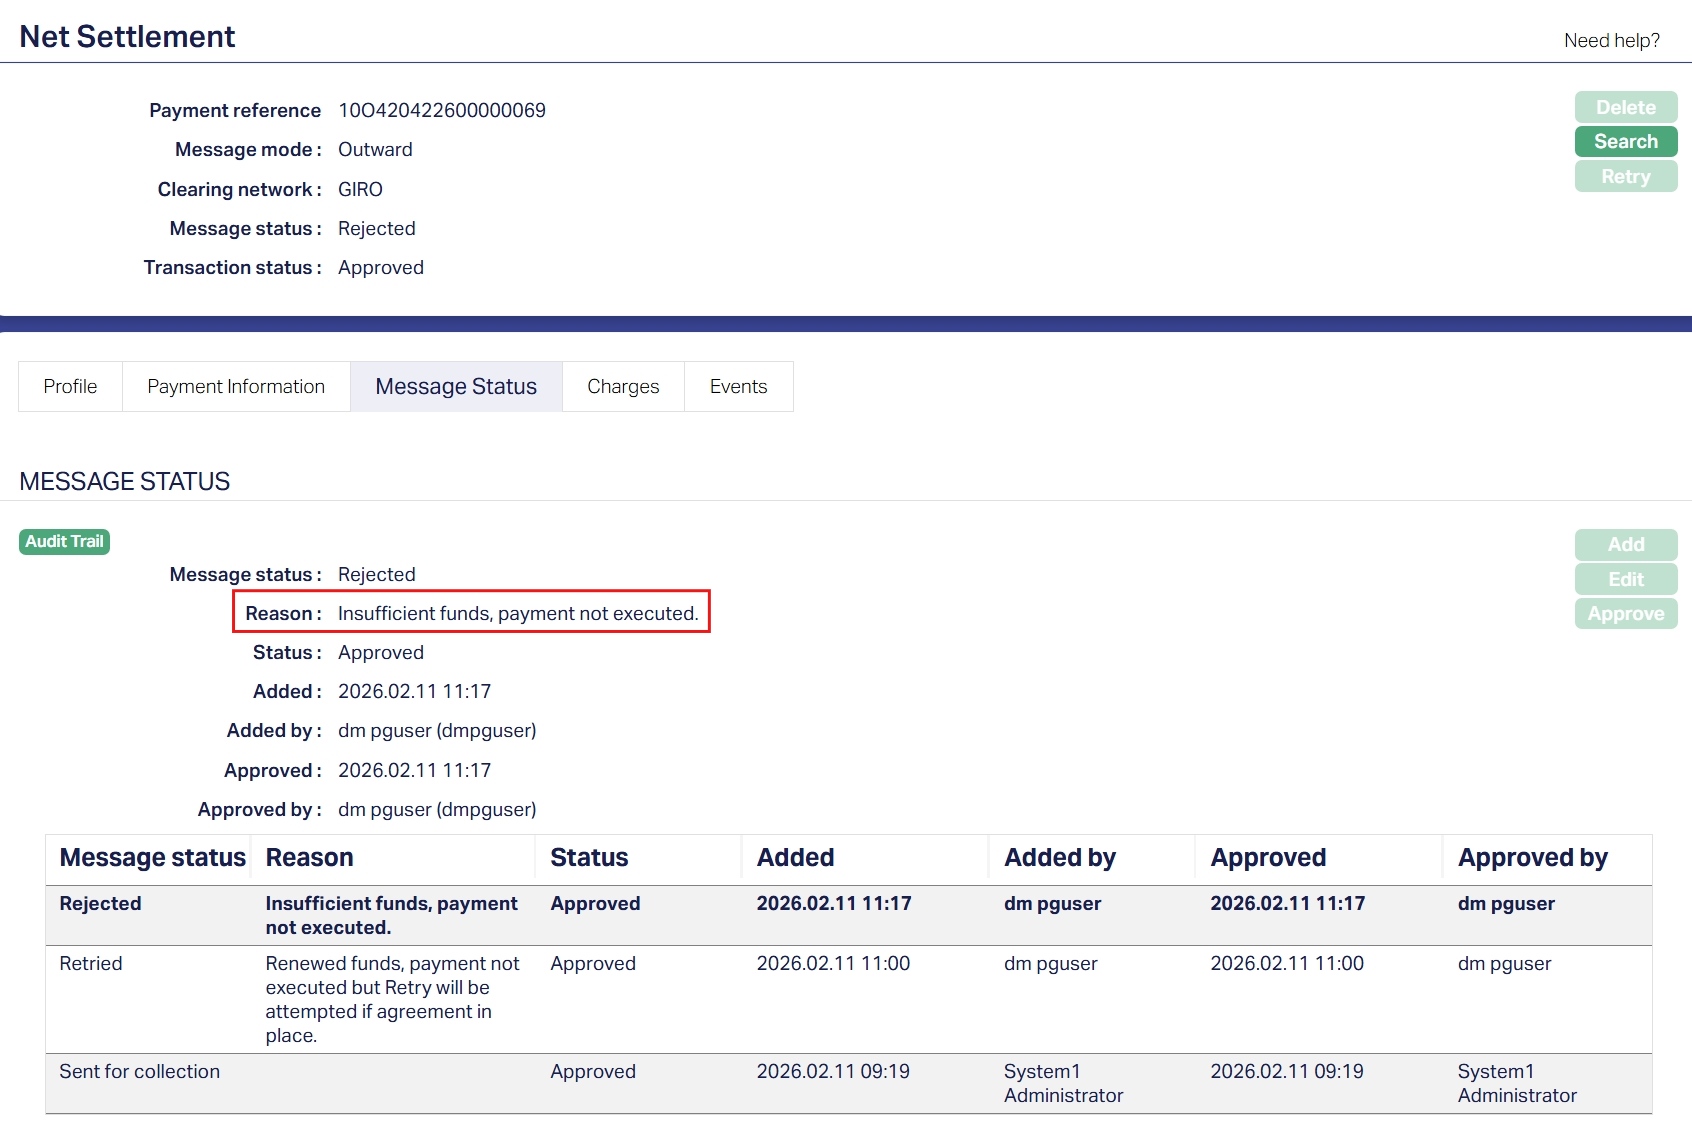
The rejection reason received from the Pain.002 message is displayed here. This reason must be reviewed before updating the payment.
Backoffice Verification and Reprocessing Requirement
In case of a Pain.002 Rejection, the payment must be verified by the backoffice team and reprocessed through Retail → Payments → Credit Transfer or any other applicable operational process.
After the payment has been successfully reprocessed, you must update the original rejected Net Settlement record to Processed to ensure closure of the payment loop. This final update is mandatory.
Updating Message Status for Rejected Payments
To handle and update Message Status for a rejected Outgoing Payment,
1. Access the PaymentGrid → Operations → Net Settlement Maintenance screen and click the Message Status tab.
When the current Message Status is Rejected and the Message Mode is Outgoing, the Add button becomes enabled.
2. Click Add. The Add Message Status page appears.
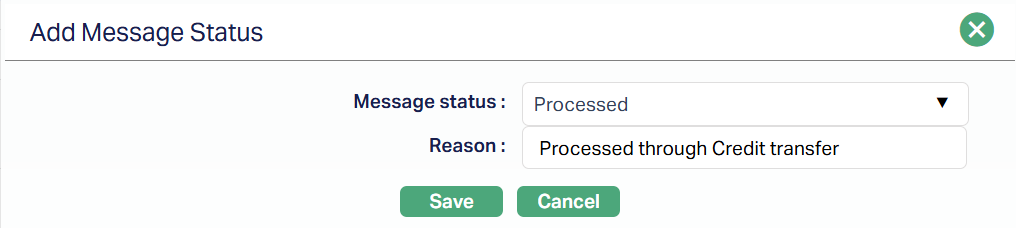
3. Select the Message status from the drop-down. Aura allows you to update the Message Status from Rejected to Processed - this is the only drop-down option available in this scenario.
4. Enter the mandatory Reason for updating the payment. This may include details such as reprocessing through Retail → Payments → Credit Transfer or alternative handling.
5. Click Save. Aura automatically approves the Message Status update.
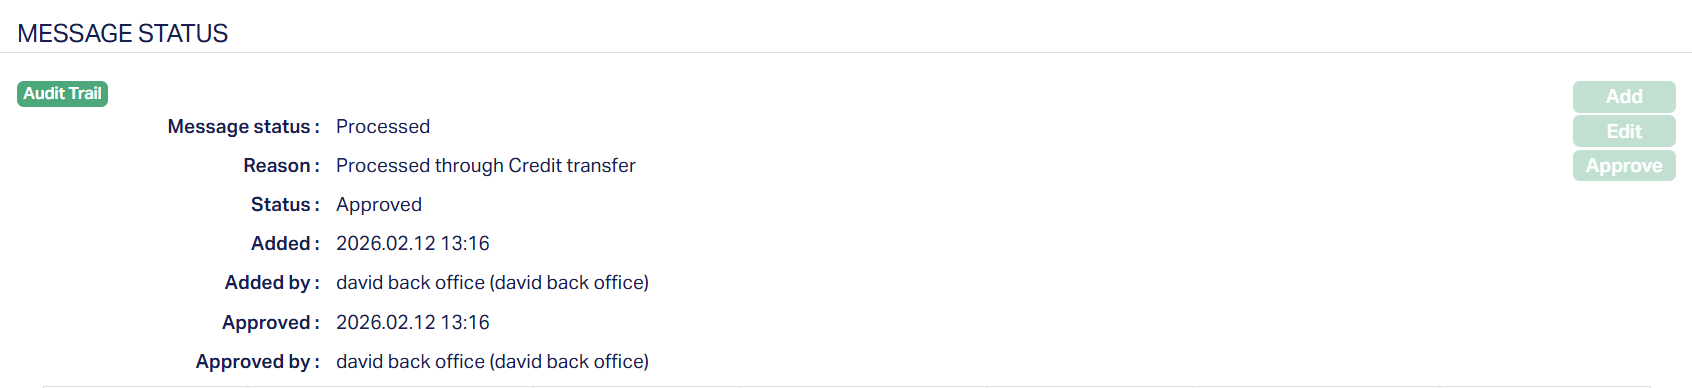
The updated record displays both Added by and Approved by information in the audit fields.
Impact on Loan Disbursements
When a Pain.002 rejection occurs for a loan disbursement-related outgoing payment, Aura reverses only the payment-side accounting entries related to the outgoing transfer through the PAYMRV event.
The loan disbursement record remains active and is not reversed as part of the payment rejection handling process.
The outgoing payment must be reprocessed separately through the applicable operational flow.
INCOMING PAYMENTS
The following are the specific maintenances for Incoming Payments:
1. Aura Transaction Processing
1.1. Retail → Settings → Payment Settings
This is required to be set up to define the Ledger Accounts and Transaction Codes that are to be used for posting accounting entries related to the incoming payments.
Depending on the needs of the implementation, multiple Payment Settings have to be maintained for the Payments coming in through different modes (like instant transfers, credits through clearing, etc.,) towards different accounts (say, Loans under different Products, Client Accounts, etc.,). As a general guide, if different General Ledgers / Transaction Codes are required for different payments (say, for the purpose of reconciliation), multiple Payment Settings should be created.
1.1.1. Profile
| Field Name | Field Description | Field Value | Notes |
|---|---|---|---|
| Description | The description of the Payment Setting | Can be anything – Should be such that one can easily identify what this Payment Setting is for | This has to be copied to the PG > Settings > Product as this field is used to relate the Retail > Payment Settings to the PG > Product. Usually, the Description for all maintenances is input as the same for ease of use, though, this need not strictly be so IMPORTANT: If you make any changes to this field value, please make sure that the same is copied to the PG > Settings > Product > External Product Code |
| Payment Type | Indicates the Type of Payment. | If Entity is an FI, this should be Incoming | |
| Settlement Type | Can be Gross or Net | If Entity is an FI, this should be Gross | |
| Currency Rate Type | Indicates the exchange rate type to be used in case of cross-currency transactions | Can be anything. | If there are no cross-currency transactions, this will not be used. If there are cross-currency transactions, provide the correct Rate Type to be used to derive the exchange rates |
| Transit Ledger | The GL Account into which funds will be credited during Nostro Accounting | Usually, for Loan Payments, this will be the actual GL that has been mapped in the Loan Product as the Settlement GL | |
| Investigation Ledger | The Ledger into which funds will be parked if there is any investigation to be carried out – for example, if AML check is positive | ||
| Repair Ledger | The ledger to be used if the incoming payment goes to repair queue because of business validations exceptions. |
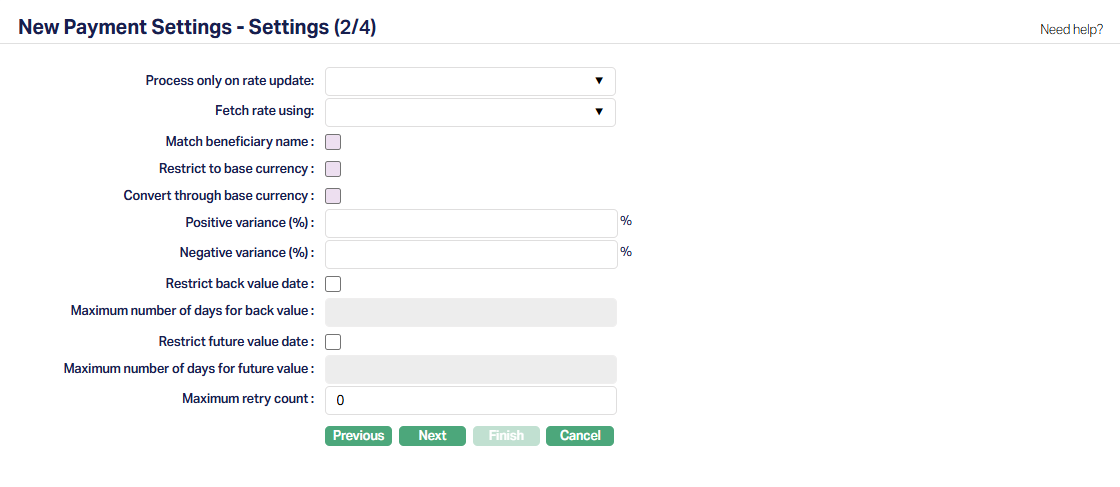
1.1.2. Settings
| Field Name | Field Description | Field Value | Notes |
|---|---|---|---|
| Process only on Rate Update | Applicable only if there are cross-currency transactions. Else, leave it blank | ||
| Fetch Rate Using | Applicable only if there are cross-currency transactions. Else, leave it blank | ||
| Match Beneficiary Name | If checked, the Incoming Payment will be processed only if Beneficiary Name in Aura matches with the name of the payment Initiator. Else, it will fail | ||
| Positive Variance % | Applicable only if there are cross-currency transactions. Else, leave it blank | ||
| Negative Variance % | Applicable only if there are cross-currency transactions. Else, leave it blank | ||
| Restrict back value date | If Entity is a Financial Institution, this will depend on the Bank in which the account is maintained. | ||
| Restrict future value date | If Entity is a Financial Institution, this will depend on the Bank in which the account is maintained. | ||
| Maximum retry count |
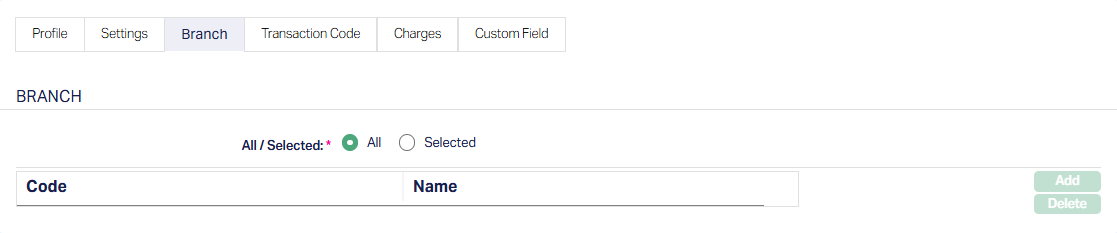
1.1.3. Branch
Applicable only in a multi-branch set up, if the Payment Setting is to be used for only selected branches.

1.1.4. Transaction Codes for Internal Processing
| Field Name | Field Description | Field Value | Notes |
|---|---|---|---|
| Debit Processing Transaction Code (Client / DB) | Used to debit a Nostro account during Debit Processing (Event Code: PAYMDP) | Example: Debit a Nostro Account during Incoming Payment Client Account (say, refund of excess receipts on a loan that was credited to an Internal Operations Account or a Client Account Transfer from an account in Aura to an external Account) | |
| Debit Processing Transaction Code (GL / DB) | Used to debit a Nostro GL during Debit Processing (Event Code: PAYMDP) | Example: Debit Loan Product > Suspense GL during Loan Disbursement to an External Bank Account and credit Transit GL | |
| Internal Debit Transaction Code (GL / DB) | Used to debit the Transit GL during Client account credit (Event Code: PAYMCP) | Example: Loan Account disbursement to an external bank account. The Transit GL will be debited and Nostro account (of the FI’s account with the Bank) will be credited | |
| Internal Credit Transaction Code (GL / CR) | Used to credit the Transit GL during Debit Processing (Event Code: PAYMDP) | Example: Debit Loan Product > Suspense GL during Loan Disbursement to an External Bank Account and credit Transit GL | |
| Credit Processing Transaction Code (Client / CR) | Used to credit a Client Account (Event Code: PAYMCP) | Example: Loan Account disbursement to an external bank account. The Transit GL will be debited and Nostro account (of the FI’s account with the Bank) will be credited | |
| Credit Processing Transaction Code (GL / CR) | Used to credit the Transit GL (Event Code: PAYMDP) | Example: This will be used if Nostro Resolution results in a GL to be credited |
1.1.5. Charge
| Field Name | Field Description | Field Value | Notes |
|---|---|---|---|
| Transaction Charge | Depends on solution / fitment. Can be blank | ||
| Advice Charge | Depends on solution / fitment. Can be blank |
1.1.6. Custom Field
Depends on solution / fitment. Can be blank
1.2. Retail → Settings → Product
1.2.1. Create a Nostro Account Product – Refer to the User Manual
1.3. Retail → Accounts → Nostro Account → Maintain
1.3.1. Create a Nostro Account – Refer to the User Manual
Note:
- Depending on the needs of the implementation (say, different Nostro accounts to be used for multiple accounts that the FI has with the Bank; and different master GLs are to be used for each Nostro Account), multiple Nostro account may have to be set up under multiple Nostro Products.
2. PaymentGrid
2.1. Settings → Message Configuration
There should be one Active Message Configuration per Clearing Network – Message Mode combination.
Note:
If the Entity has loan repayments, there should be one configuration per Clearing Network for Message Mode = Inward
If the Entity has an Internal Operations Account to park incoming funds or if the Entity user Borrower Repayment Client Accounts into which all incoming payments will be credited, there should be one configuration per Clearing Network for Message Mode = Incoming
2.1.1. Profile
2.1.1.1. Message Mode = Inward
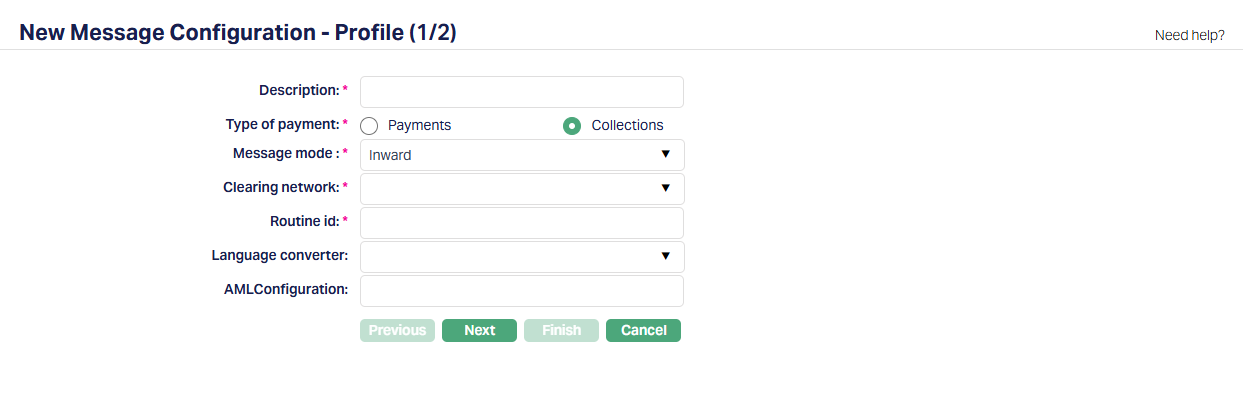
| Field Name | Field Description | Field Value | Notes |
|---|---|---|---|
| Description | The description of the Message Configuration | Can be anything – Should be such that one can easily identify what this Message Configuration is for | Usually, the Description for all maintenances is input as the same for ease of use, though, this need not strictly be so. |
| Type of Payment | To indicate Payment / Collection | Should be Collections | |
| Message Mode | Should be Inward | ||
| Clearing Network | To define the Clearing Network | Choose as required | List of Clearing Networks as required for the implementation based on the country, currencies & payment services offered by the Entity. This is decided during Implementation |
| Routine Id | This is the Routine Id in ADM that will be used to process the incoming payment message. | See Notes | If Entity = Bank it should be the valid actual Routine id in DM for the payment message processing. If Entity = FI, it can be any random number |
| Language Converter | Used to convert characters as required | Depends on solution / fitment. Can be blank | |
| AML Configuration | This is the Routine Id in ADM that will be used for AML checks, if any. | Depends on solution / fitment. Can be blank |
2.1.1.2. Message Mode = Incoming
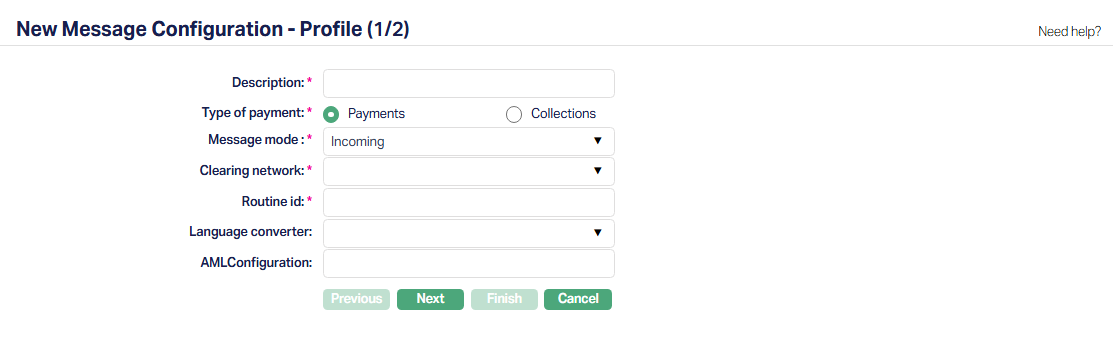
| Field Name | Field Description | Field Value | Notes |
|---|---|---|---|
| Description | The description of the Message Configuration | Can be anything – Should be such that one can easily identify what this Message Configuration is for | Usually, the Description for all maintenances is input as the same for ease of use, though, this need not strictly be so. |
| Type of Payment | To indicate Payment / Collection | Should be Payments | |
| Message Mode | Should be Incoming | ||
| Clearing Network | To define the Clearing Network | Choose as required | List of Clearing Networks as required for the implementation based on the country, currencies & payment services offered by the Entity. This is decided during Implementation |
| Routine Id | This is the Routine Id in ADM that will be used to process the incoming payment message. | See Notes | If Entity = Bank it should be the valid actual Routine id in DM for the payment message processing. If Entity = FI, it can be any random number |
| Language Converter | Used to convert characters as required | Depends on solution / fitment. Can be blank | |
| AML Configuration | This is the Routine Id in ADM that will be used, if any. | Depends on solution / fitment. Can be blank |
2.1.2. PDE (Possible Duplicate Emission) Configuration
Based on the settings configured here, Aura will check for duplicate messages. If nothing is input, there will not be any check for duplicate messages. If any duplicates are identified, these will be marked as such so that users can investigate and take an appropriate decision.
This tab is the same for both Message Modes viz., Incoming and Inward.

2.1.3. Editable Columns
This enables you to define the specific fields that can be edited for Failed Incoming Messages, so that these can be retried for processing. This tab is the same for both Message Modes viz., Incoming and Inward.
A sample is shown, where only the Creditor Account field is allowed to be edited to take care of incorrect / blank account numbers.

2.2. Settings → Product
The PG → Settings → Product is the linkage between the payment hub and the transaction processing system. Based on the payment records received from DM, the Payment Product is determined through the STP configuration and accounting entries related to the Payment are initiated by PG and posted in CC. The Product defined here, thus, has reference to the Retail → Settings → Payment Settings (using the External Product Code) and the Message Configuration for a Product Group.
Note:
If the Entity has loan repayments, there should be a Product for Message Mode = Inward
If the Entity has an Internal Operations Account to park incoming funds or if the Entity uses Borrower Repayment Client Accounts into which all incoming payments will be credited, there should be a Product for Message Mode = Incoming
Depending on the needs of the implementation, as many Products as required can be set up
2.2.1. Message Mode = Inward
2.2.1.1. Profile
| Field Name | Field Description | Field Value | Notes |
|---|---|---|---|
| Type of Payment | Should be Collections | ||
| Message Mode | Should be Inward | ||
| Description | The description of the Product | Can be anything – Should be such that one can easily identify what this Product is for | Usually, the Description for all maintenances is input as the same for ease of use, though, this need not strictly be so. |
| External Product Code | This will be the linkage between the Retail > Payment Settings and the PG > Settings > Product | Should be exactly the same as in Retail > Payment Settings > Description | Copy the Description from Retail > Payment Settings and paste it into this field so that it is exactly the same. |
| Product Group | Should be Loan Repayment | ||
| External System Code | List of active interfaces as defined in Admin > System Codes > Interface Definition > Maintain | Should be connectcore | |
| Message Configuration | List of active Message Configurations that match the Type of Payment and Message Mode chosen above |
2.2.1.2. Process Settings

| Field Name | Field Description | Field Value | Notes |
|---|---|---|---|
| AML Required | Depends on solution / fitment. | ||
| Other fields | All other fields are disabled |
2.2.1.3. Authorisation Settings
| Field Name | Field Description | Field Value | Notes |
|---|---|---|---|
| All fields | Whether an approval is required after the specific action | Depends on solution / fitment. |
2.2.2. Message Mode = Incoming
2.2.2.1. Profile
| Field Name | Field Description | Field Value | Notes |
|---|---|---|---|
| Type of Payment | Should be Payments | ||
| Message Mode | Should be Incoming | ||
| Description | The description of the Product | Can be anything – Should be such that one can easily identify what this Product is for | Usually, the Description for all maintenances is input as the same for ease of use, though, this need not strictly be so. |
| External Product Code | This will be the linkage between the Retail > Payment Settings and the PG > Settings > Product | Should be exactly the same as in Retail > Payment Settings > Description | Copy the Description from Retail > Payment Settings and paste it into this field so that it is exactly the same. |
| Product Group | Should be Payment | ||
| External System Code | List of active interfaces as defined in Admin > System Codes > Interface Definition > Maintain | Should be paymentgrid | |
| Message Configuration | List of active Message Configurations that match the Type of Payment and Message Mode chosen above |
2.2.2.2. Process Settings
| Field Name | Field Description | Field Value | Notes |
|---|---|---|---|
| AML Required | Depends on solution / fitment. | ||
| Credit Processing On | Payment Date | ||
| Add Payment Days | Leave it blank | ||
| Other fields | All other fields are disabled |
2.2.2.3. Authorisation Settings
| Field Name | Field Description | Field Value | Notes |
|---|---|---|---|
| All fields | Whether an approval is required after the specific action | Depends on solution / fitment. |
2.3. Settings → STP Configuration
A Straight-Through-Processing (STP) Configuration should be defined to resolve a PG → Product for each payment. Several handles are available to configure suitable rules such that for each payment, a unique Product can be resolved. Multiple rules can be defined.
Note:
If the Entity has loan repayments, there should be a configuration for Message Mode = Inward
If the Entity has an Internal Operations Account to park incoming funds or if the Entity user Borrower Repayment Client Accounts into which all incoming payments will be credited, there should be a configuration for Message Mode = Incoming.
A sample is shown below:

In the above sample, the Trigger uses multiple handles like Transaction Currency, Clearing Network, Remittance Information and Account With Institution to map the Payment Transaction to a unique Product. It is also important to set the Rule Sequence in such a way that there is no overlap / gap and all payment transactions can be uniquely resolved to a Product.
2.4. Settings → Nostro Configuration
This enables you to set up the Nostro that is to be used for the Incoming Payment. The Nostro entries will mirror the entries in the Bank Account from which the Incoming funds will be moved to the internal accounts as per the payment message.
One Nostro Configuration should be defined to resolve the Nostro Account for each Clearing Network for all Message Modes (like Incoming, Inward, Outgoing, Outward). Several handles are available to configure suitable rules such that for each payment, a unique Nostro Account can be resolved. Multiple rules can be defined. Usually, the STP Configuration and the Nostro Configuration have the same rules, but it need not necessarily be so. The former is used to identify the Product while the latter is used to identify the Nostro Account.
Note:
- The Originator Account # field in the pgpaymenttransaction table will store the Account # (IBAN) that the Entity has with the Bank. Thus, even if the Entity maintains multiple accounts with the same Bank (or with multiple Banks) for different purposes (like Loan Account repayments of a specific Loan Product to be paid into one Bank Account, and for other specific Loan Product, payments to be made into another Bank Account), the rules can be configured using this field to identify the transactions and resolve to different Nostro accounts if required.
2.4.1. Profile
| Field Name | Field Description | Field Value | Notes |
|---|---|---|---|
| Clearing Network | To define the Clearing Network | Choose as required | List of Clearing Networks as required for the implementation based on the country, currencies & payment services offered by the Entity. This is decided during Implementation |
| Description | The description of the Nostro Configuration | Can be anything – Should be such that one can easily identify what this Nostro Configuration is for | Usually, the Description for all maintenances is input as the same for ease of use, though, this need not strictly be so. |
| Rule Name | Any free text that identifies what the Rule is for | ||
| Trigger, Parameter, Operator, Value | Use as required to build the Rule | ||
| BIC | The Bank Identifier Code of the Bank in which the Entity maintains the Bank Account | ||
| Account # / Ledger # | The Nostro Account # or the Ledger # into which the Nostro entries have to be posted. | This has to be exactly the same as maintained in CC for the Nostro Accounting entries to be successfully posted. Copy from CC and paste here | |
| Confirmation Required | Depends on solution / fitment. This is applicable only for SWIFT & TARGET2. For others, it can remain as No |
A sample is shown below:

In the above sample, the Trigger uses certain handles that facilitate mapping of the Payment Transaction to a unique Nostro Account. It is also important to set the Rule Sequence in such a way that the broadest filter is defined as the last.
3. Aura Data Management
3.1. Admin → System Codes → Generic Definitions → Classifications
Classification enables you to categorize / label the various configurations in Data Management so that it is easier to know what the configuration is for. Create a Classification record where the Description identifies the purpose that is sought to be achieved.

3.2. Data Management → Settings → External System
Depending on the Bank / external system from which the payment files have to be transferred and the mode of download / transmission, you may have to create more records under External System.
See sample below:

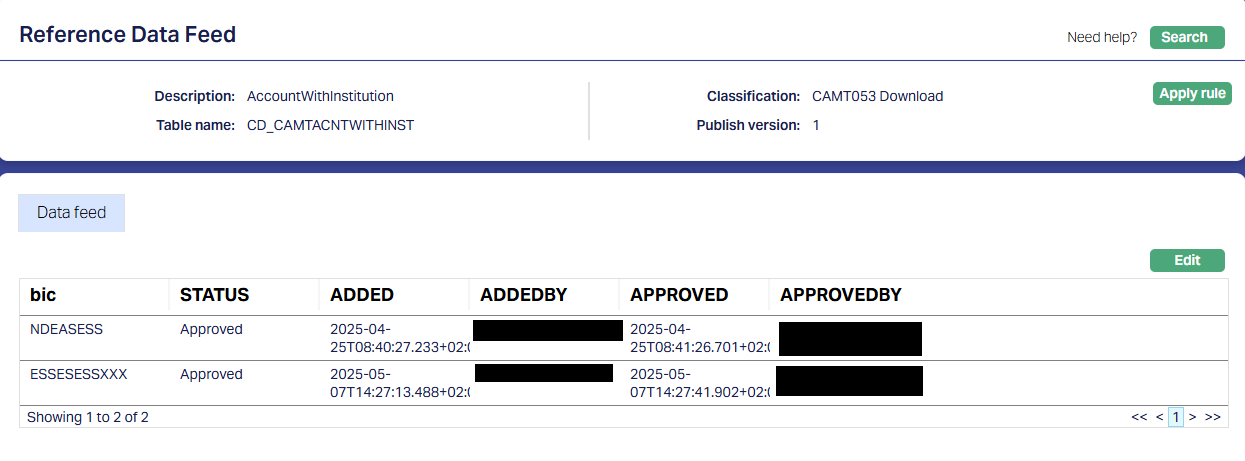
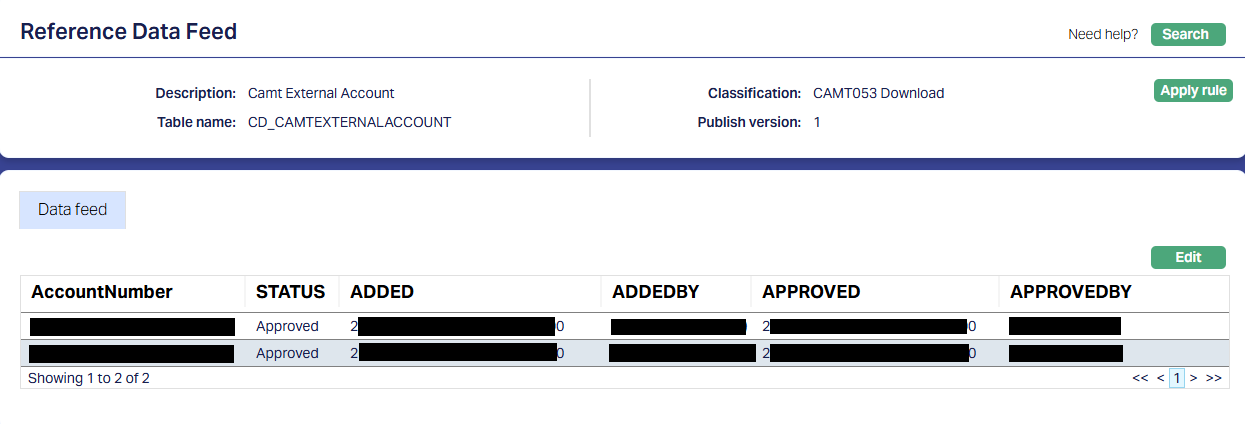
3.3. Data Management → Definitions → Reference Data → Data Feed
If Aura is being implemented in a FI and they have a Bank account from which a camt.053 file is to be received, the following Reference Data > Data Feed details have to be input, based on the agreement between the FI and the Bank.
| Field Name / Description | Field Value | Notes |
|---|---|---|
| BIC | NDExxxxx | Parameter value changes based on implementation |
| BIC | ESSExxxxxxx | Parameter value changes based on implementation |
| Account Number | xxxxxxxxxxxxxxxxxxxx4927 | Parameter value changes based on implementation |
| Account Number | xxxxxxxxxxxxxxxxxxxx4363 | Parameter value changes based on implementation |
3.3.1. Account with Institution
The BIC of the Bank in which the Entity is maintaining its accounts should be maintained in this. If the Entity has multiple Banks where its accounts are maintained, that many records should be available here.
3.3.2. camt External Account
The Account number as maintained by the FI with the Bank (say, IBAN) for each account should be maintained in this.
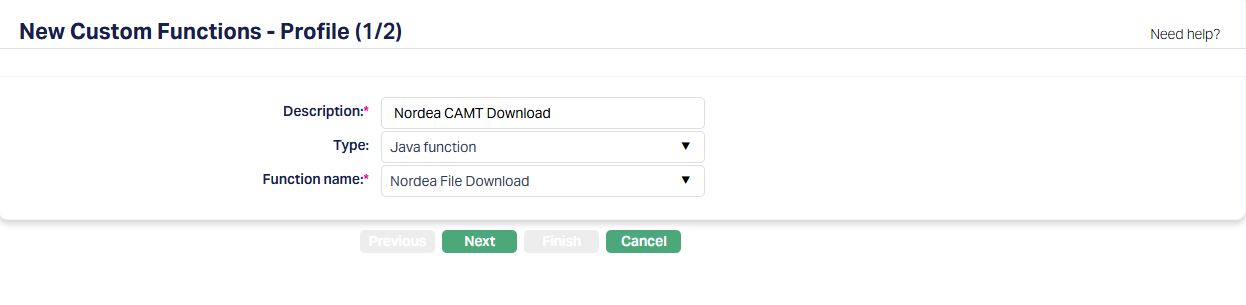
3.4. Data Management → Metadata → Custom Functions
For camt.053 processing, the following Custom Functions should be configured. Usually, this is part of the installation. If not, you need to create new Custom Functions using the Java Function already available. And you need to ensure that the Status is Published and the Parameters are correct for that Implementation.
3.4.1. Download function
This is to download the camt.053 file from the Bank to Aura's servers. This will be based on the specific implementation and the agreement between the Entity and Bank in which the Entity holds its account. The parameters and values would depend on the type of file (xml, txt,etc.,) and the mode of transmission (SFTP, Webservice, etc.,)
3.4.1.1. Profile
3.4.1.2. Parameter
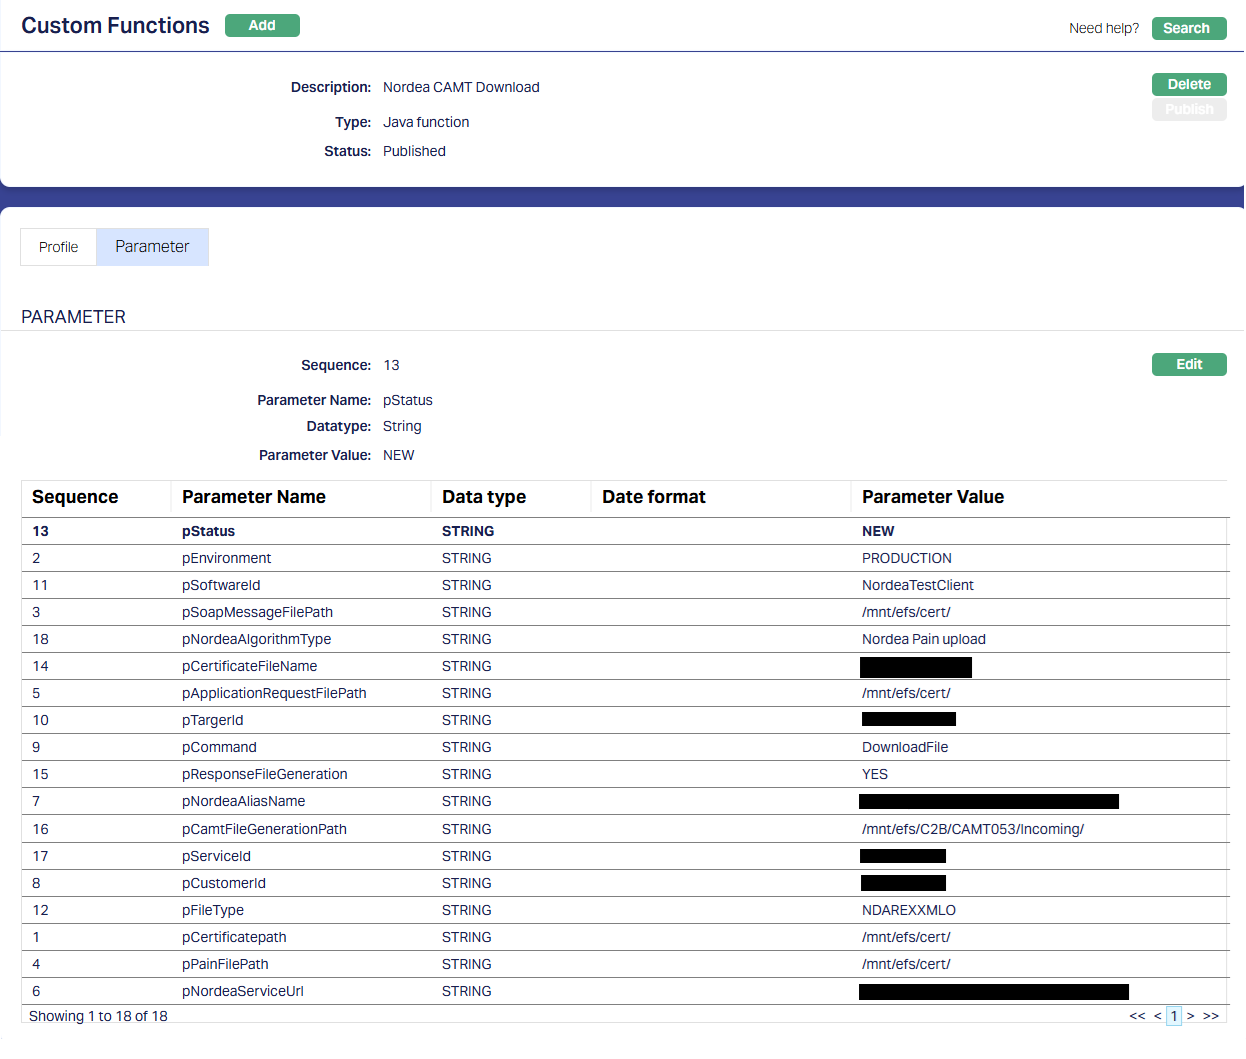
| Parameter Name | Description | Parameter Value | Notes |
|---|---|---|---|
| pCommand | Command | DownloadFile | Remains same for all implementation |
| pApplicationRequestFilePath | Application Certificate Path | /xxx/efs/xxxx/ | Parameter value changes based on implementation |
| pResponseFileGeneration | Purpose of File Generation | YES | Remains same for all implementation |
| pNordeaAliasName | Nordea Bank Alias name | nsc_xxxcontainer_xxxxxxxxxxxxxxx7450 | Parameter value changes based on implementation |
| pSoapMessageFilePath | Soap Message file path | /xxx/efs/xxxx/ | Parameter value changes based on implementation |
| pCertificateFileName | Certificate file name | Plus1xxxxx.p12 | Parameter value changes based on implementation |
| pNordeaServiceUrl | Nordea Service URL | https://xx.ebridge.xxxx.xxxxx.com/ws/Corporatexxxxxxxxxxx | Parameter value changes based on implementation |
| pFileType | File Type - CAMT053 | xxxxxxXMLO | Remains same for all implementation |
| pStatus | Status | NEW | Remains same for all implementation |
| pTargerId | Target ID | xxxxxxx4248 | Parameter value changes based on implementation |
| pNordeaAlgorithmType | Nordea Algorithm Type | xxxxx Pain upload | Parameter value changes based on implementation |
| pPainFilePath | Pain file Generation path | /xxx/efs/xxxx/ | Parameter value changes based on implementation |
| pCustomerId | Customer ID | xxxxx8168 | Parameter value changes based on implementation |
| pSoftwareId | Software ID | xxxxxxxxxxClient | Parameter value changes based on implementation |
| pEnvironment | Environment - Test or Production | PRODUCTION | Parameter value will change based on the Environment |
| pCertificatepath | Certificate Path | /xxx/efs/xxxx/ | Parameter value changes based on implementation |
| pCamtFileGenerationPath | CAMT File Generation Path | /xxx/efs/xxx/CAMT053/Incoming/ | Parameter value changes based on implementation |
| pServiceId | Service ID | xxxxx1354 | Parameter value changes based on implementation |
| pTransferType | Transfer Type | CAMT | Remains same for all implementation |
| pMode | Payment Mode | Incoming | Remains same for all implementation |
| pOutputPath | Output Generation Path | no values | N/A |
| pNetworkCutoff | Clearing Network Cutoff | no values | N/A |
| pBackupPath | File Movement - Backup Path | /xxx/efs/xxx/CAMT053/Outgoing | Parameter value changes based on implementation |
| pInputPath | File Movement - Input Path | /xxx/efs/xxx/CAMT053/Incoming | Parameter value changes based on implementation |
| pOutputPath | Output Generation Path | no values | N/A |
| pMode | Payment Mode | Incoming | Remains same for all implementation |
| pTransferType | Transfer Type | CAMTPOST | Remains same for all implementation |
| pNetworkCutoff | Clearing Network Cutoff | no values | N/A |
| pInputPath | File Movement - Input Path | /xxx/efs/xxx/CAMT053/Outgoing | Parameter value changes based on implementation |
| pBackupPath | File Movement - Backup Path | /xxx/efs/xxx/CAMT053/Backup | Parameter value changes based on implementation |
3.4.2. Data population function
This function is used to parse the camt.053 file and populate the data in the DM tables.
3.4.2.1. Profile

3.4.2.2. Parameter
Note:
- The parameter values will be provided by IT during implementation
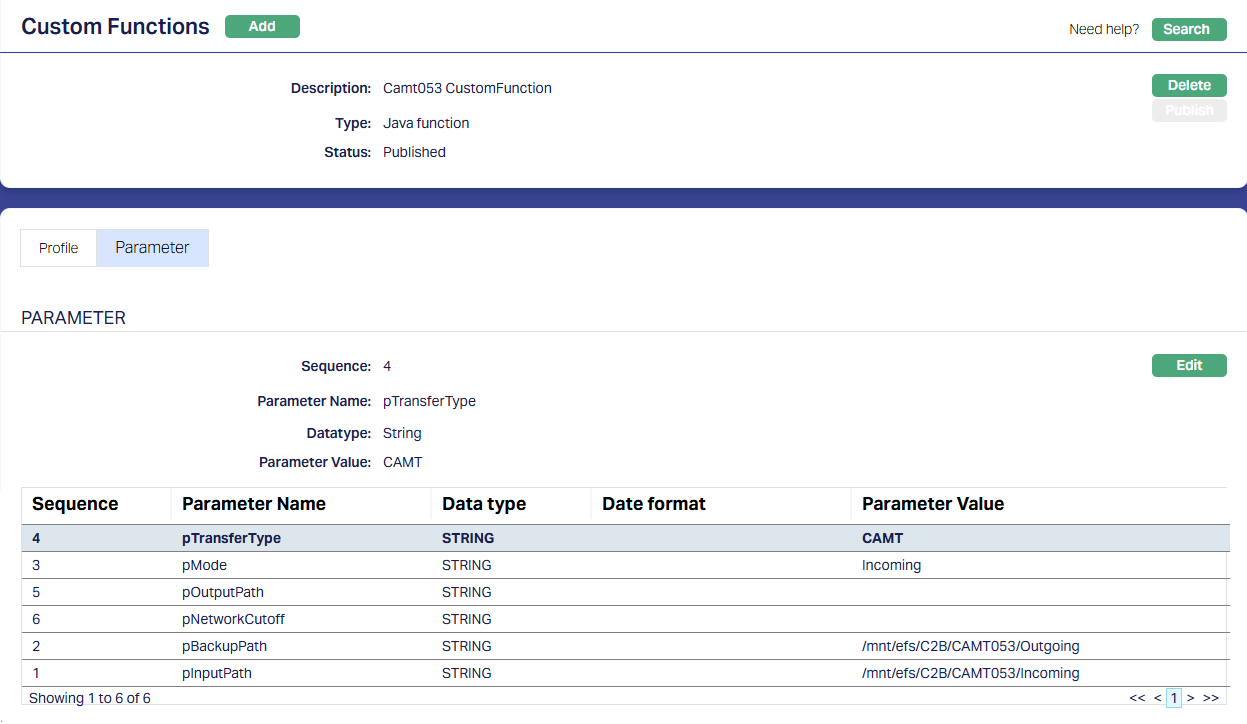
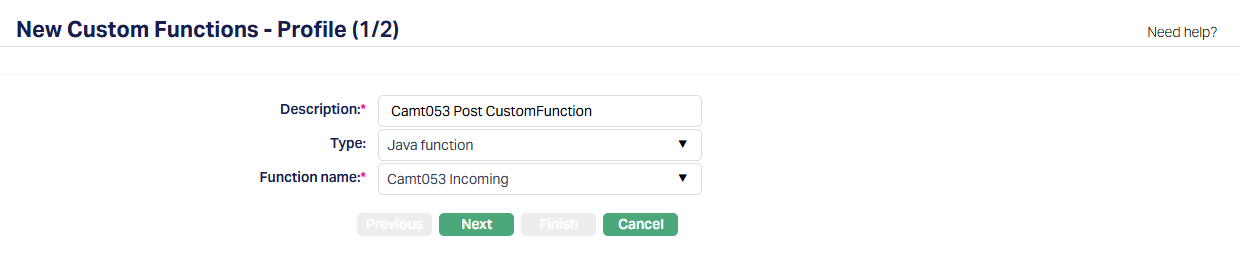
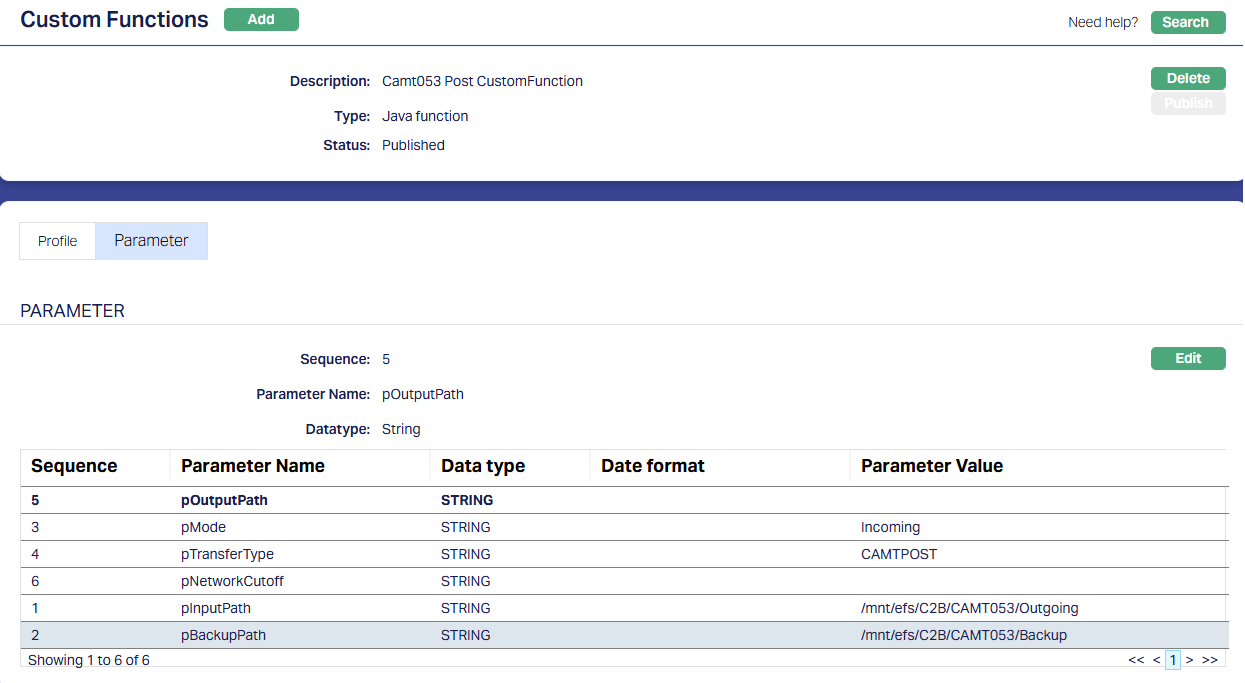
3.4.3. Post Function
This function is used to process the transactions and post them to the respective accounts / contracts in CC, through PG.
3.4.3.1. Profile
3.4.3.2. Parameter
3.4.4. Other Custom Functions
Depending on the specific needs in an Implementation, you may have to create other Custom Function records, input the required Parameter values and ensure that these are Published.
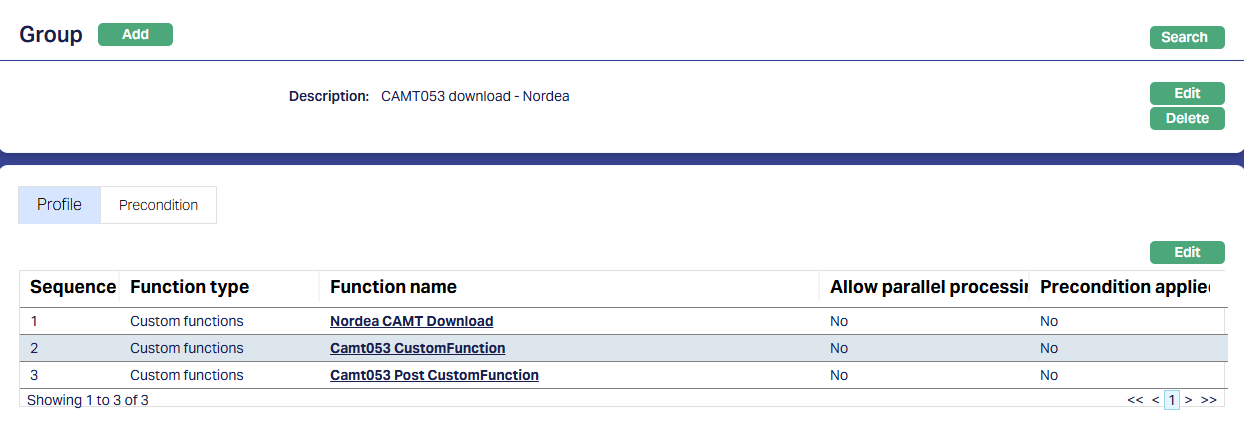
3.5. Data Management → Configurations → Groups → Maintain
Once the Custom Function records are Published, you have to create a Group and map all the required functions to that Group. This ensures that all the functions required for the camt.053 processing are executed in the specific sequence.
Usually, this is part of the installation. If not, you will have to do the same.
Note:
- The sequence of the functions is very critical and should be strictly set up as shown below.
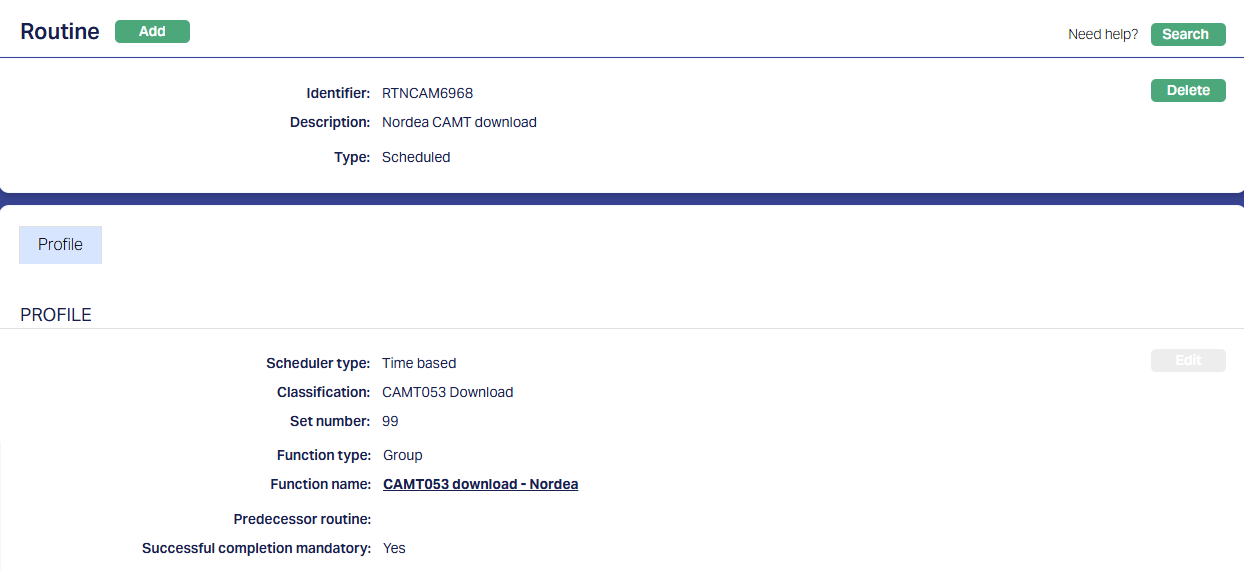
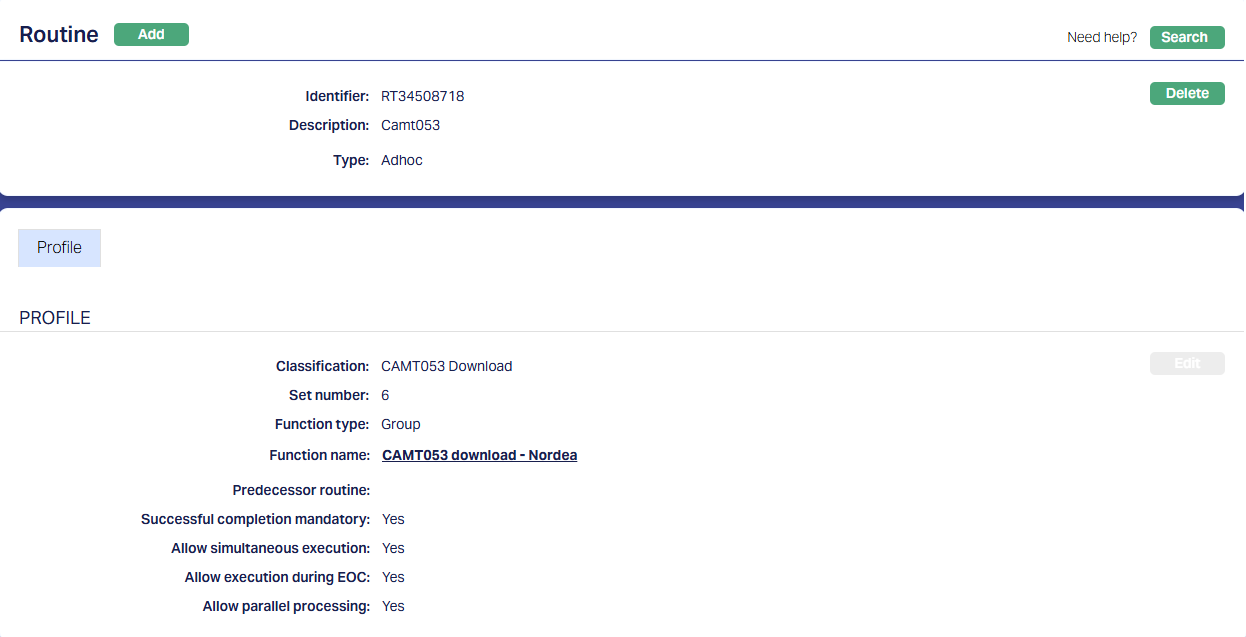
3.6. Data Management → Configurations → Routines → Maintain
You have to create a Routine and map the Group as well as the Classification. You must always create two Routines for each Group: One of Type Scheduled / Auto as required; and one other of Type Adhoc. The Scheduled / Auto routine will be automatically executed at the Scheduled Time / during EOD/BOD as defined in the Routine; and in case there is any issue with such automatic execution, and a manual intervention is required, the Adhoc Routine can be used to run the routine after such manual intervention.
Usually, this is part of the installation. If not, you will have to do the same.
3.6.1. Scheduled Routine
3.6.2. Adhoc Routine
3.7. Data Management → Configurations → Scheduler → Maintain
If the Routine has been created with Type = Scheduled, you need to create a Scheduler to define the frequency & time of execution.
3.7.1. Scheduler for camt.053 file
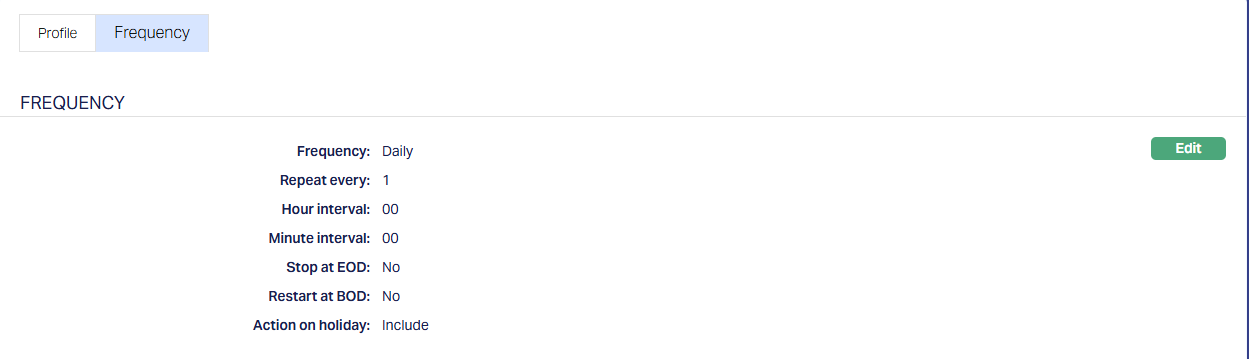
A sample is shown below where the scheduler will run every day between 04:00 and 04:10 for the period selected and as per the time zone selected.
Note:
- The scheduler has to be set up as per the needs of that specific Implementation
3.7.1.1. Profile
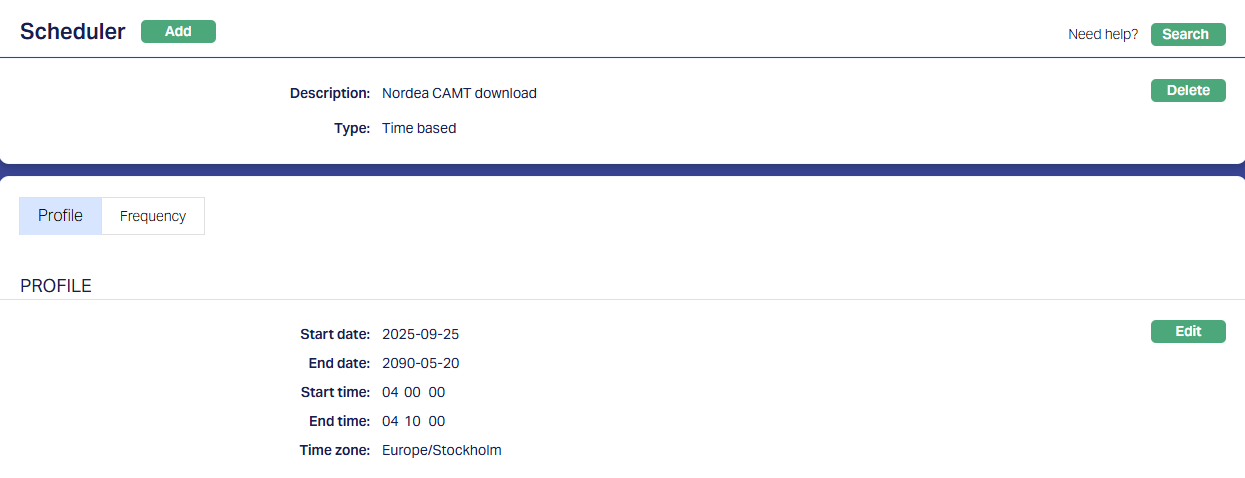
3.7.1.2. Frequency
3.8. Data Management → Configurations → Routines → Branch Mapping
Once the Routines and Schedulers are configured, these should be mapped for the Branch(es) for which the Routines should be executed. You have to map both the Adhoc and Scheduled / Auto routines.
3.8.1. Adhoc → Edit
3.8.1.1.
All Routines that are defined as Adhoc Type will display; check the relevant checkbox to map the Routine to the Branch; uncheck to unmap. Only mapped Routines can be manually executed for that Branch using Data Operations > Adhoc Routines
3.8.2. Scheduled → Edit
All Routines that are defined as Scheduled Type will display; check the relevant checkbox to map the Routine to the Branch; uncheck to unmap. Only mapped Routines will be automatically executed for that Branch as per the Scheduler mapped.
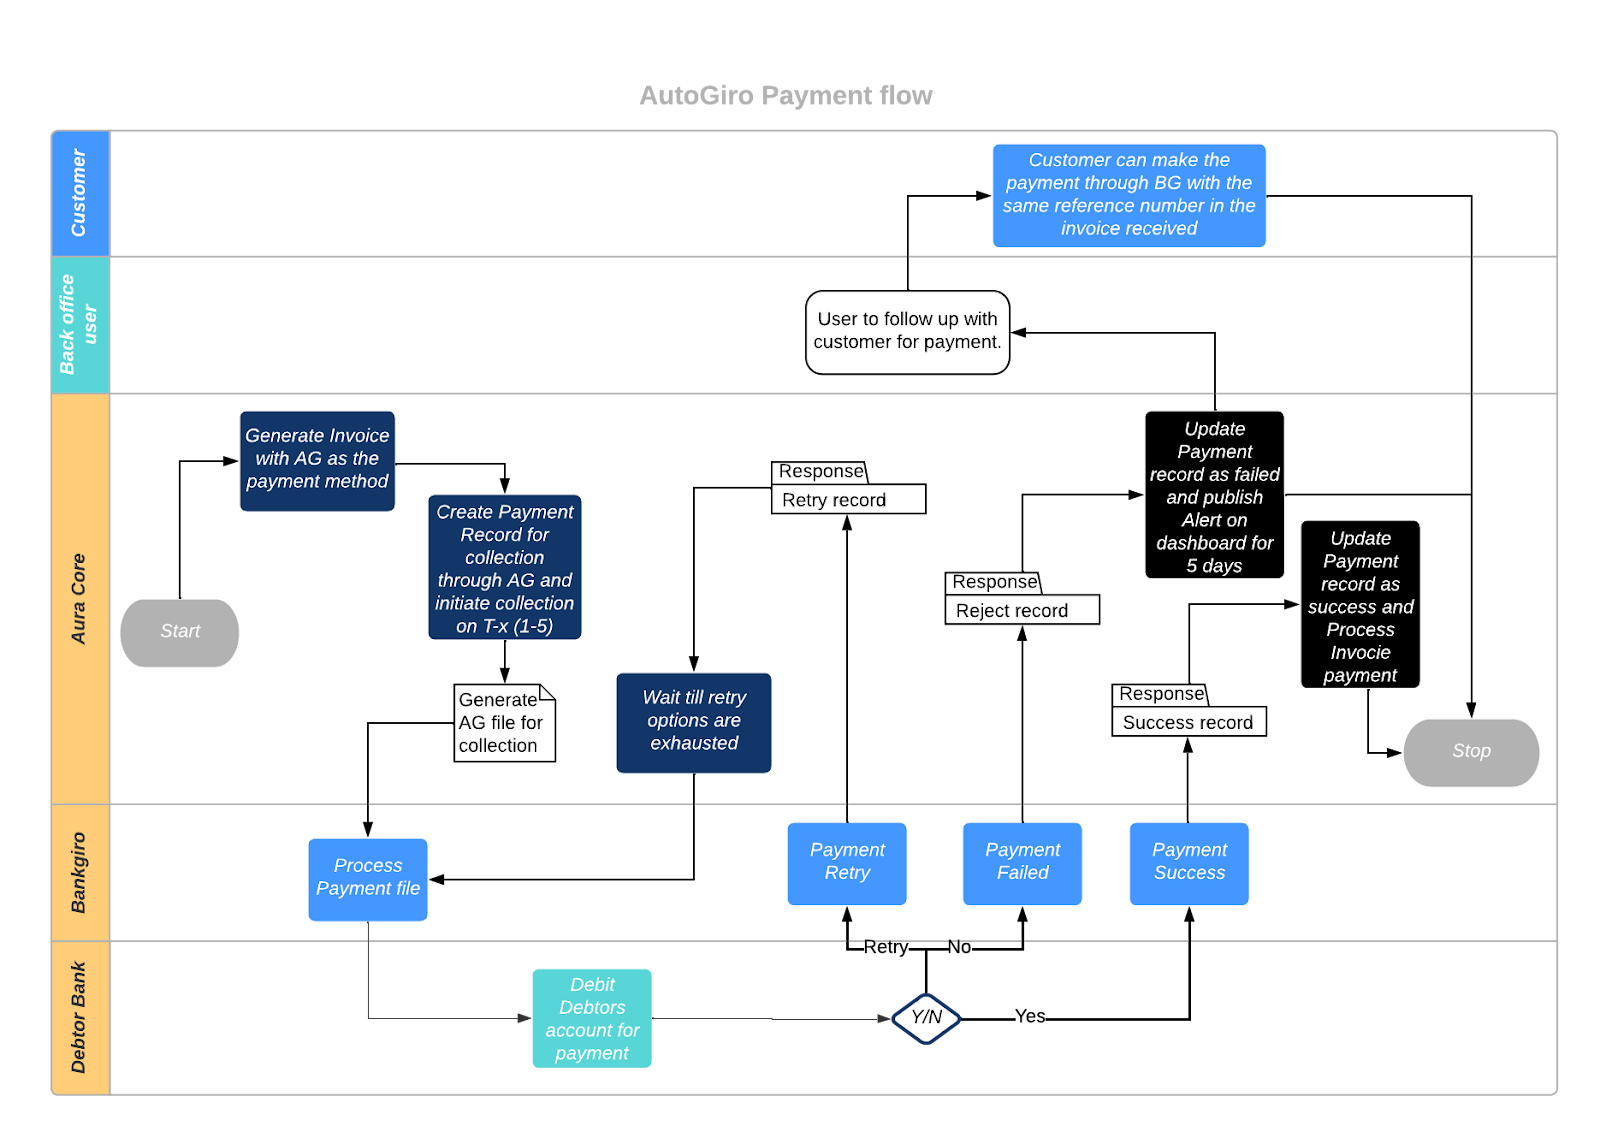
PROCESS OF INCOMING PAYMENT PROCESSING
The sequence of processing is as follows:
1. As per the scheduler that has been configured, the Payment File(s) will be downloaded and available in the path specified in the Download function
a. The function could fail if a connection could not be established with the Bank or if the required certificate has expired or such reasons. The Technical / IT Team will have to be involved for correcting and re-downloading the file.
2. The file(s) will then be parsed and data populated in the DM tables
a. The Reference Data Feeds will be used to identify the BIC / Account # for the payments.
i. If these do not match, the file data will not be populated into DM.
ii. Failure could also be due to incorrect file structure or some issue in reading the file. The Routine Status will be Failed. You can check the failure reason in the Routine History and take necessary corrective action.
b. Successfully loaded transactions will have a unique Message Reference for each transaction.
c. The Payment file(s) will be moved to the Backup Path as specified in the Custom function
3. Using the Post Function, data from the DM tables will then be posted to PG tables.
a. If there is any failure in connection between DM and PG, the entire Routine will fail. The Technical / IT team have to intervene to set this right and re-initiate the process.
4. PG resolves the PG Product using the STP Configuration and posts the accounting entries for the contracts / accounts in CC for each transaction.
a. Based on the value for the Reference #, i.e., the Creditor Account field in the pgpaymenttransaction table, the Product is resolved as follows:
i. If the value matches a Loan Account # or Invoice #, the Configuration for Type of Payment = Collection and Message Mode = Inward will be used
ii. If the value matches a Client Account # or Card Account #, the Configuration for Type of Payment = Payment and Message Mode = Incoming will be used
b. If the Creditor Account field value is null or if the value does not match the Loan Account #, Client Account #, Card Account # or Invoice #, that payment transaction will be marked as Failed and can be retried after required corrections
c. Successfully loaded transactions will have a unique Payment Reference for each transaction. This just indicates that the transaction is loaded, but the transaction posting could either be success or failure.
d. The table below summarizes the details at the end of the process:
| Type of account | Accounting entries | Message Mode | Status | Next Step |
|---|---|---|---|---|
| Loan | Successful | Inward | Processed, Approved | None |
| Loan | Failed | Incoming | Failed, Approved | User to initiate action & retry |
| Client Account | Successful | Incoming | Processed, Approved | None |
| Client Account | Failed | Incoming | Failed, Approved | User to initiate action and retry |
e. The accounting entries for successful transactions will be as follows:
i. In case of Loan Repayments:
| Event Code | Book Date | Value Date | Db / Cr | GL / Account # | Transaction Code | Amount |
|---|---|---|---|---|---|---|
| LNPAYS | Current Booking Date | Value Date in the Payment file | Db | Transit GL | ||
| Value Date in the Payment file | Cr | Loan Account | Amount allocated to Principal components | |||
| Cr | Master GL of Loan Product | Master leg (CR/GL) from Loan Product | Amount allocated to Principal components | |||
| Cr | <Respective GL based on allocation to components) | Amount allocated to various components |
ii. In case of Client Account credits:
| Event Code | Book Date | Value Date | Db / Cr | GL / Account # | Transaction Code | Amount |
|---|---|---|---|---|---|---|
| PAYMCP | Current Booking Date | Value Date in the Payment file | Db | Transit GL | ||
| Value Date in the Payment file | Cr | Client Account | Transaction Amount | |||
| Cr | Master GL of Client Account Product | Master leg (CR/GL) from Client Account Product | Transaction Amount |
f. Failure of individual payments could be due to:
i. STP Exception: If PG cannot resolve the Product through the existing rules in the STP configuration, the payment will fail and will be in STP Exception. Based on an analysis, the STP rules may have to be modified to ensure Product resolution; and the transaction has to be re-tried.
ii. Business failure: This could be due to several reasons like
Client Account: Account # incorrect, Account # is blank, Account has been disallowed for credits, Account has been blocked,
Loan Account: Loan has been marked for Manual repayment and not Auto repayment, Loan is Closed or Invoice has already been paid or some other fidelity issues.
In these cases, users can check details, correct and Retry, or, manually process for loan repayment after moving it to an Internal Ops Account / Suspense account.
iii. Technical failure: Could be due to Communication failure with Core – say, if CC user id has expired or is incorrect or somehow, a connection with Core is not established. In these cases, the technical team has to intervene to sort out the issue and re-initiate the process.
iv. PDE failure: This arises if Possible Duplicates are identified based on the Possible Duplicate Emission configuration. In such cases, these records have to be checked to determine if it is actually a duplicate or not. If it is determined that it is not a duplicate, process using Retry. If it is identified as an actual duplicate, the payment may have to be sent back to the bank manually.
g. For Failed Transactions, based on user action, the table below summarizes the details at the end of the Retry process
| User action | Type of account | Accounting entries | Message Mode | Status | Next Step |
|---|---|---|---|---|---|
| Option 1) Loan account # / Invoice # corrected | Loan | Successful | Inward | Processed, Approved | None |
| Option 2) Input a Client Account # (say, Internal Ops Account) | Client Account | Successful | Incoming | Processed, Approved | None |
- PG resolves the Nostro Account using the Nostro Configuration and posts the Nostro Accounting entries in CC for all the transactions received in that file, even if the CC posting for one or more transactions fail in the above step. This is because, the funds have been credited to the Entity's Bank Account; and the same should be correspondingly reflected in the Nostro Account.
The Nostro accounting entries will be as follows:
| Event Code | Book Date | Value Date | Db / Cr | GL / Account # | Transaction Code | Amount |
|---|---|---|---|---|---|---|
| CHQDBT | Current Booking Date | Value Date in the Payment file. If there are multiple value dates, what will this be taken as? | Db | Nostro Account / GL resolved | Total amount of credits received in the file | |
| Value Date in the Payment file | Db | Master GL of Nostro Account Product | Master leg (DB/GL) from Nostro Account Product | Total Amount posted to Nostro Account | ||
| Cr | Transit GL | Total amount of credits received in the file |
Note:
- If a Nostro Account cannot be resolved using the Nostro Configuration, the error will only be logged and the transaction will not be found in any exception queue. However, the payment will not go through. You need to check the Nostro entries every day to ensure that the Nostro posting has been completed for all the transactions.
- The incoming file is then moved to the Backup Path as specified in the Reference Data Feed.
Note:
- PG → Events Tab does not show any events.
DIRECT DEBITS
Bg Autogiro is a popular Direct Debit method for collecting payments in Sweden. Bankgirot is operated by Bankgirocentralen (BGC), which is in turn owned by multiple Swedish banking conglomerates.
There are two key features of the Autogiro system:
- Autogiro is for pull-based payments meaning that the payee (Creditor) is given the approval to collect funds from the payer’s (Debtor’s) account on a specific due date. Before initiating the first collection, an Autogiro mandate first needs to be signed by the payer and the mandate information must then be forwarded to the bank by the payee in order for it to be activated. Only after the mandate has been activated can a business collect direct debit payments from a payee.
- Autogiro payments are bank-to-bank. All communication happens directly between the banks via the Bankgirot clearing house.
Autogiro and SEPA Direct Debit
Single Euro Payments Area (SEPA is an EU-wide payment-integration initiative for making and receiving Euro-denominated payments. As part of SEPA, SEPA Direct Debit allows collection of Euro-denominated payments from 34 countries. As Sweden is outside the Eurozone, it uses the Swedish kronor (SEK) as its currency. Autogiro is Sweden’s direct debit scheme for collecting payments in kronor.
In Sweden, it’s also possible to collect payments through SEPA Direct Debit (the scheme runs alongside the Autogiro scheme). However, SEPA Direct Debit can only be used to collect payments denominated in Euro (EUR). If payments are to be collected in kronor, Autogiro should be used rather than SEPA.
Autogiro Process
The customers can register for payments by Autogiro mandate via a website, internet bank or on paper.
1. Mandate via Web page means that customers (Debtors) can register for Direct debit (Bg Autogiro) via the company (Creditor)'s web page or via a link in an e-mail.
2. Mandate via Internet Bank means that customers (Debtors) can sign up for Direct debit (Autogiro) directly via their internet bank.
3. Customers (Debtors) can also provide the mandate using the standard form.
In case 1 and 3 above, the Creditor would receive the mandate information and forward it to the Payer’s Bank. In case 2, the Payer’s Bank receives the mandate information and forwards it to the Creditor through Bankgirot.
The activation of a mandate can take up to two business days. Once the bank activates it, the payee can initiate an Autogiro collection from a payer’s account. The payment instructions must be sent to Bankgirot at least one business day before the intended collection date. If a payment fails due to insufficient funds it can be retried up to three times over the next three business days, one retry per day.
Applied to the context of Loans, the Entity that provides the loan takes the mandate from the Borrower Client and registers the same with the Debtor’s Bank through Bankgirot. There can also be instances of the Mandate received from Bankgirot where the Debtor has initiated it through their Internet Bank. The Entity then raises the periodic payment requests for the loan instalments; and the payment is received on the Due Date. Thus, there are two distinct processes:
1) Registration of Mandate & changes related to the same.
2) Payment request & receipt. The brief flows for these processes are given below; and the detailed flow charts are given in the respective sections.
Mandate Flow, in brief:
Receive Mandate – Create Agreement – Send Outward Mandate to BGC – Receive Inward Mandate from BGC – Create and/or Update Agreement
Collection Flow, in brief:
Generate Loan Invoice – Send Outward Collection to BGC – Receive Inward Collection from BGC – Update Outward Records – Process Loan Repayments
Reference:
For a complete understanding about Autogiro, it is suggested that the user familiarizes herself with the relevant Technical Manual.
AUTOGIRO OUTWARD MANDATE
The following are the specific maintenances for Autogiro Outward Mandates
1. Aura Transaction Processing
None
2. PaymentGrid
None
3. Aura Data Management
All Configurations for Outward Mandates have to be set up only in Aura Data Management. Please note that the configurations in Data Management are the same for both Outward Mandates and Outward Collections, except for Reference Data Feed that needs to be maintained for Outward Collection File generation.
3.1. Admin → System Codes → Generic Definitions → Classifications
Classification enables you to categorize / label the various configurations in Data Management so that it is easier to know what the configuration is for. Create a Classification record where the Description identifies the purpose that is sought to be achieved.
See sample below: 
3.2. Data Management → Settings → External System
Depending on the Bank / external system to which the mandate / collection files have to be transferred and the mode of upload / transmission, you may have to create more records under External System. For example, the Entity may want the file to be moved to its servers as archival / history records.
3.2.1. Bankgirot
This is to define the system to which the Outward Mandate and Collection Files have to be sent. This will be the same External System for Outward Mandates, Inward Mandates, Outward Collections and Inward Collections.

3.3. Data Management → Definitions → Reference Data → Data Feed
For generation of Outward Mandate File, there is no specific Reference Data Feed to be maintained.
3.4. Data Management → Configurations → Settings → Security
As required for an implementation, the Security configurations have to be set up for encrypting the files. A sample for encryption of the Outward Mandate file and Outward Collection file using HMAC Security is shown below. 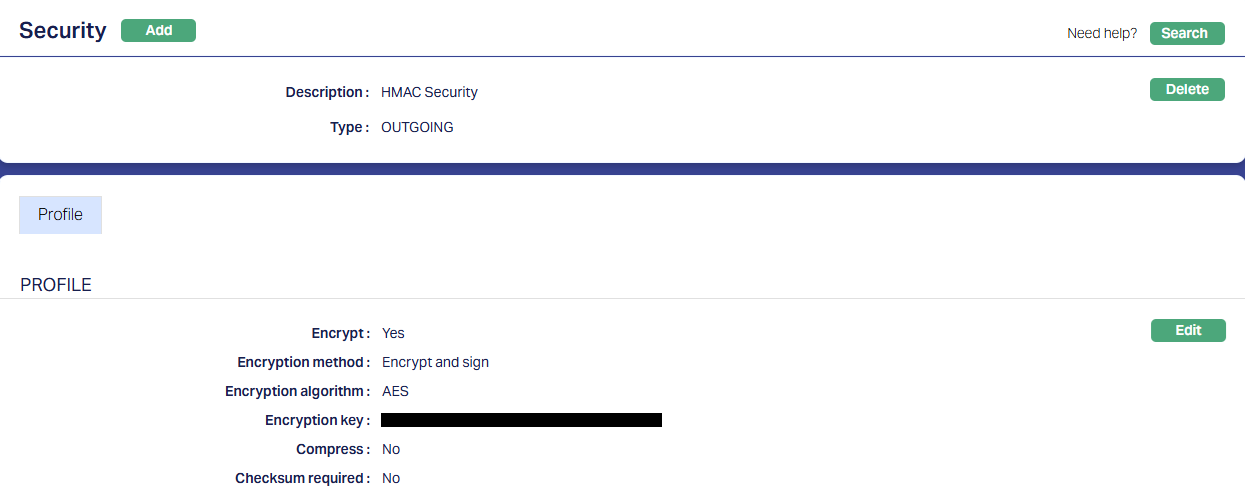
Note:
- The Description that is given for this Configuration will have to be used in the Parameter in the Custom Function related to the Security (see section under Custom Functions)
- Encryption Key should be received from Entity and input exactly as received; else, the encryption will fail
- Encryption Method and Encryption Algorithm depend on the agreement between the Entity and the Bank in which the account is held.
3.5. Data Management → Metadata → Custom Functions
For Autogiro, the following Custom Functions should be configured. Usually, this is part of the installation. If not, a new Custom Function using the Java Function already available should be configured. The Status must be Published and the Parameters should be correct for that Implementation.
3.5.1. Outgoing payment message
This function will ensure that Outward Collection File related to Loan Invoices and the Outward Mandate File related to new Agreements created in CC, are generated and available in the required designated path
3.5.1.1. Profile
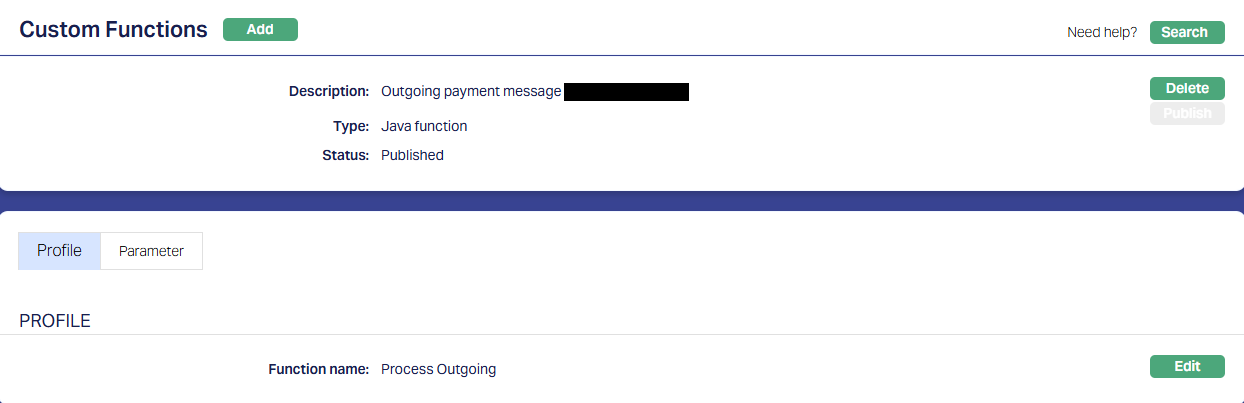
3.5.1.2. Parameter
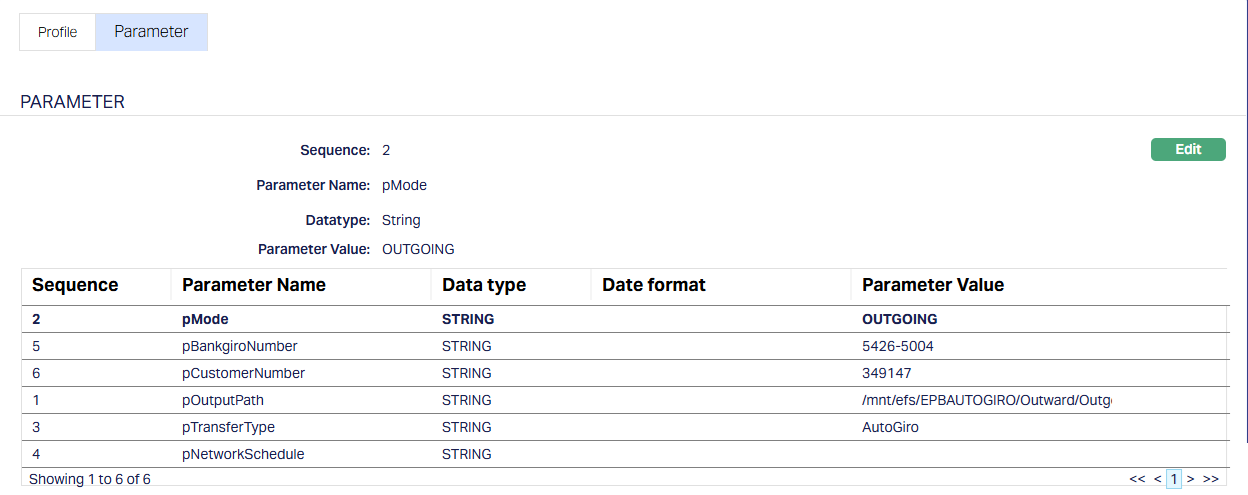
Note:
- Customer # = Entity’s id with the BGC
- Bankgiro # = A/c # into which repayment has to come
- Output path = where the generated file will be placed
3.5.2. Encryption
As required in the specific implementation, the file may have to be encrypted using a specific encryption method. In such a case, there should be a specific Custom Function configured to ensure that the Outward Files are encrypted and moved to the designated path. A sample is shown below that uses HMAC Encryption.
3.5.2.1. Profile
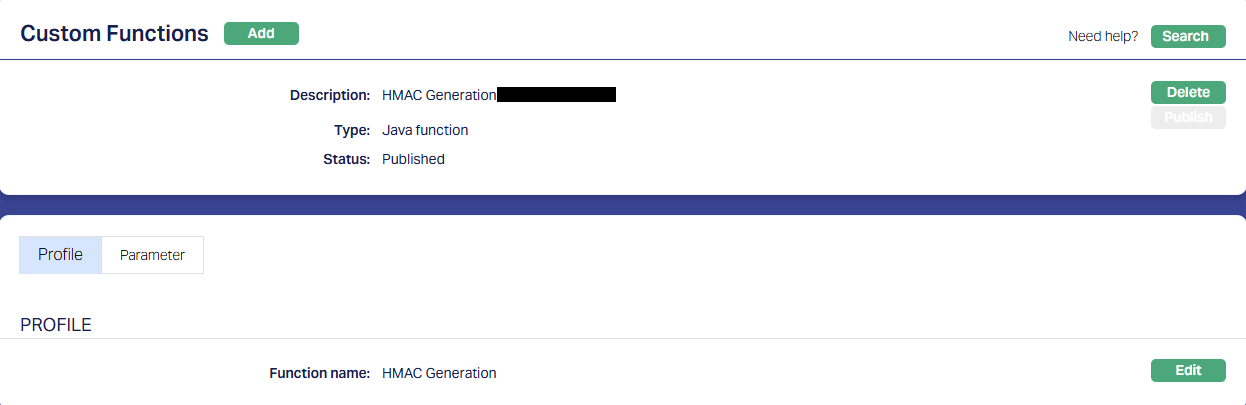
3.5.2.2. Parameter
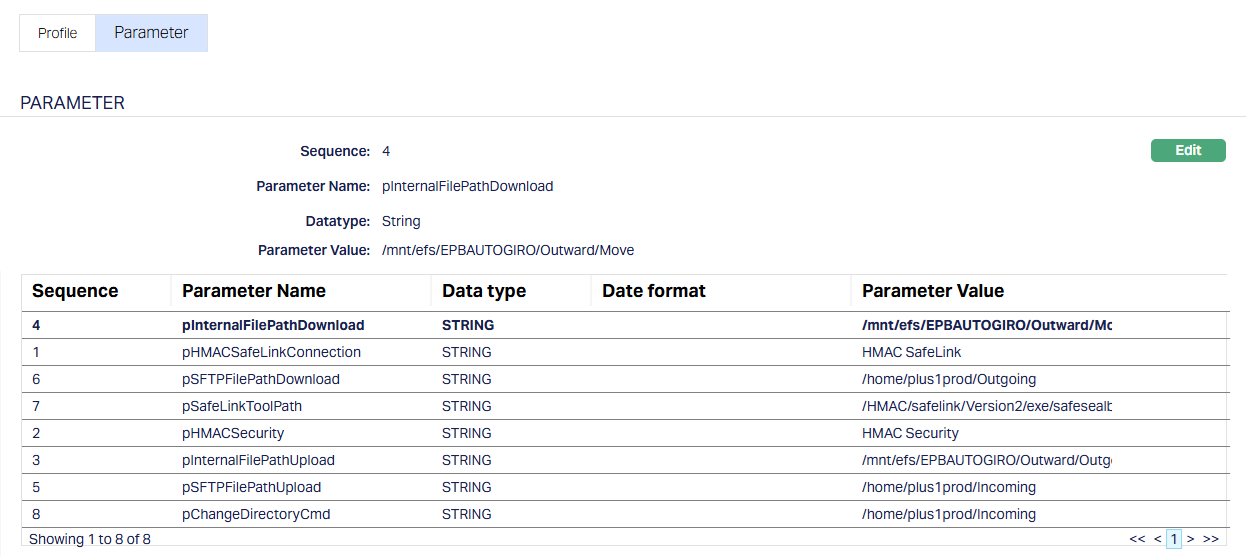
Note:
- The unencrypted file will be taken up from pInternalFilePathUpload and after applying the defined encryption, the encrypted file will be available at the destination specified in pInternalFilePathDownload.
- The specific path / folder will have to be defined in consultation with IT at the time of implementation
3.6. Data Management → Configurations → Interfaces
3.6.1. Outward Transmission
As required for the Implementation, an Interface Configuration has to be set up for transmission of the encrypted Outward Mandate and Collection Files to Bankgirot. A sample is shown below where the Protocol is SFTP.
3.6.1.1. Profile
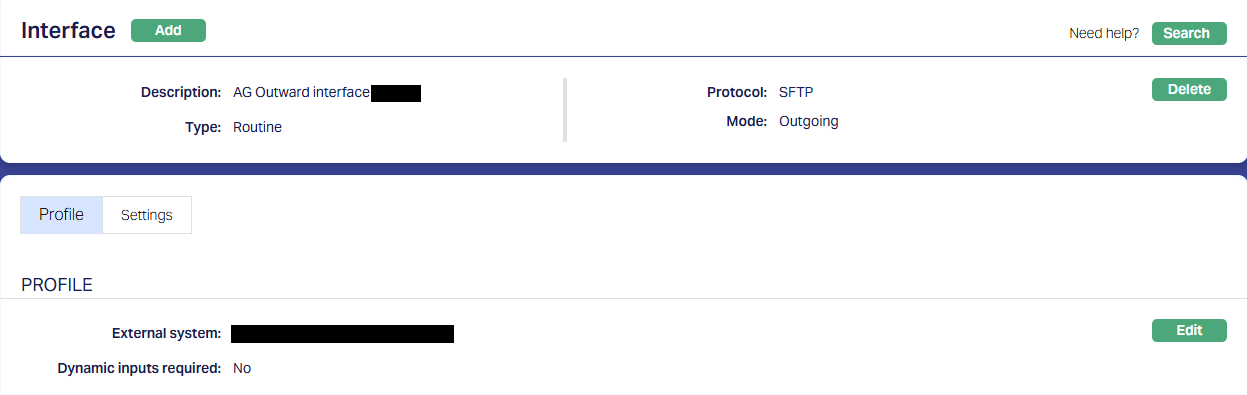
3.6.1.2. Settings
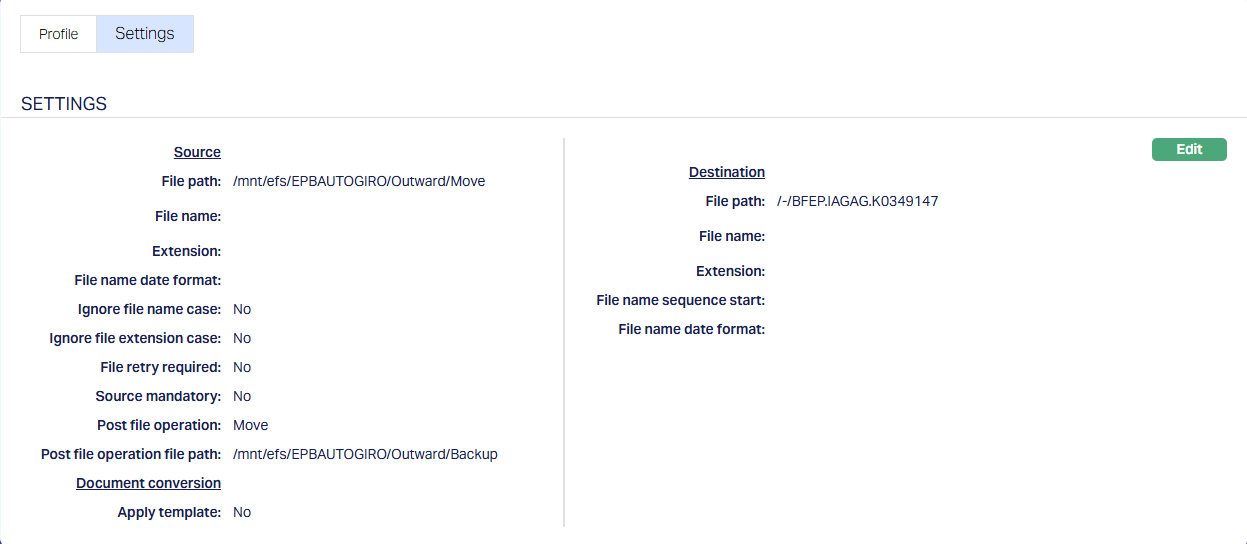
Note:
- The Source File Path: Should be the Path where the encrypted file will be available. The file available at this location will be transmitted to Bankgirot.
- The Destination File Path: Should be the one that Bankgirot has specified as the path in its servers where the Outward Mandate and Collection Files should be transmitted to.
- Post File Operation & Post File Operation File Path: Since the files that were transmitted to Bankgirot should be available for any future reference, Post File Operation is specified as Move; and the Path to which the Files have to be moved should be specified in Post File Operation File Path.
- Outgoing Folder has the Unencrypted file; Move Folder has the Encrypted file and the Backup Folder has the Encrypted file as a history record
3.7. Data Management → Configurations → Groups → Maintain
Once the required Configuration records are Published, you have to create a Group and map all the required functions to that Group. This ensures that all the functions required for generation of the Outward Mandate and Collection Files are executed in the specific sequence.
Usually, this is part of the installation. If not, you will have to do the same.
Note:
- The sequence of the functions is very critical and should be strictly set up as shown below.
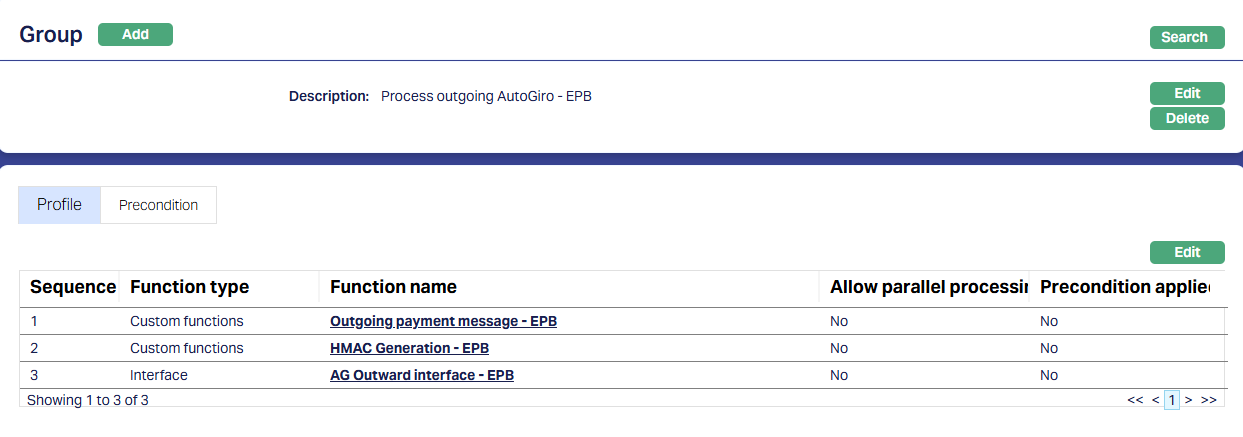
3.8. Data Management → Configurations → Routines → Maintain
You have to create a Routine and map the Group as well as the Classification. You must always create two Routines for each Group: One of Type Scheduled / Auto as required; and one other of Type Adhoc. The Scheduled / Auto routine will be automatically executed at the Scheduled Time / during EOD/BOD as defined in the Routine; and in case there is any issue with such automatic execution, and a manual intervention is required, the Adhoc Routine can be used to run the routine after such manual intervention.
Usually, this is part of the installation. If not, you will have to do the same.
3.8.1. Scheduled Routine
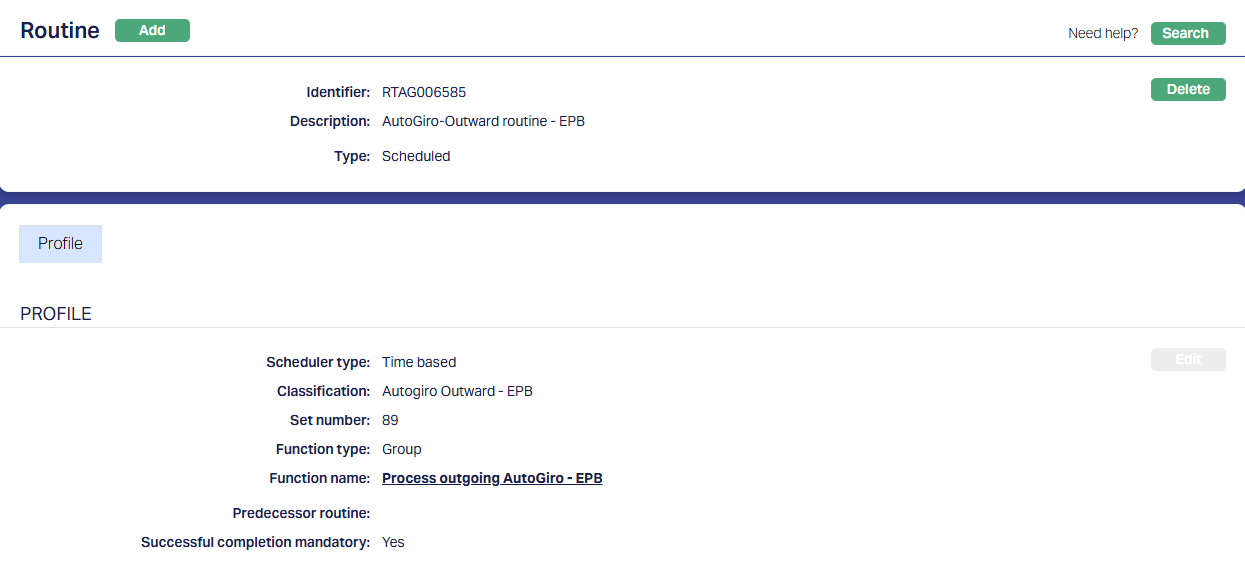
3.8.2. Adhoc Routine

3.9. Data Management → Configurations → Scheduler → Maintain
If the Routine has been created with Type = Scheduled, you need to create a Scheduler to define the frequency & time of execution.
3.9.1. Scheduler for Outward AG
A sample is shown below where the scheduler will run every day between 19:25 and 19:28 for the period selected and as per the time zone selected.
Note:
- The scheduler has to be set up as per the needs of that specific Implementation
3.9.1.1. Profile
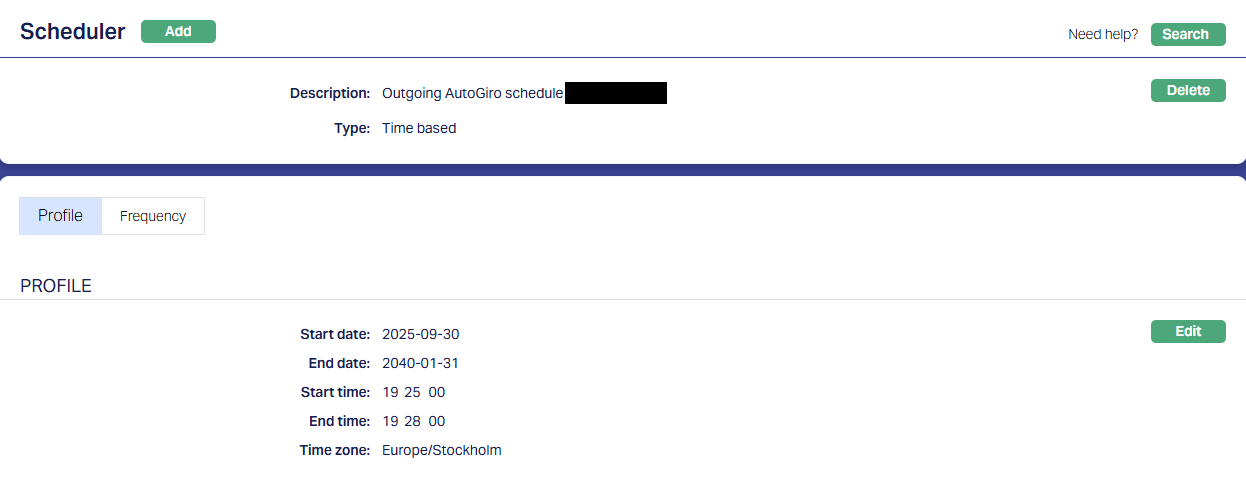
3.9.1.2. Frequency
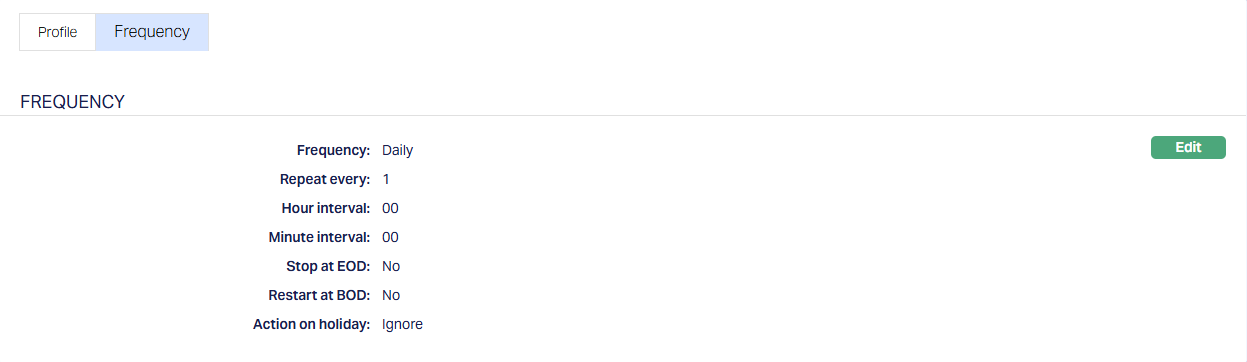
3.10. Data Management → Configurations → Routines → Branch Mapping
Once the Routines and Schedulers are configured, these should be mapped for the Branch(es) for which the Routines should be executed. You have to map both the Adhoc and Scheduled / Auto routines.
3.10.1. Adhoc → Edit 
All Routines that are defined as Adhoc Type will display; check the relevant checkbox to map the Routine to the Branch; uncheck to unmap. Only mapped Routines can be manually executed for that Branch using Data Operations > Adhoc Routines
3.10.2. Scheduled → Edit 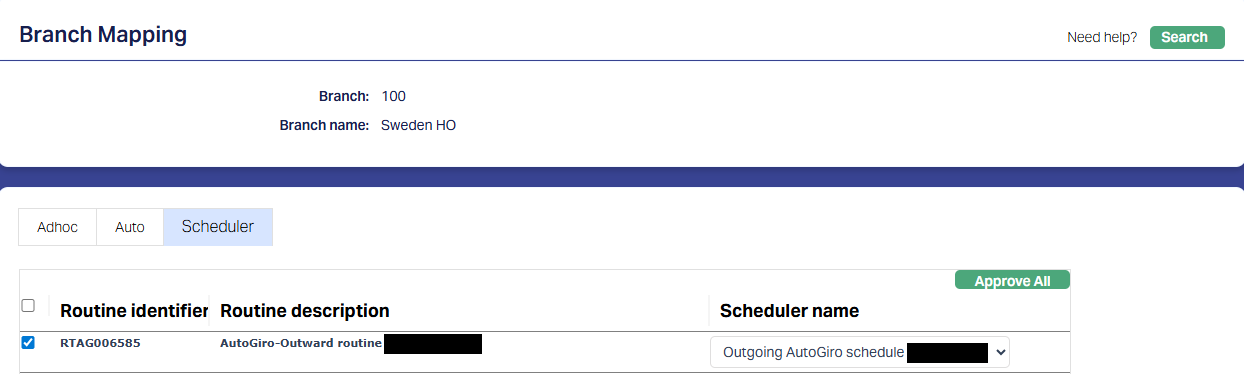
All Routines that are defined as Scheduled Type will display; check the relevant checkbox to map the Routine to the Branch; uncheck to unmap. Only mapped Routines will be automatically executed for that Branch as per the Scheduler mapped.
AUTOGIRO INWARD MANDATE
- Aura Transaction Processing
None
2. PaymentGrid
None
3. Aura Data Management
All Configurations for Inward Mandates have to be set up only in Aura Data Management. Please note that the configurations in Data Management are the same for both Inward Mandates and Inward Collections.
3.1. Admin → System Codes → Generic Definitions → Classifications
Classification enables you to categorize / label the various configurations in Aura Data Management so that it is easier to know what the configuration is for. Create a Classification record where the Description identifies the purpose that is sought to be achieved.
See sample below: 
3.2. Data Management → Settings → External System
Depending on the Bank / external system from which the mandate / collection files have to be transferred and the mode of download / transmission, more records may have to be created under External System. For example, the Entity may want the file to be moved to its servers as archival / history records.
3.2.1. Bankgirot
This is to define the system from which the Inward Mandate and Collection Files have to be received. This will be the same External System for Outward Mandates, Inward Mandates, Outward Collections and Inward Collections.
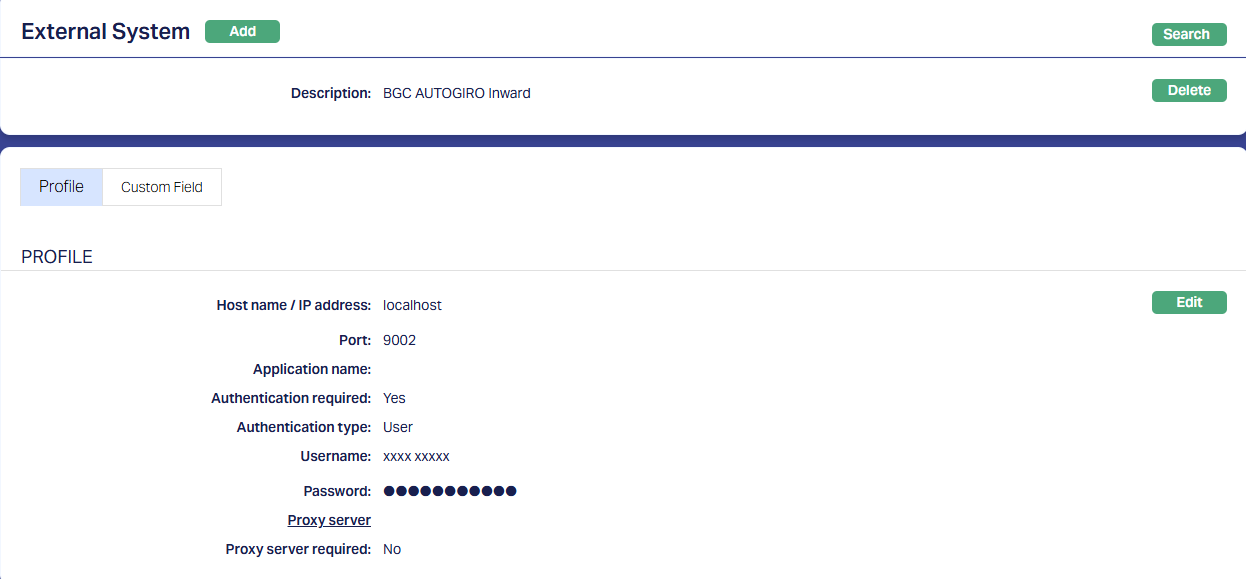
3.2.2. Entity’s SFTP
This is to define the system to which the Inward Mandate and Collection Files have to be moved in the Entity’s servers for archival / history purposes.
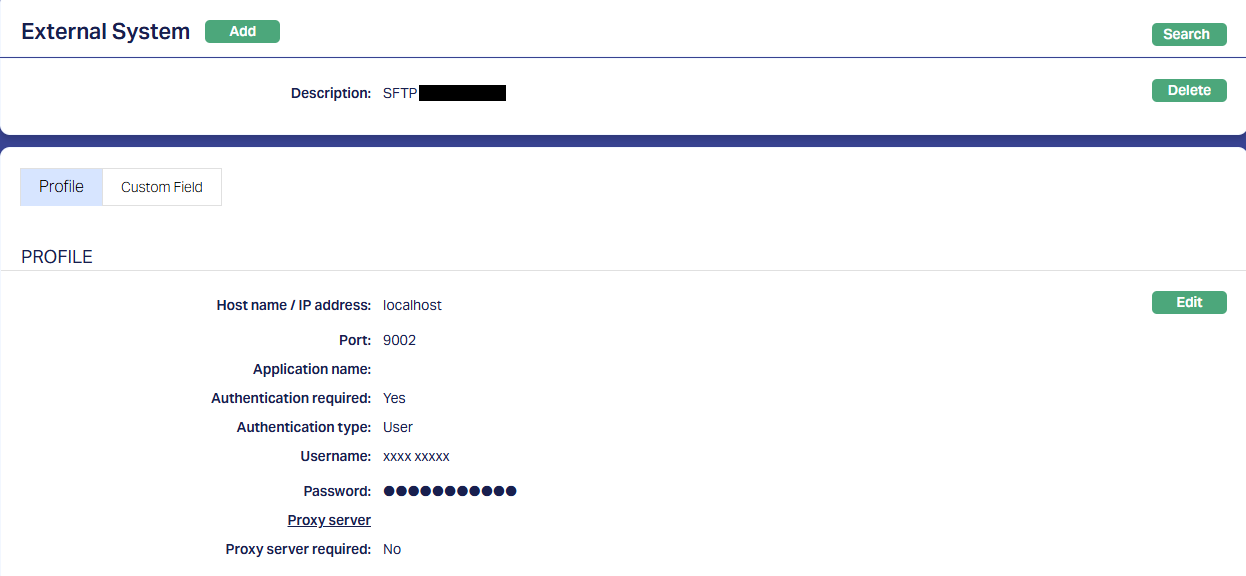
3.3. Data Management → Definitions → Reference Data → Data Feed
Nothing specific
3.4. Data Management → Configurations → Settings → Security
Nothing specific
Depending on the requirements in the Implementation, a Security Configuration may be required to Decrypt / Decompress the inward file
3.5. Data Management → Metadata → Custom Functions
3.5.1. Process Incoming
This function will ensure that the Inward Mandate and Collection Files are downloaded and available in the required designated path
3.5.1.1. Profile 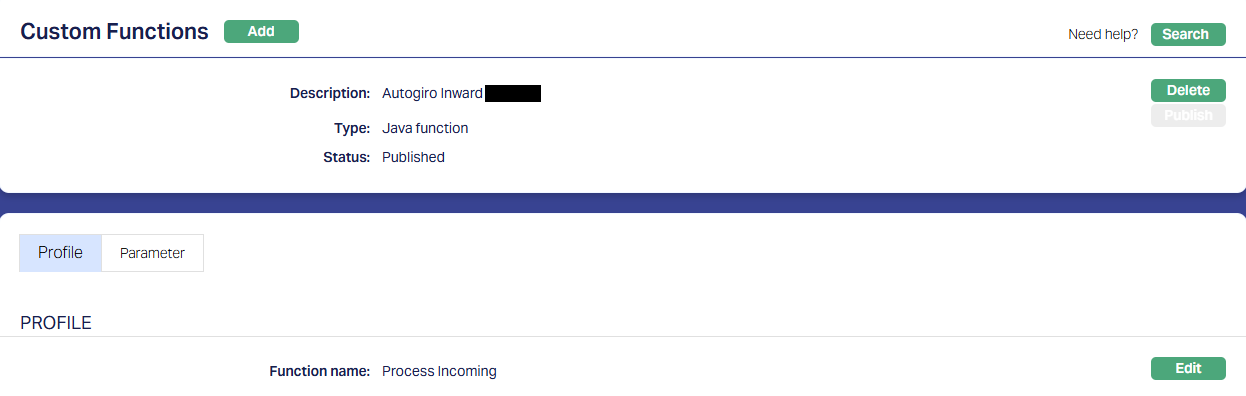
3.5.1.2. Parameter 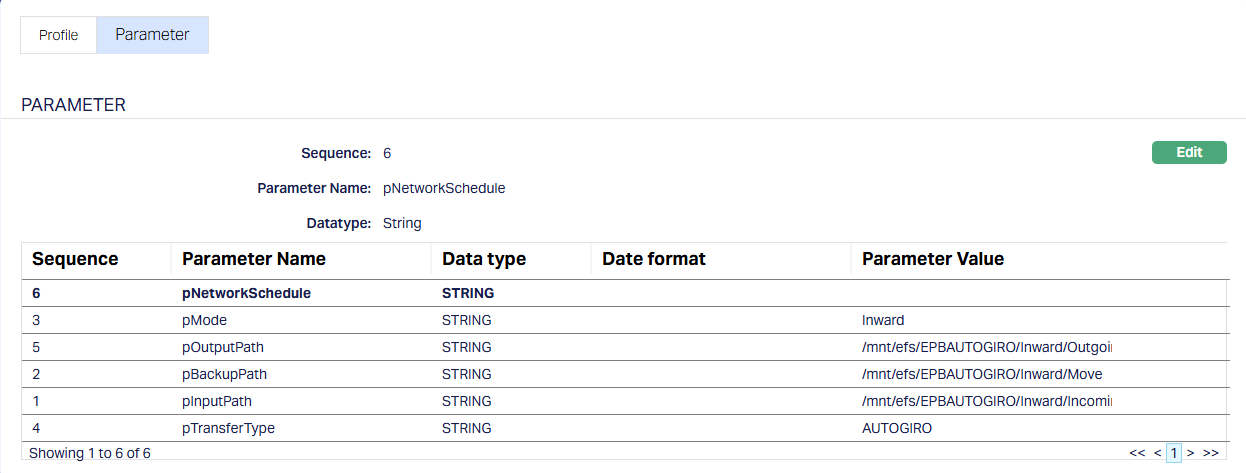
Note:
- pMode = Inward
- pTransferType = AUTOGIRO
- pInputPath = This is the path where the downloaded file will be available in Aura’s server and then moved to Output Path
- pOutputPath = This is the path from where the file processing is done
- pBackupPath = This is the path to which the file will be moved after the Processing is completed for history / archival
3.6. Data Management → Configurations → Interfaces
3.6.1. Inward Transmission
As required for the Implementation, an Interface Configuration has to be set up for transmission of the Inward Files from Bankgirot. A sample is shown below where the Protocol is SFTP.
3.6.1.1. Profile 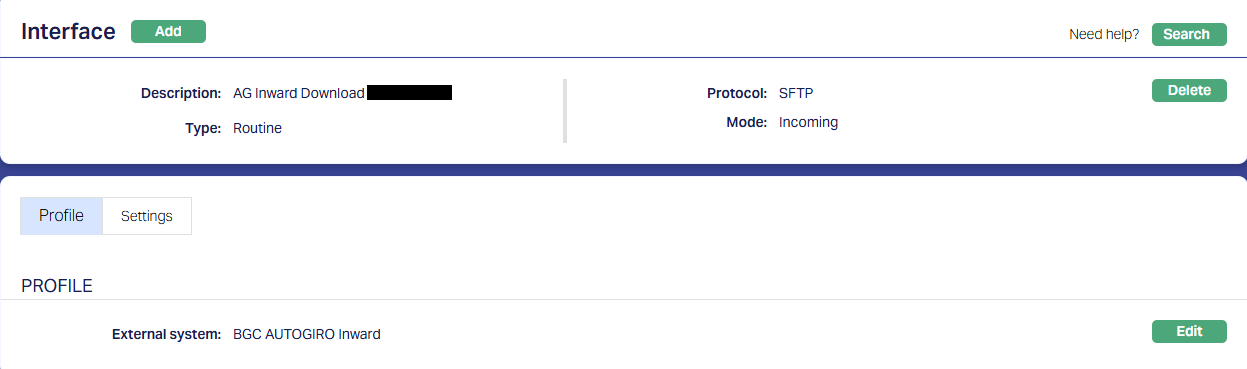
3.6.1.2. Settings 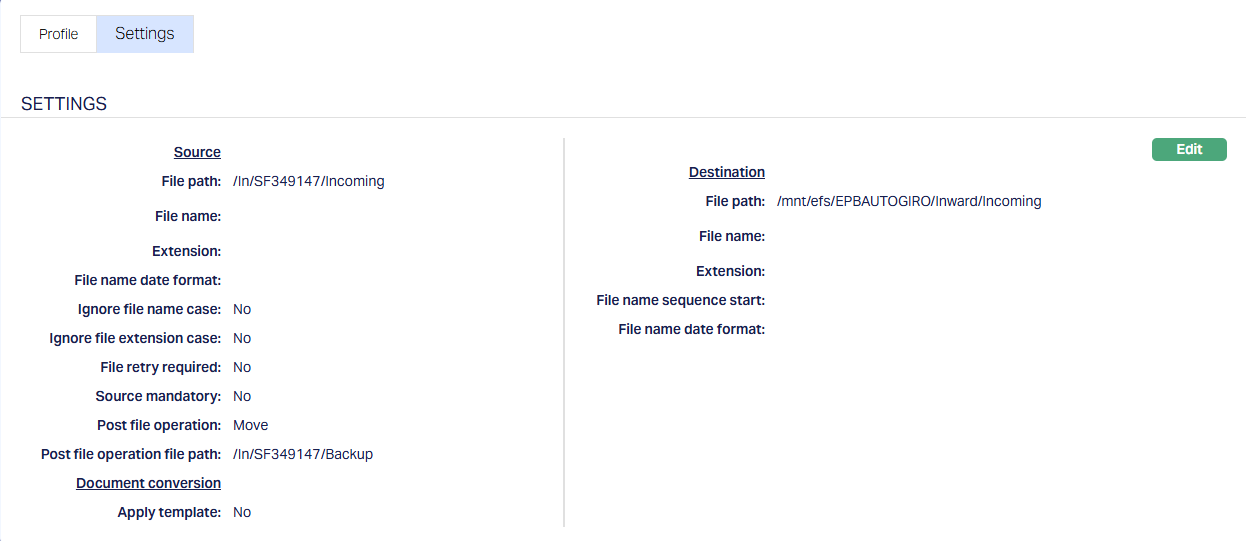
Note:
- The Source File Path: Should be the one that Bankgirot has specified as the path where the inward file should be downloaded from
- The Destination File Path: Should be the Path in Aura’s servers where the downloaded file should be available. The file available at this location should be used to process the Agreement records – to create and / or to update the Agreements in CC.
- Post File Operation & Post File Operation File Path: Since we shouldn’t process the same file twice, as soon as the file in the BGC Source File Path is read, it is moved to the Post File Operation Path which is also a folder in BGC. This is decided at the time of Implementation depending on the agreement between the Entity and BGC
3.6.2. Movement to Entity’s SFTP
This may be configured as required for the specific Implementation to move the Inward Files to the Entity’s servers as a history record
3.6.2.1. Profile 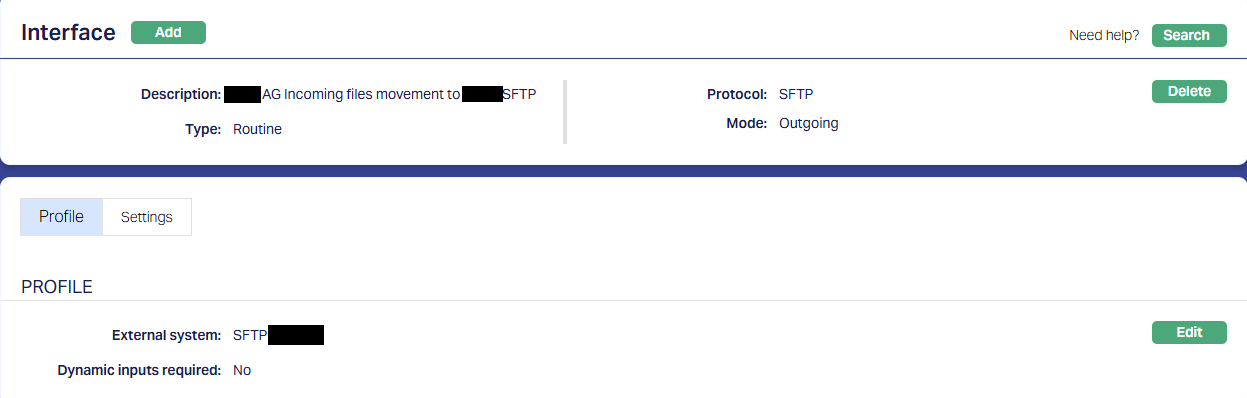
Note:
- External System = Should be mapped to the Entity’s system that has been maintained under Data Management → Settings → External System
3.6.2.2. Settings 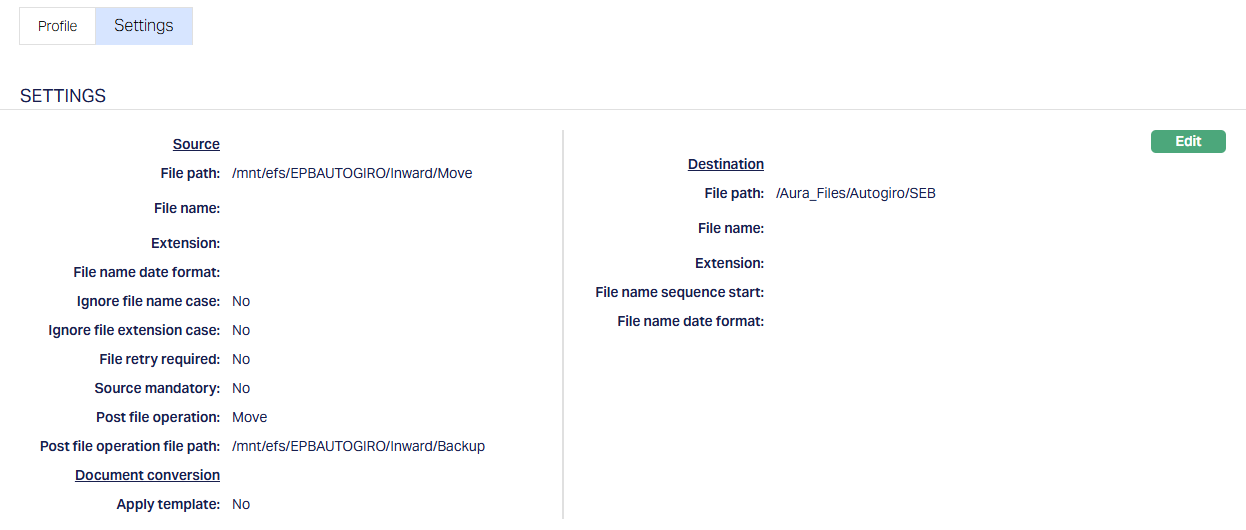
Note:
- The Source File Path: This should be the Path where the Inward Files are moved after the Processing
- The Destination File Path: Should be the Path in the Entity’s server to which the files are to be moved for history / archival
- Post File Operation & Post File Operation File Path: Should be the Path in Aura’s server to which the files are to be moved for history / archival
3.7. Data Management → Configurations → Groups → Maintain
Once the required Configuration records are Published, you have to create a Group and map all the required functions to that Group. This ensures that all the functions required for the Outward Mandate and Collection file generation are executed in the specific sequence.
Usually, this is part of the installation. If not, you will have to do the same.
Note:
- The sequence of the functions is very critical and should be strictly set up as shown below.
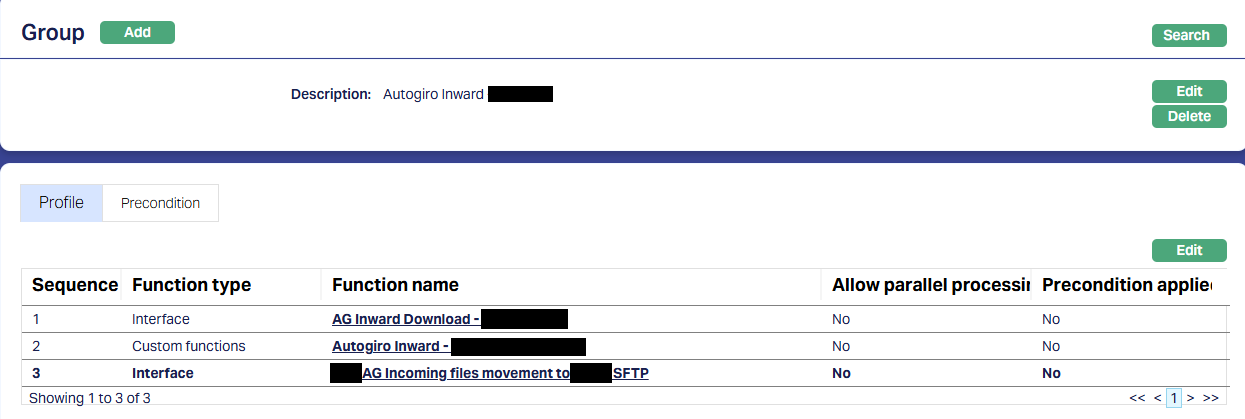
3.8. Data Management → Configurations → Routines → Maintain
You have to create a Routine and map the Group as well as the Classification. You must always create two Routines for each Group: One of Type Scheduled / Auto as required; and one other of Type Adhoc. The Scheduled / Auto routine will be automatically executed at the Scheduled Time / during EOD/BOD as defined in the Routine; and in case there is any issue with such automatic execution, and a manual intervention is required, the Adhoc Routine can be used to run the routine after such manual intervention.
Usually, this is part of the installation. If not, you will have to do the same.
3.8.1. Scheduled Routine 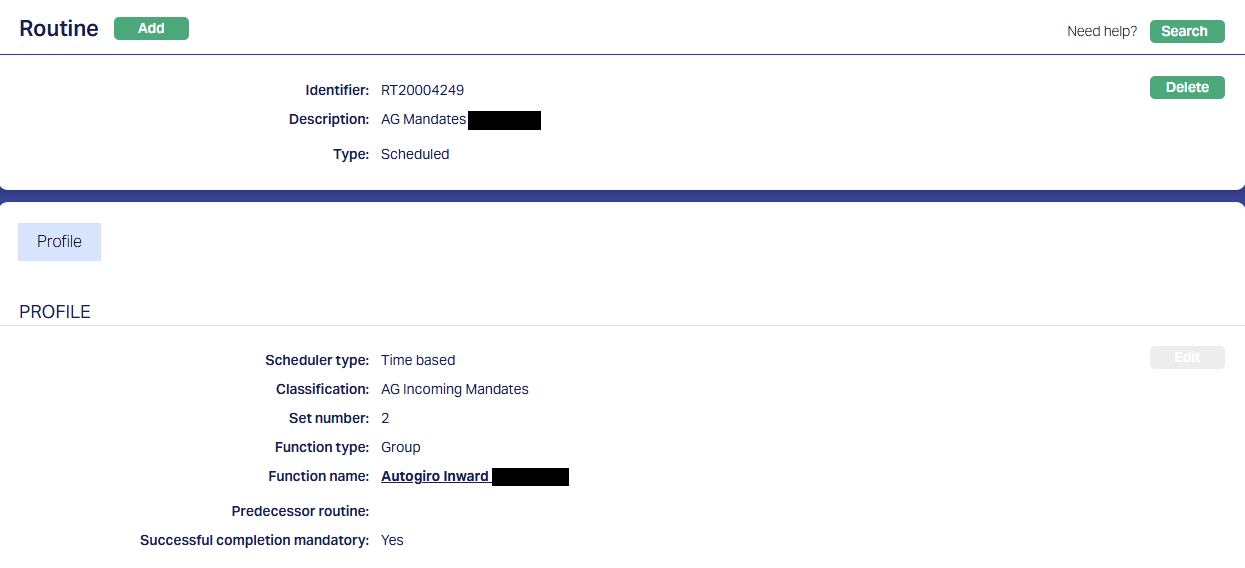
3.8.2. Adhoc Routine 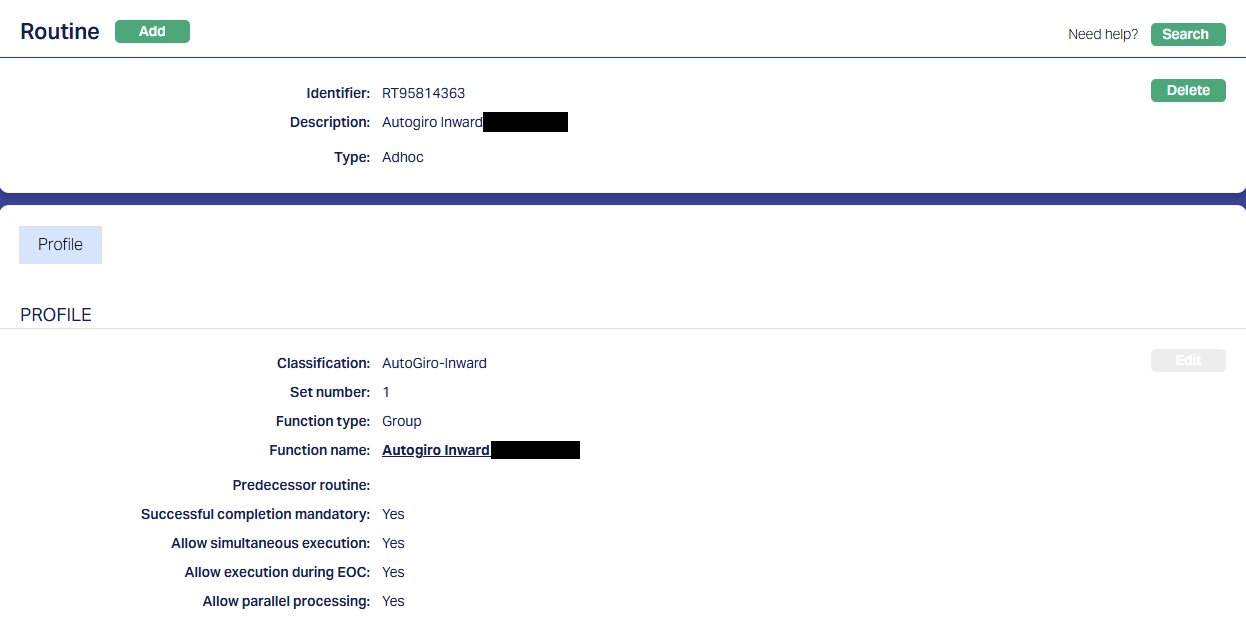
3.9. Data Management → Configurations → Scheduler → Maintain
If the Routine has been created with Type = Scheduled, you need to create a Scheduler to define the frequency & time of execution.
3.9.1. Scheduler for AG Inward
A sample is shown below where the scheduler will run every day between 17:30 and 19:35 for the period selected and as per the time zone selected.
Note:
- The scheduler has to be set up as per the needs of that specific Implementation
3.9.1.1. Profile 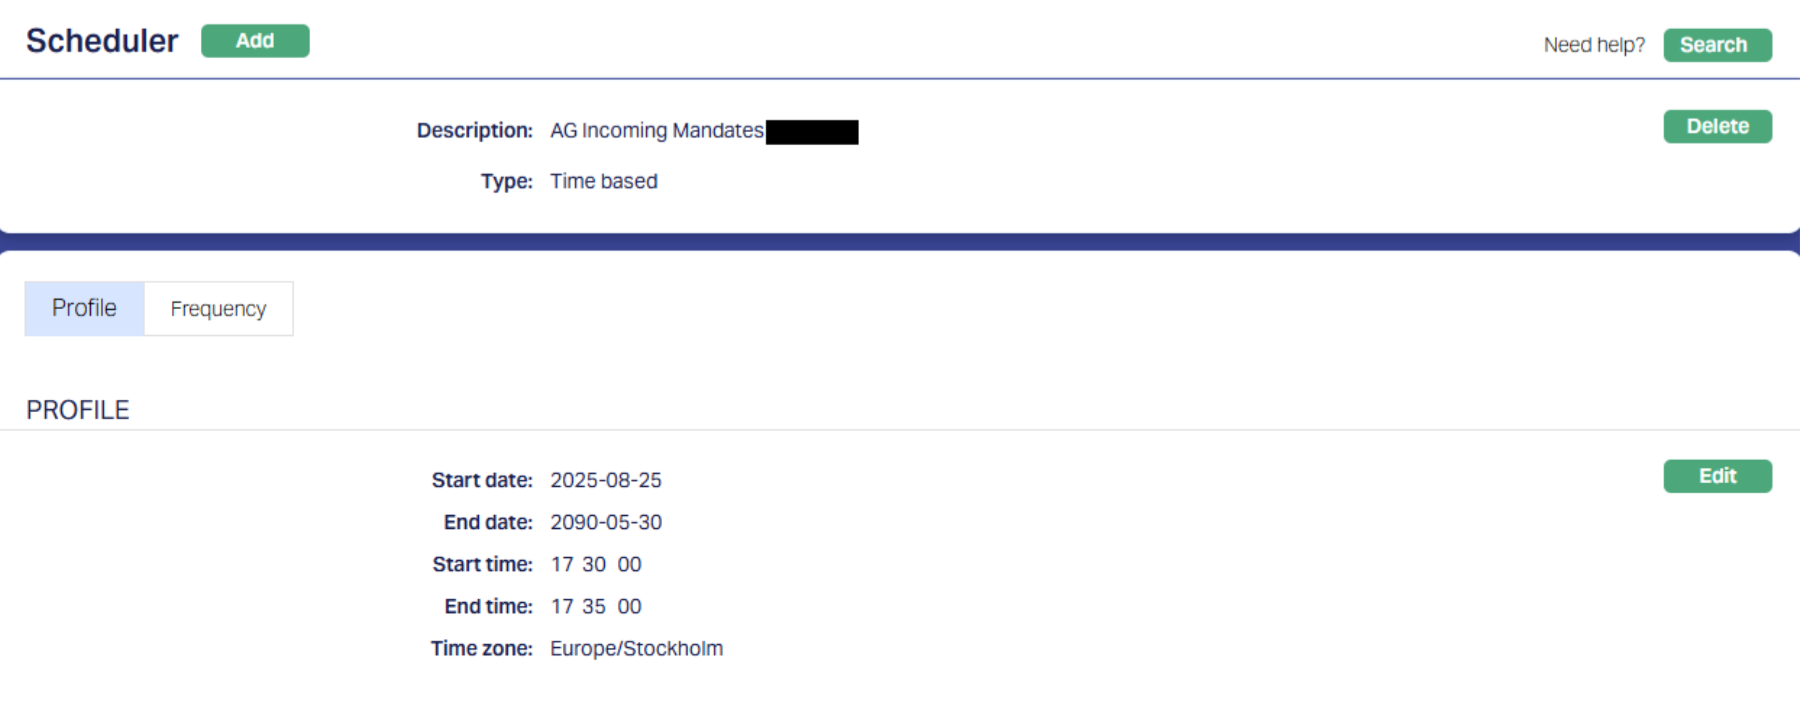
3.9.1.2. Frequency 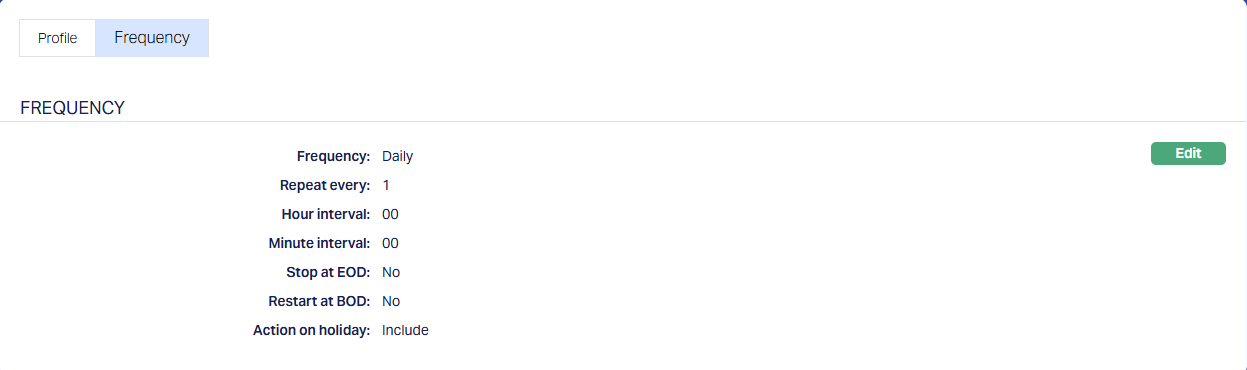
3.10. Data Management → Configurations → Routines → Branch Mapping
Once the Routines and Schedulers are configured, these should be mapped for the Branch(es) for which the Routines should be executed. You have to map both the Adhoc and Scheduled / Auto routines.
3.10.1. Adhoc → Edit 
All Routines that are defined as Adhoc Type will display; check the relevant checkbox to map the Routine to the Branch; uncheck to unmap. Only mapped Routines can be manually executed for that Branch using Data Operations > Adhoc Routines
3.10.2. Scheduled → Edit 
All Routines that are defined as Scheduled Type will display; check the relevant checkbox to map the Routine to the Branch; uncheck to unmap. Only mapped Routines will be automatically executed for that Branch as per the Scheduler mapped.
PROCESS FOR AUTOGIRO MANDATES
New Mandate for New Loan or Existing Loan
- The Mandate that the Client provides should be recorded in CC under CRM → Client → Agreement.
1.1. Step 1
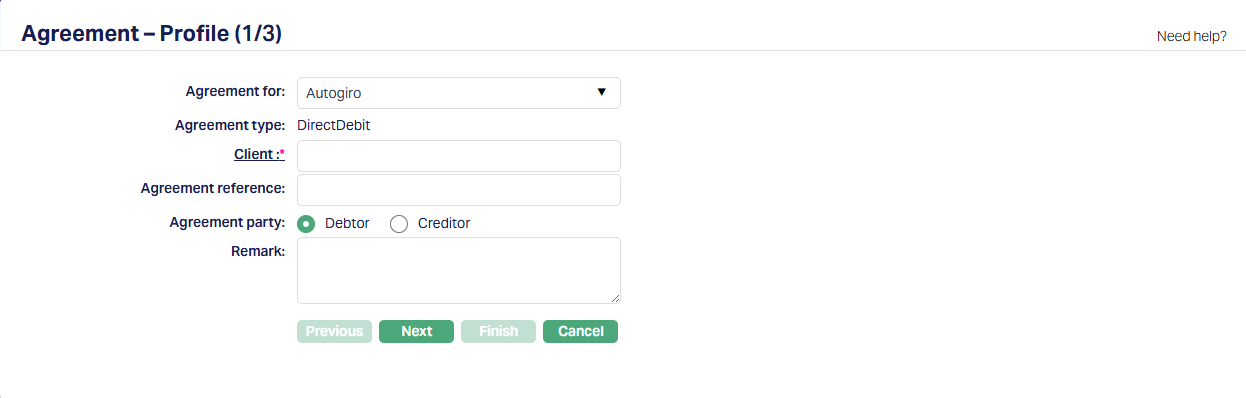
| Field Name | Field Description | Field Value | Notes |
|---|---|---|---|
| Agreement For | Should be Autogiro | ||
| Agreement Type | Will be auto-populated as DirectDebit | ||
| Client | Choose the Loan Borrower | ||
| Agreement Reference | Input the Loan Account # | This is an important field as it will be used for matching the agreement records for any status changes as well as for processing the Collection files | |
| Agreement Party | Should be Debtor | ||
| Remark | Can be any additional text | ||
| 1.2. Step 2 |
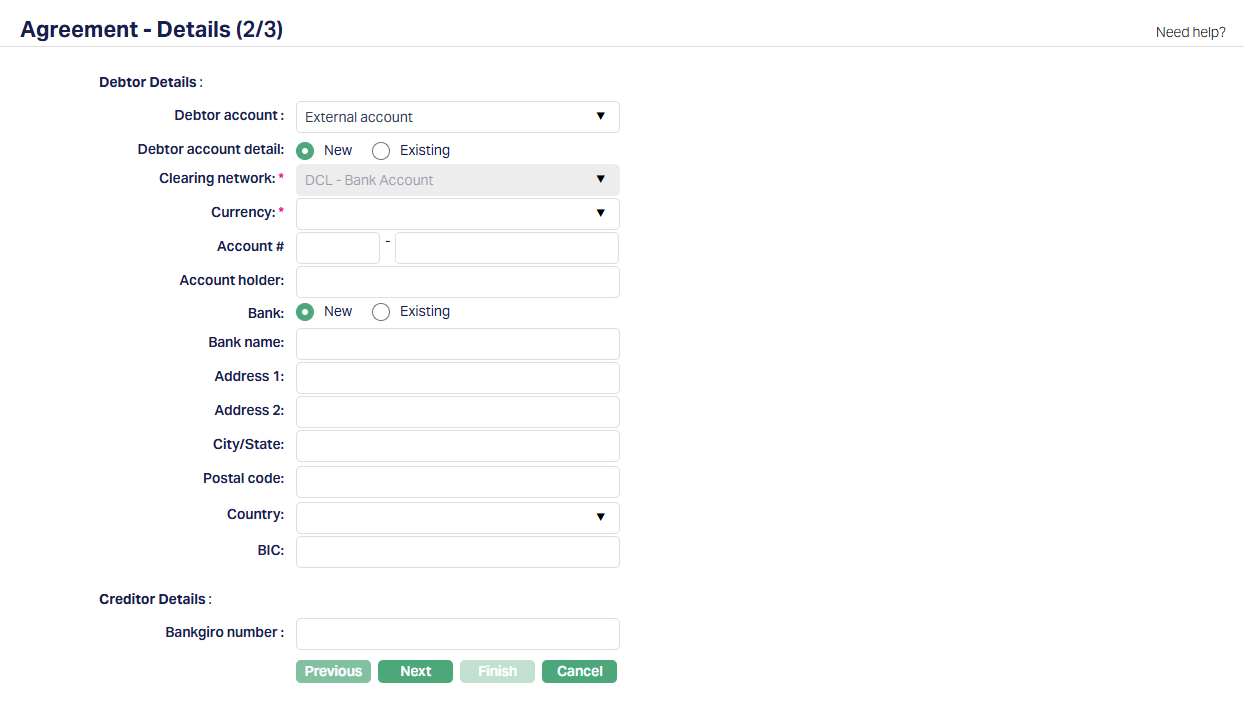
| Field Name | Field Description | Field Value | Notes |
|---|---|---|---|
| Debtor Account | Should be External Account | ||
| Debtor Account Detail | Can be New or Existing | ||
| Clearing Network | For Agreement For = Autogiro, this will be defaulted to DCL – Bank Account | ||
| Currency | Will be SEK | ||
| Account # | Input the External Bank Account # of the Client from where the loan repayment has to be collected | ||
| Account holder | Input the name of the Account Holder in the External Bank Account | ||
| Bank Details | |||
| Bankgiro number | If Entity = FI, provide the Bankgiro # of the Account # into which repayments have to be credited | ||
- If the Mandate was received by the Entity through a manual mode (like paper, email, etc.,), the Agreement record has to be created manually. If it is through the Entity’s website, the process of Agreement creation can be automated as part of Implementation. If it is through the Debtor’s Bank (internet banking), the agreement creation will happen automatically when such information is received from BGC.
- On creation of the Agreement record manually, two Status records will be inserted:
3.1. Opened, Approved and
3.2. Activated, Pending - The Status has to be approved by another user to make it Activated, Approved
- Using Retail > Loans > Change of Terms > Change Type = Settings, define the Repayment Type = Direct Debit and link up the Agreement to the Loan Account.
- On approval of the Agreement in CC, the Agreement Data is populated in Xdmpgpaymenttransaction table in DM.
6.1. Message Mode = Outward
6.2. Agreement Reference # = Loan Account # as input in the Agreement record.
6.3. Transaction Status = Activated
6.4. Message Generated = Null
6.5. Message Despatched = False
6.6. Record Despatched = False - Outward file generation:
Every day, the Routine set up for generating Outward file to BGC will run as per the Schedule set up for the same. Even if there are no records, the Routine status will be Success. If there is any failure in the Routine execution, the Routine Status will be Failed. In such a case, the entire process flow has to be checked in sequence to see the location in which the Outward file is – this will indicate the stage upto which the process was completed so that the process can be re-initiated from that point, - The Outward files can contain the following:
8.1. Outward Mandates where Agreement Status = Activated, Approved
8.2. Cancelled Mandates where Agreement Status = Cancelled, Approved
8.3. Collection records.
Here, we will focus only on the Mandates; and Collection flow will be handled in a different section
8.4. The Mandate file will contain mandate details related to the records from the xdmpgpaymenttransaction table where Message Mode = Outward, Status = Activated or Cancelled, Message Generated is null, Message Despatched is False and Record Despatched is False.
8.5. The Code field in the Mandate Record will be used to identify if it is a Mandate for Agreements with Activated Status or Cancelled Status
8.6. On completion of file generation, Xdmpgpaymenttransaction table in DM will be updated as shown below so that these records will not be picked up again in the Outward file generation
8.6.1. Message Generated = Date-timestamp
8.6.2. Message Despatched = True
8.6.3. Record Despatched = True
8.7. Based on the functions mapped to the Routine, encryption (as required) and transmission will be completed; and the Outward file will be sent to BGC.
9. Inward file processing:
Every day, the Routine set up for processing Inward file from BGC will run as per the Schedule set up for the same. Even if there are no records, the Routine status will be Success. If there is any failure in the Routine execution, the Routine Status will be Failed. The reason for failure has to be investigated and then corrective action should be taken.
10. The inward files can contain the following:
10.1. Response to Outward Mandates that were sent by the Entity (can be identified using the Header AG-MEDAVI (Opening record TK01))
10.1.1. Outward Mandates sent by the Entity that are Accepted by the Debtor Bank
10.1.2. Outward Mandates sent by the Entity that are Rejected by the Debtor Bank
10.1.3. Any cancellations initiated by the Debtor through their Bank
10.2. New mandates received by BGC through Internet Bank, that are related to the Entity’s collections (can be identified using the Header AG-EMEDGIV (Opening record TK51)
10.3. Incoming Payments based on the collections initiated by the Entity (can be identified using the Header BET.SPEC & STOPP TK (Opening record TK01))
Here, we will focus only on the Mandates; Collection flow will be covered in a different section.
- Based on the records and their status, the following actions take place automatically:
| Record in the Inward Mandate File | System flow in CC |
|---|---|
| Outward Mandates Accepted by the Debtor Bank | 1. Status of the Agreement record will be updated as Accepted, Approved. 2. In the Loan Account, there will not be any updates / changes |
| Outward Mandates Rejected by the Debtor Bank | 1. Status of the Agreement record will be updated as Rejected, Approved. 2. In the Loan Account, Repayment option will be updated from Direct Debit to Payment Invoice through Change of Terms – Settings & the Agreement record will be de-linked from the Loan account |
| New Mandates initiated on the Internet Bank | The Loan Account number should be received as the Agreement Reference #, as per the understanding between the Entity and the Bank during Implementation. 1. If this value matches an existing Loan in CC, the following will happen: a. If there is no other existing Agreement for the loan with Activated or Accepted Status (i.e., there could be Agreements whose Status is Cancelled / Rejected): i. A new agreement record will be created in CC and status records will be inserted for Opened, Activated & Accepted with approval, so that the Agreement will not be picked up as a Mandate record to be sent in the Outward file. ii. Repayment option will be updated to Direct Debit through Change of Terms – Settings & the Agreement record will be linked to the Loan account. b. If there is an existing Agreement record for that Loan, where the Status is Activated or Accepted, the Routine will succeed with Exception. The necessary corrective action has to be taken up after investigation. 2. If the Agreement Reference # does not match an existing Loan Account #, the Routine will succeed with Exception. The necessary corrective action has to be taken up after investigation. |
| Cancellations initiated by the Debtor through their Bank | 1. Status of the Agreement record will be updated as Cancelled, Approved. 2. In the Loan Account, Repayment option will be updated from Direct Debit to Payment Invoice through Change of Terms – Settings & the Agreement record will be de-linked from the Loan account |
| The detailed flow for the Mandates is shown below: |
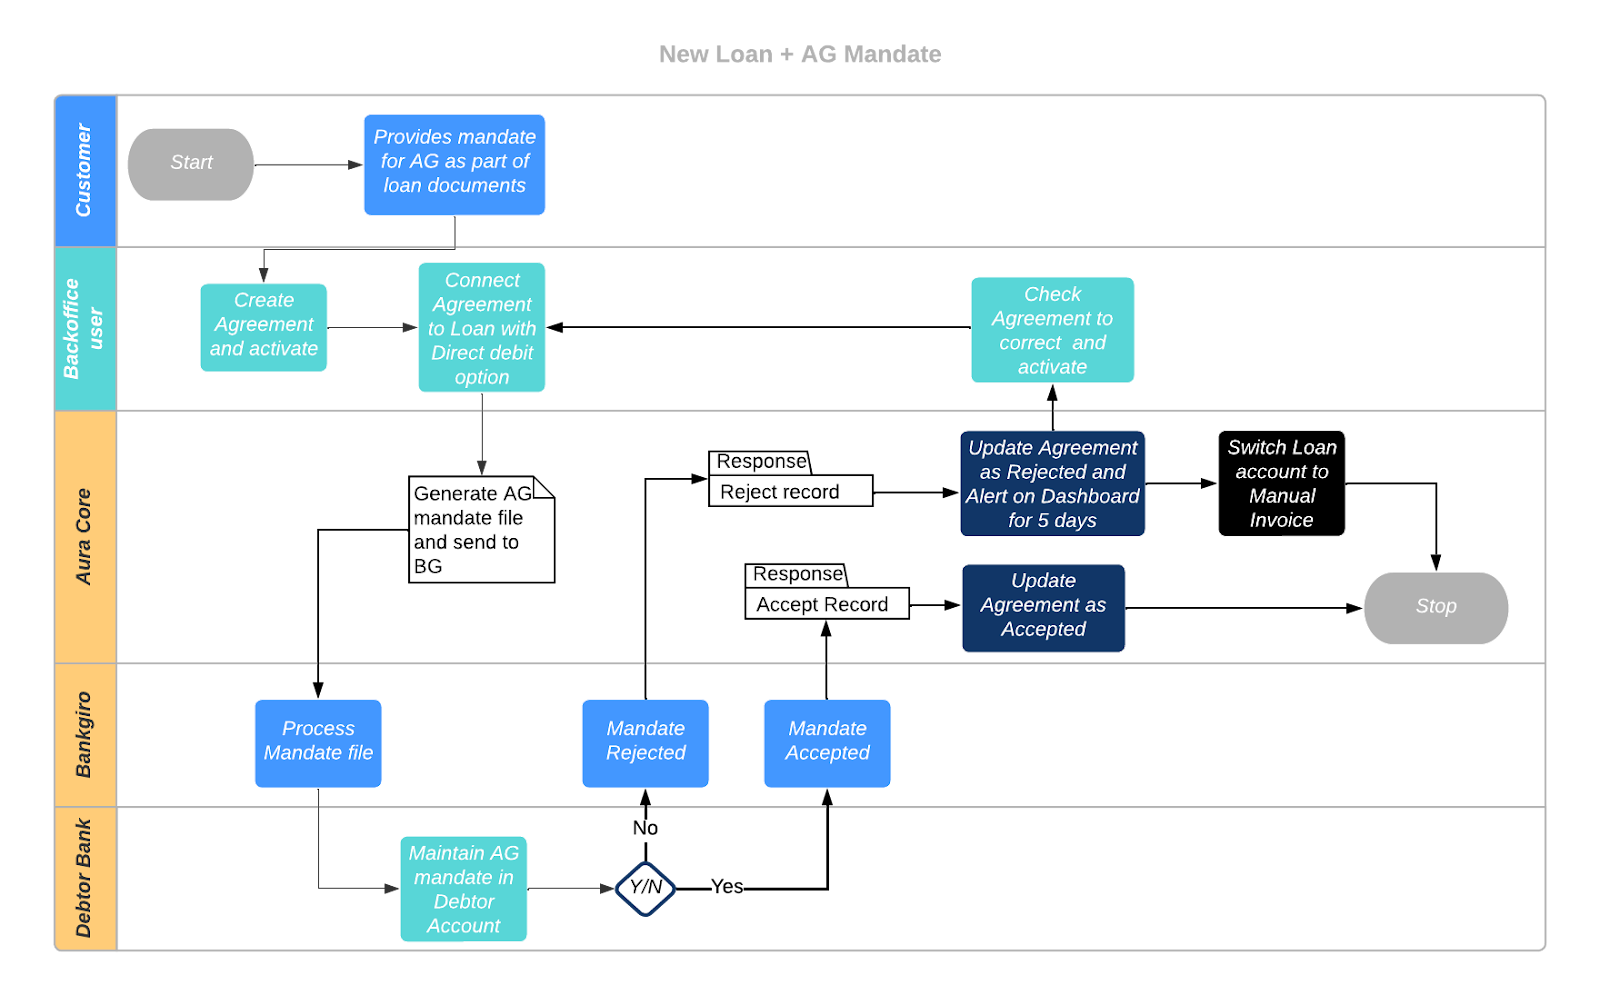
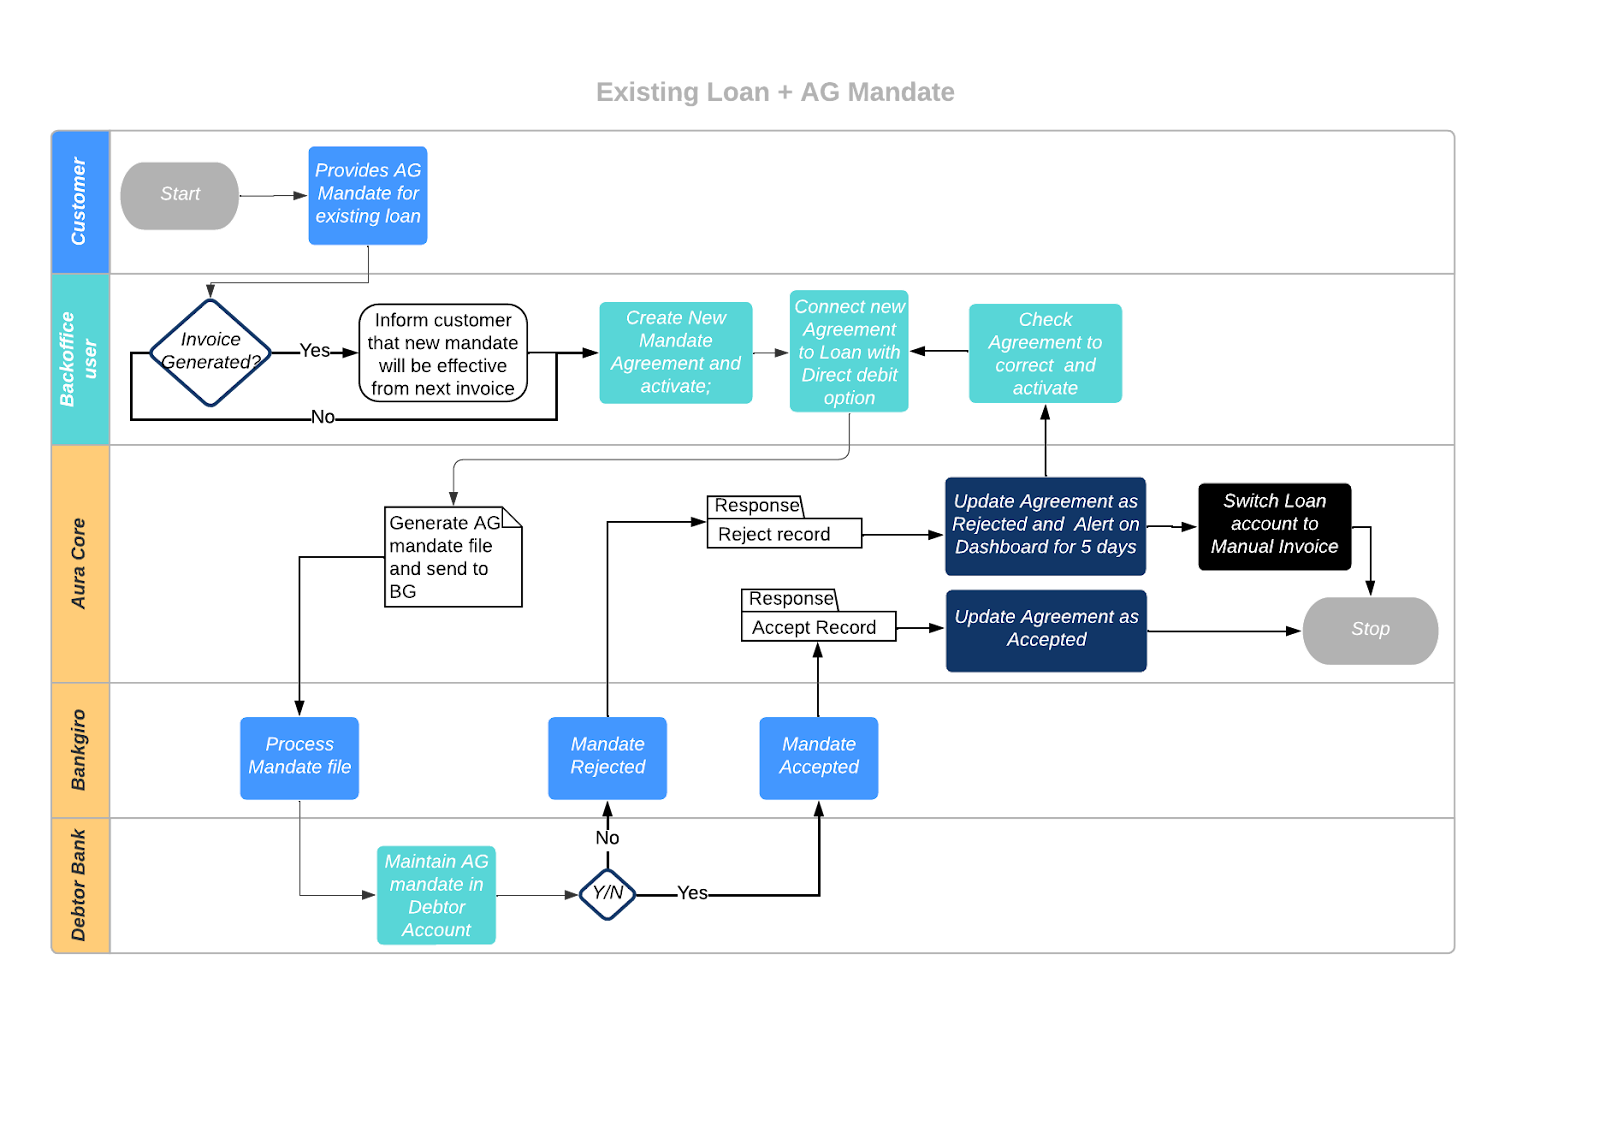

Cancellation of Autogiro Mandate for Loans - Creditor Bank
- An Agreement for Direct Debit can be cancelled in the following cases:
1.1. When a borrower issues a cancellation instruction for Autogiro Mandate for a Loan, using Retail → Loans → Change of Terms → Settings, the Repayment Type should be changed from Direct Debit to an appropriate one, say, Payment by Invoice and the Direct Debit Agreement that was earlier mapped should be delinked. This will ensure that the subsequent invoices will be sent to the Borrower and not go through the Autogiro Collection Process.
1.2. When the Loan Account to which a Direct Debit Agreement has been linked, is Closed. - The Cancellation of the Mandate should be recorded in CC under CRM → Client → Agreement → Status by adding the Cancelled Status record for that Agreement
- The Cancelled Status has to be approved by any other user
- On approval of the Agreement in CC, the Agreement Data is populated in Xdmpgpaymenttransaction table in DM.
4.1. Message Mode = Outward
4.2. Agreement Reference # = Loan Account # as input in the Agreement record.
4.3. Transaction Status = Cancelled
4.4. Message Generated = Null
4.5. Message Despatched = False
4.6. Record Despatched = False - When the DM Routine for AG Outward File generation is executed, records from the xdmpgpaymenttransaction table where Message Mode = Outward, Status = Activated or Cancelled, Message Generated is null, Message Despatched is False and Record Despatched is False will be picked up to be included in the Outward Mandate File.
5.1. The Code field in the Mandate Record will be used to identify if it is a Mandate for Agreements with Activated Status or Cancelled Status
5.2. On completion of file generation, Xdmpgpaymenttransaction table in DM will be updated as shown below so that these records will not be picked up again in the Outward file generation
5.2.1. Message Generated = Date-timestamp
5.2.2. Message Despatched = True
5.2.3. Record Despatched = True
5.3. When the Outward File is sent to BGC, the cancelled Mandate record will also be included; and the Debtor Bank can record the same when they receive the Cancellation details through BGC. - For the loans that continue to exist (Loans that are not closed), there will not be any further Outward Collection Messages on invoice generation.
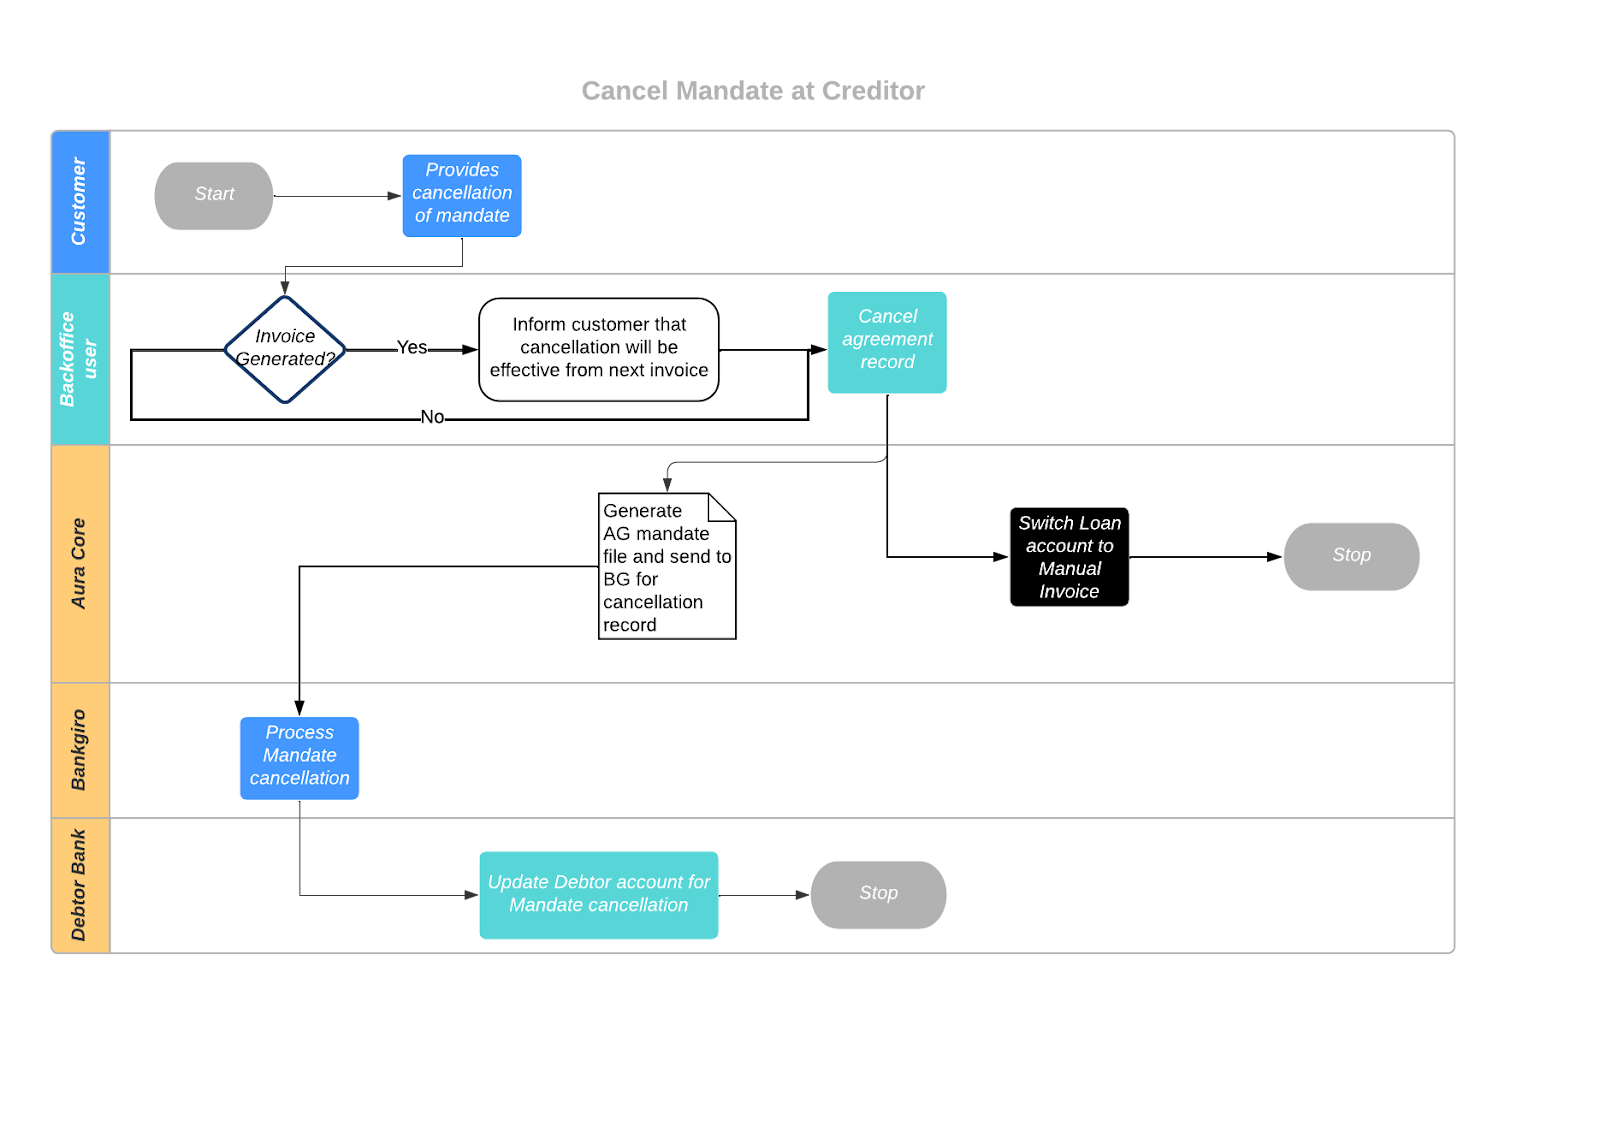
Cancellation of Autogiro Mandate for Existing Loans - Debtor Bank
1. When such a record is received in the Inward file (where status = Cancelled), for an ongoing loan, Status of the Agreement record will be updated as Cancelled, Approved.
2. In the Loan Account, Repayment option will be updated from Direct Debit to Payment Invoice through Change of Terms – Settings & the Agreement record will be de-linked from the Loan account.
3. For such loan accounts, there will not be any further outward collection records on invoice generation.
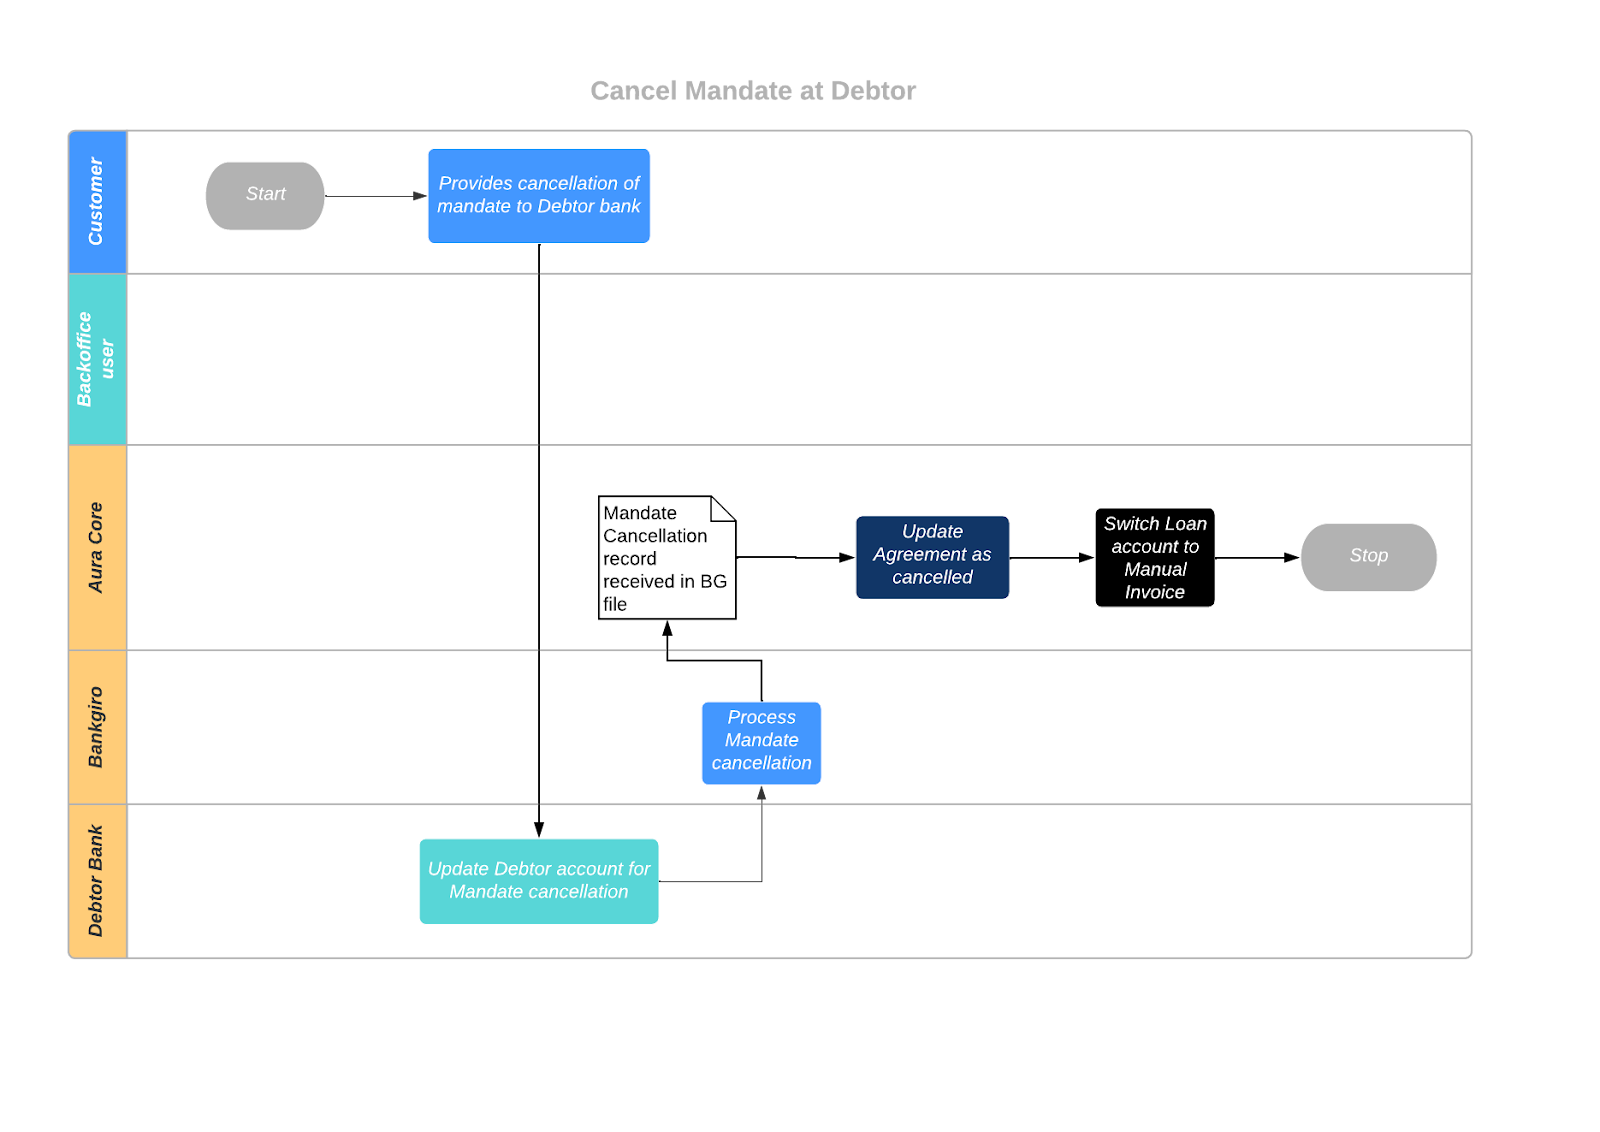
Cancellation of Autogiro Mandate for Loans in specific Account Status
The following are the specific maintenances for this purpose.
1. Aura Transaction Processing
None
2. PaymentGrid
None
3. Aura Data Management
3.1. Data Management → Definitions → Reference Data → Data Feed
For cancellation of an Autogiro agreement mapped to a Loan that has been moved to a specific Status, the following Reference Data Feed should be maintained.
3.1.1. Account Status for Agreement Cancel
This defines the specific Account Statuses for which Autogiro Agreement should be cancelled. Based on the Account Statuses input here, an automatic process will be initiated to Cancel the Autogiro Agreement and delink the Loan .
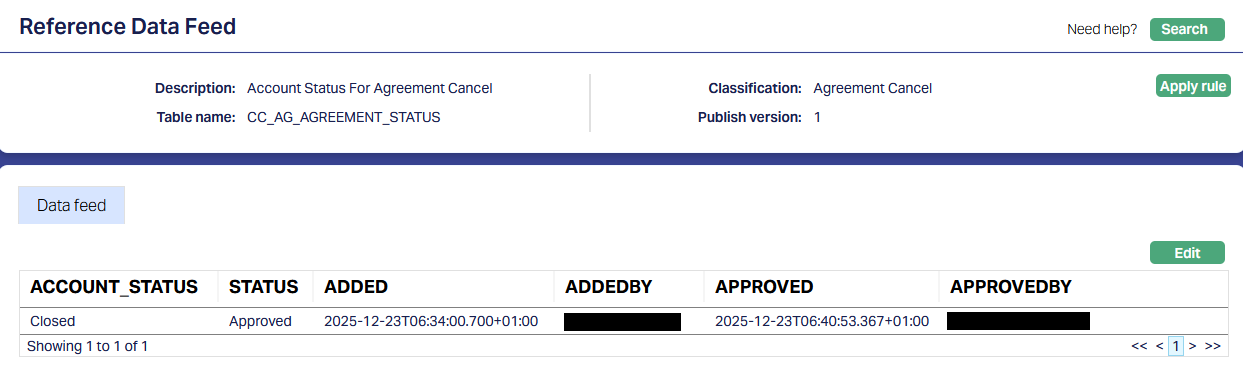
3.2. Data Management → Configurations → CC Services → Maintain 
3.3. Data Management → Configurations → Uploads → Maintain
3.3.1. Source
3.3.2. Destination
3.3.3. Column mapping
3.3.4. Exception Mapping
3.4. Data Management → Configurations → Groups → Maintain
Once the required Configuration records are Published, you have to create a Group and map all the required functions to that Group. This ensures that all the functions required for cancellation of the Autogiro Agreements are executed in the specific sequence.
Usually, this is part of the installation. If not, you will have to do the same.
Note:
- The sequence of the functions is very critical and should be strictly set up as shown below.
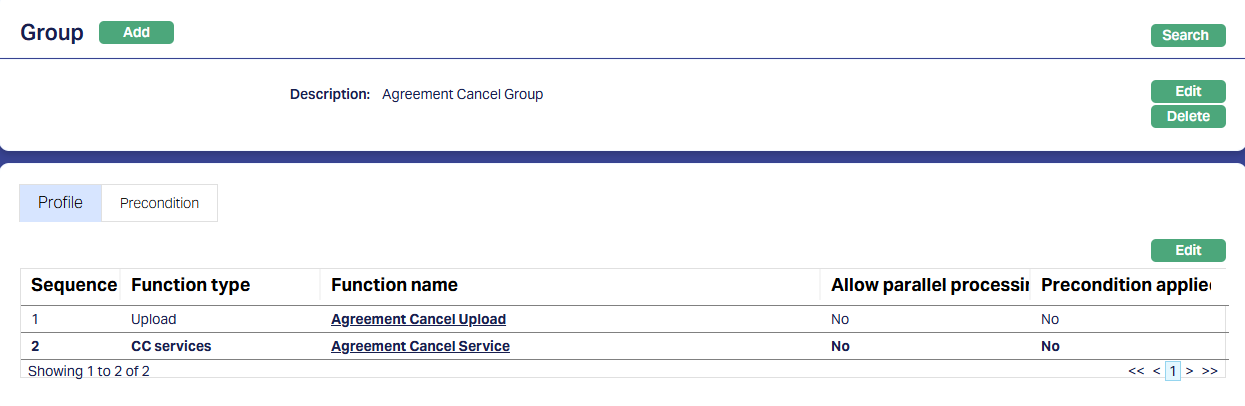
3.5. Data Management → Configurations → Routines → Maintain
You have to create a Routine and map the Group as well as the Classification. You must always create two Routines for each Group: One of Type Scheduled / Auto as required; and one other of Type Adhoc. The Scheduled / Auto routine will be automatically executed at the Scheduled Time / during EOD/BOD as defined in the Routine; and in case there is any issue with such automatic execution, and a manual intervention is required, the Adhoc Routine can be used to run the routine after such manual intervention.
Usually, this is part of the installation. If not, you will have to do the same.
3.5.1. Auto Routine
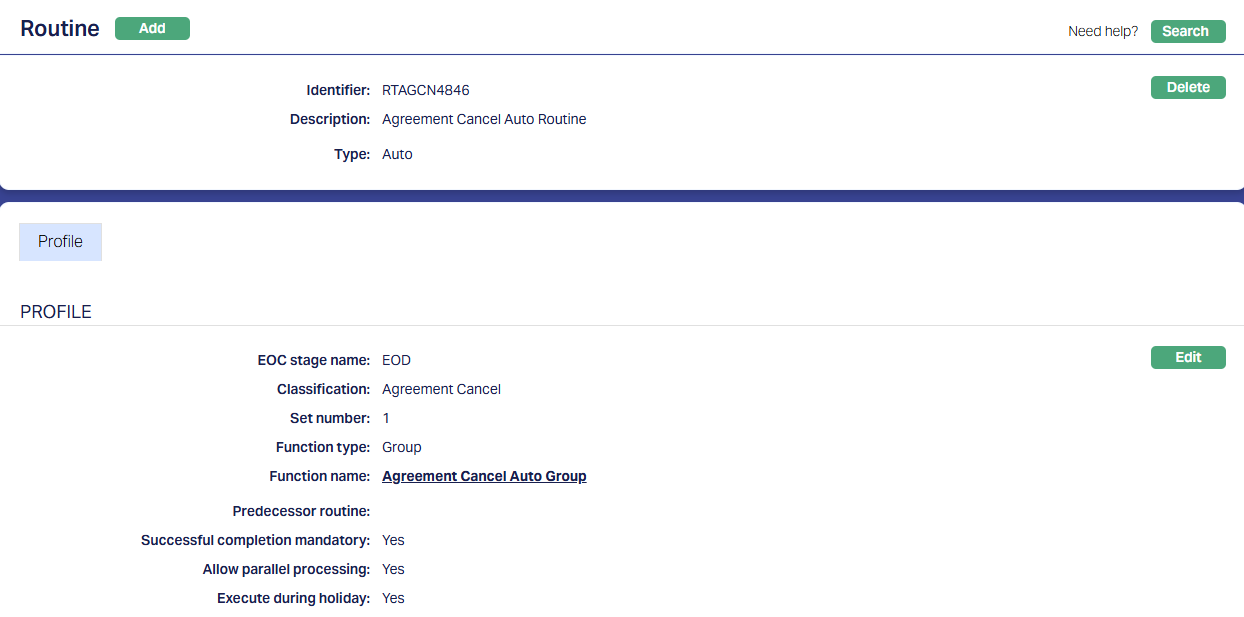
3.5.2. Adhoc Routine

3.6. Data Management → Configurations → Routines → Branch Mapping
Once the Routines are configured, these should be mapped for the Branch(es) for which the Routines should be executed. You have to map both the Adhoc and Auto routines.
3.6.1. Adhoc → Edit 
All Routines that are defined as Adhoc Type will display; check the relevant checkbox to map the Routine to the Branch; uncheck to unmap. Only mapped Routines can be manually executed for that Branch using Data Operations > Adhoc Routines
3.6.2. Auto → Edit

All Routines that are defined as Auto Type will display; check the relevant checkbox to map the Routine to the Branch; uncheck to unmap. Only mapped Routines will be automatically executed for that Branch as per the Stage name mapped.
Process flow:
- If the Entity wants to cancel an Autogiro Agreement for Loans that have moved into a specific Account Status (say, Loans moved to Closed Status or Collection Status), maintain the required values in the Reference Data Feed
Note:
- The function is case-sensitive and hence, the maintenance in the Reference Data Feed should be exactly the same as the Account Status name.
- As configured, the DM routine will run to extract all loan accounts where Repayment Method = Direct Debit, latest approved Account Status = one of the Account Statuses maintained in the Reference Data Feed and Effective Date of Status Movement = previous day.
- The status of the Direct Debit Agreements for such loans will be moved to Cancelled.
- Where Loan Account Status = Closed, Outward Collection record in DM / PG will be updated to Cancelled, if File Generation has not yet happened (message generated = False)
- Where Loan Account Status != Closed, the Loan Account Repayment Method will be updated to Payment by Invoice by using a Change of Terms – Settings record.
- For these loans, if there is an Outward record, there is no need to update the Status of such records as Cancelled. When the Outward Collection file is generated to BGC, it will include this record; and if payment is received from BGC, it will be processed for the Loan Account.
- Mandate file for the cancelled Agreements will be generated as per the scheduler in DM
AUTOGIRO OUTWARD COLLECTIONS
The following are the specific maintenances for Autogiro Outward Collections
1. Aura Transaction Processing
1.1. Retail → Settings → Payment Settings
Though there are no Accounting entries to be posted for Autogiro Outward Collection messages, the Payment Setting is mandatorily to be set up.
Only one Payment Setting is to be maintained for Outward Collections.
1.1.1. Profile
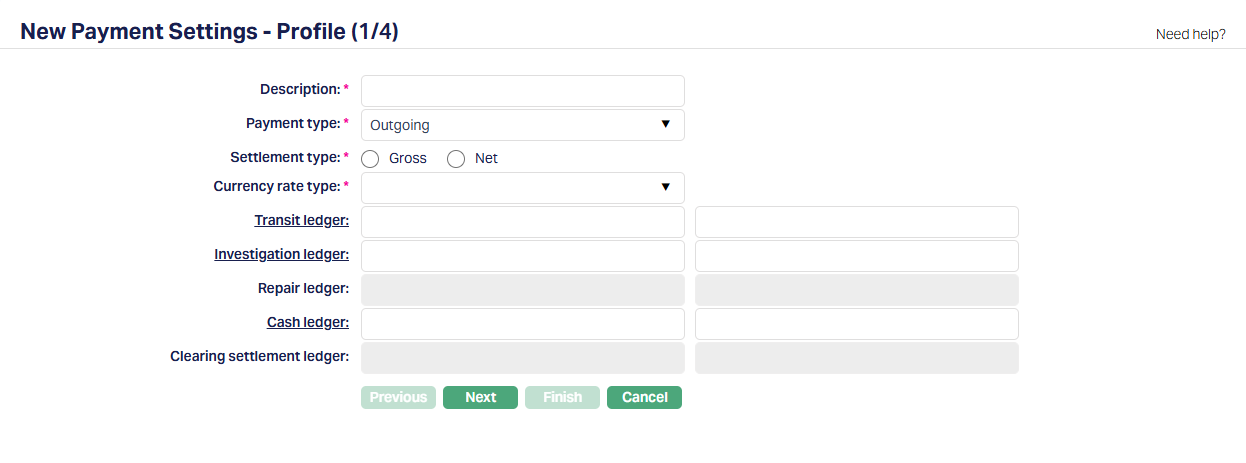
| Field Name | Field Description | Field Value | Notes |
|---|---|---|---|
| Description | The description of the Payment Setting | Can be anything – Should be such that one can easily identify what this Payment Setting is for | This has to be copied to the PG > Settings > Product as this field is used to relate the Retail > Payment Settings to the PG > Product. Usually, the Description for all maintenances is input as the same for ease of use, though, this need not strictly be so. IMPORTANT: If you make any changes to this field value, please make sure that the same is copied to the PG > Settings > Product > External Product Code |
| Payment Type | Indicates the Type of Payment. | If Entity is an FI, this should be Outgoing | |
| Settlement Type | Can be Gross or Net | If Entity is an FI, this should be Gross | |
| Currency Rate Type | Indicates the exchange rate type to be used in case of cross-currency transactions | Can be anything. | If there are no cross-currency transactions, this will not be used. If there are cross-currency transactions, provide the correct Rate Type to be used to derive the exchange rates |
| Transit Ledger | This will not be used as there is no accounting entry for AG Outward Collections | ||
| Investigation Ledger | This will not be used as there is no accounting entry for AG Outward Collections | ||
| Cash Ledger | This will not be used as there is no accounting entry for AG Outward Collections | ||
| 1.1.2. Settings |
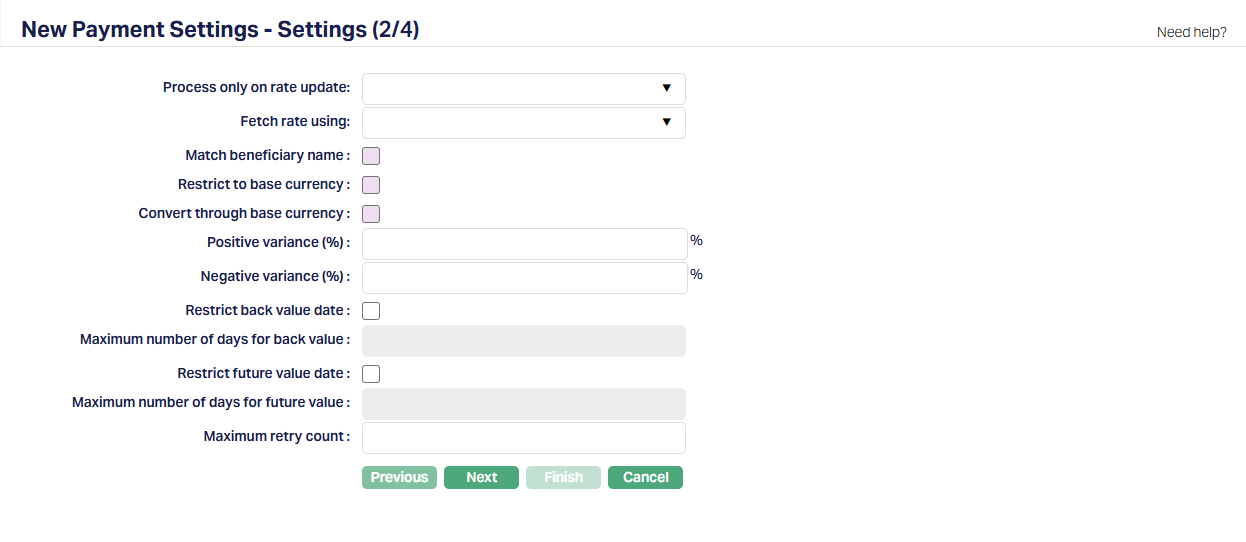
| Field Name | Field Description | Field Value | Notes |
|---|---|---|---|
| Process only on Rate Update | Applicable only if there are cross-currency transactions. Else, leave it blank | ||
| Fetch Rate Using | Applicable only if there are cross-currency transactions. Else, leave it blank | ||
| Positive Variance % | Applicable only if there are cross-currency transactions. Else, leave it blank | ||
| Negative Variance % | Applicable only if there are cross-currency transactions. Else, leave it blank | ||
| Restrict back value date | If Entity is a Financial Institution, this will depend on the Bank in which the account is maintained. | ||
| Restrict future value date | If Entity is a Financial Institution, this will depend on the Bank in which the account is maintained. | ||
1.1.3. Branch
Applicable only in a multi-branch set up, if the Payment Setting is to be used for only selected branches.
1.1.4. Transaction Codes for Internal Processing
| Field Name | Field Description | Field Value | Notes |
|---|---|---|---|
| Debit Processing Transaction Code (Client / DB) | This will not be used as there is no accounting entry for AG Outward Collections | ||
| Debit Processing Transaction Code (GL / DB) | This will not be used as there is no accounting entry for AG Outward Collections | ||
| Internal Debit Transaction Code (GL / DB) | This will not be used as there is no accounting entry for AG Outward Collections | ||
| Internal Credit Transaction Code (GL / CR) | This will not be used as there is no accounting entry for AG Outward Collections | ||
| Credit Processing Transaction Code (Client / CR) | This will not be used as there is no accounting entry for AG Outward Collections | ||
| Credit Processing Transaction Code (GL / CR) | This will not be used as there is no accounting entry for AG Outward Collections | ||
| 1.1.5. Charge | |||
| Field Name | Field Description | Field Value | Notes |
|---|---|---|---|
| Transaction Charge | Depends on solution / fitment. Can be blank | ||
| Advice Charge | Depends on solution / fitment. Can be blank |
1.1.6. Custom Field
Depends on solution / fitment. Can be blank
1.2. Retail → Settings → Product
1.2.1. Nostro Product is not required for Autogiro Outward Collection as there is no accounting entry
1.3. Retail → Accounts → Nostro Account → Maintain
1.3.1. Nostro Account is not required for Autogiro Outward Collection as there is no accounting entry
2. PaymentGrid
2.1. Settings → Message Configuration
There should be one Active Message Configuration per Clearing Network – Message Mode combination.
2.1.1. Profile
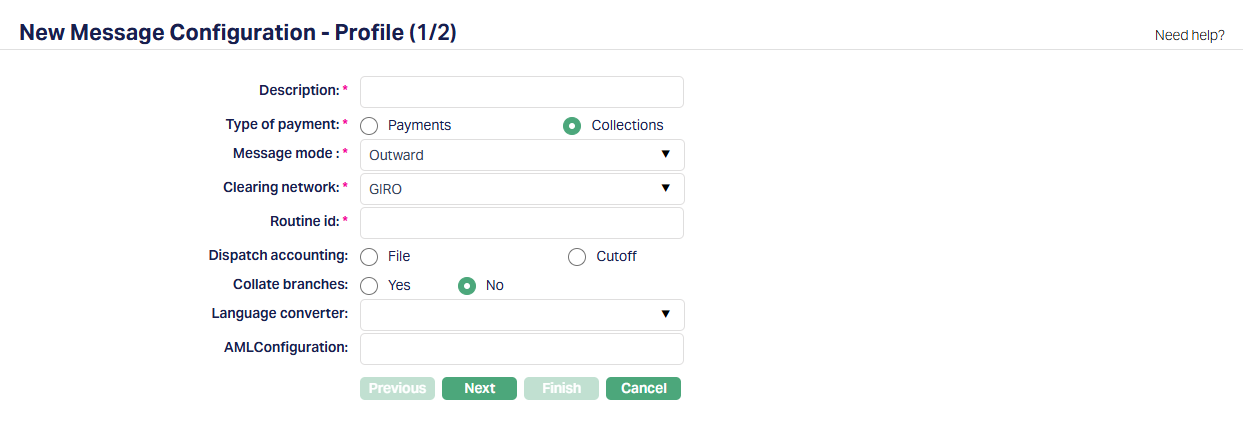
| Field Name | Field Description | Field Value | Notes |
|---|---|---|---|
| Description | The description of the Message Configuration | Can be anything – Should be such that one can easily identify what this Message Configuration is for | Usually, the Description for all maintenances is input as the same for ease of use, though, this need not strictly be so. |
| Type of Payment | To indicate Payment / Collection | Should be Collection | |
| Message Mode | Should be Outward | ||
| Clearing Network | To define the Clearing Network | Should be Giro, as Autogiro is managed under Giro | List of Clearing Networks as required for the implementation based on the country, currencies & payment services offered by the Entity. This is decided during Implementation |
| Routine Id | This is the Routine Id in ADM that will be used to generate the outgoing payment message. | See Notes | If Entity = Bank it should be the valid actual Routine id in DM for the payment message generation. If Entity = FI, it can be any random number as Aura always generates a pain.001 message |
| Language Converter | Used to convert characters as required | Depends on solution / fitment. Can be blank | |
| AML Configuration | This is the Routine Id in ADM that will be used for AML Checks, if any. | Depends on solution / fitment. Can be blank. Note that it should be the valid actual Routine id in DM for the AML Check, if any. | |
| 2.1.2. PDE Configuration |
Based on the settings configured here, Aura will check for duplicate messages. If nothing is input, there will not be any check for duplicate messages. Generally, a PDE will not be found for Loan Outward Collections as only one invoice is generated per Loan Account at the end of the day.
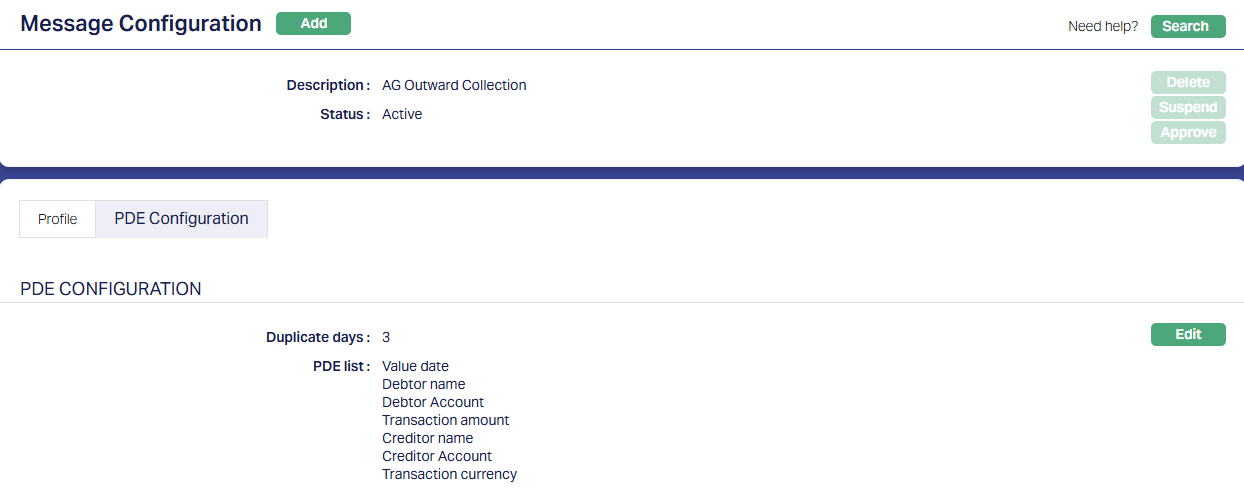
2.2. Settings → Product
The PG → Settings → Product is the linkage between the payment hub and the transaction processing system. Based on the transactions initiated in CC, the Payment Product is determined through the STP configuration to send the Collection Message as defined in the Message Configuration; but, there will be no accounting entries related to the Outward Collection. The Product defined here, thus, has reference to the Retail → Settings → Payment Settings (using the External Product Code) and the Message Configuration for a Clearing Network for a Product Group
2.2.1. Profile
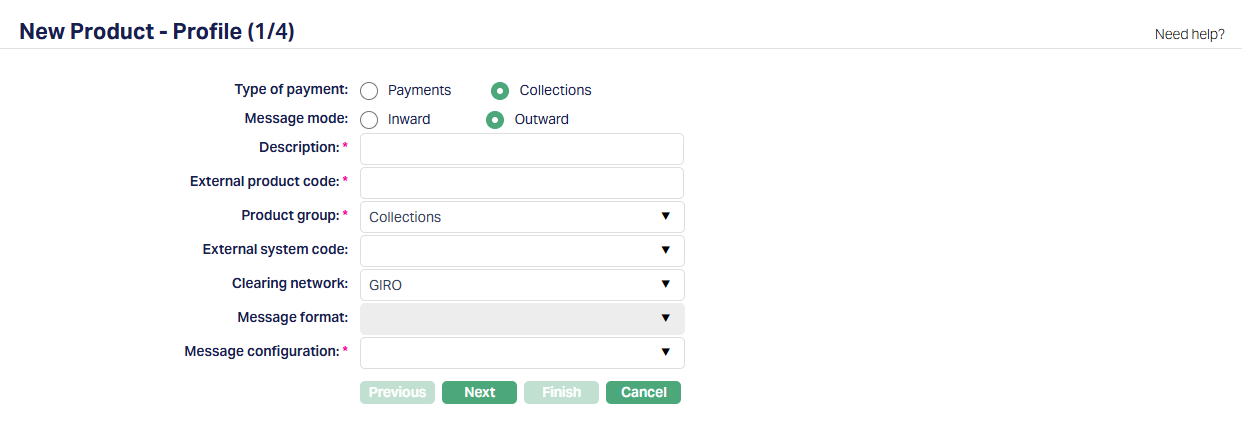
| Field Name | Field Description | Field Value | Notes |
|---|---|---|---|
| Type of Payment | Should be Collections | ||
| Message Mode | Should be Outward | ||
| Description | The description of the Product | Can be anything – Should be such that one can easily identify what this Product is for | Usually, the Description for all maintenances is input as the same for ease of use, though, this need not strictly be so. |
| External Product Code | This will be the linkage between the Retail > Payment Settings and the PG > Settings > Product | Should be exactly the same as in Retail > Payment Settings > Description | Copy the Description from Retail > Payment Settings and paste it into this field so that it is exactly the same. |
| Product Group | Should always be Collections | The option – Others – is for future use | |
| External System Code | List of active interfaces as defined in Admin > System Codes > Interface Definition > Maintain | Should be connectcore | |
| Clearing Network | To define the Clearing Network | Should be Giro as this is related to Autogiro | List of Clearing Networks as required for the implementation based on the country, currencies & payment services offered by the Entity. This is decided during Implementation |
| Message format | The format in which the payment message is to be sent out | Applies only for certain Clearing Networks. This has to be decided at the time of implementation based on whether Aura is being implemented at a Bank or FI; and also based on the arrangement between the FI and its Bank | |
| Message Configuration | List of active Message Configurations that match the Type of Payment, Message Mode and Clearing Network chosen above | ||
| 2.2.2. Process Settings |
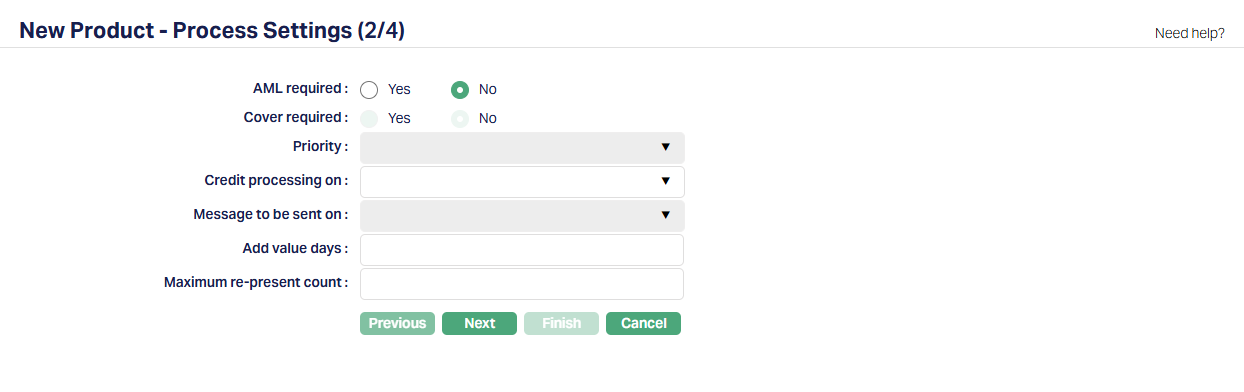
| Field Name | Field Description | Field Value | Notes |
|---|---|---|---|
| AML Required | Depends on solution / fitment. | ||
| Cover Required | Enabled only for certain Clearing Networks | ||
| Priority | Enabled only for certain Clearing Networks | ||
| Credit Processing On | Can be left blank | ||
| Message To Be Sent On | Enabled only for certain Clearing Networks | ||
| Add Value Days | Can be left blank | ||
| Maximum Re-present Count | Can be left blank | ||
| 2.2.3. Authorisation Settings |
| Field Name | Field Description | Field Value | Notes |
|---|---|---|---|
| <All fields> | Depends on solution / fitment. | ||
2.3. Settings > STP Configuration
A Straight-Through-Processing (STP) Configuration should be defined to resolve a PG → Product for each Collection. Several handles are available to configure suitable rules such that for each Collection, a unique Product can be resolved. Multiple rules can be defined.
A sample is shown below:
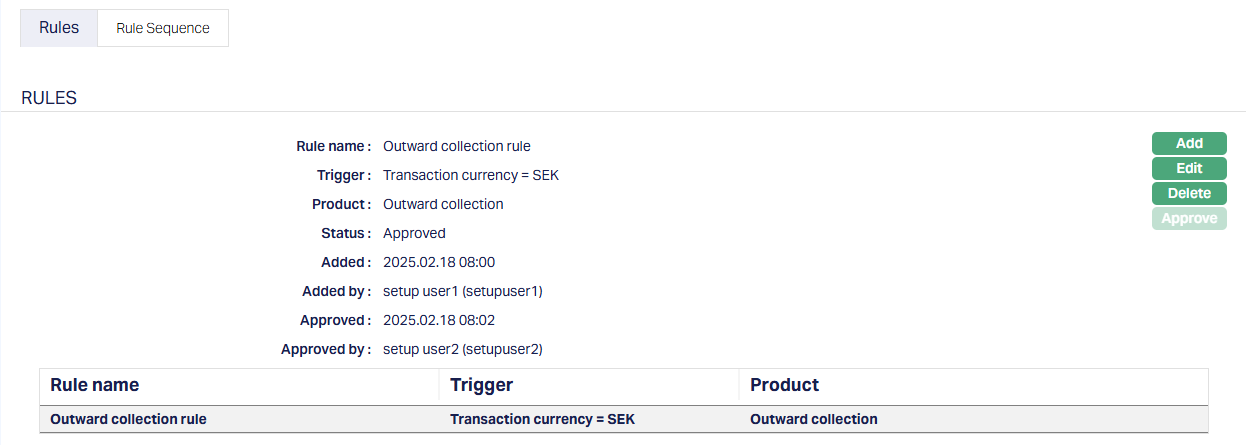
In the above sample, the Trigger uses only the Transaction Currency to map to a unique Product. If there are multiple rules, it is also important to set the Rule Sequence in such a way that the broadest filter is defined as the last.
Note:
- If a Product cannot be resolved using the STP Configuration, the Outward Collection record will not be posted to PG / DM on invoice generation for the Loan Account. Such failures will appear only in the core server log.
2.4. Settings → Nostro Configuration
In case of Autogiro Outward Collections, there is no need to set up a Nostro Configuration as there is no fund flow.
- Aura Data Management
Please note that the configurations in Data Management are the same for both Outward Mandates and Outward Collections, except for Reference Data Feed that needs to be maintained for Outward Collection File generation.
3.1. Admin → System Codes → Generic Definitions → Classifications
Classification enables you to categorize / label the various configurations in Data Management so that it is easier to know what the configuration is for. Create a Classification record where the Description identifies the purpose that is sought to be achieved.
See sample below:
3.2. Data Management → Settings → External System
Depending on the Bank / external system to which the mandate / collection files have to be transferred and the mode of upload / transmission, you may have to create more records under External System. For example, the Entity may want the file to be moved to its servers as archival / history records.
3.2.1. Bankgirot
This is to define the system to which the Outward Mandate and Collection Files have to be sent. This will be the same External System for Outward Mandates, Inward Mandates, Outward Collections and Inward Collections.
3.3. Data Management → Definitions → Reference Data → Data Feed
For generation of Outward Collection File, the following Reference Data Feed should be maintained.
3.3.1. File Generation Days
This defines when the Outward Collection File has to be generated. Based on the number of days input here, all the outward collection records where Collection Due Date minus the X days = CBD will be picked up to be included in the Outward Collection File.

3.3.2. Test or Production
This defines whether the file that is generated is for purposes of Testing or is from actual Production. Depending on the value provided here, the file name will be different so that BGC will accordingly process the same.
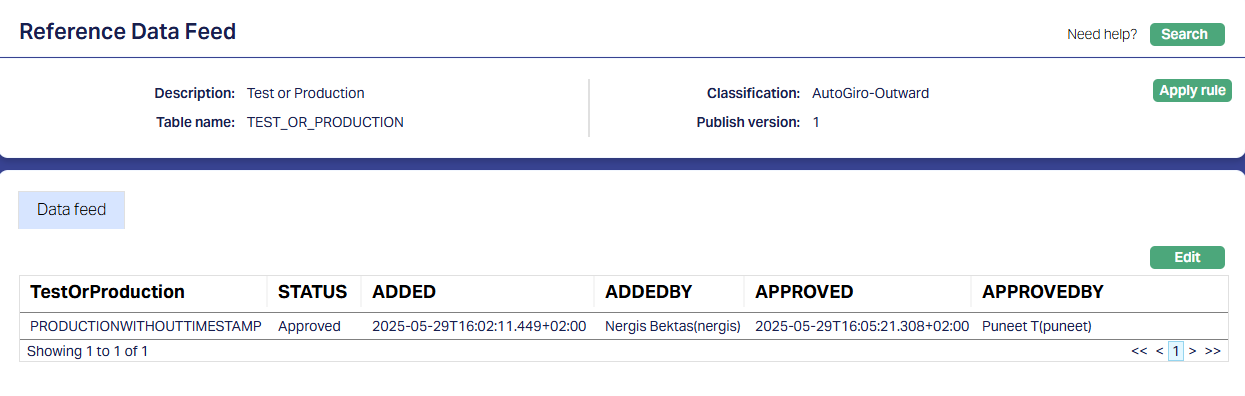
3.4. Data Management → Configurations → Settings → Security
As required for an implementation, the Security configurations have to be set up for encrypting the files. A sample for encryption of the Outward Mandate file and Outward Collection file using HMAC Security is shown below.
Note:
- The Description that is given for this Configuration will have to be used in the Parameter in the Custom Function related to the Security (see section under Custom Functions)
- Encryption Key should be received from Entity and input exactly as received; else, the encryption will fail
- Encryption Method and Encryption Algorithm depend on the agreement between the Entity and the Bank in which the account is held.
3.5. Data Management → Metadata → Custom Functions
For Autogiro, the following Custom Functions should be configured. Usually, this is part of the installation. If not, a new Custom Function using the Java Function already available should be configured. The Status must be Published and the Parameters should be correct for that Implementation
3.5.1. Outgoing payment message
This function will ensure that the Outward Collection File related to Loan Invoices and the Outward Mandate File related to new Agreements created in CC, are generated and available in the required designated path
3.5.1.1. Profile
3.5.1.2. Parameter
Note:
- Customer # = Entity’s id with the BGC
- Bankgiro # = A/c # into which repayment has to come
- Output path = where the generated file will be placed
3.5.2. Encryption
As required in the specific implementation, the file may have to be encrypted using a specific encryption method. In such a case, there should be a specific Custom Function configured to ensure that the Outward Files are encrypted and moved to the designated path. A sample is shown below that uses HMAC Encryption.
3.5.2.1. Profile
3.5.2.2. Parameter
Note:
- The unencrypted file will be taken up from pInternalFilePathUpload and after applying the defined encryption, the encrypted file will be available at the destination specified in pInternalFilePathDownload.
- The specific path / folder will have to be defined in consultation with IT at the time of implementation
3.6. Data Management → Configurations → Interfaces
3.6.1. Outward Transmission
As required for the Implementation, an Interface Configuration has to be set up for transmission of the encrypted Outward Mandate and Collection Files to Bankgirot. A sample is shown below where the Protocol is SFTP.
3.6.1.1. Profile
3.6.1.2. Settings
Note:
- The Source File Path: Should be the Path where the encrypted file will be available. The file available at this location will be transmitted to Bankgirot.
- The Destination File Path: Should be the one that Bankgirot has specified as the path where the Outward Mandate and Collection Files should be transmitted to
- Post File Operation & Post File Operation File Path: Since the files that were transmitted to Bankgirot should be available for any future reference, Post File Operation is specified as Move; and the Path to which the Files have to be moved should be specified in Post File Operation File Path
- Outgoing Folder has the Unencrypted file; Move Folder has the Encrypted file and the Backup Folder has the Encrypted file as a history record
3.7. Data Management → Configurations → Groups → Maintain
Once the required Configuration records are Published, you have to create a Group and map all the required functions to that Group. This ensures that all the functions required for generation of the Outward Mandate and Collection Files are executed in the specific sequence.
Usually, this is part of the installation. If not, you will have to do the same.
Note:
- The sequence of the functions is very critical and should be strictly set up as shown below.
3.8. Data Management → Configurations → Routines → Maintain
You have to create a Routine and map the Group as well as the Classification. You must always create two Routines for each Group: One of Type Scheduled / Auto as required; and one other of Type Adhoc. The Scheduled / Auto routine will be automatically executed at the Scheduled Time / during EOD/BOD as defined in the Routine; and in case there is any issue with such automatic execution, and a manual intervention is required, the Adhoc Routine can be used to run the routine after such manual intervention.
Usually, this is part of the installation. If not, you will have to do the same.
3.8.1. Scheduled Routine
3.8.2. Adhoc Routine
3.9. Data Management → Configurations → Scheduler → Maintain
If the Routine has been created with Type = Scheduled, you need to create a Scheduler to define the frequency & time of execution.
3.9.1. Scheduler for Outward AG
A sample is shown below where the scheduler will run every day between 19:25 and 19:28 for the period selected and as per the time zone selected.
Note:
- The scheduler has to be set up as per the needs of that specific Implementation
3.9.1.1. Profile
3.9.1.2. Frequency
3.10. Data Management → Configurations → Routines → Branch Mapping
Once the Routines and Schedulers are configured, these should be mapped for the Branch(es) for which the Routines should be executed. You have to map both the Adhoc and Scheduled / Auto routines.
3.10.1. Adhoc → Edit
All Routines that are defined as Adhoc Type will display; check the relevant checkbox to map the Routine to the Branch; uncheck to unmap. Only mapped Routines can be manually executed for that Branch using Data Operations > Adhoc Routines
3.10.2. Scheduled → Edit
All Routines that are defined as Scheduled Type will display; check the relevant checkbox to map the Routine to the Branch; uncheck to unmap. Only mapped Routines will be automatically executed for that Branch as per the Scheduler mapped.
AUTOGIRO INWARD COLLECTIONS
The following are the specific maintenances for Autogiro Inward Collections
- Aura Transaction Processing
1.1. Retail → Settings → Payment Settings
This is required to be set up to define the Ledger Accounts and Transaction Codes that are to be used for posting accounting entries related to the Autogiro Inward payments.
Depending on the needs of the implementation, multiple Payment Settings have to be maintained for the Payments coming in towards different accounts (say, Loans under different Products, Client Accounts, etc.,). As a general guide, if different General Ledgers / Transaction Codes are required for different inward collections (say, for the purpose of reconciliation), multiple Payment Settings should be created
1.1.1. Profile
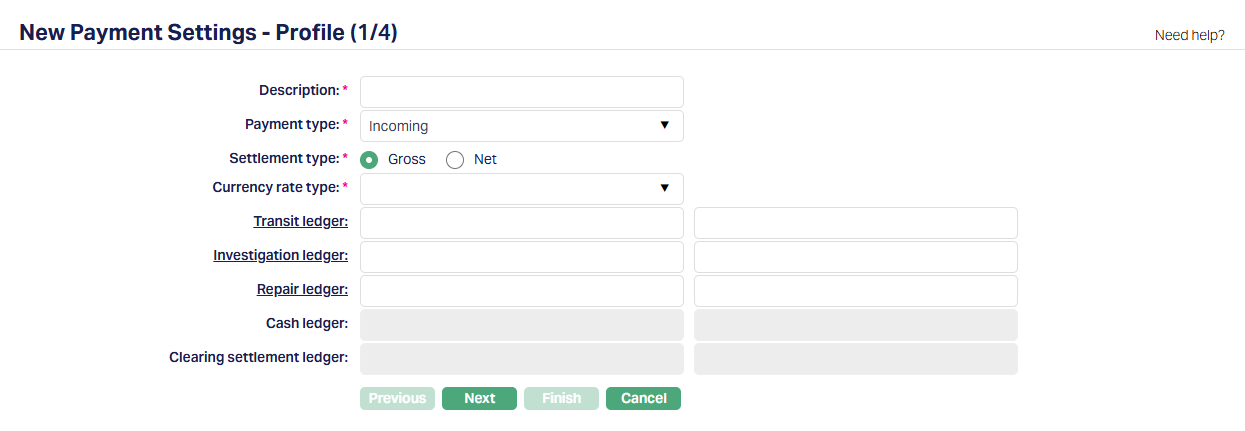
| Field Name | Field Description | Field Value | Notes |
|---|---|---|---|
| Description | The description of the Payment Setting | Can be anything – Should be such that one can easily identify what this Payment Setting is for | This has to be copied to the PG > Settings > Product as this field is used to relate the Retail > Payment Settings to the PG > Product. Usually, the Description for all maintenances is input as the same for ease of use, though, this need not strictly be so. IMPORTANT: If you make any changes to this field value, please make sure that the same is copied to the PG > Settings > Product > External Product Code |
| Payment Type | Indicates the Type of Payment. | If Entity is an FI, this should be Incoming | |
| Settlement Type | Can be Gross or Net | If Entity is an FI, this should be Gross | |
| Currency Rate Type | Indicates the exchange rate type to be used in case of cross-currency transactions | Can be anything. | If there are no cross-currency transactions, this will not be used. If there are cross-currency transactions, provide the correct Rate Type to be used to derive the exchange rates |
| Transit Ledger | The GL Account into which funds will be credited during Nostro Accounting | Usually, for Loan Collections, this will be the actual GL that has been mapped in the Loan Product as the Settlement GL | |
| Investigation Ledger | The Ledger into which funds will be parked if there is any investigation to be carried out – for example, if AML check is positive | ||
| Repair Ledger | The ledger to be used if the inward collection goes to repair queue because of business validations exceptions. | ||
| 1.1.2. Settings |
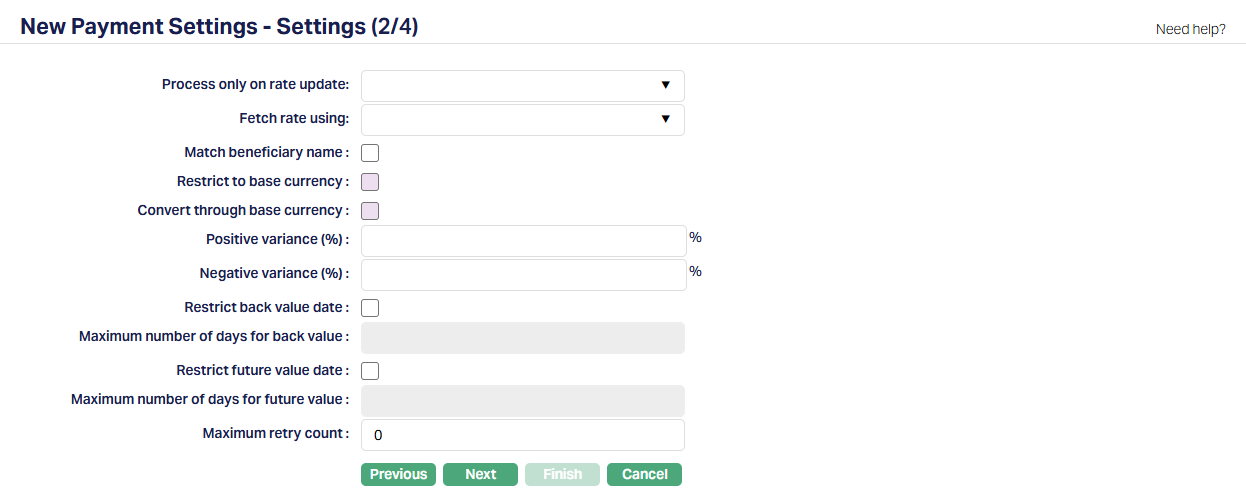
All the fields in this Step are not applicable to Autogiro Collections and hence, can be left blank / at the default values
1.1.3. Branch
Applicable only in a multi-branch set up, if the Payment Setting is to be used for only selected branches.
1.1.4. Transaction Codes for Internal Processing
| Field Name | Field Description | Field Value | Notes |
|---|---|---|---|
| Debit Processing Transaction Code (Client / DB) | Used to debit a Nostro account during Debit Processing of the Inward Collection (Event Code: PAYMDP) | ||
| Debit Processing Transaction Code (GL / DB) | If a GL is resolved as the Nostro, this Transaction Code is used to debit the Nostro GL during Debit Processing (Event Code: PAYMDP) | ||
| Internal Debit Transaction Code (GL / DB) | Used to debit the Transit GL during Client account credit (Event Code: PAYMCP) | Example: The inward collection fails due to a Business exception at the Loan Account and the Entity decides to move the funds to their Internal Operations account (Client Account). The Transit GL will be debited and Client A/c will be credited | |
| Internal Credit Transaction Code (GL / CR) | This is not used for Autogiro collections. | ||
| Credit Processing Transaction Code (Client / CR) | Used to credit a Client Account (Event Code: PAYMCP) | Example: The inward collection fails due to a Business exception at the Loan Account and the Entity decides to move the funds to their Internal Operations account (Client Account). The Transit GL will be debited and Client A/c will be credited | |
| Credit Processing Transaction Code (GL / CR) | Used to credit the Transit GL (Event Code: PAYMDP) | ||
| 1.1.5. Charge |
| Field Name | Field Description | Field Value | Notes |
|---|---|---|---|
| Transaction Charge | Depends on solution / fitment. Can be blank | ||
| Advice Charge | Depends on solution / fitment. Can be blank | ||
| 1.1.6. Custom Field |
Depends on solution / fitment. Can be blank
1.2. Retail → Settings → Product
1.2.1. Create a Nostro Account Product – Refer to the User Manual
1.3. Retail → Accounts → Nostro Account → Maintain
1.3.1. Create a Nostro Account – Refer to the User Manual
Note:
- Depending on the needs of the implementation (say, different Nostro accounts to be used for multiple accounts that the FI has with the Bank; and different Master GLs are to be used for each Nostro Account), multiple Nostro accounts may have to be set up under multiple Nostro Products.
- PaymentGrid
2.1. Settings → Message Configuration
There should be one Active Message Configuration per Clearing Network – Message Mode combination.
2.1.1. Profile

| Field Name | Field Description | Field Value | Notes |
|---|---|---|---|
| Description | The description of the Message Configuration | Can be anything – Should be such that one can easily identify what this Message Configuration is for | Usually, the Description for all maintenances is input as the same for ease of use, though, this need not strictly be so. |
| Type of Payment | To indicate Payment / Collection | Should be Collections | |
| Message Mode | Should be Inward | ||
| Clearing Network | To define the Clearing Network | Should be Giro as this is related to Autogiro | List of Clearing Networks as required for the implementation based on the country, currencies & payment services offered by the Entity. This is decided during Implementation |
| Routine Id | This is the Routine Id in ADM that will be used to process the inward collection message. | See Notes | If Entity = Bank it should be the valid actual Routine id in DM for the inward collection message processing. If Entity = FI, it can be any random number |
| Language Converter | Used to convert characters as required | Depends on solution / fitment. Can be blank | |
| AML Configuration | This is the Routine Id in ADM that will be used for AML checks, if any. | Depends on solution / fitment. Can be blank | |
| 2.1.2. PDE (Possible Duplicate Emission) Configuration |
Based on the settings configured here, Aura will check for duplicate messages. If nothing is input, there will not be any check for duplicate messages. If any duplicates are identified, these will be marked as such so that users can investigate and take an appropriate decision.
In case of Autogiro Inward, generally, there will not be any PDEs as the Inward messages are based on the Outward Message Reference; and such Outward Message Reference will always be unique.
2.1.3. Editable Columns
This enables you to define the specific fields that can be edited for Failed Inward Collection Messages, so that these can be retried for processing.
A sample is shown, where only the Creditor Account field is allowed to be edited – say, to move the funds to the Entity’s Internal Operations Account (Client Account).
Note:
- If the solution approach is to enable crediting a Client Account for Inward Collection, the required configurations for Incoming Payments should be set up.
2.2. Settings → Product
The PG → Settings → Product is the linkage between the payment hub and the transaction processing system. Based on the Collection records received from DM, the PG Product is determined through the STP configuration and accounting entries related to the Collection are initiated by PG and posted in CC. The Product defined here, thus, has reference to the Retail → Settings → Payment Settings (using the External Product Code) and the Message Configuration for a Product Group.
Note:
- Depending on the needs of the implementation, as many Products as required can be set up
2.2.1. Profile
| Field Name | Field Description | Field Value | Notes |
|---|---|---|---|
| Type of Payment | Should be Collections | ||
| Message Mode | Should be Inward | ||
| Description | The description of the Product | Can be anything – Should be such that one can easily identify what this Product is for | Usually, the Description for all maintenances is input as the same for ease of use, though, this need not strictly be so. |
| External Product Code | This will be the linkage between the Retail > Payment Settings and the PG > Settings > Product | Should be exactly the same as in Retail > Payment Settings > Description | Copy the Description from Retail > Payment Settings and paste it into this field so that it is exactly the same. |
| Product Group | Should be Loan Repayment | ||
| External System Code | List of active interfaces as defined in Admin > System Codes > Interface Definition > Maintain | Should be connectcore | |
| Message Configuration | List of active Message Configurations that match the Type of Payment and Message Mode chosen above | ||
| 2.2.2. Process Settings |
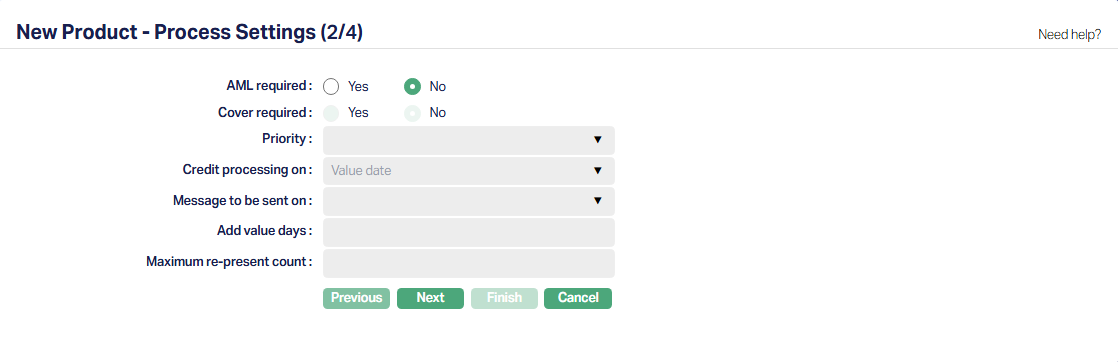
| Field Name | Field Description | Field Value | Notes |
|---|---|---|---|
| AML Required | Depends on solution / fitment. | ||
| Other fields | All other fields are disabled |
2.2.3. Authorisation Settings
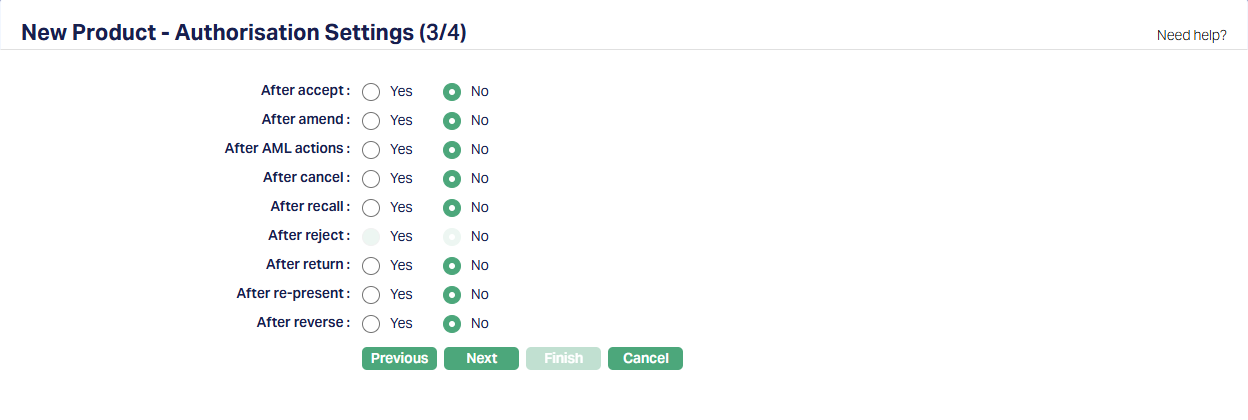
| Field Name | Field Description | Field Value | Notes |
|---|---|---|---|
| All fields | Whether an approval is required after the specific action | Depends on solution / fitment. | |
2.3. Settings → STP Configuration
A Straight-Through-Processing (STP) Configuration should be defined to resolve a PG > Product for each Collection record. Several handles are available to configure suitable rules such that for each Collection record, a unique Product can be resolved. Multiple rules can be defined.
NOTE:
- For processing of Loan Repayments through Autogiro, there should be a configuration for Message Mode = Inward
- If the Entity has an Internal Operations Account to park AG Inward funds if the need arises, there should be a configuration for Message Mode = Incoming.
A sample is shown below: 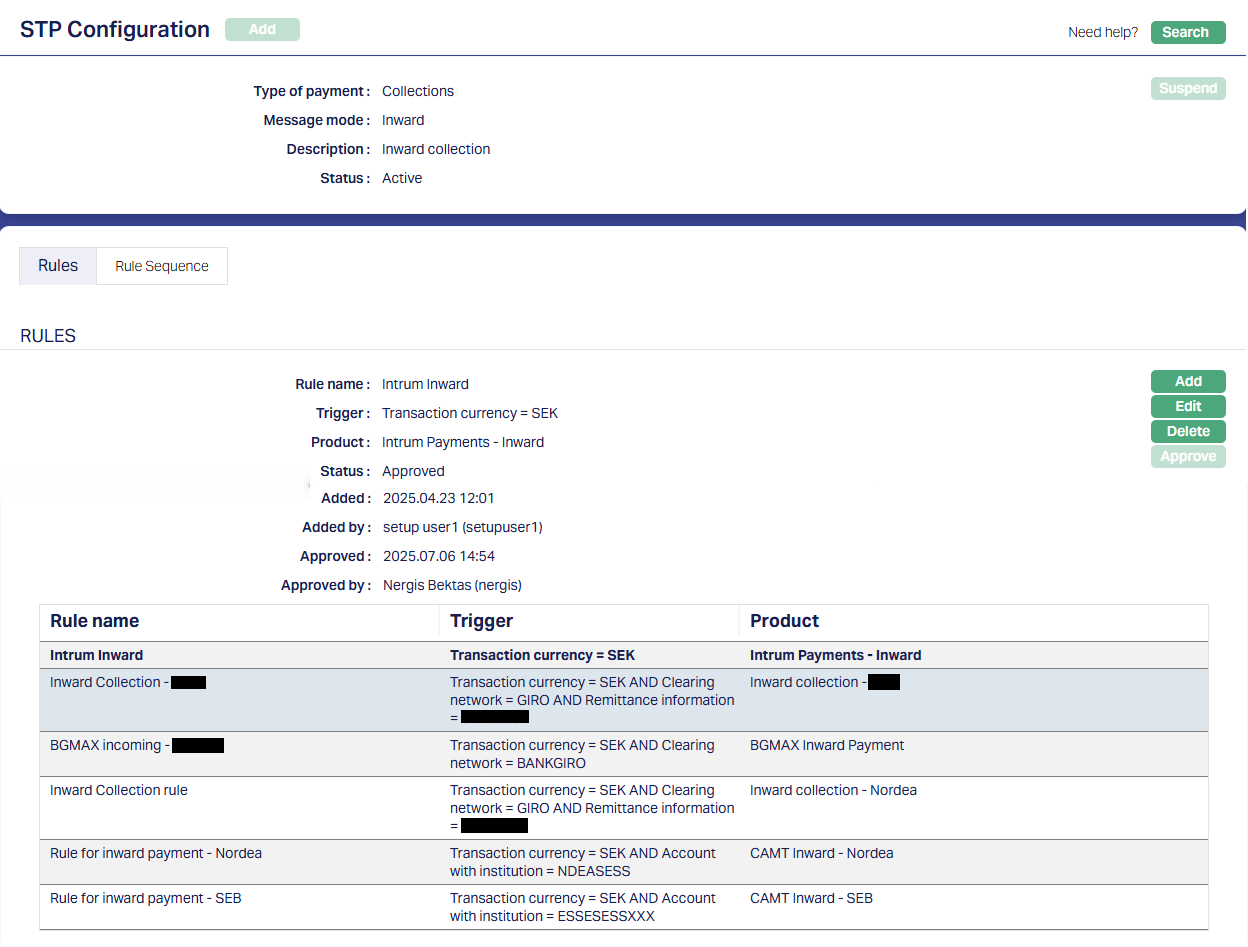
In the above sample, the Trigger uses multiple handles like Transaction Currency, Clearing Network, Remittance Information and Account With Institution to map the Payment Transaction to a unique Product. It is also important to set the Rule Sequence in such a way that there is no overlap / gap and all payment transactions can be uniquely resolved to a Product.
2.4. Settings → Nostro Configuration
This enables you to set up the Nostro that is to be used for the Inward Collection. The Nostro entries will mirror the entries in the Bank Account from which the funds will be moved to the internal accounts as per the collection message.
One Nostro Configuration should be defined to resolve the Nostro Account for each Clearing Network for all Message Modes (like Incoming, Inward, Outgoing, Outward). Several handles are available to configure suitable rules such that for each payment, a unique Nostro Account can be resolved. Multiple rules can be defined. Usually, the STP Configuration and the Nostro Configuration have the same rules, but it need not necessarily be so. The former is used to identify the Product while the latter is used to identify the Nostro Account.
Note:
- The Originator Account # field in the pgpaymenttransaction table will store the Account # (IBAN) that the Entity has with the Bank. Thus, even if the Entity maintains multiple accounts with the same Bank (or with multiple Banks) for different purposes (like Loan Account repayments of a specific Loan Product to be paid into one Bank Account, and for other specific Loan Product, payments to be made into another Bank Account), the rules can be configured using this field to identify the transactions and resolve to different Nostro accounts if required.
2.4.1. Profile
| Field Name | Field Description | Field Value | Notes |
|---|---|---|---|
| Clearing Network | To define the Clearing Network | Should be Giro as this is related to Autogiro | List of Clearing Networks as required for the implementation based on the country, currencies & payment services offered by the Entity. This is decided during Implementation |
| Description | The description of the Nostro Configuration | Can be anything – Should be such that one can easily identify what this Nostro Configuration is for | Usually, the Description for all maintenances is input as the same for ease of use, though, this need not strictly be so. |
| Rule Name | Any free text that identifies what the Rule is for | ||
| Trigger, Parameter, Operator, Value | Use as required to build the Rule | ||
| BIC | The Bank Identifier Code of the Bank in which the Entity maintains the Bank Account | ||
| Account # / Ledger # | The Nostro Account # or the Ledger # into which the Nostro entries have to be posted. | This has to be exactly the same as maintained in CC for the Nostro Accounting entries to be successfully posted. Copy from CC and paste here | |
| Confirmation Required | Depends on solution / fitment. This is applicable only for SWIFT & TARGET2. For others, it can remain as No | ||
| A sample is shown below: |
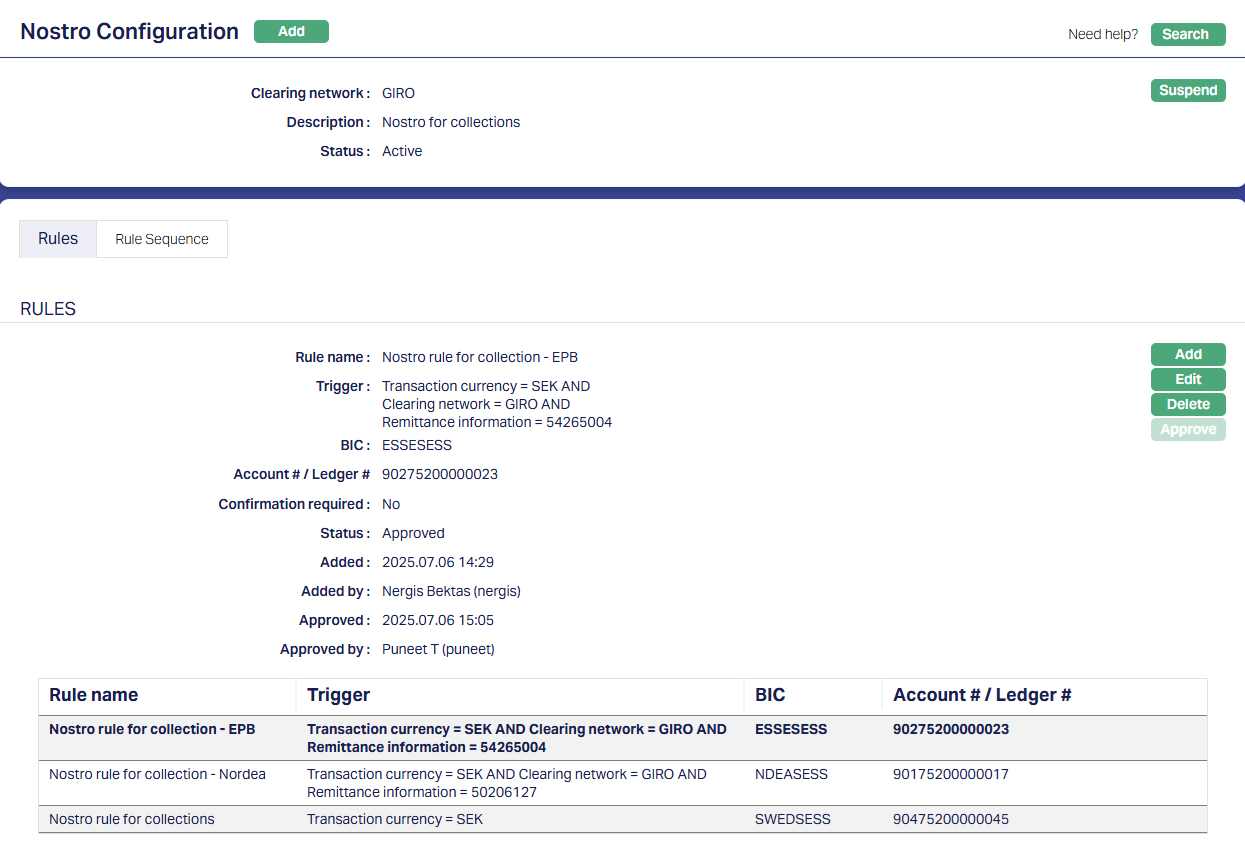
3. Aura Data Management
Please note that the configurations in Data Management are the same for both Inward Mandates and Inward Collections
3.1. Admin → System Codes → Generic Definitions → Classifications
Classification enables you to categorize / label the various configurations in Data Management so that it is easier to know what the configuration is for. Create a Classification record where the Description identifies the purpose that is sought to be achieved.
See sample below:
3.2. Data Management → Settings → External System
Depending on the Bank / external system from which the mandate / collection files have to be transferred and the mode of download / transmission, more records may have to be created under External System. For example, the Entity may want the file to be moved to its servers as archival / history records.
3.2.1. Bankgirot
This is to define the system from which the Inward Mandate and Collection Files have to be received. This will be the same External System for Outward Mandates, Inward Mandates, Outward Collections and Inward Collections.
3.2.2. Entity’s SFTP
3.3. Data Management → Definitions → Reference Data → Data Feed
Nothing specific
3.4. Data Management → Configurations → Settings → Security
Nothing specific
Depending on the requirements in the Implementation, a Security Configuration may be required to Decrypt / Decompress the inward file
3.5. Data Management → Metadata → Custom Functions
3.5.1. Process Incoming
This function will ensure that the Inward Mandate and Collection Files are downloaded and available in the required designated path
3.5.1.1. Profile
3.5.1.2. Parameter
Note:
- pMode = Inward
- pTransferType = AUTOGIRO
- pInputPath = This is the path where the downloaded file will be available in Aura’s server and then moved to Output Path
- pOutputPath = This is the path from where the file processing is done
- pBackupPath = This is the path to which the file will be moved after the Processing is completed for history / archival
3.6. Data Management → Configurations → Interfaces
3.6.1. Inward Transmission
As required for the Implementation, an Interface Configuration has to be set up for transmission of the Inward Files from Bankgirot. A sample is shown below where the Protocol is SFTP.
3.6.1.1. Profile
3.6.1.2. Settings
Note:
- The Source File Path: Should be the one that Bankgirot has specified as the path where the inward file should be downloaded from
- The Destination File Path: Should be the Path in Aura’s servers where the downloaded file should be available. The file available at this location should be used to process the Collection records – to create and / or to update the records in PG & post accounting entries in CC.
- Post File Operation & Post File Operation File Path: Since we shouldn’t process the same file twice, as soon as the file in the BGC Source File Path is read, it is moved to the Post File Operation Path which is also a folder in BGC. This is decided at the time of Implementation depending on the agreement between the Entity and BGC
3.6.2. Movement to Entity’s SFTP
This may be configured as required for the specific Implementation to move the Inward File to the Entity’s servers as a history record
3.6.2.1. Profile
- External System = Should be mapped to the Entity’s system that has been maintained under Data Management > Settings > External System
3.6.2.2. Settings
Note:
- The Source File Path: This should be the Path where the Inward Files are moved after the Processing
- The Destination File Path: Should be the Path in the Entity’s server to which the files are to be moved for history / archival
- Post File Operation & Post File Operation File Path: Should be the Path in Aura’s server to which the files are to be moved for history / archival
3.7. Data Management → Configurations → Groups → Maintain
Once the required Configuration records are Published, you have to create a Group and map all the required functions to that Group. This ensures that all the functions required for the Outward Mandate and Collection file generation are executed in the specific sequence.
Usually, this is part of the installation. If not, you will have to do the same.
Note:
- The sequence of the functions is very critical and should be strictly set up as shown below.
3.8. Data Management → Configurations → Routines → Maintain
You have to create a Routine and map the Group as well as the Classification. You must always create two Routines for each Group: One of Type Scheduled / Auto as required; and one other of Type Adhoc. The Scheduled / Auto routine will be automatically executed at the Scheduled Time / during EOD/BOD as defined in the Routine; and in case there is any issue with such automatic execution, and a manual intervention is required, the Adhoc Routine can be used to run the routine after such manual intervention.
Usually, this is part of the installation. If not, you will have to do the same.
3.8.1. Scheduled Routine
3.8.2. Adhoc Routine
3.9. Data Management → Configurations → Scheduler → Maintain
If the Routine has been created with Type = Scheduled, you need to create a Scheduler to define the frequency & time of execution.
3.9.1. Scheduler for AG Inward
A sample is shown below where the scheduler will run every day between 17:30 and 19:35 for the period selected and as per the time zone selected.
Note:
- The scheduler has to be set up as per the needs of that specific Implementation
3.9.1.1. Profile
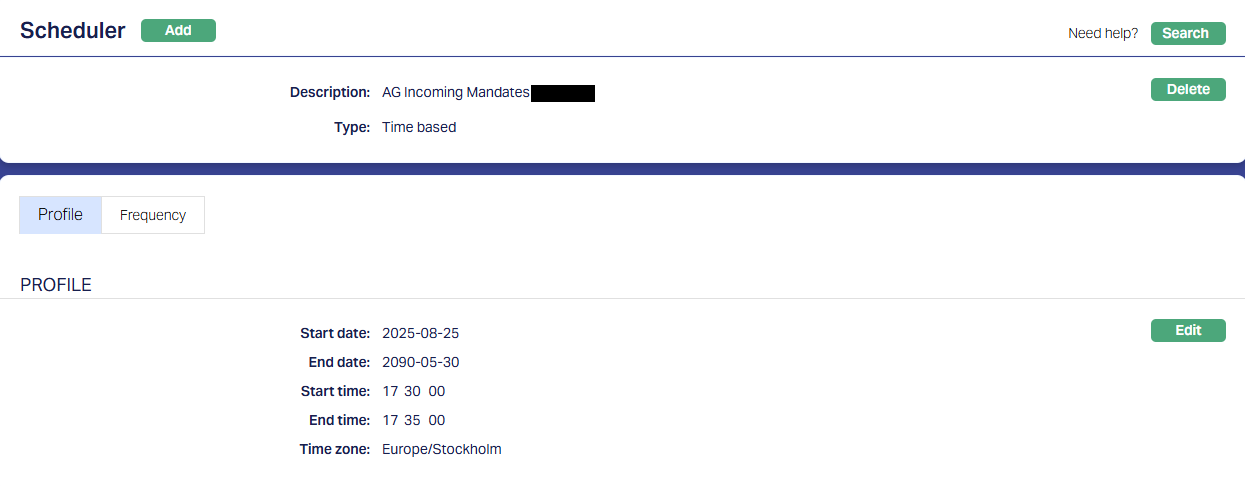
3.9.1.2. Frequency
3.10. Data Management → Configurations → Routines → Branch Mapping
Once the Routines and Schedulers are configured, these should be mapped for the Branch(es) for which the Routines should be executed. You have to map both the Adhoc and Scheduled / Auto routines.
3.10.1. Adhoc → Edit
All Routines that are defined as Adhoc Type will display; check the relevant checkbox to map the Routine to the Branch; uncheck to unmap. Only mapped Routines can be manually executed for that Branch using Data Operations → Adhoc Routines
3.10.2. Scheduled → Edit
All Routines that are defined as Scheduled Type will display; check the relevant checkbox to map the Routine to the Branch; uncheck to unmap. Only mapped Routines will be automatically executed for that Branch as per the Scheduler mapped.
PROCESS FOR AUTOGIRO COLLECTIONS FOR LOANS
- Based on the Invoice Settings at Retail → Loans → Maintain, the loan invoice will be generated x days before the Payment Schedule Due On date.
- As soon as the invoice is generated, another batch runs in CC to populate the invoice data into the Collection tables in PG & DM for those Loan Accounts where the Repayment Through = Direct Debit, the latest linked Agreement’s status is Accepted and Invoice Generation Date = Current booking date.
Note:
- If the required configurations in Retail, PG & DM are not correctly set up, the above batch will not populate the data in the required tables.
- On creation of the Outward Collection records in PG & DM, the Message Mode will be Outward and the Message Status will be Sent for Collection. You can view such records using PaymentGrid → Operations → Net Settlement. Sample screenshots for a record are shown below:
3.1. Profile
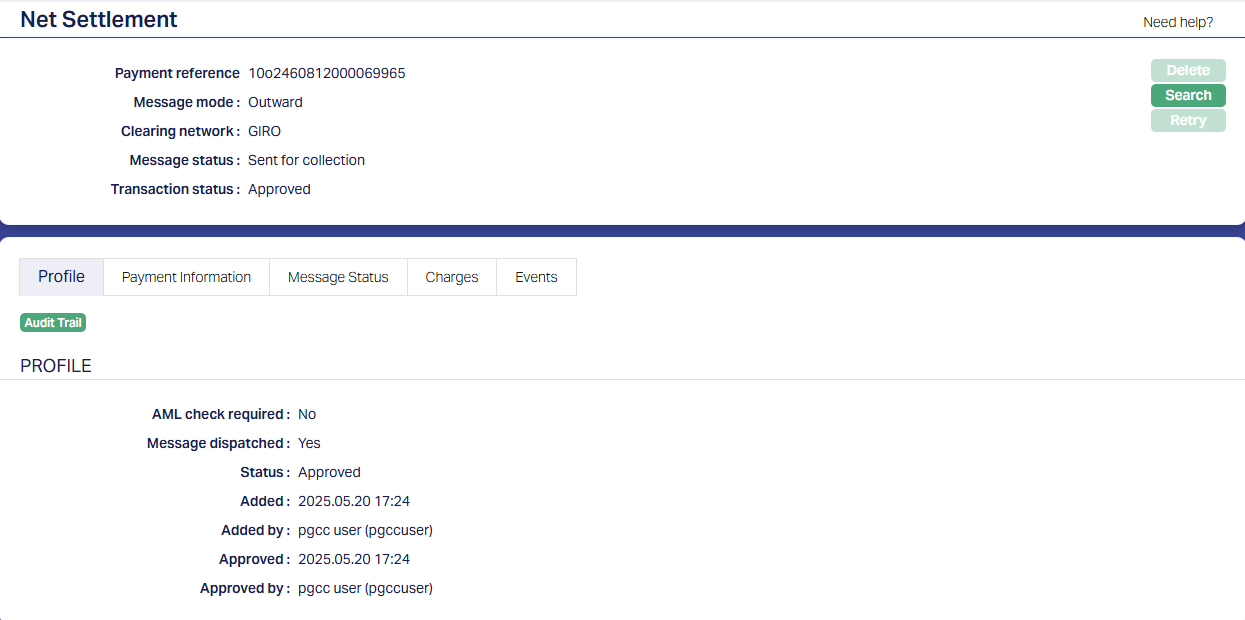
| Field Name | Field Description | Field Value | Notes |
|---|---|---|---|
| Payment Reference | Unique number generated for the collection record | ||
| Message Mode | Will always be Outward | ||
| Clearing Network | Will always be GIRO (as this is Autogiro process) | The Clearing Network will be populated when the STP Configuration resolves the Product & Message configuration for the AG Outward | |
| Message Status | Will always be Sent for Collection as soon as the record is created | ||
| Transaction Status | Will always be Approved | ||
| AML Check Required | |||
| Message Dispatched | Will be No as soon as the record is created. This will change to Yes when the Outward Collection file is generated in DM |
3.2. Payment Information
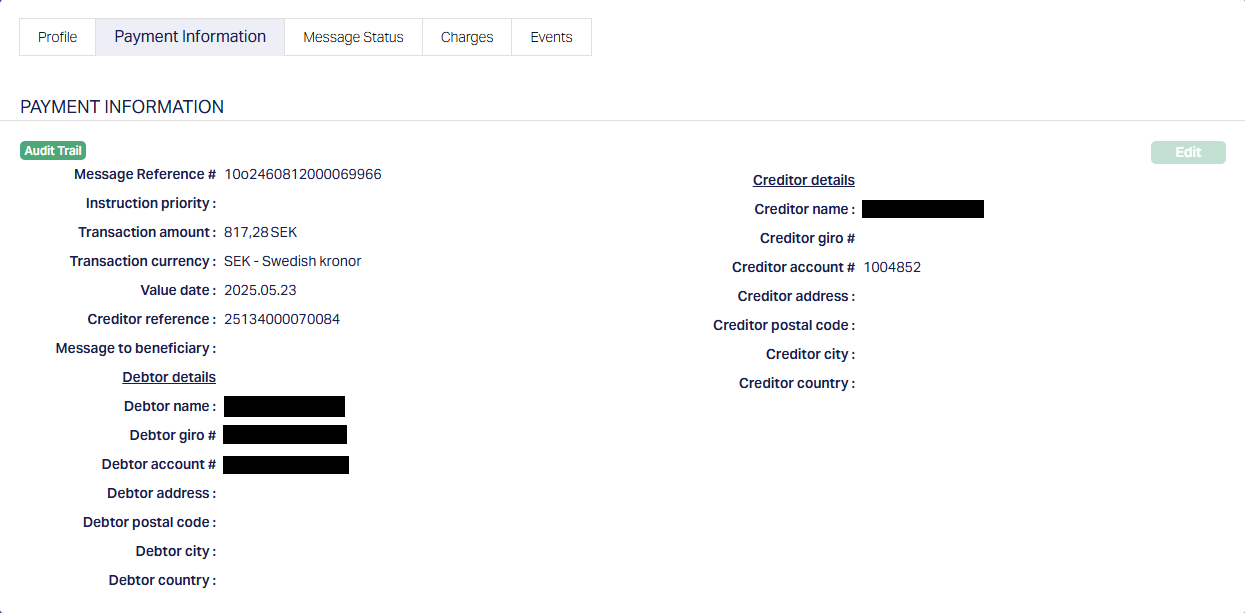
| Field Name | Field Description | Field Value | Notes |
|---|---|---|---|
| Message Reference | Unique number generated for the collection record | ||
| Transaction Amount | Amount for the Collection record. This will be picked from the Loan Invoice Amount | ||
| Transaction Currency | Always SEK as this is related to Autogiro | ||
| Value Date | Will be the date of invoice generation | ||
| Creditor Reference | The Loan account Invoice Reference # that is unique | ||
| Message to Beneficiary | For AG outward, it will always be blank | ||
| Debtor Name | Will be the Loan Account Client’s Name | ||
| Debtor giro # | Will be the Giro # as input in the Agreement from which the collection has to be made | ||
| Debtor Account # | Will be the Bank Account # for the above Giro # as input in the Agreement from which the Collection has to be made | ||
| Other fields under Debtor Details | Will always be blank | ||
| Creditor Name | Loan Client Name | ||
| Creditor Giro # | Will always be blank | ||
| Creditor Account # | The Loan Account # for which the invoice was raised | ||
| Other fields under Creditor Details | Will always be blank |
3.3. Message Status
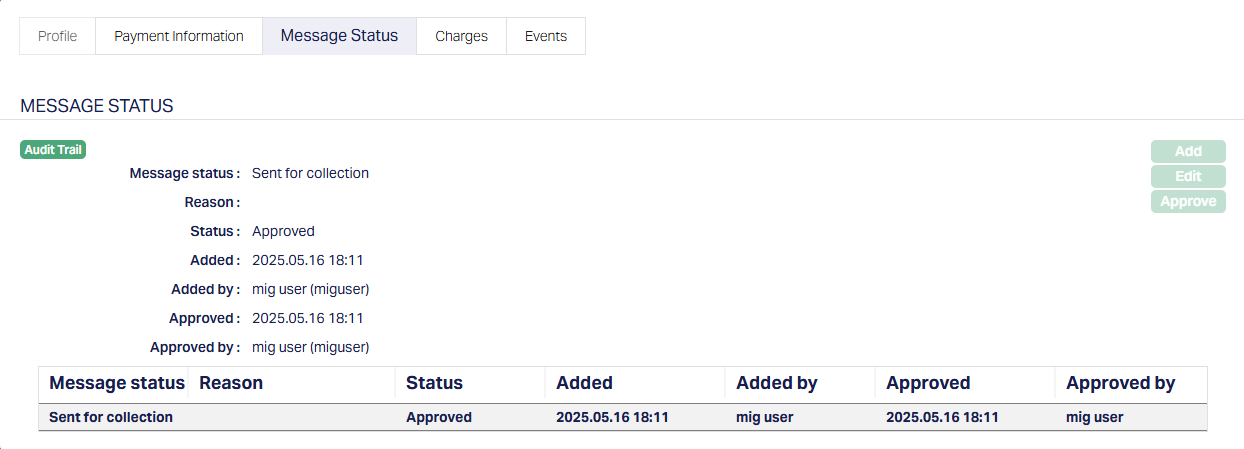
| Field Name | Field Description | Field Value | Notes |
|---|---|---|---|
| Message Status | Will always be Sent for Collection as soon as the record is created |
3.4. Charges
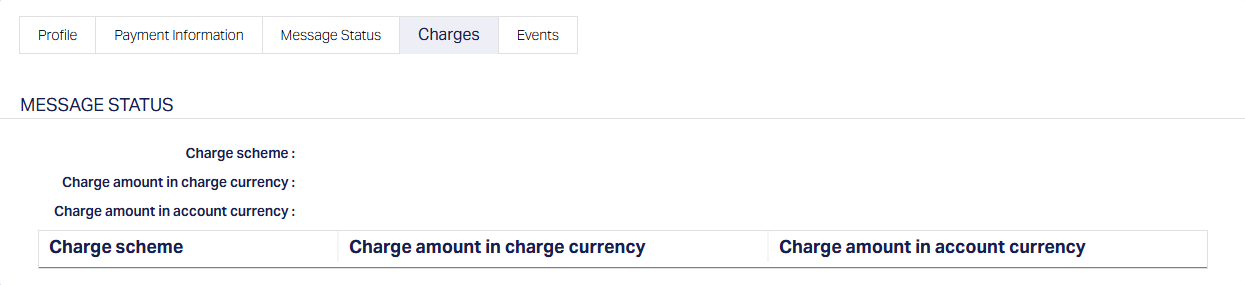
Generally, this will be blank
3.5. Events
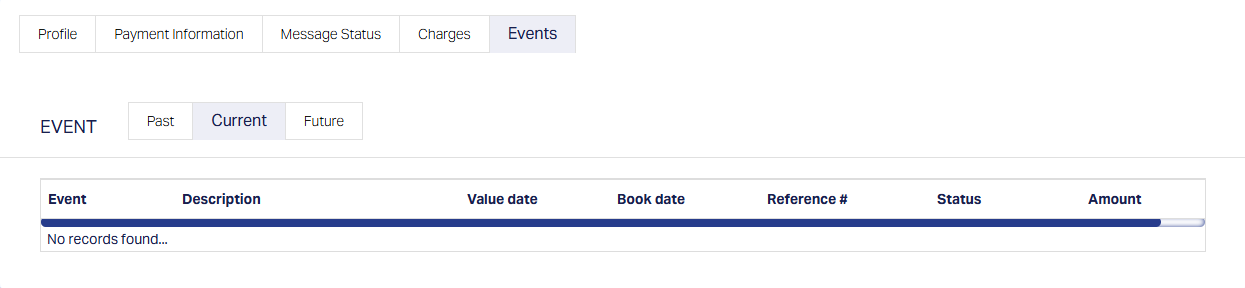
Note:
- On creation of an AG Outward Collection record, there are no accounting entries
- All such records in DM & PG will remain without further action till the date on which the File Generation has to be executed.
- DM will execute the scheduled routine for generation of Autogiro Outward File.
5.1. Based on the value maintained in the Reference Data Feed for generation of the Outward Collection file, the records that match the condition of CBD + X days = Due Date will be included in the Outward Collection File.
5.1.1. The Collection records will have the Transaction Code as TK82
5.1.2. The Mandate records will have the Transaction Code as TK73
5.1.3. The Value Date (i.e., the Payment Due Date) in each Collection record in one file will be the same as the File Generation is based on X days before the Due Date
5.2. Whether or not there are records that qualify, the Routine will be Success
5.3. As per the functions in the Group associated with the Routine, the generated file may be encrypted and then will be transmitted to BGC
5.4. On completion of file generation, Xdmpgpaymenttransaction table in DM will be updated as shown below so that these records will not be picked up again in the Outward file generation
5.4.1. Message Generated = Date-timestamp
5.4.2. Message Despatched = True
5.4.3. Record Despatched = True - DM will execute the scheduled routine for processing of Autogiro Inward Collection File.
6.1. This file will contain information only about Collections
6.2. As per the functions that are mapped to the Group associated with the Routine, each File that is available in the specified location will be moved to the backup location and moved to Aura servers
6.3. The data will be parsed and DM & PG tables will be updated, based on the Creditor Reference field (i.e., the Loan Account Invoice # which is unique) that was sent in the Outward collection record.
6.4. Actions in Aura depend on the Code received in the Inward Collection record
| Code | Means | System flow in CC |
|---|---|---|
| 0 | Funds received | 1. Status of the Outward Collection record in DM & PG tables will be updated as Processed. 2. A new record will be inserted in PG tables with Message Mode = Inward, with Status = Processed. 3. PG will trigger the loan account repayment processing as the Product Group = Loan Repayment; and repayment accounting entries will be posted for each record. Note: If Product Group = Payment, the accounting entries to Client Account or Card Account will be initiated. 4. Nostro Accounting entry will be posted in CC for the total amount of all records |
| 1 | Insufficient funds, payment not executed | 1. Status of the Outward Collection record in DM & PG tables will be updated as Failed. 2. No further inserts / updates in PG / CC |
| 2 | No connection to autogiro / bank account closed, other reason; payment not executed | 1. Status of the Outward Collection record in DM & PG tables will be updated as Failed. 2. No further inserts / updates in PG / CC |
| 9 | Payment not executed but will be retried based on agreement between borrower and his Bank | 1. Status of the Outward Collection record in DM & PG tables will be updated as Retried. 2. Based on the Retries, in the next few days, another Inward Collection Record will be received, with Code = 0 or 1 |
6.5. In case Code = 0 (Funds received), but, there is an internal failure in the posting to CC (for example, if the Loan Account has been closed after the Outward Collection was sent, or if the Loan Invoice Reference which was sent in the Outward has already been paid, or if there is some other technical / business failure), the Inward record will be inserted with Status = Failed; and the corresponding Outward Collection record will still continue with Status = Sent for Collection. When the corrective action is taken and the Inward record is retried, the corresponding updates will happen as described in the table above.
6.5.1. Since the amount has already been credited to the Entity’s Bank Account, the Entity can choose to move the funds to a Client Account (say, Internal Operations Account); and then process it towards other dues in the Loan Account or as Prepayment or Received in Excess or choose to Refund to the Borrower.
6.5.2. To do so, use the Payment Grid → Operations → Net Settlement → Payment Information → Edit to update the Creditor Account # to the Internal Operations account and then Retry
6.6. The new Inward record created for Inward Collections, can be viewed using Payment Grid → Operations → Net Settlement. A sample is shown below:
6.6.1. Profile
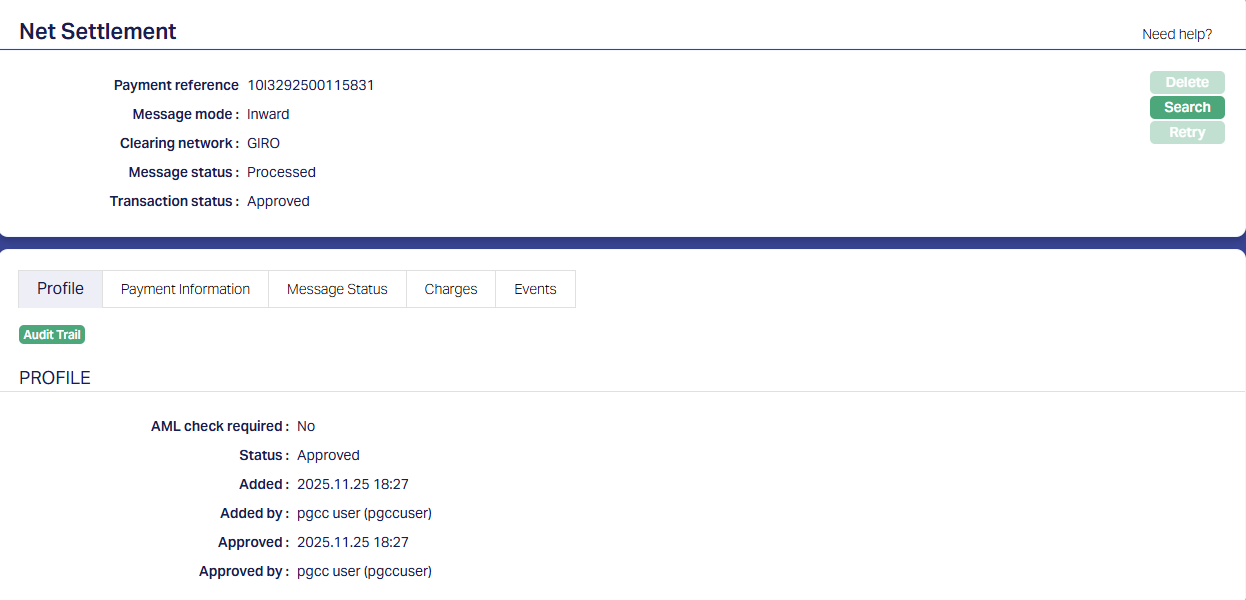
| Field Name | Field Description | Field Value | Notes |
|---|---|---|---|
| Payment Reference | This is a sequence # generated by Aura | ||
| Message Mode | Will always be Inward | ||
| Clearing Network | Will always be Giro | ||
| Message Status | For successfully processed inwards, it will be Processed; and where there are internal failures, it will be Failed | ||
| Transaction Status | Will always be Approved | ||
| AML Check Required | As per the specific implementation | ||
| 6.6.2. Payment Information |
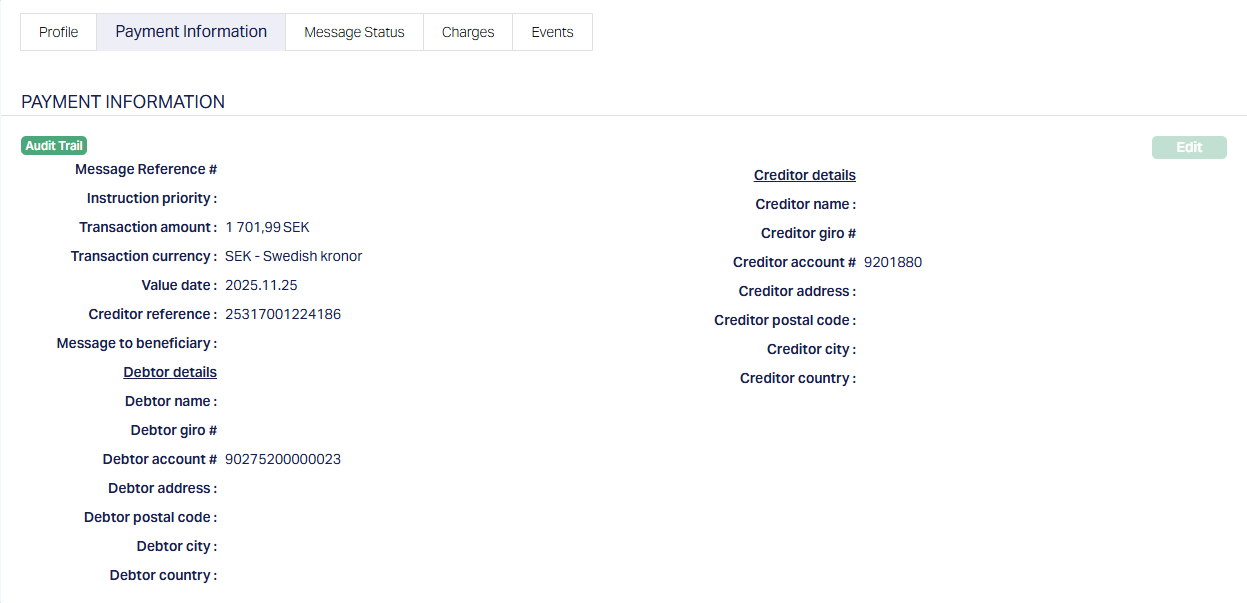
| Field Name | Field Description | Field Value | Notes |
|---|---|---|---|
| Message Reference # | |||
| Transaction Amount | Amount received; will be the same as the Invoice Amount for which the Outward Collection record was created | ||
| Transaction Currency | Will be always SEK as this is Autogiro | ||
| Value Date | Usually, it will be the same as the Payment Due On Date | ||
| Creditor Reference | This is the unique Invoice Reference # and is used to identify the Outward Collection record for status updates | ||
| Debtor Account # | This will be the Nostro Account or GL that was resolved for this record | ||
| Creditor Account # | Will be the Loan Account # | ||
| Other Debtor Details | Will usually be blank | ||
| Other Creditor Details | Will usually be blank |
6.6.3. Message Status
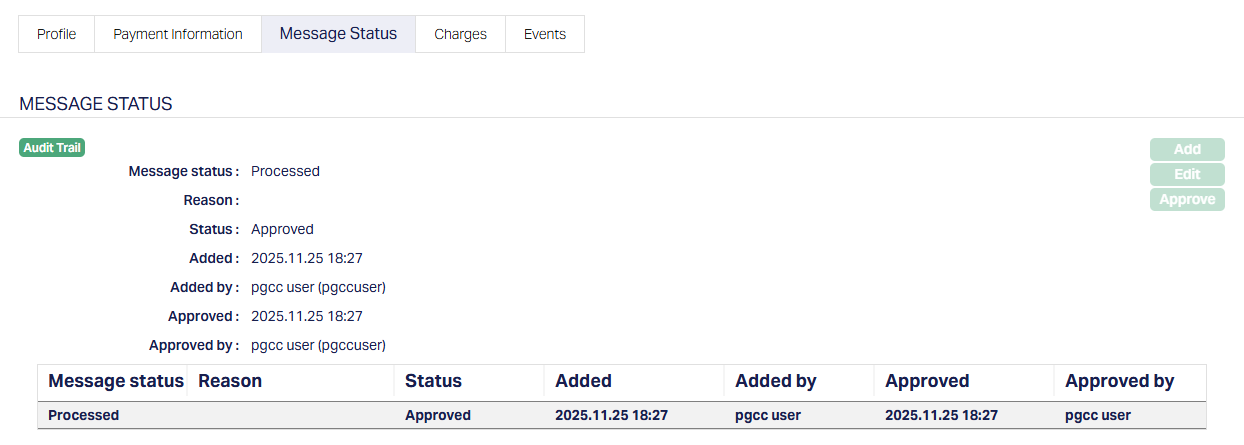
| Field Name | Field Description | Field Value | Notes |
|---|---|---|---|
| Message Status | Will be Processed for successful records; for failed records, it will be Failed |
6.6.4. Charges
Will usually be blank
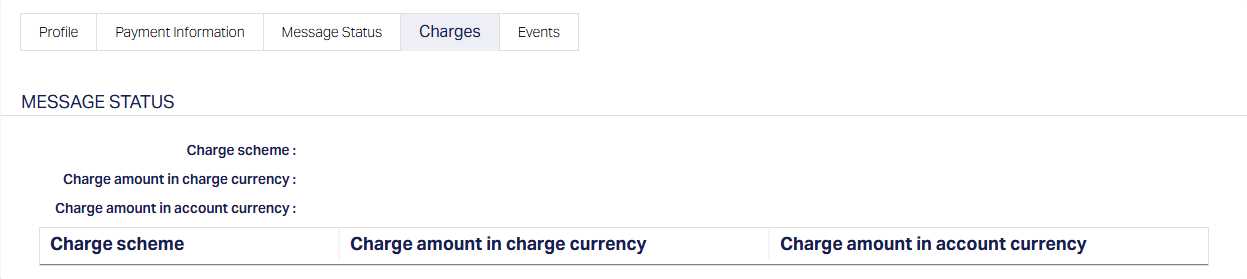
6.7. Accounting entries
6.7.1. Nostro entry
| Event Code | Book Date | Value Date | Db / Cr | GL / Account # | Transaction Code | Amount |
|---|---|---|---|---|---|---|
| PAYMDP | Current Booking Date | Value Date in the Collection record | Db | Nostro Account / GL that is resolved | Debit Processing Transaction Code (DB / Client) | Total Collected amount as per the file |
| Db | Master GL of Nostro Account Product | Master leg (DB/GL) from Nostro Account Product | Total Amount posted to Nostro Account | |||
| Cr | Transit GL | Credit Processing Transaction Code (CR/GL) | Total amount of credits received in the file | |||
| 6.7.2. Loan Processing accounting entry: |
| Event Code | Book Date | Value Date | Db / Cr | GL / Account # | Transaction Code | Amount |
|---|---|---|---|---|---|---|
| LNPAYS | Current Booking Date | Value Date in the Collection file | Db | Settlement GL from the Loan Product | <Respective TCs based on allocation to components> | |
| Value Date in the Collection file | Cr | Loan Account | <Respective TCs based on allocation to components> | Amount allocated to Principal components | ||
| Cr | Master GL of Loan Product | Master leg (CR/GL) from Loan Product | Amount allocated to Principal components | |||
| Cr | <Respective GL based on allocation to components> | <Respective TCs based on allocation to components> | Amount allocated to various components | |||
| 6.7.3. Client account processing entry: |
| Event Code | Book Date | Value Date | Db / Cr | GL / Account # | Transaction Code | Amount |
|---|---|---|---|---|---|---|
| PAYMCP | Current Booking Date | Value Date in the Collection file | Db | Transit GL | Internal Debit Transaction Code (DB / GL) | |
| Value Date in the Collection file | Cr | Client Account | (Credit Processing Transaction Code CR / Client) | Transaction Amount | ||
| Cr | Master GL of Client Account Product | Master leg (CR/GL) from Client Account Product | Transaction Amount | |||
Note:
- If a Nostro Account cannot be resolved using the Nostro Configuration, the error will only be logged and the transaction will not be found in any exception queue. However, the payment will not go through. You need to check the Nostro entries every day to ensure that the Nostro posting has been completed for all the transactions.
- The incoming file is then moved to the Backup Path as specified in the Reference Data Feed
Note:
- PG → Events Tab does not show any events.