Outlet
Outlet is a retail store in which manufacturers sell their stock directly to the public. Using this functionality, you can maintain multiple Outlets for an Outlet.
If an Outlet is linked to an Agent, and at outlet level if settlement instructions is not maintained for the selected client; then for the transactions performed at outlet level Aura will use linked Agent client settlement instructions for settlement.
If at Outlet level, settlement instructions is maintained for the selected client, then for the charge collection and settlements at outlet level; Aura will use the Settlement instruction maintained at Client level selected for the Outlet.
Each Outlet will have 'Maximum cash pay in (Outlet)' and 'Cash displacement threshold (Outlet)' provided by the bank.
Maximum cash pay in-- Maximum cash pay in should be the maximum limit of Cash deposit to any outlet.
Cash displacement threshold -- If any outlet has more cash in pocket than the provided threshold then cash above threshold should be transferred into the bank account
The following are the various tabs that appear on the Outlet Maintain page.
To add new Outlet
- From CRM menu, click Sales and then Outlet. New Outlet -- Profile (1/6) page appears.
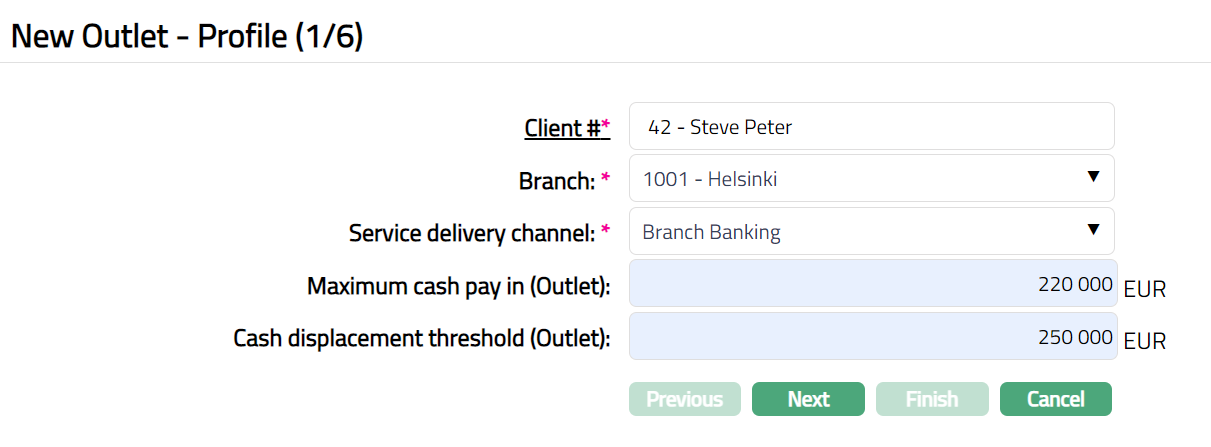
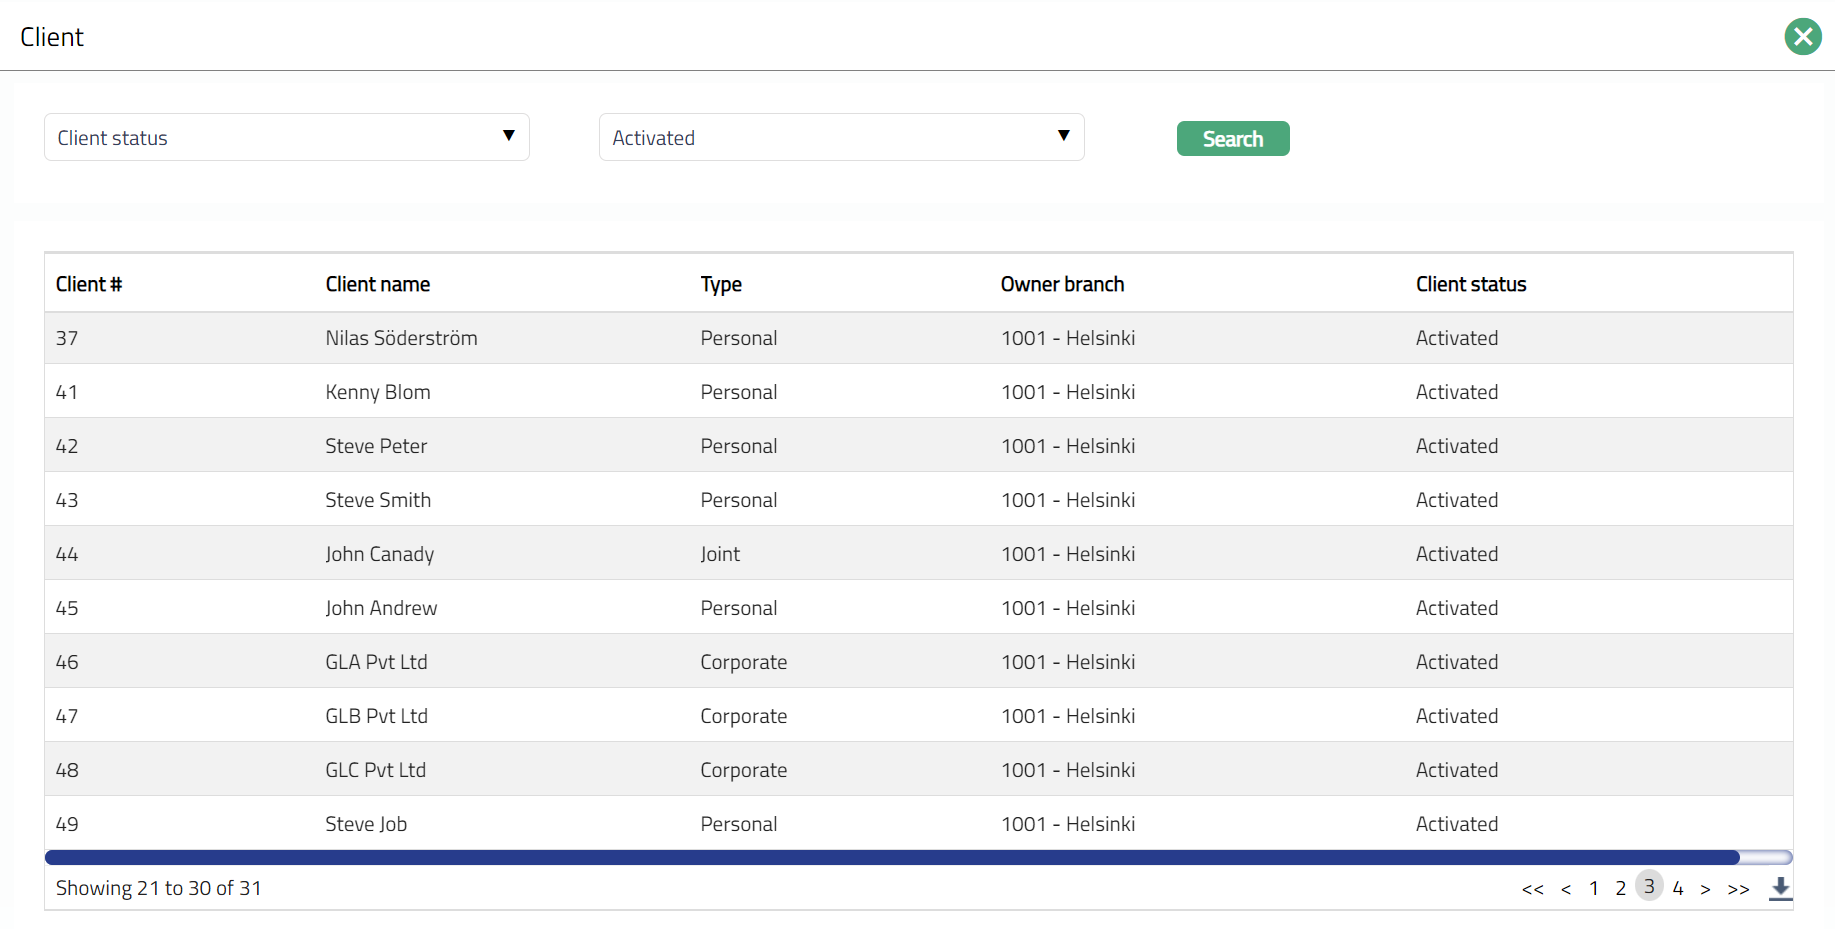
- Select Client# by clicking on client hyperlink. Client search page appears with the list of all types (Personal, Corporate and Joint) of clients; where you can search for a client with relevant criteria and select the required client. You can also input the client name and select the required client from the list displayed by Aura. Based on criteria, Aura will display the list of all the clients maintained under CRM > Client > Maintain.
Select Branch for the Outlet from the drop-down list of options maintained under Admin > Branches > Maintain.
Select Service delivery channel from the drop-down list of options maintained under Admin > System codes > Categories > Service delivery channel of type External. Service delivery channel is the mode through which the customers interact with the bank and by which the bank delivers its products and services to customers.
Enter Maximum cash pay in (Outlet). It is the maximum limit for cash pay in for an Outlet.
Enter Cash displacement threshold (Outlet). If any Outlet or Outlet has more cash in pocket than the provided threshold; then cash above threshold is transferred into bank account.
Click Next. New Outlet -- Agent (2/6) page appears.
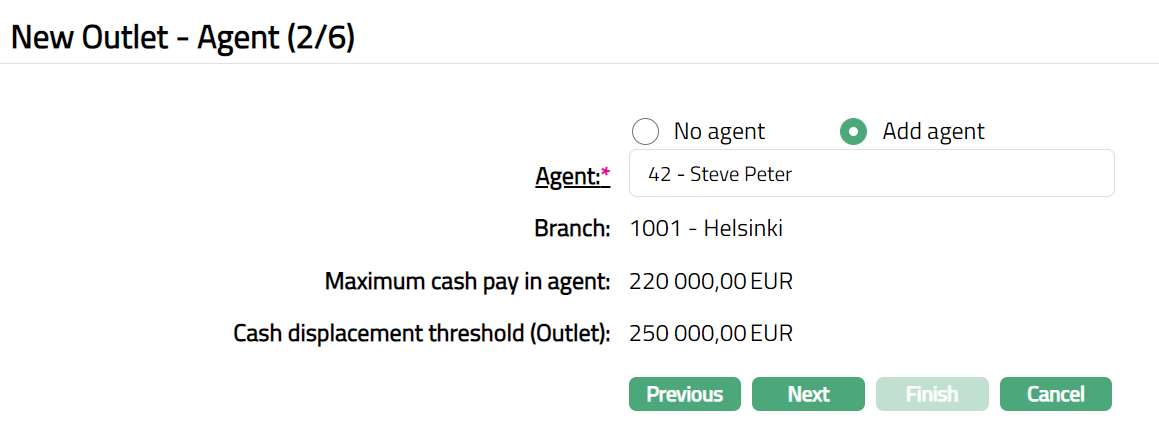
Select No agent or Add agent option. By default, No Agent option is chosen.
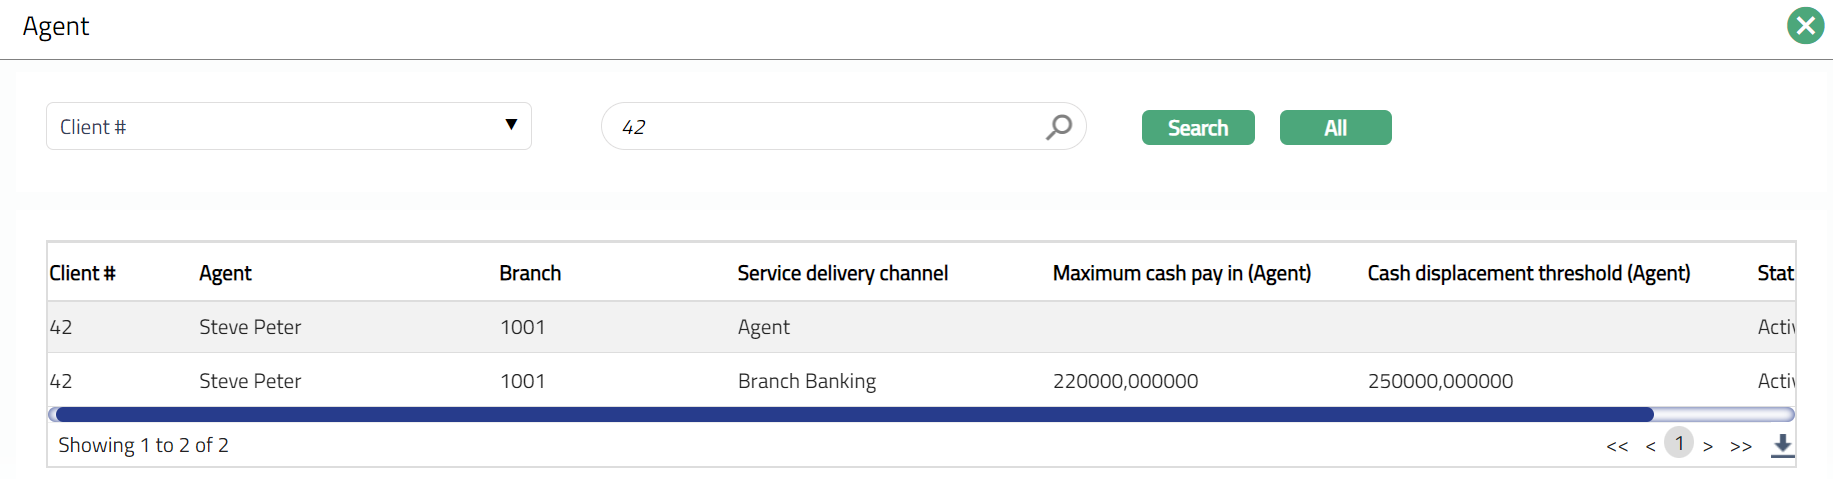
If Add Agent option is chosen, then Agent hyperlink is enabled. On click of the hyperlink, all active and unmapped Agents maintained under CRM > Sales > Agent displays in the list. Select the required Agent for the Outlet.
On selection of the Agent in the above field, Aura will by default populate the Client # linked to the Outlet.
On selection of the Agent in the above field, Aura will by default populate the Branch maintained for the Agent.
On selection of the Agent in the above field, Aura will by default populate the Maximum cash pay in limit provided at Agent level.
On selection of the Agent in the above field, Aura will by default populate the Cash displacement threshold (outlet) provided at Agent level.
Click Next. New Outlet -- Terminal (3/6) page appears.
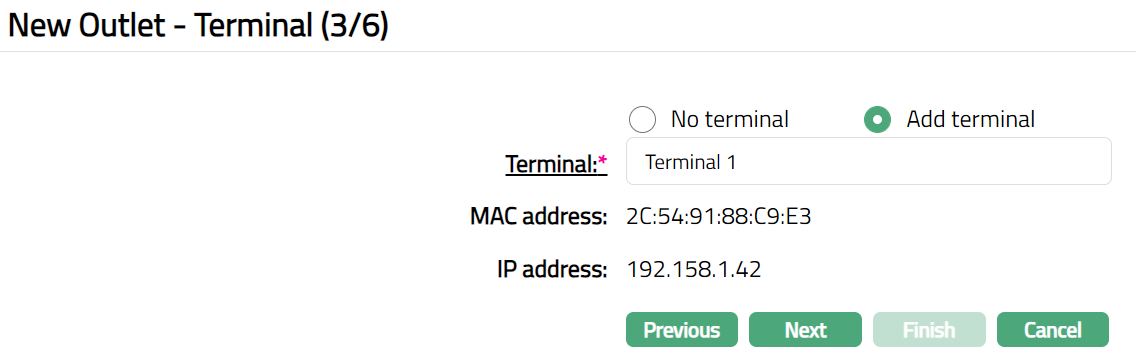
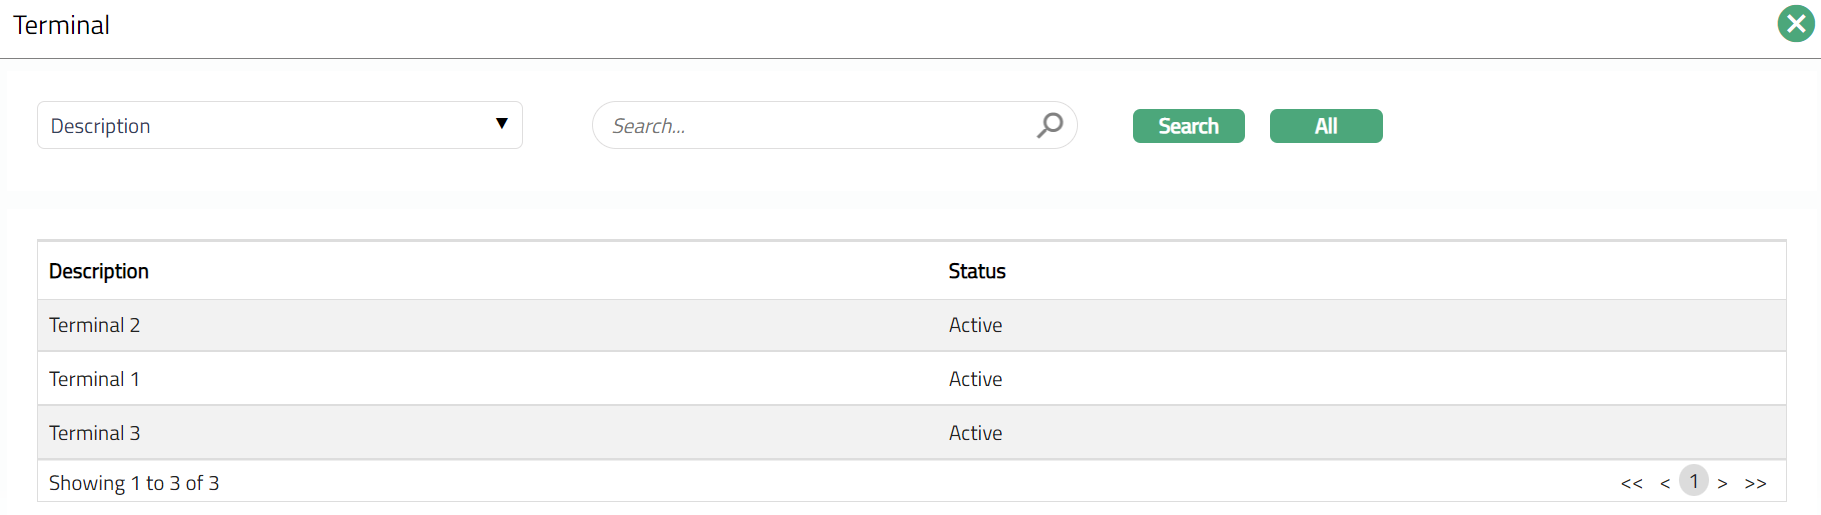
- Select No terminal or Add terminal option. By default, No terminal option is chosen. If Add terminal option is chosen, then Terminal hyperlink field is enabled. On click of the hyperlink, all the active and unmapped Terminals displays in the list. Select the required Terminal.
Aura by default will display the above mapped terminal MAC (Media Access Control) address.
Aura by default will display the mapped Terminal IP (Internet Protocol) address.
Click Next. New Outlet -- Agent User (4/6) page appears.
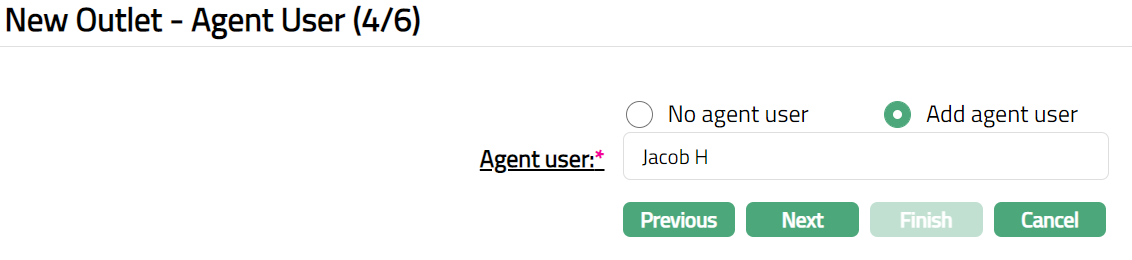
Select No agent User or Add agent User option. By default, No agent user option is chosen.
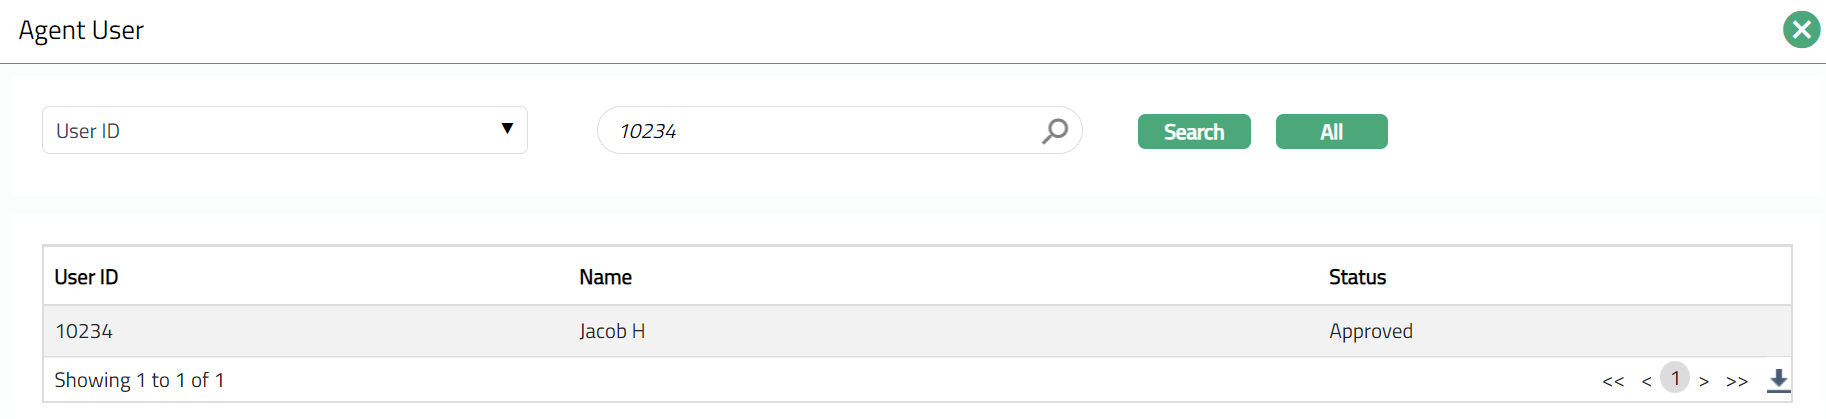
If Add agent user option is chosen, then Agent user hyperlink is enabled. On click of the hyperlink, all the active and unmapped agent users maintained under CRM > Sales > Agent user is displayed in the list. Select the required Agent user.
- Click Next. New Outlet -- Charge (5/6) page appears.

Select Transaction fee from the drop-down list of options maintained under Admin > Pricing > Charges > Charge Schemes. Aura will display all the event based flat/banded charges, where Treat as receivable is No. If banded charge is attached, transaction amount will be the basis for charge calculation. Based on each transaction, transaction fee is collected for each transaction.
Click Next. New Outlet -- Confirmation (6/6) page appears.
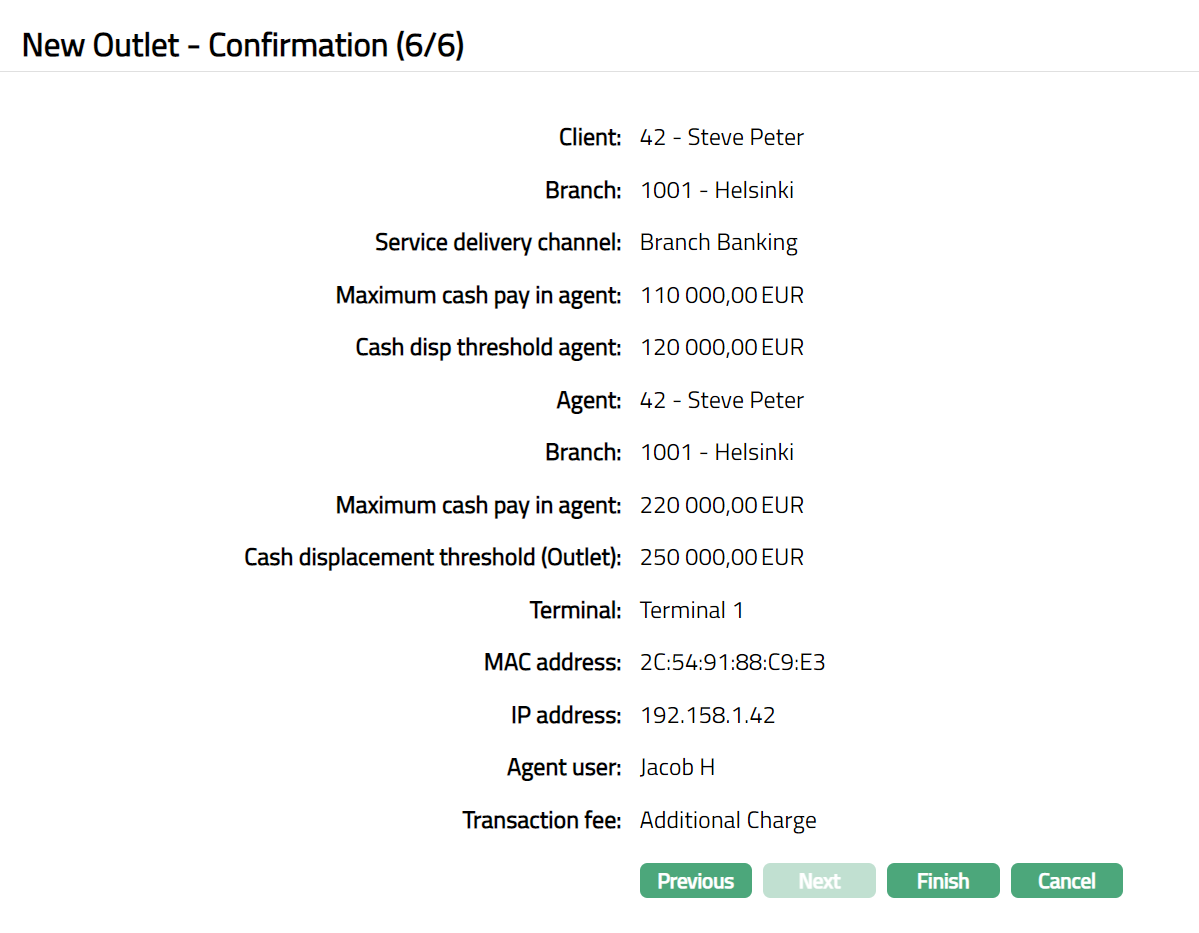
- Click Finish. Outlet page appears displaying the Profile tab by default.
Functions: Add, Search, Delete, Edit, Approve
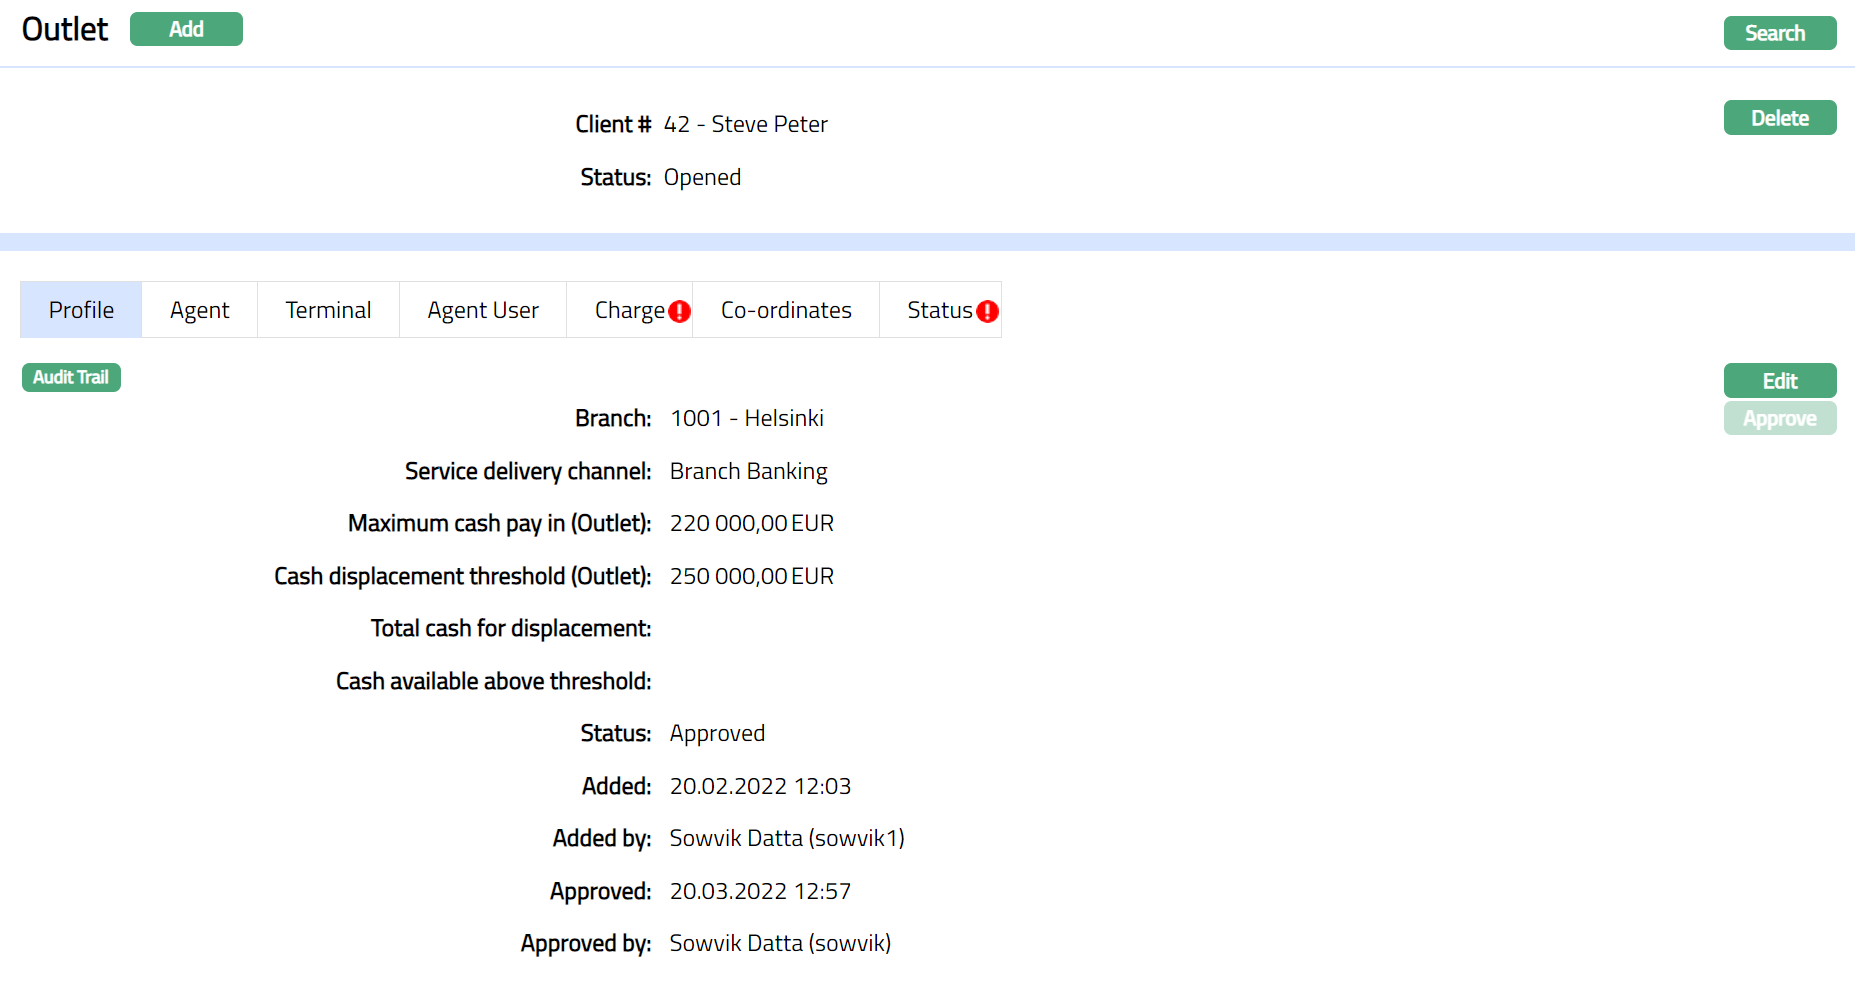
Note: Outlet status is Opened, and the record status is Pending. Unless the Outlet Maintain Status is Activated and record status is Approved, this Outlet will not be available for use elsewhere in Aura and a red bubble appears on the Profile tab. Once approved by another user / authorized person the red bubble disappears and the Status changed to Approved.
Profile
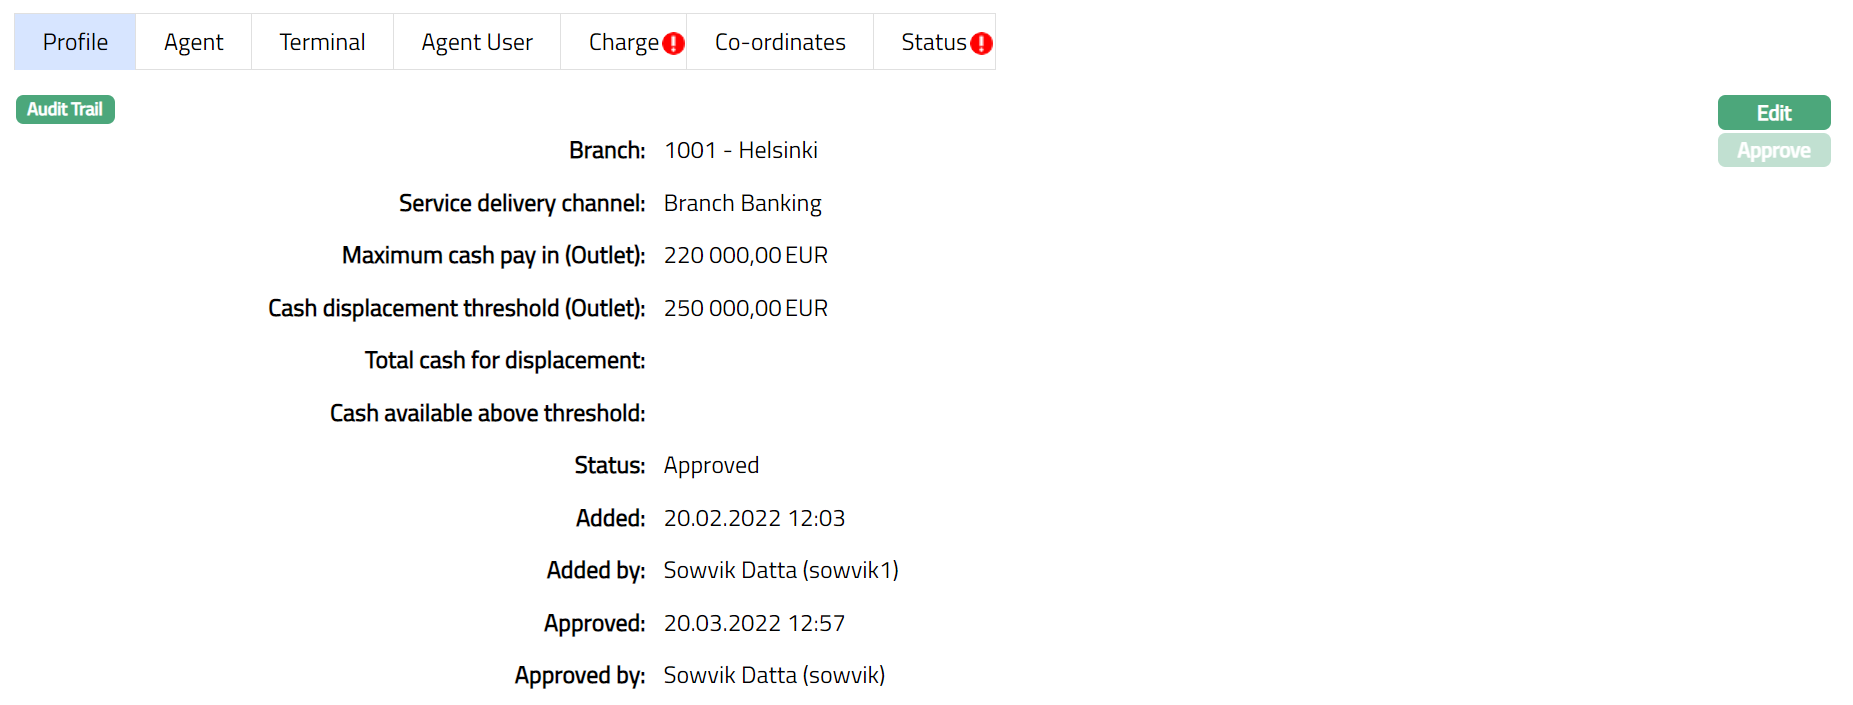
Profile tab, which is the default tab in the Outlet Maintain screen, shows the basic details of the Outlet.
To view/edit Outlet Profile
- Access Outlet Maintain page and click Profile tab.
The additional fields are as follows:
Total cash for displacement: It displays the amount that the Outlet will have after all the deposits and withdrawal.
Cash available above threshold: Aura calculates Cash available above threshold as Total cash for displacement minus Cash displacement threshold (Outlet). If the amount displayed is a positive value, then the Outlet record on search screen will appear in red color.
Status field displays the status of the Profile tab.
Added field displays the date on which the record was added.
Added by field displays the name of the user who created the record.
Approved field displays date on which the record was approved and is displayed only for approved records.
Approved by field displays name of the user who approved the record and is displayed only for approved records.
- Click Edit. Edit Profile page appears.

Note: All the fields are editable except Client #, Total cash for displacement, Cash available above threshold.
- Make required changes and click Save. Profile page appears with the edited details.

Functions: Edit, Approve
Agent
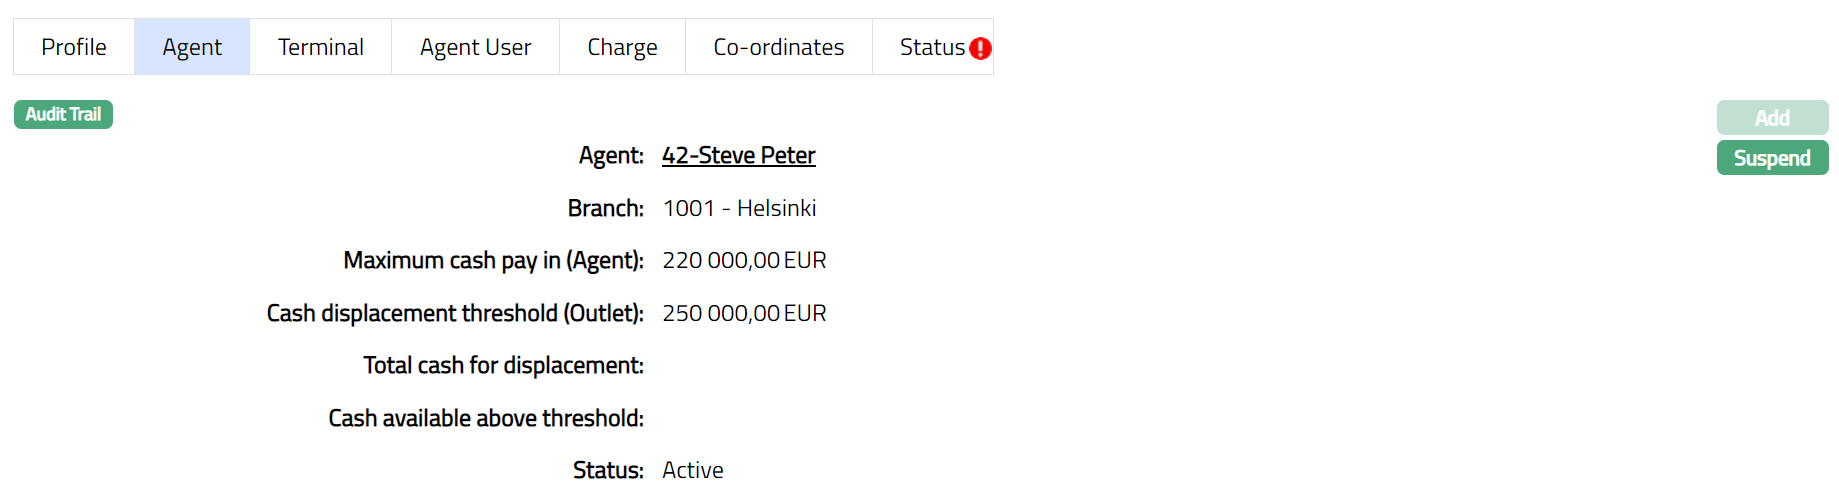
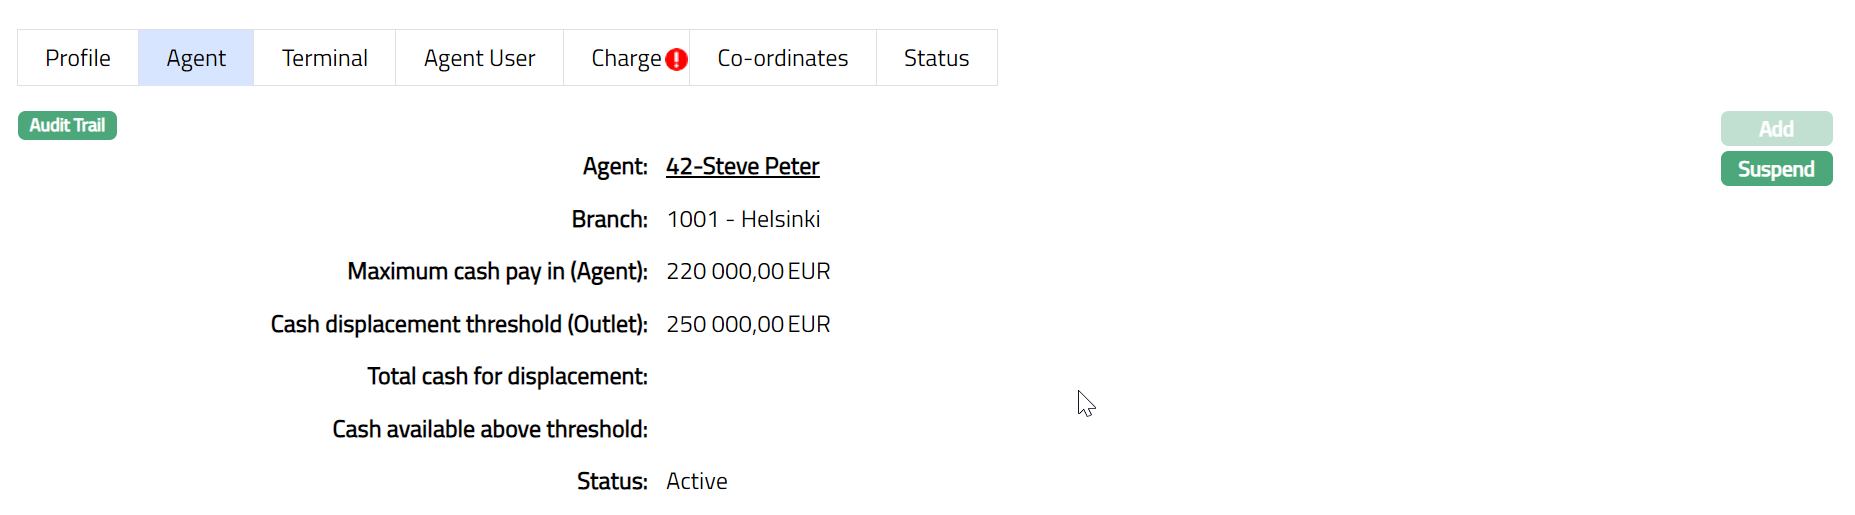
On creation of any Outlet record, if an Agent is mapped to any Outlet, the linked Agent details appear.
To view/ add an Agent
- Access Outlet page and click Agent tab. On creation of the Outlet record, if an Agent is mapped to an Outlet, then the linked Agent details will be displayed.
Functions: Add, Suspend
Agent tab displays the Agent number along with the Name as maintained for the Agent linked to the Outlet. On click of the hyperlink, Agent Maintain page appears.
Branch displays the branch maintained for the Agent linked to the outlet.
Maximum cash pay in (Agent) displays the maximum cash pay in limit maintained for the Agent.
Cash displacement threshold (Outlet) displays the cash displacement threshold maintained for the Outlet.
Total cash for displacement: It displays the amount that the Agent will have after all the deposits and withdrawal. The value gets populated from the Agent Maintenance.
Cash available above threshold: Aura calculates Cash available above threshold as Total cash for displacement minus Cash displacement threshold (Agent). If the amount displayed is a positive value, then the Agent record on search screen will appear in red color. The value gets populated from Agent Maintenance.
Status displays the status of the mapped Agent.
- Click Add. Add Agent page appears**. Add** button will be enabled only if existing mapped Agent is in suspended status.

- Click Agent hyperlink to add an Agent. Agent search page appears with the list of the active agents maintained under CRM > Sales > Agent. Select the required Agent.
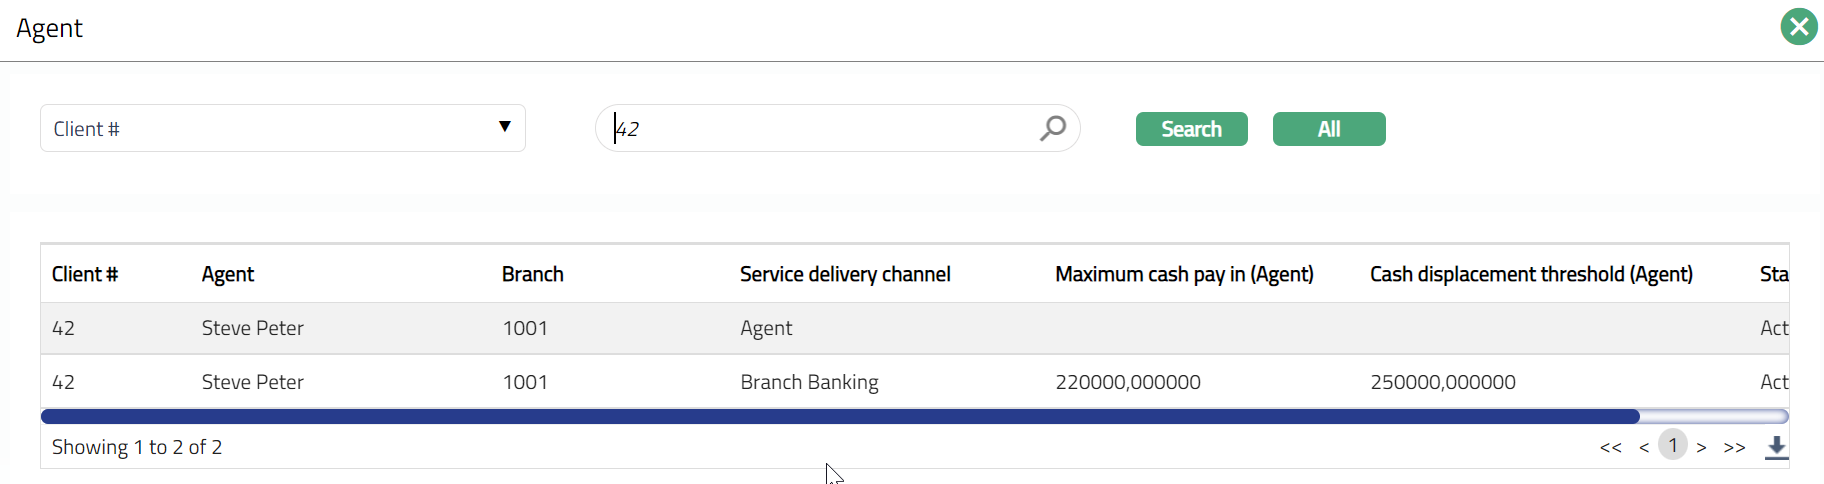
Client # will display the client maintained for the selected Agent.
Branch displays the branch maintained for the selected Agent.
Maximum cash pay in (Agent) the displays the maximum cash pay in limit maintained for the selected Agent.
Cash displacement threshold (Outlet) displays the cash displacement threshold maintained for the Outlet.
Click Save. Outlet Maintain page appears with the added details.
Functions: Add, Suspend
Suspend: You can suspend a mapped Agent by clicking on Suspend button. When you click on Suspend button, Aura displays an alert message. On confirmation Aura will suspend the mapped Agent and Activate button will appear in place of the Suspend button.
Note: Only on suspension of the mapped Agent, Add button gets enabled and you can add a new Agent.
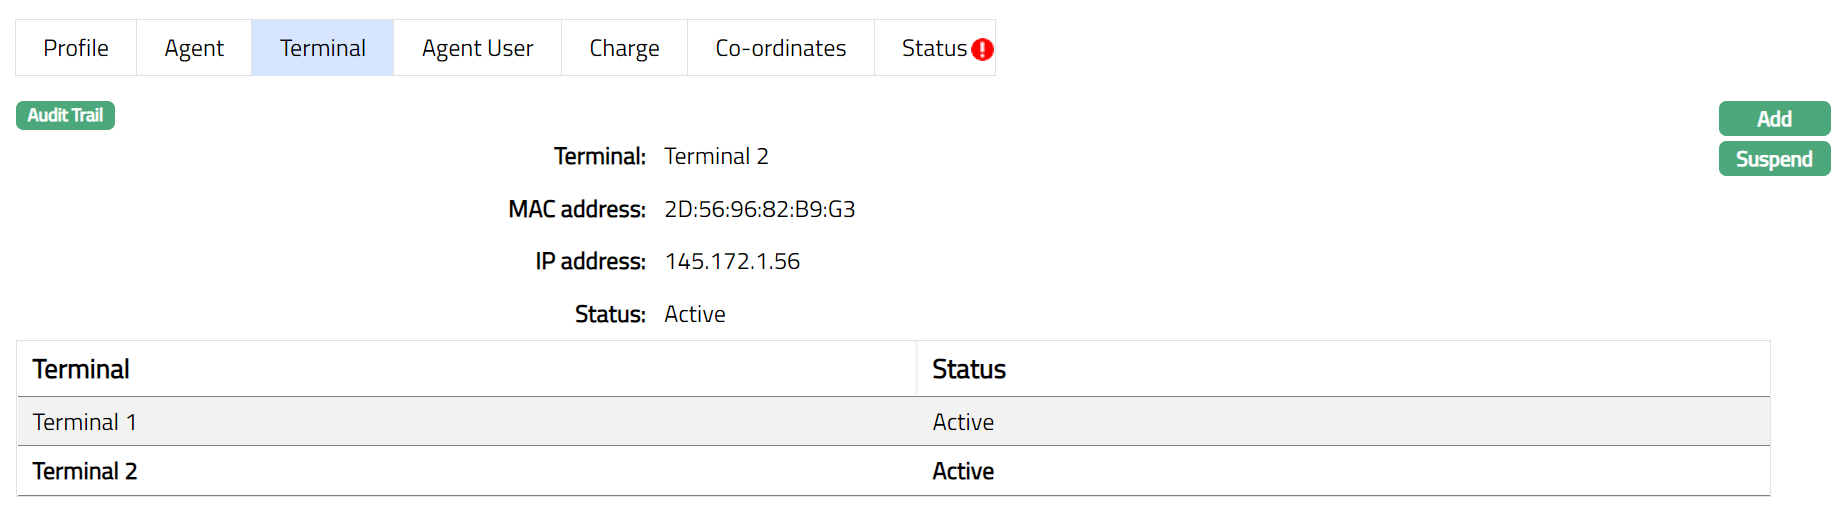
Terminal
Terminal tab allows you to view, add and suspend the Terminal record. On suspension of any Terminal at Outlet Level; the selected Terminal is not suspended at Terminal level. Only the Terminal mapped to the Outlet is removed.
To add terminal
- Access Outlet page and click Terminal tab. The values are defaulted from New Outlet Terminal (2/5); if Add Terminal option is chosen.
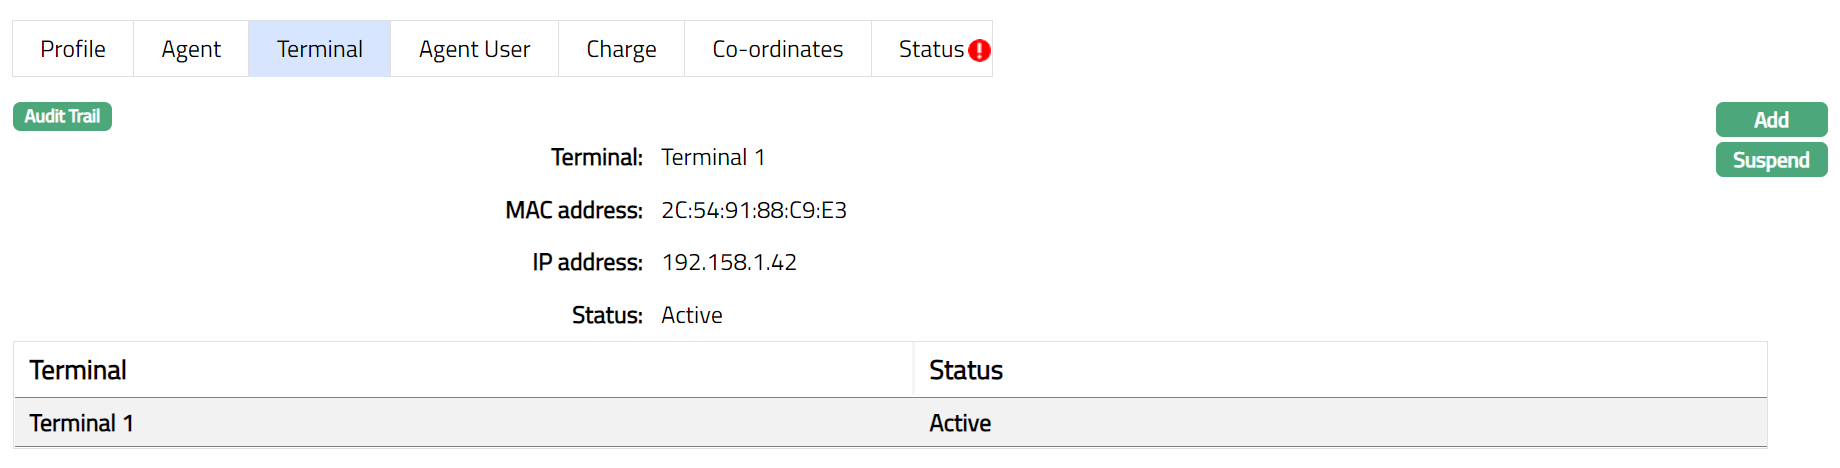
Terminal options display the mapped Terminal id.
MAC address displays the Media Access Control address of the Terminal mapped to Outlet
IP address displays the Internet Protocol address of the Terminal mapped to Outlet.
Status displays the Status of the Terminal mapped to the Outlet.
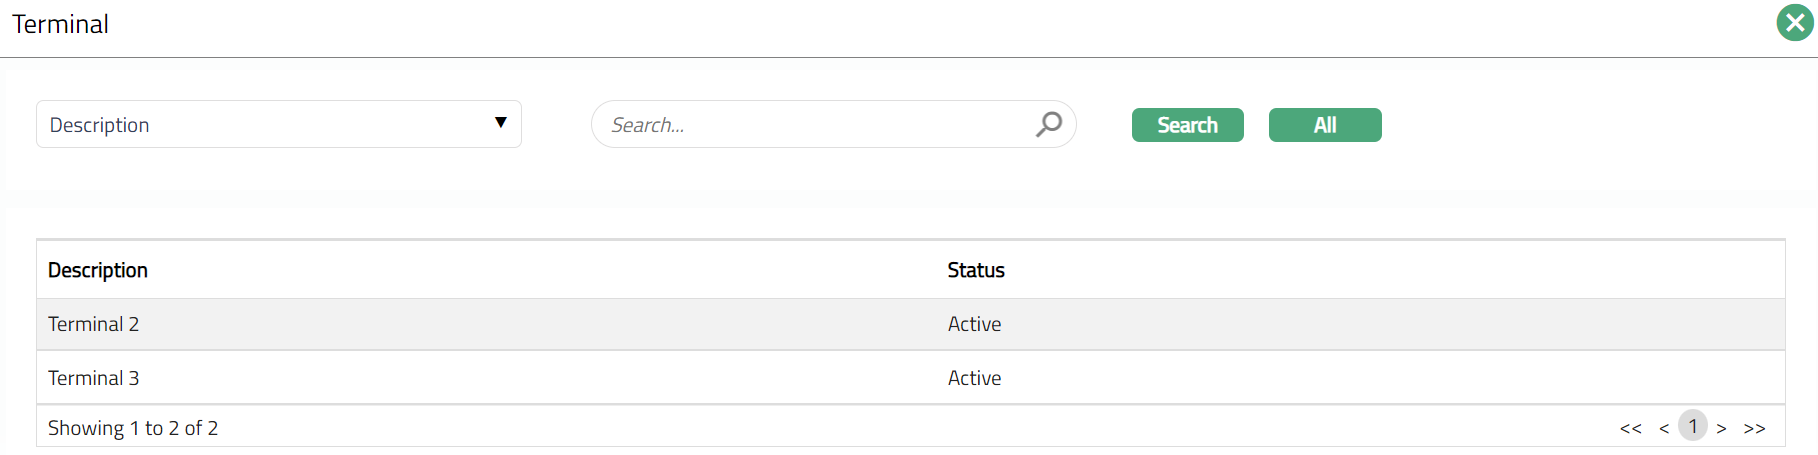
- Click Add. Add Terminal page appears.

- Click Terminal hyperlink to add a Terminal. Aura displays all the maintained active and unmapped Terminal.
By default, the selected Terminal MAC address is displayed.
By default, the selected Terminal IP address is displayed.
Click Save. Outlet page appears.
Functions: Add, Suspend.
Suspend: You can suspend a Terminal by clicking on Suspend button. When you click on Suspend button, Aura displays an alert message. On confirmation Aura will suspend the mapped Terminal and Activate button will appear in place of the Suspend button.
Note: On suspension of any Terminal at Outlet level, Aura will not suspend that terminal at Terminal Maintenance level. On suspension of any Terminal at Outlet level, the Terminal is made available for new mappings.
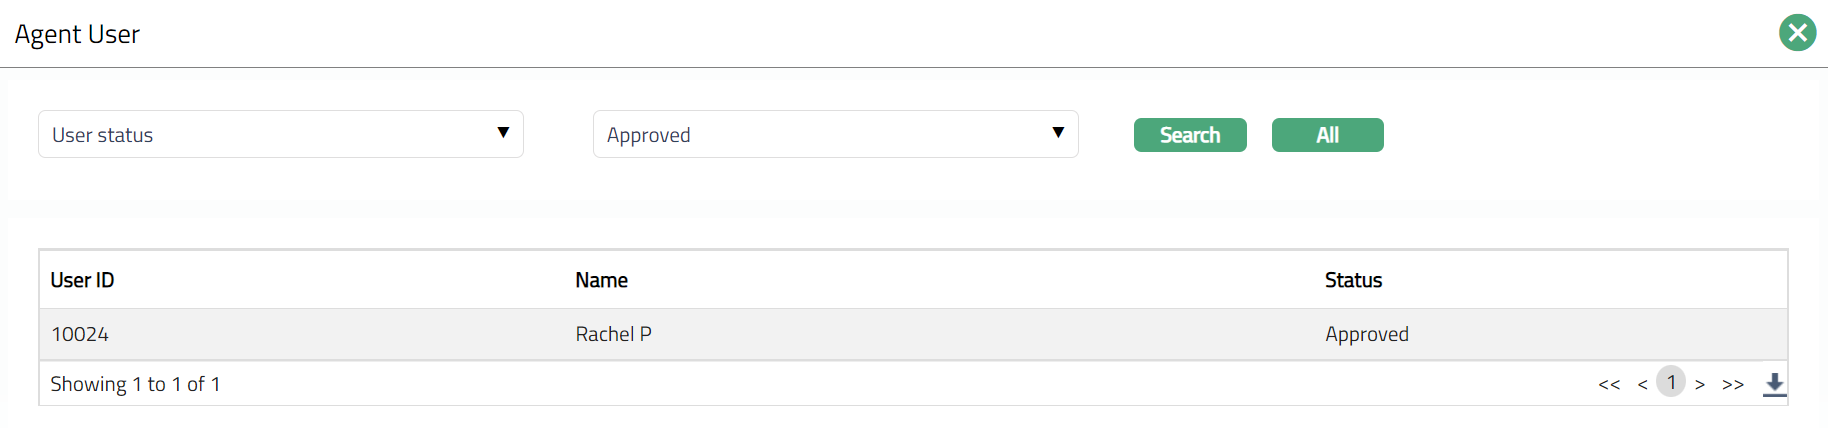
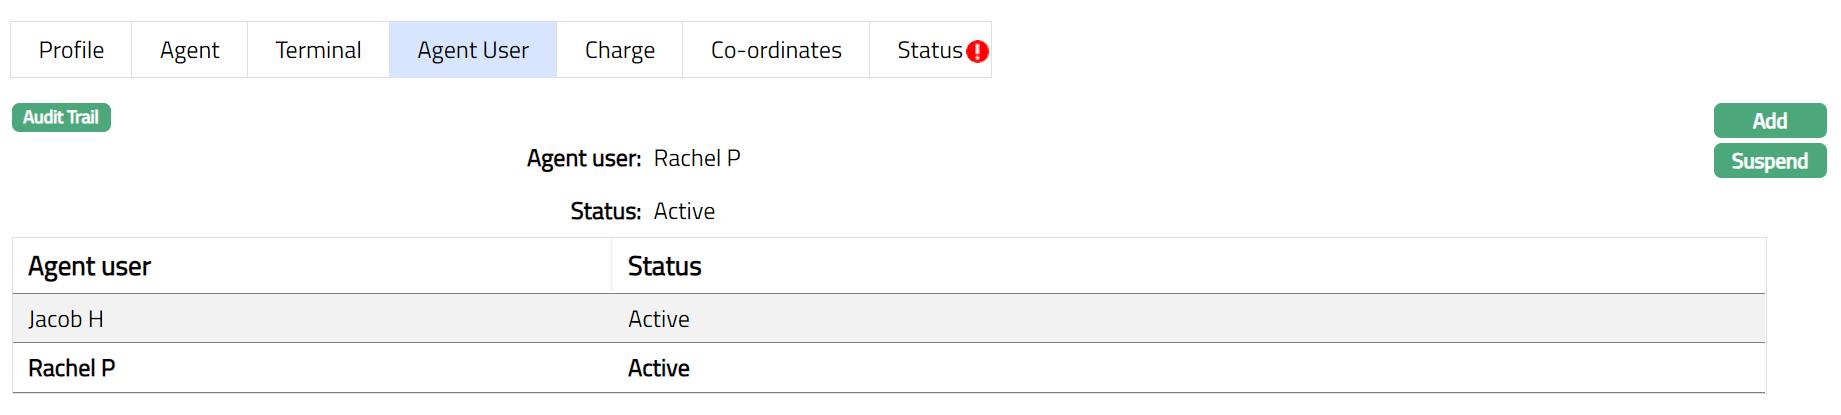
Agent User
Agent User tab allows you to view, add and suspend the Agent User details. The details are defaulted from New Agent -- Agent User (3/5). Agent users can be suspended only at Agent and Outlet level. On suspension of an Agent User at Outlet level, mapped Agent User to an Outlet is removed but the Agent User is made available for new mappings.
To add an Agent User
- Access Outlet page and click Agent User tab.

Agent user displays the Agent user added in New Agent -- Agent User (3/5) mapped to the Outlet.
Status displays the status of the Agent user mapped to the Outlet.
- Click Add. Add Agent User page appears.

- If you want to add an Agent User, then click on Agent user hyperlink. On click of the hyperlink, all the active and unmapped Agent users maintained under CRM > Sales > Agent user is displayed in the list. Select the required Agent user.
- Click Save. Agent User page appears with the added details.
Functions: Add, Suspend.
Suspend: You can suspend an Agent user by clicking on Suspend button. When you click on Suspend button, Aura displays an alert message. On confirmation Aura will suspend the Agent user and Activate button will appear in place of the Suspend button.
Charges
Using this tab, you can view the default charges and additional charges of the Outlet record. It has two sub-tabs, one for each of these.
The sub tab available in the Charge tab are as follows:
Default Charges
Default Charges tab allows you to view and maintain the details of different charges applicable for the Agent.
To view/edit the default charges
- Access Outlet page. Click Charge tab to view the details as per sample below. Default Charge is displayed by default.
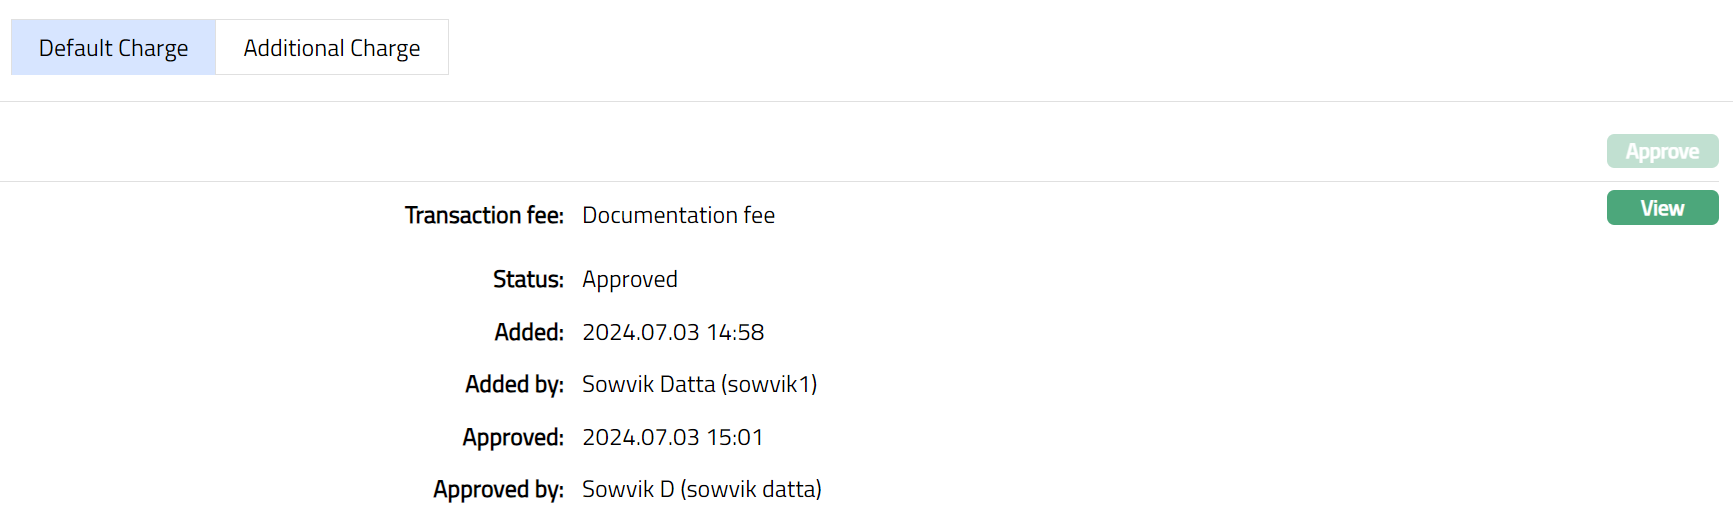
The following fields are shown only in the View screen and are not editable:
Transaction fee field denotes the name of the additional charge.
Status field denotes the status of the tab.
Added field denotes the date on which the record was added.
Added by field denotes the name of the user who created the record.
Approved field denotes date on which the record was approved and is displayed only for approved records.
Approved by field denotes name of the user who approved the record and is displayed only for approved records.
- Click View against each default charges to see the charge details and other parameters for the Charge. The details of the band of an attached charge Scheme is also displayed. The sample of the page is shown below.

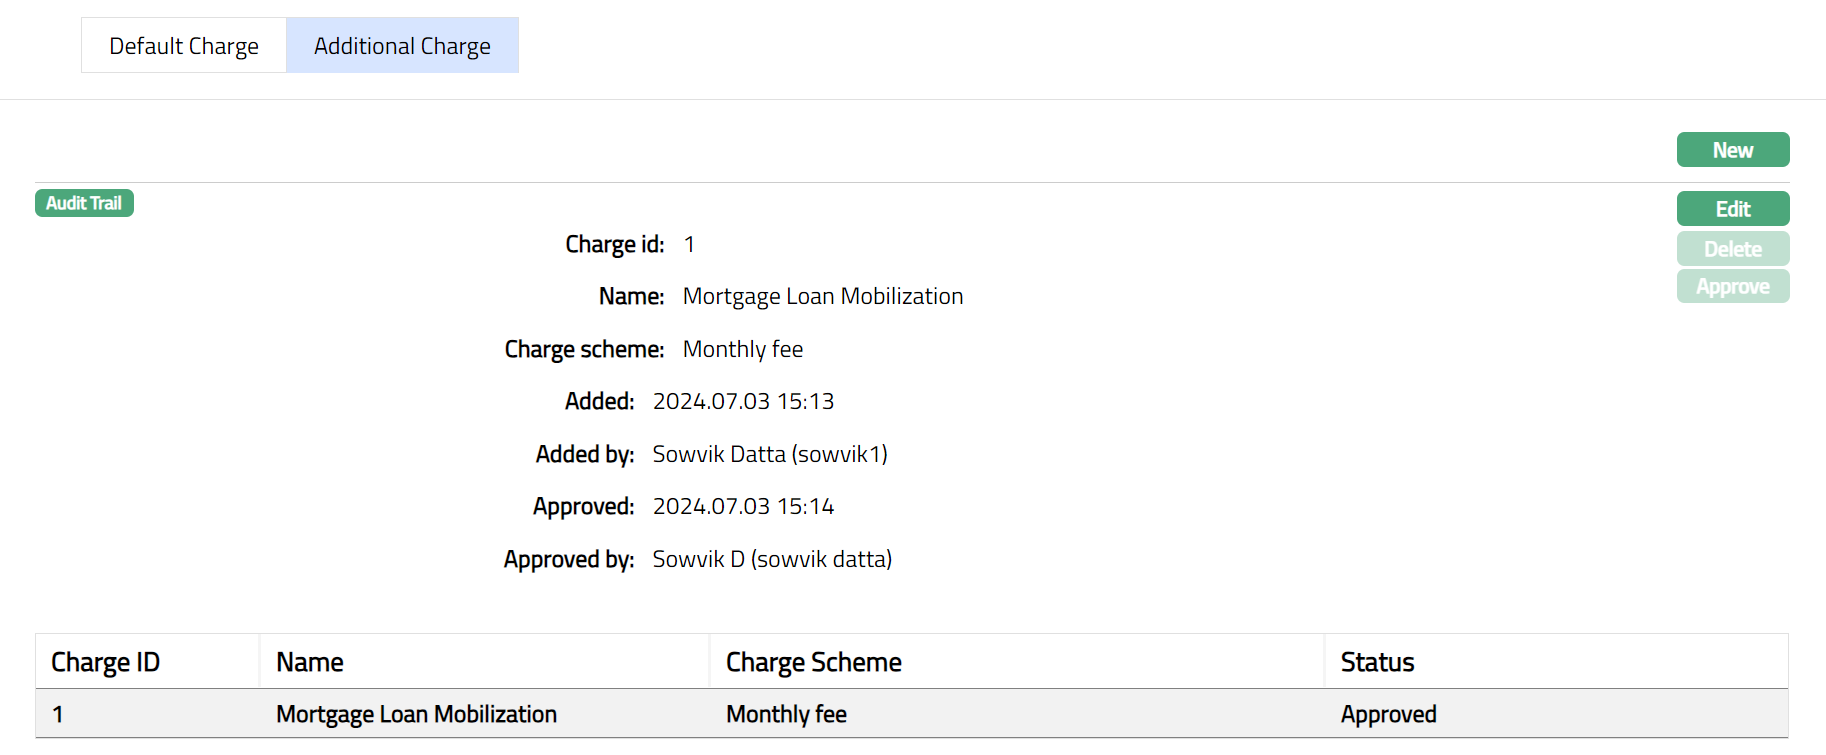
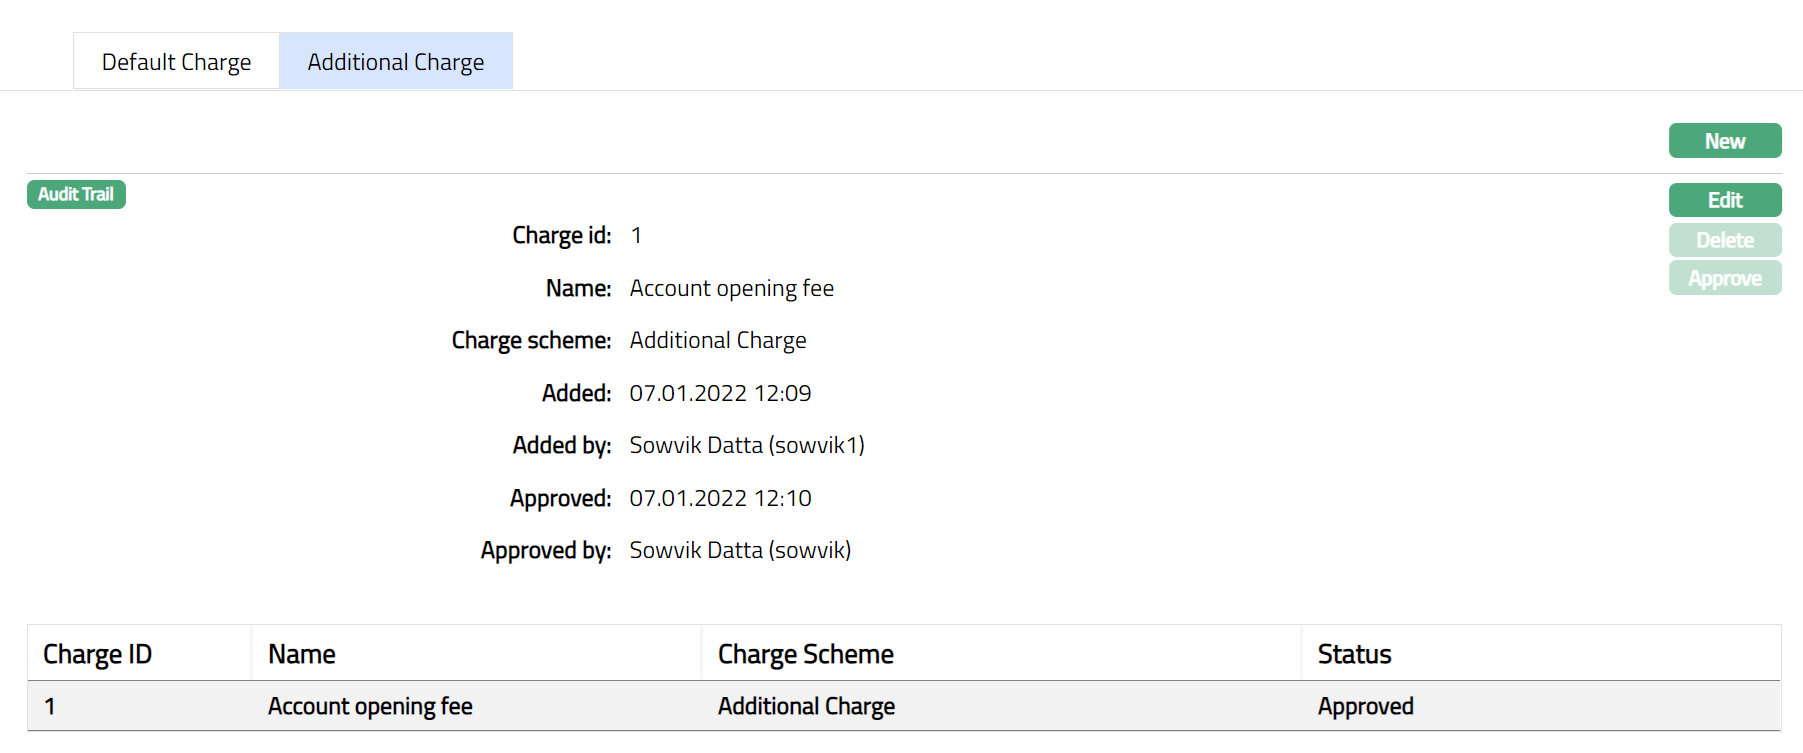
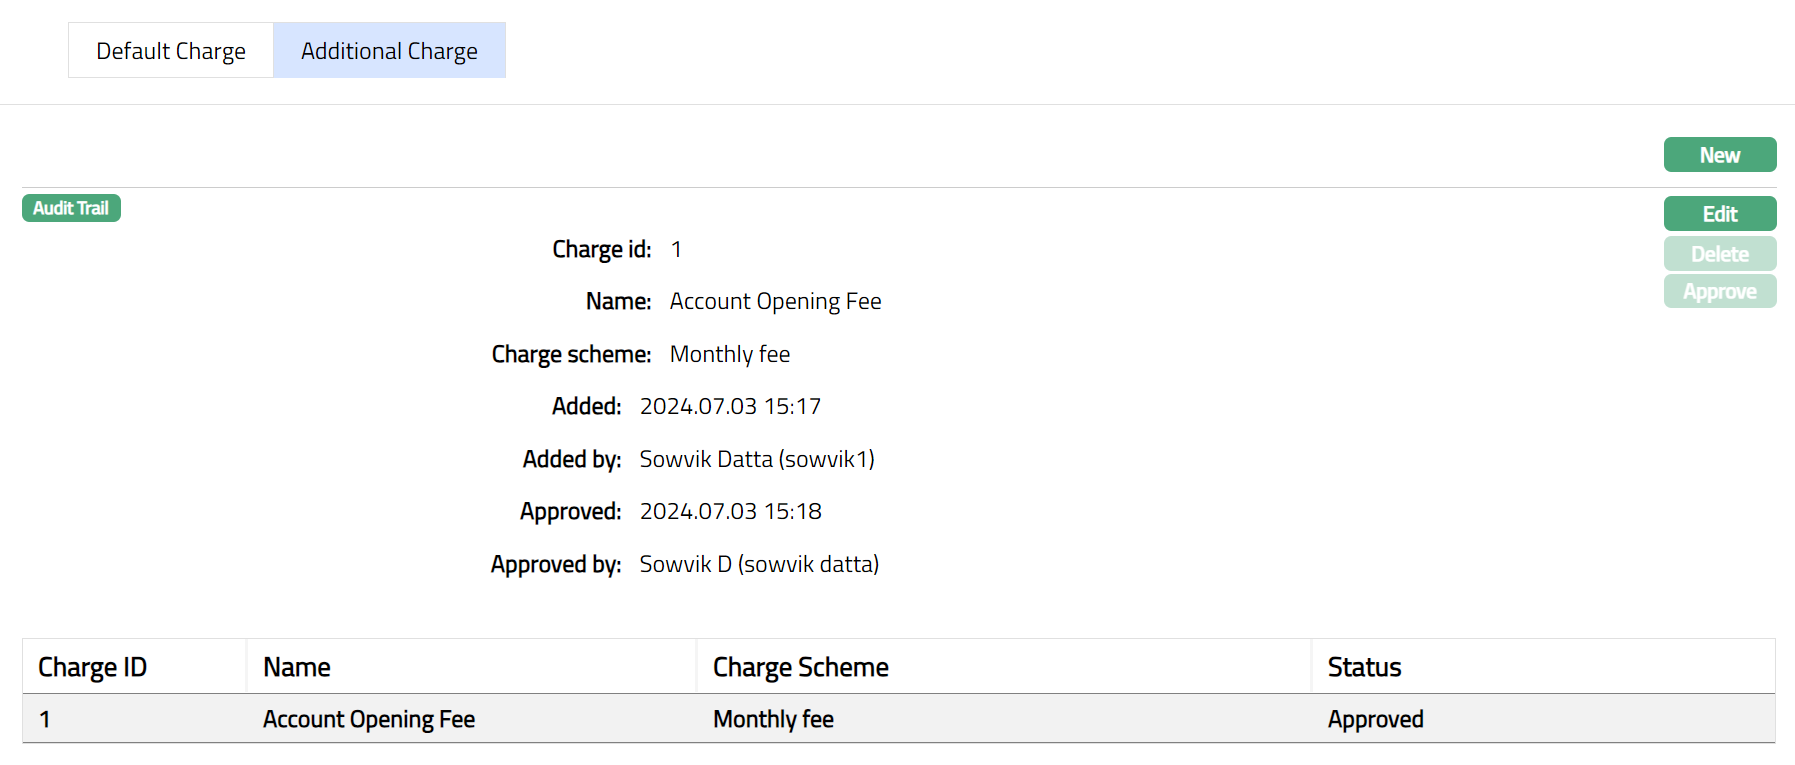
Additional Charge
The Additional Charge tab allows you to add, view and maintain additional charges for the Agent. The charge ID will be generated in sequence for individual charge attached. If any charge is deleted, then the ID of the deleted charge will not be regenerated. Aura will allow you to add only periodic flat charges.
To add an Additional Charge
- Access the Outlet Maintain page. Click on the Charge tab and then Additional charge tab to view the details as per sample below.
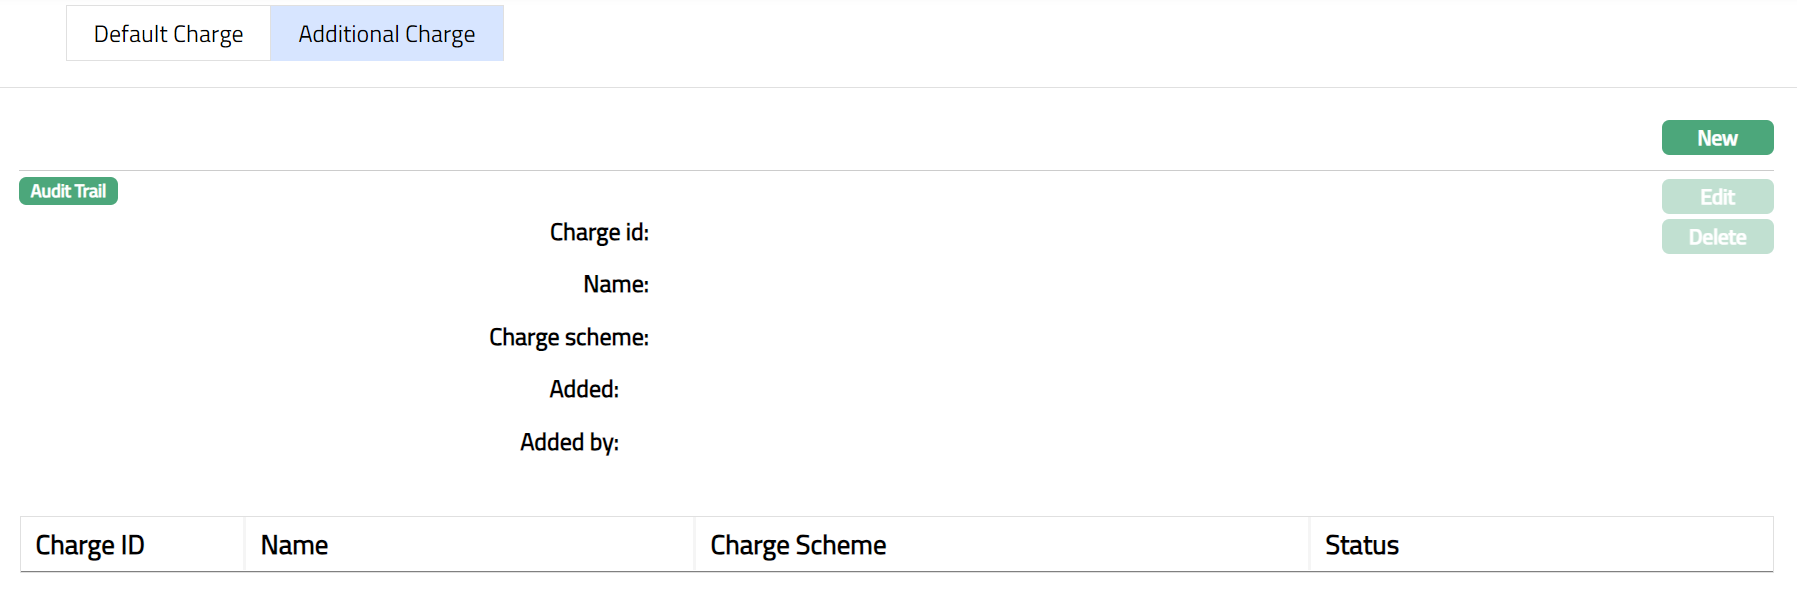
The following fields are shown only in the View screen and are not editable:
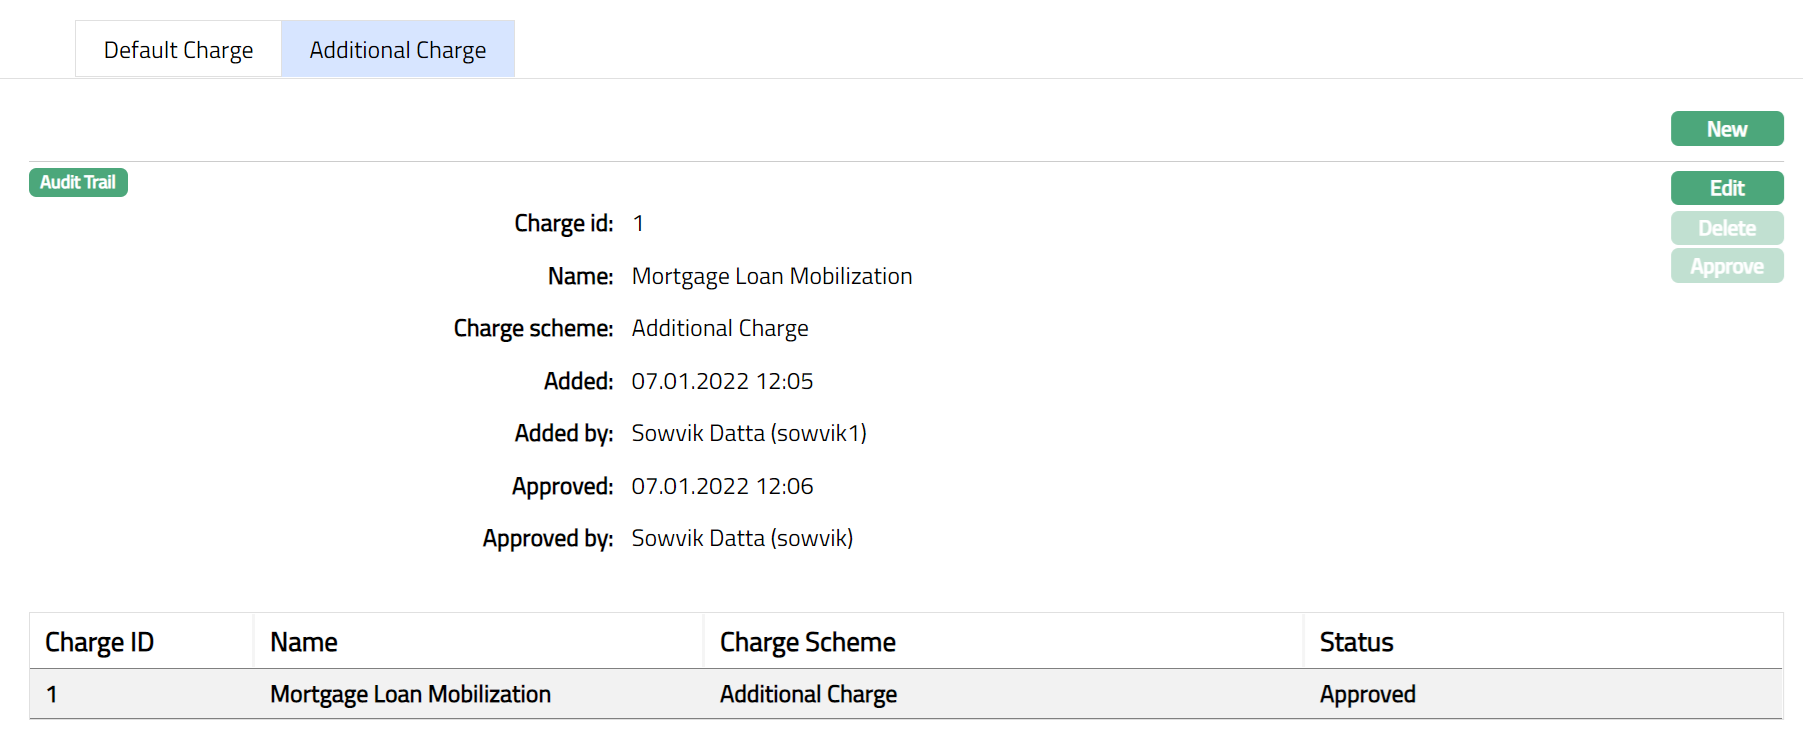
Charge Id field denotes the unique sequential charge id that gets generated for the additional charges.
Name field denotes the name of the additional charge.
Charge Scheme field denotes the name of the charge scheme attached to the additional charge.
Status field denotes the status of the tab.
Added field denotes the date on which the record was added.
Added by field denotes the name of the user who created the record.
Approved field denotes date on which the record was approved and is displayed only for approved records.
Approved by field denotes name of the user who approved the record and is displayed only for approved records.
- Click New. The New Additional Charge page appears.
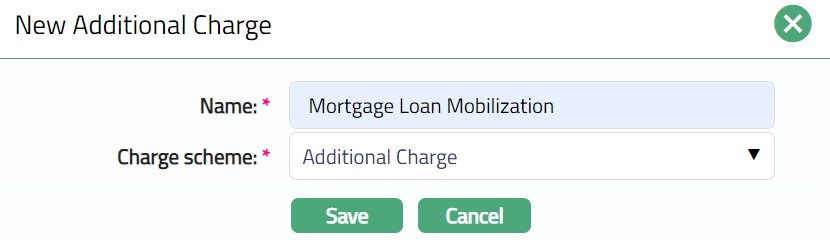

Enter charge Name.
Select Charge scheme from the dropdown list of Periodic charges maintained at Admin > Pricing > Charge > Charge scheme.
Click Save. Charge is saved, and the details are displayed on the summary pane.
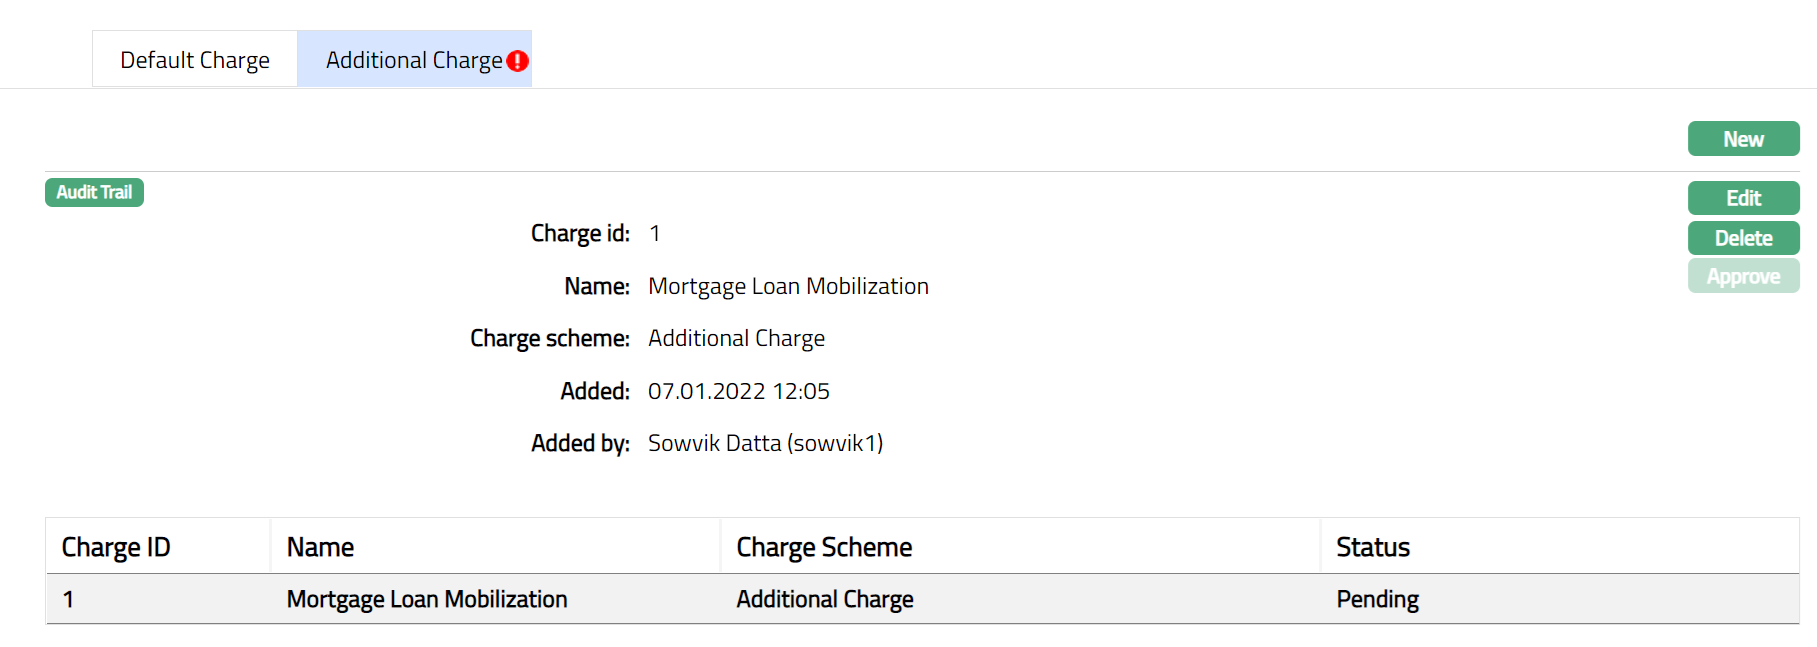

Functions: New, Edit, Delete, Approve
The additional fields are:
Approved field denotes date on which the record was approved and is displayed only for approved records.
Approved by field denotes name of the user who approved the record and is displayed only for approved records.
To edit Additional Charge
- Click Edit. Edit Additional Charge page appears.
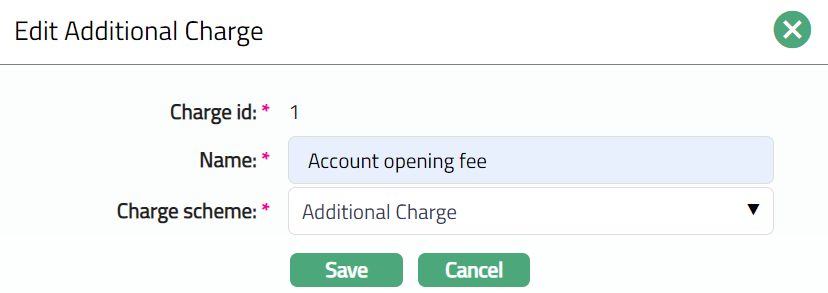
Note: Except Charge Id field all other fields are editable.
Make required changes and click Save.
Additional Charge tab appears with the edited details.
Functions: New, Edit, Delete, Approve
Note: Any change in the tab will set the tab status to Pending till it is approved by another user. On approval, the tab status is set to Approved.
Co-ordinates
The Co-ordinates tab allows you to specify the exact location of the branch attached to Agent, in terms of the latitude and longitude of the location. It follows the Google map convention of specifying position as an integer with 2 or 3 digits depending on latitude and longitude, followed by 6 decimal points, rather than the conventional degrees and minutes. You can also upload the picture of the branch.
To add working hours,
- Access Outlet Maintain page and click Co-ordinates tab and click New.
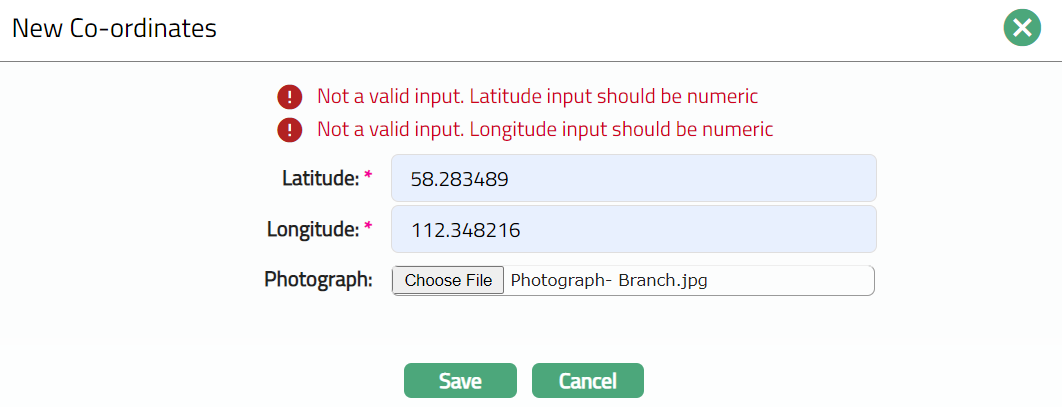
Enter the Latitude location of the branch. The Latitude range should be between 90 and -90. The number of decimals should not exceed 6 digits.
Enter the Longitude location of the branch. The Longitude range should be within 180 and -180. The number of decimals should not exceed 6 digits.
Click on browse button to select the Photograph of the branch. The photograph can either be the image of the branch or any other image related to it.
Functions: New, Edit
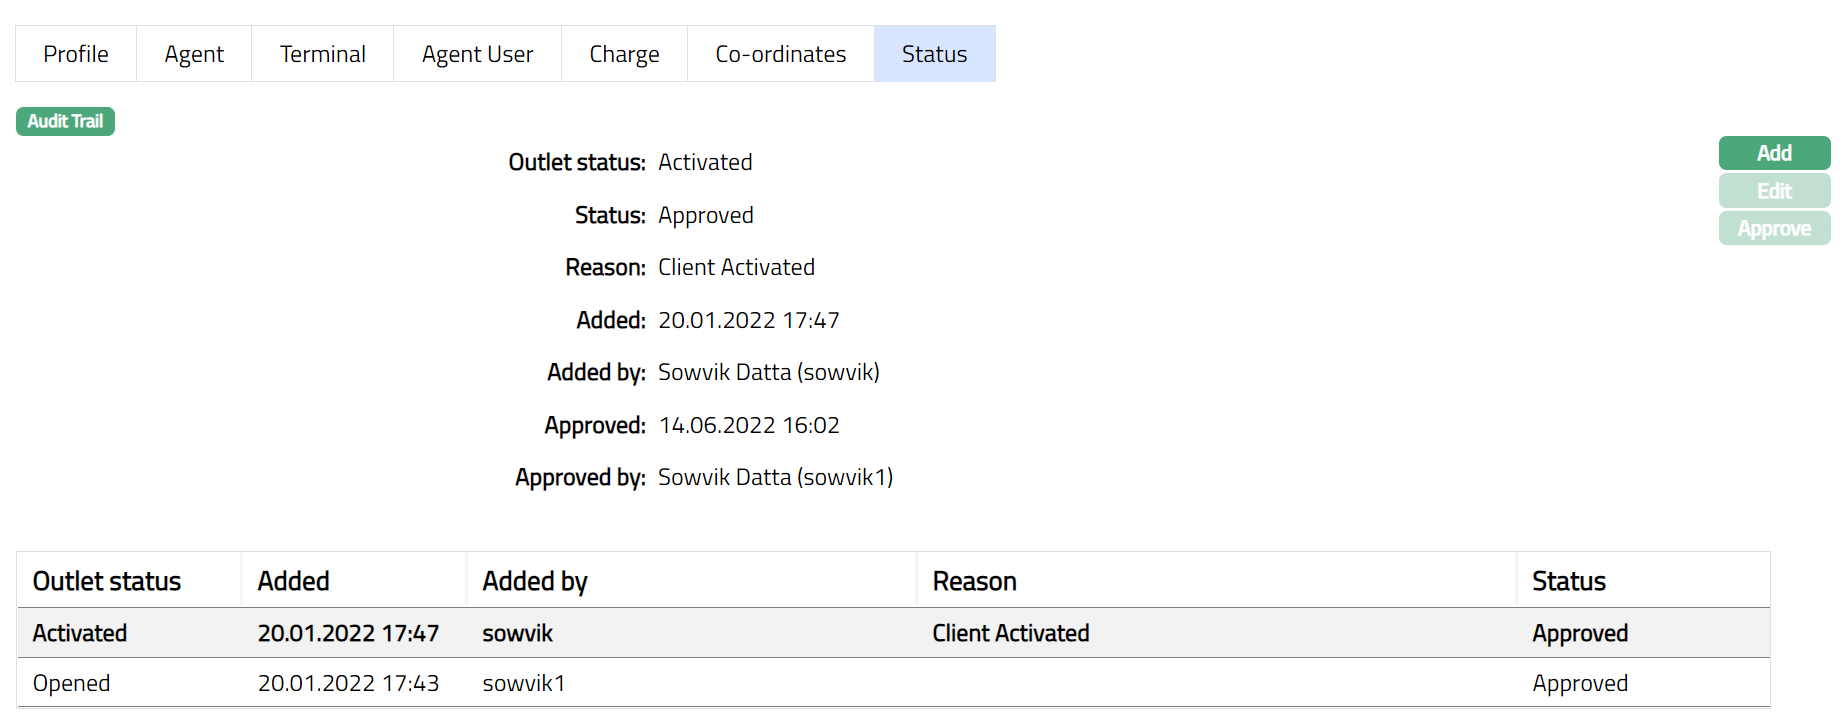
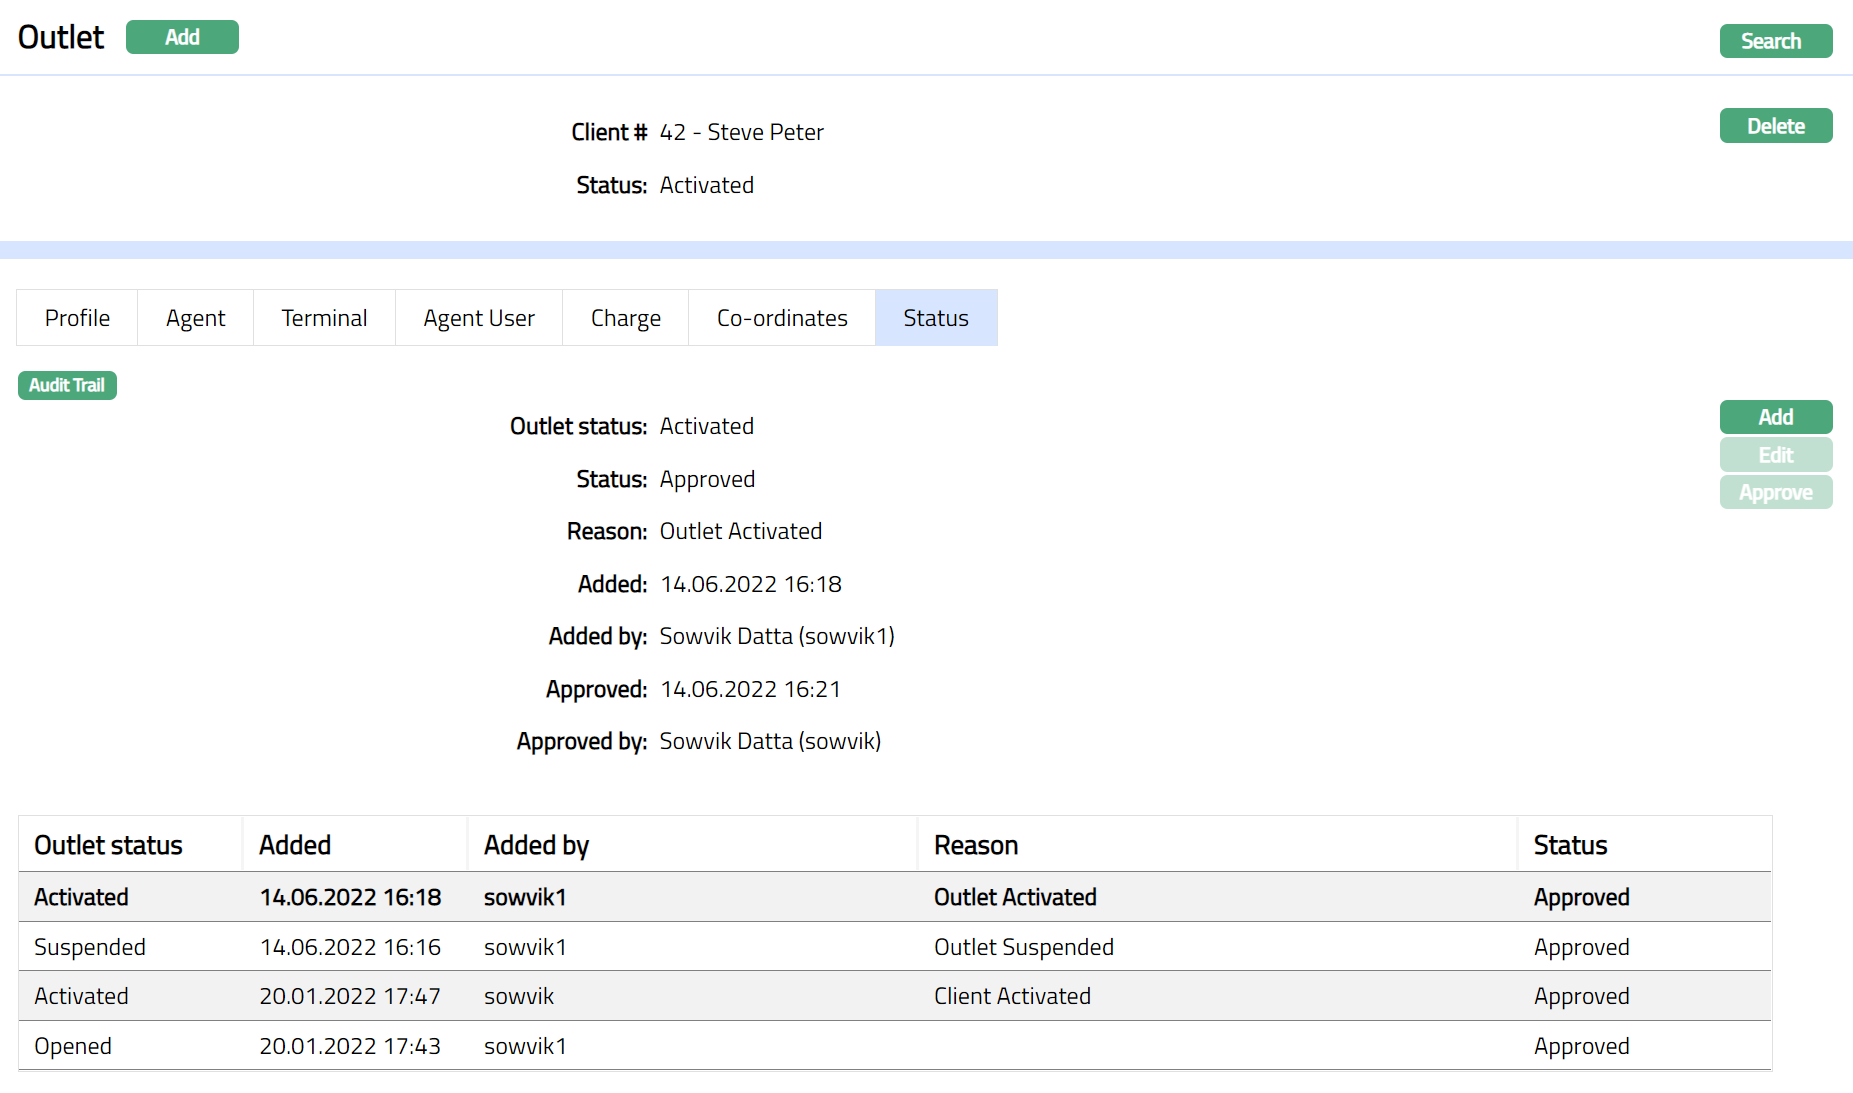
Status
Using this tab, you can add and view the history of the Outlet status, as well as approve the status records. On creating an Outlet, the status is Opened.
To add Outlet status
- Access the Outlet Maintain page and click Status tab.
- Click Add. Add Outlet Status page appears.
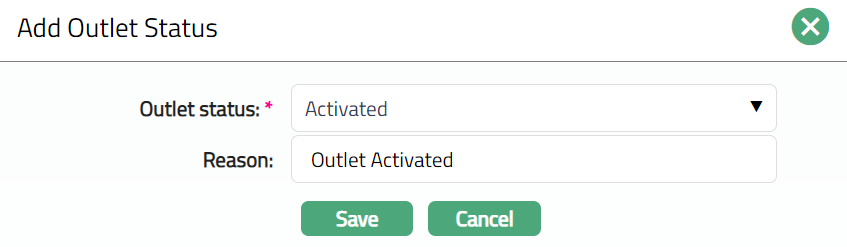
Select Outlet status from the drop-down list. Depending on the current status of the Outlet, the possible values are:
a. Opened: This is the initial status as soon as Agent record is created.
b. Activated: This is the status in which transactions are allowed. It has to be manually set by a user different from the one who created the account.
c. Suspended: If you want to suspend the Agent, then you can change the status of the record to suspend. On suspension of the Agent, Aura will suspend all Outlets, Terminals and Agent Users linked to the Agent. Aura will also suspend all Terminals and Agent Users linked to the Outlet, which is suspended at Agent Level.
Aura will validate and allow you to change the status as mentioned below.
Opened to Activate
Opened to suspended.
Activate to Suspended
Suspended to Activate.
Enter Reason for the status selected.
Click Save. Status tab appears with the added details.
Functions: Add, Edit, Approve
Note: On creation of an Outlet, the Outlet status by default will be Opened and Record status will be Approved. The Outlet will not be activated unless Activated status is added to the client and is approved by another user. Only on Approval by another user, the Outlet Status becomes Activated, record Status gets changed to Approved and the blue bubble disappears.
To edit Status
Click Edit. Edit Outlet status page appears.

Note: Only the Reason field is editable.
Make the required changes and click Save.
Functions: Add, Edit, Approve
Delete: You can delete the Outlet Status saved in Aura by clicking on Delete button. Aura will ask for confirmation, on approving which selected record will be deleted.