Card Loan Product Maintenance
Card Loan Product maintenance menu allows you to maintain the details of card loan products that are offered by your bank to its customers. These products can be created under two different types, Deferred card payment and Installment loan. Once the product is created, the values in these products are defaulted to the Card Loan Accounts that are created under the Product, with an option to change the details at the account level.
The following are the tabs in a Card Loan Product:
Creating a Card Loan Product
To create a new Card Loan Product,
1. From the Cards menu, click Settings, and then Card Loan Product. The Card Loan Product Search page appears. All card loan products available in Aura appear on the page.
2. Click Add. The New Product → Profile (1/9) appears.
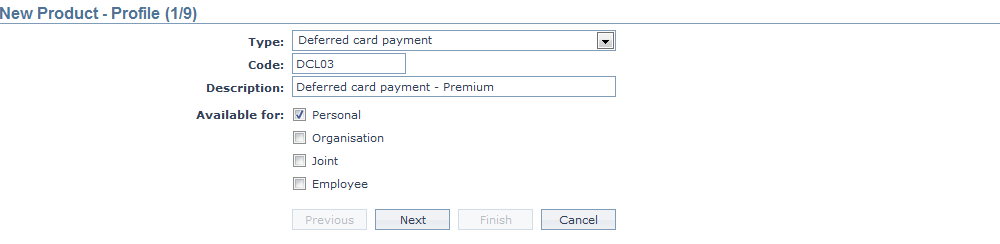
3. Select Deferred Card Payment as the Type from the drop down list for the product. The available options are:
Deferred Card Payment: These are "buy now, pay later" schemes where the client can make a purchase and the purchase will be considered for payment after a period of time. When this payment date is reached the deferred payment transaction is posted to the card account.
Installment Loan: These are typical loan products wherein the consumer can make a purchase and the purchase is treated as a separate loan with periodic payments due on the loan.
4. Enter the Code for the product. This is unique for the entity.
5. Enter the Description for the product.
6. Select the option for Available for field. This will determine the type of clients to which the product will be available. The options are:
- Personal -- Single person
- Organization -- Corporate
- Joint -- Group of two or more persons
- Employee -- Employee of the bank.
Thus, if you want the product to be available only for organizations, click only on the Organization checkbox.
Note: Employee and Joint checkboxes will be enabled only when you select Personal.
7. Click Next. The New Product → Currency (2/9) page appears.

8. Select the Currency for the product from the drop down list of GL Currencies. More currencies can be added during Edit using the Currency tab, once the Product record is created. Loan accounts for the product can be opened only in the selected currencies.
9. Enter the Minimum loan amount for the loan accounts under the product.
10. Enter the Maximum loan amount for the loan accounts under the product. Maximum amount should be greater than the minimum amount.
11. Click Next. The New Product → Settings (3/9) page appears.
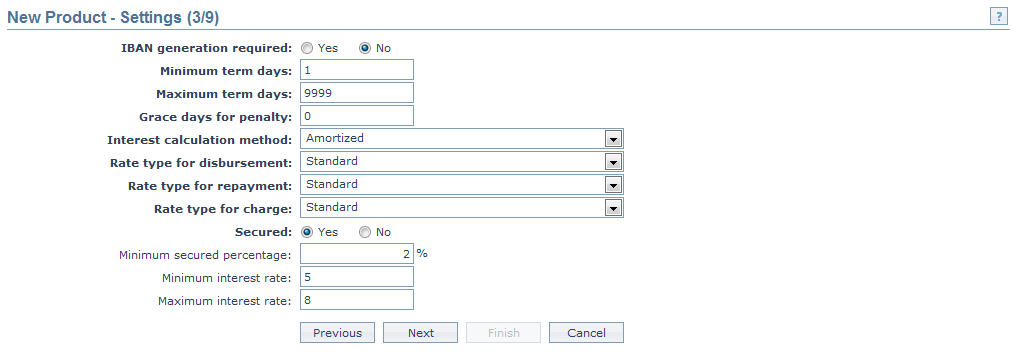
12. Click Yes or No radio button for IBAN generation required for new product. During account creation under the product, if this has been selected as Yes, Aura will automatically create IBAN according to the IBAN format maintained at the entity level.
13. Enter the minimum number of days for loans under this product in Minimum term days.
14. Enter the maximum number of days for loans under this product in Maximum term days.
15. Enter the number of days after which the penalty interest for any default will start applying in Grace days for penalty.
For example, if the grace period is marked as 2 days, then the loan installment amount can be paid within loan repayment date + 2days, without any penalty. If the loan is not paid within loan repayment date + 2 days then the penalty will be charged on the installment amount from the repayment date.
16. Select Interest calculation method from the drop down, Available options are:
- Amortized
In Amortized method, you have the ability to set different frequencies for Interest and Principal payment. You can enter the principal amount which will be constant. Thus, the interest calculation will be based on the outstanding principal at the beginning of the period and is calculated based on the amount and length of time period.
- Annuity
Annuity is a payment option where the repayment interval and the amount of principal and interest amount are fixed. You cannot change the principal amount and the interest amount.
17. Select Rate type for disbursement from the drop down list of rate types maintained under Admin → System codes → Currencies → Currency rate type. This is the rate type is used when the Loan Account Currency and Disbursement currency are different
18. Select Rate type for repayment from the drop down list of rate types maintained under Admin → System codes → Currencies → Currency rate type. This is the rate type to be used when the Loan Account Currency and Repayment Account Currency are different.
19. Select Rate type for charge from the drop down list of rate types should maintained under Admin → System codes → Currencies → Currency rate type. This is the rate type to be used when the Loan Account Currency and Charge Account currency are different and also if the Charge currency created at charge level is different.
20. Indicate if the loans under this product should be Secured or not using the radio buttons. If this has been selected as Yes, Minimum secured percentage. Minimum Interest Rate and Maximum Interest Rate fields will be enabled.
21. Enter the Minimum secured percentage for the product. Minimum Secured Percentage denotes the percentage applied on the Exposure amount (i.e., the Loan amount).
22. Enter the Minimum interest rate for the loan accounts under the product.
23. Enter the Maximum interest rate for the loan accounts under the product. Maximum rate should be greater than the minimum rate.
24. Click Next. The New Product → Interest Receivable (4/9) page appears.

25. Select the Loan Interest scheme that would be applicable to the accounts under this product from the drop down list of Interest schemes maintained under Admin → System codes → Interest → Interest Scheme. The interest receivable on the Principal amount would be derived using this scheme.
26. Select the Principal overdue scheme from the drop down list of Interest schemes maintained under Admin → System codes → Interest → Interest Scheme. The penalty receivable on the Principal overdue (i.e. the Principal amount which was due but has not been received from the client even after the grace days) would be calculated using this scheme.
27. Select the Interest overdue scheme from the drop down list of Interest schemes maintained under Admin → System codes → Interest → Interest Scheme. The penalty receivable on the Interest overdue (i.e. the Interest amount which was due but has not been received from the client even after the grace days) would be calculated using this scheme.
28. Click Next. The New Product → Charges (5/9) page appears.
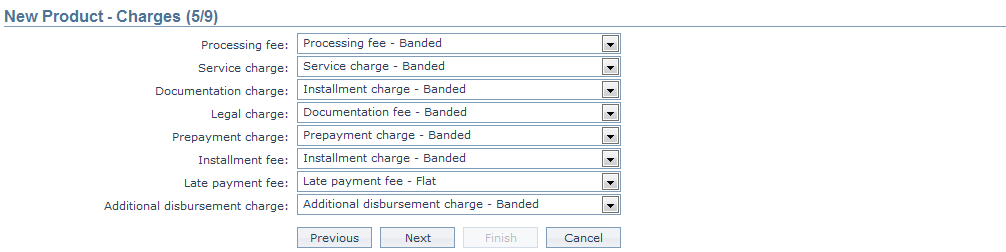
29. If you want to levy a charge for processing the loans under this Product, select the Processing fee from the drop down list of all the Charges where the Charge Type is Event. If the Charge is Banded, the charge amount will be calculated on the basis of the amount sanctioned. The charge amount is collected upon disbursement.
30. When you want to levy Service charges for the loans under this Product, select the Service charge from the drop down list of all the Charges where the Charge Type is Event. If the Charge is Banded, the charge amount will be calculated on the basis of the amount sanctioned. The charge amount is collected upon disbursement.
31. When you want to levy a Documentation charge, select the Documentation charge from the drop down list of all the Charges where the Charge Type is Event. If the Charge is Banded, the charge amount will be calculated on the basis of the amount sanctioned. The charge amount is collected upon disbursement.
32. When you want to levy a Legal charge, select the Legal charge from the drop down list of all the Charges where the Charge Type is Event. If the Charge is Banded, the charge amount will be calculated on the basis of the amount sanctioned. The charge amount is collected upon disbursement.
33. When you want to levy a Prepayment charge on payments made before their due dates, select the Prepayment charge from the drop down list of all the Charges where the Charge Type is Event. If the Charge is Banded, the charge amount will be calculated on the basis of the Loan amount. This charge will be collected when user does a prepayment using the Loan Repayment Screen.
34. When you want to levy an Installment fee, select the Installment fee from the drop down list of all the Charges where the Charge Type is Event. If the Charge is Banded, the charge amount will be calculated on the basis of the Principal Schedule amount. The charge amount is collected for every installment.
35. When you want to levy a Late payment fee, select the Late payment fee from the drop down list of all the Charges where the Charge Type is Event. If the Charge is Banded, the charge amount will be calculated on the basis of the Principal Schedule amount. The charge amount is collected when a user pays after the due date.
36. When you want to levy an Additional disbursement charge, select the Additional disbursement charge from the drop down list of all the Charges where the Charge Type is Event. If the Charge is Banded, the charge amount will be calculated on the basis of the Principal Schedule amount. The charge amount is collected when ever an additional disbursement is done.
37. Click Next. The New Product → General Ledger (6/9) page appears.
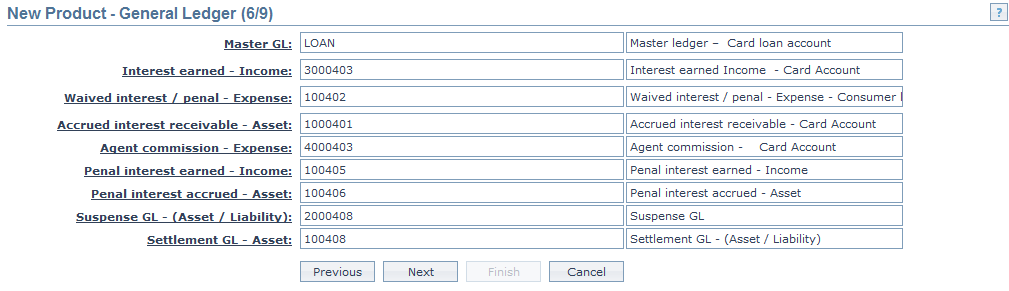
38. You will see the list of various GLs required to account for the events in the life cycle of the Product. The table below gives the fields, the use and the conditions for each of these GLs. You can either directly input the Ledger # or click on the hyperlink to see the list of GLs satisfying these conditions and select the required Ledger #.
| Sl. No. | Field name | Used | List based on |
|---|---|---|---|
| 1 | Master GL | as the Master GL to record all transactions under this product | ledger type Asset, Liability or Neutral where the cash account is No, Manual posting is No and the FX consolidation is blank |
| 2 | Interest earned – Income | for accounting the Interest earned on accounts under this product | ledger type Income |
| 3 | Waived interest / Penal - Expense | for accounting the expenses on Waiver of interest / penalty on accounts under this product | Ledger type Expense |
| 4 | Accrued Interest Receivable – Asset | for accounting the Accrued interest receivable on accounts under this product | Ledger type Asset |
| 5 | Agent commission – Expense | for accounting the Agent commission expenses on accounts under this product | Ledger type Expense |
| 6 | Penal interest earned – Income | for accounting the Penal interest earned on accounts under this product | Ledger type Income |
| 7 | Penal interest accrued – Asset | for accounting the Penal interest accrued on accounts under this product | Ledger type Asset |
| 8 | Suspense GL – (Asset / Liability) | for accounting the Suspense entries (i.e. where the transaction cannot be traced presently) on accounts under this product | Ledger type Asset or Liability |
| 9 | Settlement GL – Asset | for accounting the cash transactions (cash disbursement or cash payments) on accounts under this product | Ledger type Asset |
39. Click Next. The New Product → Transaction Settings (7/9) page appears.

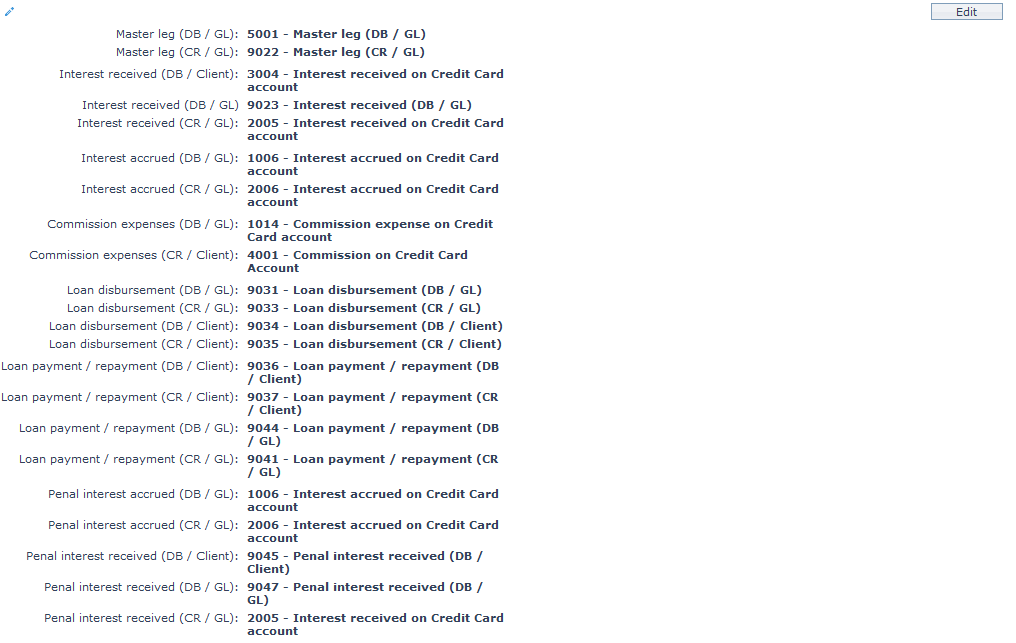
40. Input the required Transaction code to be used for accounting the various events in the life cycle of the Product. You can directly input the Transaction Code or use the hyperlink to search for and select the required Transaction Code. The list of Transaction codes shown on click of hyperlink is based on certain conditions as listed against each field.
| Sl. No. | Field name of Transaction Settings | Used for | List of Transaction codes based on | Event when it will be used |
|---|---|---|---|---|
| 1 | Master leg (DB/GL) | recording all the debit transactions affecting the accounts under this product | General Ledger Debit | Disbursement and Payments |
| 2 | Master leg (CR/GL) | recording all the credit transactions affecting the accounts under this product. | General Ledger Credit | Disbursement and Payments |
| 3 | Interest received (DB/Client) | recording all Interest received in the Client Account. | Client account Debit | Payments |
| 4 | Interest received (DB/GL) | recording all Interest received in the General Ledger Account. | General Ledger Debit | Payments |
| 5 | Interest received (CR/GL) | recording all Interest received transactions in the General Ledger Account. | General Ledger Credit | Payments |
| 6 | Interest accrued (DB/GL) | recording all Interest accrued transactions in the General Ledger account. | General ledger Debit | Accrual |
| 7 | Interest accrued (CR/GL) | recording all Interest accrued transactions in the General Ledger account. | General ledger Credit | Accrual |
| 8 | Waived interest / Penal (DB/GL) | recording all Penal Interest waived transactions in the General Ledger account. | General ledger Debit | Accrual |
| 8 | Commission expenses (DB/GL) | recording all commission expense transactions in the General Ledger account. | General ledger Debit | - |
| 9 | Commission expenses (CR/Client) | recording all commission expense transactions in the Client account. | Client account Credit. | - |
| 10 | Loan disbursement (DB/GL) | recording all loan disbursement transactions in the General Ledger accounts. | General ledger Debit | Disbursement |
| 11 | Loan disbursement (CR/GL) | recording all loan disbursement transactions in the General Ledger accounts. | General ledger Credit | Disbursement |
| 12 | Loan disbursement (DB/Client) | for recording all loan disbursement transactions in the Client accounts. | Client Credit | Disbursement |
| 13 | Loan disbursement (CR/Client) | for recording all loan disbursement transactions in the Client accounts. | Client account Debit | Disbursement |
| 14 | Loan payment/repayment (DB/Client) | for recording all payment / repayment transactions in the Client account. | Client account Credit. | Payment/Repayment |
| 15 | Loan payment/repayment (CR/Client) | for recording all payment / repayment transactions in the Client account. | General Ledger Credit. | Payment/Repayment |
| 16 | Loan payment/repayment (DB/GL) | recording all payment / repayment transactions in the Client account. | General Ledger Debit | Payment/Repayment |
| 17 | Loan payment/repayment (CR/GL) | recording all payment / repayment transactions in the Client account. | General Ledger Credit | Payment/Repayment |
| 18 | Penal interest accrued (DB/GL) | for recording the transactions in the General Ledger accounts in respect of the Penal Interest Accrued (DB/GL) will be defaulted from the transaction code that you input for Interest accrued (DB/GL). | Client account Debit | Accrual |
| 19 | Penal interest accrued (CR/GL) | for recording the transactions in the General Ledger accounts in respect of the Penal Interest Accrued (CR/GL) will be defaulted from the transaction code that you input for Interest accrued (CR/GL). | General Ledger Credit | Accrual |
| 20 | Penal interest received (DB/Client) | for recording the transactions in the Client accounts in respect of the Penal Interest Received (DB/Client) will be defaulted from the transaction code that you input for Interest received (DB/Client). | Client account Debit | Payment |
| 21 | Penal interest received (DB/GL) | for recording the transactions in the Client accounts in respect of the Penal Interest Received (DB/GL) will be defaulted from the transaction code that you input for Interest received (DB/GL | General Ledger Debit | Payment |
| 22 | Penal interest received (CR/GL) | for recording the transactions in the Client accounts in respect of the Penal Interest Received (CR/GL) will be defaulted from the transaction code that you input for Interest received (CR/GL). | General Ledger Credit | Payment |
41. Click Next. The New Product → Statement Parameter (8/9) page appears.

42. Select Format from the drop down list of statement formats that have been maintained under Admin → System codes → Generic definition → Statement formats. It is the Format of the statement that is to be generated.
43. Select Communication mode from the drop down list -- i.e. the manner in which you want to send the statement. Available options are: Data handoff, e-Invoice, Email, Paper, SMS and Web hotel.
44. Select Frequency of the statement to be generated from the drop down. Available options are: Daily, Weekly, Fortnightly, Monthly, Quarterly, Semi-annual and Annual.
45. Select the Statement fee from drop down list of charges maintained under Admin → Pricing → Charges → Charge schemes where the charge is Event-based and it is either Banded or Flat amount charge. If the Charge is Banded, the charge amount will be calculated on the basis of the amount sanctioned. The charge amount is collected upon repayment. This is the fee that is to be collected from the client for the statement defined above.
46. Click Next. The New Product → Confirmation (9/9) page appears showing all the details that you entered above.
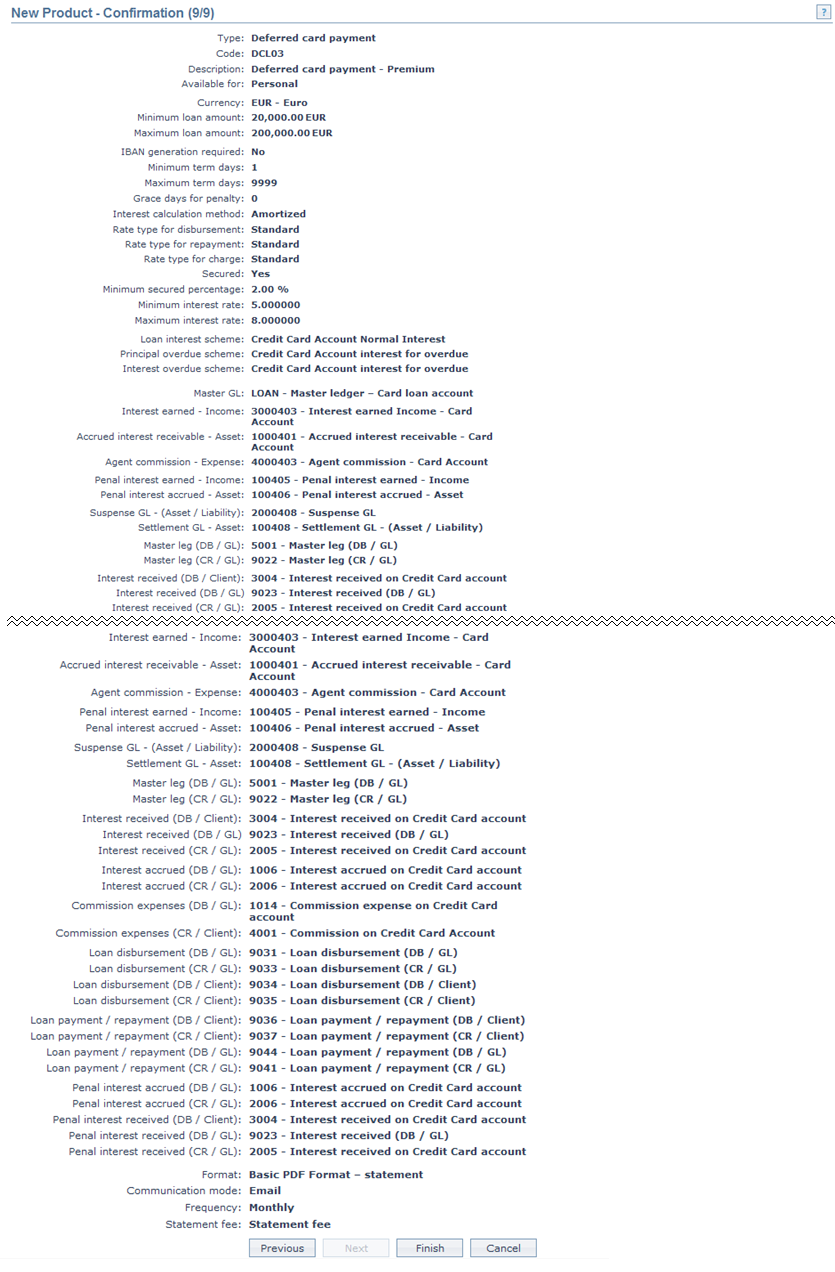
- Click Finish. The new product record is created and you will see the Profile tab by default.
Functions: Add, Search, Suspend, Activate, Edit, Delete.
Note: The status of the product is Active as soon as the product is created. The status of the Interest Receivable tab is Pending till it is approved by another user. On approval, the tab status is set to Approved. If the tab status is Pending, loan accounts under the Product cannot be created.
Edit: Using Edit, you can update details of the product. However, the updated conditions will be applicable only for any accounts that are created AFTER the changes have been done and will NOT affect the accounts already created.
Suspend: You can suspend the product by a click on Suspend button. When you click on Suspend button, Aura displays an alert message. On confirmation Aura will suspend the product. Suspending a product only makes it unavailable in future for any new account creation / any other dropdown list. Existing accounts under the product continue without any impact. Suspended products can be activated by using Activate button.
Activate: You can activate a suspended product by a click on Activate button. When you click on Activate button, Aura displays an alert message. On confirmation Aura will activate the product. Activation of a product only makes it available in future for any new account creation / any other dropdown list.
Delete: You can delete a product by a click on Delete button. When you click on Delete button, Aura displays an alert message. On confirmation Aura will delete the product.
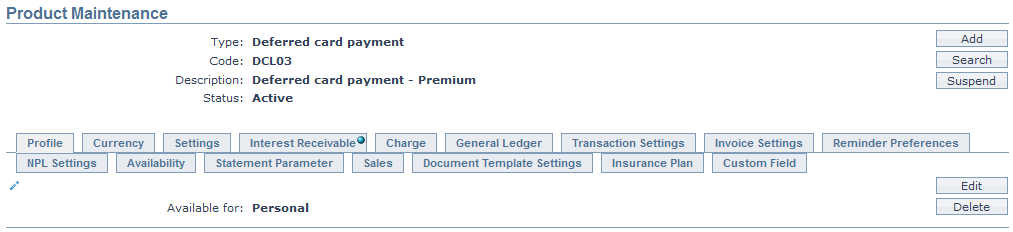
Profile
The Profile tab, which is the default tab in the Product Maintenance screen, shows the basic details of the Product.
To view / edit the Profile,
1. Access the Product Maintenance page. Click on the Profile tab to view the details as per sample below. The details are defaulted from the entries that you made during Product creation. For details refer to Card Loan → New Product → Profile (1/9).

2. Click on Edit. The Edit Product page appears.
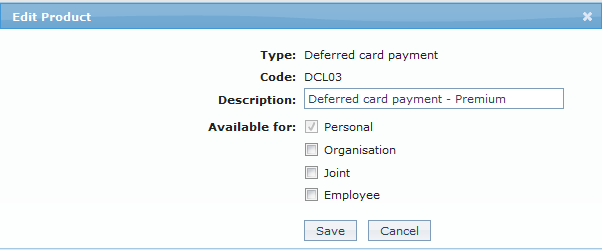
The following fields are editable:
- Description
- Available for: You can only add the client types. But, you cannot remove a client type for which the product was marked as available earlier.
3. Click Save to save the changes that you made.

Functions: Edit, Delete.
Currency
Currency tab allows you to maintain the currencies for the product. One or more currencies can be added using the Currency tab, once the product record is created. Accounts for the product can be opened only in the selected currencies.
To Add / view / edit the currency,
1. Access the Product Maintenance page. Click on the Currency tab to view the details as per sample below. The details are defaulted from the entries that you made during product creation. For details refer to Card Loan → New Product → Currency (2/9).

2. Click Add. The New Currency page will appear.
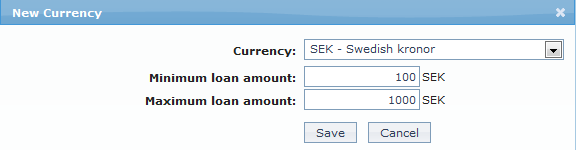
3. Select the Currency for the product from the drop down list of GL currencies.
4. Enter the Minimum loan amount for the loan accounts under the product.
5. Enter the Maximum loan amount for the loan accounts under the product. Maximum amount should be greater than the minimum amount.
6. Click Save. The Currency page appears with the added details.

To edit the currency,
7. Click Edit. The Edit Currency page appears.
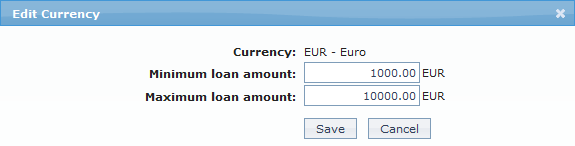
8. The Minimum Loan Amount and Maximum Loan Amount fields are editable.
9. Click Save to save the changes that you made.

Functions: New, Edit and Delete.
Settings
This Tab allows you to view and maintain certain product settings like IBAN generation required, Minimum and maximum term days, Rate types for currency conversions, etc.
To edit the settings,
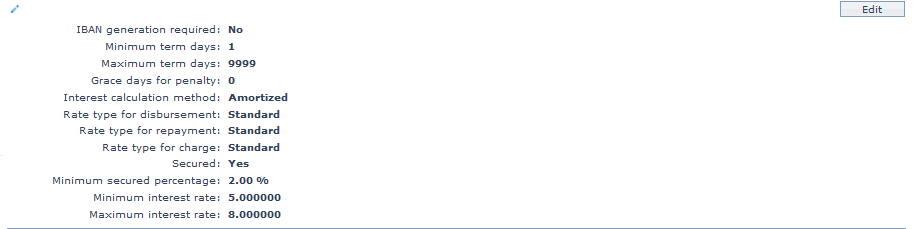
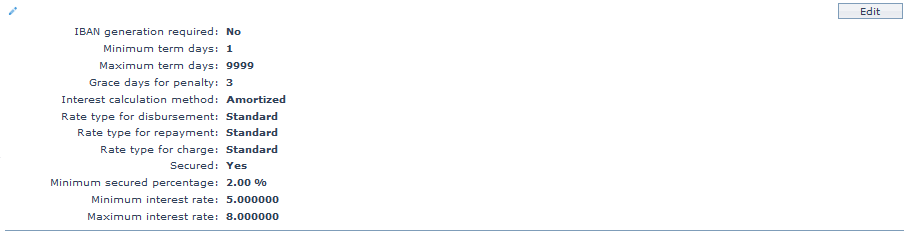
1. Access the Product Maintenance page. Click on the Settings tab to view the details as per sample below. The details are defaulted from the entries that you made during Product creation. For details refer to Card Loan → New Product → Settings (3/9).
2. Click on Edit. The Edit Product Settings page appears.
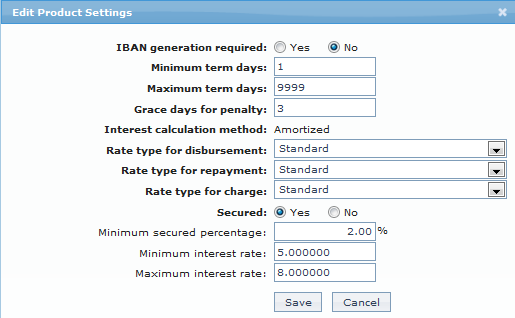
Note: Except Interest calculation method, all the fields in Settings can be updated during Edit.
3. Click Save to save the changes that you made.
Functions: Edit.
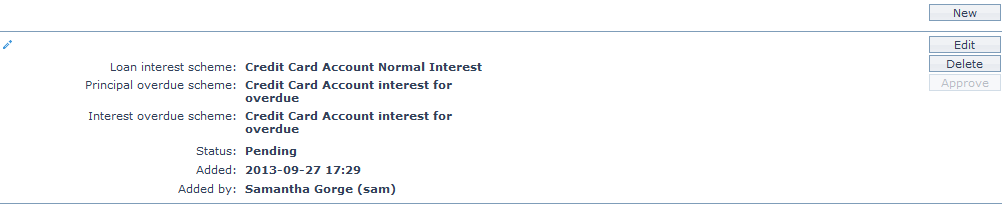
Interest Receivable
This menu option allows you to create and maintain the various interest schemes for the interest chargeable on the loan accounts under this product.
1. Access the Product Maintenance page. Click on the Interest Receivable tab to view the details as per sample below. The details are defaulted from the entries that you made during Product creation. For details refer to Card Loan → New Product → Interest Receivable (4/9).
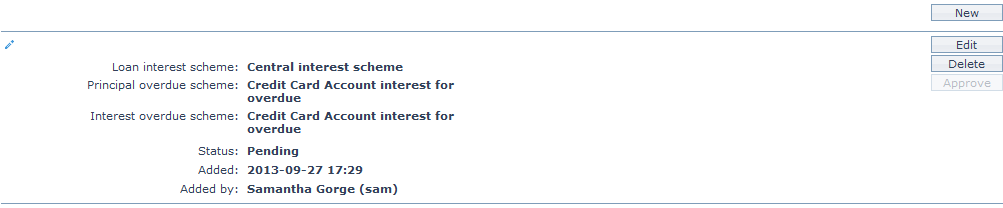
The additional fields that you can view in the Interest Receivable tab are explained below.
- Status field denotes the status of the record.
- Added field denotes the date on which the record was added.
- Added by field denotes the name of the user who created the record.
- Approved field denotes the date on which the record was approved and is displayed only on approval.
- Approved by field denotes the name of the user who approved the record and is displayed only on approval.
2. Click on Edit. The Edit Interest Receivable page appears.
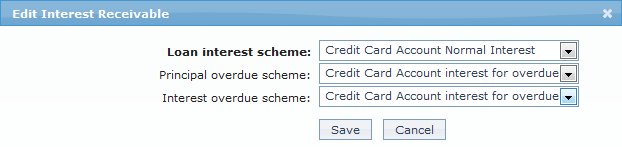
Note: All the fields in Interest receivable screen can be updated during edit. However, only the person who created the interest receivable record can edit it, till it is approved.
3. Click Save to save the changes that you made.
Functions: New, Edit, Delete and Approve.
Note:
After creation / edit, the tab is in Pending status.
When the status is Pending, the interest receivable record can be deleted by the user who created the record by a click on Delete.
To approve, a user different from the one who created / edited has to retrieve the record and click on Approve. Once the tab is approved, no further changes can be done on the Interest Receivable tab. If you want to change any settings for the Interest receivable tab for the Product you have to use the New button.
If you want to change the interest receivable settings for the product, after the same has been approved, click on New. The New Interest Receivable page appears.
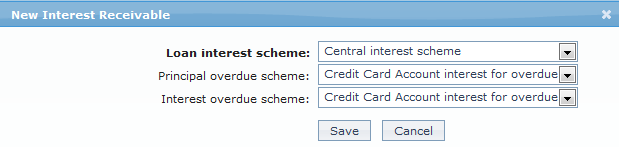
Enter the details as explained in the section Card Loan > New Product → Interest Receivable (4/9).
Charge
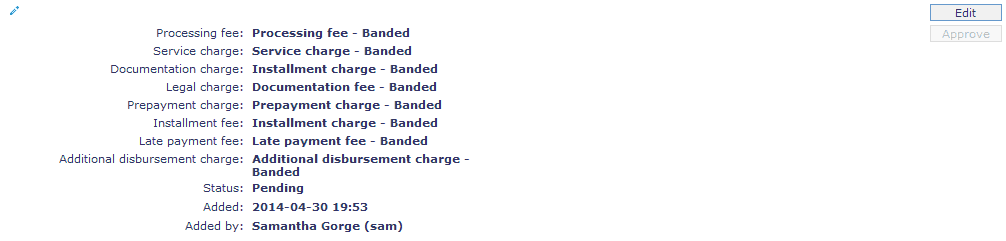
The Charge tab allows you to view and edit the details of different charges for accounts under the product.
1. Access the Product Maintenance page. Click on the Charge tab to view the details as per sample below. The details are defaulted from the entries that you made during product creation. For details refer to Card Loan → New Product → Charge (5/9).
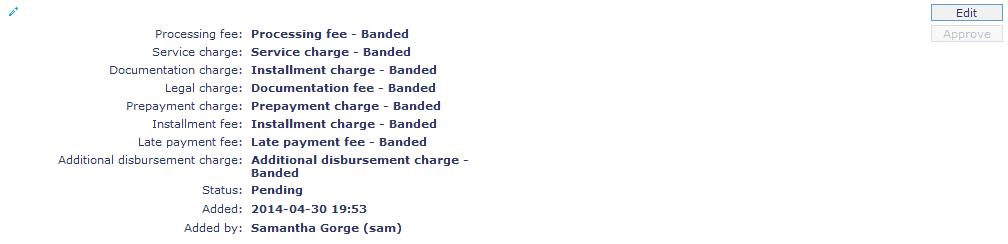
The additional fields available are:
- Status field denotes the status of the tab.
- Added field denotes the date on which the record was added.
- Added by field denotes the name of the user who created the record.
- Approved field denotes date on which the record was approved and is displayed only for approved records.
- Approved by field denotes name of the user who approved the record and is displayed only for approved records.
2. Click on Edit. The Edit Charge page appears.
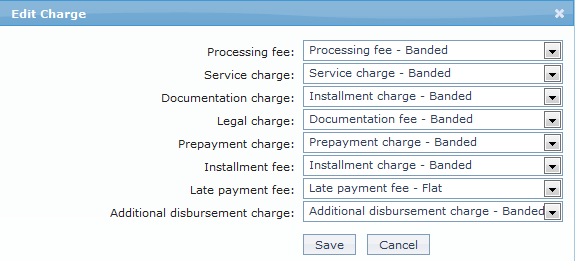
Note: All the fields in Charge can be updated during edit.
3. Click Save to save the changes that you made.
Functions: Edit, Approve.
Note: Once the charge is added or any changes made, the charge tab will be in the Pending status. On Approval, the charges will be applicable on the new Accounts created based on this product.
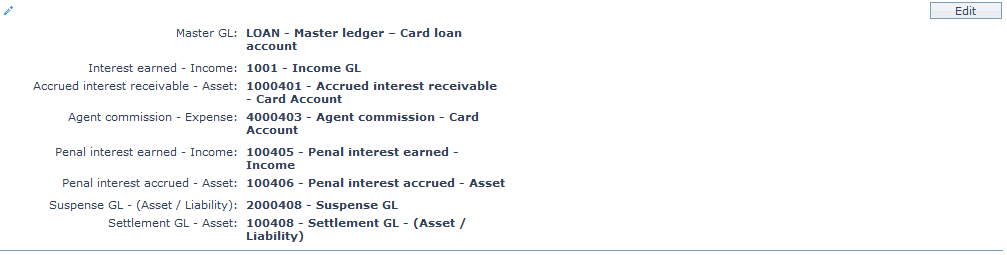
General Ledger
The General Ledger tab allows you to view and maintain the various General Ledger accounts for the product.
1. Access the Product Maintenance page. Click on the General Ledger tab to view the details as per sample below. The details are defaulted from the entries that you made during Product creation. For details refer to Card Loan → New Product → General Ledger (6/9).
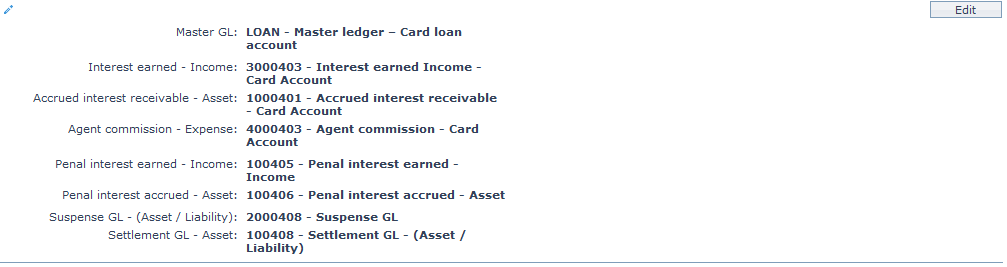
2. Click on Edit. The Edit General Ledger page appears.
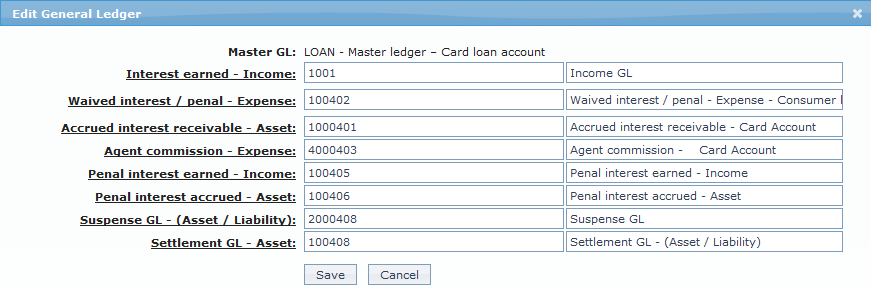
Note: Except Master GL, all the fields in General ledger can be updated during Edit. However, Aura does not update the balances of the old GL into the new GL automatically for any change in GL settings. If any GL setting is changed midway, you should take care to also move the balances from the old GL to the new GL appropriately to avoid any mismatch of the General Ledger accounts.
3. Click Save to save the changes that you made.
Functions: Edit.
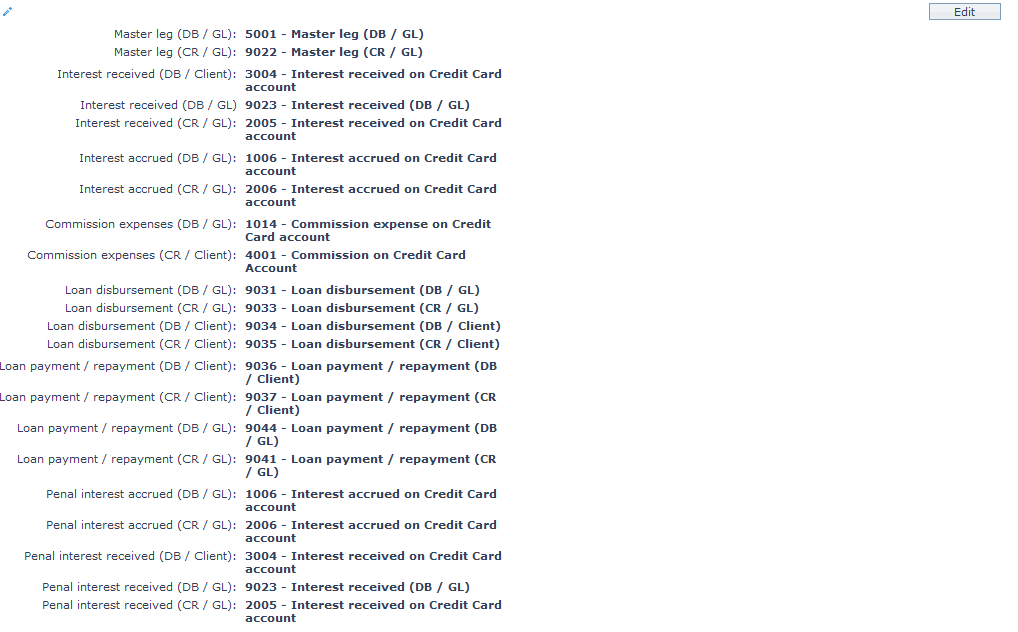
Transaction Settings
Transaction settings tab allows you to specify the transaction codes that are to be used for the various events in the life cycle of the product. These transaction codes define what description / narration is used for the account postings / statements and may also be used to trigger other charges.
1. Access the Product Maintenance page. Click on the Transaction settings tab to view the details as per sample below. The details are defaulted from the entries that you made during product creation. For details refer to Card Loan → New Product → Transaction settings (7/9).
2. Click on Edit. The Edit Transaction settings page appears.
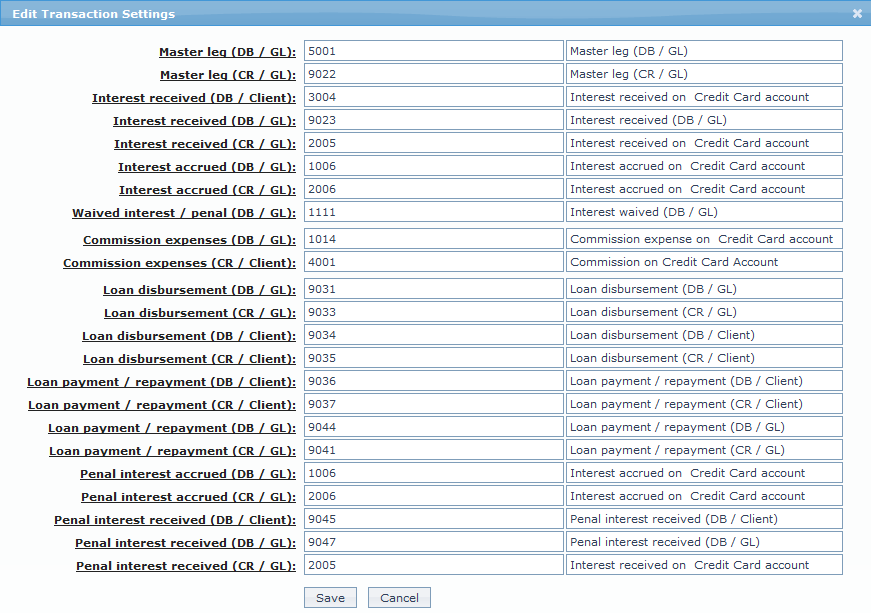
Note: All the fields in Transaction Settings can be updated during edit.
3. Click Save to save the changes that you made.
Functions: Edit.
Invoice Settings
The Invoice Settings tab allows you to view and edit the invoice settings for the loan. You can set the day on which the invoice has to be generated and the mode through which it has to be communicated to the client.
To view / edit the invoice settings,
1. Access the Product Maintenance page. Click on the Invoice Settings tab to view the details as per sample below.

2. Click on Edit. The Edit Invoice Settings page appears.
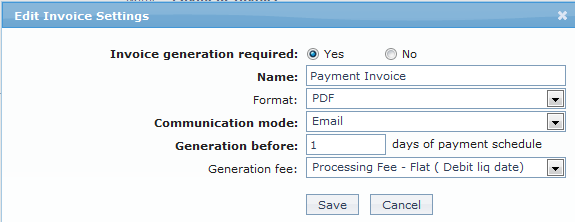
3. Since all loans need to have an invoice generated, by default, Yes radio button is selected for Invoice generation required field.
Note: All the fields in Edit Invoice Settings can be updated during edit. If you select No radio button for Invoice generation required field, all the fields will be disabled.
4. Enter the name of the invoice in the Name field.
5. Select Format from the drop down list of statement formats that have been maintained under Admin → System codes → Generic definition → Statement formats. It is the Format of the statement that is to be generated.
6. Select Communication mode from the drop down list -- i.e. the manner in which you want to send the invoice. Available options are: Data handoff, Email and Internet banking.
7. In the Generation Before field, enter the number of days before payment due date on which the invoice has to be generated.
6. Select the required Generation fee from the drop down list of Charges from Admin → System codes → Charges where the charge is Active, Event-based and it is either Banded or Flat amount charge. In case of Banded charges, the charge amount will be calculated on the basis of the amount sanctioned. The charge amount is collected upon disbursement.
7. Click Save to save the changes that you made.

Functions: Edit.
Reminder Preferences
The Reminder Preferences tab allows you to add, view and edit the preferences based on which the reminders are sent to client for recovering their dues.
To add / edit / view the Reminder preferences,
1. Access the Product Maintenance page. Click on the Reminder Preferences tab to see a list of reminders already added.

2. Click Add. The Add Reminder Preferences page appears.
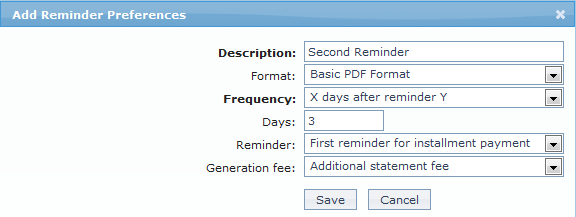
3. Enter the description in the Description field.
4. Select the Reminder Format from the drop down list of reminder formats that have been maintained under Admin → System codes → Generic definition → Reminder formats. It is the Format of the reminder that is to be generated.
5. Select the Frequency from the drop down. The following options are available in the frequency drop down:
- On Payment Due Date: The reminder will be sent on the payment due date.
- X days before Payment Date: If you select this option, enter the number of days in the Days field.
- X days after payment date: If you select this option, enter the number of days in the Days field.
- X days after grace days, if overdue: If you select this option, enter the number of days in the Days field.
- X days after reminder Y: If you select this option, enter the number of days in the Days field and select the reminder from the Reminder drop down.
6. Select the required Generation fee from the drop down list of Charges of type Event from Admin → System codes → Charges where the charge is Active, Event-based and it is either Banded or Flat amount charge. In case of Banded charges, the charge amount will be calculated on the basis of the amount sanctioned. The charge amount is collected upon disbursement.
7. Click Save to add the Reminder Preferences.

Functions: Add, Edit and Delete.
Note: In view mode, the Frequency field value display will replace X and/or Y with the actual days and/or payment status selected.
NPL Settings
The NPL (Non Performing Loan) settings tab allows you to view and edit various NPL settings for the loans that become Non performing.
To view / edit the Profile,
1. Access the Product Maintenance page. Click on the NPL Settings tab to view the details as per sample below. By default, Aura selects Loan overdue and assigns 99999 days to the Mark loan as NPL on field.

2. Click on Edit. The Edit NPL Settings page appears.
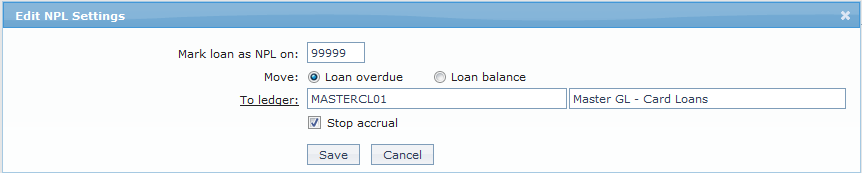
3. The Mark loan as NPL on field will be displayed automatically by the system when the product is created. By default, the value will be 99999. It denotes the number of overdue days of the components like principal, Interest, Penalty. Loan will be marked as NPL on the day as specified on Mark loan as NPL on field. For example, if the value entered is 30, the loan will be marked as NPL on the 30th day from the date on which the grace days ended.
4. Select the radio button Loan overdue or Loan balance.
By default Loan overdue radio button is selected so that the principal, interest and other penalty overdue will be moved to GL which is marked as To ledger. For example, if you take a loan of 20,000 EUR on a six month instalment scheme for which the interest charged per month is 200 EUR and the Mark as NPL on is 10 days. Suppose the instalment due date is 30th of every month but you failed to pay the instalment on the due date and even failed to pay the loan instalment on the overdue date which is 10th, then in accordance with Loan overdue method, the principal, interest and other penalty overdue will be moved to the To general ledger. And when the next instalment becomes overdue which is 10th day of the next month, that due will also be moved to this ledger.
If loan balance is selected, then the entire outstanding balance of loan and interest will be moved to To ledger. For example, if you take a loan of 20,000 EUR on a six month instalment scheme for which the interest charged per month is 200 EUR and the Mark as NPL on is 10 days. Suppose the instalment due date is 30th of every month but you failed to pay the instalment on the due date and even failed to pay the loan instalment on the overdue date which is 10th, then in accordance with loan balance method, the entire outstanding balance of the loan along with the interest will be moved to the To general ledger.
5. Click on the To Ledger hyperlink to select the ledger from the list of all active general ledgers from GL accounts of type Asset.
6. By default, Stop Accrual is unchecked which means that the Interest and penalty continue to accrue even after the movement. If you want the interest and penalty accrual to stop, uncheck Stop Accrual.
7. Click Save to save the changes that you made.

Functions: Edit.
Availability
This tab can be used to control the availability of the product to specific Branch or Client. It has two sub-tabs, one for each of these.
Availability-Branch
Using this tab, you can allow the Product to be available for all the branches or only specific branch(es).
To select the branch,
1. Go to Product Maintenance page, click on Availability tab, then click on Branch tab.

2. By default, All radio button is selected so that this Product is available for all Branches.
3. To restrict the branches for which this Product is available, click on Selected radio button. Add button is now enabled.
4. Click on Add. The Add Branch screen appears where you can select the required branch from the drop down of all active Branches of the entity.
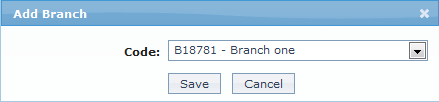
5. Click Save to save the changes that you have made. The selected branch(es) will appear in Product Maintenance screen.
 Function: Add and Delete.
6. To delete a branch, select the branch and click on Delete.
Note: You may choose to allow All Branches for the product at any time. However, Aura will prompt you to confirm if the selected branches may be deleted. If confirmed, then all the selected branches will be deleted and the product will be available for ALL branches.
Availability-Client
Using this tab, you can allow the product to be available for all the Clients or only specific Client(s).
7. Go to Product Maintenance page, click on Availability tab, then click on Client tab.

8. By default, All radio button is selected so that this product is available for all Clients.
9. To restrict the Clients for which this product is available, click on Selected radio button. Add button is now enabled.

10. Click on Add. The Add Client page appears, where you can search for the required client with relevant criteria and select the required client
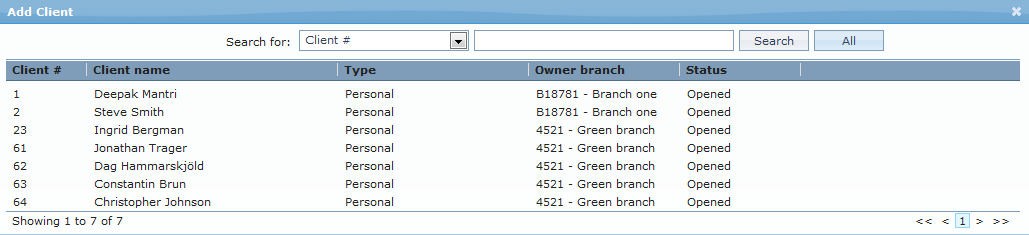
11. The selected Client(s) will appear in Product Maintenance screen as shown below.

Function: Add, Delete.
12. To delete a Client, select the client and click on Delete.
Note: You may choose to allow All Clients for the Product at any time. However, Aura will prompt you to confirm if the selected Clients may be deleted. If confirmed, then all the selected Clients will be deleted and the Product will be available for ALL Clients.
Statement Parameter
Statement Parameter tab allows you to view and maintain the preferences for generating the statements.
1. Access the Product Maintenance page. Click on the Statement Parameter tab to view the details as per sample below. The details are defaulted from the entries that you made during Product creation. For details refer to Card Loan → New Product → Statement Parameter (8/9).

2. Click on Edit. The Edit Statement Parameter page appears.

Note: All the fields in Statement Parameter can be updated during edit.
3. Click Save to save the changes that you made.

Function: Edit.
Sales
Using this tab, you can view and maintain the sales commission for the product.
1. Access the Product Maintenance page and click on the Sales tab.

2. Click on Edit. The Edit Sales page appears.
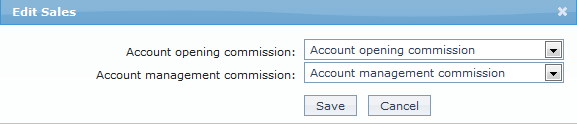
3. If you want to allow a specific commission for account opening, select the Account opening commission from the drop down list. Aura will display the Charges where the Charge type is Event, Basis is Banded and Treat as commission is Yes
4. If you want to allow a specific commission for account management, select the Account management commission from the drop down list. Aura will display the Charges where the Charge type is Periodic, Basis is Banded and Treat as commission is Yes.
5. Click Save to save the changes that you have made.

Function: Edit.
Document Template Settings
Using this tab, you can maintain the document template which can be used for creating documents for all the accounts maintained under this card loan product.
Note: This feature has to be customized for each bank during implementation as per their specific requirements.
1. Access the Product Maintenance page. Click on the Document Template Settings tab.

2. Click on New. New Document Template page appears.
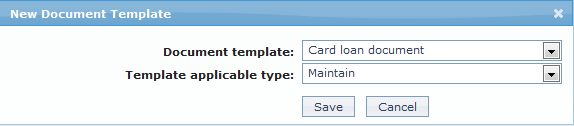
3. Select the Document template from the available dropdown as maintained under Admin → System codes → Process → Document templates.
4. Select the Template applicable type from the available drop down. The available options are Change of terms, Disbursement, Maintain and Repayment.
5. Click Save to save the changes that you have made.

Functions: New, Delete
Insurance Plan
This tab allows you to map Insurance Plans that are available for accounts under the product. You can maintain details about the fees and other conditions for the plan.
To add a new Insurance Plan,
1. Access the Product Maintenance page and click on the Insurance Plan tab.
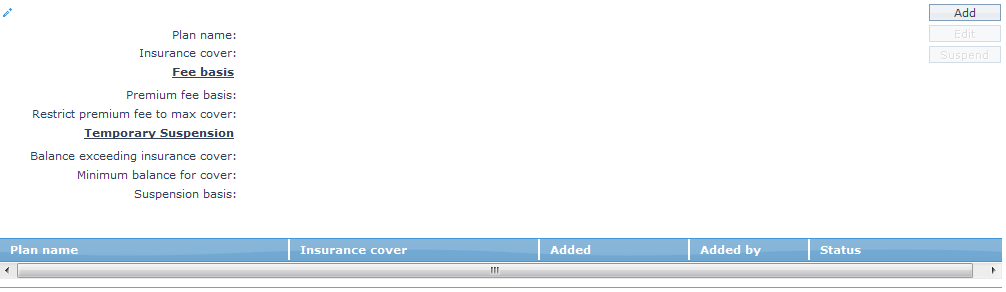
2. Click Add. The Add Insurance Plan page appears.
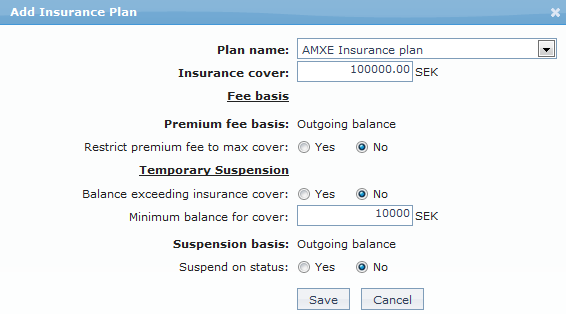
3. Select Plan Name from the drop down list of insurance plans maintained under Admin → Generic Definitions → Insurance Plan. The list will show only those insurance plans which have been marked as available for all / this specific card loan product. Once you have added an insurance plan for the card loan product, you cannot add it to the same product again.
4. You can specify the maximum amount of insurance cover under this Plan for the card loan accounts created under this product, in the Insurance cover field. By default, it will show the maximum cover for the insurance plan as maintained under Admin → System Codes → Generic definitions → Insurance Plan. However, you can update it to any lesser amount.
5. Under Fee Basis, by default,
Premium fee basis will be Outgoing balance. If the Premium fee is Flat, the Premium Fee Basis will be disabled.
No radio button is selected for Restrict premium fee to max cover option. If you select this option as Yes then the Insurance fee percentage basis calculation will be derived from the maximum cover of the insurance plan only on condition where the sum of outgoing balance of the card loan account and deferred payment balance of a card loan account exceeds the maximum cover of insurance plan
6. Under Temporary suspension, by default,
- No radio button is selected for Outgoing balance exceeding ins cover option. If the outgoing balance of the card account is exceeding the Insurance cover maintained, the insurance plan will get temporary suspended automatically. If Temporary suspension is Yes and if Insurance fee basis is selected as outgoing balance then the temporary suspension will get triggered when the outgoing balance is greater than insurance plan cover.
7. Enter the minimum balance that is required to cover the insurance in the Minimum balance to cover field.
8. Click Save to add the Insurance plan.
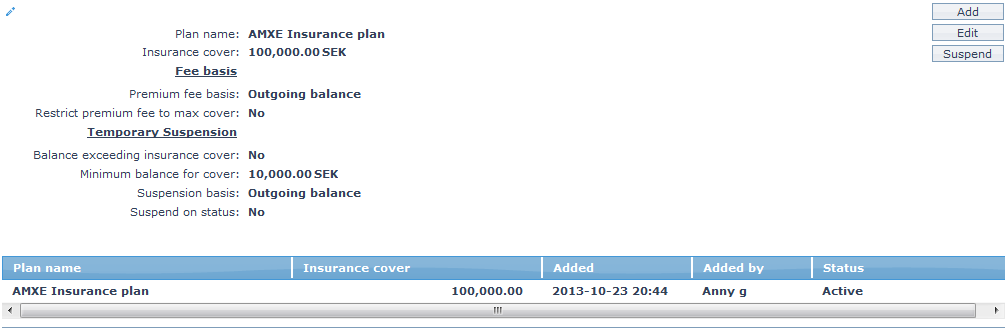
Functions: Add, Edit, Suspend and Activate
Custom Field
This menu option allows you to define fields apart from those that are already available in the standard version of Aura. Thus, it enables you to customize additional data storage and use as required to suit your specific business needs.
To maintain the Custom Field,
1. Access the Product Maintenance page. Click on the Custom Field tab.

2. The field appears only when it is created in Admin → System codes → Custom fields → Custom fields and linked to card loan product option in Admin → System codes → Custom fields → Field mappings.
3. Click on Edit. The Edit Custom Field page appears. In the following illustration, one custom field Loan Category has been mapped to the product as shown below:
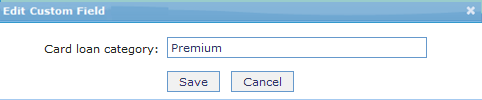
4. Enter the Loan Category to be associated with the card loan. For example, enter: Premium.
5. Click Save. The updated Custom Field record for the product is saved in Aura.

Function: Edit.