Card Account Product
Card Account Product menu allows you to maintain the details of various credit card products that are offered by the bank to the customers. These products can be created under various types like Credit card account, Bonus account and Dispute account. Once the card account product is created, you can maintain the various parameters related to it such as interests, charges, value dates, balance class, etc.
The following are the tabs in a Card Account Product.
Adding Card Account Product
- From Card menu, click Settings, and then Card accountproduct. The Card Account Product Search page appears. All Card account products available in Aura appear on the page.

- Click Add. New Product -- Profile page appears.
Select Type of Credit card account from the available drop-down list of Product. Click "New" or "Copy from existing" radio button option for the Type selected.
Enter Code for the product. This has to be unique for the Entity.
Enter Description for the Product.
Select option for Available for field. This will determine the type of clients to which the product will be available. You can choose from:
Personal -- Single person
Corporate -- Organization
Joint -- Group of two or more persons
Employee -- Employee of the Bank.
Thus, if you want the Product to be available only for organizations, click only on the Corp orate checkbox.
Note: Employee and Joint ownership checkboxes will be enabled only when you select Personal.
- Click Next. New Card Account Product -- Currency (1/11) page appears.
Select Currency for the Product from the dropdown list of GL Currencies. More currencies can be added during Edit using the Currency tab, once the Product record is created. Accounts for the product can be opened only in the selected currencies.
Enter Minimum balance that has to be maintained in accounts under the Product.
Click Next. New Card Account Product -- Settings (2/11) page appears.
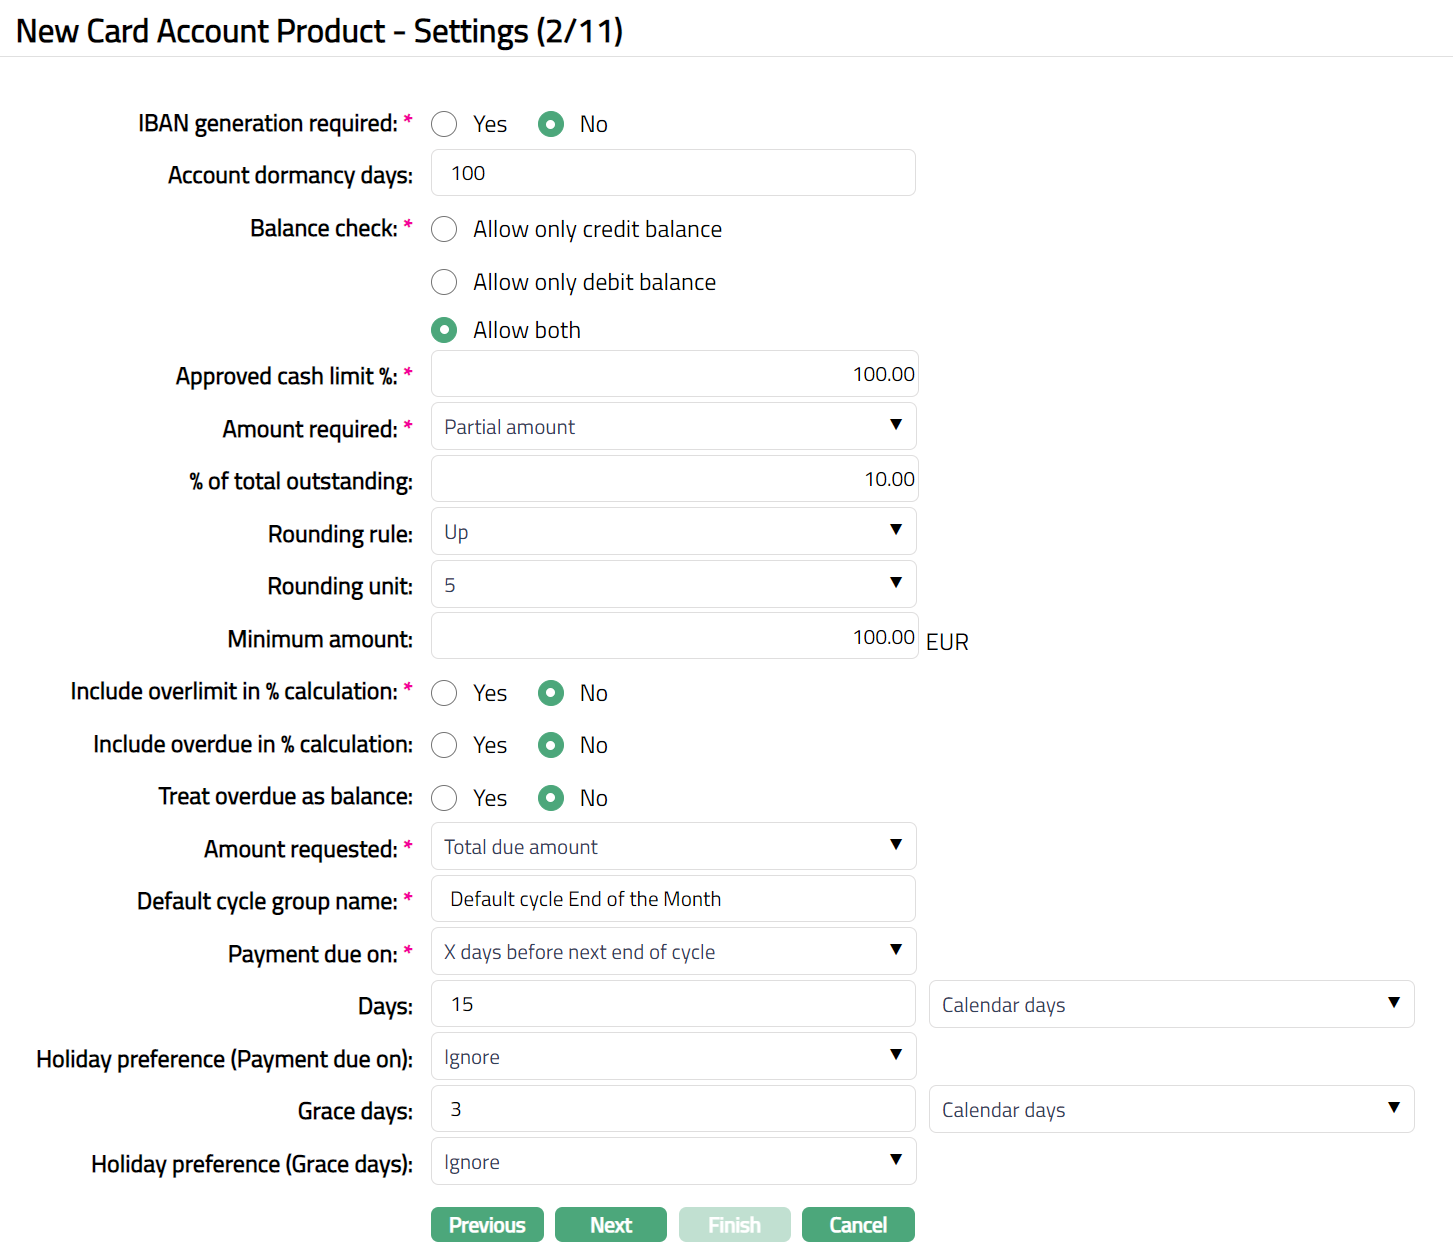
Click Yes or No radio button for IBAN generation required for New Card Account Product. During account creation under the Product, if this has been selected as Yes, Aura will automatically create IBAN according to the IBAN format maintained at the Entity level.
Enter Account dormancy days for the Product. It is the number of days beyond which the account will be treated as dormant, if there are no activities in that account.
Select Balance check field as required from the available list.
- Allow only credit balance -- If you select Allow only credit balance, then Aura will allow only credit balance for that account. If a transaction would result in a debit balance, and if this account allows only credit balance, the transaction will fail.
Allow only debit balance -- If you select Allow only debit balance, then Aura will allow only debit balance for that account. If a transaction would result in a credit balance, and if this account allows only debit balance, the transaction will fail.
Allow both -- If you select Allow both, then Aura will allow both credit and debit balances for that account.
Enter Approved Cash Limit%. This is the percentage of the Credit Limit that will be available as the Cash Limit for the account. The Cash Limit% should be between 0 and 100. By default, 100% will get displayed and you can edit it as required.
Amount required is the minimum amount that the customer has to pay to avoid overdue interest or any overdue-related charges / status changes. The following options are available:
Partial Amount: If you want the customer to pay only a part amount of the total outstanding amount due for payment, choose this option. If you choose partial amount here, then Aura will ask to enter the percentage of the outstanding amount.
Total Due Amount: If you want the customer to pay the total outstanding amount due for payment, choose this option.
If Partial amount is selected in the Amount required field above, % of total outstanding will be enabled. Enter the % of total outstanding amount that needs to be paid on the payment due date.
If Partial amount is selected in the Amount required field above, Rounding rule will be enabled. This rule is used to round the Amount required. The following options are available:
Up: This option rounds the Amount required up to a higher amount.
Down: This option rounds the amount required down to a lower amount.
None: This option does not round the amount required and gives the exact calculated figure.
- If Partial amount is selected in the Amount required field above, Rounding unit is enabled. You can specify how much the rounding rule should be applied. The available options are:
1
5
10
50
100
Example:
If total balance is (-) 3427.60 and % of total outstanding is 5% and
Round up is marked as 1, and then amount required will be calculated as 172.
Round up is marked as 10, and then amount required will be calculated as 180.
Round up is marked as 100, and then amount required will be calculated as 200.
Note: The Amount required cannot be greater than the total balance outstanding in the account. If it is so during invoice generation, then the total balance outstanding becomes the Amount required.
- Enter Minimum amount for the partial payment. If the amount calculated using the % is less than the Minimum amount specified here, then, the Minimum amount specified here becomes the Amount required.
Examples:
a. Amount required is 5 % of balance, minimum 10. Total card usage and hence, outstanding = 150. Amount required = 5% of 150 = 7.5, subject to minimum of 10, and hence, 10
b. Amount required is 5% of balance, minimum 10. Total card usage and hence outstanding = 300. Amount required = 5% of 300 = 15, subject to minimum of 10 and hence, 15.
- Include Over limit in % calculation enables you to specify how the amount required is to be calculated when the account balance is over limit. By default, it will be No which means the over limit amount will be added in full; if checked, the over limit will be included in the % calculation and the amount required will be a % of the current due amount (including over limit).
Example 1
Amount required: 5% of total outstanding, minimum amount: 0, rounding up to 100. Account Limit: 10000
If total outstanding is 5000
Amount required = 5% of 5000 = 250, rounded up to [300.]
Example 2
Amount required: 5% of total outstanding, minimum amount: 100, rounding up to 0.
Account Limit: 10 000If total outstanding is 1000
Amount required = 5% of 1000 = 50, subject to minimum amount and hence, [100].
Example 3
Amount required: 5% of total outstanding, minimum amount: 100, rounding up to 0.
Account Limit: 10 000If total outstanding is 95
Amount required = 5% of 95 = 4.75, subject to minimum amount of 100. However, since the total outstanding is only 95, amount required will be 95.
Example 4
Amount required: 5% of total outstanding, minimum amount: 100, rounding up to 0. Include Overlimitin%calculationisNo
Account Limit: 10 000If total outstanding is 11000
Amount required = 5% of 10000 = 500 plus amount over limit 1000 = 1500.
Select the Amount requested from the preshipped values. If Total due amount is selected in the Amount required field, then Amount Requested will be defaulted to Total due amount and disabled. If the user chooses Partial amount in the Amount required field, then Amount Requested can be either Total due amount or Partial Amount.
Select option for when the Payment is due using the Payment due on.
The following table shows how the Payment due on is arrived at for each of the options. In this table, the Start date and End date for the cycle is taken as 26-Apr-13 and 25-May-13 respectively and X days is taken as 5 days.
| Sl | Option Chosen | Payment Due On |
|---|---|---|
| 1 | End of cycle | 25-May-13 |
| 2 | End of month | 31-May-13 |
| 3 | Last business day of month | 31-May-13 |
| 4 | Next end of cycle | 25-Jun-13 |
| 5 | Next end of month | 30-Jun-13 -- but, since this is |
| beyond Next End of Cycle (i.e., | ||
| 25-Jun-13), Payment due on will | ||
| be 25-Jun-13 | ||
| 6 | Last business day of next | 28-Jun-13 -- but, since this is |
| month | beyond Next End of Cycle (i.e., | |
| 25-Jun-13), Payment due on will | ||
| be 25-Jun-13 | ||
| 7 | X days after End of Cycle | 30-May-13 |
| 8 | X days after End of Month | 5-Jun-13 |
| 9 | X days before next End of | 20-Jun-13 |
| Cycle | ||
| 10 | X days before next End of | 25-Jun-13 |
| Month | ||
| 11 | X days after next End of | 5-Jul-13 -- but, since this is |
| Month | beyond Next End of Cycle (i.e., | |
| 25-Jun-13), Payment due on will | ||
| be 25-Jun-13 |
If option 11 is chosen above, Interest receivable Liquidation frequency options Daily and Monthly will be disabled.
Note: During every Invoice generation, if Payment due date is greater than next EOC, Payment due date will be taken as the next EOC. Similarly, if during invoice generation, if Payment due date falls within the same cycle, Payment due date will be taken as the current EOC date. This will be the case even if the Fix Payment Date at account level is marked Yes.
Also, the actual Payment Due Date will be in conjunction with the Invoice generation date (i.e., the Debit Interest liquidation date). For example, if the Frequency is quarterly and the Payment due on is Last business day of month, the payment due date for the invoice generated during March 2013 will be 29th Mar 2013, assuming 30th and 31st Mar are holidays.
If you have selected options 7 to 11 above, you need to specify the number of Days to be taken for the Payment due date calculation and also indicate if the number days should be taken as calendar days or business days.
Indicate Holiday Preference for the Payment due date calculated using the above values.
Following options are available:
Ignore: If the Payment due date falls on a holiday, and you still want to retain that date as the payment due date, choose Ignore. For Example, if the Payment due date is 25^th^ Dec which is a holiday and you have chosen Ignore, the payment due date will still remain 25^th^ Dec.
Next Business Day: If the Payment due date falls on a holiday, and you want to move it to the next business day, choose this option. In our above example, if this option is chosen, the Payment due date would be 26^th^ Dec.
Previous Business Day: If the Payment due date falls on a holiday, and you want to move it to the previous business day, choose this option. In our above example, if this option is chosen, the Payment due date would be 24^th^ Dec.
- Grace days enables you to provide a few additional days for the customer to make his payment; and if the customer makes the payment by the end of the Grace days period, the payment is considered as having been received by the Payment due date. Enter the required number of Grace days and indicate if these days should be calendar days / business days.
Note: If payment is made within the grace days, even if it is after the payment due date, the payment is not treated as overdue and associated charges / interest is not applied. If payment is not received within the payment date + grace days, then overdue interest accrual starts from the payment due date onwards.
Indicate Holiday preference for end of grace days calculated using the above values. If Grace days is business days, then this field will be disabled. In case of calendar days, indicate if the end of grace days arrived at is a holiday, whether it should not be moved / moved to next / previous working day.
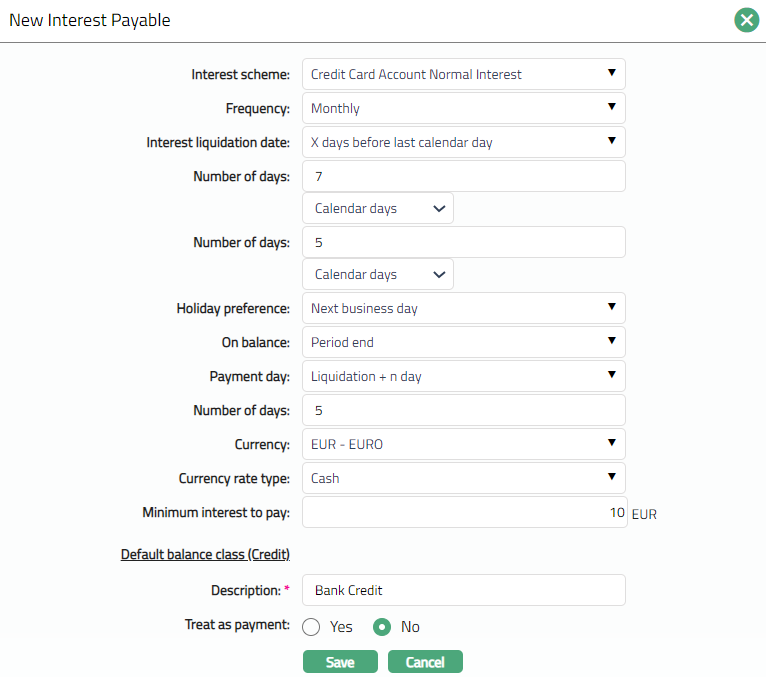
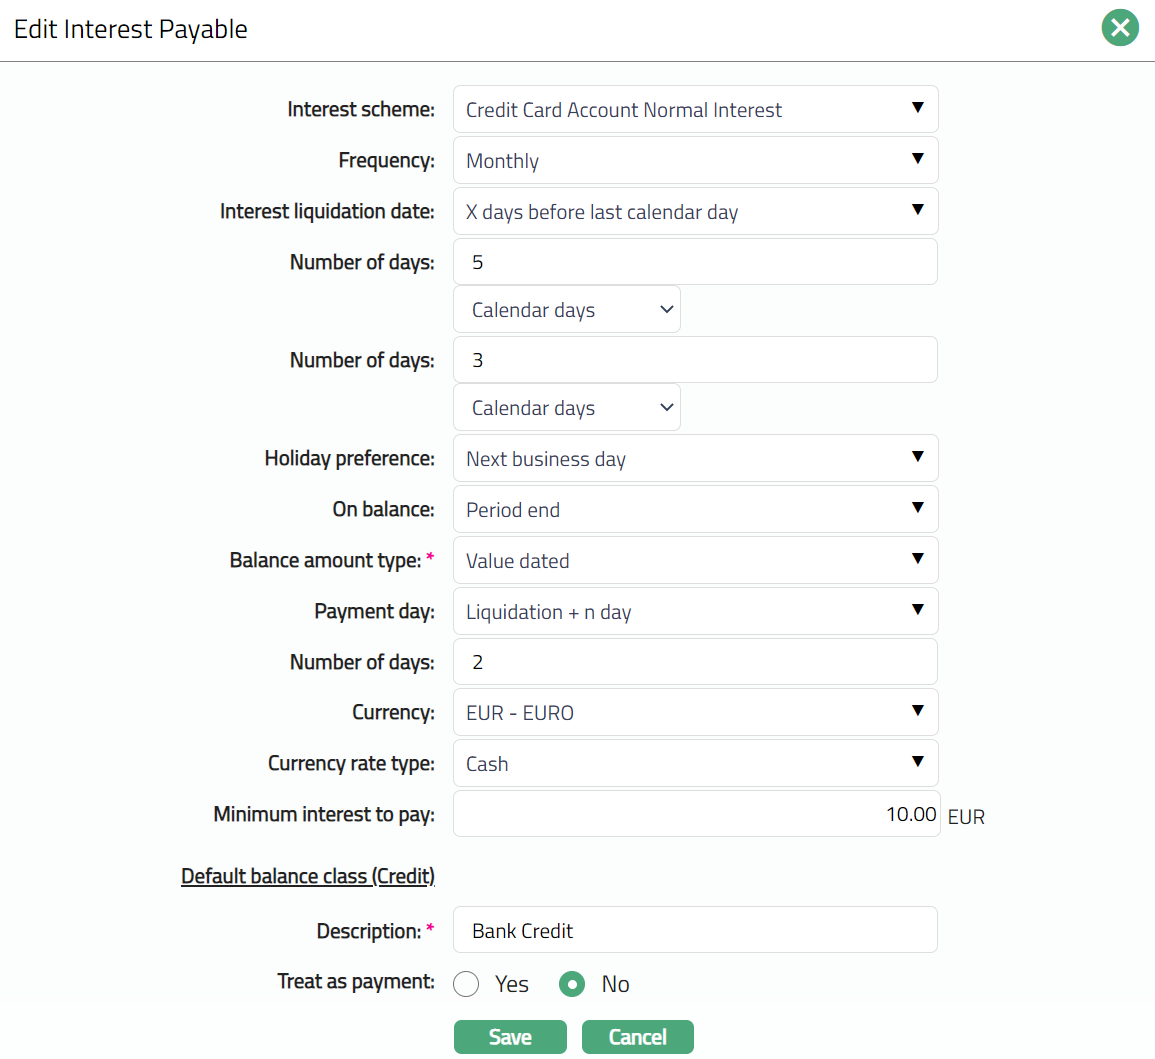
Click Next. New Card Account Product -- Interest Payable (3/11) page appears.
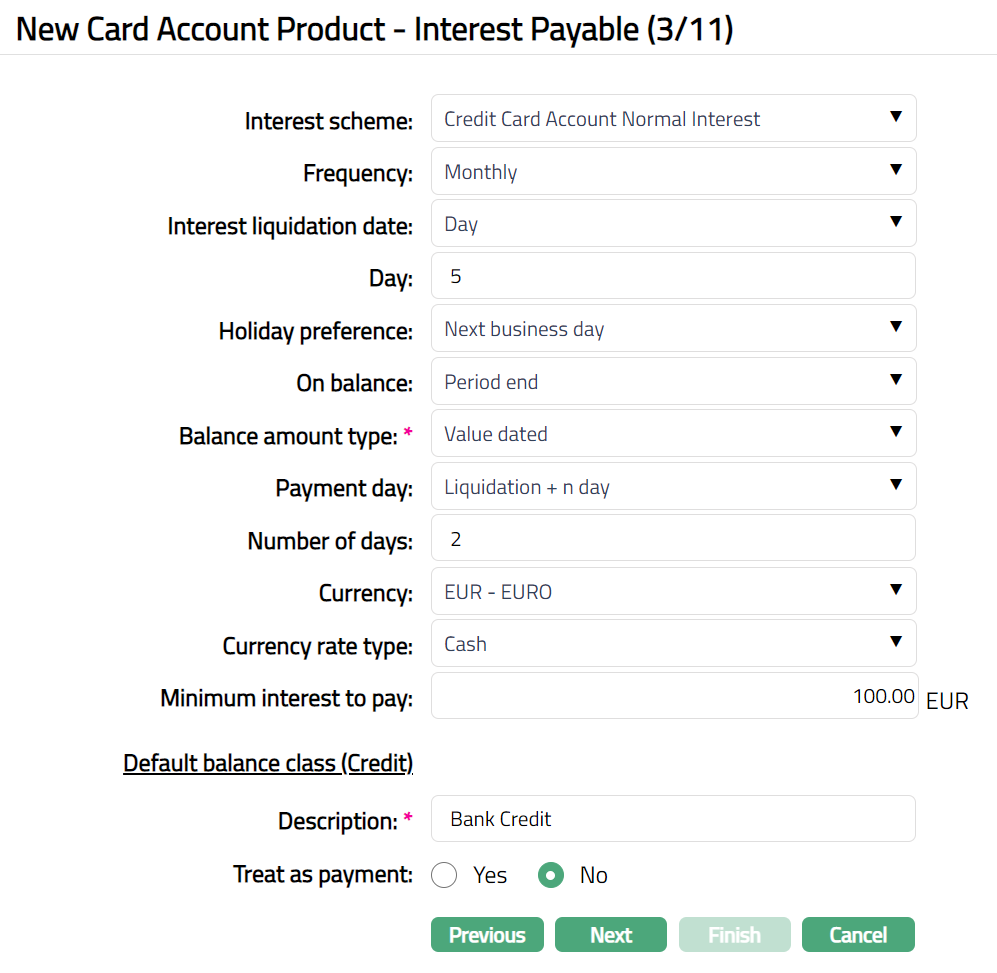
Select Interest scheme for Interest on the accounts under this product from the drop-down list. Interest schemes should have been created under Admin > System Codes > Interest > Interest Scheme.
Select Frequency for interest payable accrual from the drop-down list. Available options are: Monthly, Quarterly, Semi-annual and Annual.
If you select a frequency other than daily, you need to specify when the Interest has to be liquidated (capitalized) in the Interest Liquidation date. It is the date on which the interest will be posted to the accounts under this product. Available options are:
Day: If you want the interest to be liquidated on a specific date of the calendar month, choose this option. You need to then specify the day in the Day field.
Last Calendar day: If you want the interest to be liquidated on the last calendar day of the selected frequency instead of the specified date, choose this option.
Last Business day: If you want the interest to be liquidated on the last business day, then choose this option.
X days before last calendar day: If you want the interest to be liquidated x days before the last calendar day, then choose this option.
X days before last business day: If you want the interest to be liquidated x days before the last business day, then choose the option.
Note:
If Frequency is Monthly
If 31 is chosen and if the month has 30 days interest will be liquidated on 30th of the month
If 30 is chosen and if the month has 31 days interest will be liquidated on 30th of the month
If Frequency is quarterly, semi-annual or annual, the 'Day' parameter is interpreted in the same way as month; however, the month will be
March, June, September and December -- if it is quarterly,
June and December -- if it is semi-annual.
December -- if it is annual
If Interest liquidation date is selected as X days before last calendar day or x days before last business day, you need to then specify the value for the X in the Number of days field and also indicate if these days are calendar days or business days. The number of days field is available twice so that you can specify the interest liquidation date as: 5 business days before 2 calendar days before last calendar day.
If the interest liquidation date so arrived at is a holiday, specify how it should be treated using the Holiday preference. The options are:
Ignore: If this option is chosen, then the holiday will be ignored, and interest will be liquidated on same day. This is the default option selected.
Next business day: If this option is chosen, then interest will be liquidated on the next business day.
Previous business day: If this option is chosen, then interest will be liquidated on previous business day.
You can specify the balance amount on which the Interest payable is to be accrued using the On balance drop down list. Available options are: Daily and Period end. Based on the selected-On balance and Frequency, Aura accrues the interest. If you select the Frequency as Daily, then the On balance will be defaulted to Daily and you will not be allowed to select other options. Accrual and Liquidation will be either daily or period end.
Select Balance amount type from the drop-down list. It can be Book dated balance or Value dated balance. Based on the choice, the interest will be calculated on the chosen balance.
Select Payment day for the Interest payable from the drop-down list. Based on this, and the Number of days (next field), the date on which the interest will be paid to the accounts under this product is determined. Available options are On Liquidation day and Liquidation + n day. The latter will be allowed only on selecting the frequency as Monthly or Quarterly or Semi-annual or Annual.
Enter Number of days after which the liquidated interest is to be paid. This field will be enabled only on selecting Payment day as Liquidation plus n day.
If Frequency is Daily, Payment day can be only On Liquidation day and hence, this field is disabled.
If Frequency is Monthly, Payment day can be either of the options and hence this field is enabled. You need to enter the number of days between 1 and 30.
If Frequency is any other option, Payment day can be either of the options and hence this field is enabled. You need to enter the number of days between 1 and 90.
Select Currency for the minimum / maximum threshold for Interest from the drop-down list of GL currencies for the Entity.
Select Currency rate type for the minimum / maximum threshold for Interest. The interest will be accrued in terms of the Account Currency and will be converted into the equivalent amount in terms of the above Currency using this Currency Rate Type, as on the date of Liquidation.
Enter Minimum interest to pay. Aura will liquidate the interest to the account only if the accrued interest is greater than or equal to this amount.
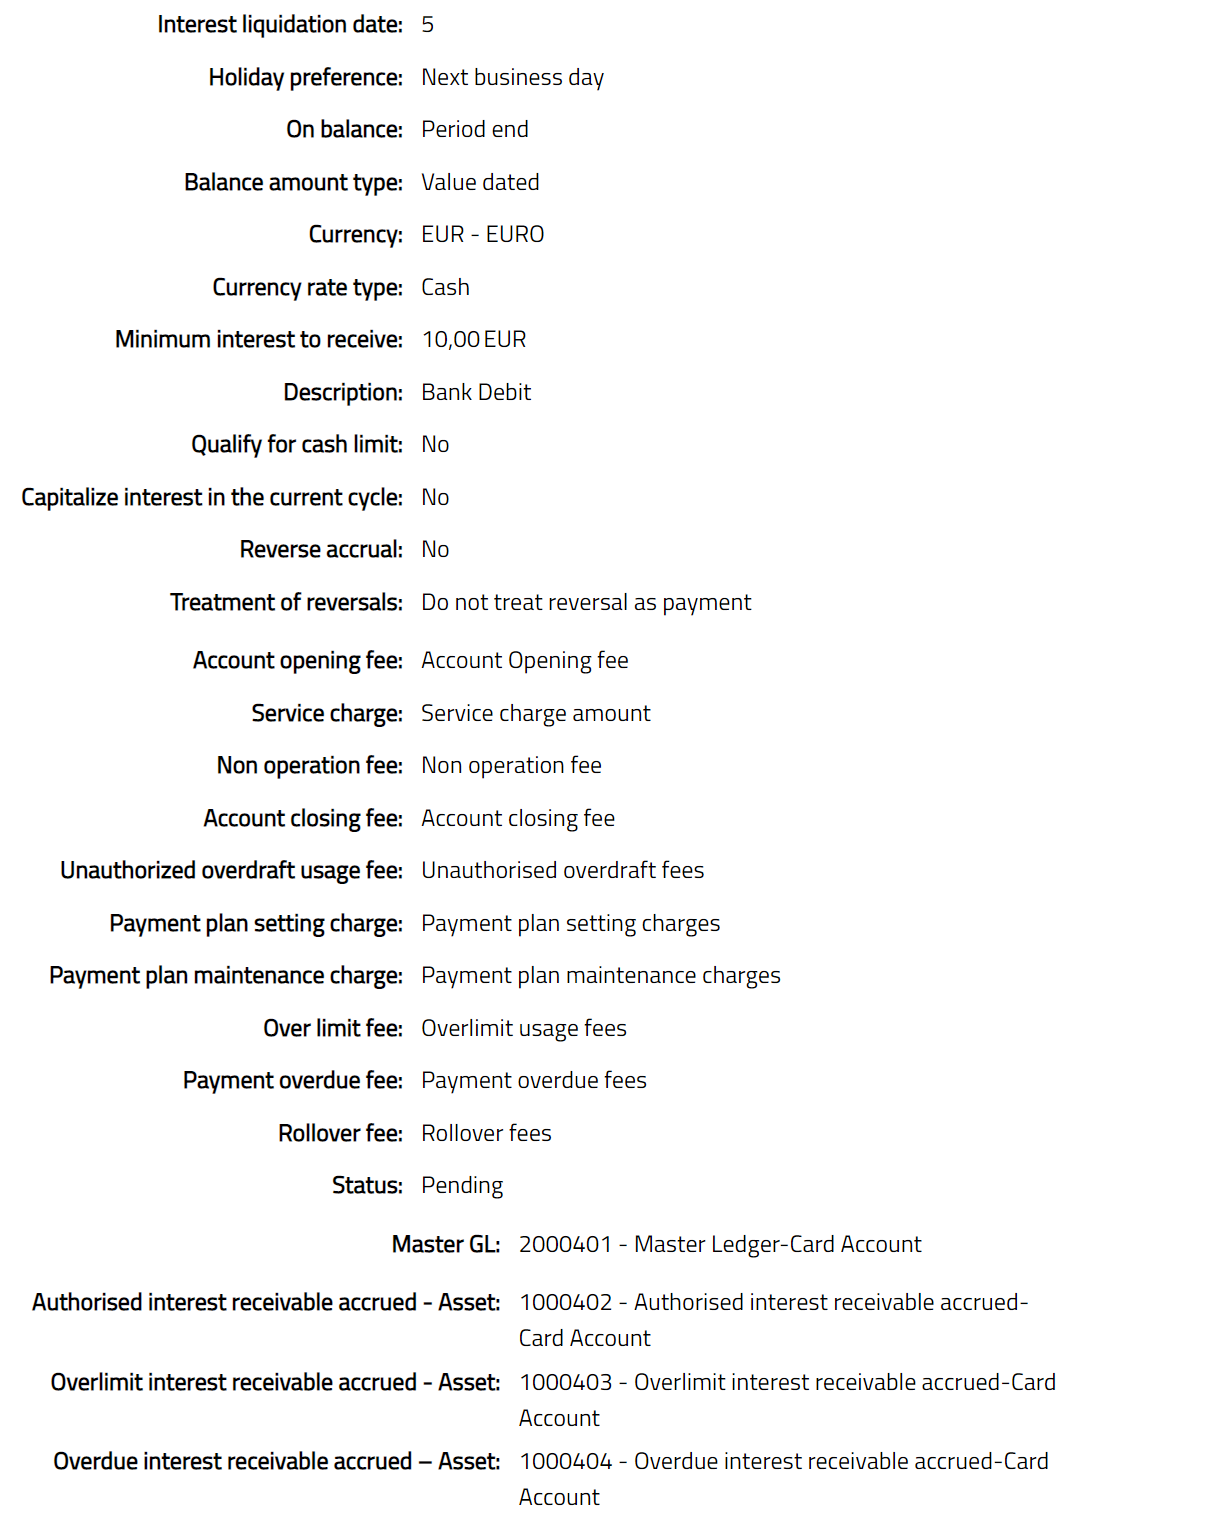
Click Next. New Card Account Product -- Interest Receivable (4/11) page appears.
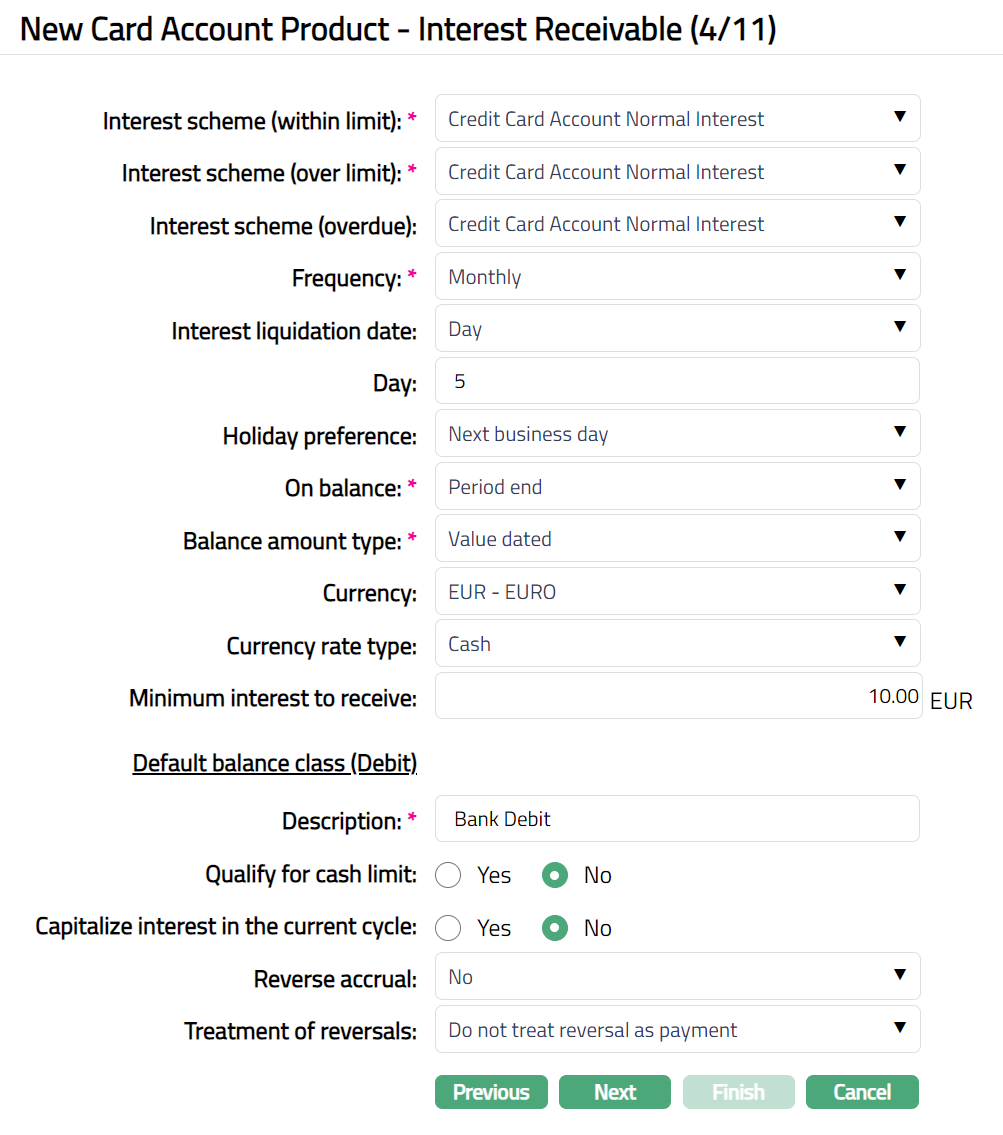
Select Interest scheme (within limit) from the drop-down list. This interest scheme will be used to calculate the interest receivable up to the approved limit for the default balance class for accounts under this product. Interest schemes should have been created under Admin > System Codes > Interest > Interest Scheme.
Select Interest scheme (over limit) from the drop-down list. In case the balance of any account under this product goes beyond the limit specified for the account, the interest receivable on such over limit amount will be calculated using this Interest scheme. Interest schemes should have been created under Admin > System Codes > Interest > Interest Scheme.
Select Interest Scheme (Overdue) from the drop-down list. This interest scheme will be used to calculate the interest receivable on the overdue amounts -- i.e., where the payment by due date + grace days does not cover the Amount required.
Select Frequency for the Interest Receivable accrual from the drop-down list. Available options are: Monthly, Quarterly, Semi-annual and Annual.
If you select a frequency other than daily, you need to specify when the Interest has to be liquidated (capitalized) in the Interest Liquidation date. It is the date on which the interest will be posted to the accounts under this product. Available options are as follows:
- Day: If you want the interest to be liquidated on a specific date of the calendar month, choose this option. You need to then specify the day in the Day field.
Last Calendar Day: If you want the interest to be liquidated on the last calendar day of the selected frequency instead of the specified date, choose this option.
Last Business day: If you want the interest to be liquidated on the last business day, then choose this option.
X days before last calendar day: If you want the interest to be liquidated x days before the last calendar day, then choose this option.
X days before last business day: If you want the interest to be liquidated x days before the last business day, then choose the option.
Note:
If frequency is Monthly
If 31 is chosen and if the month has 30 days interest will be liquidated on 30th of the month
If 30 is chosen and if the month has 31 days interest will be liquidated on 30th of the month
If frequency is quarterly, semi-annual or annual, the 'Day' parameter is interpreted in the same way as month; however, the month will be
March, June, September and December -- if it is quarterly,
June and December -- if it is semi-annual
December -- if it is annual
If Interest liquidation date is selected as X days before last calendar day or X days before last business day, you need to then specify the value for the X in the Number of days field and also indicate if these days are calendar days or business days. The number of days field is available twice so that you can specify the interest liquidation date as: 5 business days before 2 calendar days before last calendar day
If interest liquidation date so arrived at is a holiday, specify how it should be treated using the Holiday preference. The options are:
Ignore: If this option is chosen, then the holiday will be ignored, and interest will be liquidated on same day. This is the default option selected.
Next business day: If this option is chosen, then interest will be liquidated on the next business day.
Previous business day: If this option is chosen, then interest will be liquidated on previous business day
You can specify the balance amount on which the Interest receivable is to be accrued using the On balance drop down list. Available options are: Daily and Period end. Based on the selected-On balance and Frequency, Aura accrues the interest. If you select the Frequency as Daily, then the On balance will be defaulted to Daily and Aura will not allow you to select other options. Accrual and Liquidation will be either daily or period end.
Select Balance amount type from the drop-down list. It can be Book Dated balance or Value dated balance. Based on the choice, the interest will be calculated on the chosen balance.
Select the Treatment for reversals from the preshipped values. The options are as follows:
Do not consider reversals as payment: If you select this option the reversal that comes in will not be treated as payment.
Consider reversals in current cycle as payment: If you select this option the reversals in current cycle will be treated as payment.
Consider reversals in current and past cycle as payment: If you select this option reversal in current and past cycle will be treated as payment.
Select Currency name for the minimum / maximum threshold for Interest from the drop-down list of GL currencies for the Entity.
Select Currency rate type for the minimum / maximum threshold for Interest. The interest will be accrued in terms of the Account Currency and will be converted into the equivalent amount in terms of the above Currency using this Currency Rate Type, as on the date of Liquidation.
Enter Minimum interest to receive. This is the minimum interest amount that will be collected for an account under this product.
Click Next. New Card Account Product -- Charges (5/11) page appears.
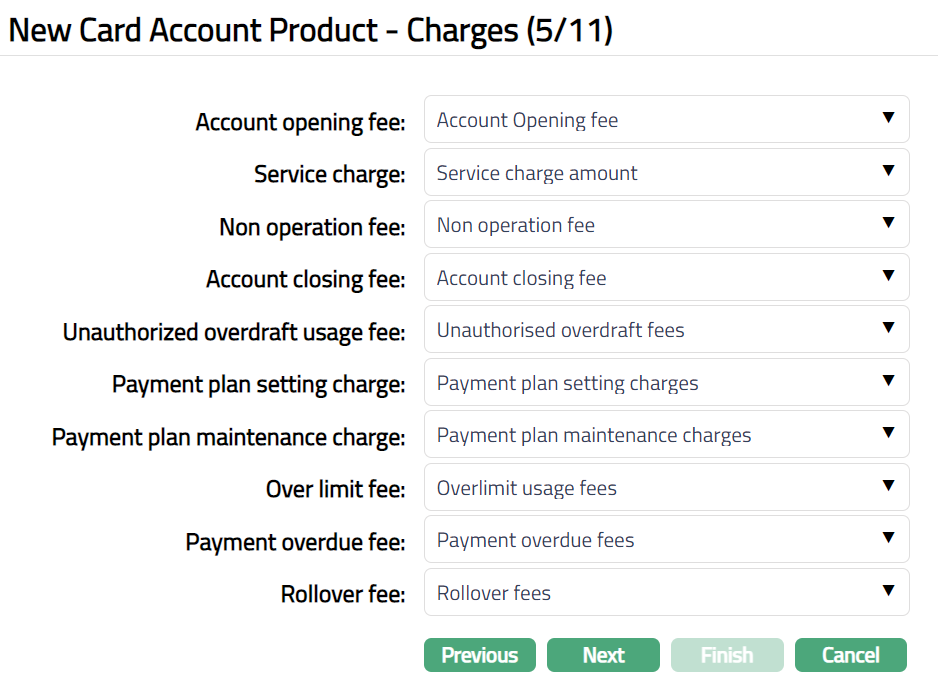
If you want to collect charges for opening the account, select Account opening fee from the list of the Event based, Flat Charges.
If you want to collect service charges, select Service charge from the list of Periodic, Flat or Banded Charges. If banded, the card account outstanding balance will be the basis for the charge.
If you want to levy a charge for an account that remains unoperated, select the Nonoperation fee from the list of Periodic, Flat Charges. If there were no card transactions during the charge period, the charge will be applied at the end of the period. It will be only arrear charges.
If you want to collect charges for closure of the account, select Account closing fee from the list of Event based Flat charges.
If you want to levy a charge every time the account goes beyond its authorized limit, select Unauthorized overdraft usage fee from the list of Event based Flat charges.
Payment plan setting charge will be applied for every payment plan for an account when activated for the first time. Select the charge from the list of Event based Flat charges.
Payment plan maintenance charge will be applied whenever the Amount required is derived from an active Payment plan. Select the charge from the list of Periodic, Flat charges.
Over limit fee will be applied if the account goes beyond limit for even one day during the cycle. Select the charge from the list of Periodic, Flat charges.
Payment overdue fee will be levied if the customer miss's payment of minimum requested amount and if the payment status is Normal. Select the charge from the list of Event based Flat charges.
Note: Any additional charges, apart from those defined above, can be defined for the Product using Additional Charges tab in edit mode.
- Click Next. New Card Account Product --General Ledger (6/11) page appears.
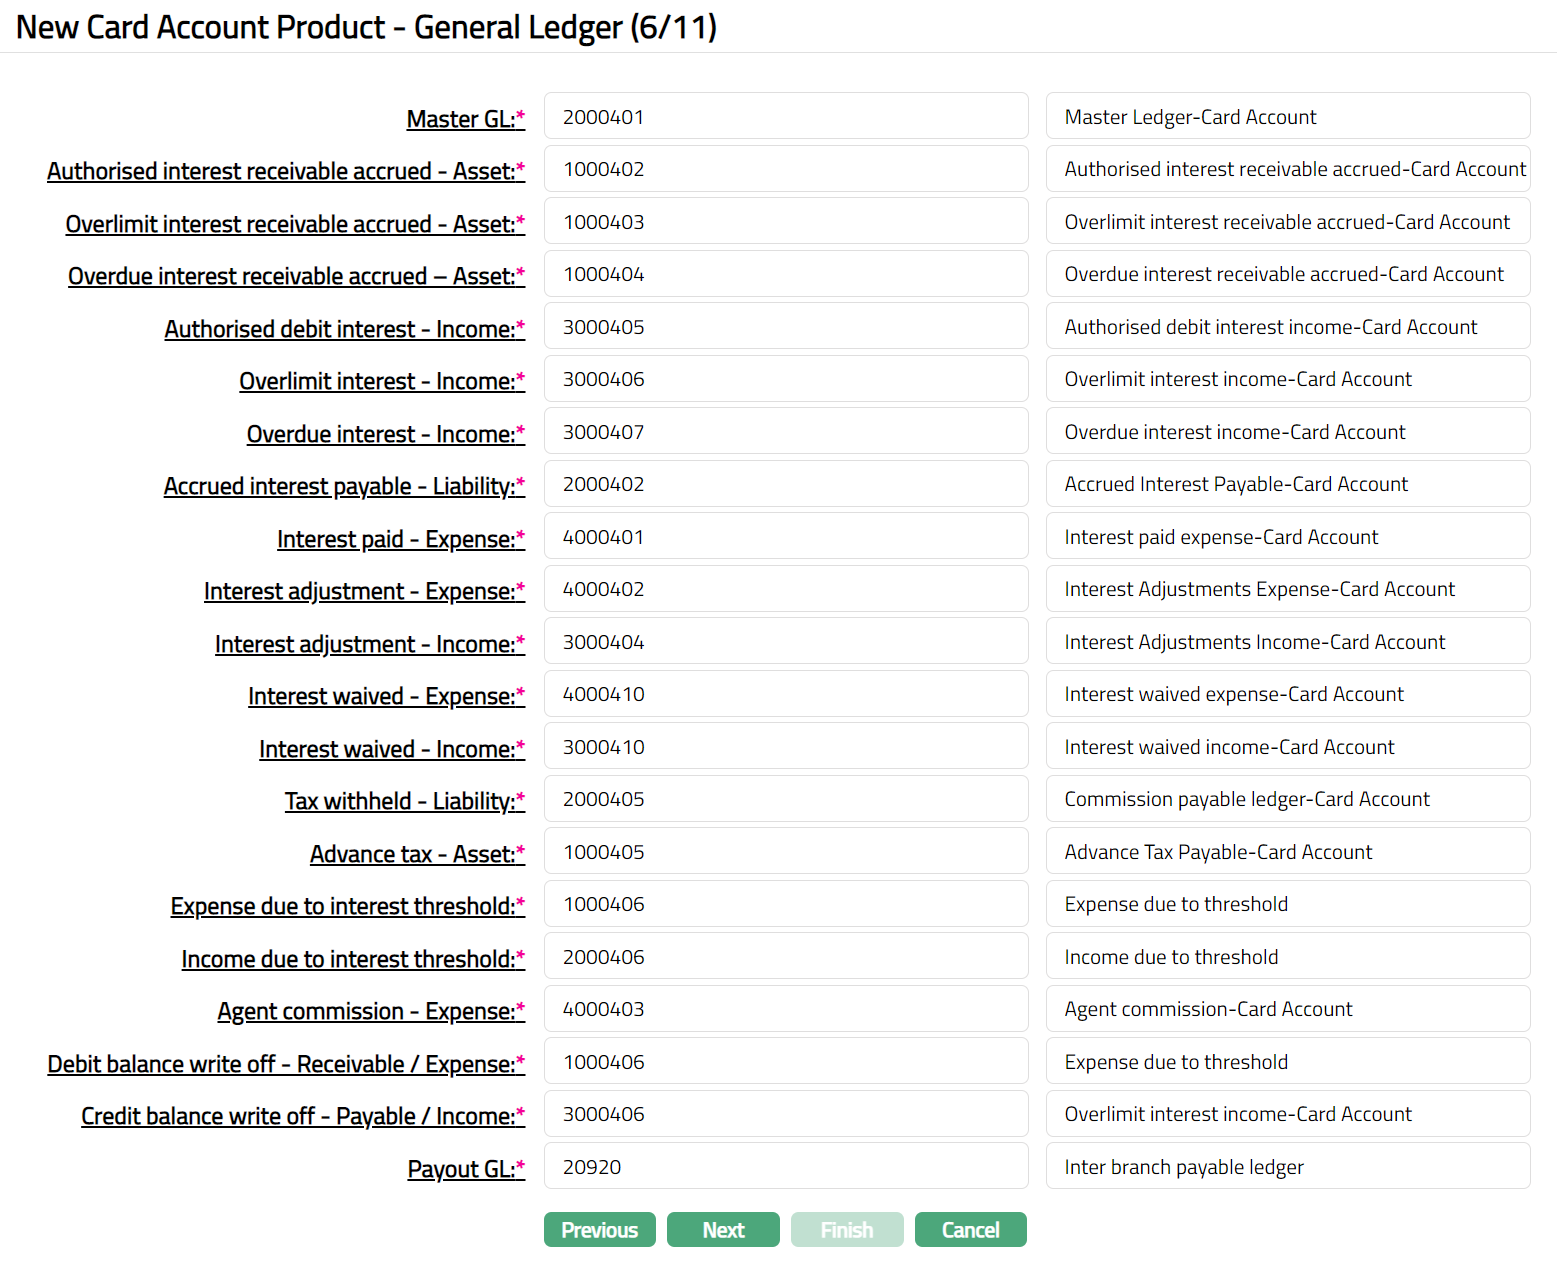
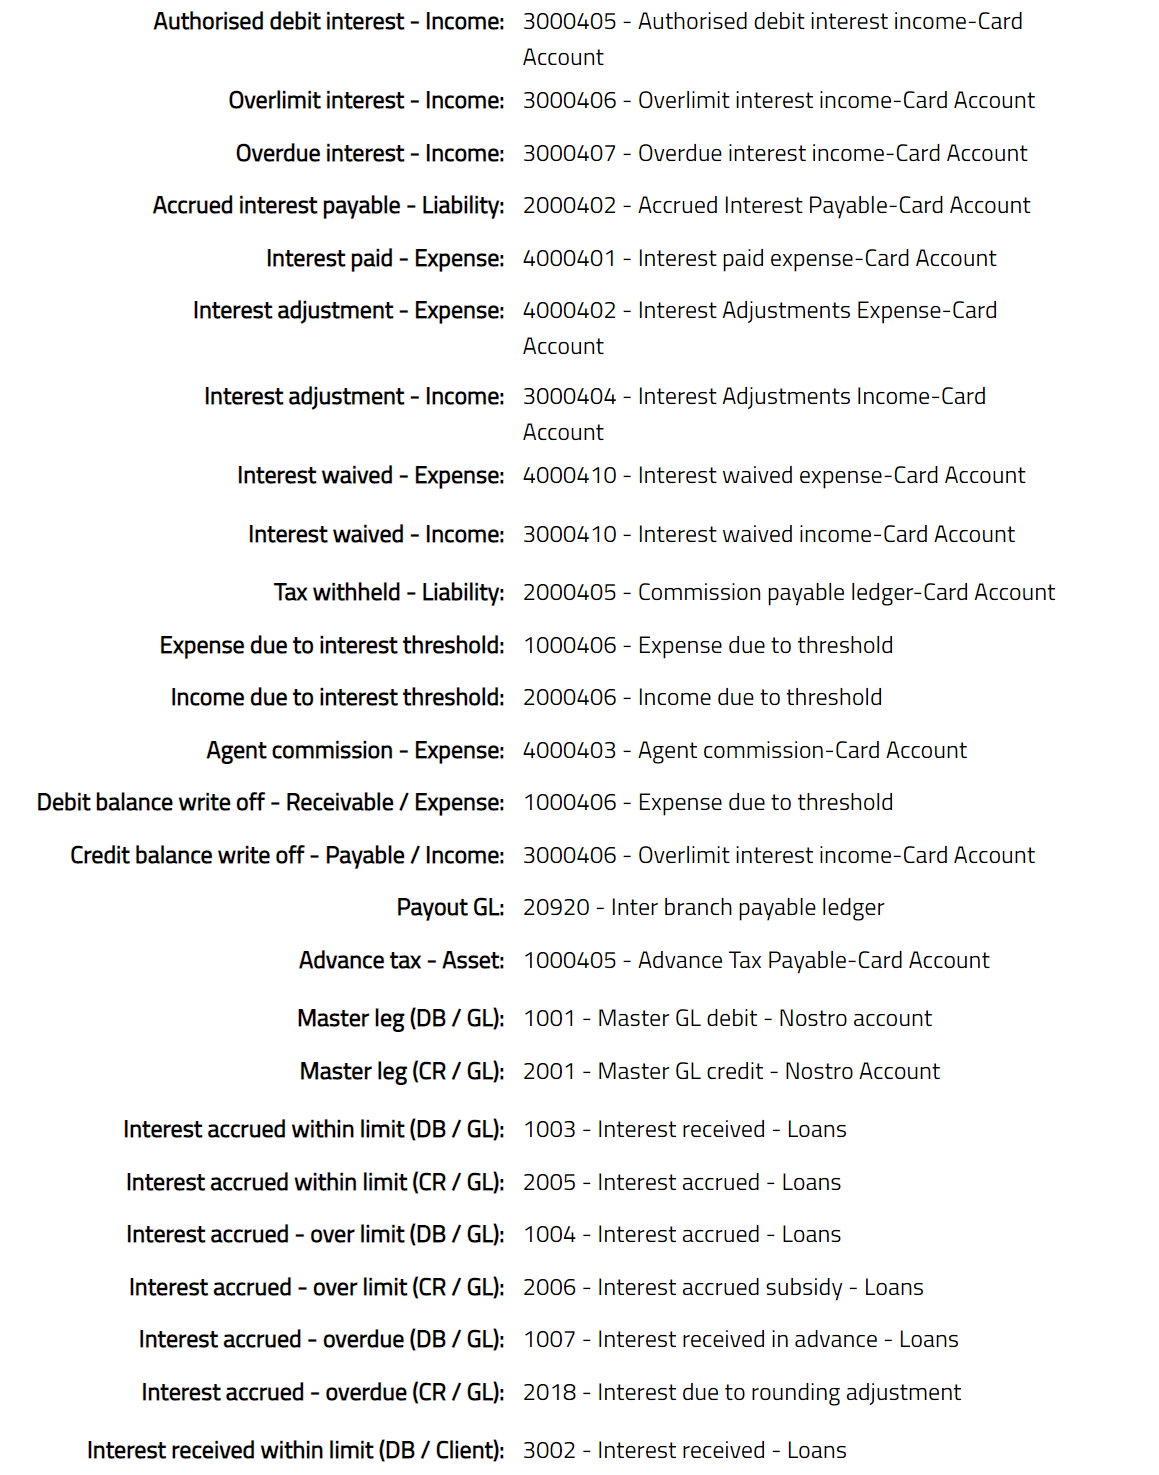
- You will see the list of various GLs required to account for the events in the life cycle of the Product. The table below gives the fields, the use and the conditions for each of these GLs. You can either directly input the Ledger # or click on the hyperlink to see the list of GLs satisfying these conditions and select the required Ledger #.
| SL.No | Fields | Used | List of Accounts based on |
|---|---|---|---|
| 1 | Master GL | as the Master GL to record all transactions | ledger type Asset, Liability or Neutral where |
| under this product | the cash account is No, Manual posting is No | ||
| and the FX consolidation is blank | |||
| 2 | Interest paid -- Expense | for accounting the Interest paid on accounts | ledger type Expense |
| under this product | |||
| 3 | Interest earned -- Income | for accounting the Interest earned on accounts | ledger type Income |
| under this product | |||
| 4 | Accrued interest payable -- | for accounting the Accrued interest payable | ledger type Liability |
| Liability | on accounts under this product | ||
| 5 | Accrued interest receivable -- | for accounting the Accrued interest receivable | ledger type Asset |
| Asset | on accounts under this product | ||
| 6 | Interest adjustment -- Income | for accounting the Interest adjustment income | ledger type Income |
| on accounts under this product | |||
| 7 | Interest adjustment -- Expense | for accounting the Interest adjustment expense | ledger type Expense |
| on accounts under this product | |||
| 8 | Tax withheld -- Liability | for accounting the Tax withheld on accounts | ledger type Liability |
| under this product | |||
| 9 | Agent commission -- Expense | for accounting the Agent commission expense | ledger type Expense |
| on accounts under this product | |||
| 10 | Payout GL | for accounting the Payout GL on accounts | ledger type Income and Asset |
| under this product | |||
| 11 | Authorised Debit-Income | for accounting the Authorised Debit interest | ledger type Income |
| Income on accounts under this product | |||
| 12 | Overlimit Interest -- Income | for accounting the Overlimit Interest Income | ledger type Income |
| on accounts under this product | |||
| 13 | Authorised interest receivable accrued -- Asset | for accounting the accrual of Authorised | ledger type Asset |
| interest receivable on accounts under this | |||
| product | |||
| 14 | Overlimit interest receivable accrued -- Asset | for accounting the accrual of Overlimit | ledger type Asset |
| interest receivable on accounts under this | |||
| product | |||
| 15 | Overdue interest receivable -- Asset | for accounting the Overdue interest receivable | ledger type Asset |
| on accounts under this product | |||
| 16 | Overdue interest -- Income | for accounting the Overdue interest Income | ledger type Income |
| on accounts under this product | |||
| 17 | Debit Balance write off -- Receivable / Expense | for accounting the Debit Balance written off | ledger type Receivable or Expense |
| on accounts under this product | |||
| 18 | Credit Balance write off -- Payable / Income | for accounting the Credit Balance written off | ledger type Payable or Income |
| on accounts under this product | |||
| 19 | Overdue interest adjustment -- Receivable / Expense | for accounting the Overdue interest adjustment | ledger type Receivable or Expense |
| on accounts under this product | |||
| 20 | Over limit interest adjustment -- Receivable / Expense | for accounting the Over limit interest adjustment | ledger type Receivable or Expense |
| on accounts under this product | |||
| 21 | Expense due to interest threshold | for accounting the Expense due to interest | ledger type Asset or Expense |
| threshold on accounts under this product | |||
| 22 | Income due to interest threshold | for accounting the Income due to interest | ledger type Income or Liability |
| threshold on accounts under this product |
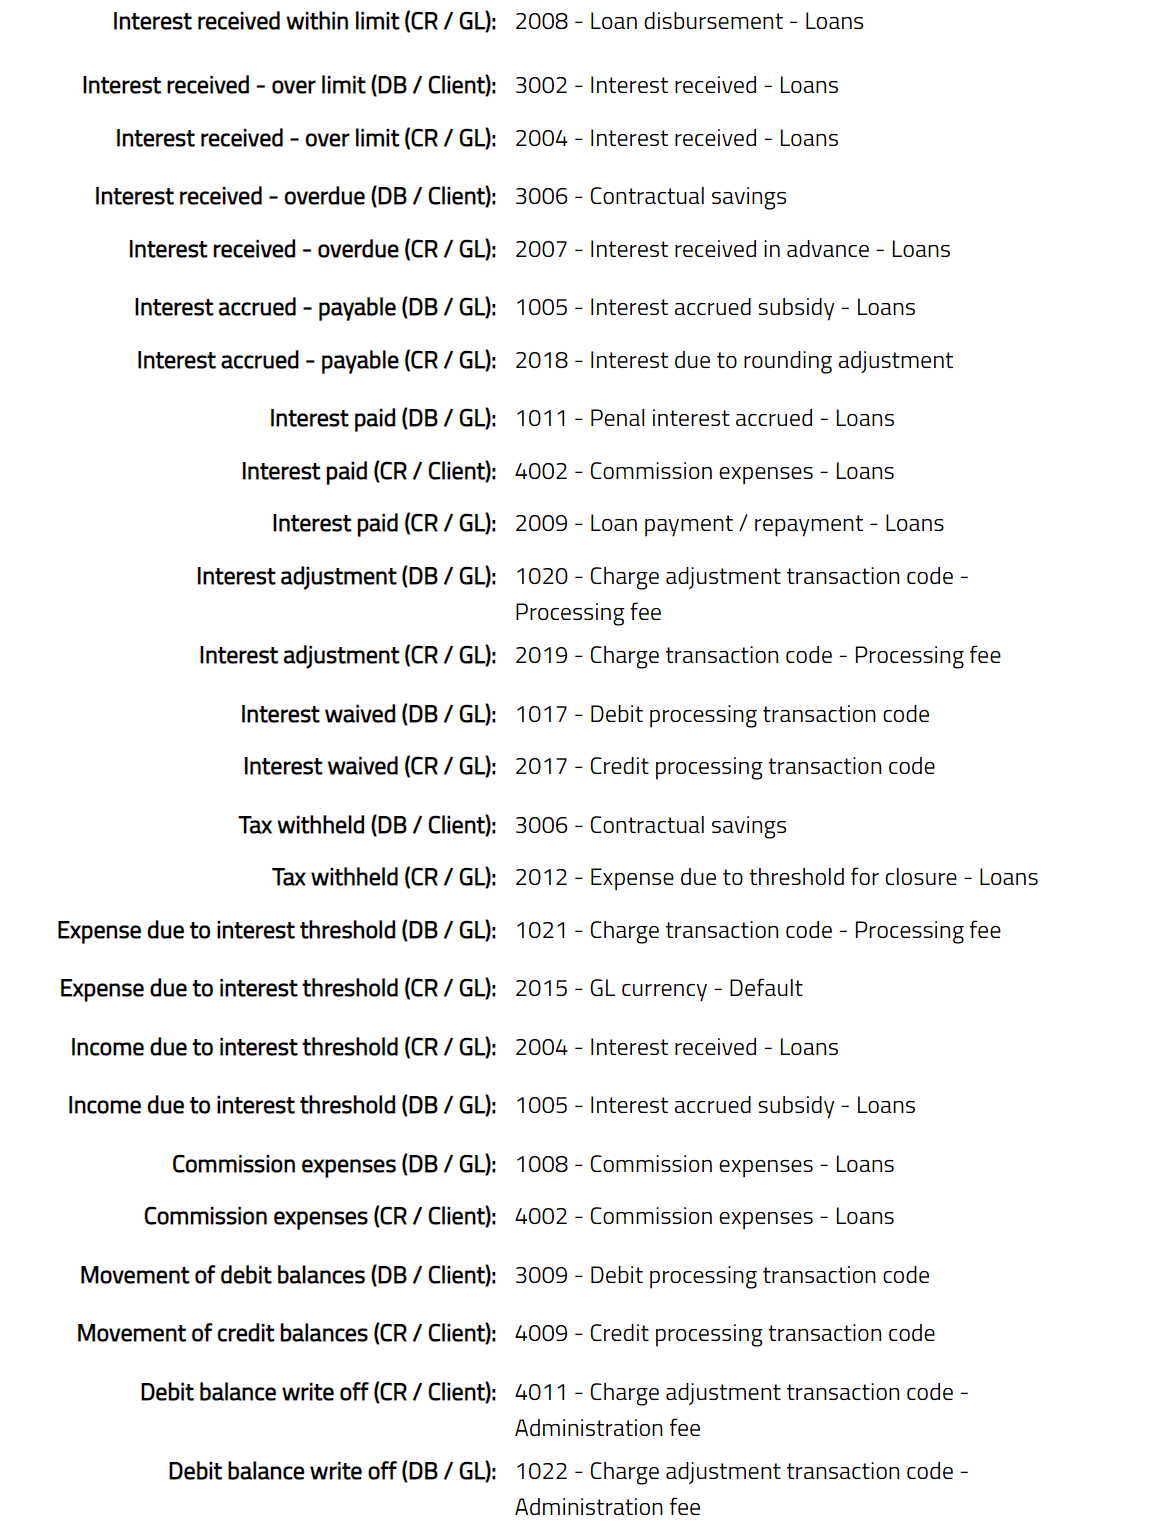
- Click Next. New Card Product -- Transaction Settings (7/10) page appears.
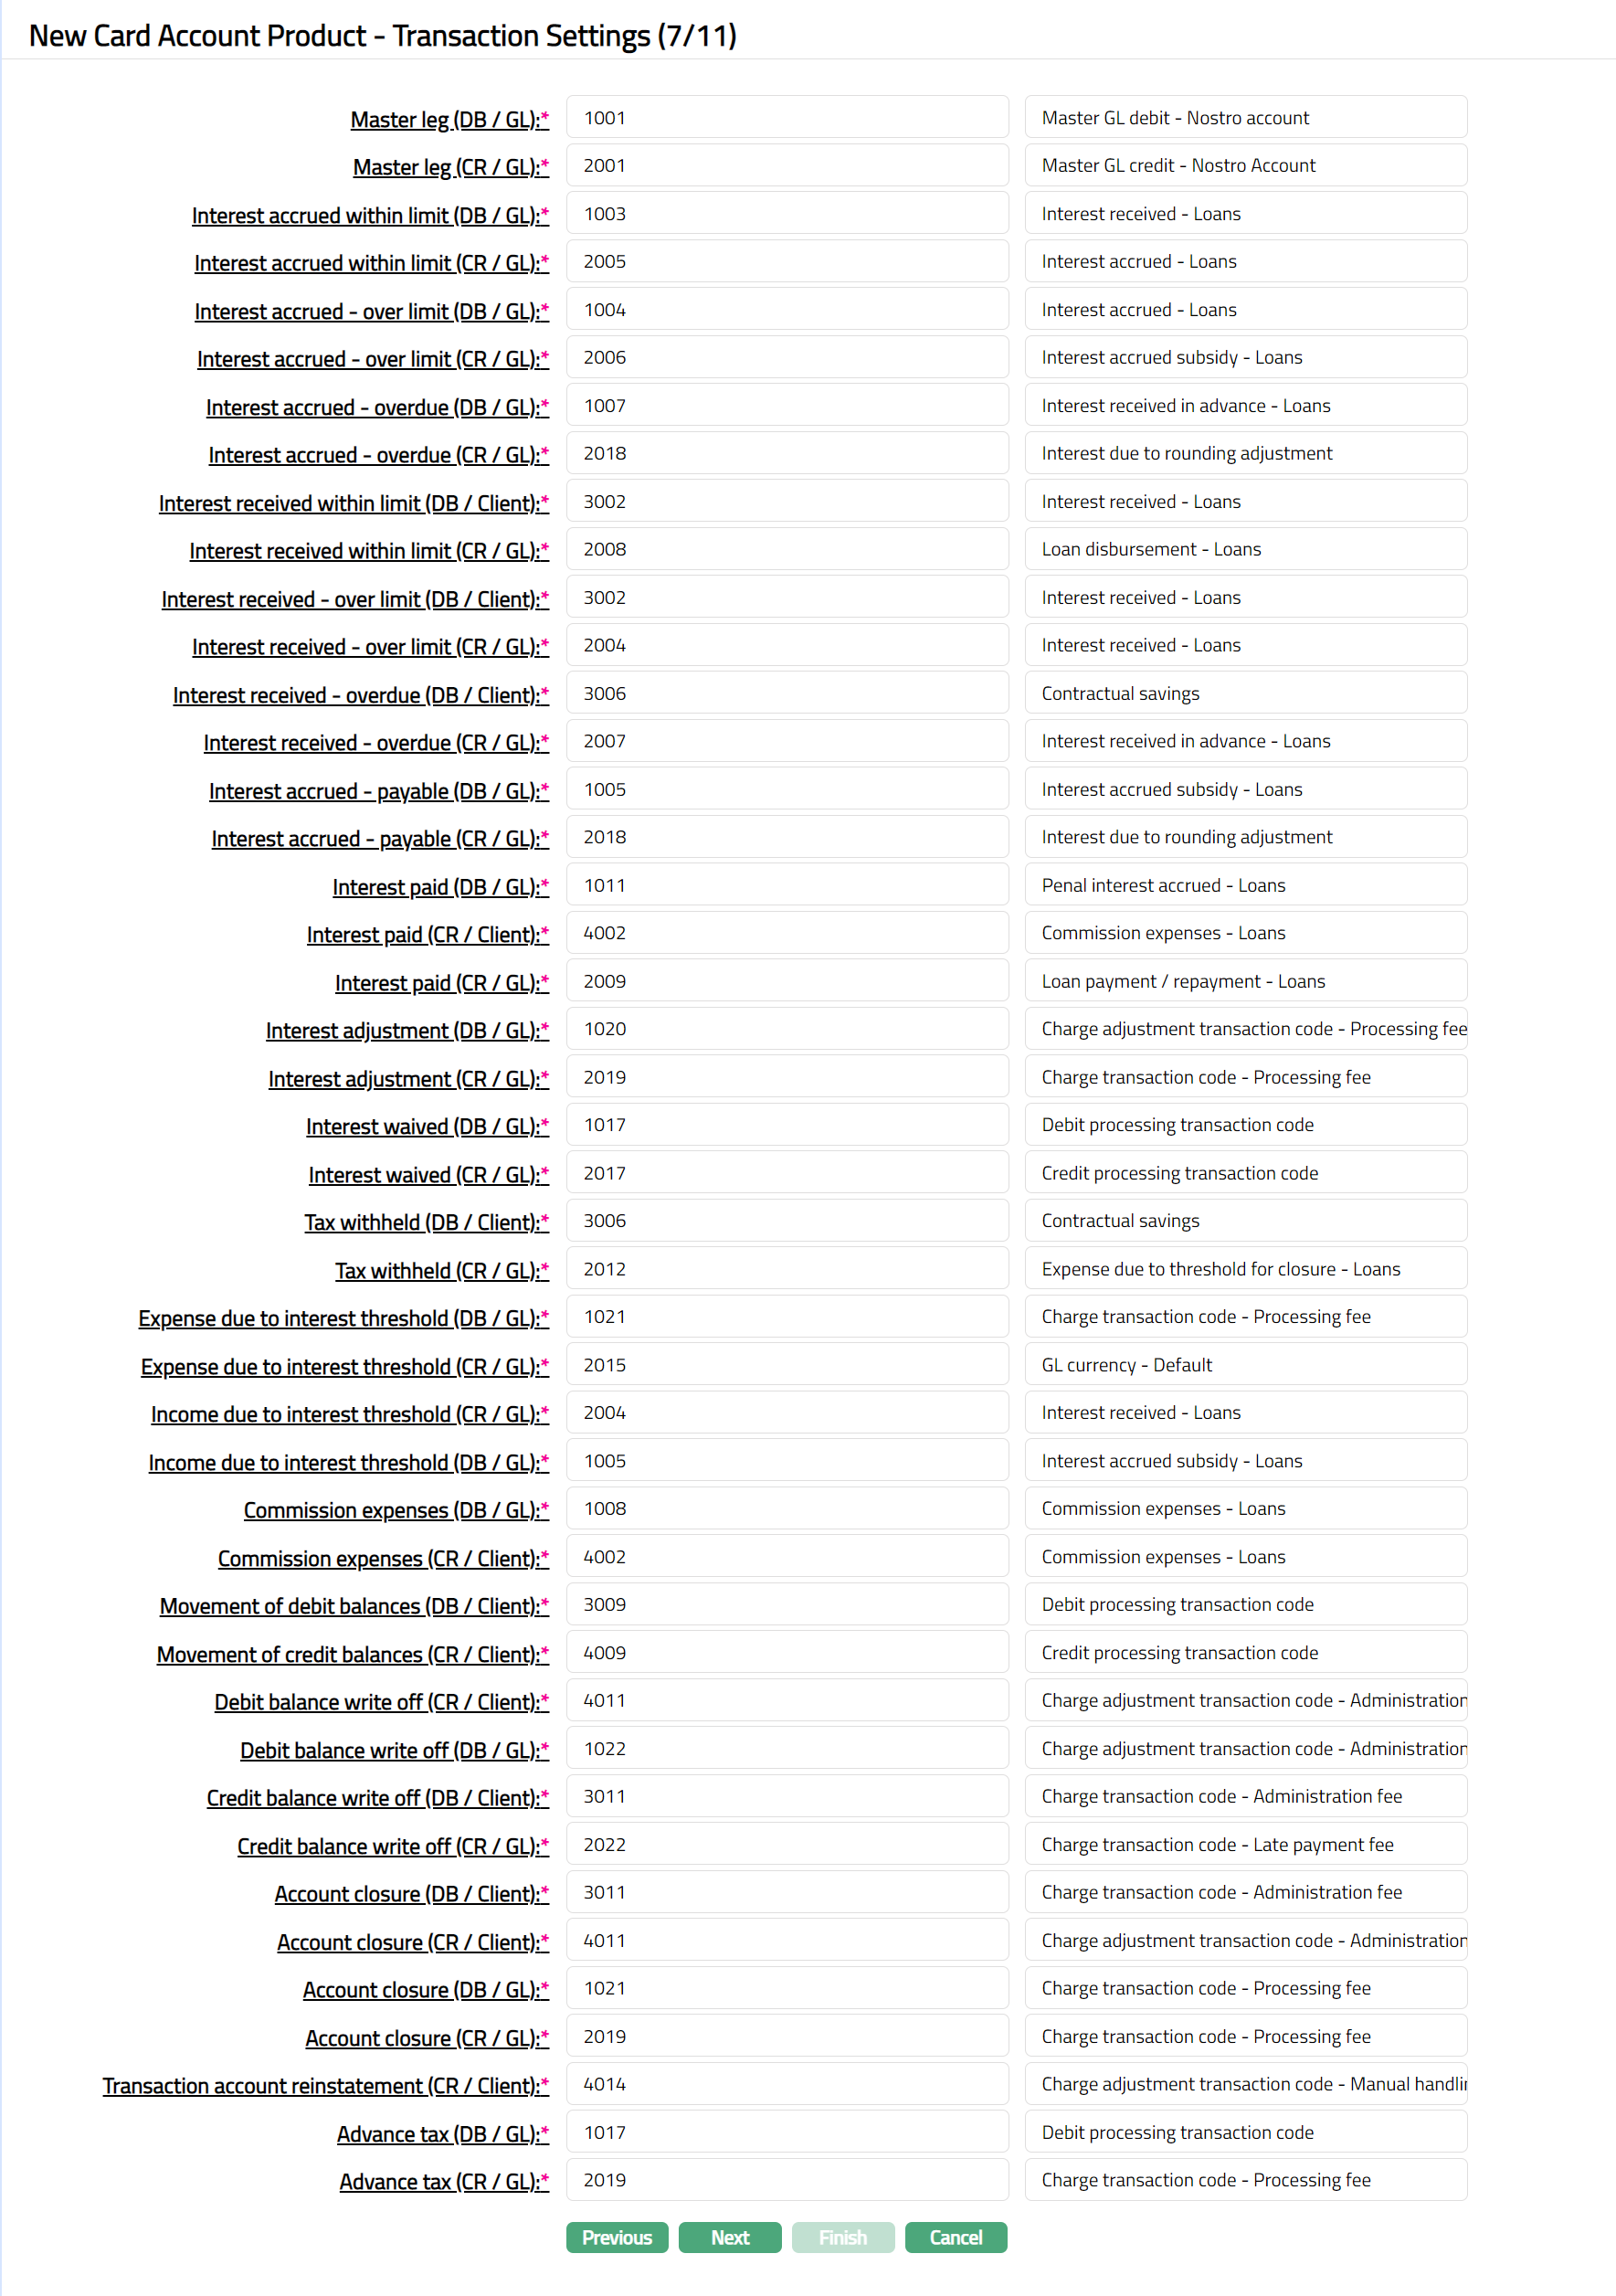
| Sl | Field Name of Transaction Settings | Used For | List of Transaction Codes Based On | Event When It Will Be Used |
|---|---|---|---|---|
| 1 | Master GL (DB/GL) | All the debit transactions affecting the | General Ledger Debit | All |
| accounts under this product. | ||||
| 2 | Master GL (CR/GL) | All the credit transactions affecting the | General Ledger Credit | All |
| accounts under this product. | ||||
| 3 | Interest Paid (DB/GL) | All the Interest paid transactions in the | General Ledger Debit | Liquidation |
| General Ledger Account | ||||
| 4 | Interest Paid (CR/Client) | All Interest paid transactions in the | Client Account Credit | Liquidation |
| Client Account | ||||
| 5 | Interest Paid (CR/GL) | All Interest paid transactions in the | General Ledger Credit | Liquidation |
| General Ledger Account | ||||
| 6 | Interest Received (DB/Client) | All Interest received transactions in the | Client Account Debit | Liquidation |
| Client Account | ||||
| 7 | Interest Received (CR/GL) | All Interest received transactions in the | General Ledger Credit | Liquidation |
| General Ledger Account | ||||
| 8 | Interest Accrued (DB/GL) | All Interest accrued transactions in the | General Ledger Debit | Accrual |
| General Ledger account | ||||
| 9 | Interest Accrued (CR/GL) | All Interest accrued transactions in the | General Ledger Credit | Accrual |
| General Ledger account | ||||
| 10 | Interest Adjustment (DB/GL) | All Interest adjustment transactions in the | General Ledger Debit | Reversal |
| General Ledger account | ||||
| 11 | Interest Adjustment (CR/GL) | All Interest adjustment transactions in the | General Ledger Credit | Reversal |
| General Ledger account | ||||
| 12 | Overdue Accrual (DB/GL) | All Overdue accrued transactions in the | General Ledger Debit | Accrual |
| General Ledger account | ||||
| 13 | Overdue Accrual (CR/GL) | All Overdue accrued transactions in the | General Ledger Credit | Accrual |
| General Ledger account | ||||
| 14 | Overdue Liquidation (DB/Client) | All Overdue Liquidation transactions in the | Client Account Credit | Liquidation |
| Client account | ||||
| 15 | Overdue Liquidation (CR/GL) | All Overdue Liquidation transactions in the | General Ledger Credit | Liquidation |
| General Ledger | ||||
| 16 | Account Closure (DB/Client) | All Account Closure transactions in the | Client Account Debit | Closure of Accounts |
| Client account | ||||
| 17 | Account Closure (CR/Client) | All Account Closure transactions in the | Client Account Credit | Closure of Accounts |
| Client account | ||||
| 18 | Account Closure (DB/GL) | All Account Closure transactions in the | General Ledger Debit | Closure of Accounts |
| General Ledger | ||||
| 19 | Account Closure (CR/GL) | All Account Closure transactions in the | General Ledger Credit | Closure of Accounts |
| General Ledger | ||||
| 20 | Tax Withheld (DB/Client) | All Tax withheld transactions in the Client | Client Account Debit | Liquidation |
| account | ||||
| 21 | Tax Withheld (CR/GL) | All Tax withheld transactions in the General | General Ledger Credit | Liquidation |
| Ledger | ||||
| 22 | Debit Balance Write Off (CR/Client) | All Debit balance write off transactions in | Client Account Credit | |
| the Client account | ||||
| 23 | Debit Balance Write Off (DB/GL) | All Debit balance write off transactions in | General Ledger Debit | |
| the General Ledger | ||||
| 24 | Credit Balance Write Off (DB/Client) | All Credit balance write off transactions in | Client Account Debit | |
| the Client account | ||||
| 25 | Credit Balance Write Off (CR/GL) | All Credit balance write off transactions in | General Ledger Credit | |
| the General Ledger | ||||
| 26 | Overdue Interest Adjustment (DB/GL) | All Overdue Interest adjustment transactions | General Ledger Debit | Reversal |
| in the General Ledger | ||||
| 27 | Overdue Interest Adjustment (CR/GL) | All Overdue Interest adjustment transactions | General Ledger Credit | Reversal |
| in the General Ledger | ||||
| 28 | Overlimit Interest Adjustment (DB/GL) | All Overlimit Interest adjustment transactions | General Ledger Debit | Reversal |
| in the General Ledger | ||||
| 29 | Overlimit Interest Adjustment (CR/GL) | All Overlimit Interest adjustment transactions | General Ledger Credit | Reversal |
| in the General Ledger | ||||
| 30 | Commission Expenses (DB/GL) | All commission expense transactions in the | General Ledger Debit | Expense |
| General Ledger account | ||||
| 31 | Commission Expenses (CR/Client) | All commission expense transactions in the | Client Account Credit | Expense |
| Client account | ||||
| 32 | Movement of Debit Balance (DB/Client) | All Movement of debit balance transactions in | Client Account Debit | |
| the Client account | ||||
| 33 | Movement of Credit Balance (CR/Client) | All Movement of credit balance transactions in | Client Account Credit | |
| the Client account | ||||
| 34 | Expense Due to Interest Threshold (DB/GL) | All Expense due to interest threshold | General Ledger Debit | Expense |
| transactions in the General Ledger | ||||
| 35 | Expense Due to Interest Threshold (CR/Client) | All Expense due to interest threshold | Client Account Credit | Expense |
| transactions in the Client account | ||||
| 36 | Income Due to Interest Threshold (CR/GL) | All Income due to interest threshold | General Ledger Credit | Income |
| transactions in the General Ledger | ||||
| 37 | Income Due to Interest Threshold (DB/Client) | All Income due to interest threshold | Client Account Debit | Income |
| transactions in the Client account |
- Click Next. New Card Account Product -- Statement Parameter (8/10) page appears.
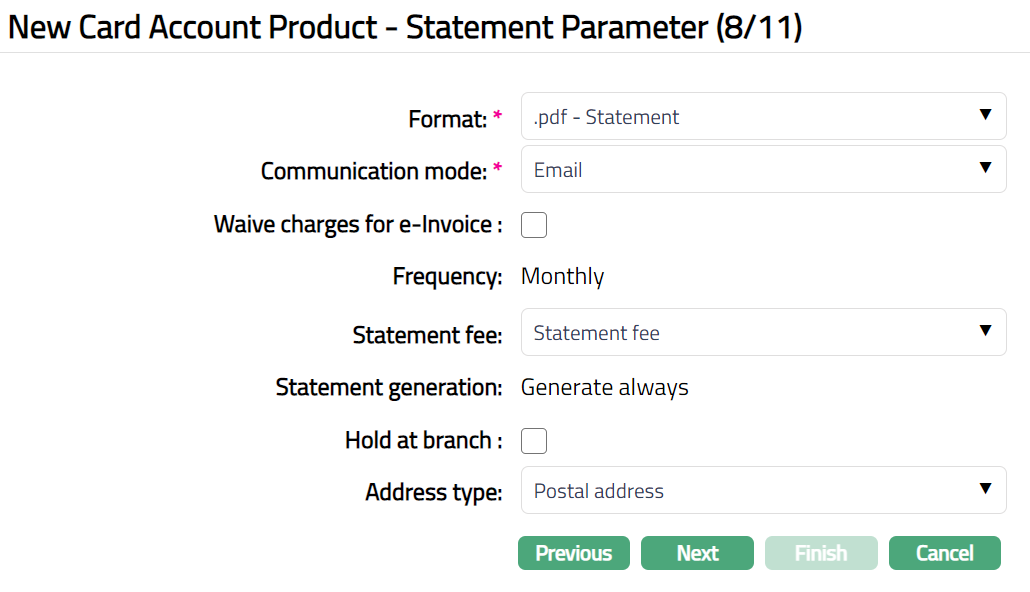
Select Format of the statement to be generated from the drop-down list of formats that have been maintained under Admin > System codes > Generic definition > Invoice formats. The statement chosen here will be considered as the Invoice for the accounts under this product.
Select Communication mode from the drop-down list -- i.e., the manner in which you want to send the statement. Available options are Email, Data handoff, e-invoice, Email, Paper, SMS, Web hotel.
The Waive charge for e-invoice flag is enabled only if communication mode is e-invoice. If checked charges for e-invoice will be waived off. If the flag is unchecked, then the charges will be levied for the e-invoice based on the statement fee chosen.
The Frequency of the statement is defaulted from the Interest Receivable frequency, as the interest liquidation and statement (invoice) generation go hand-in-hand. This cannot be edited.
If you want to levy a Statement fee for generation of this statement, select the charge from the list of Event based, Flat or Banded Charges. If banded, the card account balance will be taken as the basis for the charge.
Note: Any additional statements that may be required for the accounts under this product may be defined using Statement tab in edit mode for those accounts.
By default, Statement generation will be Generate always. This indicates that, the account statement will be generated only if there is any activity in the account or balance in the account.
If Hold at Branch flag is checked, then the statement is generated but instead of despatch to customer, it is held back at the branch.
Click Next. New Card Account Product -- Group (9/10) page appears.
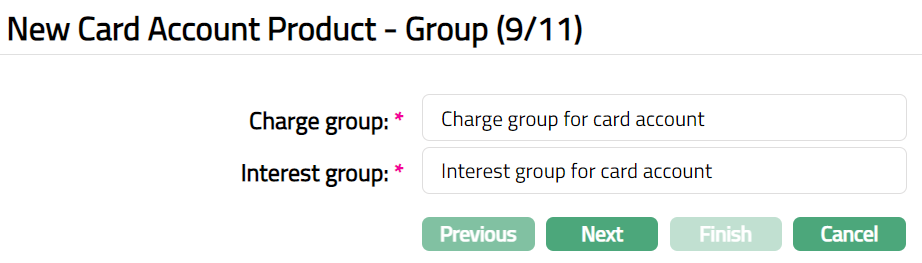
Enter name for the default Charge group. All the charges defined for the Product would be created under this Charge group as the Default Charge Group for the product.
Enter name for the default Interest group. All the interests defined for the Product would be created under this Interest group as the Default Interest Group for the product.
Click Next. Maintain Custom Field Details (10/11) page appears.
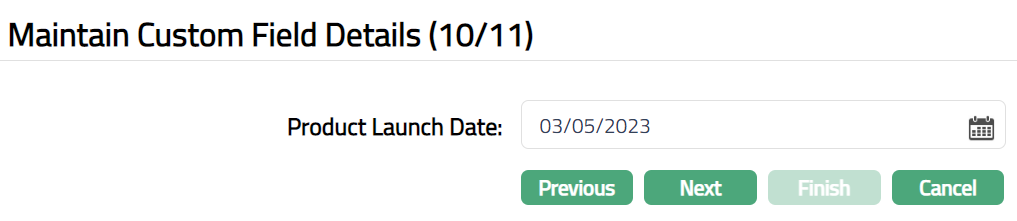
Select Product Launch Date from the available calendar.
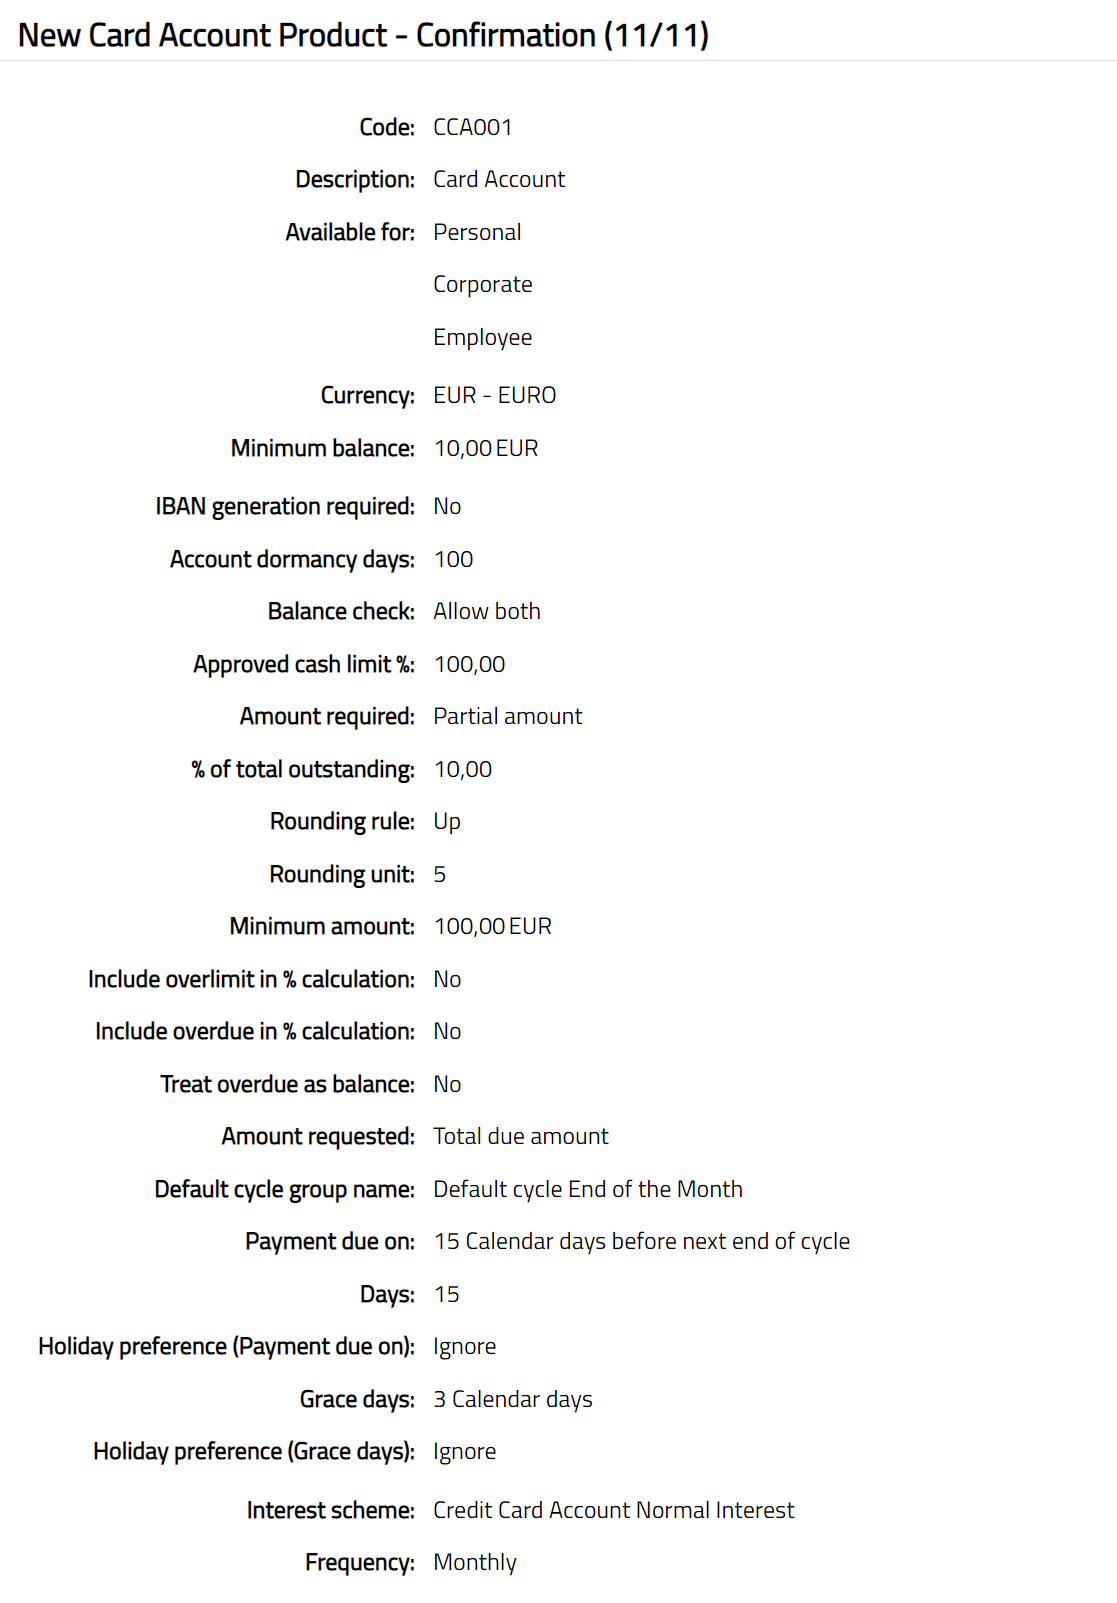
Click Next. New Card Account Product -- Confirmation (11/11) page appears showing all the details that you entered. An extract of the Confirmation screen is shown below:
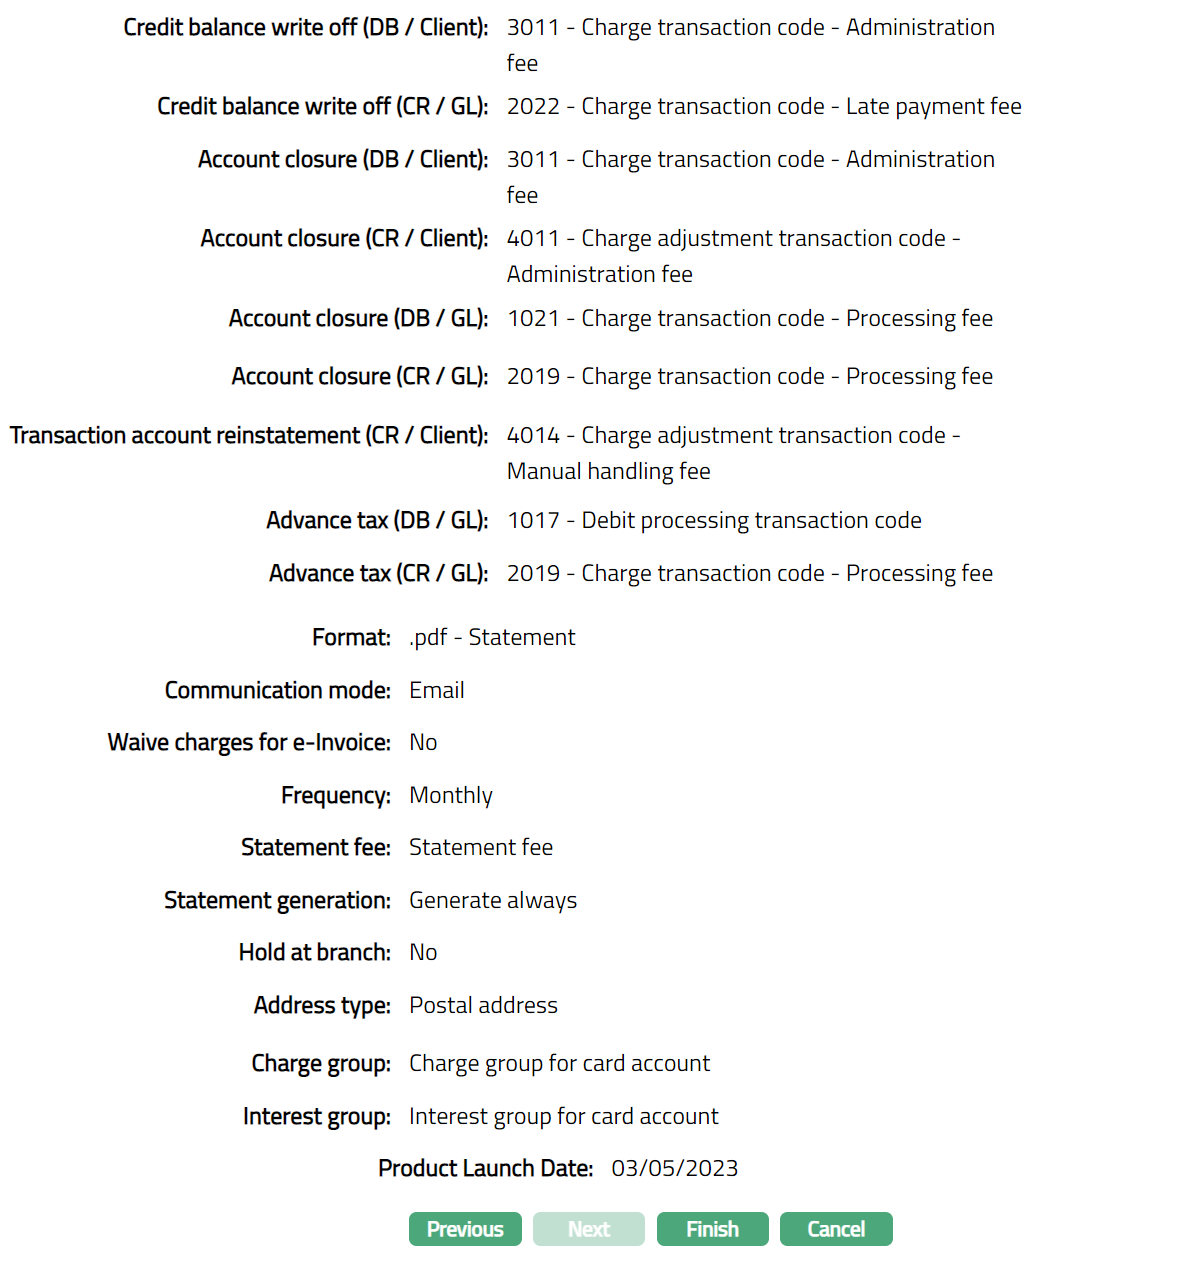
- Click Finish. Card Account Product record is created displaying the Profile tab by default.
Functions: Add, Search, Suspend, Activate,
Note: The status of the Card Account Product is Active as soon as the product is created. The status of the Interests, Charge and Statement Parameter tabs are Pending till they are approved by another user as indicated by the red bubbles on the tab. On approval, the tab status is set to Approved.
Edit: You can update the details of the Product by clicking on Edit button. The updated conditions will be applicable only for those accounts that are created after the changes have been done and will not affect the accounts that are already created.
Suspend: You can suspend the product by clicking on Suspend button. When you click on Suspend button, Aura will ask for confirmation, on approval of which of which the Product will be suspended. Suspending a product only makes it unavailable in future for any new account creation / any other dropdown list. Existing accounts under the product continue without any impact. Suspended products can be activated by using Activate button.
Delete: You can delete a product by clicking on Delete button. When you click on Delete button, Aura will ask for confirmation, on approval of which the Product will get deleted.
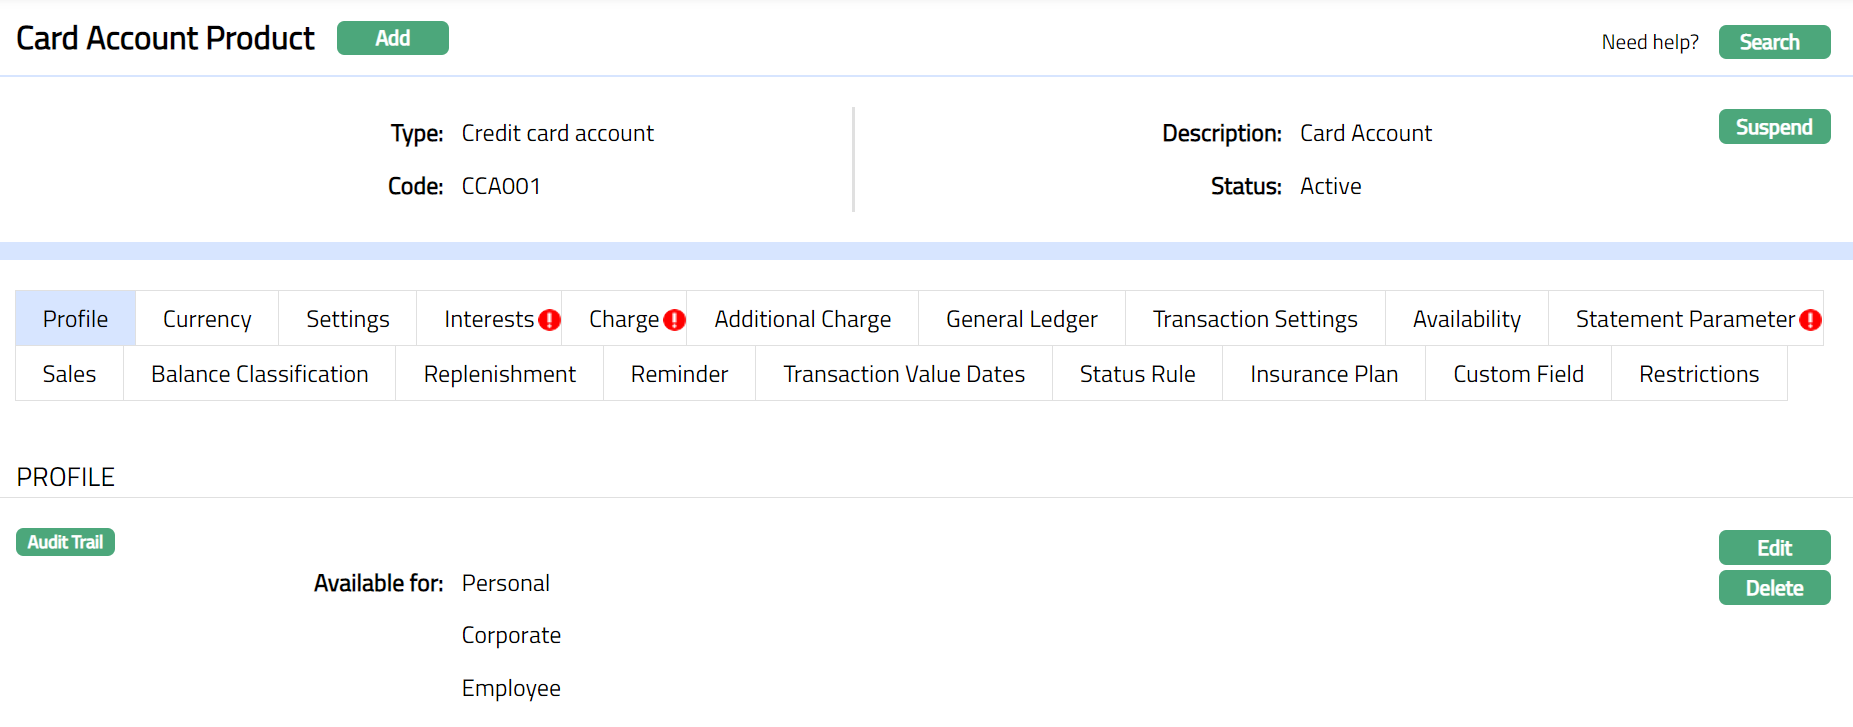
Profile
The Profile tab, which is the default tab in the Card Account Product screen, shows the basic details of the Card Account Product.
To view / edit Profile.
- Access Card Account Product page and click Profile tab to view the details as per sample below. The details are defaulted from the entries that are made during Card Account Product creation. For details refer to New Product -- Profile.

- Click Edit. Edit Card Account Product window appears.
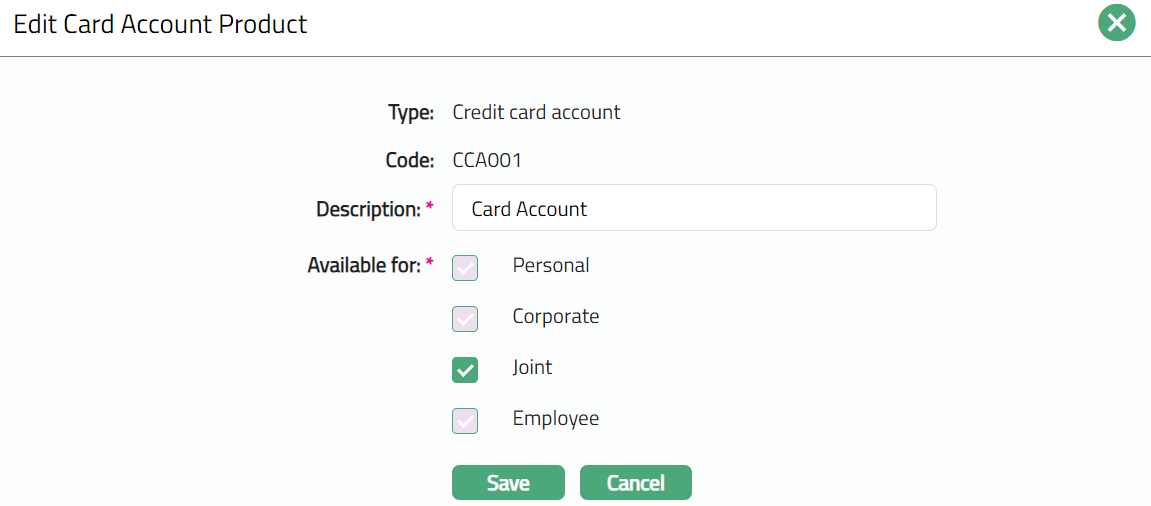
- You can edit only the following fields:
Description
Available for: You can only add types to the ones that were already added for the Product. You cannot remove any type that was already selected.
- Click Save. Profile page appears with the edited details.
 Functions: Edit, Delete
Currency
Currency tab allows you to maintain the currencies for the Card Account Product. One or more currencies can be added using the Currency tab, once the Product record is created. Accounts for the product can be opened only in the selected currencies.
To add a new currency or edit a new currency,
- Access Card Account Product page and click Currency tab to view the details as per sample below. The details are defaulted from the entries that you made during Product creation. For details refer to New Card Account Product -- Currency (1/11).

- Click New. New currency page appears.
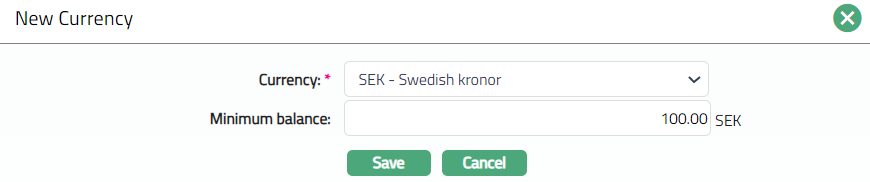
Enter new Currency and Minimum balance.
Click Save. Currency page appears with the added details.
 Functions: New, Edit, Delete
To Edit Currency
- Click Edit. Edit Currency page appears.
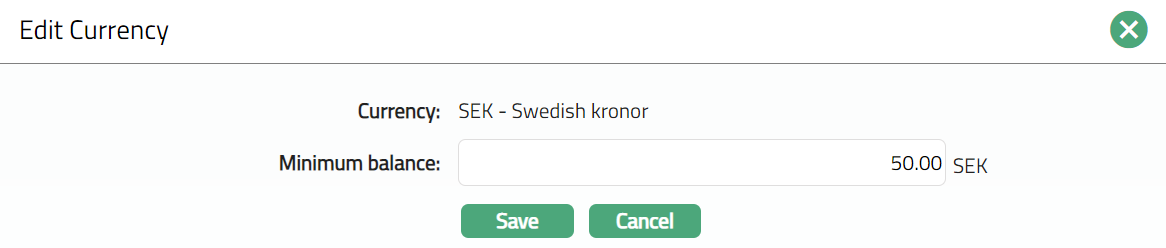
Note: Only Minimum balance field is editable.
- Click Save. Currency page appears with the edited details.
 Functions: New, Edit, Delete
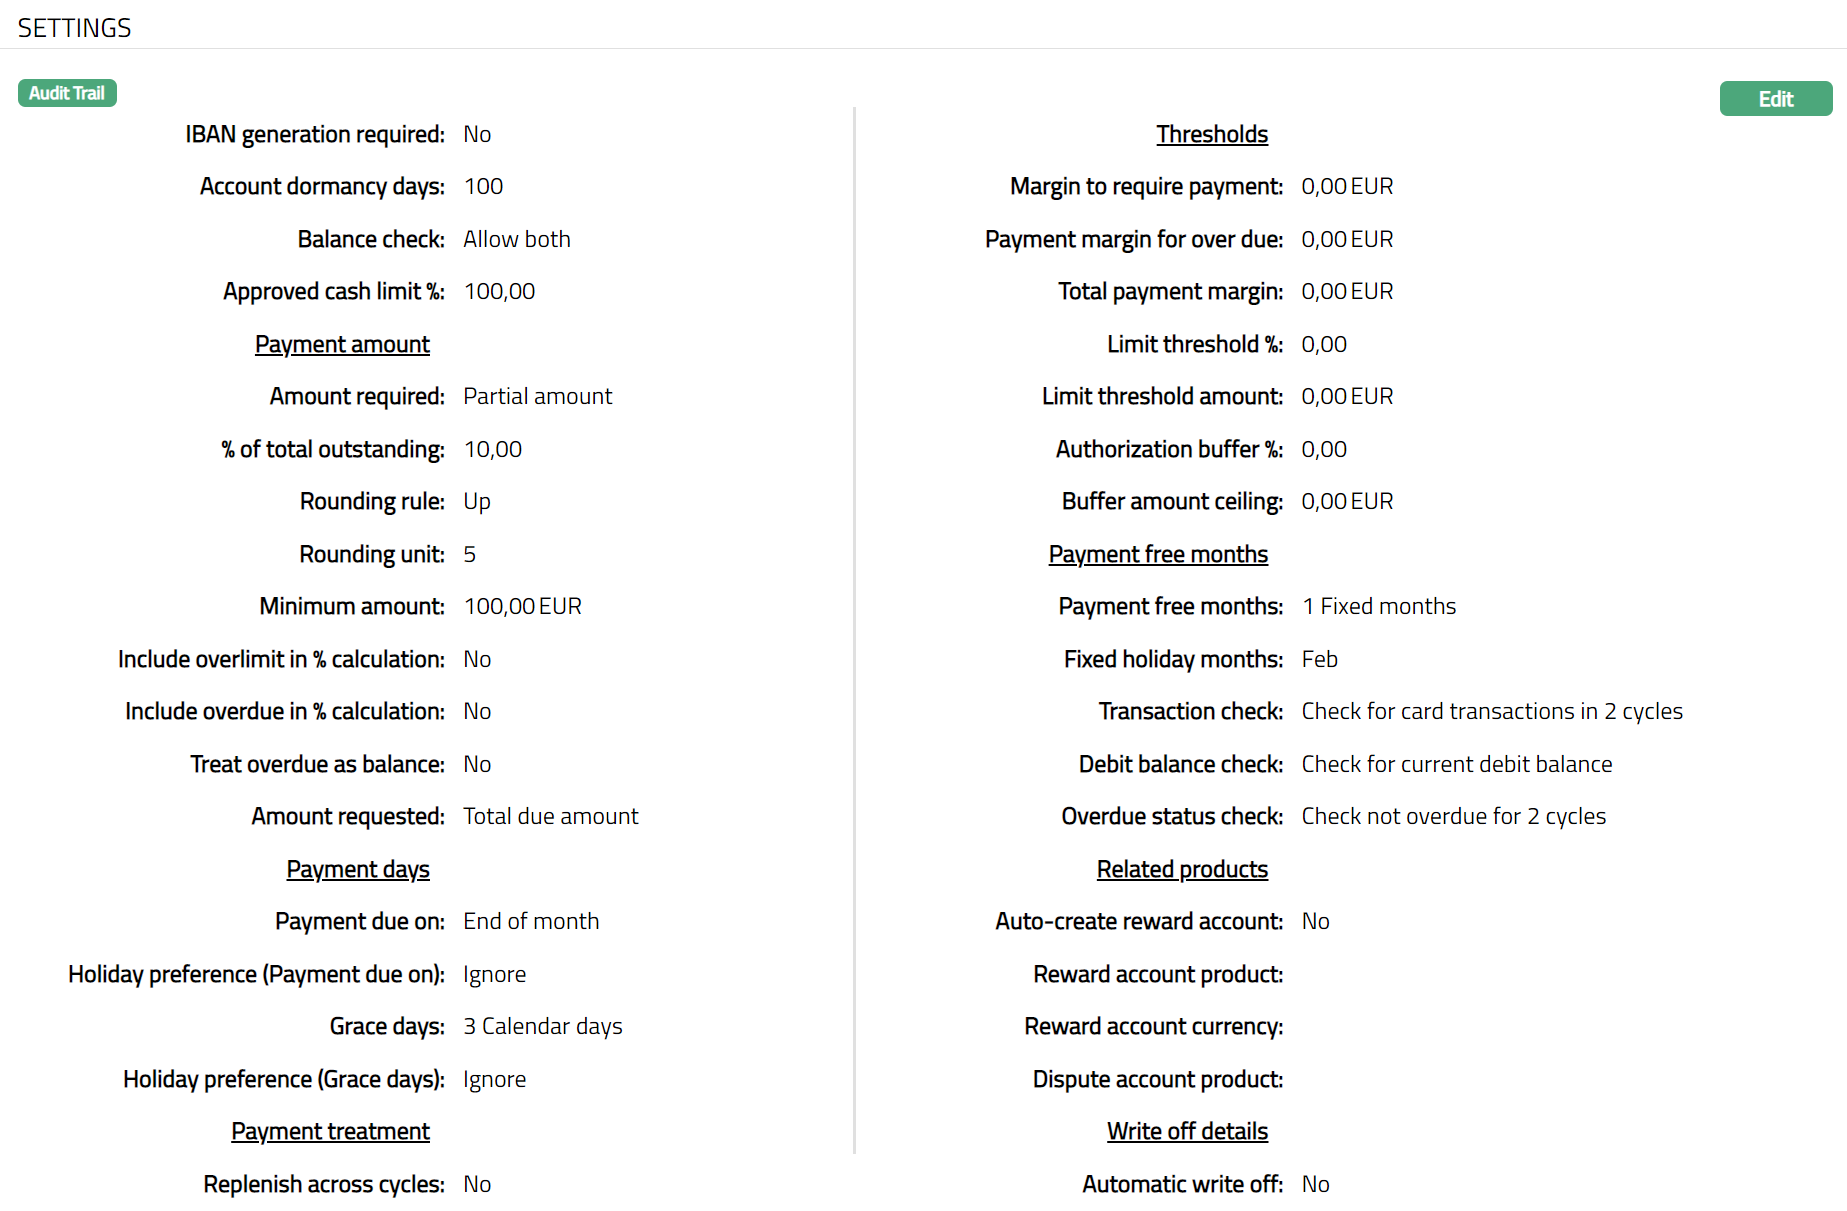
Settings
This Tab allows you to view and maintain certain product settings like Payment details, Payment days, Payment treatment, Thresholds, Payment Free months, Account dormancy, etc.
On creation of the Product, the following fields are updated with the following default values:
| Serial # | Fields | Values | Units |
|---|---|---|---|
| 1. | Replenish across cycles | No | |
| 2. | Margin to request payment | 0.00 | Base currency |
| 3. | Payment margin for overdue | 0.00 | Base currency |
| Interest | |||
| 4. | Total payment margin | 0.00 | Base currency |
| 5. | Limit threshold amount | 0.00 | Base currency |
| 6. | Limit threshold % | 0.00 | % |
| 7. | Authorization buffer % | 0.00 | % |
| 8. | Buffer amount ceiling | 0.00 | Base currency |
| 9. | Payment free months | None | |
| 10. | Auto-create bonus account | No | |
| 11. | Bonus account product | Null | |
| 12. | Bonus account currency | Null | |
| 13. | Dispute account product | Null | |
| 14. | Automatic write off | No |
To edit the settings
- Access Card Account Product page and click Settings tab to view the details as per sample below. The details are defaulted as per details above and from the entries made during Product creation. For details refer to New Card Account Product -- Settings (2/11).

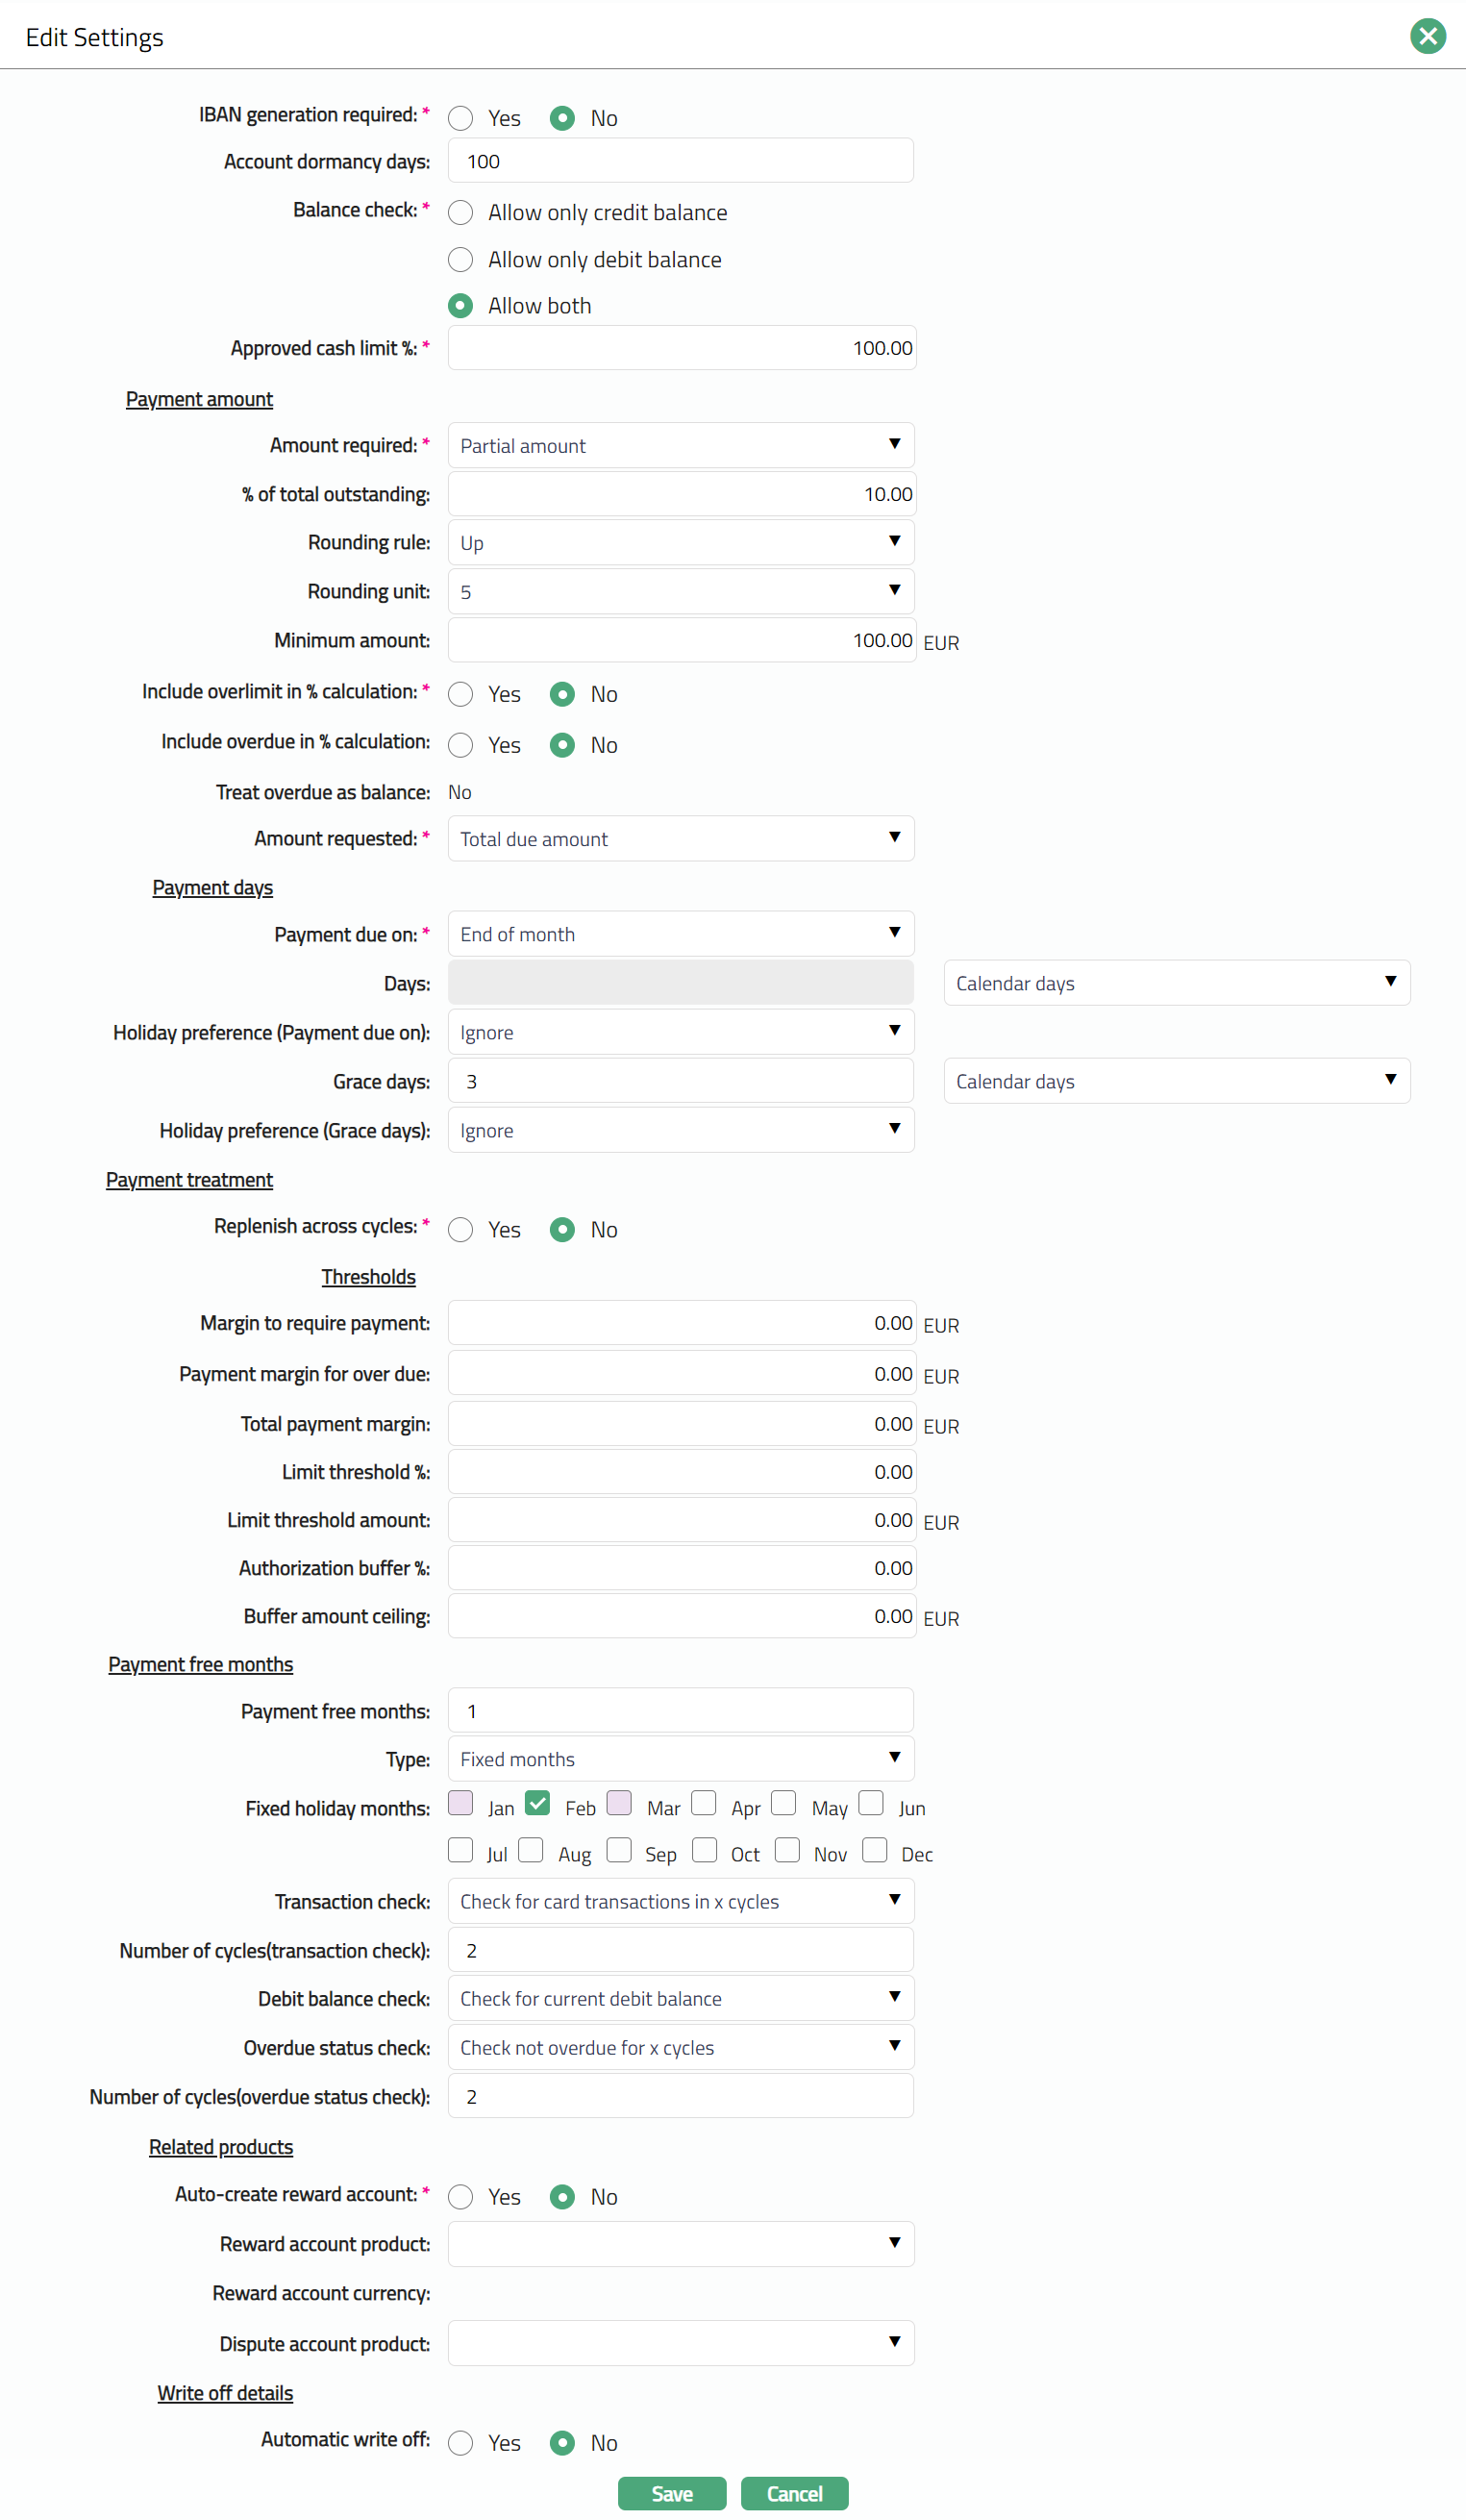
- Click Edit. Edit Settings page appears.
The additional fields are as follows.
- By default, Replenish across cycles will be unchecked. If this field is checked, Aura will replenish Balance classes according to the Replenishment order but across cycles. If this is not checked Aura will replenish within a cycle and then move on to next cycle in the same order.
Example:
| Replenishment Order | Balance Class | Past Cycle (Balance) | Current Cycle (Balance) |
|---|---|---|---|
| 1 | ATM_Interest | 100 | 150 |
| 2 | ATM_Balance | 300 | 200 |
| 3 | POS_Interest | 200 | 150 |
| 4 | POS_Balance | 800 | 600 |
Case 1: Suppose Payment of 200 has been made and the Replenish across cycles is YES. The payment made will be replenished across the cycles.
| Replenishment Order | Balance Class | Past Cycle (Balance) | Current Cycle (Balance) |
|---|---|---|---|
| 1 | ATM_Interest | 100 - 100 = 0 | 150 - 100 = 50 |
| 2 | ATM_Balance | 300 | 200 |
| 3 | POS_Interest | 200 | 150 |
| 4 | POS_Balance | 800 | 600 |
Case 2: Suppose Payment of 200 has been made and the Replenish across cycles is NO. The payment made will be replenished within the cycles.
| Replenishment Order | Balance Class | Past Cycle (Balance) | Current Cycle (Balance) |
|---|---|---|---|
| 1 | ATM_Interest | 100 - 100 = 0 | 150 |
| 2 | ATM_Balance | 300 - 100 = 200 | 200 |
| 3 | POS_Interest | 200 | 150 |
| 4 | POS_Balance | 800 | 600 |
- Enter Margin to request payment. You can input any 3-digit amount in base currency. Aura will generate Amount required only if the balance in the account is more than this amount. If the balance is less than this amount, then no payment due is requested; but the statement will still be generated.
For Example: Suppose Margin to request payment is 100 SEK and Total outstanding is 90 SEK. In this case, no payment due is requested but a statement will be generated.
Enter Payment margin for overdue interest. You can input any 3-digit amount in base currency. If the Payment margin for overdue interest is 5 SEK, Amount required is 100 SEK and Payment amount is 95 SEK. Aura will check whether the payment amount is less than the amount required + 5 SEK (95 SEK + 5 SEK). If condition is satisfied, then no overdue interest or late payment fee will be applied. If condition is not satisfied, then overdue interest and late payment fee will be applied.
Enter Total payment margin. You can input any 3-digit amount in base currency. The amount entered here is taken into consideration if the payment falls short by this amount to qualify the payment for Total payment amount. The account will get all the benefits as though the Total payment amount is received.
Enter Limit threshold %. The limit threshold % ensures that over limit charges and interest are not marked if the limit is breached by an amount set within the threshold. Limit threshold % will be calculated on the limit amount.
Enter Limit threshold amount. This is similar to Limit threshold % but is entered as an amount. Aura will charge over limit charge and interest only if the account balance goes beyond the (limit + limit threshold amount).
Note: If both Limit threshold % and Limit threshold amount are entered, Aura will consider the lesser of the two as the actual threshold.
- Enter Authorization buffer %. Authorisation buffer ensures that the authorisation is not rejected for small amounts. The authorisation buffer is a % of the overall limit subject to a maximum amount. The authorization buffer applies only when the account is within the limit at the start of the transaction. If the account is already above the limit at the start of the transaction, then the buffer does not apply, and the authorization is declined with appropriate codes. Therefore, the buffer can only be applicable for one transaction at any given point of time.
For example, the limit is 10,000 SEK. The Authorization buffer is set to 1.5% of the limit. With a limit of 10,000 SEK this means that a maximum of 150 SEK is allowed as the authorization buffer. The available balance is 100 SEK. An authorization with the amount of 120 SEK is received. It will be approved since it is (120-100=20 SEK) within the authorization buffer. If the available balance had been 0 the authorization would have been rejected because the available balance was 0 even though the threshold was 150 SEK.
- Enter Buffer amount ceiling. It is the maximum authorization buffer amount.
For Example: If the account has a limit of 10,000 SEK and if the authorisation buffer is maintained as 3% subject to maximum threshold amount of 200 SEK, then the authorisation buffer is 200 SEK. If the limit is changed from 10,000 SEK to 5000 SEK, then the buffer becomes 150 SEK.
Enter number of months that are allowed as Payment free months. This cannot be greater than 6.
Select Type of Payment free month.
Fixed holiday months: You can choose specific months equal to the number input above.
Floating months: In this case, the months are not fixed but will be floating as per the choice of the client.
If you have chosen Fixed months, then, the Fixed holiday months check boxes are enabled. Check the required checkboxes to choose the Fixed holiday months.
If you have entered Payment free months, then, you also need to specify the conditions for the payment free months. The first check for payment free month applicability is whether the customer has had any card transactions in his account. This can be specified under Transaction check. The available options are:
No check: If you want to specify that the payment free month is applicable irrespective of any transactions in the account, choose No check. No transaction check will be done.
Check for card transaction in X cycles: If you want to specify that the payment free month is applicable only if the account has had card transaction in the past X cycles, choose this option. Aura will check for card transactions in x cycles.
Check for any transaction in X cycles: If you want to specify that the payment free month is applicable only if the account has had some transaction (not necessarily card transactions) in the past X cycles, then, choose this option. Aura will check for any kind of transactions in x cycles.
If you have chosen any option other than No check above, you need to specify the number of cycles for the transaction check in Number of cycles (transaction check).
One other eligibility condition for payment free month is whether the account has any debit balance. You can use Debit Balance check options for the same:
No check: If you want to specify that the payment free month is applicable irrespective of any balance in the account, use this option. No balance check for the account will be performed.
Check for current debit balance: If you want to specify that the payment free month is applicable only if the card account has a current debit balance, use this option. Aura will check for the current debit balance.
- Overdue Status check is the next eligibility condition for payment free month applicability. The following options are available:
No check: If you want to specify that the payment free month is applicable irrespective of whether the account is overdue or not, choose this option. No overdue status check for the account will be performed.
Check not overdue for X cycles: If you want to specify that the payment free month is applicable only if the account has not been overdue for the past X cycles, choose this option. Aura will check that the account has not gone overdue for the past X cycles.
If you have chosen any option other than No check above, you need to specify the number of cycles for the overdue status check in Number of cycles (overdue status check).
If you want a bonus account to be created automatically along with the card account creation, select Yes for Auto create Reward account. If you select No, Bonus account will get created only when a transaction eligible for bonus points is processed.
Select Reward account product which will be used for auto-creation of Reward Account.
The Reward account currency will be displayed by default. Aura will display the currency available for the Reward Account Product chosen above.
Select the Dispute account product from the drop-down list of all active Dispute account products. Whenever any dispute transaction has to be posted for an account under this Card Account Product, a dispute account will be created using this Dispute account product.
If you want an automatic write off trigger for an account status, choose Yes in Automatic write off field. If you click on Yes, you need to specify the status when the write off should be triggered.
Select the Write off triggering status from the drop-down list. The status needs to be maintained under Admin > System Codes > Generic definitions > Status as Account status.
Click Save. Settings page appears with the edited details.
Functions: Edit
Interests
Using this tab you can add, edit, and delete the interest schemes for the Card Product. This tab has two sub-tabs:
Interest Payable
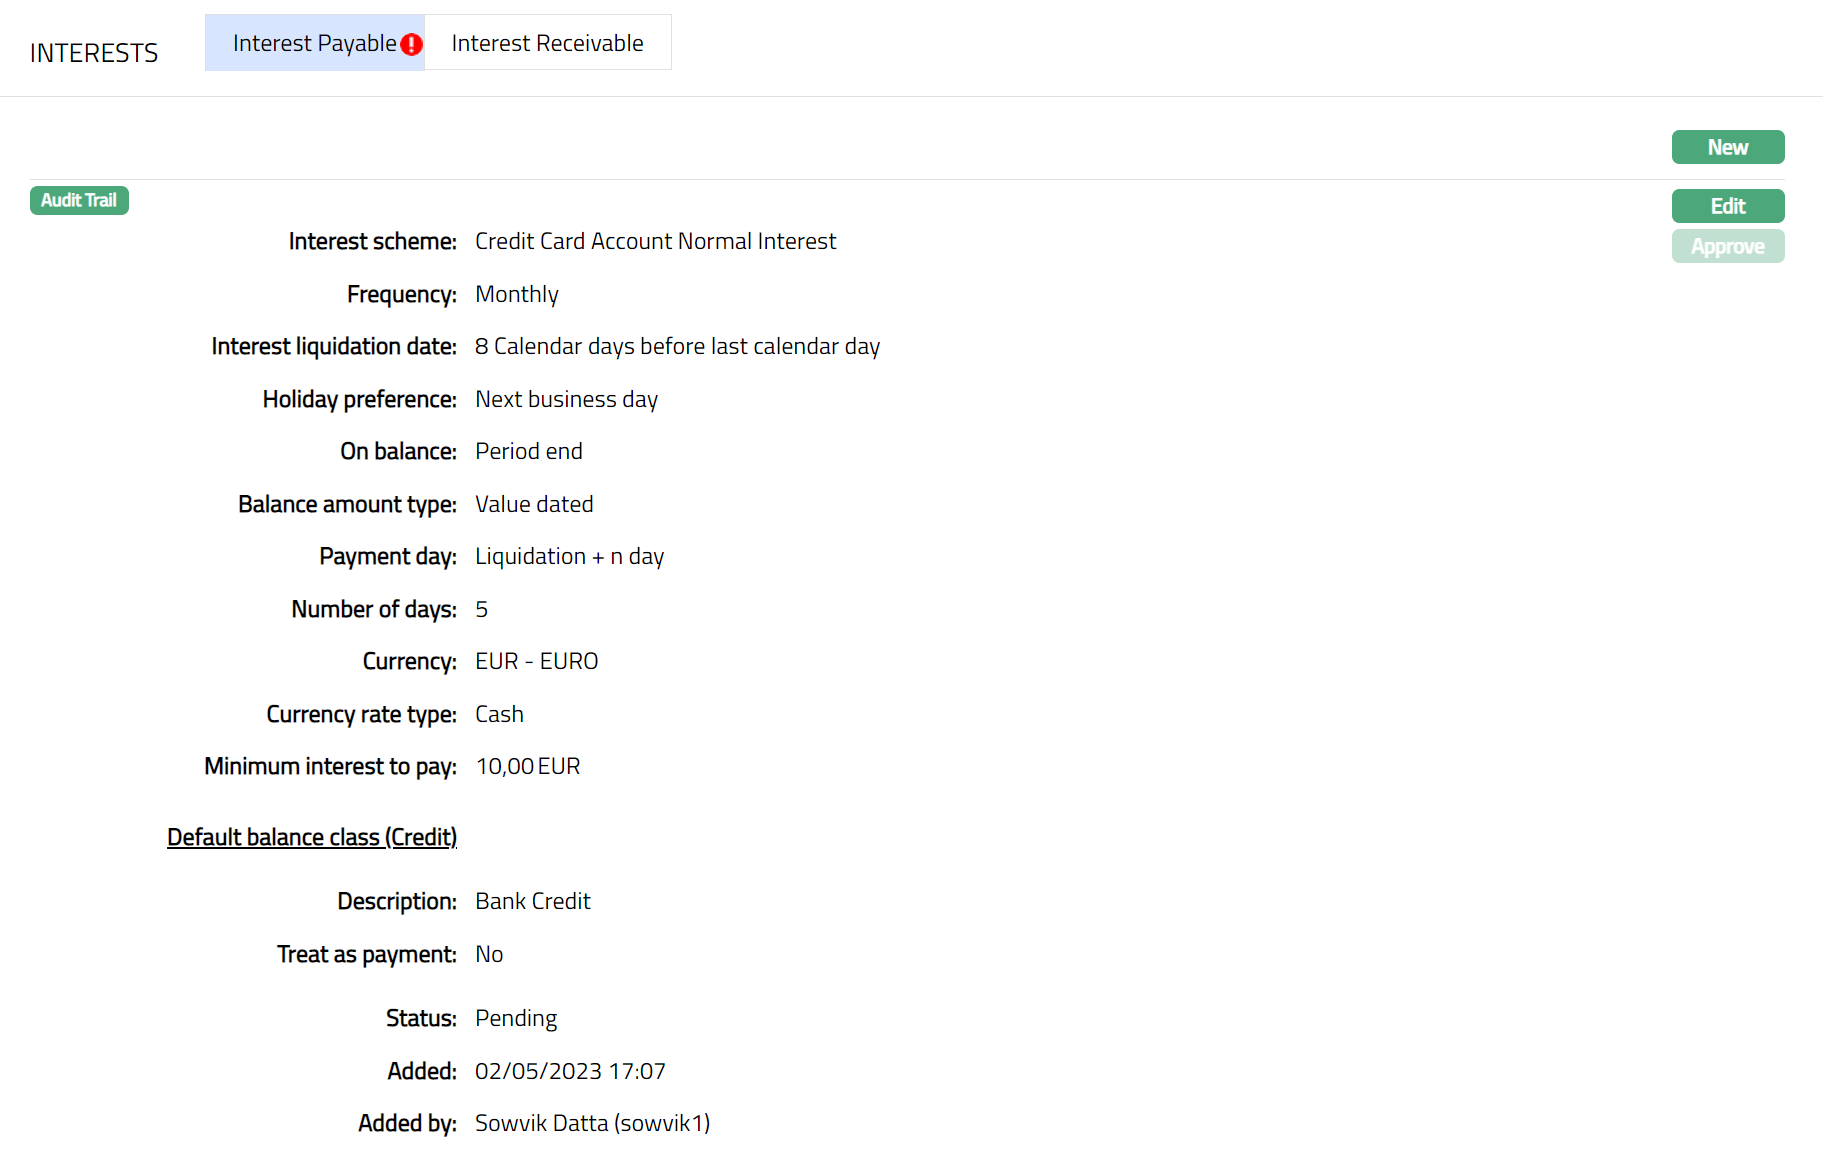
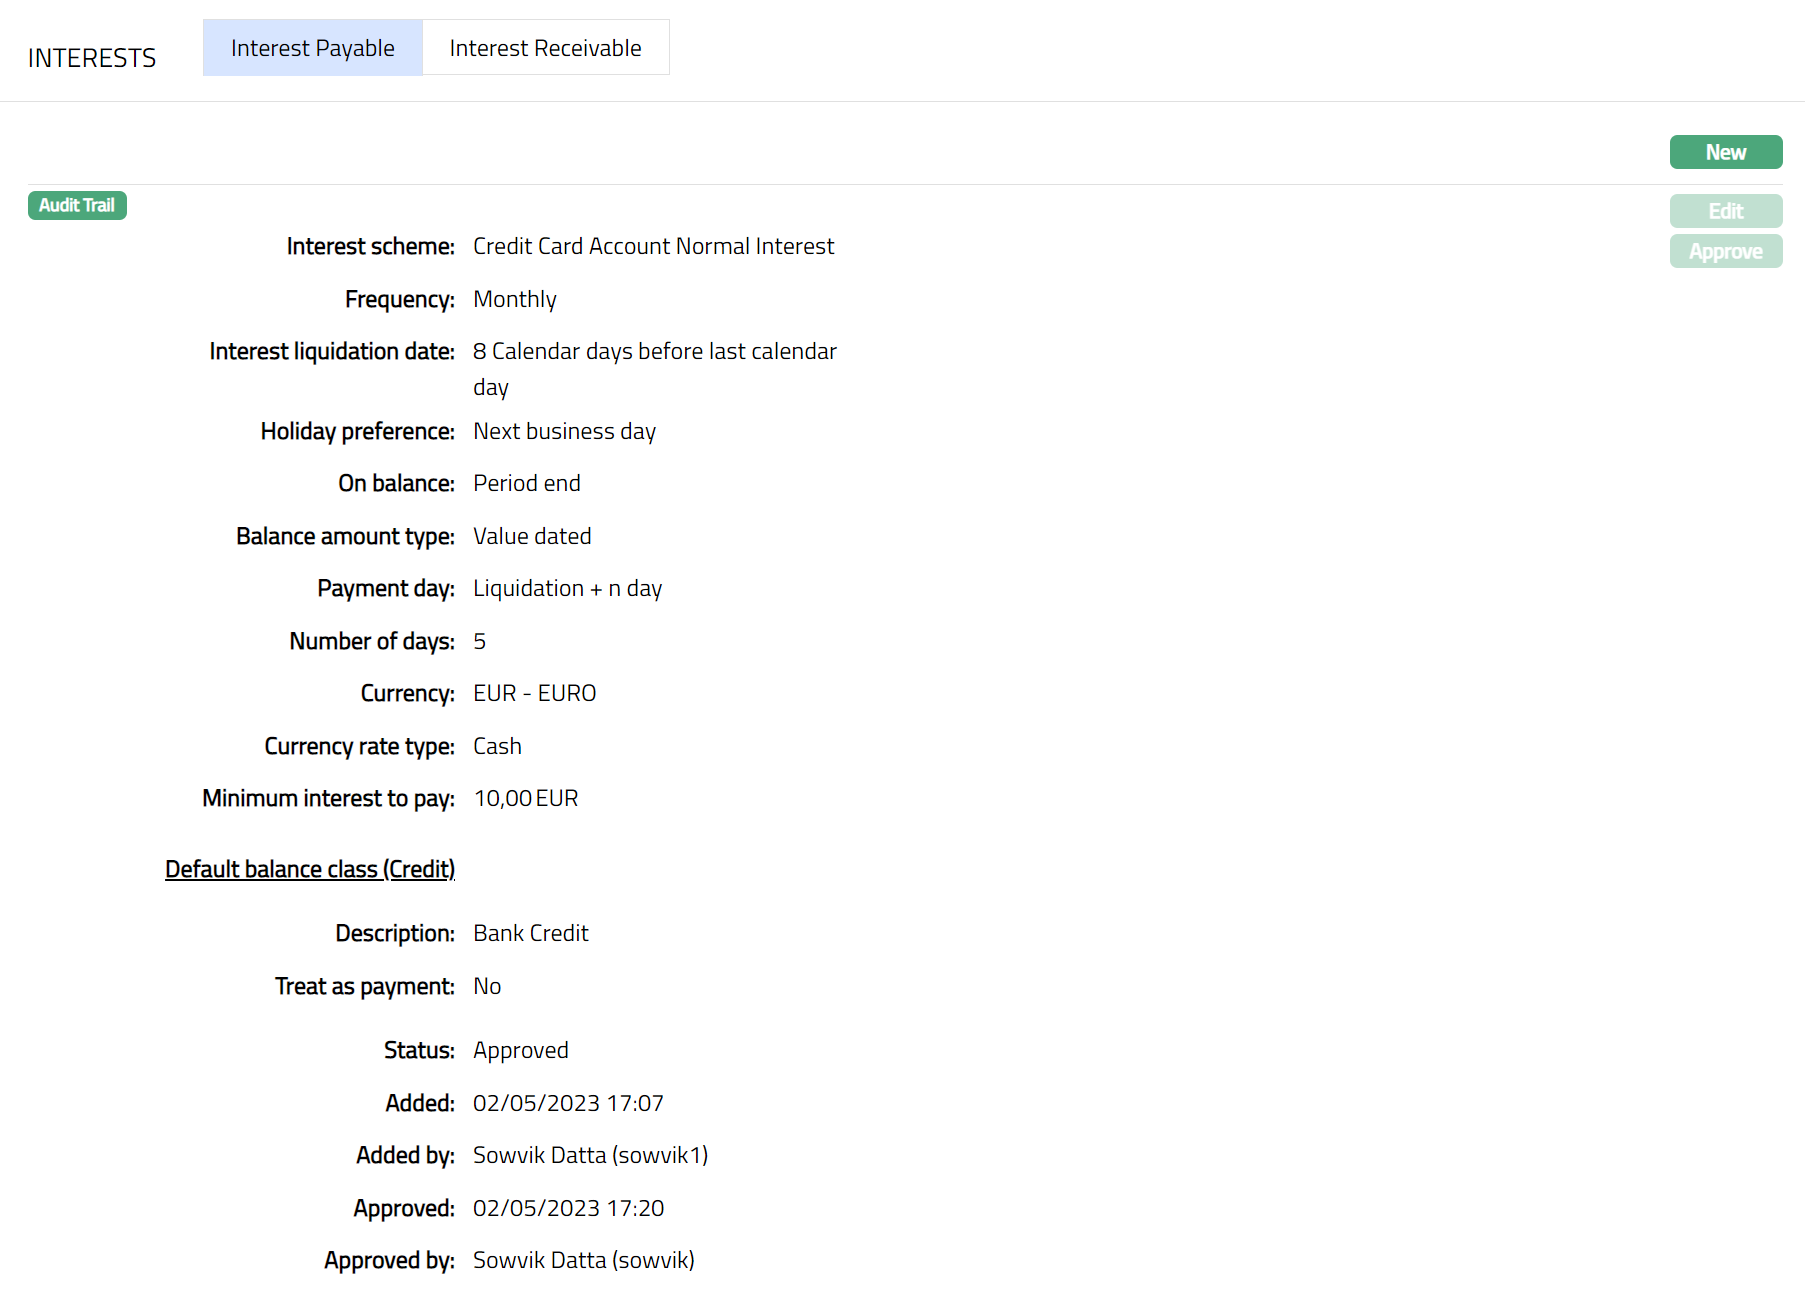
The Interest Payable tab allows you to create, view and maintain the interest rates payable on accounts under this product. As soon as a new product is created, the status of this tab is Pending -- as indicated by the bubbles on the tab heading. Once approved by a different user, the status of the tab becomes Approved, and the bubbles disappear. Only when the tab is in approved status, accounts under the product can be created.
Once the tab is approved, no further changes can be done on the Interest Payable tab. If you want to change any settings for the Product under the Interest payable tab, you have to use the New button.
- Access Card Account Product page and click Interests and then Interest Payable sub tab to view the details as per sample below. The details are defaulted from the entries that you made during Product creation. For details refer to New Card Account Product -- Interest Payable (3/11).

The additional fields that you can view in the Interest Payable tab are explained below.
Status field denotes the status of the interest payable tab.
Added field denotes the date on which the interest payable record was added.
Added by field denotes the name of the person who created the interest payable record.
Approved field denotes date on which the interest payable record was approved. This is displayed only if the record is approved.
Approved by field denotes name of the person who approved the interest payable record. This is displayed only if the record is approved.
- Click New. New Interest payable page appears.
Input new Interest Payable details. For further details regarding the fields, please refer to New Card Account Product -- Interest Payable (4/11) section in Add wizard.
Click Save. Interest Payable sub tab under Interest tab appears with the added details.
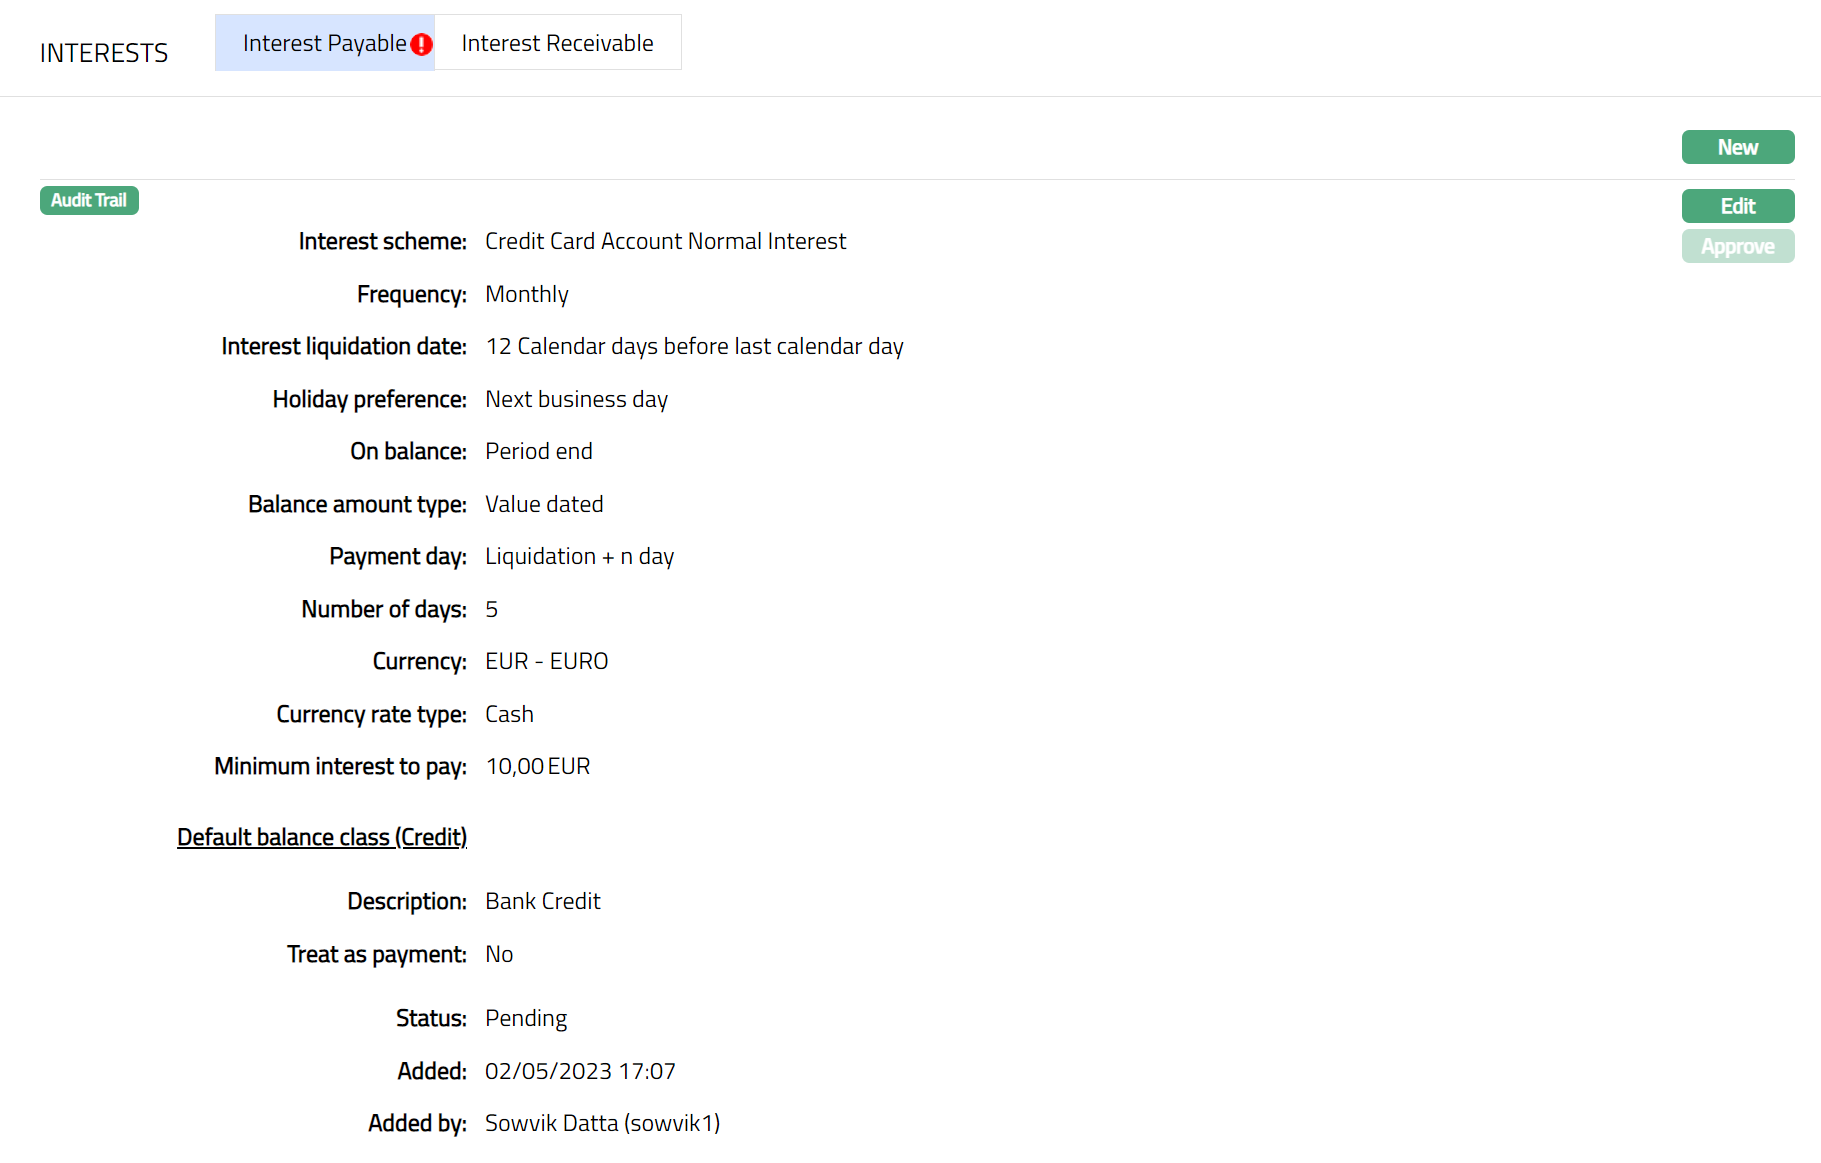
Functions: New, Edit, Approve
Note: On save, the tab status is Pending -- as indicated by the bubbles on the tab heading, till it is approved by another user. Once approved, the Interest payable cannot be edited / deleted. The New Interest payable record will replace the old record and will be applied to all accounts under the product.
- Click Edit. Edit Interest payable page appears.
Note: All fields are editable.
- Click Save. Interest Payable page appears with the edited details. Displaying status as pending.
Note: After creation / edit, the tab is in Pending status -- as indicated by the bubbles on the tab heading. To approve, retrieve the record and click on Approve.
Functions: New, Edit, Approve
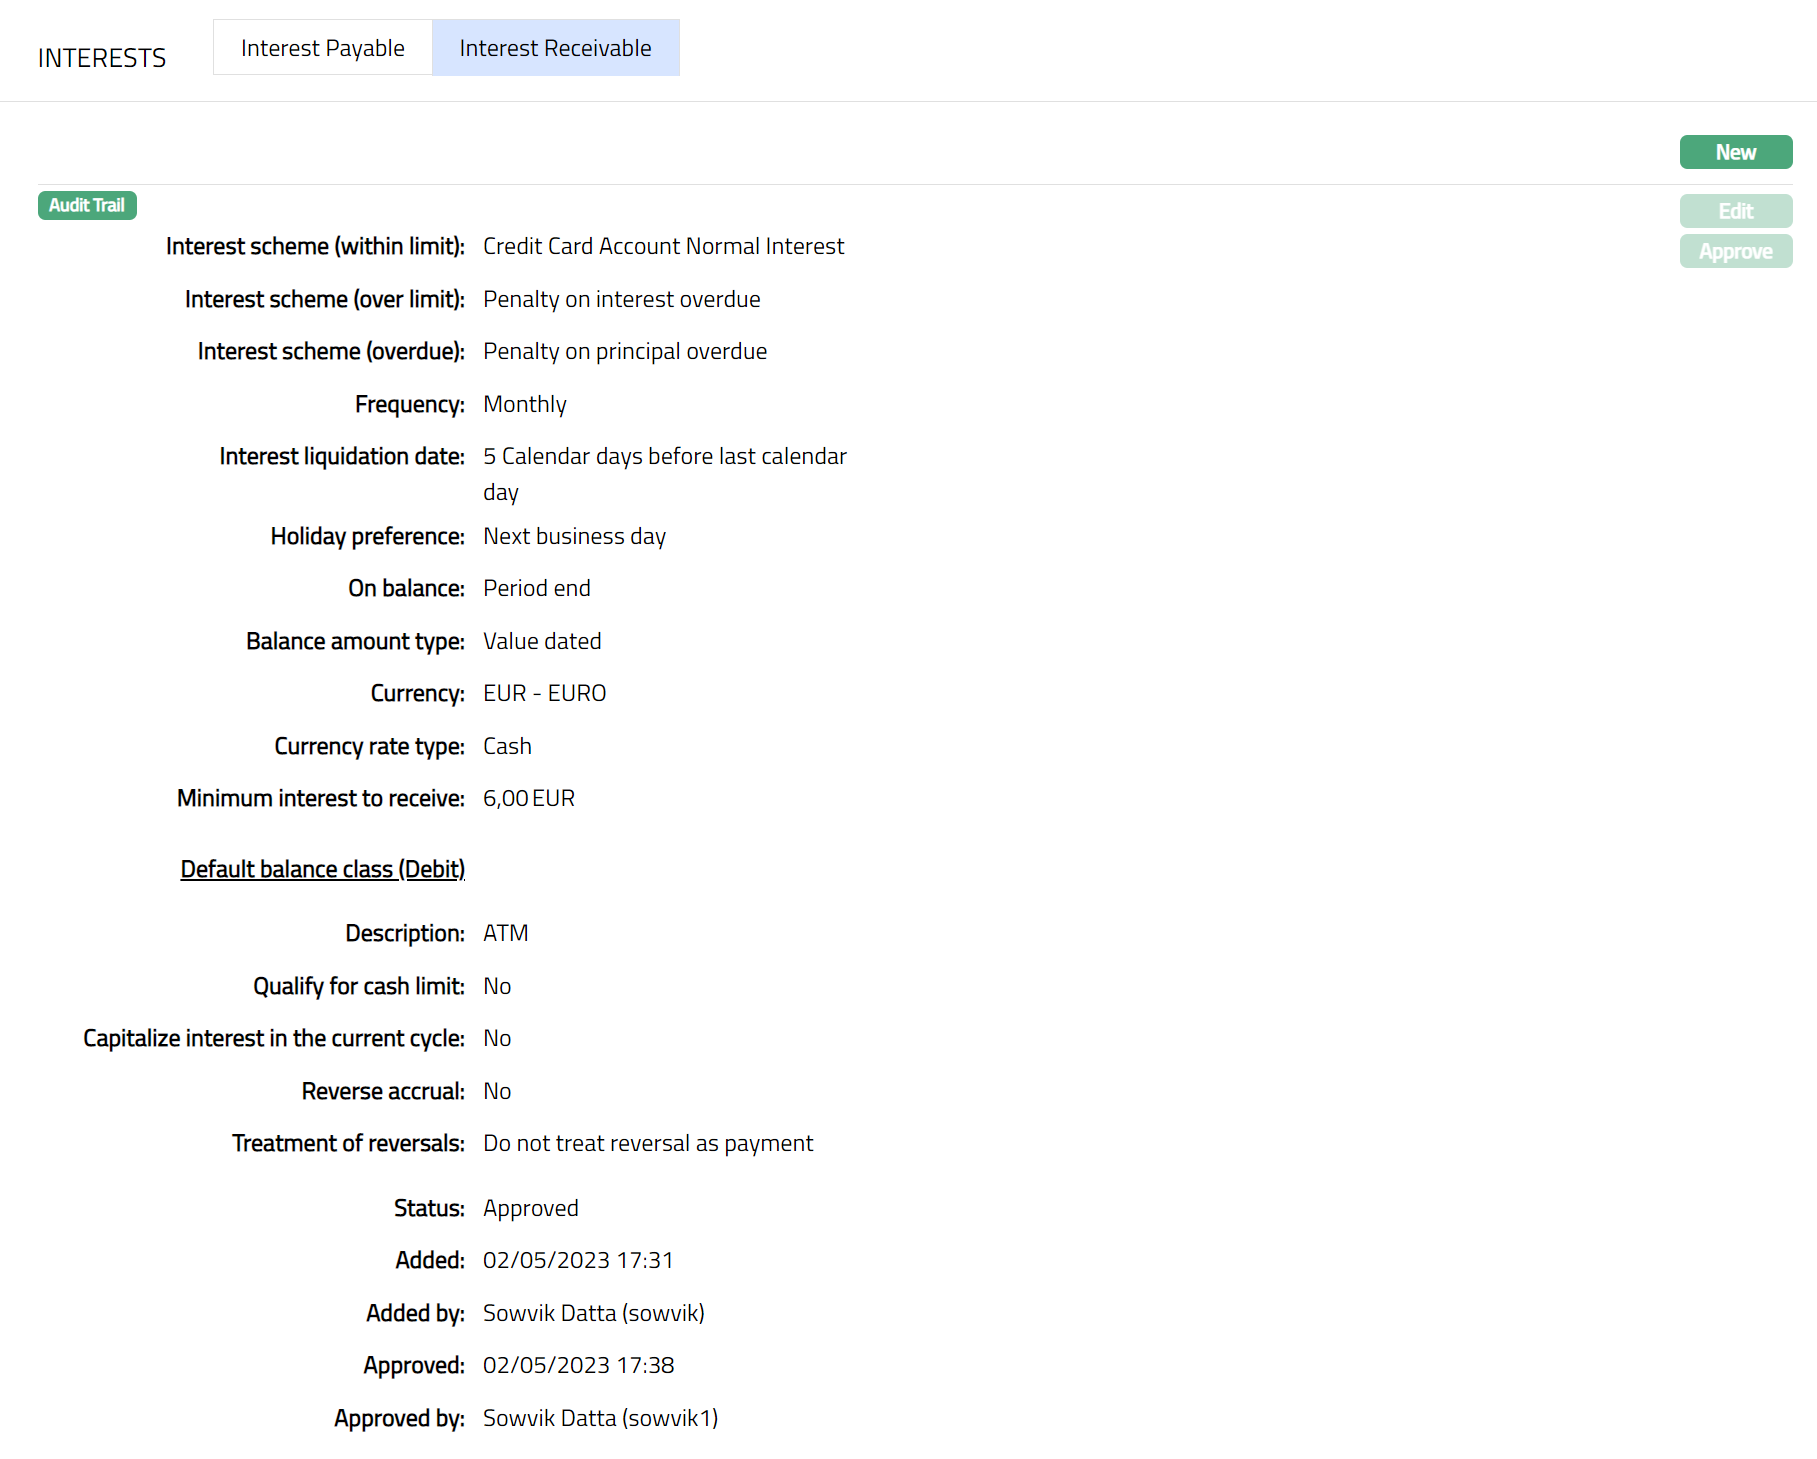
Interest Receivable
This [option](javascript:TextPopup(this)) allows you to create and maintain the interest which can be charged for the account balance under various components like within Approved limit, Overlimit or Overdue. As soon as a new product is created, the status of this tab is Pending -- as indicated by the bubbles on the tab heading. Once this is approved by a different user, the status of the tab becomes Approved, and the bubbles disappear. Only when the tab is in approved status, accounts under the product can be created.
Once the tab is approved, no further changes can be done on the Interest Receivable tab. If you want to change any settings for the Product under the Interest receivable tab, you have to use the New button.
- Access Card Account Product page and click Interests and then Interest Receivable sub tab to view the details as per sample below. The details are defaulted from the entries that you made during Product creation. For details refer to New Card Account Product -- Interest Receivable (4/11).
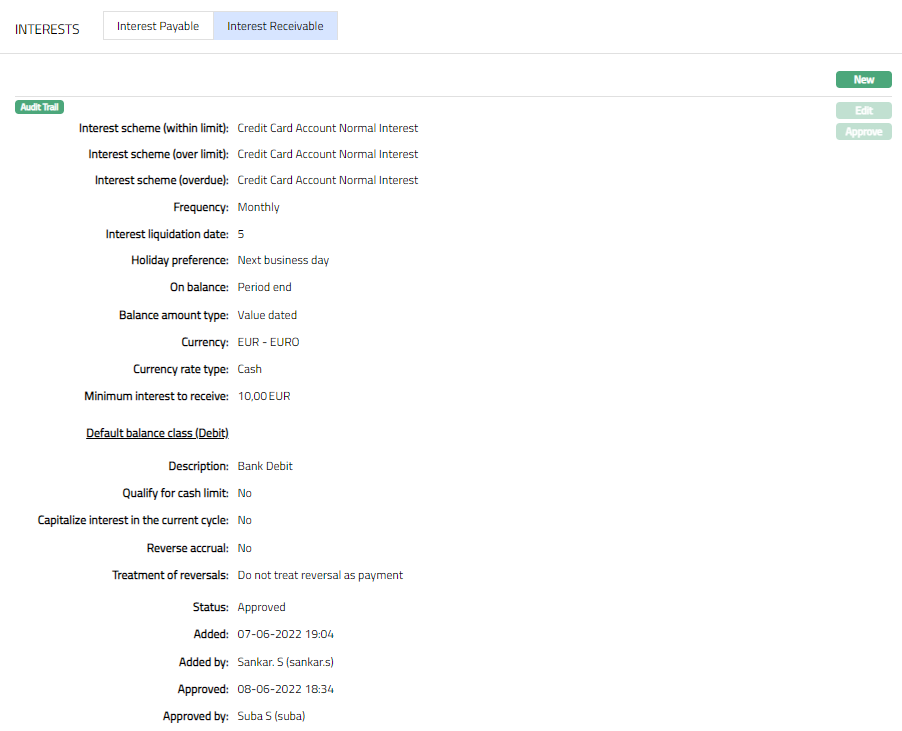
The additional fields that you can view in the Interest Receivable tab are explained below.
Status field denotes the status of the interest receivable tab.
Added field denotes the date on which the interest receivable record was added.
Added by field denotes the name of the person who created the interest receivable record.
Approved field denotes date on which the interest receivable record was approved. This is displayed only if the record is approved.
Approved by field denotes name of the person who approved the interest receivable record. This is displayed only if the record is approved.
- Click New. New Interest Receivable page appears.
Input the new Interest Receivable details. For further details regarding the fields, please refer to the New Card Account Product -- Interest Receivable (4/10) section in Add wizard.
Click Save. Interest Receivable sub tab page under Interest tab appears with the added details.
Functions: New, Edit, Approve
Note: On save, the tab status is Pending -- as indicated by the bubbles on the tab heading, till it is approved by another user. Once approved, the Interest Receivable cannot be edited / deleted. The New Interest Receivable record will replace the old record and will be applied to all accounts under the product.
- Click Edit. Edit Interest receivable page appears.
Note: All fields are editable.
- Click Save. Interest Receivable page appears with the edited details. Displaying status as pending.
Note: After creation / edit, the tab is in Pending status -- as indicated by the bubbles on the tab heading. To approve, retrieve the record and click on Approve.
Functions: New, Edit, Approve
Charge
The Charge tab allows you to view and edit the details of different charges for accounts under the Card Account Product.
- Access Card Account Product page and click the Charge tab to view the details as per sample below. The details are defaulted from the entries that you made during Card Account Product creation. For details refer to New Card Account Product -- Charges (5/11).
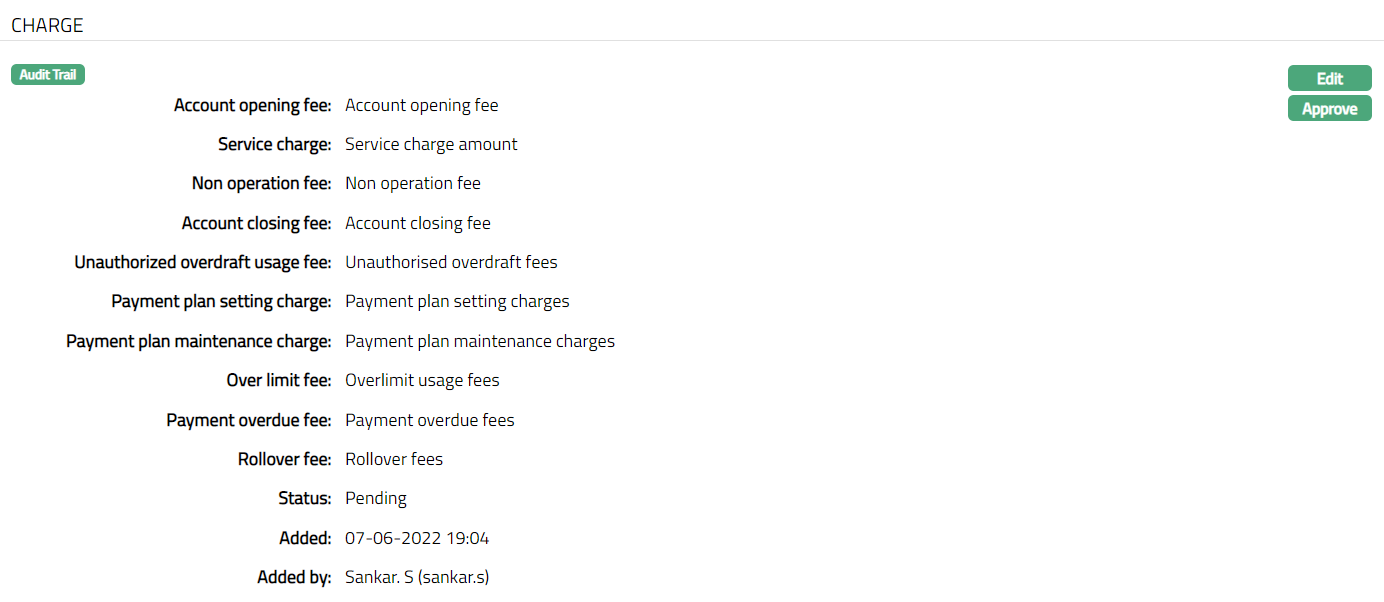
Note: Status will display as pending still the same is approved. Once approved the status will be changed to Approved.
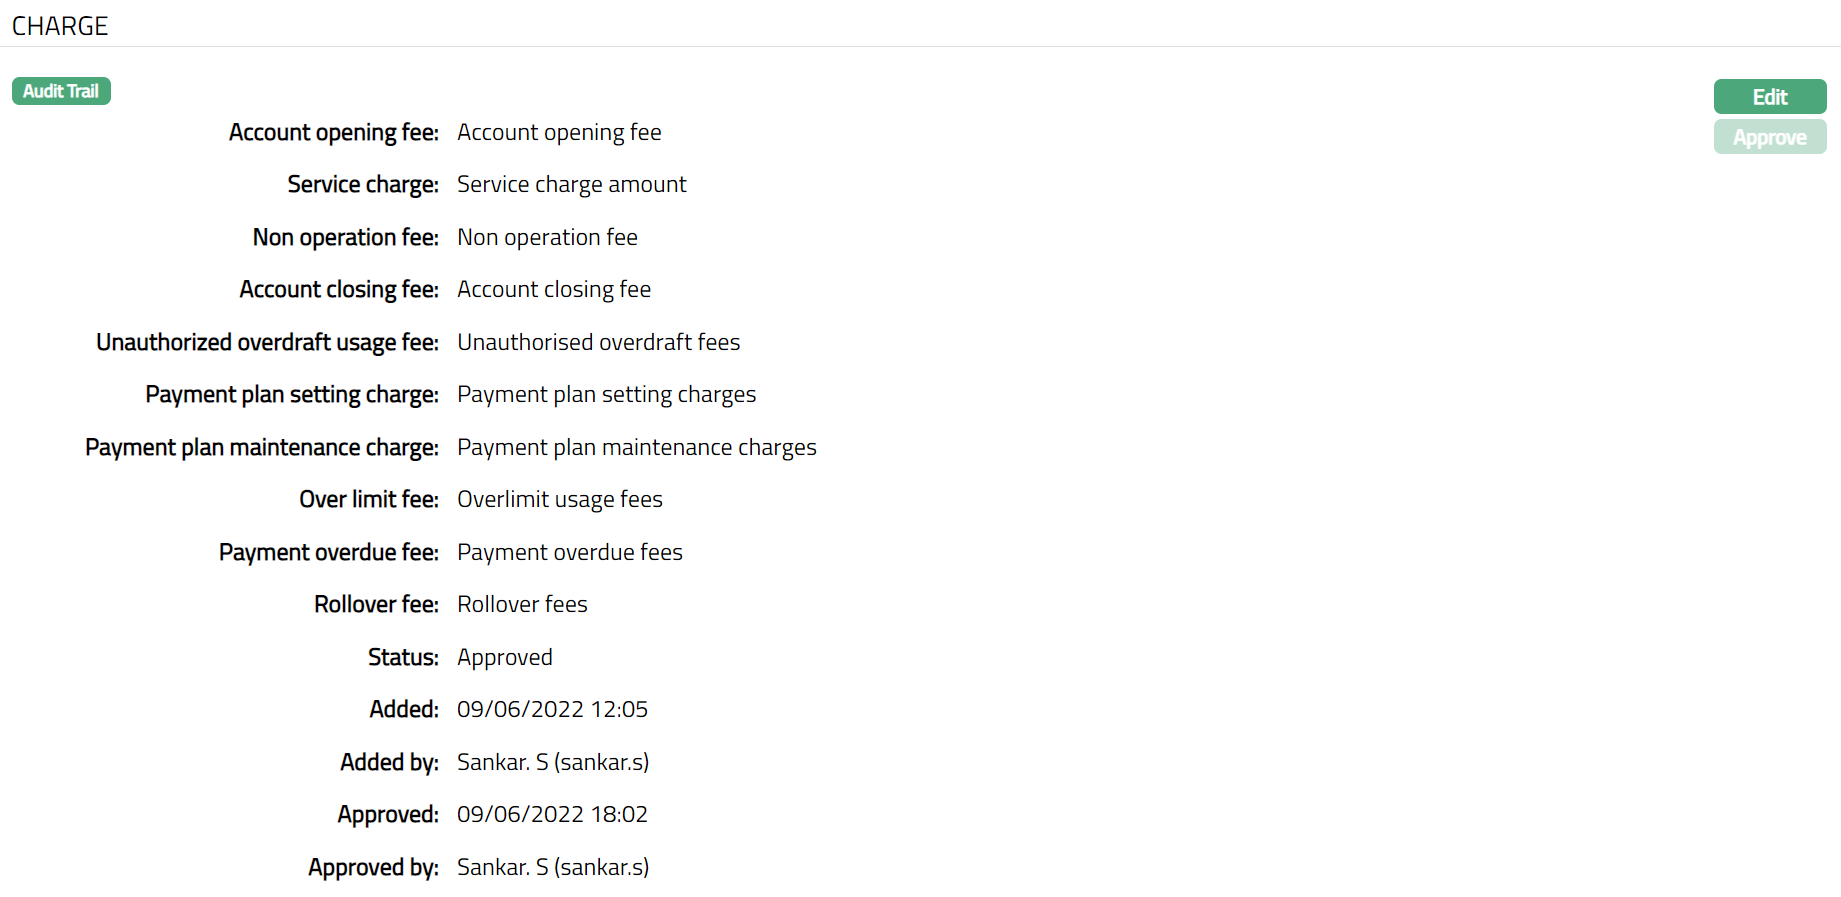
The additional fields available are:
Status field denotes the status of the tab.
Added field denotes the date on which the record was added.
Added by field denotes the name of the user who created the record.
Approved field denotes date on which the record was approved and is displayed only for approved records.
Approved by field denotes name of the user who approved the record and is displayed only for approved records.
- Click Edit. Edit Charge page appears.
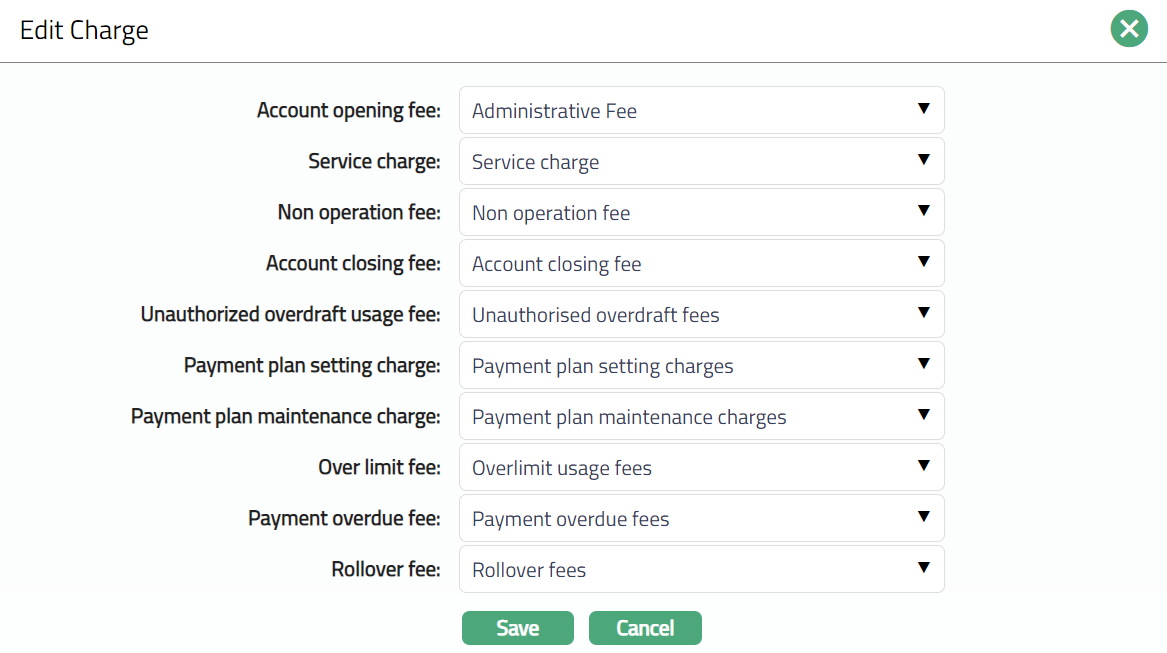
Note: All fields are editable.
- Click Save. Charge page appears with the edited details.

Note: Once charge is added or any changes made, the charge tab will be in the Pending status. On Approval, charges will be applicable on the new Accounts created based on this product.

Functions: Edit, Approve.
Additional Charge
The Additional Charge tab allows you to view and maintain additional charges for the Product -- apart from the ones that are specified under Charges tab.
- Access Card Account Product page. Click the Additional charge tab if any additional charges had already been added, these would be displayed; else, it will be blank.
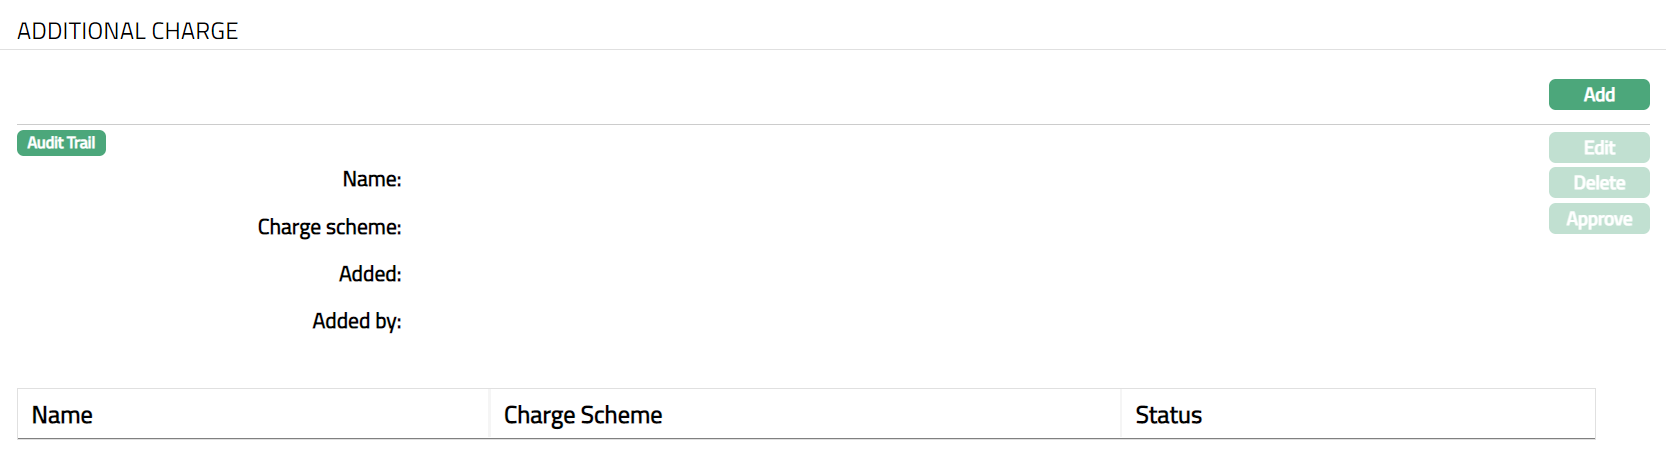
- Click Add. Add Additional Charge page appears.
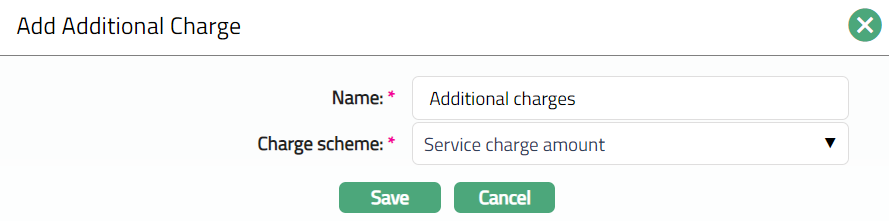
Enter Name of the additional charge to be added.
Select Charge scheme for the Additional Charge from the drop-down list which must be maintained under Admin > Pricing > Charges > Charge Schemes. You can add any Periodic charge -- whether Flat or Banded. If Banded, the Current balance will be taken as the basis for the charge.
Click Save. Additional charge page appears with the added details.
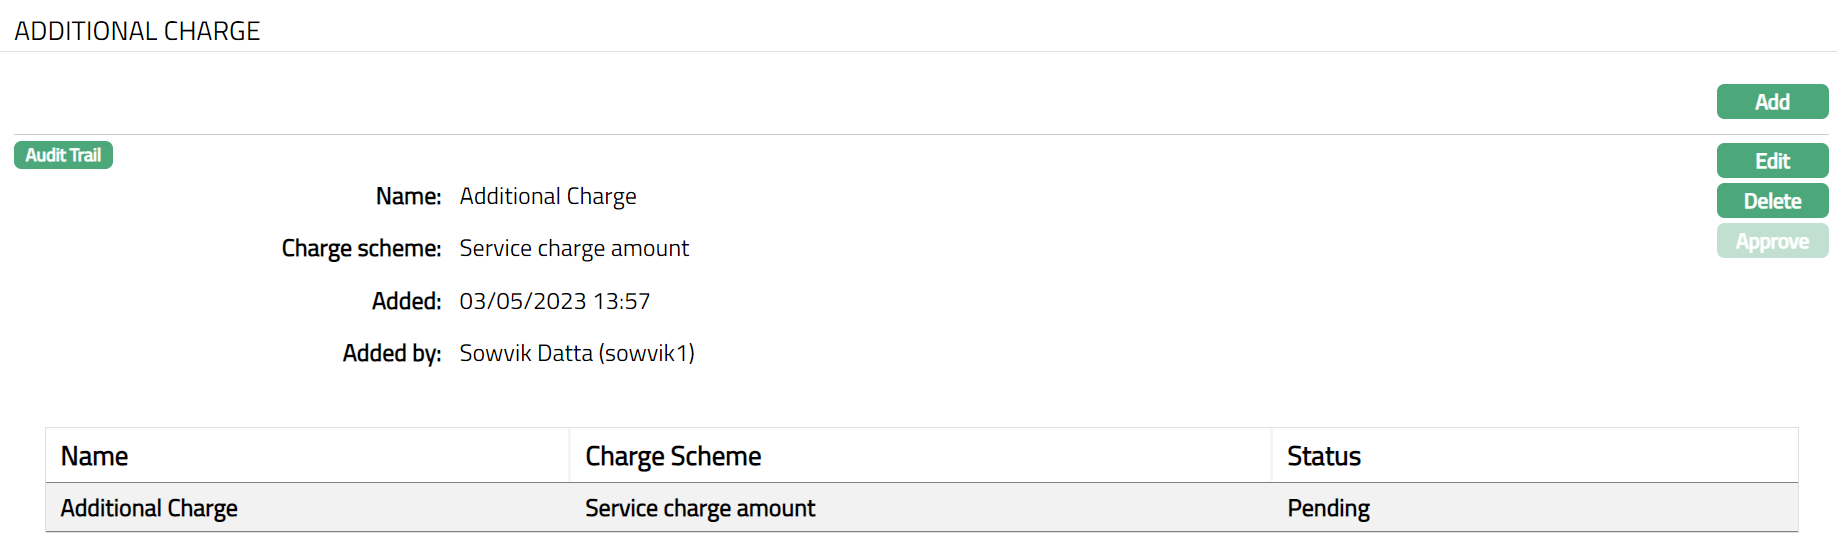 Functions: Add, Edit, Delete, Approve.
- Click Edit. Edit Additional Charge page appears.
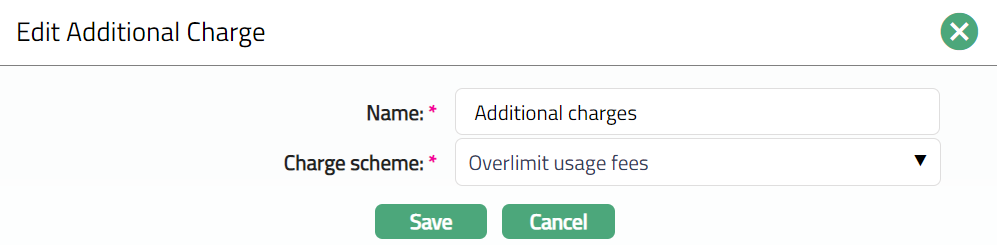
Note: All fields are editable.
- Click Save. Additional Charge page appears with the edited details.
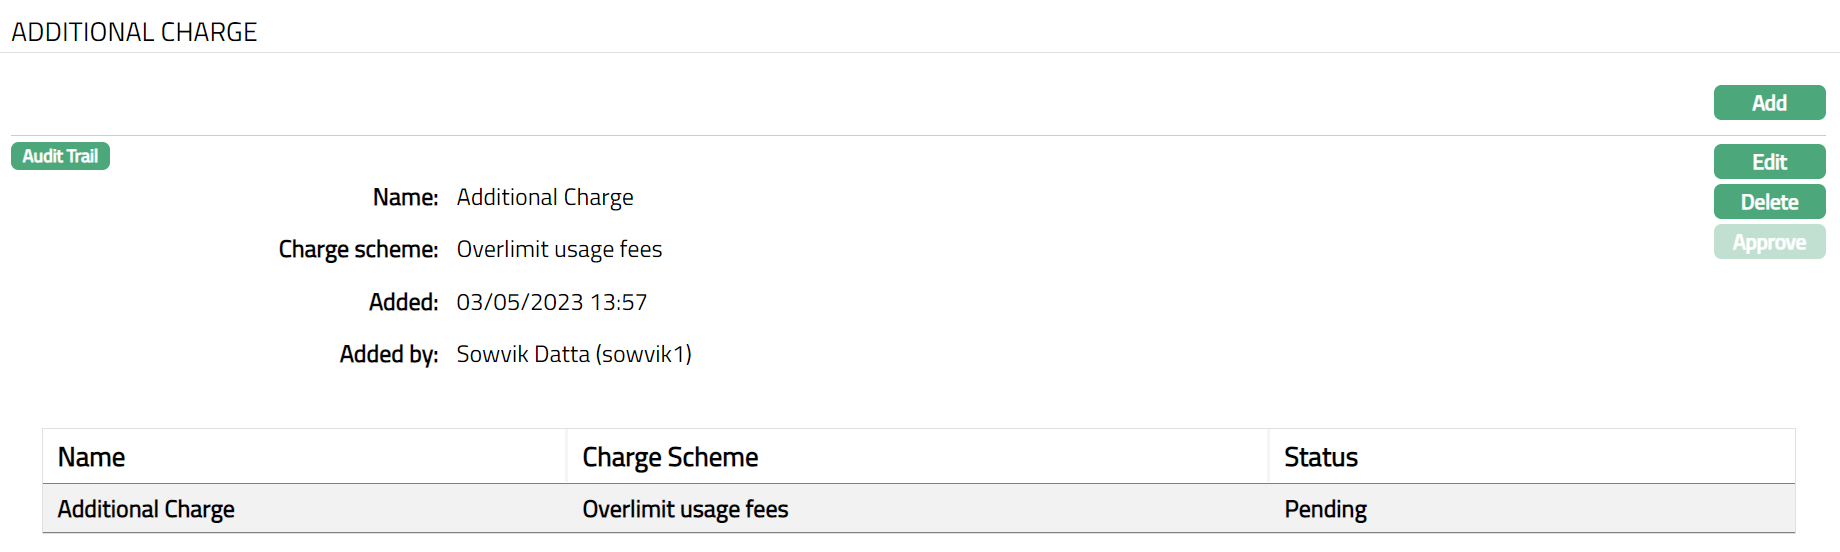
Note: Once the charge is added or any changes made, the charge tab will be in the Pending status. On Approval by another user who has not created the record, the status will change to Approve. Post approval, the charges will be applicable on the new Accounts created based on this product.

Functions: Add, Edit, Delete, Approve.
The additional fields available are:
Added field denotes the date on which the record was added.
Added by field denotes the name of the user who created the record.
Approved field denotes date on which the record was approved and is displayed only for approved records.
Approved by field denotes name of the user who approved the record and is displayed only for approved records.
General Ledger
The General Ledger tab allows you to view and maintain the various GL accounts for the Card Product.
- Access Card Account Product page and click the General Ledger tab to view the details as per sample below. The details are defaulted from the entries that you made during Product creation. For details refer to New Card Account Product -- General Ledger (6/11).
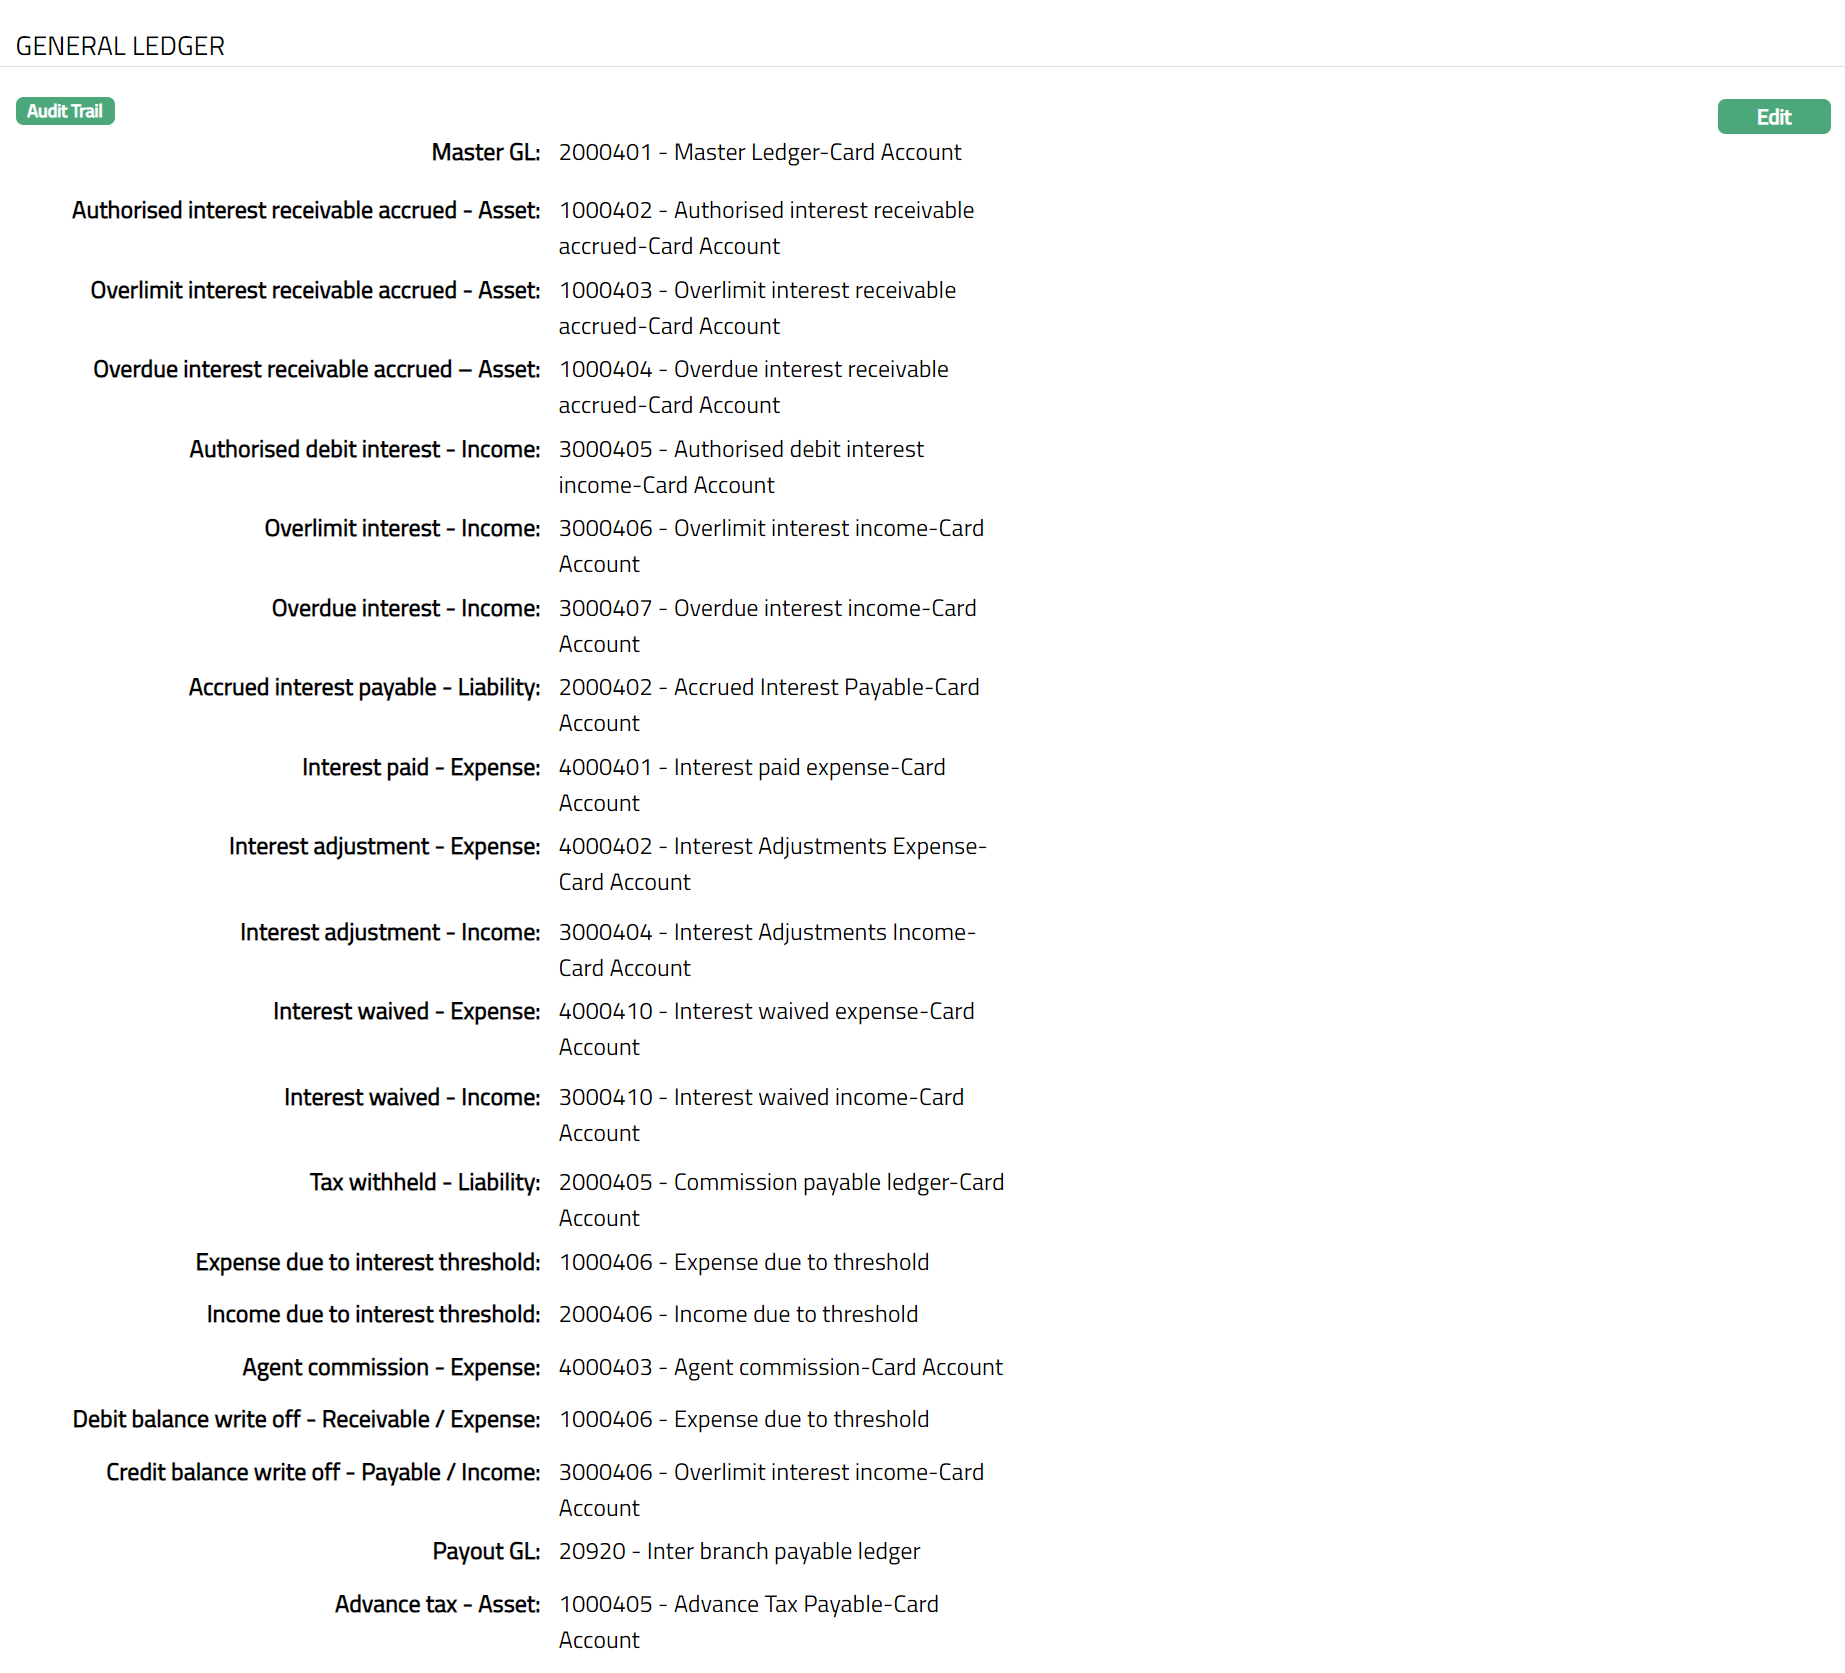
- Click Edit. Edit General Ledger page appears.
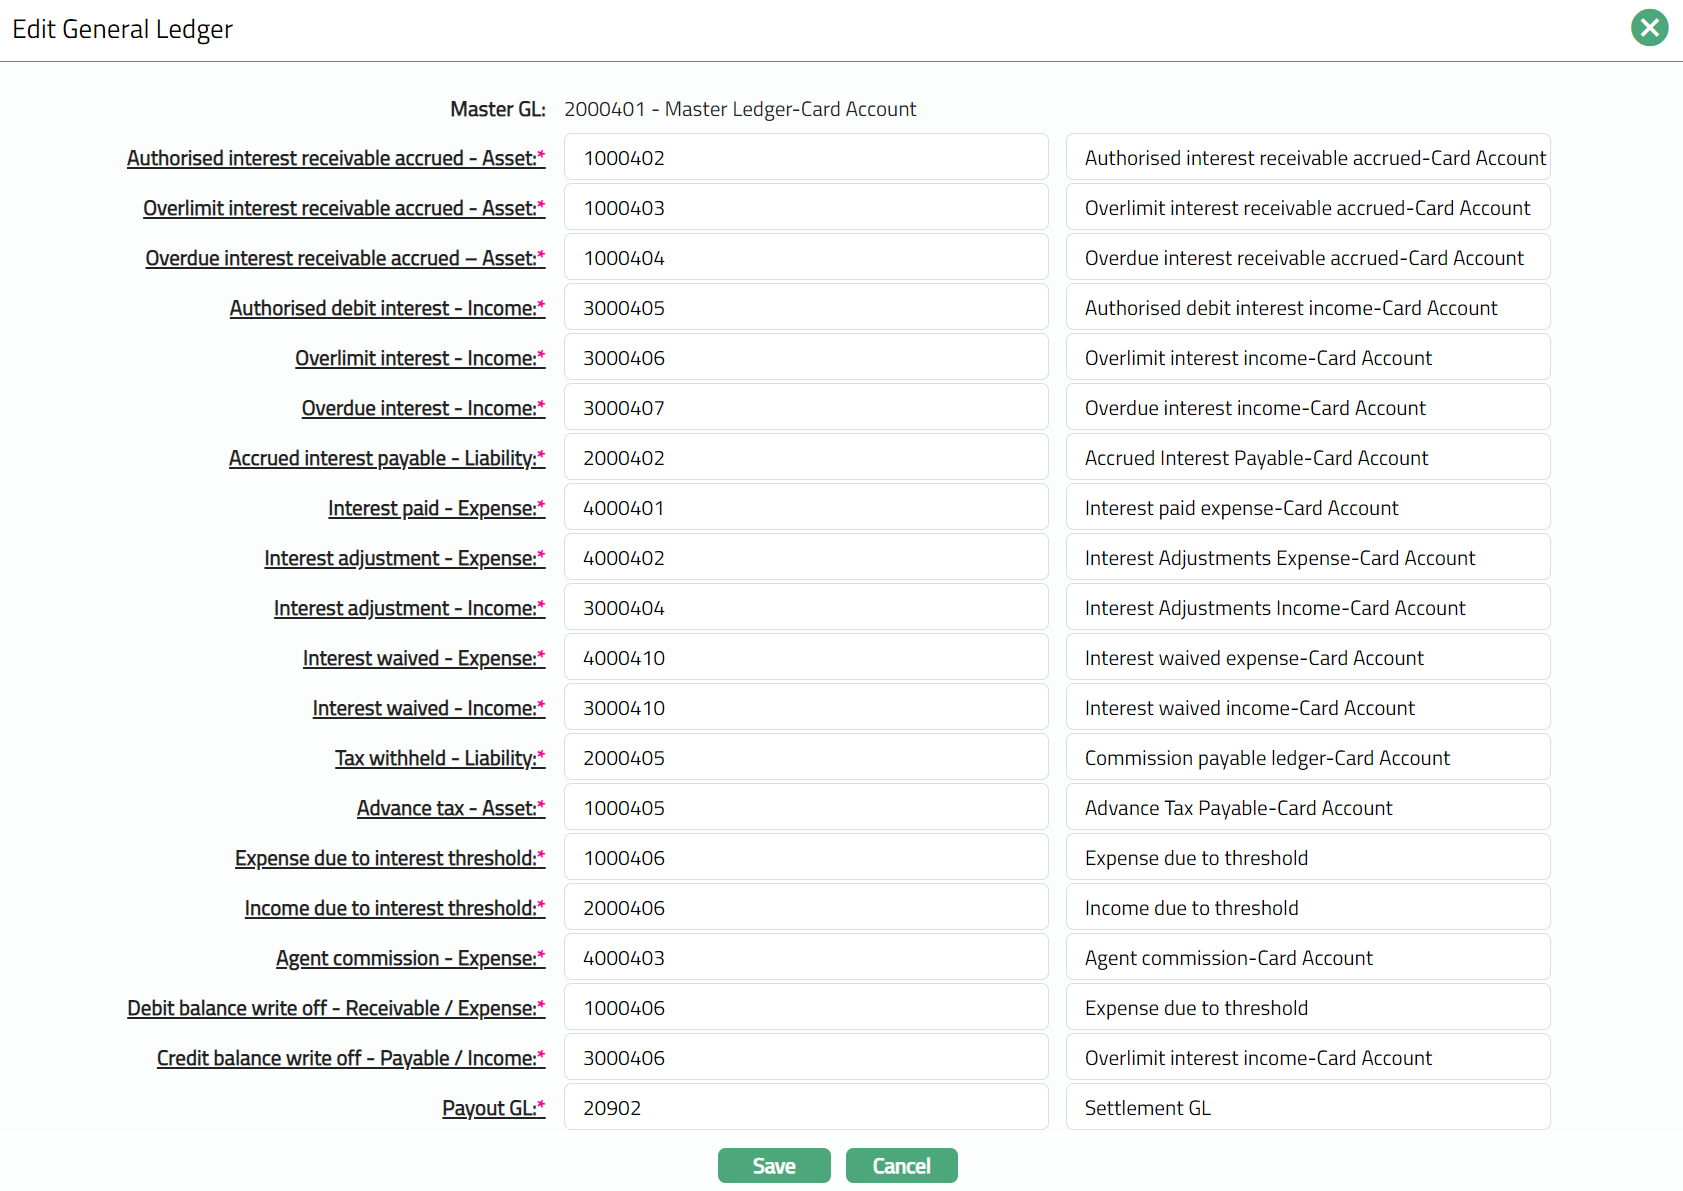
Note: Except Master GL, all other fields are Editable.
- Click Save. General Ledger page appears with the edited details.
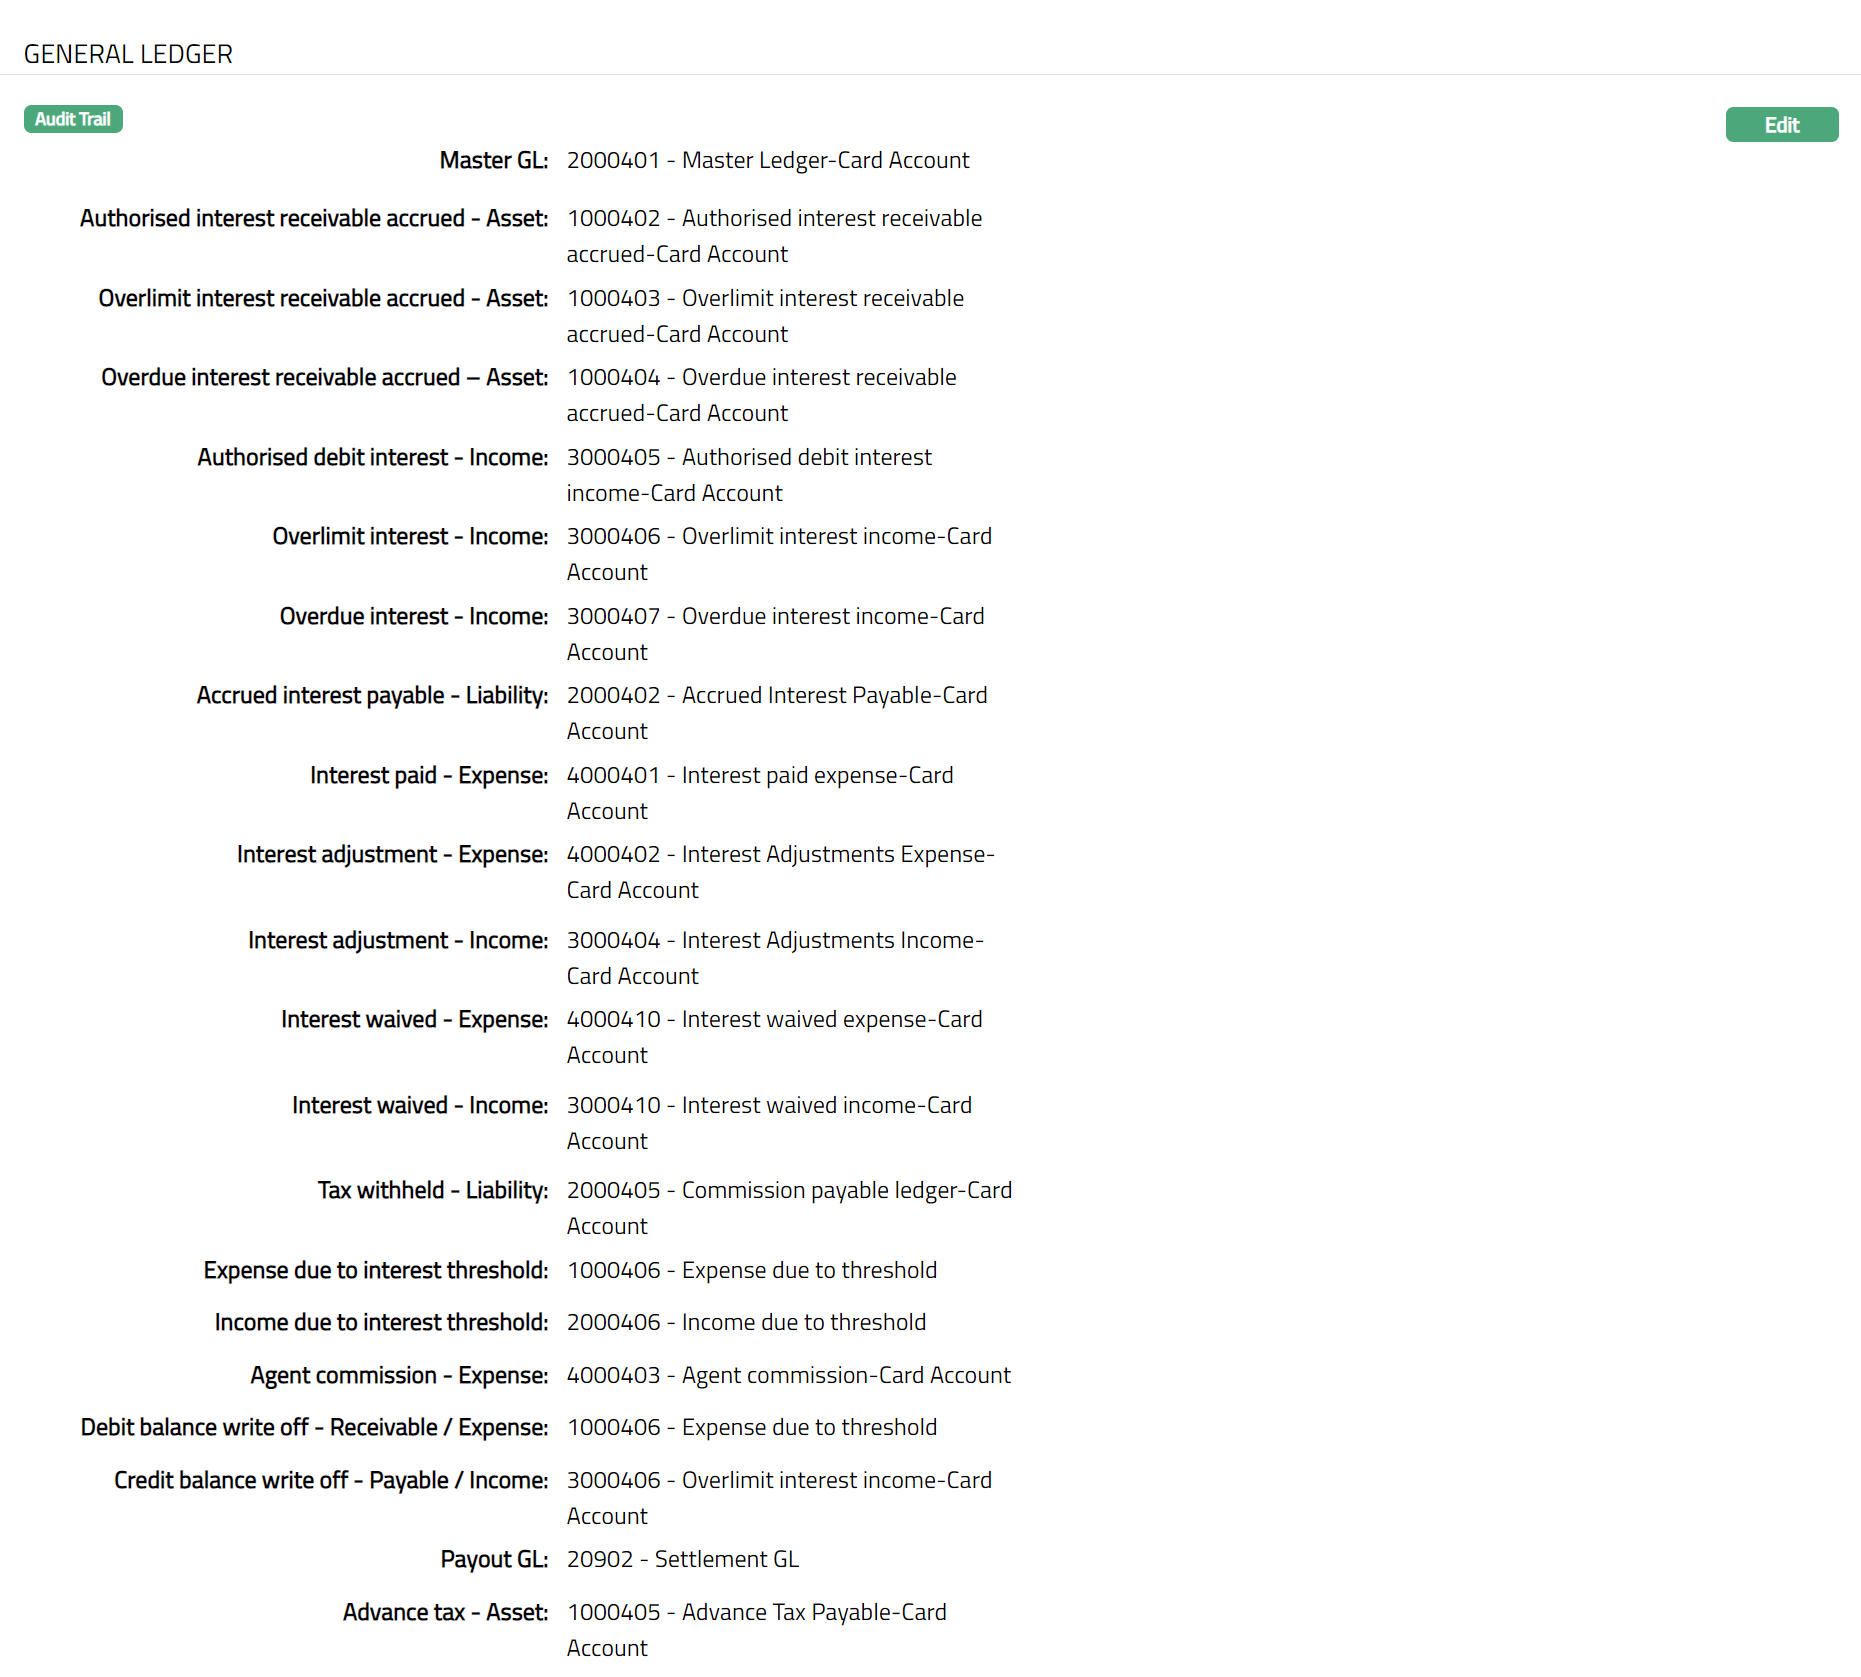
Functions: Edit
Transaction Settings
Transaction settings tab allows you to specify the transaction codes that are to be used for the various events in the life cycle of the Product. These transaction codes define what description / narration is used for the account postings / statements and may also be used to trigger other charges.
- Access Card Account Product page and click the Transaction settings tab to view the details as per sample below. The details are defaulted from the entries that you made during Product creation. For details refer to New Card Product -- Transaction Settings (7/11).

- Click Edit. Edit Transaction settings page appears.

Note: All fields are Editable.
- Click Save. Transaction Settings page appears with the edited details.
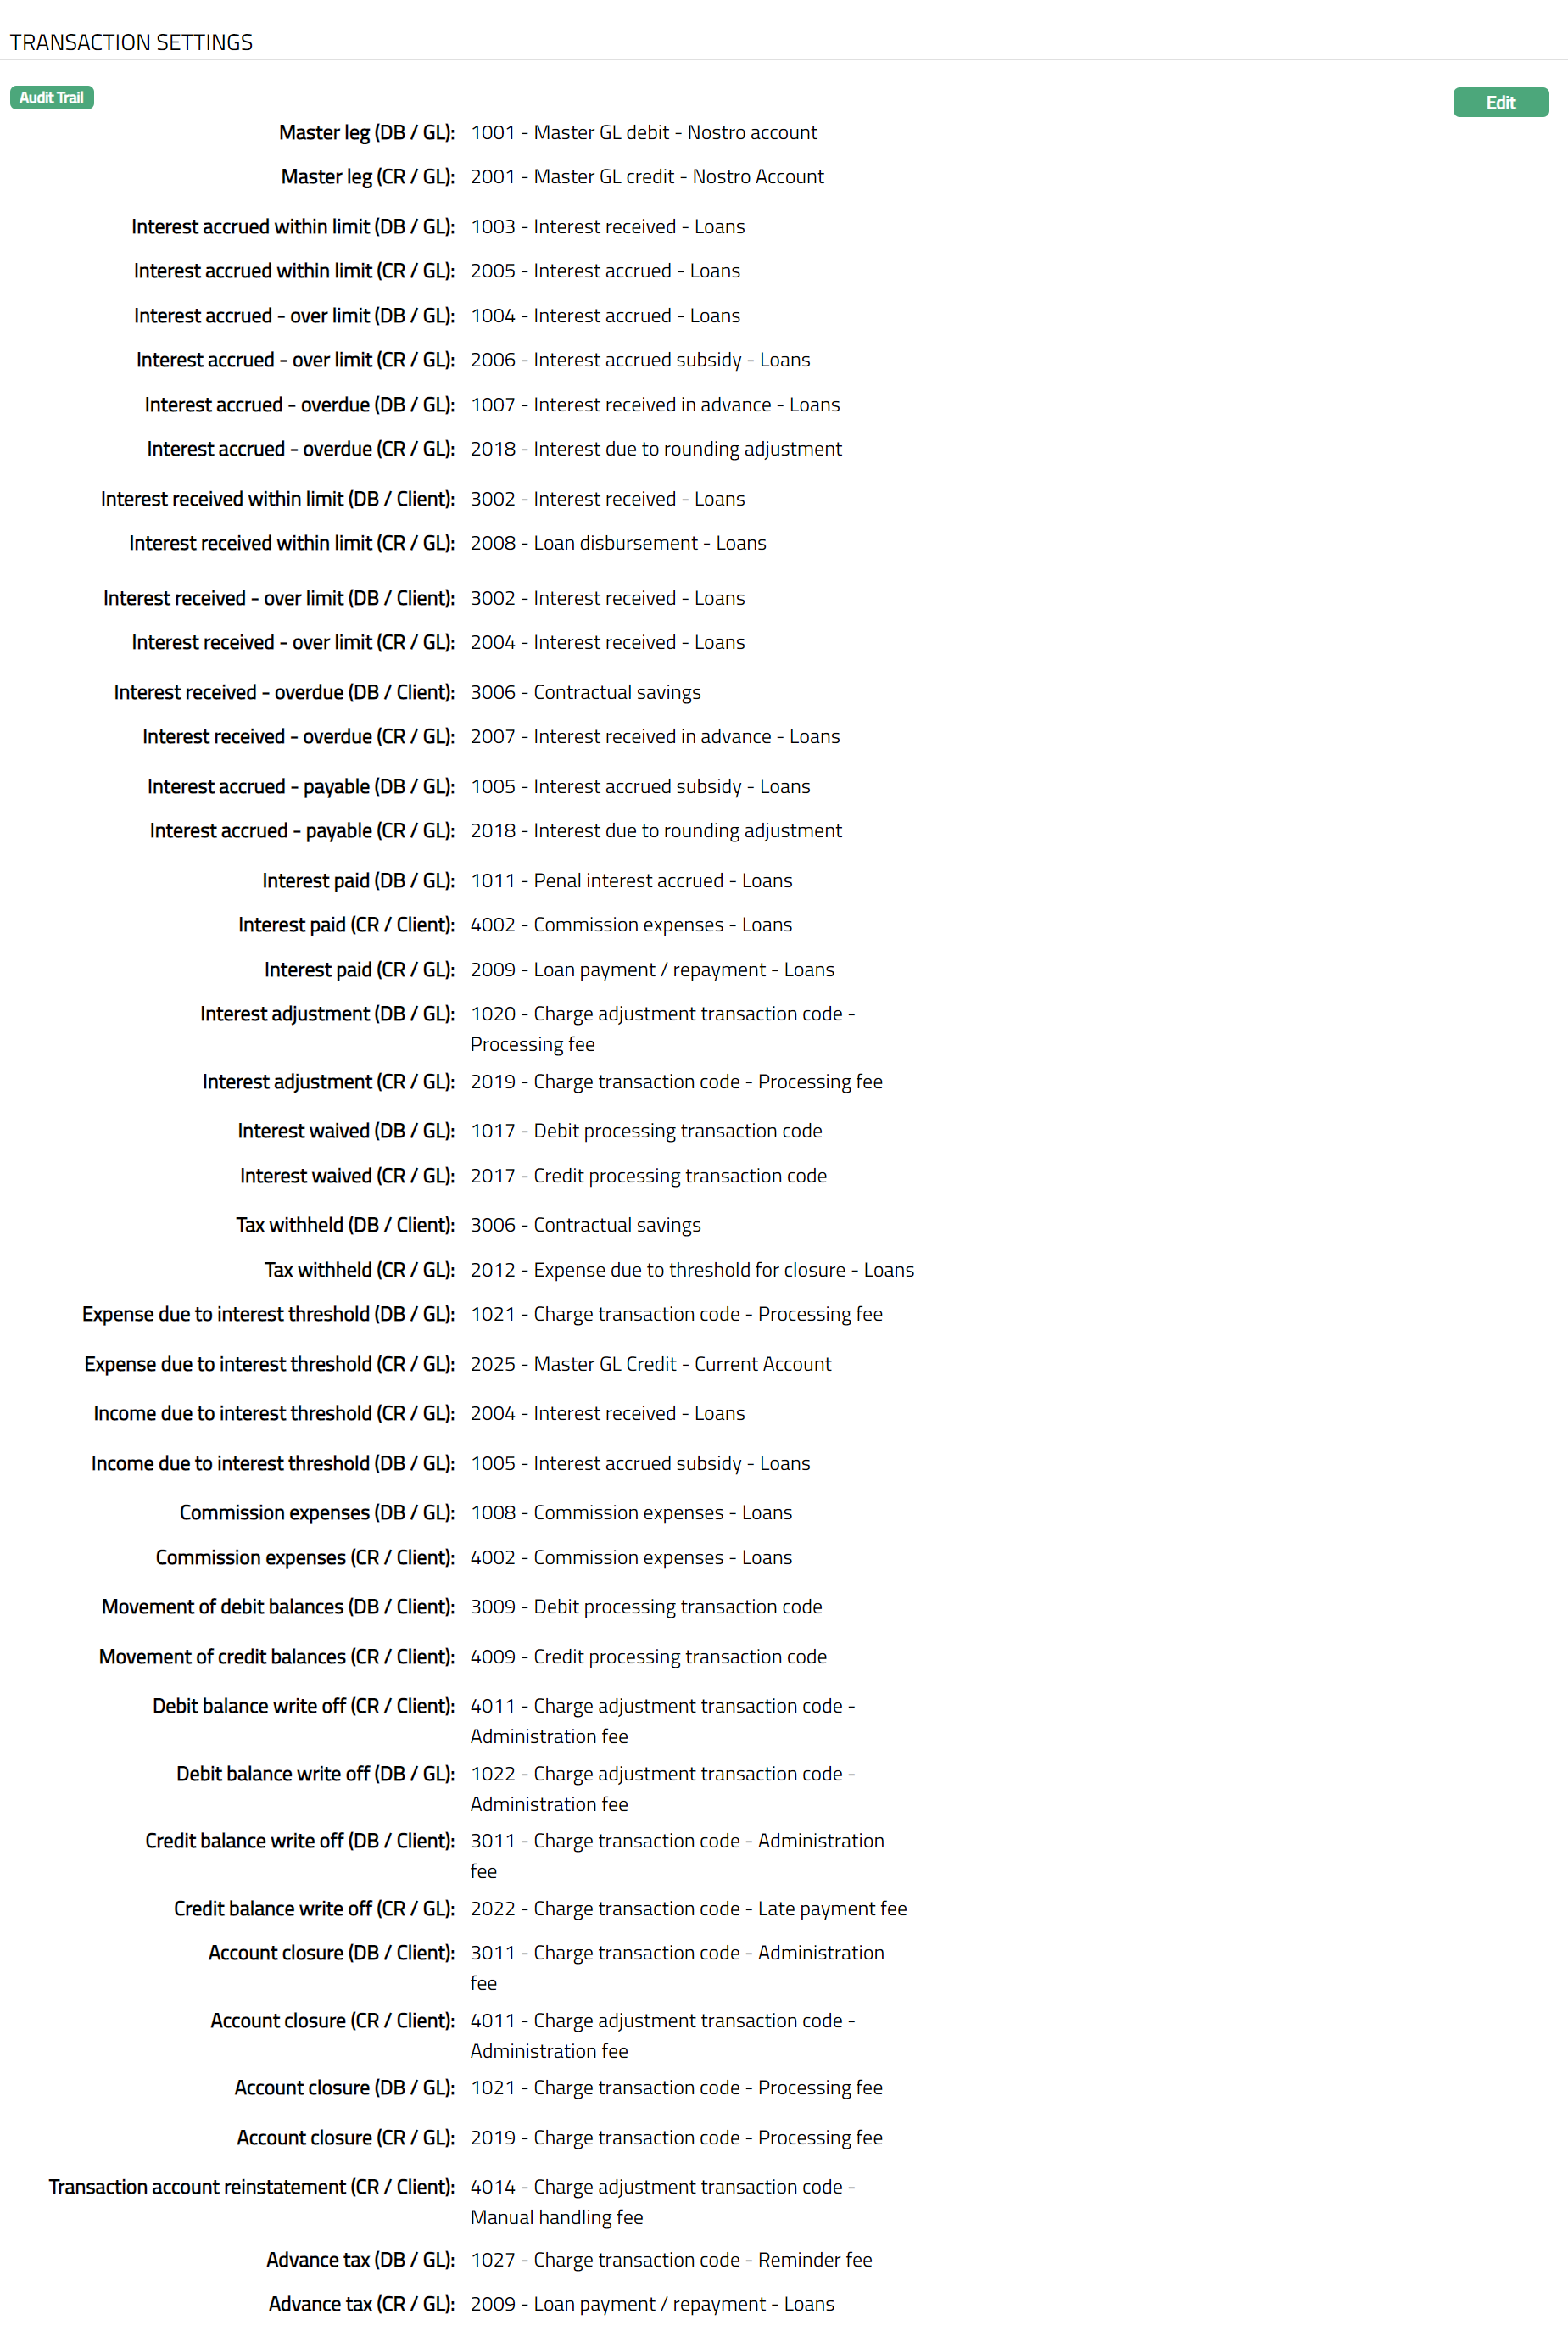
Functions: Edit
Availability
This tab can be used to control the availability of the product to specific Branch, Transaction Code, Offering or Client. It has four sub-tabs.
Availability -- Branch
Using this tab, you can allow the Card Account Product to be available for all the Branches or only specific Branch (es).
To select the branch
- Access Card Account Product page, click Availability tab, and then click Branch sub tab.

The All radio button is selected by default, so that this Product is available for all Branches.
To restrict the branches for which this Product is available, click Selected radio button. Add button is now enabled.

Click Add. Add Branch screen appears where you can select the required branch from the drop down of all active Branches of the Entity.
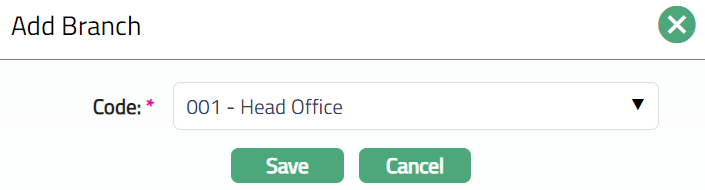
- Click Save. Branch Sub tab appears with the added details. The selected branch(es) will appear in Card Account Product screen.

Function: Add, Delete
Note: You may choose to allow All branches for the product at any time. However, Aura will prompt you to confirm if the selected branches may be deleted. If confirmed, then all the selected branches will be deleted, and the product will be available for ALL Branches.
Availability -- Transaction Code
Using this tab, you can allow the Card Account Product to be available for all the Transaction Codes or only specific Transaction Code(s).
- Access Card Account Product page, click Availability tab, and then click Transaction code sub tab.

The All radio button is selected by default, so that this Product is available for all Transaction Codes.
To restrict the Transaction Codes that are available under this product, click Selected radio button. Add button is now enabled.

- Click Add. Add Transaction Code search page appears. Search for the required Transaction code with relevant criteria and select the required Transaction code.
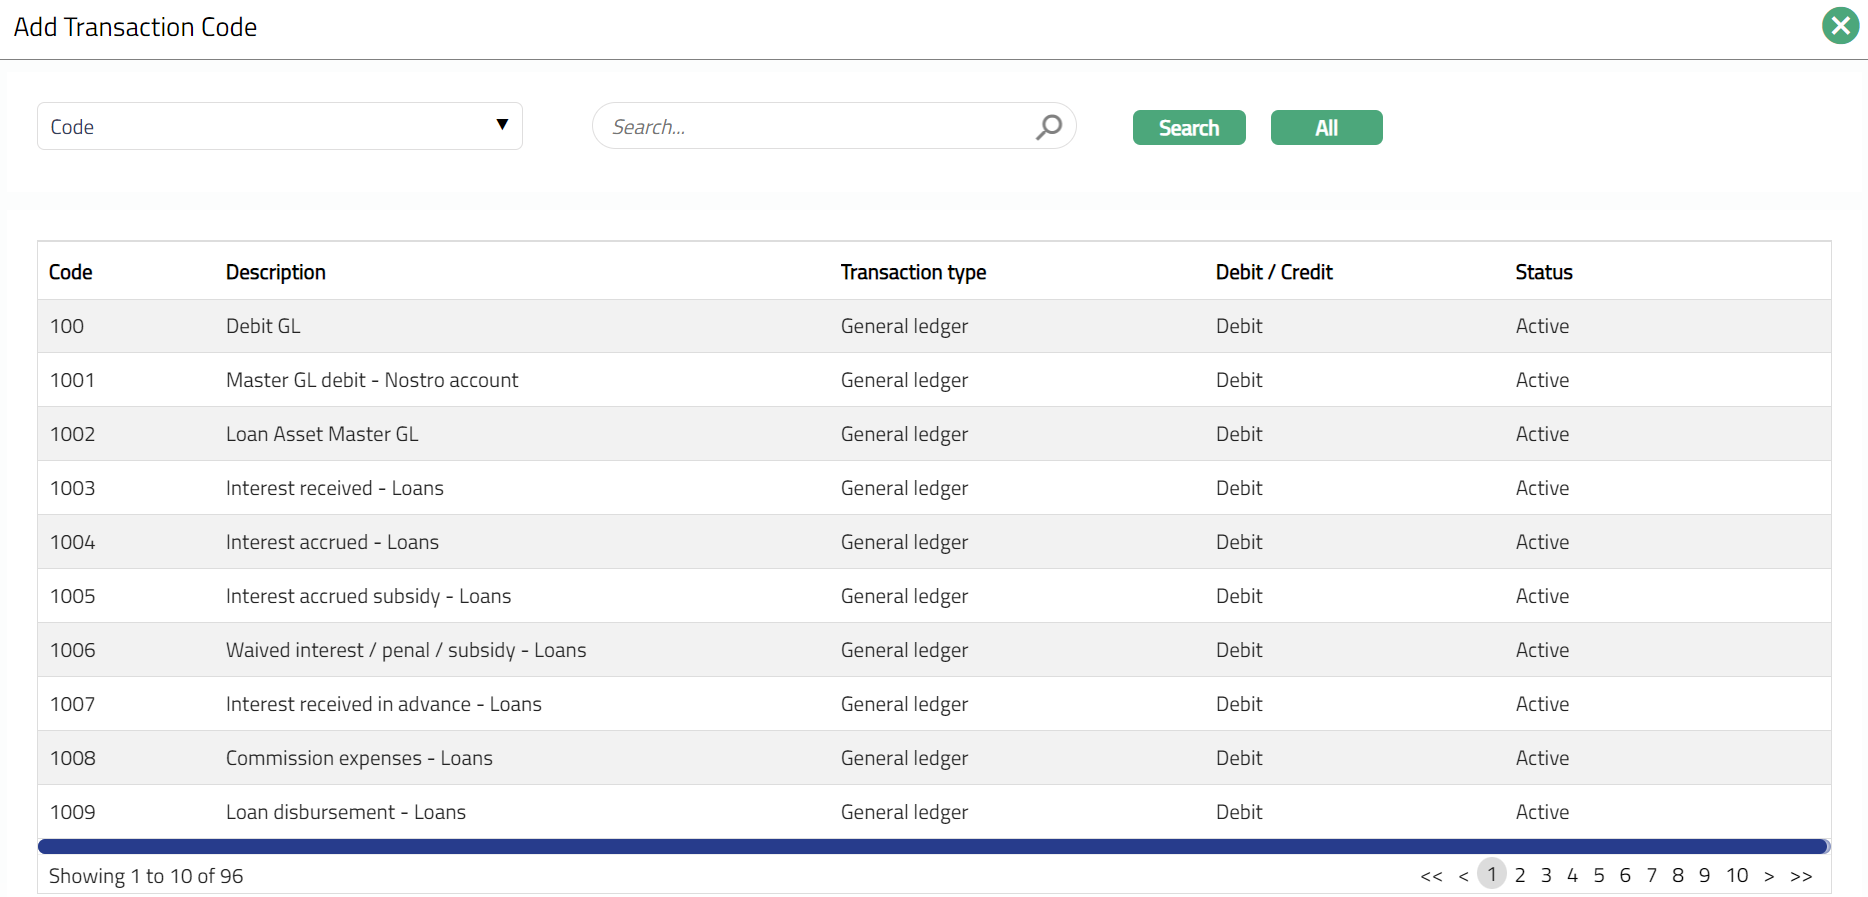
- The selected Transaction Code will appear in Card Account Product screen as shown below.
 Function: Add, Delete
Note: You may choose to allow All Transaction codes for the product at any time. However, Aura will prompt you to confirm if the selected Transaction code may be deleted. If confirmed, then all the selected Transaction codes will be deleted, and the product will be available for ALL Transaction Codes.
Availability -- Offering
Using this tab, you can allow the Card Account Product to be available for all the Offerings or only specific Offering(s).
Access Card Account Product page, click Availability tab, and then click Offering tab.

All radio button is selected by default, so that this Product is available for all Offerings.
To restrict the Offerings that are available under this product, click Selected radio button. Add button is now enabled.

- Click Add. Add Offering screen appears where you can select the required Offering from the drop-down list of active Offerings.
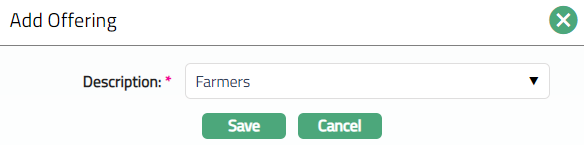
- Click Save. Offering sub tab page appears with the added details. The selected Offering will appear in Card Account Product screen as shown below.
 Function: Add, Delete
Note: You may choose to allow All Offerings for the product at any time. However, Aura will prompt you to confirm if the selected Offering may be deleted. If confirmed, then all the selected Offering will be deleted, and the product will be available for ALL Offerings.
Availability -- Client
Using this tab, you can allow the Card Account Product to be available for all the Clients or only specific Client(s).
Access Card Account Product page, click Availability tab, and then click Client tab.

All radio button is selected by default, so that this Product is available for all Clients.
To restrict the Clients to whom this product is available, click Selected radio button. Add button is now enabled.

- Click Add. Add Client page appears where you can search for the required client with relevant criteria and select the required client.
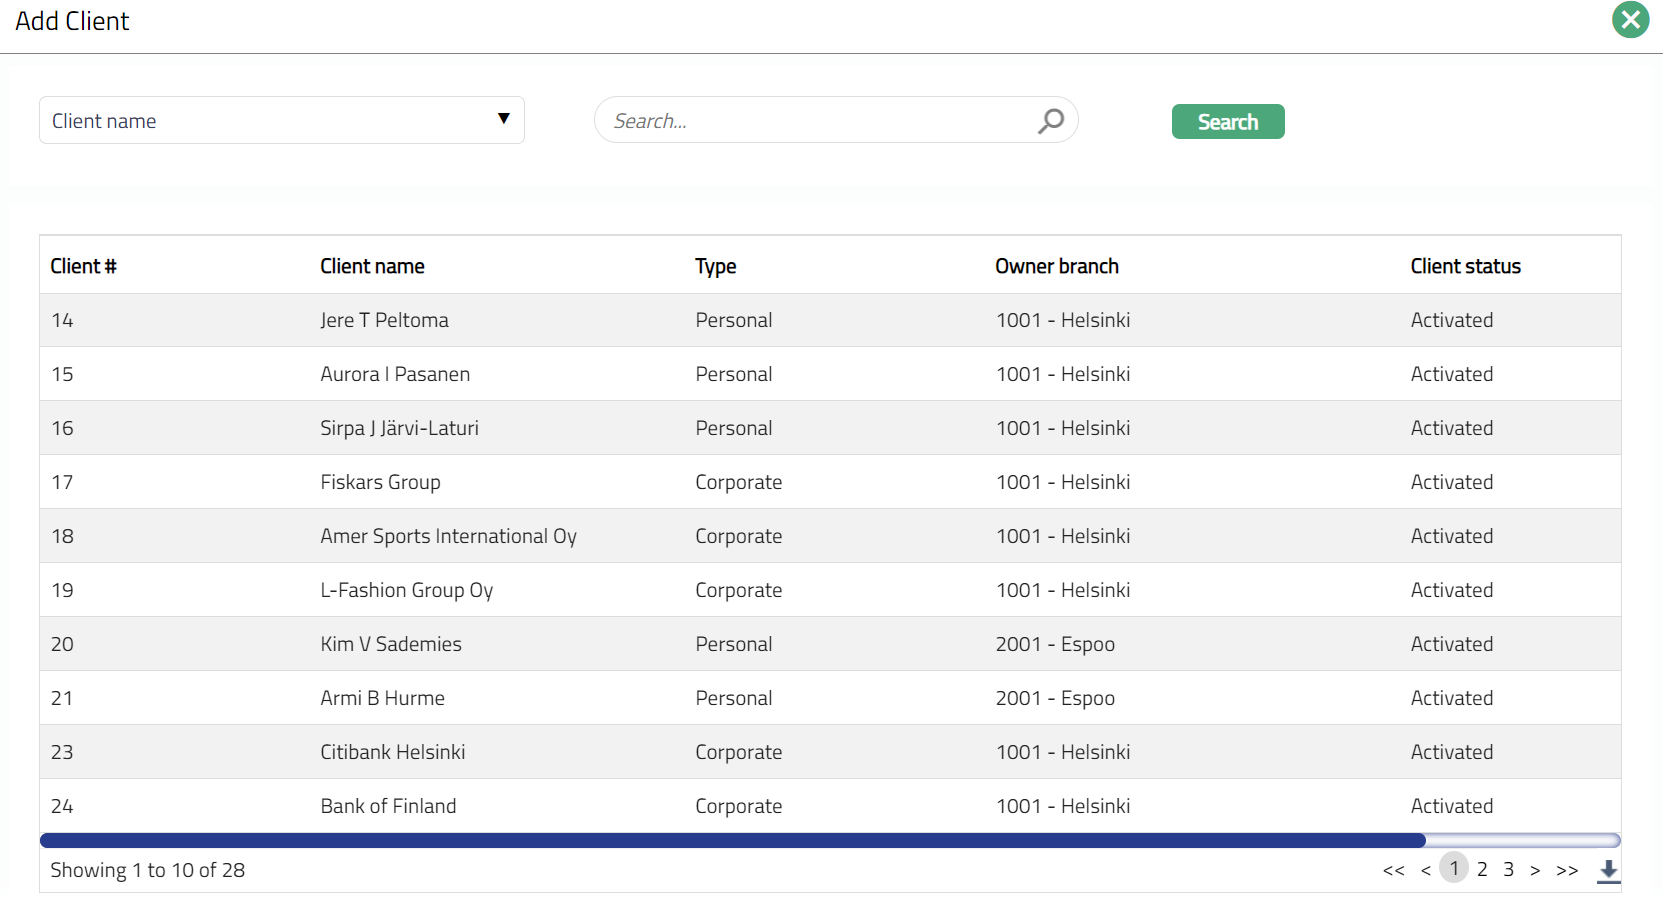
- The selected Client will appear in Card Account Product screen as shown below.
 Function: Add, Delete
Note: You may choose to allow All Clients for the product at any time. However, Aura will prompt you to confirm if the selected Clients may be deleted. If confirmed, then all the selected Clients will be deleted, and the product will be available for ALL Clients.
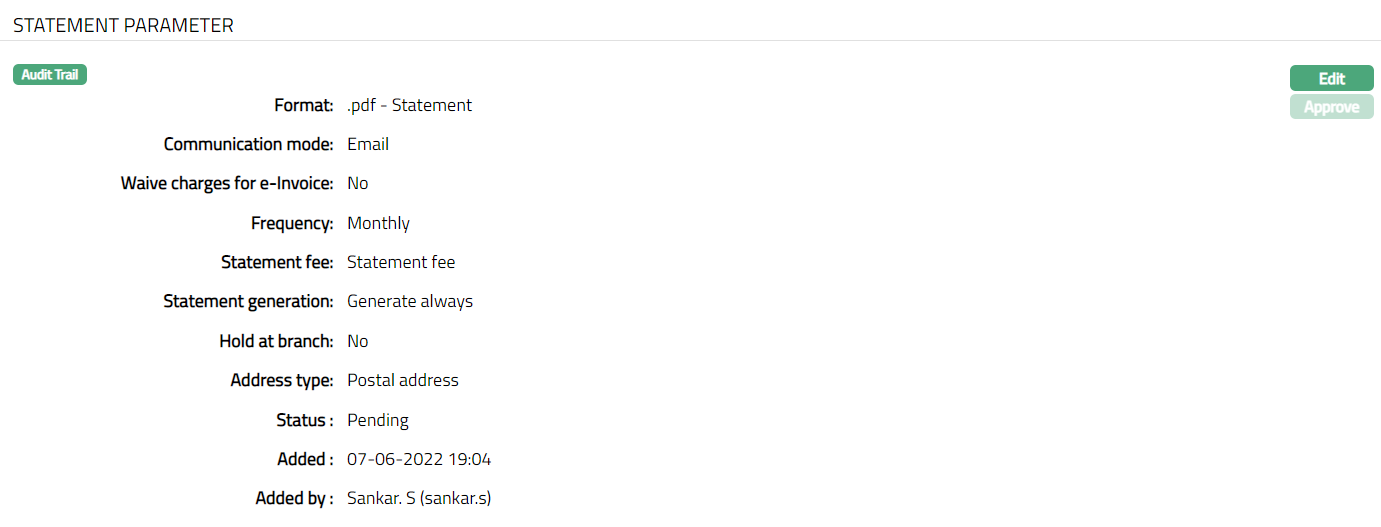
Statement Parameter
Using this tab, you can view and maintain the preferences for generating the statements. This is treated as the Invoice for the accounts created under this Product.
- Access Card Account Product page and click Statement Parameter tab to view the details as per sample below. The details are defaulted from the entries that you made during Product creation. For details refer to the New Card Account Product -- Statement Parameter (8/11)
- Click Edit. Edit Statement parameter page appears.
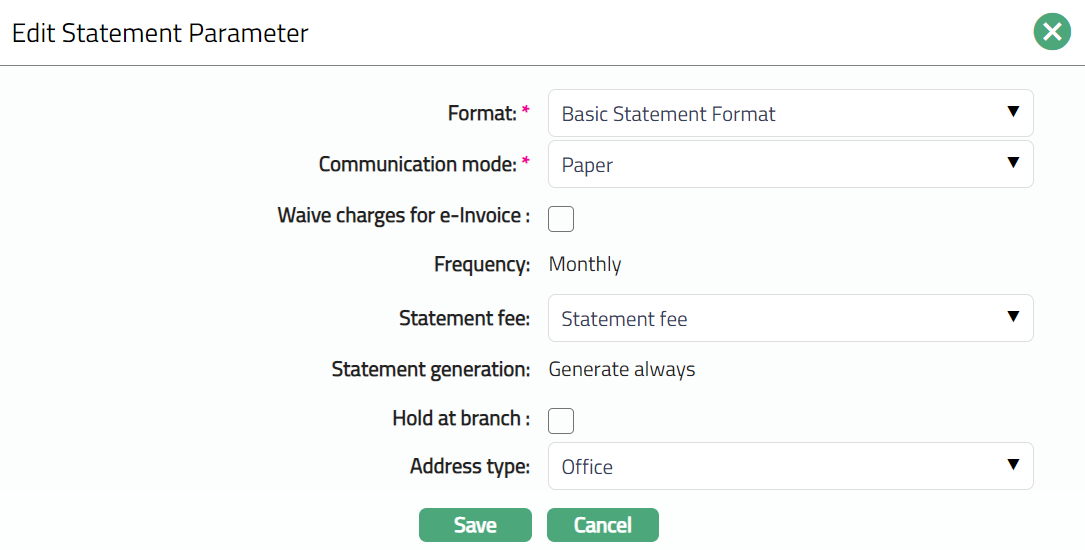
Note: Except Frequency field, all other fields are Editable.
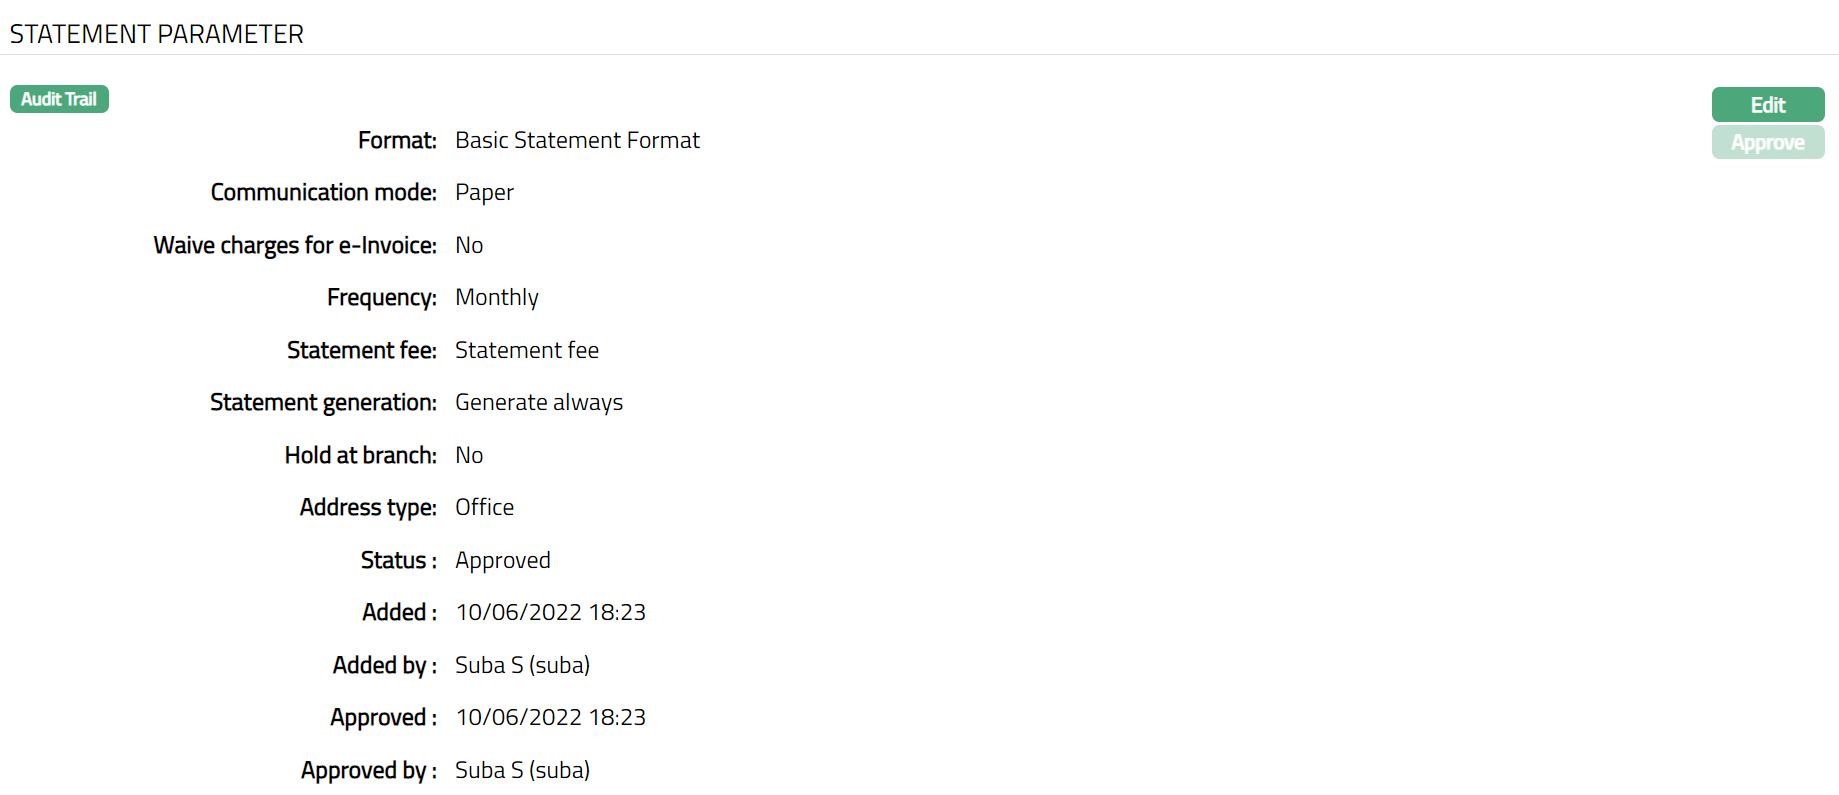
- Click Save. Statement Parameter page appears with the edited details. Note: The status will be displayed as pending, till the same is approved by another user who has not created the record. Once approved the status will change to Approve.
Function: Edit
The additional fields available are:
Added field denotes the date on which the record was added.
Added by field denotes the name of the user who created the record.
Approved field denotes date on which the record was approved and is displayed only for approved records.
Approved by field denotes name of the user who approved the record and is displayed only for approved records.
Sales
Using this tab, you can view and maintain the sales commission for the product.
Access Card Account Product page and click Sales tab.

Click Edit. Edit Sales page appears.

If you want to allow a specific commission for account opening, select the Account opening commission from the drop-down list. Aura will display the Charges where the Charge type is Event, Basis is Flat and Treat as Commission is Yes.
Click Save. Sales page appears with the edited details.
 Function: Edit
Balance Classification
Balance classification allows you to create groups of transaction codes which need differential treatment. This will provide the ability to
Treat balances differently, say, between POS withdrawals and ATM cash withdrawals -- so that cash limits can be tracked. Also, when payment is received, it gives the ability to prioritize, say, ATM withdrawals over POS withdrawals.
Provide differential interest attributes for different balances.
Group transactions for the purpose of display in statements view
There are two sub-tabs, one each for Debit Transaction Codes and Credit Transaction Codes. You can add one or more transaction codes under these sub-tabs, along with the specific interest scheme and other parameters like.
Qualify for Cash limit (Available only for Debits)
Capitalize interest in the current cycle (Available only for Debits)
Reverse accrual on full settlement (Available only for Debits)
Reverse accrual on full settlement only if not rolled over (Available only for Debits).
Liquidate interest for the current period transactions (Available only for debits)
Treat as Payment (Available only for Credits)
Interest on interest schemes (Available only for Debits)
During transaction processing, the transaction will be added to the respective balance class depending on the transaction code. If the specific transaction code is not maintained under a specific balance class, it will be added to a default balance class. The interest parameters of the default balance class will be those that are maintained at the Product -- Interest Receivable / Interest Payable tabs.
Note that the default balance classes do not have the other parameters listed above. Hence, if you want to apply any of the parameters to any transaction code, these have to be added to the required balance class.
Balance Classification sub-tabs are:
Balance Classification -- Credit
To add Credit Balance Class group
Access Card Account Product page and click the Balance Classification tab and then Credit sub tab.

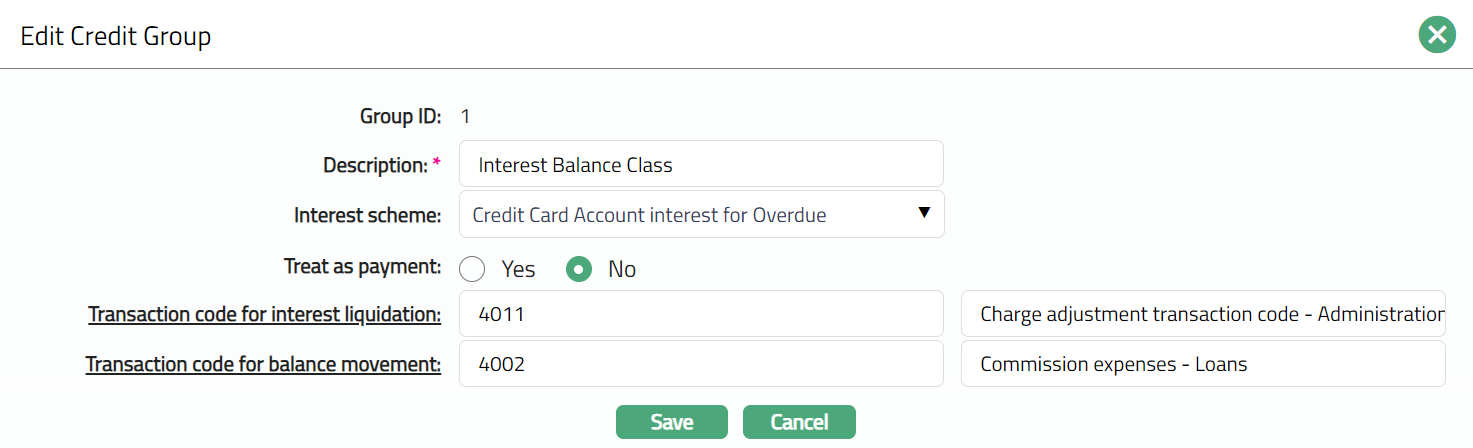
Click Add. Add Credit Group page appears.
Enter Description of the Credit Group.
Select Interest scheme for the credit group from the drop down of active Interest schemes maintained under Admin > System Codes > Interest > Interest Scheme.
If Treat as payment is selected as Yes, then the transaction code attached to the credit group will be considered as payment; else it won't be considered as Payment. By default, treat as payment is selected as No.
Click Transaction Code for interest liquidation hyperlink. Aura displays the list of all the active Client Credit transaction codes. This will be used for the liquidation of the interest on this balance class. In case of the Default balance class, the interest liquidation will be done using the transaction code selected at the Product level.

Select transaction code from the Transaction code search page.
Click Save. Credit sub tab page appears with the added details along with a unique group id which identifies that group.

Functions: Add, Edit, Transaction Codes
To add / view Transaction Codes that should belong to a Balance class group.
- Access required Balance class group and click Transaction Code.
- Click Add. Add Transaction Code page appears.

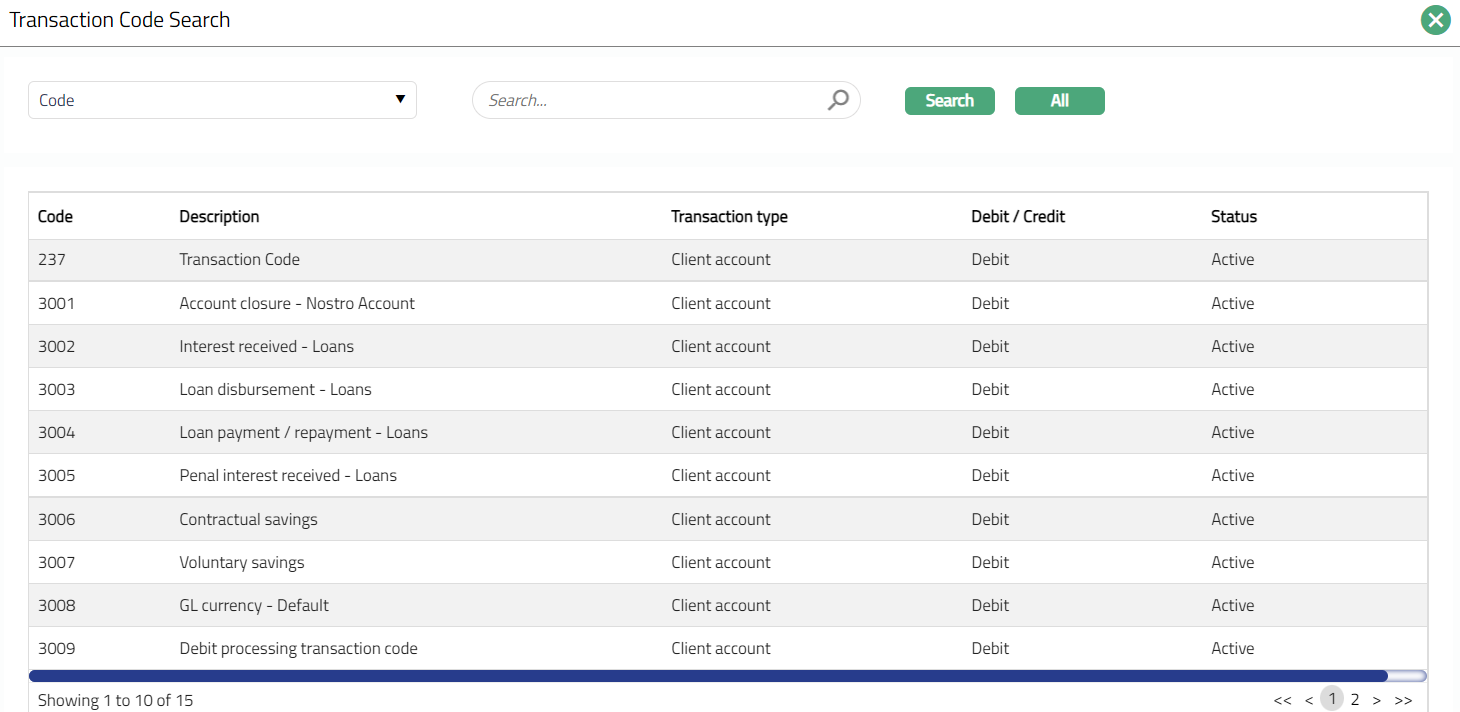
- Click the hyperlink for Transaction Code. The Transaction Code Search page appears with the list of Client Account Credit Transaction codes, apart from the ones that have already been mapped to the Product. Select the required transaction code from the list. You can also input the transaction code directly.
- Select Transaction code from the Transaction code search page. The selected code will be populated in the Add transaction code page.

- Click Save to see the added transaction code.
Functions: Add, Delete, Finish
- Click Finish. Credit sub tab page under Balance Classification tab appears with the added details.

Functions: Add, Edit, Transaction Code.
To Edit Credit
- Select the required record from the list of added record and click Edit. Edit Credit Group page appears.
Note: Except Group ID field, rest all other fields are editable.
- Click Save. Credit sub tab appears with the edited details.
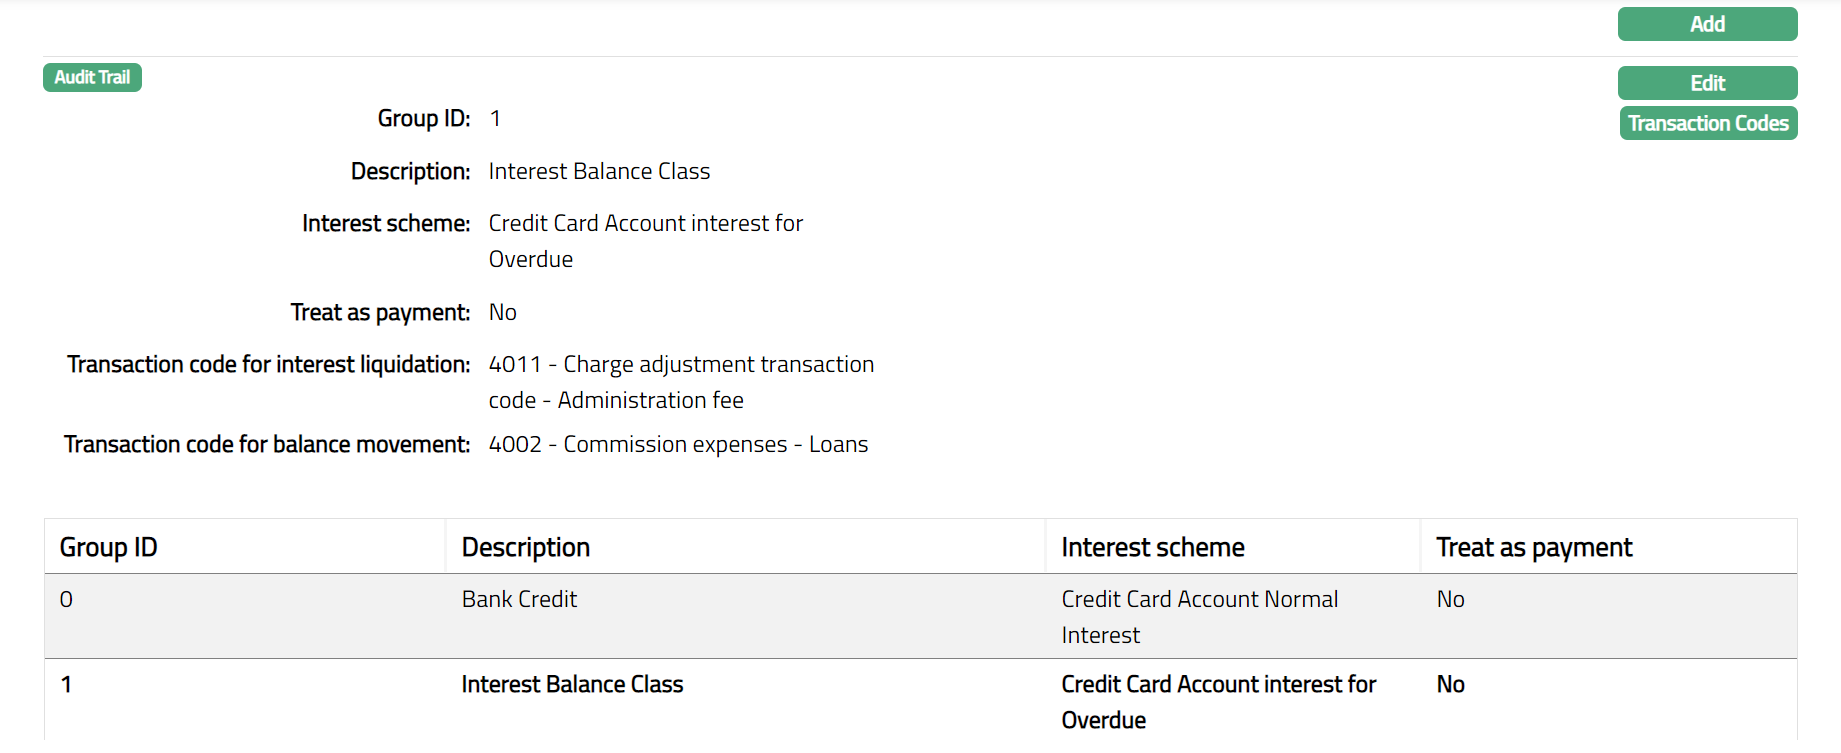
Functions: Add, Edit, Transaction Code.
Balance Classification -- Debit
To add Debit Balance Class group
Access Card Account Product page and click Balance Classification tab and then Debit sub tab.

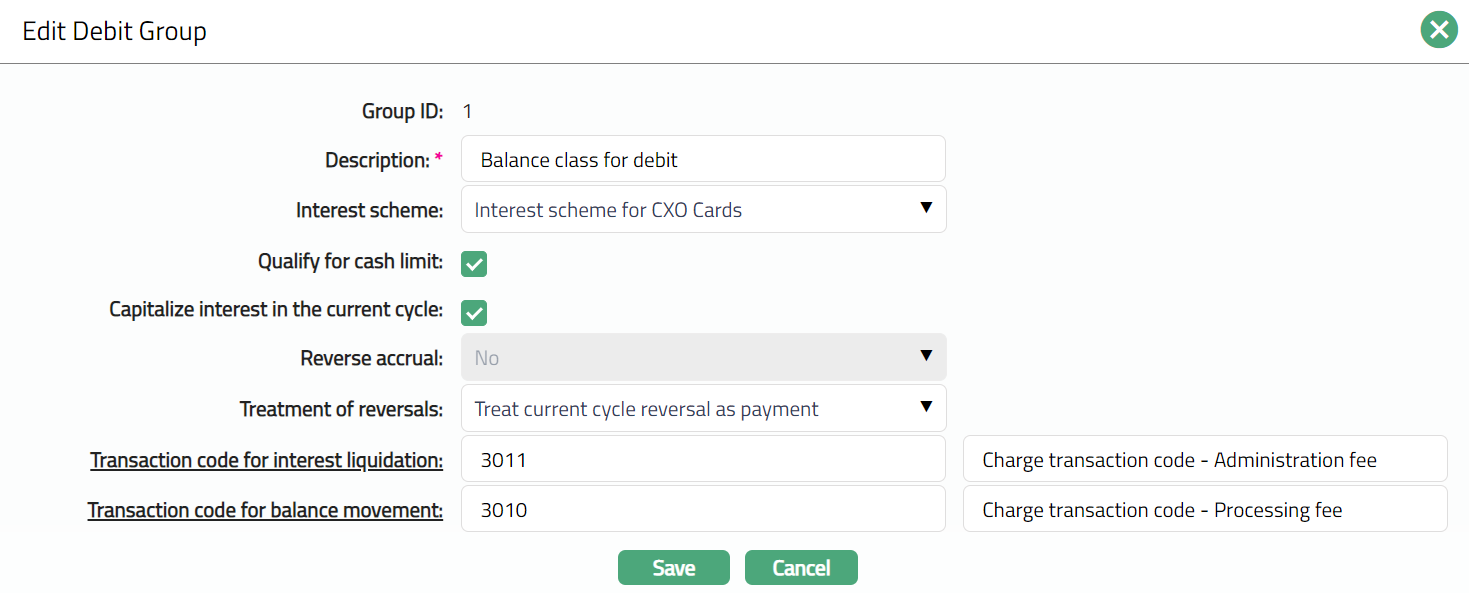
Click Add. Add Debit Group page appears.
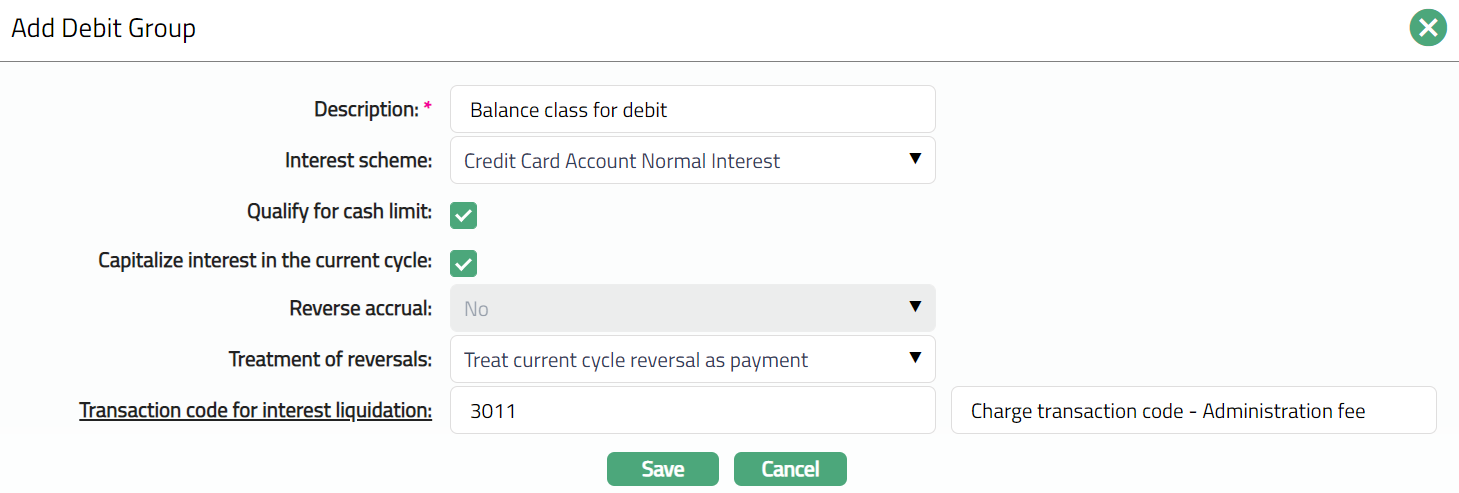
Enter Description of the Debit Group.
Select Interest scheme from the drop-down list of active interest schemes maintained under Admin > System Codes > Interest > Interest Scheme.
The Qualify for Cash limit will be available only for debit transaction codes. If the flag is checked, the transactions using the transaction codes under this balance class group would be treated as using the Cash Limit for the account and thus, the available cash limit at account level will be arrived at.
If Capitalize interest in the current cycle flag is checked, then Aura will capitalize interest on transactions that have originated in the current cycle. By default, it does for the past period. If this flag is checked, the option to Reverse accrual on full payment field will be automatically marked as No and will be disabled, since the interest is already capitalized / liquidated before the payment.
Reverse accrual list gives you the following options to indicate when the accrued interest receivable can be reversed.
No: This is the default option. When selected, it means that the accrued interest will not be reversed irrespective of the payment.
On full settlement: When selected, it means that the accrued interest will be reversed only if the total outstanding on the account was paid in full.
On full settlement if not rolled over: When selected, it means that the accrued interest will be reversed only if the total outstanding on the account was paid in full and there was no previous roll over of the outstanding amount. If the balance has been rolled-over and in the next cycle if the customer pays the full balance the interest accrued in the current cycle is not reversed for the rolled-over amounts. However, the interest will be reversed for those amounts that were debited in immediate cycle and paid fully (without roll-over).
Select Treatment of reversals from the preshipped values. The options are:
Treat Current cycle reversal as payment: If this option is chosen, then all the current cycle reversals will be treated as payments.
Treat current and past cycle reversal as payment: If this option is chosen, then all the current and past cycle reversals will be treated as payments.
Click Transaction Code for interest liquidation hyper link. Aura displays the list of all the active Client Debit transaction codes. This will be used for the liquidation of the interest on this balance class. In case of the Default balance class, the interest liquidation will be done using the transaction code selected at the Product level.
Click Save. Card Account Product page appears with the added details along with a unique group id which identifies that group.

Functions: Add, Edit, Transaction Code.
To add / view Transaction Codes that should belong to a Balance class group.
Access required Balance classification group and click Transaction Code.
Click Add. Add Transaction Code page appears.

Click hyperlinked Transaction code. Transaction Code Search page appears with the list of Client Account Debit Transaction codes, apart from the ones that have already been mapped to the Product. Select the required transaction code from the list. You can also input the transaction code directly.
Click Save to see the added transaction code.
Functions: Add, Delete, Finish.
Click Finish. Debit sub tab page under Balance Classification appears with the updated details.
Functions: Add, Edit, Transaction Code.
To Edit Debit
- Select required record from the list of added record and click Edit. Edit Debit Group page appears.
Note: Except Group ID field, rest all other fields are editable.
- Click Save. Debit sub tab appears with the edited details.
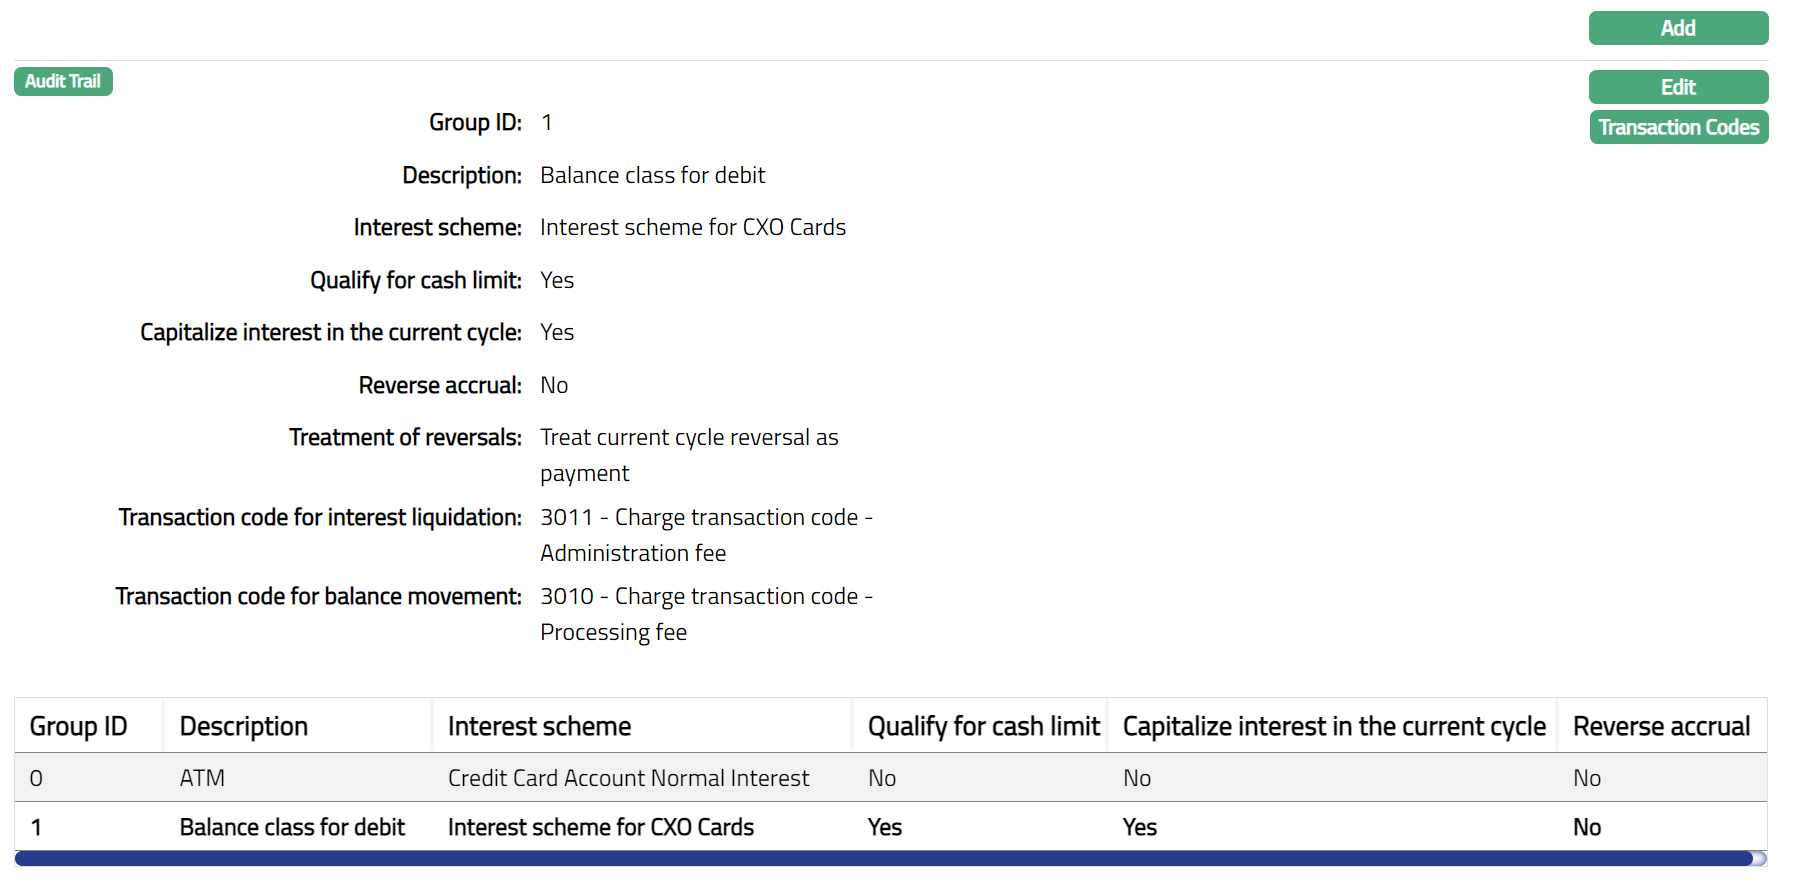
Functions: Add, Edit, Transaction Code.
Replenishment
Using Replenishment tab, you can provide the sequential preference for the groups maintained under balance classification (Debit / Credit) and Default Group. Based on the Replenishment preference, any payments coming in will allocate the paid amount in the order specified.
A replenishment function will allocate any credit balance towards debit balance classes. This function will be invoked for each transaction provided the nature of the transaction is against the nature of the current balance of the account. If the transaction is a debit while the current balance is credit, the replenishment function will be triggered. If the transaction is a credit while the current balance is debit, the replenishment function will be triggered.
Example:
Debit Classes -- ATM, POS, Default Debit (Indicates the To order)
Credit Classes -- Payments, Default Credit (Indicates the From order)
a. Account balance is 100 DB and a transaction of 25 CR comes in
I.  Replenishment function will trigger and allocate 25 towards the
    debit balance classes as per the order. Debit balance class will
    total 75 after replenishment. Credit balance will have 0
    balance.
b. Account balance is 100 DB, and a transaction of 125 CR comes in
I.  Replenishment function will trigger and allocate 100 towards the
    debit balance classes as per the order and retain 25 CR balance
    in the credit class. Debit balance class will be 0 after
    replenishment.
c. Account balance is 100 CR, and a transaction of 25 DB comes in
I.  Replenishment function will trigger and allocate 25 towards the
    debit balance classes as per the order. Debit balance class will
    total 0 after replenishment and credit balance class will be
    reduced to 75.
d. Account balance is 100 CR, and a transaction of 125 DB comes in
I.  Replenishment function will trigger and allocate 100 towards the
    debit balance classes as per the order. Debit balance class will
    be 25 after replenishment and credit balance class will be 0.
The same logic will be applied for reversals where the amount of reversal exceeds the balance.
The following are the sub-tabs under Replenishment:
Replenishment Priority -- Credit
- Access Card Account Product page and click Replenishment tab, and then click Credit.

Default Group will be the first priority by default and all the Credit Balance Class Groups will be listed below. Up and Down button will be disabled.
If you want to change the order, select the required Group Name, which enables the Up and Down buttons.
If you click on Up button, the selected Group Name will move to the next higher order of preference and interchange the position between the source and destination. For the topmost group the Up button will be disabled.

- If you click Down button, the selected Group Name will move to the next lower order of preference and interchange the position between the source and destination. For the bottom most group the Down button will be disabled.

Replenishment Priority -- Debit
- Access Card Account Product page and click Replenishment tab, and then click Debit sub tab.
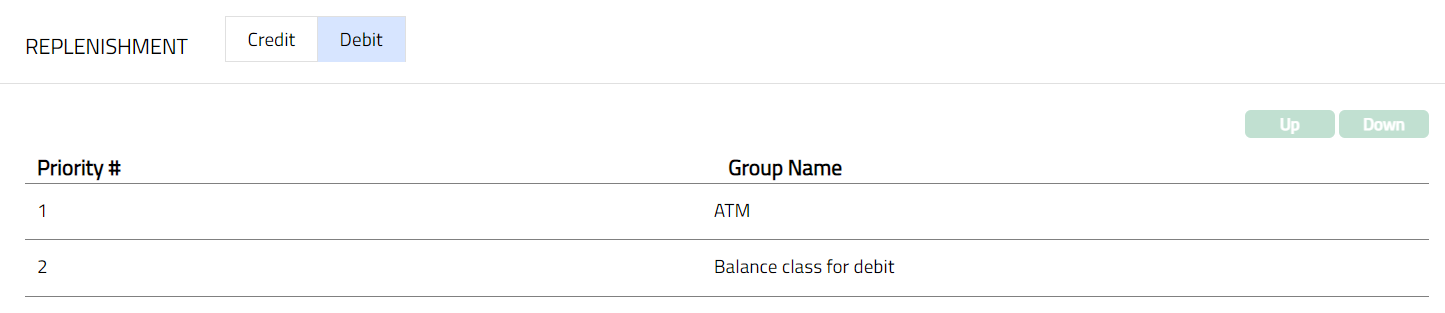
The Default Group will be the first priority by default and all the Debit Balance Class Groups will be listed below. Up and Down button will be disabled.
If you want to change the order, select the required Group Name, which enables the Up and Down buttons.
If you click Up button, the selected Group Name will move to the next higher order of preference and interchange the position between the source and destination. For the topmost group the Up button will be disabled.

- If you click Down button, the selected Group Name will move to the next lower order of preference and interchange the position between the source and destination. For the bottom most group the Down button will be disabled.

Reminder
Reminder option allows you to set up the details for sending a reminder to the customer or any other linked person informing about their account.
To add Reminder
- Access Card Account Product page and click Reminder tab.
- Click Add. Add Reminder Page appears.
Reminder Id is automatically generated by Aura to uniquely identify this reminder record. It is not editable.
Enter Name of the reminder.
Select Format from the drop-down list, which must be maintained under Admin > System Codes > Generic definitions > Reminder Format.
Select Communication mode for the Reminder.
The available options are.
Data handoff
Email
Paper
SMS
Web hotel
- Select Frequency for the Reminder.
The options are:
On End of Cycle: The Reminder will be generated at the end of the billing cycle.
On payment due date: The Reminder will be generated on the payment due date.
X days before End of Cycle: The Reminder will be generated X number of days before the end of the cycle.
X days after End of cycle: The Reminder will be generated X number of days after the end of the cycle.
X days before payment due date: The Reminder will be generated X number of days before the payment due date.
X days after grace days if overdue: The Reminder will be generated X number of days after grace days, if it still continues to be overdue.
X days after payment status Y: The Reminder will be generated X number of days after payment status is Y.
X days after reminder Y: The Reminder will be generated X number of days after the date of reminder Y.
X days before N overdue cycles: The Reminder will be generated X number of days before N overdue cycles.
X days after N overdue cycles: The Reminder will be generated X number of days after N overdue cycles.
If Frequency that you selected above has X days, then enter the number of Days. The Days field will not be displayed for On End of Cycle and On Payment due date option.
If Frequency is selected as X days after payment status Y, then Payment Status field will get displayed. Select the payment status from the drop-down list maintained under Admin > Generic definitions > Status.
If Frequency is selected as X days after reminder Y, then Reminder field will get displayed. Select the Reminder from the drop-down list. The values will come from the Reminder maintained for the product excluding the current record.
If Frequency is selected as X days before N overdue cycles or X days after N overdue cycles, then Overdue cycles field will get displayed. Enter the overdue cycles.
If a fee has to be collected based on the reminder generation, select Reminder Fee from the drop-down list of Event based, Flat charge schemes maintained under Admin > System Codes > Charges > Charges. Whenever this reminder is generated, the reminder fee will also be charged to the account.
Click Save. Reminder page appears with the added details.
Functions: Add, Edit, Delete
- Click Edit. Edit Reminder page appears.
Note: Except Reminder Id field, all other fields are Editable.
- Click Save. Reminder page appears with the edited details.
Functions: Add, Edit, Delete
Transaction Value dates
This option will allow you to maintain the parameters for the value date movement for each transaction code for a Card Account Product. If for a transaction code a value date setting is provided here, then during Transaction processing, Aura will take this value date; else the default value date provided in the transaction file will be taken for posting. The value date can be specified separately for onward and reversal transactions.
To add a transaction value date
- Access Card Account Product page and click the Transaction Value Date tab.
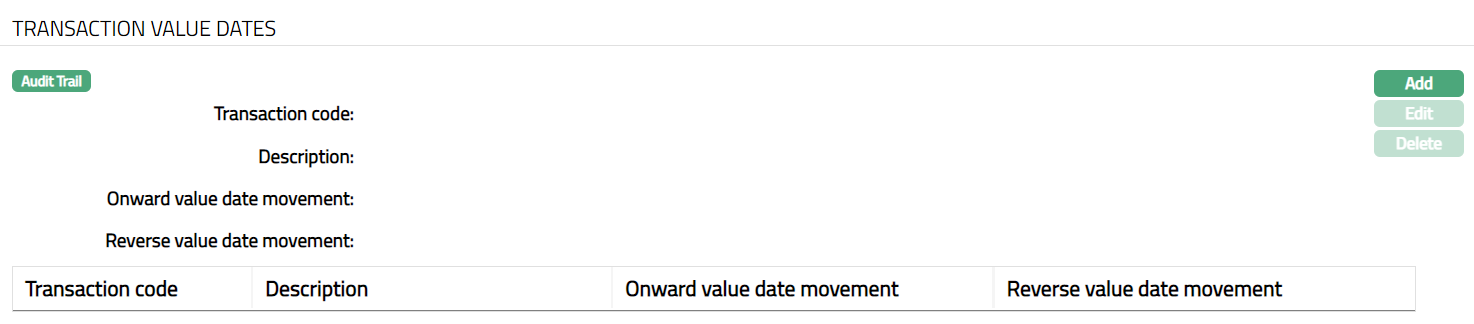
- Click Add. Add Transaction Code page appears.
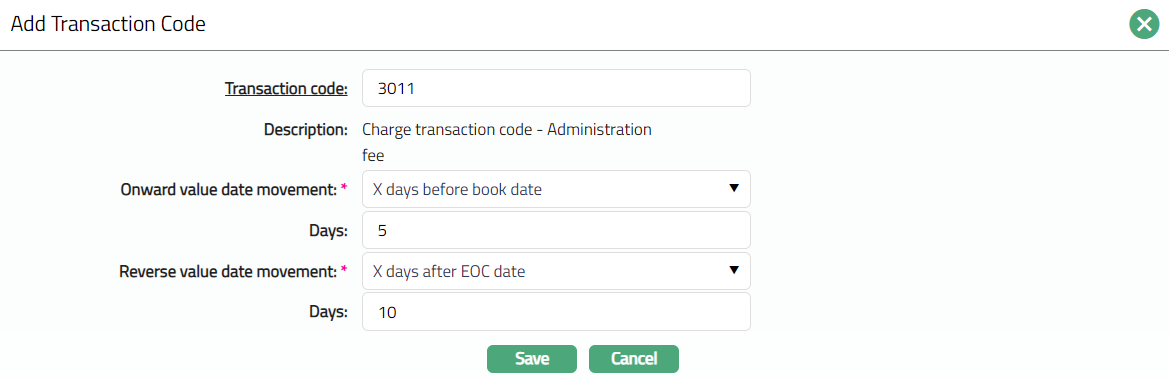
- Click for Transaction Code hyperlink Transaction code search page appears with the list of Client Account Debit/Credit Transaction code. Select the transaction code from the list maintained under General Ledger > Settings > Transaction Codes.
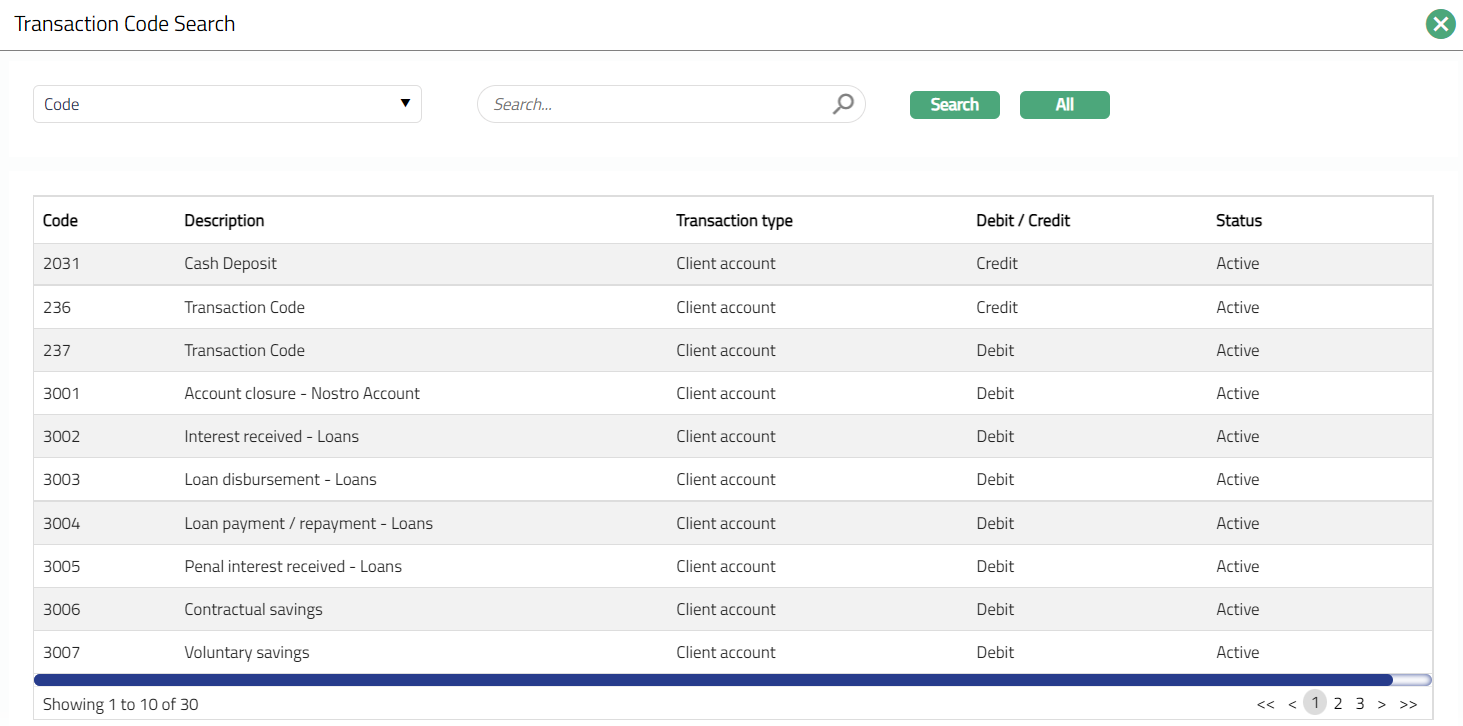
Description as maintained in Transaction Code will be displayed automatically.
Select Onward Value date movement from the preshipped values. During transaction processing, for any transaction that is received for this transaction code for this product, the value date will be replaced as per the option chosen.
The available options are:
Default Value date: The value date that comes in the transaction file will be taken as onward value date.
EOC Date: The current end of cycle date will be taken as onward value date.
Next Payment Due Date: The next payment due date will be taken as onward value date.
Book Date: The date of booking the transaction will be taken as onward value date.
X days before Book date: The X days before the book date will be taken as onward value date.
X days after Book date: The X days after the book date will be taken as onward value date.
X days before next EOC date: The X days before the next end of cycle date will be taken as onward value date.
X days after next EOC date: The X days after next end of cycle date will be taken as onward value date.
X days before next payment due date: The X days before next payment due date will be taken as onward value date.
X days after next Payment due date: The X days after next payment due date will be taken as onward value date.
X days before Default Value date: The X days before default value date will be taken as onward value date.
X days after Default Value date: The X days after default value date will be taken as onward value date.
Example:
Cycle Start date 28-Mar-14
Cycle End date 27-Apr-14
Next Payment due date 12-May-14
Book date 5-Apr-14
Default value date 3-Apr-14
The table below shows how the value date will be derived for each of the options:
| Option for Onward Value Date / Reverse Value Date Movement | Derived Value Date |
|---|---|
| Default Value Date | 03-Apr-14 |
| EOC Date | 27-Apr-14 |
| Next Payment Due Date | 12-May-14 |
| Book Date | 03-Apr-14 |
| X Days Before Book Date | 30-Mar-14 |
| X Days After Book Date | 07-Apr-14 |
| X Days Before Next EOC Date | 23-Apr-14 |
| X Days After Next EOC Date | 01-May-14 |
| X Days Before Next Payment Due Date | 08-May-14 |
| X Days After Next Payment Due Date | 16-May-14 |
| X Days Before Default Value Date | 01-Apr-14 |
| X Days After Default Value Date | 09-Apr-14 |
If Onward Value date movement selected above has X days, then you need to enter the number of Days; for other options, Days field will not be displayed.
Select Reverse Value date movement from the preshipped values. During transaction processing, if any reversal transaction is received for this transaction code for this product, the value date will be replaced as per the option chosen. Refer to the Onward Value date movement options for the preshipped values and example.
If Reverse Value date movement selected above has X days, then you need to enter the number of Days; for other options Days field will not be displayed.
Click Save. Transaction Value dates page appears with the added details.

Functions: Add, Edit, Delete.
- Click Edit. Edit Transaction Code page appears.
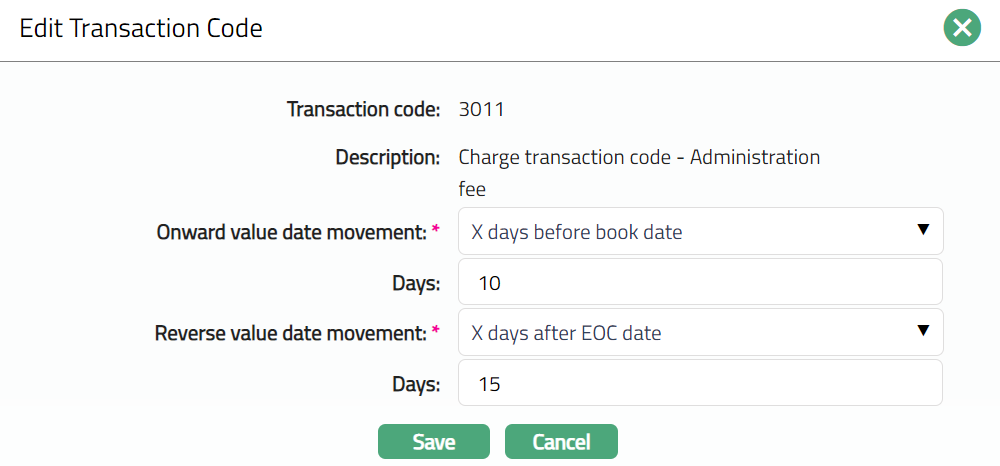
Note: Except Transaction Code and Description, all other fields are Editable.
- Click Save. Transaction Value Dates page appears with the edited details.
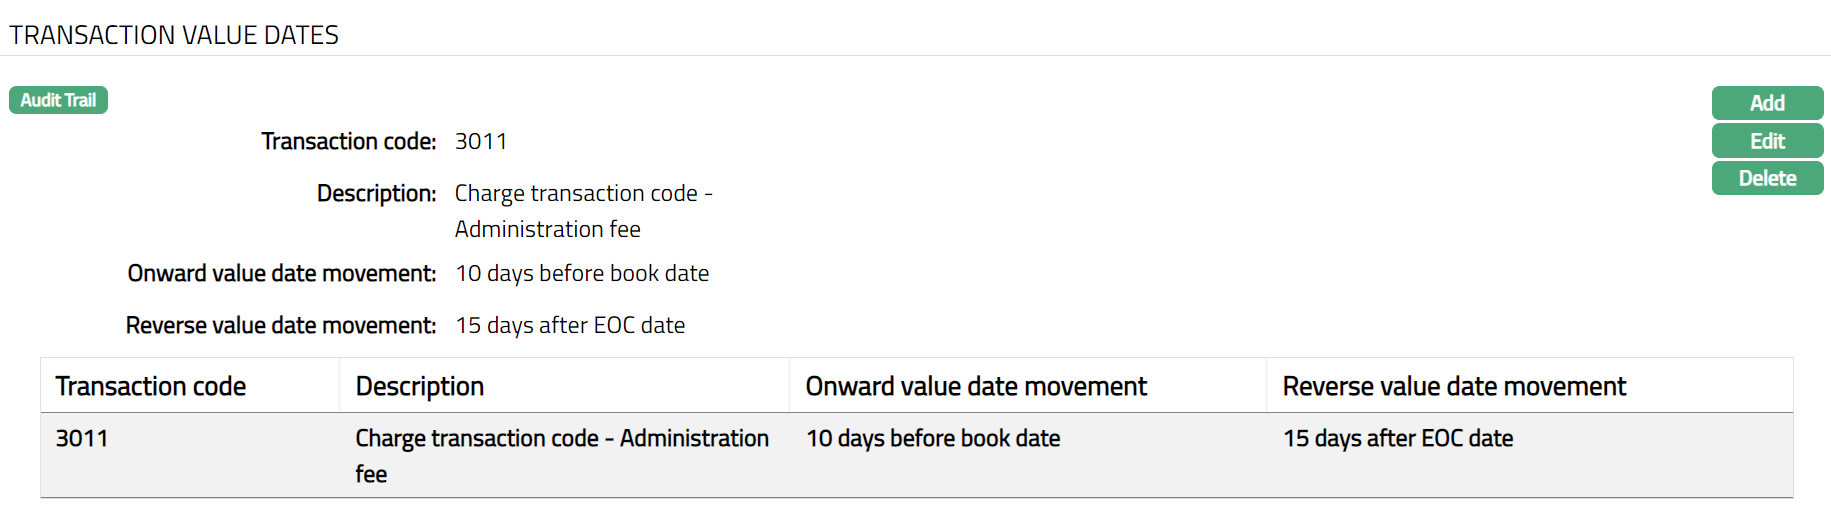
Functions: Add, Edit, Delete.
Status Rules
Status Rules option allows you to add any rules / triggers between origin payment status and destination payment status and / or account statuses to suit various business rules. For example, if you want to make the payment status of an account as Under Payment Plan as long as a Payment Plan is Active for the account, you can build a rule as follows: If the current Payment Status of an account is Any, and If Payment Plan is Active, move the Payment Status of the Account to Under Payment Plan.
The payment statuses / account statuses could be pre-shipped, or user defined. The rule is available at the Product level. Based on the rules set up, the account status and payment status of the accounts are moved automatically at the end of the day. The rules will apply in the order of preference that you set up under the Rule Sequence.
The two sub-tabs are:
Rules
To add Rules in Status Rules
- Access Card Account Product Page and click Status Rules and then Rules sub tab.
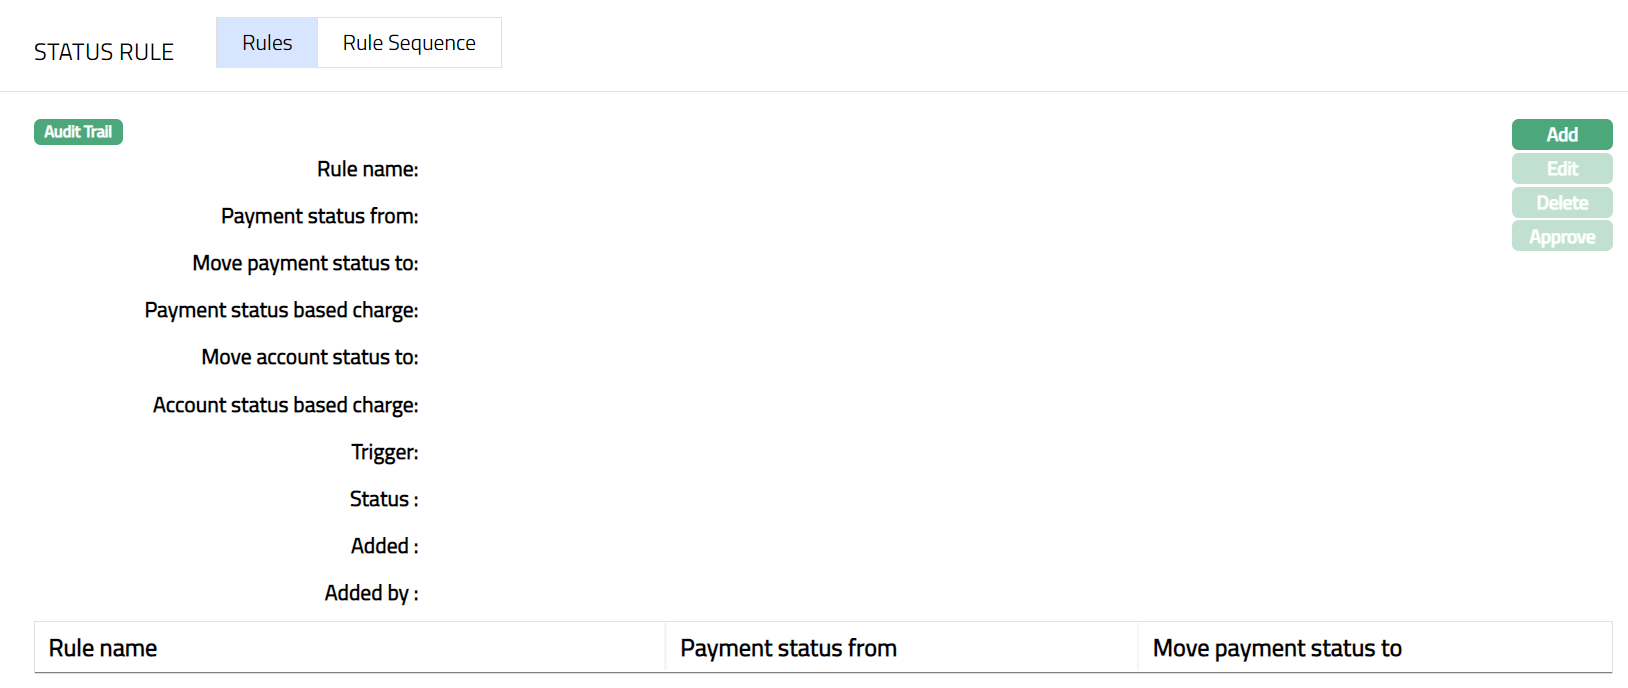
- Click Add. Add Rule page appears.
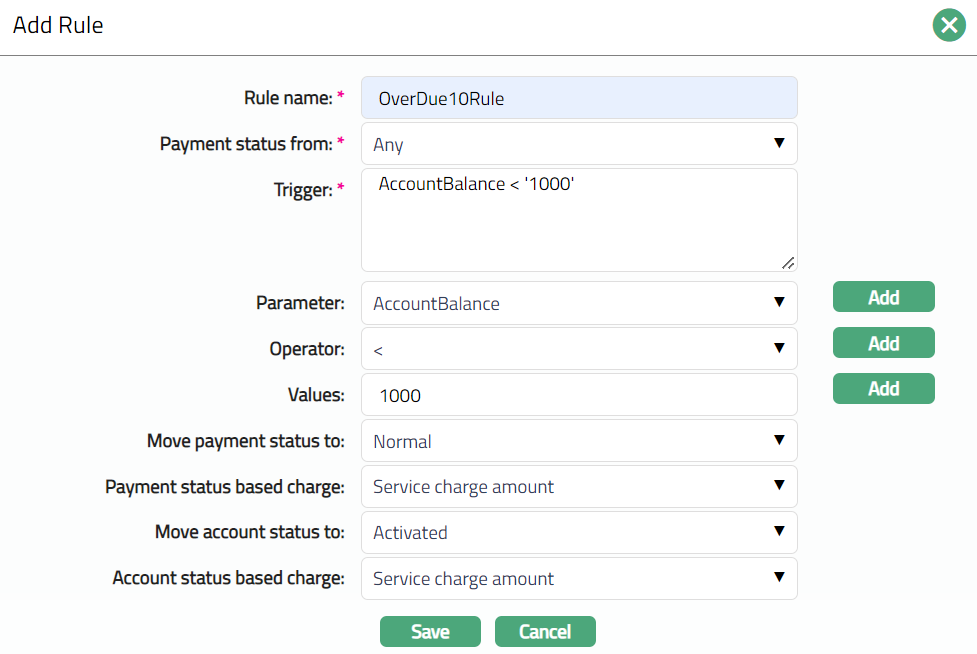
Enter Rule Name.
Select Payment Status from the drop-down list of Active Payment Statuses maintained under Admin > System Codes > Generic definitions > Status.
Enter Trigger details. Each trigger will constitute a collection of individual conditions joined by AND and / or OR operator. The Trigger details can be built using the Parameter, Operator and Values.
Select Parameter from the pre-shipped list and click Add. Aura will push the selected value of Parameter into the Trigger text area above. Based on the Parameter selected, the Operator and Values will change.
Select Operator from the pre-shipped list and click Add. Aura will push the selected value of Operator into the Trigger text area above.
Enter required Values for the Parameter and click Add. Aura will push the selected value into Trigger text area above.
Details of the Parameter, Operator and Values
Account Balance: If the Parameter is Account Balance, then the Value field becomes a text box for you to enter an amount.
Account Balance Days: This parameter can be used to evaluate the number of days an account has been having a balance >, < or = a specific Value. If the Parameter is Account Balance Days, then the Value field becomes a text box for you to enter Days. Also note that if this parameter is used, you should have necessarily used the Account Balance parameter also in the Trigger.
Account Status: If Account Status parameter is selected then the Values field will display all the active Account statuses maintained under Admin > System Codes > Generic definitions > Status, where Consider status as is equal to Account Status or Payment Status and Account Status. It will also display the pre-shipped Account Statuses and the generic value Any.
Activity: This parameter can be used to check if there has been any transactions / activity on the card account. If this is the selected parameter, the Values field will show the following list of options:
No activity: You can choose this to check for no transactions (card generated or system generated) in the account.
No card activity: You can choose this to check for no card transactions (i.e., where there have been no transactions where the transaction code has the attribute Consider as Card Activity marked as Yes) in the account.
Card Activity: You can choose this to check for card transactions (i.e., where there have been transactions where the transaction code has the attribute Consider as Card Activity marked as Yes) in the account.
Active Payment plan: You can use this parameter if you want to move the status of the account based on any Payment Plan that is active for an account. If this is the selected parameter, the Values field will show Yes or No.
Authorizations: Authorization refers to the authorization amount in cards -- i.e., Amount blocks in Aura. This parameter can be used to check if there are any active amount blocks in an account. If this is the selected parameter, the Values field will show the following list of options:
Active Amount Block: You can choose this to check if the account has any Active Amount Blocks.
No active amount blocks: You can choose this to check if the account does not have any Active Amount Blocks.
Client Category Type: If this is the selected parameter, the Values field will display all the Client Category types maintained under Admin > System codes > Categories > Category type.
Client Category Codes: If this is the selected parameter, the Values field will display all the Client Category codes maintained under Admin > System codes > Categories > Category type. Also note that if this parameter is used, you should have necessarily used the Client Category Type parameter also in the Trigger.
Client Offering Category: If this is the selected parameter, the Values field will display all the Client offering categories maintained under Admin > System codes > Categories > Offering.
Client Relationship Pricing: If this is the selected parameter, the Values field will display a list of all the relationship pricing maintained under Admin > System Codes > Category > Relationship Pricing.
Credit Rating: If this is the selected parameter, you can input the required Credit Rating in the Values field.
Currency: If this is the selected parameter, the Values field will display a list of all the GL currencies.
Overdue cycles: This parameter can be used to evaluate the number of billing cycles an account has been Overdue. If the Parameter is Overdue cycles, then the Value field becomes a text box for you to enter the number of cycles.
Overdue for: This parameter can be used to evaluate the number days an account has been having an overdue balance. If the Parameter is Overdue for then the Value field becomes a text box for you to enter Days.
Payment Status: If this is the selected parameter, the Values field will display all the active Payment statuses maintained under Admin > System Codes > Generic definitions > Status, where Consider status as is equal to Payment Status or Payment Status and Account Status. It will also display the pre-shipped Payment Statuses and the generic value Any.
Payment Status cycles: This parameter can be used to evaluate the number of billing cycles an account has been in a specific Payment status. If the Parameter is Payment Status cycles, then the Value field becomes a text box for you to enter the number of cycles. Also note that if this parameter is used, you should have necessarily used the Payment Status parameter also in the Trigger.
Payment Status days: This parameter can be used to evaluate the number of days an account has been in a specific Payment status. If the Parameter is Payment Status Days, then the Value field becomes a text box for you to enter Days. Also note that if this parameter is used, you should have necessarily used the Payment Status parameter also in the Trigger.
Person Status: If this is the selected parameter, the Values field will display the status as Living and Dead.
Reminders: You can use this parameter if you want to move the status of the account based on Reminders that have been generated for an account. If this is the selected parameter, the Values field shows the list of active reminder names for the Product.
You can specify in the Move Payment Status to field, the specific Payment Status into which the accounts have to be moved in case the rule is satisfied. This will show all the active Payment statuses maintained under Admin > System Codes > Generic definitions > Status, where Consider status as is equal to "Payment Status" or "Payment Status and Account Status". It will also display the pre-shipped Payment Statuses, apart from the one which you have already chosen under Payment status from above.
If payment status is moved to any other status and you want to levy a charge for that, you can select the charge from the drop-down list maintained under Admin > System Codes > Charges > Charges in Payment status-based charge field. Aura will display only those charges that are Periodic, or Event and the Basis should be maintained as Flat or banded. Payment status-based charge field will be enabled only if any status is selected in Move Payment status to field.
The conditions for the charges are as follows:
If the charge is Banded, then the basis will be card account outstanding balance.
If the Charge is Event, charge will be applied only once.
If the charge is Periodic, charge will be applied if the account remains in the same status at the end of the period.
You can specify in the Move Account Status to field, the specific Account Status into which the accounts have to be moved in case the rule is satisfied. This will show all the active Account statuses maintained under Admin > System Codes > Generic definitions > Status, where Consider status as is equal to "Account Status" or "Payment Status and Account Status". It will also display the pre-shipped Active and Closed Account Statuses.
If Account Status is moved to any other status and you want to levy a charge for that, you can select the charge from the drop-down list maintained under Admin > System Codes > Charges > Charges in Account status-based charge field. Aura will display only those charges that are Periodic, or Event and the Basis should be maintained as Flat or banded. Account status-based charge field will be enabled only if any status is selected in Move Account status to field.
The conditions for the charges are as follows:
If the charge is Banded, then the basis will be card account outstanding balance.
If the Charge is Event, charge will be applied only once.
If the charge is Periodic, charge will be applied if the account remains in the same status at the end of the period.
- Click Save. Rule sub tab under Status Rule tab appears with the added details.
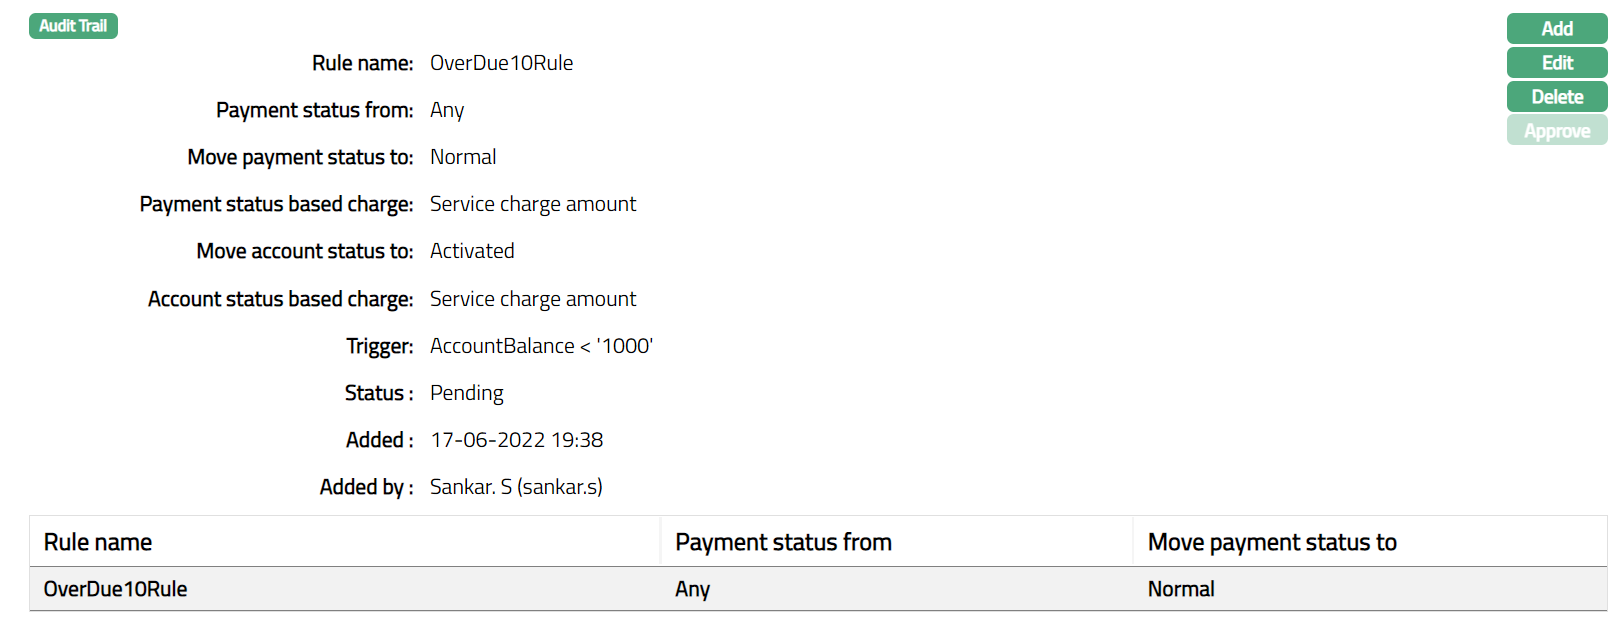
Functions: Add, Edit, Delete, Approve.
- Click Edit. Edit Rule page appears.
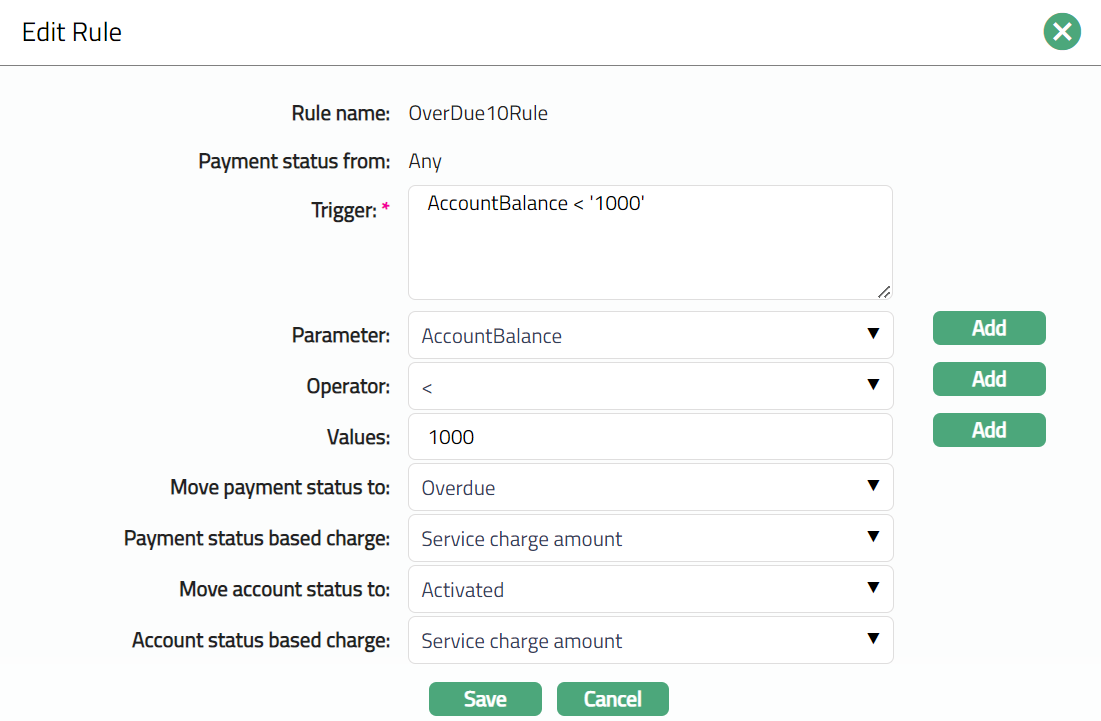
Note: Except 'Rule name' and 'Payment status from' field, all other fields are editable.
- Click Save. Rule sub tab under Status Rule tab appears with the edited details.
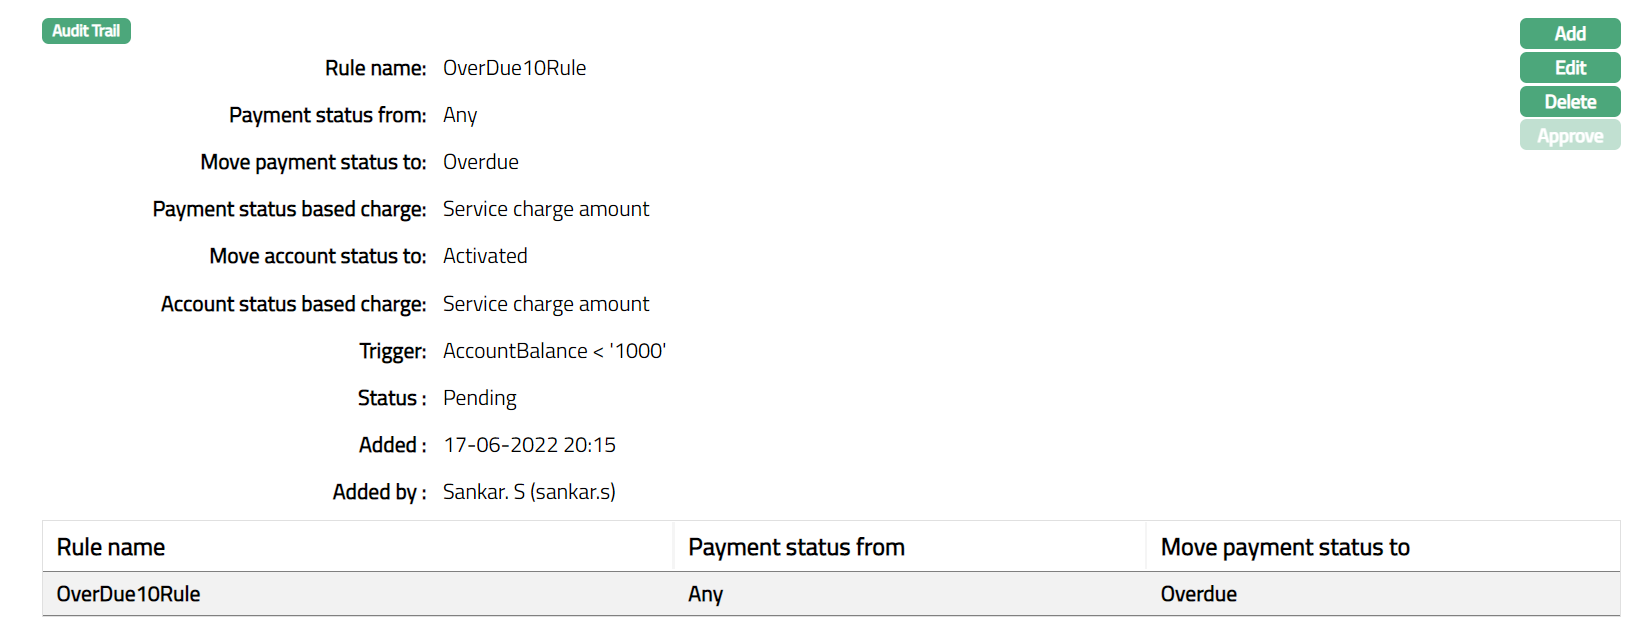
Note: Once any Rule is Added/Edited the Rule sub tab will be in the Pending status. Once approved by different user other than the user who created the record, the status will change to Approved and the Rules will be applicable on the new Accounts created based on this product.
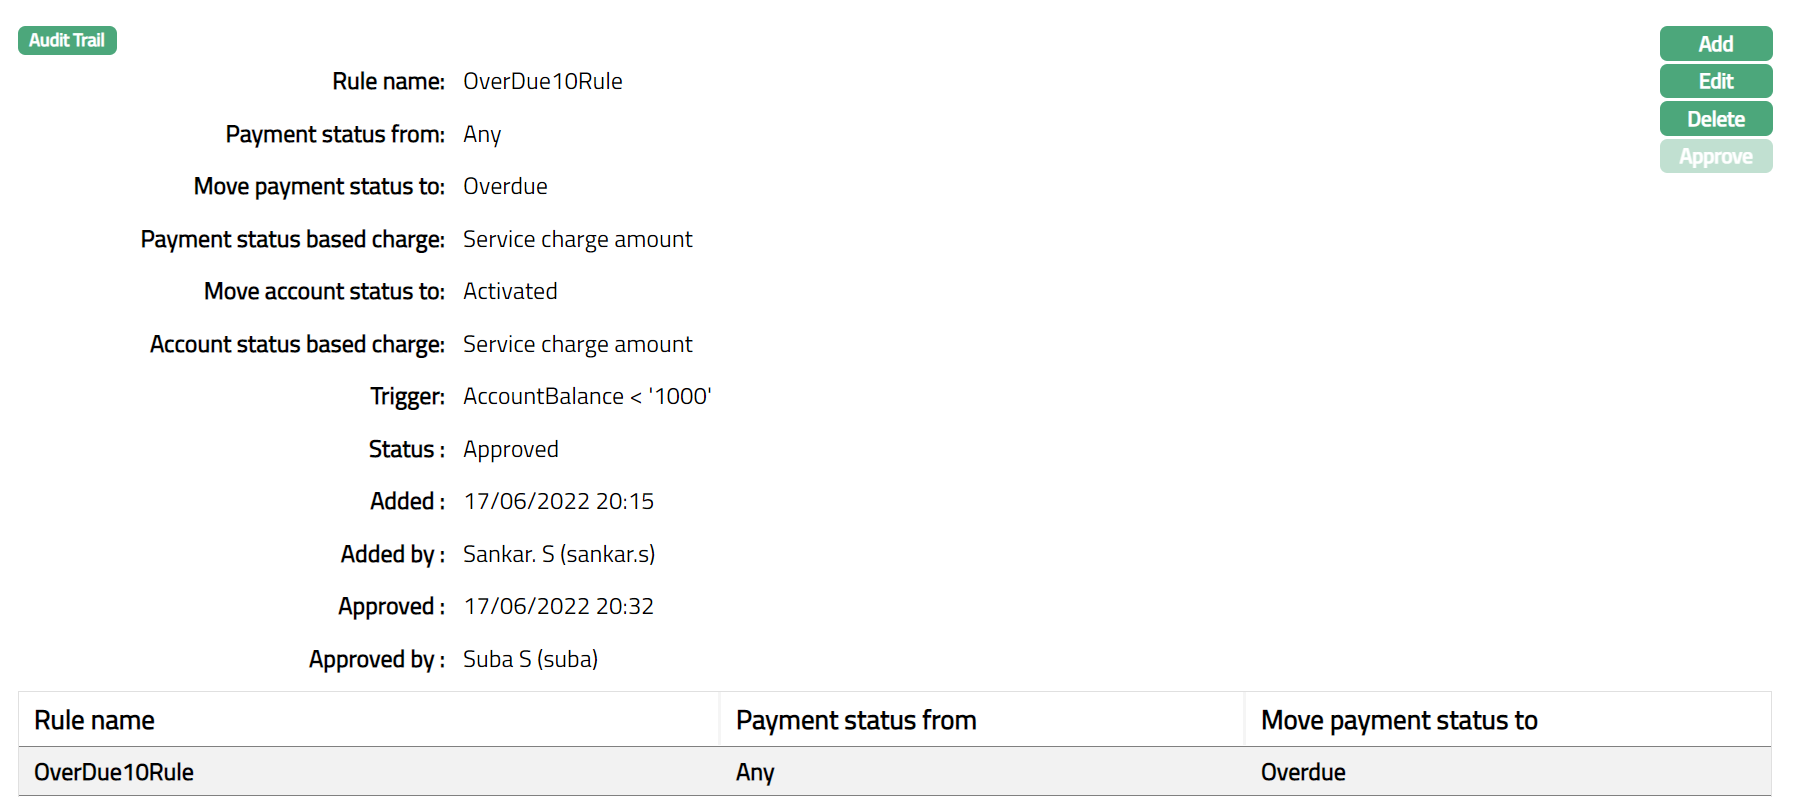
Functions: Add, Edit, Delete, Approve
The additional fields available are:
Status field denotes the status of the tab.
Added field denotes the date on which the record was added.
Added by field denotes the name of the user who created the record.
Approved field denotes date on which the record was approved and is displayed only for approved records.
Approved by field denotes name of the user who approved the record and is displayed only for approved records.
Rule Sequence
You can define the order in which the rules have to be executed using the Rule Sequence tab. By default, it will contain all the maintained Rule names. It will be displayed in ascending order and will have the provision to manipulate the sequence, as you require.
To define the Rule Sequence,
- Access Card Account Product page and click Status Rule, and then click Rule Sequence sub tab.

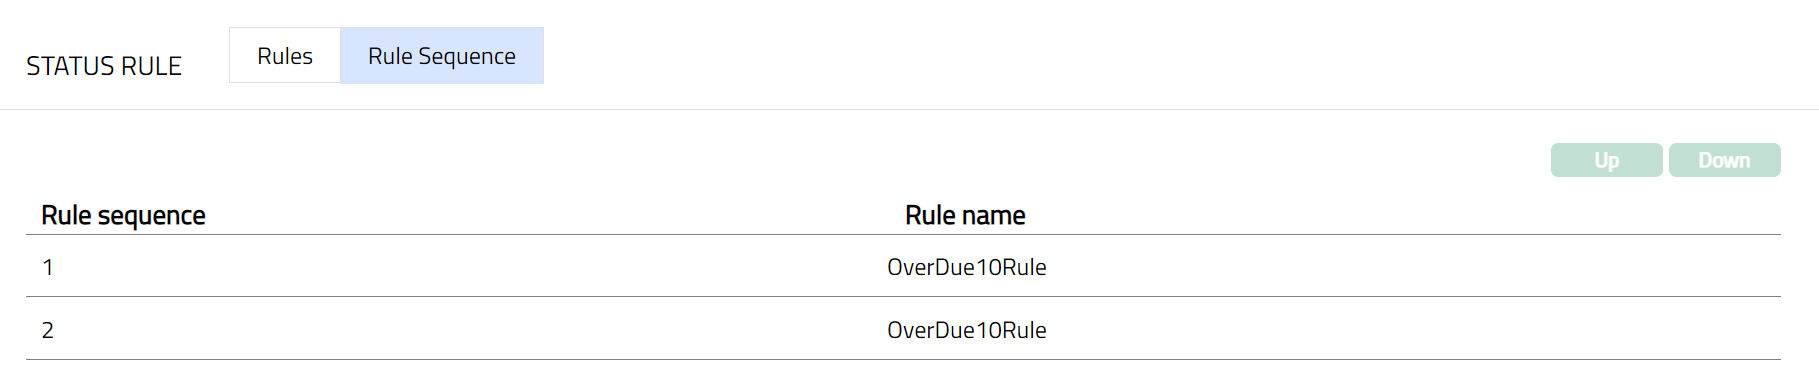
- All available Rules are displayed. Select any Rule Name and click on Up or Down button, as required.
Up: If you click up button, then Aura will move the selected Rule Name to the next higher order of preference and interchange the position between the source and destination. For the topmost Rule Name the Up button will be disabled.

Down: If you click down button, then Aura will move the selected Rule Name to the next lower order of preference and interchange the position between the source and destination. For the bottom most Rule Name the Down button will be disabled.

Insurance Plan
This tab allows you to map Insurance Plans that are available for accounts under the Product. You can maintain details about the fees and other conditions for the plan.
To add a new Insurance Plan
- Access Card Account Product page and click Insurance Plan tab.
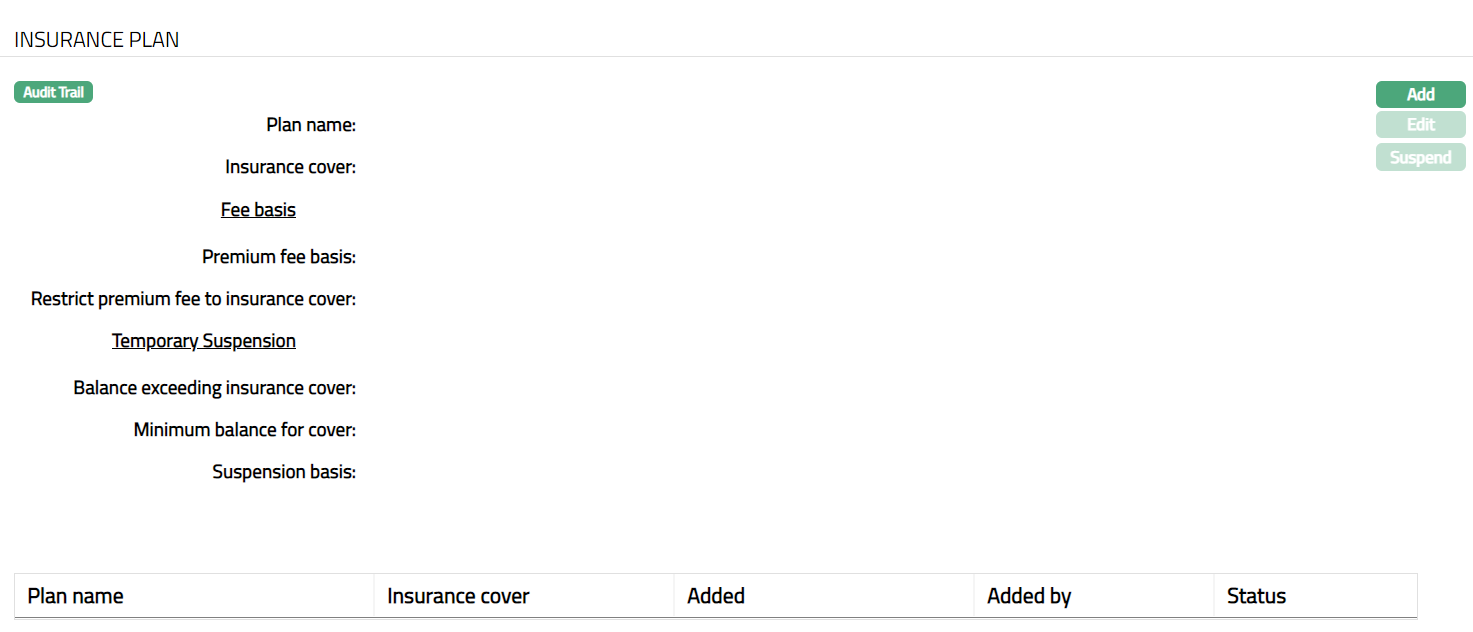
- Click Add. Add Insurance Plan page appears.
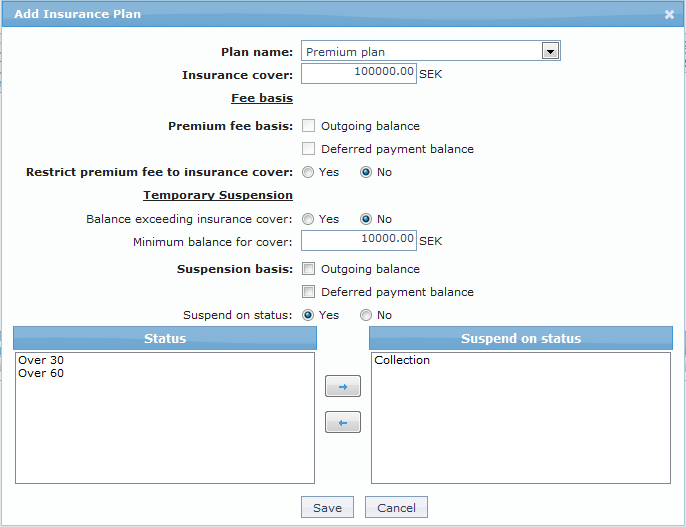
Select the Plan Name from the drop-down list maintained under Admin > System Codes > Generic definitions > Insurance Plan. The list will show only those Insurance Plans which have been marked as available for all / this specific Card Product. Once you have added an insurance plan for the card account product, you cannot add it to the same Product again.
You can specify the maximum amount of insurance cover under this Plan for the Card Accounts created under this Product, in the Insurance cover field. By default, it will show the maximum cover for the insurance plan as maintained under Admin > System Codes > Generic definitions > Insurance Plan. However, you can update it to any lesser amount.
The basis for the Premium to be charged on the Insurance Plan can be specified by selecting either or both options in Premium Fee basis. The fee will be calculated using the Charge Scheme specified for the Insurance Plan under Admin > System Codes > Generic definitions > Insurance Plan. If the Charge scheme is of FLAT amount, the options for Fee basis will be disabled. For Banded Charge schemes, the following options are available for the premium fee basis:
Outgoing Balance: If this option is selected the Premium fee will be based on the outgoing balance of a card account.
Deferred payment balance: If this option is selected then the Premium fee will be based on the sum of the associated deferred payment account balances.
If both the options are selected, then the Premium fee will be based on the total of outgoing card balance + deferred payment account balances.
Note: There can be a credit balance in the card account which can offset the debit balance in the deferred payment balance.
If the Restrict premium fee to insurance cover is marked as Yes, then the Premium fee will be based on the maximum cover of the insurance plan when the outgoing balance of the card account / deferred payment account balance / both exceeds the maximum cover of insurance plan. By default, this is No so that the Premium fee is calculated on the actual outgoing balance of the card account / deferred payment account balance / both.
If you want to temporarily suspend the insurance cover whenever the balance in the account exceeds the insurance cover, select Yes for Balance exceeding insurance cover. The balance for this purpose is taken from the premium fee basis calculation that you chose above. Hence, it could be the outgoing balance of the card account / deferred payment account balance / both. By default, this is No.
For example: If this field is 'Yes' and if Premium fee basis is selected as outgoing balance, then the temporary suspension will get triggered when the outgoing balance is greater than insurance plan cover. And if both the options are selected for Premium fee basis, then, the temporary suspension will get triggered when the outgoing balance + deferred payment balance exceeds the insurance plan cover.
- Enter the Minimum balance for cover. If the outgoing balance is less than the minimum balance for cover, then Aura will automatically suspend the account.
For example: If the minimum balance for cover is defined as 10 SEK, then the card account will be insured only if the balance is greater than or equal to 10 SEK and if outgoing balance comes below 10 SEK the insurance cover will be temporarily suspended.
If you want to temporarily suspend the insurance plan based on the status of the account, you can use the Suspend on status flag. By default, this is No and hence the insurance plan is not suspended for any of the statuses. However, if you choose Yes, you can specify the statuses (one or many) using the combo box of list of statuses. When the account reaches any of the chosen statuses, the insurance cover will be suspended.
Click Save. Insurance page appears with the added details.
Functions: Add, Edit, Approve, Suspend, Activate
Custom Field
This option allows you to define fields apart from those that are already available in the standard version of Aura. Thus, it enables you to customize additional data storage and use as required to suit your specific business needs.
To maintain the Custom Field
- Access Card Account Product page and click Custom Field tab.

The custom field(s) appears only when it is created under Admin > System codes > Custom fields > Custom fields and must be mapped to specific Product option under Admin > System codes > Custom fields > Field mappings.
Click Edit. Edit Custom Field page appears. In the following illustration, a custom field, Product Launch Date has been mapped to the Product as shown below:

Enter Product Launch Date.
Click Save. Custom Filed page appears with the edited details.
 Function: Edit
Restrictions
Restrictions tab will allow you to set or restrict the edit access to certain options / fields available at the product level. The restrictions set at the product level will be applicable at the account level.
The Restrictions tab shows the tabs and fields where Restrictions can be applied. You can choose the specific fields and values which you want to restrict for edit at account level. By default, all fields will be unchecked -- so that the user cannot edit those fields at the Account level.
Restrictions once set can be modified by edit. The updated restrictions will be applicable for future edits and will not impact updates that have already been done.
For example, while creating a Product, Aura provides you an option to select Partial amount or Total due amount for Amount required field. Here, if you select Total due amount as your option, then this option will be defaulted at the account level; and you cannot be change it to any other option. However, using restrictions tab, you can allow an edit for this field at the account level.
For the purpose of Restrictions, we can say that Aura has four types of fields. They are; dropdown lists, radio buttons, check boxes and text boxes. The way in which the Restrictions are set for each type is described below with an example.
Example for checkbox field type:
Restrictions are set by a simple check / uncheck of the relevant field in the Restrictions Tab.
Consider the Modify charges field in the Charges tab.
If you check the Edit Modify charges checkbox, you will be allowed to check or uncheck the Modify charges check box at the account level.
Example for Textbox field type:
Restrictions are set by a simple check / uncheck of the relevant field in the Restrictions Tab.
Consider Margin to require payment field in the Settings tab,
Aura will calculate Amount required only if the balance in the account is more than this amount. If you want to allow edit of this field at the account level, then check the Edit Margin to require payment field.
Example for Radio button field type:
Restrictions are set by specifying the options that are available for edit in the Restrictions Tab. The field in the Restrictions tab will display the value chosen for the Product.
Consider Balance check field.
While creating a product, you will have an option to select Allow only credit balance, Allow only debit balance or Allow both. The option selected at the product level will be defaulted at the account level and the options other than the defaulted one will be disabled.
To enable the options for the balance check field at the account level, check Edit Balance check checkbox. The corresponding Edit button will be enabled.
Click Edit button. Edit Restriction page will be displayed.
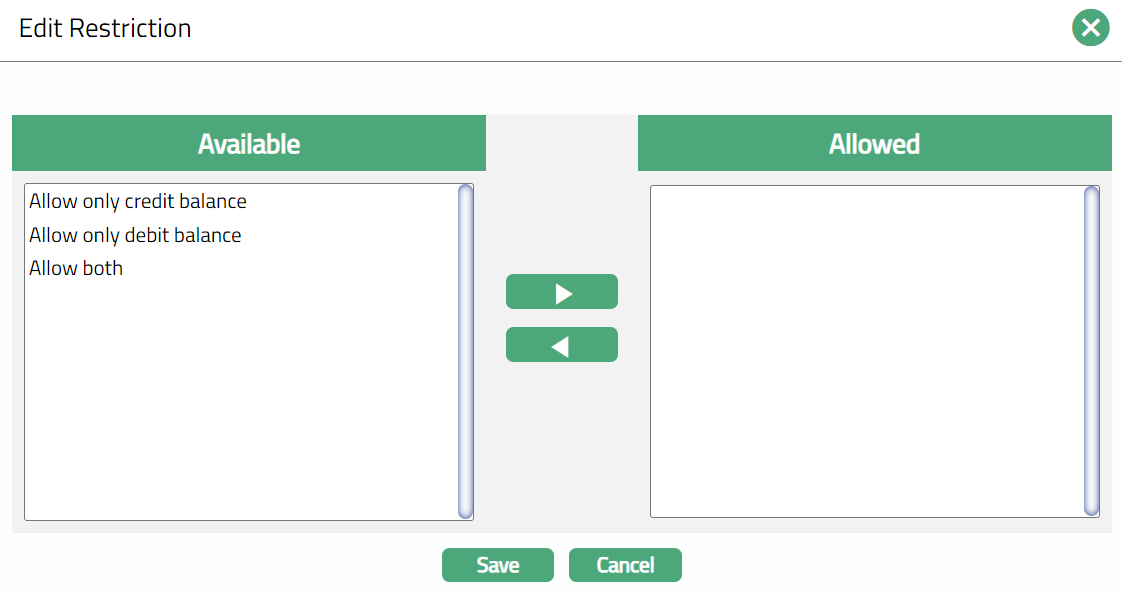
The Available list on the left will show the list of options as per the filter conditions for the field in the corresponding tab, excluding the option(s) already chosen at the Product level.
The Allowed list on the right will show the list of options that you had chosen earlier while setting the restrictions.
If the field type is dropdown, the defaulted options selected at the product level will not be shown in either of the lists.
Select option from the Available list box and click on forward arrow (🡪) button. The selected option will be moved to Allowed list box. If you want to remove an option from the Allowed list, select the same and click on backward arrow (🡨) button.

- Click Save. Restriction page appears with the edited details. On saving, at the account level you will be allowed to select the options under the Allowed list for the Balance check.
Example for Drop-down list field type:
Restrictions are set by specifying the options that are available for edit in the Restrictions Tab. The field in the Restrictions tab will display the value chosen for the Product.
Consider Amount opening fee.
At the Product level, Account opening fee is a Charge Scheme attached to the Amount opening fee charge. If you want to allow the edit of Charge Scheme at the account level, then check the Edit Account opening fee check box. The Edit button for the corresponding charge will be enabled.
Click Edit. Edit Restriction page will be displayed. Other than the default charge attached to the product, all the charges as per the filter applied for selected field will be listed in the Available list box. These charges are maintained at Admin > System codes > Charges > Charges.
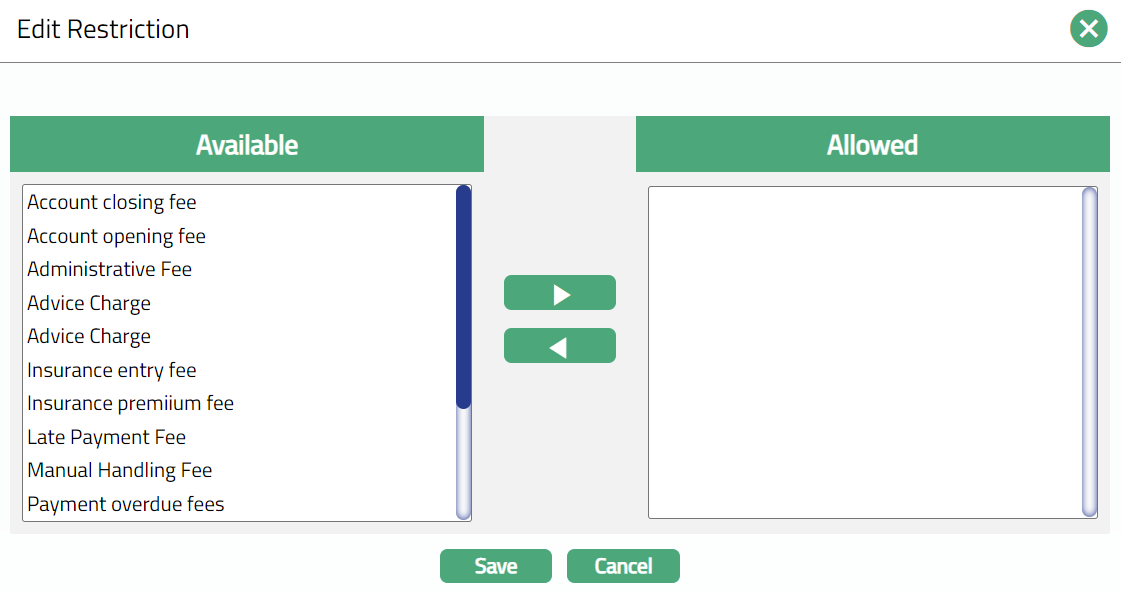
- Select charges from the Available list box and click forward arrow (🡪). The selected charges will be moved to Allowed list box. If you want to move an option from the Allowed list, click backward arrow (🡨) button.

- Click Save. On saving, at the account level, in the charge scheme drop-down list along with the default charge scheme all the charge schemes moved to Allowed list will be displayed and the user can choose as required.
Aura will allow you to set the restrictions for the options / fields available under the following tabs and sub tabs.
Default charges
Additional charges
Interest payable
Interest receivable
Debit balance class
Credit balance class
- Account status
To set the restrictions,
Access Card Account Product page and click Restrictions tab.
Select any of the tab or sub tab for which you need to set the restrictions to the options / fields available under that tab or sub tab. On clicking the tabs, the list of fields available under the selected tab will be displayed with the checkbox. For fields that are other than textbox, the values selected during the creation of product are displayed.
If the field type is text box, Aura will automatically save the restriction on checking or unchecking the check box. If the field type is Radio button or dropdown list, Edit button will be enabled. Make the required updates and then save.
Click Save.
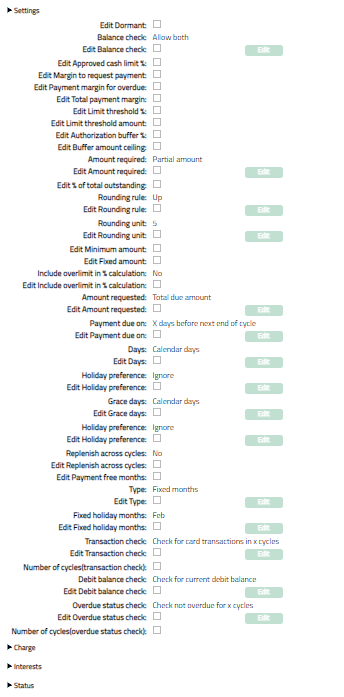
The options/ fields available under Settings tab are:
Field Definitions
| # | Field Name | Original Field Type | Remarks |
|---|---|---|---|
| 1 | Dormant | Checkbox | |
| 2 | Balance check | Radio button | Default value will be displayed. Edit button enabled on selection. |
| - a. Allow only credit balance | |||
| - b. Allow only debit balance | |||
| - c. Allow both | |||
| 3 | Approved cash limit % | Textbox | |
| 4 | Margin to request payment | Textbox | |
| 5 | Payment margin for overdue interest | Textbox | |
| 6 | Total payment margin | Textbox | |
| 7 | Limit threshold % | Textbox | |
| 8 | Limit threshold amount | Textbox | |
| 9 | Authorization buffer % | Textbox | |
| 10 | Buffer amount ceiling | Textbox | |
| 11 | Amount required | Dropdown | Default value will be displayed. Edit button enabled on selection. |
| - a. Partial amount | |||
| - b. Total due amount | |||
| 12 | % of total due amount | Textbox | |
| 13 | Rounding rule | Dropdown | Default value will be displayed. Edit button enabled on selection. |
| - a. Up | |||
| - b. Down | |||
| - c. None | |||
| 14 | Rounding currency | Dropdown | Default value will be displayed. Edit button enabled on selection. |
| - 1, 5, 10, 50, 100 | |||
| 15 | Minimum amount | Textbox | |
| 16 | Include Overlimit in % calculation | Radio button | |
| - a. Yes | |||
| - b. No | |||
| 17 | Amount requested | Dropdown | Default value will be displayed. Edit button enabled on selection. |
| - a. Amount Required | |||
| - b. Total due amount | |||
| 18 | Payment due on | Dropdown | Default value will be displayed. Edit button enabled on selection. |
| - 1. End of cycle | |||
| - 2. End of month | |||
| - 3. Last business day of month | |||
| - 4. Next end of cycle | |||
| - 5. Next end of month | |||
| - 6. Last business day of next month | |||
| - 7. X days after End of Cycle | |||
| - 8. X days after End of Month | |||
| - 9. X days before next End of Cycle | |||
| - 10. X days before next End of Month | |||
| - 11. X days after next End of Month | |||
| 19 | Days | Textbox and Dropdown | Default value will be displayed. Edit button enabled on selection. |
| - a. Calendar days | |||
| - b. Business days | |||
| Note: Restriction applies for both text box and dropdown. | |||
| 20 | Holiday preference | Dropdown | Default value will be displayed. Edit button enabled on selection. |
| - a. Ignore | |||
| - b. Next business day | |||
| - c. Previous business day | |||
| 21 | Grace days | Textbox and Dropdown | Default value will be displayed. Edit button enabled on selection. |
| - a. Calendar days | |||
| - b. Business days | |||
| Note: Restriction applies for both text box and dropdown. | |||
| 22 | Fixed holiday months | Checkbox | Defaulted value will be displayed. Edit button enabled on selection. |
| Options: Month names | |||
| 23 | Transaction check | Dropdown | Default value will be displayed. Edit button enabled on selection. |
| - a. No check | |||
| - b. Check for card transactions in X cycles | |||
| - c. Check for any transactions in X cycles | |||
| 24 | Number of cycles (transaction check) | Textbox | |
| 25 | Debit balance check | Dropdown | Default value will be displayed. Edit button enabled on selection. |
| - a. No check | |||
| - b. Check for current Debit balance | |||
| 26 | Overdue status check | Dropdown | Default value will be displayed. Edit button enabled on selection. |
| - a. No check | |||
| - b. Check not overdue for X cycles | |||
| 27 | Number of cycles (overdue status check) | Textbox |
Charge
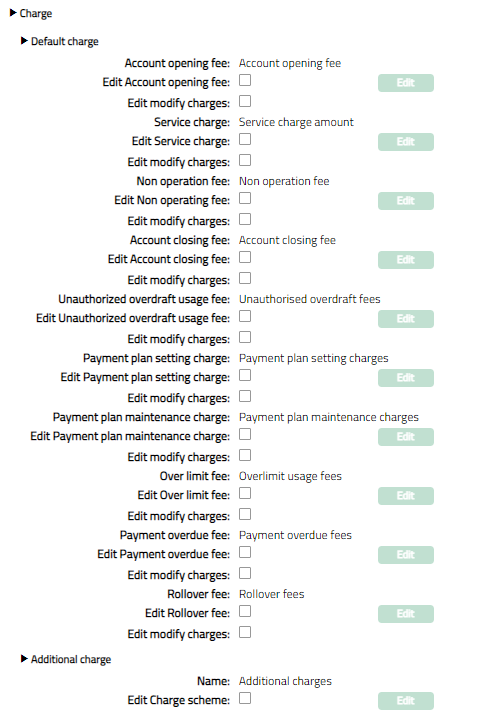
The options / fields available under Charge tab are:
Field Definitions
| # | Field Name | Original Field Type | Remarks |
|---|---|---|---|
| 1 | Default charge | NA | Heading |
| 2 | Account opening fee | Dropdown | Defaulted value will be displayed. Edit button enabled on selection of this field. |
| 3 | Modify charges | Checkbox | |
| 4 | Service charge | Dropdown | Defaulted value will be displayed. Edit button enabled on selection of this field. |
| 5 | Modify charges | Checkbox | |
| 6 | Non-operating fee | Dropdown | Defaulted value will be displayed. Edit button enabled on selection of this field. |
| 7 | Modify charges | Checkbox | |
| 8 | Account closing fee | Dropdown | Defaulted value will be displayed. Edit button enabled on selection of this field. |
| 9 | Modify charges | Checkbox | |
| 10 | Unauthorized overdraft usage fee | Dropdown | Defaulted value will be displayed. Edit button enabled on selection of this field. |
| 11 | Modify charges | Checkbox | |
| 12 | Payment plan setting charge | Dropdown | Defaulted value will be displayed. Edit button enabled on selection of this field. |
| 13 | Modify charges | Checkbox | |
| 14 | Payment plan maintenance charge | Dropdown | Defaulted value will be displayed. Edit button enabled on selection of this field. |
| 15 | Modify charges | Checkbox | |
| 16 | Over limit fee | Dropdown | Defaulted value will be displayed. Edit button enabled on selection of this field. |
| 17 | Modify charges | Checkbox | |
| 18 | Payment over due fee | Dropdown | Defaulted value will be displayed. Edit button enabled on selection of this field. |
| 19 | Modify charges | Checkbox | |
| 20 | Additional charge | NA | Heading |
| 21 | Name | Textbox | Name of the additional charge. Display all the additional charges for the product with the following set of fields. |
| 22 | Charge scheme | Dropdown | Defaulted value will be displayed. Edit button enabled on selection of this field. |
| 23 | Modify charges | Checkbox |
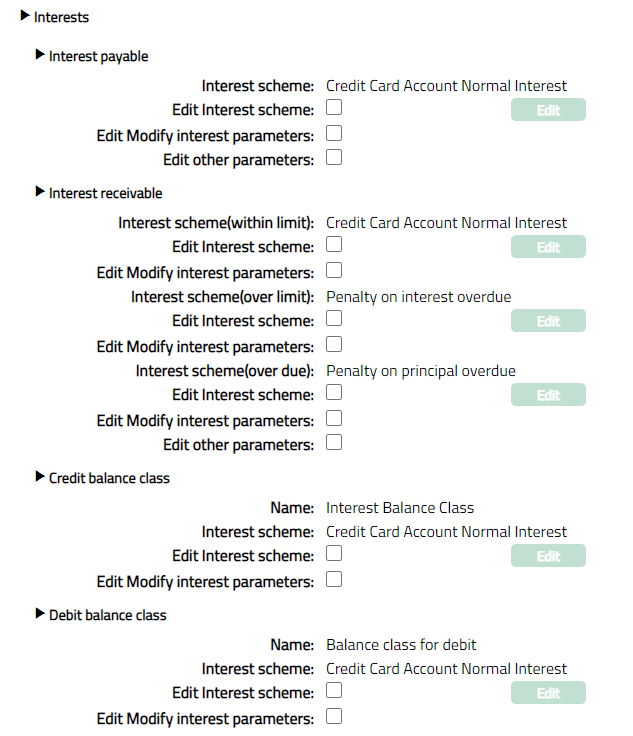
Interests
The options/ fields available under Interest tab are:
Field Definitions
| # | Field Name | Original Field Type | Remarks |
|---|---|---|---|
| 1 | Interest payable | NA | Heading |
| 2 | Interest scheme | Dropdown | Defaulted value will be displayed. Edit button enabled on selection of this field. |
| 3 | Modify interest parameters | Checkbox | |
| 4 | Other parameters | Checkbox | |
| 5 | Interest receivable | NA | Heading |
| 6 | Interest scheme (within limit) | Dropdown | Defaulted value will be displayed. Edit button enabled on selection of this field. |
| 7 | Modify interest parameters | Checkbox | |
| 8 | Interest scheme (over limit) | Dropdown | Defaulted value will be displayed. Edit button enabled on selection of this field. |
| 9 | Modify interest parameters | Checkbox | |
| 10 | Interest scheme (overdue) | Dropdown | Defaulted value will be displayed. Edit button enabled on selection of this field. |
| 11 | Modify interest parameters | Checkbox | |
| 12 | Other parameters | Checkbox | |
| 13 | Debit balance class | NA | Heading |
| 14 | Name | Textbox | Name of the debit balance class. Display all the debit balance classes for the product with the following set of fields. |
| 15 | Interest scheme | Dropdown | Defaulted value will be displayed. Edit button enabled on selection of this field. |
| 16 | Modify interest parameters | Checkbox | |
| 17 | Credit balance class | NA | Heading |
| 18 | Name | Textbox | Name of the credit balance class. Display all the credit balance classes for the product with the following set of fields. |
| 19 | Interest scheme | Dropdown | Defaulted value will be displayed. Edit button enabled on selection of this field. |
| 20 | Modify interest parameters | Checkbox |
Status

Field Definitions
| # | Field Name | Original Field Type | Remarks |
|---|---|---|---|
| 1 | Account status | NA | Heading |
| 2 | User defined status | NA | By default, this will be blank. Edit button will be enabled on selection of this field. You will be able to choose the User Defined Account Statuses for which Restrictions have to be set up. Only these statuses will appear in the next section and you can set Restrictions for the same. Other user defined account statuses will not be subject to Restrictions. |
| 3 | Name | Textbox | Name of the Account Status. If the user defined status is selected as the Account status, then Aura will display the status name selected for Account status. |
| 4 | Allow auto-movement | Radio button | |
| 5 | Modify preferences | Radio button |