Contract Maintenance
The Factoring Contract option allows you to create and maintain factoring contracts between a Seller (Client) and the Factor (Entity). These contracts are created under the respective Factoring Product maintained in Aura, and the product rules are applied by default. At the contract level, you can capture invoice details, define payout and repayment terms, and set recourse conditions, with flexibility to modify certain parameters as required. Each contract then serves as the central record for managing disbursements, repayments charges, penalties, and closure.
The following are the various tabs that appear on the Contract Maintenance page:
Maintaining a Factoring Contract
To maintain a Factoring Contract,
1. From the Commercial menu, click Factoring, and then click on Maintain under Contract. The Contract page appears.

2. Click Add. New Contract → Profile (1/8) page appears.

3. Select the Client by clicking on the client hyperlink. The Client search page appears where you can search for a client with the relevant criteria and select the required client. Alternatively, you can type in the name of the client or client number and choose the relevant client from the list suggested by Aura. The Client selected is the Seller who is receiving the finance under factoring agreement for this invoice.
4. The Origin Branch will be automatically populated as the branch into which you have logged in and it cannot be edited. This indicates the branch in which the Contract record is being created.
5. Select the Account Branch from the drop-down list of all the branches which are allowed for the product. By default, the user's logged in branch is selected. You can change as required. This is the branch in which the account is maintained.
6. Select Service Delivery Channel from the drop-down list. The service delivery channel should have been maintained under Admin > System codes > Categories > Service delivery channel.
7. Agreement Required indicates whether the contract must be linked to an Agreement. By default, this is set to Yes, meaning Aura will validate that a valid factoring agreement exists for the Client. If set to No, you can proceed without linking an Agreement -- this is used for Spot factoring arrangements.
8. This field becomes mandatory if Agreement Required = Yes. Select the factoring Agreement Reference Number from the hyperlink. Aura displays only active and approved Agreements of type Accounts Receivable Factoring maintained under CRM > Clients > Agreement for the chosen Client. If there is only one eligible Agreement, it is automatically defaulted.
9. Enter or select the Buyer against whom the invoice is raised. If Agreement Required = Yes, Aura validates the Buyer against the Agreement's Buyer Availability rules (inclusion or exclusion list). If Agreement Required = No, you can select any active Client as Buyer.
10. Click Next. The New Contract → Trade Invoice (2/8) page appears.
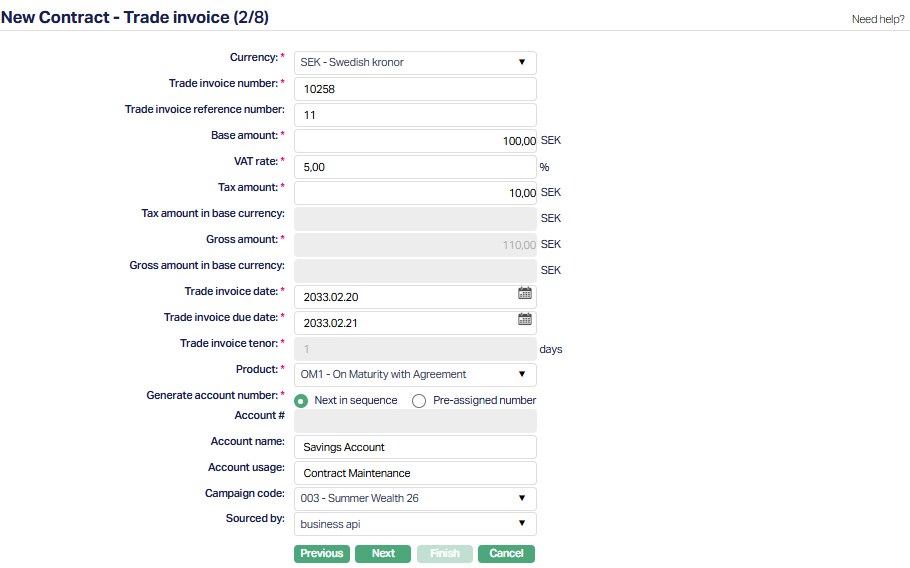
11. Select the Currency in which the trade invoice is raised. The list displays all active currencies maintained in Admin. If only one active currency exists, it is automatically defaulted.
12. Enter the unique Trade Invoice number. This is the Buyer's payable document under which the Seller expects payment. Aura ensures uniqueness for each Seller-Buyer combination.
13. Trade invoice reference number - captures an additional internal or Buyer reference number, such as the OCR number used in Swedish invoices if applicable. This field is optional.
14. Base Amount - Enter the invoice amount excluding tax. Only positive values greater than zero are allowed. The amount is suffixed with the 3-character currency code and decimals follow the settings of the chosen currency.
15. Enter the applicable VAT rate percentage. This is captured for informational purposes only, Aura does not use this field for calculations. Only positive values with up to two decimals are allowed.
16. Enter the tax amount on the invoice. This must be a positive value greater than zero, formatted with the currency code and regional separators as per entity setup.
17. Tax Amount in Base Currency - If the invoice currency differs from the base currency, enter the local currency equivalent of the tax amount. This is only for display in the Buyer's invoice and is not processed further. If the selected currency equals the base currency, this field is disabled.
18. Gross Amount - This is the total invoice value, including tax. Aura derives this as Base Amount + Tax Amount and disables it for editing.
19. Gross Amount in Base Currency - If the invoice currency differs from the base currency, enter the local currency equivalent of the gross amount. Like the tax amount in base currency, this field is only informational and is disabled if invoice currency equals base currency.
20. Trade Invoice Date - Enter the invoice issue date. It must be on or before the current booking date. If an Agreement Reference is provided, the invoice date must fall within the Agreement's effective dates.
21. Trade Invoice Due Date - Enter the Buyer's payment due date. This must be on or after the booking date. For Maturity Factoring arrangements, the due date can equal the booking date.
22. Trade Invoice Tenor - Aura automatically derives the tenor as the difference between the invoice date and due date. The field is displayed but disabled.
23. Select the factoring Product applicable for the contract from the list of Factoring Products maintained under Commercial > Factoring > Settings > Product. The way Products are displayed depends on whether an Agreement is required or not.
When Agreement Required = Yes, Aura will automatically default the Product from the Buyer Group defined in the Agreement. Only Products that are available for both the selected Seller (from Step 1) and the Buyer Group will appear. If no match is found, no Product will be displayed in the drop-down.
Example - Suppose you are creating a contract for Client A (Seller). The Products are configured as follows:
- Product 1 → Available for Sellers A, B, and C
- Product 2 → Available for Sellers A and B
- Product 3 → Available only for Seller A
- Product 4 → Available for only Seller D
Note:
- Agreement defines which Buyer Groups can use a Product (acts like a template).
- Product Availability defines which Sellers can actually use that Product (acts as a restriction).
When Agreement Required = No, Aura displays all active Accounts Receivable Factoring Products where Agreement Required is set to No, provided these conditions are met.
- The Contract Currency is allowed for the Product.
- The Gross Invoice Amount falls within the Product's defined minimum and maximum invoice amount range for that currency.
- The Trade Invoice Tenor (credit period) is within the Product's minimum and maximum term days.
- The Product is available for the selected Branch, Offering and Client.
If only one Product satisfies those conditions (whether Agreement Required = Yes or No), Aura automatically defaults it in this field.
24. Input how the account number has to be generated in Generate Account Number. If you want to auto-generate the account number, choose Next in sequence. If you want to give a specific account number for this account, choose pre-assigned number. In case of the former, Aura will generate account number internally using the account number mask maintained at the entity level. The account number is unique across the entity.
25. Account # will be enabled only on selecting pre-assigned numbers for Generate account number. Enter the required Account #. Aura will validate the pre-assigned number against the account number mask maintained at the entity level and also check if it is unique.
26. Enter Account Name. This will be used for the account.
27. Enter Account Usage, i.e., how the account will be used.
28. Select the Campaign code from the drop-down list of options maintained under Admin > Sales > Campaigns. Campaign code is a unique code which can be used as a campaign identifier in Aura.
29. Select the Sourced By. It is the Aura user whose status is activated. All activated Aura users will be available in the drop-down list.
30. Click Next. New Contract → Payee details (3/8) page appears.
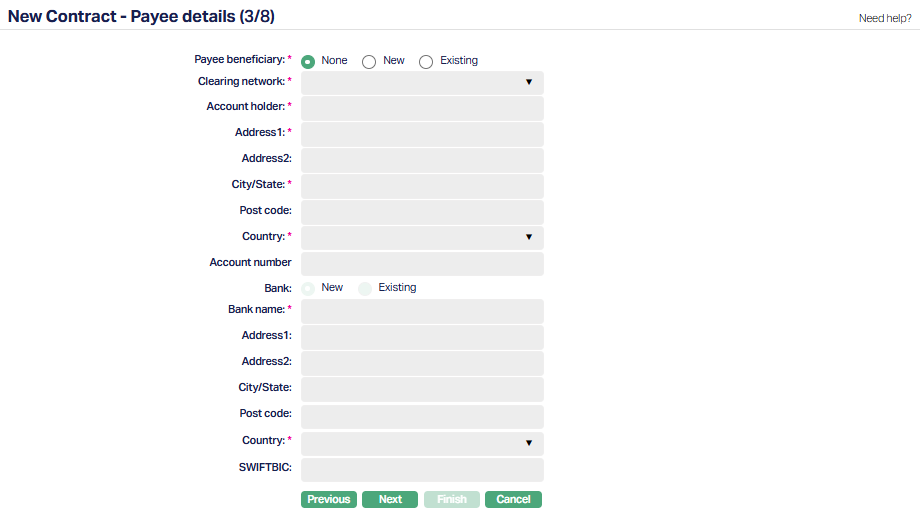
Note: This step is provided to capture the payee beneficiary details as mentioned in the Seller's trade invoice. Typically, this contains the bank account into which payments relating to the invoice should be routed. Although similar information can also be maintained under Payment Settings > Seller Payout Details, this step allows you to retain the original invoice-specific details. If the Factor uses an internal running account with the Seller and does not pay out per contract, you can skip this step, as it is non-mandatory.
When the disbursement method is set to External Account. The fields displayed may vary depending on the chosen Clearing Network.
31. Payee Beneficiary - Indicate whether you want to record beneficiary details for this contract. By default, the option is set to None, which disables all other fields.
None : No beneficiary details are recorded in this step.
New: Enter new beneficiary details manually. All subsequent fields are enabled for input.
Existing : Search and select an existing beneficiary from the Client's Beneficiary Details tab. Aura will populate all fields automatically.
32. Select the Clearing Network through which the payment will be routed. The available networks depend on the Entity's country and the contract currency. Depending on the chosen network, the subsequent fields required for payee or bank details may vary.
33. Enter Account holder name i.e., the beneficiary's name.
34. Enter Address 1 and 2 for the beneficiary.
35. Enter City/State of the beneficiary.
36. Enter the Postal code of the beneficiary.
37. Select the Country from the available drop-down list maintained under Admin > System Codes > Generic Definitions > Countries.
38. Enter the Account number of the beneficiary. Depending on the country selected above, the field will get displayed.
39. Bank - Choose whether to provide a New Bank or select an Existing Bank.
New : Enter all bank details manually.
Existing : Search and select a bank from Admin > Correspondent Bank Management.
40. Select the name of the Bank of the Beneficiary from the drop-down list. The name of the Banks are maintained under Admin > Corresponding Bank Management.
For new Bank Details,
41. Enter Address 1 and 2 for the new Bank.
42. Enter City/State of the new Bank.
43. Enter Postal code of the new Bank.
44. Select Country from the available drop-down list maintained under Admin > System Codes > Generic Definitions > Countries.
45. Enter BIC of the beneficiary bank. It is the standard format approved by the International Organization for Standardization (ISO) under ISO 9362. It is a unique identification code for both financial and non-financial institutions.
46. Add to Beneficiary List - If you are adding a new payee beneficiary, you can select this option to automatically save the details in the Client's Beneficiary List for future use. This checkbox is only visible when "New" is selected for Payee Beneficiary.
47. Click Next. New Contract → Settings (4/8) page appears.
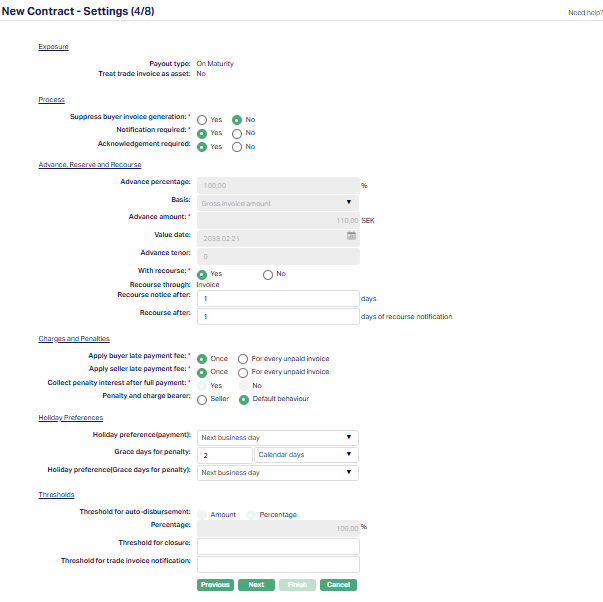
Exposure
48. The Payout Type defines when and how the Seller is funded under this contract. This field is read-only and is defaulted from the Product chosen in New Contract -- Trade Invoice (2/8) page.
Advance Amount - An advance is paid to the Seller upfront, based on the defined Advance Percentage.
On Maturity - The Seller is funded on invoice maturity, regardless of Buyer payment.
On Realisation - No advance is given; Aura acts only as collection agent.
The chosen payout type determines how subsequent fields in this step are enabled or disabled.
49. Indicate whether the trade invoice should be treated as an asset. This option is defaulted from the Product and cannot be changed here.
If Advance Amount is selected, the field is shown with the default value No.
If On Maturity or On Realisation is selected, the field is automatically defaulted to No and remains disabled.
Process
50. Suppress Buyer Invoice Generation specifies whether Buyer Invoices should be suppressed.
If you select Yes, Aura does not generate Buyer invoices. The Notification Required field is defaulted to No and disabled.
If you select No, Buyer Invoices are generated and notification settings can be applied.
If Agreement is required, the default comes from the Agreement. Otherwise, the default is No, and you can change it.
51. Enable Notification Required field to specify whether the buyer must be notified whenever the seller sends an invoice. The default value is No, and you can change it as required and is a mandatory field.
If set to Yes, the contract can be activated only after the Buyer has been notified.
If set to No, the contract can proceed without Buyer notification.
If Buyer Invoice Generation is suppressed, this field is automatically set to No and disabled. Otherwise, it defaults from the Product and can be changed.
52. Acknowledgement Required field determines whether the buyer's acknowledgement is mandatory for contract activation. This is a mandatory setting, but it becomes editable only when Notification Required is set to Yes. The default value is No, and you can change it as required.
If enabled, the contract can only be activated after the buyer acknowledges the notice.
If disabled or Notification Required is set to No, buyer acknowledgement is not considered.
Advance, Reserve and Recourse
53. Advance Percentage - Enter the percentage of the invoice amount to be released as advance to the seller. This field is conditionally enabled based on the selected Payout Type.
If the Payout Type is Advance Amount, the field is enabled and allows input of positive values up to two decimal places.
If the Payout Type is On Maturity, the field is defaulted to 100 and disabled.
If the Payout Type is On Realisation, the field is defaulted to 0 and disabled.
54. Choose the Basis on which the advance percentage should be applied to arrive at the advance amount. The drop-down includes the following options -- Gross Invoice Amount (including taxes) and Base Invoice Amount (excluding taxes).
If the Payout Type = Advance Amount, the field is enabled and defaults to Gross Invoice Amount.
If the Payout Type = On Maturity or On Realisation, the field is defaulted to Gross Invoice Amount and disabled.
This setting is not impacted by the Treat Trade Invoice as Asset flag.
55. Advance Amount field allows you to enter the advance amount payable on the invoice. The value is automatically calculated based on the selected Basis:
If Basis = Base Invoice Amount, the calculation is: Base Amount x Advance Percentage.
If Basis = Gross Invoice Amount, the calculation is: Gross Amount x Advance Percentage.
Decimal precision follows the chosen currency, while the thousands and decimal separators are applied as per the Entity > Regional Settings configuration.
56. This field captures the Value Date of the contract. Its behaviour depends on the selected Payout Type.
If Payout Type = Advance Amount : The Value Date defaults to the Current Booking Date. You can change it to any future date, provided it falls within the range:
Value Date >= Trade Invoice Date
Value Date <= Trade Invoice Due Date.
If Payout Type = On Maturity : The Value Date defaults to the Trade Invoice Due Date and is disabled for editing.
If Payout Type = On Realisation : The Value Date field is hidden.
You can either select the date using the calendar icon or enter it manually.
57. Advance Tenor - This field specifies the tenor (duration) of the advance for the contract.
If Payout Type = Advance Amount or On Maturity:
The tenor is derived as Trade Invoice Due Date -- Value Date (similar to Loan Account Tenor).
The field is system-derived and disabled.
In the case of On Maturity, the tenor will always be 0.
If Payout Type = On Realisation: The field is hidden.
Note: The fields Choose Term By and Days/Months/Years are not relevant for factoring contracts. Since the Seller has already raised the invoice and submitted it to the Factor, the Trade Invoice Due Date is pre-determined and cannot be changed. Consequently, there is no need for a "Choose Term By" option. Additionally, as factoring contracts are typically short-term in nature, the Advance/Trade Invoice Tenor is always expressed in days.
58. Reserve Release - This option specifies whether the Factor should release a portion of the Reserve Amount retained when a partial payment is received from the Buyer.
Display Conditions:
Shown only if Payout Type = Advance Amount.
Hidden if Payout Type = On Maturity or On Realisation:
For On Maturity, the Reserve is always 0.
For On Realisation, no Advance is paid. Therefore, in both cases, Reserve Release is not applicable.
Options Available:
Proportional - Reserve Amount is released proportionally after retaining the shortfall.
Full Payment of Advance - Reserve Amount is released only after the entire Advance Amount has been recovered.
Default Behavior:
The option defaults from the Product selected in the previous step. You may change it if required.
Aura Behavior:
If the Buyer makes only a partial payment and the option selected is Full Payment of Advance:
If the part payment covers the full Advance Amount, the excess (Payment Received -- Advance Amount) can be released from the Reserve.
If the part payment does not cover the full Advance Amount, no Reserve will be released. Reserve payment will occur only once the entire Advance Amount is received.
If the option selected is Proportional, the Reserve Amount is released proportionally in line with the payment received, after retaining any shortfall.
Note: The actual payment of the Reserve to the Seller is always subject to the Reserve Release Threshold defined in the Agreement.
59. With Recourse - The Radio buttons Yes and No specifies whether Aura has recourse to the seller in case the buyer does not make the payment.
If Payout Type is Advance Amount or On Maturity, the default value is taken from the Agreement (if Agreement Required = Yes) or from the Product (if Agreement Required = No). The field remains editable.
If Payout Type is On Realisation, the field is defaulted to No and is disabled.
60. Recourse through - This field specifies the method through which recourse will be applied if the Buyer fails to pay. This field is conditionally mandatory and is displayed only if With Recourse = Yes. Options include:
Invoice - A Recourse invoice is generated as per Recourse Invoice Settings.
Account - The Seller's Client Account is debited for the unpaid invoice amount. Any subsequent payments are credited back, while the invoice remains payable by the buyer.
Default Value :
Taken from Agreement if Agreement Required = Yes.
Taken from Product if Agreement Required = No.
If Agreement/Product has With Recourse = No but you change it to Yes in the Contract, the default is set to Account, requiring you to provide an Account Number.
This field is read-only and the default cannot be changed.
61. Account # - This field captures the Client Account to be debited for recourse purposes. This field is conditionally mandatory and is displayed only if With Recourse = Yes, and Recourse Through = Account. It is hidden if With Recourse = No or Recourse Through = Invoice.
Aura Behaviour:
If a Settlement Instruction is maintained for the Seller (Client chosen in New Contract - Profile (1/8) page), Aura automatically displays the Debit Account Details where:
Currency = Account Currency
Business Area = Factoring (or Any)
Product = Product chosen in an earlier step (or Any)
Repayment / Debit Account = Own Account
If Repayment / Debit Account is not equal to Own Account:
You can manually input or select the Client Account using the textbox with hyperlink.
The selectable accounts are filtered based on the following:
Contract Client = Account Client
Contract Currency = Client Account Currency
Client Account Status not in (Opened, Reopened, Closed)
62. Recourse Notice After - Enter the number of days after the End of Grace Days (EOGD) for the contract, after which the recourse notice can be sent to the Seller in case of Buyer default. This field is conditionally mandatory and is enabled only when With Recourse = Yes.
If 0 is entered, the recourse notice will be triggered at End of Day (EOD) in the EOGD.
Default Value:
Taken from the Agreement if Agreement Required = Yes.
Taken from the Product if Agreement Required = No.
The value can be changed.
If the Agreement / Product has With Recourse = No but the user changes it to Yes at the Contract level, the field cannot be defaulted from Agreement / Product. In this case, Aura defaults the field to blank, and you must provide a value manually.
If With Recourse = No, the field is hidden.
63. Recourse After - This field specifies the number of calendar days after the Recourse Notification when recourse is actually activated. This field is conditionally mandatory and is displayed only if With Recourse = Yes.
Aura Behaviour:
If Recourse Through = Invoice → A Recourse Invoice is generated.
If Recourse Through = Account → The Seller's Account is debited.
Default Value:
Always taken from the Product.
The field remains editable and you can change the value.
If the Product has With Recourse = No, but you change it to Yes at the Contract level:
The field cannot be defaulted from the Product.
Aura defaults this field to blank, and you must provide a value manually.
If With Recourse = No, the field is hidden.
Charges and Penalties
64. Specify when the Buyer Late Payment Fee should be applied. This is a mandatory field with the following options:
Once - The late payment fee is applied only once, on the next invoice after the first Buyer Invoice remains unpaid. No further fees are applied afterward.
For Every Unpaid Invoice - A late payment fee is applied on every invoice raise after an unpaid Buyer Invoice.
The value defaults from the Product configuration, but you can change it at the contract level.
65. Apply Seller Late Payment Fee indicates when the Seller Late Payment Dee should be applied. This is a mandatory field with the following options:
Once - The late payment fee is applied only once, on the next invoice after the first Seller invoice remains unpaid. No further fees are applied afterward.
For every unpaid invoice - A late payment is applied on every invoice raise after an unpaid Seller invoice.
Note: The Recourse Invoice, which is the first invoice to the Seller, will not have any late payment fee applied, even if the Buyer has not paid.
The value defaults from the Product configuration, but you can change it at the contract level.
66. Collect penalty Interest after Full Payment - This field specifies when the penalty interest should be applied in case of overdue payments. The field is defaulted to Yes and cannot be edited.
If set to Yes, Penalty interest (both buyer and seller) is not included in any regular invoice until the trade invoice is fully paid. Once the full payment is received, Aura generates a separate invoice for the penalty interest. The interest is calculated based on all overdue days, consolidated into a single accrual, and sent to the relevant party:
Buyer - if there is no recourse or recourse has not yet occurred.
Seller - if recourse has already occurred.
The payment due date for this invoice is set to the same day it is generated.
If this feature is later enhanced to support No, penalty interest will be included in each invoice as it is raised. In such cases, the calculation will use the overdue balance as of the booking date for the remaining period up to the invoice due date.
67. Penalty and Charge Bearer indicates who will bear the charges on the contract. It is a mandatory radio button with the following options:
Default Behaviour - The charge bearer is determined according to the configuration defined in the Agreement.
Seller - Overrides the Agreement settings and assigns all charges to the Seller. This includes Reminder Fees, Status Change Fees, and any other charges associated with the contract.
By default, the option is set to Default Behaviour, but you can change it to Seller if required.
Holiday Preferences
68. Holiday Preference (Payment) - Choose how Aura should handle invoice due dates that fall on a holiday. The drop-down includes:
Ignore
Next Business Day
Previous Business Day
This field is optional.
69. Grace days for Penalty - Enter the number of grace days allowed before a penalty is applied.
This is an optional numeric field. Only positive integers are allowed.
70. Select definition for Grace days for Penalty. The pre-shipped options available in the dropdown list are:
Calendar days - If this is selected, then all the calendar days will be eligible for Grace Days for Penalty, including the holidays.
Business days - If this is selected, then only working days will be eligible for Grace Days for Penalty, excluding the holidays.
71. Holiday preference (Grace days for penalty) - Specify what Aura should do if the End of Grace Days falls on a business holiday. Options include:
Ignore
Next Business Day
Previous Business Day
Note: This field is displayed only if Grace Days Type is set to Calendar Days. If Business Days is selected, this field is disabled.
Thresholds
72. Threshold for Auto-Disbursement - This field defines the threshold used for auto-disbursement of funds. It is presented as a radio button with the following options:
Percentage - The threshold is calculated as a percentage of the invoice value.
Amount - The threshold is entered as a fixed amount, based on the account currency.
The default value is derived from the Product selected in the previous step, New Contract -- Trade Invoice (2/8) page, aligned with the account currency. You can modify this value if required.
This field is conditionally enabled depending on the selected Payout Type:
Advance Amount - Field is enabled.
On Maturity - Field is defaulted to Percentage and disabled.
On Realisation - Field is hidden.
73. Percentage (or amount) - This field allows you to define the threshold for auto-disbursement, either as a percentage or as an amount, depending on the option chosen in the previous step. The default value is inherited from the Product selected earlier, but you can modify it based on your requirements.
If Percentage is selected:
The field label is displayed as Percentage.
A % symbol is shown as a suffix.
When Payout Type = Advance, you can enter an integer between 1 and 100.
When Payout Type = On Maturity, the value defaults to 100 and is disabled.
When Payout Type = Realisation, the field is disabled.
If Amount is selected:
The field label is displayed as Amount.
When Payout Type = Advance, you can enter any amount between the Minimum and Maximum Trade Invoice Amount.
The field is suffixed with the 3-character currency code of the account currency.
Decimal and thousand separators follow the Account Currency settings and Entity > Regional Settings.
When Payout Type = On Maturity or On Realisation, the field is disabled.
Validation during Disbursement:
During disbursement, if the amount to be disbursed is greater than or equal to the defined threshold, the disbursement proceeds. If the amount is less than the threshold, Aura displays an error message, except in the case of the final disbursement for the contract. For the last disbursement, Aura allows an amount less than the threshold since no further disbursement is pending.
74. Threshold for Closure - This field allows you to define a tolerance amount for invoice closure in case the payment received is slightly less than the invoice value. If the shortfall is within the threshold defined here, Aura will treat the invoice as fully paid and close it.
The default value is inherited from the Product selected in the previous step, based on the Account Currency, but you can change it if required.
The field is suffixed with the 3-character currency code of the Account Currency.
Decimal and thousand separators are displayed according to the Account Currency settings and Entity > Regional Settings.
75. Threshold for Trade Invoice Notification - This field defines the minimum invoice amount required for a notification to be triggered. Even if Notifications Required is set to Yes, Aura will only send a notification if the gross amount of the trade invoice is greater than or equal to the threshold value entered here.
The default value is inherited from the Product selected in the previous step, based on the Account Currency, but you can change it if required.
The field is suffixed with the 3-character currency code of the Account Currency.
Decimal and thousand separators are displayed according to the Account Currency settings and Entity > Regional Settings.
76. Click Next. New Contract → Payment Settings (5/8) page appears.
Payment Settings
In case of Factoring Contracts, the Seller is the Factor's client. Any payment to the Seller can be only through Own Account or External Account. Such an account will normally remain the same for almost all contracts of that Seller. In this case, it is preferable to maintain the same in the Seller's Settlement instruction (as Credit Account) and use it for all payouts. A payment message can then be triggered to the Seller's Bank Account as required. Settlement GL will always be available as an option so that a GL can be used to route the payments.
There is no payout to the Buyer under any circumstances.
Receipts are most often from the Buyer and always against an Invoice, which means Payment by INvoice is the standard method. In rare cases, if the Buyer is also the Factor's client and maintains a running account, receipts may be through Own Account, Settlement G8L will also be available so that receipts can be routed through a GL. In future, Requests for Payment from a third party may be supported, but for now -- Payment by Invoice, Settlement GL, and Own Account are managed through Settlement Instruction maintenance for the Buyer.
In case of Recourse to the Seller and hence receipt from the Seller, it will be routed through the Settlement GL maintained in the Product (or at the Seller's Settlement Instruction) or through the Own Account or External Account maintained in the Seller's Settlement Instruction as the Debit Account.
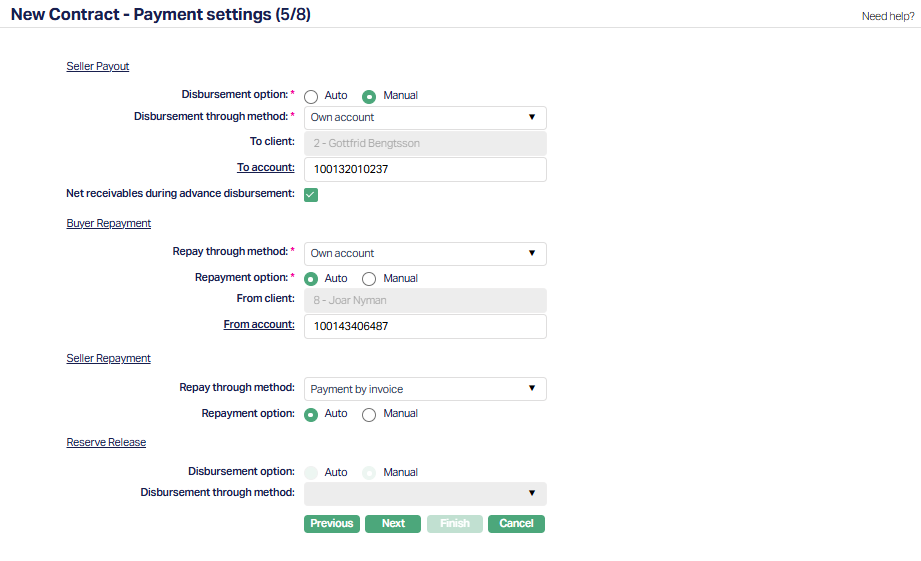
Seller Payout
This section is used to capture the details of the disbursement to be made to the Seller for the Advance, in case the Payout Type is set to Advance Amount or On Maturity. It will also be used for payments to the Seller when the Payout Type is On Realisation.
Note: The Disbursement Currency field has been removed, as disbursements are not supported in a currency other than the Account Currency for now. If such functionality is required, it can be managed through the Client Account, Multi-currency Accounts, or Cross Currency Journals. The destination account, however, can still have a currency different from the Contract's Account Currency.
77. The Disbursement Option field allows you to define how the disbursement to the Seller will be processed. By default, the option is set to Manual, but you can change it if required. You can choose between:
Auto - Aura will automatically trigger the disbursement as per the defined rules.
Manual - You will have to manually initiate the disbursement.
78. Disbursement through method - This field defines the method through which the disbursement to the Seller will be carried out. The available options depend on the Disbursement Option selected earlier:
If disbursement option = Manual:
External Account
Own Account
Settlement GL
If disbursement option = Auto:
External Account
Own Account
When you select a method, the subsequent fields are automatically populated based on the Settlement Instruction maintained for the Seller (Client chosen in Step 1) Specifically, Aura will display the Credit Account details for:
Currency = Account Currency
Business Area = 'Factoring' (or 'Any')
Product = Product chosen in the previous step (or Any)
Settlement By for Credit Account matches the option chosen under Disburse Through Method
If a match is not found, you can manually input the details.
If Disbursement Through Method = Settlement GL and no Settlement Instruction is maintained, Aura defaults the Settlement GL from the Product.
When Own Account is chosen:
To Client - Defaults to Seller Client; not editable.
To Account - Defaults to Own Accoun t# from Settlement Instruction; you can change.
When Settlement GL is chosen:
- To Ledger # - Defaults from Settlement Instruction; if not available - from Product.
When External Account is chosen: Aura defaults the details from the Seller's Settlement Instruction, and you can modify them if required.
The following information is captured -
Clearing Network
Currency
Account Holder
Account Number
Bank Details (including Bank Name, BIC, and Address)
Address (fields such Address 1, Address 2, City/State, Postal Code, and Country)
Most of these fields are conditionally enabled based on the Settlement Instruction setup, while some (like Address 2 and Postal Code) are optional and can be manually entered.
79. Net receivables during advance disbursement - This checkbox determines whether discount interest and charges should be netted during advance disbursement. It is applicable only when the Payout Type is Advance Amount. For On Maturity or On Realisation, discount interest does not apply, so this field is not relevant.
By default, the checkbox is selected. You can uncheck if the Seller's Disburse Through Method is set to Own Account.
If checked - Aura creates a compound entry, and the net amount (after deducting discount interest and charges) is credited to the seller's destination account.
If unchecked - Aura creates separate entries - crediting the gross amount and debiting discount interest and charges individually.
Note: The debit treatment for charges depends on whether charges are bundled or not. If bundled, debits follow the Charge Bundle Frequency. If not, charges are debited to the Charge Account upon approval of the contract in Opened status.
Buyer Repayment
This section captures the details of payments received from the Buyer.
80. Repay Through Method - Select how the buyer's repayment should be processed. The available options are:
Own Account - Repayment is made through the buyer's running account maintained with Aura.
Payment by Invoice - Repayment is directly linked against specific invoices.
Settlement GL - Repayment is routed through the Settlement GL maintained for the product or buyer.
81. The Repayment Option depends on Repay Through Method selected:
Own Account - Repayment can be set to Auto or Manual. You must select the From Client and From Account.
Payment by Invoice - Repayment can be set to Auto or Manual. No additional details are required.
Settlement GL - Repayment Option is always Manual (defaulted and disabled). The Settlement GL is auto-populated from the Product.
If Settlement Instruction (SI) is maintained for the Buyer (chosen in Step 1), Aura displays the Debit Account details where:
Currency = Account Currency
Business Area = 'Factoring' (or 'Any')
Product = Product chosen in the previous step (or Any)
Settlement By for Debit Account matches the option chosen under Repay Through Method.
If a match is not found, you can manually input the details.
If Repay Through Method = Settlement GL and no Settlement Instruction is maintained, Aura defaults the Settlement GL from the Product.
When Own Account is chosen:
From Client - Defaults to Buyer Client; not editable.
From Account - Defaults to Own Account # from Settlement Instruction; you can change.
If Payment by Invoice is chosen:
- No additional details are required.
If Settlement GL is chosen:
- From Ledger # - Defaults from Settlement Instruction; if not available - from Product.
Seller Repayment
This section captures the repayment details from the Seller. It is conditionally mandatory and is enabled only when With Recourse = Yes. If With Recourse = No, this entire section is disabled.
82. Repay Through Method - Select how the seller's repayment should be processed. The available options are:
Own Account - Repayment is made through the seller's client account maintained with Aura.
Payment by Invoice - Repayment is directly linked against the recourse invoice(s).
Settlement GL - Repayment is routed through the Settlement GL maintained for the product or seller.
83. The Repayment Option depends on Repay Through Method selected:
Own Account - Repayment can be set to Auto or Manual. You must select the From Client and From Account.
Payment by Invoice - Repayment can be set to Auto or Manual. No additional details are required.
Settlement GL - Repayment Option is always Manual (defaulted and disabled). The Settlement GL is auto-populated from the Product.
If Settlement Instruction (SI) is maintained for the Seller (chosen in Step 1), Aura displays the Debit Account details where:
Currency = Account Currency
Business Area = 'Factoring' (or 'Any')
Product = Product chosen in the previous step (or Any)
Settlement By for Debit Account matches the option chosen under Disburse Through Method.
If a match is not found, you can manually input the details.
If Repay Through Method = Settlement GL and no Settlement Instruction is maintained, Aura defaults the Settlement GL from the Product.
When Own Account is chosen:
From Client - Defaults to Seller Client; not editable.
From Account - Defaults to Own Account # from Settlement Instruction; you can change.
If Payment by Invoice is chosen:
- No additional details are required.
If Settlement GL is chosen:
- From Ledger # - Defaults from Settlement Instruction; if not available - from Product.
Reserve Release
This section captures the details of the reserve release to the seller, if applicable. It is conditionally mandatory when the Advance % is less than 100 and the Payout Type is set to Advance Amount.
This section is disabled when the Payout Type is On Maturity and On Realisation.
84. The Disbursement Option field allows you to define how the reserve amount should be released to the Seller.. By default, the option is set to Manual, but you can change it if required. You can choose between:
Auto - Aura will automatically trigger the disbursement as per the defined rules.
Manual - You will have to manually initiate the disbursement.
85. Disbursement through method - This field defines the method through which the reserve amount will be released.
If disbursement option = Manual:
External Account
Own Account
Settlement GL
If disbursement option = Auto:
External Account
Own Account
When you select a method, the subsequent fields are automatically populated based on the Settlement Instruction maintained for the Seller (Client chosen in Step 1) Specifically, Aura will display the Credit Account details for:
Currency = Account Currency
Business Area = 'Factoring' (or 'Any')
Product = Product chosen in the previous step (or Any)
Settlement By for Credit Account matches the option chosen under Disburse Through Method
If a match is not found, you can manually input the details.
If Disburse Through Method = Settlement GL and no Settlement Instruction is maintained, Aura defaults the Settlement GL from the Product.
When Own Account is chosen:
To Client - Defaults to Seller Client; not editable.
To Account - Defaults to Seller's own Account # from Settlement Instruction; you can change.
When Settlement GL is chosen:
- To Ledger # - Defaults from Settlement Instruction; if not available - from Product.
When External Account is chosen: Aura defaults the details from the Seller's Settlement Instruction, and you can modify them if required.
The following information is captured -
Clearing Network
Currency
Account Holder
Account Number
Bank Details (including Bank Name, BIC, and Address)
Address (fields such Address 1, Address 2, City/State, Postal Code, and Country)
Most of these fields are conditionally enabled based on the Settlement Instruction setup, while some (like Address 2 and Postal Code) are optional and can be manually entered.
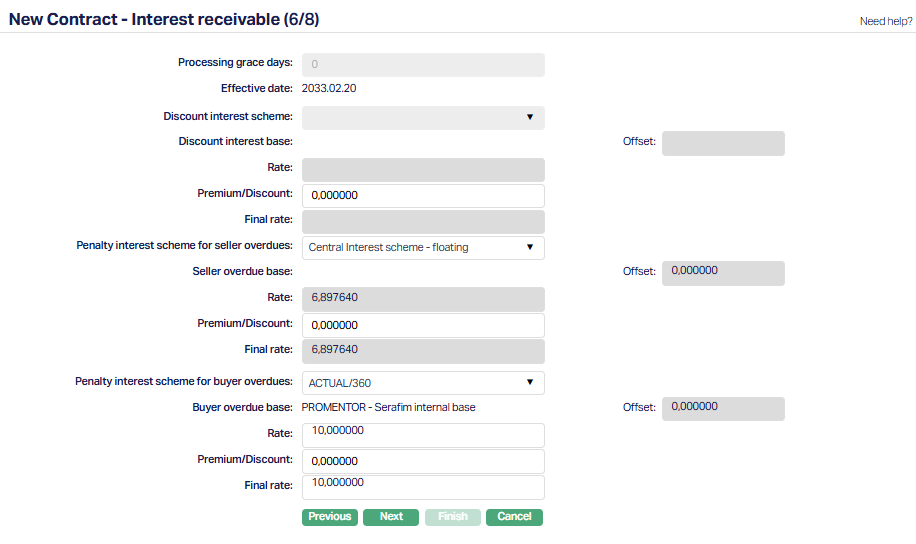
86. Click Next. New Contract → Interest Receivable (6/8) page appears.
87. Processing Grace days indicates the number of days within which disbursement must be completed to enable interest calculation on the entire Trade Invoice tenor. If disbursement is made after this, the interest calculation will be only for the Advance Tenor.
Enabled & Optional if Payout Type = Advance Amount.
Disabled if Payout Type = On Maturity or On Realisation
Default from Product, and you can input any positive integer from 0 to 99.
If left blank, Aura will treat it as 0.
Irrespective of the Trade Invoice Tenor, the Processing Grace Days will remain the same for all contracts under the Product.
Interest has to be calculated for the Trade Invoice Tenor if disbursement is done up to the date indicated based on Processing Grace Days, as per the example given below. If disbursement is after the dates, interest will be calculated for the Advance Tenor.
| Trade Invoice Date | Processing Grace Days | Disbursement up to |
|---|---|---|
| 16-Jul-20 | 0 | 16-Jul-20 |
| 16-Jul-20 | 1 | 17-Jul-20 |
| 16-Jul-20 | 2 | 18-Jul-20 |
| 26-Jul-20 | 10 | 05-Aug-20 |
| 26-Jul-20 | 12 | 07-Aug-20 |
88. This is the Effective Date of the interest rate for the contract. By default, the current system date is populated.
89. Discount Interest Scheme indicates the Interest Scheme that should be used to derive the discount rate for the contract. The scheme is derived based on the Trade Invoice Tenor and the Term Band of the Product chosen, and you can change it if required.
The field is enabled and mandatory if the Payout Type = Advance Amount. If Payout Type = On Maturity or On Realisation, this field is disabled.
90. Discount Interest Base displays the interest base only in the case of Discount interest scheme above is variable. This field is non-editable. If the Discount Interest Scheme is fixed, then no data will be populated for Discount Interest Base field.
91. Offset field is defaulted from the particular band maintained in the discount interest scheme. The value is defaulted from the interest scheme. The offset value is fixed and this field is non-editable.
92. Rate - The Discount Interest Rate applicable for this contract.
If Payout Type = On Maturity or On Realisation: Not applicable.
If Payout Type = Advance Amount:
Aura checks the Advance Amount from the applicable combination of the Interest Scheme for this contract to derive the rate.
P = x% of Base or Gross
N = Assume as TIDD - VD
R = From Tenor slab - Aura derives the Interest Scheme based on the Invoice Tenor, applies the value of P, picks the corresponding Amount Slab, and fetches the rate from that slab.
The actual interest will be calculated for the disbursed amount for the Advance Tenor, subject to Processing Grace Days.
93. Enter the Premium / Discount that is to be applied on the above Rate. By default it will be zero. Both positive and negative values are allowed. A positive value is considered as Premium and negative value is considered a Discount.
94. Final Rate is the Final Discount Interest Rate applicable for this contract. It is derived as: Base Rate +/- Offset +/- Premium/Discount. This field is non-editable.
Once the contract is activated/approved, the interest rate is frozen and will not float even if it is a Variable Interest Scheme.
95. Penalty Interest Scheme for Seller Overdues field allows you to define the interest scheme that will be used to calculate penalty interest on the Seller's overdue amounts for this contract.
The field is enabled and optional if:
The Payout Type = Advance Amount or On Maturity and,
With Recourse = Yes
It is disabled if:
The Payout Type = On Realisation or,
With Recourse = No
Aura defaults the scheme from the Product settings, but you can change it if required.
96. Seller Overdue Base displays the Interest Base if the Interest Scheme chosen in the previous field has an Interest Base mapped. The enable/disable conditions are the same as in the Penalty Interest Scheme for Seller Overdues field.
97. Offset field defines the offset applied to the Interest Base when calculating penalty interest for the Seller.
Enabled and optional if the Payout Type = Advance Amount or On Maturity, With Recourse = Yes.
Disabled if the Payout Type = On Realisation or With Recourse = No.
98. Based on the sanctioned loan amount, Penalty Interest Scheme for Seller Overdues and Seller Overdue Base and other details input for the factoring account, Rate is derived using the most appropriate interest combination.
If the interest scheme is variable, the Rate = Rate for the Interest Base.
In case of fixed interest scheme, Rate = Rate for the Interest Scheme.
99. Enter the Premium / Discount that is to be applied on the above Rate. By default it will be zero. Both positive and negative values are allowed. A positive value is considered as Premium and negative value is considered a Discount.
This field is conditionally mandatory if a Seller Overdue Scheme is chosen.
100. Final Rate is the Final Overdue Rate for the Seller applicable to this Contract. It is derived as: Base rate +/- Offset +/- Premium/Discount.
This field is enabled and optional if Payout Type is Advance Amount or On Maturity and if With Recourse = Yes and is disabled if Payout Type is On Realisation or if With Recourse = No.
This field is conditionally mandatory if a Seller Overdue Scheme is chosen.
101. Penalty Interest Scheme for Buyer Overdues field specifies the penalty interest rate that will be applied to the Buyer if the invoice remains unpaid beyond the due date. Aura calculates the overdue interest starting from the Trade Invoice Due Date up to either the Buyer's Payment Date or the Recourse Date, whichever comes earlier.
This field is enabled and optional for all Payout Types. By default, Aura picks up the penalty rate defined in the Product Settings, but you can update it if necessary. The rate supports values with up to six decimal places for accuracy.
Note: By default, penalty interest is considered as income for the Factor. However, a Retention Percentage can be set in the Product to redistribute part of this income to the Seller.
If you want the entire penalty interest to go to the Seller, set Retention % = 0.
If you want the Factor to retain a portion, define the Retention % accordingly.
102. Buyer Overdue Base displays the Interest Base if the Interest Scheme chosen in the previous field has an Interest Base mapped. The enable/disable conditions are the same as in the Penalty Interest Scheme for Buyer Overdues field.
103.The Offset field specifies the adjustment that is applied to the Interest Base when calculating the Buyer's overdue penalty interest.
This field is enabled and optional for all Payout Types.
104. Rate represents the overdue interest rate applicable for the Seller under this contract. This field is enabled and optional for all Payout Types, but becomes mandatory if a Buyer Overdue Scheme has been selected.
If the Interest Scheme is variable → Rate = Interest Base Rate & + Offset %
If the Interest Scheme is fixed → Rate = Rate defined for the Interest Scheme.
The final rate is determined based on the Approved Amount, the Interest Overdue Scheme, the Interest Overdue Base, and other details entered for the contract. Aura automatically selects the most appropriate Interest Combination according to these inputs.
105. Enter the Premium / Discount that is to be applied on the above Rate. By default it will be zero. Both positive and negative values are allowed. A positive value is considered as Premium and negative value is considered a Discount.
This field is enabled and optional for all Payout Types, but becomes mandatory if a Buyer Overdue Scheme has been selected.
106. Final Rate - This field shows the final overdue interest rate applicable for the Seller under this contract. It is system-derived and becomes available once the Rate, Offset, and Premium/Discount values are determined.
Enabled and optional for all Payout Types.
Mandatory if a Buyer Overdue Scheme is chosen.
Aura calculates the Final Rate as: Final Rate = Base Rate +/- Offset +/- Premium/Discount
Note:
If the chosen Interest Scheme is Variable, any changes made to the Interest Base or Offset after the contract is Activated or Approved will cause the Final Rate to float (adjust automatically.)
If the scheme is Fixed, the Final Rate remains constant.
107. Click Next. New Contract → Secured By (7/8) page appears.
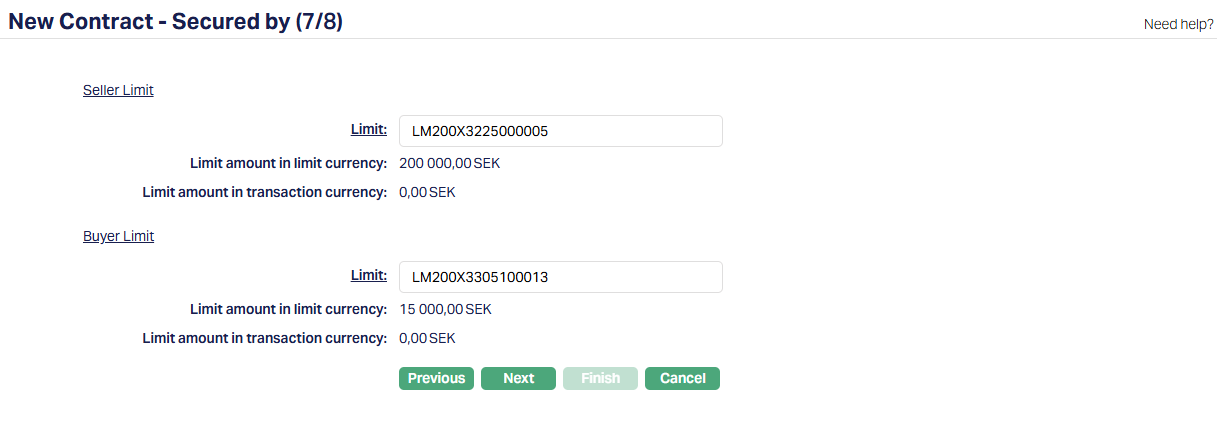
Seller Limit
In this field, you can select the Limit that will be utilized to track the Seller's exposure for this contract. This Limit is specifically used when the Payout Type is either Advance Amount or On Maturity and is disabled when Payout Type is On Realisation.
108. Enter the Limit either by typing the first few characters of the Limit code or by clicking the hyperlink to open a list of all Active Limits available for the selected Seller maintained under CRM > Collateral/Limits.
If the selected Product is configured with Track Seller Exposure = Yes, this field becomes mandatory.
If Agreement Required = Yes and the chosen Agreement already has a Limit attached, Aura automatically defaults that Limit here, but you may change it.
If Agreement Required = No, or the Agreement does not have a Limit attached, you can select a Limit manually.
Limit amount in Limit Currency - Once a Seller Limit is chosen, Aura displays the available limit amount in the limit currency.
Limit amount in Transaction Currency - Aura also displays the available limit amount for the chosen Seller Limit in the transaction (account) currency of the contract.
If the Limit Currency is different from the Transaction Currency, Aura converts the value using the mid-rate between the two currencies. The mid-rate is taken from the default rate type maintained at the entity level. The converted amount is then displayed here.
If the Limit Currency and the Transaction Currency are the same, Aura shows the same amount as in Limit Amount in Limit Currency.
Note: Both of these fields are disabled if the Payout Type is On Realisation. If a Seller Limit is entered they become mandatory.
Buyer Limit
In this field, you need to specify the Limit that will be utilized to track the Buyer's exposure for this contract. This Limit is applied against the Invoice Amount. This field is enabled for all Payout Types.
109. Enter the Limit either by typing the first few characters of the Limit code or by clicking the hyperlink to open a list of all Active Limits available for the selected Buyer maintained under CRM > Collateral/Limits.
- If the selected Product is configured with Track Buyer Exposure = Yes, this field becomes mandatory.
Limit amount in Limit Currency - Once a Buyer Limit is chosen, Aura displays the available limit amount in the limit currency.
Limit amount in Transaction Currency - Aura also displays the available limit amount for the chosen Buyer Limit in the transaction (account) currency of the contract.
If the Limit Currency is different from the Transaction Currency, Aura converts the value using the mid-rate between the two currencies. The mid-rate is taken from the default rate type maintained at the entity level. The converted amount is then displayed here.
If the Limit Currency and Transaction Currency are the same, Aura shows the same amount as in Limit Amount in Limit Currency.
Note: If a Buyer Limit is entered, both of these fields (Limit Amount in Limit Currency and Limit Amount in Transaction Currency) are mandatory.
110. Click Next. New Contract → Confirmation (8/8) page appears showing all the details you have entered above.
Note: If the custom field is mapped to Branch under Admin > System Codes > Custom fields > Field mapping, then an additional screen will appear before the confirmation screen. The custom fields will be mandatory or non-mandatory based on the rules set at the Field mappings. For more detail on custom field functionality please refer Admin> System codes > Custom fields > Field mappings manual.
111. Click Finish. The Factoring Contract is created with a unique Account # and the Contract Maintenance page appears displaying the Profile tab of the account that you added.
Status of the Account is Registered on creation.
Profile
The Profile tab, which is the default tab in the Contract Maintenance screen, shows the basic details of the contract.
To view/edit Profile
1. Access Contract Maintenance page. Click Profile tab, which is the default tab, to view the details as per sample below. The details are defaulted from the entries that you made during Contract creation. For details, refer to New Contract - Profile (1/8) page.
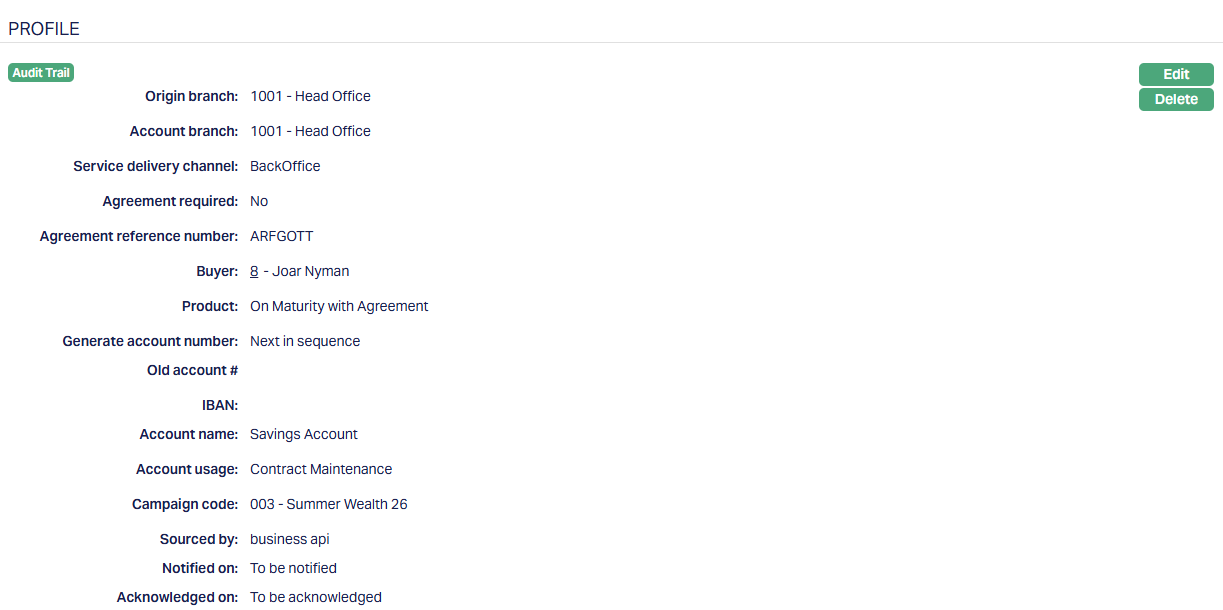
2. Click Edit. Edit Profile page appears.
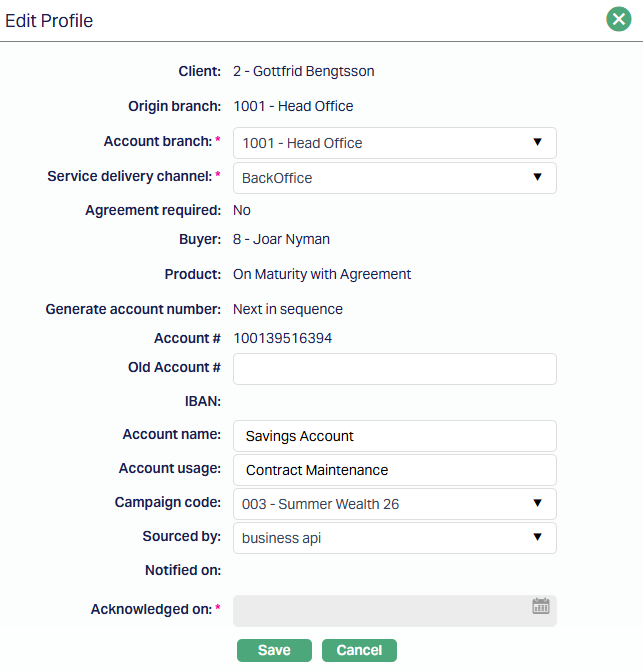
The following fields are editable:
Account Branch
Service Delivery Channel
Old Account #
Account Name
Account usage
Campaign code
Sourced by
Note:
Before any status flow begins, the fields Notified On and Acknowledged On are displayed in the Profile tab with the default values To be Notified and To be Acknowledged. These fields are system-generated and cannot be modified manually.
Notified On - Once the Account Status reaches Notified and is approved, Aura automatically updates this field with the effective notification date.
Acknowledged On - If acknowledgement is required in the product setup, Aura will enable this field when the Account Status is Notified. You must input the acknowledgement date, after which Aura records it and moves the status to Activated (Pending).
When you click Edit in the Profile tab, both fields remain disabled, confirming that they are entirely managed by Aura and not user-editable.
3. Click Save. Profile page appears with the edited details.
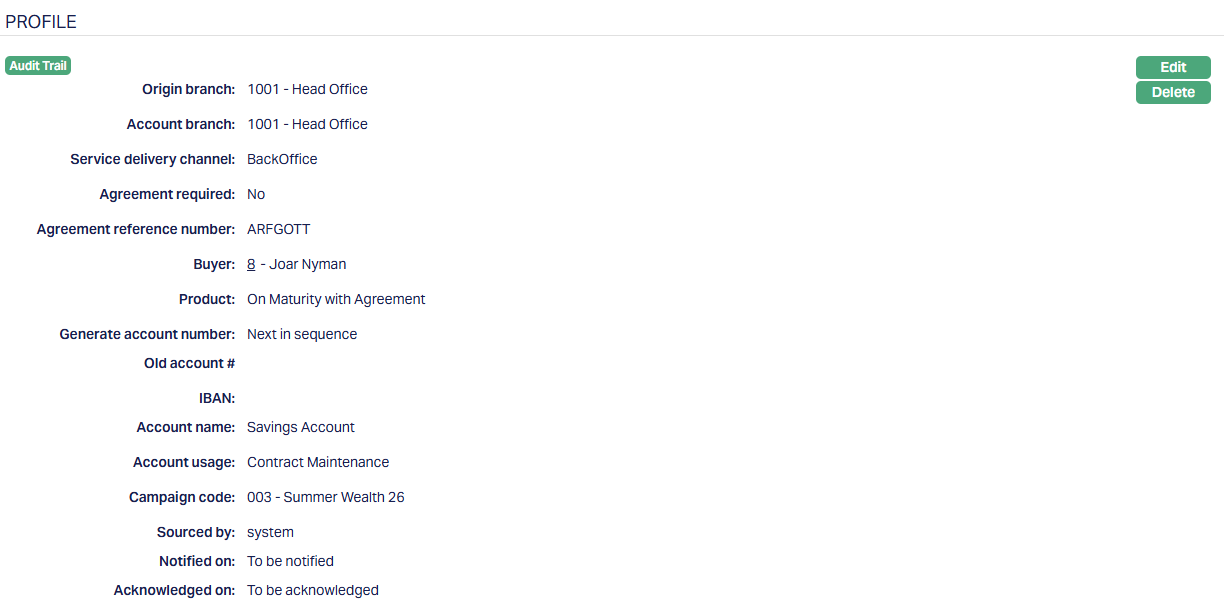
Functions: Edit, Delete
Delete: You can delete a contract only in specific cases -
The contract status must be Opened or Pending.
The option is available only to the user who originally added or last edited the contract. For all other users, the Delete button is disabled.
When you click Delete, Aura will display a confirmation message with Yes/No options. Click Yes to Delete.
Overview
The Overview tab provides a consolidated view of the Factoring contract. It is primarily display-only and allows you to quickly review the contract's core information. You can use it to check the contract reference, Seller and Buyer details, Agreement, Product, currency status and exposure information at a glance.
To view the account details,
1. Access Contract Maintenance page and click Overview tabs to view the details.
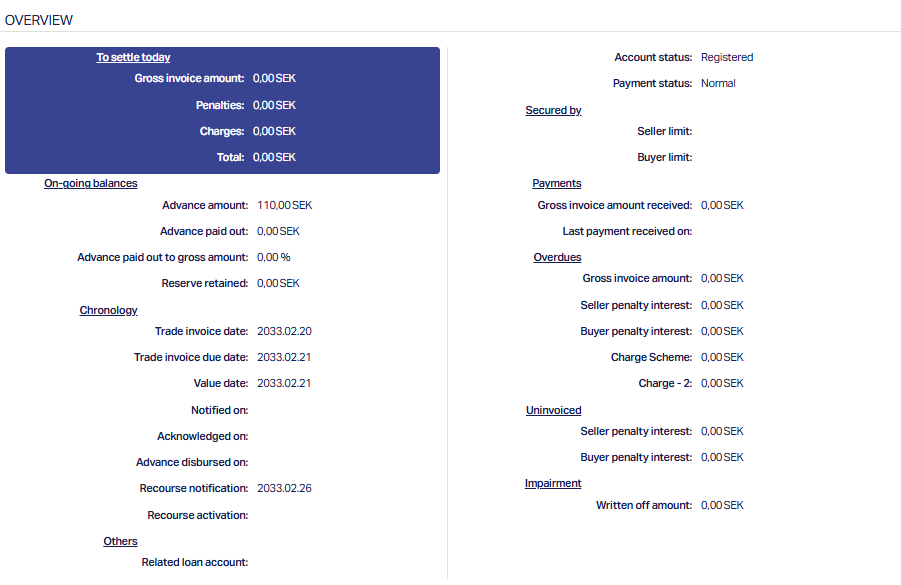
The fields available are:
To Settle Today
Gross Invoice amount shows the total invoice value that is scheduled for settlement of the current day. This represents the face value of invoices that have reached their settlement date.
Penalties display the accumulated penalty interest that has been charged up to today, based on overdue amounts. It gives you a quick view of additional costs incurred by delays.
Charges reflect the fees or service charges applied on the contract. These can include factoring fees, administrative charges, or other costs linked to the transaction.
Total represents the combined amount of gross invoices, penalties, and charges payable as of today. This figure helps you immediately understand the overall settlement obligation for the day.
On-going Balances
Advance amount shows the total advance sanctioned under the contract, representing the financing made available to the Seller.
Advance Paid out indicates how much of the sanctioned advance has already been disbursed. This helps in tracking funds released versus funds still pending.
Advance Paid out to gross amount (%) expresses the released advance as a percentage of the gross invoice value. It helps monitor the extent of financing relative invoices.
Reserve Retained shows the portion of the Invoice amount held back as a reserve. This reserve acts as a cushion against risks such as default or dispute.
Chronology
Trade Invoice date is the original date when the Buyer's invoice was raised.
Trade Invoice due date indicates the agreed date by which the Buyer is expected to make payment.
Value date represents the date on which the contract amount becomes effective for accounting and interest calculations.
Notified on shows when the Buyer was formally notified of the Invoice.
Acknowledged On shows when the Buyer confirmed the receipt of the invoice.
Advance Disbursed on displays the date when the advance was actually released to the Seller.
Recourse Notification shows the date when recourse (Seller's liability to pay) was initiated.
Recourse Activation indicates when the recourse obligation becomes effective against the Seller.
Others
Related Loan account displays the loan account number linked to this contract, if one exists, providing a direct connection to the financing arrangement.
Account Status reflects the current stage of the contract lifecycle, such as Registered, Opened, Notified, Activated, or Closed. It helps you quickly identify where the contract stands.
Payment status indicates whether the contract is in normal standing or overdue, making it easy to spot contracts that require follow-up.
Secured By
Seller Limit shows the limit that is being used to monitor the Seller's exposure under this contract.
Buyer Limit shows the limit applied to track the Buyer's exposure for the invoiced financed.
Payments
Gross Invoice Amount Received shows the total payments received from the Buyer against the financed invoices.
Last Payment Received on displays the date of the most recent payment, allowing you to track the latest inflow.
Overdues
Gross Invoice Amount shows the value of invoices that have crossed their due date and are now considered overdue.
Seller Penalty Interest displays the overdue interest charged to the Seller, typically in recourse scenarios.
Buyer Penalty Interest shows the overdue interest charged to the Buyer for late settlement.
Charge Scheme/ Charge - 2 reflect charges applied based on the predefined charge schemes configured in the product.
Note: There will be as many rows as there are overdue charges.
Uninvoiced
Seller Penalty Interest shows the penalty interest accrued on amounts that are not backed by invoices but are attributable to the Seller.
Buyer Penalty Interest displays the penalty interest accrued on uninvoiced amounts attributable to the Buyer.
Impairment
- Written Off Amount shows the value of contract amounts that have been written off due to impairment, providing visibility on losses absorbed.
Trade Invoice
The Trade Invoice Tab captures the details of each trade invoice linked to the contract. It provides a complete breakdown of the invoice amounts, dates, tax details, and status, allowing you to monitor the Buyer's obligations and Seller's exposure.
The tab consists of two sub-tabs:
Details
This section is defaulted from the entries that you make during contract creation. For details, refer to New Contract -- Trade Invoice (2/8). The fields under this tab are essential for validating the invoice against product rules and for tracking exposures.
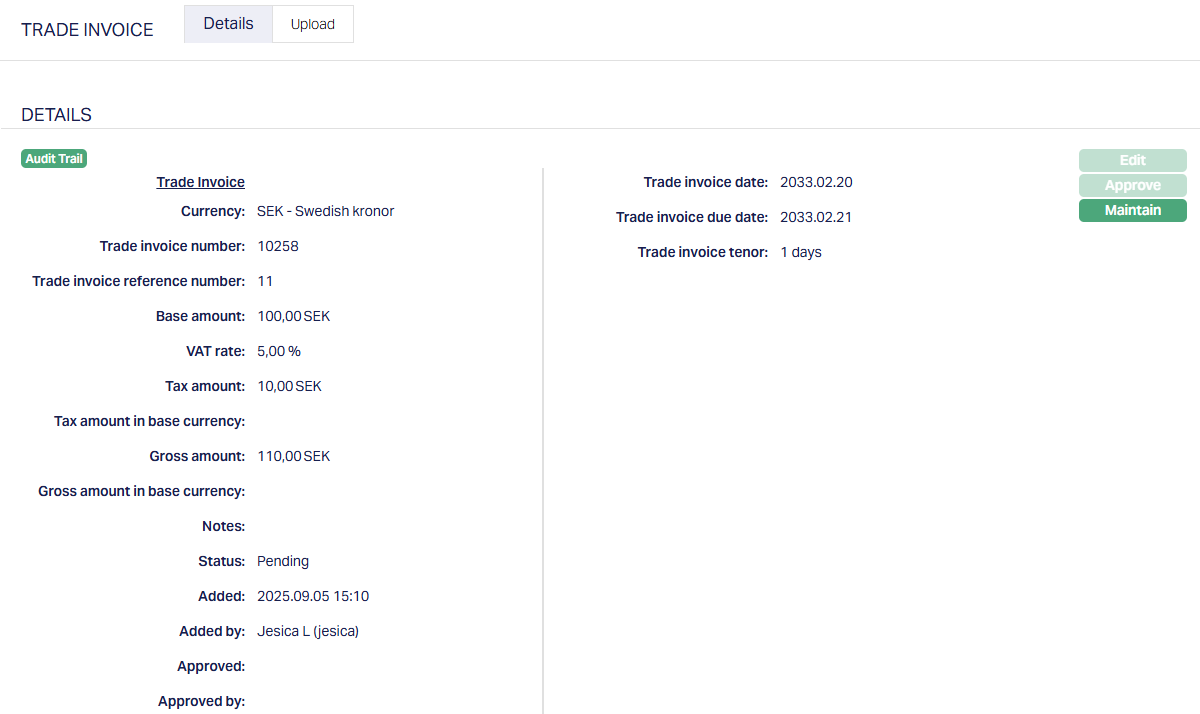
Functions: Edit, Approve, Maintain
Approve: The Approve option validates the invoice and confirms it for use in the factoring contract. Status is shown as Pending until it is approved by another user. On approval, the Status will change to Approved.
Note: The Edit button is enabled only when the Account Status of the contract is Opened or Pending.
Maintain
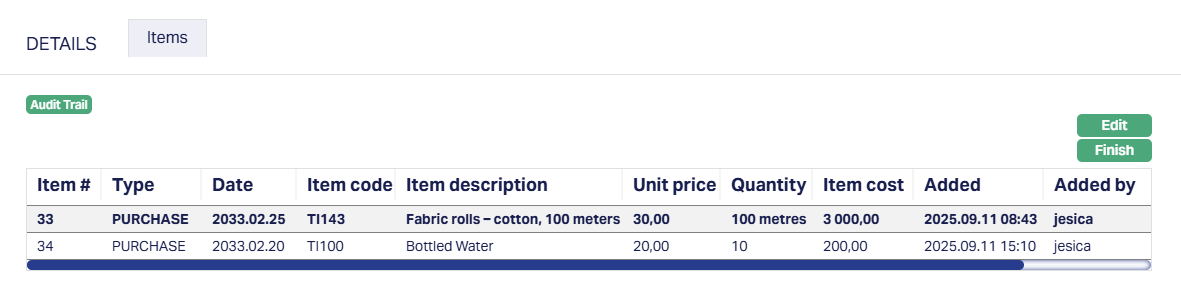
The maintain option allows you to work further on the trade invoice by opening the Items sub-tab: This sub-tab is where you break down the invoice into individual line items. Aura checks that the sum of all Item Costs = Base Amount entered on the Details tab. If they don't match, you wouldn't be able to approve the invoice.
To add a new item,
1. Access details sub-tab of the Trade invoice tab and click on the Maintain button. This opens the Items tab as per sample below.
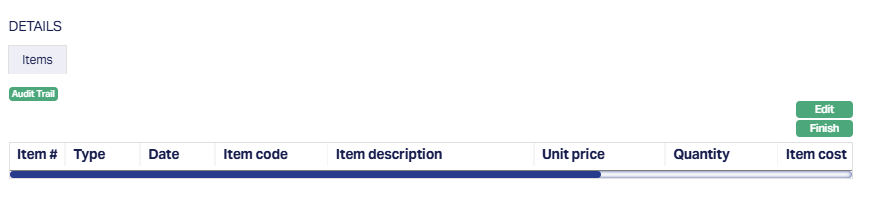
2. Click Edit. The grid switches to editable mode, allowing you to enter or update the item details.
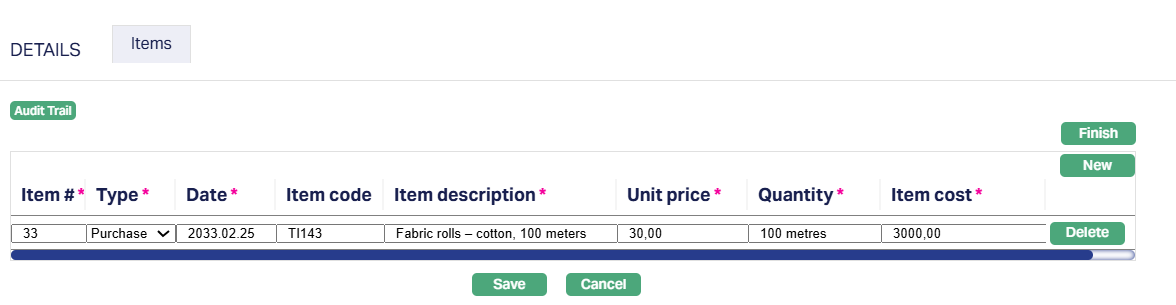
3. Enter the item # as per the Trade Invoice in this field. This helps identify the specific item within the invoice.
4. Select the Type of item from the drop-down list. The available options are :
Purchase - used for standard invoice items that represent goods or services bought by the Buyer.
Refund - used when the item represents a refund, reducing the total value of the invoice.
Return - used when the item represents a returned good, which also reduces the total value of the invoice.
Choose the option that best describes the nature of the invoice line so that the item is recorded correctly in Aura. By default, Purchase is selected.
5. Enter the Date of the Purchase, Refund, or Return manually in the field. This date represents when the transaction occurred and is recorded in Aura.
6. Enter the Item code as per the Trade Invoice. This is an optional field and can be left blank if the code is not available.
7. Enter the Description of the item listed. This field is mandatory and helps provide clarity about the item.
8. Enter the price per unit of the item. This value is used in Aura to calculate totals for the Invoice line.
9. Enter the quantity of the item, including the unit of measurement. This field is required to calculate the total amount for the invoice line.
10. Enter the cost of the item, Aura uses this value to sum up the Total Base Amount for the Invoice.
11. Click Save. The Items sub tab appears with the details you have entered.
Functions: Edit, Finish
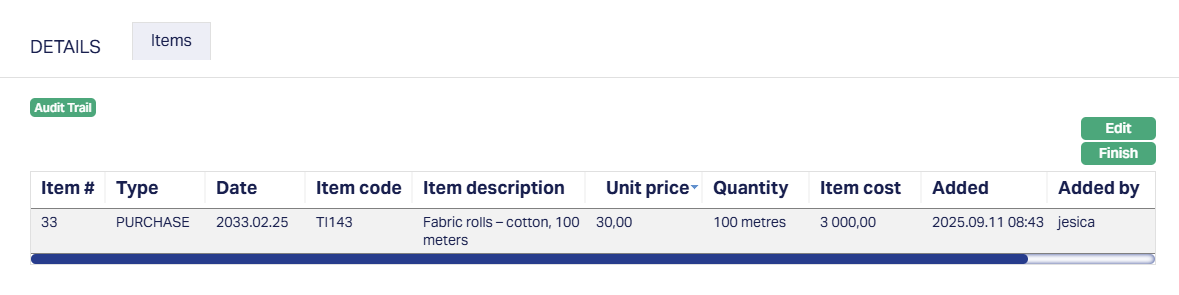
To edit the Details Items,
1. Click Edit. All fields are editable.
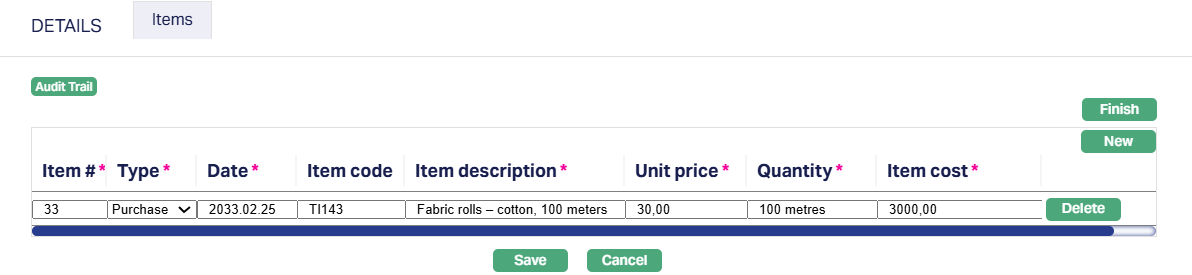
Note: After you save the invoice line, the row becomes locked for editing, and only the Edit button is visible. When you click Edit, the row becomes editable, and Aura displays two more options on the right side of the grid - New and Delete.
New allows you to add another line item to the invoice.
Delete lets you remove the currently selected line from the grid.
2. Click Save. The Items sub tab appears with the updated details.
Functions: Edit, Finish
The additional fields that are shown are:
Added: This is the field which displays the date and time when the item was added.
Added By: This is the field which displays the name of the person who added the item.
Upload
The upload sub tab allows you to view/add any relevant images, files or documents.
To upload new files,
1. Access Trade invoice tab and click on upload sub-tab.

Functions: New
2. Click New button. New Upload page appears.
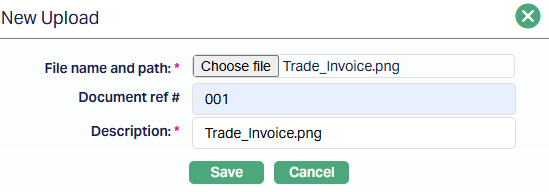
3. Click Choose File button to select the File name and path of the document.
4. Enter Document ref number for the document.
5. Based on the file selected, the Description field will be derived. If required, you can change the description.
6. Click Save. Upload page appears displaying the added details.
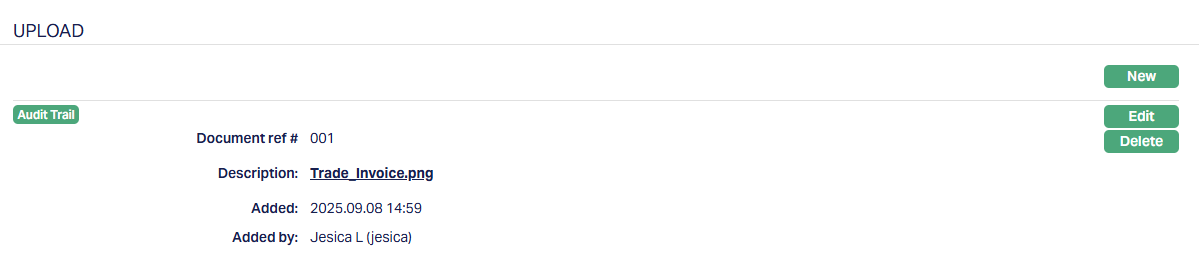
Functions: New, Edit, Delete
The additional fields that are shown are:
Added: This is the field which displays the date and time when the document/file is uploaded.
Added By: This is the field which displays the name of the person who added the document/file.
To edit upload record,
1. Access Trade invoice tab and click on upload sub-tab.
2. Click Edit. Edit Upload page appears.
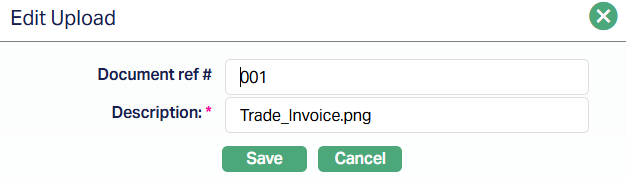
Only Document ref # and Description fields are editable.
3. Click Save after making required changes. The Upload page appears with the updated details.
Functions: New, Edit, Delete
Note: You can upload and maintain multiple files and documents under this tab.
Status
Status tab allows you to view/set the Contract status as well as define the preferences for the current status of the contract. The preferences will allow you to enable/disable certain functions on the loan account like interest accrual, waiver, liquidation, disallow debit, disallow credit, disallow disbursement, stop invoice. Etc.
The sub-tabs available are:
Account Status
The Account Status of a Factoring Contract can either move automatically based on the Status Rules defined at the Product level or be manually updated by you. The tab allows you to view the current status, check its history, and in certain cases, modify preferences associated with it.
When you create a new factoring contract and click Finish, Aura automatically inserts two Account Status records:
Registered (Approved)
Opened (Pending)
These statuses control the initial workflow of the contract.
To View Account Status,
1. Access Contract Maintenance page. Click Status tab, and the Account Status tab will be displayed by default.
2. Account Status denotes the current account status as per the chosen record.
3. Description is defaulted from the Account status Maintenance in case of user defined account statuses; and in case of pre-shipped account statuses. Description is the same as Account status.
4. Reason displays the reason for the status selected for the account. In case of automatic status movement, the reason is predefined; while in case of manual status updates, this will display the reason input during the manual status change.
5. Effective by displays the date from which the item is considered effective in Aura. It is a system-generated, read-only field and does not appear when you edit the grid. You cannot modify this value manually.
6. Allow auto-movement is defaulted from Account status maintenance in case of user defined Account Statuses; and in case of pre-shipped Account Statuses, this is predefined. When status is Opened, the Allow auto movement flag is defaulted to No, and is not editable.
7. Modify preferences is defaulted from Account status maintenance in case of user defined Account Statuses; and in case of pre-shipped Account statuses, this is predefined. When status is Opened, the Modify Preferences flag is defaulted to No, and is not editable.
8. Record Status denotes the status of the record. In case of automatic status movements, the Status is automatically set to Approved; while in case of manual status updates, this will be Pending. Once another user manually approves the record, this will be set to Approved.
Note: Status of the record is Pending till it is approved by another user. On approval, the tab status is set to Approved and the red bubble disappears.
To edit the Account Status,
9. Click Edit. Edit Account Status page appears.

All fields are editable except Account Status and Description.
When Modify Preferences is marked as Yes, then the Preferences will be enabled and you can modify them as required. When the flag is marked as No, then all Preferences from the Status Maintenance will be defaulted and disabled.
Disallow Disbursement - When the flag is marked as Yes, Aura will not allow you to disburse the factoring amount to the account. The amount cannot be debited from the factoring account, whether the disbursement option is set to Auto or Manual.
Stop all fee generation - When the flag is marked as Yes, Aura will not process any periodic or event-based fees for the account. Events will still be generated as usual, but charge-related entries will not appear in the payment schedule under the Events tab.
Stop buyer late payment fee generation - When the flag is marked as Yes, Aura halts the automatic calculation of new late payment fees for Buyers with overdue payments, while keeping existing fees unchanged. This setting is typically used for grace periods, fee waivers, or special arrangements.
Stop seller late payment fee generation - When the flag is marked as Yes, Aura prevents the calculation of new late payment fees for Sellers with overdue payments, while keeping existing fees unchanged. This is used for temporary relief or special payment terms.
Waived accrued penalty on overdues - When the flag is marked as Yes, Aura automatically waives all penalty amounts accrued before the contract moved into this status. These waived penalties will not be recovered and are removed from the outstanding balance. If the flag is set to No, previously accrued penalties remain payable.
Stop penalty accrual on overdues - When the flag is marked as Yes, Aura stops accruing new penalty charges on overdue amounts. Accruals already generated before this status will remain unless waived using the Waive accrued penalty on overdues flag.
Stop reserve release - When the flag is marked as Yes, Aura blocks the release of reserved funds associated with the contract, even if release conditions are met. This is typically used in cases of disputes, pending approvals, or financial risk controls.
Close on complete write off - When the flag is marked as Yes, Aura automatically closes the contract once a full 100% write off has been applied under impairment treatment. If impairment treatment is not applied, the contract remains in its current state.
10. Click Save. The Account status tab appears with the updated and edited details.
Account Status Movement
When you create and maintain a factoring contract, Aura automatically manages the progression of the account status. The account starts from Registered and moves through multiple stages until it is closed, depending on approvals, notifications, acknowledgements, and repayments.
1. Registered
When you click Finish during contact creation, Aura inserts the initial status as Registered - Approved.
This is a system-controlled status indicating that the contract has been created successfully
2. Opened
Along with Registered, Aura also inserts Opened - Pending.
Any other user (not the one who created the contract) must approve the Opened Status.
If Auto-approval is enabled, Aura will approve the Opened status automatically and simulate the next steps.
Approval or Opened is subject to the Buyer and Seller due diligence statuses being approved. If either is approved, Aura displays an error.
3. Notified
If Notification Required = Yes, then upon approval of Opened, Aura adds a new status record: Notified-Approved.
At this point, Aura updates the Notified On field in the Profile tab with the Current Booking date.
Aura also sends the Buyer Invoice immediately (if Suppress Buyer Invoice Generation = No)
This status is added automatically by Aura - you cannot insert it manually.
4. Activated
If Notification Required = No, then upon approval of Opened, Aura directly adds Activated -- Pending.
If Notification is required, then Activated -- Pending comes after Notified -- Approved.
If Acknowledgement Required = Yes, you must manually input the Acknowledged On date in the Profile tab for Aura to proceed.
If Acknowledgement Required = No, Aura automatically progresses without waiting for manual input.
Approval of Activated indicates that the contract is ready for disbursement of the advance, provided all supporting processes (such as documentation) are complete.
5. Activated - Approved
When activated is approved, Aura may initiate disbursement of the advance, depending on the Payout Type:
If Payout Type = Advance Amount or On Maturity and the Value Date is less than or equal to the current booking date, Aura triggers the disbursement automatically and updates the Value Date to the current booking date.
If Payout Type = On Realisation, Aura does not disburse any advance. The contract remains active until Buyer payments are received.
6. Subsequent Statuses
After Activation, status progression depends on the Status Rules defined at the Product level or by manual user updates.
If no specific rules are configured, Aura will automatically move the contract to Closed once the Buyer payments equal the gross invoice amount, subject to closure thresholds and release the advance amount.
7. Closed
This is the final status of the contract, marking the successful settlement of all amounts (or full write off if Close on Complete write off is marked as Yes)
No further actions are possible on a closed contract.

In the above screenshot, you can see that the Account Status of the factoring contract is set to Notified. This indicates that the contract account has been formally notified, but it has not yet progressed to the Activated stage. The Notified By field shows the date from which the Notified status applies.
Moving from Notified to Activated
Once the Notified status is approved, the next logical stage in the status flow is - Activated:
If Acknowledgement Required = Yes, you must manually input the Acknowledge On date in the Profile tab. Aura will then create an Activated status record in Pending state.
If Acknowledgement Required = No, Aura skips the manual input and directly generates the Activated status record in Pending state after the Notified approval.

Functions: Add, Edit, Approve.
The Activated status initially remains in Pending until another user approves it.
When Activated = Approved, the contract is considered ready for disbursement of the factoring advance, provided all pre-conditions (documentation, due diligence, approvals) are met.
If the Payout Type is Advance Amount or On Maturity, and the Value Date is less than or equal to the Current Booking date, Aura automatically triggers the disbursement.
If the Payout Type is On Realisation, no advance disbursement occurs, and Aura waits for the buyer's payment.
Once the Activate status has been approved, the Add button becomes enabled. From here, you may assign the next applicable status in the lifecycle of the factoring product. The drop-down should not be confused with a Closure action; it is intended only for progression or intermediate updates within the status rule configuration.
Payment Status
The Payment Status sub-tab under the Status tab allows you to track the current status of payments on the contract. Unlike Account Status, Payment Status is not manually controlled by you; Aura automatically inserts and updates the status based on payment events, overdue conditions, or closure rules defined in the product.
Your role is limited to viewing and approving the records created by Aura.
When a new contract is created and approved through the Add Wizard, Aura automatically inserts a default Payment Status = Normal (Approved). This record is created and approved by Aura without any user intervention, ensuring that the payment lifecycle of the contract always begins in a normal state.
As payments are received or delayed, Aura will generate new Payment Status records to reflect the updated state.
Functions: Edit, Approve.
The Edit button remains disabled because Payment Status transitions are fully system-driven. You cannot manually edit or override them. Aura determines Payment Status automatically and inserts the relevant records in this tab.
1. Payment Status field denotes the current status of the account.
2. Description field denotes the description maintained for an account.
3. Reason displays the reason for the status selected for the account. In case of automatic status movements, the reasons are pre-defined; while in case of manual status updates, this will display the reason input during the manual status change.
4. Effective by shows the date on which this payment status becomes active.
Note: There are no Preferences for any Payment Status currently.
The additional fields that are shown are -
Status indicates the current state of the record. It will be either: Pending - If the record is waiting for approval or Approved - If the record has been reviewed and finalized.
Added shows the date and timestamp when the record was created and Added by displays the user ID and full name of the person who created the record.
Approved shows the date and time when the record was approved and Approved by displays the user ID and full name of the person who approved the record.
Settings
The Settings tab allows you to review and update the configuration details of an existing factoring contract. You can modify the settings until the disbursement is completed or until the Maturity Date has passed. Aura enforces restrictions on when edits can be made, based on the Payout Type and the disbursement status.
- If the Payout Type is Advance Amount or On Maturity, you can edit the contract details until the actual disbursement is completed. Once a payment has been received, edits are disabled.
- If the Payout Type is On Realisation, since there is no disbursement, edits are allowed until the End of Day (EOD) on the Maturity Date, provided no payment has been received. Once a payment exists, further updates are not allowed.
To view/edit the Settings tab,
1. Access Contract Maintenance page and Click Settings tab. The details are defaulted from the entries that you made during Contract creation. For details, refer to New Contract - Settings (4/8) page.
2. Click Edit. Edit Settings page appears.
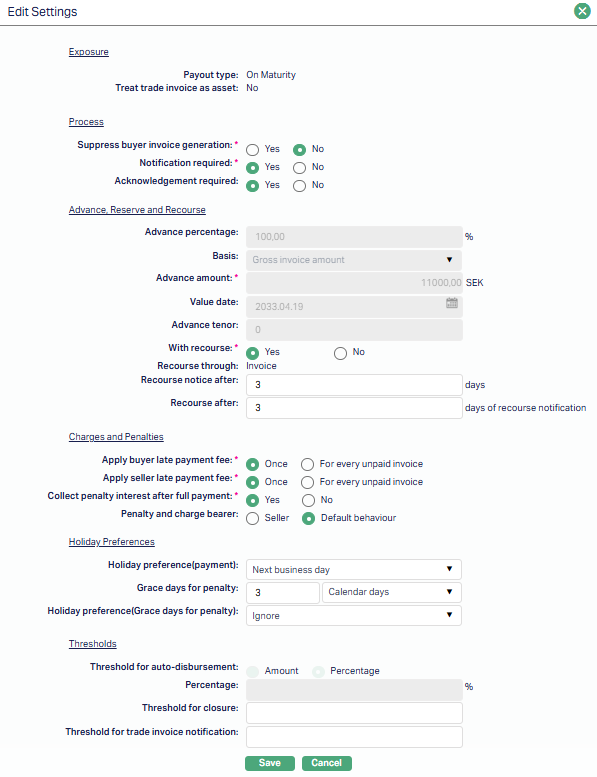
The Advance, Reserve and Recourse section includes fields such as Advance Percentage, Basis, Value Date, Reserve Release, and Account #. Certain fields, including Advance Amount, Advance Tenor, and With Recourse, remain non-editable since they are defined during contract creation and cannot be changed post disbursement. The With Recourse field can only be modified through the Change of Terms (COT) process.
In the Charges and Penalties section, you can define whether late payment fees or penalties should be applied to the buyer or seller, specify when penalty interest is collected, and identify the Penalty and Charge Bearer.
Under Holiday Preferences, you can specify the Holiday Preference (Payment), the number of Grace Days for Penalty, and the Holiday Preference (Grace Days for Penalty). These fields determine how due dates and penalties are computed when holidays are encountered.
The Thresholds section defines system behavior related to automation and contract closure. You can specify values for Threshold for Auto-Disbursement, Percentage (or Amount), Threshold for Closure, and Threshold for Trade Invoice Notification. These values determine when certain system actions are triggered automatically.
- Click Save. The Settings tab appears with the edited details.
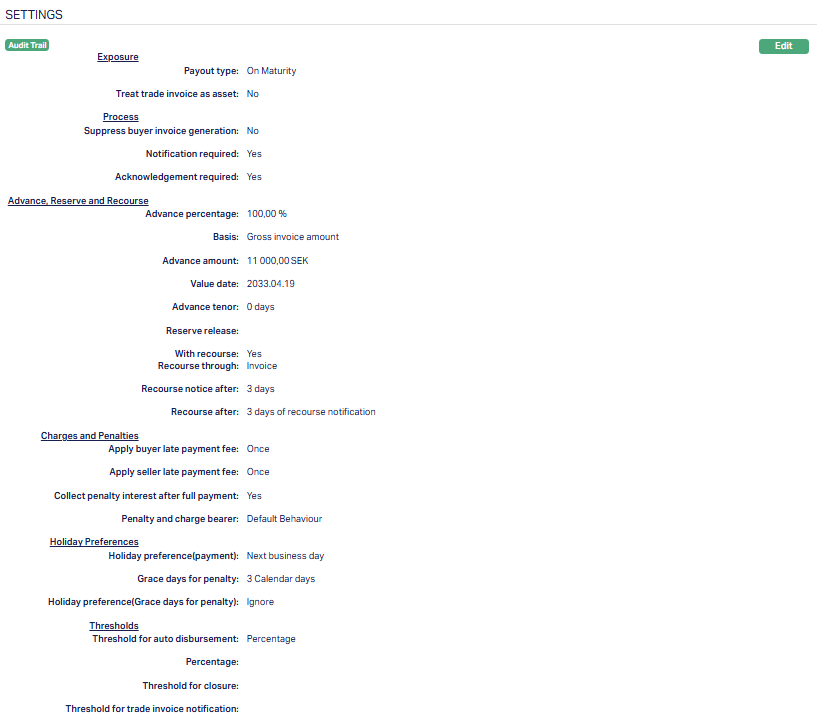
Function: Edit
Interest Receivable
The Interest Receivable tab captures the interest scheme and penalty settings that apply to a factoring contract. This tab helps you define how discount interest and penalty interest are calculated, recorded, and approved for each contract.
When a contract is created, Aura pulls the default values for discount and penalty interest schemes from the linked Product or Agreement. You can view, edit and approve these details based on the maker-checker workflow.
To edit Interest Receivable,
1. Access Contract Maintenance page. Click Interest Receivable tab to view the details as per sample below. The details are defaulted from the entries that you made during Contract creation. For details, refer to New Contract -- Interest Receivable (6/8)
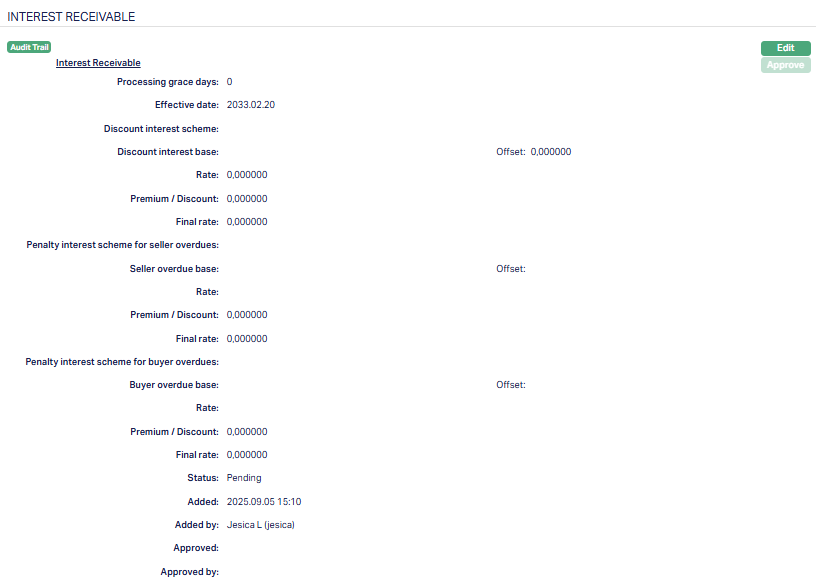
2. Click Edit. Edit Interest Receivable page appears.
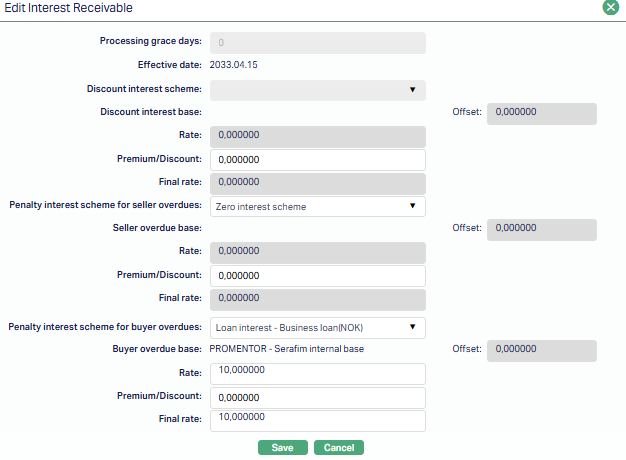
You can edit the following fields -
Penalty interest scheme for seller overdues.
Premium / Discount for Discount interest base.
Premium / Discount for Seller overdue base.
Penalty interest scheme for buyer overdue base.
Premium / Discount for Penalty interest scheme for buyer overdue base.
3. Click Save. The Interest Receivable page appears with the edited and updated details.

Functions: Edit, Approve.
You can Edit the Interest Receivable details until disbursement is completed or the maturity date is past. If you make any changes, then the status will change to Pending.
Status of the record is Pending till it is approved by another user. On approval, the tab status is set to Approved and the red bubble disappears. This record can be edited by any user after approval, before approval while the status of the tab is pending, only the user who added the record can edit the details.
Notes:
Disbursement is only possible when the interest settings are finalized. For contracts with Payout Type = Advance Amount or On Maturity, editing is allowed until disbursement is done. For Payout Type = On Realisation, editing is allowed until end-of-day (EOD) of the maturity date, provided no payments have been received.
Approval ensures that the correct discount and penalty interest rules are locked in and applied consistently to the contract.
The additional fields that are shown are -
Added field denotes the date on which the record was added.
Added by field denotes the name of the user who created the record.
Approved field denotes the date on which the record was approved.This is displayed only on approval.
Approved by field denotes the name of the user who approved the record. This is displayed only on approval.
Payment Settings
The Payment Settings tab defines how payments received against the contract are to be processed, allocated, and applied within Aura. These settings ensure that when Buyers make payments, Aura knows how to distribute amounts across principal, interest, charges, and penalties in line with the rules defined for the contract.
To view/edit Payment Settings,
1. Access Contract Maintenance page. Click Payment Settings tab to view the details as per sample below. The details are defaulted from the entries that you made during Contract creation. For details, refer to New Contract -- Payment Settings (5/8)
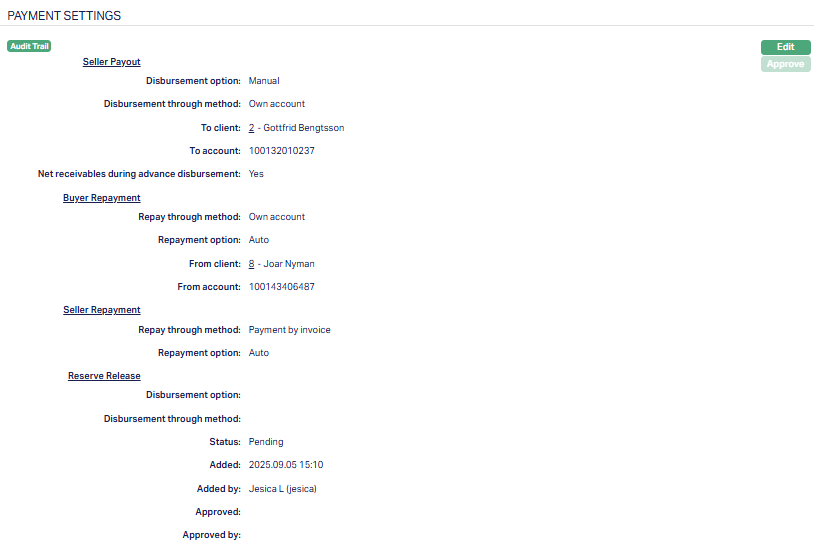
2. Click Edit. Edit Payment Settings page appears.
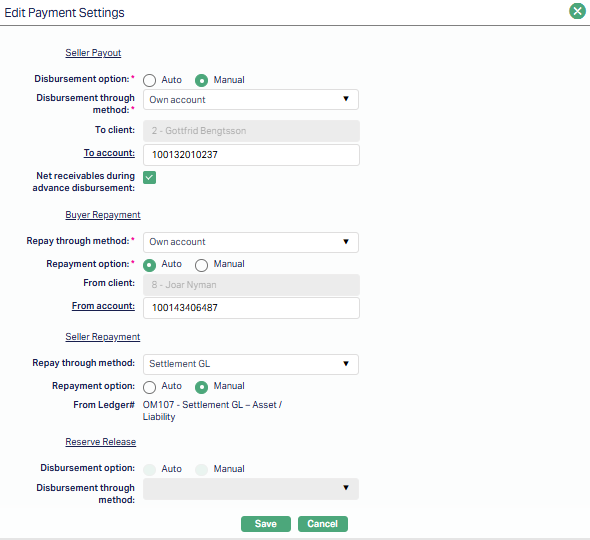
Note: All fields are editable before disbursement except for Reserve Release, which is disabled. Reserve Release rules are inherited from the Product/Agreement and cannot be modified at the contract level, since Aura manages reserve release centrally to ensure consistent and compliant handling across contracts.
3. Click Save. The Payment Settings tab appears with the edited and updated details.
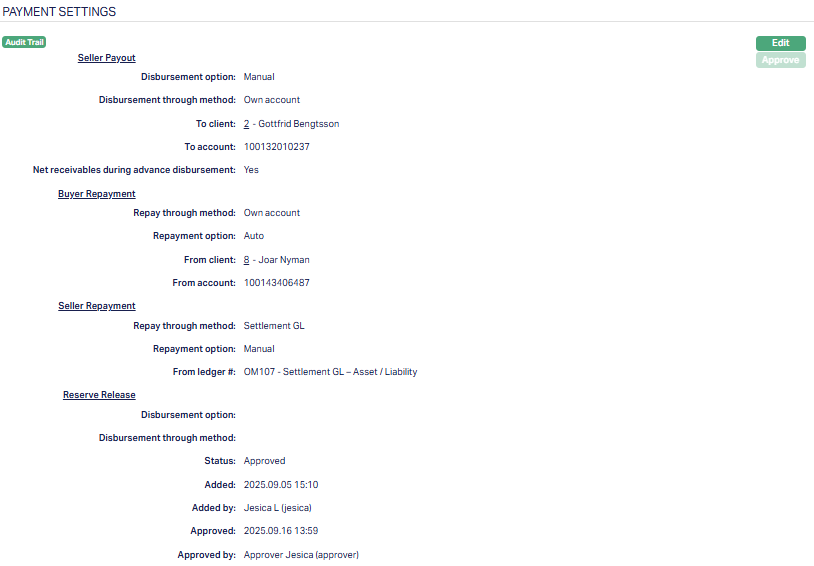
Functions: Edit Approve.
The Edit button is enabled until disbursement is completed. After that, they are disabled.
Notes:
Payment Settings are critical because they control how Buyer payments are applied. Any misconfiguration may lead to incorrect allocation of funds or overdue flags.
The values are defaulted from the Product or Agreement but can be fine-tuned at the contract level before disbursement.
Once approval, Aura consistently applies these rules to every payment processed for the contract.
Payment Invoice
Payment Invoice tab allows you to view the details of invoices linked to a factoring contract for which payments have been scheduled or received. This tab provides visibility into how Buyer payments are matched to specific invoices and ensures that the allocation follows the rules set in the Payment Settings tab.
When a contract is created, invoices financed under the agreement are automatically associated here. As Buyers make payments, Aura updates this tab to show the status of each invoice. It is divided into two sub-tabs: Current and Void.
Current Sub-tab
The Current sub-tab displays all active invoice records linked to the contract. Each row represents a financed invoice and shows its payment status.

The following fields are shown in the grid:
Invoice to - Indicates the party to whom the invoice was issued (e.g., Buyer)
Invoice number - The unique identifier of the Buyer invoice financed under the contract.
Generation date - The date when the invoice was generated.
Transaction ref no. - The reference number of the transaction linked to this invoice.
Due date - The date by which the Buyer is expected to settle the invoice.
Payment due on - The contractual date when payment should be realised.
Paid date - The date on which payment was actually received (if applicable).
Total Due Amount - The total amount due for this invoice.
Total Unpaid Amount - The outstanding balance that remains unpaid.
Behaviour:
All records here are live. As payments are received, the Total Unpaid Amount decreases, and the Paid Date is updated.
If a record is voided (e.g., payment reversal or cancellation), it is moved to the Void sub-tab.
Void Sub-tab
The Void sub-tab contains invoice records that were once active but later invalidated. This ensures that all changes are fully traceable.
The fields consist of the same grid columns as the Current sub-tab, but the record status is marked as Voided.
Behaviour:
Records here are for audit only. You cannot edit or approve them.
Aura automatically moves records to this sub-tab when an associated payment or invoice entry is cancelled or reversed.
The Current sub-tab is where you monitor the live state of the invoice payments. The Void sub-tab serves as a historical log of cancelled or reversed allocations.
Charge
The Charge tab defines and manages all charges linked to the factoring contract. Charges are defaulted from the Product setup and displayed at the contract level. You can review, edit, and approve them before they take effect.
The sub-tab available in the Charge tab are:
Default Charges
Additional Charges
Default Charge
The Default Charges tab allows you to view and maintain the details of different charges applicable for the factoring contract. These values are inherited from the Product but can be edited at the contract level, subject to approval.
To View/Edit the Charges,
1. Access Contract Maintenance page. Click Charge tab, the Default Charge tab will be displayed by default showing the charge details as per sample below. The details are defaulted from Product > Charges based on the Product that you chose for the account during creation.
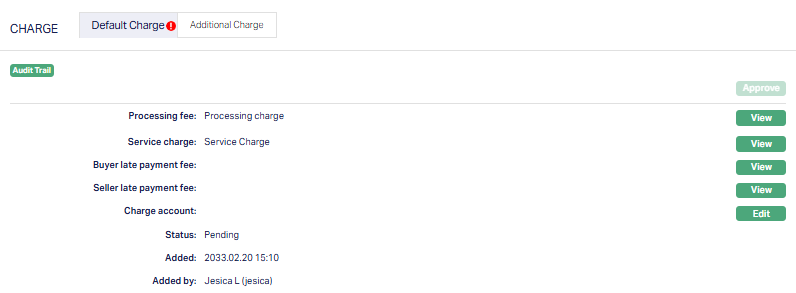
The additional fields that you can view in the tab are explained below:
Status field denotes the status of the tab.
Added field denotes the date on which the record was added.
Added by field denotes the name of the user who created the record.
Approved field denotes the date on which the record was approved and is displayed on approval.
Approved by field denotes the name of the user who approved the record and is displayed on approval.
Calculation Rules:
If the charge is Banded, Aura uses the Gross Invoice Amount to calculate the charge.
Exceptions: For Late Payment Fee - Buyer and Late Payment Fee - Seller, the Overdue Amount is used.
Seller Charge Account Behaviour:
If a Settlement Instruction exists for the Seller (Client chosen in Step 1), Aura defaults the charge account details from it.
If no Settlement Instruction is available, you must define the Seller Charge Account manually via the Edit option.
The account must be an active Client Account (status not in Opened, Reopened, Closed) belonging to the Seller.
The GL account defaulted from the Settlement Instruction cannot be edited. Aura enforces that a GL cannot be manually selected.
2. To edit Charge Account, click Edit. Edit Seller Charge account page appears.

3. The Seller charge account is selected "Own account" by default depending on the configuration. This field is disabled.
4. Select the Account # from the drop-down. This field lists valid accounts associated with the Seller.
5. Click Save. The Default Charge page appears with the edited details. Sample screenshot shown below.
Note:
Charges are inherited from the Product but can be edited before they are approved.
Edits are always effective only after approval.
Buyer Late Payment Fees are always invoiced (if payable by Buyer).
Seller Charge Account ensures there is a valid debit account for charges. This is mandatory whenever Seller-related charges exist.
Once approved, charges are locked in and posted as part of accounting and liquidation processes.
To view/edit other charges,
1. Click View button. Page along with the details of that particular charge which you wanted to view will appear.
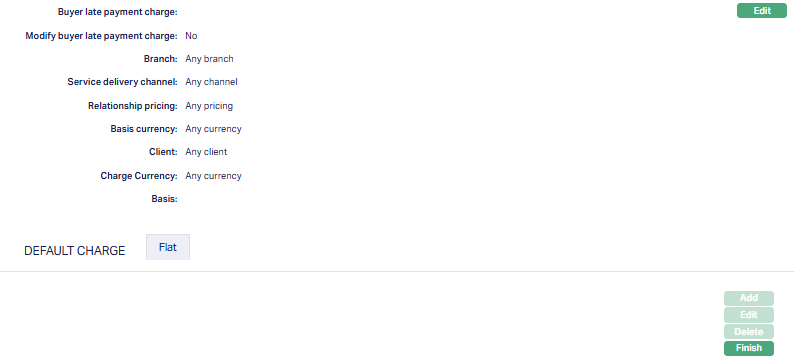
Note: You need to view and edit each charge separately as required. Sample screenshot shown above.
2. Click Edit. Edit Seller Charge Account page appears.
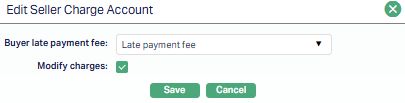
3. Select Buyer late payment fee from the available drop-down list of charges as required.
4. Select Modify Charge if you wish to modify the charge at the later stage.
5. Click Save. The selected charge gets added for the Buyer late payment charge. Sample screen shown below.
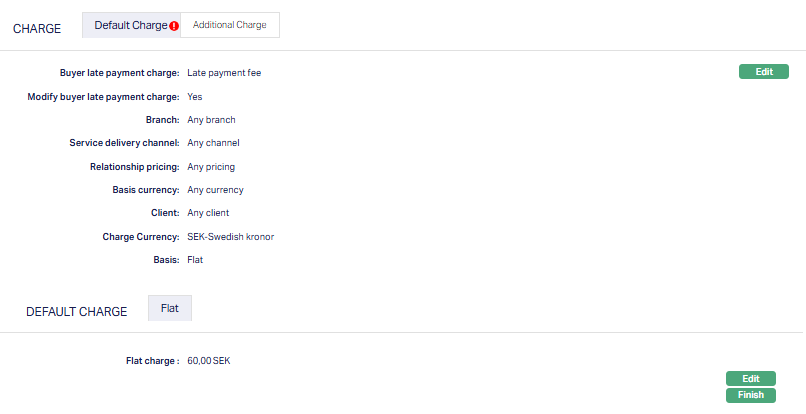
Functions: Edit, Finish.
Note: There are two Edit buttons. The first edit button is used to edit the Charge which you have selected by clicking the View button. In this case, Buyer late payment charge (Sample screen shown above.)
The second edit button is used to edit the charge amount of the selected charge. In this case, Flat charge. Also if the charge is banded, the charge amount will be calculated on the basis of the amount sanctioned.
To edit Flat Charge,
1. Click Edit. Edit Flat Charge page appears.
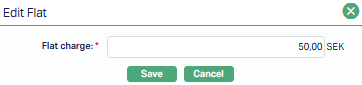
2. Enter the Flat Charge as required.
3. Click Save. Flat Charge page appears with the edited details.
 Functions: Edit, Finish.
4. Click Finish. Default Charge page appears with the edited details with status set to Pending.
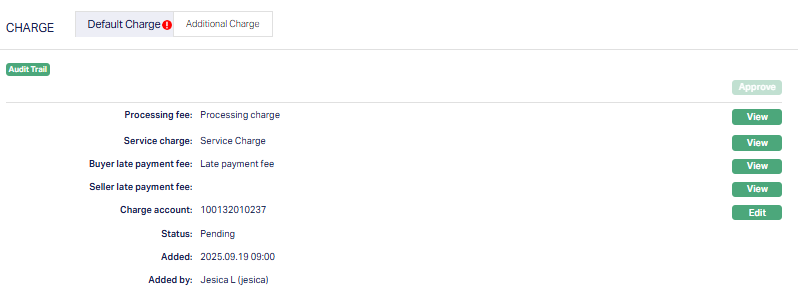
Note: Any changes in the tab will set the tab status to Pending till it is approved by another user. On approval, the tab status is set to Approved. Also, once the default Charge status is Approved, the amount mentioned against each added charge will be deducted from the selected Charge account.
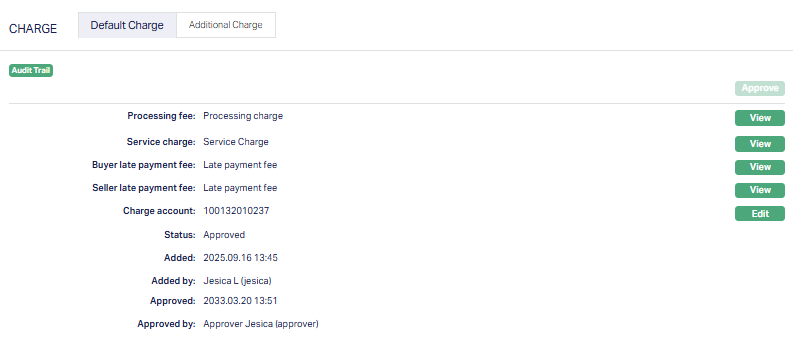
Functions: Approve, View, Edit.
Additional Charges
The Additional Charge tab allows you to add, view and maintain periodic charges for the factoring contract. If there are any additional charges attached to the product, it is defaulted at the account. The Charge ID will be generated in sequence for individual charges attached. If any charge is deleted, then the ID of the deleted charge will not be regenerated.
Aura will allow you to add additional charges attached at the product (on creation of product) to the Account. If any new additional charges are added at the product, those additional charges will be available for new accounts and not for existing accounts.
To Add an Additional Charge,
1. Access Additional Charge sub-tab under Charge tab to view the details as per sample below. On creation of account, if there are any additional charges maintained at the product level - the details are defaulted from Commercial > Factoring > Settings > Product based on the Product that you chose for the account during creation.
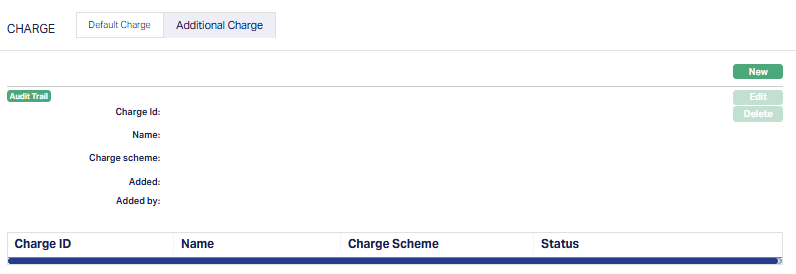
2. Click New. New Additional Charge page appears.
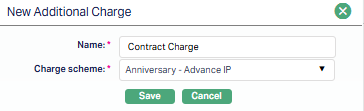
3. Enter the charge name.
4. Select Charge scheme from the drop-down list of Periodic charges maintained at Admin > Pricing > Charge > Charge Scheme.
5. Click Save. An additional Charge page appears with the added details.
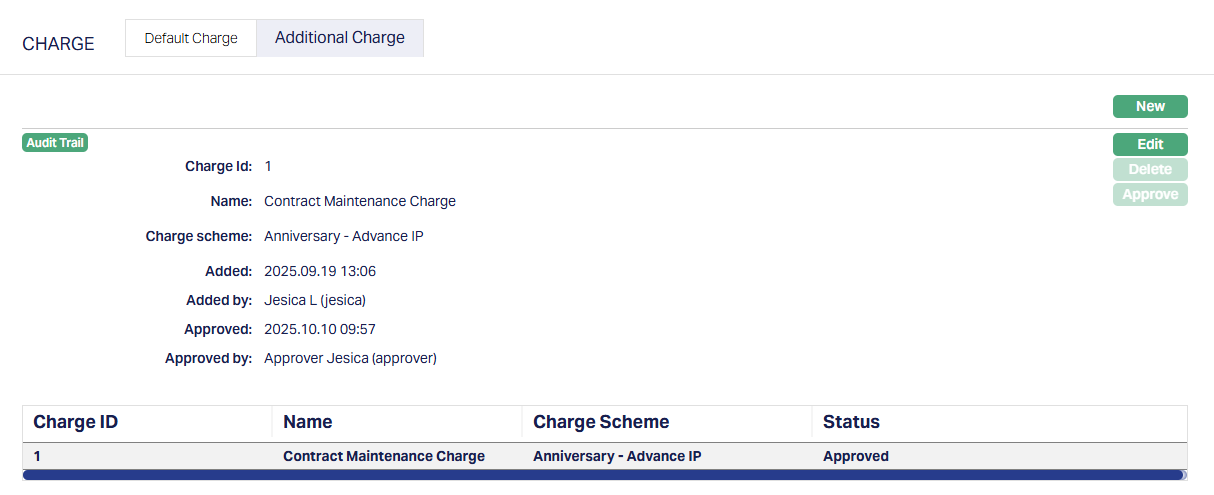
Functions: New, Edit, Delete, Approve.
To edit Additional Charge,
1. Access Contract Maintenance page, select Additional Charge sub-tab.
2. Click Edit. Edit Additional Charge page appears.
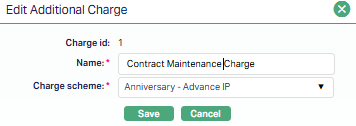
All fields are editable except Charge ID.
3. Click Save. Additional Charge page appears with the edited details.
Functions: New, Edit, Delete, Approve.
Note: Any change in the tab will set the tab status to Pending till it is approved by another user. On approval, the tab status is set to Approved and the red bubble disappears.
The additional fields that are shown are:
Status field denotes the status of the tab.
Added field denotes the date on which the record was added.
Added by field denotes the name of the user who created the record.
Approved field denotes the date on which the record was approved and is displayed only for approved records.
Approved by field denotes the name of the user who approved the record and is displayed only for approved records.
Categorisation
The Categorisation tab allows you to categorise the accounts and add the parameters in the Status Rules defined at the Product. Based on the categorization done, the account can be moved to the required statuses. It also helps in classifying the same account under different categories for various reporting purposes.
To add Category,
1. Access Contract Maintenance page, and click on Categorisation tab. The Categorisation page appears.
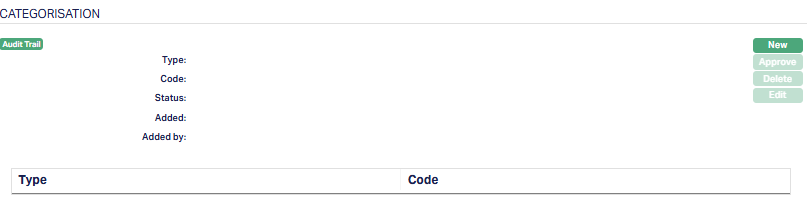
2. Click New. New Category page appears.
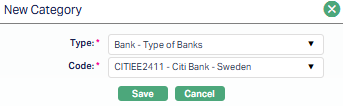
3. Select Category Type from the drop-down list maintained under Admin > Categories > Category type for which applicable for is selected as Account. This should not be a Type that has already been mapped for the Account.
4. Select Code from the drop-down list of category codes maintained for the Category Type selected above, at Admin > Categories > Category type.
5. Click Save. Categorisation page appears with the added details. Page
Note: Categorisation added has to be unique.
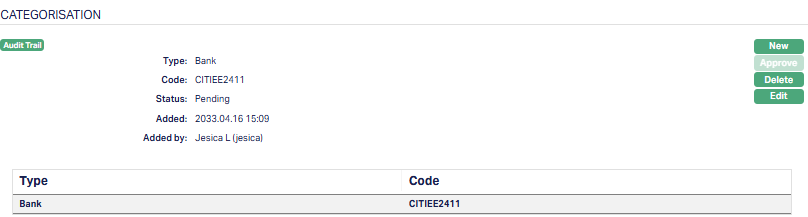
Functions: New, Approve, Delete, Edit.
Note: Any change in the tab will set the tab status to Pending till it is approved by another user. On approval, the tab status is set to Approved and the red bubble disappears.
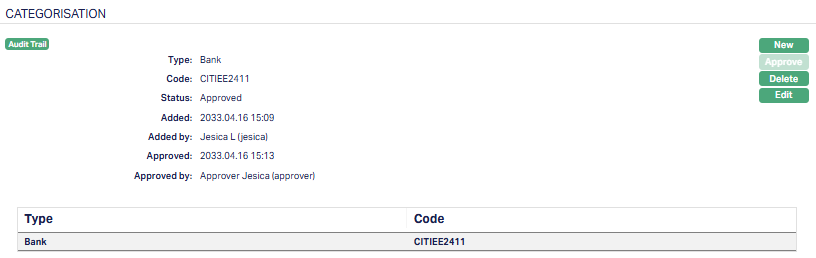
The additional fields available are:
Status field denotes the status of the tab.
Added field denotes the date on which the record was added.
Added by field denotes the name of the user who created the record.
Approved field denotes the date on which the record was approved and is displayed only on approval.
Approved by field denotes the name of the user who approved the record and is displayed only on approval.
To edit Category record,
1. Select the required Category record you wish to edit.
2. Click Edit. Edit Categorisation page appears.
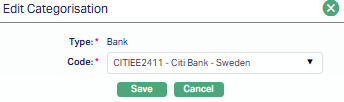
Note: Only the Code field is editable.
3. Click Save. Categorisation page appears with the edited details.
Note: Any change in the tab will set the tab status to Pending till it is approved by another user. On approval, the tab status is set to Approved and the red bubble disappears.
Functions: New, Approve, Edit, Delete
Delete: Click on the Delete button to delete the categorisation record. On click, Aura will ask for confirmation based on which the record will be deleted.
Approve: A categorisation record has to be approved by any user other than the one who had created / edited the record.
Payee Details
The Payee Details tab specifies the account(s) where disbursements under the factoring contract will be credited. This ensures that when financing proceeds are released, Aura uses the correct settlement instructions for transferring funds to the Seller or another designated payee.
This section is defaulted from the entries that you make during contract creation. For details, refer to New Contract -- Payee Details (3/8).
To view/edit Payee details,
1. Access Contract Maintenance page, and click on Payee Details tab. The details page appears.
If you select None as the Payee Beneficiary during contract creation, Aura carries this choice into the Payee Details tab. In this case, the tab displays: Payee Beneficiary: None (sample screenshot below)

Functions: Edit
This indicates that no separate beneficiary account has been defined for the contract. All disbursements will default to the Seller's own account, as per the standard setup.
You may still click Edit if you want to define a specific payee account later.
GL Account Balances
This tab allows you to view the summary of the component level balances on impairment treatment as per General Ledger (GL).
To view the GL Account Balances,
Access Contract Maintenance page, Click GL Account Balances tab to view the details as per sample below.
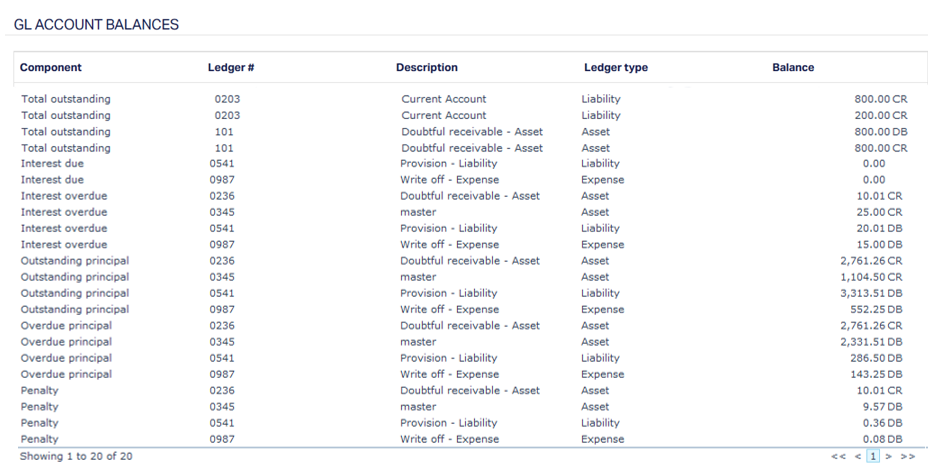
The columns available on the page are:
Component - Displays the factoring loan component to which the balance belongs. The list includes: Outstanding Principal, Overdue Principal, Interest Due, Interest Overdue, Penalty, Charge Due.
Ledger# - Shows the ledger number (GL code) where the accounting entry for that component is posted. Each component's financial transactions are mapped to a specific ledger.
Description - Displays the ledger description as maintained in the chart of accounts or GL setup. It helps identify what the ledger is used for.
Ledger Type - Indicates the type of ledger --- for example, Asset, Liability, Income, or Expense. This helps understand how the balance affects the financial statements.
Balance - Displays the current balance in the ledger for that component. The field is right-aligned for numeric readability.
Event
The Event tab allows you to view the past, current and future events. This tab is non-editable.
To view the Events,
1. Access Contract Maintenance page. Click Event tab. There are three sub-tabs within it -- Past, Current and Future.
By default, the Current tab is displayed. It shows the details of the Events that have a value date as current business date. The Past tab and Future tab show details of events that have a value date earlier than / later than the current business date respectively.
Note: If there are no events then the sub-tab will display blank as per the sample screen shot shown below.

Past
A sample of the Past tab is shown below:
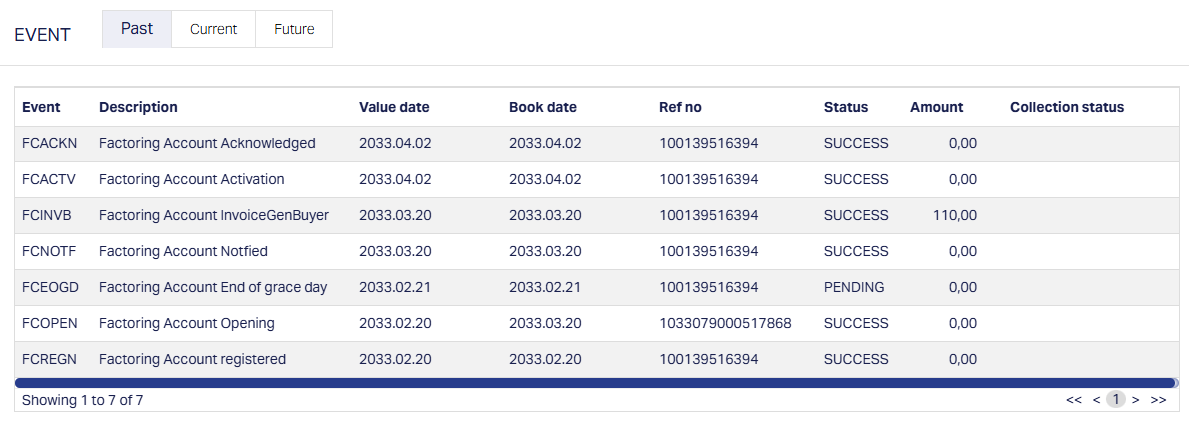
Current
A sample of the Current tab is shown below:
Future
A sample of the Future tab is shown below:

All the tabs show the following data:
Event: It displays the code for the event.
Description: It displays the description of the event.
Value Date: It indicates the date on which any event pertaining to the account gets applied. It can be back date, future date or current date.
Book Date: The date of entry / input of the event.
Ref No: The transaction reference number, if applicable, under which the event is processed.
Status: It displays the status of the event. The status can be of the following:
Pending: Where the event is not yet processed.
Success: Where the event has been processed successfully.
Failure: Where the event has failed during the process.
Retry: Indicates a failed event where the system retries to process the event on subsequent business days.
Amount: It indicates the amount processed by the event. Example: Interest liquidation event will have the amount of interest liquidated.
Collection Status: If the Collection status is Pending, it indicates that the deferred charges have not been collected and if the Collection Status is Success, it indicates that the deferred charges have been collected.
The following shows the list of events for a Factoring Client Account:
| Event Code | Description | Condition |
|---|---|---|
| FCREGN | Contact Registered | This event occurs when the user clicks Finish in the Add Wizard to create a new factoring contract. No accounting entries are posted. On success, initiates FCOPEN; on failure log error (no automatic retry). |
| FCOPEN | Contract Approved | This event occurs on approval that sets Account Status = Opened. Creates contingent entries tagged to the invoice (records payables to seller; reserve/payable tracked via contingent balance). On success initiate invoice generation or activation flows; on failure log error (no retry). |
| FCINVB | Invoice Generated to Buyer | This event occurs on FCOPEN success (subject to product settings). On success initiate FCNOTF if Notification Required = Yes, or FCACTV if Notification Required = No. On failure, retry after logging the error. |
| FCNOTF | Contract Notification | This event occurs after FCOPEN success when Notification Required = Yes. Moves account status to Notified, Approved; if Acknowledgement Required = No the system initiates FCACTV. On failure, initiate retry after logging the error. |
| FCACKN | Contract Acknowledgement | This event occurs on input of the Acknowledgement Date, after successful FCNOTF when Acknowledgement Required = Yes. On success initiate FCACTV and move account status to Activated, Pending. If input fails, display error and you must re-initiate. |
| FCACTV | Contract Activated | This event occurs depending on notification/acknowledgement settings: - If Notification Required = No and Acknowledgement Required = No: on FCOPEN success. - If Notification Required = Yes and Acknowledgement Required = No: on FCNOTF success. - If Notification Required = Yes and Acknowledgement Required = Yes: on FCACKN success. Requires manual approval unless Auto-approval is enabled. On success move account status to Activated; if conditions met auto-initiate FCADVD. On failure log error (no retry). |
| FCADVD | Disbursement to Seller (Advance or Invoice amount) | This event occurs on FCACTV success, approval of a Disbursement record, or BOD/EOD batch. Disbursement records must be inserted. Posts accounting entries and, if Disbursement Method = External Account, initiates payment message to bank. Error handling: Auto-disb retries automatically; manual disbursement shows error and requires re-approval. Linked sub-events (executed with FCADVD):
|
| FCPAYI | Repayment from Buyer/Seller (towards the Trade Invoice Gross Invoice Amount). | This event occurs on approval of a Repayment record (manual, auto-repayment or external payment) or during EOD processing. Inserts repayment record, posts accounting entries, updates receivable balance. May trigger FCRSRL or recourse release events subject to reserve rules and thresholds. Error handling: auto-repayment retries; manual shows error for re-initiation; external payment logs error and status updated for retry. |
| FCRSRL | Reserve Release | This event occurs on FCPAYI success (subject to reserve rules), on approval of a Manual Reserve Release record, during EOD batch (if Reserve Release Threshold > 0), or on FCCLOS success when using Threshold for Closure. Posts accounting entries and may initiate payment messages for external disbursement. If triggered by repayment, Aura rolls back the FCPAYI before executing FCRSRL. Manual approval failures display an error (user must re-initiate); EOD failures are logged as COB exceptions and retried. |
| FCBPIA | Buyer Penalty Interest Accrual | Runs in the EOD batch to accrue buyer penalty interest daily where applicable. Accrual stops if FCRCDA or FCRCIN succeeds. If RMINVS / RMINVB (reminder generation) has been generated up to (Due Date − 1), accrual is suspended and restarted on the invoice Due Date if unpaid. On failure, Aura retries or performs catch-up accrual the next day. |
| FCSPIA | Seller Penalty Interest Received | Runs in the EOD batch to accrue seller penalty interest daily where applicable; typically starts after recourse activation. Stops when RMINVS / RMINVB generation conditions suspend accrual and restarts on the Due Date if unpaid. Posts accounting entries. On failure, catch-up or retry is initiated. |
| FCRCNT | Recourse Notification to Seller | EOD batch trigger for invoices that are TI Overdue and have Recourse = Yes. Trigger when CBD = FCEOGD + Recourse Notice Days. On failure, initiate retry after logging error. |
| FCRCIN | Recourse Invoice Gen to Seller | This event occurs manually or via EOD when recourse through = Invoice and TI Overdue & CBD = FCRCNT + Recourse After Days (if EOD); manual initiation handles TI Overdue based on manual due date selection. On execution, responsibility shifts from buyer |
| FCRCDA | Recourse Debit from Account | Manual or EOD trigger when FCRCNT succeeded, recourse through = Debit from Account, TI Overdue and CBD = FCRCNT + Recourse After Days. Posts accounting entries; buyer remains responsible for payment actions (reminders continue). On failure, initiate retry after logging error. |
| RMINVB | Reminder Generation to Buyer (Treat as Invoice = Yes) | EOD batch trigger when Reminder Days criteria met and CBD < FCRCIN success. Can be for penalty interest or full invoice amounts depending on Buyer Group fee assignment. Triggers penalty/fee accruals FCBPIA / FCSPIA as needed. On failure, retry after logging error. |
| RMINVS | Reminder Generation to Seller (Treat as Invoice = Yes) | EOD batch trigger when Reminder Days criteria met, but only where CBD >= FCRCIN success (i.e., after recourse shift). Generates reminders to seller; pauses accruals until due date logic. On failure, retry after logging error. |
| RMGENB | Reminder Generation to Buyer (Treat as Invoice = No) | EOD batch trigger based on Reminder Days; generates non-invoice reminders to buyer (does not create invoice record). Do not generate if CBD >= FCRCIN success. On failure, retry after logging error. |
| RMGENS | Reminder Generation to Seller (Treat as Invoice = No) | EOD batch trigger based on Reminder Days; generates non-invoice reminders to seller. Consider whether generation must be gated by CBD >= FCRCIN success. On failure, retry after logging error. |
| STACHG | Status Movement | EOD batch or rule invocation that moves Account Status, Payment Status and applies Charges per defined Status Rules. On failure log error (no retry). |
| FCCLOS | Closure | EOD batch or manual trigger when Receivable <= Threshold for Closure (as defined). Posts final accounting entries and moves Account Status to Closed. On failure log error (no retry). |
| FCRDPN | Buyer Penalty Interest Redistribute to seller | This event occurs on FCPAYI success when Buyer Penalty is assigned to Buyer Group = Buyer. Posts accounting entries and redistributes penalty to seller as configured. On failure, initiate retry after logging error. |
| FCRDLT | Buyer Late Payment Fee Redistribute to Seller | This event occurs on FCPAYI success when Buyer Late Payment Fee is assigned to Buyer Group = Buyer. Posts accounting entries and redistributes fee to seller as configured. On failure, initiate retry after logging error. |
| FCRDAD | Buyer Adhoc Charges Redistribute to Seller | This event occurs on FCPAYI success. Posts accounting entries to redistribute ad-hoc charges to seller. On failure, initiate retry after logging error. |
| CHG EVENTS | Charge Incomes for Default Charges | Charge Incomes for Default Charges (Charge Events group) Condition: Triggered on FCOPEN success (or as configured) to post income for default/adhoc charges. Posts accounting entries. On failure log error (no retry). If Treat as Receivable = Yes, the Charge Amount may be blocked. |
| FCEOGD | End of Grace Days for Trade Invoice Due Date | EOD batch trigger at Trade Invoice Due Date + Grace Days. On success, triggers late payment fees and penalty interest accrual processing. On failure retry after logging error. |
| FCRRDA | Release Financial Recourse Debited from Account | Manual or EOD trigger when FCPAYI success and contract total outstanding <= Threshold for Closure. Posts accounting entries to release any debited recourse amounts. On failure, initiate retry after logging error. |
Linked People
This tab allows you to link people, Signatory or Guardian -- to the Factoring Client Account.
To add linked people,
1. Access Client Maintenance page and click Linked People table.

If you want to link a person who has already been created as a Person under CRM > Person Maintenance, then click Add. Aura will display Add Linked People window with the list of Persons maintained in Aura.
2. Select the required Person. Linked People page appears with the selected person details.

3. The Person role field will be blank. To input Person role for the existing person, click edit and select the role of the Linked person in relation to this Account using the Person role drop-down, which shows the list of Person Roles maintained under Admin > System codes > Generic definitions > Person role.
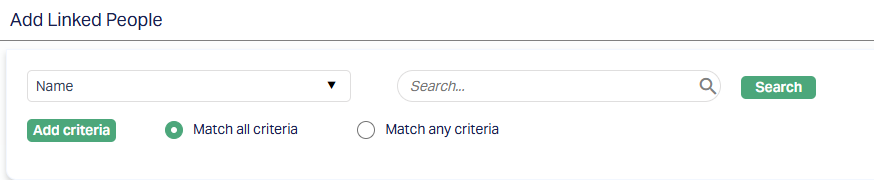
4. If you want to enter the details of a Person who has not yet been created as a Person under CRM > Person > Maintain, then click New. The New Linked People page appears.
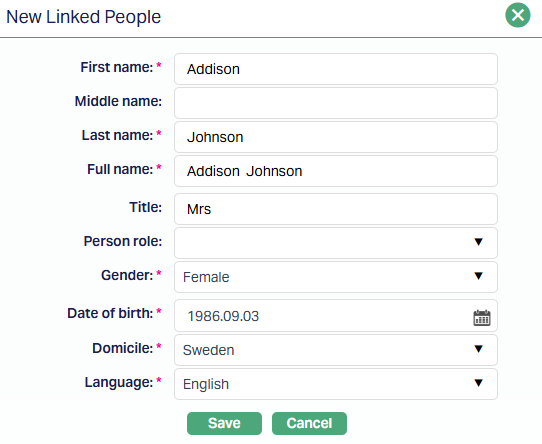
5. Enter the First name of the person.
6. Enter the Middle name of the person. This is not mandatory.
7. Enter Last name of the person.
8. On entering the First Name, Middle Name and Last Name, Aura derives Full name of the person.
9. Enter Title of the person that is to be prefixed to the person's First name.
10. Select role of the Person in relation to this account using the Person role drop-down, which shows the list of Person Roles maintained under Admin > System codes > Generic definitions > Person role.
11. Select Gender of the person from the drop-down list.
12. Enter Date of birth of the person.
13. Select Domicile of the person i.e., country of residence from the drop-down list.
Note: The list of countries for Citizen and Domicile should have been maintained under Admin > System codes > Generic definitions > Countries.
14. Select Language of the person from the drop-down list maintained under Admin > Generic definitions > Languages.
15. Click Save. Linked People page appears with the added New People details.

Note: When linking a new person not maintained under CRM > Person > Maintain, due diligence must be completed and approved under CRM > Due Diligence before they can participate in any contract actions.
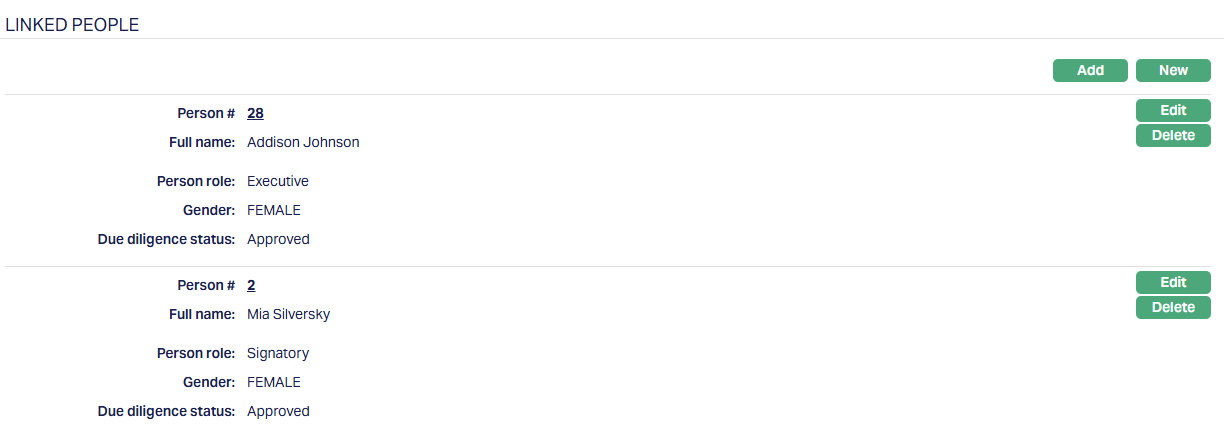
Functions: Add, New, Edit, Delete.
To edit linked people record,
1. Click Edit. Edit Linked People page appears.
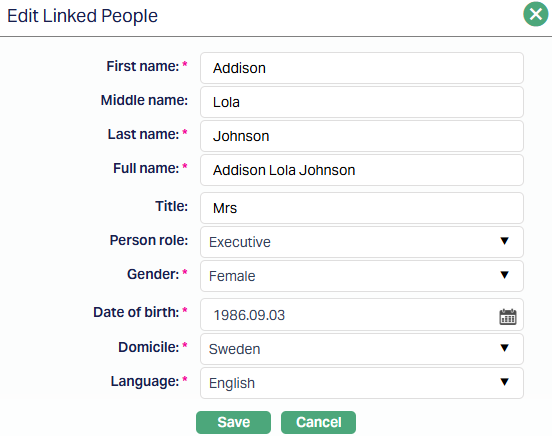
Note: All fields are editable.
2. Make the required changes and click Save. Linked People page appears with the edited details.
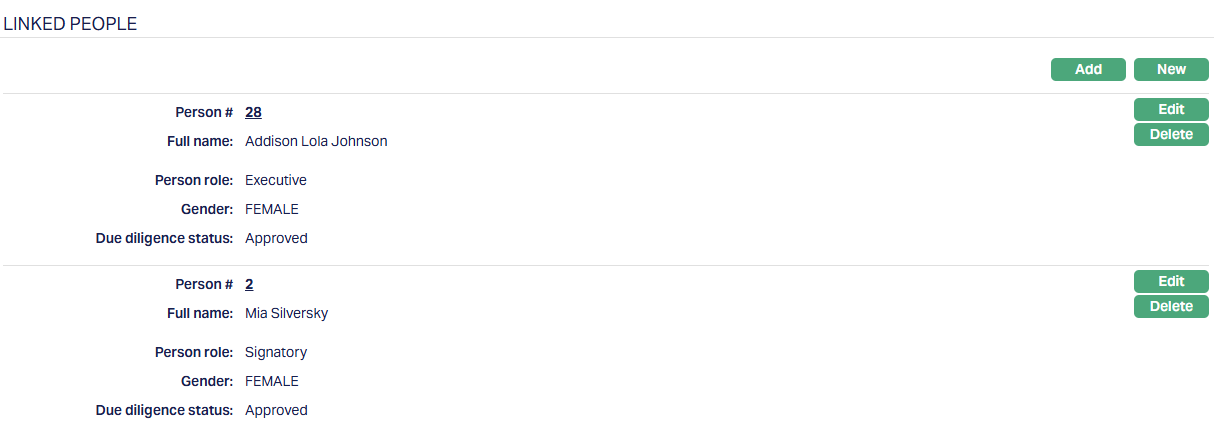
Functions: Add, New, Edit and Delete
Document
The Document tab allows you to upload / generate documents related to the Factoring Client Account. Documents in the form of scanned images or files on your computer can be uploaded. You can categorise the documents as per Document Type and store them with a document reference number. You can generate documents related to the Account based on Templates mapped to the Product.
To upload a document,
1. Access Contract Maintenance page. Click Document tab and then click on New. New Document page appears.

2. Click Choose File button to select the File name and path of the document.
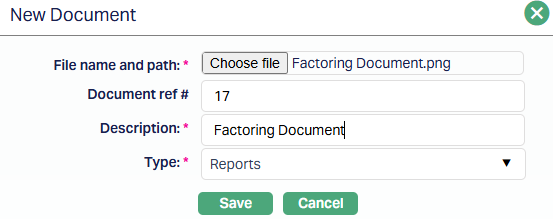
3. Enter Document ref no.
4. Based on the file selected the Description field will be derived. If required, you can change the description.
5. Select Type of the document uploaded. The document types should have been maintained using Admin > System codes > Documents > Document types. Once entered, this cannot be edited.
6. Click Save. Document gets uploaded, and the details are displayed.

Functions: New, Generate, Edit, Delete.
To generate a document,
1. Click Generate to generate the .pdf file using the template as maintained under Admin > System codes > Documents > Document templates. You have to map the document template for Loan Account using the Document Template Settings tab as maintained under Retail > Settings > Product. Generate Document page will appear where the mapped templates will be displayed.
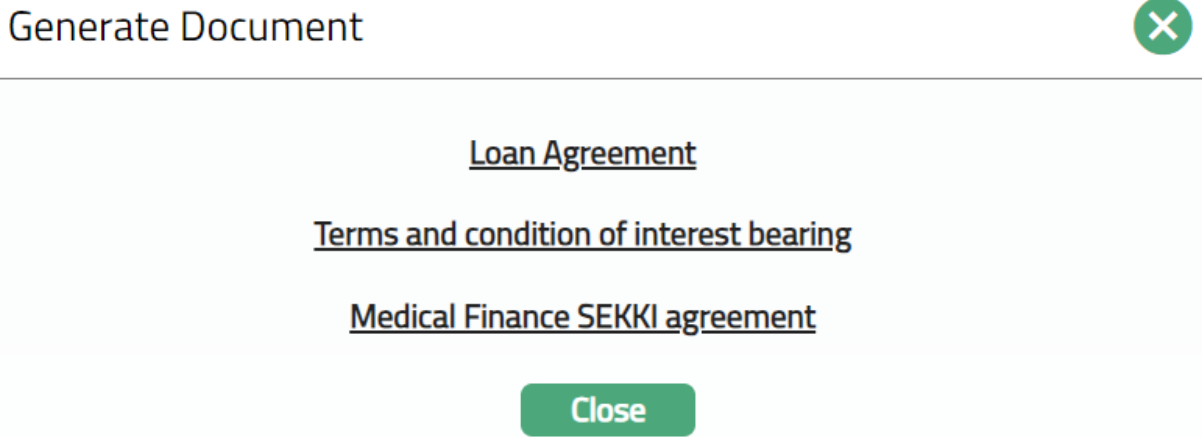
2. Click on any template from the list of templates after which the document will be generated based on the selected template as shown below.
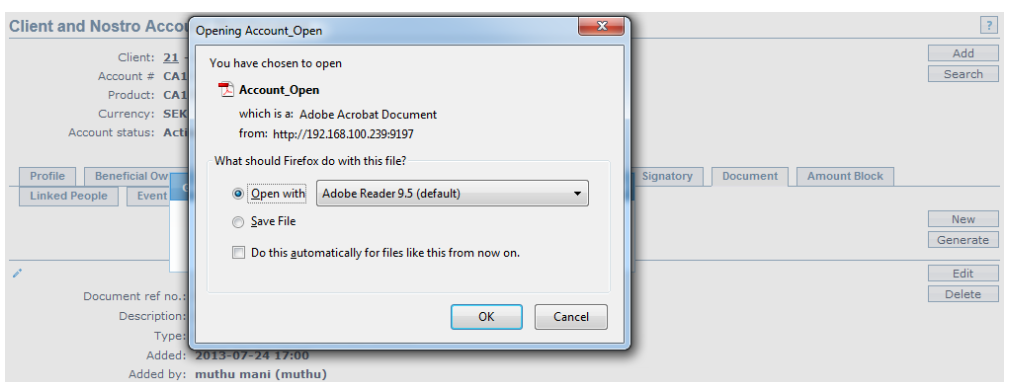
Delete: You can delete a document by a click on the Delete button. Aura will ask for confirmation, on approving which the selected document will be deleted.
To Edit document,
1. Access Contract Maintenance page. Click the Document tab.
2. Click Edit. Edit Document page appears.
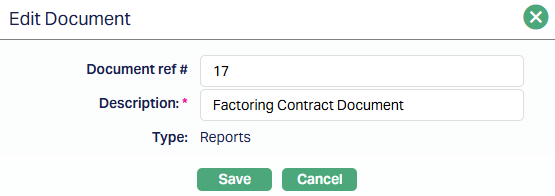
Note: Only Document ref no and Description fields are editable.
3. Click Save. The Document page appears with the edited details.
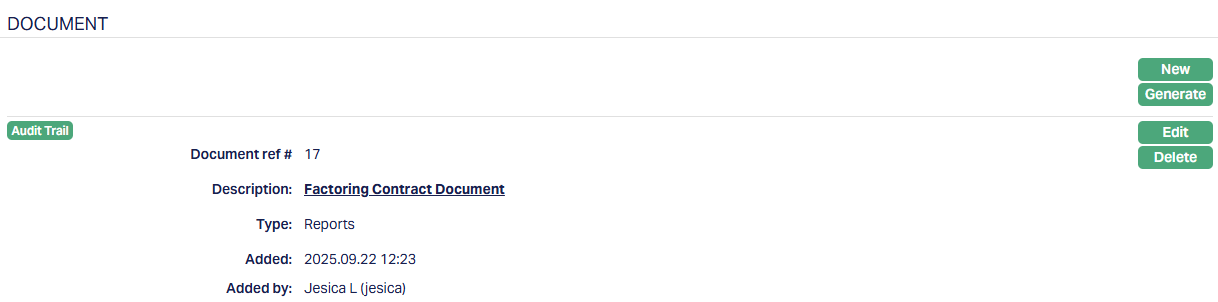
Functions: New, Generate, Edit, Delete
Invoice Settings
The Invoice Settings tab in a factoring contract allows you to manage how invoices are generated, formatted, communicated, and delivered to the respective parties. These settings are defaulted from the Product you selected during the Add Wizard, but you can review, edit, and approve them at the contract level.
Buyer Invoice
The Buyer Invoice tab allows you to maintain the default invoice generation settings and recipient details for the Buyer linked to the contract. These details are defaulted from the Buyer Invoice Settings defined at the Product level during contract creation, but you can review and update them here as required.
The Buyer Invoice sub-tab consists of two other tabs :
Settings sub-tab:
The Settings sub-tab captures the invoice generation parameters for the Buyer. When a contract is created, the details are automatically defaulted from the Product selected in the Add Wizard, New Contract -- Settings (4/8)
To view / edit the Buyer Invoice settings,
1. Access Contract Maintenance page. Click the Invoice Settings tab and then Settings sub-tab to view the details as per sample below. Details are defaulted from the Product chosen during Factoring account creation; and these can be edited as described below.
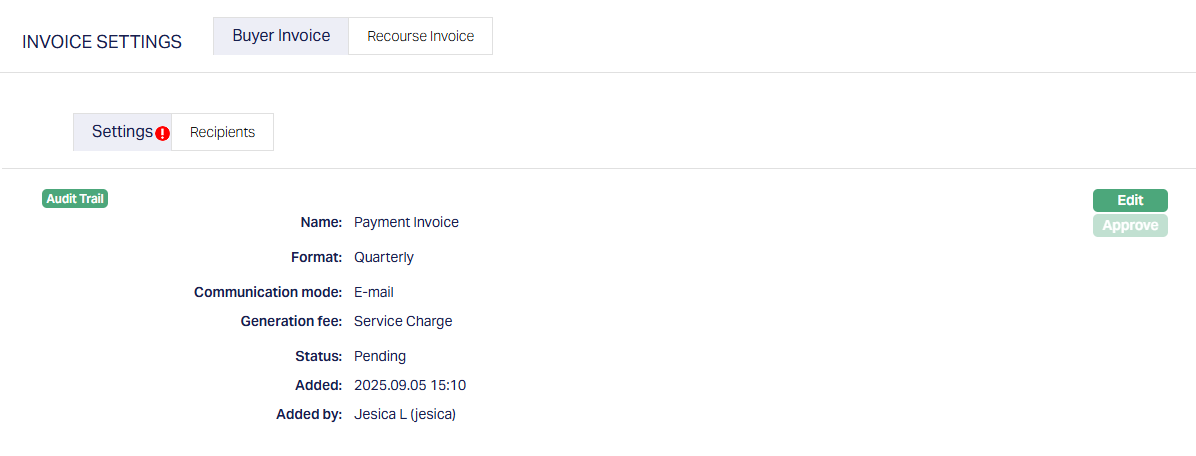
2. Click Edit. Edit Buyer Invoice Settings page appears.
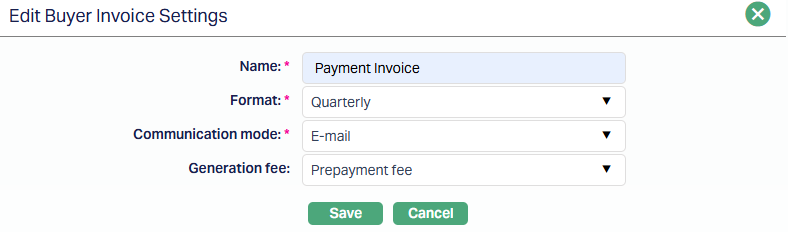
3. Enter the name of the invoice. This field is mandatory.
4. Select the invoice format from the drop-down list of active formats maintained in Admin > System Codes > Invoice Format. This field is mandatory.
5. Choose how invoice should be communicated in Communication mode. Available options include - Data Handoff, E-mail, and E-invoice. This field is mandatory.
6. Optionally, you can select a charge scheme that should apply as a generation fee for this invoice.
7. Click Save. The Buyer Invoice Settings tab appears with the updated details.

Note: Status of the record is Pending till it is approved by another user. On approval, the tab status is set to Approved and the red bubble disappears.
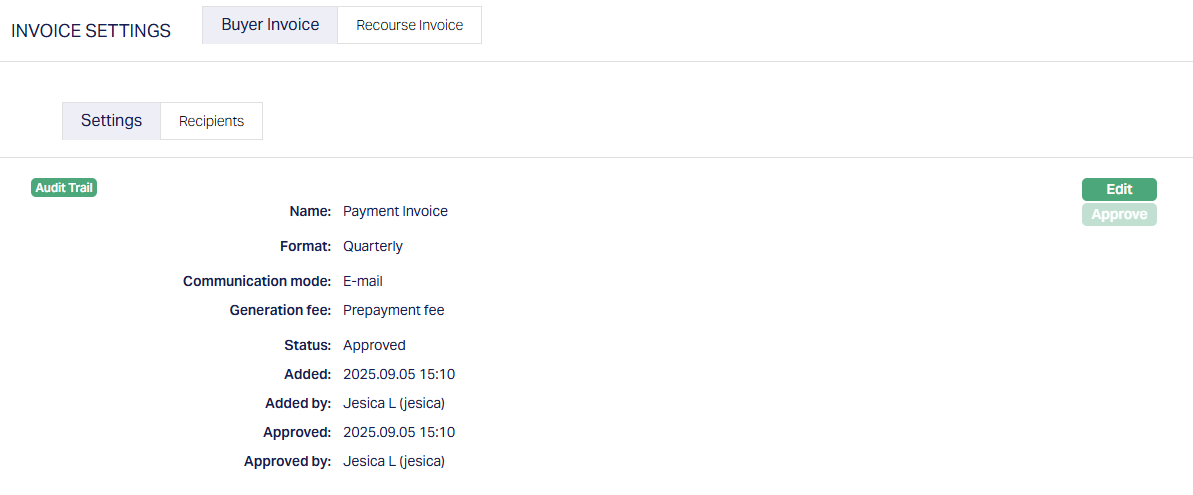
Functions: Edit, Approve.
The additional fields that are shown are -
Status indicates the current state of the record. It will be either: Pending - If the record is waiting for approval or Approved - If the record has been reviewed and finalized.
Added shows the date and timestamp when the record was created and Added by displays the user ID and full name of the person who created the record.
Approved shows the date and time when the record was approved and Approved by displays the user ID and full name of the person who approved the record.
Recipients sub-tab:
The Recipients sub-tab under the Buyer Invoice section allows you to define who will receive Buyer invoices for the contract. By default, the recipient is the Person or Organization linked to the Buyer selected during contract creation. Aura automatically displays the details of the first Beneficial Owner from the Buyer's client record.
To view / edit the Recipients sub-tab,
1. Access Contract Maintenance page. Click the Invoice Settings tab and then Recipients sub-tab to view the details as per sample below.
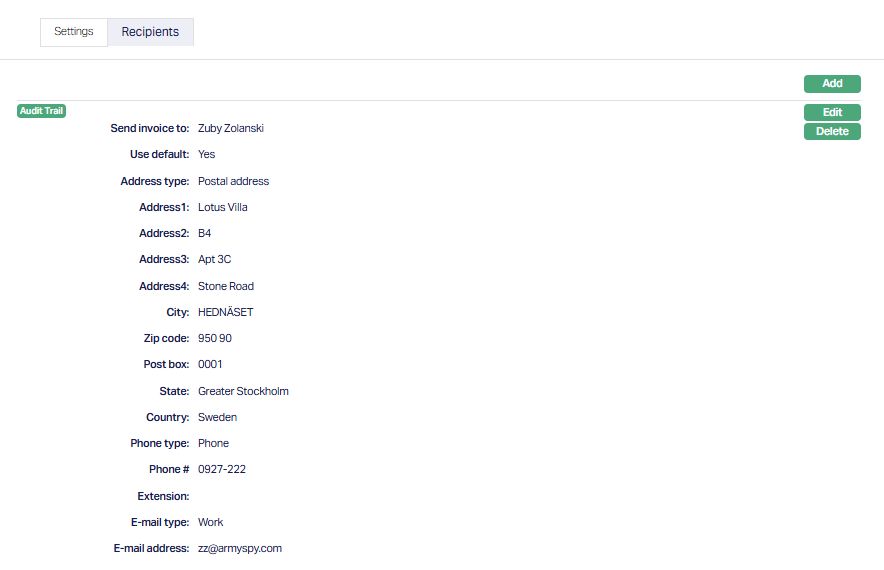
2. Click Add. The Add Buyer Invoice Recipients tab appears.
When the information is inherited from the Buyer record, the Use Default option is set to Yes by default, and all fields related to Address, Phone, and Email appear as disabled.
If you wish to modify or customize the recipient's contact details, you can uncheck Use Default - Aura will then enable all related fields for manual input.
3. Select a recipient in the Send Invoice to drop-down. You can choose from the list of Beneficial Owners maintained under the Buyer's client record or any Linked Person associated with the contract.
4. Provide the required details - Address type, Address 1 - 4, City, Zip Code, Post box.etc
Each of these panels follows the standard format used across Aura, where the mandatory fields become active based on your selections.
5. Click Save. The Recipient tab appears with the added details.
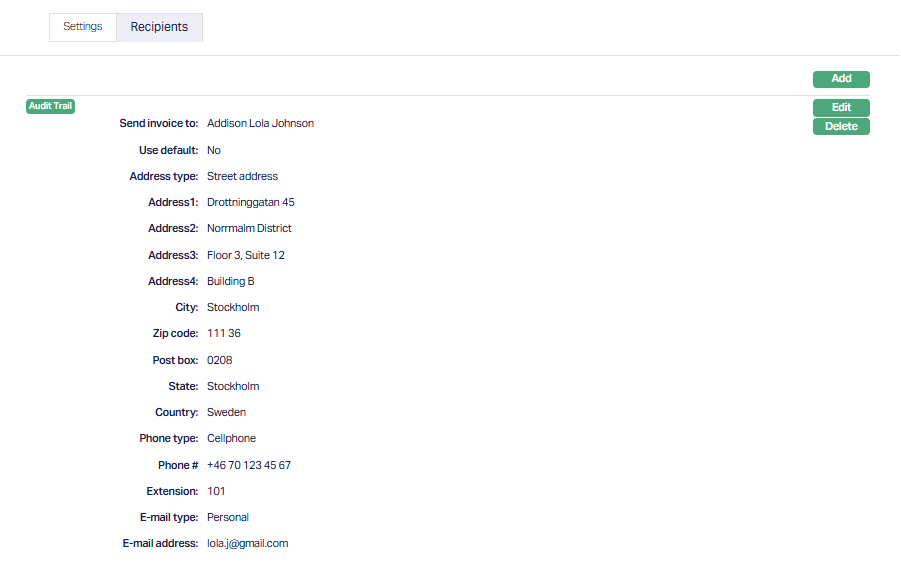
Functions: Add, Edit, Delete.
During addition, you can also select another Linked Person associated with either the Buyer client or the Contract as the "Send Invoice To" recipient, allowing flexibility when invoices must be directed to a specific representative rather than the default Buyer contact.
Edit: When you click Edit, all fields in the Buyer Invoice - Recipients sub-tab are editable, including the recipient name, Use Default flag, Address, Phone, and Email details.
Recourse Invoice Tab
The Recourse Invoice tab becomes visible and relevant only when the factoring product selected for the contract includes recourse invoice functionality. This tab allows you to manage how recourse invoices are generated, formatted, and delivered, similar to the Buyer Invoice tab.
You can review, edit, and approve settings and recipients at the contract level, ensuring that all parties receive accurate invoice communications. If the product does not support recourse invoices, this tab remains hidden.
Reminder Preferences
The Reminder Preferences tab allows you to manage reminders for recovering dues on a factoring contract. On contract creation, Aura defaults the reminder preferences from the Product selected during the Add wizard. You can add, view, edit, delete, and approve reminders at the contract level, providing flexibility to customize the collection strategy for each client.
There are two main types of reminders under Factoring:
1. Pure Reminder: This is a simple communication sent either before or after the payment due date. It does not include any new receivables such as late fees or generation fees. Only a format and communication mode need to be defined.
2. Reminder treated as invoice: This functions like a new invoice, incorporating any outstanding amounts, penalties, or applicable fees. In this case, the settings and charges are inherited from the Buyer Invoice Settings or Recourse Invoice Settings, depending on whether the reminder is being sent to Buyer or Seller.
To add / edit / view the Reminder Preferences,
1. Access the Contract Maintenance page and click on the Reminder Preferences tab. If no reminders exist, the tab will appear blank.
2. Click Add. The Add Reminder Preferences page appears.
If Treat as Invoice = Yes
In this scenario, the reminder is treated as an invoice, meaning it will include financial receivables such as penalties, late fees, and reminder fees. The settings for such reminders are drawn from the Buyer Invoice Settings or Resources Invoice Settings, depending on who the reminder is addressed to.
3. Reminder to - Select whether this reminder invoice is intended for the Buyer or Seller. Based on this, aura will fetch invoice settings from either Buyer Invoice Settings or Recourse Invoice Settings respectively.
4. Treat as Invoice - Select Yes to enable invoice treatment. This allows charges to be included in the reminder and follows invoice generation logic.
5. Enter a descriptive Name for the reminder invoice. This will help you identify this setting later. Example: Buyer Late Payment Reminder Invoice.
6. Select the Invoice Format from the drop-down list. These are maintained in Admin > System Codes > Invoice Formats.
7. Communication Mode - This field is automatically derived from the Buyer Invoice Settings or Recourse Invoice Settings, based on the selection in "Reminder To" (Buyer or Seller).
This field is disabled when Treat as Invoice = Yes.
8. Frequency - Select when this invoice reminder should be sent. Available options when Treat as Invoice = Yes:
X days after Payment Due Date
X days after Grace Days if Overdue
On Full Payment of Trade Invoice (can be used to send the Invoice for Penalty interest on Overdues when the collection is after full payment.)
9. Days - If the selected Frequency involves "X days...", enter the number of days here. For example, if you choose "X days after Payment Due Date", enter how many days after the due date the invoice should be triggered.
- Payment due after - Enter how many days after the reminder invoice is sent the payment becomes due. Must be a whole number from 0 to 999.
- Calendar/Business Days - Select whether the above "Payment due after" value is counted in Calendar days or Business days. If you enter 0 in the previous field, this drop-down will auto-set to Calendar Days and be disabled.
11. Reminder Fee - Optionally, select a charge scheme to apply a reminder generation fee. This is only available if Treat as Invoice = Yes and the selected frequency is not "On full payment of trade invoice." Only eligible schemes with valid parameters (event-based, flat, not deferred, etc.) will appear here.
If Treat as Invoice = No
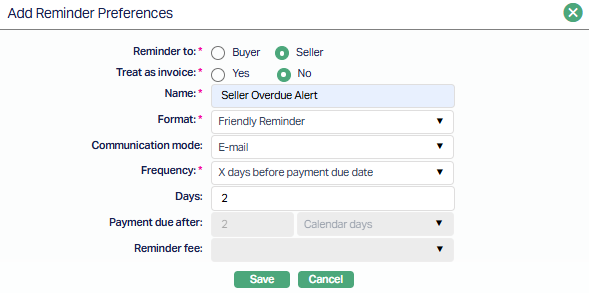
12. Select whether this reminder invoice is intended for the Buyer or Seller. Based on this, Aura will fetch invoice settings from either Buyer Invoice Settings or Recourse Invoice Settings respectively.
13. Treat as Invoice - Select No to indicate that the reminder will not be treated as an invoice. Hence, no receivables or generation fees can be applied.
14. Enter a descriptive Name for the reminder invoice. This will help you identify this setting later. Example : Seller Overdue Alert.
15. Select the document Format from the drop-down list for the reminder. These are maintained in Admin > System Codes > Invoice Formats.
16. Choose how the reminder will be delivered. Enabled only when Treat as Invoice = No. Available values: Data Handoff, E-mail, E-invoice.
17. Frequency - Select when this invoice reminder should be sent. Available options when Treat as Invoice = No:
On Payment Due Date
X days before Payment Due Date
X days after Payment Due Date
X days after Grace Days of Overdue
X days after Reminder Y
18. Days - If the selected Frequency involves "X days...", enter the number of days here. For example, if you choose "X days before Payment Due Date", enter how many days before the due date the reminder should be sent via the selected Communication mode.
19. Payment Due After, Calendar/Business days and Reminder Fee are all disabled when Treat as Invoice = No as no fee is to be charged.
20. Click Save. The Reminder Preference page appears with the details you have entered.
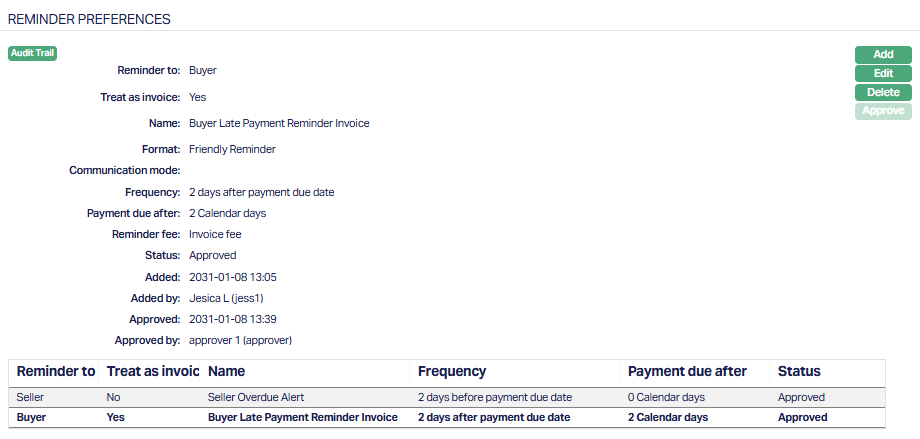
Functions: Add, Edit, Delete, Approve.
Status of the record is Pending until it is approved by another user. On approval, the status is changed to Approved.
Note:
You can add multiple Reminder Preferences for each contract to handle different reminder scenarios. For example -
One reminder before the invoice due date (e.g., a friendly alert)
Another reminder after the due date with applicable fees (treated as invoice)
Additional follow-up reminders if payment is still overdue.
Each Reminder Preference can be targeted to either the Buyer or Seller, based on the configuration in the Reminder To field.
You can freely combine both:
Treat as Invoice = Yes (reminders with receivables and generation fees), and
Treat as Invoice = No (pure alerts without receivables), to build a complete reminder and collections strategy tailored to your factoring contract.
To view/edit,
1. Access Contract maintenance Page and click on Reminder Preferences tab. Select the Reminder Preference you want to edit from the grid.
2. Click Edit. The Edit Preferences page appears.
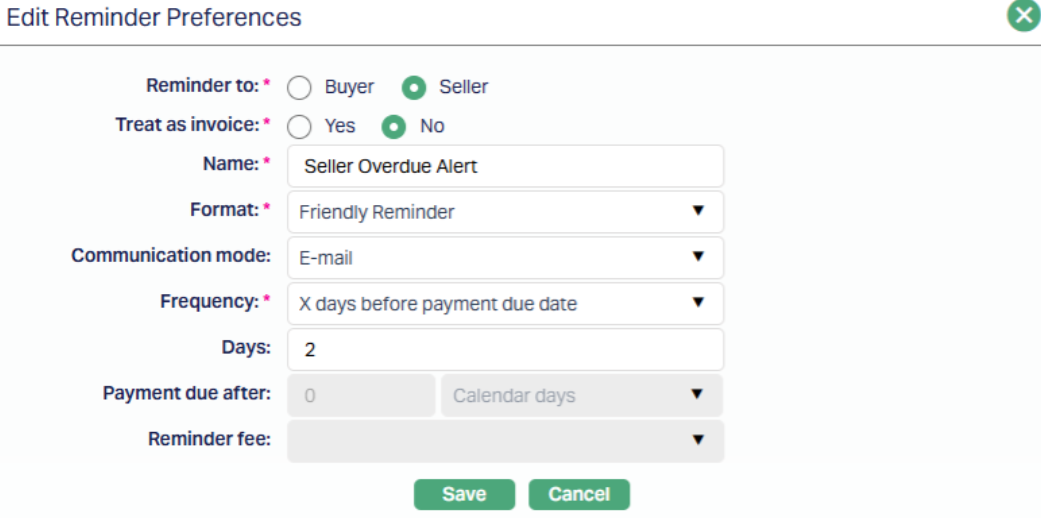
All fields are editable for both Treat as Invoice = Yes / No.
- Click Save. The Reminder Preference page appears with the edited details.
Note: Approved records can be edited; however, once the changes are saved, the record must be re-approved before it becomes effective.
Secured By
The Secured By tab allows you to view and manage the Seller and Buyer limits linked to a factoring contract. These limits are used to track exposure for both parties, ensuring that all credit utilization and disbursement validations are performed in accordance with the limits defined in CRM > Collateral/Limits.
When a new contract is created, the limit details in this tab are automatically defaulted from the selections made in the Add Wizard, New Contract -- Secured By (7/8) screen. You can use this tab to review, approve, and monitor the exposure associated with the linked limits throughout the contract's lifecycle.
The tab is divided into two sub-tabs:
Seller Limit
Buyer Limit
Seller Limit sub-tab
The Seller Limit sub-tab displays details of the limit used to monitor the Seller's exposure for the current contract. The limit is linked during contract creation when the Payout Type is set to Advance Amount or On Maturity. If the Payout Type is On Realisation, the Seller Limit fields are disabled.
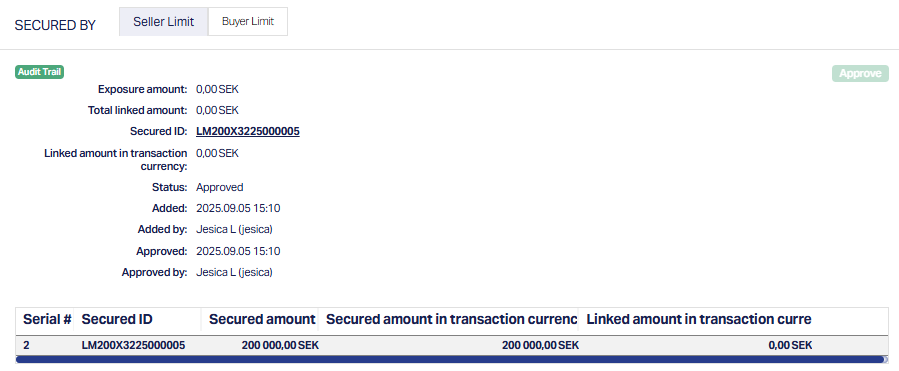
Function: Approve.
Buyer Limit sub-tab
The Buyer Limit sub-tab displays the details of the limit used to monitor the Buyer's exposure for the contract. Unlike the Seller Limit, this sub-tab remains active for all payout types. The Buyer Limit is linked during contact creation in the Add Wizard, and its details are automatically defaulted here.
Function: Approve.
The following details are displayed for both Seller and Buyer Limits, with identical behaviour. The context (Seller vs Buyer) depends on the sub-tab selected.
Exposure Amount - Displays the exposure amount based on the contract's payout type.
If Payout Type = On Maturity, Aura displays the Trade Invoice Gross Amount.
If Payout Type = Advance Amount, Aura displays the Advance Amount.
Total linked amount - Shows the total of all linked amounts associated with the selected limit.
Secured ID - Displays the Limit ID linked to the contract. This ID is a hyperlink, which you can click to open the corresponding limit record maintained under CRM > Collateral/Limits, allowing you to review the detailed setup and utilization.
Linked amount in transaction currency - Displays the portion of the limit utilized for this contract in transaction currency. This value is updated dynamically during disbursement, based on the amount disbursed in that instance.
The additional fields that are shown are:
Status indicates the current state of the record. It will be either: Pending - If the record is waiting for approval or Approved - If the record has been reviewed and finalized.
Added shows the date and timestamp when the record was created and Added by displays the user ID and full name of the person who created the record.
Approved shows the date and time when the record was approved and Approved by displays the user ID and full name of the person who approved the record.
The bottom grid displays summarized limit linkage details for each secured record. The grid automatically refreshes after any approval or disbursement action to reflect the latest secured and linked amounts.
The following columns are shown:
Serial # - Auto-generated sequential number assigned to each record in the grid.
Secured ID - Displays the Limit ID linked to the contract.
Secured amount - Displays the available limit amount in the Limit Currency.
Secured amount in Transaction Currency - Displays the limit amount converted into the contract's Transaction Currency (i.e., account currency).
Linked amount in Transaction Currency - Displays the linked amount utilized during disbursement in the contract's transaction currency.
Approve: The Approve button is enabled only if the record status is Pending, following Aura's standard maker-checker principles.
Note: Limit Utilization occurs only during disbursement, based on the actual disbursed amount in that instance. The exposure and linked amounts are updated automatically after each disbursement transaction.
Notes
The Notes tab allows you to maintain the note entries for the Factoring Contract.
To add Notes,
1. Access the Contract maintenance page and click the Notes tab.

2. Click Add. The Add Notes page appears.
3. Enter the contents for the notes in the Notes field. It is used to record the general details of the discussion so that the same may be recalled later.
4. Click Save. The Notes page appears with the added details with Status field displaying Open as per the sample screenshot shown below.

To edit notes,
- Click the Edit button. Edit Notes page appears.
Note: Only Status field is editable.
Select Status from the drop-down list. Available statuses are Open and Close. By default, the Status field will select as Close.
Click Save. The Notes page appears with the edited details displaying the Status as Closed for the selected note as per the sample screenshot below.

Function: Add, Edit.
You can add multiple notes as required.
Custom Field
This menu option allows you to define fields apart from those that are already available in the standard version of Aura. Thus, it enables you to customize additional data storage and use as required to suit your specific business needs.
To maintain Custom Field,
1. Access Contract Maintenance page. Click the Custom Field tab.

2. This field appears only when it is created in Admin > System codes > Custom fields and is linked to the Commercial contract maintenance option in Admin > System codes > Custom fields > Field mappings.
3. Click Edit. Edit Custom Field page appears. In the following illustration, one custom field Pan number Category has been mapped to the Product as shown below:

4. Enter the Pan number to be associated with the Product.
5. Click Save. Custom Field tab appears with the edited details.

Function: Edit.