Target Announcement
Target Announcement enables you to create specific communication to your Clients who use channel banking.
The following are the various tabs that appear on the Target Announcement page.
To add Target Announcement
- From Admin menu, click on Channel banking and then Target announcement. Target Announcement search page will appear.

- Click Add. Target Announcement - Description (1/2) page appears.
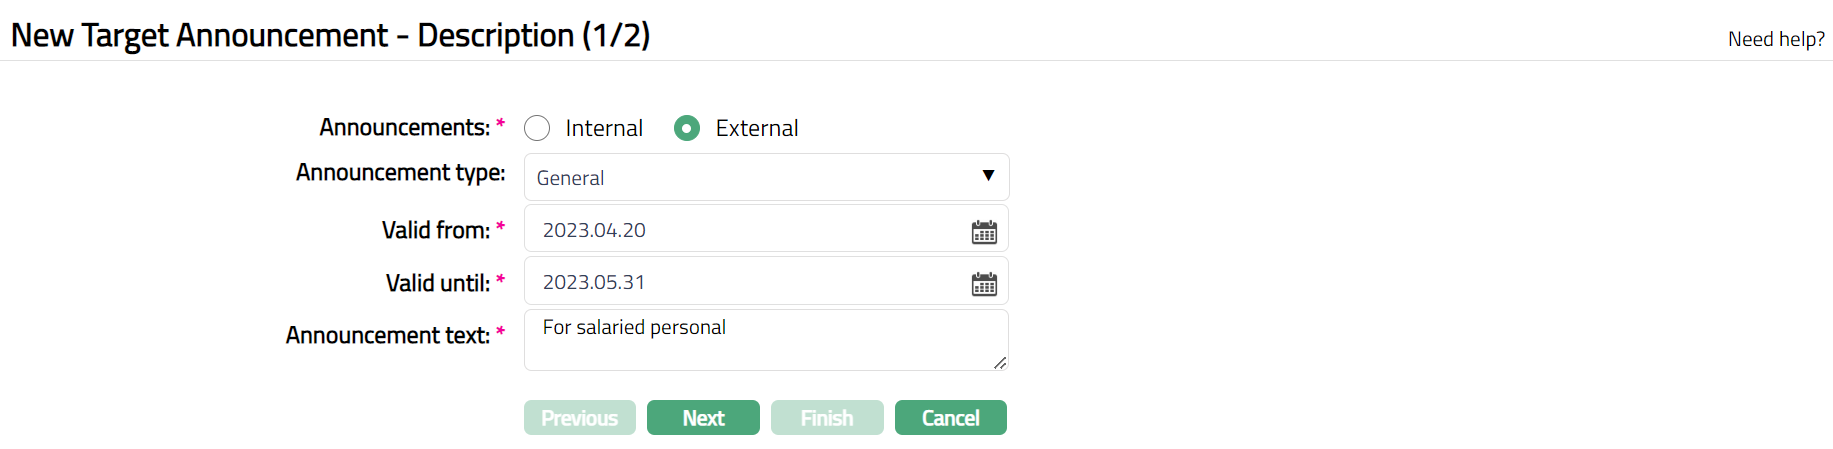
Select Announcements. The available options are Internal or External. If Internal option is chosen, then Announcement is displayed in Front End/ Core only. If the External option is chosen, then the Announcement is displayed in Internet Banking/Devices.
Select Announcement type. Based on the option chosen in Announcements field, the list of values in the drop-down will change.
If Internal option is chosen in above field, Announcement field is disabled.
If External option is chosen in the above field, Announcement field is enabled, and pre-shipped values are Specific and General.
If Specific option is chosen, the Announcement text is displayed to the specific clients linked with the selected offering.
If General option is chosen, the Announcement text is displayed to the Channel banking users in their login page in general for all users.
Enter Valid from date either directly or using the calendar. Aura will validate the date format against the format maintained under Admin > Entity maintenance > Regional > Date format.
Enter Valid until date either directly or using the calendar. Aura will validate the date format against the format maintained under Admin > Entity maintenance > Regional > Date format.
Enter description for the announcement in Announcement text field.
Click Next. Target Announcement Confirmation (2/2) page appears with all the details of the announcement for the targeted customers. After creation, the Status will be as Pending status. To approve, retrieve the record and click Approve button.

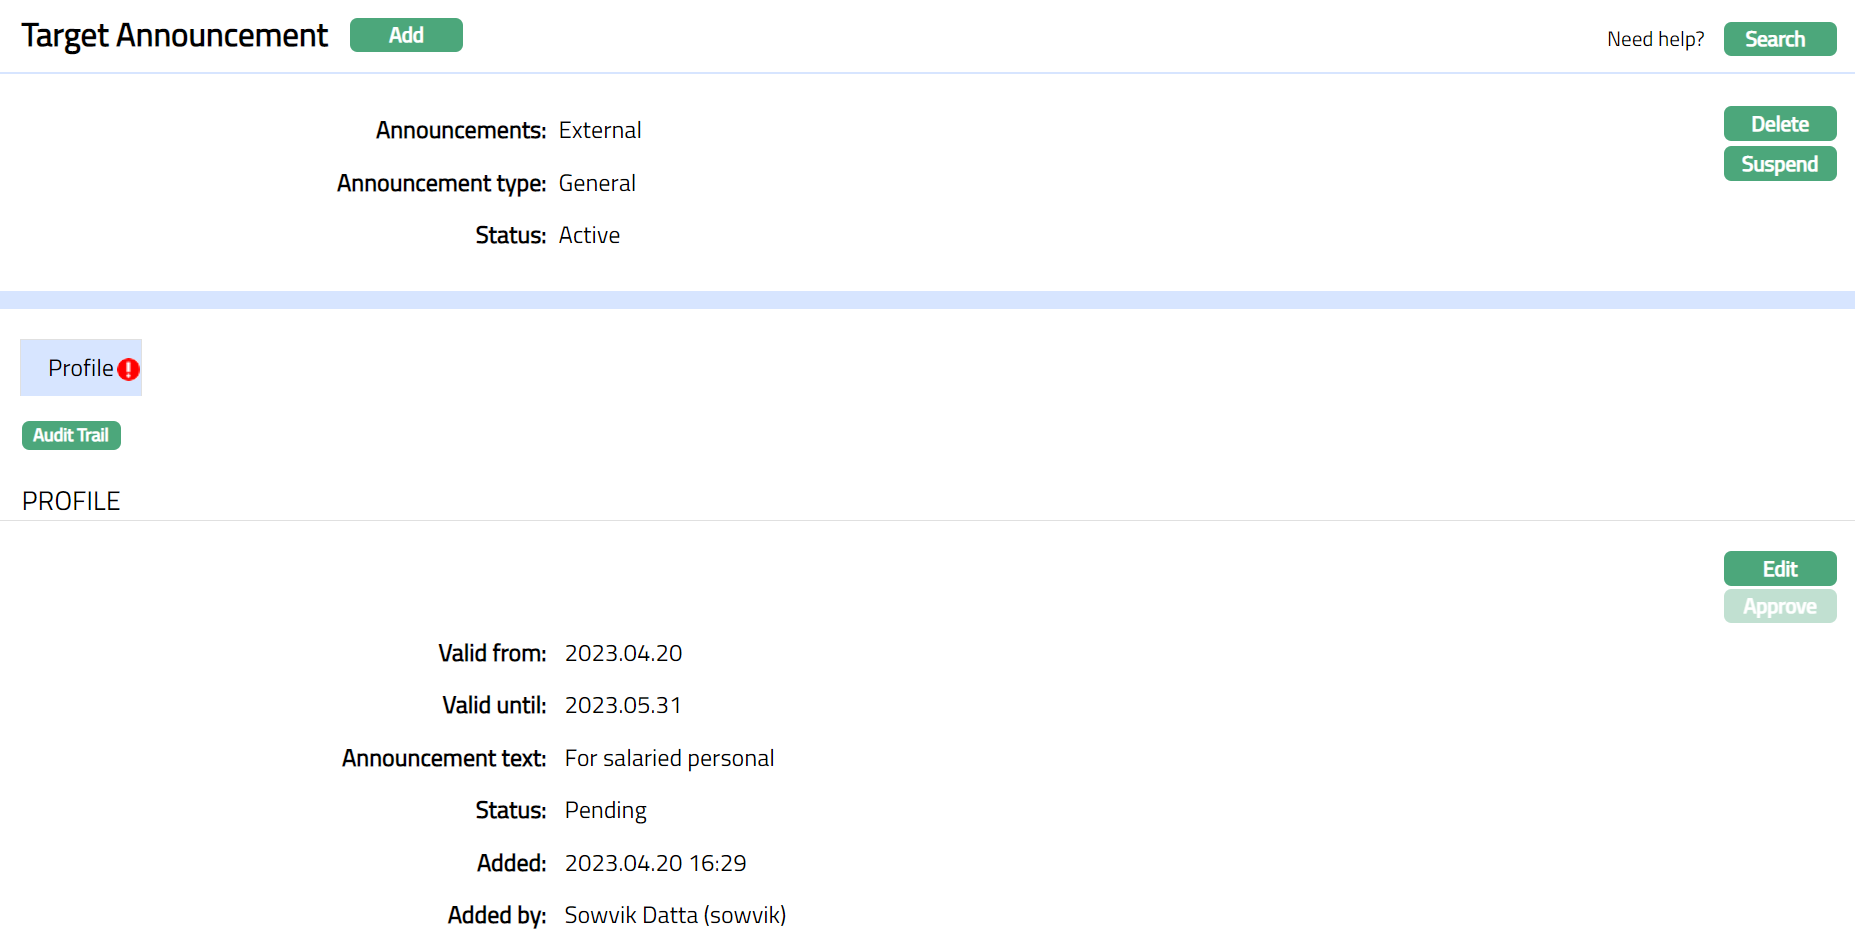
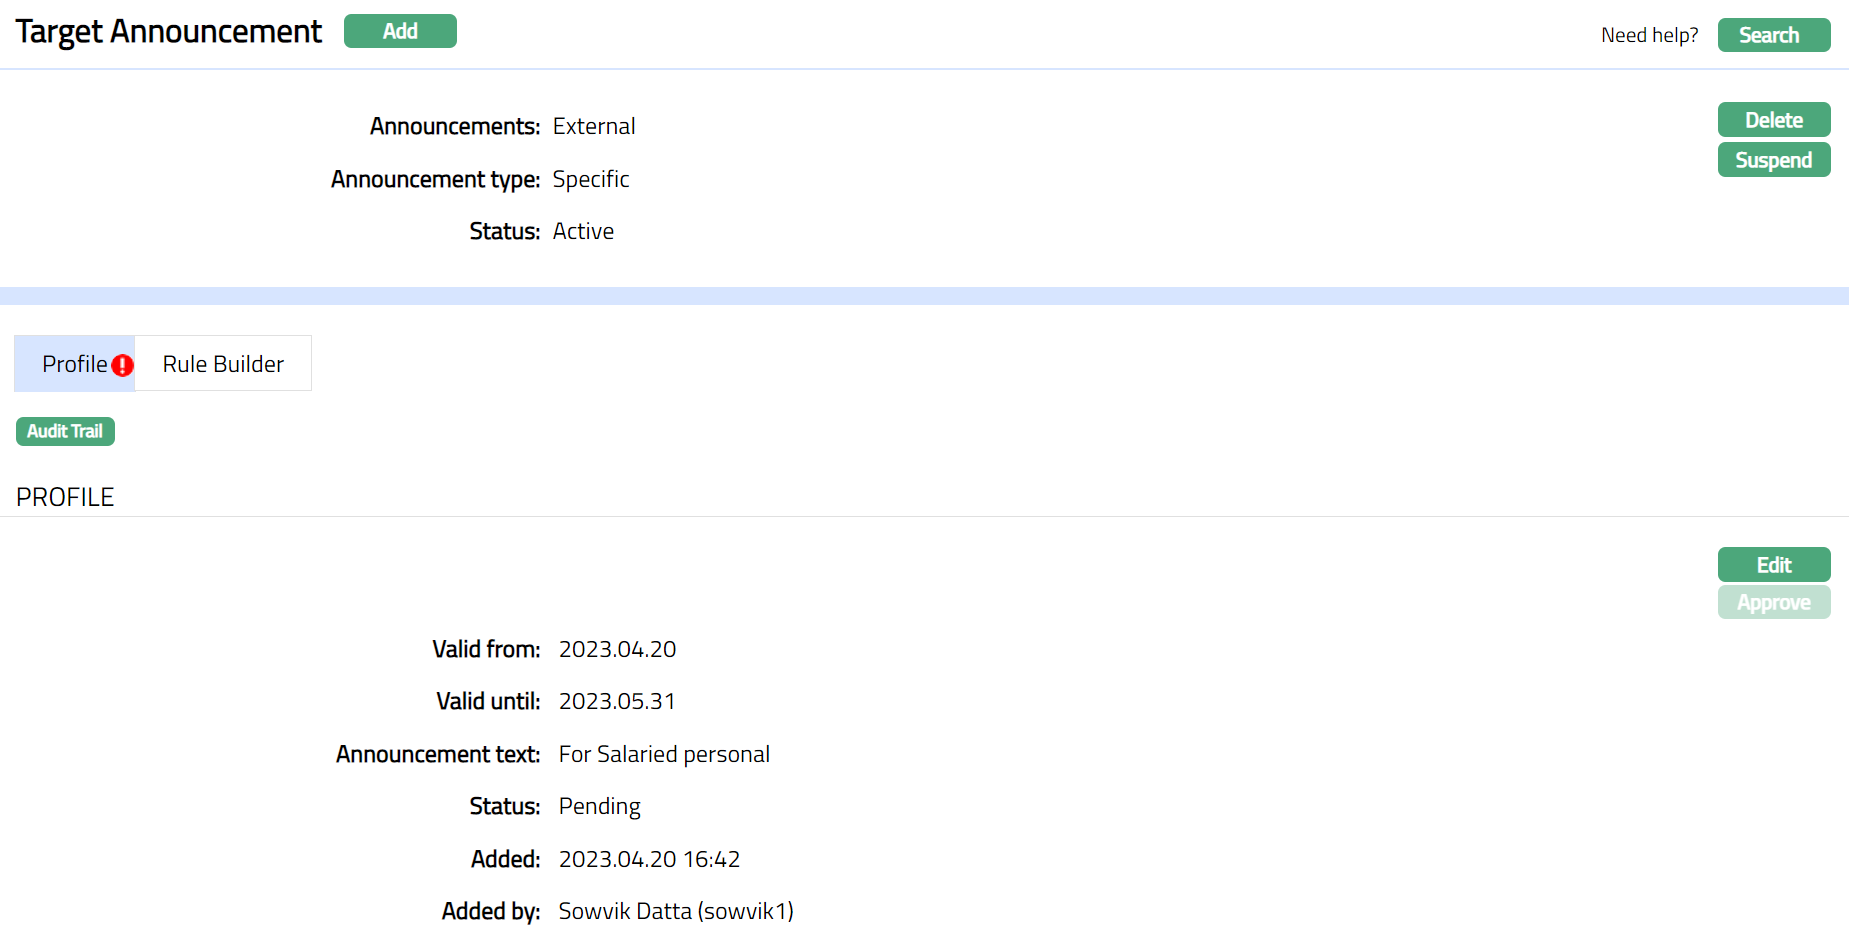
- Click Finish. Target Announcement page appears showing the Profile tab by default.
If Announcement Type: General
Functions: Add, Search, Delete, Suspend, Activate
If Announcement Type: Specific, Rule Builder tab appears
Functions: Add, Search, Delete, Suspend, Activate
Note: Status will reflect as Pending till the same is approved by another user other than the one created the record.
Suspend: You can suspend a target announcement by clicking on Suspend button. When you click on Suspend button, Aura will ask for confirmation. On confirmation Aura will suspend the target announcement and Activate button will appear in place of the Suspend button.
Activate: If you want to Activate a suspended target announcement then click on Activate button. Aura will ask for confirmation. On confirmation Aura will Activate the target announcement, and Suspend button will appear in place of Activate button
Approve: If you want to Approve a Target Announcement, then retrieve the record and Click on Approve. Aura will ask for confirmation. Once the tab is approved, status gets changed from pending to Approved.
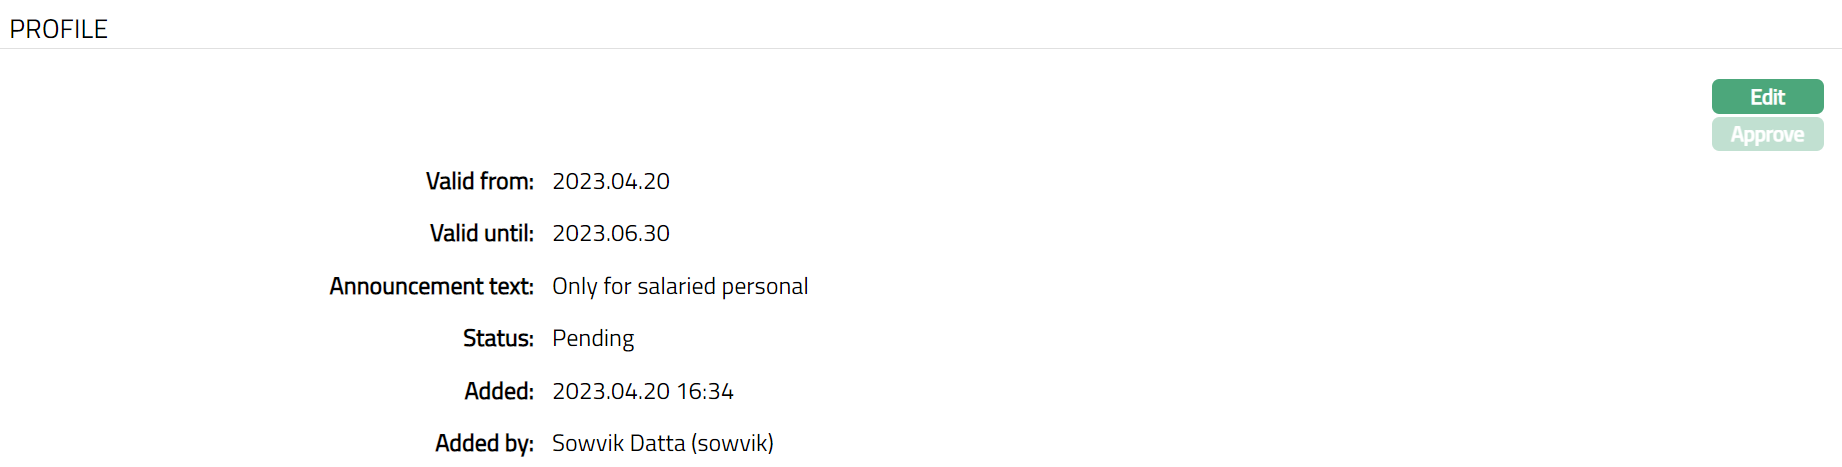
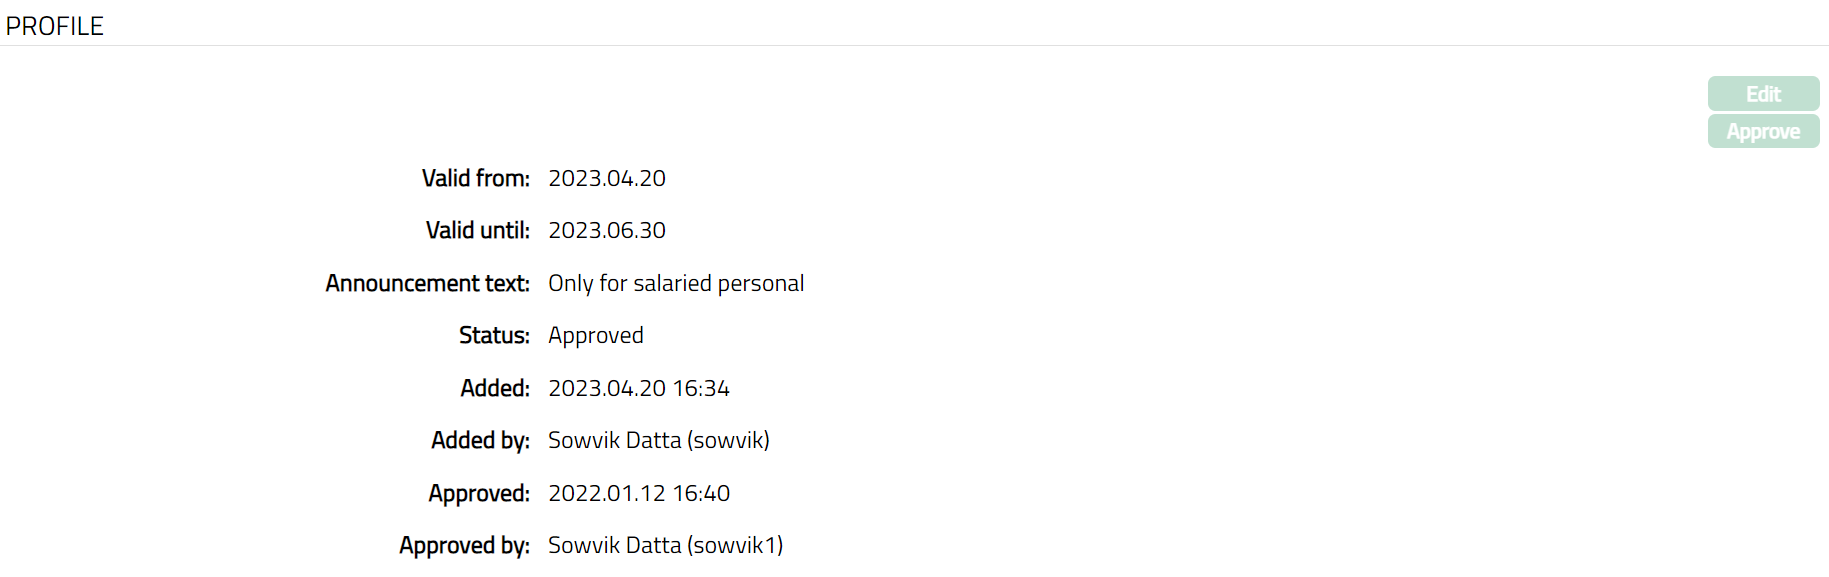
Profile
Profile tab, which is the default tab in the Target Announcement screen, shows the basic details of the announcement which were added in Target Announcement Description (1/2).
To Edit Profile
- Click Edit under Profile tab. Edit Profile screen appears.
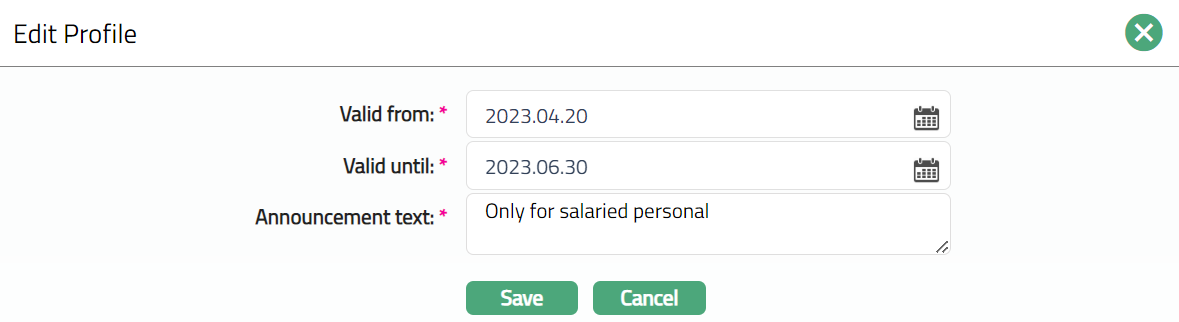
Note: All fields are editable.
- Click Save. Profile page appears with the edited details.
Note: Status will reflect as Pending till the same is approved by another user other than the one created the record. Once Approved the status will change to Approved. Note: Once you approve the record you cannot Edit the record.
Functions: Edit, Approve
The additional fields that you can view in the screen are explained below:
Added field denotes the date on which the record was added.
Added by field denotes the name of the user who created the record.
Approved field denotes date on which the record was approved. This is displayed only after the record is approved.
Approved by field denotes name of the user who approved the record. This is displayed only after the record is approved.
Rule Builder
Rule Builder tab allows you to set up the Rules for the Announcements. This tab appears only if Announcements is external and Announcement type is Specific. If Rule is not specified for an Announcement, then Announcement is displayed to all without any restrictions.
To add Rule
- Access Target Announcement page and click Rule Builder tab.

- Click Add. Add Rule page appears.
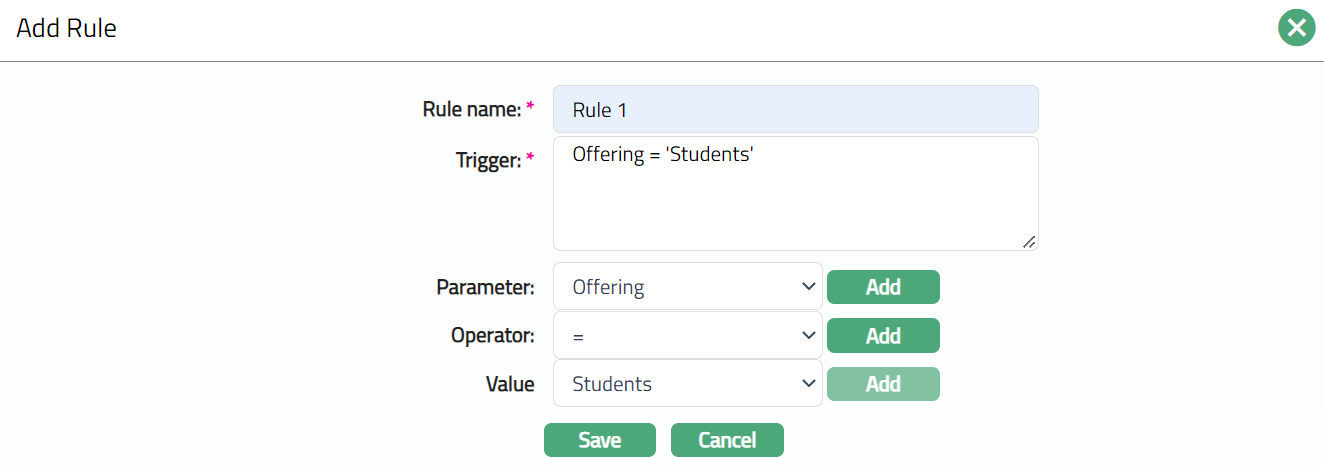
Enter Rule name.
Enter Trigger details. Each trigger will constitute a collection of individual conditions joined by AND / OR operator. The Trigger details can be built using the Parameter, Operator and Values.
Select Parameter from the pre-shipped list and click Add. Aura will push the selected value of Parameter into the Trigger text area above. Based on the Parameter selected, the Operator and Values will change.
If Internal option is chosen, then the lists of values are Branch and User roles.
If External option is chosen, then the lists of values are as follows:
Offering
Pricing
Client
AML category
Client category code
Client category type
Note: Client category code and Client category type are interdependent.
Select Operator from the pre-shipped list and click Add. Aura will push the selected value of Operator into the Trigger text area above.
Enter required Values for the Parameter and click Add. Aura will push the selected value into Trigger text area above.
Details of the Values
a. Internal
If Branch option is chosen, then Aura will display the list of all Branches maintained in the entity.
If User -- Roles is chosen, then Aura will display the list of all User -- Roles maintained in the entity.
b. External
If Offering is the selected parameter, the value field will display the list of all Offerings maintained under Admin >System codes > Categories > Offerings.
If Pricing is the selected parameter, the value field will display the list of all Relationship pricing maintained under Admin > Pricing > Settings > Relationship pricing.
If Client is the selected parameter, the value field will display the Client hyperlink. On click on the hyperlink, the Client Search page appears with the list of all active clients.
If AML category is the selected parameter, the value field will display the list of all AML categories maintained under Admin > System codes > Categories > AML category.
If Client category type is selected parameter, the value field is displays the list of all Client categories maintained under Admin > System codes > Categories > Category types.
- Click Save. The Rule Builder page appears with the added details.

Functions: Add, Edit, Delete.
To edit Rule Builder
Access Target Announcement page and click Rule Builder Tab.
Click Edit. Edit Rule page appears.

**Note**: All fields are editable
- Click Save. Rule Builder page appears with the edited details.